utnotifications manual - github pagesuniversal-tools.github.io/utnotifications/manual_1.7.pdf · -...
TRANSCRIPT

UTNotifications Manual
Version 1.7
Introduction Getting Started Creating Local Notifications Using Notification Profiles (Sounds, Icons and Other Attributes) Custom User Data & Handling Notifications Notification Buttons (Android) Image Notifications (Android) Open URL Notifications (Android) Push Notifications Overview What You Need for Push Notifications
General iOS: Apple Push Notification Service (APNS) Android: Firebase Cloud Messaging (FCM) Android: Amazon Device Messaging (ADM) Windows Store: Windows Push Notification Services (WNS)
Push Notifications Payload Format Configuring Apple Push Notification Service (APNS) Migrating from GCM to FCM Configuring the Firebase Cloud Messaging (FCM)
Apply Credentials and Test Configuring the Amazon Device Messaging (ADM)
Getting Your OAuth Credentials and API Key Apply Credentials and Test
Configuring the Windows Push Notification Services (WNS) Register your app with the Dashboard Obtain the identity values for your app Apply Credentials and Test
Unicode Support Contacts
Introduction
API Reference | Forum | Support Email | Issue Tracking
UTNotifications is an advanced and professional Unity extension that is yet very convenient and easy to use. It provides a convenient cross-platform API for posting and handling local, scheduled (including those appearing once and those repeating) and push notifications. It fully supports iOS (7.0 and newer), Android (4.1 and newer, Google Play featured and Amazon Kindle Android devices) and Windows Store/Universal Windows Platform (Windows Phone 8.1, Windows 8.1/10, Universal 8.1, Universal 10). Features:
- Immediate and scheduled (those appearing once and those repeating) local notifications with automated restoring on device reboot.
- Push notifications. - 2 Android push notifications services: Firebase Cloud Messaging (FCM) & Amazon Device
Messaging (ADM) in a single build. - Completely cross-platform API. - The full source code is provided as well as the code of the native plugins so one can change and
adjust anything one likes. - A demo push notifications provider web server with the source code is included. - A sample & test scene. - A detailed manual and an API Reference docs are included. - Default or custom notifications sounds and icons. - Convenient Unity editor extension for configuring. - Notifications enabling/disabling API for all supported platforms allows one to add notifications
toggle to the game options. - API for handling clicked & received notifications of any type both local and push. - One can attach custom data to the notification of any type and access it while handling the
received notification. - Hiding or cancelling a specific notification or all of them. - Application icon badge number management API for iOS and Android. - Android: Image notifications. - Android: Complete integration with Android 8+ Notification Channels. - Android: Custom buttons. - Android: High Priority/Heads-Up notifications support. - And more!
UTNotifications consists of two main parts: Unity client extension and a demo server which shows you how to send push (remote) notifications. For the production version of your application your own game server or a dedicated notifications server is required, but you can use the provided demo server source code as you like. There is also a number of third-party solutions for the push notification servers, such as free and open source Uniqush, and services like OneSignal, which are compatible with UTNotifications as it uses plain iOS, Google Android, Amazon Android & Windows push notifications services. You can also leverage the asset for local/scheduled notifications only - in that case you don’t need any backend. The asset works well with any edition of Unity 5.4 or newer.

Getting Started
Once you installed the asset into your project, you’re able to open its settings from Unity menu: Edit -> Project Settings -> UTNotifications (Unity restart may be required first time to see this menu item).
Local notifications doesn’t require any additional setting up. Configuring push notifications services is described below.

There is an example scene: Assets/UTNotifications/Sample/UTNotificationsSample.unity which you can use to get familiar with many of the UTNotifications features and how to use them. It also helps you checking whether the configuration is correct.
You can also add script UTNotifications.UTNotificationsSample (Assets/UTNotifications/Sample/UTNotificationsSample.cs) to any GameObject in your own scene to access this test menu. Please note that notifications are not available in some device emulators and in the Unity editor, so please deploy to a device in order test or debug notifications related functionality. You can find an API Reference in UTNotifications Unity Settings and here.
Creating Local Notifications
Local notifications are notifications shown by request of the client application itself. With UTNotifications you can create immediate, scheduled and repeated scheduled local notifications. First thing you need to know, is that the entire UTNotifications API is stored in namespace UTNotifications. So you might like adding a using statement to easily access the namespace contents: using UTNotifications; Now let’s Initialize UTNotifications.Manager. It should be done prior to accessing any UTNotifications methods. Awake() or Start() method of some MonoBehaviour is a good place for it: public void Start() {
UTNotifications.Manager.Instance.Initialize(false); }
UTNotifications.Manager.Instance (or just Manager.Instance if you added using UTNotifications) is the main access point to all methods of UTNotifications. It returns a singletone instance of the UTNotifications.Manager class. We specified false in the example above as the value of argument willHandleReceivedNotifications of UTNotifications.Manager.Initialize as we don’t have any
intention to handle shown notifications at the moment. For more info on handling notifications, please see the appropriate section of the manual. Now you can start creating local notifications. F.e.:
UTNotifications.Manager.Instance.PostLocalNotification("Title", "Text", 1); It creates an immediate local notification with title = “Title”, text = “Text” and id = 1. Notification ids are used to identify each notification. F.e. a new notification with the same id as an old one replaces that old notification instead of creating a second separate notification. id is also used to hide or cancel a specific notification (see the API Reference for the details). Note that with the default settings you will not be able to see or hear any immediate notifications on any of the supported platforms, because notifications are not shown while the application is running by default. You can modify this behaviour in UTNotifications Settings: Common Android Settings -> Show Notifications & Windows Store Settings -> Notify only when app is closed or hidden. Unfortunately, iOS doesn’t allow to control it: you can never see any notifications while the app is running on iOS. Let’s now schedule a local notification:
UTNotifications.Manager.Instance.ScheduleNotification(15, "Title", "Text", 2); A local notification with title = “Title”, text = “Text” and id = 2 wll be triggered in 15 seconds after that code is executed. You can also specify a System.DateTime value as the first argument as a date and time to trigger the notification. Similarly you can create a repeated scheduled notification:
UTNotifications.Manager.Instance.ScheduleNotificationRepeating(5, 25, "Title", "Text", 3);
This notification with title = “Title”, text = “Text” and id = 3 will be shown first time in 5 seconds after that code is executed and then will be repeated every 25 seconds. There is also a System.DateTime version of this method. Note that the repeating times are approximate and may differ, especially on iOS, where only fixed options like every minute, every day, every week and so on are available. So the provided interval value will be approximated by one of the available options. On Android there is a way to show a notification containing an image:
Manager.Instance.ScheduleNotification(10, "Image Notification", "Image notification text", 4, new Dictionary<string, string> {
{
"image_url", "http://thecatapi.com/api/images/get?format=src&type=png&size=med" } });
For more details on image notifications see Image Notifications (Android). See also Open URL Notifications (Android) and Notification Buttons (Android) for more information on some more options. You can also configure notifications icons, sounds and other notifications attributes. For more details see Using Notification Profiles (Sounds, Icons and Other Attributes).

Using Notification Profiles (Sounds, Icons and Other Attributes)
By default any notification will be posted with a default system notification sound and the application icon. UTNotifications allows definining custom sounds and icons for notifications (custom notification icons are not supported by iOS, no customization is currently supported on Windows Store). What sound and icon is used for a specific notification is defined by a notification profile - named set of the notification options. Notification profiles also define Android 8+ Notification Channels - named user-configurable groups of notifications. For example, a game might have two kinds of notifications - when a player receives a gift and when some in-game research is complete. One can define two notification profiles: “gift” & “research_complete” . First one will use a gift box icon when shown and some specific sound, and second one will have a bulb icon and another sound. You can create and edit the notification profiles in UTNotifications editor: Edit -> Project Settings -> UTNotifications -> Notification Profiles (sounds, icons and more). Each of functions UTNotifications.Manager.Instance.PostLocalNotification, UTNotifications.Manager.Instance.ScheduleNotification and UTNotifications.Manager.Instance.ScheduleNotificationRepeating has optional argument string notificationProfile which defines a name of a notification profile used for this notification. For push notifications you can also specify a notification profile.
- iOS (APNS). Notification profile name is specified as a sound in the APNS json payload: {
"aps":
{
<...>
"sound" : "Data/Raw/<NOTIFICATION PROFILE NAME>" }
}
Note that <NOTIFICATION PROFILE NAME> should not contain any file extension.
- Android. Notification profile name is stored in node “data” of the notification json. FCM: {
"registration_ids":<...>,
"data":
{
<...>,
"notification_profile":"<NOTIFICATION PROFILE NAME>" }
}
ADM: {
"data":
{

<...>,
"notification_profile":"<NOTIFICATION PROFILE NAME>" }
}
- Windows Store (WNS): Notification profile name is stored in the payload json root node: {
<...>,
"notification_profile":"<NOTIFICATION PROFILE NAME>" }
Push notifications sent from the UTNotificationsSample (Notify all registered devices) use notification profile “demo_notification_profile”. You can try configuring a profile with that name to see how the feature works. There is a predefined profile “default”, which is used on Android when no notification profile is specified for a notification. It’s important to configure at least its Small Icon (Android 5.0+): Android, starting with version 5.0, ignores any color information of small notification icons: the icons are considered to be completely white and only alpha channel of the icons is applied (so icons can be only white & transparent). So any non-transparent icons turn into just white squares when using as small notification icons.
Custom User Data & Handling Notifications
UTNotifications provides a way to handle a list of all notifications shown before or when an app was running, and also a notification which was clicked by a user. Besides, each notification (local and push) can contain some custom data which can be read when handling a clicked or received notification. In order to do so, please subscribe to UTNotifications.Manager events OnNotificationClicked / OnNotificationsReceived before initializing UTNotifications. F.e.: UTNotifications.Manager notificationsManager = UTNotifications.Manager.Instance;
notificationsManager.OnNotificationClicked += (notification) =>
{
Debug.Log(notification.text + " clicked"); };
notificationsManager.OnNotificationsReceived += (receivedNotifications) =>
{
foreach (var notification in receivedNotifications) {
Debug.Log(notification.text + " received/triggered"); }
};
notificationsManager.Initialize(true);

Here we specified true as the value of argument willHandleReceivedNotifications of UTNotifications.Manager.Initialize, as we’d like to handle received notifications with OnNotificationsReceived. Please never set it to true if you don’t intend to handle received notifications as it can be heavy for the app performance. Handling clicked notifications doesn’t require turning on willHandleReceivedNotifications. Note that iOS doesn't provide the list of all notifications shown when the app wasn't running in foreground. Received notifications list will contain only the notification which was clicked and all the notifications shown while the app is running in foreground. On the rest platforms you'll receive a list of all the shown notifications, even ones shown while the app was closed. You can specify a Dictionary<string, string> conaining any custom data which can then be accessed when handling clicked or received notifications as ReceivedNotification.userData. Each of the methods for creating local notifications can accept optional value userData. Push notifications payload is used to get the value of userData when handling them. Local notifications example:
Dictionary<string, string> userData = new Dictionary<string, string>(); userData.Add("event_type", "DAILY_GIFT_RECEIVED");
Manager.Instance.ScheduleNotificationRepeating(DateTime.Now.AddDays(1), TimeUtils.DaysToSeconds(1), "A gift for you!", "Start the game to receive your gift", 5, userData);
Push notifications example (ADM payload format):
{
"data":
{
<...>,
"event_type":"DAILY_GIFT_RECEIVED"
}
}
Now, let’s handle the user data: // Should be subscribed before initializing UTNotifications.Manager
UTNotifications.Manager.Instance.OnNotificationClicked += (notification) =>
{
if (notification.userData != null && notification.userData.ContainsKey("event_type")) {
string eventType = notification.userData["event_type"]; switch (eventType) {
case "DAILY_GIFT_RECEIVED": ShowDailyGiftDialog();
break;
default: Debug.LogWarning("Unexpected event_type: " + eventType); break; }
}
};
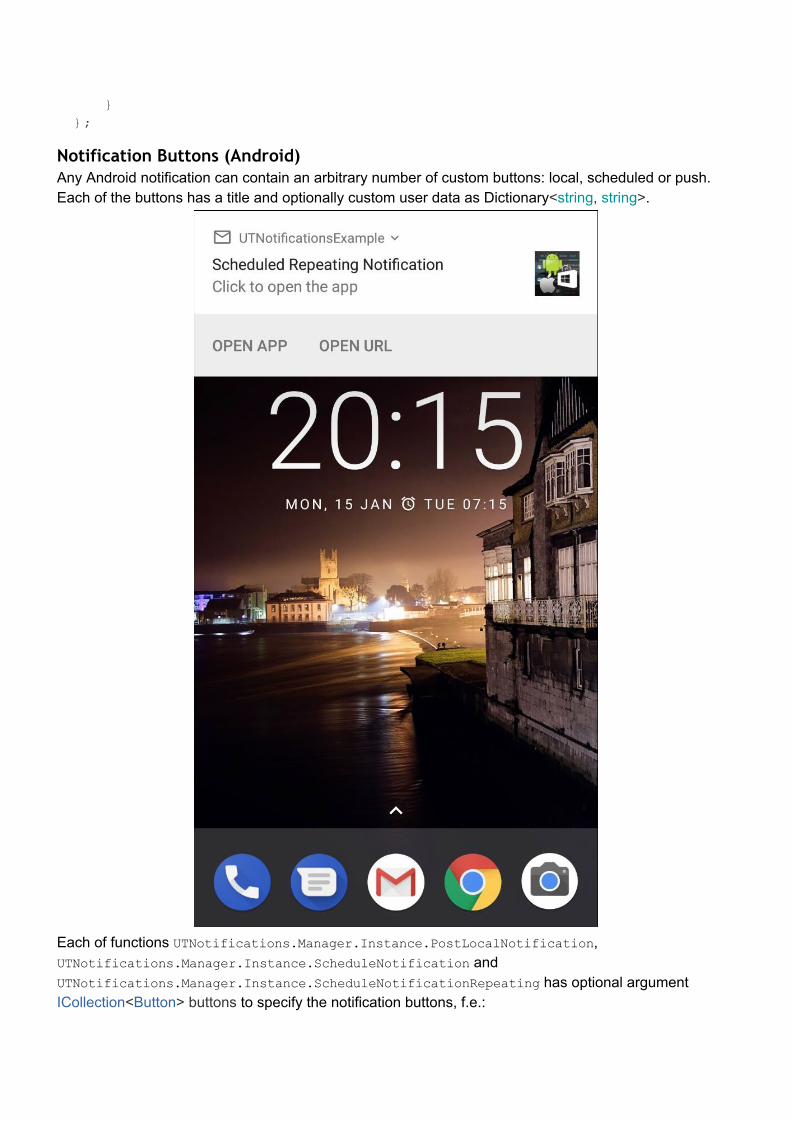
Notification Buttons (Android)
Any Android notification can contain an arbitrary number of custom buttons: local, scheduled or push. Each of the buttons has a title and optionally custom user data as Dictionary<string, string>.
Each of functions UTNotifications.Manager.Instance.PostLocalNotification, UTNotifications.Manager.Instance.ScheduleNotification and UTNotifications.Manager.Instance.ScheduleNotificationRepeating has optional argument ICollection<Button> buttons to specify the notification buttons, f.e.:
using UTNotifications; using System.Collections.Generic; List<Button> buttons = new List<Button>(); // (Android only) Just a simple button with some custom user data assigned
buttons.Add(new Button("Open App", new Dictionary<String, String> {{"button", "first"}})); // (Android only) "open_url" in userData opens an URL on a notification click
instead of the application. Can be used for the whole notification or a specific
button, like here.
buttons.Add(new Button("Open URL", new Dictionary<String, String>{{"open_url", "https://assetstore.unity.com/packages/tools/utnotifications-professional-local-pu
sh-notification-plugin-37767"}, {"button","second"}})); // Repeating scheduled notification
Manager.Instance.ScheduleNotificationRepeating(DateTime.Now.AddSeconds(10), 25, "Scheduled Repeating Notification", "Click to open the app", RepeatingNotificationId, userData, "demo_notification_profile", 1, buttons);
Push notifications (FCM & ADM) can contain custom buttons too:
"data":
{
<...>,
"buttons":
"[
{
\"title\":\"<Button title>\",
\"<Button user data key 1>\":\"<Button user data value 1>\", ...
},
<...>
]"
}
Please note, that JSON value of node “buttons” is actually a JSON array converted to string. Buttons are not supported on the rest platforms at the moment and will be ignored on them.
Image Notifications (Android)
With UTNotifications you can create image notifications, i.e. notifications containing large images. It’s supported with both local and push notifications. In order to create an image notification add a user data argument “image_url” with a string value, containing an URL of a picture to use. “image_url” value may be a normal http:// or https:// URL, or an Android file system URL: file:///<full path to a picture file> .
Open URL Notifications (Android)
You can also make clicking on a notification open a specified URL in a browser instead of activating your application. It’s supported by both local and push notifications. To achieve that add a user data argument “open_url” which string value should contain an URL to open on a click. Note, that on the rest platforms it still will activate your app.

Push Notifications Overview
Push notifications, also known as server notifications or remote notifications, are the notifications to a device without a specific request from the client. Unlike local notifications, which don’t include any server part, push notifications always originate from a server. Different devices rely on different methods to deliver push notifications. Apple, for example, uses the Apple Push Notification Service. Android doesn’t have a common system, but different Android devices provide different push notifications services. Google Play featured ones (i.e. most of Android devices) use Firebase Cloud Messaging (FCM, ex Google Cloud Messaging - GCM). Amazon Android devices (entire Kindle Fire series) don’t support FCM and have their own Amazon Device Messaging (ADM) API. Windows 8.1+ and Windows Phones use Windows Push Notification Services (WNS). UTNotifications rely on OS specific push notifications systems internally, but externally provides the common for all the supported services client side API. No matter what OS and service is used, the general scheme is the same:
1. Initialize and request a unique registration id. The client application using a push notifications
service (“PNS”: one of APNS, FCM, ADM and WNS) API requests a unique identifier for that specific PNS of that specific application on that specific device. Please note that in general it should be done on every start of the app because this identifier can get out of date and the application would receive a new one. With UTNotifications it’s done by calling UTNotifications.Manager.Instance.Initialize(...) function.
2. Registration id received. The application (game client) receives the id from PNS API asynchronously or synchronously. In order to receive it you will subscribe to UTNotifications.Manager.Instance.OnSendRegistrationId event (please subscribe before calling the Initialize function because in some cases receiving the registration id may be done synchronously).
3. Store the registration id on your game/notifications server. You send the received id to your own server which will later send push notifications. You do it in the delegate subscribed to the OnSendRegistrationId event.
4. Use the stored registration id to send a notification. Your server requests the server side of PNS API to send (i.e. “push”) custom notification to one or more clients using their registration ids which were previously stored. Please see DemoServer.PushNotificator class source code (Assets/UTNotifications/Editor/DemoServer/src/DemoServer/PushNotificator.java) for an example.
5. The notification is delivered to the appropriate client. PNS delivers the notification to the client with specified registration id. You don’t have to do anything on this stage with UTNotifications (cause it takes care of everything with both Android PNSes and there is nothing to be done on iOS). A click on the notification will open your application: it’s being started if has’t been and goes foreground if it was in a background. If you would like to handle incoming notifications please see API Reference for UTNotifications.Manager.OnNotificationsReceived event and UTNotifications.Manager.Initialize(...) function.
Please note that every push notification service requires some configuring. This is described in the sections below.
What You Need for Push Notifications
General
- A server that is connected to the internet. Push notifications are always sent by a server. For development you can use your computer as the server but for production use, you need at least something like a VPS (Virtual Private Server). A cheap shared hosting account is not good enough in most cases. You need to be able to run a background process on the server and be able to make outgoing TLS connections on certain ports.
iOS: Apple Push Notification Service (APNS)
- An iPhone or iPad. Notifications do not work in the simulator, so you will need to test on the device.
- An iOS Developer Program membership. You need to make a new App ID and provisioning profile for each app that uses push, as well as an SSL certificate for the server. You do this at the iOS Provisioning Portal (this is described below).
- An OS X computer.
Android: Firebase Cloud Messaging (FCM)
- Any Google Play featured device with Android 4.4+. - Please note that you can’t use Firebase Console for sending push notifications to FCM-enabled
devices due to its limitations. Fore more details see Push Notifications Payload Format/FCM.
Android: Amazon Device Messaging (ADM)
- Any Amazon Kindle Fire device (tablet or phone) except the 1st generation of Kindle Fire tablets which don’t support push notifications.

Windows Store: Windows Push Notification Services (WNS)
- Any Windows Phone 8.1 or Windows 8.1/10 device.
Push Notifications Payload Format
APNS requires any push notifications sent by your server to have a specific format. It is described in this document. Unlike it, FCM, ADM & WNS don’t have one common format of the message payload. Each of them accepts a JSON data payload, which then is interpreted by the client application. The client application itself is responsible for creating notifications based on the payload received from the appropriate service. Fortunately, UTNotifications does this nasty job for you. This is why it requires the JSON payload to be in a specific format, which though you can configure in the asset options in the Unity editor. The default format looks like: FCM: {
"registration_ids":["<id1>", ...], <or "to":"id1",>
"data":
{
"title":"<Title>",
"text":"<Text>",
"id":<int id>,
"badge_number":<int badge>,
"buttons":
"[
{
\"title\":\"<Button title>\",
\"<Button user data key 1>\":\"<Button user data value 1>\", ...
}, ...
]",
"<User data key 1>":"<User data value 1>", ...
}
}
Please note that UTNotifications supports “data”-only messages, and Firebase Console can send only "notification" and "notification" + "data" messages: see https://firebase.google.com/docs/cloud-messaging/concept-options#notifications_and_data_messages. It's important as messages containing "notification" node in their payload are handled by Android itself when the app is not running. It restricts the app drastically: notification profiles, image notifications and handling of received notifications gets impossible; it also creates many other issues. This is why you'll have to send FCM messages either from your own server or using a 3rd party service supporting "data"-only messages (there is a number of compatible services, including free of charge OneSignal).
ADM: {
"data": { "title":"<Title>",
"text":"<Text>",

"id":<int id>,
"badge_number":<int badge>,
"buttons":
"[
{
\"title\":\"<Button title>\",
\"<Button user data key 1>\":\"<Button user data value 1>\", ...
}, ...
]",
"<User data key 1>":"<User data value 1>", ...
} }
WNS: {
"title":"<Title>",
"text":"<Text>",
"id":<int id>,
"badge_number":<int badge>,
"<User data key 1>":"<User data value 1>", ...
}
If push server you’re going to use sends push messages in a different format, you can configure it in the UTNotifications Unity settings: Edit -> Project Settings -> UTNotifications -> Advanced -> Push Payload Format (FCM, ADM, WNS) . “data/” prefix is always added to each of the field names (but it’s ignored on WNS).
Configuring Apple Push Notification Service (APNS)
1. As explained in the official Apple documentation, generate and save a .p8 APNS enabled authentication key: http://help.apple.com/xcode/mac/current/#/dev54d690a66
2. Specify the credentials in Assets/UTNotifications/Editor/DemoServer/src/main/java/com/universal_tools/demoserver/PushNotificator.java:
- APNS_AUTH_KEY: the contents of the .p8 authentication key, without -----BEGIN PRIVATE KEY-----, -----END PRIVATE KEY----- and any line breaks. - APNS_TEAM_ID: can be found at https://developer.apple.com/account/#/membership/ - APNS_KEY_ID: is included in the .p8 key file name and also be found at

https://developer.apple.com/account/ios/authkey
- APNS_BUNDLE_ID: your application bundle id, can be found in UTNotifications Settings
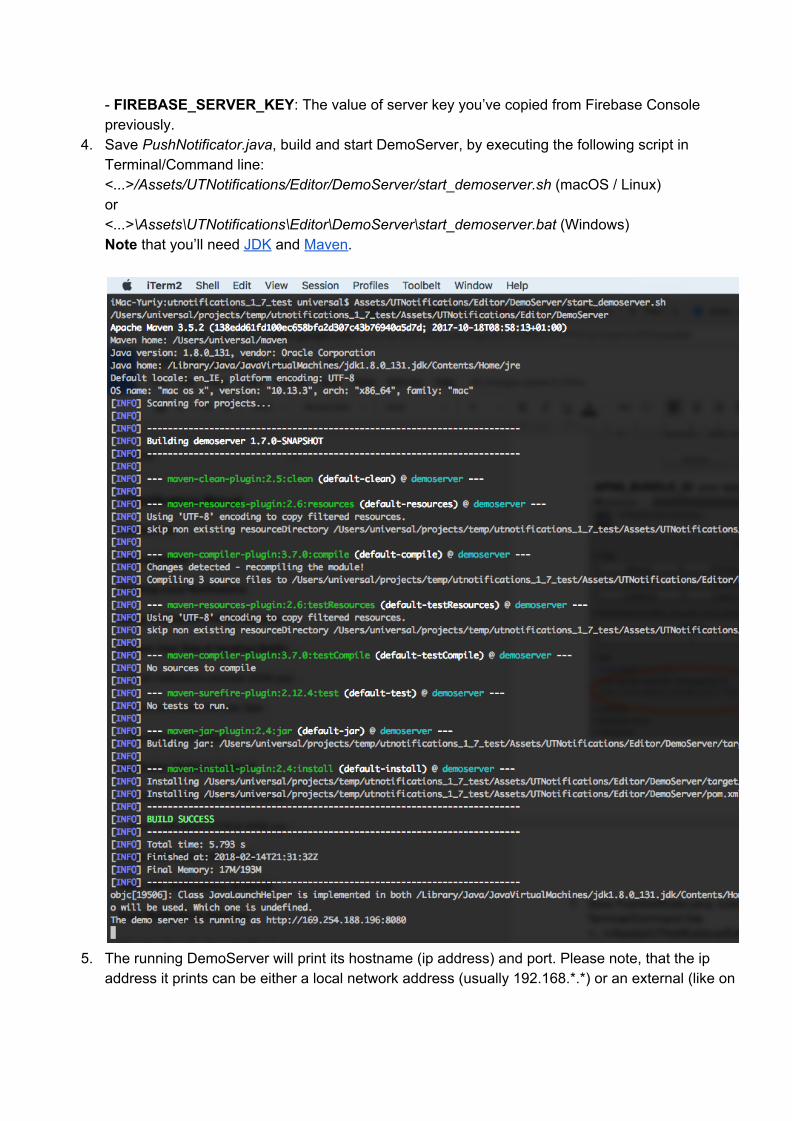
3. Save PushNotificator.java, build and start DemoServer, by executing the following script in
Terminal/Command line: <...>/Assets/UTNotifications/Editor/DemoServer/start_demoserver.sh (macOS / Linux) or <...>\Assets\UTNotifications\Editor\DemoServer\start_demoserver.bat (Windows) Note that you’ll need JDK and Maven.

4. The running DemoServer will print its hostname (ip address) and port. Please note, that the ip
address it prints can be either a local network address (usually 192.168.*.*) or an external (like on the screenshot above). In later case, please find your internal IP address in the OS network settings.
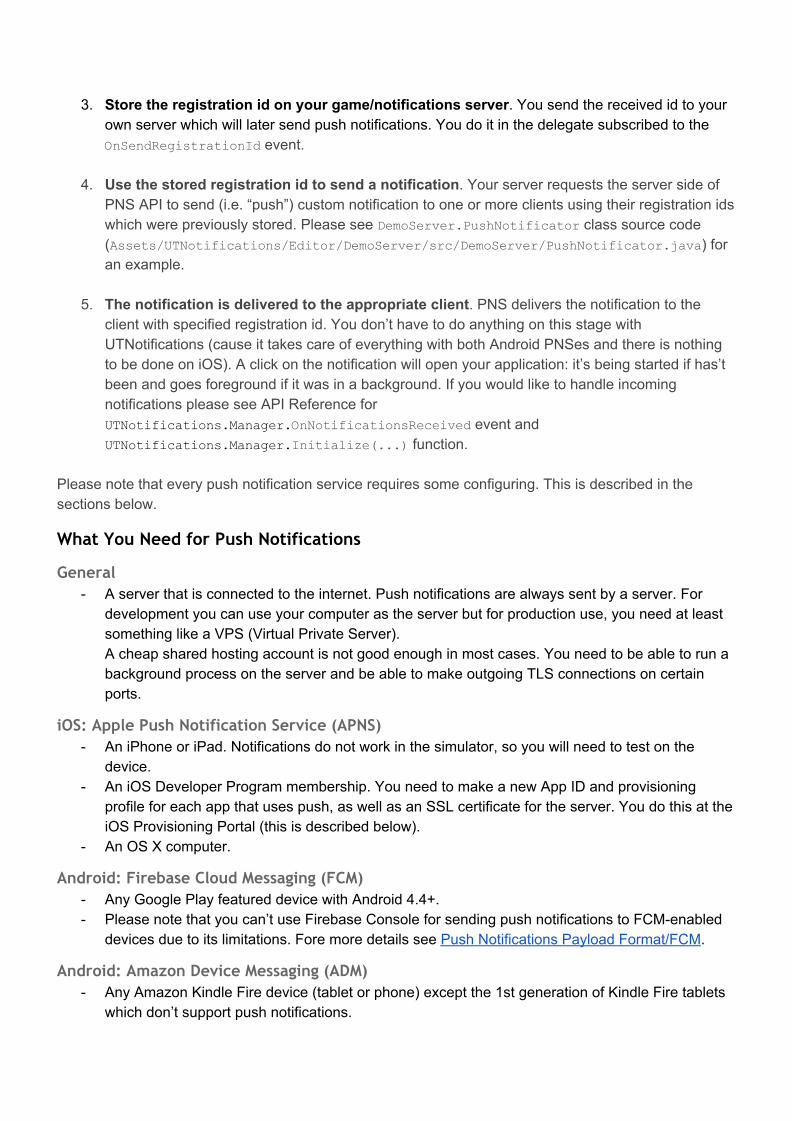
5. In UTNotifications Settings (Edit -> Project Settings -> UTNotifications) enable iOS -> Push Notifications toggle:
6. Temporarily make UTNotifications/Sample/UTNotificationsSample scene default for your Unity
project:

7. Build and run an iOS build. Make sure Push Notifications got enabled in the project Capacities in Xcode (should be done by UTNotifications post build event automatically):
8. The sample scene should start requesting an URL of DemoServer in order to continue:

9. Make sure your test device and the computer running DemoServer belong to the same local network (f.e. connected to the same Wi-Fi router). Specify the full URL of the running DemoServer (as http://<ip address>:8080) and press Initialize:
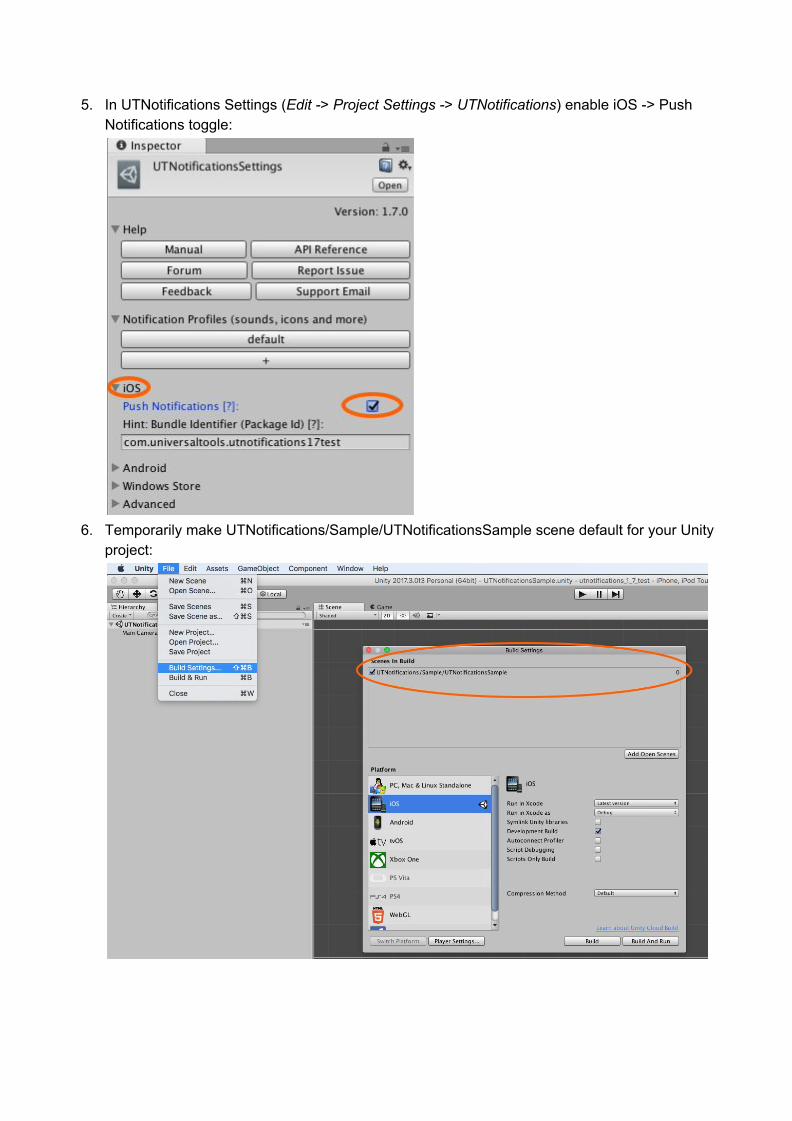
10. Press “Notify all registered devices” to send a push notification to all the DemoServer-registered devices. If everything was configured correctly, you should see how UTNotifications SampleScene handled the push message:
Migrating from GCM to FCM
Google doesn’t allow enabling GCM in new apps anymore and will once stop to service existing ones, so migrating from GCM to FCM is what you’ll have to do anyway. But here are good news: Google updated their GCM servers so they can now send messages to both GCM and FCM using the same old GCM API and even the same URL https://android.googleapis.com/gcm/send. It means that you’ll not have to modify your server code, and also any 3rd party services supporting GCM automatically support FCM. You’ll probably have to distinguish server instances/3rd party services app accounts between GCM and FCM versions of your app, as FCM version will have different server keys. There is no reason to not migrate to FCM. Please refer to the section Configuring the Firebase Cloud Messaging (FCM) to find out how.
Configuring the Firebase Cloud Messaging (FCM)
Based on FCM official documentation: https://firebase.google.com/docs/cloud-messaging/. 1. Open Firebase Developer Console. 2. Create a new Firebase project or import existing Google Project.

3. Press Add Firebase to your Android app.
4. Enter your app’s bundle id as Android package name and press REGISTER APP button (no
need to specify any other details).

5. Download google-services.json. Store it somewhere. Close the configuration dialog (you don’t have to press Continue button).
6. Open Firebase Console: https://console.firebase.google.com and choose a project you’ve just
created/configured. 7. Open the project settings and switch to tab CLOUD MESSAGING.

8. Copy and store somewhere the value of Server key.
Apply Credentials and Test
1. In Unity open the UTNotifications Settings in menu: Edit -> Project Settings -> UTNotifications (Unity restart may be required to see this menu item first time) and enable Push Notifications toggle in the Firebase Cloud Messaging.
2. In Firebase Play Settings press Load google-services.json button to load and apply the configuration file you obtained previously. You should see a numeric value of SenderID below the button.
3. Specify the credentials in
Assets/UTNotifications/Editor/DemoServer/src/main/java/com/universal_tools/demoserver/PushNotificator.java:
- FIREBASE_SERVER_KEY: The value of server key you’ve copied from Firebase Console previously.
4. Save PushNotificator.java, build and start DemoServer, by executing the following script in Terminal/Command line: <...>/Assets/UTNotifications/Editor/DemoServer/start_demoserver.sh (macOS / Linux) or <...>\Assets\UTNotifications\Editor\DemoServer\start_demoserver.bat (Windows) Note that you’ll need JDK and Maven.
5. The running DemoServer will print its hostname (ip address) and port. Please note, that the ip
address it prints can be either a local network address (usually 192.168.*.*) or an external (like on

the screenshot above). In later case, please find your internal IP address in the OS network settings.
6. Temporarily make UTNotifications/Sample/UTNotificationsSample scene default for your Unity project:

7. Build and run the Unity application on a target Android device. The sample scene should start requesting an URL of DemoServer in order to continue:

8. Make sure your test device and the computer running DemoServer belong to the same local network (f.e. connected to the same Wi-Fi router). Specify the full URL of the running DemoServer (as http://<ip address>:8080) and press Initialize:

9. Press “Notify all registered devices” to send a push notification to all the DemoServer-registered devices. If everything was configured correctly, you should see how UTNotifications SampleScene handled the push message:
Configuring the Amazon Device Messaging (ADM)
Based on ADM official documentation: https://developer.amazon.com/public/apis/engage/device-messaging/tech-docs/02-obtaining-adm-credentials
Getting Your OAuth Credentials and API Key
1. Create an account on the Amazon Apps & Games Developer Portal and add your app, if you have not already done so.
2. In Apps & Services > My Apps, select the app with which you want to use ADM or create a new one.
3. Click Device Messaging. 4. If you have already assigned a security profile to your app, proceed to step 7. 5. To assign a security profile to your app, choose an existing security profile from Select a
Security Profile or click Create a New Security Profile. A security profile provides the OAuth credentials that you use when sending messages with ADM. Note: You can share the use of a security profile among more than one app. Sharing a profile allows apps to share some types of data. For example, you may have a "My Cat - Free" app and a "My Cat - HD" app. If you apply a single security profile to both apps, data accessed by that profile is available to both apps. For a shared profile, choose a name that applies to both, for example, "My Cat Apps profile".
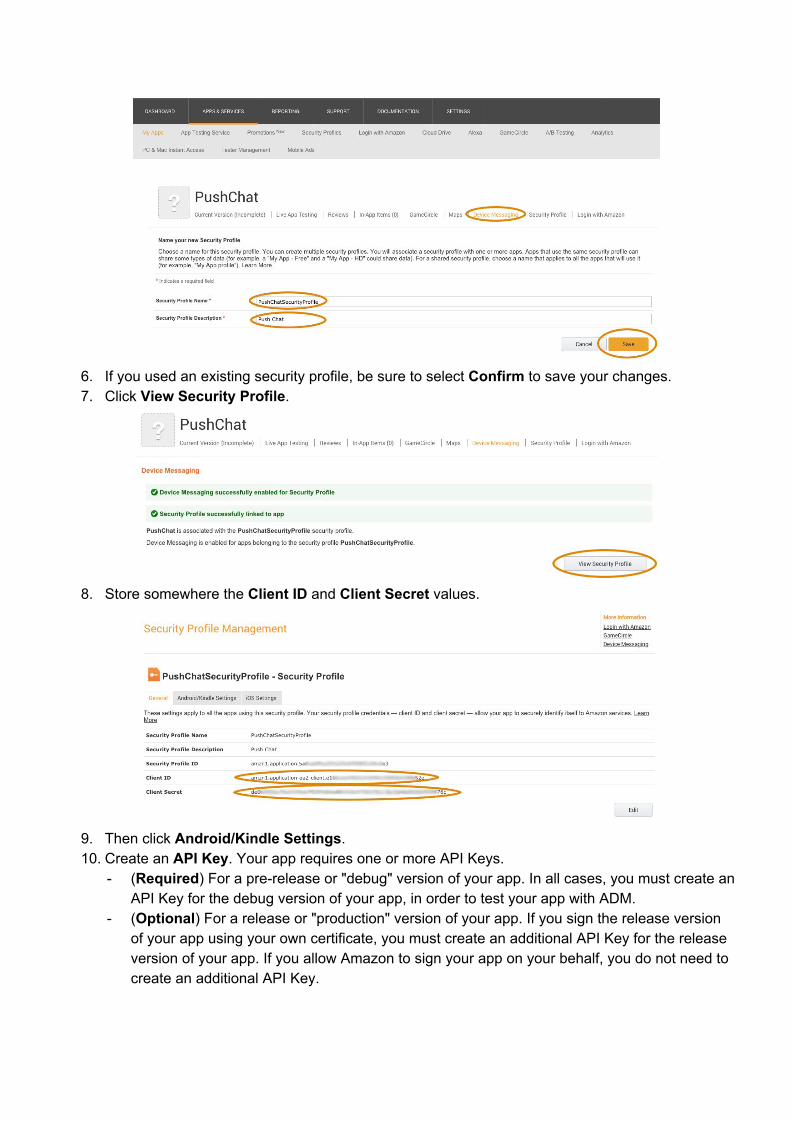
6. If you used an existing security profile, be sure to select Confirm to save your changes. 7. Click View Security Profile.
8. Store somewhere the Client ID and Client Secret values.
9. Then click Android/Kindle Settings. 10. Create an API Key. Your app requires one or more API Keys.
- (Required) For a pre-release or "debug" version of your app. In all cases, you must create an API Key for the debug version of your app, in order to test your app with ADM.
- (Optional) For a release or "production" version of your app. If you sign the release version of your app using your own certificate, you must create an additional API Key for the release version of your app. If you allow Amazon to sign your app on your behalf, you do not need to create an additional API Key.

To create an API Key, you must provide both the package name (for example, com.mycompany.bestapplication) for the app and its signature: - Debug application signature for the pre-release version of your app.
a. In Unity open the UTNotifications Settings in menu: Edit -> Project Settings -> UTNotifications (Unity restart may be required to see this menu item first time) and enable Push Notifications toggle in the Amazon Device Messaging.
b. Copy and paste the Package Name and Android debug signature MD5 hints from UTNotifications Settings / Amazon Device Messaging Settings to the Amazon Security Profile fields Package and Signature. Note: If you don’t see the Android debug signature MD5 hint value please build the Android version at least once successfully. If getting the Android debug signature MD5 is still failed after that, please see https://developer.amazon.com/public/apis/engage/device-messaging/tech-docs/02-obtaining-adm-credentials.
- Release application signature for the production version of your app. If you sign the release
version of your app using your own certificate, provide the MD5 signature for that certificate to create an additional API Key (more details at https://developer.amazon.com/public/apis/engage/device-messaging/tech-docs/02-obtaining-adm-credentials). If you allow Amazon to sign your app on your behalf, you do not need to obtain an API Key for the release signature.
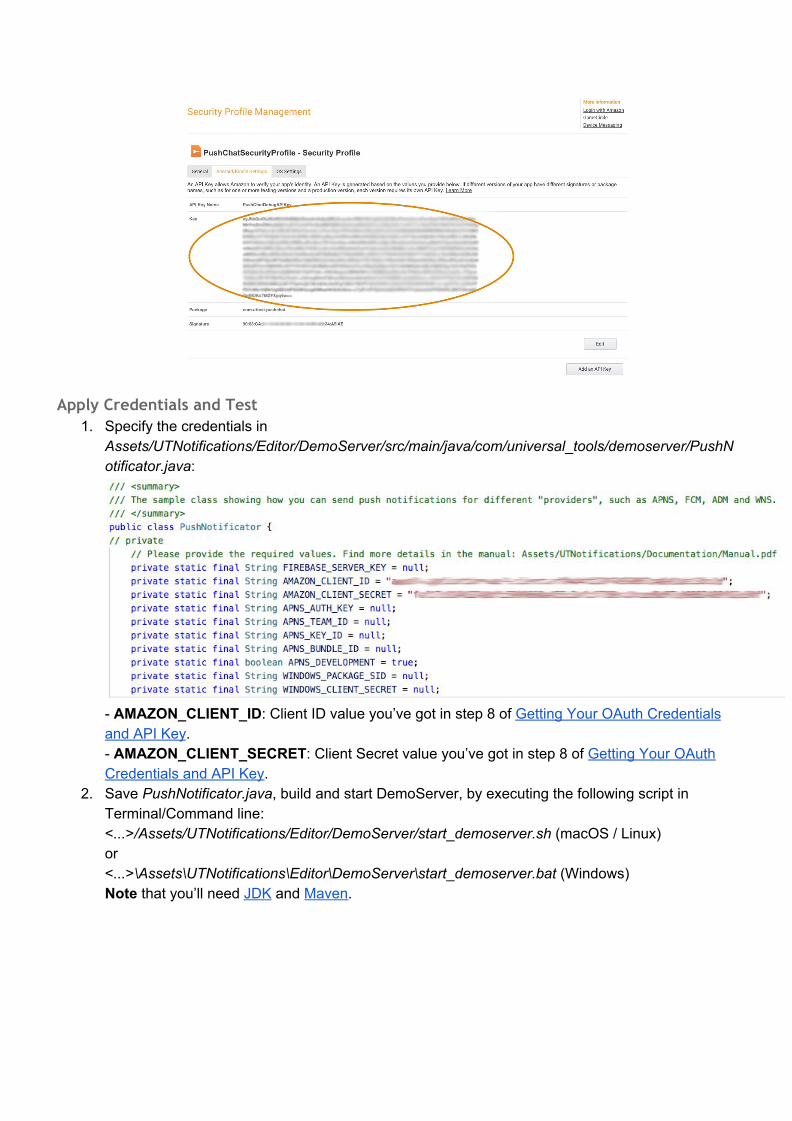
11. Click Generate New Key. 12. Store the retrieved API Key somewhere.
Note: It shouldn’t contain any spaces or newline characters.
Apply Credentials and Test
1. Specify the credentials in Assets/UTNotifications/Editor/DemoServer/src/main/java/com/universal_tools/demoserver/PushNotificator.java:
- AMAZON_CLIENT_ID: Client ID value you’ve got in step 8 of Getting Your OAuth Credentials and API Key. - AMAZON_CLIENT_SECRET: Client Secret value you’ve got in step 8 of Getting Your OAuth Credentials and API Key.
2. Save PushNotificator.java, build and start DemoServer, by executing the following script in Terminal/Command line: <...>/Assets/UTNotifications/Editor/DemoServer/start_demoserver.sh (macOS / Linux) or <...>\Assets\UTNotifications\Editor\DemoServer\start_demoserver.bat (Windows) Note that you’ll need JDK and Maven.

3. The running DemoServer will print its hostname (ip address) and port. Please note, that the ip
address it prints can be either a local network address (usually 192.168.*.*) or an external (like on the screenshot above). In later case, please find your internal IP address in the OS network settings.
4. In Unity open the UTNotifications Settings in menu: Edit -> Project Settings -> UTNotifications.
5. In Amazon Device Messaging Settings write down the Amazon Debug API Key value you got in 12th step of Getting Your OAuth Credentials and API Key.

6. Temporarily make UTNotifications/Sample/UTNotificationsSample scene default for your Unity
project:

7. Build and run the Unity application on a target Kindle Fire device. The sample scene should start requesting an URL of DemoServer in order to continue:
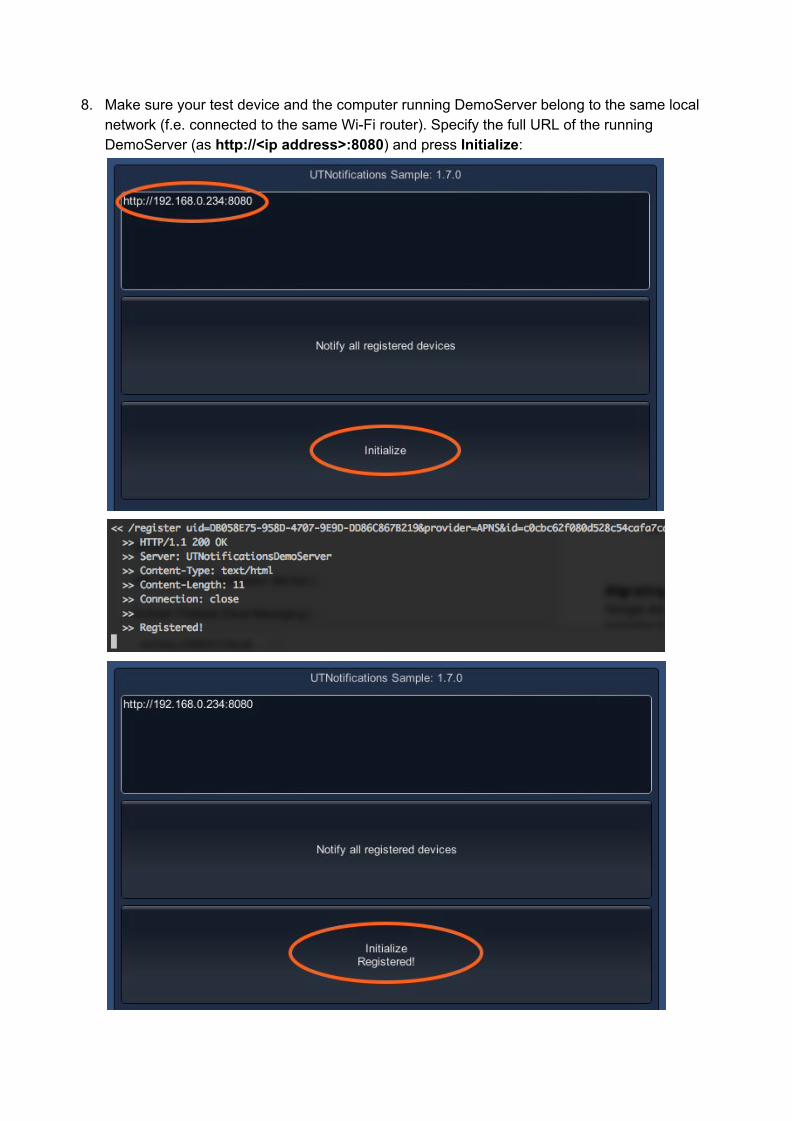
8. Make sure your test device and the computer running DemoServer belong to the same local network (f.e. connected to the same Wi-Fi router). Specify the full URL of the running DemoServer (as http://<ip address>:8080) and press Initialize:
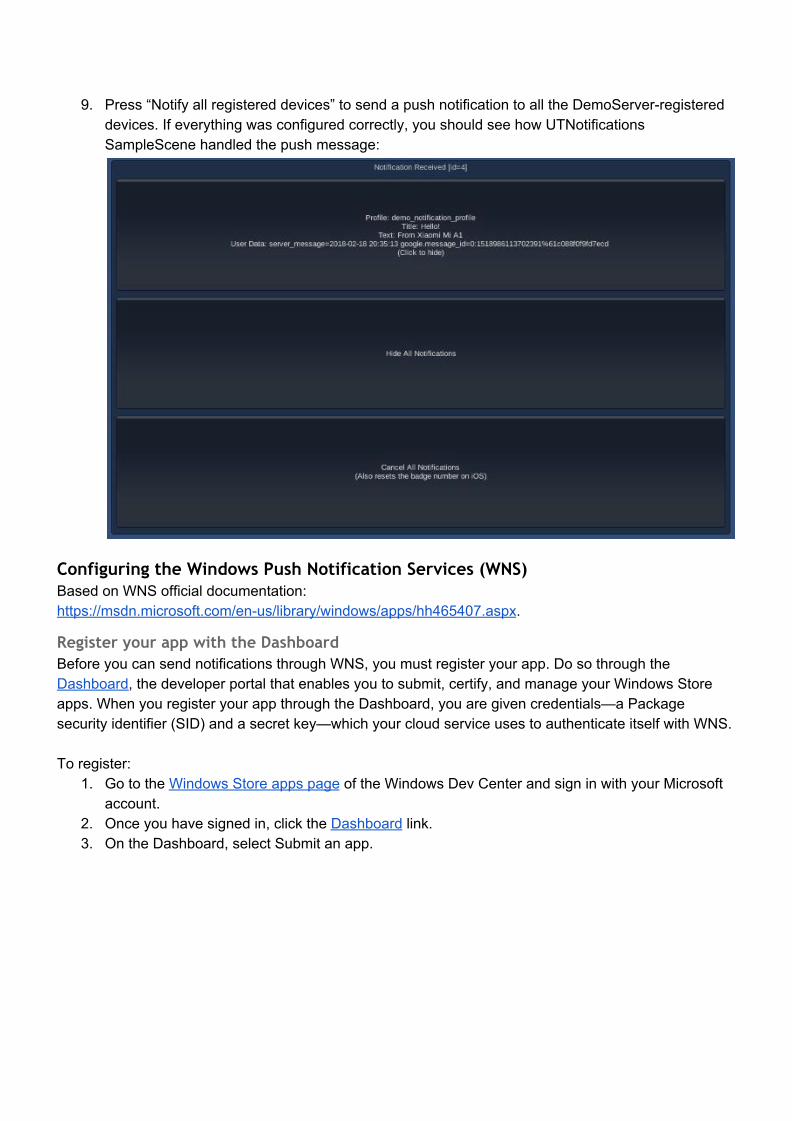
9. Press “Notify all registered devices” to send a push notification to all the DemoServer-registered devices. If everything was configured correctly, you should see how UTNotifications SampleScene handled the push message:
Configuring the Windows Push Notification Services (WNS)
Based on WNS official documentation: https://msdn.microsoft.com/en-us/library/windows/apps/hh465407.aspx.
Register your app with the Dashboard
Before you can send notifications through WNS, you must register your app. Do so through the Dashboard, the developer portal that enables you to submit, certify, and manage your Windows Store apps. When you register your app through the Dashboard, you are given credentials—a Package security identifier (SID) and a secret key—which your cloud service uses to authenticate itself with WNS. To register:
1. Go to the Windows Store apps page of the Windows Dev Center and sign in with your Microsoft account.
2. Once you have signed in, click the Dashboard link. 3. On the Dashboard, select Submit an app.
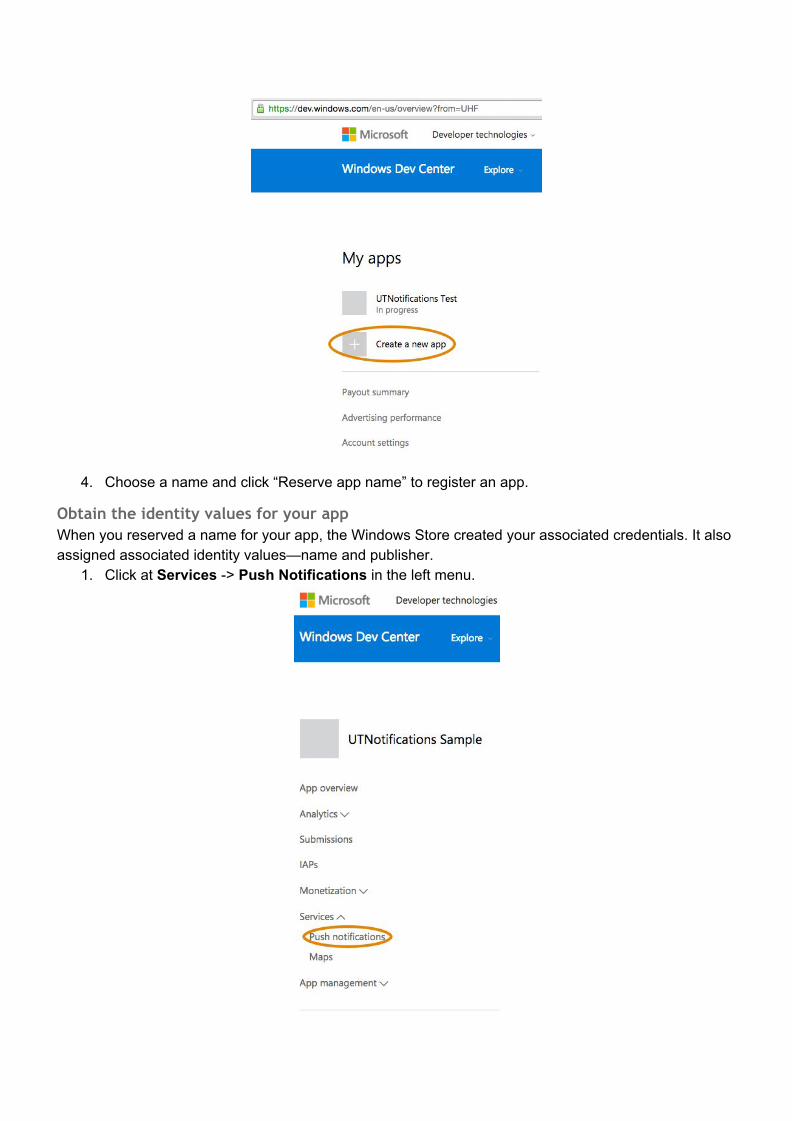
4. Choose a name and click “Reserve app name” to register an app.
Obtain the identity values for your app
When you reserved a name for your app, the Windows Store created your associated credentials. It also assigned associated identity values—name and publisher.
1. Click at Services -> Push Notifications in the left menu.

2. Press on a link Live Services site.
3. Save somewhere the following values: Package SID, Client secret, Identity Name & Publisher.
4. In Unity open the UTNotifications Settings in menu: Edit -> Project Settings ->
UTNotifications (Unity restart may be required to see this menu item first time) and enable Push Notifications toggle in the Windows Store Settings.
5. Open Windows Store player settings: File -> Build Settings… -> Windows Store -> Player Settings.
6. Use Identity Name value from 3rd step as Package Name.
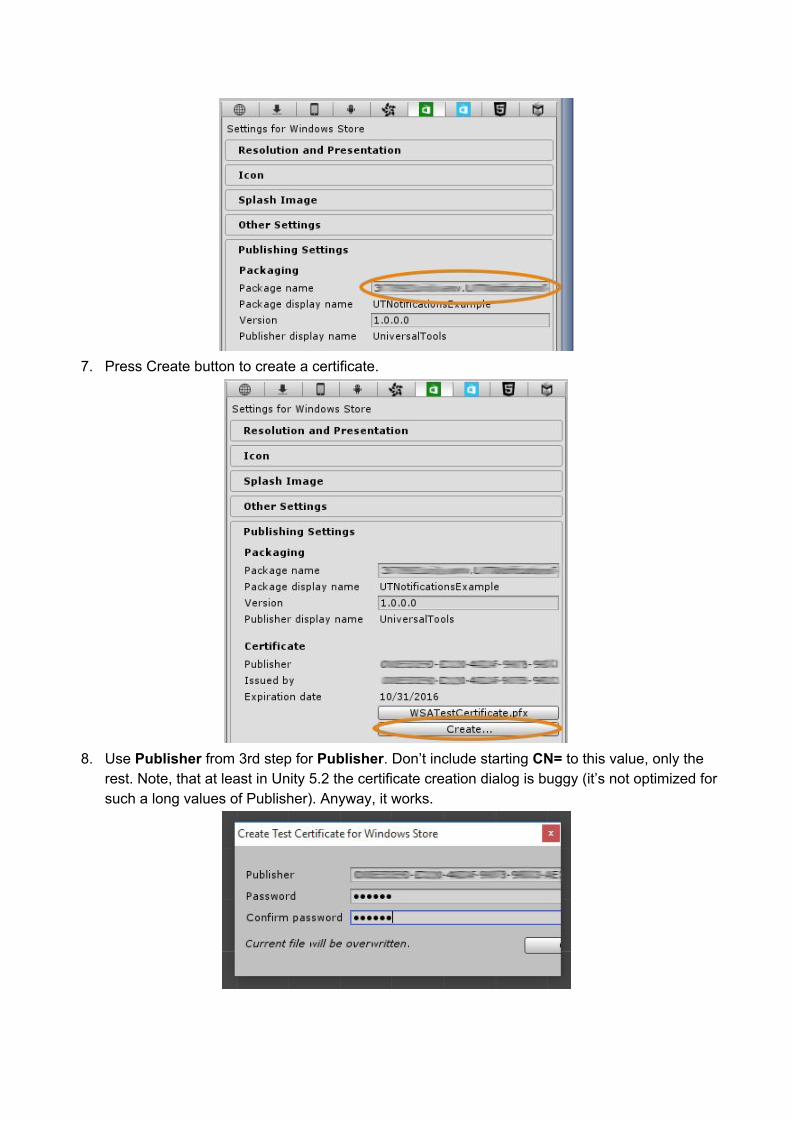
7. Press Create button to create a certificate.
8. Use Publisher from 3rd step for Publisher. Don’t include starting CN= to this value, only the
rest. Note, that at least in Unity 5.2 the certificate creation dialog is buggy (it’s not optimized for such a long values of Publisher). Anyway, it works.

Apply Credentials and Test
1. Specify the credentials in
Assets/UTNotifications/Editor/DemoServer/src/main/java/com/universal_tools/demoserver/PushNotificator.java:
- WINDOWS_PACKAGE_SID: Package SID you got in 3rd step of Obtain the identity values for your app section. - WINDOWS_CLIENT_SECRET: Client secret you got in 3rd step of Obtain the identity values for your app section.
2. Save PushNotificator.java, build and start DemoServer, by executing the following script in Terminal/Command line: <...>/Assets/UTNotifications/Editor/DemoServer/start_demoserver.sh (macOS / Linux) or <...>\Assets\UTNotifications\Editor\DemoServer\start_demoserver.bat (Windows) Note that you’ll need JDK and Maven.

3. The running DemoServer will print its hostname (ip address) and port. Please note, that the ip
address it prints can be either a local network address (usually 192.168.*.*) or an external (like on the screenshot above). In later case, please find your internal IP address in the OS network settings.
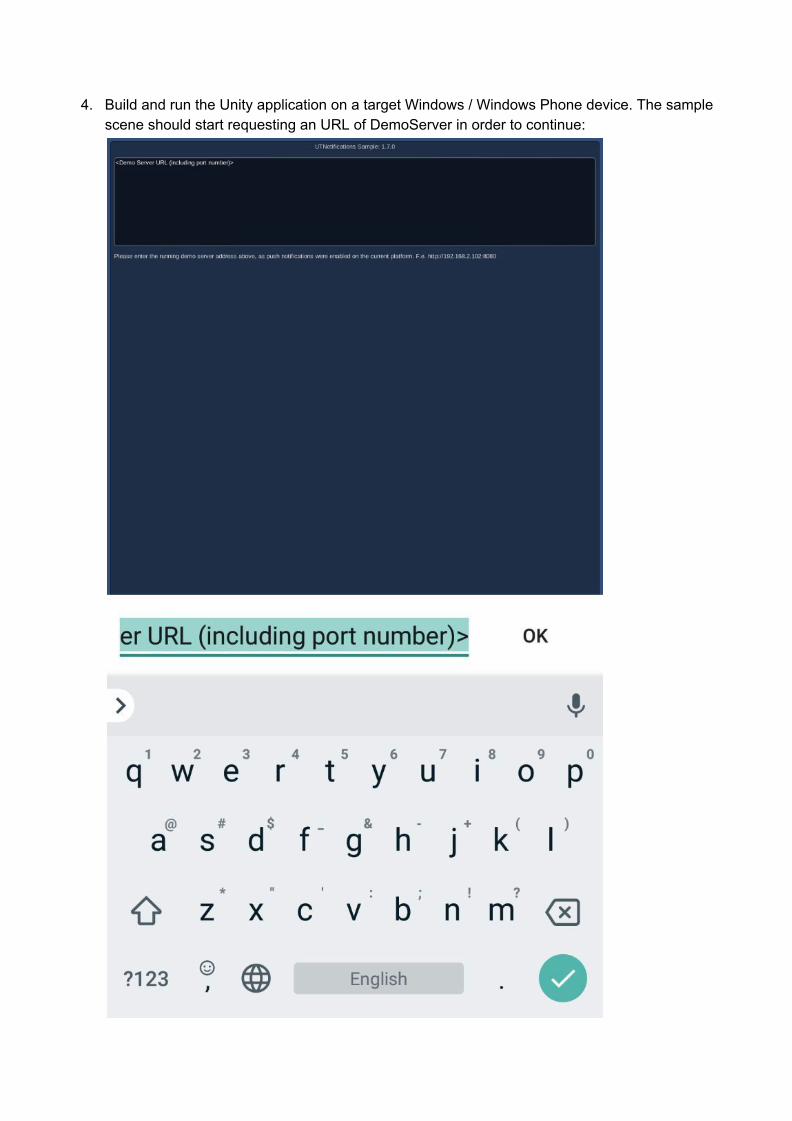
4. Build and run the Unity application on a target Windows / Windows Phone device. The sample scene should start requesting an URL of DemoServer in order to continue:

5. Make sure your test device and the computer running DemoServer belong to the same local network (f.e. connected to the same Wi-Fi router). Specify the full URL of the running DemoServer (as http://<ip address>:8080) and press Initialize:
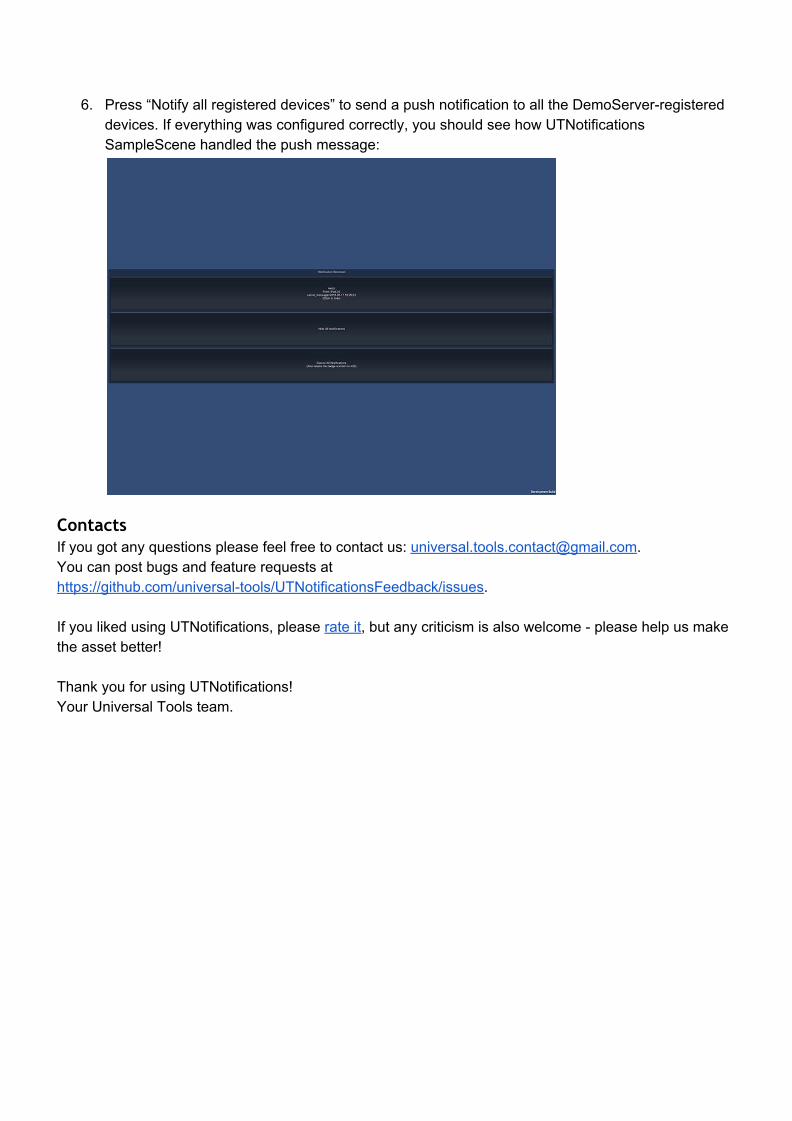
6. Press “Notify all registered devices” to send a push notification to all the DemoServer-registered devices. If everything was configured correctly, you should see how UTNotifications SampleScene handled the push message:
Contacts
If you got any questions please feel free to contact us: [email protected]. You can post bugs and feature requests at https://github.com/universal-tools/UTNotificationsFeedback/issues. If you liked using UTNotifications, please rate it, but any criticism is also welcome - please help us make the asset better! Thank you for using UTNotifications! Your Universal Tools team.