using visual basic 6 with visual basic .net: com...
TRANSCRIPT
175
Using Visual Basic 6 with Visual Basic .NET: COM Interop
This chapter focuses on making your Visual Basic 6 and Visual Basic .NETapplications work together. The mechanism that makes interoperabilitybetween the two products possible is known as COM interop. We’ll start bylooking at the various ways you can create or use existing components thatcommunicate across COM and .NET component boundaries. We’ll also showyou how to debug across calls between Visual Basic 6 and Visual Basic .NETauthored components. Finally, we’ll discuss the role of binary compatibility inVisual Basic .NET.
If you’ve been creating multitiered applications using Visual Basic 6, yourapplication has likely evolved into a large system spanning multiple compo-nents. Let’s say, for example, that you have an application composed of a VisualBasic standard EXE front end containing ActiveX controls talking to a middle-tier Visual Basic DLL. The Visual Basic DLL in turn talks to a back-end SQLServer database. Upgrading such an application to Visual Basic .NET in oneshot is nearly impossible. This is where COM interop swoops in to save the day.
COM interop allows you to upgrade one component at a time while keep-ing the system alive. For example, you can upgrade your Visual Basic 6 middle-tier component to Visual Basic .NET independently of the user interface (UI)
C0961587x.fm Page 175 Thursday, November 15, 2001 3:33 PM
176 Part II Upgrading Applications
component. Once you have tested your new Visual Basic .NET componentwith your Visual Basic 6 UI client, you can update the client to take advantageof the new Visual Basic .NET server component. At a later date you maydecide to upgrade your Visual Basic 6 client components to Visual Basic .NETcomponents. An ActiveX control vendor may offer a .NET upgrade to yourfavorite ActiveX control, leading you to replace all ActiveX versions of the con-trol in your application with the .NET version. Eventually your entire systemevolves to .NET, smoothly and without interruption.
Visual Studio .NET Is Built on COM InteropYou do not need to look far for an example of COM interop at work. Ifyou’re running Visual Studio .NET, COM interop is right under your nose.The Property Browser is written in C#, a language built on the .NETFramework. Most of the designers you will find, such as the WindowsForms designer, are written in a language supported by .NET. All of thewizards are written in either C# or Visual Basic .NET. The Visual Studio.NET environment is a traditional client application written in C++ thatinteroperates with these other .NET components using COM interop. TheUpgrade Wizard relies heavily on COM interop to accomplish its tasks.The wizard is a .NET component that calls out to the upgrade engine, anout-of-process COM EXE server, to upgrade your Visual Basic 6 project.The upgrade engine in turn calls back to the wizard to provide status. Asyour application is being upgraded, the status text and progress barupdates you see are brought to you by way of COM interop.
We look forward to the day when 100 percent of our Visual Studio.NET components are written in Visual Basic .NET. Until that day, COMinterop will be silently at work keeping Visual Studio .NET humming along.
It would be nice to be able to upgrade your entire application to .NET, butin some cases it may not be feasible. For example, what if your applicationrelies on a COM component for which there is no .NET equivalent? A goodexample is a Visual Basic 6 ActiveX document or DHTML page designer forwhich there is no equivalent component in .NET. In such cases COM interopcan help keep things running without hindering you from moving other parts ofyour system forward to Visual Basic .NET.
C0961587x.fm Page 176 Thursday, November 15, 2001 3:33 PM
Chapter 9 Using Visual Basic 6 with Visual Basic .NET: COM Interop 177
Although we’ve been talking about interoperation among Visual Basiccomponents, the concept of interoperation applies to all COM components. Forexample, your application may be composed of a Visual Basic front end talkingto a C++ authored middle-tier component. As long as the components thatmake up your application are based on COM, your Visual Basic .NET applica-tion can continue to talk to them. Similarly, your Visual Basic 6 application cancontinue to talk to a .NET component—authored in any language supported by.NET—as if it were a COM component, without any changes in yourVisual Basic 6 application.
Where COM Interop Comes into PlayThere are three common situations in which you will encounter COM interop:when using ActiveX controls, when calling a COM component from a .NETapplication or component, and when calling a .NET component from a COMapplication or component. Let’s take a look at each of these situations.
ActiveX ControlsVisual Basic .NET allows you to place either .NET or ActiveX controls on a Win-dows form. Chapter 13covers ActiveX control hosting in more detail. Suffice itto say that the way you use ActiveX controls in Visual Basic .NET is nearly iden-tical to the way you use them in Visual Basic 6. You add the control to the Tool-box, place the control on the form, set design-time property values, and thenwrite code behind it. No sweat.
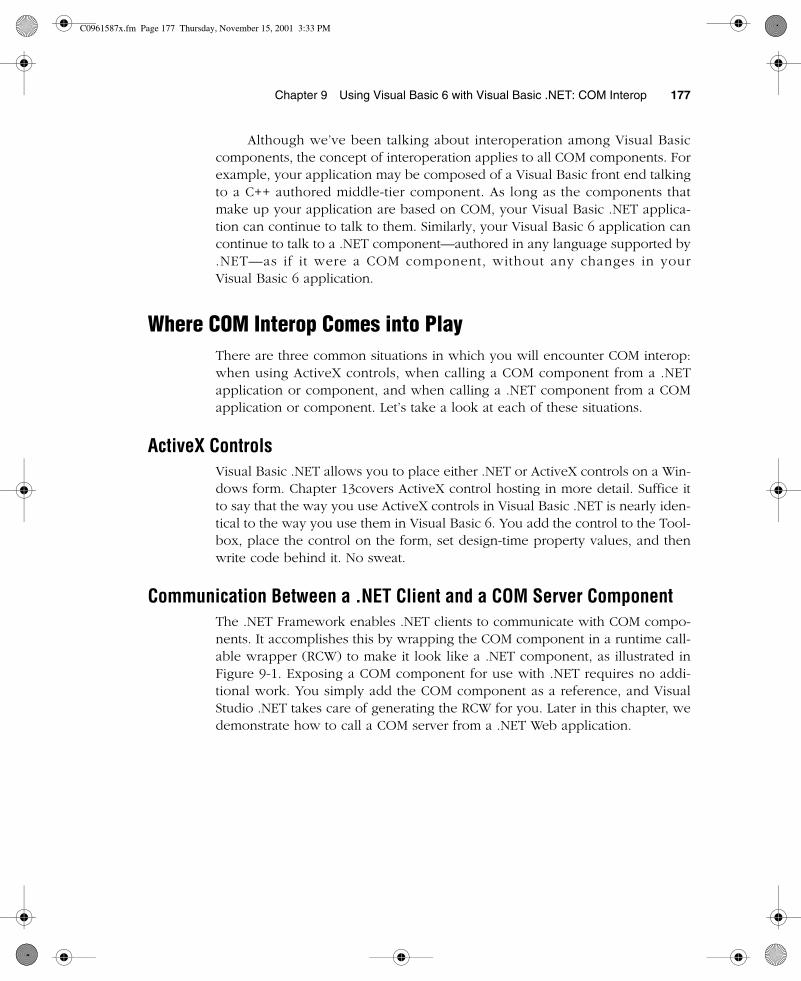
Communication Between a .NET Client and a COM Server ComponentThe .NET Framework enables .NET clients to communicate with COM compo-nents. It accomplishes this by wrapping the COM component in a runtime call-able wrapper (RCW) to make it look like a .NET component, as illustrated inFigure 9-1. Exposing a COM component for use with .NET requires no addi-tional work. You simply add the COM component as a reference, and VisualStudio .NET takes care of generating the RCW for you. Later in this chapter, wedemonstrate how to call a COM server from a .NET Web application.
C0961587x.fm Page 177 Thursday, November 15, 2001 3:33 PM
178 Part II Upgrading Applications
F09km01
Figure 9-1 Runtime callable wrapper that enables a COM componentto look like a .NET component.
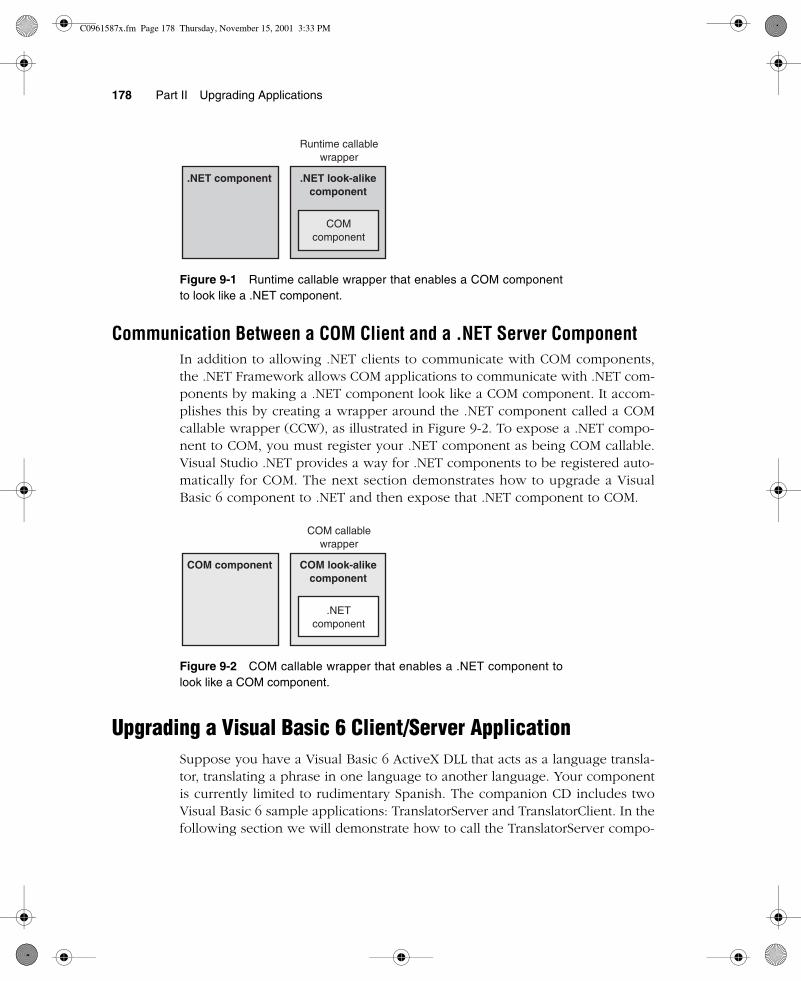
Communication Between a COM Client and a .NET Server ComponentIn addition to allowing .NET clients to communicate with COM components,the .NET Framework allows COM applications to communicate with .NET com-ponents by making a .NET component look like a COM component. It accom-plishes this by creating a wrapper around the .NET component called a COMcallable wrapper (CCW), as illustrated in Figure 9-2. To expose a .NET compo-nent to COM, you must register your .NET component as being COM callable.Visual Studio .NET provides a way for .NET components to be registered auto-matically for COM. The next section demonstrates how to upgrade a VisualBasic 6 component to .NET and then expose that .NET component to COM.
F09km0
Figure 9-2 COM callable wrapper that enables a .NET component tolook like a COM component.
Upgrading a Visual Basic 6 Client/Server ApplicationSuppose you have a Visual Basic 6 ActiveX DLL that acts as a language transla-tor, translating a phrase in one language to another language. Your componentis currently limited to rudimentary Spanish. The companion CD includes twoVisual Basic 6 sample applications: TranslatorServer and TranslatorClient. In thefollowing section we will demonstrate how to call the TranslatorServer compo-
����������� ����� ����� ���������
����������
��� ���������������
���������� ���� ����� ���������
�����������
�����������������
C0961587x.fm Page 178 Thursday, November 15, 2001 3:33 PM
Chapter 9 Using Visual Basic 6 with Visual Basic .NET: COM Interop 179
nent from a Visual Basic .NET client application. First, however, you need tobuild the Visual Basic 6 server component by following these steps:
1. Run Visual Basic 6.
2. Open TranslatorServer.Vbp provided on the companion CD.
3. Open TranslatorServer.Cls, and you will find that it contains the fol-lowing code:
Public Function Translate(ByVal SentenceFrom As String, _ByVal LanguageFrom As String, _ByVal LanguageTo As String) As String
‘ Note to self: Find someone who speaks Spanish and VB who ‘ is willing to expand this component to translate any
‘ common English phrase If LCase(LanguageFrom) = “english” And _ LCase(LanguageTo) = “spanish” Then Select Case LCase(SentenceFrom) Case “hello world" Translate = “hola mundo" End Select End If
End Function
4. From the File menu, choose Make TranslatorServer.dll and make the.DLL file into a directory on your hard drive.
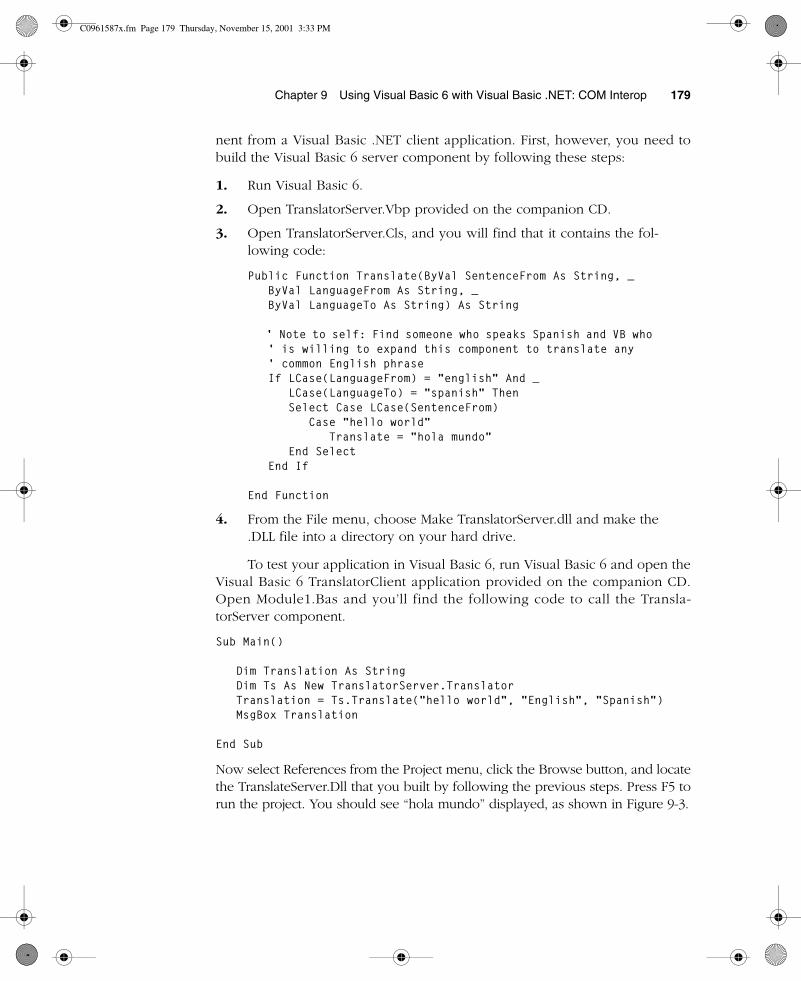
To test your application in Visual Basic 6, run Visual Basic 6 and open theVisual Basic 6 TranslatorClient application provided on the companion CD.Open Module1.Bas and you’ll find the following code to call the Transla-torServer component.
Sub Main()
Dim Translation As String Dim Ts As New TranslatorServer.Translator Translation = Ts.Translate(“hello world", “English", “Spanish”) MsgBox Translation
End Sub
Now select References from the Project menu, click the Browse button, and locatethe TranslateServer.Dll that you built by following the previous steps. Press F5 torun the project. You should see “hola mundo” displayed, as shown in Figure 9-3.
C0961587x.fm Page 179 Thursday, November 15, 2001 3:33 PM
180 Part II Upgrading Applications
F09km03
Figure 9-3 “Hola mundo” translation successfully received from VisualBasic 6 server.
You may be wondering what the point of all this is. So far, all we’ve doneis call a Visual Basic 6 component from Visual Basic 6. Now, however, we’llupgrade each component separately to see how to call a Visual Basic 6 compo-nent from Visual Basic .NET and vice versa. Finally, we’ll see how to tie theupgraded client and server components together to form a complete VisualBasic .NET solution.
Creating a .NET Client That Talks to a COM ServerLet’s create a .NET client that talks to a COM server. Since the whole point ofVisual Studio .NET is to help you create applications quickly for the Web, let’screate a Web client that calls our COM server. You might want to do this, forexample, if you have business logic stored internally—say, a Visual Basic 6ActiveX DLL function that returns a list of your company’s products—that youwant to make available for viewing by external partners or customers.
1. Run Microsoft Visual Studio .NET.
2. Choose New Project from the File menu.
3. Select Visual Basic ASP.NET Web Application, name the applicationMyAmazingTranslator, and click OK.
C0961587x.fm Page 180 Thursday, November 15, 2001 3:33 PM

Chapter 9 Using Visual Basic 6 with Visual Basic .NET: COM Interop 181
4. Right-click References on the Solution Explorer tab, and choose AddReference.
5. Select the COM tab.
6. Select TranslatorServer from the list, and click OK.
7. Open WebForm1.aspx.
8. Drag and drop the following controls from the Toolbox toWebForm1: A Label, a TextBox, and a Button.
9. For the text of the label, enter My amazing English-to-Spanishtranslator.
10. For the text of Button1, enter Translate.
11. Double-click the Translate button and insert the following code inthe Button1_Click event handler:
Dim ts As New TranslatorServer.Translator()TextBox1.Text = ts.Translate(TextBox1.Text, “English", _ “Spanish”)
12. Choose Start from the Debug menu.
13. Type hello world into the text box, and click the button. See Figure9-4 for an example of the output.
You have now taken a simple desktop application and made it available tothe world. Hola mundo indeed.
F09km04
Figure 9-4 My amazing English-to-Spanish translator at work on the Web.
C0961587x.fm Page 181 Thursday, November 15, 2001 3:33 PM
182 Part II Upgrading Applications
Debugging Between the Visual Basic .NET Client and Visual Basic 6 Server
When upgrading Visual Basic 6 code to Visual Basic .NET, it is critical that yoube able to debug the changes that you made yourself or that were made by theUpgrade Wizard. The Microsoft Visual Studio .NET development environmentmakes it possible to debug between Visual Basic 6 applications and Visual Basic.NET. However, you need to make a few changes to your Visual Basic 6 codein order to debug it using the Visual Studio .NET debugger.
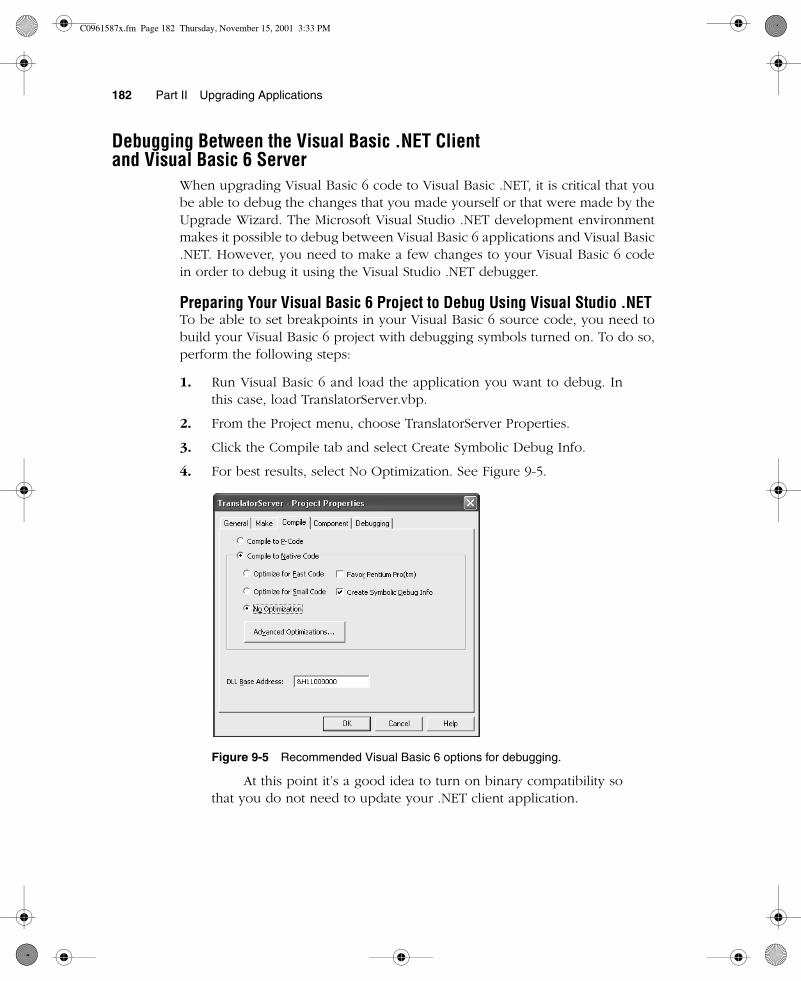
Preparing Your Visual Basic 6 Project to Debug Using Visual Studio .NETTo be able to set breakpoints in your Visual Basic 6 source code, you need tobuild your Visual Basic 6 project with debugging symbols turned on. To do so,perform the following steps:
1. Run Visual Basic 6 and load the application you want to debug. Inthis case, load TranslatorServer.vbp.
2. From the Project menu, choose TranslatorServer Properties.
3. Click the Compile tab and select Create Symbolic Debug Info.
4. For best results, select No Optimization. See Figure 9-5.
F09km05
Figure 9-5 Recommended Visual Basic 6 options for debugging.
At this point it’s a good idea to turn on binary compatibility sothat you do not need to update your .NET client application.
C0961587x.fm Page 182 Thursday, November 15, 2001 3:33 PM
Chapter 9 Using Visual Basic 6 with Visual Basic .NET: COM Interop 183
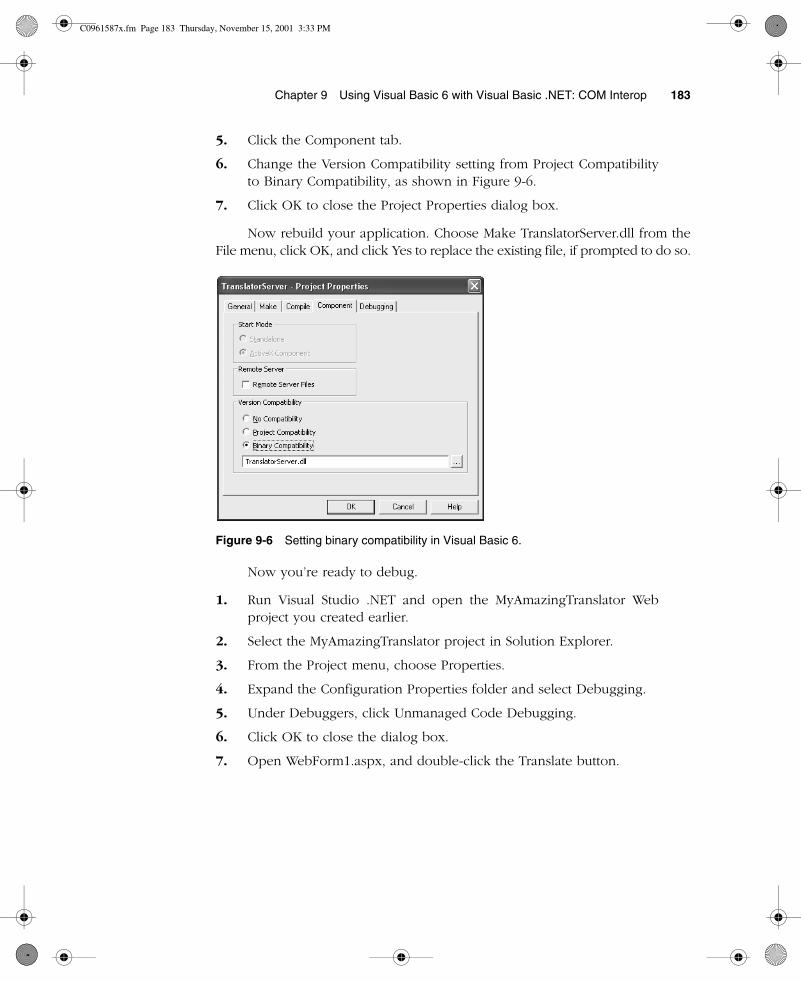
5. Click the Component tab.
6. Change the Version Compatibility setting from Project Compatibilityto Binary Compatibility, as shown in Figure 9-6.
7. Click OK to close the Project Properties dialog box.
Now rebuild your application. Choose Make TranslatorServer.dll from theFile menu, click OK, and click Yes to replace the existing file, if prompted to do so.
F09km06
Figure 9-6 Setting binary compatibility in Visual Basic 6.
Now you’re ready to debug.
1. Run Visual Studio .NET and open the MyAmazingTranslator Webproject you created earlier.
2. Select the MyAmazingTranslator project in Solution Explorer.
3. From the Project menu, choose Properties.
4. Expand the Configuration Properties folder and select Debugging.
5. Under Debuggers, click Unmanaged Code Debugging.
6. Click OK to close the dialog box.
7. Open WebForm1.aspx, and double-click the Translate button.
C0961587x.fm Page 183 Thursday, November 15, 2001 3:33 PM
184 Part II Upgrading Applications
8. Insert a breakpoint on the following line:
TextBox1.Text = ts.Translate(TextBox1.Text, “English", _
“Spanish”)
9. From the File menu, choose Open File, and open Transla-torServer.cls, saved as part of the Visual Basic 6 TranslatorServerproject.
10. Right-click the first line of code in the Translate function, and selectInsert Breakpoint.
11. Choose Start from the Debug menu.
12. Click the Translate button. Execution should break on the followingline:
TextBox1.Text = ts.Translate(TextBox1.Text, “English", _
“Spanish”)
13. Step over the line, and execution should break in your Visual Basic 6TranslatorServer.cls code file. You can now step through your VisualBasic 6 code to ensure that everything is working properly.
Note In order to debug an ASP.NET application on your localmachine, you need to be added as a member of the Debugger Usersgroup. If you do not have administrative privileges on the machine, youalso need to change the Machine.config file for Aspnet _wp.exe to runAspnet_wp.exe with User privileges rather than System account privi-leges. See Visual Studio .NET’s Help system for more details.
Exposing a Visual Basic .NET Component to Be Called by a Visual Basic 6 Client
In some cases, you will want to upgrade your Visual Basic 6 server and makeit available to your Visual Basic 6 or other COM client applications. For exam-ple, since Visual Basic .NET allows you to create multithreaded components,you may want to upgrade your Visual Basic 6 component to a .NET component.You can then register the component to take advantage of a multithreaded envi-ronment such as Microsoft Transaction Server (MTS) in order to use object pool-ing, for example.
C0961587x.fm Page 184 Thursday, November 15, 2001 3:33 PM
Chapter 9 Using Visual Basic 6 with Visual Basic .NET: COM Interop 185
Let’s take the Visual Basic 6 TranslatorServer component located on the com-panion CD and upgrade it to Visual Basic .NET by performing the following steps:
1. Run Visual Studio .NET.
2. From the File menu, choose Open Project and open Transla-torServer.vbp.
3. Step through the Upgrade Wizard by clicking Next and selecting thedefault options as you go.
Let’s change the name of the .NET server so that it doesn’t con-flict with the server name of its COM predecessor.
4. Select the TranslatorServer project in the Solution Explorer.
5. From the Project menu, choose Properties.
6. Change the Assembly Name from TranslatorServer to Transla-torServer.net.
7. Click OK to close the Project Properties dialog box.
8. View the code for TranslatorServer.vb:
Option Strict OffOption Explicit OnPublic Class Translator Public Function Translate(ByVal SentenceFrom As String, _
ByVal LanguageFrom As String, ByVal LanguageTo As String) _As String
‘ Note to self: Find someone who speaks Spanish and VB ‘ who is willing to expand this component to translate ‘ any common English phrase If LCase(LanguageFrom) = “english” And _ LCase(LanguageTo) = “spanish” Then Select Case LCase(SentenceFrom) Case “hello world" Translate = “hola mundo" End Select End If End FunctionEnd Class
Note that the upgraded code, specifically the contents of the Translatefunction, is exactly the same as the Visual Basic 6 code. The point is that you
C0961587x.fm Page 185 Thursday, November 15, 2001 3:33 PM
186 Part II Upgrading Applications
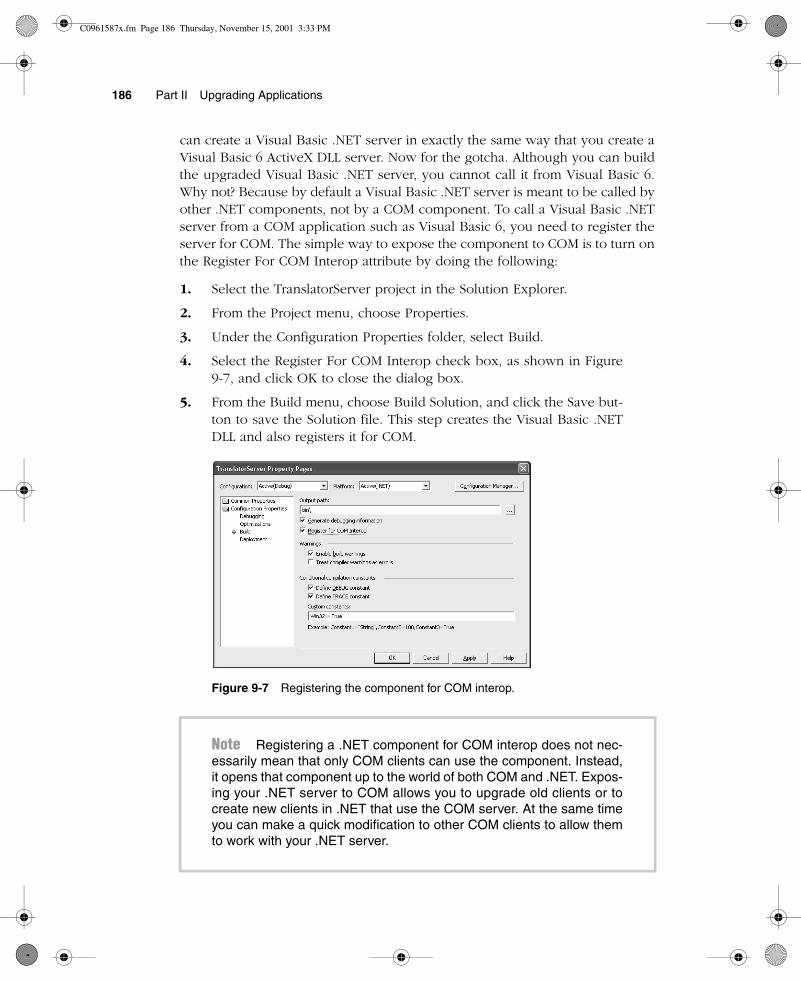
can create a Visual Basic .NET server in exactly the same way that you create aVisual Basic 6 ActiveX DLL server. Now for the gotcha. Although you can buildthe upgraded Visual Basic .NET server, you cannot call it from Visual Basic 6.Why not? Because by default a Visual Basic .NET server is meant to be called byother .NET components, not by a COM component. To call a Visual Basic .NETserver from a COM application such as Visual Basic 6, you need to register theserver for COM. The simple way to expose the component to COM is to turn onthe Register For COM Interop attribute by doing the following:
1. Select the TranslatorServer project in the Solution Explorer.
2. From the Project menu, choose Properties.
3. Under the Configuration Properties folder, select Build.
4. Select the Register For COM Interop check box, as shown in Figure9-7, and click OK to close the dialog box.
5. From the Build menu, choose Build Solution, and click the Save but-ton to save the Solution file. This step creates the Visual Basic .NETDLL and also registers it for COM.
F09km07
Figure 9-7 Registering the component for COM interop.
Note Registering a .NET component for COM interop does not nec-essarily mean that only COM clients can use the component. Instead,it opens that component up to the world of both COM and .NET. Expos-ing your .NET server to COM allows you to upgrade old clients or tocreate new clients in .NET that use the COM server. At the same timeyou can make a quick modification to other COM clients to allow themto work with your .NET server.
C0961587x.fm Page 186 Thursday, November 15, 2001 3:33 PM
Chapter 9 Using Visual Basic 6 with Visual Basic .NET: COM Interop 187
Now you are ready to call the Visual Basic .NET TranslatorServer compo-nent from Visual Basic 6. This process involves the same steps used to createthe Visual Basic 6 TranslatorClient application located on the companion CD.To call the Visual Basic .NET TranslatorServer component from Visual Basic.NET, follow these steps:
1. Run Visual Basic 6 and open the TranslatorClient application locatedon the companion CD.
2. Choose References from the Project menu.
3. Deselect TranslatorServer, the Visual Basic 6 server component.
4. Select TranslatorServer_net, the Visual Basic .NET server component.
5. Open TranslatorClient.bas.
6. Change the following declaration from
Dim Ts As New TranslatorServer.Translator
to
Dim Ts As New TranslatorServer_net.Translator
7. Run the application.
You should see the results shown in Figure 9-3.
Note If you want to add features to your upgraded Visual Basic .NETcomponent, you should add COM attributes to ensure binary compati-bility. Binary compatibility causes your Visual Basic .NET componentto look, act, and smell like existing COM clients no matter what newfeatures you add to the component. If you break compatibility, yourCOM clients will not be able to find the .NET component. You will beforced to recompile your COM client against the updated .NET serverand redistribute it. For an example of how to add COM attributes toensure binary compatibility, see “Replacing COM with .NET: BinaryCompatibility” later in this chapter.
Debugging Between the Visual Basic 6 Client and .NET ServerEarlier we showed you how to debug both Visual Basic 6 and Visual Basic .NETcode using the Microsoft Visual Studio .NET debugger. Now we’re going todebug our Visual Basic 6 client application and .NET server, using both the
C0961587x.fm Page 187 Thursday, November 15, 2001 3:33 PM
188 Part II Upgrading Applications
Visual Basic 6 debugger and the Visual Studio .NET debugger to step across thecall from Visual Basic 6 code to Visual Basic .NET code. Let’s start in the VisualStudio .NET development environment.
1. Run Visual Studio .NET and open the TranslatorServer applicationyou upgraded to Visual Basic .NET earlier.
2. Open TranslatorServer.vb and place a breakpoint within the Trans-late function on the following line:
If LCase(LanguageFrom) = “english” And _
LCase(LanguageTo) = “spanish” Then
3. Select the TranslatorServer project in Solution Explorer.
4. From the Project menu, choose Properties.
5. Under the Configuration Properties folder, select Debugging.
6. Select Start External Program, click the Browse (“…”) button, andsearch for VB6.exe.
7. From the Debug menu, choose Start. Visual Basic 6 will launch.
8. From Visual Basic 6, open TranslatorClient.vbp.
9. Place a breakpoint on the following line:
Translation = Ts.Translate(“hello world", “English", _ “Spanish”)
10. Run the Visual Basic 6 client application.
Execution will break in the Visual Basic 6 application. Step over the line ofcode.
The Visual Studio .NET debugger will appear, and execution will break inthe Visual Basic .NET server application. You can step through and debug yourVisual Basic .NET server application code. When execution returns from theVisual Basic .NET server, function execution resumes in the Visual Basic 6 debug-ger. Pretty cool, eh?
Tying It All TogetherAs you have seen, COM interop enables you to upgrade your application onepiece at a time. You can choose to upgrade one part to .NET while keepingother parts based on COM. If your goal is to move your application to the Webor an intranet environment, plenty of options are available to you. For example,you can create a Web front end that uses the same back-end logic currently inuse by your traditional Windows client applications. You can also make yourback-end functions—your business logic—available to remote clients on the
C0961587x.fm Page 188 Thursday, November 15, 2001 3:33 PM
Chapter 9 Using Visual Basic 6 with Visual Basic .NET: COM Interop 189
Internet. To do so, you can expose your functions as Web services. In the caseof the Translator class, you can expose the Translate function over the Web byadding a Web service class to the project, copying the contents of the Transla-tor class to the Web service class, and marking the Translate function as a Web-Method. We leave this task as an exercise for you to complete.
Replacing COM with .NET: Binary CompatibilityIn creating Visual Basic versions 4, 5, and 6, the Microsoft Visual Basic devel-opment team worked hard to allow you to create Visual Basic COM compo-nents that are backward compatible. This feature was enabled by an innocent-looking check box on the Component tab of the Project Properties dialog box,shown earlier in Figure 9-6. Binary compatibility in Visual Basic 6 enabled youto create version 2 of a COM component that is a compatible replacement forversion 1 of that component. What this means is that the version 2 componentcontains exactly the same public objects, properties, methods, and events as theversion 1 component. In addition, it means that the properties, methods, andevents appear in exactly the same order as in the version 1 component. Theversion 2 component also understands how to initialize itself using propertysettings saved by the version 1 component.
Although the version 2 component needs to look, act, and smell like a ver-sion 1 component, the version 2 component can include additional objects,properties, and methods that improve upon the version 1 component. No mat-ter the improvements, however, in order to keep clients of the version 1 servercomponent working with the version 2 component, the version 2 componentmust expose some subset of itself as a version 1 component. If the version 2component doesn’t expose itself as a version 1 component, you need to do oneof the following:
A. Invest in fixing the version 2 component to behave identically to theversion 1 component and then invest further in testing the compo-nent to ensure that no existing version 1 clients are broken by thechanges.
B. Rename the version 2 component and change its attributes in sucha way that it exposes itself as a completely new component. Clientsthat are using the version 1 component continue to use that com-ponent and are not disturbed by the distribution of the version 2component.
C. Recompile all clients that use the version 1 component to use theversion 2 component and then distribute the client and a version 2server component as a matched pair.
C0961587x.fm Page 189 Thursday, November 15, 2001 3:33 PM
190 Part II Upgrading Applications
Which option makes more sense? Option B is generally the recommendedapproach if you have widely distributed clients that rely on version 1 of theserver component. If there is any doubt in your mind about whether you canupdate an existing component or create a new component as a direct replace-ment of a version 1 component, don’t do it. Instead, go with option B. It’s thesafe bet.
When it comes to creating Visual Basic .NET components that are directreplacements of your Visual Basic 6 components, Visual Basic .NET adopts theoption B approach. Simply put, you can’t do it, although if the truth be told, it’spossible but not easy. You’ll sleep much better if you simply assume that youcan’t directly replace a Visual Basic 6 component with a Visual Basic .NET one.
The Visual Basic team deliberately chose not to include features thatwould make it easy for you to mark a Visual Basic .NET component as being acompatible replacement for a Visual Basic 6 component. We’ll let the followingVisual Basic code speak for itself:
Const Old_compiler = “VB6.EXE"Const New_compiler = “VBC.EXE"Const Old_runtime = “MSVBVM60.DLL"Const New_runtime = “.NET Framework and Microsoft.VisualBasic.Dll"
If New_compiler <> Old_compiler And New_runtime <> Old_runtime Then MsgBox “Minor behavioral differences that are expensive to “ & _ “find and fix"End If
Indirect Replacement ModelVisual Basic .NET takes an indirect approach in creating Visual Basic .NET com-ponents that are replacements of your Visual Basic 6 COM components. Thisapproach means that you can create a component that looks and smells like aVisual Basic .NET component but doesn’t necessarily act 100 percent like theVisual Basic 6 component it’s “replacing.” Since to take advantage of new ver-sion 2 component features you need to update your existing clients, why notlive a little and roll those features into a Visual Basic .NET component? Puttingthe new features in a separate component has the advantage of not disturbingthe version 1 component. Clients that are running against the version 1 compo-nent continue to run against it, unaffected by the changes in the version 2 com-ponent. When you are ready to move your clients to the version 2 component,you can update and redistribute them as needed.
By using the Visual Basic Upgrade Wizard, you can quickly upgrade yourVisual Basic 6 components to Visual Basic .NET components. Although the wiz-ard doesn’t give you a full, 100 percent binary-compatible replacement for your
C0961587x.fm Page 190 Thursday, November 15, 2001 3:33 PM
Chapter 9 Using Visual Basic 6 with Visual Basic .NET: COM Interop 191
Visual Basic 6 component, what you end up with is pretty close. All properties,methods, and events are brought forward, preserving the public interface ofyour component. Once you have worked out all of the upgrade-related com-ments and issues in the upgrade report, you can effectively replace your VisualBasic 6 component with the .NET version by making a quick change to theVisual Basic 6 client application so that it uses your .NET component instead ofthe Visual Basic 6 component. You then need to rebuild and redeploy yourVisual Basic 6 application to take advantage of the new Visual Basic .NET servercomponent.
Enabling Binary Compatibility in Visual Basic .NET ClassesIf you want to expose your upgraded Visual Basic .NET server component to aCOM client and you plan on making changes to the Visual Basic .NET servercomponent over time, we strongly suggest that you do the following to ensurecompatibility:
� Declare all the public class properties and methods in an interface.
� Declare all the public events in a separate event interface.
� Add attributes to the class to declare ID attributes for the class, inter-face, and event interface.
� Change the class declaration so that it implements both the program-mable and event interfaces.
Let’s step through an example that demonstrates how to enable binarycompatibility in a Visual Basic .NET class. Doing so will ensure that a COM cli-ent that uses the class will continue to work with it even after you have addednew functionality to the class.
We’ll start with a Visual Basic .NET class that was upgraded fromVisual Basic 6. Assume that the filename for the class is Class1.vb.
Option Strict OffOption Explicit On
Public Class Translator
Public Event TranslationError(ByVal ErrorMessage As String)
Public Function Translate(ByVal SentenceFrom As String, _ ByVal LanguageFrom As String, _ ByVal LanguageTo As String) As String
(continued)
C0961587x.fm Page 191 Thursday, November 15, 2001 3:33 PM
192 Part II Upgrading Applications
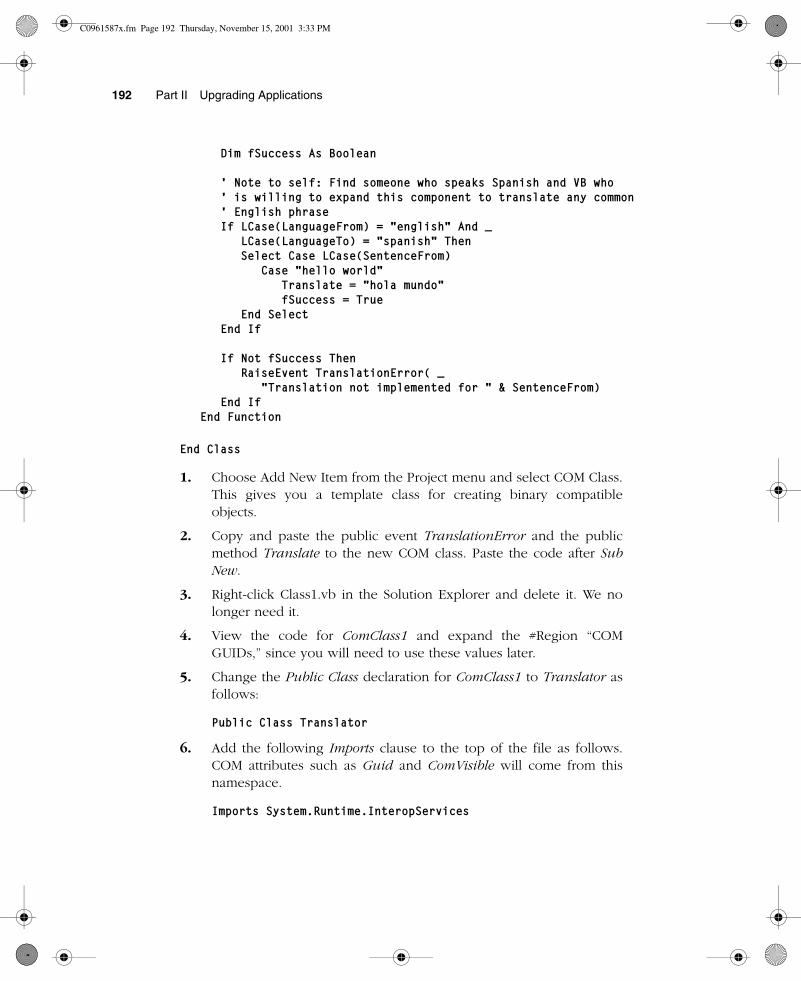
Dim fSuccess As Boolean
‘ Note to self: Find someone who speaks Spanish and VB who ‘ is willing to expand this component to translate any common ‘ English phrase If LCase(LanguageFrom) = “english” And _ LCase(LanguageTo) = “spanish” Then Select Case LCase(SentenceFrom) Case “hello world" Translate = “hola mundo" fSuccess = True End Select End If
If Not fSuccess Then RaiseEvent TranslationError( _ “Translation not implemented for “ & SentenceFrom) End If End Function
End Class
1. Choose Add New Item from the Project menu and select COM Class.This gives you a template class for creating binary compatibleobjects.
2. Copy and paste the public event TranslationError and the publicmethod Translate to the new COM class. Paste the code after SubNew.
3. Right-click Class1.vb in the Solution Explorer and delete it. We nolonger need it.
4. View the code for ComClass1 and expand the #Region “COMGUIDs,” since you will need to use these values later.
5. Change the Public Class declaration for ComClass1 to Translator asfollows:
Public Class Translator
6. Add the following Imports clause to the top of the file as follows.COM attributes such as Guid and ComVisible will come from thisnamespace.
Imports System.Runtime.InteropServices
C0961587x.fm Page 192 Thursday, November 15, 2001 3:33 PM
Chapter 9 Using Visual Basic 6 with Visual Basic .NET: COM Interop 193
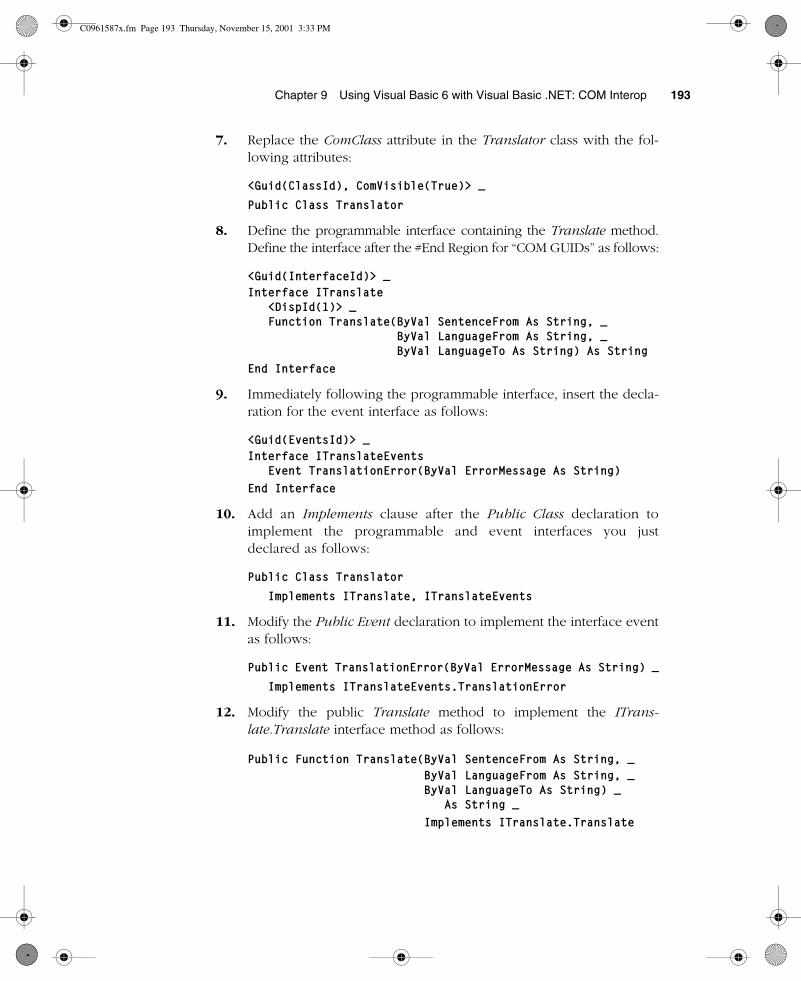
7. Replace the ComClass attribute in the Translator class with the fol-lowing attributes:
<Guid(ClassId), ComVisible(True)> _
Public Class Translator
8. Define the programmable interface containing the Translate method.Define the interface after the #End Region for “COM GUIDs” as follows:
<Guid(InterfaceId)> _Interface ITranslate <DispId(1)> _ Function Translate(ByVal SentenceFrom As String, _ ByVal LanguageFrom As String, _ ByVal LanguageTo As String) As StringEnd Interface
9. Immediately following the programmable interface, insert the decla-ration for the event interface as follows:
<Guid(EventsId)> _Interface ITranslateEvents Event TranslationError(ByVal ErrorMessage As String)End Interface
10. Add an Implements clause after the Public Class declaration toimplement the programmable and event interfaces you justdeclared as follows:
Public Class Translator
Implements ITranslate, ITranslateEvents
11. Modify the Public Event declaration to implement the interface eventas follows:
Public Event TranslationError(ByVal ErrorMessage As String) _
Implements ITranslateEvents.TranslationError
12. Modify the public Translate method to implement the ITrans-late.Translate interface method as follows:
Public Function Translate(ByVal SentenceFrom As String, _ByVal LanguageFrom As String, _ByVal LanguageTo As String) _
As String _Implements ITranslate.Translate
C0961587x.fm Page 193 Thursday, November 15, 2001 3:33 PM
194 Part II Upgrading Applications
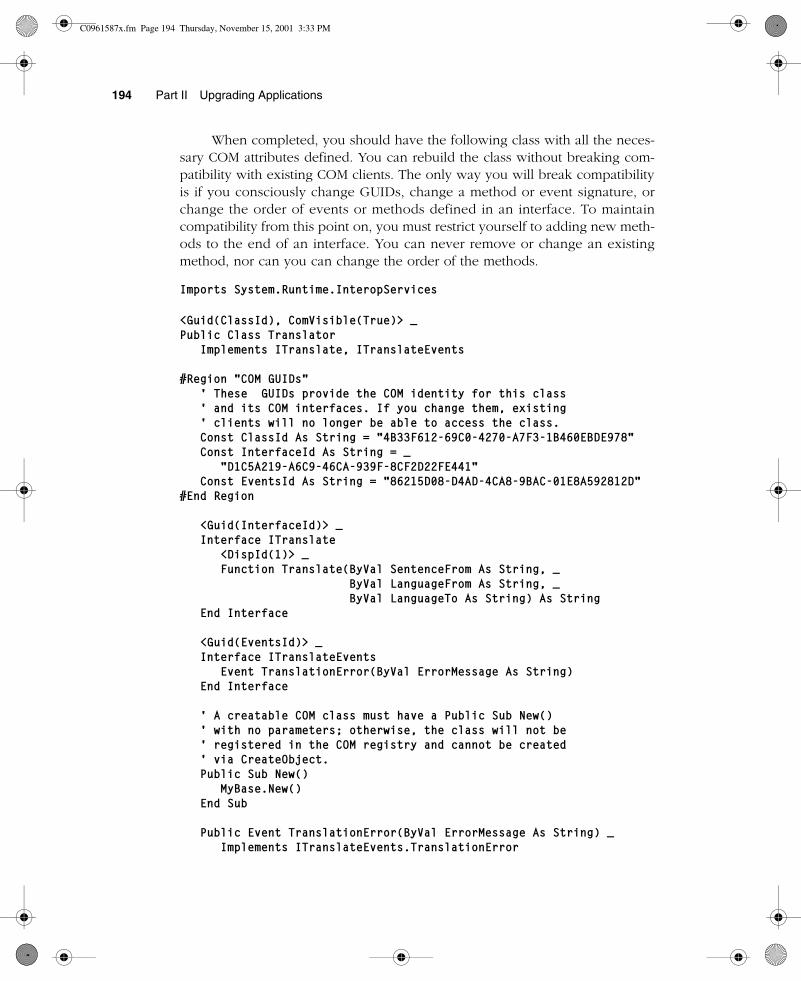
When completed, you should have the following class with all the neces-sary COM attributes defined. You can rebuild the class without breaking com-patibility with existing COM clients. The only way you will break compatibilityis if you consciously change GUIDs, change a method or event signature, orchange the order of events or methods defined in an interface. To maintaincompatibility from this point on, you must restrict yourself to adding new meth-ods to the end of an interface. You can never remove or change an existingmethod, nor can you can change the order of the methods.
Imports System.Runtime.InteropServices
<Guid(ClassId), ComVisible(True)> _Public Class Translator Implements ITranslate, ITranslateEvents
#Region “COM GUIDs" ‘ These GUIDs provide the COM identity for this class ‘ and its COM interfaces. If you change them, existing ‘ clients will no longer be able to access the class. Const ClassId As String = “4B33F612-69C0-4270-A7F3-1B460EBDE978" Const InterfaceId As String = _ “D1C5A219-A6C9-46CA-939F-8CF2D22FE441" Const EventsId As String = “86215D08-D4AD-4CA8-9BAC-01E8A592812D"#End Region
<Guid(InterfaceId)> _ Interface ITranslate <DispId(1)> _ Function Translate(ByVal SentenceFrom As String, _ ByVal LanguageFrom As String, _ ByVal LanguageTo As String) As String End Interface
<Guid(EventsId)> _ Interface ITranslateEvents Event TranslationError(ByVal ErrorMessage As String) End Interface
‘ A creatable COM class must have a Public Sub New() ‘ with no parameters; otherwise, the class will not be ‘ registered in the COM registry and cannot be created ‘ via CreateObject. Public Sub New() MyBase.New() End Sub
Public Event TranslationError(ByVal ErrorMessage As String) _ Implements ITranslateEvents.TranslationError
C0961587x.fm Page 194 Thursday, November 15, 2001 3:33 PM
Chapter 9 Using Visual Basic 6 with Visual Basic .NET: COM Interop 195
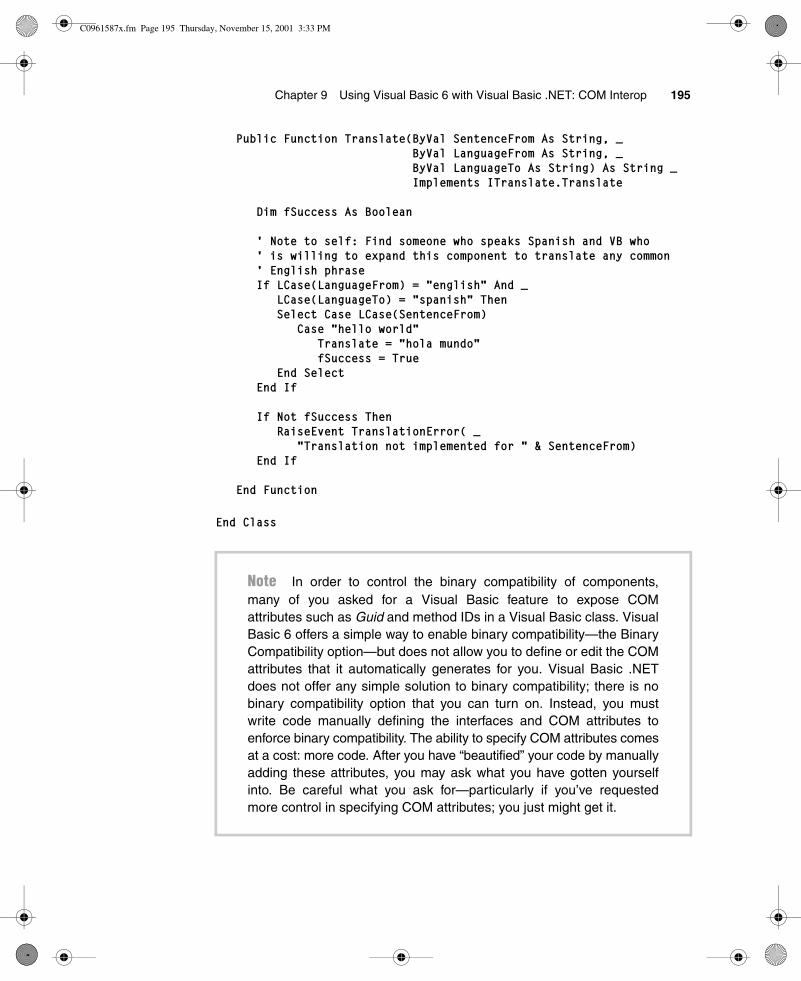
Public Function Translate(ByVal SentenceFrom As String, _ ByVal LanguageFrom As String, _ ByVal LanguageTo As String) As String _ Implements ITranslate.Translate
Dim fSuccess As Boolean
‘ Note to self: Find someone who speaks Spanish and VB who ‘ is willing to expand this component to translate any common ‘ English phrase If LCase(LanguageFrom) = “english” And _ LCase(LanguageTo) = “spanish” Then Select Case LCase(SentenceFrom) Case “hello world" Translate = “hola mundo" fSuccess = True End Select End If
If Not fSuccess Then RaiseEvent TranslationError( _ “Translation not implemented for “ & SentenceFrom) End If
End Function
End Class
Note In order to control the binary compatibility of components,many of you asked for a Visual Basic feature to expose COMattributes such as Guid and method IDs in a Visual Basic class. VisualBasic 6 offers a simple way to enable binary compatibility—the BinaryCompatibility option—but does not allow you to define or edit the COMattributes that it automatically generates for you. Visual Basic .NETdoes not offer any simple solution to binary compatibility; there is nobinary compatibility option that you can turn on. Instead, you mustwrite code manually defining the interfaces and COM attributes toenforce binary compatibility. The ability to specify COM attributes comesat a cost: more code. After you have “beautified” your code by manuallyadding these attributes, you may ask what you have gotten yourselfinto. Be careful what you ask for—particularly if you’ve requestedmore control in specifying COM attributes; you just might get it.
C0961587x.fm Page 195 Thursday, November 15, 2001 3:33 PM
196 Part II Upgrading Applications
Conclusion
You can mix and match COM with .NET in any number of ways, depending onthe needs of your business. There are economic and practical reasons forchoosing to have one part of your application based on .NET and the other partbased on COM. The beauty of COM interop is that it gives you a choice. Whenupgrading your applications, you don’t have to standardize on .NET immedi-ately to take advantage of the new features. You can start using those new fea-tures now and continue to use your existing Visual Basic 6 code andcomponents as needed to accomplish your goals more quickly and effectively.
C0961587x.fm Page 196 Thursday, November 15, 2001 3:33 PM