using the episode exporter 2.0 for adobe premiere pro cc · overview page 2 overview the episode...
TRANSCRIPT

Application NoteEpisode
Using the Episode Exporter 2.0 for Adobe® Premiere Pro CC
Overview....................................................................................... 2
Requirements................................................................................ 2
Hardware ............................................................................ 2
Software.............................................................................. 2
Licensing............................................................................. 2
Installing the Episode Exporter ..................................................... 3
Example Premiere Pro CC Workflows .......................................... 3
Exporting and Encoding a Media File ................................. 4
Encoding Media Files in a Timeline Sequence................... 6
Copyright and Trademark Notice .................................................. 6
This App Noteapplies to
Episode versions7.1 and later and the Episode
Exporter 2.0 for Adobe PremierePro CC
183555 February 2016

OverviewThe Episode Exporter 2.0 for Adobe® Premiere Pro CC combines two powerful but easy-to-use video processing products to form the perfect, complementary video processing package. Episode offers highly configurable best-in-class video and audio encoding for professionals, and Premiere Pro CC provides editing automation, video effects, and internal help so you can convert your video clips into polished, professional quality movies.
The Episode Exporter 2.0 for Premiere Pro CC allows you to select a clip, timeline, or portion of a timeline and submit the selected content to an Episode system or cluster for encoding and deployment.
The Episode Exporter panel provides these operational features in Premiere Pro CC:
• Connects to the local Episode installation, which may connect to a cluster
• Import and select Episode encode and deployment tasks
• Browse for a destination folder for encoded output files
RequirementsThe following requirements describe hardware and software you will need in order to use Episode with Premiere Pro CC.
Hardware• The minimum hardware systems as specified by Adobe are presented here:
http://www.adobe.com/products/premiere/tech-specs.html
SoftwareThe following components are required:
• Episode 7.1 (any version) for Windows or Mac
• Episode Exporter 2.0 for Premiere Pro CC for Windows or Mac
• Adobe® Premiere Pro Creative Cloud 2015 (version 9.2.0) or later for Windows or Mac
Licensing• Episode and the Episode Exporter 2.0 for Adobe® Premiere Pro CC are available from
Telestream.net.
The local Episode instance can be a standalone licensed version, or it may be unlicensed (demo mode) if it connects to a licensed cluster.
• Adobe® Premiere Pro and Creative Cloud purchase and downloads are available from Adobe.com.
Overview Page 2
Installing the Episode ExporterFollow these steps to install the Episode Exporter 2.0 for Premiere Pro CC:
1. Install Premiere Pro CC on your computer according to Adobe’s instructions.
2. Install Episode on the same or a different computer according to the instruction guide.
3. Install the Episode Exporter 2.0 on the Premiere Pro CC computer.
Once installation is complete, the Episode Exporter is ready to use with Premiere Pro CC and should simply be present and functioning when you open Premiere Pro CC the next time.
Uninstalling the Episode ExporterOn Windows, if you need to uninstall the Episode Exporter, use Control Panel > Programs and Features. Select the Episode Exporter for Premiere Pro CC, and select Uninstall.
On the Macintosh, you need to run a special uninstaller program:
1. Open a Terminal window.
2. Type the following to access and run the uninstaller program:
a. cd Library/Application Support/Adobe/Episode/b. sh uninstall.sh
The plug-in will be removed, but any epitasks you’ve created will remain.
Example Premiere Pro CC WorkflowsThere are some preliminary steps and two basic workflows for using the Episode Exporter for Premiere Pro CC:
Preliminary Steps
Exporting and Encoding a Media File
Encoding Media Files in a Timeline Sequence
Preliminary StepsBefore using the Episode Exporter 2.0 for Premiere Pro CC, complete these steps:
• Make sure Episode is running on your machine.
• In Episode, create and export Episode encoder epitasks and deployment epitasks config-ured to perform the encoding and deploy the outputs you desire. These epitasks will be used in the following Premiere Pro CC workflows.
• If you want to include any effects or transitions, add those to your clips in Premiere Pro CC prior to exporting.
Installing the Episode Exporter Page 3

Exporting and Encoding a Media FileThe following example demonstrates how to use Episode from within Premiere Pro CC:
1. Start Premiere Pro CC and create a new project or open an existing one.
2. In the Media Browser, double-click a media clip. The file opens in Source Monitor.
3. From the main menu, select File > Export > Media. The Export Settings window opens.
Select a clip in Media Browser
Clip opens in Source Monitor
Example Premiere Pro CC Workflows Page 4
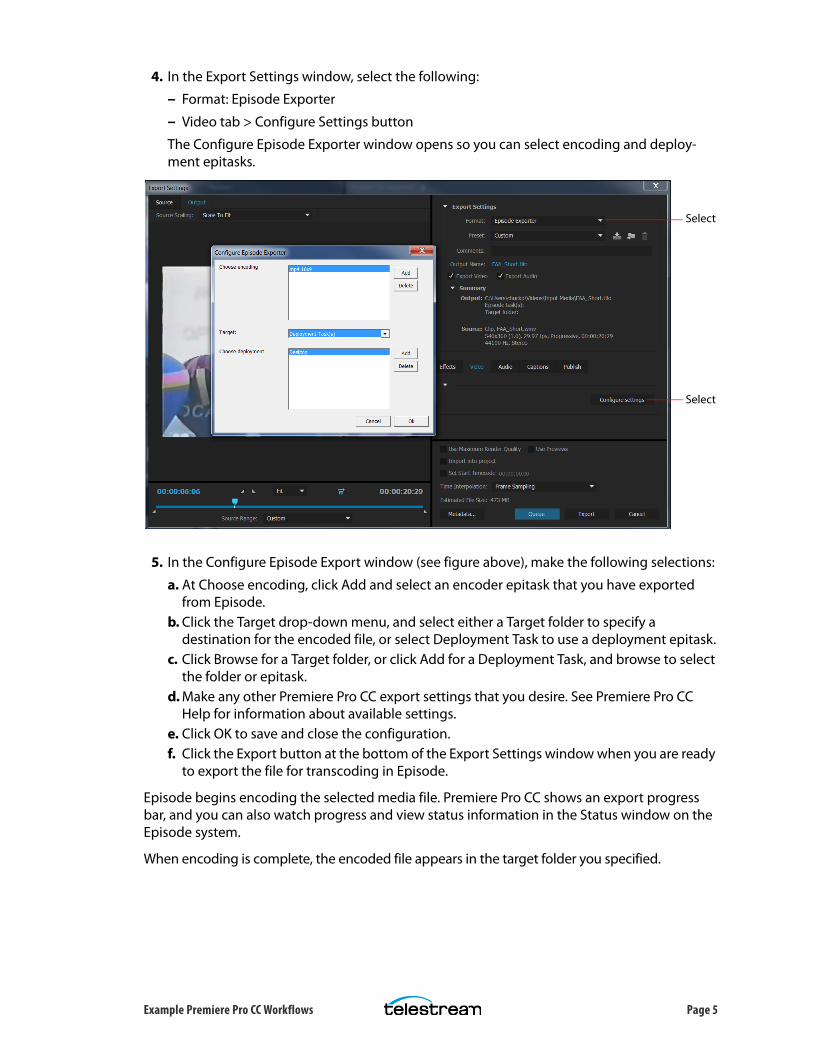
4. In the Export Settings window, select the following:
– Format: Episode Exporter
– Video tab > Configure Settings button
The Configure Episode Exporter window opens so you can select encoding and deploy-ment epitasks.
5. In the Configure Episode Export window (see figure above), make the following selections:
a. At Choose encoding, click Add and select an encoder epitask that you have exported from Episode.
b. Click the Target drop-down menu, and select either a Target folder to specify a destination for the encoded file, or select Deployment Task to use a deployment epitask.
c. Click Browse for a Target folder, or click Add for a Deployment Task, and browse to select the folder or epitask.
d. Make any other Premiere Pro CC export settings that you desire. See Premiere Pro CC Help for information about available settings.
e. Click OK to save and close the configuration.f. Click the Export button at the bottom of the Export Settings window when you are ready
to export the file for transcoding in Episode.
Episode begins encoding the selected media file. Premiere Pro CC shows an export progress bar, and you can also watch progress and view status information in the Status window on the Episode system.
When encoding is complete, the encoded file appears in the target folder you specified.
Select
Select
Example Premiere Pro CC Workflows Page 5
Encoding Media Files in a Timeline SequenceYou can also use Episode and the Episode Exporter 2.0 for Premiere Pro CC to encode multiple files on a Premiere Pro CC Timeline:
1. Import or drag and drop a media clip onto the timeline to create a sequence.
2. Play the clip in the timeline and edit as desired, including marking in and out points.
3. Repeat the steps of the previous procedure—Exporting and Encoding a Media File—to encode the media file used in the sequence.
Export progress is displayed in Premiere Pro CC, and encoding progress can be viewed in the Episode Status window. Your encoded outputs will be placed in the specified target folder.
This concludes the description of Episode with Premiere Pro CC. For more information, please visit the Telestream.net and Adobe.com Web sites.
Copyright and Trademark Notice© 2016 Telestream®, LLC All rights reserved. No part of this publication may be reproduced, transmitted, transcribed, altered, or translated into any languages without written permission of Telestream, Inc. Information and specifications in this document are subject to change without notice and do not represent a commitment on the part of Telestream.
Telestream, CaptionMaker, Episode, Flip4Mac, FlipFactory, Flip Player, Lightspeed, ScreenFlow, Switch, Vantage, Wirecast, GraphicsFactory, MetaFlip, and Split-and-Stitch are registered trademarks and Gameshow, MacCaption, e-Captioning, Pipeline, Post Producer, Tempo, TrafficManager, and VOD Producer are trademarks of Telestream, LLC. All other trademarks are the property of their respective owners.
All other brand, product, and company names are the property of their respective owners and are used only for identification purposes.
Copyright and Trademark Notice Page 6