using oracle cloud stack · oracle® cloud using oracle cloud stack release 18.3.2 e77672-23 july...
TRANSCRIPT

Oracle® CloudUsing Oracle Cloud Stack
Release 19.3.3E77672-24September 2019

Oracle Cloud Using Oracle Cloud Stack, Release 19.3.3
E77672-24
Copyright © 2016, 2019, Oracle and/or its affiliates. All rights reserved.
Primary Author: TJ Palazzolo
This software and related documentation are provided under a license agreement containing restrictions onuse and disclosure and are protected by intellectual property laws. Except as expressly permitted in yourlicense agreement or allowed by law, you may not use, copy, reproduce, translate, broadcast, modify,license, transmit, distribute, exhibit, perform, publish, or display any part, in any form, or by any means.Reverse engineering, disassembly, or decompilation of this software, unless required by law forinteroperability, is prohibited.
The information contained herein is subject to change without notice and is not warranted to be error-free. Ifyou find any errors, please report them to us in writing.
If this is software or related documentation that is delivered to the U.S. Government or anyone licensing it onbehalf of the U.S. Government, then the following notice is applicable:
U.S. GOVERNMENT END USERS: Oracle programs, including any operating system, integrated software,any programs installed on the hardware, and/or documentation, delivered to U.S. Government end users are"commercial computer software" pursuant to the applicable Federal Acquisition Regulation and agency-specific supplemental regulations. As such, use, duplication, disclosure, modification, and adaptation of theprograms, including any operating system, integrated software, any programs installed on the hardware,and/or documentation, shall be subject to license terms and license restrictions applicable to the programs.No other rights are granted to the U.S. Government.
This software or hardware is developed for general use in a variety of information management applications.It is not developed or intended for use in any inherently dangerous applications, including applications thatmay create a risk of personal injury. If you use this software or hardware in dangerous applications, then youshall be responsible to take all appropriate fail-safe, backup, redundancy, and other measures to ensure itssafe use. Oracle Corporation and its affiliates disclaim any liability for any damages caused by use of thissoftware or hardware in dangerous applications.
Oracle and Java are registered trademarks of Oracle and/or its affiliates. Other names may be trademarks oftheir respective owners.
Intel and Intel Xeon are trademarks or registered trademarks of Intel Corporation. All SPARC trademarks areused under license and are trademarks or registered trademarks of SPARC International, Inc. AMD, Opteron,the AMD logo, and the AMD Opteron logo are trademarks or registered trademarks of Advanced MicroDevices. UNIX is a registered trademark of The Open Group.
This software or hardware and documentation may provide access to or information about content, products,and services from third parties. Oracle Corporation and its affiliates are not responsible for and expresslydisclaim all warranties of any kind with respect to third-party content, products, and services unless otherwiseset forth in an applicable agreement between you and Oracle. Oracle Corporation and its affiliates will not beresponsible for any loss, costs, or damages incurred due to your access to or use of third-party content,products, or services, except as set forth in an applicable agreement between you and Oracle.

Contents
Preface
Audience vii
Documentation Accessibility vii
Related Resources vii
Conventions vii
1 Getting Started with Oracle Cloud Stack
About Oracle Cloud Stack 1-1
What is a Cloud Stack 1-1
What is a Template 1-2
About Oracle Stack Templates 1-2
About the Interfaces to Oracle Cloud Stack 1-4
Before You Begin with Oracle Cloud Stack 1-4
Accessing Oracle Cloud Stack 1-5
Accessing Cloud Stack from Infrastructure Console 1-5
Accessing Cloud Stack from the Infrastructure Classic Console 1-6
Accessing Cloud Stack from Cloud at Customer 1-7
Accessing the CLI 1-7
About Oracle Cloud Stack Roles and Users 1-8
2 Creating Templates with Oracle Cloud Stack
About Template Components 2-1
What are Parameters 2-2
What are Resources 2-3
What are Dependencies 2-4
What are Attributes 2-4
What are Conditions 2-5
What are Maps 2-5
What are Custom Actions 2-6
What are Functions 2-6
Creating a Template 2-6
iii

Creating a Template with the Template Builder 2-7
Creating Template Parameters 2-8
Creating Parameter Groups 2-9
Creating Resources 2-10
Creating Dependencies 2-11
Adding a Resource Dependency 2-11
Creating Conditions 2-12
Defining Global Conditions 2-13
Adding a Condition to a Resource 2-14
Adding a Condition to a Resource Parameter 2-14
Adding a Condition to a Template Parameter 2-15
Creating Custom Actions 2-15
Creating a Software Component 2-16
Adding a Software Component to a Resource 2-17
Adding a Condition to a Software Component 2-17
Custom Action Best Practices 2-18
Creating Maps 2-18
Defining a Map 2-19
Using a Map in a Resource Parameter 2-19
Creating Attributes 2-20
Editing Template Files 2-21
About Template Files 2-21
Using Template Parameters 2-22
Using Resources 2-28
Using Attributes 2-30
Using Conditions 2-31
Using Custom Actions 2-34
Using Validations 2-40
Using Maps 2-44
Template Best Practices 2-45
List of Resource Types 2-46
List of Functions 2-48
List of Implicit Template Parameters 2-53
3 Managing Templates with Oracle Cloud Stack
About the Template Life Cycle 3-1
Configuring Template Storage 3-3
Viewing a Template Resource Topology 3-4
Copying a Template 3-5
Cloning an Oracle Template 3-5
iv
Copying an Unpublished Template 3-5
Copying a Custom Published Template 3-6
Editing a Template 3-6
Editing with the Console 3-7
Editing Offline 3-7
Validating a Template 3-8
Validating a Template with the Console 3-8
Validating a Template with the CLI 3-8
Publishing a Template 3-9
Importing a Template 3-9
Importing a Published Template with the Console 3-10
Importing an Unpublished Template with the Console 3-10
Importing a Template with the CLI 3-10
Exporting a Template 3-11
Exporting a Published Template with the Console 3-12
Exporting an Unpublished Template with the Console 3-12
Exporting a Template with the CLI 3-12
Deleting a Template 3-13
Deleting a Template with the Console 3-13
Deleting a Template with the CLI 3-13
4 Creating and Managing Stacks with Oracle Cloud Stack
Typical Workflow for Managing Stacks 4-1
Creating a Cloud Stack 4-2
Creating a Cloud Stack with the Console 4-2
Creating a Cloud Stack with the CLI 4-4
Viewing the Details of a Cloud Stack 4-5
Viewing Cloud Stacks with the Console 4-5
Viewing Cloud Stacks with the CLI 4-7
Starting and Stopping a Cloud Stack 4-8
Starting and Stopping a Cloud Stack with the Console 4-8
Starting and Stopping a Cloud Stack with the CLI 4-8
Using Tags with Cloud Stacks 4-9
Creating, Assigning, and Unassigning Tags 4-9
Find Tags and Instances Using Search Expressions 4-10
Starting and Stopping a Resource in a Cloud Stack 4-13
Starting and Stopping a Resource with the Console 4-13
Managing SSH Access for a Resource in a Cloud Stack 4-13
Managing Access Rules for a Resource in a Cloud Stack 4-14
Deleting a Cloud Stack 4-15
v

Deleting a Cloud Stack with the Console 4-15
Deleting a Cloud Stack with the CLI 4-16
5 Frequently Asked Questions for Oracle Cloud Stack
6 Troubleshooting for Oracle Cloud Stack
Problems with Creating a Stack 6-1
Problems with Deleting a Stack 6-3
Problems with Importing a Template 6-3
Get Help for a Specific Template 6-5
7 Exploring the Oracle Cloud Stack Console
Welcome Page 7-1
Stacks Page 7-2
Stack Details Page 7-4
Published Templates Page 7-6
Unpublished Templates Page 7-7
Template Builder 7-8
Activity Page 7-11
vi

Preface
Topics:
• Audience
• Documentation Accessibility
• Related Resources
• Conventions
AudienceUsing Oracle Cloud Stack Manager is intended for experienced users of Oracle Cloudwho want to automate the provisioning of their cloud environments by using stacks.
Documentation AccessibilityFor information about Oracle's commitment to accessibility, visit the OracleAccessibility Program website at http://www.oracle.com/pls/topic/lookup?ctx=acc&id=docacc.
Access to Oracle Support
Oracle customers that have purchased support have access to electronic supportthrough My Oracle Support. For information, visit http://www.oracle.com/pls/topic/lookup?ctx=acc&id=info or visit http://www.oracle.com/pls/topic/lookup?ctx=acc&id=trs if you are hearing impaired.
Related ResourcesFor more information, see these Oracle resources:
• Oracle Public Cloud
http://cloud.oracle.com
• PaaS Service Manager Command Line Interface Reference
ConventionsThe following text conventions are used in this document:
vii
Convention Meaning
boldface Boldface type indicates graphical user interface elements associatedwith an action, or terms defined in text or the glossary.
italic Italic type indicates book titles, emphasis, or placeholder variables forwhich you supply particular values.
monospace Monospace type indicates commands within a paragraph, URLs, codein examples, text that appears on the screen, or text that you enter.
Preface
viii

1Getting Started with Oracle Cloud Stack
To get started with Oracle Cloud Stack, you should become familiar with its concepts,architecture, interfaces, and prerequisites.
Topics
• About Oracle Cloud Stack
• About Oracle Stack Templates
• About the Interfaces to Oracle Cloud Stack
• Before You Begin with Oracle Cloud Stack
• Accessing Oracle Cloud Stack
• About Oracle Cloud Stack Roles and Users
About Oracle Cloud StackOracle Cloud Stack is a feature of Oracle Cloud that empowers users to automate theprovisioning of multiple cloud services as a single unit called a stack.
In order to build and deploy their applications, businesses often require sophisticatedenvironments that consist of multiple, integrated cloud services. Consider adevelopment environment whose needs include a Java application server along withtwo relational databases. Provisioning these three service instances (1 Java and 2databases) for every member of your development team is time consuming and errorprone, regardless of whether you’re using service consoles or REST APIs to provisionthe services.
When you use Oracle Cloud Stack to create an environment, it provisions the specifiedOracle Cloud resources by using each service’s public REST APIs. It orchestrates theexecution of these APIs in a standardized, repeatable way, ensuring that you createconsistent environments in your cloud accounts or even in different cloud data centers.You can also define the dependencies between your resources, so that Oracle CloudStack creates and destroys the resources in your cloud stacks in a logical sequence.
Oracle Cloud Stack is supported on Oracle Cloud and on Oracle Cloud at Customer.
What is a Cloud StackA cloud stack is a collection of related cloud services that you provision together withOracle Cloud Stack .
It represents a complete environment whose functionality extends beyond a singleservice in Oracle Cloud. The services or resources that make up a cloud stack arecreated, deleted, started, and stopped together as a unit, but these services can alsobe individually accessed, configured and managed by using their service-specificinterfaces. A cloud stack is created from a template.
1-1

See List of Resource Types for the types of cloud resources that can be included ascomponents of a cloud stack.
What is a TemplateA template in Oracle Cloud Stack defines the cloud services that are part of a stack aswell as how they are provisioned in Oracle Cloud. They act like blueprints for thecreation of cloud environments.
You can rapidly provision similar environments, in the same cloud data center or indifferent ones, by creating multiple stacks from a single template. After a stack iscreated from a template, its lifecycle is completely independent from the template’slifecycle. In other words, modifications you make to the template will not affect existingcloud stacks.
Templates are text files that use the standard YAML syntax. You can either use thetemplate authoring tools in the Oracle Cloud Stack console, or import template filesinto Oracle Cloud Stack that you authored with some other tool.
A template is comprised of several elements:
• Resources define the cloud services to create and the dependencies betweenthem.
• Template parameters allow users of the template to customize the template for aspecific cloud stack.
• Attributes enable you to use the runtime characteristics of one resource asparameters for the creation of another resource.
• Conditions change a template’s behavior based on different criteria like the valuesof template parameters.
For more information, see About Template Components.
About Oracle Stack TemplatesIn order to help you get started creating cloud stacks, all Oracle Cloud accountsinclude templates that are ready-to-use with Oracle Cloud Stack.
These certified, Oracle-defined templates address popular use cases and deploymentpatterns. You do not have to import these templates into Oracle Cloud Stack to beginusing them. You can also copy an Oracle template, and then customize its name anddefinition to meet your requirements. See Cloning an Oracle Template.
The available Oracle templates include:
Name Description More Information
Oracle-AnalyticsCloud-Autonomous-Template
Provision Oracle Analytics Cloud onOracle Cloud Infrastructure, andusing an existing cloud storagebucket.
Creating Services in AdministeringOracle Analytics Cloud
Oracle-IntegrationCloud-CM-Template
Provision an Oracle Integrationinstance, an Oracle Database CloudService deployment, and a cloudstorage container for backups.
Creating an Oracle Integration CloudInstance in Administering OracleIntegration
Chapter 1About Oracle Stack Templates
1-2

Name Description More Information
Oracle-IoT-Asset-Monitoring
Provision an Oracle IoT AssetMonitoring Cloud Service instance,along with cloud storage containersfor backups and content.
Creating an Oracle IoT AssetMonitoring Cloud Service Instance inAdministering Oracle Internet ofThings Cloud Service
Oracle-IoT-Asset-Monitoring-CX
Provision an Oracle IoT AssetMonitoring CX Cloud Serviceinstance, along with cloud storagecontainers for backups and content.
Creating an Oracle IoT AssetMonitoring CX Cloud ServiceInstance in Administering OracleInternet of Things Cloud Service
Oracle-IoT-Connected-Worker
Provision an Oracle IoT ConnectedWorker Cloud Service instance,along with cloud storage containersfor backups and content.
Creating an Oracle IoT ConnectedWorker Cloud Service Instance inAdministering Oracle Internet ofThings Cloud Service
Oracle-IoT-Enterprise
Provision a standard Oracle Internetof Things Cloud Service instance,along with cloud storage containersfor backups and content.
Creating an Oracle Internet of ThingsCloud Service Instance inAdministering Oracle Internet ofThings Cloud Service
Oracle-IoT-Enterprise-Analytics
Provision an Oracle Internet ofThings Cloud Service instance withAnalytics, and cloud storagecontainers for backups and content.
Creating an Oracle Internet of ThingsCloud Service Instance withAnalytics in Administering OracleInternet of Things Cloud Service
Oracle-IoT-Fleet-Monitoring
Provision an Oracle IoT FleetMonitoring Cloud Service instance,along with cloud storage containersfor backups and content.
Creating an Oracle IoT FleetMonitoring Cloud Service Instance inAdministering Oracle Internet ofThings Cloud Service
Oracle-IoT-Production-Monitoring
Provision an Oracle IoT ProductionMonitoring Cloud Service instance,along with cloud storage containersfor backups and content.
Creating an Oracle IoT ProductionMonitoring Cloud Service Instance inAdministering Oracle Internet ofThings Cloud Service
Oracle-JCS-DBCS-Template
Provision an Oracle Java CloudService instance, an OracleDatabase Cloud Service deployment,and a cloud storage container forbackups.
Creating an Oracle Java CloudService Instance with Stack Managerin Administering Oracle Java CloudService
Oracle-LMP Provision one or more PHPcontainers in Oracle ApplicationContainer Cloud Service, along withan Oracle MySQL Cloud Serviceinstance. Optionally deploy anexisting PHP application to thecontainer.
Deploying an Application andConfiguring a Database with StackManager in Using Oracle ApplicationContainer Cloud Service
Oracle-MFTCS-DBCS-Template
Provision an Oracle Managed FileTransfer Cloud Service instance, anOracle Database Cloud Servicedeployment, and a cloud storagecontainer for backups.
This template is not supported ina production environment. Use thetemplate only in non-productionenvironments or for testing.
Oracle-Mobile-Bots-Standard-Rel
Provision an Oracle Mobile Cloud,Enterprise service instance thatincludes only the Bots component.
Create an Oracle Mobile Cloud,Enterprise Bots-Only Stack inAdministering Oracle Mobile CloudEnterprise in a Customer-ManagedEnvironment
Chapter 1About Oracle Stack Templates
1-3

Name Description More Information
Oracle-Mobile-Cloud-Enterprise-Template
Provision an Oracle Mobile Cloud,Enterprise service instance, includingthe Mobile Core, Custom Code,Analytics, and Bots components.
Create an Oracle Mobile Cloud,Enterprise Stack in AdministeringOracle Mobile Cloud Enterprise in aCustomer-Managed Environment
Oracle-OEHCS-BDCSCE-StackTemplate
Provision an Big Data Cloudinstance, including an Oracle EventHub Cloud Service - Platforminstance, two Oracle Event HubCloud Service instances (input andoutput), and a cloud storagecontainer for backups.
Creating a Cluster with StackManager in Using Oracle Big DataCloud
Oracle-SOACS-DBCS-Template
Provision an Oracle SOA CloudService instance, an OracleDatabase Cloud Service deployment,and a cloud storage container forbackups.
This template is not supported ina production environment. Use thetemplate only in non-productionenvironments or for testing.
Oracle-VisualBuilder-CM-Template
Provision an Oracle Visual Builderinstance, an Oracle Database CloudService deployment, and a cloudstorage container for backups.
Creating an Instance with the OracleCloud Stack Template inAdministering Oracle Visual BuilderClassic (User-Managed)
About the Interfaces to Oracle Cloud StackAll Oracle Cloud Stack operations are performed through a web console, the standardOracle Cloud command line interface or a REST API.
Type of Access Description More Information
Web Console Create and manage cloudstacks and templates from aweb browser. The consolealso includes tools to edittemplate files.
Accessing Oracle Cloud Stack
Command Line Interface (CLI) Create and manage cloudstacks and templates from acommand line or script.
• Accessing Oracle CloudStack
• About the PaaS ServiceManager Command LineInterface
• psm stack Commands
REST API Use REST endpoints tomanage cloud stacks andtemplates from a terminal,script or custom program.
REST API for Oracle CloudStack
Before You Begin with Oracle Cloud StackBefore using Oracle Cloud Stack you may have to perform certain prerequisite tasks.
• You must provide an Oracle Cloud identity domain, user name, and password tosign in to Oracle Cloud and access Oracle Cloud Stack. Check your email orcontact your Oracle Cloud account administrator for your sign-in credentials.
Chapter 1About the Interfaces to Oracle Cloud Stack
1-4

• You must have a valid Oracle Cloud account with subscriptions to the cloudresources that you plan to provision as part of your cloud stacks. However, you donot have to explicitly request or purchase a subscription to Oracle Cloud Stackitself in order to use it.
• In order to edit templates with the Oracle Cloud Stack console, you must firstcreate an object storage container in your cloud account, if one doesn’t alreadyexist. See Creating Containers in Using Oracle Cloud Infrastructure ObjectStorage Classic.
Accessing Oracle Cloud StackUse one of the available interfaces to access Oracle Cloud Stack.
Depending on how you signed up for Oracle Cloud, you’ll be directed to either theOracle Cloud Infrastructure Console or the Oracle Cloud Infrastructure ClassicConsole.
Tutorials are also available to help you get started with Oracle Cloud Stack.
Topics
• Accessing Cloud Stack from Infrastructure Console
• Accessing Cloud Stack from the Infrastructure Classic Console
• Accessing Cloud Stack from Cloud at Customer
• Accessing the CLI
Accessing Cloud Stack from Infrastructure ConsoleOn most Oracle Cloud accounts, you access the Oracle Cloud Stack console from theOracle Cloud Infrastructure Console.
1. Sign in to Oracle Cloud.
If you received a welcome email, use it to identify the URL, your user name, andyour temporary password. After signing in, you will be prompted to change yourpassword.
2. From the Infrastructure Console, click the navigation menu in the top leftcorner, expand Platform Services, and then select any available service.
Chapter 1Accessing Oracle Cloud Stack
1-5

3. From the service console, click the navigation menu in the top left corner, andthen select Cloud Stack.
The Oracle Cloud Stack console is displayed.
When you access the console for the first time, you’ll see the Welcome Page.Otherwise you’ll see the Stacks Page.
Click Help in the top right corner of a page for links to documentation, tutorialsand videos related to the features on that page. Refer to these topics to learn how tocreate templates and cloud stacks:
• Creating a Template
• About the Template Life Cycle
• Typical Workflow for Managing Stacks
Accessing Cloud Stack from the Infrastructure Classic ConsoleOn some older Oracle Cloud accounts, you access the Oracle Cloud Stack consolefrom the Oracle Cloud Infrastructure Classic Console.
1. Sign in to Oracle Cloud.
If you received a welcome email, use it to identify the URL, your user name, andyour temporary password. After signing in, you will be prompted to change yourpassword.
2. From the Infrastructure Classic Console, click the navigation menu in the topleft corner, and then click the name of any available service.
Chapter 1Accessing Oracle Cloud Stack
1-6

3. From the service console, click the navigation menu in the top left corner, andthen select Cloud Stack.
The Oracle Cloud Stack console is displayed.
When you access the console for the first time, you’ll see the Welcome Page.Otherwise you’ll see the Stacks Page.
Accessing Cloud Stack from Cloud at CustomerOn Oracle Cloud at Customer, you access the Oracle Cloud Stack console from theMy Services Dashboard.
1. Sign in to Oracle Cloud at Customer.
2. From the My Services Dashboard, click the navigation menu in the top leftcorner, and then click the name of any available service.
3. From the service console, click the navigation menu in the top left corner, andthen select Cloud Stack.
The Oracle Cloud Stack console is displayed.
When you access the console for the first time, you’ll see the Welcome Page.Otherwise you’ll see the Stacks Page.
Accessing the CLIAfter installing and configuring the Oracle Cloud command line interface (CLI), you canuse it to send commands to Oracle Cloud Stack
1. If you have not yet installed the CLI, perform the tasks described in PaaS ServiceManager (PSM) CLI Reference:
a. Performing Prerequisite Tasks for the Command Line Interface
b. Downloading the Command Line Interface
c. Installing the Command Line Interface
d. Configuring the Command Line Interface
2. Execute this CLI command:
psm help
3. Use the output to verify that the Oracle Cloud Stack commands (stack) areavailable to this account. Similarly, note the other cloud services that are availableto this account.
For example:
psm help (or psm h)
o dbcs Oracle Database Cloud Service
Chapter 1Accessing Oracle Cloud Stack
1-7

o jcs Oracle Java Cloud Service o accs Oracle Application Container Cloud Service o stack Cloud Stack Manager
Note:
If the stack commands are not present, update your CLI installation tothe latest version. See Updating the Command Line Interface in PaaSService Manager (PSM) CLI Reference.
4. Refer to these topics to learn how to use the CLI to manage templates and createcloud stacks:
• About the Template Life Cycle
• Typical Workflow for Managing Stacks
About Oracle Cloud Stack Roles and UsersUnlike other Oracle Cloud services, there are no user roles specific to using OracleCloud Stack.
Any cloud user in your identity domain can view and manage stack templates.However, in order to create a cloud stack from a template the user must have thenecessary roles to create the specific resources in the stack. For example, in order tocreate an Oracle Java Cloud Service instance as a resource in a stack, you must havethe Java Administrator role.
Only the Identity Domain Administrator is allowed to create user accounts and assignroles. See Managing Users, User Accounts, and Roles in Managing and MonitoringOracle Cloud.
Chapter 1About Oracle Cloud Stack Roles and Users
1-8
2Creating Templates with Oracle CloudStack
Templates in Oracle Cloud Stack provide a blueprint for the creation of cloud stacks,and orchestrate the creation of cloud services, or resources. Creating a templateinvolves working with parameters, attributes, conditions, and functions.
Templates are text files that use the standard YAML syntax. You can either use thetemplate authoring tools found in the Oracle Cloud Stack console, or edit template filesoffline with some other tool. After creating a template, you can publish and test it. See About the Template Life Cycle.
An alternative to creating a new template is to copy an existing one. See Copying aTemplate.
Topics
• About Template Components
• Creating a Template
• Editing Template Files
• Template Best Practices
• List of Resource Types
• List of Functions
• List of Implicit Template Parameters
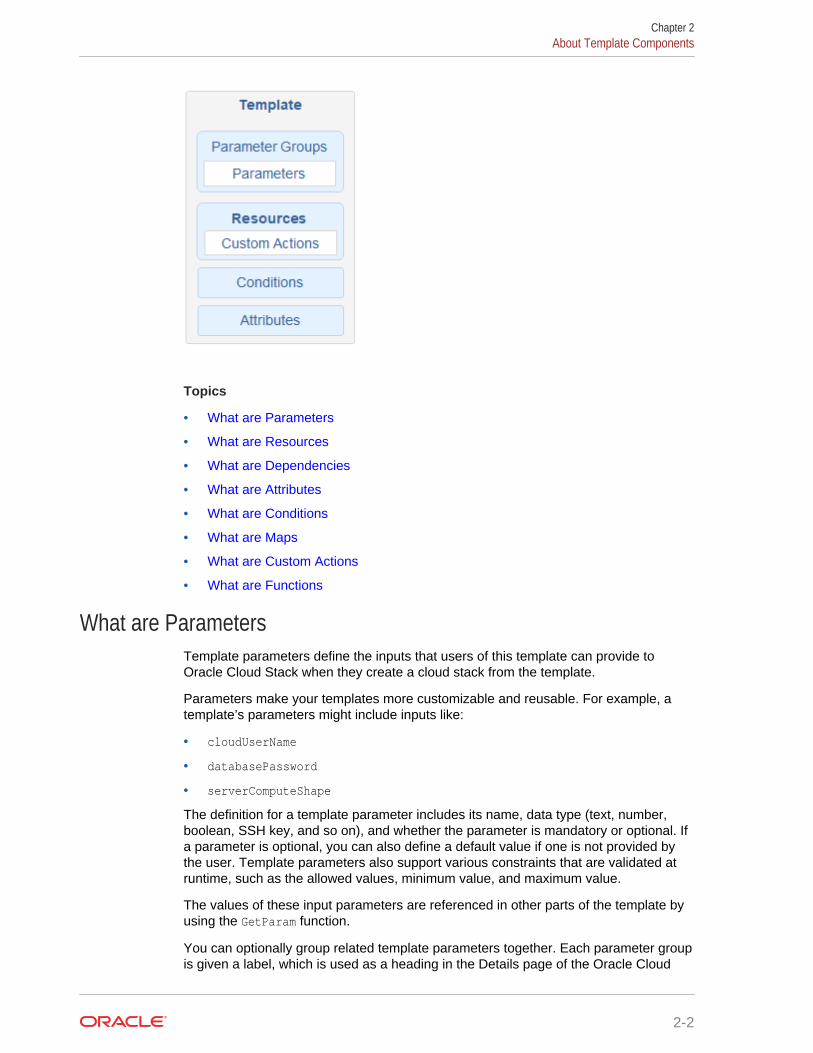
About Template ComponentsA template in Oracle Cloud Stack is a YAML document that’s comprised of severalcomponents, including parameters, resources, attributes, and conditions.
2-1
Topics
• What are Parameters
• What are Resources
• What are Dependencies
• What are Attributes
• What are Conditions
• What are Maps
• What are Custom Actions
• What are Functions
What are ParametersTemplate parameters define the inputs that users of this template can provide toOracle Cloud Stack when they create a cloud stack from the template.
Parameters make your templates more customizable and reusable. For example, atemplate’s parameters might include inputs like:
• cloudUserName
• databasePassword
• serverComputeShape
The definition for a template parameter includes its name, data type (text, number,boolean, SSH key, and so on), and whether the parameter is mandatory or optional. Ifa parameter is optional, you can also define a default value if one is not provided bythe user. Template parameters also support various constraints that are validated atruntime, such as the allowed values, minimum value, and maximum value.
The values of these input parameters are referenced in other parts of the template byusing the GetParam function.
You can optionally group related template parameters together. Each parameter groupis given a label, which is used as a heading in the Details page of the Oracle Cloud
Chapter 2About Template Components
2-2

Stack creation wizard. The image below depicts a parameter group named OracleDatabase Cloud Service Details. This group consists of four template parameters:
If you don't assign a parameter to a group, it will be displayed under a genericConfiguration heading in the creation wizard. Standard parameters that are displayedfor all templates, including Name and Description, are always displayed under theStack Details heading.
Note:
Parameter groups have no effect on the CLI or REST API.
What are ResourcesOracle Cloud Stack provisions one or more Oracle Cloud resources when a cloudstack is created from the template.
For a list of the resource types supported by Oracle Cloud Stack see List of ResourceTypes.
Each resource in a template has a name and parameters, which provide the specificnames and values that Oracle Cloud Stack sends to the REST endpoint for creatingthis type of cloud resource. For example, the REST endpoint for creating an instanceof Oracle Java Cloud Service supports parameters like:
• serviceName
• cloudStorageContainer
• backupDestination
As a template author, you assign values to these resource parameters. The value canbe typed directly into the template, or it can be determined dynamically through theuse of functions. For instance, you can use the GetParam function to retrieve a user-supplied template parameter.
Many REST endpoints in Oracle Cloud require a request payload in JSON format,which organizes parameters into a hierarchical structure. Consequently, resourceparameters in Oracle Cloud Stack are also defined as a hierarchy, with parent
Chapter 2About Template Components
2-3

parameters and child parameters. For example, Oracle Java Cloud Service supports aJSON structure like the following:
serviceName: myjcscomponents: { WLS: { adminUserName: myadmin managedServerCount: 3 }}
When a stack is created, Oracle Cloud Stack uses your resource definitions in thetemplate to automatically construct these JSON payloads.
What are DependenciesA template contains one or more resources. Dependencies control the order in whichOracle Cloud Stack provisions these resources when a new cloud stack is createdfrom a template.
As a template author, you can define explicit dependencies between resources. Forexample, a template can explicitly state that the creation of ResourceC depends on thecreation of ResourceA and ResourceB. In other words, when Oracle Cloud Stackexecutes this template it must successfully create ResourceA and ResourceB beforecreating ResourceC, regardless of the order in which these resources are defined in thetemplate.
Oracle Cloud Stack will also automatically identify and honor any implicitdependencies between resources in a template, even if the author does not explicitlydefine them. This occurs when a template states that the value of a resource’sparameter is the runtime attribute of another resource. For example, consider atemplate in which the databaseURL parameter of ResourceB is configured to use theurl attribute of ResourceA. Because Oracle Cloud Stack cannot retrieve this urlattribute until after it successfully creates ResourceA, there is an implicit dependencybetween these two resources. ResourceA must be created prior to creating ResourceB.
To optimize performance, Oracle Cloud Stack creates multiple resources in parallel ifno dependencies exist between them.
What are AttributesThe values of some resource parameters may not be known in advance because theyare generated as part of provisioning a resource in the cloud. Therefore, these valuesmust be retrieved at runtime by Oracle Cloud Stack after a resource has beensuccessfully created.
Consider a scenario in which a stack template includes an application resource and adatabase resource. The application resource requires a parameter dbURL, which is theURL of a running database resource. The database resource’s connectionStringattribute has this information. Therefore, when configuring the application resource,you can set its dbURL to the value of the database’s connectionString attribute.
Similar to creating a resource, Oracle Cloud Stack uses a REST endpoint to collectresource attributes. For example, the REST endpoint for viewing an instance of OracleDatabase Cloud Service responds with attributes like:
Chapter 2About Template Components
2-4

• service_name
• num_nodes
• listenerPort
Use the GetAtt function in your template to retrieve the value of a resource’s attribute.The response payload of these REST endpoints are often in JSON format, whichorganizes the attributes as a hierarchy like the following example:
{ "serviceId":1104, "serviceName":"MyDatabase", "cloudStorageContainer": { "value":"MyStorageURL", }}
In order to retrieve attributes within this JSON hierarchy, templates use a dot notation.For example: cloudStorageContainer.value
When you monitor running stacks from the CLI or REST API, Oracle Cloud Stackreturns a set of standard runtime attributes for each stack, such as who created thestack. But each template can also define custom stack attributes. For example, youcan define a stack attribute named database that maps to a database’sconnectionString attribute.
What are ConditionsStack templates include features that allow you to customize how a stack is createdunder different conditions.
Working with conditions in Oracle Cloud Stack is similar to working with standardprogramming constructs like If/Then/Else. You can define conditional expressions ina template and then refer to these conditions within other template elements:
• Display a template parameter to the user only if the specified conditions are true.
• Provision a resource only if the specified conditions are true.
Consider the following scenario:
• If the template parameter production is true, then set a resource’s clusterSize to3.
• If the template parameter production is false, then do not configure a resource’sclusterSize.
You can also use conditional functions like If, Equals, Not, and GreaterThan to furthercontrol the configuration of template parameters and resources.
What are MapsMaps are data structures that allow you to define static values within a template. Yourefer to these values within other template components such as resources.
You organize the data within a map as follows:
Chapter 2About Template Components
2-5
• A map contains one or more submaps.
• A submap contains one or more key-value pairs.
For example, you could use a map to define:
• The compute shapes to use in development, test, and production stacks
• The user names for the resources in a stack
mymap: shapes: {"dev":"oc3","test":"oc4","prod":"oc5"} users: {"db":"mydbuser","java":"myjavauser"}
What are Custom ActionsUse Oracle Cloud Stack to execute custom operating system (OS) commands andscripts after the creation of a resource in your template.
For example, you can use custom actions to:
• Install an OS package
• Modify the default OS configuration
• Create a database schema
• Deploy an application
• Download files from cloud storage
Custom actions are only supported for Oracle Cloud services that provide access totheir administration node (virtual machine) through a Secure Shell (SSH) interface.Custom actions are not supported on Oracle-managed or Autonomous cloud services.
Custom actions are defined within a special type of resource called a SoftwareComponent. These Software Components and their actions are assigned to othercloud resources in the same template.
What are FunctionsOracle Cloud Stack provides template authors with many functions to help validate,evaluate, and manipulate values.
These functions are executed at runtime by Oracle Cloud Stack when a stack is beingcreated. Some basic functions include:
• GetParam — Retrieve the value of a template parameter.
• GetAtt — Retrieve the value of the runtime attribute from a specific resource.
• If — Evaluate a condition in this template and return different values if thecondition evaluates to true or false.
See List of Functions.
Creating a TemplateUse the Template Builder in Oracle Cloud Stack to define template parameters,resources, and conditions.
Chapter 2Creating a Template
2-6

Video
Tutorials are also available to help you create your first template.
Template Tasks
• Task 1: Creating a Template with the Template Builder
• Task 2: Creating Template Parameters
• Task 3: Creating Parameter Groups
• Task 4: Creating Resources
• Task 5: Creating Dependencies
• Task 6: Creating Conditions
• Task 7 Creating Custom Actions
• Task 8: Creating Maps
• Task 9: Creating Attributes
Creating a Template with the Template BuilderCreate and edit templates from the Oracle Cloud Stack web console.
A template in Oracle Cloud Stack is in one of two states:
• Published — Users in this cloud account can create stacks from this template.
• Unpublished — This template is still in-progress, and is not available for stackcreation.
An alternative to creating a new template is to copy an existing one. See Copying aTemplate.
Before creating your first template, configure the storage location for unpublished files.See Configuring Template Storage.
1. Access the Oracle Cloud Stack console, and then click Templates.
2. Click Unpublished.
3. Click Add Template, and then select Create new Template.
The Template Builder is displayed.
4. In the text field at the top of the page, enter a name for this template.
5. Optional: Click , and then enter a templateVersion and templateDescription.
6. Click Save the current template .
Oracle Cloud Stack automatically saves your template as you make changes, butas a precaution Oracle recommends that you routinely click Save the currenttemplate.
After creating a template, see Creating Template Parameters.
To learn more about the user interface, see Template Builder.
Chapter 2Creating a Template
2-7

Creating Template ParametersUse parameters to define user inputs for your Oracle Cloud Stack template.
For an introduction, see What are Parameters.
Some parameters are predefined and available to all templates. You do not have toexplicitly define them. See List of Implicit Template Parameters.
Tip:
To define constraints on the stack’s name, create a template parameternamed serviceName of type String.
1. Access the Oracle Cloud Stack console, and then edit your template.
2. To the right of Parameters, click Add parameter .
3. Enter a name for the parameter.
4. Select a parameter type:
Parameter Type Description
String Users can enter any text value.
Number Users can enter only a numeric value.
Boolean Users can select either true or false (check box).
Password Users can enter any text value, but this value is not displayed in the OracleCloud Stack console.
Ssh Users can supply a Secure Shell (SSH) public key. Oracle Cloud Stack consoleusers can supply the key value as text or as a file, or let Oracle Cloud generatea value dynamically. If the key is generated, users must download a filecontaining the public key and its corresponding private key.
ComputeShape Users can select from a list of standard Oracle Cloud compute shapes (oc3,oc2m, and so on). A shape specifies the number of Oracle Compute Units(OCPUs) and the amount of memory allocated to a cloud resource.
Storage Users can specify a storage container in Oracle Cloud Infrastructure ObjectStorage Classic.
Region Users can select from a list of Oracle Cloud regions, such as a geographicallocations. The available regions vary depending on the user’s account settings.The default value is "No Preference", in which case Oracle Cloud automaticallyselects a region.
File Users can select a file to upload from their local machine.
Service_Type Users can select from a list of existing instances of cloud resource Type. See List of Resource Types.
5. Edit the attributes and constraints of the parameter:
The available attributes and constraints vary for each parameter type.
Chapter 2Creating a Template
2-8

Field Description
default The value of this parameter if none is provided
description A description of the parameter. This description is displayed if the user clicksthe help icon.
label The parameter’s display name.
mandatory (true/false) Whether or not this parameter is mandatory or optional
readOnly (true/false) Whether or not the default value of this parameter can be modified
sensitive (true/false) Whether or not this parameter’s value should be displayed to users
allowedPattern The parameter’s value must match this regular expression, such as "[a-zA-Z]*"
allowedValues A list of value options. Use one of these formats:
• A comma-separated list of values• A list of key:value pairs. The values are displayed to the user and
the GetParam function returns the selected key.
constraintDescription A custom message that is displayed to the user if the parameter’s constraintsare not met
maxLength The maximum number of characters
minLength The minimum number of characters
maxValue The minimum numeric value
minValue The maximum numeric value
6. Click Apply Changes.
7. Repeat from step 2 for each additional template parameter that you want to create.
8. Click Save the current template .
If you delete an existing parameter, Oracle Cloud Stack does not delete anyreferences to the parameter in the rest of the template (Fn::GetParam: paramName).Your template will not have valid syntax until you remove these parameter references.
After creating parameters in a template, see:
• Creating Parameter Groups (optional)
• Creating Resources
Creating Parameter GroupsUse parameter groups in a template to control how parameters are presented to usersin the Oracle Cloud Stack console.
Each group is given a label, which is used as a heading in the Details page of theOracle Cloud Stack creation wizard. For more information, see What are Parameters.
1. Access the Oracle Cloud Stack console, and then edit your template.
2. To the right of Parameter Groups, click Add parameter group .
3. Enter a name for the parameter group.
4. To the right of each parameter that you want to add to this group, click Add
parameter .
Chapter 2Creating a Template
2-9
To remove a parameter from the group, click Remove parameter .
5. Click Apply Changes.
6. Repeat from step 2 for each additional parameter group that you want to create.
7. Click Save the current template .
After creating parameters and groups, see Creating Resources.
Creating ResourcesConfigure the cloud resources that Oracle Cloud Stack provisions when your templateis used to create a stack.
For an introduction, see What are Resources.
The Template Builder in Oracle Cloud Stack provides a canvas to help you visualizeand configure the resources in your template. It also provides an interface to helpconstruct expressions and to invoke functions.
1. Access the Oracle Cloud Stack console, and then edit your template.
2. To the left of Resources, click .
The console displays a list of resource types that are available to your cloudaccount.
3. Identity the resource type that you want to add to the template. If necessary, usethe Search field above Resources.
4. Perform one of the following actions:
• Drag and drop the resource onto the canvas on the right side of the console.
• To the right of the resource, click Add resource to canvas .
By default, the new resource is given a randomly generated identifier.
5. Either click the resource on the canvas, or right-click it and select Edit.
6. Using the text field at the top of the dialog, update the identifier for the resource.
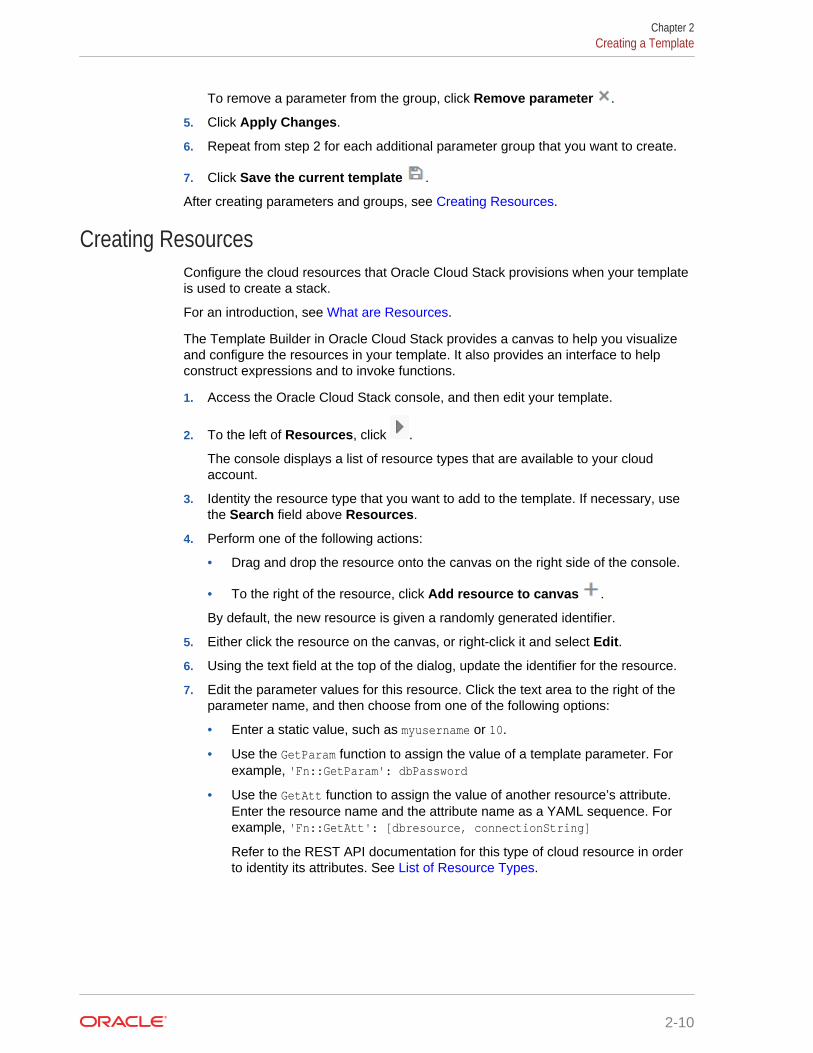
7. Edit the parameter values for this resource. Click the text area to the right of theparameter name, and then choose from one of the following options:
• Enter a static value, such as myusername or 10.
• Use the GetParam function to assign the value of a template parameter. Forexample, 'Fn::GetParam': dbPassword
• Use the GetAtt function to assign the value of another resource’s attribute.Enter the resource name and the attribute name as a YAML sequence. Forexample, 'Fn::GetAtt': [dbresource, connectionString]
Refer to the REST API documentation for this type of cloud resource in orderto identity its attributes. See List of Resource Types.
Chapter 2Creating a Template
2-10
Tip:
Place your cursor over a parameter’s name to view its description.
All required parameters for this resource type are displayed in bold andhave the text (required) beside their names. All other parameters areoptional. To hide all optional parameters, select Show Only Required.
You can search for specific parameters by name.
To configure a parameter whose value is an array, to the right of the
parameter name, click Add a parameter to this array .
8. Click Apply Changes.
9. Repeat from step 2 for each additional resource that you want to create in thistemplate.
10. Click Save the current template .
If you are ready to use your template, see Publishing a Template.
See these topics for more template features:
• Creating Dependencies
• Creating Conditions
• Creating Attributes
• List of Functions
Creating DependenciesUse dependencies in Oracle Cloud Stack to modify the order in which cloud resourcesare created within a stack.
For an introduction, see What are Dependencies.
Topics
• Adding a Resource Dependency
Adding a Resource DependencyControl the order in which Oracle Cloud Stack provisions the resources in yourtemplate.
Use the canvas in Template Builder to visually define the relationships between yourresources. In the example below, the Java resource depends on the Databaseresource.
Chapter 2Creating a Template
2-11

Oracle Cloud Stack will also automatically identify and honor any implicitdependencies between resources in a template, even if you don’t explicitly definethem. This occurs when you set the value of a resource’s parameter to the runtimeattribute of another resource in the template.
1. Access the Oracle Cloud Stack console, and then edit your template.
2. On the canvas, place your cursor over the resource on which you want to create adependency.
A circle appears on the edge of the resource.
3. Click and drag an arrow to another resource on the canvas.
4. Repeat from step 2 if the resource has additional dependencies.
5. Click Save the current template .
To delete a dependency from the canvas, place your mouse over the arrow, and then
click .
As an alternative to using the canvas, you can also add and delete dependencieswhen editing a resource’s configuration.
Creating ConditionsCreate and use conditions within your Oracle Cloud Stack template in order to changehow the template behaves for different scenarios.
For an introduction, see What are Conditions.
A conditional expression includes at least one comparison, which compares twoarguments by using a comparison operator (equals, greater than, and so on). Eachargument in a comparison can be a literal value or you can use functions likeGetParam. A comparison evaluates to true or false.
A filter in a conditional expression combines the results of two or more comparisons.A filter can evaluate if any, all, or none of the comparisons are true.
The following image depicts a filter that contains two comparisons:
Chapter 2Creating a Template
2-12

For more complex conditional expressions, you can also add filters to a filter.
Topics
• Defining Global Conditions
• Adding a Condition to a Resource
• Adding a Condition to a Resource Parameter
• Adding a Condition to a Template Parameter
Defining Global ConditionsIf you need to use the same conditional expression at multiple locations in your OracleCloud Stack template, create a condition at the template level. You can then refer tothese global conditions throughout the template.
1. Access the Oracle Cloud Stack console, and then edit your template.
2. To the right of Conditions, click Add condition .
3. Enter a name for the condition.
4. If your condition requires a single comparison, perform these steps:
a. Select Add comparison, and then click Add condition expression .
b. Enter two expressions and select a comparison operator.
5. If your condition requires two or more comparisons, perform these steps:
a. Select Add filter, and then click Add condition expression .
b. In the second input field, select Add comparison, and then click Add
condition expression .
c. For the first comparison, enter two expressions and select a comparisonoperator.
d. Below the first comparison, verify that Add comparison is selected, and then
click Add condition expression .
e. For the second comparison, enter two expressions and select a comparisonoperator.
f. Repeat this process for each comparison you want to add to this condition.
g. Select a logical operator to evaluate the results of the comparisons: Match all,Match any, or Match none.
Tip:
If you prefer to enter a conditional expression manually, select the Addvalue option. You can use any combination of functions in theexpression, but the result must return either true or false. See List ofFunctions.
6. Click Apply Changes.
7. Repeat from step 2 for each additional condition that you want to create.
Chapter 2Creating a Template
2-13

8. Click Save the current template .
When editing an existing condition:
• Click Add condition expression to add filters or comparisons.
• Click Delete condition expression to delete filters or comparisons.
Adding a Condition to a ResourceAssign a global condition to a resource in your Oracle Cloud Stack template.
If this condition evaluates to true, the resource will be created as part of the stack. If itevaluates to false the resource (and any resources on which it depends) will not becreated.
1. Access the Oracle Cloud Stack console, and then edit your template.
2. On the canvas, right click the resource to which you want to add a condition.
3. Select Assign ConditionName.
Resources on the canvas that have been assigned a condition are identified with
the icon.
4. Click Save the current template .
As an alternative to using the canvas, you can also create, assign, and removeconditions when editing a resource’s configuration.
Adding a Condition to a Resource ParameterUse global conditions to dynamically change a resource’s configuration in an OracleCloud Stack template.
For example, you can set a resource’s computeShape to the value oc3 if a condition istrue, or to the value oc4 if the condition is false.
1. Access the Oracle Cloud Stack console, and then edit your template.
2. On the canvas, right-click the resource you want to modify, and then select Edit.
3. Click the value of the parameter to edit it.
4. Use the If function. Enter the name of the global condition along with two stringvalues as a YAML sequence.
Format: 'Fn::If': [conditionName,trueValue,falseValue]
For example: 'Fn::If': [mycondition,oc3,oc4]
If the specified condition evaluates to true, the function returns the first value.Otherwise, the function returns the second value.
5. Click Apply Changes.
6. Click Save the current template .
Chapter 2Creating a Template
2-14
Tip:
A YAML sequence can also be expressed with the following syntax:
'Fn::If': - conditionName - trueValue - falseValue
Adding a Condition to a Template ParameterAssign a global condition to a parameter or parameter group in your Oracle CloudStack template.
If the condition evaluates to false, the parameter or group is hidden in the OracleCloud Stack console when a user creates a stack from this template. If it evaluates totrue, the parameter or group is displayed to the user. These conditions are dynamicallyreevaluated each time the user modifies the value of a template parameter.
1. Access the Oracle Cloud Stack console, and then edit your template.
2. To the left of Parameters or Parameter Groups, click .
3. To the right of the parameter or group that you want to modify, click Edit .
4. From the Conditions field, select an existing condition.
5. Click Apply Changes.
6. Click Save the current template .
Creating Custom Actions
This topic does not apply to Oracle Cloud at Customer.
Use Software Components in your Oracle Cloud Stack template to execute customoperating system (OS) commands or scripts after a stack resource is provisioned.
For example, you can use custom actions to automatically install an OS package,create a database schema, or deploy an application.
For an introduction, see What are Custom Actions.
Topics
• Creating a Software Component
• Adding a Software Component to a Resource
• Adding a Condition to a Software Component
• Custom Action Best Practices
Chapter 2Creating a Template
2-15

Creating a Software ComponentDefine custom actions in your Oracle Cloud Stack template within a special type ofresource called a software component.
1. Access the Oracle Cloud Stack console, and then edit your template.
2. To the right of Software components, click Add software component .
3. Enter a name for the software component.
4. Enter a name for the first configuration in this software component.
5. Set the actions to CREATE. All custom actions run after the target cloud resourceis created.
6. For config, enter one or more Bash OS commands as a Base64 encoded string.Use the following YAML structure:
Fn::Base64: Fn::Join: - "\n" - - bash_command - bash_command
For example:
'Fn::Base64': 'Fn::Join': - "\n" - - touch ~/stack.out - echo 'Updating hosts' >> ~/stack.out - echo 'myhost 192.168.1.10' >> /etc/hosts
Tip:
Be sure that all members of the same sequence have the sameindentation. The following example is invalid:
'Fn::Base64': 'Fn::Join': - "\n" - - This is - not valid
7. For runAsUser, select an OS user. Oracle Cloud Stack will run the commands inthis configuration as the selected user.
Chapter 2Creating a Template
2-16

8. Enter a timeout in minutes. If this configuration does not complete after thespecified time period, it will fail.
9. Set ContinueOnFailure to true if stack creation should continue if thisconfiguration fails or times out (a warning is added to the activity log).
10. For each additional configuration that you want to create in the software
component, click Add another software component configuration , and thenrepeat from step 4.
11. If the OS commands in any of your configurations utilize environment variables,then define an input for each environment variable:
a. Click Add another software component input .
b. For name, enter the name of the environment variable.
For example, if a configuration includes ${dbPassword}, then enterdbPassword.
12. Click Apply changes.
13. Repeat from step 2 for each additional software component that you want tocreate.
14. Click Save the current template .
Adding a Software Component to a ResourceConfigure a template resource so that Oracle Cloud Stack executes custom actionsafter provisioning the resource.
1. Access the Oracle Cloud Stack console, and then edit your template.
2. From the canvas area, right-click a resource and select Edit.
3. To the right of Software component, click Add software component .
4. Select the name of an existing software component.
5. If the selected software component defines one or more inputs, enter values forthese input fields.
You can enter static text, or use template functions like GetParam.
6. Click Apply changes.
7. Click Save the current template .
Adding a Condition to a Software ComponentAssign a global condition to a software component in your Oracle Cloud Stacktemplate.
If the condition evaluates to false during the creation of a stack, the custom actions inthis software component will not be executed. See Defining Global Conditions.
1. Access the Oracle Cloud Stack console, and then edit your template.
2. To the left of Software components, click .
Chapter 2Creating a Template
2-17

3. To the right of the software component that you want to modify, click Edit .
4. From the Conditions field, select an existing condition.
5. Click Apply Changes.
6. Click Save the current template .
Custom Action Best PracticesConsider these best practices when creating Software Components in an OracleCloud Stack template.
• The use of template functions, such as GetParam, is not supported within the OScommands of a custom action.
• Program a custom action so that it can run multiple times without failing orbehaving unexpectedly (idempotent). A custom action might be run more thanonce in the following scenarios:
– Oracle Cloud Stack retries the execution of a custom action after acommunication failure with the target resource.
– If you create a cloud stack with the RETAIN option, and then resume the stackafter a resource provisioning failure, Oracle Cloud Stack also (re)executes anycustom actions that are associated with the failed resource.
• In a custom action, return 0 to indicate success and return 1 to indicate a failure.
• By default, all existing resources are terminated if there is a failure during thecreation of a stack, which includes the deletion of any log files generated by acustom action. To facilitate troubleshooting, record log messages to an externallocation like cloud storage.
• You can use wget, curl, or similar OS commands to download scripts and otherfiles to the administration node in the target cloud resource. For example, youcould download and extract an archive file found in an Oracle Cloud InfrastructureObject Storage container, and then execute one or more scripts found in thearchive.
Creating Maps
This topic does not apply to Oracle Cloud at Customer.
Use maps in your Oracle Cloud Stack template to define static values, and then referto these values in other template components such as resources.
A map contains one or more submaps. A submap contains one or more key-valuepairs.
For an introduction, see What are Maps.
Topics
• Defining a Map
• Using a Map in a Resource Parameter
Chapter 2Creating a Template
2-18

Defining a MapDefine a map in your Oracle Cloud Stack template.
1. Access the Oracle Cloud Stack console, and then edit your template.
2. To the right of Mappings, click Add map .
3. Enter a name for the map.
4. Enter a name for the first submap.
5. To the right of the first submap, click Add submap key/value pair .
6. Enter a Key and a Value.
7. Repeat from step 5 for each additional key/value pair that you want to create in thesubmap.
8. Repeat from step 4 for each additional submap that you want to create in this map.
If you need to create more than 4 submaps in this map, click Add more submap
rows .
9. Click Apply Changes.
10. Click Save the current template .
Using a Map in a Resource ParameterUse values defined in a map to configure resources in an Oracle Cloud Stacktemplate.
1. Access the Oracle Cloud Stack console, and then edit your template.
2. On the canvas, right-click the resource you want to modify, and then select Edit.
3. Click the value of the parameter to edit it.
4. Use the FindInMap function. Enter the map name, submap name, and key nameas a YAML sequence.
Format:
'Fn::FindInMap': - mapName - submapName - keyName
For example:
'Fn::FindInMap': - shapes - dev - DB
Chapter 2Creating a Template
2-19

Any of the function parameters can be determined programmatically. For example:
'Fn::FindInMap': - shapes - 'Fn::GetParam': appState - DB
5. Click Apply Changes.
6. Click Save the current template .
Tip:
A YAML sequence can also be expressed with the following syntax:
'Fn::FindInMap': [mapName,submapName,keyName]
Creating AttributesIdentify the key runtime attributes that Oracle Cloud Stack should monitor on stacksthat are created from your template.
For an introduction, see What are Attributes.
1. Access the Oracle Cloud Stack console, and then edit your template.
2. To the right of Attributes, click Add attribute .
3. Enter a name for the attribute.
4. Optional: Enter a label and a description for the attribute.
5. Edit the value, and use the GetAtt function to retrieve the value of a resource’sattribute. Enter the resource name and the attribute name as a YAML sequence.
Format: 'Fn::GetAtt': [resourceName,attribute]
For example: 'Fn::GetAtt': [dbresource,connectionString]
Refer to the REST API documentation for this type of cloud resource in order toidentity its available attributes. See List of Resource Types.
The attribute argument supports a dot notation in order to access nestedattributes within a JSON response payload. For example,components.mysql.attributes.CONNECT_STRING.value.
6. Click Apply Changes.
7. Repeat from step 2 for each additional attribute that you want to create.
8. Click Save the current template .
Chapter 2Creating a Template
2-20

Editing Template FilesAdvanced users in Oracle Cloud Stack may prefer to directly edit a template’s sourcefile. Use YAML to define and edit parameters and resources, and to use functions fortasks like retrieving parameter values or evaluating conditions.
You can edit a template file using one of these methods:
• Use the Oracle Cloud Stack console to edit the template, and then click Open
YAML editor .
• Export the template file from Oracle Cloud Stack, and then edit the file offline. See Exporting a Template.
Topics
• About Template Files
• Using Template Parameters
• Using Resources
• Using Attributes
• Using Conditions
• Using Custom Actions
• Using Validations
• Using Maps
About Template FilesA template in Oracle Cloud Stack is a YAML file that’s comprised of severalcomponents, including parameters, resources, attributes, and conditions.
Files that contain YAML documents can use any file extension but .yaml is a typicalconvention. The first line in the file identifies it as a YAML document by using 3dashes:
---
In the template’s definition provide its name, version and description:
--- template: templateName: MyTemplateName templateVersion: 1.0 templateDescription: My Oracle cloud stack template
The values of templateName and templateVersion are used to uniquely identify atemplate in Oracle Cloud Stack. The name of the template source file is not used toidentify a template. Two templates can have identical names if they have differentversions.
Chapter 2Editing Template Files
2-21

Template documents have the following general structure:
Template Parameters (Optional) Parameter Groups (Optional) Attributes (Optional) Conditions (Optional) Resources
YAML supports two different methods of expressing sequences (collections of items).You can write a YAML sequence by using multiple lines and dashes, as shown in thefollowing example:
depends_on: - HRStorage - HRDatabase
Alternatively, you can write a YAML sequence as an array by using square brackets.For example:
depends_on: [HRStorage,HRDatabase]
Using Template ParametersEdit your Oracle Cloud Stack template file and configure user inputs by usingparameters.
For an introduction, see What are Parameters.
Some parameters are predefined and available to all templates. You do not have toexplicitly define them. See List of Implicit Template Parameters.
Topics
• Basic Syntax
• Stack Name Parameter
• Parameter Groups
• Hidden Parameters
• Password Parameters
• SSH Parameters
• Compute Shape Parameters
• Tag Parameters
• Storage Parameters
• Region Parameters
• Service Parameters
Chapter 2Editing Template Files
2-22

Basic Syntax
Define template parameters within the parameters node of your template file. For eachparameter, specify a type and other optional attributes and constraints. For example:
parameters: dbAdminUser: label: Database Username description: The admin user for the new database type: String mandatory: true sensitive: true maxLength: 15 nodeCount: label: Database Nodes description: The number of nodes in the database cluster type: Number default: 1 minValue: 1 maxValue: 3
To learn more about configuring parameters, see Creating Template Parameters.
Specify the allowedValues attribute in one of these formats:
• Enter a sequence of values. For example: [oc1,oc2]
• Enter a single JSON object with key/value pairs. The values are displayed to theuser and the GetParam function returns the selected key. For example: {"10.3.6":"WebLogic Server 11g", "12.1.3": "WebLogic Server 12c"}
• Enter a sequence of JSON objects, which each object being a key/value pair. Thevalues are displayed to the user and the GetParam function returns the selectedkey. For example: [{"10.3.6": "WebLogic Server 11g"}, {"12.1.3":"WebLogic Server 12c"}]
Stack Name Parameter
You do not need to explicitly define a parameter for the stack’s name. Retrieve thestack name in your template with the implicit parameter serviceName:
dbSchema: { "Fn::Join": ["-", ["Fn::GetParam": serviceName, DB]] }
However, if you want to define constraints on the stack’s name, such as the number ofcharacters, create a String parameter with the same name in your template:
parameters: serviceName: label: Name type: String minLength: 10 allowedPattern: "^[A-Z]+[A-Z0-9]"
Chapter 2Editing Template Files
2-23

Parameter Groups
You can optionally group related template parameters together. Each parameter groupis given a label, which is used as a heading in the Details page of the Oracle CloudStack creation wizard.
Define parameter groups within the parameterGroups node of your template file. Thisnode contains a sequence. Each item in the sequence contains a group’s label andthe group’s list of parameters. For example:
parameterGroups: - label: Database Configuration parameters: [dbVersion,dbComputeShape,dbSid] - label: Storage Configuration parameters: [storageUser,storagePassword]
Tip:
The parameters sequence can also be expressed with the following syntax:
parameters: - storageUser - storagePassword
Hidden Parameters
This topic does not apply to Oracle Cloud at Customer.
If you set the visible attribute to false for a parameter, it will not be displayed as aninput field in the Oracle Cloud Stack console:
parameters: dbSchema: ... visible: false
CLI and REST API clients can specify values for hidden parameters when creating astack.
Password Parameters
This parameter type enables users to securely enter a password in the Oracle CloudStack console. The password value is not displayed in the browser. The user mustalso enter the same password value twice in order for it to be accepted.
parameters: dbPassword: label: Database Password type: Password
Chapter 2Editing Template Files
2-24

The name of the confirmation input field is the value of label attribute prefixed with thetext “Confirm”. In the example above, the confirmation text field would have the label“Confirm Database Password”.
Unlike other parameter types, the password type is case sensitive by default.
Use the GetParam function to retrieve the password value:
adminPassword: { "Fn::GetParam": dbPassword }
SSH Parameters
This parameter type enables users to enter a Secure Shell (SSH) public key. OracleCloud Stack console users can supply the key value as text or as a file, or let OracleCloud generate a value dynamically. If the key is generated, users can download it asa file.
parameters: sshkey: label: SSH Public Key type: Ssh
Use the GetParam function to retrieve the user-supplied or generated key value:
vmPublicKey: { "Fn::GetParam": sshkey }
Compute Shape Parameters
This parameter type enables users to select a compute shape. Oracle Cloud definesstandard shapes (oc3, oc2m, and so on) that specify the number of Oracle ComputeUnits (OCPUs) and the amount of memory allocated to a cloud resource.
parameters: databaseShape: label: Database Compute Shape type: ComputeShape default: oc3
You can use the allowedValues constraint with the ComputeShape parameter type tolimit the Oracle Cloud compute shapes that the user may choose. The Oracle CloudStack console will automatically display the number of OCPUs and the amount of RAMfor each shape option in your list. If you do not provide an allowedValues constraint,the user can select any standard compute shape.
parameters: databaseShape: label: Database Compute Shape type: ComputeShape allowedValues: [ oc3, oc4, oc5, oc6, oc1m, oc2m, oc3m, oc4m ]
Chapter 2Editing Template Files
2-25

Use the GetParam function to retrieve the selected compute shape:
weblogicShape: { "Fn::GetParam": databaseShape }
Tag Parameters
This topic does not apply to Oracle Cloud at Customer.
The parameter types enables users to select one or more existing tags in this cloudaccount, or to create new tags.
parameters: dbTags: label: Database Tags type: Tag
Each tag can be a simple key, or a key:value pair. Use the GetParam function toretrieve the tags as a sequence of key:value objects. If a tag does not have a specificvalue, it will be an empty string.
tags: { "Fn::GetParam": dbTags }
Storage Parameters
This parameter type enables users to specify a storage container in Oracle CloudInfrastructure Object Storage Classic. See About Oracle Storage Cloud Service inUsing Oracle Storage Cloud Service.
parameters: backupStorage: label: Cloud Storage type: Storage
Each parameter of this type results in three separate input fields in the Oracle CloudStack console:
• The URL of the storage container
• The name of an Oracle Cloud user that has access to this container
• The password for this Oracle Cloud user
Use the GetParam function to retrieve these three input values. The storageparameter’s value is a JSON object. Use a dot notation in order to access the valueswithin this object:
• dbBackupContainer: { "Fn::GetParam":backupStorage.cloudStorageContainer }
• dbBackupUser: { "Fn::GetParam": backupStorage.cloudStorageUser }
• dbBackupPassword: { "Fn::GetParam":backupStorage.cloudStoragePassword }
Chapter 2Editing Template Files
2-26

By default, the labels and descriptions for these three input fields are generated fromthe template parameter’s label attribute. In the previous example, the label for the firsttext field would be “Cloud Storage – Backup Storage Container”. Alternatively, you canspecify your own label and description for each input field:
parameters: backupStorage: label: {"cloudStorageContainer": "Backup Storage Container", "cloudStorageUser": "Storage User", "cloudStoragePassword": "Storage Password"} description: {"cloudStorageContainer": "Oracle Storage Cloud Service container URL", "cloudStorageUser": "User with access to Oracle Storage Cloud Service", "cloudStoragePassword": "Password for the storage user"} type: Storage
When you use the CLI to create a stack from a template that has storage typeparameters, enter the parameter value as a JSON object with these three attributes.For example:
-p backupStorage:{"cloudStorageContainer":"value","cloudStorageUser":"value","cloudStoragePassword":"value"}
Region Parameters
The Oracle Cloud Stack console automatically displays a list of available Oracle Cloudregions, such as geographical locations, which will vary depending on the user’saccount settings. The default value is "No Preference", in which case Oracle Cloud willautomatically select a region. Some Oracle Cloud features like IP networks and IPreservations may not be supported if a resource is not assigned to a specific region.
The Region parameter type displays a single input field in the console:
parameters: cloudRegion: label: Cloud Region type: Region
Use the GetParam function to retrieve the user-selected region:
dbRegion: { "Fn::GetParam": cloudRegion }
Service Parameters
The Service_Type parameter type enables users to select from a list of existing OracleCloud service instances. Type is the name of a resource type in Oracle Cloud Stack(see List of Resource Types). For example, if you define a parameter of typeService_dbaas, the user can select from a list of existing Oracle Database CloudService deployments in this cloud account:
parameters: dbaasService:
Chapter 2Editing Template Files
2-27

label: Database type: Service_dbaas
Use the GetParam function to retrieve the name of the selected service instance:
dbService: { "Fn::GetParam" : dbaasService }
Using ResourcesEdit your Oracle Cloud Stack template and configure resource parameters anddependencies.
For an introduction, see What are Resources.
Topics
• Basic Syntax
• Get Template Parameters
• Get Resource Attributes
• Dependencies
Basic Syntax
Define resources within the resources node of your template file. For each node,specify itstype. For example:
resources: HRJavaApp: type: jaas
See List of Resource Types.
Add a parameters node within your resource node. Refer to the REST APIdocumentation for this type of cloud resource to identify the available parameters. See List of Resource Types. For example, this endpoint is used to create a serviceinstance in Oracle Java Cloud Service.
resources: HRJavaApp: type: jaas parameters: adminUserName: myuser clusterSize: 3
If the request payload for this resource’s REST endpoint supports a hierarchy ofparameters, model this same hierarchy in your template file. For example:
parameters: adminUserName: myuser virtualMachine:
Chapter 2Editing Template Files
2-28

shape: oc3 volumeSize: 10G
Similarly, if the request payload supports arrays, model these arrays in your templatefile as sequences. For example:
parameters: adminUserName: myuser virtualMachines: - shape: oc3 volumeSize: 10G - shape: oc3 volumeSize: 20G
Get Template Parameters
Use the GetParam function to assign the value of a template parameter to a resource’sparameter. For example:
adminUserName: { "Fn::GetParam": userName }
For more information, see Using Template Parameters.
Get Resource Attributes
Use the GetAtt function to assign the value of another resource’s runtime attribute tothis resource’s parameter. Enter the resource name and the attribute name as asequence. For example:
adminUserName: { "Fn::GetAtt": [HRDatabase, userName] }
Refer to the REST API documentation for this type of cloud resource in order toidentity its attributes. See List of Resource Types. For example, this endpoint is usedto view a service instance in Oracle Java Cloud Service.
For more information, see Using Attributes.
Dependencies
Optionally add a depends_on attribute to your resource node. Place it after theparameters node. Use this attribute to identify one or more resources in this templateon which this resource depends. Enter the value as a sequence:
resources: HRJavaApp: type: jaas parameters: resource parameters here depends_on: - HRStorage - HRDatabase
Chapter 2Editing Template Files
2-29

Tip:
YAML sequences can also be expressed as arrays, such as[HRStorage,HRDatabase].
Using AttributesEdit your Oracle Cloud Stack template, and use the runtime attributes of resources toconfigure other resources within the same template.
For an introduction, see What are Attributes.
Topics
• The GetAtt Function
• Nested Attributes
• Stack Attributes
The GetAtt Function
While provisioning a stack, Oracle Cloud Stack uses REST endpoints to collect thespecified resource attributes. For example, the response payload for the endpoint View a Service Instance describes the available attributes for an Oracle DatabaseCloud Service resource.
Refer to the REST documentation for a specific resource type in order to identify its listof attributes. See List of Resource Types.
Use the GetAtt function in your template to retrieve an attribute from a resource:
Fn::GetAtt: [resourceName, attributeName]
For example:
parameters: dbURL: { "Fn::GetAtt": [mydb, connect_descriptor] } clusterSize: { "Fn::GetAtt": [mydb, num_nodes] }
Nested Attributes
The JSON response payload from a REST endpoint may include a hierarchy ofattributes. For example:
{ "keyComponentInstance": "mysql", "adminHostName": "mytestinstance-mysql-1", "components": { "mysql": { "attributes": { "CONNECT_STRING": { "displayName": "Connect Descriptor", "type": "STRING",
Chapter 2Editing Template Files
2-30

"value": "142.114.43.1:3306\/mytestinstance" } } } }}
The attribute name input for the GetAtt function supports a dot notation in order toaccess nested attributes within a JSON payload. For example, to access thehighlighted attribute in the previous JSON response:
parameters: dbURL: { "Fn::GetAtt": [mydb, components.mysql.attributes.CONNECT_STRING.value] }
Stack Attributes
When you monitor running stacks from the CLI or REST API, Oracle Cloud Stackreturns a set of standard runtime attributes for each stack, such as who created thestack. But a template can also define custom stack attributes.
Define attributes within the attributes node of your template file. Give each attributea name and an optional description. For example:
attributes: OraConnectString: description: Connection string for Oracle database
Assign a value to each attribute. Use the GetAtt function to retrieve the value of aresource’s attribute. For example:
attributes: OraConnectString: value: { "Fn::GetAtt": [mydb, components.mysql.attributes.CONNECT_STRING.value] } description: Connection string for Oracle database
Using ConditionsEdit your Oracle Cloud Stack template and customize how a stack is created underdifferent conditions.
For an introduction, see What are Conditions.
Topics
• Using Conditional Functions
• Defining Global Conditions
• Using Global Conditions with Functions
• Assigning a Global Condition to a Resource
• Using Conditions in Template Parameters
Chapter 2Editing Template Files
2-31

Using Conditional Functions
Oracle Cloud Stack supports these conditional functions: Equals, GreaterThan,LessThan, Contains, Empty, Match, Not, And, Or.
These functions are executed at runtime by Oracle Cloud Stack when a stack is beingcreated. Each function evaluates two input strings and returns either the string true orthe string false at the function’s location in the template. The inputs to a conditionalfunction can be literal strings or functions that return strings, such as GetParam.
For example, consider a resource definition within a template that contains threeparameters:
myresource: type: xyz parameters: dbEnabled: {"Fn::Equals":[{"Fn::GetParam":"dbVersion"},"12.2"]} cacheEnabled: {"Fn::GreaterThan":[{"Fn::GetParam":"cacheSize"},"0"]} backupEnabled: {"Fn::Not":[{"Fn::Equals":[{"Fn::GetParam":"container"},""]}]}
These conditional functions result in the following logic:
• The dbEnabled parameter is set to "true" only if the value of the dbVersiontemplate parameter is set to the value "12.2".
• The cacheEnabled parameter is set to "true" only if the value of the cacheSizetemplate parameter is greater than zero.
• The backupEnabled parameter is set to "true" only if the value of the containertemplate parameter is not an empty string.
For more information, see List of Functions.
Defining Global Conditions
You often need to use the same conditional expression (cacheSize is greater thanzero) at multiple locations in your template. Alternatively, you can define theseconditions in a single location within the template and then refer to them throughoutthe template.
Define global conditions within the conditions node of your template file. Give eachcondition a name and an expression whose value evaluates to true or false. Forexample:
conditions: includeMyApp: {"Fn::Equals":[{"Fn::GetParam":"dbVersion"},"12.2"]}
This example template defines a condition named includeMyApp whose value is trueonly if the value of the dbVersion template parameter is equal to "12.2".
Using Global Conditions with Functions
Use the If function to evaluate a global condition at some location in your template.Provide the name of the global condition along with two string values. If the specified
Chapter 2Editing Template Files
2-32

condition evaluates to true the If function returns the first value. Otherwise thefunction returns the second value.
In the following example, the shape parameter for a resource is assigned the value"oc3" if the includeMyApp condition is true, or the value "oc4" if the condition is false:
myresource: type: xyz parameters: shape: {"Fn::If":["includeMyApp","oc3","oc4"]}
The If function can also be used to remove the current object, attribute or sequenceitem after evaluating its condition. Use the variable OPC::NoValue for either the true orfalse arguments. In this example, the dbService parameter is dynamically removedfrom this resource’s definition if the useDB condition is false.
myresource: type: xyz parameters: clusterSize: 2 dbService: {"Fn::If":["useDB","MyOracleDB-1","OPC::NoValue"]}
Assigning a Global Condition to a Resource
Each resource in a template can optionally be assigned the name of a globalcondition. If this condition evaluates to true, the resource will be created as part of thestack. If it evaluates to false, the resource (and any resources on which it depends)will not be created.
Place the condition attribute within a resource’s definition, after the parameters. Forexample:
resources: myapp: type: xyz parameters: param1: value1 param2: value2 condition: includeMyApp
Using Conditions in Template Parameters
You can also use conditional functions and global conditions within the definition of atemplate parameter or a parameter group. These conditions control whether or not theparameter or group is displayed in the Oracle Cloud Stack console when creating astack. If the condition evaluates to false, the parameter or group is hidden in the userinterface. If it evaluates to true, the parameter or group is shown. These conditionsare dynamically reevaluated each time the user modifies the value of a templateparameter.
Chapter 2Editing Template Files
2-33

For example, you can use a boolean (check box) parameter to determine whether ornot another parameter is shown to the user:
parameters: useBackup: label: Use Backup type: Boolean mandatory: false default: false backupPath: label: Backup Path type: String condition: {"Fn::Equals":[{"Fn::GetParam":"useBackup"},"true"]}
Alternatively, use the same parameter and a global condition to control when an entireparameter group is shown to the user:
parameters: useBackup: label: Use Backup type: Boolean mandatory: false default: false ...parameterGroups: - label: Backup Configuration parameters: [ backupPath, backupTime ] condition: backupEnabledconditions: backupEnabled: {"Fn::Equals":[{"Fn::GetParam":"useBackup"},"true"]}
Using Custom Actions
This topic does not apply to Oracle Cloud at Customer.
Edit your Oracle Cloud Stack template file and use Software Components to executecustom operating system (OS) commands or scripts after a stack resource isprovisioned.
For example, you can use custom actions to:
• Install an OS package
• Modify the default OS configuration
• Create a database schema
• Deploy an application
• Download files from cloud storage
Custom actions are only supported for cloud resources that provide a Secure Shell(SSH) interface to their administration node (virtual machine). The specified OScommands are run on the administration node after the resource is created. If a
Chapter 2Editing Template Files
2-34
resource consists of multiple administration nodes, the commands are run only fromthe first node.
Note:
Custom actions are not supported on Oracle-managed or Autonomous cloudservices.
Tutorials are also available to help you create custom actions.
Topics
• Basic Syntax
• Assigning a Custom Action to a Resource
• Inputs and Environment Variables
• Downloading Files
• Activity Log
• Best Practices
Basic Syntax
Add a resource of type SoftwareComponent to the template. Within the parametersnode of this resource, add a sequence named configs.
resources: ... resource_name: type: SoftwareComponent parameters: configs: - configuration - configuration
Each object in the configs sequence describes a custom action. Specify one or moreBash OS commands to run on the target cloud resources.
parameters: configs: - actions: [CREATE] name: configuration_name config: Fn::Base64: bash_commands runAsUser: OS_user timeout: minutes continueOnFailure: true_or_false
The available attributes for a custom action are:
Chapter 2Editing Template Files
2-35
• actions – The only supported value is [CREATE]. All custom actions run after thetarget cloud resource is created.
• name – An optional name for this custom action.
• config – One or more Bash commands as a Base64 encoded string. Separatemultiple commands with new line (\n) characters.
• runAsUser – The OS user name against which to run the commands. The defaultuser is opc.
• timeout – The number of minutes within which the custom action is expected tocomplete. If the action does not complete within this time, stack creation fails. Thedefault value is 5 minutes.
• continueOnFailure – If false, the creation of the stack fails if this custom actionfails. If true, a warning is added to the activity log, but the creation of the stackcontinues.
You can also use the Join function as a convenient method of defining an action withmultiple commands:
name: configuration_nameconfig: Fn::Base64: Fn::Join: - "\n" - - bash_command - bash_command
Below is an example Software Component resource that defines a custom action:
resources: updateDatabaseOS: type: SoftwareComponent parameters: configs: - actions: [CREATE] name: updateHosts config: Fn::Base64: Fn::Join: - "\n" - - touch ~/stack.out - echo 'Updating hosts' >> ~/stack.out - echo 'myhost 192.168.1.10' >> /etc/hosts continueOnFailure: true
Chapter 2Editing Template Files
2-36

Tip:
When using the Join function, be sure that all members of the samesequence have the same indentation. The following example is invalid:
Fn::Join: - "\n" - - This is - not valid
Assigning a Custom Action to a Resource
After defining Software Components in your template, you refer to them within thedefinitions of other cloud resources in the same template. Add a configs sequencewithin the resource, and place it after the parameters node. The configs sequencelists the names of the Software Component resources that Oracle Cloud Stack willexecute after this resource is successfully created.
Use the GetResource function to retrieve each Software Component, and also giveeach a logical configuration name.
resources: ... resource_name: type: resource_type parameters: ... configs: - name: configuration_name config: { "Fn::GetResource": software_component_name } - name: configuration_name config: { "Fn::GetResource": software_component_name }
For example:
HRDatabase: type: dbaas parameters: ... configs: - name: HRDatabaseUpdateOS config: { "Fn::GetResource": updateDatabaseOS }
Inputs and Environment Variables
The use of template functions, such as GetParam, is not supported within the OScommands of a custom action. However, you can parameterize the actions in atemplate by using environment variables in your OS commands. Add a sequence
Chapter 2Editing Template Files
2-37

named inputs within the parameters node of your Software Component resource, andthen declare the environment variables that are used in this custom action.
resources: ... resource_name: type: SoftwareComponent parameters: configs: ... inputs: - name: env_variable - name: env_variable
Refer to these environment variables in the OS commands of the SoftwareComponent. For example:
resources: updateDatabaseOS: type: SoftwareComponent parameters: configs: - actions: [CREATE] name: updateHosts config: Fn::Base64: Fn::Join: - "\n" - - echo 'Updating database OS...' - echo "myhost ${storage_address}" >> /etc/hosts inputs: - name: storage_address
When you assign the Software Component to another cloud resource using theconfigs sequence, you must specify the values for any input parameters by adding anobject named params to the sequence.
resources: ... HRDatabase: type: dbaas parameters: ... configs: - name: configuration_name config: { "Fn::GetResource": software_component_name } params: input_name: value input_name: value - name: configuration_name config: { "Fn::GetResource": software_component_name } params:
Chapter 2Editing Template Files
2-38

input_name: value input_name: value
You can use template functions when specifying an input’s value, such as GetParamand GetAtt. For example:
configs: - name: HRDatabaseUpdateOS config: { "Fn::GetResource": updateDatabaseOS } params: log_file: stack.out storage_address: { "Fn::GetParam": storageIPAddress }
Downloading Files
In your custom actions, you can use wget, curl, or similar OS commands to downloadscripts and other files to the administration node in the target cloud resource. Forexample, you could download and extract an archive file found in an Oracle CloudInfrastructure Object Storage container, and then execute one or more scripts found inthe archive.
Activity Log
You can verify the execution of your custom actions by viewing the activity log for acloud stack. The log messages specify the name of the target resource, the name ofthe action that was executed, and the node on which it was executed.
[stack_name] : Attempting to execute SoftwareComponent script - [identity_domain/resource_name] : [action_name] on host [node_ip_address]...[stack_name] : Execution completed successfully. SoftwareComponent - [identity_domain/resource_name] : [action_name] on host [node_ip_address]
For example:
[MyStack] : Execution completed successfully. SoftwareComponent - [MyIdentityDomain/HRDatabase] : [updateHosts] on host [192.168.10.10]
See Viewing the Details of a Cloud Stack.
Best Practices
• Program a custom action so that it can run multiple times without failing orbehaving unexpectedly (idempotent). A custom action might be run more thanonce in the following scenarios:
– Oracle Cloud Stack retries the execution of a custom action after acommunication failure with the target resource.
– If you create a cloud stack with the RETAIN option, and then resume the stackafter a resource provisioning failure, Oracle Cloud Stack also (re)executes anycustom actions that are associated with the failed resource.
• In a custom action, return 0 to indicate success and return 1 to indicate a failure.
Chapter 2Editing Template Files
2-39
• By default, all existing resources are terminated if there is a failure during thecreation of a stack, which includes the deletion of any log files generated by acustom action. To facilitate troubleshooting, record log messages to an externallocation like cloud storage.
Using ValidationsEdit your Oracle Cloud Stack template file and configure advanced validation criteria.
When a stack is created from a template, any validations defined in the template areexecuted prior to the provisioning of the resources in the template. If the validationssucceed, Oracle Cloud Stack attempts to create the resources. Any failed validationsare reported to the user and the stack is not created.
Topics
• Basic Syntax
• Database Connectivity
• Storage Connectivity
• Generic Constraint
Basic Syntax
Define template validations within the validations node of your template file. Foreach validation, specify a validationType and add a parameters node.
validations: myFirstValidation: validationType: DB_CONNECT parameters: ... mySecondValidation: validationType: STORAGE_CONNECT parameters: ...
The available parameters depend on the type of validation. You can assign staticvalues to these validation parameters, or assign the value of a template parameter byusing the GetParam function.
You can optionally assign the name of an existing condition. The validation will notexecute unless the specified condition evaluates to true:
validations: myValidation: condition: connectToDB validationType: DB_CONNECT parameters: ...
Chapter 2Editing Template Files
2-40
Database Connectivity
Check the connectivity to an existing Oracle Database Cloud Service deployment priorto creating a stack. Provide the connection details for the database deployment in thevalidation definition. For example:
dbConnectivityValidation: validationType: DB_CONNECT parameters: serviceName: MyDBInstance userName: SYS password: password requiredSize: 10GB constraintDescription: Failed to connect to the MyDBInstance database
Parameter Description
serviceName (Optional) Enter the name of an existing Oracle Database CloudService deployment.
You must specify either serviceName orconnectString.
connectString (Optional) Enter a Java Database Connectivity (JDBC) URL for anexisting Oracle Database Cloud Service deployment.For example:jdbc:oracle:thin:@203.0.113.100:1521:orcl.
You must specify either serviceName orconnectString.
userName The database user with which to make a connection
password The database user’s password
requiredSize (Optional) The validation fails if the database’s available capacity isless than this size.
pdbName (Optional) The validation fails if the specified pluggable database(PDB) does not exist in the database.
schemaName (Optional) The validation fails if the specified schema alreadyexists in the database.
constraintDescription (Optional) The error message to display to the user if this validationfails
Storage Connectivity
This topic does not apply to Oracle Cloud at Customer.
Check the connectivity to Oracle Cloud Infrastructure Container Service Classic priorto creating a stack. Provide the storage connection details in the validation definition.
You can connect to cloud storage with a username and password, as shown in theexample below:
storageConnectivityValidation: validationType: STORAGE_CONNECT
Chapter 2Editing Template Files
2-41

parameters: cloudStorageContainer: https://foo.storage.oraclecloud.com/v1/MyService-bar/MyContainer cloudStorageUser: [email protected] cloudStoragePassword: your_password checkIfContainerExists: false constraintDescription: Failed to connect to cloud storage as john
If you do not provide storage credentials, Oracle Cloud Stack will attempt to connect tocloud storage by using the OAuth protocol. You can optionally specify the name of anOracle Cloud service that has been previously configured for OAuth authentication tocloud storage. For example:
storageConnectivityValidation: validationType: STORAGE_CONNECT parameters: cloudStorageContainer: https://foo.storage.oraclecloud.com/v1/MyService-bar/MyContainer serviceType: jaas checkIfContainerExists: false constraintDescription: Failed to connect to cloud storage using jaas OAuth configuration
Alternatively, you can specify an Oracle Cloud entitlement ID that has been previouslyconfigured for authentication to cloud storage by using the OAuth protocol. Forexample:
storageConnectivityValidation: validationType: STORAGE_CONNECT parameters: cloudStorageContainer: https://foo.storage.oraclecloud.com/v1/MyService-bar/MyContainer serviceEntitlementId: 123456 checkIfContainerExists: false constraintDescription: Failed to connect to cloud storage using entitlement 123456
Parameter Description
cloudStorageContainer The URL for a cloud storage container
If checkIfContainerExists is true, then thiscontainer must already exist for this validation tosucceed.
cloudStorageUser (Optional) The Oracle Cloud user with which to make a connection
If you do not provide a value for this parameter, OracleCloud Stack attempts to connect to cloud storage byusing the OAuth protocol.
cloudStoragePassword (Optional) The password for the specified cloud user
If you do not provide a value for this parameter, OracleCloud Stack will attempt to connect to cloud storage byusing the OAuth protocol.
Chapter 2Editing Template Files
2-42

Parameter Description
checkIfContainerExists (Optional) If set to true, then the validation will succeed only if thespecified storage container exists.
If set to false, then the validation simply checks forconnectivity to the storage cloud service.
serviceType (Optional) The name of an Oracle Cloud service that has beenpreviously configured for authentication to cloud storageby using the OAuth protocol. Oracle Cloud Stack usesthis service’s OAuth configuration to validateconnectivity to cloud storage. See List of ResourceTypes.
If not specified, Oracle Cloud Stack automaticallyselects a service that is configured for OAuth.
serviceEntitlementId (Optional) An Oracle Cloud entitlement ID that has been previouslyconfigured for authentication to cloud storage by usingthe OAuth protocol. Oracle Cloud Stack uses thisaccount’s OAuth configuration to validate connectivity tocloud storage.
If not specified, Oracle Cloud Stack automaticallyselects an account that is configured for OAuth.
If both serviceType and serviceEntitlementId arespecified, serviceEntitlementId takes precedence.
constraintDescription (Optional) The error message to display to the user if this validationfails
Generic Constraint
This topic does not apply to Oracle Cloud at Customer.
Evaluate a conditional expression that uses standard template functions. Validationfails if the expression evaluates to false. For example:
passwordValidation: validationType: CONSTRAINT parameters: constraint: {"Fn::Equals": [{"Fn::GetParam": "password"}, "oracle"]} constraintDescription: The password oracle is not permitted. Enter a different password.
To learn more about conditional expressions, see Using Conditions and List ofFunctions.
Parameter Description
constraint A YAML expression that evaluates to either true orfalse. Validation fails if the expression evaluates tofalse.
constraintDescription (Optional) The error message to display to the user if this validationfails
Chapter 2Editing Template Files
2-43

Using Maps
This topic does not apply to Oracle Cloud at Customer.
Edit your Oracle Cloud Stack template file to define and use data structures.
Maps allow you to define static values within a template and refer to these valueswithin other template components such as resources. You organize the data within amap as follows:
• A map contains one or more submaps.
• A submap contains one or more key-value pairs.
Topics
• Defining Maps
• Using Map Values
Defining Maps
Define maps within the mappings node of your template file. Within this node, add oneor more map nodes.
mappings: map1: ... map2: ...
Within each map node, add one or more submap nodes. Each submap contains aJSON object with one or more key-value pairs.
mappings: map1: submap1: {"key1":"value1","key2":"value2", ...} submap2: ... ...
For example:
mappings: shapeMap: database: {"dev":"oc3","prod":"oc4"}
Using Map Values
Retrieve a value within a map by using the FindInMap function, which takes threearguments:
• The name of the map
• The name of the submap
Chapter 2Editing Template Files
2-44

• The key whose value you want to use
For example, suppose you want to retrieve the value for the prod key in the followingmap:
mappings: shapeMap: database: {"dev":"oc3","prod":"oc4"}
Running FindInMap with the following arguments results in the value oc4:
"Fn::FindInMap": ["shapeMap", "database", "prod"]
Any of these three arguments can be determined dynamically through the use of otherfunctions. For example, if the key name (dev or prod) is supplied by the user as atemplate parameter, use the GetParam function:
"Fn::FindInMap": ["shapeMap", "database", {"Fn::GetParam": stage}]
Template Best PracticesFollow these best practices to ensure that your Oracle Cloud Stack templates areflexible and maintainable, and work as expected.
Best Practice More Information
Describe your template Use templateDescription to explain your template’s purpose and todescribe the cloud resources that it creates. Also explain any limitations and/orconditional behavior in your template.
Create input parameters If your template uses static values for a resource’s configuration, users whowant to change this configuration must copy and edit your template. Instead,use parameters to make your template more flexible and reusable.
Provide a sensible default value for each template parameter. This minimizesthe amount of time that a typical user spends creating stacks from yourtemplate.
Describe your parameters Use the description attribute to explain the purpose of each templateparameter. Describe the default behavior if the parameter is optional, and anydependencies between this parameter and other parameters. Users can viewthis help text when they use the web console to create a stack from yourtemplate.
Configure parameter constraints Stacks can require significant time to provision. Avoid costly user errors byconfiguring appropriate constraints on your template parameters, such as aminimum value, a maximum number of characters, or a regular expression. See Creating Template Parameters.
Use parameters for passwordsand keys
Oracle does not recommend the use of default values for passwords, SSHkeys, and other secret information. Instead, use template parameters so thatusers can provide their own inputs for these values. Do not specify a defaultvalue for these parameters.
Configure template validations Stacks can require significant time to provision. Avoid costly user errors byconfiguring validations in your template. For example, a validation can checkthe connectivity to an existing database prior to creating a stack. See UsingValidations.
Chapter 2Template Best Practices
2-45

Best Practice More Information
Validate your template syntax Before publishing and testing your template, check its contents for commonsyntax errors. See Validating a Template.
Follow best practices whendeveloping custom actions for aresource
See Best Practices.
List of Resource TypesOracle Cloud Stack templates can provision the following types of resources in OracleCloud.
User-defined stack templates can create any combination of these resources. Popularcombinations are also available as standard templates. See About Oracle StackTemplates.
If you’re editing a stack template offline, refer to the specific resource’s REST APIdocumentation for a complete list of available parameters and attributes.
Resource Type Description REST Documentation
apaas An application in Oracle ApplicationContainer Cloud Service
Create an Application
View Application Details
APICatalog A service instance in Oracle APICatalog Cloud Service
APICS A service instance in API PlatformCloud Service
Create a Service Instance
View a Service Instance
AUTOANALYTICS A service instance inOracle AnalyticsCloud
BDCSCE A service instance in Oracle Big DataCloud
Create a Service Instance
View a Service Instance
BigDataAppliance
A service instance in Oracle Big DataCloud Service
BOTS A Bot component in Oracle MobileCloud, Enterprise
caching An application cache in OracleCache Cloud Service
Create a Cache
View Cache Details
CEC A suite in Oracle Content andExperience
CECS A service instance in Oracle Contentand Experience
CONTAINER A service instance in Oracle CloudInfrastructure Container ServiceClassic
dbaas A service instance in OracleDatabase Cloud Service
Create a Service Instance
View a Service Instance
DevServiceApp A project in Oracle Developer CloudService
Chapter 2List of Resource Types
2-46
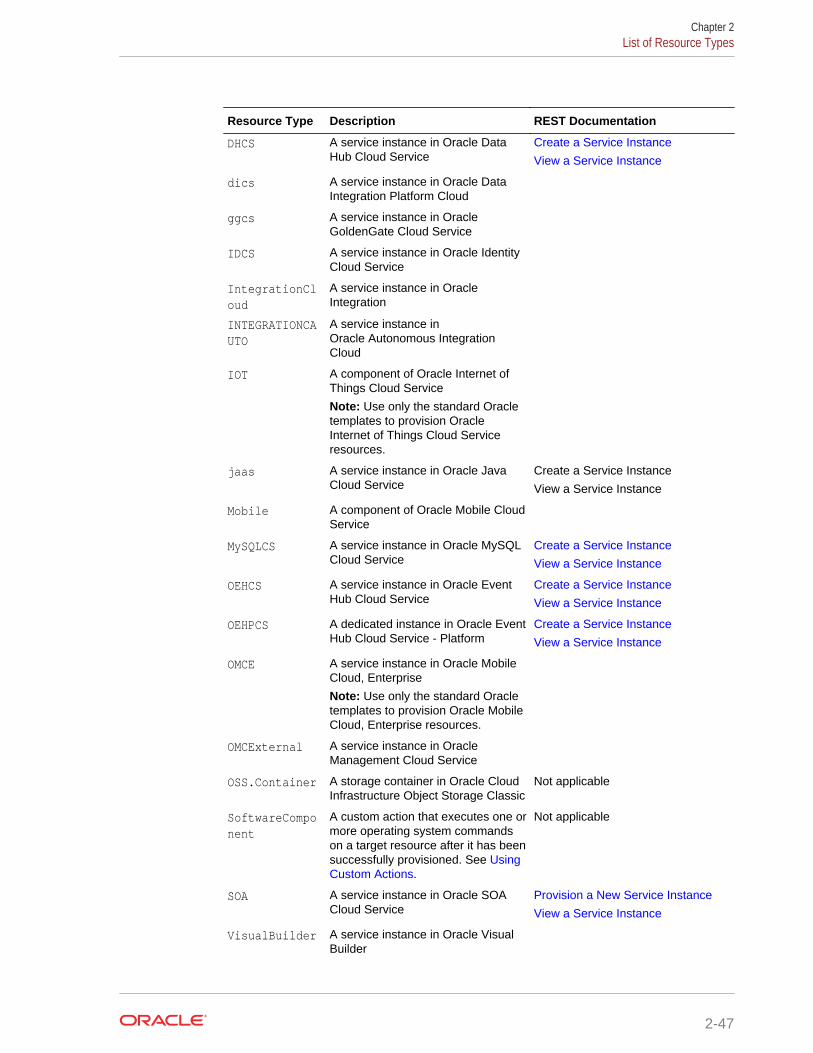
Resource Type Description REST Documentation
DHCS A service instance in Oracle DataHub Cloud Service
Create a Service Instance
View a Service Instance
dics A service instance in Oracle DataIntegration Platform Cloud
ggcs A service instance in OracleGoldenGate Cloud Service
IDCS A service instance in Oracle IdentityCloud Service
IntegrationCloud
A service instance in OracleIntegration
INTEGRATIONCAUTO
A service instance inOracle Autonomous IntegrationCloud
IOT A component of Oracle Internet ofThings Cloud Service
Note: Use only the standard Oracletemplates to provision OracleInternet of Things Cloud Serviceresources.
jaas A service instance in Oracle JavaCloud Service
Create a Service Instance
View a Service Instance
Mobile A component of Oracle Mobile CloudService
MySQLCS A service instance in Oracle MySQLCloud Service
Create a Service Instance
View a Service Instance
OEHCS A service instance in Oracle EventHub Cloud Service
Create a Service Instance
View a Service Instance
OEHPCS A dedicated instance in Oracle EventHub Cloud Service - Platform
Create a Service Instance
View a Service Instance
OMCE A service instance in Oracle MobileCloud, Enterprise
Note: Use only the standard Oracletemplates to provision Oracle MobileCloud, Enterprise resources.
OMCExternal A service instance in OracleManagement Cloud Service
OSS.Container A storage container in Oracle CloudInfrastructure Object Storage Classic
Not applicable
SoftwareComponent
A custom action that executes one ormore operating system commandson a target resource after it has beensuccessfully provisioned. See UsingCustom Actions.
Not applicable
SOA A service instance in Oracle SOACloud Service
Provision a New Service Instance
View a Service Instance
VisualBuilder A service instance in Oracle VisualBuilder
Chapter 2List of Resource Types
2-47
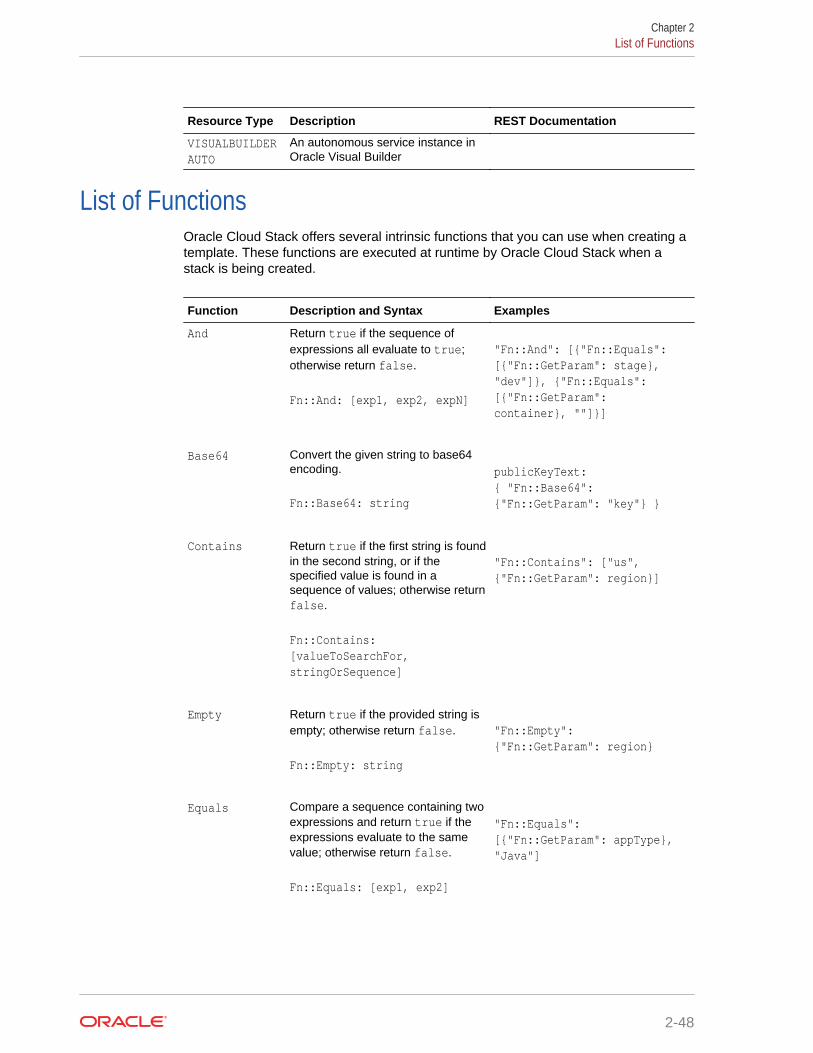
Resource Type Description REST Documentation
VISUALBUILDERAUTO
An autonomous service instance inOracle Visual Builder
List of FunctionsOracle Cloud Stack offers several intrinsic functions that you can use when creating atemplate. These functions are executed at runtime by Oracle Cloud Stack when astack is being created.
Function Description and Syntax Examples
And Return true if the sequence ofexpressions all evaluate to true;otherwise return false.
Fn::And: [exp1, exp2, expN]
"Fn::And": [{"Fn::Equals": [{"Fn::GetParam": stage}, "dev"]}, {"Fn::Equals": [{"Fn::GetParam": container}, ""]}]
Base64 Convert the given string to base64encoding.
Fn::Base64: string
publicKeyText: { "Fn::Base64": {"Fn::GetParam": "key"} }
Contains Return true if the first string is foundin the second string, or if thespecified value is found in asequence of values; otherwise returnfalse.
Fn::Contains: [valueToSearchFor, stringOrSequence]
"Fn::Contains": ["us", {"Fn::GetParam": region}]
Empty Return true if the provided string isempty; otherwise return false.
Fn::Empty: string
"Fn::Empty": {"Fn::GetParam": region}
Equals Compare a sequence containing twoexpressions and return true if theexpressions evaluate to the samevalue; otherwise return false.
Fn::Equals: [exp1, exp2]
"Fn::Equals": [{"Fn::GetParam": appType}, "Java"]
Chapter 2List of Functions
2-48

Function Description and Syntax Examples
FindInMap Retrieve the value for the specifiedkey from a map that’s defined in thistemplate.
Fn::FindInMap: [mapName, submapName, keyName]
usableStorage: "Fn::FindInMap": ["dbMap", "size", {"Fn::GetParam": projectType}]
GetAtt Retrieve the value of the runtimeattribute from a specific resource.The attribute name supports a dotnotation to access nested attributeswithin a JSON payload.
Fn::GetAtt: [resourceName, attributeName]
dbServiceName: { "Fn::GetAtt": [HRDatabase, serviceName] }
shape: { "Fn::GetAtt": [HRWeb, options.clusters.shape] }
GetParam Retrieve the value of a templateparameter.
Fn::GetParam: parameterName
network: { "Fn::GetParam": networkName }
description: { "Fn::GetParam": serviceName }
container: { "Fn::GetParam": backupStorage.cloudStorageContainer }
GetRandom Generate a string of randomcharacters.
Fn::GetRandom: [size, characterSet]
Use characterSet to limit thecharacters that are allowed in thegenerated string:
• ALPHANUMERIC - The charactersA-Z,a-z,0-9
• ALPHABET - The characters A-Z,a-z
• NUMERIC - The characters 0–9• A custom sequence of
characters. For example:[$,!,#,&]
password: { "Fn::GetRandom": [10, "ALPHANUMERIC"] }
dbServiceName: { "Fn::Join": ["", ["DB",{"Fn::GetRandom" : [8, "ALPHABET"] }]] }
Chapter 2List of Functions
2-49

Function Description and Syntax Examples
GetResource Retrieve a resource’s definition.
Fn::GetResource: resourceName
configs: - name: DB1-dbScripts config: { "Fn::GetResource": dbScripts }
GetTimestamp Return the current time in thespecified format.
Fn::GetTimestamp: format
See SimpleDateFormat for theavailable date and time options in theformat string.
serviceName: { "Fn::GetTimestamp": "'DB'yyMMdd" }
For example: DB180521
description: { "Fn::GetTimestamp": "'Created on' EEE, MMM dd" }
For example: Created on Wed,May 21
GreaterThan Compare a sequence containing twoexpressions and return true if thefirst expression evaluates to a valuethat is greater than the value of thesecond expression; otherwise returnfalse.
Fn::GreaterThan: [exp1, exp2]
"Fn::GreaterThan": [{"Fn::GetParam": clusterSize}, 1]
If Evaluate a global condition definedin this template. If the specifiedcondition evaluates to true, returnthe second item in the sequence;otherwise return the third item in thesequence.
Fn::If: [conditionName, trueValue, falseValue]
shape: { "Fn::If": ["prodEnv","oc4","oc3"] }
Chapter 2List of Functions
2-50

Function Description and Syntax Examples
Join Combine a sequence of values into asingle string, and using the specifieddelimiter character between thevalues.
The function takes a sequence(delimiter, values) as its argument,and the values themselves are asequence. To simply join the valueswithout a delimiter specify an emptystring for the first argument.
Fn::Join: [delimiterChar, [value1, value2, valueN]]
serviceName: { "Fn::Join": ["_", [HRApp, "Fn::GetParam": userName]] }
If the userName parameter’s value isbill5, the serviceName parameterwould be HRApp_bill5.
LessThan Compare a sequence containing twoexpressions and return true if thefirst expression evaluates to a valuethat is less than the value of thesecond expression; otherwise returnfalse.
Fn::LessThan: [exp1, exp2]
"Fn::LessThan": [{"Fn::GetParam": clusterSize}, 2]
Match Return true if a string matches aregular expression; otherwise returnfalse.
Fn::Match: [regularExpression, string]
This expression returns true if theregion parameter begins with thetext us:
"Fn::Match": ["^us", {"Fn::GetParam": region}]
This expression returns true if theschemaName parameter containsonly letters and the numbers 0-3:
"Fn::Match": ["^(?=.*?[A-Z])(?=.*?[a-z])(?=.*[0-3])[a-zA-Z]([a-zA-Z0-3_#])+$", {"Fn::GetParam": schemaName}]
Not Negate the boolean value of anexpression. If the expressionevaluates to true, return false.
Fn::Not: booleanExpression
"Fn::Not": {"Fn::Equals": [{"Fn::GetParam":"userName"}, ""]}}
Chapter 2List of Functions
2-51

Function Description and Syntax Examples
Or Return true if at least oneexpression in the sequenceevaluates to true; otherwise returnfalse.
Fn::Or: [exp1, exp2, expN]
"Fn::Or": [{"Fn::Equals": [{"Fn::GetParam": shape}, "oc3"]}, {"Fn::Equals": [{"Fn::GetParam": shape}, "oc4"]}]
Replace Dynamically find and replace one ormore values in a string (body).
The replacements (substitutions)object can contain one or morename/value attributes and theirvalues can be static or dynamic.
Fn::Replace: {"body" : string, "substitutions" : {find:replace, find:replace, ...}
appURL: { "Fn::Replace": {"body" : "host:port/myapp", "substitutions" : {"host" : "Fn:GetParam": publicIP, "port" : "7002"}} }
If the publicIP parameter’s value is192.0.2.10, the appURL parameterwould be 192.0.2.10:7002/myapp.
Select Select an object from a list ofindexed objects, by passing in theindex of the desired object.
Fn::Select: [indexToFetch, objectList]
serverHost: { "Fn::Select": [0, "Fn::Split": [":", "host123:9001"]] }
The serverHost parameter isassigned the value host123.
Size Return the number of characters inthe specified string, or the number ofelements in the specified sequence.
Fn::Size: stringOrSequence
"Fn::Size": {"Fn::GetParam": dbName}
If the dbName parameter is the string“mydb”, the value returned is 4. If theparameter is a sequence["db1","db2"], the value returnedis 2.
Chapter 2List of Functions
2-52
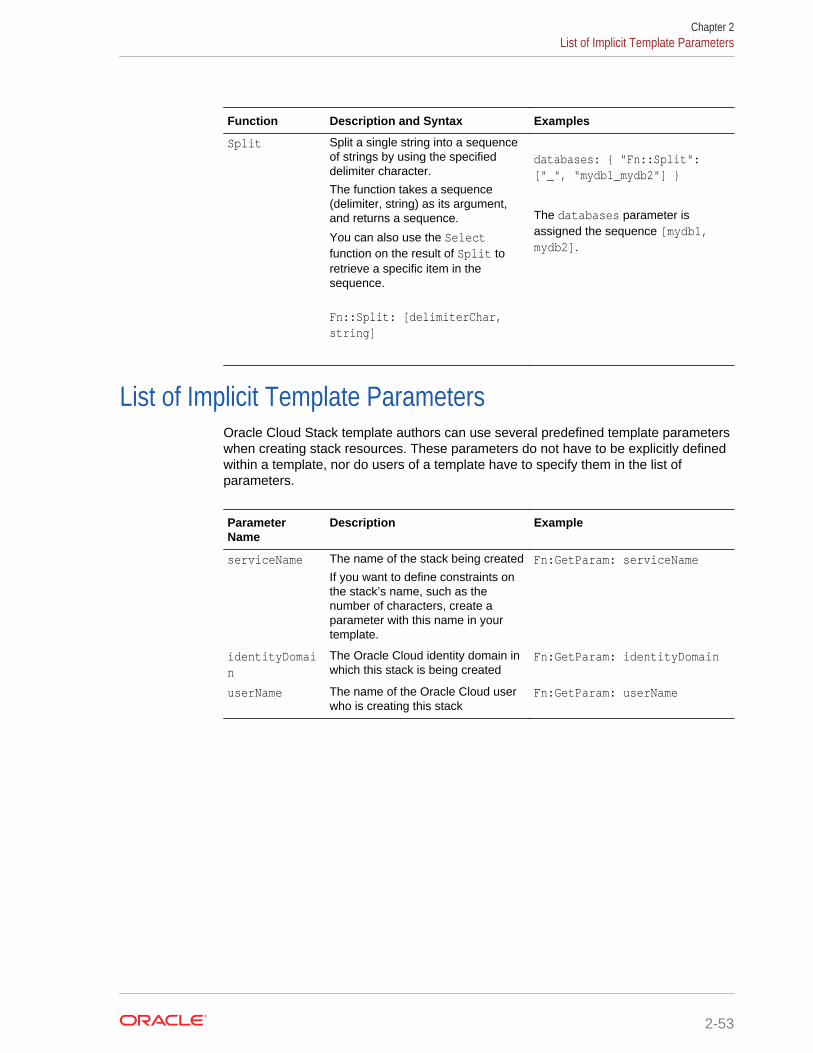
Function Description and Syntax Examples
Split Split a single string into a sequenceof strings by using the specifieddelimiter character.
The function takes a sequence(delimiter, string) as its argument,and returns a sequence.
You can also use the Selectfunction on the result of Split toretrieve a specific item in thesequence.
Fn::Split: [delimiterChar, string]
databases: { "Fn::Split": ["_", "mydb1_mydb2"] }
The databases parameter isassigned the sequence [mydb1,mydb2].
List of Implicit Template ParametersOracle Cloud Stack template authors can use several predefined template parameterswhen creating stack resources. These parameters do not have to be explicitly definedwithin a template, nor do users of a template have to specify them in the list ofparameters.
ParameterName
Description Example
serviceName The name of the stack being created
If you want to define constraints onthe stack’s name, such as thenumber of characters, create aparameter with this name in yourtemplate.
Fn:GetParam: serviceName
identityDomain
The Oracle Cloud identity domain inwhich this stack is being created
Fn:GetParam: identityDomain
userName The name of the Oracle Cloud userwho is creating this stack
Fn:GetParam: userName
Chapter 2List of Implicit Template Parameters
2-53

3Managing Templates with Oracle CloudStack
Templates in Oracle Cloud Stack provide a blueprint for the creation of cloud stacks,and orchestrate the creation of cloud resources. You can create new templates, copyor import existing ones, and publish them.
Topics
• About the Template Life Cycle
• Configuring Template Storage
• Viewing a Template Resource Topology
• Copying a Template
• Editing a Template
• Validating a Template
• Publishing a Template
• Importing a Template
• Exporting a Template
• Deleting a Template
About the Template Life CycleA template in Oracle Cloud Stack is a YAML document that’s managed according to astandard life cycle.
A template is in one of two states:
• Published — Users in this cloud account can create stacks from this template.
• Unpublished — This template is still in-progress, and is not available for stackcreation.
These states and their supported operations are illustrated in the following diagram:
3-1
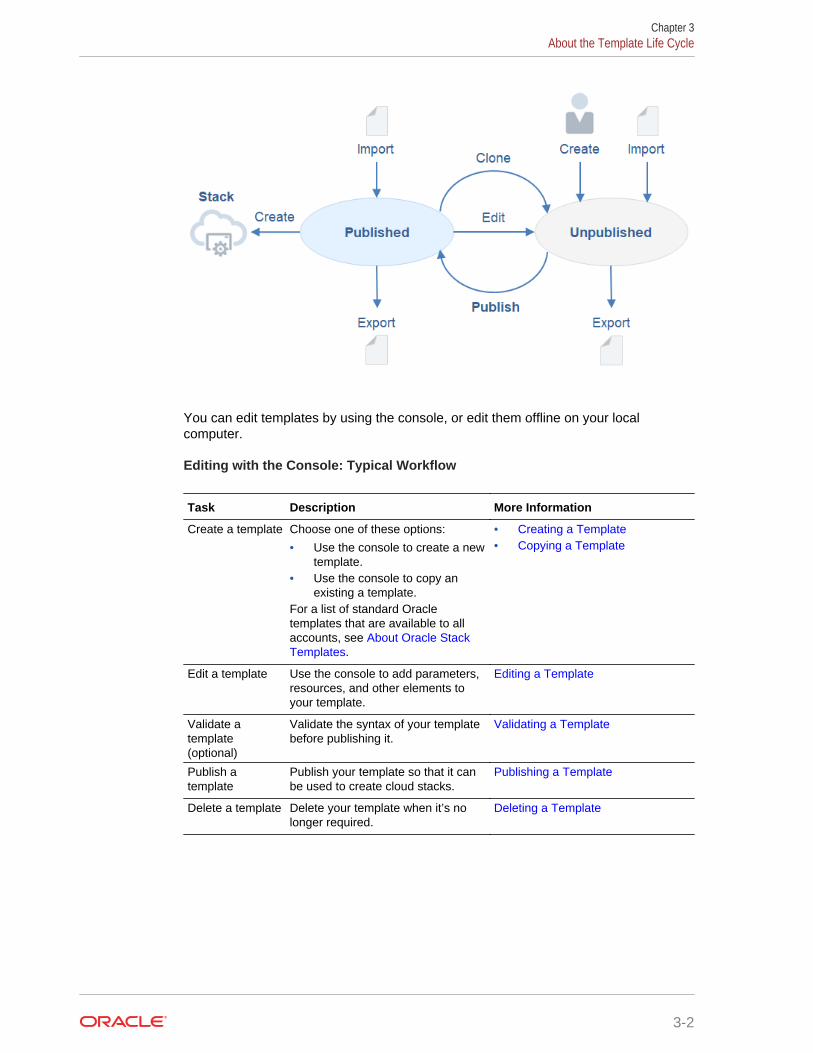
You can edit templates by using the console, or edit them offline on your localcomputer.
Editing with the Console: Typical Workflow
Task Description More Information
Create a template Choose one of these options:
• Use the console to create a newtemplate.
• Use the console to copy anexisting a template.
For a list of standard Oracletemplates that are available to allaccounts, see About Oracle StackTemplates.
• Creating a Template• Copying a Template
Edit a template Use the console to add parameters,resources, and other elements toyour template.
Editing a Template
Validate atemplate(optional)
Validate the syntax of your templatebefore publishing it.
Validating a Template
Publish atemplate
Publish your template so that it canbe used to create cloud stacks.
Publishing a Template
Delete a template Delete your template when it’s nolonger required.
Deleting a Template
Chapter 3About the Template Life Cycle
3-2

Editing Offline: Typical Workflow
Task Description More Information
Export a template Export an existing template to yourlocal computer.
For a list of standard Oracletemplates that are available to allaccounts, see About Oracle StackTemplates.
Exporting a Template
Edit a template Use your own text editor to addparameters, resources, and otherelements to your template.
Editing a Template
Validate atemplate(optional)
Validate the syntax of your templatebefore importing it.
Validating a Template
Import a template Import the updated template backinto Oracle Cloud Stack.
Importing a Template
Delete a template Delete your template when it’s nolonger required.
Deleting a Template
Configuring Template StorageSpecify the location in which Oracle Cloud Stack stores your template files.
The Template Builder in the Oracle Cloud Stack console saves your unpublishedtemplates to a storage container in Oracle Cloud Infrastructure Object Storage Classic.
Oracle Cloud Stack can create a storage container for you, or you can use an existingone. To create a storage container without using Oracle Cloud Stack, see CreatingContainers in Using Oracle Cloud Infrastructure Object Storage Classic.
1. Sign in to the Oracle Cloud Stack console and navigate to the Templates page.
2. Click Unpublished.
3. Click Configure cloud storage .
Note:
If this is the first time anyone in this cloud account has accessed thispage, you do not need to click Configure cloud storage. The CloudStorage Credentials dialog is displayed automatically.
4. For Cloud Storage Container, enter the URL for an Oracle Cloud InfrastructureObject Storage container.
Format: rest_endpoint_url/containerName
The default container name is stackTemplates.
See Finding the REST Endpoint URL for Your Service Instance in Using OracleCloud Infrastructure Object Storage Classic.
Chapter 3Configuring Template Storage
3-3

5. Optional: If you select the option Create a new container, Oracle Cloud Stack willcreate the specified container if it doesn’t already exist.
6. For Username and Password, enter the credentials of an Oracle Cloud user whohas write access to the specified storage container.
If you selected Create a new container, then this user must have the StorageAdministrator role.
7. Click Apply Changes.
If you change the storage location at a later time, Oracle Cloud Stack will notautomatically move your template files from the previous container. To move or copyfiles between containers, see Typical Workflow for Managing Objects in Using OracleCloud Infrastructure Object Storage Classic.
Viewing a Template Resource TopologyUse the Oracle Cloud Stack console to explore the topology of a published stacktemplate as an interactive diagram.
A template contains one or more cloud resources. Dependencies control the order inwhich Oracle Cloud Stack provisions these resources when a new cloud stack iscreated from a template. For more information, see What are Dependencies.
Oracle Cloud Stack helps you to visualize these resource dependencies by inspectinga template’s definition and creating a diagram that consists of icons and arrows.
1. Access the Oracle Cloud Stack console, and then click Templates.
2. Click the name or icon of a published template.
Tip:
To view an unpublished (draft) template, click Unpublished, and thenclick the name of the template.
To view the template that was used create an existing stack, from theStacks page, click the Template link for the stack.
The Topology page of the Stack Template Details dialog is displayed. This pagehas an interactive diagram that depicts the resources created by this template.The diagram also uses arrows to show the dependencies between resources andtherefore the order in which they will be created by Oracle Cloud Stack.
3. Position your mouse over an icon in the template diagram.
A dialog box displays the name of this cloud resource as defined in the template,as well as its resource type. Each type of resource is represented by a differenticon.
In addition, the diagram is updated so that only those arrows that are linked to thisresource (both incoming and outgoing) are displayed.
4. Position your mouse over an arrow that links two of the resources in this template.
A dialog box describes the relationship between these two resources.
Chapter 3Viewing a Template Resource Topology
3-4
The direction of the arrow indicates the direction of the dependency. For example,if an arrow begins at ResourceA and ends at ResourceB, ResourceA depends onResourceB.
5. Optional: Click the Template tab.
This page displays the definition of this template as a YAML document.
6. Optional: Click Export to save this template as a file to your local machine.
7. When you are finished viewing this template, click Done to return to theTemplates page.
Copying a TemplateCopy an existing template in Oracle Cloud Stack as an alternative to creating a newtemplate.
Before copying a template for the first time, configure the storage location forunpublished template files. See Configuring Template Storage.
Topics
• Cloning an Oracle Template
• Copying an Unpublished Template
• Copying a Custom Published Template
Cloning an Oracle TemplateCreate a copy of an Oracle-defined Oracle Cloud Stack template.
To learn more about these templates, see About Oracle Stack Templates.
1. Access the Oracle Cloud Stack console, and then click Templates.
2. To the right of the Oracle template that you want to copy, click Clone this
template .
The new template is added to the list of unpublished (draft) templates and it isdisplayed in the Template Builder. By default, the new template has the samename as the source template, but the text “Oracle” is removed.
3. In the text field at the top of the page, update the default name for this template.
4. Optional: Click , and then update the templateVersion andtemplateDescription.
5. Click Save the current template .
Copying an Unpublished TemplateCopy an unpublished Oracle Cloud Stack template.
1. Access the Oracle Cloud Stack console, and then click Templates.
2. Click Unpublished.
3. Click the template that you want to copy.
Chapter 3Copying a Template
3-5

4. Click Copy the current template .
The new template is displayed in the Template Builder and by default has thename SourceTemplateName-copy.
5. In the text field at the top of the page, update the default name for this template.
6. Optional: Click , and then update the templateVersion andtemplateDescription.
7. Click Save the current template .
Copying a Custom Published TemplateCopy a previously-published, user-defined template by editing it in the Oracle CloudStack console.
1. Access the Oracle Cloud Stack console, and then click Templates.
2. To the right of the template that you want to copy, click Edit this template .
The new template is added to the list of unpublished (draft) templates and it isdisplayed in the Template Builder. By default the new template has the samename and version as the source template.
3. To the left of the template’s name, click .
4. Choose from one of these options:
• If the new template will replace the source template, modify thetemplateVersion. Do not modify the template’s name.
• If the new template will be used in addition to the source template, modify thetemplate’s name, and optionally modify the templateVersion.
In order a publish a template, it must have a unique name or version.
5. Optional: Update the templateDescription.
6. Click Save the current template .
Editing a TemplateModify an existing stack template by either using the Oracle Cloud Stack console or byediting the template file offline.
Tutorials are also available to help you customize an existing template.
Topics
• Editing with the Console
• Editing Offline
Chapter 3Editing a Template
3-6

Editing with the ConsoleThe Oracle Cloud Stack console provides a web-based Template Builder and YAMLeditor.
To edit a published template with the console, you must first create a copy of it. See Copying a Template.
1. Access the Oracle Cloud Stack console, and then click Templates.
2. Click Unpublished.
3. Click the template that you want to edit.
The Template Builder is displayed.
4. Edit the template.
For more information, refer to the topics in Creating Templates with Oracle CloudStack.
To directly edit the template’s source, click Open YAML editor .
Tip:
If an existing resource is not visible on the canvas area, click Snap to
grid , and then click Sort resources .
5. Click Save the current template .
After making your modifications, you must publish the template before cloud users cancreate stacks from it. See Publishing a Template.
Editing OfflineExport an Oracle Cloud Stack template if you want to edit it on your local computer inyour choice of text editor.
Export the template file, modify its contents, and then import the updated file. See:
• Exporting a Template
• Editing Template Files
• Importing a Template
The values of the templateName and templateVersion attributes in the template fileare used to uniquely identify a template in Oracle Cloud Stack. The actual name of thetemplate source file is not used by Oracle Cloud Stack to identify a template.
If you are editing a published template, modify the templateVersion attribute. Youcannot publish a template that has the same name and version as an existingpublished template. For example:
--- template: templateName: MyTemplateName
Chapter 3Editing a Template
3-7

templateVersion: 2.0 templateDescription: My updated Oracle cloud stack template . . .
Validating a TemplateAs you develop an Oracle Cloud Stack template, you can use the validation feature tohelp identify template errors before you publish or import the template.
Oracle Cloud Stack validates your template’s syntax. It does not verify that:
• Your resource definitions adhere to the REST APIs of the underlying cloudservices.
• Your use of the GetAtt function adheres to the REST APIs of the underlying cloudservices.
Validating a Template with the ConsoleUse the web console to validate an unpublished template in Oracle Cloud Stack.
To validate a published template with the console, you must first create a copy of it.See Copying a Template.
1. Access the Oracle Cloud Stack console, and then click Templates.
2. Click Unpublished.
3. Click the template that you want to validate.
The Template Builder is displayed.
4. Click Validate current template .
Validating a Template with the CLIWhen you import a template into Oracle Cloud Stack the template’s syntax isautomatically validated. You can also optionally validate your template file and itstemplate parameters prior to importing it into the cloud by using the CLI.
Execute the stack validate-template command.
Provide the fully-qualified path of the template YAML file on your local file system. Youcan also test the template against specific input parameters, if desired. Templateparameters are separated by spaces:
psm stack validate-template -f filePath -p param1:value1 param2:value2 ... paramN:valueN
For example:
psm stack validate-template -f /home/oracle/cloud/dev_stack_template.yaml -p shape:OC3 clusterSize:2
Chapter 3Validating a Template
3-8

For more information about the CLI commands for Oracle Cloud Stack, see psm stackCommands.
Publishing a TemplatePublish an Oracle Cloud Stack template so that you and other cloud users can createstacks from the template.
Oracle recommends that you validate your template prior to publishing it. See Validating a Template.
You cannot publish a template that has the same name and version as an existingpublished template. If a published template already exists with the same name andversion, you must modify the name and/or version of your template prior to publishingit.
If you publish a template that has the same name as an existing published template,but has a newer version, your template will replace the existing published template.New stacks will be created from the latest version of the template. Any existing stacksthat were created from previous versions of this template are not affected.
Tip:
If you want to create a stack using an older version of a template, you mustedit and then publish the template again prior to creating the stack.Alternatively, you can publish these versions as separate templates withdifferent names.
1. Access the Oracle Cloud Stack console, and then click Templates.
2. Click Unpublished.
3. To the right of the template that you want to publish, click Publish this template
.
You can also publish a template while editing it within the Template Builder. Besure to save your changes before publishing.
4. Click Published.
5. Verify the presence on your template.
You can also use the Search input field to locate your template.
To create a stack from your published template, see Creating a Cloud Stack.
Importing a TemplateImport a custom template file into Oracle Cloud Stack.
The value of the templateName attribute in the file is used as the name of the templatein Oracle Cloud Stack. The actual name of the template source file is not used byOracle Cloud Stack to identify a template. If you import a template with the same nameas an existing template but with a newer templateVersion, you replace the existingone. Any existing stacks that were created from previous versions of this template arenot affected. See Editing a Template.
Chapter 3Publishing a Template
3-9

Topics
• Importing a Published Template with the Console
• Importing an Unpublished Template with the Console
• Importing a Template with the CLI
Importing a Published Template with the ConsoleUse the web console to import a template file into Oracle Cloud Stack. The template isautomatically published and is available to all users in this account for the creation ofcloud stacks.
1. Access the Oracle Cloud Stack console, and then click Templates.
2. Click Import.
3. Select one of the following options:
• Template File — Click Choose File and select the YAML template file onyour local machine.
• Template URL — Enter the URL to the YAML template file.
4. Click Import.
The format and contents of the template file are automatically validated. If anyvalidation errors are found, you must edit the template file, correct the problemsand then import again.
5. Verify the presence of your template on the Templates page.
You can also use the Search input field to locate your template.
Importing an Unpublished Template with the ConsoleUse the web console to import a unpublished (draft) template file into Oracle CloudStack. The template cannot be used to create stacks until it is published.
Before importing an unpublished template for the first time, see Configuring TemplateStorage.
1. Access the Oracle Cloud Stack console, and then click Templates.
2. Click Unpublished.
3. Click Add Template, and then select Import existing Template.
4. Navigate to and select the YAML template file on your local machine.
5. Verify the presence of your template on the Unpublished Templates page.
You can also use the Search input field to locate your template.
After making any modifications to the imported template with the console, you canpublish it. See Publishing a Template.
Importing a Template with the CLIUse the CLI to import a template file into Oracle Cloud Stack.
Chapter 3Importing a Template
3-10

1. Execute the stack import-template command.
Provide the fully-qualified path of the template YAML file on your local file system:
psm stack import-template -f filePath
For example:
psm stack import-template -f /home/oracle/cloud/myappdev_stack_template.yaml
"status":"Template [myappdev:1.0.0] saved successfully"
The format and contents of the template file are automatically validated. Anyvalidation errors are provided in the output of this command.
2. Execute the stack describe-template command to verify the presence of yournew template:
psm stack describe-template -n name
For example:
psm stack describe-template -n myappdev
Note:
You can also view a list of all templates in this account by using thestack list-templates command. The output of both of thesecommands include a list of stack names that were created from thistemplate.
You can also validate a template file without importing it. See Validating a Template.
For more information about the CLI commands for Oracle Cloud Stack, see psm stackCommands.
Exporting a TemplateExport an existing stack template as a YAML document from Oracle Cloud Stack. Afterexporting the template you can update it or use it to create a new template.
Topics
• Exporting a Published Template with the Console
• Exporting an Unpublished Template with the Console
• Exporting a Template with the CLI
Chapter 3Exporting a Template
3-11

Exporting a Published Template with the ConsoleUse the web console to export a published template file from Oracle Cloud Stack.
1. Access the Oracle Cloud Stack console, and then click Templates.
2. To the right of the template that you want to export, click Download this template
.
3. Follow the instructions in your web browser to save the YAML template file on yourlocal machine.
Exporting an Unpublished Template with the ConsoleUse the web console to export an unpublished (draft) template file from Oracle CloudStack.
1. Access the Oracle Cloud Stack console, and then click Templates.
2. Click Unpublished.
3. Click the template that you want to export.
4. Click Export the current template .
5. Enter a file name for the template, and then click OK.
6. Follow the instructions in your web browser to save the YAML file on your localmachine.
Exporting a Template with the CLIUse the CLI to export a template file from Oracle Cloud Stack.
1. Identify the name of the template to export. Execute the stack list-templatescommand.
2. Execute the stack export-template command. Provide the name of the templateand redirect the output to a file:
psm stack export-template -n templateName > fileName
For example:
psm stack export-template -n MyTemplateName > MyTemplateName.yaml
The command results in a YAML document that contains the template definition:
--- template: templateName: MyTemplateName templateVersion: 1.0 templateDescription: My Oracle cloud stack template . . .
Chapter 3Exporting a Template
3-12

After exporting the template you can modify its definition using any text editor. If youwant to create a new template from the exported document modify the document’stemplateName property. After you’re finished changing the template, import thedocument back into Oracle Cloud Stack. See Importing a Template.
For more information about the CLI commands for Oracle Cloud Stack, see psm stackCommands.
Deleting a TemplateUse Oracle Cloud Stack to delete a stack template.
Note:
• User-created templates can be deleted. Oracle templates cannot bedeleted.
• Deleting a template does not affect any existing stacks that were createdfrom the template.
Deleting a Template with the ConsoleUse the web console to delete a template file from Oracle Cloud Stack.
1. Access the Oracle Cloud Stack console, and then click Templates.
2. Optional: To delete an unpublished (draft) template, click Unpublished.
3. To the right of the template that you want to delete, click Delete this template .
4. When prompted for confirmation, click OK.
Deleting a Template with the CLIUse the CLI to delete an existing template from Oracle Cloud Stack.
1. Identify the name of the template to delete. Execute the stack list-templatescommand.
2. Execute the stack delete-template command. Supply the name of the template:
psm stack delete-template -n name
For example:
psm stack delete-template -n MyTemplate
For more information about the CLI commands for Oracle Cloud Stack, see psm stackCommands.
Chapter 3Deleting a Template
3-13

4Creating and Managing Stacks with OracleCloud Stack
Use Oracle Cloud Stack to create one or more cloud stacks from an existing template.
You can use one of the standard Oracle templates, or use a custom template that youpreviously created or imported into Oracle Cloud Stack.
• For more information on using a specific Oracle template, see About Oracle StackTemplates.
• For more information about custom templates, see Creating a Template.
Topics
• Typical Workflow for Managing Stacks
• Creating a Cloud Stack
• Viewing the Details of a Cloud Stack
• Starting and Stopping a Cloud Stack
• Using Tags with Cloud Stacks
• Starting and Stopping a Resource in a Cloud Stack
• Managing SSH Access for a Resource in a Cloud Stack
• Managing Access Rules for a Resource in a Cloud Stack
• Deleting a Cloud Stack
Typical Workflow for Managing StacksTo manage the lifecycle of a cloud stack with Oracle Cloud Stack, refer to the typicaltask workflow.
Task Description More Information
Create a stack Create a cloud stack from an existingtemplate.
Creating a Cloud Stack.
View stack details Periodically check the status andconfiguration of your cloud stacks.
Viewing the Details of a Cloud Stack
Start and stop astack
Start and stop all of the resourceswithin a cloud stack.
Starting and Stopping a Cloud Stack
Manage stackresources
Configure and manage the individualcloud resources that make up acloud stack.
• Starting and Stopping aResource in a Cloud Stack
• Managing SSH Access for aResource in a Cloud Stack
• Managing Access Rules for aResource in a Cloud Stack
4-1

Task Description More Information
Delete a stack Delete an existing cloud stack. Deleting a Cloud Stack
Creating a Cloud StackCreate a cloud stack in Oracle Cloud Stack to provision a group of related cloudservices. After selecting a template and initiating the creation of a stack, monitor itsprogress and status.
Video
Tutorials are also available to help you create your first cloud stack.
You can use one of the standard Oracle stack templates, or use a custom templatethat you previously created or imported into Oracle Cloud Stack.
• For more information on using a specific Oracle template, see About Oracle StackTemplates.
• For more information about custom templates, see Creating a Template.
You cannot create a stack from a custom template that is in the unpublished state.See Publishing a Template.
In order to create a cloud stack you must have a valid subscription to all of the OracleCloud services of which the stack is comprised. For example, in order to use a stacktemplate that includes an Oracle Java Cloud Service instance, your Oracle Cloudaccount must have a subscription to Oracle Java Cloud Service and it also must havethe appropriate entitlements to use the desired features of Oracle Java Cloud Service.If these requirements are not met, you will receive a Forbidden error message.
A stack template defines zero or more named templates parameters. Values for theseparameters can be provided when a stack is created. A template parameter may bemandatory (does not have a default value) or optional. A parameter’s value can alsobe limited to certain values or have to meet certain requirements.
If the creation of a stack fails, Oracle Cloud Stack can take one of these actions:
• Rollback (default): Any resources that were created as part of this stack will bedeleted.
• Retain: For troubleshooting purposes, any resources that were created as part ofthis stack are not deleted. See Troubleshooting for Oracle Cloud Stack.
Creating a Cloud Stack with the ConsoleUse the web console to create a cloud stack in Oracle Cloud Stack.
1. Sign in to the Oracle Cloud Stack console and navigate to the Stacks page.
2. Click Create Stack.
Alternatively, go to the Templates page and click the icon to the right of thetemplate you want to use.
The Create New Oracle Cloud Stack — Details page is displayed.
Chapter 4Creating a Cloud Stack
4-2

3. Enter a Name and optional Description for the stack.
Hyphens are not permitted in a stack’s name.
4. Select a Template from which to create the stack.
5. Optional: For Notification Email, enter an email address that should receive amessage when the stack’s creation is complete.
6. Optional: For Tags, select one or more existing tags to assign to this stack, and/or
click Create a tag to create and assign new tags to this stack.
Tags can be simple values or key:value pairs.
7. Optional: Select the On Failure Retain Resources check box to retain (notdelete) any successfully created resources, in the event the stack creation fails.
8. Enter values for the remaining template parameters. The available parameters arespecific to the template you selected.
• Mandatory parameters are indicated with an asterisk.
• Read-only parameters cannot be modified.
• Click Help next to a parameter to learn more information about it.
9. For any secure shell (SSH) key parameters, do the following:
a. Click the Edit button.
b. Choose from one of these options:
• Select Key File Name. Click Choose File and select a public key file onyour local machine.
• Select Key Value and paste the value of the public key into the text area.
• Select Create a New Key if you want Oracle Cloud to generate a public/private key pair for you.
c. Click Enter.
d. If you selected the Create a New Key option, click Download and save thegenerated keys to your local machine. Then click Done.
Note:
Be sure to download the generated keys to a permanent location.Without the private key file, you will not be able to access andadminister the nodes that are created as part of this cloud stack.
10. Click Next.
11. Review the values you provided for the template parameters and click Confirm tocreate your stack.
Chapter 4Creating a Cloud Stack
4-3

Tip:
Click Download Payload to save your parameter values as aJSON file. You can use this file to create a stack with the CLI or RESTAPI.
Click Back if you want to change the parameter values. Click Cancel if you wantto exit the creation wizard without creating a stack.
12. Your new stack appears on the Stacks page. Click its status to monitor theprogress of your stack’s creation.
You can also monitor this operation by:
• Expanding the Stack Create and Delete History section of the Stacks page.
• Navigating to the Activity Page.
Creating a Cloud Stack with the CLIUse the CLI to create a cloud stack in Oracle Cloud Stack.
To discover the available parameters for a template, you can download it as a file andview its contents. See Exporting a Template.
You can specify parameter values for a stack using either of these methods:
• Enter a single string, and separate each parameter with a space.
param1:value1 param2:value2 ... paramN:valueN
• Provide the location of a JSON file.
{ "param1":"value1", "param2":"value2", ..., "paramN":"valueN"}
To create a stack with the CLI:
1. Execute the stack create command.
Provide a name for the new stack and the name of the existing template. You canalso optionally provide a description, template parameters and a failure action(ROLLBACK or RETAIN ).
psm stack create -n name -d description -t template -f RETAIN|ROLLBACK [-p parameters | -pf parameterFile]
Chapter 4Creating a Cloud Stack
4-4
For example:
psm stack create -n dev1 -t dev_template -f RETAIN -p shape:OC3 clusterSize:2psm stack create -n dev2 -t dev_template -pf params_dev2.json
Hyphens are not permitted in a stack’s name.
2. The output of the stack create command includes a job ID number. Use thestack operation-status command to periodically check the state of the createoperation:
psm stack operation-status -j jobID
3. If you created the stack with the -f RETAIN or --on-failure RETAIN options andstack creation failed, you can attempt to correct the cause of the failure and thenexecute the stack resume command:
psm stack resume -n name
Oracle Cloud Stack will resume the creation of the stack and attempt to recreatethe failed resource.
4. Execute the stack describe command to view details about the stack and theservices of which it is comprised:
psm stack describe -n name
Note:
You can also view a list of all cloud stacks in this account by using thestack list command.
For more information about the CLI commands for Oracle Cloud Stack, see psm stackCommands.
Viewing the Details of a Cloud StackView the resources and other attributes of your cloud stacks in Oracle Cloud Stack.
Viewing Cloud Stacks with the ConsoleUse the web console to monitor your cloud stacks in Oracle Cloud Stack.
1. Sign in to the Oracle Cloud Stack console and navigate to the Stacks page.
The Stacks page lists the cloud stacks in this identity domain. A stack’s icon isused to indicate its status and health. This page also shows the number of OracleCPUs (OCPUs), memory and block storage allocated to the resources in eachstack.
Chapter 4Viewing the Details of a Cloud Stack
4-5

Tip:
To view the template definition that was used to create a stack, click itsTemplate link.
2. Locate the stack you want to view.
If tags are assigned to stacks, you can also search for stacks using tagexpressions and wild cards. See Find Tags and Instances Using SearchExpressions.
3. Click the name of the stack.
The Stack Details page is displayed.
4. Click Stack Details , located at the top of the page, for additional informationabout the stack.
5. Locate the Resources area of the Stack Details page.
This section lists the cloud resources of which this stack is made up. Differenticons are used to distinguish different types of cloud resources, as well as theirstatus.
For each resource, this page shows its Name and Type, along with the number ofOCPUs, memory and block storage allocated to the resource (if applicable).
6. Click the Name link for a specific resource to go to the console for this cloudservice.
Use a resource’s service console for more detailed monitoring andtroubleshooting.
Note:
You may not be able to click on some types of cloud resources, such asOracle Cloud Infrastructure Object Storage Classic containers.
7. At the top of the page, click the link with the name of your stack in order to returnback to the Stack Details page in the Oracle Cloud Stack console.
8. Click the Stacks link at the top of the page to go back to the Stacks page.
9. Click the icon to expand the Stack Create and Delete History area
This area lists the operations that Oracle Cloud Stack has executed on all stacks,or is in the process of executing.
10. Click the icon for a specific operation to view its log.
Tip:
You can also use the Activity page to monitor stack operations. To viewonly those operations performed by Oracle Cloud Stack, set the ServiceType to Oracle Cloud Stack.
Chapter 4Viewing the Details of a Cloud Stack
4-6

For more information about the console user interface see these topics:
• Stacks Page
• Stack Details Page
Viewing Cloud Stacks with the CLIUse the CLI to monitor your cloud stacks in Oracle Cloud Stack.
1. Execute the stack list command.
Use the output to identify the names of your existing cloud stacks. For example:
psm stack list
{ "identityDomain":"MyIdentityDomain", "stacks":[ { "serviceName":"MyStack1", "description":"", "serviceURI":"http://example.org:7200//paas/api/v1.1/instancemgmt/MyIdentityDomain/services/stack/instances/MyStack1", "state":"READY", "stateDetail":"Ready", "identityDomain":"MyIdentityDomain", "createdBy":"[email protected]", "creationJobId":"80161", "creationTime":"2016-07-26T15:48:18.366+0000", "lastModifiedTime":"2016-07-26T15:48:18.365+0000", "template":{ "templateName":"MyTemplate", "templateVersion":"1.0.0", "templateURI":"http://example.org:7200//paas/api/v1.1/instancemgmt/MyIdentityDomain/templates/cst/instances/MyTemplate/export?version=1.0.0" } }, { "serviceName":"MyStack2", "description":"", "serviceURI":"http://example.org:7200//paas/api/v1.1/instancemgmt/MyIdentityDomain/services/stack/instances/MyStack1", "state":"READY", "stateDetail":"Ready", "identityDomain":"MyIdentityDomain", "createdBy":"[email protected]", "creationJobId":"80161", "creationTime":"2016-07-27T15:48:18.366+0000", "lastModifiedTime":"2016-07-27T15:48:18.365+0000", "template":{ "templateName":"MyTemplate", "templateVersion":"1.0.0", "templateURI":"http://example.org:7200//paas/api/v1.1/instancemgmt/MyIdentityDomain/templates/cst/instances/MyTemplate/export?
Chapter 4Viewing the Details of a Cloud Stack
4-7

version=1.0.0" } } ]}
2. To retrieve additional details about a specific cloud stack, use the CLI to executethe stack describe command.
psm stack describe -n stackName
For example:
psm stack describe -n MyStack1
For more information about the CLI commands for Oracle Cloud Stack, see psm stackCommands.
Starting and Stopping a Cloud StackUse Oracle Cloud Stack to start and stop all of the cloud resources within an existingstack. The dependencies between the resources within a stack determine the order inwhich they are started and stopped.
Starting and Stopping a Cloud Stack with the ConsoleUse the web console to start or stop all of the resources in a stack.
1. Sign in to the Oracle Cloud Stack console and navigate to the Stacks page.
You can also start and stop a stack from the Stack Details Page for a specificstack.
2. Click the
menu to the right of the stack you want to start or stop.
3. Select Start or Stop.
4. If any of the resources in your stack support start or stop parameters, you will beprompted to provide values for them.
5. When prompted for confirmation, click OK.
The stack’s icon changes to indicate that it is in either the Starting or Stopping state.You can monitor the operation’s progress from the Activity Page.
Starting and Stopping a Cloud Stack with the CLIUse the CLI to start or stop all of the resources in a stack.
Chapter 4Starting and Stopping a Cloud Stack
4-8

1. Execute the stack start or stack stop command. Supply the name of the cloudstack:
psm stack start -n namepsm stack stop -n name
2. The output of the command includes a job ID number. Use the stack operation-status command to periodically check the state of the start or stop operation:
psm stack operation-status -j jobID
For more information about the CLI commands for Oracle Cloud Stack, see psm stackCommands.
Using Tags with Cloud Stacks
This topic does not apply to Oracle Cloud at Customer.
A tag is an arbitrary key or a key-value pair that you can assign to your cloud stacksin Oracle Cloud Stack. You can use tags to organize and categorize your stacks, andto search for them.
Topics
• Creating, Assigning, and Unassigning Tags
• Find Tags and Instances Using Search Expressions
Creating, Assigning, and Unassigning TagsYou can create and assign tags to Oracle Cloud Stack instances while creating theinstances or later. When you no longer need certain tags for an instance, you canunassign them.
To assign tags to an instance or to unassign tags:
1. Navigate to the Overview page for the instance for which you want to assign orunassign tags.
2. Click Manage this instance in the instance name bar at the top.
3. Select Manage Tags or Add Tags.
If any tags are already assigned, then the menu shows Manage Tags; otherwise,it shows Add Tags.
4. In the Manage Tags dialog box, create and assign the required tags, or unassigntags:
• In the Assign section, in the Tags field, select the tags that you want to assignto the instance.
• If the tags that you want to assign don't exist, then select Create and Assignin the Tags field, and click just above the field. Enter the required new tags inthe Enter New Tags field.
Chapter 4Using Tags with Cloud Stacks
4-9

• To unassign a tag, in the Unassign section, look for the tag that you want tounassign, and click the X button next to the tag.
Note:
You might see one or more tags with the key starting with ora_.Such tags are auto-assigned and used internally. You can’t assign orunassign them.
• To exit without changing any tag assignments for the instance, click Cancel.
5. After assigning and unassigning tags, click OK for the tag assignments to takeeffect.
Find Tags and Instances Using Search ExpressionsA tag is an arbitrary key or a key-value pair that you can create and assign to yourOracle Cloud Stack instances. You can use tags to organize and categorize yourinstances, and to search for them. Over time, you might create dozens of tags, andyou might assign one or more tags to your instances. To search for specific tags andto find instances that are assigned specific tags, you can use filtering expressions.
Search for Instances with Tags
From the Instances page of the web console, select Tags, and then enter a searchexpression in the Search field.
For example, you can search for the instances that are assigned a tag with the key envand any value starting with dev (example: env:dev1, env:dev2), by entering the searchexpression 'env':'dev%'.
Similarly, when you use the REST API to find tags or to find instances that areassigned specific tags, you can filter the results by appending the optionaltagFilter=expression query parameter to the REST endpoint URL.
• To find specific tags: GET paas/api/v1.1/tags/{identity_domain}/tags?tagFilter={expression}
• To get a list of instances that are assigned specific tags: GET paas/api/v1.1/instancemgmt/{identity_domain}/instances?tagFilter={expression}
Syntax and Rules for Building Tag-Search Expressions
• When using cURL to send tag-search API requests, enclose the URL in doublequotation marks.
Chapter 4Using Tags with Cloud Stacks
4-10

Example:
curl -s -u username:password -H "X-ID-TENANT-NAME:acme" "restEndpointURL/paas/api/v1.1/instancemgmt/acme/instances?tagFilter='env'"
This request returns all the tags that have the key env.
• Enclose each key and each value in single quotation marks. And use a colon (:) toindicate a key:value pair.
Examples:
'env''env':'dev'
• You can include keys or key:value pairs in a tag-filtering expression.
SampleExpression
Description Sample Search Result
'env' Finds the tags with the key env, or theinstances that are assigned the tagswith that key.
The following tags, or the instancesthat are assigned any of these tags:
env:devenv:qa
'env':'dev'
Finds the tag with the key env and thevalue dev, or the instances that areassigned that tag.
The following tag, or the instancesthat are assigned this tag
env:dev
• You can build a tag-search expression by using actual keys and key values, or byusing the following wildcard characters.
% (percent sign): Matches any number of characters.
_ (underscore): Matches one character.
SampleExpression
Description Sample Search Result
'env':'dev%'
Finds the tags with the key env and avalue starting with dev, or theinstances that are assigned such tags.
Note: When you use curl or anycommand-line tool to send tag-searchREST API requests, encode thepercent sign as %25.
The following tags, or the instancesthat are assigned any of these tags:
env:devenv:dev1
Chapter 4Using Tags with Cloud Stacks
4-11

SampleExpression
Description Sample Search Result
'env':'dev_'
Finds the tags with the key env andthe value devX where X can be anyone character, or finds the instancesthat are assigned such tags.
The following tags, or the instancesthat are assigned any of these tags:
env:dev1env:dev2
• To use a single quotation mark ('), the percent sign (%), or the underscore (_) as aliteral character in a search expression, escape the character by prefixing abackslash (\).
SampleExpression
Description Sample Search Result
'env':'dev\_%'
Finds the tags with the key env anda value starting with dev_, or theinstances that are assigned suchtags.
The following tags, or the instancesthat are assigned any of these tags:
env:dev_1env:dev_admin
• You can use the Boolean operators AND, OR, and NOT in your searchexpressions:
Sample Expression Description Sample Search Result
'env' OR 'owner' Finds the tags with thekey env or the keyowner, or the instancesthat are assigned eitherof those keys.
The following tags, or theinstances that areassigned any of thesetags:
env:devowner:admin
'env' AND 'owner' Finds the instances thatare assigned the tagsenv and owner.
Note: This expressionwon’t return any resultswhen used to search fortags, because a tag canhave only one key.
The instances that areassigned all of thefollowing tags:
env:devowner:admin
NOT 'env’ Finds the tags that havea key other than env, orthe instances that areassigned such tags.
Note: Untaggedinstances as well willsatisfy this searchexpression.
The following tags, or theinstances that areassigned any of thesetags or no tags:
owner:admindepartment
Chapter 4Using Tags with Cloud Stacks
4-12
Sample Expression Description Sample Search Result
('env' OR 'owner') AND NOT'department'
Finds the tags that havethe key env or the keyowner but not the keydepartment, or theinstances that areassigned such tags.
The following tags, or theinstances that areassigned any of thesetags:
env:devowner:admin
Starting and Stopping a Resource in a Cloud StackFor convenience, you can use Oracle Cloud Stack to start and stop individual cloudresources within an existing stack. You don’t have to use a separate cloud interface tomanage each type of resource.
Starting and Stopping a Resource with the ConsoleUse the web console to start or stop a specific resource in a cloud stack.
1. Sign in to the Oracle Cloud Stack console and navigate to the Stacks page.
2. Click the stack’s name.
3. Click the
menu to the right of the resource you want to start or stop.
4. Select Start or Stop.
Note:
Some resources may also support a Restart option. Resources of typeOracle Cloud Infrastructure Object Storage Classic cannot be started orstopped.
5. When prompted for confirmation, click OK.
Managing SSH Access for a Resource in a Cloud StackSome Oracle Cloud resources can be accessed through the Secure Shell (SSH)protocol by using SSH keys. You typically provide a public key when you initiallycreate these resources, but you can also use Oracle Cloud Stack to add more keys toan existing resource in your cloud stack.
Use the web console to add SSH keys to a resource in a cloud stack.
1. Sign in to the Oracle Cloud Stack console and navigate to the Stacks page.
2. Click the stack’s name.
Chapter 4Starting and Stopping a Resource in a Cloud Stack
4-13

3. Click the
menu to the right of the resource you want to update.
4. Select SSH Access.
The SSH Access page is displayed.
Note:
Some cloud resources, such as Oracle Cloud Infrastructure ObjectStorage Classic containers, are not associated with SSH keys.
5. Click Add New Key.
6. Choose one of these options:
• Select Upload a new SSH Public Key value from file and then click Browseto add a new SSH public key from an existing file.
• Select Key Value and then paste the new public key value in the text area.
7. Click Add New Key.
8. To return to the Stack Details page, click the name of your stack in the breadcrumb trail at the top of the page. Or click Stacks to return to the Stacks page.
Managing Access Rules for a Resource in a Cloud StackSome Oracle Cloud resources use access rules to control access to the componentsthat make up the resource, including access by other Oracle Cloud resources and byexternal clients. Oracle Cloud typically creates default access rules for a resourcewhen it is provisioned, but you can also use Oracle Cloud Stack to create custom ruleson existing resources.
Use the web console to add an access rule to a resource in a cloud stack.
1. Sign in to the Oracle Cloud Stack console and navigate to the Stacks page.
2. Click the stack’s name.
3. Click the
menu to the right of the resource you want to update.
4. Select Access Rules.
Note:
Some cloud resources, such as Oracle Cloud Infrastructure ObjectStorage Classic containers, are not associated with access rules.
5. Click Create Rule.
6. Enter a name for the access rule in the Rule Name field.
Enter an optional description of the access rule in the Description field.
Chapter 4Managing Access Rules for a Resource in a Cloud Stack
4-14

7. Select a Source for the rule. The available options will vary for each cloudresource, depending on its type and configuration.
For example, PUBLIC-INTERNET is any host on the internet.
Choose <custom> to provide a custom list of IP addresses from which trafficshould be allowed. In the field that displays below, enter a comma-separated list ofthe subnets (in CIDR format, such as 192.0.2.1/24) or IPv4 addresses for whichyou want to permit access.
8. Select a Destination for the rule. The available options will vary for each cloudresource, depending on its type and configuration.
9. Enter the port or port range through which the source will access the destination inthe Destination Port(s) field.
10. For Protocol, select TCP or UDP.
11. Click Create.
12. To return to the Stacks page, click Stacks in the bread crumb trail at the top of thepage.
Deleting a Cloud StackWhen an environment is no longer needed, delete the cloud stack with Oracle CloudStack in order to free up account resources.
Deleting a stack terminates all cloud resources that are components of the stack.Oracle Cloud Stack does not clean up any related resources that are not directly partof the stack. For example, if a stack resource is configured to use an existing objectstorage container for backups, these backups may not be deleted when the stackresource is deleted.
If a stack contains more than one resource, you must delete these resources withOracle Cloud Stack. You cannot delete the resources individually from their respectiveservice consoles or APIs.
Deleting a Cloud Stack with the ConsoleUse the web console to delete a cloud stack from Oracle Cloud Stack.
1. Sign in to the Oracle Cloud Stack console and navigate to the Stacks page.
2. Click the
menu to the right of the stack you want to delete.
3. Select Delete.
4. Choose a value for Force service deletion:
• No (default) – If an error occurs while a resource in this stack is being deleted,the rest of the stack will not be deleted.
• Yes – The stack and all of its resources will be deleted, even if an error occursduring the delete operation.
5. If any of the cloud resources in your stack support additional deletion parameters,you will be prompted to provide values for these parameters.
Chapter 4Deleting a Cloud Stack
4-15

6. Click Delete.
Deleting a Cloud Stack with the CLIUse the CLI to delete a cloud stack from Oracle Cloud Stack.
1. Execute the stack delete command. Supply the name of the cloud stack:
psm stack delete -n name
If any of the resources in your stack support deletion parameters, use the -coption to provide values for them.
By default, the stack and all of its resources will be deleted, even if an error occursduring the delete operation. If you specify the -f false option and an error occurswhile a resource in this stack is being deleted, the rest of the stack will not bedeleted.
2. The output of the stack delete command includes a job ID number. Use thestack operation-status command to periodically check the state of the deleteoperation:
psm stack operation-status -j jobID
For more information about the CLI commands for Oracle Cloud Stack, see psm stackCommands.
Chapter 4Deleting a Cloud Stack
4-16

5Frequently Asked Questions for OracleCloud Stack
Get answers to frequently asked questions for Oracle Cloud Stack.
Topics:
• What is Oracle Cloud Stack?
• What Oracle Cloud services can I create with Oracle Cloud Stack?
• What does Oracle Cloud Stack cost?
• How do I access Oracle Cloud Stack?
• What is a stack template?
• How do I create a custom stack template?
• Who uses Oracle Cloud Stack?
What is Oracle Cloud Stack?
Oracle Cloud Stack is a feature of Oracle Cloud that empowers users to automate theprovisioning and management of multiple cloud services as a single unit called astack.
See About Oracle Cloud Stack.
What Oracle Cloud services can I create with Oracle Cloud Stack?
Oracle Cloud Stack supports the creation of specific types of cloud resources, andOracle is continually adding to this list.
See About Oracle Stack Templates and List of Resource Types.
What does Oracle Cloud Stack cost?
You do not have to explicitly obtain a subscription for Oracle Cloud Stack — it is freeto use for all Oracle Cloud customers. However, in order to create a cloud stack youmust have a valid subscription to all of the Oracle Cloud services of which the stack iscomprised. For example, in order to use a stack template that includes an Oracle JavaCloud Service instance, your Oracle Cloud account must have a subscription to OracleJava Cloud Service and it also must have the appropriate entitlements to use thedesired features of Oracle Java Cloud Service.
How do I access Oracle Cloud Stack?
The features of Oracle Cloud Stack are accessible from a web console, a command-line interface (CLI) or a REST API.
See Accessing Oracle Cloud Stack.
5-1

What is a stack template?
Cloud stacks are created from templates. A template is a text file that defines whatcloud resources to create, how to create them and any dependencies between them.Templates can also define input parameters that enable cloud users to furthercustomize each stack. Oracle Cloud Stack provides you with standard templates forcommon scenarios, but you can also create your own templates.
See About Oracle Stack Templates and About Template Components.
How do I create a custom stack template?
You can create a new template from scratch, or you can copy one of the standardOracle templates and use it as a starting point.
The Oracle Cloud Stack console provides a graphical Template Builder tool to simplifythe creation and maintenance of templates. By using the Template Builder andlearning a few simple template functions, you can implement most cloud stackrequirements. More experienced authors can use additional template features andfunctions in order to implement more advanced requirements like conditional logic.
If you prefer to use your own favorite editor for template development, you can alsoimport and export template files to and from Oracle Cloud Stack.
See Creating a Template and Editing Template Files.
Who uses Oracle Cloud Stack?
Oracle Cloud Stack gives IT Operations more control over how your development andtesting environments are created and managed in Oracle Cloud, and also ensures thatthese tasks are easily repeatable. Your Operations team can create custom stacktemplates that meet their precise setup requirements. Working with templates requiressome familiarity with YAML documents and the underlying REST APIs used to createcloud services.
Developer Operations (or DevOps) advocates automating the tasks of provisioningand managing environments for developers, testers and end users. Similarly, DevOpstreats all of the resources used to provision these environments just like other codeartifacts. Oracle Cloud Stack aligns with these IT objectives by providing users withstack templates, a command-line interface and a REST API.
Chapter 5
5-2

6Troubleshooting for Oracle Cloud Stack
This section describes common problems that you might encounter when using OracleCloud Stack and explains how to solve them.
Topics
• Problems with Creating a Stack
• Problems with Deleting a Stack
• Problems with Importing a Template
• Get Help for a Specific Template
Problems with Creating a StackThe creation of a cloud stack will fail if an error occurs during the creation of any of theresources that comprise the new stack. By default Oracle Cloud Stack rolls back(deletes) any resources that were created prior to the error.
Some Oracle-defined templates provide additional troubleshooting resources. See GetHelp for a Specific Template.
Follow this procedure in the Oracle Cloud Stack console to help identify the source ofthe stack creation error:
1. Create the same stack again, but select the On Failure Retain Resourcescheckbox on the Create New Oracle Cloud Stack — Stack Details page. When thecreation of this stack fails, any resources that were created will not beautomatically deleted.
2. From the main Stacks page of the console click Activity.
3. Verify that the Service Type is set to Oracle Cloud Stack. Search for and locateyour failed Create Service operation.
4. Click to the left of the operation to view its log.
5. From the log identify the resource in the stack that caused the failure and note itsService Type. For example, Oracle Java Cloud Service.
Alternatively, from the main Stacks page click the name of the failed stack. Thenuse the Stack Details page to identity the type of the failed resource.
6. From the same Activity page change the Service Type to the type of the failedresource. Search for and locate the failed Create Service operation for this specificcloud resource.
7. Click to the left of the operation to view its log. Use this information todetermine the exact cause of the resource creation failure.
8. Take an appropriate corrective action:
6-1

• If the resource creation problem was due to the value of a template parameter,you will need to delete the stack and create it again with a different parametervalue. See Deleting a Cloud Stack.
• If the resource creation problem was due to some external issue in theenvironment and you can correct it, Oracle Cloud Stack can attempt to createthe failed resource again. Return to the Stacks page, click the
menu to the right of the stack and select Resume.
To troubleshoot a stack failure from the command line interface (CLI):
1. Turn on the debug logging level in the CLI:
psm log -l debug
2. Run the same stack create command again, but specify the RETAIN option:
psm stack create -f RETAIN . . .
The output includes the Oracle Cloud Stack job ID.
3. Monitor the progress of your stack by using the stack operation-statuscommand. From the output of this command identify the resource in the stack thatcaused the failure.
For example:
"message":"Failed to create service MyApp-JCS. Please refer to the service activity logs for more details"
4. Use the operation-status or similar command for the specific cloud service thatfailed.
For example, if the failed resource is an Oracle Java Cloud Service instance referto psm jcs operation-status in PaaS Service Manager Command Line InterfaceReference.
Use this information to determine the exact cause of the resource creation failure.
5. Take an appropriate corrective action:
• If the resource creation problem was due to the value of a template parameter,you will need to delete the stack and create it again with a differentparameter value.
• If the resource creation problem was due to some external issue in theenvironment and you can correct it, use the stack resume command. OracleCloud Stack will attempt to create the failed resource again:
psm stack resume -n YourStackName
Chapter 6Problems with Creating a Stack
6-2

Problems with Deleting a StackSolve problems related to deleting a stack in Oracle Cloud Stack.
Database is Stopped
Error message when attempting to delete a cloud stack:
Error while either uploading sql file or executing sql command on VM
Some cloud resources such as Oracle Java Cloud Service and Oracle SOA CloudService instances depend on a schema in a relational database. By default, before aservice instance is deleted, the service attempts to delete its associated schema in thedatabase. If the database is stopped or is otherwise not available, the deletion of theservice instance with fail.
Choose from one of the following options:
• Start the database on which the resource depends, and then delete the stack.
• When you delete the stack, select the option Force service deletion.
Problems with Importing a TemplateSolve problems related to importing custom templates into Oracle Cloud Stack.
Topics
• Not a YAML Document
• Unsupported Template Parameter Type
• Invalid Indentation for a Sequence
• Resource Configuration is not Displayed in the Template Builder
Not a YAML Document
You can import a template by either uploading a YAML file from your local machine, orproviding the location of a YAML file as a URL.
You receive this error message when uploading a template from a URL:
Template import failed! Mapping values are not allowed here.
Be sure that your URL resolves to a file of type YAML, and not HTML. For example, ifyour template is located in GitHub, enter its Raw URL.
Unsupported Template Parameter Type
You receive this error message when importing a template:
Template cannot use reserved parameter type Type
Chapter 6Problems with Deleting a Stack
6-3

Some parameter types are supported only in Oracle-defined templates. Oracle doesnot support these reserved parameter types in custom templates. Modify yourtemplate and use a different parameter type. See Using Template Parameters.
Invalid Indentation for a Sequence
You receive an error message similar to the following when you import a template:
Fn::Join - within template expects 2 members in json array. However, a Fn::Join usage was found in template with 4 member(s)
A YAML sequence can be expressed in either of these equivalent formats:
[item1,item2,item3]
- item1- item2- item3
You can also nest sequences. For example:
- item1- item2- - item3a - item3b
Members of same sequence must have the same preceding whitespace. For example,when you use the Join function, you specify a sequence that contains two arguments.The second argument in this sequence is another sequence:
Fn::Join: - "\n" - - This is line 1 - This is line 2
The following Join example is not valid YAML because the whitespace, or indentation,does not match the expected syntax of the function:
Fn::Join: - "\n" - - This is - not valid
Chapter 6Problems with Importing a Template
6-4
Resource Configuration is not Displayed in the Template Builder
The provisioning API for some Oracle Cloud services supports this older payloadformat for backwards compatibility:
parameters: serviceParameters: ... componentParameters: ...
Oracle Cloud Stack continues to support templates whose resources use this payloadformat. However, you cannot edit these resources using the Template Builder in theweb console because the Template Builder supports only the most recent APIpayload:
parameters: ... components: ...
If you want to modify a template that uses the deprecated provisioning API payload fora resource, choose from one of the following options:
• Do not use the Template Builder. Edit the template offline, and then import it intoOracle Cloud Stack. See Editing Offline.
• From the Template Builder, edit the YAML source for the template, and thenconvert the resource(s) to the new payload format. See Editing with the Console.
Get Help for a Specific TemplateAdditional help resources are available for specific Oracle Cloud Stack templates.
Name More Information
Oracle-Mobile-Bots-Standard-Rel
Oracle-Mobile-Cloud-Enterprise-Template
Troubleshoot Your OMCe Service in Administering OracleMobile Cloud Enterprise in a Customer-Managed Environment
Chapter 6Get Help for a Specific Template
6-5

7Exploring the Oracle Cloud Stack Console
Get help on the various pages of the Oracle Cloud Stack console.
Topics
• Welcome Page
• Stacks Page
• Stack Details Page
• Published Templates Page
• Unpublished Templates Page
• Template Builder
• Activity Page
Welcome PageThe Welcome page is shown the first time you access the Oracle Cloud Stackconsole.
What You Can Do From the Welcome Page
Use this page to access documentation, tutorials, videos and other getting startedcontent for Oracle Cloud Stack.
What You See on the Welcome Page
The following table describes the key information shown on the Welcome page.
Element Description
HeaderAccess other Oracle Cloud services.
Depending on how you signed up for Oracle Cloud, you can alsoaccess either the Oracle Cloud Infrastructure Console or the OracleCloud Infrastructure Classic Console.
Access help for this page, including documentation, tutorials, videosand FAQs.
Access help, accessibility options, console version information andsign-out.
Welcome! Go to the Welcome Page.
Stacks Go to the Stacks Page.
Templates Go to the Published Templates Page.
Activity Go to the Activity Page.
Welcome
7-1

Element Description
Follow Tutorial Access the Oracle Cloud Stack Tutorials.
Go to Console Go to the Stacks Page.
Stacks PageThe Stacks page in the Oracle Cloud Stack console allows the user to create andmanage cloud stacks, and to also view the recent stack creation history.
What You Can Do From the Stacks Page
Use this page to perform the following tasks:
• Creating a Cloud Stack
• Viewing the Details of a Cloud Stack
• Starting and Stopping a Cloud Stack
• Deleting a Cloud Stack
• Viewing a Template Resource Topology
What You See on the Stacks Page
The following table describes the key information shown on the Stacks page.
Element Description
HeaderAccess other Oracle Cloud services.
Depending on how you signed up for Oracle Cloud, you can alsoaccess either the Oracle Cloud Infrastructure Console or the OracleCloud Infrastructure Classic Console.
Access help for this page, including documentation, tutorials, videosand FAQs.
Access help, accessibility options, console version information andsign-out.
Welcome! Go to the Welcome Page.
Stacks Go to the Stacks Page.
Templates Go to the Published Templates Page.
Activity Go to the Activity Page.
Chapter 7Stacks Page
7-2
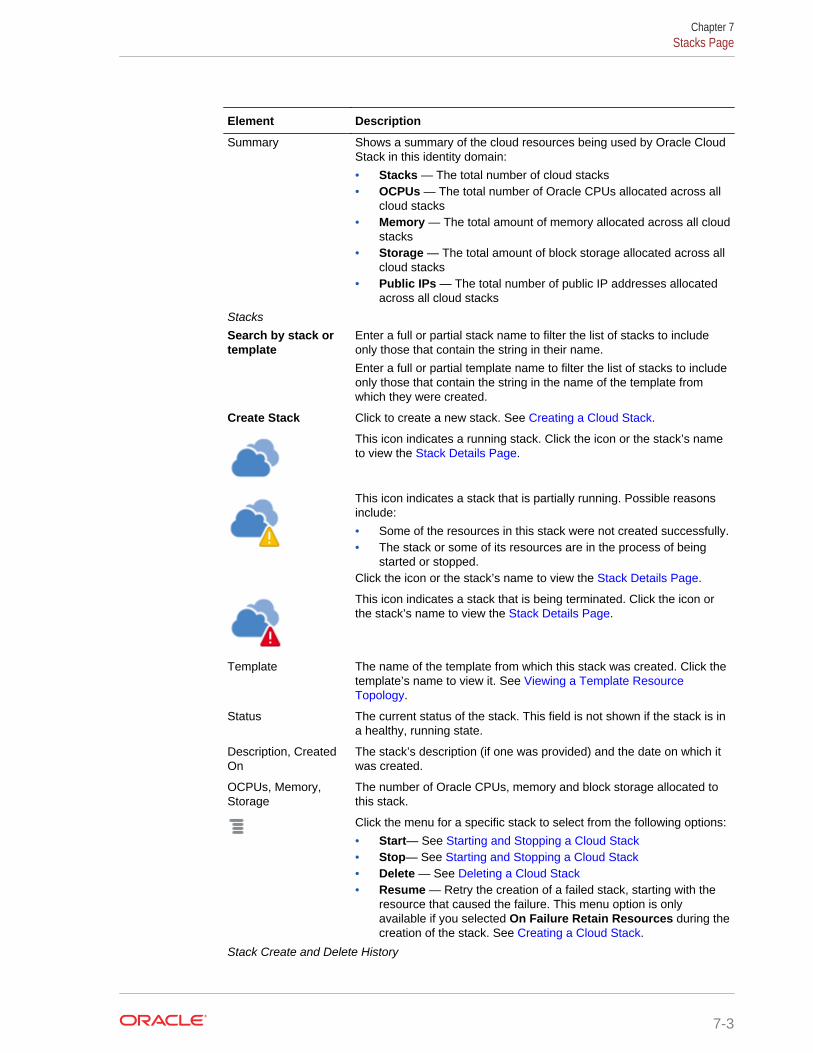
Element Description
Summary Shows a summary of the cloud resources being used by Oracle CloudStack in this identity domain:
• Stacks — The total number of cloud stacks• OCPUs — The total number of Oracle CPUs allocated across all
cloud stacks• Memory — The total amount of memory allocated across all cloud
stacks• Storage — The total amount of block storage allocated across all
cloud stacks• Public IPs — The total number of public IP addresses allocated
across all cloud stacks
StacksSearch by stack ortemplate
Enter a full or partial stack name to filter the list of stacks to includeonly those that contain the string in their name.
Enter a full or partial template name to filter the list of stacks to includeonly those that contain the string in the name of the template fromwhich they were created.
Create Stack Click to create a new stack. See Creating a Cloud Stack.
This icon indicates a running stack. Click the icon or the stack’s nameto view the Stack Details Page.
This icon indicates a stack that is partially running. Possible reasonsinclude:
• Some of the resources in this stack were not created successfully.• The stack or some of its resources are in the process of being
started or stopped.Click the icon or the stack’s name to view the Stack Details Page.
This icon indicates a stack that is being terminated. Click the icon orthe stack’s name to view the Stack Details Page.
Template The name of the template from which this stack was created. Click thetemplate’s name to view it. See Viewing a Template ResourceTopology.
Status The current status of the stack. This field is not shown if the stack is ina healthy, running state.
Description, CreatedOn
The stack’s description (if one was provided) and the date on which itwas created.
OCPUs, Memory,Storage
The number of Oracle CPUs, memory and block storage allocated tothis stack.
Click the menu for a specific stack to select from the following options:
• Start— See Starting and Stopping a Cloud Stack• Stop— See Starting and Stopping a Cloud Stack• Delete — See Deleting a Cloud Stack• Resume — Retry the creation of a failed stack, starting with the
resource that caused the failure. This menu option is onlyavailable if you selected On Failure Retain Resources during thecreation of the stack. See Creating a Cloud Stack.
Stack Create and Delete History
Chapter 7Stacks Page
7-3

Element Description
Choose from the following options to filter the list of stack creation anddeletion jobs that are displayed:
• Last 24 hours• Last 7 days• Last month• All failed
Show only failedattempts
Show only stack creation and deletion jobs that failed. Click the job formore details. Alternatively, use the Activity Page.
Stack Details PageThe Stack Details page in the Oracle Cloud Stack console allows you to monitor astack’s resource usage, monitor the status of the resources in the stack, and view asummary of the operations that were performed on this stack. It also providesconvenient access to the service console for each resource in the stack.
What You Can Do From the Stack Details Page
Use this page to perform the following tasks:
• Starting and Stopping a Cloud Stack
• Starting and Stopping a Resource in a Cloud Stack
• Managing SSH Access for a Resource in a Cloud Stack
• Managing Access Rules for a Resource in a Cloud Stack
What You See on the Stack Details Page
The following table describes the key information shown on the Stack Details page.
Element Description
HeaderAccess other Oracle Cloud services.
Depending on how you signed up for Oracle Cloud, you can alsoaccess either the Oracle Cloud Infrastructure Console or the OracleCloud Infrastructure Classic Console.
Access help for this page, including documentation, tutorials, videosand FAQs.
Access help, accessibility options, console version information andsign-out.
Welcome! Go to the Welcome Page.
Stacks Go to the Stacks Page.
Templates Go to the Published Templates Page.
Activity Go to the Activity Page.
Chapter 7Stack Details Page
7-4

Element Description
Click to view general information about this stack:
• Identity Domain• Created By• Created OnClick the stack menu to select from the following options:
• Start — See Starting and Stopping a Cloud Stack• Stop — See Starting and Stopping a Cloud Stack• View Activity — Go to the Activity Page
Oracle Cloud Stack Click to view the Stacks Page.
Stacks Click to view the Stacks Page.
Start this stack. See Starting and Stopping a Cloud Stack.
Stop this stack. See Starting and Stopping a Cloud Stack.
View the template from which this stack was created. See Viewing aTemplate Resource Topology.
Stack Overview Shows a summary of the cloud resources being used by this stack:
• Resources — The number of resources that comprise this stack• OCPUs — The total number of Oracle CPUs allocated for the
resources in this stack• Memory — The total amount of memory allocated for the
resources in this stack• Storage — The total amount of block storage allocated for the
resources in this stack• Public IPs — The total number of public IP addresses allocated
for the resources in this stack
ResourcesAn icon with no badges indicates a cloud resource in this stack thatwas created successfully and is running. The icon is specific to thetype of cloud service (Oracle Database Cloud Service in this example).
An icon with the hourglass badge indicates a cloud resource in thisstack that has not yet been created. The icon is specific to the type ofcloud service.
This resource likely has a dependency on another resource in thestack, which either is still being created or failed to create successfully.
An icon with the red badge indicates a cloud resource in this stack thatis either being deleted or was not created successfully. The icon isspecific to the type of cloud service (Oracle MySQL Cloud Service inthis example).
Click the resource’s Name to go to this cloud service’s console and tolearn more about the cause of the error.
Name Click the name of a resource to go to the console for this cloud service.
Type, Version,Created On
The type of cloud service that was used to create this resource (OracleDatabase Cloud Service for example), the software version running onthis resource, if applicable, and the date/time on which this resourcewas created.
OCPUs, Memory,Storage
The number of Oracle CPUs, memory and block storage allocated tothis resource.
Chapter 7Stack Details Page
7-5

Element Description
Container, Username,URL
If this resource is an Oracle Cloud Infrastructure Object StorageClassic container, the name of the storage container, the cloud userthat Oracle Cloud Stack used to create and access the container, andthe base URL of the container.
One or more patchesavailable
Click this link to go to the console for this cloud service. Use theservice’s Patching page to view the available patches.
Click the menu for a specific resource to select from the followingoptions. Some options may not be available on all resource types:
• Start — See Starting and Stopping a Resource in a Cloud Stack• Stop — See Starting and Stopping a Resource in a Cloud Stack• Restart — See Starting and Stopping a Resource in a Cloud
Stack• SSH Access — See Managing SSH Access for a Resource in a
Cloud Stack• Access Rules — See Managing Access Rules for a Resource in
a Cloud Stack
Published Templates PageThe Published Templates page in the Oracle Cloud Stack console shows the stacktemplates that are available to the current cloud user. Users can manage thesetemplates and also create cloud stacks from a template.
What You Can Do From the Published Templates Page
Use this page to perform the following tasks:
• Viewing a Template Resource Topology
• Importing a Template
• Creating a Cloud Stack
• Copying a Template
• Exporting a Template
• Deleting a Template
What You See on the Published Templates Page
The following table describes the key information shown on the Published Templatespage.
Element Description
HeaderAccess other Oracle Cloud services.
Depending on how you signed up for Oracle Cloud, you can alsoaccess either the Oracle Cloud Infrastructure Console or the OracleCloud Infrastructure Classic Console.
Access help for this page, including documentation, tutorials, videosand FAQs.
Chapter 7Published Templates Page
7-6
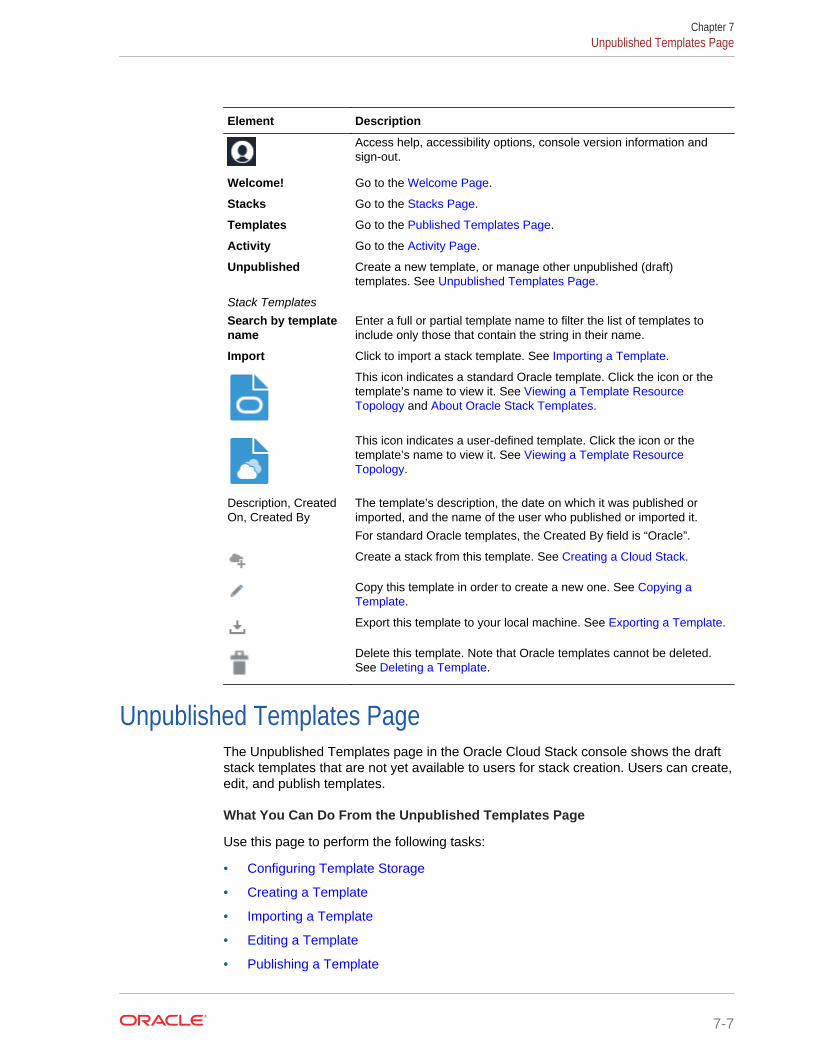
Element Description
Access help, accessibility options, console version information andsign-out.
Welcome! Go to the Welcome Page.
Stacks Go to the Stacks Page.
Templates Go to the Published Templates Page.
Activity Go to the Activity Page.
Unpublished Create a new template, or manage other unpublished (draft)templates. See Unpublished Templates Page.
Stack TemplatesSearch by templatename
Enter a full or partial template name to filter the list of templates toinclude only those that contain the string in their name.
Import Click to import a stack template. See Importing a Template.
This icon indicates a standard Oracle template. Click the icon or thetemplate’s name to view it. See Viewing a Template ResourceTopology and About Oracle Stack Templates.
This icon indicates a user-defined template. Click the icon or thetemplate’s name to view it. See Viewing a Template ResourceTopology.
Description, CreatedOn, Created By
The template’s description, the date on which it was published orimported, and the name of the user who published or imported it.
For standard Oracle templates, the Created By field is “Oracle”.
Create a stack from this template. See Creating a Cloud Stack.
Copy this template in order to create a new one. See Copying aTemplate.
Export this template to your local machine. See Exporting a Template.
Delete this template. Note that Oracle templates cannot be deleted.See Deleting a Template.
Unpublished Templates PageThe Unpublished Templates page in the Oracle Cloud Stack console shows the draftstack templates that are not yet available to users for stack creation. Users can create,edit, and publish templates.
What You Can Do From the Unpublished Templates Page
Use this page to perform the following tasks:
• Configuring Template Storage
• Creating a Template
• Importing a Template
• Editing a Template
• Publishing a Template
Chapter 7Unpublished Templates Page
7-7
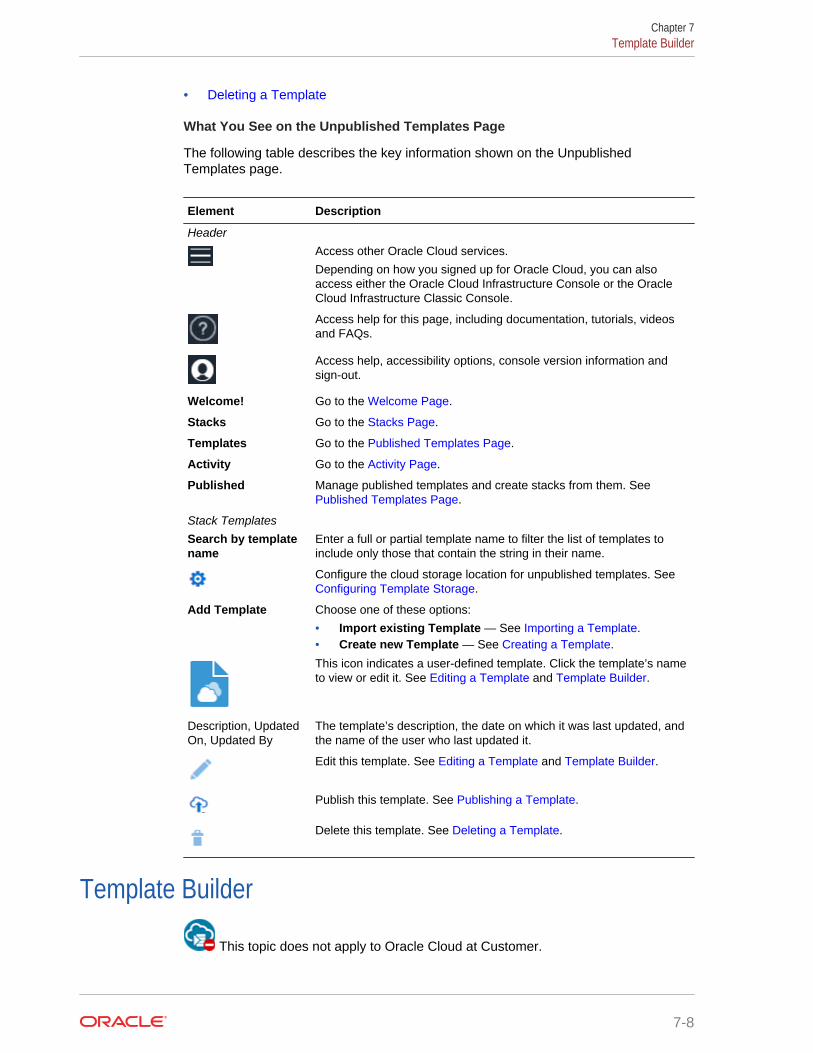
• Deleting a Template
What You See on the Unpublished Templates Page
The following table describes the key information shown on the UnpublishedTemplates page.
Element Description
HeaderAccess other Oracle Cloud services.
Depending on how you signed up for Oracle Cloud, you can alsoaccess either the Oracle Cloud Infrastructure Console or the OracleCloud Infrastructure Classic Console.
Access help for this page, including documentation, tutorials, videosand FAQs.
Access help, accessibility options, console version information andsign-out.
Welcome! Go to the Welcome Page.
Stacks Go to the Stacks Page.
Templates Go to the Published Templates Page.
Activity Go to the Activity Page.
Published Manage published templates and create stacks from them. See Published Templates Page.
Stack TemplatesSearch by templatename
Enter a full or partial template name to filter the list of templates toinclude only those that contain the string in their name.
Configure the cloud storage location for unpublished templates. See Configuring Template Storage.
Add Template Choose one of these options:
• Import existing Template — See Importing a Template.• Create new Template — See Creating a Template.
This icon indicates a user-defined template. Click the template’s nameto view or edit it. See Editing a Template and Template Builder.
Description, UpdatedOn, Updated By
The template’s description, the date on which it was last updated, andthe name of the user who last updated it.
Edit this template. See Editing a Template and Template Builder.
Publish this template. See Publishing a Template.
Delete this template. See Deleting a Template.
Template Builder
This topic does not apply to Oracle Cloud at Customer.
Chapter 7Template Builder
7-8

The Template Builder page in the Oracle Cloud Stack console lets users edit a stacktemplate by using graphical tools or by editing the YAML source. Users can alsovalidate, publish, and copy templates.
What You Can Do From the Template Builder Page
Use this page to perform the following tasks:
• Creating a Template
• Copying a Template
• Publishing a Template
• Exporting a Template
• Validating a Template
• Editing Template Files
What You See on the Template Builder Page
The following table describes the key information shown on the Template Builderpage.
Element Description
HeaderAccess other Oracle Cloud services.
Depending on how you signed up for Oracle Cloud, you can alsoaccess either the Oracle Cloud Infrastructure Console or the OracleCloud Infrastructure Classic Console.
Access help for this page, including documentation, tutorials, videosand FAQs.
Access help, accessibility options, console version information andsign-out.
Welcome! Go to the Welcome Page.
Stacks Go to the Stacks Page.
Templates Go to the Published Templates Page.
Activity Go to the Activity Page.
Template MetadataUnpublishedTemplates
Return to the list of unpublished templates. See UnpublishedTemplates Page.
Click to edit the template’s version and description.
ToolbarCreate a new template. See Creating a Template.
Return to the list of unpublished templates. See UnpublishedTemplates Page.
Save the template.
Create a new template by copying the current one. See Copying aTemplate.
Chapter 7Template Builder
7-9

Element Description
Publish the template so that it can be used to create cloud stacks. See Publishing a Template.
Export the template file to your local machine. See Exporting aTemplate.
Delete the template.
Undo the previous modification to the template.
Redo the previous modification to the template.
Display a grid of horizontal and vertical lines on the canvas area,behind the resources and connectors.
Rearrange the resources on the canvas area so that all of them arepositioned on the intersections of the horizontal and vertical lines of thegrid.
Display all connectors on the canvas area as straight lines (rays).
Display all connectors on the canvas area using multiple lines (pipes).
Rearrange the resources on the canvas area based on theirdependencies.
Zoom in and out on the canvas area.
Validate the syntax of the entire template. See Validating a Template.
Open the template in the online YAML editor. See Editing TemplateFiles.
Template Elements
Enter a text string and click in order to search the template for thestring and then display a list of matching resource types and matchingtemplate elements (resources, parameters, attributes, conditions, andso on). Click one of the items in the search results to navigate to thatelement within the template.
Click to clear the search results.
Click this icon to the left of each type of template element (resources,parameters, parameter groups, and so on) in order to display a list ofelements of this type within the template. Click the icon again to hidethe list of elements.
Click this icon to the right of each type of template element (resources,parameters, parameter groups, and so on) in order to add a newelement of this type to the template. Refer to the following topics:
• Creating Template Parameters• Creating Parameter Groups• Creating Resources• Creating Attributes• Creating Conditions
Click this icon to the right of each type of template element (resources,parameters, parameter groups, and so on) in order to sort the existingelements of this type alphabetically. Click the icon again to sort theexisting elements reverse alphabetically.
Chapter 7Template Builder
7-10

Element Description
Click this icon to the right of each element in this template (resources,parameters, parameter groups, and so on) in order to edit theelement’s configuration.
Click this icon to the right of each element in this template (resources,parameters, parameter groups, and so on) in order to delete theelement from the template.
Activity PageUse the Activity page in the console to monitor activity across all of the platform cloudservices in this identity domain, including operations performed by Oracle Cloud Stack.Search for operations by date, status, service type and service (stack) name.
Tip:
To view only those operations performed by Oracle Cloud Stack, set theService Type to Oracle Cloud Stack.
What You See on the Activity Page
Element Description
Start Time Range Filters activity results to include only operations started within a specifiedtime range. The range defaults to the previous 24 hours.
Status Filters operations by status of the operation:
• All• Scheduled• Running• Succeeded• FailedYou can select any subset of status types. The default value is All.
Service Name Filters the activity results to include operations only for the specified serviceinstance. You can enter a full or partial service instance name.
Service Type Filters the activity results to include operations only for instances of thespecified service type. The default value is the current cloud service.
Operation Filters the activity results to include selected types of operations. You canselect any subset of the given operations. The default value is All.
Search Searches for activities by applying the filters specified by the Start TimeRange, Status, Service Name, Service Type and Operation fields, anddisplays activity results in the table.
Reset Clears the Start Time Range and Service Name fields, and returns theStatus and Operation fields to their default values.
Results per page Specifies the number of results you want to view per page. The defaultvalue is 10.
Displays status messages for the given operation. Clicking on the resultingdownward arrow hides the status messages.
Chapter 7Activity Page
7-11

Element Description
Service Name Shows the name of the service instance and its identity domain:
service_instance:identity_domain
You can sort the column in ascending or descending order.
Service Type Shows the type of cloud service for this instance.
You can sort the column in ascending or descending order.
Operation Shows the type of operation performed on the service instance.
You can sort the column in ascending or descending order.
Status Shows the status of the operation performed on the service instance.
You can sort the column in ascending or descending order.
Start Time Shows the time the operation started.
You can sort the column in ascending or descending order.
End Time Shows the time the operation ended, if the operation is complete.
You can sort the column in ascending or descending order.
Initiated By Shows the user that initiated the operation. The user can be any user in theidentity domain who initiated the operation or, for certain operations such asautomated backup, System.
You can sort the column in ascending or descending order.
Chapter 7Activity Page
7-12