user installation guide--sas 9.1.3 foundation for microsoft windows
TRANSCRIPT
i User Installation Guide for SAS 9.1.3 Foundation for Microsoft Windows
User Installation Guidefor SAS® 9.1.3 Foundation for Microsoft® Windows®
User Installation Guide for SAS 9.1.3 Foundation for Microsoft Windows
Copyright Notice The correct bibliographic citation for this manual is as follows: SAS Institute Inc., User Installation Guide for SAS® 9.1.3 Foundation for Microsoft® Windows®, Cary, NC: SAS Institute Inc., 2008.
User Installation Guide for SAS® 9.1.3 Foundation for Microsoft® Windows®, Copyright © 2008 SAS Institute Inc., Cary, NC, USA.
All rights reserved. Printed in the United States of America. No part of this publication may be reproduced, stored in a retrieval system, or transmitted, by any form or by any means, electronic, mechanical, photocopying, or otherwise, without the prior written permission of the publisher, SAS Institute, Inc. These installation instructions are copyrighted.
Limited permission is granted to store the copyrighted material in your system and display it on terminals, print only the number of copies required for use by those persons responsible for installing and supporting the SAS programming and licensed programs for which this material has been provided, and to modify the material to meet specific installation requirements. The SAS Institute copyright notice must appear on all printed versions of this material or extracts thereof and on the display medium when the material is displayed. Permission is not granted to reproduce or distribute the material except as stated above.
U.S. Government Restricted Rights Notice. Use, duplication, or disclosure of the software by the government is subject to restrictions as set forth in FAR 52.227-19 Commercial Computer Software-Restricted Rights (June 1987).
SAS Institute Inc., SAS Campus Drive, Cary, North Carolina 27513.
SAS® and all other SAS Institute Inc. product or service names are registered trademarks or trademarks of SAS Institute Inc. in the USA and other countries.
® indicates USA registration.
Certain products on this media include software developed by the Apache Software Foundation (http://www.apache.org/).
Certain products on this media include software developed by WebGain, Inc.
ACE™ is copyrighted by Douglas C. Schmidt and his research group at Washington University and University of California, Irvine.
Other brand and product names are trademarks of their respective companies.
User Installation Guide for SAS 9.1.3 Foundation for Microsoft Windows i 28 February 2008
User Installation Guide for SAS® 9.1.3 Foundation for Microsoft Windows
Table of Contents
Copyright Notice................................................................................................................................... ii About This Guide.................................................................................................................................. ii
WHERE TO BEGIN..................................................................................................................... 1
Installing SAS 9.1.3 Foundation for Microsoft Windows.............................................. 1 Antivirus and/or Firewall Software................................................................................................ 1 Using the SAS Log ............................................................................................................................... 1
Two Starting Points for Installing SAS ................................................................................... 1 AutoPlay on the SAS Setup Disk.................................................................................................... 2 AutoPlay and the System Requirements Wizard ..................................................................... 2 AutoPlay and the SAS Setup Wizard ............................................................................................ 2 The SAS Software Navigator ........................................................................................................... 2
Client and Personal Installations ............................................................................................... 3 Client Installation................................................................................................................................. 3 Personal Installation ........................................................................................................................... 3
Documentation for Installing SAS 9.1.3 ................................................................................ 3 Accessing the Documentation ......................................................................................................... 3 Installation Qualification Tool.......................................................................................................... 4
Installing SAS from the SAS Setup Disk ................................................................................ 4 Run the System Requirements Wizard ........................................................................................ 5 Run the SAS Setup Wizard............................................................................................................... 5
Updating Your SAS Installation .................................................................................................. 5
THE SYSTEM REQUIREMENTS WIZARD FOR USERS ................................................... 7 Reducing the Number of Required Reboots............................................................................... 7 Starting the System Requirements Wizard................................................................................ 7 Updating to Minimum System Requirements............................................................................ 7
System Requirements Wizard Dialogs .................................................................................... 8 Sequence of System Requirements Wizard Windows............................................................ 8 System Requirements Wizard Dialogs & Directions ............................................................... 8
THE SAS SETUP WIZARD FOR END USERS ................................................................... 10 Starting the SAS Setup Wizard .................................................................................................... 10
ii User Installation Guide for SAS 9.1.3 Foundation for Microsoft Windows
SAS Setup Wizard Dialogs ............................................................................................................ 10 Sequence of Setup Windows ......................................................................................................... 10 SAS Setup Wizard Dialogs & Directions .................................................................................... 11 Dialogs Used More than Once in Setup ..................................................................................... 20
INSTALLING THE SAS SYSTEM VIEWER........................................................................ 22 Starting the SAS System Viewer ................................................................................................. 22
REMOVING SAS SOFTWARE ............................................................................................... 23
USER INSTALLATION GLOSSARY ..................................................................................... 24
About This Guide This document provides user installation instructions for SAS 9.1.3 Foundation, which is made up of server-side Base SAS and a variety of server-side SAS products (the exact products vary by customer). Information about the installation of mid-tier and client-side products are available from your SAS Software Navigator. If you need to perform a setup or other system administration tasks, please refer to the Administrator Guide for SAS 9.1.3 Foundation for Microsoft Windows. To find configuration information and instructions for customizing the installation of specific SAS components and products, please refer to Post-Installation Guide for SAS 9.1.3 Foundation for Microsoft Windows. The server-side configuration instructions contained in this document are for the configuration of a generic SAS server. For information about configuring workspace and stored process servers, please see SAS Integration Technologies: Server Administrator's Guide. For information about configuring an OLAP server, please see SAS OLAP Server: Administrator's Guide, Second Edition. For information about setting up a metadata server, please see SAS Metadata Server: Setup and Administration Guide. This material can be found at http://support.sas.com/documentation/configuration/index.html.
User Installation Guide for SAS 9.1.3 Foundation for Microsoft Windows 1
Where to Begin
Most people who install the SAS 9.1.3 Foundation can be considered either administrators or end users. This User Installation Guide is intended for end users who will install SAS 9.1.3 Foundation.
Installing SAS 9.1.3 Foundation for Microsoft Windows
If the System Requirements have not been updated by a System Administrator, users can update their System Requirements, as described in “The System Requirements Wizard for Users” on page 7. When you install SAS software, close all SAS programs including SAS services and processes that are running in the Task Manager (for example, spawner.exe, objspawn.exe, SAS Lev1 CS, SAS Lev1 MS, SAS Lev1 OB, etc).
Antivirus and/or Firewall Software Before you proceed with this installation, it is recommended that you close your anti-virus software and your firewall software. Some anti-virus and/or firewall configurations can prevent an application from installing successfully. If you are unable to close the anti-virus or firewall software, make sure that your configuration allows you to install software and to update the registry. If your SAS installation fails and you have mandatory anti-virus or firewall software running, please check with your system administrator. Remember that you must have Administrative rights to complete a SAS installation.
Using the SAS Log If you view the SAS log (as a part of the installation log or separate from the installation), please note that SAS 9.1.3 and SAS 9.1.3 Foundation are displayed in the log as SAS 9.1 TS1M2.
Two Starting Points for Installing SAS To install SAS 9.1.3 Foundation in its simplest form, you can run the installation from the SAS Setup Disk. This AutoPlay method is introduced below and described in more detail in “The SAS Setup Wizard for End Users” on page 10. If your SAS 9.1.3 software installation is intended for multiple platforms, or if your software mix requires post-installation configuration, the SAS Software Navigator (SSN) would be your best choice. The SSN is designed for this type of deployment across a multiplatform and/or multi-machine environment. For more information, please see “The SAS Software Navigator” on page 2. Which ever starting point you use for your Windows environment, a SAS 9.1.3 Foundation installation includes both the System Requirements Wizard and SAS Setup. In a software update, these tools ensure that newer files will be placed in the same locations as their predecessors. For the user, the result is a streamlined wizard sequence in which certain windows are skipped. In addition, when new software is installed, SAS Setup checks to
2 User Installation Guide for SAS 9.1.3 Foundation for Microsoft Windows
see if updates are required. The Setup tool then applies any needed software as part of the installation.
AutoPlay on the SAS Setup Disk The SAS AutoPlay, which is launched when you insert the SAS Setup Disk, is the simplest method for installing SAS 9.1.3 Foundation. The AutoPlay menu displays links that you need to begin your installation. The links under the heading End User Steps include “Verify System Requirements” and “Install SAS Software.” While you can proceed by selecting either of these links, “Verify System Requirements” is recommended. This choice runs a tool that installs system updates if they are needed. If you begin an installation on a system that does not meet the minimum system requirements, the installation process will not continue until this tool runs.
AutoPlay and the System Requirements Wizard The System Requirements Wizard indicates if updates are required, and if so, which products will be installed. If your computer needs updated software, a reboot may be required. To use this tool, click on “Verify System Requirements” under the End User Steps. If you are asked to choose a Setup language, select one from the menu in the window. For descriptions of the remaining steps in the SRW, please see the chapter “The System Requirements Wizard for Users” on page 7.
AutoPlay and the SAS Setup Wizard After the System Requirements Wizard runs, you can perform your installation of SAS 9.1.3 Foundation by clicking Install SAS 9.1 Foundation under End User Steps. SAS Setup will ask for your SAS Installation Data (SID), which is sent to your site’s SAS Installation Representative by e-mail. The Customer Key and Order number can be found in the SAS Installation Kit on the SAS Order Information letter. Follow the steps in the window dialogs presented by SAS Setup to complete your installation of SAS 9.1.3 Foundation.
The SAS Software Navigator The SAS Software Navigator is designed for enterprise deployment across a multiplatform and/or multi-machine environment. Note: To install SAS 9.1.3 Foundation in its simplest form by bypassing the SAS Software
Navigator, you can run the installation from the SAS Setup Disk, as described in “Installing SAS from the SAS Setup Disk” on page 4.
When SAS Setup is run from a server or the SAS Software Depot, the SAS Software Navigator is the first window to appear. The SAS Software Navigator serves as a launch pad for interactive use of SAS Setup and the System Requirements Wizard mentioned above. In addition to supporting these installation tools, the SAS Software Navigator provides access to online installation and configuration documentation, installation qualification tests, the Install Center, and SAS Technical Support. The SAS Software Navigator was written in Java, to take advantage of the platform independence offered by that programming language.
User Installation Guide for SAS 9.1.3 Foundation for Microsoft Windows 3
Client and Personal Installations SAS 9.1.3 Foundation can be installed in two different scenarios, Client Installation and Personal Installation.
Client Installation A Client installation uses the SAS Installation Wizard, SAS Setup, to install the software you need to run SAS in association with shared files on a network server. Before a client installation can be performed, a System Administrator creates a server for clients, as described in the Administrator Guide for SAS 9.1.3 Foundation for Microsoft Windows. This method allows a majority of the files used by SAS to be stored in a central location and shared by multiple clients.
Personal Installation A Personal Installation uses the SAS Installation Wizard, SAS Setup, to install all the software you need to run SAS on your PC. In general, users who complete a Personal Installation of the SAS System are planning to run SAS without a server installation of SAS software in the network. If you are installing from CDs, you are performing a Personal Installation. A Personal Installation can also be performed by using the SAS Setup Wizard from a network location created by your System Administrator.
Documentation for Installing SAS 9.1.3 In SAS 9.1.3 Foundation, installation documentation can be viewed by using a Web browser. Documents are in PDF format and can be accessed from either of the following locations:
• the Documentation for Installing and Configuring SAS CD, found inside the lid of your installation kit. (To begin, insert the media into your CD-ROM drive and open \documentation\eng\index.html.)
• the Install Center section of our Web site, http://support.sas.com/documentation/installcenter/913/kit/index.html.
You can always find the most recent version of the installation documentation on the Install Center site.
Accessing the Documentation The materials are divided into three documents:
• The User Installation Guide is accessible from the SAS Software Navigator by selecting the View User Installation Guide option.
• The System Requirements document can be reviewed before or after you run the
System Requirements Wizard. The document can be accessed from the SAS Software Navigator by selecting the View System Requirements option.
• The Post-Installation Guide is intended for anyone who needs to tune the behavior of
specific SAS products or solutions after installation. This document is accessible from the SAS Software Navigator by selecting the View Post-Installation Guide option.
To see the Installation Kit materials and other sources of installation-related information, visit the Install Center Web site.
4 User Installation Guide for SAS 9.1.3 Foundation for Microsoft Windows
Installation Qualification Tool The Installation Qualification Tool can be used to validate the SAS System installation image. For more information about this tool, please see the SAS Installation Qualification Tools User Guide. After SAS is installed, both the Installation Qualification Tool and its User Guide are available from Start > Programs (or All Programs on WinXP) > SAS > SAS 9.1 Utilities.
Installing SAS from the SAS Setup Disk While the SAS Software Navigator was designed as the starting point for an enterprise deployment of SAS 9.1.3 Foundation, the SAS Setup Disk can be used for an installation of SAS 9.1.3 Foundation in its simplest form. If you want to install SAS 9.1.3 Foundation using the SAS Setup Disk, follow these steps:
1. Make sure that you are logged in as the Administrator.
2. Locate the SAS Setup Disk in the media container(s) inside your installation kit.
3. If the SAS Software Navigator is running from the SAS Software Navigator Disk, close this application by clicking the ‘X’ in the upper right-hand corner. In order for the SAS Setup Disk to autoplay, the SAS Software Navigator must be closed.
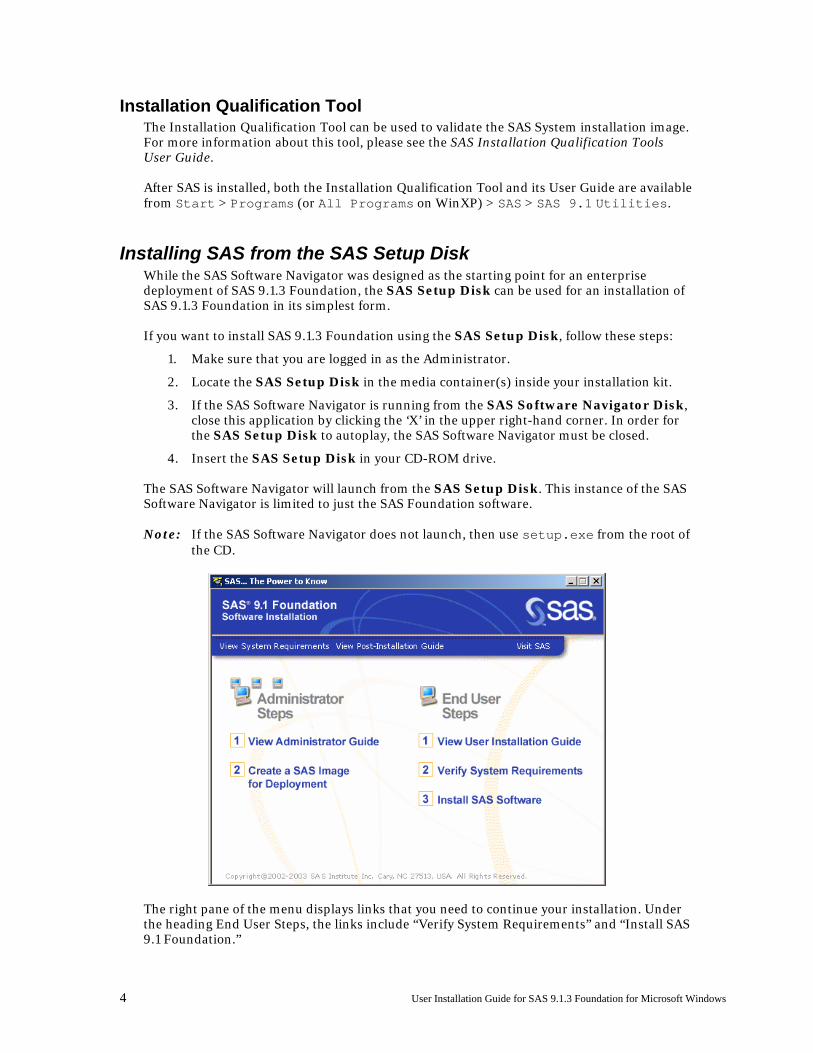
4. Insert the SAS Setup Disk in your CD-ROM drive. The SAS Software Navigator will launch from the SAS Setup Disk. This instance of the SAS Software Navigator is limited to just the SAS Foundation software. Note: If the SAS Software Navigator does not launch, then use setup.exe from the root of
the CD.
The right pane of the menu displays links that you need to continue your installation. Under the heading End User Steps, the links include “Verify System Requirements” and “Install SAS 9.1 Foundation.”
User Installation Guide for SAS 9.1.3 Foundation for Microsoft Windows 5
While you can proceed by selecting either of these links, “Verify System Requirements” is recommended. This choice runs a tool that installs system updates if they are needed. If you begin an installation on a system that does not meet the minimum system requirements, the installation process will not continue until this tool runs.
Run the System Requirements Wizard To use this tool, click on “Verify System Requirements” under the End User Steps. If you are asked to choose a Setup language, select one from the menu in the window.
For descriptions of the remaining steps in the SRW, please see the chapter “The System Requirements Wizard for Users” on page 7. The System Requirements Wizard indicates if updates are required, and if so, which products will be installed. If your computer needs updated software, a reboot may be required.
Run the SAS Setup Wizard After the System Requirements Wizard runs, you can perform your installation of SAS 9.1.3 Foundation.
1. Return to the SAS Setup Disk AutoPlay menu. 2. Under End User Steps, click on Install SAS 9.1 Foundation. 3. SAS Setup begins with a Welcome screen. Click Next on this screen. 4. Retrieve your SAS Installation Data file from a file location.
Follow the steps in the window dialogs presented by SAS Setup to complete your installation of SAS 9.1.3 Foundation. For descriptions of the remaining steps in SAS Setup, please see the chapter “The SAS Setup Wizard for End Users” on page 14.
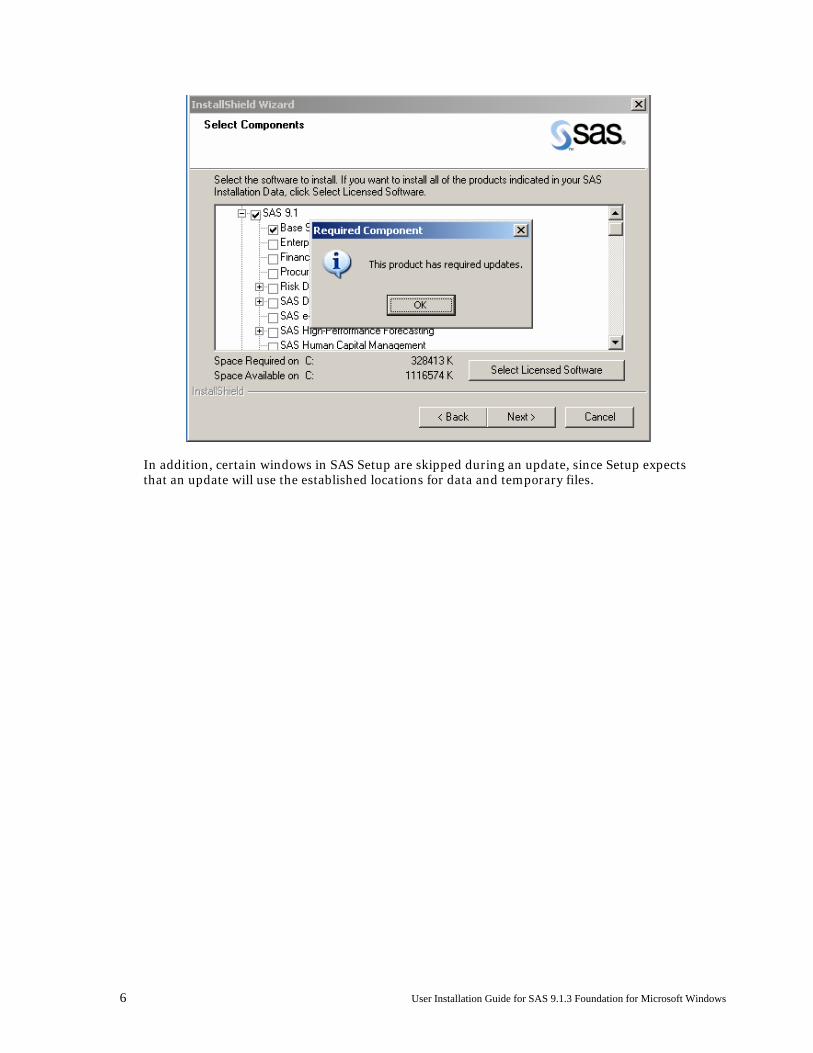
Updating Your SAS Installation If you have installed SAS 9.1 or SAS 9.1.2, there are some options to consider as you plan for your installation of SAS 9.1.3. In the case of a Personal installation, there can be only one SAS 9.1 release (SAS 9.1, SAS 9.1.2, or SAS 9.1.3) installed per PC. It is not possible to maintain your current SAS software on the same computer with your new SAS software. When new software is installed, SAS Setup recognizes if required updates are needed. The Select Components window in SAS Setup displays a list of all the products that are licensed for your installation. If any of these products require an update, their respective names cannot be deselected.
6 User Installation Guide for SAS 9.1.3 Foundation for Microsoft Windows
In addition, certain windows in SAS Setup are skipped during an update, since Setup expects that an update will use the established locations for data and temporary files.
User Installation Guide for SAS 9.1.3 Foundation for Microsoft Windows 7
The System Requirements Wizard for Users The System Requirements Wizard makes sure that the minimum system requirements are installed on your computer before the SAS System is installed.
The System Requirements Wizard may update system components that are part of the operating system. Updating these components to appropriate levels is an important part of a successful SAS System installation.
It is possible that some of the system components that need to be updated by the System Requirements Wizard will be in use by the operating system. Unfortunately, this situation will require a reboot of the computer to properly update the system components in use.
Reducing the Number of Required Reboots Before you start the System Requirements Wizard, it is recommended that you close your anti-virus and firewall software. This will keep the number of required reboots to a minimum. The number of reboots that will be required can vary from computer to computer, since it is determined by the level of the system components installed on the computer when the System Requirements Wizard is run. Some anti-virus and/or firewall configurations can prevent an application from installing successfully. If you are unable to close the anti-virus or firewall software, make sure that your configuration allows you to install software and to update the registry. If your SAS installation fails and you have mandatory anti-virus or firewall software running, please check with your system administrator.
Starting the System Requirements Wizard To start the System Requirements Wizard, complete the following steps: 1. Insert the Setup Disk CD into the source drive. The SAS Software AutoPlay window
appears. If this does not happen, or if you are running from a network location provided by your administrator, select the Run menu option from the Windows Start menu and type:
<source_drive>:\SETUP
In this context, <source_drive> is the drive containing the SAS System installation media.
2. Select “Verify System Requirements” from the list of options.
Updating to Minimum System Requirements After starting the System Requirements Wizard, follow these steps: 1. Carefully read the Welcome dialog and then select Next. 2. The next window displays a complete list of all system components that need to be
updated by the System Requirements Wizard. Review the list and click Next.
If the computer already satisfies the minimum system requirements, a dialog appears to indicate that no updates are required for this computer.
8 User Installation Guide for SAS 9.1.3 Foundation for Microsoft Windows
3. The update process begins for any system components listed in step 2. Some system components may require a reboot of the computer. Carefully read the instructions on the reboot dialog.
• If you elect to reboot, the System Requirements Wizard restarts automatically
following the logon process. • If you elect not to reboot, the System Requirements Wizard exits. Run the System
Requirements Wizard when you are ready to continue updating the system components.
4. When all system components have been updated, a final dialog appears stating that the
computer has been updated to the minimum system requirements for the SAS System.
System Requirements Wizard Dialogs This section describes the steps required to update your system to the minimum system requirements for the software. Users run the System Requirements Wizard and respond to the dialogs as each window is presented. Most of the dialogs described below offer directions printed here in bold text. These represent the quickest method for updating your system.
Sequence of System Requirements Wizard Windows These are the names of the dialog windows in the System Requirements Wizard. Indented dialog titles represent windows that may not be a part of your installation. Welcome to the System Requirements Wizard Automatic Log On
System Components Update Restarting Windows System Update Not Required
System Update Finished
System Requirements Wizard Dialogs & Directions Read Welcome to the System Requirements Wizard Click Next. Or, click Cancel to exit the SAS Requirements Wizard.
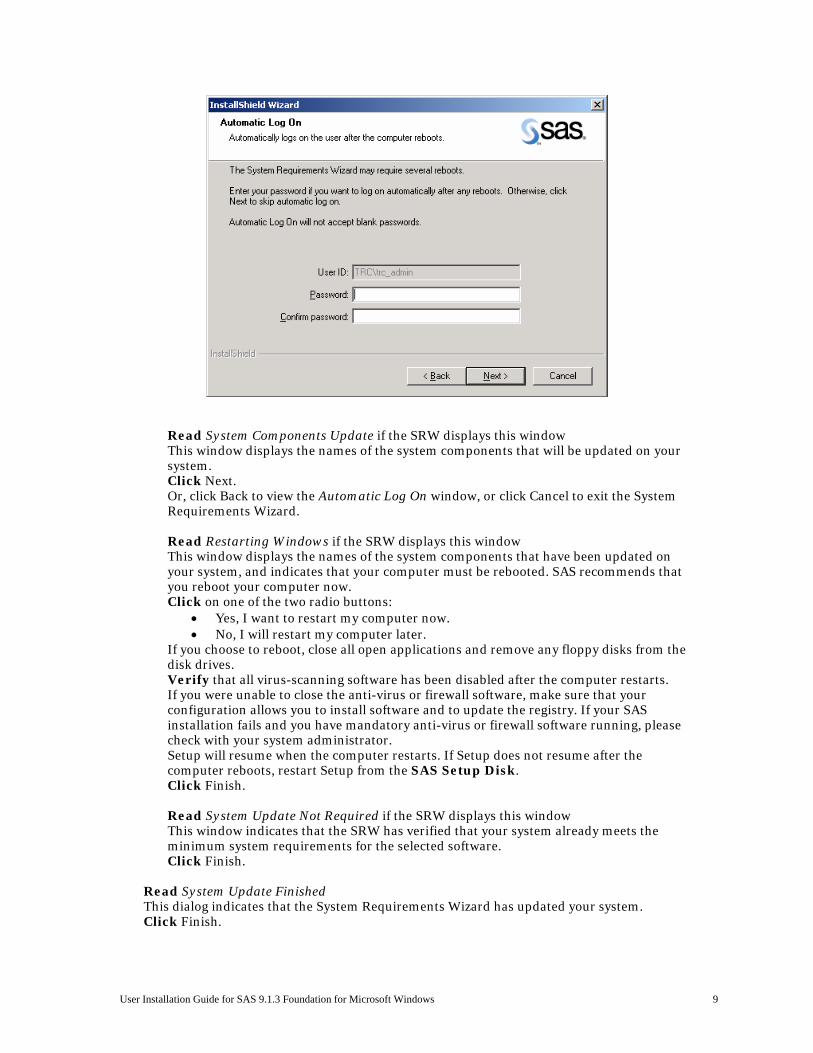
Read Automatic Log On The System Requirements Wizard may require several reboots. If you want to log on automatically after any reboots, enter your password in the Password field. This is optional, and you can click Next to skip automatic log on. If you enter a password, you will need to enter it again in the Confirm password field. Click Next. Or, click Back to view the Welcome to the System Requirements Wizard window, or click Cancel to exit the System Requirements Wizard.
User Installation Guide for SAS 9.1.3 Foundation for Microsoft Windows 9
Read System Components Update if the SRW displays this window This window displays the names of the system components that will be updated on your system. Click Next. Or, click Back to view the Automatic Log On window, or click Cancel to exit the System Requirements Wizard.
Read Restarting Windows if the SRW displays this window This window displays the names of the system components that have been updated on your system, and indicates that your computer must be rebooted. SAS recommends that you reboot your computer now. Click on one of the two radio buttons:
• Yes, I want to restart my computer now. • No, I will restart my computer later.
If you choose to reboot, close all open applications and remove any floppy disks from the disk drives. Verify that all virus-scanning software has been disabled after the computer restarts. If you were unable to close the anti-virus or firewall software, make sure that your configuration allows you to install software and to update the registry. If your SAS installation fails and you have mandatory anti-virus or firewall software running, please check with your system administrator. Setup will resume when the computer restarts. If Setup does not resume after the computer reboots, restart Setup from the SAS Setup Disk. Click Finish. Read System Update Not Required if the SRW displays this window This window indicates that the SRW has verified that your system already meets the minimum system requirements for the selected software. Click Finish.
Read System Update Finished This dialog indicates that the System Requirements Wizard has updated your system. Click Finish.

10 User Installation Guide for SAS 9.1.3 Foundation for Microsoft Windows
The SAS Setup Wizard for End Users This section describes the steps required to install and run SAS. Users respond to the dialogs as each window is presented. Most of the dialogs described below offer directions printed in bold text. The lines that begin with bolded words represent the quickest setup method. Dialogs that are shown indented below may not be a part of your installation. All Setup dialogs are listed below according to the order in which SAS Setup presents them, with the exception of the dialogs that can appear more than once. These are grouped on page 20.
Starting the SAS Setup Wizard To start SAS Setup, complete the following three steps: 1. Insert the SAS Setup Disk CD into the source drive. The SAS AutoPlay window appears.
If this does not happen, or if you are running from a network location provided by your administrator, select the Run menu option from the Windows Start menu and type:
<source_drive>:\SETUP
In this context, <source_drive> is the drive containing the SAS System installation media.
2. If the “Choose Setup Language” window appears, click OK to select the highlighted language for the Setup dialogs.
You may also click on the pull-down menu to view other language choices, or click Cancel to exit. Note: This dialog will not be presented more than once when you run Setup programs
from within the SAS Software Navigator. The language for those Setup dialogs will be the same as the one chosen for the SAS Software Navigator itself.
3. Select “Install SAS Software” from the list of options.
SAS Setup Wizard Dialogs
Sequence of Setup Windows Indented dialog titles represent windows that may not be a part of your installation. InstallShield Initialization Dialog
Choose Setup Language Welcome to the SAS Setup Wizard
System Requirements Check Retrieve SAS Installation Data SAS Installation Data SAS Installation Data Retrieved Language Selections Default Language SAS Shared Files Choose Destination Folder
User Installation Guide for SAS 9.1.3 Foundation for Microsoft Windows 11
Specify Data Files Folder Specify Temporary Files Folder
Select Components Select File Types Start Copying Files
Confirm Update SAS Setup Complete
SAS Setup Wizard Dialogs & Directions
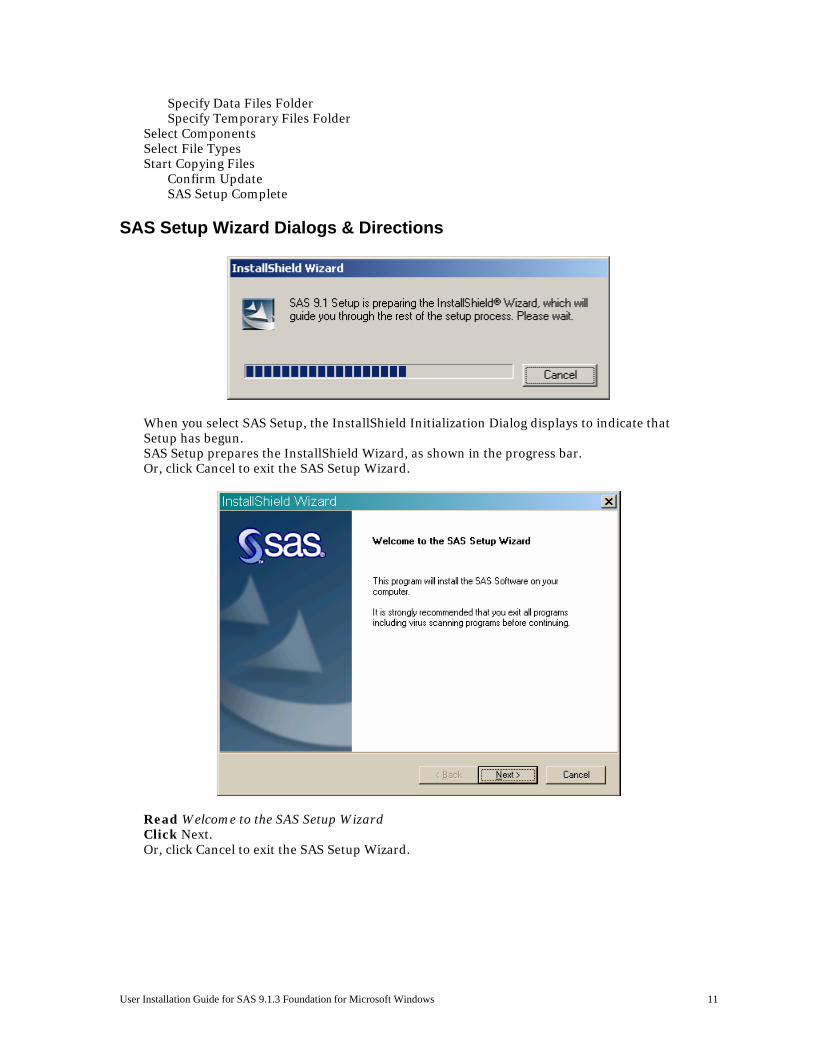
When you select SAS Setup, the InstallShield Initialization Dialog displays to indicate that Setup has begun. SAS Setup prepares the InstallShield Wizard, as shown in the progress bar. Or, click Cancel to exit the SAS Setup Wizard.
Read Welcome to the SAS Setup Wizard Click Next. Or, click Cancel to exit the SAS Setup Wizard.
12 User Installation Guide for SAS 9.1.3 Foundation for Microsoft Windows
Read System Requirements Check, if Setup displays this window. Click the checkbox next to Run System Requirements Wizard. Click Finish to run the System Requirements Wizard. For more information on the System Requirements Wizard, please refer to page 7. After the System Requirements Wizard updates your system, you can restart the SAS installation. Or, click Back to view the Welcome to the SAS Setup Wizard window again, or click Cancel to exit Setup.
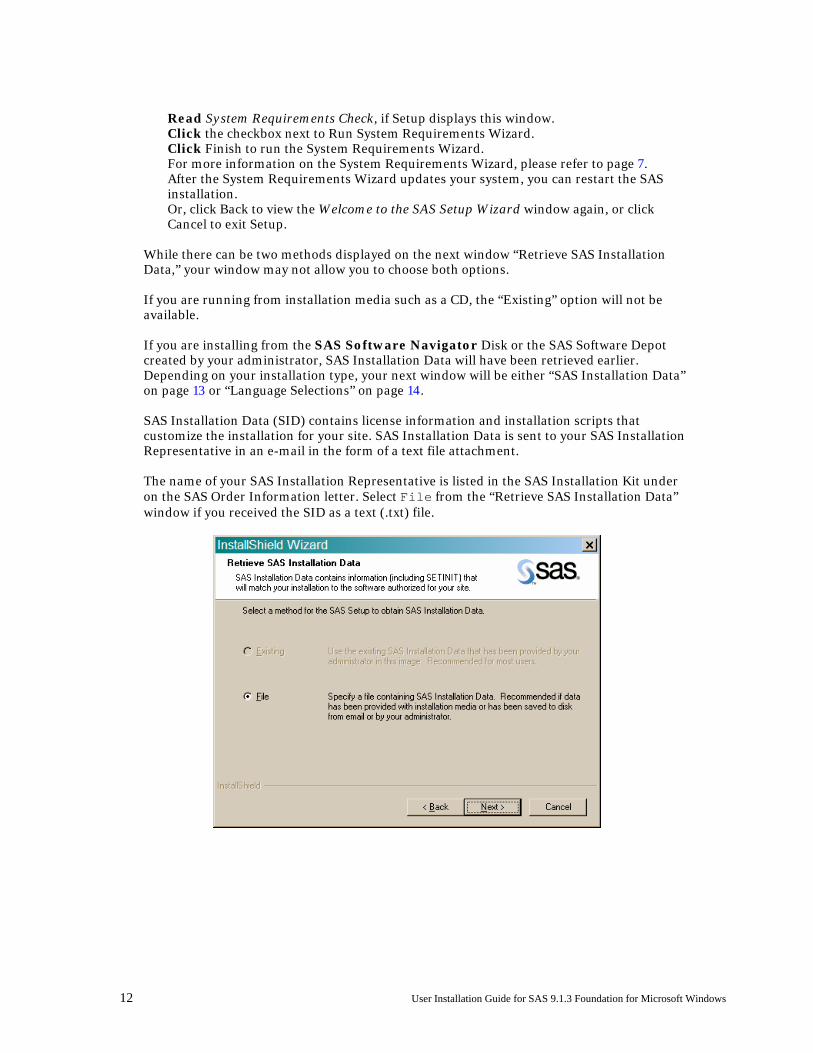
While there can be two methods displayed on the next window “Retrieve SAS Installation Data,” your window may not allow you to choose both options. If you are running from installation media such as a CD, the “Existing” option will not be available. If you are installing from the SAS Software Navigator Disk or the SAS Software Depot created by your administrator, SAS Installation Data will have been retrieved earlier. Depending on your installation type, your next window will be either “SAS Installation Data” on page 13 or “Language Selections” on page 14. SAS Installation Data (SID) contains license information and installation scripts that customize the installation for your site. SAS Installation Data is sent to your SAS Installation Representative in an e-mail in the form of a text file attachment. The name of your SAS Installation Representative is listed in the SAS Installation Kit under on the SAS Order Information letter. Select File from the “Retrieve SAS Installation Data” window if you received the SID as a text (.txt) file.
User Installation Guide for SAS 9.1.3 Foundation for Microsoft Windows 13
Read Retrieve SAS Installation Data, if Setup displays this window. Click on one of the radio buttons to pick the method that the SAS Setup Wizard will use to obtain the SAS Installation Data file. There will be up to three radio buttons available:
• Existing • File
The SAS Installation Data file contains information (including SETINIT) about the SAS software that has been prepared for your site. Select “Existing,” unless you plan to specify a different file, or expect to provide the SAS Installation Data later. Most users can use the network location provided by an administrator. However, if your SAS Installation Data has been placed in a different location, select “File” to enter that location on the SAS Installation Data File dialog. More information on that window can be found below. Click Next. Or, click Back to view the previous window, or click Cancel to exit Setup.
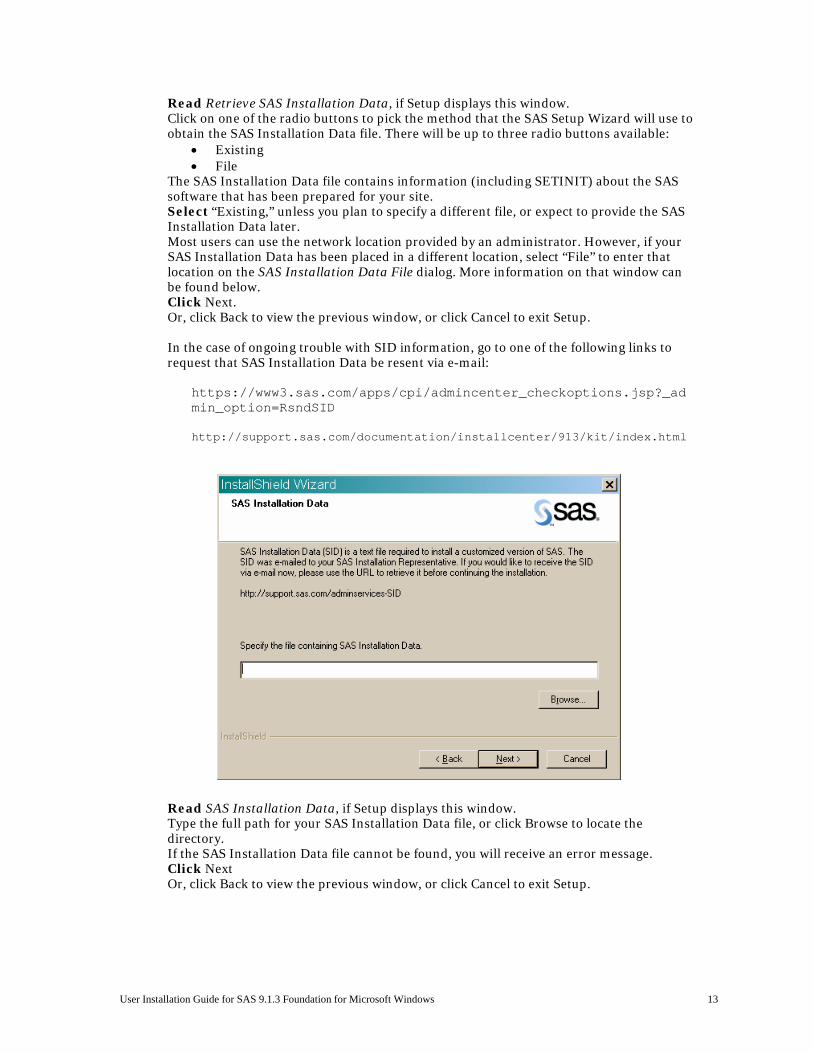
In the case of ongoing trouble with SID information, go to one of the following links to request that SAS Installation Data be resent via e-mail:
https://www3.sas.com/apps/cpi/admincenter_checkoptions.jsp?_admin_option=RsndSID http://support.sas.com/documentation/installcenter/913/kit/index.html
Read SAS Installation Data, if Setup displays this window. Type the full path for your SAS Installation Data file, or click Browse to locate the directory. If the SAS Installation Data file cannot be found, you will receive an error message. Click Next Or, click Back to view the previous window, or click Cancel to exit Setup.
14 User Installation Guide for SAS 9.1.3 Foundation for Microsoft Windows
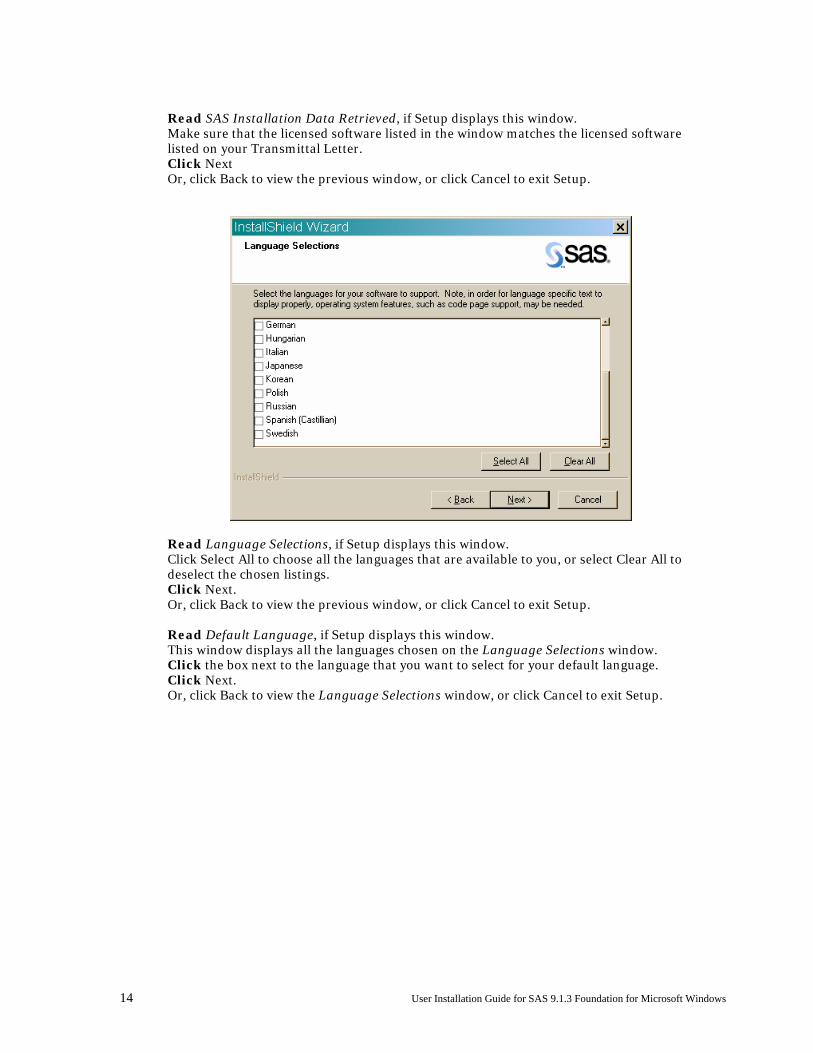
Read SAS Installation Data Retrieved, if Setup displays this window. Make sure that the licensed software listed in the window matches the licensed software listed on your Transmittal Letter. Click Next Or, click Back to view the previous window, or click Cancel to exit Setup.
Read Language Selections, if Setup displays this window. Click Select All to choose all the languages that are available to you, or select Clear All to deselect the chosen listings. Click Next. Or, click Back to view the previous window, or click Cancel to exit Setup. Read Default Language, if Setup displays this window. This window displays all the languages chosen on the Language Selections window. Click the box next to the language that you want to select for your default language. Click Next. Or, click Back to view the Language Selections window, or click Cancel to exit Setup.
User Installation Guide for SAS 9.1.3 Foundation for Microsoft Windows 15
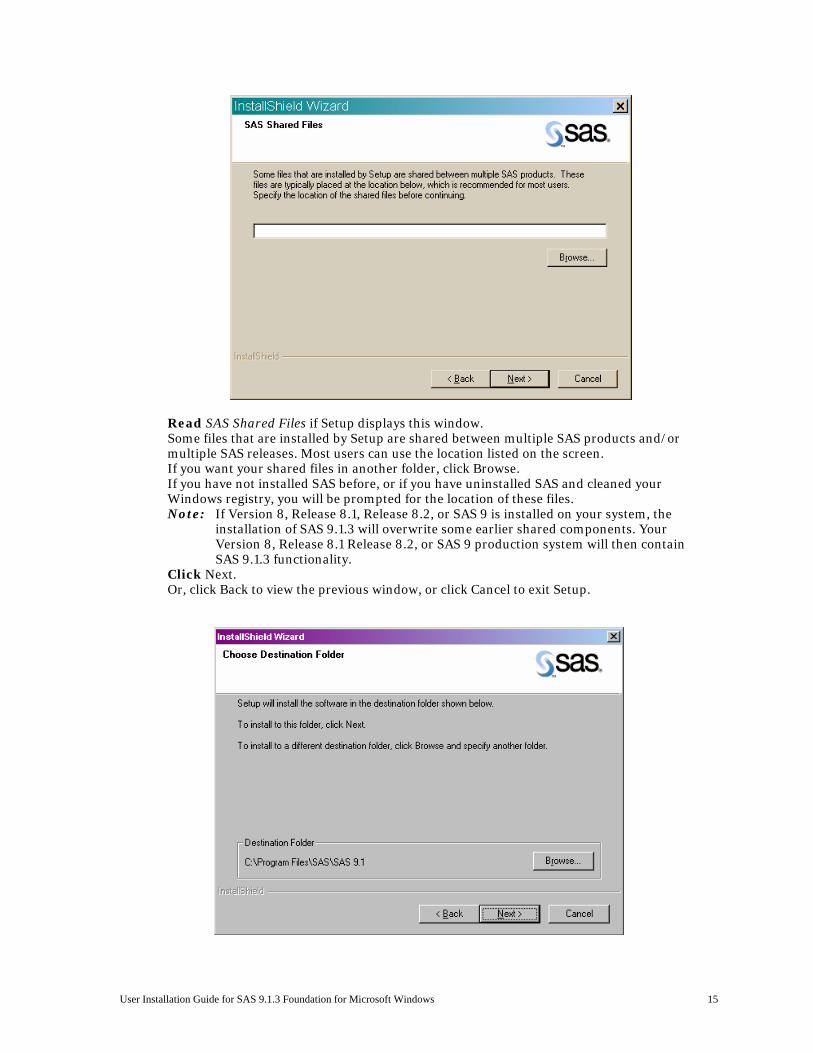
Read SAS Shared Files if Setup displays this window. Some files that are installed by Setup are shared between multiple SAS products and/or multiple SAS releases. Most users can use the location listed on the screen. If you want your shared files in another folder, click Browse. If you have not installed SAS before, or if you have uninstalled SAS and cleaned your Windows registry, you will be prompted for the location of these files. Note: If Version 8, Release 8.1, Release 8.2, or SAS 9 is installed on your system, the
installation of SAS 9.1.3 will overwrite some earlier shared components. Your Version 8, Release 8.1 Release 8.2, or SAS 9 production system will then contain SAS 9.1.3 functionality.
Click Next. Or, click Back to view the previous window, or click Cancel to exit Setup.
16 User Installation Guide for SAS 9.1.3 Foundation for Microsoft Windows
Read Choose Destination Folder if Setup displays this window. Click Next to install SAS in the destination folder listed on the screen. Or, click Browse to choose a different folder. Click Back to view the previous window, or click Cancel to exit Setup.
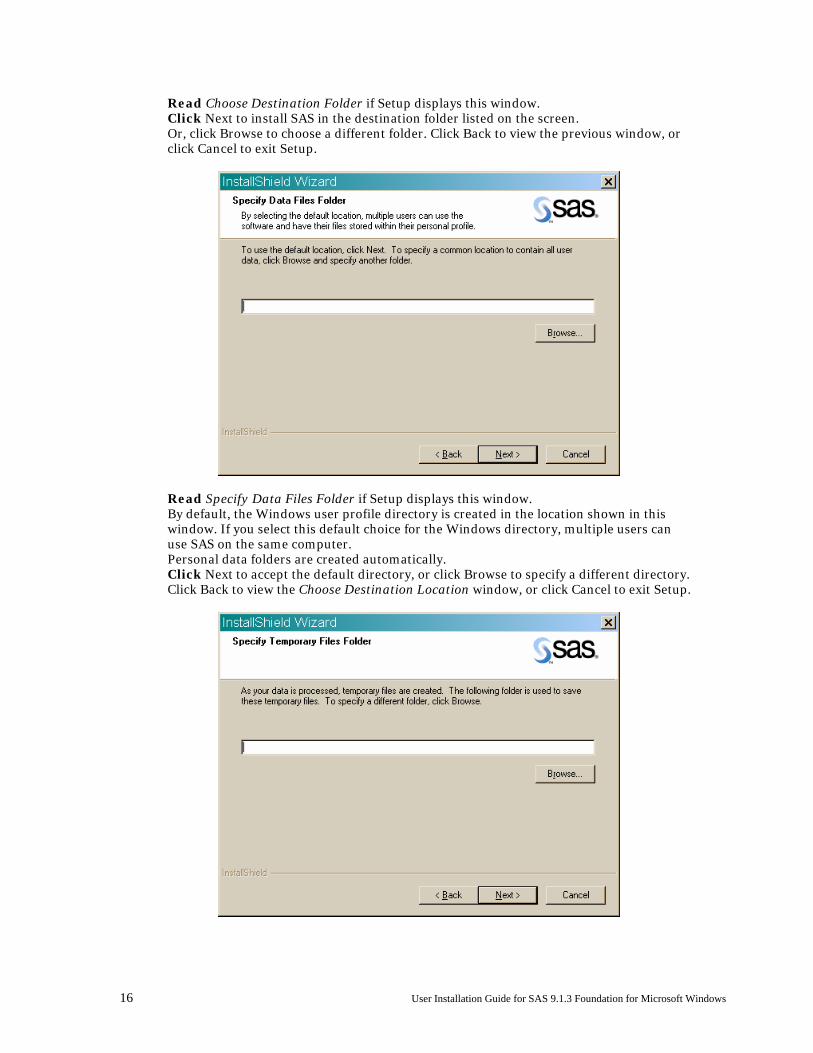
Read Specify Data Files Folder if Setup displays this window. By default, the Windows user profile directory is created in the location shown in this window. If you select this default choice for the Windows directory, multiple users can use SAS on the same computer. Personal data folders are created automatically. Click Next to accept the default directory, or click Browse to specify a different directory. Click Back to view the Choose Destination Location window, or click Cancel to exit Setup.
User Installation Guide for SAS 9.1.3 Foundation for Microsoft Windows 17
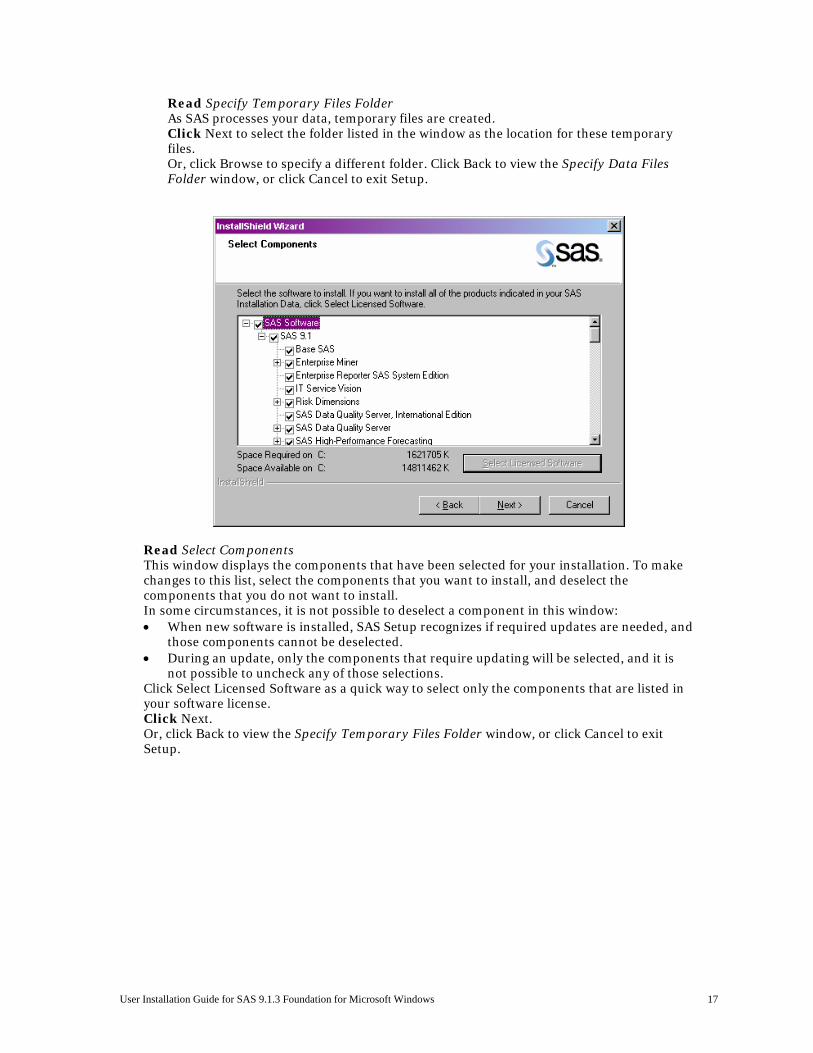
Read Specify Temporary Files Folder As SAS processes your data, temporary files are created. Click Next to select the folder listed in the window as the location for these temporary files. Or, click Browse to specify a different folder. Click Back to view the Specify Data Files Folder window, or click Cancel to exit Setup.
Read Select Components This window displays the components that have been selected for your installation. To make changes to this list, select the components that you want to install, and deselect the components that you do not want to install. In some circumstances, it is not possible to deselect a component in this window: • When new software is installed, SAS Setup recognizes if required updates are needed, and
those components cannot be deselected. • During an update, only the components that require updating will be selected, and it is
not possible to uncheck any of those selections. Click Select Licensed Software as a quick way to select only the components that are listed in your software license. Click Next. Or, click Back to view the Specify Temporary Files Folder window, or click Cancel to exit Setup.

18 User Installation Guide for SAS 9.1.3 Foundation for Microsoft Windows
Read Select File Types This window displays the file types that are already associated with applications on your PC, and the SAS Stored Programs that are designed to use those file types. To make changes to this list, select the file types that you want to associate with SAS software, and deselect the file types that you do not want to associate with SAS. Click Select All to make SAS the default choice for all the file types, or click Clear All to leave your current file associations as they are. Click Next. Or, click Back to view the Select Components window, or click Cancel to exit Setup.
User Installation Guide for SAS 9.1.3 Foundation for Microsoft Windows 19
Read Start Copying Files At this point in the installation, Setup has enough information to start copying the program files. Click Next if you are satisfied with the settings. Or, if you want to review or change any settings, click Back to return to the Select File Types window. Click Cancel to exit Setup.
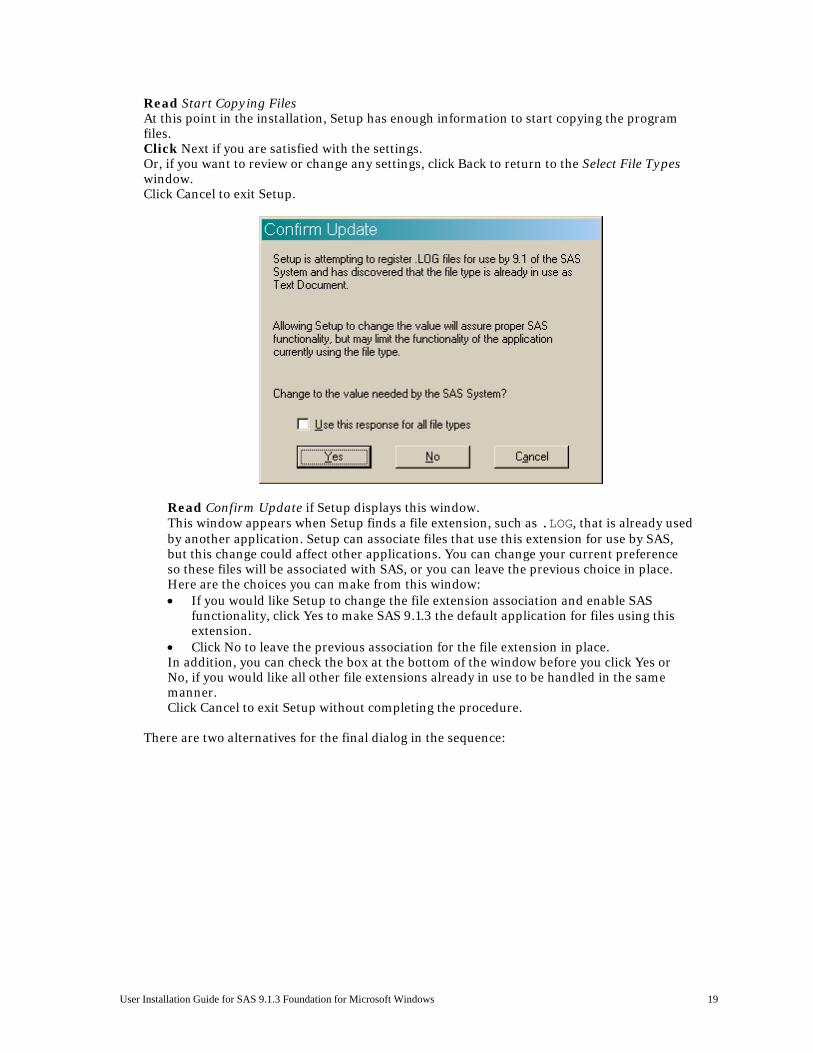
Read Confirm Update if Setup displays this window. This window appears when Setup finds a file extension, such as .LOG, that is already used by another application. Setup can associate files that use this extension for use by SAS, but this change could affect other applications. You can change your current preference so these files will be associated with SAS, or you can leave the previous choice in place. Here are the choices you can make from this window: • If you would like Setup to change the file extension association and enable SAS
functionality, click Yes to make SAS 9.1.3 the default application for files using this extension.
• Click No to leave the previous association for the file extension in place. In addition, you can check the box at the bottom of the window before you click Yes or No, if you would like all other file extensions already in use to be handled in the same manner. Click Cancel to exit Setup without completing the procedure.
There are two alternatives for the final dialog in the sequence:
20 User Installation Guide for SAS 9.1.3 Foundation for Microsoft Windows
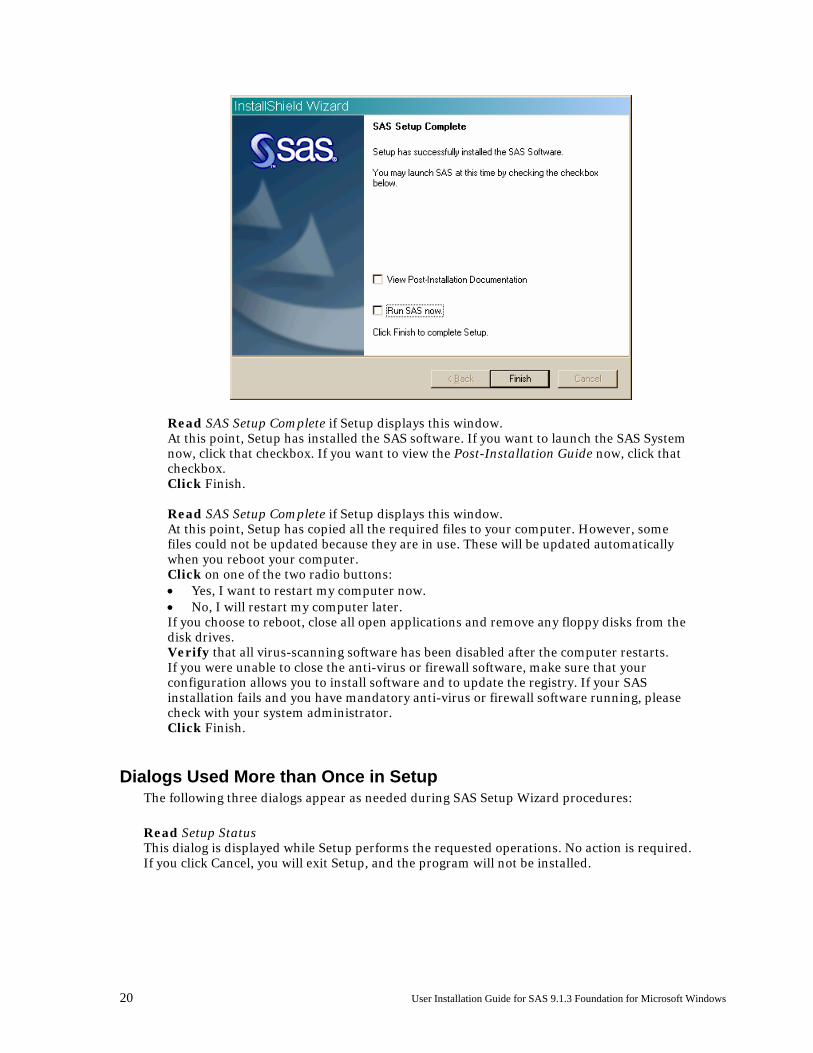
Read SAS Setup Complete if Setup displays this window. At this point, Setup has installed the SAS software. If you want to launch the SAS System now, click that checkbox. If you want to view the Post-Installation Guide now, click that checkbox. Click Finish. Read SAS Setup Complete if Setup displays this window. At this point, Setup has copied all the required files to your computer. However, some files could not be updated because they are in use. These will be updated automatically when you reboot your computer. Click on one of the two radio buttons: • Yes, I want to restart my computer now. • No, I will restart my computer later. If you choose to reboot, close all open applications and remove any floppy disks from the disk drives. Verify that all virus-scanning software has been disabled after the computer restarts. If you were unable to close the anti-virus or firewall software, make sure that your configuration allows you to install software and to update the registry. If your SAS installation fails and you have mandatory anti-virus or firewall software running, please check with your system administrator. Click Finish.
Dialogs Used More than Once in Setup The following three dialogs appear as needed during SAS Setup Wizard procedures:
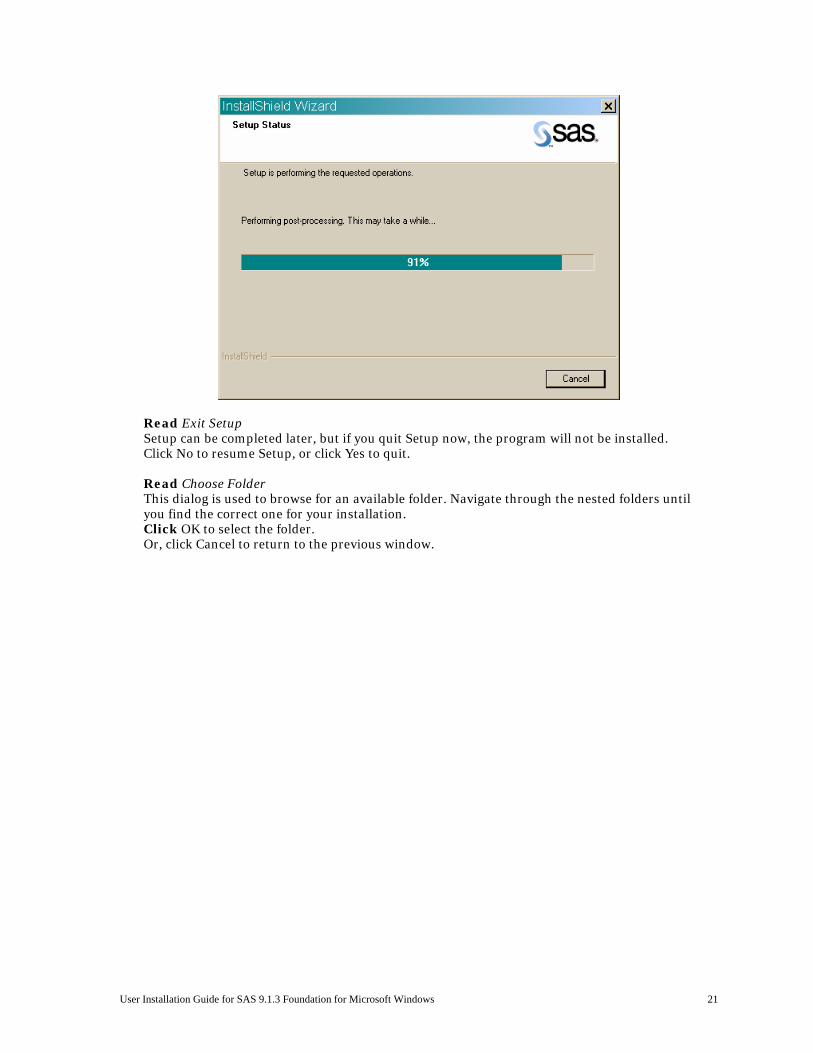
Read Setup Status This dialog is displayed while Setup performs the requested operations. No action is required. If you click Cancel, you will exit Setup, and the program will not be installed.
User Installation Guide for SAS 9.1.3 Foundation for Microsoft Windows 21
Read Exit Setup Setup can be completed later, but if you quit Setup now, the program will not be installed. Click No to resume Setup, or click Yes to quit. Read Choose Folder This dialog is used to browse for an available folder. Navigate through the nested folders until you find the correct one for your installation. Click OK to select the folder. Or, click Cancel to return to the previous window.
22 User Installation Guide for SAS 9.1.3 Foundation for Microsoft Windows
Installing the SAS System Viewer The SAS System Viewer is available to users during a CD installation from the Client-Side Components Volume 1 CD, and after an Administrator lays down the image on the server. There are several ways to install SAS System Viewer 9.1.3:
• Insert the Client-Side Components Volume 1 CD. Go to the systemviewer directory and run SASView91.exe.
• For an Administrator/Personal installation, point to the directory
\SAS Client-Side Components Volume 1\client1cd\systemviewer and run SASView91.exe.
• From the SAS Software Navigator menu under the “Client-Side Components Volume
1” section, click CD Index, then click SAS Client-Side Components Volume 1, then Click SAS System Viewer. On the right side of the page, towards the bottom, click install (and/or install instructions.)
Starting the SAS System Viewer There are two ways to open the SAS System Viewer after it is installed:
1. Click on Start> Programs> SAS > SAS System Viewer 9.1
2. From Windows Explorer, navigate to the directory C:\Program Files\SAS\SAS System Viewer\9.1 and run sv.exe
User Installation Guide for SAS 9.1.3 Foundation for Microsoft Windows 23
Removing SAS Software
For an end user, the process of removing or uninstalling SAS software works just as it does for any other Windows software. Click on My Computer, then Control Panel, and then Add/Remove Programs. (You can also use the path Start --> Settings --> Control Panel to reach Add/Remove Programs.) Select “SAS 9.1.3” from the list to remove SAS from your computer.
24 User Installation Guide for SAS 9.1.3 Foundation for Microsoft Windows
User Installation Glossary This glossary defines terms that are used in the installation documentation and terms that you may encounter during installation of SAS 9.1.3. The terms are listed in alphabetic order.
Client Installation A Client installation uses the SAS Installation Wizard, SAS Setup, to
install the software you need to run SAS in association with shared files on a network server. SAS System components are not installed on a local disk; only a few essential files are installed locally.
Personal Installation A Personal Installation uses the SAS Installation Wizard, SAS Setup, to install all the software you need to run SAS on your PC. In general, users who complete a Personal Installation of the SAS System are planning to run SAS without a server installation of SAS software in the network.
SAS 9.1.3 Foundation SAS 9.1.3 Foundation is the combination of Base SAS 9.1.3 and the server side products that you have ordered which are installed at the same time as Base SAS 9.1.3.
SAS Installation Data SAS Installation Data is required to install SAS Software. It includes your company’s SETINIT and installation process customization parameters.
SAS Installation Representative
The SAS Installation Representative is a person appointed at your site who serves as the liaison between the site and SAS Institute. This person is the contact for all SAS software matters.
SAS Setup SAS Setup (or “Setup”) is a program that guides you in the installation of your SAS 9.2.1 and the configuration of your SAS operating environment.
SAS Software Depot A SAS Software Depot is a network copy of all the CDs that you may want to install in your enterprise. It is desirable in a multi-machine deployment because you load the software on to a network drive and access it from all the machines in your deployment.
SETINIT The SETINIT is a file of information about the software in your license. The SAS System is authorized on an annual basis. In order to run each software product, you must obtain a product authorization code from SAS Institute. When you install the SAS System, the SETINIT information is used to initialize the software for the current authorization period.

support.sas.com SAS is the world leader in providing software and services that enable customers to transform data from all areas of their business into intelligence. SAS solutions help organizations make better, more informed decisions and maximize customer, supplier, and organizational relationships. For more than 30 years, SAS has been giving customers around the world The Power to Know®. Visit us at www.sas.com.