upcoming demos 7 may main event ii 5 guest writer 8 ... · volume 10 issue 9 june 2008...
TRANSCRIPT

Volume 10 Issue 9 June 2008
President's Column - Kerry Deane-CloutierPresident’s Column 1Kerry Deane-Cloutier
MAY MAIN EVENT I 2Ed Pretty -Fire Saftey Concerns For WoodturnersAllan Cusworth
MAY MAIN EVENT II 5Peter McLarenCreating Bowls With Handles Peter McLaren
Upcoming Demos 7
Guest Writer 8
Olympia Symposium 9
Presidents Challenge 10
Turner's Gallery 11
Turning 101: 13
Announcements 13
Classifieds 14
Guild Executive 14
WednesdayJune 25, 2008 - 6:30
SappertonPensioners' Hall
318 Keary St.,New Westminster
Forum on Form & Finish:-
Bring in a completed piece and receive valuable input from other turners
Focus on Fundamentals:-
Will take place but the subject was not available at press time
Main Event:-
Rose Engine Lathe TurningJohn Weir
September Food Suppliers:-
Fred Baldwin, Scott Belway, Michael Bender, Myrna Berera, Marco Berera, & Gari Biasillo
NEXT MEETING
Although the weather shows no signs of it, summer is approaching, and
with it the end of our Guild’s year. The June meeting will be the last until September.
Remember that the President’s Challenge is, “Something I learned from Todd Hoyer and Haley Smith”. I am sorry that I will not be there to see the creativity that was spawned by that demonstration and class, but I will be making shavings in Colorado at that time.
Remember as well that we will be having a Wood Exchange in the parking lot at the June meeting. Bring your donations, but please, no junk! Tickets will be sold and then will be drawn to determine the order that people get to make their choices. This is a great way to get a nice
piece of wood for $2, and hopefully the weather will cooperate.
Keep in mind as well that just because we take a summer break from meeting, this does not mean that our Guild activities will end. Graeme Priddle will be demonstrating in July, and I look forward to seeing all of you then.
We can also look forward to September, with a new season of demonstrators, classes and Turning 101. We are also planning a more social meeting for November, with a pot luck dinner and auction of the demonstrator pieces we have. Please bring your spouses and significant others to this event. You can leave this Newsletter in a conspicuous place, to remind them that the auction pieces would make marvellous presents.
Evolution
A Collaborative Piece
Kerry Deane CloutierDennis Cloutier
Cherry 5 in x 2.5 in Lacquer

Volume 10 Issue 9 - June 2008 Page 2
continued on page 3
Classes of FiresEd gave us some basic information about the four different classes of fires:
Class A - Normal combustibles: Wood, paper, etc.
Use cooling and quenching to extinguish - an ABC type extinguisher is OK.
Class B - Flammable Liquids: This is a misnomer as liquids, and solids for that matter, do not burn, vapours do. Heat vaporizes the materials to create the vapour that burns.
Do not use water to extinguish; it spreads the fire around. Use a dry powder extinguisher to remove the source of oxygen - an ABC extinguisher is OK. CO2 will work but is not recommended since it dissipates and the fire can restart.
Class C - Energized Electrical: The key word here is “energized”. You must shut off the power source first. The fire then becomes A or B Class and can be dealt with as above.
Class D - Flammable Metals: Metals such as Sodium,
Magnesium, and Lithium will ignite and burn and are almost impossible to extinguish. Do not use water as it will cause a major explosion and spread the fire rapidly. The fire must be encapsulated and allowed to burn itself out. Use carbon to encase to fire ball.
Shop Fire
The best class of fire extinguisher to have in your shop is an ABC since most of the materials are either
Ed brought thirty six years of experience in the fire service to our meeting and it certainly showed. His presentation was not only informative, but also dramatic and even humorous.
How to Choose, Maintain and Place an ABC Fire ExtinguisherThe best type of ABC class fire extinguisher has a metal head. It should also have a hose and nozzle to direct the powder discharge at the base of the fire easier.
DO NOT TEST it! If you do, the pressure will bleed down and the extinguisher will be useless.
Over time, the powder will settle and become hard. It should slosh when you shake the extinguisher. To check it, use a RUBBER mallet to tap the bottom and sides to release the powder till it sloshes. Also, check the pressure gauge.
A fire extinguisher should be located near the exits of the room. You should always be able to keep yourself between the fire and the door so you will not get trapped by the fire.
Take away any oneof these three components and the fire goes out.
By: Allan Cusworth
Ed started by defining what makes a fire. This sounds
simple, and basically, it is. Fire is a Triangle in
which the three sides are: Fuel, Oxygen and Heat.
MAY MAIN EVENT #1 - ED PRETTY :-
Fire Safety and Concerns for Woodturners
FU
EL
OX
YG
EN
H E AT

Volume 10 Issue 9 - June 2008 Page 3
continued on page 4
continued from page 2normal combustibles, or flammable liquids. A water hose is good only for small fires.
Call the Fire Department.
Spontaneous CombustionEd spent some time discussing spontaneous combustion which is of particular interest to woodturners since we do use materials that can self-ignite under certain conditions. He emphasized that rags and paper towels used with flammable liquids should be placed in air-tight metal containers to exclude oxygen. Do not crumple them up. It is a good idea to dry the rags out before disposing of them.An interesting fact about spontaneous combustion is that is caused by bacteria in the product. They create heat and when that heat is concentrated, it can self-ignite.
Ed stated that Watco Danish Oil is a major fire hazard and should be treated accordingly. Raw linseed oil also contains bacteria.
Other Fire Hazards1) The plastic coverings on Cabtire electrical cable can break down and crack creating an opportunity for electrical shorts and arcing which can cause a fire.2) Dust can explode when mixed in the correct proportions with air. Ed dramatized this with wood dust, a rubber hose, and a torch. These explosions
and fires can occur in a shop dust collector with the ever present static electricity being the source of ignition. These systems should be grounded according to the manufacturer’s instructions.3) Ed re-emphasized the danger associated with liquids/vapours by demonstrating that flammable vapours are heavier that air and collect in low areas creating and explosion waiting for an ignition source. He noted that furnace and water heater pilot lights are a notorious ignition source in the home and home workshop. Ed put a small amount of lighter fluid in a plastic bottle, allowed it to vaporize and asked for a volunteer, Marco Berera, to hold the ignition source below the open mouth of the bottle. The accompanying picture shows the results.Ed also noted that the mixture of vapour and oxygen has to be optimum for an explosion. The correct mixture percentage varies from material to material, but a general rule is that 0% is too lean, 100% is too rich, but from between 5% to 9% is a general explosion mixture range.
MSDSA good source of information about fire and explosion hazards for a material is in its Material Safety Data Sheet (MSDS). These documents are available wherever you buy the material. However, they are quite detailed so you may want to read the part you are particularly concerned about.Check for the SADT; the Self Accelerated
Alarms & DetectorsThere is a basic difference between
a fire alarm, and a fire detector.A fire alarm alerts you that a fire has ignited while you are in the room.
A fire detector senses a fire and sends a signal to an alarm panel in a central location which, in turn, does whatever it is programmed to do; sound an alarm, call the fire department, call you, etc.
Do not mount a smoke alarm in a damp or dusty location like a bathroom or kitchen. Water vapour or dust can set them off.
Marco Berera - Pyromaniac?
MAY MAIN EVENT #1 - ED PRETTY :-
Fire Safety and Concerns for Woodturners

Volume 10 Issue 9 - June 2008 Page 4
continued from page 3
MarcoMagic
Decomposition Temperature at which the vapour of the material inside with explode.HousekeepingEd advised that a clean shop is a safe shop. Good
B OILING
L IQUID
E XPANDING
V APOUR
E XPLOSION
Sometimes when a gas container such as a propane tank is involved with a fire it can have a unique reaction causing a BLEVE. This occurs when the liquid inside the vessel starts to boil. The quantity of vapour increases and expands rapidly and explodes
This is a very dangerous situation; Ed suggested the “NIKE” defense system to deal with it; “Run as fast as you can away from the area!!!”
housekeeping is paramount. (Editor’s note: My Industrial Arts teacher in High School always said, “The project is not finished until the floor is swept.”. That statement certainly holds true here.)Ed advised that if you have done any “hot work”, you should keep a fire watch. Check back to the area frequently four at least two hours.An interesting note to woodturners; wood’s basic ignition temperature is 350° F, however, it can vary.Ed’s presentation opened a few people’s minds as to the potential of a fire or explosion in our home workshops. With some focus on prevention and preparedness, we can minimize the chance of a dangerous situation. As we have said many times at our meetings and demonstrations, “Safety is Paramount”.
MAY MAIN EVENT #1 - ED PRETTY :-
Fire Safety and Concernsfor Woodturners
By Allan Cusworth
When I turn hollow vessels, bowls or jewellery boxes I often need to check the depth distance from the top edge to the inside bottom while I’m making them. The depth gauges that you buy are usually too small to measure anything bigger than a small ring box. I needed to make a larger one. To do this I created a depth gauge based on a compilation of ideas from various designs I found on the internet. The design that I came up with can be made in various sizes to measure different sized vessels. The one shown in the attached picture is 12" long by 8 1/2" wide.I started with a piece of 3/8" hardwood dowel and marked it off in 1/2" increments for depth measuring.I then used my band saw to cut a piece of 1 1/2" x 8 1/2" scrap softwood (pine) to the flat shape shown in the picture. The next step was to drill a 3/8" hole through centre of the edge for the dowel to pass through. This hole needs to be relaxed a little by running the drill bit through it a few times. Then I drilled a 1/4" hole through the flat side, just off to one side of centre. Next I cut a 1 1/8" deep groove in the edge of the flat piece on my table saw. This slot was made to so the flexible softwood flat piece would clamp onto the dowel.The next step was to insert a 1/4" 20 tpi T-nut fastener into the 1/4" hole on one side to the flat piece. I then placed a 1/4" flat washer on a 1/4" x 1" male Jig knob, placed it through the 1/4" hole from the other side and
Depth Measuring Gauge
slightly threaded it into the T-nut. After putting a little paste wax on the dowel I inserted it through the 3/8" hole. To use the gauge I merely placed the flat part on the edge of the vessel, pushed the dowel to the bottom of the vessel and snugged up the Jig knob. And, there you have it; a very inexpensive yet accurate depth measuring gauge.
Depth Gauge compiled from many ideas and designs

Volume 10 Issue 9 - June 2008 Page 5
How many of you have made bowls with appendages or handles on them? Very few, from what I was able to see on our GVWG web site, and I was surprised that the book 500 Wood Bowls only includes a small number of examples. (All photos are shown with permission of the publisher)You can see from these examples that there is a wide variety of styles and level of functionality. Most are simply to enhance the form or to make us wonder, how did they do that?
Side HandleRemember that including a handle does not mean adding anything to your piece, it simply requires that you plan ahead to leave extra material where you want to locate the handle that is already attached to your piece. If you start with a square block of wood, you will always have a couple of corners that can be converted to handles.The one basic challenge for a side ‘handle’ is to make sure that the shape is consistent on both sides and the ‘handle to be’ is inline for a continuous shape when you remove what should not be there. The second challenge is, after the handle has been designed, to hollow the inside.
Some handles are left solid; some may be placed on an angle, while others may have indents on the bottom side rather than a through hole. Attached are a few shots of a work in progress showing first the thick band left around this bowl for the handles. I took it from the lathe, still attached to the chuck and mounted it on Marco’s handy carving jig that I attached to a low work bench. This allows me to either sit at my work bench or stand over it for sawing. These photos show the sections removed
I hope this demo will encourage one more member to try something like this, or to just try something different from what you have become comfortable doing. I urge everyone to ‘branch out’. - Peter McLaren
with the jig saw, the cutting drill bit and the padding used to protect the very soft yellow cedar. I finished the handles and mounted the piece back onto my lathe and continued to hollow out the bowl.Of all examples in the 500 Wood Bowls book I think the best example of a side handle is shown on Stan Clarke’s lovely carved face bowl.
Stan ClarkeFace Bowl with Handles
Turned and carvedbigleaf maple
Condensed Presenter’s notes by Peter McLaren
What are handles on bowls? Generally a handle is an appendage to a form that assists one in using the vessel; or in our context, it may be anything attached to enhance the form, function or feel of a piece.
Carving a HandleSide Handle 1st StepReady for Hollowing
continued on page 6
MAY MAIN EVENT #2 - PETER McLAREN :-
Creating Bowls with Handles
'no reason not to try'

Volume 10 Issue 9 - June 2008 Page 6
Top HandlePlacing the handle on top of a piece is a little bit more complicated whether it is a vessel or a platter form. The reason for this is the related hollowing of the piece – as you don’t want to mess up the handle material while you are hollowing. Keep in mind that the inside of the handle may be inline with the bowl wall and exposed to your scraper etc. when finishing the inner surface. On my first piece I carved the handles and then did the hollowing. If the handles are to be carved from a fairly delicate base it would make sense to carve them before removing the mass, as we do with hollow vessels.
Some people say life is too short to turn crappy wood; I say the crappy wood provides the best opportunities. Remember you don’t learn to sail well on smooth waters!
With most forms, you want to start with a design in mind so the selection of wood, grain orientation, and other variables such as rot, cracks or bark may impact the shape or location of the planned handles. The concept of a nesting vessel that could be hung in the shelter of a tree made me consider this piece of spalted birch as a candidate for a three handled vessel. When it is finished I will drill a small drain hole in the bottom. The three handles are intended to provide more stability when hung from a single point.Locate, mark, and cut the handlesWith the upright or top-handled vessel the planning stage should include a finished rim with the handle outline added on top. One caution about the inside hollowing is that when you cut the handles, you may do damage to the final rim forcing you to consider the ‘creative opportunity’ plan ‘B’.The examples passed around show you the types of problems I encountered; a) rough cutting the handles too square to the rim, and b) cutting too deeply – again ruining the rim. If your piece is rather plain, then the location of handles is considerably easier; one across from the other, centered and of the same size. Using a ruler you can locate and mark them off for rough cutting. Should you have some ‘pretty maple’ or one of our more interesting woods to work with then the location may have to be more carefully chosen. Grain may
also have an influence on where you select to place your handles.I mark the location of each handle and draw a line on the rim, as a warning not to cut below that line – or I mess up the rim of my piece. Using a straight edge I find the centre, mark the location of the two handles and then mark outside width and thickness of the final shape. Using a straight edge, held on the diagonal of the opposite handles, gives you a line that will make the side of each handle fairly perpendicular to the rim. There are two low tech tools I use for the process of carving the handles; the first is a small Jig saw, and the second is a cutting drill bit that I use with a Dremel type tool. I start with taking away the bulk of the excess material with the Jig saw and then clean up the surface with the cutting bit. Always control the hand piece with two hands and watch out for it skipping back or jumping. Leave a smooth transition area to be hand sanded later. I use the cutting bit to smooth out as much rough material as possible reducing the work of the 80 grit gouge. The cutting bit also is used to create the space within the handle. From there it is a matter of cleaning things up with 80 grit sandpaper on a special holder, i.e. wrap around a flat surface, or carpenter’s pencil, held on with double sided tape, and then working to finer grits.SummaryWe saw how easy it is to leave a handles on the side of almost any kind of piece, and we saw that placing handles on top of a bowl is not complicated, but it does require planning and a little care. Once you have a shape and the right material the design opportunities are limitless.
continued from page 5
Remember don’t be shy to try a new tool or technique, remember it is only wood and there is always more - save your crappy wood for practice pieces so you don’t feel too bad if you have more design opportunities than anticipated.
MAY MAIN EVENT #2 - PETER McLAREN :-
Creating Bowls with Handles
Protect finished work
Volume 10 Issue 9 - June 2008 Page 7
SUMMER GUEST DEMONSTRATOR :-
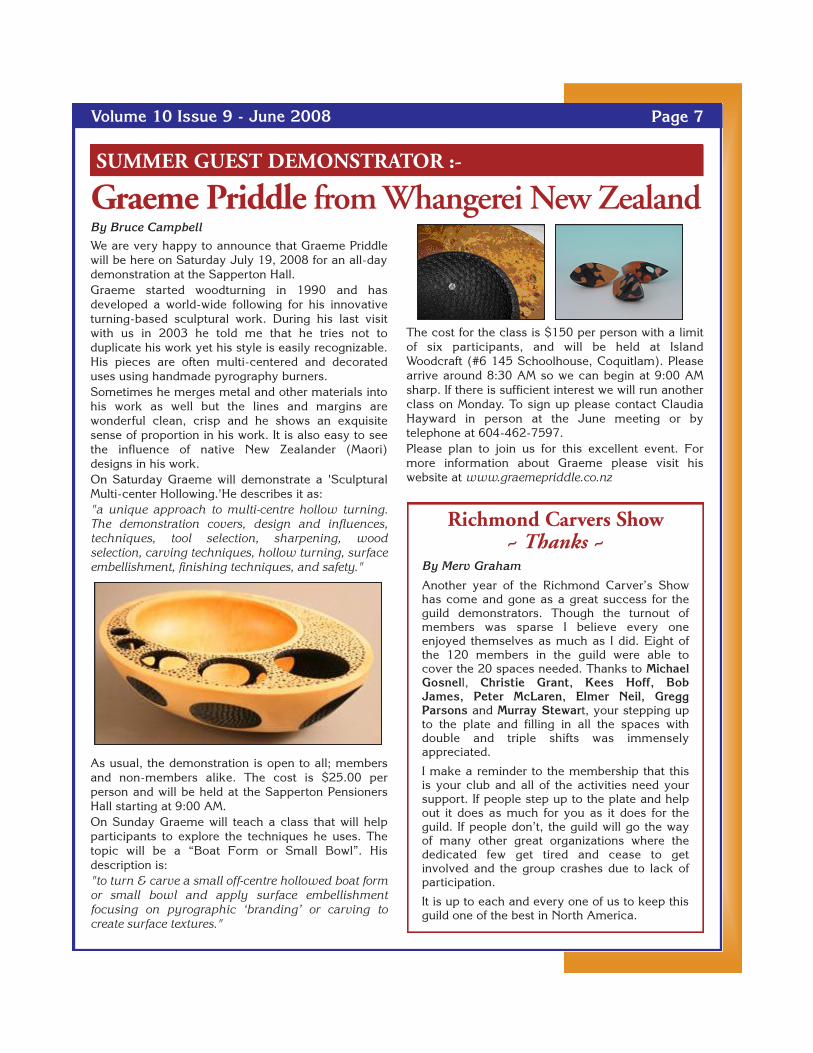
Graeme Priddle from Whangerei New ZealandBy Bruce Campbell
We are very happy to announce that Graeme Priddle will be here on Saturday July 19, 2008 for an all-day demonstration at the Sapperton Hall.Graeme started woodturning in 1990 and has developed a world-wide following for his innovative turning-based sculptural work. During his last visit with us in 2003 he told me that he tries not to duplicate his work yet his style is easily recognizable. His pieces are often multi-centered and decorated uses using handmade pyrography burners.Sometimes he merges metal and other materials into his work as well but the lines and margins are wonderful clean, crisp and he shows an exquisite sense of proportion in his work. It is also easy to see the influence of native New Zealander (Maori) designs in his work.On Saturday Graeme will demonstrate a 'Sculptural Multi-center Hollowing.'He describes it as:"a unique approach to multi-centre hollow turning. The demonstration covers, design and influences, techniques, tool selection, sharpening, wood selection, carving techniques, hollow turning, surface embellishment, finishing techniques, and safety."
As usual, the demonstration is open to all; members and non-members alike. The cost is $25.00 per person and will be held at the Sapperton Pensioners Hall starting at 9:00 AM.On Sunday Graeme will teach a class that will help participants to explore the techniques he uses. The topic will be a “Boat Form or Small Bowl”. His description is:"to turn & carve a small off-centre hollowed boat form or small bowl and apply surface embellishment focusing on pyrographic ‘branding’ or carving to create surface textures."
The cost for the class is $150 per person with a limit of six participants, and will be held at Island Woodcraft (#6 145 Schoolhouse, Coquitlam). Please arrive around 8:30 AM so we can begin at 9:00 AM sharp. If there is sufficient interest we will run another class on Monday. To sign up please contact Claudia Hayward in person at the June meeting or by telephone at 604-462-7597.Please plan to join us for this excellent event. For more information about Graeme please visit his website at www.graemepriddle.co.nz
Richmond Carvers Show~ Thanks ~
By Merv Graham
Another year of the Richmond Carver’s Show has come and gone as a great success for the guild demonstrators. Though the turnout of members was sparse I believe every one enjoyed themselves as much as I did. Eight of the 120 members in the guild were able to cover the 20 spaces needed. Thanks to Michael Gosnell, Christie Grant, Kees Hoff, Bob James, Peter McLaren, Elmer Neil, Gregg Parsons and Murray Stewart, your stepping up to the plate and filling in all the spaces with double and triple shifts was immensely appreciated.
I make a reminder to the membership that this is your club and all of the activities need your support. If people step up to the plate and help out it does as much for you as it does for the guild. If people don’t, the guild will go the way of many other great organizations where the dedicated few get tired and cease to get involved and the group crashes due to lack of participation.
It is up to each and every one of us to keep this guild one of the best in North America.

Volume 10 Issue 9 - June 2008 Page 8
By Ed Pretty
A couple of years ago my wife, Arlene and I were on a cruise to the Mexican Riviera and one of the ports was Mazatlan. From there we took a shore excursion that included a couple of villages, a visit with an adobe brick maker, a visit in a leather artist's gallery (very unique leather faces now hanging on our wall) and a tour of a furniture factory.
The whole thing was very interesting and even though we were part of a tour group (something that I swore I would never do), we found a few opportunities to talk one-on-one with a few people - as best we could, not speaking the language. Naturally the furniture factory would be of most interest to a bunch of dusty woodturners and of course what's a furniture factory without a woodturner. I thought it would be worth sharing.
The absence of walls allows for a most efficient method of dust control
Basically the pictures tell it all but there were a few unique things that I would like to point out. First of all, one will note that walls are highly over-rated. The absence of walls however, allows for a most efficient method of dust control and of course there is no need for a spray booth either. Even though the lack of walls is apparently a good thing, the minimal guards on the band saw was a little unnerving - but then I'm probably a bit of a sissy. You don’t want to know about the cut off saw. Note also the wood lathe and wood turner. The dust control device on the outboard end is simple yet effective. Again, being the sissy that I am, I would prefer rubber blades. On the other
What I did On My Mexican Holidayhand, the custom-made, universal, full-length, infinitely adjustable tool rest really caught my eye: at the same time lightweight, portable and rigid. I can’t help but wonder if this guy has a patent on these items. If not, I saw them first so hands off - and don’t tell Richard Raffan! A side note: you will notice that hard-toe boots are not required when all you really need are, uh, hard toes.
After visiting this factory and the other equally primitively equipped (by our standards) artisans, I found myself with the same humble feeling that I had when I saw Kate Woods’ (Victoria area wood artist) “pile-of-lumber” lathe. Kate turns out the most incredible and unique work, easily worthy of a One Way and Sorby tools or equivalent, yet did some of her best work on a homemade plywood and 2X4 lathe using mild steel tools. Kind of reminded me of one of my mother’s (many) sayings: “A good carpenter never blames his tools”. My mother never said “his/her” but that’s what she meant. And she was always irritatingly right.
Note: the author is a contributing washed-up newsletter editor that apparently finds more time to write than turn.
Hard-toe boots are not required when all you really need are, uh,hard toes
Custom-made, universal, full-length,
infinitely adjustabletool rest caught
my eye

Volume 10 Issue 9 - June 2008 Page 9
Woodturners of OlympiaPresents
Woodturning SymposiumCreativity in Woodturning
July 26, 2008
The American Legion Post #33201 Eastbay Dr. NE. ( Boston Harbor Rd. NE )
Olympia, Wa. 98507
Cost: $50.00 - early registration until July1, 2008$65.00 after July 1, 2008
$10 - Youth under the age of 18 when accompanied by a paying adult
Includes Meconis Combo Bag lunch with registration until July 21, 2008Limited to 130 registrants - No refunds after July 1, 2008
7:30am Doors open & registration8:30am – 8:40am Welcome and introductions8:40am – 10:25am Demo: Eric Lofstrom : Winged Bowls10:25am – 10:40am Break10:40am – 12:25pm Demo: Dan Ackerman: Turned & hand carved boxes12:25pm – 1:05pm Lunch - Meconis bag lunches1:05pm – 2:50pm Demo: Bonnie Klein: Turning a cast acrylic threaded Box2:50pm – 3:05pm Break3:05pm – 4:50pm Demo: Dave Schweitzer: Deep hollowing4:50pm – 5:00pm Ending comments and Door prize drawing
For information and Map w/Directions or to register on line visit :www.woodturnersofolympia.org or www.wtooly.org
Name: ___________________________Phone #: _________________________
E-mail: ___________________________Woodturning club affiliation (if one):____________
Make Cheque or Money Order Payable to: Woodturners of Olympia and Mail to:
Woodturners of Olympia, C/O Al Price4112 Teakwood Ct. SELacey, Wa. 98503360-791-0396 ; email:[email protected]
Registration Form
Volume 10 Issue 9 - June 2008 Page 10
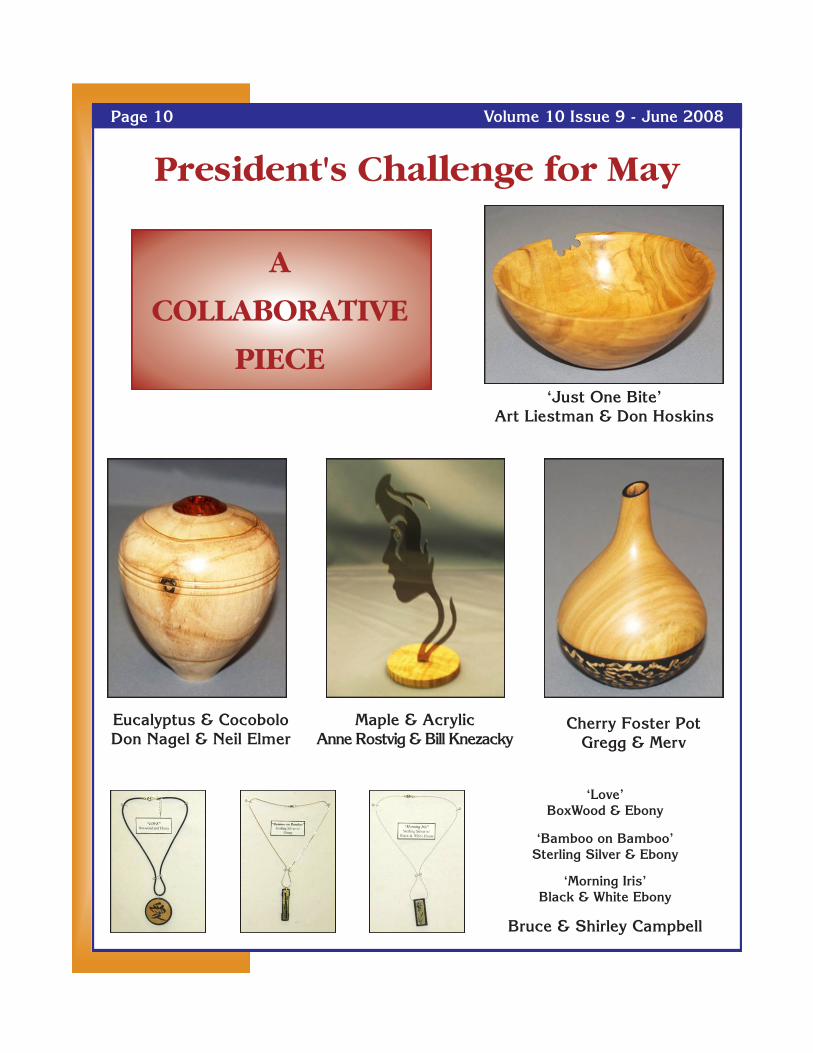
President's Challenge for May
Cherry Foster PotGregg & Merv
Maple & AcrylicAnne Rostvig & Bill Knezacky
Eucalyptus & CocoboloDon Nagel & Neil Elmer
‘Just One Bite’Art Liestman & Don Hoskins
‘Bamboo on Bamboo’Sterling Silver & Ebony
‘Morning Iris’Black & White Ebony
Bruce & Shirley Campbell
A
COLLABORATIVE
PIECE
‘Love’BoxWood & Ebony

Volume 10 Issue 9 - June 2008 Page 11
Maple With Ink & GessoWipe on Poly -Bruce Campbell
Birch Platter-Tung oil & Beeswax-Anne Rostvig
Platter - Carver Show EntryLacquer finish -Merv
Maple BoxLacquer finish -Merv
Maple-18 x 6-Tung oil-Bruce Hodgson
Walnut-6 x 4-Tung Oil-Bruce Hodgson
Remnants -Art Liestman
3 Axis Candle Stick -Merv
Cherry 6 x 6-Jared Altman
Maple DishSalad Bowl finish -Peter
CherryWork in Progress -Rich
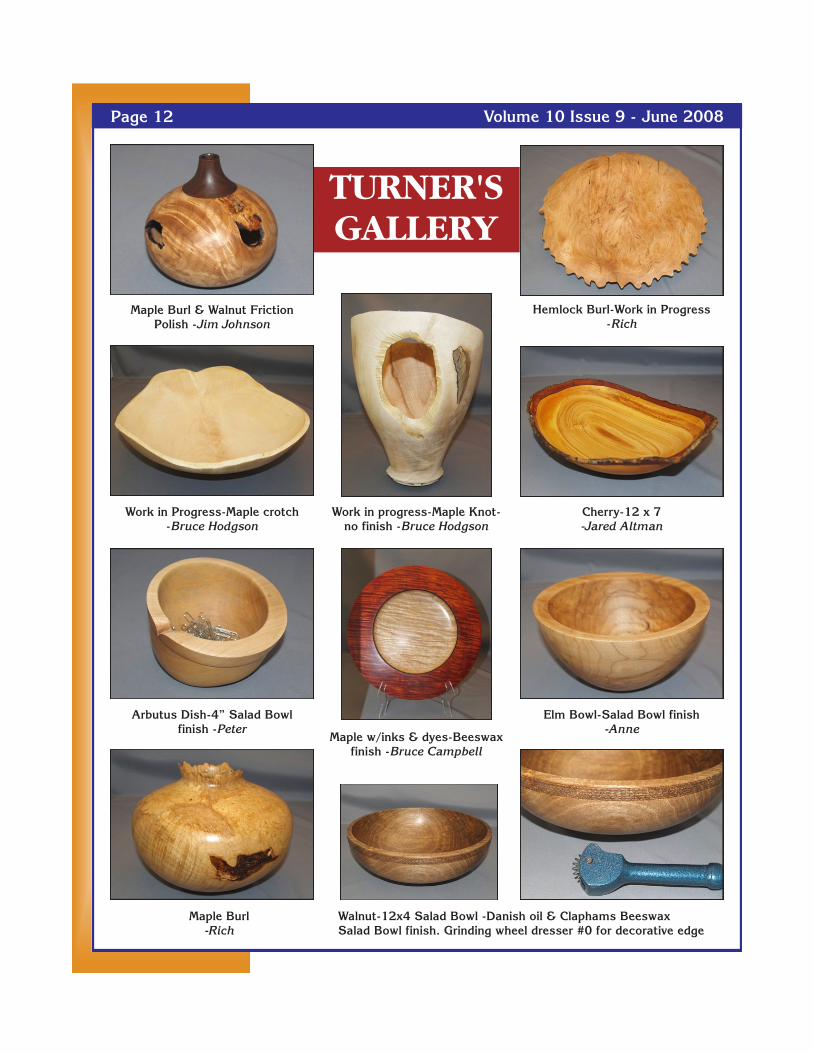
TURNER'SGALLERY
Volume 10 Issue 9 - June 2008 Page 12
Work in Progress-Maple crotch -Bruce Hodgson
Hemlock Burl-Work in Progress-Rich
Arbutus Dish-4” Salad Bowl finish -Peter
Maple Burl-Rich
Cherry-12 x 7-Jared Altman
Elm Bowl-Salad Bowl finish-Anne
Work in progress-Maple Knot-no finish -Bruce Hodgson
Maple w/inks & dyes-Beeswax finish -Bruce Campbell
Walnut-12x4 Salad Bowl -Danish oil & Claphams BeeswaxSalad Bowl finish. Grinding wheel dresser #0 for decorative edge
TURNER'SGALLERY
Maple Burl & Walnut Friction Polish -Jim Johnson

Volume 10 Issue 9 - June 2008 Page 13
continued on page 14
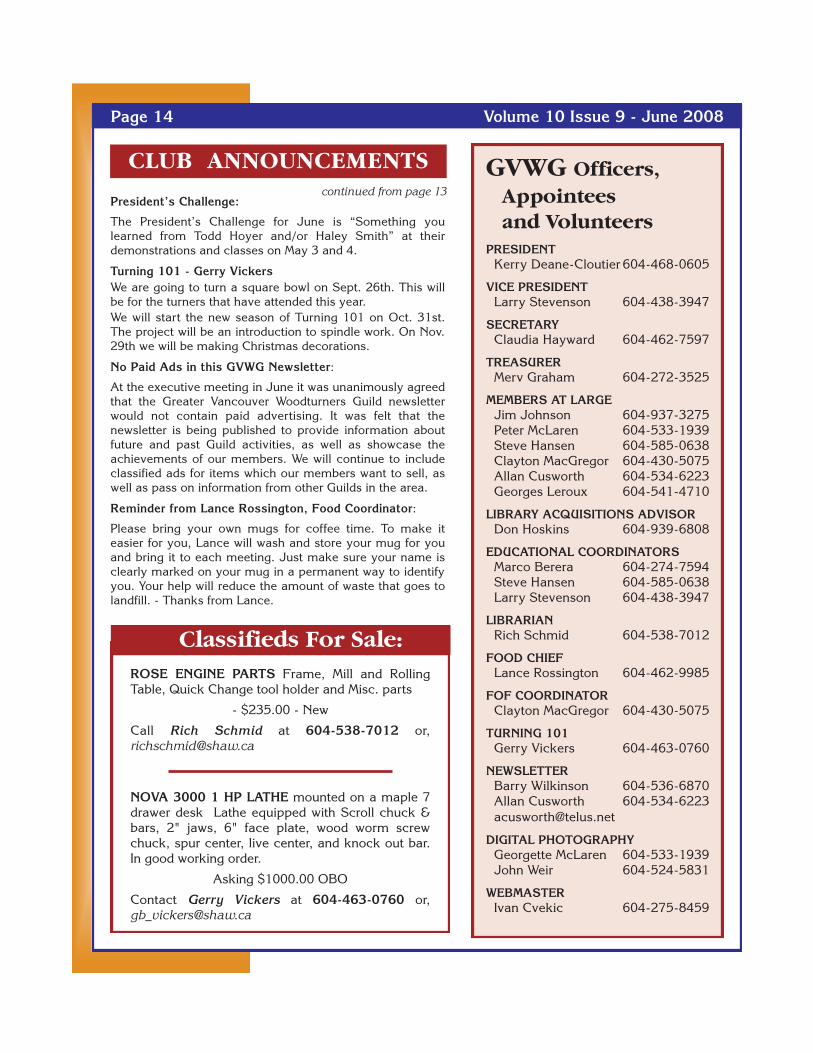
CLUB ANNOUNCEMENTS
Turning 101
Ring Box Lorne Cawley
Project for May 31st
Maple PlatterCrystal coat finishClaudia Hayward
7 Enthusiastic Turners Make A Small PlatterClaudia HaywardSeven enthusiastic woodturners gave up a rare sunny day and joined the Turning 101 class. The project this month was to make a small platter. After a brief refresher of safety procedures and design parameters we mounted a piece of 2” maple on a faceplate and proceeded to turn the base. Rather than make a tenon, the base was to be “once turned” using a chuck in expansion mode in the foot.Different cuts with the bowl gouge were used – aggressive cuts, gentle cuts and shear scraping all had their place. After finishing the base and
mounting the platter in the chuck, the rim was shaped and the platter hollowed out using the gouge. We finished up with a light touch using a scraper - a little sanding and the project was finished.After cleanup we still had time to get home and enjoy the last few hours of sunshine. Everyone had fun and we all learned something!Thanks to Lorne Nelson for helping out, and to Gerry Vickers for putting in so much time organizing the Turning 101 program. I’m looking forward to the June meeting and seeing all the platters on display.
Wood Exchange: At our June 25 meeting a Wood Exchange will be happening in the parking lot at the Sapperton Pensioners Hall. If you have some pieces of good wood that you want to contribute, bring it out. No garbage, please. If you wouldn’t turn it yourself, please don’t bring it.
Newsletter Changes: Barry Wilkinson has taken over the Newsletter Publishing role from Dennis Cloutier. Barry and Allan Cusworth will be working together to produce a great newsletter as we have enjoyed the past. Many thanks to Dennis for his dedicated publishing work over the past few years.
Please send all submissions to Allan Cusworth at [email protected], Remember, good content is the key to a good newsletter, and we encourage input from all members.
If you want to have a For Sale item repeated in the succeeding month’s newsletter there’s no need to resend the ad unless you want it changed, but you do need to advise Allan to put it in again.
Volume 10 Issue 9 - June 2008 Page 14
GVWG Officers,Appointeesand Volunteers
PRESIDENTKerry Deane-Cloutier 604-468-0605
VICE PRESIDENTLarry Stevenson 604-438-3947
SECRETARYClaudia Hayward 604-462-7597
TREASURERMerv Graham 604-272-3525
MEMBERS AT LARGEJim Johnson 604-937-3275Peter McLaren 604-533-1939Steve Hansen 604-585-0638Clayton MacGregor 604-430-5075Allan Cusworth 604-534-6223Georges Leroux 604-541-4710
LIBRARY ACQUISITIONS ADVISORDon Hoskins 604-939-6808
EDUCATIONAL COORDINATORSMarco Berera 604-274-7594Steve Hansen 604-585-0638Larry Stevenson 604-438-3947
LIBRARIANRich Schmid 604-538-7012
FOOD CHIEFLance Rossington 604-462-9985
FOF COORDINATORClayton MacGregor 604-430-5075
TURNING 101Gerry Vickers 604-463-0760
NEWSLETTERBarry Wilkinson 604-536-6870Allan Cusworth [email protected]
DIGITAL PHOTOGRAPHYGeorgette McLaren 604-533-1939John Weir 604-524-5831
WEBMASTERIvan Cvekic 604-275-8459
CLUB ANNOUNCEMENTScontinued from page 13
Classifieds For Sale:
President’s Challenge:
The President’s Challenge for June is “Something you learned from Todd Hoyer and/or Haley Smith” at their demonstrations and classes on May 3 and 4.
Turning 101 - Gerry VickersWe are going to turn a square bowl on Sept. 26th. This will be for the turners that have attended this year.We will start the new season of Turning 101 on Oct. 31st. The project will be an introduction to spindle work. On Nov. 29th we will be making Christmas decorations.
No Paid Ads in this GVWG Newsletter:
At the executive meeting in June it was unanimously agreed that the Greater Vancouver Woodturners Guild newsletter would not contain paid advertising. It was felt that the newsletter is being published to provide information about future and past Guild activities, as well as showcase the achievements of our members. We will continue to include classified ads for items which our members want to sell, as well as pass on information from other Guilds in the area.
Reminder from Lance Rossington, Food Coordinator:
Please bring your own mugs for coffee time. To make it easier for you, Lance will wash and store your mug for you and bring it to each meeting. Just make sure your name is clearly marked on your mug in a permanent way to identify you. Your help will reduce the amount of waste that goes to landfill. - Thanks from Lance.
ROSE ENGINE PARTS Frame, Mill and Rolling Table, Quick Change tool holder and Misc. parts
- $235.00 - New
Call Rich Schmid at 604-538-7012 or, [email protected]
NOVA 3000 1 HP LATHE mounted on a maple 7 drawer desk Lathe equipped with Scroll chuck & bars, 2" jaws, 6" face plate, wood worm screw chuck, spur center, live center, and knock out bar. In good working order.
Asking $1000.00 OBO
Contact Gerry Vickers at 604-463-0760 or, [email protected]