twido programmable controllers -...
TRANSCRIPT

3501
1390
.03
www.schneider-electric.com
TwidoProgrammable ControllersCommunication ModulesHardware Guide06/2008

2

Table of Contents
Safety Information . . . . . . . . . . . . . . . . . . . . . . . . . . . . . . . . . . . .5
About the Book . . . . . . . . . . . . . . . . . . . . . . . . . . . . . . . . . . . . . . .7
Part I Communication Modules. . . . . . . . . . . . . . . . . . . . . . . . . . 9
Chapter 1 Overview for Communication Modules . . . . . . . . . . . . . . . . . .11Communication Overview . . . . . . . . . . . . . . . . . . . . . . . . . . . . . . . . . . . . . . . . . . 11
Chapter 2 Descriptions, Specifications, and Wiring . . . . . . . . . . . . . . . . .192.1 AS-Interface V2 Bus Master Module . . . . . . . . . . . . . . . . . . . . . . . . . . . . . . . . . . 20
Reminder About the AS-Interface Bus . . . . . . . . . . . . . . . . . . . . . . . . . . . . . . . . 21Presentation of the Main Constituent Elements of the AS-Interface Bus . . . . . . 24Main Specifications of the AS-Interface V2 Bus . . . . . . . . . . . . . . . . . . . . . . . . . 26Parts Description of an AS-Interface Master Module: TWDNOI10M3. . . . . . . . . 29Technical Specifications of the TWDNOI10M3 Module and the AS-Interface V2 Bus . . . . . . . . . . . . . . . . . . . . . . . . . . . . . . . . . . . . . . . . . . . . . . . . . . . . . . . . . . . 30Wiring and Connections . . . . . . . . . . . . . . . . . . . . . . . . . . . . . . . . . . . . . . . . . . . 33TWDNOI10M3 Operating Modes and Push Buttons. . . . . . . . . . . . . . . . . . . . . . 36AS-Interface Module TWDNOI10M3 Display Panel . . . . . . . . . . . . . . . . . . . . . . 38
2.2 CANopen Fieldbus Master Module . . . . . . . . . . . . . . . . . . . . . . . . . . . . . . . . . . . 41About the CANopen Fieldbus . . . . . . . . . . . . . . . . . . . . . . . . . . . . . . . . . . . . . . . 42CANopen Fieldbus Topology . . . . . . . . . . . . . . . . . . . . . . . . . . . . . . . . . . . . . . . 43Cable Length and Transmission Speed . . . . . . . . . . . . . . . . . . . . . . . . . . . . . . . 45Dimensions of the CANopen Master Module: TWDNCO1M. . . . . . . . . . . . . . . . 46Parts Description of a CANopen Master Module: TWDNCO1M . . . . . . . . . . . . . 47Technical Specifications of the TWDNCO1M Module and the CANopen Fieldbus. . . . . . . . . . . . . . . . . . . . . . . . . . . . . . . . . . . . . . . . . . . . . . . . . . . . . . . . 48CANopen Wiring and Connections . . . . . . . . . . . . . . . . . . . . . . . . . . . . . . . . . . . 51
2.3 The ConneXium TwidoPort Ethernet Interface Module. . . . . . . . . . . . . . . . . . . . 57Overview of the ConneXium TwidoPort Ethernet Interface Module . . . . . . . . . . 58TwidoPort's External Features . . . . . . . . . . . . . . . . . . . . . . . . . . . . . . . . . . . . . . 59TwidoPort's LED-Panel Description . . . . . . . . . . . . . . . . . . . . . . . . . . . . . . . . . . 61TwidoPort's Wiring . . . . . . . . . . . . . . . . . . . . . . . . . . . . . . . . . . . . . . . . . . . . . . . 63General Specifications . . . . . . . . . . . . . . . . . . . . . . . . . . . . . . . . . . . . . . . . . . . . 64
35011390 06/2008 3

Chapter 3 Installation . . . . . . . . . . . . . . . . . . . . . . . . . . . . . . . . . . . . . . . . . 673.1 Installation Overall Instructions . . . . . . . . . . . . . . . . . . . . . . . . . . . . . . . . . . . . . . 68
Installation Safety Guidelines. . . . . . . . . . . . . . . . . . . . . . . . . . . . . . . . . . . . . . . . 69Installation Preparation . . . . . . . . . . . . . . . . . . . . . . . . . . . . . . . . . . . . . . . . . . . . 72Compact and Modular Bases Mounting Positions . . . . . . . . . . . . . . . . . . . . . . . . 73Assembling an Expansion I/O Module to a Base. . . . . . . . . . . . . . . . . . . . . . . . . 75Minimum Clearances for Bases and Expansion I/O Modules in a Control Panel . . . . . . . . . . . . . . . . . . . . . . . . . . . . . . . . . . . . . . . . . . . . . . . . . . . . . . . . . . 77Disassembling an Expansion I/O Module from a Base . . . . . . . . . . . . . . . . . . . . 79
3.2 Communication Modules Installation . . . . . . . . . . . . . . . . . . . . . . . . . . . . . . . . . . 80Dimensions of AS-Interface V2 Bus Master Module: TWDNOI10M3 . . . . . . . . . 81How to Install and Remove an AS-Interface Bus Interface Module or a CANopen Fieldbus Master Module from a DIN Rail . . . . . . . . . . . . . . . . . . . . . . 82How to Direct Mount on a Panel Surface. . . . . . . . . . . . . . . . . . . . . . . . . . . . . . . 85How to Install the TwidoPort Ethernet Interface Module . . . . . . . . . . . . . . . . . . . 87
Appendices . . . . . . . . . . . . . . . . . . . . . . . . . . . . . . . . . . . . . . . . . . . . . . .91
Appendix A AS-Interface and CANopen Diagnostic using the Front Panel LED’s. . . . . . . . . . . . . . . . . . . . . . . . . . . . . . . . . . . . . . . . . . . . . . 93Troubleshooting Using the Front Panel LEDs . . . . . . . . . . . . . . . . . . . . . . . . . . . 93
Appendix B The DIN Rail . . . . . . . . . . . . . . . . . . . . . . . . . . . . . . . . . . . . . . . . 95The DIN Rail . . . . . . . . . . . . . . . . . . . . . . . . . . . . . . . . . . . . . . . . . . . . . . . . . . . . 95
Appendix C IEC Symbols . . . . . . . . . . . . . . . . . . . . . . . . . . . . . . . . . . . . . . . . 97Glossary of Symbols . . . . . . . . . . . . . . . . . . . . . . . . . . . . . . . . . . . . . . . . . . . . . . 97
Appendix D Agency Compliance. . . . . . . . . . . . . . . . . . . . . . . . . . . . . . . . . . 99Agency Requirements . . . . . . . . . . . . . . . . . . . . . . . . . . . . . . . . . . . . . . . . . . . . . 99
Glossary . . . . . . . . . . . . . . . . . . . . . . . . . . . . . . . . . . . . . . . . . . . . . .101
4 35011390 06/2008

§
Safety InformationImportant Information
NOTICE Read these instructions carefully, and look at the equipment to become familiar with the device before trying to install, operate, or maintain it. The following special messages may appear throughout this documentation or on the equipment to warn of potential hazards or to call attention to information that clarifies or simplifies a procedure.
The addition of this symbol to a Danger or Warning safety label indicatesthat an electrical hazard exists, which will result in personal injury if theinstructions are not followed.
This is the safety alert symbol. It is used to alert you to potential personalinjury hazards. Obey all safety messages that follow this symbol to avoidpossible injury or death.
DANGER indicates an imminently hazardous situation, which, if not avoided, will result in death or serious injury.
DANGER
WARNING indicates a potentially hazardous situation, which, if not avoided, can result in death, serious injury, or equipment damage.
WARNING
CAUTION indicates a potentially hazardous situation, which, if not avoided, can result in injury or equipment damage.
CAUTION
35011390 06/2008 5

Safety Information
PLEASE NOTE Electrical equipment should be installed, operated, serviced, and maintained only by qualified personnel. No responsibility is assumed by Schneider Electric for any consequences arising out of the use of this material.
© 2008 Schneider Electric. All Rights Reserved.
6 35011390 06/2008

About the Book
At a Glance
Document Scope This manual provides parts descriptions, specifications, wiring diagrams, installation, setup, and troubleshooting information for communication modules.
Validity Note The information in this manual is applicable only for Twido programmable controllers.
The data and illustrations found in this book are not binding. We reserve the right to modify our products in line with our policy of continuous product development. The information in this document is subject to change without notice and should not be construed as a commitment by Schneider Electric.
Product Related Warnings
Schneider Electric assumes no responsibility for any errors that may appear in this document. If you have any suggestions for improvements or amendments or have found errors in this publication, please notify us.
No part of this document may be reproduced in any form or by any means, electronic or mechanical, including photocopying, without express written permission of Schneider Electric.
Copyright © Schneider Electric 2008. All rights reserved.
All pertinent state, regional, and local safety regulations must be observed when installing and using this product. For reasons of safety and to ensure compliance with documented system data, only the manufacturer should perform repairs to components.
When controllers are used for applications with technical safety requirements, please follow the relevant instructions.
Failure to use Schneider Electric software or approved software with our hardware products may result in injury, harm, or improper operating results.
Failure to observe this product related warning can result in injury or equipment damage.
35011390 06/2008 7

About the Book
User Comments We welcome your comments about this document. You can reach us by e-mail at [email protected]
8 35011390 06/2008

35011390 06/2008
I
Communication ModulesAt a Glance
Introduction This part of the guide provides parts descriptions, specifications, wiring diagrams, installation, set up, and troubleshooting information about Twido Communication modules.
What's in this Part?
This part contains the following chapters:
Chapter Chapter Name Page
1 Overview for Communication Modules 11
2 Descriptions, Specifications, and Wiring 19
3 Installation 67
9

Communication Modules
10 35011390 06/2008

35011390 06/2008
1
Overview for Communication ModulesCommunication Overview
Introduction Twido bases have one, or an optional second, serial port that is used for real-time or system management services.
Four types of communications can be used with Twido controllers:
AS-Interface bus connection
CANopen fieldbus connection
Ethernet Network connection
Modem connection
The real-time services provide data distribution functions for exchanging data with I/O devices and messaging functions for communicating to external devices. System management services manage and configure the base through TwidoSuite. Either serial port is used for any of these services but only serial port 1 is for communicating with TwidoSuite.
To provide these services, there are three protocols available on each base:
Remote Link
Modbus
ASCII
In addition, the TWDLC•sE40DRF compact bases feature a built-in RJ45 Ethernet communications port enabling all real-time communications and system management tasks via the network. Ethernet communications implements the following protocol:
Modbus TCP/IP
11

Overview for Communication Modules
Communications Architecture with the protocols
The following diagram shows a communication architecture with all three protocols.
AS-Interface Connection
The AS-Interface (abbreviation for Actuator-Sensor-Interface) bus is a field bus (level 0), and can be used to connect sensors/actuators. This allows "discrete" or analog type information to run between a bus "master" and sensor/actuator type "slave" devices.
AS-Interface is made up of three major basic elements:
a specific supply providing a 30 VDC voltage,a bus master,one or more slave devices (sensors, actuators and others).
These components are interconnected by a two-wire cable dedicated to data transmission and power supply.
Note: Communication between the "Modbus" and "Remote Link" protocols cannot occur at the same time.
ASCII
ModbusModbus
Remote link
Masterbase
TwidoSuite
1 2... 7
Remote I/Oor
Peer
(slave base
base)
Remote I/Oor
Peer
(slave base
base)
Remote I/Oor
Peer
(slave base
base)
12 35011390 06/2008

Overview for Communication Modules
AS-Interface Connection Illustration
Illustration: Active distributor
AS-Interface
AS-Interface function via
Traditional product Communicating product
Communicating product
Integrated AS-Interface
Passive distributor Connection T
434 I/O maximum 248 Inputs 186 Outputs
Maximum 62 slaves(31 standard or 62 extended maximum)
Integrated AS-Interface
35011390 06/2008 13
Overview for Communication Modules
CANopen Fieldbus Connection
The CAN open architecture of a Twido system consists of:
a Twido PLC (compact base or modular base)1,a CANopen fieldbus master module (TWDNCO1M module) installed on the
Twido PLC’s expansion bus2,
CANopen slave devices3,4.
Note: 1. The TWDNCO1M CANopen master module is supported by the following Twido
base controllers:Compact bases: TWDLC•A24DRF and TWDLC••40DRF seriesAll modular bases: TWDLMDA20••• and TWDLMDA40••• series
2. Only 1 TWDNCO1M CANopen master module can be installed on the Twido system expansion bus.
3. The TWDNCO1M CANopen master module can manage up to 16 CAN slave devices on a single bus segment.
4. The TWDNCO1M CANopen fieldbus does not support extended addressing for CANopen slave devices.
5. The baud rate of the bus depends on the bus length (see p. 45) and the cable type used. .
14 35011390 06/2008

Overview for Communication Modules
Twido CANopen Fieldbus Topology
The following figure shows the Twido CANopen fieldbus topology: TWIDO PLC TWDNCO1M CANopen
Master
CANopen SlavePDO Address: 1
CANopen SlavePDO Address: 2
CANopen SlavePDO Address: 16
35011390 06/2008 15

Overview for Communication Modules
Ethernet Network Connection
The following figure shows a PC-to-Twido connection via a network Ethernet hub/switch:
The Twido TWDLCAE40DRF (or TWDLCDE40DRF) features a RJ45 connector to connect to the 100 BASE-TX network Ethernet with auto negotiation. It can accomodate both 100Mbps and 10 Mbps network speeds.
The following figure shows the RJ45 connector of the Twido controller:
Note: Although direct cable connection (using a Ethernet crossover cable) is supported between the Twido TWDLCAE40DRF (or TWDLCDE40DRF) and the PC running the TwidoSuite programming software, we do not recommend it. Therefore, you should always favor a connection via a network Ethernet hub/switch.
Note: The PC running the TwidoSuite application must be Ethernet-capable.
SFTP Cat5 RJ45 Ethernet cable
TWDLCAE40DRF (or TWDLCDE40DRF) Twido controller
Ethernet hub/switch
RJ45 male
RJ45 Ethernet port
Connect to RJ45 Ethernet port1
RJ45 male
16 35011390 06/2008

Overview for Communication Modules
The eight pins of the RJ45 connector are arranged vertically and numbered in order from bottom to top. The pinout for the RJ45 connector is described in the table below:
Communication between TwidoSuite and a Modem
A PC executing TwidoSuite can be connected to a Twido controller for transferring applications, animating objects and executing operator mode commands. It is also possible to connect a Twido controller to other devices, such as another Twido controller, for establishing communication with the application process.
Pinout Function Polarity
8 NC
7 NC
6 RxD (-)
5 NC
4 NC
3 RxD (+)
2 TxD (-)
1 TxD (+)
Note: The same connector and pinout is used for both 10Base-T and 100Base-TX. When connecting the Twido controller to a 100Base-TX network, you should use at least a category 5 Ethernet cable.
Twido
TEL.LINE
POWER
V24/RS-232-CTD-33
WESTERMO
TDRDRTSDTRDCDPWR
35011390 06/2008 17

Overview for Communication Modules
18 35011390 06/2008
35011390 06/2008
2
Descriptions, Specifications, and WiringAt a Glance
Introduction This chapter provides wiring rules and recommendations, overviews, parts descriptions, specifications, and wiring schematics for the Twido products.
What's in this Chapter?
This chapter contains the following sections:
Section Topic Page
2.1 AS-Interface V2 Bus Master Module 20
2.2 CANopen Fieldbus Master Module 41
2.3 The ConneXium TwidoPort Ethernet Interface Module 57
19

Descriptions, Specifications, and Wiring
2.1 AS-Interface V2 Bus Master Module
At a Glance
Introduction This section provides a review of the AS-Interface bus, presents the description, specifications and use of the AS-Interface master moduleTWDNOI10M3.
What's in this Section?
This section contains the following topics:
Topic Page
Reminder About the AS-Interface Bus 21
Presentation of the Main Constituent Elements of the AS-Interface Bus 24
Main Specifications of the AS-Interface V2 Bus 26
Parts Description of an AS-Interface Master Module: TWDNOI10M3 29
Technical Specifications of the TWDNOI10M3 Module and the AS-Interface V2 Bus
30
Wiring and Connections 33
TWDNOI10M3 Operating Modes and Push Buttons 36
AS-Interface Module TWDNOI10M3 Display Panel 38
20 35011390 06/2008

Descriptions, Specifications, and Wiring
Reminder About the AS-Interface Bus
General The AS-Interface (abbreviation for Actuator-Sensor-Interface) bus is a field bus (level 0), and can be used to connect sensors/actuators. This allows "discrete" or analog type information to run between a bus "master" and sensor/actuator type "slave" devices.
AS-Interface is made up of three major basic elements:
a specific supply providing a 30 VDC voltage,a bus master,one or more slave devices (sensors, actuators and others).
These components are interconnected by a two-wire cable dedicated to data transmission and power supply.
The Main Types of Sensors/Actuators
Table of the main types of sensors:
Type of sensor Description
Communicating sensors/actuators (compatible with AS-Interface)
Thanks to the integrated AS-Interface feature, they connect directly to the AS-Interface bus via a passive dispatcher or a connection T.
Traditional sensors/actuators (not compatible with AS-Interface)
They connect to the bus via an AS-Interface interface (active dispatcher). These interfaces connect the sensors and traditional actuators to the AS-Interface bus and provide them with dialog capacity on the bus.
35011390 06/2008 21

Descriptions, Specifications, and Wiring
Illustration Illustration: Active distributor
AS-Interface
AS-Interface function via
Traditional product Communicating product
Communicating product
Integrated AS-Interface
Passive distributor Connection T
434 I/O maximum 248 Inputs 186 Outputs
Maximum 62 slaves(31 standard or 62 extended maximum)
Integrated AS-Interface
22 35011390 06/2008

Descriptions, Specifications, and Wiring
Overview of AS-Interface Products from the Schneider Catalog
Non-exhaustive list of AS-Interface products from the Schneider catalog:
Motorstarter
Photo-electricdetector
Inductiveproximitysensor
Buttonbox
12 Keykeyboard
Illuminatedindicator bank
Master Power Supply
Activedistribution box
Telefastbus interface
Passivedistribution box
AS-Interfaceactuators
AS-Interfacesensors
Human/Machine Interface
2I/2O4O4I
For connection by M12 portsof standard sensors/actuators/ HMI and indicator units: inductive sensors. capacity switches. photoelectric barriers. limit switches. LEDs relays. control valves.
4 channels for AS-Interface sensors/actuators connection equipped with M12 sockets.
AS-Interface bus interface/discrete input-output. 4 I 4 O 8 I/O (4I + 4O)
For connection by screw or pull-out terminals of standard sensors/actuators/HMI and indicator units: 2 or 3 wire inductive sensors. capacity switches. limit switches. LEDs relays. contactors. control valves. resistors.
Inte
rfac
e fo
r se
nsor
s an
d ac
tuat
ors
35011390 06/2008 23

Descriptions, Specifications, and Wiring
Presentation of the Main Constituent Elements of the AS-Interface Bus
24 35011390 06/2008

Descriptions, Specifications, and Wiring
Introduction to the Main Constituent Elements
The following table lists the main constituent elements of an AS-Interface bus:
Part Illustration
AS-Interface bus masterConnected to a modular controller or a compact TWDLC•A24DRF or TWDLCA•40DRF series, it manages all exchange of data on the AS-Interface network. It also enables slave status to be monitored.
AS-Interface Power SupplySpecific AS-Interface power supplies, dedicated to 30 VDC, designed to supply the constituents connected to the AS-Interface bus.The power supply is distributed with the same medium used for data exchange.
CableThis transmits data and carries the power. It can be made up from:
Either a standard two-wire AS-Interface yellow ribbon cable, unshielded and polarized,Or a standard round, shielded or unshielded two-wire cable.
SlavesDifferent types of slaves can be connected to the AS-Interface, bus, including the sensors, actuators and splitters, as well as the analog slaves.Slaves are available as slaves with standard address settings, or as slaves with extended address settings (A/B).
Module TWDNOI10M3
Power supply (30 VDC)
Guiding ribbon cable
Round cable
Actuator PassiveSensor
35011390 06/2008 25
Descriptions, Specifications, and Wiring
Main Specifications of the AS-Interface V2 Bus
Overview AS-Interface is a system in which exchange management is ensured by a single master which, by scanning the bus, calls each detected slave in succession and awaits a response. The master manages the inputs/outputs, parameters and identity codes of each slave, as well as their addressing.
For slaves with AS-Interface V2 standard addressing, the serial communications frame carries:
4 data bits (D0 to D3), which are the image of inputs or outputs according to the type of interface,4 parametering bits (P0 to P3), which are used to set the operating modes of the interface.
Communication series frame for slaves with extended addressing settings:
4 data bits (D0 to D3), which are the image of inputs or outputs according to the type of interface,3 parametering bits (P0 to P2), which are used to set the operating modes of the interface.
All slave devices connected to the AS-Interface bus are identified by at least one "I/O Code" and one "ID code" which completes the functional identification of the slave.
Some slaves have an ID2 and ID1 code, which define the internal functions of the slave: on analog slaves, for example, ID2 shows the slave's analog channel number.
In the AS-Interface master request, outputs are positioned and AS-Interface input devices are sent back in the slave's response.
26 35011390 06/2008

Descriptions, Specifications, and Wiring
Table of Main Specifications
The following table provides the main specifications of the AS-Interface V2 bus:
Specifications Description
Slave Addressing Each slave connected to the AS-Interface bus must have an address between 1 and 31, accompanied by "bank" /A or "bank" /B for extended addressing. The slaves delivered from the factory have the address 0 (the address of the slave is memorized in a non-volatile format). Addresses are programmed using a specialized addressing terminal.
Identification of Slaves All slave devices connected to the AS-Interface bus are identified by:
an ID identity code (coded on 4 bits) that specifies the type of slave (sensor, extended slave, etc.). For example, the ID code of an extended slave is 0xA,an I/O code (coded on 4 bits) that shows input/output distribution. For example, the I/O code of a slave with 4 inputs is 0, with 4 inputs is 8 and with 2 I/2O is 4,an ID2 code (coded on 4 bits) that specifies the internal functionalities of the slave,an ID1 code (coded on 4 bits) that specifies an additional slave identity,
These identifications allow the AS-Interface master to recognize the configuration present on the bus.These different profiles have been developed by the AS-Interface association. They are used to distinguish between input, output and mixed modules, "intelligent" device families, etc.
Maximum number of slaves and inputs/outputs
On the same bus, an AS-Interface bus can support a maximum of:
31 slaves with standard address settings; each slave can have a maximum of 4 inputs and/or 4 outputs, with addresses from 1 to 31,62 slaves with extended address settings; each slave can have a maximum of 4 inputs and/or 3 outputs, with addresses from 1 A/B to 31A/B.
This makes it possible to manage a maximum of 248 inputs +186 outputs (thus 434 inputs/outputs) when all extended slaves have 4 inputs and 3 outputs.
Topology and Maximum Length of AS-Interface Bus
The topology of the AS-Interface bus is flexible. It can be perfectly adapted to meet the user’s needs (point to point, on line, tree structure etc.). In every case, the total length of all the branches of the bus must not exceed 100 meters (328 ft) without a repeater.
35011390 06/2008 27

Descriptions, Specifications, and Wiring
AS-Interface Bus Cycle Time This is the cycle time between slave(s) and the master module. The AS-Interface system always transmits information, which is the same length to each slave on the bus. The AS-Interface cycle time depends on the number of active slaves connected to the bus.The scan time t represents the exchange time between a master and n active slaves (a maximum of 31 on /A or /B).So, for:
up to 19 active slaves, t = 3ms20 to 31 active slaves t = (1+n) * 0.156msWhen two slaves A and B have the same address, each slave in the pair is scanned every two cycles.This means that for 31 extended address setting slaves configured in /A, + 31 extended address setting slaves configured in /B. the scan time will be 10 ms.
Maximum cycle time:maximum 5 ms for 31 standard or extended address setting slaves,maximum 10 ms for 62 extended address setting slaves.
Reliability, Flexibility The transmission process used (current modulation and Manchester code) guarantees dependable operation. The master monitors the line supply voltage and the data sent. It detects transmission errors as well as slave failures, and sends the information to the PLC.The exchange of a slave or connection of a new slave during operations does not disrupt communications with the other slaves.
Note: When a faulty slave is replaced, the update of the replacement slave's address can be automatically carried out if the automatic addressing function is allowed on the master module.
Note: When there is mixed use of slaves with standard and extended address settings, a standard address setting slave only use an address from 1(A) to 31(A). The same address accompanied by "bank" /B can only be used by an extended address setting slave.
Specifications Description
28 35011390 06/2008

Descriptions, Specifications, and Wiring
Parts Description of an AS-Interface Master Module: TWDNOI10M3
Parts Description
The following diagram shows the different parts of the AS-Interface TWDNOI10M3 master module:
Legend The module is made up of the following elements:
1
2
3
4
5
5
6
7
No. Part Description
1 Display Status display LEDs: show AS-Interface bus status,
I/O LEDs: show the I/O status of a slave specified by the address LEDs,
Address LEDs: show slave addresses.
2 Push Buttons Allow selection of a slave's address and change of mode.
3 User terminal Is connected to the AS-Interface cable.
4 AS-Interface cable connector To install the terminal.
5 Latch button Holds/releases the module from a controller.
6 Expansion Connector Enables connection to the Twido module and connection to another I/O module.
7 Product Label Shows the module reference and specification.
35011390 06/2008 29

Descriptions, Specifications, and Wiring
Technical Specifications of the TWDNOI10M3 Module and the AS-Interface V2 Bus
AS-Interface V2 Bus
Technical specifications:
Specification Value
Maximum cycle time of AS-Interface bus: from 1 to 19 slaves = 3ms,from 20 to 62 slaves = (1+n) x 0.156ms where n = number of active slaves.
5 ms for 31 standard or extended address setting slaves,10 ms for 62 extended address setting slaves.
Maximum number of slaves on the bus: 31 standard address setting slaves or,62 extended address setting slaves.
Maximum length of AS-Interface bus cables: all branches without repeater: 100 meters (328 ft)with two repeaters: 300 meters (984 ft)
Maximum number of I/O managed by the bus standard address setting slaves: 124 inputs + 124 outputsextended address setting slaves: 248 inputs + 186 outputs
Nominal bus supply voltage 30 VDC
30 35011390 06/2008

Descriptions, Specifications, and Wiring
AS-Interface TWDNOI10M3 Module
Technical specifications:
Specification Value
Operating temperature 0 to 55°C (32°F to 131°F) operating ambient temperature
Storage temperature -25°C to +70°C (-13°F to 158°F)
Relative humidity from 30 to 95% Rh (non-condensing)
Pollution degree 2 (IEC60664)
Degree of protection IP20
Corrosion immunity Free from corrosive gases
Altitude Operation: from 0 to 2000 m (0 to 6,560 ft)Transport: 0 to 3,000 m (0 to 9,840 ft)
Resistance to Vibration When mounted on a DIN rail:from 10 to 57 Hz amplitude 0.075 mm, from 57 to 150 Hz
acceleration 9.8 ms2 (1G), 2 hours per axis on each of three mutually perpendicular axes.When mounted on a panel surface:from 2 to 25 Hz amplitude 1.6 mm, from 25 to 100 Hz
acceleration 39.2 ms2 (4G) Lloyd’s 90 min per axis on each of three mutually perpendicular axes.
Resistance to Shock 147 ms2 (15G), 11 ms duration, 3 shocks per axis, on three mutually perpendicular axes (IEC 61131).
Allowable voltage range from 29.5 to 31.6 VDC
Current consumed on the AS-Interface bus Typically 65 mA / 110 mA maximum
Protection against polarity inversion on bus inputs Yes
Connector on mother board MSTB2.5/3-GF-5.08BK (Phoenix contact)
Average number of connector insertions/removals 100 times minimum
Power consumption At 5 VDC: 80 mAAt 24 VDC: 0 mA
Power dissipation 540 mW (24 VDC)
Weight 85 g (3 oz)
35011390 06/2008 31
Descriptions, Specifications, and Wiring
CAUTIONOVERHEATING HAZARD
When an AS-Interface module is connected to a Twido module, do not connect more than five I/O expansion modules (if Twido can usually accept seven) because of the amount of heat that is generated.The AS-Interface master module can accept a maximum of seven analog I/O slaves; otherwise the AS-Interface system will not operate correctly.
Failure to follow these instructions can result in injury or equipment damage.
32 35011390 06/2008

Descriptions, Specifications, and Wiring
Wiring and Connections
Different Cable Types
The AS-Interface bus cables carry the signals and provide a 30 VDC power supply to the sensors and actuators connected to this bus.
Types of AS-Interface cables:
Cable type Specifications Illustration
Polarized AS-Interface ribbon cable
Jacket color: yellow
Wire cross-section: 1.5 mm2
(AWG 16)
Standard round cableorseparated cables
Wire cross-section:
- stranded: from 0.5 mm2 to
1.0 mm2
- solids: from 0.75 mm2 to
1.5 mm2
(AWG: from 16 to 20)
(Blue) (Brown)AS-i - AS-i +
(Blue) (Brown)AS-i - AS-i +
35011390 06/2008 33

Descriptions, Specifications, and Wiring
Procedure for Connecting the AS-Interface Master Module to the Bus
The following table describes the connection procedure:
Steps Description
1 Remove the terminal from the module bus connector.
2 Respect the polarities of the AS-Interface cable: brown cable for the AS-i+ pole and blue cable for the AS-i– pole. Connect the cable according to the colors shown on the terminal.
3 Connect the AS-Interface ground terminal block to the DIN rail (see p. 95).
4 Using a screwdriver, tighten the screws on the terminal between 0.5 to 0.6 N.m (4.4 to 5.3 lbf.in) of torque. The use of end ferrules crimped at the stranded or solid wires terminators will prevent the cable from slipping out of the terminal.
5 Insert the terminal into the module connector on the module. Using a screwdriver, tighten the mounting screws on the terminal between 0.3 to 0.5 N.m (2.6 to 4.4 lbf.in) of torque.
DANGERHAZARD OF ELECTRIC SHOCKDo not touch the cable terminators, including immediately after the module has been switched off.
Failure to follow these instructions will result in death or serious injury.
34 35011390 06/2008

Descriptions, Specifications, and Wiring
Illustration of Connection
Illustration of Connection:
CAUTIONINCOMPATIBLE POWER SUPPLYUse an AS-Interface SELV (Very Low Safety Voltage) supply, with nominal voltage of 30VDC.
Failure to follow these instructions can result in injury or equipment damage.
blue (AS-i–)
brown (AS-i+)
to the DIN rail
35011390 06/2008 35

Descriptions, Specifications, and Wiring
TWDNOI10M3 Operating Modes and Push Buttons
At a Glance The actions performed using the push buttons PB1 and PB2 on the front panel of the AS-Interface module depend on the length of time for which they are pressed. A "long press" selects the operating mode and a "short press" selects the address of the slave on which you wish to perform diagnostics. If the length for which the buttons are pressed does not correspond to either of those mentioned above or the two buttons are pressed simultaneously, the status of the module remains unchanged.
Illustration The following illustration shows the position of the buttons:
Pressing Buttons
The following table describes the function of the buttons:
PB1
PB2
Action Description
Long press A "long press" is effective when the button is pressed for 3 seconds or more. Use a long press to change the operating mode of the AS-Interface master.
Short press A "short press" corresponds to pressing the button for not more than 0.5 seconds. Use a short press to change the address of the slave for which you wish to view the I/O status via the LEDs on the AS-Interface master. Pressing PB1 increments the slave address, and PB2 decrements it. When the last address 31B is reached, pressing PB1 returns you to the first address 0A.
36 35011390 06/2008

Descriptions, Specifications, and Wiring
AS-Interface Master Module Operating Modes
As soon as it is powered up, the AS-Interface module goes into online mode. The Twido module can then communicate with the AS-Interface master to allow viewing and checking of the status of each slave. Online mode consists of the three following modes:
Normal protected mode: On power up, the AS-Interface master initially goes into this mode if no error occurs. This is the normal operating mode in which the AS-Interface master exchanges communication data with slaves connected to it.Normal protected mode - Offline (software not connected): To enter this mode from the previous mode, press and hold down ("long press") the push button PB2. The AS-Interface master then stops all communication with slaves allowing you to perform operations such as the initialization of the master module. In this mode, the Twido module cannot display the status of slaves. The OFF LED (see p. 40) of the AS-Interface master illuminates to indicate that the module is in Offline mode. To return to the previous mode, press and hold down ('long press") push button PB2 a second time.Normal protected mode - Data Exchange Off:This mode can be entered and exited only by a user program in TwidoSuite. In this mode all forms of communication with slaves is prohibited.
35011390 06/2008 37
Descriptions, Specifications, and Wiring
AS-Interface Module TWDNOI10M3 Display Panel
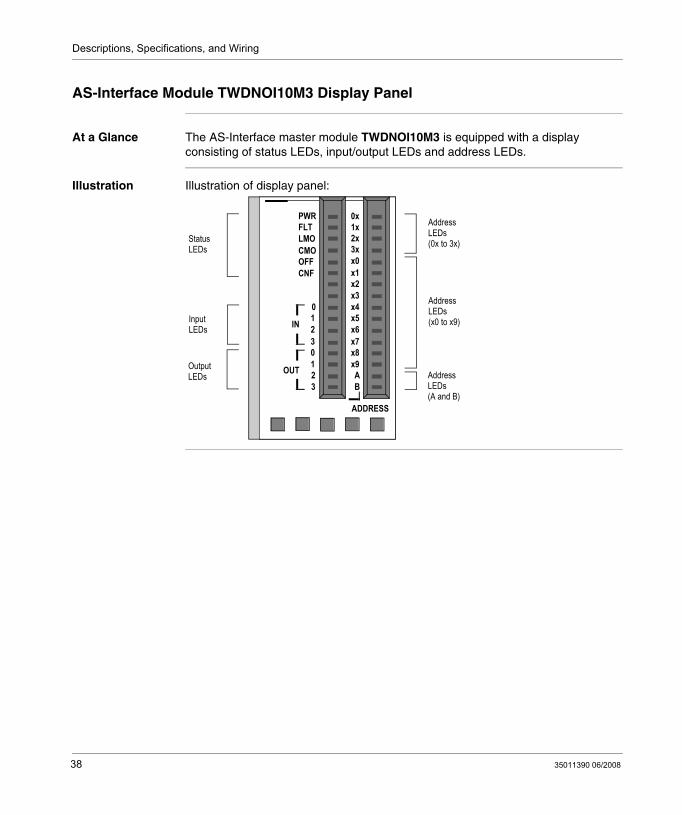
At a Glance The AS-Interface master module TWDNOI10M3 is equipped with a display consisting of status LEDs, input/output LEDs and address LEDs.
Illustration Illustration of display panel:
PWRFLTLMOCMOOFFCNF
01230123
IN
OUT
x4x5x6x7x8x9AB
2x3xx0x1x2x3
0x1x
ADDRESS
StatusLEDs
InputLEDs
OutputLEDs
AddressLEDs(0x to 3x)
AddressLEDs(x0 to x9)
AddressLEDs(A and B)
38 35011390 06/2008

Descriptions, Specifications, and Wiring
Display of Module Status
Module status is displayed by the status LEDs on the module which provide information depending on their state (indicator extinguished or illuminated) on the module operating mode.
Status LED descriptions
LED Status Description
PWR Indicates that the AS-Interface module is not powered up.
Indicates that insufficient power is being delivered to the AS-Interface module.
FLT Indicates that the configuration loaded onto the AS-Interface master is not correct or that an error has occurred on the AS-Interface bus.
Module OK.
LMO Indicates that the module is not in offline mode (the module is online from power up).Note: Flickers on power up.
CMO Indicates that the module is in online mode.
OFF Indicates that the module is in offline normal protected mode.
Indicates that the module is in another operating mode.
CNF This indicator is no longer used.Note: Flickers on power up.
IlluminatedExtinguished
35011390 06/2008 39

Descriptions, Specifications, and Wiring
Display of AS-Interface Master Operating Modes
The operating modes of the AS-Interface module can be changed using the push buttons or TwidoSuite programming software. The status LEDs also allow you to determine what mode the AS-Interface module is in.
Mode display table
Diagnostics of the AS-Interface Bus
The input/output LEDs and address LEDs can be used to view slaves on the AS-Interface bus and determine their operating status.
Diagnostics table:
The slave address is selected using the buttons PB1 and PB2. An address with an assigned slave can be read using the address LEDs as shown in the following example:
If LEDS 2x, x5 and B are illuminated, this indicates that there is a slave assigned to address 25B.
Operating modes PWR FLT LMO CMO OFF CNF
Normal Protected Mode
Normal Protected Mode (Offline)
Normal Protected Mode (Data Exchange OFF)
IlluminatedExtinguished
State of address LEDs
State of IN/OUT LEDs
Description
orThere is a slave at this address and its inputs/outputs are on and active.
There is a slave at this address, but an error has occurred.
No slave is assigned to this address.
Communication on the AS-Interface bus has been interrupted because no power is being supplied or because the AS-Interface module is offline normal protected mode.
IlluminatedFlashingExtinguished
40 35011390 06/2008

Descriptions, Specifications, and Wiring
2.2 CANopen Fieldbus Master Module
At a Glance
Introduction This section provides a review of the CANopen fieldbus, provides a description of the module, and describes the specifications and use of the CANopen master moduleTWDNCO1M.
What's in this Section?
This section contains the following topics:
Topic Page
About the CANopen Fieldbus 42
CANopen Fieldbus Topology 43
Cable Length and Transmission Speed 45
Dimensions of the CANopen Master Module: TWDNCO1M 46
Parts Description of a CANopen Master Module: TWDNCO1M 47
Technical Specifications of the TWDNCO1M Module and the CANopen Fieldbus
48
CANopen Wiring and Connections 51
35011390 06/2008 41

Descriptions, Specifications, and Wiring
About the CANopen Fieldbus
Introduction Originally developed for automotive vehicle borne systems, the CAN communication bus is now used in many areas, such as:
transport,moving part devices,medical devices,building,industrial control.
The advantages of the CAN system are:
the bus allocation system,error detection,data exchange reliability.
Master/slave structure
The CAN bus has a master/slave structure for bus management.
The master manages
slave initialization,communication errors,slave status.
Peer to peer communication
Communications on the bus are made peer to peer; at any moment, each device can send a request on the bus and the relevant devices reply. The priority of the requests circulating on the bus is determined by an identifier at individual message level.
CAN identifiers Explicit exchanges of CAN PDOs at link level use extended identifiers over 29 bits (CAN standard V2.0B).
11 bit identifiers (CAN standard V2.0A) can only be used for sending and receiving.
42 35011390 06/2008

Descriptions, Specifications, and Wiring
CANopen Fieldbus Topology
At a Glance The CANopen architecture of a Twido system consists of:
a Twido PLC (compact base or modular base)1,a CANopen fieldbus master module (TWDNCO1M module) installed on the
Twido PLC’s expansion bus2,
CANopen slave devices3,4.
The baud rate of the bus depends on its length and the cable type used (see p. 45).
Note: 1. The TWDNCO1M CANopen master module is supported by the following Twido
base controllers:Compact bases: TWDLC•A24DRF and TWDLC••40DRF seriesAll modular bases: TWDLMDA20••• and TWDLMDA40••• series
2. Only 1 TWDNCO1M CANopen master module can be installed on the Twido system expansion bus.
3. The TWDNCO1M CANopen master module can manage up to 16 CAN slave devices on a single bus segment.
4. The TWDNCO1M CANopen fieldbus does not support extended addressing for CAN slave devices.
35011390 06/2008 43

Descriptions, Specifications, and Wiring
Twido CANopen Fieldbus Topology
The following figure shows the Twido CANopen fieldbus topology:
TWIDO PLC TWDNCO1M CANopen Master
CANopen SlavePDO Address: 1
CANopen SlavePDO Address: 2
CANopen SlavePDO Address: 16
44 35011390 06/2008

Descriptions, Specifications, and Wiring
Cable Length and Transmission Speed
At a Glance The TWDNCO1M CANopen master allows up to 16 slave devices on the bus. Transmission speed depends strictly on the bus length and the type of cable used. The following two tables enable you to evaluate authorized values.
Baud Rate versus Cable Length
The following table describes the relationship between the maximum transmission speed and the bus length (on a single CAN segment without repeater).
Baud Rate and Cable Length versus Cable Impedance and Type
The following table describes the relationship between the maximum transmission speed for a given bus length in relation to the type of cable used (cable gauge and impedance).
Maximum transmission baud rate Bus length
500 Kbit/s 100 m (328 ft)
250 Kbit/s 250 m (820 ft)
125 Kbit/s 500 m (1,640 ft)
Maximum baud rate Bus length Cable impedance Cable section/gauge
500 Kbit/s @ 100 m (328 ft)
40 - 300 m(131 - 984 ft)
< 60 mΩ/m(< 18.3 mΩ/ft)
0.34 - 0.6 mm2, (e.g. AWG 22, AWG 20)
125 Kbit/s @ 500 m (1,640 ft)
300 - 600 m(984 - 1,968 ft)
< 40 mΩ/m(< 12.2 mΩ/ft)
0.5 - 0.6 mm2, (e.g. AWG 20)
35011390 06/2008 45

Descriptions, Specifications, and Wiring
Dimensions of the CANopen Master Module: TWDNCO1M
CANopen Master Module Dimensions
The following diagram shows the dimensions of the CANopen Master module TWDNCO1M:
3.8 mm 29.7 mm 14.6 mm 70.0 mm
4.5
mm
90.0
mm
0.15 in. 1.17 in. 0.57 in. 2.76 in.
3.54
in.
0.18
in.
46 35011390 06/2008

Descriptions, Specifications, and Wiring
Parts Description of a CANopen Master Module: TWDNCO1M
Parts Description
The following diagram shows the different parts of the CANopen TWDNCO1M master module:
Legend The module is made up of the following elements:
7
5
5
6
3
2
4
1
No. Part Description
1 Power supply connector 3-point connector used to connect a 24 VDC power supply.
2 CANopen status LED Shows the CANopen bus status.(see p. 93.)
3 DSUB (DB9) terminal To connect the CANopen interface cable.
4 PE ground Protective earth (PE) ground (M3 screw terminal).
5 Latch button Holds/releases the module from a controller.
6 Module name Shows the module reference and specification.
7 Expansion Connector Enables connection to the Twido module and connection to another I/O module.
35011390 06/2008 47

Descriptions, Specifications, and Wiring
Technical Specifications of the TWDNCO1M Module and the CANopen Fieldbus
CANopen Fieldbus
Technical specifications:
Specification Value
Maximum number of slaves on the bus 16 CANopen slave devices, not to exceed a total of 16 TPDOs and 16 RPDOs over the CAN bus.
Maximum length of CANopen fieldbus cables According to the CAN specification (see p. 45.)
Maximum number of PDOs managed by the bus 16 TPDOs + 16 RPDOs
48 35011390 06/2008

Descriptions, Specifications, and Wiring
CANopen TWDNCO1M Module
Technical specifications:
Specification Value
Operating temperature 0 to 55°C (32°F to 131°F) operating ambient temperature
Storage temperature -40°C to +70°C (-40°F to 158°F)
Relative humidity from 10 to 95% Rh (non-condensing)
Pollution degree Housing:3 (IEC60664-1)PCB:2 (IEC60664-1)
Degree of protection IP20
Corrosion immunity Free from corrosive gases
Altitude Operation: from 0 to 2000 m (0 to 6,565 ft)Transport: 0 to 3,000 m (0 to 9,840 ft)
Resistance to Vibration When mounted on a DIN rail:from 10 to 57 Hz amplitude 0.75 mm, from 57 to 150
Hz acceleration 9.8 ms2 (1G), 2 hours per axis on each of three mutually perpendicular axes.When mounted on a panel surface:from 2 to 25 Hz amplitude 1.6 mm, from 25 to 100
Hz acceleration 9.8 ms2 (1G) Lloyd’s 90 min per axis on each of three mutually perpendicular axes.
Resistance to Shock 147 ms2 (15G), 11 ms duration, 3 shocks per axis, on three mutually perpendicular axes (IEC 61131).
Allowable voltage range from 19.2 to 30 VDC
Protection against polarity inversion on bus inputs Yes
CANopen fieldbus interface connector D SUB (DB9)
Power consumption At 5 VDC: 60 mA (INTERNAL BUS)At 24 VDC: 50 mA (EXTERNAL POWER SUPPLY)
Power dissipation 1.2W (@24 VDC)
Weight 100 g ( 3.5 oz.)
Overall dimensions 29.7mm(W) x 84.6mm(H) x 90mm(D)1.17in(W) x 3.33in(H) x 3.54in(D)
35011390 06/2008 49

Descriptions, Specifications, and Wiring
WARNINGUNINTENDED EQUIPMENT OPERATION
When a CANopen master module is connected to a Twido module, do not connect more than 6 additional I/O expansion modules on the Twido internal bus (not to exceed a maximum of 450 mA of current on the Twido internal bus).The CANopen master module can accept a maximum of sixteen CAN slave devices (not to exceed a total of 16 TPDOs and 16 RPDOs over the CAN bus); otherwise the CANopen system will not operate correctly.Failure to observe these limits can result in interruption of power to the I/O ports. Depending on I/O configuration, unintended equipment operation may result.
Failure to follow these instructions can result in death, serious injury, or equipment damage.
50 35011390 06/2008

Descriptions, Specifications, and Wiring
CANopen Wiring and Connections
Introduction This sub-section describes how to connect the CANopen power supply and the CANopen bus.
35011390 06/2008 51

Descriptions, Specifications, and Wiring
Procedure for Connecting the CANopen Power Supply
The following procedure describes how to connect the 24 VDC power supply to the CANopen power supply terminal:
Steps Description
1 Remove the power supply connector from the CANopen master module.
2 Plug the external power supply leads into the removable connector, observing the correct polarity as indicated by the connection diagram below.
4 Using a screwdriver, tighten the screws on the removable connector to 0.2 N·m (1.77 lbf·in) of torque. The use of end ferrules crimped at the multifilament or solid wires terminators will prevent the cable from slipping out of the terminal.
5 Place the removable connector back onto the CANopen master module.
3 Connect the CANopen protective earth (PE) ground screw terminal to the proper earth ground in your facility.
DANGERHAZARD OF ELECTRIC SHOCKDo not touch the cable terminators, including immediately after the module has been switched off.
Failure to follow these instructions will result in death or serious injury.
WARNINGUNINTENDED EQUIPMENT OPERATION
Do not use the Twido controller’s 24VDC sensor power supply to provide +24VDC power to the CANopen module for this will make the photocoupler isolation inoperative.Use only dedicated external power supply to provide power to the CANopen module.
Failure to follow these instructions can result in death, serious injury, or equipment damage.
52 35011390 06/2008

Descriptions, Specifications, and Wiring
Procedure for Turning On the CANopen Devices
Turn on your equipment connected to the CANopen master module in the following order:
Power Supply Connector Pin Assignment
The following figure illustrates the pin assignment for the TwidoPort’s CANopen power supply connector:
Illustration of Power Supply Connection
Illustration of power supply connection:
Step Action
1 Turn on all CANopen slave devices connected to the CANopen master module.
2 Turn on the CANopen master module by applying the specified CANopen power supply. (see p. 52)Note: Allow sufficient time for the CANopen master module to complete its power-up sequence before you proceed to the next step.
3 Turn on the Twido controller connected to the CANopen master module.
Please follow the above power-on sequence to ensure that all equipment present on the CANopen bus are detected correctly by the Twido controller.
0V pin 3
Unused pin 2
24 VDC pin 1
Not connected
+24 VDC
-
Proctective Earth (PE) ground
35011390 06/2008 53

Descriptions, Specifications, and Wiring
Proper Grounding
The following figure describes the grounding screw terminal (PE):
Ground Cable
The PE ground must be capable of supporting 30 A of current for 2 minutes and have no more than 100 mΩ of resistance. The recommended PE wire size is AWG #12
(2.5 mm2). The maximum allowable length of the wire at AWG #12 is less than 2 meters. Use the shortest wire length possible.
PE Ground Screw Terminal
Using a screwdriver, tighten the screw on the PE ground terminal to a 0.5 N·m (4.4 lbf·in) torque.
DANGERHAZARD OF ELECTRIC SHOCKThe grounding screw terminal (PE) must be used to provide protective earth at all times. Make sure that PE is attached before connecting or disconnecting the D-SUB CAN fieldbus cable the device.
Failure to follow these instructions will result in death or serious injury.
Proctective Earth (PE) ground
AWG 12(2.5 mm2)
< 2 m
54 35011390 06/2008

Descriptions, Specifications, and Wiring
Connection to the CANopen Field Bus
The CANopen field bus connector is located in the lower pane of the master module front-panel:
We recommend you use a D-SUB 9-pin female metal connector compliant with standard DIN 41652, or with the corresponding international standard to connect the network field bus cable to the master module. The connection must conform to the following pin assignment:
Contacts Signal Description
1 Unused Reserved
2 CAN_L CAN-L bus line (low dominant)
3 CAN_GND CAN earth
4 Unused Reserved
5 CAN_SHLD Optional CAN shielding
6 GND Optional ground
7 CAN_H CAN-H bus line (high dominant)
8 Unused Reserved
9 CAN_V+ NC (not connected)
Note 1: The contacts pinout corresponds to the legend of the above figure.Note 2: Reserved contacts will be used in a future specification.
35011390 06/2008 55

Descriptions, Specifications, and Wiring
CANopen Network Connectors and Cables
The branch cable between the field bus and the master module must have a female connector complying with the above contact assignment diagram. The CANopen network cable is a shielded twisted double-pair cable complying with the CANopen standard CiA DR-303-1. No wire interruption is authorized in the bus cable. This enables the reserved contacts to be used in a future specification.
56 35011390 06/2008

Descriptions, Specifications, and Wiring
2.3 The ConneXium TwidoPort Ethernet Interface Module
At a Glance
Introduction This section provides an overview and describes external features and specifications of the 499TWD01100 ConneXium TwidoPort Ethernet interface module.
What's in this Section?
This section contains the following topics:
Topic Page
Overview of the ConneXium TwidoPort Ethernet Interface Module 58
TwidoPort's External Features 59
TwidoPort's LED-Panel Description 61
TwidoPort's Wiring 63
General Specifications 64
35011390 06/2008 57

Descriptions, Specifications, and Wiring
Overview of the ConneXium TwidoPort Ethernet Interface Module
Introduction The ConneXium TwidoPort adds Ethernet connectivity to Telemecanique's Twido product line. It is the gateway between a single Twido Modbus/RTU (RS485) device and the physical layer of Modbus/TCP networks in slave mode.
TwidoPort does not require a separate power supply because it gets power from the Twido controller through its serial port.
This gateway module supports slave mode only.
Package Contents
The ConneXium TwidoPort 499TWD01100 package contains:One 499TWD01100 TwidoPort moduleOne Quick Reference GuideOne adapter cable (mini-din, RJ45 male, 50 cm length)
Product Designation
The 499TWD01100 ConneXium TwidoPort Ethernet interface module will be referred to as TwidoPort in the remainder of this document.
58 35011390 06/2008

Descriptions, Specifications, and Wiring
TwidoPort's External Features
External Features
The following figure shows the parts of the 499TWD01100 TwidoPort Ethernet interface module.
35011390 06/2008 59

Descriptions, Specifications, and Wiring
Legend The following table describes the external features of the 499TWD01100 TwidoPort Ethernet interface module.
Feature Function
1 Model numberModel name
499TWD01100ConneXium
2 LED display visual indications of TwidoPort’s operating status
3 RJ45 modular jack power and communications connection to Twido's RS485 port (over the supplied cable)
4 RJ45 modular jack connection to TCP/IP over Ethernet cable (not supplied)
5 PE ground protective earth (PE) ground (M3 screw terminal)
6 DIN rail connector for DIN rail mounting
60 35011390 06/2008

Descriptions, Specifications, and Wiring
TwidoPort's LED-Panel Description
LED-Panel The five LEDs implemented in TwidoPort are visual indications of the operating status of the module:
35011390 06/2008 61

Descriptions, Specifications, and Wiring
Description of the Communication LEDs
This table describes the condition(s), colors, and blink patterns that indicate the operating status of the module:
Using the LED Table
Individual blinks are approximately 200 ms. There is a one-second interval between blink sequences. For example:
blinking—blinks steadily, alternating between 200 ms on and 200 ms offblink 1—blinks once (200 ms), then 1 second offblink 2—blinks twice (200 ms on, 200 ms off, 200 ms on), then one second off, etc.
Label Meaning Pattern Indication(s)
SER ACT(yellow)
serial active on serial activity
off no serial activity
STATUS(green)
module status on normal condition
off abnormal condition
blink: 2 invalid MAC address
blink: 3 link not connected
blink: 4 duplicate IP connection
blink: 5 attempting to get IP condition through BootP
blink: 6 default IP condition
blink: 7 kernel mode
LINK(green)
Ethernet link on link is active
off link is not active
100MB(yellow)
speed on 100 MB/sec (half duplex only, no full duplex support)
off 10 MB/sec (full/half duplex)
ETH ACT(green)
Ethernet activity
on Ethernet is active
off Ethernet is not active
Note: During the autobaud process, the serial activity LED blinks at a 50Hz rate and appears to be on solid. When the serial activity LED goes off, the autobaud process is complete.
62 35011390 06/2008

Descriptions, Specifications, and Wiring
TwidoPort's Wiring
Ethernet Wiring TwidoPort contains an RJ45 10/100 Mbps port. The port negotiates speed to the fastest condition that the end device can support.
Ethernet Connector Pin Assignment
The following figure illustrates the pin assignment for TwidoPort’s Ethernet port: pin 8pin 7
RX-pin 6pin 5pin 4
RX+pin 3TX-pin 2TX+pin 1
35011390 06/2008 63

Descriptions, Specifications, and Wiring
General Specifications
Environmental
Electrical
Specification Specified value
operating temperature 0 to 55 °C (32 °F to 131 °F)
storage temperature -40 °C to +70 °C (-40 °F to 158 °F)
relative humidity 10 to 95% (non-condensing)
pollution degree 2
degree of protection IP20
corrosion immunity free from corrosive gases
altitude operation: 0 to 2,000 m (0 to 6,565 ft)storage: 0 to 3,040 m (0 to 10,000 ft)
vibration resistance When mounted on a DIN rail:10 to 57 Hz: 0.075 mm double amplitude (peak-to-peak) displacement.57 to 100 Hz: 9.8 m ms2 (1g) constant acceleration.duration: 10 sweeps at 1 octave/min on each of three mutually perpendicular axes.
shock resistance 147 ms2 (15g), 11 ms duration, 3 shocks per axis, on three mutually perpendicular axes (IEC 61131-2)
weight < 200g (7 oz)
Specification Specified value
max. current draw 180 mA @ 5 VDC
supply voltage 5 +/- 0.5 VDC
64 35011390 06/2008

Descriptions, Specifications, and Wiring
Agency Certification
Specification
UL 508, UL 1604 hazardous class 1, Div. 2, groups A, B, C, D
CSA C22.2 No. 142
CSA C22.2 No. 213 hazardous class 1, Div. 2, groups A, B, C, D
CE EN 61131-2
EN 55011 (class A)
(IEC 61000-4-2)Electrostatic Discharge (ESD)
4KV contact
4KV air
(IEC 61000-4-3)RFI Immunity (RS)
80 MHz to 2.0 GHz 10V/m, 1 KHz 80% AM
(IEC 61000-4-4)Fast Transients (EFT)
communications ports/cables +/- 1KV
(IEC 61000-4-5)surge withstand capability (transients)
1.2 x 50 μs
shielded communications cable 1KVCM 2Ω
EN61000-4-6 3Vrms 150KHz to 80 MHz, 1 KHz 80% AM
flammability connector: UL 94V-0
enclosure: UL 94V-0
Note: This product complies with the requirements of EN 61132-3: 2003.
35011390 06/2008 65

Descriptions, Specifications, and Wiring
66 35011390 06/2008

35011390 06/2008
3
InstallationAt a Glance
Introduction This chapter provides installation overall instructions with safety information and installation preparation, installation and mounting instructions for the Twido Communication modules.
What's in this Chapter?
This chapter contains the following sections:
Section Topic Page
3.1 Installation Overall Instructions 68
3.2 Communication Modules Installation 80
67
Installation
3.1 Installation Overall Instructions
At a Glance
Introduction This section provides information for installing bases and modules, and minimum clearances for bases and modules.
What's in this Section?
This section contains the following topics:
Topic Page
Installation Safety Guidelines 69
Installation Preparation 72
Compact and Modular Bases Mounting Positions 73
Assembling an Expansion I/O Module to a Base 75
Minimum Clearances for Bases and Expansion I/O Modules in a Control Panel 77
Disassembling an Expansion I/O Module from a Base 79
68 35011390 06/2008

Installation
Installation Safety Guidelines
NOTICE Electrical equipment should be serviced only by qualified personnel. No responsi-bility is assumed by Schneider Electric for any consequences arising out of the use of this material. This document is not intended as an instruction manual for untrained persons. Assembly and installation instructions are provided in the TwidoSuite Hardware Reference Manual, TWD USE 10AE.
(c) 2008 Schneider Electric All Rights Reserved
Additional Safety Information
Those responsible for the application, implementation or use of this product must ensure that the necessary design considerations have been incorporated into each application, completely adhering to applicable laws, performance and safety requirements, regulations, codes and standards.
35011390 06/2008 69

Installation
General Warnings and Cautions DANGER
HAZARD OF ELECTRIC SHOCK, BURN OR EXPLOSIONTurn off all power before starting installation, removal, wiring, maintenance or inspection of equipment.
Failure to follow these instructions will result in death or serious injury.
WARNINGEXPLOSION HAZARD
This equipment is suitable for use in Class 1, Division 2, Groups A, B, C and D or non-hazardous locations only.Substitution of components may impair suitability for Class I, Div 2 compliance.Do not disconnect equipment unless power has been switched off or the area is known to be non-hazardous.
Failure to follow these instructions can result in death, serious injury, or equipment damage.
70 35011390 06/2008

Installation
WARNINGUNINTENDED EQUIPMENT OPERATION
Turn power off before installing, removing, wiring, or maintaining.
This product is not intended for use in safety critical machine functions. Where personnel and or equipment hazards exist, use appropriate safety interlocks.
Do not disassemble, repair, or modify the modules.
This controller is designed for use within an enclosure.
Install the modules in the operating environment conditions described.
Use the sensor power supply only for supplying power to sensors connected to the module.
For power line and output circuits, use a fuse designed to Type T standards per IEC60127. The fuse must meet the circuit voltage and current requirements. Recommended: Littelfuse® 218 Series, 5x20mm time lag (slow blow) fuses.
Failure to follow these instructions can result in death, serious injury, or equipment damage.
35011390 06/2008 71

Installation
Installation Preparation
Introduction The following section provides information for all TwidoSuite bases and expansion I/O modules.
Before Starting Before installing any of the TwidoSuite products read the Safety Information at the beginning of this book.
CAUTIONEQUIPMENT DAMAGEBefore adding/removing any module or adapter, turn off the power to the base. Otherwise, the module, adapter, or base may be damaged, or the base may not operate correctly.
Failure to follow these instructions can result in injury or equipment damage.
Note: All options, expansion I/Os, AS-Interface bus and CANopen fieldbus interface modules should be assembled before installing a Twido system on a DIN rail, onto a mounting plate, or in a control panel. The Twido system should be removed from a DIN rail, a mounting plate, or a control panel before disassembling the modules.
72 35011390 06/2008

Installation
Compact and Modular Bases Mounting Positions
Introduction This section shows the correct and incorrect mounting positions for all bases.
Correct Mounting Position for all Bases
Compact and Modular bases must be mounted horizontally on a vertical plane as shown in the figures below.
Note: Keep adequate spacing for proper ventilation and to maintain an ambient temperature between 0°C (32°F) and 55°C (131°F).
CAUTIONOVERHEATING HAZARDDo not place heat generating devices such as transformers and power supplies underneath the controllers or expansion I/O modules.
Failure to follow these instructions can result in injury or equipment damage.
Compact base with an expansion I/O module
Modular base with an expansion I/O module
35011390 06/2008 73

Installation
Correct and Incorrect Mounting Positions for Compact Bases
A Compact base should only be positioned as shown in "Correct Mounting Position for all Bases" figure. When the ambient temperature is 35°C (95°F) or below, the Compact base can also be mounted upright on a horizontal plane as shown in (1). When the ambient temperature is 40°C (104°F) or below, the Compact base can also be mounted sideways on a vertical place as shown in figure (2). Figure (3) shows an incorrect mounting position.
Incorrect Mounting Positions for Modular Bases
A Modular base should only be positioned as shown in "Correct Mounting Position for all Bases" figure. The figures below show the incorrect mounting positions for all Modular bases.
1 2 3
74 35011390 06/2008

Installation
Assembling an Expansion I/O Module to a Base
Introduction This section shows how to assemble an expansion I/O module to a base. This procedure is for both Compact and Modular bases. Your base and expansion I/O module may differ from the illustrations in this procedure.
WARNINGUNEXPECTED EQUIPMENT OPERATIONMake sure that you update the software each time you change the hardware configuration of the I/O expansion bus. Otherwise, the expansion bus will no longer operate while the local base inputs and outputs will continue to operate.
Failure to follow these instructions can result in death, serious injury, or equipment damage.
35011390 06/2008 75

Installation
Assembling an Expansion I/O Module to a Base.
The following procedure shows how to assemble a base and an expansion I/O module together.
Step Action
1 Remove the expansion connector cover from the base.
2 Make sure the black latch button on the I/O module is in the up position.
3 Align the connector on the left side of the Expansion I/O module with the connector on the right side of the base.
4 Press the expansion I/O module to the base until it "clicks" into place.
5 Push down the black latch button on the top of the expansion I/O module to lock the module to the base.
76 35011390 06/2008

Installation
Minimum Clearances for Bases and Expansion I/O Modules in a Control Panel
Introduction This section provides the minimum clearances for bases and expansion I/O modules in a control panel.
Minimum Clearances for a Compact Base and Expansion I/O Modules
In order to maintain a natural circulation of air around the Compact base and expansion I/O modules in a control panel, observe the minimum clearances shown in the figures below.
20 mm (0.79 in)
20 mm (0.79 in)
40 mm(1.57 in)
40 mm(1.57 in)
20 mm (0.79 in)
80 mm(3.15 in)
Wiring Duct
Front Panel
20 mm (0.79 in)
35011390 06/2008 77

Installation
Minimum Clearances for a Modular Base and Expansion I/O Modules
In order to maintain a natural circulation of air around the Modular base and expansion I/O modules in a control panel, observe the minimum clearances shown in the figures below.
20 mm (0.79 in)
20 mm (0.79 in)
80 mm(1.57 in)
80 mm(1.57 in)
Wiring Duct
20 mm (0.79 in)
20 mm (0.79 in)
80 mm(3.15 in)
Front Panel
78 35011390 06/2008

Installation
Disassembling an Expansion I/O Module from a Base
Introduction This section describes how to disassemble an expansion I/O module from a base. This procedure is for both Compact and Modular bases. Your base and expansion I/O module may differ from the illustrations in these procedures but the basic mechanism procedures are still applicable.
Disassembling an Expansion I/O Module from a Base.
The following procedure describes how to disassemble an expansion I/O module from a base.
Step Action
1 Remove the assembled base and module from the DIN rail before disassembling them, (see p. 95).
2 Push up the black latch from the bottom of the expansion I/O module to disengage it from the base.
3 Pull apart the base and module.
35011390 06/2008 79

Installation
3.2 Communication Modules Installation
At a Glance
Introduction This section provides information for installing Communication modules.
What's in this Section?
This section contains the following topics:
Topic Page
Dimensions of AS-Interface V2 Bus Master Module: TWDNOI10M3 81
How to Install and Remove an AS-Interface Bus Interface Module or a CANopen Fieldbus Master Module from a DIN Rail
82
How to Direct Mount on a Panel Surface 85
How to Install the TwidoPort Ethernet Interface Module 87
80 35011390 06/2008
Installation
Dimensions of AS-Interface V2 Bus Master Module: TWDNOI10M3
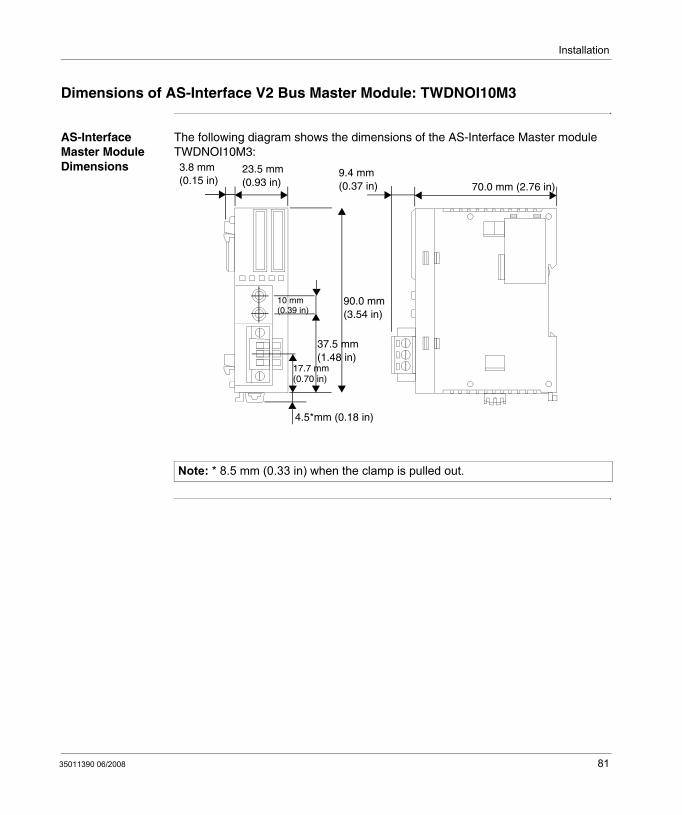
AS-Interface Master Module Dimensions
The following diagram shows the dimensions of the AS-Interface Master module TWDNOI10M3:
Note: * 8.5 mm (0.33 in) when the clamp is pulled out.
70.0 mm (2.76 in)
23.5 mm(0.93 in)
3.8 mm(0.15 in)
9.4 mm(0.37 in)
90.0 mm(3.54 in)
10 mm(0.39 in)
4.5*mm (0.18 in)
37.5 mm(1.48 in)
17.7 mm(0.70 in)
35011390 06/2008 81

Installation
How to Install and Remove an AS-Interface Bus Interface Module or a CANopen Fieldbus Master Module from a DIN Rail
Introduction This section describes how to install and remove AS-Interface bus master modules or CANopen fieldbus master module from a DIN rail. The device you want to install or remove may differ from the illustrations in these procedures but the basic mechanism procedures are applicable.
Note: When mounting controllers on a DIN rail, use two end stops, type AB1-AB8P35 or equivalent.
82 35011390 06/2008

Installation
How to Install an AS-Interface Bus Interface Module or CANopen Fieldbus Master Module on a DIN Rail
The following procedure shows how to install an AS-Interface bus master module or CANopen fieldbus master module on a DIN rail.
Step Action
1 Fasten the DIN rail to a panel using screws.
2 Pull out the clamp at the bottom of the controller and module assembly.
3 Put the top groove of the controller and module on the DIN rail and press the modules toward the DIN rail.
4 Push the clamp into the DIN rail.
5 Place mounting clips on both sides of the modules to prevent the system from moving sideways.
Groove
35 mm wide DIN rail
Clamp
35011390 06/2008 83

Installation
How to Remove an AS-Interface Bus Interface Module or CANopen Fieldbus Master Module from a DIN Rail
The following procedure shows how to remove an AS-Interface bus master module or a CANopen fieldbus master module from a DIN rail.
Step Action
1 Insert a flat screwdriver into the slot in the clamp.
2 Pull out the clamp.
3 Pull the controller and the associated module off the DIN rail from the bottom.
Clamp
84 35011390 06/2008

Installation
How to Direct Mount on a Panel Surface
Introduction This section shows how to install mounting strips directly on AS-Interface bus interface modules and the CANopen fieldbus interface module. This section also provides mounting hole layouts for each module. Your module may differ from the illustrations in these procedures but the basic mechanism procedures are applicable.
Installing a Mounting Strip
The following procedure shows how to install a mounting strip.
Mounting Hole Layout for the AS-Interface Bus Interface Module
The following diagram shows the mounting hole layout for the TWDNOI10M3 AS-Interface bus interface module:
Step Action
1 Remove the clamp from the back side of the module by pushing the clamp inward.
2 Insert the mounting strip, with the hook entering last, into the slot where the clamp was removed.
3 Slide the mounting strip into the slot until the hook enters into the recess in the module.
90.0 mm
27.3 mm
6.3 mm
103.0 mm
0.25 in
3.54 in 4.06 in
1.07 in
2 x Ø4.3 mm2 x Ø11/64 in
3.0 mm0.118 in
35011390 06/2008 85

Installation
Mounting Hole Layout for the CANopen Fieldbus Master Module
The following diagram shows the mounting hole layout for the TWDNCO1M CANopen fieldbus master module:
3.54 in90.0 mm
29.7 mm0.25 in6.3 mm
4.06 in103.0 mm
1.17 in
2 x Ø4.3 mm2 x Ø11/64 in
3.0 mm0.118 in
86 35011390 06/2008

Installation
How to Install the TwidoPort Ethernet Interface Module
Introduction This section shows how to install the TwidoPort Ethernet interface module and connect it to a Twido controller.
Foreword The equipment is delivered in ready-to-operate condition. The following procedure is appropriate for installation.
Proper Grounding
Ground Cable
The PE ground must be capable of supporting 30 A of current for 2 minutes and have no more than 50 mΩ of resistance. The recommended PE wire size is AWG #12 (3.2
mm2) through #18 (0.87 mm2). The maximum allowable length of the wire at AWG #18 is less than 2 meters (6.56 ft).
The TwidoPort-to-Twido Controller Connecting Cable
The supplied TwidoPort-to-Twido cable is 50 cm (1.64 ft) long. It has a mini-din connector at one end and a modular plug at the other:
DANGERHAZARD OF ELECTRIC SHOCKThe grounding screw terminal (PE) must be used to provide protective earth at all times. Make sure that PE is attached before connecting or disconnecting any Ethernet shielded cables to the device.
Failure to follow these instructions will result in death or serious injury.
35011390 06/2008 87

Installation
Mounting Instructions
Usually, TwidoPort is mounted on a DIN rail or a panel with the Twido panel mount kit (TWDXMT5).
To connect TwidoPort to the DIN rail, take the following steps (as shown in the diagram below):
The following figure shows TwidoPort being mounted on a DIN rail:
Note: Before installing a TwidoPort module, read the Safety Information at the beginning of this guide as well as the instructions for Proper Grounding (see p. 87) in this section.
Step Action Comment
1 Attach the hinges on the back of TwidoPort to the DIN rail, then press down to align TwidoPort vertically with the rail.
Make sure the DIN rail latch is pulled down to the open position.
2 Lock TwidoPort to the DIN rail. Push up the plastic DIN rail clip on the bottom.
88 35011390 06/2008

Installation
TwidoPort Dimensions
The following diagram shows the dimensions of TwidoPort:
35011390 06/2008 89

Installation
90 35011390 06/2008

Appendices
At a Glance
Introduction This appendix provides information on system diagnostic using LED’s, operator display operation, troubleshooting, the DIN rail, common IEC symbols used in this manual, and agency compliance.
What's in this Appendix?
The appendix contains the following chapters:
Chapter Chapter Name Page
A AS-Interface and CANopen Diagnostic using the Front Panel LED’s
93
B The DIN Rail 95
C IEC Symbols 97
D Agency Compliance 99
35011390 06/2008 91

Appendices
92 35011390 06/2008

35011390 06/2008
A
AS-Interface and CANopen Diagnostic using the Front Panel LED’sTroubleshooting Using the Front Panel LEDs
Introduction This section provides information on the module operating status and troubleshooting using the front panel LEDs.
Status of AS-Interface bus interface module
The following table summarizes the problems that may occur on AS-Interface master module startup:
Problems Causes and action to be taken
PWR Insufficient power is being delivered to the AS-Interface module.Check AS-Interface power supply and connections.
Check the connection between the Twido module and the AS-Interface master.
FLT The slave configuration on the AS-Interface bus is incorrect: Use TwidoSuite to check that the slaves are correctly connected.
If the configuration is correct and the LED remains on: Disconnect and reconnect the AS-Interface connector, or switch off the power supply and switch it back on again.
OFF A slave is connected at address 0 at power up: Change the slave's address and repeat power up:
Instable slave operation
If two slaves have the same address and the same identity codes, the AS-Interface master may fail to detect an error:
Remove one of the slaves from the bus and perform readdressing using TwidoSuite.
IlluminatedOff
93

AS-Interface and CANopen diagnostic using the Front Panel LED’s
CANopen Status LED
The following table describes the CANopen status LED:
CANopen LED state Possible causes and actions
ON (Solid) Bus On (no error)
ON (Blinking) Bus initialization in progress (at startup)
OFF Bus OffPossible causes:
either the CANopen master module is not powered normally,or the bus configuration is invalid. (See also %SW81...87 and %SW20...27 system words to check operating status of CANopen master and slave devices respectively, in TwidoSuite Reference Guide.)
IlluminatedBlinkingOff
94 35011390 06/2008

35011390 06/2008
B
The DIN RailThe DIN Rail
Introduction You can mount the Twido controller and its expansions on a DIN rail. A DIN rail can be attached to a smooth mounting surface or suspended from a EIA rack or in a NEMA cabinet.
Dimensions of the DIN Rail
The DIN rail measures 35 mm (1.38 in.) high and 15 mm (0.59 in.) deep, as shown below.
35 mm
15 mm
35 mm1.38 in.
0.59 in.
1.38 in.
95

The DIN Rail
Recommended Equipment
You can order the suitable DIN rail from Schneider Electric:
Rail depth Catalogue part number
15 mm (0.59 in.) AM1DE200
96 35011390 06/2008

35011390 06/2008
C
IEC SymbolsGlossary of Symbols
Introduction This section contains illustrations and definitions of common IEC symbols used in describing wiring schematics.
97

IEC Symbols
Symbols Common IEC symbols are illustrated and defined in the table below:
Fuse
Load
AC power
DC power
Discrete sensor/input, for example, contact, switch, initiator, light barrier, and so on.
Earth ground
2-wire sensor
Thermocouple element
L
~+ _
+_
+_ +_
98 35011390 06/2008

35011390 06/2008
D
Agency ComplianceAgency Requirements
Introduction This section provides agency standards for the Twido products.
Standards Twido controllers comply with the main national and international standards concerning electronic industrial control devices.
The following are specific controller requirements:
EN61131-2 (IEC61131-2)
UL508
UL1604/CSA 213 Class I Division 2 Groups A, B, C, D
99

Agency Compliance
100 35011390 06/2008

Glossary
Analog potentiometer
It can be used to preset a value for an analog timer. All Modular controllers and Compact 10 and 16 I/O controllers have one analog potentiometer. The Compact 24 I/O controller has two:
Analog Voltage Input Connector
Connects an analog voltage source of 0 through 10 VDC. The analog voltage is converted to a discrete value and is stored in a system word.
CAN Controller Area Network: field bus originally developed for automobile applications which is now used in many sectors, from industrial to tertiary.
Cartridge Connector
A connector to attach an optional memory cartridge or an RTC.
Catch Input Makes sure to receive short input pulses (rising pulse of 40 μs or falling pulse of 150 μs minimum) from sensors without regard to the scan time.
CiA CAN in Automation: international organization of users and manufacturers of CAN products.
A
C
35011390 06/2008 101

Glossary
COB Communication OBject: transport unit on CAN bus. A COB is identified by a unique identifier, which is coded on 11 bits, [0, 2047]. A COB contains a maximum of 8 data bytes. The priority of a COB transmission is shown by its identifier - the weaker the identifier, the more priority the associated COB has.
Communication Adapter
An optional cartridge that can be attached to any Compact controller or Operator Display Expansion Module to provide an optional Serial Port 2.
Communication Expansion Module
An optional module that can be attached to any Modular controllers communications expansion bus to provide an optional Serial Port 2.
Controller status output
A special function. This function is used in safety circuits, external to the controller, to control the power supply to the output devices or the controller power supply.
EDS Electronic Data Sheet: description file for each CAN device (provided by the manufacturers).
ERR LED An LED that illuminates when an error occurs in the controller.
Expansion connector
A connector to attach expansion I/O modules.
Expansion Connector Cover
A cover to protect the expansion connector.
Expansion I/O Module
Either a discrete or analog module that adds additional I/O to the base controller.
Fast Counting A special function, it is available as a single up counter and single down counter. These functions enable up counting or down counting of pulses (rising edges)on a discrete I/O. Compact controllers can be equipped with three fast counters. Modular controllers can have two fast counters.
E
F
102 35011390 06/2008

Glossary
Free Wire The end of a discrete I/O cable whose wires do not have a connector. This scheme provides connectivity from Modular I/O to discrete I/O points.
I/O Input/Output.
I/O terminals Terminals on all Modular controllers and expansion I/O modules used to connect input and output signals. The input terminals accept both sink and source DC input signals. The output terminals are either transistor source or sink or relay contacts.
IN LED An LED that illuminates when a corresponding input is on. All modules have IN LEDs.
Input Filter A special function that rejects input noises. This function is useful for eliminating input noises and chatter in limit switches. All inputs provide a level of input filtering using the hardware. Additional filtering using the software is also configurable through TwidoSuite.
Input Simulators An optional accessory for Compact controllers that is used for debugging. It can simulate input sensors to test application logic.
Input terminals Terminals on the top of all Compact controllers used to connect input signals from input devices such as sensors, push buttons, and limit switches. The input terminals accept both sink and source DC input signals.
Latching input A special function. This function is used to memorize any pulse with a duration less than the controller scan time. When a pulse is shorter than one scan and has a value greater than or equal to 100 μs, the controller latches the pulse, which is then updated in the next scan.
I
L
35011390 06/2008 103

Glossary
Memory Cartridge
An optional cartridge available in two sizes: 32 KB and 64 KB (64 KB not available on Compact). It can be added to any controller for removable backup of applications or to load an application, if certain conditions exist. The 64 KB cartridge is also used to increase program memory.
Modbus Master Mode
Allows the controller to initiate a Modbus query transmission, with a response expected from a Modbus slave.
Modbus Slave Mode
Allows the controller to respond to Modbus queries from a Modbus master and is the default communications mode if no communication is configured.
Operator display expansion module
An optional module that can be attached to any Modular controller to display program information.
Operator display module
An optional module that can be attached to any Compact controller to display program information.
OUT LED An LED that illuminates when a corresponding output is on. All modules have OUT LEDs.
Output terminals Terminals on the bottom of all Compact controllers used to connect output signals from output devices such as electromechanical relays and solenoid valves. The internal output relay contact is rated up to 240 VAC/2A or 30 VDC/2A.
PLS A special function. This user-defined function block generates a signal on output %Q0.0.0 or %Q0.0.1. This signal has a variable period but has a constant duty cycle, or on to off ratio of 50% of the period.
M
O
P
104 35011390 06/2008

Glossary
Power Supply Terminals
The power supply is connected to these terminals to provide power to the controller. The power voltage for a Compact controller is 100-240 VAC and 24 VDC for a Modular controller.
PWM A special function. This user-defined function block generates a signal on output %Q0.0.0 or %Q0.0.1. This signal has a constant period with the possibility of varying the duty cycle, or on to off ratio.
PWR LED An LED that illuminates when power is supplied to the controller.
Removable Cover
A cover on all Compact controllers that can be removed to install an optional Operator Display.
RTC Real Time Clock.
RTD Temperature detector of type PT100, PT1000 etc. Resistor Temperature Detector.
RUN LED An LED that illuminates when the controller is executing a program.
Sensor power terminals
Supplies power to the sensors (24 VDC, 400 mA for -40DRF compact controllers and 250 mA for all other controllers). Output terminals are only intended for input devices and should not be used as a source for driving external loads.
Serial Port 1 An EIA RS-485 connector used to download and monitor the controller operation using TwidoSuite.
Serial port 2 An optional port that can be configured as either EIA RS-232 or EIA RS-485.
STAT LED An LED that blinks on and off to indicate a specific status of the user program.
R
S
35011390 06/2008 105

Glossary
Terminal cover A cover on all Compact controllers to protect the input and output terminals.
Very Fast Counting
A special function available as an up/down counter, an up/down 2-phase counter, a single up counter, a single down counter, and frequency meter. The counter functions enable counting of pulses from 0 to 65,535 in single-word mode and from 0 to 4,294,967,295 in double-word mode. The frequency meter function measures the frequency of a periodic signal in Hz.
T
V
106 35011390 06/2008

CBAIndex
AAgency requirements, 99AS-Interface bus
Illustration, 13, 22AS-Interface cable
Connection procedure, 34Specifications, 33
AS-Interface master module, 20AS-Interface Master module TWDNOI10M3
Dimensions, 81LEDs, 38Operating modes, 37Push buttons, 36Status, 93
AS-Interface TWDNOI10M3 master moduleMounting hole layout, 85Parts description, 29Specifications, 30, 31
AS-Interface V2 bus, 20Components, 24Main specifications, 27Reminder, 12, 21Specifications, 30
BBases
Assembling an expansion I/O module, 75Disassembling an expansion I/O module, 79Minimum clearance, 77Mounting positions, 73
35011390 06/2008
CCANopen
Field bus interface, 55CANopen fieldbus, 41
Specifications, 48Topology, 43
CANopen master module, 41CANopen power supply cable
Connection procedure, 52CANopen TWDNCO1M master module
CANopen Status LED, 94Mounting hole layout, 86Parts description, 47Specifications, 48, 49
Communication architecture, 12Compact
Minimum clearance, 77Controllers
Installing on a DIN rail, 83Removing from a DIN rail, 84
DDimensions
AS-Interface Master Module TWDNOI10M3, 81
DIN rail15 mm AM1DE200 rail, 96
107

Index
EExpansion I/O modules
Assembling to a base, 75Disassembling from a base, 79
FField bus interface
Connection, 55
IIEC symbols, 97Installation preparation, 72Installing on a DIN rail, 83
MMinimum clearance
Bases, 77Compact, 77Modular, 78
ModularMinimum clearance, 78
Mounting hole layoutAS-Interface TWDNOI10M3 master module, 85CANopen TWDNCO1M master module, 86
OOverview
AS-Interface V2 bus, 26
PParts description
AS-Interface TWDNOI10M3 master module, 29CANopen TWDNCO1M master module, 47
108
RRead before starting, 72
SSpecifications
AS-Interface cable, 33AS-Interface TWDNOI10M3 master module, 30, 31AS-Interface V2 bus, 26, 30CANopen fieldbus, 48CANopen TWDNCO1M master module, 48, 49
Standards, 99Starting, 72Status
AS-Interface Master module TWDNOI10M3, 93CANopen TWDNCO1M master module, 94
Symbols, 97
TTopology
CANopen fieldbus, 43Troubleshooting
Using LEDs, 93
35011390 06/2008