tutoriales photoshop
TRANSCRIPT

1.) Para comenzar abrimos la imagen sobre la que vamos a realizar el efecto. En éste caso hemos elegido ésta
imagen redimensionada, click para agrandar
2.) Ahora creamos una nueva capa, seleccionamos un pincel difuso, color blanco, dureza 0%, y comenzamos a hacer puntitos sobre nuestra imagen.
3.) Seguimos con el mismo tipo de pincel, pero en este caso reducimos el diámetro, y hacemos unos cuantos puntitos más, hasta que nos quede algo así

imagen redimensionada, click para agrandar
4.) a continuación seleccionamos PINCELES VARIOS,y escogemos estos que veís en la imagen

Y ponemos unas cuantas estrellitas y destellos.

imagen redimensionada, click para agrandar
5.) Creamos una nueva capa[/b]. La situamos entre la capa fondo (la de nuestra fotografia original) y la capa de las estrellitas y los puntitos.Seleccionamos un pincel difuso, en color blanco, con un diametro que abarque todo el dibujo que hemos creado con los pinceles, y pintamos una linea gruesa, nos tiene que quedar algo así

imagen redimensionada, click para agrandar
Bajamos la opcidad de esta capa al 50%.(aseguraos de que esta capa está en medio)
6.) Ahora vamos a capa/combinar visibes para seguir trabajando.
7.) Duplicamos la capa[/b].Aplicamos a la capa duplicada FILTRO/INTERPRETAR/EFECTOS DE ILUMINACIÓN tal y como se ve en la imagen

imagen redimensionada, click para agrandar
Y ponemos esta capa en modo MULTIPLICAR
8.) Volvemos a duplicar la capa fondo y la situamos encima de todo.la ponemos en modo de fusion LUZ SUAVE. y ahora tendemos que darle el toque de color a nuestra imagen para conseguir ese efecto romántico.
9.) Creamos una nueva capa.la situamos entre la capa de LUZ SUAVE y la capa que tenemos en MULTIPLICAR.Podeís elegir el tono que queráis, depende del tipo de fotografía y del efecto que queráis conseguir.En este caso yo he elegido un tono este tono azul.

10.) Rellenamos con el bote de pintura y cambiamos el modo de fusion a SUPERPONER.A partir de ahí, podéis jugar con las opacidades de las capas hasta conseguir el efecto que más nos guste.en este caso, yo puse la capa de color azul a un 80%,
y éste es mi resultado

imagen redimensionada, click para agrandar
EFECTO REVISTA
1. Abrimos la imagen que deseamos trabajar.

2. Seleccionamos con cualquier herramienta de seleccion el fondo de la imagen.

3. En la capa FONDO Hacemos un degradado RADIAL con los colores: Frontal [88959D] y de Fondo [102B3E].
Hagan el degradado desde el centro hacia un exterior, EJEMPLO

4. La imagen estará quedando mas o menos asi:

5. Luego mantenemos presinada la tecla CTRL y hacemos click sobre la capa de la Imagen, esto nos sirve para selecionar la capa. Creamos una capa nueva, luego vamos a Edición->Rellenar y Ponemos rellenar con color de Fondo...
Quedando asi:

6. En la opcion COLOR
La imagen va quedando por ahora asi:

7. Seleccionamos la capa de la foto y con la herramienta "Subexponer" le damos un efecto de sombra en el lateral que quieran...
Quedando finalmente la imagen asi :)
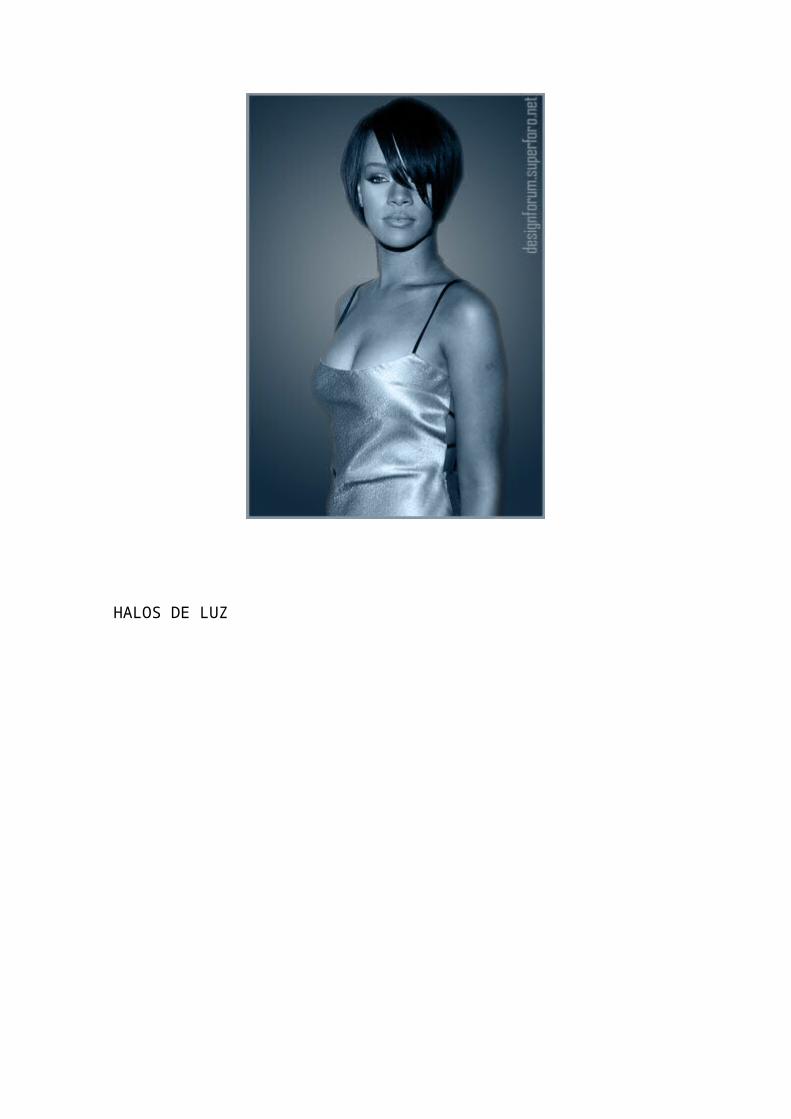
HALOS DE LUZ


AÑADIR NUBES CON PINCELES DE NUBES
17-JUL-2007 Jane Alexander
Adding clouds with cloud brush

Isabel came across a great freebie - a cloud brush for photoshop. The cloud brush came along with a tutorial for using channels to make the background selection. I
tried the tutorial but I think I have a way that is easier and quicker. It works perfect when you have a pretty strong blue original background.
Mini Tutorial:
Open your photo in PhotoShop Shift+ Ctrl+ N for a new layer
Choose white for your brush color for the clouds and apply the cloud brush at 100% opacity to the new layer
Go to Edit - Transform - Scale and drag the corners of the cloud layer to cover the whole photo
Use the move tool to place the cloud cover where you want it on the image Click on the eye on the cloud layer so that only the original layer is visible and make
sure you are working on this original layer and that it is no longer locked. Go to "Select" and choose "color range"
Use the dropper and run it down the sky that you want to change on the original layer. Click OK and the selection will be made.
Now click back so that you are working on the cloud layer. Make this layer visible. Shift + Ctrl + i to invert the selection
Now click "delete" Ctrl + D to deselect
merge the layers if you are happy with the result!
EXPLOSIÓN
Asi quedaria el Resultado:
Paso 1Abrimos un nuevo documento, yo use uno de 800×600. Consigue una foto de una

carretera en internet, la que yo use esta aqui. Despues coloca la foto en el documento.
Paso 2
Ahora necesitaremos la foto de una persona, la que use se encuentra aqui. Una vez que tienes la foto es hora de extraer al individuo del fodo. Usando la Pen Tool (P) creamos un path como el de la imagen de abajo. Despues ve a la Paths Palette y crea una seleccion de ese path. Luego ve a Layer>Layer Mask>Reveal Selection. Finalmente

llamemos a esta capa amigo.


Paso 3
Vamos a Edit>Transform>Scale y reducimos el tamaño del tipo. Luego ve a
Go to Edit>Transform>Scale and reduce the size of the guy. Then go to Edit>Transform>Flip Horizontal. We do that to match the light direction.
Paso 4

Go to Image>Adjustments>Curves. The idea here is to darken the guy a little bit; So, he will fit better with the background. Use the image below as a reference.
SPaso 5
Holding Cmd/Ctrl click on the mask thumb of the dude layer. That will create a marquee selection of the guy. After that create a new layer. Rename it to shadow and fill it with black. Then go to Edit>Transform>Distort and move the vertices to make the

shadow in perspective. The last thing here is go to Filter>Blur>Gaussian Blur.
Step 6
Grab the Ellipse Tool(U). Select Paths instead of Shape Layer. Create a Circle, like the image below. After that grab the Direct Selection Tool(A) and adjust the bottom of

the circle.
Step 7

Create a new layer. Rename it to clouds. Then go to Filter>Render>Clouds. While holding ALT, click on Clouds. After that go to the Path’s Palette and create a selection from the path and mask the layer.
Tip: As you will be using the Render>Clouds, you will probably need to apply the filter several times until you got the clouds just right. Keep working with it until the light and

dark areas are in a good position.

Step 8
Go to Filter>Liquify. In the Liquify Dialog Box select the Bloat Tool (B). Then for the settings use: Brush Size 550, Brush Density 100, Brush Pressure 100, Brush Rate 60, and Turbulent Jitter 75.
Then select the Show Backdrop Option. That will allow you to see the clouds and the background. It will be necessary to use the Bloat tool in the right place. Click a few times and deselect the Show Backdrop. Then you will see the effect and will be able to

repeat it more times in the correct place.

Step 9
Change the Blend Mode of the cloud layer to Soft Light. Then create another layer and rename it to Clouds 2 and repeat Steps 7 and 8. We will need another cloud to make it more turbulent. This time however use Multiply for the Blend Mode.
After that, create yet another layer. Rename it to Clouds 3 and repeat Steps 7 and 8. For this layer use Color Dodge for the Blend Mode. The last thing here is with the Eraser

Tool (E) delete some parts. This layer is used to give highlights to the clouds.

Step 10
Group the Clouds 3 layer and go to Layer>Layer Mask>Reveal All. After that, select the Brush Tool (B), give it a black color, and mask some parts of the clouds that are close to the ground.
Step 11

Select the Clouds layer and go to Filter>Sharpen>Sharpen More. Then repeat this Sharpen filter on Clouds 2 and 3 layers.
Step 12
Create a new layer. Rename it to Glow. Fill it with white and go to the Path Palette. Create a selection from the clouds path as we did in Step 9. Then mask the layer.
After that go to Layer>Layer Style>Outer Glow. Use the default settings. Then go to Layer>Layer Style>Create Layer. This command will create another layer from the

Outer Glow. You can delete the white layer and leave just the Outer Glow

layer.

Step 13
Create a folder called Lights. Move the Glow layer to this folder. Next, select the Glow layer. Then go to Layer>Layer Mask>Reveal All. Then select the Brush Tool, black for the color, and start masking the glow. We need just the outline; however, some bright spots in the middle will give a nice result.
Step 14

Create a new layer beneath the clouds group. Using the Elliptical Marquee Tool create a selection like the image below. Fill the layer with black and use 40% opacity.


Step 15
Go to Layer>Layer Mask>Reveal All. After that select the Gradient Tool(G) and use a black and white gradient. Then Mask the layer, like in the image below.
Step 16
Duplicate the layer and go to Layer>Layer Mask>Apply. Then go to Edit>Transform>Distort. Repeat the same thing we did for the shadow of the guy on

this layer. Group these 2 layers and rename the group to Shadows.

Step 17
Create a new layer right above the road photo. Go to Filter>Render>Clouds. Then go to Filter>Distort>ZigZag. Use 100 for the Amount and 5 for the Ridges. For the Style use Pond Ripples.

Step 18
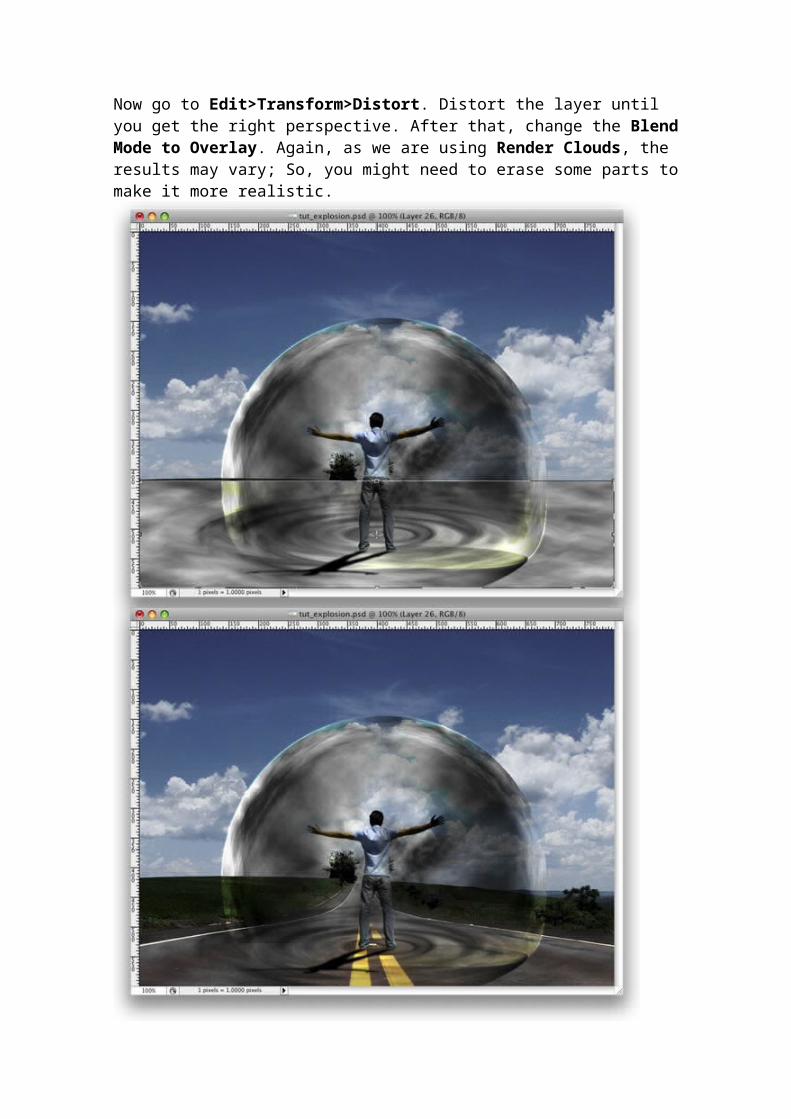
Now go to Edit>Transform>Distort. Distort the layer until you get the right perspective. After that, change the Blend Mode to Overlay. Again, as we are using Render Clouds, the results may vary; So, you might need to erase some parts to make it more realistic.

Step 19
Create an Elliptical Selection like the image below. Then fill it with black. After that, create another Elliptical Selection, but smaller. Then delete that part of the layer. With the Magic Wand Tool(W) select the black part of the layer.
Step 20
Duplicate the Road’s layer and select it. Make sure that you still have the Marquee Selection from the Step 19. Then go to Layer>Layer Mask>Reveal Selection. You can delete the black ellipse layer from the Step 19, or just hide it.
Go to Layer>Layer Styles>Bevel and Emboss. This is another way to create the ripple effect, you could use Displace as well.

Step 21
Go to Layer>New Layer Fill>Gradient. Use Radial for the Style. For the colors use #ddc396 and #2f1e00. Change the Blend mode to Color Dodge.
Step 22

Here I used another image from Stock.Xchng, image. Just place it on top of all layers and change the Blend Mode to Overlay.
Step 23
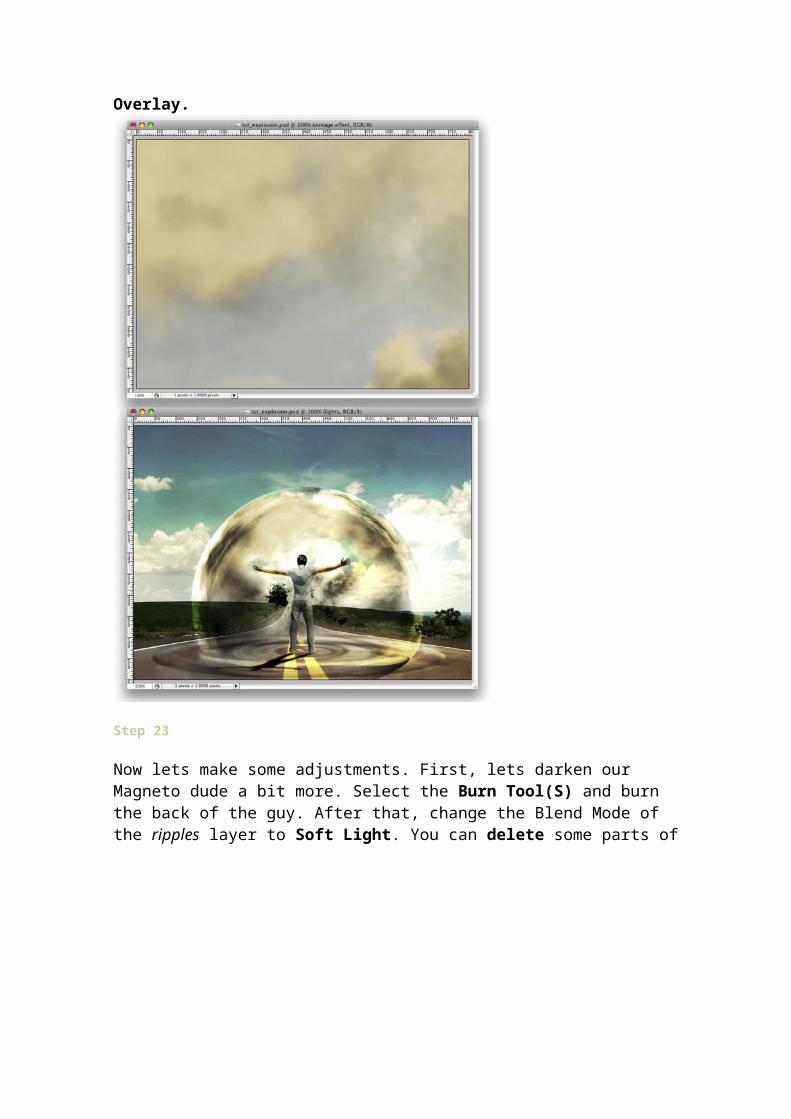
Now lets make some adjustments. First, lets darken our Magneto dude a bit more. Select the Burn Tool(S) and burn the back of the guy. After that, change the Blend Mode of

the ripples layer to Soft Light. You can delete some parts of the clouds as well.
Step 24
Create a new folder, beneath the dude layer. Name the group power and change the Blend Mode to Color Dodge. After that, create a new layer inside of this group. Then using the Brush Tool with white color, create some lights coming from the hands of the guy. Tip: use a regular brush with 0% for the hardness.

After that you create another layer. Use some brushes to add more effects. I used some abstract brushes from http://brusheezy.com. Then add a Pink Outer Glow Layer Style.

Step 25
Import the truck image, you can download it at image. Then with the Magic Wand Tool(W) select and delete the background of the photo; Leave just the truck. After that

go to Edit>Transform>Flip Horizontal. Move the truck to the side of the road.


Step 26
Go to Image>Adjustments>Curves and make the truck a bit darker. After that using the Rectangular Marquee Tool(M) create a rectangular selection a bit bigger than the truck. Then go to Filter>Blur>Radial Blur. For the settings use: Amount 2, Method use Spin, and set Best Quality. Next, go to Filter>Blur>Motion Blur. Then use -75

degrees for the angle and 3 pixels for the Distance.


Step 27
Now we will create the truck’s shadow. To do that select the Truck’s layer, click with the right button of the mouse and choose Select Pixels. Then create a new layer and fill it with black. Put this layer beneath the truck layer and go to Edit>Transform>Distort. Distort the shadow to make it look more real. Then go to

Filter>Blur>Gaussian Blur. Change the Opacity of this layer to 60%.


Step 28
Group the truck and the shadow layer and rename it to truck. Then organize your folders in the Layers Palette.
Conclusion
You can add more elements to the image, like a traffic cone or more cars. But always change the curves in order to make the objects have the same lighting. That will make the image more realistic. For some effects there will be many other ways to achieve a similar result. Experiment with different methods of achieving an effect, like we did

with the ripples. Finally, stick with the ones you think are the best for that image.
EMBELLECER UNA FOTO
Step 1:
Open a lady photo (as sexy as good!)
How about this one?


Use any cutting tools and get your lady out off the background...
Reopen that photo and put the layer under "cut layer" :

Pick Brush Tool
Download and load this brush into Photoshop: Odysee_brush
Creat a new layer under "cut layer"

Pick this brush :
Brush on the new layer like this :

OK. continue!
Download and load this brush into Photoshop : Green Lotus
Creat a new layer up on "cut layer"
Pick this brush :

Put the brush like this with color #c6eaf9
Choose any brush (just downloaded) and creat any new layer, make your photo be plendid!

Step 2 :
Pick Smudge Tool
Choose this brush : (Chalk brush 60 px)

Go to Window ~> Brushes, set option :

Duplicate "cut layer" once. Rechoose "cut layer". Start smudging on the edge of your lady how to have something like this :

Change mode = Color Dodge

Duplicate "cut layer copy", a new layer will appear up on "cut layer copy"
Keep smudge on the edge...
Change mode = Softlight.

Not bad? Want more? Ok! Let's continue!
Step 3 :
Click the top layer on layer palette.
Go to menu Layer ~> New adjustment layer ~> Curve

Result :

Wow, more impressive.
More more??? Yes yes!!!
Go to menu Layer ~> New adjustment layer ~> Gradient Map
Pick any gradient you feel it suitable to your photo, and here's some examples :

Mode = Overlay. Opacity = 70%


Mode = Multiply. Opacity = 70%

Mode = Soft light. Opacity = 60%

You've already finished this tutorial. Good luck!
CAMBIAR FONDOS
Antes

Despues

Paso 1°
Abrimos un documento con la imagen que queremos quitar el fondo..

Seleccionamos la herramienta, Borrador de fondos como en la imagen
Despues nos vamos a las opciones de el borrador de fondos y colocamos estos parlamentos lo que esta en rojo eso si es necesario , aunque ustedes lo pueden modificar si quieren..
Paso 2
seleccionamos el cuentagotas como en la imagen

y despues le damos un click al cielo , para obtener el color del cielo exacto
y debemos de tener el color azul frontal y seleccionamos de nuevo la herramienta borrador de fondos como en los circulos rojos de la imagen
Paso 3
Le damos solo 1 click al cielo y lo dejamos apretado y lo vamos borrando no le den 2 que se borrara todo lo demas o el color seleccionado de atras..

y magia se borra solo el cielo , bueno no es magia es la herramienta..
y ahora si ponemos alguna imagen abajo de la de nuestro paisaje y listo..
TEXTO EROSIONADO
1.) Lo primero que haremos para realizar este efecto será abrir un documento de 800 x 800 píxeles.
2.) Rellenaremos esa capa de color negro. Lo primero que tenemos que hacer es, restaurar los colores principales del photoshop a estándar, por tanto presionaremos comando directo de nuestro teclado “D” para resetear los colores a FRONTAL NEGRO / FONDO BLANCO. Ahora tenemos 2 opciones para rellenar esa capa. Comando directo de nuestro teclado ALT + BACKSPACE de nuestro teclado, que seria retroceso o seleccionamos el bote de pintura directamente y rellenamos de negro. El bote de pintura lo podremos ubicar presionando comando directo G. Si por casualidades al presionar comando directo G nos sale la herramienta degradado no se preocupen, presionen SHIFT + G y automáticamente se seleccionara la otra opción que trae nuestra

panel de herramientas, “el bote de pintura”. Este truco funciona con todos los comandos.
imagen redimensionada, click para agrandar
3.) Seguidamente seleccionaremos un pincel redondo y subimos su tamaño a 250 píxeles y bajamos la dureza a 0% para que nuestro color nos quede difuminado.
4.) Comenzamos a pintar haciendo solamente clic en las esquinas de nuestro cuadro. Yo he comenzado con el color rojo.
imagen redimensionada, click para agrandar
5.) La idea será ir rellenando todo el cuadro de color con distinto colores hasta obtener algo parecido a esto.
imagen redimensionada, click para agrandar
6.) Pasamos seguidamente ha aplicar FILTRO – PIXELAR – PUNTILLISTA y aplicaremos el filtro con estos valores. Es importante que nuestro color de fondo en el panel de herramientas sea de color BLANCO. Para aquellos que conozcan poco del photoshop aquí les dejo muestra donde ubicarlo.
Y estos los valores a usar en nuestro filtro.

7.) Vamos a resetear nuestros colores nuevamente en la barra de herramientas a negro/blanco, para ellos presionamos comando directo “D” de nuestro teclado y seguidamente comando directo “X” para invertir a FRONTAL BLANCO / FONDO NEGRO.
8.) Vamos ha aplicar FILTRO – BOSQUEJAR – PAPEL HUMEDO y utilizaremos estos valores.
Longitud de Fibra: 4Brillo: 15Contraste: 15
imagen redimensionada, click para agrandar
9.) Aplicamos ahora FILTRO – TRAZOS DE PINCEL – CONTORNOS CON TINTA.
Longitud del Trazo: 4Intensidad de la Sombra: 6Intensidad de Luz: 10
imagen redimensionada, click para agrandar
10.) Aplicamos ahora FILTRO – TEXTURA – AZULEJO DE MOSAICO.
Tamaño de azulejo: 6Anchura de Lechada: 8Aclara Lechada: Al máximo
imagen redimensionada, click para agrandar

11.) Ahora creamos una capa por debajo de nuestra capa efecto, escribimos algo de texto a nuestro gusto e inmediatamente seleccionamos con nuestro ratón nuevamente la capa efecto. Presionamos comando directo del teclado CONTROL + G, que nos creara una mascara de recorte o vamos a CAPA – CREAR MASCARA DE RECORTE. En nuestra ventana de capas deberíamos tener algo así parecido. Yo he colocado un degradado para hacer el efecto más atractivo y visual.
12.) Si les gusta la fuente que he utilizado la pueden obtener de esta pagina. Fuente Utilizada, el nombre de la misma es 321impact.
RESULTADO FINAL

imagen redimensionada, click para agrandar
Hace ya tiempo que tenia ganas de probar una tecnica de crear destellos de luz para decorar nuestras fotos o creaciones, y hoy me he puesto a ello oye.Así que vamos aya.1.- Creamos un documento con fondo negro y le añadimos una nueva capa, donde pintaremos una linea blanca con un pincel rigido de 3px… intentaremos hacerla con un angulo de 45º para que luego nos resulte mas facil aplicarle los filtros.
2.- Duplicamos la capa de la linea blanca y a la nueva capa le aplicamos un FILTRO–>DESENFOQUE–>DESENFOQUE DE MOVIMIENTO con un angulo apropiado [37º en mi caso] y una distancia de entre 100 y 200px, dependiendo del tamaño de la linea.

3.- Duplicamos ahora la capa que acabamos de desenfocar y le aplicamos otro FILTRO–>DESENFOQUE–>DESENFOQUE DE MOVIMIENTO, pero esta vez lo vamos a hacer en perpendicular… le demos un angulo de -37º y una distancia de unos 30, para que le salga una especie de sombra.
Aplicamos el filtro y movemos la capa para que la parte superior del degradado quede sobre la linea blanca.
4.- Acoplamos solo las capas de las lineas, dejando como resultado 2 capas, una del fondo negro y otra con todas las capas de la linea y sus desenfoques en una.
Ahora a esa capa le aplicamos otra vez FILTRO–>DESENFOQUE–>DESENFOQUE DE MOVIMIENTO con angulo de 37º y distancia de 150-200, para suavizar el rayo.

5.- Duplicamos la capa tantas veces comno rayos queramos poner y los colocamos cada uno en su sitio, pudiendo hacerlos mas pequeños en caso necesario, hasta que nos quede

algo parecido a esto.
Para conseguir mas brillo en los rayos, he acoplado todas las capas con el fondo negro y luego he movido los NIVELES [Crtl+L] hasta conseguir el brillo deseado.6.- Creamos una nueva capa y la rellenamos con un degradado de arcoiris en diagonal… luego le asignamos el MODO DE CAPA –> COLOR para que nos rellene los tonos grises con el degradado, y le vajamos la opacidad al 65% para que se vea mas blanco.

7.- Por ultimo creamos una nueva capa, la rellenamos de negro y con un pincel enorme [300px] y bordes difuminados creamos una forma abstracta en el vertice del que saldran los rayos, qudando una especie de degradado blanco-negro… aplicando un MODO DE FUSION –> TRAMA
Colocamos otra capa de arcoiris sobre enta ultima y le damos MODO DE FUSION –> COLOR, pero se la aplicamso solo a la capa anterior, poniendonos sobre ella y dandole al BOTON DERECHO del raton –> MASCARA DE RECORTE.

Ale, ya tenemos listos nuestros rayos para aplicar sobre cualquier imagen, tan solo colocandolo sobre ellas y dandole MODO DE FUSION –> TRAMA, o el que mejor nos quede… prueba unos cuantos.

Dando brillo a los ojos con Photoshop
Antes de nada, debo decirte que no funciona igual de bien con todos los tipos de ojos. Con los ojos oscuros puede no quedar tan bien el efecto, pero desde luego, no se pierde nada por probar. Y lo que te puedo asegurar es que para ojos claros funciona francamente bien.
Para trabajar con el brillo de los ojos vamos a utilizar unas herramientas muy básicas: el pincel para realizar selecciones en modo máscara rápida y capas de ajuste de niveles.
Una vez abierta la foto sobre la que vamos a trabajar, seleccionamos la herramienta pincel, ajustamos el grosor del pincel, la opacidad y el flujo.
Para trabajar, nos pondremos en modo "Máscara rápida" (tecla Q en Windows), y comenzaremos a pintar con el pincel en negro sobre el iris del ojo. La zona que vayamos pintando irá poniendose de un tono rojizo (si no hemos cambiado la configuración de Photoshop). Es la máscara que estamos creando. Repasaremos tantas veces como necesitemos, pudiendo cambiar del modo de máscara rápida a normal para ver nuestra selección con la tecla Q.
Una vez tengamos la selección que deseamos, nos pondremos en modo normal (tecla Q) e invertiremos la selección (May+Ctrl+I o Selección -> Invertir).
Creamos una nueva capa de ajuste de Niveles (Capa -> Nueva capa de ajuste -> Niveles) y ponemos el modo de fusión de la capa en modo Trama. Al hacerlo, el iris se volverá mucho más claro. En el histograma de niveles moveremos el puntero de las sombras y de los medios tonos hasta dejarlo a nuestro gusto).

Podemos suavizar la selección aplicando a continuación un desenfoque gaussiano (Filtro -> Desenfocar -> Desenfoque gaussiano).
Ya tenemos el iris. Ahora toca la cornea.
Vamos a repetir el mismo proceso, en modo máscara rápida, pero pintando esta vez sobre la zona blanca del ojo.
Cuando tengamos nuestra selección bien hecha, crearemos una nueva capa de ajuste de niveles. Esta vez la podemos dejar en modo normal, y lo que haremos será aclarar la zona de medios tonos. También en esta selección aplicarenos un desenfoque gaussiano para suavizar los trazos que hayamos podido realizar.

Si vemos que en cualquiera de las capas, la del iris o la de la cornea, el efecto ha quedado muy pronunciado, podemos reajustar los niveles para suavizar el efecto o jugar con la opacidad o el relleno de la capa.
Corregir perspectiva
Arreglar la inclinación de la foto es muy sencillo, a pesar de que Photoshop no tiene ninguna opción o utilidad de enderezar foto. Si queremos corregir una foto inclinada en Photoshop, simplemente tenemos que abrir la imagen en Photoshop, localizar una línea recta como puede ser el horizonte, y utilizar la herramienta medición. Es el icono en el que aparece el dibujo de una regla de la barra de herramientas de Photoshop.
Seleccionamos esta herramienta, y dibujamos una línea sobre la horizontal que tengamos identificada.

Una vez trazada la línea, vamos al menú Imagen -> Rotar Lienzo -> Arbitrario... Dejamos el ángulo que aparezca, y pulsamos Aceptar.
Con esto, conseguiremos corregir la inclinación de nuestra fotografía. Habremos conseguido arreglar una foto torcida, teniendo ahora nuestra imagen enderezada.

Tan solo quedaría volver a reencuadrar la imagen para poder eliminar la zona negra.