ts gateway step-by-step gi útmutatók/egyéb... · pdf filets gateway...
TRANSCRIPT

TS Gateway Step-By-Step Guide Microsoft Corporation
Published: December 2007
Modified: July 2008
Abstract Terminal Services Gateway (TS Gateway) is a new role service available to users of the Microsoft Windows Server® 2008 operating system. TS Gateway enables authorized remote users to connect to resources on an internal corporate or private network, from any Internet-connected device that can run the Remote Desktop Connection (RDC) client. The internal network resources can be terminal servers, terminal servers running RemoteApp™ programs, or computers with Remote Desktop enabled. TS Gateway encapsulates Remote Desktop Protocol (RDP) within RPC, within HTTP over a Secure Sockets Layer (SSL) connection. In this way, TS Gateway helps improve security by establishing an encrypted connection between remote users on the Internet and the internal network resources on which their productivity applications run.

This document supports a preliminary release of a software product that may be changed substantially prior to final commercial release, and is the confidential and proprietary information of Microsoft Corporation. It is disclosed pursuant to a non-disclosure agreement between the recipient and Microsoft. This document is provided for informational purposes only and Microsoft makes no warranties, either express or implied, in this document. Information in this document, including URL and other Internet Web site references, is subject to change without notice. The entire risk of the use or the results from the use of this document remains with the user. Unless otherwise noted, the example companies, organizations, products, domain names, e-mail addresses, logos, people, places, and events depicted herein are fictitious, and no association with any real company, organization, product, domain name, e-mail address, logo, person, place, or event is intended or should be inferred. Complying with all applicable copyright laws is the responsibility of the user. Without limiting the rights under copyright, no part of this document may be reproduced, stored in or introduced into a retrieval system, or transmitted in any form or by any means (electronic, mechanical, photocopying, recording, or otherwise), or for any purpose, without the express written permission of Microsoft Corporation.
Microsoft may have patents, patent applications, trademarks, copyrights, or other intellectual property rights covering subject matter in this document. Except as expressly provided in any written license agreement from Microsoft, the furnishing of this document does not give you any license to these patents, trademarks, copyrights, or other intellectual property.
© 2008 Microsoft Corporation. All rights reserved.
Active Directory, Terminal Services, Microsoft, MS-DOS, Visual Basic, Visual Studio, Windows, Windows NT, and Windows Server are either registered trademarks or trademarks of Microsoft Corporation in the United States and/or other countries.
All other trademarks are property of their respective owners.

Contents
TS Gateway Step-by-Step Guide ................................................................................................. 7
TS Gateway Overview ................................................................................................................. 7
Who should use TS Gateway? .............................................................................................. 7
Benefits of TS Gateway ........................................................................................................ 8
Additional references ......................................................................................................... 9
Prerequisites for TS Gateway ...................................................................................................... 9
Role, role service, and feature dependencies ...................................................................... 10
Administrative credentials ................................................................................................... 10
Special Considerations for TS Gateway ..................................................................................... 10
TS Gateway server considerations ......................................................................................... 10
Name resolution issues ....................................................................................................... 10
Terminal Services client considerations .................................................................................. 11
Automatic reconnection to a TS Gateway server might fail after the Terminal Services client comes out of hibernation ................................................................................................. 11
TS Gateway server connection requests from a client running Windows XP with SP2 might fail if a smart card is used for authentication ..................................................................... 11
Configuring the TS Gateway Core Scenario .............................................................................. 12
System requirements for the TS Gateway core scenario ..................................................... 12
Setting up the TS Gateway core scenario ........................................................................... 13
Connection sequence for the TS Gateway core scenario..................................................... 14
Steps for configuring the TS Gateway server for the TS Gateway core scenario ..................... 16
1. Install the TS Gateway role service ................................................................................. 16
Verify successful role service installation and TS Gateway service status ........................ 18
2. Obtain a certificate for the TS Gateway server ................................................................ 19
Certificate requirements for TS Gateway .......................................................................... 19
Using existing certificates ................................................................................................ 20
Certificate installation and configuration process overview ............................................... 20
Create a self-signed certificate for TS Gateway................................................................ 23
3. Configure a certificate for the TS Gateway server ............................................................ 24
Install a certificate on the TS Gateway server .................................................................. 24
Map the TS Gateway server certificate ............................................................................ 25
Understand authorization policies for TS Gateway .............................................................. 26
TS CAPs ......................................................................................................................... 26
TS RAPs ......................................................................................................................... 27
Security groups and TS Gateway-managed computer groups associated with TS RAPs .. 27
4. Create a TS CAP for the TS Gateway server ................................................................... 28

5. Create a TS RAP and specify computers that users can connect to through the TS Gateway server .......................................................................................................... 29
6. Limit the maximum number of simultaneous connections through TS Gateway (optional) 31
Steps for configuring a Terminal Services client for the TS Gateway core scenario ................. 32
1. Install the TS Gateway server root certificate in the Trusted Root Certification Authorities Store on the Terminal Services client (optional) ............................................................... 33
2. Configure Remote Desktop Connection settings .............................................................. 35
3. Verify that end-to-end connectivity through TS Gateway is functioning correctly .............. 36
Configuring the TS Gateway NAP Scenario ............................................................................... 36
System requirements for the TS Gateway NAP scenario ..................................................... 38
Setting up the TS Gateway NAP scenario ........................................................................... 38
Steps for configuring TS Gateway for the NAP scenario ......................................................... 39
1. Enable NAP health policy checking on the TS Gateway server ........................................ 40
2. Delete existing TS CAPs and create three new TS CAPs on the TS Gateway server ....... 40
3. Configure a Windows Security Health Validator on the TS Gateway server ..................... 41
4. Create NAP policies on the TS Gateway server by using the Configure NAP Wizard ....... 42
Steps for configuring a Terminal Services client as a NAP enforcement client......................... 43
1. Download and run the Terminal Services NAP client configuration command .................. 44
2. Test to confirm that the TS Gateway NAP health policy is successfully applied to the Terminal Services client ................................................................................................... 45
Test for successful blocked connection for NAP-capable client ........................................ 46
Verify that the NAP health policy blocked the connection ................................................. 46
Test for successful allowed connection for NAP-capable client ......................................... 47
Verify that the NAP health policy allowed the connection ................................................. 48
Test for successful blocked connection for non-NAP capable client .................................. 48
Additional references ....................................................................................................... 49
Configuring the TS Gateway ISA Server Scenario ..................................................................... 49
System configurations tested for the TS Gateway ISA Server scenario ............................... 50
Configuring connections between ISA Server and TS Gateway server ................................ 51
Setting up the TS Gateway ISA Server scenario ................................................................. 51
Steps for configuring TS Gateway for the ISA Server scenario ............................................... 52
1. Export the SSL certificate for the TS Gateway server and copy it to the ISA Server ......... 53
2. Install the SSL certificate for the TS Gateway server on the ISA Server ........................... 54
3. Copy and install the TS Gateway server root certificate on the ISA Server ....................... 56
4. Create a new Web publishing rule on the ISA Server ...................................................... 57
Create a new Web publishing rule for ISA Server 2004 .................................................... 57
Create a new Web publishing rule for ISA Server 2006 .................................................... 59
5. Enable or disable HTTPS-HTTP bridging on the TS Gateway server ............................... 61
6. Verify client configuration and test end-to-end connectivity .............................................. 61
Additional references ....................................................................................................... 62
Monitoring Active Connections Through a TS Gateway Server .................................................. 62

Specify TS Gateway events to log ....................................................................................... 62
View details about active connections through a TS Gateway server ................................... 65
Example Script for Validating Certificate Configuration .............................................................. 66
Running the Rpcpingtest example script ............................................................................. 67
Example of successful output .............................................................................................. 67
Rpcping example script ....................................................................................................... 67
Disclaimer ........................................................................................................................... 69
Appendix: Configuring the TS Gateway OTP Scenario .............................................................. 69
System configuration for this scenario .................................................................................... 70
Network topology ................................................................................................................ 72
Steps to configure OTP .......................................................................................................... 72


7
TS Gateway Step-by-Step Guide This Step-by-Step Guide describes functionality for the Windows Server® 2008 release of Terminal Services Gateway (TS Gateway).
The following topics are covered in this Step-by-Step Guide:
• TS Gateway Overview
• Prerequisites for TS Gateway
• Special Considerations for TS Gateway
• Configuring the TS Gateway Core Scenario
• Configuring the TS Gateway NAP Scenario
• Configuring the TS Gateway ISA Server Scenario
• Monitoring Active Connections Through a TS Gateway Server
• Example Script for Validating Certificate Configuration
• Appendix: Configuring the TS Gateway OTP Scenario
TS Gateway Overview Windows Server® 2008 Terminal Services Gateway (TS Gateway) is a role service that enables authorized remote users to connect to resources on an internal corporate or private network, from any Internet-connected device that can run the Remote Desktop Connection (RDC) client. The network resources can be terminal servers, terminal servers running RemoteApp™ programs, or computers with Remote Desktop enabled.
TS Gateway encapsulates Remote Desktop Protocol (RDP) within RPC, within HTTP over a Secure Sockets Layer (SSL) connection. In this way, TS Gateway helps improve security by establishing an encrypted connection between remote users on the Internet and the internal network resources on which their productivity applications run.
The procedures in this guide will help you set up a TS Gateway server, enabling remote users to access terminal servers, terminal servers running RemoteApp programs, or computers with Remote Desktop enabled on your internal corporate or private network.
Who should use TS Gateway? This guide is targeted at these audiences:
• IT administrators, planners, and analysts who are evaluating remote access and mobile solution products
• Enterprise IT architects and designers
• Early adopters

8
• Security architects who are responsible for implementing trustworthy computing
• IT professionals who are responsible for terminal servers or remote access to desktops
Benefits of TS Gateway TS Gateway provides many benefits, including the following:
• TS Gateway enables remote users to connect to internal network resources over the Internet, by using an encrypted connection, without needing to configure virtual private network (VPN) connections.
• TS Gateway provides a comprehensive security configuration model that enables you to control access to specific internal network resources. TS Gateway provides a point-to-point RDP connection, rather than allowing remote users access to all internal network resources.
• TS Gateway enables most remote users to connect to internal network resources that are hosted behind firewalls in private networks and across network address translators (NATs). With TS Gateway, you do not need to perform additional configuration for the TS Gateway server or clients for this scenario.
In earlier versions of Windows Server, security measures prevented remote users from connecting to internal network resources across firewalls and NATs. This is because port 3389, the port used for RDP connections, is typically blocked for network security purposes. TS Gateway transmits RDP traffic to port 443 instead, by using an HTTP Secure Sockets Layer/Transport Layer Security (SSL/TLS) tunnel. Because most corporations open port 443 to enable Internet connectivity, TS Gateway takes advantage of this network design to provide remote access connectivity across multiple firewalls.
• The TS Gateway Manager snap-in console enables you to configure authorization policies to define conditions that must be met for remote users to connect to internal network resources. For example, you can specify:
• Who can connect to network resources (in other words, the user groups who can connect).
• What network resources (computer groups) users can connect to.
• Whether client computers must be members of Active Directory® security groups.
• Whether device and disk redirection is allowed.
• Whether clients need to use smart card authentication or password authentication, or whether they can use either method.
• You can configure TS Gateway servers and Terminal Services clients to use Network Access Protection (NAP) to further enhance security. NAP is a health policy creation, enforcement, and remediation technology that is included in Windows Vista® RTM, Windows Server 2008, and Windows Vista Service Pack 1 (SP1) and Windows XP Service Pack 3 (SP3).
With NAP, system administrators can enforce health requirements, which can include software requirements, security update requirements, required computer configurations, and other settings.

9
• You can use a TS Gateway server in conjunction with Microsoft Internet Security and Acceleration (ISA) Server to enhance security. In this scenario, you can host TS Gateway servers in a private network rather than a perimeter network, and host ISA Server in the perimeter network. Or, ISA Server can serve as an isolation point for either or both ends of the perimeter network. The SSL connection between the Terminal Services client and ISA Server can be terminated at the ISA Server, which is Internet-facing.
• TS Gateway Manager provides tools to help you monitor TS Gateway connection status, health, and events. By using TS Gateway Manager, you can specify events (such as unsuccessful connection attempts to the TS Gateway server) that you want to monitor for auditing purposes.
Additional references • For product support, see the Terminal Services page on the Windows Server 2008
TechCenter (http://go.microsoft.com/fwlink/?LinkId=48555).
• To access newsgroups for Terminal Services, see the Terminal Services Community page on the Microsoft TechNet Web site (http://go.microsoft.com/fwlink/?LinkId=85730).
Prerequisites for TS Gateway For TS Gateway to function correctly, you must meet these prerequisites:
• You must have a server with Windows Server 2008 installed.
• You must obtain an SSL certificate for the TS Gateway server if you do not have one already. By default, on the TS Gateway server, the RPC/HTTP Load Balancing service and the IIS service use Transport Layer Security (TLS) 1.0 to encrypt communications between clients and TS Gateway servers over the Internet. For TLS to function correctly, you must install an SSL certificate on the TS Gateway server.
Note
You do not need a certification authority (CA) infrastructure within your organization if you can use another method to obtain an externally trusted certificate that meets the requirements for TS Gateway. If your company does not maintain a stand-alone CA or an enterprise CA and you do not have a compatible certificate from a trusted public CA, you can create and import a self-signed certificate for your TS Gateway server for technical evaluation and testing purposes.
For information about certificate requirements for TS Gateway and how to obtain and install a certificate, see "Obtain a certificate for the TS Gateway server" in Configuring the TS Gateway Core Scenario.
• TS Gateway servers must be joined to an Active Directory domain in the following cases:
• If you configure a TS Gateway authorization policy that requires that users be domain members to connect to the TS Gateway server.

10
• If you configure a TS Gateway authorization policy that requires that client computers be domain members to connect to the TS Gateway server.
• If you are deploying a load-balanced TS Gateway server farm.
Role, role service, and feature dependencies To function correctly, TS Gateway requires several role services and features to be installed and running. When you use Server Manager to install the TS Gateway role service, the following additional roles, role services, and features are automatically installed and started, if they are not already installed:
• Remote Procedure Call (RPC) over HTTP Proxy
• Web Server (IIS) [Internet Information Services 7.0]
IIS 7.0 must be installed and running for the RPC over HTTP Proxy feature to function.
• Network Policy and Access Services
You can also configure TS Gateway to use Terminal Services connection authorization policies (TS CAPs) that are stored on another server that runs the Network Policy Server (NPS) service. By doing this, you are using the NPS server—formerly known as a Remote Authentication Dial-In User Service (RADIUS) server—to centralize the storage, management, and validation of TS CAPs. If you have already deployed an NPS server for remote access scenarios such as VPN and dial-up networking, using the existing NPS server for TS Gateway scenarios as well can enhance your deployment.
Administrative credentials You must be a member of the Administrators group on the computer that you want to configure as a TS Gateway server.
Special Considerations for TS Gateway The following are special considerations for TS Gateway in Windows Server 2008.
TS Gateway server considerations Following are special considerations for the TS Gateway server.
Name resolution issues When remote users attempt to access a computer on the internal corporate network through a TS Gateway server, they can specify either a NetBIOS name or a fully qualified domain name (FQDN) for the computer that they are attempting to connect to. When users specify the FQDN name of the target computer, and the associated Terminal Services resource authorization policy

11
(TS RAP) that is configured on the TS Gateway server uses a NetBIOS name for the target computer, the client connection will succeed.
However, if the user attempts to connect to the target computer by using its NetBIOS name when the TS RAP configured on the TS Gateway server uses an FQDN name for the target computer, name resolution will fail and the user will not be able to connect to the target computer.
To avoid name resolution failure, and to support either NetBIOS names or FQDNs, include each possible computer name in the computer group that you create when you configure a TS RAP. For example, the computer names MySAPReportingServer and MySAPReportingServer.seattle.corp.microsoft.com would each need to be included in the computer group that you create, although both names represent the same computer.
Terminal Services client considerations Following are special considerations for the Terminal Services client, when the client is used for connections through a TS Gateway server.
Automatic reconnection to a TS Gateway server might fail after the Terminal Services client comes out of hibernation After you establish a remote connection through a TS Gateway server to another computer, if the Terminal Services client that initiated the connection hibernates and then comes out of hibernation, the client might not automatically reconnect to the remote computer through the TS Gateway server. To resolve this problem, open Task Manager, end the mstsc (Remote Desktop Connection) process, and then attempt the remote connection again. Closing mstsc will not resolve this problem.
TS Gateway server connection requests from a client running Windows XP with SP2 might fail if a smart card is used for authentication If you are using a client running Windows® XP with SP2 to connect to a remote computer through a TS Gateway server, you will receive an error message stating that the remote computer is misconfigured if you do the following:
1. Connect to a remote computer and leave your smart card in the smart card reader during the session.
2. End the session, leaving the smart card in the smart card reader.
3. Start another connection while leaving the smart card in the smart card reader.
To resolve this problem, remove the smart card, reinsert it, and then try to connect to the remote computer again.

12
Configuring the TS Gateway Core Scenario The following steps are required for the successful setup and demonstration of the TS Gateway core scenario described as an example in this guide. This scenario enables you to configure a TS Gateway server so that a remote user can access an internal network resource over the Internet, through the TS Gateway server. In this scenario, the internal network resource can be either a terminal server, a terminal server running RemoteApp programs, or a computer with Remote Desktop enabled.
1. We recommend that you set up three computers to evaluate this scenario. These computers are:
• The TS Gateway server (known as "TSGSERVER" in this example)
• The Terminal Services client (known as "TSCLIENT" in this example)
• An internal network resource (known as "CORPORATERESOURCE" in this example)
The computers must meet the system requirements described in System requirements for the TS Gateway core scenario.
2. Configure the TS Gateway server by following the instructions in Steps for configuring the TS Gateway server for the TS Gateway core scenario.
3. Configure the Terminal Services client by following the instructions in Steps for configuring a Terminal Services client for the TS Gateway core scenario.
4. Configure the internal network resource.
5. Demonstrate that the Terminal Services client can connect to the internal network resource through the TS Gateway server by following the instructions in Verify that end-to-end connectivity through TS Gateway is functioning correctly.
System requirements for the TS Gateway core scenario The three computers used in the TS Gateway core scenario must meet the following system requirements.
Computer Required configuration
TS Gateway server (TSGSERVER) • Windows Server 2008. The installation can be an upgrade from Windows Server® 2003 Service Pack 1 (SP1) or Windows Server 2008 Release Candidate 0 (RC0). For more information, see "Supported upgrade paths" in Installing Windows Server 2008 (http://go.microsoft.com/fwlink/?LinkId=104824).
Terminal Services client (TSCLIENT) • Windows Vista SP1 or Windows XP SP3.

13
Computer Required configuration
• Windows Vista. The installation can be an upgrade from Windows XP with Service Pack 2 (SP2).
• Windows XP SP2 and Remote Desktop Connection (RDC) 6.0. To download RDC 6.0, see article 925876 in the Microsoft Knowledge Base (http://go.microsoft.com/fwlink/?LinkId=79373).
• Windows Server 2008. The installation can be an upgrade.
• Windows Server 2003 with Service Pack 1 (SP1) or SP2 and RDC 6.0.
Internal network resource (CORPORATERESOURCE)
For computers with Remote Desktop enabled:
• Windows Vista SP1 or Windows XP SP3.
• Windows Vista. The installation can be an upgrade from Windows XP with SP2.
• Windows XP with SP2.
• Windows Server 2003 with SP1 or SP2.
For terminal servers:
• Windows Server 2008. The installation can be an upgrade.
• Windows Server 2003 with SP1 or SP2.
Setting up the TS Gateway core scenario The following diagram illustrates the core scenario for TS Gateway.

14
Note
The steps in this setup guide describe how to set up the core TS Gateway scenario for remote access from a Terminal Services client through a TS Gateway server to an internal network resource. The guide does not describe how to set up the firewalls illustrated in the diagram, terminal servers running RemoteApp programs, or the Active Directory infrastructure. The diagram is provided to suggest one of many ways in which the TS Gateway core remote access scenario might be implemented in a production environment.
For information about how to set up a terminal server, see the Help topic "Terminal Server" (http://go.microsoft.com/fwlink/?LinkId=72052).
For information about setting up RemoteApp programs, see the Terminal Services RemoteApp Step-by-Step Guide (http://go.microsoft.com/fwlink/?linkId=84895).
For information about how to enable Remote Desktop, see the topic "Using Remote Desktop" in the Windows Server 2008 Help.
Connection sequence for the TS Gateway core scenario Following is a simplified description of the sequence that TSCLIENT follows when connecting through TSGSERVER to CORPORATERESOURCE:
1. The user on the Terminal Services client, TSCLIENT, might initiate the connection by doing one of the following:
• Clicking an RDP file that the administrator has configured, to access his or her full desktop.

15
• Clicking a RemoteApp program icon. RemoteApp programs are represented in an RDP file that the administrator has configured.
• Visiting a Web site (either from the Internet or from an intranet) to access a list of RemoteApp programs that the administrator has made available by using Terminal Services Web Access (TS Web Access), and then clicking a RemoteApp program icon.
• Opening the Remote Desktop Connection client and manually specifying the appropriate settings for the connection.
2. An SSL tunnel is established between TSCLIENT and TSGSERVER by using the TS Gateway server's SSL certificate. Before a connection between TSCLIENT and TSGSERVER is established, TSGSERVER must authenticate and authorize the user according to Terminal Services connection authorization policies (TS CAPs) that the administrator has configured on TSGSERVER.
3. After authentication and authorization succeed, TSGSERVER signals TSCLIENT to continue with the connection sequence.
4. TSCLIENT requests a connection from TSGSERVER to CORPORATERESOURCE. Before authorizing the request, TSGSERVER verifies that both of the following conditions are met simultaneously, for at least one Terminal Services resource authorization policy (TS RAP) that is configured on TSGSERVER:
• CORPORATERESOURCE is a member of a computer group that is specified in the TS RAP; and
• The user is a member of a user group that is specified in the TS RAP.
If both requirements are met, TSGSERVER authorizes the request.
5. An SSL connection is established between TSCLIENT and TSGSERVER, and an RDP connection is established between TSGSERVER and CORPORATERESOURCE.
From this point, any packets that TSCLIENT sends to TSGSERVER are forwarded to CORPORATERESOURCE, and any packets that CORPORATERESOURCE sends to TSGSERVER are forwarded to TSCLIENT.
6. TSCLIENT will attempt to create a user session on CORPORATERESOURCE. CORPORATERESOURCE performs Windows authentication to validate the identity of the user requesting the connection and the privileges that the user has on CORPORATERESOURCE. (These are the same steps that would be followed if TSCLIENT were to request a remote connection to CORPORATERESOURCE without using TSGSERVER.)
7. TSCLIENT exchanges encrypted RDP packets encapsulated within SSL with TSGSERVER over port 443. TSGSERVER forwards the RDP packets to CORPORATERESOURCE over port 3389.

16
Steps for configuring the TS Gateway server for the TS Gateway core scenario To configure the TS Gateway server, complete these tasks.
Task Reference/Step-by-step instructions
1. Install the TS Gateway role service. Install the TS Gateway role service
2. Obtain a certificate for the TS Gateway server.
Obtain a certificate for the TS Gateway server
3. Configure a certificate for the TS Gateway server.
Configure a certificate for the TS Gateway server
4. Create a Terminal Services connection authorization policy (TS CAP).
Create a TS CAP
5. Create a Terminal Services resource authorization policy (TS RAP).
Create a TS RAP
6. Limit the maximum number of simultaneous connections though TS Gateway (optional).
Limit the maximum number of simultaneous connections through TS Gateway
1. Install the TS Gateway role service Follow these steps to install the TS Gateway role service. Optionally, during the role service installation process, you can select an existing certificate (or create a new self-signed certificate), and you can create a TS CAP and a TS RAP.
To install the TS Gateway role service
1. Open Server Manager. To open Server Manager, click Start, point to Administrative Tools, and then click Server Manager.
2. If the Terminal Services role is not already installed:
a. In Server Manager, under Roles Summary, click Add roles.
b. In the Add Roles Wizard, if the Before You Begin page appears, click Next. This page will not appear if you have already installed other roles and you have selected the Skip this page by default check box.
c. On the Select Server Roles page, under Roles, select the Terminal Services check box, and then click Next.
d. On the Terminal Services page, click Next.
e. On the Select Role Services page, in the Role services list, select the TS Gateway check box.
f. If prompted to specify whether you want to install the additional role services required

17
for TS Gateway, click Add Required Role Services.
g. On the Select Role Services page, confirm that TS Gateway is selected, and then click Next.
If the Terminal Services role is already installed:
a. Under Roles Summary, click Terminal Services.
b. Under Role Services, click Add Role Services.
c. On the Select Role Services page, select the TS Gateway check box, and then click Next.
d. If prompted to specify whether you want to install the additional role services required for TS Gateway, click Add Required Role Services.
e. On the Select Role Services page, click Next.
3. On the Choose a Server Authentication Certificate for SSL Encryption page, specify whether to choose an existing certificate for SSL encryption (recommended), create a self-signed certificate for SSL encryption, or choose a certificate for SSL encryption later. If you are completing an installation for a new server that does not yet have certificates, see Obtain a certificate for the TS Gateway server for certificate requirements and information about how to obtain and install a certificate.
Under the Choose an existing certificate for SSL encryption (recommended) option, only certificates that have the intended purpose (server authentication) and Enhanced Key Usage (EKU) [Server Authentication (1.3.6.1.5.5.7.3.1)] that are appropriate for the TS Gateway role service will appear in the list of certificates. If you select this option, click Import, and then import a new certificate that does not meet these requirements, the imported certificate will not appear in the list.
4. On the Create Authorization Policies for TS Gateway page, specify whether you want to create authorization policies (a TS CAP and a TS RAP) during the TS Gateway role service installation process or later. If you select Later, follow the procedures in Create a TS CAP to create this policy. If you select Now, do the following:
a. On the Select User Groups That Can Connect Through TS Gateway page, click Add to specify additional user groups. In the Select Groups dialog box, specify the user group location and name, and then click OK as needed to check the name and to close the Select Groups dialog box.
b. To specify more than one user group, do either of the following: Type the name of each user group, separating the name of each group with a semi-colon; or add additional groups from different domains by repeating the first part of this step for each group.
c. After you finish specifying additional user groups, on the Select User Groups that Can Connect Through TS Gateway page, click Next.
d. On the Create a TS CAP for TS Gateway page, accept the default name for the TS CAP (TS_CAP_01) or specify a new name, select one or more supported Windows authentication methods, and then click Next.

18
e. On the Create a TS RAP for TS Gateway page, accept the default name for the TS RAP (TS_RAP_01) or specify a new name, and then do one of the following: Specify whether to allow users to connect only to computers in one or more computer groups, and then specify the computer groups; or specify that users can connect to any computer on the network. Click Next.
5. On the Network Policy and Access Services page (which appears if this role service is not already installed), review the summary information, and then click Next.
6. On the Select Role Services page, verify that Network Policy Server is selected, and then click Next.
7. On the Web Server (IIS) page (which appears if this role service is not already installed), review the summary information, and then click Next.
8. On the Select Role Services page, accept the default selections for Web Server (IIS), and then click Next.
9. On the Confirm Installation Options page, verify that the following roles, role services, and features will be installed:
• Terminal Services\TS Gateway
• Network Policy and Access Services\Network Policy Server
• Web Server (IIS)\Web Server\Management Tools
• RPC over HTTP Proxy
• Windows Process Activation Service\Process Model\Configuration APIs
10. Click Install.
11. On the Installation Progress page, installation progress will be noted.
If any of these roles, role services, or features has already been installed, installation progress will be noted only for the new roles, role services, or features that are being installed.
12. On the Installation Results page, confirm that installation for these roles, role services, and features was successful, and then click Close.
Verify successful role service installation and TS Gateway service status Use the following procedure to verify that the TS Gateway role service and dependent roles, role services, and features are installed correctly and running.
To verify that installation was successful
1. Open Server Manager. To open Server Manager, click Start, point to Administrative Tools, and then click Server Manager.
2. In the console tree, expand Roles, and then double-click Terminal Services.
3. On the Terminal Services summary page, in the System Services area, verify that the status of Terminal Services Gateway is Running and that the startup type is set to Auto.

19
4. Close Server Manager.
5. Open Internet Information Services (IIS) Manager. To open IIS Manager, click Start, point to Administrative Tools, and then click Internet Information Services (IIS) Manager.
6. In the console tree, expand <TS Gateway_Server_Name>\Sites\Default Web Site, and then click Default Web Site.
7. Right-click Default Web Site, point to Manage Web Site, and then click Advanced Settings.
8. In the Advanced Settings dialog box, under (General), verify that Start Automatically is set to True. If it is not set to True, click the drop-down arrow to display the list, and then click True.
9. Click OK.
10. Close IIS Manager.
2. Obtain a certificate for the TS Gateway server This section assumes an understanding of certificate trust chaining, certificate signing, and general certificate configuration principles. For information about PKI configuration in Windows Server 2008, see ITPROADD-204: PKI Enhancement in Windows Vista and Windows Server 2008 (http://go.microsoft.com/fwlink/?LinkId=93995). For information about PKI configuration in Windows Server 2003, see Public Key Infrastructure (http://go.microsoft.com/fwlink/?LinkID=54917).
As mentioned earlier in this guide, by default TLS 1.0 is used to encrypt communications between Terminal Services clients and TS Gateway servers over the Internet. TLS is a standard protocol that helps to secure Web communications on the Internet or intranets. TLS is the latest and most secure version of the SSL protocol. For more information about TLS, see:
• SSL/TLS in Windows Server 2003 (http://go.microsoft.com/fwlink/?LinkID=19646)
• RFC 2246: The TLS Protocol Version 1.0 (http://go.microsoft.com/fwlink/?LinkID=40979)
For TLS to function correctly, you must install an SSL-compatible X.509 certificate on the TS Gateway server.
Certificate requirements for TS Gateway Certificates for TS Gateway must meet these requirements:
• The name in the Subject line of the server certificate (certificate name, or CN) must match the DNS name that the client uses to connect to the TS Gateway server, unless you are using wildcard certificates or the SAN attributes of certificates. If your organization issues certificates from an enterprise certification authority (CA), a certificate template must be configured so that the appropriate name is supplied in the certificate request. If your organization issues certificates from a stand-alone CA, you do not need to do this.
20
Note
If you are using the SAN attributes of certificates, clients that connect to the TS Gateway server must be running Remote Desktop Connection (RDC) 6.1. (RDC 6.1 [6.0.6001] supports Remote Desktop Protocol 6.1.). RDC 6.1 is included with Windows Server 2008 and Windows Vista SP1 and Windows XP SP3.
• The certificate is a computer certificate.
• The intended purpose of the certificate is server authentication. The Extended Key Usage (EKU) is Server Authentication (1.3.6.1.5.5.7.3.1).
• The certificate has a corresponding private key.
• The certificate has not expired. We recommend that the certificate be valid one year from the date of installation.
• A certificate object identifier (also known as OID) of 2.5.29.15 is not required. However, if the certificate that you plan to use contains an object identifier of 2.5.29.15, you can only use the certificate if at least one of the following key usage values is also set: CERT_KEY_ENCIPHERMENT_KEY_USAGE, CERT_KEY_AGREEMENT_KEY_USAGE, and CERT_DATA_ENCIPHERMENT_KEY_USAGE.
For more information about these values, see Advanced Certificate Enrollment and Management (http://go.microsoft.com/fwlink/?LinkID=74577).
• The certificate must be trusted on clients. That is, the public certificate of the CA that signed the TS Gateway server certificate must be located in the Trusted Root Certification Authorities store on the client computer.
Using existing certificates If you already have a certificate, you can reuse it for the TS Gateway server if the certificate:
• Is issued by one of the trusted public CAs that participate in the Microsoft Root Certificate Program Members program [as listed in article 931125 in the Microsoft Knowledge Base (http://go.microsoft.com/fwlink/?LinkID=59547)]; and
• Meets the certificate requirements for TS Gateway server.
If the certificate is not trusted by the Microsoft Root Certificate Program Members program (for example, if you create and install a self-signed certificate on the TS Gateway server and you do not manually configure the certificate to trust the Terminal Services client computer), a warning stating that you do not have a trusted certificate appears when the client attempts to connect through the TS Gateway server, and the connection will not succeed. To prevent this error from occurring, install the certificate onto the computer certificate store on the client computer before the client attempts to connect through the TS Gateway server.
Certificate installation and configuration process overview The process of obtaining, installing, and configuring a certificate for TS Gateway server involves the following steps:

21
1. Obtain a certificate for the TS Gateway server by doing one of the following:
• If your company maintains a stand-alone or enterprise CA that is configured to issue SSL-compatible X.509 certificates that meet TS Gateway requirements, you can generate and submit a certificate request in several ways, depending on the policies and configuration of your organization's CA. Methods for obtaining a certificate include:
• Initiating auto-enrollment from the Certificates snap-in.
• Requesting certificates by using the Certificate Request Wizard.
• Requesting a certificate over the Web.
Note
If you have a Windows Server 2003 CA, be aware that the Windows Server 2003 Certificate Services Web enrollment functionality relies on an ActiveX control that is named Xenroll. This ActiveX control is available in Microsoft Windows 2000, Windows Server 2003, and Windows XP. However, Xenroll has been deprecated in Windows Server 2008 and Windows Vista. The sample certificate enrollment Web pages that are included with the original release version of Windows Server 2003, Windows Server 2003 Service Pack 1 (SP1), and Windows Server 2003 Service Pack 2 (SP2) are not designed to handle the change in how Windows Server 2008 and Windows Vista perform Web-based certificate enrollment operations. For information about the steps that you can take to address this issue, see article 922706 in the Microsoft Knowledge Base (http://go.microsoft.com/fwlink/?LinkId=94472).
• Using the Certreq command-line tool.
For more information about using any of these methods to obtain certificates for Windows Server 2008, see the "Obtain a Certificate" topic in the Certificates snap-in Help and the "Certreq" topic in the Windows Server 2008 Command Reference. To review the Certificates snap-in Help topics, click Start, click Run, type hh certmgr.chm, and then click OK. For information about how to request certificates for Windows Server 2003, see Requesting Certificates (http://go.microsoft.com/fwlink/?LinkID=19638).
A stand-alone or enterprise CA-issued certificate must be co-signed by a trusted public CA that participates in the Microsoft Root Certification Program Members program (http://go.microsoft.com/fwlink/?LinkID=59547). Otherwise, users connecting from home computers or kiosks might not be able to connect to TS Gateway servers. These connections might fail because the enterprise CA-issued root might not be trusted by computers that are not members of domains, such as home computers or kiosks.
• If your company does not maintain a stand-alone or enterprise CA that is configured to issue SSL-compatible X.509 certificates, you can purchase a certificate from a trusted public CA that participates in the Microsoft Root Certificate Program Members program (http://go.microsoft.com/fwlink/?LinkID=59547). Some of these vendors might offer certificates at no cost on a trial basis.
• Alternatively, if your company does not maintain a stand-alone or enterprise CA and you do not have a compatible certificate from a trusted public CA, you can create and import a self-

22
signed certificate for your TS Gateway server for technical evaluation and testing purposes. For step-by-step instructions, see Create a self-signed certificate for TS Gateway.
In the example configurations described in this guide, a self-signed certificate is used.
Important
If you use either of the first two methods to obtain a certificate (that is, if you obtain a certificate from a stand-alone or enterprise CA or a trusted public CA), you must also install the certificate on the TS Gateway server and map the certificate. However, if you create a self-signed certificate by using the Add Roles Wizard during installation of the TS Gateway role service or by using TS Gateway Manager after installation (as described in Create a self-signed certificate for TS Gateway), you do not need to install or map the certificate to the TS Gateway server. In this case, the certificate is automatically created, installed in the correct location on the TS Gateway server, and mapped to the TS Gateway server.
Note
Terminal Services clients must have the certificate of the CA that issued the server certificate in their Trusted Root Certification Authorities store. Therefore, if you create a self-signed certificate by following the procedure in this guide, you must copy the certificate to the client computer (or to a network share that can be accessed from the client computer) and then install the certificate in the Trusted Root Certification Authorities store on the client computer. For step-by-step instructions, see Install the TS Gateway server root certificate in the Trusted Root Certification Authorities store on the Terminal Services client.
If you use one of the first two methods to obtain a certificate and the Terminal Services client computer trusts the issuing CA, you do not need to install the certificate of the CA that issued the server certificate in the client computer certificate store. For example, you do not need to install the certificate of the issuing CA in the client computer certificate store if a VeriSign or other public, trusted CA certificate is installed on the TS Gateway server.
If you use the third method to obtain a certificate (that is, if you create a self-signed certificate), you do need to copy the certificate of the CA that issued the server certificate to the client computer. Then, you must install that certificate in the Trusted Root Certification Authorities store on the client computer. For more information, see Install the TS Gateway server root certificate in the Trusted Root Certification Authorities store on the Terminal Services client.
2. Install the certificate.
Install a certificate on the TS Gateway server. Use this procedure, described later in this guide, to install the certificate on your TS Gateway server.
3. Map the certificate.
Map the TS Gateway certificate. This procedure, described later in this guide, allows you to specify that the existing certificate be used by the TS Gateway server.

23
Create a self-signed certificate for TS Gateway This procedure describes how to use TS Gateway Manager to create a self-signed certificate for technical evaluation and testing purposes, if you did not already create one by using the Add Roles Wizard when you installed the TS Gateway role service.
Important
We recommend that you use self-signed certificates only for testing and evaluation purposes. After you create the self-signed certificate, you must copy it to the client computer (or to a network share that can be accessed from the client computer), and then install it in the Trusted Root Certification Authorities store on the client computer.
If you create a self-signed certificate by using the Add Roles Wizard during installation of the TS Gateway role service, or by using TS Gateway Manager after installation (as described in this procedure), you do not need to install or map the certificate to the TS Gateway server.
To create a self-signed certificate for the TS Gateway server
1. Open TS Gateway Manager. To open TS Gateway Manager, click Start, point to Administrative Tools, point to Terminal Services, and then click TS Gateway Manager.
2. In the console tree, click to select the node that represents your TS Gateway server, which is named for the computer on which the TS Gateway server is running.
3. In the results pane, under Configuration Status, click View or modify certificate properties.
4. On the SSL Certificate tab, click Create a self-signed certificate for SSL encryption, and then click Create Certificate.
5. In the Create Self-Signed Certificate dialog box, do the following:
a. Under Certificate name, verify that the correct common name (CN) is specified for the self-signed certificate, or specify a new name. The CN must match the DNS name that the client uses to connect to the TS Gateway server, unless you are using wildcard certificates or the SAN attributes of certificates.
b. Under Certificate location, to store the root certificate in a specified location so that you can manually distribute the root certificate to clients, verify that the Store the root certificate check box is selected, and then specify where to store the certificate. By default, this check box is selected and the certificate is stored under the %Windir%\Users\<Username>\Documents folder.
c. Click OK.
6. If you selected the Store the root certificate check box and specified a location for the certificate, a message will appear stating that TS Gateway has successfully created the self-signed certificate, and confirming the location of the stored certificate. Click OK to close the message.
7. Click OK again to close the TS Gateway server Properties dialog box.

24
3. Configure a certificate for the TS Gateway server The process of configuring a certificate for a TS Gateway server involves these steps:
Install a certificate on the TS Gateway server
Map the TS Gateway server certificate
Install a certificate on the TS Gateway server After you obtain a certificate, use this procedure to install the certificate in the correct location on the TS Gateway server, if the certificate is not already installed. After you complete this procedure, you must map the certificate.
Note
This procedure is not required if you created a self-signed certificate by using the Add Roles Wizard during installation of the TS Gateway role service, or by using TS Gateway Manager after installation, as described in Create a self-signed certificate for TS Gateway. In either case, a certificate is automatically created, installed in the correct location on the TS Gateway server, and mapped to the TS Gateway server.
To install a certificate on the TS Gateway server
1. Open the Certificates snap-in console. If you have not already added the Certificates snap-in console, you can do so by doing the following:
a. Click Start, click Run, type mmc, and then click OK.
b. On the File menu, click Add/Remove Snap-in.
c. In the Add or Remove Snap-ins dialog box, in the Available snap-ins list, click Certificates, and then click Add.
d. In the Certificates snap-in dialog box, click Computer account, and then click Next.
e. In the Select Computer dialog box, click Local computer: (the computer this console is running on), and then click Finish.
f. In the Add or Remove snap-ins dialog box, click OK.
2. In the Certificates snap-in console, in the console tree, expand Certificates (Local Computer), and then click Personal.
3. Right-click the Personal folder, point to All Tasks, and then click Import.
4. On the Welcome to the Certificate Import Wizard page, click Next.
5. On the File to Import page, in the File name box, specify the name of the certificate that you want to import, and then click Next.
6. On the Password page, do the following:
a. If you specified a password for the private key associated with the certificate earlier, type the password.
b. If you want to mark the private key for the certificate as exportable, ensure that Mark

25
this key as exportable is selected.
c. If you want to include all extended properties for the certificate, ensure that Include all extended properties is selected.
d. Click Next.
7. On the Certificate Store page, accept the default option, and then click Next.
8. On the Completing the Certificate Import Wizard page, confirm that the correct certificate has been selected.
9. Click Finish.
10. After the certificate import has successfully completed, a message appears confirming that the import was successful. Click OK.
11. With Certificates selected in the console tree, in the details pane, verify that the correct certificate appears in the list of certificates on the TS Gateway server. The certificate must be under the Personal store of the local computer.
Map the TS Gateway server certificate You must use TS Gateway Manager to map the TS Gateway server certificate. If you map a TS Gateway server certificate by using any other method, TS Gateway will not function correctly.
Note
This procedure is not required if you created a self-signed certificate by using the Add Roles Wizard during installation of the TS Gateway role service, or by using TS Gateway Manager after installation, as described in Create a self-signed certificate for TS Gateway.
To map a certificate to the local TS Gateway server
1. Open TS Gateway Manager. To open TS Gateway Manager, click Start, point to Administrative Tools, point to Terminal Services, and then click TS Gateway Manager.
2. In the TS Gateway Manager console tree, right-click the local TS Gateway server, and then click Properties.
3. On the SSL Certificate tab, click Select an existing certificate for SSL encryption (recommended), and then click Browse Certificates.
4. In the Install Certificate dialog box, click the certificate that you want to use, and then click Install.
5. Click OK to close the Properties dialog box for the TS Gateway server.
6. If this is the first time that you have mapped the TS Gateway certificate, after the certificate mapping is completed, you can verify that the mapping was successful by viewing the TS Gateway Server Status area in TS Gateway Manager. Under Configuration Status and Configuration Tasks, the warning stating that a server certificate is not yet installed or selected and the View or modify certificate properties

26
hyperlink are no longer displayed.
Understand authorization policies for TS Gateway After you install the TS Gateway role service and configure a certificate for the TS Gateway server, you must create Terminal Services connection authorization policies (TS CAPs), computer groups, and Terminal Services resource authorization policies (TS RAPs).
TS CAPs TS CAPs allow you to specify who can connect to a TS Gateway server. You can specify a user group that exists on the local TS Gateway server or in Active Directory Domain Services. You can also specify other conditions that users must meet to access a TS Gateway server. For example, you can specify that all users who connect to a specific terminal server that is hosting a human resources (HR) database through a TS Gateway server must be members of the "HR Users" security group. You can also specify that the client computer that is initiating the connection must be a member of an Active Directory security group in the internal network to connect to the TS Gateway server. By requiring that the computer be a member of a specific Active Directory security group in the internal network, you can exclude users who are attempting to connect to the internal network from kiosks, airport computers, or home computers that are not trusted.
For enhanced security when clients are connecting to the internal network through TS Gateway, you can also specify whether to disable client device redirection for all devices supported by the Terminal Services client, or just for a specific type of device such as a disk drive or supported Plug and Play devices. If you disable client device redirection for all devices supported by the client, all device redirection is disabled, except for audio and smart card redirection.
When you select the option to disable device redirection for specific device types or to disable all device types except for smart cards, the TS Gateway server will send the request back to the client with a list of the device types to be disabled. This list is a suggestion only; it is possible for the client to modify the device redirection settings in the list.
Warning
Because the TS Gateway server relies on the client to enforce the device redirection settings suggested by the server, this feature should not be considered to provide guaranteed security. The suggested device redirection settings can only be enforced for Remote Desktop Connection (RDC) clients; the settings cannot be enforced for clients that do not use RDC. Additionally, it is possible for a malicious user to modify an RDC client so that the client ignores the suggested settings. In such cases, this feature cannot provide guaranteed security, even for RDC clients.
Additionally, you can specify whether remote clients must use smart card authentication or password authentication to access internal network resources through a TS Gateway server. When both of these options are selected, clients that use either authentication method are allowed to connect.

27
Finally, if your organization has deployed Network Access Protection (NAP), you can specify that the client must send a statement of health (SoH). For information about how to configure TS Gateway for NAP, see Configuring the TS Gateway NAP Scenario.
Important
Users are granted access to a TS Gateway server if they meet the conditions specified in the TS CAP. You must also create a TS RAP. A TS RAP allows you to specify the internal network resources (computers) that users can connect to through TS Gateway. Until you create both a TS CAP and a TS RAP, users cannot connect to internal network resources through this TS Gateway server.
TS RAPs TS RAPs allow you to specify the internal network resources that remote users can connect to through a TS Gateway server. When you create a TS RAP, you can create a computer group (a list of computers on the internal network to which you want the remote users to connect) and associate it with the TS RAP. For example, you can specify that users who are members of the “HR Users” user group be allowed to connect only to computers that are members of the “HR Computers” computer group, and that users who are members of the “Finance Users” user group be allowed to connect only to computers that are members of the "Finance Computers" computer group.
Remote users connecting to an internal network through a TS Gateway server are granted access to computers on the network if they meet the conditions specified in at least one TS CAP and one TS RAP.
Note
When you associate a TS Gateway-managed computer group with a TS RAP, you can support both fully qualified domain names (FQDNs) and NetBIOS names by adding both names to the TS Gateway-managed computer group separately. When you associate an Active Directory security group with a TS RAP, both FQDNs and NetBIOS names are supported automatically if the internal network computer that the client is connecting to belongs to the same domain as the TS Gateway server. If the internal network computer belongs to a different domain than the TS Gateway server, users must specify the FQDN of the internal network computer.
Together, TS CAPs and TS RAPs provide two different levels of authorization to provide you with the ability to configure a more specific level of access control to computers on an internal network.
Security groups and TS Gateway-managed computer groups associated with TS RAPs Remote users can connect through TS Gateway to internal network resources in a computer group. The computer group members can be any one of the following:
28
• Members of an existing security group. The security group can exist in Local Users and Groups on the TS Gateway server, or it can exist in Active Directory Domain Services.
• Members of an existing TS Gateway-managed computer group or a new TS Gateway-managed computer group. You can configure a TS Gateway-managed computer group by using TS Gateway Manager after installation.
A TS Gateway-managed group will not appear in Local Users and Groups on the TS Gateway server, nor can it be configured by using Local Users and Groups.
• Any network resource. In this case, users can connect to any computer on the internal network that they could connect to when they use Remote Desktop Connection.
4. Create a TS CAP for the TS Gateway server This procedure describes how to use TS Gateway Manager to create a custom TS CAP. Alternatively, you can use the Authorization Policies Wizard to quickly create a TS CAP and a TS RAP for TS Gateway.
Important
If you configure more than one TS CAP, keep in mind that TS Gateway uses the following policy lookup behavior: policies are applied in the numerical order shown in the TS Gateway Manager results pane, and access to the TS Gateway server is granted by the first matching policy. That is, if a client does not meet the requirements of the first TS CAP in the list, TS Gateway will evaluate the second policy in the list, and so forth, until it locates a TS CAP whose requirements are met. If a client does not meet the requirements of any TS CAP in the list, TS Gateway denies access to the client.
To create a TS CAP for the TS Gateway server
1. Open TS Gateway Manager.
2. In the console tree, click to select the node that represents the TS Gateway server, which is named for the computer on which the TS Gateway server is running.
3. In the console tree, expand Policies, and then click Connection Authorization Policies.
4. Right-click the Connection Authorization Policies folder, click Create New Policy, and then click Custom.
5. On the General tab, type a name for the policy, and then verify that the Enable this policy check box is selected.
6. On the Requirements tab, under Supported Windows authentication methods, select one or both of the following check boxes:
• Password
• Smart card
When both of these options are selected, clients that use either authentication method are allowed to connect.

29
7. Under User group membership (required), click Add Group, and then specify a user group whose members can connect to the TS Gateway server. You must specify at least one user group.
8. In the Select Groups dialog box, specify the user group location and name, and then click OK as needed to check the name and to close the Select Groups dialog box To specify more than one user group, do either of the following:
• Type the name of each user group, separating the name of each group with a semi-colon.
• Add additional groups from different domains by repeating this step for each group.
9. To specify computer domain membership criteria that client computers should meet (optional), on the Requirements tab, under Client computer group membership (optional), click Add Group, and then specify the computer groups. In the example configurations, no computer group is specified.
To specify computer groups, you can use the same steps that you used to specify user groups.
10. On the Device Redirection tab, select one of the following options to enable or disable redirection for remote client devices:
• To permit all client devices to be redirected when connecting through the TS Gateway server, click Enable device redirection for all client devices. By default, this option is selected.
• To disable device redirection for all client devices except for smart cards when connecting through the TS Gateway server, select Disable device redirection for all client devices except for smart card.
• To disable device redirection for only certain device types when connecting through the TS Gateway server, click Disable device redirection for the following client device types, and then select the check boxes that correspond to the client device types for which device redirection should be disabled.
Important
Device redirection settings can be enforced only for Microsoft Remote Desktop Connection (RDC) clients.
11. Click OK.
12. The new TS CAP that you created appears in the TS Gateway Manager results pane. When you click the name of the TS CAP, the policy details appear in the lower pane.
5. Create a TS RAP and specify computers that users can connect to through the TS Gateway server This procedure describes how to use TS Gateway Manager to create a custom TS RAP, and to specify computers that users can connect to through the TS Gateway server. Alternatively, you can use the Authorization Policies Wizard to complete these tasks.
30
Important
If users are connecting to members of a terminal server farm, you must configure a TS RAP that explicitly specifies the name of the terminal server farm. To do so, when you create the TS RAP, on the Computer Group tab, select the Select existing TS Gateway-managed computer group or create a new one option, and then explicitly specify the name of the terminal server farm. If the name of the terminal server farm is not explicitly specified, users will not be able to connect to members of the farm. For optimal security and ease of administration, to specify the terminal servers that are members of the farm, create a second TS RAP. On the Computer Group, select the Select an Active Directory security group option, and then specify the security group that contains the terminal servers in the farm. Doing this optimizes security by ensuring that the members of the farm are trusted members of an Active Directory security group.
To create a TS RAP and specify computers that users can connect to through the TS Gateway server
1. Open TS Gateway Manager.
2. In the console tree, click to select the node that represents your TS Gateway server, which is named for the computer on which the TS Gateway server is running.
3. In the console tree, expand Policies, and then click Resource Authorization Policies.
4. Right-click the Resource Authorization Policies folder, click Create New Policy, and then click Custom.
5. On the General tab, in the Policy name box, enter a name that is no longer than 64 characters.
6. In the Description box, enter a description for the new TS RAP.
7. On the User Groups tab, click Add to select the user groups to which you want this TS RAP to apply.
8. In the Select Groups dialog box, specify the user group location and name, and then click OK. To specify more than one user group, do either of the following:
• Type the name of each user group, separating the name of each group with a semi-colon.
• Add additional groups from different domains by repeating Step 7 for each group.
9. On the Computer Group tab, specify the computer group that users can connect to through TS Gateway by doing one of the following:
• To specify an existing security group, click Select an existing Active Directory security group, and then click Browse. In the Select Group dialog box, specify the user group location and name, and then click OK. Note that you can select a security group in Local Users and Groups, rather than in Active Directory Domain Services.
• To specify a TS Gateway-managed computer group, click Select an existing TS Gateway-managed computer group or create a new one, and then click Browse. In the Select a TS Gateway-managed Computer Group dialog box, do

31
one of the following:
Select an existing TS Gateway-managed computer group by clicking the name of the computer group that you want to use, and then click OK to close the dialog box.
Create a new TS Gateway-managed computer group by clicking Create New Group. On the General tab, type a name and description for the new group. On the Network Resources tab, type the name or IP address of the computer or Terminal Services farm that you want to add, and then click Add. Repeat this step as needed to specify additional computers, and then click OK to close the New TS Gateway-Managed Computer Group dialog box. In the Select a TS Gateway-managed Computer Group dialog box, click the name of the new computer group, and then click OK to close the dialog box.
Important
When you add an internal network computer to the list of TS Gateway-managed computers, keep in mind that if you want to allow remote users to connect to the computer by specifying either its computer name or its IP address, you must add the computer to the computer group twice (by specifying the computer name of the computer and adding it to the computer group, and then specifying the IP address of the computer and adding it to the computer group again). If you specify only an IP address for a computer when you add it to a computer group, users must also specify the IP address of that computer when they connect to that computer through TS Gateway. To ensure that remote users connect to the internal network computers that you intend, we recommend that you do not specify IP addresses for the computers, if the computers are not configured to use static IP addresses. For example, you should not specify IP addresses if your organization uses DHCP to dynamically reconfigure IP addresses for the computers.
• To specify any network resource, click Allow users to connect to any network resource, and then click OK.
10. After you specify a computer group, the new TS RAP that you created appears in the TS Gateway Manager results pane. When you click the name of the TS RAP, the policy details appear in the lower pane.
6. Limit the maximum number of simultaneous connections through TS Gateway (optional) By default, with the exception of TS Gateway servers that are running on Windows Server® 2008 Standard, no limit is set for the number of simultaneous connections that clients can make to internal network resources through a TS Gateway server. To optimize TS Gateway server performance or to ensure compliance with the connection/security policies of your organization, you can set a limit for the number of simultaneous connections that clients can make to network resources through a TS Gateway server.

32
Note
For TS Gateway servers that are running on Windows Server 2008 Standard, a maximum of 250 simultaneous connections is supported.
To limit the maximum number of allowable connections for TS Gateway
1. Open TS Gateway Manager.
2. In the console tree, click to select the node that represents your TS Gateway server, which is named for the computer on which the TS Gateway server is running.
3. In the console tree, expand Monitoring.
4. With the Monitoring folder selected, right-click the Monitoring folder, and then click Edit Connection Limit.
5. On the General tab, under Maximum Connections, do one of the following:
• To set a limit for the maximum number of simultaneous connections that Terminal Services clients can make to internal network resources through TS Gateway, click Limit maximum allowed simultaneous connections to, and then specify the number of allowable connections.
• To set no limit on the number of allowable connections between clients and internal network resources through TS Gateway, click Allow the maximum supported simultaneous connections. This is the default option. Keep in mind that for TS Gateway servers that are running on Windows Server 2008 Standard, a maximum of 250 simultaneous connections is supported.
• To prevent new connections from being made between clients and internal network resources through TS Gateway, click Disable new connections. If you select this option, only new connection attempts will be rejected. Current connections will not be ended by TS Gateway.
6. Click OK.
Steps for configuring a Terminal Services client for the TS Gateway core scenario To configure the Terminal Services client for the TS Gateway core scenario, complete these tasks.
Task Reference/Step-by-step instructions
1. Install the TS Gateway server root certificate in the Trusted Root Certification Authorities store on the Terminal Services client (optional).
Note
This procedure is not required if a
Install the TS Gateway server root certificate in the Trusted Root Certification Authorities store on the Terminal Services client

33
Task Reference/Step-by-step instructions
certificate that is issued by one of the trusted public CAs that participate in the Microsoft Root Certificate Program Members program is installed on the TS Gateway server, and the Terminal Services client computer trusts the certificate.
2. Configure Remote Desktop Connection settings.
Configure Remote Desktop Connection settings
3. Verify that end-to-end connectivity through the TS Gateway server is functioning correctly.
Verify that end-to-end connectivity through the TS Gateway server is functioning correctly
1. Install the TS Gateway server root certificate in the Trusted Root Certification Authorities Store on the Terminal Services client (optional) The client computer must verify and trust the identity of the TS Gateway server before the client can send the user's password and logon credentials securely and complete the authentication process. To establish this trust, the clients must trust the root of the server’s certificate. That is, clients must have the certificate of the certification authority (CA) that issued the server certificate in their Trusted Root Certification Authorities store. You can view this store by using the Certificates snap-in.
As mentioned, this procedure is not required if:
• A certificate that is issued by one of the trusted public CAs that participate in the Microsoft Root Certificate Program Members program [as listed in article 931125 in the Microsoft Knowledge Base (http://go.microsoft.com/fwlink/?LinkID=59547)] is installed on the TS Gateway server; and
• The Terminal Services client computer already trusts the issuing CA.
If the TS Gateway server is using a certificate that is issued by one of the trusted public CAs, and the certificate is recognized and trusted by your client computer, proceed to complete the steps in the Configure remote desktop connection settings section.
Important
Do not install certificates from any untrusted sources or individuals.
Note
If you are configuring the Terminal Services client for use with Network Access Protection (NAP), you must install the TS Gateway server root certificate by using the computer account. If not, you can install the TS Gateway server root certificate by using the user account.

34
Before completing the steps in the following procedure, you must have already copied the certificate to the client computer. For example, if you created a self-signed certificate for the TS Gateway server by using TS Gateway Manager, you must have already copied that certificate from the TS Gateway server to the client computer.
To install the TS Gateway server root certificate in the Trusted Root Certification Authorities store on the Terminal Services client
1. Open the Certificates snap-in console. If you have not already added the Certificates snap-in console, you can do so by doing the following:
a. Click Start, click Run, type mmc, and then click OK.
b. On the File menu, click Add/Remove Snap-in.
c. In the Add or Remove Snap-ins dialog box, in the Available snap-ins list, click Certificates, and then click Add.
d. In the Certificates snap-in dialog box, to open the snap-in for a computer account, click Computer account, and then click Next. To open the snap-in for a user account, click My user account, and then click Finish.
e. If you opened the Certificates snap-in for a computer account, in the Select Computer dialog box, click Local computer: (the computer this console is running on), and then click Finish.
f. In the Add or Remove snap-ins dialog box, click OK.
2. In the Certificates snap-in console, in the console tree, expand Certificates (Local Computer), expand Trusted Root Certification Authorities, right-click Certificates, point to All Tasks, and then click Import.
3. On the Welcome to the Certificate Import Wizard page, click Next.
4. On the File to Import page, in the File name box, browse to the TS Gateway server root certificate, click Open, and then click Next.
5. On the Certificate Store page, accept the default option (Place all certificates in the following store - Trusted Root Certification Authorities), and then click Next.
6. On the Completing the Certificate Import Wizard page, confirm that the following certificate settings appear:
• Certificate Store Selected by User: Trusted Root Certification Authorities
• Content: Certificate
• File Name: FilePath\<Root_Certificate_Name.cer>, where <Root_Certificate_Name> is the name of the TS Gateway server root certificate.
7. Click Finish.
8. After the certificate import has successfully completed, a message appears confirming that the import was successful. Click OK.
9. With Certificates selected in the console tree, in the details pane, verify that the root certificate of the TS Gateway server appears in the list of certificates on the client. Ensure

35
that the certificate appears under the Trusted Root Certification Authorities store.
2. Configure Remote Desktop Connection settings
To configure Remote Desktop Connection settings
1. Open the Remote Desktop Connection client. To open the Remote Desktop Connection client, click Start, point to All Programs, point to Accessories, and then click Remote Desktop Connection.
2. In the Remote Desktop Connection dialog box, click Options to expand the dialog box and view settings.
3. On the Advanced tab, in the Connect from anywhere area, click Settings.
4. In the TS Gateway Server Settings dialog box, select the appropriate options:
• Automatically detect TS Gateway server settings (default). If you select this option, the Terminal Services client attempts to use Group Policy settings that determine the behavior of client connections to TS Gateway servers or TS Gateway server farms, if these settings have been configured and enabled. For more information, see the "Using Group Policy to Manage Client Connections Through TS Gateway" topic in the TS Gateway Help.
• Use these TS Gateway server settings. If a TS Gateway server name or TS Gateway server farm name and a logon method are not already enabled and enforced by Group Policy, you can select this option and specify the name of the TS Gateway server or TS Gateway server farm that you want to connect to and the logon method to use for the connection. The name that you specify for the server must match the name in the Issued to field of the TS Gateway server certificate. If you create a self-signed certificate by using the Add Roles Wizard during installation of the TS Gateway role service or by using TS Gateway Manager after installation, specify the fully qualified domain name (FQDN) of the TS Gateway server.
• Bypass TS Gateway server for local addresses. This option is selected by default.
If you want the Terminal Services client to automatically detect when TS Gateway is required, select this check box. If you use a mobile computer, selecting this option will optimize client connectivity performance and minimize latency because TS Gateway will only be used when it is required. If your computer is always connected to the local area network (LAN) or if it is hosted inside the internal network firewall, TS Gateway will not be used. If you are outside the internal network and connecting to the internal network over the Internet, TS Gateway will be used.
If you are in a LAN, but want to test connectivity through a TS Gateway server or TS Gateway server farm, clear this check box. Otherwise, the client will not connect through the TS Gateway server or TS Gateway server farm in this case.
• Do not use a TS Gateway server. Select this option if your computer is always connected to the LAN or if it is hosted inside the internal network firewall. This option

36
is appropriate if you know that you do not need to use TS Gateway to traverse a firewall.
5. Do one of the following:
• To save the settings and close the Remote Desktop Connection dialog box, click Save, and then click Cancel. The settings will be saved as an RDP file to a default location (by default, the file is saved to Drive:\<Username>\Documents).
• To save the RDP file to a specified location (you can customize and distribute the file later to multiple clients as needed), click Save As. In the Save as dialog box, in the File name box, specify the file name and location, and then click Save.
• To proceed with a connection to an internal network resource, click Save, click Connect, and then proceed to Step 5 in the next procedure ("Verify that end-to-end connectivity through TS Gateway is functioning correctly").
3. Verify that end-to-end connectivity through TS Gateway is functioning correctly
To verify that end-to-end connectivity through TS Gateway is functioning correctly
1. Open the Remote Desktop Connection client. To open the Remote Desktop Connection client, click Start, point to All Programs, point to Accessories, and then click Remote Desktop Connection.
2. In the Remote Desktop Connection dialog box, click Options to expand the dialog box and view settings.
3. On the General tab, type the name of the computer (terminal server or computer running Remote Desktop) to which you want to connect remotely through TS Gateway.
4. Click Connect.
5. In the Enter your credentials dialog box, select the user account that you want to use to log on remotely to the computer, enter the required credentials, and then click OK.
6. In the Gateway server credentials dialog box, select the user name that you want to use to log on to the TS Gateway server, enter the required credentials, and then click OK.
7. After a few moments, the connection completes and a connection will be established through the TS Gateway server to the computer.
Configuring the TS Gateway NAP Scenario To enhance security, you can configure TS Gateway servers and clients to use Network Access Protection (NAP). NAP is a health policy creation, enforcement, and remediation technology that

37
is included in Windows Vista and Windows Server 2008. By using NAP, you can enforce health requirements on clients that connect to the TS Gateway server, which can include firewalls being enabled, security update requirements, and other required computer configurations.
By using NAP, you can help ensure that clients meet the health policy requirements of your organization before they are allowed to connect to internal network resources through TS Gateway servers.
The following steps are required for the successful setup and demonstration of the TS Gateway NAP scenario described as an example in this guide.
1. We recommend that you set up three computers to evaluate this scenario. These computers are:
• The TS Gateway server/Network Policy Server (NPS server) (known as "TSGSERVER" in this example)
• The Terminal Services client (known as "TSCLIENT" in this example)
• An internal network resource (known as "CORPORATERESOURCE" in this example)
The computers must meet the system requirements described in System requirements for the TS Gateway NAP scenario.
2. Complete the core TS Gateway server configuration by following the instructions in "Steps for configuring the TS Gateway server for the TS Gateway core scenario" in Configuring the TS Gateway Core Scenario.
3. Configure the TS Gateway server for NAP health policy checking by following the instructions in Steps for configuring TS Gateway for the NAP scenario.
4. Complete the core Terminal Services client configuration for TS Gateway by following the instructions in "Steps for configuring a Terminal Services client for the TS Gateway core scenario" in Configuring the TS Gateway Core Scenario.
5. Configure the client as a NAP enforcement client by following the instructions in Steps for configuring a Terminal Services client as a NAP enforcement client.
6. Configure the internal network resource. As mentioned, this resource can be any terminal server or any computer with Remote Desktop enabled.
7. Verify that the NAP health policies created on the TS Gateway server are successfully applied to the Terminal Services client by completing the following two tasks:
• Testing for a successful blocked connection. If the health policies are correctly applied to the Terminal Services client, the client connection attempt will be blocked by the NPS server when automatic updating is disabled on the Terminal Services client computer.
• Testing for a successful allowed connection. If the health policies are correctly applied to the Terminal Services client, the client connection attempt will be allowed by the NPS server when automatic updating is enabled on the Terminal Services client computer.
To complete these two testing tasks, follow the instructions in Test to confirm that the TS Gateway NAP health policy is successfully applied to the Terminal Services client.

38
System requirements for the TS Gateway NAP scenario The three computers used in the TS Gateway NAP scenario must meet the following system requirements.
Computer Required configuration
TS Gateway server (TSGSERVER) • In this scenario, TSGSERVER is used as the TS Gateway server and as an NPS server, and it must run Windows Server 2008. The installation can be an upgrade from Windows Server 2003 SP1 or Windows Server 2008 Release Candidate 0 (RC0). For more information, see "Supported upgrade paths" in Installing Windows Server 2008 (http://go.microsoft.com/fwlink/?LinkId=104824).
Terminal Services client (TSCLIENT) In this scenario, TSCLIENT is used as a Terminal Services client and as a NAP client, and it can run any of the following:
• Windows Vista SP1 or Windows XP SP3.
• Windows Vista. The installation can be an upgrade from Windows XP with SP2.
• Windows Server 2008. The installation can be an upgrade.
Internal network resource (CORPORATERESOURCE)
• Windows Vista SP1 or Windows XP SP3.
• Windows Vista. The installation can be an upgrade from Windows XP with SP2.
• Windows XP with SP2.
• Windows XP with SP3.
• Windows Server 2008. The installation can be an upgrade.
• Windows Server 2003 with SP1 or SP2.
Setting up the TS Gateway NAP scenario The following diagram illustrates how TS Gateway can be used with NAP.

39
Note
The steps in this setup guide describe how to set up remote access from a Terminal Services client through a TS Gateway server to an internal network resource, with health policy checking for Terminal Services (the NPS server is used to perform the health policy checking). The guide does not describe how to set up the firewalls illustrated in the diagram, the terminal servers running RemoteApp programs, or the perimeter network or Active Directory infrastructure. The diagram is provided to suggest one way in which this scenario might be implemented in a production environment.
Steps for configuring TS Gateway for the NAP scenario To configure the TS Gateway server NAP scenario, complete these tasks.
Task Reference/Step-by-step instructions
1. Enable NAP health policy checking on the TS Gateway server.
Enable NAP health policy checking on the TS Gateway server
2. Delete existing TS CAPs and create three Delete existing TS CAPs and create three new
40
Task Reference/Step-by-step instructions
new TS CAPs on the TS Gateway server. TS CAPs on the TS Gateway server
3. Configure a Windows Security Health Validator on the TS Gateway server.
Configure a Windows Security Health Validator on the TS Gateway server
4. Create NAP policies on the TS Gateway server by using the Configure NAP Wizard.
Create NAP policies on the TS Gateway server by using the Configure NAP Wizard
1. Enable NAP health policy checking on the TS Gateway server To enable NAP health policy checking on the TS Gateway server, you enable a setting on the server that requests that the Terminal Services client send an SoH.
To enable health checking on the TS Gateway server
1. Open TS Gateway Manager. To open TS Gateway Manager, click Start, point to Administrative Tools, point to Terminal Services, and then click Terminal Services Gateway.
2. In the TS Gateway Manager console tree, right-click the local TS Gateway server, and then click Properties.
3. On the TS CAP Store tab, select the Request clients to send a statement of health check box.
4. A message will appear, stating that you must also configure TS CAPs for NAP to ensure that health policies are enforced. Click OK to close the message.
5. Click OK again to close the TS Gateway server Properties dialog box.
2. Delete existing TS CAPs and create three new TS CAPs on the TS Gateway server If you have already created one or more TS CAPs on the TS Gateway server by using TS Gateway Manager and following the procedures in "Create a TS CAP for the TS Gateway server" in Configuring the TS Gateway Core Scenario, we strongly recommend that you delete those TS CAPs by following the steps in this procedure.
Warning
Failure to delete existing TS CAPs might result in security vulnerabilities for your internal network because these TS CAPs might bypass the NAP authorization policies that you will create for the TS Gateway NAP scenario. If the NAP authorization policies are bypassed, Terminal Services clients that do not meet NAP authorization policy requirements will be allowed access to the TS Gateway server.

41
To delete existing TS CAPs on the TS Gateway server
1. Open TS Gateway Manager.
2. In the console tree, click to select the node that represents the TS Gateway server, which is named for the computer on which the TS Gateway server is running.
3. In the console tree, expand Policies, and then click Connection Authorization Policies.
4. In the details pane, right-click any existing TS CAPs, and then click Delete.
After you delete any previously created TS CAPs from TS Gateway Manager, create three new identical TS CAPs (TSCAP1, TSCAP2, and TSCAP3) by following the procedures in "Create a TS CAP for the TS Gateway server" in Configuring the TS Gateway Core Scenario.
If you have not already done so, also create a TS RAP in TS Gateway Manager. If you have already created a TS RAP that meets your security requirements, you do not need to delete the existing TS RAP and create a new TS RAP. For step-by-step instructions about how to create a TS RAP, see "Create a TS RAP for the TS Gateway server" in Configuring the TS Gateway Core Scenario.
3. Configure a Windows Security Health Validator on the TS Gateway server When you configure a Windows Security Health Validator (WSHV), you are creating a client health policy that establishes the requirements for client computers that are allowed to connect to your network. When client computers attempt to connect to your network and their configuration does not match the WSHV, their network connection is blocked until the clients meet the conditions of the WSHV.
In this example, the WSHV only requires that automatic updating be enabled.
To configure a Windows Security Health Validator on the TS Gateway server
1. Open the Network Policy Server snap-in console. To open Network Policy Server, click Start, point to Administrative Tools, and then click Network Policy Server.
2. In the console tree, click Network Access Protection.
3. In the details pane, under System Health Validators, click Configure System Health Validators.
4. In the details pane, under Name, right-click Windows Security Health Validator, and then click Properties.
5. In the Windows Security Health Validator Properties dialog box, on the Settings tab, click Configure.
6. On the Windows Vista and/or the Windows XP tab (depending on the operating system that the Terminal Services client is running), clear every check box except for Automatic updating is enabled, Restrict access for clients that do not have all available security updates installed, and Windows Update.

42
7. Click OK to close the Windows Security Health Validator Properties dialog box (with the Windows Vista and Windows XP tabs), and then click OK again to close the Windows Security Health Validator Properties dialog box with the Settings tab.
4. Create NAP policies on the TS Gateway server by using the Configure NAP Wizard You can use the Configure NAP wizard to easily create the policies required to configure the TS Gateway server as a NAP enforcement client. This section describes how to create the following policies for TS Gateway:
• Health policies: Health policies allow you to define client configuration requirements for the NAP-capable computers that attempt to connect to internal network resources through the TS Gateway server.
• Connection request policy: Connection request policies are an ordered set of rules that allow the NPS service to determine whether a specific connection attempt request or an accounting message received from a RADIUS client should be processed locally or forwarded to another RADIUS server. When you are configuring the NPS server to perform NAP health determination and enforcement, NPS is acting as a RADIUS server. The TS Gateway server is the RADIUS client.
• Network policies: Network policies allow you to designate who is authorized to connect to the network and the circumstances under which they can connect. During the authorization process, NAP performs client health checks.
To create NAP policies on the TS Gateway server by using the Configure NAP Wizard
1. Open the Network Policy Server snap-in console. To open Network Policy Server, click Start, point to Administrative Tools, and then click Network Policy Server.
2. In the console tree, click NPS (Local).
3. In the details pane, under Standard Configuration, click Configure NAP.
4. In the Configure NAP wizard, on the Select Network Connection Method for Use with NAP page, do the following:
a. Under Network connection method, select Terminal Services Gateway (TS Gateway).
b. Under Policy Name, accept the default name (NAP TS Gateway) or type a new name, and then click Next.
5. On the Specify NAP Enforcement Servers Running TS Gateway page, under TS Gateway servers, confirm that TS Gateway server is specified, and then click Next.
6. On the Configure Client Device Redirection and Authentication Methods page, do the following:
a. Under Device redirection, select the option that is appropriate for your environment.
b. Under Authentication Method, select the authentication method(s) that is

43
appropriate for your environment. When both authentication methods are selected, clients that use either method will be allowed to connect.
7. On the Configure User Groups and Machine Groups page, do the following:
a. Under User Groups: (Required), click Add User, and then specify a user group whose members can connect to the TS Gateway server. You must specify at least one user group.
b. In the Select Groups dialog box, specify the user group location and name, and then click OK as needed to check the name and to close the Select Groups dialog box. To specify more than one user group, do either of the following:
c. Type the name of each user group, separating the name of each group with a semi-colon.
d. Add additional groups from different domains by repeating this step for each group.
e. Under Machine Groups: (Optional), to specify computer domain membership criteria that client computers must meet (optional), click Add Machine, and then specify the computer groups. In the example configurations, no computer group is specified.
f. To specify computer groups, you can use the same steps that you used to specify user groups.
8. Click Next.
9. On the Define NAP Health Policy page, verify that the Windows Security Health Validator check box is selected and that Deny client access to terminal servers or computers running Remote Desktop is selected, and then click Next.
10. On the Completing New Network Access Protection Policies and RADIUS clients page, confirm that the following policies appear:
• Under Health Policies: NAP TS Gateway Compliant, NAP TS Gateway Noncompliant
• Under Connection Request Policy: NAP TS Gateway
• Under Network Policies: NAP TS Gateway Compliant, NAP TS Gateway Noncompliant, and NAP TS Gateway Non NAP-Capable
11. Click Finish.
Steps for configuring a Terminal Services client as a NAP enforcement client To configure a Terminal Services client computer as a Network Access Protection (NAP) enforcement client, you must complete these tasks.
Task Reference/Step-by-step instructions
1. Download and run the Terminal Services Download and run the Terminal Services NAP

44
Task Reference/Step-by-step instructions
NAP client configuration command. client configuration command
2. Test to confirm that the NAP health policy is successfully applied to the Terminal Services client.
Test to confirm that the NAP health policy is successfully applied to the Terminal Services client
1. Download and run the Terminal Services NAP client configuration command The Terminal Services NAP client configuration command (Tsgqecclientconfig.cmd) performs the following tasks to configure the Terminal Services client as a NAP enforcement client:
• Adds the TS Gateway server name to the Trusted Server list on the client.
• Starts the Network Access Protection Agent service and sets the service startup type to Automatic.
The NAP agent collects and manages health information. The NAP agent processes statements of health (SoH) from the various system health agents (SHAs) and reports client health to the NAP administration server. For NAP to function correctly, you must start the Network Access Protection Agent service on the client, and then set the service startup type to Automatic. By default, this service does not start automatically.
• Enables the TS Gateway Quarantine Enforcement client.
To run this example script, use the following procedure. Note that you must run the script as a member of the local Administrators group on the TS Gateway server.
To download and run the Terminal Services NAP client configuration command
1. To download the Terminal Services NAP client configuration command, go to the Terminal Services NAP Client Configuration Command page on the Download Center (http://go.microsoft.com/fwlink/?LinkId=103093). When you open the command prompt, right-click the command prompt, and then click Run as Administrator. You must run this command with elevated privileges for the command to succeed. For information about how to run this command with elevated privileges in Windows XP, see article 294676 in the Microsoft Knowledge Base (http://go.microsoft.com/fwlink/?LinkId=87531). For information about how to do this in Windows Server 2003, see Run a program with administrative credentials (http://go.microsoft.com/fwlink/?LinkId=87533).
2. At the command prompt, type:
tsgqecclientconfig TS_GATEWAY_SERVER_NAME
where TS_GATEWAY_SERVER_NAME is the fully qualified domain name (FQDN) of the TS Gateway server that you want to add to the list of trusted TS Gateway servers on the client.
The name that you specify for the server must match the name in the Issued to field of

45
the TS Gateway server certificate. If you create a self-signed certificate by using the Add Roles Wizard during installation of the TS Gateway role service or by using TS Gateway Manager after installation, specify the fully qualified domain name (FQDN) of the TS Gateway server.
To specify more than one TS Gateway server, separate each server name with a \0 (for example, SERVER_NAME1\0SERVER_NAME2\0SERVER_NAME3).
3. Restart the client computer to implement the configuration changes, and then log back on to the client computer by using the same account that you used to run the client configuration command.
4. Open Registry Editor. To open Registry Editor, in the Start search box, type regedit, and then press ENTER.
5. Navigate to the following registry subkey: HKEY_LOCAL_MACHINE\Software\Microsoft\Terminal Server Client\TrustedGateways
6. Under TrustedGateways, verify that the following value exists:
<TS_Gateway_Server_NAME>
where TS_GATEWAY_SERVER_NAME is the fully qualified domain name (FQDN) of the TS Gateway server that you specified in Step 2. If you specified more than one TS Gateway server, ensure that each TS Gateway server is listed.
2. Test to confirm that the TS Gateway NAP health policy is successfully applied to the Terminal Services client Use the following procedures to verify that the health policy that you configured on the TS Gateway server is being applied to the Terminal Services client.
Recall that the Windows Security Health Validator (WSHV) policy that you created on the TS Gateway server requires that you enable automatic updating for the connection to succeed.
To test whether the health policy is correctly applied to the Terminal Services client, perform the following tasks:
• Test for successful blocked connection for NAP-capable client. If the health policy is correctly applied to the Terminal Services NAP-capable client, the client connection attempt will be blocked by the server when automatic updating is disabled on the client.
• Test for successful allowed connection for NAP-capable client. If the health policy is correctly applied to the Terminal Services NAP-capable client, the client connection attempt will be allowed by the server when automatic updating is enabled on the client.
• Test for successful blocked connection for non-NAP capable client. If the health policy is correctly applied to the Terminal Services non-NAP capable client, the client connection attempt will be blocked by the server because the client cannot send a statement of health (SoH).

46
Test for successful blocked connection for NAP-capable client Perform the following procedure on the client computer to test whether at least one NAP health policy is correctly configured to block the NAP-capable Terminal Services client connection to the TS Gateway server when automatic updating is disabled on the client.
To attempt an end-to-end connection through the TS Gateway server when automatic updating is disabled on the client
1. Open Control Panel. To open Control Panel, click Start, and then click Control Panel.
2. In Control Panel, double-click Security Center.
3. Under Security Essentials, check whether Automatic Updating is set to On. If so, proceed to the next step. If Automatic Updating is already set to Off, skip to Step 7.
4. In the navigation pane, click Windows Update.
5. In Windows Update, in the navigation pane, click Change Settings.
6. In the Choose how Windows can install updates dialog box, click Never check for updates (not recommended), and then click OK.
7. Open the Remote Desktop Connection client. To open the Remote Desktop Connection client, click Start, point to All Programs, point to Accessories, and then click Remote Desktop Connection.
8. In the Remote Desktop Connection dialog box, click Options to expand the dialog box and view settings.
9. On the General tab, type the name of the computer (terminal server or computer with Remote Desktop enabled) to which you want to connect through TS Gateway.
10. Click Connect.
11. On the Enter your credentials page, select the user account that you want to use to log on remotely to the computer, enter the required credentials, and then click OK.
12. On the Gateway server credentials page, select the user name that you want to use to log on to the TS Gateway server, enter the required credentials, and then click OK.
13. After a few moments, the following error message appears:
This computer can't connect to the remote computer because your computer or device did not pass the Network Access Policies validation set by your network administrator. Please contact your network administrator for assistance.
14. Click OK to close the message, and then cancel the connection.
Verify that the NAP health policy blocked the connection On the TS Gateway server, the following three events will appear in the Event Log to confirm that client access to the TS Gateway server was denied because the health policy was successfully applied:
• Event ID 6272, Keyword: Audit Success: This event, which appears under Windows Logs\Security, indicates that the NPS server granted access to the client.

47
• Event ID 6276, Keyword: Audit Success: This event, which appears under Windows Logs\Security, indicates that the client was denied access to the TS Gateway server and quarantined because the health policy was successfully applied.
• Event ID 204, Keyword: Audit Failure: This event, which appears under Applications and Services Logs\Microsoft\Windows\TerminalServices-Gateway\Operational, indicates that the client did not meet the requirements of the NAP policies on the NPS server and therefore is not authorized to access the TS Gateway server.
To verify that the NAP health policy blocked the connection
1. On the TS Gateway server, open Event Viewer. To open Event Viewer, click Start, point to Administrative Tools, and then click Event Viewer.
2. In Event Viewer, expand Windows Logs, and then click Security.
3. With Security selected in the console tree, search for event IDs 6272 and 6276.
4. In the console tree, expand Applications and Services Logs\Microsoft\Windows\TerminalServices-Gateway, and then click Operational.
5. With Operational selected in the console tree, search for Event ID 204.
6. Close Event Viewer.
Test for successful allowed connection for NAP-capable client Perform the following procedure to test whether at least one NAP health policy is correctly configured to allow the Terminal Services client connection to the TS Gateway server when automatic updating is enabled on the client.
To attempt an end-to-end connection through the TS Gateway server when automatic updating is enabled on the client
1. Open Control Panel. To open Control Panel, click Start, and then click Control Panel.
2. In Control Panel, double-click Security Center.
3. Under Security Essentials, under Automatic updating, click Change settings.
4. In the Choose an automatic updating option dialog box, click Install updates automatically (recommended).
5. Open the Remote Desktop Connection client. To open the Remote Desktop Connection client, click Start, point to All Programs, point to Accessories, and then click Remote Desktop Connection.
6. In the Remote Desktop Connection dialog box, click Options to expand the dialog box and view settings.
7. On the General tab, type the name of the computer (terminal server or computer with Remote Desktop enabled) to which you want to connect through TS Gateway.
8. Click Connect.
9. On the Enter your credentials page, select the user account that you want to use to log

48
on remotely to the computer, enter the required credentials, and then click OK.
10. On the Gateway server credentials page, select the user name that you want to use to log on to the TS Gateway server, enter the required credentials, and then click OK.
11. After a few moments, the connection completes and a connection will be established through the TS Gateway server to the computer.
Verify that the NAP health policy allowed the connection On the TS Gateway server, the following three events will appear in the Event Log to confirm that client access to the TS Gateway server was granted because the health policy was successfully applied:
• Event ID 6272, Keyword: Audit Success: This event, which appears under Windows Logs\Security, indicates that the NPS server granted access to the client.
• Event ID 6278, Keyword: Audit Success: This event, which appears under Windows Logs\Security, indicates that the client was granted access to the TS Gateway server because the health policy was successfully applied.
• Event ID 200: This event, which appears under Applications and Services Logs\Microsoft\Windows\TerminalServices-Gateway\Operational, indicates that the client is healthy and therefore can access the TS Gateway server.
To verify that the NAP health policy allowed the connection
1. On the TS Gateway server, open Event Viewer. To open Event Viewer, click Start, point to Administrative Tools, and then click Event Viewer.
2. In Event Viewer, expand Windows Logs, and then click Security.
3. With Security selected in the console tree, search for event IDs 6272 and 6278.
4. In the console tree, expand Applications and Services Logs\Microsoft\Windows\TerminalServices-Gateway, and then click Operational.
5. With Operational selected in the console tree, search for Event ID 200.
6. Close Event Viewer.
Test for successful blocked connection for non-NAP capable client Perform the following procedure to test whether at least one NAP health policy is correctly configured to block the Terminal Services client connection to the TS Gateway server when the client cannot send an SoH to the TS Gateway server.
To attempt an end-to-end connection through the TS Gateway server when the client cannot send an SoH
1. Open Control Panel. To open Control Panel, click Start, and then click Control Panel.
2. In Control Panel, double-click Security Center.
3. Under Security Essentials, confirm that Automatic updating is set to On.

49
4. Open the command prompt, right-click the command prompt, and then click Run as Administrator.
5. At the command prompt, type the following:
net stop napagent
6. Open the Remote Desktop Connection client. To open the Remote Desktop Connection client, click Start, point to All Programs, point to Accessories, and then click Remote Desktop Connection.
7. In the Remote Desktop Connection dialog box, click Options to expand the dialog box and view settings.
8. On the General tab, type the name of the computer (terminal server or computer with Remote Desktop enabled) to which you want to connect through TS Gateway.
9. Click Connect.
10. On the Enter your credentials page, select the user account that you want to use to log on remotely to the computer, enter the required credentials, and then click OK.
11. On the Gateway server credentials page, select the user name that you want to use to log on to the TS Gateway server, enter the required credentials, and then click OK.
12. After a few moments, the following error message appears:
"This computer can't connect to the remote computer because your computer or device did not pass the Network Access Policies validation set by your network administrator. Please contact your network administrator for assistance."
13. Click OK to close the message, and then cancel the connection.
On the TS Gateway server, follow the steps in Verify that the NAP health policy blocked the connection to confirm that client access to the TS Gateway server was denied because the health policy was successfully applied.
Additional references • Network Access Protection (http://go.microsoft.com/fwlink/?LinkID=70047)
• Terminal Services page on the Windows Server 2008 TechCenter (http://go.microsoft.com/fwlink/?LinkID=48555)
Configuring the TS Gateway ISA Server Scenario You can use Internet Security and Acceleration (ISA) Server 2004 or ISA Server 2006 with TS Gateway to enhance security for a TS Gateway server by configuring ISA Server to function as an SSL bridging device. When SSL bridging is used, ISA Server can terminate SSL sessions, inspect packets, and re-establish SSL sessions. ISA Server helps enhance security by decrypting incoming SSL traffic, statefully inspecting the traffic for malicious code, and then blocking
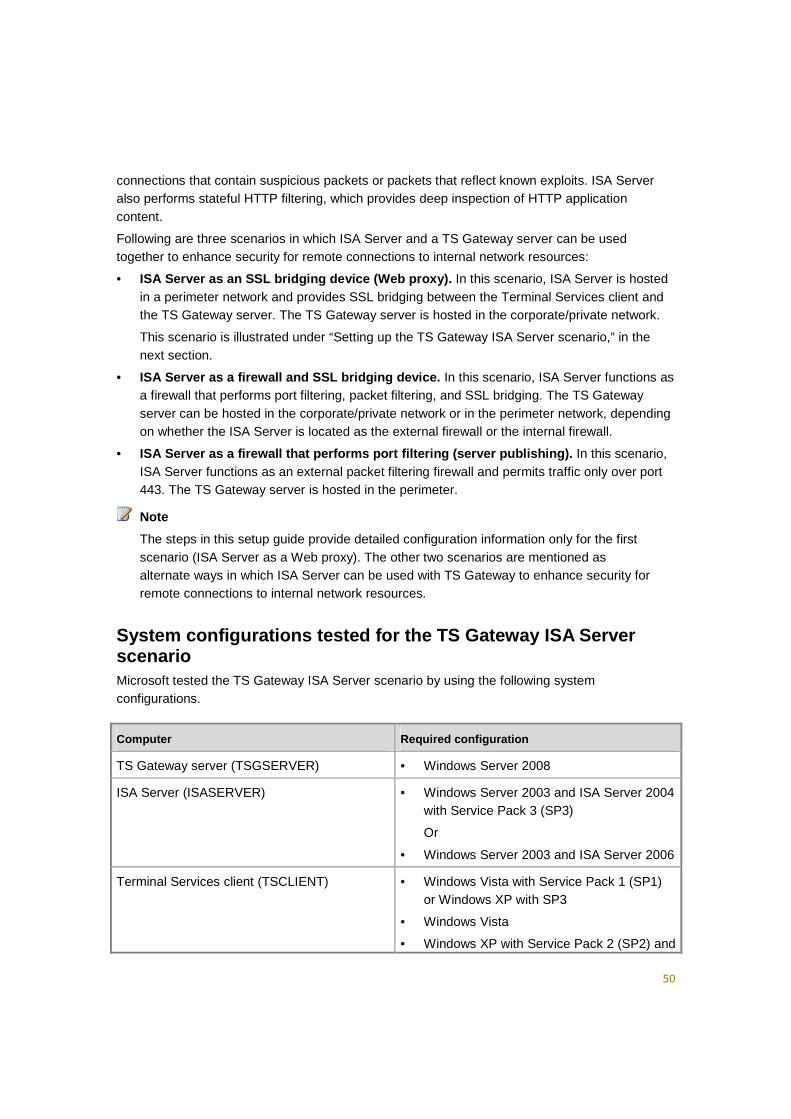
50
connections that contain suspicious packets or packets that reflect known exploits. ISA Server also performs stateful HTTP filtering, which provides deep inspection of HTTP application content.
Following are three scenarios in which ISA Server and a TS Gateway server can be used together to enhance security for remote connections to internal network resources:
• ISA Server as an SSL bridging device (Web proxy). In this scenario, ISA Server is hosted in a perimeter network and provides SSL bridging between the Terminal Services client and the TS Gateway server. The TS Gateway server is hosted in the corporate/private network.
This scenario is illustrated under “Setting up the TS Gateway ISA Server scenario,” in the next section.
• ISA Server as a firewall and SSL bridging device. In this scenario, ISA Server functions as a firewall that performs port filtering, packet filtering, and SSL bridging. The TS Gateway server can be hosted in the corporate/private network or in the perimeter network, depending on whether the ISA Server is located as the external firewall or the internal firewall.
• ISA Server as a firewall that performs port filtering (server publishing). In this scenario, ISA Server functions as an external packet filtering firewall and permits traffic only over port 443. The TS Gateway server is hosted in the perimeter.
Note
The steps in this setup guide provide detailed configuration information only for the first scenario (ISA Server as a Web proxy). The other two scenarios are mentioned as alternate ways in which ISA Server can be used with TS Gateway to enhance security for remote connections to internal network resources.
System configurations tested for the TS Gateway ISA Server scenario Microsoft tested the TS Gateway ISA Server scenario by using the following system configurations.
Computer Required configuration
TS Gateway server (TSGSERVER) • Windows Server 2008
ISA Server (ISASERVER) • Windows Server 2003 and ISA Server 2004 with Service Pack 3 (SP3)
Or
• Windows Server 2003 and ISA Server 2006
Terminal Services client (TSCLIENT) • Windows Vista with Service Pack 1 (SP1) or Windows XP with SP3
• Windows Vista
• Windows XP with Service Pack 2 (SP2) and

51
Computer Required configuration
the Terminal Services client, Remote Desktop Connection (RDC) 6.0. To download RDC 6.0, see article 925876 in the Microsoft Knowledge Base (http://go.microsoft.com/fwlink/?LinkId=79373).
• Windows Server 2008
• Windows Server 2003 with SP1 or SP2 and RDC 6.0
Internal network resource (CORPORATERESOURCE)
• Windows Vista with SP1 or Windows XP with SP3
• Windows Vista
• Windows XP with SP2
• Windows Server 2008
• Windows Server 2003 with SP1 or SP2
Configuring connections between ISA Server and TS Gateway server You can configure ISA Server communication with the TS Gateway server in either of the following two ways:
• HTTPS-HTTPS bridging: In this configuration, the TS Gateway client initiates an SSL (HTTPS) request to the SSL bridging device. The SSL bridging device initiates a new HTTPS request to the TS Gateway server, for maximum security.
• HTTPS-HTTP bridging: In this configuration, the TS Gateway client initiates an SSL (HTTPS) request to the SSL bridging device. The SSL bridging device initiates a new HTTP request to the TS Gateway server.
Setting up the TS Gateway ISA Server scenario The following diagram illustrates the ISA Server scenario for TS Gateway, in which ISA Server is used as an SSL bridging device.

52
Note
The steps in this setup guide describe how to set up remote access from a Terminal Services client through a TS Gateway server, where SSL traffic from the client is first sent to the ISA Server, which is used for SSL bridging. The guide does not describe how to install ISA Server 2004 or ISA Server 2006, nor does it describe how to configure the firewalls illustrated in the diagram, the terminal servers running RemoteApp programs (hosting LOB applications), or the perimeter network or Active Directory infrastructure. The diagram is provided to suggest one way in which this scenario might be implemented in a production environment.
Steps for configuring TS Gateway for the ISA Server scenario To configure the TS Gateway server and ISA Server bridging scenario, complete these tasks.
Task Reference/Step-by-step instructions
1. Export the SSL certificate for the TS Gateway server and copy it to the ISA Server.
Export the certificate for the TS Gateway server and copy it to the ISA Server
2. Install the SSL certificate for the TS Gateway Install the SSL certificate for the TS Gateway

53
Task Reference/Step-by-step instructions
server on the ISA Server. server on the ISA Server
3. Copy and install the TS Gateway server root certificate on the ISA Server.
Note
This step is required only if you are using a self-signed certificate or another SSL certificate type that is not trusted.
Copy and install the TS Gateway server root certificate on the ISA Server
4. Create a new Web publishing rule on the ISA Server.
Create a new Web publishing rule on the ISA Server
5. Enable or disable HTTPS-HTTP bridging on the TS Gateway server.
Enable or disable the HTTPS-HTTP bridging setting on the TS Gateway server
6. Verify client configuration and test end-to-end connectivity.
Verify client configuration and test end-to-end connectivity
1. Export the SSL certificate for the TS Gateway server and copy it to the ISA Server When you export the certificate, ensure that you export the private key. If this option is not available for the certificate that you have selected, you must obtain a new certificate for ISA Server. For information about ISA Server certificate requirements, see Digital Certificates for ISA Server 2004 (http://go.microsoft.com/fwlink/?LinkId=104827) and Troubleshooting SSL Certificates in ISA Server Publishing (http://go.microsoft.com/fwlink/?LinkId=104826).
Perform the following procedure on the TS Gateway server to export the SSL certificate for the TS Gateway server and copy it to the ISA Server.
To export the SSL certificate for the TS Gateway server and copy it to the ISA Server
1. On the TS Gateway server, open the Certificates snap-in console. If you have not already added the Certificates snap-in console, you can do so by doing the following:
a. Click Start, click Run, type mmc, and then click OK.
b. On the File menu, click Add/Remove Snap-in.
c. In the Add or Remove Snap-ins dialog box, in the Available snap-ins list, click Certificates, and then click Add.
d. In the Certificates snap-in dialog box, click Computer account, and then click Next.
e. In the Select Computer dialog box, click Local computer: (the computer this console is running on), and then click Finish.

54
f. In the Add or Remove snap-ins dialog box, click OK.
2. In the Certificates snap-in console, in the console tree, expand Certificates (Local Computer), expand Personal, and then click Certificates.
3. Under certificates, click the TS Gateway server certificate. If more than one certificate is listed and you are unsure which certificate to select, view the properties for each certificate to identify the certificate that meets TS Gateway server requirements.
4. Right-click the TS Gateway certificate to export, point to All Tasks, and then click Export.
5. On the Welcome to the Certificate Export Wizard page, click Next.
6. On the Export Private Key page, click Yes, export the private key, and then click Next.
7. On the Export File Format page, ensure that Personal Information Exchange - PKCS #12 (.PFX) is selected, select the Include all certificates in the certification path if possible check box, and then click Next.
8. On the Password page, type a password to protect the private key for the certificate, confirm the password, and then click Next.
9. On the File to Export page, in the File name box, click Browse.
10. In the Save As dialog box, specify the name of the certificate that you want to export and the location to which you want to export the certificate (ensure that the location can be accessed from the ISA Server), and then click Save.
11. On the File to Export page, click Next.
12. On the Completing the Certificate Export Wizard page, confirm that the correct certificate is specified, that Export Keys is set to Yes, and that Include all certificates in the certification path is set to Yes, and then click Finish.
13. After the certificate export has successfully completed, a message appears confirming that the export was successful. Click OK.
14. Close the Certificates snap-in.
15. Copy the certificate to the ISA Server.
2. Install the SSL certificate for the TS Gateway server on the ISA Server Perform the following procedure on the ISA Server to install the SSL certificate for the TS Gateway server.
To install the SSL certificate for the TS Gateway server on the ISA Server
1. On the ISA Server, open the Certificates snap-in console. If you have not already added the Certificates snap-in console, you can do so by doing the following:
a. Click Start, click Run, type mmc, and then click OK.
b. On the File menu, click Add/Remove Snap-in.

55
c. In the Add or Remove Snap-ins dialog box, in the Available snap-ins list, click Certificates, and then click Add.
d. In the Certificates snap-in dialog box, click Computer account, and then click Next.
e. In the Select Computer dialog box, click Local computer: (the computer this console is running on), and then click Finish.
f. In the Add or Remove snap-ins dialog box, click OK.
2. In the Certificates snap-in console, in the console tree, expand Certificates (Local Computer), and then click Personal.
3. Right-click the Personal folder, point to All Tasks, and then click Import.
4. On the Welcome to the Certificate Import Wizard page, click Next.
5. On the File to Import page, in the File name box, click Browse, and then browse to the location where you copied the SSL certificate for the TS Gateway server. Select the certificate (Certificate_Name.pfx), click Open, and then click Next.
6. On the Password page, do the following:
• If earlier you specified a password for the private key associated with the certificate, type the password.
• If you want to mark the private key as exportable, select the Mark this key as exportable check box.
• Ensure that the Include all extended properties check box is selected.
7. Click Next.
8. On the Certificate Store page, click Automatically select the certificate store based on the type of certificate, and then click Next.
9. On the Completing the Certificate Import Wizard page, confirm that the correct certificate has been selected and that the following certificate settings appear:
• Certificate Store Selected: Automatically determined by the wizard.
• Content: PFX
• File Name: FilePath\<Certificate_Name.pfx>, where <Certificate_Name> is the name of the TS Gateway server SSL certificate.
10. Click Finish.
11. After the certificate import has successfully completed, a message appears confirming that the import was successful. Click OK.
12. With Certificates selected in the console tree, in the details pane, verify that the correct certificate appears in the list of certificates on the ISA Server. The certificate must be under the Personal store of the local computer.

56
3. Copy and install the TS Gateway server root certificate on the ISA Server This procedure is required only in the following circumstances:
• If you are using a self-signed certificate or another SSL certificate type that is not trusted.
• If you did not select the option to download a certificate chain or Automatically select the certificate store based on the type of certificate when you installed the certificate on the ISA Server (as described in the preceding procedure).
To copy and install the TS Gateway server root certificate on the ISA Server
1. On the ISA Server, open the Certificates snap-in console. If you have not already added the Certificates snap-in console, you can do so by doing the following:
a. Click Start, click Run, type mmc, and then click OK.
b. On the File menu, click Add/Remove Snap-in.
c. In the Add or Remove Snap-ins dialog box, in the Available snap-ins list, click Certificates, and then click Add.
d. In the Certificates snap-in dialog box, click Computer account, and then click Next.
e. In the Select Computer dialog box, click Local computer: (the computer this console is running on), and then click Finish.
f. In the Add or Remove snap-ins dialog box, click OK.
2. In the Certificates snap-in console, in the console tree, expand Certificates (Local Computer), expand Trusted Root Certification Authorities, right-click Certificates, point to All Tasks, and then click Import.
3. On the Welcome to the Certificate Import Wizard page, click Next.
4. On the File to Import page, in the File name box, click Browse, and then browse to the location of the TS Gateway server root certificate. Select the root certificate (<Root_Certificate_Name.cer, or, if the private key was also exported, <Root_Certificate_Name.pfx>), click Open, and then click Next.
Note
If you created a self-signed certificate by using the Add Remove Roles Wizard during installation of the TS Gateway role service, or by using TS Gateway Manager after installation (as described in "Create a self-signed certificate for TS Gateway" in Configuring the TS Gateway Core Scenario), note that the self-signed certificate is also the root certificate.
5. On the Password page, if earlier you specified a password for the private key associated with the certificate, type the password.
6. On the Certificate Store page, accept the default option (Place all certificates in the following store - Trusted Root Certification Authorities), and then click Next.
7. On the Completing the Certificate Import Wizard page, confirm that the following

57
certificate settings appear:
• Certificate Store Selected by User: Trusted Root Certification Authorities
• Content: Certificate (or PFX)
• File Name: FilePath\<Root_Certificate_Name.cer> (or <Root_Certificate_Name.pfx>), where <Root_Certificate_Name> is the name of the TS Gateway server root certificate.
8. Click Finish.
9. After the certificate import has successfully completed, a message appears confirming that the import was successful. Click OK.
10. With Certificates selected in the console tree, in the details pane, verify that the root certificate of the TS Gateway server appears in the list of certificates on the ISA Server. Ensure that the certificate appears under the Trusted Root Certification Authorities store on the local computer.
4. Create a new Web publishing rule on the ISA Server To configure the TS Gateway server and ISA Server for HTTPS-HTTP bridging or for HTTPS-HTTPS bridging, you must create the appropriate Web publishing rule on the ISA Server.
Important
The steps for creating a Web publishing rule for ISA Server will vary, based on whether you are using ISA Server 2004 or ISA Server 2006. Ensure that you follow the steps that correspond to the version of ISA Server that you are using.
Create a new Web publishing rule for ISA Server 2004 Use the following procedure to create a new Web publishing rule for ISA Server 2004.
To create a new Web publishing rule for ISA Server 2004
1. On the ISA Server, open ISA Server Management. To open ISA Server Management, click Start, point to All Programs, point to Microsoft ISA Server, and then click ISA Server Management.
2. In the console tree, browse to <Local ISA Server>.
3. Right-click Firewall Policy, point to New, and then click Secure Web Server Publishing Rule.
4. On the Welcome to the SSL Publishing Rule Wizard page, in the SSL Web Publishing Rule Name box, type a name for the new server publishing rule, and then click Next.
5. On the Publishing Mode page, click SSL Bridging, and then click Next.
6. On the Select Rule Action page, click Allow, and then click Next.
7. On the Bridging Mode page, do one of the following:

58
• To enable HTTPS-HTTP bridging, click Secure connections to clients, and then click Next.
• To enable HTTPS-HTTPS bridging, click Secure connection to clients and Web server, and then click Next.
8. On the Define Website to Publish page, do the following:
a. In the Computer name or IP address box, type the name of the TS Gateway server. The specified name must match the name of the TS Gateway server through which users will connect in this scenario. This name must also match the certificate name (CN) in the certificate that is installed on the TS Gateway server.
b. Select the Forward the original host header instead of the actual one (specified above) check box.
c. In the Path box, type /*.
9. On the Public Name Details page, do the following:
a. In Accept requests for, ensure that This domain name is selected.
b. In the Public name box, type the name of the TS Gateway server. The specified name must match the name of the TS Gateway server through which users will connect in this scenario.
c. In the Path box, type /*.
d. Click Next.
10. If required, create a new SSL Web listener. If you have a pre-existing listener with a certificate that matches the public name, you do not need to create a new SSL Web listener. In this case, select the appropriate Web listener, click Next, and then proceed to Step 11.
If you do need to create a new SSL Web listener, do the following:
a. On the Welcome to the New Web Listener page, in the Web Listener Name box, type a name for the Web listener, and then click Next. If Web listeners have already been configured for the ISA Server, on the Select Web Listener page, click New to open the Welcome to the New Web Listener page and begin specifying a new Web listener.
b. On the IP Addresses page, under Listen for requests from these networks, select the External check box, and then click Next.
c. On the Port Specification page, do the following:
d. Under SSL, select the Enable SSL check box, and then clear the Enable HTTP box.
e. Click Select, and in the Select Certificate dialog box, click the certificate that you want to use.
f. Click OK to close the Select Certificate dialog box, and then click Next.
g. On the Completing the New Web Listener Wizard page, click Finish.
11. On the Select Web Listener page, confirm that the correct Web listener properties appear, and then click Next.

59
12. On the User Sets page, click All Users, and then click Next.
13. On the Completing the New SSL Web Publishing Rule Wizard page, click Finish.
14. To save the changes and update the ISA Server firewall policy, in the details pane of the ISA Server Management console, click Apply.
15. In the Apply New Configuration dialog box, click OK after the changes are applied (a progress bar appears while the changes are being applied).
Create a new Web publishing rule for ISA Server 2006 Use the following procedure to create a new Web publishing rule for ISA Server 2006.
To create a new Web publishing rule for ISA Server 2006
1. On the ISA Server, open ISA Server Management. To open ISA Server Management, click Start, point to All Programs, point to Microsoft ISA Server, and then click ISA Server Management.
2. In the console tree, expand the ISA Server name. (If you are using ISA Server 2006 Enterprise Edition, expand Arrays, and then expand the ISA Server name.)
3. Click Firewall Policy.
4. On the Tasks tab, click Publish Web Sites.
5. On the Welcome to the New Web Publishing Rule Wizard page, in the Web publishing rule name box, type a name for the new publishing rule, and then click Next.
6. On the Select Rule Action page, click Allow, and then click Next.
7. On the Publishing Type page, ensure that Publish a single Web site or load balancer is selected, and then click Next.
8. On the Server Connection Security page, select Use SSL to connect to the published Web server or server farm, and then click Next.
9. On the Internal Publishing details page, in the Internal site name box, type the name of the TS Gateway server, and then click Next.
If the ISA Server cannot resolve the name of the TS Gateway server, type the IP address of the TS Gateway server. Alternatively you can include this information in the Hosts file.
10. On the second instance of the Internal Publishing Details page, do the following:
a. Ensure that the Path box is empty.
b. Ensure that the Forward the original host header instead of the actual one specified in the Internal site name field on the previous page check box is cleared.
c. Click Next.
11. On the Public Name Details page, do the following:
a. In Accept requests for, ensure that This domain name (type below) is selected.
b. In the Public name box, type the name of the TS Gateway server. The specified

60
name must match the name of the TS Gateway server through which users will connect in this scenario. This name must also match the certificate name (CN) or the Storage Area Network (SAN) in the certificate that is installed on the TS Gateway server.
Note
If you are using the SAN attributes of certificates, clients that connect to the TS Gateway server must be running RDC 6.1. RDC 6.1 is available with Windows Server 2008, Windows Vista with SP1, and Windows XP with SP3. The RDC 6.1 (6.0.6001) client supports Remote Desktop Protocol 6.1.
c. Ensure that the Path box is empty.
d. Click Next.
12. If required, create a new SSL Web listener. If you have a pre-existing listener with a certificate that matches the public name, you do not need to create a new SSL Web listener. In this case, select the appropriate Web listener, click Next, and then proceed to Step 13.
If you do need to create a new SSL Web listener, do the following:
a. On the Select Web Listener page, click New.
b. On the Welcome to the New Web Listener Wizard page, in the Web Listener Name box, type a name for the Web listener, and then click Next.
c. On the Client Connection Security page, click Require SSL secured connections with clients, and then click Next.
d. On the Web Listener IP Addresses page, do the following:
e. Under Listen for incoming Web requests from these networks, select the External check box.
f. Ensure that The ISA Server will compress content sent to clients through this Web Listener if the clients requesting the content support compression check box is selected.
g. Click Select IP Addresses.
h. On the External Listener IP Selection page, do the following:
i. Click Specified IP addresses on the ISA Server in the selected Network. Under Available IP addresses, select the appropriate IP address, click Add, and then click OK.
j. Click Next.
k. On the Listener SSL Certificates page, click Assign a certificate for each IP address, click the appropriate IP address, and then click Select Certificate.
l. On the Select Certificate page, under Select certificate, click the TS Gateway server certificate, click Select, and then click Next.
m. On the Authentication Settings page, click No Authentication, and then click Next.
n. On the Single Sign On Settings page, click SSO is not relevant for this setup,

61
and then click Next.
o. On the Completing the New Web Listener Wizard page, click Finish.
p. On the second instance of the Completing the NewWeb Listener Wizard page, confirm that the correct Web listener properties appear, and then click Finish.
13. On the Select Web Listener page, confirm that the appropriate Web listener is selected, and then click Next.
14. On the Authentication Delegation page, click No delegation, but client may authenticate directly, and then click Next.
15. On the User Sets page, ensure that All Users is selected, and then click Next.
16. On the Completing the New Web Site Publishing Rule Wizard page, click Finish.
17. To save the changes and update the ISA Server firewall policy, in the details pane of the ISA Server Management console, click Apply.
18. In the Apply New Configuration dialog box, click OK after the changes are applied (a progress bar appears while the changes are being applied).
5. Enable or disable HTTPS-HTTP bridging on the TS Gateway server To enable HTTPS-HTTP bridging, select the Use HTTPS-HTTP bridging check box on the SSL Bridging tab of the TS Gateway server. To disable HTTPS-HTTP bridging, clear this check box (if this setting is cleared and you attempt to use HTTPS-HTTP bridging, the TS Gateway server will not function). By design, selecting or clearing this check box creates or updates the value of the AllowAnonymous registry entry.
Important
If you enable HTTPS-HTTP bridging, the TS Gateway server will allow anonymous access, and authentication will be performed by the ISA Server. HTTPS-HTTP bridging cannot be used for clients to authenticate by using smart cards. To deactivate the ISA Server for SSL termination in this scenario, we strongly recommend that you update the configuration by disabling HTTPS-HTTP bridging on the TS Gateway server. If you do not update the configuration changes in this scenario, TS Gateway will continue to allow anonymous access.
6. Verify client configuration and test end-to-end connectivity Terminal Services clients that connect through the ISA Server to the TS Gateway server can be located in the external network range of the ISA Server. Web publication can also be configured for the internal network. Doing this allows you to use a single namespace for the TS Gateway server and ensure that Terminal Services clients must connect through ISA Server before connecting to the TS Gateway server.
In a typical deployment, the TS Gateway server address and the IP address of the ISA Server will be published in DNS. As a result, clients will resolve the TS Gateway server address to the ISA

62
Server. The secure Web publishing rule that you create for the ISA Server ensures that all incoming requests to the TS Gateway server from the external network will be forwarded to the TS Gateway server, which is located in the internal network.
If you cannot publish entries to DNS, for testing purposes, you can add an entry to the Hosts file of the client that maps the TS Gateway server address to the IP address of the ISA Server. The Hosts file on the client is located at %windir%\system32\drivers\etc\hosts.
Next, ensure that the client is correctly configured as a TS Gateway client as described in "Steps for configuring a Terminal Services client for the TS Gateway core scenario" in Configuring the TS Gateway Core Scenario. To ensure that connectivity is successful in this scenario, follow the steps in "Verify that end-to-end connectivity through TS Gateway is functioning correctly" in Configuring the TS Gateway Core Scenario.
Additional references The following resources provide information about testing and troubleshooting RPC over HTTP through ISA Server:
• Description of the ISA Server 2006 hotfix package that is dated May 14, 2007 (http://go.microsoft.com/fwlink/?LinkId=107462)
• Testing RPC over HTTP through ISA Server 2006, Part 1: Protocols, Authentication and Processing (http://go.microsoft.com/fwlink/?LinkId=104828)
• Testing RPC over HTTP through ISA Server 2006, Part 2: Test Tools and Strategies (http://go.microsoft.com/fwlink/?LinkId=104830)
• Testing RPC over HTTP through ISA Server 2006, Part 3: Common Failures and Resolutions (http://go.microsoft.com/fwlink/?LinkId=104831)
• RPC over HTTP Logging Wildness (http://go.microsoft.com/fwlink/?LinkId=104832)
Monitoring Active Connections Through a TS Gateway Server After you have configured Terminal Services clients to connect to remote computers on the network through TS Gateway, you can monitor active connections. This section provides the following information about monitoring active connections through a TS Gateway server:
• Specify TS Gateway events to log
• View details about active connections through a TS Gateway server
Specify TS Gateway events to log By using TS Gateway Manager, you can specify the types of events that you want to monitor, such as unsuccessful or successful connection attempts to internal network computers through a TS Gateway server.

63
When these events occur, you can monitor the corresponding events by using Windows Event Viewer. TS Gateway server events are stored in Event Viewer under Application and Services Logs\Microsoft\Windows\Terminal Services-Gateway\.
To specify TS Gateway events to log
1. Open TS Gateway Manager.
2. In the console tree, click to select the node that represents your TS Gateway server, which is named for the computer on which the TS Gateway server is running.
3. With the name of the TS Gateway server highlighted in the console tree, right-click the name of the server, and then click Properties.
4. On the Auditing tab, select or clear the appropriate check boxes to specify the events that you want to monitor for TS Gateway.
The following table lists and describes the TS Gateway event types that you can monitor.
Table 1: TS Gateway Event Types
Event name Description Event ID
Successful User Disconnection from the Resource
By monitoring the timestamp for this event and the related Successful User Connection to the Resource event, you can verify the user session time and the amount of data (in kilobytes) that was sent and received by the remote client through the TS Gateway server.
303: When the client disconnects from the resource
202: When an administrator disconnects the client
Failed User Connection to the Resource
The remote client met the conditions specified in the TS CAP and the TS RAP, but could not connect to the internal network resource (computer) through the TS Gateway server because the remote computer was unavailable.
By auditing this event, you can determine which connectivity issues are caused by problems with Terminal Services and
304

64
Event name Description Event ID
Remote Desktop rather than the TS Gateway server.
Failed Connection Authorization
The remote client could not connect to a TS Gateway server because the client did not meet the conditions specified in the TS CAPs.
201
Failed Resource Authorization
The remote client could not connect through a TS Gateway server to the specified computer because no TS RAPs are configured to allow the user access to the specified computer.
For example, as mentioned earlier, this issue might occur if the user attempts to connect to the computer by using its NetBIOS name when the TS RAP configured on the TS Gateway server uses an FQDN name for the computer.
301
Successful User Connection to the Resource
The remote client successfully connected to a computer through the TS Gateway server.
302
Successful Connection Authorization
The remote client successfully connected to the TS Gateway server because the client met the conditions specified in at least one TS CAP.
200
Successful Resource Authorization
The remote client successfully connected through the TS Gateway server to the specified internal network resource because the client met the conditions specified in at least one TS RAP.
300

65
View details about active connections through a TS Gateway server You can use TS Gateway Manager to view information about active connections from Terminal Services clients to internal network resources through a TS Gateway server. This information is displayed in the Monitoring details pane and includes:
Event name Description
Connection ID In the format <a:b> where "a" is the tunnel ID that uniquely identifies a specific connection to the TS Gateway server and "b" is the channel ID. The tunnel ID represents the number of connections that the TS Gateway server has received since the Terminal Services Gateway service has been running. Each time the TS Gateway server receives a new connection, the tunnel ID is incremented by 1.
User ID The domain and user ID of the user logged on to the client, in the format <domain\userID>.
User Name The full name of the user logged on to the client.
Note
You can only view the full name of the user if you are logged on to the TS Gateway server as a domain user. If you are logged on as member of the local administrators group, you can view the full name of the user in the User ID column.
Connected On The date and time when the connection was initiated.
Connection Duration The length of time that the connection was active.
Idle Time The length of time that the connection is idle, if applicable.
Target Computer The name of the internal network computer to which the client is connected.
Client IP Address The IP address of the client.

66
Event name Description
Note
If your network configuration includes proxy servers, the IP address that appears in this column will reflect the IP address of the proxy server, rather than the IP address of the Terminal Services client.
Target Port The port on the internal network computer to which the client is connected.
Use the following procedure to view details about active connections through a TS Gateway server.
To view details about active connections through a TS Gateway server
1. Open TS Gateway Manager.
2. In the console tree, click to select the node that represents your TS Gateway server, which is named for the computer on which the TS Gateway server is running.
3. In the console tree, click Monitoring.
The TS Gateway Manager results pane displays a summary of the number of connections from remote users to computers on the internal network. Specific connections, if any, are listed below the summary.
When you click a connection, the connection details appear in the lower pane. If necessary, you can disconnect a specific connection or all TS Gateway connections for a user.
4. To refresh the display of connection status, in the Actions pane, click Refresh.
Example Script for Validating Certificate Configuration After you have completed certificate configuration for the TS Gateway server and Terminal Service client (as described in Configuring the TS Gateway Core Scenario), you can use the Rpcping.exe resource kit tool to confirm that the certificate configuration is correct. The following script provides an example of how you can use Rpcping.exe for this purpose. Rpcping.exe is available for download from Windows Server 2003 Resource Kit Tools (http://go.microsoft.com/fwlink/?LinkId=16544).

67
This appendix describes how to save the example script as a text file and run the script by using Rpcping.exe, and provides an example of successful output and the example script syntax.
Running the Rpcpingtest example script To run this example script, use the following procedure. Note that you must run the script as a member of the local Administrators group on the TS Gateway server.
To run the example script
1. Copy and paste the example script into a text file.
2. Save the text file as Rpcpingtest.cmd.
3. Open the command prompt, switch to the directory where Rpcping.exe is located, and then type Rpcpingtest.cmd.
4. For example, if you saved Rpcping.exe to the C:\Tools directory, you would do the following:
At the command prompt, type the following (replace TSGATEWAYSERVERNAME with the name of your TS Gateway server):
C:\Tools\Rpcpingtest TSGATEWAYSERVERNAME <user name> <domain name>
5. Press ENTER.
6. Type the password for RPC/http proxy (the password for the TS Gateway server).
Example of successful output If the script is successful and the certificate configuration is correct, output similar to the following will appear:
Results: RPC/HTTP server preferred auth scheme is: 2
Results: Pinging successfully completed in 78 sec.
------------------------------------------------------------
Prompting for second rpc ping command in the scripting file
Enter the password for server: <password for TS Gateway>
Enter the password for RCP/http Proxy: <password for TS Gateway>
Results: Completed 1 calls in 141 ms
Results: 7 T/S or 141.000 ms/T.
Rpcping example script @echo off
setlocal

68
set _TARGETGATEWAY=%1
set _USERNAME=%2
set _DOMAINNAME=%3
if "%_TARGETGATEWAY%" == "" goto DO_USAGE
if "%_USERNAME%" == "" goto DO_USAGE
if "%_DOMAINNAME%" == "" goto DO_USAGE
Echo *******************************************************************
Echo * The first RPCPing will authenticate to the RPC over HTTP
Echo * Proxy service. If this ping fails, then the certificate
Echo * on the client computer is not correctly configured,
Echo * or you might have entered the wrong password.
Echo *******************************************************************
Rpcping -v 2 -e 3388 -t ncacn_http -s localhost -o RpcProxy=%_TARGETGATEWAY% -P
"%_USERNAME%,%_DOMAINNAME%,*" -H NTLM -u NTLM -a connect -F ssl -B msstd:%_TARGETGATEWAY%
-E
-R None
Echo *******************************************************************
Echo * The second RPCPing will attempt to authenticate to the TS
Echo * Gateway service. If this ping fails, then the TS Gateway
Echo * service is probably not running.
Echo *******************************************************************
Rpcping -v 2 -e 3388 -t ncacn_http -s localhost -o RpcProxy=%_TARGETGATEWAY% -P
"%_USERNAME%,%_DOMAINNAME%,*" -I "%_USERNAME%,%_DOMAINNAME%,*" -H NTLM -u NTLM -a connect
-F
ssl -B msstd:%_TARGETGATEWAY%
goto endall
:DO_USAGE

69
Echo ******************************************************************
Usage: *
Echo * testclient.cmd [gateway] [user] [domain/machine] *
Echo * *
Echo ******************************************************************
goto endall
:ENDALL
Endlocal
Disclaimer The sample script is not supported under any Microsoft standard support program or service. The sample script is provided AS IS without warranty of any kind. Microsoft further disclaims all implied warranties including, without limitation, any implied warranties of merchantability or of fitness for a particular purpose. The entire risk arising out of the use or performance of the sample script and documentation remains with you. In no event shall Microsoft, its authors, or anyone else involved in the creation, production, or delivery of the script be liable for any damages whatsoever (including, without limitation, damages for loss of business profits, business interruption, loss of business information, or other pecuniary loss) arising out of the use of or inability to use the sample scripts or documentation, even if Microsoft has been advised of the possibility of such damages.
Appendix: Configuring the TS Gateway OTP Scenario This scenario discusses how to configure One Time Password (OTP) authentication with Terminal Services Gateway (TS Gateway). In this scenario, Network Policy Server (NPS) is used as a Remote Authentication Dial-In User Service (RADIUS) server to authenticate users on a Microsoft Internet Security and Acceleration (ISA) Server 2006-based edge server.
NPS enables you to provide local and remote network access services and to define and enforce policies for network access authentication, authorization, and client health. The NPS role service in Windows Server 2008 is the replacement for the Internet Authentication Service (IAS) in Windows Server 2003. Deploying NPS as a RADIUS server enables users with supported clients to authenticate on the edge server by using OTP authentication. After OTP authentication, users are allowed to cross the corporate perimeter and are authenticated again for access to corporate resources. Therefore, users need to provide two forms of credentials before they are allowed to connect to the corporate resource.

70
Note
If you use OTP for client authentication, this configuration does not allow you to digitally sign e-mail messages or easily share identities between different organizations.
The instructions for this scenario assume that you are already familiar with TS Gateway.
System configuration for this scenario This example scenario uses the following configuration.
Computer Configuration
ISA Server
(“contoso-fw.contoso.com”)
• The server is running Windows Server 2003.
• The server is running ISA Server 2006.
• The ISA Server contains a server certificate for www.contoso.com that is installed to the local computer certificate store.
• The ISA Server 2006 Supportability Update package is installed from the following Web site: http://go.microsoft.com/fwlink/?LinkId=115136.
• The server has the following name and IP addresses assigned:
Name: contoso-fw.contoso.com
Internal IP address: 192.168.1.1
External IP address: 206.73.118.1
TS Gateway/TS Web Access server
(“www.contoso.com”)
• The server is running Windows Server 2008.
• The server is running the TS Gateway and TS Web Access role services, with the TS Web Access Web site accessible at https://www.contoso.com/ts.
• TS Web Access is configured to populate its list of RemoteApp programs from the terminal server “contoso-ts.contoso.com”.
• The server has the following name and IP address assigned:
Name: www.contoso.com
IP address: 192.168.1.2

71
Computer Configuration
NPS (RADIUS) server
(“contoso-otp.contoso.com”)
• The server is running Windows Server 2008.
• The server is running the NPS role service.
• The server has the following name and IP address assigned:
Name: contoso-otp.contoso.com
Internal IP address: 192.168.1.3
Terminal Server
(“contoso-ts.contoso.com”)
• The server is running Windows Server 2008.
• The server is running the Terminal Server role service.
• The terminal server has RemoteApp programs installed that are available through TS Web Access. The RemoteApp programs are configured to use TS Gateway. For more information about how to configure Terminal Services RemoteApp, see the “Terminal Services RemoteApp Step-by-Step Guide” (http://go.microsoft.com/fwlink/?LinkId=84895).
• The server has the following name and IP address assigned:
Name: contoso-ts.contoso.com
IP address: 192.168.1.4
Client computer
(“client1”)
• The client computer is running Windows Vista with Service Pack 1 (SP1).
• The computer has the following configuration:
Name: client1
IP address: 206.73.118.2
Important
The OTP scenario is supported only for Remote Desktop Connection (RDC) 6.1 clients. RDC 6.1 is available in Windows Vista with SP1, Windows XP with Service Pack 3 (SP3), and Windows Server 2008.

72
Network topology The following diagram illustrates the OTP scenario for TS Gateway.
Steps to configure OTP To configure OTP in this scenario, you must perform the following steps:
1. Configure the NPS (RADIUS) server.
2. Set the Dial-in permission for the RADIUS user.
3. Create a RADIUS client on the ISA Server.
4. Create a Web listener on the ISA Server.
5. Publish a Web site on the ISA Server by using the Web listener.
6. Disable the HTTPOnly attribute on the ISA Server.
7. Modify the Remote Desktop Protocol (.rdp) file that clients will use to connect.
8. Set up the client computer.
9. Test the configuration.
To configure the NPS (RADIUS) server
1. Log on to the NPS server (“contoso-otp.contoso.com”) with an account that has Administrator privileges.

73
2. Click Start, point to Administrative Tools, and then click Network Policy Server.
3. In the console tree, expand RADIUS Clients and Servers, right-click RADIUS Clients, and then click New RADIUS Client.
4. In the New RADIUS Client dialog box, do the following:
a. In the Friendly name box, type the friendly name of the ISA Server, contoso-fw.
b. In the Address (IP or DNS) box, type the fully qualified domain name of the ISA Server, contoso-fw.contoso.com.
c. In the Vendor name list, accept the default setting of RADIUS Standard, and then click OK.
Note
For this scenario, you do not have to configure any settings in the Shared Secret section.
5. In the console tree, expand Policies, and then click Network Policies.
6. Under Policy Name, double-click Connections to other access servers.
7. In the Connections to other access servers Properties dialog box, click the Constraints tab.
8. In the Constraints column, click Authentication Methods.
9. Select the Unencrypted authentication (PAP, SPAP) check box. Leave the other check boxes with their default values, and then click OK.
NPS uses Windows Authentication to authenticate users. To use the RADIUS service that is provided by NPS, users must have the Dial-in permission assigned. You can set this permission for domain users on a domain controller by using Active Directory Users and Computers, or for local users on a member server by using Local Users and Groups. In this example scenario, the Dial-in permission is set for a local user on the NPS server.
Note
The following procedure assumes that you have set up a local user account on the NPS server that you want to use for testing.
To set the Dial-in permission for the RADIUS user
1. Log on to the NPS server ("contoso-otp.contoso.com") with an account that has Administrator privileges.
2. Click Start, point to Administrative Tools, and then click Computer Management.
3. In the console tree, expand Local Users and Groups, and then click Users.
4. Right-click the user account that you want to modify, and then click Properties.
5. Click the Dial-in tab.
6. Under Network Access Permission, click Allow access, and then click OK.

74
To create a RADIUS client on the ISA Server
1. Log on to the ISA Server ("contoso-fw.contoso.com") with an account that has Administrator privileges.
2. Start ISA Server Management. To do this, click Start, point to All Programs, point to Microsoft ISA Server, and then click ISA Server Management.
3. In the console tree, expand the server name, expand Configuration, and then click General. (If you are running ISA Server 2006 Enterprise Edition, expand Arrays, expand the server name, expand Configuration, and then click General.)
4. In the middle pane, under ISA Server Administration, click Specify RADIUS and LDAP Servers.
5. On the RADIUS Servers tab, click Add.
6. In the Server name box, type the name of the RADIUS server to use (in this case, contoso-otp.contoso.com), and then click OK.
7. Click OK to close the Authentication Servers dialog box.
To create a Web listener on the ISA Server
1. In the console tree of ISA Server Management, expand the server name, and then click Firewall Policy. (If you are running ISA Server 2006 Enterprise Edition, expand Arrays, expand the server name, and then click Firewall Policy.)
2. In the right pane, click the Toolbox tab, and then click Network Objects.
3. On the Network Objects toolbar, click New, and then click Web Listener.
The New Web Listener Definition Wizard starts.
4. In the Web listener name box, type OTP, and then click Next.
5. On the Client Connection Security page, click Require SSL secured connections with clients, and then click Next.
6. On the Web Listener IP Addresses page, do the following:
a. Under Listen for incoming Web requests on these networks, select the External check box.
b. Click Select IP Addresses.
c. Under Listen for requests on, click Specified IP addresses on the ISA Server computer in the selected network.
d. Under Available IP Addresses, click 206.73.118.1, click Add, and then click OK.
e. Accept the default (selected) setting for the ISA Server will compress content sent to clients through this Web Listener if the clients requesting the content support compression check box.
f. Click Next.
7. On the Listener SSL Certificates page, do the following:
a. Click Assign a certificate for each IP address.

75
b. In the IP Address column, click 206.73.118.1, and then click Select Certificate.
c. On the Select Certificate page, select the certificate that is issued to www.contoso.com, and then click Select.
d. Click Next.
8. On the Authentication Settings page, do the following:
a. In the Select how clients will provide credentials to ISA Server list, click HTML Form Authentication.
b. Under Select how ISA Server will validate client credentials, click RADIUS OTP, and then click Next.
9. On the Single Sign On Settings page, clear the Enable SSO for Web sites published with this Web listener check box, and then click Next. (SSO is not relevant for this solution.)
10. On the Completing the New Web Listener Wizard page, click Back to make any changes, or click Finish to complete the wizard.
To publish a Web site on the ISA Server by using the Web listener
1. In the console tree of ISA Server Management, expand the server name, and then click Firewall Policy. (If you are running ISA Server 2006 Enterprise Edition, expand Arrays, expand the server name, and then click Firewall Policy.)
2. In the right pane, click the Tasks tab, and then click Publish Web Sites.
The New Web Publishing Rule Wizard starts.
3. In the Web publishing rule name box, type Web Site Publishing, and then click Next.
4. On the Select Rule Action page, under Action to take when rule conditions are met, click Allow, and then click Next.
5. On the Publishing Type page, click Publish a single Web site or load balancer, and then click Next.
6. On the Server Connection Security page, click Use SSL to connect to the published Web server or server farm, and then click Next.
7. On the Internal Publishing Details page, in the Internal site name box, type www.contoso.com, and then click Next.
8. On the Internal Publishing Details page, click Next. (Leave the Path (optional) box empty, and the Forward the original host header instead of the actual one specified in the Internal site name field on the previous page check box cleared.)
9. On the Public Name Details page, do the following:
a. In the Accept requests for list, ensure that This domain name (type below) is selected.
b. In the Public name box, type www.contoso.com, and then click Next.
10. On the Select Web Listener page, in the Web listener list, click OTP, and then click

76
Next. (This is the Web listener that you created in the previous procedure.)
11. On the Authentication Delegation page, in the Select the method used by ISA Server to authenticate to the published Web server list, click No delegation, but client may authenticate directly, and then click Next.
12. On the User Sets page, under This rule applies to requests from the following user sets, ensure that All Authenticated Users is listed, and then click Next.
13. On the Completing the New Web Publishing Rule Wizard page, click Back to make any changes, or click Finish to complete the wizard.
14. Click Apply to update the configuration. (If you are running ISA Server 2006 Enterprise Edition, you can check the status by using the Configuration tab that is available when you click Monitoring in the console tree.)
To disable the HTTPOnly attribute on the ISA Server
1. Copy and paste the following script into a text editor such as Notepad. On the ISA Server, save the file to the C:\ directory as DisableHttpOnlyAuthCookies.vbs.
Important
Microsoft provides programming examples for illustration only, without warranty either expressed or implied. This includes, but is not limited to, the implied warranties of merchantability or fitness for a particular purpose.
Note
This script is also available at the following Web site: http://go.microsoft.com/fwlink/?LinkId=115137
If Not WScript.Arguments.Named.Exists("WebListener") Then
WScript.Echo "WebListener not defined"
WScript.Quit(1)
End If
Set fpcRoot = CreateObject("FPC.Root")
Set fpcArray = fpcRoot.GetContainingArray()
Set fpcWebListener =
fpcArray.RuleElements.WebListeners(WScript.Arguments.Named("WebListener"))
Set fpcWebListenerVps = fpcWebListener.VendorParametersSets
On Error Resume Next
Set fpcCookieAuthVps = fpcWebListenerVps.Item("{29022EBA-B030-4839-9CA6-
DD8875BC7B47}")
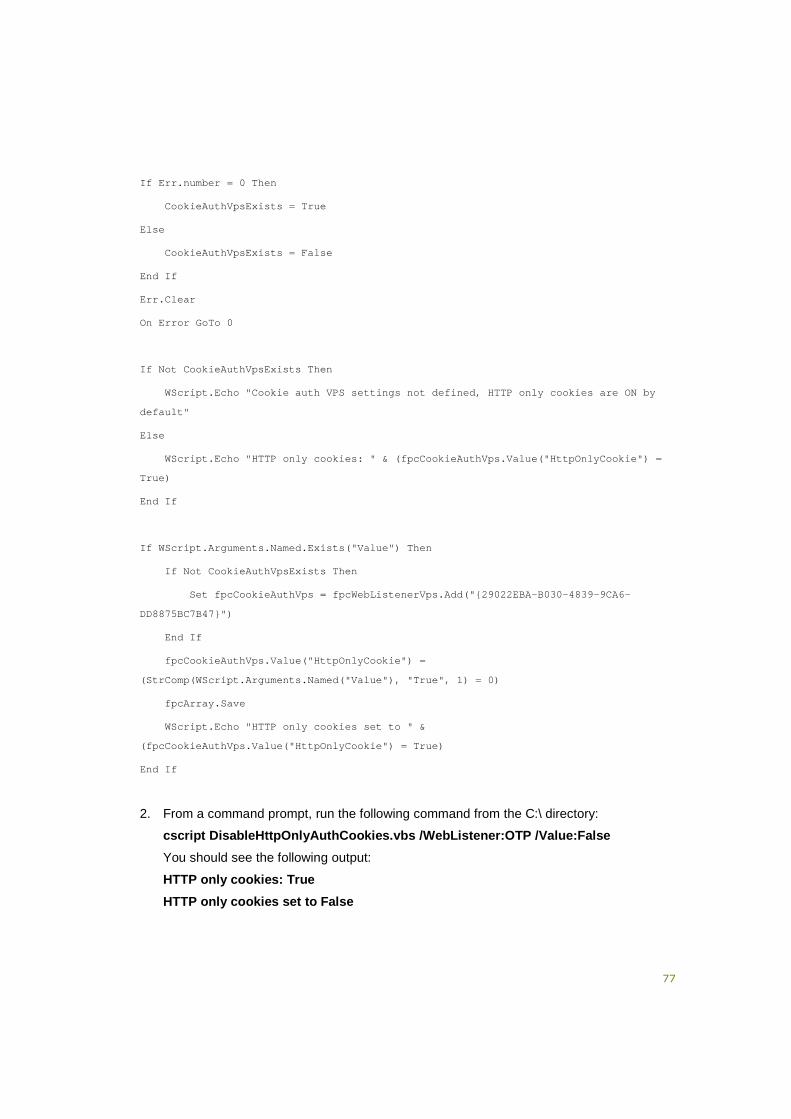
77
If Err.number = 0 Then
CookieAuthVpsExists = True
Else
CookieAuthVpsExists = False
End If
Err.Clear
On Error GoTo 0
If Not CookieAuthVpsExists Then
WScript.Echo "Cookie auth VPS settings not defined, HTTP only cookies are ON by
default"
Else
WScript.Echo "HTTP only cookies: " & (fpcCookieAuthVps.Value("HttpOnlyCookie") =
True)
End If
If WScript.Arguments.Named.Exists("Value") Then
If Not CookieAuthVpsExists Then
Set fpcCookieAuthVps = fpcWebListenerVps.Add("{29022EBA-B030-4839-9CA6-
DD8875BC7B47}")
End If
fpcCookieAuthVps.Value("HttpOnlyCookie") =
(StrComp(WScript.Arguments.Named("Value"), "True", 1) = 0)
fpcArray.Save
WScript.Echo "HTTP only cookies set to " &
(fpcCookieAuthVps.Value("HttpOnlyCookie") = True)
End If
2. From a command prompt, run the following command from the C:\ directory:
cscript DisableHttpOnlyAuthCookies.vbs /WebListener:OTP /Value:False
You should see the following output:
HTTP only cookies: True
HTTP only cookies set to False

78
To modify the RDP file that clients will use to connect
1. Log on to the terminal server ("contoso-ts.contoso.com") with an account that has Administrator privileges.
2. Click Start, point to Administrative Tools, point to Terminal Services, and then click TS RemoteApp Manager.
3. In the Overview pane of TS RemoteApp Manager, next to RDP Settings, click Change.
4. On the Custom RDP Settings tab, type or copy the following RDP settings into the Custom RDP settings box:
pre-authentication server address: s: https://www.contoso.com/ts
require pre-authentication:i:1
5. When you have finished adding the settings, click Apply.
To set up the client computer
1. Log on to the client computer (“client1”).
2. From an elevated command prompt, type the following commands, pressing ENTER after each command:
cd c:\windows\system32\drivers\etc
edit hosts
3. Add the following line to the Hosts file:
206.73.118.1 www.contoso.com
4. Save the Hosts file.
Note
Typically, you would not have to modify the Hosts file, as the address would be resolvable through DNS.
To test the configuration from the client computer
1. Open Internet Explorer and specify https://www.contoso.com/ts as the address.
You will be redirected to the OTP logon page on the ISA Server.
2. Type the user name in the format contoso-otp\user.
Note
If the user is a domain user and the RADIUS server is a member of the domain, you do not have to specify a domain name. However, because in this procedure the test user is a local user on the RADIUS server, you must specify the computer name where the account exists.
3. Enter the user’s password.
The ISA Server will pass the credentials to the NPS server for authentication. If successful, the client will be redirected to the Web site and retrieve the TS Web Access

79
page.