trigenƒ nail extraction...
TRANSCRIPT
†
TriGen� Nail Extraction Technique†
� Trademark of Smith & Nephew. Reg. U.S. Pat. & Tm. Off.
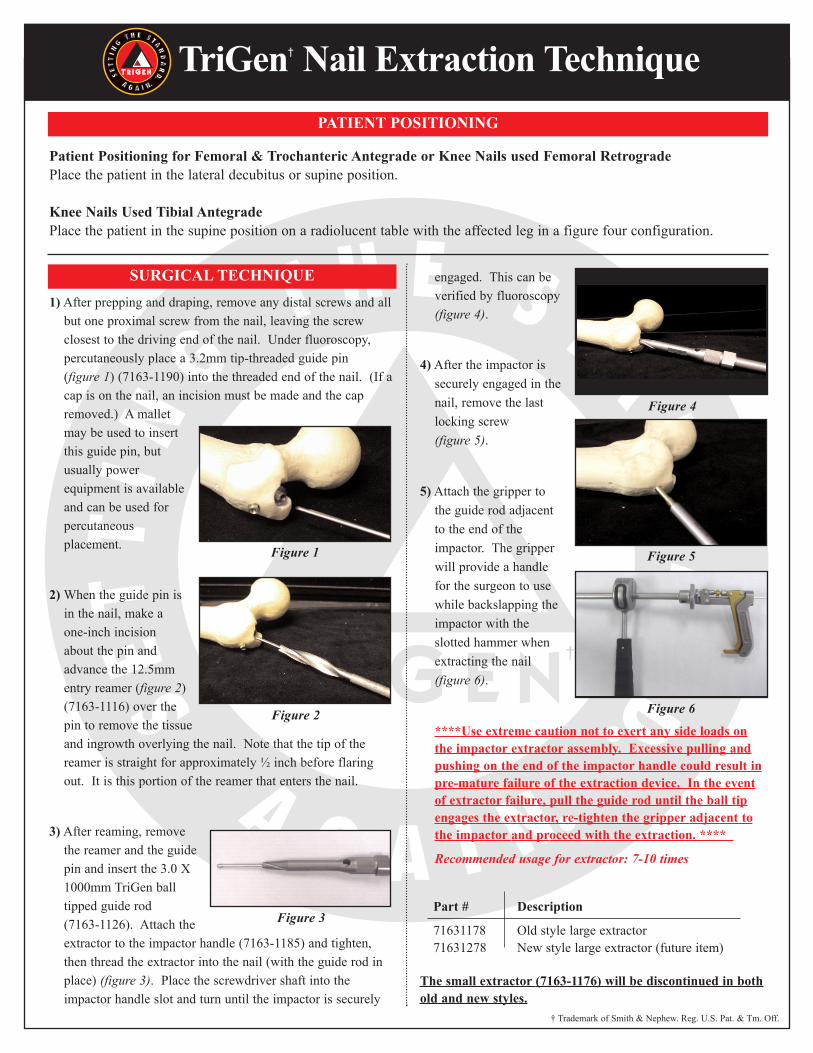
1) After prepping and draping, remove any distal screws and allbut one proximal screw from the nail, leaving the screwclosest to the driving end of the nail. Under fluoroscopy,percutaneously place a 3.2mm tip-threaded guide pin (figure 1) (7163-1190) into the threaded end of the nail. (If acap is on the nail, an incision must be made and the capremoved.) A malletmay be used to insertthis guide pin, butusually powerequipment is availableand can be used forpercutaneousplacement.
2) When the guide pin isin the nail, make aone-inch incisionabout the pin andadvance the 12.5mmentry reamer (figure 2)(7163-1116) over thepin to remove the tissueand ingrowth overlying the nail. Note that the tip of thereamer is straight for approximately ½ inch before flaringout. It is this portion of the reamer that enters the nail.
3) After reaming, removethe reamer and the guidepin and insert the 3.0 X1000mm TriGen balltipped guide rod (7163-1126). Attach theextractor to the impactor handle (7163-1185) and tighten,then thread the extractor into the nail (with the guide rod inplace) (figure 3). Place the screwdriver shaft into theimpactor handle slot and turn until the impactor is securely
engaged. This can beverified by fluoroscopy(figure 4).
4) After the impactor issecurely engaged in thenail, remove the lastlocking screw (figure 5).
5) Attach the gripper tothe guide rod adjacentto the end of theimpactor. The gripperwill provide a handlefor the surgeon to usewhile backslapping theimpactor with theslotted hammer whenextracting the nail(figure 6).
****Use extreme caution not to exert any side loads onthe impactor extractor assembly. Excessive pulling andpushing on the end of the impactor handle could result inpre-mature failure of the extraction device. In the eventof extractor failure, pull the guide rod until the ball tipengages the extractor, re-tighten the gripper adjacent tothe impactor and proceed with the extraction. ****
Recommended usage for extractor: 7-10 times
Part # Description
71631178 Old style large extractor71631278 New style large extractor (future item)
The small extractor (7163-1176) will be discontinued in bothold and new styles.
Figure 1
Figure 2
Figure 4
Figure 3
Figure 5
Figure 6
Patient Positioning for Femoral & Trochanteric Antegrade or Knee Nails used Femoral RetrogradePlace the patient in the lateral decubitus or supine position.
Knee Nails Used Tibial AntegradePlace the patient in the supine position on a radiolucent table with the affected leg in a figure four configuration.
SURGICAL TECHNIQUE
PATIENT POSITIONING
†
1) Jamming of the guide rods Utilizing two guide rods, one 3.0mm ball tip and one2.0mm smooth, advance the 3.0mm ball tip guide rod pastthe end of the nail then insert the 2.0mm smooth rod in asimilar manner, past the tip of the nail. Once both wires arein place, attach the gripper to the end of the 3.0mm balltipped rod and pull back to wedge the ball tip with the 2.0rod and the end of the nail. Backslap against the gripper toremove the nail.
Part # Description115120 2.0 x 700mm smooth71631126 3.0 x 1000mm ball tip71118280 2.0 x 900mm smooth 71118202 3.0 x 900mm ball tip112069 3.0 x 900mm ball tip
2) After following the patient positioning and entry reamingtechniques cited at the beginning of this document,proceed with the following substitution for the quickbolt:Attach the Russell - Taylor� Tibial extraction bolt (112041)to the slide hammer (112011). Thread the assembly into thenail and proceed with extracting the nail via the slidehammer mechanism.
Part # Description112041 5/16 - 24 extraction bolt11-2011 Slide hammer
TriGen Nail Extraction: Alternative Tips
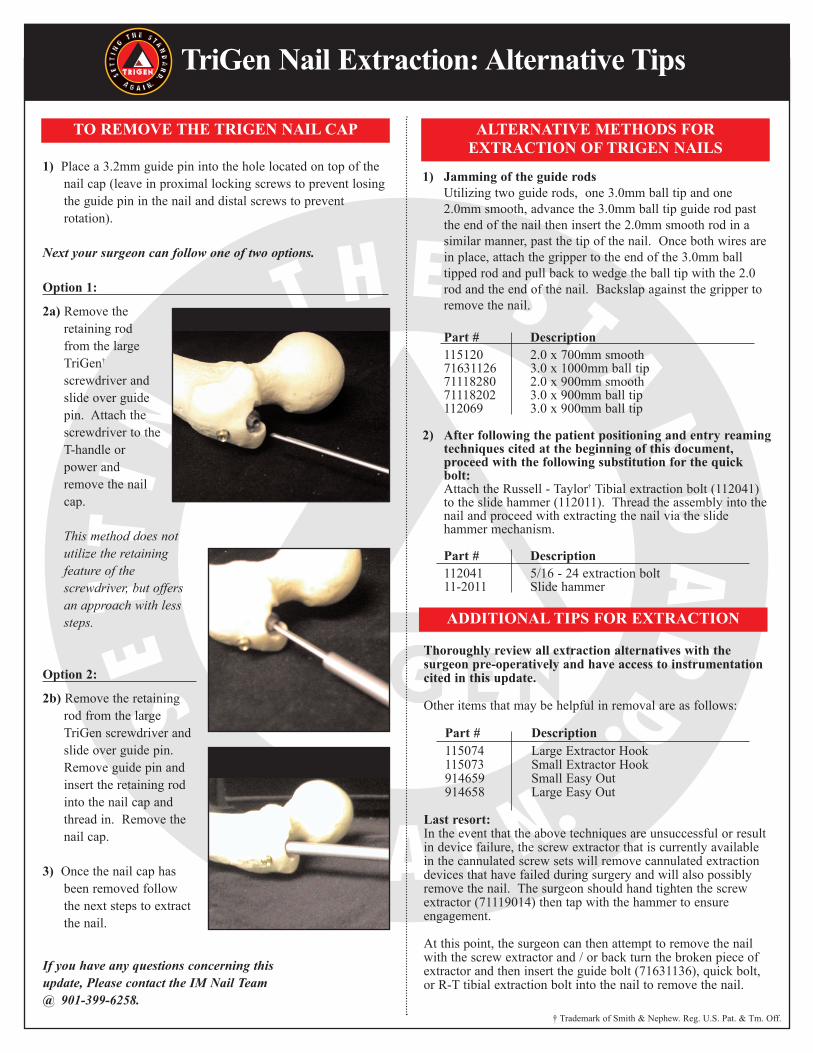
1) Place a 3.2mm guide pin into the hole located on top of thenail cap (leave in proximal locking screws to prevent losingthe guide pin in the nail and distal screws to preventrotation).
Next your surgeon can follow one of two options.
Option 1:
2a) Remove theretaining rodfrom the largeTriGen�
screwdriver andslide over guidepin. Attach thescrewdriver to theT-handle orpower andremove the nailcap.
This method does notutilize the retainingfeature of thescrewdriver, but offersan approach with lesssteps.
Option 2:
2b) Remove the retainingrod from the largeTriGen screwdriver andslide over guide pin.Remove guide pin andinsert the retaining rodinto the nail cap andthread in. Remove thenail cap.
3) Once the nail cap hasbeen removed followthe next steps to extractthe nail.
If you have any questions concerning this update, Please contact the IM Nail Team @ 901-399-6258.
Thoroughly review all extraction alternatives with thesurgeon pre-operatively and have access to instrumentationcited in this update.
Other items that may be helpful in removal are as follows:
Part # Description115074 Large Extractor Hook115073 Small Extractor Hook914659 Small Easy Out 914658 Large Easy Out
Last resort:In the event that the above techniques are unsuccessful or resultin device failure, the screw extractor that is currently availablein the cannulated screw sets will remove cannulated extractiondevices that have failed during surgery and will also possiblyremove the nail. The surgeon should hand tighten the screwextractor (71119014) then tap with the hammer to ensureengagement.
At this point, the surgeon can then attempt to remove the nailwith the screw extractor and / or back turn the broken piece ofextractor and then insert the guide bolt (71631136), quick bolt,or R-T tibial extraction bolt into the nail to remove the nail.
†
TO REMOVE THE TRIGEN NAIL CAP ALTERNATIVE METHODS FOREXTRACTION OF TRIGEN NAILS
ADDITIONAL TIPS FOR EXTRACTION
� Trademark of Smith & Nephew. Reg. U.S. Pat. & Tm. Off.