tree fruit home nurseries - british columbia · for a 1000-tree nursery, the estimated labour time...
TRANSCRIPT
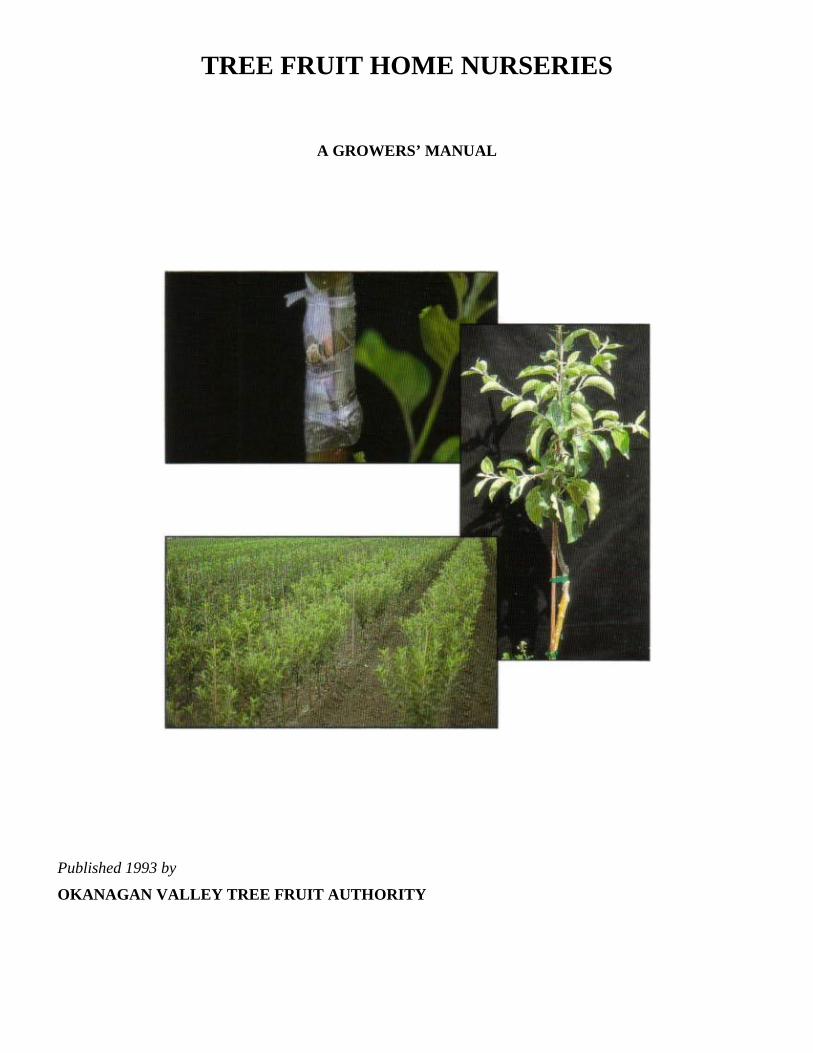
TREE FRUIT HOME NURSERIES
A GROWERS’ MANUAL
Published 1993 by
OKANAGAN VALLEY TREE FRUIT AUTHORITY

2
ACKNOWLEDGEMENT AND DISCLAIMER
This study was funded by the Canada-British Columbia Orchard Revitalization Agreement (1991-1992). The Agreement, which provides a variety of programs for the development of the tree fruit industry, is funded by the government of Canada through Agriculture Canada, and is delivered by the British Columbia Ministry of Agriculture, Fisheries and Food through contract with the Okanagan Valley Tree Fruit Authority.
The responsibility for the report as written and all conclusions reached herein are the authors’ alone. The report does not necessarily reflect the opinions of the Federal and Provincial governments.
This Manual is a joint production of the Okanagan Valley Tree Fruit Authority, the British Columbia Ministry of Agriculture, Fisheries and Food, and Agriculture Canada, Summerland Research Station. To comment on possible additions or changes to the Manual, please contact one of the following:
P. Waterman, Horticulturist, BCMAFF, Penticton, B.C. E.J. Hogue, Research Scientist, Agriculture Canada Research Station, Summerland, B.C. H. Quamme, Research Scientist, Agriculture Canada Research Station, Summerland, B.C.

3
THE HOME NURSERY- A PRODUCTION MANUAL FOREWORD In recent years, there has been a rapid increase in high-density orcharding. The result has been that demand for high-quality trees, mainly of new cultivars, has often exceeded supply and growers have had to grow their own trees. Orchard surveys the Okanagan Valley Tree Fruit Authority conducted in 1990-91 revealed that 15% of growers had established home nurseries to grow some or all of their replacement trees.
These growers have had varying degrees of success. Many have said they wish to increase their knowledge on the subject and have been asking for information. This manual is an attempt to answer some of their questions and to help growers, especially beginners in home nursery production, consider some of the options available, learn some of the necessary techniques, and find out where they can get more information.
Setting up and maintaining a productive home nursery, however, is neither inexpensive nor simple. Several key components should be considered before investing in the time and money involved.
First, do you have a good site? You should not only have a fertile soil, but the location should be convenient.
Second, do you have the skills? Have you ever done any propagation? Budding and grafting are only a small part of nursery work and many other operations require a high level of special management skills.
Third, do you have the time? A very important feature of a successful nursery is the timeliness of the various steps. For a 1000-tree nursery, the estimated labour time is 120 hours in the first year and 60 hours in the second. As tree numbers increase, there is a small decrease in hours required per tree, that is, your efficiency increases.
Finally, the costs. Labour, material, and equipment costs will be highly variable for different operations. The owner-operator and family members may carry out most of the labour or additional, hired, help may be needed. Machinery may already be available or may need to be purchased or rented. The use of plastic mulch will require some material to be purchased, but will save in weed control costs. Though variable, there will be costs, and the per unit costs will be highest for a small-scale orchard, especially if the success rate is low.
Since this is a ‘how-to’ manual, we have used a concise format in presenting the text and supplementing it with illustrations. It is not intended to replace standard references on propagation, but to add to these and outline the essential steps in establishing and maintaining a successful home nursery.
We intend to revise the manual regularly. Revisions will include new information gleaned from research here and elsewhere and from techniques developed or improved upon by growers from whom we encourage feedback about their experience.
For a general discussion of tree fruit propagation, refer to Bruce Macdonald, Practical Wood Plant Propagation, Timber Press, Portland Oregon, 1986.

4
TABLE OF CONTENTS
FOREWORD ......................................................................................................... 3
TABLE OF CONTENTS ...................................................................................... 4
GENERAL CONDITIONS FOR A SUCCESSFUL HOME NURSERY ....... 6
A. Site Selection and Preparation for Field-Grown Trees .................................................6 B. Plastic Mulch - To Use or Not to Use ...........................................................................6
THE APPLE NURSERY ...................................................................................... 8
THE APPLE NURSERY ...................................................................................... 9
A. Choosing Rootstock ......................................................................................................9 B. Nursery Options ............................................................................................................9
PROPAGATION OPTIONS AND TIMELINES ............................................12
THE SUMMER-BUDDED NURSERY: YEAR ONE ....................................13
A. Ordering and Receiving Stock ....................................................................................13 B. Planting........................................................................................................................13 C. Irrigation ......................................................................................................................14 D. Nutrition Using Plastic Mulch.....................................................................................15 E. Nutrition Without Plastic Mulch.................................................................................15 F. Budding Techniques....................................................................................................16 G. Weed, Disease, and Insect Control..............................................................................19 H. Fall Care of Nursery ....................................................................................................22
THE SUMMER -BUDDED NURSERY: YEAR TWO ..................................23
A. Maintenance ................................................................................................................23 B. Management ................................................................................................................25
THE BENCHGRAFTED NURSERY: YEAR ONE .......................................26
A. Procedures ...................................................................................................................27 B. Storage of Grafted Trees .............................................................................................27 C. Planting Grafted Trees.................................................................................................28 D. Benchgraft Maintenance After Planting......................................................................29
THE BENCHGRAFTED NURSERY: YEAR TWO......................................30
A. Maintenance ................................................................................................................30 B. ‘Feathering’ .................................................................................................................31
5
C. Management ................................................................................................................31
‘SLEEPING EYE’ STOCK MANAGEMENT ................................................32
APPLE NURSERY WORK SCHEDULE ........................................................33
THE STONE FRUIT NURSERY ......................................................................36
THE STONE FRUIT NURSERY: YEAR ONE..............................................37
A. General Considerations ...............................................................................................37 B. Growing Your Own Stock From Seed ........................................................................37 C. Seed Sources................................................................................................................37
THE STONE FRUIT NURSERY: YEAR ONE..............................................38
A. Seed Dormancy ...........................................................................................................38 B. Breaking Dormancy (Stratification)............................................................................38 C. Growing Seedling Transplants ....................................................................................38 D. Planting Through Plastic Mulch..................................................................................39 E. Growing the Rootstocks ..............................................................................................40 F. Budding..........................................................................................................................41 G. Fall Maintenance .........................................................................................................42
THE STONE FRUIT NURSERY: YEAR TWO.............................................43
STONE FRUIT NURSERY WORK SCHEDULE ..........................................44
MATERIALS LIST .............................................................................................46
REFERENCE BIBLIOGRAPHY ......................................................................47
GENERAL CONDITIONS FOR A SUCCESSFUL HOME NURSERY
A. Site Selection and Preparation for Field-Grown Trees For the best chance of success, the site you select for your nursery must have fertile, well-drained soil free of replant problems. The latter are commonly the result of using land previously planted to the same species, although they can also occur where trees of other fruit species have been planted. The site should have good access to water, electricity, and other services so that it will be convenient to provide the care necessary for a healthy, vigorous nursery.
• if the soil on your site is not virgin, fumigate before planting; the fall before planting your nursery, apply Roundup (glyphosate) to control perennial weeds
• use spader or other deep tilling implement to ensure good tilth; rotovate site to level soil and help control perennial weeds
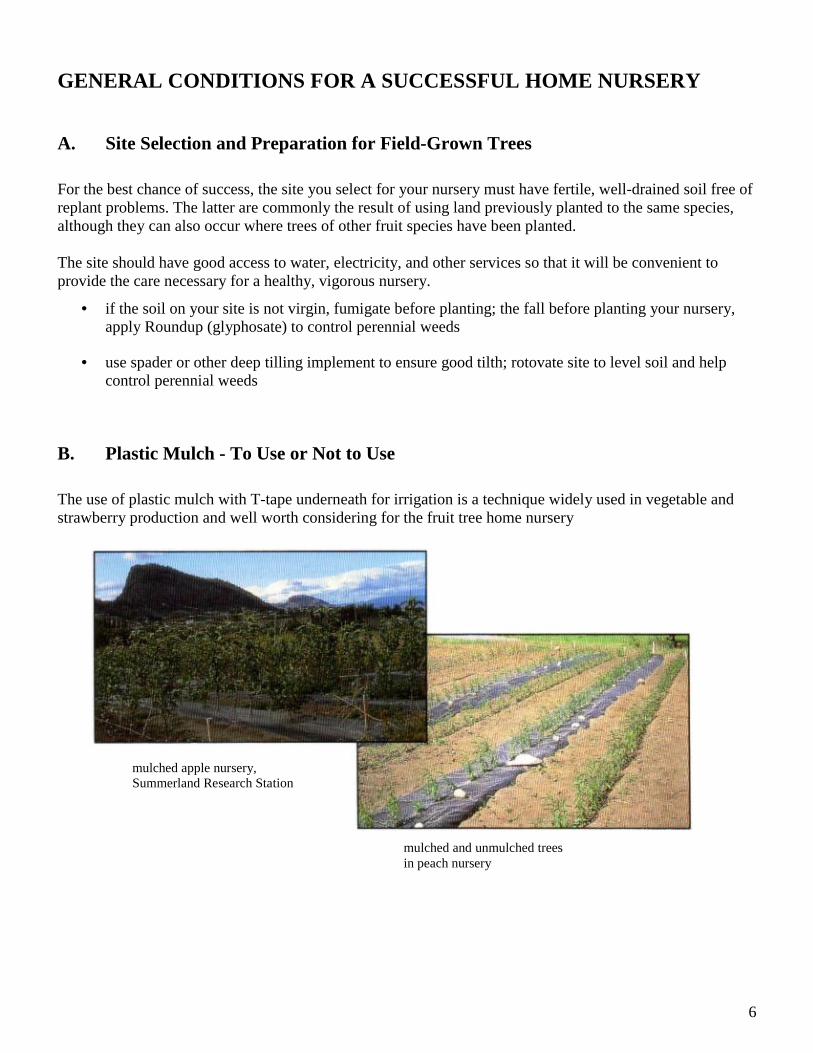
B. Plastic Mulch - To Use or Not to Use
The use of plastic mulch with T-tape underneath for irrigation is a technique widely used in vegetable and strawberry production and well worth considering for the fruit tree home nursery
n
mulched apple nursery, Summerland Research Statio6
mulched and unmulched trees in peach nursery

7
a) Home Nursery with Plastic Mulch
ADVANTAGES DISADVANTAGES weed control, essential for good growth, is simplified and effective
cost of plastic sheeting, irrigation T-tape, and machine to lay them
less chance of soil moisture stress (too much or too little water)
more time taken in planting
easier to apply fertilizer through irrigation need to know how to lay plastic properly increases soil temperature. need suitable, well-prepared soil under
plastic, pre-punched holes for trees, and well-trimmed roots
more rapid growth, improved caliper, and better ‘feathering’ of young trees (see p.31 for description of ‘feathering’)
The following are a few points on laying plastic. Throughout the text, however, additional details are supplied concerning the technique of using plastic mulch in growing nursery trees.
Laying plastic:
• use at least 2-mil plastic
• set machine for correct width of row and plastic
• irrigation T-tape is laid down as part of the plastic-laying operation
• tension on springs of machine must be kept even to ensure plastic is laid evenly
• tie T-tape to stake at head of row
• have assistant stand on plastic behind machine to watch for problems such as soil gathering on the discs or plastic over-stretching if tension is not equal on both sides
• if T-tape is damaged in planting, it can be repaired with a poly insert and clamps; severely damaged T-tape can be replaced by tying a new T-tape to the old one and pulling it all the way through
b) Home Nursery Without Plastic Mulch
ADVANTAGES DISADVANTAGES inexpensive growth and ‘feathering’ of trees may not be
as good as with T-tape and plastic mulch since more chance for variations in soil moisture and stress which can slow growth; research has also shown increased caliper size and ‘feathering’ using plastic mulch
no special materials or machinery needed weed control more difficult difficult to adjust frequency and length of
irrigation time to provide optimum soil moisture

8
THE APPLE NURSERY
The following information applies primarily to the apple nursery, but may apply to pear as well. The authors have had limited experience with pear in the home nursery, but that experience indicates that essentially the same principles are involved as in the apple nursery and similar techniques can be used with few or no modifications.

9
THE APPLE NURSERY
A. Choosing Rootstock Your choice of rootstock will depend on a number of factors. For a detailed discussion of apple rootstocks, see Quamme, H.A. and R.T. Brownlee, Root stocks for High-Density Apple Plantings in British Columbia, Summerland Research Station Technical Report # 90-02.
B. Nursery Options
a) Summer Budding
‘Budding’, or ‘bud grafting, consists of placing a single bud plus a portion of bark, with or without a sliver of wood, on a non-dormant rootstock. These grafts are usually of T-buds (shield buds), or chip buds. A bud placed between two flaps of bark is ‘T-budding’; replacing a pre-cut section of bark and woody tissue of the rootstock with a bud is ‘chip budding’.
ADVANTAGES DISADVANTAGES • small amount of handling and labour involved in first season since no staking or tying needed with good, healthy stock
• no possibility of producing a tree in the nursery in first season
• with stock well established, there is good root-to-bud differential which promotes sufficient vigour to produce a feathered tree in year 2
• if bud doesn’t take, only spring budding at start of second year will provide a last chance to generate a tree
• summer-budded stock grown in plastic with fertigation can produce a well-feathered tree in two years
• with M9 rootstock, there is chance of dieback after rootstock cut back, a frequent cause of bud loss when rootstock cut above bud in spring following fall budding
• as bud grows, you must disbud below 50cm

10
b) Benchgrafting
‘Grafting’ is the union of a rootstock and the scion of the desired variety. ‘Benchgrafting’ is done ‘at the bench’ in a protected place in late winter using dormant rootstock and scions. Benchgrafting can be done by hand or by machine.
ADVANTAGES
DISADVANTAGES
• main advantage of benchgrafting over other types of grafting is the number of chances it gives you to ensure a successful graft
• requires considerable skill to do by hand
• if benchgraft fails, you can summer bud • very time consuming if you are grafting a large number of trees
• if both fail, you can spring chip graft the second season
• extra care required in handling trees at planting to avoid damaging the graft
• if the benchgraft grows well there are several buds and shoots to choose from at the 45-55-cm height when you cut the tree above the variety bud at the start of the second season
• care (disbudding, staking, and tying) needed in first season which is not needed with summer budding except for some disbudding
• avoids problem of M9 dieback, a frequent cause of bud loss when rootstock is cut above the bud in spring following fall budding
• need to retie benchgrafted trees as tops grow
• benchgrafting can be done by hand • grafting slower than for summer budding • some benchgrafted trees will not be as
uniformly branched as summer-budded ones under plastic and fertigation

11
c) Sleeping Eyes
‘Sleeping eye’ describes a summer-budded rootstock cut above the dormant scion bud and stored for planting in a nursery or orchard.
ADVANTAGES DISADVANTAGES • a good quality tree can be produced in
one season as opposed to two for a summer- budded tree
• costs more than twice that of unbudded rootstock
• simpler for grower than benchgrafting, yet can produce a tree of similar quality in same period of time
• quality of root and bud important for success of this method
d) Spring Budding
ADVANTAGES DISADVANTAGES
• often more successful than dormant chip budding
• success of spring chip budding depends on growth of one bud in contrast to benchgrafts where there is a choice of several buds
• can make up for bud failures from the previous summer budding season
• growth on spring chip buds will start later and be less than on conventional summer buds
• make efficient use of a small bud supply
• spring chip buds will not likely produce trees of the same caliper and height or with as many ‘feathers’ as trees budded the previous summer or spring benchgrafted
12
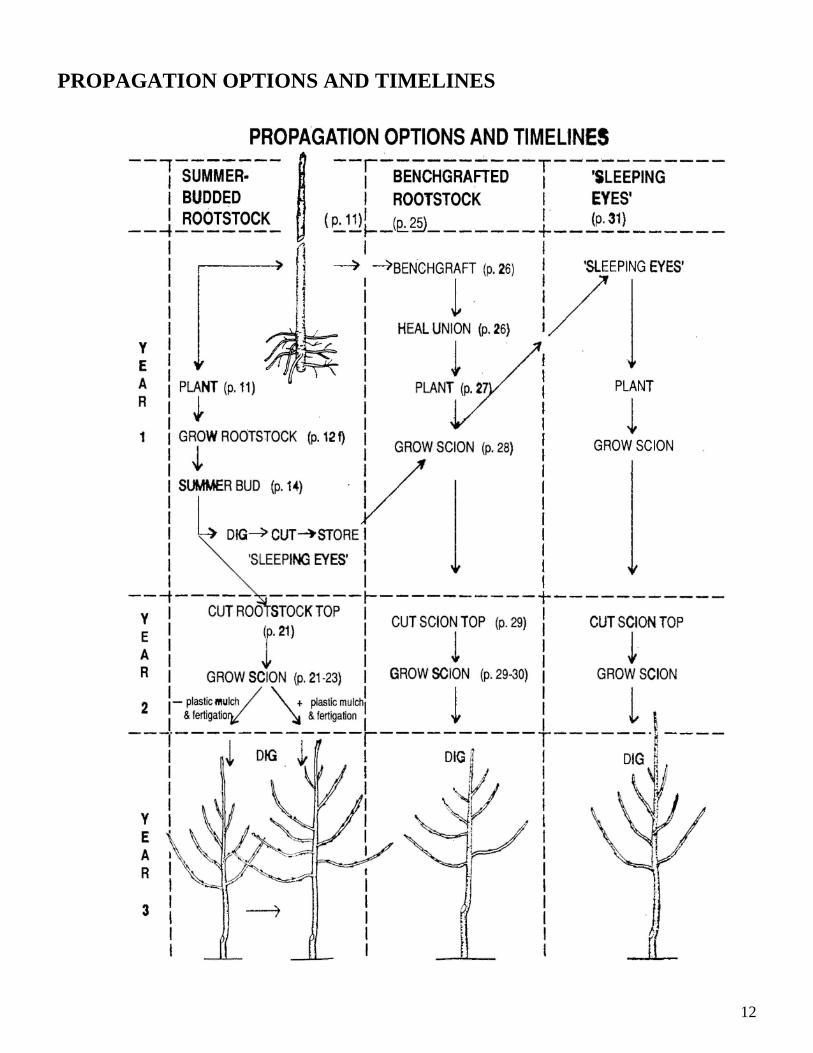
PROPAGATION OPTIONS AND TIMELINES

13
THE SUMMER-BUDDED NURSERY: YEAR ONE
Most nursery stock is produced by summer budding. Benchgrafting, discussed in the next section, is used less frequently for propagation in the home nursery.
Year One
A. Ordering and Receiving Stock
• order for March delivery
• request stock 6-10 mm in diameter; two-year-old stock is sometimes available and will survive better in the nursery, but may be larger than optimum at budding time
• on delivery, verify condition; dehydrated stock will not grow well
• if stock not planted immediately, store in cool (0-2°C), moist conditions; do not allow to dry out
B. Planting
• plant as soon as soil moisture and temperature will allow
• if soil has been spaded and rotovated the previous fall, it may not need more tillage
• before planting, remove broken, dried, and decayed roots; all roots may be cut back to stubs .05-1 cm long
• a distance of 40 cm between plants is advisable to maximize tree size and branching; offset planting can increase the number of trees per linear row in nurseries under plastic
• stock should be planted at least 15 cm deep with roots firmed in so no air gaps are left around root base
• stock shoots are cut back uniformly to about 30 cm above ground after planting

14
C. Irrigation
Irrigation Using Plastic:
Proper scheduling of irrigation is critical for nursery trees since they have no roots when planted. Early in the season, it is difficult to assess how often to irrigate with T-tape and plastic mulch. Frequencies and length of each watering vary with soil type and climatic conditions.
• excessive moisture, especially early in the season, causes waterlogged conditions and limits soil aeration preventing normal root growth; even infrequent moisture stress (too little or too much) will severely affect root growth
• excessive moisture will encourage root-rot organisms • excessive moisture on any soil, but particularly on sandy soils, will
leach out nutrients
The following is a general guide only:
• water soil moderately before laying plastic to raise moisture levels to near field capacity and provide good growing conditions for first week or two
• irrigate for 10-15 minutes every two to three days depending on your soil type until leaf and top growth begins
• increase to daily irrigation as leaf and top growth develops and increase length of time to 15-20 minutes per day for first-year trees
• as much as 30-45 minutes irrigation daily may be needed in second year, but at no time do you want to put the trees under stress by watering either too little or too much
fertigation setup with backflow regulator
automated irrigation system

15
Irrigation Without Plastic Mulch:
Overhead irrigation is suitable only for nurseries planted without plastic mulch.
D. Nutrition Using Plastic Mulch Foliar feeding is essential to ensure the trees receive adequate amounts of minor elements; weekly application of 20-20-20 fertilizer from early June to mid July suggested and include boron with magnesium and zinc in the first two applications since young trees grow quickly and may become deficient in magnesium resulting in blind wood.
N requirements for rootstock to be summer budded are lower since excessively large rootstocks are not desirable for budding. On the other hand, good vigour and caliper size are needed to ensure a good root structure which will give the desired growth in the second season.
• 5-10 g actual N per tree over the season; start low, increase to a peak in mid to late June, and taper off in late July
• 5-10 g actual P per tree over the season; start higher than with N, peak in early to mid June, and taper off to mid July
E. Nutrition Without Plastic Mulch
• incorporate about 50 kg of actual N per ha in the soil, using 16-20-0 or a similar fertilizer, before planting the young trees.
• small amounts of N can be broadcast at frequent intervals early in the growing season if required
• increase fertilizer use in second year to maintain vigorous growth
• foliar feeding is critical where fertigation and plastic mulch is not used.

16
F. Budding Techniques
a) Preparation for Budding • four to six weeks after planting, disbud the rootstock to leave a smooth
shank on which to bud; leave two to three shoots at the top
• in late June or early July, disbud again before the wood hardens
• in early July, order budwood; check in early August to confirm delivery date.
• most growers start budding in early to mid August especially for T-budding, but small nurseries of 1000 to 5000 trees can wait until later when budwood is more mature and buds placed are less likely to break dormancy and grow in fall; if budding is delayed past mid September, bud take may drop.
• gather supplies and tools needed including budding rubbers or chip tape and a sharp budding knife.
• always wrap budwood in moist paper and keep in cool or shaded place to prevent it drying out while in the field.
disbudding M9 rootstock
wrapping chip tape for ease in handling; cut at board edge budwood wrapped to
prevent drying

17
b) Different Types of Budding T-Budding:
‘T-budding’ derives its name from the shape of the cuts on the rootstock; the alternate name for this technique, ‘shield-budding’ comes from the shape of the piece of stem carrying the scion bud. The method involves placing a scion bud shield, with or without a small sliver of woody tissue, between two flaps of bark on the rootstock. (see Macdonald, p. 468)
• irrigate scion and rootstock trees well beforehand so bark will slip easily
• on scion or bud stick, make shallow cut starting above bud and a light cut through bark below bud
• peel bud away
• you can also make a heavier cut below the bud and remove both bud and wood; most budders leave wood on bud
• on rootstock trees, make T cut with vertical, 2 cm cut lengthways through bark and a cross cut at top with twisting motion which lifts side flaps of bark
• place bud at least 15 cm above soil level to allow enough shank for transplanting into orchard and avoid rooting scion
1st, vertical, cut on bark
bud pushed firmly into ‘T’ cut

18
• loosen flaps with back of knife and insert bud
• trim bud edges if necessary and wrap with grafting rubbers which will rot away
• be careful to wrap rubber band flat to avoid string-like tie which may damage tree
Chip Budding: ‘Chip-budding’ is the substitution of a scion variety chip, consisting of a bud, bark, and sliver of wood, for a matching chip of rootstock tissue. (see Macdonald, p. 478)
• can be done in spring, early summer, or early fall since bark slip is not needed
• make a medium-shallow cut starting above the bud to just below it; as for scion in T-budding, make sharp-angled deep cut below the bud to meet the first cut
• make a cut as similar as possible to this in the rootstock 15 cm above soil level
• place chips with cambiums matching at least on one side, preferably on both
T-bud wrapped
removing chip bud from scion
1st cut for chip bud
Rootstock prepared for chip bud

• wrap with chip-budding tape starting below the bud; moving upward, cover all cut surfaces and tie off above bud
• remove wrap after three to four weeks if cut healewrap will dry and fall away on its own
G. Weed, Disease, and Insect Control Most home nurseries have between 1000 and 5000 trees: Rshotgun approach nor spraying by the calendar is advised.that are causing significant damage. Note, however, that ireduction in growth and affect the quality of the trees. Larand indicate good vigour.
a) Weed Control Weed control can include both manual and chemical methsite, however, should be prepared with high rates of Rounfollowed by tillage to destroy all perennials before plantinpreferable to rototilling.
** For further details, consult current BC Ministry of AgrGuide.
p wrapping chip bud in spiral to promote healing
cut tape knot to remove wra19
d; stretch loose end of tape and cut on overlap; the
egular pest monitoring is essential. Neither a Spray only when required and only for the pests nsect and disease outbreaks can cause severe ge, green leaves are needed to induce ‘feathering’
ods. The nursery dup (glyphosate) g. Spading is
iculture, Fisheries and Food Tree Fruit Production
clean-cultivated nursery

20
Non-chemical:
• till with a hoe, dutch hoe, and hand-weeding; timing is critical with this method since even small weeds compete with trees
• some hand-weeding needed with plastic mulch since some weeds will grow through the openings for the trees
• mulches of straw, hay, sawdust, or bark chips will control annual weeds, but not perennials
• 2-mil plastic mulch best for two-season use
Chemical:
• apply Gramoxone (paraquat) at 100-180 ml to 15 L water directed to young weeds; use shield to avoid contact with green or young bark; use high-volume nozzle tips and keep pressure low
• apply Devrinol (napropamide) at 9 kg/ha for pre-emergence control of annual grasses and some broadleaf weeds
• wet soil before and after chemical application for good activity
• apply low rates of a combination of simazine and Devrinol or Casoron and Devrinol in the walking space between the plastic mulch
b) Disease Control
Powdery Mildew:
• nursery stock in general is prone to mildew because of vigorous growth; many new varieties of apple and pear are particularly susceptible
• monitor closely; regular sprays at 7-14-day intervals needed early in the season, using Kumulus DF, Easeout, or Nova
European Canker:
• if this a problem, remove affected rootstocks or trees
• Bordeaux sprays at leaf fall will prevent new infections

21
Crown Rot:
• all rootstocks are susceptible to varying degrees, although some appear to be more resistant than others (Quamme and Brownlee, 1990)
• avoid excessive watering early in season; with very little leaf surface, plants are easily over watered
• plastic mulch may increase possibility of crown rot because of moisture retention and greater warmth and humidity
• for chemical control, drench tree or rootstock base with Ridomil (metalaxyl) at 4.25 ml in 5 L of water
c) Insect Control
Weevils:
• nocturnal insect which can be a problem in newly tilled ground, especially previously grassed areas
Cutworms:
• also nocturnal
• check in soil around base of trees when damage noticed and if needed, drench thoroughly with Sevin
Aphids:
• can severely check growth of growing tip
• monitor regularly and treat with Pirimor or dimethoate as needed
Leafroller:
• important to catch the first generation from early June to late July
• treat with Thiodan (endosuilfan)
leafroller damage to 1st-leaf benchgraft

22
Campylomma:
• can severely disfigure shoot tips in late May to early June
• treat with diazinon
Mites:
• Rust, McDaniel, and Two-spotted spider, and European red mites can cause problems in late June through July; rust mite populations in particular can explode quickly
• predators may be low because of the nursery environment
H. Fall Care of Nursery
• set out mouse-bait stations, one for about each 20 square metres
• mouse (vole) protection is especially important for nurseries under plastic mulch
• cut long grass and weeds in the immediate vicinity of the nursery

THE SUMMER -BUDDED NURSERY: YEAR TWO
Year Two A. Maintenance
a) Cutting back
• because of difficulties with M9 dieback, some growers cut two times, once at 15 cm above the bud and later, once growth has started, to bud level
• other growers are concerned as well about ‘flooding’ of bud by a heavy, vigorous root and will leave ‘wild’ rootstock buds above the placed one to absorb the vigour; when placed bud has grown 5-10 cm, they then cut the top back or remove one ‘wild’ bud and later the second ‘wild’ one
• rootstock will push out several new buds in addition to the bud placed on it the previous summer; remove these extras as soon as possible since they compete for nutrients with clonal bud; operation will need to be repeated several times
b) Tying
• place bamboo stakes before growth begins; secure rbamboo to ensure rootstock is in a vertical position
• when new shoot is 20-30 cm long, tie it to bamboo which rootstock was tied earlier
• make about one tie per month, and a total of two to depending on the growth
cutting back rootstock 2nd time
as above; note ‘wild’ shoots23
ootstock to
stake to
four,
tying newly grown benchgraft
• make sure to check in late September and tie tops so that snow will not bend and break the trees
• use #6 or #8 Max tape; #4 is too light and will break
• use Max-tape machine to speed up tying
c) ‘Feathering’
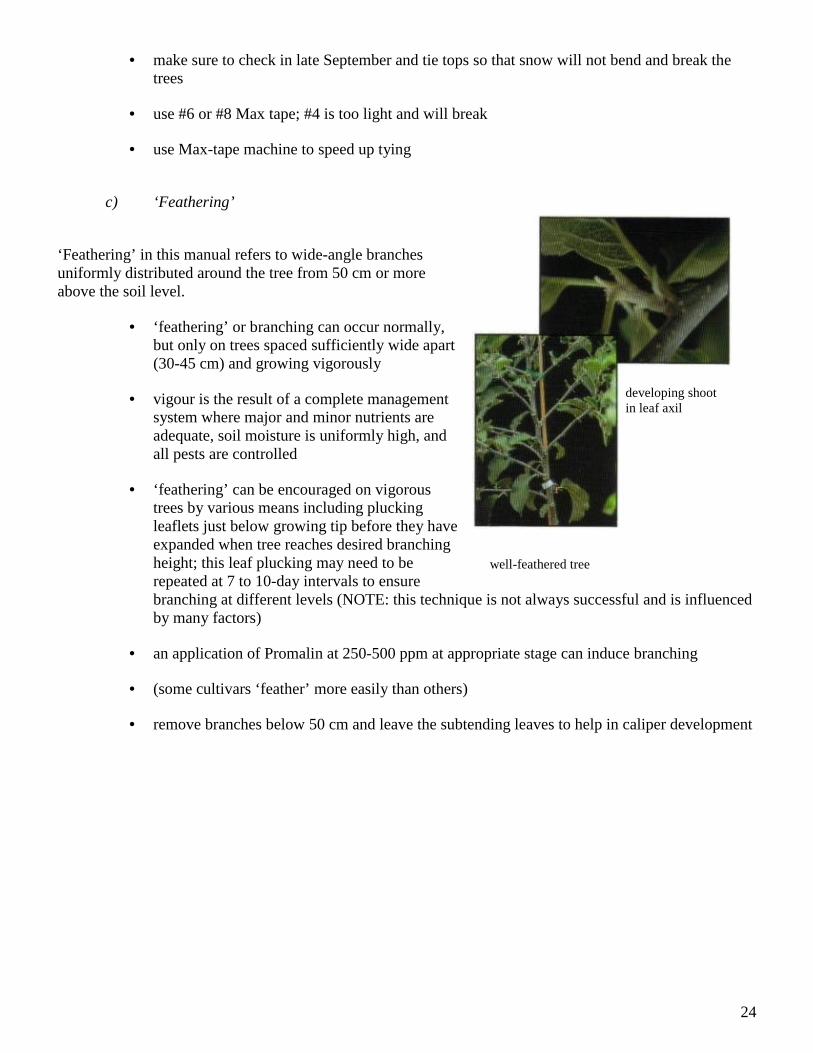
‘Feathering’ in this manual refers to wide-angle branches uniformly distributed around the tree from 50 cm or more above the soil level.
• ‘feathering’ or branching can occur normally, but only on trees spaced sufficiently wide apart (30-45 cm) and growing vigorously
• vigour is the result of a complete management system where major and minor nutrients are adequate, soil moisture is uniformly high, and all pests are controlled
• ‘feathering’ can be encouraged on vigorous trees by various means including plucking leaflets just below growing tip before they have expanded when tree reaches desired branching height; this leaf plucking may need to be repeated at 7 to 10-day intervals to ensure branching at different levels (NOTE: this technique is not always successby many factors)
• an application of Promalin at 250-500 ppm at appropriate stage can induc
• (some cultivars ‘feather’ more easily than others)
• remove branches below 50 cm and leave the subtending leaves to help in
well-feathered tree
developing shoot in leaf axil
24
ful and is influenced
e branching
caliper development

25
B. Management
a) Nutrition
• 10-15 g actual N per tree over the season; start low, peak in late June, and taper off through July
• important to have sustained, uninterrupted growth through late summer; vigour usually expressed in large, dark green leaves
b) Weed Control
• nursery should be kept essentially weed-free at all times
• if using herbicides, avoid drift damage with post-emergence chemicals or phytotoxicity from excessive rates of residual chemicals
c) Insect and Disease Control
• monitor carefully and continually
26
THE BENCHGRAFTED NURSERY: YEAR ONE
Year One
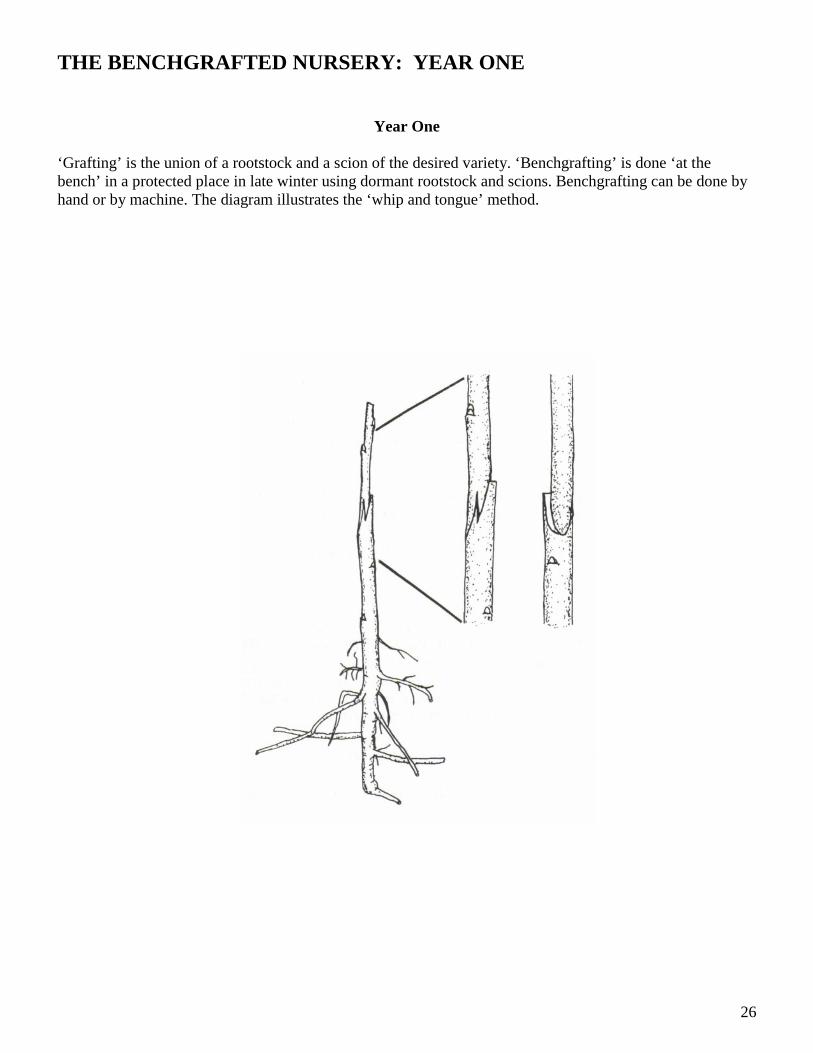
‘Grafting’ is the union of a rootstock and a scion of the desired variety. ‘Benchgrafting’ is done ‘at the bench’ in a protected place in late winter using dormant rootstock and scions. Benchgrafting can be done by hand or by machine. The diagram illustrates the ‘whip and tongue’ method.
27
A. Procedures
a) Hand Grafting (see Macdonald, p. 511)
• graft
• seal union and top of scion; grafting wax is preferred to paraffin as former won’t crack; wax should be at 60°C (140°F):
WARNING: WAX MUST NOT BE TOO HOT OR TISSUE WILL BE DAMAGED
• keep moist in sawdust and cover with plastic
• store in cool (0-7°C), frost-free area until planting out to avoid scion growth
b) Machine Grafting
Benchgrafting can also be done by machine: Dutch Knife, V Cut, or Omega Cut.
• the Dutch Knife, run by air compressor, makes a slanted cut which provides a good surface area for healing and takes little time to do
• neither the V Cut nor the Omega Cut provides a good healing surface; they are not recommended
B. Storage of Grafted Trees CORRECT STORAGE CONDITIONS ARE CRITICAL FOR SUCCESS IN GRAFTING TREES. To heal properly, benchgrafts need temperatures of 2-7° C warm enough to allow healing, but cool enough not to encourage bud and root growth. They will take 4-6 weeks to heal at these temperatures. DURING THIS TIME, THE TREES MUST NOT BE ALLOWED TO DRY OUT.
For small home nurseries of 1000 to several thousand grafts:
• pack trees in apple boxes or bins with moist sawdust around the roots and a plastic cover, OR
• pack trees in a plastic-lined bin with no sawdust, but with roots moistened and a plastic cover

28
• apple boxes hold up to 200 grafted roots and are easy to move to field at planting time
• store in a root cellar with no apples or pears present as these give off ethylene gas which will kill buds
C. Planting Grafted Trees Trees should be planted as early as possible, from mid March to mid April depending on the year and location of orchard.
• trim roots
• plant at a depth of 15 cm
• pre-punch holes through plastic and soil as plastic can catch in roots and prevent rooting
• avoid disturbing T-tape as you plant
• space rows 1-1.5 m (3-5 ft) apart
• space trees 40-46 cm (16-18 in) apart
• if no plastic used, plant with a shovel
• if using plastic, plant by pushing root into well-prepared soil after pre-punching holes in plastic; roots must be trimmed close; firm soil well with feet on either side of plant
• make sure no air space remains around roots and that tree is vertical
• if you have benchgrafted, handle trees carefully, by rootstock only; avoid handling scion since union is quite brittle at this time
benchgrafts in plastic mulch with T-tape

29
D. Benchgraft Maintenance After Planting
• stake trees early with bamboo stakes 1.5 m long
• secure tree to stake with #6 or stronger Max tape
• tie rootstock only to stake and do not attempt to tape scion until it grows about 30-45 cm long
• after scion has grown 5-10 cm (3-4 weeks), remove benchgrafting tape or rubber bands; tape can be left longer without harmful restriction, but do not leave rubber bands any longer
• remove poor shoots and keep one good scion shoot
• do not tie up shoot too early as it is easily broken
• after 30-45 cm growth, carefully tie shoot to bamboo stake pulling shoot towards main scion
• tie up the shoot as needed; three ties will be needed in one season over the length of the shoot
• by late August or September, bamboo stakes can work their way out of the ground; reset as needed and be sure ties at top are secure against breaking from a heavy snow load
cutting benchgrafting rubbers
30
THE BENCHGRAFTED NURSERY: YEAR TWO
Year Two
A. Maintenance The timings here are suggested ones; much of the work is best done early to maximize shoot growth, but should be done as needed.
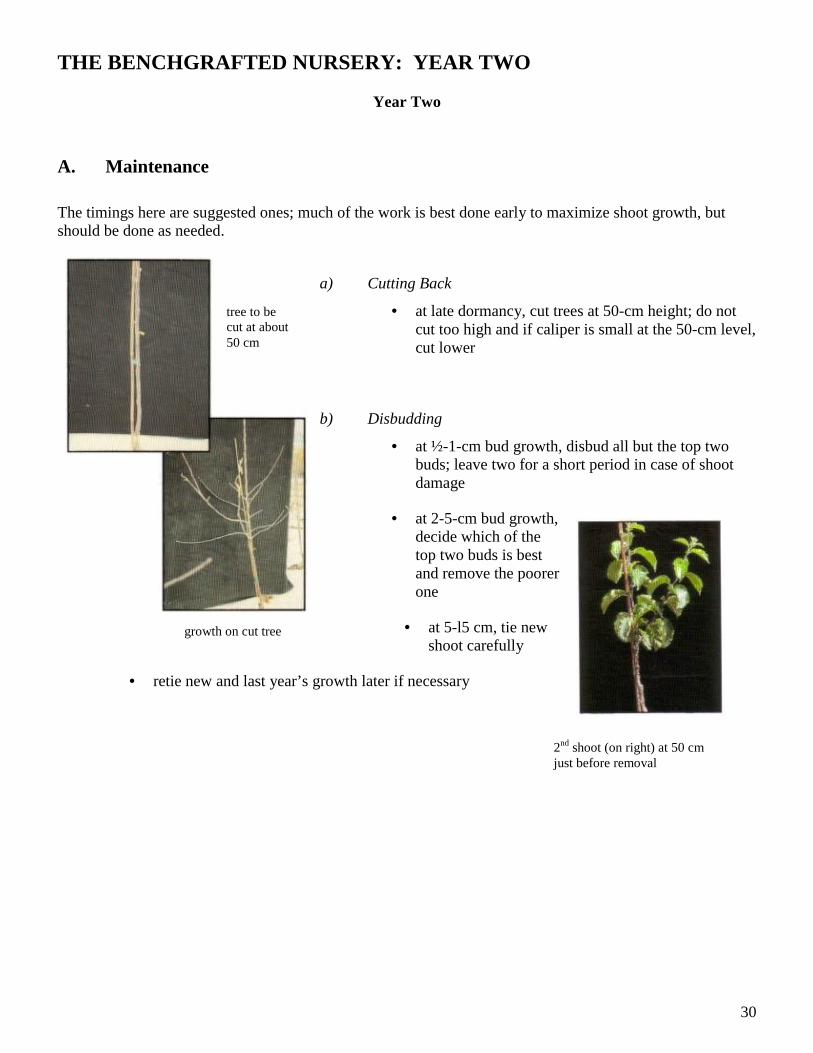
a) Cutting Back
• at late dormancy, cut trees at 50-cm height; do not cut too high and if caliper is small at the 50-cm level, cut lower
b) Disbudding
• at ½-1-cm bud growth, disbud all but the top two buds; leave two for a short period in case of shoot damage
• at 2-5-cm bud growth, decide which of the top two buds is best and remove the poorer one
• at 5-l5 cm, tie new shoot carefully
• retie new and last year’s growth later if necessary
growth on cut tree
2nd shoot (on right) at 50 cm just before removal
tree to be cut at about 50 cm

31
B. ‘Feathering’
Factors favouring ‘feathering’ are the same as those described in “Summer Budding, Year Two”, p. 24)
• if tree is cut at 50 cm, remove all branches below that height
• if tree is cut lower than 50 cm, remove branches below that level, but not leaves
C. Management a) Nutrition
• 15-20 g actual N per tree; peak in mid to late June
• 10-15 g actual P per tree; peak in early to mid June
b) Weed, Insect, and Disease Control These are covered under “Summer Budded Nursery, Year 1”, pp. 19-22.
2nd season tree - 2 shoots.

32
‘SLEEPING EYE’ STOCK MANAGEMENT
‘Sleeping eye’ trees, once planted, can be treated as summer-budded trees in year two (pp. 23-25). The ‘sleeping eyes’ planted in the orchard generally will not be under plastic mulch and will be planted at lower densities than in the nursery. For orchard-planted tree, nutrition should be adjusted to suit not only the plant density, but also the soil fertility level. Good weed control and proper irrigation is very important.

33
APPLE NURSERY WORK SCHEDULE

34

35

36
THE STONE FRUIT NURSERY
37
THE STONE FRUIT NURSERY: YEAR ONE
A. General Considerations Growing stone fruit trees in the home nursery from purchased rootstocks is very similar to the process for apple and pear trees as described earlier. Clonal or seedling rootstock for fruit grown in British Columbia can be purchased from suppliers in Canada, the United States, and Europe. On the other hand, the orchardist can grow several types of rootstocks with little effort and experience, particularly those grown from seed (pits).
B. Growing Your Own Stock From Seed At present, the three main fruit grown on seedling rootstock are peaches, nectarines, and apricots. Sour cherries are also grown on seedling rootstock, but sweet cherries and plums are generally grown on clonal rootstock.
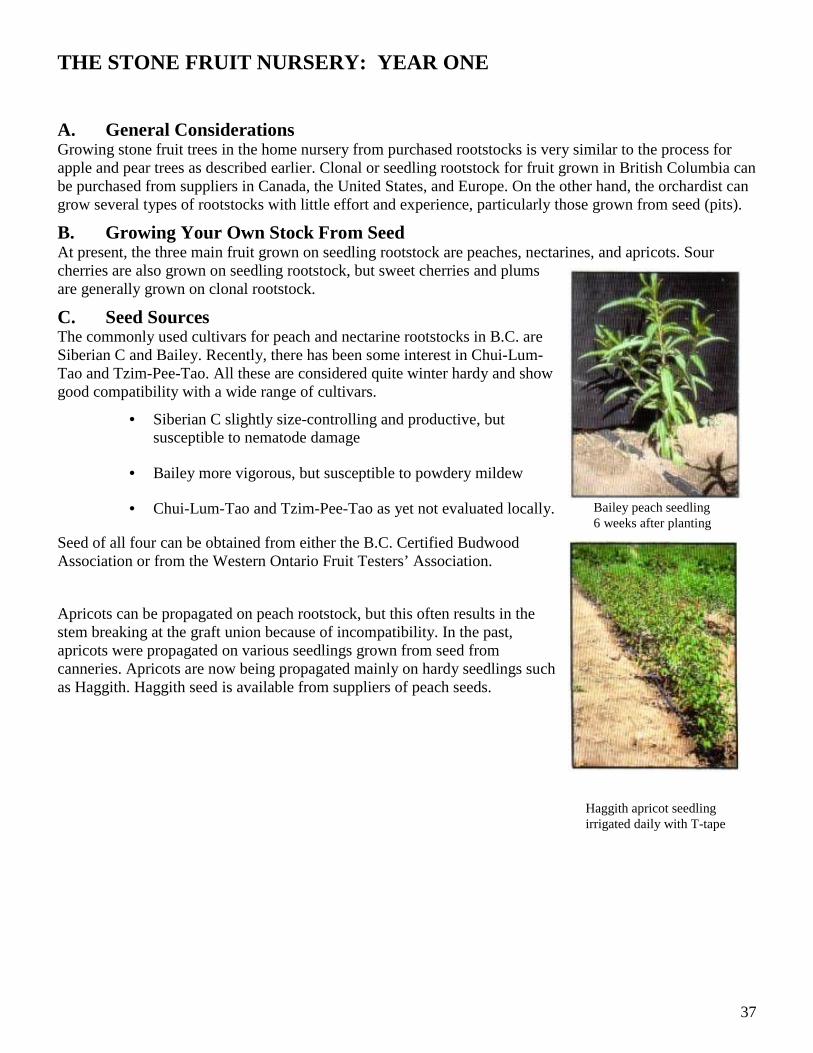
C. Seed Sources The commonly used cultivars for peach and nectarine rootstocks in B.C. are Siberian C and Bailey. Recently, there has been some interest in Chui-Lum-Tao and Tzim-Pee-Tao. All these are considered quite winter hardy and show good compatibility with a wide range of cultivars.
• Siberian C slightly size-controlling and productive, but susceptible to nematode damage
• Bailey more vigorous, but susceptible to powdery mildew
• Chui-Lum-Tao and Tzim-Pee-Tao as yet not evaluated locally.
Seed of all four can be obtained from either the B.C. Certified Budwood Association or from the Western Ontario Fruit Testers’ Association.
Apricots can be propagated on peach rootstock, but this often results in the stem breaking at the graft union because of incompatibility. In the past, apricots were propagated on various seedlings grown from seed from canneries. Apricots are now being propagated mainly on hardy seedlings such as Haggith. Haggith seed is available from suppliers of peach seeds.
Bailey peach seedling 6 weeks after planting
Haggith apricot seedling irrigated daily with T-tape

38
THE STONE FRUIT NURSERY: YEAR ONE
Year One
A. Seed Dormancy Stone fruit seed are normally dormant when taken from the fruit and will not grow until their cold requirements are satisfied; that is, the seed must be given conditions that simulate those it would receive naturally in a temperate climate: about 1500 to 2000 hours (nine to twelve weeks) of moist chilling.
B. Breaking Dormancy (Stratification) Pits are dry when received and can be stored without loss of viability in a cool, dry place for a long time. To break the dormancy, the seed inside the pits must be fully rehydrated.
• removal of the hard outer shell of the pit (hull) of the seed by cracking is advisable to obtain a high germination rate; seed can be sown with hull intact, but germination is often low
• soak extracted seed at room temperature for 12-24 hours
• drain and treat seed with fungicide
• store in moist, not wet, sand at 2-4°C for nine to twelve weeks; use plastic bags or covered container to reduce moisture loss
C. Growing Seedling Transplants There are two main methods of growing seedlings from transplants: under greenhouse conditions to produce buddable plants the same year, or in the field to be used for budding the following year.
a) Greenhouse Method
• plant seedlings in pots after peach or apricot seeds have been stored in moist, cool conditions
• large pots make for easier management, but these require more soil mix and take up more greenhouse space; a practical compromise is a 7.5-cm (3-in) pot if the seedlings are not grown more than 15-20 cm (6-8 in); for larger seedlings, a 10-cm pot may be needed

• seed must have completed dormancy to produce uniform, healthy seedlings, but not have begun to grow radicles (rootlets), which are very brittle and will not produce seedlings if injured
• plant seed in any good soil or soil-less mix provided the mix retains moisture well and has good structure
• pots should be in a warm environment for rapid germination and reduced incidence of emergence diseases
• fertilize seedlings with a complete, soluble fertilizer such as 20-20-20 once a week until planted in the field; under good growing conditions, they will reach transplant size about five weeks after seeding
Transplanting Greenhouse-Grown Seedling into the Nursery:
• transplant seedlings into well-prepared soil after danger of ground frost is past
• water pots well just before you plant, and irrigate to settle and moisten the soil immediately after you finish transplanting
• moisture-stressed seedlings may stop growing: many may not resume growth for some time, and when they do, side branches will break resulting in a bushy stock plant
b) Field Method
For the field-seeded method, seed heavily in late spring or early summer to obtain small plantlets by fall. The following spring, transplant seedlings into the nursery where they will be budded that fall.
D. Planting Through Plastic Mulch Planting seedling rootstock for stone fruit in plastic mulch has the same advantages as for apple rootstock:
• complete weed control through the two years in the nursery
• more uniform soil moisture to promote shallower and more fibrous root system
comparison of mulched and unmulched stone fruit seedlings
39

40
• better growth, which in turn will bring about earlier budding, higher percent buddable stock, and better bud take
For additional information, see instructions for the use of plastic mulch in apple and pear nurseries, pp. 6-7.
E. Growing the Rootstocks
a) Weed Control
• complete control of weeds throughout the season is essential for a nursery to succeed
• other mulches besides plastic can be considered; however, nitrogen fertilization should be maintained very carefully since several organic mulches tie up available soil N and severely affect growth
• chemical weed control can be used and is discussed in the Tree Fruit Production Guide from the BCMAFF
b) Insect Control
• monitor aphid levels closely
c) Disease Control
• powdery mildew can be a problem on rootstock such as Bailey peaches and must be controlled
d) Nutrition
• if possible, apply fertilizer through drip or T-tape irrigation line as this appears preferable for seedling nursery stock; nutrient requirements are slightly less than those for apple rootstocks
• if above not possible, adequate nutrition can be provided by a combination of preplant application of a general fertilizer such as 13-16-10 at 200 kg/ha followed by a side-dressed application of 34-0-0 at 150 kg/ha soon after seedlings are established with a few applications of soluble foliar fertilizer such as 20-20-20 later in the season.
41
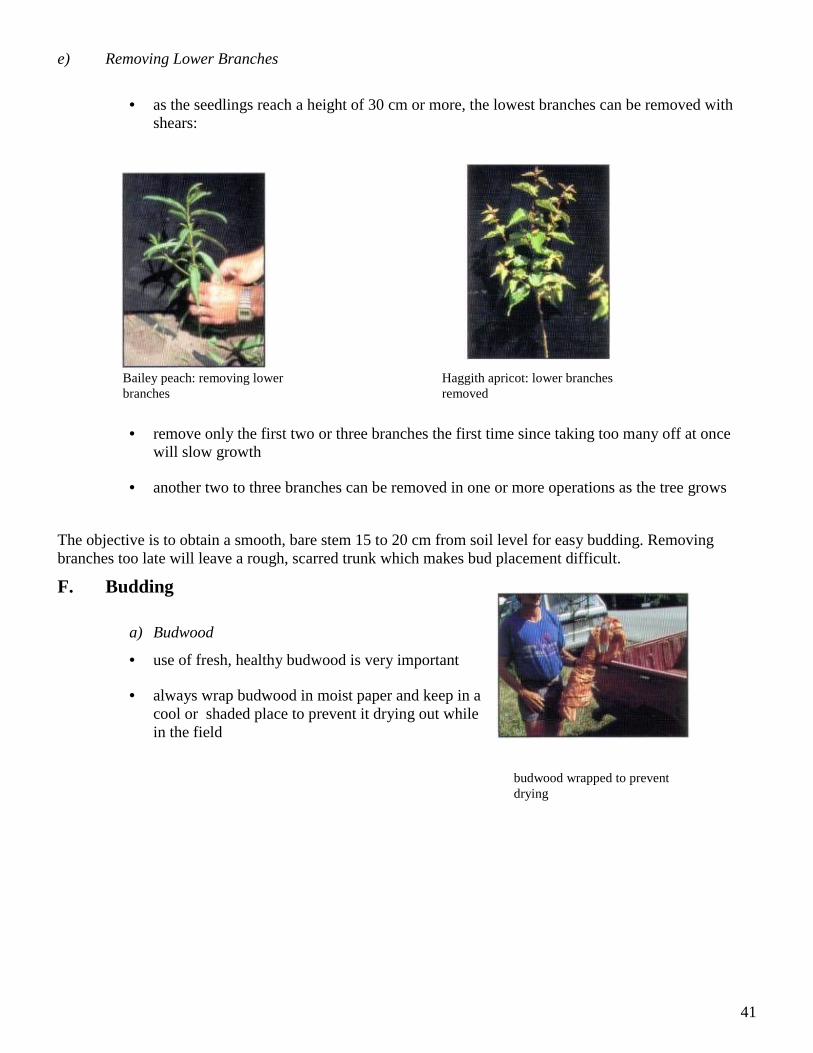
e) Removing Lower Branches
• as the seedlings reach a height of 30 cm or more, the lowest branches can be removed with shears:
• remove only the first two or three branches the first time since taking too many off at once
will slow growth
• another two to three branches can be removed in one or more operations as the tree grows
The objective is to obtain a smooth, bare stem 15 to 20 cm from soil level for easy budding. Removing branches too late will leave a rough, scarred trunk which makes bud placement difficult.
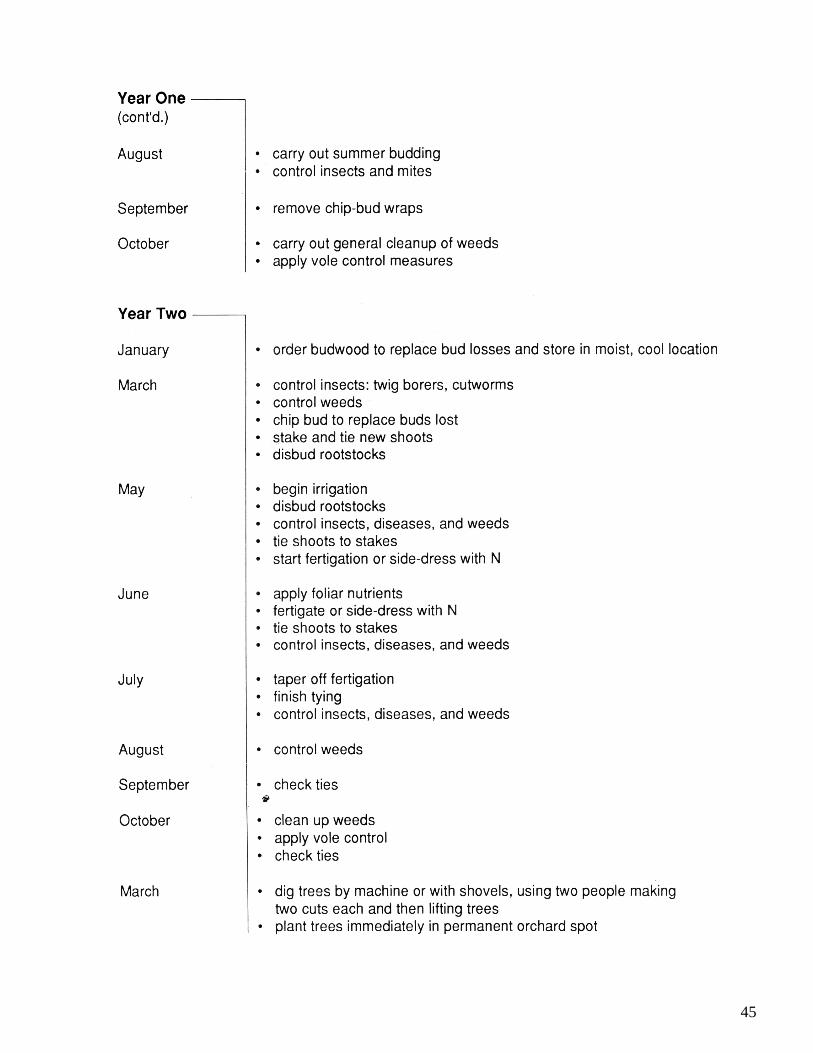
F. Budding
a) Budwood
• use of fresh, healthy budwood is very important
• always wrap budwood in moist paper and keep in a cool or shaded place to prevent it drying out while in the field
Bailey peach: removing lower branches
Haggith apricot: lower branches removed
budwood wrapped to prevent drying

42
b) Chip-budding or T-budding
• nurseries generally prefer chip-budding for soft fruit, but both types are equally effective; for more detailed instructions, see section on apple nursery or Macdonald, p. 478.
G. Fall Maintenance
• remove wraps about three weeks after chip-budding
• after leaf-fall, distribute mouse-bait stations throughout the nursery; particularly important for nurseries close to unmowed grassland and in years when mouse or vole populations are high

43
THE STONE FRUIT NURSERY: YEAR TWO
Year Two
• rootstock tops should be cut in spring following budding as soon as buds begin to swell; cut should be clean and just above bud
• rootstock will push out several new buds in addition to bud placed on it the previous summer; remove these as soon as possible since they compete for nutrients with clonal bud; operation will need to be repeated several times
• when clonal bud has grown into a 15-20-cm shoot, stake it to produce a straight tree and to prevent shoot being broken off at the bud union by strong winds
• as trees reach 60 cm or more, remove some of lower branches to start shaping tree
• early control of twig borers, before bud-break, is very important; control cutworms after shoots begin to grow; later, aphids may need to be controlled (see p. 21 for more detail)
• good weed control throughout season is very important to produce large, healthy trees
• nutrition program should be adjusted to produce sufficient, but not excessive vigour; amount of fertilizer needed will depend on natural fertility of your soil; for the fertigated nursery under plastic mulch, use guidelines for second-year apple nursery stock (10-15 g N/tree: see p. 25); for the unmulched nursery, two side-dressings of 34-0-0 at about 100 kg/ha should be sufficient, the first shortly after bud break, the second when plants are 40-50 cm high

44
STONE FRUIT NURSERY WORK SCHEDULE
45

46
MATERIALS LIST Material
• rootstock
• sleeping eyes
• plastic mulch
• T-tape
• bamboo stakes
• benchgrafting machine
• budding tape
• rubber ties
• grafting wax
• Max tapener gun
• Max tape
• staples
• plastic-laying machine (rental outlet)
• spader
• budding knife (left or right handed) Pesticides
• insecticides for leafroller, aphid, cutworm, mite
• fungicides for mildew (wettable sulphur, Kumulus S, canker-fixed copper)
• herbicides (Roundup, Gramafine, simazine, Devrinol, Casoron) Irrigation Equipment (simple design at a reasonable cost)
• electrical source
• timer
• backflow preventer
• PRV (pressure regulator valve)
• injector (Venturi)
• filter pipe and wire for overhead systems
47
REFERENCE BIBLIOGRAPHY Hartmann, Hudson T. and Dale E. Kester. 1975. Plant Propagation: Principles and Practices. 3rd Ed. Prentice-Hall, Inc., NJ Macdonald, Bruce. 1986. Practical Woody Plant Propagation. Vol 1. Timber Press, Portland, OR Quamme, H.A. and R.T. Brownlee. 1990. Rootstocks for High-density Apple Plantings in British Columbia. Technical Report # 90-02, Agriculture Canada Research Station, Summerland, BC. Spangelo, L.P.S., R. Watkins, and E.J. Davis. 1968. Fruit Tree Propagation. Publication #1289, Canadian Department of Agriculture, Ottawa, ON.