traktor manual english - sven maerivoet · 8.1.2 audio device ... traktor - manual - 8. 12.2.1...
TRANSCRIPT
Manual
The information in this document is subject to change without notice and does not represent acommitment on the part of Native Instruments GmbH. The software described by this docu-ment is subject to a License Agreement and may not be copied to other media. No part of thispublication may be copied, reproduced or otherwise transmitted or recorded, for any purpose,without prior written permission by Native Instruments GmbH, hereinafter referred to as NativeInstruments.
“Native Instruments”, “NI” and associated logos are (registered) trademarks of Native Instru-ments GmbH.
Mac, Mac OS, GarageBand, Logic, iTunes and iPod are registered trademarks of Apple Inc.,registered in the U.S. and other countries.Windows, Windows Vista and DirectSound are registered trademarks of Microsoft Corporationin the United States and/or other countries.All other trade marks are the property of their respective owners and use of them does not im-ply any affiliation with or endorsement by them.
Document authored by: Native Instruments GmbH
Software version: 2.6 (10/2012)
Special thanks to the Beta Test Team, who were invaluable not just in tracking down bugs, butin making this a better product.
Disclaimer
Germany
Native Instruments GmbHSchlesische Str. 29-30D-10997 BerlinGermanywww.native-instruments.de
USA
Native Instruments North America, Inc.6725 Sunset Boulevard5th FloorLos Angeles, CA 90028USAwww.native-instruments.com
© Native Instruments GmbH, 2012. All rights reserved.
Contact
Table of Contents1 Welcome ..................................................................................................................17
1.1 TRAKTOR 2 Documentation Overview .......................................................................................... 18
1.1.1 In This Manual ........................................................................................................... 18
1.1.2 Other Documentation ................................................................................................. 19
1.1.3 Recommended Reading Order ................................................................................... 19
1.2 System Requirements and Compatibility .................................................................................... 20
2 Upgrading (from TRAKTOR PRO, TRAKTOR LE, and TRAKTOR ME) ..................................21
2.1 Backup ....................................................................................................................................... 21
2.2 Installation ................................................................................................................................. 21
2.3 Importing Your Data ................................................................................................................... 22
3 TRAKTOR's Setup Wizard ...........................................................................................23
4 The User Interface (Overview) ....................................................................................31
4.1 The Big Picture ........................................................................................................................... 32
4.2 Interface Elements ..................................................................................................................... 33
4.2.1 Application Menu Bar ................................................................................................ 33
4.2.2 Header ....................................................................................................................... 34
4.2.3 Global Section ........................................................................................................... 36
4.2.4 Decks ......................................................................................................................... 40
4.2.5 Mixer .......................................................................................................................... 45
4.2.6 Browser ..................................................................................................................... 46
5 The Browser ..............................................................................................................49
5.1 The Track Collection ................................................................................................................... 49
5.2 Importing Music Folders ............................................................................................................. 50
5.2.1 Alternative Importing Methods .................................................................................. 52
5.3 Tracks Managed by iTunes ......................................................................................................... 52
5.3.1 Playing Tracks Managed by iTunes ............................................................................ 53
Table of Contents
TRAKTOR - Manual - 4
5.3.2 Importing a Selection of Tracks from iTunes .............................................................. 53
5.3.3 Importing iTunes Playlists ......................................................................................... 53
5.4 Track Search ............................................................................................................................... 54
5.4.1 Filtering Playlists ....................................................................................................... 54
5.4.2 Refining a Search ...................................................................................................... 55
5.4.3 Searching for Similar Tracks ..................................................................................... 55
5.4.4 Search in Playlists ..................................................................................................... 55
5.5 Working with the Track Collection and Playlists ......................................................................... 56
5.5.1 Creating a Playlist ..................................................................................................... 56
5.5.2 Adding Tracks to Playlists ......................................................................................... 56
5.5.3 Showing Tracks in Collection ..................................................................................... 57
5.5.4 Deleting Tracks .......................................................................................................... 57
5.5.5 Sorting Playlists ........................................................................................................ 58
5.5.6 Organizing Playlists in Folders .................................................................................. 59
5.5.7 Track Collection Subfolders ....................................................................................... 59
5.5.8 Favorites .................................................................................................................... 59
5.5.9 Preparation Playlists ................................................................................................. 60
5.5.10 Exporting Playlists ..................................................................................................... 61
5.5.11 Importing Playlists .................................................................................................... 61
5.5.12 Printing Playlists ....................................................................................................... 62
5.5.13 More Playlist Functions .............................................................................................. 62
5.5.14 History Playlist ........................................................................................................... 64
5.6 Editing Track Meta Data ............................................................................................................. 64
5.6.1 Editing Track Properties via Inline Editing ................................................................. 65
5.6.2 Editing Track Properties via the Edit Dialog .............................................................. 65
5.7 Track Icons ................................................................................................................................. 66
5.8 The Preview Player ...................................................................................................................... 67
5.9 Cover Art ..................................................................................................................................... 68
Table of Contents
TRAKTOR - Manual - 5
5.9.1 Show Cover Art .......................................................................................................... 68
5.9.2 Editing Cover Art ....................................................................................................... 68
5.10 Collection Maintenance .............................................................................................................. 69
5.10.1 Consistency Check ..................................................................................................... 69
5.10.2 Analysis ..................................................................................................................... 71
5.10.3 Data Directories ......................................................................................................... 72
5.10.4 Other Maintenance Functions .................................................................................... 72
5.11 Working with Audio CDs .............................................................................................................. 73
5.11.1 CD Text ...................................................................................................................... 73
5.11.2 Audio CDs and Favorites ............................................................................................ 73
5.11.3 Eject CD ..................................................................................................................... 73
5.12 Working with Digital Audio Players ............................................................................................. 74
5.12.1 iPod ........................................................................................................................... 74
6 The Decks .................................................................................................................75
6.1 Deck Flavor Descriptions ............................................................................................................ 75
6.1.1 Track Deck ................................................................................................................. 77
6.1.2 Remix Deck ................................................................................................................ 79
6.1.3 Live Input .................................................................................................................. 85
6.2 Loading Tracks / Remix Sets ....................................................................................................... 85
6.3 The Deck Heading ....................................................................................................................... 86
6.3.1 Deck Focus ................................................................................................................ 86
6.3.2 Deck Flavor ................................................................................................................ 86
6.3.3 Playback Mode ........................................................................................................... 87
6.3.4 Flux Mode .................................................................................................................. 87
6.3.5 Deck Layout ............................................................................................................... 88
6.3.6 Deck Audio Drag and Drop ......................................................................................... 89
6.4 The Waveform Display and the Stripe View ................................................................................. 90
6.5 The Transport Controls ............................................................................................................... 91
Table of Contents
TRAKTOR - Manual - 6
6.6 Loop Controls .............................................................................................................................. 93
6.7 Tempo Controls ........................................................................................................................... 94
6.7.1 Manual Tempo Controls ............................................................................................. 95
6.7.2 Phase Meter ............................................................................................................... 96
6.7.3 Beat Syncing ............................................................................................................. 96
6.8 The Advanced Panel ................................................................................................................... 98
6.8.1 BeatJump and Loop Move (MOVE Panel) .................................................................... 99
6.8.2 Cue Point and Loop Management Panel (CUE Panel) ................................................. 105
6.8.3 Cue Point Types ......................................................................................................... 107
6.8.4 Deleting a Stored Cue Point or Loop ........................................................................... 109
6.8.5 Hotcue Mapping ........................................................................................................ 110
6.8.6 Beatgrid Panel (GRID) ............................................................................................... 110
7 The Internal Mixer & the Crossfader ...........................................................................117
7.1 Channel Faders .......................................................................................................................... 117
7.2 Crossfader .................................................................................................................................. 117
7.3 Equalizer .................................................................................................................................... 118
7.3.1 Equalizer Types .......................................................................................................... 119
7.4 GAIN, Cue and PAN ..................................................................................................................... 120
7.5 FILTER, KEY and Effect Insert ..................................................................................................... 121
7.5.1 Headphone Controls .................................................................................................. 123
7.6 The Internal Mixer in External Mixer Mode ................................................................................... 124
8 Using TRAKTOR with an External Mixer .......................................................................125
8.1 Requirements ............................................................................................................................. 125
8.1.1 The Mixer ................................................................................................................... 125
8.1.2 Audio Device .............................................................................................................. 125
8.2 Hardware Setup .......................................................................................................................... 126
8.3 Software Setup ........................................................................................................................... 126
Table of Contents
TRAKTOR - Manual - 7
9 Using the Header and Global Sections ........................................................................128
9.1 Header ........................................................................................................................................ 128
9.1.1 TRAKTOR 2 Logo ........................................................................................................ 128
9.1.2 Status Indicators ....................................................................................................... 128
9.1.3 Layout Selector .......................................................................................................... 129
9.1.4 Utility Buttons ........................................................................................................... 130
9.2 The Global Section ...................................................................................................................... 131
9.2.1 Master Panel ............................................................................................................. 132
9.2.2 The Loop Recorder ..................................................................................................... 133
9.2.3 Master Clock Panel .................................................................................................... 134
9.2.4 MIDI Clock Send ......................................................................................................... 135
9.3 Effect Panels .............................................................................................................................. 136
9.3.1 Group Mode ............................................................................................................... 137
9.3.2 Single Mode ............................................................................................................... 138
9.3.3 Audio Recorder Panel ................................................................................................. 140
9.3.4 Broadcasting ............................................................................................................. 141
10 Mouse Control for Faders and Knobs ..........................................................................142
10.1 Basic Controls ............................................................................................................................ 142
10.2 Advanced Control ....................................................................................................................... 143
11 Control via Keyboard & MIDI Hotkeys .........................................................................144
11.1 Keyboard Hotkeys ........................................................................................................................ 144
11.2 MIDI Hotkeys ............................................................................................................................... 145
12 Setting Up TRAKTOR SCRATCH ...................................................................................147
12.1 The Turntable Setup ................................................................................................................... 147
12.1.1 Making Connections for Turntables ........................................................................... 147
12.1.2 Test Drive TRAKTOR SCRATCH with Turntables .......................................................... 148
12.1.3 The Control Zones on Vinyl ......................................................................................... 148
12.2 CD Player Setup .......................................................................................................................... 149
Table of Contents
TRAKTOR - Manual - 8
12.2.1 Making connections ................................................................................................... 149
12.2.2 Test Drive TRAKTOR SCRATCH with CD Players .......................................................... 149
12.2.3 The Control Zones on CD ............................................................................................ 150
12.3 Mixed Setup ................................................................................................................................ 150
12.4 Enabling the Decks ..................................................................................................................... 151
12.5 Calibration ................................................................................................................................. 151
12.6 Tracking Modes .......................................................................................................................... 152
12.6.1 Absolute Tracking Mode ............................................................................................. 152
12.6.2 Relative Tracking Mode ............................................................................................. 152
12.6.3 Internal Playback Mode ............................................................................................. 153
12.7 Timecode Preferences ................................................................................................................. 153
12.8 TRAKTOR SCRATCH PRO 2 Troubleshooting ................................................................................ 154
12.8.1 Calibration Troubleshooting ...................................................................................... 154
12.8.2 Audio Troubleshooting ............................................................................................... 168
13 Preferences ..............................................................................................................169
13.1 ................................................................................................................................................... 169
13.1.1 The Preferences Window ............................................................................................ 169
13.2 Audio Setup ................................................................................................................................ 171
13.2.1 Audio Device .............................................................................................................. 171
13.2.2 Phono / Line ............................................................................................................... 171
13.2.3 Routing ...................................................................................................................... 172
13.2.4 Built-in Soundcard (only Windows) ............................................................................ 172
13.2.5 Multi-Core ................................................................................................................. 172
13.3 Output Routing ........................................................................................................................... 172
13.3.1 Mixing Mode .............................................................................................................. 172
13.4 Input Routing ............................................................................................................................. 173
13.5 MIDI Clock .................................................................................................................................. 174
13.6 Timecode Setup .......................................................................................................................... 174
Table of Contents
TRAKTOR - Manual - 9
13.7 Loading ...................................................................................................................................... 176
13.8 Transport .................................................................................................................................... 177
13.9 Decks Layout .............................................................................................................................. 181
13.10 Track Decks ................................................................................................................................ 182
13.11 Remix Decks ............................................................................................................................... 183
13.12 Mixer ........................................................................................................................................... 185
13.13 Global Settings ........................................................................................................................... 186
13.14 Effects ........................................................................................................................................ 187
13.15 Mix Recorder ............................................................................................................................... 189
13.16 Loop Recorder ............................................................................................................................. 190
13.17 Broadcasting .............................................................................................................................. 190
13.18 Browser Details .......................................................................................................................... 192
13.19 Layout Manager .......................................................................................................................... 192
13.20 File Management ........................................................................................................................ 193
13.21 Controller Manager ..................................................................................................................... 195
13.21.1 Overview .................................................................................................................... 196
13.21.2 Device Setup .............................................................................................................. 196
13.21.3 Assignment Table ...................................................................................................... 198
13.21.4 Device Mapping ......................................................................................................... 199
13.21.5 Mapping Details ........................................................................................................ 200
13.21.6 Available Controller Types ......................................................................................... 201
14 Advanced Operation of TRAKTOR ................................................................................204
14.1 TRAKTOR Profiles ........................................................................................................................ 204
14.1.1 The TRAKTOR Root folder ........................................................................................... 204
14.1.2 The Recordings folder ................................................................................................ 205
14.1.3 Complete Backup ...................................................................................................... 205
14.1.4 Restoring TRAKTOR from a Backup ............................................................................ 206
14.1.5 Creating a portable version of TRAKTOR .................................................................... 206
Table of Contents
TRAKTOR - Manual - 10

14.1.6 Automatic Collection Backup (Security Backup) ........................................................ 207
14.1.7 Repairing a Corrupted Collection ............................................................................... 208
14.2 Syncing via MIDI Clock ............................................................................................................... 208
14.2.1 TRAKTOR as Tempo Source (MIDI Clock send) ............................................................ 208
14.2.2 Syncing TRAKTOR to an external MIDI Clock Signal (External Sync) ........................... 209
14.2.3 Syncing two versions of TRAKTOR .............................................................................. 209
14.3 Broadcasting .............................................................................................................................. 210
14.3.1 Streaming Protocol .................................................................................................... 210
14.3.2 Configuring TRAKTOR ................................................................................................ 210
14.3.3 Starting the Broadcast .............................................................................................. 211
14.3.4 How to setup a microphone for your Broadcast .......................................................... 211
14.4 The Effects in Detail ................................................................................................................... 212
14.4.1 Introduction ............................................................................................................... 212
14.4.2 FX Panel Modes ......................................................................................................... 213
14.4.3 Common Parameters ................................................................................................. 215
14.4.4 Delay ......................................................................................................................... 216
14.4.5 Reverb ....................................................................................................................... 217
14.4.6 Flanger ...................................................................................................................... 217
14.4.7 Flanger Pulse ............................................................................................................. 218
14.4.8 Flanger Flux ............................................................................................................... 219
14.4.9 Gater ......................................................................................................................... 219
14.4.10 Beatmasher 2 ............................................................................................................ 220
14.4.11 Delay T3 ..................................................................................................................... 221
14.4.12 Filter LFO ................................................................................................................... 222
14.4.13 Filter Pulse ................................................................................................................ 223
14.4.14 Filter .......................................................................................................................... 224
14.4.15 Filter:92 LFO .............................................................................................................. 225
14.4.16 Filter:92 Pulse ........................................................................................................... 226
Table of Contents
TRAKTOR - Manual - 11
14.4.17 Filter:92 ..................................................................................................................... 226
14.4.18 Phaser ....................................................................................................................... 227
14.4.19 Phaser Pulse .............................................................................................................. 228
14.4.20 Phaser Flux ................................................................................................................ 229
14.4.21 Reverse Grain ............................................................................................................ 230
14.4.22 Turntable FX .............................................................................................................. 231
14.4.23 Iceverb ....................................................................................................................... 231
14.4.24 Reverb T3 .................................................................................................................. 232
14.4.25 Ring Modulator .......................................................................................................... 232
14.4.26 Digital LoFi ................................................................................................................ 233
14.4.27 Mulholland Drive ....................................................................................................... 234
14.4.28 Transpose Stretch ...................................................................................................... 234
14.4.29 BeatSlicer Buffer ....................................................................................................... 236
14.4.30 Formant Filter ............................................................................................................ 236
14.4.31 Peak Filter ................................................................................................................. 237
14.4.32 Tape Delay ................................................................................................................. 237
14.4.33 Ramp Delay ............................................................................................................... 238
14.4.34 Auto Bouncer ............................................................................................................. 239
14.4.35 Bouncer ..................................................................................................................... 240
15 Tutorials ...................................................................................................................241
15.1 Prerequisites .............................................................................................................................. 241
15.2 Goals of the Following Chapters ................................................................................................. 242
15.3 Playing Your First Track .............................................................................................................. 243
15.3.1 Quick Loading a Track ............................................................................................... 243
15.3.2 Playing the Track ....................................................................................................... 245
15.3.3 If You Don’t Hear the Track ........................................................................................ 246
15.4 Mixing In a Second Track ............................................................................................................ 248
15.4.1 Pre-listening a Second Track in the Preview Player ................................................... 248
Table of Contents
TRAKTOR - Manual - 12
15.4.2 Loading and Playing the Second Track ...................................................................... 250
15.4.3 Using Headphones to Prepare the Mix ....................................................................... 250
15.4.4 Synchronizing the Second Track ................................................................................ 251
15.4.5 Setting a Cue Point as Starting Point ........................................................................ 252
15.4.6 Snapping to the Beats ............................................................................................... 255
15.4.7 Sticking to the Beats ................................................................................................. 255
15.4.8 Interlude: In Case the Left Track Is Over… ............................................................... 256
15.4.9 Mixing In the Track by Using the Channel EQ and Filter ............................................ 256
15.4.10 Manual Beat-matching ............................................................................................. 258
15.5 Adjusting Levels ......................................................................................................................... 260
15.5.1 The Theory… ............................................................................................................. 260
15.5.2 …and the Practice .................................................................................................... 261
15.6 Looping and Cueing .................................................................................................................... 263
15.6.1 Playing with Loops ..................................................................................................... 264
15.6.2 Using Hotcues ........................................................................................................... 267
15.7 Adding FX ................................................................................................................................... 269
15.7.1 Assigning a Deck to an FX Unit .................................................................................. 270
15.7.2 Group Mode ............................................................................................................... 271
15.7.3 Getting the FX Unit Ready .......................................................................................... 271
15.7.4 Controlling the FX Unit .............................................................................................. 272
15.7.5 Single Mode ............................................................................................................... 273
15.7.6 Storing a Snapshot .................................................................................................... 273
15.8 Using the Remix Decks in Your Mix ............................................................................................. 274
15.8.1 Loading a Sample from the Collection ....................................................................... 275
15.8.2 Triggering the Sample ............................................................................................... 276
15.8.3 Capturing a Sample from a Track .............................................................................. 278
15.8.4 More Sample Controls ................................................................................................ 279
15.8.5 Saving A Remix Set .................................................................................................... 282
Table of Contents
TRAKTOR - Manual - 13
15.9 Using the Loop Recorder ............................................................................................................. 282
15.9.1 Choosing a Source ..................................................................................................... 283
15.9.2 Recording a Loop ....................................................................................................... 284
15.9.3 Overdubbing .............................................................................................................. 286
15.9.4 Further Uses of the Recorded Loop ............................................................................ 286
15.10 Synchronization .......................................................................................................................... 287
15.10.1 Introduction ............................................................................................................... 287
15.10.2 The Tempo Master ..................................................................................................... 287
15.10.3 The Beatgrid .............................................................................................................. 292
15.10.4 Other Useful Tools for Synching ................................................................................. 293
16 Troubleshooting ........................................................................................................296
16.1 TRAKTOR Won’t Start .................................................................................................................. 296
16.2 Latency Issues ............................................................................................................................ 296
16.3 TRAKTOR 2 Crashes .................................................................................................................... 297
16.4 Updates ...................................................................................................................................... 297
17 Getting Help ..............................................................................................................298
17.1 Knowledge Base ......................................................................................................................... 298
17.2 Technical Support ....................................................................................................................... 298
17.3 Registration Support .................................................................................................................. 299
17.4 User Forum ................................................................................................................................. 299
18 Appendix — Common Setups .....................................................................................300
18.1 TRAKTOR with an On-board Sound Card and Fallback ................................................................ 300
18.2 TRAKTOR with an External Audio Interface ................................................................................. 301
18.3 TRAKTOR with an External Mixer ................................................................................................. 302
18.4 TRAKTOR with a Controller .......................................................................................................... 303
18.4.1 Controllers with Mixer Controls (and optionally a Built-In Audio Interface) ............... 304
18.4.2 Controllers without Mixer Controls ............................................................................. 306
18.5 TRAKTOR KONTROL S4 with TRAKTOR SCRATCH PRO 2 ............................................................... 306
Table of Contents
TRAKTOR - Manual - 14
18.6 Adding a Microphone .................................................................................................................. 307
18.6.1 Using Your Microphone with the Loop Recorder ......................................................... 307
18.6.2 Using Your Microphone as a Live Input and with TRAKTOR FX ................................... 307
18.7 Recording Setup ......................................................................................................................... 308
18.7.1 Recording from the Internal Source ........................................................................... 308
18.7.2 Recording from an External Source ............................................................................ 309
19 Default Keyboard Mappings .......................................................................................312
19.1 Transport .................................................................................................................................... 312
19.2 Remix Decks ............................................................................................................................... 313
19.3 Cue & Loop ................................................................................................................................. 314
19.4 Favorites & Navigation ............................................................................................................... 314
19.5 Loop Recorder ............................................................................................................................. 315
19.6 Zoom & Layout ............................................................................................................................ 315
19.7 Scratch Modes ............................................................................................................................ 316
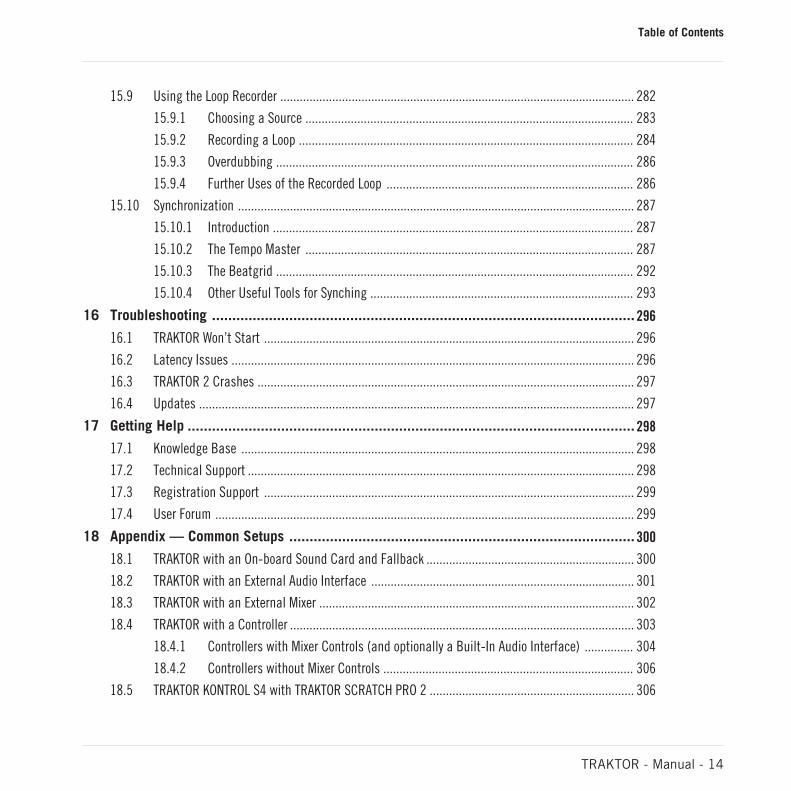
20 Assignable MIDI Controls ...........................................................................................317
20.1 Deck Common ............................................................................................................................. 318
20.2 Track Deck .................................................................................................................................. 320
20.3 Remix Deck ................................................................................................................................. 322
20.4 Mixer ........................................................................................................................................... 324
20.5 FX Unit ........................................................................................................................................ 326
20.6 Browser ...................................................................................................................................... 327
20.7 Preview Player ............................................................................................................................ 330
20.8 Loop Recorder ............................................................................................................................. 330
20.9 Audio Recorder ........................................................................................................................... 330
20.10 Master Clock ............................................................................................................................... 331
20.11 Global ......................................................................................................................................... 331
20.12 Layout ......................................................................................................................................... 332
Table of Contents
TRAKTOR - Manual - 15
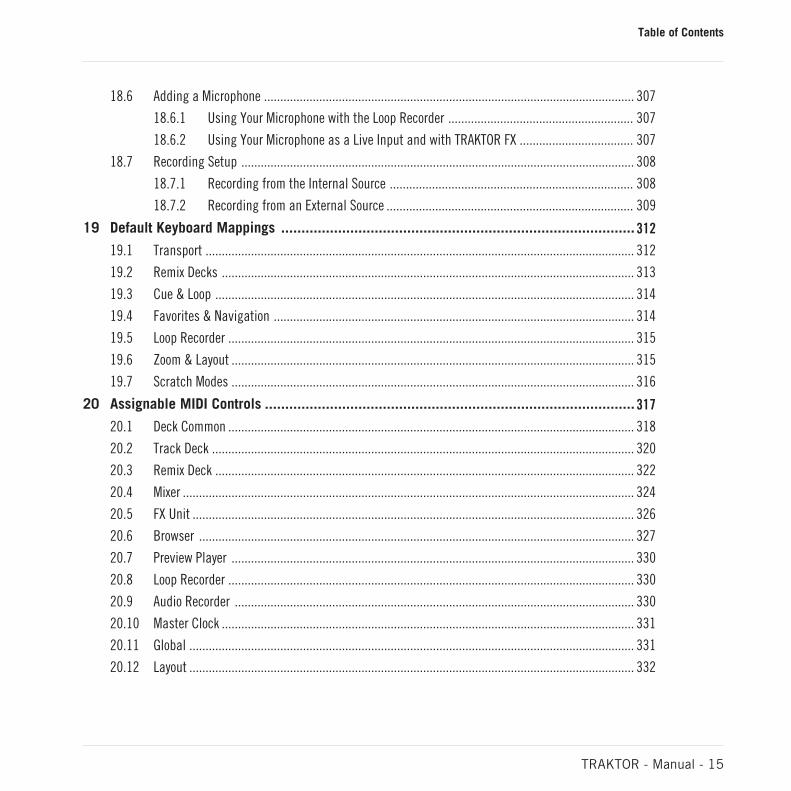
20.13 Modifier ...................................................................................................................................... 332
Index ........................................................................................................................334
Table of Contents
TRAKTOR - Manual - 16
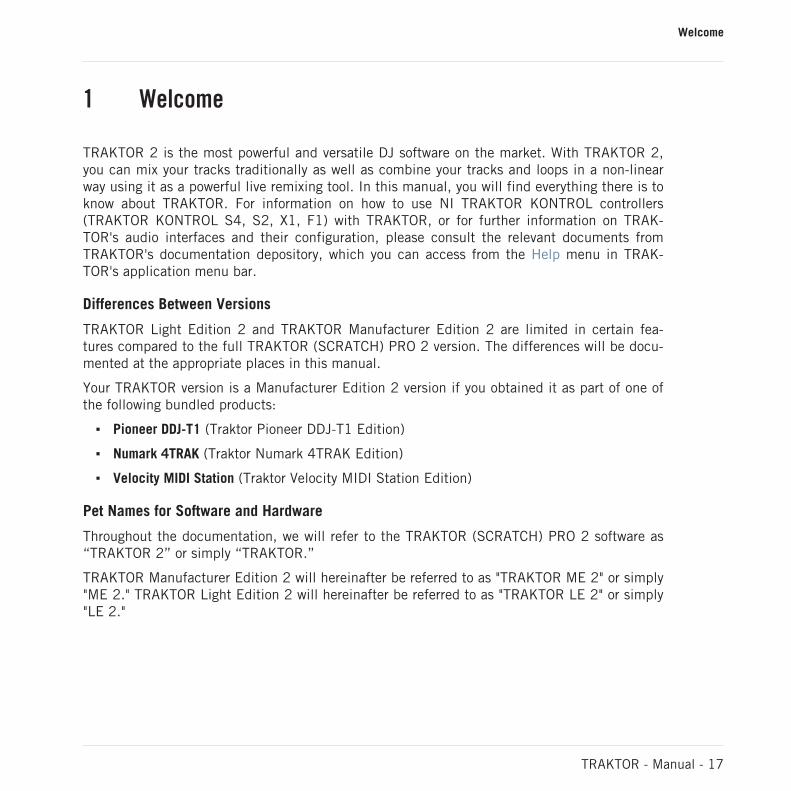
1 Welcome
TRAKTOR 2 is the most powerful and versatile DJ software on the market. With TRAKTOR 2,you can mix your tracks traditionally as well as combine your tracks and loops in a non-linearway using it as a powerful live remixing tool. In this manual, you will find everything there is toknow about TRAKTOR. For information on how to use NI TRAKTOR KONTROL controllers(TRAKTOR KONTROL S4, S2, X1, F1) with TRAKTOR, or for further information on TRAK-TOR's audio interfaces and their configuration, please consult the relevant documents fromTRAKTOR's documentation depository, which you can access from the Help menu in TRAK-TOR's application menu bar.
Differences Between Versions
TRAKTOR Light Edition 2 and TRAKTOR Manufacturer Edition 2 are limited in certain fea-tures compared to the full TRAKTOR (SCRATCH) PRO 2 version. The differences will be docu-mented at the appropriate places in this manual.
Your TRAKTOR version is a Manufacturer Edition 2 version if you obtained it as part of one ofthe following bundled products:
▪ Pioneer DDJ-T1 (Traktor Pioneer DDJ-T1 Edition)
▪ Numark 4TRAK (Traktor Numark 4TRAK Edition)
▪ Velocity MIDI Station (Traktor Velocity MIDI Station Edition)
Pet Names for Software and Hardware
Throughout the documentation, we will refer to the TRAKTOR (SCRATCH) PRO 2 software as“TRAKTOR 2” or simply “TRAKTOR.”
TRAKTOR Manufacturer Edition 2 will hereinafter be referred to as "TRAKTOR ME 2" or simply"ME 2." TRAKTOR Light Edition 2 will hereinafter be referred to as "TRAKTOR LE 2" or simply"LE 2."
Welcome
TRAKTOR - Manual - 17
Document Conventions
This manual uses particular formatting to point out special facts and to warn you of potentialissues. The icons introducing these notes let you see what kind of information is to be expect-ed:
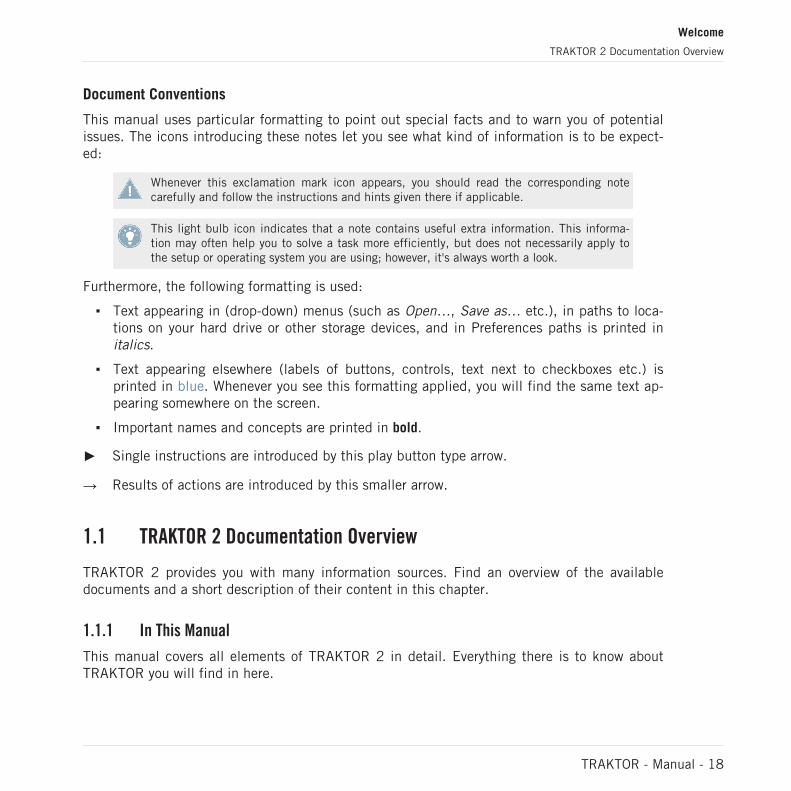
Whenever this exclamation mark icon appears, you should read the corresponding notecarefully and follow the instructions and hints given there if applicable.
This light bulb icon indicates that a note contains useful extra information. This informa-tion may often help you to solve a task more efficiently, but does not necessarily apply tothe setup or operating system you are using; however, it's always worth a look.
Furthermore, the following formatting is used:
▪ Text appearing in (drop-down) menus (such as Open…, Save as… etc.), in paths to loca-tions on your hard drive or other storage devices, and in Preferences paths is printed initalics.
▪ Text appearing elsewhere (labels of buttons, controls, text next to checkboxes etc.) isprinted in blue. Whenever you see this formatting applied, you will find the same text ap-pearing somewhere on the screen.
▪ Important names and concepts are printed in bold.
► Single instructions are introduced by this play button type arrow.
→ Results of actions are introduced by this smaller arrow.
1.1 TRAKTOR 2 Documentation Overview
TRAKTOR 2 provides you with many information sources. Find an overview of the availabledocuments and a short description of their content in this chapter.
1.1.1 In This Manual
This manual covers all elements of TRAKTOR 2 in detail. Everything there is to know aboutTRAKTOR you will find in here.
Welcome
TRAKTOR 2 Documentation Overview
TRAKTOR - Manual - 18
1.1.2 Other Documentation
These are the additional documents available to help you aquaint yourself with TRAKTOR 2(find also a recommended reading order in ↑1.1.3, Recommended Reading Order).
The Setup Guide
The Setup Guide will guide you through the software (and hardware where appropriate) instal-lation of TRAKTOR 2 from the very beginning to the first sound coming through your speakers.This should be your first stop in learning TRAKTOR 2. The Setup Guide is available on theTRAKTOR 2 registration page. Find a link to the registration page on the registration flyer,which is included in your TRAKTOR product box.
The Getting Started Guide
After having read the Setup Guide and followed its instructions, TRAKTOR should be up andrunning. The next step is to read the Getting Started guide. The Getting Started guide givesyou a practical approach to TRAKTOR.
The Keyboard Shortcut Overview Card
A keyboard shortcut overview card is included in the product box. It provides quick access tothe dedicated keyboard mappings for the TRAKTOR 2 software.
The Video Tutorials
The Native Instruments website provides you with a bunch of video tutorials that give you ahands-on approach to many sides of the TRAKTOR 2 workflow. Find them here:
http://www.native-instruments.com/traktor
1.1.3 Recommended Reading Order
The documentation items should be read in the following order:
1. Setup Guide relating to your TRAKTOR product.2. TRAKTOR 2 Getting Started guide and video tutorials.3. TRAKTOR 2 Manual.
Welcome
TRAKTOR 2 Documentation Overview
TRAKTOR - Manual - 19
The whole documentation is available via the Open Manual... entry from the Help drop-downmenu in TRAKTOR.
1.2 System Requirements and Compatibility
For the minimum system requirements your computer needs to meet, see the TRAKTOR sec-tion of the Native Instruments website:
http://www.native-instruments.com/#/en/products/dj/traktor-pro-2/specifications/?page=2050
Please note that meeting the system requirements does not guarantee running all TRAK-TOR 2 features hassle-free. You might be forced to tweak your system following Native In-struments’ tuning tips for audio computers. You can find these tuning tips in the Knowl-edge Base—see ↑17.1, Knowledge Base for more information.
To check the compatibility with several operating systems, please have a look at: http://www.native-instruments.com/compatibility
Welcome
System Requirements and Compatibility
TRAKTOR - Manual - 20
2 Upgrading (from TRAKTOR PRO, TRAKTOR LE, andTRAKTOR ME)
When upgrading from one of the aforementioned versions, you will need to import your userdata and mappings. This is a straightforward process assisted by the TRAKTOR software; how-ever, there are a few things to be observed when upgrading. See the following sections formore info.
2.1 Backup
Before installing TRAKTOR 2 over your previous version, backup the following folders and files:
▪ your TRAKTOR folder, per default found in [User]\My Documents\Native Instruments\Traktor (Windows) and User:Documents:Native Instruments:Traktor (Mac OS X)
▪ your Music folders as defined in Preferences > Data Location > Music Folders
▪ any other data that is not stored in the aforementioned places because you have chosenanother location for them.
At this point, it is a good idea to remove all unnecessary files from your TRAKTOR folder,e.g,. mappings for controllers you don’t use anymore, etc.
2.2 Installation
Follow the instructions from the Setup Guide carefully.
As a general rule: start with the software installation before you install the hardware (TRAK-TOR AUDIO 6/10, TRAKTOR KONTROL X1, TRAKTOR KONTROL S4, etc.)!
The installation creates a new User Folder in [User]\My Documents\Native Instruments\Traktor2.x.x (Windows) and User:Documents:Native Instruments:Traktor 2.x.x (Mac OS X). Also, yourprevious TRAKTOR version will not be uninstalled. This means that from now on you’ll alwaysbe able to easily return to the last version if needed.
Upgrading (from TRAKTOR PRO, TRAKTOR LE, and TRAKTOR ME)
Backup
TRAKTOR - Manual - 21
2.3 Importing Your Data
▪ When you start TRAKTOR 2 for the first time, the Setup Wizard greets you with some sim-ple questions regarding your setup. This will adjust TRAKTOR’s look and Preferences ac-cordingly. Read more about the Setup Wizard in ↑3, TRAKTOR's Setup Wizard.
▪ Next, TRAKTOR will ask if you want to import your previous data by copying the existinguser content to a new folder in your user folder. Your previous data will not be altered ifyou copy it to the new default folder.
Importing Your MIDI and Hotkey Mappings
For TRAKTOR 2, the mapping system has been changed. While some mappings created withprevious versions of TRAKTOR may still work, others will not be imported correctly.
We recommend double-checking your imported mappings before you use them in a live sit-uation.
Upgrading (from TRAKTOR PRO, TRAKTOR LE, and TRAKTOR ME)
Importing Your Data
TRAKTOR - Manual - 22
3 TRAKTOR's Setup Wizard
The Setup Wizard lets you configure TRAKTOR in a few simple steps. It also is a convenientway to restart with a fresh out-of-the-box setup. The Setup Wizard does two things:
▪ It lets you choose from a few basic audio, MIDI, and general setup configurations and au-tomatically sets the available options accordingly.
▪ It resets all other TRAKTOR 2 settings to their default values.
Depending on the version of TRAKTOR software you have (e.g., LE 2, ME 2), the SetupWizard may not offer all shown screens or selections.
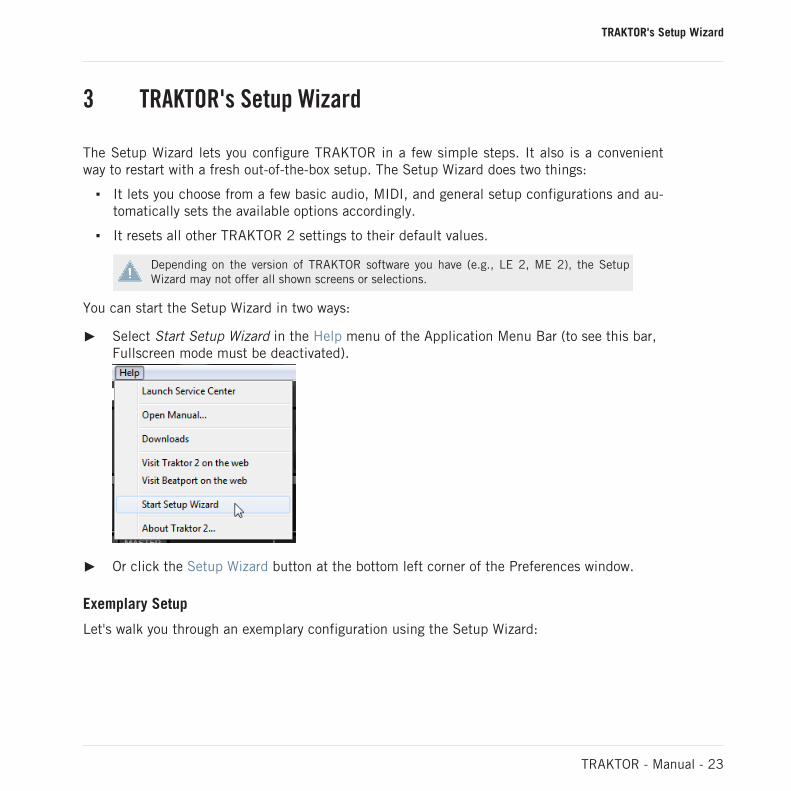
You can start the Setup Wizard in two ways:
► Select Start Setup Wizard in the Help menu of the Application Menu Bar (to see this bar,Fullscreen mode must be deactivated).
► Or click the Setup Wizard button at the bottom left corner of the Preferences window.
Exemplary Setup
Let's walk you through an exemplary configuration using the Setup Wizard:
TRAKTOR's Setup Wizard
TRAKTOR - Manual - 23
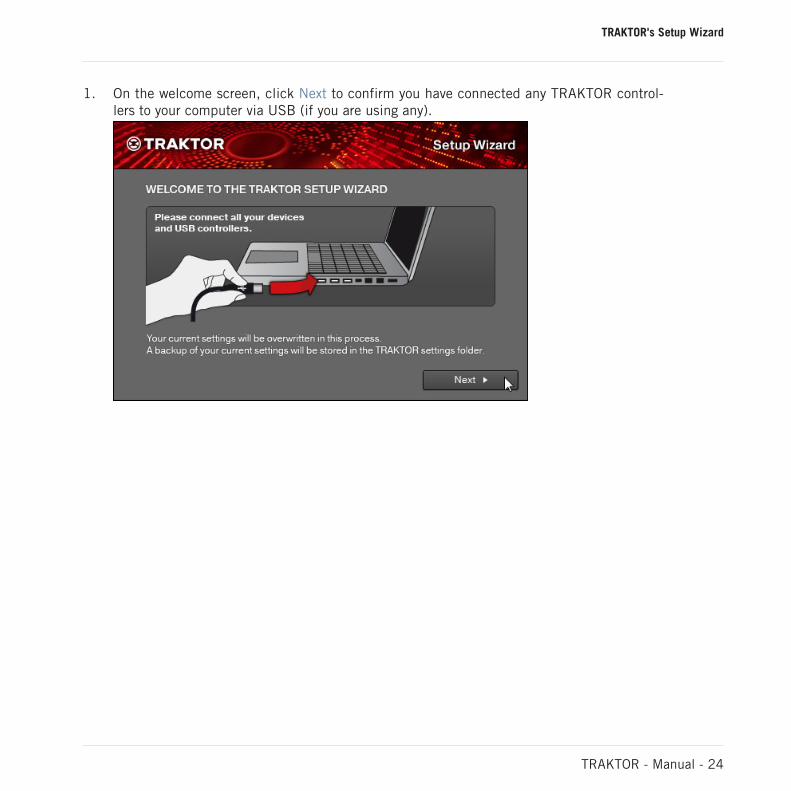
1. On the welcome screen, click Next to confirm you have connected any TRAKTOR control-lers to your computer via USB (if you are using any).
TRAKTOR's Setup Wizard
TRAKTOR - Manual - 24
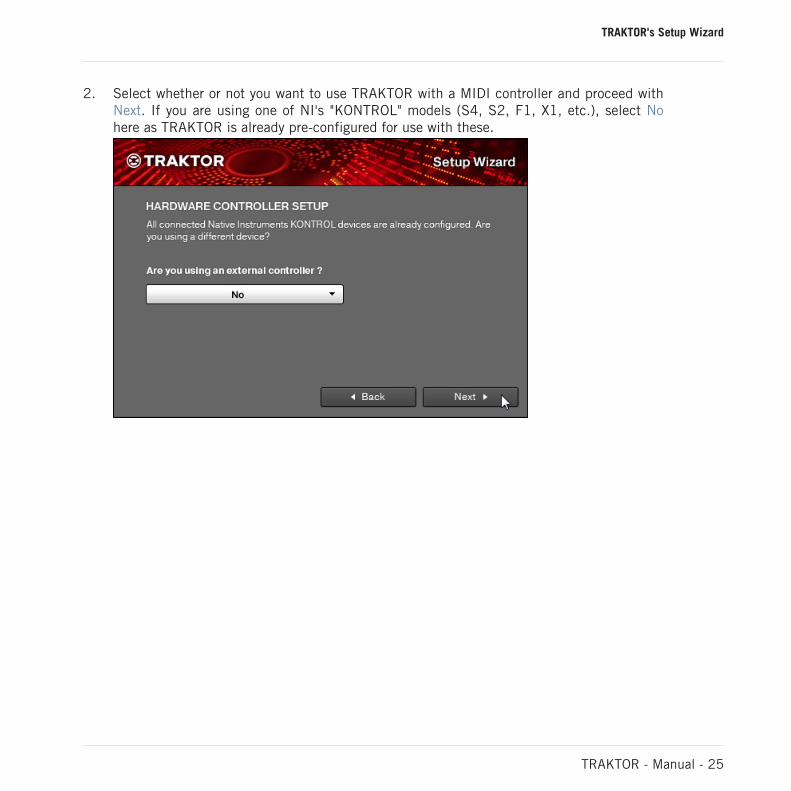
2. Select whether or not you want to use TRAKTOR with a MIDI controller and proceed withNext. If you are using one of NI's "KONTROL" models (S4, S2, F1, X1, etc.), select Nohere as TRAKTOR is already pre-configured for use with these.
TRAKTOR's Setup Wizard
TRAKTOR - Manual - 25
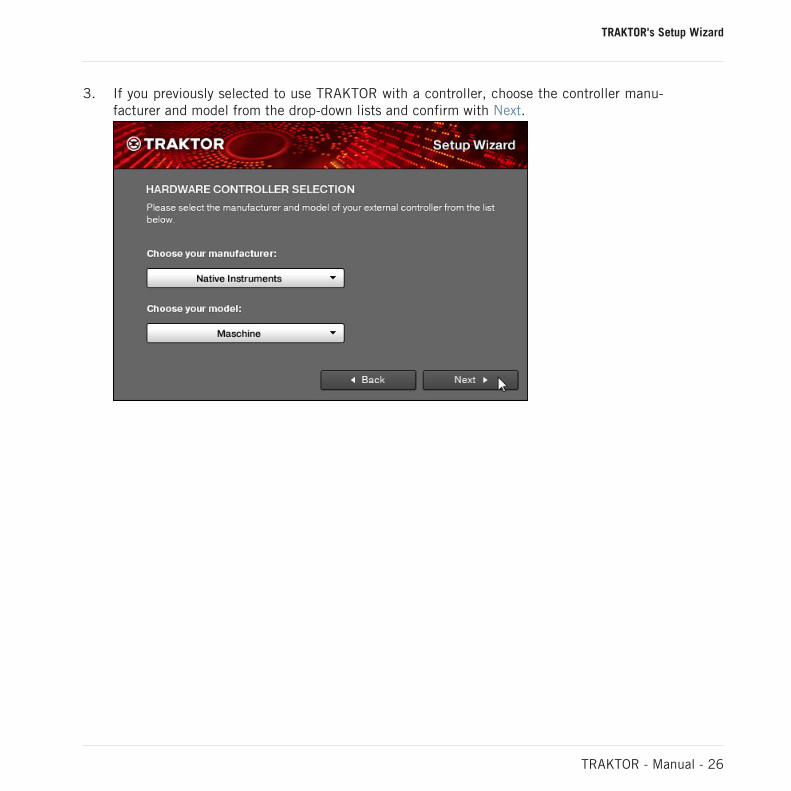
3. If you previously selected to use TRAKTOR with a controller, choose the controller manu-facturer and model from the drop-down lists and confirm with Next.
TRAKTOR's Setup Wizard
TRAKTOR - Manual - 26
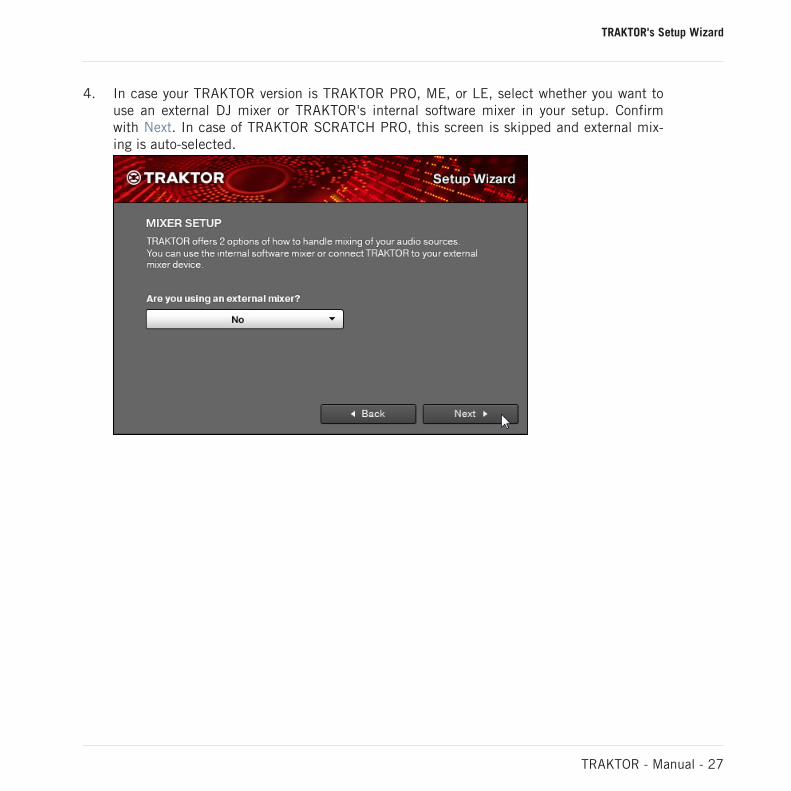
4. In case your TRAKTOR version is TRAKTOR PRO, ME, or LE, select whether you want touse an external DJ mixer or TRAKTOR's internal software mixer in your setup. Confirmwith Next. In case of TRAKTOR SCRATCH PRO, this screen is skipped and external mix-ing is auto-selected.
TRAKTOR's Setup Wizard
TRAKTOR - Manual - 27

5. Select a basic setup for your Decks (how many Decks and what Deck Flavors to use). Thiscan later be easily changed from within the software. The available options can vary, de-pending on your TRAKTOR version.
6. The last screen of the Setup Wizard sums up your selection of options. Below you see asummary screen with an exemplary configuration of TRAKTOR with: four Decks (two TrackDecks and two Remix Decks); an external DJ mixer; a German keyboard layout (derived
TRAKTOR's Setup Wizard
TRAKTOR - Manual - 28
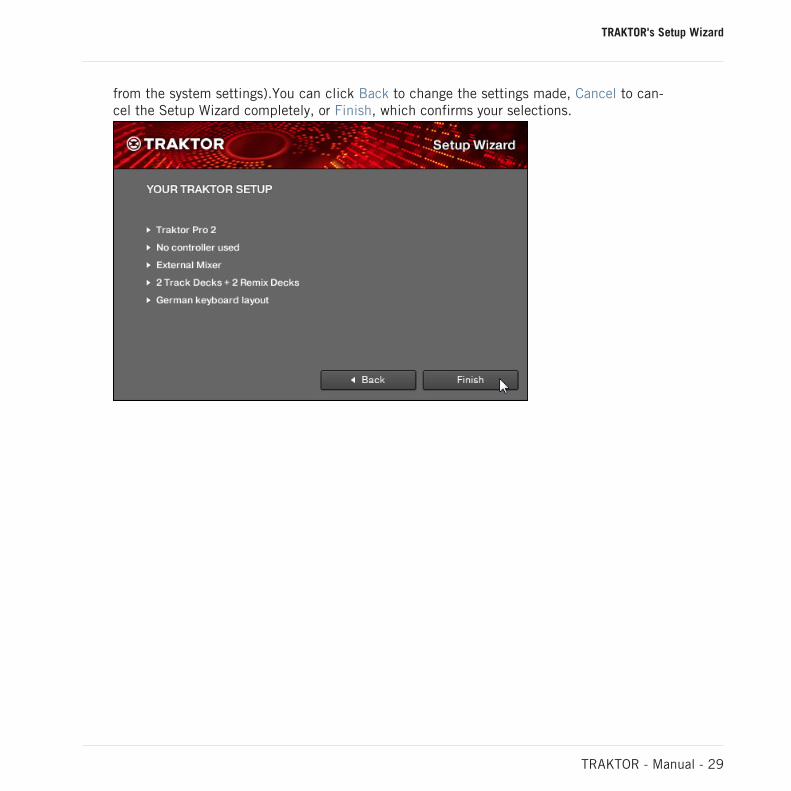
from the system settings).You can click Back to change the settings made, Cancel to can-cel the Setup Wizard completely, or Finish, which confirms your selections.
TRAKTOR's Setup Wizard
TRAKTOR - Manual - 29
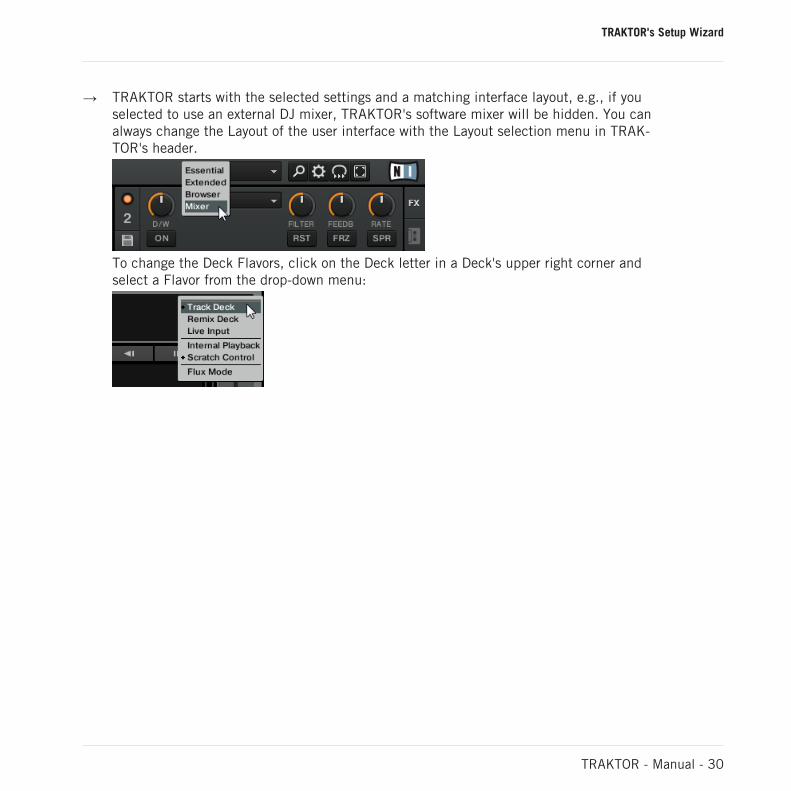
→ TRAKTOR starts with the selected settings and a matching interface layout, e.g., if youselected to use an external DJ mixer, TRAKTOR's software mixer will be hidden. You canalways change the Layout of the user interface with the Layout selection menu in TRAK-TOR's header.
To change the Deck Flavors, click on the Deck letter in a Deck's upper right corner andselect a Flavor from the drop-down menu:
TRAKTOR's Setup Wizard
TRAKTOR - Manual - 30
4 The User Interface (Overview)
This chapter will introduce you to TRAKTOR’s user interface.
Take the time to read these few pages, as they will familiarize you with the way TRAKTORworks and provide insight on the power of its design.
Preparation
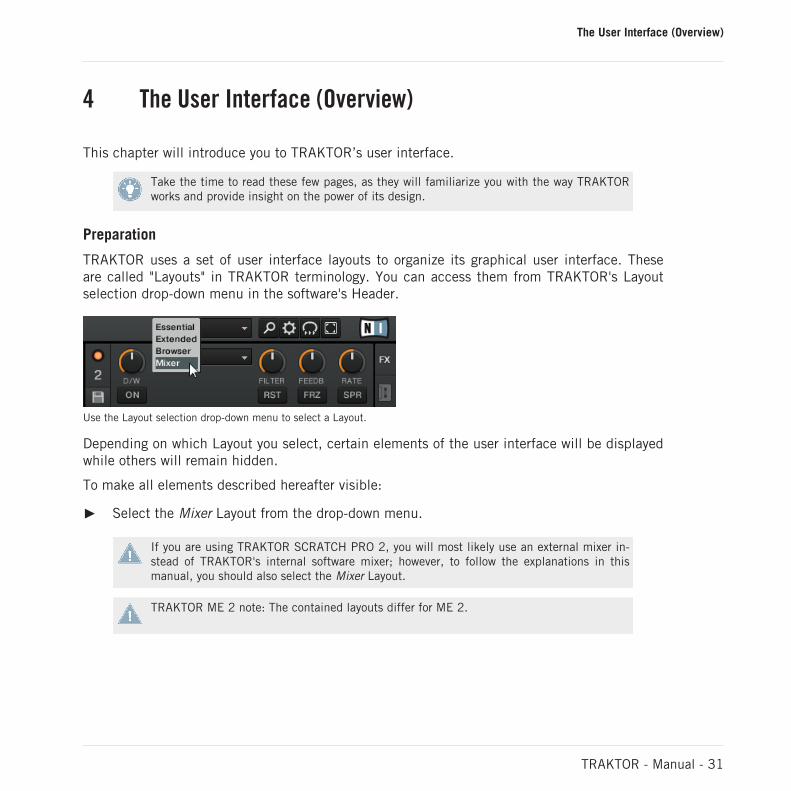
TRAKTOR uses a set of user interface layouts to organize its graphical user interface. Theseare called "Layouts" in TRAKTOR terminology. You can access them from TRAKTOR's Layoutselection drop-down menu in the software's Header.
Use the Layout selection drop-down menu to select a Layout.
Depending on which Layout you select, certain elements of the user interface will be displayedwhile others will remain hidden.
To make all elements described hereafter visible:
► Select the Mixer Layout from the drop-down menu.
If you are using TRAKTOR SCRATCH PRO 2, you will most likely use an external mixer in-stead of TRAKTOR's internal software mixer; however, to follow the explanations in thismanual, you should also select the Mixer Layout.
TRAKTOR ME 2 note: The contained layouts differ for ME 2.
The User Interface (Overview)
TRAKTOR - Manual - 31
4.1 The Big Picture
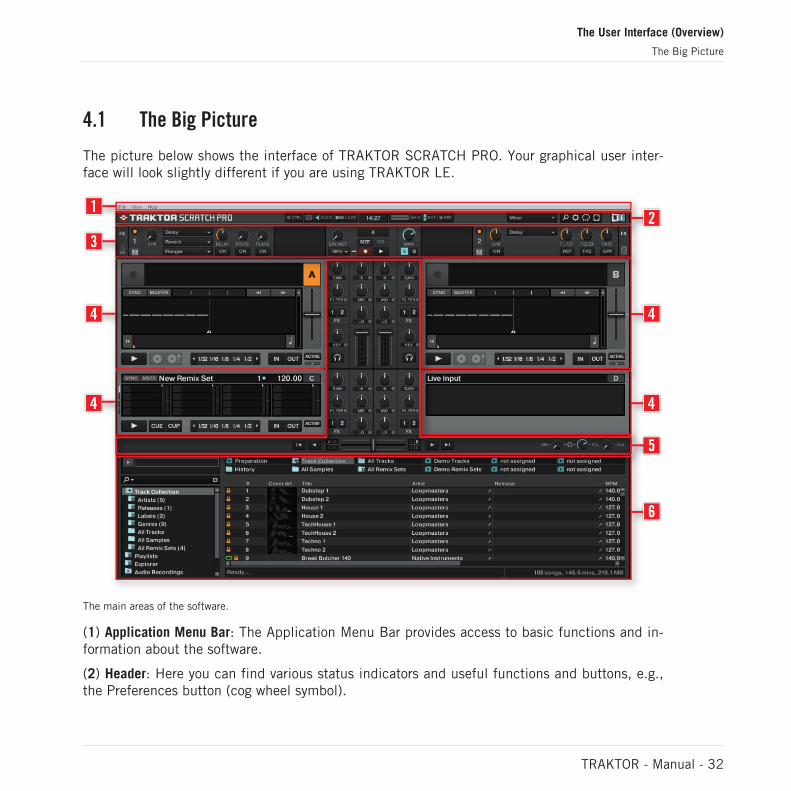
The picture below shows the interface of TRAKTOR SCRATCH PRO. Your graphical user inter-face will look slightly different if you are using TRAKTOR LE.
The main areas of the software.
(1) Application Menu Bar: The Application Menu Bar provides access to basic functions and in-formation about the software.
(2) Header: Here you can find various status indicators and useful functions and buttons, e.g.,the Preferences button (cog wheel symbol).
The User Interface (Overview)
The Big Picture
TRAKTOR - Manual - 32
(3) Global section: The Global section contains the FX Units, Master Clock, the Audio Recorder,and the Loop Recorder.
(4) Decks: TRAKTOR provides you with four virtual Decks. The Decks are the place wheretracks, Samples, and live input are played back. The Decks can be seen as the virtual equiva-lent to good old vinyl or CD decks. If you previously selected to use only two Decks from theSetup Wizard, you can make the lower Decks C and D visible via Preferences > Decks Layout >Deck Layout; simply put a checkmark next to Show C & D, and confirm by closing the Prefer-ences window.
(5) Mixer: Sitting in the middle of your TRAKTOR window is the Mixer. It receives on its four channels the audio signals coming from the four Decks described above. There is one channelfor each Deck. As with any DJ mixer, the Mixer’s basic purpose is to adjust the relative level ofeach channel, to control the channels’ frequency content, possibly feeding them into the FXUnits, before sending the overall result to your audience.
(6) Browser: The Browser manages all your tracks in a database, called the Track Collection (al-so Collection). You can group tracks in Playlists, sort them according to various attributes, andsearch within Playlists as well as in the whole Collection.
TRAKTOR LE 2 note: The Audio Recorder is not available in LE 2.
4.2 Interface Elements
This chapter explains the main areas and elements of the TRAKTOR 2 software.
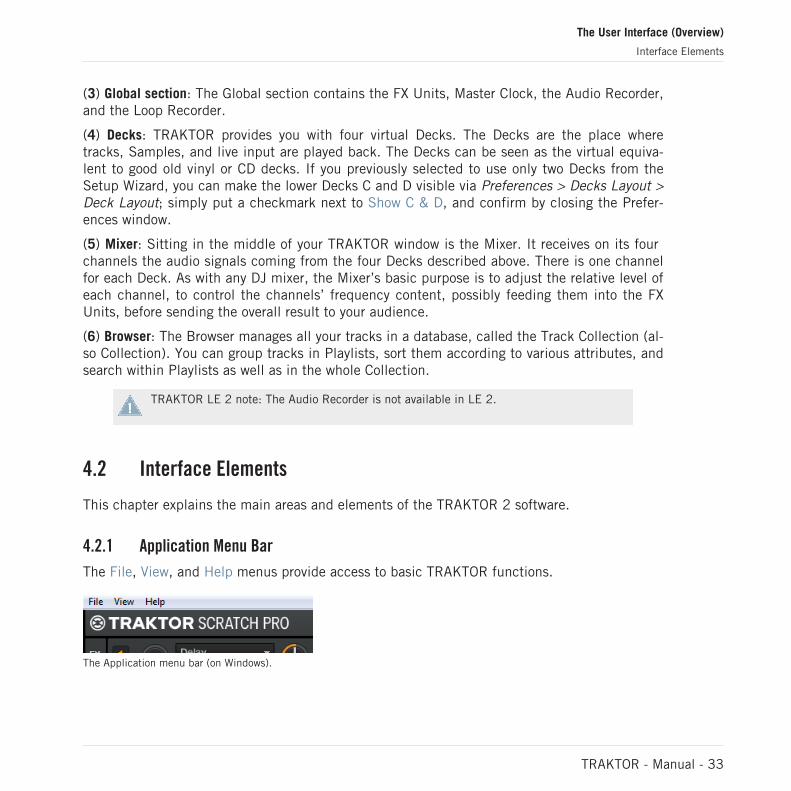
4.2.1 Application Menu Bar
The File, View, and Help menus provide access to basic TRAKTOR functions.
The Application menu bar (on Windows).
The User Interface (Overview)
Interface Elements
TRAKTOR - Manual - 33
4.2.2 Header
TRAKTOR’s Header.
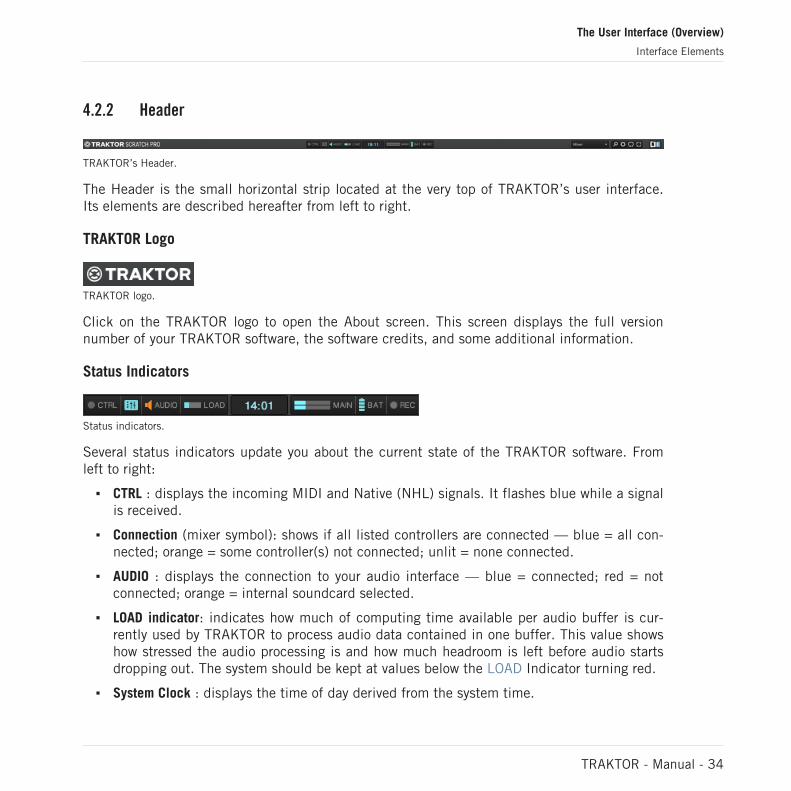
The Header is the small horizontal strip located at the very top of TRAKTOR’s user interface.Its elements are described hereafter from left to right.
TRAKTOR Logo
TRAKTOR logo.
Click on the TRAKTOR logo to open the About screen. This screen displays the full versionnumber of your TRAKTOR software, the software credits, and some additional information.
Status Indicators
Status indicators.
Several status indicators update you about the current state of the TRAKTOR software. Fromleft to right:
▪ CTRL : displays the incoming MIDI and Native (NHL) signals. It flashes blue while a signalis received.
▪ Connection (mixer symbol): shows if all listed controllers are connected — blue = all con-nected; orange = some controller(s) not connected; unlit = none connected.
▪ AUDIO : displays the connection to your audio interface — blue = connected; red = notconnected; orange = internal soundcard selected.
▪ LOAD indicator: indicates how much of computing time available per audio buffer is cur-rently used by TRAKTOR to process audio data contained in one buffer. This value showshow stressed the audio processing is and how much headroom is left before audio startsdropping out. The system should be kept at values below the LOAD Indicator turning red.
▪ System Clock : displays the time of day derived from the system time.
The User Interface (Overview)
Interface Elements
TRAKTOR - Manual - 34

▪ MAIN : displays the Master Output level. There are three colors: blue, orange and red. Ad-just it so that the MAIN level meter fully uses the available range (peaks go into the or-ange area) but without clipping (red area).
▪ BAT : gives information about how much power remains in your computer’s battery. Itglows blue if you have a power supply connected and red when you’re running out of bat-tery.
▪ REC : displays the status of TRAKTOR’s Audio Recorder. It turns red when recording.
TRAKTOR LE 2 note: The REC indicator is not available in LE 2.
Layout Selection Menu
Layout selection drop-down menu.
TRAKTOR uses a set of user interface layouts to organize its graphical user interface. Theseare called "Layouts" in TRAKTOR terminology. You can access them from TRAKTOR's Layoutselection menu.
Click on the drop-down menu and choose from one of the default Layouts. You can delete, de-fine, and save your own Layouts in TRAKTOR's Preferences.
TRAKTOR LE 2 note: Layout customizing and managing is not available in LE 2.
Utility Buttons
Utility buttons.
From left to right:
The User Interface (Overview)
Interface Elements
TRAKTOR - Manual - 35
▪ Maximize Browser : A click on this button will toggle the maximized Browser view whichcomes in handy whenever you’re searching for a track in a large list.
▪ Preferences : here you can open the Preferences — all TRAKTOR settings are made here.
▪ Cruise : if you activate this button, Cruise mode starts (i.e., autoplay of the current Play-list).
▪ Fullscreen : activates Fullscreen mode, where none of the operating system’s controls arevisible.
TRAKTOR ME 2 note: The Utility buttons are not available in ME 2.
4.2.3 Global Section
The Global section.
The Global section offers six distinct panels. Depending on the screen size and resolution ofyour computer, not all panels can be displayed at the same time. In that case, you can reachevery panel by clicking on the corresponding tab at the far left and right. We will describe ev-ery panel in the sections below.
TRAKTOR LE 2 note: Loop Recorder and Master Clock are disabled in LE 2. In addition tothis, the Snap and Quantize buttons are not available in LE 2.
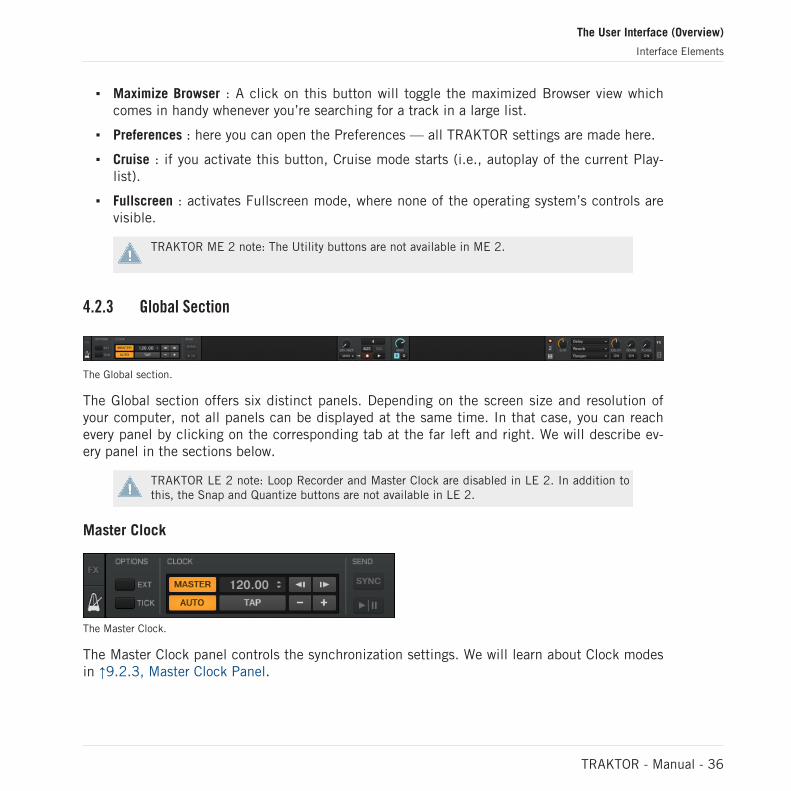
Master Clock
The Master Clock.
The Master Clock panel controls the synchronization settings. We will learn about Clock modesin ↑9.2.3, Master Clock Panel.
The User Interface (Overview)
Interface Elements
TRAKTOR - Manual - 36
TRAKTOR LE 2 note: The Master Clock is not available in LE 2.
TRAKTOR ME 2 note: The Master Clock is not available in ME 2.
FX Units
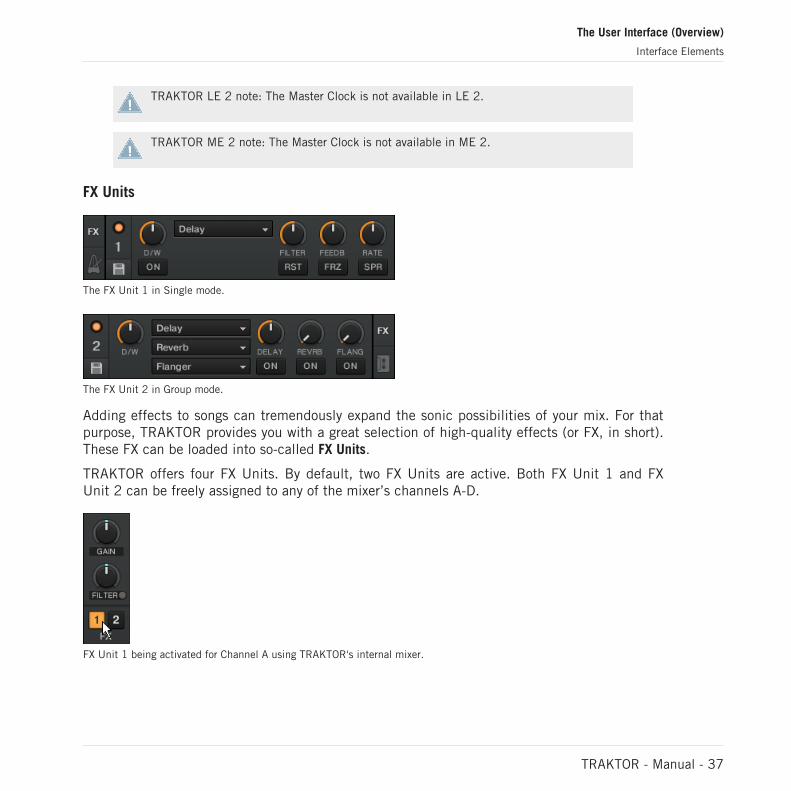
The FX Unit 1 in Single mode.
The FX Unit 2 in Group mode.
Adding effects to songs can tremendously expand the sonic possibilities of your mix. For thatpurpose, TRAKTOR provides you with a great selection of high-quality effects (or FX, in short).These FX can be loaded into so-called FX Units.
TRAKTOR offers four FX Units. By default, two FX Units are active. Both FX Unit 1 and FXUnit 2 can be freely assigned to any of the mixer’s channels A-D.
FX Unit 1 being activated for Channel A using TRAKTOR's internal mixer.
The User Interface (Overview)
Interface Elements
TRAKTOR - Manual - 37
You can choose from two different FX Unit modes in TRAKTOR: Either Single, where four but-tons and four knobs control one effect, or Group, where you can use three effects simultaneous-ly.
You can switch the FX Unit modes via Preferences > Effects > FX Panel Mode.
TRAKTOR LE 2 note: In LE 2, only one Group FX is available, and the number of effecttypes has been reduced.
TRAKTOR ME 2 note: Only the FX Group mode is available in ME 2.
For a detailed overview of FX units, please see ↑14.4, The Effects in Detail.
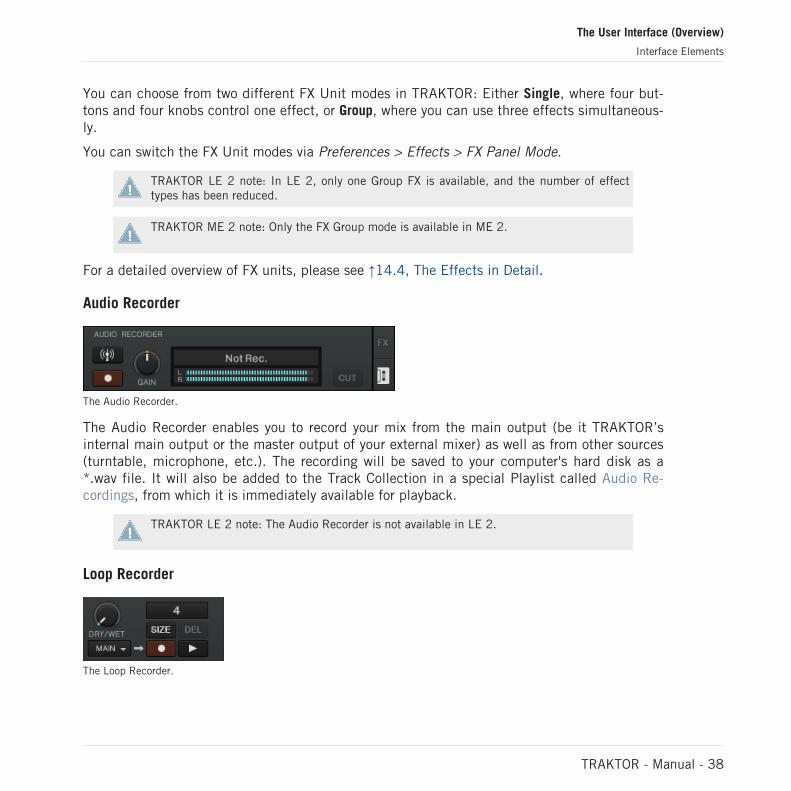
Audio Recorder
The Audio Recorder.
The Audio Recorder enables you to record your mix from the main output (be it TRAKTOR’sinternal main output or the master output of your external mixer) as well as from other sources(turntable, microphone, etc.). The recording will be saved to your computer's hard disk as a*.wav file. It will also be added to the Track Collection in a special Playlist called Audio Re-cordings, from which it is immediately available for playback.
TRAKTOR LE 2 note: The Audio Recorder is not available in LE 2.
Loop Recorder
The Loop Recorder.
The User Interface (Overview)
Interface Elements
TRAKTOR - Manual - 38
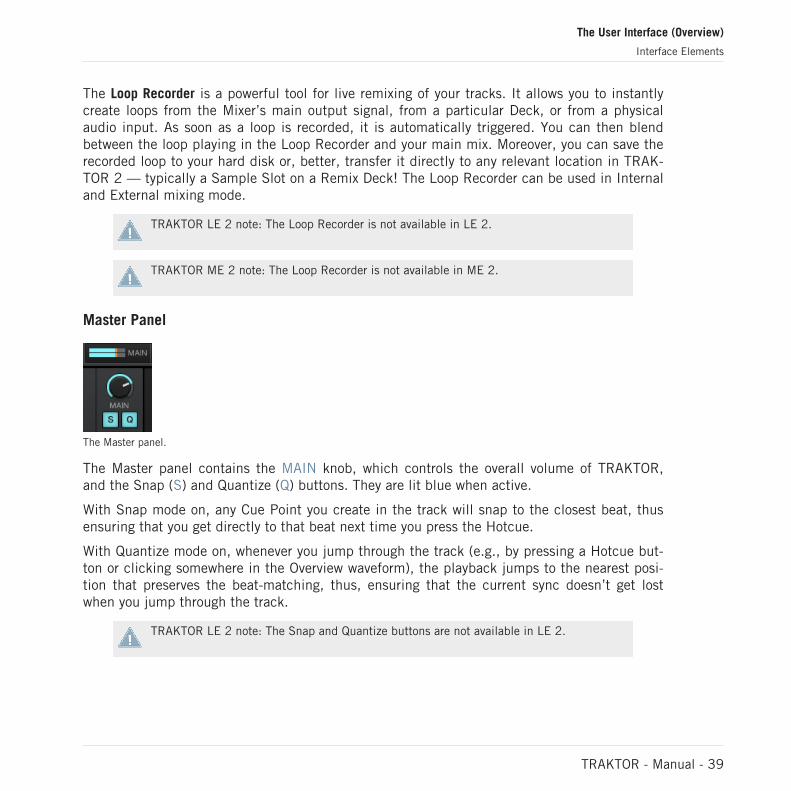
The Loop Recorder is a powerful tool for live remixing of your tracks. It allows you to instantlycreate loops from the Mixer’s main output signal, from a particular Deck, or from a physicalaudio input. As soon as a loop is recorded, it is automatically triggered. You can then blendbetween the loop playing in the Loop Recorder and your main mix. Moreover, you can save therecorded loop to your hard disk or, better, transfer it directly to any relevant location in TRAK-TOR 2 — typically a Sample Slot on a Remix Deck! The Loop Recorder can be used in Internaland External mixing mode.
TRAKTOR LE 2 note: The Loop Recorder is not available in LE 2.
TRAKTOR ME 2 note: The Loop Recorder is not available in ME 2.
Master Panel
The Master panel.
The Master panel contains the MAIN knob, which controls the overall volume of TRAKTOR,and the Snap (S) and Quantize (Q) buttons. They are lit blue when active.
With Snap mode on, any Cue Point you create in the track will snap to the closest beat, thusensuring that you get directly to that beat next time you press the Hotcue.
With Quantize mode on, whenever you jump through the track (e.g., by pressing a Hotcue but-ton or clicking somewhere in the Overview waveform), the playback jumps to the nearest posi-tion that preserves the beat-matching, thus, ensuring that the current sync doesn’t get lostwhen you jump through the track.
TRAKTOR LE 2 note: The Snap and Quantize buttons are not available in LE 2.
The User Interface (Overview)
Interface Elements
TRAKTOR - Manual - 39
4.2.4 Decks
TRAKTOR provides you with four virtual Decks. The Decks can be operated in different Deckmodes (which are called Deck Flavors in TRAKTOR terminology). The available Flavors are:
▪ Track Deck Flavor
▪ Remix Deck Flavor
▪ Live Input Flavor
See the following sections for a quick overview. For a more detailed description of the Decksand their control elements, please refer to chapter ↑6, The Decks.
Track Deck
The Track Deck in TRAKTOR is the equivalent of a record player or a CD player in a classicmixing setup; however, TRAKTOR's Track Decks come with an arsenal of additional mixing fea-tures to be utilized in your mix.
The User Interface (Overview)
Interface Elements
TRAKTOR - Manual - 40
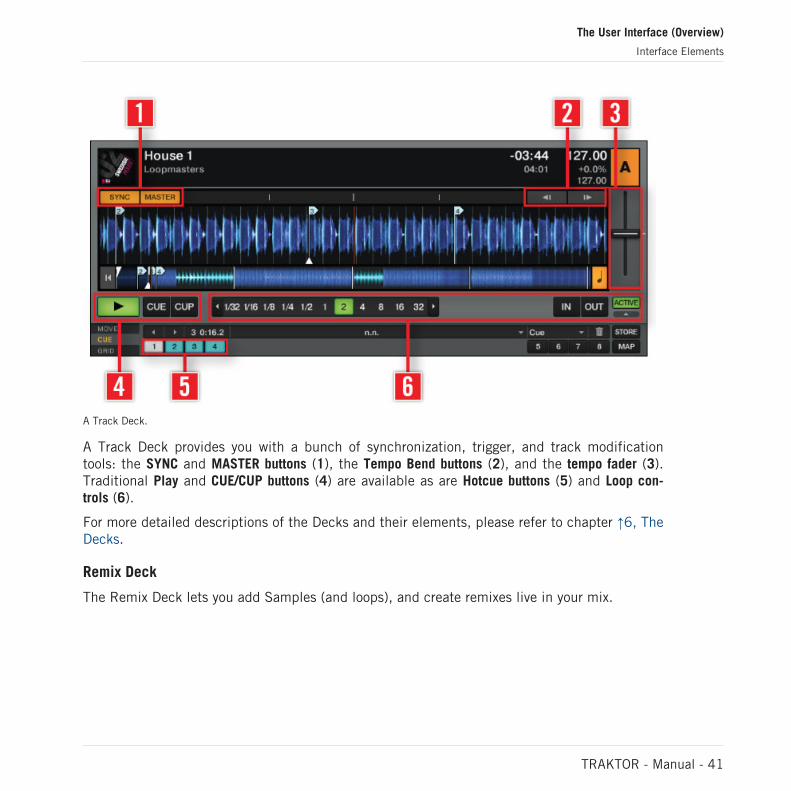
A Track Deck.
A Track Deck provides you with a bunch of synchronization, trigger, and track modificationtools: the SYNC and MASTER buttons (1), the Tempo Bend buttons (2), and the tempo fader (3).Traditional Play and CUE/CUP buttons (4) are available as are Hotcue buttons (5) and Loop con-trols (6).
For more detailed descriptions of the Decks and their elements, please refer to chapter ↑6, TheDecks.
Remix Deck
The Remix Deck lets you add Samples (and loops), and create remixes live in your mix.
The User Interface (Overview)
Interface Elements
TRAKTOR - Manual - 41
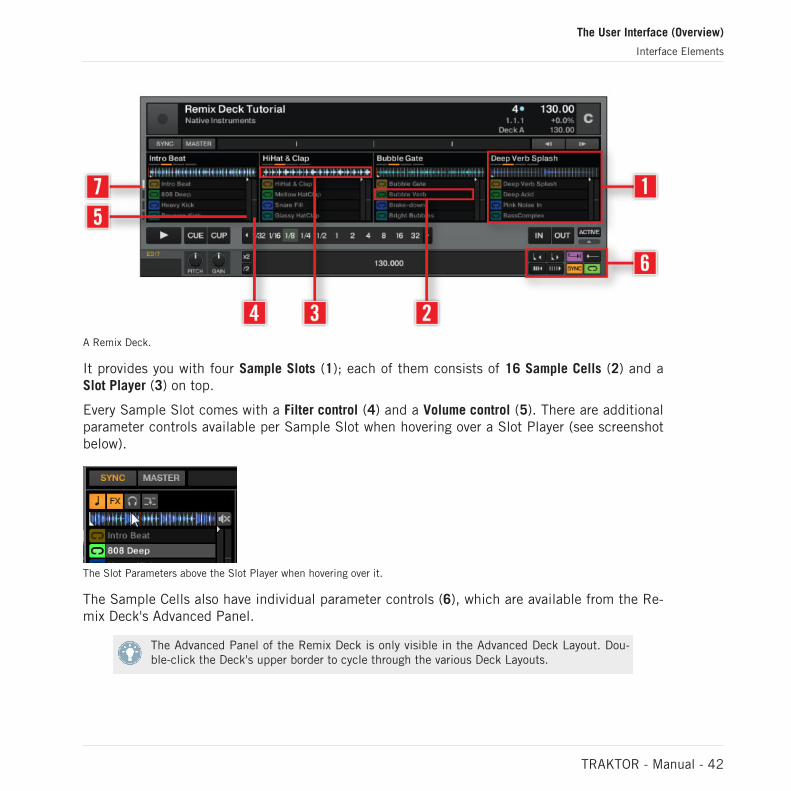
A Remix Deck.
It provides you with four Sample Slots (1); each of them consists of 16 Sample Cells (2) and aSlot Player (3) on top.
Every Sample Slot comes with a Filter control (4) and a Volume control (5). There are additionalparameter controls available per Sample Slot when hovering over a Slot Player (see screenshotbelow).
The Slot Parameters above the Slot Player when hovering over it.
The Sample Cells also have individual parameter controls (6), which are available from the Re-mix Deck's Advanced Panel.
The Advanced Panel of the Remix Deck is only visible in the Advanced Deck Layout. Dou-ble-click the Deck's upper border to cycle through the various Deck Layouts.
The User Interface (Overview)
Interface Elements
TRAKTOR - Manual - 42
The entirety of the Sample Cells (4x16 equals 64 Sample Cells in total) amounts to the SampleGrid of the Remix Deck. To navigate through the pages of the Sample Grid, use the Page Selec-tor buttons (7).
You can build complex sets and then save a Remix Deck as a Remix Set to your Collection.
For a better understanding of the Remix Deck (especially if you are coming from an olderversion of TRAKTOR, and are used to the former Sample Decks), it is also important toknow that this Deck Flavor is now a fully functional Deck, completely independent with itsown Tempo, Transport controls, Sync, and it can be scratched using Timecode. Therefore,it shares a common set of basic Deck controls with the Track Deck, such as the Transportbuttons, SYNC/MASTER controls, Loop controls, etc. These unified Deck controls can bemapped to a MIDI controller and respond to the same trigger across both Deck Flavors,Track Deck and Remix Deck, so you only have to map the control once; when initiated, itwill affect the Deck currently in focus. For more information on mapping controls in TRAK-TOR, please refer to the Controller Manager manual.
Find an in-depth description of the Remix Deck and all of its elements in ↑6.1.2, Remix Deck.For a tutorial on using a Remix Deck, please refer to ↑15.8, Using the Remix Decks in YourMix.
TRAKTOR LE 2 note: The Remix Decks are not available in LE 2.
TRAKTOR ME 2 note: The Remix Decks are not available in ME 2.
The User Interface (Overview)
Interface Elements
TRAKTOR - Manual - 43
Live Input
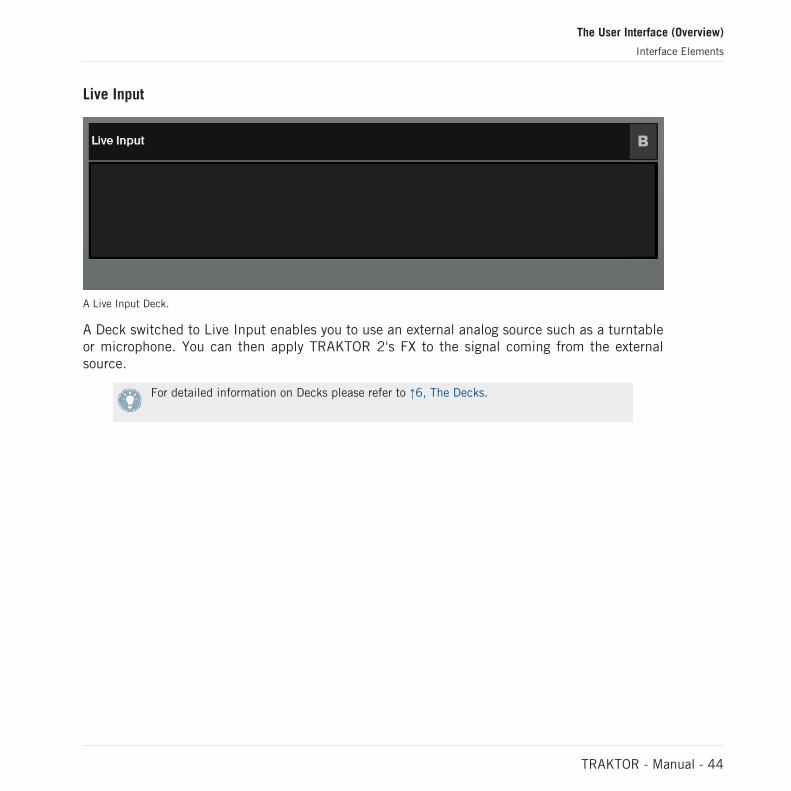
A Live Input Deck.
A Deck switched to Live Input enables you to use an external analog source such as a turntableor microphone. You can then apply TRAKTOR 2's FX to the signal coming from the externalsource.
For detailed information on Decks please refer to ↑6, The Decks.
The User Interface (Overview)
Interface Elements
TRAKTOR - Manual - 44
4.2.5 Mixer
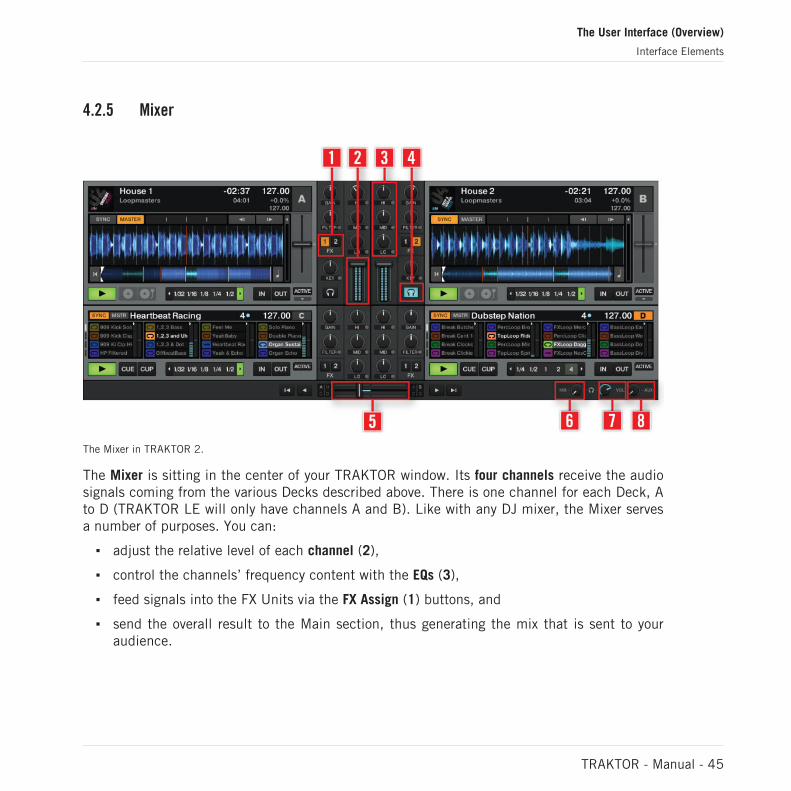
The Mixer in TRAKTOR 2.
The Mixer is sitting in the center of your TRAKTOR window. Its four channels receive the audiosignals coming from the various Decks described above. There is one channel for each Deck, Ato D (TRAKTOR LE will only have channels A and B). Like with any DJ mixer, the Mixer servesa number of purposes. You can:
▪ adjust the relative level of each channel (2),
▪ control the channels’ frequency content with the EQs (3),
▪ feed signals into the FX Units via the FX Assign (1) buttons, and
▪ send the overall result to the Main section, thus generating the mix that is sent to youraudience.
The User Interface (Overview)
Interface Elements
TRAKTOR - Manual - 45
Of course, the Mixer also provides you with a crossfader (5), which allows you to make seam-less transitions between various channels, and Headphones Cue (4) buttons to pre-listen to yoursongs. Cue Mix (6) and Cue Vol knobs (7) controlling your headphones signal can be found onthe right of the crossfader (5). The AUX knob (8) controls the volume of the Aux input, whichcan be fed by an external signal like a microphone.
TRAKTOR LE 2 note: FX assignments are fixed, and no PAN knobs are available in LE 2.
For more information on the Mixer, please read ↑7, The Internal Mixer & the Crossfader.
4.2.6 Browser
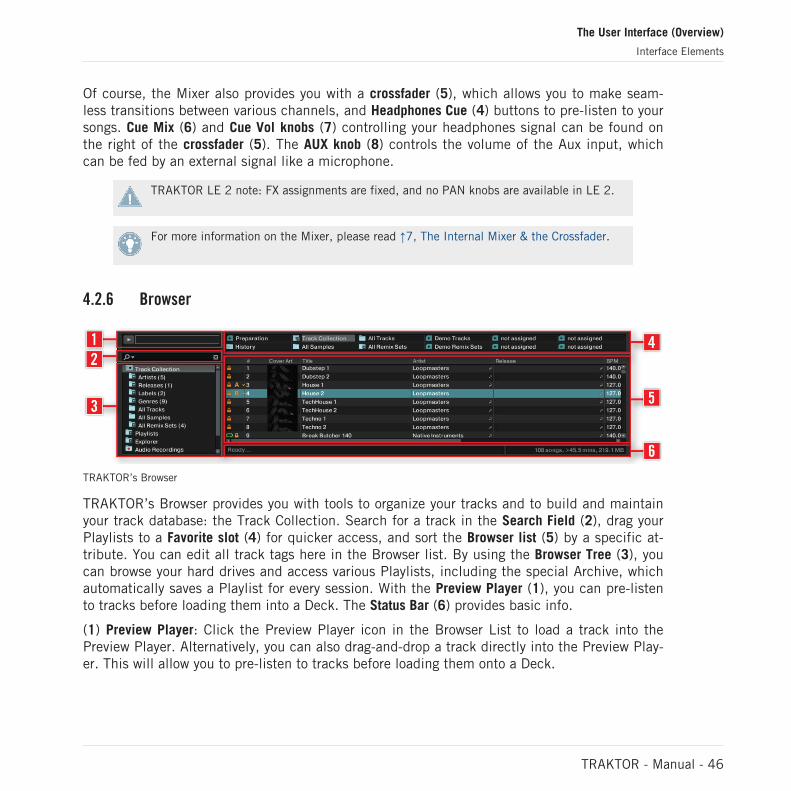
TRAKTOR’s Browser
TRAKTOR’s Browser provides you with tools to organize your tracks and to build and maintainyour track database: the Track Collection. Search for a track in the Search Field (2), drag yourPlaylists to a Favorite slot (4) for quicker access, and sort the Browser list (5) by a specific at-tribute. You can edit all track tags here in the Browser list. By using the Browser Tree (3), youcan browse your hard drives and access various Playlists, including the special Archive, whichautomatically saves a Playlist for every session. With the Preview Player (1), you can pre-listento tracks before loading them into a Deck. The Status Bar (6) provides basic info.
(1) Preview Player: Click the Preview Player icon in the Browser List to load a track into thePreview Player. Alternatively, you can also drag-and-drop a track directly into the Preview Play-er. This will allow you to pre-listen to tracks before loading them onto a Deck.
The User Interface (Overview)
Interface Elements
TRAKTOR - Manual - 46
(2) Search Field: provides a live search based on the tags of the tracks in the Collection. Readmore in chapter ↑5.4, Track Search called Finding Tracks (Search).
(3) Browser Tree:
▪ Track Collection: contains all Tracks imported to your Collection. They are automaticallysorted by Artist, Release, Label or Genre.
▪ Playlists: contains all your TRAKTOR Playlists.
▪ Explorer: Browse your hard drive for music tracks. This can be useful in finding trackswhich have not been imported.
◦ Archive: Via the Archive browser sub-node in the Explorer node you can quickly accessthe folder containing all your History Playlists. Each History Playlist is time-stampedand contains the additional columns “Start-Time”, “Duration”, “Deck” for more infor-mation about when and how you have played the track.
▪ Audio Recordings: contains all recordings done with the TRAKTOR Audio Recorder.
▪ iTunes: provides direct access to your iTunes Library including all Playlists.
▪ Favorites: Favorites provide direct access to Playlists or folders. Drag and drop a folder orPlaylist onto one of the Favorites slots to map them.
▪ Track Info: displays the title and the artist of the currently chosen track.
▪ History: contains the History Playlist of your current session. It is stored automatically af-ter every session. You can find History Playlists from former sessions in the Archive sub-node of the Explorer node.
(4) Favorite Slot: drag and drop any folder or Playlist from the Browser List.
(5) Browser List: shows tracks depending on the source that is selected (folder, Playlist, searchresults or tag-based).
▪ Click on the column headline to sort the list. Another click inverts the sorting.
▪ Right-/[Ctrl]-Click on the column headline to customize which columns are displayed orhidden.
▪ Drag-and-drop columns to the left or to the right to re-arrange their order.
(6) Status Bar: displays track analysis progress, analyzing, error messages, and the overall sta-tus of TRAKTOR.
The User Interface (Overview)
Interface Elements
TRAKTOR - Manual - 47

For further information on the Browser, please refer to ↑5, The Browser.
The User Interface (Overview)
Interface Elements
TRAKTOR - Manual - 48
5 The Browser
This section provides detailed information on TRAKTOR’s Browser. The Browser’s primary de-sign is to help you quickly manage your songs through the use of Playlists. Let’s first look atwhich file types are compatible with TRAKTOR.
Compatible Music File Formats
TRAKTOR supports the following music file formats:
▪ MP3
▪ M4A (AAC)
▪ WAV
▪ AIFF
▪ WMA
▪ FLAC
▪ OGG Vorbis
DRM-protected music files cannot be played back in TRAKTOR. This affects for exampleAAC-tracks bought in the iTunes store.
You have to install Windows Media Player in order to use WMA files in TRAKTOR.
You have to install QuickTime in order to use M4A files in TRAKTOR.
5.1 The Track Collection
TRAKTOR's Track Collection (or simply “Collection”) represents the music that you have used,that you are using, or that you plan to use in TRAKTOR.
The Browser
The Track Collection
TRAKTOR - Manual - 49

Based on the music files on your computer, the Collection makes it easy to organize, tag, andprepare your tracks for being played as part of your mix.
Worth noting is that the Track Collection doesn’t care about the actual file structure onyour hard disk, nor will it alter this structure in any way (as long as you don’t delete yourfiles from within TRAKTOR).
The Track Collection is:
▪ A database storing information about your music files.
▪ A convenient way to filter your music files by many of their characteristics (tags) like title,artist name, BPM, genre, etc.
▪ The place where TRAKTOR-specific information about your tracks is stored.
▪ The basis on which you can create your Playlists.
The Track Collection is not:
▪ Moving, copying, or converting any audio file to some secret location.
▪ Modifying in any way the hierarchic structure of the files on your hard disk.
To make use of the Track Collection, you have to populate it by importing your music files.
TRAKTOR reads existing song tags during the import of the music and writes tags to thetracks immediately when you change some property of one or more track(s), like changingthe Genre of a song.
5.2 Importing Music Folders
TRAKTOR offers an easy import function for tracks stored on your hard drive:
► Right-click (Windows) or [Ctrl]+click (Mac OS X) on the Collection icon in the BrowserTree and select Import Music Folders from the menu.
The Browser
Importing Music Folders
TRAKTOR - Manual - 50
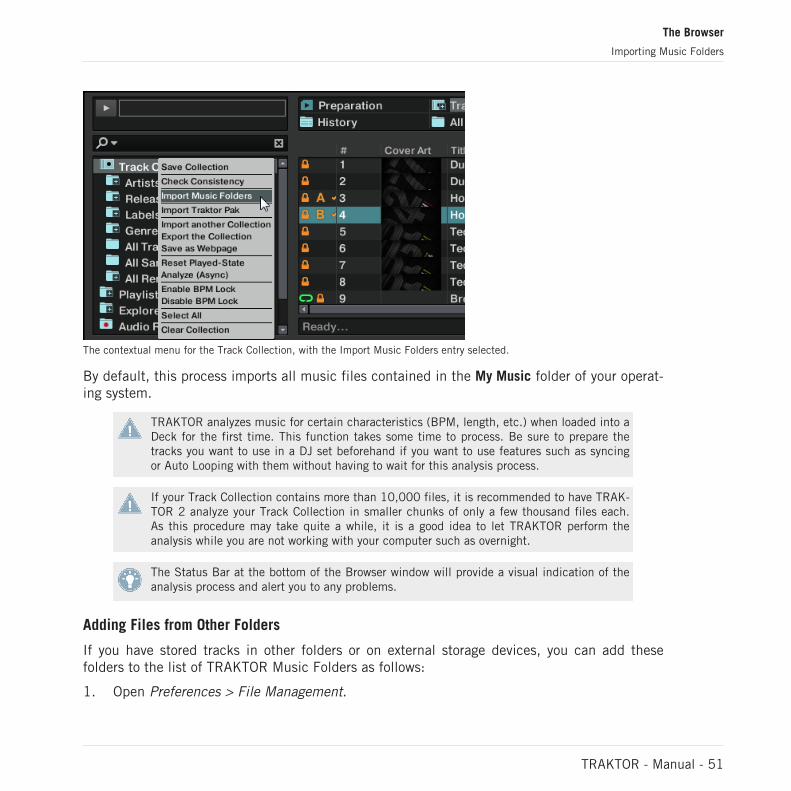
The contextual menu for the Track Collection, with the Import Music Folders entry selected.
By default, this process imports all music files contained in the My Music folder of your operat-ing system.
TRAKTOR analyzes music for certain characteristics (BPM, length, etc.) when loaded into aDeck for the first time. This function takes some time to process. Be sure to prepare thetracks you want to use in a DJ set beforehand if you want to use features such as syncingor Auto Looping with them without having to wait for this analysis process.
If your Track Collection contains more than 10,000 files, it is recommended to have TRAK-TOR 2 analyze your Track Collection in smaller chunks of only a few thousand files each.As this procedure may take quite a while, it is a good idea to let TRAKTOR perform theanalysis while you are not working with your computer such as overnight.
The Status Bar at the bottom of the Browser window will provide a visual indication of theanalysis process and alert you to any problems.
Adding Files from Other Folders
If you have stored tracks in other folders or on external storage devices, you can add thesefolders to the list of TRAKTOR Music Folders as follows:
1. Open Preferences > File Management.
The Browser
Importing Music Folders
TRAKTOR - Manual - 51
2. Click Add… at the bottom of the Music Folders section.3. Navigate to a folder you want to add.4. Confirm with Choose (Mac OS X) or OK (Windows).5. Click Close to apply the changes.Repeat to add all of your music folders.
Subfolders are automatically included in the scan. Hence, you don’t need to add them tothis list.
5.2.1 Alternative Importing Methods
TRAKTOR offers alternative methods to import single tracks and special folders that are notpart of your normal Music Folder structure:
► Drag and drop a track or folder from either the Mac OS X Finder or Windows Explorer ontothe Collection icon within the TRAKTOR Browser Tree.
or
► Drag and drop a track or a folder from within the TRAKTOR Explorer icon. This Icon rep-resents all of the drives connected to your computer.
or
► You can also right-/[Ctrl]-click on a track or folder within the TRAKTOR Explorer icon andchoose Add to Collection.
Any track played within a Deck will be added to the collection.
5.3 Tracks Managed by iTunes
If you have organized your music collection with iTunes, TRAKTOR offers direct access to youriTunes Library and your iTunes Playlists.
The Browser
Importing Music Folders
TRAKTOR - Manual - 52
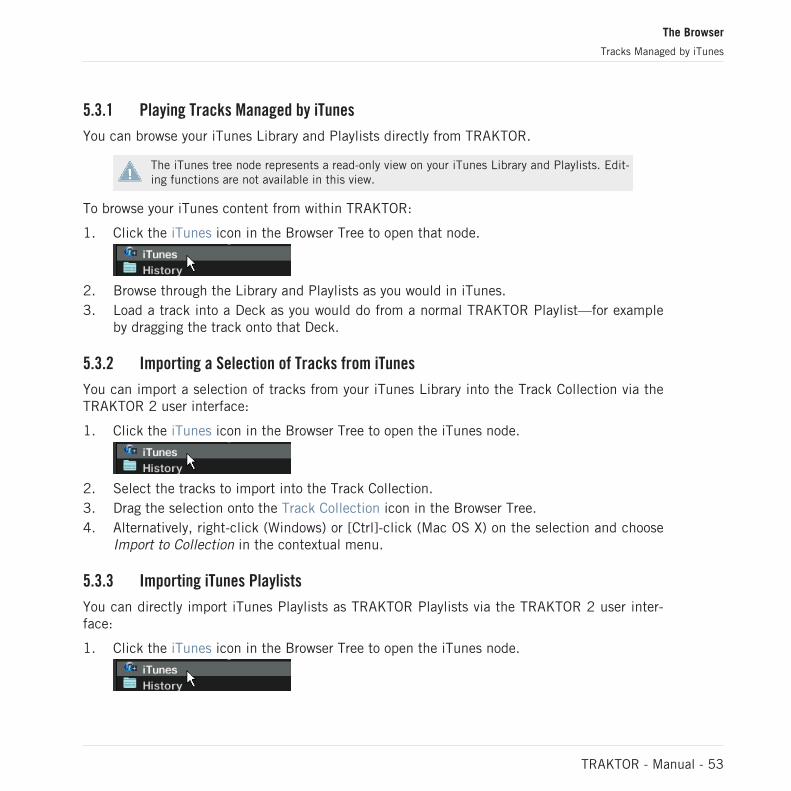
5.3.1 Playing Tracks Managed by iTunes
You can browse your iTunes Library and Playlists directly from TRAKTOR.
The iTunes tree node represents a read-only view on your iTunes Library and Playlists. Edit-ing functions are not available in this view.
To browse your iTunes content from within TRAKTOR:
1. Click the iTunes icon in the Browser Tree to open that node.
2. Browse through the Library and Playlists as you would in iTunes.3. Load a track into a Deck as you would do from a normal TRAKTOR Playlist—for example
by dragging the track onto that Deck.
5.3.2 Importing a Selection of Tracks from iTunes
You can import a selection of tracks from your iTunes Library into the Track Collection via theTRAKTOR 2 user interface:
1. Click the iTunes icon in the Browser Tree to open the iTunes node.
2. Select the tracks to import into the Track Collection.3. Drag the selection onto the Track Collection icon in the Browser Tree.4. Alternatively, right-click (Windows) or [Ctrl]-click (Mac OS X) on the selection and choose
Import to Collection in the contextual menu.
5.3.3 Importing iTunes Playlists
You can directly import iTunes Playlists as TRAKTOR Playlists via the TRAKTOR 2 user inter-face:
1. Click the iTunes icon in the Browser Tree to open the iTunes node.
The Browser
Tracks Managed by iTunes
TRAKTOR - Manual - 53
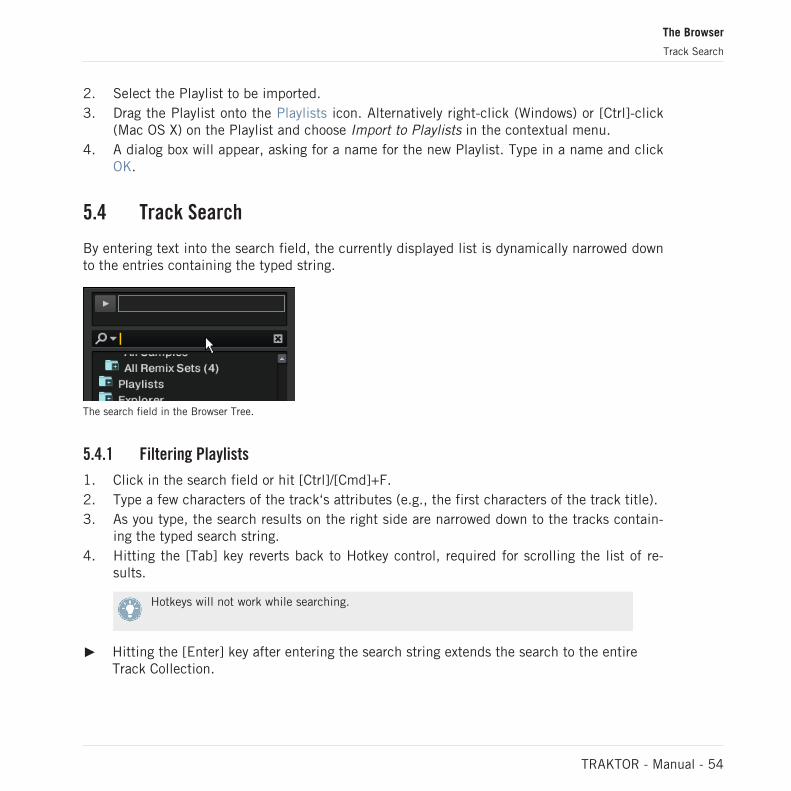
2. Select the Playlist to be imported.3. Drag the Playlist onto the Playlists icon. Alternatively right-click (Windows) or [Ctrl]-click
(Mac OS X) on the Playlist and choose Import to Playlists in the contextual menu.4. A dialog box will appear, asking for a name for the new Playlist. Type in a name and click
OK.
5.4 Track Search
By entering text into the search field, the currently displayed list is dynamically narrowed downto the entries containing the typed string.
The search field in the Browser Tree.
5.4.1 Filtering Playlists
1. Click in the search field or hit [Ctrl]/[Cmd]+F.2. Type a few characters of the track‘s attributes (e.g., the first characters of the track title).3. As you type, the search results on the right side are narrowed down to the tracks contain-
ing the typed search string.4. Hitting the [Tab] key reverts back to Hotkey control, required for scrolling the list of re-
sults.
Hotkeys will not work while searching.
► Hitting the [Enter] key after entering the search string extends the search to the entireTrack Collection.
The Browser
Track Search
TRAKTOR - Manual - 54
► Pressing [Esc] clears the search string and terminates text entry mode.
► Each individual Playlist will retain independent search entries until they are cleared fromthe text entry box.
5.4.2 Refining a Search
You can narrow a search to a specific subset of metadata fields by selecting one of the optionsfrom the Refine List.
1. Type a word into the search field.2. Click the Refine button (magnifying glass) behind the Search field and choose a field
from the drop-down menu.3. The list is narrowed down to only display tracks fitting the criteria chosen from the drop-
down menu.
5.4.3 Searching for Similar Tracks
In the Browser List, you will notice that some metadata fields have a small Magnifying Glassicon. Click this to search for tracks sharing the category of that specific metadata field. Forexample:
► In the Browser List, click the Magnifying Glass next to an artist name.
→ TRAKTOR will search for tracks sharing the same information within the Artist field.
5.4.4 Search in Playlists
You can call up a list of all Playlists containing a certain track.
1. In the Browser List, right-/[Ctrl]-click on a track and choose Show in Playlists. A list isshown with all of the Playlists containing this track.
2. Click on an entry to select a Playlist.
→ The entries are displayed in the Browser List.
The Browser
Track Search
TRAKTOR - Manual - 55
5.5 Working with the Track Collection and Playlists
Playlists are an effective way of organizing your tracks while preparing for a set. Essentially,Playlists offer a means of grouping tracks into an order that has several significant advantagesover physical record crates.
► One track can be contained in multiple Playlists.
► A Playlist can be re-ordered or reset to the original state rapidly.
► Additional advantages are saving, loading and exporting Playlists.
5.5.1 Creating a Playlist
Method I:
1. Right-/[Ctrl]-click on the Playlists folder icon in the Browser Tree.2. Choose Create Playlist from the context menu.3. Type a name for your new Playlist into the window.4. Click OK to confirm.5. Your new Playlist will appear under the Playlists folder.
Method II:
1. Select one or more tracks in the Browser List.2. Drag these tracks onto the Playlists folder in the Browser Tree.3. Type a name for your Playlist in the pop-up window.4. Click OK to confirm.5. Your new Playlist will now appear under the Playlists folder.
5.5.2 Adding Tracks to Playlists
1. Click and hold one or more tracks.
The Browser
Working with the Track Collection and Playlists
TRAKTOR - Manual - 56
2. Drag it onto a Playlist of your choice while holding the mouse button. The view of theBrowser List changes and shows the destination Playlist. (This behavior is shown if thePlaylist follows its original order.)
3. If you move your mouse over the content of the Playlist now, you will see a red line indi-cating where the track(s) will be inserted when releasing the mouse button.
4. If the Playlist has a sorted order, the track(s) will be inserted according to the sorting.
This behavior is shown if the Playlist follows a sorted order.
5.5.3 Showing Tracks in Collection
When browsing inside the Explorer Node of the Browser Tree or in the iTunes folder withinTRAKTOR, all tracks that are already imported into the Track Collection have the option Showin Collection when right-/[Ctrl]-clicking them. The browser then directly jumps to the tracks inyour collection.
5.5.4 Deleting Tracks
General Deleting Options
To delete tracks from your collection, select the tracks to be deleted, then right-/[Ctrl]-click onthe selection and select the Delete entry from the context menu. The security dialog contains 3different options to choose from:
Delete from collection
If this option is checked the chosen track(s) will be removed from the collection.
Deleting track(s) from the Collection will also delete them from all Playlists.
Delete from collection and remove TRAKTOR tags
If this option is checked all TRAKTOR specific tags will be removed from the music files.
Delete from collection and delete from hard drive
Check this option if you want to completely erase the music file(s) from your computer.
The Browser
Working with the Track Collection and Playlists
TRAKTOR - Manual - 57
Deleting Tracks from One Playlist
There are two ways for deleting tracks:
► Click on one or more track(s) and press the [Del] or [Backspace] key of your computerkeyboard.
or
► Right-/[Ctrl]-click on one or more track(s) and choose Delete.
5.5.5 Sorting Playlists
There are several ways to sort and arrange Playlists. Changes to the sort order can be undoneby clicking on #.
Sorting by Columns
1. Click on the name of the column header to sort the Playlist by this category. Click a sec-ond time to invert the sort order.
2. Click on the header of the #-column to restore the Playlist to its original order.3. After restarting TRAKTOR all Playlists will reset to their original order.
Consolidating a new Sorting Order
1. Click on the name of the column header to sort the Playlist by this category.2. To make the new order permanent, right-/[Ctrl]-click on that Playlist’s icon and choose the
option Consolidate.
Permanently Changing the Position of Selected Tracks within a Playlist
1. Reset a Playlist to its original order by clicking on the header of the #-Column.2. Select one or more track(s) and drag them up or down in the Playlist.3. The red line indicates where the selection will drop when releasing the mouse button.
This is only possible when the Playlist is in its original order which you get by clicking onthe header of the #-Column.
The Browser
Working with the Track Collection and Playlists
TRAKTOR - Manual - 58
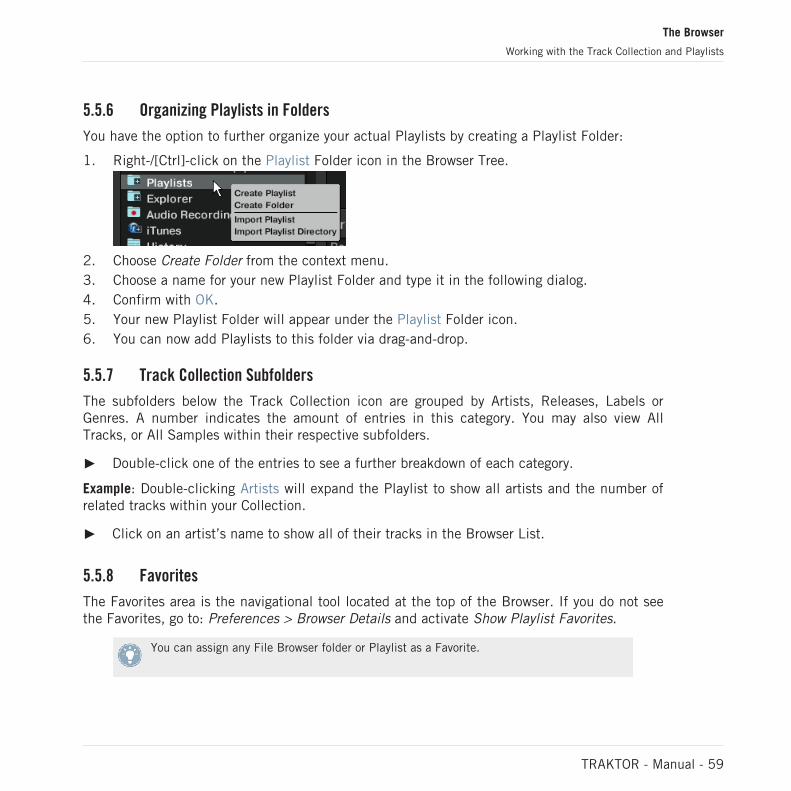
5.5.6 Organizing Playlists in Folders
You have the option to further organize your actual Playlists by creating a Playlist Folder:
1. Right-/[Ctrl]-click on the Playlist Folder icon in the Browser Tree.
2. Choose Create Folder from the context menu.3. Choose a name for your new Playlist Folder and type it in the following dialog.4. Confirm with OK.5. Your new Playlist Folder will appear under the Playlist Folder icon.6. You can now add Playlists to this folder via drag-and-drop.
5.5.7 Track Collection Subfolders
The subfolders below the Track Collection icon are grouped by Artists, Releases, Labels orGenres. A number indicates the amount of entries in this category. You may also view AllTracks, or All Samples within their respective subfolders.
► Double-click one of the entries to see a further breakdown of each category.
Example: Double-clicking Artists will expand the Playlist to show all artists and the number ofrelated tracks within your Collection.
► Click on an artist’s name to show all of their tracks in the Browser List.
5.5.8 Favorites
The Favorites area is the navigational tool located at the top of the Browser. If you do not seethe Favorites, go to: Preferences > Browser Details and activate Show Playlist Favorites.
You can assign any File Browser folder or Playlist as a Favorite.
The Browser
Working with the Track Collection and Playlists
TRAKTOR - Manual - 59
Pre-assigned Favorites:
▪ Track Collection
▪ History
▪ Preparation
▪ All Tracks
▪ All Samples
▪ All Remix Sets
▪ Demo Tracks
▪ Demo Loops
▪ Demo One-Shots
To create a new Favorite:
1. Click the Playlists folder to browse its contents.2. Click, hold and drag the Playlist name onto a free (not assigned) Favorite slot.Now you can access the Playlist quickly by clicking on the relevant Favorite.
Dragging a new Playlist onto an existing Favorite will replace the previous Favorite with thenew one.
5.5.9 Preparation Playlists
Any Playlist can be defined as the Preparation Playlist, but only one Playlist can be the Prepa-ration Playlist at a time. The Preparation Playlist has the following special features:
▪ The Playlist icon changes to a dedicated Preparation Playlist icon.
▪ Each track contained in the Preparation Playlist is displayed with a diamond icon. Theicon suggests a “Waiting” state. This way you can see what tracks you already added tothe Preparation Playlist while browsing.
▪ Right-/[Ctrl]-click on any Playlist and choose Select as Preparation List to change this listinto the Preparation List.
The Browser
Working with the Track Collection and Playlists
TRAKTOR - Manual - 60
▪ Right-/[Ctrl]-click on any track(s) and choose Append to Preparation Playlist to add the se-lection to the Preparation Playlist.
▪ Right-/[Ctrl]-click on any track(s) and choose Add as Next to Preparation Playlist to insertthe selection after the last loaded track into the Preparation Playlist.
5.5.10 Exporting Playlists
Exporting a Playlist creates a folder containing the tracks in the Playlist as well as the Playlistfile. To export a Playlist:
1. Right-/[Ctrl]-click on the Playlist and select Export Playlist from the context menu.2. Enter a name for the exported Playlist.3. Enter a destination path.4. Confirm with OK.
5.5.11 Importing Playlists
Importing Playlists can be done in several ways:
Method I
1. Locate the Playlist in the TRAKTOR Explorer inside the Browser Tree.2. Drag-and-drop the Playlist file onto the Playlists folder in the Browser Tree or onto a Play-
list folder you have created.3. The Playlist and all contained tracks will be added to your Track Collection.
You can use this method to import Playlists from previous TRAKTOR versions after export-ing as explained above.
Method II
1. Locate the Playlist file (*.nml) in the Windows Explorer or Mac OS X Finder.2. Drag-and-drop the Playlist file onto the Playlists folder in the Browser Tree or onto a Play-
list Folder you have created.3. The Playlist and all contained tracks will be added to your Track Collection.
The Browser
Working with the Track Collection and Playlists
TRAKTOR - Manual - 61
Method III
► Right-/[Ctrl]-click on the TRAKTOR Playlists folder or a Playlist Folder you have createdand choose Import Playlist.
► The Playlist and all contained tracks will be added to your Track Collection.
Method IV
Right-/[Ctrl]-click on the TRAKTOR Playlists folder or a Playlist Folder you have created andchoose Import Playlist Folder.
The Playlist Folder and all contained tracks will be added to your Track Collection.
5.5.12 Printing Playlists
Printing Playlists allows you to save Playlist track name contents in a format readable by anyweb browser (HTML).
1. Right-/[Ctrl]-click on the Playlist in the Browser Tree.2. Choose Save as Webpage.3. Enter a name for the Playlist.4. Enter a destination for the exported file.5. From the List Options select the columns you want to add to the file.6. Confirm with OK.
5.5.13 More Playlist Functions
Right-/[Ctrl]-click on a TRAKTOR Playlist to find the following additional options:
▪ Rename: enables you to rename the selected Playlist.
▪ Consolidate: stores the current sorting order and arrangement for the current Playlist.
▪ Remove Duplicates: removes all double entries in the selected Playlist.
The Browser
Working with the Track Collection and Playlists
TRAKTOR - Manual - 62
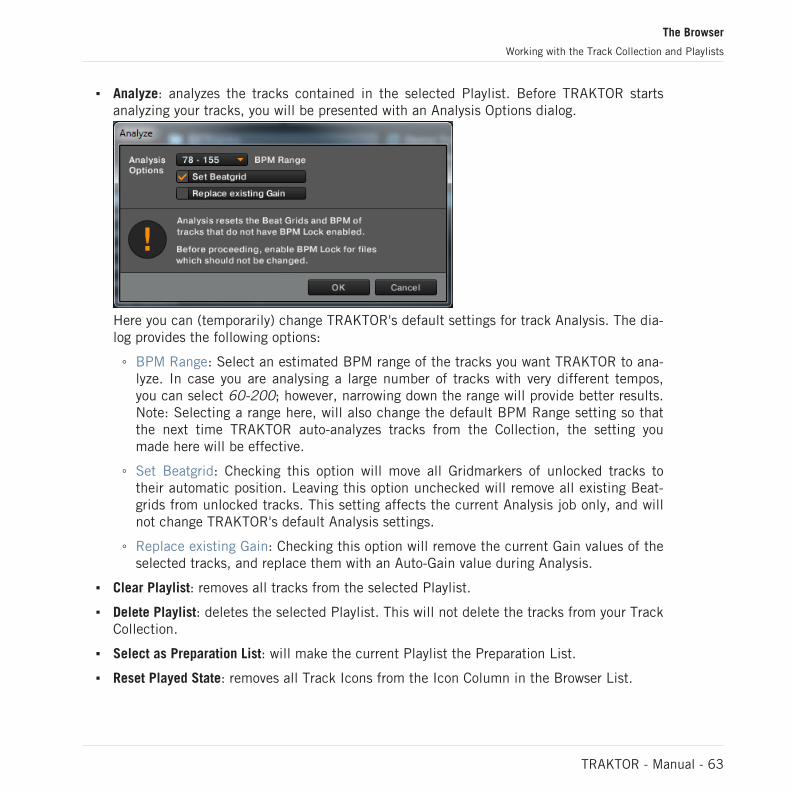
▪ Analyze: analyzes the tracks contained in the selected Playlist. Before TRAKTOR startsanalyzing your tracks, you will be presented with an Analysis Options dialog.
Here you can (temporarily) change TRAKTOR's default settings for track Analysis. The dia-log provides the following options:
◦ BPM Range: Select an estimated BPM range of the tracks you want TRAKTOR to ana-lyze. In case you are analysing a large number of tracks with very different tempos,you can select 60-200; however, narrowing down the range will provide better results.Note: Selecting a range here, will also change the default BPM Range setting so thatthe next time TRAKTOR auto-analyzes tracks from the Collection, the setting youmade here will be effective.
◦ Set Beatgrid: Checking this option will move all Gridmarkers of unlocked tracks totheir automatic position. Leaving this option unchecked will remove all existing Beat-grids from unlocked tracks. This setting affects the current Analysis job only, and willnot change TRAKTOR's default Analysis settings.
◦ Replace existing Gain: Checking this option will remove the current Gain values of theselected tracks, and replace them with an Auto-Gain value during Analysis.
▪ Clear Playlist: removes all tracks from the selected Playlist.
▪ Delete Playlist: deletes the selected Playlist. This will not delete the tracks from your TrackCollection.
▪ Select as Preparation List: will make the current Playlist the Preparation List.
▪ Reset Played State: removes all Track Icons from the Icon Column in the Browser List.
The Browser
Working with the Track Collection and Playlists
TRAKTOR - Manual - 63
▪ Restore AutoGain: will recalculate original gain values if they have been changed.
5.5.14 History Playlist
TRAKTOR automatically lists the tracks you have played during a gig in the History Playlist.Often, it can be useful to have a record of which tracks were played in a specific session.
TRAKTOR LE 2 note: The History Playlist is not available in LE 2.
History Playlist storage location
► After closing TRAKTOR, the History Playlist is cleared. However, you can find the Playliststored under: My Documents\Native Instruments\Traktor\History (Windows) and Users/~/Native Instruments/Traktor/History (Mac OS X).
► A History Playlist is labeled with a date and time after every TRAKTOR session.
Tips for Using the History Playlist
You can import History Playlists after good sessions for use during future gigs. If you have beenworking with TRAKTOR for a long time, the amount of History Playlists can become very large.Try this trick:
1. In the Windows Explorer/Mac OS X Finder, navigate to your Traktor folder and open theHistory (Windows: My Documents\Native Instruments\Traktor\History; Mac OS X: Users/~/Native Instruments/Traktor).
2. As a rule of thumb: every track in a list equals around 1 kB. This means that all Playlistsof 5 kB or less will have less than 4-6 tracks within them.
3. You can delete the smaller files making browsing in the History Playlists more managea-ble.
5.6 Editing Track Meta Data
Each track in your Collection has track properties (“tags” or “metadata”) such as Song Title,Artist Name, Album Name, Cover Artwork, etc. TRAKTOR gives you the option to edit this datain two ways.
The Browser
Working with the Track Collection and Playlists
TRAKTOR - Manual - 64
TRAKTOR LE 2 note: Editing track metadata is not available in LE 2.
If you are using iTunes for collection management we recommend that you only edit tagdata in iTunes.
5.6.1 Editing Track Properties via Inline Editing
1. In the Browser List, click on a track to highlight it.2. Click again in the field you want to edit, e.g. the artist name.3. You will see a cursor appear in the info field.4. Edit the artist's name.5. Click in another property field to edit its contents.6. Hit the [Enter] key on your keyboard to exit Inline Editing mode and confirm your entries,
or hit [Esc] to abort editing.
5.6.2 Editing Track Properties via the Edit Dialog
Not all properties of a track are visible in the Browser List. To get access to all available prop-erties of a track, use the Edit Dialog. This dialog allows simultaneous editing of a selection oftracks.
Editing a Single Track
1. Select a track in the Browser List by clicking it.2. Right-/[Ctrl]-Click the selected track and choose Edit from the context menu.3. The Browser List turns into the Edit dialog.4. Edit the desired information for your track.5. Use the drop-down menu next to a track property to select a previously stored property
from your Track Collection.6. Use the Restore button to undo any changes you have made. To apply the changes, click
the button labeled Apply or OK. You can abort editing by clicking Cancel.
The Browser
Editing Track Meta Data
TRAKTOR - Manual - 65
Editing a Selection of Tracks
► If you want to edit a selection of tracks (e.g., all tracks of an album), select them andchoose Edit from the context menu, (just as you did when editing a single track).
► In the Edit dialog you will notice that most of the checkboxes beneath the attributes areunchecked.
► At the bottom of the Edit dialog you will notice 3 new buttons called Previous, Select Alland Next. You can use these buttons to browse your selection of tracks.
► The checkboxes indicate which of the attributes share the same value across the selectedtracks. The checks also indicate that anything written into the related field will be savedto the metadata tag upon applying changes.
► If you want to change an attribute globally for all selected tracks (e.g. to change an ArtistName), make sure that the box is checked and press Apply or OK.
► If you want to edit your selected tracks one by one, use the Previous and Next buttons atthe bottom of the dialog to step through the list.
► Clicking Restore will undo your changes.
► To abort editing click Cancel.
5.7 Track Icons
It is important to have an overview of your set when you are performing in front of an audience.
The icon column provides information about the status of a track. It can be sorted in the orderof the status messages.
▪ The letters A, B, C and D identify the tracks currently loaded into the Decks.
▪ A Check Mark means that the track has been played in one of the Decks.
▪ An Exclamation Mark identifies tracks not found at the file’s previous location. Some pos-sible reasons for this could be that a storage medium is unavailable (external hard drivefor example), the location of the track has been changed or the track has been renamed.
The Browser
Track Icons
TRAKTOR - Manual - 66
▪ A Lock marks tracks with a locked Beatgrid.
▪ A Triangle marks tracks that have already been played live. Tracks that have been pre-viewed will not be marked. This icon is only available in the History and Archive folders.
Sorting by this column orders the tracks as follows
▪ Already played tracks on top.
▪ Currently playing tracks in the center.
▪ Unplayed tracks below.
▪ Missing tracks at the bottom.
5.8 The Preview Player
TRAKTOR’S Browser provides a Preview Player to pre-listen to tracks without loading them intoa Deck. The Preview Player is designed for use with Internal and External Mixer mode. To pre-listen to a track in the Preview Player:
► Drag-and-drop a track from the Browser List onto the Preview Player.
or
► Click the small Headphones icon in the Pre-listen column of the Browser List.
One advantage of using the Preview Player is that you do not need an additional Deck. Also thePlayed State and Play Count of the tracks will not change. You can stop the Preview Player byclicking on the small Play/Pause button. Skip through the track by clicking the small Stripe.
To use the Preview Player you need to assign an output to "Output Preview" (for ExternalMixer mode) or "Output Monitor" (for Internal Mixer mode). Find these settings in: Prefer-ences > Output Routing.
The Browser
The Preview Player
TRAKTOR - Manual - 67
5.9 Cover Art
TRAKTOR has several Cover Art features at your disposal. Not only can you see Cover Art with-in the Browser, but you can also freely assign your own Cover Art from image files on your harddrive.
5.9.1 Show Cover Art
Cover Art Window
TRAKTOR provides a Cover Art Window underneath the Browser Tree. It can be activated ordeactivated within the Preferences window.
► Go to Preferences > Browser Details and check or uncheck Show Cover Art.
List Window
There is a column for cover art in the Browser List. To activate or deactivate it:
► Right-/[Ctrl]-Click on the Headline of the Browser List and check or uncheck Cover Art.
5.9.2 Editing Cover Art
TRAKTOR allows you to either import or delete .jpeg cover art from your track collection.
It works as follows:
Importing Cover Art
1. Right-/[Ctrl]-Click on a track and choose: Import Cover.2. Use the dialog box to direct TRAKTOR to the cover art image file.3. Select the image file and confirm the dialog.4. The cover art is now stored within the file.
You can also choose several tracks and import cover art for all selected tracks at once.
The Browser
Cover Art
TRAKTOR - Manual - 68

TRAKTOR LE 2 note: Editing cover art is not available in LE 2.
TRAKTOR LE 2 note: Editing cover art is not available in LE 2.
Deleting Cover Art
To delete Cover Art:
1. Right-/[Ctrl]-Click on a track and choose: Delete Cover.2. The cover art is now deleted.
You can also choose several tracks and delete the cover art for all selected tracks at once.
5.10 Collection Maintenance
Working with the Browser before the gig or in a live situation can be intense. There are manythings to keep track of such as removing obsolete tracks or relocating tracks that have beenmoved to another folder on your HD, etc.
5.10.1 Consistency Check
The Consistency Check Report provides an overview of your Track Collection by providing op-tions to help you manage it.
1. In the Browser Tree, right-/[Ctrl]-click the Track Collection Icon and select Check Consis-tency from the menu.
2. Once TRAKTOR has run the check, the Consistency Check Report will appear showing theresults.
Show Overview / Missing Tracks / Tracks to Analyze
The Consistency Check Report gives you information about the following:
▪ Total Tracks: The total number of tracks in your Collection.
The Browser
Collection Maintenance
TRAKTOR - Manual - 69
▪ Tracks Missing: The total number of tracks that have been deleted from your hard drive ormoved from their original location.
▪ Tracks Not Analyzed: The total number of tracks that have not been analyzed.
▪ Tracks Missing Stripe: The total number of tracks that have been imported and analyzedbut their Overview Waveform (Stripe) has been moved or deleted.
▪ Total Tracks To Analyze: The total number of tracks that need to be analyzed.
Relocate Missing Tracks
The Consistency Check Report also allows you to relocate tracks that are missing from yourCollection.
1. Click the Relocate button.2. Relocating tracks in a folder that contains many subfolders can be a lengthy process.
Don’t hesitate to interrupt relocation — this will not damage your Collection consistency.3. Use the browse window to navigate to the folder where your missing tracks have been
moved.4. To find multiple tracks in different folders, choose the top-level folder where they are stor-
ed. You can even choose your main hard drive folder.
Remove Missing Tracks
If you no longer want these missing tracks to be referenced in your Collection, delete their ref-erences by clicking the Remove button.
Analyze Tracks
If you have tracks in the Collection that are not analyzed yet, you can analyze them by clickingthe Analyze button.
Show Consistency Check on Startup
The Consistency Check Report can be set to run each time you open TRAKTOR. Please beaware that this feature can increase TRAKTOR’s startup time, thus can be impractical withlarge collections in a live situation.
1. Go to: Preferences > File Management.
The Browser
Collection Maintenance
TRAKTOR - Manual - 70
2. Check the box labeled Show Consistency Check Report on Startup and close the Preferen-ces.
3. The Consistency Check Report will now open each time you start TRAKTOR.
5.10.2 Analysis
TRAKTOR uses an “Analysis” function to collect several important pieces of information fromyour tracks. These are:
BPM Estimate
The BPM Estimate is an accurate tempo readout based on the type of music you are scanning.Read more about verifying the BPM Estimate and about how to create a Beatgrid in ↑6.8.6,Beatgrid Panel (GRID).
Gain Value
Each track has a perceived loudness based on its musical properties. The Gain Value establish-ed during the Analysis is an accurate estimation for the optimal setting of the channel GAINknob to match the loudness of a track to 0dB.
► To use this gain estimation when loading a track into a Deck, enable the Auto Gain func-tion by activating Set Autogain When Loading Track in Preferences > Mixer > Level. Youcan at any time readjust the Autogain set during Analysis as described in ↑7.4, GAIN,Cue and PAN.
Stripe
The analysis process creates a small representation of the waveform underneath the WaveformDisplay, which is called the Stripe. If the Stripe of a track is missing it has not yet been ana-lyzed.
To keep file size to a minimum Stripe is not stored in files. When moving your music toanother computer you should re-analyze your music on the target machine.
Auto Analysis
You can set TRAKTOR to analyze your tracks automatically either when loading a track into aDeck or after importing it into your Collection.
The Browser
Collection Maintenance
TRAKTOR - Manual - 71

► Open Preferences > File Management for options on background track analysis.
► Read more about the analysis options in ↑13.20, File Management.
► The Status Bar at the bottom of the Browser will provide a visual indication of the analy-sis process and alert you to any problems.
5.10.3 Data Directories
TRAKTOR has functions that create and reference certain file types. These file types are storedin their own default directories. These directory paths can be changed in the Preferences win-dow:
► Open: Preferences > File Management > Directories.
You can change the directory path for the following file types by clicking on the button withthe exclamation mark (…!):
▪ Root Dir (Root Directory): the file path TRAKTOR follows for loading and storing Collec-tion information and settings.
▪ Sample Dir (Sample Directory): the file path TRAKTOR follows for loading and storingSample information and settings.
▪ iTunes Music Library : the file path to your iTunes Library (this path has to be identical tothe settings in iTunes).
▪ Music Folders: use to specify the location of music to be scanned when using the ImportMusic Folders function.
5.10.4 Other Maintenance Functions
▪ Reset Played State : Resets the play count and the Track Icon next to any track that hasbeen played.
▪ Relocate: Opens a dialog in which you can navigate to the folder containing the missingtrack(s). This can be useful if you have restructured a Music Folder.
▪ Analyze (Async): Starts analysis for the selected track(s).
The Browser
Collection Maintenance
TRAKTOR - Manual - 72
▪ Show in Explorer/Finder : Use to find the track in the Windows Explorer or Mac OS X Find-er.
▪ Search in Playlists: Searches for the selected track(s) and returns with a report showing allPlaylists containing the selected track(s).
5.11 Working with Audio CDs
This chapter provides information on how to work with audio CDs.
5.11.1 CD Text
In the past, tracks of audio CDs were displayed as Track01, Track02, etc; however, if you in-sert an audio CD with related information — artist, title, etc. — you will be able to see thisdata in TRAKTOR’s Browser.
Not all commercial Audio CDs show these additional info texts.
5.11.2 Audio CDs and Favorites
► If you drag the Audio CD icon onto a Favorite, the CD will stay assigned to the Favoriteeven if you remove the CD.
► If you do not have an audio CD loaded in your CD drive, the Favorite will be displayedwith a Missing Icon, shown as a red cross.
5.11.3 Eject CD
You can also eject a CD from within TRAKTOR.
► Right-click/[Ctrl]-click on the Audio CD icon and choose Eject CD to eject the CD.
The Browser
Working with Audio CDs
TRAKTOR - Manual - 73
5.12 Working with Digital Audio Players
TRAKTOR allows you to play tracks directly from your digital audio player.
1. Start TRAKTOR and plug your player into your computer. TRAKTOR will then recognizeyour digital audio player as a hard drive and display its icon in the Browser Tree — thismay take up to 10 seconds.
2. When first selecting the player, the message Loading will appear to let you know thatTRAKTOR is reading the track information.
3. When loading is finished you will be able to select tracks just as you would from any otherhard drive.
Plugging and un-plugging the player while tracks are playing may cause the audio to stopbriefly. Be careful not to unplug the player when playing a track from it!
5.12.1 iPod
The Apple iPod uses a unique file system for storing music. When you connect an iPod to yourcomputer, TRAKTOR will recognize it and display the iPod in the Browser with its name.
Double-click the iPod to access the Playlists and tracks stored on the iPod.
You cannot play protected DRM files purchased in the iTunes Store.
The Browser
Working with Digital Audio Players
TRAKTOR - Manual - 74
6 The Decks
TRAKTOR 2 provides you with four virtual Decks. The Decks can be operated in differentmodes (called Deck Flavors in TRAKTOR). The available Flavors are:
▪ Track Deck
▪ Remix Deck
▪ Live Input
TRAKTOR LE 2 note: Only two Decks are available in LE 2.
TRAKTOR LE 2 note: The Remix Decks are not available in LE 2.
TRAKTOR ME 2 note: The Remix Decks are not available in ME 2.
6.1 Deck Flavor Descriptions
For each Deck you can choose one of the following Flavors:
▪ Track Deck: A Track Deck in TRAKTOR is the equivalent of a record player or a CD playerin a classic mixing setup. Use this Deck Flavor if you want to play back a particular se-quence of tracks. Find an in-depth description in ↑6.1.1, Track Deck. For a tutorial onusing Track Decks, please refer to ↑15.3, Playing Your First Track.
▪ Remix Deck: A Remix Deck provides you with four Sample Slots, which you will use foradding Samples (and loops) to your mix. With a Remix Deck, you can build and save com-plex Remix Sets (which is the term for a saved set of Samples in a Remix Deck in TRAK-TOR terminology), and arrange and remix Samples live in your mix. A Remix Deck comeswith a variety of Sample-related features. Find an in-depth description of the Remix Deckand its elements in ↑6.1.2, Remix Deck. For a tutorial on using a Remix Deck, please re-fer to ↑15.8, Using the Remix Decks in Your Mix.
The Decks
Deck Flavor Descriptions
TRAKTOR - Manual - 75
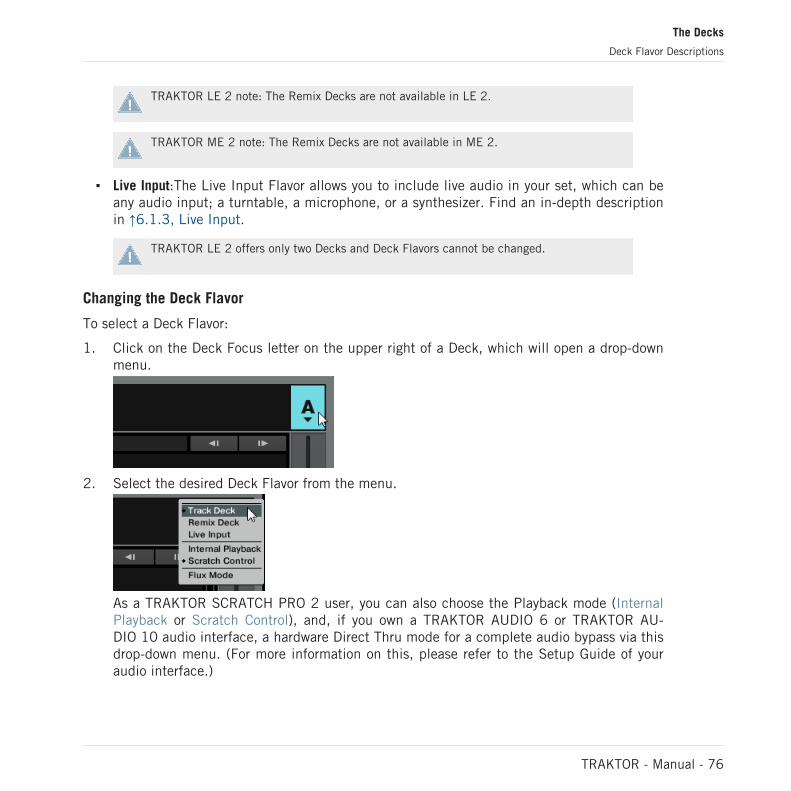
TRAKTOR LE 2 note: The Remix Decks are not available in LE 2.
TRAKTOR ME 2 note: The Remix Decks are not available in ME 2.
▪ Live Input:The Live Input Flavor allows you to include live audio in your set, which can beany audio input; a turntable, a microphone, or a synthesizer. Find an in-depth descriptionin ↑6.1.3, Live Input.
TRAKTOR LE 2 offers only two Decks and Deck Flavors cannot be changed.
Changing the Deck Flavor
To select a Deck Flavor:
1. Click on the Deck Focus letter on the upper right of a Deck, which will open a drop-downmenu.
2. Select the desired Deck Flavor from the menu.
As a TRAKTOR SCRATCH PRO 2 user, you can also choose the Playback mode (InternalPlayback or Scratch Control), and, if you own a TRAKTOR AUDIO 6 or TRAKTOR AU-DIO 10 audio interface, a hardware Direct Thru mode for a complete audio bypass via thisdrop-down menu. (For more information on this, please refer to the Setup Guide of youraudio interface.)
The Decks
Deck Flavor Descriptions
TRAKTOR - Manual - 76
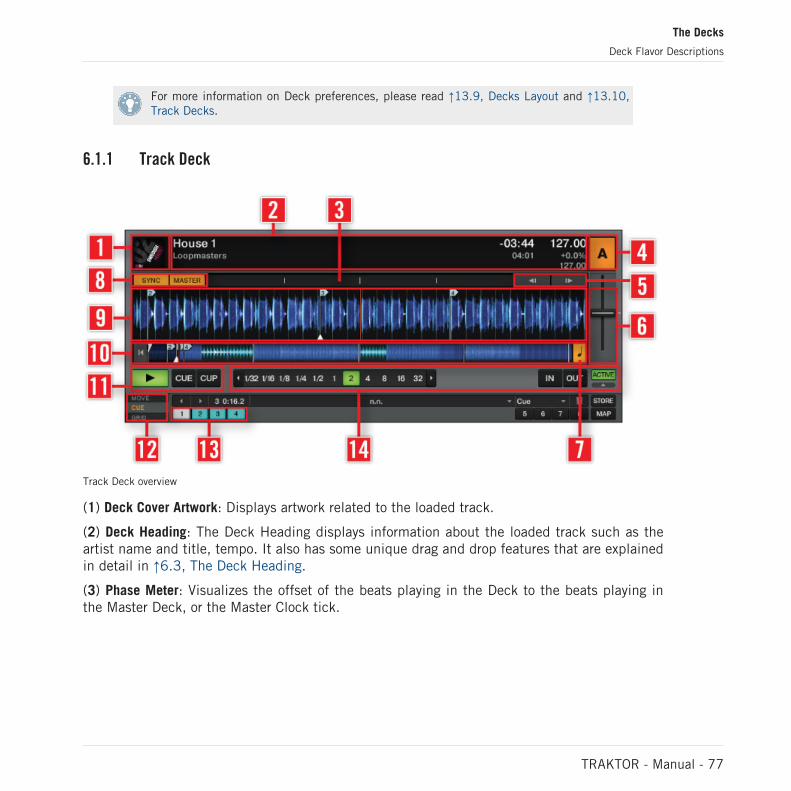
For more information on Deck preferences, please read ↑13.9, Decks Layout and ↑13.10,Track Decks.
6.1.1 Track Deck
Track Deck overview
(1) Deck Cover Artwork: Displays artwork related to the loaded track.
(2) Deck Heading: The Deck Heading displays information about the loaded track such as theartist name and title, tempo. It also has some unique drag and drop features that are explainedin detail in ↑6.3, The Deck Heading.
(3) Phase Meter: Visualizes the offset of the beats playing in the Deck to the beats playing inthe Master Deck, or the Master Clock tick.
The Decks
Deck Flavor Descriptions
TRAKTOR - Manual - 77
(4) Deck Focus: Holds a menu for selecting the Deck Flavor and the playback method for theDeck. Click the Deck letter and use the drop-down menu to change the Deck Flavor and play-back method. The Deck letter is highlighted orange for the Deck currently in focus. (If no Deckletter is highlighted, the function is propably disabled in the Preferences. You can activate fo-cus highlighting from the Preferences via Global Settings > Deck Focus > Software.)
(5) Bend: Temporarily slows down or speeds up the Deck.
(6) Tempo Fader: Decreases or increases the tempo of the track playing by moving the slider upor down.
(7) Key: Activates or deactivates the Keylock feature.
(8) SYNC button: Synchronizes the current track to the tempo master. MASTER button: Definesthe Deck as tempo master for syncing.
(9) Waveform Display: Visually represents a localized view of the loaded track. The brighter col-or shade represents higher frequencies, while the darker color shade represents lower frequen-cies.
(10) Stripe: The Stripe displays the whole waveform of the loaded track including Cue Pointsand Loops.
(11) Transport: Includes the Play/Pause, CUE (Cue/Play) and CUP (Cue/Pause) buttons.
(12) Advanced Panels: Contains advanced control options for MOVE (Loop move and beatjump), CUE (Cue Point and Loop Management) and GRID (Beatgrid) panels.
(13) Hotcues: Provides direct access to 8 user-definable Cue/Loop In Points per track.
(14) Loop Controls: Set Auto Loops and control their size.
For a tutorial on using Track Decks, please refer to ↑15.3, Playing Your First Track.
The Decks
Deck Flavor Descriptions
TRAKTOR - Manual - 78
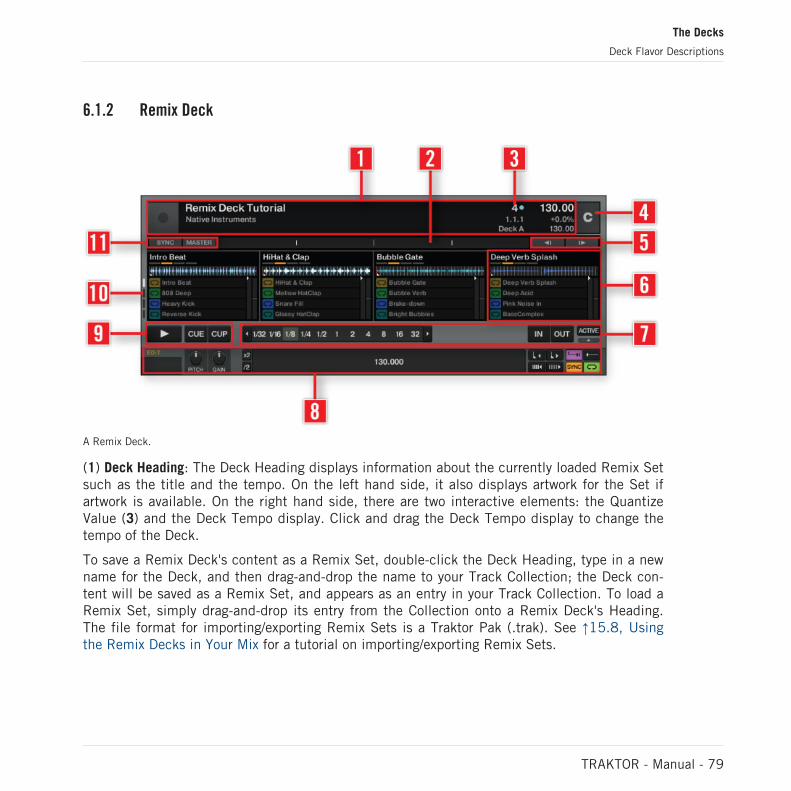
6.1.2 Remix Deck
A Remix Deck.
(1) Deck Heading: The Deck Heading displays information about the currently loaded Remix Setsuch as the title and the tempo. On the left hand side, it also displays artwork for the Set ifartwork is available. On the right hand side, there are two interactive elements: the QuantizeValue (3) and the Deck Tempo display. Click and drag the Deck Tempo display to change thetempo of the Deck.
To save a Remix Deck's content as a Remix Set, double-click the Deck Heading, type in a newname for the Deck, and then drag-and-drop the name to your Track Collection; the Deck con-tent will be saved as a Remix Set, and appears as an entry in your Track Collection. To load aRemix Set, simply drag-and-drop its entry from the Collection onto a Remix Deck's Heading.The file format for importing/exporting Remix Sets is a Traktor Pak (.trak). See ↑15.8, Usingthe Remix Decks in Your Mix for a tutorial on importing/exporting Remix Sets.
The Decks
Deck Flavor Descriptions
TRAKTOR - Manual - 79
(2) Phase Meter: Visualizes the offset of the Remix Deck's internal beat count to the beat countplaying in the Master Deck, or the Master Clock tick. See ↑6.7.2, Phase Meter for more infor-mation on the Phase Meter.
(3) Quantize Value: When Quantize is activated, a triggered Sample will become active at a cer-tain point of the Remix Deck's internal timeline; e.g., setting the Quantize Value to "1" will ac-tivate the triggered Sample at the next beat of the Remix Deck's internal timeline. Setting it to"4," a Sample you hit will start playing with the next 4/4 bar of the Remix Deck's internal time-line. You can see the internal timeline displayed below the Quantize Value display.
Note that the Quantize Value does not represent the amount of beats it will take before aSample starts playing, therefore, it is not a "delay" value; the Quantize Value represents amark in the Remix Deck's internal timeline (such as a bar line on a sheet of music).
To activate/deactivate the Quantize feature for the Deck, click the dot on the right hand side ofthe value. Click the arrow on the left hand side of the value to open the drop-down menu toselect a Quantize Value.
(4) Deck Focus: Holds a menu for selecting the Deck Flavor and the playback method for theDeck. Click the Deck letter and use the drop-down menu to change the Deck Flavor and play-back method. The Deck letter is highlighted orange for the Deck currently in focus. (If no Deckletter is highlighted, the function is propably disabled in the Preferences. You can activate fo-cus highlighting from the Preferences via Global Settings > Deck Focus > Software.)
(5) Bend: Temporarily slows down or speeds up the Deck.
(6) Sample Slot: This is where the main action takes place. A Sample Slot consists of a SlotPlayer on top and 16 Sample Cells below. Click the Page Selector buttons (10) to navigatethrough the pages of Sample Cells, the so-called Sample Grid. Load single Samples to a Sam-ple Cell, capture Loops from the Loop Recorder or the Track Decks to a Cell, or load whole Re-mix Sets — the TRAKTOR term for a saved set of Samples in a Remix Deck — to the SampleGrid (for a tutorial on using Remix Decks, please refer to ↑15.8, Using the Remix Decks inYour Mix). While a Sample is being played, the Slot Player will show the Sample’s waveformand include a moving red playhead, indicating the current playback position.
For a detailed description of the Sample Slot's features, see the subsection "Inside the SampleSlot" below.
(7) Loop Controls: Set Auto Loops and control their size from here.
The Decks
Deck Flavor Descriptions
TRAKTOR - Manual - 80
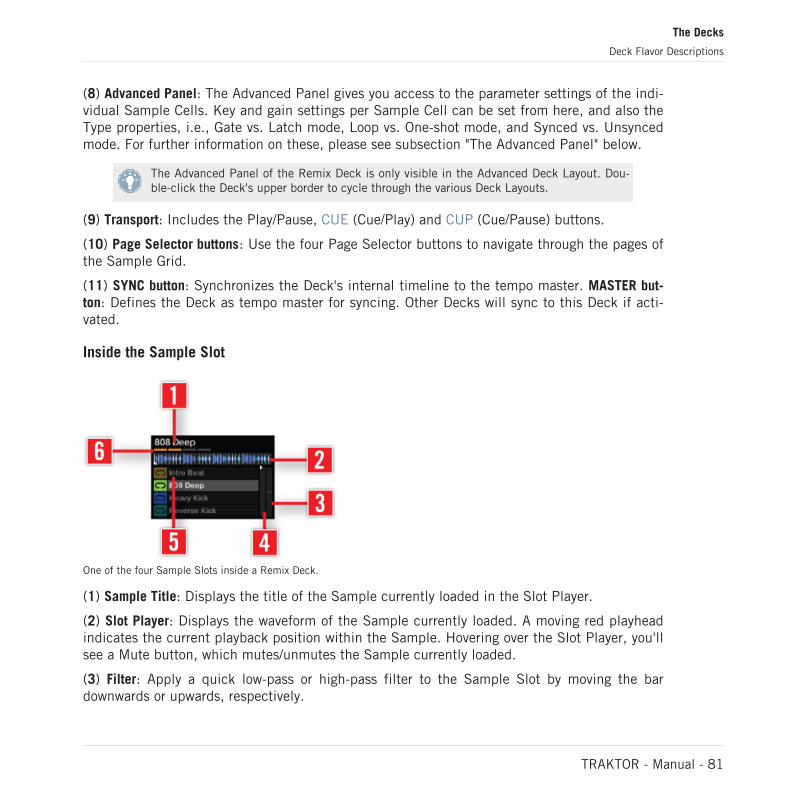
(8) Advanced Panel: The Advanced Panel gives you access to the parameter settings of the indi-vidual Sample Cells. Key and gain settings per Sample Cell can be set from here, and also theType properties, i.e., Gate vs. Latch mode, Loop vs. One-shot mode, and Synced vs. Unsyncedmode. For further information on these, please see subsection "The Advanced Panel" below.
The Advanced Panel of the Remix Deck is only visible in the Advanced Deck Layout. Dou-ble-click the Deck's upper border to cycle through the various Deck Layouts.
(9) Transport: Includes the Play/Pause, CUE (Cue/Play) and CUP (Cue/Pause) buttons.
(10) Page Selector buttons: Use the four Page Selector buttons to navigate through the pages ofthe Sample Grid.
(11) SYNC button: Synchronizes the Deck's internal timeline to the tempo master. MASTER but-ton: Defines the Deck as tempo master for syncing. Other Decks will sync to this Deck if acti-vated.
Inside the Sample Slot
One of the four Sample Slots inside a Remix Deck.
(1) Sample Title: Displays the title of the Sample currently loaded in the Slot Player.
(2) Slot Player: Displays the waveform of the Sample currently loaded. A moving red playheadindicates the current playback position within the Sample. Hovering over the Slot Player, you'llsee a Mute button, which mutes/unmutes the Sample currently loaded.
(3) Filter: Apply a quick low-pass or high-pass filter to the Sample Slot by moving the bardownwards or upwards, respectively.
The Decks
Deck Flavor Descriptions
TRAKTOR - Manual - 81
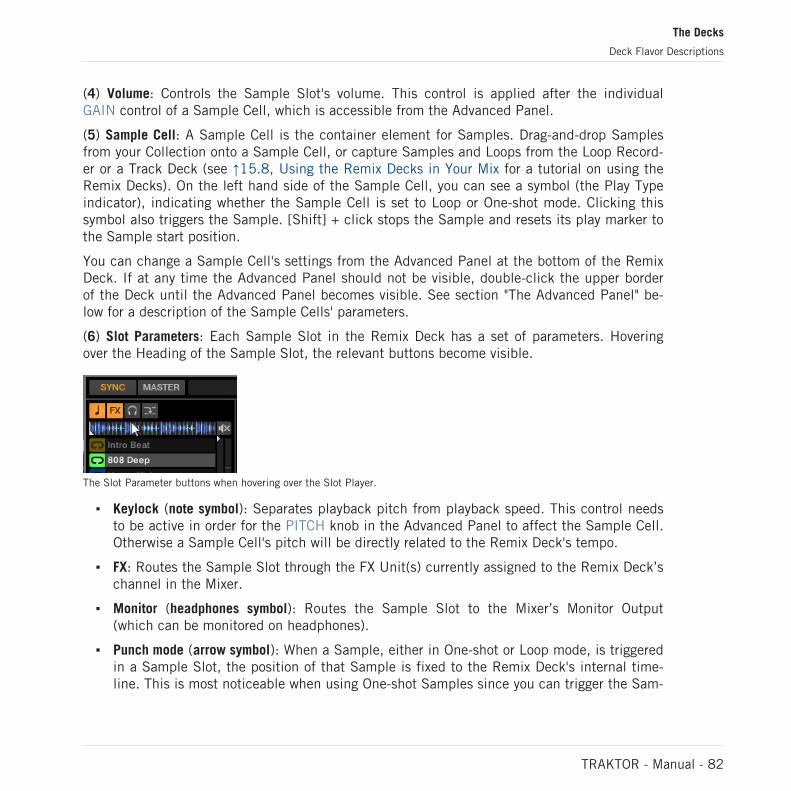
(4) Volume: Controls the Sample Slot's volume. This control is applied after the individualGAIN control of a Sample Cell, which is accessible from the Advanced Panel.
(5) Sample Cell: A Sample Cell is the container element for Samples. Drag-and-drop Samplesfrom your Collection onto a Sample Cell, or capture Samples and Loops from the Loop Record-er or a Track Deck (see ↑15.8, Using the Remix Decks in Your Mix for a tutorial on using theRemix Decks). On the left hand side of the Sample Cell, you can see a symbol (the Play Typeindicator), indicating whether the Sample Cell is set to Loop or One-shot mode. Clicking thissymbol also triggers the Sample. [Shift] + click stops the Sample and resets its play marker tothe Sample start position.
You can change a Sample Cell's settings from the Advanced Panel at the bottom of the RemixDeck. If at any time the Advanced Panel should not be visible, double-click the upper borderof the Deck until the Advanced Panel becomes visible. See section "The Advanced Panel" be-low for a description of the Sample Cells' parameters.
(6) Slot Parameters: Each Sample Slot in the Remix Deck has a set of parameters. Hoveringover the Heading of the Sample Slot, the relevant buttons become visible.
The Slot Parameter buttons when hovering over the Slot Player.
▪ Keylock (note symbol): Separates playback pitch from playback speed. This control needsto be active in order for the PITCH knob in the Advanced Panel to affect the Sample Cell.Otherwise a Sample Cell's pitch will be directly related to the Remix Deck's tempo.
▪ FX: Routes the Sample Slot through the FX Unit(s) currently assigned to the Remix Deck’schannel in the Mixer.
▪ Monitor (headphones symbol): Routes the Sample Slot to the Mixer’s Monitor Output(which can be monitored on headphones).
▪ Punch mode (arrow symbol): When a Sample, either in One-shot or Loop mode, is triggeredin a Sample Slot, the position of that Sample is fixed to the Remix Deck's internal time-line. This is most noticeable when using One-shot Samples since you can trigger the Sam-
The Decks
Deck Flavor Descriptions
TRAKTOR - Manual - 82

ple, let it play, then wind the Deck backwards to the original location of the Sample andplay it again. Since only one Sample can be played in a Slot at a time, triggering a newOne-shot Sample will remove the previous Sample from the Deck's internal timeline andwill fix the new Sample to the current location.This behavior is changed, however, when Punch mode is enabled. With Punch enabled, ev-ery Sample you trigger will be placed in the same location as the previous Sample in theDeck's internal timeline. What this means is that you can trigger a One-shot Sample, let itplay, trigger a different One-shot Sample in the Sample Slot, then wind the Deck back-wards to the location of the first Sample and you will hear the new Sample instead.Punch mode is also beneficial when using Loops because it allows musical phrasing to bemaintained when switching Loops. Just as with One-shots, triggering a Loop while Punchmode is enabled will place the Loop back at the location of the previous Loop. BecauseLoops repeat themselves infinitely into the future and past of the Deck's internal timeline,you'll hear the new Sample playing at your current playback location, but the Loop will beplaying in the correct position as if it had been triggered back at the position of the firstLoop.
The Advanced Panel
Each Sample Cell has a set of individual parameters, which are accessible from the RemixDeck's Advanced Panel. If at any time the Advanced Panel of a Remix Deck is not visible, dou-ble-click the upper border of the Deck until the Advanced Panel becomes visible.
The Advanced Panel at the bottom of a Remix Deck.
(1) Move Grid Left: Moves the Samle Cell's Beatgrid to the left.
(2) Move Grid Right: Moves the Samle Cell's Beatrgid to the right.
The Decks
Deck Flavor Descriptions
TRAKTOR - Manual - 83
(3) Trigger Type: When activated (Latch mode), a Sample will continue to play after you releasethe mouse button, either until the end of the Sample is reached (for One-shot Samples) or un-til it is stopped by some other method (like triggering a new Sample in the same Slot).
The alternative Type is Gate mode, where a Sample will play only while you’re holding down onthe mouse button. Upon releasing the mouse button, the Sample will stop playing.
Note that both modes are also subject to the settings of the Quantize system; e.g., with Quan-tize active, a Sample in Gate mode must be held until the Quantize interval is reached beforeit starts playing. Similarly, after releasing the mouse button, the Sample will continue to playuntil the next Quantize interval is reached at which point it will stop.
(4) Reverse Playback: Activate reverse playback for the Sample Cell currently being played inthe Slot Player.
(5) Play Type: This property determines whether a Sample stops after reaching its end or if itcontinuously loops. When set to One-Shot (arrow symbol), a Sample will stop playing when itgets to its end. When set to Loop (ellipse symbol), the Sample will automatically return to itsstart and continue playing indefinitely.
(6) Sync Type: This property determines if the Sample should be synchronized to the RemixDeck’s Tempo or not. When SYNC is on, the Sample’s BPM will match the Remix Deck’s BPM.When SYNC is off, the Sample will play at its original speed.
(7) BPM Decrease: This button changes the BPM of a Sample. As a result, the Beatgrid getsexpanded.
(8) BPM Increase: This button changes the BPM of a Sample. As a result, the Beatgrid getscompressed.
(9) x2: Doubles the tempo of the Sample.
(10) /2: Halves the tempo of the Sample.
(11) GAIN: Each Cell in the Sample Grid has its own gain value. Click the name of the Sampleyou want to edit in order to select it, and adjust the GAIN knob.
(12) PITCH: Each Cell in the Sample Grid has its own pitch value. Click the name of the Sam-ple Cell you want to edit in order to select it, and adjust the PITCH knob. A Sample’s pitch canonly be altered if Keylock is enabled for the Slot. If Keylock is disabled, the Sample’s pitchwill be directly related to the playback speed of the Deck (changing speed will change thepitch), and the KEY control will have no effect.
The Decks
Deck Flavor Descriptions
TRAKTOR - Manual - 84
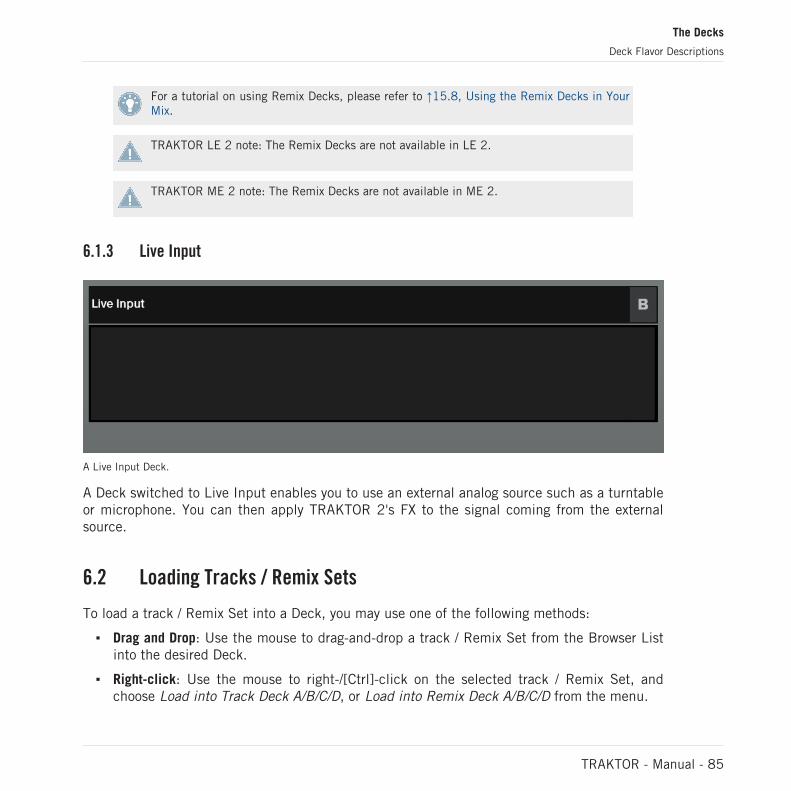
For a tutorial on using Remix Decks, please refer to ↑15.8, Using the Remix Decks in YourMix.
TRAKTOR LE 2 note: The Remix Decks are not available in LE 2.
TRAKTOR ME 2 note: The Remix Decks are not available in ME 2.
6.1.3 Live Input
A Live Input Deck.
A Deck switched to Live Input enables you to use an external analog source such as a turntableor microphone. You can then apply TRAKTOR 2's FX to the signal coming from the externalsource.
6.2 Loading Tracks / Remix Sets
To load a track / Remix Set into a Deck, you may use one of the following methods:
▪ Drag and Drop: Use the mouse to drag-and-drop a track / Remix Set from the Browser Listinto the desired Deck.
▪ Right-click: Use the mouse to right-/[Ctrl]-click on the selected track / Remix Set, andchoose Load into Track Deck A/B/C/D, or Load into Remix Deck A/B/C/D from the menu.
The Decks
Deck Flavor Descriptions
TRAKTOR - Manual - 85
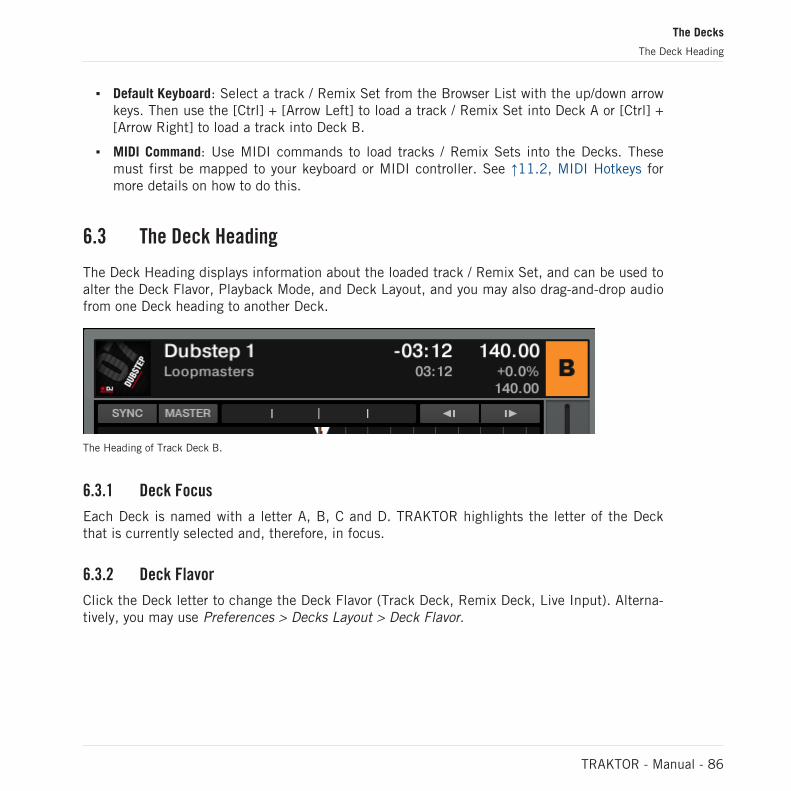
▪ Default Keyboard: Select a track / Remix Set from the Browser List with the up/down arrowkeys. Then use the [Ctrl] + [Arrow Left] to load a track / Remix Set into Deck A or [Ctrl] +[Arrow Right] to load a track into Deck B.
▪ MIDI Command: Use MIDI commands to load tracks / Remix Sets into the Decks. Thesemust first be mapped to your keyboard or MIDI controller. See ↑11.2, MIDI Hotkeys formore details on how to do this.
6.3 The Deck Heading
The Deck Heading displays information about the loaded track / Remix Set, and can be used toalter the Deck Flavor, Playback Mode, and Deck Layout, and you may also drag-and-drop audiofrom one Deck heading to another Deck.
The Heading of Track Deck B.
6.3.1 Deck Focus
Each Deck is named with a letter A, B, C and D. TRAKTOR highlights the letter of the Deckthat is currently selected and, therefore, in focus.
6.3.2 Deck Flavor
Click the Deck letter to change the Deck Flavor (Track Deck, Remix Deck, Live Input). Alterna-tively, you may use Preferences > Decks Layout > Deck Flavor.
The Decks
The Deck Heading
TRAKTOR - Manual - 86
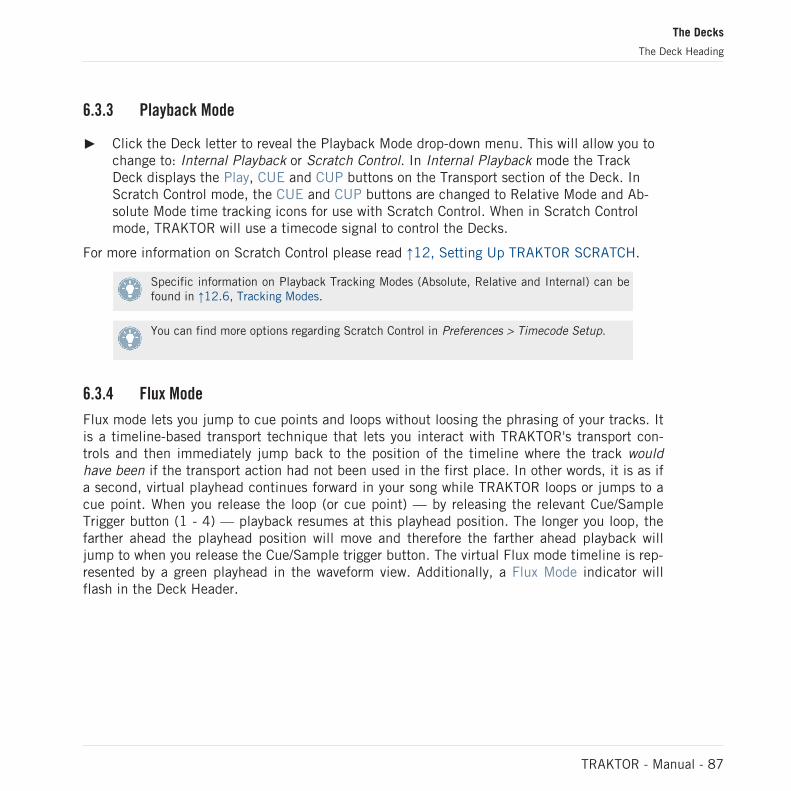
6.3.3 Playback Mode
► Click the Deck letter to reveal the Playback Mode drop-down menu. This will allow you tochange to: Internal Playback or Scratch Control. In Internal Playback mode the TrackDeck displays the Play, CUE and CUP buttons on the Transport section of the Deck. InScratch Control mode, the CUE and CUP buttons are changed to Relative Mode and Ab-solute Mode time tracking icons for use with Scratch Control. When in Scratch Controlmode, TRAKTOR will use a timecode signal to control the Decks.
For more information on Scratch Control please read ↑12, Setting Up TRAKTOR SCRATCH.
Specific information on Playback Tracking Modes (Absolute, Relative and Internal) can befound in ↑12.6, Tracking Modes.
You can find more options regarding Scratch Control in Preferences > Timecode Setup.
6.3.4 Flux Mode
Flux mode lets you jump to cue points and loops without loosing the phrasing of your tracks. Itis a timeline-based transport technique that lets you interact with TRAKTOR's transport con-trols and then immediately jump back to the position of the timeline where the track wouldhave been if the transport action had not been used in the first place. In other words, it is as ifa second, virtual playhead continues forward in your song while TRAKTOR loops or jumps to acue point. When you release the loop (or cue point) — by releasing the relevant Cue/SampleTrigger button (1 - 4) — playback resumes at this playhead position. The longer you loop, thefarther ahead the playhead position will move and therefore the farther ahead playback willjump to when you release the Cue/Sample trigger button. The virtual Flux mode timeline is rep-resented by a green playhead in the waveform view. Additionally, a Flux Mode indicator willflash in the Deck Header.
The Decks
The Deck Heading
TRAKTOR - Manual - 87
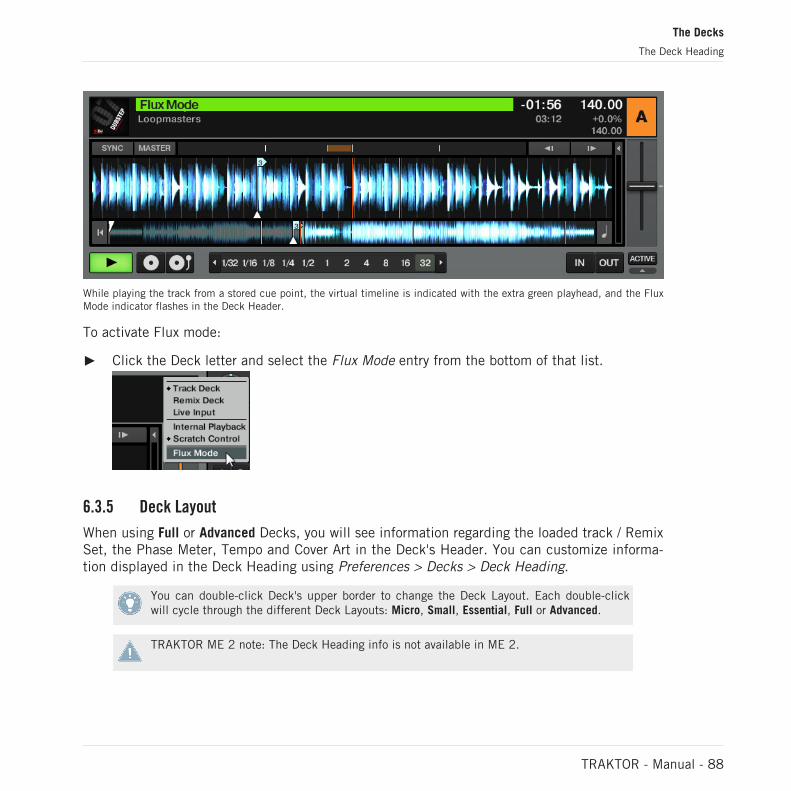
While playing the track from a stored cue point, the virtual timeline is indicated with the extra green playhead, and the FluxMode indicator flashes in the Deck Header.
To activate Flux mode:
► Click the Deck letter and select the Flux Mode entry from the bottom of that list.
6.3.5 Deck Layout
When using Full or Advanced Decks, you will see information regarding the loaded track / RemixSet, the Phase Meter, Tempo and Cover Art in the Deck's Header. You can customize informa-tion displayed in the Deck Heading using Preferences > Decks > Deck Heading.
You can double-click Deck's upper border to change the Deck Layout. Each double-clickwill cycle through the different Deck Layouts: Micro, Small, Essential, Full or Advanced.
TRAKTOR ME 2 note: The Deck Heading info is not available in ME 2.
The Decks
The Deck Heading
TRAKTOR - Manual - 88
6.3.6 Deck Audio Drag and Drop
▪ If a track / Remix Set is currently loaded into a Deck, you can copy it to another Deck viadrag-and-drop from one Deck Heading to another. This action can be performed while atrack / Remix Set is playing.
▪ You can also drag and drop a track from a Track Deck into the Sample Slot of a RemixDeck:
◦ If the current playback position is within an active Loop, the Sample is a copy of theLoop and the playback position in the Sample Slot mirrors the playback position inthe Loop.
◦ If the current playback position is outside any active Loop, the Sample starts at thecurrent playback position and its size is defined by the selected loop size (as dis-played by the Loop Size Display).
When importing a Sample from the loaded track, as soon as the Sample is played live threetimes in the main mix, the Sample is automatically saved to the Collection for later use!Samples can be accessed for reuse via the ‘All Samples’ folder in the Browser.
Dragging audio to Sample Slots can help you to quickly build a complex mix on the fly. Addeffects such as Filter LFO and Gater to these short Samples, and they become interestingtempo locked sweeping synth effects over your mixes. Remember to activate Snap (S) andQuantize (Q) in the Master panel for a tempo locked mix!
For a tutorial on using the Remix Decks, refer to ↑15.8, Using the Remix Decks in Your Mix.
The Decks
The Deck Heading
TRAKTOR - Manual - 89
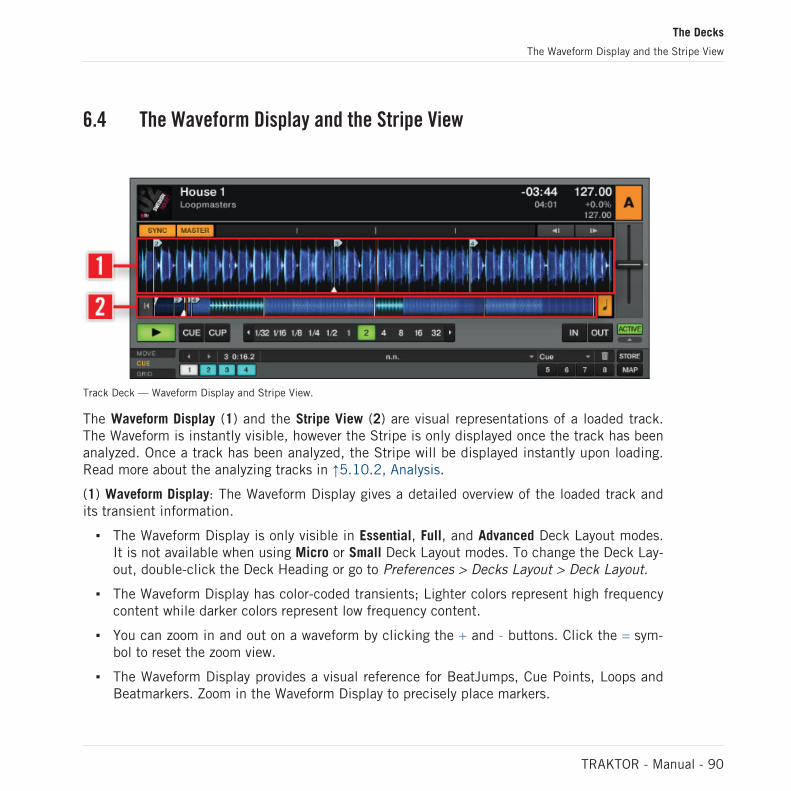
6.4 The Waveform Display and the Stripe View
Track Deck — Waveform Display and Stripe View.
The Waveform Display (1) and the Stripe View (2) are visual representations of a loaded track.The Waveform is instantly visible, however the Stripe is only displayed once the track has beenanalyzed. Once a track has been analyzed, the Stripe will be displayed instantly upon loading.Read more about the analyzing tracks in ↑5.10.2, Analysis.
(1) Waveform Display: The Waveform Display gives a detailed overview of the loaded track andits transient information.
▪ The Waveform Display is only visible in Essential, Full, and Advanced Deck Layout modes.It is not available when using Micro or Small Deck Layout modes. To change the Deck Lay-out, double-click the Deck Heading or go to Preferences > Decks Layout > Deck Layout.
▪ The Waveform Display has color-coded transients; Lighter colors represent high frequencycontent while darker colors represent low frequency content.
▪ You can zoom in and out on a waveform by clicking the + and - buttons. Click the = sym-bol to reset the zoom view.
▪ The Waveform Display provides a visual reference for BeatJumps, Cue Points, Loops andBeatmarkers. Zoom in the Waveform Display to precisely place markers.
The Decks
The Waveform Display and the Stripe View
TRAKTOR - Manual - 90
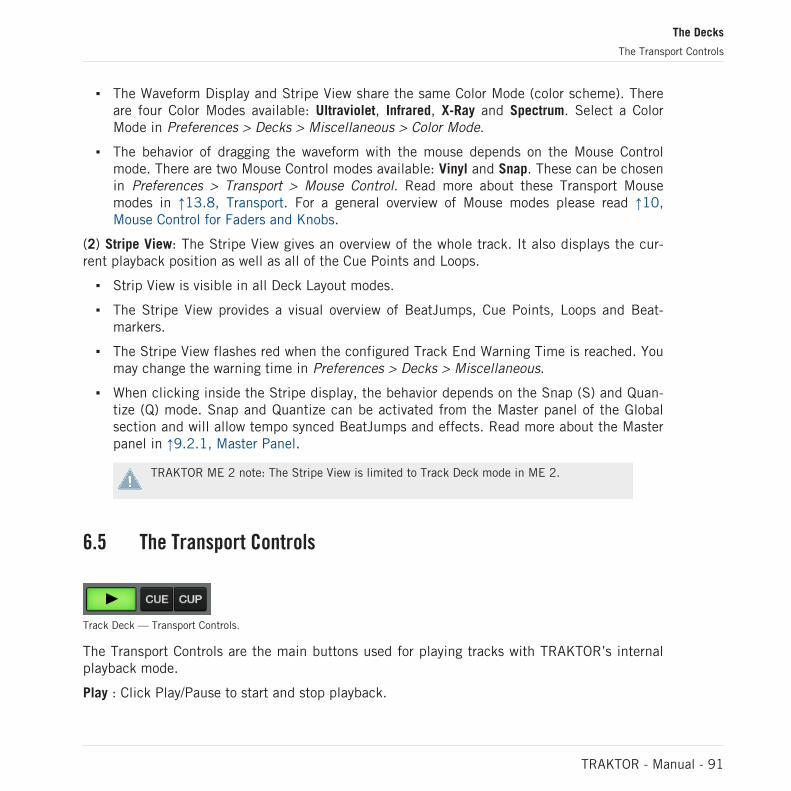
▪ The Waveform Display and Stripe View share the same Color Mode (color scheme). Thereare four Color Modes available: Ultraviolet, Infrared, X-Ray and Spectrum. Select a ColorMode in Preferences > Decks > Miscellaneous > Color Mode.
▪ The behavior of dragging the waveform with the mouse depends on the Mouse Controlmode. There are two Mouse Control modes available: Vinyl and Snap. These can be chosenin Preferences > Transport > Mouse Control. Read more about these Transport Mousemodes in ↑13.8, Transport. For a general overview of Mouse modes please read ↑10,Mouse Control for Faders and Knobs.
(2) Stripe View: The Stripe View gives an overview of the whole track. It also displays the cur-rent playback position as well as all of the Cue Points and Loops.
▪ Strip View is visible in all Deck Layout modes.
▪ The Stripe View provides a visual overview of BeatJumps, Cue Points, Loops and Beat-markers.
▪ The Stripe View flashes red when the configured Track End Warning Time is reached. Youmay change the warning time in Preferences > Decks > Miscellaneous.
▪ When clicking inside the Stripe display, the behavior depends on the Snap (S) and Quan-tize (Q) mode. Snap and Quantize can be activated from the Master panel of the Globalsection and will allow tempo synced BeatJumps and effects. Read more about the Masterpanel in ↑9.2.1, Master Panel.
TRAKTOR ME 2 note: The Stripe View is limited to Track Deck mode in ME 2.
6.5 The Transport Controls
Track Deck — Transport Controls.
The Transport Controls are the main buttons used for playing tracks with TRAKTOR’s internalplayback mode.
Play : Click Play/Pause to start and stop playback.
The Decks
The Transport Controls
TRAKTOR - Manual - 91
CUE : This button has multiple functions depending on the playback state of the track.
▪ On a paused Deck, clicking CUE sets a new Floating Cue Point at the current play posi-tion. In Snap mode this Cue Point will snap to the beat nearest the play position.
▪ When the track is paused and cued up to the Floating Cue Point, click and hold the CUEbutton to pre-listen to the Cue placement. Release CUE to return to the Floating CuePoint.
▪ Clicking CUE during playback jumps the current play position back to the previously setFloating Cue Point and stops playback.
CUP (Cue/Play) : The CUP button behaves similarly to CUE, but stops playback as long as it isheld down.
▪ On a paused Deck, clicking CUP sets a Floating Cue Point and starts playback when uponreleasing the button.
▪ Clicking CUP during playback jumps the current play position back to the Floating CuePoint and pauses playback. Release the button to resume playback.
The Decks
The Transport Controls
TRAKTOR - Manual - 92

6.6 Loop Controls
Track Deck Loop Controls
The main Loop controls offer the functions required for the creative use of loops in your mix.
Auto Looping :
▪ Click on a number in the Loop Size control (3) to set a loop. The numbers represent theloop length in beats.
▪ Upon choosing a loop size, the relevant button and the ACTIVE button (7) will both high-light in green. When inactive, the buttons are gray.
▪ When active the loop (1) will be highlighted in green in the Waveform Display.
▪ To stop looping, click on either the same loop length number or on the ACTIVE button (7).
The Decks
Loop Controls
TRAKTOR - Manual - 93
▪ To change the size of an active loop on the fly, click on another length in the Loop Sizecontrol (3).
▪ Click on the Arrow buttons (2 or 4) on each end of the Loop Size control (3) to see higher orlower values. The Arrow buttons flash if the currently selected length is out of range.
Manual Looping :
▪ Click on the Loop In button (5) to set the start point of the loop.
▪ Click on the Loop Out button (6) to set the end point of the loop. Your track will begin toloop between these two points and the ACTIVE button will be highlighted.
▪ To stop looping, click on the highlighted ACTIVE button (7).
Activate Snap (S) and Quantize (Q) in the Master Panel to get seamless loops.
6.7 Tempo Controls
TRAKTOR provides a Tempo Fader with customizable range, a pair of Tempo Bend buttons aswell as a variety of automated sync functions. These features will give you more control overyour mixes than ever before.
The Decks
Tempo Controls
TRAKTOR - Manual - 94
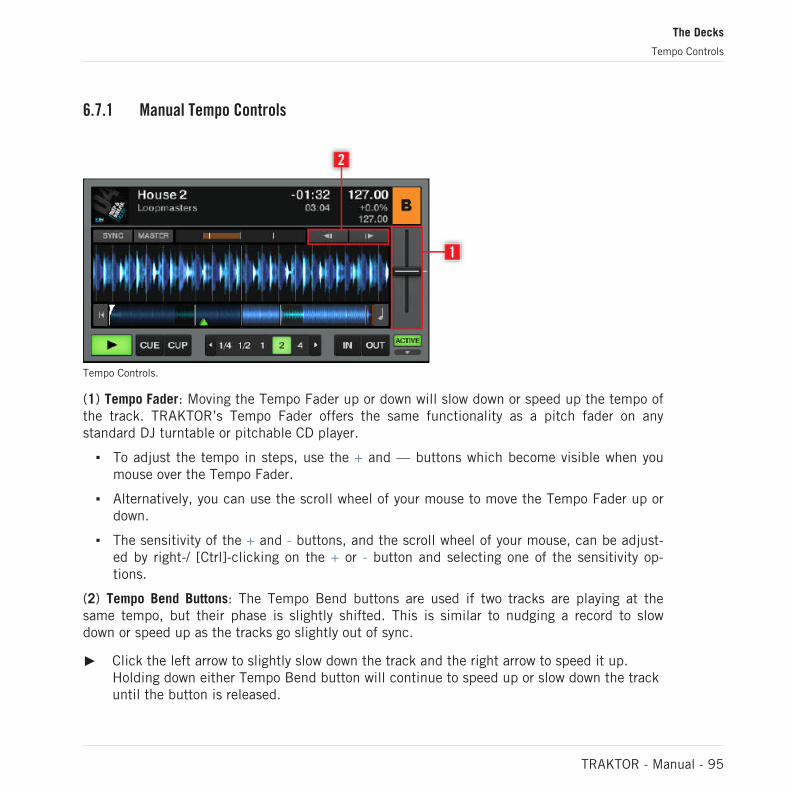
6.7.1 Manual Tempo Controls
Tempo Controls.
(1) Tempo Fader: Moving the Tempo Fader up or down will slow down or speed up the tempo ofthe track. TRAKTOR’s Tempo Fader offers the same functionality as a pitch fader on anystandard DJ turntable or pitchable CD player.
▪ To adjust the tempo in steps, use the + and — buttons which become visible when youmouse over the Tempo Fader.
▪ Alternatively, you can use the scroll wheel of your mouse to move the Tempo Fader up ordown.
▪ The sensitivity of the + and - buttons, and the scroll wheel of your mouse, can be adjust-ed by right-/ [Ctrl]-clicking on the + or - button and selecting one of the sensitivity op-tions.
(2) Tempo Bend Buttons: The Tempo Bend buttons are used if two tracks are playing at thesame tempo, but their phase is slightly shifted. This is similar to nudging a record to slowdown or speed up as the tracks go slightly out of sync.
► Click the left arrow to slightly slow down the track and the right arrow to speed it up.Holding down either Tempo Bend button will continue to speed up or slow down the trackuntil the button is released.
The Decks
Tempo Controls
TRAKTOR - Manual - 95
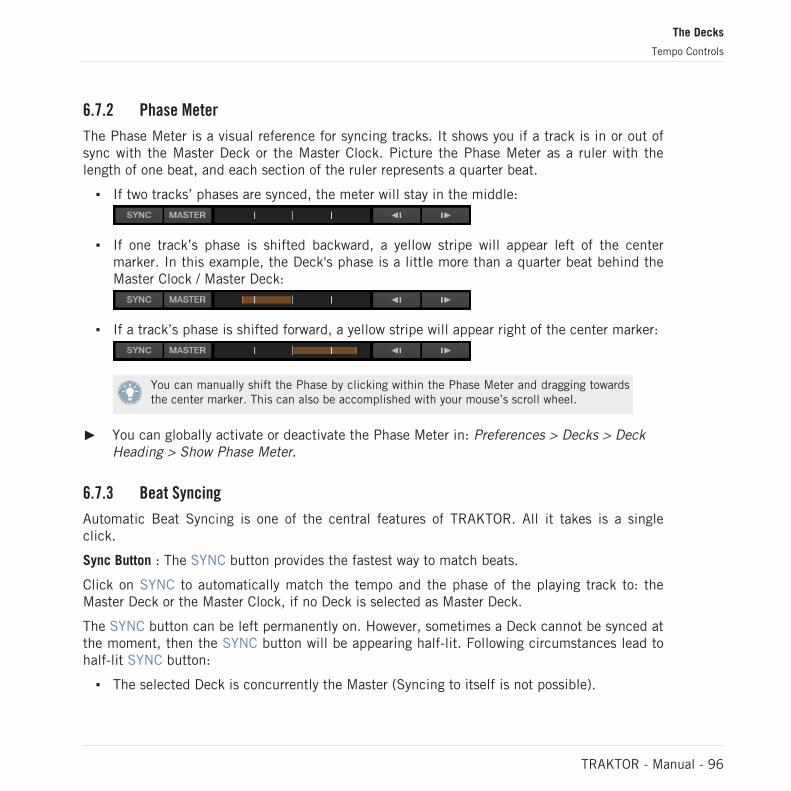
6.7.2 Phase Meter
The Phase Meter is a visual reference for syncing tracks. It shows you if a track is in or out ofsync with the Master Deck or the Master Clock. Picture the Phase Meter as a ruler with thelength of one beat, and each section of the ruler represents a quarter beat.
▪ If two tracks’ phases are synced, the meter will stay in the middle:
▪ If one track’s phase is shifted backward, a yellow stripe will appear left of the centermarker. In this example, the Deck's phase is a little more than a quarter beat behind theMaster Clock / Master Deck:
▪ If a track’s phase is shifted forward, a yellow stripe will appear right of the center marker:
You can manually shift the Phase by clicking within the Phase Meter and dragging towardsthe center marker. This can also be accomplished with your mouse’s scroll wheel.
► You can globally activate or deactivate the Phase Meter in: Preferences > Decks > DeckHeading > Show Phase Meter.
6.7.3 Beat Syncing
Automatic Beat Syncing is one of the central features of TRAKTOR. All it takes is a singleclick.
Sync Button : The SYNC button provides the fastest way to match beats.
Click on SYNC to automatically match the tempo and the phase of the playing track to: theMaster Deck or the Master Clock, if no Deck is selected as Master Deck.
The SYNC button can be left permanently on. However, sometimes a Deck cannot be synced atthe moment, then the SYNC button will be appearing half-lit. Following circumstances lead tohalf-lit SYNC button:
▪ The selected Deck is concurrently the Master (Syncing to itself is not possible).
The Decks
Tempo Controls
TRAKTOR - Manual - 96

▪ The loop length is smaller than 1 beat (Phase syncing is not possible).
As soon as these circumstances are resolved, because you choose another Deck as Master, in-creased the loop length above 1 beat, deactivated the loop, loaded a track with valid Beatgridinto the Deck, either increased the Tempo Fader’s range in the Preferences, or chose a trackwith a tempo closer to the other track’s tempo, the SYNC button will be lit fully and the synch-ing will work again.
It is not possible to activate SYNC if a track does not have a valid Beatgrid. A track is auto-matically analyzed the first time it is added to a Deck. If your track does not have a Beat-grid or the Beatgrid is incorrect, you may need to manually set the Beatgrid. For more infor-mation see ↑6.8.6, Beatgrid Panel (GRID).
Sync Mode : There are two methods for synchronizing tracks: TempoSync and BeatSync. You canselect Sync Mode in Preferences > Transport > Sync Mode.
▪ TempoSync : maintains tempo-only synchronization between the tracks. The phase of theDecks will be aligned when the SYNC button is turned on and SYNC will turn dim if thephase of the Decks are shifted. Tempos will remain synced in this mode.
▪ BeatSync : forces tempo and phase synchronization between the tracks. The phase of theDecks will be aligned when the SYNC button is turned on. SYNC will turn dim if thephase of the tracks are shifted manually (i.e. Scratching or holding a Deck in the stoppedposition), but TRAKTOR will re-align the phase of the tracks when the Deck plays normal-ly again (i.e. you release the record or jog wheel).
TRAKTOR ME 2 note: The Sync mode is limited to BeatSync in ME 2.
This concept allows you, (even if you are using TRAKTOR SCRATCH) to keep your tracks tem-po-matched, and also raise the tempo of two or more tracks simultaneously, even if their phas-es are shifted!
Master Deck:
▪ The Master Deck provides the target tempo to which other Decks can sync. Two MasterDeck modes are selectable from the Master Clock panel of the Global section.
◦ In Auto mode TRAKTOR will automatically select the Master Deck depending on whichtrack has the longest uninterrupted playtime.
The Decks
Tempo Controls
TRAKTOR - Manual - 97
◦ In Manual mode the Master Deck must be selected by clicking the MASTER button onthe desired Deck.
You can prevent Remix Decks from becoming the Master Deck by deactivating the relevantoption in the Transport section of the Preferences. See ↑13.8, Transport for further infor-mation.
When switching the Master Clock to Manual mode, you must manually select the Master Deckfor it will no longer be done automatically.
▪ The Master Clock will define the target tempo if no Master Deck is selected in Manualmode.
Sync Start/Sync Lock: Once you have SYNC engaged for a Deck, it will remain engaged whenloading a new track. This is basically all you need to do and never have to press the SYNC but-ton again.
Several circumstances can lead to a situation where a synced track will not run in sync. Theseare:
▪ Non-Integer Loop Sizes such as 1/16-1/2 (Master & Slave)
▪ Synced tempo out of range of tempo fader (Master & Slave)
When playing tracks without Beatgrid, the SYNC button will not stay locked in order toavoid unwanted sync skips. In this case you need to engage SYNC manually for the nexttrack loaded.
To view the tutorial on Beat Syncing please go to ↑15.10, Synchronization.
6.8 The Advanced Panel
The Advanced panels provide additional editing and storing functions for Loops and Cue Points,Hotcueing, BeatJumping, and for adding Beatgrids to your tracks.
You cannot open the Advanced panels when using Micro, Small or Essential Deck layout. Youmust switch to Full or Advanced Deck Layout by double-clicking the Deck Heading or by goingto Preferences > Decks Layout > Deck Layout.
The Decks
The Advanced Panel
TRAKTOR - Manual - 98
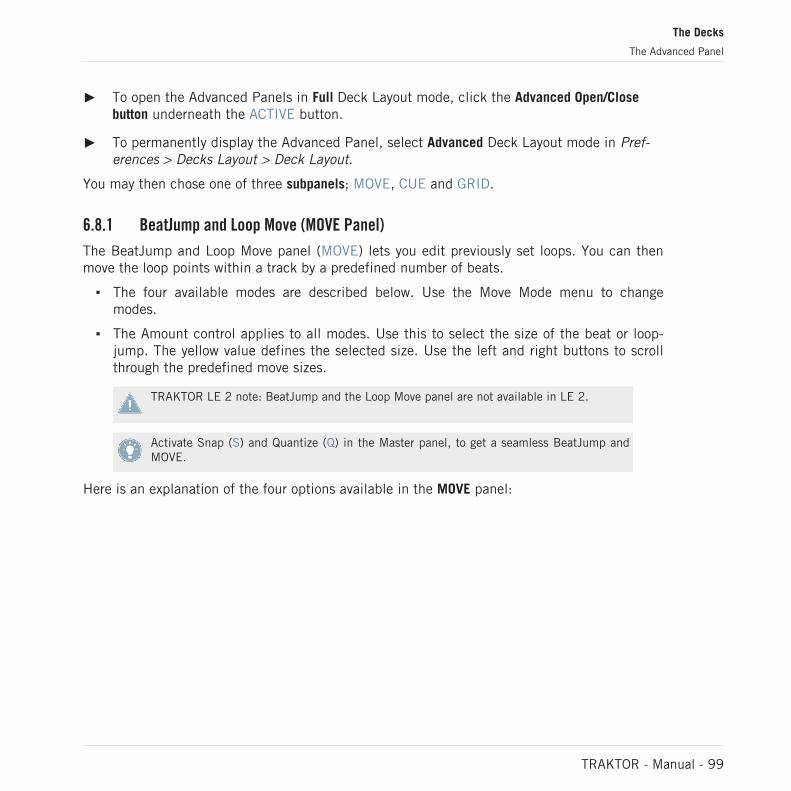
► To open the Advanced Panels in Full Deck Layout mode, click the Advanced Open/Closebutton underneath the ACTIVE button.
► To permanently display the Advanced Panel, select Advanced Deck Layout mode in Pref-erences > Decks Layout > Deck Layout.
You may then chose one of three subpanels; MOVE, CUE and GRID.
6.8.1 BeatJump and Loop Move (MOVE Panel)
The BeatJump and Loop Move panel (MOVE) lets you edit previously set loops. You can thenmove the loop points within a track by a predefined number of beats.
▪ The four available modes are described below. Use the Move Mode menu to changemodes.
▪ The Amount control applies to all modes. Use this to select the size of the beat or loop-jump. The yellow value defines the selected size. Use the left and right buttons to scrollthrough the predefined move sizes.
TRAKTOR LE 2 note: BeatJump and the Loop Move panel are not available in LE 2.
Activate Snap (S) and Quantize (Q) in the Master panel, to get a seamless BeatJump andMOVE.
Here is an explanation of the four options available in the MOVE panel:
The Decks
The Advanced Panel
TRAKTOR - Manual - 99

Move — BeatJump
Move BeatJump Advanced Panel.
This Move mode allows you to jump forwards or backwards within the track.
► Use the Move Amount Control (2) to choose a move size.
► Click the MOVE buttons (4) to jump forwards or backwards by the selected MOVE size (3).
► With the FINE button (5) activated, you can jump by a precise amount. Further, choosingxFNE (1) allows for even more precise BeatJumping.
Assign the MOVE buttons to a MIDI controller for on the fly BeatJumping. For more infor-mation on the assigning BeatJump markers and the TRAKTOR Controller Manager see↑13.21, Controller Manager.
The Decks
The Advanced Panel
TRAKTOR - Manual - 100

Move — Loop
Move Loop Mode Advanced Panel.
This Move mode allows you to move the whole loop. The active loop (1) is highlighted in green.
► Select Loop from the Move Mode menu (2).
► Use the Move Amount Control (3) to choose a move size.
► Click the Move buttons (5) to move the loop by the chosen MOVE size (4).
► With LOOP (7) activated, the Loop will be moved a full loop length. The Move Amount con-trol (3) automatically switches to LOOP (4) when clicking the LOOP (7) button.
The Decks
The Advanced Panel
TRAKTOR - Manual - 101
► With the FINE button (6) activated, you can move the Loop by a precise amount. Further,choosing xFNE allows for even more precise loop jumping.
Activate Snap (S) and Quantize (Q) in the Master panel to get an absolutely seamless loopjump.
If you find a loop you like, click and drag from the Deck Heading to copy the loop to a Re-mix Deck slot. For more information on Remix Decks, please read ↑15.8, Using the RemixDecks in Your Mix.
TRAKTOR ME 2 note: The Move Loop function is not available in ME 2.
The Decks
The Advanced Panel
TRAKTOR - Manual - 102

Move — Loop In
Move — Loop In Mode Advanced Panel.
This Move mode allows you to move the Loop In Point. This will change the loop size making itsmaller or larger by a set amount when the MOVE Forward or Backward buttons are pressed.The active loop (1) is highlighted in green.
▪ Select Loop In from the Move Mode menu (2).
▪ Choose a move size using the Move Size Control (5).
▪ Use the CUE MOVE Back/Forward buttons (6) to move the Loop In Point by the chosenamount.
◦ With LOOP (8) activated, the Loop Length is halved or doubled by using the CUE MOVEBack/Forward buttons (6).
The Decks
The Advanced Panel
TRAKTOR - Manual - 103
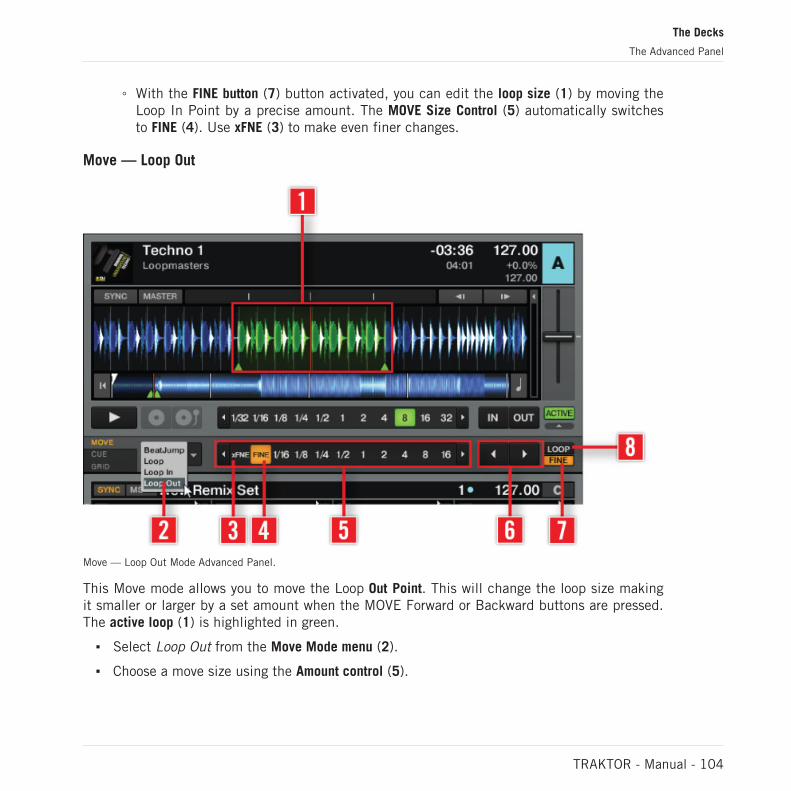
◦ With the FINE button (7) button activated, you can edit the loop size (1) by moving theLoop In Point by a precise amount. The MOVE Size Control (5) automatically switchesto FINE (4). Use xFNE (3) to make even finer changes.
Move — Loop Out
Move — Loop Out Mode Advanced Panel.
This Move mode allows you to move the Loop Out Point. This will change the loop size makingit smaller or larger by a set amount when the MOVE Forward or Backward buttons are pressed.The active loop (1) is highlighted in green.
▪ Select Loop Out from the Move Mode menu (2).
▪ Choose a move size using the Amount control (5).
The Decks
The Advanced Panel
TRAKTOR - Manual - 104
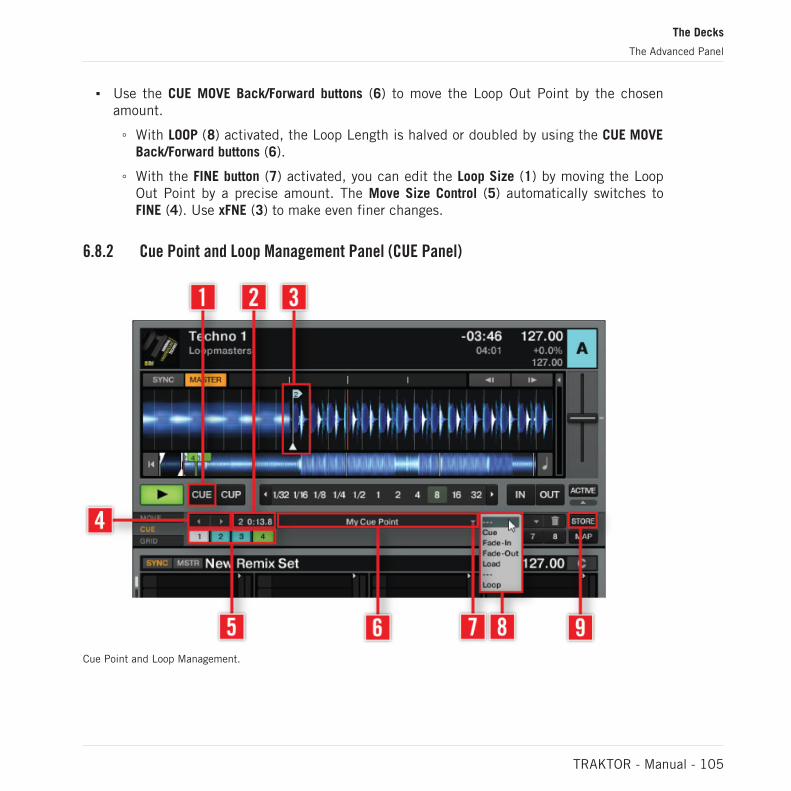
▪ Use the CUE MOVE Back/Forward buttons (6) to move the Loop Out Point by the chosenamount.
◦ With LOOP (8) activated, the Loop Length is halved or doubled by using the CUE MOVEBack/Forward buttons (6).
◦ With the FINE button (7) activated, you can edit the Loop Size (1) by moving the LoopOut Point by a precise amount. The Move Size Control (5) automatically switches toFINE (4). Use xFNE (3) to make even finer changes.
6.8.2 Cue Point and Loop Management Panel (CUE Panel)
Cue Point and Loop Management.
The Decks
The Advanced Panel
TRAKTOR - Manual - 105
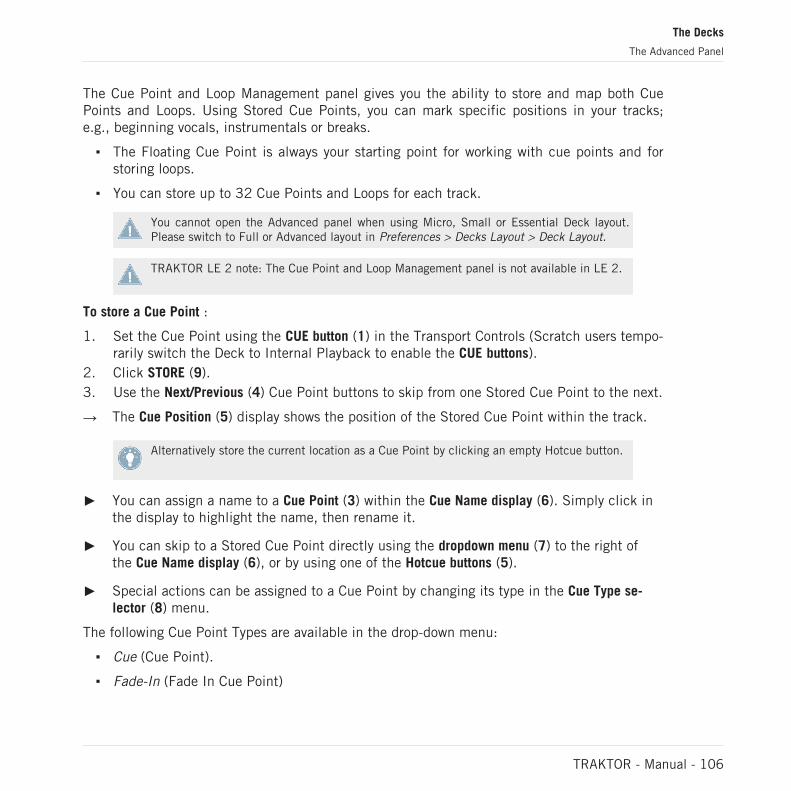
The Cue Point and Loop Management panel gives you the ability to store and map both CuePoints and Loops. Using Stored Cue Points, you can mark specific positions in your tracks;e.g., beginning vocals, instrumentals or breaks.
▪ The Floating Cue Point is always your starting point for working with cue points and forstoring loops.
▪ You can store up to 32 Cue Points and Loops for each track.
You cannot open the Advanced panel when using Micro, Small or Essential Deck layout.Please switch to Full or Advanced layout in Preferences > Decks Layout > Deck Layout.
TRAKTOR LE 2 note: The Cue Point and Loop Management panel is not available in LE 2.
To store a Cue Point :
1. Set the Cue Point using the CUE button (1) in the Transport Controls (Scratch users tempo-rarily switch the Deck to Internal Playback to enable the CUE buttons).
2. Click STORE (9).3. Use the Next/Previous (4) Cue Point buttons to skip from one Stored Cue Point to the next.
→ The Cue Position (5) display shows the position of the Stored Cue Point within the track.
Alternatively store the current location as a Cue Point by clicking an empty Hotcue button.
► You can assign a name to a Cue Point (3) within the Cue Name display (6). Simply click inthe display to highlight the name, then rename it.
► You can skip to a Stored Cue Point directly using the dropdown menu (7) to the right ofthe Cue Name display (6), or by using one of the Hotcue buttons (5).
► Special actions can be assigned to a Cue Point by changing its type in the Cue Type se-lector (8) menu.
The following Cue Point Types are available in the drop-down menu:
▪ Cue (Cue Point).
▪ Fade-In (Fade In Cue Point)
The Decks
The Advanced Panel
TRAKTOR - Manual - 106
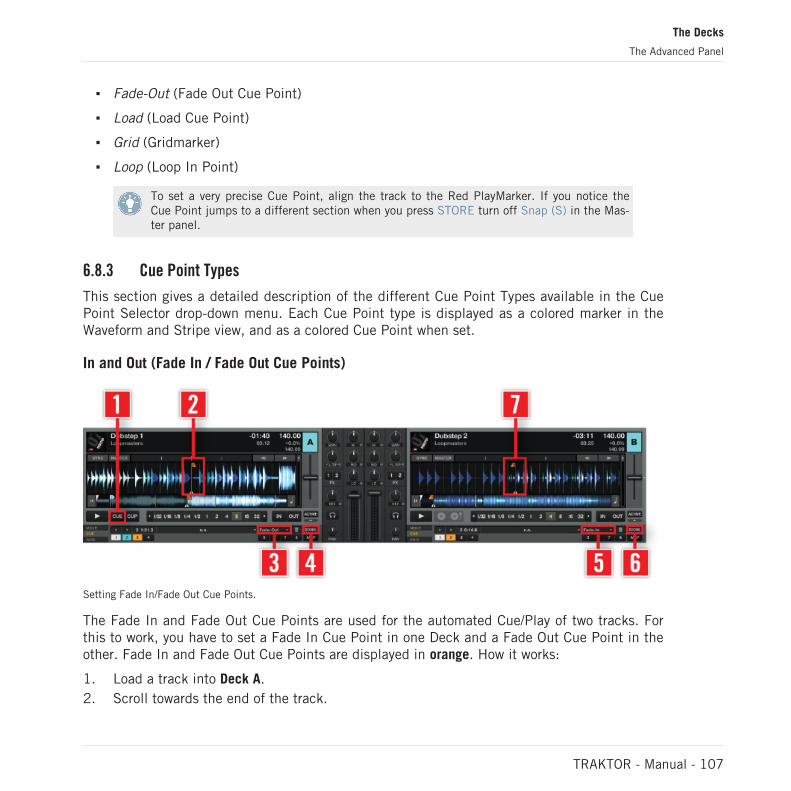
▪ Fade-Out (Fade Out Cue Point)
▪ Load (Load Cue Point)
▪ Grid (Gridmarker)
▪ Loop (Loop In Point)
To set a very precise Cue Point, align the track to the Red PlayMarker. If you notice theCue Point jumps to a different section when you press STORE turn off Snap (S) in the Mas-ter panel.
6.8.3 Cue Point Types
This section gives a detailed description of the different Cue Point Types available in the CuePoint Selector drop-down menu. Each Cue Point type is displayed as a colored marker in theWaveform and Stripe view, and as a colored Cue Point when set.
In and Out (Fade In / Fade Out Cue Points)
Setting Fade In/Fade Out Cue Points.
The Fade In and Fade Out Cue Points are used for the automated Cue/Play of two tracks. Forthis to work, you have to set a Fade In Cue Point in one Deck and a Fade Out Cue Point in theother. Fade In and Fade Out Cue Points are displayed in orange. How it works:
1. Load a track into Deck A.2. Scroll towards the end of the track.
The Decks
The Advanced Panel
TRAKTOR - Manual - 107
3. Click CUE (1) to move the Floating Cue Point to this position.4. Click STORE (4) to convert the Cue Point into a Stored Cue Point.5. Drop-down the Cue Type Selector (3) menu and select Fade-Out.6. An orange Fade Out Cue Point (2) will appear in the Waveform Display and the Stripe View.7. Load a track into Deck B.8. Set a Stored Cue Point at the beginning of the track by clicking STORE (6).9. Dropdown the Cue Type selector (5) and select Fade-In from the menu.10. An orange Fade In Cue Point (7) will appear in the Waveform Display and Stripe View.11. Start the playback of the track in Deck A shortly before the Fade Out Cue Point (2).12. When the Fade Out Cue Point (2) in Deck A crosses the play position, the track in Deck B
will automatically begin playing from its Fade In Cue Point (7).Note:
▪ You have to enable the Activate Fade In & Fade Out Markers option in: Preferences >Loading > Loading.
▪ While a Fade Out Cue Point always triggers the playback of the next track, a Fade In CuePoint triggers no action.
▪ If the opposite Deck is empty, no action is triggered.
▪ You can also use Fade In and Fade Out Cue Points with Cruise mode.
Load (Load Cue Point)
A track with a Load Cue Point will automatically cue to this point when loaded, saving youfrom the need to manually cue your track to this point. Load Cue Points are displayed in yel-low.
► If you want to make use of the Load Cue Points, enable the option Initially cue to LoadMarker in: Preferences > Loading > Loading.
Grid (Beatmarker)
A Beatmarker sets the starting point for a Beatgrid. This is a special cue point from which aregularly spaced grid of beat lines is created. TRAKTOR then uses these grids to sync yourtracks. Beatmarkers are displayed in white. Please read ↑6.8.6, Beatgrid Panel (GRID) for a de-tailed explanation of Beatmarkers and Beatgrids.
The Decks
The Advanced Panel
TRAKTOR - Manual - 108
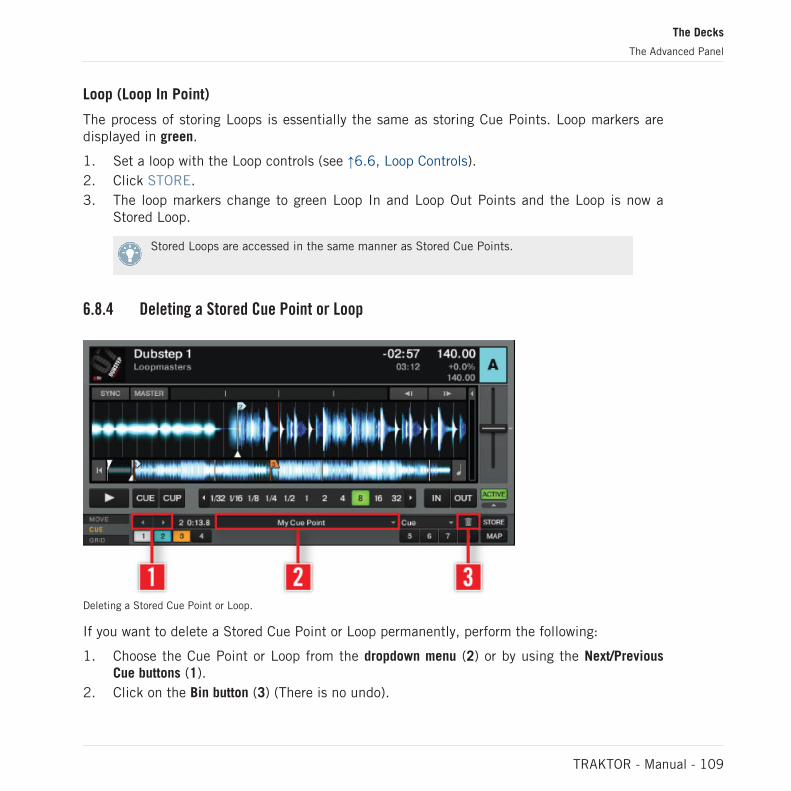
Loop (Loop In Point)
The process of storing Loops is essentially the same as storing Cue Points. Loop markers aredisplayed in green.
1. Set a loop with the Loop controls (see ↑6.6, Loop Controls).2. Click STORE.3. The loop markers change to green Loop In and Loop Out Points and the Loop is now a
Stored Loop.
Stored Loops are accessed in the same manner as Stored Cue Points.
6.8.4 Deleting a Stored Cue Point or Loop
Deleting a Stored Cue Point or Loop.
If you want to delete a Stored Cue Point or Loop permanently, perform the following:
1. Choose the Cue Point or Loop from the dropdown menu (2) or by using the Next/PreviousCue buttons (1).
2. Click on the Bin button (3) (There is no undo).
The Decks
The Advanced Panel
TRAKTOR - Manual - 109
3. The Cue Point or Loop is deleted.
6.8.5 Hotcue Mapping
In TRAKTOR, you can assign any Stored Cue Point or Loop to one of the 8 Hotcue buttons.This allows for instant access to your most important Cue Points and Loops.
▪ Storing a Cue Point instantly maps it to the next available Hotcue. Click a second time onSTORE to duplicate the Hotcue.
▪ If you want to change the assignment; click on the assigned Hotcue, then click on MAPand then on the new Hotcue button.
▪ To delete a Cue/Loop In point: select the Cue/Loop In Point and click on the WastebinIcon. This deletes the Cue/Loop In Point permanently.
MAP enables you to store Cue Points and Loops in a non-sequential order.
How to use Hotcues
The behavior of a Hotcue button depends on the playback status of the track.
▪ When the Deck is playing, clicking a Hotcue button will jump the play position to themapped Cue/Loop In Point and continue playing.
▪ When the Deck is paused, the Hotcue buttons behave in the same manner as the CUEbutton in the Transport Controls, i.e. clicking it jumps the play position to the mappedCue/Loop In Point. Holding the Hotcue button will continue playback until it is released.Upon release the playback position will jump back to the Cue/Loop In Point and remainpaused.
Activate Snap (S) and Quantize (Q) in the Master panel to get a seamless Hotcue jump.
6.8.6 Beatgrid Panel (GRID)
The Beatgrid is the foundation for setting perfect loops. Beatgrids act as a visual reference forthe DJ in showing a visible tempo for a track.
The Decks
The Advanced Panel
TRAKTOR - Manual - 110

The Beatgrid panel (GRID) gives control over the Beatmarker, Beatgrid and the stored BPM ofa track.
It is possible to alter the visual appearance of the Beatgrid using Preferences > Decks >Miscellaneous > Grid Mode.
Working with Beatgrids
Working with Beatgrids.
To guarantee that all Tempo, Loop and Move controls work as expected, you will have to verifythe Beatgrid for your tracks:
1. Analyze a track (see ↑5.10.2, Analysis) and load it into a Deck. This can be set to happenautomatically depending on settings in Preferences > File Management > File Manage-ment.
2. Click the + symbol in the Waveform display to get a more precise view. The + symbol willbecome visible as you mouse over the Waveform Display.
The Decks
The Advanced Panel
TRAKTOR - Manual - 111
3. Check the Beatmarker (1) at the beginning of the track. If it does not sit directly on thebeat, use the Move Grid buttons (3) to correct it. Alternatively, you can manually set aBeatmarker at the position of your choice by using the CUE panel (2). To set an Auto-Beat-marker, manually click the AUTO button (9).
4. Move the track slowly forward (by dragging the Waveform Display) from the Beatmarkerand check that the Beatgrid sits correctly on the beat. In Snap mode, you can click in theWaveform to audibly check the position of the Beatgrid. Turn on the TICK (5) button with-in the Master Clock (Global section) to help audibly align the Beatgrid while in playback.
5. Use the BPM Increase and Decrease buttons (4) to make precise adjustments to the align-ment of the grid.
6. Use the x2 and /2 buttons (8) to double or half the tempo, as well as use the TAP button(10) to tap the precise tempo. Alternatively, double-click in the Tempo display (7) to man-ually enter a BPM value. (Quickly set the Beatgrid by clicking four times during playbackon the TAP button (10) according to the tempo of the track. Thus you set the proper tempoand downbeat location and it also saves lots of time compared to using all the other con-trols in the Advanced Panel.)
7. Continue on until you reach the end of the track. Once the Beatgrid sits correctly on thebeat throughout the whole track, click the Lock Beatgrid button (6) and you are done — aprecise tempo has been permanently defined for the track.
Here are a few things you should consider when creating a Beatgrid:
► In External Mixer Mode you will also need to activate the Internal Mixer Cue button inorder to hear the Beat Tick (5).
► If using an internal sound card on a laptop you will need to activate the Cue button onthe Internal Mixer and adjust your output monitor settings to hear the Tick. You can ad-just monitor settings in Preferences > Output Routing > Output Monitor.
► When pressing the Move Beatmarker buttons (3) the Left mouse-click moves the Beatmark-er in fine steps, right-/[Ctrl]-click in coarse steps.
► When pressing the BPM Increase and Decrease buttons (4) the Left mouse-click changesthe Grid in fine steps, right-/[Ctrl]-click in coarse steps.
► If no Beatmarker is set, enable Set Beat-Grid when detecting BPM in: Preferences > FileManagement > BPM Detection.
The Decks
The Advanced Panel
TRAKTOR - Manual - 112
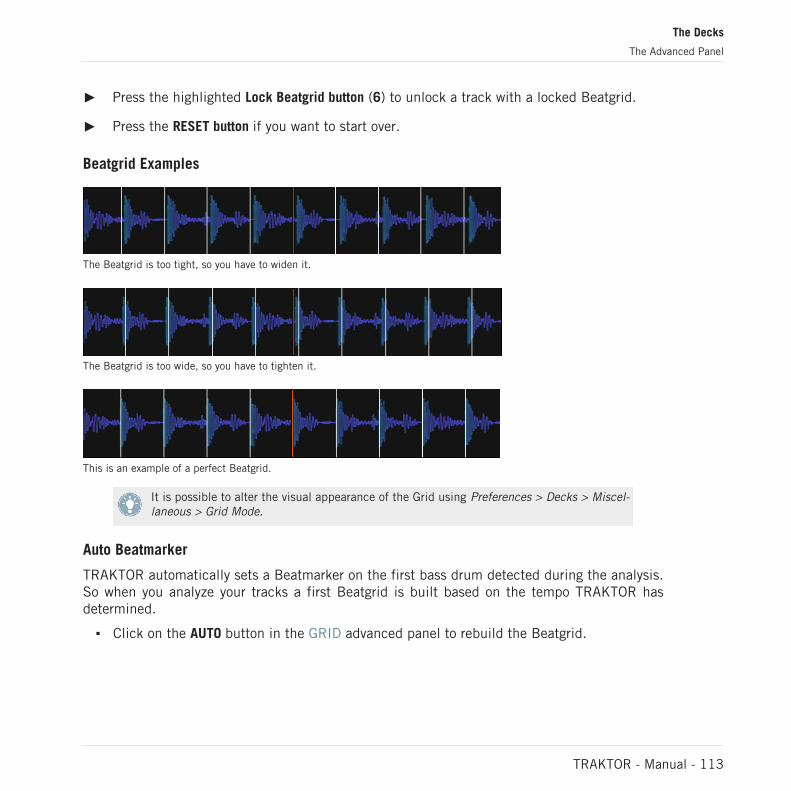
► Press the highlighted Lock Beatgrid button (6) to unlock a track with a locked Beatgrid.
► Press the RESET button if you want to start over.
Beatgrid Examples
The Beatgrid is too tight, so you have to widen it.
The Beatgrid is too wide, so you have to tighten it.
This is an example of a perfect Beatgrid.
It is possible to alter the visual appearance of the Grid using Preferences > Decks > Miscel-laneous > Grid Mode.
Auto Beatmarker
TRAKTOR automatically sets a Beatmarker on the first bass drum detected during the analysis.So when you analyze your tracks a first Beatgrid is built based on the tempo TRAKTOR hasdetermined.
▪ Click on the AUTO button in the GRID advanced panel to rebuild the Beatgrid.
The Decks
The Advanced Panel
TRAKTOR - Manual - 113
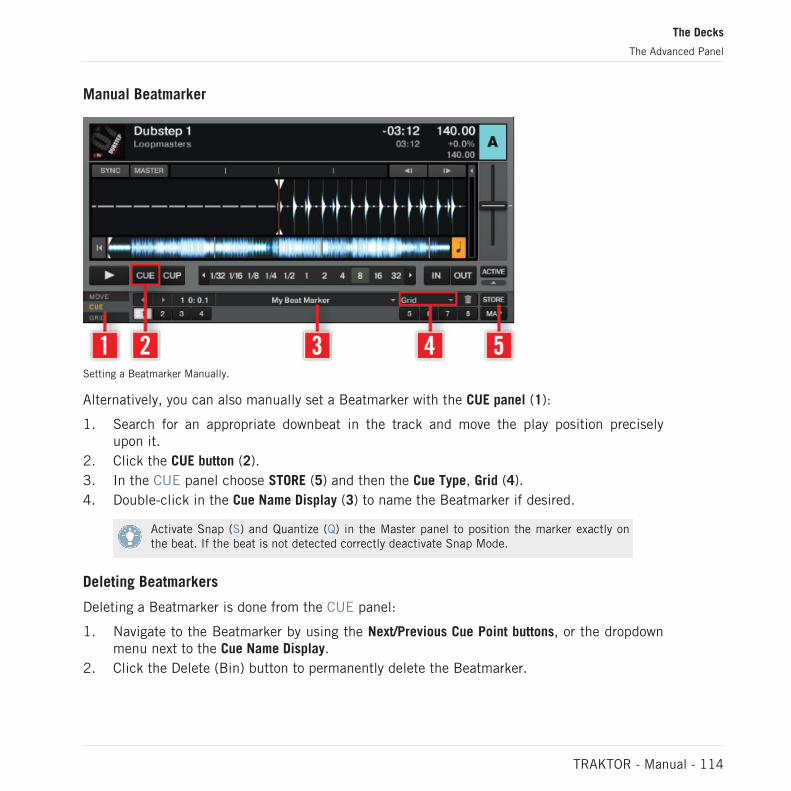
Manual Beatmarker
Setting a Beatmarker Manually.
Alternatively, you can also manually set a Beatmarker with the CUE panel (1):
1. Search for an appropriate downbeat in the track and move the play position preciselyupon it.
2. Click the CUE button (2).3. In the CUE panel choose STORE (5) and then the Cue Type, Grid (4).4. Double-click in the Cue Name Display (3) to name the Beatmarker if desired.
Activate Snap (S) and Quantize (Q) in the Master panel to position the marker exactly onthe beat. If the beat is not detected correctly deactivate Snap Mode.
Deleting Beatmarkers
Deleting a Beatmarker is done from the CUE panel:
1. Navigate to the Beatmarker by using the Next/Previous Cue Point buttons, or the dropdownmenu next to the Cue Name Display.
2. Click the Delete (Bin) button to permanently delete the Beatmarker.
The Decks
The Advanced Panel
TRAKTOR - Manual - 114
Lock the Beatgrid
If the Beatmarker and Beatgrid are set, you can lock your results by clicking the Lock button.
1. After clicking the Lock button, all buttons in the GRID panel are deactivated.2. The stored tempo (BPM) is locked and cannot be changed until you unlock it by clicking
Lock again.3. All tracks with a locked Beatgrid will show a small Lock Icon within the Browser.
Tick (Audible Beatgrid)
The Tick is essentially a metronome used to obtain audible feedback as to the positioning ofthe Beatgrid relatively to the beats of the track (the Tick is on the same channel as the MonitorOutput).
Setting audible Beatgrid.
(1) Cue: Pre-listen to a track over the internal TRAKTOR mixer.
(2) Tick: With the Tick button (small headphones icon) you can activate an audible beat tickthat works like a metronome and helps you while editing Beatgrids.
► In Internal Mixer mode the tick is only audible on signals cued over the headphones.
The Decks
The Advanced Panel
TRAKTOR - Manual - 115
► In External Mixer mode the tick is laid over the Deck channel signal when HeadphoneCue on the Internal Mixer is active.
(3) MIX: The MIX knob lets you mix the cued signal with the master signal in your headphones.
(4) VOL: The VOL knob controls the volume of the Monitor output for your headphones.
► If using an internal sound card on a laptop you will need to activate the Cue button onthe Internal Mixer and adjust your output monitor settings to hear the Tick. You can ad-just monitor settings in Preferences > Output Routing > Output Monitor.
The Decks
The Advanced Panel
TRAKTOR - Manual - 116
7 The Internal Mixer & the Crossfader
The Internal Mixer is the nerve center of TRAKTOR. With the Internal Mixer you can control themix and modulate the sound of your tracks for smooth transitions.
7.1 Channel Faders
The Channel Faders adjust the channel volume. Their Channel Level meters help you to adjustthe volume of the next track against the currently running track.
► The Channel Faders are only visible when Micro, Essential, Full or Advanced Deck Layoutsare selected. Select these layout modes by double-clicking the Deck Heading or fromPreferences > Decks Layout > Deck Layout.
► Select Mixer from the Layout Selector in the TRAKTOR Header. By default the ChannelFaders are visible with this layout.
7.2 Crossfader
The Crossfader.
The Crossfader enables you to make transitions between Decks by dragging it from one side tothe other.
(1) Crossfader Assign Buttons: Select which Decks are audible on the left and right position ofthe Crossfader.
The Internal Mixer & the Crossfader
Channel Faders
TRAKTOR - Manual - 117
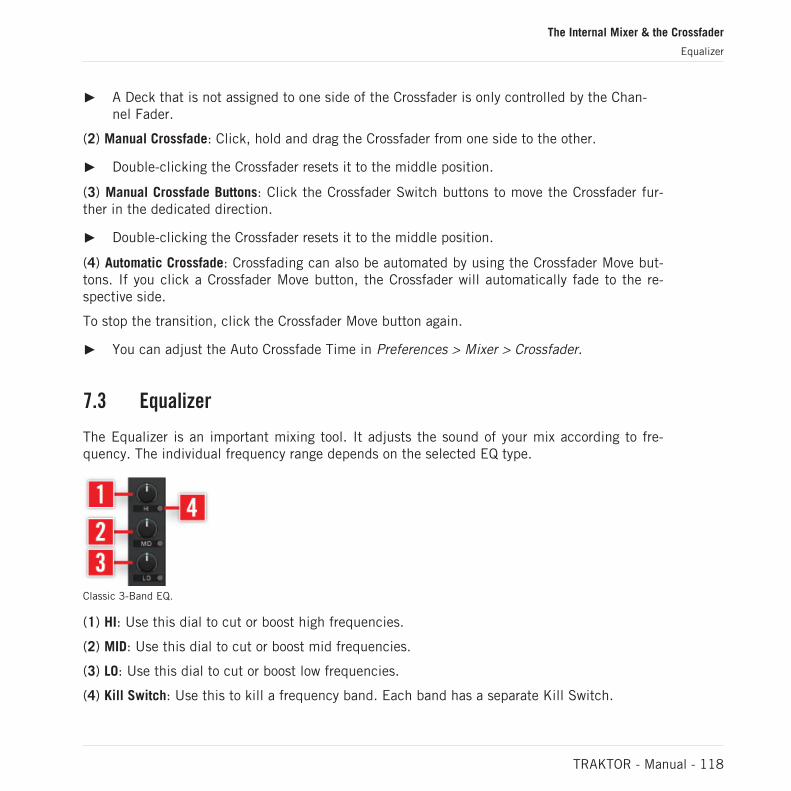
► A Deck that is not assigned to one side of the Crossfader is only controlled by the Chan-nel Fader.
(2) Manual Crossfade: Click, hold and drag the Crossfader from one side to the other.
► Double-clicking the Crossfader resets it to the middle position.
(3) Manual Crossfade Buttons: Click the Crossfader Switch buttons to move the Crossfader fur-ther in the dedicated direction.
► Double-clicking the Crossfader resets it to the middle position.
(4) Automatic Crossfade: Crossfading can also be automated by using the Crossfader Move but-tons. If you click a Crossfader Move button, the Crossfader will automatically fade to the re-spective side.
To stop the transition, click the Crossfader Move button again.
► You can adjust the Auto Crossfade Time in Preferences > Mixer > Crossfader.
7.3 Equalizer
The Equalizer is an important mixing tool. It adjusts the sound of your mix according to fre-quency. The individual frequency range depends on the selected EQ type.
Classic 3-Band EQ.
(1) HI: Use this dial to cut or boost high frequencies.
(2) MID: Use this dial to cut or boost mid frequencies.
(3) LO: Use this dial to cut or boost low frequencies.
(4) Kill Switch: Use this to kill a frequency band. Each band has a separate Kill Switch.
The Internal Mixer & the Crossfader
Equalizer
TRAKTOR - Manual - 118
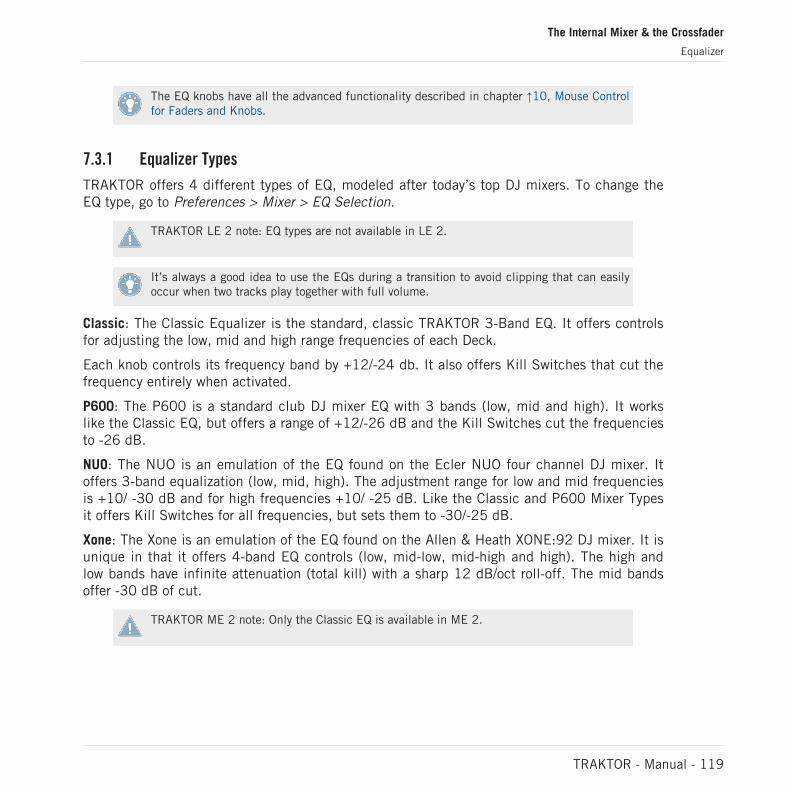
The EQ knobs have all the advanced functionality described in chapter ↑10, Mouse Controlfor Faders and Knobs.
7.3.1 Equalizer Types
TRAKTOR offers 4 different types of EQ, modeled after today’s top DJ mixers. To change theEQ type, go to Preferences > Mixer > EQ Selection.
TRAKTOR LE 2 note: EQ types are not available in LE 2.
It’s always a good idea to use the EQs during a transition to avoid clipping that can easilyoccur when two tracks play together with full volume.
Classic: The Classic Equalizer is the standard, classic TRAKTOR 3-Band EQ. It offers controlsfor adjusting the low, mid and high range frequencies of each Deck.
Each knob controls its frequency band by +12/-24 db. It also offers Kill Switches that cut thefrequency entirely when activated.
P600: The P600 is a standard club DJ mixer EQ with 3 bands (low, mid and high). It workslike the Classic EQ, but offers a range of +12/-26 dB and the Kill Switches cut the frequenciesto -26 dB.
NUO: The NUO is an emulation of the EQ found on the Ecler NUO four channel DJ mixer. Itoffers 3-band equalization (low, mid, high). The adjustment range for low and mid frequenciesis +10/ -30 dB and for high frequencies +10/ -25 dB. Like the Classic and P600 Mixer Typesit offers Kill Switches for all frequencies, but sets them to -30/-25 dB.
Xone: The Xone is an emulation of the EQ found on the Allen & Heath XONE:92 DJ mixer. It isunique in that it offers 4-band EQ controls (low, mid-low, mid-high and high). The high andlow bands have infinite attenuation (total kill) with a sharp 12 dB/oct roll-off. The mid bandsoffer -30 dB of cut.
TRAKTOR ME 2 note: Only the Classic EQ is available in ME 2.
The Internal Mixer & the Crossfader
Equalizer
TRAKTOR - Manual - 119

7.4 GAIN, Cue and PAN
Mixer with Gain, Cue and Pan.
(1) GAIN: With the GAIN knob you can control the pre-fader level of each channel shown in theLevel Meters of the Channel Faders.
▪ GAIN is only visible when full size Deck Layouts are activated. If GAIN is not visibleplease change the layout in Preferences > Decks Layout.
▪ TRAKTOR offers a powerful Autogain function enabled in Preferences > Mixer. This func-tion relies on the gain values extracted from the Analysis process. You can at any timeadjust the Autogain set during track Analysis with the GAIN knob. To do so, click the littlebutton next to the GAIN label. The label then reads AUTO, and the knob is in Autogainmode. You can then adjust the previously set Autogain to your liking. The new Autogainvalue will be saved with the track file.
(2) Cue: With the Cue button you can audition the Deck via the Monitor outputs.
To use the cue functionality a multi channel audio device is required. Cue is only visiblewhen full size Decks are activated.
(3) PAN: With the PAN knob you can control the balance between the left and right stereochannels for each Deck individually.
The Internal Mixer & the Crossfader
GAIN, Cue and PAN
TRAKTOR - Manual - 120
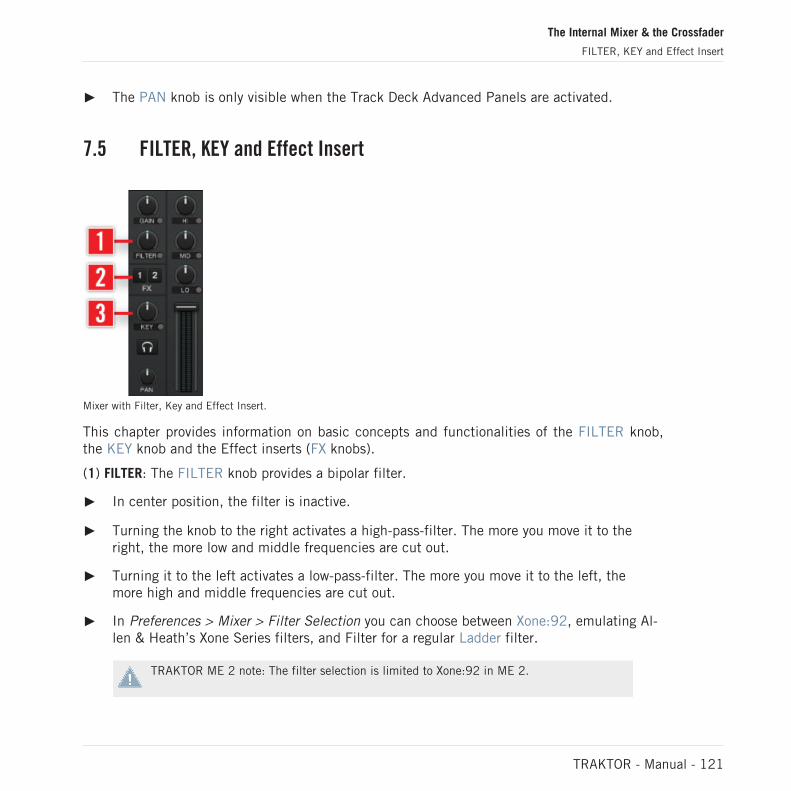
► The PAN knob is only visible when the Track Deck Advanced Panels are activated.
7.5 FILTER, KEY and Effect Insert
Mixer with Filter, Key and Effect Insert.
This chapter provides information on basic concepts and functionalities of the FILTER knob,the KEY knob and the Effect inserts (FX knobs).
(1) FILTER: The FILTER knob provides a bipolar filter.
► In center position, the filter is inactive.
► Turning the knob to the right activates a high-pass-filter. The more you move it to theright, the more low and middle frequencies are cut out.
► Turning it to the left activates a low-pass-filter. The more you move it to the left, themore high and middle frequencies are cut out.
► In Preferences > Mixer > Filter Selection you can choose between Xone:92, emulating Al-len & Heath’s Xone Series filters, and Filter for a regular Ladder filter.
TRAKTOR ME 2 note: The filter selection is limited to Xone:92 in ME 2.
The Internal Mixer & the Crossfader
FILTER, KEY and Effect Insert
TRAKTOR - Manual - 121
(2) Effect Insert: The two (or four) Effect Insert buttons in each channel insert the effect unitsinto the signal chain.
► You can insert all Effect Units in one channel.
► You can insert the same Effect Unit in more than one channel.
► You can insert an Effect Unit on all channels to simulate a Master Effect.
► When switching an Effect Unit to External Send mode, the according FX button is disa-bled.
Turning off an effect with the Insert Buttons stops processing of this effect instance andtherefore saves CPU power.
(3) KEY: With the KEY knob you can control the pitch of a playing track without affecting itstempo. Key control has to be activated by pressing the small button underneath the knob. Keycan be used for harmonic mixing.
► In the center position, the track is played at original pitch.
► Turning it left or right adjusts the pitch up or down.
TRAKTOR LE 2 note: KEY knob is not available in LE 2.
The Internal Mixer & the Crossfader
FILTER, KEY and Effect Insert
TRAKTOR - Manual - 122
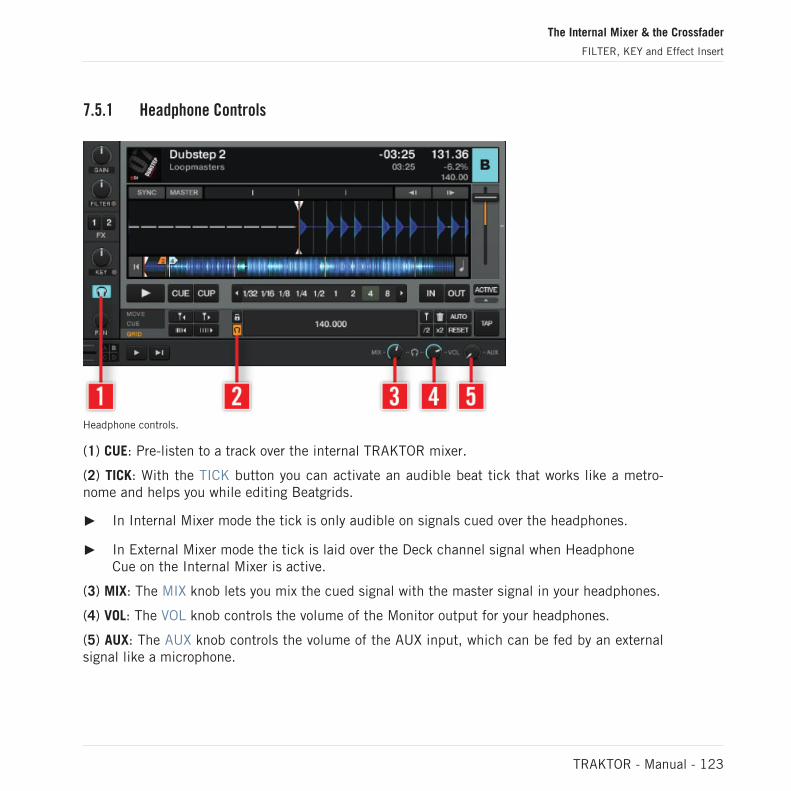
7.5.1 Headphone Controls
Headphone controls.
(1) CUE: Pre-listen to a track over the internal TRAKTOR mixer.
(2) TICK: With the TICK button you can activate an audible beat tick that works like a metro-nome and helps you while editing Beatgrids.
► In Internal Mixer mode the tick is only audible on signals cued over the headphones.
► In External Mixer mode the tick is laid over the Deck channel signal when HeadphoneCue on the Internal Mixer is active.
(3) MIX: The MIX knob lets you mix the cued signal with the master signal in your headphones.
(4) VOL: The VOL knob controls the volume of the Monitor output for your headphones.
(5) AUX: The AUX knob controls the volume of the AUX input, which can be fed by an externalsignal like a microphone.
The Internal Mixer & the Crossfader
FILTER, KEY and Effect Insert
TRAKTOR - Manual - 123
► If using an internal sound card on a laptop you will need to activate the Cue button onthe Internal Mixer and adjust your output monitor settings to hear the Tick. You can ad-just monitor settings in Preferences > Output Routing > Output Monitor.
7.6 The Internal Mixer in External Mixer Mode
TRAKTOR can be used with an external mixer that replaces the Internal Mixer. However, youcan use certain features of the Internal Mixer also in External Mixer mode.
The Crossfader and the Channel Faders are disabled in External Mixer mode.
The controls of the Internal Mixer that can be combined with an external mixer are:
▪ The EQs of TRAKTOR’s internal mixer.
▪ The Deck’s FILTER
▪ KEY and FX
▪ GAIN knob.
▪ The headphone Cue button is used to make the beat tick audible on that channel if TICKin the Master Clock panel is activated.
▪ The PAN knob is useful as not all hardware mixers have individual pan controls.
The MAIN Knob in the Master panel works also in External Mixer Mode and can be used toraise or lower the overall volume.
TRAKTOR's internal EQs are also available in external mixer mode.
The Internal Mixer & the Crossfader
The Internal Mixer in External Mixer Mode
TRAKTOR - Manual - 124
8 Using TRAKTOR with an External Mixer
TRAKTOR can either replace an entire DJ setup or it can just replace your Decks. In the lattercase, you will be using TRAKTOR in combination with an external mixer. This allows you to mixyour digital tracks with the analog feel of the knobs and faders of a hardware mixer.
8.1 Requirements
The requirements of your hardware depend on the complexity of your setup.
8.1.1 The Mixer
In External Mixer mode, each Deck of TRAKTOR is routed to one of the channels of your mixer.The inputs required for TRAKTOR Decks are LINE level inputs—the same as for CD players.
The most basic TRAKTOR setup uses two playback Decks and therefore requires a two-channelmixer.
Adding a third and fourth Deck can extend this setup. Each additional source requires an addi-tional input on your mixer.
An even more advanced setup integrates the TRAKTOR send effects. Using them not only re-quires one more channel on your mixer but also an effects send output on the mixer to feedthe effects directly from the mixer. Usually this output can be controlled either via FX sendknobs or buttons on each channel of the mixer.
8.1.2 Audio Device
For connecting all Decks to the mixer an audio interface with as many stereo channels asDecks used is required. TRAKTOR does not support two sound cards side by side, but there areways to aggregate sound cards to make them appear as a single audio device in TRAKTOR'saudio setup.
If you want to use the send effect feature, the audio interface also must have an additionalstereo input for the effects send signal coming from the mixer.
Using TRAKTOR with an External Mixer
Requirements
TRAKTOR - Manual - 125
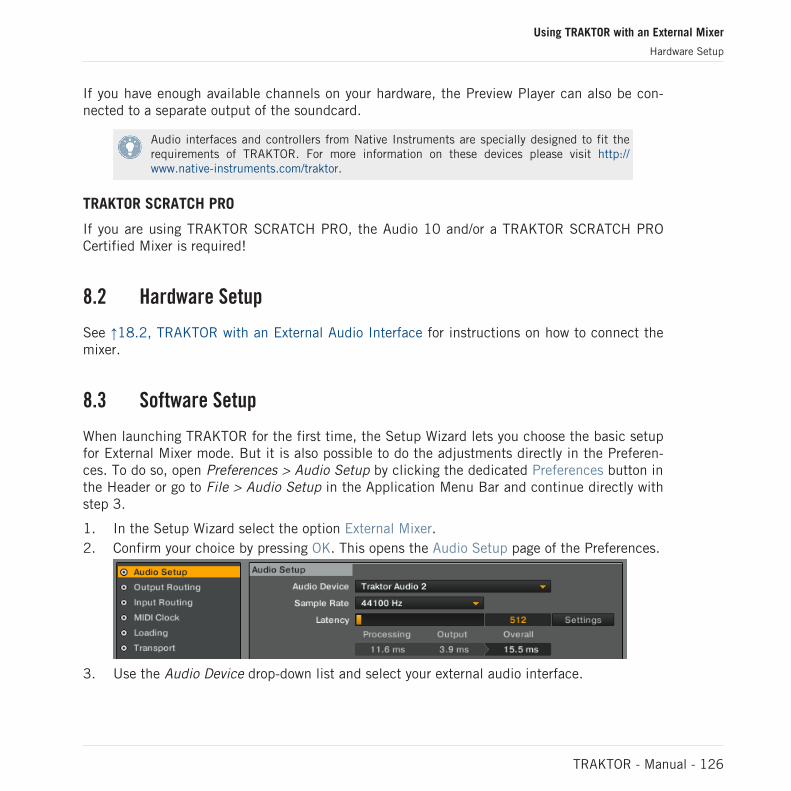
If you have enough available channels on your hardware, the Preview Player can also be con-nected to a separate output of the soundcard.
Audio interfaces and controllers from Native Instruments are specially designed to fit therequirements of TRAKTOR. For more information on these devices please visit http://www.native-instruments.com/traktor.
TRAKTOR SCRATCH PRO
If you are using TRAKTOR SCRATCH PRO, the Audio 10 and/or a TRAKTOR SCRATCH PROCertified Mixer is required!
8.2 Hardware Setup
See ↑18.2, TRAKTOR with an External Audio Interface for instructions on how to connect themixer.
8.3 Software Setup
When launching TRAKTOR for the first time, the Setup Wizard lets you choose the basic setupfor External Mixer mode. But it is also possible to do the adjustments directly in the Preferen-ces. To do so, open Preferences > Audio Setup by clicking the dedicated Preferences button inthe Header or go to File > Audio Setup in the Application Menu Bar and continue directly withstep 3.
1. In the Setup Wizard select the option External Mixer.2. Confirm your choice by pressing OK. This opens the Audio Setup page of the Preferences.
3. Use the Audio Device drop-down list and select your external audio interface.
Using TRAKTOR with an External Mixer
Hardware Setup
TRAKTOR - Manual - 126
4. Set a latency and sample rate your system can handle. Start with a higher latency at first,such as 15 ms. (For now use a moderate latency setting. You can change this later andtest what your system is able to handle.)
5. Open the Output Routing page to assign the outputs of TRAKTOR to the physical outputsof your audio interface.
6. Verify that External is selected in the Mixing Mode section.7. Assign Output Deck A, B, C and D to all outputs of the external audio interface that are
connected to the mixer. Note that you have to connect a pair of outputs to each channel,so Deck A typically connects to Outputs 1 and 2 of your audio interface, Deck B to Out-puts 3 and 4, and so on. To use send effects you also have to assign the Output FX Re-turn (typically to the channel that is connected to the FX Return of the mixer).
8. If you want to use the send effects, go to the Input Routing page and assign the Input FXSend (Ext). Typically this is fed by the FX Send output of the mixer.
9. Close the Preferences by clicking the Close button.
Be aware that effects set to Post Fader mode will not be audible when switching to externalmixing.
Audio interfaces and controllers from Native Instruments are specially designed to fit therequirements of TRAKTOR. Please refer to the documentation of your device for specific in-formation regarding setup.
TRAKTOR ME 2 note: The FX Send is not available in ME 2.
TRAKTOR SCRATCH PRO 2
When using TRAKTOR SCRATCH PRO 2 you also need to configure the Timecode Setup (see↑13.6, Timecode Setup).
Using TRAKTOR with an External Mixer
Software Setup
TRAKTOR - Manual - 127
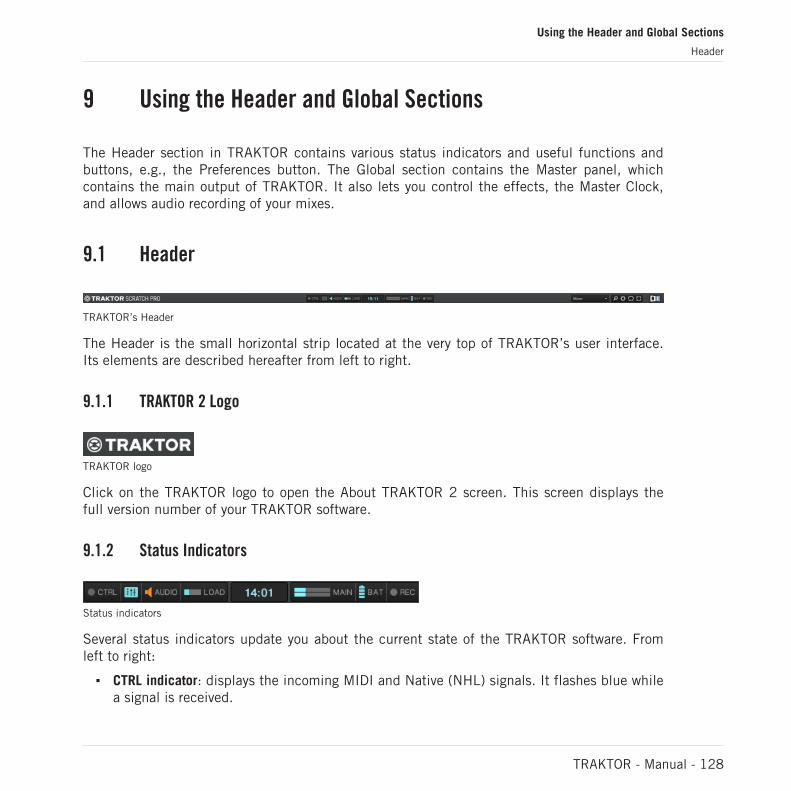
9 Using the Header and Global Sections
The Header section in TRAKTOR contains various status indicators and useful functions andbuttons, e.g., the Preferences button. The Global section contains the Master panel, whichcontains the main output of TRAKTOR. It also lets you control the effects, the Master Clock,and allows audio recording of your mixes.
9.1 Header
TRAKTOR’s Header
The Header is the small horizontal strip located at the very top of TRAKTOR’s user interface.Its elements are described hereafter from left to right.
9.1.1 TRAKTOR 2 Logo
TRAKTOR logo
Click on the TRAKTOR logo to open the About TRAKTOR 2 screen. This screen displays thefull version number of your TRAKTOR software.
9.1.2 Status Indicators
Status indicators
Several status indicators update you about the current state of the TRAKTOR software. Fromleft to right:
▪ CTRL indicator: displays the incoming MIDI and Native (NHL) signals. It flashes blue whilea signal is received.
Using the Header and Global Sections
Header
TRAKTOR - Manual - 128
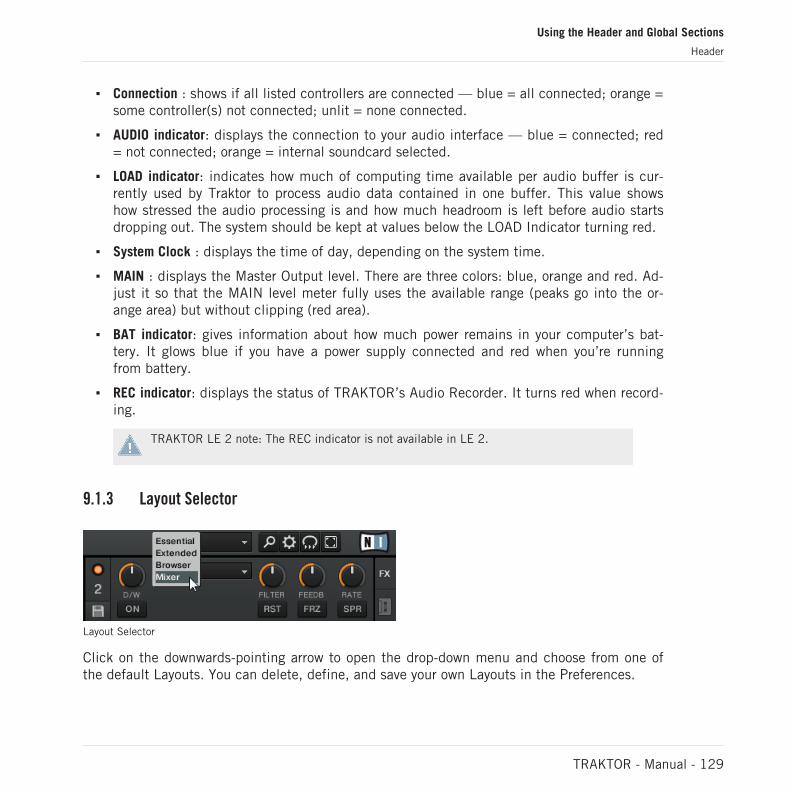
▪ Connection : shows if all listed controllers are connected — blue = all connected; orange =some controller(s) not connected; unlit = none connected.
▪ AUDIO indicator: displays the connection to your audio interface — blue = connected; red= not connected; orange = internal soundcard selected.
▪ LOAD indicator: indicates how much of computing time available per audio buffer is cur-rently used by Traktor to process audio data contained in one buffer. This value showshow stressed the audio processing is and how much headroom is left before audio startsdropping out. The system should be kept at values below the LOAD Indicator turning red.
▪ System Clock : displays the time of day, depending on the system time.
▪ MAIN : displays the Master Output level. There are three colors: blue, orange and red. Ad-just it so that the MAIN level meter fully uses the available range (peaks go into the or-ange area) but without clipping (red area).
▪ BAT indicator: gives information about how much power remains in your computer’s bat-tery. It glows blue if you have a power supply connected and red when you’re runningfrom battery.
▪ REC indicator: displays the status of TRAKTOR’s Audio Recorder. It turns red when record-ing.
TRAKTOR LE 2 note: The REC indicator is not available in LE 2.
9.1.3 Layout Selector
Layout Selector
Click on the downwards-pointing arrow to open the drop-down menu and choose from one ofthe default Layouts. You can delete, define, and save your own Layouts in the Preferences.
Using the Header and Global Sections
Header
TRAKTOR - Manual - 129

Layout customizing and managing is disabled in TRAKTOR LE 2.
TRAKTOR ME 2 note: Layout management and selection is not available in ME 2.
9.1.4 Utility Buttons
Utility Buttons
From left to right:
▪ Maximize Browser : A click on this button will toggle the maximized Browser view whichcomes in handy whenever you’re searching for a track in a large list.
▪ Preferences : here you can open the Preferences — all TRAKTOR settings are made here.
▪ Cruise : Cruise mode allows you to automatically play one track after the other from aPlaylist or your Track Collection. Engaging Cruise seamlessly takes over playback control.
► To activate Cruise mode click the Cruise button in the Header:
TRAKTOR LE 2 note: Cruise mode is not available in LE 2.
▪ The Channel Fader of the playing track will be completely opened while the other will beclosed.
▪ The Crossfader is set automatically to the center position.
▪ The currently playing track continues to play.
▪ The next song from the Playlist will be loaded in the opposite Deck and started by TRAK-TOR automatically when the first track reaches its end.
▪ Then the next song of the Playlist will be loaded and played automatically and so on.
Using the Header and Global Sections
Header
TRAKTOR - Manual - 130

Note
► At least one track has to be playing when engaging Cruise mode.
► To avoid an unwanted volume jump, move the channel fader of the track playing to itsmaximum position. Optionally lower the MAIN knob in the Master panel instead.
► Use a Playlist to create an order for the tracks to be played automatically.
► You can automate Cruise mode when using it in combination with Fade and Load Markersto control the transitions. For that, select Activate Fade In & Out Markers in Preferences> Loading > Loading.
► You can manually trigger the transition to the next song at any moment by pulling downthe channel fader of the currently playing track.
Cruise Mode will also work when using an external mixer.
▪ Fullscreen : activates Fullscreen mode where none of the operating system’s controls arevisible.
9.2 The Global Section
The Global section
The Global section offers six distinct panels. Depending on the screen size and resolution ofyour computer, not all panels can be displayed at the same time. In that case, you can reachevery panel by clicking on the corresponding tab at the far left and right.
TRAKTOR LE 2 note: Loop Recorder and Master Clock are disabled. In addition to this, theSnap and Quantize buttons are not available in LE 2.
TRAKTOR ME 2 note: The Loop Recorder is not available in ME 2.
Using the Header and Global Sections
The Global Section
TRAKTOR - Manual - 131
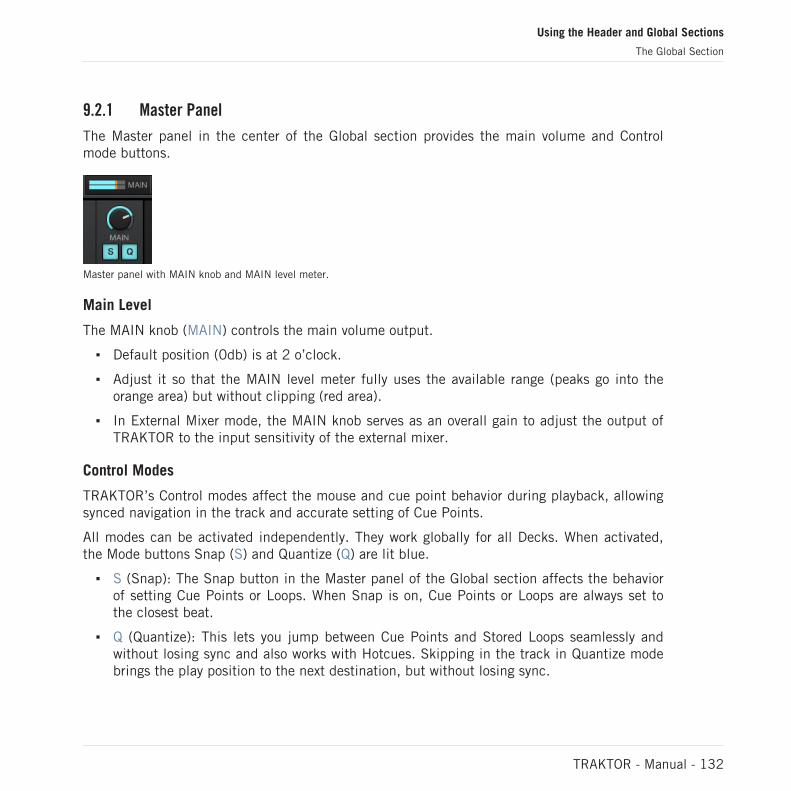
9.2.1 Master Panel
The Master panel in the center of the Global section provides the main volume and Controlmode buttons.
Master panel with MAIN knob and MAIN level meter.
Main Level
The MAIN knob (MAIN) controls the main volume output.
▪ Default position (0db) is at 2 o’clock.
▪ Adjust it so that the MAIN level meter fully uses the available range (peaks go into theorange area) but without clipping (red area).
▪ In External Mixer mode, the MAIN knob serves as an overall gain to adjust the output ofTRAKTOR to the input sensitivity of the external mixer.
Control Modes
TRAKTOR’s Control modes affect the mouse and cue point behavior during playback, allowingsynced navigation in the track and accurate setting of Cue Points.
All modes can be activated independently. They work globally for all Decks. When activated,the Mode buttons Snap (S) and Quantize (Q) are lit blue.
▪ S (Snap): The Snap button in the Master panel of the Global section affects the behaviorof setting Cue Points or Loops. When Snap is on, Cue Points or Loops are always set tothe closest beat.
▪ Q (Quantize): This lets you jump between Cue Points and Stored Loops seamlessly andwithout losing sync and also works with Hotcues. Skipping in the track in Quantize modebrings the play position to the next destination, but without losing sync.
Using the Header and Global Sections
The Global Section
TRAKTOR - Manual - 132
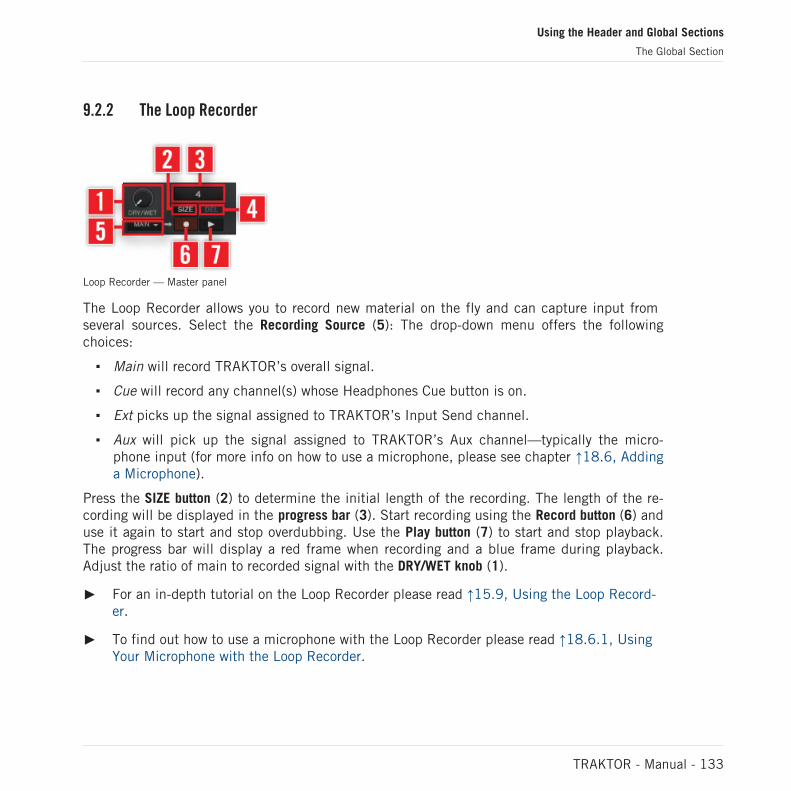
9.2.2 The Loop Recorder
Loop Recorder — Master panel
The Loop Recorder allows you to record new material on the fly and can capture input from several sources. Select the Recording Source (5): The drop-down menu offers the followingchoices:
▪ Main will record TRAKTOR’s overall signal.
▪ Cue will record any channel(s) whose Headphones Cue button is on.
▪ Ext picks up the signal assigned to TRAKTOR’s Input Send channel.
▪ Aux will pick up the signal assigned to TRAKTOR’s Aux channel—typically the micro-phone input (for more info on how to use a microphone, please see chapter ↑18.6, Addinga Microphone).
Press the SIZE button (2) to determine the initial length of the recording. The length of the re-cording will be displayed in the progress bar (3). Start recording using the Record button (6) anduse it again to start and stop overdubbing. Use the Play button (7) to start and stop playback.The progress bar will display a red frame when recording and a blue frame during playback.Adjust the ratio of main to recorded signal with the DRY/WET knob (1).
► For an in-depth tutorial on the Loop Recorder please read ↑15.9, Using the Loop Record-er.
► To find out how to use a microphone with the Loop Recorder please read ↑18.6.1, UsingYour Microphone with the Loop Recorder.
Using the Header and Global Sections
The Global Section
TRAKTOR - Manual - 133
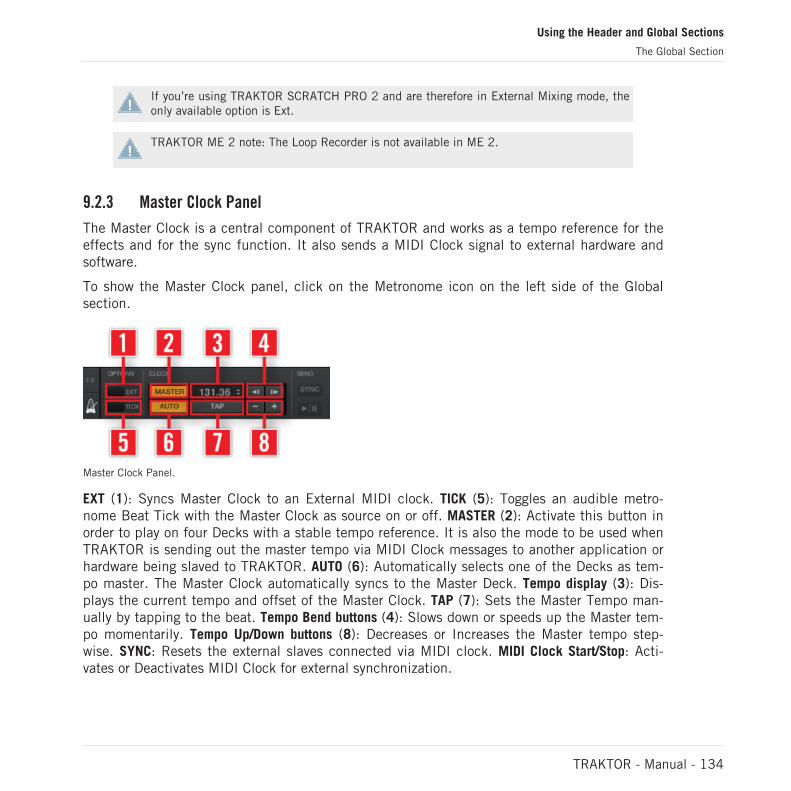
If you’re using TRAKTOR SCRATCH PRO 2 and are therefore in External Mixing mode, theonly available option is Ext.
TRAKTOR ME 2 note: The Loop Recorder is not available in ME 2.
9.2.3 Master Clock Panel
The Master Clock is a central component of TRAKTOR and works as a tempo reference for theeffects and for the sync function. It also sends a MIDI Clock signal to external hardware andsoftware.
To show the Master Clock panel, click on the Metronome icon on the left side of the Globalsection.
Master Clock Panel.
EXT (1): Syncs Master Clock to an External MIDI clock. TICK (5): Toggles an audible metro-nome Beat Tick with the Master Clock as source on or off. MASTER (2): Activate this button inorder to play on four Decks with a stable tempo reference. It is also the mode to be used whenTRAKTOR is sending out the master tempo via MIDI Clock messages to another application orhardware being slaved to TRAKTOR. AUTO (6): Automatically selects one of the Decks as tem-po master. The Master Clock automatically syncs to the Master Deck. Tempo display (3): Dis-plays the current tempo and offset of the Master Clock. TAP (7): Sets the Master Tempo man-ually by tapping to the beat. Tempo Bend buttons (4): Slows down or speeds up the Master tem-po momentarily. Tempo Up/Down buttons (8): Decreases or Increases the Master tempo step-wise. SYNC: Resets the external slaves connected via MIDI clock. MIDI Clock Start/Stop: Acti-vates or Deactivates MIDI Clock for external synchronization.
Using the Header and Global Sections
The Global Section
TRAKTOR - Manual - 134
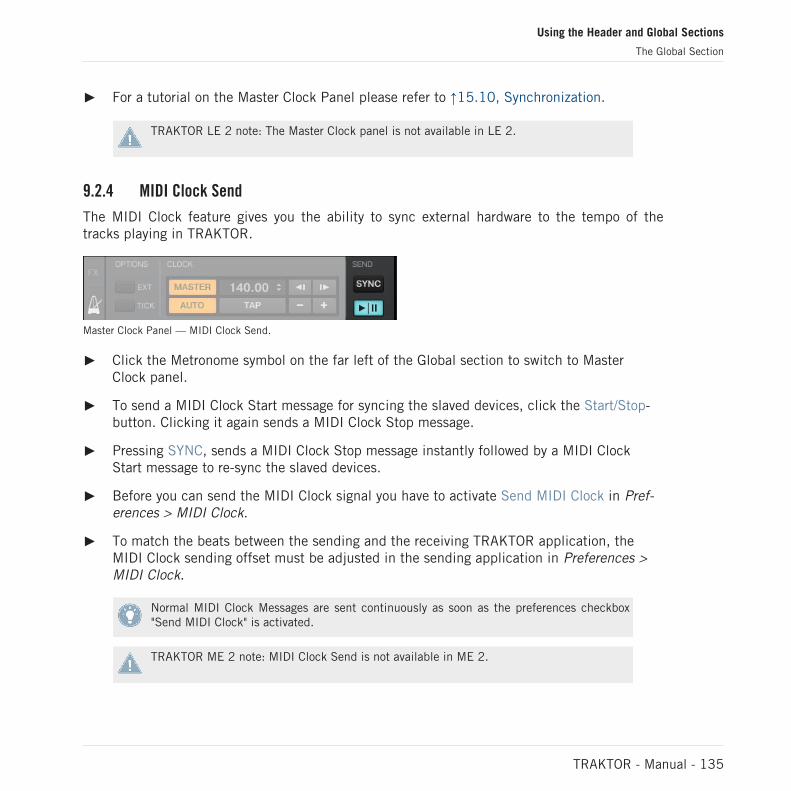
► For a tutorial on the Master Clock Panel please refer to ↑15.10, Synchronization.
TRAKTOR LE 2 note: The Master Clock panel is not available in LE 2.
9.2.4 MIDI Clock Send
The MIDI Clock feature gives you the ability to sync external hardware to the tempo of thetracks playing in TRAKTOR.
Master Clock Panel — MIDI Clock Send.
► Click the Metronome symbol on the far left of the Global section to switch to MasterClock panel.
► To send a MIDI Clock Start message for syncing the slaved devices, click the Start/Stop-button. Clicking it again sends a MIDI Clock Stop message.
► Pressing SYNC, sends a MIDI Clock Stop message instantly followed by a MIDI ClockStart message to re-sync the slaved devices.
► Before you can send the MIDI Clock signal you have to activate Send MIDI Clock in Pref-erences > MIDI Clock.
► To match the beats between the sending and the receiving TRAKTOR application, theMIDI Clock sending offset must be adjusted in the sending application in Preferences >MIDI Clock.
Normal MIDI Clock Messages are sent continuously as soon as the preferences checkbox"Send MIDI Clock" is activated.
TRAKTOR ME 2 note: MIDI Clock Send is not available in ME 2.
Using the Header and Global Sections
The Global Section
TRAKTOR - Manual - 135
9.3 Effect Panels
TRAKTOR has four individual Effect Units. Their control panels are located on the left and theright side of the Global section. For switching from either the Master Clock or the Audio Re-corder to the respective Effect panel, click on the tabs labeled FX on either end of the Globalsection.
You can choose between 2 or 4 visible Effects. To switch from 2 Effects mode (default) to 4Effects mode, go to Preferences > Effects > FX Unit Routing.
Each of the Effects Units can be inserted into any of the TRAKTOR Decks individually or intomore than one Deck at a time by clicking on the FX Assign buttons found in the mixer strip ofeach Deck.
TRAKTOR’s effects are insert effects by default, but you can also use them as post fader ef-fects, and as send effects.
Each of the Effects Units can be used in 2 modes — Group and Single — described hereafter.The mode can be switched in Preferences > Effects > FX Panel Mode.
► To follow an effects tutorial please read ↑15.7, Adding FX.
► For detailed information on effect parameters go to ↑14.4, The Effects in Detail.
► For a list of effects preferences please refer to ↑13.14, Effects.
TRAKTOR ME 2 note: Only two FX Units are available in ME 2.
Using the Header and Global Sections
Effect Panels
TRAKTOR - Manual - 136

9.3.1 Group Mode
2 FX view.
4 FX view.
In Group Effect mode you can use and control up to three effects in one panel. It works asfollows:
► Choose the effect(s) you want to use with an Effect Selector (5).
► You can switch on and off every effect in the chain with the 3 Effect On buttons (ON) (4)and control its amount with the Effect Amount knobs (3).
► For the whole effect chain you can control the relative mix of the direct-to-processed sig-nal with the D/W knob (2).
► You can save a specific setting as default with the Snapshot button (1).
► To recall the default setting of an effect, double-click the effect knob.
Using the Header and Global Sections
Effect Panels
TRAKTOR - Manual - 137

TRAKTOR LE 2 note: The 4 FX view is not available in LE 2.
TRAKTOR ME 2 note: 4 FX view is not available in ME 2.
9.3.2 Single Mode
2 FX view.
4 FX view.
In Single Effect mode you get full control over all parameters of a single effect:
► Choose an effect with the Effect Selector (3).
► With the Effect Parameter knobs 1 - 3 (4) and Effect buttons 1, 2 (7) you can modulate thebehavior of the selected effect. Available options depend on the chosen effect (see↑14.4, The Effects in Detail).
Using the Header and Global Sections
Effect Panels
TRAKTOR - Manual - 138
Note that in both Group and Single mode, the knobs are replaced by little sliders if 4 FXUnits are activated.
► With the Effect On button (ON) (5) you can switch the effect on and off.
► The D/W knob (2) controls the direct-to-processed signal mix.
► You can save a specific setting as default with the Snapshot button (1).
► The Reset button (RST) (6) resets all effect settings inside the panel to the default.
TRAKTOR LE 2 note: The Single mode is not available in LE 2.
TRAKTOR ME 2 note: Single mode is not available in ME 2.
Send Effects
The Effect Units can also be used in Send Effect mode. This is only available in External Mixermode (with a multichannel soundcard) and has to be set up in the Preferences:
1. Go to Preferences > Output Routing and set Mixing mode to External. Also set an outputof your audio device as Output Send. This output will typically be connected to the FXreturn input of the external mixer.
2. Go to the Preferences > Input Routing > Input FX Send (Ext.) and set an input of youraudio device as Input Send. This input typically is connected to the FX send output of themixer.
3. Now open the Preferences > Effects > FX Unit Routing and set at least one Effect Unit toSend.
4. The audio signal that is sent to the FX Units is now entirely controlled by the FX Sendknobs or buttons of the external mixer.
TRAKTOR LE 2 note: The Send effects are not available in LE 2.
TRAKTOR ME 2 note: Effect sends are not available in ME 2.
Using the Header and Global Sections
Effect Panels
TRAKTOR - Manual - 139
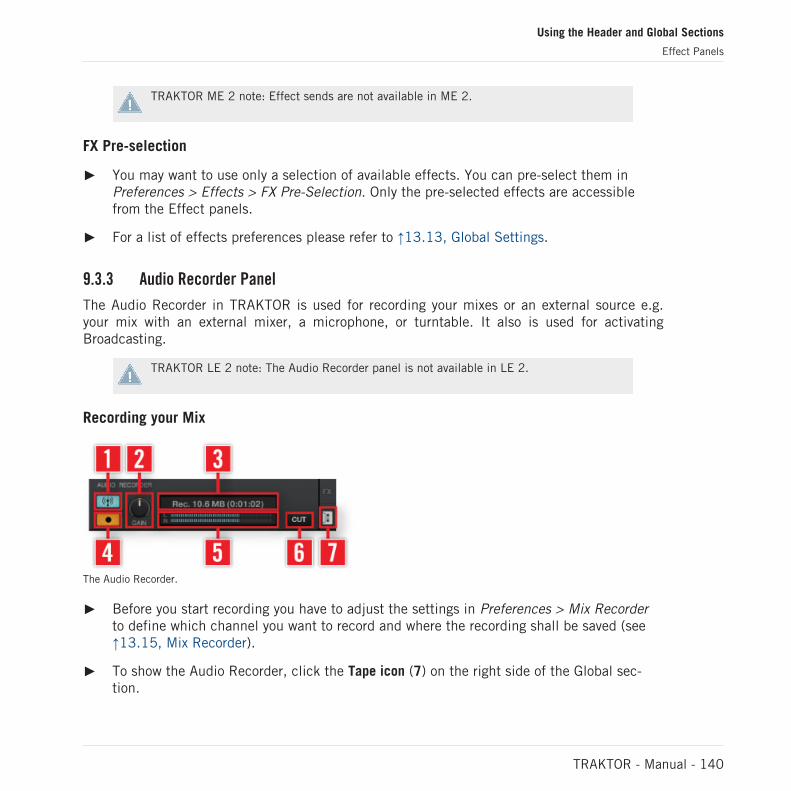
TRAKTOR ME 2 note: Effect sends are not available in ME 2.
FX Pre-selection
► You may want to use only a selection of available effects. You can pre-select them inPreferences > Effects > FX Pre-Selection. Only the pre-selected effects are accessiblefrom the Effect panels.
► For a list of effects preferences please refer to ↑13.13, Global Settings.
9.3.3 Audio Recorder Panel
The Audio Recorder in TRAKTOR is used for recording your mixes or an external source e.g.your mix with an external mixer, a microphone, or turntable. It also is used for activatingBroadcasting.
TRAKTOR LE 2 note: The Audio Recorder panel is not available in LE 2.
Recording your Mix
The Audio Recorder.
► Before you start recording you have to adjust the settings in Preferences > Mix Recorderto define which channel you want to record and where the recording shall be saved (see↑13.15, Mix Recorder).
► To show the Audio Recorder, click the Tape icon (7) on the right side of the Global sec-tion.
Using the Header and Global Sections
Effect Panels
TRAKTOR - Manual - 140
► With the GAIN knob (2) you can adjust the level for recording. The Recording meter (5)helps you to set the right level.
► Start recording by clicking the red Record button (4). Clicking it again stops recording andsaves the recorded file in the Audio Recordings folder.
► The display (3) shows the actual file size and recorded time.
► By clicking CUT (6), TRAKTOR saves the current recording and seamlessly starts a newfile for recording.
► By clicking the blue Broadcast button (1) you may broadcast your mix once a server hasbeen installed and configured. For more information see ↑13.16, Loop Recorder.
9.3.4 Broadcasting
TRAKTOR gives you the ability to broadcast your mix or a radio show over the Internet.
► To start broadcasting, activate the Audio Recorder panel and click the Broadcast button.
► Broadcasting needs to be set up in the Preferences > Broadcasting. The required settingsdepend on your network and server settings.
► For more information see ↑13.17, Broadcasting.
TRAKTOR LE 2 note: The Broadcasting function is not available in LE 2.
TRAKTOR ME 2 note: Broadcasting is not available for Manufacturer Edition 2.
Using the Header and Global Sections
Effect Panels
TRAKTOR - Manual - 141
10 Mouse Control for Faders and Knobs
To make your life easier when controlling the software via mouse or touch pad, TRAKTOR sup-ports a variety of on-screen control features.
10.1 Basic Controls
All knobs and faders in TRAKTOR are either controlled by dragging the mouse, by using themouse wheel or by clicking the small Plus and Minus buttons next to the knob or fader. Drag-ging the mouse is a good way to make dynamic changes, whereas the Plus and Minus buttonsallow more subtle changes and are better suited to set a knob to a specific value.
Mouse Drag
Hold your mouse arrow over a knob or fader, then click, hold and drag the mouse up or down.This will move the knob clockwise or counter-clockwise and the fader up or downwards.
Double-Click on the knob or fader to return it to its default setting.
Scroll Wheel
Hover over a fader or knob and use your scroll wheel to move it either up and down or clock-and counter-clockwise.
Click, hold and drag a knob horizontally. The knob will adjust within a finer range.
Plus and Minus Buttons
When hovering over a knob or fader, small “+” and “-“ buttons appear.
Click them to move the knob or fader and change its value in steps.
Mouse Control for Faders and Knobs
Basic Controls
TRAKTOR - Manual - 142
10.2 Advanced Control
Besides the standard mouse click functions explained above, TRAKTOR offers advanced func-tions utilizing Plus and Minus buttons, the mouse wheel and the right mouse button.
If you have a track pad or mouse without a second button, you can utilize these functionsby pressing and holding the [Ctrl] key of your computer keyboard while clicking.
Sensitivities
TRAKTOR offers five sensitivities for stepwise control of parameters:
1. Right-/[Ctrl]-click on the + or - button to open a menu of five sensitivity options: Min,Fine, Default, Coarse, Switch.
2. Select one of the options.3. Click the + and - buttons or use the mouse wheel to see how the behavior of the knob or
fader has changed.
TRAKTOR ME 2 note: Sensitivities are not available in ME 2.
Right-click/[Ctrl]-click Functions
1. Right-/[Ctrl]-click, hold and drag a knob or fader. A Ghost Pointer will appear in grey, al-though the knob or fader itself will not move.
2. Keep holding the right mouse button, then left-click and hold. This will bring the knob orfader to the value of the Ghost Pointer.
3. Keep holding the right mouse button and let go the left mouse button. The knob or faderwill return to its last position and the grey Ghost Pointer remains visible.
4. If you want the knob or fader to stay at the value of the Ghost Pointer, simply release theright mouse button after the knob or fader has reached the value of the Ghost Pointer.The grey Ghost Pointer will disappear, and you can release the left mouse button as well.
Mouse Control for Faders and Knobs
Advanced Control
TRAKTOR - Manual - 143
11 Control via Keyboard & MIDI Hotkeys
All controls in TRAKTOR can be used with your computer keyboard or a MIDI controller. TRAK-TOR uses settings files (*.tsi) to store the mapping for your keyboard and MIDI controllers.
You also can use a combination of mouse actions, keyboard, and MIDI Hotkeys to controlTRAKTOR.
11.1 Keyboard Hotkeys
Keyboard Hotkeys are used to control TRAKTOR with your computer keyboard. TRAKTOR con-tains a standard mapping with all the basic controls that is loaded by default. You can find thedefault mapping documented on the enclosed card provided in the package.
Alternative Keyboard Mappings can be loaded via the Preferences:
1. Open the Controller Manager via File > Preferences > Controller Manager from the Appli-cation Menu Bar (or by clicking on the Preferences button in TRAKTOR’s Header andthen clicking on Controller Manager in the left column of the Preferences window).
2. Click Add… in the Device Setup section.3. Choose Import from the drop-down menu.4. Navigate to My Documents\Native Instruments\Traktor\Settings\Default Settings\Keyboard
(Windows) or Users/~/Native Instruments/Traktor/Settings/Default Settings (Mac OS X)and choose the appropriate .tsi file for your language and your TRAKTOR version.
5. Confirm your choice by clicking on Close in the lower right corner of the Preferences.6. Use your computer keyboard to control TRAKTOR.
► You can create your own mappings in ↑13.21, Controller Manager.
► Clicking Application Menu > Help > Downloads will open the TRAKTOR Downloads web-site of the Native Instruments Homepage. There you can download several other Key-board Mappings.
TRAKTOR LE 2 note: Keyboard Hotkeys are not available in LE 2.
Control via Keyboard & MIDI Hotkeys
Keyboard Hotkeys
TRAKTOR - Manual - 144
11.2 MIDI Hotkeys
TRAKTOR works with all MIDI controllers and comes installed with settings files for the manypopular controllers on the market.
To set them up continue as follows:
1. Connect the MIDI controller as described in its manual with your computer.2. Open TRAKTOR and go to Preferences > Controller Manager.3. Click on Add… in the Device Setup section and activate your controller by choosing it from
the drop-down menu.4. Click the Import button in the lower left corner of the Preferences window.5. Navigate to My Documents\Native Instruments\Traktor\Settings\Default Settings\Controller
(Windows) or Users/~/Native Instruments/Traktor/Settings/Default Settings (Mac OS X)and choose the appropriate .tsi file for your controller.
6. Confirm your choice by clicking on Close in the lower right corner of the Preferences.7. Use your MIDI controller to control TRAKTOR.
► If there is no setting file included for your controller or if you just want to setup your ownmapping, you’ll find an explanation how to create your own mapping in ↑13.21, Control-ler Manager.
► Clicking Help > Downloads from the Application Menu Bar will open the TRAKTOR Down-loads website of the Native Instruments Homepage. There you can download several otherMIDI Mappings.
TRAKTOR LE 2 note: MIDI Hotkeys are not available in LE 2.
The MIDI Indicator in the Header will light up whenever a MIDI message is received.
Control via Keyboard & MIDI Hotkeys
MIDI Hotkeys
TRAKTOR - Manual - 145
High-Resolution (14 Bit) MIDI support
High Resolution MIDI (14-bit MIDI messages or 2 byte MIDI messages) controls, such as high-resolution Tempo Faders, are supported by TRAKTOR. You can assign high-resolution MIDIfaders to TRAKTOR parameters in the same manner as normal MIDI faders, utilizing MIDILearn.
Control via Keyboard & MIDI Hotkeys
MIDI Hotkeys
TRAKTOR - Manual - 146
12 Setting Up TRAKTOR SCRATCH
This chapter describes how to set up TRAKTOR SCRATCH and all of its functionalities.
Users of the TRAKTOR AUDIO 6/10 will notice that by default TRAKTOR's Decks are disabledbecause the output channels are switched to Direct Thru on the soundcard. You can access theDeck Mode menu by clicking on the Deck letter (e.g. "A").
To start TRAKTOR with enabled Decks by default, change the Direct Thru default in the con-trol panel of the audio interface.
TRAKTOR LE 2 note: Scratch is not available in LE 2.
TRAKTOR ME 2 note: Scratch is not available in ME 2.
12.1 The Turntable Setup
Here you will learn how to connect your turntables.
12.1.1 Making Connections for Turntables
Please refer to the documentation that has been installed with your audio drivers for instruc-tions on how to connect your turntables. The manuals are found in:
▪ Mac OS X: Macintosh HD/Applications/Native Instruments/Traktor Audio 6/10 Driver
▪ Windows: Start > All Programs > Native Instruments > Traktor Audio 6/10 Driver
We assume that your TRAKTOR SCRATCH system is up and running and the audio routingis correct. You should not need to worry about this, since TRAKTOR SCRATCH 2 featuresautomated interface detection. However, if you run into problems, please refer to the SetupGuide for more information on how to set up your hardware.
Setting Up TRAKTOR SCRATCH
The Turntable Setup
TRAKTOR - Manual - 147
12.1.2 Test Drive TRAKTOR SCRATCH with Turntables
1. Start TRAKTOR SCRATCH.2. Click on the downwards pointing arrow below the Deck letter and verify that Scratch Con-
trol is chosen as input source.3. Put the Control Records on your turntables.4. Verify if the input sensitivity of your audio interface is set to PHONO - otherwise change it
to PHONO in the control panel. For more instructions, please refer to the documentationof your audio interface.
5. Load a Track from the Demo Playlist into Deck A, start the turntable, and drop the needleon the Control Record.
6. Once TRAKTOR SCRATCH calibrates the timecode control signal, the blue Absolute Modebutton will light up and the Track will play back.
If you encounter problems, please refer to the documentation that came with your audio inter-face or see ↑12.8, TRAKTOR SCRATCH PRO 2 Troubleshooting.
12.1.3 The Control Zones on Vinyl
The Control Vinyl consists of the following three zones, each with different playback functions:
LEAD-IN – The First Few Millimeters of the Record
► Dropping the needle into the lead-in zone of the record will skip to the beginning of theTrack.
► Use this to skip back to the beginning of a track when playing in the Relative ControlReading mode.
PLAYBACK – Main Body of the Record
▪ This is subdivided into 10 Tracks on Side A and 15 Tracks on Side B. This zone is usedfor regular playback.
▪ The divisions are visual markers of time, equally spaced by 1 minute and do not affect thecontinuous playback of the loaded track.
Setting Up TRAKTOR SCRATCH
The Turntable Setup
TRAKTOR - Manual - 148
TRAKTOR will switch to Internal mode when reaching the end groove in vinyl.
BROWSE – Last Track of the Record
► Dropping the needle in the Scroll Zone allows you to scroll up and down through yourplaylist by manually spinning the record forward or backward.
► To play the selected track, simply place the tonearm back into the Playback Zone.
12.2 CD Player Setup
Here you will learn how to connect your CD players.
12.2.1 Making connections
Please refer to the documentation that has been installed with your audio drivers for instruc-tions on how to connect your CD players. The manuals are found in:
▪ Mac OS X: Macintosh HD/Applications/Native Instruments/Traktor Audio 6/10 Driver
▪ Windows: Start > All Programs > Native Instruments > Traktor Audio 6/10 Driver
We assume that your TRAKTOR SCRATCH system is up and running and the audio routingis correct. You should not need to worry about this, since TRAKTOR SCRATCH 2 featuresautomated interface detection. However, if you run into problems, please refer to the SetupGuide for more information on how to set up your hardware.
12.2.2 Test Drive TRAKTOR SCRATCH with CD Players
1. Start TRAKTOR SCRATCH.2. Click on the downwards pointing arrow below the Deck letter and verify that Scratch Con-
trol is chosen as input source.3. Put the Control CDs in your CD players.4. Verify if the input sensitivity of your audio interface is set to LINE - otherwise change it to
LINE in the control panel. For more instructions, please refer to the documentation ofyour audio interface.
Setting Up TRAKTOR SCRATCH
CD Player Setup
TRAKTOR - Manual - 149
5. Load a track from the Demo Playlist into Deck A and start the CD player.6. Once TRAKTOR SCRATCH calibrates the timecode control signal, the blue Absolute Mode
button will light up and the track will play back.If you encounter problems, please refer to the documentation that came with your audio inter-face or see ↑12.8, TRAKTOR SCRATCH PRO 2 Troubleshooting.
12.2.3 The Control Zones on CD
The control CD consists of the following three tracks, each with different playback functions:
▪ CD Track 1: LEAD-IN — (0:04 min)
Skipping to CD Track 1 will skip into the lead-in of the loaded track. It also allows for scratch-ing on the first beat of Track 2.
▪ CD Track 2: PLAYBACK — (25:00)
This track is used for regular playback.
TRAKTOR will switch to Internal mode when reaching the end of Track 2 on the controlCD.
▪ CD Track 3: BROWSE — (5:00)
Skipping to CD Track 3 allows you to scroll up and down through your Playlist by manuallyspinning the jog wheel of your CD player.
To play the selected Track, simply skip back to CD Track 2 by pressing the “previous track”button on your CD player.
12.3 Mixed Setup
If you are using one turntable and one CD player, connect them as explained above and keepthe TRAKTOR AUDIO 6/10 in Timecode Control Vinyl mode.
Setting Up TRAKTOR SCRATCH
CD Player Setup
TRAKTOR - Manual - 150
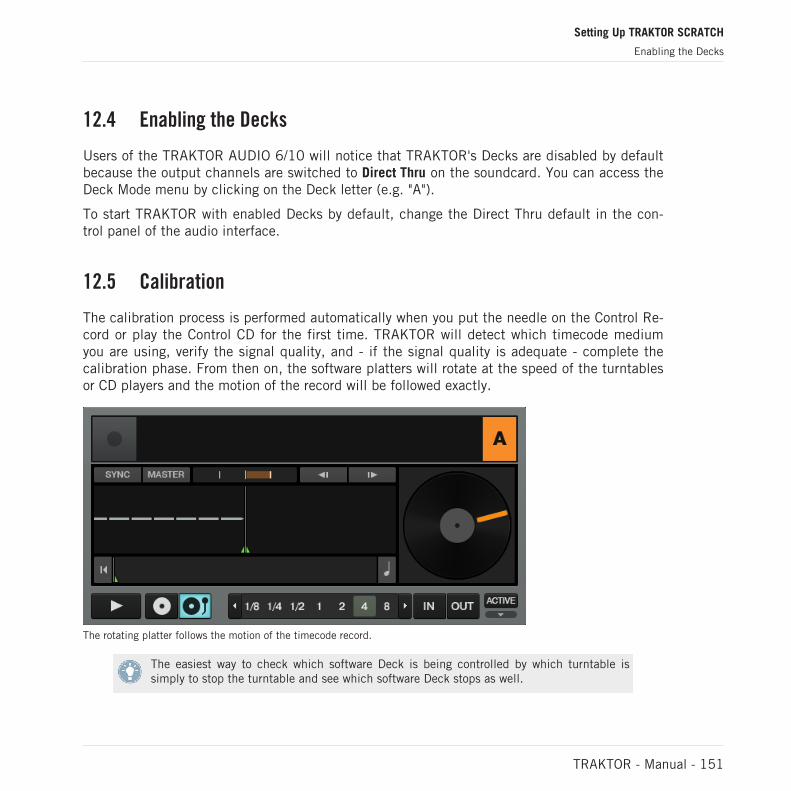
12.4 Enabling the Decks
Users of the TRAKTOR AUDIO 6/10 will notice that TRAKTOR's Decks are disabled by defaultbecause the output channels are switched to Direct Thru on the soundcard. You can access theDeck Mode menu by clicking on the Deck letter (e.g. "A").
To start TRAKTOR with enabled Decks by default, change the Direct Thru default in the con-trol panel of the audio interface.
12.5 Calibration
The calibration process is performed automatically when you put the needle on the Control Re-cord or play the Control CD for the first time. TRAKTOR will detect which timecode mediumyou are using, verify the signal quality, and - if the signal quality is adequate - complete thecalibration phase. From then on, the software platters will rotate at the speed of the turntablesor CD players and the motion of the record will be followed exactly.
The rotating platter follows the motion of the timecode record.
The easiest way to check which software Deck is being controlled by which turntable issimply to stop the turntable and see which software Deck stops as well.
Setting Up TRAKTOR SCRATCH
Enabling the Decks
TRAKTOR - Manual - 151
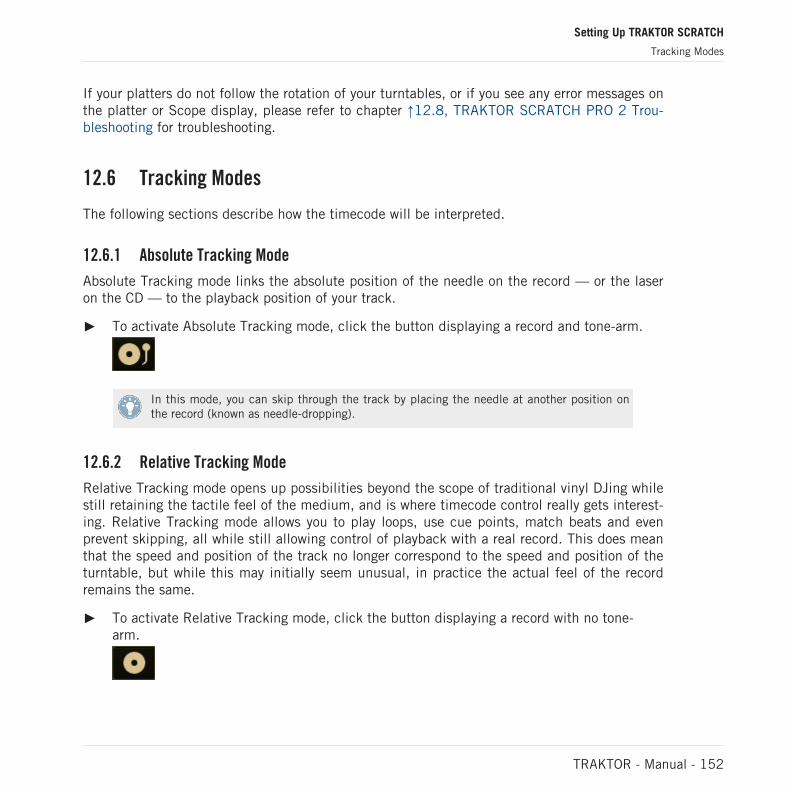
If your platters do not follow the rotation of your turntables, or if you see any error messages onthe platter or Scope display, please refer to chapter ↑12.8, TRAKTOR SCRATCH PRO 2 Trou-bleshooting for troubleshooting.
12.6 Tracking Modes
The following sections describe how the timecode will be interpreted.
12.6.1 Absolute Tracking Mode
Absolute Tracking mode links the absolute position of the needle on the record — or the laseron the CD — to the playback position of your track.
► To activate Absolute Tracking mode, click the button displaying a record and tone-arm.
In this mode, you can skip through the track by placing the needle at another position onthe record (known as needle-dropping).
12.6.2 Relative Tracking Mode
Relative Tracking mode opens up possibilities beyond the scope of traditional vinyl DJing whilestill retaining the tactile feel of the medium, and is where timecode control really gets interest-ing. Relative Tracking mode allows you to play loops, use cue points, match beats and evenprevent skipping, all while still allowing control of playback with a real record. This does meanthat the speed and position of the track no longer correspond to the speed and position of theturntable, but while this may initially seem unusual, in practice the actual feel of the recordremains the same.
► To activate Relative Tracking mode, click the button displaying a record with no tone-arm.
Setting Up TRAKTOR SCRATCH
Tracking Modes
TRAKTOR - Manual - 152
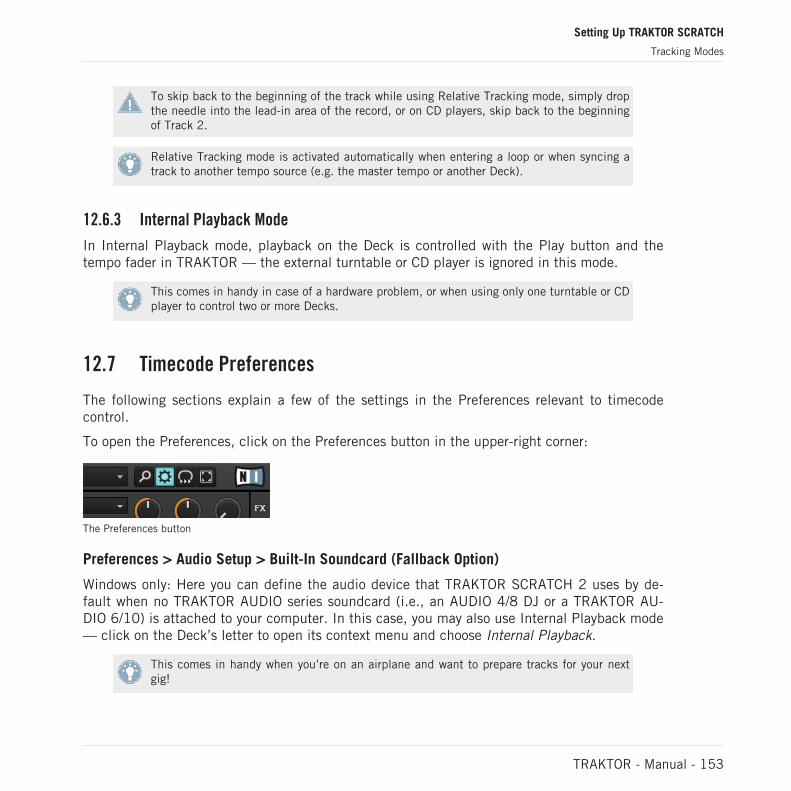
To skip back to the beginning of the track while using Relative Tracking mode, simply dropthe needle into the lead-in area of the record, or on CD players, skip back to the beginningof Track 2.
Relative Tracking mode is activated automatically when entering a loop or when syncing atrack to another tempo source (e.g. the master tempo or another Deck).
12.6.3 Internal Playback Mode
In Internal Playback mode, playback on the Deck is controlled with the Play button and thetempo fader in TRAKTOR — the external turntable or CD player is ignored in this mode.
This comes in handy in case of a hardware problem, or when using only one turntable or CDplayer to control two or more Decks.
12.7 Timecode Preferences
The following sections explain a few of the settings in the Preferences relevant to timecodecontrol.
To open the Preferences, click on the Preferences button in the upper-right corner:
The Preferences button
Preferences > Audio Setup > Built-In Soundcard (Fallback Option)
Windows only: Here you can define the audio device that TRAKTOR SCRATCH 2 uses by de-fault when no TRAKTOR AUDIO series soundcard (i.e., an AUDIO 4/8 DJ or a TRAKTOR AU-DIO 6/10) is attached to your computer. In this case, you may also use Internal Playback mode— click on the Deck’s letter to open its context menu and choose Internal Playback.
This comes in handy when you’re on an airplane and want to prepare tracks for your nextgig!
Setting Up TRAKTOR SCRATCH
Tracking Modes
TRAKTOR - Manual - 153
Preferences > Timecode Setup > Switch to Absolute Mode in Lead-In
Several TRAKTOR commands, such as looping or synching, automatically switch to RelativeTracking mode. When this option is active, you can easily switch back to Absolute Trackingmode without touching the computer:
► On vinyl, drop the needle in the lead-in area of the record
► On CD, skip to Track 1
Preferences > Loading > Duplicate Deck when Loading Same Track
Imagine a track running in a Loop in Deck A. If you load the same track in Deck B, the play-back position starts exactly at the playback position of Deck A when this preference is enabled.The activated Loop and all tempo information will also be duplicated. Turntablists prefer tohave this option activated for faster access to manual beat-juggle actions.
12.8 TRAKTOR SCRATCH PRO 2 Troubleshooting
This chapter describes a few common issues when using timecode. More troubleshooting tipscan be found in chapter ↑16, Troubleshooting.
12.8.1 Calibration Troubleshooting
In general, we recommend always checking the Scope panel when setting up TRAKTOR to en-sure timecode control is working properly. This is especially important if the Deck platters donot follow the movement of your turntables or CD players as expected.
You can open the Scope panel by clicking on the platter, or, if the platter is not shown, by click-ing on the small arrow (minimize button) above the timecode quality meter.
The small arrow (minimize button) above the quality meter will also minimize the Scopepanel if you would rather have a larger view of the track waveform.
The panel provides four valuable indicators:
Setting Up TRAKTOR SCRATCH
TRAKTOR SCRATCH PRO 2 Troubleshooting
TRAKTOR - Manual - 154

The four indicators on the Scope panel.
(1) The central Scope with a circular representation of the incoming timecode signal
(2) The orange quality meter on the right side
(3) The small stereo input level meter on the bottom right
(4) The status information on the bottom center
In addition, the CALIBRATE button resets timecode calibration. This is executed automaticallywhen starting TRAKTOR.
The following pictures describe the most common setup scenarios:
Successful Calibration
▪ SCOPE: blue circle and an orange diagonal line (or two orange circles using timecodeMK1)
▪ QUALITY: fully orange
▪ INPUT: two channels about halfway up
▪ TEXT: one of the following
Setting Up TRAKTOR SCRATCH
TRAKTOR SCRATCH PRO 2 Troubleshooting
TRAKTOR - Manual - 155
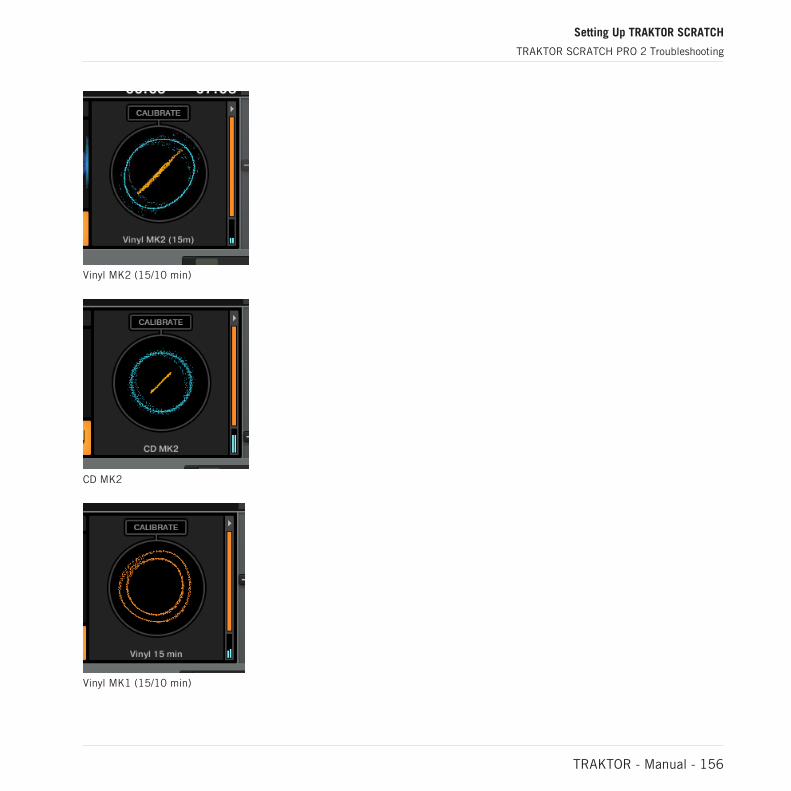
Vinyl MK2 (15/10 min)
CD MK2
Vinyl MK1 (15/10 min)
Setting Up TRAKTOR SCRATCH
TRAKTOR SCRATCH PRO 2 Troubleshooting
TRAKTOR - Manual - 156

CD MK1
CD MK1 (dotted line shows up at specific playback speeds)
Scratch Disabled
Scratch functionality in TRAKTOR is only available with specific audio interfaces whichhave been "certified" by Native Instruments.
▪ SCOPE: blank
▪ QUALITY: blank
▪ INPUT: two channels about halfway up
▪ TEXT: "Scratch disabled"
Setting Up TRAKTOR SCRATCH
TRAKTOR SCRATCH PRO 2 Troubleshooting
TRAKTOR - Manual - 157
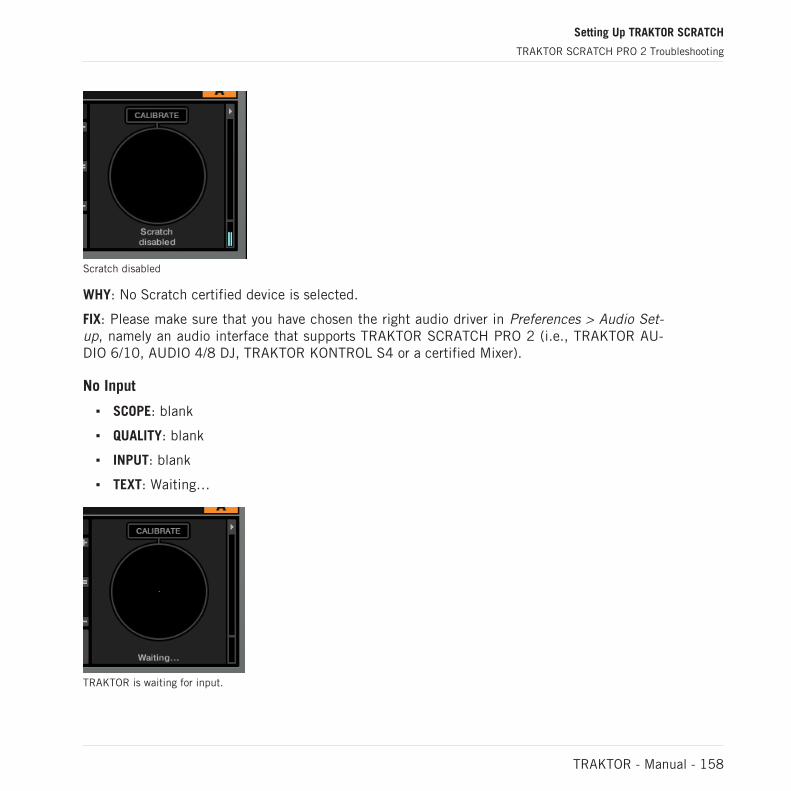
Scratch disabled
WHY: No Scratch certified device is selected.
FIX: Please make sure that you have chosen the right audio driver in Preferences > Audio Set-up, namely an audio interface that supports TRAKTOR SCRATCH PRO 2 (i.e., TRAKTOR AU-DIO 6/10, AUDIO 4/8 DJ, TRAKTOR KONTROL S4 or a certified Mixer).
No Input
▪ SCOPE: blank
▪ QUALITY: blank
▪ INPUT: blank
▪ TEXT: Waiting…
TRAKTOR is waiting for input.
Setting Up TRAKTOR SCRATCH
TRAKTOR SCRATCH PRO 2 Troubleshooting
TRAKTOR - Manual - 158
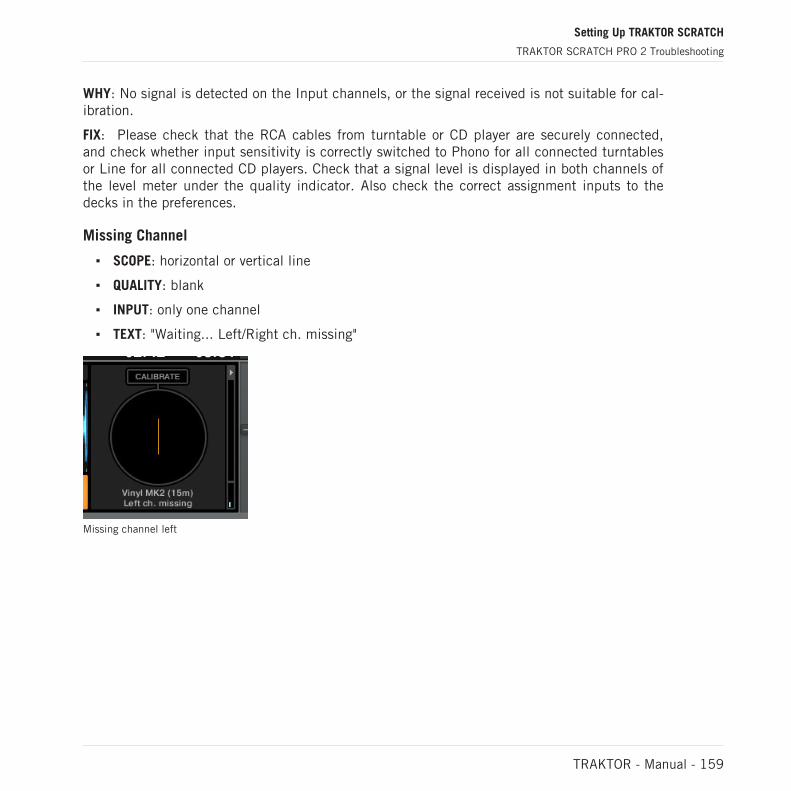
WHY: No signal is detected on the Input channels, or the signal received is not suitable for cal-ibration.
FIX: Please check that the RCA cables from turntable or CD player are securely connected,and check whether input sensitivity is correctly switched to Phono for all connected turntablesor Line for all connected CD players. Check that a signal level is displayed in both channels ofthe level meter under the quality indicator. Also check the correct assignment inputs to thedecks in the preferences.
Missing Channel
▪ SCOPE: horizontal or vertical line
▪ QUALITY: blank
▪ INPUT: only one channel
▪ TEXT: "Waiting... Left/Right ch. missing"
Missing channel left
Setting Up TRAKTOR SCRATCH
TRAKTOR SCRATCH PRO 2 Troubleshooting
TRAKTOR - Manual - 159
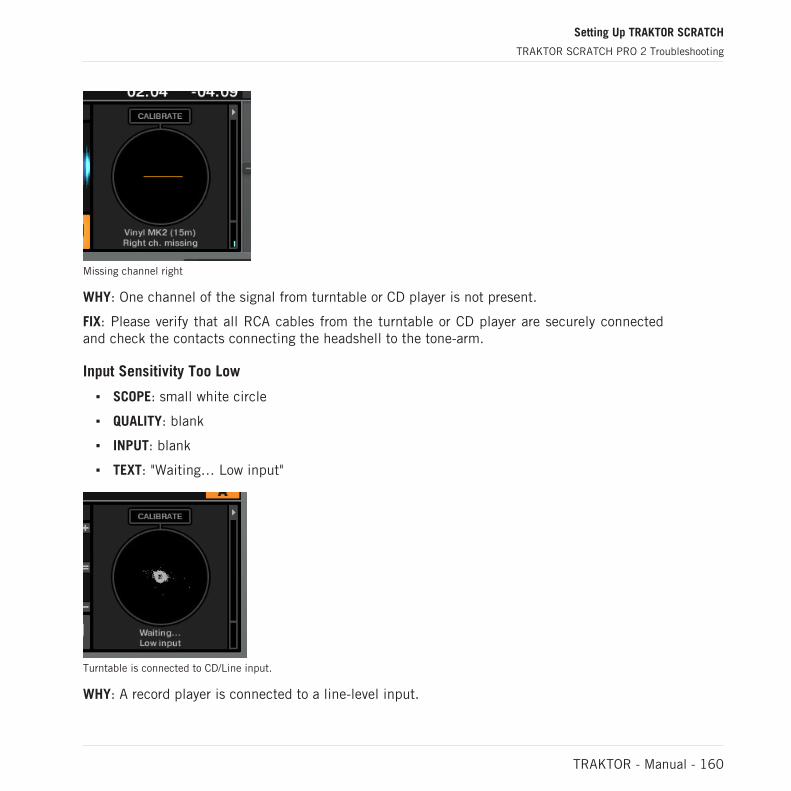
Missing channel right
WHY: One channel of the signal from turntable or CD player is not present.
FIX: Please verify that all RCA cables from the turntable or CD player are securely connectedand check the contacts connecting the headshell to the tone-arm.
Input Sensitivity Too Low
▪ SCOPE: small white circle
▪ QUALITY: blank
▪ INPUT: blank
▪ TEXT: "Waiting… Low input"
Turntable is connected to CD/Line input.
WHY: A record player is connected to a line-level input.
Setting Up TRAKTOR SCRATCH
TRAKTOR SCRATCH PRO 2 Troubleshooting
TRAKTOR - Manual - 160
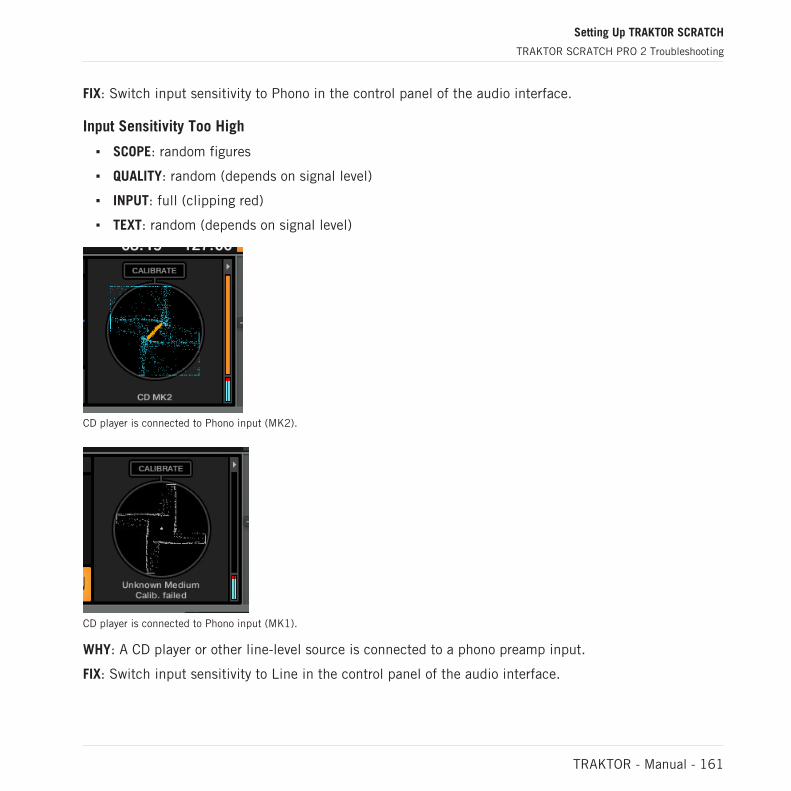
FIX: Switch input sensitivity to Phono in the control panel of the audio interface.
Input Sensitivity Too High
▪ SCOPE: random figures
▪ QUALITY: random (depends on signal level)
▪ INPUT: full (clipping red)
▪ TEXT: random (depends on signal level)
CD player is connected to Phono input (MK2).
CD player is connected to Phono input (MK1).
WHY: A CD player or other line-level source is connected to a phono preamp input.
FIX: Switch input sensitivity to Line in the control panel of the audio interface.
Setting Up TRAKTOR SCRATCH
TRAKTOR SCRATCH PRO 2 Troubleshooting
TRAKTOR - Manual - 161
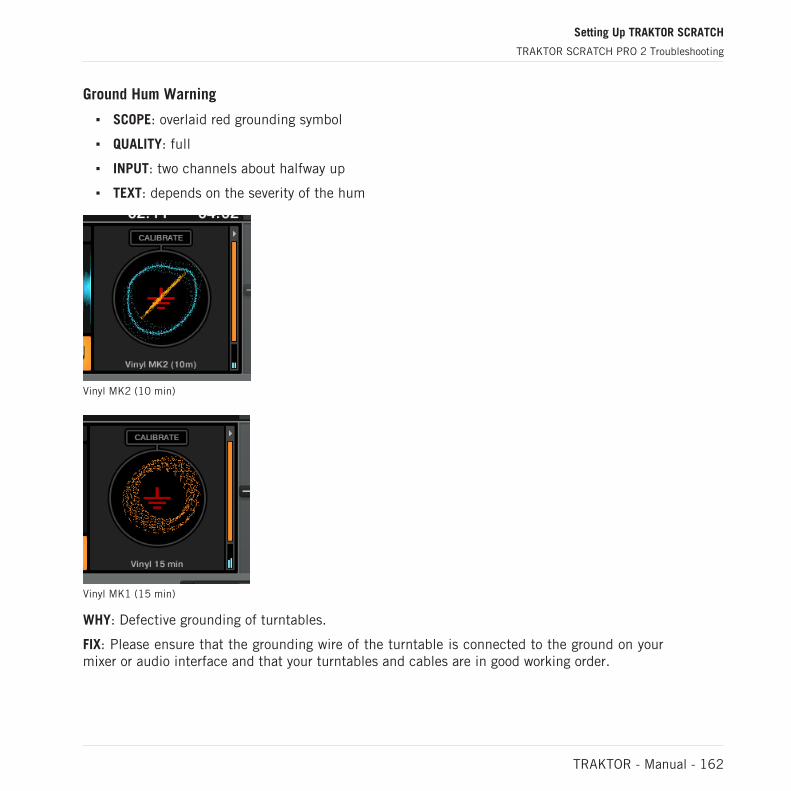
Ground Hum Warning
▪ SCOPE: overlaid red grounding symbol
▪ QUALITY: full
▪ INPUT: two channels about halfway up
▪ TEXT: depends on the severity of the hum
Vinyl MK2 (10 min)
Vinyl MK1 (15 min)
WHY: Defective grounding of turntables.
FIX: Please ensure that the grounding wire of the turntable is connected to the ground on yourmixer or audio interface and that your turntables and cables are in good working order.
Setting Up TRAKTOR SCRATCH
TRAKTOR SCRATCH PRO 2 Troubleshooting
TRAKTOR - Manual - 162

Note that the ground hum warning may be triggered when playing "normal" audio recordsinto a timecode input, and also when a CD player is connected to a Phono input. You candisregard the warning in this case.
Heavy Rumble
▪ SCOPE: oscillating and unsteady
▪ QUALITY: full
▪ INPUT: two channels about halfway up
▪ TEXT: type of played timecode medium
Vinyl MK2 (15 min)
Vinyl MK1 (15 min)
WHY: Your turntable is subject to strong vibrations due to, e.g., loud bass or heavy dancing.
Setting Up TRAKTOR SCRATCH
TRAKTOR SCRATCH PRO 2 Troubleshooting
TRAKTOR - Manual - 163
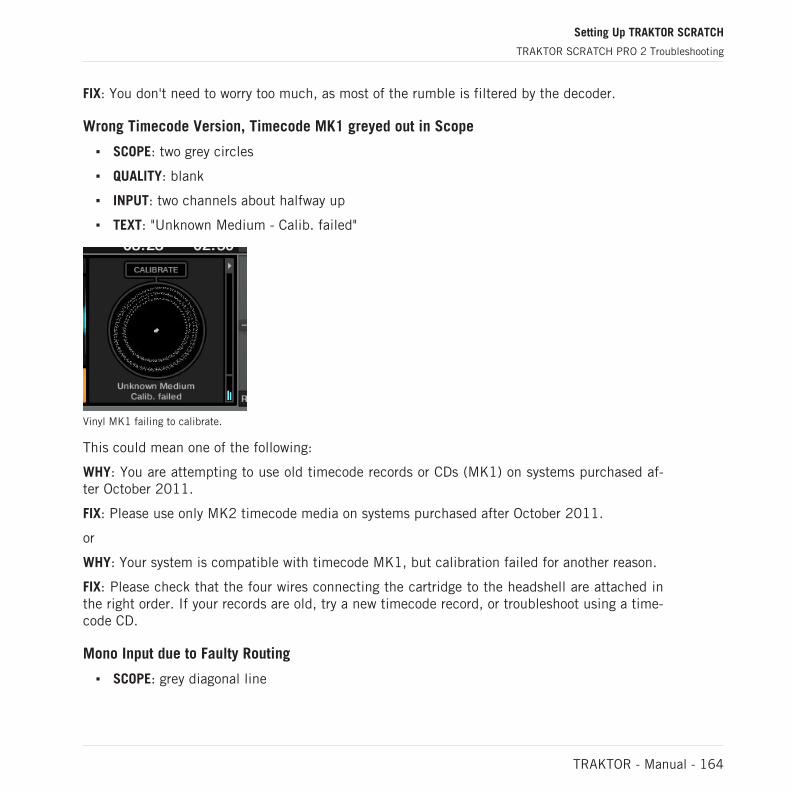
FIX: You don't need to worry too much, as most of the rumble is filtered by the decoder.
Wrong Timecode Version, Timecode MK1 greyed out in Scope
▪ SCOPE: two grey circles
▪ QUALITY: blank
▪ INPUT: two channels about halfway up
▪ TEXT: "Unknown Medium - Calib. failed"
Vinyl MK1 failing to calibrate.
This could mean one of the following:
WHY: You are attempting to use old timecode records or CDs (MK1) on systems purchased af-ter October 2011.
FIX: Please use only MK2 timecode media on systems purchased after October 2011.
or
WHY: Your system is compatible with timecode MK1, but calibration failed for another reason.
FIX: Please check that the four wires connecting the cartridge to the headshell are attached inthe right order. If your records are old, try a new timecode record, or troubleshoot using a time-code CD.
Mono Input due to Faulty Routing
▪ SCOPE: grey diagonal line
Setting Up TRAKTOR SCRATCH
TRAKTOR SCRATCH PRO 2 Troubleshooting
TRAKTOR - Manual - 164
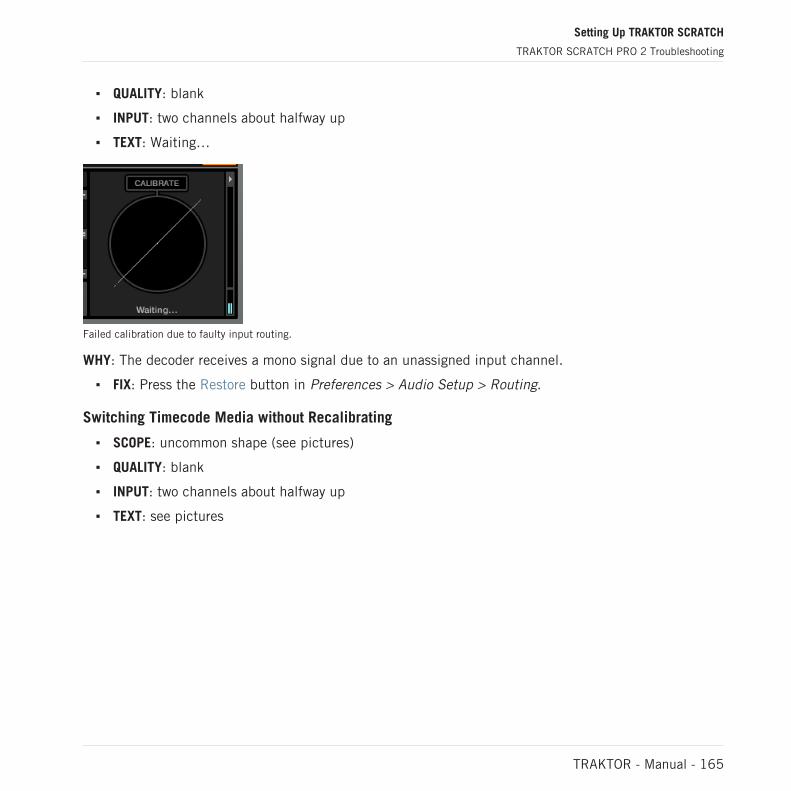
▪ QUALITY: blank
▪ INPUT: two channels about halfway up
▪ TEXT: Waiting…
Failed calibration due to faulty input routing.
WHY: The decoder receives a mono signal due to an unassigned input channel.
▪ FIX: Press the Restore button in Preferences > Audio Setup > Routing.
Switching Timecode Media without Recalibrating
▪ SCOPE: uncommon shape (see pictures)
▪ QUALITY: blank
▪ INPUT: two channels about halfway up
▪ TEXT: see pictures
Setting Up TRAKTOR SCRATCH
TRAKTOR SCRATCH PRO 2 Troubleshooting
TRAKTOR - Manual - 165

Vinyl MK1 calibrated as MK2.
CD MK2 calibrated as MK1.
CD MK1 calibrated as MK2.
Setting Up TRAKTOR SCRATCH
TRAKTOR SCRATCH PRO 2 Troubleshooting
TRAKTOR - Manual - 166
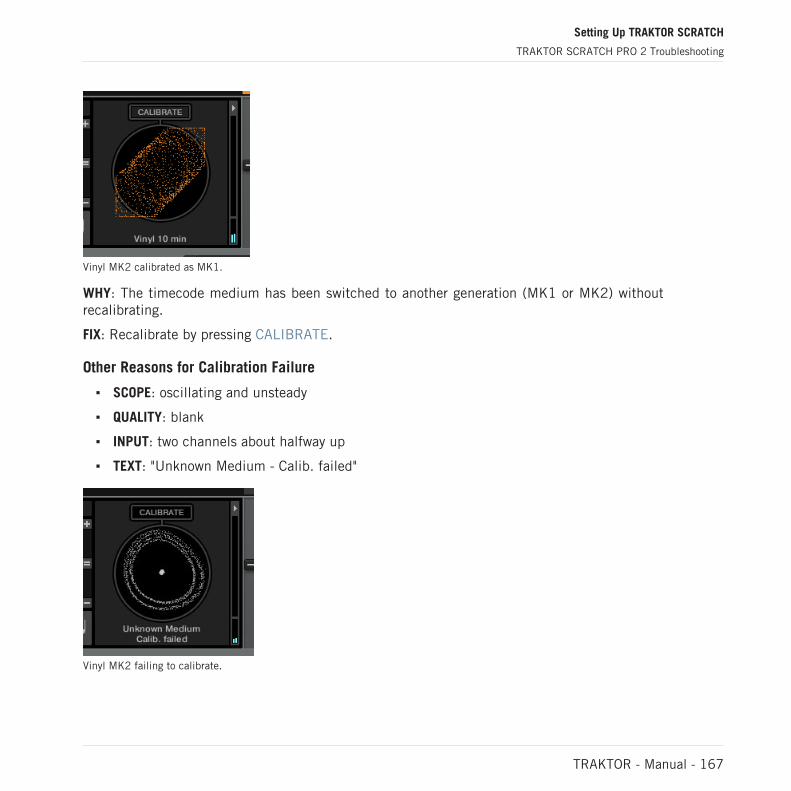
Vinyl MK2 calibrated as MK1.
WHY: The timecode medium has been switched to another generation (MK1 or MK2) withoutrecalibrating.
FIX: Recalibrate by pressing CALIBRATE.
Other Reasons for Calibration Failure
▪ SCOPE: oscillating and unsteady
▪ QUALITY: blank
▪ INPUT: two channels about halfway up
▪ TEXT: "Unknown Medium - Calib. failed"
Vinyl MK2 failing to calibrate.
Setting Up TRAKTOR SCRATCH
TRAKTOR SCRATCH PRO 2 Troubleshooting
TRAKTOR - Manual - 167

Calibration has failed for an unknown reason. Please check that the four wires connecting thecartridge to the headshell are attached in the right order. If your records are old, try a newtimecode record, or troubleshoot using a timecode CD.
12.8.2 Audio Troubleshooting
In case you run into sound problems like crackles and interruptions, you should have a look atchapter ↑16.2, Latency Issues first for general performance improvement tips.
Setting Up TRAKTOR SCRATCH
TRAKTOR SCRATCH PRO 2 Troubleshooting
TRAKTOR - Manual - 168
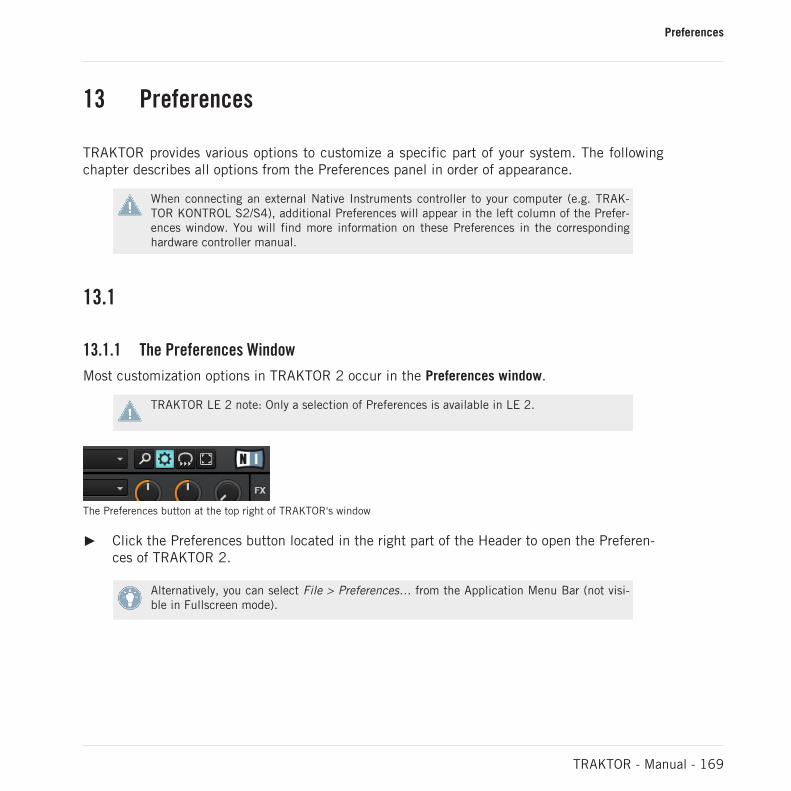
13 Preferences
TRAKTOR provides various options to customize a specific part of your system. The followingchapter describes all options from the Preferences panel in order of appearance.
When connecting an external Native Instruments controller to your computer (e.g. TRAK-TOR KONTROL S2/S4), additional Preferences will appear in the left column of the Prefer-ences window. You will find more information on these Preferences in the correspondinghardware controller manual.
13.1
13.1.1 The Preferences Window
Most customization options in TRAKTOR 2 occur in the Preferences window.
TRAKTOR LE 2 note: Only a selection of Preferences is available in LE 2.
The Preferences button at the top right of TRAKTOR's window
► Click the Preferences button located in the right part of the Header to open the Preferen-ces of TRAKTOR 2.
Alternatively, you can select File > Preferences… from the Application Menu Bar (not visi-ble in Fullscreen mode).
Preferences
TRAKTOR - Manual - 169
The Setup Wizard
The bottom left-hand corner of the Preferences window contains a button to start the SetupWizard. This is a convenient way to restart with a fresh “out-of-the-box” TRAKTOR 2 setup.The Setup Wizard does two things:
▪ It lets you choose from a few basic Audio, MIDI, and general setup configurations and au-tomatically sets the available options accordingly.
▪ It resets all other TRAKTOR 2 settings to their default values.
For more information on the Setup Wizard please refer to chapter ↑3, TRAKTOR's SetupWizard.
Global Import and Export
The bottom left-hand corner of the Preferences window also contains Import and Export but-tons. These buttons allow you to load (Import) and save (Export) all preference settings to andfrom hard disk. You may also filter exported settings to your requirements.
▪ Import: After you have selected a settings file on the hard disk for import, an Import filterwill be displayed allowing you to choose exactly which settings will be imported.
▪ Export: This allows you to save all preferences to hard disk. An export filter is displayed atexport allowing you to define which preferences are written to the settings file.
▪ Import and Export Filters:
◦ Keyboard Mappings: filter settings for keyboard mappings as configured in Preferences> Controller Manager.
◦ Controller Mappings: filter settings for Controller Mappings as configured in Preferen-ces > Controller Manager.
◦ GUI Layout: filter settings for GUI layouts as set in Preferences > Layout Manager.
◦ File Load- And Write- paths: filter settings for file directories as configured in Preferen-ces > File Management > Directories.
◦ Favorites: filter favorite browser details as configured in Preferences > Browser Details.
◦ Broadcasting: filter Proxy, Server and Metadata settings from Preferences > Broadcast-ing.
Preferences
TRAKTOR - Manual - 170
◦ Audio Device Settings: filter audio setup device details from Preferences > Audio Set-up.
◦ MIDI Clock settings: Export MIDI clock setting from Preferences > MIDI Clock.
◦ Effect Settings: Export effects setting including FX unit routing, FX Unit mode and FXpre-selection as configured in Preferences > Effects.
◦ Other Preferences and setting: Export all other preference and settings such as Globalsettings for example, Tool tips on or off, or if TRAKTOR starts in Fullscreen mode etc.
13.2 Audio Setup
This chapter provides information about TRAKTOR’s audio options.
13.2.1 Audio Device
▪ Audio Device: Choose your audio device. If no external audio interface is currently select-ed, you can always select the built-in sound card as the audio device.
▪ Sample Rate: Choose a sample rate according to the sound card. Note that higher samplerates stress your computer more. The standard is 44.1 kHz and is the sampling rate usedby CDs.
▪ Latency: On Mac OS X, use the slider to set an audio latency that is suitable for your sys-tem. On Windows, click the Settings button to open your audio device’s control panel thatlets you set the audio latency. Lower latency values are better but stress your computermore. A setting too low can lead to audio dropouts, artifacts, or other unwanted behavior.Start with a latency setting of around 15ms and adjust it according to your system. A set-ting of between 5 and 10ms is considered adequate.
13.2.2 Phono / Line
Input Channel: Enables you to switch the Input channel from Phono to Line mode on a Na-tive Instruments AUDIO 4 DJ and AUDIO 8 DJ Interface. This is necessary when switchingfrom using from Turntables to CD players.
Preferences
Audio Setup
TRAKTOR - Manual - 171
Note that TRAKTOR AUDIO 6 and TRAKTOR AUDIO 10 must have their input modeschanged in their respective Control Panel applications.
For information on the range of audio interfaces from Native Instruments, please visithttp://www.nativeinstruments.com/traktor.
13.2.3 Routing
Swap Channel: Enables you to reroute channels (swap channel pairs) from your audio interfacewithin TRAKTOR. This is useful for rerouting channels without the hassle of physically swap-ping leads on your audio hardware.
13.2.4 Built-in Soundcard (only Windows)
Win Built-In: Here you can set your fall-back soundcard. This will be the soundcard used byyour system in case your Audio Device set in the Audio Setup section will be removed.
13.2.5 Multi-Core
When the option Enable Multi-Core Processor Support is activated, the application load can bebrought down for demanding tasks such as running keylock on all decks.The function must be disabled, when running a second real-time application on the same com-puter.
13.3 Output Routing
Use Preferences > Output Routing to configure the signal path from TRAKTOR to your audioInterface. First you must select which mixing mode you are going to use.
13.3.1 Mixing Mode
Internal: Choose Internal mixing mode if you want to use TRAKTOR’s internal mixer. Internalmixing mode provides the following options:
Preferences
Audio Setup
TRAKTOR - Manual - 172
▪ Output Monitor: Choose an output pair to pre-listen to your tracks. Using the Cue buttons(headphone icon) on TRAKTOR’s internal mixer the audio signal will be sent to a separatestereo pair independent of the internal mixers channel or cross faders. In Internal MixingMode the Monitor Channel is also the output channel from the Preview Player in theBrowser. Click on Mono to merge the channels into mono mode.
▪ Output Master: Choose an output pair for the master output. Click on Mono to merge thechannels into mono mode.
▪ Output Record: Choose an output pair for the recording output. The recording outputs areused to send the master output signal from TRAKTOR to a separate mixer input or record-ing device for recording your mix.
If you use TRAKTOR in internal mixing mode you should use an audio interface. Native In-struments recommend the TRAKTOR AUDIO 6/10 interfaces, which are specifically de-signed for TRAKTOR. These devices will allow you to hear the stereo master output andyour headphone mix (Cue signal).
External: Choose External mixing mode if you want to use an external hardware mixer. Externalmixing mode provides the following options:
▪ Output Deck A/B/C/D: Choose an output pair for each Deck. Your options depend on youraudio device. You may also sum Decks up to one output pair. This is useful if your audiointerface has limited outputs.
▪ Output Preview: Choose an output pair for the Preview Player.
▪ Output FX Return: Choose an output pair for using send effects.
Native Instruments recommend the TRAKTOR AUDIO 6/10 interfaces, which are specifi-cally designed for TRAKTOR.
13.4 Input Routing
▪ Input Deck A — D: Use this menu to configure TRAKTOR to use the various inputs of yoursound card for incorporating audio from an external device. The Volume Meters to theright of the input selections will display the signal level if a signal is present. You mayalso sum Decks up to one input pair.
Preferences
Input Routing
TRAKTOR - Manual - 173
▪ Input FX Send (Ext): Choose an input pair for using send effects.
▪ Input Aux: Choose an input pair for an Auxiliary input.
Input Aux is only available when Internal is selected in the Mixing Mode menu in OutputRouting.
13.5 MIDI Clock
Send MIDI Clock
▪ Send MIDI Clock: If this option is checked, TRAKTOR will send a MIDI Clock signal to theselected device. This allows you to sync external hardware and software.
▪ Sending Offset: Here you can setup an offset time for the MIDI Clock signal.
TRAKTOR LE 2 note: The MIDI Clock is not available in LE 2.
TRAKTOR ME 2 note: MIDI Clock is not available in ME 2.
13.6 Timecode Setup
Timecode Inputs
The control signal Scopes give you a visual idea of the quality of the Timecode Control signal.
TRAKTOR LE 2 note: The Timecode setup is not available in LE 2.
TRAKTOR ME 2 note: The Timecode Setup is not available in ME 2.
Scratch options are only available if you own a TRAKTOR SCRATCH license and the re-quired hardware must to be installed.
Preferences
MIDI Clock
TRAKTOR - Manual - 174
Decoder Gain
Here, the volume of the incoming Timecode Control signal is displayed. A higher gain signalnormally means better control tracking.
Tracking
▪ Track Start Position: You can choose the start position of the tracking here. This is usefulif you want to sticker your record with a lead-in sticker, or the beginning of your controlrecord is worn out or scratched.
▪ Turntable Speed: Put a checkmark in the 45 RPM handling mode if you prefer this over33 RPM.
▪ Tracking Alert: If the Timecode Control signal becomes bad, the tracking buttons startflashing in red. While the red flashing is normal when you move the record back andforth, if the red flashing occurs during normal forward playback, you probably have dustunder the needle.
▪ Load next track when flipping record: With this option checked, you can load the next trackof any Playlist by flipping the record.
▪ Use playlist scrolling zone: With this option, you can enable Playlist Scrolling for exampleskipping to CD Track 3 allows you to scroll up and down through your Playlist by manuallyspinning the jog wheel of your CD player. For more information please read chapter↑12.2.3, The Control Zones on CD.
▪ Switch to Absolute mode in lead-in: When you place the needle in the Lead-In of the Con-trol Vinyl or skip to the first track of the Control CD, the tracking mode switches to Abso-lute mode. Read more about the playback modes in chapter ↑12.6, Tracking Modes.
▪ Switch to Absolute mode when loading: When loading a track, the tracking mode alwaysswitches to Absolute mode. Read more about the playback modes in chapter ↑12.6,Tracking Modes.
Preferences
Timecode Setup
TRAKTOR - Manual - 175
13.7 Loading
Loading
▪ Loading only into stopped Deck: Prevents loading into a playing Deck and therefore stopsyou from accidentally loading a track into the wrong Deck.
▪ Stop playback at end of track: Stops the playback of a Deck when a track is at its end.
▪ Duplicate Deck when loading same track: If a track is currently loaded into a Deck, you candirectly copy the track and its playback position by pressing and holding the mouse but-ton while dragging from the Deck Heading to another Deck. For more information on per-forming this action please read chapter ↑6.3.6, Deck Audio Drag and Drop.
▪ Load next at end of track: This enables TRAKTOR to automatically load the next track fromthe active Playlist, i.e. the Playlist the currently playing track is in. Switching to anotherPlaylist during playback does not activate another Playlist.
▪ Initially Cue to Load Marker: With this enabled, a track will automatically cue to an estab-lished Load Marker when it is loaded.
TRAKTOR LE 2 note: Initially Cue to Load Marker is not available in LE 2.
▪ Activate Fade In & Fade Out Markers: This option allows the use of Fade In and Fade Outmarkers for automatic crossfades between tracks.
TRAKTOR LE 2 note: Active Fade In and Fade Out Markers are not available in LE 2.
▪ Cruise Loops Playlist: This option affects the Cruise mode (Autoplay). With this optionchecked, TRAKTOR will repeat the Playlist from the beginning when the end of the list isreached.
TRAKTOR LE 2 note: The Cruise Loops Playlist is not available in LE 2.
Preferences
Loading
TRAKTOR - Manual - 176
Resetting Controls
▪ Reset all Deck controls when loading track: Resets all Deck controls to their default valuewhen a track is loaded.
▪ Reset all mixer controls when loading track: Resets all mixer controls to their default valuewhen a track is loaded.
13.8 Transport
Tempo
Set Tempo Range: Set a global tempo range for all Tempo Faders or set a range for each Deckindividually. This will define the maximum amount you can increase or decrease tempo. Theavailable values are 2 %, 4 %, 6 %, 8 %, 10 %, 12 %, 14 %, 16 %, 18 %, 20 %, 25 %,35 %, 50 % and 100 %.
If you choose a range of 100 % you are able to perform a full stop of a track with TRAKTOR’ssoftware Tempo Fader.
TRAKTOR LE 2 note: The Tempo Fader Range is not available in LE 2.
Tempo Bend Sensitivity
You can adjust the sensitivity of the Tempo Bend function by moving the Tempo Bend Sensi-tivity slider.
To increase the sensitivity of the Tempo Bend control, move the Tempo Bend Sensitivity sliderto the right; to decrease it, move the slider to the left.
The value range of the slider is 0–200 %.
► To speed-up or slow-down the tempo progressively, tick the Tempo Bend Progressive Sen-sitivity button.
Sync Mode
There are two methods for synchronizing tracks: TempoSync and BeatSync.
Preferences
Transport
TRAKTOR - Manual - 177
▪ TempoSync : maintains tempo-only synchronization between the tracks. The phase of theDecks will be aligned when the SYNC button is turned on and SYNC will turn dim if thephase of the Decks are shifted. Tempos will remain synced in this mode.
▪ BeatSync : forces tempo and phase synchronization between the tracks. The phase of theDecks will be aligned when the SYNC button is turned on. SYNC will turn dim if thephase of the tracks are shifted manually (i.e. Scratching or holding a Deck in the stoppedposition), but TRAKTOR will re-align the phase of the tracks when the Deck plays normal-ly again (i.e. you release the record or jog wheel).
This concept allows you, even if you are using TRAKTOR SCRATCH, to keep your tracks tem-po-matched, and also raise the tempo of two or more tracks simultaneously, even if their phas-es are shifted!
Additionally there are two options for enabling tempo master ability for the remix Deck, and forrestricting assignment of the tempo master to Decks that are on air:
▪ Remix Decks can be Tempo Master: With this option enabled, Remix Decks will behave in astandard Deck manner, i.e., they can become your tempo master throughout a mix. If youwish for Remix Decks to never be the tempo master, disable this option.
▪ Only On-Air Decks can be Tempo Master: The Auto mode in the Master Clock panel (see also↑9.2.3, Master Clock Panel) allows TRAKTOR to automatically switch the tempo masterbetween the various Decks to ensure the sync system is following the appropriate Deck. ADeck can only become the tempo master automatically if it's loaded and playing. There-fore, if you stop the current tempo master, TRAKTOR will find the next playing Deck andassign it as the tempo master. Now by activating this preference, it will also be necessarythat the playing Deck is on-air (i.e., audible at the master output) in order to become tem-po master.You might prefer having this option turned on as it will ensure that the tempo master isalways a track that you can hear, so there is no risk of synced Decks following the tempoof a Deck that cannot be heard.However, in some cases, especially when performing scratch routines, you will prefer toleave this preference turned off. That way, you can perform scratch routines (which in-cludes turning the volume down on certain Decks with either the volume faders or thecrossfader) without having to worry about TRAKTOR assigning the tempo master to a dif-ferent Deck.
Preferences
Transport
TRAKTOR - Manual - 178
TRAKTOR ME 2 note: Sync Mode is not available in ME 2.
Key Lock
This adjusts the quality of time stretching method used when using the Key Lock function.
Quality
▪ Use ECO with a slower processor.
▪ Use HiQ with a fast processor.
Mode
▪ When having Scratch mode enabled, Key Lock gets disabled when playback speed is be-low -30 % or above +50 %. When doing scratch routines with timecode media or jog-wheels, this leads to a more natural scratch sound.
▪ When having Normal mode enabled, Key Lock is enabled within the full tempo range.
TRAKTOR LE 2 note: The Key Lock Quality is not available in LE 2.
Key Lock can be switched on and off manually in the Decks independently from the KeyLock Range setting.
Loops
▪ Auto-Detect Size: Use this slider to adjust the size beneath which a track is automaticallydetected as loop and therefore will be looped automatically. An automatically detectedloop will show the green loop markers at the beginning and end.
▪ Sync Phase when exiting Loop: Use this option to automatically sync two tracks that havebecome desynchronized after a loop size smaller than 1 beat has been used.
Preferences
Transport
TRAKTOR - Manual - 179
Play Count
Min. Playtime: This slider adjusts the time that must to be exceeded until a track is marked asplayed and therefore is added to the history Playlist for this session. When the minimum play-time is reached, the track is displayed with the Checkmark icon, which marks it as played. Al-so, its Play Count is raised.
Beat Counter
Bars per Phrase: Define here how many bars a phrase shall contain. A bar consists of 4 beats.This setting influences directly the Beats and Beats to Cue options in Preferences > Decks >Deck Heading.
Mouse Control
The following options affect the behavior of the detailed waveform when clicking it with themouse. The following modes are available:
▪ Vinyl: Clicking the waveform stops the track like putting your hand on a record on a turn-table. Holding the mouse and dragging back and forth works like scratching or spinning arecord.
▪ Snap: The mouse arrow will always snap to the beat of the loaded track.
◦ If you click inside the waveform the play position jumps to the beat next to where youclicked and the playback stops.
◦ Clicking in the waveform and holding the mouse button while the Deck is pausedworks like the Cue button.
◦ Right-clicking on the waveform works like the Deck Play button.
The Snap mode in the Preferences differs from the Snap mode available in the Master pan-el! Read more about the Snap button in the Master panel in chapter ↑9.2.1, Master Panel.
TRAKTOR LE 2 note: Mouse Control is not available in LE 2.
TRAKTOR ME 2 note: Mouse Control is not available in ME 2.
Preferences
Transport
TRAKTOR - Manual - 180
Cue Play (CUP) Mode
▪ Instant: Instantly starts playback when pushing CUP.
▪ On Release: Starts playback after releasing CUP button.
13.9 Decks Layout
Deck Flavor
▪ Switch each Deck to a Track Deck, Remix Deck or Live Input.
Deck Layout
▪ Switch between Micro, Small, Essential, Full or Advanced Decks to save screen space.Micro and Small Decks do not show the Waveform and Advanced Controls. Select Ad-vanced Decks to make Advanced Controls visible.
▪ Enable Deck C&D: Switches Decks C and D on and off. If unchecked, Decks C and D arehidden and muted, except for Live Input flavor which will stay live even if Decks C and Dare disabled.
Tempo Fader
▪ Choose on which Decks the Tempo Fader will be displayed.
Platter / Scope
▪ Switch between Minimized, Platter, and Scope Scratch panels for use with TRAKTORSCRATCH. You may also turn the panels off.
Scratch Panels are only available if TRAKTOR SCRATCH and the required hardware are in-stalled.
TRAKTOR ME 2 note: Platter panels are not available in ME 2.
Preferences
Decks Layout
TRAKTOR - Manual - 181
Miscellaneous
▪ Grid Mode: Switches the view of the Beatmarker from Full, Dim, Ticks and Invisible.
▪ Show Minute Markers: Switches the Minute Markers for all Decks on and off. The MinuteMarkers are a visual reference on the Stripe view for each minute of a track.
▪ Color Mode: Select from four waveforms: Ultraviolet, Infrared, X-Ray and Spectrum.
Deck Header
▪ Show Cover Art: Switches the Cover Art icon on and off.
▪ Show Phase Meter: Switches the Phase Meters on or off for all Decks.
13.10 Track Decks
Deck Header
Top/Middle/Bottom Row: Here you can choose which information for a loaded track will beshown in the Deck Heading. There are nine fields in three rows available. The top row is dis-played larger and the bottom row smaller, so you can sort the information by importance.
TRAKTOR ME 2 note: No editable Deck Heading in ME 2.
Advanced Tabs
Switch between the three different Advanced Panel modes that are displayed when the Ad-vanced Panel has been selected in Deck Layout. These are Move, Cue and Grid.
Miscellaneous
▪ Track End Warning: Use the slider to set when the track end warning will begin. When theplayback position on the Track Deck reaches the set Track End Warning time the Stripeview will flash red indicating the track is about to end. The timescale of the Track EndWarning ranges from 0 to 120 seconds.
Preferences
Track Decks
TRAKTOR - Manual - 182
▪ PlayMarker Position: Change the position of the PlayMarker for all Decks. The PlayMarkerindicates the current playback position within a track. Move the slider to set the Play-Marker position: At 0 the PlayMarker Position will be at the far left, 50 will move themarker to the middle (default position) and 100 will move the marker to the far right.
▪ Stripe View Fit: Switch the Stripe view from the length of the Record (timecode media) tothe actual length of the loaded Track. The Record will represent the whole Stripe vieweven if the loaded track is shorter.
▪ Default Zoom: Change the default Zoom level of the Waveform view on the Track Decks. Avalue of -1.00 will zoom out as far possible and likewise a value of +1.00 will zoom in asclose as possible. Once the default value is set the Track Decks will maintain this vieweach time they are used. Alternatively, you may use the + and - symbols on the waveformdisplay itself to alter the zoom view.
13.11 Remix Decks
Remix Deck Layout
▪ Show Volume Fader: This preference determines if the Slot Volume controls should be visi-ble or hidden in the Remix Deck. When unchecked, the Volume faders are hidden.
▪ Show Filter Fader: This preference determines if the Filter fader controls should be visibleor hidden in the Remix Deck. When unchecked, the Filter faders are hidden.
▪ Permanently Show Slot Indicators: This preference determines if the minimized Slot Param-eter indicators will be visible or not in the Remix Deck. When checked, you will see mini-mized Slot Parameter indicators when not hovering over the Remix Deck's Sample Slotswith the mouse pointer. When unchecked, the minimized Slot Parameter indicators willbe hidden. In both cases, the Slot Parameter buttons will always appear when hoveringover the Sample Slots with the mouse pointer.
▪ Set Auto-Gain When Loading Samples: This preference determines if TRAKTOR should usethe Auto-Gain value stored in a Sample when it is loaded into the Remix Deck. When thisoption is unchecked, TRAKTOR will leave the Sample's gain at 0.0dB, thus, playing the
Preferences
Remix Decks
TRAKTOR - Manual - 183
Sample at its original level. When checked, TRAKTOR will adjust the gain level as speci-fied by the Auto-Gain level in the Sample so that it plays at an almost maximum volume(matching the level of other Samples that were loaded with Auto-Gain).
Behaviors
▪ Auto-Enable Deck Play on Sample Trigger: With this option enabled, TRAKTOR will forcethe Remix Deck's Play button to the On state whenever you trigger a Sample, even if theDeck had been previously stopped. When this option is unchecked, triggering Sampleswill have no effect on the Remix Deck's Play button, allowing you to select the Samplebefore starting the Deck as a whole.
▪ One-Shot Samples Ignore Punch Mode: When this option is checked, Samples in One-shotmode will ignore the setting of Punch mode, they will always play starting from the begin-ning. When the option is unchecked, Samples in One-shot mode will follow the rules ofPunch mode: they will start playing from a location corresponding to the phase/location ofthe previously playing Sample.
Saving
When this option is enabled, TRAKTOR will automatically save the current Remix Set whenyou initiate actions that will alter the current contents of the Remix Deck.
This includes the following actions:
▪ Switching the Deck Flavor from Remix Deck to a different type of Deck: the Remix Set will besaved right before the Deck Flavor is switched.
▪ Loading a new Remix Set into the Remix Deck: the Remix Set will be saved right before thenew Remix Set is loaded.
▪ Triggering the "Delete All" action from the F1: the Remix Set will be saved right before thecontents of the Remix Deck are cleared.
▪ Quitting TRAKTOR: the Remix Set will be saved before the rest of the Collection is saved.
When initiating Auto-Save, you will not be presented with any dialogs. If the Remix Set al-ready exists in the Collection, the older version will be automatically overwritten!
Preferences
Remix Decks
TRAKTOR - Manual - 184
When this option is unchecked, TRAKTOR will not attempt to save edited Remix Sets in theabove conditions. Instead, TRAKTOR will simply discard all changes made. This can be thepreferred workflow if you want your Remix Sets to always start from the same state for eachperformance, regardless of what you did to them during a previous performance.
13.12 Mixer
TRAKTOR LE 2 note: The Mixer is not available in LE 2.
EQ Selection
EQ Type: Choose between the classical 3-band-EQ (Classic) or an emulated mixer EQ from Pio-neer DJM-600 (P600), Ecler Nuo4 (NUO) or Allen & Heath XONE:92 (Xone).
TRAKTOR ME 2 note: The EQ selection is not available in ME 2.
Filter Selection
▪ Ladder: Uses the ladder filter, also used in the Filter effect for the channel filter knobs.
▪ Xone: Uses the emulation of the Xone:92 filters, also used in the Filter:92 effect, for thechannel filter knobs.
TRAKTOR ME 2 note: Filter selection is not available in ME 2.
Crossfader
▪ Auto Crossfade Time: This slider adjusts the amount of time for the auto crossfade featureto crossfade between tracks.
▪ Smooth/Sharp: Adjust the crossfader curve here.
Preferences
Mixer
TRAKTOR - Manual - 185
Level
▪ Set Autogain when loading track: With this option checked, TRAKTOR adjusts the gain foryou.
▪ Enable Limiter: Enabling this option prevents clipping.
▪ Headroom: This setting is useful when you want to mix multiple tracks or sources inTRAKTOR since each source added will increase the overall output of the mix. By usingthis feature, TRAKTOR will attenuate its output in order to maintain digital headroom soyou don't have to turn down the Master volume via the MAIN knob. If you only mix twoDecks at a time, a setting of -3 dB is usually acceptable. If you wish to mix up to fourDecks or include multiple samples, a setting of -9 dB is recommended.
Mixer Layout
▪ EQ + Fader: Add or remove the EQ and Fader from the Mixer by enabling or disabling thisoption.
▪ Filter + Key + Gain + Cue + Balance: Add or remove the Filter, Key, Gain, Cue and Balancefrom the Mixer by enabling or disabling this option.
▪ Crossfader: Add or remove the Crossfader from the Mixer by enabling or disabling this op-tion.
13.13 Global Settings
Global Section
▪ Show Global Section: Add or remove visibility of the Global section by enabling or disablingthis option.
▪ Left: Select Effect 1 or Master Clock to be displayed by default on the left-hand side ofthe Global section.
▪ Right: Select Effect 2 or Recorder to be displayed by default on the right-hand side of theGlobal section.
Preferences
Global Settings
TRAKTOR - Manual - 186
Miscellaneous
▪ Fullscreen Resolution: Determines the zoom factor of TRAKTOR’s full screen view. If set toDesktop, TRAKTOR uses the native resolution of your computer 1:1. When choosing an-other option, the full screen view appears larger (zoomed in) because TRAKTOR assumesa lower screen resolution. The available options depend on your hardware.
▪ Switch to Fullscreen on Startup: With this selected, TRAKTOR will open in full screen mode(maximizing the TRAKTOR window) each time it is started.
▪ Show Tooltips: Enable or disable Tools Tips. If you would like to familiarize yourself withTRAKTOR we recommend you enable Tool Tips as they provide a short descriptions of in-terface.
▪ Deck Focus: Select control of the visual Deck Focus from the following menu:
◦ Software: Enable Software control of Deck Focus.
◦ Hardware: Enable Hardware control of Deck Focus.
◦ None: Disable Deck Focus.
▪ Show value when over control: With this option checked, knobs like Gain, Master Volume,or the Effects’ knobs show their actual value when hovering over it.
▪ Reset Hidden Dialogs: The Reset button will reset all dialogs that have been hidden byclicking on the “Don’t Show This Again” checkbox.
13.14 Effects
FX Unit Routing
TRAKTOR can route all effects as insert, send, or post-fader effects.
▪ Insert: In Insert mode, the effect is inserted into the signal chain right before the channelfilter. The balance of the direct signal (Dry) and effect signal (Wet) is controlled by the D/W-knob in the effect panel.
▪ Send: In Send mode, the effect unit becomes independent from TRAKTOR’s internal sig-nal flow. The effect unit receives input externally from one of the inputs of the audio in-terface as selected in Preferences > Input Routing. The effect sends its output to one of
Preferences
Effects
TRAKTOR - Manual - 187
the Outputs of the audio interface, as selected in Preferences > Output Routing. Only onesoundcard input and output is supported. If you use more than one send effect, they arechained in the order 1-2-3-4.
▪ Post Fader: In Post Fader mode, the effect is inserted into the signal chain after the chan-nel's volume fader so it will still be audible when turning down the volume on a channel.The balance of the direct signal (Dry) and effect signal (Wet) is controlled by the D/W-knob in the effect panel. Post Fader effects are not available in External Mixer mode.
▪ 2 FX Units/4 FX Units: Choose between 2 or 4 effect units.
▪ Restore Parameters when switching FX: Check this option if you wish to restore effects totheir default settings when switching.
TRAKTOR LE 2 note: Effect unit routing is not available in LE 2.
TRAKTOR ME 2 note: Effect unit routing is not available in ME 2.
FX Panel Mode
FX1/FX2/FX3/FX4: choose between Single and Group effects.
▪ The Single mode provides a more detailed control over one selected effect.
▪ The Group mode gives you control of up to three selected effects in one panel.
TRAKTOR LE 2 note: FX Panel mode is not available in LE 2.
TRAKTOR ME 2 note: FX panel mode is not available in ME 2.
Effect pre-selection
TRAKTOR provides a vast range of effects. You can create a personal selection of all availableeffects to narrow down the effects appearing in the Effect Selector of the effect units.
► To remove an effect from the pre-selection, select it and press the Remove button, ordouble-click it.
Preferences
Effects
TRAKTOR - Manual - 188
► To add an available effect to the pre-selection, select it and press the Add button or dou-ble-click it.
► To change the order in which the effects appear in the drop down selection of the effectunits, move the pre-selected effect(s) up and down the list with the Up and Down but-tons.
13.15 Mix Recorder
Source
▪ Source: Choose Internal to record from TRAKTOR’s internal Master output or choose Ex-ternal to record an external audio source like a turntable, microphone, or from your exter-nal hardware mixer.
▪ External Input: Select which input channel TRAKTOR will record external audio. The drop-down menu offers the following options:
◦ Deck A
◦ Deck B
◦ Deck C
◦ Deck D
◦ Input FX Send (Ext.)
File
▪ Directory: This determines the file path in which your audio recordings are stored.
▪ Prefix: Use a prefix for the filename of each recording.
▪ Split File at Size: With a file size selected, your audio recordings will be split each time thefile size is reached. The maximum file size is 2048 megabytes.
TRAKTOR LE 2 note: Recording not available in LE 2.
Preferences
Mix Recorder
TRAKTOR - Manual - 189
13.16 Loop Recorder
Latency
Rec. Latency: Adjust the recording latency of the Loop Recorder if in External mixer mode.
Overdubbing
Loop Decay: Adjust the percentage of how long it takes for recorded audio to fade out whenoverdubbing.
13.17 Broadcasting
TRAKTOR LE 2 note: Broadcasting is not available in LE 2.
TRAKTOR ME 2 note: Broadcasting is not available in ME 2.
Broadcasting allows you to stream your DJ set live over the Internet. To do this you must firstsetup a 'client and server' configuration. You can do this by installing a server on your comput-er that will provide a stream of the source (TRAKTOR) to clients connected to your server.
► You must have a server configured correctly and running before you can begin your broad-cast. For more information on setting up a server and Broadcasting please refer to chap-ter ↑14.3, Broadcasting.
A description of the Broadcasting preferences page follows:
Proxy Settings
Proxy Settings: If connecting to the Internet through a Proxy, use this section to configureTRAKTOR to use your Proxy settings.
▪ Custom: Use this option if you want to add your own custom Proxy Settings.
Preferences
Loop Recorder
TRAKTOR - Manual - 190
▪ Default: Select this option to use the same Proxy Settings from your computer as theProxy in TRAKTOR.
▪ None: Select this option if you do not want to use a Proxy.
Server Settings
Use this menu to configure TRAKTOR to use your server.
▪ Address: Manually enter the IP (Internet Protocol) address of your computer.
Please refer to the help section of your operating system for information on how to find yourcomputers IP address.
▪ Port: Most servers use the default port setting of 8000.
▪ Mount Path: Enter the mount path (a specific directory) you want your listeners to connectto. This is useful when broadcasting two events on the same server.
▪ Password: Enter the password of your server.
For security remember to change the default password of your server!
▪ Format: Select the sound quality you want to broadcast. Higher resolutions will requiremore bandwidth, so please use an appropriate setting for your connection.
Metadata Settings
Use this section to configure metadata for your broadcasting stream. This is the informationyour listeners will see.
▪ Stream URL: This is the URL (User Resource Location) you are broadcasting on and theURL you should give to your listeners.
▪ Stream Name: Enter a name for your broadcast.
▪ Stream Description: Enter a description for your broadcast.
▪ Stream Genre: Enter the genre of music you broadcast.
Preferences
Broadcasting
TRAKTOR - Manual - 191
13.18 Browser Details
Editing
▪ Allow Inline Editing in List Window: If checked, you can edit metadata of your music filesby double-clicking them in the Browser List.
◦ Check this option if you’re preparing tracks at home for faster access to the tags.
◦ With this option unchecked, Inline Editing of a track’s tags in the Browser List is notallowed to prevent unwanted changes, e.g. during a live set.
Browser Details
▪ Show Preview Player: switches the Preview Player on and off.
▪ Show Cover Art: switches the cover art window on and off.
▪ Show Playlist Favorites: switches the Browser Favorites on top of the Collection Browser onand off.
▪ Show Track Info: switches the Info Window on and off.
▪ Show Status Bar/Error Messages: switches the Status Bar on and off. This area also dis-plays error messages.
TRAKTOR LE 2 note: Browser Details not available in LE 2.
▪ Font & Font Size: Here you can choose the font and the font size TRAKTOR uses in theBrowser.
▪ List Row Height: Choose how big your Browser List rows will be.
13.19 Layout Manager
Learn in this chapter how to adjust TRAKTOR’s layouts.
Preferences
Browser Details
TRAKTOR - Manual - 192

TRAKTOR LE 2 note: Layout Manager not available in LE 2.
TRAKTOR ME 2 note: The Layout Manager is not available in ME 2.
▪ Change Name: Here you can type in a name for the selected Layout. Click Rename to veri-fy your entry.
▪ Personal Layouts: In this list all stored Layouts are shown. To activate a Layout, double-click the entire row. The active layout is marked with Active in the first column. The orderin this list also defines the order of layouts in the Layout Selector of TRAKTOR’s Header.Clicking Add appends a new layout to the Layout Manager. Remove deletes the selectedlayout. Move Up/Down changes the position of the selected layout in the layout dropdownof TRAKTOR’s header section.
13.20 File Management
This subdirectory contains all options related to your music files.
File Management
▪ Import Music-Folders at Startup: With this selected, each time TRAKTOR is started, it willautomatically import all tracks in your Music Folder that have not already been imported.
▪ Determine track-time automatically (before analysis): With this option checked TRAKTORestimates the track-time before analyzing it.
▪ Analyze new imported tracks: Performs an automatic analysis of all new tracks when im-ported into the Collection.
▪ Analyze new tracks when loading into deck: This option triggers the analysis only whenloading a track into a Deck. A progress bar at the bottom of TRAKTOR will provide visualfeedback on analysis and alert you if there is a problem. By analyzing the tracks on de-mand you don’t run into the CPU problems you may encounter with a permanent back-ground analysis.
Preferences
File Management
TRAKTOR - Manual - 193

Analysis generates high CPU load. Due to lower prioritization of the analysis process thereis no risk of slowdowns for TRAKTOR itself, but when using additional software along withTRAKTOR, you may note that the software performs slower than usual.
▪ Save created Loops and Samples automatically: Automatically saves the Loops and Samplesyou created in TRAKTOR for later use.
▪ Show Consistency Check Report on Startup: With this selected, the Consistency Check Re-port will be displayed each time you start TRAKTOR. This report displays informationabout your Track Collection and gives options to manage it.
TRAKTOR LE 2 note: File management not available in LE 2.
File Structure Mode
The File Structure mode determines the file structure when exporting a Playlist.
▪ None: File names will not be changed during export.
▪ Flat: File names will be changed into a 01 Artist - Title format during export.
▪ Artist: During export, sub-folders with the artist names will be created.
▪ Label: During export, sub-folders with the label names will be created.
BPM Detection Range
▪ Min/Max: Dial in the minimum and maximum beats per minute (BPM) values of yourtracks. This will help TRAKTOR’s BPM-analysis find the correct BPM value when analyz-ing. It is advisable to keep the range small and to avoid the doubling of a value (e.g. 80 -159 BPM is better than 80 — 161 BPM). The lowest possible value you can enter is 40BPM, whereas the highest possible value is 300 BPM.
▪ Set Beatgrid when detecting BPM: With this option checked, TRAKTOR automatically pla-ces a Beatmarker.
▪ Store Beatmarker as Hotcue: When TRAKTOR analyzes a track it creates a Beatmarker asreference for detecting the BPM. With this option enabled the Beatmarker is also availa-ble for use as a HotCue. Disable this option to prevent accidental erasure, as a result, youwill not be able to use the Beatmarker as a HotCue.
Preferences
File Management
TRAKTOR - Manual - 194
Directories
▪ Root Dir: This is the path to your Collection/Playlists/Settings/History/Mappings files. Youcan change the folder. To change it, click the …! button and select the path of your pre-ferred folder. Click on Default Dir to reset the paths back to the defaults.
▪ Sample Dir: This is the path to your Sample files used in Remix Decks. You can changethe folder. To change it, click the …! button and select the path of your preferred folder.Click on Default Dir to reset the paths back to the defaults.
▪ iTunes Music Library: If you want to use TRAKTOR’s iTunes integration you have to selectthe path of your iTunes Library. Click the …! button and choose the path to your iTunesLibrary file.
Music Folders
If you want to use your own music folder structure you can add your music folders in this list.TRAKTOR can automatically import all music files stored within this Music Folder.
▪ Add…: lets you add folders as Music Folders.
▪ Delete: deletes the selected Music Folder from the list.
▪ Change…: if you changed the directory or the name of a Music Folder click this button totell TRAKTOR about this change.
13.21 Controller Manager
This section offers an in-depth explanation of TRAKTOR's Controller Manager (Preferences >Controller Manager). Before creating any new controller mappings, we recommend to firstcheck if your controller hardware is included in the TRAKTOR Setup Wizard (please refer tochapter ↑3, TRAKTOR's Setup Wizard). There are templates available for many MIDI control-lers, which can be loaded easily with the Setup Wizard.
We recommend leaving TRAKTOR's Preferences page open while editing and testing a con-troller mapping, otherwise a different mapping might be selected when reopening the Pref-erences window.
Preferences
Controller Manager
TRAKTOR - Manual - 195
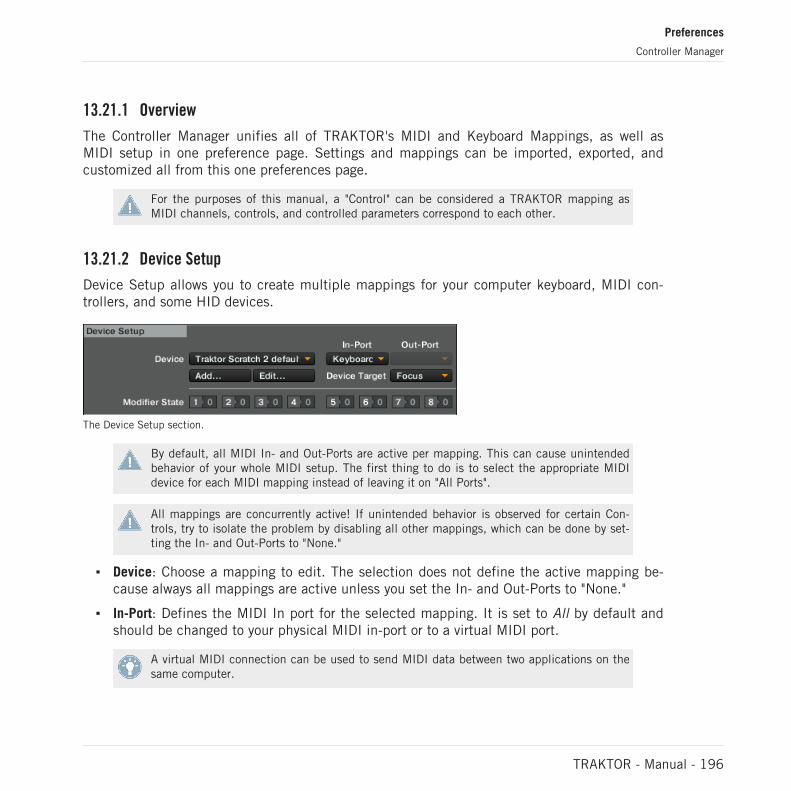
13.21.1 Overview
The Controller Manager unifies all of TRAKTOR's MIDI and Keyboard Mappings, as well asMIDI setup in one preference page. Settings and mappings can be imported, exported, andcustomized all from this one preferences page.
For the purposes of this manual, a "Control" can be considered a TRAKTOR mapping asMIDI channels, controls, and controlled parameters correspond to each other.
13.21.2 Device Setup
Device Setup allows you to create multiple mappings for your computer keyboard, MIDI con-trollers, and some HID devices.
The Device Setup section.
By default, all MIDI In- and Out-Ports are active per mapping. This can cause unintendedbehavior of your whole MIDI setup. The first thing to do is to select the appropriate MIDIdevice for each MIDI mapping instead of leaving it on "All Ports".
All mappings are concurrently active! If unintended behavior is observed for certain Con-trols, try to isolate the problem by disabling all other mappings, which can be done by set-ting the In- and Out-Ports to "None."
▪ Device: Choose a mapping to edit. The selection does not define the active mapping be-cause always all mappings are active unless you set the In- and Out-Ports to "None."
▪ In-Port: Defines the MIDI In port for the selected mapping. It is set to All by default andshould be changed to your physical MIDI in-port or to a virtual MIDI port.
A virtual MIDI connection can be used to send MIDI data between two applications on thesame computer.
Preferences
Controller Manager
TRAKTOR - Manual - 196
▪ Out-Port: This defines the MIDI Out port for the selected mapping. It is set to "All" by de-fault and should be set to your physical MIDI out-port or to a virtual MIDI port.
▪ Add...: This opens a drop-down menu with the following options:
◦ Generic Keyboard: Creates a mapping for assigning computer keyboard keys to TRAK-TOR Controls.
◦ Generic MIDI: Creates a mapping for assigning MIDI controls to TRAKTOR Controls.
◦ Import: Here you can add a mapping to the Device list from the hard disk. Mappingsthat are already loaded will not be overwritten or deleted. Since this function alwayscreates a new device, you need to delete the other devices in the list if you do notwant to use them at the same time.
◦ The Add... menu includes all mappings for the devices natively supported by this ver-sion of TRAKTOR.
▪ Edit...: This opens a drop-down menu with the following options:
◦ Edit Comment: Add a comment to the Mapping name. This will appear at the begin-ning of the mapping name in the Device drop-down list.
◦ Duplicate: Makes a copy of the currently selected mapping.
◦ Export: Allows you to store the currently selected mapping as a file on your hard disk.
◦ Delete: Deletes the currently selected mapping.
◦ Show Version: Shows the version of the underlying TSI file.
▪ Device Target: Chooses the device you wish to control. Available options are Decks A — D,or Deck Focus.
▪ Modifier State: This line displays the current value for each of the eight modifiers withinthe current mapping, and is mainly used as a debugging tool for complex mappings. Ifyou work with modifiers, it is important to know what value is currently assigned to amodifier, particularly if something is not working as intended.
Preferences
Controller Manager
TRAKTOR - Manual - 197
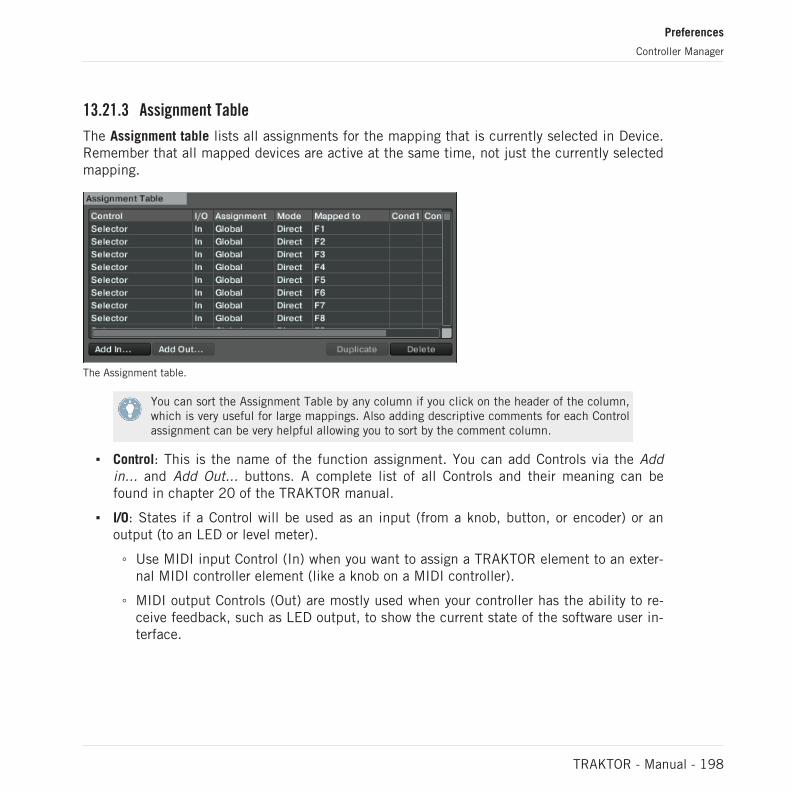
13.21.3 Assignment Table
The Assignment table lists all assignments for the mapping that is currently selected in Device.Remember that all mapped devices are active at the same time, not just the currently selectedmapping.
The Assignment table.
You can sort the Assignment Table by any column if you click on the header of the column,which is very useful for large mappings. Also adding descriptive comments for each Controlassignment can be very helpful allowing you to sort by the comment column.
▪ Control: This is the name of the function assignment. You can add Controls via the Addin... and Add Out... buttons. A complete list of all Controls and their meaning can befound in chapter 20 of the TRAKTOR manual.
▪ I/O: States if a Control will be used as an input (from a knob, button, or encoder) or anoutput (to an LED or level meter).
◦ Use MIDI input Control (In) when you want to assign a TRAKTOR element to an exter-nal MIDI controller element (like a knob on a MIDI controller).
◦ MIDI output Controls (Out) are mostly used when your controller has the ability to re-ceive feedback, such as LED output, to show the current state of the software user in-terface.
Preferences
Controller Manager
TRAKTOR - Manual - 198
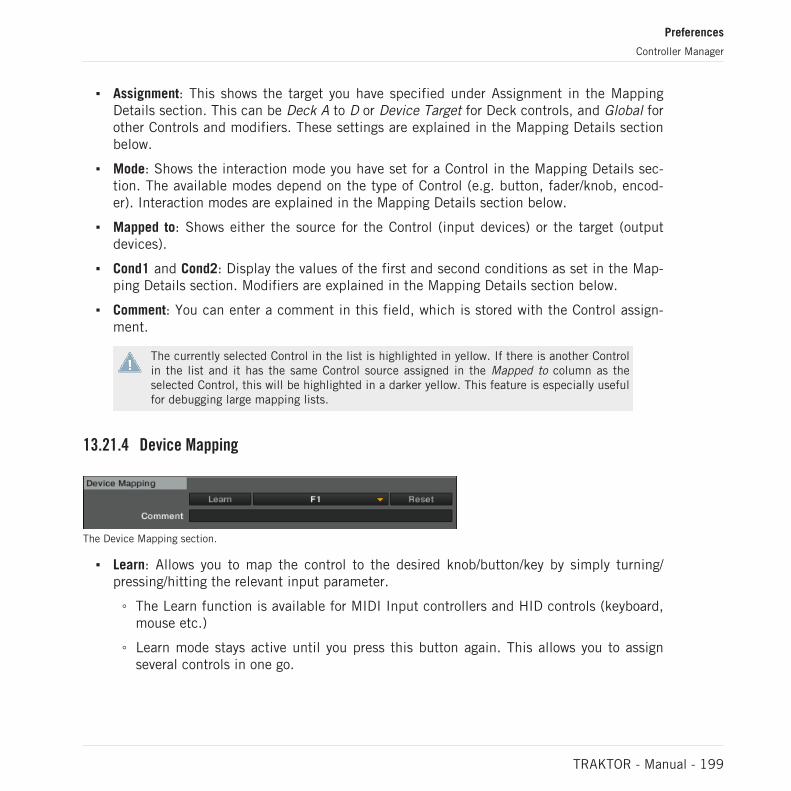
▪ Assignment: This shows the target you have specified under Assignment in the MappingDetails section. This can be Deck A to D or Device Target for Deck controls, and Global forother Controls and modifiers. These settings are explained in the Mapping Details sectionbelow.
▪ Mode: Shows the interaction mode you have set for a Control in the Mapping Details sec-tion. The available modes depend on the type of Control (e.g. button, fader/knob, encod-er). Interaction modes are explained in the Mapping Details section below.
▪ Mapped to: Shows either the source for the Control (input devices) or the target (outputdevices).
▪ Cond1 and Cond2: Display the values of the first and second conditions as set in the Map-ping Details section. Modifiers are explained in the Mapping Details section below.
▪ Comment: You can enter a comment in this field, which is stored with the Control assign-ment.
The currently selected Control in the list is highlighted in yellow. If there is another Controlin the list and it has the same Control source assigned in the Mapped to column as theselected Control, this will be highlighted in a darker yellow. This feature is especially usefulfor debugging large mapping lists.
13.21.4 Device Mapping
The Device Mapping section.
▪ Learn: Allows you to map the control to the desired knob/button/key by simply turning/pressing/hitting the relevant input parameter.
◦ The Learn function is available for MIDI Input controllers and HID controls (keyboard,mouse etc.)
◦ Learn mode stays active until you press this button again. This allows you to assignseveral controls in one go.
Preferences
Controller Manager
TRAKTOR - Manual - 199
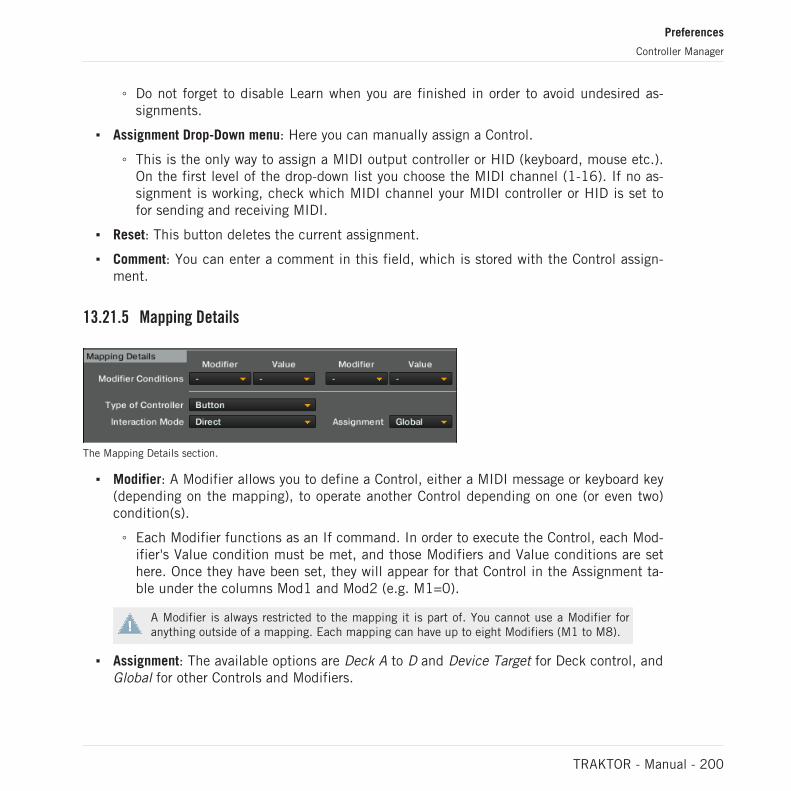
◦ Do not forget to disable Learn when you are finished in order to avoid undesired as-signments.
▪ Assignment Drop-Down menu: Here you can manually assign a Control.
◦ This is the only way to assign a MIDI output controller or HID (keyboard, mouse etc.).On the first level of the drop-down list you choose the MIDI channel (1-16). If no as-signment is working, check which MIDI channel your MIDI controller or HID is set tofor sending and receiving MIDI.
▪ Reset: This button deletes the current assignment.
▪ Comment: You can enter a comment in this field, which is stored with the Control assign-ment.
13.21.5 Mapping Details
The Mapping Details section.
▪ Modifier: A Modifier allows you to define a Control, either a MIDI message or keyboard key(depending on the mapping), to operate another Control depending on one (or even two)condition(s).
◦ Each Modifier functions as an If command. In order to execute the Control, each Mod-ifier's Value condition must be met, and those Modifiers and Value conditions are sethere. Once they have been set, they will appear for that Control in the Assignment ta-ble under the columns Mod1 and Mod2 (e.g. M1=0).
A Modifier is always restricted to the mapping it is part of. You cannot use a Modifier foranything outside of a mapping. Each mapping can have up to eight Modifiers (M1 to M8).
▪ Assignment: The available options are Deck A to D and Device Target for Deck control, andGlobal for other Controls and Modifiers.
Preferences
Controller Manager
TRAKTOR - Manual - 200
◦ If you select one of the Decks here, the Control is always routed to this Deck. If youselect Device Target, you can specify the actual target in the Device Setup section atthe top.
To achieve the Focus option as in previous versions of TRAKTOR, do the following: SelectDevice Target in the Assignment dropdown menu and Focus in the Device Target menu ofthe Device Setup section (see chapter 5.2).
▪ Type of Controller: The controller types available here depend on the Control target youhave added to the mapping. For example:
◦ While a Deck's Play/Pause only allows to be mapped to a button, other parameters(like the Filter Cutoff knob) can be assigned to knobs and faders. The Interactionmode and the Options below the Mapping Details section depend on the selectedType.
As opposed to previous TRAKTOR versions, the available types are only displayed after as-signing via Learn function or selecting a physical Control.
13.21.6 Available Controller Types
Remember that the available types depend on the Control target.
Button
The modes listed in the Interaction Mode drop-down list depend on the actual parameteryou edit. E.g. while the Play/Pause Control lists the Button Interaction Modes Toggle, Holdand Direct, the Tempo Control lists the modes Direct, Inc, Dec and Reset.
Available Interaction modes for buttons:
▪ Toggle: When you press and release the MIDI button or Key, the TRAKTOR button is ena-bled, when you press and release it again, it is disabled.
▪ Hold: This is the default setting for buttons. The TRAKTOR button will stay pressed aslong as your MIDI button or keyboard key is pressed. If you release the MIDI button/key,the TRAKTOR button will also be released.
▪ Invert: Inverts the action. For an input controller this means that the TRAKTOR button ispressed when you release the MIDI button or keyboard key and vice versa.
Preferences
Controller Manager
TRAKTOR - Manual - 201
▪ Direct: When selecting this, you can specify either 0 or 1 in the Button options below.This can be used if you want a specific MIDI button or Key to always set a certain TRAK-TOR button status, independently of the current TRAKTOR status. For example: Define aPlay/Pause controller for Deck A, set the Interaction mode to Direct and the Value for theDirect mode to 1. Now assign a MIDI note or keyboard key to it using MIDI learn. Whatev-er the current state of the Deck A Start button is (pressed or not pressed), hitting the de-fined MIDI button or Key will always playback the track in Deck A, so if the Start button isnot pressed yet, the playback will start, if it is already playing, nothing will happen.
Button options:
The elements appearing in the Button options are dependent on the Interaction Mode youhave set and in some cases on the actual parameter you edit.
▪ Value (Direct mode): The available range of numbers can differ and is dependent on theControl you are editing. Some Controls only allow integers while others allow fractions.
▪ Invert (Toggle and Hold modes): Inverts the movement of your external Control. For an in-put controller this means that the TRAKTOR button is pressed when you release the MIDIbutton or keyboard key and vice versa.
▪ Auto Repeat: Holding down the button will auto repeat that input. This is only available forspecific Controls.
▪ Resolution: Allows you to adjust (fine or coarse) the increment or decrement of the input.This is only available for specific Controls such as the buttons below the Deck TEMPOfader.
There are other parameters available in this section. Remember that all parameters appear-ing here are pre-defined for each available Control.
Fader/Knob
Faders or knobs can have one of the following Interaction Modes:
▪ Direct: The position of the external Control always matches the position of the TRAKTORparameter.
▪ Relative: The position of the TRAKTOR parameter can be shifted compared to the externalControl. Relative mode is best suited for incremental knobs (which send -1 and +1 in-stead of absolute values). Here are some examples of Relative Interaction mode applica-tions:
Preferences
Controller Manager
TRAKTOR - Manual - 202
◦ Tempo fader at high resolution. This allows you to press Sync and then fine-controlthe tempo fader at the synched position.
◦ When you can only control a certain portion of the entire range of a parameter, suchas the filter.
◦ Relative mode can be used when a knob or fader is shared between different parame-ters to avoid skips when switching to the other assignment.
Fader / Knob Options
▪ Soft Takeover (Direct mode): Enable this to avoid parameter jumps when starting control-ling a parameter.
▪ Invert (Direct and Relative mode): Inverts the action of your external Control. High fader/knob values become low values in the TRAKTOR and vice versa.
Encoder
▪ Enc.-Mode: You can switch between two types of encoders. 7Fh/01h is standard for mostcontrollers. However if your encoder mapping does not behave as intended (e.g. inverted)or the mapped parameter reacts too coarsely, it is most likely due to the wrong encodermode and we recommend trying the alternate mode (3Fh/41h).
Encoder Options
▪ Rotary Sensitivity (Relative mode): This defines the speed of the TRAKTOR Control move-ment. A higher value will make a TRAKTOR fader or knob move faster.
▪ Rotary Acceleration (Relative mode): It is recommended to set this to 0% for most applica-tions. We recommend experimenting with this after you have tried the Sensitivity parame-ter.
◦ The TRAKTOR Control position is influenced by the speed of the external Controlmovement. As a side effect, this results in a different value of the TRAKTOR Control iffor example you move a fader up fast and then slowly down to its original position.
▪ Invert (Direct and Relative mode): Inverts the action of your external Control. High fader/knob values become low values in TRAKTOR and vice versa.
Preferences
Controller Manager
TRAKTOR - Manual - 203
14 Advanced Operation of TRAKTOR
This chapter provides deeper knowledge about some of TRAKTOR’s features.
14.1 TRAKTOR Profiles
14.1.1 The TRAKTOR Root folder
TRAKTOR stores all information required to create a personalized TRAKTOR Profile in onefolder, called the Root folder.
The default path of the Root folder is:
▪ Windows: My Documents\Native Instruments\Traktor
▪ Mac OS X: Users/~/Native Instruments/Traktor
You can change the path in Preferences > File Management > Directories.
It contains the following file types
▪ *.nml = all Playlists have this extension as do the Collection, the History Playlists, anduser-created Playlists
▪ *.tsi = extension for all settings (keyboard, MIDI, Preferences settings, Layouts)
▪ *.log = extension of the log-files that get created when opening TRAKTOR
You can make a copy of the Root folder for several purposes:
▪ For making a backup of this folder, which backs up the entire profile including the collec-tion, your current Settings, MIDI mappings and Hotkeys.
▪ For playing on a host computer running TRAKTOR, by storing your entire workspace ontoa portable hard drive. Pointing from a host computer to your personal Root fully reprodu-ces your workspace on the host computer. Note that you have to store your music on thatportable hard drive as well.
Advanced Operation of TRAKTOR
TRAKTOR Profiles
TRAKTOR - Manual - 204

▪ For transferring your workspace onto another computer running TRAKTOR.
▪ For creating distinct User Profiles with separated Collections on the same computer.
TRAKTOR can be told to switch to another Root folder, which results in switching the Profile ofTRAKTOR.
14.1.2 The Recordings folder
Besides the Root folder TRAKTOR creates a second folder containing the audio files recordedwith TRAKTOR’s recording function. TRAKTOR records in WAV format. The Recordings folderis found by default in:
▪ Windows: My Music\Traktor\Recordings
▪ Mac OS X: Users/~/Music/Traktor/Recordings
The location of the Recordings folder can be changed in Preferences > Mix Recorder.
14.1.3 Complete Backup
Besides the automatic backups of the collection, it is useful to manually backup the entireTRAKTOR Root folder from time to time.
▪ The Root folder is called TRAKTOR. The default path to the Root folder is mentionedabove in chapter ↑14.1.1, The TRAKTOR Root folder.
If you have moved the Root folder to another destination, you can find the correct path to theRoot folder as follows:
Open Preferences > File Management > Directories.
Click the “…!” button next to the Root Dir field.
The file browser will reveal the current position of the Root folder.
To make a complete backup of your personal TRAKTOR files, copy the entire TRAKTOR Rootfolder and save it onto a separate hard drive.
Make sure that you also back up your Recordings folder. The default path to the Recordingsfolder is mentioned above in chapter ↑14.1.2, The Recordings folder.
Advanced Operation of TRAKTOR
TRAKTOR Profiles
TRAKTOR - Manual - 205
14.1.4 Restoring TRAKTOR from a Backup
Method 1
This method deletes the current settings and the Collection. Use this method after re-installingTRAKTOR.
Make sure that TRAKTOR is not running
1. Overwrite the current Root folder with the content of the backed up Root folder. The de-fault path of the folder to replace is: Windows: My Documents\Native Instruments\Traktor,Mac OS X: Users/~/Native Instruments/Traktor.
2. Restart TRAKTOR.
You can change the path in Preferences > File Management > Directories.
Method 2
This method preserves the current settings and the Collection. You can switch back at any timeto these settings by performing this method.
1. Copy the backup of the Root folder back to your DJing computer.2. Open Preferences > File Management > Directories.3. Click the “…!” button next to the Root Dir field.4. Point to the location of the backup folder that you created in step 1.5. Confirm and restart TRAKTOR.
14.1.5 Creating a portable version of TRAKTOR
By storing all your tracks and the Root folder on a portable hard drive you can recreate yourpersonal profile on a host computer running TRAKTOR. Proceed as follows.
On computer 1
Make sure TRAKTOR is shut down.
1. Move all required tracks onto the portable drive
Advanced Operation of TRAKTOR
TRAKTOR Profiles
TRAKTOR - Manual - 206
2. Copy the current Root folder onto the portable drive3. Start TRAKTOR.4. Open Preferences > File Management > Directories.5. Click the “…!” button next to the Root Dir field.6. Point to the copy of the Root folder that you have just created on the portable drive.7. Close and restart TRAKTOR to make sure that the switch worked.
On computer 2
1. Connect the portable drive2. Start the local TRAKTOR3. Open Preferences > File Management > Directories.4. Click the “…!” button next to the Root Dir field.5. Point to the Root folder on the portable drive.6. Restart TRAKTOR.If the drive letter (Windows) or the name of the drive and user directory (Mac OS X) of yourcustomized location didn’t change, you should find everything as it was before the re-install.
If the drive letter of your customized location did change, you will find all tracks with an excla-mation mark (“!”) indicating that the links are broken. Use the Relocate function to update thelinks to the new drive letter/volume.
14.1.6 Automatic Collection Backup (Security Backup)
Each time you change something in your Collection and close TRAKTOR, a backup of your Col-lection is created in the folder “Backup” contained in your “Traktor” Root folder. If you deleteor partly ruin your Track Collection by mistake proceed as follows:
1. Right/[Ctrl] click the Collection Tree Icon and choose Import Another Collection from thecontext menu.
2. Select Backup.3. In the Collection folder, select the backup version that you would like to restore.4. Confirm with OK.
Advanced Operation of TRAKTOR
TRAKTOR Profiles
TRAKTOR - Manual - 207
14.1.7 Repairing a Corrupted Collection
A corrupted Collection may cause TRAKTOR to crash during start-up. If you can’t start TRAK-TOR proceed as follows:
1. Rename the file collection.nml in the current TRAKTOR Root folder into collection_origi-nal.nml.
2. Restart TRAKTOR — this will create a new Collection.3. Try to import the backup of the Collection as described above.
Severe types of file corruption cannot be cured with this method.
14.2 Syncing via MIDI Clock
TRAKTOR allows you to sync external hard- and software. For this functionality it uses MIDIClock Signals and the Master Clock panel in the Global section.
TRAKTOR ME 2 note: The MIDI Clock is not available in ME 2.
14.2.1 TRAKTOR as Tempo Source (MIDI Clock send)
To use TRAKTOR as the tempo source (Master Clock) it has to send the MIDI Clock Signal tothe external hard- or software.
1. Create a new generic MIDI device in Preferences > Controller Manager. Assign the Out-Port to the device you want to send the MIDI Clock Signal to.
2. To send MIDI clock you have to go to Preferences > MIDI Clock and tick the Send MIDIClock option.
3. In the Global section, open the Master Clock panel by clicking the Metronome.4. Choose AUTO or MANUAL mode.5. To start sending a MIDI Clock signal, click the Start/Stop button. Clicking it again stops
sending. When MIDI Clock is active, the Start/Stop button is lit blue.6. The Tempo Display shows the tempo of the MIDI Clock signal in BPM.
Advanced Operation of TRAKTOR
TRAKTOR Profiles
TRAKTOR - Manual - 208
7. By clicking the SYNC button, TRAKTOR triggers a MIDI Clock Stop Message immediatelyfollowed by a MIDI Clock Start Message to re-sync the external hard- or software.
8. It may be required to adjust the offset between TRAKTOR and the receiving hard- or soft-ware. To do so, use the slider labeled Sending Offset found in Preferences > MIDI Clock.
For syncing external hardware with the MIDI Clock, the Master Clock has to be set as Mas-ter Tempo Source.
14.2.2 Syncing TRAKTOR to an external MIDI Clock Signal (External Sync)
TRAKTOR is able to receive MIDI Clock Signals (Clock Slave) from another computer runningTRAKTOR, other applications, or from MIDI hardware sending MIDI Clock.
1. Create a new generic MIDI device in Preferences > Controller Manager. Assign the In-Portto the device you want to use for receiving the incoming MIDI Clock Signal.
2. In the Global section open the Master Clock panel by clicking the Metronome.3. Choose External mode by clicking the EXT button. In this mode the TRAKTOR Master
Clock follows the external MIDI Clock signal once it is started.4. To sync the clock to the phase of the application or hardware sending the MIDI Clock sig-
nal, press the start button on the sending device.5. In case of an offset between the sending hard- or software and TRAKTOR, the offset has
to be adjusted in the sending (Master) device.
14.2.3 Syncing two versions of TRAKTOR
These are the steps to sync two versions of TRAKTOR running on different computers:
Connect the two computers via MIDI in order to transmit the MIDI Clock signals
1. Decide which of the two computers should be the Clock Master and follow the instruc-tions described in chapter ↑9.2.3, Master Clock Panel.
2. On the other computer follow the instructions described in chapter ↑9.2.3, Master ClockPanel.
3. For syncing both computers, press the TICK button in the Master Clock panel.4. Once the two ticks are audible, press the SYNC button on the sending computer in order
to reset the receiving computer.
Advanced Operation of TRAKTOR
Syncing via MIDI Clock
TRAKTOR - Manual - 209
5. Now start tweaking the slider labeled MIDI Clock Sending Offset found in Preferences >MIDI Clock until the two Ticks are in perfect sync.
6. You can then turn off the Ticks and are ready to go.
14.3 Broadcasting
With TRAKTOR you are able to broadcast your mix over the Internet. Basically everything thatis audible from the Master Out will be streamed to the Internet and listeners all over the worldwill be able to tune in and listen to your show in real time.
TRAKTOR ME 2 note: Broadcasting is not available in ME 2.
14.3.1 Streaming Protocol
TRAKTOR uses a streaming protocol called Icecast. The TRAKTOR software contains an Ice-cast client, which can send data to an Icecast server.
To use this feature, you need access to a computer running as an Icecast server. It is recom-mended that this computer has an Internet connection with at least 128 kb/s upstream trans-fer rate. The available bandwidth is being shared among the listeners, so it should be as highas possible.
► To learn how to set up an Icecast server, read on the Icecast website in the “Docs” area:http://www.icecast.org/docs.php
To learn more about this streaming protocol and how to setup a server, please refer to theofficial Icecast homepage (www.icecast.org).
Mac OS X users: Icecast only works on Windows and Linux. For Broadcasting with a Mactake a look at the easy-to-use application Nicecast from rogue amoeba: rogueamoeba.com/nicecast/
14.3.2 Configuring TRAKTOR
Before getting started, it is necessary to configure TRAKTOR so that the local client can con-nect to the server and the metadata of the radio stream contains the correct information:
Advanced Operation of TRAKTOR
Broadcasting
TRAKTOR - Manual - 210
1. Open TRAKTOR Preferences > Broadcasting.2. Adjust the Proxy Settings according to your current Internet configuration. If you are not
using a proxy, simply check None.3. Next, input the address of the Icecast server you want to connect to. This can be either a
hostname or an IP-address.4. Specify the port where the server can be reached. Most servers use the default setting of
8000.5. Type in the mount path and password. This information can be obtained from the host of
the Icecast server and permits only authorized clients to stream data from there.6. Choose the streaming format. Keep in mind that with a higher bit rate, more bandwidth is
used for every single stream. Therefore, given the same bandwidth, fewer listeners cantune in at the same time.
7. Finally, you can specify the client metadata settings. This information is sent to the serverand your listeners.
Be specific in your description; the easier it is to identify the musical content of yourstream, the more likely listeners will tune in!
14.3.3 Starting the Broadcast
Once the necessary configurations have been done, you can start your live stream:
1. Open the Audio Recorder panel in the Global section.2. Click the Broadcast On/Off button.3. If the button is highlighted, you are connected to the server and can now start your broad-
cast.4. If the symbol starts flashing, the connection with the Icecast server could not be estab-
lished. Please go through the configuration process once more and make sure that all datahas been input correctly.
14.3.4 How to setup a microphone for your Broadcast
It is possible to use a microphone with effects in your broadcast.
In this example we will use Deck C as an Input Deck although any Deck may be used for thesame purpose.
Advanced Operation of TRAKTOR
Broadcasting
TRAKTOR - Manual - 211
1. Go to Preferences > Decks Layout > Deck Layout and select enable C&D.2. Go to Preferences > Decks Layout > Deck Flavor and select Line Input on Deck C.3. Connect a Microphone to the Mic or Line input (you may need to adjust Gain accordingly)
on your Audio Interface.4. Go to Preferences > Input Routing > Input Deck C and select the input your microphone
is connected to from the dropdown list.
You can enable FX slot 1 or FX slot 2 on the Input Deck to add effects to your microphone!
14.4 The Effects in Detail
14.4.1 Introduction
This chapter provides in-depth information regarding all aspects of the effects provided withTRAKTOR. Before we look at the individual FX and their parameters, lets look at the way theFX units work as a whole:
The FX Units may be accessed via the Global section. FX Unit 1 on the left occupies the samespace as the Master Clock panel and FX Unit 2 on the right occupies space with the AudioRecorder. Use the FX buttons to access the FX Units.
TRAKTOR offers four FX Units. By default, two FX Units are active. All FX Units can be freelyassigned to any of the mixer’s channels A-D.
You can choose from two different FX Unit modes in TRAKTOR 2: Either choose Single FX,where four buttons and four knobs control one effect, or choose Group FX, where you can usethree effects simultaneously with a one-knob control. Effects used in Group Mode are chainedin series.
You can switch the FX Unit mode in Preferences > Effects > FX Panel Mode.
TRAKTOR LE 2 note: Only one Group FX is available and the number of effect types hasbeen reduced for LE 2.
Advanced Operation of TRAKTOR
The Effects in Detail
TRAKTOR - Manual - 212
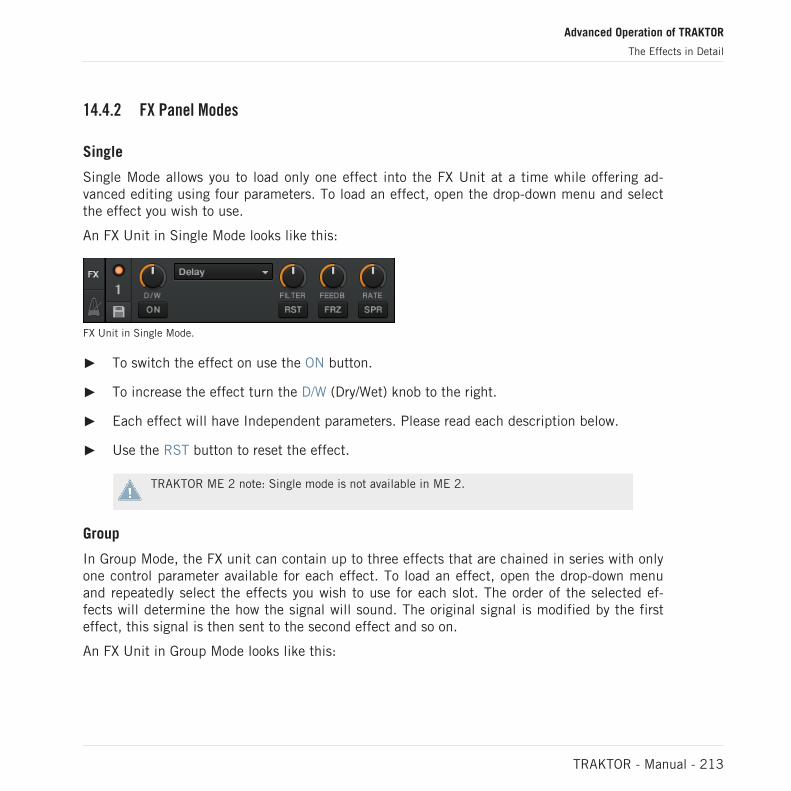
14.4.2 FX Panel Modes
Single
Single Mode allows you to load only one effect into the FX Unit at a time while offering ad-vanced editing using four parameters. To load an effect, open the drop-down menu and selectthe effect you wish to use.
An FX Unit in Single Mode looks like this:
FX Unit in Single Mode.
► To switch the effect on use the ON button.
► To increase the effect turn the D/W (Dry/Wet) knob to the right.
► Each effect will have Independent parameters. Please read each description below.
► Use the RST button to reset the effect.
TRAKTOR ME 2 note: Single mode is not available in ME 2.
Group
In Group Mode, the FX unit can contain up to three effects that are chained in series with onlyone control parameter available for each effect. To load an effect, open the drop-down menuand repeatedly select the effects you wish to use for each slot. The order of the selected ef-fects will determine the how the signal will sound. The original signal is modified by the firsteffect, this signal is then sent to the second effect and so on.
An FX Unit in Group Mode looks like this:
Advanced Operation of TRAKTOR
The Effects in Detail
TRAKTOR - Manual - 213
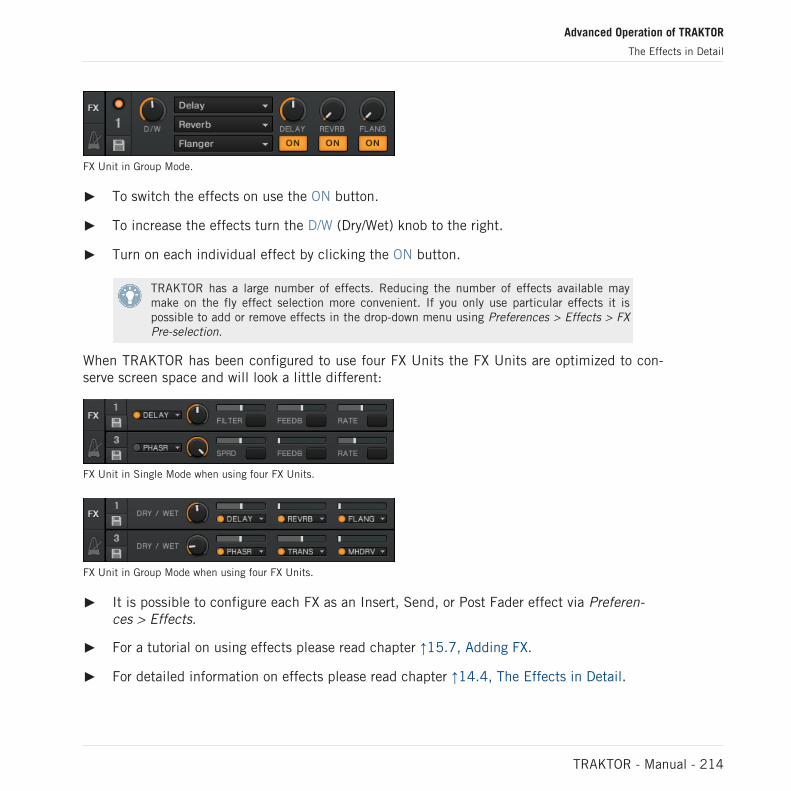
FX Unit in Group Mode.
► To switch the effects on use the ON button.
► To increase the effects turn the D/W (Dry/Wet) knob to the right.
► Turn on each individual effect by clicking the ON button.
TRAKTOR has a large number of effects. Reducing the number of effects available maymake on the fly effect selection more convenient. If you only use particular effects it ispossible to add or remove effects in the drop-down menu using Preferences > Effects > FXPre-selection.
When TRAKTOR has been configured to use four FX Units the FX Units are optimized to con-serve screen space and will look a little different:
FX Unit in Single Mode when using four FX Units.
FX Unit in Group Mode when using four FX Units.
► It is possible to configure each FX as an Insert, Send, or Post Fader effect via Preferen-ces > Effects.
► For a tutorial on using effects please read chapter ↑15.7, Adding FX.
► For detailed information on effects please read chapter ↑14.4, The Effects in Detail.
Advanced Operation of TRAKTOR
The Effects in Detail
TRAKTOR - Manual - 214

► For a list of effects preferences please refer to chapter ↑13.13, Global Settings.
You can control FX Units via MIDI by making assignments to your controller in ControllerManager, Preferences > Controller Manager.
14.4.3 Common Parameters
All effects have the following set of parameters in common:
▪ D/W (Dry/Wet): For all effects, this parameter controls the mix between the original directsignal (Dry; full left position) and the processed effect signal (Wet; full right position).
A few effects integrate more than simple Dry-Wet control into the D/W knob. For these ef-fects the knob is called D/RNG (Dry-Range) and its action is described separately in theeffects details.
▪ ON: For all effects, this button turns the effect on and off. Some buffer-based effectssuch as the Delay or the Reverb will continue outputting sound for a certain amount oftime even after turning them off. To fully disable the action of an effect on a specificchannel, use the Effect Assign buttons (FX button 1, 2, 3 or 4) in the mixer strip.
Some effects use the ON button for triggering the sampling process required to fill the ef-fect buffer. These effects have to be started in an OFF state. Starting them in an ON statewill result in no audio.
▪ RST (Reset): For all effects, the RST button resets the effect parameters to their defaultvalue. When switching effects the new effect will be reset to its default.
▪ Snapshot: A new default value can be stored by pressing the Snapshot button (floppy disksymbol) in the effect panel. The Snapshot can be recalled at any time by pressing theRST button.
TRAKTOR ME 2 note: The FX parameters are reduced in ME 2.
Advanced Operation of TRAKTOR
The Effects in Detail
TRAKTOR - Manual - 215
14.4.4 Delay
This is the classic tempo-synced Delay with Freeze button. The rate of the Delay is directlycontrolled by the Master Clock of TRAKTOR to ensure that the Delay syncs to the beat evenduring tempo changes.
Single Mode
▪ FILTER: Internal carbonized high pass and low pass filter (similar to a bandpass filter).The filter is open when the knob is in full left position and progressively cuts out low andhigh frequencies when turned to the right.
▪ FEEDB (Feedback): Controls the strength of the delay’s feedback, making the effectstronger and more colorful. Min: low feedback, Max: strong feedback.
▪ RATE: Controls the Delay time. The 7 available values are expressed in fractions of bars,and are equally distributed over the range of the knob. Min — Max: 1/32, 1/16, 1/8,3/16, 1/4, 3/8, 4/4.
The Rate knob continues to work in Freeze mode and allows interesting mash-ups. It is im-portant, though, to turn the knob down to low values only briefly because otherwise thebuffer will empty.
The effect rate can be switched during operation without any crackles or glitches in audio!
▪ FRZ (Freeze): Freezes the Delay by closing the input and turning up the Feedback to max-imum value. The filter remains active in the feedback loop. For endless freezes, the FIL-TER knob has to be therefore turned down to full left position.
Even in Freeze mode the Delay follows the Master Clock and will therefore seamlesslymerge into the mix once released.
▪ SPRD (Stereo Spread): Creates an offset between the delay times of the left and rightchannel giving the effect of spatial depth. The Delay times are: L Min — Max: 1/32,1/16, 1/8, 3/16, 2/4, 3/8, 4/4 R Min — Max: 1/32, 1/8, 3/16, 3/8, 3/8, 2/4, 4/4.
Advanced Operation of TRAKTOR
The Effects in Detail
TRAKTOR - Manual - 216
Group Mode (1-Knob Control)
The knob works like the RATE knob in Single mode at a medium Feedback value.
14.4.5 Reverb
Classic Reverb with extreme room sizes, individual low and high pass filter controls, andFreeze function.
Single Mode
▪ HP: High Pass filter in the effect loop — fully open when turned to the left.
▪ LP: Low Pass filter in the effect loop — fully open when turned to the right.
▪ SIZE: Controls the size of the added reverb, ranging from small to vast room sizes.
▪ FRZ (Freeze): Freezes the Reverb by closing the input and leaving the output open.
Group Mode (1-Knob Control)
Works like the SIZE knob in Single mode.
14.4.6 Flanger
A Classic Flanger with tempo based and free running rate control and stereo phasing.
Single Mode
▪ SPRD (Stereo Spread): Creates a stereo spread effect by controlling the phase offset be-tween the left and right stereo channel. Min: no phase offset, Max: maximum phase offset(1/2 period)
▪ FEEDB (Feedback): Controls the amount of the Flanger’s feedback, making the effectstronger and more colorful. Min: no feedback, Max: maximum feedback
▪ RATE: Controls the rate of Flanger oscillation. The 11 available values are expressed infractions of bars, and are equally distributed over the range of the knob. Max — Min: 16bars, 8 bars, 4 bars, 2 bars, 4/4, 2/4, 3/8, 1/4, 3/16, 1/8, 1/16.
▪ UP: When pressed the direction of the oscillation is inverted, starting with the lowest fre-quency, and moves upward.
Advanced Operation of TRAKTOR
The Effects in Detail
TRAKTOR - Manual - 217
▪ FR.R: Enables continuous rate control, independent from tempo and ranges from 30 sec(Max) to 1/30 sec (Min).
▪ LFO RESET (Master panel): Resets the oscillation and restarts at the lowest or highestpoint, according to the status of DN/UP.
The LFO RESET button in the Master panel resets the low frequency oscillation phase tozero (highest point).
Group Mode (1-Knob Control)
► The knob controls the rate of the up and down oscillation of the flanging sound. The knobbehaves like the RATE knob in Single mode with Freerun activated.
14.4.7 Flanger Pulse
Innovative, semi-automatic Flanger effect that is triggered by signal peaks in the music pro-ducing interesting lashing sounds.
Has the most effect on music with gaps in it, such as drum loops, because the self-oscillationcan develop best in empty parts of the music.
Single Mode
▪ SHAPE: Controls the shape of the Flanger Pulse. The range of the controller bears a mul-titude of patterns and morphs between them for continuously new sound effects. Explorethe range of this knob in combination with the FEEDB and the AMNT knob and store thepreset whenever you like it.
▪ FEEDB (Feedback): Controls the strength of the Flanger’s feedback making the effectstronger and more colorful. Min: low feedback, Max: strong feedback
▪ AMNT (Amount): The knob has two operating zones on the left and the right side of thecenter position and controls the modulation amount of the Flanger frequency.
▪ FB- (Inverted Feedback): Only passes uneven harmonics, making the flanging effectsound deeper in frequency.
▪ SPR (Stereo Spread): Creates an offset between the flanging effect of the right and leftstereo channel giving the effect of spatial depth.
Advanced Operation of TRAKTOR
The Effects in Detail
TRAKTOR - Manual - 218
Group Mode (1-Knob Control)
The knob has two operating zones on the left and the right side of the center position. It be-haves like the AMNT knob in Single mode.
14.4.8 Flanger Flux
Manually controlled Flanger suited for jog wheel control.
Single Mode
▪ FEEDB (Feedback): Controls the amount of the Flanger’s feedback, making the effectstronger and more colorful. Min: low feedback, Max: strong feedback.
▪ PITCH: Controls the pitch of the effect. The center position of the knob is neutral, to ei-ther side the flanging effect moves from high to low frequencies.
▪ FB- (Inverted Feedback): Only passes uneven harmonics making the flanging effect sounddeeper in frequency.
▪ SPR (Stereo Spread): Creates an offset between the flanging effect of the right and leftstereo channel, giving the effect of spatial depth.
Group Mode (1-Knob Control)
The knob controls the PITCH of the effect. The center position of the knob is neutral — to ei-ther side the flanging effect moves from high to low frequencies.
14.4.9 Gater
The Gater rhythmically mutes parts of the audio at adjustable rates. The Master Clock controlsthe rate and the moment in time of muting. A hissing noise can be added to the Gater for em-phasizing the rhythmical pattern.
In order for the Gater to match the beats in the music, it is absolutely necessary that yourtracks have well aligned Beatgrids and that the Master Clock follows the track tempo in Au-to Mode.
Advanced Operation of TRAKTOR
The Effects in Detail
TRAKTOR - Manual - 219
Single Mode
▪ NOISE (Noise Level): Controls the amount of hissing noise added to the Gate. Min: Noadded hissing, Max: Much added hissing.
▪ SHAPE: Controls the shape of the Gate. Min — Center: 1 % Hold, 0 % Decay — 50 %Hold, 0 % Decay Center — Max: 50 % Hold, 0 % Decay — 0 % Hold, 100 % Decay.
▪ RATE: Controls the rate of the Gater. The 5 available values are expressed in fractions ofbars, and are equally distributed over the range of the knob. Min — Max: Off — 1/4 —1/8 — 1/16 — 1/32.
▪ MTE (Mute): Fully mutes the music and passes only the added hissing noise.
Activating MTE in combination with no added Noise Level results in no audio output.
▪ STT (Stutter): Activates 3/16 gating time for producing a stuttering effect.
Activating STT disables the action of the RATE knob.
Group Mode (1-Knob Control)
The knob controls the rate of the Gater and behaves like the RATE knob in Single mode.
14.4.10 Beatmasher 2
The Beatmasher 2 is a buffer-based effect that captures a short loop from the current audiomaterial and mashes it up.
Single Mode
▪ ON: When turning on the effect it samples one bar or audio based on the tempo of themaster clock. To sample a new piece of audio, turn the effect off and then back on.
The effect has to be started in off mode and then turned on to sample the current audio.
▪ GATE: Combined controller for different ways of mixing and gating the sampled material:
Advanced Operation of TRAKTOR
The Effects in Detail
TRAKTOR - Manual - 220
◦ In full left position bypasses the effect. From full left to centre mixes in progressivelybigger chunks of the buffered audio.
◦ In centre position just plays the buffered audio. From center to full right position cutsout progressively bigger chunks of audio like a gater.
▪ ROT (Rotate): Shifts the sampled audio relative to its original position in steps of 1/8notes. At minimum Length, the Rotate knob continuously rotates the sample.
▪ LEN (Length): Controls the length of the audio played back from the buffer.
▪ WRP (Warp): Re-syncs the effect on each bar for more musical results.
▪ REV (Reverse): Reverses the playback direction of the buffered audio samples.
Group Mode (1-Knob Control)
This knob behaves like the LEN (Length) knob in Single mode.
14.4.11 Delay T3
Classical tempo-synced Delay with a Freeze button. The Rate of the Delay is directly controlledby TRAKTOR’s Master Clock to ensure that the Delay syncs to the beat also during tempochanges.
Single Mode
▪ FILTER: Internal high pass filter and low pass filter (similar to a band pass filter). The fil-ter is open when the knob is in center position. It progressively cuts out low frequencieswhen turned to the right and cuts out high frequencies when turned to the left.
▪ FEEDB (Feedback): Controls the strength of the delays feedback, making the effect stron-ger and more colorful:
◦ Min: low feedback
◦ Max: strong feedback
▪ RATE: Controls the Delay time. Compared to prior TRAKTOR versions, the orientation ofthe knob has changed to: Min: long delay times, Max: short delay times. The 7 availablevalues are expressed in fractions of bars, and are equally distributed over the range of theknob. The knobs position is displayed in bold letters:
Advanced Operation of TRAKTOR
The Effects in Detail
TRAKTOR - Manual - 221
◦ Min ⇨ Max: 4/4, 3/8, 1/4, 3/16, 1/8, 1/16, 1/32.
The effect rate can be switched during operation without any crackles or glitches in audio!
▪ FRZ (Freeze): Freezes the Delay by closing the input while playing the delay with the setFeedback. The filer remains active in the feedback loop. For endless freezes, the FILTERknob has to be therefore turned to the middle position.
Even in Freeze mode the Delay follows the Master Clock and will therefore seamlesslymerge into the mix once it is released.
The RATE knob continues to work in Freeze mode and allows interesting mash-ups. It isimportant to turn the knob down to low values only shortly because otherwise the bufferwill empty.
▪ FR.R (Free Run): When pressed, delay times are not quantized and can be changed con-tinuously. Changing delay times while the Delay is active may result in sudden skips inpitch and rhythm.
Group Mode (1-Knob Control)
The knob works like the RATE knob in Single mode at a medium Feedback value.
14.4.12 Filter LFO
This is a classic filter based on ladder filter architecture with tempo-synced LFO. The LFO iseither driven by the Beatgrid (and therefore is always in sync with the track) or can be driven inFreerun mode.
In Freerun mode (FR.R) the rate of the Flanger oscillation is not tied to the musical tempoand varies continuously from 30 sec (Max) to 1/30 sec (Min).
Single Mode
▪ D/RNG (Dry-Range): Controls the strength of the effect with a combination of Dry-Wet andthe LFO-Range. The filter is fully bypassed in full left position. As soon as the knob is notin full left position the filter kicks in fully and the knob progressively increases the rangeof the LFO when turned clockwise.
Advanced Operation of TRAKTOR
The Effects in Detail
TRAKTOR - Manual - 222
▪ SHAPE: Controls the shape of the LFO. At the full left knob position the shape is a trian-gle, morphing into a saw tooth with sharp decay at the full right knob position.
▪ RES: Controls the resonance of the filter. High resonance makes the filter sound colorfuland more noticeable. Min: low resonance, Max: high resonance
▪ RATE: Controls the rate of Filter oscillation. The 11 available values are expressed in frac-tions of bars, and are equally distributed over the range of the knob. –Max — Min :16 bars, 8 bars, 4 bars, 2 bars, 4/4, 2/4, 3/8, 1/4, 3/16, 1/8, 1/16
The LFO RST button resets the low frequency oscillation phase to zero (highest point).
▪ UP: When pressed the direction of the oscillation is inverted, starting with the lowest fre-quency, and moves upward.
▪ FR.R: In Freerun mode (FR.R) the rate of the Phaser oscillation is not tied to the musicaltempo and varies continuously from 30 sec (Max) to 1/30 sec (Min).
Group Mode (1-Knob Control)
The knob behaves like the RATE knob in Freerun mode in Single mode.
14.4.13 Filter Pulse
Innovative, auto-controlled Filter effects based on ladder filter architecture, and triggered bysignal peaks in the music producing interesting lashing sounds.
It has the most effect on music with gaps in it, such as drum loops, because the self-oscilla-tion can develop in empty parts of the music.
Single Mode
▪ SOFTEN: Controls the smoothness of the cutoff envelope. The more the knob is turned tothe right, the softer the filter sweeps will be.
▪ RES: Controls the resonance of the filter. High resonance makes the filter sound colorfuland more noticeable. Min: low resonance, Max: high resonance.
Advanced Operation of TRAKTOR
The Effects in Detail
TRAKTOR - Manual - 223
▪ AMT: Controls the frequency where the filter action takes place. Compared to a regularfilter, the filter frequency is modulated by the peaks in the music resulting in a dynamicpattern of filter sweeps. In center position the modulation is neutral, to the right the mod-ulation goes upwards and to the left the modulation goes downwards.
▪ P.SN (Peak Sensitivity): This raises the threshold for the peak envelope follower from50 % to 80 %.
▪ P.MD (Peak Mode): This enabled Peak Sensitivity (see above).
Group Mode (1-Knob Control)
The knob behaves like the AMNT knob in Single mode.
14.4.14 Filter
Classic filter with 2-knob and single knob control modes, based on ladder filter architecture.
Single Mode
▪ HP (High Pass):
◦ Controls the low cutoff frequency.
◦ Passes the entire band in full left position (bypass).
◦ Progressively cuts frequencies from low to high when turned to the right.
▪ RES: Controls the resonance of the filter. High resonance makes the filter sound colorfuland more noticeable. Min: low resonance, Max: high resonance
▪ LP (Low Pass):
◦ Controls the high cutoff frequency.
◦ Passes the entire band in full right position (bypass).
◦ Progressively cuts frequencies from high to low when turned to the left.
▪ BRJ (Band Reject): Switches the filter to Band Reject mode. In this mode the frequenciesbetween the two cutoff frequencies are eliminated rather than passed through.
▪ DJM (DJ Mode):
Advanced Operation of TRAKTOR
The Effects in Detail
TRAKTOR - Manual - 224
◦ Switches the panel to 1-knob filter control. The LP knob becomes a bipolar control forcontrolling both the lower and higher cutoff frequency.
◦ Passes the entire band in center position.
◦ Progressively cuts frequencies from high to low when turned from center to the left.
◦ Progressively cuts frequencies from low to high when turned from center to the right.
In DJ Mode (DJM) the LP knob is labeled LP/HP and has a combined function to controlboth low-cut and high-cut frequencies.
Group Mode (1-Knob Control)
The knob controls the effect in DJ mode and behaves like the LP/HP knob in Single mode.
14.4.15 Filter:92 LFO
This filter is modeled after Allen & Heath’s Xone:92 mixer with tempo-synced LFO. The LFO iseither driven by the Beatgrid (and therefore is always in sync with the track) or can be driven inFreerun mode.
Single Mode
▪ D/RNG (Dry-Range): Controls the strength of the effect with a combination of Dry-Wet andthe LFO-Range. The filter is fully bypassed in full left position. As soon as the knob is notin full left position the filter kicks in fully and the knob progressively increases the rangeof the LFO when turned clockwise.
▪ SHAPE: Controls the shape of the LFO. At the full left knob position the shape is a trian-gle, morphing into a saw tooth with sharp decay at the full right knob position.
▪ RES: Controls the resonance of the filter. High resonance makes the filter sound colorfuland more noticeable. Min: low resonance, Max: high resonance.
▪ RATE: Controls the rate of Filter oscillation. The 11 available values are expressed in frac-tions of bars, and are equally distributed over the range of the knob. –Max — Min : 16bars, 8 bars, 4 bars, 2 bars, 4/4, 2/4, 3/8, 1/4, 3/16, 1/8, 1/16.
The LFO RST button resets the low frequency oscillation phase to zero (highest point).
Advanced Operation of TRAKTOR
The Effects in Detail
TRAKTOR - Manual - 225
▪ UP: When pressed the direction of the oscillation is inverted, starting with the lowest fre-quency, and moves upward.
▪ FR.R: In Freerun mode (FR.R) the rate of the LFO oscillation is not tied to the musicaltempo and varies continuously from 30 sec (Max) to 1/30 sec (Min).
14.4.16 Filter:92 Pulse
Innovative, auto-controlled Filter effect modeled after the filters on Allen & Heath’s Xone:92mixer and triggered by signal peaks in the music producing interesting lashing sounds.
It has the most effect on music with gaps in it, such as drum loops, because the self-oscilla-tion can develop best in empty parts of the music.
Single Mode
▪ SOFTEN: Controls the smoothness of the cutoff envelope. The more the knob is turned tothe right, the softer the filter sweeps will be.
▪ RES: Controls the resonance of the filter. High resonance makes the filter sound colorfuland more noticeable. Min: low resonance, Max: high resonance.
▪ AMT:
◦ Controls the frequency where the filter action takes place. Compared to a regular fil-ter, the filter frequency is modulated by the peaks in the music resulting in a dynamicpattern of filter sweeps.
◦ In center position the modulation is neutral, to the right the modulation goes upwardsand to the left the modulation goes downwards.
▪ P.SN (Peak Sensitivity): Raises the threshold for the peak envelope follower from 50 % to80 %.
▪ P.MD (Peak Mode): This enables Peak Sensitivity (see above).
14.4.17 Filter:92
This Filter is modeled after the filters on Allen & Heaths Xone:92 mixer.
Advanced Operation of TRAKTOR
The Effects in Detail
TRAKTOR - Manual - 226

Single Mode
▪ HP (High Pass):
◦ Controls the low cutoff frequency.
◦ Passes the entire band in full left position (bypass).
◦ Progressively cuts frequencies from low to high when turned to the right.
▪ RES: Controls the resonance of the filter. High resonance makes the filter sound colorfuland more noticeable. Min: low resonance, Max: high resonance
▪ LP (Low Pass):
◦ Controls the high cutoff frequency.
◦ Passes the entire band in full right position (bypass).
◦ Progressively cuts frequencies from high to low when turned to the left.
▪ BRJ (Band Reject): Switches the filter to Band Reject mode. In this mode the frequenciesbetween the two cutoff frequencies are eliminated rather than passed through.
▪ DJM (DJ Mode):
◦ Switches the panel to 1-knob filter control. The LP knob becomes a bipolar control forcontrolling both the lower and higher cutoff frequency.
◦ Passes the entire band in center position.
◦ Progressively cuts frequencies from high to low when turned from center to the left.
◦ Progressively cuts frequencies from low to high when turned from center to the right.
In DJ Mode (DJM) the LP knob is labeled LP/HP and has a combined function to controlboth lowcut and highcut frequencies.
14.4.18 Phaser
Classic Phaser with tempo based and free running rate control and stereo phasing.
The controls of the Phaser are identical in behavior to those of the Flanger.
Advanced Operation of TRAKTOR
The Effects in Detail
TRAKTOR - Manual - 227
Single Mode
▪ SPRD (Stereo Spread): Creates a stereo spread effect by controlling the phase offset be-tween the left and right stereo channel. Min: no phase offset, Max: maximum phase offset(1/2 period).
▪ FEEDB (Feedback): Controls the amount of the Phaser’s feedback, making the effectstronger and more colorful. Min: no feedback, Max: maximum feedback.
▪ RATE: Controls the rate of Phaser oscillation. The 11 available values are expressed infractions of bars, and are equally distributed over the range of the knob. Max — Min:16 bars, 8 bars, 4 bars, 2 bars, 4/4, 2/4, 3/8, 1/4, 3/16, 1/8, 1/16.
▪ UP: When pressed the direction of the oscillation is inverted, starting with the lowest fre-quency, and moves upward.
▪ FR.R: Enables continuous rate control, independent from tempo and ranges from 30 sec(Max) to 1/30 sec (Min).
▪ LFO RST: Resets the oscillation and restarts at the lowest or highest point, according tothe status of DN/UP.
The RST button resets the low frequency oscillation phase to zero (highest point).
Group Mode (1-Knob Control)
The knob controls the rate of the up and down oscillation of the flanging sound. The knob be-haves like the RATE knob in Single mode with Freerun activated.
14.4.19 Phaser Pulse
Innovative, auto-controlled Phaser effect that is triggered by signal peaks in the music produc-ing interesting lashing sounds.
It has the most effect on music with gaps in it, such as drum loops, because the self-oscilla-tion can develop best in empty parts of the music.
Advanced Operation of TRAKTOR
The Effects in Detail
TRAKTOR - Manual - 228

Single Mode
▪ SHAPE: Controls the shape of the Phaser Pulse. The range of the controller bears a multi-tude of patterns and morphs between them for continuously new sound effects. Explorethe range of this knob in combination with the FEEDB and the AMNT knob and store thepreset whenever you like it.
▪ FEEDB (Feedback): Controls the strength of the Phaser’s feedback making the effectstronger and more colorful. Min: low feedback, Max: strong feedback
▪ AMNT (Amount): The knob has two operating zones on the left and the right side of thecenter position and controls the modulation amount of the Phaser's frequency.
▪ 8PL (8 Pole): Switches between 6 Pole and 8 Pole filters making the effect more intense.
▪ SPRD (Stereo Spread): Creates an offset between the phasing effect of the right and leftstereo channel giving the effect of spatial depth.
Group Mode (1-Knob Control)
The knob has two operating zones on the left and the right side of the center position. It be-haves like the AMNT knob in Single mode.
14.4.20 Phaser Flux
Manually controlled Phaser suited for jog wheel control. The controls of the Phaser Flux areidentical in behavior to those of the Flanger Flux described above, except for the 8 Poleswitch:
Single Mode
▪ FEEDB (Feedback): Controls the amount of the Phaser’s feedback, making the effectstronger and more colorful. Min: low feedback, Max: strong feedback.
▪ PITCH: Controls the pitch of the effect. The center position of the knob is neutral, to ei-ther side the phasing effect moves from high to low frequencies.
▪ 8PL (8 Pole): Switches between 6 Pole and 8 Pole filters, making the effect more in-tense.
▪ SPR (Stereo Spread): Creates an offset between the phasing effect of the right and leftstereo channel, giving the effect of spatial depth.
Advanced Operation of TRAKTOR
The Effects in Detail
TRAKTOR - Manual - 229
Group Mode (1-Knob Control)
The knob controls the PITCH of the effect. The center position of the knob is neutral — to ei-ther side the flanging effect moves from high to low frequencies.
14.4.21 Reverse Grain
Buffer based effect for capturing a loop form the current audio material and successively play-ing it backwards with different mash up options.
The effect has to be started in off mode and then turned on to sample the current audio.
Single Mode
▪ ON: Samples audio and plays the buffer backwards.
▪ PITCH:
◦ Controls the pitch of the sampled audio.
◦ Normal pitch in full right position. Progressively decreases pitch when turned to theleft.
◦ Ranges from 0 to 100.
▪ GRAIN: Controls the size of the audio grains. Creates interesting effects when used incombination with the SPEED knob.
▪ SPEED:
◦ Controls playback speed of the samples’ audio grains.
◦ Plays at normal speed in full right position.
◦ Progressively reduces playback speed when turned to the left.
▪ INV (Inverted): Plays the grains in reversed order.
▪ FWD (Forward): Inverts playback direction from backward playback to forward playback.
Group Mode (1-Knob Control)
Behaves like the GRAIN knob in Single Effect mode.
Advanced Operation of TRAKTOR
The Effects in Detail
TRAKTOR - Manual - 230
14.4.22 Turntable FX
This effect emulates sounds produced by spinning back or slowing down a record playing on aturntable.
The effect has to be started in off mode and then turned on to sample the current audio.
Single Mode
▪ BRK (Turntable Brake):
◦ Triggers the turntable brake effect produced when pressing start/stop on a turntable.
◦ The speed of the braking sound is controlled by the B.SPD knob.
◦ The wind down time and the speed up time can be individually controlled by changingthe position of the B.SPD knob while BRK is on.
▪ AMNT: Controls the amount of the rocking motion triggered with the RCK button.
▪ R.SPD (Rocking Speed): Controls the speed of the rocking motion triggered with the RCKbutton.
▪ B.SPD (Braking Speed): Controls the speed of the brake motion triggered with the BRKbutton.
▪ RCK (Rock): Triggers the rocking motion of the turntable.
▪ REW: Triggers a rewind effect. The acceleration of the rewind effect is controlled by withthe B.SPD knob.
Group Mode (1-Knob Control)
The ON button behaves like the BRK button and the knob like the B.SPD knob in Single Effectmode.
14.4.23 Iceverb
The Iceverb is an innovative Reverb with self-oscillating filters for interesting colorful effects.The Filter of the Iceverb is outside the feedback loop, which makes the decay independentfrom the filter settings.
Advanced Operation of TRAKTOR
The Effects in Detail
TRAKTOR - Manual - 231

Single Mode
▪ ICING: Controls the resonance of the filter and therefore the intensity of the color.
▪ COLOR: Controls the cutoff frequency of the filter and therefore the color of the reverb.
▪ SIZE: Controls the size of the added reverb, ranging from small to vast room sizes.
▪ FRZ (Freeze): Freezes the reverb by closing the input and leaving the output open. TheSIZE control remains active in Freeze mode allowing interesting pitch effects.
Group Mode (1-Knob Control)
Works like the SIZE knob in Single mode.
14.4.24 Reverb T3
Classic Reverb with extreme room sizes, individual low pass & high pass Filter Controls, andFreeze function like in TRAKTOR 3 and previous TRAKTOR SCRATCH versions.
Single Mode
▪ LP: LP filter in the effect loop — fully open when turned to the left.
▪ HP: HP filter in the effect loop — fully open when turned to the right.
▪ SIZE: Control the size of the added reverb, ranging from small to vast room sizes.
▪ FRZ (Freeze): Freezes the Reverb by closing the input and leaving open the output.
Group Mode (1-Knob Control)
► Works like the SIZE knob in Single mode.
14.4.25 Ring Modulator
The Ring Modulator is an effect that modulates the tracks by multiplying the high frequencysignal onto the audio material.
Advanced Operation of TRAKTOR
The Effects in Detail
TRAKTOR - Manual - 232
Single Mode
▪ AM-RM: Morphs the type of modulation from amplitude modulation in full left position toring modulation in full right position. Amplitude modulation sounds softer compared toring modulation.
▪ RAW: Controls the shape of the modulation oscillator. The oscillator is a sine wave in fullleft position for smooth sounds and a filtered square wave in full right position for harshersounds.
▪ PITCH: Controls the frequency of the modulating oscillator from low in full left position tohigh in full right position (100 Hz — 8371 Hz).
Group Mode (1-Knob Control)
This knob behaves with a combination of RAW and PITCH controls in Single Effect mode.
14.4.26 Digital LoFi
Digital LoFi decomposes the music by reducing its bit depth and the sample rate.
Single Mode
▪ BIT (Bit Depth): Controls the bit rate ranging from full bit rate in full left position to justabove one bit in full right position.
▪ SMTH (Sample Rate Smooth): Creates a smoother effect by introducing a lag into thesample rate reduction.
▪ SRTE (Sample Rate): Controls the Sample Rate reduction raging from no reduction in fullleft position to 100 Hz sample rate in full right position.
This knob only has an effect in combination with SMTH (sample rate smooth).
▪ SPREAD: Creates an offset between the sample reproduced on the right and left stereochannel giving the effect of spatial depth.
Group Mode (1-Knob Control)
Works like a combination of the SRTE and the BIT knob in Single mode.
Advanced Operation of TRAKTOR
The Effects in Detail
TRAKTOR - Manual - 233

14.4.27 Mulholland Drive
The Mulholland Drive is a highly sensitive overdrive effect with two independent overdrive unitsand unpredictable self-oscillating behavior. When Feedback is activated it has most effect onmusic with gaps in it, such as drum loops, because the self-oscillation can develop best inempty parts of the music.
Without Feedback activated it behaves like a regular drive effect.
Single Mode
▪ TONE:
◦ Controls the frequency of the feedback tone.
◦ Requires a certain amount of feedback to have an effect.
◦ Creates a great variety of tones when used in combination with the FEEDB knob.
▪ FEEDB (Feedback): Controls the amount of feedback in the effect ranging from 0 to100 %. With zero feedback in full left position, the effect behaves like regular tube dis-tortion.
▪ DRIVE (Overdrive): Controls which of the two overdrive units is fed and by how much.Drives only one unit in full left and full right position and morphs between them when inbetween.
▪ FB- (Inverted Feedback): Only passes uneven harmonics, making the effect sound deeperin frequency.
Group Mode (1-Knob Control)
This knob behaves like the DRIVE knob in Single Effect mode.
At high DRIVE and FEEDB values the effect can produce sound even without any input.
14.4.28 Transpose Stretch
The Transpose Stretch is a classic Pitch-Shifter with additional Grain-Size and Time-Stretchcontrol.
Advanced Operation of TRAKTOR
The Effects in Detail
TRAKTOR - Manual - 234

Single Mode
▪ STRCH (Time Stretch): As soon as the knob is moved away from full left position, the in-put is recorded for 1 bar (2 if the button “Tx2” is pressed) and then is endlessly loopedand played back. The more the knob is moved to the right, the more the time is stretcheduntil the music comes to a complete stop on a single “Grain”.
The STRCH knob has to be in full left position to open the input of the effect. The effectmust be loaded with the STRCH knob in full left position!
▪ GRNSZ (Grain Size):
◦ This knob only works when the GRN button below is enabled, and controls the size ofthe grains. Otherwise the grain size is automatically linked internally for best overallpitching.
◦ It ranges from large grains (333 ms) in full left position to short grains (5 ms) in fullright position.
◦ Very small sizes can lead to nice FM/ring modulating metallic sounds. Also try startingat “full stop” and then transpose to max for metallic “moaning” sounds.
▪ KEY:
◦ Controls the pitch of the grains.
◦ Center position is neutral and plays the grains at original pitch.
◦ To the right, the grains are pitched up to +1 octave in full right position.
◦ To the left, the grains are pitched down to -5 octaves.
▪ GRN: Enables Grain Size Control.
▪ ST.2: Play 2 bars instead of 1 bar when in STRCH mode.
Group Mode (1-Knob Control)
Works like the KEY knob in Single mode.
Advanced Operation of TRAKTOR
The Effects in Detail
TRAKTOR - Manual - 235

14.4.29 BeatSlicer Buffer
BeatSlicer Buffer samples 2 bars of audio, subdivides it in small chunks and replays thechunks in a different sequence creating a rhythmically shuffled version of the original music.The effect provides 20 different patterns grouped in 5 styles. The effect starts sampling twobars when turned ON and will stay in sync with the Master Clock even during tempo changes.
Single Mode
▪ BUZZ: Creates a beat-roll effect by increasing the repetition rate within one beat of thecurrent pattern.
▪ STYLE: Selects one of five groups of patterns.
▪ PAT (Pattern): Switches between different patterns within a group. The first pattern of agroup is always neutral (i.e. bypasses the signal in original sequence).
▪ GO: When pressing GO audio material is buffered and at the same time manipulated. Sizeof the buffered loop is 1 bar.
▪ 2 BAR (2 Bars): When activating the 2 BAR button, the entire buffer of two bars is usedfor slicing. Otherwise only the first bar of audio buffer is sliced.
Group Mode
The knob represents the PAT (Pattern) knob in Single Effects mode.
14.4.30 Formant Filter
Formant Filter imitates the sound of spoken vowels by morphing three bandpass filters intoeach other.
Single Mode
▪ SHARP: Makes the vowel sound more present.
▪ TALK: Morphs between the formants produced from the mouth (a, e, i, o, u). On the left itsounds dark becoming brighter when moved to the right.
▪ TYP: Type button deactivated makes the vowels sound "German". Activating the buttonmakes it sound more "English"
Advanced Operation of TRAKTOR
The Effects in Detail
TRAKTOR - Manual - 236
Group Mode (1-Knob Control)
Represents the TALK knob in Single Effects Mode.
14.4.31 Peak Filter
The Peak Filter adds a peak to the original signal for a specific frequency spectrum. The peakcan be increased to four times louder than the original signal. An additional brickwall limitermakes sure that the increased dB is limited to the maximum 0 db.
Single Mode
▪ D/W: The D/W not only mixes the modulated audio signal to the original signal but addi-tionally increases the filter frequency of the peak.
▪ PUMP: Adds brickwall limitation to the effected signal.
▪ EDGE: Modulates the width of the peak by increasing the resonance. When turned to theright, the emphasized frequency becomes more pronounced.
▪ FREQ: Controls the frequency that is emphasized.
▪ KILL: Inverts the peak and makes the effect similar to a notch filter.
Group Mode (1-Knob Control)
This knob represents the FREQ knob in Single effects mode.
14.4.32 Tape Delay
An emulation of a tempo synced analog tape delay with tape saturation. The effect also allowsa filter to be applied to delayed signals and a freeze function to hold the signal itself.
Single Mode
▪ FILT (Filter): Internal high pass filter. The filter is open when the knob is in full left posi-tion and progressively cuts out low frequencies when turned to the right.
▪ FBK (Feedback): Controls the strength of the delay’s feedback, making the effect strongerand more colorful.
▪ SPEED: Controls the speed of the Tape Delay.
Advanced Operation of TRAKTOR
The Effects in Detail
TRAKTOR - Manual - 237
The effect rate can be switched during operation without any crackles or glitches in audio!
▪ FRZ (Freeze): Freezes the Delay by closing the input and turning up the Feedback to max-imum value. The filter remains active in the feedback loop. For endless freezes, the FIL-TER knob has to be therefore turned down to full left position.
Even in Freeze mode the Delay follows the Master Clock and will therefore seamlesslymerge into the mix once released.
▪ ACCL: Activates a higher acceleration of the virtual tape speed.
Group Mode (1-Knob Control)
This knob works like the ACCL knob in Single effects mode.
14.4.33 Ramp Delay
Creative delay with adjustable transition time between different delay rates.
Single Mode
▪ FILTER: Bipolar control for controlling both the lower and higher cutoff frequency. Passesthe entire band in center position. Progressively cuts frequencies from high to low, whenturned from center to the left. Progressively cuts frequencies from low to high, whenturned from center to the right.
▪ DURATION:
◦ Controls the length of the delay ramp. The ramp defines how long the delay takes totransition between different delay rates.
◦ The 7 available values are expressed in fractions of bars, and are equally distributedover the range of the knob. The knobs position is displayed in bold letters: Min ⇨Max: 1/4, 2/4, 4/4, 2 BARS, 4 BARS, 8 BARS, 16 BARS.
▪ RATE:
◦ Controls the speed of the Ramp Delay.
Advanced Operation of TRAKTOR
The Effects in Detail
TRAKTOR - Manual - 238
◦ The 7 available values are expressed in fractions of bars, and are equally distributedover the range of the knob. The knobs position is displayed in bold letters: Min ⇨Max: 4/4, 3/8, 1/4, 3/16, 1/8, 1/16, 1/32.
The effect rate can be switched during operation without any crackles or glitches in audio!
▪ FRZ (Freeze): Freezes the Delay by closing the input and turning up the Feedback to max-imum value. The filter remains active in the feedback loop. For endless freezes, the FIL-TER knob has to be therefore turned down to full left position.
Even in Freeze mode the Delay follows the Master Clock and will therefore seamlesslymerge into the mix once released.
▪ FB+ (Feedback): Raises the feedback to 90 %.
Group Mode (1-Knob Control)
The knob works like the RATE knob in Single effects mode with a predefined duration of 2Bars.
14.4.34 Auto Bouncer
The Auto Bouncer is a buffer-based effect that captures snippets of 1 beat and repeats thembased on 5 predefined patterns.
Single Mode
▪ TRANS (Transpose): Adjusts transposition of the repetitions. When turned from center toright the transposition will increase as it follows the pattern. When turned from center toleft the transposition will decrease as it follows the pattern.
▪ BEND: Increases and decreases the repetitions. When turned from center to right thespeed will decrease by progress of the pattern. When turned from center to left the speedwill increase by progress of the pattern.
▪ PATTERN: The 5 available patterns are numbered 0-4.
▪ X2: Doubles the Density of repetitions.
▪ ALT: Activates alternative patterns 0-4.
Advanced Operation of TRAKTOR
The Effects in Detail
TRAKTOR - Manual - 239
Group Mode (1-Knob Control)
The knob works like the BEND knob in Single effects mode.
14.4.35 Bouncer
The Bouncer is a buffer-based effect that captures snippets of 1 beat and repeats them at vari-ous speeds and pitch.
Single Mode
▪ TRANS (Transpose): Adjusts the transposition of the repetitions. When turned from centerto right the repetitions will be pitched up. When turned from center to left the repetitionswill be pitched down.
▪ FILTER: Low-pass filter that is open when turned fully to the right. Turning it to the leftwill progressively cut high frequencies.
▪ SPEED: Defines the speed of the repeated samples.
▪ AUT: Re-samples the input every 2 (2/4) beats when activated.
▪ X2: Doubles the current speed value.
Group Mode (1-Knob Control)
The knob works like the SPEED knob in Single effects mode.
Advanced Operation of TRAKTOR
The Effects in Detail
TRAKTOR - Manual - 240
15 Tutorials
This chapter will guide you through the most common tasks that you will encounter during yourwork with TRAKTOR.
The tutorials are workflow-oriented. They start with the simplest tasks and progressively leadyou to more complex operation, helping you to get more and more familiar with TRAKTOR 2.After reading this, you should have the basic know-how allowing you to mix with TRAKTOR 2.
If you are using TRAKTOR LE 2 or TRAKTOR Manufacturer Edition 2, some of the instruc-tions do not apply due to the limitations of your software flavor.
15.1 Prerequisites
These tutorials can be read in a linear manner from the first to the last tutorial. However, if youhave used previous TRAKTOR versions and are already familiar with certain tasks, you can skipthe first tutorials and continue reading the later tutorials. Or, if you want to experiment morewith TRAKTOR and come back to the tutorials later, you can find the needed prerequisites forevery tutorial here.
Even if you’re already familiar with TRAKTOR, all tutorials are worth a read as every chap-ter may have little workflow hints of which you weren’t aware.
The tutorials make use of the included demo tracks which were copied to your hard disk duringthe installation procedure. Thus, you can follow these tutorials even if you haven’t importedyour own music into the Track Collection yet. For more info on how to import your music intothe Track Collection, please refer to chapter ↑5.2, Importing Music Folders.
We assume that your TRAKTOR is already up and running. If it’s not the case, please followthe instructions in the Setup Guide and come back here when you have set up your systemcorrectly!
In case you already changed some settings in TRAKTOR before you started with these tutorials,we strongly recommend you to reset TRAKTOR to the factory settings:
Tutorials
Prerequisites
TRAKTOR - Manual - 241
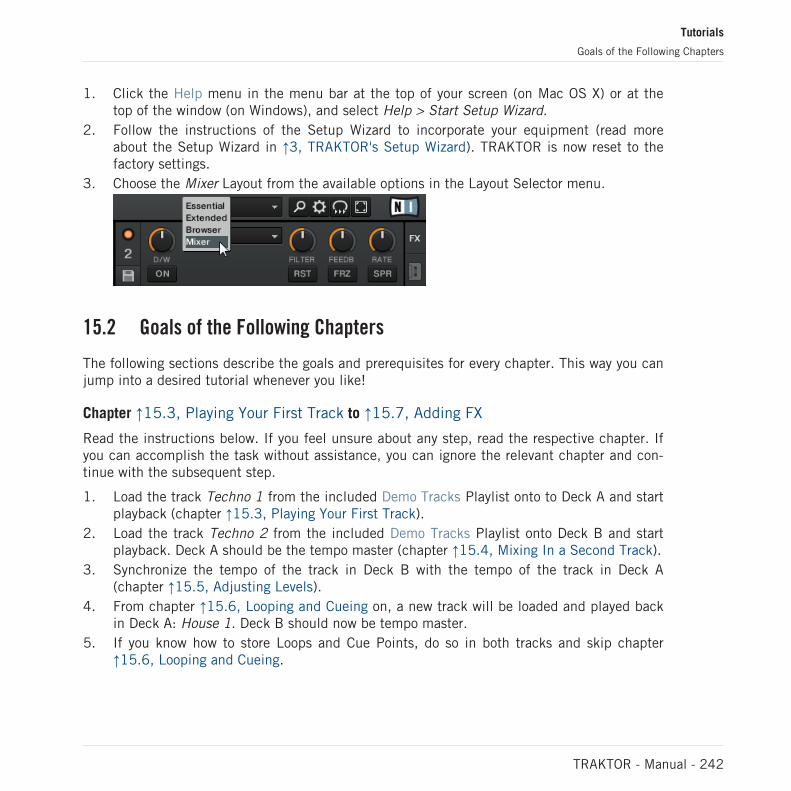
1. Click the Help menu in the menu bar at the top of your screen (on Mac OS X) or at thetop of the window (on Windows), and select Help > Start Setup Wizard.
2. Follow the instructions of the Setup Wizard to incorporate your equipment (read moreabout the Setup Wizard in ↑3, TRAKTOR's Setup Wizard). TRAKTOR is now reset to thefactory settings.
3. Choose the Mixer Layout from the available options in the Layout Selector menu.
15.2 Goals of the Following Chapters
The following sections describe the goals and prerequisites for every chapter. This way you canjump into a desired tutorial whenever you like!
Chapter ↑15.3, Playing Your First Track to ↑15.7, Adding FX
Read the instructions below. If you feel unsure about any step, read the respective chapter. Ifyou can accomplish the task without assistance, you can ignore the relevant chapter and con-tinue with the subsequent step.
1. Load the track Techno 1 from the included Demo Tracks Playlist onto to Deck A and startplayback (chapter ↑15.3, Playing Your First Track).
2. Load the track Techno 2 from the included Demo Tracks Playlist onto Deck B and startplayback. Deck A should be the tempo master (chapter ↑15.4, Mixing In a Second Track).
3. Synchronize the tempo of the track in Deck B with the tempo of the track in Deck A(chapter ↑15.5, Adjusting Levels).
4. From chapter ↑15.6, Looping and Cueing on, a new track will be loaded and played backin Deck A: House 1. Deck B should now be tempo master.
5. If you know how to store Loops and Cue Points, do so in both tracks and skip chapter↑15.6, Looping and Cueing.
Tutorials
Goals of the Following Chapters
TRAKTOR - Manual - 242
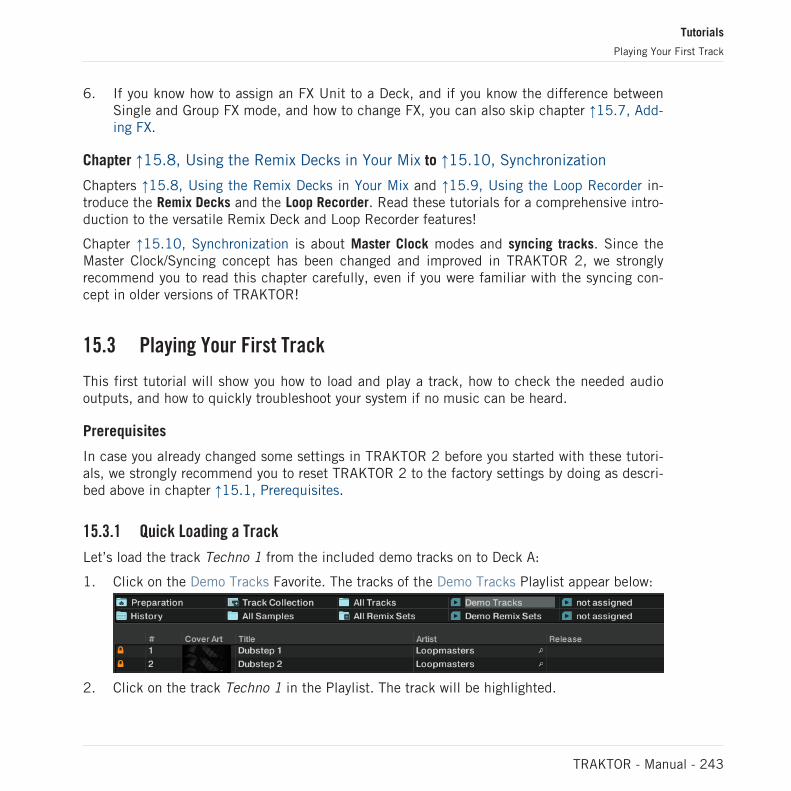
6. If you know how to assign an FX Unit to a Deck, and if you know the difference betweenSingle and Group FX mode, and how to change FX, you can also skip chapter ↑15.7, Add-ing FX.
Chapter ↑15.8, Using the Remix Decks in Your Mix to ↑15.10, Synchronization
Chapters ↑15.8, Using the Remix Decks in Your Mix and ↑15.9, Using the Loop Recorder in-troduce the Remix Decks and the Loop Recorder. Read these tutorials for a comprehensive intro-duction to the versatile Remix Deck and Loop Recorder features!
Chapter ↑15.10, Synchronization is about Master Clock modes and syncing tracks. Since theMaster Clock/Syncing concept has been changed and improved in TRAKTOR 2, we stronglyrecommend you to read this chapter carefully, even if you were familiar with the syncing con-cept in older versions of TRAKTOR!
15.3 Playing Your First Track
This first tutorial will show you how to load and play a track, how to check the needed audiooutputs, and how to quickly troubleshoot your system if no music can be heard.
Prerequisites
In case you already changed some settings in TRAKTOR 2 before you started with these tutori-als, we strongly recommend you to reset TRAKTOR 2 to the factory settings by doing as descri-bed above in chapter ↑15.1, Prerequisites.
15.3.1 Quick Loading a Track
Let’s load the track Techno 1 from the included demo tracks on to Deck A:
1. Click on the Demo Tracks Favorite. The tracks of the Demo Tracks Playlist appear below:
2. Click on the track Techno 1 in the Playlist. The track will be highlighted.
Tutorials
Playing Your First Track
TRAKTOR - Manual - 243

3. Drag and drop the Track onto Deck A. The track will be loaded. Its waveform and info ap-pear on Deck A:
Favorites are customizable shortcuts sitting at the top of the Browser in TRAKTOR’s win-dow. If you can’t see the Favorite Playlists, you can activate them via Preferences > Brows-er Details > Show Playlist Favorites. Note: this option doesn’t exist in TRAKTOR LE 2.
Alternative Loading Methods
► Right-click (Windows) or [Ctrl]-click (Mac OS X) on a track and choose Load Track inDeck A.
► Click the hotkey [Ctrl]+[Left].
Tutorials
Playing Your First Track
TRAKTOR - Manual - 244
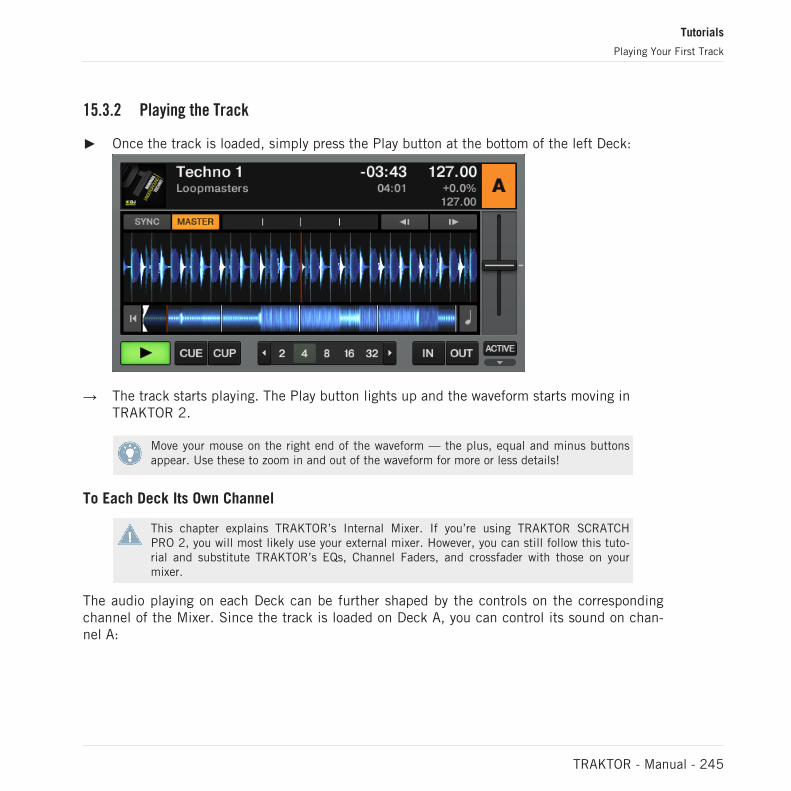
15.3.2 Playing the Track
► Once the track is loaded, simply press the Play button at the bottom of the left Deck:
→ The track starts playing. The Play button lights up and the waveform starts moving inTRAKTOR 2.
Move your mouse on the right end of the waveform — the plus, equal and minus buttonsappear. Use these to zoom in and out of the waveform for more or less details!
To Each Deck Its Own Channel
This chapter explains TRAKTOR’s Internal Mixer. If you’re using TRAKTOR SCRATCHPRO 2, you will most likely use your external mixer. However, you can still follow this tuto-rial and substitute TRAKTOR’s EQs, Channel Faders, and crossfader with those on yourmixer.
The audio playing on each Deck can be further shaped by the controls on the correspondingchannel of the Mixer. Since the track is loaded on Deck A, you can control its sound on chan-nel A:
Tutorials
Playing Your First Track
TRAKTOR - Manual - 245
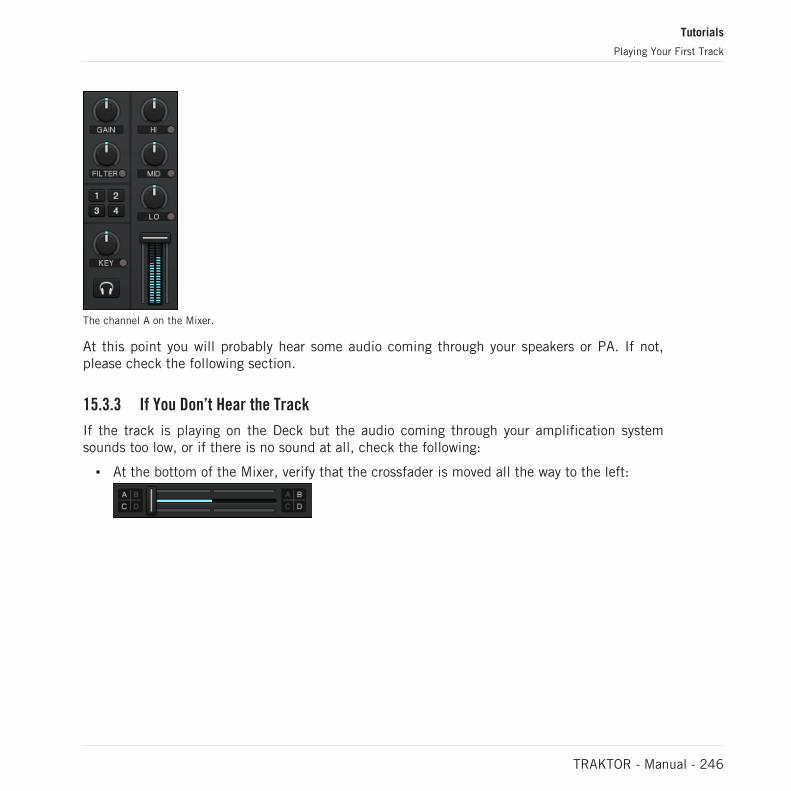
The channel A on the Mixer.
At this point you will probably hear some audio coming through your speakers or PA. If not,please check the following section.
15.3.3 If You Don’t Hear the Track
If the track is playing on the Deck but the audio coming through your amplification systemsounds too low, or if there is no sound at all, check the following:
▪ At the bottom of the Mixer, verify that the crossfader is moved all the way to the left:
Tutorials
Playing Your First Track
TRAKTOR - Manual - 246
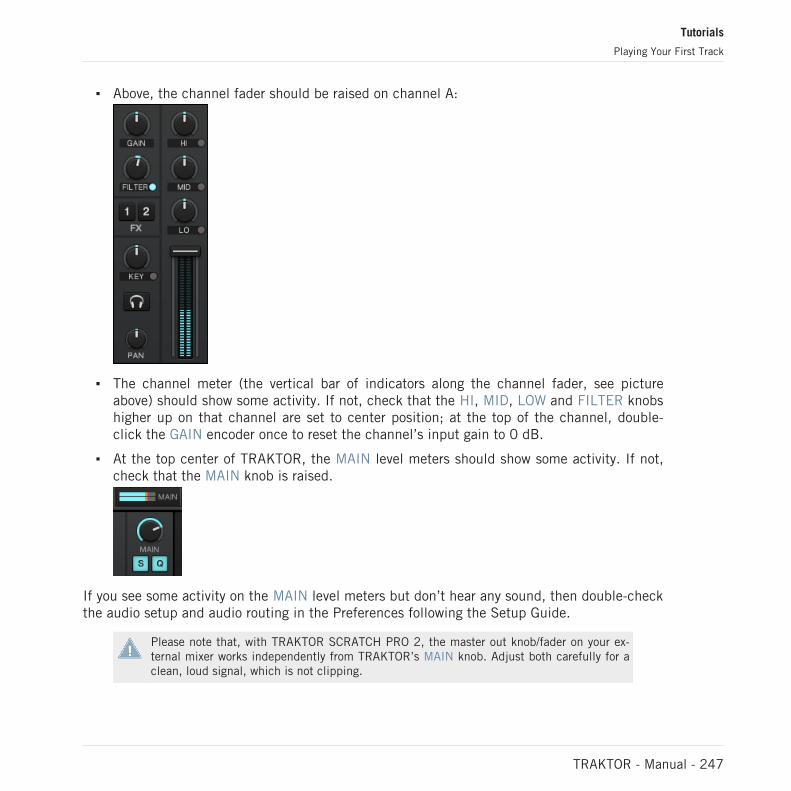
▪ Above, the channel fader should be raised on channel A:
▪ The channel meter (the vertical bar of indicators along the channel fader, see pictureabove) should show some activity. If not, check that the HI, MID, LOW and FILTER knobshigher up on that channel are set to center position; at the top of the channel, double-click the GAIN encoder once to reset the channel’s input gain to 0 dB.
▪ At the top center of TRAKTOR, the MAIN level meters should show some activity. If not,check that the MAIN knob is raised.
If you see some activity on the MAIN level meters but don’t hear any sound, then double-checkthe audio setup and audio routing in the Preferences following the Setup Guide.
Please note that, with TRAKTOR SCRATCH PRO 2, the master out knob/fader on your ex-ternal mixer works independently from TRAKTOR’s MAIN knob. Adjust both carefully for aclean, loud signal, which is not clipping.
Tutorials
Playing Your First Track
TRAKTOR - Manual - 247
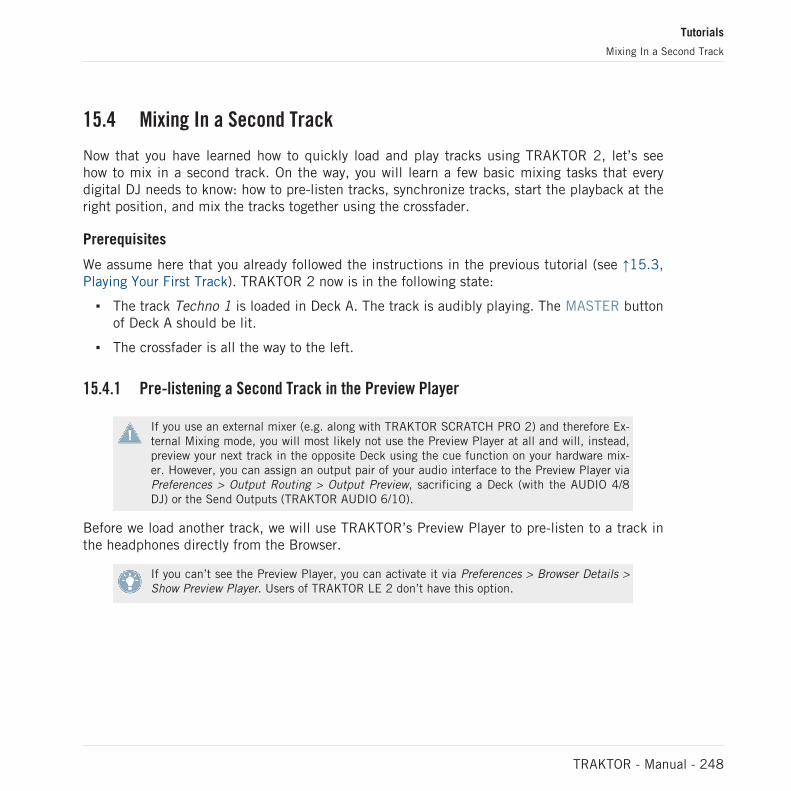
15.4 Mixing In a Second Track
Now that you have learned how to quickly load and play tracks using TRAKTOR 2, let’s seehow to mix in a second track. On the way, you will learn a few basic mixing tasks that everydigital DJ needs to know: how to pre-listen tracks, synchronize tracks, start the playback at theright position, and mix the tracks together using the crossfader.
Prerequisites
We assume here that you already followed the instructions in the previous tutorial (see ↑15.3,Playing Your First Track). TRAKTOR 2 now is in the following state:
▪ The track Techno 1 is loaded in Deck A. The track is audibly playing. The MASTER buttonof Deck A should be lit.
▪ The crossfader is all the way to the left.
15.4.1 Pre-listening a Second Track in the Preview Player
If you use an external mixer (e.g. along with TRAKTOR SCRATCH PRO 2) and therefore Ex-ternal Mixing mode, you will most likely not use the Preview Player at all and will, instead,preview your next track in the opposite Deck using the cue function on your hardware mix-er. However, you can assign an output pair of your audio interface to the Preview Player viaPreferences > Output Routing > Output Preview, sacrificing a Deck (with the AUDIO 4/8DJ) or the Send Outputs (TRAKTOR AUDIO 6/10).
Before we load another track, we will use TRAKTOR’s Preview Player to pre-listen to a track inthe headphones directly from the Browser.
If you can’t see the Preview Player, you can activate it via Preferences > Browser Details >Show Preview Player. Users of TRAKTOR LE 2 don’t have this option.
Tutorials
Mixing In a Second Track
TRAKTOR - Manual - 248
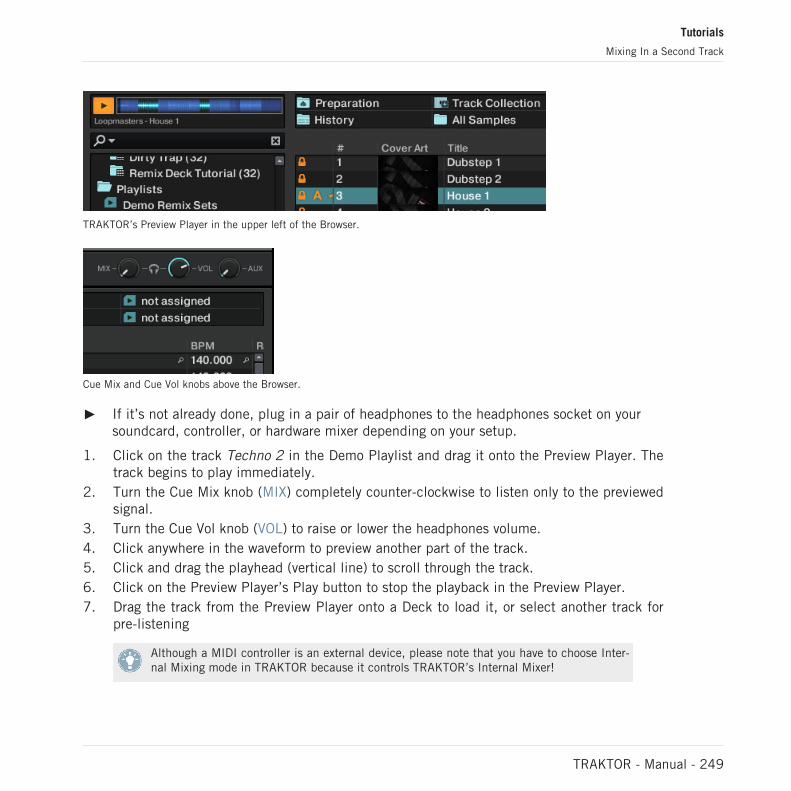
TRAKTOR’s Preview Player in the upper left of the Browser.
Cue Mix and Cue Vol knobs above the Browser.
► If it’s not already done, plug in a pair of headphones to the headphones socket on yoursoundcard, controller, or hardware mixer depending on your setup.
1. Click on the track Techno 2 in the Demo Playlist and drag it onto the Preview Player. Thetrack begins to play immediately.
2. Turn the Cue Mix knob (MIX) completely counter-clockwise to listen only to the previewedsignal.
3. Turn the Cue Vol knob (VOL) to raise or lower the headphones volume.4. Click anywhere in the waveform to preview another part of the track.5. Click and drag the playhead (vertical line) to scroll through the track.6. Click on the Preview Player’s Play button to stop the playback in the Preview Player.7. Drag the track from the Preview Player onto a Deck to load it, or select another track for
pre-listening
Although a MIDI controller is an external device, please note that you have to choose Inter-nal Mixing mode in TRAKTOR because it controls TRAKTOR’s Internal Mixer!
Tutorials
Mixing In a Second Track
TRAKTOR - Manual - 249
15.4.2 Loading and Playing the Second Track
We will choose the track Techno 2, load and play it on Deck B:
1. Drag and drop the track from the Preview Player onto Deck B. Alternatively, use any otherloading method described in chapter ↑15.3.1, Quick Loading a Track. The track info andwaveform appear on Deck B.
2. Press the Play button on the right Deck to start the playback. The track starts playing. ThePlay button lights up and the waveform starts moving on TRAKTOR’s Deck B.
We don’t hear anything from Deck B through the speakers yet because we have set the cross-fader all the way to the left—our plan is to slowly mix in the track on Deck B.
You can already give it a try: by slowly moving the crossfader to the right, you should hear thetrack on Deck B fade in, whereas the track on Deck A progressively fades out as you move thecrossfader further to the right. Obviously, our mix is not satisfying at all yet—before mixing inthe second track, we first have to beat-match it to the track playing on Deck A. So for now,pull the crossfader all the way back to the left.
15.4.3 Using Headphones to Prepare the Mix
From now on, let’s get used to preparing our mix with headphones until the next track (here onDeck B) is ready to be mixed in.
Tutorials
Mixing In a Second Track
TRAKTOR - Manual - 250
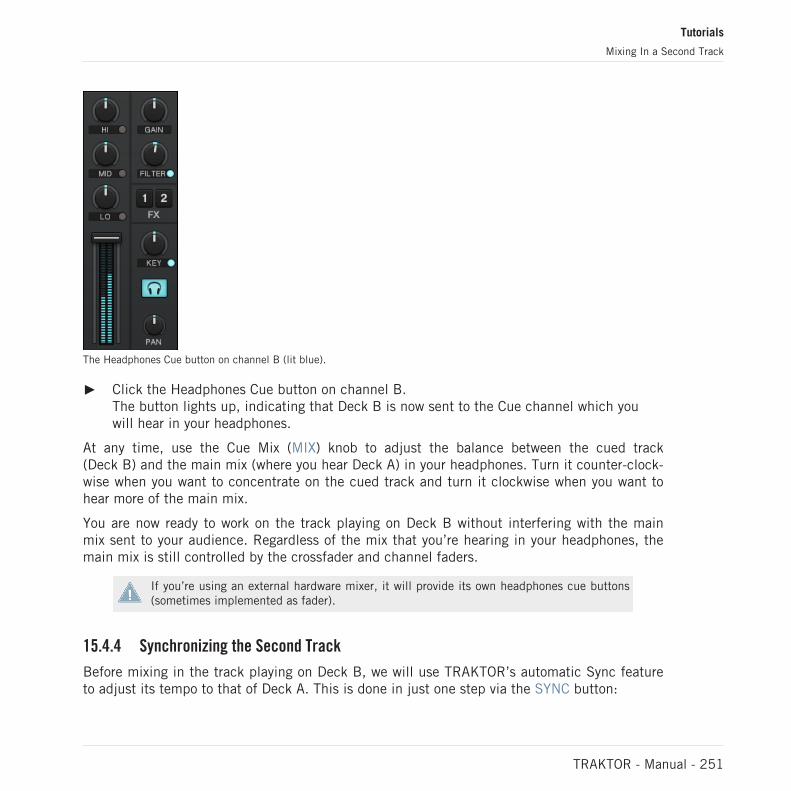
The Headphones Cue button on channel B (lit blue).
► Click the Headphones Cue button on channel B.The button lights up, indicating that Deck B is now sent to the Cue channel which youwill hear in your headphones.
At any time, use the Cue Mix (MIX) knob to adjust the balance between the cued track(Deck B) and the main mix (where you hear Deck A) in your headphones. Turn it counter-clock-wise when you want to concentrate on the cued track and turn it clockwise when you want tohear more of the main mix.
You are now ready to work on the track playing on Deck B without interfering with the mainmix sent to your audience. Regardless of the mix that you’re hearing in your headphones, themain mix is still controlled by the crossfader and channel faders.
If you’re using an external hardware mixer, it will provide its own headphones cue buttons(sometimes implemented as fader).
15.4.4 Synchronizing the Second Track
Before mixing in the track playing on Deck B, we will use TRAKTOR’s automatic Sync featureto adjust its tempo to that of Deck A. This is done in just one step via the SYNC button:
Tutorials
Mixing In a Second Track
TRAKTOR - Manual - 251
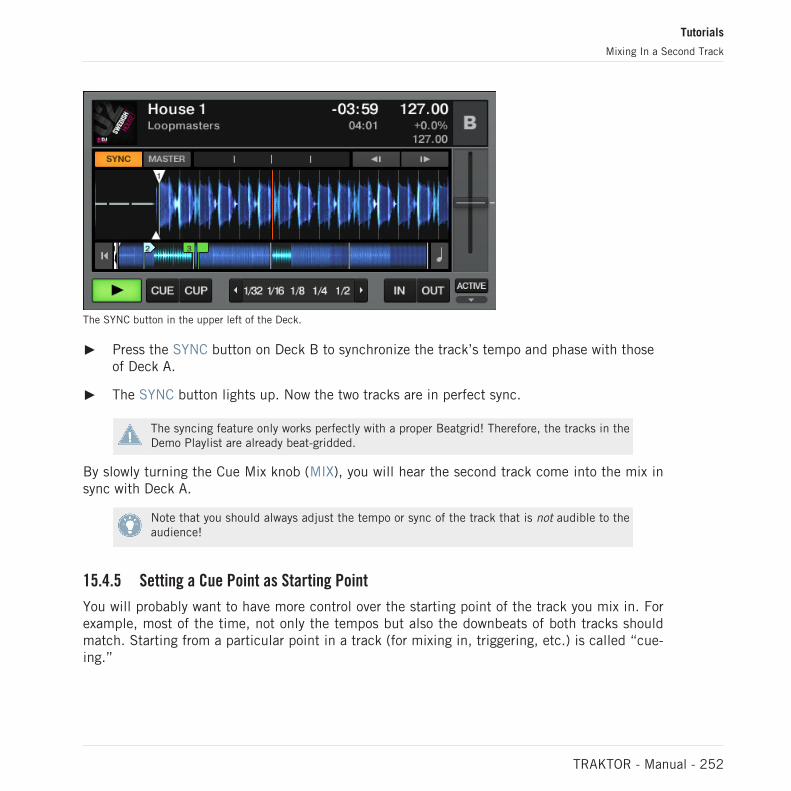
The SYNC button in the upper left of the Deck.
► Press the SYNC button on Deck B to synchronize the track’s tempo and phase with thoseof Deck A.
► The SYNC button lights up. Now the two tracks are in perfect sync.
The syncing feature only works perfectly with a proper Beatgrid! Therefore, the tracks in theDemo Playlist are already beat-gridded.
By slowly turning the Cue Mix knob (MIX), you will hear the second track come into the mix insync with Deck A.
Note that you should always adjust the tempo or sync of the track that is not audible to theaudience!
15.4.5 Setting a Cue Point as Starting Point
You will probably want to have more control over the starting point of the track you mix in. Forexample, most of the time, not only the tempos but also the downbeats of both tracks shouldmatch. Starting from a particular point in a track (for mixing in, triggering, etc.) is called “cue-ing.”
Tutorials
Mixing In a Second Track
TRAKTOR - Manual - 252
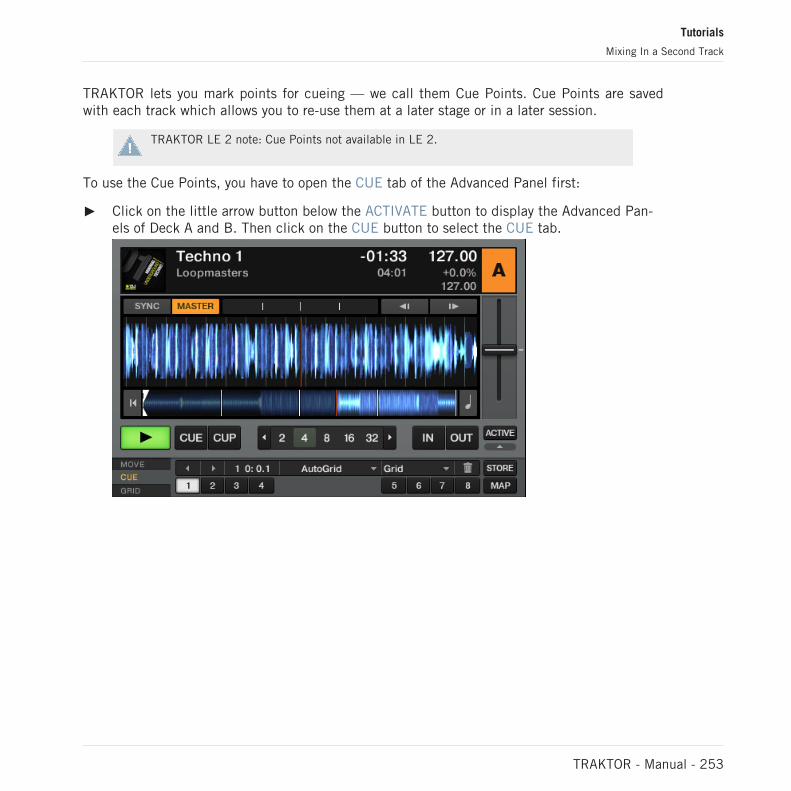
TRAKTOR lets you mark points for cueing — we call them Cue Points. Cue Points are savedwith each track which allows you to re-use them at a later stage or in a later session.
TRAKTOR LE 2 note: Cue Points not available in LE 2.
To use the Cue Points, you have to open the CUE tab of the Advanced Panel first:
► Click on the little arrow button below the ACTIVATE button to display the Advanced Pan-els of Deck A and B. Then click on the CUE button to select the CUE tab.
Tutorials
Mixing In a Second Track
TRAKTOR - Manual - 253
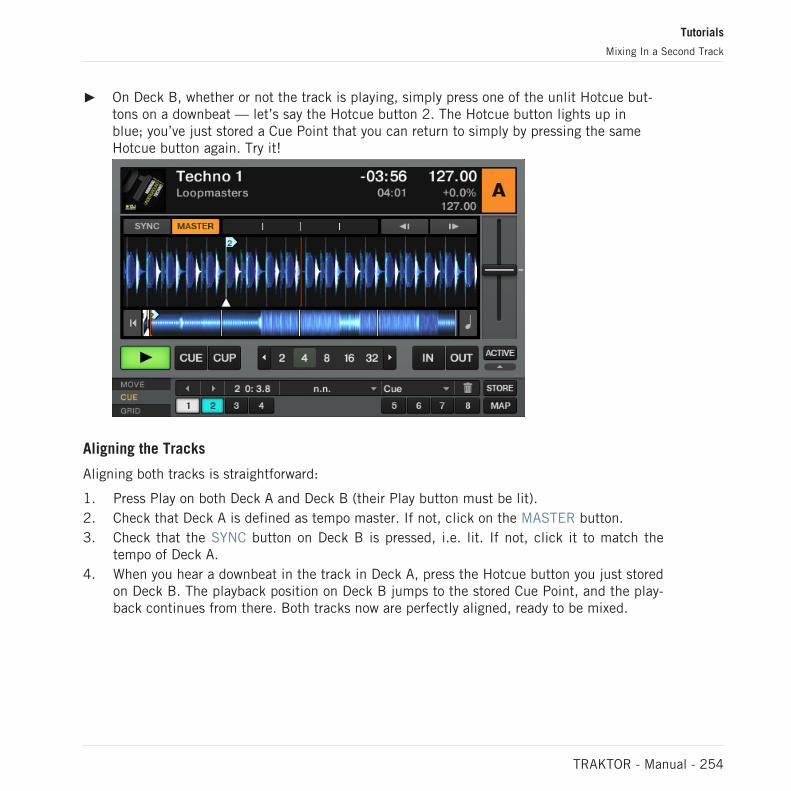
► On Deck B, whether or not the track is playing, simply press one of the unlit Hotcue but-tons on a downbeat — let’s say the Hotcue button 2. The Hotcue button lights up inblue; you’ve just stored a Cue Point that you can return to simply by pressing the sameHotcue button again. Try it!
Aligning the Tracks
Aligning both tracks is straightforward:
1. Press Play on both Deck A and Deck B (their Play button must be lit).2. Check that Deck A is defined as tempo master. If not, click on the MASTER button.3. Check that the SYNC button on Deck B is pressed, i.e. lit. If not, click it to match the
tempo of Deck A.4. When you hear a downbeat in the track in Deck A, press the Hotcue button you just stored
on Deck B. The playback position on Deck B jumps to the stored Cue Point, and the play-back continues from there. Both tracks now are perfectly aligned, ready to be mixed.
Tutorials
Mixing In a Second Track
TRAKTOR - Manual - 254
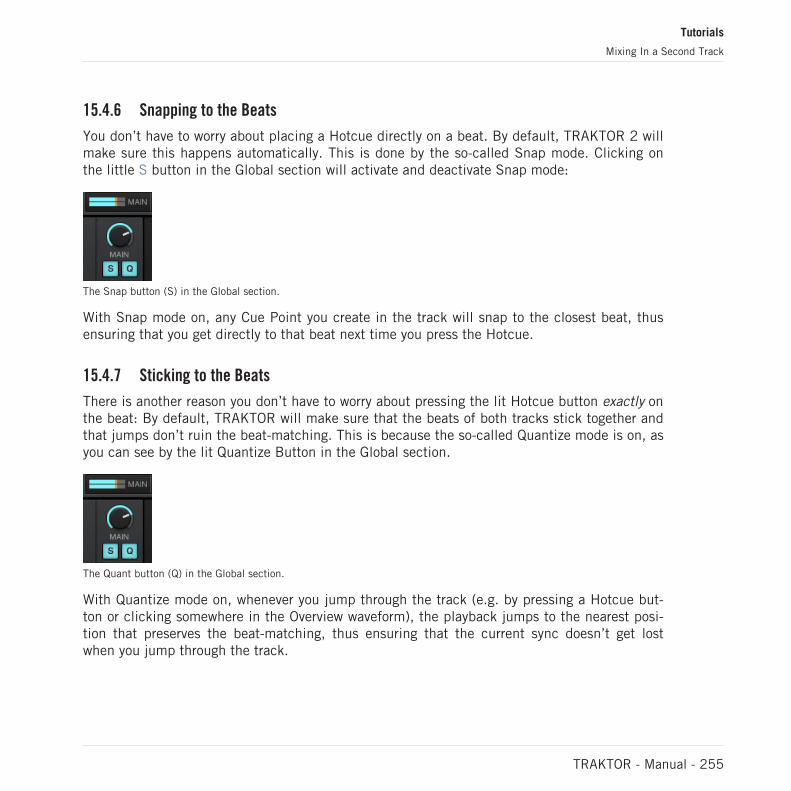
15.4.6 Snapping to the Beats
You don’t have to worry about placing a Hotcue directly on a beat. By default, TRAKTOR 2 willmake sure this happens automatically. This is done by the so-called Snap mode. Clicking onthe little S button in the Global section will activate and deactivate Snap mode:
The Snap button (S) in the Global section.
With Snap mode on, any Cue Point you create in the track will snap to the closest beat, thusensuring that you get directly to that beat next time you press the Hotcue.
15.4.7 Sticking to the Beats
There is another reason you don’t have to worry about pressing the lit Hotcue button exactly onthe beat: By default, TRAKTOR will make sure that the beats of both tracks stick together andthat jumps don’t ruin the beat-matching. This is because the so-called Quantize mode is on, asyou can see by the lit Quantize Button in the Global section.
The Quant button (Q) in the Global section.
With Quantize mode on, whenever you jump through the track (e.g. by pressing a Hotcue but-ton or clicking somewhere in the Overview waveform), the playback jumps to the nearest posi-tion that preserves the beat-matching, thus ensuring that the current sync doesn’t get lostwhen you jump through the track.
Tutorials
Mixing In a Second Track
TRAKTOR - Manual - 255
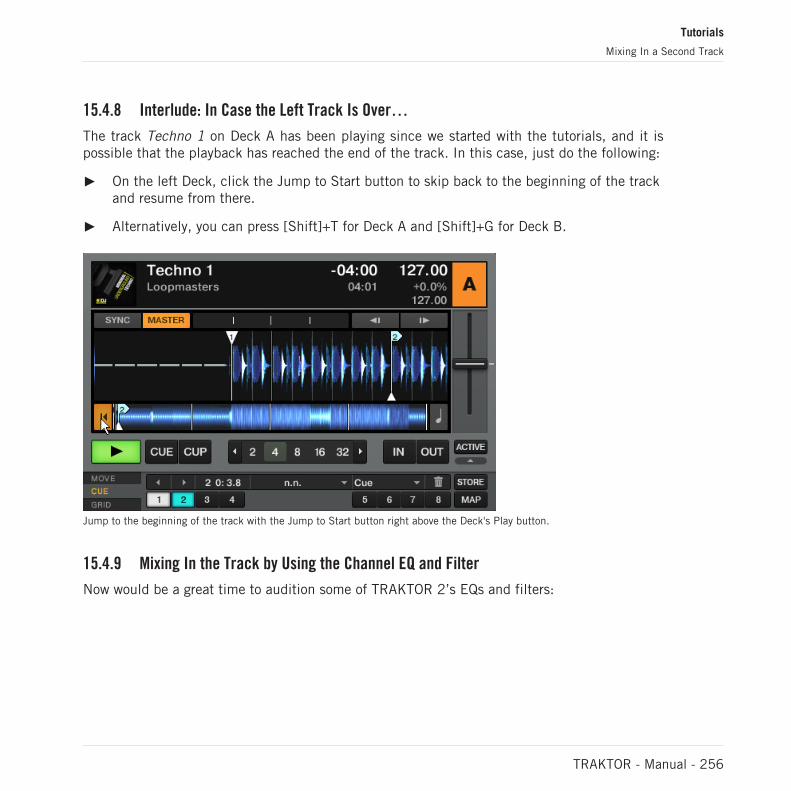
15.4.8 Interlude: In Case the Left Track Is Over…
The track Techno 1 on Deck A has been playing since we started with the tutorials, and it ispossible that the playback has reached the end of the track. In this case, just do the following:
► On the left Deck, click the Jump to Start button to skip back to the beginning of the trackand resume from there.
► Alternatively, you can press [Shift]+T for Deck A and [Shift]+G for Deck B.
Jump to the beginning of the track with the Jump to Start button right above the Deck's Play button.
15.4.9 Mixing In the Track by Using the Channel EQ and Filter
Now would be a great time to audition some of TRAKTOR 2’s EQs and filters:
Tutorials
Mixing In a Second Track
TRAKTOR - Manual - 256
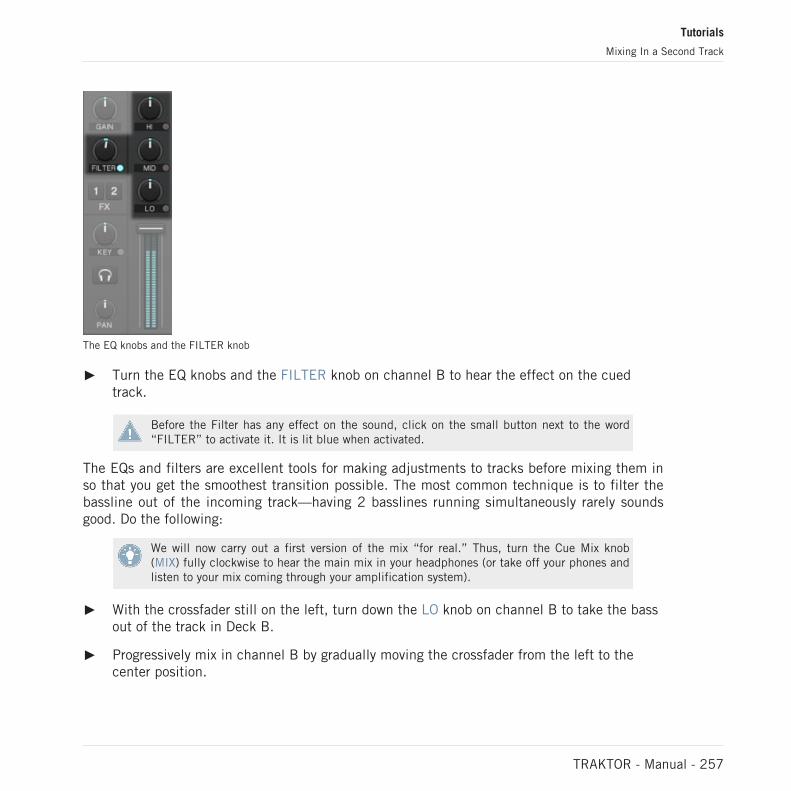
The EQ knobs and the FILTER knob
► Turn the EQ knobs and the FILTER knob on channel B to hear the effect on the cuedtrack.
Before the Filter has any effect on the sound, click on the small button next to the word“FILTER” to activate it. It is lit blue when activated.
The EQs and filters are excellent tools for making adjustments to tracks before mixing them inso that you get the smoothest transition possible. The most common technique is to filter thebassline out of the incoming track—having 2 basslines running simultaneously rarely soundsgood. Do the following:
We will now carry out a first version of the mix “for real.” Thus, turn the Cue Mix knob(MIX) fully clockwise to hear the main mix in your headphones (or take off your phones andlisten to your mix coming through your amplification system).
► With the crossfader still on the left, turn down the LO knob on channel B to take the bassout of the track in Deck B.
► Progressively mix in channel B by gradually moving the crossfader from the left to thecenter position.
Tutorials
Mixing In a Second Track
TRAKTOR - Manual - 257

► When both tracks are running together and you want to bring the bass back in, graduallydecrease the bass amount of channel A while simultaneously increasing that of channel Busing the LO knobs on both channels.
► Complete the transition by gradually moving the crossfader all the way to the right. Youjust did your first mix with TRAKTOR 2!
15.4.10 Manual Beat-matching
You can also beat-match manually instead of using TRAKTOR’s sync facilities. Some DJs justprefer manual beat-matching, but it can also become necessary in certain situations:
▪ playing tracks that have not been beat-gridded
▪ syncing to a vinyl record or audio CD
▪ playing “back-to-back” with another DJ
▪ playing music styles that don’t have quantized beats, e.g. Soul, Funk and other musicwith a live drummer.
To show this, let’s mix the track in Deck B with a new track in Deck A.
From now on, the track on Deck B is “on air,” i.e. it is heard by your audience. Hence, wewill now exclusively work on the Deck A.
First Steps
► First check that the crossfader is at full right.
► Make sure the SYNC button of Deck A is off.
At first, it may help to select a track with a similar BPM.
Adjusting the Tempo with Tempo Fader and Phase Meter
The tempo for each Deck can be manually controlled via the Tempo fader:
Tutorials
Mixing In a Second Track
TRAKTOR - Manual - 258
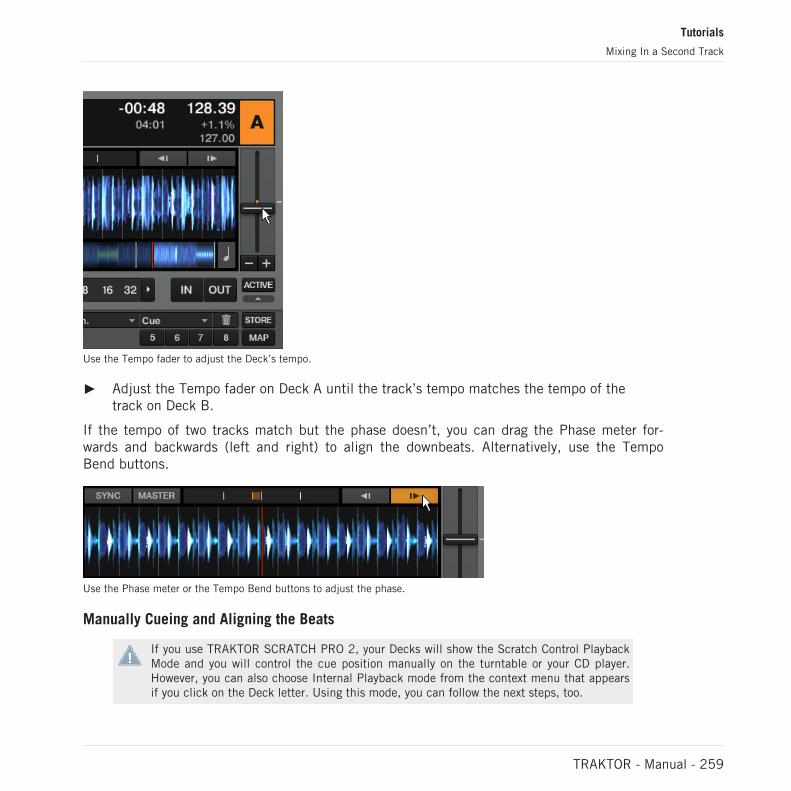
Use the Tempo fader to adjust the Deck’s tempo.
► Adjust the Tempo fader on Deck A until the track’s tempo matches the tempo of thetrack on Deck B.
If the tempo of two tracks match but the phase doesn’t, you can drag the Phase meter for-wards and backwards (left and right) to align the downbeats. Alternatively, use the TempoBend buttons.
Use the Phase meter or the Tempo Bend buttons to adjust the phase.
Manually Cueing and Aligning the Beats
If you use TRAKTOR SCRATCH PRO 2, your Decks will show the Scratch Control PlaybackMode and you will control the cue position manually on the turntable or your CD player.However, you can also choose Internal Playback mode from the context menu that appearsif you click on the Deck letter. Using this mode, you can follow the next steps, too.
Tutorials
Mixing In a Second Track
TRAKTOR - Manual - 259
First, find an interesting Cue Point to start from, e.g., the break:
1. With Deck A stopped, drag the waveform of the track in Deck A until the beginning of thebreak.
2. Click the CUE button. A blue triangle shows that there is now a floating Cue Point.3. Click the CUP button and release it when you hear a downbeat in Deck B. The track will
start playing when you release the button.4. If done correctly, the songs will be in sync. If the songs begin to fall out of sync, adjust
the tempo with TRAKTOR’s Tempo fader and re-press the CUP button to try again.5. Use the Phase meter to align the downbeats.6. When you’re ready, you can bring the crossfader over from Deck B and slowly mix in the
track in Deck A.
Don’t expect to be capable of manually matching beats right away, though—this requiresintensive training and can’t be fully explained here in detail. In fact, it’s often much easierto learn beat-matching by watching someone perform it. For this reason, it is recommendedthat you search the Internet for beat-matching tutorial videos to see the process in action.Remember: Practice makes perfect!
15.5 Adjusting Levels
For TRAKTOR SCRATCH PRO 2 users, the theory described in the next sections is prettymuch the same, however, you have to continue the practice on your hardware mixer!
Before going any further, we would like you to be aware of how important it is to have your mixat the right level. We provide you here with a few simple hints in order to get the best soundout of your mix.
Even if this section might look a bit technical, please take the time to read these few pagesas they can save you a lot of trouble, especially in a live situation!
15.5.1 The Theory…
There are three basic mixing rules:
Tutorials
Adjusting Levels
TRAKTOR - Manual - 260
Making best use of the available dynamic range on each stage of the mix. This ensures to besafely above the so called "noise floor", which is the “buzz” that you hear when stopping alldecks and cranking up the speakers.
Leveling the signals from your decks for a smooth mix - none of the tracks should dominateover the others.
Avoiding clipping at all costs. Audio interfaces have physical limits - if you exceed these limitsyour sound get's distorted, hurts peoples ears and looses punch.
Note that internally TRAKTOR's mixer cannot clip, due to its digital nature - clipping onlyoccurs at the output stage towards the audio interface.
15.5.2 …and the Practice
To assist you in adjusting levels, the Mixer of TRAKTOR 2 is equipped with level meters andcontrols. Each level meter consists of a colored bar indicating the signal level. The rules men-tioned above can thus be translated as follows:
► Best practices when adjusting levels: The levels should be kept in the upper third andshould not at all (or only rarely) touch the red top of the level meter.
By using a mixing technique where you swap the bass lines of two tracks as described inchapter ↑15.4.9, Mixing In the Track by Using the Channel EQ and Filter, you should alsoensure that the main level (Master output signal) doesn’t clip or distort.
Making Best Use of the Dynamic Range on Each Channel
Each channel on the Mixer provides you with a vertical channel meter. This meter shows youthe pre-fader level of the signal on that channel, i.e., the level of the signal before it passesthe channel fader. To adjust this level, use the GAIN knob:
► Adjust the channel’s GAIN knob so that the level displayed on the channel meter stays inthe upper third without reaching the top.
Of course, the artistic side of your tracks should not be overlooked: for tracks with a varia-ble average level over time (e.g. a track starting with a soft intro), you should consider theloudest parts of the track when adjusting the channel level.
Tutorials
Adjusting Levels
TRAKTOR - Manual - 261
TRAKTOR 2 already does this for you by automatically setting the level for each newly load-ed track to a satisfying value. This so-called “Autogain” feature relies on the gain valuesextracted from your tracks. It is activated by default and can be turned off via Preferences> Mixer > Set Autogain when Loading Track. (You can always re-adjust the Autogain levelas described in ↑7.4, GAIN, Cue and PAN). Nevertheless, depending on the particular EQ,filter, and FX applied to the cued track, you might have to double-check the level beforeyou mix in the track. Moreover, what is important here is the average level of the specificpart of the track that you’re about to mix in.
Matching Levels Between Channels
Moreover, in order to avoid any level jump when crossfading between two channels, you mustadjust the average channel levels between the decks involved in a mix:
► Before mixing in a cued channel, adjust its GAIN encoder so that its channel meter activ-ity roughly matches that of the channel currently on air. In doing so, you must be aware,that variations of volume within the tracks may influence this procedure – the Autogainvalue always gives you a good indication of the Gain level that should be applied to atrack as described above.
Controlling the Main Output Level
The MAIN output level in TRAKTOR can be adjusted independently from a master out con-trol on an external hardware mixer!
The signals coming from all channels are mixed together according to the relative levels set bythe channel faders and by the crossfader. This mix is then sent to TRAKTOR’s MAIN output. Inthis section, the MAIN level meters show you the (left and right) overall level of your mix andcan be adjusted by the MAIN level knob:
► Adjust the MAIN knob in so that the level meters stay in the upper blue and orange areawithout reaching the red ends.
Tutorials
Adjusting Levels
TRAKTOR - Manual - 262
By default a mixer headroom of -6 dB is applied to the output. This provides you an extra6 dB of headroom between the MAIN level meter’s upper orange area (clear signal) and thered area (signal starts clipping). Headroom is used to avoid instantly creating signal peaksthat clip the output as this can create unpleasant distortion. However, headroom is appliedat the cost of the overall output volume, to compensate for this the hardware level (or gain)on the DJ mixer or amplifiers driving the speaker system should be increased during sound-check.
In simple words: your sound will benefit from keeping it a bit lower on software level andboosting it afterwards on hardware level.
The digital headroom using in TRAKTOR’s internal mixer can be set in Preferences > Mixer> Levels > Headroom. Set it to -3 dB or even 0 dB if due to poor amplification you can’tachieve the output volume you whish – but don’t overdo this, because more volume easilyturns into less punch!
For safety reasons a limiter is enabled on TRAKTOR’s main output by default. With thislimiter enabled, the MAIN level meters’ red clipping indicators show when the limiter is ac-tively limiting the volume. While the limiter virtually cancels any distortion that might oc-cur, the resulting reduction of the dynamic range cannot be undone. Therefore, even withthe limiter enabled, ensure that the clipping indicators don’t light up too often! For un-al-tered sound even in the peaks you can deactivate the limiter via Preferences > Mixer > En-able Limiter but you must watch your outputs much more thoroughly, because clipping ona powerful speaker system can easily harm your audiences ears!
15.6 Looping and Cueing
Now that you have learned the basic mixing tasks, we will focus on one of TRAKTOR’s greatfeatures: its looping facilities.
Prerequisites
TRAKTOR 2 is in the following state:
▪ The track House 1 is loaded on Deck A. The track is playing and audible. It is also thetempo master.
▪ The crossfader is all the way to the left.
Tutorials
Looping and Cueing
TRAKTOR - Manual - 263
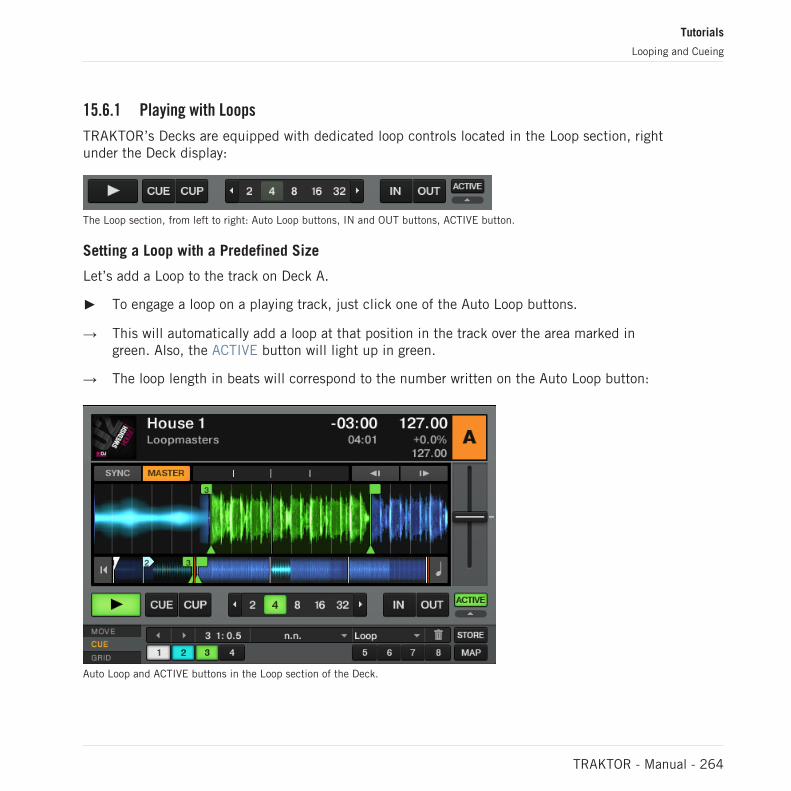
15.6.1 Playing with Loops
TRAKTOR’s Decks are equipped with dedicated loop controls located in the Loop section, rightunder the Deck display:
The Loop section, from left to right: Auto Loop buttons, IN and OUT buttons, ACTIVE button.
Setting a Loop with a Predefined Size
Let’s add a Loop to the track on Deck A.
► To engage a loop on a playing track, just click one of the Auto Loop buttons.
→ This will automatically add a loop at that position in the track over the area marked ingreen. Also, the ACTIVE button will light up in green.
→ The loop length in beats will correspond to the number written on the Auto Loop button:
Auto Loop and ACTIVE buttons in the Loop section of the Deck.
Tutorials
Looping and Cueing
TRAKTOR - Manual - 264
► To change the size of the Loop, just click another Auto Loop button.
Setting a Loop Manually
You can also manually set loop start and loop end points. To do this, use the Loop IN and LoopOUT buttons in the Loop section:
The Loop IN and Loop OUT buttons.
► Press the IN button to set the Loop In Point.
► Press the OUT button to set the Loop Out Point. As soon as you hit the OUT button, theLoop is set and the track will start looping.
We already introduced the Snap mode in the previous tutorial (see ↑15.4.5, Setting a CuePoint as Starting Point). This mode also affects the Loop In and Loop Out Points so that theywill automatically be positioned directly on the beat.
Moving a Loop
You can also quickly move the active Loop across your track by using the MOVE Advanced tab:
Tutorials
Looping and Cueing
TRAKTOR - Manual - 265
The MOVE Advanced Tab
► Select Loop from the drop-down menu on the left.
► Select a Move Size from the list on the right by clicking on the desired button.
► Move the Loop forward or backward with the Loop Move buttons (arrow buttons).
The MOVE Advanced tab also offers the options to move only the Loop In or Loop Out pointwhich can be used for tension-building drum rolls.
TRAKTOR LE 2 note: Moving Loops is not available in LE 2.
Storing a Loop
In the previous tutorial, we looked at how to store Cue Points. In a similar fashion, you canstore Loops as well:
► To store the active Loop, press an unlit Hotcue button.
→ The Hotcue button lights up, this time in green—you’ve just stored a Loop that you canreturn to simply by pressing the same Hotcue button again.
The Cue tab with a stored loop, marked in green.
Tutorials
Looping and Cueing
TRAKTOR - Manual - 266

If you exceed the 8 Hotcue slots, you can use the STORE button to store even more Hot-cues or Loops in your track. The MAP button allows you to re-organize their order.
TRAKTOR LE 2 note: Storing Loops is not available in LE 2.
Deactivating Looping
If you want to deactivate the current Loop, do the following:
► To deactivate looping, click the green ACTIVE button. The playback continues after theLoop.
By pressing the ACTIVE button when there is no Loop currently active, you activate looping.The next Loop in the track will be activated.
15.6.2 Using Hotcues
We’ve already seen how to use Hotcues to store Cue Points and Loops. We want to show youhere a few more details on their use.
► First, open the CUE Advanced tab again.
As already explained, when pressing an unlit Hotcue button, if there is no Loop active, youstore a Cue Point at the current playback position (the Hotcue button turns blue). If there is aLoop active, you store this Loop (the Hotcue button turns green).
In the waveform of the Deck, you can see that a vertical line with the same color appears inthe track at the corresponding position. Moreover, a little number at the top reminds you whichbutton you should use to jump to that Cue Point or Loop:
Tutorials
Looping and Cueing
TRAKTOR - Manual - 267
A waveform with a Cue Point stored as Hotcue 1 and a Loop stored as Hotcue 2.
If you made a mistake, or just decide you no longer want a particular Hotcue, you can quickly delete it:
1. Click on the respective Hotcue.2. Click on the Trash button (trash can symbol).
→ You can see that the button is no longer lit.
TRAKTOR LE 2 note: Hotcues are not available in LE 2.
Creative Uses of Hotcues
Hotcues aren’t just bookmarks to particular sections of a track—they can also be used for crea-tive techniques such as remixing parts of a song, beat-juggling, etc.
As an example, we will show you here how you can quickly make use of a Loop stored in aHotcue slot to introduce the track you’re about to mix in. By the way, this will allow us to sumup what we’ve learned until now.
The track Techno 2 is still loaded on Deck B. The track on Deck A is on air (crossfader at fullleft) and you want to prepare the track on Deck B for mixing in:
► Start the playback of the track in Deck B and send it to your headphones by activatingthe Headphones Cue button of Deck B.
Tutorials
Looping and Cueing
TRAKTOR - Manual - 268
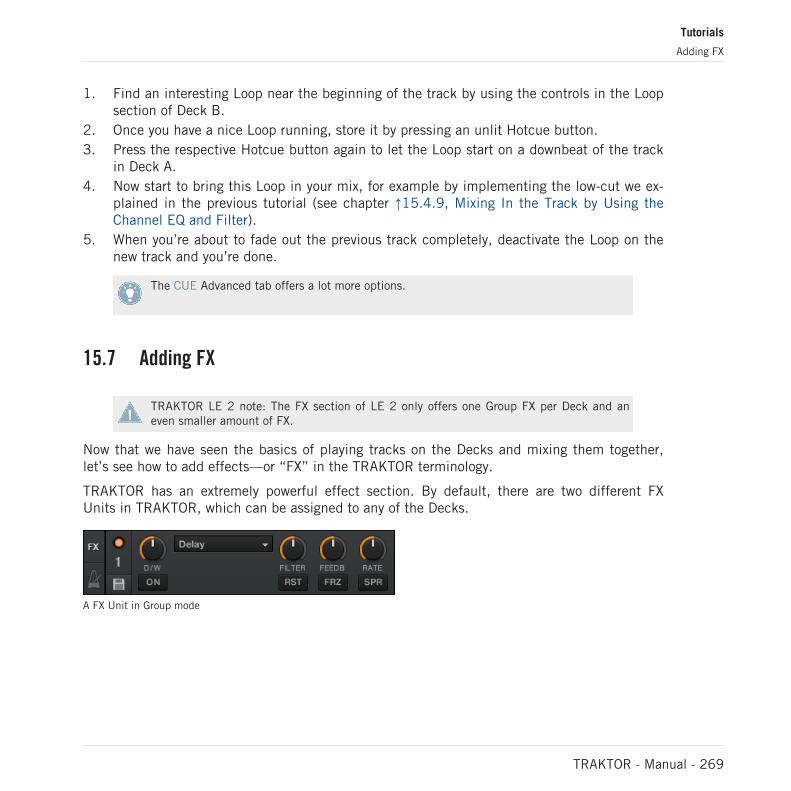
1. Find an interesting Loop near the beginning of the track by using the controls in the Loopsection of Deck B.
2. Once you have a nice Loop running, store it by pressing an unlit Hotcue button.3. Press the respective Hotcue button again to let the Loop start on a downbeat of the track
in Deck A.4. Now start to bring this Loop in your mix, for example by implementing the low-cut we ex-
plained in the previous tutorial (see chapter ↑15.4.9, Mixing In the Track by Using theChannel EQ and Filter).
5. When you’re about to fade out the previous track completely, deactivate the Loop on thenew track and you’re done.
The CUE Advanced tab offers a lot more options.
15.7 Adding FX
TRAKTOR LE 2 note: The FX section of LE 2 only offers one Group FX per Deck and aneven smaller amount of FX.
Now that we have seen the basics of playing tracks on the Decks and mixing them together,let’s see how to add effects—or “FX” in the TRAKTOR terminology.
TRAKTOR has an extremely powerful effect section. By default, there are two different FXUnits in TRAKTOR, which can be assigned to any of the Decks.
A FX Unit in Group mode
Tutorials
Adding FX
TRAKTOR - Manual - 269
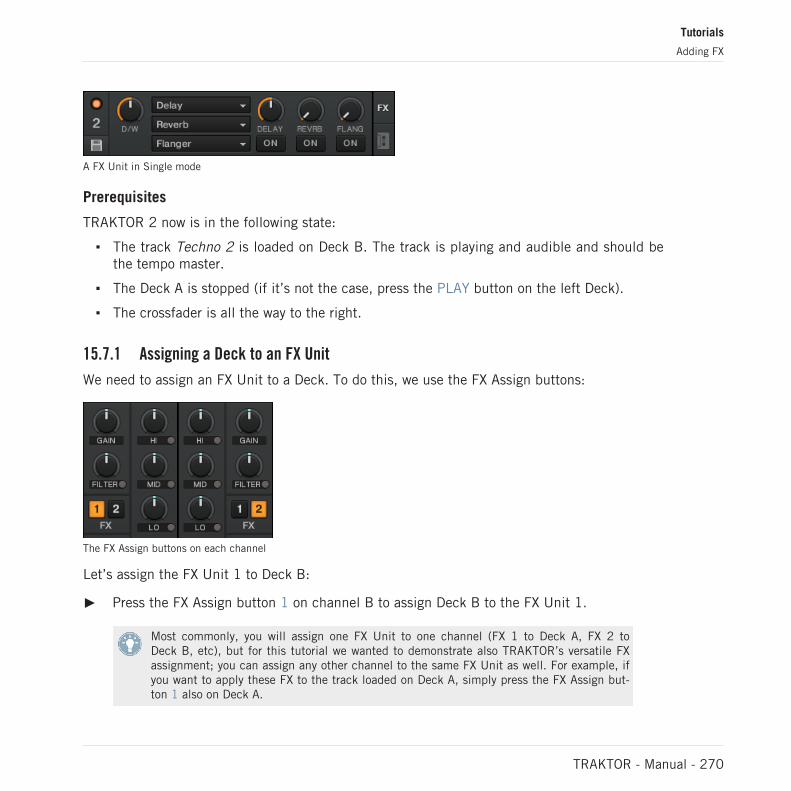
A FX Unit in Single mode
Prerequisites
TRAKTOR 2 now is in the following state:
▪ The track Techno 2 is loaded on Deck B. The track is playing and audible and should bethe tempo master.
▪ The Deck A is stopped (if it’s not the case, press the PLAY button on the left Deck).
▪ The crossfader is all the way to the right.
15.7.1 Assigning a Deck to an FX Unit
We need to assign an FX Unit to a Deck. To do this, we use the FX Assign buttons:
The FX Assign buttons on each channel
Let’s assign the FX Unit 1 to Deck B:
► Press the FX Assign button 1 on channel B to assign Deck B to the FX Unit 1.
Most commonly, you will assign one FX Unit to one channel (FX 1 to Deck A, FX 2 toDeck B, etc), but for this tutorial we wanted to demonstrate also TRAKTOR’s versatile FXassignment; you can assign any other channel to the same FX Unit as well. For example, ifyou want to apply these FX to the track loaded on Deck A, simply press the FX Assign but-ton 1 also on Deck A.
Tutorials
Adding FX
TRAKTOR - Manual - 270
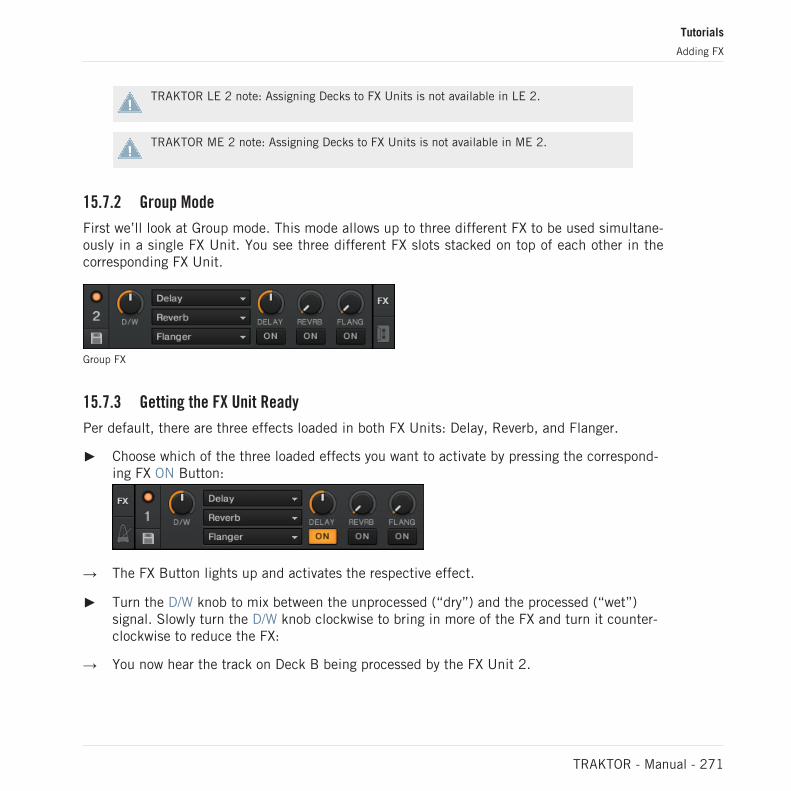
TRAKTOR LE 2 note: Assigning Decks to FX Units is not available in LE 2.
TRAKTOR ME 2 note: Assigning Decks to FX Units is not available in ME 2.
15.7.2 Group Mode
First we’ll look at Group mode. This mode allows up to three different FX to be used simultane-ously in a single FX Unit. You see three different FX slots stacked on top of each other in thecorresponding FX Unit.
Group FX
15.7.3 Getting the FX Unit Ready
Per default, there are three effects loaded in both FX Units: Delay, Reverb, and Flanger.
► Choose which of the three loaded effects you want to activate by pressing the correspond-ing FX ON Button:
→ The FX Button lights up and activates the respective effect.
► Turn the D/W knob to mix between the unprocessed (“dry”) and the processed (“wet”)signal. Slowly turn the D/W knob clockwise to bring in more of the FX and turn it counter-clockwise to reduce the FX:
→ You now hear the track on Deck B being processed by the FX Unit 2.
Tutorials
Adding FX
TRAKTOR - Manual - 271
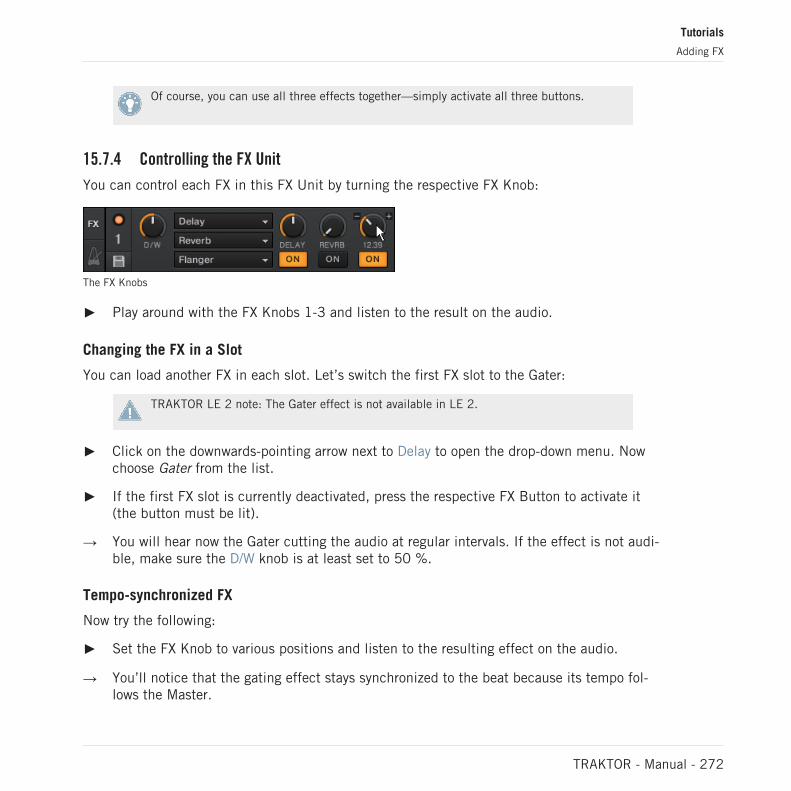
Of course, you can use all three effects together—simply activate all three buttons.
15.7.4 Controlling the FX Unit
You can control each FX in this FX Unit by turning the respective FX Knob:
The FX Knobs
► Play around with the FX Knobs 1-3 and listen to the result on the audio.
Changing the FX in a Slot
You can load another FX in each slot. Let’s switch the first FX slot to the Gater:
TRAKTOR LE 2 note: The Gater effect is not available in LE 2.
► Click on the downwards-pointing arrow next to Delay to open the drop-down menu. Nowchoose Gater from the list.
► If the first FX slot is currently deactivated, press the respective FX Button to activate it(the button must be lit).
→ You will hear now the Gater cutting the audio at regular intervals. If the effect is not audi-ble, make sure the D/W knob is at least set to 50 %.
Tempo-synchronized FX
Now try the following:
► Set the FX Knob to various positions and listen to the resulting effect on the audio.
→ You’ll notice that the gating effect stays synchronized to the beat because its tempo fol-lows the Master.
Tutorials
Adding FX
TRAKTOR - Manual - 272
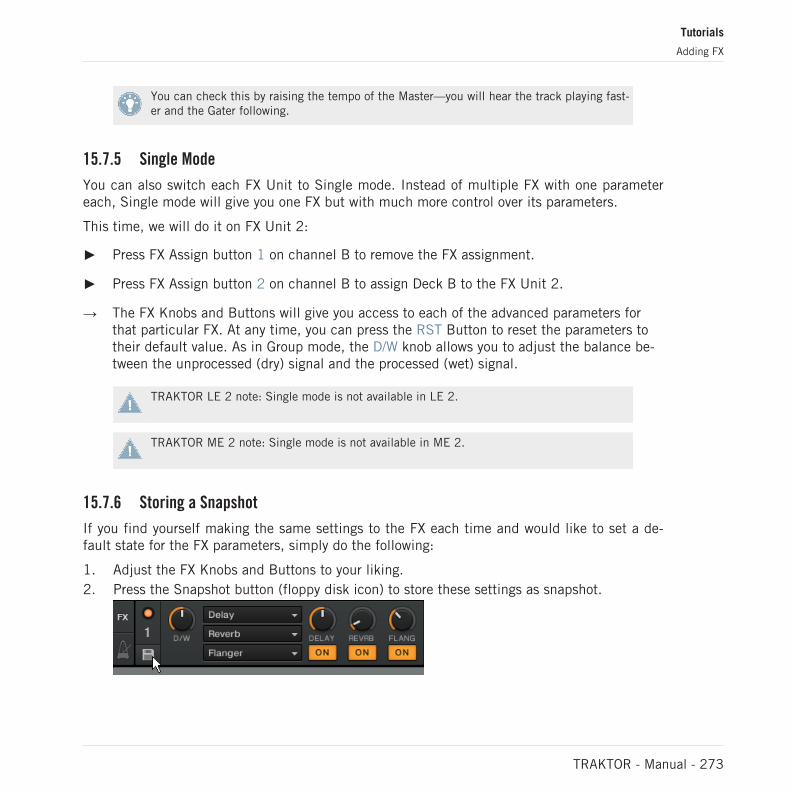
You can check this by raising the tempo of the Master—you will hear the track playing fast-er and the Gater following.
15.7.5 Single Mode
You can also switch each FX Unit to Single mode. Instead of multiple FX with one parametereach, Single mode will give you one FX but with much more control over its parameters.
This time, we will do it on FX Unit 2:
► Press FX Assign button 1 on channel B to remove the FX assignment.
► Press FX Assign button 2 on channel B to assign Deck B to the FX Unit 2.
→ The FX Knobs and Buttons will give you access to each of the advanced parameters forthat particular FX. At any time, you can press the RST Button to reset the parameters totheir default value. As in Group mode, the D/W knob allows you to adjust the balance be-tween the unprocessed (dry) signal and the processed (wet) signal.
TRAKTOR LE 2 note: Single mode is not available in LE 2.
TRAKTOR ME 2 note: Single mode is not available in ME 2.
15.7.6 Storing a Snapshot
If you find yourself making the same settings to the FX each time and would like to set a de-fault state for the FX parameters, simply do the following:
1. Adjust the FX Knobs and Buttons to your liking.2. Press the Snapshot button (floppy disk icon) to store these settings as snapshot.
Tutorials
Adding FX
TRAKTOR - Manual - 273
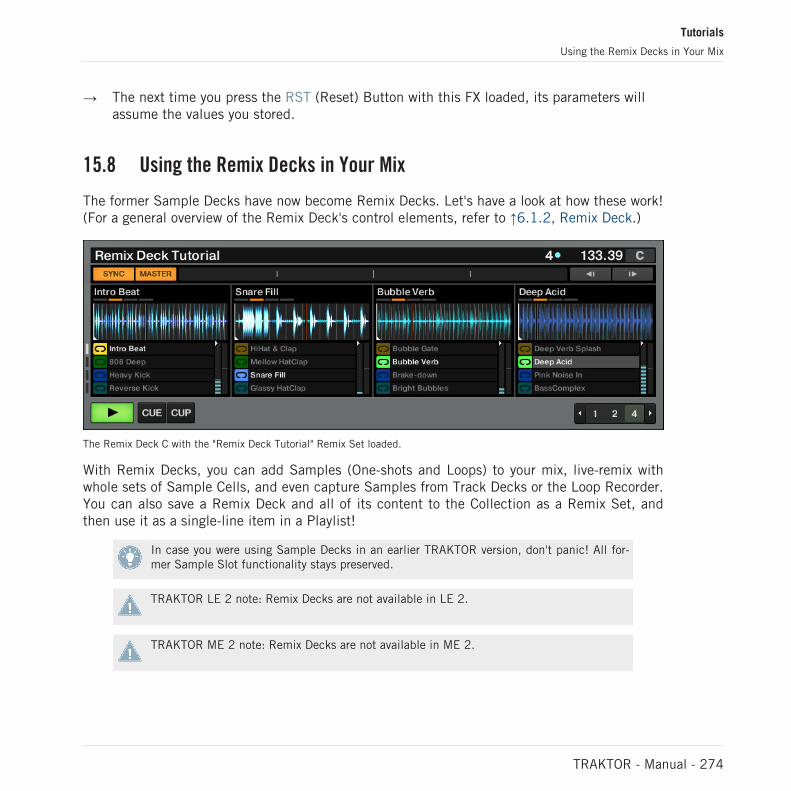
→ The next time you press the RST (Reset) Button with this FX loaded, its parameters willassume the values you stored.
15.8 Using the Remix Decks in Your Mix
The former Sample Decks have now become Remix Decks. Let's have a look at how these work!(For a general overview of the Remix Deck's control elements, refer to ↑6.1.2, Remix Deck.)
The Remix Deck C with the "Remix Deck Tutorial" Remix Set loaded.
With Remix Decks, you can add Samples (One-shots and Loops) to your mix, live-remix withwhole sets of Sample Cells, and even capture Samples from Track Decks or the Loop Recorder.You can also save a Remix Deck and all of its content to the Collection as a Remix Set, andthen use it as a single-line item in a Playlist!
In case you were using Sample Decks in an earlier TRAKTOR version, don't panic! All for-mer Sample Slot functionality stays preserved.
TRAKTOR LE 2 note: Remix Decks are not available in LE 2.
TRAKTOR ME 2 note: Remix Decks are not available in ME 2.
Tutorials
Using the Remix Decks in Your Mix
TRAKTOR - Manual - 274
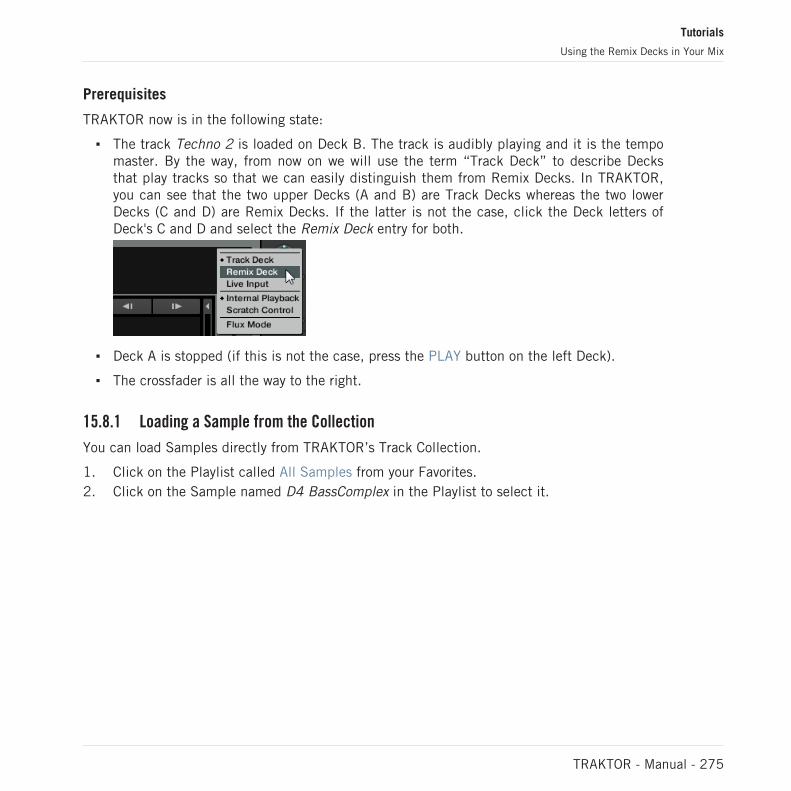
Prerequisites
TRAKTOR now is in the following state:
▪ The track Techno 2 is loaded on Deck B. The track is audibly playing and it is the tempomaster. By the way, from now on we will use the term “Track Deck” to describe Decksthat play tracks so that we can easily distinguish them from Remix Decks. In TRAKTOR,you can see that the two upper Decks (A and B) are Track Decks whereas the two lowerDecks (C and D) are Remix Decks. If the latter is not the case, click the Deck letters ofDeck's C and D and select the Remix Deck entry for both.
▪ Deck A is stopped (if this is not the case, press the PLAY button on the left Deck).
▪ The crossfader is all the way to the right.
15.8.1 Loading a Sample from the Collection
You can load Samples directly from TRAKTOR’s Track Collection.
1. Click on the Playlist called All Samples from your Favorites.2. Click on the Sample named D4 BassComplex in the Playlist to select it.
Tutorials
Using the Remix Decks in Your Mix
TRAKTOR - Manual - 275
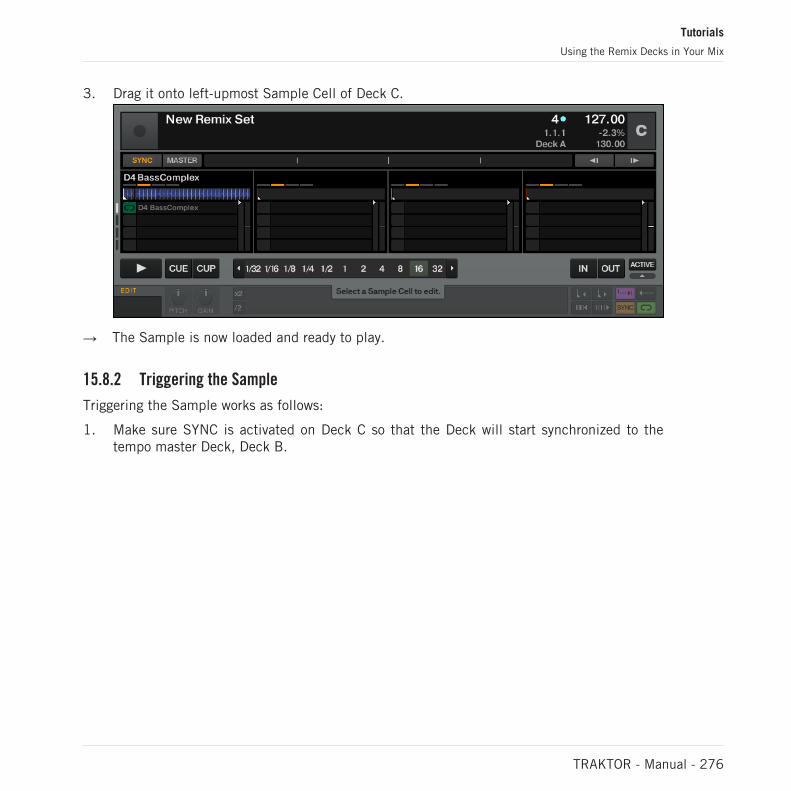
3. Drag it onto left-upmost Sample Cell of Deck C.
→ The Sample is now loaded and ready to play.
15.8.2 Triggering the Sample
Triggering the Sample works as follows:
1. Make sure SYNC is activated on Deck C so that the Deck will start synchronized to thetempo master Deck, Deck B.
Tutorials
Using the Remix Decks in Your Mix
TRAKTOR - Manual - 276
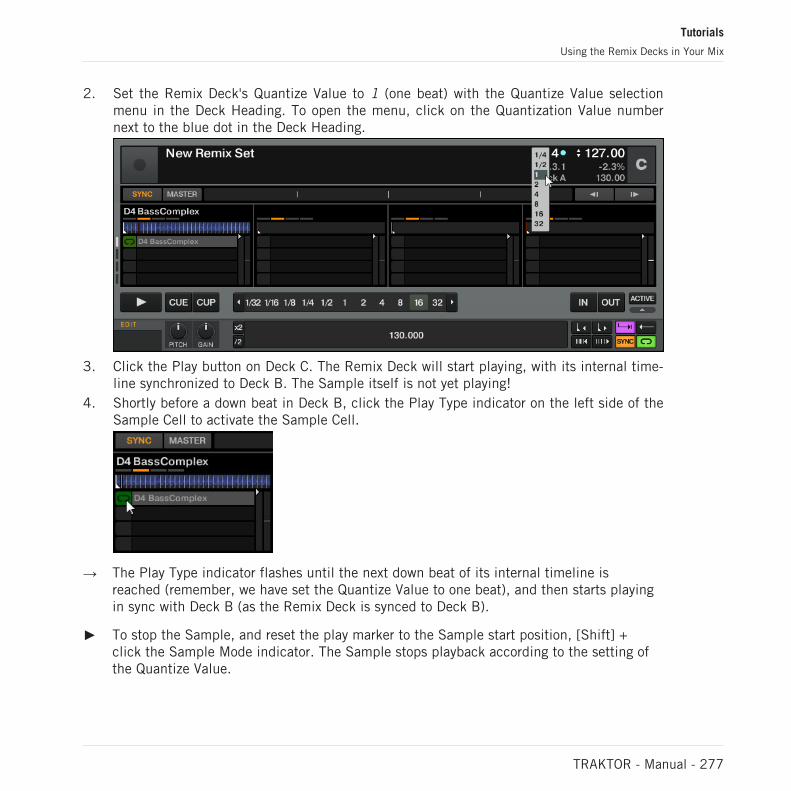
2. Set the Remix Deck's Quantize Value to 1 (one beat) with the Quantize Value selectionmenu in the Deck Heading. To open the menu, click on the Quantization Value numbernext to the blue dot in the Deck Heading.
3. Click the Play button on Deck C. The Remix Deck will start playing, with its internal time-line synchronized to Deck B. The Sample itself is not yet playing!
4. Shortly before a down beat in Deck B, click the Play Type indicator on the left side of theSample Cell to activate the Sample Cell.
→ The Play Type indicator flashes until the next down beat of its internal timeline isreached (remember, we have set the Quantize Value to one beat), and then starts playingin sync with Deck B (as the Remix Deck is synced to Deck B).
► To stop the Sample, and reset the play marker to the Sample start position, [Shift] +click the Sample Mode indicator. The Sample stops playback according to the setting ofthe Quantize Value.
Tutorials
Using the Remix Decks in Your Mix
TRAKTOR - Manual - 277
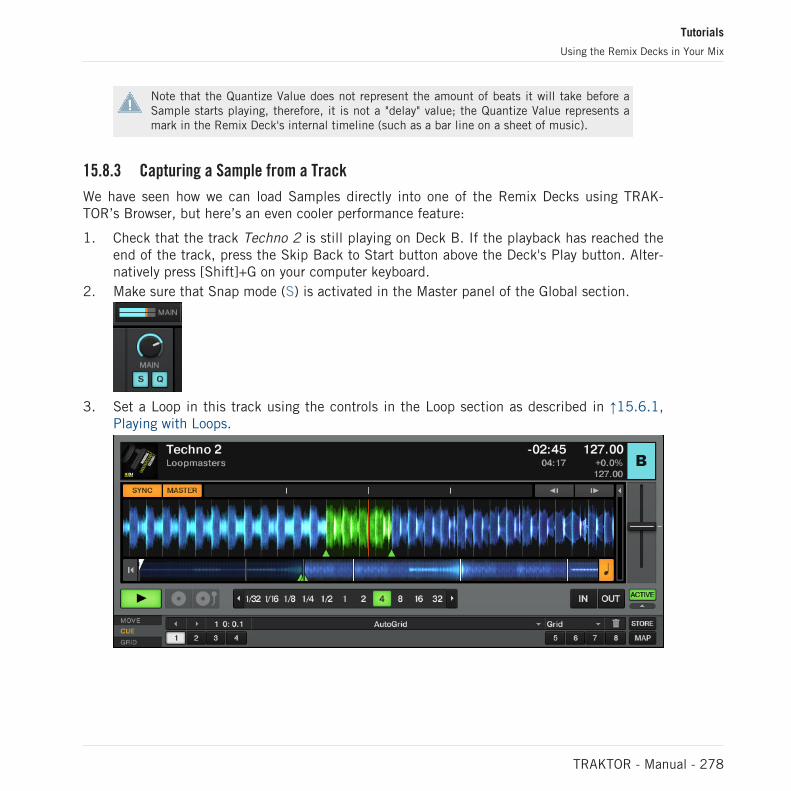
Note that the Quantize Value does not represent the amount of beats it will take before aSample starts playing, therefore, it is not a "delay" value; the Quantize Value represents amark in the Remix Deck's internal timeline (such as a bar line on a sheet of music).
15.8.3 Capturing a Sample from a Track
We have seen how we can load Samples directly into one of the Remix Decks using TRAK-TOR’s Browser, but here’s an even cooler performance feature:
1. Check that the track Techno 2 is still playing on Deck B. If the playback has reached theend of the track, press the Skip Back to Start button above the Deck's Play button. Alter-natively press [Shift]+G on your computer keyboard.
2. Make sure that Snap mode (S) is activated in the Master panel of the Global section.
3. Set a Loop in this track using the controls in the Loop section as described in ↑15.6.1,Playing with Loops.
Tutorials
Using the Remix Decks in Your Mix
TRAKTOR - Manual - 278

4. Drag and drop the track name (Techno 2) from Deck B's Deck Heading into the first Sam-ple Cell of Sample Slot 2 in our Remix Deck C.
→ The loop is copied as a Sample to Remix Deck C.
► You could now load a different track into Track Deck B, and still have the loop from theoriginal song playing in Remix Deck C. It’s great for capturing loops on the fly and usingthem to build an alternate mix.
If the Deck you copied from wasn’t playing a Loop, the Remix Deck will still capture a loopfrom the capture source Deck, but it will instead take it from the current playback position.The loop will automatically be cut to the length of the current loop size (grey-shaded AutoLoop button in the Track Deck).
► Capture a few Samples from various places from the track in Deck B and play around toget used to the basic playback controls that we described above.
15.8.4 More Sample Controls
Once you have a Sample loaded on one of the Remix Decks, you can change its sound utilizinga number of controls. There's more possibilities than described here (see also ↑6.1.2, RemixDeck for a detailed overview of all control elements of the Remix Deck, and also the TRAKTORKONTROL F1 manual), but we will at least show you some of the available functions:
Tutorials
Using the Remix Decks in Your Mix
TRAKTOR - Manual - 279
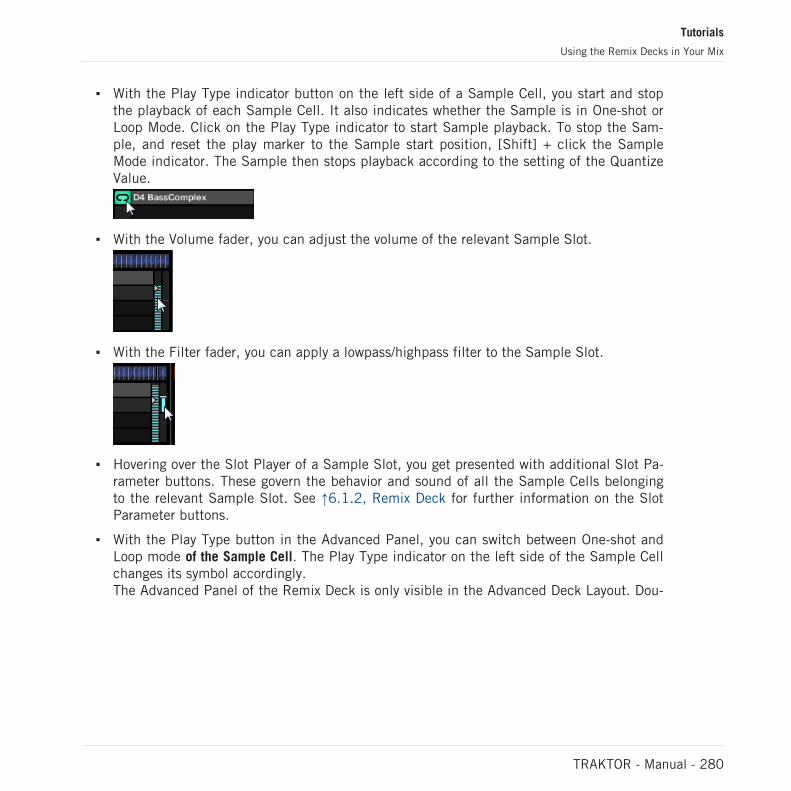
▪ With the Play Type indicator button on the left side of a Sample Cell, you start and stopthe playback of each Sample Cell. It also indicates whether the Sample is in One-shot orLoop Mode. Click on the Play Type indicator to start Sample playback. To stop the Sam-ple, and reset the play marker to the Sample start position, [Shift] + click the SampleMode indicator. The Sample then stops playback according to the setting of the QuantizeValue.
▪ With the Volume fader, you can adjust the volume of the relevant Sample Slot.
▪ With the Filter fader, you can apply a lowpass/highpass filter to the Sample Slot.
▪ Hovering over the Slot Player of a Sample Slot, you get presented with additional Slot Pa-rameter buttons. These govern the behavior and sound of all the Sample Cells belongingto the relevant Sample Slot. See ↑6.1.2, Remix Deck for further information on the SlotParameter buttons.
▪ With the Play Type button in the Advanced Panel, you can switch between One-shot andLoop mode of the Sample Cell. The Play Type indicator on the left side of the Sample Cellchanges its symbol accordingly.The Advanced Panel of the Remix Deck is only visible in the Advanced Deck Layout. Dou-
Tutorials
Using the Remix Decks in Your Mix
TRAKTOR - Manual - 280
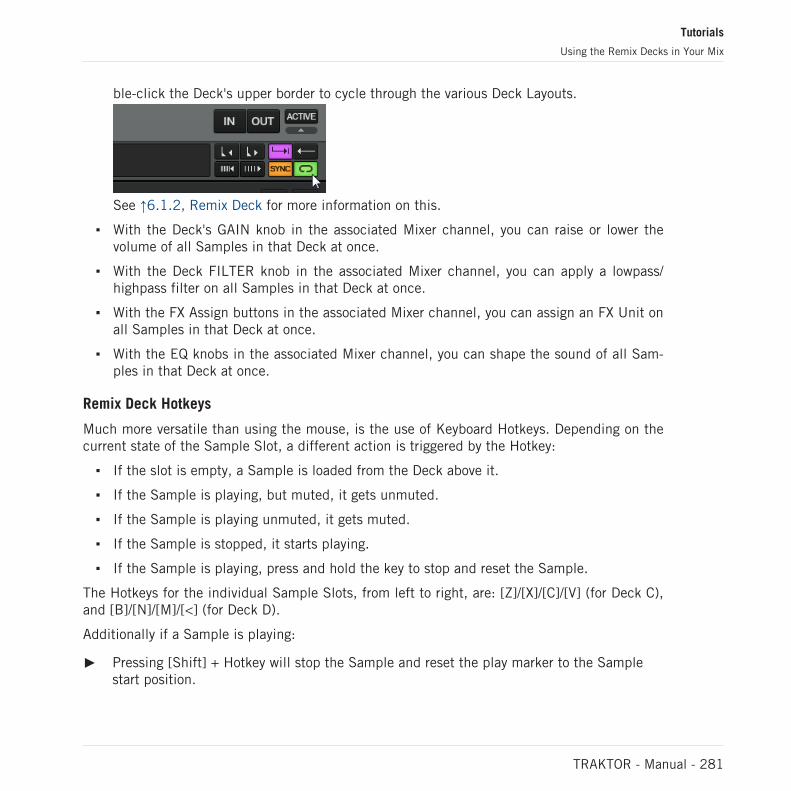
ble-click the Deck's upper border to cycle through the various Deck Layouts.
See ↑6.1.2, Remix Deck for more information on this.
▪ With the Deck's GAIN knob in the associated Mixer channel, you can raise or lower thevolume of all Samples in that Deck at once.
▪ With the Deck FILTER knob in the associated Mixer channel, you can apply a lowpass/highpass filter on all Samples in that Deck at once.
▪ With the FX Assign buttons in the associated Mixer channel, you can assign an FX Unit onall Samples in that Deck at once.
▪ With the EQ knobs in the associated Mixer channel, you can shape the sound of all Sam-ples in that Deck at once.
Remix Deck Hotkeys
Much more versatile than using the mouse, is the use of Keyboard Hotkeys. Depending on thecurrent state of the Sample Slot, a different action is triggered by the Hotkey:
▪ If the slot is empty, a Sample is loaded from the Deck above it.
▪ If the Sample is playing, but muted, it gets unmuted.
▪ If the Sample is playing unmuted, it gets muted.
▪ If the Sample is stopped, it starts playing.
▪ If the Sample is playing, press and hold the key to stop and reset the Sample.
The Hotkeys for the individual Sample Slots, from left to right, are: [Z]/[X]/[C]/[V] (for Deck C),and [B]/[N]/[M]/[<] (for Deck D).
Additionally if a Sample is playing:
► Pressing [Shift] + Hotkey will stop the Sample and reset the play marker to the Samplestart position.
Tutorials
Using the Remix Decks in Your Mix
TRAKTOR - Manual - 281
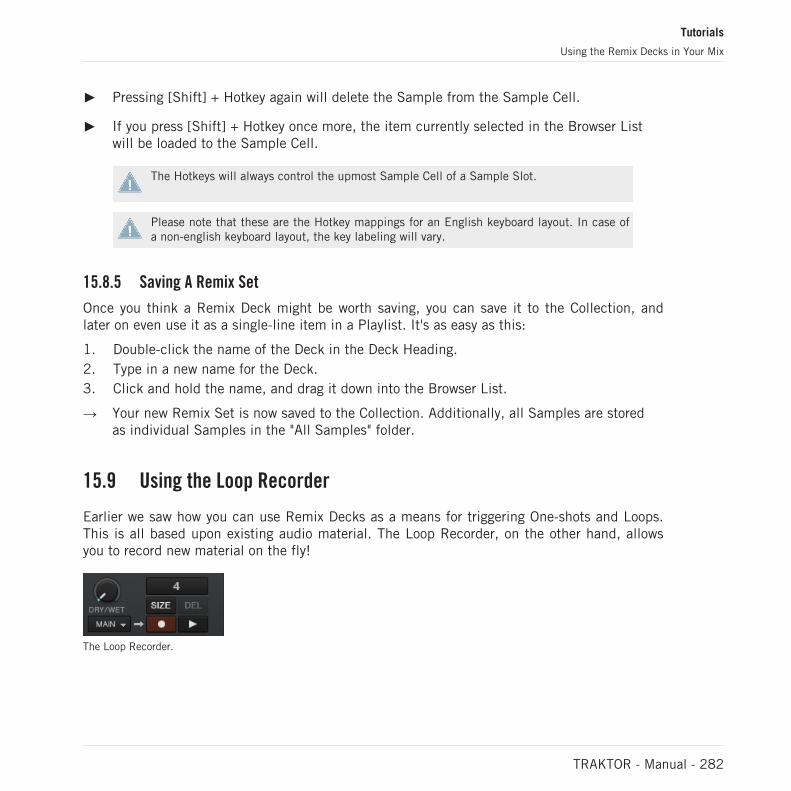
► Pressing [Shift] + Hotkey again will delete the Sample from the Sample Cell.
► If you press [Shift] + Hotkey once more, the item currently selected in the Browser Listwill be loaded to the Sample Cell.
The Hotkeys will always control the upmost Sample Cell of a Sample Slot.
Please note that these are the Hotkey mappings for an English keyboard layout. In case ofa non-english keyboard layout, the key labeling will vary.
15.8.5 Saving A Remix Set
Once you think a Remix Deck might be worth saving, you can save it to the Collection, andlater on even use it as a single-line item in a Playlist. It's as easy as this:
1. Double-click the name of the Deck in the Deck Heading.2. Type in a new name for the Deck.3. Click and hold the name, and drag it down into the Browser List.
→ Your new Remix Set is now saved to the Collection. Additionally, all Samples are storedas individual Samples in the "All Samples" folder.
15.9 Using the Loop Recorder
Earlier we saw how you can use Remix Decks as a means for triggering One-shots and Loops.This is all based upon existing audio material. The Loop Recorder, on the other hand, allowsyou to record new material on the fly!
The Loop Recorder.
Tutorials
Using the Remix Decks in Your Mix
TRAKTOR - Manual - 282
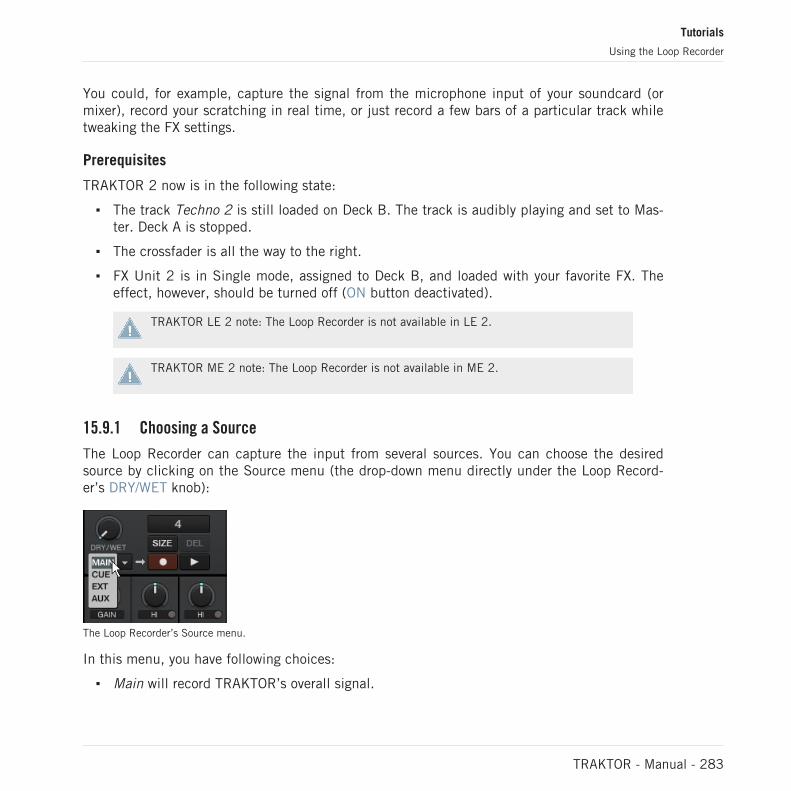
You could, for example, capture the signal from the microphone input of your soundcard (ormixer), record your scratching in real time, or just record a few bars of a particular track whiletweaking the FX settings.
Prerequisites
TRAKTOR 2 now is in the following state:
▪ The track Techno 2 is still loaded on Deck B. The track is audibly playing and set to Mas-ter. Deck A is stopped.
▪ The crossfader is all the way to the right.
▪ FX Unit 2 is in Single mode, assigned to Deck B, and loaded with your favorite FX. Theeffect, however, should be turned off (ON button deactivated).
TRAKTOR LE 2 note: The Loop Recorder is not available in LE 2.
TRAKTOR ME 2 note: The Loop Recorder is not available in ME 2.
15.9.1 Choosing a Source
The Loop Recorder can capture the input from several sources. You can choose the desiredsource by clicking on the Source menu (the drop-down menu directly under the Loop Record-er’s DRY/WET knob):
The Loop Recorder’s Source menu.
In this menu, you have following choices:
▪ Main will record TRAKTOR’s overall signal.
Tutorials
Using the Loop Recorder
TRAKTOR - Manual - 283
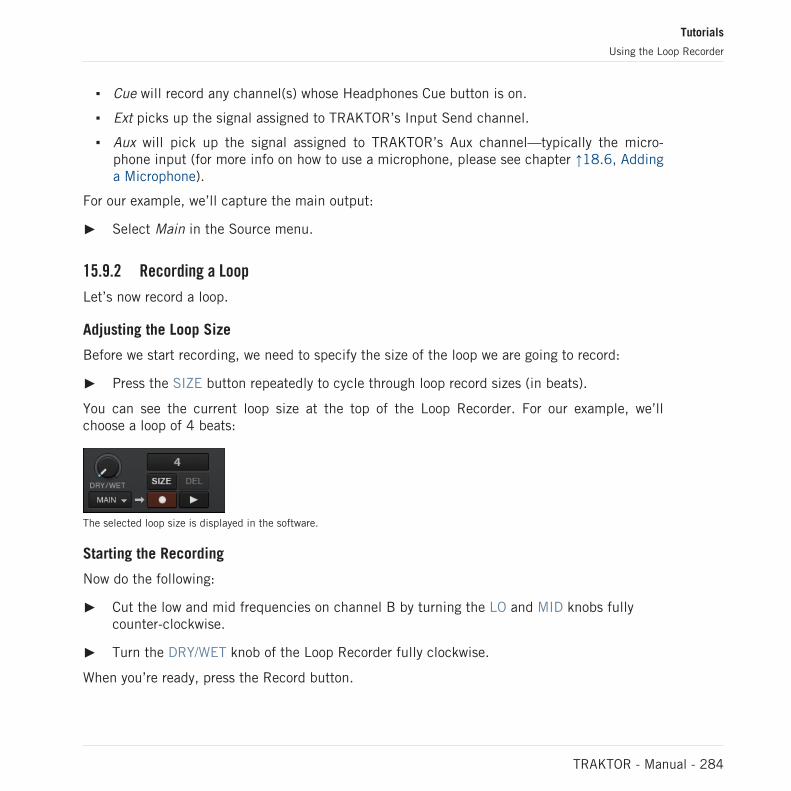
▪ Cue will record any channel(s) whose Headphones Cue button is on.
▪ Ext picks up the signal assigned to TRAKTOR’s Input Send channel.
▪ Aux will pick up the signal assigned to TRAKTOR’s Aux channel—typically the micro-phone input (for more info on how to use a microphone, please see chapter ↑18.6, Addinga Microphone).
For our example, we’ll capture the main output:
► Select Main in the Source menu.
15.9.2 Recording a Loop
Let’s now record a loop.
Adjusting the Loop Size
Before we start recording, we need to specify the size of the loop we are going to record:
► Press the SIZE button repeatedly to cycle through loop record sizes (in beats).
You can see the current loop size at the top of the Loop Recorder. For our example, we’llchoose a loop of 4 beats:
The selected loop size is displayed in the software.
Starting the Recording
Now do the following:
► Cut the low and mid frequencies on channel B by turning the LO and MID knobs fullycounter-clockwise.
► Turn the DRY/WET knob of the Loop Recorder fully clockwise.
When you’re ready, press the Record button.
Tutorials
Using the Loop Recorder
TRAKTOR - Manual - 284
The Loop Recorder will punch in (Record button lit) and out (Record button back off) accord-ing to the selected loop size and then begin playing (Play button lit). That’s all!
You can hear that our adjustments to the EQ are now part of the recording.
You’ll notice that the loop automatically started playing when it finished recording. If youdon’t want this to happen, just push the Play button during recording. Now the loop willonly trigger when you explicitly tell it to.
Playing with the Recorded Loop
You can control the balance between the looped recording and the main output using the LoopRecorder’s DRY/WET knob:
You can stop and start again the recorded loop by using the Play button. By doing this, you’llnotice the following:
▪ The Loop Recorder always stays in sync the current tempo master, which is Deck B at themoment in our example.
▪ You don’t have to bother with the DRY/WET knob position when stopping the Loop Re-corder. When you stop the Loop Recorder, the DRY/WET knob is automatically bypassedregardless of its current position. This ensures a seamless transition with the main signalat its original level.
Deleting the Loop and Trying Again
If you don’t like what you hear and want to try again:
► Press the UNDO button when the Loop Recorder is stopped (when the Loop Recorder isplaying the button is hidden).
→ Now the recording has been cleared and you can try again.
For example, you could try again to record a loop from the track on Deck B, this time whiletweaking the FX loaded on the FX Unit 2:
1. Turn channel B’s EQ knobs back to neutral position.2. Press the Record button on the Loop Recorder and tweak the FX knobs and buttons of the
FX Unit 2.
Tutorials
Using the Loop Recorder
TRAKTOR - Manual - 285
Since the Loop Recorder records the audio (including any processing by the FX), you can cre-ate brand new loops from your existing tracks!
15.9.3 Overdubbing
You can also dub over the current recorded loop, building additional recorded layers on the fly.To do this:
► Press the Record button while the Loop Recorder is already playing an existing loop, per-form your tweaks, scratches, or vocals, and press it again to exit overdubbing.
→ The new audio will then be added to the existing loop.
► If you don’t like the overdub, just hit UNDO and it will clear your last overdub and youcan try it again.
► If you hit UNDO once more, it will act as a “redo” and bring back the overdub.
► If you want to completely clear all the contents of the Loop Recorder, just press DELwhile the Loop Recorder is stopped.
15.9.4 Further Uses of the Recorded Loop
One of the great things about the Loop Recorder is that you can use it to record loops that youcan then transfer to the Remix Decks. This is how it works:
► Click on the Loop Length display of the Loop Recorder and drag the Loop from there toan empty Sample Slot in a Remix Deck.
→ Now the loop has been stored, and you can record a new loop into the Loop Recorder ifyou like.
→ Last but not least, the loop is automatically added to your Collection and can be re-usedwhenever you want to!
Tutorials
Using the Loop Recorder
TRAKTOR - Manual - 286
15.10 Synchronization
It is now time to give a closer look at the advanced synchronization features offered by TRAK-TOR. Once you will get more familiar with them, you will be able to use these powerful tools tobuild rich and complex mixes.
15.10.1 Introduction
In the previous tutorials, we have already seen TRAKTOR’s synchronization facilities manytimes in action:
▪ We synchronized a track to the previous one before we mixed it in (see chapter ↑15.4,Mixing In a Second Track).
▪ We played with Loops and jumped to Cue Points without losing the beat (see chapter↑15.6, Looping and Cueing).
▪ We noticed that the Gater FX was synchronized to the track it was processing (see chapter↑15.7, Adding FX).
▪ We captured a Sample from a track and it played in sync with the track (see chapter↑15.8, Using the Remix Decks in Your Mix).
▪ We recorded a loop in the Loop Recorder and it played in sync with the track (see chapter↑15.9, Using the Loop Recorder).
15.10.2 The Tempo Master
Note that, in TRAKTOR 2, the syncing concept has been extended and improved so TRAK-TOR SCRATCH PRO 2 users can also take full advantage of sync-lock when using Time-code Vinyl or CD control!
For all this to work, TRAKTOR needs both a tempo and beat reference to which it can syn-chronize things. We call this reference source the tempo master. The tempo master doesn’thave to be the same source throughout the entirety of your mix, but there will always be onesource designated as the tempo master—and only one.
Tutorials
Synchronization
TRAKTOR - Manual - 287
For example, by activating SYNC on a Track Deck, you are saying to TRAKTOR: “Synchron-ize the track on this Deck with the current tempo master.”
In TRAKTOR, the Master Clock or any Deck can be the tempo master:
▪ TRAKTOR’s Master Clock can provide a tempo and a tick (which can be used for beat-gridding).
▪ A Deck can provide the master tempo and the master phase.
TRAKTOR LE 2 users only have the option to set a Deck as tempo master.
You can prevent Remix Decks from becoming the Master Deck by deactivating the relevantoption in the Transport section of the Preferences. See ↑13.8, Transport for further infor-mation.
Who’s the Master?
You can build your mix using various Deck setups: you can mix with two Track Decks only, ormake also use of the Remix Decks (default setup), or even replace the Remix Decks with an-other two Track Decks.
Depending on your preferred way of DJing and Deck setup, you will have different needs andperspectives for choosing your tempo master. We will describe here the various use cases.
What’s New in the New Synching Concept?
Up until now, if you had synced a track to another, the Phase has always been synced as well.TRAKTOR 2 now decouples the phase-syncing from the tempo-syncing when using TempoSyncmode. In other words, SYNC doesn’t get completely deactivated if TempoSync is selected andyou nudge the tracks out-of-phase—instead, it turns dim. If you use BeatSync, the SYNC but-ton will turn dim when the tracks are out of phase, but TRAKTOR will then force the tracksback into sync.
This concept allows all users, including the TRAKTOR SCRATCH users, to keep their trackstempo-matched, thus enabling them to raise the tempo of two or more tracks simultaneously,even if their phases are shifted!
Tutorials
Synchronization
TRAKTOR - Manual - 288
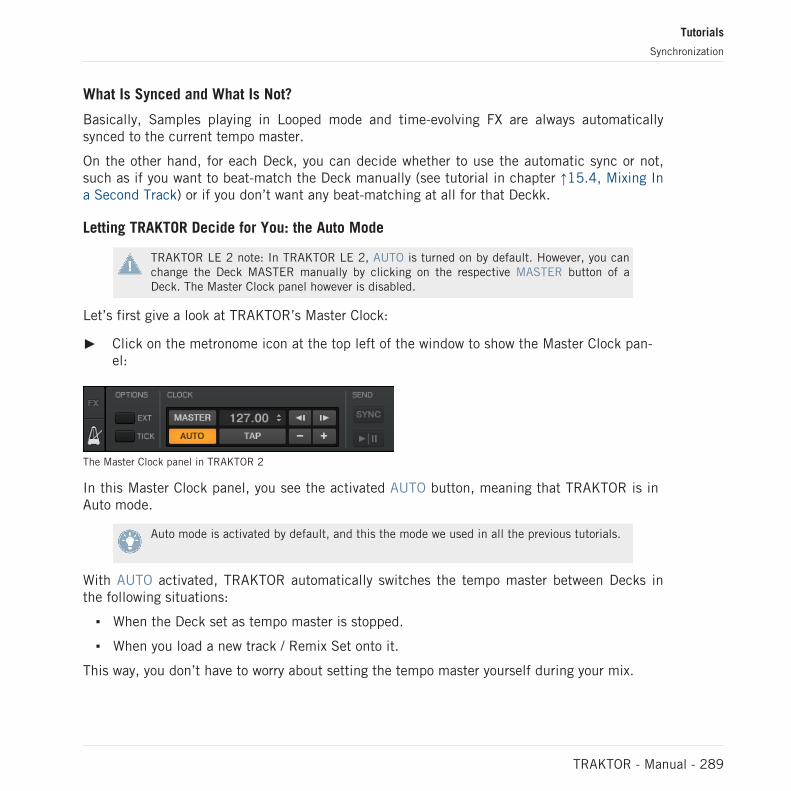
What Is Synced and What Is Not?
Basically, Samples playing in Looped mode and time-evolving FX are always automaticallysynced to the current tempo master.
On the other hand, for each Deck, you can decide whether to use the automatic sync or not,such as if you want to beat-match the Deck manually (see tutorial in chapter ↑15.4, Mixing Ina Second Track) or if you don’t want any beat-matching at all for that Deckk.
Letting TRAKTOR Decide for You: the Auto Mode
TRAKTOR LE 2 note: In TRAKTOR LE 2, AUTO is turned on by default. However, you canchange the Deck MASTER manually by clicking on the respective MASTER button of aDeck. The Master Clock panel however is disabled.
Let’s first give a look at TRAKTOR’s Master Clock:
► Click on the metronome icon at the top left of the window to show the Master Clock pan-el:
The Master Clock panel in TRAKTOR 2
In this Master Clock panel, you see the activated AUTO button, meaning that TRAKTOR is in Auto mode.
Auto mode is activated by default, and this the mode we used in all the previous tutorials.
With AUTO activated, TRAKTOR automatically switches the tempo master between Decks inthe following situations:
▪ When the Deck set as tempo master is stopped.
▪ When you load a new track / Remix Set onto it.
This way, you don’t have to worry about setting the tempo master yourself during your mix.
Tutorials
Synchronization
TRAKTOR - Manual - 289
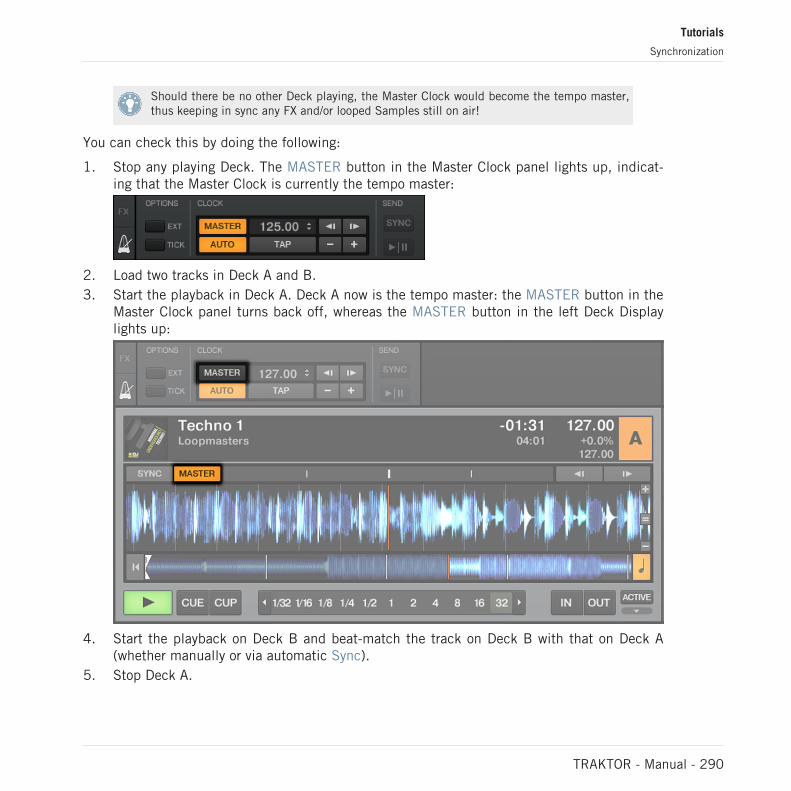
Should there be no other Deck playing, the Master Clock would become the tempo master,thus keeping in sync any FX and/or looped Samples still on air!
You can check this by doing the following:
1. Stop any playing Deck. The MASTER button in the Master Clock panel lights up, indicat-ing that the Master Clock is currently the tempo master:
2. Load two tracks in Deck A and B.3. Start the playback in Deck A. Deck A now is the tempo master: the MASTER button in the
Master Clock panel turns back off, whereas the MASTER button in the left Deck Displaylights up:
4. Start the playback on Deck B and beat-match the track on Deck B with that on Deck A(whether manually or via automatic Sync).
5. Stop Deck A.
Tutorials
Synchronization
TRAKTOR - Manual - 290
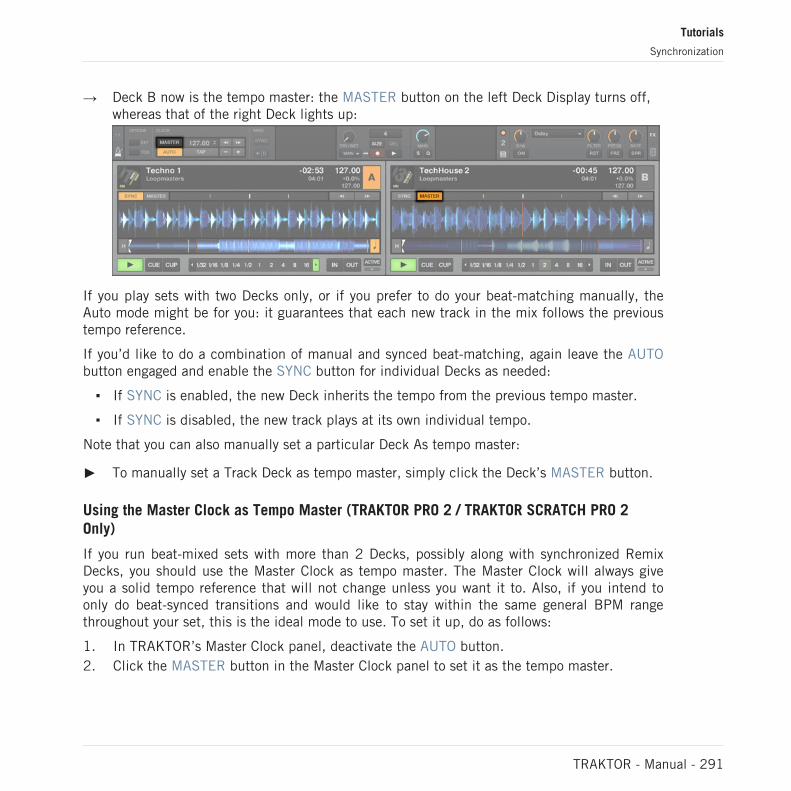
→ Deck B now is the tempo master: the MASTER button on the left Deck Display turns off,whereas that of the right Deck lights up:
If you play sets with two Decks only, or if you prefer to do your beat-matching manually, theAuto mode might be for you: it guarantees that each new track in the mix follows the previoustempo reference.
If you’d like to do a combination of manual and synced beat-matching, again leave the AUTObutton engaged and enable the SYNC button for individual Decks as needed:
▪ If SYNC is enabled, the new Deck inherits the tempo from the previous tempo master.
▪ If SYNC is disabled, the new track plays at its own individual tempo.
Note that you can also manually set a particular Deck As tempo master:
► To manually set a Track Deck as tempo master, simply click the Deck’s MASTER button.
Using the Master Clock as Tempo Master (TRAKTOR PRO 2 / TRAKTOR SCRATCH PRO 2Only)
If you run beat-mixed sets with more than 2 Decks, possibly along with synchronized RemixDecks, you should use the Master Clock as tempo master. The Master Clock will always giveyou a solid tempo reference that will not change unless you want it to. Also, if you intend toonly do beat-synced transitions and would like to stay within the same general BPM rangethroughout your set, this is the ideal mode to use. To set it up, do as follows:
1. In TRAKTOR’s Master Clock panel, deactivate the AUTO button.2. Click the MASTER button in the Master Clock panel to set it as the tempo master.
Tutorials
Synchronization
TRAKTOR - Manual - 291
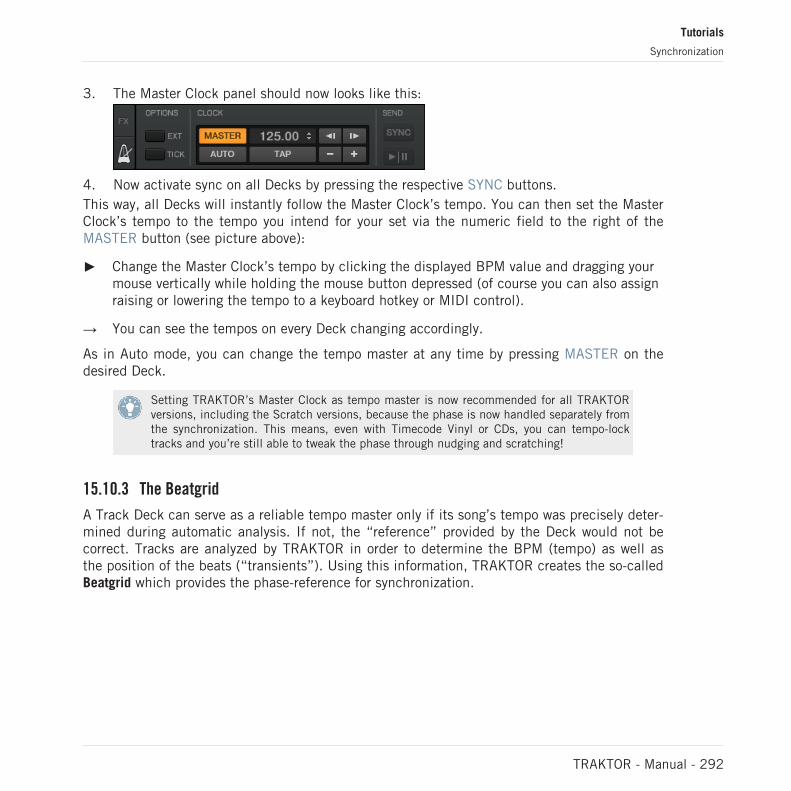
3. The Master Clock panel should now looks like this:
4. Now activate sync on all Decks by pressing the respective SYNC buttons.This way, all Decks will instantly follow the Master Clock’s tempo. You can then set the MasterClock’s tempo to the tempo you intend for your set via the numeric field to the right of theMASTER button (see picture above):
► Change the Master Clock’s tempo by clicking the displayed BPM value and dragging yourmouse vertically while holding the mouse button depressed (of course you can also assignraising or lowering the tempo to a keyboard hotkey or MIDI control).
→ You can see the tempos on every Deck changing accordingly.
As in Auto mode, you can change the tempo master at any time by pressing MASTER on thedesired Deck.
Setting TRAKTOR’s Master Clock as tempo master is now recommended for all TRAKTORversions, including the Scratch versions, because the phase is now handled separately fromthe synchronization. This means, even with Timecode Vinyl or CDs, you can tempo-locktracks and you’re still able to tweak the phase through nudging and scratching!
15.10.3 The Beatgrid
A Track Deck can serve as a reliable tempo master only if its song’s tempo was precisely deter-mined during automatic analysis. If not, the “reference” provided by the Deck would not becorrect. Tracks are analyzed by TRAKTOR in order to determine the BPM (tempo) as well asthe position of the beats (“transients”). Using this information, TRAKTOR creates the so-calledBeatgrid which provides the phase-reference for synchronization.
Tutorials
Synchronization
TRAKTOR - Manual - 292
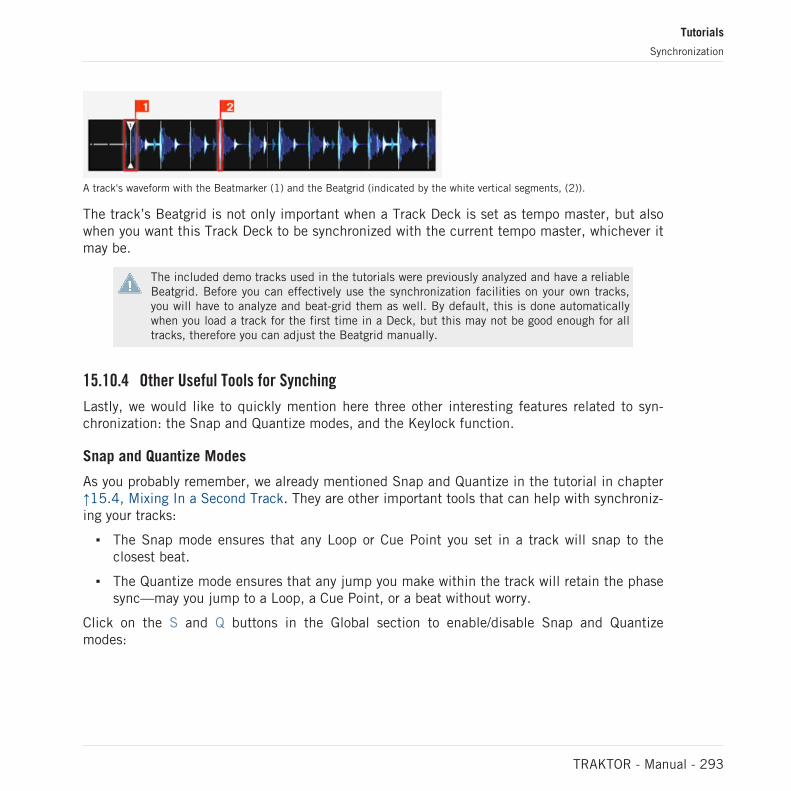
A track's waveform with the Beatmarker (1) and the Beatgrid (indicated by the white vertical segments, (2)).
The track’s Beatgrid is not only important when a Track Deck is set as tempo master, but alsowhen you want this Track Deck to be synchronized with the current tempo master, whichever itmay be.
The included demo tracks used in the tutorials were previously analyzed and have a reliableBeatgrid. Before you can effectively use the synchronization facilities on your own tracks,you will have to analyze and beat-grid them as well. By default, this is done automaticallywhen you load a track for the first time in a Deck, but this may not be good enough for alltracks, therefore you can adjust the Beatgrid manually.
15.10.4 Other Useful Tools for Synching
Lastly, we would like to quickly mention here three other interesting features related to syn-chronization: the Snap and Quantize modes, and the Keylock function.
Snap and Quantize Modes
As you probably remember, we already mentioned Snap and Quantize in the tutorial in chapter↑15.4, Mixing In a Second Track. They are other important tools that can help with synchroniz-ing your tracks:
▪ The Snap mode ensures that any Loop or Cue Point you set in a track will snap to theclosest beat.
▪ The Quantize mode ensures that any jump you make within the track will retain the phasesync—may you jump to a Loop, a Cue Point, or a beat without worry.
Click on the S and Q buttons in the Global section to enable/disable Snap and Quantizemodes:
Tutorials
Synchronization
TRAKTOR - Manual - 293
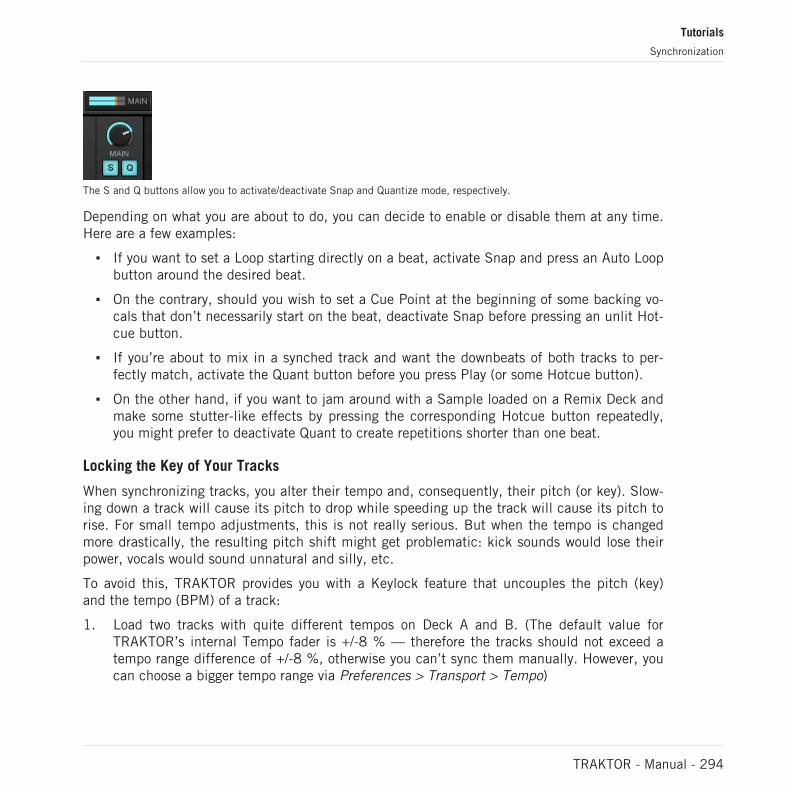
The S and Q buttons allow you to activate/deactivate Snap and Quantize mode, respectively.
Depending on what you are about to do, you can decide to enable or disable them at any time.Here are a few examples:
▪ If you want to set a Loop starting directly on a beat, activate Snap and press an Auto Loopbutton around the desired beat.
▪ On the contrary, should you wish to set a Cue Point at the beginning of some backing vo-cals that don’t necessarily start on the beat, deactivate Snap before pressing an unlit Hot-cue button.
▪ If you’re about to mix in a synched track and want the downbeats of both tracks to per-fectly match, activate the Quant button before you press Play (or some Hotcue button).
▪ On the other hand, if you want to jam around with a Sample loaded on a Remix Deck andmake some stutter-like effects by pressing the corresponding Hotcue button repeatedly,you might prefer to deactivate Quant to create repetitions shorter than one beat.
Locking the Key of Your Tracks
When synchronizing tracks, you alter their tempo and, consequently, their pitch (or key). Slow-ing down a track will cause its pitch to drop while speeding up the track will cause its pitch torise. For small tempo adjustments, this is not really serious. But when the tempo is changedmore drastically, the resulting pitch shift might get problematic: kick sounds would lose theirpower, vocals would sound unnatural and silly, etc.
To avoid this, TRAKTOR provides you with a Keylock feature that uncouples the pitch (key)and the tempo (BPM) of a track:
1. Load two tracks with quite different tempos on Deck A and B. (The default value forTRAKTOR’s internal Tempo fader is +/-8 % — therefore the tracks should not exceed atempo range difference of +/-8 %, otherwise you can’t sync them manually. However, youcan choose a bigger tempo range via Preferences > Transport > Tempo)
Tutorials
Synchronization
TRAKTOR - Manual - 294
2. Start the playback on both Decks and synchronize Deck B to Deck A.You can clearly hear how the key of the track on Deck B changed.
3. Now press the Keylock On button in Deck B. This activates the Keylock on that Deck.
→ The key of the track goes back to its original pitch, thus preserving most of its acousticfeeling. In the Mixer and in the corresponding Deck, the Keylock indicator lights up toremind you that the Keylock is active on that Deck:
If you activate the Keylock button in the Mixer, the current key will be preserved. Use theKEY knob to change the key which can allow you to harmonically mix into a track in anoth-er Deck.
Tutorials
Synchronization
TRAKTOR - Manual - 295
16 Troubleshooting
A few common issues and possible solutions when working with TRAKTOR 2.
16.1 TRAKTOR Won’t Start
► Check the system requirements for TRAKTOR 2. The minimum requirements are the veryleast you can get by with and are often not enough for advanced use (i.e. Keylock, FX).Increasing your RAM may save you a lot of trouble.
1. Make sure you have the most recent TRAKTOR 2 version installed. You can find the latestavailable version following this link: http://www.native-instruments.com/updates.
2. Make sure that you have not clicked an outdated application alias/shortcut.3. Try to restart your computer. Disconnect any other audio interfaces and computer periph-
erals like printers, scanners, and the like.4. Try to rename the file collection.nml in the TRAKTOR 2 Root folder to restart TRAKTOR
with a clean Track Collection, and then re-import the renamed Collection file.
16.2 Latency Issues
Please check if your computer is suited for handling real-time audio processing without drop-outs. In general, it is not recommended to use laptops with shared-memory graphic cards. Youwill need all the memory and processing power available for your audio software.
▪ It is not recommended to run the laptop on battery, as built-in power management sys-tems might slow the clock rate of the CPU in an effort to extend battery life.
▪ Disconnect all unused hardware (e.g., printer, scanner). This will increase the amount ofprocessing power available for your music software.
▪ Laptops often are equipped with built-in devices that disturb audio processing, most com-monly Bluetooth transceivers, an Ethernet network adapter, or a wireless LAN card. Youmight need to disable these devices while working with the TRAKTOR 2.
Troubleshooting
TRAKTOR Won’t Start
TRAKTOR - Manual - 296
▪ Keylock is a resource-hungry process. If you’re encountering audio problems like cracklesor drops, make sure you’re using ECO mode via Preferences > Transport > Keylock. With aweak computer, you may be forced to disable the Keylock feature completely.
16.3 TRAKTOR 2 Crashes
In case of a crash during runtime, please contact the Native Instruments technical supportteam as described in chapter ↑17.2, Technical Support and send them your crashlog. You willfind the crashlog in the following folders:
▪ Windows: My Documents\Native Instruments\TRAKTOR 2.x.x\Crashlogs
▪ Mac OS X: Users/~/Library/Logs/CrashReporter
16.4 Updates
Whenever you encounter problems, it is recommended that you first download and install anyavailable software updates. Updates are released regularly to fix known problems, maintaincompatibility with operating system updates, and to continuously improve the software. Theversion number of your software is displayed in the About dialog for any Native Instruments ap-plication. This dialog can be opened by clicking on the NI logo in the upper right corner of theuser interface. Alternatively, you can find the version numbers of all installed Native Instru-ments applications when showing the details for an application within the Overview page of theService Center. Updates are available on the Update page in Service Center or on our websiteunder: http://www.native-instruments.com/updates.
Troubleshooting
TRAKTOR 2 Crashes
TRAKTOR - Manual - 297
17 Getting Help
If you are experiencing problems related to your Native Instruments product that the supplieddocumentation does not cover, there are several ways of getting help!
The links in the following sections can also be reached from the Service Center application:Open the Service Center application and click on the Support button in the upper-right cor-ner.
17.1 Knowledge Base
The Online Knowledge Base gathers useful information about your Native Instruments productand can be of great help to solve possible issues you may encounter. You can reach the Knowl-edge Base via: www.native-instruments.com/knowledge.
17.2 Technical Support
If no Knowledge Base entry matches your problem, or if the matching entry does not solve theproblem, you can use the Online Support Form to contact the Technical Support team of Na-tive Instruments. The Online Support Form will ask you to enter information about your hard-ware and software setup. This information is essential for our Support team to be able to pro-vide you with quality assistance. You can reach the Online Support via: www.native-instru-ments.com/knowledge.
When communicating with the Native Instruments Support team, keep in mind that the moredetails you can provide about your hardware, your operating system, the version of the softwareyou are running, and the problem you are experiencing, the better they will be able to help you.In your description, you should mention:
▪ How to reproduce the problem
▪ What you have already tried to fix the problem
▪ A description of your setup, including all hardware and the version of your software
▪ The brand and specifications of your computer
Getting Help
Knowledge Base
TRAKTOR - Manual - 298
When installing new software or software updates, a Readme file is included that containslate breaking news and new information that was not yet included in the documentation.Please open and read this Readme file before contacting Technical Support.
17.3 Registration Support
If problems occur during the product activation procedure, please contact our RegistrationSupport team: www.native-instruments.com/regsuppfrm.
17.4 User Forum
In the Native Instruments User Forum (http://www.native-instruments.com/forum), you can dis-cuss product features directly with other users and with experts moderating the forum. Pleasebe aware that the Technical Support team does not participate in the forum. If you’re encoun-tering an issue that can’t be solved by other users, contact Native Instruments’ Technical Sup-port team via the online support as described above.
Getting Help
Registration Support
TRAKTOR - Manual - 299
18 Appendix — Common Setups
This appendix shows you how to integrate TRAKTOR 2 with your other gear in various setups.
Of course, all setups require that TRAKTOR 2 was correctly installed on your computer be-forehand! For more info on the installation procedure, please refer to the separate SetupGuide.
18.1 TRAKTOR with an On-board Sound Card and Fallback
This setup is meant mainly to get TRAKTOR up and running on your computer without any ad-ditional hardware, e.g. while preparing tracks in the train, airplane, etc.
Be aware that with only an on-board sound card you will not be able to monitor (pre-listen)tracks while another track is playing.
► Open Preferences > Audio Setup.
1. Choose your on-board/built-in sound card as Audio Device.2. Open Preferences > Output Routing.3. Select your only output pair as Output Master.
If you use an external soundcard, choose your on-board/built-in sound card as Fallback.From now on, whenever you start TRAKTOR 2 and your external audio interface is not con-nected, TRAKTOR 2 defaults to the fallback sound card. This new option has the advant-age that, whenever you’re travelling and preparing tracks, you don‘t need to manuallychange anything in TRAKTOR’s Preferences.
Appendix — Common Setups
TRAKTOR with an On-board Sound Card and Fallback
TRAKTOR - Manual - 300
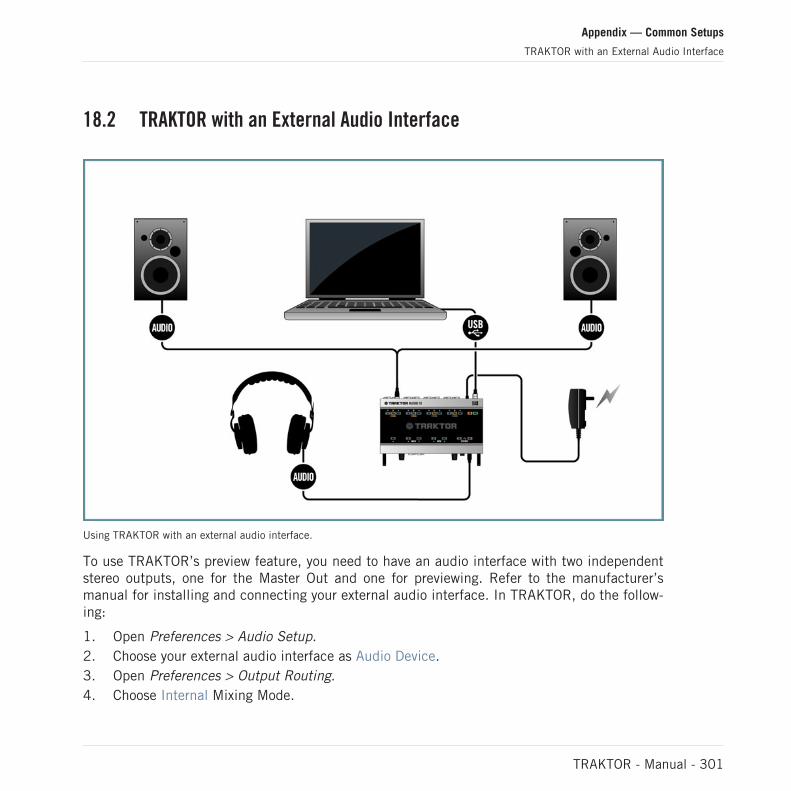
18.2 TRAKTOR with an External Audio Interface
Using TRAKTOR with an external audio interface.
To use TRAKTOR’s preview feature, you need to have an audio interface with two independentstereo outputs, one for the Master Out and one for previewing. Refer to the manufacturer’smanual for installing and connecting your external audio interface. In TRAKTOR, do the follow-ing:
1. Open Preferences > Audio Setup.2. Choose your external audio interface as Audio Device.3. Open Preferences > Output Routing.4. Choose Internal Mixing Mode.
Appendix — Common Setups
TRAKTOR with an External Audio Interface
TRAKTOR - Manual - 301
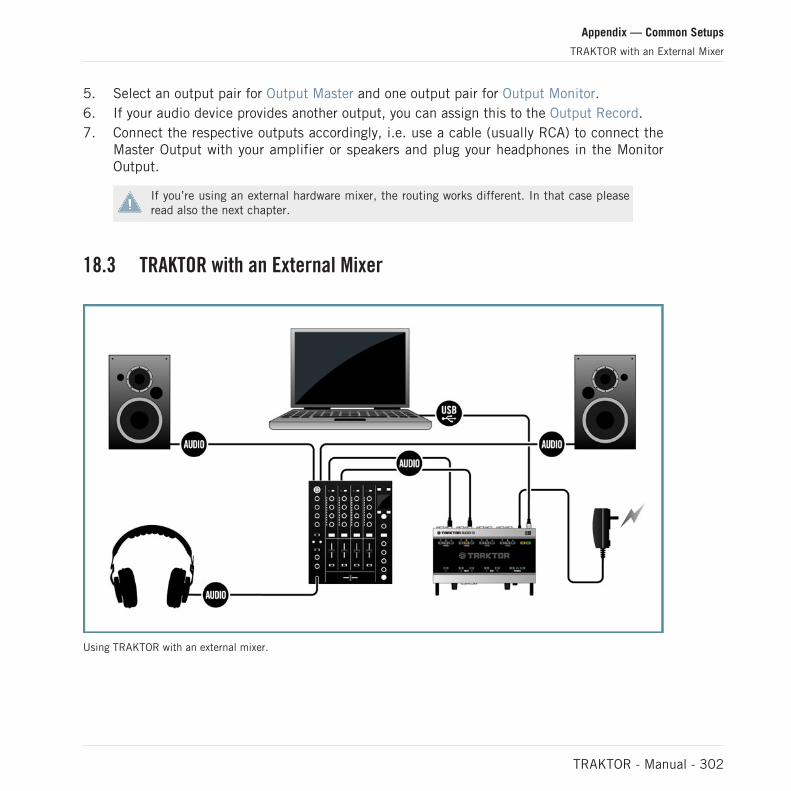
5. Select an output pair for Output Master and one output pair for Output Monitor.6. If your audio device provides another output, you can assign this to the Output Record.7. Connect the respective outputs accordingly, i.e. use a cable (usually RCA) to connect the
Master Output with your amplifier or speakers and plug your headphones in the MonitorOutput.
If you’re using an external hardware mixer, the routing works different. In that case pleaseread also the next chapter.
18.3 TRAKTOR with an External Mixer
Using TRAKTOR with an external mixer.
Appendix — Common Setups
TRAKTOR with an External Mixer
TRAKTOR - Manual - 302

While nearly all users of TRAKTOR SCRATCH PRO will use an external mixer naturally insteadof TRAKTOR’s Internal Mixer, this is an option for all other TRAKTOR users as well. You’llneed an audio interface with (at least) as many output pairs as Decks you use to play. Alsoyou’ll need a mixer with as many input channels as desired. In TRAKTOR, do the following:
1. Open Preferences > Audio Setup.2. If not done already, choose now your external audio interface as Audio Device.3. Open Preferences > Output Routing.4. Choose External Mixing Mode.5. Select an output pair for every Deck.6. Connect the respective outputs accordingly, i.e. use a cable (usually RCA) to connect Out-
put Deck A with the respective input channel of your hardware mixer.7. Repeat this step for all other Deck channels, too.8. Connect the master out of your hardware mixer with your amplifier or speakers.
While you can now control all mixer related functions with your external hardware mixer,you still can’t control the rest of TRAKTOR’s features with it. For this, you would need aMIDI controller. Read the next chapter how to add a MIDI controller to your setup.
18.4 TRAKTOR with a Controller
TRAKTOR LE 2 note: LE 2 is limited to the use with the controllers provided in the SetupWizard.
Nowadays, you can choose from a wide variety of controllers in all price ranges from a lot ofdifferent manufacturers. Most controllers will be connected via USB to your computer. Gener-ally, you can differentiate between two kinds of controllers:
▪ Controllers with mixer controls, i.e. TRAKTOR KONTROL S4.
▪ Controllers without mixer controls, i.e. TRAKTOR KONTROL X1
Furthermore, there are controllers with built-in audio interfaces and those without. Typical-ly, only controllers with mixer controls contain a built-in audio interface, therefore we willdescribe this case in the next section and take the TRAKTOR KONTROL S4 as an example.
Appendix — Common Setups
TRAKTOR with a Controller
TRAKTOR - Manual - 303
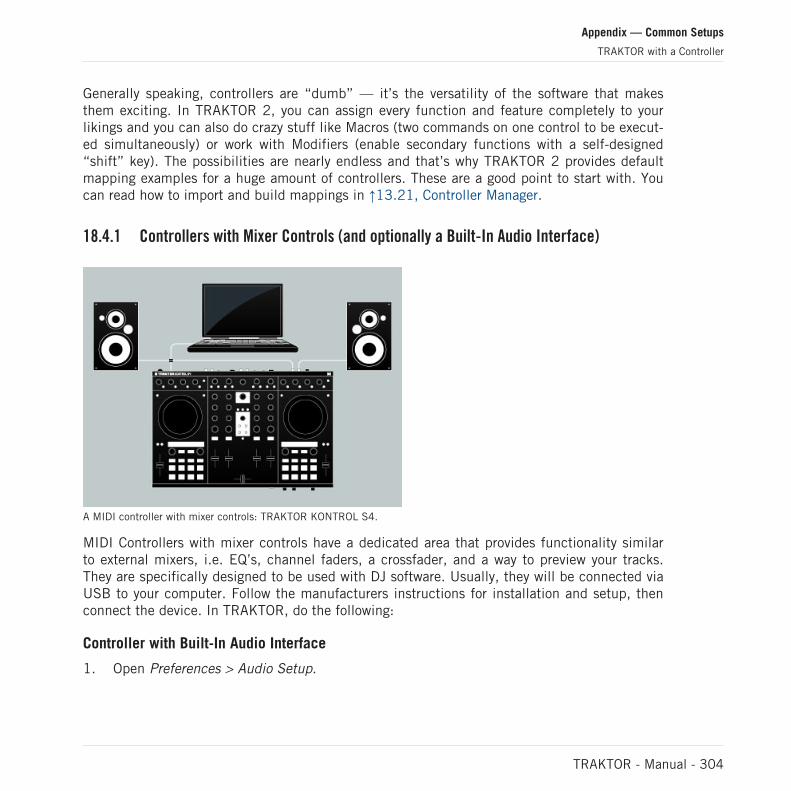
Generally speaking, controllers are “dumb” — it’s the versatility of the software that makesthem exciting. In TRAKTOR 2, you can assign every function and feature completely to yourlikings and you can also do crazy stuff like Macros (two commands on one control to be execut-ed simultaneously) or work with Modifiers (enable secondary functions with a self-designed“shift” key). The possibilities are nearly endless and that’s why TRAKTOR 2 provides defaultmapping examples for a huge amount of controllers. These are a good point to start with. Youcan read how to import and build mappings in ↑13.21, Controller Manager.
18.4.1 Controllers with Mixer Controls (and optionally a Built-In Audio Interface)
A MIDI controller with mixer controls: TRAKTOR KONTROL S4.
MIDI Controllers with mixer controls have a dedicated area that provides functionality similarto external mixers, i.e. EQ’s, channel faders, a crossfader, and a way to preview your tracks.They are specifically designed to be used with DJ software. Usually, they will be connected viaUSB to your computer. Follow the manufacturers instructions for installation and setup, thenconnect the device. In TRAKTOR, do the following:
Controller with Built-In Audio Interface
1. Open Preferences > Audio Setup.
Appendix — Common Setups
TRAKTOR with a Controller
TRAKTOR - Manual - 304
2. Choose the audio interface of your MIDI controller as Audio Device, in this example: Trak-tor Kontrol S4 (ASIO).
3. Open Preferences > Output Routing.4. Choose Internal Mixing Mode.5. With the S4, the outputs will be auto-configured. If you use another MIDI controller, se-
lect an output pair for Output Master and one output pair for Output Monitor.6. If your audio device provides another output, you can assign this to the Output Record.7. Connect the respective outputs accordingly, i.e. use a cable (usually RCA) to connect the
Master Output of your MIDI controller with your amplifier or speakers and plug your head-phones in the Monitor Output.
8. Open Preferences > Controller Manager.9. Click Add > Import, then navigate to Default Settings > Controller and choose your con-
troller from the list.10. Move a fader or knob on the MIDI controller (e.g. the crossfader) and observe the CTRL
status indicator. Whenever you move anything on the MIDI controller, it should show ac-tivity by glowing blue.
11. You’ll also notice that the corresponding control in TRAKTOR (in the above example, thecrossfader) will also move as you manipulate the MIDI Controller.
Controller without Built-In Audio Interface
1. Follow the instructions given in chapter ↑18.2, TRAKTOR with an External Audio Inter-face.
2. Open Preferences > Controller Manager.3. Click Add > Import, then navigate to Default Settings > Controller and choose your con-
troller from the list.4. Move a fader or knob on the MIDI controller (e.g. the crossfader) and observe the CTRL
status indicator. Whenever you move anything on the MIDI controller, it should show ac-tivity by glowing blue.
5. You’ll also notice that the corresponding control in TRAKTOR (in the above example, thecrossfader) will also move as you manipulate the MIDI Controller.
Appendix — Common Setups
TRAKTOR with a Controller
TRAKTOR - Manual - 305
18.4.2 Controllers without Mixer Controls
MIDI controllers without mixer controls serve usually as additions to an existing setup. For ex-ample, this can be in conjunction with a TRAKTOR SCRATCH PRO 2 setup with an externalmixer, but also using it as secondary controller along with a primary MIDI controller is also pos-sible. In TRAKTOR, do the following:
1. Open Preferences > Controller Manager.2. Click Add > Import, then navigate to Default Settings > Controller and choose your con-
troller from the list3. Move a fader or knob on the MIDI controller (e.g. the Browse knob) and observe the CTRL
status indicator. Whenever you move anything on the MIDI controller, it should show ac-tivity by glowing blue.
4. You’ll also see that TRAKTOR responds to the MIDI Controller (in the above example, theselection highlight in TRAKTOR’s File List will move)
18.5 TRAKTOR KONTROL S4 with TRAKTOR SCRATCH PRO 2
TRAKTOR SCRATCH PRO 2 enables you to use your TRAKTOR KONTROL S4 with Timecodecontrol. Proceed as follows:
1. Plug your turntables or CD Players into the inputs C and D of your TRAKTOR KON-TROL S4.
2. Put the Input Level Switch to Phono if you use turntables and to Line if you’re using CDPlayers.
3. Open Preferences > Audio Setup and select Kontrol S4 (ASIO) as Audio Device.The turntables / CD Players are routed to Deck C and D per default. If you want to have themon Deck A and B, you need to re-route them manually:
1. Open Preferences > Input Routing.2. Choose In Ch C left/right for Input Deck A and In Ch D left/right for Input Deck B.3. Choose In Ch A left/right for Input Deck C and In Ch B left/right for Input Deck D.4. On the main Track Decks, click on the Deck letters and make sure you have chosen
Scratch Control.
Appendix — Common Setups
TRAKTOR with a Controller
TRAKTOR - Manual - 306
18.6 Adding a Microphone
If you want to use a microphone with TRAKTOR, connect it to the microphone input on youraudio interface and follow the instructions in the subsequent sections.
18.6.1 Using Your Microphone with the Loop Recorder
In case you are using the TRAKTOR AUDIO 10, the input is the MIC-labeled input in theMAIN area on the front panel. This input is routed to TRAKTOR's Input FX Send (Ext)channel by default, which again outputs signal through the MAIN OUT on TRAKTOR AU-DIO 10's front panel by default. You can then use your microphone input with TRAKTOR'sLoop Recorder straight away.
In case you do not use the TRAKTOR AUDIO 10 as your audio interface:
1. Click the cog wheel symbol to open the Preferences dialog, and select the Input Routingpage.
2. Assign the channel to which you connected the microphone to the Input FX Send (Ext)channel in TRAKTOR. Use the drop-down menu next to the corresponding label to assignthe channel.
3. Adjust the input gain of your microphone input channel if your audio interface provides again control (TRAKTOR AUDIO 10 does). Monitor the gain setting with the level metersright to the drop-down selection menus.
→ You should now be able to use your microphone with the TRAKTOR’s Loop Recorder.
18.6.2 Using Your Microphone as a Live Input and with TRAKTOR FX
In case you want to add FX from the TRAKTOR Decks to your microphone signal, you can as-sign your microphone input to an empty Deck (A to D, whichever you currently don't use formixing):
1. Click the cog wheel symbol to open the Preferences dialog, and select the Input Routingpage.
2. Assign the channel to which you connected the microphone to an empty Deck (A to D) inTRAKTOR with the drop-down menu next to the corresponding label.
Appendix — Common Setups
Adding a Microphone
TRAKTOR - Manual - 307
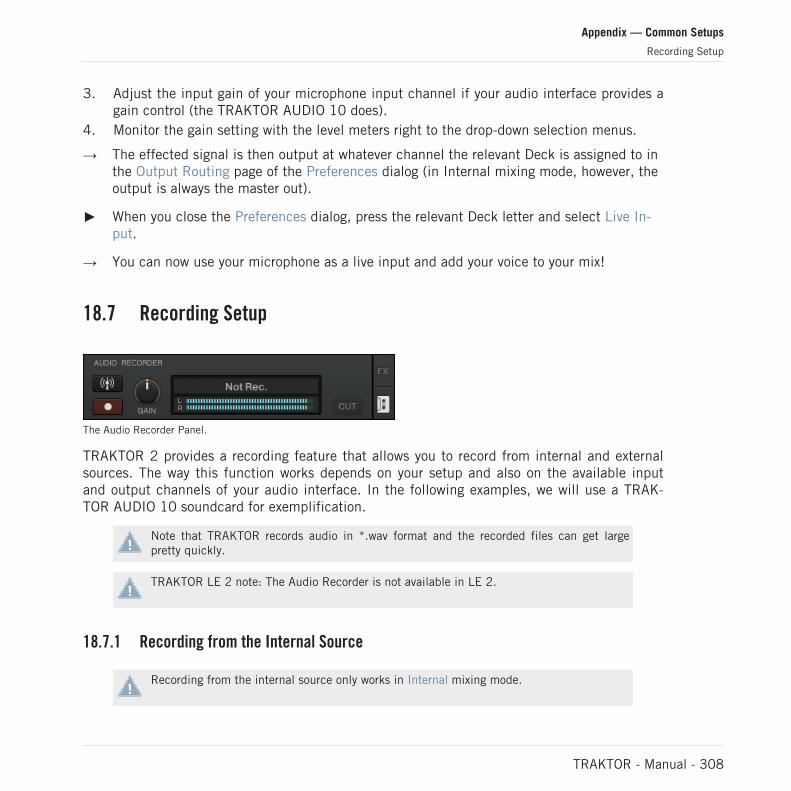
3. Adjust the input gain of your microphone input channel if your audio interface provides again control (the TRAKTOR AUDIO 10 does).
4. Monitor the gain setting with the level meters right to the drop-down selection menus.
→ The effected signal is then output at whatever channel the relevant Deck is assigned to inthe Output Routing page of the Preferences dialog (in Internal mixing mode, however, theoutput is always the master out).
► When you close the Preferences dialog, press the relevant Deck letter and select Live In-put.
→ You can now use your microphone as a live input and add your voice to your mix!
18.7 Recording Setup
The Audio Recorder Panel.
TRAKTOR 2 provides a recording feature that allows you to record from internal and externalsources. The way this function works depends on your setup and also on the available inputand output channels of your audio interface. In the following examples, we will use a TRAK-TOR AUDIO 10 soundcard for exemplification.
Note that TRAKTOR records audio in *.wav format and the recorded files can get largepretty quickly.
TRAKTOR LE 2 note: The Audio Recorder is not available in LE 2.
18.7.1 Recording from the Internal Source
Recording from the internal source only works in Internal mixing mode.
Appendix — Common Setups
Recording Setup
TRAKTOR - Manual - 308
In this setup we use TRAKTOR’s Internal Mixer and the Internal recording method. This meansTRAKTOR records from the Master Output of its own mixer. You don’t have to do any cablingwith this method. In TRAKTOR, do the following:
1. Open Preferences > Output Routing.2. Choose Internal Mixing Mode.3. Open Preferences > Mix Recorder.4. Choose Internal as Source.5. Choose where the recordings should be saved or leave the default settings My Documents/
My Music/Traktor (Windows) and User:Music:Traktor (Mac OS X).6. Choose a Prefix, e.g. live_jan15th_ — this prefix will be added as part of the filename
which also contains a timestamp. Defining a prefix makes it easier to sort and find yourrecordings afterwards.
7. Choose a file size at which your recording file will be split. If you want to burn your re-cordings to CD later, a file size of 650 MB is recommended.
8. Click on the cassette icon in the upper right corner of the global section to open the AudioRecorder panel.
9. Load a track in a Deck and press Play.10. You should see the level meters move now.11. Adjust the recording level with the GAIN knob. It should not clip!12. Press the Record button to start the recording!
After you finished your recording, you can directly load the file from TRAKTOR’s Browser >Audio Recordings onto a Deck.
18.7.2 Recording from an External Source
Recording from an external source works in Internal and External mixing mode and is alsosuited for TRAKTOR SCRATCH PRO users.
Appendix — Common Setups
Recording Setup
TRAKTOR - Manual - 309
Recording in External Mixing Mode from an External Source
In this mode, you can record from any external source you like. Since we’re in External mixingmode here, we will use your external hardware mixer as source. This setup requires a secondoutput on the mixer, often labeled REC OUT or OUT 2. Connect this output pair to an availableinput pair of your audio interface, e.g., Inputs 9|10 (= Channel D) of the TRAKTOR AUDIO 10.In TRAKTOR, do the following:
1. Click the cog wheel symbol to open the Preferences dialog, and open the Output Routingpage.
2. If not done already, choose External mixing mode.3. Open the Input Routing page in the Preferences dialog.4. Assign the channel to which you connected the mixer to the appropriate channel in TRAK-
TOR. In case of the TRAKTOR AUDIO 10, it should be auto-configured to Channel D.5. Open the Mix Recorder page in the Preferences dialog.6. Choose Extern as Source.7. For External Input, select the corresponding input channel of your audio interface. In our
example with the TRAKTOR AUDIO 10, this would be Channel D.8. Choose where the recordings should be saved or leave the default settings: My Docu-
ments/My Music/Traktor (Windows), or User:Music:Traktor (Mac OS X).9. Choose a Prefix, e.g., live_jan15th_ — this prefix will be added as part of the filename
which also contains a timestamp. Defining a prefix makes it easier to sort and find yourrecordings afterwards.
10. Choose a file size at which your recording file will be split. If you want to burn your re-cordings to CD later, a file size of 650 MB is recommended.
This would be the typical setup for a TRAKTOR SCRATCH PRO 2 user to record a live set.However, other setups are possible. Instead of the mixer, you could connect a microphone withyour audio interface and record your voice. If you want to know how to add a microphone toyour setup, please read chapter ↑18.6, Adding a Microphone.
Recording in Internal Mixing Mode from an External Source
The external source in this setup can be a turntable, a CD player, a microphone, etc. All youhave to do, is to connect the device of choice to an available input of your audio interface. Inthis example we use a microphone on Channel MAIN of the TRAKTOR AUDIO 10 soundcard.In TRAKTOR, do the following:
Appendix — Common Setups
Recording Setup
TRAKTOR - Manual - 310
1. Click the cog wheel symbol to open the Preferences dialog, and open the Output Routingpage.
2. Choose Internal mixing mode.3. Open the Input Routing page in the Preferences dialog.4. Assign the channel to which you connected the microphone to the corresponding channel
in TRAKTOR. In case of the TRAKTOR AUDIO 10, it should be auto-configured to InputFX Send (Ext).
5. Open the Mix Recorder page in the Preferences dialog.6. Choose Extern as Source.7. For External Input, select the relevant input channel of your audio interface. In our exam-
ple (TRAKTOR AUDIO 10 soundcard), this would be Input FX Send (Ext).8. Choose where the recordings should be saved or leave the default settings My Documents/
My Music/Traktor (Windows), or User:Music:Traktor (Mac OS X).9. Choose a Prefix, e.g. live_jan15th_ — this prefix will be added as part of the filename
which also contains a timestamp. Defining a prefix makes it easier to sort and find yourrecordings afterwards.
10. Choose a file size at which your recording file will be split. If you want to burn your re-cordings to CD later, a file size of 650 MB is recommended.
You cannot record a turntable via a line level channel. If you want to do this, use a phono-to-line level converter, which is available at your local music retailer.
Appendix — Common Setups
Recording Setup
TRAKTOR - Manual - 311
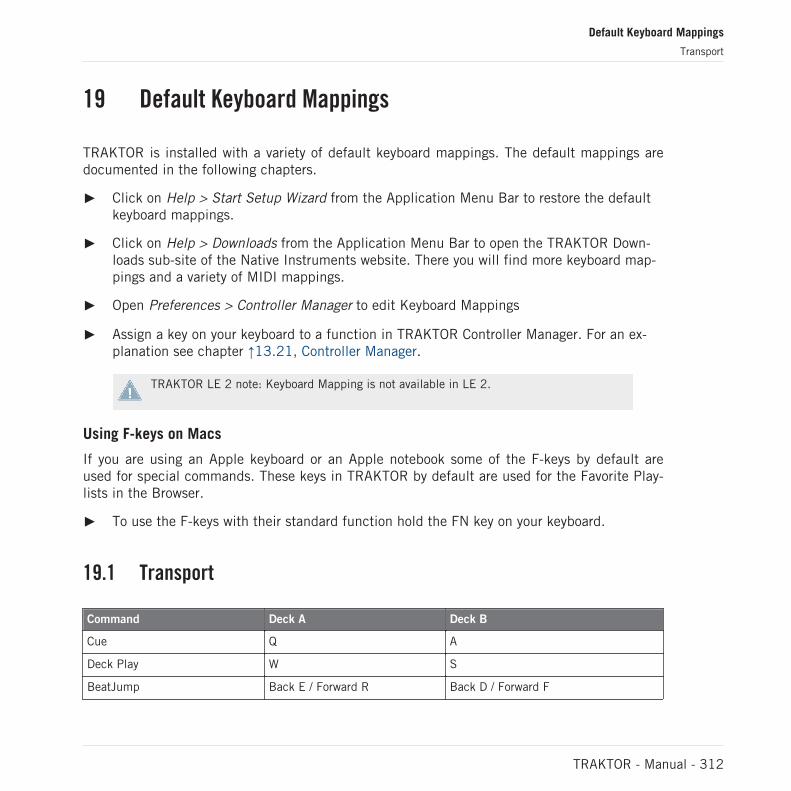
19 Default Keyboard Mappings
TRAKTOR is installed with a variety of default keyboard mappings. The default mappings aredocumented in the following chapters.
► Click on Help > Start Setup Wizard from the Application Menu Bar to restore the defaultkeyboard mappings.
► Click on Help > Downloads from the Application Menu Bar to open the TRAKTOR Down-loads sub-site of the Native Instruments website. There you will find more keyboard map-pings and a variety of MIDI mappings.
► Open Preferences > Controller Manager to edit Keyboard Mappings
► Assign a key on your keyboard to a function in TRAKTOR Controller Manager. For an ex-planation see chapter ↑13.21, Controller Manager.
TRAKTOR LE 2 note: Keyboard Mapping is not available in LE 2.
Using F-keys on Macs
If you are using an Apple keyboard or an Apple notebook some of the F-keys by default areused for special commands. These keys in TRAKTOR by default are used for the Favorite Play-lists in the Browser.
► To use the F-keys with their standard function hold the FN key on your keyboard.
19.1 Transport
Command Deck A Deck B
Cue Q A
Deck Play W S
BeatJump Back E / Forward R Back D / Forward F
Default Keyboard Mappings
Transport
TRAKTOR - Manual - 312
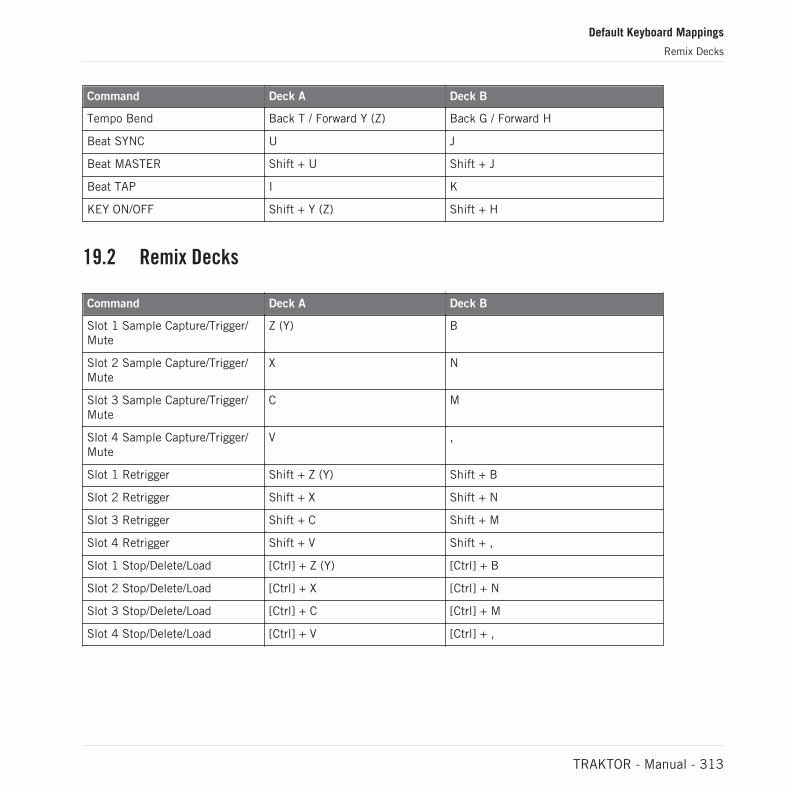
Command Deck A Deck B
Tempo Bend Back T / Forward Y (Z) Back G / Forward H
Beat SYNC U J
Beat MASTER Shift + U Shift + J
Beat TAP I K
KEY ON/OFF Shift + Y (Z) Shift + H
19.2 Remix Decks
Command Deck A Deck B
Slot 1 Sample Capture/Trigger/Mute
Z (Y) B
Slot 2 Sample Capture/Trigger/Mute
X N
Slot 3 Sample Capture/Trigger/Mute
C M
Slot 4 Sample Capture/Trigger/Mute
V ,
Slot 1 Retrigger Shift + Z (Y) Shift + B
Slot 2 Retrigger Shift + X Shift + N
Slot 3 Retrigger Shift + C Shift + M
Slot 4 Retrigger Shift + V Shift + ,
Slot 1 Stop/Delete/Load [Ctrl] + Z (Y) [Ctrl] + B
Slot 2 Stop/Delete/Load [Ctrl] + X [Ctrl] + N
Slot 3 Stop/Delete/Load [Ctrl] + C [Ctrl] + M
Slot 4 Stop/Delete/Load [Ctrl] + V [Ctrl] + ,
Default Keyboard Mappings
Remix Decks
TRAKTOR - Manual - 313
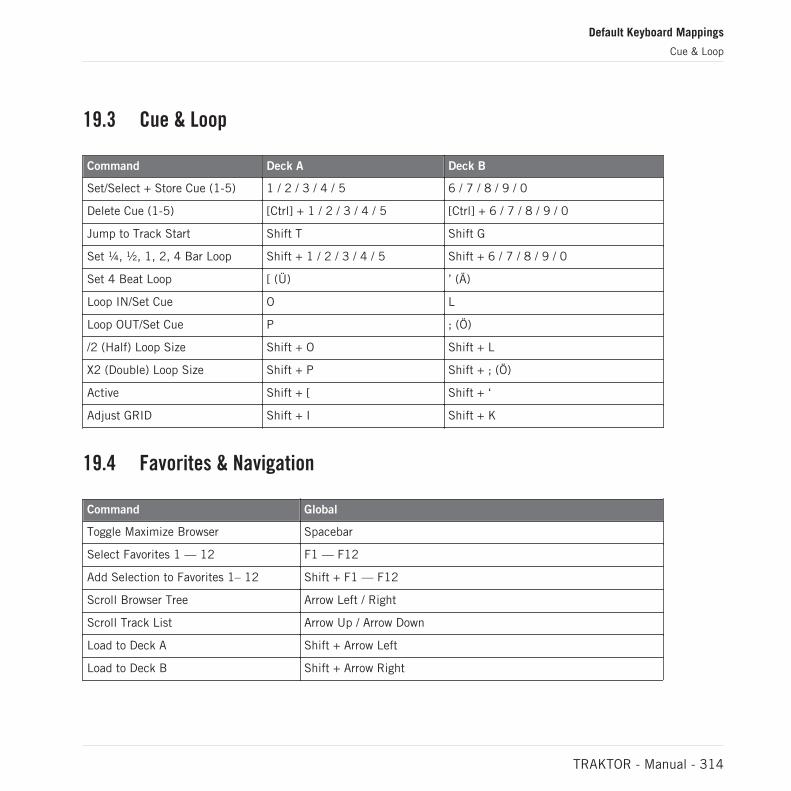
19.3 Cue & Loop
Command Deck A Deck B
Set/Select + Store Cue (1-5) 1 / 2 / 3 / 4 / 5 6 / 7 / 8 / 9 / 0
Delete Cue (1-5) [Ctrl] + 1 / 2 / 3 / 4 / 5 [Ctrl] + 6 / 7 / 8 / 9 / 0
Jump to Track Start Shift T Shift G
Set ¼, ½, 1, 2, 4 Bar Loop Shift + 1 / 2 / 3 / 4 / 5 Shift + 6 / 7 / 8 / 9 / 0
Set 4 Beat Loop [ (Ü) ’ (Ä)
Loop IN/Set Cue O L
Loop OUT/Set Cue P ; (Ö)
/2 (Half) Loop Size Shift + O Shift + L
X2 (Double) Loop Size Shift + P Shift + ; (Ö)
Active Shift + [ Shift + ‘
Adjust GRID Shift + I Shift + K
19.4 Favorites & Navigation
Command Global
Toggle Maximize Browser Spacebar
Select Favorites 1 — 12 F1 — F12
Add Selection to Favorites 1– 12 Shift + F1 — F12
Scroll Browser Tree Arrow Left / Right
Scroll Track List Arrow Up / Arrow Down
Load to Deck A Shift + Arrow Left
Load to Deck B Shift + Arrow Right
Default Keyboard Mappings
Cue & Loop
TRAKTOR - Manual - 314
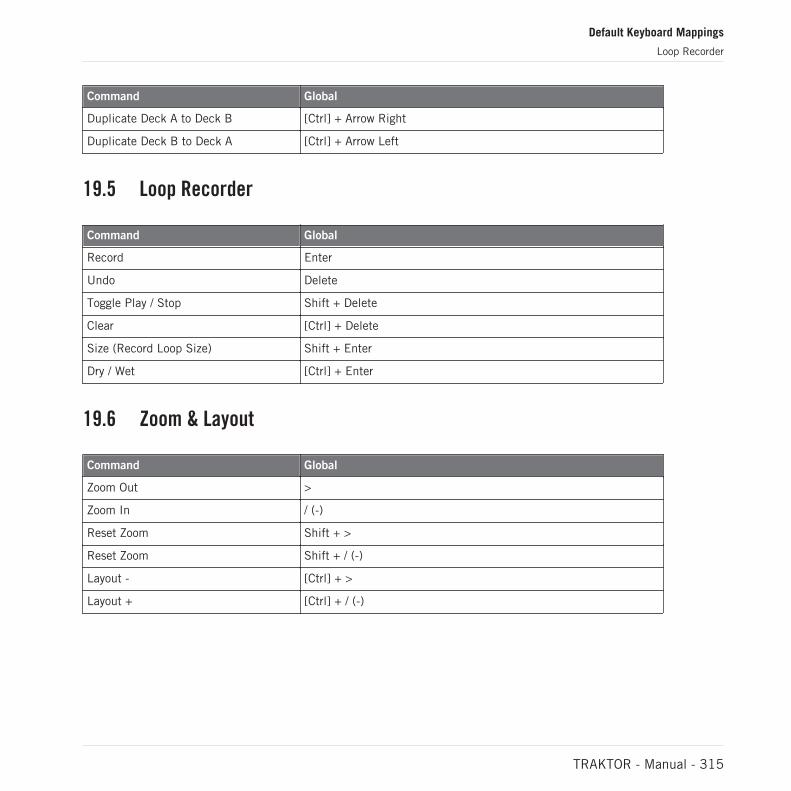
Command Global
Duplicate Deck A to Deck B [Ctrl] + Arrow Right
Duplicate Deck B to Deck A [Ctrl] + Arrow Left
19.5 Loop Recorder
Command Global
Record Enter
Undo Delete
Toggle Play / Stop Shift + Delete
Clear [Ctrl] + Delete
Size (Record Loop Size) Shift + Enter
Dry / Wet [Ctrl] + Enter
19.6 Zoom & Layout
Command Global
Zoom Out >
Zoom In / (-)
Reset Zoom Shift + >
Reset Zoom Shift + / (-)
Layout - [Ctrl] + >
Layout + [Ctrl] + / (-)
Default Keyboard Mappings
Loop Recorder
TRAKTOR - Manual - 315

19.7 Scratch Modes
Command Deck A Deck B
Play / Internal mode W S
Relative mode Shift + Q Shift + A
Absolute mode Shift + W Shift + S
Default Keyboard Mappings
Scratch Modes
TRAKTOR - Manual - 316
20 Assignable MIDI Controls
In this chapter, you will find a list of all MIDI controls available for assignment to externalMIDI controllers (via the Controller Manager section of TRAKTOR's Preferences). See ↑13.21,Controller Manager for further information on assigning MIDI controls and building controllermappings; however, before building individual mappings for your controller, you should checkwhether a mapping file is already available via the Setup Wizard, or as a download from NI'swebsite:
► To start the Setup Wizard, go to Help > Start Setup Wizard in TRAKTOR's ApplicationMenu Bar.
► Click on Help > Downloads from the Application Menu Bar to open the TRAKTOR Down-loads sub-site of the Native Instruments website. After logging in to your NI user account,you will find more keyboard mappings and a variety of MIDI mappings.
About Input and Output Controls
There are two types of assignable controls:
▪ Input controls: these controls can receive MIDI signals from an external MIDI controllersuch as a slider or a knob. E.g., the Play/Pause control can be assigned to a button on aMIDI controller and triggered by it. Every Input control also has an Output control coun-terpart, which can send LED states to a controller for visual feedback. Input controls areavailable via the Add In... button of the Assignment Table.
▪ Output controls: these controls can send LED states to external hardware for visual feed-back. E.g., you can assign the "Track End Warning" control from the Track Deck controlsto a controller LED so that the LED lights up when a Track in a Track Deck is nearbyreaching its end. Output controls are available via the Add Out... button of the Assign-ment Table.
In the screenshot below, you see a TRAKTOR control mapped to a controller both as an input,receiving signal, and as an output, sending signal. In this example, TRAKTOR's Deck Play/Pause control receives a MIDI signal from a button on the controller, and it also sends an on-state to the button's LED when Play/Pause is initiated.
Assignable MIDI Controls
TRAKTOR - Manual - 317
The Play/Pause control added to the mapping both as an input and as an output control.
20.1 Deck Common
Controls that are common to Track Decks and Remix Decks.
Name Description Input/Output
Load Next Loads the next track of a list into the Deck In/Out
Load Previous Loads the previous track of a list into the Deck In/Out
Load Selected Loads the selected track into the Deck In/Out
Unload Unload the track from the Deck In/Out
Play/Pause Play/pause Deck playback In/Out
Cue Cue to the current Floating Cue Point In/Out
CUP (Cue Play) Cue to the current Floating Cue Point and start playingimmediately
In/Out
Seek Position Seek back/forth in the track In/Out
Jog Touch On Map jogwheel's top plate. When track is playing, this willstop the track and start Scratch mode (in cooperationwith Jog Turn)
In/Out
Jog Turn Map jogwheel to pitch bend track. In cooperation withJog Touch On this starts scratching when the track isplaying
In/Out
Assignable MIDI Controls
Deck Common
TRAKTOR - Manual - 318

Name Description Input/Output
Set as Tempo Master Sets a Deck as the tempo master In/Out
Sync On Activates sync for a Deck In/Out
Phase Sync Syncs a Deck's phase In/Out
Tempo Sync Syncs a Deck's tempo In/Out
Tempo Bend Increases/decreases playback speed temporarily in steps In/Out
Tempo Bend (stepless) Increases/decreases playback speed temporarily In/Out
Tempo Adjust Adjusts the tempo of a Deck In/Out
Tempo Range Selector Sets the tempo range for a Deck In/Out
Keylock On Activates/deactivates keylock for a Deck In/Out
Keylock On (Preserve Pitch) Activates/deactivates keylock for a Deck with preservingthe current pitch
In/Out
Key Adjust Adjusts the key for a Deck In/Out
Analyze Loaded Track Initiates the Analysis for the track loaded in a Deck In/Out
Deck Flavor Selector Sets the Deck Flavor to Track Deck, Remix Deck or LiveInput for a Deck
In/Out
Deck Size Selector Sets the Deck Size to Micro, Small, Essential, Full or Ad-vanced for two corresponding Decks
In/Out
Advanced Panel Toggle Shows/hides the Advanced panel for two correspondingDecks
In/Out
Advanced Panel Tab Selector Selects the Move, Cue or Grid tab in the advanced panelof a Track Deck
In/Out
Timecode > Scratch Control On Activates/deactivates scratch control for a Deck (onlyavailable in TRAKTOR SCRATCH PRO)
In/Out
Timecode > Playback Mode Int/Rel/Abs
Sets the playback mode for a scratch controlled Deck toInternal, Relative or Absolute (only available in TRAKTORSCRATCH PRO)
In/Out
Timecode > Platter/Scope ViewSelector
Sets the Platter/Scope view to Off, Minimized, Platter orScope (only available in TRAKTOR SCRATCH PRO)
In/Out
Timecode > Calibrate Initiates the calibration for the timecode signal of a Deck(only available in TRAKTOR SCRATCH PRO)
In/Out
Assignable MIDI Controls
Deck Common
TRAKTOR - Manual - 319
Name Description Input/Output
Timecode > Reset Tempo Offset Resets the tempo offset for a Deck in scratch controlmode (only available in TRAKTOR SCRATCH PRO)
In/Out
Move > Size Selector Sets the move size In/Out
Move > Mode Selector Sets the move mode to beatjump, loop, loop in or loopout
In/Out
Move > Move Initiates a forward or backward move In/Out
Move > Beatjump Sets the beatjump length and intitiates the beatjump di-rectly
In/Out
Loop > Loop In/Set Cue Sets the loop In/floating cue point In/Out
Loop > Loop Out Sets the loop out point and activates the loop In/Out
Loop > Loop Size Selector Sets the auto loop size In/Out
Loop > Loop Set Sets an auto loop with the current loop size at the play-back position and activates it
In/Out
Loop > Loop Size Select + Set Sets the auto loop size and sets an active auto loop withthe current loop size at the playback position
In/Out
Loop > Backward Loop Size Se-lect + Set
Sets the auto loop size and sets an active backward autoloop with the current loop size at the playback position
In/Out
Loop > Loop Active On Activates/deactivates all loops In/Out
Phase Outputs the value of the phase meter as it is visible on aDeck (output value is 0 when the phase of the decksmatch)
Out
Beat Phase Outputs the Distance to the next gridline (output value is0 when playback marker hits gridline)
Out
Deck is Loaded Outputs if a track is loaded in a Deck Out
Is In Active Loop Outputs 1 if the track is in a loop and 0 otherwise Out
20.2 Track Deck
Controls that are specific to Track Decks.
Assignable MIDI Controls
Track Deck
TRAKTOR - Manual - 320
Name Description Input/Output
Load into Next Stopped Deck Load selected track into the first available stopped Deck In/Out
Load, Loop, and Play Load the selected track, cue to Load Marker, set Autoloopwith current loop length, and play Deck
In/Out
Duplicate Track Deck A Duplicate the loaded track from Deck A into a Deck In/Out
Duplicate Track Deck B Duplicate the loaded track from Deck B into a Deck In/Out
Duplicate Track Deck C Duplicate the loaded track from Deck C into a Deck In/Out
Duplicate Track Deck D Duplicate the loaded track from Deck D into a Deck In/Out
Waveform Zoom Adjust Adjusts the zoom of the waveform for a Deck In/Out
Cue > Set Cue and Store as nextHotcue
Sets a cue point and stores it as the next available hotcue In/Out
Cue > Store Floating Cue/Loopas next Hotcue
Stores the floating cue/loop as the next available hotcue In/Out
Cue > Delete current Hotcue Deletes the current Hotcue In/Out
Cue > Jump to Next/Prev Cue/Loop
Jumps to the previous/next cue or loop In/Out
Cue > Map Hotcue Maps the floating cue point to a Hotcue In/Out
Cue > Select/Set+Store Hotcue Sets and stores a Hotcue at the playback position orjumps to the Hotcue if it already exists
In/Out
Cue > Delete Hotcue Deletes a Hotcue In/Out
Cue > Cue Type Selector Sets the cue type (cue, fade-in, fade-out, load, grid orloop) for a Hotcue
In/Out
Hotcue 1 Type Outputs the type of hotcue 1 Out
Hotcue 2 Type Outputs the type of hotcue 2 Out
Hotcue 3 Type Outputs the type of hotcue 3 Out
Hotcue 4 Type Outputs the type of hotcue 4 Out
Hotcue 5 Type Outputs the type of hotcue 5 Out
Hotcue 6 Type Outputs the type of hotcue 6 Out
Hotcue 7 Type Outputs the type of hotcue 7 Out
Assignable MIDI Controls
Track Deck
TRAKTOR - Manual - 321
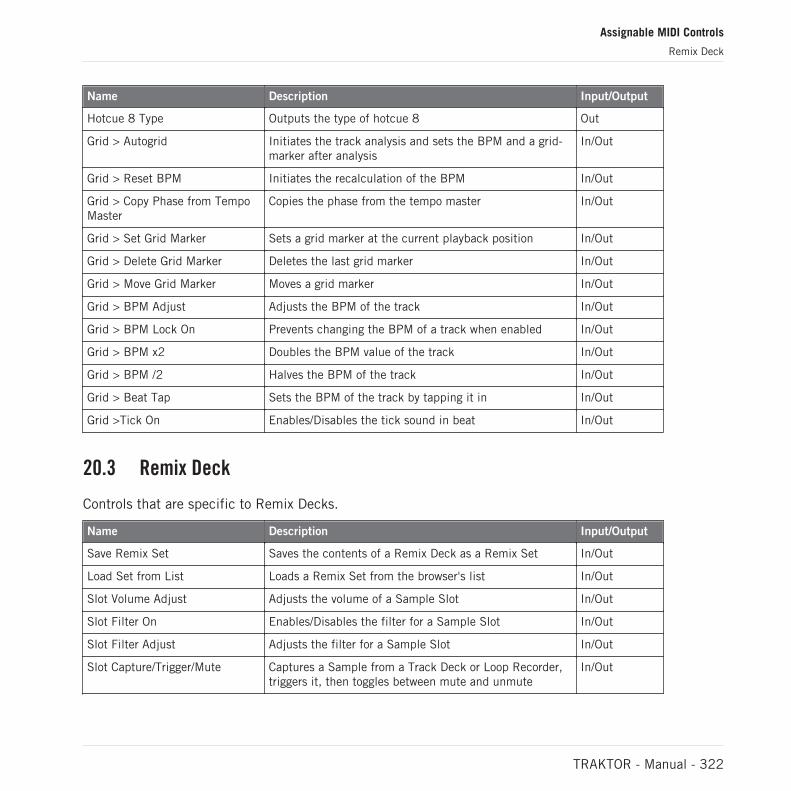
Name Description Input/Output
Hotcue 8 Type Outputs the type of hotcue 8 Out
Grid > Autogrid Initiates the track analysis and sets the BPM and a grid-marker after analysis
In/Out
Grid > Reset BPM Initiates the recalculation of the BPM In/Out
Grid > Copy Phase from TempoMaster
Copies the phase from the tempo master In/Out
Grid > Set Grid Marker Sets a grid marker at the current playback position In/Out
Grid > Delete Grid Marker Deletes the last grid marker In/Out
Grid > Move Grid Marker Moves a grid marker In/Out
Grid > BPM Adjust Adjusts the BPM of the track In/Out
Grid > BPM Lock On Prevents changing the BPM of a track when enabled In/Out
Grid > BPM x2 Doubles the BPM value of the track In/Out
Grid > BPM /2 Halves the BPM of the track In/Out
Grid > Beat Tap Sets the BPM of the track by tapping it in In/Out
Grid >Tick On Enables/Disables the tick sound in beat In/Out
20.3 Remix Deck
Controls that are specific to Remix Decks.
Name Description Input/Output
Save Remix Set Saves the contents of a Remix Deck as a Remix Set In/Out
Load Set from List Loads a Remix Set from the browser's list In/Out
Slot Volume Adjust Adjusts the volume of a Sample Slot In/Out
Slot Filter On Enables/Disables the filter for a Sample Slot In/Out
Slot Filter Adjust Adjusts the filter for a Sample Slot In/Out
Slot Capture/Trigger/Mute Captures a Sample from a Track Deck or Loop Recorder,triggers it, then toggles between mute and unmute
In/Out
Assignable MIDI Controls
Remix Deck
TRAKTOR - Manual - 322
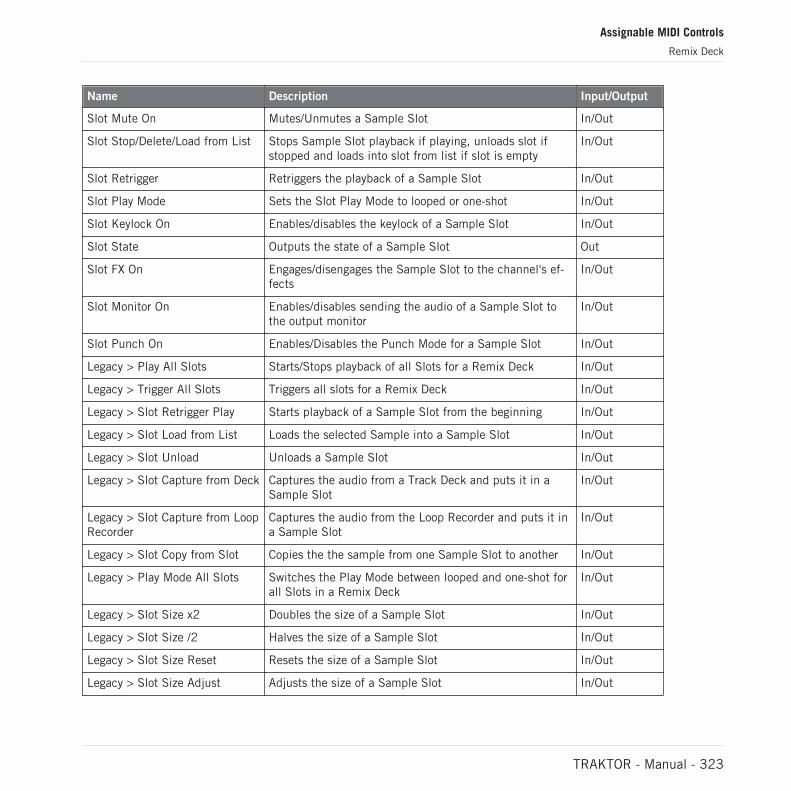
Name Description Input/Output
Slot Mute On Mutes/Unmutes a Sample Slot In/Out
Slot Stop/Delete/Load from List Stops Sample Slot playback if playing, unloads slot ifstopped and loads into slot from list if slot is empty
In/Out
Slot Retrigger Retriggers the playback of a Sample Slot In/Out
Slot Play Mode Sets the Slot Play Mode to looped or one-shot In/Out
Slot Keylock On Enables/disables the keylock of a Sample Slot In/Out
Slot State Outputs the state of a Sample Slot Out
Slot FX On Engages/disengages the Sample Slot to the channel's ef-fects
In/Out
Slot Monitor On Enables/disables sending the audio of a Sample Slot tothe output monitor
In/Out
Slot Punch On Enables/Disables the Punch Mode for a Sample Slot In/Out
Legacy > Play All Slots Starts/Stops playback of all Slots for a Remix Deck In/Out
Legacy > Trigger All Slots Triggers all slots for a Remix Deck In/Out
Legacy > Slot Retrigger Play Starts playback of a Sample Slot from the beginning In/Out
Legacy > Slot Load from List Loads the selected Sample into a Sample Slot In/Out
Legacy > Slot Unload Unloads a Sample Slot In/Out
Legacy > Slot Capture from Deck Captures the audio from a Track Deck and puts it in aSample Slot
In/Out
Legacy > Slot Capture from LoopRecorder
Captures the audio from the Loop Recorder and puts it ina Sample Slot
In/Out
Legacy > Slot Copy from Slot Copies the the sample from one Sample Slot to another In/Out
Legacy > Play Mode All Slots Switches the Play Mode between looped and one-shot forall Slots in a Remix Deck
In/Out
Legacy > Slot Size x2 Doubles the size of a Sample Slot In/Out
Legacy > Slot Size /2 Halves the size of a Sample Slot In/Out
Legacy > Slot Size Reset Resets the size of a Sample Slot In/Out
Legacy > Slot Size Adjust Adjusts the size of a Sample Slot In/Out
Assignable MIDI Controls
Remix Deck
TRAKTOR - Manual - 323
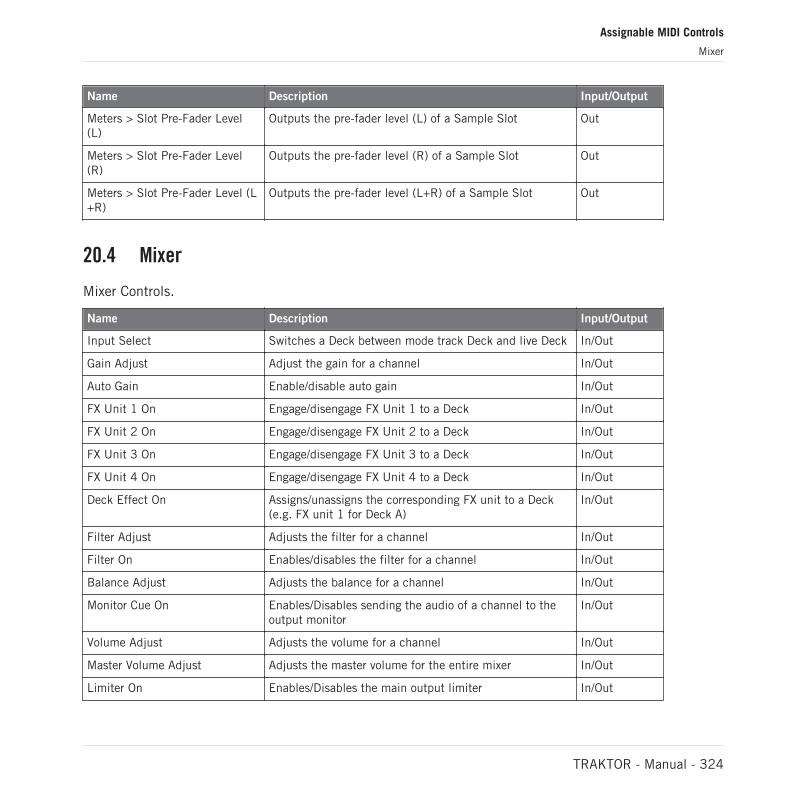
Name Description Input/Output
Meters > Slot Pre-Fader Level(L)
Outputs the pre-fader level (L) of a Sample Slot Out
Meters > Slot Pre-Fader Level(R)
Outputs the pre-fader level (R) of a Sample Slot Out
Meters > Slot Pre-Fader Level (L+R)
Outputs the pre-fader level (L+R) of a Sample Slot Out
20.4 Mixer
Mixer Controls.
Name Description Input/Output
Input Select Switches a Deck between mode track Deck and live Deck In/Out
Gain Adjust Adjust the gain for a channel In/Out
Auto Gain Enable/disable auto gain In/Out
FX Unit 1 On Engage/disengage FX Unit 1 to a Deck In/Out
FX Unit 2 On Engage/disengage FX Unit 2 to a Deck In/Out
FX Unit 3 On Engage/disengage FX Unit 3 to a Deck In/Out
FX Unit 4 On Engage/disengage FX Unit 4 to a Deck In/Out
Deck Effect On Assigns/unassigns the corresponding FX unit to a Deck(e.g. FX unit 1 for Deck A)
In/Out
Filter Adjust Adjusts the filter for a channel In/Out
Filter On Enables/disables the filter for a channel In/Out
Balance Adjust Adjusts the balance for a channel In/Out
Monitor Cue On Enables/Disables sending the audio of a channel to theoutput monitor
In/Out
Volume Adjust Adjusts the volume for a channel In/Out
Master Volume Adjust Adjusts the master volume for the entire mixer In/Out
Limiter On Enables/Disables the main output limiter In/Out
Assignable MIDI Controls
Mixer
TRAKTOR - Manual - 324
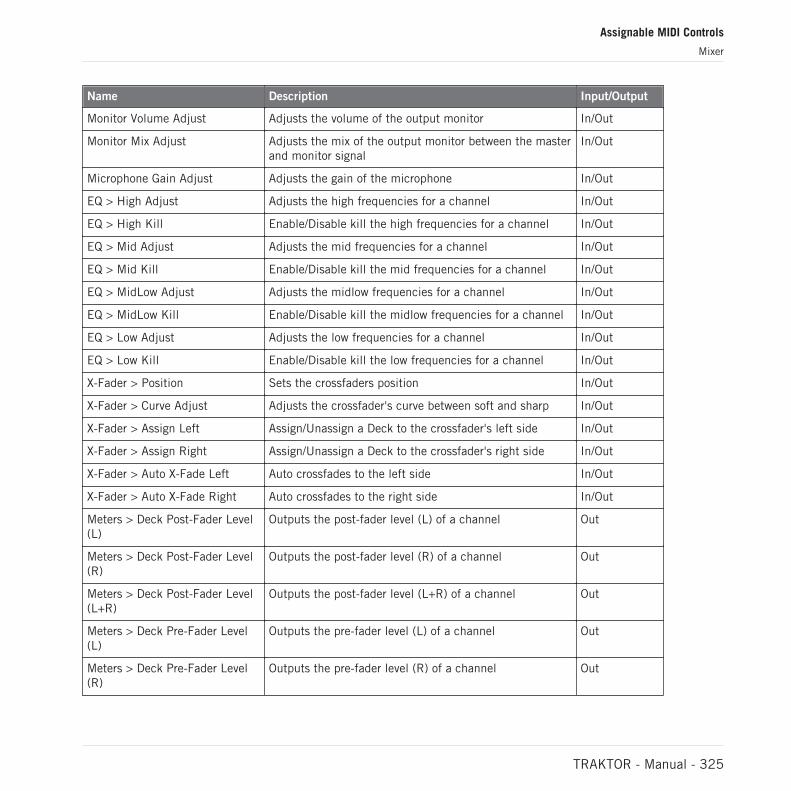
Name Description Input/Output
Monitor Volume Adjust Adjusts the volume of the output monitor In/Out
Monitor Mix Adjust Adjusts the mix of the output monitor between the masterand monitor signal
In/Out
Microphone Gain Adjust Adjusts the gain of the microphone In/Out
EQ > High Adjust Adjusts the high frequencies for a channel In/Out
EQ > High Kill Enable/Disable kill the high frequencies for a channel In/Out
EQ > Mid Adjust Adjusts the mid frequencies for a channel In/Out
EQ > Mid Kill Enable/Disable kill the mid frequencies for a channel In/Out
EQ > MidLow Adjust Adjusts the midlow frequencies for a channel In/Out
EQ > MidLow Kill Enable/Disable kill the midlow frequencies for a channel In/Out
EQ > Low Adjust Adjusts the low frequencies for a channel In/Out
EQ > Low Kill Enable/Disable kill the low frequencies for a channel In/Out
X-Fader > Position Sets the crossfaders position In/Out
X-Fader > Curve Adjust Adjusts the crossfader's curve between soft and sharp In/Out
X-Fader > Assign Left Assign/Unassign a Deck to the crossfader's left side In/Out
X-Fader > Assign Right Assign/Unassign a Deck to the crossfader's right side In/Out
X-Fader > Auto X-Fade Left Auto crossfades to the left side In/Out
X-Fader > Auto X-Fade Right Auto crossfades to the right side In/Out
Meters > Deck Post-Fader Level(L)
Outputs the post-fader level (L) of a channel Out
Meters > Deck Post-Fader Level(R)
Outputs the post-fader level (R) of a channel Out
Meters > Deck Post-Fader Level(L+R)
Outputs the post-fader level (L+R) of a channel Out
Meters > Deck Pre-Fader Level(L)
Outputs the pre-fader level (L) of a channel Out
Meters > Deck Pre-Fader Level(R)
Outputs the pre-fader level (R) of a channel Out
Assignable MIDI Controls
Mixer
TRAKTOR - Manual - 325
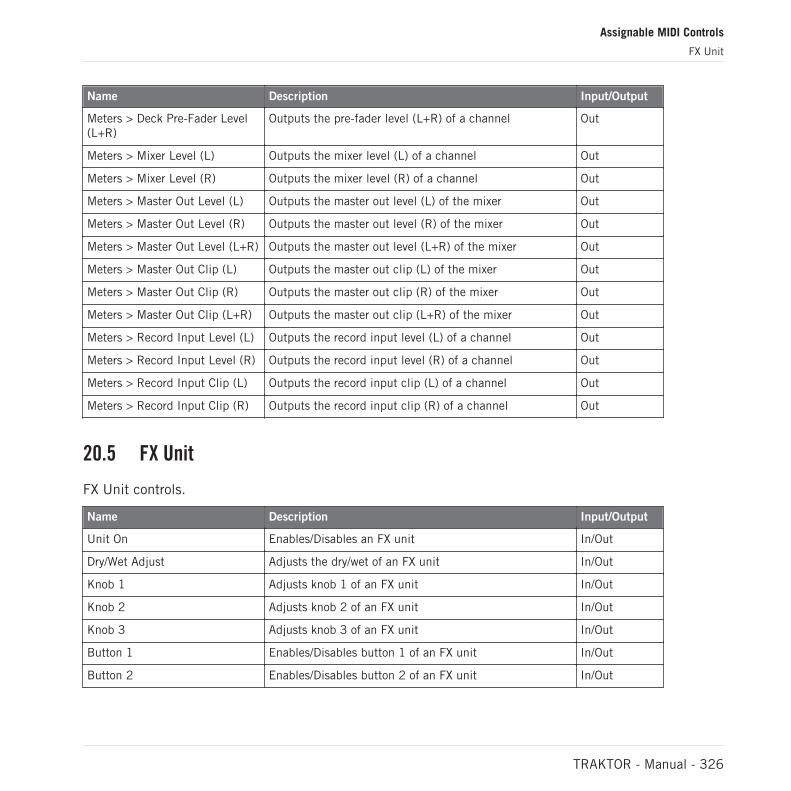
Name Description Input/Output
Meters > Deck Pre-Fader Level(L+R)
Outputs the pre-fader level (L+R) of a channel Out
Meters > Mixer Level (L) Outputs the mixer level (L) of a channel Out
Meters > Mixer Level (R) Outputs the mixer level (R) of a channel Out
Meters > Master Out Level (L) Outputs the master out level (L) of the mixer Out
Meters > Master Out Level (R) Outputs the master out level (R) of the mixer Out
Meters > Master Out Level (L+R) Outputs the master out level (L+R) of the mixer Out
Meters > Master Out Clip (L) Outputs the master out clip (L) of the mixer Out
Meters > Master Out Clip (R) Outputs the master out clip (R) of the mixer Out
Meters > Master Out Clip (L+R) Outputs the master out clip (L+R) of the mixer Out
Meters > Record Input Level (L) Outputs the record input level (L) of a channel Out
Meters > Record Input Level (R) Outputs the record input level (R) of a channel Out
Meters > Record Input Clip (L) Outputs the record input clip (L) of a channel Out
Meters > Record Input Clip (R) Outputs the record input clip (R) of a channel Out
20.5 FX Unit
FX Unit controls.
Name Description Input/Output
Unit On Enables/Disables an FX unit In/Out
Dry/Wet Adjust Adjusts the dry/wet of an FX unit In/Out
Knob 1 Adjusts knob 1 of an FX unit In/Out
Knob 2 Adjusts knob 2 of an FX unit In/Out
Knob 3 Adjusts knob 3 of an FX unit In/Out
Button 1 Enables/Disables button 1 of an FX unit In/Out
Button 2 Enables/Disables button 2 of an FX unit In/Out
Assignable MIDI Controls
FX Unit
TRAKTOR - Manual - 326
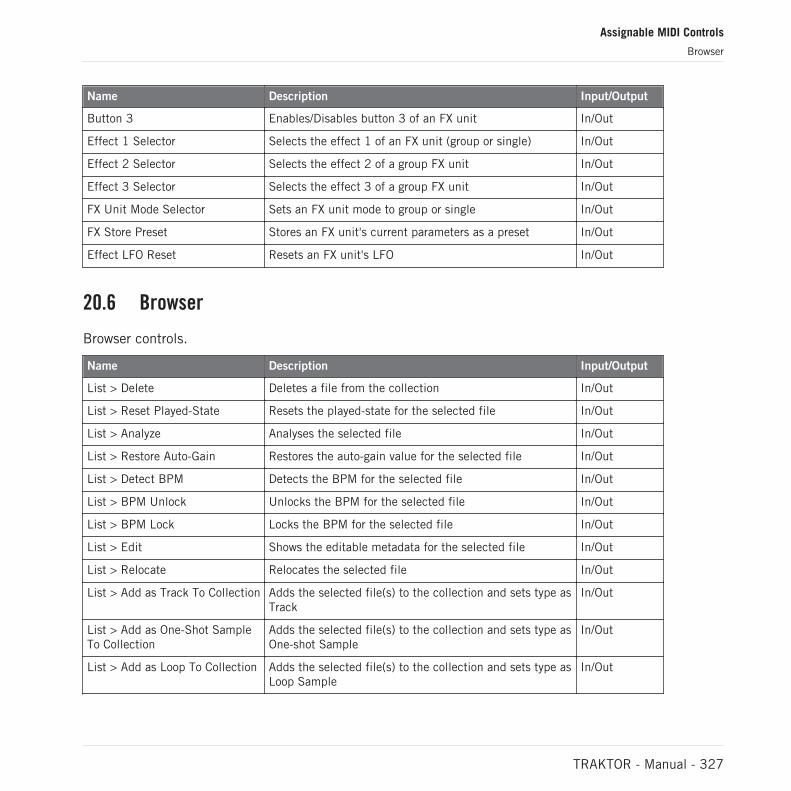
Name Description Input/Output
Button 3 Enables/Disables button 3 of an FX unit In/Out
Effect 1 Selector Selects the effect 1 of an FX unit (group or single) In/Out
Effect 2 Selector Selects the effect 2 of a group FX unit In/Out
Effect 3 Selector Selects the effect 3 of a group FX unit In/Out
FX Unit Mode Selector Sets an FX unit mode to group or single In/Out
FX Store Preset Stores an FX unit's current parameters as a preset In/Out
Effect LFO Reset Resets an FX unit's LFO In/Out
20.6 Browser
Browser controls.
Name Description Input/Output
List > Delete Deletes a file from the collection In/Out
List > Reset Played-State Resets the played-state for the selected file In/Out
List > Analyze Analyses the selected file In/Out
List > Restore Auto-Gain Restores the auto-gain value for the selected file In/Out
List > Detect BPM Detects the BPM for the selected file In/Out
List > BPM Unlock Unlocks the BPM for the selected file In/Out
List > BPM Lock Locks the BPM for the selected file In/Out
List > Edit Shows the editable metadata for the selected file In/Out
List > Relocate Relocates the selected file In/Out
List > Add as Track To Collection Adds the selected file(s) to the collection and sets type asTrack
In/Out
List > Add as One-Shot SampleTo Collection
Adds the selected file(s) to the collection and sets type asOne-shot Sample
In/Out
List > Add as Loop To Collection Adds the selected file(s) to the collection and sets type asLoop Sample
In/Out
Assignable MIDI Controls
Browser
TRAKTOR - Manual - 327
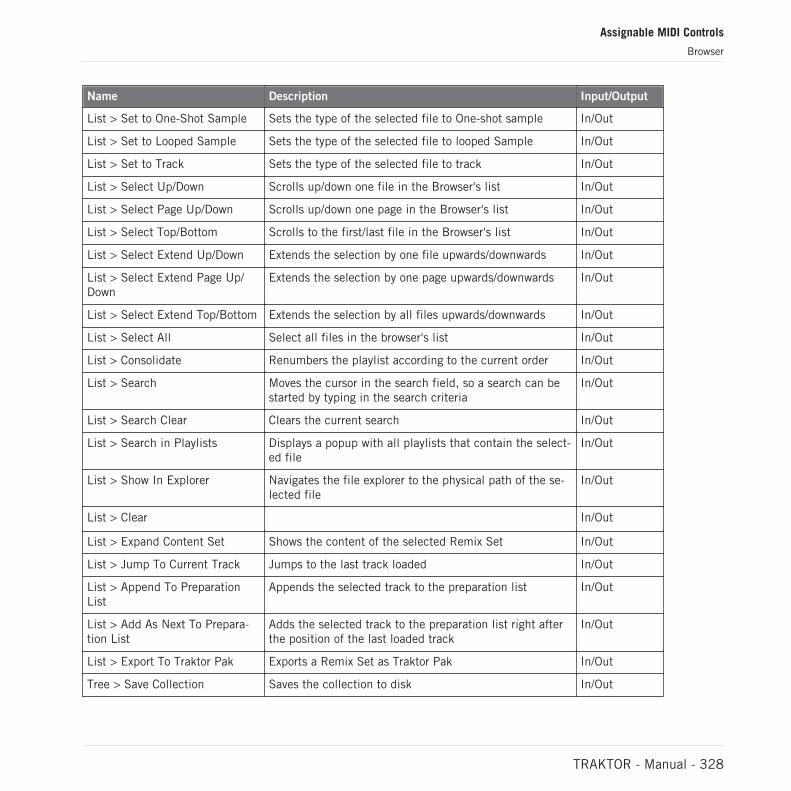
Name Description Input/Output
List > Set to One-Shot Sample Sets the type of the selected file to One-shot sample In/Out
List > Set to Looped Sample Sets the type of the selected file to looped Sample In/Out
List > Set to Track Sets the type of the selected file to track In/Out
List > Select Up/Down Scrolls up/down one file in the Browser's list In/Out
List > Select Page Up/Down Scrolls up/down one page in the Browser's list In/Out
List > Select Top/Bottom Scrolls to the first/last file in the Browser's list In/Out
List > Select Extend Up/Down Extends the selection by one file upwards/downwards In/Out
List > Select Extend Page Up/Down
Extends the selection by one page upwards/downwards In/Out
List > Select Extend Top/Bottom Extends the selection by all files upwards/downwards In/Out
List > Select All Select all files in the browser's list In/Out
List > Consolidate Renumbers the playlist according to the current order In/Out
List > Search Moves the cursor in the search field, so a search can bestarted by typing in the search criteria
In/Out
List > Search Clear Clears the current search In/Out
List > Search in Playlists Displays a popup with all playlists that contain the select-ed file
In/Out
List > Show In Explorer Navigates the file explorer to the physical path of the se-lected file
In/Out
List > Clear In/Out
List > Expand Content Set Shows the content of the selected Remix Set In/Out
List > Jump To Current Track Jumps to the last track loaded In/Out
List > Append To PreparationList
Appends the selected track to the preparation list In/Out
List > Add As Next To Prepara-tion List
Adds the selected track to the preparation list right afterthe position of the last loaded track
In/Out
List > Export To Traktor Pak Exports a Remix Set as Traktor Pak In/Out
Tree > Save Collection Saves the collection to disk In/Out
Assignable MIDI Controls
Browser
TRAKTOR - Manual - 328
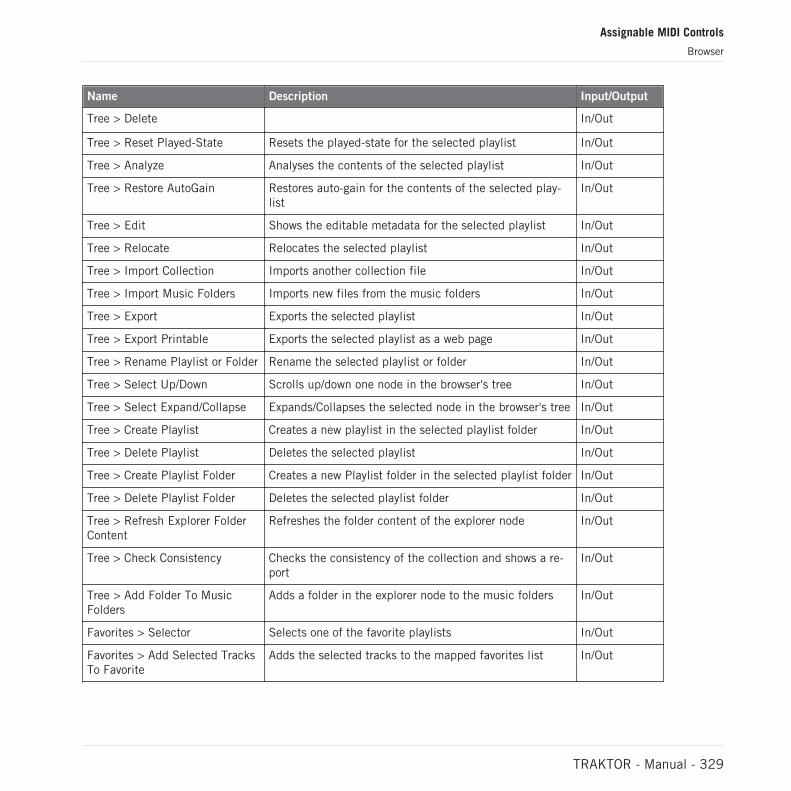
Name Description Input/Output
Tree > Delete In/Out
Tree > Reset Played-State Resets the played-state for the selected playlist In/Out
Tree > Analyze Analyses the contents of the selected playlist In/Out
Tree > Restore AutoGain Restores auto-gain for the contents of the selected play-list
In/Out
Tree > Edit Shows the editable metadata for the selected playlist In/Out
Tree > Relocate Relocates the selected playlist In/Out
Tree > Import Collection Imports another collection file In/Out
Tree > Import Music Folders Imports new files from the music folders In/Out
Tree > Export Exports the selected playlist In/Out
Tree > Export Printable Exports the selected playlist as a web page In/Out
Tree > Rename Playlist or Folder Rename the selected playlist or folder In/Out
Tree > Select Up/Down Scrolls up/down one node in the browser's tree In/Out
Tree > Select Expand/Collapse Expands/Collapses the selected node in the browser's tree In/Out
Tree > Create Playlist Creates a new playlist in the selected playlist folder In/Out
Tree > Delete Playlist Deletes the selected playlist In/Out
Tree > Create Playlist Folder Creates a new Playlist folder in the selected playlist folder In/Out
Tree > Delete Playlist Folder Deletes the selected playlist folder In/Out
Tree > Refresh Explorer FolderContent
Refreshes the folder content of the explorer node In/Out
Tree > Check Consistency Checks the consistency of the collection and shows a re-port
In/Out
Tree > Add Folder To MusicFolders
Adds a folder in the explorer node to the music folders In/Out
Favorites > Selector Selects one of the favorite playlists In/Out
Favorites > Add Selected TracksTo Favorite
Adds the selected tracks to the mapped favorites list In/Out
Assignable MIDI Controls
Browser
TRAKTOR - Manual - 329
20.7 Preview Player
Preview Player controls.
Name Description Input/Output
Load Selected Loads the selected track into the preview player In/Out
Play/Pause Starts/Stops playback of the preview player In/Out
Seek Position Seeks the position in the preview player In/Out
Unload Unloads the preview player In/Out
20.8 Loop Recorder
Loop Recorder controls.
Name Description Input/Output
Record Starts/stops the recording in the loop recorder In/Out
Size Sets the recording size of the loop recorder In/Out
Dry/Wet Adjust Adjusts the dry/wet ratio of the loop recorder In/Out
Play/Pause Starts/stops playback of the loop recorder In/Out
Delete Deletes the loop in the loop recorder In/Out
Undo/Redo Undoes/redoes the last action in the loop recorder In/Out
Playback Position Outputs the playback position of the loop recorder (range:0 to 1)
Out
Undo State Outputs the undo state of the Loop Recorder Out
State Outputs the state of the Loop Recorder Out
20.9 Audio Recorder
Audio Recorder controls.
Assignable MIDI Controls
Preview Player
TRAKTOR - Manual - 330
Name Description Input/Output
Record/Stop Starts/stops the recording of the audio recorder In/Out
Cut Cuts the audio of the audio recorder at the current posi-tion and begins a new file
In/Out
Gain Adjust Adjusts the gain of the audio recorder In/Out
Load Last Recording Loads the last audio recording into a Deck In/Out
20.10 Master Clock
Master Clock controls.
Name Description Input/Output
Auto Master Mode Sets the master clock mode to auto In/Out
Master Tempo Selector Sets the master tempo's source to Clock, Deck A, Deck B,Deck C or Deck D
In/Out
Set Tempo Master Adjusts the master clock's tempo In/Out
Tempo Bend Up Increases the tempo temporarily In/Out
Tempo Bend Down Decreases the tempo temporarily In/Out
Beat Tap Sets the master tempo by tapping it in In/Out
Tick On Enables/Disables the master clock's tick sound In/Out
Clock Int/Ext Switches the master clock between internal and external In/Out
Clock Send Enables/Disables sending of the MIDI clock In/Out
Clock Trigger MIDI Sync Triggers the MIDI clock synchronization (MIDI Start) In/Out
20.11 Global
Global controls.
Assignable MIDI Controls
Master Clock
TRAKTOR - Manual - 331
Name Description Input/Output
Snap On Enables/disables the snap to beat function In/Out
Quant On Enables/disables the quantization function In/Out
Broadcasting On Enables/disables broadcasting In/Out
Cruise Mode On Enables/disables the cruise mode In/Out
Show Slider Values On Enables/disables showing the values of each slider In/Out
Tool Tips On Enables/disables the tooltips In/Out
Send Monitor State Sends the current state to all LED buttons In/Out
20.12 Layout
User interface Layout controls.
Name Description Input/Output
Only Browser On Maximises the browser section In/Out
Layout Selector Selects one of the screen layouts In/Out
Fullscreen On Enables/disables fullscreen mode In/Out
Deck Focus Selector Sets the focused Deck In/Out
Toggle Last Focus Switches the Deck focus between the last Deck and thecurrent Deck
In/Out
20.13 Modifier
Modifier controls.
Name Description Input/Output
Modifier #1 Sets modifier #1 In/Out
Modifier #2 Sets modifier #2 In/Out
Modifier #3 Sets modifier #3 In/Out
Modifier #4 Sets modifier #4 In/Out
Assignable MIDI Controls
Layout
TRAKTOR - Manual - 332
Name Description Input/Output
Modifier #5 Sets modifier #5 In/Out
Modifier #6 Sets modifier #6 In/Out
Modifier #7 Sets modifier #7 In/Out
Modifier #8 Sets modifier #8 In/Out
Assignable MIDI Controls
Modifier
TRAKTOR - Manual - 333
IndexAAdjusting levels [260]
Advanced Panel [98]
BeatJump [99]
Cue Points [107]
Grid Panel [110]
Hotcue:Mapping [110]
Move Loop Out [104]
Move:BeatJump [100]
Move:Loop [101]
Move:Loop In [103]
Aligning tracks [254]
Analysis [51] [71] [292]
auto analyze [71]
Application Menu Bar [33]
Assignable MIDI Controls [317]
Load [318]
Assigning FX to channels [270]
Assignment Table [198]
AUDIO [129]
Audio CDs
Eject [73]
Favorites [73]
working with [73]
AUDIO indicator [34]
Audio input [76]
Audio latency
setting [171]
Audio Recorder [38]
Audio Setup
Fallback [153]
AUTO button [289]
Auto mode (tempo master) [289]
AUX knob [46]
Index
TRAKTOR - Manual - 334
BBackup [21]
BAT [129]
BAT status
checking [129]
Battery indicator [35]
Beat Sync [178]
Beat Syncing [96]
Beatgrid [292]
Audible Tick [115]
create [111]
Grid view [182]
Lock [115]
Beatmarker
auto [113]
manual [114]
Beatmarkers
deleting [114]
BeatSync [97]
BPM [292]
Broadcast
Configuring [210]
Broadcasting [210]
Browser [46] [49] [248]
Browser list [46]
Browser List [47]
Consistency Check [69]
Consistency Check on Startup [70]
Cover Art [68]
Favorites [46] [47] [59]
Maintenance Tools [69]
Maximize Browser button [36] [130]
Preview Player [46] [67]
Reset Played State [72]
Search Field [46]
Search field [47]
Show in Explorer/Finder [73]
Status Bar [46] [47]
Track Icons [66]
Browser Tree [47]
Index
TRAKTOR - Manual - 335
CChanging the size of a Loop [265]
Channel [33] [45] [245]
CUE button [251]
fader [247] [261]
FILTER knob [247]
FX Assign buttons [270] [273]
GAIN encoder [247] [261]
HI knob [247]
LOW knob [247]
meter [247] [261]
MID knob [247]
Channel fader [247]
Channel meter [247] [261]
Clearing a Hotcue [268]
Clock [288] [289]
panel [289]
setting as tempo master [290] [291]
setting the Clock’s tempo (BPM) [292]
Common setups [300]
Compatibility [20]
Compatible Music File Formats [49]
Connection [34] [129]
Controller Types [201]
Cover Art [68]
Delete [69]
Import [68]
Show [68]
CPU [34] [129]
Crossfader [246] [257]
Cruise [36] [130]
Cruise mode
activating [130]
Utility Buttons [130]
CTRL [34] [128]
Cue Advanced [267]
CUE button (Mixer) [251]
Cue channel [251]
CUE MIX knob [251]
Cue Point
Beatmarker [108]
Deleting [109]
Fade In / Fade Out [107]
Load [108]
Loop [109]
Store [106]
Cue Point Types [107]
Cue Points [252]
Deleting a Hotcue [267]
Setting a Cue Point [252]
Index
TRAKTOR - Manual - 336
Setting a Hotcue [267]
setting and storing [252]
CUE VOL knob [249]
Cueing [252] [263]
DData Directories [72]
Deactivating looping [267]
Deck [33]
Track direct copy [89]
Deck Display
MASTER indicator [290]
Deck Flavor [86]
Deck Focus [86]
Deck Heading [86]
Deck Layout [88]
Deck Mode [87]
Decks [40] [75]
Default FX [271]
Default Keyboard Mappings [312]
Delay (FX) [271]
Deleting Tracks [57]
from Playlist [58]
Demo Tracks [243]
Device Mapping [199]
Device Setup [196]
Documentation [18]
DRY/WET knob (FX Unit) [271] [273]
DRY/WET knob (Loop Recorder) [283]
Index
TRAKTOR - Manual - 337
EEffects [37] [269]
Assigning a Deck to an FX Unit [270]
Group Mode [271]
Saving FX (Snapshot) [273]
Single Mode [273]
Effects in Detail [212]
EQ
HI [118]
Kill Switch [118]
LO [118]
MID [118]
Types [119]
EQs [247]
using when mixing in a track [256]
Equalizer Types [119]
Export
Playlist [61]
External audio input [76]
External Mixer [125] [303]
External mixer
Software setup [126]
FFaders
channel [247]
TEMPO [258]
Favorites [275]
Filter (FX) [271]
FILTER knob [247]
for mixing in a track [256]
Flux mode [87] [88]
Forum [299]
Fullscreen mode [36]
activating [131]
FX [269]
default [271]
loading (Group mode) [272]
synchronization [289]
tempo-synched [272]
FX Assign buttons [270] [273]
FX Buttons 00001-00003 [271]
FX Details [212]
Auto Bouncer [239]
BeatSlicer Buffer [236]
Bouncer [240]
Common Parameters [215]
Delay [216]
Index
TRAKTOR - Manual - 338
Delay T3 [221]
Digital LoFi [233]
Filter [224]
Filter LFO [222]
Filter:92 [226]
Filter:92 LFO [225]
Filter:92 Pulse [226]
Flanger [217]
Flanger Flux [219]
Flanger Pulse [218]
Formant Filter [236]
Gater [219] [223]
Iceverb [231]
Mulholland Drive [234]
Panel Modes:Group [213]
Panel Modes:Single [213]
Peak Filter [237]
Phaser [227]
Phaser Flux [229]
Phaser Pulse [228]
Ramp Delay [238]
Reverb [217]
Reverb T3 [232]
Reverse Grain [230]
Ring Modulator [232]
Tape Delay [237]
Transpose Stretch [234]
Turntable FX [231]
FX Knobs 00001-00003 [272] [273]
FX Panel Modes [213]
FX Unit [37] [269]
assigning to channels [270]
controlling [272]
DRY/WET knob [271] [273]
FX Buttons 00001-00003 [271]
FX Knobs 00001-00003 [272] [273]
Group mode [271]
Single mode [273]
snapshot [273]
FX Units [37]
Index
TRAKTOR - Manual - 339
GGAIN encoder [247] [261]
Gater (FX) [272]
Getting Started guide [19]
Global section [131]
Effect Panels [136]
Loop Recorder [133]
Master Clock Panel [134]
Master panel [132]
MIDI Clock Send [135]
Grid Panel [110]
Group mode [271]
GUI
Application Menu Bar [32]
Browser [33]
Decks [33]
Global section [33]
Header [32]
Mixer [33]
HHeader [34] [128]
Utility Buttons [130]
Headphone
Controls [123]
Headphones [248]
Headphones Mix knob (CUE MIX) [251]
Headphones socket (PHONES) [249]
Headphones Volume knob (CUE VOL) [249]
Help [298]
Forum [299]
Knowledge Base [298]
Support [298]
HI [118]
HI knob [247]
Hotcue buttons [254]
Hotcue Mapping [110]
Hotcues [267]
clearing [268]
storing [254]
Hotkeys [312]
Index
TRAKTOR - Manual - 340
IImport
Data Import [22]
Mappings [22]
Music folders [50]
Playlist [61]
Importing your music [293]
Indicator
AUDIO [34]
BAT (Battery) [35]
MAIN [35]
Installation [21]
Internal Mixer [245]
iPod
working with [74]
iTunes [52]
iTunes Directory [72]
JJump to Start button [256]
KKey Lock
Preferences [179]
Keyboard Mapping [312]
Keyboard Shortcut Overview Card [19]
Keylock [294]
Kill Switch [118]
Knowledge Base [298]
Index
TRAKTOR - Manual - 341
LLatency
setting [171]
Layout Menu [35]
Layout Selector [129]
Level meters [261]
Levels
adjusting [260]
Library
iTunes [52]
Live Input [76]
LO [118]
Loading
Layout [35] [129]
Samples [275]
Track [243]
tracks [243]
Loading Tracks [85]
Loop
Auto [93]
Manual [94]
Loop Controls [93]
LOOP IN button
on Track Decks [265]
Loop Move [99]
LOOP MOVE encoder
on Track Decks [265]
LOOP OUT button
on Track Decks [265]
Loop Recorder [39] [282]
adjusting the loop size [284]
deleting a recorded loop [285]
DRY/WET knob [283]
More options [286]
overdubbing [286]
Overdubbing [286]
PLAY button [285]
Playback [285]
REC button [286]
Record button [284]
Recording [284]
recording a loop [284]
SIZE button [284]
Source [133] [283]
Source menu (software) [133] [283]
UNDO button [285] [286]
Loop section
on Track Decks [264]
Looped mode [289]
Looping [263]
Index
TRAKTOR - Manual - 342
Loops [263]
activating/deactivating [267]
adjusting the size [265]
Deactivating a Loop [267]
Loops with a predefined size [264]
Manual Loops [265]
moving [265]
Moving a Loop [265]
setting in a track [264] [265]
storing [266]
Storing Loops [266]
LOW knob [247]
MMAIN [35] [129]
MAIN knob (software) [247]
MAIN LEVEL
knob [262]
meters [262]
Main level [262]
MAIN level meters [247]
Manual Beatmatching [258]
Manual Conventions [18]
Mapping Details [200]
Mappings
importing [22]
Master Clock [36]
Master Display [255]
MASTER button and indicator [290]
QUANT button and indicator [255] [293]
SNAP button and indicator [293]
MASTER indicator (Deck Display) [290]
MASTER indicator (Master Display) [290]
Master panel
controls [39]
indicators [39]
Meta Data
edit [64]
Index
TRAKTOR - Manual - 343
Meters
channel [247]
Metronome icon [289]
MID [118]
MID knob [247]
MIDI Clock
send [208]
Syncing [208]
Missing Tracks
relocate [70]
remove [70]
Mixer [45]
AUX knob [46]
channel [45] [245]
Channel Faders [117]
Channels [45]
Crossfader [46] [117]
Cue [120]
Cue Mix knob [46] [252]
Cue Vol knob [46]
EQ [45]
Equalizer [118]
FILTER [121]
FX Assign buttons [45]
Gain [120]
Headphones Cue button [46] [251]
HI [118]
Kill Switch [118]
LO [118]
Master Display [255]
MID [118]
Pan [120]
Mixing
by hand [258]
Matching Levels [260]
using automatic sync [248]
Using EQs [256]
Using the Filter [256]
Mouse Control [142]
Mouse Drag [142]
Plus and Minus Buttons [142]
Right-/[Ctrl]-Click Functions [143]
Scroll Wheel [142]
Sensitivities [143]
Move Panel [99]
Moving a Loop [265]
MP3 Player
working with [74]
Music
Loading a Track [243]
Index
TRAKTOR - Manual - 344
Mixing [248]
Playing a track [245]
Pre-listening [248]
Synchronization [251]
Music files [50]
Music folders [50]
OOverdubbing [286]
Overview [31] [32]
Features:Live Input [44] [85]
Track Deck [41]
PPhase Meter [96]
PHONES socket [249]
Pitch (tracks) [294]
PLAY button (Deck)
on Track Decks [245]
PLAY button (Loop Recorder) [285]
Playing a track [243]
Playlist [275]
analyze [63]
clear [63]
consolidate [62]
create [56]
delete [63]
deleting tracks [58]
export [61]
history [64]
import [61]
in iTunes [52]
Printing [62]
remove duplicates [62]
rename [62]
reset [63]
Playlists
adding tracks [56]
Index
TRAKTOR - Manual - 345
filtering [54]
folder organization [59]
importing from iTunes [53]
Preparing [60]
search [55]
sorting [58]
Preferences [36] [130] [169]
Audio Setup [171]
Broadcasting [190]
Browser Details [192]
Controller Manager [195]
Deck Heading [182]
Deck Style [181]
Decks [181]
Effects [187]
File Management [193]
Global Settings [186]
Import and Export [170]
Input Routing [173]
Layout Manager [192]
Loading [176]
Loop Recorder [190]
Mix Recorder [189]
Output Routing [172]
Setup Wizard [170]
Timecode Setup [127] [174]
Transport [177]
Preferences button [169]
Pre-listening a track in the Browser [248]
Preparing the mix using headphones [250]
Preview Player [248]
Playlist [62]
Priofiles
Automatic Backup Security [207]
Profiles
Backup and Restore [205]
Creating a portable TRAKTOR Version [206]
Recordings folder [205]
Repairing a Corrupted Collection [208]
Root folder [204]
QQuant button [255]
QUANT button and indicator [255] [293]
Quantize mode [255] [293]
Quick Loading
tracks [242] [243]
Index
TRAKTOR - Manual - 346
RREC [129]
REC button [286]
Record button [284]
Recording [35] [308]
External Recording [310]
Internal Recording [309]
Recording a loop [284]
Remix Deck [41] [75] [274]
Reverb (FX) [271]
Root Directory [72]
SSamples [274]
capturing from a track [278]
grabbing from a track [89] [176]
loading [275]
Loading a Sample (Collection) [275]
Loading a Sample (Track) [278]
playing [276]
Sample Controls [279]
Specific Hotkeys [281]
stopping & skipping back to start [276]
triggering [276]
Scratch
Absolute mode [152]
Calibration [151]
Control Zones on CD [150]
Control Zones on Vinyl [148]
Duplicate [154]
Setting Up [147]
Tracking modes [152]
Troubleshooting [154]
Service Center [298]
Setting a Loop in a track [264]
Setup
Audio device [171]
Index
TRAKTOR - Manual - 347
Setup Guide [19]
Setup Wizard [23]
Setups [300]
External audio interface [301]
external Controller [303]
external mixer (analog) [303]
Microphone [307]
On-board sound card [300]
Recording [308]
TRAKTOR KONTROL S4 and TRAKTORSCRATCH [306]
Single mode [273]
SIZE button [284]
Skipping back to start of track [256]
Snap Button [255]
SNAP button and indicator [293]
Snap mode [255] [265] [293]
Snapshot (FX Unit) [273]
Status
Utility Buttons [35]
Status Indicators [34]
Status indicators [128]
Status LEDs [34]
Storing a Cue Point [254]
Storing a Hotcue [254]
Storing a Loop [266]
Stripe View [91]
Support [298]
Sync
MIDI Clock [208]
SYNC button
on Track Decks [251] [291]
Sync Button [96]
Sync Mode
BeatSync [97]
Preferences [177]
TempoSync [97]
Synchronization [251] [287]
Auto Mode [289]
Beatgrid [292]
Clock mode [291]
Manual Beatmatching [258]
Phase meter [258]
Quant button [293]
Snap button [293]
Synching concept [288]
Tempo fader [258]
Tempo Master [287]
Synchronizing tracks
by hand [258]
Index
TRAKTOR - Manual - 348
using automatic sync [251]
System Clock [34] [129]
System requirements [20]
TTempo
automatically adjusting (Sync) [251]
manually adjusting [258]
Preferences [177]
Tempo Bend [95]
Tempo Bend Sensitivity
Preferences [177]
Tempo Controls [94]
Manual [95]
Tempo Fader [95]
TEMPO fader [258]
Tempo master [287]
setting a Track Deck as [291] [292]
setting the Clock as [291]
Tempo Sync [178]
TempoSync [97]
Track
import [53]
info [244]
loading [243]
playing [243]
Track Collection
Overview [49]
Track Deck [75] [275]
Index
TRAKTOR - Manual - 349
Track search [54]
TRAKTOR 2 Logo [128]
TRAKTOR Clock [288] [289]
setting as tempo master [290] [291]
TRAKTOR Versions [17]
TRAKTOR 2 Logo [34]
Transport
CUE [92]
CUP (Cue/Play) [92]
Play [91]
Troubleshooting [296]
Audio Drops [296]
Crashes [297]
Forum [299]
Help [298]
Knowledge Base [298]
Latency [296]
no audio [246]
Support [298]
TRAKTOR won’t start [296]
Tutorials [241]
Goals [242]
Prerequisites [241]
video [19]
UUNDO button [285] [286]
Updates [297]
Upgrade
Upgrading from TRAKTOR PRO, TRAKTORLE, and TRAKTOR Manufacturer Edi-tion [21]
User Forum [299]
Using the S4 with a laptop [296]
Utility Buttons [35] [130]
VVideo tutorials [19]
WWaveform [244] [267]
Waveform Display [90]
Index
TRAKTOR - Manual - 350