tracker user guide - efi.com expresspay, fabrivu, fast-4, fiery, the fiery logo, fiery driven, the...
TRANSCRIPT

Tracker User Guide
PrintSmith Vision Version 2.4
March / 2015
2 EFI PrintSmith Vision | Tracker User Guide
Copyright © 1997 - 2015 by Electronics for Imaging, Inc. All Rights Reserved.
EFI PrintSmith Vision | Tracker User Guide
March 2015 PrintSmith Vision 2.4
This publication is protected by copyright, and all rights are reserved. No part of it may be reproduced or transmitted in any form or by any means for any purpose without express prior written consent from Electronics for Imaging, Inc. Information in this document is subject to change without notice and does not represent a commitment on the part of Electronics for Imaging, Inc.
Patents
This product may be covered by one or more of the following U.S. Patents: 4,716,978, 4,828,056, 4,917,488, 4,941,038, 5,109,241, 5,170,182, 5,212,546, 5,260,878, 5,276,490, 5,278,599, 5,335,040, 5,343,311, 5,398,107, 5,424,754, 5,442,429, 5,459,560, 5,467,446, 5,506,946, 5,517,334, 5,537,516, 5,543,940, 5,553,200, 5,563,689, 5,565,960, 5,583,623, 5,596,416, 5,615,314, 5,619,624, 5,625,712, 5,640,228, 5,666,436, 5,745,657, 5,760,913, 5,799,232, 5,818,645, 5,835,788, 5,859,711, 5,867,179, 5,940,186, 5,959,867, 5,970,174, 5,982,937, 5,995,724, 6,002,795, 6,025,922, 6,035,103, 6,041,200, 6,065,041, 6,112,665, 6,116,707, 6,122,407, 6,134,018, 6,141,120, 6,166,821, 6,173,286, 6,185,335, 6,201,614, 6,215,562, 6,219,155, 6,219,659, 6,222,641, 6,224,048, 6,225,974, 6,226,419, 6,238,105, 6,239,895, 6,256,108, 6,269,190, 6,271,937, 6,278,901, 6,279,009, 6,289,122, 6,292,270, 6,299,063, 6,310,697, 6,321,133, 6,327,047, 6,327,050, 6,327,052, 6,330,071, 6,330,363, 6,331,899, 6,340,975, 6,341,017, 6,341,018, 6,341,307, 6,347,256, 6,348,978, 6,356,359, 6,366,918, 6,369,895, 6,381,036, 6,400,443, 6,429,949, 6,449,393, 6,476,927, 6,490,696, 6,501,565, 6,519,053, 6,539,323, 6,543,871, 6,546,364, 6,549,294, 6,549,300, 6,550,991, 6,552,815, 6,559,958, 6,572,293, 6,590,676, 6,606,165, 6,633,396, 6,636,326, 6,643,317, 6,647,149, 6,657,741, 6,662,199, 6,678,068, 6,707,563, 6,741,262, 6,748,471, 6,753,845, 6,757,436, 6,757,440, 6,778,700, 6,781,596, 6,816,276, 6,825,943, 6,832,865, 6,836,342, RE33,973, RE36,947, D341,131, D406,117, D416,550, D417,864, D419,185, D426,206, D439,851, D444,793.
Trademarks
The APPS logo, AutoCal, Auto-Count, Balance, Best, the Best logo, BESTColor, BioVu, BioWare, ColorPASS, Colorproof, ColorWise, Command WorkStation, CopyNet, Cretachrom, Cretaprint, the Cretaprint logo, Cretaprinter, Cretaroller, DockNet, Digital StoreFront, DocBuilder, DocBuilder Pro, DocStream, DSFdesign Studio, Dynamic Wedge, EDOX, EFI, the EFI logo, Electronics For Imaging, Entrac, EPCount, EPPhoto, EPRegister, EPStatus, Estimate, ExpressPay, Fabrivu, Fast-4, Fiery, the Fiery logo, Fiery Driven, the Fiery Driven logo, Fiery JobFlow, Fiery JobMaster, Fiery Link, Fiery Prints, the Fiery Prints logo, Fiery Spark, FreeForm, Hagen, Inktensity, Inkware, Jetrion, the Jetrion logo, LapNet, Logic, MiniNet, Monarch, MicroPress, OneFlow, Pace, PhotoXposure, PressVu, Printcafe, PrinterSite, PrintFlow, PrintMe, the PrintMe logo, PrintSmith, PrintSmith Site, Printstream, Print to Win, Prograph, PSI, PSI Flexo, Radius, Rastek, the Rastek logo, Remoteproof, RIPChips, RIP-While-Print, Screenproof, SendMe, Sincrolor, Splash, Spot-On, TrackNet, UltraPress, UltraTex, UltraVu, UV Series 50, VisualCal, VUTEk, the VUTEk logo, and WebTools are trademarks of Electronics For Imaging, Inc. and/or its wholly owned subsidiaries in the U.S. and/or certain other countries.
All other terms and product names may be trademarks or registered trademarks of their respective owners, and are hereby acknowledged.

Contents 3
Contents Welcome to Tracker ...................................................................................................... 5
About Tracker ....................................................................................................................................... 6 About this Guide ................................................................................................................................... 6 If You Are Upgrading from PrintSmith 8.1 ......................................................................................... 6 Additional Sources ............................................................................................................................... 7 Customer Support ................................................................................................................................ 7
Setting Up Tracker ........................................................................................................ 9
Overview of Setup .............................................................................................................................. 10 Setting Up Tracker-Related Tables ................................................................................................... 10
Production Copiers table ................................................................................................................ 10 Production Exceptions table .......................................................................................................... 10 Production Facilities table .............................................................................................................. 10 Production Locations table ............................................................................................................. 10 Production Presses table ............................................................................................................... 10 Production Priority table ................................................................................................................. 11 Production Stations table ............................................................................................................... 11
Adding Tracker Information to PrintSmith Pricing Definitions ...................................................... 11 Press definitions ............................................................................................................................. 11 Digital definitions ............................................................................................................................ 12 Charge definitions .......................................................................................................................... 12
Managing Employees ......................................................................................................................... 15 Using Employee Manager .............................................................................................................. 15 Defining employees ........................................................................................................................ 16 Reviewing and editing employees ................................................................................................. 24 Deleting employees ........................................................................................................................ 24
Setting Clock Options ........................................................................................................................ 25 Defining a Pay Period for Time Cards .............................................................................................. 26 If You Plan to Scan Bar Codes .......................................................................................................... 26
Bar codes for jobs and production locations .................................................................................. 26 Bar codes for employees who use Tracker.................................................................................... 27 Job tracker ticket ............................................................................................................................ 28
If You Purchase Tracker After Using Scheduler ............................................................................. 29
Tracking Work ............................................................................................................. 31
Overview .............................................................................................................................................. 32 Before You Begin................................................................................................................................ 32 Clocking In and Out ............................................................................................................................ 32 Opening the Tracker Console ........................................................................................................... 33 Understanding the Active Items Tab ................................................................................................ 34
List of all items ............................................................................................................................... 34 Current Station area ....................................................................................................................... 35 Barcode Input area ......................................................................................................................... 35 Buttons on Active Items tab ........................................................................................................... 36 Timer bar ........................................................................................................................................ 36
4 EFI PrintSmith Vision | Tracker User Guide
Digital timer .................................................................................................................................... 38 List of active items .......................................................................................................................... 38
Setting Preferences for the Active Items Tab .................................................................................. 39 Releasing Jobs to Production ........................................................................................................... 40
Release all jobs in an invoice to production ................................................................................... 40 Release a job to production, print a job tracker ticket, or assign a priority .................................... 40
Recording Time Spent on a Job ........................................................................................................ 42 General procedure for tracking time .............................................................................................. 42 Pausing and continuing processes ................................................................................................ 43 Indicating setup is complete ........................................................................................................... 44 Stopping work and completing the Stop Tracker Step window...................................................... 44
Viewing Tracker Details ..................................................................................................................... 48 Viewing Completed Items .................................................................................................................. 50
Management and Administration ............................................................................... 51
Overview .............................................................................................................................................. 52 Using Tracker Manager ...................................................................................................................... 52
Setting Tracker Manager preferences ........................................................................................... 52 Viewing active items with Tracker Manager................................................................................... 53 Running Production and Employee reports ................................................................................... 54 Clearing Tracker history ................................................................................................................. 55
Checking the Status of Invoices ....................................................................................................... 55 Reviewing Costs ................................................................................................................................. 56 Reviewing and Editing Time Cards................................................................................................... 58 Running Employee Time Reports ..................................................................................................... 60 Exporting Employee Time Information............................................................................................. 61
Index ............................................................................................................................. 63

Welcome to Tracker 5
Welcome to Tracker
In this chapter
About Tracker 6 About this Guide 6 If You Are Upgrading from PrintSmith 8.1 6 Additional Sources 7 Customer Support 7
6 EFI PrintSmith Vision | Tracker User Guide
About Tracker Tracker provides real-time shop floor data collection and job costing. This add-on to PrintSmith™ Vision tracks the time jobs take to go through the production process. Tracker also calculates the costs associated with the production of a job.
Using the time and cost data collected by Tracker, you can improve the efficiency of your production processes, as well as adjust your pricing to reflect your costs more accurately.
With Tracker you can:
• Filter the information each department or employee sees. For example, employees on the shop floor typically see just their own jobs.
• Release jobs to production to manage the flow of work through your shop.
• Review job tickets and other instructions (such as cutting diagrams) as you work on tasks.
• Use bar code readers (available from EFI) for scanning information at various production steps.
• Pause each step in the production process if necessary and restart it at the point left off. Time is tracked for each step, including setup time and washup time, as well as for the process as a whole.
• Keep service people, salespeople, and managers informed about the exact location of jobs and who is working on them so that customer inquiries can be answered immediately.
• Obtain accurate information about job costs and compare estimated to actual times. Production and employee reports help managers analyze the data collected by Tracker.
• Track across multiple facilities.
Tracker is integrated with PrintSmith Vision Scheduler, but you do not have to own Scheduler to use Tracker.
About this Guide This guide describes how to set up and use Tracker. The guide assumes that PrintSmith Vision is already installed and set up, and that you are familiar with its features.
If You Are Upgrading from PrintSmith 8.1 When you upgrade from PrintSmith 8.1 to PrintSmith Vision, you export your data from PrintSmith 8.1 and import it into PrintSmith Vision. As part of this process, your Tracker data will be imported into PrintSmith Vision.
Important For complete details of exporting/importing, see the PrintSmith Vision Installation and Upgrade Guide.
If you were using Tracker in PrintSmith 8.1, before you export data, make sure:
• There are no active items in the Tracker Console. Active items will not be imported into PrintSmith Vision. Make sure all items are completed, or pause any active items if you do not want to wait for them to complete. (You will be prevented from exporting data if there are active items.)
• All employees are clocked out (not just on break).
Warning If your employees currently use a PIN when logging into the Tracker Console, you will need to re-create the PINs after upgrading to PrintSmith Vision. PINs are not imported.
When you use Tracker in PrintSmith Vision, you will find the user interface and procedures very familiar, and will have little to re-learn.
Note Routings are not supported in PrintSmith Vision Tracker.
Welcome to Tracker 7
Additional Sources For information about See
Installing PrintSmith Vision and upgrading from PrintSmith 8.1 PrintSmith Vision Installation and Upgrade Guide Setting up and using PrintSmith Vision PrintSmith Vision Setup and User Guide Fiery® integration PrintSmith Vision and Fiery Integration Guide Integrated credit card processing in PrintSmith Vision PrintSmith Vision Secure Credit Card Processing
Guide Using PrintSmith Site® PrintSmith Vision and PrintSmith Site Integration
Guide Using Digital StoreFront with PrintSmith Vision PrintSmith Vision and Digital StoreFront Integration
Guide Using Scheduler PrintSmith Vision Scheduler User Guide
Customer Support You can contact PrintSmith Vision Customer Support in any of the following ways.
Phone
North America
888.731.2618 480.538.5800 Monday - Friday 7 A.M. - 5 P.M. US Mountain Standard Time
UK
0800 783 2737 Monday - Friday 8 A.M. - 5 P.M. UK Time
EMEA
+49 2102 745 4500 Monday - Friday 9 A.M. - 6 P.M. Central European Time
Fax
480.538.5804 (North America)
North America
EMEA
EFI, 17250 N. Hartford Drive, Scottsdale, AZ 85255, U.S.A.

8 EFI PrintSmith Vision | Tracker User Guide
Setting Up Tracker 9
Setting Up Tracker
In this chapter
Overview of Setup 10 Setting Up Tracker-Related Tables 10 Adding Tracker Information to PrintSmith Pricing Definitions 11 Managing Employees 15 Setting Clock Options 25 Defining a Pay Period for Time Cards 26 If You Plan to Scan Bar Codes 26 If You Purchase Tracker After Using Scheduler 29
10 EFI PrintSmith Vision | Tracker User Guide
Overview of Setup Before you can start using Tracker, you must complete some initial setup tasks:
• Enter data in Tracker-related tables in PrintSmith Vision.
• Enter Tracker-related information in your press, digital, and charge definitions in PrintSmith Vision, and specify associated costs.
Note Although you do not have to specify your costs to use Tracker, without costing you will not be taking advantage of what Tracker has to offer.
• Set up the employees who will be using Tracker.
• Define settings for clocking in and out.
• Define a pay period for time cards.
Note If you purchase Tracker after purchasing and using Scheduler, you must integrate Tracker with Scheduler. See page 29.
Setting Up Tracker-Related Tables Several tables in PrintSmith Vision include information that is used by Tracker. Use Table Editor (Admin > Table Editor) to enter information in these tables. For information about using Table Editor, see the PrintSmith Vision Setup and User Guide.
Production Copiers table The Production Copiers table contains the names of your copiers and other digital equipment. These should be the manufacturers’ names for the equipment, for example, Docutech or Canon CLC 5000.
You select information from this table to complete the Machine Name field in the Digital Definitions window (see page 12). This machine name is displayed in various places in Tracker.
The digital presses and copiers defined in the Production Copiers table are also used in employee production filters to determine which jobs an employee sees in the Tracker Console, which is the Tracker “command station.” (For information about production filters, see page 20.)
Production Exceptions table The Production Exceptions table contains reasons for problems during the production process, for example, static in paper or bad plate. The types of reasons you enter in this table are up to you, but should provide a standard way for production staff to explain problems without requiring them to type a note. The reasons in this table can then be selected by employees during the production process.
Production Facilities table The Production Facilities table contains the names of the physical locations/buildings where your production machinery is run and operated. The default facility is set to In House, but you can edit this name to match your conventions. If all of your jobs are processed in one building, you do not need to enter anything in the Production Facilities table.
Production Locations table The Production Locations table contains the names of stages in the overall production process, for example, Design, Running - Print, Stripping, or Boxing. The names of the locations are up to you, and are typically based on the terminology used in your shop. For example, when a job is in the printing stage, you could call that production location Press, On Press, or In Printing. When a job is being copied, you could call that production location Copy, Being Copied, or In Copying.
Production Presses table The Production Presses table contains the names of your presses. These should be the manufacturers’ names for the presses, for example, Komori 6 or AB Dick.
Setting Up Tracker 11
You select a press from this table to complete the Machine Name field in the Press Definitions window (see page 11). This machine name is displayed in various places in Tracker.
The presses defined in the Production Presses table are also used in employee production filters to determine which jobs an employee sees in the Tracker Console. (For information about production filters, see page 20.)
Production Priority table The Production Priority table includes precedence levels for jobs, for example, Normal, Priority, or Red. The priorities you define are up to you; they should match the terminology used at your shop. A priority can be assigned to a job when it is released to production. (See “Release a job to production, print a job tracker ticket, or assign a priority” on page 40.)
Production Stations table The Production Stations table includes names for the computers from which employees are running PrintSmith Vision, for example, Press Station One, Copy Room, Folding Station, or Shipping Station. These names are up to you, but they should identify where work is taking place so filters can be defined to display just the jobs that are in the vicinity of a production station.
Adding Tracker Information to PrintSmith Pricing Definitions After you enter information in the tables related to Tracker, you must select some of the information from those tables in your press, digital, and charge definitions so it is available to Tracker. You must also ensure your costs are defined so that Tracker can use this information to compare your estimated costs to the actual costs of producing jobs.
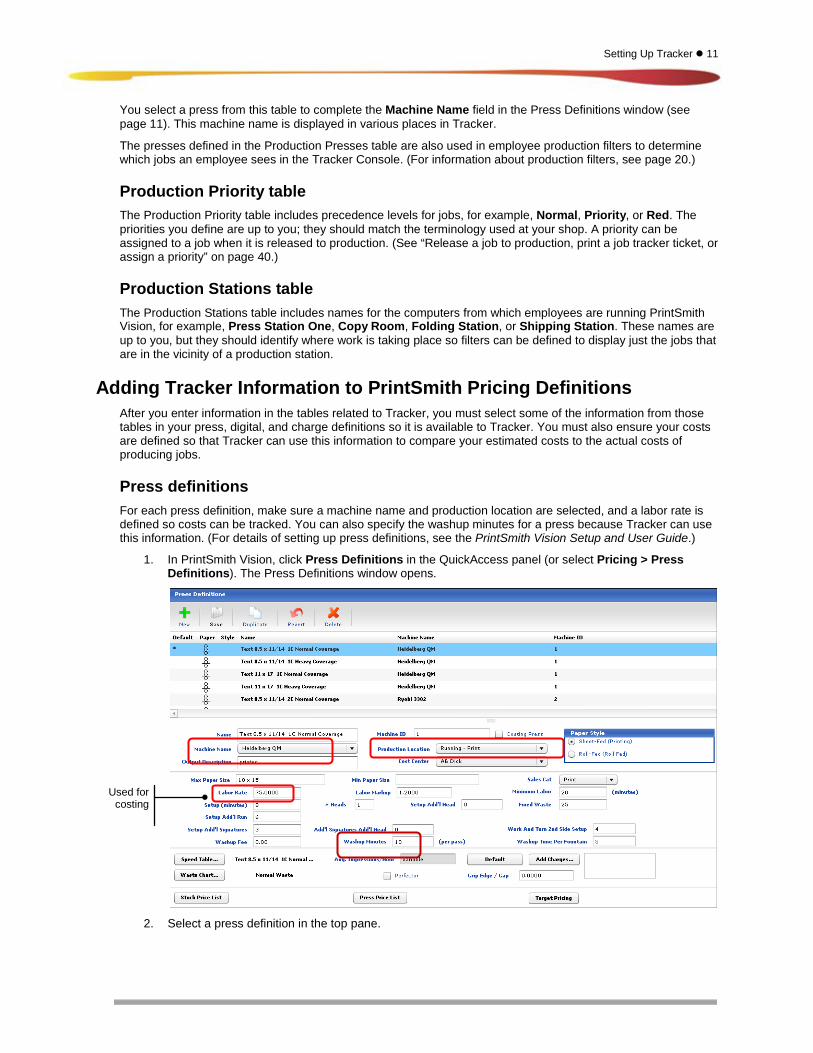
Press definitions For each press definition, make sure a machine name and production location are selected, and a labor rate is defined so costs can be tracked. You can also specify the washup minutes for a press because Tracker can use this information. (For details of setting up press definitions, see the PrintSmith Vision Setup and User Guide.)
1. In PrintSmith Vision, click Press Definitions in the QuickAccess panel (or select Pricing > Press Definitions). The Press Definitions window opens.
2. Select a press definition in the top pane.
Used for costing
12 EFI PrintSmith Vision | Tracker User Guide
3. In the Machine Name field, select the name of the press, for example, Heidelberg QM. (These names are defined in the Production Presses table.)
4. In the Production Location field, select the process associated with the press, for example, Running – Print. (These are defined in the Production Locations table.)
5. Make sure a Labor Rate is defined so Tracker can track costs.
6. In the Washup Minutes field, enter the time per wash.
7. Click Save on the toolbar.
8. Repeat steps 2 through 7 for all your press definitions.
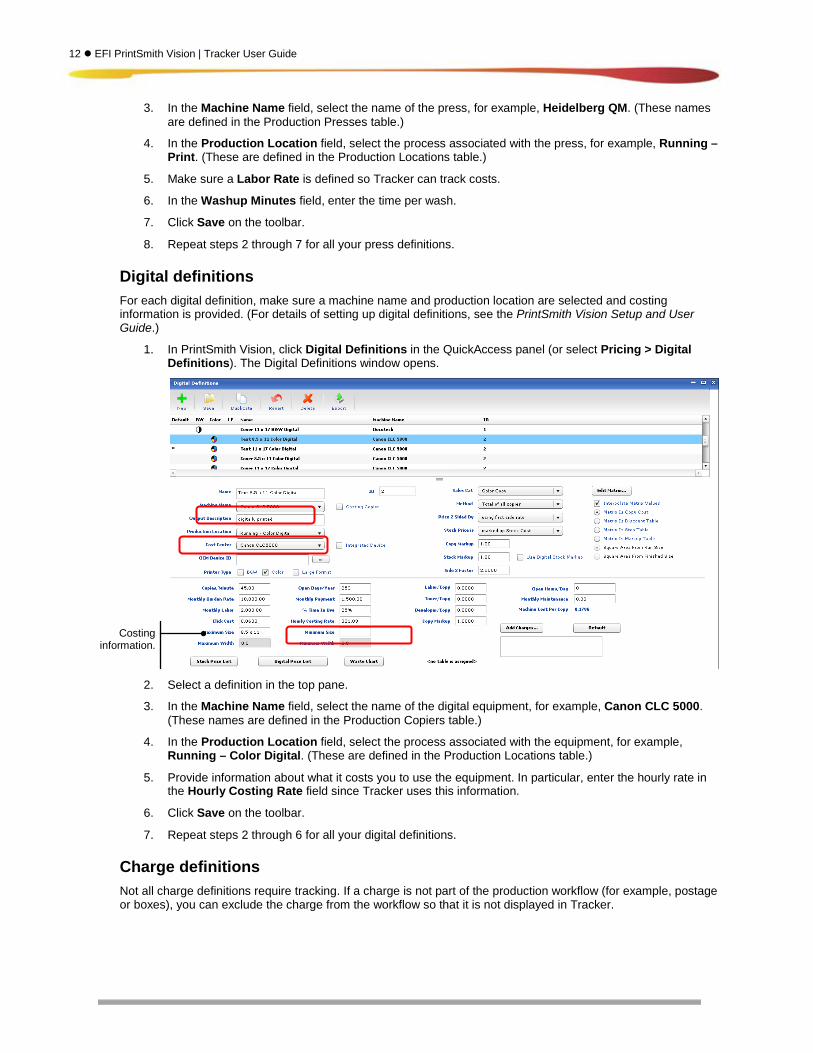
Digital definitions For each digital definition, make sure a machine name and production location are selected and costing information is provided. (For details of setting up digital definitions, see the PrintSmith Vision Setup and User Guide.)
1. In PrintSmith Vision, click Digital Definitions in the QuickAccess panel (or select Pricing > Digital Definitions). The Digital Definitions window opens.
2. Select a definition in the top pane.
3. In the Machine Name field, select the name of the digital equipment, for example, Canon CLC 5000. (These names are defined in the Production Copiers table.)
4. In the Production Location field, select the process associated with the equipment, for example, Running – Color Digital. (These are defined in the Production Locations table.)
5. Provide information about what it costs you to use the equipment. In particular, enter the hourly rate in the Hourly Costing Rate field since Tracker uses this information.
6. Click Save on the toolbar.
7. Repeat steps 2 through 6 for all your digital definitions.
Charge definitions Not all charge definitions require tracking. If a charge is not part of the production workflow (for example, postage or boxes), you can exclude the charge from the workflow so that it is not displayed in Tracker.
Costing information.
Setting Up Tracker 13
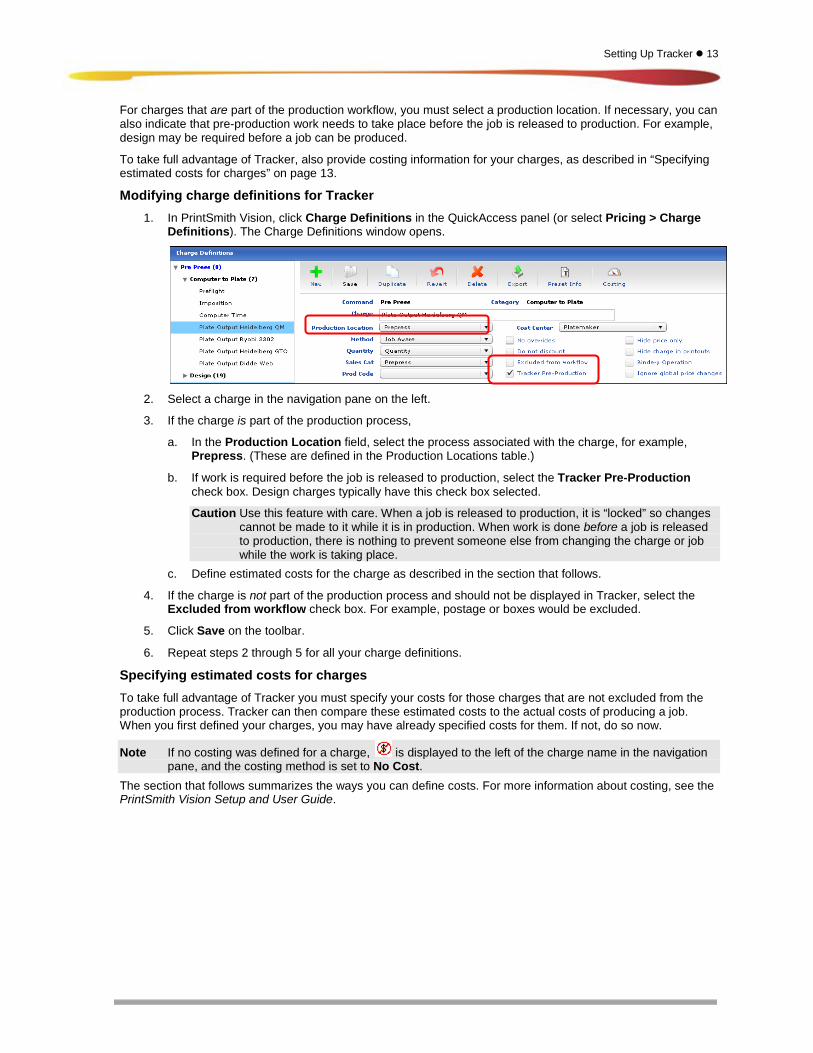
For charges that are part of the production workflow, you must select a production location. If necessary, you can also indicate that pre-production work needs to take place before the job is released to production. For example, design may be required before a job can be produced.
To take full advantage of Tracker, also provide costing information for your charges, as described in “Specifying estimated costs for charges” on page 13.
Modifying charge definitions for Tracker 1. In PrintSmith Vision, click Charge Definitions in the QuickAccess panel (or select Pricing > Charge
Definitions). The Charge Definitions window opens.
2. Select a charge in the navigation pane on the left.
3. If the charge is part of the production process,
a. In the Production Location field, select the process associated with the charge, for example, Prepress. (These are defined in the Production Locations table.)
b. If work is required before the job is released to production, select the Tracker Pre-Production check box. Design charges typically have this check box selected.
Caution Use this feature with care. When a job is released to production, it is “locked” so changes cannot be made to it while it is in production. When work is done before a job is released to production, there is nothing to prevent someone else from changing the charge or job while the work is taking place.
c. Define estimated costs for the charge as described in the section that follows.
4. If the charge is not part of the production process and should not be displayed in Tracker, select the Excluded from workflow check box. For example, postage or boxes would be excluded.
5. Click Save on the toolbar.
6. Repeat steps 2 through 5 for all your charge definitions.
Specifying estimated costs for charges To take full advantage of Tracker you must specify your costs for those charges that are not excluded from the production process. Tracker can then compare these estimated costs to the actual costs of producing a job. When you first defined your charges, you may have already specified costs for them. If not, do so now.
Note If no costing was defined for a charge, is displayed to the left of the charge name in the navigation pane, and the costing method is set to No Cost.
The section that follows summarizes the ways you can define costs. For more information about costing, see the PrintSmith Vision Setup and User Guide.
14 EFI PrintSmith Vision | Tracker User Guide
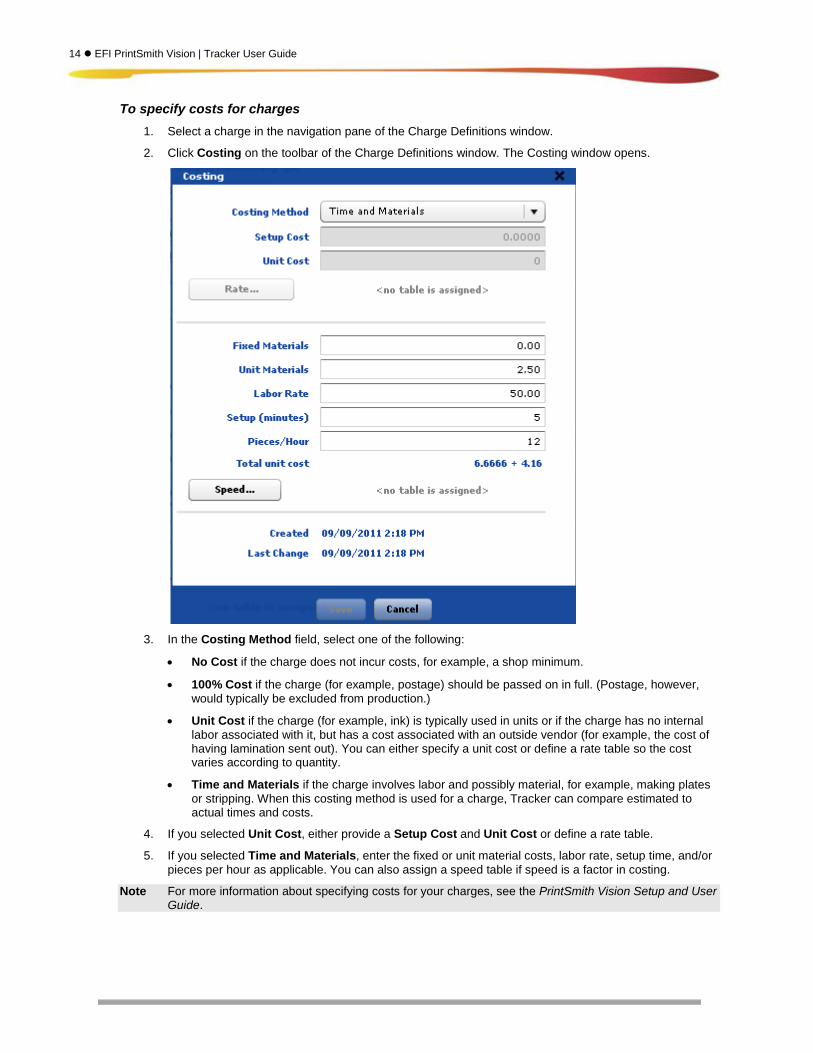
To specify costs for charges 1. Select a charge in the navigation pane of the Charge Definitions window.
2. Click Costing on the toolbar of the Charge Definitions window. The Costing window opens.
3. In the Costing Method field, select one of the following:
• No Cost if the charge does not incur costs, for example, a shop minimum.
• 100% Cost if the charge (for example, postage) should be passed on in full. (Postage, however, would typically be excluded from production.)
• Unit Cost if the charge (for example, ink) is typically used in units or if the charge has no internal labor associated with it, but has a cost associated with an outside vendor (for example, the cost of having lamination sent out). You can either specify a unit cost or define a rate table so the cost varies according to quantity.
• Time and Materials if the charge involves labor and possibly material, for example, making plates or stripping. When this costing method is used for a charge, Tracker can compare estimated to actual times and costs.
4. If you selected Unit Cost, either provide a Setup Cost and Unit Cost or define a rate table.
5. If you selected Time and Materials, enter the fixed or unit material costs, labor rate, setup time, and/or pieces per hour as applicable. You can also assign a speed table if speed is a factor in costing.
Note For more information about specifying costs for your charges, see the PrintSmith Vision Setup and User Guide.
Setting Up Tracker 15
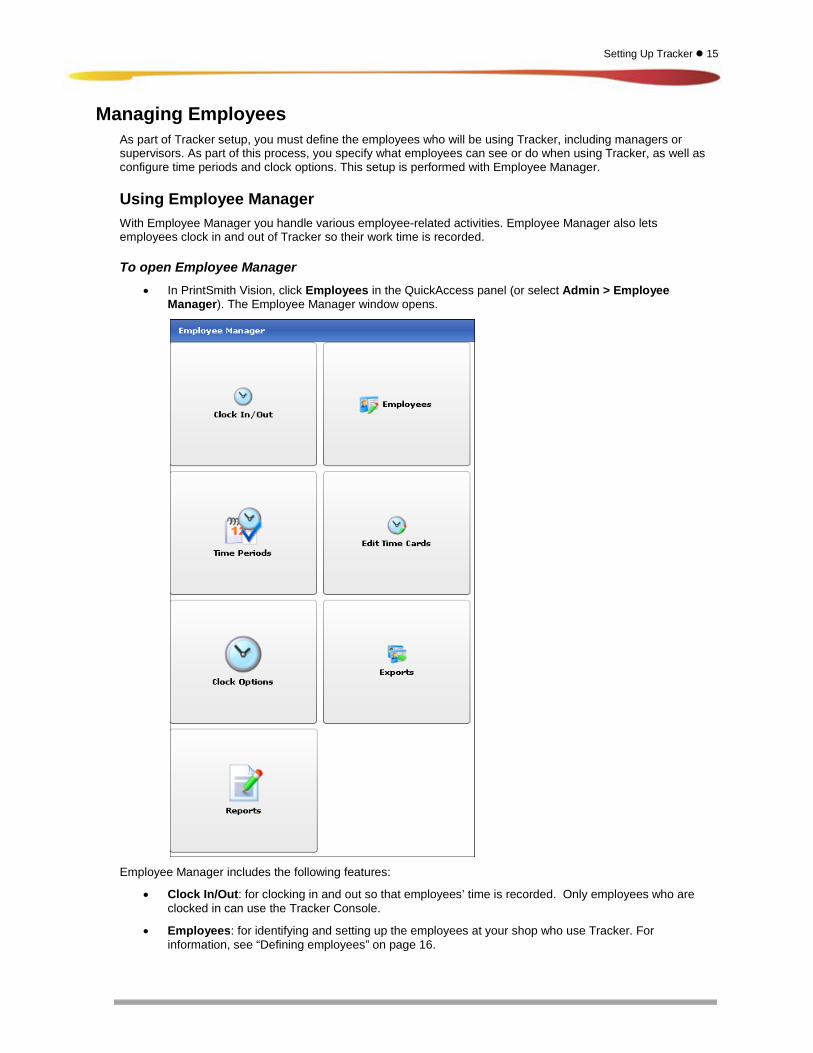
Managing Employees As part of Tracker setup, you must define the employees who will be using Tracker, including managers or supervisors. As part of this process, you specify what employees can see or do when using Tracker, as well as configure time periods and clock options. This setup is performed with Employee Manager.
Using Employee Manager With Employee Manager you handle various employee-related activities. Employee Manager also lets employees clock in and out of Tracker so their work time is recorded.
To open Employee Manager • In PrintSmith Vision, click Employees in the QuickAccess panel (or select Admin > Employee
Manager). The Employee Manager window opens.
Employee Manager includes the following features:
• Clock In/Out: for clocking in and out so that employees’ time is recorded. Only employees who are clocked in can use the Tracker Console.
• Employees: for identifying and setting up the employees at your shop who use Tracker. For information, see “Defining employees” on page 16.
16 EFI PrintSmith Vision | Tracker User Guide
• Time Periods: for defining pay periods. For information, see “Defining a Pay Period for Time Cards” on page 26.
• Edit Time Cards: for reviewing and changing employee time cards. For information, see “Reviewing and Editing Time Cards” on page 58.
• Clock Options: for setting options such as the message to be displayed at clock in/out for individual employees. For information, see “Setting Clock Options” on page 25.
• Exports: for exporting data about the time employees worked so the data can be imported into another system like a payroll system. For information, see “Exporting Employee Time Information” on page 61.
• Reports: for running reports about the time employees worked. For information, see “Running Employee Time Reports” on page 60.
Note This chapter focuses on setup activities performed with Employee Manager; other activities are described later in this guide.
Defining employees Before your production staff can use Tracker, they must be defined as employees. An employee definition (or profile) includes general information about an employee as well as settings that control what the employee can see and do while using Tracker.
Note Employee definitions are required only for production staff whose time needs to be tracked or for supervisors who need to work with Tracker.
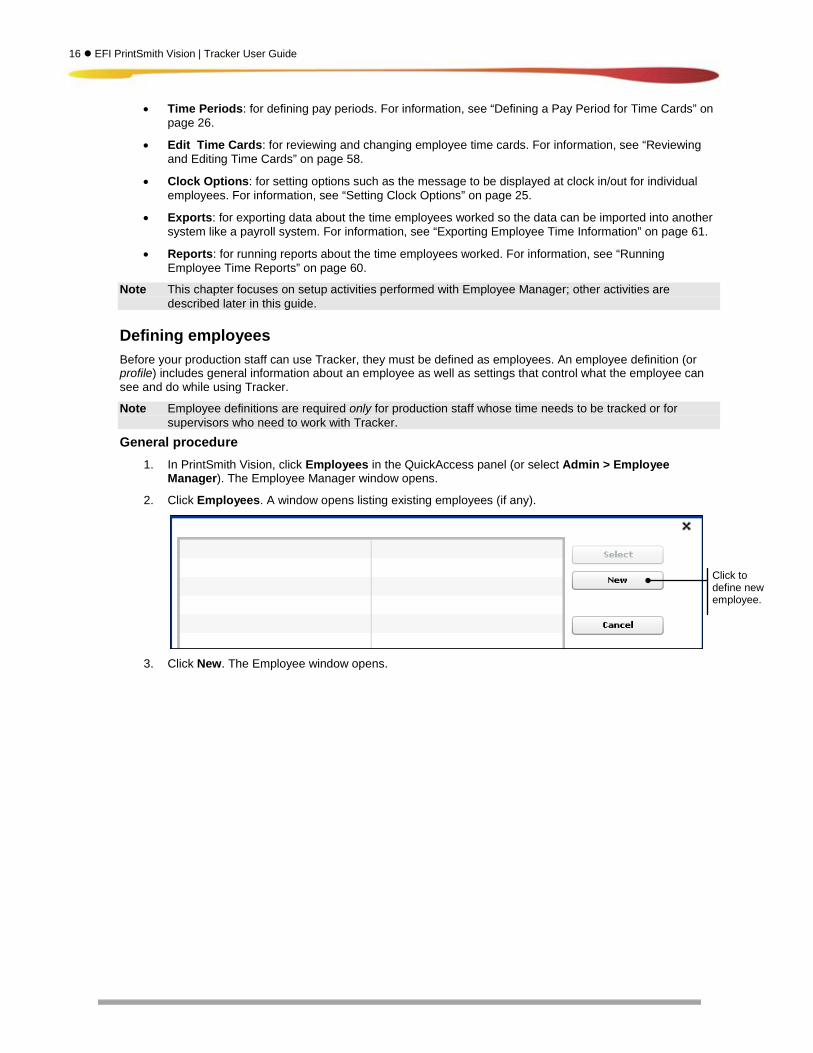
General procedure 1. In PrintSmith Vision, click Employees in the QuickAccess panel (or select Admin > Employee
Manager). The Employee Manager window opens.
2. Click Employees. A window opens listing existing employees (if any).
3. Click New. The Employee window opens.
Click to define new employee.
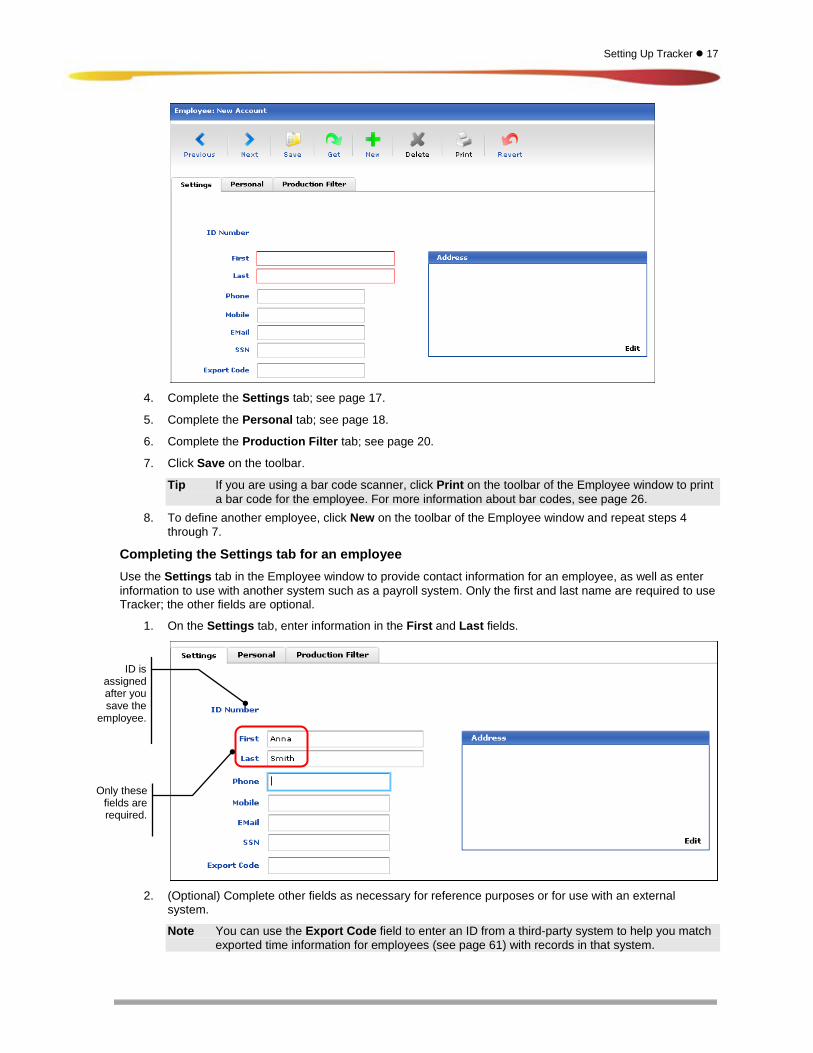
Setting Up Tracker 17
4. Complete the Settings tab; see page 17.
5. Complete the Personal tab; see page 18.
6. Complete the Production Filter tab; see page 20.
7. Click Save on the toolbar.
Tip If you are using a bar code scanner, click Print on the toolbar of the Employee window to print a bar code for the employee. For more information about bar codes, see page 26.
8. To define another employee, click New on the toolbar of the Employee window and repeat steps 4 through 7.
Completing the Settings tab for an employee Use the Settings tab in the Employee window to provide contact information for an employee, as well as enter information to use with another system such as a payroll system. Only the first and last name are required to use Tracker; the other fields are optional.
1. On the Settings tab, enter information in the First and Last fields.
2. (Optional) Complete other fields as necessary for reference purposes or for use with an external
system.
Note You can use the Export Code field to enter an ID from a third-party system to help you match exported time information for employees (see page 61) with records in that system.
ID is assigned after you save the
employee.
Only these fields are required.
18 EFI PrintSmith Vision | Tracker User Guide
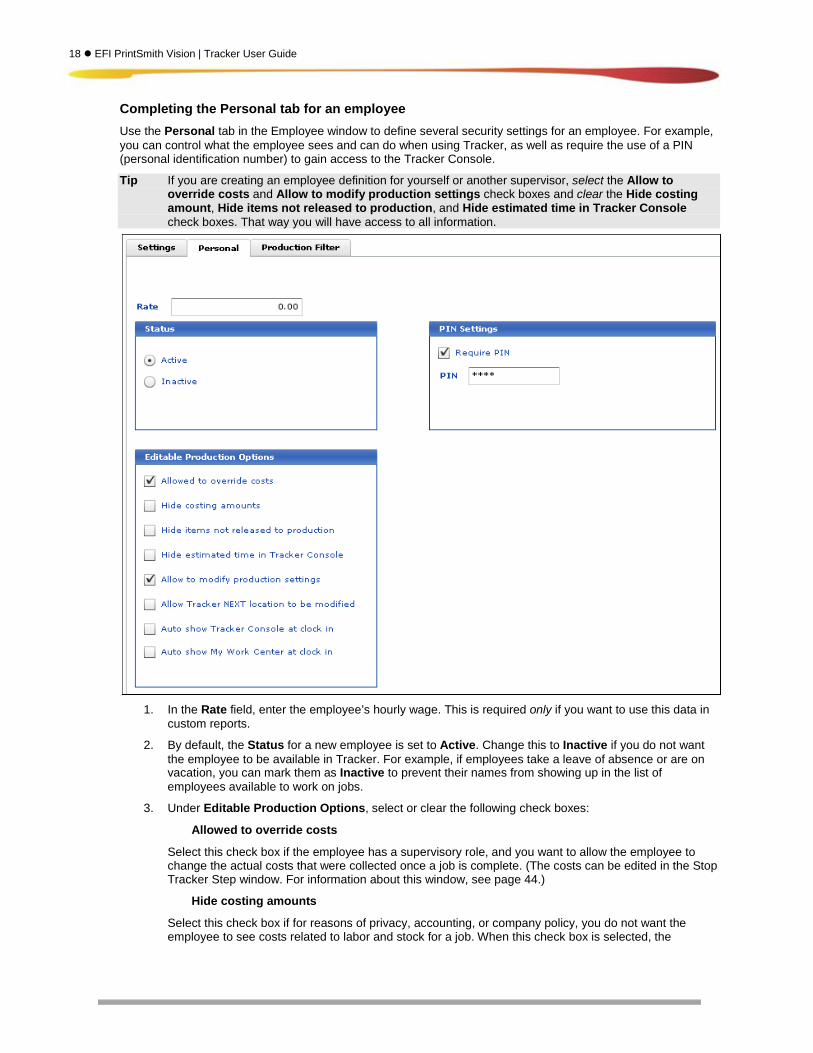
Completing the Personal tab for an employee Use the Personal tab in the Employee window to define several security settings for an employee. For example, you can control what the employee sees and can do when using Tracker, as well as require the use of a PIN (personal identification number) to gain access to the Tracker Console.
Tip If you are creating an employee definition for yourself or another supervisor, select the Allow to override costs and Allow to modify production settings check boxes and clear the Hide costing amount, Hide items not released to production, and Hide estimated time in Tracker Console check boxes. That way you will have access to all information.
1. In the Rate field, enter the employee’s hourly wage. This is required only if you want to use this data in
custom reports.
2. By default, the Status for a new employee is set to Active. Change this to Inactive if you do not want the employee to be available in Tracker. For example, if employees take a leave of absence or are on vacation, you can mark them as Inactive to prevent their names from showing up in the list of employees available to work on jobs.
3. Under Editable Production Options, select or clear the following check boxes:
Allowed to override costs
Select this check box if the employee has a supervisory role, and you want to allow the employee to change the actual costs that were collected once a job is complete. (The costs can be edited in the Stop Tracker Step window. For information about this window, see page 44.)
Hide costing amounts
Select this check box if for reasons of privacy, accounting, or company policy, you do not want the employee to see costs related to labor and stock for a job. When this check box is selected, the
Setting Up Tracker 19
estimated and actual stock and labor costs are not displayed in the Stop Tracker Step window (page 44) or the Tracker Details window (page 48).
Hide items not released to production
Select this check box if the employee should only see jobs that were released to production, not those that are waiting to be released.
Hide estimated time in Tracker Console
Select this check box if the employee should not see estimated times (for example, in the Tracker Console or in the Tracker Details window).
Allow to modify production settings
Select this check box to let the employee make certain kinds of changes related to the production process, for example, release the job to production or change the priority of the job. For information, see “Release a job to production, print a job tracker ticket, or assign a priority” on page 40.
Allow Tracker NEXT location to be modified
Select this check box if you want to allow the employee to select the next location for the job when in the Stop Tracker Step window (page 44).
Auto show Tracker Console at clock in
Select this check box if the Tracker Console window should open automatically when the employee clocks in.
Auto show My Work Center at clock in
This feature is for future use.
4. If for security reasons you want the employee to enter a PIN (personal identification number) before working in the Tracker Console:
a. Under PIN Settings, select the Require PIN check box.
b. In the PIN field, enter a number between four and nine digits long. (The PIN is not displayed as you enter it.)
20 EFI PrintSmith Vision | Tracker User Guide
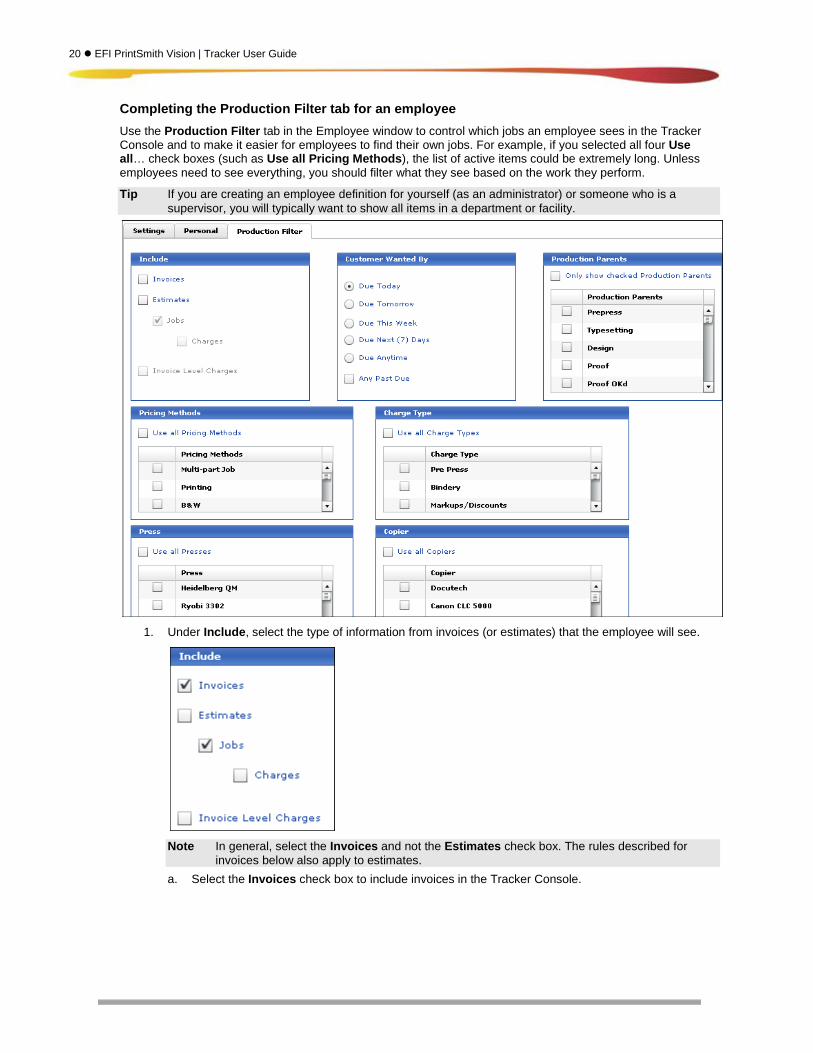
Completing the Production Filter tab for an employee Use the Production Filter tab in the Employee window to control which jobs an employee sees in the Tracker Console and to make it easier for employees to find their own jobs. For example, if you selected all four Use all… check boxes (such as Use all Pricing Methods), the list of active items could be extremely long. Unless employees need to see everything, you should filter what they see based on the work they perform.
Tip If you are creating an employee definition for yourself (as an administrator) or someone who is a supervisor, you will typically want to show all items in a department or facility.
1. Under Include, select the type of information from invoices (or estimates) that the employee will see.
Note In general, select the Invoices and not the Estimates check box. The rules described for
invoices below also apply to estimates. a. Select the Invoices check box to include invoices in the Tracker Console.
Setting Up Tracker 21
b. Select one or both of the following check boxes:
Jobs So the employee sees each job in an invoice on the Active Items tab in the Tracker Console. For example, if invoice 1803 includes jobs for Letterhead, Envelopes, and Business Cards, the jobs are displayed in the Tracker Console as 1803/1 Letterhead, 1803/2 Envelopes, and 1803/3 Business Cards.
If you also want job-level charges displayed in the Tracker Console, select the Charges check box. In this case, for job 1803/3 Business Cards, the employee might see 1803/3/1 Plates, 1803/3/2 Ink, and 1803/3/3 Design, depending on other filter settings
Invoice Level Charges So the employee sees invoice-level charges on the Active Items tab in the Tracker Console.
Important Either the Jobs check box or the Invoice Level Charges check box must be selected in addition to the Invoices check box, or nothing will be displayed in the Tracker Console.
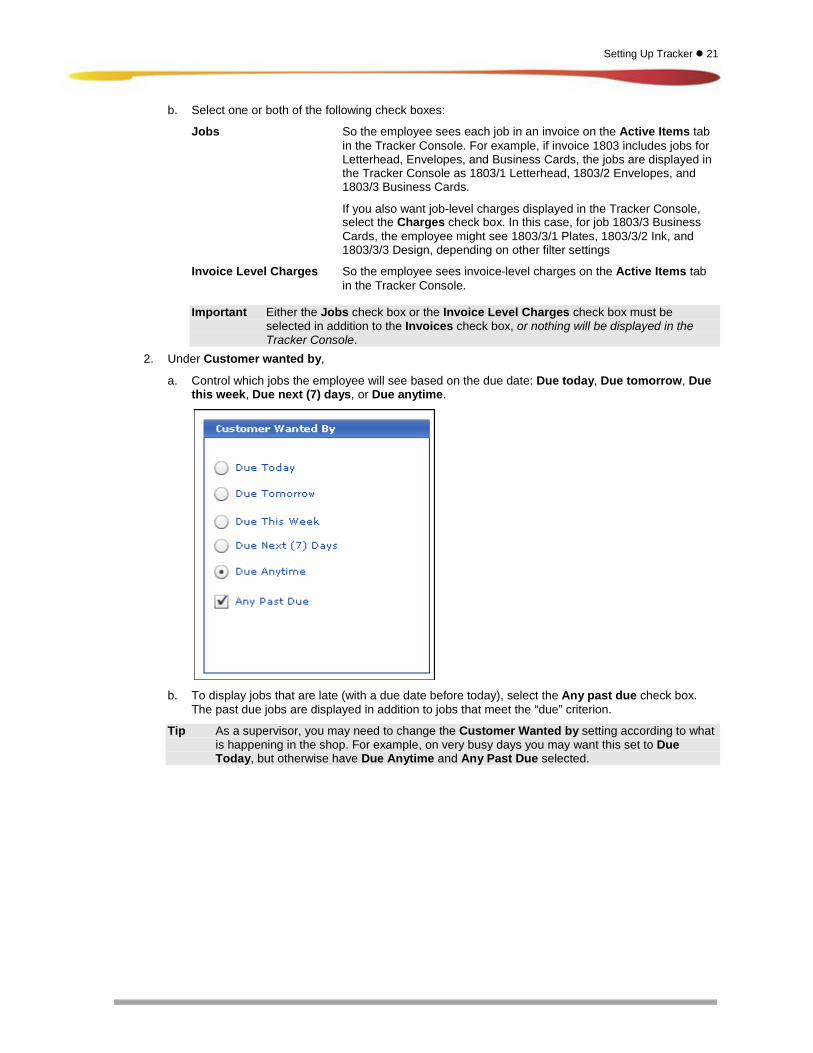
2. Under Customer wanted by,
a. Control which jobs the employee will see based on the due date: Due today, Due tomorrow, Due this week, Due next (7) days, or Due anytime.
b. To display jobs that are late (with a due date before today), select the Any past due check box.
The past due jobs are displayed in addition to jobs that meet the “due” criterion.
Tip As a supervisor, you may need to change the Customer Wanted by setting according to what is happening in the shop. For example, on very busy days you may want this set to Due Today, but otherwise have Due Anytime and Any Past Due selected.
22 EFI PrintSmith Vision | Tracker User Guide
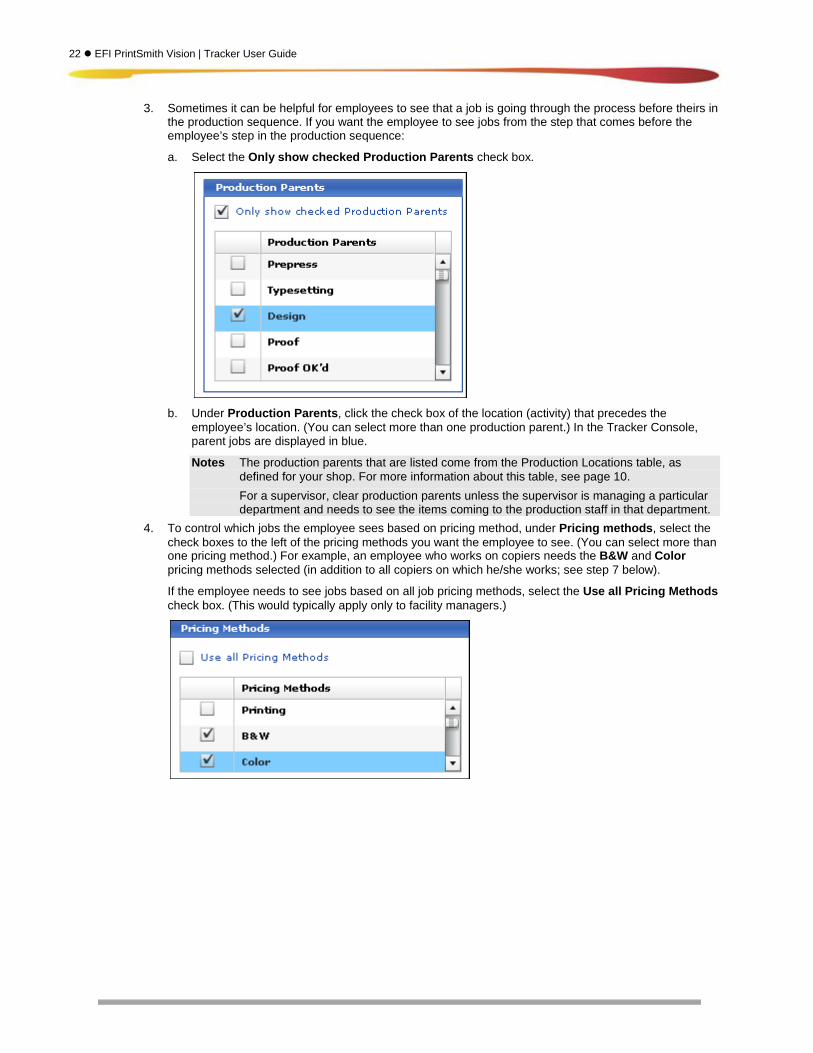
3. Sometimes it can be helpful for employees to see that a job is going through the process before theirs in the production sequence. If you want the employee to see jobs from the step that comes before the employee’s step in the production sequence:
a. Select the Only show checked Production Parents check box.
b. Under Production Parents, click the check box of the location (activity) that precedes the
employee’s location. (You can select more than one production parent.) In the Tracker Console, parent jobs are displayed in blue.
Notes The production parents that are listed come from the Production Locations table, as defined for your shop. For more information about this table, see page 10.
For a supervisor, clear production parents unless the supervisor is managing a particular department and needs to see the items coming to the production staff in that department.
4. To control which jobs the employee sees based on pricing method, under Pricing methods, select the check boxes to the left of the pricing methods you want the employee to see. (You can select more than one pricing method.) For example, an employee who works on copiers needs the B&W and Color pricing methods selected (in addition to all copiers on which he/she works; see step 7 below).
If the employee needs to see jobs based on all job pricing methods, select the Use all Pricing Methods check box. (This would typically apply only to facility managers.)

Setting Up Tracker 23
5. To control what kinds of charges the employee sees, under Charge type, select the check boxes of the types of charges you want the employee to see. (You can select more than one kind of charge.)
If the employee needs to see all types of charges, select the Use all Charge Types check box. (This would typically apply only to facility managers.)
Note Charge types correspond to the charge commands that are displayed in the navigation pane of the Charge Definitions window in PrintSmith Vision. The names of these commands at your shop may be different from those shown in the figure below.
6. To control which jobs the employee sees based on presses, under Press select the check box of the
press on which the employee works. (You can select more than one press.)
If the employee needs to see jobs on all presses, select the Use all Presses check box. (This would typically apply only to facility managers or printing foremen.)
If the employee does not work on presses, no press selection is necessary.
Note Only presses that are defined in the Production Presses table are available for selection.
7. To control which jobs the employee sees based on copiers/digital presses, under Copier select the
check box of the equipment on which the employee works. (You can select more than one piece of equipment.)
If the employee needs to see jobs on all pieces of digital equipment, select the Use all Copiers check box. (This would typically apply only to facility managers or those managing digital printing.)
If the employee does not work on digital equipment, no copier selection is necessary.
Note Only digital equipment that is defined in the Production Copiers table is available for selection.

24 EFI PrintSmith Vision | Tracker User Guide
8. Click Save on the toolbar to save the employee.
Reviewing and editing employees You can review and change the information about an employee at any time. Some changes, such as a different address, have no effect on the way Tracker works, but changes to security settings or production filters can change the way the employee gains access to the Tracker Console and can affect the type of information that is displayed in the Tracker Console.
To review and edit an employee 1. Open an employee record in any of these ways:
• In Employee Manager, click Employees. Double-click an employee in the list that is displayed (or click an employee and click Select). The Employee window opens.
• In the Employee window, click Get on the toolbar, and double-click an employee in the list that is displayed (or click an employee and click Select).
• In the Tracker Console (see page 33), select an employee in the Employee field and click . The Employee window opens.
2. In the Employee window, make your changes on the Settings, Personal, or Production Filter tabs.
Tip If you change your mind about the changes you made, click Revert on the toolbar to restore the employee information to the way it was when you last saved it.
3. To save your changes, click Save on the toolbar. Any changes you made on the Production Filter tab are immediately reflected on the Active Items tab in the Tracker Console.
Tip Use Previous and Next on the toolbar to move among employee records.
Deleting employees Although you can permanently remove an employee from PrintSmith Vision, this is not always the best practice for accounting purposes. Rather than delete an employee who perhaps is no longer with your company, EFI recommends that you mark the employee as inactive on the Personal tab in the Employee window. This way, the employee is still part of your records. (For information about the Personal tab, see “Completing the Personal tab for an employee” on page 18.)
If you do decide to delete an employee, you can do so only if the employee has no active items in the Tracker Console and is not currently clocked in.
To delete an employee 1. Open the employee record as described in “Reviewing and editing employees” above.
2. Click Delete on the toolbar.
3. Click Yes to confirm the deletion.
Setting Up Tracker 25
Setting Clock Options You can establish some settings for individual employees related to clocking in and out. For example, you can display a message when an employee clocks in and/or out. The window where you set these options also lets managers see which employees are clocked in and out, or on break.
1. In PrintSmith Vision, click Employees in the QuickAccess panel (or select Admin > Employee Manager). The Employee Manager window opens.
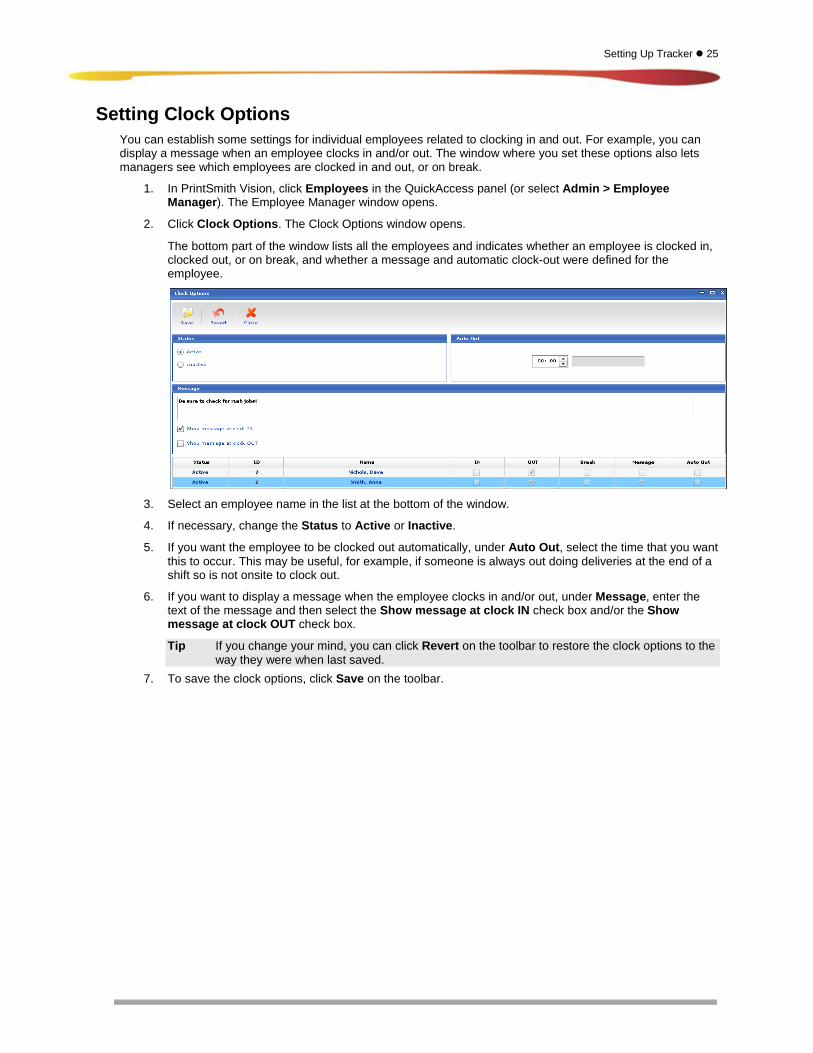
2. Click Clock Options. The Clock Options window opens.
The bottom part of the window lists all the employees and indicates whether an employee is clocked in, clocked out, or on break, and whether a message and automatic clock-out were defined for the employee.
3. Select an employee name in the list at the bottom of the window.
4. If necessary, change the Status to Active or Inactive.
5. If you want the employee to be clocked out automatically, under Auto Out, select the time that you want this to occur. This may be useful, for example, if someone is always out doing deliveries at the end of a shift so is not onsite to clock out.
6. If you want to display a message when the employee clocks in and/or out, under Message, enter the text of the message and then select the Show message at clock IN check box and/or the Show message at clock OUT check box.
Tip If you change your mind, you can click Revert on the toolbar to restore the clock options to the way they were when last saved.
7. To save the clock options, click Save on the toolbar.
26 EFI PrintSmith Vision | Tracker User Guide
Defining a Pay Period for Time Cards Employee time cards are grouped by pay period. A period can be set to weekly, bi-weekly, semi-monthly, or monthly, or can be defined for a custom time.
1. In PrintSmith Vision, click Employees in the QuickAccess panel (or select Admin > Employee Manager). The Employee Manager window opens.
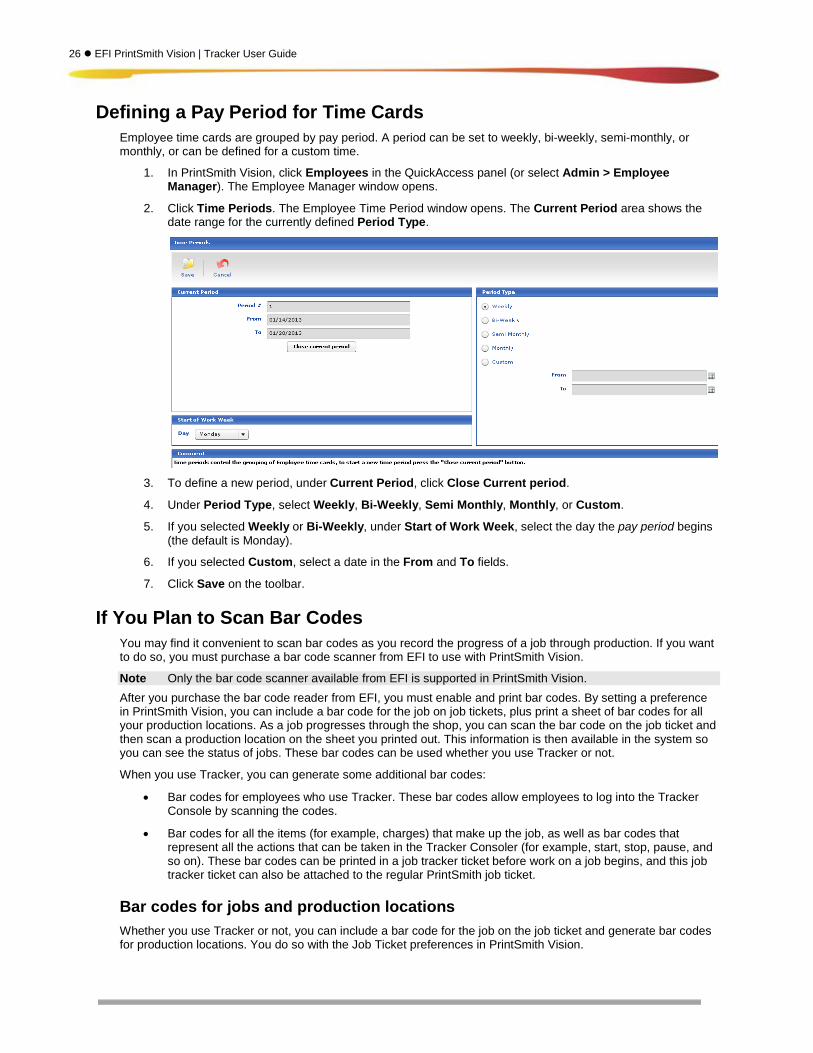
2. Click Time Periods. The Employee Time Period window opens. The Current Period area shows the date range for the currently defined Period Type.
3. To define a new period, under Current Period, click Close Current period.
4. Under Period Type, select Weekly, Bi-Weekly, Semi Monthly, Monthly, or Custom.
5. If you selected Weekly or Bi-Weekly, under Start of Work Week, select the day the pay period begins (the default is Monday).
6. If you selected Custom, select a date in the From and To fields.
7. Click Save on the toolbar.
If You Plan to Scan Bar Codes You may find it convenient to scan bar codes as you record the progress of a job through production. If you want to do so, you must purchase a bar code scanner from EFI to use with PrintSmith Vision.
Note Only the bar code scanner available from EFI is supported in PrintSmith Vision. After you purchase the bar code reader from EFI, you must enable and print bar codes. By setting a preference in PrintSmith Vision, you can include a bar code for the job on job tickets, plus print a sheet of bar codes for all your production locations. As a job progresses through the shop, you can scan the bar code on the job ticket and then scan a production location on the sheet you printed out. This information is then available in the system so you can see the status of jobs. These bar codes can be used whether you use Tracker or not.
When you use Tracker, you can generate some additional bar codes:
• Bar codes for employees who use Tracker. These bar codes allow employees to log into the Tracker Console by scanning the codes.
• Bar codes for all the items (for example, charges) that make up the job, as well as bar codes that represent all the actions that can be taken in the Tracker Consoler (for example, start, stop, pause, and so on). These bar codes can be printed in a job tracker ticket before work on a job begins, and this job tracker ticket can also be attached to the regular PrintSmith job ticket.
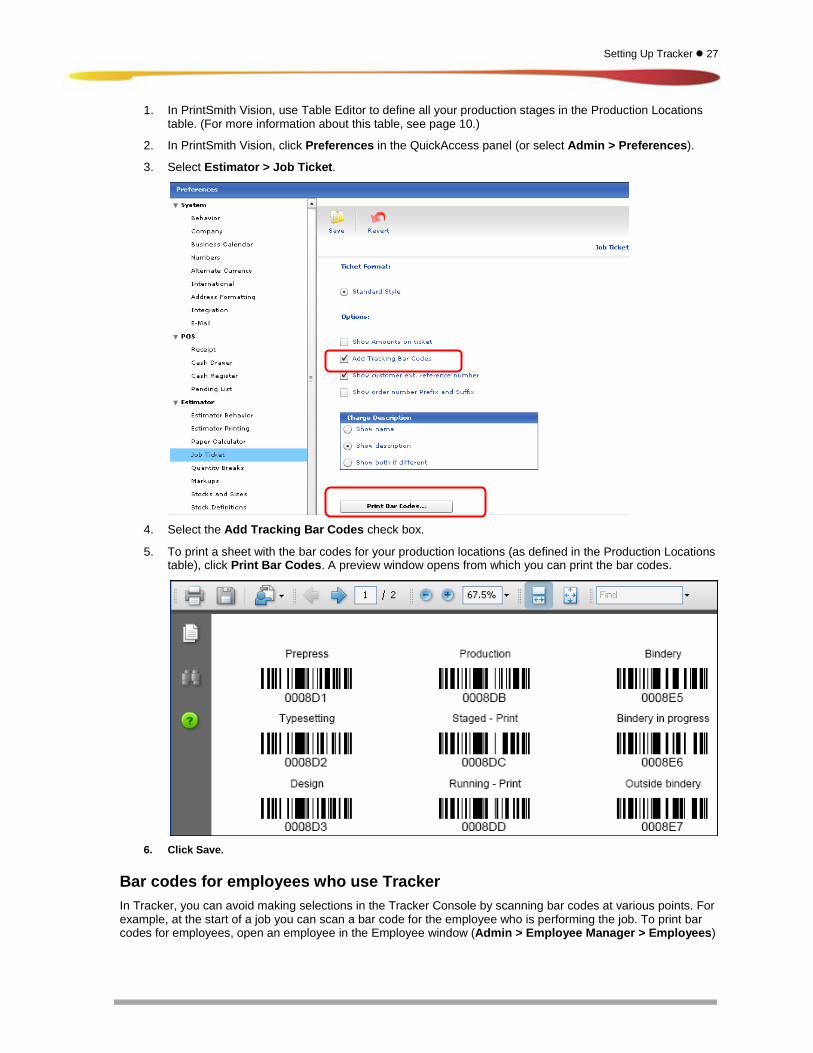
Bar codes for jobs and production locations Whether you use Tracker or not, you can include a bar code for the job on the job ticket and generate bar codes for production locations. You do so with the Job Ticket preferences in PrintSmith Vision.
Setting Up Tracker 27
1. In PrintSmith Vision, use Table Editor to define all your production stages in the Production Locations table. (For more information about this table, see page 10.)
2. In PrintSmith Vision, click Preferences in the QuickAccess panel (or select Admin > Preferences).
3. Select Estimator > Job Ticket.
4. Select the Add Tracking Bar Codes check box.
5. To print a sheet with the bar codes for your production locations (as defined in the Production Locations table), click Print Bar Codes. A preview window opens from which you can print the bar codes.
6. Click Save.
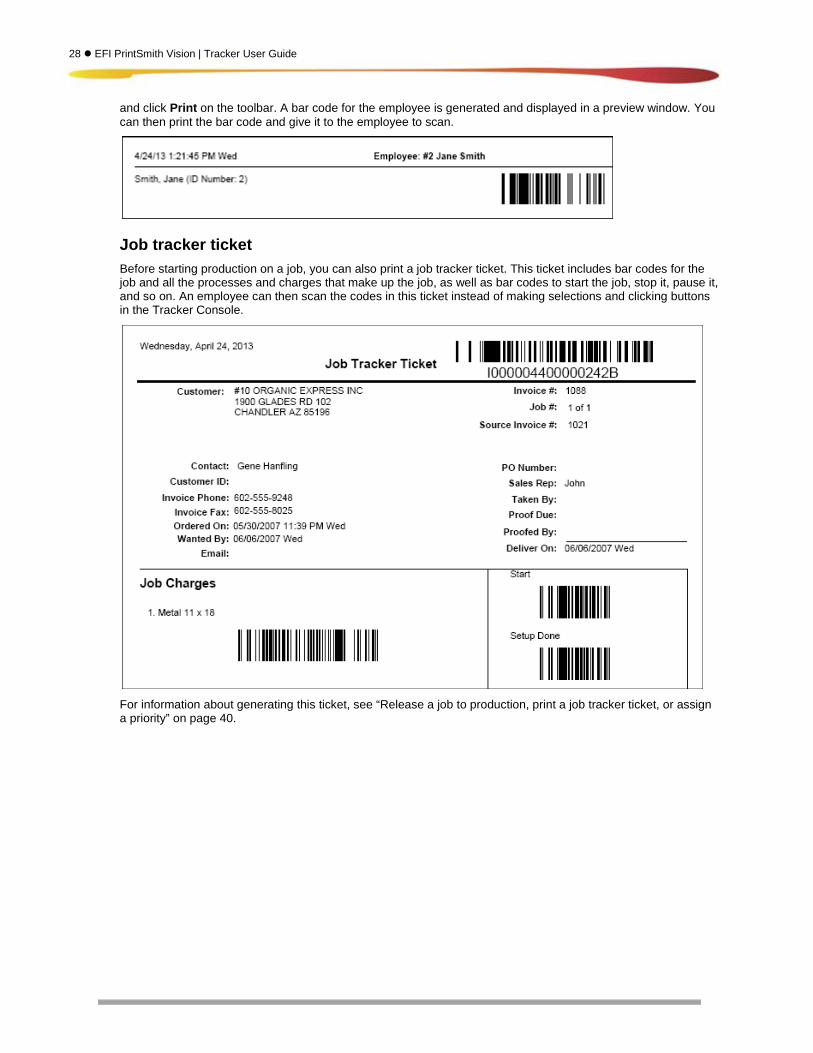
Bar codes for employees who use Tracker In Tracker, you can avoid making selections in the Tracker Console by scanning bar codes at various points. For example, at the start of a job you can scan a bar code for the employee who is performing the job. To print bar codes for employees, open an employee in the Employee window (Admin > Employee Manager > Employees)
28 EFI PrintSmith Vision | Tracker User Guide
and click Print on the toolbar. A bar code for the employee is generated and displayed in a preview window. You can then print the bar code and give it to the employee to scan.
Job tracker ticket Before starting production on a job, you can also print a job tracker ticket. This ticket includes bar codes for the job and all the processes and charges that make up the job, as well as bar codes to start the job, stop it, pause it, and so on. An employee can then scan the codes in this ticket instead of making selections and clicking buttons in the Tracker Console.
For information about generating this ticket, see “Release a job to production, print a job tracker ticket, or assign a priority” on page 40.
Setting Up Tracker 29
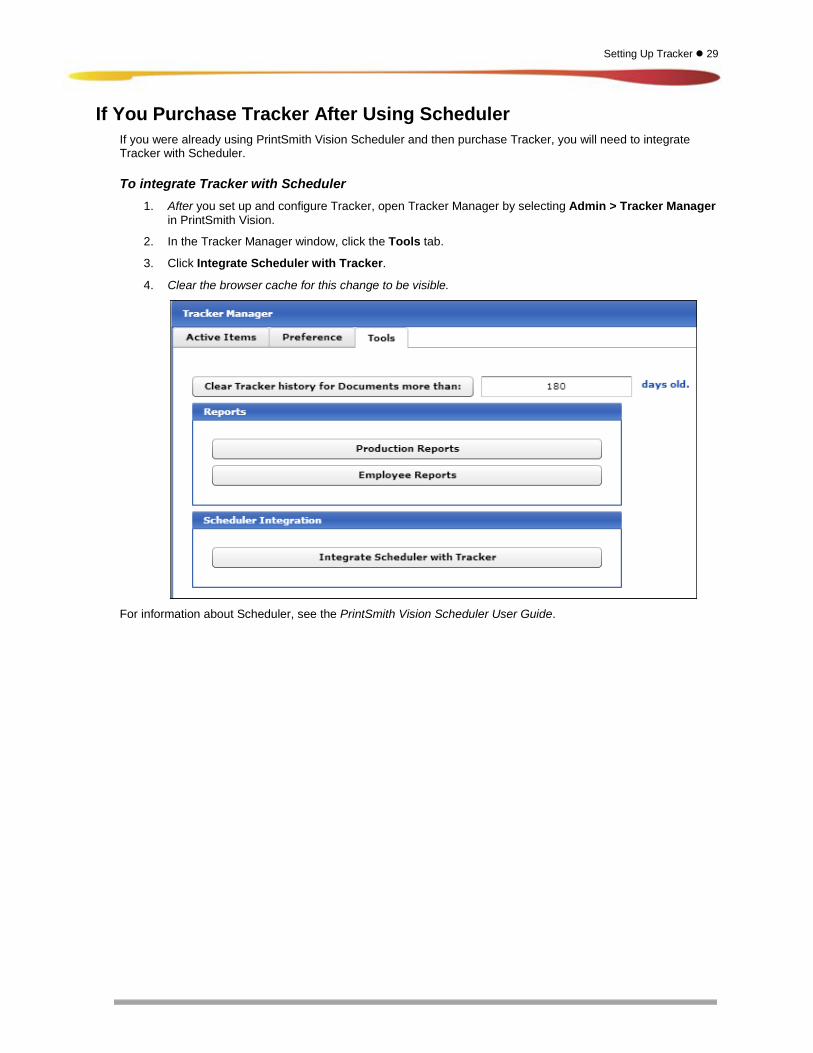
If You Purchase Tracker After Using Scheduler If you were already using PrintSmith Vision Scheduler and then purchase Tracker, you will need to integrate Tracker with Scheduler.
To integrate Tracker with Scheduler 1. After you set up and configure Tracker, open Tracker Manager by selecting Admin > Tracker Manager
in PrintSmith Vision.
2. In the Tracker Manager window, click the Tools tab.
3. Click Integrate Scheduler with Tracker.
4. Clear the browser cache for this change to be visible.
For information about Scheduler, see the PrintSmith Vision Scheduler User Guide.

30 EFI PrintSmith Vision | Tracker User Guide
Tracking Work 31
Tracking Work
In this chapter
Overview 32 Before You Begin 32 Clocking In and Out 32 Opening the Tracker Console 33 Understanding the Active Items Tab 34 Setting Preferences for the Active Items Tab 39 Releasing Jobs to Production 40 Recording Time Spent on a Job 42 Viewing Tracker Details 48 Viewing Completed Items 50
32 EFI PrintSmith Vision | Tracker User Guide
Overview This chapter describes how to use Tracker on the shop floor. The Tracker Console is the heart of PrintSmith Tracker – this is where you record data about the work you are performing.
Before you can use the Tracker Console, you must clock in. Depending on your employee profile, you may then need to provide a PIN or swipe a card with your employee bar code before you can use the Tracker Console.
Before You Begin Before you start using the Tracker Console, EFI strongly recommends that you read the introductory information about the Tracker Console features (especially “Understanding the Active Items Tab” starting on page 34) so you understand the process of using it.
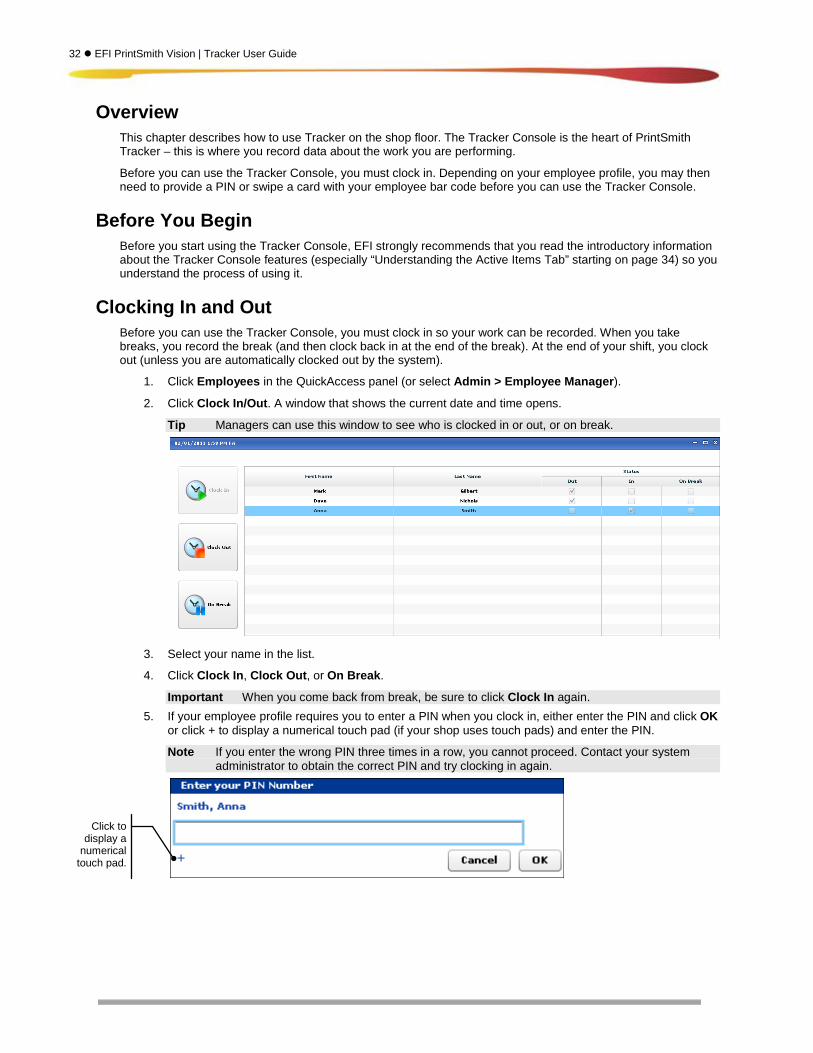
Clocking In and Out Before you can use the Tracker Console, you must clock in so your work can be recorded. When you take breaks, you record the break (and then clock back in at the end of the break). At the end of your shift, you clock out (unless you are automatically clocked out by the system).
1. Click Employees in the QuickAccess panel (or select Admin > Employee Manager).
2. Click Clock In/Out. A window that shows the current date and time opens.
Tip Managers can use this window to see who is clocked in or out, or on break.
3. Select your name in the list.
4. Click Clock In, Clock Out, or On Break.
Important When you come back from break, be sure to click Clock In again. 5. If your employee profile requires you to enter a PIN when you clock in, either enter the PIN and click OK
or click + to display a numerical touch pad (if your shop uses touch pads) and enter the PIN.
Note If you enter the wrong PIN three times in a row, you cannot proceed. Contact your system administrator to obtain the correct PIN and try clocking in again.
Click to display a
numerical touch pad.
Tracking Work 33
Opening the Tracker Console Notes If your employee profile requires you to enter a PIN, you will need to do this before you can start to use
the Tracker Console. If your employee profile has Auto show Tracker Console at clock in selected on the Personal tab
(see page 18), the Tracker Console window opens automatically after you clock in. Otherwise, perform step 1 below.
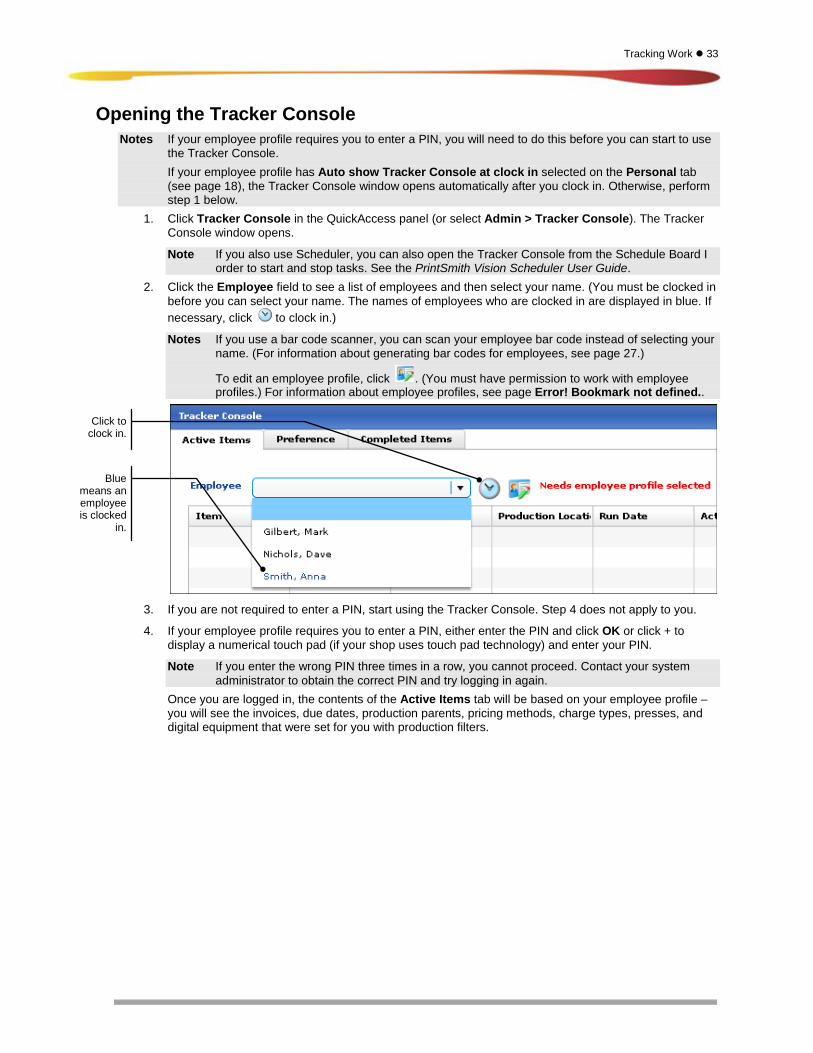
1. Click Tracker Console in the QuickAccess panel (or select Admin > Tracker Console). The Tracker Console window opens.
Note If you also use Scheduler, you can also open the Tracker Console from the Schedule Board I order to start and stop tasks. See the PrintSmith Vision Scheduler User Guide.
2. Click the Employee field to see a list of employees and then select your name. (You must be clocked in before you can select your name. The names of employees who are clocked in are displayed in blue. If necessary, click to clock in.)
Notes If you use a bar code scanner, you can scan your employee bar code instead of selecting your name. (For information about generating bar codes for employees, see page 27.)
To edit an employee profile, click . (You must have permission to work with employee profiles.) For information about employee profiles, see page Error! Bookmark not defined..
3. If you are not required to enter a PIN, start using the Tracker Console. Step 4 does not apply to you.
4. If your employee profile requires you to enter a PIN, either enter the PIN and click OK or click + to display a numerical touch pad (if your shop uses touch pad technology) and enter your PIN.
Note If you enter the wrong PIN three times in a row, you cannot proceed. Contact your system administrator to obtain the correct PIN and try logging in again.
Once you are logged in, the contents of the Active Items tab will be based on your employee profile – you will see the invoices, due dates, production parents, pricing methods, charge types, presses, and digital equipment that were set for you with production filters.
Blue means an employee is clocked
in.
Click to clock in.
34 EFI PrintSmith Vision | Tracker User Guide
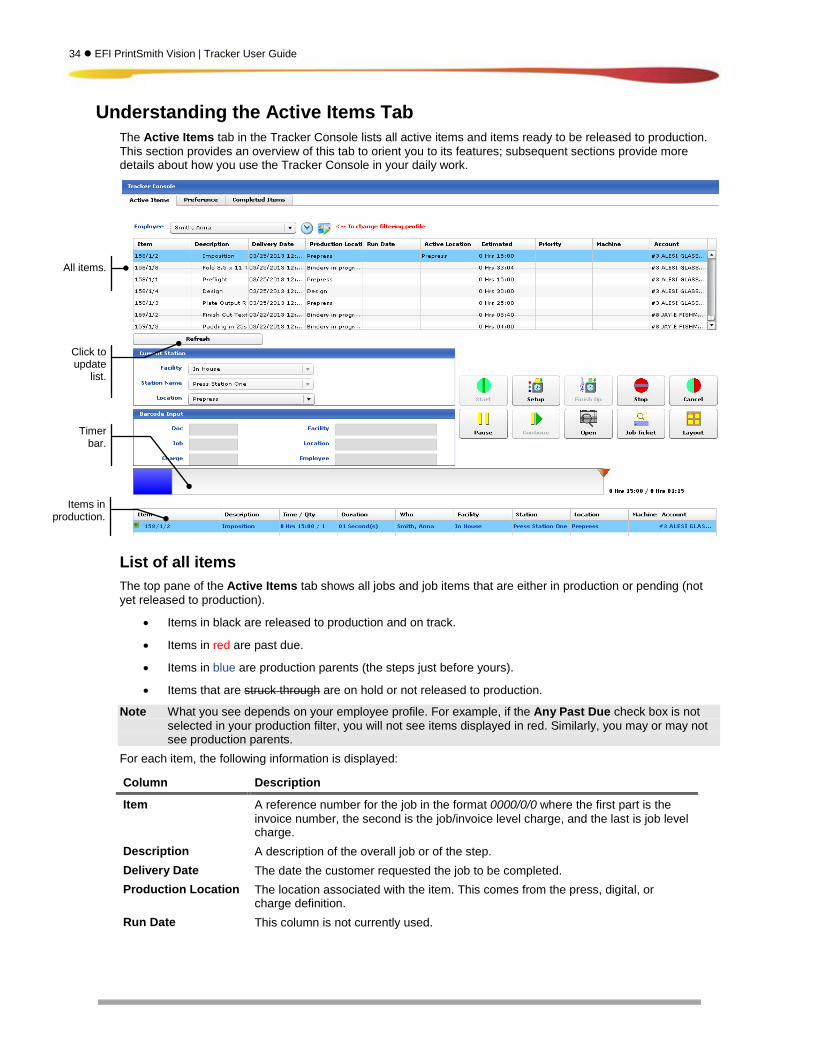
Understanding the Active Items Tab The Active Items tab in the Tracker Console lists all active items and items ready to be released to production. This section provides an overview of this tab to orient you to its features; subsequent sections provide more details about how you use the Tracker Console in your daily work.
List of all items The top pane of the Active Items tab shows all jobs and job items that are either in production or pending (not yet released to production).
• Items in black are released to production and on track.
• Items in red are past due.
• Items in blue are production parents (the steps just before yours).
• Items that are struck through are on hold or not released to production.
Note What you see depends on your employee profile. For example, if the Any Past Due check box is not selected in your production filter, you will not see items displayed in red. Similarly, you may or may not see production parents.
For each item, the following information is displayed:
Column Description
Item A reference number for the job in the format 0000/0/0 where the first part is the invoice number, the second is the job/invoice level charge, and the last is job level charge.
Description A description of the overall job or of the step. Delivery Date The date the customer requested the job to be completed. Production Location The location associated with the item. This comes from the press, digital, or
charge definition. Run Date This column is not currently used.
All items.
Click to update
list.
Items in production.
Timer bar.
Tracking Work 35
Active Location The location where the item is running. (You select this location when you start work on an item.)
Estimated The estimated time for completing the overall job or step. Priority The priority of the job. (This is set in the Tracker production window; see “Release
a job to production, print a job tracker ticket, or assign a priority” on page 40.) Machine The ID of the press or digital equipment. (This comes from the press or digital
definition.) Account The number and name of the customer who ordered the job.
You can do any of the following while reviewing the list of items:
• Sort the list differently by clicking the header of the column by which you want the information sorted, for example, by Priority or Active Location.
• Update the production information by clicking Refresh below the list.
• Double-click an item to open the Tracker production window where you can release a job to production or set a priority. For more information, see “Release a job to production, print a job tracker ticket, or assign a priority” on page 40.
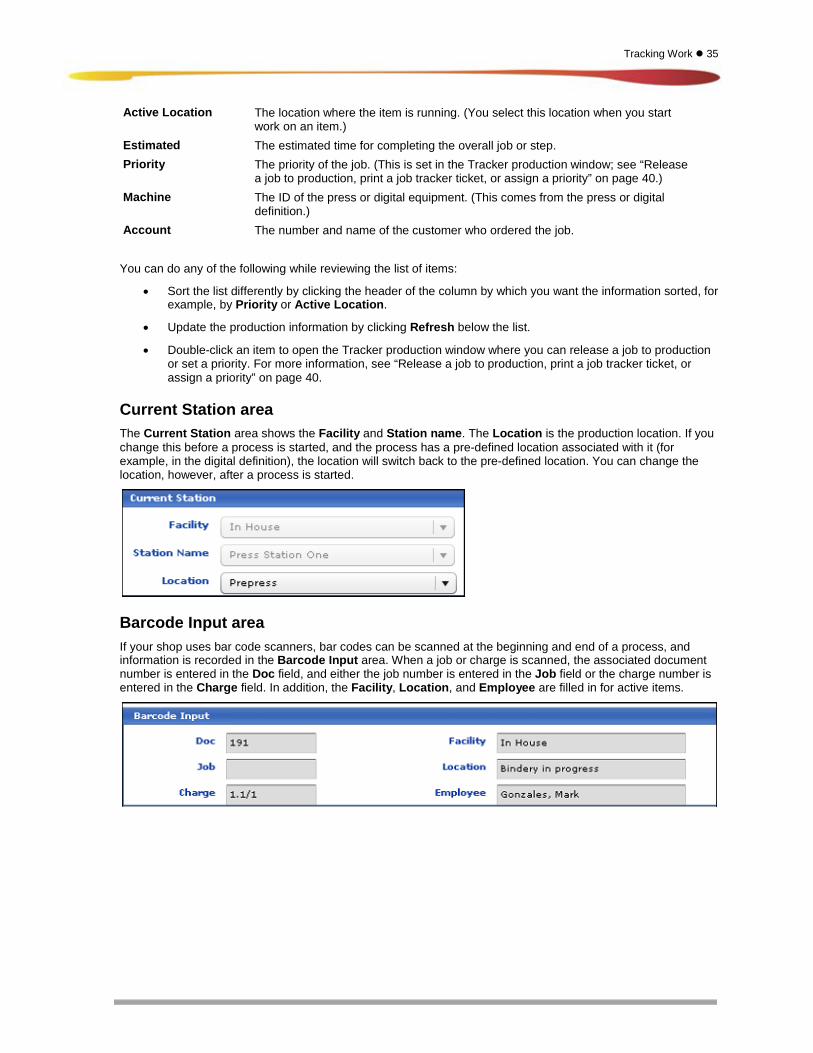
Current Station area The Current Station area shows the Facility and Station name. The Location is the production location. If you change this before a process is started, and the process has a pre-defined location associated with it (for example, in the digital definition), the location will switch back to the pre-defined location. You can change the location, however, after a process is started.
Barcode Input area If your shop uses bar code scanners, bar codes can be scanned at the beginning and end of a process, and information is recorded in the Barcode Input area. When a job or charge is scanned, the associated document number is entered in the Doc field, and either the job number is entered in the Job field or the charge number is entered in the Charge field. In addition, the Facility, Location, and Employee are filled in for active items.
36 EFI PrintSmith Vision | Tracker User Guide
Buttons on Active Items tab
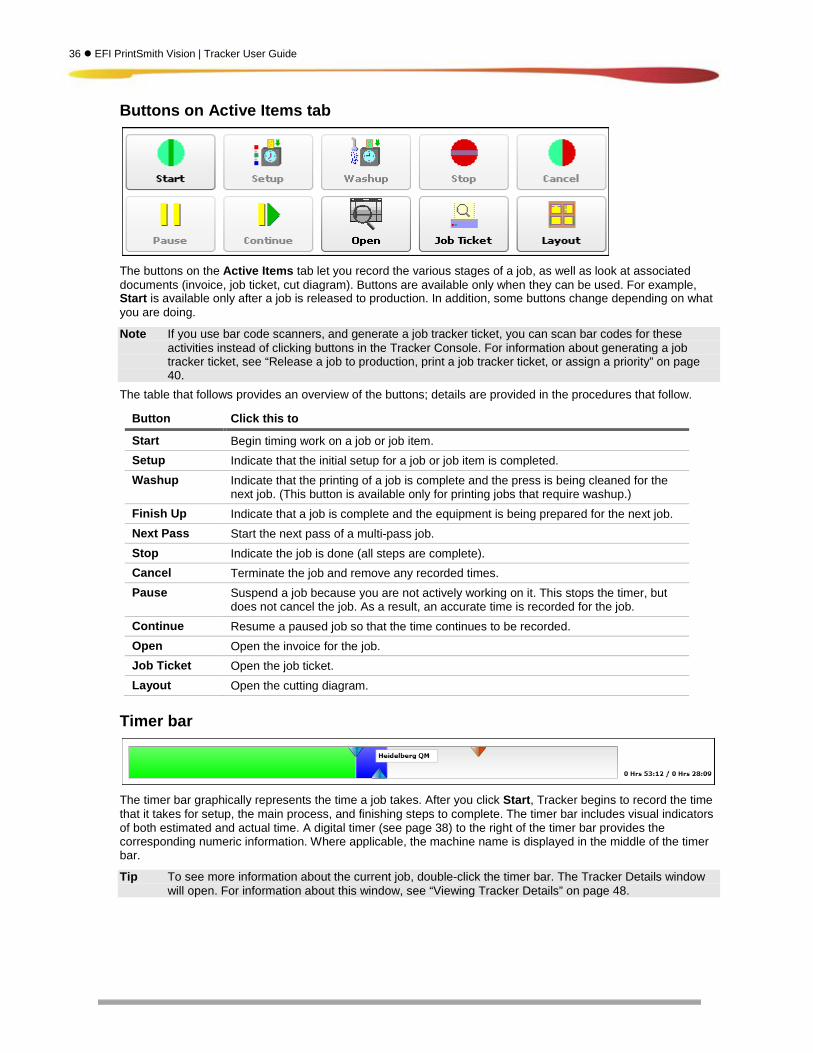
The buttons on the Active Items tab let you record the various stages of a job, as well as look at associated documents (invoice, job ticket, cut diagram). Buttons are available only when they can be used. For example, Start is available only after a job is released to production. In addition, some buttons change depending on what you are doing.
Note If you use bar code scanners, and generate a job tracker ticket, you can scan bar codes for these activities instead of clicking buttons in the Tracker Console. For information about generating a job tracker ticket, see “Release a job to production, print a job tracker ticket, or assign a priority” on page 40.
The table that follows provides an overview of the buttons; details are provided in the procedures that follow.
Button Click this to
Start Begin timing work on a job or job item. Setup Indicate that the initial setup for a job or job item is completed. Washup Indicate that the printing of a job is complete and the press is being cleaned for the
next job. (This button is available only for printing jobs that require washup.) Finish Up Indicate that a job is complete and the equipment is being prepared for the next job. Next Pass Start the next pass of a multi-pass job. Stop Indicate the job is done (all steps are complete). Cancel Terminate the job and remove any recorded times. Pause Suspend a job because you are not actively working on it. This stops the timer, but
does not cancel the job. As a result, an accurate time is recorded for the job. Continue Resume a paused job so that the time continues to be recorded. Open Open the invoice for the job. Job Ticket Open the job ticket. Layout Open the cutting diagram.
Timer bar
The timer bar graphically represents the time a job takes. After you click Start, Tracker begins to record the time that it takes for setup, the main process, and finishing steps to complete. The timer bar includes visual indicators of both estimated and actual time. A digital timer (see page 38) to the right of the timer bar provides the corresponding numeric information. Where applicable, the machine name is displayed in the middle of the timer bar.
Tip To see more information about the current job, double-click the timer bar. The Tracker Details window will open. For information about this window, see “Viewing Tracker Details” on page 48.

Tracking Work 37
Colors in timer bar Colors in the timer bar are used as follows:
• Green identifies the setup time for a job.
• Blue identifies the main process for a job.
• Yellow indicates that the job was paused or stopped.
• Red identifies the finishing washup time (if any) for a job.
Triangles in timer bar Colored triangles at the top and bottom of the timer bar provide additional information:
• A blue triangle at the top of the timer bar indicates when setup is estimated to be complete.
Note For multi-pass jobs, the top blue triangle has a white line dividing it. In addition, text to the left of the timer bar - Pass (n of n) - identifies the current pass out of the total number of passes for the entire job.
• A blue triangle at the bottom of the timer bar indicates when setup was actually completed (the Setup button was clicked).
• A red triangle at the top of the timer bar indicates when the job is estimated to be complete.
• A red triangle at the bottom of the timer bar indicates that the main process was completed and the washup or finishing steps were started (Washup or Finish Up was clicked).
Estimated end of setup
Actual end of setup
38 EFI PrintSmith Vision | Tracker User Guide
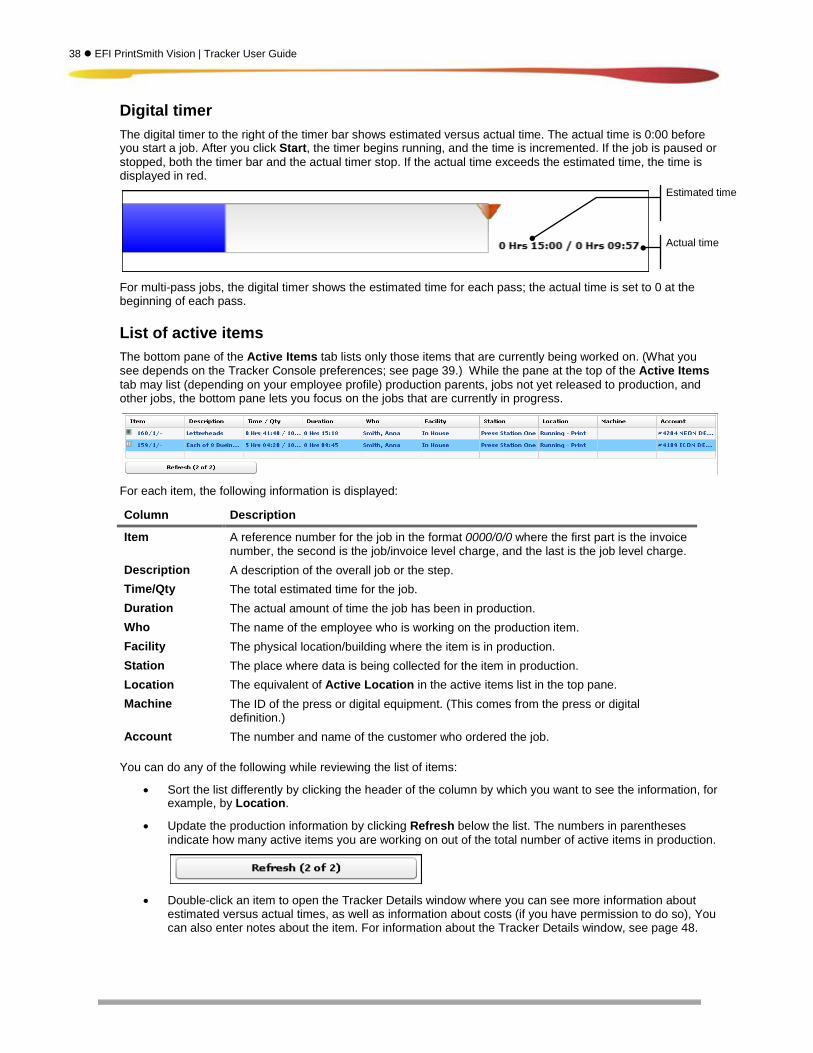
Digital timer The digital timer to the right of the timer bar shows estimated versus actual time. The actual time is 0:00 before you start a job. After you click Start, the timer begins running, and the time is incremented. If the job is paused or stopped, both the timer bar and the actual timer stop. If the actual time exceeds the estimated time, the time is displayed in red.
For multi-pass jobs, the digital timer shows the estimated time for each pass; the actual time is set to 0 at the beginning of each pass.
List of active items The bottom pane of the Active Items tab lists only those items that are currently being worked on. (What you see depends on the Tracker Console preferences; see page 39.) While the pane at the top of the Active Items tab may list (depending on your employee profile) production parents, jobs not yet released to production, and other jobs, the bottom pane lets you focus on the jobs that are currently in progress.
For each item, the following information is displayed:
Column Description
Item A reference number for the job in the format 0000/0/0 where the first part is the invoice number, the second is the job/invoice level charge, and the last is the job level charge.
Description A description of the overall job or the step. Time/Qty The total estimated time for the job. Duration The actual amount of time the job has been in production. Who The name of the employee who is working on the production item. Facility The physical location/building where the item is in production. Station The place where data is being collected for the item in production. Location The equivalent of Active Location in the active items list in the top pane. Machine The ID of the press or digital equipment. (This comes from the press or digital
definition.) Account The number and name of the customer who ordered the job.
You can do any of the following while reviewing the list of items:
• Sort the list differently by clicking the header of the column by which you want to see the information, for example, by Location.
• Update the production information by clicking Refresh below the list. The numbers in parentheses indicate how many active items you are working on out of the total number of active items in production.
• Double-click an item to open the Tracker Details window where you can see more information about estimated versus actual times, as well as information about costs (if you have permission to do so), You can also enter notes about the item. For information about the Tracker Details window, see page 48.
Estimated time
Actual time
Tracking Work 39
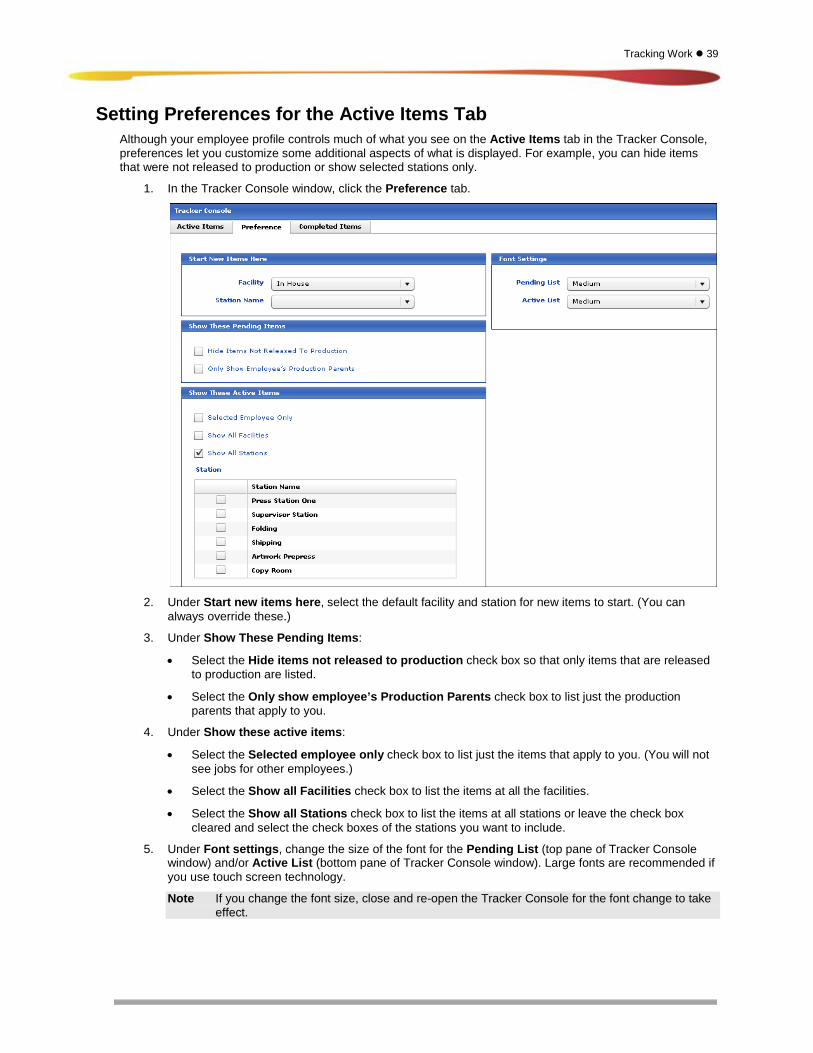
Setting Preferences for the Active Items Tab Although your employee profile controls much of what you see on the Active Items tab in the Tracker Console, preferences let you customize some additional aspects of what is displayed. For example, you can hide items that were not released to production or show selected stations only.
1. In the Tracker Console window, click the Preference tab.
2. Under Start new items here, select the default facility and station for new items to start. (You can
always override these.)
3. Under Show These Pending Items:
• Select the Hide items not released to production check box so that only items that are released to production are listed.
• Select the Only show employee’s Production Parents check box to list just the production parents that apply to you.
4. Under Show these active items:
• Select the Selected employee only check box to list just the items that apply to you. (You will not see jobs for other employees.)
• Select the Show all Facilities check box to list the items at all the facilities.
• Select the Show all Stations check box to list the items at all stations or leave the check box cleared and select the check boxes of the stations you want to include.
5. Under Font settings, change the size of the font for the Pending List (top pane of Tracker Console window) and/or Active List (bottom pane of Tracker Console window). Large fonts are recommended if you use touch screen technology.
Note If you change the font size, close and re-open the Tracker Console for the font change to take effect.
40 EFI PrintSmith Vision | Tracker User Guide
Releasing Jobs to Production Before employees can work on jobs and record the time they are spending on them, the jobs must be released to production. Typically, someone in a supervisory role releases jobs to production, but you can allow any employee to release jobs to production by selecting the Allow to modify production settings check box in the employee’s profile (see “Completing the Personal tab for an employee” on page 18).
Note Jobs that are not released to production are listed in the Tracker Console with a strike through them. (An employee’s profile controls whether an employee sees unreleased jobs in the Tracker Console.)
You can release jobs to production in two ways:
• Release all the jobs in an invoice to production at the same time.
• Release individual jobs to production.
Tip When you release an individual job to production, you can also assign a priority to the job. In addition, if you use bar code scanners at your shop, you can print a job tracker ticket with bar codes to scan during the production process.
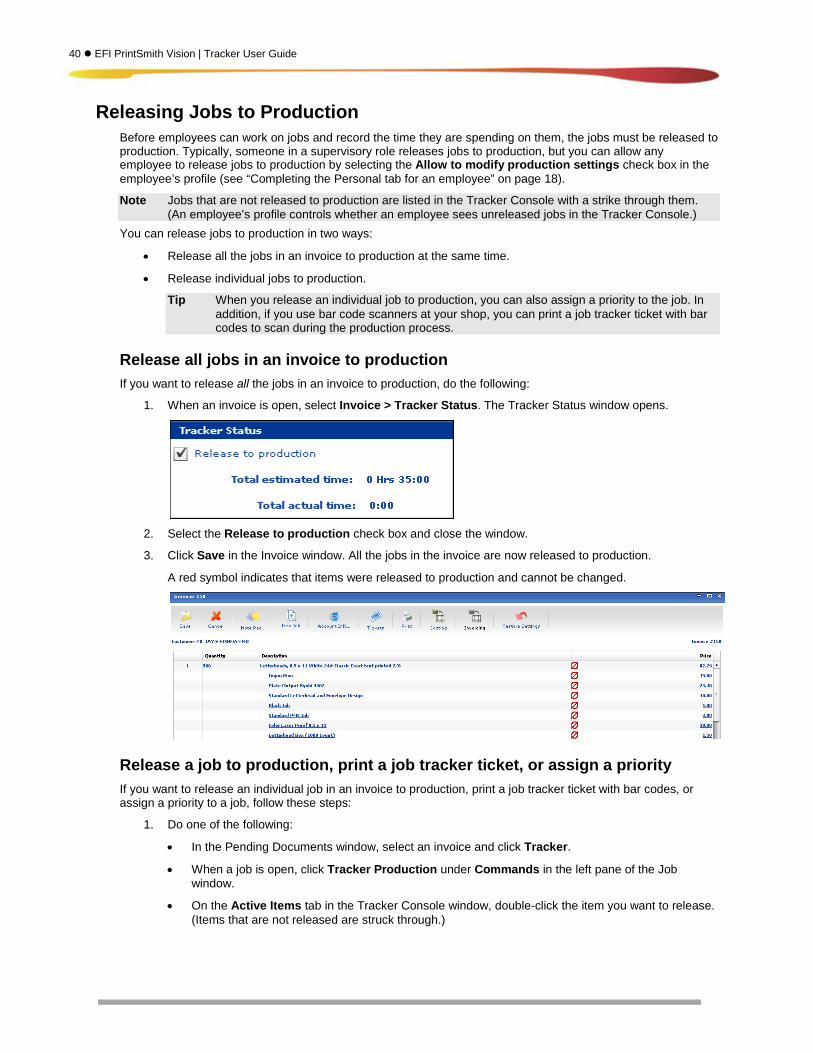
Release all jobs in an invoice to production If you want to release all the jobs in an invoice to production, do the following:
1. When an invoice is open, select Invoice > Tracker Status. The Tracker Status window opens.
2. Select the Release to production check box and close the window.
3. Click Save in the Invoice window. All the jobs in the invoice are now released to production.
A red symbol indicates that items were released to production and cannot be changed.
Release a job to production, print a job tracker ticket, or assign a priority If you want to release an individual job in an invoice to production, print a job tracker ticket with bar codes, or assign a priority to a job, follow these steps:
1. Do one of the following:
• In the Pending Documents window, select an invoice and click Tracker.
• When a job is open, click Tracker Production under Commands in the left pane of the Job window.
• On the Active Items tab in the Tracker Console window, double-click the item you want to release. (Items that are not released are struck through.)

Tracking Work 41
A window opens with the number of the invoice and job displayed in its title bar. This is known as the Tracker production window.
Note If you selected an invoice with multiple jobs in the Pending Documents window, the Tracker
production window opens for each job in the invoice so you can release or not release individual jobs.
2. Select the Release to production check box.
3. If necessary, select the Costing Press.
4. In the Priority field, select the kind of priority the job should receive, for example, Normal or Rush. (Priorities are defined in the Production Priority table and are specific to your shop.)
5. If you scan bar codes at your shop, do one of the following:
• To print a job tracker ticket with bar codes for all the processes and charges that make up the job and for all the actions you can perform in the Tracker Console (for example, start, stop, pause), click Print. A preview window opens from which you can print this ticket.
• To add the job tracker ticket to the regular job ticket, select the Attach to Job Ticket check box.
When the job ticket is printed it will then include the job tracker ticket with all the bar codes.
6. Click Save.
42 EFI PrintSmith Vision | Tracker User Guide
Recording Time Spent on a Job After a job is released to production, you can start work on it and record your time. Depending on your employee profile, you may see production parent items (items in the step before yours) on the Active Items tab to let you know that a job is coming your way. For example, if you work in the bindery, items in the press location would typically be your production parents.
Production parent items are displayed in blue on the Active Items tab. After a production parent item is completed in the step before yours, it is still displayed in blue, but the Active Location column indicates that the step is done, for example, Press (done).
Tip Click Refresh frequently to make sure you are seeing the most current production information.
General procedure for tracking time This procedure assumes that you already clocked in (page 32) and selected your employee profile in the Tracker Console (page 33).
Tips If you use scanners, you can use the job tracker ticket to scan bar codes at the beginning and end of each process instead of clicking buttons on the screen. For information about generating the job tracker ticket, see “Release a job to production, print a job tracker ticket, or assign a priority” on page 40.
If you also use Scheduler, as you go through the process of producing a job, the status of tasks gets updated in Scheduler.
1. In the top pane of the Active Items tab in the Tracker Console window, select the item on which you want to work.
2. Do any of the following (at any time):
• To look at the invoice for the item, click Open.
• To look at the ticket, click Job Ticket.
• To look at the cutting diagram, click Layout.
3. When you are ready to start work on the item, click Start.
The item that you started is now listed in the bottom pane, and the timer starts running.
Note If you try to start a job that you already started, a message asks if you want to restart the beginning timers. You cannot start the same active item more than once, but other employees can start the same item because several people may need to work on the same production process at the same time. In this case, information for all the employees is tracked and can be seen in the Tracker Status window.
4. Once timing has started, do the following as necessary:
a. To see more details about an item, double-click the timer bar or the item in the bottom pane. The Tracker Details window opens. For information about this window, see page 48.
b. To change your mind about recording time spent on the item, click Cancel and then click Yes to confirm. The time that was recorded is discarded, and the item is listed just in the top pane again.
c. If you need to stop recording the time temporarily, click Pause and then click Continue to resume. If you are pausing because you are going on break, record the break. For more information about pausing jobs and recording breaks, see page 43.
d. If the job requires preparation (such as make-ready), click Setup after the preparations are done. For more information, see “Indicating setup is complete” on page 44.
e. When the main process of a job is complete, but the job requires washup, click Washup. (This applies only to printing jobs.) If the job requires other finishing steps, click Finish Up. (These buttons are available only when applicable.)
Tracking Work 43
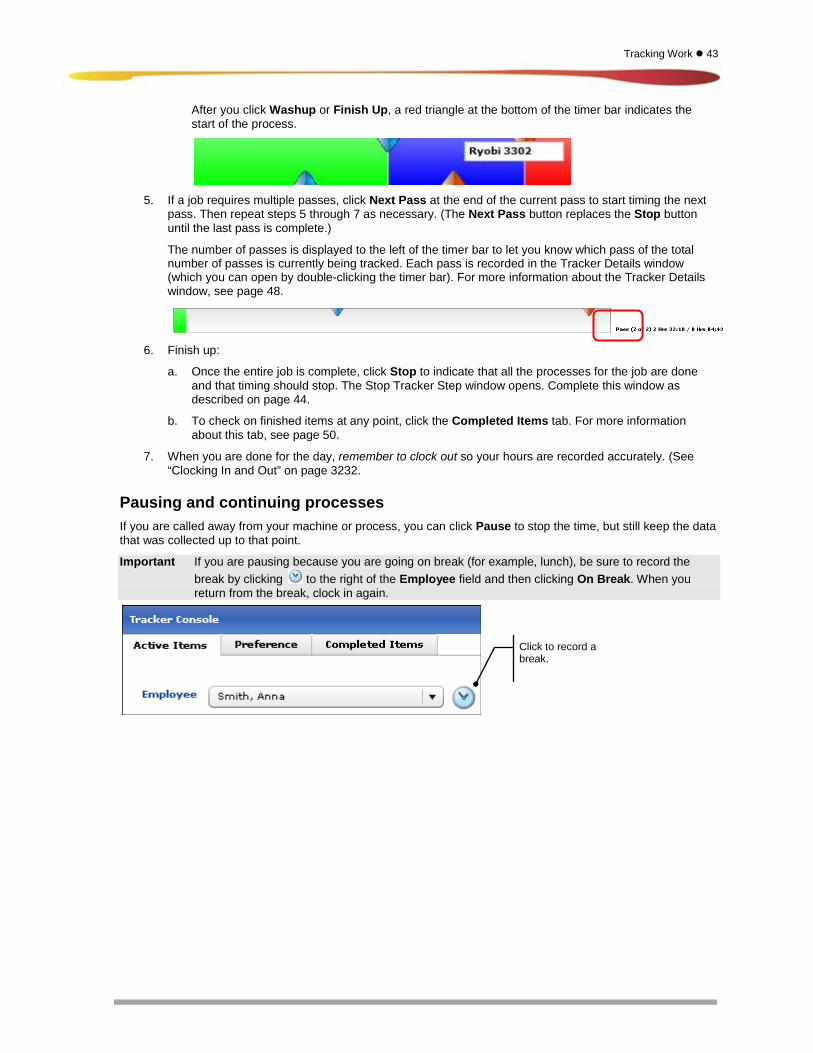
After you click Washup or Finish Up, a red triangle at the bottom of the timer bar indicates the start of the process.
5. If a job requires multiple passes, click Next Pass at the end of the current pass to start timing the next
pass. Then repeat steps 5 through 7 as necessary. (The Next Pass button replaces the Stop button until the last pass is complete.)
The number of passes is displayed to the left of the timer bar to let you know which pass of the total number of passes is currently being tracked. Each pass is recorded in the Tracker Details window (which you can open by double-clicking the timer bar). For more information about the Tracker Details window, see page 48.
6. Finish up:
a. Once the entire job is complete, click Stop to indicate that all the processes for the job are done and that timing should stop. The Stop Tracker Step window opens. Complete this window as described on page 44.
b. To check on finished items at any point, click the Completed Items tab. For more information about this tab, see page 50.
7. When you are done for the day, remember to clock out so your hours are recorded accurately. (See “Clocking In and Out” on page 3232.
Pausing and continuing processes If you are called away from your machine or process, you can click Pause to stop the time, but still keep the data that was collected up to that point.
Important If you are pausing because you are going on break (for example, lunch), be sure to record the break by clicking to the right of the Employee field and then clicking On Break. When you return from the break, clock in again.
Click to record a break.
44 EFI PrintSmith Vision | Tracker User Guide
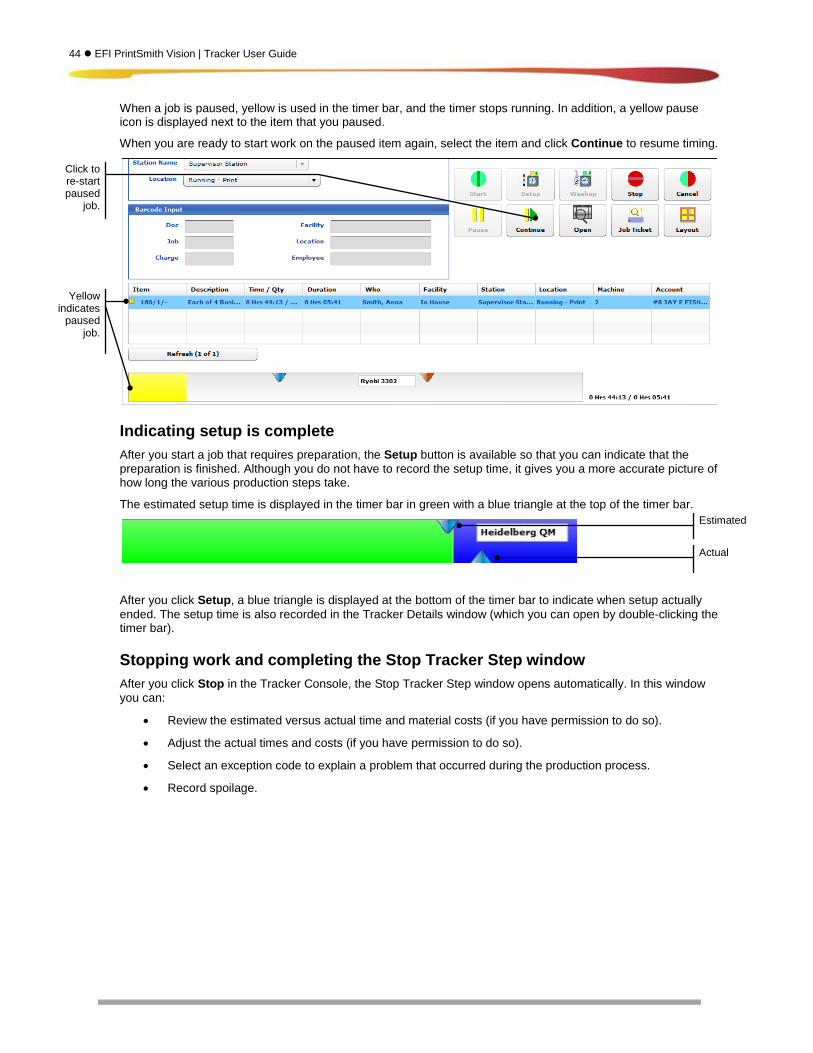
When a job is paused, yellow is used in the timer bar, and the timer stops running. In addition, a yellow pause icon is displayed next to the item that you paused.
When you are ready to start work on the paused item again, select the item and click Continue to resume timing.
Indicating setup is complete After you start a job that requires preparation, the Setup button is available so that you can indicate that the preparation is finished. Although you do not have to record the setup time, it gives you a more accurate picture of how long the various production steps take.
The estimated setup time is displayed in the timer bar in green with a blue triangle at the top of the timer bar.
After you click Setup, a blue triangle is displayed at the bottom of the timer bar to indicate when setup actually ended. The setup time is also recorded in the Tracker Details window (which you can open by double-clicking the timer bar).
Stopping work and completing the Stop Tracker Step window After you click Stop in the Tracker Console, the Stop Tracker Step window opens automatically. In this window you can:
• Review the estimated versus actual time and material costs (if you have permission to do so).
• Adjust the actual times and costs (if you have permission to do so).
• Select an exception code to explain a problem that occurred during the production process.
• Record spoilage.
Estimated
Actual
Click to re-start paused
job.
Yellow indicates
paused job.
Tracking Work 45
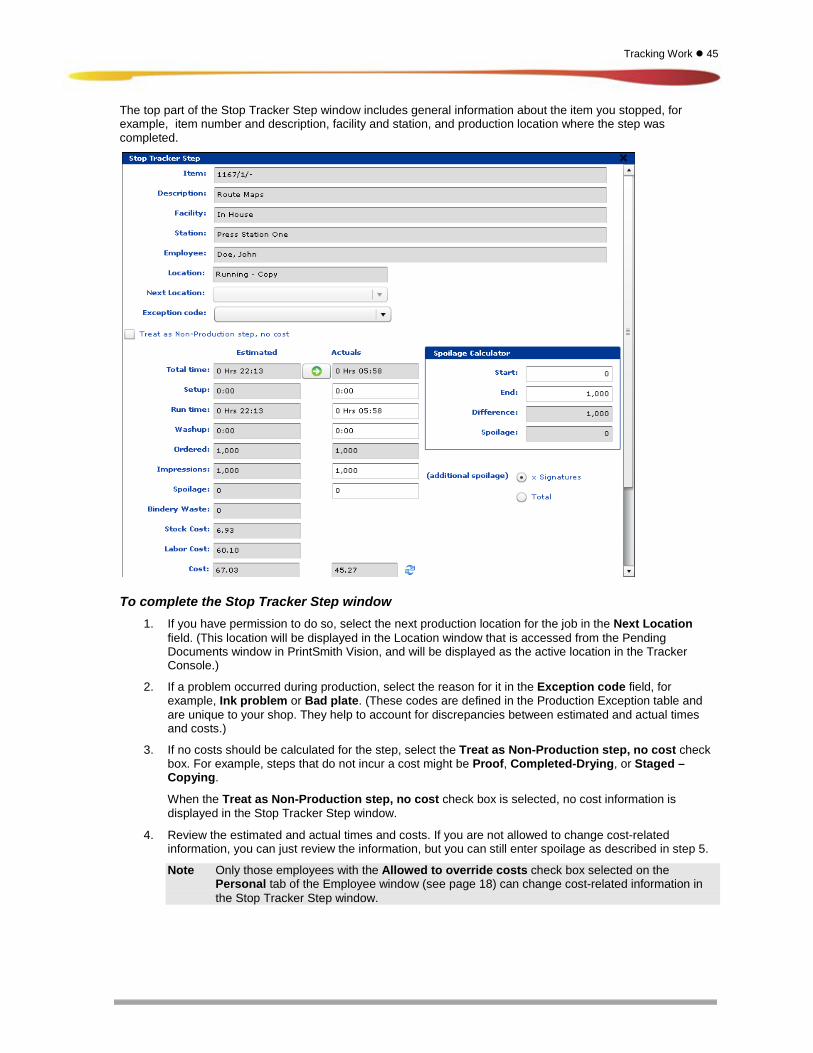
The top part of the Stop Tracker Step window includes general information about the item you stopped, for example, item number and description, facility and station, and production location where the step was completed.
To complete the Stop Tracker Step window 1. If you have permission to do so, select the next production location for the job in the Next Location
field. (This location will be displayed in the Location window that is accessed from the Pending Documents window in PrintSmith Vision, and will be displayed as the active location in the Tracker Console.)
2. If a problem occurred during production, select the reason for it in the Exception code field, for example, Ink problem or Bad plate. (These codes are defined in the Production Exception table and are unique to your shop. They help to account for discrepancies between estimated and actual times and costs.)
3. If no costs should be calculated for the step, select the Treat as Non-Production step, no cost check box. For example, steps that do not incur a cost might be Proof, Completed-Drying, or Staged – Copying.
When the Treat as Non-Production step, no cost check box is selected, no cost information is displayed in the Stop Tracker Step window.
4. Review the estimated and actual times and costs. If you are not allowed to change cost-related information, you can just review the information, but you can still enter spoilage as described in step 5.
Note Only those employees with the Allowed to override costs check box selected on the Personal tab of the Employee window (see page 18) can change cost-related information in the Stop Tracker Step window.

46 EFI PrintSmith Vision | Tracker User Guide
5. If you are allowed to override costs and need to do so, do one of the following:
• If you want to replace the information in the Actuals column with information from the Estimated column, click the green arrow between the two columns.
• If you want to enter actual times manually, enter them in the Setup, Run time, and Washup fields in the Actuals column.
6. To calculate and record spoilage:
a. If you need help calculating the spoilage, under Spoilage Calculator, enter the number of sheets that were used for the job in the Start field and enter the number of good impressions that were produced in the End field. Press Tab and the Difference is displayed as a negative number.
Click to replace actual costing data with estimated costing data.
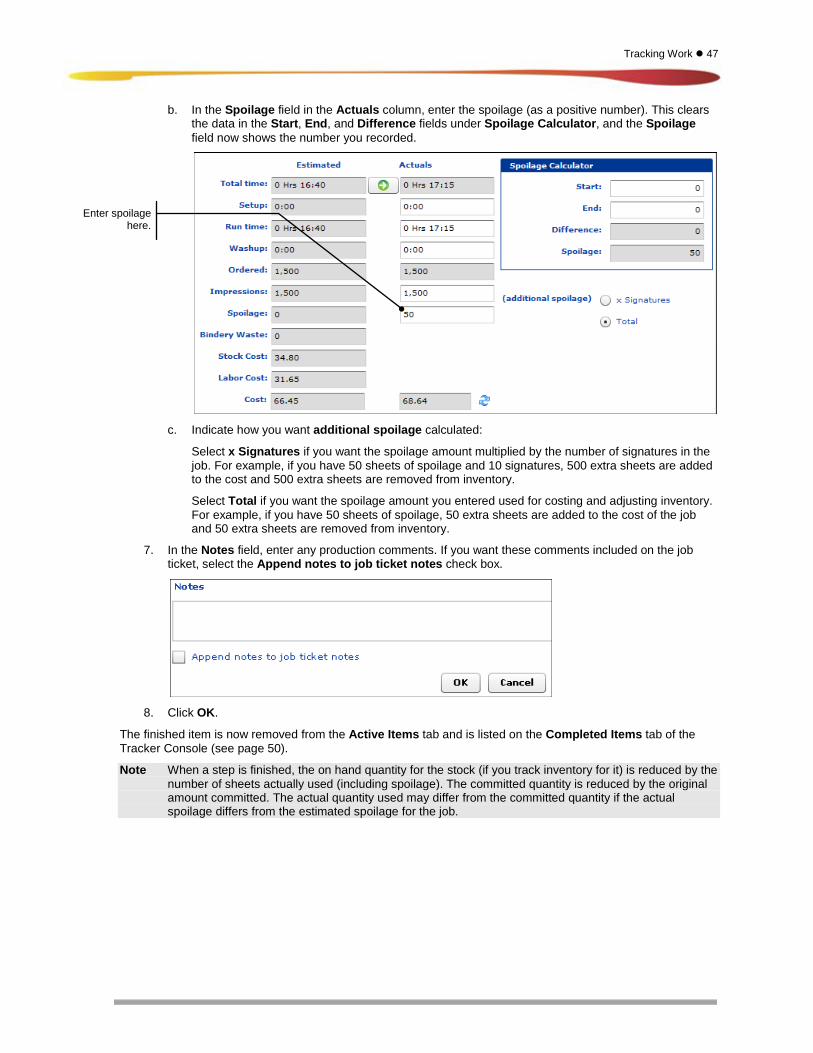
Tracking Work 47
b. In the Spoilage field in the Actuals column, enter the spoilage (as a positive number). This clears the data in the Start, End, and Difference fields under Spoilage Calculator, and the Spoilage field now shows the number you recorded.
c. Indicate how you want additional spoilage calculated:
Select x Signatures if you want the spoilage amount multiplied by the number of signatures in the job. For example, if you have 50 sheets of spoilage and 10 signatures, 500 extra sheets are added to the cost and 500 extra sheets are removed from inventory.
Select Total if you want the spoilage amount you entered used for costing and adjusting inventory. For example, if you have 50 sheets of spoilage, 50 extra sheets are added to the cost of the job and 50 extra sheets are removed from inventory.
7. In the Notes field, enter any production comments. If you want these comments included on the job ticket, select the Append notes to job ticket notes check box.
8. Click OK.
The finished item is now removed from the Active Items tab and is listed on the Completed Items tab of the Tracker Console (see page 50).
Note When a step is finished, the on hand quantity for the stock (if you track inventory for it) is reduced by the number of sheets actually used (including spoilage). The committed quantity is reduced by the original amount committed. The actual quantity used may differ from the committed quantity if the actual spoilage differs from the estimated spoilage for the job.
Enter spoilage here.

48 EFI PrintSmith Vision | Tracker User Guide
Viewing Tracker Details You can review the details of an active or completed item in the Tracker Details window. You can open this window from many places in PrintSmith Tracker.
1. Do any of the following to open the Tracker Details window:
• On the Active Items tab in the Tracker Console window, double-click the timer bar or double-click an item in the bottom pane (your active items).
• On the Completed Items tab in the Tracker Console window, double-click an item.
• On the Active Items tab in the Tracker Manager window, double-click an item.
• In the Tracker Status window, double-click an item.
Note If you try to open the Tracker Details window for an active item that is not assigned to you, a warning message is displayed.
2. Review the information in the window. The information that is displayed depends on the status of the
item, your employee profile, and whether the job is a single or multi-pass job. The Status field indicates the state of the current item, for example, Active, Paused, or Completed.
If a job required multiple passes, the Actuals column is replaced by a Current Pass column and Previous Passes column. (This applies to active items only.) The Current Pass column displays the times for the pass now taking place. The Previous Passes column displays cumulative times for all the
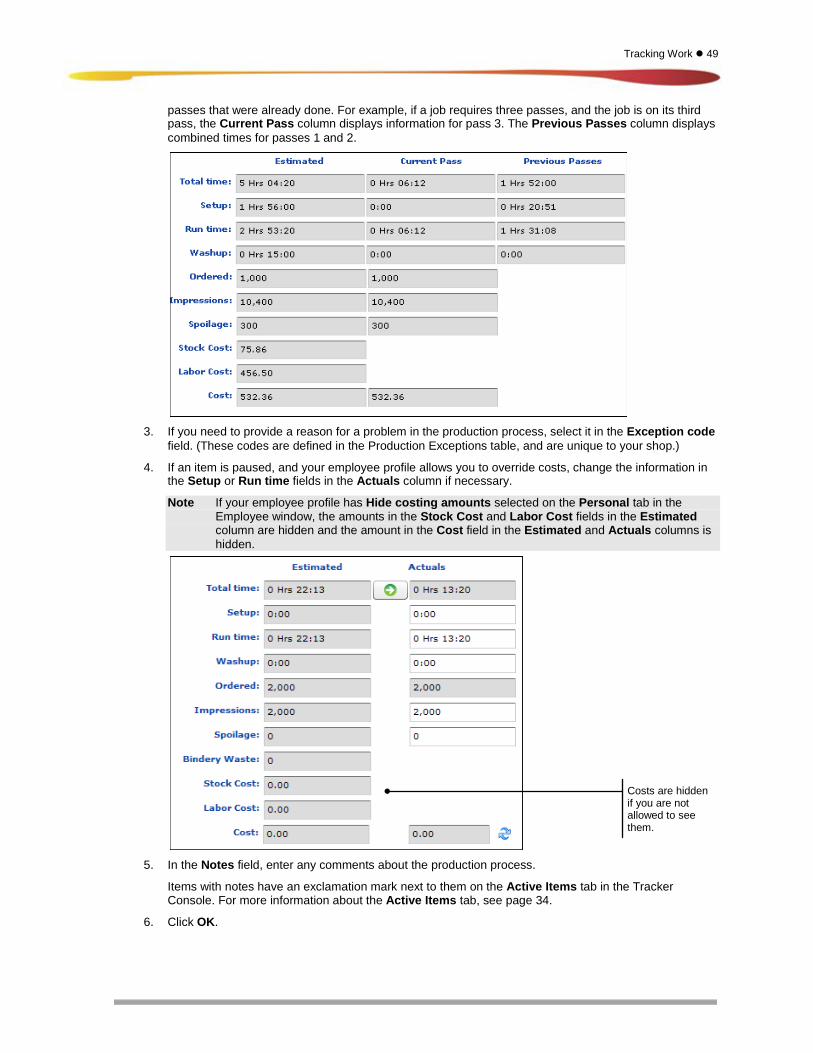
Tracking Work 49
passes that were already done. For example, if a job requires three passes, and the job is on its third pass, the Current Pass column displays information for pass 3. The Previous Passes column displays combined times for passes 1 and 2.
3. If you need to provide a reason for a problem in the production process, select it in the Exception code
field. (These codes are defined in the Production Exceptions table, and are unique to your shop.)
4. If an item is paused, and your employee profile allows you to override costs, change the information in the Setup or Run time fields in the Actuals column if necessary.
Note If your employee profile has Hide costing amounts selected on the Personal tab in the Employee window, the amounts in the Stock Cost and Labor Cost fields in the Estimated column are hidden and the amount in the Cost field in the Estimated and Actuals columns is hidden.
5. In the Notes field, enter any comments about the production process.
Items with notes have an exclamation mark next to them on the Active Items tab in the Tracker Console. For more information about the Active Items tab, see page 34.
6. Click OK.
Costs are hidden if you are not allowed to see them.
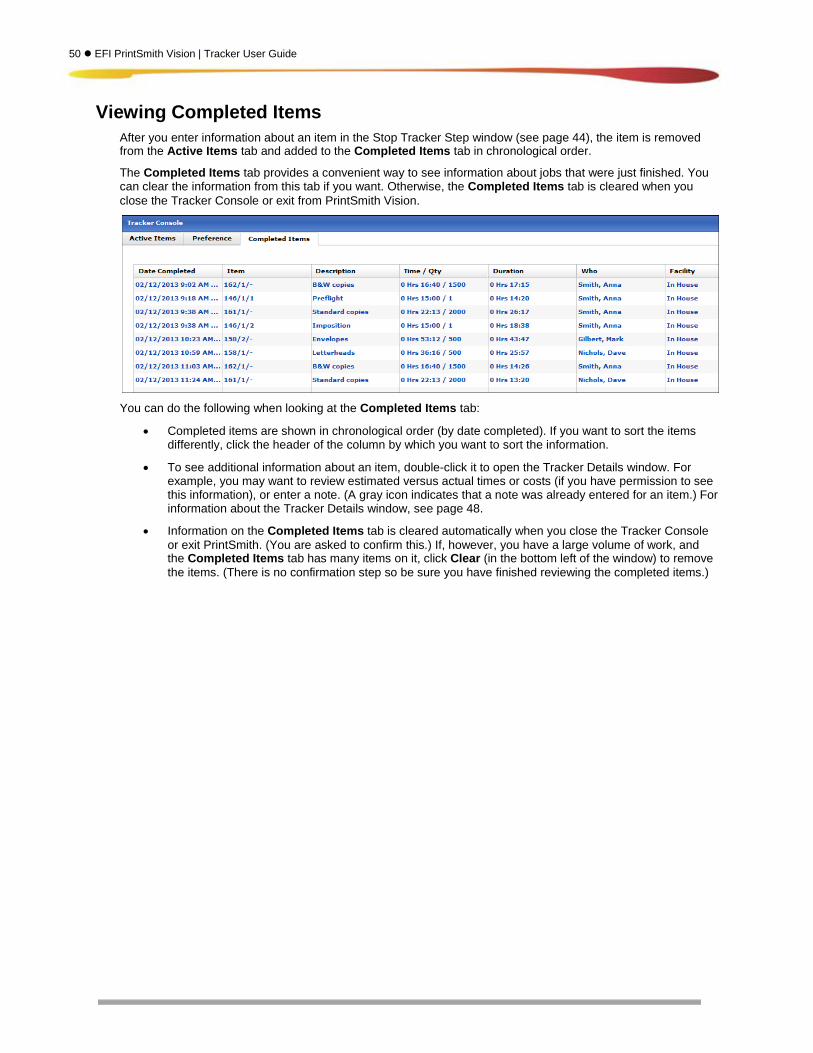
50 EFI PrintSmith Vision | Tracker User Guide
Viewing Completed Items After you enter information about an item in the Stop Tracker Step window (see page 44), the item is removed from the Active Items tab and added to the Completed Items tab in chronological order.
The Completed Items tab provides a convenient way to see information about jobs that were just finished. You can clear the information from this tab if you want. Otherwise, the Completed Items tab is cleared when you close the Tracker Console or exit from PrintSmith Vision.
You can do the following when looking at the Completed Items tab:
• Completed items are shown in chronological order (by date completed). If you want to sort the items differently, click the header of the column by which you want to sort the information.
• To see additional information about an item, double-click it to open the Tracker Details window. For example, you may want to review estimated versus actual times or costs (if you have permission to see this information), or enter a note. (A gray icon indicates that a note was already entered for an item.) For information about the Tracker Details window, see page 48.
• Information on the Completed Items tab is cleared automatically when you close the Tracker Console or exit PrintSmith. (You are asked to confirm this.) If, however, you have a large volume of work, and the Completed Items tab has many items on it, click Clear (in the bottom left of the window) to remove the items. (There is no confirmation step so be sure you have finished reviewing the completed items.)
Management and Administration 51
Management and Administration
In this chapter
Overview 52 Using Tracker Manager 52 Checking the Status of Invoices 55 Reviewing Costs 56 Reviewing and Editing Time Cards 58 Running Employee Time Reports 60 Exporting Employee Time Information 61
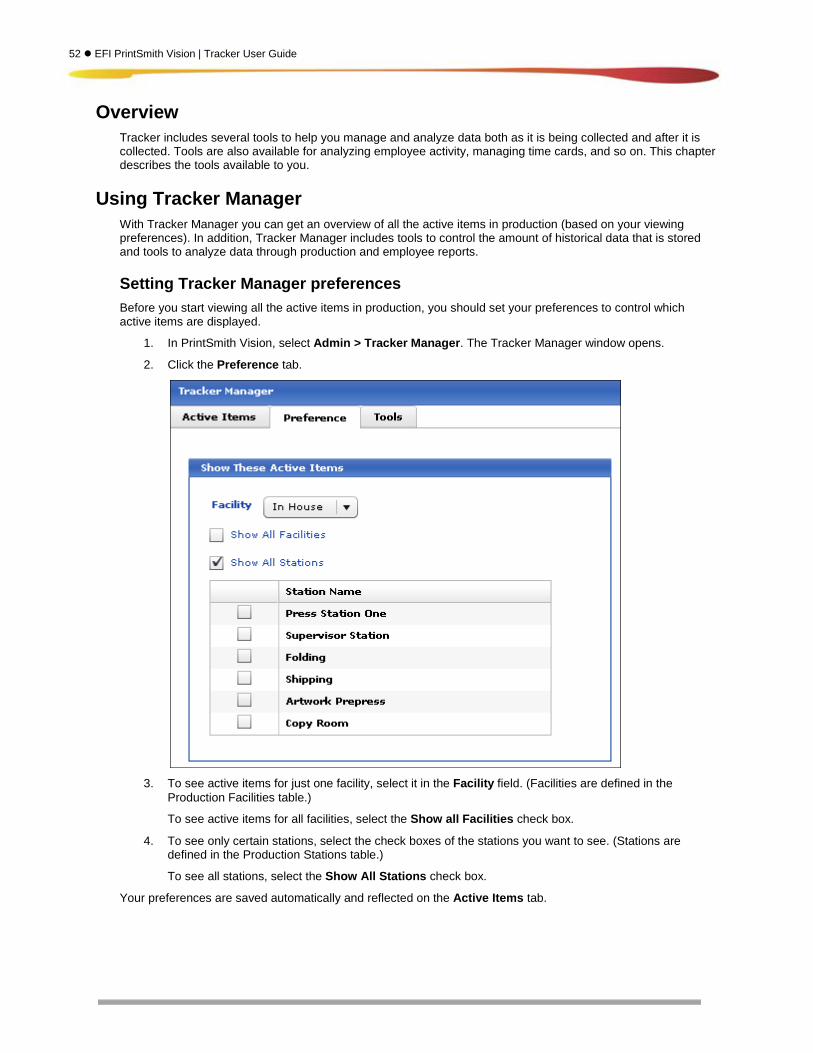
52 EFI PrintSmith Vision | Tracker User Guide
Overview Tracker includes several tools to help you manage and analyze data both as it is being collected and after it is collected. Tools are also available for analyzing employee activity, managing time cards, and so on. This chapter describes the tools available to you.
Using Tracker Manager With Tracker Manager you can get an overview of all the active items in production (based on your viewing preferences). In addition, Tracker Manager includes tools to control the amount of historical data that is stored and tools to analyze data through production and employee reports.
Setting Tracker Manager preferences Before you start viewing all the active items in production, you should set your preferences to control which active items are displayed.
1. In PrintSmith Vision, select Admin > Tracker Manager. The Tracker Manager window opens.
2. Click the Preference tab.
3. To see active items for just one facility, select it in the Facility field. (Facilities are defined in the
Production Facilities table.)
To see active items for all facilities, select the Show all Facilities check box.
4. To see only certain stations, select the check boxes of the stations you want to see. (Stations are defined in the Production Stations table.)
To see all stations, select the Show All Stations check box.
Your preferences are saved automatically and reflected on the Active Items tab.
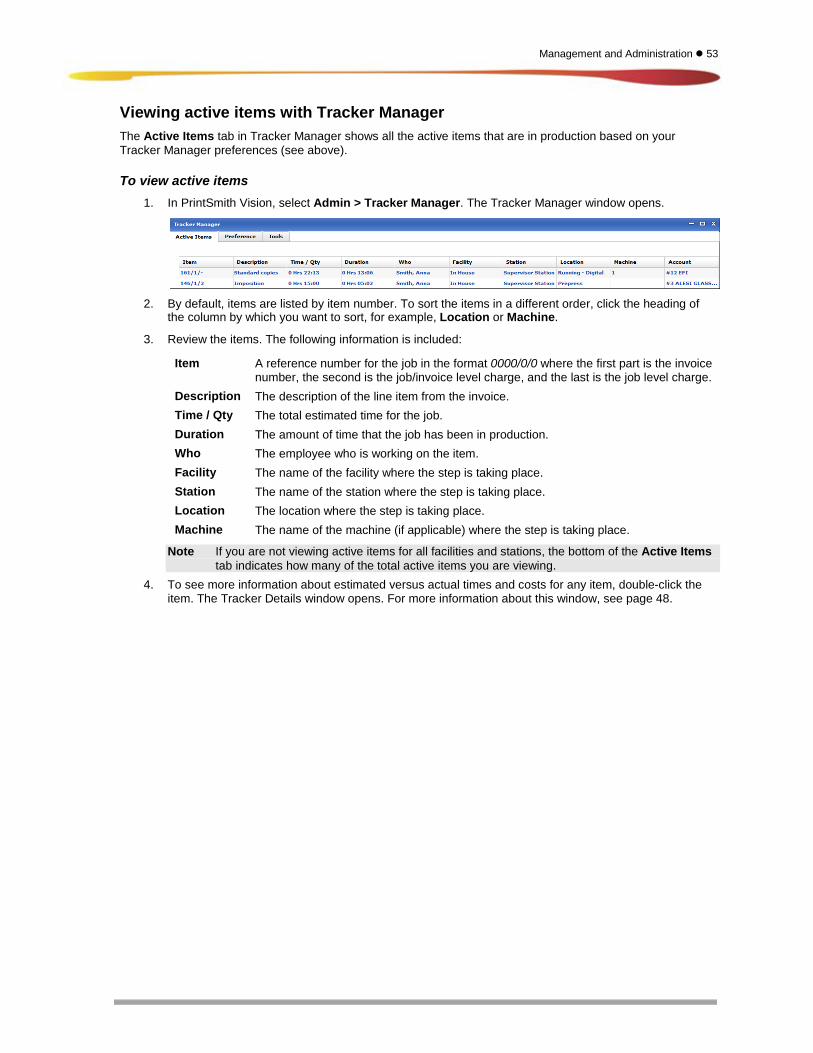
Management and Administration 53
Viewing active items with Tracker Manager The Active Items tab in Tracker Manager shows all the active items that are in production based on your Tracker Manager preferences (see above).
To view active items 1. In PrintSmith Vision, select Admin > Tracker Manager. The Tracker Manager window opens.
2. By default, items are listed by item number. To sort the items in a different order, click the heading of
the column by which you want to sort, for example, Location or Machine.
3. Review the items. The following information is included:
Item A reference number for the job in the format 0000/0/0 where the first part is the invoice number, the second is the job/invoice level charge, and the last is the job level charge.
Description The description of the line item from the invoice. Time / Qty The total estimated time for the job. Duration The amount of time that the job has been in production. Who The employee who is working on the item. Facility The name of the facility where the step is taking place. Station The name of the station where the step is taking place. Location The location where the step is taking place. Machine The name of the machine (if applicable) where the step is taking place.
Note If you are not viewing active items for all facilities and stations, the bottom of the Active Items tab indicates how many of the total active items you are viewing.
4. To see more information about estimated versus actual times and costs for any item, double-click the item. The Tracker Details window opens. For more information about this window, see page 48.

54 EFI PrintSmith Vision | Tracker User Guide
Running Production and Employee reports Tracker Manager includes production reports that provide information about completion dates, estimated versus actual costs, and missed targets. The Employee report provides information about billing hours.
Production reports 1. Select Admin > Tracker Manager.
2. Click the Tools tab.
3. Click Production Reports. The Production Tracker Report window opens.
4. In the Report Type field, select one of the following:
Completed Date For a report that shows scheduled versus completed dates, estimated versus actual times, and exception codes.
Estimated vs. Actual For a report that shows completed dates, estimated versus actual costs, and exception codes.
5. Under Date Range to View, select Last Week or select Date Range and enter a range.
6. Click View and review the information in the report.
7. To print the report, select File > Print. (You may want to print in landscape mode so all the columns fit.)
Employee report The Employee report provides information about billable hours and includes completion dates, estimated versus actual times, estimated versus actual costs, and the percentage of time that was billable.
1. Select Admin > Tracker Manager.
2. Click the Tools tab.
3. Click Employee Reports. The Employee Tracker Report window opens. Billing Hours is the only format available.
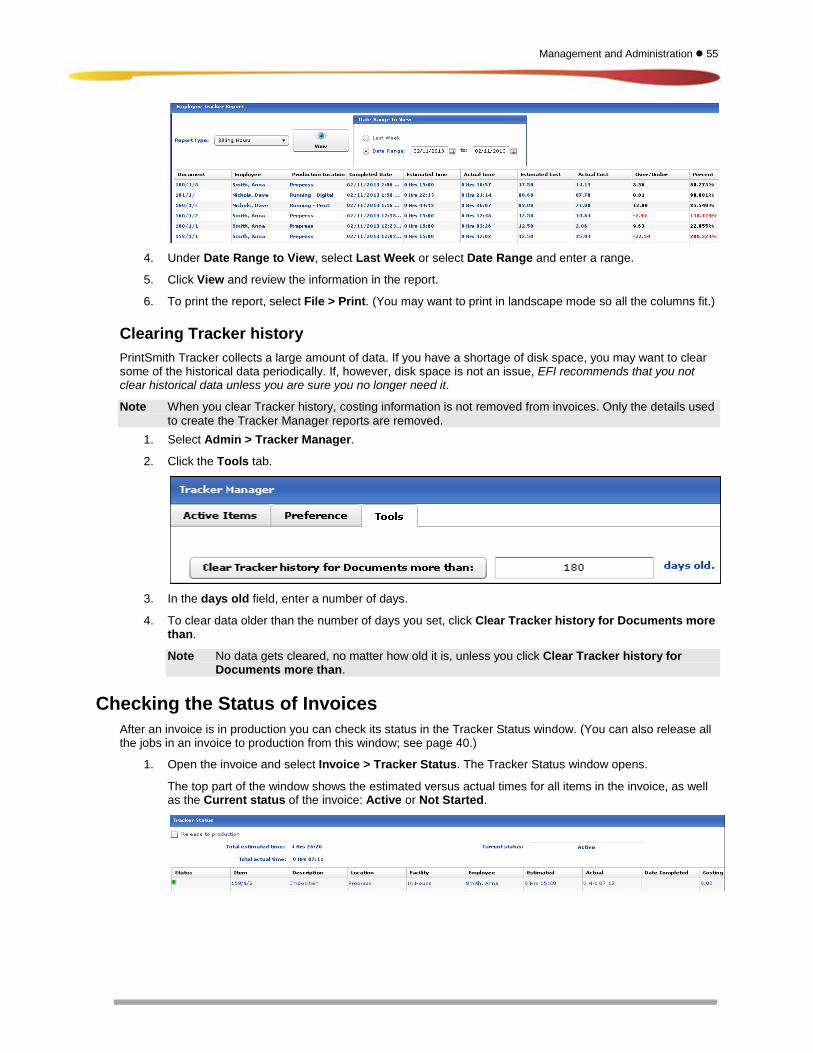
Management and Administration 55
4. Under Date Range to View, select Last Week or select Date Range and enter a range.
5. Click View and review the information in the report.
6. To print the report, select File > Print. (You may want to print in landscape mode so all the columns fit.)
Clearing Tracker history PrintSmith Tracker collects a large amount of data. If you have a shortage of disk space, you may want to clear some of the historical data periodically. If, however, disk space is not an issue, EFI recommends that you not clear historical data unless you are sure you no longer need it.
Note When you clear Tracker history, costing information is not removed from invoices. Only the details used to create the Tracker Manager reports are removed.
1. Select Admin > Tracker Manager.
2. Click the Tools tab.
3. In the days old field, enter a number of days.
4. To clear data older than the number of days you set, click Clear Tracker history for Documents more than.
Note No data gets cleared, no matter how old it is, unless you click Clear Tracker history for Documents more than.
Checking the Status of Invoices After an invoice is in production you can check its status in the Tracker Status window. (You can also release all the jobs in an invoice to production from this window; see page 40.)
1. Open the invoice and select Invoice > Tracker Status. The Tracker Status window opens.
The top part of the window shows the estimated versus actual times for all items in the invoice, as well as the Current status of the invoice: Active or Not Started.

56 EFI PrintSmith Vision | Tracker User Guide
2. Review the information:
• Icons in the Status column provide visual cues:
Notes were entered for the item.
The item was started and is active in the production process.
The item was cancelled during the production process.
The item was processed and is complete.
An exception code was entered for the item.
The item was paused during the production process.
• In addition to the status icons, the following information is available:
Column Description
Item A reference number for the job in the format 0000/0/0 where the first part is the invoice number, the second is the job number, and the last is the step in the process (if applicable).
Description The description of the job. Location The place where the item is being (or was) completed. Facility The name of the facility where production is taking place. Employee The name of the employee who is working on the item. Estimated The time estimated for the completion of the item. Actual The actual time it took to complete the item in the production process. Date Complete The date and time the item was completed. Costing If costing was defined, the actual cost based on time and materials.
3. Do any of the following:
• Sort the list of items differently by clicking a column header.
• Update the information in the window by clicking Refresh (in the bottom left of the window).
• Double-click an item to open the Tracker Details window where you can see more information about estimated versus actual times and costs (if you have permission to do so), as well as enter notes about the item. For more information about the Tracker Details window, see page 48.
Reviewing Costs Once work is finished on a job, you can open the invoice and review the information that Tracker collected and see how the actual costs compared to your estimated costs.
1. Open an invoice.
2. Click Costing on the toolbar of the Invoice window.

Management and Administration 57
The Costing window opens.
3. The actual costs collected by PrintSmith Tracker are displayed in orange. Compare the estimated to
actual costs and examine your profit margins:
• Actual Cost – Actual cost of the job (labor and material).
• Difference – The difference (as an amount and percentage) between estimated and actual costs. (A negative number means the estimated costs were higher than the actual costs.)
• Price – The amount the customer is being charged.
• Margin – The profit or loss (as an amount and a percentage) based on the actual costs and the price.
Orange identifies
data collected by
Tracker.
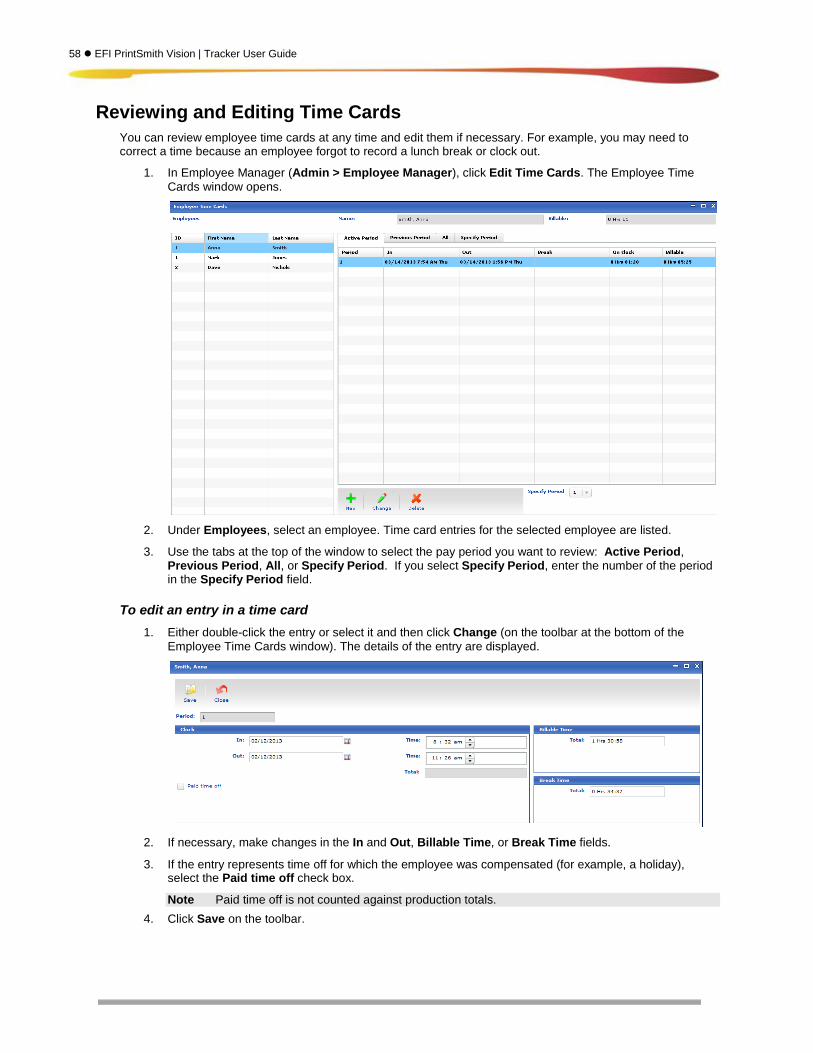
58 EFI PrintSmith Vision | Tracker User Guide
Reviewing and Editing Time Cards You can review employee time cards at any time and edit them if necessary. For example, you may need to correct a time because an employee forgot to record a lunch break or clock out.
1. In Employee Manager (Admin > Employee Manager), click Edit Time Cards. The Employee Time Cards window opens.
2. Under Employees, select an employee. Time card entries for the selected employee are listed.
3. Use the tabs at the top of the window to select the pay period you want to review: Active Period, Previous Period, All, or Specify Period. If you select Specify Period, enter the number of the period in the Specify Period field.
To edit an entry in a time card 1. Either double-click the entry or select it and then click Change (on the toolbar at the bottom of the
Employee Time Cards window). The details of the entry are displayed.
2. If necessary, make changes in the In and Out, Billable Time, or Break Time fields.
3. If the entry represents time off for which the employee was compensated (for example, a holiday), select the Paid time off check box.
Note Paid time off is not counted against production totals. 4. Click Save on the toolbar.

Management and Administration 59
To add an entry to a time card for one employee or for multiple employees 1. In the Employee Time Cards window, select an employee and click New. A time card window opens for
the selected employee.
2. If you want this entry to apply to several employees, click + next to Show affected employees.
Tip Selecting multiple employees is useful when the same change applies to all of them, for example, a paid holiday.
To select all the employees, select the check box in the header of the first column; to select individual employees, select their check boxes.
3. If necessary, select the Period.
4. Make your changes in the In and Out fields to correct clock in or out dates and adjust the Time fields as necessary.
5. Change the Billable Time or Break Time if necessary.
6. If you are recording time for a holiday, select the Paid time off check box.
7. Click Save. If you selected multiple employees, the change is made for all of them.
To delete an entry in a time card 1. In the Employee Time Cards window, select an employee and then the time card entry you want to
delete.
2. Click Delete.
Note If a time card entry was made for multiple employees in one step, deleting the entry for the selected employee does not delete it for the other employees.
Select this check box to select all the
listed employees.
Click to apply to multiple
employees.
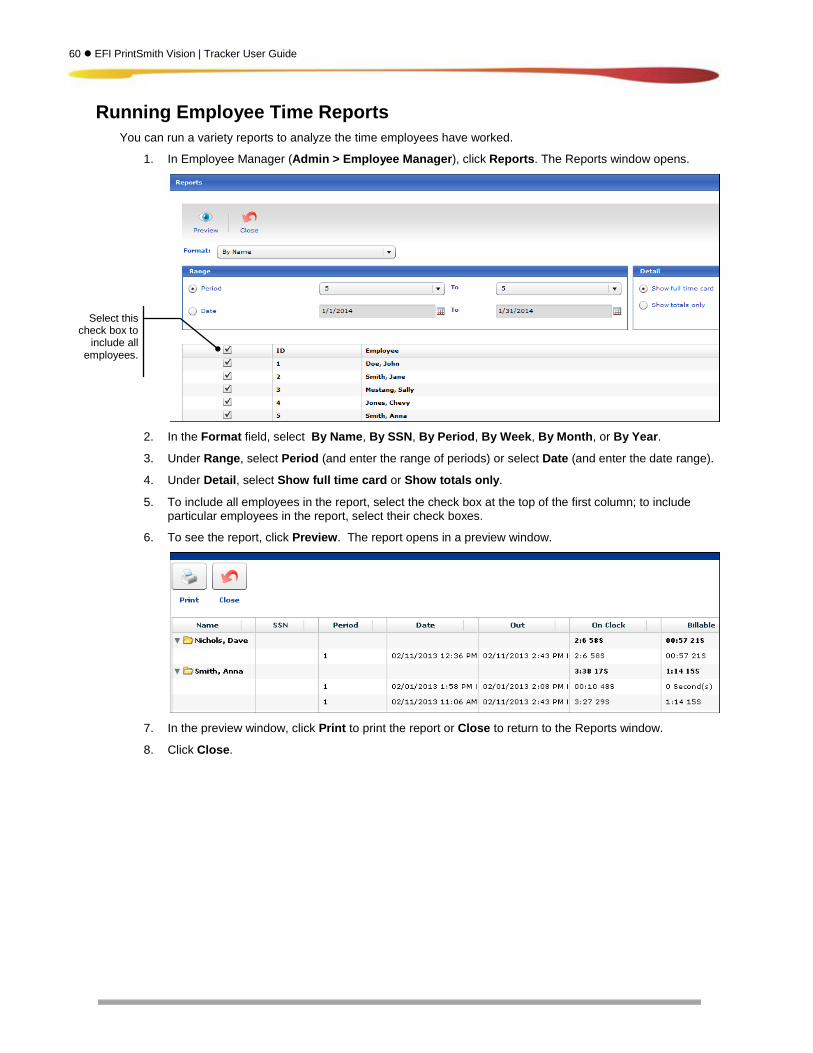
60 EFI PrintSmith Vision | Tracker User Guide
Running Employee Time Reports You can run a variety reports to analyze the time employees have worked.
1. In Employee Manager (Admin > Employee Manager), click Reports. The Reports window opens.
2. In the Format field, select By Name, By SSN, By Period, By Week, By Month, or By Year.
3. Under Range, select Period (and enter the range of periods) or select Date (and enter the date range).
4. Under Detail, select Show full time card or Show totals only.
5. To include all employees in the report, select the check box at the top of the first column; to include particular employees in the report, select their check boxes.
6. To see the report, click Preview. The report opens in a preview window.
7. In the preview window, click Print to print the report or Close to return to the Reports window.
8. Click Close.
Select this check box to
include all employees.
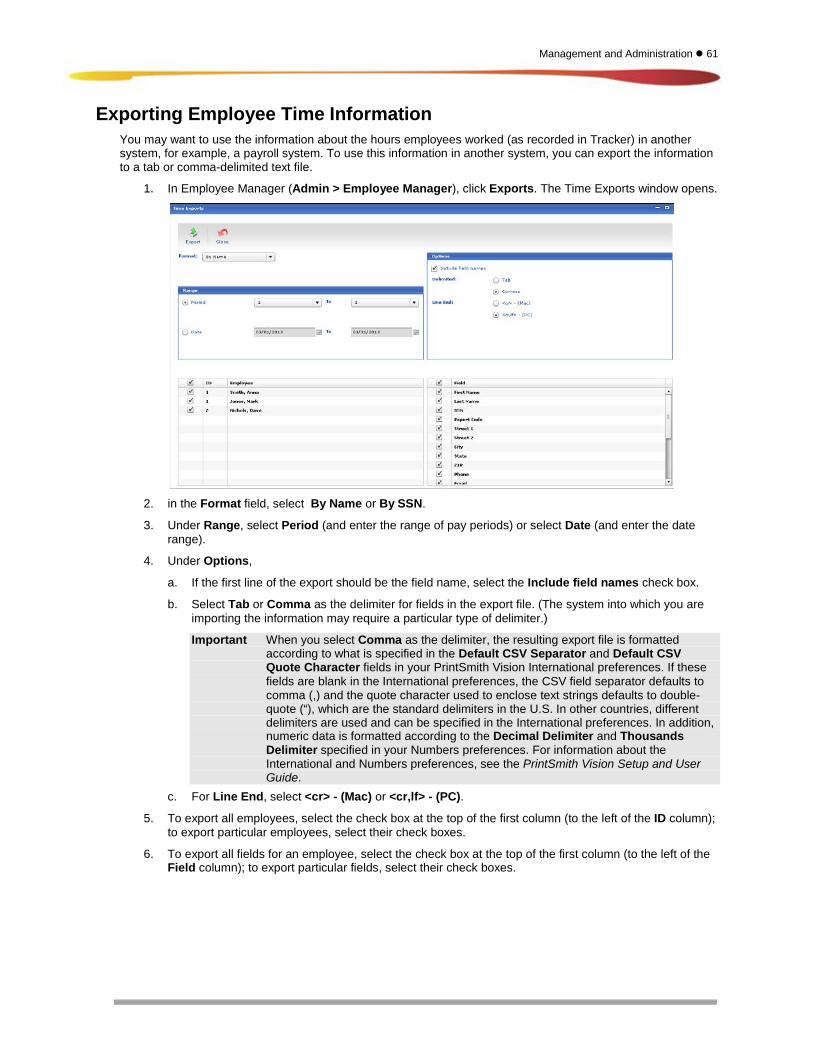
Management and Administration 61
Exporting Employee Time Information You may want to use the information about the hours employees worked (as recorded in Tracker) in another system, for example, a payroll system. To use this information in another system, you can export the information to a tab or comma-delimited text file.
1. In Employee Manager (Admin > Employee Manager), click Exports. The Time Exports window opens.
2. in the Format field, select By Name or By SSN.
3. Under Range, select Period (and enter the range of pay periods) or select Date (and enter the date range).
4. Under Options,
a. If the first line of the export should be the field name, select the Include field names check box.
b. Select Tab or Comma as the delimiter for fields in the export file. (The system into which you are importing the information may require a particular type of delimiter.)
Important When you select Comma as the delimiter, the resulting export file is formatted according to what is specified in the Default CSV Separator and Default CSV Quote Character fields in your PrintSmith Vision International preferences. If these fields are blank in the International preferences, the CSV field separator defaults to comma (,) and the quote character used to enclose text strings defaults to double-quote (“), which are the standard delimiters in the U.S. In other countries, different delimiters are used and can be specified in the International preferences. In addition, numeric data is formatted according to the Decimal Delimiter and Thousands Delimiter specified in your Numbers preferences. For information about the International and Numbers preferences, see the PrintSmith Vision Setup and User Guide.
c. For Line End, select <cr> - (Mac) or <cr,lf> - (PC).
5. To export all employees, select the check box at the top of the first column (to the left of the ID column); to export particular employees, select their check boxes.
6. To export all fields for an employee, select the check box at the top of the first column (to the left of the Field column); to export particular fields, select their check boxes.

62 EFI PrintSmith Vision | Tracker User Guide
7. Click Export. A Save As dialog opens.
8. In the Save As dialog box,
a. Leave the default name for the export file or enter a new name.
b. Browse to the folder where you want to save the file.
c. Click Save. The file is saved as a .txt file in the folder you specified.
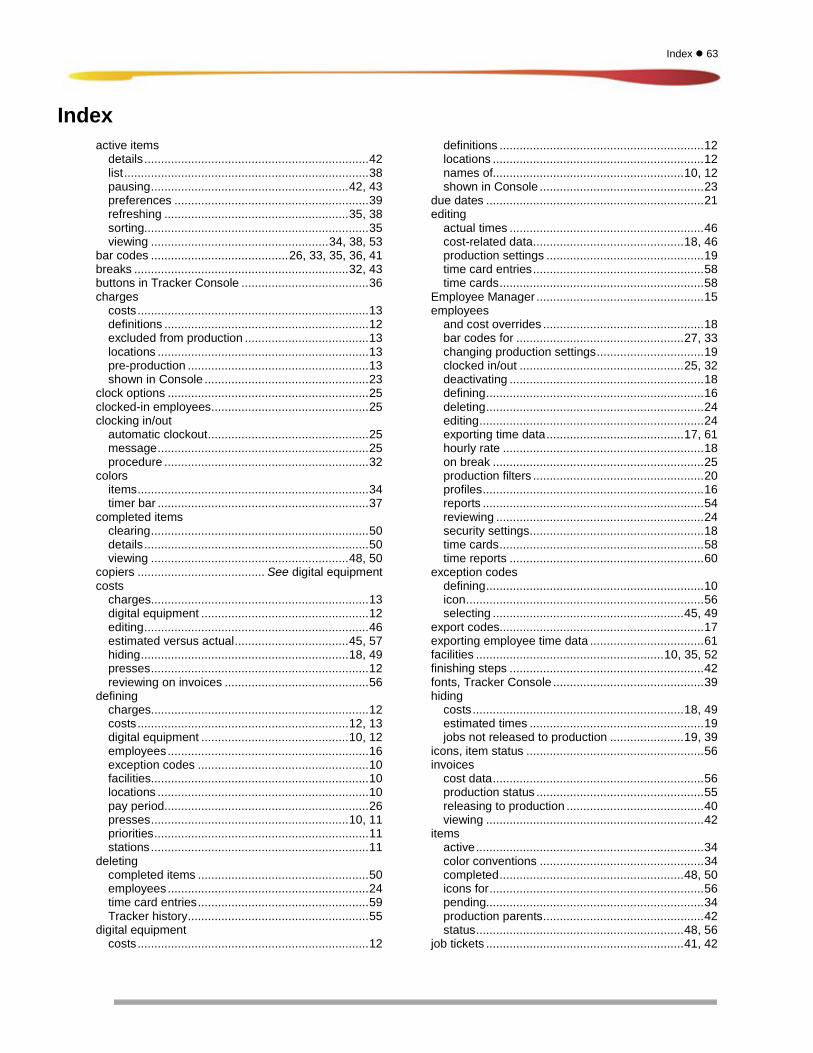
Index 63
Index active items
details ................................................................... 42 list ......................................................................... 38 pausing ........................................................... 42, 43 preferences .......................................................... 39 refreshing ....................................................... 35, 38 sorting................................................................... 35 viewing ..................................................... 34, 38, 53
bar codes ......................................... 26, 33, 35, 36, 41 breaks ................................................................ 32, 43 buttons in Tracker Console ...................................... 36 charges
costs ..................................................................... 13 definitions ............................................................. 12 excluded from production ..................................... 13 locations ............................................................... 13 pre-production ...................................................... 13 shown in Console ................................................. 23
clock options ............................................................ 25 clocked-in employees ............................................... 25 clocking in/out
automatic clockout ................................................ 25 message ............................................................... 25 procedure ............................................................. 32
colors items ..................................................................... 34 timer bar ............................................................... 37
completed items clearing ................................................................. 50 details ................................................................... 50 viewing ........................................................... 48, 50
copiers ...................................... See digital equipment costs
charges................................................................. 13 digital equipment .................................................. 12 editing ................................................................... 46 estimated versus actual .................................. 45, 57 hiding .............................................................. 18, 49 presses ................................................................. 12 reviewing on invoices ........................................... 56
defining charges................................................................. 12 costs ............................................................... 12, 13 digital equipment ............................................ 10, 12 employees ............................................................ 16 exception codes ................................................... 10 facilities................................................................. 10 locations ............................................................... 10 pay period ............................................................. 26 presses ........................................................... 10, 11 priorities ................................................................ 11 stations ................................................................. 11
deleting completed items ................................................... 50 employees ............................................................ 24 time card entries ................................................... 59 Tracker history ...................................................... 55
digital equipment costs ..................................................................... 12
definitions ............................................................. 12 locations ............................................................... 12 names of......................................................... 10, 12 shown in Console ................................................. 23
due dates ................................................................. 21 editing
actual times .......................................................... 46 cost-related data ............................................. 18, 46 production settings ............................................... 19 time card entries ................................................... 58 time cards ............................................................. 58
Employee Manager .................................................. 15 employees
and cost overrides ................................................ 18 bar codes for .................................................. 27, 33 changing production settings ................................ 19 clocked in/out ................................................. 25, 32 deactivating .......................................................... 18 defining ................................................................. 16 deleting ................................................................. 24 editing ................................................................... 24 exporting time data ......................................... 17, 61 hourly rate ............................................................ 18 on break ............................................................... 25 production filters ................................................... 20 profiles .................................................................. 16 reports .................................................................. 54 reviewing .............................................................. 24 security settings .................................................... 18 time cards ............................................................. 58 time reports .......................................................... 60
exception codes defining ................................................................. 10 icon ....................................................................... 56 selecting ......................................................... 45, 49
export codes............................................................. 17 exporting employee time data .................................. 61 facilities ........................................................ 10, 35, 52 finishing steps .......................................................... 42 fonts, Tracker Console ............................................. 39 hiding
costs ............................................................... 18, 49 estimated times .................................................... 19 jobs not released to production ...................... 19, 39
icons, item status ..................................................... 56 invoices
cost data ............................................................... 56 production status .................................................. 55 releasing to production ......................................... 40 viewing ................................................................. 42
items active .................................................................... 34 color conventions ................................................. 34 completed ....................................................... 48, 50 icons for ................................................................ 56 pending................................................................. 34 production parents ................................................ 42 status .............................................................. 48, 56
job tickets ........................................................... 41, 42
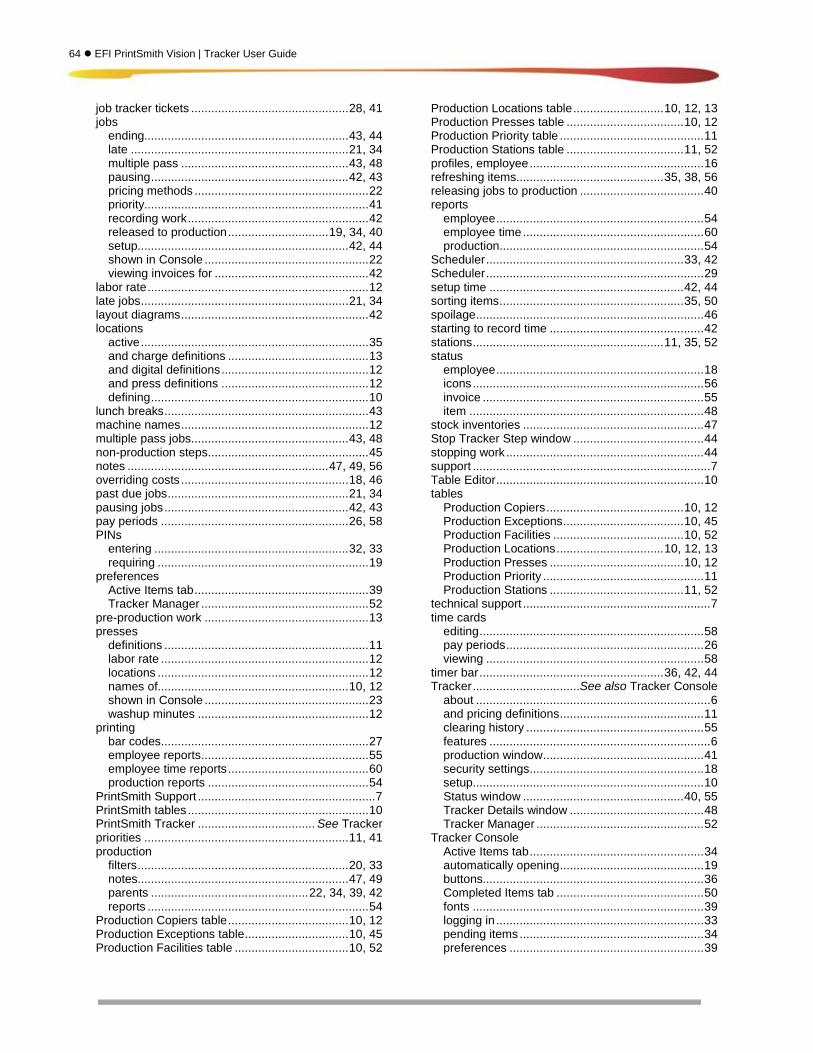
64 EFI PrintSmith Vision | Tracker User Guide
job tracker tickets ............................................... 28, 41 jobs
ending............................................................. 43, 44 late ................................................................. 21, 34 multiple pass .................................................. 43, 48 pausing ........................................................... 42, 43 pricing methods .................................................... 22 priority................................................................... 41 recording work ...................................................... 42 released to production .............................. 19, 34, 40 setup............................................................... 42, 44 shown in Console ................................................. 22 viewing invoices for .............................................. 42
labor rate .................................................................. 12 late jobs .............................................................. 21, 34 layout diagrams ........................................................ 42 locations
active .................................................................... 35 and charge definitions .......................................... 13 and digital definitions ............................................ 12 and press definitions ............................................ 12 defining ................................................................. 10
lunch breaks ............................................................. 43 machine names ........................................................ 12 multiple pass jobs ............................................... 43, 48 non-production steps ................................................ 45 notes ............................................................ 47, 49, 56 overriding costs .................................................. 18, 46 past due jobs ...................................................... 21, 34 pausing jobs ....................................................... 42, 43 pay periods ........................................................ 26, 58 PINs
entering .......................................................... 32, 33 requiring ............................................................... 19
preferences Active Items tab .................................................... 39 Tracker Manager .................................................. 52
pre-production work ................................................. 13 presses
definitions ............................................................. 11 labor rate .............................................................. 12 locations ............................................................... 12 names of......................................................... 10, 12 shown in Console ................................................. 23 washup minutes ................................................... 12
printing bar codes .............................................................. 27 employee reports .................................................. 55 employee time reports .......................................... 60 production reports ................................................ 54
PrintSmith Support ..................................................... 7 PrintSmith tables ...................................................... 10 PrintSmith Tracker ................................... See Tracker priorities ............................................................. 11, 41 production
filters ............................................................... 20, 33 notes............................................................... 47, 49 parents ............................................... 22, 34, 39, 42 reports .................................................................. 54
Production Copiers table .................................... 10, 12 Production Exceptions table ............................... 10, 45 Production Facilities table .................................. 10, 52
Production Locations table ........................... 10, 12, 13 Production Presses table ................................... 10, 12 Production Priority table ........................................... 11 Production Stations table ................................... 11, 52 profiles, employee .................................................... 16 refreshing items............................................ 35, 38, 56 releasing jobs to production ..................................... 40 reports
employee .............................................................. 54 employee time ...................................................... 60 production ............................................................. 54
Scheduler ........................................................... 33, 42 Scheduler ................................................................. 29 setup time .......................................................... 42, 44 sorting items ....................................................... 35, 50 spoilage .................................................................... 46 starting to record time .............................................. 42 stations ......................................................... 11, 35, 52 status
employee .............................................................. 18 icons ..................................................................... 56 invoice .................................................................. 55 item ...................................................................... 48
stock inventories ...................................................... 47 Stop Tracker Step window ....................................... 44 stopping work ........................................................... 44 support ....................................................................... 7 Table Editor .............................................................. 10 tables
Production Copiers ......................................... 10, 12 Production Exceptions .................................... 10, 45 Production Facilities ....................................... 10, 52 Production Locations ................................ 10, 12, 13 Production Presses ........................................ 10, 12 Production Priority ................................................ 11 Production Stations ........................................ 11, 52
technical support ........................................................ 7 time cards
editing ................................................................... 58 pay periods ........................................................... 26 viewing ................................................................. 58
timer bar ....................................................... 36, 42, 44 Tracker ................................See also Tracker Console
about ...................................................................... 6 and pricing definitions ........................................... 11 clearing history ..................................................... 55 features .................................................................. 6 production window ................................................ 41 security settings .................................................... 18 setup..................................................................... 10 Status window ................................................ 40, 55 Tracker Details window ........................................ 48 Tracker Manager .................................................. 52
Tracker Console Active Items tab .................................................... 34 automatically opening ........................................... 19 buttons.................................................................. 36 Completed Items tab ............................................ 50 fonts ..................................................................... 39 logging in .............................................................. 33 pending items ....................................................... 34 preferences .......................................................... 39
Index 65
timer ............................................................... 36, 38 triangles, timer bar ................................................... 37 updating items .............................................. 35, 38, 56 viewing
active items .................................................... 38, 53 clocked in/out employees ............................... 25, 32 completed items ................................................... 50 employee time reports .......................................... 60
invoice production status ...................................... 55 invoices ................................................................ 42 job tickets ............................................................. 42 layout diagrams .................................................... 42 time cards ............................................................. 58 Tracker details ...................................................... 48
washup ............................................................... 12, 42