total pool chemistry tm
TRANSCRIPT

092332DCopyright © 2008 Goldine Controls
June 2008Download and use
the latest manual at:www.goldlinecontrols.com
Total Pool Chemistry
Aqua Rite Pro
Pro Logic
Installation and Operation Manual
for
AQL-CHEM
LDC
G LINEON TROLS
North Kingstown, RI 02852 USA
LDC
G LINEON TROLS
Questions? Refer to www.goldlinecontrols.com for latest
manual revisions, additional information and helpful service.
and
forTM
TM
®
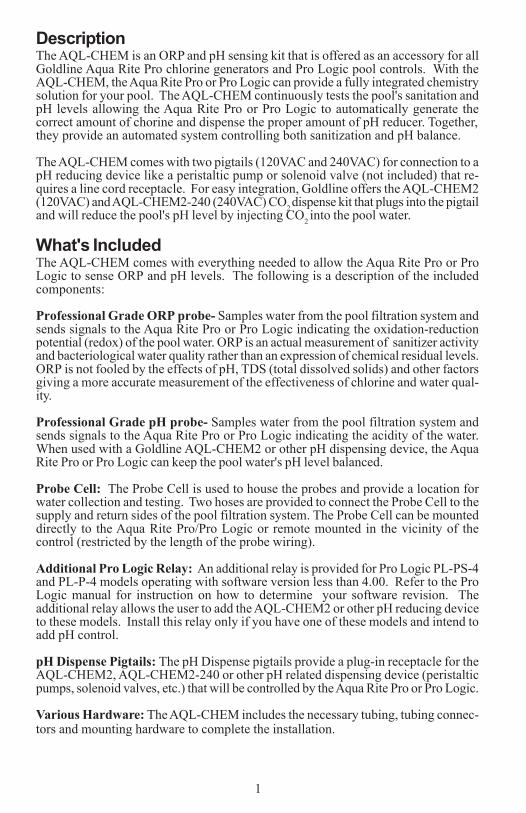
DescriptionThe AQL-CHEM is an ORP and pH sensing kit that is offered as an accessory for allGoldline Aqua Rite Pro chlorine generators and Pro Logic pool controls. With theAQL-CHEM, the Aqua Rite Pro or Pro Logic can provide a fully integrated chemistrysolution for your pool. The AQL-CHEM continuously tests the pool's sanitation andpH levels allowing the Aqua Rite Pro or Pro Logic to automatically generate thecorrect amount of chorine and dispense the proper amount of pH reducer. Together,they provide an automated system controlling both sanitization and pH balance.
The AQL-CHEM comes with two pigtails (120VAC and 240VAC) for connection to apH reducing device like a peristaltic pump or solenoid valve (not included) that re-quires a line cord receptacle. For easy integration, Goldline offers the AQL-CHEM2(120VAC) and AQL-CHEM2-240 (240VAC) CO2 dispense kit that plugs into the pigtailand will reduce the pool's pH level by injecting CO2 into the pool water.
What's IncludedThe AQL-CHEM comes with everything needed to allow the Aqua Rite Pro or ProLogic to sense ORP and pH levels. The following is a description of the includedcomponents:
Professional Grade ORP probe- Samples water from the pool filtration system andsends signals to the Aqua Rite Pro or Pro Logic indicating the oxidation-reductionpotential (redox) of the pool water. ORP is an actual measurement of sanitizer activityand bacteriological water quality rather than an expression of chemical residual levels.ORP is not fooled by the effects of pH, TDS (total dissolved solids) and other factorsgiving a more accurate measurement of the effectiveness of chlorine and water qual-ity.
Professional Grade pH probe- Samples water from the pool filtration system andsends signals to the Aqua Rite Pro or Pro Logic indicating the acidity of the water.When used with a Goldline AQL-CHEM2 or other pH dispensing device, the AquaRite Pro or Pro Logic can keep the pool water's pH level balanced.
Probe Cell: The Probe Cell is used to house the probes and provide a location forwater collection and testing. Two hoses are provided to connect the Probe Cell to thesupply and return sides of the pool filtration system. The Probe Cell can be mounteddirectly to the Aqua Rite Pro/Pro Logic or remote mounted in the vicinity of thecontrol (restricted by the length of the probe wiring).
Additional Pro Logic Relay: An additional relay is provided for Pro Logic PL-PS-4and PL-P-4 models operating with software version less than 4.00. Refer to the ProLogic manual for instruction on how to determine your software revision. Theadditional relay allows the user to add the AQL-CHEM2 or other pH reducing deviceto these models. Install this relay only if you have one of these models and intend toadd pH control.
pH Dispense Pigtails: The pH Dispense pigtails provide a plug-in receptacle for theAQL-CHEM2, AQL-CHEM2-240 or other pH related dispensing device (peristalticpumps, solenoid valves, etc.) that will be controlled by the Aqua Rite Pro or Pro Logic.
Various Hardware: The AQL-CHEM includes the necessary tubing, tubing connec-tors and mounting hardware to complete the installation.
1
LIMITED WARRANTY Goldline warrants its Aqua Rite, Aqua Rite Pro, Aqua Trol, Aqua Logicand Pro Logic products (products with Goldline part numbers starting with AQ-RITE-, AQ-RT-PRO, AQ-TROL-, AQ-LOGIC-, AQL-P-, AQL-PS-, AQL-CL-, PL-P-, PL-PS-, and HPC-2) to befree from defects in material or workmanship, under normal use and service:
For three years from the date of the initial system installation on private, residential swimmingpools within the USA or Canada and one year from the date of initial system installation oncommercial installations, installations outside of the USA or Canada and for any replacementparts or accessory products including Sense and Dispense™ products (products with Goldline partnumbers starting with AQL-CHEM), provided they are installed in accordance with the Goldlineinstallation instructions and specifications provided with the product. If written proof of the dateof the initial system installation is not provided to Goldline, the manufacturing datecode on theAqua Rite, Aqua Rite Pro, Aqua Trol, Aqua Logic and Pro Logic electronics unit will be the soledeterminant of the date of the initial system installation.
For residential installations in USA or Canada: If a product is defective in workmanship ormaterials and is removed and returned freight prepaid within three (3) years after the date of theinitial system installation, Goldline will, at its option, either repair or replace the defectiveproduct and return it freight prepaid.
For commercial installations, installations outside the USA and Canada, and accessory productsand replacement parts: If a product is defective in workmanship or materials and is removed andreturned freight prepaid within one (1) year after the date of the initial system installation,Goldline will, at its option, either repair or replace the defective product and return it freightprepaid.
Contact any Goldline dealer or contact Goldline at 61 Whitecap Drive, North Kingstown, RI02852 for warranty service. The costs incurred in removal and/or reinstallation of the productare NOT covered under this warranty. Some states do not allow limitations on how long animplied warranty lasts, so the above limitation may not apply to you.
WARRANTY EXCLUSIONS:1. Material supplied or workmanship performed by others in process of installation.
2. Damage resulting from improper installation including installation on pools larger than theproduct rating.
3. Problems resulting from failure to operate the product(s) in accordance with the recom-mended instructions contained in product’s owners manual(s).
4. Problems resulting from failure to maintain pool water chemistry in accordance with therecommendations in the owners manual(s).
5. Problems resulting from tampering, accident, abuse, negligence, unauthorized repairs oralternations, fire, flood, lightning, freezing, external water, degradation of natural stoneused in or immediately adjacent to a pool or spa, war or acts of God.
DISCLAIMER. THE EXPRESS LIMITED WARRANTY ABOVE CONSTITUTES THE EN-TIRE WARRANTY OF GOLDLINE WITH RESPECT TO ITS POOL AUTOMATION ANDCHLORINATION PRODUCTS AND IS IN LIEU OF ALL OTHER WARRANTIES, EX-PRESSED OR IMPLIED, INCLUDING WARRANTIES OF MERCHANTABILITY OR FIT-NESS FOR A PARTICULAR PURPOSE. THIS WARRANTY GIVES YOU SPECIFICLEGAL RIGHTS, AND YOU MAY ALSO HAVE OTHER RIGHTS WHICH VARY FROMSTATE TO STATE. IN NO EVENT SHALL GOLDLINE BE RESPONSIBLE FOR ANYCONSEQUENTIAL, SPECIAL OR INCIDENTAL DAMAGES OF ANY NATURE WHAT-SOEVER, INCLUDING, BUT NOT LIMITED TO, PERSONAL INJURY, PROPERTY DAM-AGE, DAMAGE TO OR LOSS OF EQUIPMENT, LOST PROFITS OR REVENUE, COSTSOF RENTING REPLACEMENTS, AND OTHER ADDITIONAL EXPENSES, EVEN IF THESELLER HAD BEEN ADVISED OF THE POSSIBILITY OF SUCH DAMAGES. SOMESTATES DO NOT ALLOW THE EXCLUSION OF LIMITATION OF INCIDENTAL ORCONSEQUENTIAL DAMAGES, SO THE ABOVE LIMITATION OR EXCLUSION MAYNOT APPLY TO YOU.
NO WHOLESALER, AGENT, DEALER, CONTRACTOR OR OTHER PERSON IS AUTHO-RIZED TO GIVE ANY WARRANTY ON BEHALF OF GOLDLINE.
THIS WARRANTY IS VOID IF THE PRODUCT HAS BEEN ALTERED IN ANY WAY AFTERLEAVING THE FACTORY.
18

CompatibilityThe AQL-CHEM is compatible with all Goldline Aqua Rite Pro and Pro Logic poolcontrols. An AQL-CL chemistry kit must be used with the Pro Logic if automaticchlorine generation is desired. The AQL-CHEM is not compatible with Aqua Rite orAqua Logic controls.
InstallationOverviewInstalling the AQL-CHEM requires the following steps:
• Mounting the Probe Cell• Plumbing the Probe Cell• Installing ORP and pH probes• Wiring probes to Probe Cell communication box• Wiring the Probe Cell to the Aqua Rite Pro or Pro Logic• Wiring the pH Dispense Pigtail to the Aqua Rite Pro or Pro Logic• Configuring the Aqua Rite Pro or Pro Logic• Validating Operation• Establishing Maintenance Schedule
Materials Needed for Installation• 7/16” drill bit• ¼” NPT tap• Two small adjustable wrenches if side mounting to Aqua Rite Pro or Pro Logic• 3/16” drill bit if side mounting to Aqua Rite Pro or Pro Logic• Deburring tool or file if side mounting• Tape and scissors if side mounting to Pro Logic (for drill template)• Mounting hardware if surface mounting (not side mounting)• Flex tubing cutter• Water-tight strain relief for dispense pigtail• Flathead screwdriver and mallet to remove knock-out and install strain relief• 120VAC Ground Fault Circuit Breaker (GFCB) for powering 120VAC dispense
pigtail or 240VAC (GFCB) for powering 240VAC dispense pigtail• Extra wire, wire strippers, and wire nuts could be helpful in some installations• Any items that would be required for wiring and installation per local code
Before carrying out any part of the installation, be sure to shut off input power to theAqua Rite Pro or Pro Logic. Turn off the pool filter pump, water features and any otherrelated equipment. Relieve pressure from the pool filtration system.
Mounting the Probe CellThe Probe Cell can be mounted directly on the side of the Aqua Rite Pro/Pro Logic ormounted up to 15' away (limited by length of Probe Cell cable). The key to successfulProbe Cell installation is in the plumbing. A pressure differential is required to allowclean, untreated water to pass through the cell and across the probes. Consider thiswhen looking for an ideal mounting location.
217
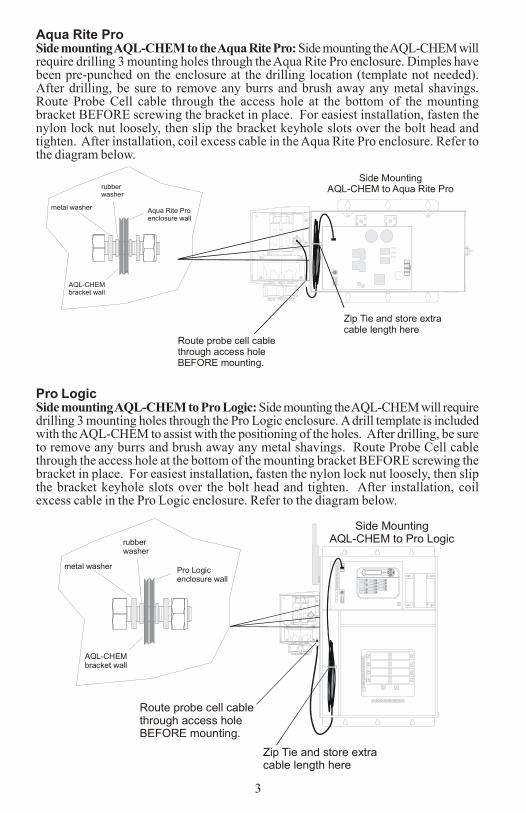
Aqua Rite ProSide mounting AQL-CHEM to the Aqua Rite Pro: Side mounting the AQL-CHEM willrequire drilling 3 mounting holes through the Aqua Rite Pro enclosure. Dimples havebeen pre-punched on the enclosure at the drilling location (template not needed).After drilling, be sure to remove any burrs and brush away any metal shavings.Route Probe Cell cable through the access hole at the bottom of the mountingbracket BEFORE screwing the bracket in place. For easiest installation, fasten thenylon lock nut loosely, then slip the bracket keyhole slots over the bolt head andtighten. After installation, coil excess cable in the Aqua Rite Pro enclosure. Refer tothe diagram below.
Pro LogicSide mounting AQL-CHEM to Pro Logic: Side mounting the AQL-CHEM will requiredrilling 3 mounting holes through the Pro Logic enclosure. A drill template is includedwith the AQL-CHEM to assist with the positioning of the holes. After drilling, be sureto remove any burrs and brush away any metal shavings. Route Probe Cell cablethrough the access hole at the bottom of the mounting bracket BEFORE screwing thebracket in place. For easiest installation, fasten the nylon lock nut loosely, then slipthe bracket keyhole slots over the bolt head and tighten. After installation, coilexcess cable in the Pro Logic enclosure. Refer to the diagram below.
3
Route probe cell cablethrough access hole BEFORE mounting.
metal washer
rubberwasher
Aqua Rite Proenclosure wall
AQL-CHEMbracket wall
Zip Tie and store extracable length here
Side MountingAQL-CHEM to Aqua Rite Pro
Route probe cell cablethrough access hole BEFORE mounting.
metal washer
rubberwasher
Pro Logicenclosure wall
AQL-CHEMbracket wall
Side MountingAQL-CHEM to Pro Logic
Zip Tie and store extracable length here
16

4
Remote surface mounting the AQL-CHEM: The Probe Cell can be mounted up to 15'away from the Aqua Rite Pro or the Pro Logic (limited by length of cable). Use thefour mounting holes on the back of the bracket when surfacing mounting. Commonwood screws can be used for most applications.
Plumbing the Probe Cell to the pool plumbingThe Probe Cell requires connection to the pool plumbing using the supplied flextubing. Two ports on the Probe Cell, influent and effluent, are connected to thesupply and return sides of the pool plumbing. Refer to diagram below as well as thefollowing steps:
Use remotemounting holeswhen surface mounting.
MaintenanceWater ChemistryAlways test water chemistry with a quality manual test kit. The AQL-CHEM providesinstrument grade accuracy which exceeds that of most liquid-standard water testingkits. Therefore, it may be preferable to calibrate pH using commercially availablereference solutions. Calibrate pH periodically using the pH Calibration Wizard asdescribed earlier in this manual. It's important to note that changes in pH, cyanuricacid concentration, total dissolved solids, and use of additional or alternative sanitizerswill all affect the primary sanitizer residual level relative to ORP. Maintain total alkalin-ity on regular basis to ensure pH stability. To maintain a consistent sanitizer residualin parts per million (ppm), periodically adjust the ORP level.
Probe MaintenanceThe probes must be clean and free from oil, chemical deposits and contamination tofunction properly. After saturation in pool or spa water, the probes may need to becleaned on a weekly or monthly basis depending on bather load and other poolspecific characteristics. Slow response, increased need to calibrate pH, and inconsis-tent readings are indications that the probes are in need of cleaning.
To clean the ORP and pH probes, run the Clean Probe Wizard within the SettingsMenu on the Aqua Rite Pro or the Maintenance Menu on the Pro Logic. This Wizardwill walk the user through the probe cleaning process. Answer the questions whenprompted, and follow the instructions for proper cleaning.
To clean the probes without running the Wizard, turn off input power to the Aqua RitePro or Pro Logic. Disconnect the probe connectors from the communication box,unscrew the probe and carefully remove them from the Probe Cell. Clean the referencejunction (the white ring at the bottom of the probe body) with a soft toothbrush andregular tooth paste. A household liquid dishwashing detergent may also be used toremove any oil. Rinse with fresh water, replace teflon tape on threads and reinstallprobes. If properly cleaned probes continue to provide unstable readings or requireexcessive calibration, the probes should be replaced.
Probe StorageExposure to atmospheric conditions will cause the probe tips to dry out. Store theprobes with the included plastic probe storage caps if removed from the Probe Cell formore than one hour. If the storage caps have been misplaced, store the probes indi-vidually in small glass or plastic containers with clean water covering the probe tips.Store probes in a location that will not be subjected to freezing temperatures.
WinterizingThe AQL-CHEM probes must be protected from freezing conditions. If the pool iswinterized, plan to remove and store the probes (as described above) as part of thenormal pool winterizing process. The Probe Cell and related plumbing must be drainedas well. BNC connectors should be capped with the original protective covers. Awinterizing kit with probe caps, BNC covers, and other necessary winterizing acces-sories is available to replace any missing items. Contact your local Goldline dealer formore information.
15
FROMPOOL
FROMSPA
RETURNTO POOL
RETURNTO SPA
POOL
InfluentPort
EffluentPort
SampleStream
Port

5
Drill and tap a 1/4" NPT hole using a 7/16" drill bit on the return side of the poolplumbing at a location just downstream of the filter, but upstream from the AQL-CLElectrolytic Cell. Use caution not to tap tapered threads too deeply. Using teflonplumber's tape, install a tubing connector into the hole. Run flex tubing from thetubing connector to the influent Probe Cell port. Push the flex tubing all the way intothe pressure fitting to seat.
Drill and tap another 1/4" NPT hole on the supply side of the pool plumbing. Usecaution not to tap tapered threads too deeply. Using teflon plumber's tape, install theremaining tubing connector and run flex tubing to the effluent Probe Cell port. Pushthe flex tubing all the way into the pressure fitting to seat.
Cut a 3" length of flex tubing and insert it into the sample stream port. This port can beused to draw water samples if needed.
If flex tubing needs to be replaced, use only 3/8” UV-resistant cross-linked polyethyl-ene tubing (PEX).
Installing ORP and pH probes to the Probe CellThe ORP and pH probes are shipped "wet" in plastic storage caps. It's very importantthat the probes remain wet at all times. If the probes are allowed to dry out, they willfail and the AQL-CHEM will be ineffective. After installation, the Probe Cell will en-sure that the probes are constantly exposed to pool water. During periods when thefilter pump is off (even extended periods), there should be sufficient moisture remain-ing in the Probe Cell to ensure that the probes are protected.
Remove the ORP and pH probes from their plastic storage caps and save the caps forfuture use. To ensure that the probes continue to remain wet, fill the Probe Cell withpool water before installing the probes. Apply a length of plumber's tape to the probethreads. Hand-tighten the probes only. At startup, check for leaks. If probe leaks, donot tighten more—instead remove and re-apply new Teflon tape.
pHProbe
ORPProbe
apply teflonplumber's tapeto threads
IF YOU CHOOSE AN ACID FEEDER FOR pH CONTROL, additional safety precau-tions are required to ensure that an equipment malfunction is detected. Great caremust be taken when installing, maintaining and operating acid pump feed systems.Acid is dangerous to handle, and will harm people and equipment if not properlycontained, transported, poured, stored, and dispensed.
CAUTION: Equipment failure can potentially cause too much acid to be dispensedinto the water, causing an equipment and health hazard which would not be detect-able without the use of independent pH measurement.
• Always use a 4:1 dilution in the acid feed system.• To prevent violent boiling and splashing, ALWAYS ADD ACID TO WATER,
never add water to acid to dilute it. Some use the rhyme “Remember, do as yououghta- add acid to water”
• Strictly follow the acid vendor’s safety and handling protocols including hand,body and eye protection when transferring or handling acid.
• Choose a 5 gallon per day acid feed pump to keep flow rate low.• Limit the available acid reservoir to 1 gallon per 15,000 gallons of water. This
limits the available acid in the event that equipment malfunctions and emptiesthe tank into the pool or spa.
• Only a properly installed and maintained system will control the pH and sanitizerlevels of the water.
• If acid is not diluted properly or the feed pump is oversized, it will overshoot thepH correction.
• Periodically use an independent pH and Chlorine test kit to verify that pH is at asafe level, and that chlorine is at a safe level. If the probes are broken, depleted,dirty, fouled with oils, lotions, or other contaminants, they can report inaccurateresult to the system causing incorrect water chemistry, which at worst, couldharm people or equipment.
• Check the Aqua Rite Pro or Pro Logic’s display each day before entering thewater. If there is any Check System alarm, following the troubleshooting guide inthis manual to understand and rectify the condition. If the display is blank, orreporting a communications error, troubleshoot the equipment and rectify thefailure before entering the water.
• Follow the installation checklist to verify proper operation upon installation andat the beginning of each pool season.
14

6
Wiring the probes to the Probe CellBoth probes must be wired to the communication box within the Probe Cell. The probecables use typical BNC connectors that attach to the designated connectors on thecommunication box. Refer to the label on the communication box for the appropriateconnections. Push the connectors in and turn clockwise until locked. After connect-ing, route the wires in a manner where they will not interfere with the door of the ProbeCell. Save BNC connector protective covers for future use.
Wiring the Probe Cell to the Aqua Rite Pro or Pro LogicThe Probe Cell is supplied with a 15' cable which connects to the circuit board of theAqua Rite Pro or Pro Logic. Route the cable through an available knockout and makethe proper connection as shown below. When side mounting the Probe Cell, routethe cable through the access hole at the bottom of the mounting bracket BEFOREscrewing the bracket in place.
Pro Logic
Route cablethroughaccess hole
Routethoughknockout
Aqua Rite Pro
Route cablethroughaccess hole
Routethoughknockout
Aux1 Config.+ to view/change
Aux1 FunctionpH Dispense
Aux1 NameAux 1
Push to access Aux options
Rotates between all available names Move to previous/next configuration menu
Move to next menu itemRotates between Manual On/Off (default), Countdown Timer, Low Speed-FilterTimeclock, Solar, Low speed-Spa Filter, Group & Super Chlorinate, and pH DispenseMove to next menu item
Caution: Be certain to verify that the proper relay has been used and configuredfor pH.
• Verify proper relay operation by using the pH Reduction CTRL set to “Forced on”• Observe that the relay immediately turns on and applies power to the CO2 feed
solenoid or acid dispense pump• Once this is verified, set pH Reduction CTRL back to AUTO
As a last check for proper configuration, push the corresponding output button forthe pH Dispensing device. The device SHOULD NOT TURN ON. If it does, go backthrough the configuration to determine the problem.
OperationBefore operating the AQL-CHEM, test and adjust the pool water chemistry to therecommended levels in the Aqua Rite Pro or Pro Logic Operation manuals. This is animportant step and is crucial to the successful operation of the AQL-CHEM. Adjustsalt to recommended levels if using an Aqua Rite Pro or a Pro Logic with an AQL-CLchlorination kit.
During normal operation, the AQL-CHEM will sense ORP and pH requiring no userinput. The current ORP and pH levels will periodically be shown on the display.Pushing the "<" or ">" buttons will advance you to this display quickly. For the ProLogic, this information can also be found within the Diagnostic Menu.
The desired ORP and pH levels can be changed by restarting the Chemistry Config.Wizard.
Controlling pH with the Aqua Rite Pro or Pro LogicPlaster pools and pools serviced by salt-chlorine generators typically cause a slowpH rise which must be managed. With the Sense and Dispense technology, CO2 oracid is dispensed into the filter system’s return water as needed until the pH probereports proper pH level.
Goldline strongly recommends CO2 injection instead of acid feed systems for pHcontrol of residential pools. Both systems are effective at reducing pH, but CO2 ismuch safer to handle and store. The Goldline AQL-CHEM2(-240) are CO2 dispensingsystems that eliminate the need to handle acid and are economical and efficient meth-ods for effective pH control. When the CO2 gas is injected into water, it dissolves andbecomes carbonic acid, a weak acid that is very effective at lowering pH but becomesself-limiting if over-fed.
13

7
Wiring the Pigtail or pH Dispensing DeviceTwo pigtails (120VAC and 240VAC) are included with the AQL-CHEM sensing kit tobe used with pH dispensing devices (peristaltic pumps, solenoid valves, etc.) thatrequire a plug-in receptacle, including the Goldline AQL-CHEM2 and AQL-CHEM2-240. If your pH dispensing device will be direct wired (hardwired), the pigtail is notnecessary. Note that the Aqua Rite Pro can control a 120VAC or a 240VAC pH relateddispensing device. The Pro Logic can only be used with 120VAC devices.
NOTE: Follow local codes for pigtail installation. Installation may require retrofittinga weather-tight outlet and plug to the pigtail and dispense hardware (such as CooperWaterTight or similar connectors) or weather proof junction box.
A screw terminal block located inside of the Aqua Rite Pro enclosure is provided forconnection to the pigtail or pH dispensing device. If connecting to a Pro Logic, the120VAC pigtail or 120VAC direct wired pH dispensing device will connect to one ofthe internal relays. If using a P-4 or PS-4 operating software version less than 4.00, therelay that is supplied with the AQL-CHEM must be installed and used for connectionto the 120VAC pigtail or direct wired device.
Refer to the following information and diagrams for proper wiring of the pigtail ordirect wired device.
Aqua Rite ProIMPORTANT: Input power to the Aqua Rite Pro must be provided by a GFCB (GroundFault Circuit Breaker).
240 VAC
120 VACN
L2
L1
L1
EP1
EP2
Ground
For 120VAC operationposition connectors as shown
Groundto 120VAC Pigtail or
120VAC pH Dispensing Device
to 240VAC Pigtail or240VAC pH Dispensing Device
WHITE
WHITE
BLACK
BLACK
EP1
EP3
240VAC pH Dispensing Device(Factory Default)
120VAC pH Dispensing Device
Aqua Rite Pro
Aqua Rite Pro
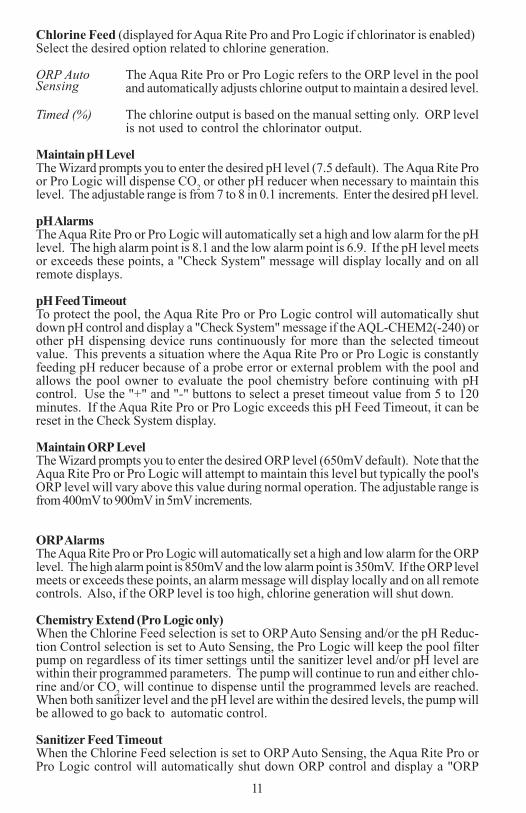
Timeout" message if the timeout value is exceeded (1-24 hours). This prevents asituation where the Aqua Rite Pro or Pro Logic is constantly generating chlorinebecause of a probe error or external problem with the pool and allows the pool ownerto evaluate the pool chemistry before continuing with ORP control. The Timeout canbe reset in the Check System Default Menu display.
pH Calibration WizardAfter installation, the pH probe must be calibrated using the pH Calibration Wizard.Periodically, a pool water test should be compared to the pH level reported by theAqua Rite Pro or Pro Logic. If there is a discrepancy between the two values, the pHCalibration Wizard should be redone.
Run the pool pump for a minimum of 20 minutes before starting the pH CalibrationWizard. The procedure to perform the Wizard is shown below. Detailed informationabout specific screens can also be found below.
Aqua Rite Pro1. Press the "Settings" button.2. Press ">" repeatedly until "pH Calibration Wizard" is displayed.3. Push "+" to start Wizard.4. Advance through the Wizard using "<" and ">" buttons. Use "+" and "-"
buttons to answer questions when prompted.5. Continue until finished.
Pro Logic1. Press "Menu" until Maintenance Menu is displayed.2. Press ">" repeatedly until "pH Calibration Wizard" is displayed.3. Push "+" to start Wizard.4. Advance through the Wizard using "<" and ">" buttons. Use "+" and "-"
buttons to answer questions when prompted.5. Continue until finished.
Enter Independent pH Test ResultTest the pH of the pool water with a dependable quality test kit after the pool pumphas been running for a period of time. Goldline suggests that you take more than onetest and average the results before entering the value in the pH Calibration Wizard.After entering the pH value, press the "+" button to calibrate the pH probe. A "CheckSystem" warning will display if the probe value and the entered value are different by± 1.0 or greater. If this is the case, retest the pH (possibly with another test kit) andconsider cleaning the pH probe per the instructions found in the Probe Maintenancesection of this manual.
Configuring the pH Dispense Relay (Pro Logics operating with software ver-sion less than 4.00)IMPORTANT:The relay used to control the AQL-CHEM2(-240) or other pH dispens-ing device needs to be configured properly to prevent accidental release of CO2 oracid into the pool water. Determine which relay is being used (this is the relay that thepigtail or 120VAC pH dispensing device is connected to). Follow the configurationprocedure found in the Pro Logic Installation and Operation manuals under Configu-ration Menu to set the function of this relay to "pH Dispense". An example of this(using Aux1) is shown on page 13. Note that PL-P-4 and PL-PS-4 models will requirethe additional relay to be installed and automatically use Aux 3.
12

8
IMPORTANT: The dispensing device must be powered by the same voltage used topower the Aqua Rite Pro. Configure the output voltage to the pH device by movingthe wiring connections on the mainboard according to the diagrams on page 7.
Example of AQL-CHEM2-240 used with Aqua Rite Pro:The Aqua Rite Pro must bepowered by 240VAC. Connect the 240VAC pigtail supplied with the AQL-CHEM tothe Aqua Rite Pro’s terminal block as shown in the diagram on page 9. The AQL-CHEM2-240 will then plug into the pigtail’s 240VAC receptacle.
Pro LogicNOTE: The Pro Logic can only be used with a 120VAC pH dispensing device. Thereare two Pro Logic versions that require different installation techniques. Pro Logicsoperating with a software version less than 4.00 require the pigtail or pH dispensingdevice to be connected to an internal relay. Units using version 4.00 or later have adedicated pH output through screw terminals mounted on the inside of the enclosure.Refer to the instructions that relate to your particular version.
Pro Logic operating with software version less than 4.00The 120VAC pigtail or 120VAC direct wired device is wired directly to one of the ProLogic relays. The particular relay used will depend on the Pro Logic model and theauxiliary outputs that are already in use.:
Pro Logic P-4 and PS-4 models: The factory installed relays can not be used. Therelay included with the AQL-CHEM kit must be installed and used to control the pHdispensing device on these models. Installation instructions for this relay can befound packaged with the relay. Once installed, wire the pigtail directly to this relay ina similar fashion to the diagram on page 9. If a direct wired device will be used, wiredirectly to this relay. The Pro Logic's Aux3 output will automatically be used to controlthis relay and the dispensing device.
Pro Logic PS-8 and PS-16 models: Any available Aux or the Lights relay can beused. Locate a relay that is not already in use and wire the pigtail or direct wireddevice according to the diagram on page 9. After configuration, the relay's corre-sponding Aux/Lights output will be used to control the dispensing device.
The diagram on page 9 shows a typical installation of the 120VAC pigtail connected toa Pro Logic PS-8 relay. The Pro Logic will control an AQL-CHEM2 that plugs into thepigtail. If a direct wired pH dispensing device will be used, disregard the pigtail andconnect directly to the relay.
Chlorine Feed (displayed for Aqua Rite Pro and Pro Logic if chlorinator is enabled)Select the desired option related to chlorine generation.
ORP Auto The Aqua Rite Pro or Pro Logic refers to the ORP level in the pooland automatically adjusts chlorine output to maintain a desired level.
Timed (%) The chlorine output is based on the manual setting only. ORP levelis not used to control the chlorinator output.
Maintain pH LevelThe Wizard prompts you to enter the desired pH level (7.5 default). The Aqua Rite Proor Pro Logic will dispense CO2 or other pH reducer when necessary to maintain thislevel. The adjustable range is from 7 to 8 in 0.1 increments. Enter the desired pH level.
pH AlarmsThe Aqua Rite Pro or Pro Logic will automatically set a high and low alarm for the pHlevel. The high alarm point is 8.1 and the low alarm point is 6.9. If the pH level meetsor exceeds these points, a "Check System" message will display locally and on allremote displays.
pH Feed TimeoutTo protect the pool, the Aqua Rite Pro or Pro Logic control will automatically shutdown pH control and display a "Check System" message if the AQL-CHEM2(-240) orother pH dispensing device runs continuously for more than the selected timeoutvalue. This prevents a situation where the Aqua Rite Pro or Pro Logic is constantlyfeeding pH reducer because of a probe error or external problem with the pool andallows the pool owner to evaluate the pool chemistry before continuing with pHcontrol. Use the "+" and "-" buttons to select a preset timeout value from 5 to 120minutes. If the Aqua Rite Pro or Pro Logic exceeds this pH Feed Timeout, it can bereset in the Check System display.
Maintain ORP LevelThe Wizard prompts you to enter the desired ORP level (650mV default). Note that theAqua Rite Pro or Pro Logic will attempt to maintain this level but typically the pool'sORP level will vary above this value during normal operation. The adjustable range isfrom 400mV to 900mV in 5mV increments.
ORP AlarmsThe Aqua Rite Pro or Pro Logic will automatically set a high and low alarm for the ORPlevel. The high alarm point is 850mV and the low alarm point is 350mV. If the ORP levelmeets or exceeds these points, an alarm message will display locally and on all remotecontrols. Also, if the ORP level is too high, chlorine generation will shut down.
Chemistry Extend (Pro Logic only)When the Chlorine Feed selection is set to ORP Auto Sensing and/or the pH Reduc-tion Control selection is set to Auto Sensing, the Pro Logic will keep the pool filterpump on regardless of its timer settings until the sanitizer level and/or pH level arewithin their programmed parameters. The pump will continue to run and either chlo-rine and/or CO2 will continue to dispense until the programmed levels are reached.When both sanitizer level and the pH level are within the desired levels, the pump willbe allowed to go back to automatic control.
Sanitizer Feed TimeoutWhen the Chlorine Feed selection is set to ORP Auto Sensing, the Aqua Rite Pro orPro Logic control will automatically shut down ORP control and display a "ORP
11
Sensing

9 10
Pro Logic operating with software version 4.00 or laterPro Logics operating with software version 4.00 or later have built-in support for theAQL-CHEM2 or other 120VAC pH dispensing devices. A screw terminal block mountedinside of the Pro Logic enclosure offers a dedicated connection to the 120VAC pigtailor device. The diagram below shows typical wiring information for these Pro Logicunits.
Pigtail
to AQL-CHEM2120VACpH dispense Pigtail
(included with AQL-CHEM)
use watertightstrain relief here
factory wiring
N L1
Configuring the Aqua Rite Pro or Pro LogicAfter the AQL-CHEM is mounted, plumbed and wired, the Aqua Rite Pro or Pro Logicmust be configured using the Chemistry Config. Wizard and pH Calibration Wizard.These wizards are found in the Settings Menu of the Aqua Rite Pro. For the Pro Logic,the Chemistry Config. Wizard is found in the Configuration Menu and the pH Calibra-tion Wizard is found in the Maintenance Menu.
If a pH dispensing device is used, the relay that is used to control the device must beconfigured. Refer to page 12 for detailed information.
Chemistry Config WizardThe Chemistry Config Wizard will prompt the user for information and automaticallyconfigure the Aqua Rite Pro or Pro Logic to use the AQL-CHEM sensing kit. Theprocedure to perform the Wizard is shown below. Detailed information about specificscreens relating to the configuration can be found on the following pages. To enterthe Chemistry Config Wizard follow the steps below:
Aqua Rite Pro1. Press the "Settings" button.2. Press ">" repeatedly until "Chemistry Config. Wizard" is displayed.4. Push "+" to start Wizard.5. Advance through the Wizard using "<" and ">" buttons. Use "+" and "-"
buttons to answer questions when prompted.6. Continue until finished.
Pro LogicIf the AQL-CL chlorination kit will be used, be sure that it is enabled BEFORE enteringthe Chemistry Config Wizard.
1. Press "Menu" until Configuration Menu is displayed.2. Hold both "<" and ">" for three seconds.3. Press ">" repeatedly until "Chemistry Config. Wizard" is displayed.4. Push "+" to start Wizard.5. Advance through the Wizard using "<" and ">" buttons. Use "+" and "-"
buttons to answer questions when prompted.6. Continue until finished.
Sensing SystemSelect Enable to configure the AQL-CHEM.
pH Reduction ControlSelect the desired option related to pH control.
Disabled pH control is turned off. Select this mode if no pH dispenser will beconnected to the Aqua Rite Pro or Pro Logic.
Auto Sensing Use this mode when an AQL-CHEM2(-240) kit or other type of auto-matic pH reducer will be used. The Aqua Rite Pro or Pro Logic willdispense pH reducer (CO2 or acid) when necessary to prevent thepH level from rising.
Forced On pH reducer is added for 15 minutes regardless of pH level and thenautomatically goes to Auto Sensing mode. This mode is helpfulwhen setting up and testing the AQL-CHEM2(-240) or other auto-matic dispenser.
to Lineon GFCB
to Neutralon GFCB
Pigtail
to AQL-CHEM2
120 VAC Load
120 VACGFCB
pH dispense Pigtail (included with AQL-CHEM)
use watertightstrain relief here
120VAC
8
IMPORTANT: The dispensing device must be powered by the same voltage used topower the Aqua Rite Pro. Configure the output voltage to the pH device by movingthe wiring connections on the mainboard according to the diagrams on page 7.
Example of AQL-CHEM2-240 used with Aqua Rite Pro:The Aqua Rite Pro must bepowered by 240VAC. Connect the 240VAC pigtail supplied with the AQL-CHEM tothe Aqua Rite Pro’s terminal block as shown in the diagram on page 9. The AQL-CHEM2-240 will then plug into the pigtail’s 240VAC receptacle.
Pro LogicNOTE: The Pro Logic can only be used with a 120VAC pH dispensing device. Thereare two Pro Logic versions that require different installation techniques. Pro Logicsoperating with a software version less than 4.00 require the pigtail or pH dispensingdevice to be connected to an internal relay. Units using version 4.00 or later have adedicated pH output through screw terminals mounted on the inside of the enclosure.Refer to the instructions that relate to your particular version.
Pro Logic operating with software version less than 4.00The 120VAC pigtail or 120VAC direct wired device is wired directly to one of the ProLogic relays. The particular relay used will depend on the Pro Logic model and theauxiliary outputs that are already in use.:
Pro Logic P-4 and PS-4 models: The factory installed relays can not be used. Therelay included with the AQL-CHEM kit must be installed and used to control the pHdispensing device on these models. Installation instructions for this relay can befound packaged with the relay. Once installed, wire the pigtail directly to this relay ina similar fashion to the diagram on page 9. If a direct wired device will be used, wiredirectly to this relay. The Pro Logic's Aux3 output will automatically be used to controlthis relay and the dispensing device.
Pro Logic PS-8 and PS-16 models: Any available Aux or the Lights relay can beused. Locate a relay that is not already in use and wire the pigtail or direct wireddevice according to the diagram on page 9. After configuration, the relay's corre-sponding Aux/Lights output will be used to control the dispensing device.
The diagram on page 9 shows a typical installation of the 120VAC pigtail connected toa Pro Logic PS-8 relay. The Pro Logic will control an AQL-CHEM2 that plugs into thepigtail. If a direct wired pH dispensing device will be used, disregard the pigtail andconnect directly to the relay.
Chlorine Feed (displayed for Aqua Rite Pro and Pro Logic if chlorinator is enabled)Select the desired option related to chlorine generation.
ORP Auto The Aqua Rite Pro or Pro Logic refers to the ORP level in the pooland automatically adjusts chlorine output to maintain a desired level.
Timed (%) The chlorine output is based on the manual setting only. ORP levelis not used to control the chlorinator output.
Maintain pH LevelThe Wizard prompts you to enter the desired pH level (7.5 default). The Aqua Rite Proor Pro Logic will dispense CO2 or other pH reducer when necessary to maintain thislevel. The adjustable range is from 7 to 8 in 0.1 increments. Enter the desired pH level.
pH AlarmsThe Aqua Rite Pro or Pro Logic will automatically set a high and low alarm for the pHlevel. The high alarm point is 8.1 and the low alarm point is 6.9. If the pH level meetsor exceeds these points, a "Check System" message will display locally and on allremote displays.
pH Feed TimeoutTo protect the pool, the Aqua Rite Pro or Pro Logic control will automatically shutdown pH control and display a "Check System" message if the AQL-CHEM2(-240) orother pH dispensing device runs continuously for more than the selected timeoutvalue. This prevents a situation where the Aqua Rite Pro or Pro Logic is constantlyfeeding pH reducer because of a probe error or external problem with the pool andallows the pool owner to evaluate the pool chemistry before continuing with pHcontrol. Use the "+" and "-" buttons to select a preset timeout value from 5 to 120minutes. If the Aqua Rite Pro or Pro Logic exceeds this pH Feed Timeout, it can bereset in the Check System display.
Maintain ORP LevelThe Wizard prompts you to enter the desired ORP level (650mV default). Note that theAqua Rite Pro or Pro Logic will attempt to maintain this level but typically the pool'sORP level will vary above this value during normal operation. The adjustable range isfrom 400mV to 900mV in 5mV increments.
ORP AlarmsThe Aqua Rite Pro or Pro Logic will automatically set a high and low alarm for the ORPlevel. The high alarm point is 850mV and the low alarm point is 350mV. If the ORP levelmeets or exceeds these points, an alarm message will display locally and on all remotecontrols. Also, if the ORP level is too high, chlorine generation will shut down.
Chemistry Extend (Pro Logic only)When the Chlorine Feed selection is set to ORP Auto Sensing and/or the pH Reduc-tion Control selection is set to Auto Sensing, the Pro Logic will keep the pool filterpump on regardless of its timer settings until the sanitizer level and/or pH level arewithin their programmed parameters. The pump will continue to run and either chlo-rine and/or CO2 will continue to dispense until the programmed levels are reached.When both sanitizer level and the pH level are within the desired levels, the pump willbe allowed to go back to automatic control.
Sanitizer Feed TimeoutWhen the Chlorine Feed selection is set to ORP Auto Sensing, the Aqua Rite Pro orPro Logic control will automatically shut down ORP control and display a "ORP
11
Sensing

7
Wiring the Pigtail or pH Dispensing DeviceTwo pigtails (120VAC and 240VAC) are included with the AQL-CHEM sensing kit tobe used with pH dispensing devices (peristaltic pumps, solenoid valves, etc.) thatrequire a plug-in receptacle, including the Goldline AQL-CHEM2 and AQL-CHEM2-240. If your pH dispensing device will be direct wired (hardwired), the pigtail is notnecessary. Note that the Aqua Rite Pro can control a 120VAC or a 240VAC pH relateddispensing device. The Pro Logic can only be used with 120VAC devices.
NOTE: Follow local codes for pigtail installation. Installation may require retrofittinga weather-tight outlet and plug to the pigtail and dispense hardware (such as CooperWaterTight or similar connectors) or weather proof junction box.
A screw terminal block located inside of the Aqua Rite Pro enclosure is provided forconnection to the pigtail or pH dispensing device. If connecting to a Pro Logic, the120VAC pigtail or 120VAC direct wired pH dispensing device will connect to one ofthe internal relays. If using a P-4 or PS-4 operating software version less than 4.00, therelay that is supplied with the AQL-CHEM must be installed and used for connectionto the 120VAC pigtail or direct wired device.
Refer to the following information and diagrams for proper wiring of the pigtail ordirect wired device.
Aqua Rite ProIMPORTANT: Input power to the Aqua Rite Pro must be provided by a GFCB (GroundFault Circuit Breaker).
240 VAC
120 VACN
L2
L1
L1
EP1
EP2
Ground
For 120VAC operationposition connectors as shown
Groundto 120VAC Pigtail or
120VAC pH Dispensing Device
to 240VAC Pigtail or240VAC pH Dispensing Device
WHITE
WHITE
BLACK
BLACK
EP1
EP3
240VAC pH Dispensing Device(Factory Default)
120VAC pH Dispensing Device
Aqua Rite Pro
Aqua Rite Pro
Timeout" message if the timeout value is exceeded (1-24 hours). This prevents asituation where the Aqua Rite Pro or Pro Logic is constantly generating chlorinebecause of a probe error or external problem with the pool and allows the pool ownerto evaluate the pool chemistry before continuing with ORP control. The Timeout canbe reset in the Check System Default Menu display.
pH Calibration WizardAfter installation, the pH probe must be calibrated using the pH Calibration Wizard.Periodically, a pool water test should be compared to the pH level reported by theAqua Rite Pro or Pro Logic. If there is a discrepancy between the two values, the pHCalibration Wizard should be redone.
Run the pool pump for a minimum of 20 minutes before starting the pH CalibrationWizard. The procedure to perform the Wizard is shown below. Detailed informationabout specific screens can also be found below.
Aqua Rite Pro1. Press the "Settings" button.2. Press ">" repeatedly until "pH Calibration Wizard" is displayed.3. Push "+" to start Wizard.4. Advance through the Wizard using "<" and ">" buttons. Use "+" and "-"
buttons to answer questions when prompted.5. Continue until finished.
Pro Logic1. Press "Menu" until Maintenance Menu is displayed.2. Press ">" repeatedly until "pH Calibration Wizard" is displayed.3. Push "+" to start Wizard.4. Advance through the Wizard using "<" and ">" buttons. Use "+" and "-"
buttons to answer questions when prompted.5. Continue until finished.
Enter Independent pH Test ResultTest the pH of the pool water with a dependable quality test kit after the pool pumphas been running for a period of time. Goldline suggests that you take more than onetest and average the results before entering the value in the pH Calibration Wizard.After entering the pH value, press the "+" button to calibrate the pH probe. A "CheckSystem" warning will display if the probe value and the entered value are different by± 1.0 or greater. If this is the case, retest the pH (possibly with another test kit) andconsider cleaning the pH probe per the instructions found in the Probe Maintenancesection of this manual.
Configuring the pH Dispense Relay (Pro Logics operating with software ver-sion less than 4.00)IMPORTANT:The relay used to control the AQL-CHEM2(-240) or other pH dispens-ing device needs to be configured properly to prevent accidental release of CO2 oracid into the pool water. Determine which relay is being used (this is the relay that thepigtail or 120VAC pH dispensing device is connected to). Follow the configurationprocedure found in the Pro Logic Installation and Operation manuals under Configu-ration Menu to set the function of this relay to "pH Dispense". An example of this(using Aux1) is shown on page 13. Note that PL-P-4 and PL-PS-4 models will requirethe additional relay to be installed and automatically use Aux 3.
12

6
Wiring the probes to the Probe CellBoth probes must be wired to the communication box within the Probe Cell. The probecables use typical BNC connectors that attach to the designated connectors on thecommunication box. Refer to the label on the communication box for the appropriateconnections. Push the connectors in and turn clockwise until locked. After connect-ing, route the wires in a manner where they will not interfere with the door of the ProbeCell. Save BNC connector protective covers for future use.
Wiring the Probe Cell to the Aqua Rite Pro or Pro LogicThe Probe Cell is supplied with a 15' cable which connects to the circuit board of theAqua Rite Pro or Pro Logic. Route the cable through an available knockout and makethe proper connection as shown below. When side mounting the Probe Cell, routethe cable through the access hole at the bottom of the mounting bracket BEFOREscrewing the bracket in place.
Pro Logic
Route cablethroughaccess hole
Routethoughknockout
Aqua Rite Pro
Route cablethroughaccess hole
Routethoughknockout
Aux1 Config.+ to view/change
Aux1 FunctionpH Dispense
Aux1 NameAux 1
Push to access Aux options
Rotates between all available names Move to previous/next configuration menu
Move to next menu itemRotates between Manual On/Off (default), Countdown Timer, Low Speed-FilterTimeclock, Solar, Low speed-Spa Filter, Group & Super Chlorinate, and pH DispenseMove to next menu item
Caution: Be certain to verify that the proper relay has been used and configuredfor pH.
• Verify proper relay operation by using the pH Reduction CTRL set to “Forced on”• Observe that the relay immediately turns on and applies power to the CO2 feed
solenoid or acid dispense pump• Once this is verified, set pH Reduction CTRL back to AUTO
As a last check for proper configuration, push the corresponding output button forthe pH Dispensing device. The device SHOULD NOT TURN ON. If it does, go backthrough the configuration to determine the problem.
OperationBefore operating the AQL-CHEM, test and adjust the pool water chemistry to therecommended levels in the Aqua Rite Pro or Pro Logic Operation manuals. This is animportant step and is crucial to the successful operation of the AQL-CHEM. Adjustsalt to recommended levels if using an Aqua Rite Pro or a Pro Logic with an AQL-CLchlorination kit.
During normal operation, the AQL-CHEM will sense ORP and pH requiring no userinput. The current ORP and pH levels will periodically be shown on the display.Pushing the "<" or ">" buttons will advance you to this display quickly. For the ProLogic, this information can also be found within the Diagnostic Menu.
The desired ORP and pH levels can be changed by restarting the Chemistry Config.Wizard.
Controlling pH with the Aqua Rite Pro or Pro LogicPlaster pools and pools serviced by salt-chlorine generators typically cause a slowpH rise which must be managed. With the Sense and Dispense technology, CO2 oracid is dispensed into the filter system’s return water as needed until the pH probereports proper pH level.
Goldline strongly recommends CO2 injection instead of acid feed systems for pHcontrol of residential pools. Both systems are effective at reducing pH, but CO2 ismuch safer to handle and store. The Goldline AQL-CHEM2(-240) are CO2 dispensingsystems that eliminate the need to handle acid and are economical and efficient meth-ods for effective pH control. When the CO2 gas is injected into water, it dissolves andbecomes carbonic acid, a weak acid that is very effective at lowering pH but becomesself-limiting if over-fed.
13
5
Drill and tap a 1/4" NPT hole using a 7/16" drill bit on the return side of the poolplumbing at a location just downstream of the filter, but upstream from the AQL-CLElectrolytic Cell. Use caution not to tap tapered threads too deeply. Using teflonplumber's tape, install a tubing connector into the hole. Run flex tubing from thetubing connector to the influent Probe Cell port. Push the flex tubing all the way intothe pressure fitting to seat.
Drill and tap another 1/4" NPT hole on the supply side of the pool plumbing. Usecaution not to tap tapered threads too deeply. Using teflon plumber's tape, install theremaining tubing connector and run flex tubing to the effluent Probe Cell port. Pushthe flex tubing all the way into the pressure fitting to seat.
Cut a 3" length of flex tubing and insert it into the sample stream port. This port can beused to draw water samples if needed.
If flex tubing needs to be replaced, use only 3/8” UV-resistant cross-linked polyethyl-ene tubing (PEX).
Installing ORP and pH probes to the Probe CellThe ORP and pH probes are shipped "wet" in plastic storage caps. It's very importantthat the probes remain wet at all times. If the probes are allowed to dry out, they willfail and the AQL-CHEM will be ineffective. After installation, the Probe Cell will en-sure that the probes are constantly exposed to pool water. During periods when thefilter pump is off (even extended periods), there should be sufficient moisture remain-ing in the Probe Cell to ensure that the probes are protected.
Remove the ORP and pH probes from their plastic storage caps and save the caps forfuture use. To ensure that the probes continue to remain wet, fill the Probe Cell withpool water before installing the probes. Apply a length of plumber's tape to the probethreads. Hand-tighten the probes only. At startup, check for leaks. If probe leaks, donot tighten more—instead remove and re-apply new Teflon tape.
pHProbe
ORPProbe
apply teflonplumber's tapeto threads
IF YOU CHOOSE AN ACID FEEDER FOR pH CONTROL, additional safety precau-tions are required to ensure that an equipment malfunction is detected. Great caremust be taken when installing, maintaining and operating acid pump feed systems.Acid is dangerous to handle, and will harm people and equipment if not properlycontained, transported, poured, stored, and dispensed.
CAUTION: Equipment failure can potentially cause too much acid to be dispensedinto the water, causing an equipment and health hazard which would not be detect-able without the use of independent pH measurement.
• Always use a 4:1 dilution in the acid feed system.• To prevent violent boiling and splashing, ALWAYS ADD ACID TO WATER,
never add water to acid to dilute it. Some use the rhyme “Remember, do as yououghta- add acid to water”
• Strictly follow the acid vendor’s safety and handling protocols including hand,body and eye protection when transferring or handling acid.
• Choose a 5 gallon per day acid feed pump to keep flow rate low.• Limit the available acid reservoir to 1 gallon per 15,000 gallons of water. This
limits the available acid in the event that equipment malfunctions and emptiesthe tank into the pool or spa.
• Only a properly installed and maintained system will control the pH and sanitizerlevels of the water.
• If acid is not diluted properly or the feed pump is oversized, it will overshoot thepH correction.
• Periodically use an independent pH and Chlorine test kit to verify that pH is at asafe level, and that chlorine is at a safe level. If the probes are broken, depleted,dirty, fouled with oils, lotions, or other contaminants, they can report inaccurateresult to the system causing incorrect water chemistry, which at worst, couldharm people or equipment.
• Check the Aqua Rite Pro or Pro Logic’s display each day before entering thewater. If there is any Check System alarm, following the troubleshooting guide inthis manual to understand and rectify the condition. If the display is blank, orreporting a communications error, troubleshoot the equipment and rectify thefailure before entering the water.
• Follow the installation checklist to verify proper operation upon installation andat the beginning of each pool season.
14

4
Remote surface mounting the AQL-CHEM: The Probe Cell can be mounted up to 15'away from the Aqua Rite Pro or the Pro Logic (limited by length of cable). Use thefour mounting holes on the back of the bracket when surfacing mounting. Commonwood screws can be used for most applications.
Plumbing the Probe Cell to the pool plumbingThe Probe Cell requires connection to the pool plumbing using the supplied flextubing. Two ports on the Probe Cell, influent and effluent, are connected to thesupply and return sides of the pool plumbing. Refer to diagram below as well as thefollowing steps:
Use remotemounting holeswhen surface mounting.
MaintenanceWater ChemistryAlways test water chemistry with a quality manual test kit. The AQL-CHEM providesinstrument grade accuracy which exceeds that of most liquid-standard water testingkits. Therefore, it may be preferable to calibrate pH using commercially availablereference solutions. Calibrate pH periodically using the pH Calibration Wizard asdescribed earlier in this manual. It's important to note that changes in pH, cyanuricacid concentration, total dissolved solids, and use of additional or alternative sanitizerswill all affect the primary sanitizer residual level relative to ORP. Maintain total alkalin-ity on regular basis to ensure pH stability. To maintain a consistent sanitizer residualin parts per million (ppm), periodically adjust the ORP level.
Probe MaintenanceThe probes must be clean and free from oil, chemical deposits and contamination tofunction properly. After saturation in pool or spa water, the probes may need to becleaned on a weekly or monthly basis depending on bather load and other poolspecific characteristics. Slow response, increased need to calibrate pH, and inconsis-tent readings are indications that the probes are in need of cleaning.
To clean the ORP and pH probes, run the Clean Probe Wizard within the SettingsMenu on the Aqua Rite Pro or the Maintenance Menu on the Pro Logic. This Wizardwill walk the user through the probe cleaning process. Answer the questions whenprompted, and follow the instructions for proper cleaning.
To clean the probes without running the Wizard, turn off input power to the Aqua RitePro or Pro Logic. Disconnect the probe connectors from the communication box,unscrew the probe and carefully remove them from the Probe Cell. Clean the referencejunction (the white ring at the bottom of the probe body) with a soft toothbrush andregular tooth paste. A household liquid dishwashing detergent may also be used toremove any oil. Rinse with fresh water, replace teflon tape on threads and reinstallprobes. If properly cleaned probes continue to provide unstable readings or requireexcessive calibration, the probes should be replaced.
Probe StorageExposure to atmospheric conditions will cause the probe tips to dry out. Store theprobes with the included plastic probe storage caps if removed from the Probe Cell formore than one hour. If the storage caps have been misplaced, store the probes indi-vidually in small glass or plastic containers with clean water covering the probe tips.Store probes in a location that will not be subjected to freezing temperatures.
WinterizingThe AQL-CHEM probes must be protected from freezing conditions. If the pool iswinterized, plan to remove and store the probes (as described above) as part of thenormal pool winterizing process. The Probe Cell and related plumbing must be drainedas well. BNC connectors should be capped with the original protective covers. Awinterizing kit with probe caps, BNC covers, and other necessary winterizing acces-sories is available to replace any missing items. Contact your local Goldline dealer formore information.
15
FROMPOOL
FROMSPA
RETURNTO POOL
RETURNTO SPA
POOL
InfluentPort
EffluentPort
SampleStream
Port

Aqua Rite ProSide mounting AQL-CHEM to the Aqua Rite Pro: Side mounting the AQL-CHEM willrequire drilling 3 mounting holes through the Aqua Rite Pro enclosure. Dimples havebeen pre-punched on the enclosure at the drilling location (template not needed).After drilling, be sure to remove any burrs and brush away any metal shavings.Route Probe Cell cable through the access hole at the bottom of the mountingbracket BEFORE screwing the bracket in place. For easiest installation, fasten thenylon lock nut loosely, then slip the bracket keyhole slots over the bolt head andtighten. After installation, coil excess cable in the Aqua Rite Pro enclosure. Refer tothe diagram below.
Pro LogicSide mounting AQL-CHEM to Pro Logic: Side mounting the AQL-CHEM will requiredrilling 3 mounting holes through the Pro Logic enclosure. A drill template is includedwith the AQL-CHEM to assist with the positioning of the holes. After drilling, be sureto remove any burrs and brush away any metal shavings. Route Probe Cell cablethrough the access hole at the bottom of the mounting bracket BEFORE screwing thebracket in place. For easiest installation, fasten the nylon lock nut loosely, then slipthe bracket keyhole slots over the bolt head and tighten. After installation, coilexcess cable in the Pro Logic enclosure. Refer to the diagram below.
3
Route probe cell cablethrough access hole BEFORE mounting.
metal washer
rubberwasher
Aqua Rite Proenclosure wall
AQL-CHEMbracket wall
Zip Tie and store extracable length here
Side MountingAQL-CHEM to Aqua Rite Pro
Route probe cell cablethrough access hole BEFORE mounting.
metal washer
rubberwasher
Pro Logicenclosure wall
AQL-CHEMbracket wall
Side MountingAQL-CHEM to Pro Logic
Zip Tie and store extracable length here
16

CompatibilityThe AQL-CHEM is compatible with all Goldline Aqua Rite Pro and Pro Logic poolcontrols. An AQL-CL chemistry kit must be used with the Pro Logic if automaticchlorine generation is desired. The AQL-CHEM is not compatible with Aqua Rite orAqua Logic controls.
InstallationOverviewInstalling the AQL-CHEM requires the following steps:
• Mounting the Probe Cell• Plumbing the Probe Cell• Installing ORP and pH probes• Wiring probes to Probe Cell communication box• Wiring the Probe Cell to the Aqua Rite Pro or Pro Logic• Wiring the pH Dispense Pigtail to the Aqua Rite Pro or Pro Logic• Configuring the Aqua Rite Pro or Pro Logic• Validating Operation• Establishing Maintenance Schedule
Materials Needed for Installation• 7/16” drill bit• ¼” NPT tap• Two small adjustable wrenches if side mounting to Aqua Rite Pro or Pro Logic• 3/16” drill bit if side mounting to Aqua Rite Pro or Pro Logic• Deburring tool or file if side mounting• Tape and scissors if side mounting to Pro Logic (for drill template)• Mounting hardware if surface mounting (not side mounting)• Flex tubing cutter• Water-tight strain relief for dispense pigtail• Flathead screwdriver and mallet to remove knock-out and install strain relief• 120VAC Ground Fault Circuit Breaker (GFCB) for powering 120VAC dispense
pigtail or 240VAC (GFCB) for powering 240VAC dispense pigtail• Extra wire, wire strippers, and wire nuts could be helpful in some installations• Any items that would be required for wiring and installation per local code
Before carrying out any part of the installation, be sure to shut off input power to theAqua Rite Pro or Pro Logic. Turn off the pool filter pump, water features and any otherrelated equipment. Relieve pressure from the pool filtration system.
Mounting the Probe CellThe Probe Cell can be mounted directly on the side of the Aqua Rite Pro/Pro Logic ormounted up to 15' away (limited by length of Probe Cell cable). The key to successfulProbe Cell installation is in the plumbing. A pressure differential is required to allowclean, untreated water to pass through the cell and across the probes. Consider thiswhen looking for an ideal mounting location.
217

DescriptionThe AQL-CHEM is an ORP and pH sensing kit that is offered as an accessory for allGoldline Aqua Rite Pro chlorine generators and Pro Logic pool controls. With theAQL-CHEM, the Aqua Rite Pro or Pro Logic can provide a fully integrated chemistrysolution for your pool. The AQL-CHEM continuously tests the pool's sanitation andpH levels allowing the Aqua Rite Pro or Pro Logic to automatically generate thecorrect amount of chorine and dispense the proper amount of pH reducer. Together,they provide an automated system controlling both sanitization and pH balance.
The AQL-CHEM comes with two pigtails (120VAC and 240VAC) for connection to apH reducing device like a peristaltic pump or solenoid valve (not included) that re-quires a line cord receptacle. For easy integration, Goldline offers the AQL-CHEM2(120VAC) and AQL-CHEM2-240 (240VAC) CO2 dispense kit that plugs into the pigtailand will reduce the pool's pH level by injecting CO2 into the pool water.
What's IncludedThe AQL-CHEM comes with everything needed to allow the Aqua Rite Pro or ProLogic to sense ORP and pH levels. The following is a description of the includedcomponents:
Professional Grade ORP probe- Samples water from the pool filtration system andsends signals to the Aqua Rite Pro or Pro Logic indicating the oxidation-reductionpotential (redox) of the pool water. ORP is an actual measurement of sanitizer activityand bacteriological water quality rather than an expression of chemical residual levels.ORP is not fooled by the effects of pH, TDS (total dissolved solids) and other factorsgiving a more accurate measurement of the effectiveness of chlorine and water qual-ity.
Professional Grade pH probe- Samples water from the pool filtration system andsends signals to the Aqua Rite Pro or Pro Logic indicating the acidity of the water.When used with a Goldline AQL-CHEM2 or other pH dispensing device, the AquaRite Pro or Pro Logic can keep the pool water's pH level balanced.
Probe Cell: The Probe Cell is used to house the probes and provide a location forwater collection and testing. Two hoses are provided to connect the Probe Cell to thesupply and return sides of the pool filtration system. The Probe Cell can be mounteddirectly to the Aqua Rite Pro/Pro Logic or remote mounted in the vicinity of thecontrol (restricted by the length of the probe wiring).
Additional Pro Logic Relay: An additional relay is provided for Pro Logic PL-PS-4and PL-P-4 models operating with software version less than 4.00. Refer to the ProLogic manual for instruction on how to determine your software revision. Theadditional relay allows the user to add the AQL-CHEM2 or other pH reducing deviceto these models. Install this relay only if you have one of these models and intend toadd pH control.
pH Dispense Pigtails: The pH Dispense pigtails provide a plug-in receptacle for theAQL-CHEM2, AQL-CHEM2-240 or other pH related dispensing device (peristalticpumps, solenoid valves, etc.) that will be controlled by the Aqua Rite Pro or Pro Logic.
Various Hardware: The AQL-CHEM includes the necessary tubing, tubing connec-tors and mounting hardware to complete the installation.
1
LIMITED WARRANTY Goldline warrants its Aqua Rite, Aqua Rite Pro, Aqua Trol, Aqua Logicand Pro Logic products (products with Goldline part numbers starting with AQ-RITE-, AQ-RT-PRO, AQ-TROL-, AQ-LOGIC-, AQL-P-, AQL-PS-, AQL-CL-, PL-P-, PL-PS-, and HPC-2) to befree from defects in material or workmanship, under normal use and service:
For three years from the date of the initial system installation on private, residential swimmingpools within the USA or Canada and one year from the date of initial system installation oncommercial installations, installations outside of the USA or Canada and for any replacementparts or accessory products including Sense and Dispense™ products (products with Goldline partnumbers starting with AQL-CHEM), provided they are installed in accordance with the Goldlineinstallation instructions and specifications provided with the product. If written proof of the dateof the initial system installation is not provided to Goldline, the manufacturing datecode on theAqua Rite, Aqua Rite Pro, Aqua Trol, Aqua Logic and Pro Logic electronics unit will be the soledeterminant of the date of the initial system installation.
For residential installations in USA or Canada: If a product is defective in workmanship ormaterials and is removed and returned freight prepaid within three (3) years after the date of theinitial system installation, Goldline will, at its option, either repair or replace the defectiveproduct and return it freight prepaid.
For commercial installations, installations outside the USA and Canada, and accessory productsand replacement parts: If a product is defective in workmanship or materials and is removed andreturned freight prepaid within one (1) year after the date of the initial system installation,Goldline will, at its option, either repair or replace the defective product and return it freightprepaid.
Contact any Goldline dealer or contact Goldline at 61 Whitecap Drive, North Kingstown, RI02852 for warranty service. The costs incurred in removal and/or reinstallation of the productare NOT covered under this warranty. Some states do not allow limitations on how long animplied warranty lasts, so the above limitation may not apply to you.
WARRANTY EXCLUSIONS:1. Material supplied or workmanship performed by others in process of installation.
2. Damage resulting from improper installation including installation on pools larger than theproduct rating.
3. Problems resulting from failure to operate the product(s) in accordance with the recom-mended instructions contained in product’s owners manual(s).
4. Problems resulting from failure to maintain pool water chemistry in accordance with therecommendations in the owners manual(s).
5. Problems resulting from tampering, accident, abuse, negligence, unauthorized repairs oralternations, fire, flood, lightning, freezing, external water, degradation of natural stoneused in or immediately adjacent to a pool or spa, war or acts of God.
DISCLAIMER. THE EXPRESS LIMITED WARRANTY ABOVE CONSTITUTES THE EN-TIRE WARRANTY OF GOLDLINE WITH RESPECT TO ITS POOL AUTOMATION ANDCHLORINATION PRODUCTS AND IS IN LIEU OF ALL OTHER WARRANTIES, EX-PRESSED OR IMPLIED, INCLUDING WARRANTIES OF MERCHANTABILITY OR FIT-NESS FOR A PARTICULAR PURPOSE. THIS WARRANTY GIVES YOU SPECIFICLEGAL RIGHTS, AND YOU MAY ALSO HAVE OTHER RIGHTS WHICH VARY FROMSTATE TO STATE. IN NO EVENT SHALL GOLDLINE BE RESPONSIBLE FOR ANYCONSEQUENTIAL, SPECIAL OR INCIDENTAL DAMAGES OF ANY NATURE WHAT-SOEVER, INCLUDING, BUT NOT LIMITED TO, PERSONAL INJURY, PROPERTY DAM-AGE, DAMAGE TO OR LOSS OF EQUIPMENT, LOST PROFITS OR REVENUE, COSTSOF RENTING REPLACEMENTS, AND OTHER ADDITIONAL EXPENSES, EVEN IF THESELLER HAD BEEN ADVISED OF THE POSSIBILITY OF SUCH DAMAGES. SOMESTATES DO NOT ALLOW THE EXCLUSION OF LIMITATION OF INCIDENTAL ORCONSEQUENTIAL DAMAGES, SO THE ABOVE LIMITATION OR EXCLUSION MAYNOT APPLY TO YOU.
NO WHOLESALER, AGENT, DEALER, CONTRACTOR OR OTHER PERSON IS AUTHO-RIZED TO GIVE ANY WARRANTY ON BEHALF OF GOLDLINE.
THIS WARRANTY IS VOID IF THE PRODUCT HAS BEEN ALTERED IN ANY WAY AFTERLEAVING THE FACTORY.
18

092332DCopyright © 2008 Goldine Controls
June 2008Download and use
the latest manual at:www.goldlinecontrols.com
Total Pool Chemistry
Aqua Rite Pro
Pro Logic
Installation and Operation Manual
for
AQL-CHEM
LDC
G LINEON TROLS
North Kingstown, RI 02852 USA
LDC
G LINEON TROLS
Questions? Refer to www.goldlinecontrols.com for latest
manual revisions, additional information and helpful service.
and
forTM
TM
®