tivoli workload scheduler: dynamic workload console userâ„¢s
TRANSCRIPT

IBM Tivoli Workload Scheduler
Dynamic Workload Console User’s GuideVersion 8 Release 6 Fix Pack 2
���

IBM Tivoli Workload Scheduler
Dynamic Workload Console User’s GuideVersion 8 Release 6 Fix Pack 2
���

NoteBefore using this information and the product it supports, read the information in “Notices” on page 197.
This edition applies to version 8, release 6, modification level 0 Fix Pack 2 of Tivoli Workload Scheduler (programnumber 5698-WSH) and to all subsequent releases and modifications until otherwise indicated in new editions.
© Copyright IBM Corporation 1999, 2012.US Government Users Restricted Rights – Use, duplication or disclosure restricted by GSA ADP Schedule Contractwith IBM Corp.
Contents
Figures . . . . . . . . . . . . . . . v
About this publication . . . . . . . . viiWhat is new in this release . . . . . . . . . viiWho should read this publication . . . . . . . viiPublications . . . . . . . . . . . . . . viiAccessibility . . . . . . . . . . . . . . viiTivoli technical training . . . . . . . . . . viiiSupport information . . . . . . . . . . . viii
Chapter 1. Overview . . . . . . . . . 1Naming conventions for scheduling objects . . . . 3Convention for specific platform information . . . 4
Chapter 2. Installing and configuring theDynamic Workload Console . . . . . . 7
Chapter 3. Using the Dynamic WorkloadConsole from mobile devices . . . . . 9
Chapter 4. Configuring High Availability 11Managing user settings . . . . . . . . . . 11Changing settings repository . . . . . . . . 12Sharing a settings repository. . . . . . . . . 13Changing the Dynamic Workload Console user ofDB repository . . . . . . . . . . . . . 14
Chapter 5. Customizing Your Console 17Customizing your portfolio . . . . . . . . . 17Customizing your startup page . . . . . . . . 17Customizing your tasks . . . . . . . . . . 18Adding tasks to your favorite bookmarks . . . . 19Using the news notification beacon . . . . . . 19
Disabling news notification . . . . . . . . 20Customizing the list of notification recipients . . 21Sending internal communications . . . . . . 22
Customizing your global settings . . . . . . . 23Getting Started . . . . . . . . . . . . . 24
Creating and managing engine connections. . . 26Setting user preferences . . . . . . . . . 26Event management configuration . . . . . . 27
Chapter 6. Tivoli Workload SchedulerConcepts. . . . . . . . . . . . . . 29Scheduling environment . . . . . . . . . . 29
Workstation . . . . . . . . . . . . . 29Domain. . . . . . . . . . . . . . . 32
Scheduling objects . . . . . . . . . . . . 35Job . . . . . . . . . . . . . . . . 36Job stream . . . . . . . . . . . . . . 36Period . . . . . . . . . . . . . . . 37Calendar . . . . . . . . . . . . . . 38Run cycle . . . . . . . . . . . . . . 39
Operator instructions . . . . . . . . . . 40Parameter . . . . . . . . . . . . . . 40Dependencies. . . . . . . . . . . . . 40User . . . . . . . . . . . . . . . . 50Workstation class . . . . . . . . . . . 50Variable table . . . . . . . . . . . . . 50Workload Broker job definition . . . . . . . 51
Production process . . . . . . . . . . . . 51Database . . . . . . . . . . . . . . 52Plans . . . . . . . . . . . . . . . 52
Engine connections . . . . . . . . . . . . 54Event management . . . . . . . . . . . . 55Reports . . . . . . . . . . . . . . . . 57Workload service assurance . . . . . . . . . 59
Processing and monitoring critical jobs . . . . 60Planning critical jobs . . . . . . . . . . 62
Tivoli Workload Scheduler for SAP . . . . . . 64
Chapter 7. Creating and EditingObjects in the Database . . . . . . . 65Designing your Scheduling Environment . . . . 65
Creating a workstation . . . . . . . . . 65Creating a domain . . . . . . . . . . . 67Creating a pool of agents . . . . . . . . . 68
Designing your Workload . . . . . . . . . 69Editing objects from the Working List View. . . 70Editing objects from the Quick Open View . . . 71Editing objects from the Details View. . . . . 72Editing objects from the Graphical View . . . . 72Editing object properties . . . . . . . . . 73Creating job definitions . . . . . . . . . 73Adding a job to a job stream . . . . . . . 82Adding and removing dependencies . . . . . 84Creating cross dependencies . . . . . . . . 86Creating Workload Broker objects . . . . . . 87Creating an event rule . . . . . . . . . . 88Listing object definitions in the database. . . . 93
Chapter 8. Monitoring your Objects inthe Plan . . . . . . . . . . . . . . 97Monitoring the progress of your plan. . . . . . 97Monitor tasks. . . . . . . . . . . . . . 98Monitoring your Scheduling Environment . . . . 99
Creating a task to Monitor Workstations . . . . 99Creating a task to Monitor Domains . . . . . 101
Monitoring your Workload . . . . . . . . . 102Event management tasks . . . . . . . . 103Plan view tasks. . . . . . . . . . . . 104Creating a task to Monitor Jobs . . . . . . 104Creating a task to Monitor Critical Jobs. . . . 106Creating a task to Monitor Jobs on MultipleEngines . . . . . . . . . . . . . . 108Creating a task to Monitor Job Streams . . . . 110Creating a task to Monitor Job Streams onMultiple Engines . . . . . . . . . . . 111
© Copyright IBM Corp. 1999, 2012 iii
|||
|||||||||||
||||||||
Creating a task to Monitor Files . . . . . . 113Creating a task to Monitor Prompts . . . . . 114Creating a task to Monitor Resources . . . . 115Creating a task to Monitor Event Rules . . . . 116Creating a task to Monitor Triggered Actions 118Creating a task to Monitor Operator Messages 119
Controlling Jobs and Job Streams Processing . . . 120Using dependencies to control job and jobstream processing . . . . . . . . . . . 120Using time restrictions to control job and jobstream processing . . . . . . . . . . . 121Using job priority and workstation fence tocontrol distributed job processing. . . . . . 122Using limits to control job and job streamprocessing . . . . . . . . . . . . . 122Using job confirmation to control job processing 123Using job recovery actions to control jobprocessing . . . . . . . . . . . . . 123
Chapter 9. Working with Plans . . . . 125Selecting the working plan . . . . . . . . . 125Generating Trial and Forecast Plans . . . . . . 126Creating a task to Show Plan View . . . . . . 127
Chapter 10. Submitting Workload onRequest in Production . . . . . . . 129Submitting ad hoc jobs . . . . . . . . . . 129Submitting predefined jobs . . . . . . . . . 129Submitting predefined job streams . . . . . . 130Setting properties for ad hoc jobs and predefinedjobs and job streams . . . . . . . . . . . 130
Chapter 11. Reporting . . . . . . . . 133Creating a task to generate a Job Run Statisticsreport . . . . . . . . . . . . . . . . 133Creating a task to generate a Job Run Historyreport . . . . . . . . . . . . . . . . 134Creating a task to generate a WorkstationWorkload Summary report . . . . . . . . . 135Creating a task to generate a WorkstationWorkload Runtimes report . . . . . . . . . 136Creating a task to Generate Plan Reports . . . . 137Creating a task to Generate Custom SQL Reports 138
Chapter 12. Scenarios. . . . . . . . 141Customizing your job stream . . . . . . . . 141Using workload service assurance to monitor z/OScritical jobs . . . . . . . . . . . . . . 143Monitoring jobs running on multiple engines. . . 145
Chapter 13. Troubleshooting theDynamic Workload Console . . . . . 149
Chapter 14. Reference . . . . . . . 151Accessing online publications . . . . . . . . 151Dynamic Workload Console global settings . . . 151
Override graphical view limits . . . . . . 152Plan View in new window . . . . . . . . 152Disable and customize NewsFeed function . . 152Disable and customize the creation ofpredefined tasks . . . . . . . . . . . 154Add customized URL to job and job streams 154User registry . . . . . . . . . . . . 156z/OS http connections . . . . . . . . . 156Limit the number of objects retrieved by queries 156Limit task and engine sharing . . . . . . . 157TdwcGlobalSettings.xml sample . . . . . . 157
Users and groups . . . . . . . . . . . . 159Type of communication based on SSLcommunication options . . . . . . . . . . 161Status description and mapping for distributed jobs 161Status description and mapping for z/OS jobs . . 163Status description and mapping for distributed jobstreams . . . . . . . . . . . . . . . 165Status description and mapping for z/OS jobstreams . . . . . . . . . . . . . . . 167Workstation types . . . . . . . . . . . . 168Graphical Views in the plan . . . . . . . . 173Workload Designer . . . . . . . . . . . 176
Working List . . . . . . . . . . . . 176Quick Open . . . . . . . . . . . . . 177Details view . . . . . . . . . . . . . 179Graphical View. . . . . . . . . . . . 180Run Cycle Preview . . . . . . . . . . 183Message History . . . . . . . . . . . 184Using recovery options in job definitions . . . 185
Reports . . . . . . . . . . . . . . . 187Regular Expressions . . . . . . . . . . 187SQL report examples . . . . . . . . . . 191
Event rule . . . . . . . . . . . . . . 193Action properties . . . . . . . . . . . 193Event properties . . . . . . . . . . . 194Activation statuses of the event rules . . . . 195Schemas for generic events . . . . . . . . 196
Notices . . . . . . . . . . . . . . 197Trademarks . . . . . . . . . . . . . . 198
Index . . . . . . . . . . . . . . . 201
iv Tivoli Workload Scheduler: Dynamic Workload Console User’s Guide: Dynamic Workload Console User’s Guide
||
||
Figures
1. Single-domain network . . . . . . . . 332. Multiple-domain network . . . . . . . . 343. Example of a condition dependency definition 464. Example of a condition dependency at run
time . . . . . . . . . . . . . . . 465. Auto-recovery job stream with step level
dependency . . . . . . . . . . . . 47
6. Example of recovery job with conditiondependencies . . . . . . . . . . . . 48
7. Cross dependencies . . . . . . . . . . 498. Critical path . . . . . . . . . . . . 61
© Copyright IBM Corp. 1999, 2012 v

vi Tivoli Workload Scheduler: Dynamic Workload Console User’s Guide: Dynamic Workload Console User’s Guide
About this publication
IBM® Tivoli® Workload Scheduler simplifies systems management acrossdistributed environments by integrating systems management functions. TivoliWorkload Scheduler plans, automates, and controls the processing of yourenterprise's entire production workload. The Tivoli Workload Scheduler DynamicWorkload Console User's Guide provides detailed information about how to configureand use the Dynamic Workload Console to manage your Tivoli WorkloadScheduler environment.
What is new in this releaseFor information about the new or changed functions in this release, see the IBMTivoli Workload Automation Overview.
For information about the APARs that this release addresses, see the TivoliWorkload Scheduler Download Document at http://www.ibm.com/support/docview.wss?rs=672&uid=swg24027501.
Who should read this publicationThis publication is intended for the following audience:v Tivoli Workload Scheduler operatorsv Tivoli Workload Scheduler administrators
PublicationsFull details of Tivoli Workload Scheduler publications can be found in TivoliWorkload Automation: Publications. This document also contains information aboutthe conventions used in the publications.
A glossary of terms used in the product can be found in Tivoli Workload Automation:Glossary.
Both of these are in the Information Center as separate publications.
AccessibilityAccessibility features help users with a physical disability, such as restrictedmobility or limited vision, to use software products successfully. With this product,you can use assistive technologies to hear and navigate the interface. You can alsouse the keyboard instead of the mouse to operate all features of the graphical userinterface.
For full information with respect to the Dynamic Workload Console, see theAccessibility Appendix in the IBM Tivoli Workload Scheduler User’s Guide andReference.
© Copyright IBM Corp. 1999, 2012 vii
Tivoli technical trainingFor Tivoli technical training information, refer to the following IBM TivoliEducation website:
http://www.ibm.com/software/tivoli/education
Support informationIf you have a problem with your IBM software, you want to resolve it quickly. IBMprovides the following ways for you to obtain the support you need:v Searching knowledge bases: You can search across a large collection of known
problems and workarounds, Technotes, and other information.v Obtaining fixes: You can locate the latest fixes that are already available for your
product.v Contacting IBM Software Support: If you still cannot solve your problem, and
you need to work with someone from IBM, you can use a variety of ways tocontact IBM Software Support.
For more information about these three ways of resolving problems, see theappendix on support information in Tivoli Workload Scheduler: Troubleshooting Guide.
viii Tivoli Workload Scheduler: Dynamic Workload Console User’s Guide: Dynamic Workload Console User’s Guide
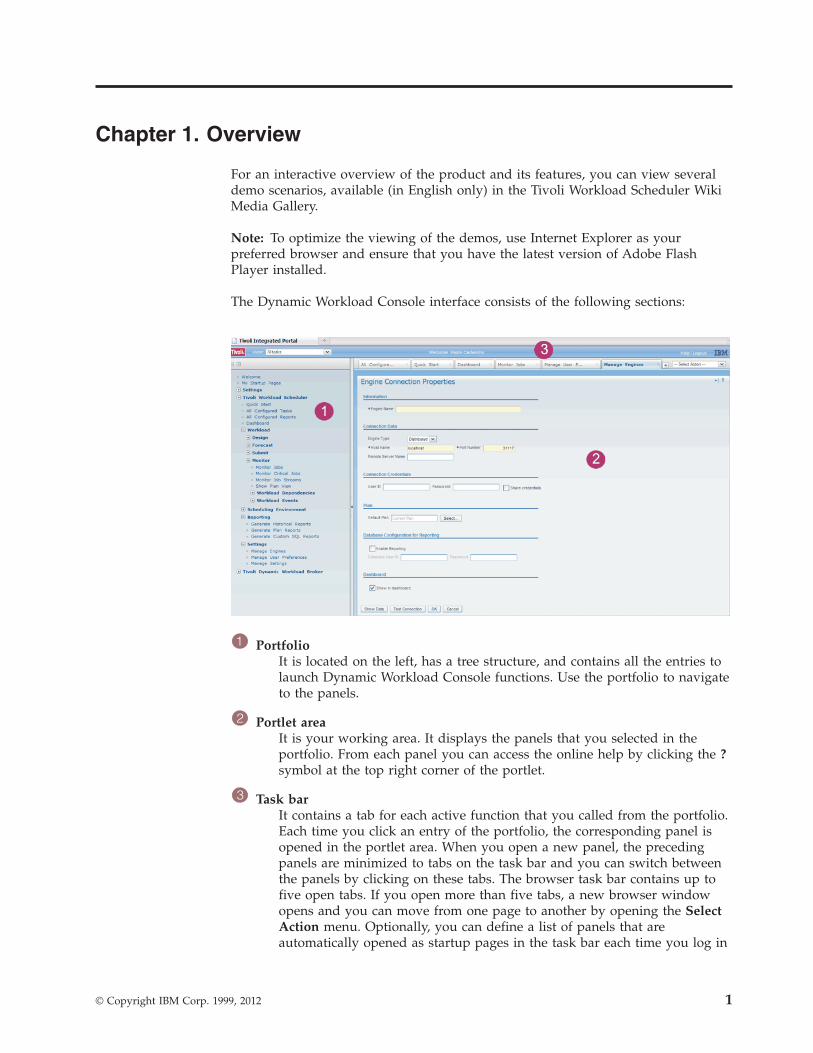
Chapter 1. Overview
For an interactive overview of the product and its features, you can view severaldemo scenarios, available (in English only) in the Tivoli Workload Scheduler WikiMedia Gallery.
Note: To optimize the viewing of the demos, use Internet Explorer as yourpreferred browser and ensure that you have the latest version of Adobe FlashPlayer installed.
The Dynamic Workload Console interface consists of the following sections:
1 PortfolioIt is located on the left, has a tree structure, and contains all the entries tolaunch Dynamic Workload Console functions. Use the portfolio to navigateto the panels.
2 Portlet areaIt is your working area. It displays the panels that you selected in theportfolio. From each panel you can access the online help by clicking the ?symbol at the top right corner of the portlet.
3 Task barIt contains a tab for each active function that you called from the portfolio.Each time you click an entry of the portfolio, the corresponding panel isopened in the portlet area. When you open a new panel, the precedingpanels are minimized to tabs on the task bar and you can switch betweenthe panels by clicking on these tabs. The browser task bar contains up tofive open tabs. If you open more than five tabs, a new browser windowopens and you can move from one page to another by opening the SelectAction menu. Optionally, you can define a list of panels that areautomatically opened as startup pages in the task bar each time you log in
© Copyright IBM Corp. 1999, 2012 1
to the console. To add a panel to your startup pages, open the panel andclick Select Action > Add To My Startup Pages at the top-right corner ofthe panel.
The portfolio main entries that you work with are:
Quick StartClick this entry to run some basic operations. From this view you cancreate and manage queries of objects on the plan and you can also createand modify connections to Tivoli Workload Scheduler engines.
All Configured TasksClick this entry to view a list of all your saved tasks to monitor objects inthe plan. A set of predefined tasks is provided to help you start using theapplication for the first time. These tasks cover the most common queriesyou might want to launch to find information about scheduling objectsrunning on distributed, z/OS, or both platforms.
All Configured ReportsClick this entry to view a list of all your saved reports. From this view youcan create new reports and customize existing ones.
DashboardClick this entry to open a graphical view that shows the progress of thecurrent plan on the engines for which you configured a connection andspecified its inclusion in the dashboard.
Workload
You can manage your workload to design objects in the database, to handle plans,to submit jobs or job streams to monitor objects in the plan, and to generatereports.
DesignExpand this entry to create, list, and edit objects and object definitions inthe database. From this entry, for example, you can create and modify jobs,job streams, and event rules.
ForecastExpand this entry to work with plans, creating and viewing trial andforecast plans and listing archived plans.
SubmitExpand this entry to submit jobs and job streams on request.
MonitorExpand this entry to create, list, and edit tasks to monitor objects in theplan. From this entry, for example, you can create and modify queries forjobs or job streams in the plan. You can also manage queries aboutworkload dependencies and events.
Scheduling Environment
You can design and control the topology of your scheduling environment, that is,your workstations and domains.
DesignExpand this entry to create, list, and edit workstations and domains inyour environment.
2 Tivoli Workload Scheduler: Dynamic Workload Console User’s Guide: Dynamic Workload Console User’s Guide
MonitorExpand this entry to create, list, and edit tasks to monitor workstations anddomains in the plan.
Reporting
You can define and run reports to gather historical data or details about yourplans. Expand this entry also to generate and run customized SQL reports.
Settings
You can configure and modify general settings about the Dynamic WorkloadConsole.
Manage EnginesClick this entry to create, list, and edit your connections to Tivoli WorkloadScheduler engines.
Manage User PreferencesClick this entry to configure and modify settings about table layout, timezone, and dashboard layout.
Manage SettingsClick this entry to import and export user preferences, configured tasks,and engine connections and to configure your settings repository.
Related tasks:“Accessing online publications” on page 151Accessing the Tivoli products online publications in the Tivoli software informationcenter website.Related information:Chapter 12, “Scenarios,” on page 141
Naming conventions for scheduling objects
The Dynamic Workload Console allows you to manage and control TivoliWorkload Scheduler production for z/OS and distributed environments.
There are some differences in the processing and behavior between the TivoliWorkload Scheduler products for z/OS and distributed environments. When thereare differences, the descriptions and related actions of scheduling objects areexplained for both environments.
Table 1 lists the objects and object names typical of the Tivoli Workload Schedulerenvironment where they are defined.
Table 1. Naming convention for scheduling objects
Object descriptionObject name in a distributedenvironment
Object name in a z/OSenvironment
An ordered list ofactivities in plan for thecurrent productionperiod.
Production Plan Current Plan
Chapter 1. Overview 3
Table 1. Naming convention for scheduling objects (continued)
Object descriptionObject name in a distributedenvironment
Object name in a z/OSenvironment
A unit of work that ispart of an application ora job stream and that isprocessed at aworkstation.
Job Operation. An operation cancontain a list of steps to run.
A list of jobs that run asa unit to accomplish atask (such as calculatingpayroll), together withtimes, priorities, andother dependencies thatdetermine the order inwhich the jobs run.
Job stream Application
A run of a job stream oran application scheduledin the plan.
Instance Occurrence
A type of applicationdescription related torun cycle, calendarinformation, or jobdescriptions common toall applications definedas members of thegroup.
N/A Application Group
A physical or logicalasset where jobprocessing occurs.
Workstation. It is qualifiedaccording to its position in thetopology of the schedulingnetwork and on its ability tointeract with the informationcontained in the current plan.
Workstation. It is qualifiedaccording to the type of jobprocessing it does incomputer workstation,general workstation, printworkstation.
Tivoli WorkloadScheduler database
A customized set of tables in arelational database containingdefinitions for all schedulingobjects, network topology,variables, and job processingstatistics.
A collection of six sets ofdata, acting as a flatdatabase, that containinformation about calendars,periods, workstationdescriptions, JCL variabletables, applicationdescriptions, and operatorinstructions.
Related concepts:“Workstation” on page 29“Job” on page 36“Job stream” on page 36“Production process” on page 51
Convention for specific platform informationIcons to identify the information related only to specific platforms.
This publication uses the following icons to identify the information related only tospecific platforms:
4 Tivoli Workload Scheduler: Dynamic Workload Console User’s Guide: Dynamic Workload Console User’s Guide

Distributed
The information applies only to Tivoli Workload Scheduler running in adistributed environment.
z/OS
The information applies only to Tivoli Workload Scheduler running in az/OS environment.
All information that is not marked by an icon applies to all the supportedenvironments.
Chapter 1. Overview 5

6 Tivoli Workload Scheduler: Dynamic Workload Console User’s Guide: Dynamic Workload Console User’s Guide

Chapter 2. Installing and configuring the Dynamic WorkloadConsole
For more information about this installation, see Planning and Installation orPlanning and Installation
To configure the Dynamic Workload Console, see Configuring the DynamicWorkload Console to find information about:v Launching in context with the Dynamic Workload Consolev Configuring access to the Dynamic Workload Consolev ConfiguringDynamic Workload Console to use Single Sign-Onv Configuring Dynamic Workload Console to use SSLv Customizing your global settingsv Configuring High Availability for Dynamic Workload Consolev Configuring Dynamic Workload Console to view reports
© Copyright IBM Corp. 1999, 2012 7

8 Tivoli Workload Scheduler: Dynamic Workload Console User’s Guide: Dynamic Workload Console User’s Guide
Chapter 3. Using the Dynamic Workload Console from mobiledevices
Use your mobile device to easily and quickly interact with the Dynamic WorkloadConsole. You can monitor and run your workload from your mobile device bysimply logging in to a URL and starting an app.
The IT market is moving towards mobile devices, which help you perform a largenumber of tasks, such as manage your sales workforce, read your e-mail, checkyour accounting system, or attend a web conference. Applications designed formobile devices must be intuitive and user-friendly while remaining robust andreliable, and providing instant access to business and client data wherever they are.
You can interact withTivoli Workload Scheduler by using the followingapplications:
To open this home page on your mobile device, access the following URL:https://host_name:port_number/ibm/TWSWebUI/mobile
where host_name and port_number are the host name and port number of theDynamic Workload Console you are connecting to.
DashboardTo monitor your workload in plan, see the job details, and send thisinformation via e-mail. Launch the Dashboard from your mobile device byconnecting to the following URL:https://host_name:port_number/ibm/TWSWebUI/dash.jsp
where host_name and port_number are the host name and port number ofthe Dynamic Workload Console you are connecting to.
To launch and use the Dashboard, you must have one of the followingroles:
TWSWEBUIAdministratorUsers with this role can view and edit objects.
TWSWEBUIOperatorUsers with this role can only view objects.
Self-Service CatalogTo submit job streams from your mobile, even if you do not have anyexperience with Tivoli Workload Scheduler. Launch the Self-Service Catalogfrom your mobile device by connecting to the following URL:https://host_name:port_number/ibm/TWSWebUI/sscatalog.jsp
where host_name and port_number are the host name and port number ofthe Dynamic Workload Console you are connecting to.
© Copyright IBM Corp. 1999, 2012 9
|
|
|
|||
|||||
|||
||
|
||
||||
|
||
||
||
||
||||
|
||
To launch and use this application, you must have one of the followingroles:
TWSWEBUIAnalystThis is the minimum role required to access Self-Service Catalog.Users with this role can view catalogs and services to which theyare authorized and submit service requests. They cannot modifyservices or catalogs.
TWSWEBUIAdministratorUsers with this role can create, edit, and delete catalogs andservices. They can also associate roles to services and catalogs toauthorize other users to work with them.
Related concepts:“Monitoring the progress of your plan” on page 97Request a graphical view of the progress of the current plan.
10 Tivoli Workload Scheduler: Dynamic Workload Console User’s Guide: Dynamic Workload Console User’s Guide
||
|||||
||||
|
||
Chapter 4. Configuring High Availability
How to configure, change, and share your settings repository.
Performance can be highly improved by migrating the Dynamic Workload Consoleto High Availability Configuration, so as to have multiple console instancesworking at the same time as one console.
If you use a Dynamic Workload Console in High Availability configuration, whenyou connect to a Dynamic Workload Console you are not actually connecting to aspecific console but to a load balancer that dispatches and redirects the connectionsamong the nodes in the configuration. Therefore, for example, if a node fails, newuser sessions are directed to other active nodes in the configuration and thischange is completely transparent to users.
For more information about High Availability configuration, see Configuring HighAvailability for Dynamic Workload Console in the Tivoli Workload SchedulerAdministration
To implement this kind of configuration, you must change your settings repository.The user settings such as user preferences, saved tasks, and engine connections,which by default are stored in a settings repository that is a local XML file, mustbe exported and stored in a settings repository on a DB2 database. Using adatabase as your repository, all your existing user settings relating to currentDynamic Workload Console are saved in the database, and all the operationsinvolving user settings are run using the settings in this repository.
Managing user settingsHow to export the user settings and import them into a new Dynamic WorkloadConsole
Before you begin
To perform this task you need to have the TWSWEBUIAdministrator role.
About this task
User settings such as user preferences, saved tasks, and engine connections arestored in the settings repository, which by default is a local file. However, you candecide to have your settings repository on a database for all Dynamic WorkloadConsole operations that involve user settings.
You can export the content of your settings repository as an XML file, optionallymodify it, and then import it into the same or another instance of DynamicWorkload Console.
This is particularly useful for migration purposes or if you want to modify thesame settings in multiple Dynamic Workload Console instances.
To export the settings and import them into a new Dynamic Workload Console,perform the following procedure.
© Copyright IBM Corp. 1999, 2012 11
|
|
|
|||
||||||
|||
|||||||
||
||
|
|
|
||||
|||
||
||
Note: Import and export operations are performed from and to thecurrently-selected repository.
Procedure1. Click Settings > Manage Settings.2. In the Manage Settings panel, click Export Settings and save the XML file in a
directory of your choice.3. Optionally, edit the file using an XML editor and save it.4. Log in to the Dynamic Workload Console where you want to import the
settings and open the Manage Settings panel.5. Click Import Settings and browse to the XML file containing the settings you
want to import. During the import operation, you choose to update or tooverwrite the existing settings with the new settings.
6. If you are using a local file as repository, restart the Dynamic WorkloadConsole to make the change effective or click Undo before restarting it torestore previous settings. This is not required if you are using a database asyour repository, but in this case you must ensure that during the importoperation there are no other users connected to the Dynamic Workload Consolewhile the repository content is being updated.
Changing settings repositoryChanging the settings repository.
Before you beginv To perform this task you need to have the TWSWEBUIAdministrator role.v You need to have access to an installed DB2 where a database has already been
created. If you need information about how to create a DB2 database, see IBMDB2 Database for Linux, UNIX, and Windows Information Center.
v You must have Administrator rights on that database.
About this task
User settings such as user preferences, saved tasks, and engine connections arestored in the settings repository, which by default is a local file. However, you candecide to have your settings repository on a database for all Dynamic WorkloadConsole operations that involve user settings.
This can be useful, for example, for scalability purposes or to have multipleDynamic Workload Console instances sharing the same user settings.
To use a database for your settings repository, you must configure the databasesettings, as described in the following procedure:
Procedure1. Run the wastool:
a. From the Tivoli Workload Scheduler installation path, open theinstall_dir\wastools directory and run installTDWCDatasource wastool tocreate the data source.
b. Specify the connection details of the DB2 database inTDWCDatasource.properties file, located in install_dir\wastools directory.
2. Restart the Dynamic Workload Console.
12 Tivoli Workload Scheduler: Dynamic Workload Console User’s Guide: Dynamic Workload Console User’s Guide
||
|
|
||
|
||
|||
||||||
||
|
|
|
|||
|
|
||||
||
||
|
|
|||
||
|
3. Export your settings:a. From the Dynamic Workload Console portfolio, click Settings > Manage
Settings.b. Optionally, in the Manage Settings panel, click Export Settings and save the
XML file in a directory of your choice. In this way you save your usersettings in a local file to load them on the database, when it becomes yoursettings repository.
4. Switch repository to DB2.a. In the same panel, click Configure settings repository > Use database as
settings repository to specify that settings must be saved in the databaseinstead of a local file.
b. In the Database connection properties section, specify the credentialsrequired to connect to the database.
Note: For all the details about options and fields displayed in the panels,see the online help by clicking the question mark located at the top-rightcorner of each panel.
c. Optionally, you can test the connection.d. Save the new configuration.
5. Import your settings or initialize the database:a. Optionally, click Import settings to import your user settings from the XML
file to the database repository. During the import operation, keep thedefault choice, which overwrites the existing settings with the new settings.Performing this step, the database is automatically initialized.
b. If you have not performed previous step, click Configure settingsrepository >Initialize database .
Results
As a result, all your existing user settings relating to current Dynamic WorkloadConsole are saved in the database, and all the operations involving user settingsare run using the settings in this repository.
Sharing a settings repositoryHow to share a settings repository on multiple Dynamic Workload Consoleinstances.
Before you begin
To perform this task you need to have the TWSWEBUIAdministrator role.
About this task
User settings such as user preferences, saved tasks, and engine connections arestored in the settings repository, which by default is a local file. However, you candecide to have your settings repository on a database for all Dynamic WorkloadConsole operations that involve user settings.
This can be useful, for example, for scalability purposes or to have multipleDynamic Workload Console instances sharing the same user settings.
Chapter 4. Configuring High Availability 13
|
||
||||
|
|||
||
|||
|
|
|
||||
||
|
|||
||
||
|
|
|
||||
||
To use a database for your settings repository, you must configure the databasesettings, as described in the following procedure:
Procedure1. Ensure that all the Dynamic Workload Console instances that will share the
same settings repository, also use the same user registry.2. Ensure that one Dynamic Workload Console settings repository has been
switched to database, as described in Switch repository to DB2.3. Specify this repository as the default one for all the other Dynamic Workload
Console instances that must share it:a. From the Tivoli Workload Scheduler installation path, open the
install_dir\wastools directory and run installTDWCDatasource wastool tocreate the data source, specifying the same database settings as in the firstDynamic Workload Console instance.
b. Restart the Dynamic Workload Console.c. From the Dynamic Workload Console portfolio, click Settings > Manage
Settings.d. In the same panel, click Configure settings repository > Use database as
settings repository to specify that settings must be saved in the databaseinstead of a local file.
e. In the Database connection properties section, specify the credentialsrequired to connect to the database.
f. Optionally, you can test the connection.g. Save the new configuration.
Results
As a result, all user settings are saved in the database, shared by all the DynamicWorkload Console instances, and all the operations involving user settings are runusing the settings in this repository.
Changing the Dynamic Workload Console user of DB repositoryHow to change the Dynamic Workload Console user that updates the settingsrepository on DB2.
Before you begin
To perform this task you need to have the TWSWEBUIAdministrator role.
You must have switched the Dynamic Workload Console settings repository from alocal file to a database repository, as described in “Changing settings repository”on page 12.
About this task
Only users with database administrator rights are authorized to initialize theDynamic Workload Console related tables on the database.
If you want the Dynamic Workload Console to access the database repository witha user without database administrator privileges you must follow these steps:
14 Tivoli Workload Scheduler: Dynamic Workload Console User’s Guide: Dynamic Workload Console User’s Guide
||
|
||
||
||
||||
|
||
|||
||
|
|
|
|||
||
||
|
|
|||
|
||
||
Procedure1. Create a new DB2 user and grant this user with SELECT, INSERT, UPDATE,
DELETE rights on all the following tables, belonging to TDWC schema:TDWC_EngineConnectionTDWC_QueryTaskTDWC_ReportTaskTDWC_MEQueryTaskTDWC_CredentialTDWC_ConfigurationPropertyTDWC_Preferenceable
The above are the default permissions. However, if you need to restrict yourpolicy, you can give the following permissions to the new DB2user:revoke connect,bindadd, createtab, implicit_schema on database from public;revoke use of tablespace USERSPACE1 from public;
grant use of tablespace userspace1 to user twsdb2;grant createtab on database to user twsdb2;grant implicit_schema on database to user twsdb2;
2. Change Dynamic Workload Console user accessing DB2a. Return to the Dynamic Workload Console portfolio, click Settings >
Manage Settings
b. In the Database Settings section, specify the credentials of the newlycreated user that must to connect to the database.
Note: As a result of this user switch, theDynamic Workload Console withoutdatabase administrator privileges will no longer be authorized to the followingactions in the Manage Settings panel:v Initialize database
v Import settings with Cancel and recreate option.
Chapter 4. Configuring High Availability 15
|
||
|||||||
||
||||||
|
||
||
|||
|
|
|

16 Tivoli Workload Scheduler: Dynamic Workload Console User’s Guide: Dynamic Workload Console User’s Guide
Chapter 5. Customizing Your Console
How to customize your Console.
When you log in to the Tivoli Integrated Portal, you see a portfolio on the left withan entry for each Tivoli product installed inside it, such as, for example, theDynamic Workload Console.
In the following sections you can see how to customize the portfolio and thestartup page to include only the entries and the pages that you really need toaccess. In addition to this, you can see how to customize the tasks that you need torun and how to enable or disable the notification about product updates.
Customizing your portfolioHow to customize your portfolio.
About this task
In the Tivoli Integrated Portal, use the View selection list at the top left of thepanel to select the entries to be displayed in your console portfolio.
You can decide to see only the entries related to a specific application by selectingthe related entry in the list, for example, Tivoli Workload Scheduler.
To customize your list of entries to be displayed in the console portfolio, performthe following steps.
Procedure1. Select My tasks from the View selection list. If you did not customize your
portfolio before, you must click Add tasks to open the My Tasks pane.2. From the My tasks pane, select the entries you want to display.3. Click Apply to save your changes.
Results
Your customized list is displayed in the console portfolio.
You can define which view is displayed by default every time you log into theTivoli Integrated Portal by selecting it in the My Startup Pages pane.
For additional information about the Tivoli Integrated Portal, click Help at the topright of the panel and select Using the console in the Contents section on the leftof the displayed panel.
Customizing your startup pageHow to customize the startup page
© Copyright IBM Corp. 1999, 2012 17
About this task
In the Tivoli Integrated Portal, you can define the list of pages that are launchedevery time you log in to the console.
To add a page to your startup pages, perform the following steps.
Procedure1. Open the page you want to be launched when you log in to the console.2. In the Select Action list at the top right of the panel, select Add to My Startup
Pages.
Results
The page that you added is launched every time you log in to the console.
To manage the pages you added, select My Startup Pages in the portfolio on theleft to access the My Startup Pages pane. From this pane you can remove the pagesfrom the list or define the default page to be displayed when you log in.
From the My Startup Pages pane, you can also specify the default console viewthat is displayed as your portfolio.
For additional information about the Tivoli Integrated Portal, click Help at the topright of the panel and select Using the console in the Contents section on the leftof the displayed panel.
Customizing your tasksBefore you begin
To customize a task, you must be the task owner.
About this task
Configured tasks are provided with default values. However, you can customizetheir properties and save the newly-modified tasks. You can modify the properties,such as filters and columns, of all the tasks that you own. Starting from a task, youcan also customize the properties of secondary queries that are launched startingfrom the objects resulting from the task.
If you have administrator's rights, you can configure a global setting so as to limitthe number of results retrieved by monitor tasks. You can specify the maximumnumber of items that must be retrieved by the queries, and this configuration willapply to all monitor tasks run by current Dynamic Workload Console, except forMonitor Critical jobs. For more information, see “Limit the number of objectsretrieved by queries” on page 156.
To customize your tasks, perform the following steps:
Procedure1. Click All Configured Tasks.2. In the All Configured Tasks panel, select a task and click Task Properties. The
task opens displaying some tabs on the left.
18 Tivoli Workload Scheduler: Dynamic Workload Console User’s Guide: Dynamic Workload Console User’s Guide
||||||
Note: You can access the same task window by running the task and clicking
the task properties icon from the navigation bar, above the table of results.3. Click the tabs that refer to the properties you want to customize.4. Modify the values as required and click Save to save the modified task.
Results
You have personalized your task. Consider that any customization only applies tothe single task you edited. For example, if you change the columns to be displayedin a task named All Jobs in plan, this change does not affect any other task tomonitor jobs.
What to do next
Customizing secondary queries
While editing or creating a task, you can also choose the columns to display insecondary queries. Secondary queries are those that are run from the table of resultsof a task. For example, from the list of jobs resulting from a task named My Jobs,you can run a secondary query to list all job streams and workstations associatedto one of the listed jobs.
You can also customize these secondary queries from the Columns Definition panelof any task. In the Columns Definition panel of My Jobs task, you can also choosethe columns to display in job stream and workstation tasks. However, this columnselection only applies to the lists of job streams and workstations obtained bydrilling down from the results of the My Jobs task; it does not apply to any othergeneric monitoring task about job streams or workstations.
Adding tasks to your favorite bookmarksHow to save a task to the favorite bookmarks of your browser.
About this task
When you run a task, you can save it as one of the favorite bookmarks of yourbrowser so that you can launch it directly from the browser.
To add a task to your favorite bookmarks, from the panel displaying your task
results, click the add link icon .Related concepts:“Monitoring your Scheduling Environment” on page 99“Monitoring your Workload” on page 102
Using the news notification beaconHow to be always up to date with the latest news and information about theproduct and receive internal communications from the environment administrator.
About this task
A beacon appears on your screen when an update for the product or an internalcommunication from the administrator is made available. Click the beacon to opena pop-up that describes the update and gives you a direct link to it.
Chapter 5. Customizing Your Console 19
|
||
|
|||
Update and news notifications relate to different topics, belonging to categories,such as:v APARsv Fixes and utilitiesv Newsv Technotesv Product documentation and publicationsv Internal communications
By default, the news notification is enabled for all users to all the categories,however, optionally, the TWSWEBUIAdministrator can customize this behaviorspecifying which user roles must receive all the notifications or only some of themor even none. For more information, see: “Disable and customize NewsFeedfunction” on page 152.
The news notification is enabled by default, however, to unsubscribe from all thenews, or only form the displayed news category, you can select the relatedcheck-box in the news pop-up.
In th pop-up window that displays the latest news, you can also navigate throughpast news and notifications and provide your feedback on a piece of news troughan IBM feedback form.
If you have TWSWEBUIAdministrator role or writing rights on the system whereDynamic Workload Console, is installed, you can add multiple NewsFeed sectionsin the TdwcGlobalSettings.xml file to transmit different notifications to differentuser roles. For more information, see “Sending internal communications” on page22.
Disabling news notificationHow to enable and disable news notification preventing the beacon fromappearing on your screen when an update for the product is made available.
About this task
By default, all users receive all the news notifications. However, optionally, you cancustomize this behavior by preventing all or only some specific news from beingnotified to you.
When the beacon appears on your screen and you click it, the first notificationdisplays in a pop-up. If you do not want to receive any notifications at all, or ifyou want to unsubscribe from some specific categories of notifications, select therelated checkbox in the news pop-up.
To enable again all the news notifications, perform the following steps:1. From the Dynamic Workload Console navigation tree, click Settings > Manage
User Preferences. The Manage User Preferences panel containing the currentsettings is displayed.
2. Click Restore beacon defaults .
20 Tivoli Workload Scheduler: Dynamic Workload Console User’s Guide: Dynamic Workload Console User’s Guide
||
|
|
|
|
|
|
|||||
|||
|||
|||||
|
||
|
|||
||||
|
|||
|
Related reference:“Disable and customize NewsFeed function” on page 152
Customizing the list of notification recipientsHow to customize the list of recipients of the news notification beacon, byspecifying who must receive what kind of notification or communication.
Before you begin
You must have TWSWEBUIAdministrator role or writing rights on the systemwhere Dynamic Workload Console is installed.
About this task
By default, the news notification is enabled for all users to all the categories,however, optionally, the TWSWEBUIAdministrator can customize this behaviorspecifying which user roles must receive all the notifications and internalcommunications, or only some of them or even none.
For example, often operators do not need to have information about new patchesand fix packs to be installed or about product events. Analysts are only interestedin information and updates about reporting. Whereas, Administrators want toreceive all notifications (and, optionally, force the default settings and send anotification to those who are normally excluded from a category).
Procedure
Customize the TdwcGlobalSettings.xml file to specify the news categories thatmust be notified to users, based on their roles.The TdwcGlobalSettings.xml file is organized into several sections that can berepeated multiple times in the same file and applied differently to different userroles. Therefore, to customize a behavior based on the user role, uncomment thesection corresponding to the user role and include the sections that must apply tothis role.The Disable and customize NewsFeed function section contains the configurationdetails regarding the notification beacon. Therefore, for example, to enable thenotifications of specific categories only to a specific user role, you can insert asection like the following:<settings role="TWSWEBUIAdministrator"><NewsFeed><property name="NewsFeed" type="RSS" value="http://www.my.company.com/RSS_administrators.xml" /><property name="NewsFeedCategory" value="Administrators"icon="http://www.my.company.com/administrator.png" /></NewsFeed></settings><settings role="TWSWEBUIOperator"><NewsFeed><property name="NewsFeed" type="RSS" value="http://www.my.company.com/RSS_operators.xml" /><property name="NewsFeedCategory" value="Operators"icon="http://www.my.company.com/operators.png" /></NewsFeed></settings>
Chapter 5. Customizing Your Console 21
|
|
|
||
|
||
|
||||
|||||
|
|||||||||||
|||||||||||||||||
Example
If no customized feed is specified, the default feed is used, which retrieves thelatest product information from official support sites. To disable any notification,comment the entire section. To disable only external notifications about productinformation updates, assign an empty string as value to the FeedURL property ofJSONP feed like:
<property name="FeedURL" type="JSONP" value="" />
Related reference:“Disable and customize NewsFeed function” on page 152
Sending internal communicationsHow to use the news feed beacon to transmit internal communications to all orsome Dynamic Workload Console users.
Before you begin
You must have TWSWEBUIAdministrator role or writing rights on the systemwhere Dynamic Workload Console, is installed.
About this task
You can use the news notification beacon to send specific communications tointernal Dynamic Workload Console users, simply by storing thesecommunications on the Dynamic Workload Console server. For example,administrators can use this feature to broadcast maintenance notices or companyrelated announcements.
Note:
If no customized feed is specified, the default feed is used, which retrieves thelatest product information from official support sites. To disable any notification,comment the entire section. To disable only external notifications about productinformation updates, assign an empty string as value to the FeedURL property ofJSONP feed like:
<property name="FeedURL" type="JSONP" value="" />
To add customized feeds, specify a list of sections named NewsFeed in theTdwcGlobalSettings.xml file by performing the following procedure:
Procedure1. Edit the TdwcGlobalSettings.xml file by adding the properties specifying the
name and format of the file in the NewsFeed section. Example:<property name="NewsFeed" type="RSS" value="http://www.DWC_hostname:portnumber.com/news_rss.xml"/>
For more details, see the Example2. Optionally, specify a polling interval for the feed reading and an image
associated to the notification. Example:<property name="PollInterval" value="600" /><property name="PollInitialDelay" value="1" /><property name="NewsFeedCategory" value="my company info"icon="http://www.my.company.com/info.png" /><property name="NewsFeedCategory" value="my company alert"icon="http://www.my.company.com/alert.png" />
22 Tivoli Workload Scheduler: Dynamic Workload Console User’s Guide: Dynamic Workload Console User’s Guide
|
|||||
|
|
|
|
||
|
||
|
|||||
|
|||||
|
||
|
||
|
|
||
||||||
Note: To specify multiple feeds, you must specify multiple NewsFeedproperties.
3. Optionally, specify a list of feeds that must be taken into consideration by thenotification feature. The browser detects new items from all the specified feedsand merge them sorting them by date in a single list.
4. Write the communication in ATOM 1.0 or RSS 2.0 format and store this file inthe an HTTP server complying with the same origin policy. For browser securityreasons, this policy permits to access information only on server using the sameprotocol, hostname and port number as the one to which you are connected.
5. Optionally, if you want to store your customized feed on an external server,you must configure an HTTP reverse proxy server mapping the external serveraddress.
Results
The notification beacon function reads all the feeds specified in the NewsFeedsection, detects new information and aggregates all in a single file ordering it bydate. Then, it transmits notifications and internal communications to the recipientsbased on the roles specified in the TdwcGlobalSettings.xml file.Related reference:“Disable and customize NewsFeed function” on page 152
Customizing your global settingsAbout this task
Some general settings of Dynamic Workload Console can be included in acustomizable file named TdwcGlobalSettings.xml.
Users with Administrator privileges can use a configuration file, namedTdwcGlobalSettings.xml, to add and modify some customizable information, suchas:v The maximum number of objects shown in the graphical views.v The configuration details to enable the news notification beacon and be
constantly up-to-date with product information. See “Disabling newsnotification” on page 20.
v The URLs where you can store customized documentation about your jobs orjob streams to associate customized documentation to them.
v The timeout to read and write information on a Tivoli Workload Scheduler forz/OS engine.
v The maximum number of objects retrieved with a query.
A template of this file is located on the installation DVD underWEBUI/platform_name/utils. You can modify it, replacing default values withcustomized ones and enabling commented sections. After customizing, you mustcopy it under the following path: Installation_dir/TWA/eWAS/profiles/TIPProfile/registry directory.
This file is accessed at each login, and all configurations specified in the file areimmediately applied, except for precannedTaskCreation property. This property isread only when a user logs in for the first time and then is used whenever thisuser logs in again.
Chapter 5. Customizing Your Console 23
||
|||
||||
|||
|
||||
|
|
You can use any text or XML editor to edit this file, but ensure that you save it isas a valid XML file.
The file is organized into the following sections that group similar properties:
Sections can also be repeated multiple times in the same file and applieddifferently to different user roles. To apply a section only to the users belonging toa role, the section must be included within the following setting:
settings roleThe user for which the following configuration must be applied. Defaultvalue: all users, unless otherwise specified.
Only one settings section can be specified for each role. If a user has more thanone role, the settings associated to the higher role are taken into consideration.
Example:<settings><graphViews><property name="planViewNewWindow" value="true"/></graphViews></settings>
<settings role="TWSWEBUIOperator"><graphViews><property name="planViewNewWindow" value="false"/></graphViews></settings>
Getting StartedInformation about the Dynamic Workload Console installation and configuration
For more information about this installation, see Planning and Installation orPlanning and Installation
To configure the Dynamic Workload Console, see Configuring the DynamicWorkload Console to find information about:v Launching in context with the Dynamic Workload Consolev Configuring access to the Dynamic Workload Consolev Configuring Dynamic Workload Console to use Single Sign-Onv Configuring the use of Lightweight Third-Party Authenticationv Configuring Dynamic Workload Console to use SSLv Customizing your global settingsv Configuring Dynamic Workload Console to view reports
You can access the Dynamic Workload Console from any computer in yourenvironment using a web browser through either the secure HTTPS or HTTPprotocol.
When you log in to the Tivoli Integrated Portal, you see a portfolio on the leftcontaining an entry for each Tivoli product installed and integrated with it, forexample, the Dynamic Workload Console. Expand the Tivoli Workload Schedulerentry in the portfolio to start to work with the console.
24 Tivoli Workload Scheduler: Dynamic Workload Console User’s Guide: Dynamic Workload Console User’s Guide
To access the Dynamic Workload Console online embedded documentation, clickHelp at the top right of the panel and select IBM Tivoli Workload Scheduler in theContents section on the left of the panel that opens.
The first and main actions that you perform when you connect to the DynamicWorkload Console are:
Creating a connection to a Tivoli Workload Scheduler engineYou specify the details (such as IP address, user name, and password) toaccess a Tivoli Workload Scheduler engine, and, optionally, a database tooperate with objects defined in plans or stored in the database.
From the Dynamic Workload Console, you can access the current plan, atrial plan, a forecast plan, or an archived plan for the distributedenvironment or the current plan for the z/OS environment.
You might want to access the database to perform actions against objectsstored in it or to generate reports showing historical or statistical data.
In addition, working both on the database and on plans, you can createand run event rules to define and trigger actions that you want to run inresponse to events occurring on Tivoli Workload Scheduler nodes.
Defining a scheduling environmentYou define your Tivoli Workload Scheduler network. You createworkstation definitions in the database to represent the physical machinesor computer systems on which your workload is scheduled to run. A TivoliWorkload Scheduler network is made up of the workstations where joband job stream processing occurs. When you design your network, youassign roles to these workstations to suit your specific businessrequirements. You can design your network with multiple domains, todivide control of a large network into smaller manageable groups. Atypical Tivoli Workload Scheduler network consists of a workstation actingas the master domain manager and at least one domain.
Defining scheduling objects in the databaseYou define your workload, which consists of jobs that are concatenated injob streams. Then, you specify the calendars and run cycles according towhich job streams must run. You can also define dependencies to conditionthe workload processing. All these definitions can be done within theWorkload Designer.
Creating tasks to manage Tivoli Workload Scheduler objects in the planYou specify some filtering criteria to query a list of scheduling objectswhose attributes satisfy the criteria you specified. Starting from this list,you can navigate and modify the content of the plan, switching betweenobjects, opening more lists, and accessing other plans or other TivoliWorkload Scheduler environments.
Chapter 5. Customizing Your Console 25
Related concepts:“Designing your Scheduling Environment” on page 65“Monitoring your Scheduling Environment” on page 99“Monitoring your Workload” on page 102Related tasks:“Creating and managing engine connections”“Designing your Workload” on page 69
Creating and managing engine connectionsAbout this task
To create, modify, or delete an engine connection, perform the following steps.
Note: You can modify or delete only engine connections that you created.
Procedure1. From the Dynamic Workload Console portfolio either:
a. Click Quick Start.b. Click Manage Engines.... This button is enabled only if you are the owner
of at least one connection.
or:a. Click Settings > Manage Engines.
2. From the displayed panel you can create, edit, delete, or share an engineconnection, and test the connection to the remote server where Tivoli WorkloadScheduler is installed. You can order the list of engine connections displayed inthis panel by using sorting criteria that you select with the buttons at the topleft corner of the table.
Related concepts:“Scheduling objects” on page 35“Engine connections” on page 54
Setting user preferencesAbout this task
To set the preferences to use in the output of tasks and reports, perform thefollowing steps.
Note: The preferences that you set in this panel are not used in the output of planreports. Those reports follow the preferences set on the workstation where thequery is run.
Procedure1. Click Settings > Manage User Preferences. The Manage User Preferences panel
containing the current settings is displayed.2. To modify the current settings click Edit. In this panel you can specify the:
v Number of rows that are displayed in the table of results of all your tasks asthe default setting
v Options to display dates, times, and time zonesv Layout and the refresh rate for the dashboard
26 Tivoli Workload Scheduler: Dynamic Workload Console User’s Guide: Dynamic Workload Console User’s Guide
3. Click Save changes to save the changes you made or Discard changes to exitthe page without saving.
Results
In the Manage User Preferences panel, you can also enable again the newsnotification. For details, see “Disabling news notification” on page 20.
Event management configurationYou can use the event management feature both from the Tivoli WorkloadScheduler command line interface and from the Dynamic Workload Console.
You need the following authorizations to perform event management operationsfrom the Dynamic Workload Console:
On Tivoli Integrated PortalThe user ID you use to log in to Dynamic Workload Console must bedefined as user on Tivoli Integrated Portal and must be defined within oneof the following groups:
Table 2. Event Management Authorizations
Groups Event management operations you can perform
TWSWEBUIOperator List and manage Event Rule Instances, Log Messages, andTriggered Actions.
TWSWEBUIDeveloper Create, list, and manage Event Rules.
Note: Dynamic Workload Console users belonging to theTWSWEBUIAdministrator group can perform all operations available inthe web-based user interface.
On Tivoli Workload SchedulerThe Tivoli Workload Scheduler user credentials defined in the engineconnection must belong to a Tivoli Workload Scheduler user authorized toperform event management operations in the Tivoli Workload Schedulersecurity file.
You need the create permission set for the rule object. You also need the usepermission on the objects (job, job stream, and so on) that you want to useas events.
For more information about how to define and manage user authorizationsin the security file, see Administration Guide.
Related concepts:“Event management” on page 55
Chapter 5. Customizing Your Console 27

28 Tivoli Workload Scheduler: Dynamic Workload Console User’s Guide: Dynamic Workload Console User’s Guide
Chapter 6. Tivoli Workload Scheduler Concepts
Conceptual information about Tivoli Workload Scheduler
This section provides conceptual information about Tivoli Workload Scheduler andthe Dynamic Workload Console.
Scheduling environmentThis section contains the main concepts that help you to understand what ascheduling environment is and what it comprises.
Workstation
Note: This section provides information relating to the use of workstations forscheduling jobs and job streams.
If, instead, you want to learn about workstations because you are planning yournetwork, see Planning and Installation or Planning and Installation
The computer system where you run your jobs and job streams is called aworkstation. Workstations can be grouped logically into workstation classes andorganized hierarchically into domains, managed by domain managers.
When you create a workstation definition for a system in your network you definea set of characteristics that uniquely identify the system and that control how jobsrun on it. For example, the IP address of the workstation, if it is behind a firewall,if communications with it must be secure, what time zone it is in, and the identityof its domain manager.
Workstations in the Tivoli Workload Scheduler scheduling network perform joband job stream processing, but can also have other roles. When your network isdesigned, these roles are assigned to these workstations to suit the specific needsof your business. The following types of workstation are available:
Distributed Master domain managerA workstation acting as the management hub for the network. It managesall your scheduling objects. The master domain manager workstation mustbe installed with this role.
Distributed Backup master domain managerA workstation that can act as a backup for the master domain managerwhen problems occur. It is a master domain manager, waiting to beactivated. Its use is optional. This workstation must be installed as amaster domain manager workstation.
Learn more about switching to a backup master domain manager inAdministration Guide.
Distributed Domain managerA workstation that controls a domain and that shares managementresponsibilities for part of the Tivoli Workload Scheduler network. It isinstalled as an agent, and then configured as a domain managerworkstation when you define the workstation in the database.
© Copyright IBM Corp. 1999, 2012 29

Dynamic domain managerAn installed component in a distributed Tivoli Workload Schedulernetwork that is the management hub in a domain. All communication toand from the dynamic agents in the domain is routed through the dynamicdomain manager. When you install a dynamic domain manager theworkstation types listed below are created in the database:
fta Fault-tolerant agent component manually configured as domainmanager
brokerBroker server component
agent Dynamic agent component
Backup dynamic domain managerA workstation which can act as a backup for the dynamic domainmanager, when problems occur. It is effectively a dynamic domainmanager, waiting to be activated. Its use is optional.
Learn more about switching to a backup dynamic domain manager inAdministration Guide.. When you install a dynamic domain manager theworkstation types listed below are created in the database:
fta Fault-tolerant agent component.
brokerBroker server component
agent Dynamic agent component
Fault-tolerant agentA workstation that receives and runs jobs. If there are communicationproblems with its domain manager, it can run jobs locally. It is installed asan agent, and then configured as a fault-tolerant agent workstation whenyou define the workstation in the database. This workstation is recorded inthe Tivoli Workload Scheduler database as fta.
Standard agentA workstation that receives and runs jobs only under the control of itsdomain manager. It is installed as an agent, and then configured as astandard agent workstation when you define the workstation in thedatabase.
Extended agentA workstation that has a host and an access method. The host is any otherworkstation, except another extended agent. The access method is anIBM-supplied or user-supplied script or program that is run by the hostwhenever the extended agent is referenced in the production plan.Extended agents are used to extend the job scheduling functions of TivoliWorkload Scheduler to other systems and applications. For example, tolaunch a job on an extended agent, the host runs the access method,passing it job details as command line options. The access methodcommunicates with the external system or application to launch the joband return the status of the job.
Also it is a workstation where a Tivoli Workload Scheduler forApplications access method has been installed as a bridge so that you canschedule jobs in the SAP R/3, Oracle E-Business Suite, PeopleSoft, z/OS,or custom applications. It must be physically hosted by a fault-tolerantagent (up to 255 extended agents per fault-tolerant agent) and then definedas an extended agent in the database.
30 Tivoli Workload Scheduler: Dynamic Workload Console User’s Guide: Dynamic Workload Console User’s Guide
For more information, see User's Guide and Reference and Tivoli WorkloadScheduler for Applications User's Guide
Workload broker agentA workstation that manages the life cycle of Tivoli Workload SchedulerWorkload Broker jobs in Workload Broker It is installed and configured asa dynamic workload broker workstation in the database.
TWS for z/OS agentA distributed workstation that runs jobs scheduled from Tivoli WorkloadScheduler for z/OS. Like fault-tolerant workstations, it is installed in aTivoli Workload Scheduler distributed domain. Unlike fault-tolerantworkstations, it does not:v Have fault tolerancev Require an end-to-end serverv Need topology definitions
Communication with the agents is handled directly by the controller. Formore information about the end-to-end scheduling with fault tolerancecapabilities, see for z/OS Scheduling End-to-end with z-centricCapabilities.
z/OS Virtual workstationA workstation that is created with the automatic reporting attribute andthe virtual option, defining a list of destinations, for the workloadsubmission, that are used to spread the workload across trackers. When thescheduler processes the jobs submitted to a virtual workstation, itdistributes the workload according to a sequenced turn criteria, based on around-robin algorithm. To submit the job, at least one of the destinations inthe list must be available.
You can associate open intervals, parallel servers, and fixed resources toeach destination belonging to the defined pool. The association is disabledat virtual workstation level, because the jobs that you submit on a virtualworkstation are actually run on a single destination. When you associateparallel servers with a virtual workstation destination, you can specify avalue up to 65535. The alternative workstation definition is not applicableeither at workstation level or at single destination level.
Remote engineA workstation that represents locally a remote Tivoli Workload Schedulerengine. It is a workstation used to run only shadow jobs. A shadow job is ajob that runs locally and is used to map another job running on a remoteengine. This relationship between the two jobs is called a cross dependency.You define a remote engine workstation if you want to federate yourenvironment with another Tivoli Workload Scheduler environment, eitherdistributed or z/OS, to add and monitor dependencies on jobs running inthe other scheduling environment. This type of workstation uses aconnection based on HTTP protocol to allow the two environments tocommunicate.
Dynamic agentA workstation that manages a wide variety of job types, for example,specific database or FTP jobs, in addition to existing job types. Thisworkstation is automatically created and registered when you install thedynamic agent. Because the installation and registration processes areperformed automatically, when you view the agent in the Tivoli DynamicWorkload Console, it results as updated by the Resource Advisor Agent.You can group agents in pools and dynamic pools.
Chapter 6. Tivoli Workload Scheduler Concepts 31
Pool A workstation grouping a set of dynamic agents with similar hardware orsoftware characteristics to submit jobs to. Tivoli Workload Schedulerbalances the jobs among the dynamic agents within the pool andautomatically reassigns jobs to available dynamic agents if an agent is nolonger available. To create a pool of dynamic agents in your TivoliWorkload Scheduler environment, define a workstation of type pool hostedby the workload broker workstation, then select the dynamic agents youwant to add to the pool. A computer system group is automaticallydefined in the workload broker database together with its associateddynamic agents.
Dynamic poolA workstation grouping a set of dynamic agents that is dynamicallydefined based on the resource requirements you specify. For example, ifyou require a workstation with low CPU usage and the Windowsoperating system installed to run your job, you specify these requirementsusing the Tivoli Dynamic Workload Console or the composer command.When you save the set of requirements, a new workstation is automaticallycreated in the Tivoli Workload Scheduler database. This workstation ishosted by the workload broker workstation. This workstation maps all thedynamic agents in your environment that meet the requirements youspecified. The resulting pool is dynamically updated whenever a newsuitable agent becomes available. Jobs scheduled on this workstationautomatically inherit the requirements defined for the workstation.
Related tasks:“Creating distributed workstations” on page 65“Creating z/OS workstations” on page 66“Creating z/OS virtual workstations” on page 67“Creating a task to Monitor Workstations” on page 99“Creating Workload Broker objects” on page 87Related reference:“Workstation types” on page 168
DomainDistributed
The domain.
All the workstations in a distributed Tivoli Workload Scheduler network areorganized into one or more domains, each of which consists of one or more agentsand a domain manager acting as the management hub. Most communication toand from the agents in the domain is routed through the domain manager. If theagent has the "behind firewall" designation, all of it is.
All the networks have a master domain where the domain manager is the masterdomain manager. It maintains the database of all the scheduling objects in thedomain and the central configuration files. The master domain manager generatesthe plan and creates and distributes the Symphony file. In addition, logs andreports for the network are maintained on the master domain manager.
You can organize all the agents in your network into a single domain or intomultiple domains.
32 Tivoli Workload Scheduler: Dynamic Workload Console User’s Guide: Dynamic Workload Console User’s Guide
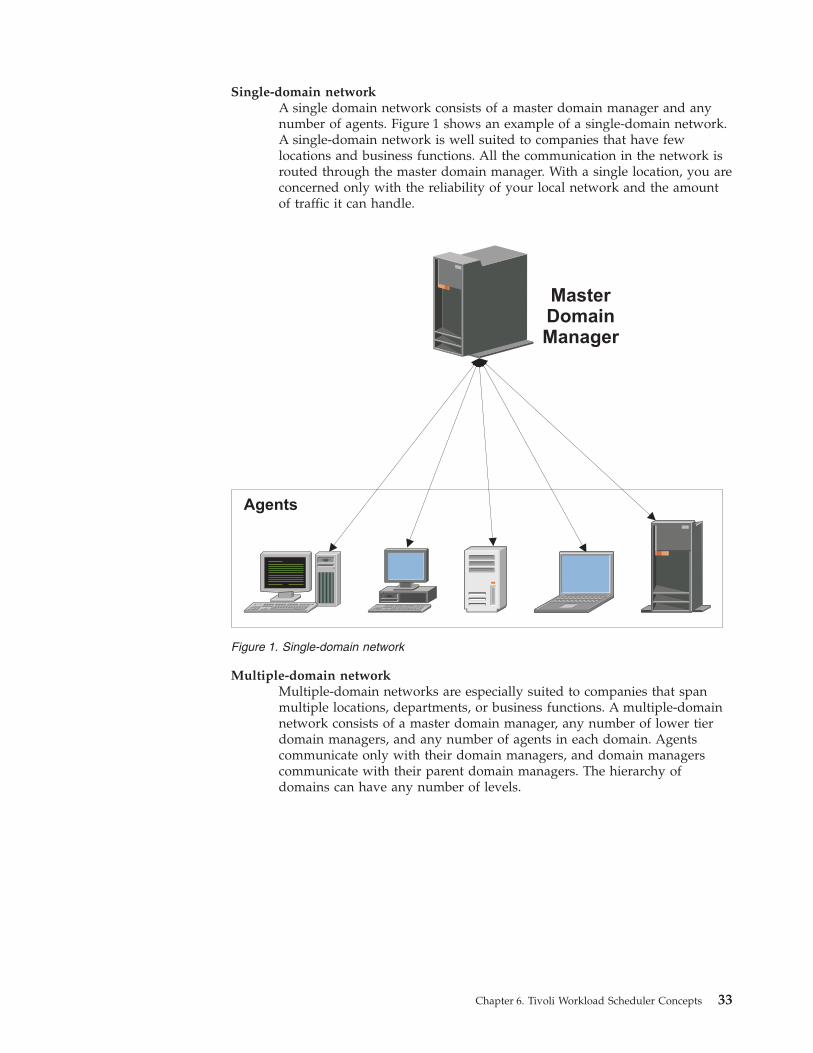
Single-domain networkA single domain network consists of a master domain manager and anynumber of agents. Figure 1 shows an example of a single-domain network.A single-domain network is well suited to companies that have fewlocations and business functions. All the communication in the network isrouted through the master domain manager. With a single location, you areconcerned only with the reliability of your local network and the amountof traffic it can handle.
Multiple-domain networkMultiple-domain networks are especially suited to companies that spanmultiple locations, departments, or business functions. A multiple-domainnetwork consists of a master domain manager, any number of lower tierdomain managers, and any number of agents in each domain. Agentscommunicate only with their domain managers, and domain managerscommunicate with their parent domain managers. The hierarchy ofdomains can have any number of levels.
MasterDomainManager
Agents
Figure 1. Single-domain network
Chapter 6. Tivoli Workload Scheduler Concepts 33
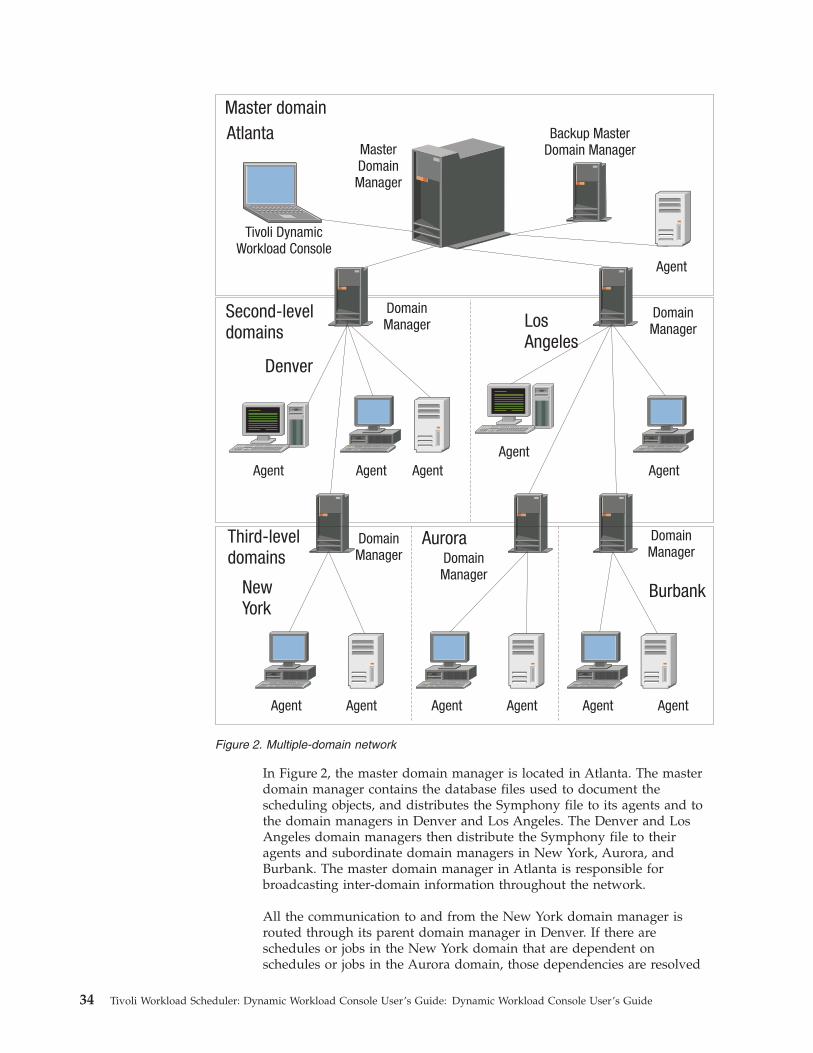
In Figure 2, the master domain manager is located in Atlanta. The masterdomain manager contains the database files used to document thescheduling objects, and distributes the Symphony file to its agents and tothe domain managers in Denver and Los Angeles. The Denver and LosAngeles domain managers then distribute the Symphony file to theiragents and subordinate domain managers in New York, Aurora, andBurbank. The master domain manager in Atlanta is responsible forbroadcasting inter-domain information throughout the network.
All the communication to and from the New York domain manager isrouted through its parent domain manager in Denver. If there areschedules or jobs in the New York domain that are dependent onschedules or jobs in the Aurora domain, those dependencies are resolved
Tivoli DynamicWorkload Console
MasterDomainManager
Master domain
Denver
Backup MasterDomain Manager
Agent
DomainManager
Agent Agent Agent
Second-leveldomains
LosAngeles
DomainManager
AgentAgent
NewYork
DomainManager
Agent Agent
AuroraDomainManager
Agent Agent
Burbank
DomainManager
Agent Agent
Third-leveldomains
Atlanta
Figure 2. Multiple-domain network
34 Tivoli Workload Scheduler: Dynamic Workload Console User’s Guide: Dynamic Workload Console User’s Guide
by the Denver domain manager. Most inter-agent dependencies arehandled locally by the lower tier domain managers, greatly reducing trafficon the network.
You can change the domain infrastructure dynamically as you develop yournetwork. You move a workstation to a different domain, by changing the domainname in its database definition. The change takes effect when the mastergenerates/extends the plan.
Tip: You cannot schedule jobs or job streams to run on all workstations in a domainby identifying the domain in the job or job stream definition. To achieve this,you must create a workstation class that contains all the workstations in thedomain.
Related tasks:“Creating a domain” on page 67“Creating distributed workstations” on page 65“Creating a task to Monitor Domains” on page 101
Scheduling objectsThe set of scheduling objects described in the current plan is a subset of all thescheduling objects stored in the database. The scheduling objects accessible fromthe Dynamic Workload Console depend on your Tivoli Workload Schedulerenvironment.
Distributed For distributed environments, the scheduling objects reported in theproduction plan are:
v All the active workstations defined in the database. These are theworkstations whose definition does not have the ignore flag set to on.
v All the domains.v All the job streams scheduled to start in the production period and all
jobs belonging to these job streams.v All the resources, files, parameters, variables, and prompts defined in
the job streams.
z/OS For z/OS environments, the scheduling objects reported in the currentplan are:
v All the active workstations defined in the database.v All the job streams scheduled to start in the production period and all
jobs belonging to these job streams.v All the resources that these jobs and jobs streams depend on.
To differentiate between jobs and job streams defined in the database and jobs andjob streams scheduled to run within the production period, according to the TivoliWorkload Scheduler standard naming convention, each occurrence of a job or a jobstream scheduled to run in the current plan is called an instance. A current plan cancontain more than one instance of the same job or job stream.
Chapter 6. Tivoli Workload Scheduler Concepts 35
Related concepts:“Designing your Scheduling Environment” on page 65“Monitoring your Scheduling Environment” on page 99“Monitoring your Workload” on page 102Related tasks:“Creating and managing engine connections” on page 26“Designing your Workload” on page 69
JobA job is a unit of work that specifies an action, such as a weekly data backup, to beperformed on specific workstations in the Tivoli Workload Scheduler network.
Distributed In a Tivoli Workload Scheduler distributed environment, jobs can bedefined either independently from job streams or within a job stream definition.
z/OS In a Tivoli Workload Scheduler for z/OS environment, jobs can bedefined only within a job stream and are called operations. You can havestarted-task operations, which are operations run on a computer workstation thatare used to start and stop started tasks.
Regardless of whether the Tivoli Workload Scheduler engine is distributed or z/OSbased, you can define locally a shadow job to map a remote job instance running ona different Tivoli Workload Scheduler engine.Related tasks:“Creating a task to Monitor Jobs” on page 104“Creating a task to Monitor Critical Jobs” on page 106“Creating a task to Monitor Jobs on Multiple Engines” on page 108“Adding a job to a job stream” on page 82“Listing jobs and job streams” on page 95“Creating job definitions” on page 73“Prerequisite steps to create job types with advanced options” on page 79Related reference:“Status description and mapping for distributed jobs” on page 161“Status description and mapping for z/OS jobs” on page 163
Job streamA job stream is a sequence of jobs to be run, together with times, priorities, andother dependencies that determine the order of processing. Each job stream isassigned a time to run, represented by run cycle with type calendar, set of dates, orrepetition rates.
z/OS In a Tivoli Workload Scheduler for z/OS environment, job streams arecalled applications.
36 Tivoli Workload Scheduler: Dynamic Workload Console User’s Guide: Dynamic Workload Console User’s Guide
Related concepts:“Customizing your job stream” on page 141Related tasks:“Creating a task to Monitor Job Streams” on page 110“Creating a task to Monitor Job Streams on Multiple Engines” on page 111“Adding a job to a job stream” on page 82“Listing jobs and job streams” on page 95Related reference:“Status description and mapping for distributed job streams” on page 165“Status description and mapping for z/OS job streams” on page 167
Periodz/OS
Periods are either cyclic, such as a week or 28-day period, or noncyclic, such as anacademic semester.
Cyclic periodsDefined by their origin date and their length: a cyclic period starts on aspecific date and has a specified number of days. There are two kinds ofcyclic periods:
work-days-only cyclic periodsOnly working days are considered.
all-days cyclic periodsAll the days are considered.
Noncyclic periodsDefined by the origin date of each interval and can optionally have an enddate for each interval.
Periods can be combined with offsets to create run cycles and define when a jobstream runs. For example, an offset of 1 in a weekly period specifies Monday. Anoffset of 10 in a monthly period specifies the tenth day of each month.
The long-term planning process uses the calendar information, the perioddefinitions, and the run cycle, to determine the days on which an application isscheduled to run.
If you run workload on fixed days of the week, month, or year, and take one ofthe standard Tivoli Workload Scheduler for z/OS actions when this day falls on anon-working day, you do not need to create your own periods. You can describemost cases with rules such as:v First Sunday in Junev First working day in the weekv Last Friday in the yearv Last non-working day in the month
If you use rules with their built-in calendar cycles (days of the week, months of theyear, and so on), you probably need to create only special noncyclic periods, suchas university semesters and tax years. The following sections show some examplesof types of periods.
Chapter 6. Tivoli Workload Scheduler Concepts 37
Cyclic period examples
Examples of cyclic periods are a day, a week, and a fortnight, with fixed intervalsof 1 day, 7 days, and 14 days, respectively. An academic semester cannot bedescribed as a cyclic period, because spring, summer, and fall semesters havedifferent lengths. The following example shows a lunar calendar month, assumedto be 28 days:
Period nameMoon
Type Cyclic based on all days
Interval28 days
Interval origin7 February 2009 (date of a new moon)
Non-cyclic period examples
Examples of non-cyclic periods are a quarter and a payroll period. You specify thestart of each interval of a non-cyclic period with an origin date. This exampleshows a period for university semesters, with the interval origin and end specifiedfor each semester:
Period nameSemester
Type Non-cyclic
Interval origin26 August 2009, 13 January 2010, 9 June 2010.
Interval end13 December 2009, 16 May 2010, 28 June 2010
Non-cyclic periods have a once-a-year maintenance overhead when you mustcreate the intervals for the coming months. For this reason, carefully consider howflexible your period definitions are, and remove potentially duplicated definitions.
CalendarA calendar is a list of dates that define when a job stream runs.
Distributed
Calendar in a distributed environment
A calendar can also be designated as a non-working days calendar in a job stream. Anon-working days calendar is a calendar that is assigned to a job stream torepresent the days when the job stream and its jobs do not run. It can also be usedto designate Saturdays or Sundays, or both, as workdays. The default non-workingdays calendar for all job streams is called the holidays calendar.
z/OS
Calendar in a z/OS environment
The calendar specifies normal working days and public holidays. Tivoli WorkloadScheduler for z/OS uses the calendar to determine when job streams are scheduledand to calculate dates for JCL tailoring.
38 Tivoli Workload Scheduler: Dynamic Workload Console User’s Guide: Dynamic Workload Console User’s Guide
You can specify the calendar when you create a job stream. If no calendar isspecified for the job stream, Tivoli Workload Scheduler for z/OS uses the calendarin the CALENDAR keyword of the BATCHOPT initialization statement, for batchservices such as extending the long-term plan, or the calendar specified under theTivoli Workload Scheduler for z/OS options, for online services such as testing arule with GENDAYS.
If no calendar is specified, a calendar with the name DEFAULT is used. If theDEFAULT calendar does not exist, all days are considered as working days. Youcan have several calendars, but always name your default calendar DEFAULT, andspecify the same calendar name on BATCHOPT or in the Tivoli WorkloadScheduler for z/OS options. A calendar must contain at least one working day.Related tasks:“Designing your Workload” on page 69“Listing workload objects” on page 93
Run cycleA run cycle specifies the days that a job stream is scheduled to run. Each run cycleis defined for a specific job stream and cannot be used by other job streams. Youcan specify the following types of run cycle:
Distributed simpleA specific set of user-defined days when a job stream is run.
daily A run cycle that specifies that the job stream runs according to a dayfrequency and type that you set. For example, it might run daily, everythree days, or just on working days.
weeklyA run cycle that specifies the days of the week when a job stream is run.For example, a job stream can be run every Monday, Wednesday, andFriday using a weekly run cycle.
monthlyA run cycle that specifies that the job stream runs according to a monthlyday or date that you set. For example, it might run every 1st and 2nd dayof the month, or every 1st Monday and 2nd Tuesday of the month.
Distributed It can also run, for example, every 1st and 2nd day of the monthevery two months.
yearly A run cycle that specifies that a job stream runs, for example, yearly.
Distributed It can also run, for example, every three years.
exclusiveA run cycle that specifies the days and times when a job stream cannot berun. Exclusive run cycles take precedence over inclusive run cycles.
inclusiveA run cycle that specifies the days and times when a job stream isscheduled to run. Exclusive run cycles take precedence over inclusive runcycles.
offset-basedA run cycle that uses a combination of user-defined periods and offsets.For example, an offset of 3 in a period of 15 days is the third day from thebeginning of the period. It is more practical to use offset-based run cycles
Chapter 6. Tivoli Workload Scheduler Concepts 39
when the cycle is based on cyclic periods. This term is used only in TivoliWorkload Scheduler for z/OS, but the concept applies also to thedistributed product.
rule-basedA run cycle that uses rules based on lists of ordinal numbers, types ofdays, and common calendar intervals (or period names in Tivoli WorkloadScheduler for z/OS). For example, the last Thursday of every month.Rule-based run cycles are based on conventional periods, such as calendarmonths, weeks of the year, and days of the week. In Tivoli WorkloadScheduler for z/OS, run cycles can also be based on periods that youdefine, such as a semester. This term is used only in Tivoli WorkloadScheduler for z/OS, but the concept applies also to the distributed product.You can also specify a rule to establish when a job stream runs if it falls ona free day.
Operator instructionsz/OS
In a Tivoli Workload Scheduler for z/OS environment, some jobs might requirespecific instructions about how they are to be handled. These instructions arecalled operator instructions.
An operator instruction can be permanent or temporary. A temporary instruction hasa validity period associated with it, which specifies when the instruction is valid.
ParameterA parameter is an object to which you assign different values to be substituted injobs and job streams, either from values in the database or at run time.
Note: You cannot use parameters with extended agent jobs.
Parameters are useful when you have values that change depending on your job orjob stream. Job and job stream definitions that use parameters are updatedautomatically with the value at the start of the production cycle.
Use parameters as substitutes for repetitive values when defining jobs and jobstreams. For example, using parameters for user logon and script file names in jobdefinitions and for file and prompt dependencies allows the use of values that canbe maintained centrally in the database on the master.
DependenciesControlling processing using dependencies
When defining job streams and managing the workload in the plan, you cancontrol processing using dependencies.
You can specify the following types of dependencies:
Distributed Dependencies in a distributed environment:You can have dependencies between jobs, between job streams, or betweenjobs and job streams. They can be:
Internal dependenciesThese are dependencies established between jobs belonging to thesame job stream.
40 Tivoli Workload Scheduler: Dynamic Workload Console User’s Guide: Dynamic Workload Console User’s Guide
External dependenciesThese are dependencies between job streams, between job streamsand jobs belonging to other job streams, or between jobs belongingto different job streams. The following resolution criteria are usedto satisfy these dependencies:
Closest precedingThe closest preceding in time before the instance thatincludes the dependency.
Same scheduled dateThe instance planned to run on the same day.
Within a relative intervalThe closest preceding instance within the relative timeinterval you chose, or, if none is found, the closestfollowing instance within the relative time interval youchose.
Within an absolute intervalThe closest preceding instance within an absolute timeinterval you chose, or, if none is found, the closestfollowing instance within the absolute time interval youchose.
Regardless of the used matching criteria, if multiple instances ofpotential predecessor job streams exist in the specified timeinterval, the rule used by the product to identify the correctpredecessor instance is the following:1. Tivoli Workload Scheduler searches for the closest instance that
precedes the depending job or job stream start time. If such aninstance exists, this is the predecessor instance.
2. If there is no preceding instance, Tivoli Workload Schedulerconsiders the correct predecessor instance as the closest instancethat starts after the depending job or job stream start time.
Internetwork dependenciesThese are dependencies on jobs or job streams running in anotherTivoli Workload Scheduler network. Internetwork dependenciesrequire a network agent workstation to communicate with theexternal Tivoli Workload Scheduler network.
z/OS Dependencies in a z/OS environment:You can have dependencies only between jobs. They can be:
Dependencies between jobs belonging to the same job streamWhen you create a job stream, you link, in a sequence, the jobs thatit contains. You can also set dependencies between the jobs to havea successor job not begin until its predecessor job is complete.Dependencies determine when the successor job runs.
Dependencies between jobs belonging to different job streamsThese dependencies are named external. External jobs represent jobsthat are part of other job streams. You can create a dependencybetween jobs in different job streams by creating a dependency onan external job.
“Condition dependencies” on page 43It is a relationship between one job, named a conditional successor,and one or more jobs, named conditional predecessors, stating that
Chapter 6. Tivoli Workload Scheduler Concepts 41
the conditional successor can run only when a specific combinationof conditional predecessor status and return code values occurs.You can define a conditional dependency where the conditionalsuccessor starts if its conditional predecessors are in ended-in-erroror started status.
Note: Condition dependencies are always managed as externaldependencies, even if they link jobs belonging to the same jobstream occurrence in the plan.
Job streams in a z/OS environment do not support dependencies on filesor prompts.
“Cross dependencies” on page 48In multiple heterogeneous scheduling environments you can definedependencies on batch activities managed by other Tivoli WorkloadScheduler environments. To define a cross dependency on a job running ona different Tivoli Workload Scheduler engine, you must define adependency on a locally-defined shadow job pointing to the remote jobinstance and running on a remote engine workstation. The remote engineworkstation manages the communication with the remote engine using anHTTP or HTTPS connection.
Dependencies on resources are supported by Tivoli Workload Scheduler in both thedistributed and z/OS environments.Related tasks:“Adding a dependency” on page 85“Removing a dependency” on page 86
PromptDistributed
A prompt identifies a text message that is displayed to the operator and haltsprocessing of the job or job stream until an affirmative answer is received (eithermanually from the operator or automatically by an event rule action). After theprompt is replied to, processing continues. You can use prompts as dependenciesin jobs and job streams. You can also use prompts to alert an operator that aspecific task was performed. In this case, an operator response is not required.
There are the following types of prompt:
global or namedA prompt that is defined in the database as a scheduling object. It isidentified by a unique name and can be used by any job or job stream.
local or ad-hocA prompt that is defined within a job or job stream definition. It does nothave a name, and it is not defined as a scheduling object in the database,therefore it cannot be used by other jobs or job streams.
recovery or abendA special type of prompt that you define to be used when a job endsabnormally. The response to this prompt determines the outcome of the jobor job stream to which the job belongs. A recovery prompt can also beassociated to an action and to a special type of job called a recovery job.
42 Tivoli Workload Scheduler: Dynamic Workload Console User’s Guide: Dynamic Workload Console User’s Guide
Related tasks:“Creating a task to Monitor Prompts” on page 114“Adding a dependency” on page 85“Removing a dependency” on page 86“Designing your Workload” on page 69“Listing workload objects” on page 93
ResourceA resource is either a physical or logical system resource that you use as adependency for jobs and job streams. A job or job stream with a resourcedependency cannot start to run until the required quantity of the defined resourceis available.Related tasks:“Creating a task to Monitor Resources” on page 115“Adding a dependency” on page 85“Removing a dependency” on page 86“Designing your Workload” on page 69“Listing workload objects” on page 93
FileDistributed
A file is used as a dependency for jobs and job streams. A job or job stream with afile dependency cannot start to run until the file exists with the characteristicsdefined in the dependency.Related tasks:“Creating a task to Monitor Files” on page 113“Adding a dependency” on page 85“Removing a dependency” on page 86“Designing your Workload” on page 69“Listing workload objects” on page 93
Condition dependenciesz/OS
In Tivoli Workload Scheduler for z/OS, you can specify that jobs are dependent onother jobs. For example, if job A1 must complete before job A2 can start, then A1 isa predecessor of A2, and A2 is a successor of A1. These relationships between jobsare called dependencies.
When specifying dependencies, you can also define work flows with alternativebranches based on conditions, specifically to achieve the same results as usingIF/THEN/ELSE statements in the job JCL. You can use both job return code andjob status as conditional logic elements to determine the start of a successor job. Thefollowing example shows how this works.
A condition dependency relationship is set up by using a condition.
You can define condition dependencies at the following levels:
Chapter 6. Tivoli Workload Scheduler Concepts 43
Job levelBy conditioning the start of the successor to the check on job return codeor status of the predecessor.
Step levelBy conditioning the start of the successor to a specific step return code ofthe predecessor.
How condition dependencies work
A condition dependency is a specific check of the status or return code of apredecessor job or of the return code of a job step.
The job processing flow is affected by the conditions set and their final status.
The status of a condition is set based on the rule defined and on the statuses of itscondition dependencies.
The condition dependency is evaluated only when a path in the plan exists,otherwise the condition dependency remains Undefined until a manualintervention or a rerun is done.
A possible path for the conditional predecessor exists when at least one of thefollowing conditions occurs:v The job has status Completed and a normal successor exists.v There is at least one conditional successor that has all the subsets of conditions,
referencing that conditional predecessor, set to true, according to the conditionrules.
For example:v A conditional predecessor (Job A) has several conditional successors (Jobs B, C,
D)v Each conditional successor has a set of condition dependencies, relating to job A,
that must be satisfied to make it possible for the successor to start.v Job A runs and changes its status.v If at least one subset of conditions between job A and one of its successors is
true, the path in plan exists and all the successors' condition dependenciesrelated to job A are evaluated. Otherwise all condition dependencies are leftundefined.
When specifying predecessors in the database, you can define a list of conditions bycombining single condition dependencies on predecessor job status or return code.You cannot define a job both as a conditional and as a normal predecessor ofanother job. For each condition you can specify one of the following rules:v At least n number of conditions out of all the condition dependencies must be
satisfied. This rule corresponds to the OR operator in Boolean logic.v All the condition dependencies in the list must be satisfied. This rule
corresponds to the AND operator in Boolean logic.
At run time, the scheduler evaluates the condition status resulting from thecondition dependencies statuses, based on the selected rule. The condition statuscan be:True When ALL condition dependencies are true.
If the rule is set to ANDWhen ALL condition dependencies are true.
44 Tivoli Workload Scheduler: Dynamic Workload Console User’s Guide: Dynamic Workload Console User’s Guide
If the rule is set to OR (at least n condition dependencies must be true)When at least n condition dependencies are true.
False The condition was not satisfied.If the rule is set to AND
When at least one condition dependency is false.If the rule is set to OR (at least n condition dependencies must be true)
When at least n condition dependencies cannot be true.Undefined
When the rule cannot be evaluated yet.
A set of conditions results as satisfied if all the conditions are satisfied, accordingto the logic of the AND operator.
When a predecessor ends, the successor job status changes to one of the followingstatuses:Waiting
Undefined, until the scheduler evaluates all the defined conditions. At leastone normal predecessor is not in Completed or Suppressed by Conditionstatus or at least one condition is U (Undefined). The scheduler processesall subsequent statuses as usual, up to a final status.
Ready Ready, when all the defined conditions are satisfied. Job normalpredecessors are in Completed or Suppressed by Condition status and allits conditions are True. The scheduler processes all subsequent statuses asusual, up to a final status.
Suppressed by ConditionSuppressed by condition, when the defined condition dependency is notsatisfied. At least one condition is False.
Note: When evaluating conditional successors status, predecessor jobs instatus Suppressed by Condition are considered equal to predecessoroperations in status Completed.
Examples of condition dependencies
Use a job-level condition dependency when you want a successor job to startdepending on a combination of one or more return codes or statuses ofpredecessor jobs.
Figure 3 on page 46 shows the two different types of job level conditions, onebased on the predecessor return code and the other based on the predecessor jobstatus. For example, using the return code as condition type, you can define thatjob OP2 is dependent on job OP1, specifying that OP2 must run when OP1 endswith a return code in the range from 1 to 3. Similarly, using job status as condition,you can define job OP4 as dependent on job OP3, specifying that OP4 must run ifOP3 ends with status Error.
Chapter 6. Tivoli Workload Scheduler Concepts 45
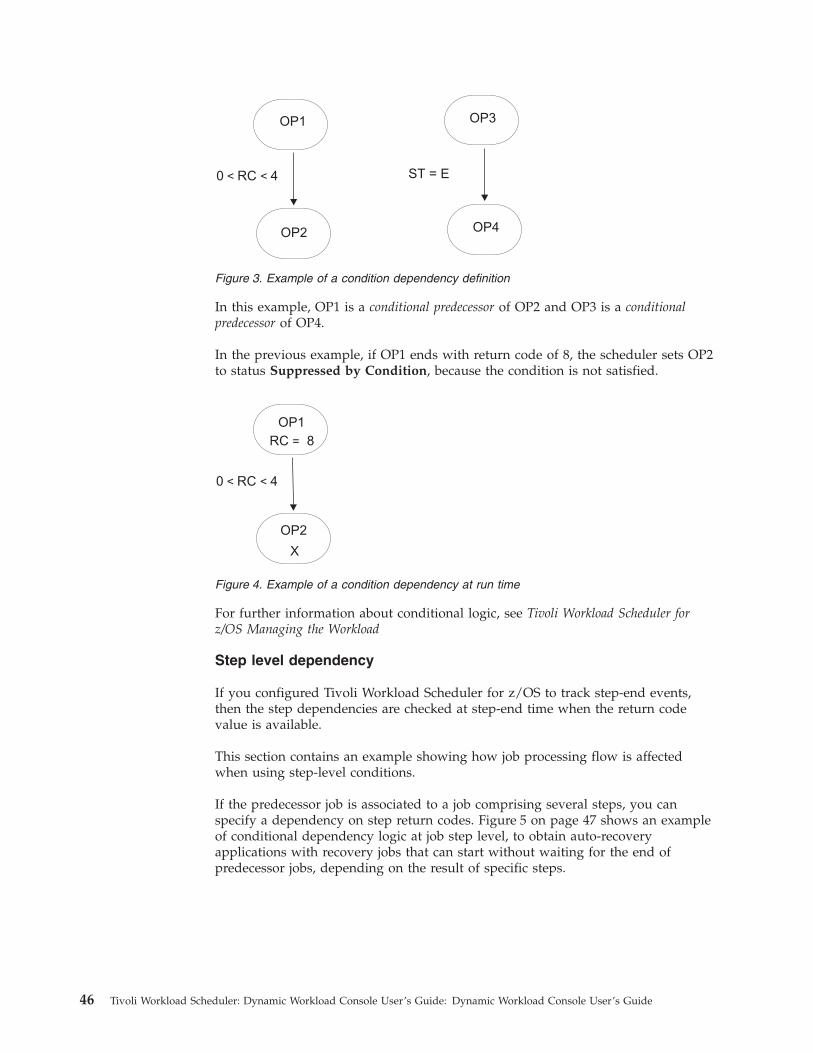
In this example, OP1 is a conditional predecessor of OP2 and OP3 is a conditionalpredecessor of OP4.
In the previous example, if OP1 ends with return code of 8, the scheduler sets OP2to status Suppressed by Condition, because the condition is not satisfied.
For further information about conditional logic, see Tivoli Workload Scheduler forz/OS Managing the Workload
Step level dependency
If you configured Tivoli Workload Scheduler for z/OS to track step-end events,then the step dependencies are checked at step-end time when the return codevalue is available.
This section contains an example showing how job processing flow is affectedwhen using step-level conditions.
If the predecessor job is associated to a job comprising several steps, you canspecify a dependency on step return codes. Figure 5 on page 47 shows an exampleof conditional dependency logic at job step level, to obtain auto-recoveryapplications with recovery jobs that can start without waiting for the end ofpredecessor jobs, depending on the result of specific steps.
Figure 3. Example of a condition dependency definition
Figure 4. Example of a condition dependency at run time
46 Tivoli Workload Scheduler: Dynamic Workload Console User’s Guide: Dynamic Workload Console User’s Guide
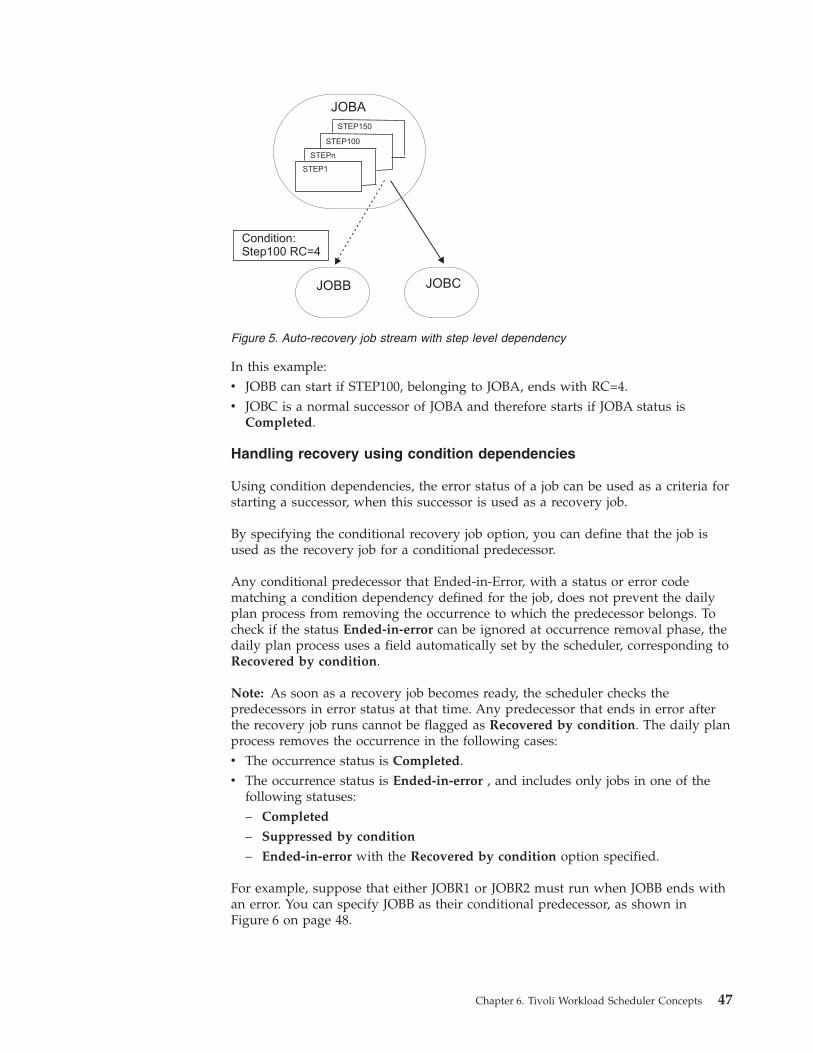
In this example:v JOBB can start if STEP100, belonging to JOBA, ends with RC=4.v JOBC is a normal successor of JOBA and therefore starts if JOBA status is
Completed.
Handling recovery using condition dependencies
Using condition dependencies, the error status of a job can be used as a criteria forstarting a successor, when this successor is used as a recovery job.
By specifying the conditional recovery job option, you can define that the job isused as the recovery job for a conditional predecessor.
Any conditional predecessor that Ended-in-Error, with a status or error codematching a condition dependency defined for the job, does not prevent the dailyplan process from removing the occurrence to which the predecessor belongs. Tocheck if the status Ended-in-error can be ignored at occurrence removal phase, thedaily plan process uses a field automatically set by the scheduler, corresponding toRecovered by condition.
Note: As soon as a recovery job becomes ready, the scheduler checks thepredecessors in error status at that time. Any predecessor that ends in error afterthe recovery job runs cannot be flagged as Recovered by condition. The daily planprocess removes the occurrence in the following cases:v The occurrence status is Completed.v The occurrence status is Ended-in-error , and includes only jobs in one of the
following statuses:– Completed
– Suppressed by condition
– Ended-in-error with the Recovered by condition option specified.
For example, suppose that either JOBR1 or JOBR2 must run when JOBB ends withan error. You can specify JOBB as their conditional predecessor, as shown inFigure 6 on page 48.
JOBA
Condition:Step100 RC=4
JOBB JOBC
STEP100
STEP1
STEPn
STEP150
Figure 5. Auto-recovery job stream with step level dependency
Chapter 6. Tivoli Workload Scheduler Concepts 47
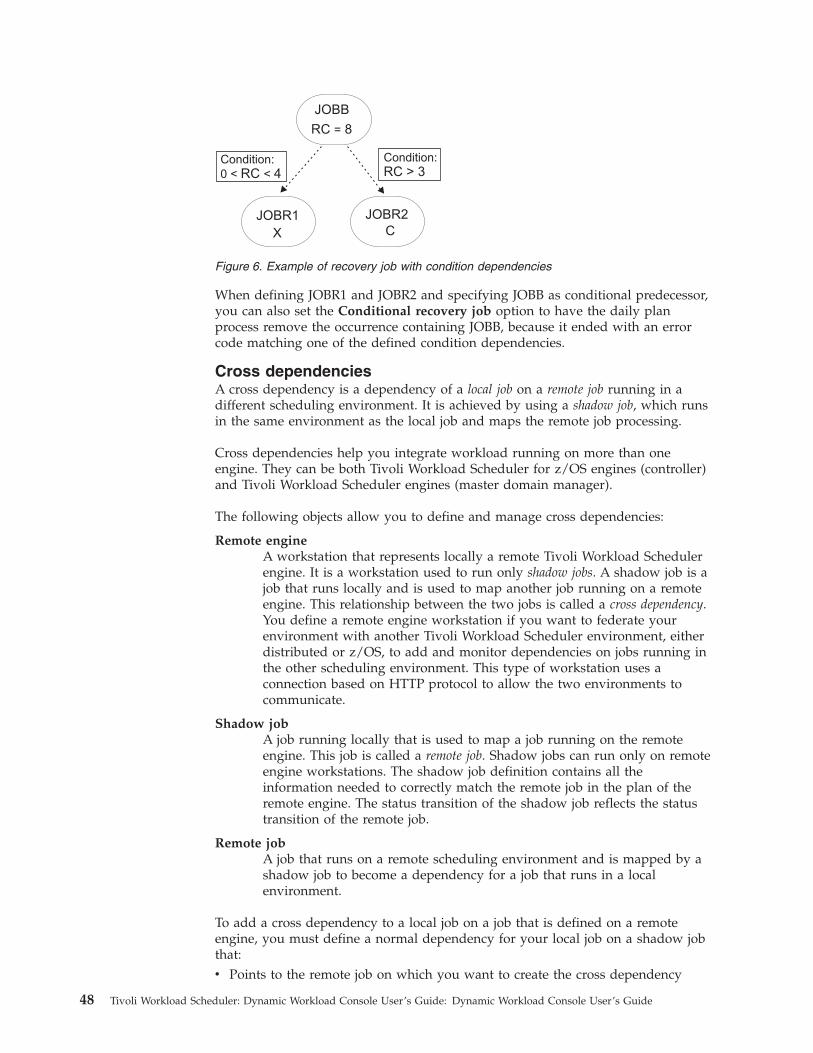
When defining JOBR1 and JOBR2 and specifying JOBB as conditional predecessor,you can also set the Conditional recovery job option to have the daily planprocess remove the occurrence containing JOBB, because it ended with an errorcode matching one of the defined condition dependencies.
Cross dependenciesA cross dependency is a dependency of a local job on a remote job running in adifferent scheduling environment. It is achieved by using a shadow job, which runsin the same environment as the local job and maps the remote job processing.
Cross dependencies help you integrate workload running on more than oneengine. They can be both Tivoli Workload Scheduler for z/OS engines (controller)and Tivoli Workload Scheduler engines (master domain manager).
The following objects allow you to define and manage cross dependencies:
Remote engineA workstation that represents locally a remote Tivoli Workload Schedulerengine. It is a workstation used to run only shadow jobs. A shadow job is ajob that runs locally and is used to map another job running on a remoteengine. This relationship between the two jobs is called a cross dependency.You define a remote engine workstation if you want to federate yourenvironment with another Tivoli Workload Scheduler environment, eitherdistributed or z/OS, to add and monitor dependencies on jobs running inthe other scheduling environment. This type of workstation uses aconnection based on HTTP protocol to allow the two environments tocommunicate.
Shadow jobA job running locally that is used to map a job running on the remoteengine. This job is called a remote job. Shadow jobs can run only on remoteengine workstations. The shadow job definition contains all theinformation needed to correctly match the remote job in the plan of theremote engine. The status transition of the shadow job reflects the statustransition of the remote job.
Remote jobA job that runs on a remote scheduling environment and is mapped by ashadow job to become a dependency for a job that runs in a localenvironment.
To add a cross dependency to a local job on a job that is defined on a remoteengine, you must define a normal dependency for your local job on a shadow jobthat:v Points to the remote job on which you want to create the cross dependency
JOBB
RC 8=
Condition:
0 < <RC 4
JOBR1
X
JOBR2
Condition:
RC > 3
C
Figure 6. Example of recovery job with condition dependencies
48 Tivoli Workload Scheduler: Dynamic Workload Console User’s Guide: Dynamic Workload Console User’s Guide
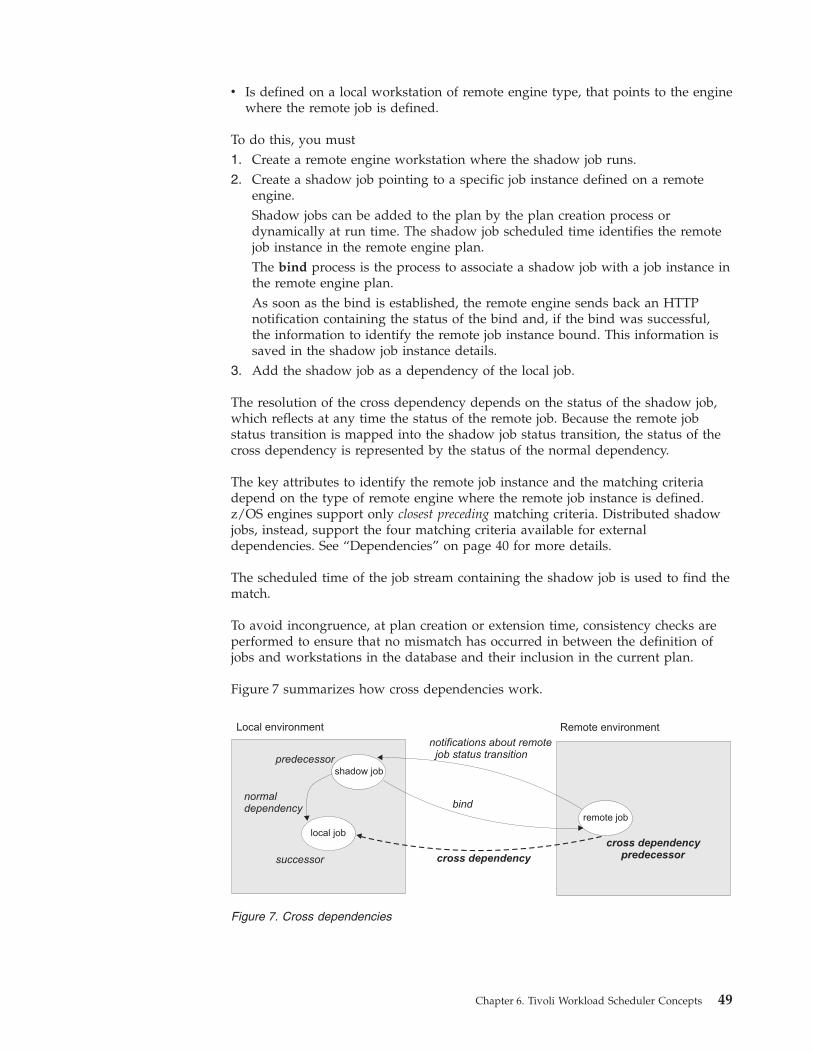
v Is defined on a local workstation of remote engine type, that points to the enginewhere the remote job is defined.
To do this, you must1. Create a remote engine workstation where the shadow job runs.2. Create a shadow job pointing to a specific job instance defined on a remote
engine.Shadow jobs can be added to the plan by the plan creation process ordynamically at run time. The shadow job scheduled time identifies the remotejob instance in the remote engine plan.The bind process is the process to associate a shadow job with a job instance inthe remote engine plan.As soon as the bind is established, the remote engine sends back an HTTPnotification containing the status of the bind and, if the bind was successful,the information to identify the remote job instance bound. This information issaved in the shadow job instance details.
3. Add the shadow job as a dependency of the local job.
The resolution of the cross dependency depends on the status of the shadow job,which reflects at any time the status of the remote job. Because the remote jobstatus transition is mapped into the shadow job status transition, the status of thecross dependency is represented by the status of the normal dependency.
The key attributes to identify the remote job instance and the matching criteriadepend on the type of remote engine where the remote job instance is defined.z/OS engines support only closest preceding matching criteria. Distributed shadowjobs, instead, support the four matching criteria available for externaldependencies. See “Dependencies” on page 40 for more details.
The scheduled time of the job stream containing the shadow job is used to find thematch.
To avoid incongruence, at plan creation or extension time, consistency checks areperformed to ensure that no mismatch has occurred in between the definition ofjobs and workstations in the database and their inclusion in the current plan.
Figure 7 summarizes how cross dependencies work.
Remote environmentLocal environment
local job
remote job
shadow job
normaldependency
cross dependency
bind
notifications about remotejob status transitionpredecessor
successor
cross dependencypredecessor
Figure 7. Cross dependencies
Chapter 6. Tivoli Workload Scheduler Concepts 49
For more information about cross dependencies, see the sections about definingand managing cross dependencies in Tivoli Workload Scheduler User's Guide andReference and in Tivoli Workload Scheduler for z/OS Managing the Workload
Related tasks:“Creating cross dependencies” on page 86
UserDistributed
A User is the user name used as the login value for several operating system jobdefinition. Users must be defined in the database.
If you schedule a job on an agent, on a pool, or on a dynamic pool, the job runswith the user defined on the pool or dynamic pool. However, the User must existon all workstations in the pool or dynamic pool where you plan to run the job.Related tasks:“Designing your Workload” on page 69“Listing workload objects” on page 93
Workstation classA workstation class is a group of workstations with similar job schedulingcharacteristics. Any number of workstations can be grouped in a class, and aworkstation can be included in many classes. Jobs and job streams can be assignedto run on a specific workstation class and this makes the running of jobs and jobstreams across multiple workstations easier.
For example, you can set up the following types of workstation classes:v Workstation classes that group workstations according to your internal
departmental structure, so that you can define a job to run on all theworkstations in a department
v Workstation classes that group workstations according to the software installedon them, so that you can define a job to run on all the workstations that have aparticular application installed
v Workstation classes that group workstations according to the role of the user, sothat you can define a job to run on all the workstations belonging to, forexample, managers
In the previous example, an individual workstation can be in one workstation classfor its department, another for its user, and several for the software installed on it.
Distributed Workstations can also be grouped into domains when your network isset up. Because the domain name is not one of the selection criteria used whenchoosing where to run a job, you might need to mirror your domain structure withworkstation classes if you want to schedule a job to run on all workstations in adomain.Related tasks:“Designing your Workload” on page 69“Listing workload objects” on page 93
Variable tableA variable table is a table containing multiple variables and their values. All globalparameters, now called variables, are contained in at least one variable table.
50 Tivoli Workload Scheduler: Dynamic Workload Console User’s Guide: Dynamic Workload Console User’s Guide
You are not required to create variable tables to be able to use variables, becausethe scheduler provides a default variable table.
However, you might want to define a variable with the same name, but differentvalues, depending on when and where it is used. You do this by assigningdifferent values to the same variable in different variable tables. You can then usethe same variable name in different job definitions and when defining prompts andfile dependencies. Variable tables can be assigned at run cycle, job stream, andworkstation level.
You can also define verification criteria and dependency list and associate them tovariables.
Variable tables can be particularly useful in job definitions when a job definition isused as a template for a job that belongs to more than one job stream. Forexample, you can assign different values to the same variable and reuse the samejob definition in different job streams.Related tasks:“Designing your Workload” on page 69“Listing workload objects” on page 93
Workload Broker job definitionA Workload Broker job definition is a text file in Job Submission DescriptionLanguage (JSDL) schema file format, which contains all the parameters necessaryto run a job.
The Job Brokering Definition Console provides an easy-to-use graphical interfacethat you can install locally to create and edit job definitions. Job definitions, savedin the JSDL schema, are created by your input into the Job Brokering DefinitionConsole.
The JSDL schema offers great flexibility and supports a wide variety of criteria todetermine job requirements, scheduling and load-balancing.
Examples of how to define a job to achieve different objectives are provided inTivoli Workload Scheduler Scheduling Workload Dynamically.
From the Dynamic Workload Console, you can create Workload Broker jobdefinitions that map Workload Broker jobs. You can also monitor Workload Brokerjobs and browse the corresponding job logs.Related tasks:“Creating Workload Broker objects” on page 87
Production processTivoli Workload Scheduler production is based on a plan that runs in a productionperiod.
You can define the production period when creating or extending the productionplan and it can span from a few hours to multiple days (by default it lasts 24hours).
Chapter 6. Tivoli Workload Scheduler Concepts 51
The production plan contains information about the jobs to run, on whichfault-tolerant agent, and what dependencies must be satisfied before each job canstart.
Distributed You use the JnextPlan script to generate the production plan anddistribute it across the Tivoli Workload Scheduler network. Then, if you want toextend your production plan at a fixed time interval, for example every day, youhave the option to automate the extension by using the final job stream at the endof each production period. A sample job stream helps you to automate planmanagement and runs the sequence of script files included in JnextPlan togenerate the new production plan.
When the production plan is generated, all of the required information about thatproduction period is taken from the scheduling environment and object definitionsand is included in the plan.
During the production period, the production plan is regularly updated to showwhat work is completed, in progress, and left to process.
In Tivoli Workload Scheduler for distributed environments or in a z/OS end-to-endnetwork, a file called Symphony contains all the information about the productionplan. This file is sent to all the subordinate domain managers and fault-tolerantagents in the scheduling environment. This allows the fault-tolerant agentsthroughout the network to continue their processing even if the networkconnection to their domain manager is down.
Tivoli Workload Scheduler processes monitor the production plan and make callsto the operating system to launch jobs as required. The operating system runs thejobs, and informs Tivoli Workload Scheduler if the job completed successfully. Thisinformation is used to update the production plan to indicate the status of the job.
From the Dynamic Workload Console or the command line interface, you can viewand make changes in the current production plan.
DatabaseThe Tivoli Workload Scheduler database, hereafter referred to as the database, is arelational database that is accessible by the master domain manager and containsall the definitions for scheduling objects, such as jobs, job streams, resources, andworkstations. It also holds statistics of job and job stream execution, as well asinformation about the user ID that created an object and when an object was lastmodified.
For more information about the types and versions of the supported relationaldatabase, see the Tivoli Workload Scheduler documentation.Related tasks:“Designing your Workload” on page 69
PlansA plan contains all jobs and job-related scheduling objects that are scheduled for aselected time interval. There are different types of plans based on the type of TivoliWorkload Scheduler environment you are connected to.
Note: z/OS The only type of plan that you can access through the DynamicWorkload Console is the current plan.
52 Tivoli Workload Scheduler: Dynamic Workload Console User’s Guide: Dynamic Workload Console User’s Guide
The following plans are available:
Production plan (current plan)A production plan (in distributed environment) or current plan (in z/OSenvironment) is the master control for all job scheduling activity plannedfor a user-defined time interval, named the production period. Schedulingobject definitions stored in the database, such as jobs and job streams,become instances in the production plan, where they can be monitored andmodified.
The production plan is created on the master domain manager andcontains all the jobs and job streams that are scheduled to run within theproduction period together with their depending objects and allworkstation definitions. The production plan can be extended to coverfuture time intervals. Any job streams that did not complete successfullywithin the production period or that are either running or still waiting tobe run, can be carried forward into the plan extension.
Preproduction planA preproduction plan is used to identify in advance the job streaminstances and the job stream dependencies involved in a specified timeperiod.
This improves performance when generating the production plan bypreparing in advance a high-level schedule of the anticipated productionworkload.
The preproduction plan contains:v The job stream instances to be run during the covered time period.v The external dependencies that exist between the job streams and jobs
included in different job streams.
Symnew planA Symnew plan is a temporary plan. It is an intermediate production planthat covers the whole time the new production plan that is being generatedwill cover. It is replaced by the production plan as soon as it starts.
Archived PlanAn archived plan is a copy of an old production plan that ran in the TivoliWorkload Scheduler environment and that is now stored in the TivoliWorkload Scheduler database.
Using this type of plan you can, for example, see the result of running apast production plan. The difference between using an archived plan and aforecast plan covering the same time interval is that an archived planshows how the real production was based on the job and job streamprocessing results, while a forecast plan shows how the production wasplanned to be.
Trial planA trial plan is a projection of what a production plan would be if itcovered a longer period of time. For example, if you generate a productionplan that covers two days, but you want to know what the plan would beif it covered three days, you can generate a trial plan.
A trial plan is typically created to extend a production plan and to have anidea of future impacts on the scheduling environment. Therefore, if there isa valid production plan, the start time option is greyed out. By default, thetrial plan start date is the same as the production plan end date.
Chapter 6. Tivoli Workload Scheduler Concepts 53

Using this type of plan you can, for example, see how the currentproduction evolves based on the job and job stream dependencies definedin the production plan, if available, or in the preproduction plan. Trialplans are based on the information contained either in the production or inthe preproduction plan. If neither is available, a trial plan cannot becreated.
Forecast planA forecast plan is a projection of what the production plan would be in achosen time interval. For example, if you generate a production plan thatcovers two days and you want to know what the plan would be for thenext week you can generate a forecast plan.
A forecast plan is typically created to anticipate and solve any kind ofscheduling problems, therefore the start time is always enabled and it is amandatory field.
Using this type of plan you can, for example, see how the production willbe in a future time interval based on the job and job stream dependenciesdefined in the Tivoli Workload Scheduler database. Based on thisinformation, you can modify some information in the database, if needed,before extending the production plan.
When workload service assurance is enabled, it can calculate the predictedstart time of each job in the job stream. You can enable and disable thisfeature using the enForecastStartTime global option. Tivoli WorkloadScheduler calculates the average run for each job based on all previousruns. For complex plans, enabling this feature could negatively impact thetime taken to generate the forecast plan.
Note: Neither the trial nor the forecast plan takes into account any dynamicupdates made to the Symphony file while the production plan is being processed.Therefore, all the job streams it contains are in one of the following states:
HOLDIf they are dependent on other job streams or if their start time is later thanthe plan start time.
READYIf they are free from dependencies and their start time has elapsed.
Related concepts:“Selecting the working plan” on page 125“Monitoring the progress of your plan” on page 97Request a graphical view of the progress of the current plan.Related tasks:“Creating a task to Show Plan View” on page 127“Generating Trial and Forecast Plans” on page 126Related information:“Graphical Views in the plan” on page 173
Engine connectionsAn engine connection is a set of configuration information that identifies a specificworkstation in the Tivoli Workload Scheduler environment in the network.
54 Tivoli Workload Scheduler: Dynamic Workload Console User’s Guide: Dynamic Workload Console User’s Guide
To manage scheduling objects you must connect from the Dynamic WorkloadConsole to a Tivoli Workload Scheduler environment. In Dynamic WorkloadConsole you do this by defining engine connections.
You can connect to both Tivoli Workload Scheduler distributed and z/OSenvironments and you can create as many engine connections as you need.
When you create an engine connection, you give it a name and select the plan thatyou want it to access. The selected plan must be accessible from that workstation.
z/OS If you connect to a Tivoli Workload Scheduler for z/OS environment,the plan that you access is the current plan and the engine that you connect to isthe controller workstation, which is the management hub of the Tivoli WorkloadScheduler for z/OS environment.
Distributed If you connect to a Tivoli Workload Scheduler distributed environment,you can access different types of plans and connect to different types of engines.Based on the type of plan that you select and the engine that you connect to, youcan get different results when running your tasks in the same Tivoli WorkloadScheduler distributed environment. You can connect to:
The master domain manager workstationThe top management hub. Select this workstation if you want to access theentire set of objects involved in the current plan, or if you want to access atrial plan, a forecast plan, or an archived plan. You can define and usedifferent engine connections to the master domain manager, each accessinga different plan.
A fault-tolerant agent if the connector is installedA workstation where jobs and job streams are run. Select this workstationif you want to access the set of objects involved in the current plan andscheduled to run in that fault-tolerant agent. You choose this option if youneed up-to-date information regarding job status on this workstation.
Related tasks:“Creating and managing engine connections” on page 26
Event managementYou can use the event management feature to launch a predefined set of actions inresponse to events that occur on the nodes where Tivoli Workload Scheduler runs.
The main elements of event management are:v “Events”v “Actions” on page 56v “Event rules” on page 57
You can use event management capabilities to:v Create Event Rulesv Create and run Workload Events tasks
Events
An event represents a set of circumstances that match selected criteria. Events aredivided into the following major categories:
Chapter 6. Tivoli Workload Scheduler Concepts 55
Tivoli Workload Scheduler objects related eventsAll the events relating to scheduling objects such as jobs, job streams,workstations, and prompts. This type of event is described in more detailin Tivoli Workload Scheduler plan events.
Note: Any change performed on a workstation referenced in a rule is notreported in the rule. For example if you modify, update, or delete aworkstation that is referenced in a rule, the rule ignores the change andcontinues to consider the workstation as it was when it was included inthe rule.
File monitoring eventsEvents relating to changes to files and logs. This type of event is describedin more detail in File monitor.
Application monitoring eventsEvents relating to Tivoli Workload Scheduler processes, file system, andmessage box. This type of event is described in more detail in ApplicationMonitor.
SAP related eventsThese events are available only if you have installed Tivoli WorkloadScheduler for Applications and they are generated by external SAPsystems. This type of event is described in more detail in SAP Monitor.
Generic eventsEvents used to manage custom events sent by external applications. Youcan write an XML file to define a custom event. A schema is provided tovalidate your XML, as well as a basic event template that you can use as astarting point. For more information, see the schemas for generic events.Events of this category are:v Changes in a resource of the operating system, such as processes and
memoryv Email received
Actions
When one or more of the above events occurs, you can specify which actions toperform. Actions are divided into the following main categories:
Operational actionsActions that cause a change in the status of one or more Tivoli WorkloadScheduler objects. Actions in this category include:v Submitting jobs or job streamsv Submitting ad hoc jobsv Replying to a prompt
This type of action is described in more detail in Tivoli WorkloadScheduler actions.v Adding an application occurrence (job stream) to the current plan on
Tivoli Workload Scheduler for z/OS in Tivoli Workload Scheduler-TivoliWorkload Scheduler for z/OS end-to-end scheduling configurations.
This type of action is described in more detail in Tivoli WorkloadScheduler for z/OS actions.
Notification actionsActions such as sending emails or SMS, forwarding Tivoli Enterprise
56 Tivoli Workload Scheduler: Dynamic Workload Console User’s Guide: Dynamic Workload Console User’s Guide
||||
|||
||
Console events, and writing messages in a logging repository. This type ofaction is described in more detail in Mail sender plug-in, Message logger,and Tivoli Enterprise Console event forwarder.
Generic actionsActions performed by running a command. This type of action is describedin more detail in Generic action plug-in.
Event rules
Use event rules to associate one or more events to the response actions that youwant to perform. When you create an event rule, you are actually creating an eventrule definition in the database. While the event rule is in Draft status, it is notdeployed to the Tivoli Workload Scheduler. All new and modified non-draft rulessaved in the database are periodically (by default every five minutes) found, built,and deployed by an internal process named rule builder. At this time they becomeactive. Meanwhile, an event processing server, which is normally located in themaster domain manager, receives all events from the agents and processes them.The updated monitoring configurations are downloaded to the Tivoli WorkloadScheduler agents and activated. The occurrence of an event rule that hasperformed the corresponding actions is called the event rule instance.Related concepts:“Event management configuration” on page 27
ReportsCreate a report task to customize and generate Tivoli Workload Scheduler reports,which you can then view, print, and save, in different kinds of output. Reportshelp you in many business-related activities, such as:
Tuning the workload on the workstations
v Workstation Workload Summaryv Workstation Workload Runtimes
Extract detailed information about the plan
v Planned Production Detailsv Actual Production Details
Detect jobs with exceptions
v Job Run Historyv Job Run Statistics
The following table shows the available reports and their details.
Table 3. Report types
Report Name Description Output
Job Run History Collects the historical job run data during aspecified time interval. Use it to detect which jobsended in error or were late. It also shows whichjobs missed their deadline, long duration jobs,and rerun indicators for reruns.
Available in tableformat only. Itcan be HTML orCSV.
Job Run Statistics Collects the job run statistics. Use it to detectsuccess, error rates; minimum, maximum, andaverage duration; late and long duration statistics.
Available ingraphic and tableformats. It can beHTML or CSV.
Chapter 6. Tivoli Workload Scheduler Concepts 57

Table 3. Report types (continued)
Report Name Description Output
WorkstationWorkload Summary
Shows the workload on the specifiedworkstations. The workload is expressed in termsof number of jobs that ran on them. It helps forcapacity planning adjustments (workloadmodelling and workstation tuning).
Available ingraphic and tableformats. It can beHTML or CSV.
WorkstationWorkload Runtimes
Shows job run times and duration on thespecified workstations. It helps for capacityplanning adjustments (workload modelling andworkstation tuning).
Available ingraphic and tableformats. It can beHTML or CSV.
Custom SQL Allows you to create reports that best fit yourbusiness needs. You can specify an SQL query orimport SQL scripts.
Available in tableformat only. Itcan be HTML orCSV.
Planned ProductionDetails
Extracts information about planned productionplans into either an XML or a CSV format, to beused respectively, with Microsoft Project andMicrosoft Excel. This also allows users who donot know Tivoli Workload Scheduler to accessplan information in a familiar format.
Available in CSVor XML formatonly.
Actual ProductionDetails
Extracts current plan information into either anXML or a CSV format, to be used, respectively,with Microsoft Project and Microsoft Excel. Thisalso allows users who do not know TivoliWorkload Scheduler to access plan information ina familiar format.
Available in CSVor MicrosoftProject formatonly.
The output of historical reports, which is extracted from the database, consists ofthe following main sections. The output of a Planned and Actual report is notstructured because it is a file that must be opened with an external program.
Report headerContains the report title, description, engine name, engine type, creationtime, type, and the total number of the result set extracted.
Report of contentContains a set of hyper-links to each section and subsection.
Report formatDepending on the kind of information you are processing, you can chooseto view it in the most appropriate format. The report output can be in:
Table formatIt shows information organized in rows and columns, in a CSV orHTML file.
Graphical format (HTML)If you choose the graphical formats, depending on the report type,and on the information you choose to include, you can have datadisplayed in pie charts, bar charts, line charts, or tables.
Note: To see report output correctly, make sure that you configure your browser asfollows:v Allow pop-up windows.v Remove any optional browser toolbar that you installed, if its settings prevent
new windows from opening.
58 Tivoli Workload Scheduler: Dynamic Workload Console User’s Guide: Dynamic Workload Console User’s Guide
v To see CSV reports, configure the browser security settings to automaticallyprompt for file downloads.
Related reference:Chapter 11, “Reporting,” on page 133“Reports” on page 187
Workload service assuranceWorkload service assurance is an optional feature that allows you to identifycritical jobs and to ensure that they are processed in a timely manner.
When the workload service assurance feature is enabled, you can indicate that ajob is critical and define a deadline by which it must be completed when you addthe job to a job stream. Defining a critical job and deadline triggers the calculationof timings for all jobs that make up the critical network. The critical networkincludes the critical job itself and any predecessors that are defined for the criticaljob. When changes that have an impact on timings are made to the criticalnetwork, for example addition or removal of jobs or follows dependencies, thecritical start times are automatically recalculated.
The critical network is constantly monitored to ensure that the critical job deadlinecan be met. When a critical network job completes, timings of jobs that follow itare recalculated to take account of the actual duration of the job. The system alsoacts automatically to remedy delays by prioritizing jobs that are actually orpotentially putting the target deadline at risk. Some conditions that cause delaysmight require your intervention. A series of specialized critical job views, availableon the Dynamic Workload Console, allow you to monitor critical jobs, display theirpredecessors and the critical paths associated with them, identify jobs that arecausing problems, and drill down to identify and remedy problems.
Dynamic critical path
If a job is critical and must complete by the deadline set on the database you canmark it as a critical job thus specifying that it must be considered as the target of acritical path. The critical path consists of the critical job predecessors with the leastslack time. In a critical job predecessor path, the slack time is the amount of timethe predecessor processing can be delayed without exceeding the critical jobdeadline. It is the spare time calculated using the deadline, scheduled start, andduration settings of predecessors jobs. The calculation of critical path is performeddynamically. In this way, during daily planning processing, a critical pathincluding the internal and external predecessors of the critical job is calculated, anda table of predecessors is cached (in the local memory for z/OS and on the masterdomain manager for distributed systems). Every time a predecessor of the criticaljob starts delaying, the scheduler dynamically recalculates the critical path, to checkwhether a new path, involving different jobs, became more critical than the pathcalculated at daily planning phase.
You can launch a query for all the jobs included in a critical path by clickingCritical Path in the panels that show the results of monitor jobs tasks.
As well as jobs included in the critical path job list, there are other lists of jobs thatmight be important to manage to ensure that your critical job does not fail.
Chapter 6. Tivoli Workload Scheduler Concepts 59
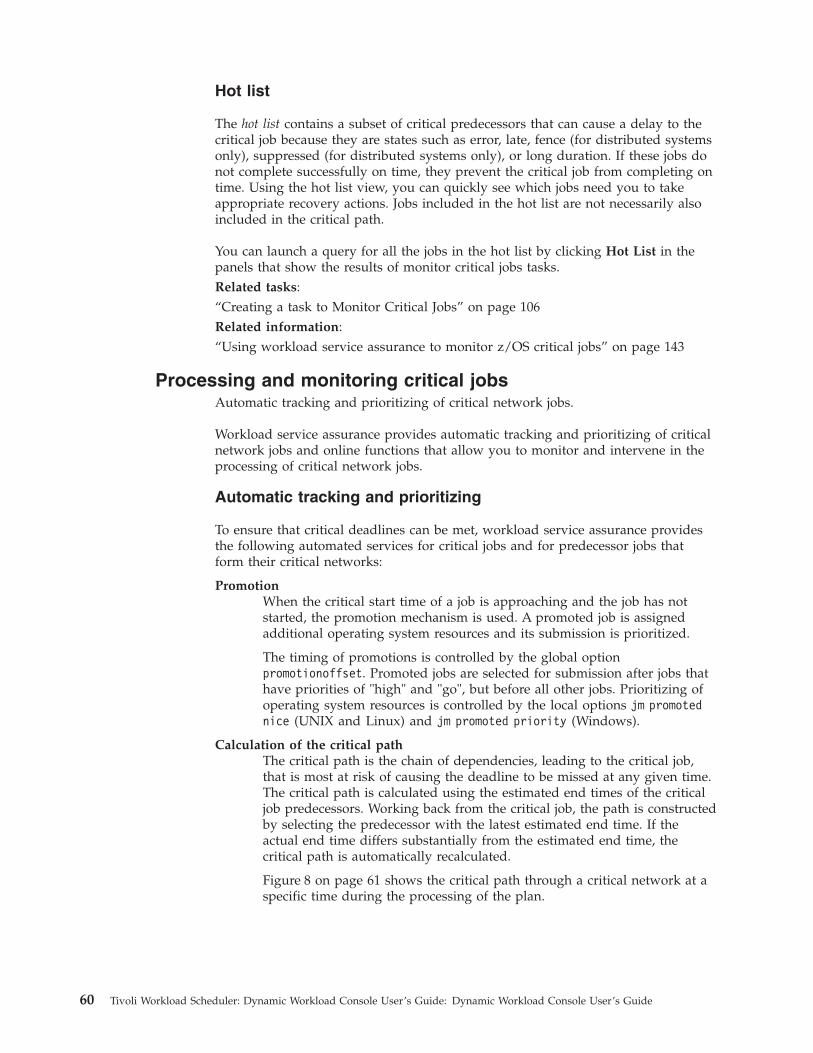
Hot list
The hot list contains a subset of critical predecessors that can cause a delay to thecritical job because they are states such as error, late, fence (for distributed systemsonly), suppressed (for distributed systems only), or long duration. If these jobs donot complete successfully on time, they prevent the critical job from completing ontime. Using the hot list view, you can quickly see which jobs need you to takeappropriate recovery actions. Jobs included in the hot list are not necessarily alsoincluded in the critical path.
You can launch a query for all the jobs in the hot list by clicking Hot List in thepanels that show the results of monitor critical jobs tasks.Related tasks:“Creating a task to Monitor Critical Jobs” on page 106Related information:“Using workload service assurance to monitor z/OS critical jobs” on page 143
Processing and monitoring critical jobsAutomatic tracking and prioritizing of critical network jobs.
Workload service assurance provides automatic tracking and prioritizing of criticalnetwork jobs and online functions that allow you to monitor and intervene in theprocessing of critical network jobs.
Automatic tracking and prioritizing
To ensure that critical deadlines can be met, workload service assurance providesthe following automated services for critical jobs and for predecessor jobs thatform their critical networks:
PromotionWhen the critical start time of a job is approaching and the job has notstarted, the promotion mechanism is used. A promoted job is assignedadditional operating system resources and its submission is prioritized.
The timing of promotions is controlled by the global optionpromotionoffset. Promoted jobs are selected for submission after jobs thathave priorities of "high" and "go", but before all other jobs. Prioritizing ofoperating system resources is controlled by the local options jm promotednice (UNIX and Linux) and jm promoted priority (Windows).
Calculation of the critical pathThe critical path is the chain of dependencies, leading to the critical job,that is most at risk of causing the deadline to be missed at any given time.The critical path is calculated using the estimated end times of the criticaljob predecessors. Working back from the critical job, the path is constructedby selecting the predecessor with the latest estimated end time. If theactual end time differs substantially from the estimated end time, thecritical path is automatically recalculated.
Figure 8 on page 61 shows the critical path through a critical network at aspecific time during the processing of the plan.
60 Tivoli Workload Scheduler: Dynamic Workload Console User’s Guide: Dynamic Workload Console User’s Guide
At this specific time, the critical path includes Job3a, Job2a, and Job1a.Job3a and Job3b are the immediate predecessors of the critical job, job4,and Job3a has the later estimated end date. Job3a has two immediatepredecessors, Job2a and Job_y. Job2a has the later estimated end time, andso on.
Addition of jobs to the hot listJobs that are part of the critical network are added to a hot list that isassociated to the critical job itself. The hot list includes any critical networkjobs that have a real or potential impact on the timely completion of thecritical job. Jobs are added to the hot list for the one or more of thefollowing reasons. Note that only the jobs that begin the current criticalnetwork, for which there is no predecessor, can be included in the hot list.v The job has stopped with an error. The length of time before the critical
start time is determined by the approachingLateOffset global option.v The job has been running longer than estimated by a factor defined in
the longDurationThreshold global option.v The job has still not started, although all its follows dependencies have
either been resolved or released, and at least one of the followingconditions is true:– The critical start time has nearly been reached.– The job is scheduled to run on a workstation where the limit is set to
zero.– The job belongs to a job stream for which the limit is set to zero.– The job or its job stream has been suppressed.
Figure 8. Critical path
Chapter 6. Tivoli Workload Scheduler Concepts 61
– The job or its job stream currently has a priority that is lower than thefence or is set to zero.
Setting a high or potential risk status for the critical jobA critical job can be set to the following risk statuses:
High riskCalculated timings show that the critical job will finish after itsdeadline.
Initially, estimated start and end times are used. As jobs arecompleted, timings are recalculated to take account of the actualstart and end times of jobs.
Potential riskCritical predecessor jobs have been added to the hot list.
Online tracking of critical jobs
The Dynamic Workload Console provides specialized views for tracking theprogress of critical jobs and their predecessors. You can access the views from theDashboard or by creating Monitor Critical Jobs tasks.
The initial view lists all critical jobs for the engine, showing their status: normal,potential risk, or high risk. From this view, you can navigate to see:v The hot list of jobs that put the critical deadline at risk.v The critical path.v Details of all critical predecessors.v Details of completed critical predecessors.v Job logs of jobs that have already run.
Using the views, you can monitor the progress of the critical network, find outabout current and potential problems, release dependencies, and rerun jobs.
Planning critical jobsPlanning critical jobs.
Workload service assurance provides the means to identify critical jobs, definedeadlines, and calculate timings for all jobs that must precede the critical job.
If it is critical that a job must be completed before a specific time, you can flag it ascritical when you add it to a job stream using the Workload Designer functions onthe Tivoli Dynamic Workload Console. You can define the deadline either at job orjob stream level.
Jobs can also be flagged as critical by including the critical key word on the jobstatement when you create or modify a job stream using the composer commandline.
When you run the command to include the new job in the production plan, all jobsthat are direct or indirect predecessors of the critical job are identified. These jobs,together with the critical job itself, form a critical network.
Because timing of jobs in the critical network must be tightly controlled, TimePlanner calculates the following timing benchmarks for each critical network job:
62 Tivoli Workload Scheduler: Dynamic Workload Console User’s Guide: Dynamic Workload Console User’s Guide

Critical startApplies to distributed systems only and represents the latest time at whichthe job can start without causing the critical job to miss its deadline.
Critical start times are calculated starting with the deadline set for thecritical job and working backwards using the estimated duration of eachjob to determine its critical start time. For example, if the critical jobdeadline is 19:00 and the estimated duration of the critical job is 30minutes, the critical job will not finish by the deadline unless it starts by18:30. If the immediate predecessor of the critical job has an estimatedduration of 20 minutes, it must start at latest by 18.10.
Note: Only the deadline of the critical job is considered when calculatingcritical start times for jobs in the critical network. If other jobs havedeadlines defined, their critical start times might be later than theirdeadlines.
Earliest startRepresents the earliest time at which a job in the critical network can start,taking into consideration all dependencies and resource requirements.
Estimated start times are calculated starting with the earliest time at whichthe first job or jobs in the critical network can start and working forwardusing the estimated duration of each job to estimate the start time of thejob that follows it.
Estimated start and end timeFor the initial calculations, these values are set to the planned start andend time. They are subsequently recalculated to take into consideration anychanges or delays in the plan.
Estimated durationThe estimated duration of a job is based on statistics collected fromprevious runs of the job. If the job has never run before, a default value ofone minute is used. Take this into account when considering the accuracyof calculated timings for critical job networks that include jobs running forthe first time.
The timings for each job in the critical network are added to the Symphony file,which includes all the plan information and is distributed to all workstations onwhich jobs are to be run.
As the plan is run, Plan Monitor monitors all critical networks: subsequent changesto the critical network that affect the timing of jobs trigger the recalculation of thecritical and estimated start times. Changes might include manual changes, forexample, releasing dependencies or rerunning jobs, and changes madeautomatically by the system in response to a potential or actual risk to the timelycompletion of the critical job.
Specific views for critical jobs and their predecessors, available from the TivoliDynamic Workload Console, allow you to keep track of the processing of thecritical network. The views can immediately identify problems in your planning ofthe critical job. For example, if the estimated start time of a job in the criticalnetwork is later than the critical start time, this is immediately signalled as apotential risk to the critical job.
Chapter 6. Tivoli Workload Scheduler Concepts 63
Tivoli Workload Scheduler for SAPWith SAP R/3 support, you can use Tivoli Workload Scheduler to do the followingtasks:v Use Tivoli Workload Scheduler standard job dependencies and controls on SAP
R/3 jobs.v Create SAP R/3 jobs using the Tivoli Workload Scheduler interface.v Schedule SAP R/3 jobs to run on specified days and times, and in a defined
order.v Define inter-dependencies between SAP R/3 jobs and jobs that run on different
platforms.v Define the national language support options.v Use the SAP R/3 Business Warehouse Support function.v Customize job execution return codes.v Use SAP R/3 logon groups for load balancing and fault-tolerance.v Work with SAP R/3 variants and placeholders.v Use Business Component-eXternal Interface Background Processing (BC-XBP 2.0)
interface support to:– Intercept jobs– Track child jobs– Keep all job attributes when you rerun a job– Raise events
Note: For more information about SAP, see Tivoli Workload Scheduler forApplications User's Guide.
Scheduling process for the SAP R/3 extended agent
Tivoli Workload Scheduler launches jobs in SAP R/3 by using jobs defined on thefollowing workstations that support the r3batch access method:v A Tivoli Workload Scheduler extended agent workstation. A workstation that is
hosted by a fault-tolerant agent or master workstation.v A dynamic agent workstation.v A dynamic pool.v A z-centric workstation.
These supported workstations use the r3batch access method to communicate withthe SAP system. The access method is used to pass SAP R/3 job-specificinformation to predefined SAP R/3 instances. The access method uses informationprovided in an options file to connect and launch jobs on an SAP R/3 instance.
Note: For more information about this, see Tivoli Workload Scheduler forApplications User's Guide.
You can define multiple agent workstations to use the same host, by usingmultiple options entries or multiple options files. Using the SAP R/3 agent nameas a key, r3batch uses the corresponding options file to determine which instanceof SAP R/3 will run the job. It makes a copy of a template job in SAP R/3 andmarks it as able to run with a start time of start immediate. It then monitors thejob through to completion, writing job progress and status information to a jobstandard list found on the host workstation.
64 Tivoli Workload Scheduler: Dynamic Workload Console User’s Guide: Dynamic Workload Console User’s Guide
Chapter 7. Creating and Editing Objects in the Database
To create and edit objects in the database read the following sections.
Designing your Scheduling EnvironmentTo begin working with Tivoli Workload Scheduler you must design yourscheduling environment.
The scheduling environment is composed of the following objects:v Workstationsv Distributed Domains
Depending on whether your engine is distributed or z/OS, the steps to follow aredifferent:v Distributed You create workstations and domains. Depending on the business
needs of your organization and the complexity of your network, you can decideto have a hierarchical domain structure.
v z/OS You define workstations.Related concepts:“Scheduling objects” on page 35
Creating a workstationAbout this task
To create a workstation definition in the database, perform the steps described inthe following sections.
Creating distributed workstationsDistributed
About this task
You can create multiple workstation definitions.
For more information about the main workstation types and their attributes, seethe section about workstation definition in the Tivoli Workload Scheduler User'sGuide and Reference.
To add a workstation definition to the database and to assign it to a domain,perform the following steps.
Note: For all the details about options and fields displayed in the panels, see theonline help by clicking the question mark located at the top-right corner of eachpanel.
Procedure1. Click Scheduling Environment > Design > Create Workstations.2. Select a distributed engine from the list and click Create Workstations.
© Copyright IBM Corp. 1999, 2012 65
3. In the Workstations properties panel, specify the attributes for the workstationyou are creating. Depending on the type of workstation you select, someattributes are mandatory.
4. To assign the workstation to an existing domain or to create a new domain,click Assign to Domain.
5. Click Save.
Results
The workstation is now added to the database. Alternatively, click SchedulingEnvironment > Design > List Workstations, select a distributed engine, and clickDisplay. From the workstation table, click New.
Note: You can add workstation definitions to the database at any time, but youmust run JnextPlan -for 0000 again to be able to run jobs on newly-createdworkstations. Every time you run JnextPlan all workstations are shut down andrestarted.Related concepts:“Workstation” on page 29“Domain” on page 32The domain.Related reference:“Workstation types” on page 168“Type of communication based on SSL communication options” on page 161
Creating z/OS workstationsz/OS
About this task
To create a z/OS workstation definition in the database, perform the followingsteps.
Note: For all the details about options and fields displayed in the panels, see theonline help by clicking the question mark located at the top-right corner of eachpanel.
Procedure1. Click Scheduling Environment > Design > Create Workstations.2. Select a z/OS engine from the list and click Create Workstation.3. Specify the workstation attributes using the General, Resources, and Open
Time Intervals tabs as appropriate. Depending on the type of workstation youselect, some attributes are mandatory.
4. Click Save.
Results
The workstation is now added to the database. Alternatively, click SchedulingEnvironment > Design > List Workstations, select a z/OS engine, and clickDisplay. From the workstation table, click New.
66 Tivoli Workload Scheduler: Dynamic Workload Console User’s Guide: Dynamic Workload Console User’s Guide
Related concepts:“Workstation” on page 29Related reference:“Workstation types” on page 168
Creating z/OS virtual workstationsz/OS
About this task
To create a z/OS virtual workstation definition in the database, perform thefollowing steps.
Note: For all the details about options and fields displayed in the panels, see theonline help by clicking the question mark located at the top-right corner of eachpanel.
Procedure1. Click Scheduling Environment > Design > Create Workstations.2. Select a z/OS engine from the list and click Create Virtual Workstation.3. Specify the workstation attributes using the General and Destinations tabs as
appropriate. Depending on the type of workstation you select, some attributesare mandatory.
4. Click Save.
Results
The workstation is now added to the database. Alternatively, click SchedulingEnvironment > Design > List Workstations, select a z/OS engine, and clickDisplay. From the workstation table, click New Virtual.Related concepts:“Workstation” on page 29Related reference:“Workstation types” on page 168
Creating a domainDistributed
About this task
You add domain definitions to the Tivoli Workload Scheduler database in either ofthe following ways:v When you are creating a distributed workstation, from the Create Workstations
option in the portfoliov From the List Distributed Workstations panel, by selecting Domains view.
Note: For all the details about options and fields displayed in the panels, see theonline help by clicking the question mark located at the top-right corner of eachpanel.
Chapter 7. Creating and Editing Objects in the Database 67
Procedure
To create a new domain when creating a workstation, perform the following steps:1. Click Scheduling Environment > Design > Create Workstations.2. Select a distributed engine from the list and click Go.3. In the Workstations Properties panel, specify the attributes for the workstation
you are creating, then click Assign to Domain and, on the Select Domainpanel, click New to create a new domain.
4. Click Save to add the domain to the database and return to the Select Domainpanel.
5. In the Select Domain panel click OK to assign the new domain to theworkstation you are creating.
To add a new domain definition from the List Distributed Workstations panel,perform the following steps:1. Click Scheduling Environment > Design > List Workstations.2. From the Workstations filter, click Display.3. From the List Distributed Workstations, panel click Domains View.4. Click New and, on the Domain Properties panel, specify the properties for the
domain.5. Click Save to add the domain to the database or Cancel to exit without saving.Related concepts:“Domain” on page 32The domain.
Creating a pool of agentsAbout this task
You can define and schedule dynamic jobs to perform specific database, filetransfer, Java, and Web Services operations. You can customize the sample filesprovided with the product to match the requirements of your environment.
To run these job types, you can use dynamic agents, a workstation type that youcreate by running the related installation process. The dynamic agents areautomatically created and registered at installation time. You can also organize thedynamic agents into groups, called pools or dynamic pools.
For more information about dynamic scheduling, see Scheduling WorkloadDynamically
To add this kind of workstation definition to the database and to assign it to adomain, perform the following steps.
Note: For all the details about options and fields displayed in the panels, see theonline help by clicking the question mark located at the top-right corner of eachpanel.
Procedure1. Click Scheduling Environment > Design > Create Workstations.2. Select an engine from the list and click Create Workstations.
68 Tivoli Workload Scheduler: Dynamic Workload Console User’s Guide: Dynamic Workload Console User’s Guide
3. In the Workstations properties panel, specify the attributes for the pool ofdynamic agents you are creating. In the Workstation Type menu, select Pool orDynamic Pool, depending on the set of dynamic agents you are defining.v Select Pool to define a cluster of dynamic agents with similar hardware or
software characteristics to submit jobs to. Then, in the Member table thatdisplays the dynamic agents that belong to the Pool, click Add to add newdynamic agents and Remove to remove unwanted dynamic agents.
v Select Dynamic Pool to define a set of dynamic agents that is dynamicallydefined based on the resource requirements you specify. Then click EditRequirements to display a panel where you can specify the requirementsnecessary for running your jobs. All your selections produce an XML file,which is used to select a workstation with the characteristics you require, torun Workload Broker jobs. When you provide the requirements, you specifya list of workstation candidates to be included in the Dynamic Pool ofdynamic agents and the preferred order in which they must be considered.You also specify the best criteria, which is used to change the workstation(workload balance, CPU utilization, or its use of logical resources).
4. Optionally, you can associate the new pool to a variable table.5. Specify the Workload Broker hosting the workstation.Related concepts:“Workstation” on page 29
Designing your WorkloadBefore you begin
You can use the Workload Designer to manage your workload and to define andedit objects in the database.1. Open the Workload Designer, from the portfolio, click Tivoli Workload
Scheduler > Workload > Design > Create Workload Definitions.2. In the displayed panel, specify the engine connection you want to use. Only the
categories of objects supported by the engine that you selected are available.
You can open multiple occurrences of the Workload Designer. The followingscenarios are supported:v Same user connected to multiple enginesv Multiple users connected to the same engine.
When you open the Workload Designer panel, the following window is displayed,showing several working areas that you can use, depending on the task you wantto perform.
Click the links in the picture below to find more information about each pane:
Chapter 7. Creating and Editing Objects in the Database 69
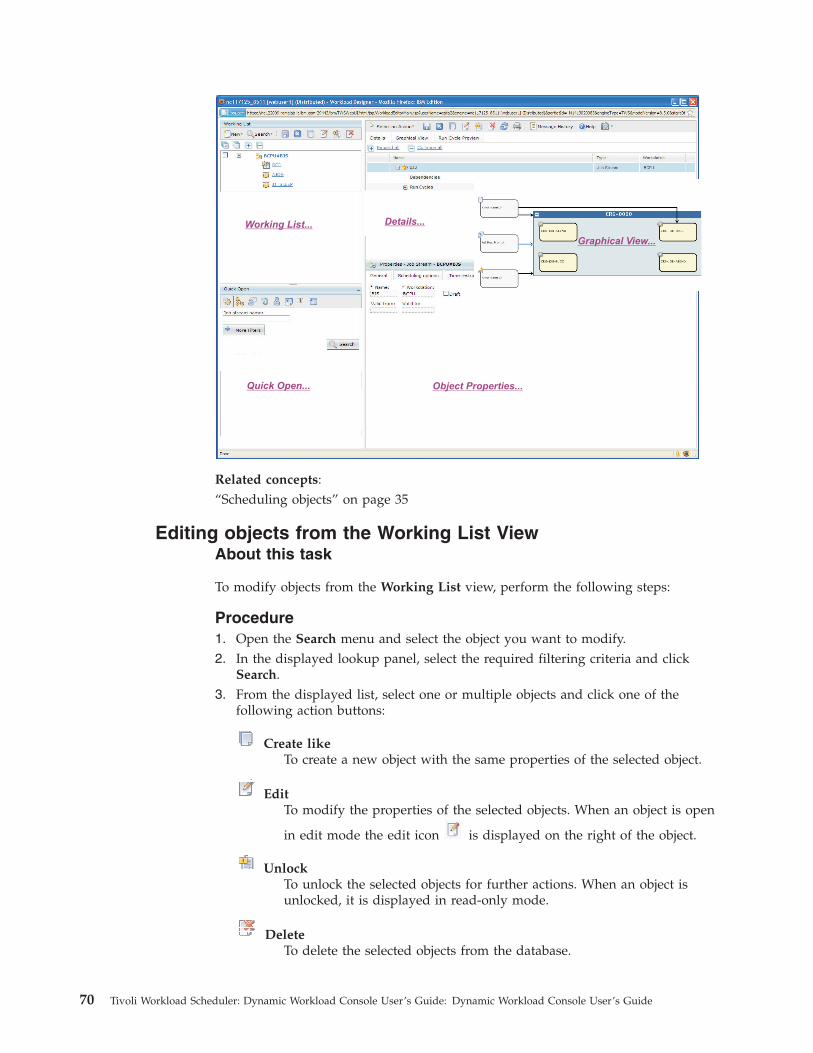
Working List...
Graphical View...
Quick Open... Object Properties...
Details...
Related concepts:“Scheduling objects” on page 35
Editing objects from the Working List ViewAbout this task
To modify objects from the Working List view, perform the following steps:
Procedure1. Open the Search menu and select the object you want to modify.2. In the displayed lookup panel, select the required filtering criteria and click
Search.3. From the displayed list, select one or multiple objects and click one of the
following action buttons:
Create likeTo create a new object with the same properties of the selected object.
EditTo modify the properties of the selected objects. When an object is open
in edit mode the edit icon is displayed on the right of the object.
UnlockTo unlock the selected objects for further actions. When an object isunlocked, it is displayed in read-only mode.
DeleteTo delete the selected objects from the database.
70 Tivoli Workload Scheduler: Dynamic Workload Console User’s Guide: Dynamic Workload Console User’s Guide
What to do next
All the selected objects are listed in the Working List view. When you select anobject from this list, its properties are displayed in the right pane, where you canview or edit them, if you have the required authorization defined in the TivoliWorkload Scheduler security file.
By hovering with the cursor over the icons located on the toolbar, you can see allthe actions you can perform on the selected objects.Related information:“Working List” on page 176
Editing objects from the Quick Open ViewAbout this task
To modify objects from the Quick Open view, perform the following steps:
Procedure1. Click one of the following icons displayed at the top of the pane to select the
category of your search. Available categories depend on the engine connectionyou selected.
Distributed In a distributed environment
z/OS In a z/OS environment
2. Refine your search by using some filtering criteria. You can filter by objectname by entering the name, or part of it, in the text box, or by using wildcards.Optionally, you can further filter your search by choosing more filtering criteriafrom the drop-down menu.
3. Click Search. The list of results is shown, up to a maximum of 250 items. If thelist is longer, use the filters to refine your search and reduce the number ofresults.
4. Select one or more objects to open them in edit mode by clicking the Editbutton. The open objects are locked in the database until you finish editing andsave them.
What to do next
When an object is open in edit mode, its properties are displayed in the right pane,where you can view and edit them.
You can drag the objects in the Quick Open pane and drop them in the GraphicalView or you can quickly associate them to the item you are working with, byclicking the Add button. For example, you can search for jobs and automaticallyadd them to the job stream you are editing, or add other objects as dependencies,such as resources or prompts.
Chapter 7. Creating and Editing Objects in the Database 71
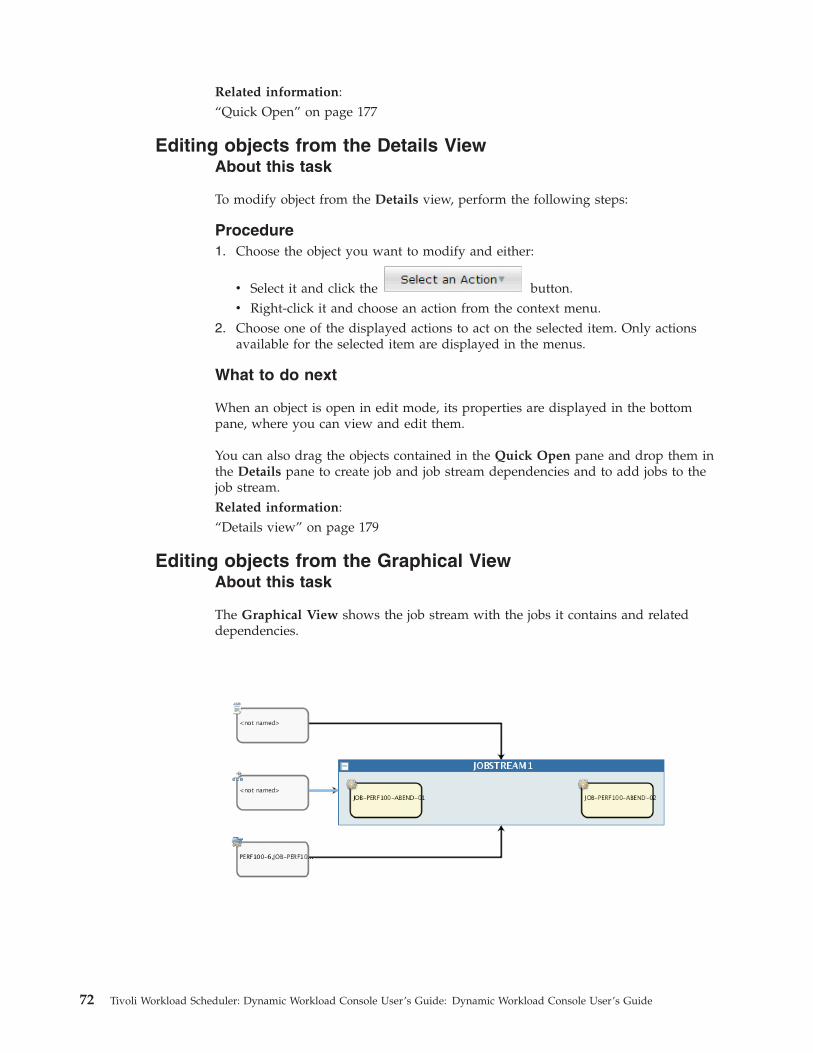
Related information:“Quick Open” on page 177
Editing objects from the Details ViewAbout this task
To modify object from the Details view, perform the following steps:
Procedure1. Choose the object you want to modify and either:
v Select it and click the button.v Right-click it and choose an action from the context menu.
2. Choose one of the displayed actions to act on the selected item. Only actionsavailable for the selected item are displayed in the menus.
What to do next
When an object is open in edit mode, its properties are displayed in the bottompane, where you can view and edit them.
You can also drag the objects contained in the Quick Open pane and drop them inthe Details pane to create job and job stream dependencies and to add jobs to thejob stream.Related information:“Details view” on page 179
Editing objects from the Graphical ViewAbout this task
The Graphical View shows the job stream with the jobs it contains and relateddependencies.
72 Tivoli Workload Scheduler: Dynamic Workload Console User’s Guide: Dynamic Workload Console User’s Guide
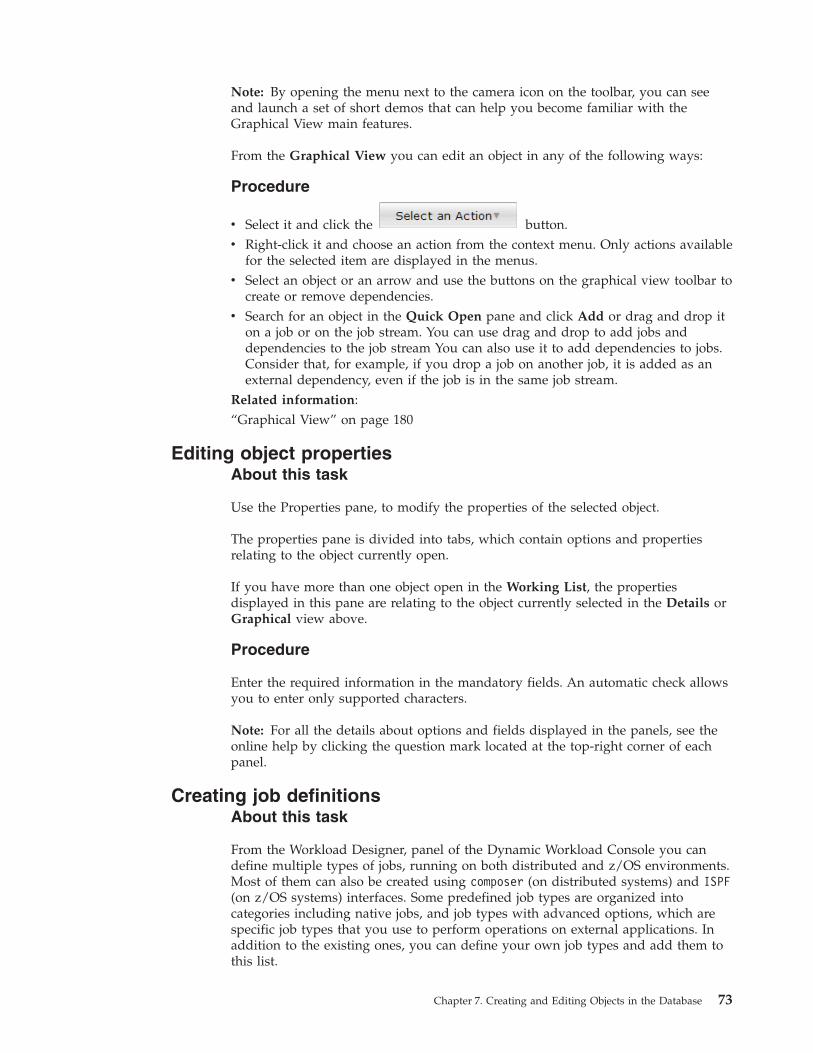
Note: By opening the menu next to the camera icon on the toolbar, you can seeand launch a set of short demos that can help you become familiar with theGraphical View main features.
From the Graphical View you can edit an object in any of the following ways:
Procedure
v Select it and click the button.v Right-click it and choose an action from the context menu. Only actions available
for the selected item are displayed in the menus.v Select an object or an arrow and use the buttons on the graphical view toolbar to
create or remove dependencies.v Search for an object in the Quick Open pane and click Add or drag and drop it
on a job or on the job stream. You can use drag and drop to add jobs anddependencies to the job stream You can also use it to add dependencies to jobs.Consider that, for example, if you drop a job on another job, it is added as anexternal dependency, even if the job is in the same job stream.
Related information:“Graphical View” on page 180
Editing object propertiesAbout this task
Use the Properties pane, to modify the properties of the selected object.
The properties pane is divided into tabs, which contain options and propertiesrelating to the object currently open.
If you have more than one object open in the Working List, the propertiesdisplayed in this pane are relating to the object currently selected in the Details orGraphical view above.
Procedure
Enter the required information in the mandatory fields. An automatic check allowsyou to enter only supported characters.
Note: For all the details about options and fields displayed in the panels, see theonline help by clicking the question mark located at the top-right corner of eachpanel.
Creating job definitionsAbout this task
From the Workload Designer, panel of the Dynamic Workload Console you candefine multiple types of jobs, running on both distributed and z/OS environments.Most of them can also be created using composer (on distributed systems) and ISPF(on z/OS systems) interfaces. Some predefined job types are organized intocategories including native jobs, and job types with advanced options, which arespecific job types that you use to perform operations on external applications. Inaddition to the existing ones, you can define your own job types and add them tothis list.
Chapter 7. Creating and Editing Objects in the Database 73
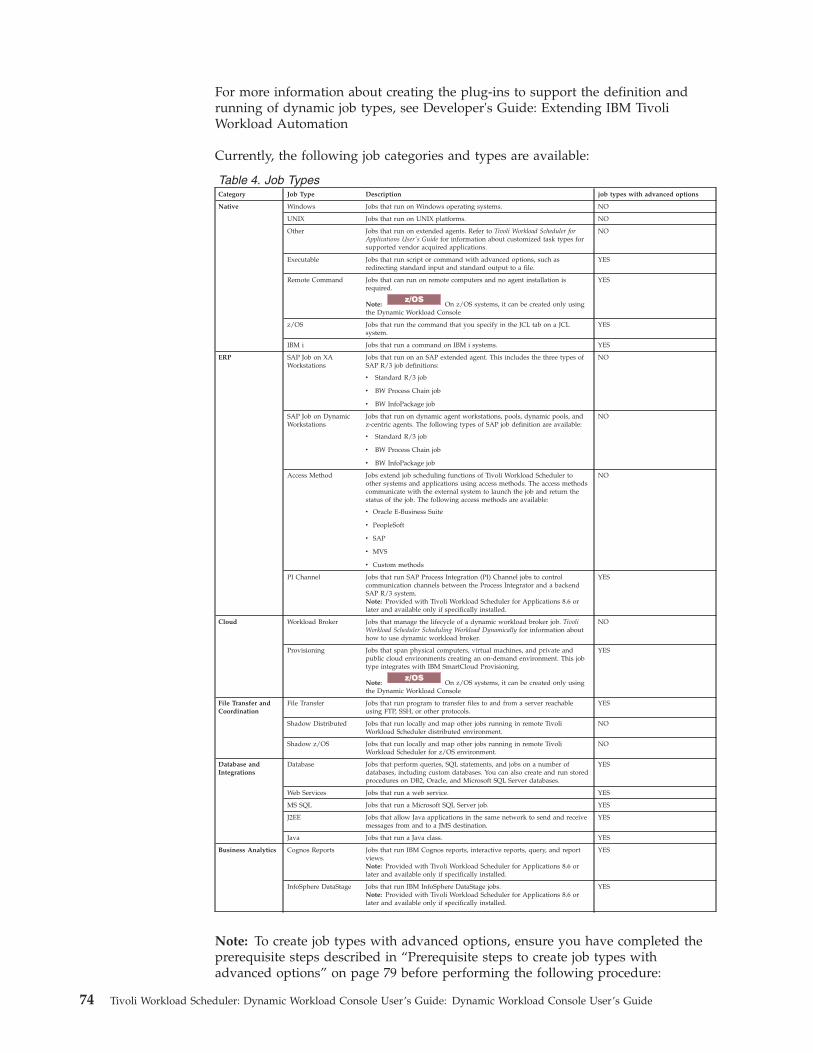
For more information about creating the plug-ins to support the definition andrunning of dynamic job types, see Developer's Guide: Extending IBM TivoliWorkload Automation
Currently, the following job categories and types are available:
Table 4. Job TypesCategory Job Type Description job types with advanced options
Native Windows Jobs that run on Windows operating systems. NO
UNIX Jobs that run on UNIX platforms. NO
Other Jobs that run on extended agents. Refer to Tivoli Workload Scheduler forApplications User's Guide for information about customized task types forsupported vendor acquired applications.
NO
Executable Jobs that run script or command with advanced options, such asredirecting standard input and standard output to a file.
YES
Remote Command Jobs that can run on remote computers and no agent installation isrequired.
Note:z/OS
On z/OS systems, it can be created only usingthe Dynamic Workload Console
YES
z/OS Jobs that run the command that you specify in the JCL tab on a JCLsystem.
YES
IBM i Jobs that run a command on IBM i systems. YES
ERP SAP Job on XAWorkstations
Jobs that run on an SAP extended agent. This includes the three types ofSAP R/3 job definitions:
v Standard R/3 job
v BW Process Chain job
v BW InfoPackage job
NO
SAP Job on DynamicWorkstations
Jobs that run on dynamic agent workstations, pools, dynamic pools, andz-centric agents. The following types of SAP job definition are available:
v Standard R/3 job
v BW Process Chain job
v BW InfoPackage job
NO
Access Method Jobs extend job scheduling functions of Tivoli Workload Scheduler toother systems and applications using access methods. The access methodscommunicate with the external system to launch the job and return thestatus of the job. The following access methods are available:
v Oracle E-Business Suite
v PeopleSoft
v SAP
v MVS
v Custom methods
NO
PI Channel Jobs that run SAP Process Integration (PI) Channel jobs to controlcommunication channels between the Process Integrator and a backendSAP R/3 system.Note: Provided with Tivoli Workload Scheduler for Applications 8.6 orlater and available only if specifically installed.
YES
Cloud Workload Broker Jobs that manage the lifecycle of a dynamic workload broker job. TivoliWorkload Scheduler Scheduling Workload Dynamically for information abouthow to use dynamic workload broker.
NO
Provisioning Jobs that span physical computers, virtual machines, and private andpublic cloud environments creating an on-demand environment. This jobtype integrates with IBM SmartCloud Provisioning.
Note:z/OS
On z/OS systems, it can be created only usingthe Dynamic Workload Console
YES
File Transfer andCoordination
File Transfer Jobs that run program to transfer files to and from a server reachableusing FTP, SSH, or other protocols.
YES
Shadow Distributed Jobs that run locally and map other jobs running in remote TivoliWorkload Scheduler distributed environment.
NO
Shadow z/OS Jobs that run locally and map other jobs running in remote TivoliWorkload Scheduler for z/OS environment.
NO
Database andIntegrations
Database Jobs that perform queries, SQL statements, and jobs on a number ofdatabases, including custom databases. You can also create and run storedprocedures on DB2, Oracle, and Microsoft SQL Server databases.
YES
Web Services Jobs that run a web service. YES
MS SQL Jobs that run a Microsoft SQL Server job. YES
J2EE Jobs that allow Java applications in the same network to send and receivemessages from and to a JMS destination.
YES
Java Jobs that run a Java class. YES
Business Analytics Cognos Reports Jobs that run IBM Cognos reports, interactive reports, query, and reportviews.Note: Provided with Tivoli Workload Scheduler for Applications 8.6 orlater and available only if specifically installed.
YES
InfoSphere DataStage Jobs that run IBM InfoSphere DataStage jobs.Note: Provided with Tivoli Workload Scheduler for Applications 8.6 orlater and available only if specifically installed.
YES
Note: To create job types with advanced options, ensure you have completed theprerequisite steps described in “Prerequisite steps to create job types withadvanced options” on page 79 before performing the following procedure:
74 Tivoli Workload Scheduler: Dynamic Workload Console User’s Guide: Dynamic Workload Console User’s Guide

To create a new job definition from the Dynamic Workload Console, perform thefollowing procedure:
Procedure1. From the Dynamic Workload Console portfolio, click Workload>Design>Create
Workload Definitions
2. Specify an engine name, either distributed or z/OS. The Workload Designeropens. Job types and characteristics vary depending on whether you select adistributed or a z/OS engine.
3. In the Working List pane, select New > Job Definition.4. Select the category and type of job you want to create.5. In the properties panel, specify the attributes for the job definition you are
creating. For all the details about available fields and options, see the onlinehelp by clicking the "?" on the top-right corner.
6. Click Save to save the job definition in the database.Related concepts:“Job” on page 36“Workstation” on page 29“Variable table” on page 50“Run cycle” on page 39“Dependencies” on page 40Controlling processing using dependencies“Customizing your job stream” on page 141
Defining jobs based on the agent typeAbout this task
How to create a job definition for supported agents using the Dynamic WorkloadConsole.
Steps for defining a job for supported agents.
Fault-tolerant agents
To define jobs, follow these steps:1. From the Dynamic Workload Console portfolio, click
Workload>Design>Create Workload Definitions.2. Specify an engine name, either distributed or z/OS. The Workload
Designer opens. Job types and characteristics vary depending onwhether you select a distributed or a z/OS engine.
3. In the Working List pane, selectv Distributed New > Job Definition
v z/OS New
4. Select the category and type of job you want to create.v For Tivoli Workload Scheduler native jobs, click
– Distributed Native > Windows, UNIX or Other.– z/OS z/OS job. See Tivoli Workload Scheduler for Applications
User's Guide, section about Creating SAP Standard R/3 jobs fromthe Dynamic Workload Console.
Chapter 7. Creating and Editing Objects in the Database 75
5. In the properties panel, specify the attributes for the job definition youare creating. For all the details about available fields and options, seethe online help by clicking the "?" in the top-right corner.
6. Click Save to save the job definition in the database.
Remote engines
To define shadow jobs, follow these steps:1. From the Dynamic Workload Console portfolio, click
Workload>Design>Create Workload Definitions.2. Specify an engine name, either distributed or z/OS. The Workload
Designer opens. Job types and characteristics vary depending onwhether you select a distributed or a z/OS engine.
3. In the Working List pane, selectv For Tivoli Workload Scheduler native jobs,
– Distributed New > Job Definition.– z/OS New.
4. Select the category and type of job you want to create.v ForTivoli Workload Scheduler jobs,
– For Tivoli Workload Scheduler native jobs,- Distributed File Transfer and Coordination > Shadow
Distributed or Shadow z/OS. See Tivoli Workload SchedulerUser's Guide and Reference, section about Job definition - Shadowjobs.
- z/OS Shadow Distributed or Shadow z/OS. See TivoliWorkload Scheduler for z/OS Managing the Workload, section aboutSpecifying cross dependencies and shadow jobs.
5. In the properties panel, specify the attributes for the job definition youare creating. For all the details about available fields and options, seethe online help by clicking the "?" in the top-right corner.
6. Click Save to save the job definition in the database.
Extended agents
To define jobs, follow these steps:1. From the Dynamic Workload Console portfolio, click
Workload>Design>Create Workload Definitions.2. Specify an engine name, either distributed or z/OS. The Workload
Designer opens. Job types and characteristics vary depending onwhether you select a distributed or a z/OS engine.
3. In the Working List pane, select New > Job Definition.4. Select the category and type of job you want to create.
v For SAP jobs, ERP > SAP Job on XA Workstations. See TivoliWorkload Scheduler for Applications User's Guide, section about CreatingSAP Standard R/3 jobs from the Dynamic Workload Console.
v
v For Oracle E-Business Suite, and PeopleSoft, Native > Other.v For z/OS, Native > z/OS.
5. In the properties panel, specify the attributes for the job definition youare creating. For all the details about available fields and options, seethe online help by clicking the "?" in the top-right corner.
6. Click Save to save the job definition in the database.
76 Tivoli Workload Scheduler: Dynamic Workload Console User’s Guide: Dynamic Workload Console User’s Guide
Dynamic agent and Tivoli Workload Scheduler for z/OS agents
The steps described here for defining a job are common to all accessmethods.
Follow these steps:1. From the Dynamic Workload Console portfolio, click
Workload>Design>Create Workload Definitions.2. Specify an engine name, either distributed or z/OS. The Workload
Designer opens. Job types and characteristics vary depending onwhether you select a distributed or a z/OS engine.
3. In the Working List pane, selectv Distributed New > Job Definition
v z/OS New
4. Select the category and type of job you want to create.v For SAP R/3 jobs, ERP,
– Distributed SAP Job on Dynamic Workstations. See Tivoli WorkloadScheduler for Applications User's Guide, section about Creating SAPStandard R/3 jobs from the Dynamic Workload Console.
– z/OS SAP. See Tivoli Workload Scheduler for Applications User'sGuide, section about Creating SAP Standard R/3 jobs from theDynamic Workload Console.
– SAP PI Channel, see Tivoli Workload Scheduler for ApplicationsUser's Guide, section about Defining a Tivoli Workload Schedulerjob that runs an SAP PI Channel job.
v For Tivoli Workload Scheduler native job types, Native
– Executable, see Tivoli Workload Scheduler User's Guide and Reference,section about Job definition - Executable jobs
– IBM i, see Limited Fault-Tolerant Agent IBM i.– z/OS, see Tivoli Workload Scheduler for z/OS Scheduling End-to-end
with z-centric Capabilities.– Remote command, see Tivoli Workload Scheduler User's Guide and
Reference, section about Job definition -remote command jobs.v For Database and Integrations job types with advanced options,
Database and Integrations,– Database, see Tivoli Workload Scheduler User's Guide and Reference,
section about Job definition - Database jobs.– J2EE, see Tivoli Workload Scheduler User's Guide and Reference,
section about Job definition - J2EE jobs.– Java, see Tivoli Workload Scheduler User's Guide and Reference,
section about Job definition - Java jobs.– MS SQL, see Tivoli Workload Scheduler User's Guide and Reference,
section about Creating job types with advanced options.– Web Services, see Tivoli Workload Scheduler User's Guide and
Reference, section about Job definition - Web services jobs.v For Business Analytics job types with advanced options, Business
Analytics,– InfoSphere DataStage, see Tivoli Workload Scheduler for Applications
User's Guide, section about Defining a Tivoli Workload Schedulerjob to run an InfoSphere DataStage job.
Chapter 7. Creating and Editing Objects in the Database 77
– Cognos, see Tivoli Workload Scheduler for Applications User's Guide,section about Defining jobs by using composer.
v For Cloud environments, Cloud > IBM SmartCloud Provisioning,see Tivoli Workload Scheduler User's Guide and Reference, section aboutJob definition - IBM SmartCloud Provisioning jobs
v For Access Method job types, Oracle E-Business Suite, andPeopleSoft, ERP > Access Method.
v For File Transfer and Coordination > File Transfer, see TivoliWorkload Scheduler User's Guide and Reference, section about Jobdefinition - File transfer jobs.
5. In the properties panel, specify the attributes for the job definition youare creating. For all the details about available fields and options, seethe online help by clicking the "?" in the top-right corner.
6. Click Save to save the job definition in the database.
Note: The access method for SAP R/3 provides supplementary features if you usethe alternative steps described in Tivoli Workload Scheduler for Applications User'sGuide, section about Create an SAP job and associate it to a Tivoli WorkloadScheduler job or Creating SAP Standard R/3 jobs from the Dynamic WorkloadConsole. You can create native SAP R/3 Standard jobs on a remoteSAP systemdirectly from the Dynamic Workload Console.
Prerequisite steps to create Provisioning jobsAbout this task
To create an Provisioning job definition, you must first complete the prerequisitesteps listed below:
For more information about creating Provisioning job definitions, see the relevantchapter about Job definition - SmartCloud Provisioning jobs in the Tivoli WorkloadScheduler User's Guide and Reference
Procedure1. Obtain the SmartCloud HTTP server certificate and save it in a directory that
you will later use. Provisioning administrator can provide the certificate, or,with Firefox browser, for example, you can retrieve the certificate performingthe following steps:a. Log in to Provisioning server providing Provisioning credentials.b. Download the certificate by clicking in the browser toolbar:
Tools>Options>Advanced>Encryption>View Certificates
c. Select IBM> IBM Websphere Cloudburst Appliance and click Export. Afile, named IBMWebSphereCloudBurstAppliance.crt (X509 Certificate -PEM) is created.
2. Browse to the directory where a JRE is installed, for example: C:\ProgramFiles\IBM\TWS\javaExt\JRE\JRE
3. Create a new truststore by launching the following command: keytool-genkeypair -alias certificatekey -keyalg RSA -validity 7 -keystorekeystore.jks,where, keystore.jks is the file path to the keystore.
4. Add IBM SmartCloud certificate to the truststore by launching the followingcommand: keytool -import -file certificate_directory\IBMWebSphereCloudBurstAppliance.crt -alias scp -keystoretrustore_directory\keystore.jks,
78 Tivoli Workload Scheduler: Dynamic Workload Console User’s Guide: Dynamic Workload Console User’s Guide
||
||
|||
|
||||
|
||
|||
||
|||
|
||||
5. Open the TWA_HOME\TWS\ITA\cpa\config\JobManager.ini file, and locateJavaJobLauncher section, JVMOptions row.
6. Add the following instructions to the row: "-Djavax.net.ssl.trustStore=DIRECTORY_TRUSTSTORE/keystore.jks-Djavax.net.ssl.trustStorePassword=TRUSTSTORE_PASSWORD" For example:JVMOptions = -Xdebug -Xrunjdwp:transport=dt_socket,server=y,suspend=n,address=7775-Djavax.net.debug=all:verbose -Dssl.debug=true-Djavax.net.ssl.trustStore=C:/myUtils/keystore.jks -Djavax.net.ssl.trustStorePassword=passw0rd
7. To complete the procedure, stop and restart the agent.
Prerequisite steps to create job types with advanced optionsAbout this task
Most job types include additional operations which vary depending on the jobtype to help you define and schedule the job correctly. For example, you can usethese job-specific options to check for the connection to the database when defininga database job or to retrieve the list of available operations for a web service whendefining a web service job. If you try to perform job-specific options on a dynamicagent, version 8.5.1, fix pack 1, an error message is returned because the optionsare not supported, but the job can be scheduled correctly.
Distributed In the distributed environment, you define job types with advancedoptions using the Dynamic Workload Console connected to a distributed engine orthe composer command.
For more information about defining job types with advanced options using thecomposer command, see Tivoli Workload Scheduler User's Guide and Reference.
z/OS In the z/OS environment, you define job types with advanced optionsusing the Dynamic Workload Console connected to a z/OS engine or the JOBRECstatement. .
For more information about defining job types with advanced options using theJOBREC statement, see the section about defining a job in the JOBLIB data set infor z/OS Scheduling End-to-end with z-centric Capabilities.
In both environments, you can use the related configuration files to define optionsfor some job types with advanced options.
For more information, see the section about configuring to schedule job types withadvanced options in awsadwelcome.htm and in for z/OS Scheduling End-to-end withz-centric Capabilities.
In addition, you can create custom plug-ins to implement your own job types withadvanced options for applications not supported by Tivoli Workload Scheduler.
For more information about how to create custom plug-ins, see the Developer'sGuide
You can schedule job types with advanced options only on dynamic agents, pools,and dynamic pools. If you schedule the job on a dynamic agent, version 8.5.1 fixpack 1,
This procedure describes how to create a file transfer job in both the distributed anz/OS environments. The procedure for creating other job types is similar, but eachjob type contains job-specific options. For more information about each job type,
Chapter 7. Creating and Editing Objects in the Database 79
||
|||
|||
|
||
|||||||
|||
||
|||
|||
||
|||
||
||
|||
|||
see the Dynamic Workload Console online help. To create a file transfer job,perform the following steps:
Procedure1. Install a number of dynamic agents and add the Java runtime
To install dynamic agents, run the installation program. You can install thedynamic agent during the full installation of Tivoli Workload Scheduler or in astand-alone installation of just the agent. During the installation, you have theoption of adding the Java runtime to run job types with advanced options, boththose types supplied with the product and the additional types implementedthrough the custom plug-ins.Follow the installation wizard to complete the installation.See the section about installation options in Tivoli Workload Scheduler Planningand Installation for descriptions of the installation parameters and options.
2. Organize the dynamic agents in pools and dynamic pools.
Pools and dynamic pools help you organize the environment based on theavailability of your workstations and the requirements of the jobs you plan torun.a. In the console navigation tree, expand Scheduling Environment > Design
and click Create Workstations.b. Select a distributed or z/OS engine. The workstations you can create vary
depending on the engine type you select.c. Select the workstation type you want to create.
v To create a pool, define the dynamic agents you want to add to the pooland the workload broker workstation where the pool is hosted.
v To create a dynamic pool, specify the requirements that each dynamicagent must meet to be added to the dynamic pool.
3. Grant the required authorization for defining job types with advancedoptions.
The Tivoli Workload Scheduler administrator has to grant specificauthorizations in the security file to allow the operators to create job types withadvanced options.v Distributed In the distributed environment, perform the following steps:
a. Navigate to the TWA_home/TWS directory from where the dumpsec andmakesec commands must be run.
b. Run the dumpsec command to decrypt the current security file into aneditable configuration file.For more information, see the section about dumpsec inawsadwelcome.htm.
c. Add display and run access to the workstation, as follows:– If the operation is performed on the Tivoli Workload Scheduler
Connector, display and run access is required on the CPUcorresponding to the workstation where the job is created.
– If the operation is performed on the workstation where the job runs,display access is required on the workload broker workstation.
For more information, see the section about configuring the security filein awsadwelcome.htm.
d. Close any open conman user interfaces using the exit command.e. Stop any connectors on systems running Windows operating systems.
80 Tivoli Workload Scheduler: Dynamic Workload Console User’s Guide: Dynamic Workload Console User’s Guide
||
|
|
||||||
|
||
|
|||
||
||
|
||
||
||
|||
|
||
||
||
|
|||
||
||
|
|
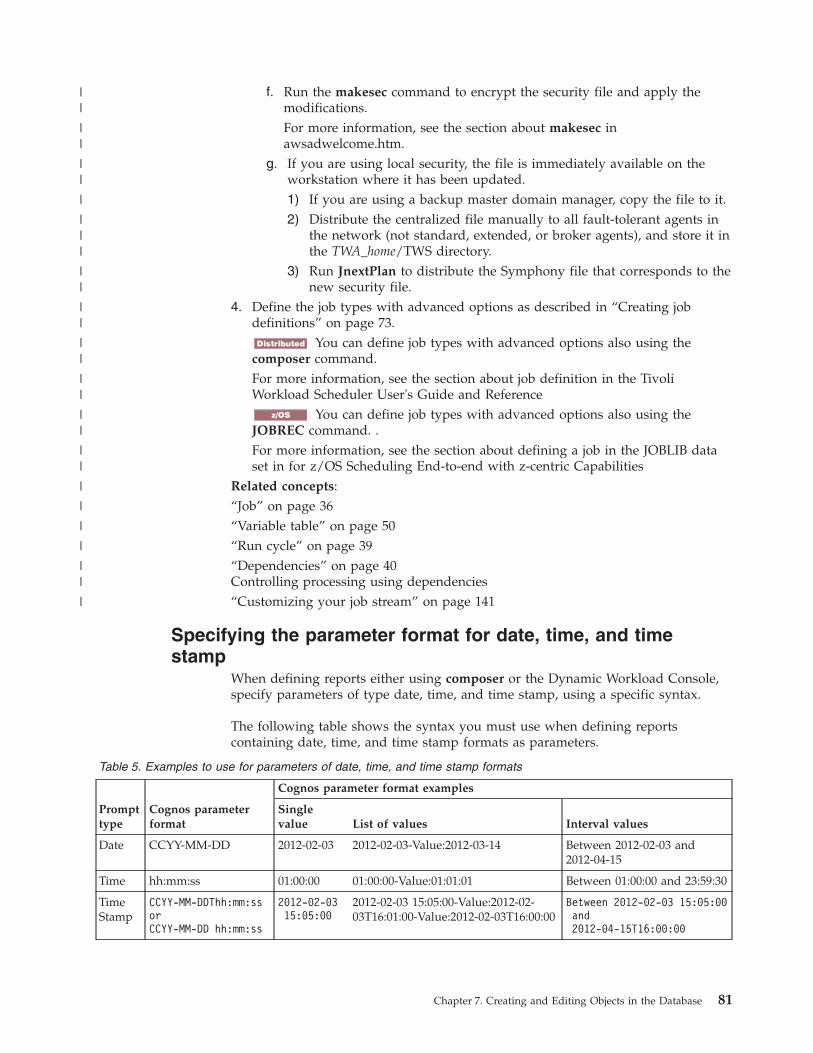
f. Run the makesec command to encrypt the security file and apply themodifications.For more information, see the section about makesec inawsadwelcome.htm.
g. If you are using local security, the file is immediately available on theworkstation where it has been updated.1) If you are using a backup master domain manager, copy the file to it.2) Distribute the centralized file manually to all fault-tolerant agents in
the network (not standard, extended, or broker agents), and store it inthe TWA_home/TWS directory.
3) Run JnextPlan to distribute the Symphony file that corresponds to thenew security file.
4. Define the job types with advanced options as described in “Creating jobdefinitions” on page 73.
Distributed You can define job types with advanced options also using thecomposer command.For more information, see the section about job definition in the TivoliWorkload Scheduler User's Guide and Reference
z/OS You can define job types with advanced options also using theJOBREC command. .For more information, see the section about defining a job in the JOBLIB dataset in for z/OS Scheduling End-to-end with z-centric Capabilities
Related concepts:“Job” on page 36“Variable table” on page 50“Run cycle” on page 39“Dependencies” on page 40Controlling processing using dependencies“Customizing your job stream” on page 141
Specifying the parameter format for date, time, and timestamp
When defining reports either using composer or the Dynamic Workload Console,specify parameters of type date, time, and time stamp, using a specific syntax.
The following table shows the syntax you must use when defining reportscontaining date, time, and time stamp formats as parameters.
Table 5. Examples to use for parameters of date, time, and time stamp formats
Prompttype
Cognos parameterformat
Cognos parameter format examples
Singlevalue List of values Interval values
Date CCYY-MM-DD 2012-02-03 2012-02-03-Value:2012-03-14 Between 2012-02-03 and2012-04-15
Time hh:mm:ss 01:00:00 01:00:00-Value:01:01:01 Between 01:00:00 and 23:59:30
TimeStamp
CCYY-MM-DDThh:mm:ssorCCYY-MM-DD hh:mm:ss
2012-02-0315:05:00
2012-02-03 15:05:00-Value:2012-02-03T16:01:00-Value:2012-02-03T16:00:00
Between 2012-02-03 15:05:00and2012-04-15T16:00:00
Chapter 7. Creating and Editing Objects in the Database 81
||
||
||
|
|||
||
||
||
||
||
||
|
|
|
|
||
|
Note: You must specify the parameter format exactly as they are shown in thetable respecting lower case and upper case formats.
Adding a job to a job streamBefore you begin
To perform this task, you must have a connection with a Tivoli WorkloadScheduler engine up and running. You must also be connected to the databasewhere the object definitions are stored.
About this task
To edit an object in the database you can use the different views available in theWorkload Designer window.
Procedure1. You can open an existing job stream in either of the following ways:
v Perform the following steps:a. Click Workload > Design > List Workload Definitions.b. Specify the engine connection and filtering criteria to retrieve the job
stream to which you want to add the job.c. Select the job stream and click Edit.The Workload Designer panel opens in a new window displaying theselected job stream open in edit mode.
v Perform the following steps:a. Click Workload > Design > Create Workload Definitions.b. Specify the engine connection and the Workload Designer panel opens in
a new window.c. Open the job stream to which you want to add a job. To find the job
stream you need, use either of the following ways:– Search for it using the Search menu in the Working List pane
– Select the job stream icon and launch a search (optionallyfiltered) in the Quick Open pane.
2. You can now work with the job stream by using either the Graphical or theDetails view. Select the tab for the view you want in the right part of the panel.
82 Tivoli Workload Scheduler: Dynamic Workload Console User’s Guide: Dynamic Workload Console User’s Guide
Related concepts:“Job” on page 36“Job stream” on page 36
Adding a job from the Graphical ViewAbout this task
You can add a job to the job stream using the Graphical View.
From the Graphical View you can add a job to a job stream in either of thefollowing ways:
Procedurev Perform the following steps:
1. Right-click inside the job stream area, and select Add Jobs from the contextmenu
2. Search for the required job by using the displayed Search panel and add it tothe job stream.
v Search for the job in the Quick Open pane and click Add or drag and drop it onthe job stream. Consider that if you drop the job on another job contained in thejob stream, it is added as an external dependency, even if the job is in the samejob stream.
v You can then edit the properties of the newly added job, optionally specifying itsscheduling options and time restrictions. For example, here you can set a job asCritical if the job is mission critical and must be processed accordingly.
Adding a job from the Details ViewAbout this task
If you use the Details view, you see a tree-table view of the job stream with all itsjobs, dependencies, and run cycles.
Chapter 7. Creating and Editing Objects in the Database 83
From the Details view you can add a job to a job stream in either of the followingways:
Procedurev Perform the following steps:
1. Right-click the job stream row and select Add Jobs from the context menu.2. Search for the required job by using the Search panel, and add it to the job
stream.v Search for the job in the Quick Open pane and click Add or drag and drop it on
the job stream. Consider that if you drop the job on another job contained in thejob stream, it is added as an external dependency, even if the job is in the samejob stream.
v You can then edit the properties of the newly added job, optionally specifying itsscheduling options and time restrictions. For example, here you can set a job asCritical if the job is mission critical and must be processed accordingly.
What to do next
If you want to remove the job click the remove icon at the end of the job row.
Adding and removing dependenciesBefore you begin
To perform this task, you must have a connection with a Tivoli WorkloadScheduler engine up and running. You must also be connected to the databasewhere the object definitions are stored.
About this task
To manage objects in the database, open the Workload Designer window from theportfolio by clicking Workload > Design > Create Workload Definitions.
84 Tivoli Workload Scheduler: Dynamic Workload Console User’s Guide: Dynamic Workload Console User’s Guide
Adding a dependencyAbout this task
To add a dependency, from the Workload Designer window perform the followingsteps:
Procedure1. Open the job stream to which you want to add a dependency or the job stream
containing the job to which you want to add a dependency. To find the jobstream, do either of the following actions:v Search for it using the Search menu in the Working List
v Select the job stream icon and launch a search (optionally filtered) inthe Quick Open pane.
2. You can now work on the job stream by using either the Details or theGraphical view. Select the tab for the view you want.v From the Details view, do either of the following actions:
– by using the menus, do the following steps:a. Right-click the job or job stream and select Add Dependencies from
the context menu or select the object and choose an option from theSelect an Action menu.
b. From the context menu, select the type of dependency you want toadd.
c. From the Search panel, search for the required object and add it to thejob or job stream.
– by using drag and drop, do the following steps:a. Select an object from the Quick Open pane.b. Drag and drop it on the object that must depend on it.
v From the Graphical view, do either of the following actions:– by using the menus, do the following steps:
a. Right-click the job or job stream and select Add Dependencies fromthe context menu or select the object and choose an option from theSelect an Action menu.
b. From the context menu, select the type of dependency you want toadd.
c. From the Search panel, search for the required object and add it to thejob or job stream.
– by using the toolbar, do the following steps:a. Select the create dependency icon .b. Draw a line from the dependency to the job or job stream that must
depend on it. You can use this tool to create dependencies onlybetween objects displayed in the view.
– by using drag and drop, do the following steps:a. Select an object from the Quick Open pane.b. Drag and drop it on the object that must depend on it.
Chapter 7. Creating and Editing Objects in the Database 85
Related concepts:“Dependencies” on page 40Controlling processing using dependencies
Removing a dependencyAbout this task
From the Workload Designer window you can remove a dependency in either ofthe following ways:
Procedure
v From the Details view, click the remove icon at the end of the dependencyrow.
v From the Graphical View, select the dependency by clicking the node (if it is anexternal dependency) or by right-clicking the arrow. When the arrow you want
to remove is highlighted, click the remove icon on the toolbar or from thecontext menu. If an object has multiple dependencies, click it again until thearrow you want to remove is highlighted.
Related concepts:“Dependencies” on page 40Controlling processing using dependencies
Creating cross dependenciesAbout this task
To add a cross dependency to a local job on a job that is defined on a remoteengine, you must define a normal dependency for your local job on a shadow jobthat:v Points to the remote job on which you want to create the cross dependencyv Is defined on a local workstation of remote engine type, that points to the engine
where the remote job is defined.
To define the cross dependency, perform the following steps:
Procedure1. Define a remote engine workstation
On a remote engine workstation you can run only shadow jobs. As aprerequisite for creating a remote engine workstation, you must ensure that anHTTP or HTTPS destination to communicate with the remote engine exists. Thename of this destination must be specified in the remote engine workstationdefinition.a. Click Scheduling Environment > Design > Create Workstations.b. Select an engine from the list and click Create Workstation.c. Specify the workstation attributes, selecting Remote engine as Workstation
Type. For more details about the options to select, see the online help byclicking the question mark located at the top right corner of the panel.
2. Define a shadow job
It runs on the remote engine workstation and must contain the key values toidentify the remote job.a. Click Workload > Design > Create Workload Definitions to define a job of
type Shadow Job.
86 Tivoli Workload Scheduler: Dynamic Workload Console User’s Guide: Dynamic Workload Console User’s Guide
b. Select an engine from the list and click Go. You can select either adistributed engine (to create a shadow job as an independent object) or on az/OS engine (to create a shadow job within an existing job stream.)
c. The Workload Designer opens. In the Working List panel, create the newjob.
z/OS
New > File Transfer and Coordination
Distributed
New > Job Definition > File Transfer and Coordination
d. Select either Shadow Job Distributed or Shadow Job z/OS, depending onthe type of remote engine on which the remote job is scheduled to run. Formore details about the attributes to select, see the online help by clickingthe question mark located at the top right corner of the panel.
Shadow jobs can be added to the plan by the plan creation process ordynamically at run time. The shadow job scheduled time is used to identify thejob instance in the remote engine plan.
3. Add the shadow job as a dependency of the local job
The dependency can be internal (distributed only) or external. In the Detailsview, right-click the local job and use the pop-up menu to add the shadow jobas a dependency.
Results
As soon as the shadow job status satisfies the dependency rule, the dependency ofthe local job on the shadow job is resolved, and the cross dependency for the localjob on the remote job is also resolved.
For more information about cross dependencies, see the sections about definingand managing cross dependencies in Tivoli Workload Scheduler User's Guide andReference and in Tivoli Workload Scheduler for z/OS Managing the Workload
Related concepts:“Cross dependencies” on page 48
Creating Workload Broker objectsAbout this task
You can manage Workload Broker jobs in a Tivoli Workload Schedulerenvironment by creating special workstations and job definitions.
Using the Dynamic Workload Console you can:v Create the Workload Broker workstation in the Tivoli Workload Scheduler
database.v Create Workload Broker job definitions that map Workload Broker jobs.v Monitor Workload Broker workstations in the plan.v Submit jobs to the Workload Broker workstation.v Monitor Workload Broker jobs and browse the corresponding job logs.
For more information about Tivoli Workload Broker, see .
Chapter 7. Creating and Editing Objects in the Database 87
Procedure
To create a Workload Broker workstation, perform the following steps:1. Click Scheduling Environment > Design > Create Workstations.2. Select a distributed engine from the list and click Go.
3. In the Workstations Properties panel, specify the following fields. The valuesyou specify here must match the values specified during the installation of theWorkload Broker component. You can retrieve them from theBrokerWorkstation.properties configuration file.
Name It is the value specified in the TWS Agent name field.
Workstation typeSelect Workload Broker from the available workstation types.
Node NameThe host name of the computer where the Tivoli Workload Schedulermaster is installed.
TCP/IP portThe port number you specified when installing the Tivoli WorkloadScheduler master. It is the value specified in the TWS Agent Port field.
Leave all other fields with their default values.4. Click Save to add the workstation to the database.
You can create Tivoli Workload Scheduler job definitions that map to WorkloadBroker jobs, and submit and monitor the job status. To create a new WorkloadBroker job definition, perform the following steps:1. Click Workload > Design > Create Workload Definitions.2. In the Workload Designer, from the Working List pane click New > Job
Definition > Cloud > Workload Broker .3. In the Workspace pane, specify the properties for the job using the General,
Task, Affinity, and Recovery Options tabs.4. Click Save to add the Workload Broker job definition.Related concepts:“Workstation” on page 29“Workload Broker job definition” on page 51
Creating an event ruleAbout this task
Use an event rule to specify a predefined set of actions in response to events thatoccur on the nodes where Tivoli Workload Scheduler runs. When one or moredefined events occurs, you can specify which actions must be performed.
To create an event rule definition, perform the following steps:
Procedure1. Make sure you have the required authorizations granted as Tivoli Integrated
Portal user, and in the Tivoli Workload Scheduler security file. For moreinformation about security settings, see “Event management configuration” onpage 27. Each time you create or modify an event rule, the correspondingobject in the database is automatically locked. To release an object when you
88 Tivoli Workload Scheduler: Dynamic Workload Console User’s Guide: Dynamic Workload Console User’s Guide
close the panel, click Close or the close button . You can unlock an eventrule that you own by using the Unlock command.
2. From the portfolio, expand Workload > Design and click Create Event Rules.3. In the Engine field, specify the engine (this must be either the master domain
manager or a node installed as backup master domain manager but notnecessarily belonging to the master domain) where you want to run the eventrule and click Go. Only after you have selected an engine connection, is theremainder of the panel displayed. If you have only one engine defined, it isdisplayed by default and the whole panel is displayed.
Note: When you change the engine connection, the available events andactions are also changed and the list of actions and events you had previouslyselected is reset. When you save your changes or select a different tab, awarning message is issued to inform you of the reset.The Event Rule Editor panel displays the following main sections relating to:v General Information
v Events
v Actions
Click the header bar of each section to minimize or expand it.4. In the General Information section, enter the required information. All
mandatory fields have a yellow background and are marked by an asterisk.
Note: Every time you modify and save any of these settings, the event rule (ifnot in Draft status) is newly deployed, and all possible events that werecollected before the new deployment are ignored.
Rule nameEnter a name for the rule definition. It is a mandatory field with amaximum length of 40 characters. Blanks and special characters are notsupported, except for minus (-) and underscore (_) characters. If youenter invalid characters, the field becomes red and the rule saving failswith an error.
DescriptionA generic descriptive text for the rule, with a maximum length of 120characters.
Draft When an event rule is in Draft status, it is neither deployed noractivated. When the event rule is not in Draft status, it is eligible to bedeployed (automatically or manually, according to your deploymentpolicy) and activated. As a result, actions are started whenever all thedefined events take place, within the specified validity period. Whenyou change a rule status into Draft or Not Draft, the rule goesrespectively into Deactivation Pending or Activation Pending internalstatus.
Use the following options to specify time settings for the rule. The rule is activein the specified time zone, within the specified validity period during the daysand hours defined.
Time zoneSelect a time zone from the list. It is the time zone according to whichthe rule is active (regardless of the engine time zone). If no time zone isspecified, the engine time zone is used by default.
Chapter 7. Creating and Editing Objects in the Database 89

Valid from...Valid toEnter the time period during which the rule is valid. If the conditionsspecified in the rule are satisfied within this time period, the definedactions are run. You can also specify only one value, leaving the otherfield blank. Blank fields are considered as infinite.
Daily start/Daily endIt indicates the hours during which the rule is active, every day duringthe validity period specified. You can specify only one value, leavingthe other field blank. The value of a blank field is considered midnight.You can also enter time values that cross midnight. For example, youcan specify: a start time of 7 p.m. and an end time of 6 a.m. In this casethe rule is active 24 hours a day, except from 7 p.m. to 6 a.m. everyday,for all the validity period.
5. In the Events section, select the events you want to monitor:a. Each item of the list displayed on the left pane represents a category of
events. Click an event category to view all the events belonging to it.b. Click an event to automatically add it as a new box in the event section on
the right pane. Within each of the boxes representing an event, click:
To open a new window listing the event properties and details.
To remove the event from the list.
The left or the right arrow at the bottom of the box to change theorder in which the events occur. This is important when you define,within the event rule, a sequence of events.
c. In the Properties section, specify the event properties.The following list describes all the categories of events and their properties:
Note: PDF users, the parameter tables listed below are html files referencedby the PDF. They are not saved locally with the PDF from the infocenter.You must first view them on the infocenter before saving or printing.
Tivoli Workload Scheduler objects related eventsAll the events relating to scheduling objects such as jobs, jobstreams, workstations, and prompts. This type of event is describedin more detail in Tivoli Workload Scheduler plan events.
Note: Any change performed on a workstation referenced in a ruleis not reported in the rule. For example if you modify, update, ordelete a workstation that is referenced in a rule, the rule ignores thechange and continues to consider the workstation as it was when itwas included in the rule.
File monitoring eventsEvents relating to changes to files and logs. This type of event isdescribed in more detail in File monitor.
Application monitoring eventsEvents relating to Tivoli Workload Scheduler processes, file system,and message box. This type of event is described in more detail inApplication Monitor.
SAP related eventsThese events are available only if you have installed Tivoli
90 Tivoli Workload Scheduler: Dynamic Workload Console User’s Guide: Dynamic Workload Console User’s Guide
||

Workload Scheduler for Applications and they are generated byexternal SAP systems. This type of event is described in more detailin SAP Monitor.
Generic eventsEvents used to manage custom events sent by external applications.You can write an XML file to define a custom event. A schema isprovided to validate your XML, as well as a basic event templatethat you can use as a starting point. For more information, see theschemas for generic events. Events of this category are:v Changes in a resource of the operating system, such as processes
and memoryv Email received
d. In the Events toolbar, choose an icon to specify the relationship between theevents. The corresponding response actions are started only when theevents take place according to this relationship. Click:
To specify one single event. Select this icon if you want a responseaction to start whenever the specified event occurs within thedefined time period.
To specify a set of events, regardless of the sequence in which theyoccur. Select this icon if you want a response action to start if all thespecified events occur, regardless of the order, within the definedtime period.
To specify various events in sequence. Select this icon if you want aresponse action to start if all the specified events occur in sequence,within the defined time period.
e. Optionally, in the event toolbar, you can specify a Timeout period. This is afurther condition that can be set for the rule, only if you selected a set orsequence of two or more events. When you set the timeout option, thespecified period is calculated starting from the first event that occurs; if allthe remaining events occur within the specified timeout, the response actionsare started. If the timeout period expires before all the specified events havetaken place, the defined timeout actions start.
f. Optionally, in the Correlate events on: section, you can select some commonproperties.These properties are common to the events selected. You can use them tocreate a correlation to further identify the events to monitor. The propertiescommon to the selected events are automatically detected and listed in theright hand part of the event section. Select the properties you want to usefor event correlation.For example, if you want to receive an email every time a workstationremains unlinked for more than 10 minutes, you can correlate the followingsettings:
Event 1Whatever workstation is unlinked.
Event 2Whatever workstation is linked.
Chapter 7. Creating and Editing Objects in the Database 91
|||
Event correlationStart the action only if the property workstation_name is the same inEvent 1 and Event 2.
TimeoutThe two events must take place within 10 minutes of each other.
ActionSend an email to the administrator.
6. In the Actions section:a. Select the Actions tab. The number displayed in this tab, if any, represents
the actions that have already been defined.b. In the left pane of this section, select the actions you want to start. Click an
action to automatically add it to the action section on the right. Within eachof the boxes representing an action click:
In the new panel that lists the action properties. Hover with thecursor over the fields to see an explanation about the action and itsproperties.
To remove the action from the list.c. In the Properties section, specify the action properties. The following list
describes all the actions and their properties:
Operational actionsActions that cause a change in the status of one or more TivoliWorkload Scheduler objects. Actions in this category include:v Submitting jobs or job streamsv Submitting ad hoc jobsv Replying to a prompt
This type of action is described in more detail in Tivoli WorkloadScheduler actions.v Adding an application occurrence (job stream) to the current plan
on Tivoli Workload Scheduler for z/OS in Tivoli WorkloadScheduler-Tivoli Workload Scheduler for z/OS end-to-endscheduling configurations.
This type of action is described in more detail in Tivoli WorkloadScheduler for z/OS actions.
Notification actionsActions such as sending emails or SMS, forwarding Tivoli EnterpriseConsole events, and writing messages in a logging repository. Thistype of action is described in more detail in Mail sender plug-in,Message logger, and Tivoli Enterprise Console event forwarder.
Generic actionsActions performed by running a command. This type of action isdescribed in more detail in Generic action plug-in.
When defining the action properties, you can:v Click Variable to associate the property to one or more variable values.
At run time these values are displayed as properties associated to theselected action.
v Only for Tivoli Workload Scheduler and Tivoli Workload Scheduler forz/OS Actions, you can click Lookup to select jobs, job streams, andworkstations defined in the database.
92 Tivoli Workload Scheduler: Dynamic Workload Console User’s Guide: Dynamic Workload Console User’s Guide
||||
||
|||
d. Optionally, select Timeout actions to define a further set of actions to startif the timeout period expires before all the specified events are performed.The number displayed in this tab, if any, represents the actions that havealready been defined.
Results
After you have defined events and actions, you can clear the Draft check box atthe top of the panel and save the rule. The rule definition is then ready to bedeployed and remains active according to its validity period, or until you disable itby marking it as Draft.Related concepts:“Event management” on page 55“Event management configuration” on page 27“Event rule” on page 193
Listing object definitions in the databaseAbout this task
The following sections describe how you list the object definitions available in thedatabase.
Listing workload objectsAbout this task
To list all the workload definitions except for event rules, open the WorkloadDesigner as follows:1. From the portfolio, click Tivoli Workload Scheduler > Workload > Design >
Create Workload Definitions.2. In the displayed panel, specify the engine connection you want to use. Only the
categories of objects supported by the engine you selected are available.
You can open multiple occurrences of the Workload Designer, but only thefollowing scenarios are supported:v Same user connected to multiple enginesv Multiple users connected to the same engine.
Procedure
From the Workload Designer you can use the following views to list objects:
Working ListUse this pane to search for objects in the database. Perform the followingsteps:1. Open the Search menu and select the object you want to view or
modify.2. In the displayed lookup panel, select the required filtering criteria and
click Search.3. From the displayed list, select one or multiple objects and click one of
the following action buttons:
Chapter 7. Creating and Editing Objects in the Database 93

Create likeTo create a new object with the same properties of the selectedobject.
EditTo modify the properties of the selected objects. When an object
is open in edit mode the edit icon is displayed on the rightof the object.
UnlockTo unlock the selected objects for further actions. When anobject is unlocked, it is displayed in read-only mode.
DeleteTo delete the selected objects from the database.
New To create a new object.
Close To close the currently open object.
All the selected objects are listed in the Working List view. When youselect an object from this list, its properties are displayed in the right pane,where you can view or edit them, if you have the required authorizationdefined in the Tivoli Workload Scheduler security file.
By hovering with the cursor over the icons located on the toolbar, you cansee all the actions you can perform on the selected objects.
Quick OpenUse this pane to rapidly open objects from the database. Perform thefollowing steps:1. Click one of the icons displayed at the top of the pane to select the
category of your search. Available categories depend on the engineconnection you selected.
2. Refine your search by using some filtering criteria. You can filter byobject name by entering the name, or part of it, in the text box, or byusing the wildcard. Optionally, you can further filter your search bychoosing more filtering criteria from the drop-down menu.
3. Click Search. The list of results is shown up to a maximum of 250items. If the list is longer, use the filters to refine your search to reducethe number of results.
4. Select one or more objects and click Edit, to modify their properties, orView, to browse their properties.You can drag the objects in the Quick Open pane and drop them in theGraphical View or you can quickly associate them to the item you areworking with, by clicking the Add button. For example, you can searchfor jobs and automatically add them to the job stream you are editing,or add other objects as dependencies, such as resources or prompts.
94 Tivoli Workload Scheduler: Dynamic Workload Console User’s Guide: Dynamic Workload Console User’s Guide
Related concepts:“Prompt” on page 42“File” on page 43“Resource” on page 43“Calendar” on page 38“User” on page 50“Workstation class” on page 50“Variable table” on page 50
Listing jobs and job streamsDistributed
About this task
To view a list of jobs and job streams available in the database, perform thefollowing steps:
Procedure1. From the portfolio, click Tivoli Workload Scheduler > Workload > Design >
List Workload Definitions.2. In the displayed panel, specify your engine connection and the filtering criteria
for your query. With distributed engine connections, from the Object typedrop-down menu, select the object you want to list.
3. In the Columns section, select the column you want to display in the list ofresults.
4. Click Display to launch the query.Related concepts:“Job” on page 36“Job stream” on page 36
Listing event rulesDistributed
About this task
To view a list of event rules available in the database, perform the following steps:
Procedure1. From the portfolio, click Tivoli Workload Scheduler > Workload > Design >
List Event Rules. Or In the portfolio on the left, click Quick Start > NewTask... or All Configured Tasks > New.
2. In the Select Task Type panel, select Event Management Task > List EventRule Definitions and click Next.
3. In the Enter Task Information panel, specify the task name and select theengine connection where you want to run the task. You can run this type ofquery only in a Tivoli Workload Scheduler distributed environment on eitherthe master domain manager or on a node installed as a backup master domainmanager, but not necessarily belonging to the master domain. You can alsospecify whether to share the task with others, to allow them to see and run thetask, but not to modify it.
Chapter 7. Creating and Editing Objects in the Database 95
4. Click Next to proceed with task creation or click Finish to complete thecreation using the default values and exit without proceeding to the followingsteps. If you are editing an existing task, properties are organized in tabs.
5. In the Filter Criteria panel, specify some broad filtering criteria to limit theresults retrieved by your query. Here you start refining the scope of your queryby also considering the amount of information you want to retrieve. You cansearch for event rule definitions based on their status, validity intervals, ortypes of events and associated actions.
6. In the Columns Definition panel, select the information you want to display inthe table containing the query results. According to the columns you choosehere, the corresponding information is displayed in the task results table. Forexample, for each of the event rule definitions resulting from your query, youmight want to see the status, type, or timeframe during which it is valid. Youcan then drill down into this information displayed in the table and navigate it.In the Columns Definition panel, not only can you select the columns for thistask results, but you can also specify the columns for secondary queries on eventrule instances. The information to be retrieved with these secondary queries isspecified in this panel.
7. In the Create New Task panel, you can see the main details about the task youjust created. You can also choose to run the task immediately. In this case, ifyou have not yet specified an engine connection name, you must do so now.The task is now in the list of your tasks where you can open and modify it.You can find it in the task lists displayed by clicking the following options: AllConfigured Tasks or Workload > Design > List Event Rules.
8. After running the task, a table is displayed showing a list of event ruledefinitions, on which you can take several actions, such as setting them ascomplete or as draft depending whether you want to make them available fordeployment.
Listing workstationsAbout this task
To view a list of workstations available in the database, perform the followingsteps:
Procedure1. From the portfolio, click Tivoli Workload Scheduler > Workload > Design >
List Workstations.2. In the displayed panel, specify your engine connection and the filtering criteria
for your query.3. In the Columns section, select the column you want to display in the list of
results.4. Click Display to launch the query.
96 Tivoli Workload Scheduler: Dynamic Workload Console User’s Guide: Dynamic Workload Console User’s Guide
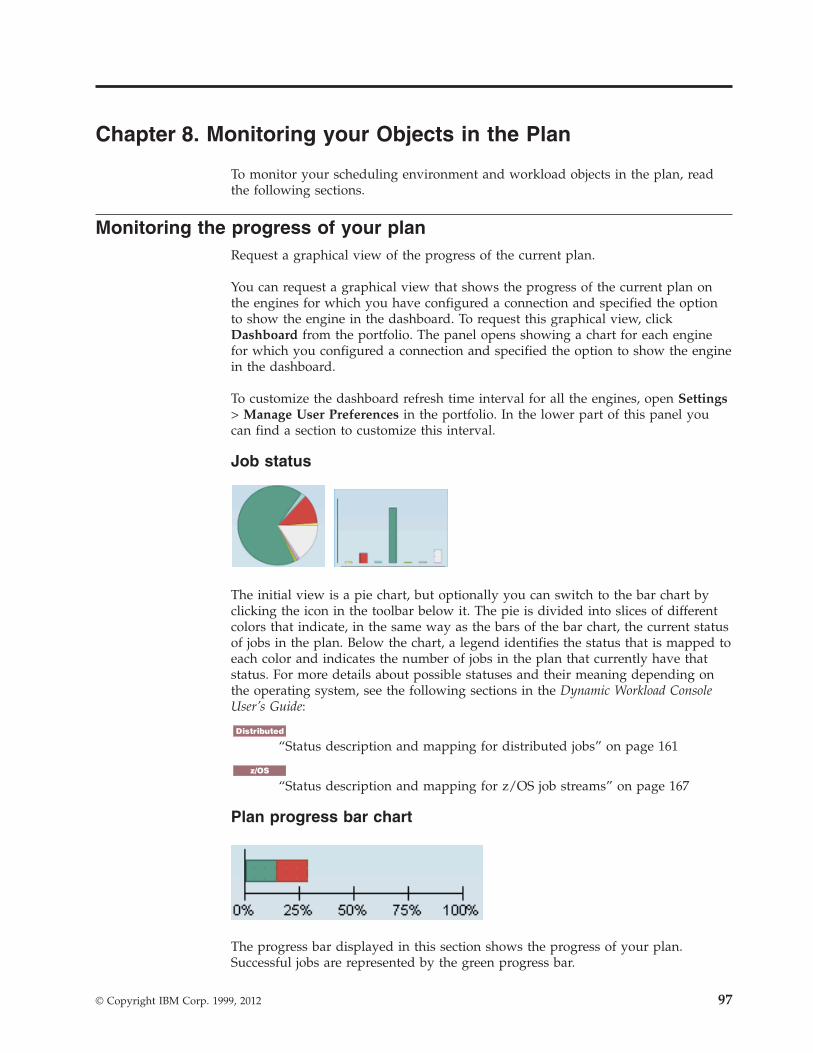
Chapter 8. Monitoring your Objects in the Plan
To monitor your scheduling environment and workload objects in the plan, readthe following sections.
Monitoring the progress of your planRequest a graphical view of the progress of the current plan.
You can request a graphical view that shows the progress of the current plan onthe engines for which you have configured a connection and specified the optionto show the engine in the dashboard. To request this graphical view, clickDashboard from the portfolio. The panel opens showing a chart for each enginefor which you configured a connection and specified the option to show the enginein the dashboard.
To customize the dashboard refresh time interval for all the engines, open Settings> Manage User Preferences in the portfolio. In the lower part of this panel youcan find a section to customize this interval.
Job status
The initial view is a pie chart, but optionally you can switch to the bar chart byclicking the icon in the toolbar below it. The pie is divided into slices of differentcolors that indicate, in the same way as the bars of the bar chart, the current statusof jobs in the plan. Below the chart, a legend identifies the status that is mapped toeach color and indicates the number of jobs in the plan that currently have thatstatus. For more details about possible statuses and their meaning depending onthe operating system, see the following sections in the Dynamic Workload ConsoleUser’s Guide:
Distributed
“Status description and mapping for distributed jobs” on page 161
z/OS
“Status description and mapping for z/OS job streams” on page 167
Plan progress bar chart
The progress bar displayed in this section shows the progress of your plan.Successful jobs are represented by the green progress bar.
© Copyright IBM Corp. 1999, 2012 97

The progress bar view includes a subset of the job statuses included in the piechart view. The following statuses are included:v Successfulv Error
You can work with each pane in the following ways:
Change chart viewTo switch between the pie chart and the bar chart view, click the graphic
icons in the toolbar below the graphic: , .
View details about the jobs that have a particular statusClick the hyperlinks to run a query to show details about the jobs with theselected status. The results of the query are displayed in a separate tab ofDynamic Workload Console. With engines version 8.6 and later, in case ofrerun jobs, only the last rerun job instance is displayed in the query results.
View details about critical jobs
Critical jobs can be displayed only on engines on which the critical path
feature is available and enabled. Click the critical job icon to view thesection that displays the risk level of critical jobs on each engine. Click thehyperlinks to run a query on all the critical jobs with that risk level,running on that engine. The results of the query are displayed in aseparate tab of Dynamic Workload Console
Critical jobs can have one of the following risk levels:
High Risk. Critical jobs with high risk of missing their deadline.Their estimated end time is later than their deadline. This is probablybecause some predecessors have missed their deadline.
No Risk. Critical jobs with no risk of missing their deadline. Theirestimated end time is before their deadline. No action has to be taken.
Potential Risk. Critical jobs with potential risk of missing theirdeadline. This is probably because some predecessors are late or arehaving a long duration process.
Related concepts:Chapter 3, “Using the Dynamic Workload Console from mobile devices,” on page 9Use your mobile device to easily and quickly interact with the Dynamic WorkloadConsole. You can monitor and run your workload from your mobile device bysimply logging in to a URL and starting an app.“Plans” on page 52
Monitor tasksCreate and run monitor tasks to obtain a list of objects on which you can performmonitoring and control actions. Creating and running a monitor task meanscreating a filter and running a search on it. This search returns a list of objectswhose attributes satisfy the criteria that are defined in the task. From this list, youcan click an item to view its properties or to run actions against it. In this way youcan easily change some settings and the processing of the plan.
If you have administrator's rights, you can configure a global setting so as to limitthe number of results retrieved by monitor tasks. You can specify the maximum
98 Tivoli Workload Scheduler: Dynamic Workload Console User’s Guide: Dynamic Workload Console User’s Guide
||
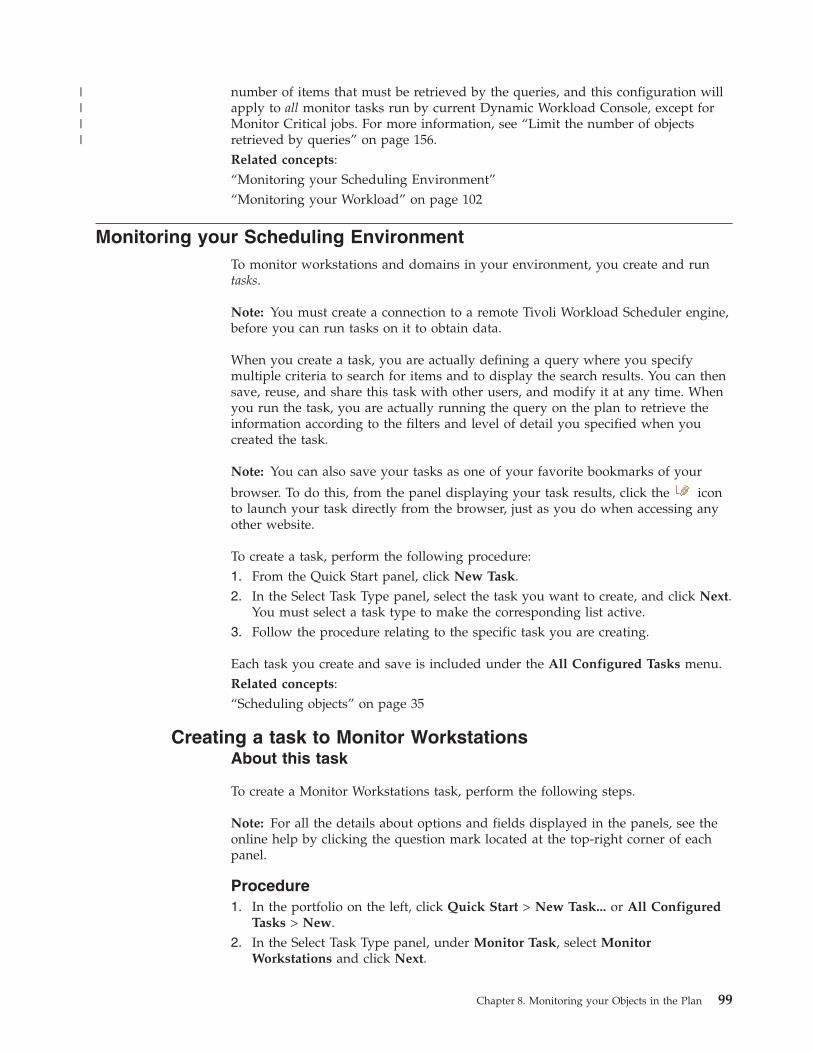
number of items that must be retrieved by the queries, and this configuration willapply to all monitor tasks run by current Dynamic Workload Console, except forMonitor Critical jobs. For more information, see “Limit the number of objectsretrieved by queries” on page 156.Related concepts:“Monitoring your Scheduling Environment”“Monitoring your Workload” on page 102
Monitoring your Scheduling EnvironmentTo monitor workstations and domains in your environment, you create and runtasks.
Note: You must create a connection to a remote Tivoli Workload Scheduler engine,before you can run tasks on it to obtain data.
When you create a task, you are actually defining a query where you specifymultiple criteria to search for items and to display the search results. You can thensave, reuse, and share this task with other users, and modify it at any time. Whenyou run the task, you are actually running the query on the plan to retrieve theinformation according to the filters and level of detail you specified when youcreated the task.
Note: You can also save your tasks as one of your favorite bookmarks of your
browser. To do this, from the panel displaying your task results, click the iconto launch your task directly from the browser, just as you do when accessing anyother website.
To create a task, perform the following procedure:1. From the Quick Start panel, click New Task.2. In the Select Task Type panel, select the task you want to create, and click Next.
You must select a task type to make the corresponding list active.3. Follow the procedure relating to the specific task you are creating.
Each task you create and save is included under the All Configured Tasks menu.Related concepts:“Scheduling objects” on page 35
Creating a task to Monitor WorkstationsAbout this task
To create a Monitor Workstations task, perform the following steps.
Note: For all the details about options and fields displayed in the panels, see theonline help by clicking the question mark located at the top-right corner of eachpanel.
Procedure1. In the portfolio on the left, click Quick Start > New Task... or All Configured
Tasks > New.2. In the Select Task Type panel, under Monitor Task, select Monitor
Workstations and click Next.
Chapter 8. Monitoring your Objects in the Plan 99
||||
3. In the Enter Task Information panel, define the type of scheduler engine whereyou want to run the task. You can select a specific engine, if available in thedrop-down list, or you can select Ask when needed and choose the engine at alater time. Remember that the engine name must be specified before runningthe task. Depending on the engine type you choose, the filtering criteria andthe results you can display are different. You can also specify whether to sharethe task with others, to allow them to see and run the task, but not to modifyit. Task and engine sharing can be disabled by the TWSWEBUIAdministrator inthe global settings customizable file.
4. Click Next to proceed with task creation or click Finish to complete thecreation using the default values and exit without proceeding to the followingsteps. If you are editing an existing task, properties are organized in tabs.
5. In the General Filter panel, specify some broad filtering criteria to limit theresults retrieved by your query. Here you start refining the scope of your queryby also considering the amount of information you want to retrieve. Optionally,you can customize how often to refresh the information in the results table byspecifying the refresh interval in seconds. If the periodic refresh is enabled for atask, when the task runs, the refresh time control options are shown in theresults table. You can also set or change the periodic refresh interval directly inthe results table. In this case, the value specified at task creation time istemporarily overwritten.
Distributed You can filter the task results based on the workstation and domainnames, or part of names (using wildcard characters).
z/OS You can filter the task results based on the workstation types andreporting attributes.
6. In the Columns Definition panel, select the information you want to display inthe table containing the query results. According to the columns you choosehere, the corresponding information is displayed in the task results table. Forexample, for all the objects resulting from your query, you might want to seetheir link statuses, domains, and type, or you might want to see their statusesand the number of jobs successful or running on them. You can then drill downinto this information displayed in the table and navigate it.In the Columns Definition panel, not only can you select the columns for thistask results, but you can also specify the columns for secondary queries on:
Distributed jobs, job streams domains, files, and resources. For example, youare creating a task to search for all the workstations of a domain. From theresulting list of workstations, you can navigate to see (secondary query) alist of all the jobs running on each of them.
z/OS jobs. For example, you are creating a task to search for all thevirtual workstations that are also fault-tolerant. From the resulting list ofworkstations, you can navigate to see (secondary query) a list of all the jobsrunning on each of them.
7. In the Create New Task panel, you can see the main details about the task youjust created. You can also choose to run the task immediately. In this case, ifyou have not yet specified an engine connection name, you must do so now.The task is now in the list of your tasks where you can open and modify it.You can find it in the task lists displayed by clicking the following options: AllConfigured Tasks or Scheduling Environment > Monitor > MonitorWorkstations.
Results
You have created your task that, when run, creates a list of workstations satisfyingyour filtering criteria and showing, for each workstation in the list, the information
100 Tivoli Workload Scheduler: Dynamic Workload Console User’s Guide: Dynamic Workload Console User’s Guide
contained in the columns you selected to view.Related concepts:“Workstation” on page 29Related reference:“Workstation types” on page 168
Creating a task to Monitor DomainsDistributed
About this task
To create a Monitor Domains task, perform the following steps.
Note: For all the details about options and fields displayed in the panels, see theonline help by clicking the question mark located at the top-right corner of eachpanel.
Procedure1. In the portfolio on the left, click Quick Start > New Task... or All Configured
Tasks > New.2. In the Select Task Type panel, under Monitor Task, select Monitor Domains
and click Next.3. In the Enter Task Information panel, define the type of scheduler engine where
you want to run the task. You can select a specific engine, if available in thedrop-down list, or you can select Ask when needed and choose the engine at alater time. Remember that the engine name must be specified before runningthe task. Depending on the engine type you choose, the filtering criteria andthe results you can display are different. You can also specify whether to sharethe task with others, to allow them to see and run the task, but not to modifyit. Task and engine sharing can be disabled by the TWSWEBUIAdministrator inthe global settings customizable file.
4. Click Next to proceed with task creation or click Finish to complete thecreation using the default values and exit without proceeding to the followingsteps. If you are editing an existing task, properties are organized in tabs.
5. In the General Filter panel, specify some broad filtering criteria to limit theresults retrieved by your query. Here you start refining the scope of your queryby also considering the amount of information you want to retrieve. Optionally,you can customize how often to refresh the information in the results table byspecifying the refresh interval in seconds. If the periodic refresh is enabled for atask, when the task runs, the refresh time control options are shown in theresults table. You can also set or change the periodic refresh interval directly inthe results table. In this case, the value specified at task creation time istemporarily overwritten. You can filter the task results based on the domainname, or part of name (using wildcard characters). You can also configure theautomatic refresh of the task results in the table.
6. In the Columns Definition panel, select the information you want to display inthe table containing the query results. According to the columns you choosehere, the corresponding information is displayed in the task results table. Youcan then drill down into this information displayed in the table and navigate it.In the Columns Definition panel, not only can you select the columns for thistask results, but you can also specify the columns for secondary queries onworkstations. Starting from the Monitor Domains task table of result, you can
Chapter 8. Monitoring your Objects in the Plan 101
start further queries on the workstations associated to one of the domains inthe table; the information to be retrieved with these secondary queries isspecified in this panel.
7. In the Create New Task panel, you can see the main details about the task youjust created. You can also choose to run the task immediately. In this case, ifyou have not yet specified an engine connection name, you must do so now.The task is now in the list of your tasks where you can open and modify it.You can find it in the task lists displayed by clicking the following options: AllConfigured Tasks or Scheduling Environment > Monitor > Monitor Domains.
Results
You have created your task that, when run, creates a list of domains satisfyingyour filtering criteria and showing, for each domain in the list, the informationcontained in the columns you selected to view.Related concepts:“Domain” on page 32The domain.
Monitoring your WorkloadTo control and manage scheduling activities and objects in plans, you create andrun tasks.
Note: You must create a connection to a remote Tivoli Workload Scheduler engine,before you can run tasks on it to obtain data.
You can create the following types of task:
Monitor TaskWhen you create a Monitor task, you define a query where you specifymultiple criteria to search for items and to display the search results. Youcan then save, reuse, and share this task with other users, and modify it atany time. Task sharing is enabled only if your role is authorized to sharetasks. If you are not, contact the administrator or see: “Limit task andengine sharing” on page 157. When you run the task, you launch thequery, according to the filtering criteria, on all the objects associated to theTivoli Workload Scheduler connection you specified. A list of the objectsthat satisfy the search criteria is displayed when you run the task. You canview the objects resulting from your query, and their properties, and takeactions on some of them.
See also “Monitoring your Scheduling Environment” on page 99 forinformation about other monitor tasks.
Event Management TaskWhen you create an Event Management Task you define a query whereyou specify multiple criteria to search for specific monitoring objects storedon the database and to display the search results. Available monitoringobjects are event rules, triggered actions, and operator messages. You canthen save, reuse, and share this task with other users, and modify it at anytime. When you run the task, you launch the query, according to thefiltering criteria, on all the objects associated to the Tivoli WorkloadScheduler connection you specified. A list of the objects that satisfy thesearch criteria is displayed when you run the task. You can view theobjects resulting from your query, and their properties, and take actions onsome of them.
102 Tivoli Workload Scheduler: Dynamic Workload Console User’s Guide: Dynamic Workload Console User’s Guide
Report TaskSee Chapter 11, “Reporting,” on page 133 for information about this type oftask.
To create a task, perform the following procedure:1. From the Quick Start panel, click New Task.2. In the Select Task Type panel, select the task you want to create, and click Next.
You must select a task type to make the corresponding list active.3. Follow the procedure relating to the specific task you are creating.
Note: You can also save your tasks as one of your favorite bookmarks in yourbrowser. To do this, from the panel displaying your task results, click the add link
icon to launch your task directly from the browser, in the same way you dowhen accessing any other website.
Each task you create and save is included under the All Configured Tasks menu.Saved tasks are also listed under:
Workload > MonitorFor tasks to monitor jobs, critical jobs, and job streams.
Workload > Monitor > Workload DependenciesFor tasks to monitor files, resources, and prompts.
Workload > Monitor > Workload EventsFor tasks to monitor event rules, operator messages, and triggered actions.
Related concepts:“Scheduling objects” on page 35
Event management tasksYou can create and run an event management task by creating a filter and runninga search to get information about event management related objects.
The information retrieved when running event tasks is stored in the TivoliWorkload Scheduler databases, therefore, to run event tasks you must be connectedto a Tivoli Workload Scheduler engine and must be authorized in the TivoliWorkload Scheduler security file to access those objects in the database.
You can create event management tasks to query for:
Event rule definitionsThe template that defines an event rule consists of:v One or more events, defined with its properties.v The relationship between the specified events (they can be randomly
grouped or listed in chronological order).v The actions that must be performed when all the event conditions are
satisfied.
Event rulesThe instance of a rule definition in the plan.
Triggered actionThe actual occurrence of an action defined in the event rule and triggeredwhen the event conditions have been satisfied.
Operator messagesThe instance of the MessageLogger action specified in the event rule
Chapter 8. Monitoring your Objects in the Plan 103
definition. It provides information about the result of an event ruleinstance on a repository stored in the Tivoli Workload Scheduler relationaldatabase.
Related tasks:“Creating a task to Monitor Event Rules” on page 116“Creating a task to Monitor Triggered Actions” on page 118“Creating a task to Monitor Operator Messages” on page 119
Plan view tasksYou can create and run plan view tasks to obtain a view of a collapsed plan showingits job streams, but hiding its jobs and dependencies. You can use this view to havean overall picture of the plan and how it is structured.
Creating and running a plan view task means creating a filter and running asearch on it. This search returns a graphical representation of job streams whoseattributes satisfy the criteria that are defined in the task.
From plan view, you can click a job stream to view its properties or to run someactions against it. You can also modify the filtering criteria to display different jobstreams.Related tasks:“Creating a task to Show Plan View” on page 127Related information:“Graphical Views in the plan” on page 173
Creating a task to Monitor JobsAbout this task
To create a Monitor Jobs task, perform the following steps.
Note: For all the details about options and fields displayed in the panels, see theonline help by clicking the question mark located at the top-right corner of eachpanel.
Procedure1. In the portfolio on the left, click Quick Start > New Task... or All Configured
Tasks > New.2. In the Select Task Type panel, under Monitor Task, select Monitor Jobs and
click Next.3. In the Enter Task Information panel, define the type of scheduler engine where
you want to run the task. You can select a specific engine, if available in thedrop-down list, or you can select Ask when needed and choose the engine at alater time. Remember that the engine name must be specified before runningthe task. Depending on the engine type you choose, the filtering criteria andthe results you can display are different. You can also specify whether to sharethe task with others, to allow them to see and run the task, but not to modifyit. Task and engine sharing can be disabled by the TWSWEBUIAdministrator inthe global settings customizable file.
4. Click Next to proceed with task creation or click Finish to complete thecreation using the default values and exit without proceeding to the followingsteps. If you are editing an existing task, properties are organized in tabs.
104 Tivoli Workload Scheduler: Dynamic Workload Console User’s Guide: Dynamic Workload Console User’s Guide
5. In the General Filter panel, specify some broad filtering criteria to limit theresults retrieved by your query. Here you start refining the scope of your queryby also considering the amount of information you want to retrieve. Optionally,you can customize how often to refresh the information in the results table byspecifying the refresh interval in seconds. If the periodic refresh is enabled for atask, when the task runs, the refresh time control options are shown in theresults table. You can also set or change the periodic refresh interval directly inthe results table. In this case, the value specified at task creation time istemporarily overwritten. You can search for jobs based on their status, on theworkstation where they run, or the job streams they belong to. For example,you can look for all the jobs that did not complete successfully on the specifiedworkstations, or you can look for all the jobs with the same owner and thathave a specific priority level and an immediate restart option set.
6. In the Time Data Filter panel, specify a time range to limit your search to jobsor job streams that ran within a specific time period.
Note: If no date and time is specified then the jobs and job streams are notfiltered based on their processing time.
7. Distributed In the Dependencies Filter panel, you can filter your results based onthe dependencies they have. Only jobs that have the dependencies you specifyin this panel are included in the query results. Dependencies can be jobs, jobstreams, resources, files, or prompts.
8. In the Columns Definition panel, select the information you want to display inthe table containing the query results. According to the columns you choosehere, the corresponding information is displayed in the task results table. Forexample, for all the objects resulting from your query, you might want to seetheir statuses, the workstations where the ran, when they ran, and when theywere scheduled to run. You can then drill down into this information displayedin the table and navigate it. In the Columns Definition panel, not only can youselect the columns for this task results, but you can also specify the columns forsecondary queries on job streams, jobs on critical network, and workstations.Starting from the Monitor Jobs task table of results, you can start furtherqueries on the secondary objects associated to one of the jobs in the table; theinformation to be retrieved with these secondary queries is specified in thispanel.
9. In the Create New Task panel, you can see the main details about the task youjust created. You can also choose to run the task immediately. In this case, ifyou have not yet specified an engine connection name, you must do so now.The task is now in the list of your tasks where you can open and modify it.You can find it in the task lists displayed by clicking the following options: AllConfigured Tasks or Workload > Monitor > Monitor Jobs.
Results
You have created your task that, when run, creates a list of jobs satisfying yourfiltering criteria and showing, for each job in the list, the information contained inthe columns you selected to view.
Chapter 8. Monitoring your Objects in the Plan 105
Related concepts:“Job” on page 36Related reference:“Status description and mapping for distributed jobs” on page 161“Status description and mapping for z/OS jobs” on page 163
Creating a task to Monitor Critical JobsAbout this task
You can use this task to retrieve all the jobs that were marked as Critical duringtheir job stream creation. If it is critical that a job must be completed before aspecific time, you can flag it as critical when you add it to a job stream using theWorkload Designer. Jobs can also be flagged as critical by including the criticalkeyword to the job statement when you create or modify a job stream using thecomposer command line.
For more information about this, see the Tivoli Workload Scheduler User's Guide andReference.
You can then use this list of critical jobs to control them, ensuring that nothingprevents them from completing on time.
Note: Distributed This task can only be run against the current plan and only on amaster workstation.
Starting from the list of critical jobs, you can drill down and take actions on theirpredecessors (internal and external), which might be located faraway in the wholecritical job network.
You can retrieve the following lists of predecessors to act on them (for example, byreleasing dependencies or answering prompts) if they compromise the critical jobsuccess:
Critical PathCritical job predecessors with the least slack time (delay allowed to let thecritical job complete on time).
Hot ListThe hot list contains a subset of critical predecessors that can cause a delayof the critical job because they are in such states as error, late, fence (fordistributed systems only), suppressed (for distributed systems only) orlong duration. If these jobs do not complete successfully on time, theyprevent the critical job from completing on time. In the hot list view, youcan quickly see which jobs need you to take appropriate recovery actions.Jobs included in the Hot List are not necessarily included in the CriticalPath.
To create a Monitor Critical Jobs task, perform the following steps.
Note: For all the details about options and fields displayed in the panels, see theonline help by clicking the question mark located at the top-right corner of eachpanel.
106 Tivoli Workload Scheduler: Dynamic Workload Console User’s Guide: Dynamic Workload Console User’s Guide
Procedure1. In the portfolio on the left, click Quick Start > New Task... or All Configured
Tasks > New.2. In the Select Task Type panel, under Monitor Task, select Monitor Critical Jobs
and click Next.3. In the Enter Task Information panel, define the type of scheduler engine where
you want to run the task. You can select a specific engine, if available in thedrop-down list, or you can select Ask when needed and choose the engine at alater time. Remember that the engine name must be specified before runningthe task. Depending on the engine type you choose, the filtering criteria andthe results you can display are different. You can also specify whether to sharethe task with others, to allow them to see and run the task, but not to modifyit. Task and engine sharing can be disabled by the TWSWEBUIAdministrator inthe global settings customizable file.
4. Click Next to proceed with task creation or click Finish to complete thecreation using the default values and exit without proceeding to the followingsteps. If you are editing an existing task, properties are organized in tabs.
5. In the General Filter panel, specify some broad filtering criteria to limit theresults retrieved by your query. Here you start refining the scope of your queryby also considering the amount of information you want to retrieve. Optionally,you can customize how often to refresh the information in the results table byspecifying the refresh interval in seconds. If the periodic refresh is enabled for atask, when the task runs, the refresh time control options are shown in theresults table. You can also set or change the periodic refresh interval directly inthe results table. In this case, the value specified at task creation time istemporarily overwritten. You can search for jobs based on their status, on theworkstation where they run, or on the job streams they belong to. For example,you can look for all the jobs that have a specific priority level and a high riskof missing their deadlines.
Note: The Monitor Critical Jobs task searches only for jobs that have beenmarked as critical.Depending on what you choose as Risk Level, one or more of the followingalert levels is shown in the list of critical jobs:
Critical jobs at high risk. This icon means that the critical job estimatedend is beyond the job deadline. If nothing changes, the critical job isgoing to miss its deadline. The critical job estimated end is dynamicallyrecalculated.
Critical jobs at potential risk. This icon means that the critical jobestimated end has not yet passed the job deadline . However, thecritical job has some predecessors in late, long duration, or error state.For distributed systems, the late condition can also be due to priority,limit, or fence values that are preventing jobs from running. If nothingchanges, there is the possibility that the critical job will miss itsdeadline.
Critical job is on track. If nothing changes, it will meet its deadline.6. In the Time Data Filter panel, specify a time range to limit your search to jobs
or job streams that ran within a specific time period. If no date and time arespecified, the jobs and job streams are not filtered based on their processingtime.
Chapter 8. Monitoring your Objects in the Plan 107
7. In the Columns Definition panel, select the information you want to display inthe table containing the query results. According to the columns you choosehere, the corresponding information is displayed in the task results table. Forexample, for all the objects resulting from your query, you might want to seetheir statuses, the workstations where the ran, when they ran, and when theywere scheduled to run. You can then drill down into this information displayedin the table and navigate it. In the Columns Definition panel, not only can youselect the columns for this task results, but you can also specify the columns forsecondary queries on jobs, job streams, jobs in critical network, andworkstations. Starting from the Monitor Critical Jobs results, you can launchfurther queries on secondary objects associated to the jobs in the table. Theinformation you can retrieve with these queries is specified in this panel. Oneof these secondary queries retrieves the list of jobs in the critical network,which includes all the critical job predecessors. The critical path is part of thecritical network. The columns set for the list of jobs in the critical network aredisplayed as details of all the critical jobs Predecessors, and in the Hot List andCritical Path views. All these views can be launched by using thecorresponding buttons from the Monitor Critical Jobs table of results.
8. In the Create New Task panel, you can see the main details about the task youjust created. You can also choose to run the task immediately. In this case, ifyou have not yet specified an engine connection name, you must do so now.The task is now in the list of your tasks where you can open and modify it.You can find it in the task lists displayed by clicking the following options: AllConfigured Tasks or Workload > Monitor > Monitor Critical Jobs.
Results
You have created your task that, when run, creates a list of jobs satisfying yourfiltering criteria and showing, for each job in the list, the information contained inthe columns you selected to view.
You can find a workload service assurance scenario in the Tivoli Workload SchedulerUser's Guide and Reference about using this feature to monitor critical jobs.Related concepts:“Job” on page 36“Workload service assurance” on page 59Related reference:“Status description and mapping for distributed jobs” on page 161“Status description and mapping for z/OS jobs” on page 163Related information:“Using workload service assurance to monitor z/OS critical jobs” on page 143
Creating a task to Monitor Jobs on Multiple EnginesAbout this task
If you need to combine queries about jobs running on multiple distributed andz/OS engines, you can use Monitor Tasks on Multiple Engines. For example, itmight be useful to run a query to find all the jobs in error in your environment byrunning a single task.
To create this task, perform the following steps.
108 Tivoli Workload Scheduler: Dynamic Workload Console User’s Guide: Dynamic Workload Console User’s Guide
Note: For all the details about options and fields displayed in the panels, see theonline help by clicking the question mark located at the top-right corner of eachpanel.
Procedure1. In the portfolio on the left, click Quick Start > New Task... or All Configured
Tasks > New.2. In the Select Task Type panel, click Monitor Tasks on Multiple Engines >
Monitor Jobs and click Next.3. In the Enter Task Information panel, specify a name for the task you are
creating (a default name is provided) and define the Tivoli Workload Schedulerengines where you want to run the task. The task is run following the specifiedengine sequence. In this panel, you can also specify whether to share the taskwith others, to allow them to see and run the task, but not to modify it.
4. Click Next to proceed with task creation or click Finish to complete thecreation using the default values and exit without proceeding to the followingsteps. If you are editing an existing task, properties are organized in tabs.
5. In the General Filter panel, specify some broad filtering criteria to limit theresults retrieved by your query. Here you start refining the scope of your queryby also considering the amount of information you want to retrieve. Optionally,you can customize how often to refresh the information in the results table byspecifying the refresh interval in seconds. If the periodic refresh is enabled for atask, when the task runs, the refresh time control options are shown in theresults table. You can also set or change the periodic refresh interval directly inthe results table. In this case, the value specified at task creation time istemporarily overwritten. You can search for jobs based on their identifier, onthe job streams they belong to, or on their status, scheduled time, and priority.For example, you can look for all the jobs that did not complete successfullyand were scheduled to run within a specific time period.
6. In the Columns Definition panel, select the information you want to display inthe table containing the query results. According to the columns you choosehere, the corresponding information is displayed in the task results table. Forexample, for all the objects resulting from your query, you might want to seetheir statuses, the job streams they belong to, when they were scheduled to run,and the engines on which they ran. You can then drill down into thisinformation displayed in the table and navigate it.
7. In the Create New Task panel, you can see the main details about the task youjust created. Here you can also choose to launch the task immediately. The taskis now in the list of your tasks where you can open and modify it. You can findit in the task lists displayed by clicking the following options: All ConfiguredTasks or Workload > Monitor > Monitor Jobs.
Results
You have created your task that, when run, creates a list of jobs satisfying yourfiltering criteria and showing, for each job in the list, the information contained inthe columns you selected to view.
To view connection status information and statistical information about the engines
against which the task was run, click the statistical icon on the table toolbar.
A pie chart showing the number of query results and job status is displayed foreach engine on which the task ran successfully. Click the pie sections to see furtherdetails. If the task did not run successfully on one or more engines, you see a
Chapter 8. Monitoring your Objects in the Plan 109
message containing details about the errors.Related concepts:“Job” on page 36“Monitoring jobs running on multiple engines” on page 145Related reference:“Status description and mapping for distributed jobs” on page 161“Status description and mapping for z/OS jobs” on page 163
Creating a task to Monitor Job StreamsAbout this task
To create a Monitor Job Streams task, perform the following steps.
Note: For all the details about options and fields displayed in the panels, see theonline help by clicking the question mark located at the top-right corner of eachpanel.
Procedure1. In the portfolio on the left, click Quick Start > New Task... or All Configured
Tasks > New.2. In the Select Task Type panel, under Monitor Task, select Monitor Job Streams
and click Next.3. In the Enter Task Information panel, define the type of scheduler engine where
you want to run the task. You can select a specific engine, if available in thedrop-down list, or you can select Ask when needed and choose the engine at alater time. Remember that the engine name must be specified before runningthe task. Depending on the engine type you choose, the filtering criteria andthe results you can display are different. You can also specify whether to sharethe task with others, to allow them to see and run the task, but not to modifyit. Task and engine sharing can be disabled by the TWSWEBUIAdministrator inthe global settings customizable file.
4. Click Next to proceed with task creation or click Finish to complete thecreation using the default values and exit without proceeding to the followingsteps. If you are editing an existing task, properties are organized in tabs.
5. In the General Filter panel, specify some broad filtering criteria to limit theresults retrieved by your query. Here you start refining the scope of your queryby also considering the amount of information you want to retrieve. Optionally,you can customize how often to refresh the information in the results table byspecifying the refresh interval in seconds. If the periodic refresh is enabled for atask, when the task runs, the refresh time control options are shown in theresults table. You can also set or change the periodic refresh interval directly inthe results table. In this case, the value specified at task creation time istemporarily overwritten. You can search for job streams based on theirscheduled run time, status, or the workstation where they run. For example,you can look for all the job streams with a given priority level that remained inwaiting state on a set of workstations, or you can look for all the job streamswith a specific group, a given priority level, and whose most critical job has aspecified duration.
6. In the Time Data Filter panel, specify a time range to limit your search to jobsor job streams that ran within a specific time period.
110 Tivoli Workload Scheduler: Dynamic Workload Console User’s Guide: Dynamic Workload Console User’s Guide
Note: If no date and time is specified, then the jobs and job streams are notfiltered based on their processing time.
7. Distributed In the Dependencies Filter panel, you can filter your results based onthe dependencies they have. Only job streams that have the dependencies youspecify in this panel are included in the query results. Dependencies can bejobs, job streams, resources, files, or prompts.
8. In the Columns Definition panel, select the information you want to display inthe table containing the query results. According to the columns you choosehere, the corresponding information is displayed in the task results table. Forexample, for all the objects resulting from your query, you might want to seetheir statuses, the workstations where the ran, when they ran, and when theywere scheduled to run. You can then drill down into this information displayedin the table and navigate it. In the Columns Definition panel, not only can youselect the columns for this task results, but you can also specify the columns forsecondary queries on jobs and workstations (for distributed job streams only).Starting from the Monitor Job Streams task table of result, you can start furtherqueries on jobs and workstations associated to one of the job streams in thetable; the information to be retrieved with these secondary queries is specifiedin this panel.
9. In the Create New Task panel, you can see the main details about the task youjust created. You can also choose to run the task immediately. In this case, ifyou have not yet specified an engine connection name, you must do so now.The task is now in the list of your tasks where you can open and modify it.You can find it in the task lists displayed by clicking the following options: AllConfigured Tasks or Workload > Monitor > Monitor Job Streams.
Results
You have created your task that, when run, creates a list of job streams satisfyingyour filtering criteria and showing, for each job stream in the list, the informationcontained in the columns you selected to view.Related concepts:“Job stream” on page 36Related reference:“Status description and mapping for distributed job streams” on page 165“Status description and mapping for z/OS job streams” on page 167
Creating a task to Monitor Job Streams on Multiple EnginesAbout this task
If you need to combine queries about job streams running on multiple distributedand z/OS engines, you can use Monitor Tasks on Multiple Engines. For example, itmight be useful to run a query to find all the job streams running in yourenvironment by running a single task.
To create this task, perform the following steps.
Note: For all the details about options and fields displayed in the panels, see theonline help by clicking the question mark located at the top-right corner of eachpanel.
Chapter 8. Monitoring your Objects in the Plan 111
Procedure1. In the portfolio on the left, click Quick Start > New Task... or All Configured
Tasks > New.2. In the Select Task Type panel, click Monitor Tasks on Multiple Engines >
Monitor Job Streams and click Next.3. In the Enter Task Information panel, specify a name for the task you are
creating (a default name is provided) and define the Tivoli Workload Schedulerengines where you want to run the task. The task is run following the specifiedengine sequence. In this panel, you can also specify whether to share the taskwith others, to allow them to see and run the task, but not to modify it.
4. Click Next to proceed with task creation or click Finish to complete thecreation using the default values and exit without proceeding to the followingsteps. If you are editing an existing task, properties are organized in tabs.
5. In the General Filter panel, specify some broad filtering criteria to limit theresults retrieved by your query. Here you start refining the scope of your queryby also considering the amount of information you want to retrieve. Optionally,you can customize how often to refresh the information in the results table byspecifying the refresh interval in seconds. If the periodic refresh is enabled for atask, when the task runs, the refresh time control options are shown in theresults table. You can also set or change the periodic refresh interval directly inthe results table. In this case, the value specified at task creation time istemporarily overwritten. You can search for job streams based on theiridentifier, status, scheduled time, and priority. For example, you can look for allthe job streams that are currently running and were scheduled to run within aspecific time period.
6. In the Columns Definition panel, select the information you want to display inthe table containing the query results. According to the columns you choosehere, the corresponding information is displayed in the task results table. Forexample, for all the objects resulting from your query, you might want to seetheir statuses, when they were scheduled to run, and the engines on whichthey ran. You can then drill down into this information displayed in the tableand navigate it.
7. In the Create New Task panel, you can see the main details about the task youhave just created. Here you can also choose to launch the task immediately. Thetask is now in the list of your tasks where you can open and modify it. You canfind it in the task lists displayed by clicking the following options: AllConfigured Tasks or Workload > Monitor > Monitor Job Streams.
Results
You have created your task that, when run, creates a list of job streams satisfyingyour filtering criteria and showing, for each job stream in the list, the informationcontained in the columns you selected to view.
To view connection status information and statistical information about the engines
against which the task was run, click the statistical icon on the table toolbar.
A pie chart showing the number of query results and job stream status is displayedfor each engine on which the task ran successfully. Click the pie sections to seefurther details. If the task did not run successfully on one or more engines, you seea message containing details about the errors.
112 Tivoli Workload Scheduler: Dynamic Workload Console User’s Guide: Dynamic Workload Console User’s Guide
Related concepts:“Job stream” on page 36Related reference:“Status description and mapping for distributed job streams” on page 165“Status description and mapping for z/OS job streams” on page 167
Creating a task to Monitor FilesAbout this task
To create a Monitor Files task, perform the following steps.
Note: For all the details about options and fields displayed in the panels, see theonline help by clicking the question mark located at the top-right corner of eachpanel.
Procedure1. In the portfolio on the left, click Quick Start > New Task... or All Configured
Tasks > New.2. In the Select Task Type panel, under Monitor Task, select Monitor Files and
click Next.3. In the Enter Task Information panel, define the type of scheduler engine where
you want to run the task. You can select a specific engine, if available in thedrop-down list, or you can select Ask when needed and choose the engine at alater time. Remember that the engine name must be specified before runningthe task. Depending on the engine type you choose, the filtering criteria andthe results you can display are different. You can also specify whether to sharethe task with others, to allow them to see and run the task, but not to modifyit. Task and engine sharing can be disabled by the TWSWEBUIAdministrator inthe global settings customizable file.
4. Click Next to proceed with task creation or click Finish to complete thecreation using the default values and exit without proceeding to the followingsteps. If you are editing an existing task, properties are organized in tabs.
5. In the General Filter panel, specify some broad filtering criteria to limit theresults retrieved by your query. Here you start refining the scope of your queryby also considering the amount of information you want to retrieve. Optionally,you can customize how often to refresh the information in the results table byspecifying the refresh interval in seconds. If the periodic refresh is enabled for atask, when the task runs, the refresh time control options are shown in theresults table. You can also set or change the periodic refresh interval directly inthe results table. In this case, the value specified at task creation time istemporarily overwritten. You can filter the task results based on the file andworkstation names, or part of names (using wildcard characters). You can alsoconfigure the automatic refresh of the task results in the table.
6. In the Columns Definition panel, select the information you want to display inthe table containing the query results. According to the columns you choosehere, the corresponding information is displayed in the task result. Forexample, for all the files resulting from your query, you might want to knowtheir status and associated workstations. You can then drill down into thisinformation displayed in the table and navigate it. In the Columns Definitionpanel, not only can you select the columns for this task results, but you canalso specify the columns for secondary queries on jobs, job streams, andworkstations. For example, you are creating a task to search for all the fileswhose names start with the same characters. From the resulting list of files, you
Chapter 8. Monitoring your Objects in the Plan 113
can launch a secondary query to view a list of all the jobs associated to each ofthese files. Starting from the Monitor Files task results table, you can startfurther queries on secondary objects associated to one of the files in the table;the information to be retrieved with these secondary queries is specified in thispanel.
7. In the Create New Task panel, you can see the main details about the task youjust created. You can also choose to run the task immediately. In this case, ifyou have not yet specified an engine connection name, you must do so now.The task is now in the list of your tasks where you can open and modify it.You can find it in the task lists displayed by clicking the following options: AllConfigured Tasks or Workload > Monitor > Workload Dependencies >Monitor Files.
Results
You have created your task that, when run, creates a list of files satisfying yourfiltering criteria and showing, for each file in the list, the information contained inthe columns you selected to view.Related concepts:“File” on page 43
Creating a task to Monitor PromptsAbout this task
To create a Monitor Prompts task, perform the following steps.
Note: For all the details about options and fields displayed in the panels, see theonline help by clicking the question mark located at the top-right corner of eachpanel.
Procedure1. In the portfolio on the left, click Quick Start > New Task... or All Configured
Tasks > New.2. In the Select Task Type panel, under Monitor Task, select Monitor Prompts
and click Next.3. In the Enter Task Information panel, define the type of scheduler engine where
you want to run the task. You can select a specific engine, if available in thedrop-down list, or you can select Ask when needed and choose the engine at alater time. Remember that the engine name must be specified before runningthe task. Depending on the engine type you choose, the filtering criteria andthe results you can display are different. You can also specify whether to sharethe task with others, to allow them to see and run the task, but not to modifyit. Task and engine sharing can be disabled by the TWSWEBUIAdministrator inthe global settings customizable file.
4. Click Next to proceed with task creation or click Finish to complete thecreation using the default values and exit without proceeding to the followingsteps. If you are editing an existing task, properties are organized in tabs.
5. In the General Filter panel, specify some broad filtering criteria to limit theresults retrieved by your query. Here you start refining the scope of your queryby also considering the amount of information you want to retrieve. Optionally,you can customize how often to refresh the information in the results table byspecifying the refresh interval in seconds. If the periodic refresh is enabled for atask, when the task runs, the refresh time control options are shown in the
114 Tivoli Workload Scheduler: Dynamic Workload Console User’s Guide: Dynamic Workload Console User’s Guide
results table. You can also set or change the periodic refresh interval directly inthe results table. In this case, the value specified at task creation time istemporarily overwritten. You can filter the task results based on the promptname or status. You can also configure the automatic refresh of the task resultsin the table.
6. In the Columns Definition panel, select the information you want to display inthe table containing the query results. According to the columns you choosehere, the corresponding information is displayed in the task results table. Forexample, for all the prompts resulting from your query, you might want toknow their type and text. You can then drill down into this informationdisplayed in the table and navigate it. In the Columns Definition panel, notonly can you select the columns for this task results, but you can also specifythe columns for secondary queries on jobs, and job streams. From the resultinglist of prompts, you can launch a secondary query to view a list of all the jobsassociated to each of them. Starting from the Monitor Prompts task resultstable, you can start further queries on secondary objects associated to one ofthe prompts in the table; the information to be retrieved with these secondaryqueries is specified in this panel.
7. In the Create New Task panel, you can see the main details about the task youjust created. You can also choose to run the task immediately. In this case, ifyou have not yet specified an engine connection name, you must do so now.The task is now in the list of your tasks where you can open and modify it.You can find it in the task lists displayed by clicking the following options: AllConfigured Tasks or Workload > Monitor > Workload Dependencies >Monitor Prompts.
Results
You have created your task that, when run, creates a list of prompts that satisfyingyour filtering criteria and showing, for each prompt in the list, the informationcontained in the columns you selected to view.Related concepts:“Prompt” on page 42
Creating a task to Monitor ResourcesAbout this task
To create a Monitor Resources task, perform the following steps.
Note: For all the details about options and fields displayed in the panels, see theonline help by clicking the question mark located at the top-right corner of eachpanel.
Procedure1. In the portfolio on the left, click Quick Start > New Task... or All Configured
Tasks > New.2. In the Select Task Type panel, under Monitor Task, select Monitor Resources
and click Next.3. In the Enter Task Information panel, define the type of scheduler engine where
you want to run the task. You can select a specific engine, if available in thedrop-down list, or you can select Ask when needed and choose the engine at alater time. Remember that the engine name must be specified before runningthe task. Depending on the engine type you choose, the filtering criteria andthe results you can display are different. You can also specify whether to share
Chapter 8. Monitoring your Objects in the Plan 115
the task with others, to allow them to see and run the task, but not to modifyit. Task and engine sharing can be disabled by the TWSWEBUIAdministrator inthe global settings customizable file.
4. Click Next to proceed with task creation or click Finish to complete thecreation using the default values and exit without proceeding to the followingsteps. If you are editing an existing task, properties are organized in tabs.
5. In the General Filter panel, specify some broad filtering criteria to limit theresults retrieved by your query. Here you start refining the scope of your queryby also considering the amount of information you want to retrieve. Optionally,you can customize how often to refresh the information in the results table byspecifying the refresh interval in seconds. If the periodic refresh is enabled for atask, when the task runs, the refresh time control options are shown in theresults table. You can also set or change the periodic refresh interval directly inthe results table. In this case, the value specified at task creation time istemporarily overwritten. You can filter the task results based on the resourceand workstation names, or part of names (using wildcard characters). You canalso configure the automatic refresh of the task results in the table.
6. In the Columns Definition panel, select the information you want to display inthe table containing the query results. According to the columns you choosehere, the corresponding information is displayed in the task results table. Forexample, for all the resources resulting from your query, you might want toknow if they are in use and the associated workstations. You can then drilldown into this information displayed in the table and navigate it. In theColumns Definition panel, not only can you select the columns for this taskresults, but you can also specify the columns for secondary queries on jobs, jobstreams, and workstations. For example, you are creating a task to search for allthe resources whose names start with the same characters. From the resultinglist of resources, you can navigate to see (secondary query) a list of all the jobsthat use each of them. Starting from the Monitor Task task results table, youcan start further queries on secondary objects associated to one of the resourcesin the table; the information to be retrieved with these secondary queries isspecified in this panel.
7. In the Create New Task panel, you can see the main details about the task youjust created. You can also choose to run the task immediately. In this case, ifyou have not yet specified an engine connection name, you must do so now.The task is now in the list of your tasks where you can open and modify it.You can find it in the task lists displayed by clicking the following options: AllConfigured Tasks or Workload > Monitor > Workload Dependencies >Monitor Resources.
Results
You have created your task that, when run, creates a list of resources satisfyingyour filtering criteria and showing, for each resource in the list, the informationcontained in the columns you selected to view.Related concepts:“Resource” on page 43
Creating a task to Monitor Event RulesAbout this task
To create a Monitor Event Rules task, perform the following steps.
116 Tivoli Workload Scheduler: Dynamic Workload Console User’s Guide: Dynamic Workload Console User’s Guide
Note: For all the details about options and fields displayed in the panels, see theonline help by clicking the question mark located at the top-right corner of eachpanel.
Procedure1. In the portfolio on the left, click Quick Start > New Task... or All Configured
Tasks > New.2. In the Select Task Type panel, under Event Management Task, select Monitor
Event Rules and click Next.3. In the Enter Task Information panel, specify the task name and select the
engine connection where you want to run the task. You can run this type ofquery only in a Tivoli Workload Scheduler distributed environment on eitherthe master domain manager or on a node installed as a backup master domainmanager, but not necessarily belonging to the master domain. Here you alsospecify whether to share the task with others, to allow them to see and run thetask, but not to modify it.
4. Click Next to proceed with task creation or click Finish to complete thecreation using the default values and exit without proceeding to the followingsteps. If you are editing an existing task, properties are organized in tabs.
5. In the General Filter panel, specify some broad filtering criteria to limit theresults retrieved by your query. Here you start refining the scope of your queryby also considering the amount of information you want to retrieve. Optionally,you can customize how often to refresh the information in the results table byspecifying the refresh interval in seconds. If the periodic refresh is enabled for atask, when the task runs, the refresh time control options are shown in theresults table. You can also set or change the periodic refresh interval directly inthe results table. In this case, the value specified at task creation time istemporarily overwritten. You can search for rule instances based on their status,type, or trigger timestamps.
6. In the Columns Definition panel, select the information you want to display inthe table containing the query results. According to the columns you choosehere, the corresponding information is displayed in the task results table. Forexample, for all the objects resulting from your query, you might want to seetheir statuses, and the kind of rule that generated them. You can then drilldown into this information displayed in the table and navigate it. In theColumns Definition panel, not only can you select the columns for this taskresults, but you can also specify the columns for secondary queries on eventrules (the event rule definition stored in the database). The information to beretrieved with these secondary queries is specified in this panel.
7. In the Create New Task panel, you can see the main details about the task youjust created. You can also choose to run the task immediately. In this case, ifyou have not yet specified an engine connection name, you must do so now.The task is now in the list of your tasks where you can open and modify it.You can find it in the task lists displayed by clicking the following options: AllConfigured Tasks or Workload > Monitor > Workload Events > MonitorEvent Rules.
Results
You have created your query that, when run, lists the event rule instancessatisfying your filtering criteria and shows, for each event rule in the list, theinformation you selected to view.
Chapter 8. Monitoring your Objects in the Plan 117
Related concepts:“Event management tasks” on page 103“Event management configuration” on page 27
Creating a task to Monitor Triggered ActionsAbout this task
To create a Monitor Triggered Actions task, perform the following steps.
Note: For all the details about options and fields displayed in the panels, see theonline help by clicking the question mark located at the top-right corner of eachpanel.
Procedure1. In the portfolio on the left, click Quick Start > New Task... or All Configured
Tasks > New.2. In the Select Task Type panel, select Event Management Task > Monitor
Triggered Actions and click Next.3. In the Enter Task Information panel, specify the task name and select the
engine connection where you want to run the task. You can run this type ofquery only in a Tivoli Workload Scheduler distributed environment on eitherthe master domain manager or on a node installed as a backup master domainmanager, but not necessarily belonging to the master domain. You can alsospecify whether to share the task with others, to allow them to see and run thetask, but not to modify it.
4. Click Next to proceed with task creation or click Finish to complete thecreation using the default values and exit without proceeding to the followingsteps. If you are editing an existing task, properties are organized in tabs.
5. In the General Filter panel, specify some broad filtering criteria to limit theresults retrieved by your query. Here you start refining the scope of your queryby also considering the amount of information you want to retrieve. Optionally,you can customize how often to refresh the information in the results table byspecifying the refresh interval in seconds. If the periodic refresh is enabled for atask, when the task runs, the refresh time control options are shown in theresults table. You can also set or change the periodic refresh interval directly inthe results table. In this case, the value specified at task creation time istemporarily overwritten. You can search for triggered actions based on the typeof rule instance that triggers them or on their scope. The scope of an action (oran event) is the set of properties that most characterize it.
6. In the Columns Definition panel, select the information you want to display inthe table containing the query results. According to the columns you choosehere, the corresponding information is displayed in the task results table. Forexample, for each of the actions resulting from your query, you might want tosee the status, type, or associated message. You can then drill down into thisinformation displayed in the table and navigate it. In the Columns Definitionpanel, not only can you select the columns for this task results, but you canalso specify the columns for secondary queries on event rule instances. Theinformation to be retrieved with these secondary queries is specified in thispanel.
7. In the Create New Task panel, you can see the main details about the task youjust created. You can also choose to run the task immediately. In this case, ifyou have not yet specified an engine connection name, you must do so now.The task is now in the list of your tasks where you can open and modify it.
118 Tivoli Workload Scheduler: Dynamic Workload Console User’s Guide: Dynamic Workload Console User’s Guide
You can find it in the task lists displayed by clicking the following options: AllConfigured Tasks or Workload > Monitor > Workload Events > MonitorTriggered Actions.
Results
You have created your query that, when run, lists the event rule instancessatisfying your filtering criteria and shows, for each event rule in the list, theinformation you selected to view.Related concepts:“Event management tasks” on page 103“Event management configuration” on page 27
Creating a task to Monitor Operator MessagesAbout this task
To create a Monitor Operator Messages task, perform the following steps.
Note: For all the details about options and fields displayed in the panels, see theonline help by clicking the question mark located at the top-right corner of eachpanel.
Procedure1. In the portfolio on the left, click Quick Start > New Task... or All Configured
Tasks > New.2. In the Select Task Type panel, select Event Management Task > Monitor
Operator Messages and click Next.3. In the Enter Task Information panel, specify the task name and select the
engine connection where you want to run the task. You can run this type ofquery only in a Tivoli Workload Scheduler distributed environment on eitherthe master domain manager or on a node installed as a backup master domainmanager, but not necessarily belonging to the master domain. You also specifywhether to share the task with others, to allow them to see and run the task,but not to modify it.
4. Click Next to proceed with task creation or click Finish to complete thecreation using the default values and exit without proceeding to the followingsteps. If you are editing an existing task, properties are organized in tabs.
5. In the General Filter panel, specify some broad filtering criteria to limit theresults retrieved by your query. Here you start refining the scope of your queryby also considering the amount of information you want to retrieve. Optionally,you can customize how often to refresh the information in the results table byspecifying the refresh interval in seconds. If the periodic refresh is enabled for atask, when the task runs, the refresh time control options are shown in theresults table. You can also set or change the periodic refresh interval directly inthe results table. In this case, the value specified at task creation time istemporarily overwritten. You can search for operator messages based on theirseverity, time stamp, or scope. The scope of an operator message is the set ofproperties that most characterize it.
6. In the Columns Definition panel, select the information you want to display inthe table containing the query results. According to the columns you choosehere, the corresponding information is displayed in the task results table. Forexample, for each of the operator messages resulting from your query, you
Chapter 8. Monitoring your Objects in the Plan 119
might want to see the severity, the type of associated event, or the group inwhose queue the message is. You can then drill down into this informationdisplayed in the table and navigate it.
7. In the Create New Task panel, you can see the main details about the task youjust created. You can also choose to run the task immediately. In this case, ifyou have not yet specified an engine connection name, you must do so now.The task is now in the list of your tasks where you can open and modify it.You can find it in the task lists displayed by clicking the following options: AllConfigured Tasks or Workload > Monitor > Workload Events > MonitorOperator Messages.
Results
You have created your query that, when run, lists the event rule instancessatisfying your filtering criteria and shows, for each event rule in the list, theinformation you selected to view.Related concepts:“Event management tasks” on page 103“Event management configuration” on page 27
Controlling Jobs and Job Streams ProcessingIn the Dynamic Workload Console, you can control job and job streams processingby specifying dependencies and other properties as described in the followingsections.
Using dependencies to control job and job stream processingA dependency is a prerequisite that must be satisfied before processing can proceed.You can define dependencies for both jobs and job streams to ensure the correctorder of processing. You can use these types of dependencies: Distributed
On completion of jobs and job streamsA job or a job stream must not begin processing until other jobs and jobstreams have completed. May be defined to require success or justcompletion
ResourceA job or a job stream needs one or more resources available before it canbegin to run.
File A job or a job stream needs to have one or more files meet the specifiedcriteria before it can begin to run.
PromptA job or a job stream needs to wait for an affirmative response to a promptbefore it can begin to run.
You can define up to 40 dependencies for a job or job stream. In a Tivoli WorkloadScheduler network, dependencies can cross workstation and network boundaries.
z/OS
On completion of jobs belonging to the same job streamA job must not begin processing until other jobs belonging to the same jobstream have completed successfully.
120 Tivoli Workload Scheduler: Dynamic Workload Console User’s Guide: Dynamic Workload Console User’s Guide
On completion of jobs belonging to different job streamsA job must not begin processing until other jobs belonging to other jobstreams have completed successfully.
ResourceA job or a job stream needs one or more resources available before it canbegin to run.
In addition to this, each job needs the workstation where it is scheduled to run tobe available.
To add a dependency to a job or to a job stream from the Workload Designer, see“Adding and removing dependencies” on page 84.
You can also add a dependency from the panel displayed as result of your monitortask related to jobs or job streams by performing the following steps:1. In the query result panel select a job or a job stream and click Dependencies.2. In the Dependencies panel expand the section related to the dependency type
you want to add and click Add.3. Enter the required information and click OK.
For all the details about options and fields displayed in the panel, see theonline help by clicking the question mark located at the top-right corner of thepanel.
Using time restrictions to control job and job streamprocessing
Time restrictions can be specified for both jobs and job streams.
For a specific job or job stream you can specify the time that processing begins,earliest start, or the time after which processing can no longer be started, lateststart. By specifying both, you define a time interval within which a job or jobstream runs. You can use them as time dependencies.
You can also specify a deadline to specify the time within which a job or a jobstream must complete. Jobs or job streams that have not yet started or that are stillrunning when the deadline time is reached, are considered late in the plan. Thedeadline does not prevent jobs or job streams from starting.
You can also specify a maximum duration or a minimum duration for a jobdefined within a job stream. If a job is running and the maximum duration timehas been exceeded, then the job can either be killed or can continue to run. If a jobdoes not run long enough to reach the minimum duration time, then the job can beset to Abend status, to Confirm status awaiting user confirmation, or it cancontinue running.
For jobs you can also specify a repeat range; for example, you can have TivoliWorkload Scheduler launch the same job every 30 minutes between 8:30 a.m. and1:30 p.m.
To specify time restrictions for a job or a job stream, perform the following steps:1. Click Workload > Design > Create Workload Definitions.2. In the Workload Designer, edit the job stream you want to modify. For
information about editing an object see “Editing objects from the Working ListView” on page 70.
Chapter 8. Monitoring your Objects in the Plan 121
3. Select the job or the job stream in the Details view and click the Timerestrictions tab in the Properties section.
4. Enter the time restriction properties and save the job stream.For all the details about options and fields displayed in the panel, see theonline help by clicking the question mark located at the top-right corner of thepanel.
Using job priority and workstation fence to control distributedjob processing
Distributed
Tivoli Workload Scheduler has its own queuing system, consisting of levels ofpriority. Assigning a priority to jobs gives you added control over their precedenceand order of running.
The fence provides another type of control over job processing on a workstation.When it is set to a priority level, it only allows jobs whose priority exceeds thefence value to run on that workstation. Setting the fence to 40, for example,prevents jobs with priorities of 40 or less from being launched.
To specify job priority for a job, perform the following steps:1. Click Workload > Design > Create Workload Definitions.2. In the Workload Designer, edit the job you want to modify. For information
about editing an object see “Editing objects from the Working List View” onpage 70.
3. Select the job in the Details view and click the Scheduling options tab in theProperties section.
4. Enter the job priority and save the job.For all the details about options and fields displayed in the panel, see theonline help by clicking the question mark located at the top-right corner of thepanel.
You can also add a job priority from the panel displayed as result of your monitortask related to jobs by performing the following steps:1. In the query result panel select a job and click More Actions > Priority.2. In the Set Priority panel specify a priority value and click OK.
To set a workstation fence perform the following steps:1. In the panel displayed as results of your monitor workstation task, select the
workstation and click More Actions > Fence.2. In the Set Fence panel specify a fence value and click OK.
Using limits to control job and job stream processingThe limit provides a means of setting the highest number of jobs that TivoliWorkload Scheduler is allowed to launch. You can set a limit:v In the job stream definitionv In the workstation definition
Setting the limit on a workstation to 25, for example, allows Tivoli WorkloadScheduler to have no more than 25 jobs running concurrently on that workstation.
To specify a limit for a job stream, perform the following steps:
122 Tivoli Workload Scheduler: Dynamic Workload Console User’s Guide: Dynamic Workload Console User’s Guide
1. Click Workload > Design > Create Workload Definitions.2. In the Workload Designer, edit the job stream you want to modify. For
information about editing an object see “Editing objects from the Working ListView” on page 70.
3. Select the job stream in the Details view and click the Scheduling options tabin the Properties section.
4. Enter the limit value and save the job stream.For all the details about options and fields displayed in the panel, see theonline help by clicking the question mark located at the top-right corner of thepanel.
You can also add a limit from the panel displayed as result of your monitor jobstream task by performing the following steps:1. In the query result panel select a job stream and click More Actions > Limit.2. In the Set Limit panel specify a new limit value and click OK.
To set a workstation limit perform the following steps:1. In the panel displayed as result of your monitor workstation task, select the
workstation and click More Actions > Limit.2. In the Set Limit panel specify a new limit value and click OK.
Using job confirmation to control job processingThere might be scenarios where the completion status of a job cannot bedetermined until you have performed some tasks. You might want to check theresults printed in a report, for example. In this case, you can set in the jobdefinition that the job requires confirmation, and Tivoli Workload Scheduler waits foryour response before marking the job as successful or failed.
To specify that a job requires confirmation, perform the following steps:1. Click Workload > Design > Create Workload Definitions.2. In the Workload Designer, edit the job stream you want to modify. For
information about editing an object see “Editing objects from the Working ListView” on page 70.
3. Select the job in the Details view and click the Scheduling options tab in theProperties section.
4. Check Requires confirmation and save the job stream.For all the details about options and fields displayed in the panel, see theonline help by clicking the question mark located at the top-right corner of thepanel.
Using job recovery actions to control job processingWhen you schedule a job, you can specify the type of recovery you wantperformed by Tivoli Workload Scheduler if the job fails. The predefined recoveryoptions are:v Continue with the next jobv Stop and do not start the next jobv Run the failed job again
In addition, you can specify other actions to be taken in terms of recovery jobs andrecovery prompts. For example, if a job fails, you can have Tivoli Workload
Chapter 8. Monitoring your Objects in the Plan 123

Scheduler automatically run a recovery job, issue a recovery prompt that requiresan affirmative response, and then run the failed job again.
To specify the job recovery actions, perform the following steps:1. Click Workload > Design > Create Workload Definitions.2. In the Workload Designer, edit the job you want to modify. For information
about editing an object see “Editing objects from the Working List View” onpage 70.
3. Click the Recovery options tab in the Properties section.4. Enter the recovery Action and the other information. Then save the job.
For all the details about options and fields displayed in the panel, see theonline help by clicking the question mark located at the top-right corner of thepanel.
124 Tivoli Workload Scheduler: Dynamic Workload Console User’s Guide: Dynamic Workload Console User’s Guide
Chapter 9. Working with Plans
This section contains the main tasks that involve plans. You can find informationabout selecting the working plan, creating trial and forecast plans, monitoring theprogress of a plan, and generating a plan view.
Selecting the working planWhen you monitor the processing of your scheduling activities, you can choose theplan you want to work with. This plan is called the active plan.
There are several ways of defining the active plan. By default, the active plan is thedefault plan, which is associated to the engine connection. However, you can selecta different plan and define it as active in the following ways:
“Associating a plan to the task”Every time the task is run, it is run using the specified plan. Usually thissetting is useful if you want to run multiple queries at the same timeagainst different plans. To run the task on a different plan, you must eitherchange this selection or use a temporary plan selection that lasts only untilthe current session expires. This plan selection takes precedence over allother selections and is the first to be used. It is made during the taskcreation when specifying the engine connection in the Enter TaskInformation panel.
“Dynamically defining a temporary plan” on page 126You can set a temporary plan selection. This plan is used as the active planfor the current session only. All tasks and engines that have been set to usethe active plan will use the currently defined plan. This plan selection isvalid unless a different plan is defined as the active plan in the Enter TaskInformation panel.
“Associating a plan to an engine” on page 126If none of the above settings are specified, tasks are run against the planassociated to the engine. By default, this plan and the active plan are thesame.
Associating a plan to the task
To associate a plan to a task, perform the following steps:1. In the portfolio on the left, click Quick Start > New Task... or All Configured
Tasks > New.2. In the Select Task Type panel, select the type of task you want to create and
click Next.3. In the Enter Task Information panel, select a distributed engine as the scheduler
engine where you want to run the task. If you select Ask when needed, youcannot perform the next steps.
4. Click Select to specify the plan that you want to associate to this task. Unlessyou change this selection, this task is always run against this plan.Alternatively, click Use Active Plan, if you want this task to run using the planthat is set as the active plan in the plan list panel.
5. In the Select Plan panel, select the plan that you want to associate to this taskand click OK to return to the Enter Task Information panel.
© Copyright IBM Corp. 1999, 2012 125
If you do not select any plan, the task uses the plan set as active. You canchange the active plan by following the procedure described in “Dynamicallydefining a temporary plan.”
Dynamically defining a temporary plan
From the List Available Plans entry in the portfolio, you can specify some filteringcriteria to retrieve a list of plans.
Regardless of whether you are the owner of the engine connection or if it is onlyshared with you, you can select a plan from the list to define it as the active planfor the current session.
Follow these steps to define a filter and run a query to create a list of availableplans:1. Click Workload > Forecast > List Available Plans.2. In the View Available Plans panel:
a. Under Select an Engine, select the engine where you want to list the plans.b. Under Select Plan Type, click the corresponding check box to select the
type of plan you want to list. Selections are mutually exclusive. By default,all available plans are listed.
c. Under Select Plan Name, specify the name of the file containing the planyou want to search. You can use wildcard characters.
d. Click Display Plans List to generate a list of plans.3. From the displayed list, select a plan and click Set as active to set it as a
temporary plan that remains valid until the current session expires or you setanother active plan.
Only for the current session, the plan selection made in this panel overrides theplan selection specified in the engine connection properties panel. However, it doesnot override the plan selection specified during the task definition.
Associating a plan to an engine
To associate a plan to an engine, perform the following steps:1. Click Quick Start > Manage Engines... or Settings > Manage Engines
2. In the Manage Engines panel, select an engine and click Connection Properties.3. Under the Plans section, click Select to view a list of the available plans.4. Choose a plan from the list and click OK. This setting is overridden by the
plan selection made in the Enter Task Information panel or, if not available, bythe selection made in the List Available Plans panel.
Related concepts:“Plans” on page 52
Generating Trial and Forecast PlansAbout this task
To create a new plan, perform the following steps:
Procedure1. In the portfolio, under Workload > Forecast, select:
126 Tivoli Workload Scheduler: Dynamic Workload Console User’s Guide: Dynamic Workload Console User’s Guide

Generate Trial PlanTo create a trial plan. The Create Trial Plan panel is displayed.
Generate Forecast PlanTo create a new forecast plan. The Create Forecast Plan panel isdisplayed.
2. Under the Plan Information section, enter the required information:
Engine NameIn the drop-down menu, select the engine where you want to create theplan. Only the engine connections that you created are available in themenu.
Plan FilenameAssign a name to the file that contains the plan. This is a mandatoryfield.
3. Under the Plan Start section, assign the date and time when the plan starts.Because the trial plan is mainly an extension of an existing and processingcurrent plan, if you selected to create a new trial plan and a current plan isavailable on the engine, these fields are grayed out and their values are thesame as the current plan end date. If you selected to create a new trial plan anda current plan is not available on the engine, or if you selected to create a newforecast plan, you can enter a date and time for the plan to start.
4. Under the Plan End section, assign one of the following values:v A date and time when the plan ends.v The number of days and hours the plan lasts.
By default the plan covers a one-day time interval.5. Under the Plan Time Zone section, choose the time zone used in the plan.6. Click OK to create the plan.Related concepts:“Plans” on page 52
Creating a task to Show Plan ViewAbout this task
Note: This task can be run only on Tivoli Workload Scheduler v8.5.1 or later andTivoli Workload Scheduler for z/OS v8.5.1 using the z/OS Connector v8.5.1 orlater.
When you create a task, you define a query where you specify multiple criteria tosearch for items and to display the search results. You can then save, reuse, andshare this task with other users, and modify it at any time. When you run the task,you run the query on the plan to retrieve the information according to the filtersand level of detail you specified when you created the task.
Note: For all the details about options and fields displayed in the panels, see theonline help by clicking the question mark located at the top-right corner of eachpanel.
To create a Show Plan View task, perform the following steps:
Chapter 9. Working with Plans 127
Procedure1. In the portfolio on the left, click Quick Start > New Task... or All Configured
Tasks > New.2. In the Select Task Type panel, under Monitor Task, select Show Plan View and
click Next.3. In the Enter Task Information panel, define the type of scheduler engine where
you want to run the task. You can select a specific engine, if available in thedrop-down list, or you can select Ask when needed and choose the engine at alater time. Remember that the engine name must be specified before runningthe task. Depending on the engine type you choose, the filtering criteria andthe results you can display are different. You can also specify whether to sharethe task with others, to allow them to see and run the task, but not to modifyit. Task and engine sharing can be disabled by the TWSWEBUIAdministrator inthe global settings customizable file.
4. Click Next to proceed with task creation or click Finish to complete thecreation using the default values and exit without proceeding to the followingsteps. If you are editing an existing task, properties are organized in tabs.
5. In the General Filter panel, specify some filtering criteria to limit the number ofjob streams displayed as a result. You can filter based on the names of jobstreams and workstation (distributed systems only), or on the starting times ofthe job streams. You can also decide whether to include predecessors andsuccessors in the Plan View. Consider that predecessors and successors areincluded in the graphic only after all filter-matching job streams have alreadybeen included. When the maximum number of displayed job streams isreached, no more predecessors and successors are included in the graphic.
6. In the Create New Task panel, you can see the main details about the task youjust created. You can also choose to run the task immediately. In this case, ifyou have not yet specified an engine connection name, you must do so now.The task is now in the list of your tasks where you can open and modify it.You can find it in the task lists displayed by clicking the following options: AllConfigured Tasks or Workload > Monitor > Show Plan View.
Results
You have created your task that, when run, generates the Plan View. The PlanView is a graphical representation of a filtered set of the job streams that make upthe plan. Using the Plan View toolbar, you can perform several actions on theobject displayed, as shown in the picture below: From the Plan View, you can alsomodify the filtering criteria to display different job streams, by clicking the view
and update filter icon . However, changes performed from this view apply tothe current view only, they do not apply to the task saved in the task list.Related concepts:“Plans” on page 52“Plan view tasks” on page 104Related information:“Graphical Views in the plan” on page 173
128 Tivoli Workload Scheduler: Dynamic Workload Console User’s Guide: Dynamic Workload Console User’s Guide
Chapter 10. Submitting Workload on Request in Production
About this task
In addition to the jobs and job streams that are scheduled to run in production,you can also submit at any time other jobs and job streams. However, these jobsand jobs streams are not considered when identifying predecessors for jobs and jobstream dependencies.
In production you can:
Distributed Submit Ad Hoc JobsThis is a job that is:v Not defined in the database.v Used to run a command or a script in production.
Distributed Submit Predefined JobsThis is a job that is:v Defined in the database.
Submit Predefined Job StreamsThis is a job stream that is:v Defined in the database.
See the following sections for instructions about inserting each of these types.
Submitting ad hoc jobsDistributed
About this task
To add an ad hoc job to the current plan, perform the following steps:
Procedure1. From the portfolio, expand Workload > Submit, and click Submit Ad Hoc
Jobs.2. In the displayed panel, select, from the drop-down list, the engine where you
want to run the job, and click Go.3. Enter all the required information about the job that you want to add. For more
details about the information to enter in this panel, see the screen help, whichyou can open by clicking the question mark located at the top-right corner ofthe panel.
4. Click OK to save your changes, exit the panel and submit the job.
Submitting predefined jobsDistributed
About this task
To add a predefined job to the current plan, perform the following steps:
© Copyright IBM Corp. 1999, 2012 129

Procedure1. From the portfolio, expand Workload > Submit, and click Submit Predefined
Jobs.2. In the displayed panel, select, from the drop-down list, the engine where you
want to run the job, and click Go.3. Enter all the required information about the job that you want to add. For more
details about the information to enter in this panel, see the screen help, whichyou can open by clicking the question mark located at the top-right corner ofthe panel.
4. Click OK to save your changes, exit the panel and submit the job.
Submitting predefined job streamsAbout this task
To add a predefined job stream to the current plan, perform the following steps:
Procedure1. From the portfolio, expand Workload > Submit, and click Submit Predefined
Job Streams.2. In the displayed panel, select, from the drop-down list, the engine where you
want to run the job.3. Enter all the required information about the job stream that you want to add.
For more details about the information to enter in this panel, see the screenhelp, which you can open by clicking the question mark located at the top-rightcorner of the panel. To find the job stream that you want to submit, you canlaunch searches based on part of the job stream name, workstation name, aliasor variable table associated to it.
4. Optionally, specify a scheduled time to submit the job stream.5. After completing the panel, click Submit to submit your job stream in the plan.
Close the tab to exit discarding your changes.
Setting properties for ad hoc jobs and predefined jobs and jobstreams
About this task
To set the properties required to add jobs or job streams to the current plan,perform the following steps.
Note: For all the details about options and fields displayed in the panels, see theonline help by clicking the question mark located at the top-right corner of eachpanel.
Procedure1. Enter the required information in the General section.2. For predefined and ad hoc jobs only: under the Task tab, enter the task
properties for the job in the displayed panel.3. Select the Time Restrictions tab, and enter the required information in the
displayed panel to set time restrictions for the job or job stream.4. Select the Resources tab to set resource dependencies.
130 Tivoli Workload Scheduler: Dynamic Workload Console User’s Guide: Dynamic Workload Console User’s Guide
v To create a new resource, click New and enter the required information inthe Info panel.
v To delete an existing resource, select it from the list and click Delete.v To modify a resource listed in the table, double-click its name and edit its
properties in the Info panel.5. Select the Prompts tab to set prompts as dependencies for the job or job stream.
v To create a new prompt, click New and enter the required information in theInfo panel.
v To delete an existing prompt, select it from the list and click Delete.v To modify a prompt listed in the table, double-click its name and edit its
properties in the Info panel.6. Select the Files tab to set file dependencies for the job or job stream.
v To create a new file, click New and enter the required information in the Infopanel.
v To delete an existing file, select it from the list and click Delete.v To modify the file properties, double-click the file and edit the settings in the
displayed table.7. Select the Internetwork Predecessors tab to add predecessor dependencies
from a remote Tivoli Workload Scheduler network. The displayed panel showsexisting internetwork predecessor properties.v To create a new internetwork predecessor, click New and enter the required
information in the Info panel. Click the ... (Browse) button to search for andselect the name of the network agent. Internetwork dependencies require thata network agent is configured to communicate with the external schedulernetwork.
v To delete an existing internetwork predecessor, select it from the list and clickDelete.
v To modify an existing internetwork predecessor properties, double-click it,and edit its settings.
8. Select the Predecessors tab to set predecessor dependencies for the job or jobstream. The displayed panel shows existing predecessor properties.v To create a new predecessor, click New and enter the required information in
the displayed panel.v To delete an existing predecessor, select it from the list and click Delete.v To modify an existing predecessor properties, double-click it, and edit its
settings in the displayed table.
Chapter 10. Submitting Workload on Request in Production 131

132 Tivoli Workload Scheduler: Dynamic Workload Console User’s Guide: Dynamic Workload Console User’s Guide
Chapter 11. Reporting
To create a report you must create and run tasks.
Note: You must create a connection to a remote Tivoli Workload Scheduler engine,before you can run tasks on it to obtain data.
When you create a Report task, you generate Tivoli Workload Scheduler reports,which you can then view, print, and save, in different kinds of output. You canthen save, reuse, and share this task with other users, and modify it at any time.You can also create customized reports by writing SQL scripts.Related concepts:“Reports” on page 57Related reference:“Reports” on page 187
Creating a task to generate a Job Run Statistics reportAbout this task
To create a task to run a Job Run Statistics Report, perform the following steps:
Procedure1. Click All Configured Reports > New. Alternatively, expand the Reporting
section, click Generate Historical Reports, and click New.2. In the Select Task Type panel, select Report Definition, Job Run Statistics
Report, and then click Next.3. In the Enter Task Information panel, define the type of scheduler engine where
you want to run the task. You can select a specific engine, if available in thedrop-down list, or you can select Ask when needed and choose the engine at alater time. Remember that the engine name must be specified before runningthe task. Depending on the engine type you choose, the filtering criteria andthe results you can display are different. You can also specify whether to sharethe task with others, to allow them to see and run the task, but not to modifyit. Task and engine sharing can be disabled by the TWSWEBUIAdministrator inthe global settings customizable file.
4. In the Report Header panel, choose the name and the format of the output ofthe report, and click Next to proceed, or click Finish to complete the taskcreation using all the default values. If you are editing an existing taskproperties, click Save to keep your changes and open the next panel, if needed.
5. In the Filter Criteria panel, define a filter to select the jobs you want to includein the report. All the information about fields and options is available in thepanel help. Click Next to proceed or click Finish to complete the task creationusing all the default values.
6. In the Report Output Content panel, select the layout of your report. You canview the information either as a chart or as a table. The chart view displays thestatistics for each job run in pie charts. You can select the report format. If youselect HTML format, you can also limit the size of the report. You can alsoselect the job details and the statistics you want to include in your report. After
© Copyright IBM Corp. 1999, 2012 133
you made your selection, click Next to proceed or click Finish to complete thetask creation using all the default values.
7. In the Create New Task panel:v Select Run this Task Now and click Finish if you want to run the report
task. If you have not yet specified an engine connection, you are prompted todo so now.
v Click Cancel to exit without saving your changes.v Click Finish to save the task, without starting it immediately.
Results
You have created your task that, when run, creates a report of jobs satisfying yourfiltering criteria and showing, for each job in the list, the information you selectedto view.Related concepts:“Reports” on page 57
Creating a task to generate a Job Run History reportAbout this task
To create a task to run a Job Run History report, perform the following steps:
Procedure1. Click All Configured Reports > New. Alternatively, expand the Reporting
section, click Generate Historical Reports, and click New.2. In the Select Task Type panel, select Report Definition, Job Run History
Report, and then click Next.3. In the Enter Task Information panel, define the type of scheduler engine where
you want to run the task. You can select a specific engine, if available in thedrop-down list, or you can select Ask when needed and choose the engine at alater time. Remember that the engine name must be specified before runningthe task. Depending on the engine type you choose, the filtering criteria andthe results you can display are different. You can also specify whether to sharethe task with others, to allow them to see and run the task, but not to modifyit. Task and engine sharing can be disabled by the TWSWEBUIAdministrator inthe global settings customizable file.
4. In the Report Header panel, choose the name and the format of the output ofthe report, and click Next to proceed, or click Finish to complete the taskcreation using all the default values. If you are editing an existing taskproperties, click Save to keep your changes and open the next panel, if needed.
5. In the Filter Criteria panel, define a filter to select the jobs you want to includein the report. All the information about fields and options is available in thepanel help. Click Next to proceed or click Finish to complete the task creationusing all the default values.
6. In the Report Output Content panel, select the layout of your report. You canview the information only as a table, but you can format it as an HTML or CSVfile. If you select HTML format, you can also limit the size of the report. Youcan also select the job details you want to include in your report. After youmake your selection, click Next to proceed or click Finish to complete the taskcreation using all the default values.
7. In the Create New Task panel:
134 Tivoli Workload Scheduler: Dynamic Workload Console User’s Guide: Dynamic Workload Console User’s Guide
v Select Run this Task Now and click Finish if you want to run the reporttask. If you have not yet specified an engine connection, you are prompted todo so now.
v Click Cancel to exit without saving your changes.v Click Finish to save the task, without starting it immediately.
Results
You have created your task that, when run, creates a report of jobs satisfying yourfiltering criteria and showing, for each job in the list, the information you selectedto view.Related concepts:“Reports” on page 57
Creating a task to generate a Workstation Workload Summary reportAbout this task
To create a task to run a Workstation Workload Summary report, perform thefollowing steps:
Procedure1. Click All Configured Reports > New. Alternatively, expand the Reporting
section, click Generate Historical Reports, and click New.2. In the Select Task Type panel, select Report Definition, Workstation Workload
Summary Report, and click Next.3. In the Enter Task Information panel, define the type of scheduler engine where
you want to run the task. You can select a specific engine, if available in thedrop-down list, or you can select Ask when needed and choose the engine at alater time. Remember that the engine name must be specified before runningthe task. Depending on the engine type you choose, the filtering criteria andthe results you can display are different. You can also specify whether to sharethe task with others, to allow them to see and run the task, but not to modifyit. Task and engine sharing can be disabled by the TWSWEBUIAdministrator inthe global settings customizable file.
4. In the Report Header panel, choose the name and the format of the output ofthe report, and click Next to proceed, or click Finish to complete the taskcreation using all the default values. If you are editing an existing taskproperties, click Save to keep your changes and open the next panel, if needed.
5. In the Filter Criteria panel, define a filter to select the jobs you want to includein the report. All the information about fields and options is available in thepanel help. Click Next to proceed or click Finish to complete the task creationusing all the default values.
6. In the Report Output Content panel, select the layout of your report. You canview the information either as a chart or as a table. The chart view shows theworkload of all the specified workstations, aggregated by time. You can alsochoose to view the workloads of all the specified workstations in a single linechart. Aggregating all the information, you have a comparative view of theworkstation workloads. You can select the report format. If you select HTMLformat, you can also limit the size of the report. You can also select thegranularity with which to extract the data (by day or hour) and to order thereport. After you make your selection, click Next to proceed or Finish tocomplete the task creation using all the default values.
Chapter 11. Reporting 135
7. In the Create New Task panel:v Select Run this Task Now and click Finish if you want to run the report
task. If you have not yet specified an engine connection, you are prompted todo so now.
v Click Cancel to exit without saving your changes.v Click Finish to save the task, without starting it immediately.
Results
You have created your task that, when run, creates a report of jobs satisfying yourfiltering criteria and showing, for each job in the list, the information you selectedto view.Related concepts:“Reports” on page 57
Creating a task to generate a Workstation Workload Runtimes reportAbout this task
To create a task to run a Workstation Workload Runtimes report, perform thefollowing steps:
Procedure1. Click All Configured Reports > New. Alternatively, expand the Reporting
section, click Generate Historical Reports, and click New.2. In the Select Task Type panel, select Report Definition, Workstation Workload
Runtimes Report, and click Next.3. In the Enter Task Information panel, define the type of scheduler engine where
you want to run the task. You can select a specific engine, if available in thedrop-down list, or you can select Ask when needed and choose the engine at alater time. Remember that the engine name must be specified before runningthe task. Depending on the engine type you choose, the filtering criteria andthe results you can display are different. You can also specify whether to sharethe task with others, to allow them to see and run the task, but not to modifyit. Task and engine sharing can be disabled by the TWSWEBUIAdministrator inthe global settings customizable file.
4. In the Report Header panel, choose the name and the format of the output ofthe report, and click Next to proceed, or click Finish to complete the taskcreation using all the default values. If you are editing an existing taskproperties, click Save to keep your changes and open the next panel, if needed.
5. In the Filter Criteria panel, define a filter to select the jobs you want to includein the report. All the information about fields and options is available in thepanel help. Click Next to proceed or click Finish to complete the task creationusing all the default values.
6. In the Report Output Content panel, select the layout of your report. You canview the information either as a chart or as a table. The chart view shows in abar chart the number of jobs that are running on the workstations. Selecting thechart view, you can also specify how many jobs to display in each chart. Youcan specify the format of your report. If you select HTML format, you can alsolimit the size of the report. You can also select the information you want toinclude in the report and how you want it ordered. After you make yourselection, click Next to proceed or Finish to complete the task creation using allthe default values.
136 Tivoli Workload Scheduler: Dynamic Workload Console User’s Guide: Dynamic Workload Console User’s Guide
7. In the Create New Task panel:v Select Run this Task Now and click Finish if you want to run the report
task. If you have not yet specified an engine connection, you are prompted todo so now.
v Click Cancel to exit without saving your changes.v Click Finish to save the task, without starting it immediately.
Results
You have created your task that, when run, creates a report of jobs satisfying yourfiltering criteria and showing, for each job in the list, the information you selectedto view.Related concepts:“Reports” on page 57
Creating a task to Generate Plan ReportsAbout this task
Perform the following steps to create one of the following reports:
Planned Production Details ReportA report based on the information stored either in a trial or in a forecastplan. The information contained in these plans is retrieved from the TivoliWorkload Scheduler database. A Planned Production Details Report can berun on distributed engines (master domain manager and backup domainmanager). A real production report extracted from a fault-tolerant agentmight contain different information with respect to a plan extracted from amaster domain manager. For example, the number of jobs and job streamsis the same, but their status can change, because a job successful on themaster can be in hold or ready on the agent. The update status rate is thesame only on the full status agent that runs on the domain master.
Actual Production Details ReportA report based on the information stored either in the current or in anarchived plan. The information contained in these plans is retrieved fromthe Symphony files. Actual Production Details Report can be run ondistributed engines (master domain manager, backup domain manager,domain manager with connector, and fault-tolerant agent with connector).
Procedure1. Click All Configured Reports > New. Alternatively, expand the Reporting
section, click Generate Plan Reports, and click New.2. In the Select Task Type panel, choose the type of report that you want to create,
and click Next.3. In the Enter Task Information panel, define the type of scheduler engine where
you want to run the task. You can select a specific engine, if available in thedrop-down list, or you can select Ask when needed and choose the engine at alater time. Remember that the engine name must be specified before runningthe task. Depending on the engine type you choose, the filtering criteria andthe results you can display are different. You can also specify whether to sharethe task with others, to allow them to see and run the task, but not to modifyit. Task and engine sharing can be disabled by the TWSWEBUIAdministrator inthe global settings customizable file.
Chapter 11. Reporting 137
4. In the Report Header panel, choose the name and the format of the output ofthe report and click Next to proceed or click Finish to complete the taskcreation using all the default values.
5. In the Filter Criteria panel, define a filter to select the jobs that you want toinclude in the report. All the information about fields and options is availablein the panel help. Click Next to proceed or click Finish to complete the taskcreation using all the default values.
6. In the Report Output Content panel, select the job information that you want todisplay in the report output. After you make your selection, click Next toproceed or Finish to complete the task creation using all the default values.
7. In the Create New Task panel:v Select Run this Task Now and click Finish if you want to run the report
task. If you have not yet specified an engine connection, you are prompted todo so now.
v Click Cancel to exit without saving your changes.v Click Finish to save the task, without starting it immediately.
Results
You have created your task that, when run, creates a report of job and job streamsprocessing details satisfying your filtering criteria.Related concepts:“Reports” on page 57
Creating a task to Generate Custom SQL ReportsAbout this task
Use this task to define your own reports by writing or importing SQL queries forextracting data in HTML or CSV format. To create an SQL report task, perform thefollowing steps:
Procedure1. Click All Configured Reports > New. Alternatively, expand the Reporting
section, click Generate Custom SQL Reports, and click New.2. In the Select Task Type panel, select Report Task, Custom SQL Report, and
click Next.3. In the Enter Task Information panel, define the type of scheduler engine where
you want to run the task. You can select a specific engine, if available in thedrop-down list, or you can select Ask when needed and choose the engine at alater time. Remember that the engine name must be specified before runningthe task. Depending on the engine type you choose, the filtering criteria andthe results you can display are different. You can also specify whether to sharethe task with others, to allow them to see and run the task, but not to modifyit. Task and engine sharing can be disabled by the TWSWEBUIAdministrator inthe global settings customizable file.
4. In the Report Header panel, choose the name and the format of the output ofthe report and click Next to proceed or Finish to complete the task creationusing all the default values. The Custom SQL Report supports only the TablesView in either HTML or CSV format.
5. In the Filter Criteria panel, enter the SQL statement on which you want to baseyour report. You can write the query in the text pane or load an existing query
138 Tivoli Workload Scheduler: Dynamic Workload Console User’s Guide: Dynamic Workload Console User’s Guide
from a file by browsing to the required file and clicking Load. Click Next toproceed or Finish to complete the task creation using all the default values.
6. In the Report Output Content panel, select the job information that you want todisplay in the report output. After you make your selection click Next toproceed or Finish to complete the task creation using all the default values.
7. In the Create New Task panel:v Select Run this Task Now and click Finish if you want to run the report
task. If you have not yet specified an engine connection, you are prompted todo so now.
v Click Cancel to exit without saving your changes.v Click Finish to save the task, without starting it immediately.
Results
You have created your task that, when run, creates a report satisfying your filteringcriteria and showing the information you selected to view.Related concepts:“Reports” on page 57Related information:“SQL report examples” on page 191
Chapter 11. Reporting 139

140 Tivoli Workload Scheduler: Dynamic Workload Console User’s Guide: Dynamic Workload Console User’s Guide
Chapter 12. Scenarios
This section provides some scenarios about the product usage that can help youget familiar with Tivoli Workload Scheduler.
You can find additional scenarios about the product usage at the following links:v Tivoli Workload Scheduler Wiki Media Gallery, to access demos (only available
in English) about how to use the Tivoli Workload Scheduler productv Scenarios and How to Demos, to access scenarios about dynamic scheduling and
variable table usagev A workload service assurance scenario in the Tivoli Workload Scheduler User's
Guide and Reference about using this feature to monitor critical jobs.
Customizing your job streamThis scenario describes how you can use the Dynamic Workload Console to createa job stream, schedule it to run at specified times, and change its behavior basedon the day when it is scheduled to run.
Overview
A sales department manager needs to collect data on sales reports both at businessunit level and at corporation level. For this reason the department manager needsreports both on a weekly and on a monthly basis. Report data is stored in twodifferent directories, as follows:v Data for weekly reports is stored in a set of files located in the directory
/reports/weekly.v Data for monthly reports is stored in a set of files located in the directory
/reports2/monthly.
The job stream used for generating the reports has a dependency on the presenceof these files. To collect the required data, the Tivoli Workload Scheduleradministrator creates one job stream with two different run cycles, one scheduledto run on a weekly basis and one scheduled to run on a monthly basis.
Each run cycle references two different variable tables, which contain the variableand the related value used to define the path where the correct input files arelocated.
Creating the job stream and the related objects
To create all the database objects required to reach the business goal, the TivoliWorkload Scheduler designer uses the Workload Designer on the DynamicWorkload Console.1. He opens the Dynamic Workload Console and selects Tivoli Workload
Scheduler > Workload > Design > Create Workload Definitions. TheWorkload Designer is displayed.Using the New menu in the Working List section, the administrator can createall the necessary objects. He can also search for existing objects to edit andinsert in the plan in the Quick Open section.
© Copyright IBM Corp. 1999, 2012 141
2. The administrator selects New > Variable Table to create the two variabletables required to provide the two different values for the input file paths.a. He creates a variable table with name SC1_WEEKLY_DATA_TABLE. This
table is the default table. The path to the files required to generate theweekly reports is indicated by the REP_PATH variable, to which he assignsthe value "/reports/weekly".
b. He creates a variable table with name SC1_MONTHLY_DATA_TABLE. Thepath to the files required to generate the monthly reports is indicated by theREP_PATH variable, to which he assigns the value "/reports2/monthly".
3. The administrator selects New > Job Definition > Windows Job Definition tocreate the job definitions which generate the reports. All job definitions run ascript each, which receives the value of the REP_PATH variable as the inputvalue. He creates the following job definitions:a. The job definition named SC1_PARSE_DATA SCRIPTNAME runs on the
relevant workstation logging in as root. It runs a script which contains thefollowing statement: "/reportApp/parseData.sh ^REP_PATH^".
b. The job definition named SC1_PROCESS_DATA SCRIPTNAME runs on therelevant workstation logging in as root. It runs a script which contains thefollowing statement: "/reportApp/processData.sh ^REP_PATH^".
c. The job definition named SC1_CREATE_REPORTS SCRIPTNAME runs onthe relevant workstation logging in as root. It runs a script which containsthe following statement: "/reportApp/createReports.sh ^REP_PATH^".
4. The administrator selects New > Job Stream to create the job stream whichcontains the jobs. The job stream is named SC1_RUN_REPORTS and runs onthe relevant workstation.
5. The administrator selects Add to Selected > Run Cycle > Inclusive to definetwo run cycles for the job stream, as follows:a. The run cycle named SC1_WEEKLY_RCY uses the variable table
SC1_WEEKLY_DATA_TABLE, which contains the value for the file path tobe used for generating the weekly report. The run cycle also specifies thatthe job stream is to run once per week on Friday.
b. The run cycle named SC1_MONTHLY_RCY uses the variable tableSC1_MONTHLY_DATA_TABLE, which contains the value for the file pathto be used for generating the monthly report. The run cycle also specifiesthat the job stream is to run once per month on the 27th day.
6. The administrator selects Add to Selected > Add Dependency > File to specifya dependency from the files containing the data used for report generation. Heuses the REP_PATH variable to define the path to the required files.
7. The administrator searches for the job definitions he previously created(SC1_PARSE_DATA SCRIPTNAME, SC1_PROCESS_DATA SCRIPTNAME,SC1_CREATE_REPORTS SCRIPTNAME) and adds them to the job stream.
8. The administrator creates a plan lasting 30 days to generate multiple instancesof the job stream.
As a result, the variable REP_PATH is assigned different values depending on therun cycle that applies. The administrator defines two run cycles, each of whichreferences a specific variable table.
In this way, the job stream instances have a dependency on a different set of filesdepending on the type of report they have to produce, either monthly or weekly,as follows:
142 Tivoli Workload Scheduler: Dynamic Workload Console User’s Guide: Dynamic Workload Console User’s Guide

v The job stream instances that generate the weekly report have a dependency onthe files located in the /reports/weekly directory.
v The job stream instances that generate the monthly report have a dependency onthe files located in the /reports2/monthly directory.
Furthermore, the name of the target directory is correctly replaced in the taskstring of the three jobs run by every job stream instance, as follows:v The jobs run by job stream instances that generate the weekly report run shell
scripts with the directory /reports/weekly as an input argument.v The jobs run by job stream instances that generate the monthly report run shell
scripts with the directory /reports2/monthly as an input argument.
The administrator can therefore define a single job stream with two different runcycles and ensure that the appropriate reports are generated on the correct dateswithout further user intervention.Related concepts:“Job stream” on page 36“Job” on page 36“Variable table” on page 50“Run cycle” on page 39“Dependencies” on page 40Controlling processing using dependenciesRelated tasks:“Designing your Workload” on page 69“Creating job definitions” on page 73“Prerequisite steps to create job types with advanced options” on page 79
Using workload service assurance to monitor z/OS critical jobsz/OS
This scenario shows how an operator can monitor the jobs that are critical for thecustomer business and that must complete by their deadline.
Overview
The operator uses the Tivoli Dynamic Workload Console to meet a Service LevelAgreement (SLA) that requires a DB2 database to be up and running each day by 3p.m., after its backup.
The operator must be informed whether critical jobs risk missing their deadline, totake the appropriate actions if needed. While the plan is running, the operatorexpects that the scheduler dynamically controls the network of submitted jobs,detecting when a critical job predecessor is late, long running, or ended with anerror.
Roles
The scheduling administrator and the operator are involved in this scenario:
Tivoli Workload Scheduler for z/OS scheduling administratorWhen planning the operations, the administrator defines:v Scheduled time, duration, and deadline times.
Chapter 12. Scenarios 143
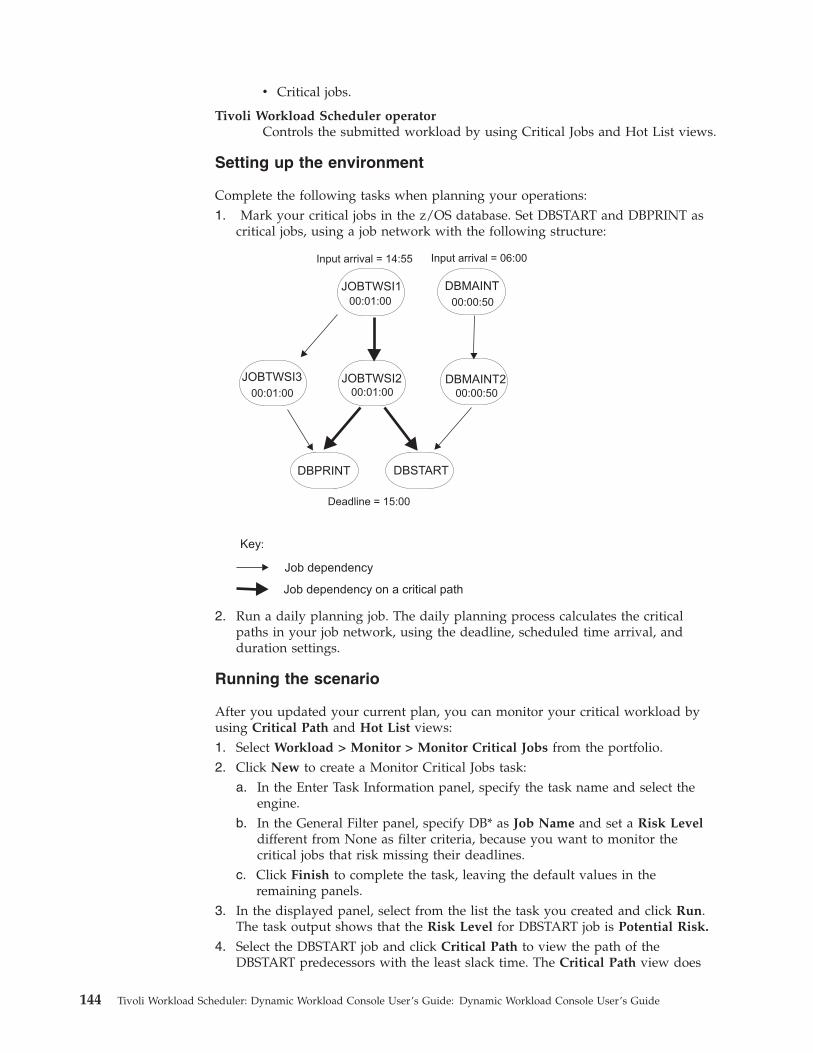
v Critical jobs.
Tivoli Workload Scheduler operatorControls the submitted workload by using Critical Jobs and Hot List views.
Setting up the environment
Complete the following tasks when planning your operations:1. Mark your critical jobs in the z/OS database. Set DBSTART and DBPRINT as
critical jobs, using a job network with the following structure:
2. Run a daily planning job. The daily planning process calculates the criticalpaths in your job network, using the deadline, scheduled time arrival, andduration settings.
Running the scenario
After you updated your current plan, you can monitor your critical workload byusing Critical Path and Hot List views:1. Select Workload > Monitor > Monitor Critical Jobs from the portfolio.2. Click New to create a Monitor Critical Jobs task:
a. In the Enter Task Information panel, specify the task name and select theengine.
b. In the General Filter panel, specify DB* as Job Name and set a Risk Leveldifferent from None as filter criteria, because you want to monitor thecritical jobs that risk missing their deadlines.
c. Click Finish to complete the task, leaving the default values in theremaining panels.
3. In the displayed panel, select from the list the task you created and click Run.The task output shows that the Risk Level for DBSTART job is Potential Risk.
4. Select the DBSTART job and click Critical Path to view the path of theDBSTART predecessors with the least slack time. The Critical Path view does
144 Tivoli Workload Scheduler: Dynamic Workload Console User’s Guide: Dynamic Workload Console User’s Guide
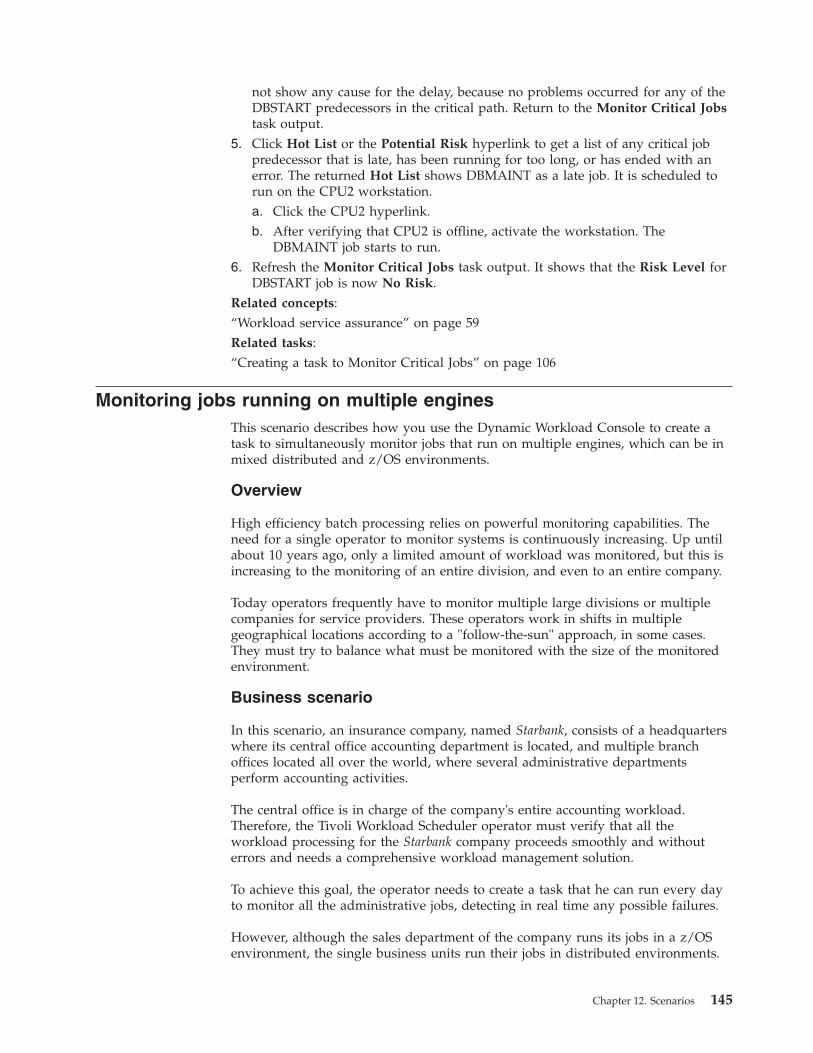
not show any cause for the delay, because no problems occurred for any of theDBSTART predecessors in the critical path. Return to the Monitor Critical Jobstask output.
5. Click Hot List or the Potential Risk hyperlink to get a list of any critical jobpredecessor that is late, has been running for too long, or has ended with anerror. The returned Hot List shows DBMAINT as a late job. It is scheduled torun on the CPU2 workstation.a. Click the CPU2 hyperlink.b. After verifying that CPU2 is offline, activate the workstation. The
DBMAINT job starts to run.6. Refresh the Monitor Critical Jobs task output. It shows that the Risk Level for
DBSTART job is now No Risk.Related concepts:“Workload service assurance” on page 59Related tasks:“Creating a task to Monitor Critical Jobs” on page 106
Monitoring jobs running on multiple enginesThis scenario describes how you use the Dynamic Workload Console to create atask to simultaneously monitor jobs that run on multiple engines, which can be inmixed distributed and z/OS environments.
Overview
High efficiency batch processing relies on powerful monitoring capabilities. Theneed for a single operator to monitor systems is continuously increasing. Up untilabout 10 years ago, only a limited amount of workload was monitored, but this isincreasing to the monitoring of an entire division, and even to an entire company.
Today operators frequently have to monitor multiple large divisions or multiplecompanies for service providers. These operators work in shifts in multiplegeographical locations according to a "follow-the-sun" approach, in some cases.They must try to balance what must be monitored with the size of the monitoredenvironment.
Business scenario
In this scenario, an insurance company, named Starbank, consists of a headquarterswhere its central office accounting department is located, and multiple branchoffices located all over the world, where several administrative departmentsperform accounting activities.
The central office is in charge of the company's entire accounting workload.Therefore, the Tivoli Workload Scheduler operator must verify that all theworkload processing for the Starbank company proceeds smoothly and withouterrors and needs a comprehensive workload management solution.
To achieve this goal, the operator needs to create a task that he can run every dayto monitor all the administrative jobs, detecting in real time any possible failures.
However, although the sales department of the company runs its jobs in a z/OSenvironment, the single business units run their jobs in distributed environments.
Chapter 12. Scenarios 145
The operator needs a single console panel, from which he can control all the jobs,both z/OS and distributed, at the same time.
The operator creates a task to monitor jobs that run on multiple engines, includingboth the environments. He does this by creating and running a task to MonitorJobs on multiple engines.
Creating a Monitor Jobs task for multiple engines
The operator logs in to the Dynamic Workload Console and clicks Tivoli WorkloadScheduler > Quick Start > New Task....
In the Select Task Type panel, under Monitor Tasks on Multiple Engines, theoperator selects Monitor Jobs and clicks Next.
Selecting the engines
In the Enter Task Information panel, the operator specifies a name for the task, forexample AccError, and defines the scheduler engines on which to run the task.
According to a company naming convention policy, all the engine names have aprefix specifying to which department they belong. Therefore, the operatorincludes in the Selected Engines list all the engines named acc_*. The operatorthen organizes the list by importance, placing the engines belonging to the mostcritical company departments (like Finance and Sales) at the beginning of the list, soas to have their results displayed as the first rows of the table. The task runsfollowing the engine sequence, but the results are displayed altogether, only afterthe task has run on all the engines in the list.
146 Tivoli Workload Scheduler: Dynamic Workload Console User’s Guide: Dynamic Workload Console User’s Guide
Defining the filter
In the General Filter panel, the Tivoli Workload Scheduler operator specifies somefiltering criteria to limit the results retrieved by the query. Here he starts refiningthe scope of the query by also considering the amount of information to retrieve.Defining a meaningful filter is very important to avoid unnecessary overhead,considering that the task runs on multiple engines. First, the operator sets theautomatic refresh time to 600 so as to receive the updated monitoring results every600 seconds (10 minutes). He then filters for jobs based on their job streams.According to a company policy, all administrative job streams begin with thecompany name followed by the department code. In our scenario, the operatorlooks for all the job streams whose identifier starts with Starb* that did notcomplete successfully.
Selecting the columns
In the Columns Definition panel, the operator selects the information to display inthe table containing the query results. According to the columns he chooses, thecorresponding information is displayed in the task results table. In our scenario,for all the jobs resulting from the query, the operator wants to see their statuses,the job streams they belong to, when they were scheduled to run, and the engineson which they ran. Then, if more details are necessary, he can drill down into thisinformation displayed in the table of results and navigate it.
Results
In the Create New Task panel, the operator can see the main details about the taskthat he has just created and launch the task immediately. The task is now in the listof saved tasks from where the operator can open and modify it any time. To findthe task from the displayed task lists, he clicks the following options: Workload >Monitor > Monitor Jobs.
The operator has created a task that can be run every day to highlight possiblecritical failure in real time. If there is a failure in any of the administrative jobs runby the selected offices, the operator discovers it no later than 10 minutes after theerror occurs.
Running the Monitor Jobs task for multiple engines
To launch the task, the operator clicks Workload > Monitor > Monitor Jobs.
The operator clicks AccError task to launch it. Because some engine connections donot work correctly, the Checking engine connections panel reports some errors ontwo of the eight engines defined. The failing connections are the Tokyo and Parisoffices. The operator could ignore the failed connections and proceed, running thetask on the successful engines only. However, monitoring the entire workloadrunning in all the branch offices is crucial to his activity, and he does not want toskip any engine connection. Therefore, by clicking Fix it next to each failing engineconnection, the operator opens a dialog where he can enter the credentials requiredfor that engine. After entering the correct credentials, also the remaining engineconnections work successfully and the operator clicks Proceed to run the taskagainst all the engines.
Chapter 12. Scenarios 147
Viewing results and taking corrective actions
Viewing the results of the AccError task, the operator realizes that there is a job inerror, named PayAcc1. He right-clicks the job to open its job log, to betterdetermine the cause and effects of this error.
From the job log, he finds out that only the last step of the job failed, which was adata backup process. This step can be done manually at a later time. The mostimportant part of the job, consisting of the accounting processes related to payrolls,completed successfully.
Now the operator needs to determine the impact that this job in error has on theoverall plan. To do this, he selects the PayAcc1 job and clicks Graphical View >Impact View. From this view, he realizes that this job is a predecessor dependencyof another job, named Balance1. The operator releases the failing job dependency soas to make it possible for the successor Balance1 to start and the whole workloadprocessing to complete.
A second job in error results from the AccError task. It is a z/OS job, named Info.The operator selects this job from the list and right-clicks it to open the OperatorInstructions that give him important information about what to do. According tothe instructions, this is an optional procedure, which can be skipped withoutconsequence for the entire processing. Therefore, the operator right-clicks the joband cancels it.
The operator then refreshes the view to ensure that there are no other jobs in error.
To view connection status information and statistical information about the engines
against which the task was run, the operator clicks the statistical icon on thetable toolbar.
A pie chart showing the number of query results and job status is displayed foreach engine on which the task ran successfully. By clicking the pie sections, he cansee further details. If the task did not run successfully run on one or more engines,he sees a message containing details about the errors.Related tasks:“Creating a task to Monitor Jobs on Multiple Engines” on page 108
148 Tivoli Workload Scheduler: Dynamic Workload Console User’s Guide: Dynamic Workload Console User’s Guide
Chapter 13. Troubleshooting the Dynamic Workload Console
Accessing troubleshooting information.
About this task
You can find information about how to troubleshoot problems with the DynamicWorkload Console, related to connections, performance, user access, reports, andothers at the following link: Tivoli Workload Scheduler Troubleshooting, under thesection about troubleshooting Dynamic Workload Console problems.
Note: If you print PDF publications on other than letter-sized paper, set the optionin the File -> Print window that enables Adobe Reader to print letter-sized pageson your local paper.
© Copyright IBM Corp. 1999, 2012 149

150 Tivoli Workload Scheduler: Dynamic Workload Console User’s Guide: Dynamic Workload Console User’s Guide
Chapter 14. Reference
This section provides some reference information that can be useful to perform themain tasks and activities from the Dynamic Workload Console.
Accessing online publicationsAccessing the Tivoli products online publications in the Tivoli software informationcenter website.
About this task
IBM posts publications for this and all other Tivoli products, as they becomeavailable and whenever they are updated, to the Tivoli software information centerwebsite. Access the Tivoli software information center at the following links:v Tivoli Workload Scheduler Information Center, to access all the publications
related to the Tivoli Workload Scheduler productv Tivoli Workload Scheduler Wiki Media Gallery, to access demos (only available
in English) about how to use the Tivoli Workload Scheduler productv Tivoli Workload Automation wiki, to access information about Tivoli Workload
Scheduler such as best practices, product features, and new tools.
Note: If you print PDF publications on other than letter-sized paper, set the optionin the File -> Print window that enables Adobe Reader to print letter-sized pageson your local paper.
Dynamic Workload Console global settingsRole based customization
The file eWAS/profiles/TIPProfile/registry/TdwcGlobalSettings.xml is organizedinto several sections that group similar properties. Sections can be repeatedmultiple times in the same file and applied differently to different user roles.
To apply a section only to the users belonging to a role, the section must beincluded within the following setting:
settings roleThe user for which the following configuration must be applied. Defaultvalue: all users, unless otherwise specified.
Only one settings section can be specified for each role. If a user has more thanone role, the settings associated to the higher role are taken into consideration.
Example:<settings><graphViews><property name="planViewNewWindow" value="true"/></graphViews></settings><settings role="TWSWEBUIOperator">
© Copyright IBM Corp. 1999, 2012 151
<graphViews><property name="planViewNewWindow" value="false"/></graphViews></settings>
Override graphical view limitsThis section contains the configuration parameters that apply to the graphicalviews in the plan, such as the maximum number of objects shown in each view.
planViewMaxJobstreamsThe maximum number of job streams displayed in the Plan View. Defaultvalue is 1000.
jobstreamViewLimitThe maximum number of objects displayed in the Job Stream View. Defaultvalue is 1000.
impactViewLimitThe maximum number of job streams displayed in the Impact View.Default value is 2000.
<graphViews><property name="planViewMaxJobstreams" value="1000"></property><property name="jobstreamViewLimit" value="1000"></property><property name="impactViewLimit" value="1000"></property></graphViews>
Plan View in new windowThis section is used to prevent Internet Explorer 7 from freezing while using thePlan View. To solve the problem, set value to true.
planViewNewWindowSet it to true if you want the plan view to be displayed in a new windoweach time it is launched. Default value is false.
<graphViews><property name="planViewNewWindow" value="true"/></graphViews>
Disable and customize NewsFeed functionThis section contains the configuration details to be constantly up-to-date withproduct information.
FeedURLContains the URL from which you receive news and updates. Defaultvalue is: https://www.ibm.com/developerworks/community/wikis/form/anonymous/api/wiki/585f5525-a7f5-48ef-9222-50ad582e85f4/page/e599dd3c-8dc3-4ab6-89fd-33f81a994799/attachment/de677e63-5a9d-46db-a010-18ca38f05812/media/tws.jsonp
FeedTypeA string that identifies the format of update information. Default value isJSONP.
PollIntervalThe interval in seconds between two checks for updates. Default value is600.
PollInitialDelayAn initial delay in seconds before the first attempt to read the news feeds.After the initial load, the poll interval is used. Default value is 120.
152 Tivoli Workload Scheduler: Dynamic Workload Console User’s Guide: Dynamic Workload Console User’s Guide
|
||
||||||
|||
|||
|||
NewsFeedProperty used to add further customized news feeds. Specify the formatand address of the file that contains the customized communication.Supported formats are RSS 2.0 and ATOM 1.0.<property name="NewsFeed" type="RSS" value="http://DWC_hostname:portnumber.com/news.rss" />
Note: To specify multiple feeds, you must specify multiple NewsFeedproperties.
Note: You must write the communication in ATOM 1.0 or RSS 2.0 formatand store this file in the an HTTP server complying with the same originpolicy. For browser security reasons, this policy permits to accessinformation only on server using the same protocol, hostname and portnumber as the one to which you are connected. Optionally, if you want tostore your customized feed on an external server, you must configure anHTTP reverse proxy server mapping the external server address.
NewsFeedCategoryThe name of the customized information. It can be used to identifyinformational, warning or alert messages, for example. The path to animage can also be added to better identify the information with an icon.
To add more category images, specify a list of properties namedNewsFeedCategory, for example:<property name="NewsFeedCategory" value="my company info"icon="http://www.my.company.com/info.png" /><property name="NewsFeedCategory" value="my company alert"icon="http://www.my.company.com/alert.png" />
If no customized feed is specified, the default feed is used, which retrieves thelatest product information from official support sites. To disable any notification,comment the entire section. To disable only external notifications about productinformation updates, assign an empty string as value to the FeedURL property ofJSONP feed like:
<property name="FeedURL" type="JSONP" value="" />
Example:<NewsFeed><property name="NewsFeed" type="RSS" value="http://www.DWC_hostname:portnumber.com/my_rss.xml" /><property name="NewsFeed" type="ATOM" value="http://www.DWC_hostname:portnumber.com/my_atom.xml" />
<property name="PollInterval" value="600" /><property name="PollInitialDelay" value="1" />
<property name="FeedURL" type="JSONP" value="" />
<property name="NewsFeedCategory" value="my company info" icon="http://www.DWC_hostname:portnumber.com/info.png" /><property name="NewsFeedCategory" value="my company alert" icon="http://www.DWC_hostname:portnumber.com/alert.png" />
</NewsFeed>
Chapter 14. Reference 153
||||
|
||
|||||||
||||
||
||||
|||||
|
|
|||||||||||||||
Related tasks:“Customizing the list of notification recipients” on page 21How to customize the list of recipients of the news notification beacon, byspecifying who must receive what kind of notification or communication.“Disabling news notification” on page 20How to enable and disable news notification preventing the beacon fromappearing on your screen when an update for the product is made available.“Sending internal communications” on page 22How to use the news feed beacon to transmit internal communications to all orsome Dynamic Workload Console users.
Disable and customize the creation of predefined tasksThis section defines the environment for which predefined tasks are created.
precannedTaskCreationSome predefined tasks are created by default and are available when youlog in to the console. There is a predefined Monitor task for every object,for both z/OS® and distributed engines. Default value is all. To change thissetting, use one of the following values:
all All predefined tasks are created. This is the default.
distributedOnly predefined tasks for distributed engines are created
zos Only predefined tasks for z/OS engines are created
none No predefined task is created.<application><property name="precannedTaskCreation" value="all">/</application>
Add customized URL to job and job streamsThis section contains URLs where you can store customized documentation aboutyour jobs or job streams. By default this setting is not specified. If you want toassociate customized documentation to a job or job stream, use this setting tospecify the external address where this information is located.
If you want to specify a URL to be opened as a documentation for job and jobstream, uncomment the section lines and an action (Open Documentation ) toaccess the relevant documentation becomes available from More Actions menus inMonitor Jobs and Monitor Job Streams tasks as well as in the graphical views inthe plan (in the object's tooltips, context menus and properties) making it possibleto open the documentation while monitoring your job or job stream in the plan.
To change this setting, use one of the following values:
customActionLabelThe name of the action displayed in menus, object properties, and tooltipsto access customized documentation about your jobs or job streams.
jobUrlTemplateThe address of your job documentation. No default value available.
jobstreamUrlTemplateThe address of your job stream documentation. No default value available.
154 Tivoli Workload Scheduler: Dynamic Workload Console User’s Guide: Dynamic Workload Console User’s Guide
|
|||
|||
|||
<twsObjectDoc><property name="jobstreamUrlTemplate"value="http://www.yourhost.com/tws/docs/jobstream/${js_name_w}"/><property name="jobUrlTemplate" value="http://www.yourhost.com/docs/jobs/${job_name_w}"/><property name="customActionLabel" value="Custom Action"/></twsObjectDoc>
These properties must be valid URLs, containing one or more of the variableslisted in the table below.
If you use any of the following special characters in the URL, you must write themas follows:
Table 6. Syntax for special characters
Special characters Write them as...
quote (") \"
apostrophe (') '
ampersand (&) &
less than (<) <
greater than (>) >
backslash (\) \\
Multiple variables can be included in a URL and must be specified using thefollowing syntax: ${variable}:
Table 7. Variables used in the URL definition
Name Object Description
job_number_w Job z/OS The number of the job
job_wkst_w Job The name of the workstationon which the job runs
job_jsname_w Job The name of the job streamthat contains the job
job_jswkst_w Job The name of the workstationon which the job stream runs
job_actualarrival_w Job z/OS The actual start time of thejob (date format:YYYY-MM-DDThh:mm:ss)
job_actualend_w Job z/OS When the job actuallycompleted (date format:YYYY-MM-DDThh:mm:ss)
job_starttime_w Job The start time of the job(date format:YYYY-MM-DDThh:mm:ss)
job_id_w Job The ID of the job
job_returncode_w Job The return code of the job
js_name_w Job stream The name of the job streamthat contains the job
js_wkst_w Job stream The name of the workstationon which the job stream runs
js_id_w Job stream The job stream ID
Chapter 14. Reference 155
Table 7. Variables used in the URL definition (continued)
Name Object Description
js_latest_start_w Job stream The latest time at which ajob stream can start (dateformat: YYYY-MM-DDThh:mm:ss)
engine_name_w Engine The name of the engineconnection
engine_host_w Engine The hostname of the engineconnection
engine_port_w Engine The port number of theengine connection
engine_plan_w Engine The ID of selected plan
engine_serv_w Engine The remote server name ofthe engine connection
User registryUse this section to configure some properties related to the User Registry in use.
groupIdMapThe property is related to the groups of User Registry, and can be modifiedto map and display the specified value of each group. The default is thecommon name of the group.
Examples:<settings><security><property name="groupIdMap" value="cn"></property></security></settings>
Therefore, if you need to change the default value "cn" to "racfid", you can definethis property as follows:<property name="groupIdMap" value="racfid"></property>
z/OS http connectionsUse this section to configure the timeout to read and write information on TivoliWorkload Scheduler for z/OS engine. When you connect to the Tivoli WorkloadScheduler for z/OS engine to retrieve a list of defined objects, you receive an errormessage if the list is not returned within the timeout period. The value isexpressed in milliseconds.
Example:<http><property name="zosHttpTimeout" value="90000" /></http>
Limit the number of objects retrieved by queriesUse this section to limit the number of results of Monitor tasks. This setting appliesto all tasks except for Monitor critical jobs.
If you want to limit the number of results produced by your queries, you canspecify the maximum number of items that must be retrieved.
156 Tivoli Workload Scheduler: Dynamic Workload Console User’s Guide: Dynamic Workload Console User’s Guide
|
||
||
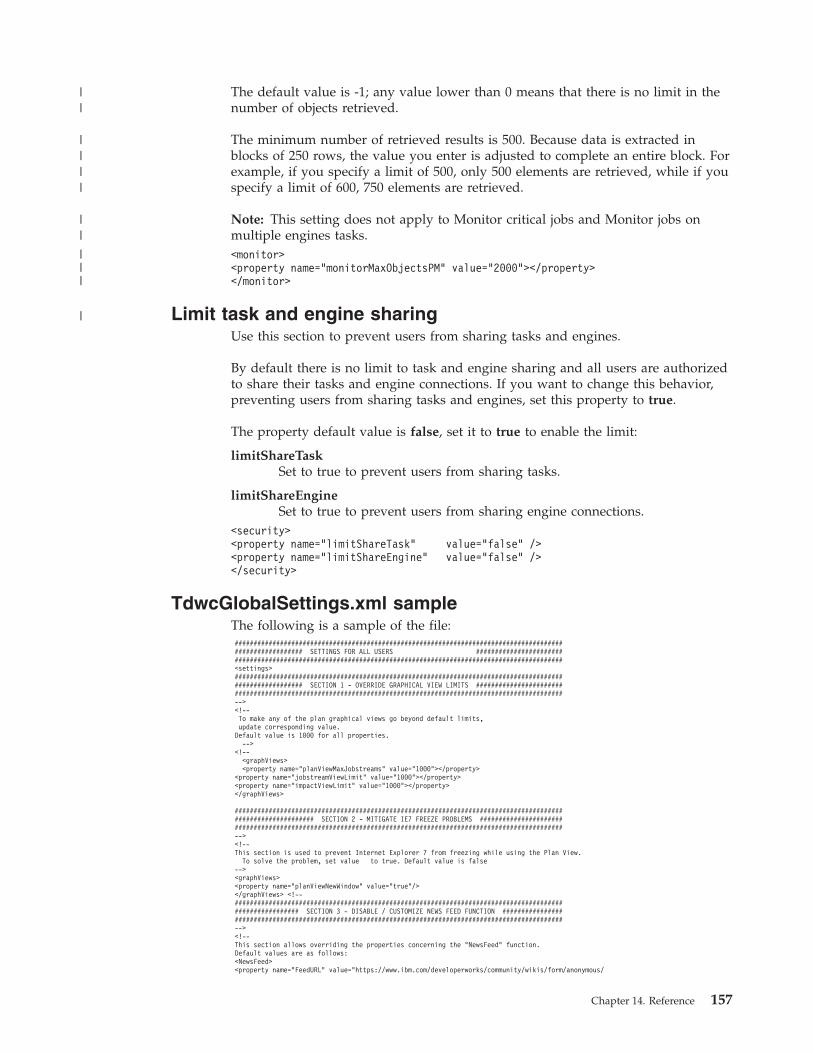
The default value is -1; any value lower than 0 means that there is no limit in thenumber of objects retrieved.
The minimum number of retrieved results is 500. Because data is extracted inblocks of 250 rows, the value you enter is adjusted to complete an entire block. Forexample, if you specify a limit of 500, only 500 elements are retrieved, while if youspecify a limit of 600, 750 elements are retrieved.
Note: This setting does not apply to Monitor critical jobs and Monitor jobs onmultiple engines tasks.<monitor><property name="monitorMaxObjectsPM" value="2000"></property></monitor>
Limit task and engine sharingUse this section to prevent users from sharing tasks and engines.
By default there is no limit to task and engine sharing and all users are authorizedto share their tasks and engine connections. If you want to change this behavior,preventing users from sharing tasks and engines, set this property to true.
The property default value is false, set it to true to enable the limit:
limitShareTaskSet to true to prevent users from sharing tasks.
limitShareEngineSet to true to prevent users from sharing engine connections.
<security><property name="limitShareTask" value="false" /><property name="limitShareEngine" value="false" /></security>
TdwcGlobalSettings.xml sampleThe following is a sample of the file:######################################################################################################### SETTINGS FOR ALL USERS ##############################################################################################################<settings>######################################################################################################### SECTION 1 - OVERRIDE GRAPHICAL VIEW LIMITS ##############################################################################################################--><!--To make any of the plan graphical views go beyond default limits,update corresponding value.
Default value is 1000 for all properties.-->
<!--<graphViews><property name="planViewMaxJobstreams" value="1000"></property>
<property name="jobstreamViewLimit" value="1000"></property><property name="impactViewLimit" value="1000"></property></graphViews>
############################################################################################################ SECTION 2 - MITIGATE IE7 FREEZE PROBLEMS #############################################################################################################--><!--This section is used to prevent Internet Explorer 7 from freezing while using the Plan View.
To solve the problem, set value to true. Default value is false--><graphViews><property name="planViewNewWindow" value="true"/></graphViews> <!--######################################################################################################## SECTION 3 - DISABLE / CUSTOMIZE NEWS FEED FUNCTION #######################################################################################################--><!--This section allows overriding the properties concerning the "NewsFeed" function.Default values are as follows:<NewsFeed><property name="FeedURL" value="https://www.ibm.com/developerworks/community/wikis/form/anonymous/
Chapter 14. Reference 157
||
||||
||
|||
|
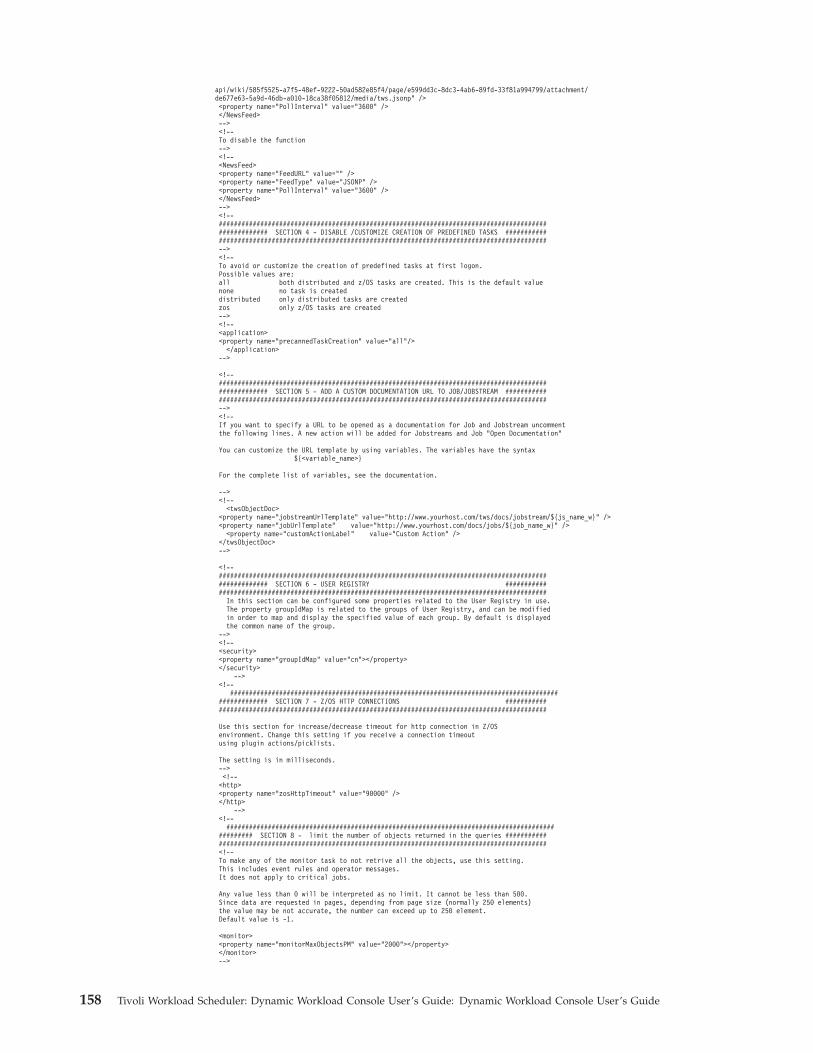
api/wiki/585f5525-a7f5-48ef-9222-50ad582e85f4/page/e599dd3c-8dc3-4ab6-89fd-33f81a994799/attachment/de677e63-5a9d-46db-a010-18ca38f05812/media/tws.jsonp" /><property name="PollInterval" value="3600" /></NewsFeed>--><!--To disable the function--><!--<NewsFeed><property name="FeedURL" value="" /><property name="FeedType" value="JSONP" /><property name="PollInterval" value="3600" /></NewsFeed>--><!--#################################################################################################### SECTION 4 - DISABLE /CUSTOMIZE CREATION OF PREDEFINED TASKS ##################################################################################################--><!--To avoid or customize the creation of predefined tasks at first logon.Possible values are:all both distributed and z/OS tasks are created. This is the default valuenone no task is createddistributed only distributed tasks are createdzos only z/OS tasks are created--><!--<application><property name="precannedTaskCreation" value="all"/>
</application>-->
<!--#################################################################################################### SECTION 5 - ADD A CUSTOM DOCUMENTATION URL TO JOB/JOBSTREAM ##################################################################################################--><!--If you want to specify a URL to be opened as a documentation for Job and Jobstream uncommentthe following lines. A new action will be added for Jobstreams and Job "Open Documentation"
You can customize the URL template by using variables. The variables have the syntax${<variable_name>}
For the complete list of variables, see the documentation.
--><!--
<twsObjectDoc><property name="jobstreamUrlTemplate" value="http://www.yourhost.com/tws/docs/jobstream/${js_name_w}" /><property name="jobUrlTemplate" value="http://www.yourhost.com/docs/jobs/${job_name_w}" />
<property name="customActionLabel" value="Custom Action" /></twsObjectDoc>-->
<!--#################################################################################################### SECTION 6 - USER REGISTRY ##################################################################################################
In this section can be configured some properties related to the User Registry in use.The property groupIdMap is related to the groups of User Registry, and can be modifiedin order to map and display the specified value of each group. By default is displayedthe common name of the group.
--><!--<security><property name="groupIdMap" value="cn"></property></security>
--><!--
#################################################################################################### SECTION 7 - Z/OS HTTP CONNECTIONS ##################################################################################################
Use this section for increase/decrease timeout for http connection in Z/OSenvironment. Change this setting if you receive a connection timeoutusing plugin actions/picklists.
The setting is in milliseconds.--><!--
<http><property name="zosHttpTimeout" value="90000" /></http>
--><!--
################################################################################################ SECTION 8 - limit the number of objects returned in the queries ##################################################################################################<!--To make any of the monitor task to not retrive all the objects, use this setting.This includes event rules and operator messages.It does not apply to critical jobs.
Any value less than 0 will be interpreted as no limit. It cannot be less than 500.Since data are requested in pages, depending from page size (normally 250 elements)the value may be not accurate, the number can exceed up to 250 element.Default value is -1.
<monitor><property name="monitorMaxObjectsPM" value="2000"></property></monitor>-->
158 Tivoli Workload Scheduler: Dynamic Workload Console User’s Guide: Dynamic Workload Console User’s Guide
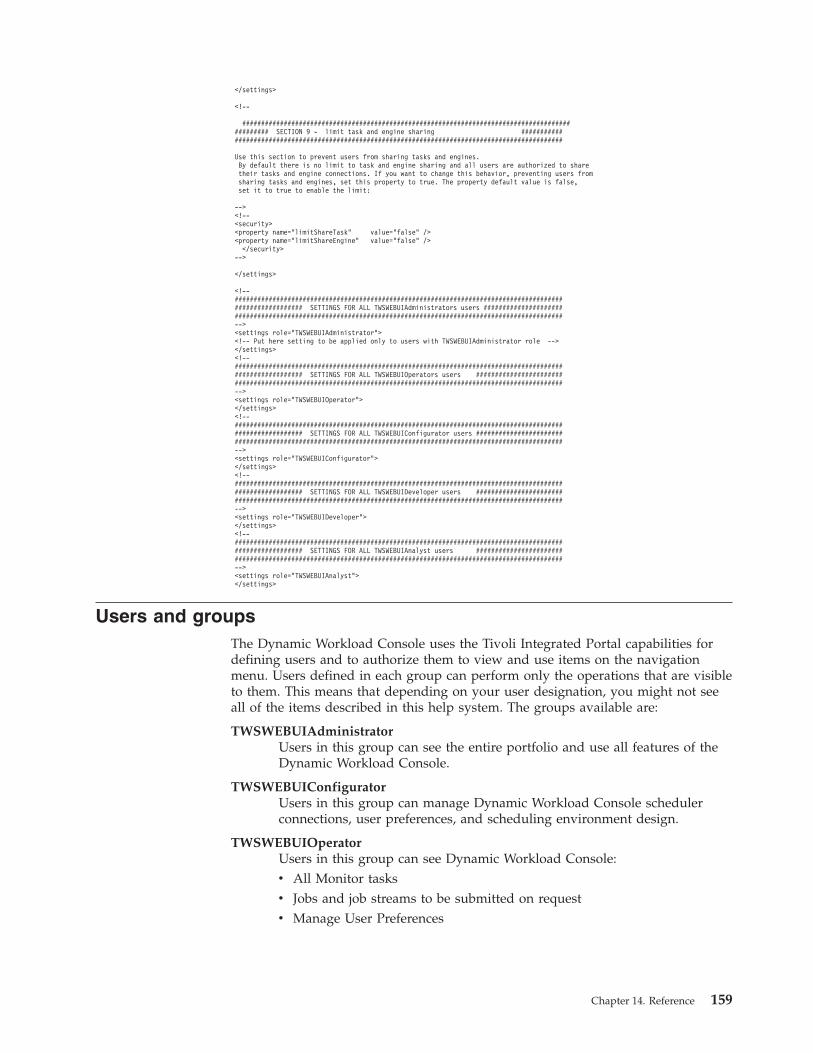
</settings>
<!--
################################################################################################ SECTION 9 - limit task and engine sharing ##################################################################################################
Use this section to prevent users from sharing tasks and engines.By default there is no limit to task and engine sharing and all users are authorized to sharetheir tasks and engine connections. If you want to change this behavior, preventing users fromsharing tasks and engines, set this property to true. The property default value is false,set it to true to enable the limit:
--><!--<security><property name="limitShareTask" value="false" /><property name="limitShareEngine" value="false" />
</security>-->
</settings>
<!--######################################################################################################### SETTINGS FOR ALL TWSWEBUIAdministrators users ############################################################################################################--><settings role="TWSWEBUIAdministrator"><!-- Put here setting to be applied only to users with TWSWEBUIAdministrator role --></settings><!--######################################################################################################### SETTINGS FOR ALL TWSWEBUIOperators users ##############################################################################################################--><settings role="TWSWEBUIOperator"></settings><!--######################################################################################################### SETTINGS FOR ALL TWSWEBUIConfigurator users ##############################################################################################################--><settings role="TWSWEBUIConfigurator"></settings><!--######################################################################################################### SETTINGS FOR ALL TWSWEBUIDeveloper users ##############################################################################################################--><settings role="TWSWEBUIDeveloper"></settings><!--######################################################################################################### SETTINGS FOR ALL TWSWEBUIAnalyst users ##############################################################################################################--><settings role="TWSWEBUIAnalyst"></settings>
Users and groupsThe Dynamic Workload Console uses the Tivoli Integrated Portal capabilities fordefining users and to authorize them to view and use items on the navigationmenu. Users defined in each group can perform only the operations that are visibleto them. This means that depending on your user designation, you might not seeall of the items described in this help system. The groups available are:
TWSWEBUIAdministratorUsers in this group can see the entire portfolio and use all features of theDynamic Workload Console.
TWSWEBUIConfiguratorUsers in this group can manage Dynamic Workload Console schedulerconnections, user preferences, and scheduling environment design.
TWSWEBUIOperatorUsers in this group can see Dynamic Workload Console:v All Monitor tasksv Jobs and job streams to be submitted on requestv Manage User Preferences
Chapter 14. Reference 159
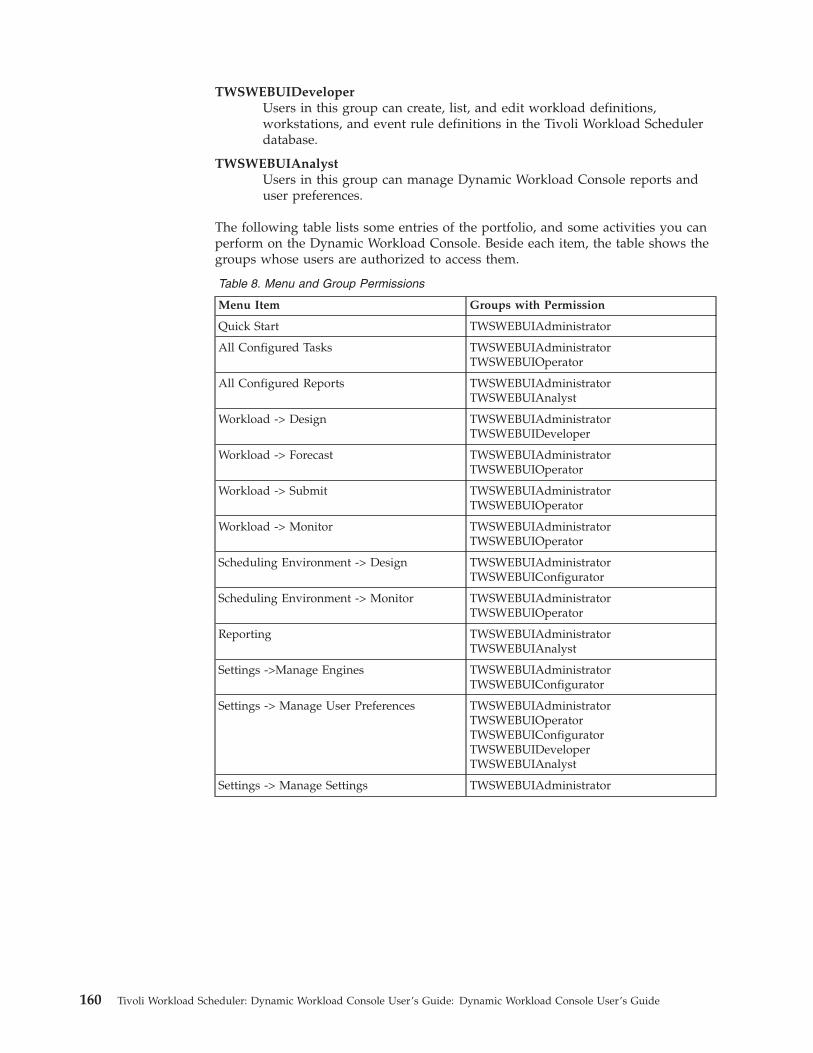
TWSWEBUIDeveloperUsers in this group can create, list, and edit workload definitions,workstations, and event rule definitions in the Tivoli Workload Schedulerdatabase.
TWSWEBUIAnalystUsers in this group can manage Dynamic Workload Console reports anduser preferences.
The following table lists some entries of the portfolio, and some activities you canperform on the Dynamic Workload Console. Beside each item, the table shows thegroups whose users are authorized to access them.
Table 8. Menu and Group Permissions
Menu Item Groups with Permission
Quick Start TWSWEBUIAdministrator
All Configured Tasks TWSWEBUIAdministratorTWSWEBUIOperator
All Configured Reports TWSWEBUIAdministratorTWSWEBUIAnalyst
Workload -> Design TWSWEBUIAdministratorTWSWEBUIDeveloper
Workload -> Forecast TWSWEBUIAdministratorTWSWEBUIOperator
Workload -> Submit TWSWEBUIAdministratorTWSWEBUIOperator
Workload -> Monitor TWSWEBUIAdministratorTWSWEBUIOperator
Scheduling Environment -> Design TWSWEBUIAdministratorTWSWEBUIConfigurator
Scheduling Environment -> Monitor TWSWEBUIAdministratorTWSWEBUIOperator
Reporting TWSWEBUIAdministratorTWSWEBUIAnalyst
Settings ->Manage Engines TWSWEBUIAdministratorTWSWEBUIConfigurator
Settings -> Manage User Preferences TWSWEBUIAdministratorTWSWEBUIOperatorTWSWEBUIConfiguratorTWSWEBUIDeveloperTWSWEBUIAnalyst
Settings -> Manage Settings TWSWEBUIAdministrator
160 Tivoli Workload Scheduler: Dynamic Workload Console User’s Guide: Dynamic Workload Console User’s Guide
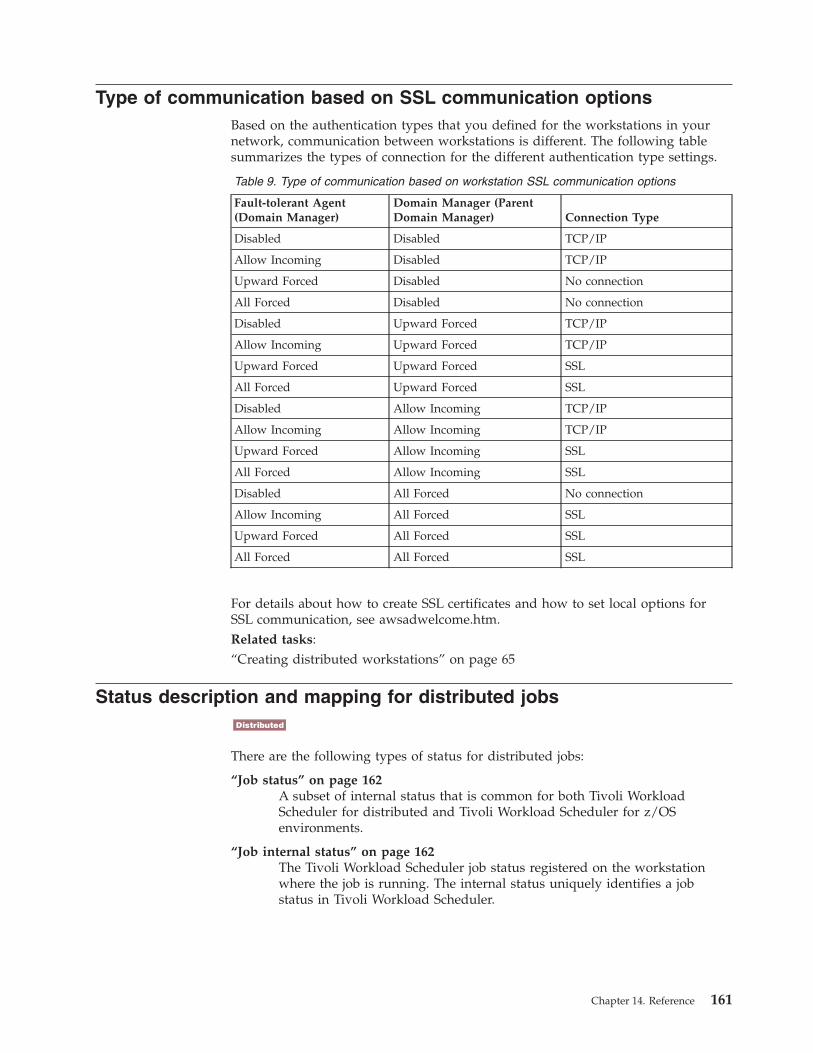
Type of communication based on SSL communication optionsBased on the authentication types that you defined for the workstations in yournetwork, communication between workstations is different. The following tablesummarizes the types of connection for the different authentication type settings.
Table 9. Type of communication based on workstation SSL communication options
Fault-tolerant Agent(Domain Manager)
Domain Manager (ParentDomain Manager) Connection Type
Disabled Disabled TCP/IP
Allow Incoming Disabled TCP/IP
Upward Forced Disabled No connection
All Forced Disabled No connection
Disabled Upward Forced TCP/IP
Allow Incoming Upward Forced TCP/IP
Upward Forced Upward Forced SSL
All Forced Upward Forced SSL
Disabled Allow Incoming TCP/IP
Allow Incoming Allow Incoming TCP/IP
Upward Forced Allow Incoming SSL
All Forced Allow Incoming SSL
Disabled All Forced No connection
Allow Incoming All Forced SSL
Upward Forced All Forced SSL
All Forced All Forced SSL
For details about how to create SSL certificates and how to set local options forSSL communication, see awsadwelcome.htm.Related tasks:“Creating distributed workstations” on page 65
Status description and mapping for distributed jobsDistributed
There are the following types of status for distributed jobs:
“Job status” on page 162A subset of internal status that is common for both Tivoli WorkloadScheduler for distributed and Tivoli Workload Scheduler for z/OSenvironments.
“Job internal status” on page 162The Tivoli Workload Scheduler job status registered on the workstationwhere the job is running. The internal status uniquely identifies a jobstatus in Tivoli Workload Scheduler.
Chapter 14. Reference 161
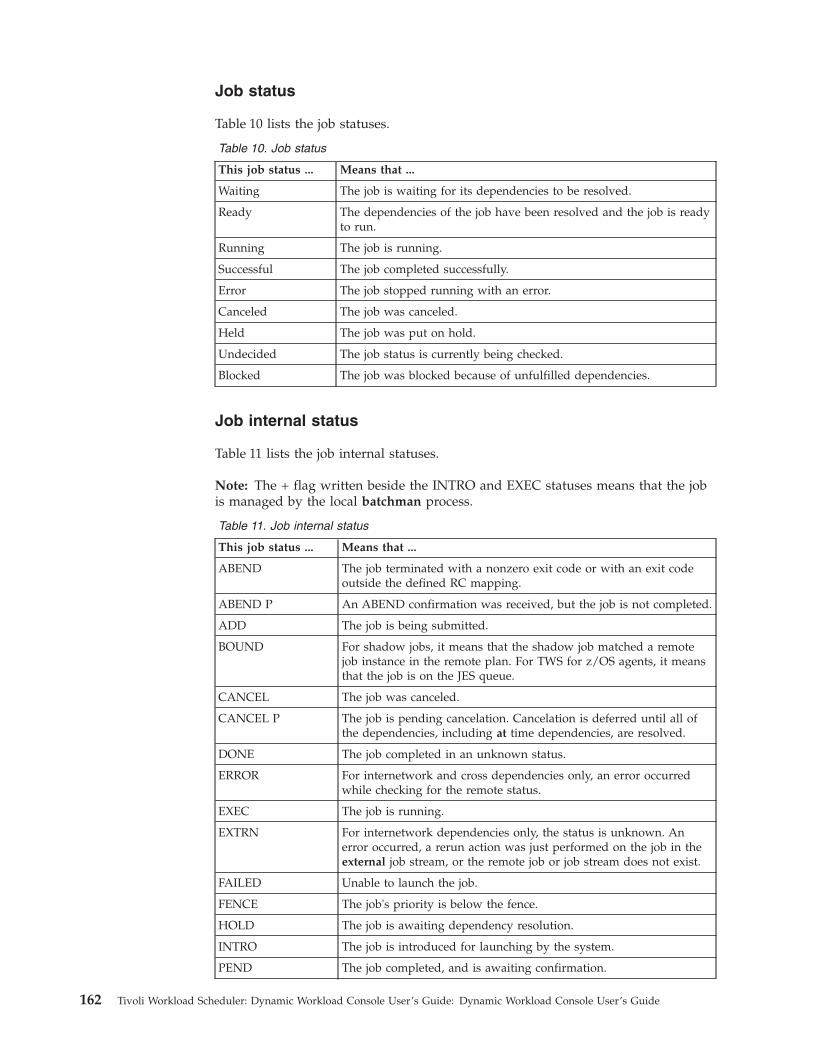
Job status
Table 10 lists the job statuses.
Table 10. Job status
This job status ... Means that ...
Waiting The job is waiting for its dependencies to be resolved.
Ready The dependencies of the job have been resolved and the job is readyto run.
Running The job is running.
Successful The job completed successfully.
Error The job stopped running with an error.
Canceled The job was canceled.
Held The job was put on hold.
Undecided The job status is currently being checked.
Blocked The job was blocked because of unfulfilled dependencies.
Job internal status
Table 11 lists the job internal statuses.
Note: The + flag written beside the INTRO and EXEC statuses means that the jobis managed by the local batchman process.
Table 11. Job internal status
This job status ... Means that ...
ABEND The job terminated with a nonzero exit code or with an exit codeoutside the defined RC mapping.
ABEND P An ABEND confirmation was received, but the job is not completed.
ADD The job is being submitted.
BOUND For shadow jobs, it means that the shadow job matched a remotejob instance in the remote plan. For TWS for z/OS agents, it meansthat the job is on the JES queue.
CANCEL The job was canceled.
CANCEL P The job is pending cancelation. Cancelation is deferred until all ofthe dependencies, including at time dependencies, are resolved.
DONE The job completed in an unknown status.
ERROR For internetwork and cross dependencies only, an error occurredwhile checking for the remote status.
EXEC The job is running.
EXTRN For internetwork dependencies only, the status is unknown. Anerror occurred, a rerun action was just performed on the job in theexternal job stream, or the remote job or job stream does not exist.
FAILED Unable to launch the job.
FENCE The job's priority is below the fence.
HOLD The job is awaiting dependency resolution.
INTRO The job is introduced for launching by the system.
PEND The job completed, and is awaiting confirmation.
162 Tivoli Workload Scheduler: Dynamic Workload Console User’s Guide: Dynamic Workload Console User’s Guide
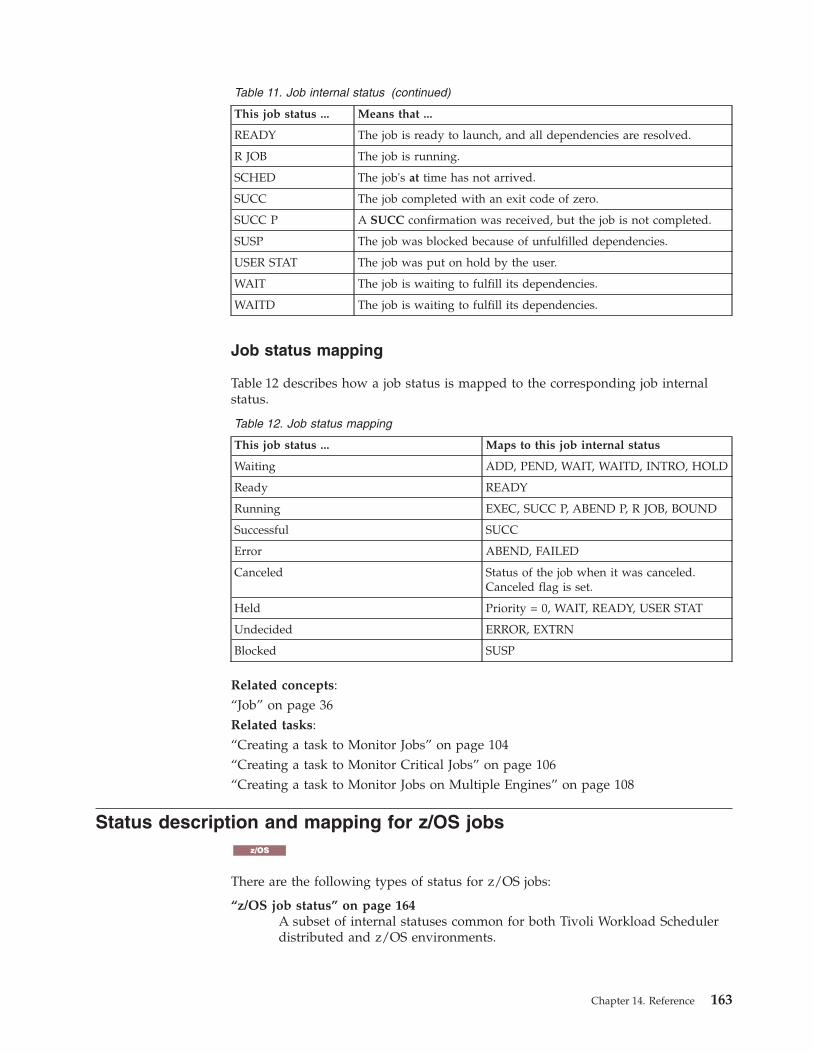
Table 11. Job internal status (continued)
This job status ... Means that ...
READY The job is ready to launch, and all dependencies are resolved.
R JOB The job is running.
SCHED The job's at time has not arrived.
SUCC The job completed with an exit code of zero.
SUCC P A SUCC confirmation was received, but the job is not completed.
SUSP The job was blocked because of unfulfilled dependencies.
USER STAT The job was put on hold by the user.
WAIT The job is waiting to fulfill its dependencies.
WAITD The job is waiting to fulfill its dependencies.
Job status mapping
Table 12 describes how a job status is mapped to the corresponding job internalstatus.
Table 12. Job status mapping
This job status ... Maps to this job internal status
Waiting ADD, PEND, WAIT, WAITD, INTRO, HOLD
Ready READY
Running EXEC, SUCC P, ABEND P, R JOB, BOUND
Successful SUCC
Error ABEND, FAILED
Canceled Status of the job when it was canceled.Canceled flag is set.
Held Priority = 0, WAIT, READY, USER STAT
Undecided ERROR, EXTRN
Blocked SUSP
Related concepts:“Job” on page 36Related tasks:“Creating a task to Monitor Jobs” on page 104“Creating a task to Monitor Critical Jobs” on page 106“Creating a task to Monitor Jobs on Multiple Engines” on page 108
Status description and mapping for z/OS jobsz/OS
There are the following types of status for z/OS jobs:
“z/OS job status” on page 164A subset of internal statuses common for both Tivoli Workload Schedulerdistributed and z/OS environments.
Chapter 14. Reference 163
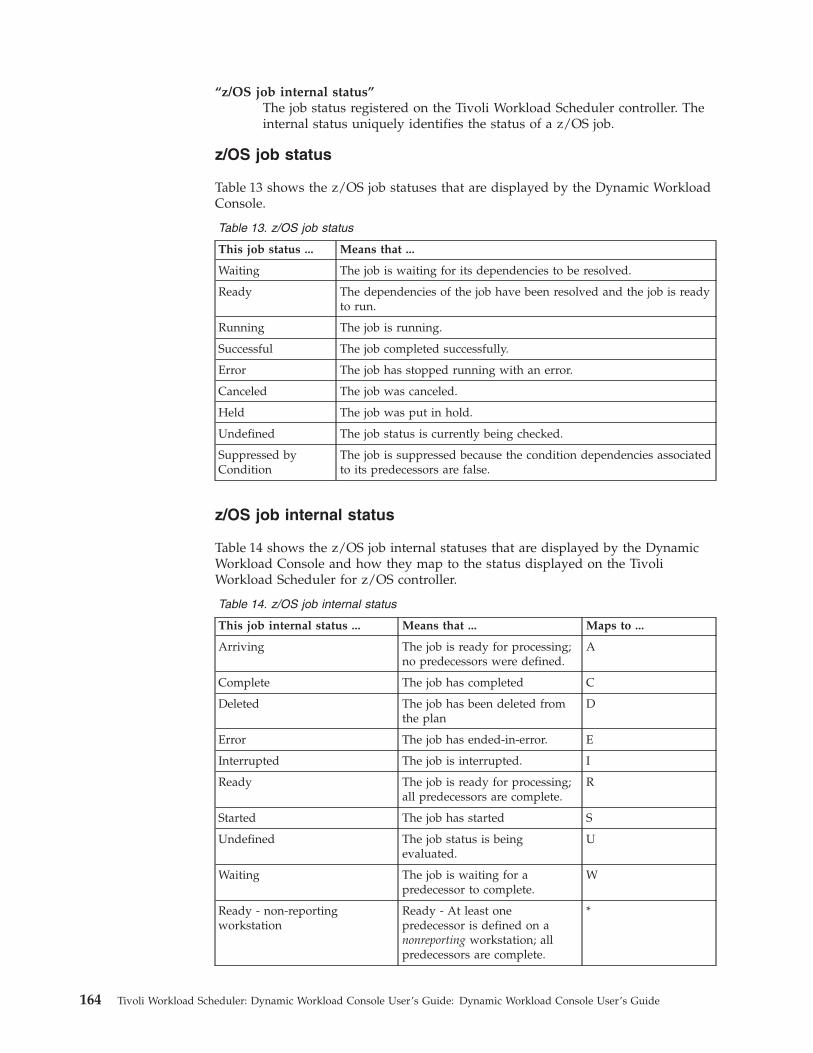
“z/OS job internal status”The job status registered on the Tivoli Workload Scheduler controller. Theinternal status uniquely identifies the status of a z/OS job.
z/OS job status
Table 13 shows the z/OS job statuses that are displayed by the Dynamic WorkloadConsole.
Table 13. z/OS job status
This job status ... Means that ...
Waiting The job is waiting for its dependencies to be resolved.
Ready The dependencies of the job have been resolved and the job is readyto run.
Running The job is running.
Successful The job completed successfully.
Error The job has stopped running with an error.
Canceled The job was canceled.
Held The job was put in hold.
Undefined The job status is currently being checked.
Suppressed byCondition
The job is suppressed because the condition dependencies associatedto its predecessors are false.
z/OS job internal status
Table 14 shows the z/OS job internal statuses that are displayed by the DynamicWorkload Console and how they map to the status displayed on the TivoliWorkload Scheduler for z/OS controller.
Table 14. z/OS job internal status
This job internal status ... Means that ... Maps to ...
Arriving The job is ready for processing;no predecessors were defined.
A
Complete The job has completed C
Deleted The job has been deleted fromthe plan
D
Error The job has ended-in-error. E
Interrupted The job is interrupted. I
Ready The job is ready for processing;all predecessors are complete.
R
Started The job has started S
Undefined The job status is beingevaluated.
U
Waiting The job is waiting for apredecessor to complete.
W
Ready - non-reportingworkstation
Ready - At least onepredecessor is defined on anonreporting workstation; allpredecessors are complete.
*
164 Tivoli Workload Scheduler: Dynamic Workload Console User’s Guide: Dynamic Workload Console User’s Guide
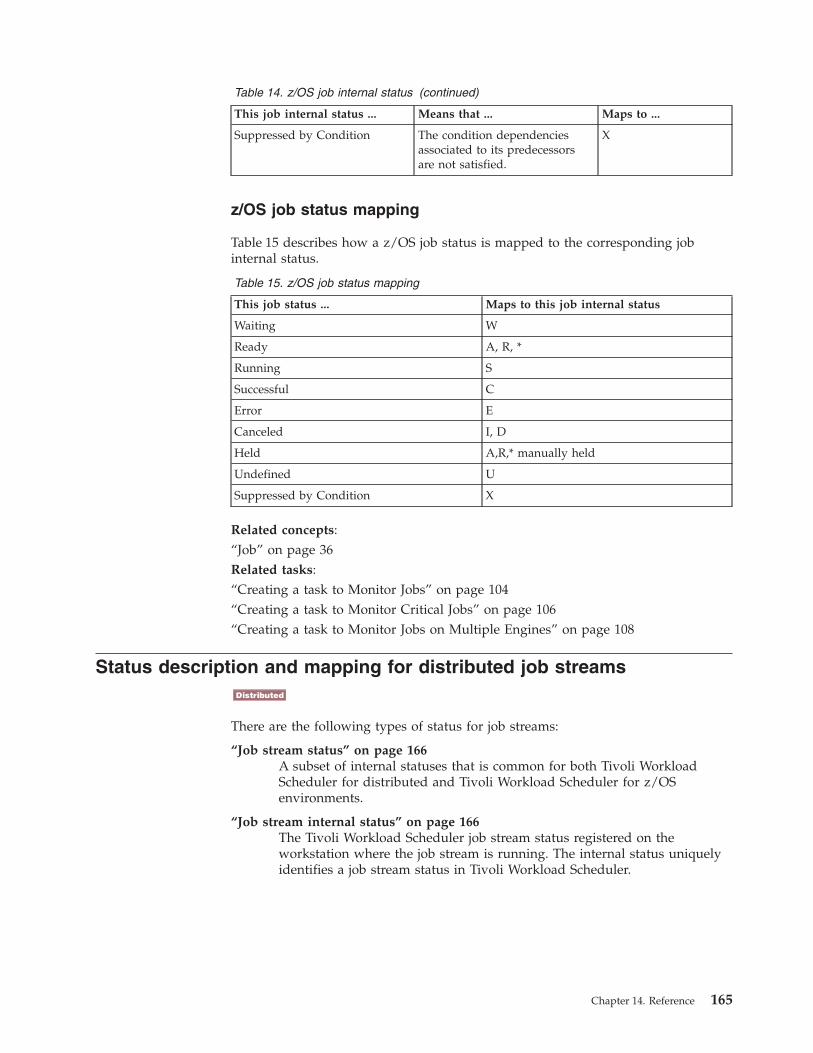
Table 14. z/OS job internal status (continued)
This job internal status ... Means that ... Maps to ...
Suppressed by Condition The condition dependenciesassociated to its predecessorsare not satisfied.
X
z/OS job status mapping
Table 15 describes how a z/OS job status is mapped to the corresponding jobinternal status.
Table 15. z/OS job status mapping
This job status ... Maps to this job internal status
Waiting W
Ready A, R, *
Running S
Successful C
Error E
Canceled I, D
Held A,R,* manually held
Undefined U
Suppressed by Condition X
Related concepts:“Job” on page 36Related tasks:“Creating a task to Monitor Jobs” on page 104“Creating a task to Monitor Critical Jobs” on page 106“Creating a task to Monitor Jobs on Multiple Engines” on page 108
Status description and mapping for distributed job streamsDistributed
There are the following types of status for job streams:
“Job stream status” on page 166A subset of internal statuses that is common for both Tivoli WorkloadScheduler for distributed and Tivoli Workload Scheduler for z/OSenvironments.
“Job stream internal status” on page 166The Tivoli Workload Scheduler job stream status registered on theworkstation where the job stream is running. The internal status uniquelyidentifies a job stream status in Tivoli Workload Scheduler.
Chapter 14. Reference 165

Job stream status
Table 16 lists the job stream statuses.
Table 16. Job stream status
This job streamstatus ... Means that ...
Waiting The job stream is waiting for its dependencies to be resolved.
Ready The dependencies of the job stream have been resolved and the jobstream is ready to run.
Running The job stream is running.
Successful The job stream completed successfully.
Error The job stream has stopped running with an error.
Canceled The job stream was canceled.
Held The job stream was interrupted.
Undefined The job stream status is currently being checked.
Blocked The job stream was blocked because of unfulfilled dependencies.
Job stream internal status
Table 17 lists the job stream internal statuses.
Table 17. Job stream internal status
This job streamstatus ... Means that ...
ABEND The job stream terminated with a nonzero exit code.
ADD The job stream was added with operator intervention.
CANCEL The job stream was canceled.
CANCEL P The job stream is pending cancelation. Cancellation is deferred untilall of the dependencies, including an at time, are resolved.
EXEC The job stream is running.
EXTRN The job stream is in a remote Tivoli Workload Scheduler networkand its status is unknown. An error occurred, a Rerun action wasperformed on the EXTERNAL job stream, or the INET job or jobstream does not exist.
HOLD The job stream is awaiting dependency resolution.
READY The dependencies for the job stream have been met but the timerestrictions for the job stream have not.
STUCK The job stream was interrupted. No jobs are launched withoutoperator intervention.
SUCC The job stream completed with an exit code of zero.
Get Job Status Error This is for internetwork job streams and specifies that an erroroccurred while checking for the remote status.
Job stream status mapping
Table 18 on page 167 describes how a job stream status is mapped to thecorresponding job stream internal status.
166 Tivoli Workload Scheduler: Dynamic Workload Console User’s Guide: Dynamic Workload Console User’s Guide
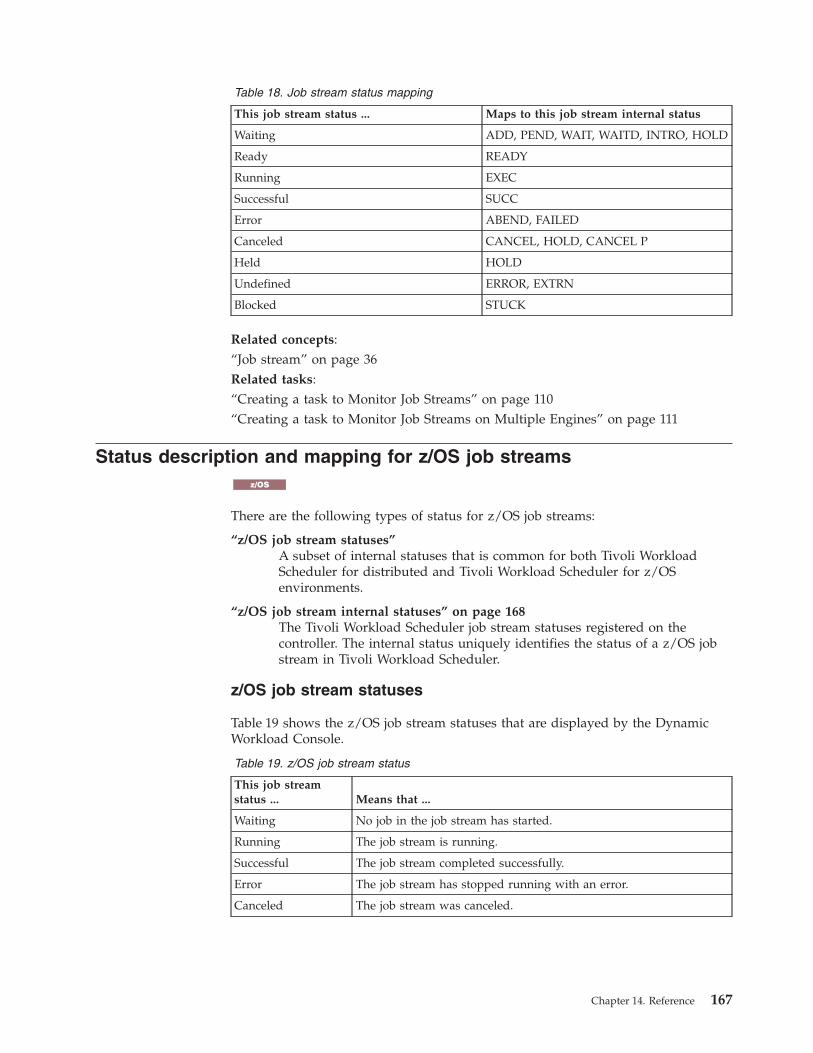
Table 18. Job stream status mapping
This job stream status ... Maps to this job stream internal status
Waiting ADD, PEND, WAIT, WAITD, INTRO, HOLD
Ready READY
Running EXEC
Successful SUCC
Error ABEND, FAILED
Canceled CANCEL, HOLD, CANCEL P
Held HOLD
Undefined ERROR, EXTRN
Blocked STUCK
Related concepts:“Job stream” on page 36Related tasks:“Creating a task to Monitor Job Streams” on page 110“Creating a task to Monitor Job Streams on Multiple Engines” on page 111
Status description and mapping for z/OS job streamsz/OS
There are the following types of status for z/OS job streams:
“z/OS job stream statuses”A subset of internal statuses that is common for both Tivoli WorkloadScheduler for distributed and Tivoli Workload Scheduler for z/OSenvironments.
“z/OS job stream internal statuses” on page 168The Tivoli Workload Scheduler job stream statuses registered on thecontroller. The internal status uniquely identifies the status of a z/OS jobstream in Tivoli Workload Scheduler.
z/OS job stream statuses
Table 19 shows the z/OS job stream statuses that are displayed by the DynamicWorkload Console.
Table 19. z/OS job stream status
This job streamstatus ... Means that ...
Waiting No job in the job stream has started.
Running The job stream is running.
Successful The job stream completed successfully.
Error The job stream has stopped running with an error.
Canceled The job stream was canceled.
Chapter 14. Reference 167
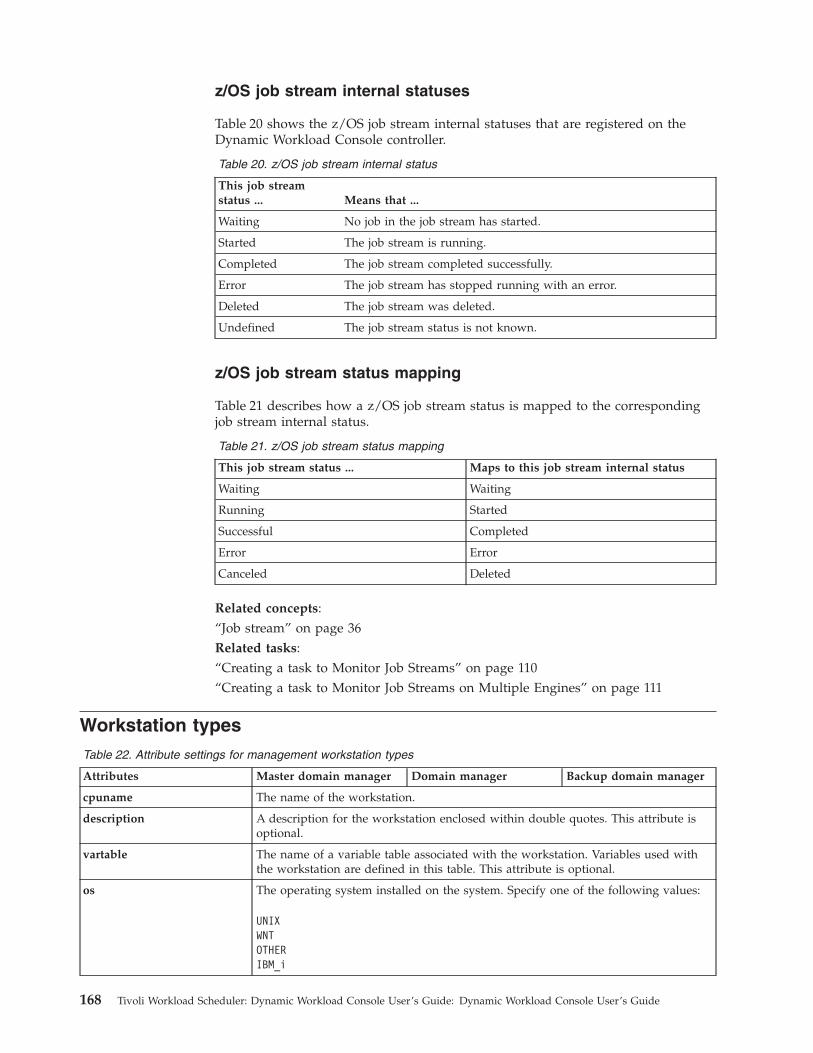
z/OS job stream internal statuses
Table 20 shows the z/OS job stream internal statuses that are registered on theDynamic Workload Console controller.
Table 20. z/OS job stream internal status
This job streamstatus ... Means that ...
Waiting No job in the job stream has started.
Started The job stream is running.
Completed The job stream completed successfully.
Error The job stream has stopped running with an error.
Deleted The job stream was deleted.
Undefined The job stream status is not known.
z/OS job stream status mapping
Table 21 describes how a z/OS job stream status is mapped to the correspondingjob stream internal status.
Table 21. z/OS job stream status mapping
This job stream status ... Maps to this job stream internal status
Waiting Waiting
Running Started
Successful Completed
Error Error
Canceled Deleted
Related concepts:“Job stream” on page 36Related tasks:“Creating a task to Monitor Job Streams” on page 110“Creating a task to Monitor Job Streams on Multiple Engines” on page 111
Workstation typesTable 22. Attribute settings for management workstation types
Attributes Master domain manager Domain manager Backup domain manager
cpuname The name of the workstation.
description A description for the workstation enclosed within double quotes. This attribute isoptional.
vartable The name of a variable table associated with the workstation. Variables used withthe workstation are defined in this table. This attribute is optional.
os The operating system installed on the system. Specify one of the following values:
UNIXWNTOTHERIBM_i
168 Tivoli Workload Scheduler: Dynamic Workload Console User’s Guide: Dynamic Workload Console User’s Guide
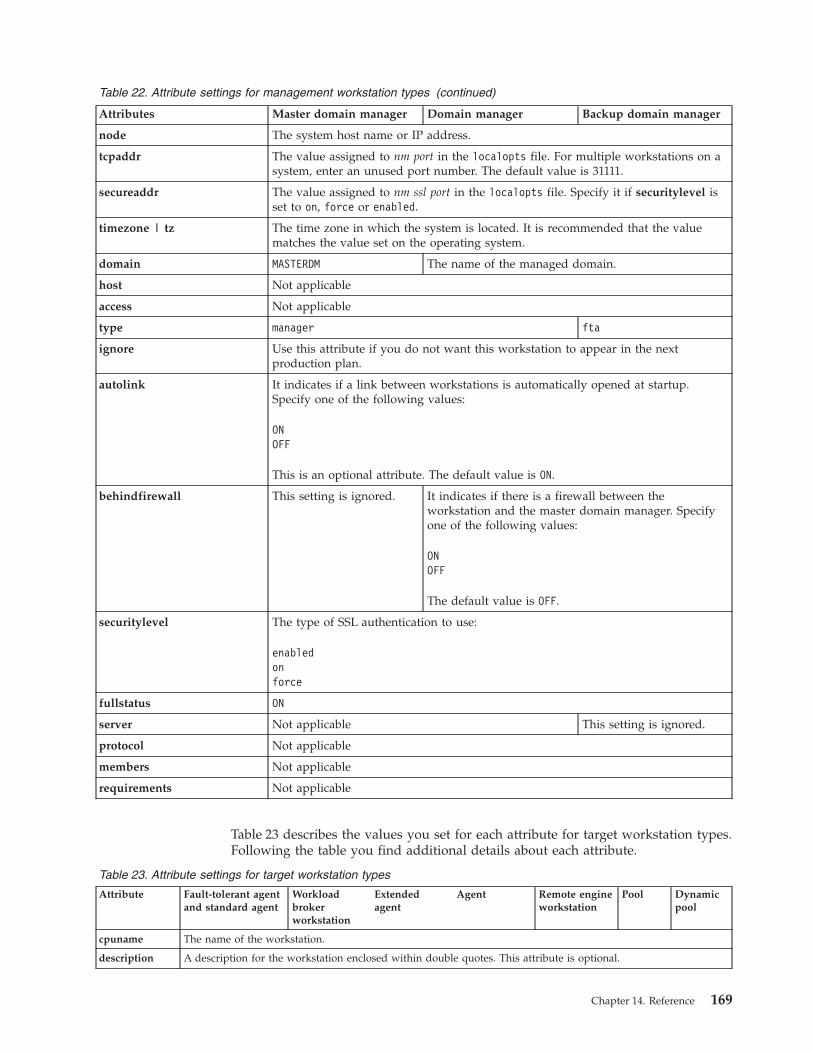
Table 22. Attribute settings for management workstation types (continued)
Attributes Master domain manager Domain manager Backup domain manager
node The system host name or IP address.
tcpaddr The value assigned to nm port in the localopts file. For multiple workstations on asystem, enter an unused port number. The default value is 31111.
secureaddr The value assigned to nm ssl port in the localopts file. Specify it if securitylevel isset to on, force or enabled.
timezone | tz The time zone in which the system is located. It is recommended that the valuematches the value set on the operating system.
domain MASTERDM The name of the managed domain.
host Not applicable
access Not applicable
type manager fta
ignore Use this attribute if you do not want this workstation to appear in the nextproduction plan.
autolink It indicates if a link between workstations is automatically opened at startup.Specify one of the following values:
ONOFF
This is an optional attribute. The default value is ON.
behindfirewall This setting is ignored. It indicates if there is a firewall between theworkstation and the master domain manager. Specifyone of the following values:
ONOFF
The default value is OFF.
securitylevel The type of SSL authentication to use:
enabledonforce
fullstatus ON
server Not applicable This setting is ignored.
protocol Not applicable
members Not applicable
requirements Not applicable
Table 23 describes the values you set for each attribute for target workstation types.Following the table you find additional details about each attribute.
Table 23. Attribute settings for target workstation types
Attribute Fault-tolerant agentand standard agent
Workloadbrokerworkstation
Extendedagent
Agent Remote engineworkstation
Pool Dynamicpool
cpuname The name of the workstation.
description A description for the workstation enclosed within double quotes. This attribute is optional.
Chapter 14. Reference 169
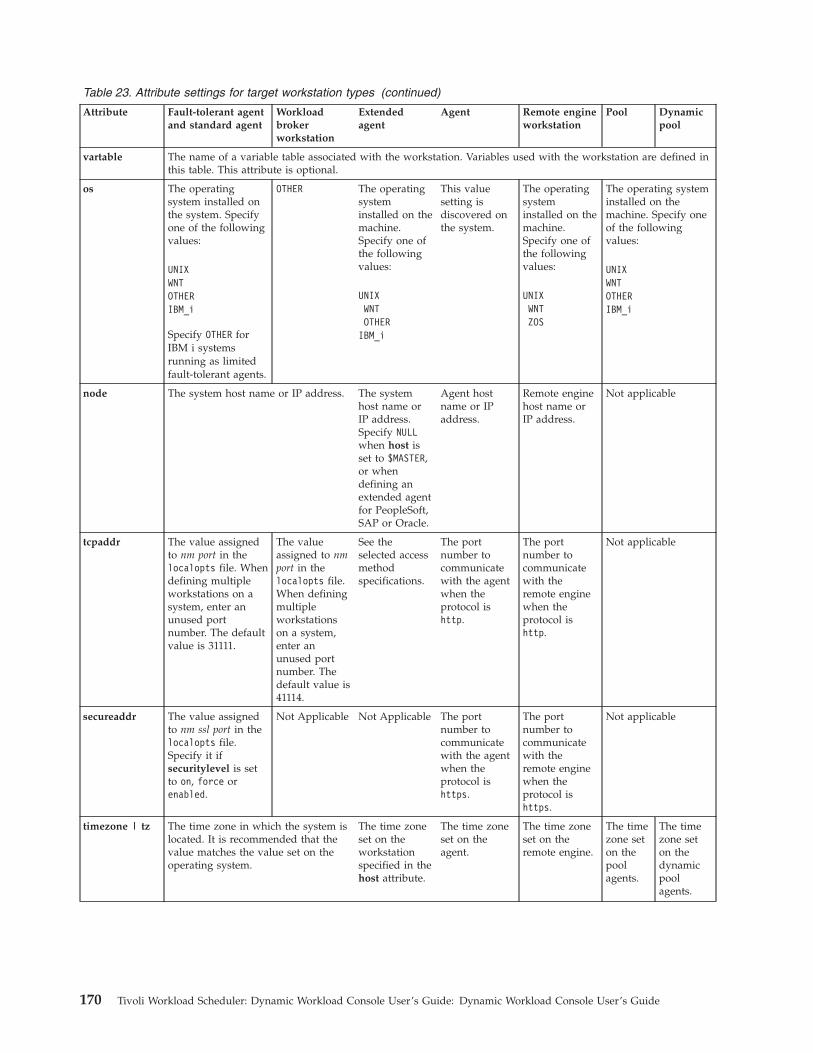
Table 23. Attribute settings for target workstation types (continued)
Attribute Fault-tolerant agentand standard agent
Workloadbrokerworkstation
Extendedagent
Agent Remote engineworkstation
Pool Dynamicpool
vartable The name of a variable table associated with the workstation. Variables used with the workstation are defined inthis table. This attribute is optional.
os The operatingsystem installed onthe system. Specifyone of the followingvalues:
UNIXWNTOTHERIBM_i
Specify OTHER forIBM i systemsrunning as limitedfault-tolerant agents.
OTHER The operatingsysteminstalled on themachine.Specify one ofthe followingvalues:
UNIXWNTOTHER
IBM_i
This valuesetting isdiscovered onthe system.
The operatingsysteminstalled on themachine.Specify one ofthe followingvalues:
UNIXWNTZOS
The operating systeminstalled on themachine. Specify oneof the followingvalues:
UNIXWNTOTHERIBM_i
node The system host name or IP address. The systemhost name orIP address.Specify NULLwhen host isset to $MASTER,or whendefining anextended agentfor PeopleSoft,SAP or Oracle.
Agent hostname or IPaddress.
Remote enginehost name orIP address.
Not applicable
tcpaddr The value assignedto nm port in thelocalopts file. Whendefining multipleworkstations on asystem, enter anunused portnumber. The defaultvalue is 31111.
The valueassigned to nmport in thelocalopts file.When definingmultipleworkstationson a system,enter anunused portnumber. Thedefault value is41114.
See theselected accessmethodspecifications.
The portnumber tocommunicatewith the agentwhen theprotocol ishttp.
The portnumber tocommunicatewith theremote enginewhen theprotocol ishttp.
Not applicable
secureaddr The value assignedto nm ssl port in thelocalopts file.Specify it ifsecuritylevel is setto on, force orenabled.
Not Applicable Not Applicable The portnumber tocommunicatewith the agentwhen theprotocol ishttps.
The portnumber tocommunicatewith theremote enginewhen theprotocol ishttps.
Not applicable
timezone | tz The time zone in which the system islocated. It is recommended that thevalue matches the value set on theoperating system.
The time zoneset on theworkstationspecified in thehost attribute.
The time zoneset on theagent.
The time zoneset on theremote engine.
The timezone seton thepoolagents.
The timezone seton thedynamicpoolagents.
170 Tivoli Workload Scheduler: Dynamic Workload Console User’s Guide: Dynamic Workload Console User’s Guide

Table 23. Attribute settings for target workstation types (continued)
Attribute Fault-tolerant agentand standard agent
Workloadbrokerworkstation
Extendedagent
Agent Remote engineworkstation
Pool Dynamicpool
domain Specify an existingdomain. The defaultvalue forfault-tolerant agentsis MASTERDM. Thissetting is mandatoryfor standard agents.
Specify anexistingdomain. Thissetting ismandatory.
This setting isneeded only ifthe valueassigned tohost is$MANAGER.
Not applicable
host Not Applicable The hostworkstation. Itcan be set to$MASTER or$MANAGER.
The broker workstation.
access Not Applicable Select theappropriateaccess methodfile name.
Not Applicable
agentID The uniqueidentifier ofthe dynamicagent
type ftas-agent
The default value isfta.
Specify fta for IBMi systems running aslimited fault-tolerantagents.
broker x-agent agent rem-eng pool d-pool
ignore Use this attribute if you do not want this workstation to appear in the next production plan.
autolink It indicates if a link betweenworkstations is automatically openedat startup. Specify one of thefollowing values:
ONOFF
This is an optional attribute. Thedefault value is ON.
OFF Not applicable
behindfirewall It indicates if there is a firewallbetween the workstation and themaster domain manager. Specify oneof the following values:
ONOFF
The default value is OFF.
OFF Not applicable
Chapter 14. Reference 171
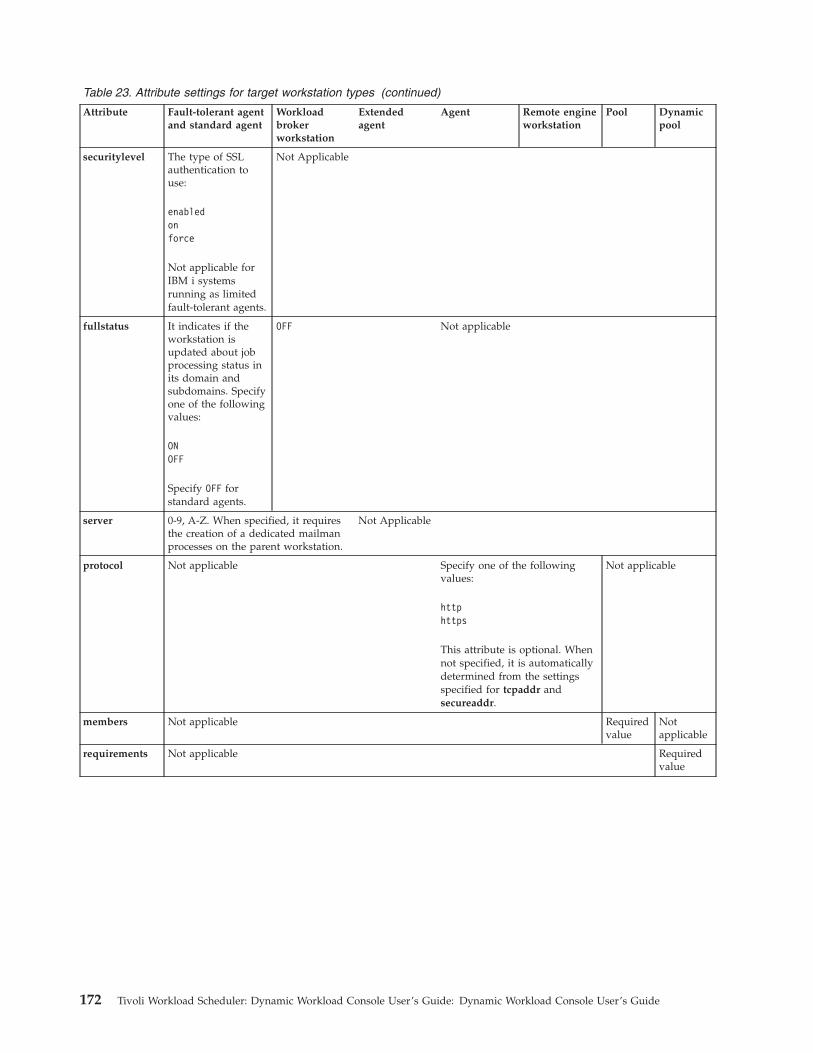
Table 23. Attribute settings for target workstation types (continued)
Attribute Fault-tolerant agentand standard agent
Workloadbrokerworkstation
Extendedagent
Agent Remote engineworkstation
Pool Dynamicpool
securitylevel The type of SSLauthentication touse:
enabledonforce
Not applicable forIBM i systemsrunning as limitedfault-tolerant agents.
Not Applicable
fullstatus It indicates if theworkstation isupdated about jobprocessing status inits domain andsubdomains. Specifyone of the followingvalues:
ONOFF
Specify OFF forstandard agents.
OFF Not applicable
server 0-9, A-Z. When specified, it requiresthe creation of a dedicated mailmanprocesses on the parent workstation.
Not Applicable
protocol Not applicable Specify one of the followingvalues:
httphttps
This attribute is optional. Whennot specified, it is automaticallydetermined from the settingsspecified for tcpaddr andsecureaddr.
Not applicable
members Not applicable Requiredvalue
Notapplicable
requirements Not applicable Requiredvalue
172 Tivoli Workload Scheduler: Dynamic Workload Console User’s Guide: Dynamic Workload Console User’s Guide
Related concepts:“Workstation” on page 29Related tasks:“Creating distributed workstations” on page 65“Creating z/OS workstations” on page 66“Creating z/OS virtual workstations” on page 67“Creating a task to Monitor Workstations” on page 99
Graphical Views in the planYou can use these views to monitor the progress of your job streams in the plan ina graphical map.
You can also take several actions on the objects displayed in the maps. Almost allthe actions and information available in the traditional views resulting fromMonitor tasks are also graphically available from these views.
All the panels provide a toolbar that you can use to act upon the views and theobjects displayed. For more information about the actions available from thetoolbars, see the specific panel help.
The actions that have any effect on the plan require that you click the Refreshbutton before their outcome is displayed. The action is submitted to the engine andthe outcome becomes visible only after the engine has processed it.
By clicking the export icon , you can also export the displayed graphic in aScalable Vector Graphics (SVG) file. With this type of file, vector-based images canbe scaled indefinitely without degrading.
The following graphical views are currently available in the plan:v “Plan View” (available only with Tivoli Workload Scheduler 8.5.1 or higher and
Tivoli Workload Scheduler for z/OS 8.5.1 via z/OS Connector 8.5.1 or higher.)v “Impact View” on page 174v “Job Stream View” on page 175
Plan View
Use this view to get an overall picture of your plan.
This view shows a collapsed plan; it shows only the job streams, hiding any jobsand internal dependencies. External dependencies, both at job and job streamlevels, are shown as arrows between job streams. If a job stream has multipledependencies on another job stream, these are shown as one single arrow.
The following is an example of the view:
Chapter 14. Reference 173

Because potentially a plan can contain a huge number of job streams, by defaultthe Plan View displays a limited number of objects. You can determine which jobstreams to display by specifying filtering criteria in the Show Plan View task.
The maximum number of job streams displayed by the Plan View is 1000.
You can launch this view, in the following way:1. From the portfolio, click: Workload > Monitor > Show Plan View.2. From the list of Show Plan View tasks, click the task you want to run.
From the Plan View, you can modify the filters to show different job streams byclicking the icon, changing filter criteria, and running the task again. Consider thatchanges in the filters apply only to the current view; not to the task definition.
Impact View
This view has similar appearance and available actions to the Job Stream View.
An important difference is that the Impact View allows you to navigate throughthe displayed jobs and job streams, choosing the level of predecessors andsuccessors to display.
You can open this view, in the following ways:v From the table of results of a Monitor Jobs or Monitor Job Streams task, select an
item and select Graphical Views > Impact View.v From a Job Stream View, right-click a job or job stream and select Open >
Impact View. In the new panel the object from which you started the Impactview is centered and highlighted.
v From an Impact View, right-click a job or job stream and select Show > ImpactView. The same panel is refreshed, displaying a new view where the object fromwhich you started the Impact view is centered and highlighted.
174 Tivoli Workload Scheduler: Dynamic Workload Console User’s Guide: Dynamic Workload Console User’s Guide
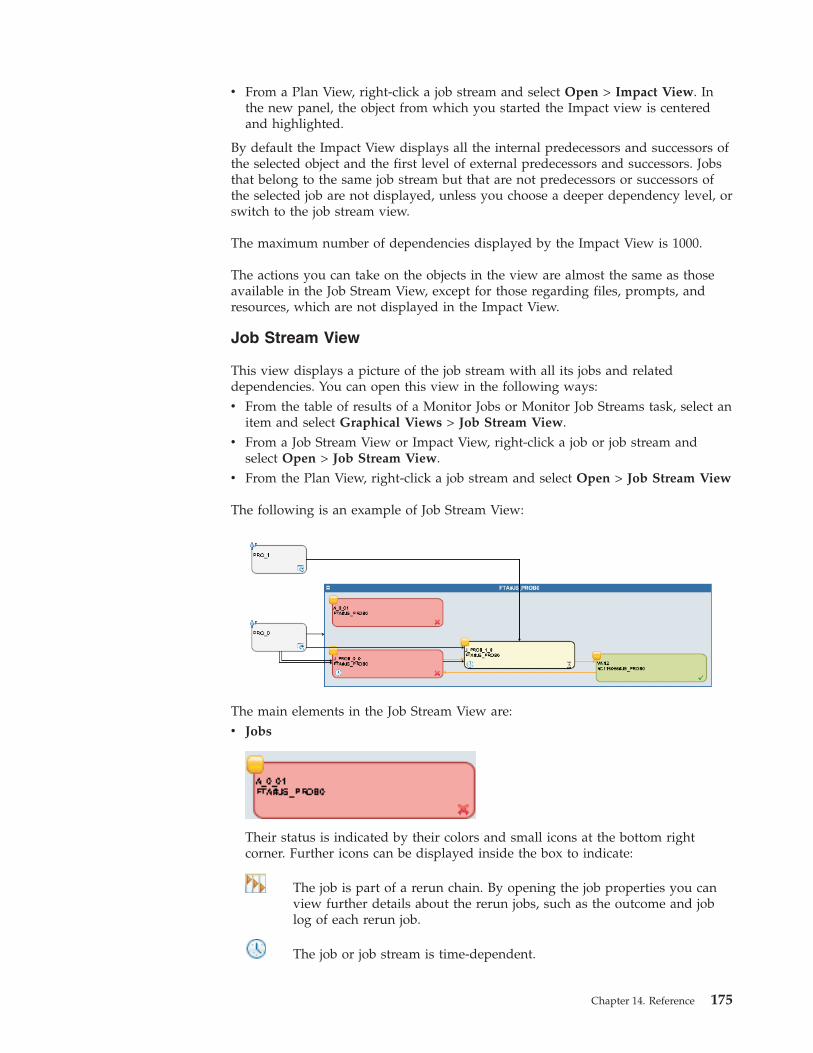
v From a Plan View, right-click a job stream and select Open > Impact View. Inthe new panel, the object from which you started the Impact view is centeredand highlighted.
By default the Impact View displays all the internal predecessors and successors ofthe selected object and the first level of external predecessors and successors. Jobsthat belong to the same job stream but that are not predecessors or successors ofthe selected job are not displayed, unless you choose a deeper dependency level, orswitch to the job stream view.
The maximum number of dependencies displayed by the Impact View is 1000.
The actions you can take on the objects in the view are almost the same as thoseavailable in the Job Stream View, except for those regarding files, prompts, andresources, which are not displayed in the Impact View.
Job Stream View
This view displays a picture of the job stream with all its jobs and relateddependencies. You can open this view in the following ways:v From the table of results of a Monitor Jobs or Monitor Job Streams task, select an
item and select Graphical Views > Job Stream View.v From a Job Stream View or Impact View, right-click a job or job stream and
select Open > Job Stream View.v From the Plan View, right-click a job stream and select Open > Job Stream View
The following is an example of Job Stream View:
The main elements in the Job Stream View are:v Jobs
Their status is indicated by their colors and small icons at the bottom rightcorner. Further icons can be displayed inside the box to indicate:
The job is part of a rerun chain. By opening the job properties you canview further details about the rerun jobs, such as the outcome and joblog of each rerun job.
The job or job stream is time-dependent.
Chapter 14. Reference 175
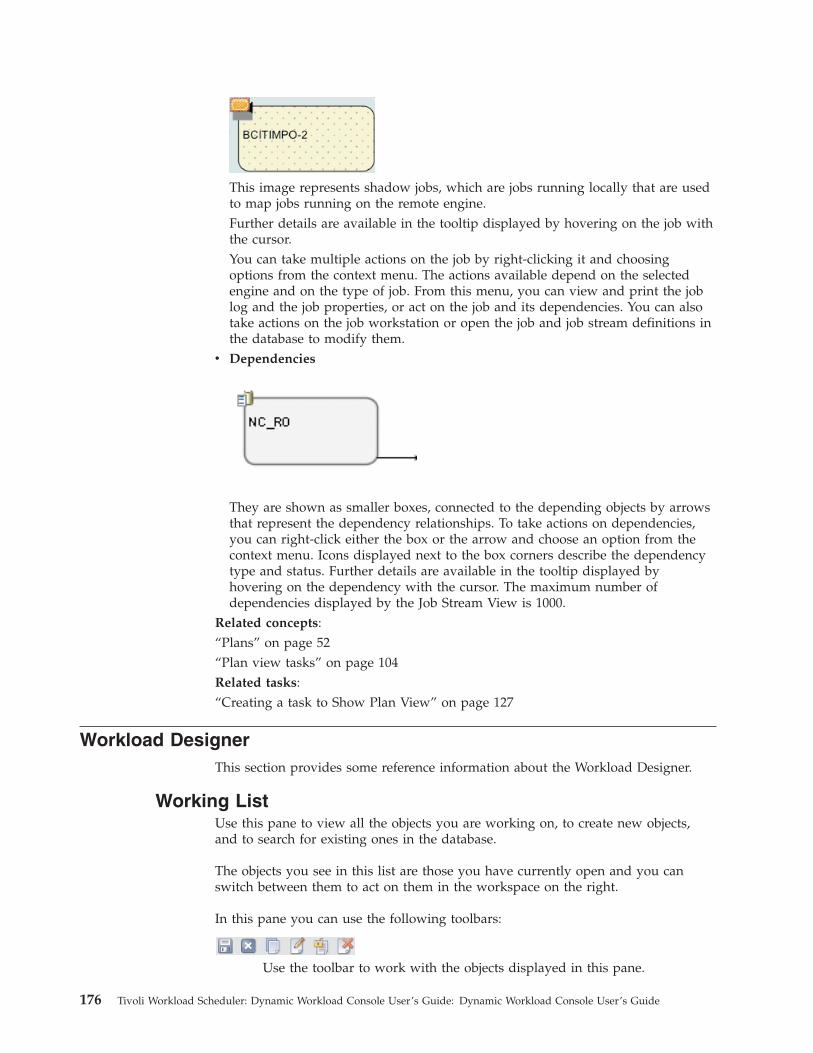
This image represents shadow jobs, which are jobs running locally that are usedto map jobs running on the remote engine.Further details are available in the tooltip displayed by hovering on the job withthe cursor.You can take multiple actions on the job by right-clicking it and choosingoptions from the context menu. The actions available depend on the selectedengine and on the type of job. From this menu, you can view and print the joblog and the job properties, or act on the job and its dependencies. You can alsotake actions on the job workstation or open the job and job stream definitions inthe database to modify them.
v Dependencies
They are shown as smaller boxes, connected to the depending objects by arrowsthat represent the dependency relationships. To take actions on dependencies,you can right-click either the box or the arrow and choose an option from thecontext menu. Icons displayed next to the box corners describe the dependencytype and status. Further details are available in the tooltip displayed byhovering on the dependency with the cursor. The maximum number ofdependencies displayed by the Job Stream View is 1000.
Related concepts:“Plans” on page 52“Plan view tasks” on page 104Related tasks:“Creating a task to Show Plan View” on page 127
Workload DesignerThis section provides some reference information about the Workload Designer.
Working ListUse this pane to view all the objects you are working on, to create new objects,and to search for existing ones in the database.
The objects you see in this list are those you have currently open and you canswitch between them to act on them in the workspace on the right.
In this pane you can use the following toolbars:
Use the toolbar to work with the objects displayed in this pane.
176 Tivoli Workload Scheduler: Dynamic Workload Console User’s Guide: Dynamic Workload Console User’s Guide

Use the toolbar to select or clear all the objects displayed in the list or tocollapse and expand the list.
The object highlighted in the list is open in the workspace on the right, where youcan edit it.
The object open in the workspace on the right is displayed in bold in this list.
The objects in the list can be marked by the following icons: The objects in the listcan be marked by the following icons:
The object is open in edit mode.
The object has pending changes that must still be saved. Click the Saveicon to commit the changes to the database.
The object is incorrect or incomplete and cannot be saved until all errors arefixed.
The object is currently being loaded. It cannot be edited until the loadingcompletes.
If you close an object, it is removed from the working list. If it was locked, byclosing it you also unlock it.Related tasks:“Designing your Workload” on page 69“Editing objects from the Working List View” on page 70
Quick OpenUse this pane to rapidly open objects from the database.
To create dependencies as well as to add jobs to a job stream, you can drag one ormore of the objects contained in the Quick Open pane and drop them in theDetails pane or Graphical View in the workspace on the right.
Each of the following icons represents an object category. Click the iconcorresponding to the object type that you want to open. Distributed
Job Definition
Remote SAP Standard R/3 Job
Job Stream
Prompt
Resource
User
Calendar
Workstation Class
Chapter 14. Reference 177
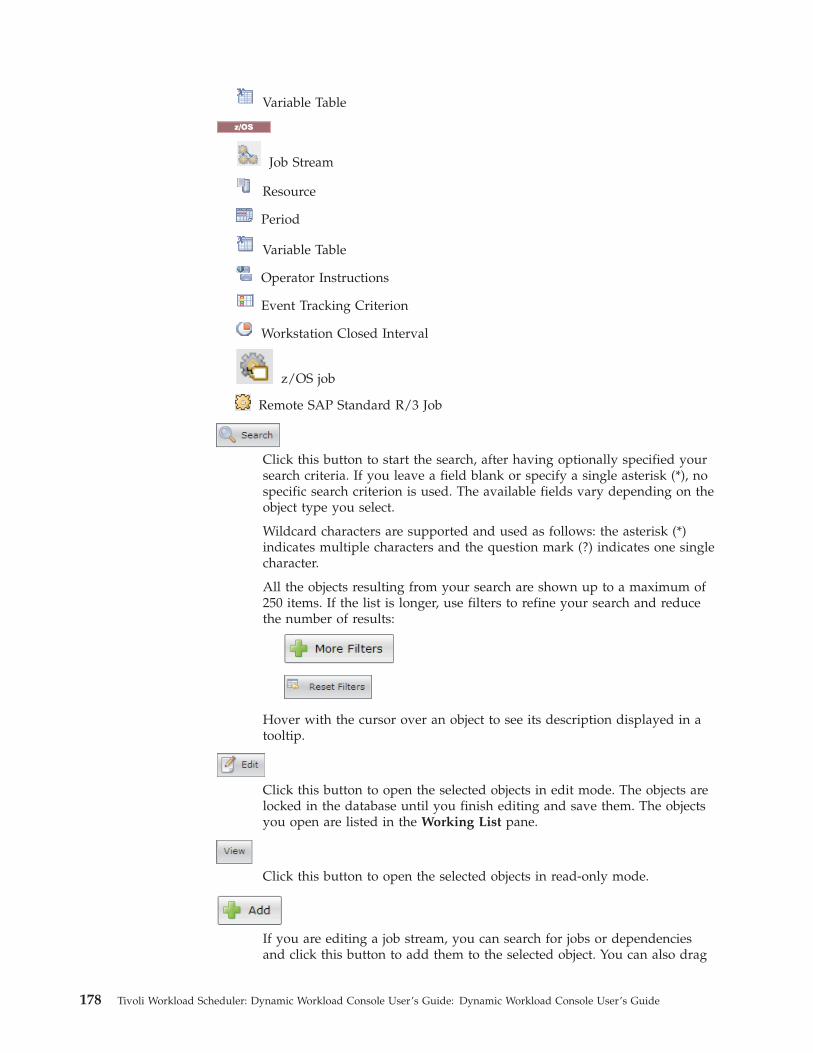
Variable Table
z/OS
Job Stream
Resource
Period
Variable Table
Operator Instructions
Event Tracking Criterion
Workstation Closed Interval
z/OS job
Remote SAP Standard R/3 Job
Click this button to start the search, after having optionally specified yoursearch criteria. If you leave a field blank or specify a single asterisk (*), nospecific search criterion is used. The available fields vary depending on theobject type you select.
Wildcard characters are supported and used as follows: the asterisk (*)indicates multiple characters and the question mark (?) indicates one singlecharacter.
All the objects resulting from your search are shown up to a maximum of250 items. If the list is longer, use filters to refine your search and reducethe number of results:
Hover with the cursor over an object to see its description displayed in atooltip.
Click this button to open the selected objects in edit mode. The objects arelocked in the database until you finish editing and save them. The objectsyou open are listed in the Working List pane.
Click this button to open the selected objects in read-only mode.
If you are editing a job stream, you can search for jobs or dependenciesand click this button to add them to the selected object. You can also drag
178 Tivoli Workload Scheduler: Dynamic Workload Console User’s Guide: Dynamic Workload Console User’s Guide
the objects contained in the Quick Open pane and drop them in theDetails pane or Graphical View to create dependencies and to add jobs tothe job stream.
Related tasks:“Designing your Workload” on page 69“Editing objects from the Quick Open View” on page 71
Details viewUse this view to create, display, and modify job streams, and to add jobs, runcycles, and dependencies to them. It shows the job stream with all the jobs itcontains, associated dependencies, and run cycles.
This view displays the structure of the objects in a tree table. It applies toDistributed job streams
z/OS job streams and resources.
z/OS It also shows the resource availability intervals. Use the view also tocreate, display, and modify resources, and to add availability intervals to them.
You can drag objects from the Quick Open section and drop them in these panesto:v Add jobs to the job stream.v Add external dependencies to the job stream and its jobs.
For example, you can:v Drag a job definition and drop it into a job stream to add a new job to the job
stream.v Drag a job definition and drop it outside a job stream to create a job stream
external dependency.v Drag a job definition and drop it over a job in the job stream to create a job
external dependency.v Drag a resource, prompt, or job stream and drop it over a job or job stream to
create an external dependency.
In this view you can use the following toolbar, icons, and buttons:
All the actions available using the icons of the toolbar act on the root objectof the tree table.
Use this button to print the contents of the tree in text format for jobstreams. Click the button to open a new page containing the information inthe tree table for the job stream you are viewing. The output is organizedin columns. For all job streams, the object properties shown are Name,Type, and Workstation.
z/OS For z/OS job streams, also Task Type and Owner are shown.
This icon is located at the end of each row and in the objects pop-upmenu. Click it to remove the corresponding object from the tree table. Useit, for example, to remove a job from a job stream or a dependency from ajob. The removal becomes effective only when you save the object.
Chapter 14. Reference 179
Use this button to act on objects located at inner levels. Select the object inthe tree table and open the menu, or use the context menu byright-clicking the object. This button is enabled only if the operation isavailable for the selected object.
Some of the actions available from the action menus are:
Add Objects Selected in Working ListAdd all the objects currently selected in the Working List. The objects areadded as part of the flow or as dependencies. For example, adding a jobdefinition to a job stream adds it to the job stream flow, while adding aprompt adds it as a dependency.
Add objectAdd any specific object listed in the option.
Open Job DefinitionOpen the definition of the job to display its properties as they are definedin the database.
Copy Copy the object and keep it in memory until you either copy anotherobject or close the Workload Designer window. You can only copy a jobstream if it already exists in the database (that is, it must have been savedat least once). You can also copy dependencies, except for internal jobdependencies.
Paste as DependencyPaste the object previously copied as a dependency of the selected one. Thecopied object can be a job, a job stream, or any kind of dependency. Youcan only paste source objects that already exist in the database.
You can paste a job stream as:v External job stream dependency of the same or of another job streamv External job stream dependency of a job in the same or in another job
stream
You can paste a job as:v External job dependency of itself or of the job stream it belongs tov Internal job dependency of another job in the same job streamv External job dependency of another job stream or job in another job
stream
The object selected in the tree table is highlighted in light blue and is displayed inbold in the Working List. When you select an object in the tree table, its propertiesare displayed in the lower pane, where you can view and edit them, if you areauthorized to do so.Related tasks:“Designing your Workload” on page 69“Editing objects from the Details View” on page 72
Graphical ViewThis view shows the job stream with all the jobs it contains and their associateddependencies. When you select an object in the graphical view, the objectproperties are displayed at the bottom of the properties pane.
180 Tivoli Workload Scheduler: Dynamic Workload Console User’s Guide: Dynamic Workload Console User’s Guide
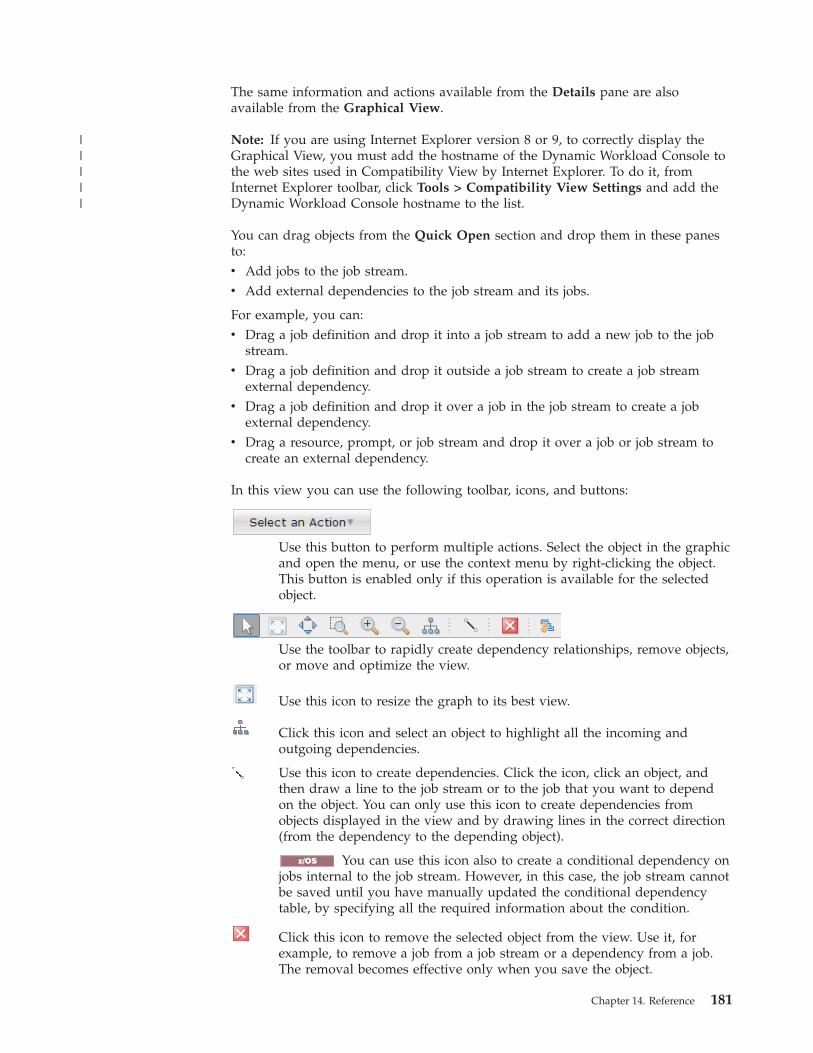
The same information and actions available from the Details pane are alsoavailable from the Graphical View.
Note: If you are using Internet Explorer version 8 or 9, to correctly display theGraphical View, you must add the hostname of the Dynamic Workload Console tothe web sites used in Compatibility View by Internet Explorer. To do it, fromInternet Explorer toolbar, click Tools > Compatibility View Settings and add theDynamic Workload Console hostname to the list.
You can drag objects from the Quick Open section and drop them in these panesto:v Add jobs to the job stream.v Add external dependencies to the job stream and its jobs.
For example, you can:v Drag a job definition and drop it into a job stream to add a new job to the job
stream.v Drag a job definition and drop it outside a job stream to create a job stream
external dependency.v Drag a job definition and drop it over a job in the job stream to create a job
external dependency.v Drag a resource, prompt, or job stream and drop it over a job or job stream to
create an external dependency.
In this view you can use the following toolbar, icons, and buttons:
Use this button to perform multiple actions. Select the object in the graphicand open the menu, or use the context menu by right-clicking the object.This button is enabled only if this operation is available for the selectedobject.
Use the toolbar to rapidly create dependency relationships, remove objects,or move and optimize the view.
Use this icon to resize the graph to its best view.
Click this icon and select an object to highlight all the incoming andoutgoing dependencies.
Use this icon to create dependencies. Click the icon, click an object, andthen draw a line to the job stream or to the job that you want to dependon the object. You can only use this icon to create dependencies fromobjects displayed in the view and by drawing lines in the correct direction(from the dependency to the depending object).
z/OS You can use this icon also to create a conditional dependency onjobs internal to the job stream. However, in this case, the job stream cannotbe saved until you have manually updated the conditional dependencytable, by specifying all the required information about the condition.
Click this icon to remove the selected object from the view. Use it, forexample, to remove a job from a job stream or a dependency from a job.The removal becomes effective only when you save the object.
Chapter 14. Reference 181
|||||
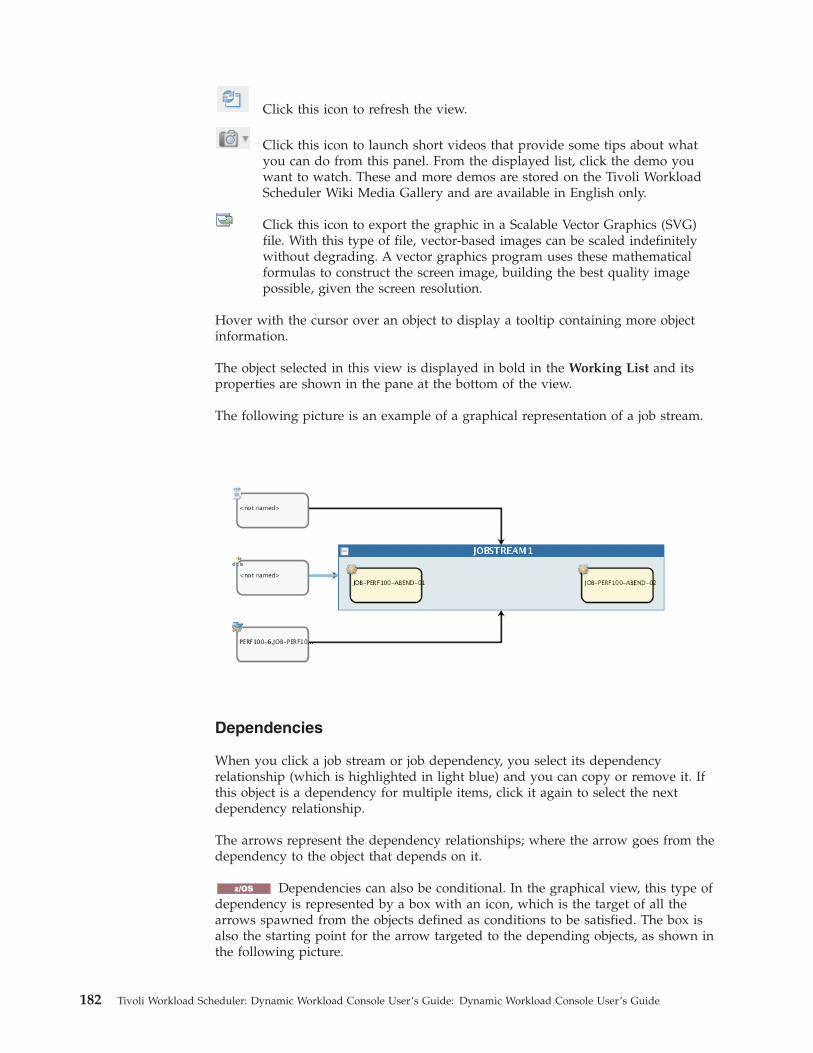
Click this icon to refresh the view.
Click this icon to launch short videos that provide some tips about whatyou can do from this panel. From the displayed list, click the demo youwant to watch. These and more demos are stored on the Tivoli WorkloadScheduler Wiki Media Gallery and are available in English only.
Click this icon to export the graphic in a Scalable Vector Graphics (SVG)file. With this type of file, vector-based images can be scaled indefinitelywithout degrading. A vector graphics program uses these mathematicalformulas to construct the screen image, building the best quality imagepossible, given the screen resolution.
Hover with the cursor over an object to display a tooltip containing more objectinformation.
The object selected in this view is displayed in bold in the Working List and itsproperties are shown in the pane at the bottom of the view.
The following picture is an example of a graphical representation of a job stream.
Dependencies
When you click a job stream or job dependency, you select its dependencyrelationship (which is highlighted in light blue) and you can copy or remove it. Ifthis object is a dependency for multiple items, click it again to select the nextdependency relationship.
The arrows represent the dependency relationships; where the arrow goes from thedependency to the object that depends on it.
z/OS Dependencies can also be conditional. In the graphical view, this type ofdependency is represented by a box with an icon, which is the target of all thearrows spawned from the objects defined as conditions to be satisfied. The box isalso the starting point for the arrow targeted to the depending objects, as shown inthe following picture.
182 Tivoli Workload Scheduler: Dynamic Workload Console User’s Guide: Dynamic Workload Console User’s Guide
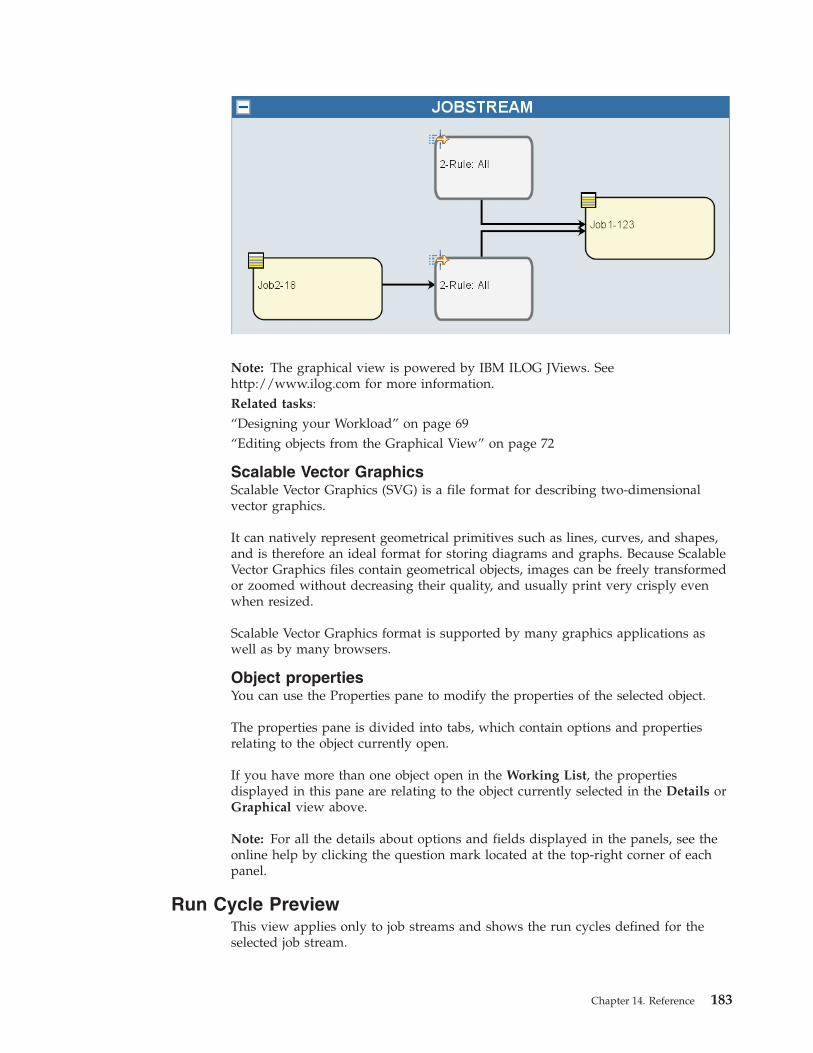
Note: The graphical view is powered by IBM ILOG JViews. Seehttp://www.ilog.com for more information.Related tasks:“Designing your Workload” on page 69“Editing objects from the Graphical View” on page 72
Scalable Vector GraphicsScalable Vector Graphics (SVG) is a file format for describing two-dimensionalvector graphics.
It can natively represent geometrical primitives such as lines, curves, and shapes,and is therefore an ideal format for storing diagrams and graphs. Because ScalableVector Graphics files contain geometrical objects, images can be freely transformedor zoomed without decreasing their quality, and usually print very crisply evenwhen resized.
Scalable Vector Graphics format is supported by many graphics applications aswell as by many browsers.
Object propertiesYou can use the Properties pane to modify the properties of the selected object.
The properties pane is divided into tabs, which contain options and propertiesrelating to the object currently open.
If you have more than one object open in the Working List, the propertiesdisplayed in this pane are relating to the object currently selected in the Details orGraphical view above.
Note: For all the details about options and fields displayed in the panels, see theonline help by clicking the question mark located at the top-right corner of eachpanel.
Run Cycle PreviewThis view applies only to job streams and shows the run cycles defined for theselected job stream.
Chapter 14. Reference 183
It shows the days on which the job stream runs and the days on which it isexplicitly excluded from running. You can see this view as a Month or full Yearview, and use the navigation toolbar to go to the next or previous Month or Year.
When you modify a run cycle, the view is automatically updated.
Color coding and symbols are used to indicate included and excluded days in therun cycle rule.
Selecting a run cycle, the colors have the following meanings:
The run cycle includes that day.
The run cycle excludes that day.
Selecting a job stream, the colors have the following meanings:
The job stream runs only once on that day.
The job stream runs more than once on that day.
The job stream runs, but some runs have been excluded.
The job stream runs more than once, but some runs have beenexcluded.
The job stream does not run, because it is excluded by a rule.
Non-working day.
Click any highlighted day to view details about the run cycles occurring on theselected day.Related tasks:“Designing your Workload” on page 69
Message HistoryUse this panel to view all the messages related to the active session.
When you open this section, by default all warning and error messages of thecurrent session are displayed.
Click the error, warning or information icon to filter for the correspondingmessages. No message is displayed until you click an icon.
Click this icon to view error messages.
Click this icon to view warning messages.
Click this icon to view informational messages.
Click this icon to clear all messages from the list, regardless of whetherthey are displayed or filtered out.
Click this icon to clear only the messages currently displayed.
184 Tivoli Workload Scheduler: Dynamic Workload Console User’s Guide: Dynamic Workload Console User’s Guide
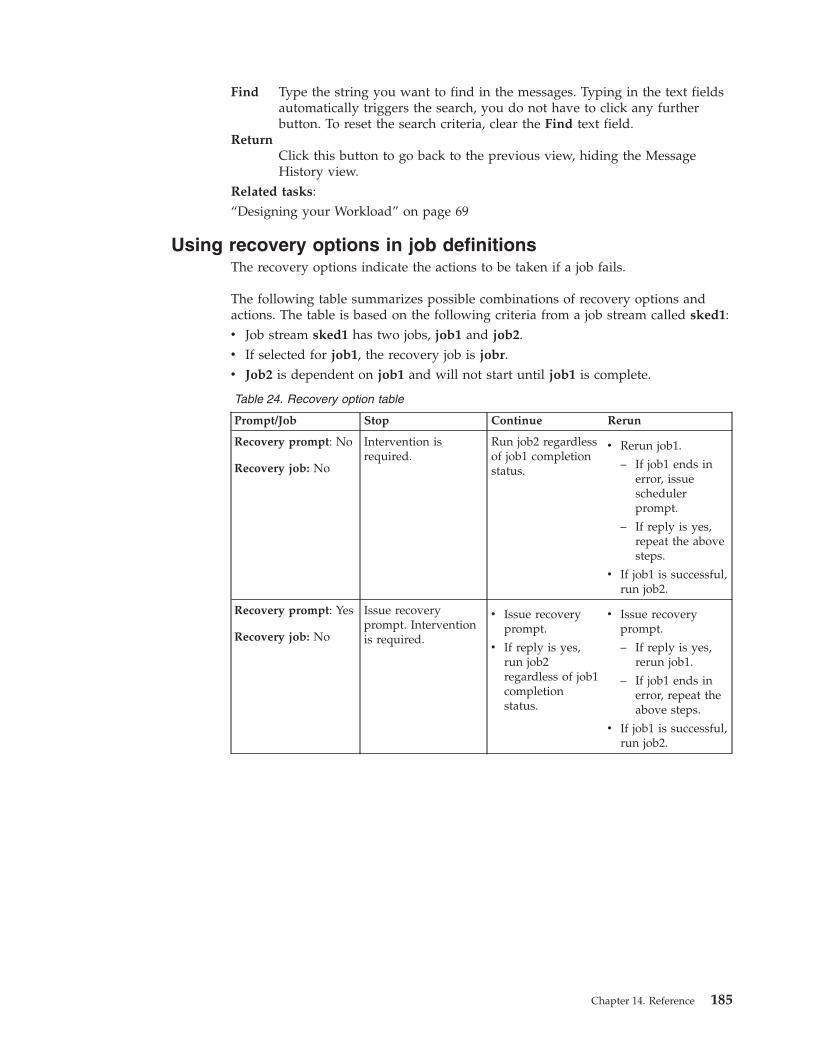
Find Type the string you want to find in the messages. Typing in the text fieldsautomatically triggers the search, you do not have to click any furtherbutton. To reset the search criteria, clear the Find text field.
ReturnClick this button to go back to the previous view, hiding the MessageHistory view.
Related tasks:“Designing your Workload” on page 69
Using recovery options in job definitionsThe recovery options indicate the actions to be taken if a job fails.
The following table summarizes possible combinations of recovery options andactions. The table is based on the following criteria from a job stream called sked1:v Job stream sked1 has two jobs, job1 and job2.v If selected for job1, the recovery job is jobr.v Job2 is dependent on job1 and will not start until job1 is complete.
Table 24. Recovery option table
Prompt/Job Stop Continue Rerun
Recovery prompt: No
Recovery job: No
Intervention isrequired.
Run job2 regardlessof job1 completionstatus.
v Rerun job1.
– If job1 ends inerror, issueschedulerprompt.
– If reply is yes,repeat the abovesteps.
v If job1 is successful,run job2.
Recovery prompt: Yes
Recovery job: No
Issue recoveryprompt. Interventionis required.
v Issue recoveryprompt.
v If reply is yes,run job2regardless of job1completionstatus.
v Issue recoveryprompt.
– If reply is yes,rerun job1.
– If job1 ends inerror, repeat theabove steps.
v If job1 is successful,run job2.
Chapter 14. Reference 185
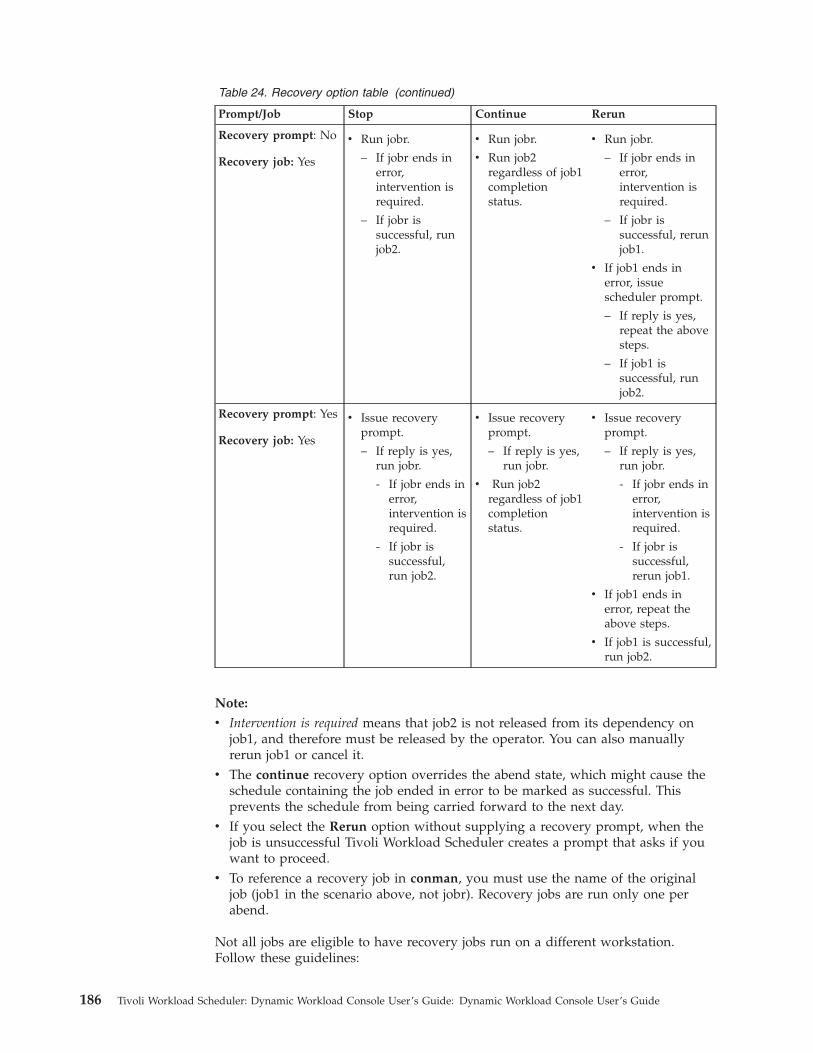
Table 24. Recovery option table (continued)
Prompt/Job Stop Continue Rerun
Recovery prompt: No
Recovery job: Yes
v Run jobr.
– If jobr ends inerror,intervention isrequired.
– If jobr issuccessful, runjob2.
v Run jobr.
v Run job2regardless of job1completionstatus.
v Run jobr.
– If jobr ends inerror,intervention isrequired.
– If jobr issuccessful, rerunjob1.
v If job1 ends inerror, issuescheduler prompt.
– If reply is yes,repeat the abovesteps.
– If job1 issuccessful, runjob2.
Recovery prompt: Yes
Recovery job: Yes
v Issue recoveryprompt.
– If reply is yes,run jobr.
- If jobr ends inerror,intervention isrequired.
- If jobr issuccessful,run job2.
v Issue recoveryprompt.
– If reply is yes,run jobr.
v Run job2regardless of job1completionstatus.
v Issue recoveryprompt.
– If reply is yes,run jobr.
- If jobr ends inerror,intervention isrequired.
- If jobr issuccessful,rerun job1.
v If job1 ends inerror, repeat theabove steps.
v If job1 is successful,run job2.
Note:
v Intervention is required means that job2 is not released from its dependency onjob1, and therefore must be released by the operator. You can also manuallyrerun job1 or cancel it.
v The continue recovery option overrides the abend state, which might cause theschedule containing the job ended in error to be marked as successful. Thisprevents the schedule from being carried forward to the next day.
v If you select the Rerun option without supplying a recovery prompt, when thejob is unsuccessful Tivoli Workload Scheduler creates a prompt that asks if youwant to proceed.
v To reference a recovery job in conman, you must use the name of the originaljob (job1 in the scenario above, not jobr). Recovery jobs are run only one perabend.
Not all jobs are eligible to have recovery jobs run on a different workstation.Follow these guidelines:
186 Tivoli Workload Scheduler: Dynamic Workload Console User’s Guide: Dynamic Workload Console User’s Guide

v If either workstation is an extended agent, it must be hosted by a domainmanager or a fault-tolerant agent that runs in Full Status mode.
v The recovery job workstation must be in the same domain as the parent jobworkstation.
v If the recovery job workstation is a fault-tolerant agent, it must run in FullStatus mode.
Reports
This section contains examples of regular expressions and SQL reports. Somesamples of report output are also shown.Related concepts:“Reports” on page 57Related reference:Chapter 11, “Reporting,” on page 133
Regular ExpressionsThis section gives some examples of useful regular expressions, together with atable that defines the expressions supported by Tivoli Workload Scheduler. Furtherinformation about regular expressions is also widely available in the Internet.
Useful regular expressions
The following table shows some useful regular expressions for use with the planextractor, both for filtering jobs and job streams, and for configuring business unitnames.
Table 25. Useful regular expressions
RequirementRegularexpression Example
To obtain the same effect as using the"@"character in the Tivoli WorkloadScheduler command line
.* -JScpu .*
Used as a parameter to the planextractor, filters for all job streamworkstations.
To join different criteria in an "OR"relationship
| (TIV.*)|(.*IBM.*)
Filters for all items that beginwith the string "TIV or thatcontain the string "IBM" (regularexpressions are case-sensitive).
To select objects that begin with oneof several characters
[<thecharacters tobe included>]
[ABC].*
Filters for all items that beginwith either "A", "B", or "C".
To select objects that do not beginwith one of several characters
[^<thecharacters tobe excluded>]
[^ABC].*
Filters for all items that do notbegin with either "A", "B", or "C".
To select objects in which certaincharacters appear a certain numberof times
<the characterto becounted>{<thecharactercount>}
A{3}.*
Filters for all items that beginwith the string "AAA".
Chapter 14. Reference 187
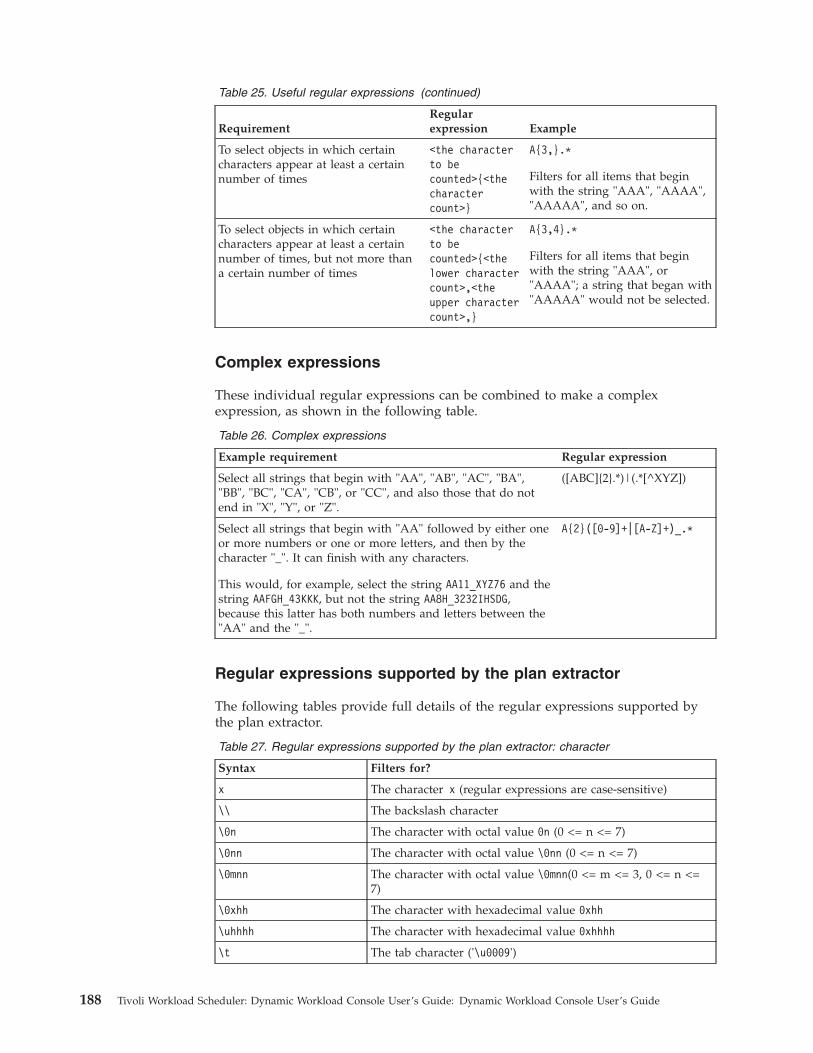
Table 25. Useful regular expressions (continued)
RequirementRegularexpression Example
To select objects in which certaincharacters appear at least a certainnumber of times
<the characterto becounted>{<thecharactercount>}
A{3,}.*
Filters for all items that beginwith the string "AAA", "AAAA","AAAAA", and so on.
To select objects in which certaincharacters appear at least a certainnumber of times, but not more thana certain number of times
<the characterto becounted>{<thelower charactercount>,<theupper charactercount>,}
A{3,4}.*
Filters for all items that beginwith the string "AAA", or"AAAA"; a string that began with"AAAAA" would not be selected.
Complex expressions
These individual regular expressions can be combined to make a complexexpression, as shown in the following table.
Table 26. Complex expressions
Example requirement Regular expression
Select all strings that begin with "AA", "AB", "AC", "BA","BB", "BC", "CA", "CB", or "CC", and also those that do notend in "X", "Y", or "Z".
([ABC]{2}.*)|(.*[^XYZ])
Select all strings that begin with "AA" followed by either oneor more numbers or one or more letters, and then by thecharacter "_". It can finish with any characters.
This would, for example, select the string AA11_XYZ76 and thestring AAFGH_43KKK, but not the string AA8H_3232IHSDG,because this latter has both numbers and letters between the"AA" and the "_".
A{2}([0-9]+|[A-Z]+)_.*
Regular expressions supported by the plan extractor
The following tables provide full details of the regular expressions supported bythe plan extractor.
Table 27. Regular expressions supported by the plan extractor: character
Syntax Filters for?
x The character x (regular expressions are case-sensitive)
\\ The backslash character
\0n The character with octal value 0n (0 <= n <= 7)
\0nn The character with octal value \0nn (0 <= n <= 7)
\0mnn The character with octal value \0mnn(0 <= m <= 3, 0 <= n <=7)
\0xhh The character with hexadecimal value 0xhh
\uhhhh The character with hexadecimal value 0xhhhh
\t The tab character ('\u0009')
188 Tivoli Workload Scheduler: Dynamic Workload Console User’s Guide: Dynamic Workload Console User’s Guide
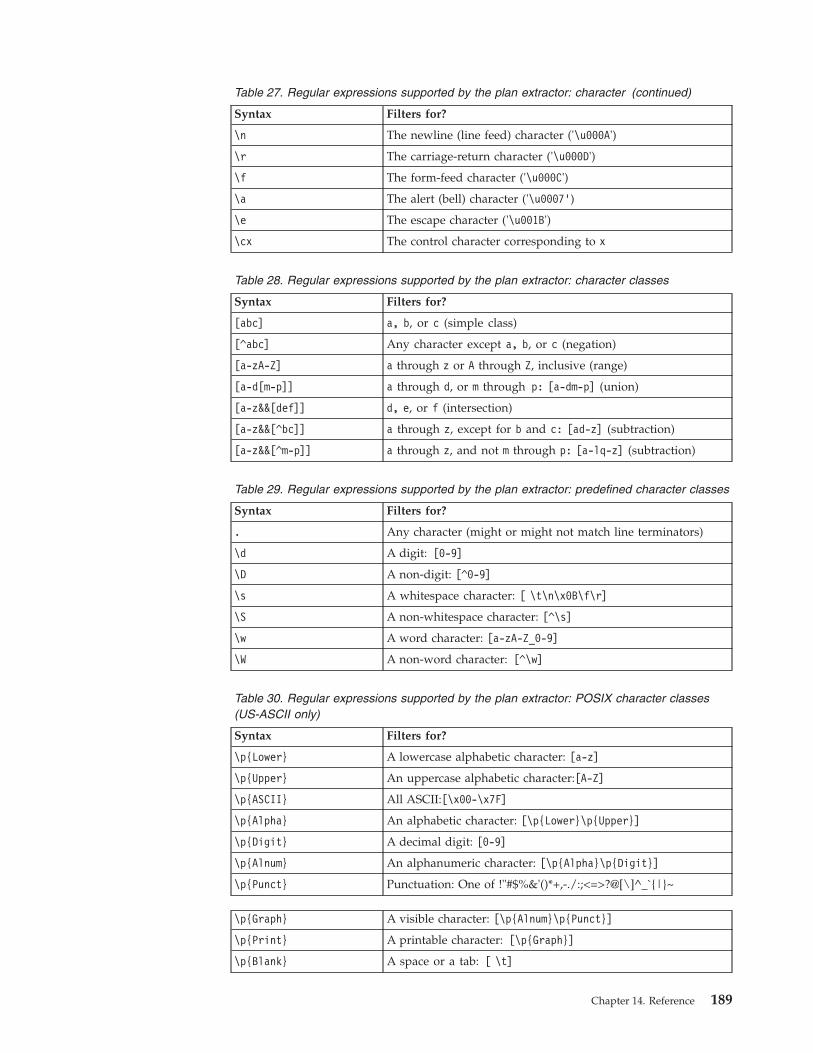
Table 27. Regular expressions supported by the plan extractor: character (continued)
Syntax Filters for?
\n The newline (line feed) character ('\u000A')
\r The carriage-return character ('\u000D')
\f The form-feed character ('\u000C')
\a The alert (bell) character ('\u0007’)
\e The escape character ('\u001B')
\cx The control character corresponding to x
Table 28. Regular expressions supported by the plan extractor: character classes
Syntax Filters for?
[abc] a, b, or c (simple class)
[^abc] Any character except a, b, or c (negation)
[a-zA-Z] a through z or A through Z, inclusive (range)
[a-d[m-p]] a through d, or m through p: [a-dm-p] (union)
[a-z&&[def]] d, e, or f (intersection)
[a-z&&[^bc]] a through z, except for b and c: [ad-z] (subtraction)
[a-z&&[^m-p]] a through z, and not m through p: [a-lq-z] (subtraction)
Table 29. Regular expressions supported by the plan extractor: predefined character classes
Syntax Filters for?
. Any character (might or might not match line terminators)
\d A digit: [0-9]
\D A non-digit: [^0-9]
\s A whitespace character: [ \t\n\x0B\f\r]
\S A non-whitespace character: [^\s]
\w A word character: [a-zA-Z_0-9]
\W A non-word character: [^\w]
Table 30. Regular expressions supported by the plan extractor: POSIX character classes(US-ASCII only)
Syntax Filters for?
\p{Lower} A lowercase alphabetic character: [a-z]
\p{Upper} An uppercase alphabetic character:[A-Z]
\p{ASCII} All ASCII:[\x00-\x7F]
\p{Alpha} An alphabetic character: [\p{Lower}\p{Upper}]
\p{Digit} A decimal digit: [0-9]
\p{Alnum} An alphanumeric character: [\p{Alpha}\p{Digit}]
\p{Punct} Punctuation: One of !"#$%&'()*+,-./:;<=>?@[\]^_`{|}~
\p{Graph} A visible character: [\p{Alnum}\p{Punct}]
\p{Print} A printable character: [\p{Graph}]
\p{Blank} A space or a tab: [ \t]
Chapter 14. Reference 189
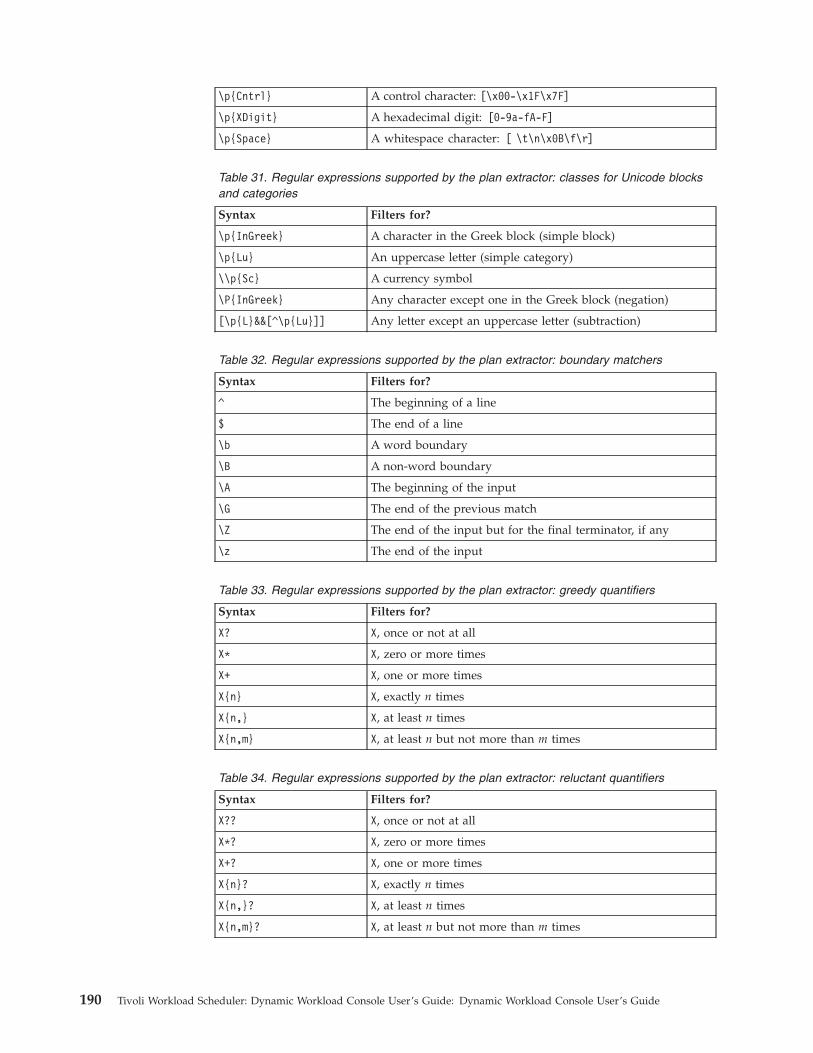
\p{Cntrl} A control character: [\x00-\x1F\x7F]
\p{XDigit} A hexadecimal digit: [0-9a-fA-F]
\p{Space} A whitespace character: [ \t\n\x0B\f\r]
Table 31. Regular expressions supported by the plan extractor: classes for Unicode blocksand categories
Syntax Filters for?
\p{InGreek} A character in the Greek block (simple block)
\p{Lu} An uppercase letter (simple category)
\\p{Sc} A currency symbol
\P{InGreek} Any character except one in the Greek block (negation)
[\p{L}&&[^\p{Lu}]] Any letter except an uppercase letter (subtraction)
Table 32. Regular expressions supported by the plan extractor: boundary matchers
Syntax Filters for?
^ The beginning of a line
$ The end of a line
\b A word boundary
\B A non-word boundary
\A The beginning of the input
\G The end of the previous match
\Z The end of the input but for the final terminator, if any
\z The end of the input
Table 33. Regular expressions supported by the plan extractor: greedy quantifiers
Syntax Filters for?
X? X, once or not at all
X* X, zero or more times
X+ X, one or more times
X{n} X, exactly n times
X{n,} X, at least n times
X{n,m} X, at least n but not more than m times
Table 34. Regular expressions supported by the plan extractor: reluctant quantifiers
Syntax Filters for?
X?? X, once or not at all
X*? X, zero or more times
X+? X, one or more times
X{n}? X, exactly n times
X{n,}? X, at least n times
X{n,m}? X, at least n but not more than m times
190 Tivoli Workload Scheduler: Dynamic Workload Console User’s Guide: Dynamic Workload Console User’s Guide
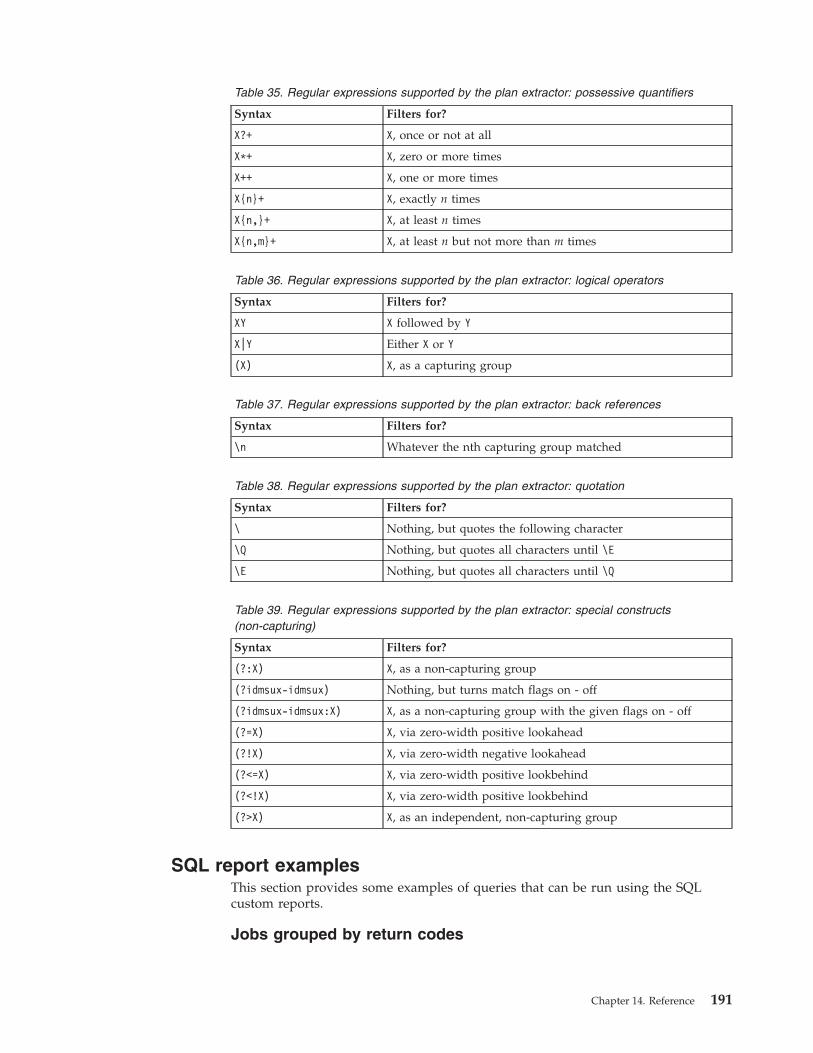
Table 35. Regular expressions supported by the plan extractor: possessive quantifiers
Syntax Filters for?
X?+ X, once or not at all
X*+ X, zero or more times
X++ X, one or more times
X{n}+ X, exactly n times
X{n,}+ X, at least n times
X{n,m}+ X, at least n but not more than m times
Table 36. Regular expressions supported by the plan extractor: logical operators
Syntax Filters for?
XY X followed by Y
X|Y Either X or Y
(X) X, as a capturing group
Table 37. Regular expressions supported by the plan extractor: back references
Syntax Filters for?
\n Whatever the nth capturing group matched
Table 38. Regular expressions supported by the plan extractor: quotation
Syntax Filters for?
\ Nothing, but quotes the following character
\Q Nothing, but quotes all characters until \E
\E Nothing, but quotes all characters until \Q
Table 39. Regular expressions supported by the plan extractor: special constructs(non-capturing)
Syntax Filters for?
(?:X) X, as a non-capturing group
(?idmsux-idmsux) Nothing, but turns match flags on - off
(?idmsux-idmsux:X) X, as a non-capturing group with the given flags on - off
(?=X) X, via zero-width positive lookahead
(?!X) X, via zero-width negative lookahead
(?<=X) X, via zero-width positive lookbehind
(?<!X) X, via zero-width positive lookbehind
(?>X) X, as an independent, non-capturing group
SQL report examplesThis section provides some examples of queries that can be run using the SQLcustom reports.
Jobs grouped by return codes
Chapter 14. Reference 191
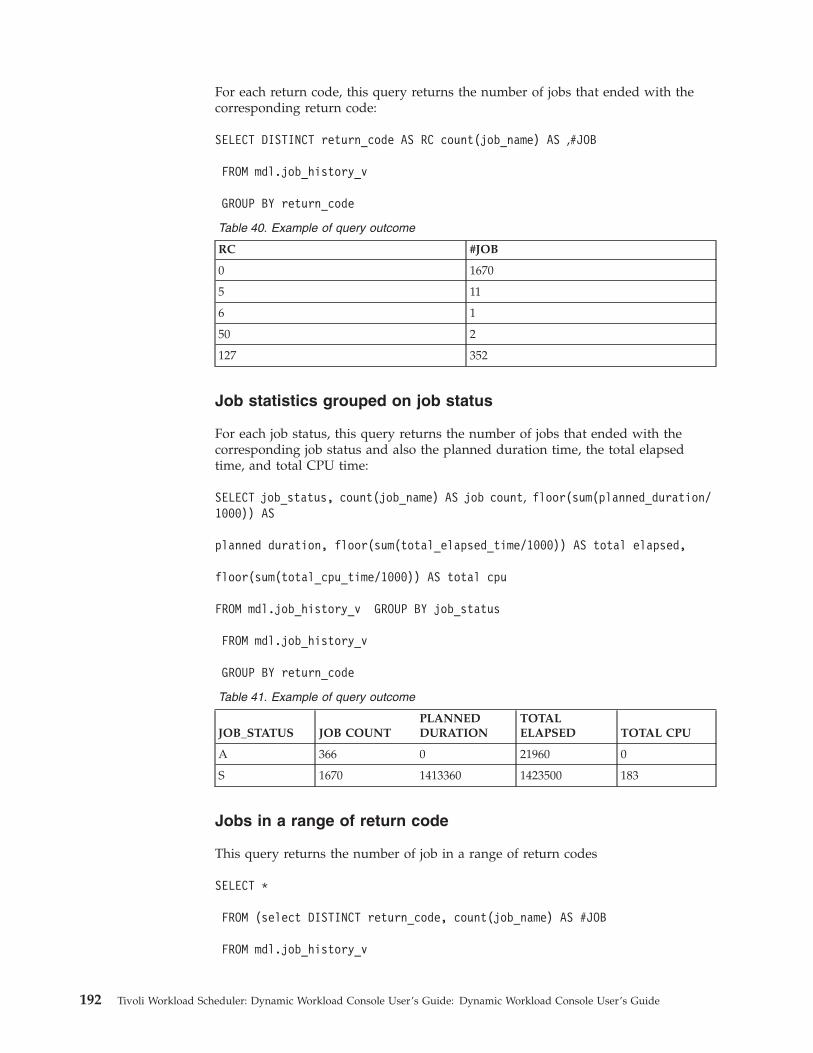
For each return code, this query returns the number of jobs that ended with thecorresponding return code:
SELECT DISTINCT return_code AS RC count(job_name) AS ,#JOB
FROM mdl.job_history_v
GROUP BY return_code
Table 40. Example of query outcome
RC #JOB
0 1670
5 11
6 1
50 2
127 352
Job statistics grouped on job status
For each job status, this query returns the number of jobs that ended with thecorresponding job status and also the planned duration time, the total elapsedtime, and total CPU time:
SELECT job_status, count(job_name) AS job count, floor(sum(planned_duration/1000)) AS
planned duration, floor(sum(total_elapsed_time/1000)) AS total elapsed,
floor(sum(total_cpu_time/1000)) AS total cpu
FROM mdl.job_history_v GROUP BY job_status
FROM mdl.job_history_v
GROUP BY return_code
Table 41. Example of query outcome
JOB_STATUS JOB COUNTPLANNEDDURATION
TOTALELAPSED TOTAL CPU
A 366 0 21960 0
S 1670 1413360 1423500 183
Jobs in a range of return code
This query returns the number of job in a range of return codes
SELECT *
FROM (select DISTINCT return_code, count(job_name) AS #JOB
FROM mdl.job_history_v
192 Tivoli Workload Scheduler: Dynamic Workload Console User’s Guide: Dynamic Workload Console User’s Guide
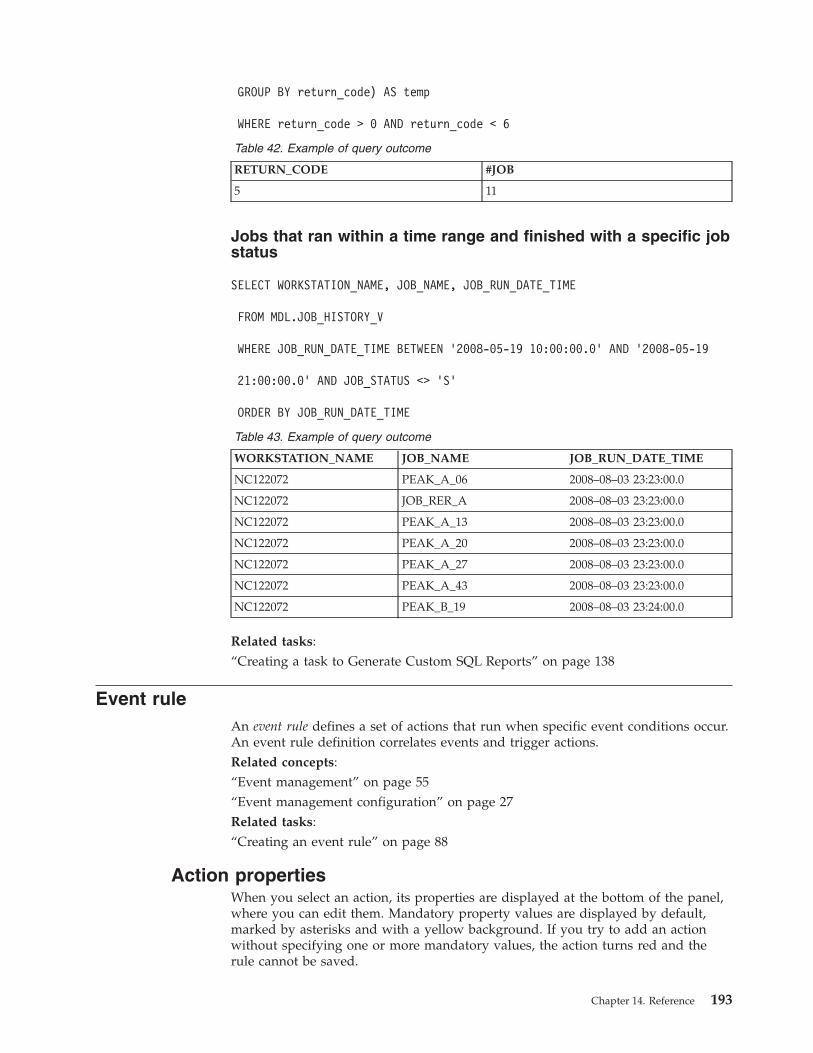
GROUP BY return_code) AS temp
WHERE return_code > 0 AND return_code < 6
Table 42. Example of query outcome
RETURN_CODE #JOB
5 11
Jobs that ran within a time range and finished with a specific jobstatus
SELECT WORKSTATION_NAME, JOB_NAME, JOB_RUN_DATE_TIME
FROM MDL.JOB_HISTORY_V
WHERE JOB_RUN_DATE_TIME BETWEEN ’2008-05-19 10:00:00.0’ AND ’2008-05-19
21:00:00.0’ AND JOB_STATUS <> ’S’
ORDER BY JOB_RUN_DATE_TIME
Table 43. Example of query outcome
WORKSTATION_NAME JOB_NAME JOB_RUN_DATE_TIME
NC122072 PEAK_A_06 2008–08–03 23:23:00.0
NC122072 JOB_RER_A 2008–08–03 23:23:00.0
NC122072 PEAK_A_13 2008–08–03 23:23:00.0
NC122072 PEAK_A_20 2008–08–03 23:23:00.0
NC122072 PEAK_A_27 2008–08–03 23:23:00.0
NC122072 PEAK_A_43 2008–08–03 23:23:00.0
NC122072 PEAK_B_19 2008–08–03 23:24:00.0
Related tasks:“Creating a task to Generate Custom SQL Reports” on page 138
Event ruleAn event rule defines a set of actions that run when specific event conditions occur.An event rule definition correlates events and trigger actions.Related concepts:“Event management” on page 55“Event management configuration” on page 27Related tasks:“Creating an event rule” on page 88
Action propertiesWhen you select an action, its properties are displayed at the bottom of the panel,where you can edit them. Mandatory property values are displayed by default,marked by asterisks and with a yellow background. If you try to add an actionwithout specifying one or more mandatory values, the action turns red and therule cannot be saved.
Chapter 14. Reference 193
You can add further properties by selecting them from the drop-down list. Whenyou add new properties, they become mandatory, therefore you cannot leave themblank, but you can delete them by clicking the close icon.
You can also add the same property multiple times assigning different values to it.In this case all these properties are logically correlated by the conjunction and,creating a cumulative filter.
For examples, when you define your event filter, if you want to exclude some filesfrom it, you can define as event properties all the filenames thatmatch/tmp/tool/oldfiles, and all the filenames that do not match /tmp/tools/newfiles. Additionally, you can also remove the non-required properties, by
clicking the close icon next to them. You cannot remove mandatory properties.
Using variable information into action properties
To better qualify your action, you can use some event properties as variableinformation that can be added to the action properties.
For example, you can include the job name in the mail body, if you have mailnotification as a response action to a job-related event. You can include thisvariable information together with normal text in action properties that require astring value. For those properties that require a numeric value, you can enter eitherthe variable information or a number.
The event properties that can be used as variable information for the actions can beselected from the list that is displayed if you click the button Variable. SelectMachine-readable format check box when you want to use the variable as input toa command or a script. Alternatively, you can recall this information within theaction property by copying the event alias (displayed in the first row of the eventbox) and pasting it into the action property field, complying with the followingsyntax:
%{event_alias.property_name}Use it to include normal text information. This can be useful if you want tosee this text in a message or an email.
${event_alias.property_name}Use it to include machine-readable information. This can be useful if youwant to use the action as input to a command or a script.
Event propertiesWhen you select an event, its properties are displayed at the bottom of the panel,where you can edit them. A tooltip over the event box shows all the eventproperties available as variables that you can use to define the action properties.
When you choose the event properties, you define a filter for all the events thatyou want to monitor and manage. The most meaningful properties you choose arelogically correlated and represent the event scope, which is displayed in the eventbox.
You can add further properties by selecting them from the drop-down list. Whenyou add new properties, they become mandatory, therefore you cannot leave themblank but you can delete them by clicking the close icon.
194 Tivoli Workload Scheduler: Dynamic Workload Console User’s Guide: Dynamic Workload Console User’s Guide
Mandatory property values are displayed by default, marked by asterisks and witha yellow background. If you try to add an event without specifying one or moremandatory values, the event turns red, the invalid fields are highlighted, and therule cannot be saved.
You can also add the same property multiple times assigning different values to it.In this case all these properties are logically correlated by the conjunction and,creating a cumulative filter.
For example, when you define your event filter, if you want to exclude some filesfrom it, you can define as event properties all the filenames thatmatch/tmp/tool/oldfiles, and all the filenames that do not match/tmp/tools/newfiles. You can also remove the non-required properties, by clicking
the close icon next to them. You cannot remove mandatory properties.
When completing this section, consider that wildcard characters are supported,depending on the event type. When wildcard characters are supported, the
wildcard icon is enabled.
Event properties that do not support wildcard characters are identified by the
wildcards not supported icon .
Some event properties allow you to specify multiple values separated by semicolon
(;). These properties are identified by the multiple filter icon . When youspecify multiple values, these values are logically correlated by the conjunction or.
For example, if you create a Job Status Changed event specifying the Job nameproperty as "A;B;C", an action is triggered each time either of the specified jobschanges its status.
Event properties that do not support multiple values are identified by this icon
.Activation statuses of the event rules
The following list shows the possible statuses of the event rules:
ActiveThis status includes rules that are in any of the following internalconditions:v Activev Update Pendingv Error During Updatev Deactivation Pendingv Error During Deactivation
InactiveThis status includes rules that are in any of the following internalconditions:v Inactive
Chapter 14. Reference 195
v Activation Pending (an intermediate status that occurs, for example,when you change a rule, save these changes, and set the rule to NonDraft)
v Error During Activation
Schemas for generic eventsThis section lists some schemas that you can use to produce a customized event.
Note: For PDF users, the parameter tables listed below are files referenced by thePDF. They are not saved locally with the PDF from the infocenter. You must firstview them on the infocenter before saving or printing.v Action definitions
v Event definition
v Common definitions
196 Tivoli Workload Scheduler: Dynamic Workload Console User’s Guide: Dynamic Workload Console User’s Guide
Notices
This information was developed for products and services offered in the U.S.A.IBM may not offer the products, services, or features discussed in this document inother countries. Consult your local IBM representative for information on theproducts and services currently available in your area. Any reference to an IBMproduct, program, or service is not intended to state or imply that only that IBMproduct, program, or service may be used. Any functionally equivalent product,program, or service that does not infringe any IBM intellectual property right maybe used instead. However, it is the user's responsibility to evaluate and verify theoperation of any non-IBM product, program, or service.
IBM may have patents or pending patent applications covering subject matterdescribed in this document. The furnishing of this document does not give youany license to these patents. You can send license inquiries, in writing, to:
IBM Director of LicensingIBM CorporationNorth Castle DriveArmonk, NY 10504-1785 U.S.A.
For license inquiries regarding double-byte (DBCS) information, contact the IBMIntellectual Property Department in your country or send inquiries, in writing, to:
Intellectual Property LicensingLegal and Intellectual Property LawIBM Japan, Ltd.19-21, Nihonbashi-Hakozakicho, Chuo-kuTokyo 103-8510, Japan
The following paragraph does not apply to the United Kingdom or any othercountry where such provisions are inconsistent with local law:
INTERNATIONAL BUSINESS MACHINES CORPORATION PROVIDES THISPUBLICATION "AS IS" WITHOUT WARRANTY OF ANY KIND, EITHEREXPRESS OR IMPLIED, INCLUDING, BUT NOT LIMITED TO, THE IMPLIEDWARRANTIES OF NON-INFRINGEMENT, MERCHANTABILITY OR FITNESSFOR A PARTICULAR PURPOSE.
Some states do not allow disclaimer of express or implied warranties in certaintransactions, therefore, this statement might not apply to you.
This information could include technical inaccuracies or typographical errors.Changes are periodically made to the information herein; these changes will beincorporated in new editions of the publication. IBM may make improvementsand/or changes in the product(s) and/or the program(s) described in thispublication at any time without notice.
Any references in this information to non-IBM websites are provided forconvenience only and do not in any manner serve as an endorsement of thosewebsites. The materials at those websites are not part of the materials for this IBMproduct and use of those websites is at your own risk.
© Copyright IBM Corp. 1999, 2012 197
IBM may use or distribute any of the information you supply in any way itbelieves appropriate without incurring any obligation to you.
Licensees of this program who wish to have information about it for the purposeof enabling: (i) the exchange of information between independently createdprograms and other programs (including this one) and (ii) the mutual use of theinformation which has been exchanged, should contact:
IBM Corporation2Z4A/10111400 Burnet RoadAustin, TX 78758 U.S.A.
Such information may be available, subject to appropriate terms and conditions,including in some cases payment of a fee.
The licensed program described in this document and all licensed materialavailable for it are provided by IBM under terms of the IBM Customer Agreement,IBM International Program License Agreement or any equivalent agreementbetween us.
This information contains examples of data and reports used in daily businessoperations. To illustrate them as completely as possible, the examples include thenames of individuals, companies, brands, and products. All of these names arefictitious and any similarity to the names and addresses used by an actual businessenterprise is entirely coincidental.
TrademarksIBM, the IBM logo, and ibm.com are trademarks or registered trademarks ofInternational Business Machines Corporation in the United States, other countries,or both. If these and other IBM trademarked terms are marked on their firstoccurrence in this information with a trademark symbol (® or ™), these symbolsindicate U.S. registered or common law trademarks owned by IBM at the time thisinformation was published. Such trademarks may also be registered or commonlaw trademarks in other countries. A current list of IBM trademarks is available onthe Web at "Copyright and trademark information" at http://www.ibm.com/legal/copytrade.shtml.
Adobe, the Adobe logo, PostScript, and the PostScript logo are either registeredtrademarks or trademarks of Adobe Systems Incorporated in the United States,and/or other countries.
Intel, Intel logo, Intel Inside, Intel Inside logo, Intel Centrino, Intel Centrino logo,Celeron, Intel Xeon, Intel SpeedStep, Itanium, and Pentium are trademarks orregistered trademarks of Intel Corporation or its subsidiaries in the United Statesand other countries.
Microsoft, Windows, Windows NT, and the Windows logo are trademarks ofMicrosoft Corporation in the United States, other countries, or both.
198 Tivoli Workload Scheduler: Dynamic Workload Console User’s Guide: Dynamic Workload Console User’s Guide
Java and all Java-based trademarks and logos are trademarks or registeredtrademarks of Oracle and/or its affiliates.
Linux is a registered trademark of Linus Torvalds in the United States, othercountries, or both.
UNIX is a registered trademark of The Open Group in the United States and othercountries.
Notices 199

200 Tivoli Workload Scheduler: Dynamic Workload Console User’s Guide: Dynamic Workload Console User’s Guide
Index
Aabend prompt 42access method jobs 73, 79accessibility viiaccessing
online publications 151action
generic 56notification 56operational 56properties
using variable information 194activation status
event rules 195ad-hoc prompt 42adding
a job to a job stream 82dependency 85task
to favorite bookmarks 19agents pool
creating 68application monitoring event 55archived plan 53associating
planto engine 126to task 125
Bbackup domain manager
attributes 65configuring 65
backup dynamic domain managerattributes 65configuring 65
backup master domain manager 29attributes 65configuring 65
beacon 19, 20, 21, 22, 152send internal communications 22
bookmarkadding tasks to 19
Ccalendar
definition 38holidays 38
call to a Web servicesample JSDL files 73, 79
changingsettings repository user 14
Cognos prompt typedate syntax 81time stamp syntax 81time syntax 81
communicationtype based on SSL communication
options 161complex expressions 188condition dependencies
definition 41, 43examples 45handling recovery 47step level 46
conditional logic 43conditional recovery job option 47configuring
settings repository 12console
customizing 17controlling
job processingby using dependencies 120by using job confirmation 123by using job priority 122by using job recovery actions 123by using limits 122by using time restrictions 121by using workstation fence 122
job stream processingby using dependencies 120by using limits 122by using time restrictions 121
conventions used in publications viicreating
cross dependencies 86database objects 69distributed workstation 65domain 67Dynamic Workload Broker objects 87event rule 88objects in the database 65pool of agents 68task
generate Custom SQL report 138generate Job Run History
report 134generate Job Run Statistics
report 133generate Plan report 137generate Workstation Workload
Runtimes report 136generate Workstation Workload
Summary report 135list event rule definitions 95monitor critical jobs 106monitor domains 101monitor event rules 116monitor files 113monitor job streams 110monitor job streams on multiple
engines 111monitor jobs 104monitor jobs on multiple
engines 108monitor operator messages 119
creating (continued)task (continued)
monitor prompts 114monitor resources 115monitor triggered actions 118monitor workstations 99show plan view 127
z/OS virtual workstation 67z/OS workstation 66
creating job definitionscp, prerequisite steps 78
critical jobhigh risk status 62monitoring 60monitoring scenario
by using workload serviceassurance 143
planning 62potential risk status 62processing 60tracking 62
critical pathcalculation of 60
cross dependencies 42, 48creating 86
current plan 53customize
news notification beacon 21customizing
console 17job stream
scenario 141news notification beacon 152portfolio 17secondary queries 19startup page 18task 18
cyclic periodsdefinition 37examples 38
Ddaily run cycle 39database
definition 52object properties 183
database data extract 73, 79database data validation 73, 79database objects
creating 69editing 69
from the Details view 72from the Graphical view 72from the Quick Open view 71from the Working List view 70
file 43job 36listing 93prompt 42resource 43
© Copyright IBM Corp. 1999, 2012 201
database objects (continued)variable table 50workstation class 50
database operationssample JSDL files 73, 79
database repositorychanging user 14
database stored proceduredatabase jobs
sample JSDL files 73, 79sample JSDL files 73, 79
date syntax Cognosprompt type 81
DB2 repositorychanging user 14
definingtemporary plan 126
dependenciesadding 85condition 41, 43cross 42, 48definition 40external 41file 43internal 40internetwork 41prompt 42removing 86resource 43using
to control job processing 120to control job stream
processing 120designing
scheduling environment 65Details view 179
editingdatabase objects 72
disablingnews notification beacon 20, 152
distributed workstationcreating 65
domain 32creating 67monitoring 101
domain manager 29attributes 65configuring 65
dynamic agent 31dynamic agent workstation 64dynamic critical path 59dynamic domain manager
attributes 65configuring 65
dynamic pool 32, 64creating 68
dynamic scheduling 31, 32Dynamic Workload Broker
creating objects 87Dynamic Workload Console
accessibility viidefining supported agents job 75, 77troubleshooting 149
dynamic workstations 31, 32
Eediting
database objects 69from the Details view 72from the Graphical view 72from the Quick Open view 71from the Working List view 70
objects in the database 65education viiienabling
news notification beacon 20engine
associating a plan to 126connection 54
eventapplication monitoring 55definition 55generic 55
schemas for 196management 55
task 103objects related 55properties 194rules 57
event ruleactivation status 195creating 88definition
listing 95monitoring 116
examplesSQL report 191
exclusive run cycle 39executable jobs 73, 79exporting
settings 11expression
complex 188regular 187, 188
extended agent workstation 30, 64external dependencies 41
Ffault-tolerant agent 30
attributes 65configuring 65
favoriteadding task to 19
feed 22, 152send notification 22
filedefinition 43monitoring 113monitoring event 55
file transfer jobssample JSDL files 73, 79
file transfer operationssample JSDL files 73, 79
forecast plan 54generating 126
Ggenerating
forecast plan 126
generating (continued)report
Custom SQL 138Job Run History 134Job Run Statistics 133Plan 137Workstation Workload
Runtimes 136Workstation Workload
Summary 135trial plan 126
genericaction 56event 55
generic Java jobtemplate 73, 79
generic Web service calltemplate 73, 79
global prompt 42global settings
customizing 23glossary viigraphical 180Graphical view
editingdatabase objects 72
in the plan 173groups 159
Hhigh risk status 62holidays calendar 38hot list 60
addition of jobs 61
IIBM i jobs 73, 79
AS400 jobs 73, 79impact view 174importing
settings 11inclusive run cycle 39installation
Dynamic Workload Console 7, 24installing
Dynamic Workload Console 7, 24internal dependencies 40internal status
distributed job stream 166distributed jobs 162z/OS job stream 168z/OS jobs 164
internetwork dependencies 41
JJ2EE jobs 73, 79Java jobs
sample JSDL files 73, 79Java operations
sample JSDL files 73, 79JnextPlan 52
202 Tivoli Workload Scheduler: Dynamic Workload Console User’s Guide: Dynamic Workload Console User’s Guide
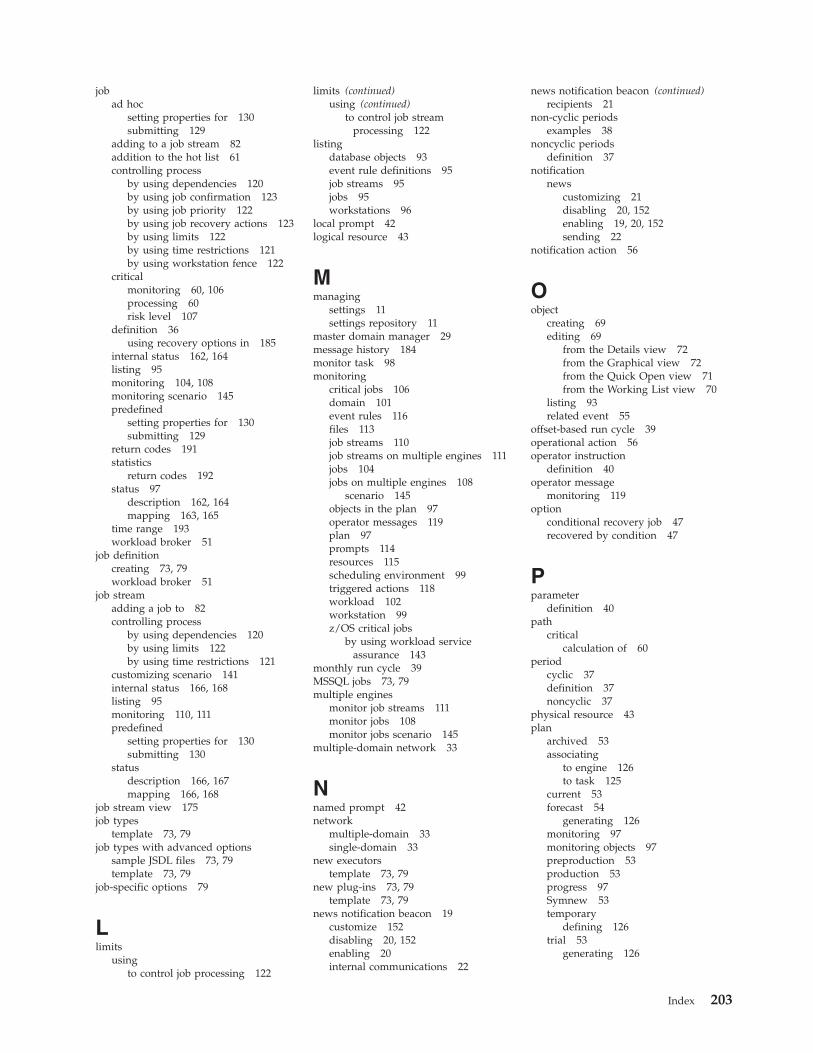
jobad hoc
setting properties for 130submitting 129
adding to a job stream 82addition to the hot list 61controlling process
by using dependencies 120by using job confirmation 123by using job priority 122by using job recovery actions 123by using limits 122by using time restrictions 121by using workstation fence 122
criticalmonitoring 60, 106processing 60risk level 107
definition 36using recovery options in 185
internal status 162, 164listing 95monitoring 104, 108monitoring scenario 145predefined
setting properties for 130submitting 129
return codes 191statistics
return codes 192status 97
description 162, 164mapping 163, 165
time range 193workload broker 51
job definitioncreating 73, 79workload broker 51
job streamadding a job to 82controlling process
by using dependencies 120by using limits 122by using time restrictions 121
customizing scenario 141internal status 166, 168listing 95monitoring 110, 111predefined
setting properties for 130submitting 130
statusdescription 166, 167mapping 166, 168
job stream view 175job types
template 73, 79job types with advanced options
sample JSDL files 73, 79template 73, 79
job-specific options 79
Llimits
usingto control job processing 122
limits (continued)using (continued)
to control job streamprocessing 122
listingdatabase objects 93event rule definitions 95job streams 95jobs 95workstations 96
local prompt 42logical resource 43
Mmanaging
settings 11settings repository 11
master domain manager 29message history 184monitor task 98monitoring
critical jobs 106domain 101event rules 116files 113job streams 110job streams on multiple engines 111jobs 104jobs on multiple engines 108
scenario 145objects in the plan 97operator messages 119plan 97prompts 114resources 115scheduling environment 99triggered actions 118workload 102workstation 99z/OS critical jobs
by using workload serviceassurance 143
monthly run cycle 39MSSQL jobs 73, 79multiple engines
monitor job streams 111monitor jobs 108monitor jobs scenario 145
multiple-domain network 33
Nnamed prompt 42network
multiple-domain 33single-domain 33
new executorstemplate 73, 79
new plug-ins 73, 79template 73, 79
news notification beacon 19customize 152disabling 20, 152enabling 20internal communications 22
news notification beacon (continued)recipients 21
non-cyclic periodsexamples 38
noncyclic periodsdefinition 37
notificationnews
customizing 21disabling 20, 152enabling 19, 20, 152sending 22
notification action 56
Oobject
creating 69editing 69
from the Details view 72from the Graphical view 72from the Quick Open view 71from the Working List view 70
listing 93related event 55
offset-based run cycle 39operational action 56operator instruction
definition 40operator message
monitoring 119option
conditional recovery job 47recovered by condition 47
Pparameter
definition 40path
criticalcalculation of 60
periodcyclic 37definition 37noncyclic 37
physical resource 43plan
archived 53associating
to engine 126to task 125
current 53forecast 54
generating 126monitoring 97monitoring objects 97preproduction 53production 53progress 97Symnew 53temporary
defining 126trial 53
generating 126
Index 203
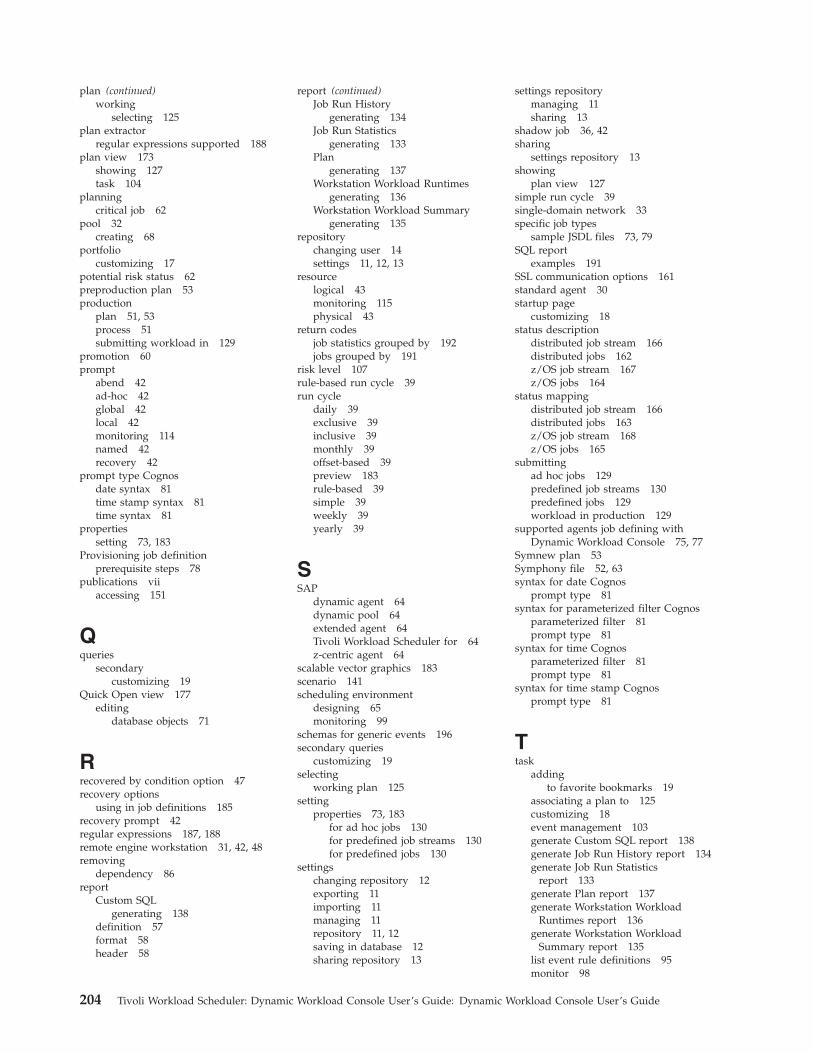
plan (continued)working
selecting 125plan extractor
regular expressions supported 188plan view 173
showing 127task 104
planningcritical job 62
pool 32creating 68
portfoliocustomizing 17
potential risk status 62preproduction plan 53production
plan 51, 53process 51submitting workload in 129
promotion 60prompt
abend 42ad-hoc 42global 42local 42monitoring 114named 42recovery 42
prompt type Cognosdate syntax 81time stamp syntax 81time syntax 81
propertiessetting 73, 183
Provisioning job definitionprerequisite steps 78
publications viiaccessing 151
Qqueries
secondarycustomizing 19
Quick Open view 177editing
database objects 71
Rrecovered by condition option 47recovery options
using in job definitions 185recovery prompt 42regular expressions 187, 188remote engine workstation 31, 42, 48removing
dependency 86report
Custom SQLgenerating 138
definition 57format 58header 58
report (continued)Job Run History
generating 134Job Run Statistics
generating 133Plan
generating 137Workstation Workload Runtimes
generating 136Workstation Workload Summary
generating 135repository
changing user 14settings 11, 12, 13
resourcelogical 43monitoring 115physical 43
return codesjob statistics grouped by 192jobs grouped by 191
risk level 107rule-based run cycle 39run cycle
daily 39exclusive 39inclusive 39monthly 39offset-based 39preview 183rule-based 39simple 39weekly 39yearly 39
SSAP
dynamic agent 64dynamic pool 64extended agent 64Tivoli Workload Scheduler for 64z-centric agent 64
scalable vector graphics 183scenario 141scheduling environment
designing 65monitoring 99
schemas for generic events 196secondary queries
customizing 19selecting
working plan 125setting
properties 73, 183for ad hoc jobs 130for predefined job streams 130for predefined jobs 130
settingschanging repository 12exporting 11importing 11managing 11repository 11, 12saving in database 12sharing repository 13
settings repositorymanaging 11sharing 13
shadow job 36, 42sharing
settings repository 13showing
plan view 127simple run cycle 39single-domain network 33specific job types
sample JSDL files 73, 79SQL report
examples 191SSL communication options 161standard agent 30startup page
customizing 18status description
distributed job stream 166distributed jobs 162z/OS job stream 167z/OS jobs 164
status mappingdistributed job stream 166distributed jobs 163z/OS job stream 168z/OS jobs 165
submittingad hoc jobs 129predefined job streams 130predefined jobs 129workload in production 129
supported agents job defining withDynamic Workload Console 75, 77
Symnew plan 53Symphony file 52, 63syntax for date Cognos
prompt type 81syntax for parameterized filter Cognos
parameterized filter 81prompt type 81
syntax for time Cognosparameterized filter 81prompt type 81
syntax for time stamp Cognosprompt type 81
Ttask
addingto favorite bookmarks 19
associating a plan to 125customizing 18event management 103generate Custom SQL report 138generate Job Run History report 134generate Job Run Statistics
report 133generate Plan report 137generate Workstation Workload
Runtimes report 136generate Workstation Workload
Summary report 135list event rule definitions 95monitor 98
204 Tivoli Workload Scheduler: Dynamic Workload Console User’s Guide: Dynamic Workload Console User’s Guide
task (continued)monitor critical jobs 106monitor domains 101monitor event rules 116monitor files 113monitor job streams 110monitor job streams on multiple
engines 111monitor jobs 104monitor jobs on multiple engines 108monitor operator messages 119monitor prompts 114monitor resources 115monitor triggered actions 118monitor workstations 99plan view 104show plan view 127
technical training viiitime range 193time restrictions
usingto control job processing 121to control job stream
processing 121time stamp syntax Cognos
prompt type 81time syntax Cognos
prompt type 81Tivoli technical training viiiTivoli Workload Scheduler for z/OS
agent 31tracking
critical job 62training
technical viiitrial plan 53
generating 126triggered actions
monitoring 118troubleshooting
Dynamic Workload Console 149
Uusage scenario 141users 159using
news notification beacon 19
Vvariable information
using into action properties 194variable table 50view
details 179graphical 180impact 174job stream 175plan 173
virtual workstation 31
WWeb service jobs
sample JSDL files 73, 79
weekly run cycle 39working list 176Working List view
editingdatabase objects 70
working planmonitoring 125
workloadmonitoring 102submitting in production 129
workload brokeragent workstation 31job definition 51
workload designer 176workload service assurance 59
scenario 143workstation
backup master domain manager 29class 50creating 65, 66, 67definition 29domain manager 29dynamic agent 31, 64dynamic pool 32extended agent 30, 64fault-tolerant agent 30master domain manager 29monitoring 99pool 32remote engine 31, 48standard agent 30Tivoli Workload Scheduler for z/OS
agent 31virtual 31workload broker agent 31z-centric agent 64
workstation fenceusing
to control job processing 122workstations
listing 96
Yyearly run cycle 39
Zz-centric agent workstation 64z/OS virtual workstation
creating 67z/OS workstation
creating 66
Index 205

206 Tivoli Workload Scheduler: Dynamic Workload Console User’s Guide: Dynamic Workload Console User’s Guide


����
Product Number: 5698-WSH
Printed in USA