tips & tricks to improve reality capture -...
TRANSCRIPT
Tips & tricks to improve reality capture
Matthew Byrd – Director of 3D Services - DeWalt Corporation
RC6115 This presentation will outline the new workflow that DeWalt Corporation implemented to dramatically improve the efficiency of its laser scanning, processing, and modeling. Attendees will learn specific tools, tips, and tricks that the firm implemented to quickly perform 215 target-less laser scans in a 600 foot by 600 foot detailed oil-treatment facility. The firm used ReCap Pro software to register and clean the scans. The final deliverable was an as-built 3D model for phase 1 of a facility redesign project that included tanks, vessels, pipelines, steel pipe racks and pipe supports, ground surface, and more..
Learning Objectives At the end of this class, you will be able to:
• Learn how to improve overall scan-project workflow
• Learn about tools that will make you more competitive in the scan-project bidding stage
• Discover pros and cons of target-less scan registration
• Discover pros and cons of automatic feature extraction
About the Speaker Matthew Byrd is known for his passion and involvement in the world’s leading 3D
technology. He began his career while in high school at a land surveying and engineering firm, and he hasn’t stopped since. His pursuit has carried him into an array of positions, including survey field crew member, office CAD technician, and scanning technician, until he finally became DeWalt Corporation’s Director of 3D Services. His technical skillset and passion for 3D technology has continued to improve and increase over the last few years. He has completed many projects for world-renowned engineering and oil and gas companies, and he is becoming a frequent speaker and panelist at industry conventions.
Tips & tricks to improve reality capture – case study review
Picking the right technology: A few key things to think about while looking at new technology…
1. Explore hardware & software options. 2. Test & trial different methods. 3. Apply the technology in the proper way. 4. Know the limitations.
3D Laser Scanning
What is 3D Laser Scanning ?
3D Laser Scanning uses a pulse of infra-red light to measure objects in their real-world position. The scanner collects 3D Data on every surface the laser can see from its current setup position.
A typical scan setup can produce anywhere from 30 -140 million individual 3D data points. (Each point contains accurate XYZ Information)
Terrestrial Laser Scanning
1. Phase Based Scanner a. Shorter Range b. 5-120meters c. Speeds of up to 1 million points per second d. Higher accuracy data
2. Time-Of-Flight Scanner a. Longer Range b. Up to 1,000meters c. Slower speeds, up to 100k points per second d. Lower accuracy data
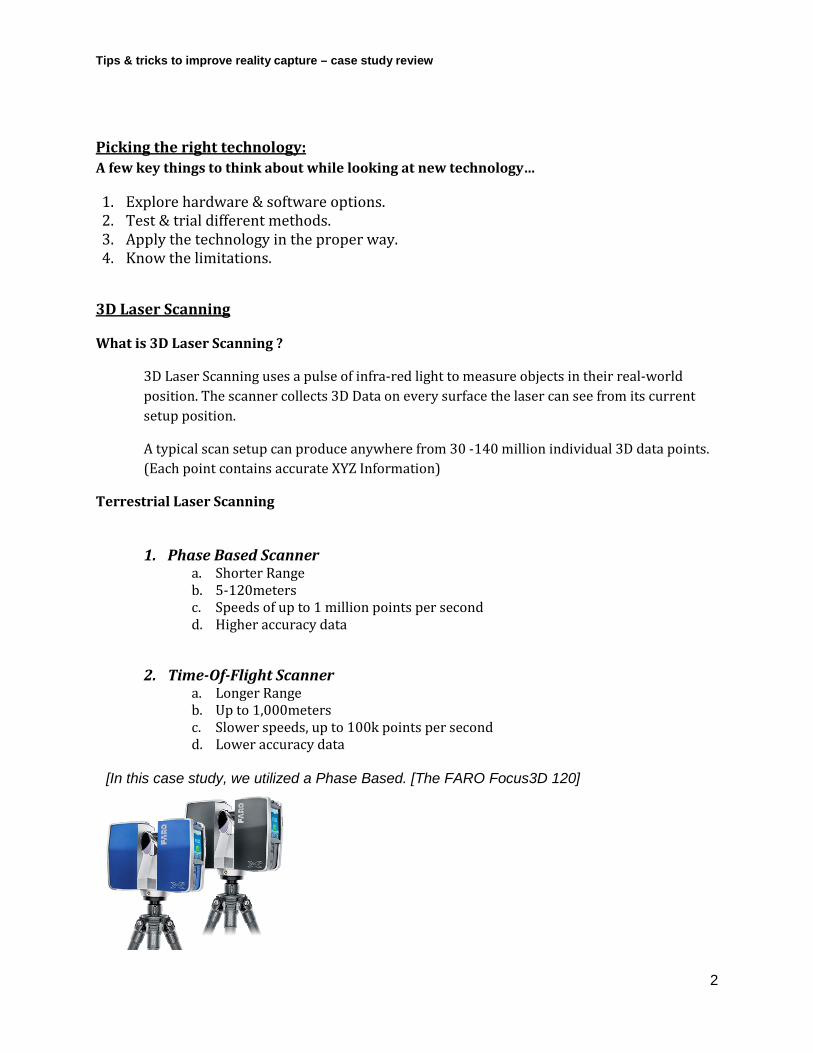
[In this case study, we utilized a Phase Based. [The FARO Focus3D 120]
2
Tips & tricks to improve reality capture – case study review
Point Cloud After the field portion of “3D Laser Scanning” is complete, the scan data is brought back into the office for processing. There are multiple methods and software's that are used for the registration, clean up, and final point cloud creation. There are options to use reference targets, or cloud 2 cloud registration. Either way the final product from registration is a complete, accurate point cloud.
(You can picture this process as a puzzle. When you open the box you have individual puzzle pieces. “Registration” takes all the individual pieces and puts them together.)
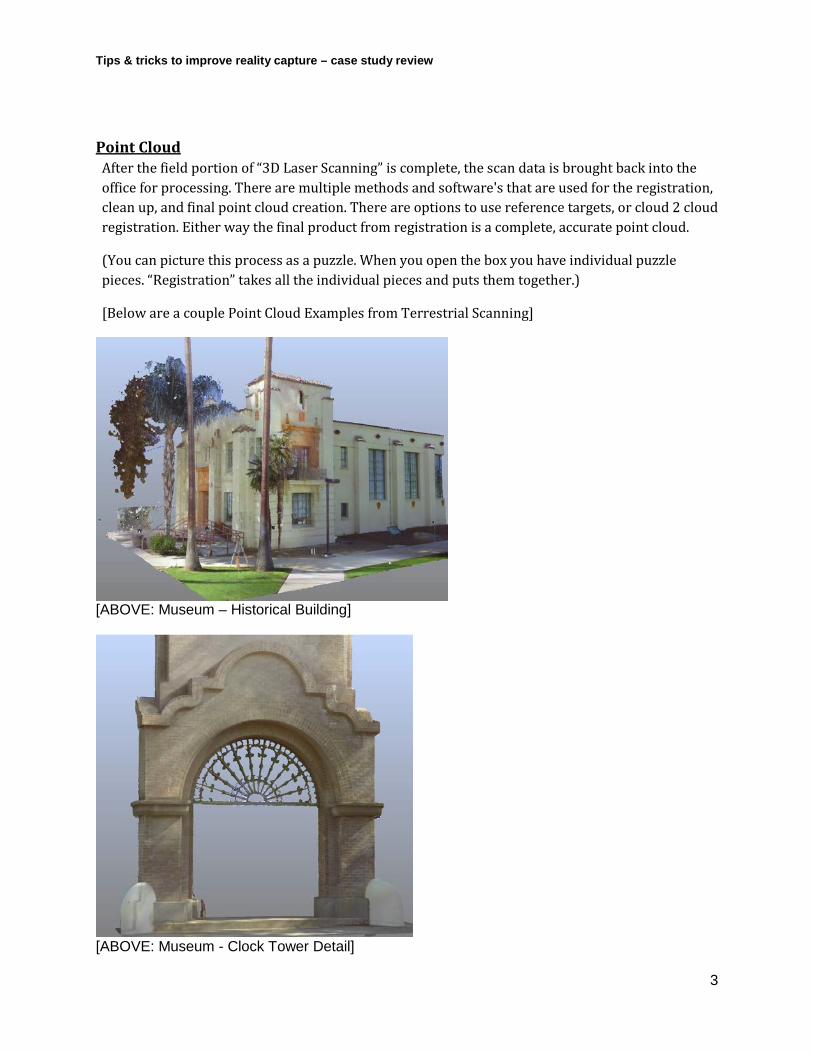
[Below are a couple Point Cloud Examples from Terrestrial Scanning]
[ABOVE: Museum – Historical Building]
[ABOVE: Museum - Clock Tower Detail]
3
Tips & tricks to improve reality capture – case study review
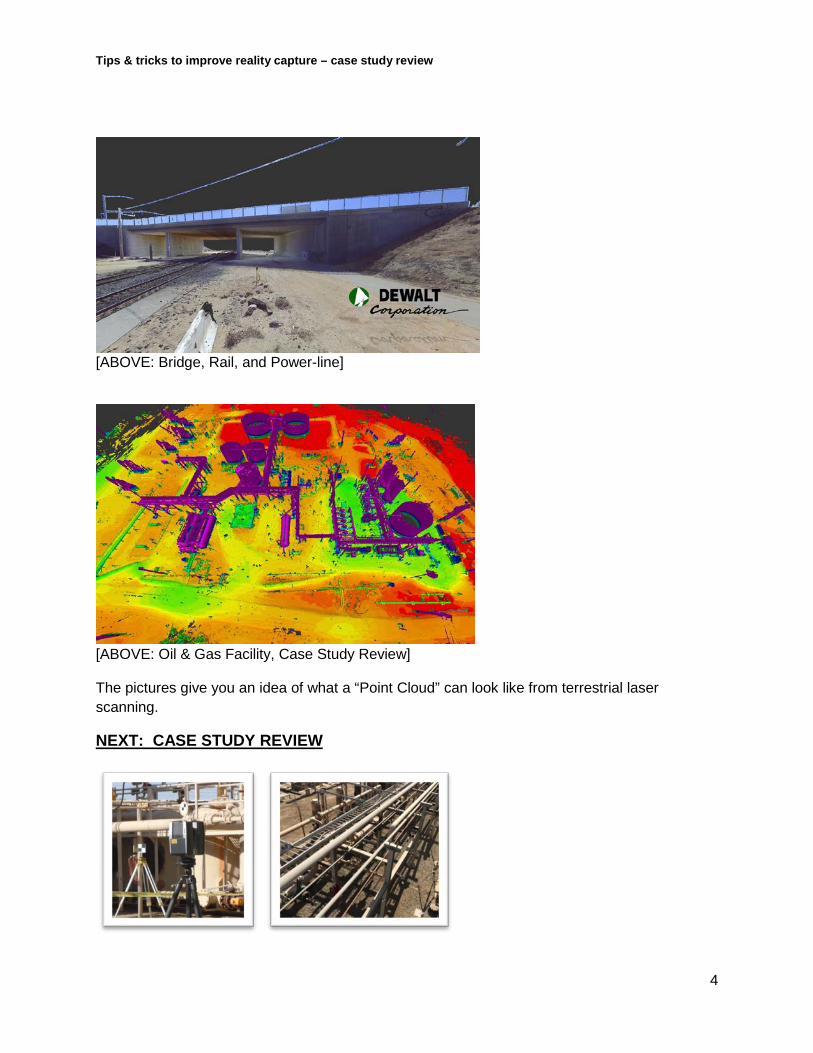
[ABOVE: Bridge, Rail, and Power-line]
[ABOVE: Oil & Gas Facility, Case Study Review] The pictures give you an idea of what a “Point Cloud” can look like from terrestrial laser scanning.
NEXT: CASE STUDY REVIEW
4
Tips & tricks to improve reality capture – case study review
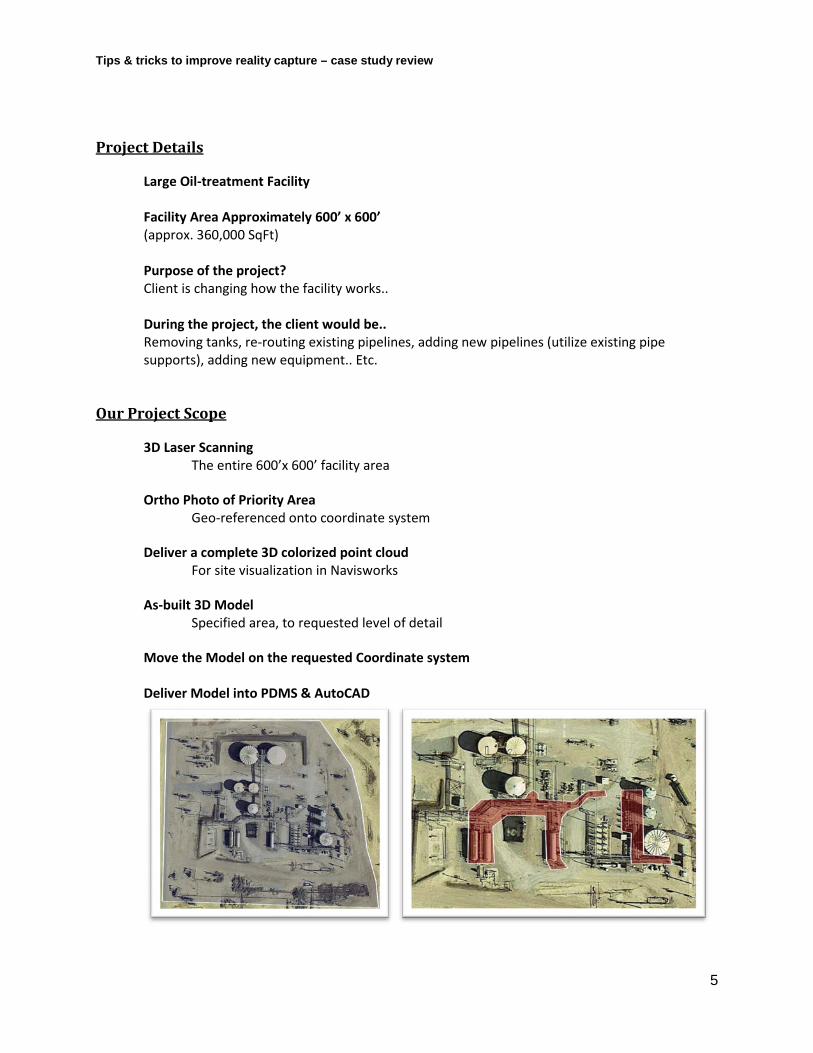
Project Details
Large Oil-treatment Facility
Facility Area Approximately 600’ x 600’ (approx. 360,000 SqFt)
Purpose of the project? Client is changing how the facility works..
During the project, the client would be.. Removing tanks, re-routing existing pipelines, adding new pipelines (utilize existing pipe supports), adding new equipment.. Etc.
Our Project Scope
3D Laser Scanning The entire 600’x 600’ facility area
Ortho Photo of Priority Area
Geo-referenced onto coordinate system
Deliver a complete 3D colorized point cloud For site visualization in Navisworks
As-built 3D Model
Specified area, to requested level of detail
Move the Model on the requested Coordinate system Deliver Model into PDMS & AutoCAD
5
Tips & tricks to improve reality capture – case study review
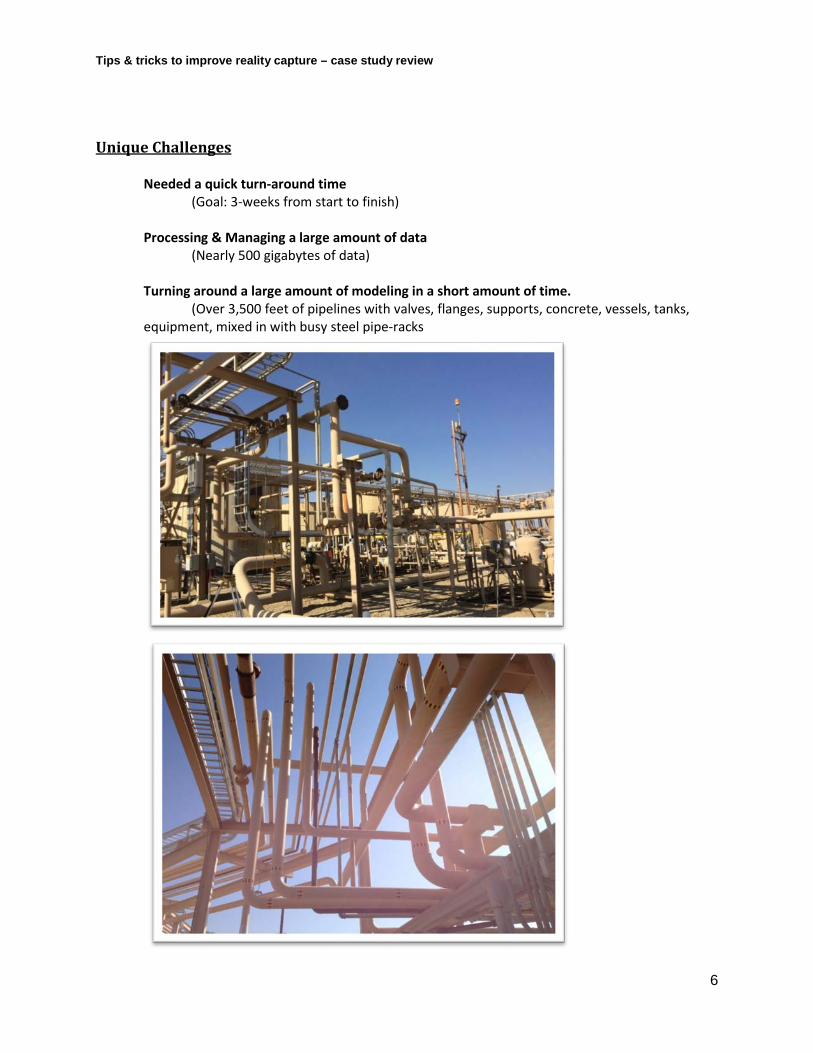
Unique Challenges
Needed a quick turn-around time (Goal: 3-weeks from start to finish)
Processing & Managing a large amount of data
(Nearly 500 gigabytes of data)
Turning around a large amount of modeling in a short amount of time. (Over 3,500 feet of pipelines with valves, flanges, supports, concrete, vessels, tanks,
equipment, mixed in with busy steel pipe-racks
6
Tips & tricks to improve reality capture – case study review
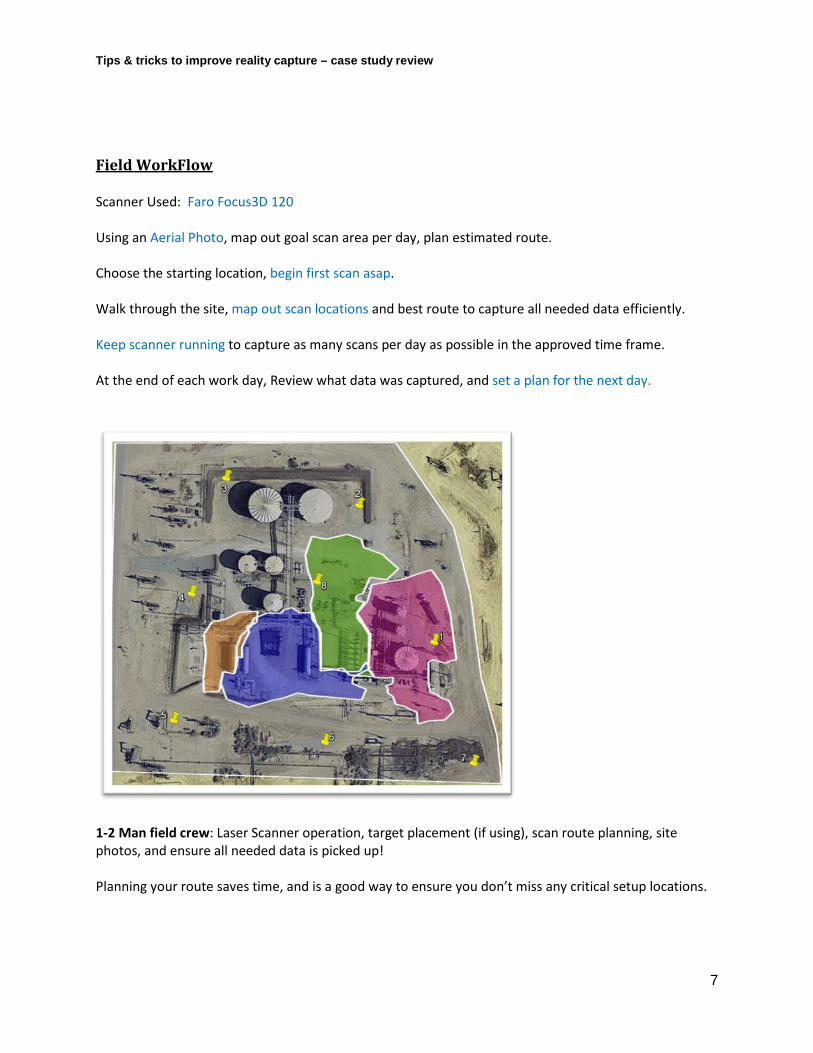
Field WorkFlow Scanner Used: Faro Focus3D 120
Using an Aerial Photo, map out goal scan area per day, plan estimated route.
Choose the starting location, begin first scan asap.
Walk through the site, map out scan locations and best route to capture all needed data efficiently.
Keep scanner running to capture as many scans per day as possible in the approved time frame.
At the end of each work day, Review what data was captured, and set a plan for the next day.
1-2 Man field crew: Laser Scanner operation, target placement (if using), scan route planning, site photos, and ensure all needed data is picked up! Planning your route saves time, and is a good way to ensure you don’t miss any critical setup locations.
7
Tips & tricks to improve reality capture – case study review
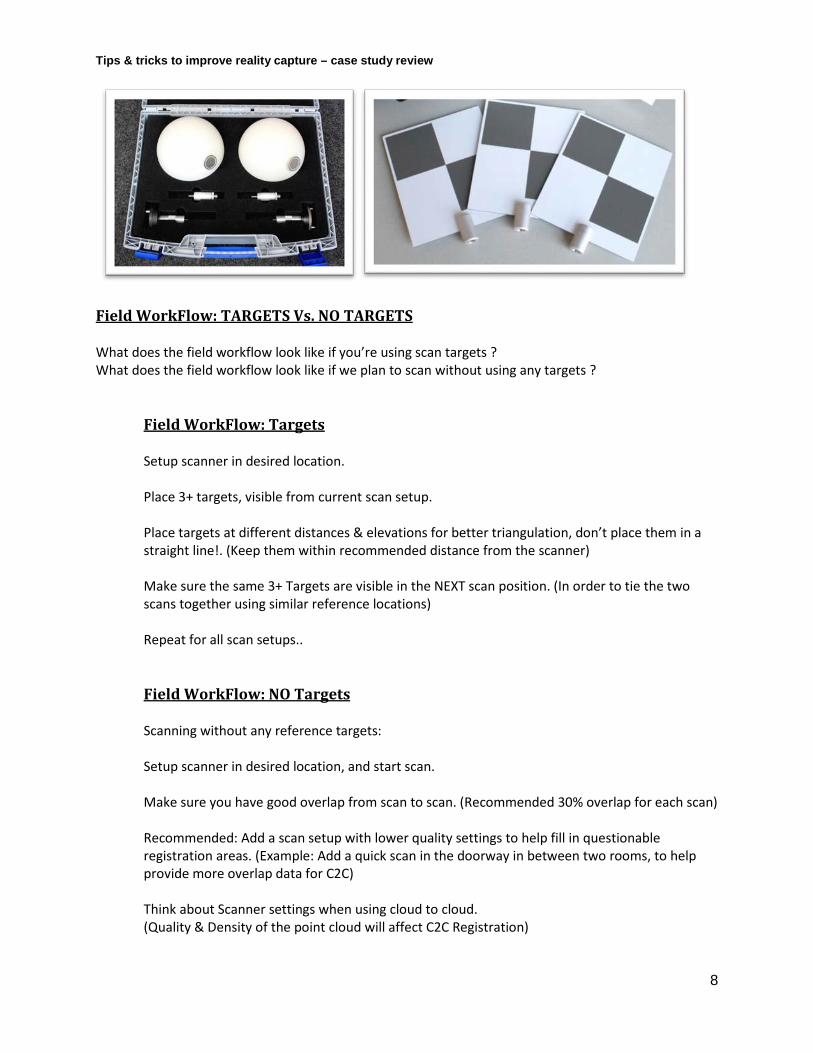
Field WorkFlow: TARGETS Vs. NO TARGETS What does the field workflow look like if you’re using scan targets ? What does the field workflow look like if we plan to scan without using any targets ?
Field WorkFlow: Targets
Setup scanner in desired location. Place 3+ targets, visible from current scan setup. Place targets at different distances & elevations for better triangulation, don’t place them in a straight line!. (Keep them within recommended distance from the scanner) Make sure the same 3+ Targets are visible in the NEXT scan position. (In order to tie the two scans together using similar reference locations) Repeat for all scan setups..
Field WorkFlow: NO Targets
Scanning without any reference targets: Setup scanner in desired location, and start scan. Make sure you have good overlap from scan to scan. (Recommended 30% overlap for each scan) Recommended: Add a scan setup with lower quality settings to help fill in questionable registration areas. (Example: Add a quick scan in the doorway in between two rooms, to help provide more overlap data for C2C) Think about Scanner settings when using cloud to cloud. (Quality & Density of the point cloud will affect C2C Registration)
8
Tips & tricks to improve reality capture – case study review
Data Processing Workflow
Step 1. Save a backup copy of original “Raw Scan Files”..
Step 2.
Scan Registration. Target based, or Cloud 2 Cloud (In this project, we used Autodesk Recap Pro – Cloud2Cloud)
Data Processing: REGISTRATION
1. Bring Scans into Autodesk Recap Pro 2. Register Scans Using Cloud to Cloud Registration 3. Index scans into Autodesk recap 4. Export to desired point cloud file format 5. Data is ready to import into preferred Modeling Software
Autodesk Recap Pro (Our Experience) Pros No targets during field scanning process! Overall faster laser scanning, not having to move targets and check sight alignment with targets etc. Provides AutoCad familiar point cloud files. (Rcs, Rcp, if you use CAD Softwares, such as Navisworks) Cons Software was brand new, and has some kinks that need to be worked out. (Stability: crashing randomly, not keeping your progress when saving a project and re-opening it..) When not using any external targets or references, the “quality report” wasn’t as detailed. (So make sure to setup your own Quality Check / Reporting, as some clients may request it.) (NOTE: These Pros / Cons were written based off the version of Recap that was used at the time of the project. Autodesk has already made significant improvements, and additions.)
9
Tips & tricks to improve reality capture – case study review
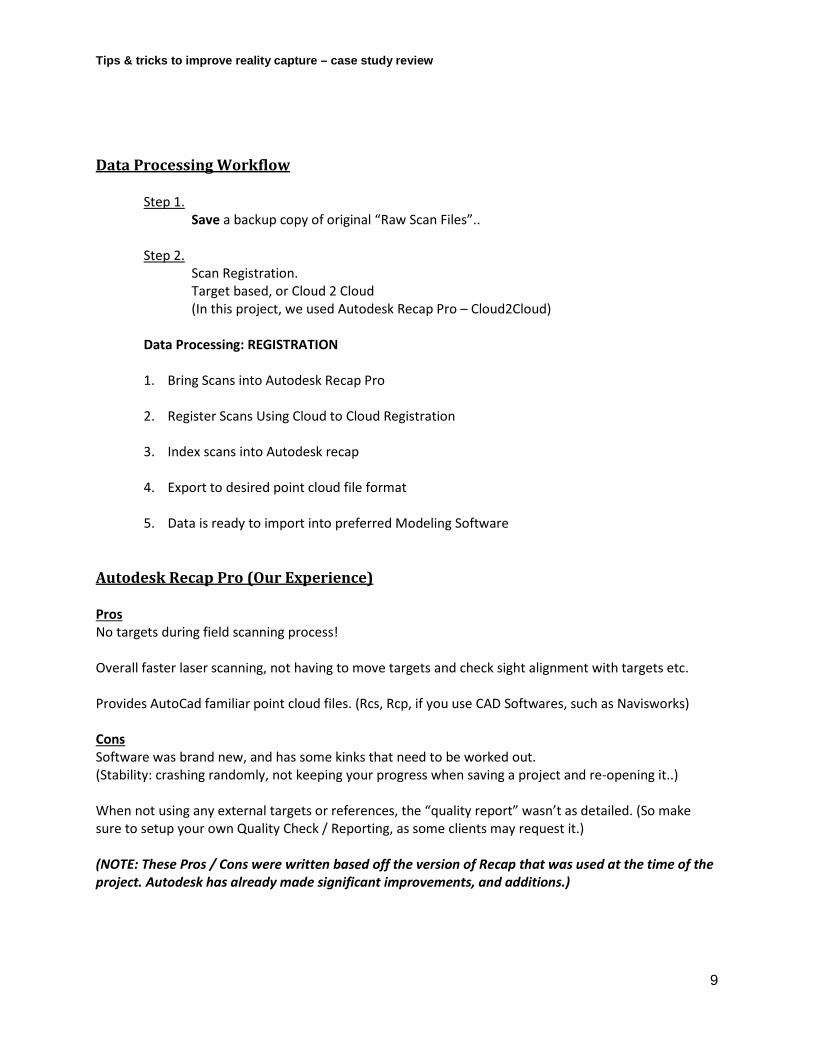
Autodesk Recap Pro (Suggestions) For the first trial, you can trial Autodesk Recap Pro by using raw scans from a past project, go through the registration process and review the outcome of the registered point cloud. If you want to try target-less registration on a project, complete scanning with your normal methods (using targets) and register it both with your current software, and with Autodesk Recap Pro. Compare the time and quality of the registered point clouds. Autodesk Recap Pro (Overall Comments) Our Overall Experience with Recap Pro on this project. The data looks great, the registration process is simple, and the interface is very clean and easy to use. We will be using Recap on future projects. We don’t feel confident enough to use it on every project, However we’re confidant using it on small-mid size projects (10-50 Scans) with the right type of environment & features. Autodesk is doing a great job with recap, and we’re definitely looking forward to seeing them continue to develop and expand its capabilities. 3D Modeling
1. Modeling Workflow on this project:
2. Import registered scans into modeling software. (On this project, we used Edgewise Plant & INOVx RealityLINx)
(SEE NEXT PAGE)
10
Tips & tricks to improve reality capture – case study review
3. Perform 3D Modeling of requested items in contract. (Tanks, Vessels, Steel Structure, Pipe supports, Ground Surface, Pipelines, Nozzles, Valves, Flanges, etc.)
4. Move model onto requested coordinate system
5. Export to AutoCAD & PDMS deliverable files
6. Quality Check, ensure model is complete to agreed level of detail
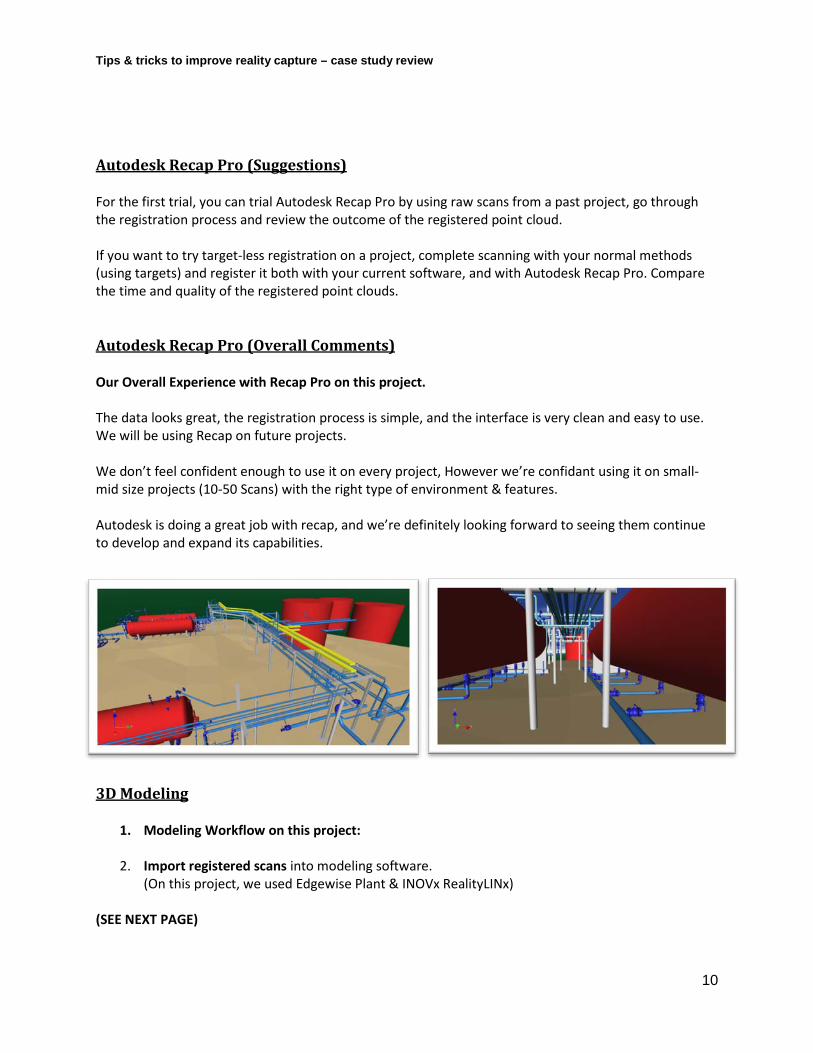
Automatic Feature Extraction
Edgewise Plant – ClearEdge3D
Processing Scans: Automatically creates the project point cloud in edgewise format, extracts pipelines, and an optional ground surface model Smart-sheet: Quality Inspection tools validate the extraction accuracy
Point Cloud in Edgewise
11
Tips & tricks to improve reality capture – case study review
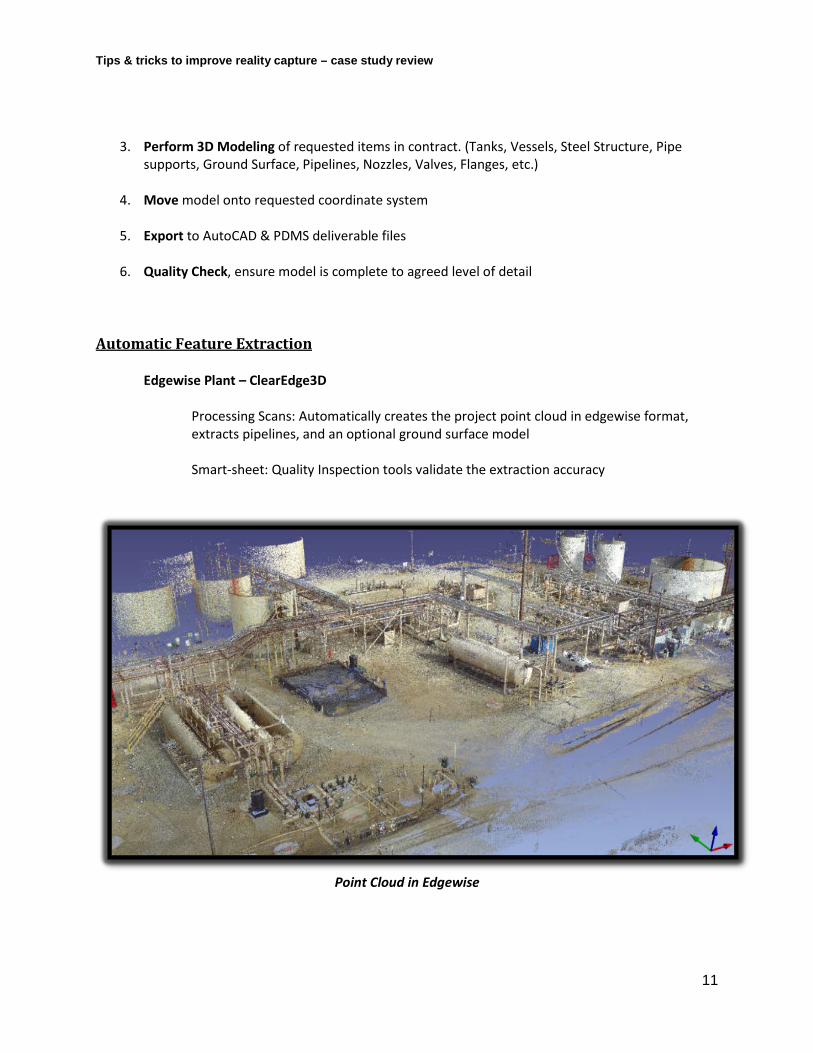
Auto-Extracted Pipelines
Edgewise can also model pipe components such as tee’s, reducers, flanges, valves, etc.
Edgewise Plant reduced the pipeline modeling time by 60-70%
12
Tips & tricks to improve reality capture – case study review
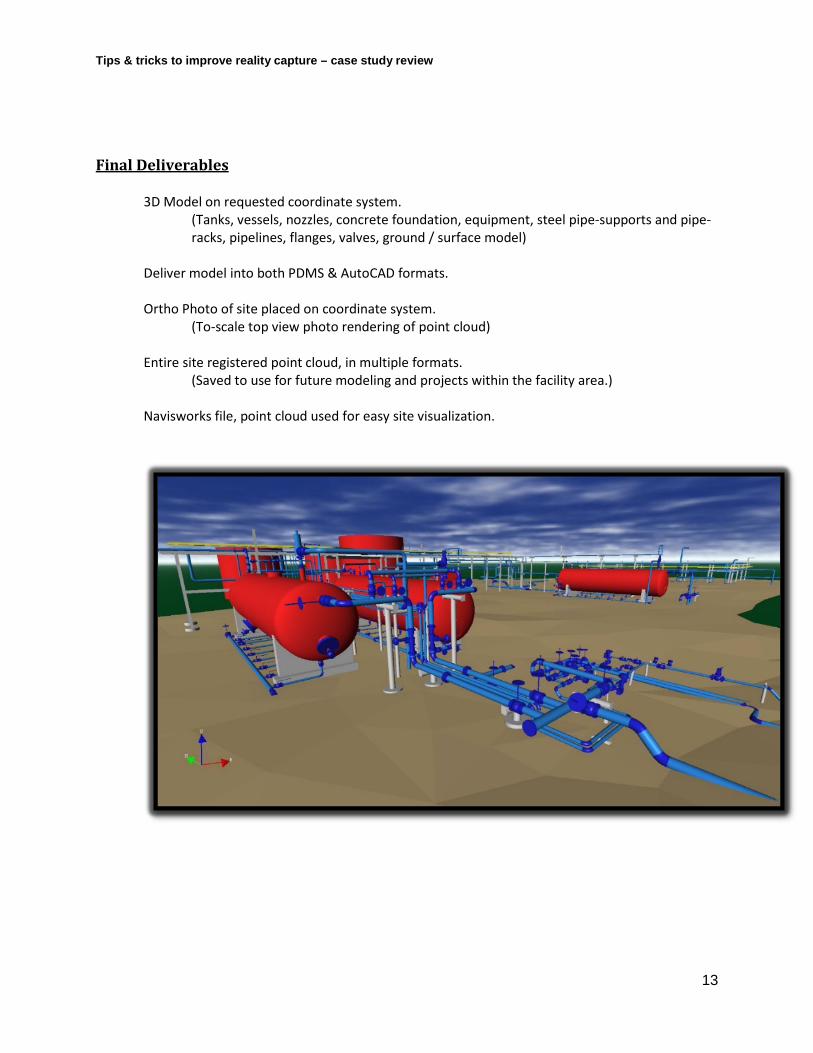
Final Deliverables
3D Model on requested coordinate system. (Tanks, vessels, nozzles, concrete foundation, equipment, steel pipe-supports and pipe-racks, pipelines, flanges, valves, ground / surface model)
Deliver model into both PDMS & AutoCAD formats. Ortho Photo of site placed on coordinate system.
(To-scale top view photo rendering of point cloud) Entire site registered point cloud, in multiple formats. (Saved to use for future modeling and projects within the facility area.) Navisworks file, point cloud used for easy site visualization.
13
Tips & tricks to improve reality capture – case study review
As-built Project: Tips & Tactics
1) Visit the site! This is critical on any large project, estimating the unknown can be risky! (and expensive!)
2) Communication and a working relationship with your client is KEY!
3) Be very specific in your communication with clients, and your contract: -Exactly what is to be modeled -To what level of detail
4) Workflow Planning: Who will be handling what task ? What software will you be using ? Know the answer to these questions before the project even starts!
5) Safety: All personal safety equipment is up-to-date ? Are there any specific requirements or guidelines we need to follow while working in this facility ?
6) Control QC shots ensure awareness of possible registration issues. (Placed Survey grade control points around and through the site, used the XYZ coordinates from the survey control to compare to point cloud XYZ information.)
7) Save & BACK-UP your work on a daily / hourly basis!.. (When software decides to crash, or technology shuts down, you will be prepared to pick up where you left off, instead of losing days, and hours of work..)
8) Predefine a rotation and translation scheme prior to execution of modeling (If placing on a coordinate system is requested)
9) Integrate new tools into your workflow, that offer time savings and value to both you and your client! (such as Autodesk Recap and Edgewise Software)
10) Last but not least.. CUSTOMER SERVICE! Be personable! When you hand over the final deliverable, ask them to review and give feedback. (IE. How could we make our next project even more efficient and customized for you?)
14