tiled hexagon tessellation
DESCRIPTION
origamiTRANSCRIPT

Tiled Hexagon TessellationI called this fold a tiled hexagon, for lack of a better term. In essence it’s just a folded demonstration of a pure hexagonal tessellation- hexagons are one of the three polygons that can fully tessellate a plane (triangles, quadrilaterals, and hexagons).
The actual “top” of this pattern forms a flat plane of hexagons; the really interesting part is the “bottom” which is made up of triangu-lar squashed twist folds. This particular sort of fold is a basic ele-ment in many origami tessellation patterns, whether it be a trian-gle, square, hexagon, or other polygonal unit. It allows the excess material that builds up at crease intersections to be dispersed in a flat-foldable way which is also usually quite fun to fold. I think of it as something similar to popping bubble wrap.
While the crease pattern(s) for this fold are usable, the model usu-ally folded initially from a standard precreased sheet of paper, us-ing the 60 degree creasing method listed at the end of this document. Initial hexagonal shapes are roughed out from the precreased sheet, and the crease intersections are folded with the squashed twist. This becomes rather easy once you get the hang of it. I’ve included a simple single squashed twist fold to try out as an example.
Everything I release is available online at http://www.origamitessellations.com.
-Eric Gjerde
This document is released under the Creative Commons Attribution-NonCommercial-NoDerivs 2.0 license. This allows you to freely copy, distribute, display, and perform this work under the following conditions:
Attribution: You must give the original author credit.
Noncommercial: You may not use this work for commercial purposes.
No Derivative Works: You may not alter, transform, or build upon this work.
Any of these conditions can be waived if you get permission from the copyright holder (Eric Gjerde, [email protected]).
Your fair use and other rights are in no way affected by the above.
The full legal license is available at: http://creativecommons.org/licenses/by-nc-nd/2.0/
Origami Tessellations Eric Gjerde
2005-06-08 www.origamitessellations.com
Squashed Twist Fold

Origami Tessellations Eric Gjerde
2005-06-08 www.origamitessellations.com
Roughing out the initial hexagons Shaping the first crease intersection for squashing.
Squashing the crease intersection Notice the orientation of the surrounding pleats.
First ring of squashing and creasing complete. Just repeat the pattern
from this point on.
The completed fold, fully tessellating the plane of this paper.

This tessellation makes a very attractive pattern when held up to a light. The folding structure locks the paper together, so you could fold additional things with a sheet of this tessellated pattern if you so desired. The squashed twist fold is a basic building block of folded tessellations, so it’s a good fold to add to your repertoire.
Origami Tessellations Eric Gjerde
2005-06-08 www.origamitessellations.com
The Crease Patterns
Origami Tessellations Eric Gjerde
2005-06-08 www.origamitessellations.com
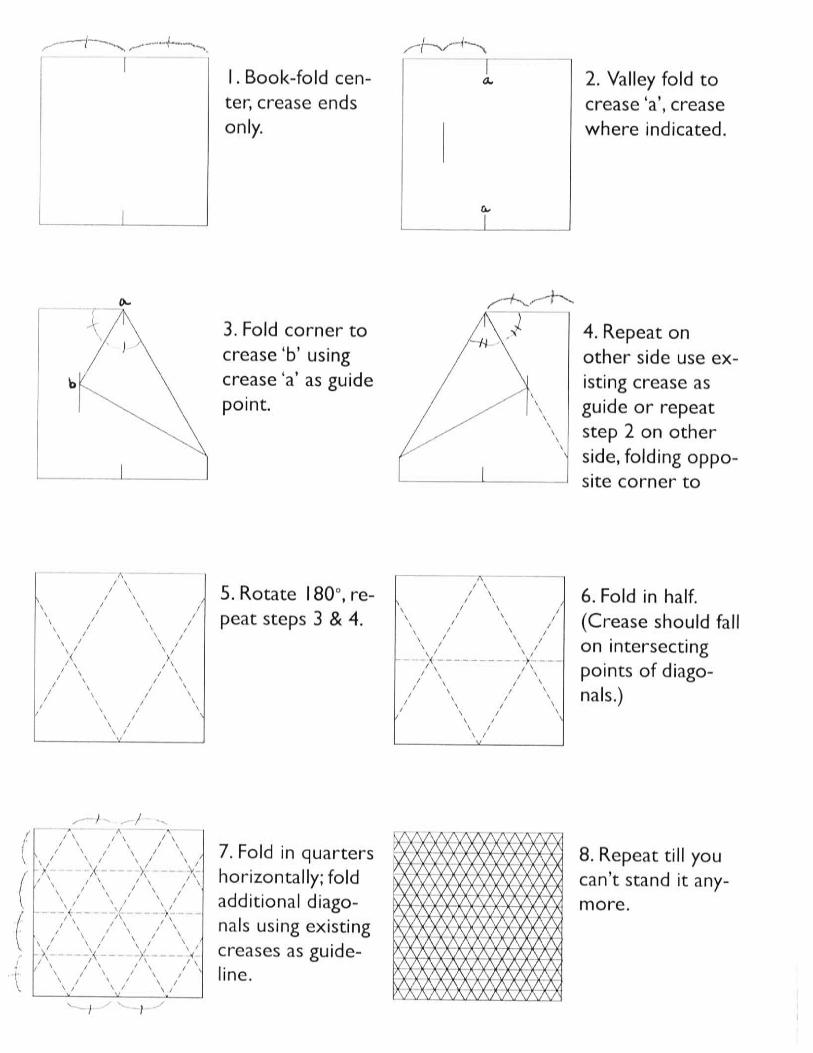
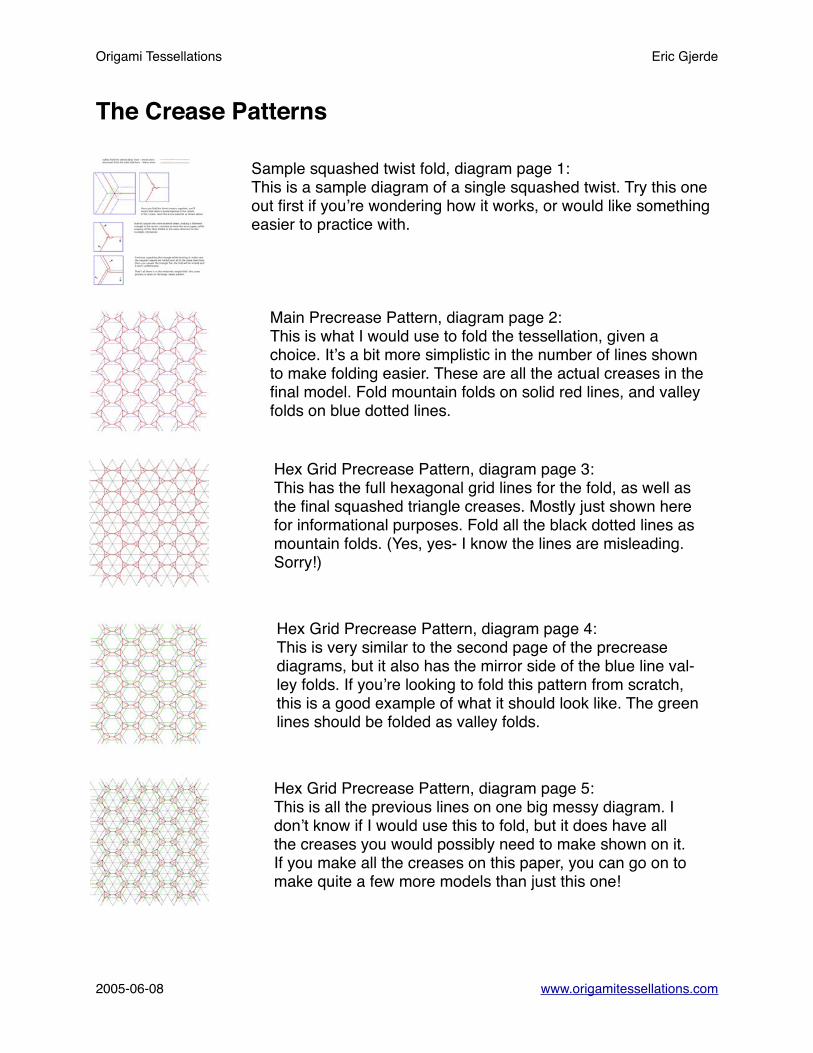
Sample squashed twist fold, diagram page 1:This is a sample diagram of a single squashed twist. Try this one out first if you’re wondering how it works, or would like something easier to practice with.
Main Precrease Pattern, diagram page 2:This is what I would use to fold the tessellation, given a choice. It’s a bit more simplistic in the number of lines shown to make folding easier. These are all the actual creases in the final model. Fold mountain folds on solid red lines, and valley folds on blue dotted lines.
Hex Grid Precrease Pattern, diagram page 3:This has the full hexagonal grid lines for the fold, as well as the final squashed triangle creases. Mostly just shown here for informational purposes. Fold all the black dotted lines as mountain folds. (Yes, yes- I know the lines are misleading. Sorry!)
Hex Grid Precrease Pattern, diagram page 4:This is very similar to the second page of the precrease diagrams, but it also has the mirror side of the blue line val-ley folds. If you’re looking to fold this pattern from scratch, this is a good example of what it should look like. The green lines should be folded as valley folds.
Hex Grid Precrease Pattern, diagram page 5:This is all the previous lines on one big messy diagram. I don’t know if I would use this to fold, but it does have all the creases you would possibly need to make shown on it.If you make all the creases on this paper, you can go on to make quite a few more models than just this one!

Valley Fold the dotted blue lines - these ones:Mountain Fold the solid red lines - these ones:
Once you fold the three creases together, youʼllnotice that there is extra material in the centerof the crease. twist this extra material as shown above.
Start to squash the extra material down, making a flattenedtriangle in the center. continue to twist the extra paper, while keeping all the flaps folded in the same direction (in thisexample, clockwise).
Continue squashing the triangle while twisting it; make surethe angular creases are folded over all in the same directions.Once you squash the triangle flat, the fold will be locked and it wonʼt unfold easily. Thatʼs all there is to this relatively simple fold- this sameprocess is done on the large crease pattern.