the berlin wall in nato chess berlin wall in nato chess - with... · the berlin wall in nato chess...
TRANSCRIPT

The Berlin Wall in NATO Chess
Jan Cheung, 1 March 2017
Last year one of the games had its premiere. For the first time in the history of NATO Chess, a Berlin
Defence made its debut. So far I had never seen this middle game at amateur level! The Berlin
Defe e, i k a ed The Be li Wall , is a st ategi iddle ga e ithout uee s, diffi ult to pla from both white and black. It is mostly played at 2600+ grandmaster level when black is happy with a
draw. Amateurs do not play this defence because in open tournaments, black should create chances
to win the game. Even the top 12 of women chess do not play this defence. A reason may be that the
Berlin Defence requires sophisticated play from both sides.
A minor reason for black not to play the Berlin Defence is that in one side variation, white can force a
draw by repetition of moves. Hundreds of games between grandmasters have been played in this
manner, to get around the Sofia rule. To avoid spoiling my chess creativity, I will not show you this
variation.
In this article I want to show you some ideas of the Berlin Defence, with the game played in the 3rd
round of the 2016 NATO Chess Championship. You do not have to know much theory about the
Berlin Defence to understand the middle game concepts.
Pietruszewski, Marcin (2163) – Nielsen, Morten Majlund (2004)
C67 NATO-ch 27th
Shrivenham (3.8) 23.08.2016
1.e4 e5 2.Nf3 Nc6 3.Bb5
We start with the Ruy Lopez.
…Nf6
Black has many options at the 3rd
move. By attacking the pawn at e4 he makes clear that he is willing
to play the Berlin Defence. Does white accept this?
4.0-0
Yes, he accepts! In the last couple of years grand masters of ELO 2700+ regularly play 4.d3 to prevent
the Berlin Defence, because of its high drawing chances.
…Nxe .d Nd .Bx dxc6 7.dxe5 Nf5 8.Qxd8+ Kxd8

This is the key position of the Berlin Defence. The history of this middle game is surprisingly young. In
the 19th
century, the verdict was that whites position is superior because black has 2 weaknesses.
Weaknesses of black
1. Black has lost the right to castle. As a result, it costs much time to bring the rooks into play.
2. If we took all the pieces of the board, white would win the resulting pawn ending because he can
create a passed pawn at the king side while black cannot create a passed pawn at the queen side,
due to the double pawns at the c file.
With this verdict, strong players in the 19th
century did not pay much attention to the Berlin Defence,
until it became into attention in 2000 when Kramnik used it as a successful defence weapon in his
match against Kasparov. His preparation team discovered that blacks weaknesses are balanced by
whites weaknesses.
Weaknesses of white
1. White has lost the bishop pair.
2. The pawn at e5 and whites dark coloured bishop are placed on the same colour. The pawn
structure of white in the Ruy Lopez Exchange Variation (1.e4 e5 2.Nf3 Nc6 3.Bb5 a6 4.Bxc6 dxc6)
is therefore better than the pawn structure of white in the Berlin Defence,
Coupled with weaknesses of white are strong points for black.

Strong points for black
1. Squares around pawn e5, especially square f5. As a result, white has difficulties to create a
passed pawn at the king side.
2. Black has a bishop pair.
3. After trading rooks, the black king can move easier to the center than whites king.
Coupled with weak spots and strong points, we get strategy play for both sides.
Strategy play for black
If blacks succeeds trading 1 or 2 pair of rooks, he has got a good end game, due to the fact that the
bishop pair and the better king position will count.
Strategy play for white
White task: keep as much as pieces at the board, control square f5, put a knight at e4 or g5, exchange
one of blacks bishops, try to break with e5-e6 to activate the bishop, create a passed pawn at the
king side.
It is not a simple task for both sides. Nowadays, this Defence seems to be a night mare for top
grandmasters who wants to win with 1.e4 and many players switched to 4.d3 to get a closed Italian
position.
Let us go back to the game.
9.Rd1+
It is difficult to say whether rook is best placed at square d1. If white chooses to place the other rook
to d1, then the following variation could be played:
9.Nc3 Ke8 10.h3 h5 (This move secures square f5 and it also develops blacks worst piece, the rook at
h8) 11.Bf4 Be7 12.Rad1 Be6 13.Ng5! (Attacking the bishop pair. Without a bishop pair, black would
have fewer attacking options …Rh ! A i ge ious defe e. The ook ill defe d the d o 14.g3 (White does not trade at e6 as this makes his e5 pa eak … B g .B g Rg .h f6
17.exf6 gxf6 18.Bf4 Nxh4 19.f3 Rd8

With an equal position. Many pieces have been traded and many games ended in a draw. Let us go
back to the game.
…Ke .N
…h6
Black could play 10...Be7 11.h3 h5! to set up a defence with Rh8-h6 to cover the 6th rank. Perhaps
black was worried about 11.Bg5 in which he ill lose the ishop pai , ut the positio afte …B g 12.Nxg5 Ke7 offers black adequate counter play because black has control of the light squares
around pawn e5. White has difficulties to create a passed pawn at the king side.
11.h3 Be7
A e i te esti g optio as …Nf !?, putti g the k ight at g a d the ishop at f .
12.b3

Exercise
Choose between A) … a d B …Be .
Solution
Black has only one task: exchange 1 or 2 pairs of rooks and activate the king to control the
weak squares around pawn e5. This could be done with 12...Be6 13.Bb2 Rd8. In this position black
has no weak squares around his pawns.
Let us go back to the game.
…
Black wants to develop the bishop at b7 and at a later moment play c6-c5 to activate the bishop. This
method has one disadvantage: after c6-c5 the squares around c5 become weak. This means that
…Be is a ette optio tha … .
13.Bb2 c5?
Too early. Square d5 becomes too weak. Better was first putting the pieces to better squares before
pla i g a pa o e. A o e like …B follo ed Ra -d8 exchanging a rook, deserves attention.
14.Nd5 Bd8
Now white takes over the initiative, because the black pieces are placed at passive squares.
15.Rd2 Be6 16.Re1 Ne7 17.c4 Nc6 18.Nh2 Nb4 19.a3 Nc6

Bette as …N d . d Bg .Rdd Bf .Re Rd . In this position, black has nearly found the
best squares for his pieces.
20.f4 h5
Mo e a u ate as ….Na .Rd R , to eate ou te pla at the file afte .a .Ne .
21.Bc3 Ne7 22.g4?
Too early. There was time to put the knight at h2 to a better square with 22.Nf1 before putting the
pawn at g4.
….hxg .hxg
Exercise
Find blacks best move.
Solution
Pa f ill e eak afte …B d . d Rh ! .R Ng . Afte .f Nf ! White has p o le s to find good squares for his pieces!
Let us go back to the game.
…

Exercise
Choose between 24.Nxe7 and 27.Ne3.
Solution
White has more space and he should keep the knights with 24.Ne3.
Black does not have an optimal Berlin strategy - he should play h7-h5 in the middle game to prevent
g2-g4, but now he is forced to sit and wait.
After 23.Ne3 g6 25.Nf3 Bc7 (25...b5 only weakens pawn c5 and shouldn't be played) 26.Kg2 a5 27.a4
Rd8 28.Rdd1 Rxd1 29.Rxd1 there is nothing black can do about Nf3-g5-e4.
Let us go back to the game.
24.Nxe7? Bxe7 25.f5 Rh3!
Black gets counter play.
26.Bb2 Bg5 27.Rc2 Bc8 28.Kg2 Rxb3 29.Nf3 Be3 30.Rce2
There is nothing wrong with 30.Rh1
…Bd
Here the game ended in a draw. After 31.Bxd4 cxd4 32.e6 f6! 33.Nxd4 Rd3! the position is unclear,
for example 34.e7 Bd7 35.g5 fxg5 36.Rh1 Kf7 37.Nf3 Rxf3 38.Kxf3 Re8 39.Rhe1 Bxf5
½-½

Here are 10 exercises of some positions of the tournament.
Position 1
Position after 20...0-0. Choose between A) 21.c4 and B) 21.Nf6+
Position 2
Position after 61...Rb2xa2. White to move. Choose between A) 62.Rf7+ and B) 62.Rh4+

Position 3
Position after 22...Ra8-d8. White to move. Choose between A) 23.Bxd5 and B) 23.Rfe1
Position 4
Position after 33.Rb4-a4 Black to move.

Position 5
Position after 13...b6-b5. White to move. Choose between A) 14.a5 and B) 14.Re1
Position 6
Position after 30.Qd2-d1. Black to move.

Position 7
Position after 34.Kd4-c5. Black to move.
Position 8
Positio afte … -c3. White to play.

Position 9
Position after 38.Rb4xb5. Black to move.
Position 10
Position after 31.Nh4-f5+. Black to move.
Solutions
Position 1 is the game Pedersen - Krainski (3.5).
The battle is concentrated at square d5. Blacks threat is b7-b5, securing square d5 for his pieces. To
counter this threat, white can play 21.c4. Blacks only way of counter play is b7-b5. First he should
make d4-d u att a ti e pla i g …Rad .

This move also contests square d4. After 22.Rhf1 c5! 23.d5 Nd4! Black has got counter play. A better
move for white at the 22nd
o e is .N . Afte …N .Rhf . N ! .N Q
Black keeps control of square d5. After 26.Qxb5 cxb5 27.Rc1 white has a slight advantage, but black
a defe d this positio ith …f !? .g f e f .Rg f e .d e Kh .
In the game
21.Nf6+!?
was played. This move is from position point of view, sound. Black can win a piece but his bishop will
be out of play for a long time. In the mean while white has taken over control over the centre. Black
has no choice than accepting the piece e ause …Kh .Rhf Rad8 23.c3! (protects square d4)
gives black a position in which he can do nothing than accepting the offer. After
…exf .gxf
black is at a cross road.

1. …Bh
White will now try to support d4-d5 with
23.c4!
This move takes away square d5 for the black queen. Weaker is 23.Rhg1 Qd5! Now 24.Qxh5?
fails afte …B f . After 23.c4! the position is hard to assess. Important to note is that white
controls the centre which restricts blacks possibilities. Here are some possible continuations.
a. …Rfd .Rhg1 Rd7 25.Qc2 with a complicated position.
b. …Q .Rhg .Qxh x .Rxg + fxg .Qxg + Ng .Rf Rf .e Rxf6 30.Rxf6 Rf8 31.Rf7 with an unclear position.
2. …Bxf6 23.exf6.
The game continuation. In this position, black has eliminated whites pressure. The position is
somewhat equal. The game went as follows
…Rfe .Rhg Rad 25.Qf2 Kh7 26.Rdf1 Rd5 27.Bd2 Qd8 28.c3
Bla k o pla ed …Rf ? a d lost the esulti g e d ga e afte .Q f ! g f .R f Qd 31.Rxd5 cxd5 32.Re1. Better was
…Qd .
After
29.Bc1!? Rf8 30.Qd2 Rxf1 31.Rxf1
both sides have chances to win the game.
Conclusion: Both moves 21.c4 and 21.Nf6+ are playable, but 21.Nf6+ offers white more practical
chances to play for a win.
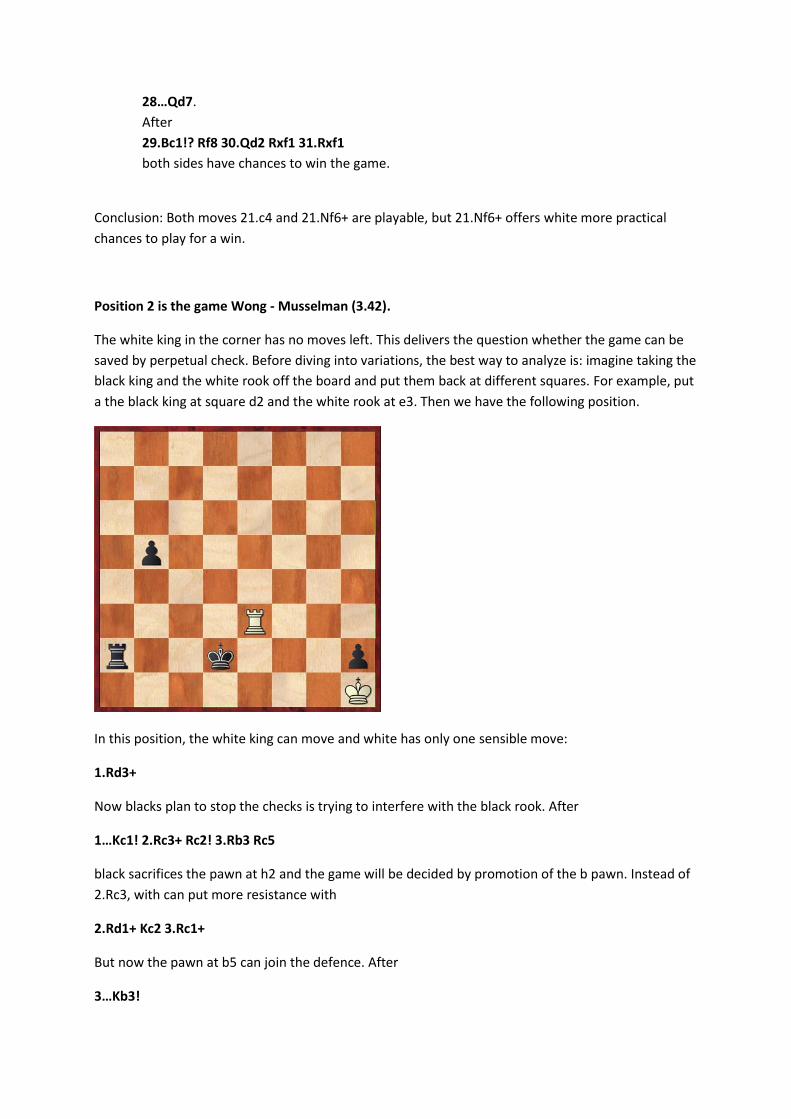
Position 2 is the game Wong - Musselman (3.42).
The white king in the corner has no moves left. This delivers the question whether the game can be
saved by perpetual check. Before diving into variations, the best way to analyze is: imagine taking the
black king and the white rook off the board and put them back at different squares. For example, put
a the black king at square d2 and the white rook at e3. Then we have the following position.
In this position, the white king can move and white has only one sensible move:
1.Rd3+
Now blacks plan to stop the checks is trying to interfere with the black rook. After
…K ! .R + R ! .R R
black sacrifices the pawn at h2 and the game will be decided by promotion of the b pawn. Instead of
2.Rc3, with can put more resistance with
2.Rd1+ Kc2 3.Rc1+
But now the pawn at b5 can join the defence. After
…K !

White is out of perpetual checks:
1. 4.Rc3+ Ka4
2. 4.Rb1+ Rb2 5.Rd1 Ka3! 6.Ra1+ Kb4
A conclusion we can draw with this analysis, is that black can escape perpetual check if the black king
can enter the second row. With this conclusion, we can solve the exercise. White should play
62.Rh4!+
After
…Ke .Rh +!
The white king cannot enter the second row, e ause …Kd ?? ill lose the ook afte .R h +. So black has to play
…Kd
Now that the black rook cannot interfere with the checks, white can continue with
64.Rd3+! Kd4 65.Rc3+ Kb4 66.Rb3+ Ka4 67.Rb4+
with perpetual check or stale mate. In the game white played
62.Rf7+?
And lost after
…Ke 63.Rf2 Ra8 64.Kxh2 Kd4 65.Kg3 b4.
Instead of 63.Rf2, a stubborn defence was
63.Rf4+
But this move also does not save the game. After

…Kd .Rf +
(For 64.Td4+ Kc2 we can use the analysis that the black king is able to escape the checks.)
…K .R +
(or 65.Rf2+ Kb3 66.Rf3+ Ka4 65.Rf4+ Ka5)
…Kd .R +
(or 66.Rb3 Ra5)
…Kd .Rd + K .R + K .R +
(or 69.Rc3+ Ka4)
…R .Ra K
White has no more checks and black can win the game by sacrificing the pawn at h2.
Position 3 is the game Krainski - Kersic (4.14).
Looking at the position, the first impression is that white has structural advantage.
More space
Active pieces
Strong squares
The question is whether these advantages are worth a trade for a pawn, resulting in a position with
bishops of different colours. The first impression is that winning the pawn is not advisable, if black
can improve the position of his pieces. After the game moves
23.Bxd5 exd5 24.Qxd5+ Be6
White has won a pawn, but the black pieces suddenly got some activity in a position of bishops of
different colours. The game ended in a draw.
Better was to continue improving the position of the pieces. With
23.Rfe1!
black cannot improve his position, for example:
…N e .Nd B .Qd
Preventing Nd5-f4. White has firm control of the position. Now a mo e like …N is ot pla a le. After 26.Nxc6.bxc6 27.Bxd5! exd5 28.Bc7! Rxe1+ 29.Rxe1 Rf8 30.Bd6! white wins material.
Position 4 is the game Keough - Tucker (4.16).

All of black pieces are performing defending tasks, while whites pieces are all active. Black has to do
something to restore the balance. The break f6-f5 will dissolve one of blacks weaknesses, the pawns
f6 and g6. Playing that move now, however, does not relieve the pressure. After
…f5 34.exf5 gxf5 35.Rg7+ Kb8 36.Kd3
Black has improved his pawn structure, but the activity of his pieces has not improved. This could be
done with the preparation move
… !
After
34.Ra8 f5! 35.exf5 gxf5 36.Rg7+ Kb6
The black king is active, and he is making room for the rook at c6, which can return into the game.
Co lusio : … ! is ore a urate tha …f .

Position 5 is the game Wagenaar - Marquandt (4.22).
The move 14.a5 has the disadvantage that pawn a5 will become weak. The rook at a1 will always be
tied with its defence. Furthermore, the move weakens square b5, a good square for the passive
knight at c7. After the game continuation
14.a5?! Re8 15.Re1 Bf8 16.Bf4 Nd7 17.Bc2 b4 18.Na4 h6 19.Qd3 g6 20.Bg3 Nb5
Black went on to win pawn a5.
14.Re1!
is the most multifunctional move:
Centralizing the rook
Making room for the bishop at d3 in case black plays c5-c4.
Keeping the tension at b5.
Preventing the active knight move Nc7-b5 in case black plays b5-b4.
After 14.Re1 black has to make a decision about how to cope with the pressure at b5.
1. … .
This move has the disadvantage that it weakens square c4. After
15.Nb1 Nh5 16.Nh2 g6 17.Nd2 Bg5
black best option is to trade off his bad bishop, but the weak square c4 assures white some
advantage:
18.Nc4 Bxc1 19.Qxc1 a5 20.Ng4 Ba6 21.Qd2 Bxc4 22.Bxc4.
The black knights are not active and white is ready for preparing e4-e5.
2. … .
This move gives black square c5 for his knight but because black has no pressure at pawn e4 yet,

the weakness of the squares d4 and c6 favors white. After
15.Bf1 Re8 16.Nd4 b4 17.Na2 a5 18.Bxc4 Nd7 19.Be3
black has sacrificed a pawn to activate his pieces, but the weaknesses at squares d4 and c6 favors
white.
3. …Qd .
The safest option. Black does not want to make a concession about his queen side pawns yet.
White now has to find a useful move.
15.Bf4
This move supports e4-e5.
…Nh .Bh .N f !?
This is the best moment for black because the knight at b1 is not active at the moment.
18.exf5 Rae8 19.Nbd2 Bf6
In this position black has sacrificed a pawn in return for some active piece play, but the
vulnerable position of Nh5 favors white. The safest move is now 20.Ra2.
Position 6 is the game Wells - Krainski (5.16).
Nearly all of black pieces are pointing to whites king position. White has some weak squares at the
king side: f3, f4 and h3. It is time to strike. After the game continuation
…Rxf !? 31.gxf3 Qh5+ 32.Kg1 Ngf4 33.Bxf4 Nxf4
White now has only one move to prevent Qh5-h3-g2#.
34.Re3

No a i po ta t o e t a ises. While thi ki g a out …R f la k should ha e studied the position after 34.Re3. Black has sacrificed the exchange for keeping strong squares around the white
king. In the game
…Bxd ?
was played. This move however, is tactically not justified. We will see that later. First let us see how
the game continued.
35.Rd3?
Now black corrects his mistake and finished the game in style.
…Qg + .Kf Qg + .Ke Bxf + .Nxf Qg + .Kd Qxf + .N Nxd .Kxd Rxf + .Ke Re3+ 0-1.
No let us go a k to the positio afte …B d .The fi st thi g ou asked ou self is, hat ill happen after
35.Qxd4 Qh3

It looks like there is nothing to do about Qh3-g2#, but the combination is not finished yet, because
white can give a check! The consequences of this check should always be calculated when you
o side …B d . Afte
36.Nf6+
the knight at f4 is suddenly undefended, so black should take this knight with
…Rxf
And the combination is still not finished yet! What to do after
37.Re8+
No …Kf fails afte .Rf +, so la k pla s
…Kg

Has the combination ended? Not yet! After
38.Rxc7+ Kg6 39.Qe4+ Kh5 40.Rg7
white has achieved the unthinkable performance to defend square g2 while keeping the exchange.
Black is completely lost. This ea s that …B d is ot pla a le a d that la ks o l o pe satio is keeping the pressure with
…Qh .Qf Qd
In this position, white has difficulties in defending the pawn at d4, for example
36.Rd1 Bxd4 This move is possible due to the vulnerable position of the white king.
36.Qd1 h5!? With ideas of Bg7-h6.
36.Ng3 Bxd4 37.Re4 Be5
Position 7 is the game Wells - Keough (7.19).
Black is a pawn up, but has difficulties in defending the position:
The black bishop at d7 is temporary out of play.
The dark squares are very weak.
The black king is temporary out of play
Besides attacking the rook at b6, white has two more threats:
Ra1-a8, permanently keeping the black king out of play.
Kc5-d6-e7, totally controlling the position.
The only move to defend these threats is
…R

After
35.Ra7 Be8 36.Kd6 Kf8
black has set up a sound defence.
Position 8 is the same game Wells - Keough (7.19).
In the end position, a draw was agreed, but white has a study like win:
44.Kf6! Kh7 45.Rf7+!
Not 45.Be8? Rg2.
…Kh6
Now white has 2 ways to win.
1. The best move: 46.Rg7
a. …c2 47.Rxg6+ Kh7 48.Rg5 Rb6 49.Be8 Rb7 50.Bg6+ Kh8 51.Bf7 Rxf7+ 52.Kxf7
b. …Rg .Bxe h .Bg Kh .h ! 2. A practical solution: 46.Bxe6
a. 46...c2 47.Rf8 Rb7 48.Bf7! Rxf7+ 49.Kxf7 Kh7 50.Rc8
b. …Rf 47.f5! c2 48.Rf8 Kh7 49.Rc8 d4 50.h4! d3 51.Bg8+Kh6 52.Rc7 Rxf5+ 53.Ke6
Rxe5+ 54.Kxe5 g5 55.Kf6 gxh4 56.Rh7#
Position 9 is the game Slaidins - Oltean (7.24).
White has problems to defend pawn h3. Taking at h3 now does not yield much because of the pin at
g3. After
…Rxh ? .Nf R h .Nxg Rxg .Ra fxg .Rf + Kg .Rxg Re .Rxe Re + .Kg Rxc2 46.Rb4
black has the initiative, but white has high drawing chances because there is not much material left.
There is another way to attack h3 by putting the knight at e3 first. After
…Ne ! .N
Or 39.Nf1 Rc7
…Nd6! 40.Rb4 Nc4

The knight will enter square e3 for a decisive attack at pawn h3.
Position 10 is the game Boudry - Ghiacy (7.48).
After
…Bxf .exf gxf
Not …g ? .f + Kh .h ! ith atta k.
33.Kh2 Kh7 34.gxf5 Rg8 35.Qf4 f6
The position is unclear.
With
31...gxf5! 32.gxf5+ Kh8!
black holds his extra pawn:
33.Qf4 Rg8+ 34.Kh2 Qg5 35.Qxg5 hxg5 36.fxe6 fxe6 37.Nf6 Rf8.