the american college of radiology national … american college of radiology national mammography...
TRANSCRIPT
The American College of Radiology
National Mammography Database
User Guide
October 14, 2010
American College of Radiology 1891 Preston White Drive Reston, VA 20191-4397
Copyright © 2010, American College of Radiology. All rights reserved.
NMD User Guide
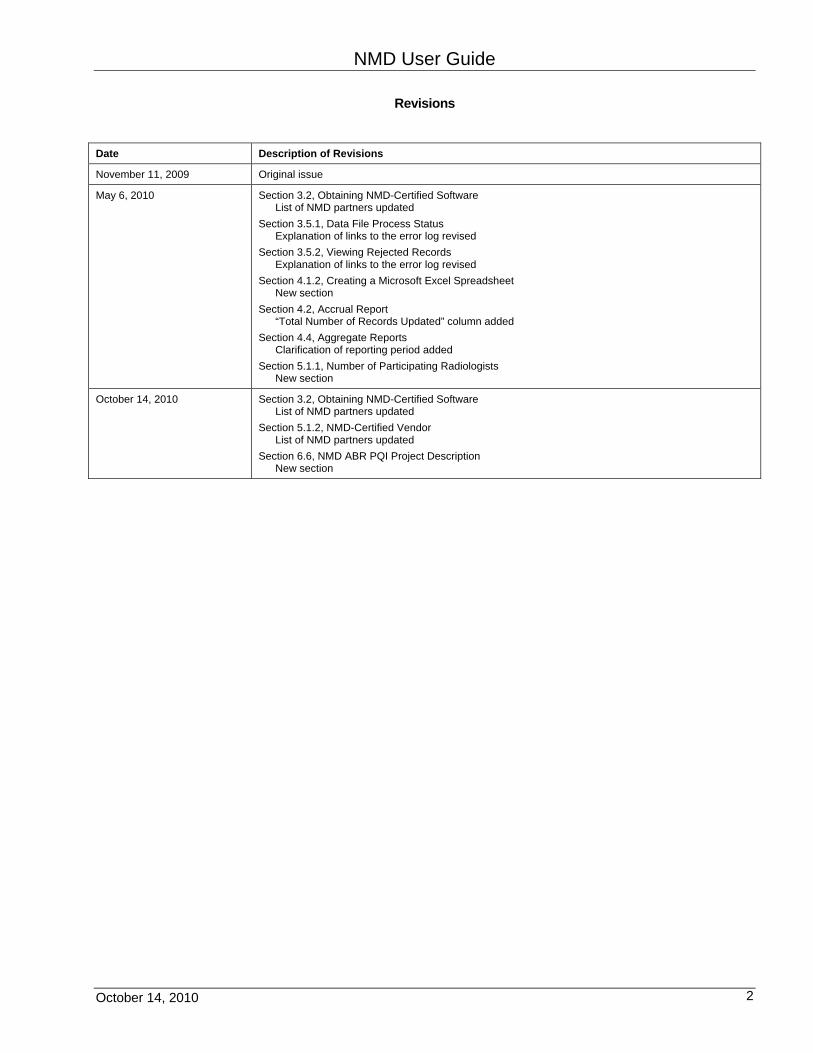
Revisions
Date Description of Revisions
November 11, 2009 Original issue
May 6, 2010 Section 3.2, Obtaining NMD-Certified Software List of NMD partners updated
Section 3.5.1, Data File Process Status Explanation of links to the error log revised
Section 3.5.2, Viewing Rejected Records Explanation of links to the error log revised
Section 4.1.2, Creating a Microsoft Excel Spreadsheet New section
Section 4.2, Accrual Report “Total Number of Records Updated” column added
Section 4.4, Aggregate Reports Clarification of reporting period added
Section 5.1.1, Number of Participating Radiologists New section
October 14, 2010 Section 3.2, Obtaining NMD-Certified Software List of NMD partners updated
Section 5.1.2, NMD-Certified Vendor List of NMD partners updated
Section 6.6, NMD ABR PQI Project Description New section
October 14, 2010 2
NMD User Guide
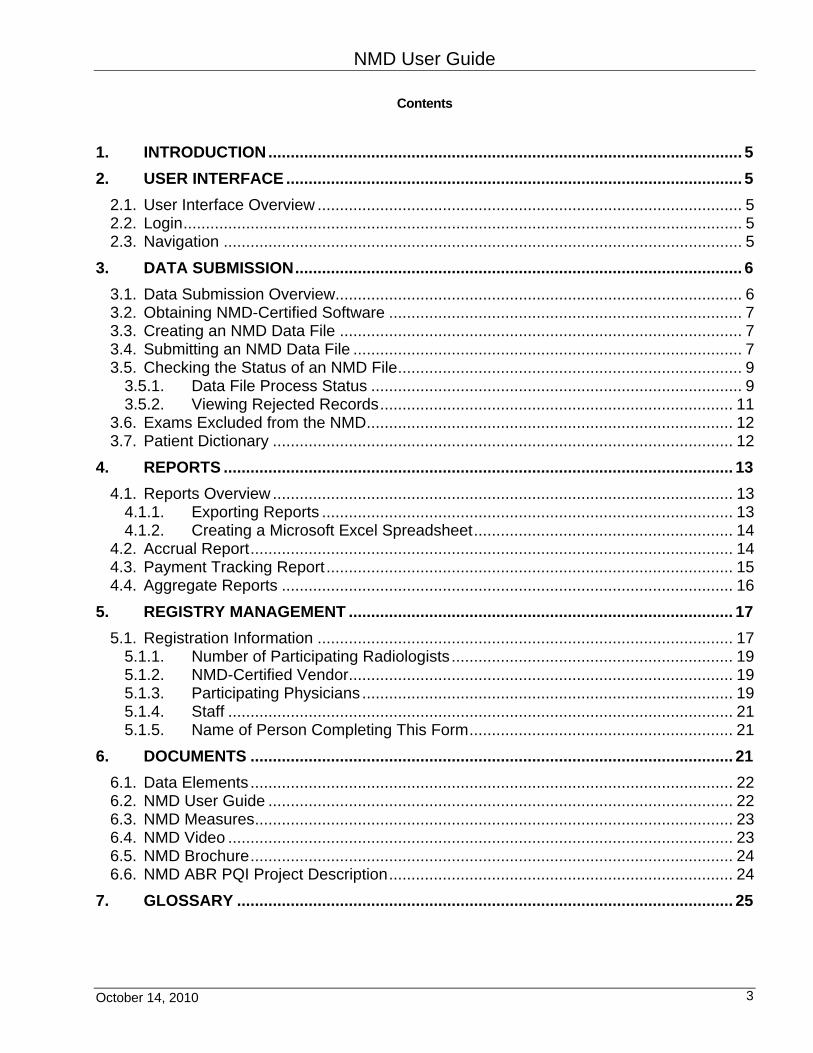
Contents
1. INTRODUCTION.......................................................................................................... 5
2. USER INTERFACE ...................................................................................................... 5
2.1. User Interface Overview ............................................................................................... 5 2.2. Login............................................................................................................................. 5 2.3. Navigation .................................................................................................................... 5
3. DATA SUBMISSION.................................................................................................... 6
3.1. Data Submission Overview........................................................................................... 6 3.2. Obtaining NMD-Certified Software ............................................................................... 7 3.3. Creating an NMD Data File .......................................................................................... 7 3.4. Submitting an NMD Data File ....................................................................................... 7 3.5. Checking the Status of an NMD File............................................................................. 9
3.5.1. Data File Process Status ................................................................................... 9 3.5.2. Viewing Rejected Records............................................................................... 11
3.6. Exams Excluded from the NMD.................................................................................. 12 3.7. Patient Dictionary ....................................................................................................... 12
4. REPORTS .................................................................................................................. 13
4.1. Reports Overview ....................................................................................................... 13 4.1.1. Exporting Reports ............................................................................................ 13 4.1.2. Creating a Microsoft Excel Spreadsheet.......................................................... 14
4.2. Accrual Report............................................................................................................ 14 4.3. Payment Tracking Report ........................................................................................... 15 4.4. Aggregate Reports ..................................................................................................... 16
5. REGISTRY MANAGEMENT ...................................................................................... 17
5.1. Registration Information ............................................................................................. 17 5.1.1. Number of Participating Radiologists ............................................................... 19 5.1.2. NMD-Certified Vendor...................................................................................... 19 5.1.3. Participating Physicians ................................................................................... 19 5.1.4. Staff ................................................................................................................. 21 5.1.5. Name of Person Completing This Form........................................................... 21
6. DOCUMENTS ............................................................................................................ 21
6.1. Data Elements ............................................................................................................ 22 6.2. NMD User Guide ........................................................................................................ 22 6.3. NMD Measures........................................................................................................... 23 6.4. NMD Video ................................................................................................................. 23 6.5. NMD Brochure............................................................................................................ 24 6.6. NMD ABR PQI Project Description............................................................................. 24
7. GLOSSARY ............................................................................................................... 25
October 14, 2010 3
NMD User Guide
THIS PAGE INTENTIONALLY LEFT BLANK
October 14, 2010 4
NMD User Guide
1. INTRODUCTION
The American College of Radiology’s (ACR’s) National Mammography Database (NMD) is part of the National Radiology Data Registry (NRDR), a web-based collection of registries related to various radiological procedures. Participating facilities provide data to the ACR by uploading files to the NMD website using NMD-certified mammography reporting software. In return, participants receive semi-annual reports comparing their data to aggregate data collected from all NMD sites.
You can access the NMD through the NRDR website at http://nrdr.acr.org. If you have any questions or difficulties using the website, please contact Lu Meyer, NRDR Administrator, by e-mail at [email protected], or by phone at 703-648-8958.
For more information on NRDR, refer to the NRDR User Guide, available on the NRDR website.
2. USER INTERFACE
2.1. User Interface Overview You must have a user type, user name and password to access the NMD. The person who registers your facility in NRDR is known as the Facility Administrator, and is assigned a user type, user name and password during the NRDR registration process. Other users at your facility are assigned a user type, user name and password when the Facility Administrator adds them to the NRDR User Dictionary. For information about the NRDR registration process, refer to Section 2, “Getting Started”, in the NRDR User Guide. For information about adding users to the User Dictionary, refer to Section 6.3.1, “Adding Users”, in the NRDR User Guide.
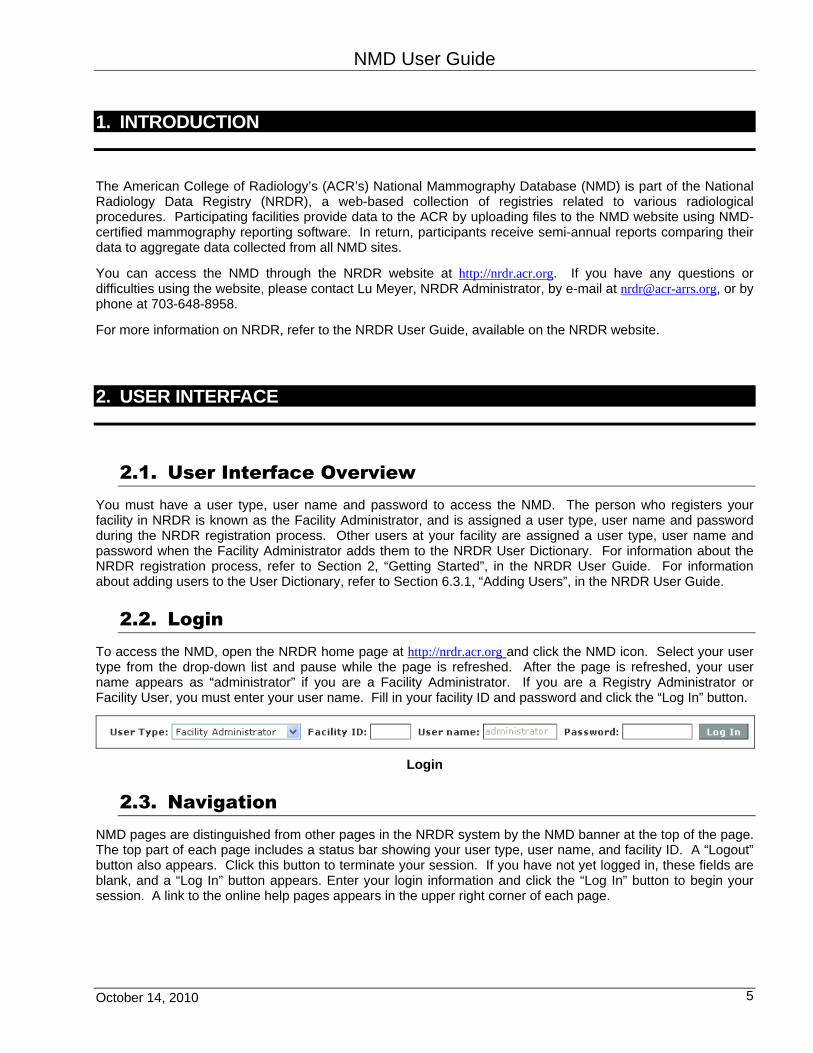
2.2. Login To access the NMD, open the NRDR home page at http://nrdr.acr.org and click the NMD icon. Select your user type from the drop-down list and pause while the page is refreshed. After the page is refreshed, your user name appears as “administrator” if you are a Facility Administrator. If you are a Registry Administrator or Facility User, you must enter your user name. Fill in your facility ID and password and click the “Log In” button.
Login
2.3. Navigation NMD pages are distinguished from other pages in the NRDR system by the NMD banner at the top of the page. The top part of each page includes a status bar showing your user type, user name, and facility ID. A “Logout” button also appears. Click this button to terminate your session. If you have not yet logged in, these fields are blank, and a “Log In” button appears. Enter your login information and click the “Log In” button to begin your session. A link to the online help pages appears in the upper right corner of each page.
October 14, 2010 5
NMD User Guide
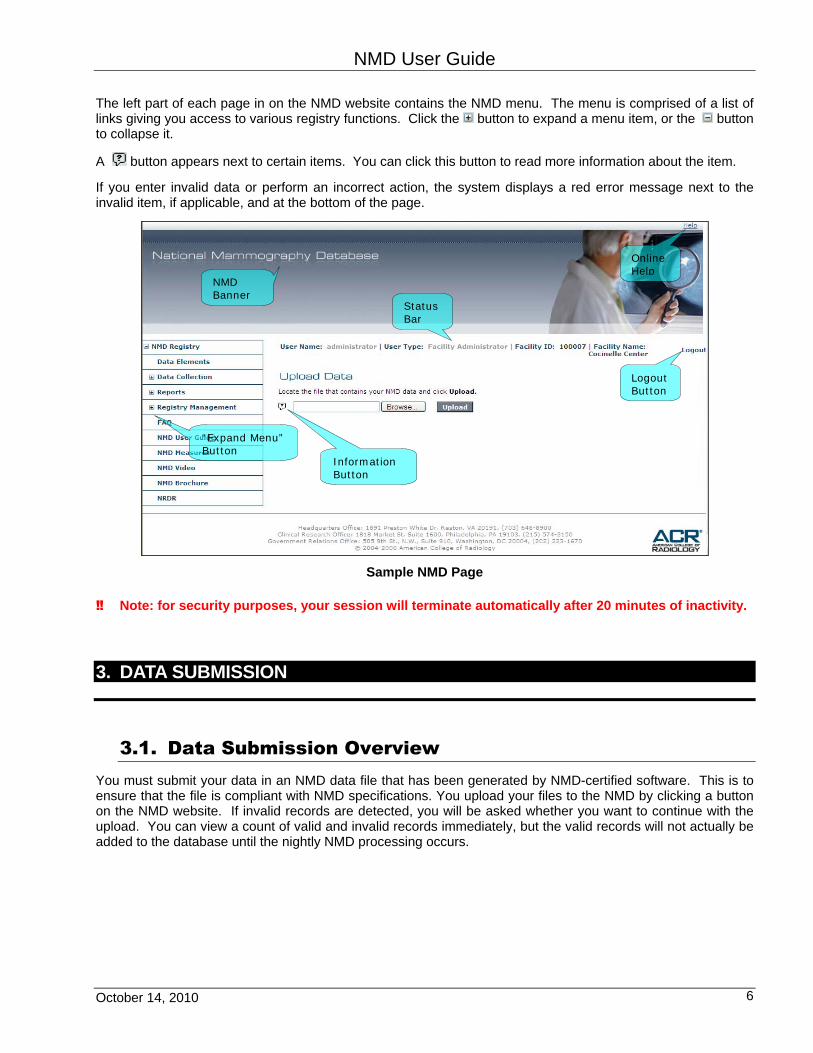
The left part of each page in on the NMD website contains the NMD menu. The menu is comprised of a list of links giving you access to various registry functions. Click the button to expand a menu item, or the button to collapse it.
A button appears next to certain items. You can click this button to read more information about the item.
If you enter invalid data or perform an incorrect action, the system displays a red error message next to the invalid item, if applicable, and at the bottom of the page.
Online Help
Logout Button
Status Bar
NMD Banner
“Expand Menu” Button
Information Button
Sample NMD Page
‼ Note: for security purposes, your session will terminate automatically after 20 minutes of inactivity.
3. DATA SUBMISSION
3.1. Data Submission Overview You must submit your data in an NMD data file that has been generated by NMD-certified software. This is to ensure that the file is compliant with NMD specifications. You upload your files to the NMD by clicking a button on the NMD website. If invalid records are detected, you will be asked whether you want to continue with the upload. You can view a count of valid and invalid records immediately, but the valid records will not actually be added to the database until the nightly NMD processing occurs.
October 14, 2010 6
NMD User Guide
3.2. Obtaining NMD-Certified Software NMD-certified software is available from the following NMD partners:
GE – call the GE National Service Center (NSC) at 802-658-5540 or enter a case through eService. Insight – call Eran Peery at 800-643-0123. Jambeyang Research – call Dr. Weiwen Lin at 408-446-0598. MagView – call the MagView support line at1-800-553-8996, Extension 2. Merge – call (877) 44-MERGE. MRS – call the MRS Technical Support hotline at 1-800-253-4827. PenRad – call PenRad Support at (763) 475-3388. Siemens – contact your local Siemens Healthcare representative. Swearingen – call Swearingen Support at 1-800-564-6997. Tombolo – call Allison Salke at (617) 620-2111.
If you would like to develop your own NMD-certified software, contact the NRDR Administrator by e-mail at [email protected], or by phone at 703-648-8958, for details.
3.3. Creating an NMD Data File The procedure for creating an NMD data file varies according to the software you use. In general, you specify beginning and end dates for the period for which you would like to submit data. The software generates an NMD data file with data from all mammography exams within that period that qualify for inclusion in the NMD. The file is stored on your computer with the name nmd_yyyymodd-hhmiss.txt, where yyyymodd-hhmiss indicates the date and time the file was created, as follows:
yyyy = year mo = month dd = day hh = hour mi = minute ss = second
If you have updated the data from a certain exam and would like to re-submit the exam to the NMD, you can specify a time period that includes the exam you want to re-submit. When you upload the resulting file to the NMD, all records in the file will be updated, including the record from the exam you want to re-submit. Some software products offer additional selection criteria in addition to the date, allowing you to be more selective in the records you want to update.
For more detailed information on creating an NMD data file, contact your software vendor.
3.4. Submitting an NMD Data File To submit your data file to the NMD, follow the steps below.
1. Log in to the NMD at https://nrdr.acr.org/Portal/NMD/Main/page.aspx .
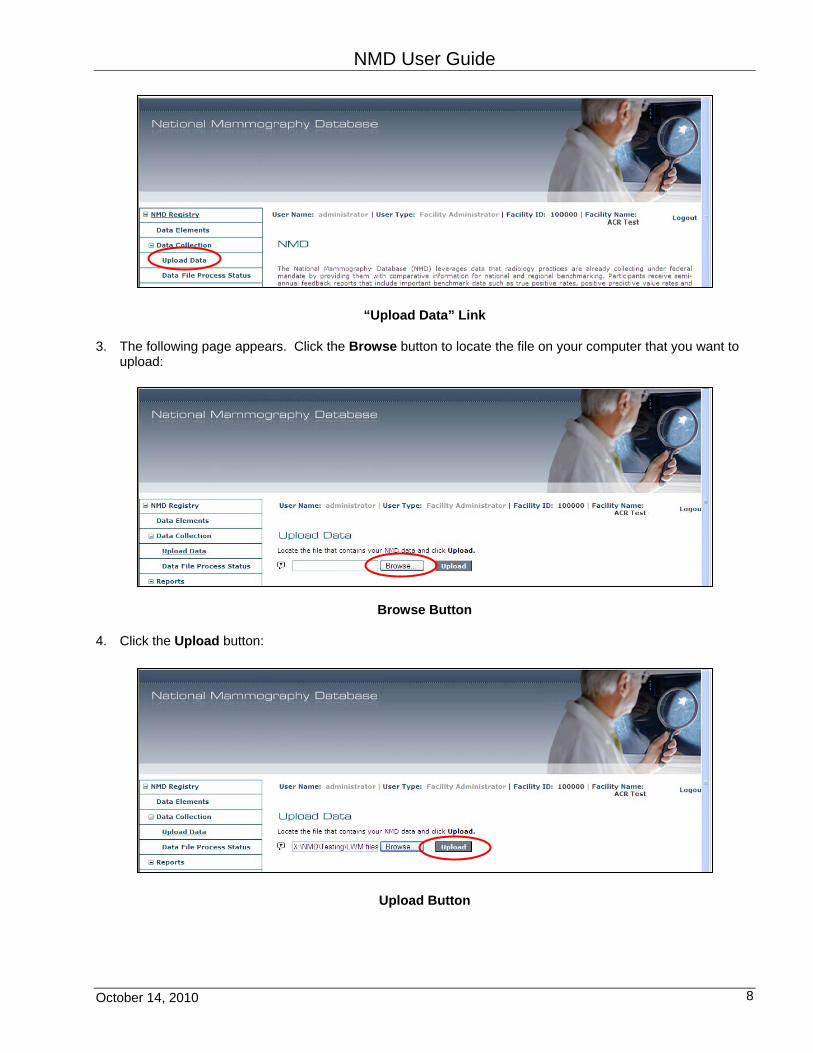
2. Find the NMD Registry menu, expand the Data Collection submenu and click Upload Data:
October 14, 2010 7
NMD User Guide
“Upload Data” Link
3. The following page appears. Click the Browse button to locate the file on your computer that you want to upload:
Browse Button
4. Click the Upload button:
Upload Button
October 14, 2010 8
NMD User Guide
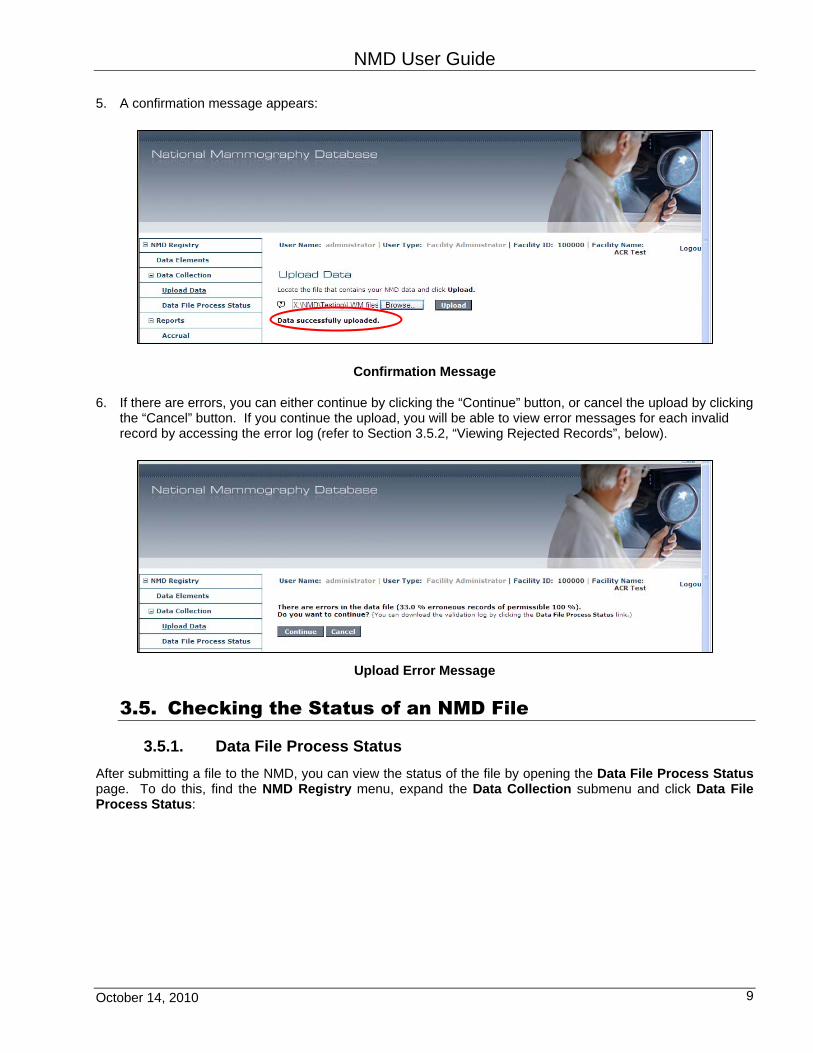
5. A confirmation message appears:
Confirmation Message
6. If there are errors, you can either continue by clicking the “Continue” button, or cancel the upload by clicking the “Cancel” button. If you continue the upload, you will be able to view error messages for each invalid record by accessing the error log (refer to Section 3.5.2, “Viewing Rejected Records”, below).
Upload Error Message
3.5. Checking the Status of an NMD File
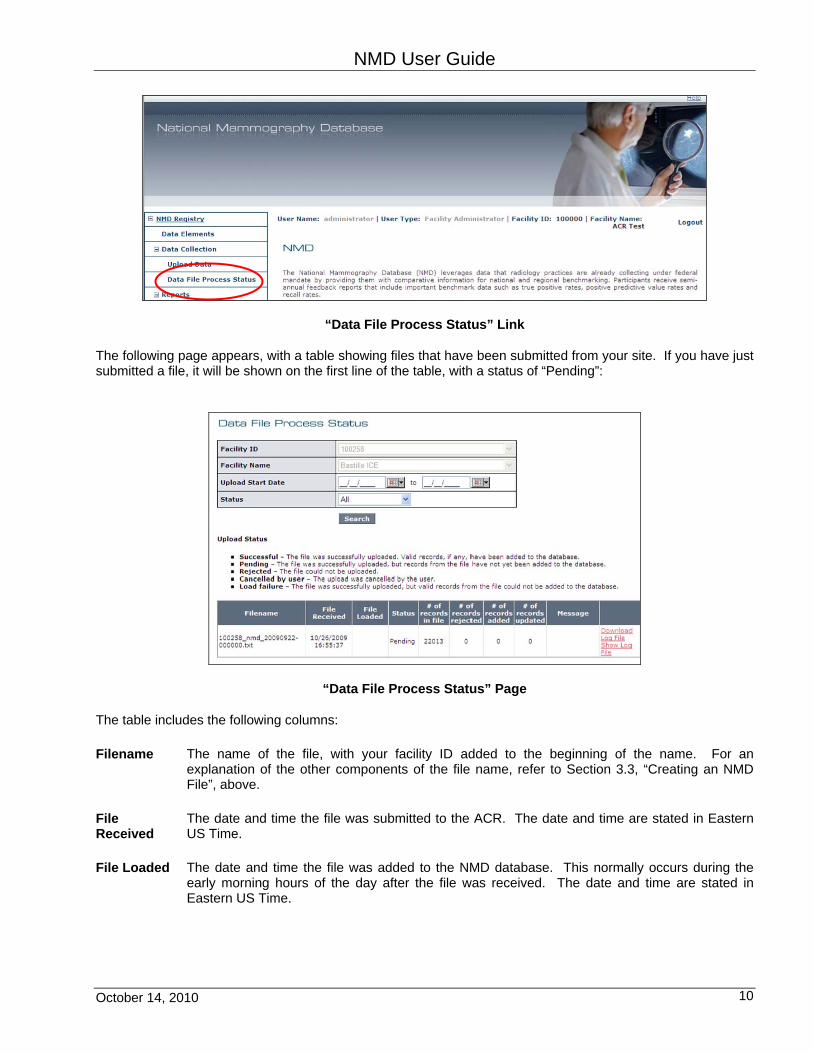
3.5.1. Data File Process Status After submitting a file to the NMD, you can view the status of the file by opening the Data File Process Status page. To do this, find the NMD Registry menu, expand the Data Collection submenu and click Data File Process Status:
October 14, 2010 9
NMD User Guide
“Data File Process Status” Link
The following page appears, with a table showing files that have been submitted from your site. If you have just submitted a file, it will be shown on the first line of the table, with a status of “Pending”:
“Data File Process Status” Page
The table includes the following columns:
Filename The name of the file, with your facility ID added to the beginning of the name. For an explanation of the other components of the file name, refer to Section 3.3, “Creating an NMD File”, above.
File Received
The date and time the file was submitted to the ACR. The date and time are stated in Eastern US Time.
File Loaded The date and time the file was added to the NMD database. This normally occurs during the early morning hours of the day after the file was received. The date and time are stated in Eastern US Time.
October 14, 2010 10
NMD User Guide
The status of the file, indicated as one of the following: Status
Pending – The file was successfully uploaded, but records from the file have not yet been added to the database. All files are in pending status when first submitted. Records from the file are normally added to or updated in the database during the early morning hours of the day following submission.
Successful – The file was successfully uploaded. Valid records, if any, have been added to or updated in the database.
Rejected – The file could not be uploaded. An explanation appears in the “Message” column.
Cancelled by user – The upload was cancelled by the person attempting to submit the file, as described in Step 6 of Section 3.4, “Submitting an NMD File”, above.
Load failure – The file was successfully uploaded, but valid records from the file could not be added to the database. Please contact the NRDR Administrator at 703-648-8958 or [email protected] for assistance if your file has a status of “Load Failure”.
# of records in file
The number of records read from the file.
# of records rejected
The number of invalid records. These records were not added to or updated in the NMD database. If the file is in “pending” status, you can view a list of rejected records with reasons for rejection by clicking Show Log File in the rightmost column of the table. Otherwise, click Download Log File to create a text file that can be saved and viewed with a software application such as Microsoft Excel.
# of records added
The number of records that were added to the NMD database. If a record in the file does not match the facility ID, patient ID, exam date and indication for exam of an existing record on the database, it is added as a new record.
# of records updated
The number of records that were updated in the NMD database. If a record in the file has the same facility ID, patient ID, exam date and indication for exam as an existing record on the database, the existing record is replaced with the record in the file. No history of changes to updated records is retained.
Message An explanation of why a file was rejected, such as “Invalid file name”.
You can restrict the list of files by using the search filter that appears at the top of the page. If you want to restrict the list to a certain date range, enter the dates in the “Upload Start Date” fields and click the “Search” button. You can also restrict the list by selecting a file status from the drop-down menu in the “Status” field.
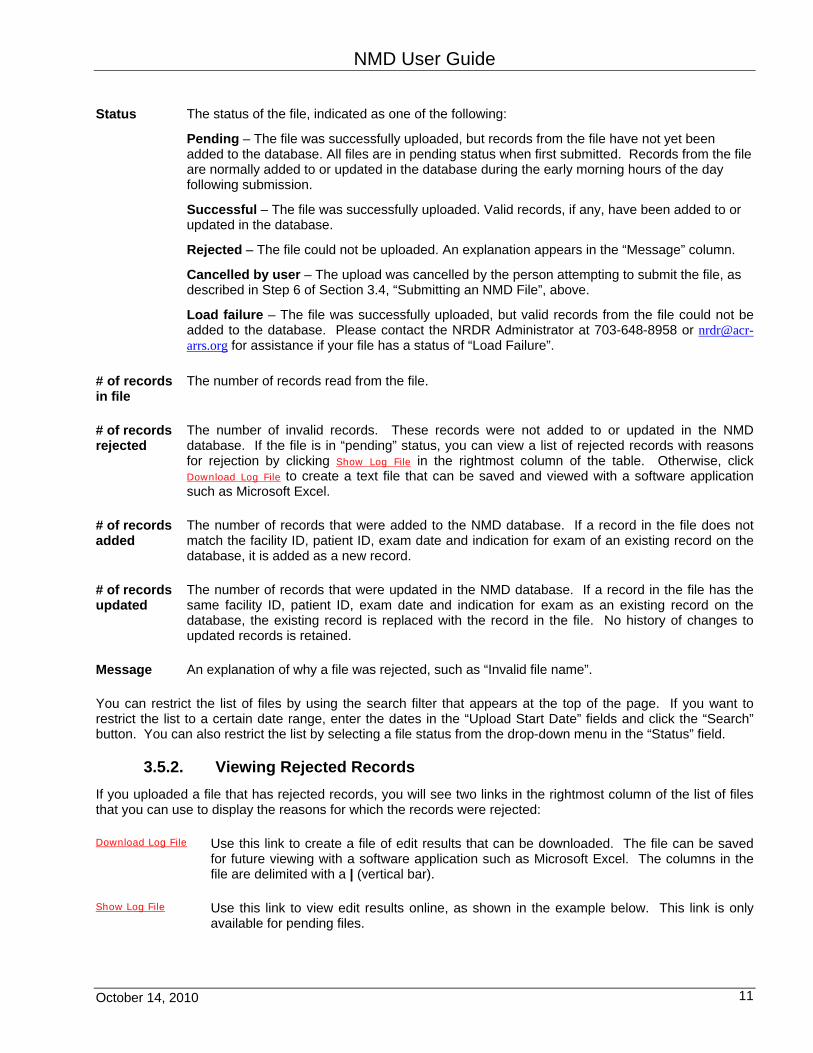
3.5.2. Viewing Rejected Records If you uploaded a file that has rejected records, you will see two links in the rightmost column of the list of files that you can use to display the reasons for which the records were rejected:
Download Log File Use this link to create a file of edit results that can be downloaded. The file can be saved for future viewing with a software application such as Microsoft Excel. The columns in the file are delimited with a | (vertical bar).
Show Log File Use this link to view edit results online, as shown in the example below. This link is only available for pending files.
October 14, 2010 11
NMD User Guide
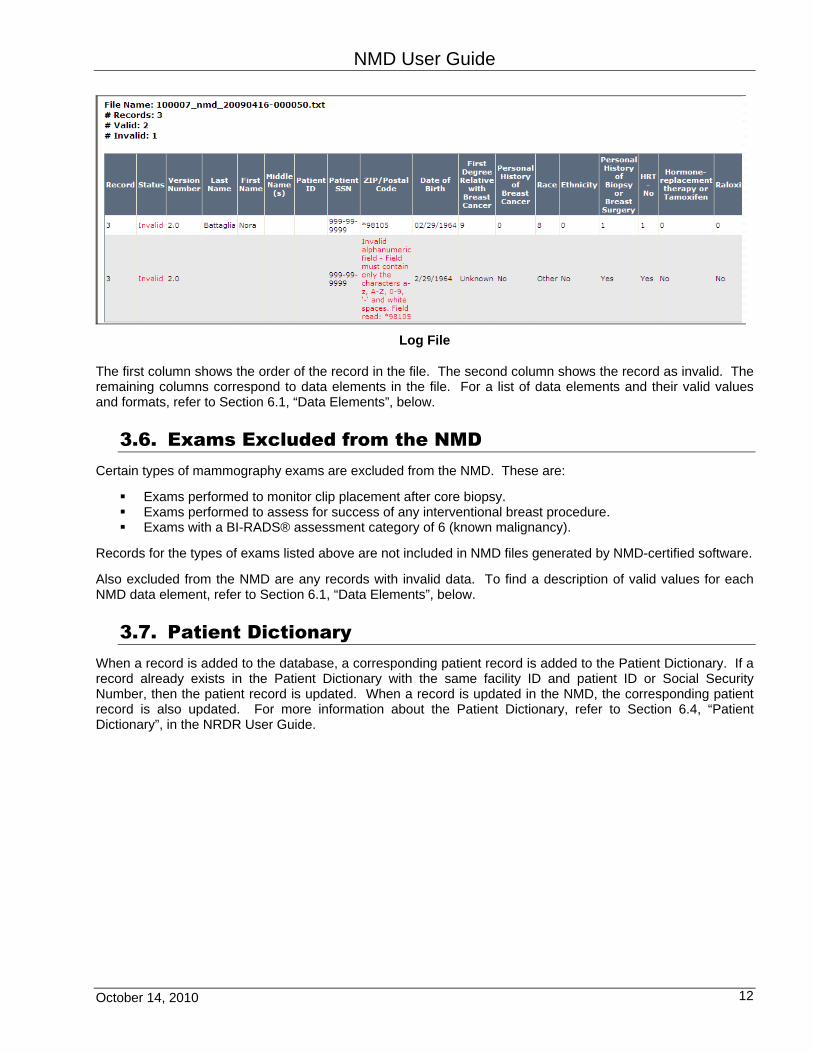
Log File
The first column shows the order of the record in the file. The second column shows the record as invalid. The remaining columns correspond to data elements in the file. For a list of data elements and their valid values and formats, refer to Section 6.1, “Data Elements”, below.
3.6. Exams Excluded from the NMD Certain types of mammography exams are excluded from the NMD. These are:
Exams performed to monitor clip placement after core biopsy. Exams performed to assess for success of any interventional breast procedure. Exams with a BI-RADS® assessment category of 6 (known malignancy).
Records for the types of exams listed above are not included in NMD files generated by NMD-certified software.
Also excluded from the NMD are any records with invalid data. To find a description of valid values for each NMD data element, refer to Section 6.1, “Data Elements”, below.
3.7. Patient Dictionary When a record is added to the database, a corresponding patient record is added to the Patient Dictionary. If a record already exists in the Patient Dictionary with the same facility ID and patient ID or Social Security Number, then the patient record is updated. When a record is updated in the NMD, the corresponding patient record is also updated. For more information about the Patient Dictionary, refer to Section 6.4, “Patient Dictionary”, in the NRDR User Guide.
October 14, 2010 12
NMD User Guide
4. REPORTS
4.1. Reports Overview You can run the following reports from the NMD website:
Accrual Report Payment Tracking Report Aggregate Reports
You can only view data from your own facility.
Reports are displayed as HTML documents in new browser windows.
To navigate report pages, use the navigation buttons:
To print a report, click the button.
To zoom in on or out of a report, select a scale percent from the drop-down list.
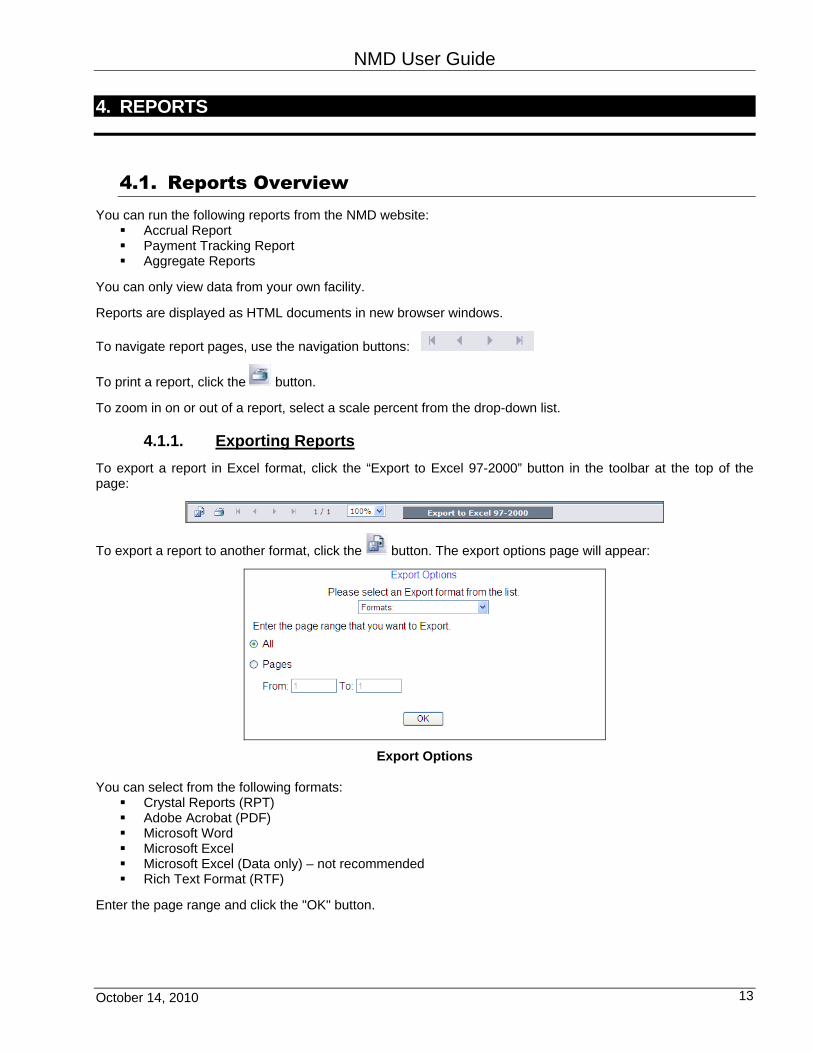
4.1.1. Exporting Reports To export a report in Excel format, click the “Export to Excel 97-2000” button in the toolbar at the top of the page:
To export a report to another format, click the button. The export options page will appear:
Export Options
You can select from the following formats: Crystal Reports (RPT) Adobe Acrobat (PDF) Microsoft Word Microsoft Excel Microsoft Excel (Data only) – not recommended Rich Text Format (RTF)
Enter the page range and click the "OK" button.
October 14, 2010 13

NMD User Guide
4.1.2. Creating a Microsoft Excel Spreadsheet If you want to create a spreadsheet that is suitable for printing, use the “Microsoft Excel” format listed in the Export Options above. If you want to create a spreadsheet suitable for data manipulation, use the “Export to Excel 97-2000” button shown above.
Using the “Microsoft Excel (Data only)” format, listed in the Export Options, is not recommended.
4.2. Accrual Report The Accrual Report shows the total number of records received, rejected, loaded and updated from all files submitted by your facility. All users can view this report.
To view the report, find the NMD Registry menu, expand the Reports submenu, and click Accrual:
Accrual Report Link
The Accrual Report filter appears:
Accrual Report Filter
The NRDR Facility Number and NRDR Facility Name are automatically filled in and cannot be changed.
You can narrow the files whose totals will appear in the report by entering one or both dates in the “Uploaded Date Range” fields. The date range refers to the date that files were submitted by your facility, not the date that they were added to the NMD database. If you leave both date fields blank, the report will include all files for your facility.
To run the report, click the "Submit" button. The report will appear in a new window:
October 14, 2010 14

NMD User Guide
Accrual Report
Records that updated an existing record on the NMD database are not counted in the “Total Number of Records Loaded” column. Records from pending files are included in the “Total Number of Records Received” column only. Refer to Section 3.5.1, “Data File Process Status”, above, for a definition of pending files.
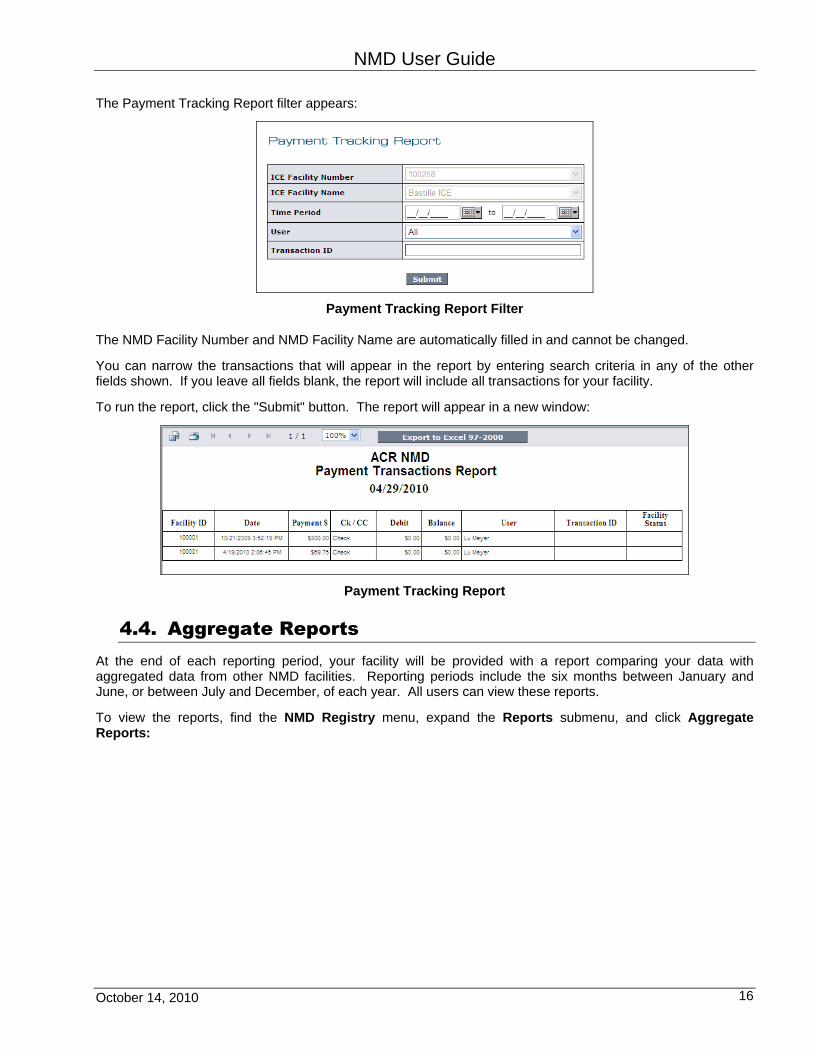
4.3. Payment Tracking Report The Payment Tracking Report shows the date, amount, method of payment and transaction number for each of your facility’s payment transactions for the NMD, as well as the user who submitted the transaction. All users can view this report.
To view the report, find the NMD Registry menu, expand the Reports submenu, and click Payment Tracking:
Payment Tracking Report Link
October 14, 2010 15
NMD User Guide
The Payment Tracking Report filter appears:
Payment Tracking Report Filter
The NMD Facility Number and NMD Facility Name are automatically filled in and cannot be changed.
You can narrow the transactions that will appear in the report by entering search criteria in any of the other fields shown. If you leave all fields blank, the report will include all transactions for your facility.
To run the report, click the "Submit" button. The report will appear in a new window:
Payment Tracking Report
4.4. Aggregate Reports At the end of each reporting period, your facility will be provided with a report comparing your data with aggregated data from other NMD facilities. Reporting periods include the six months between January and June, or between July and December, of each year. All users can view these reports.
To view the reports, find the NMD Registry menu, expand the Reports submenu, and click Aggregate Reports:
October 14, 2010 16

NMD User Guide
Aggregate Report Link
A list of available reports appears:
List of reports available for downloading
You can download a report by clicking the corresponding “Download” link.
5. REGISTRY MANAGEMENT
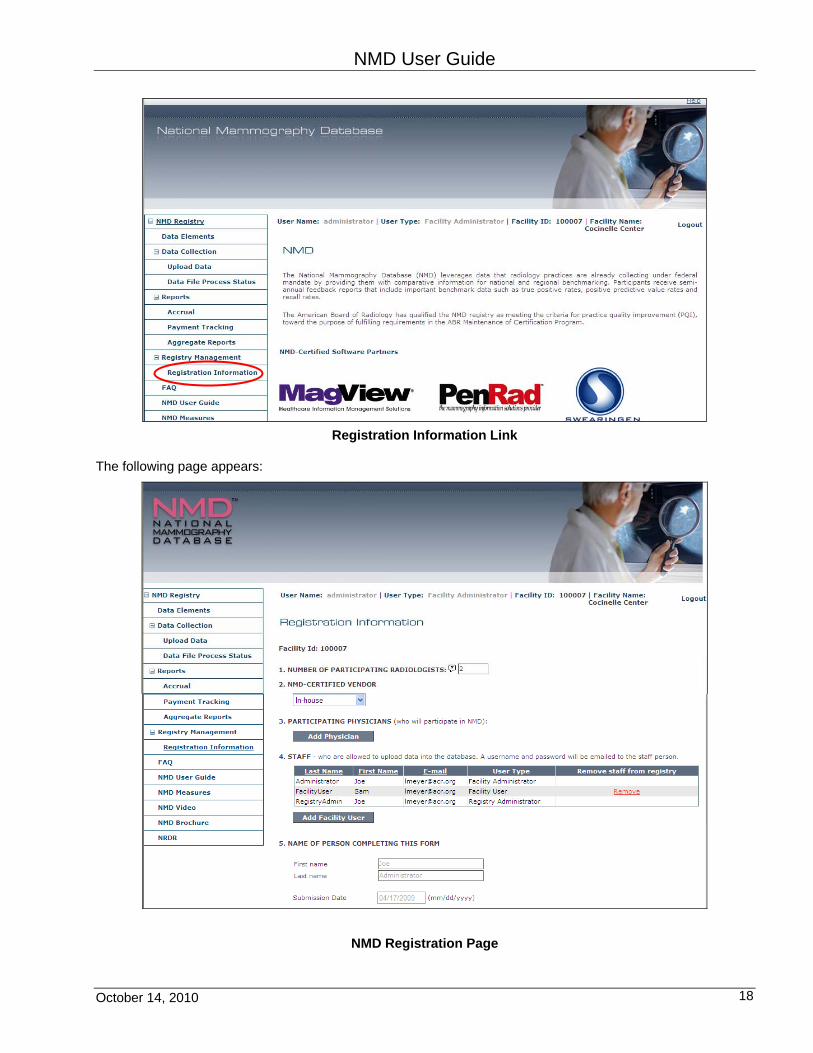
5.1. Registration Information The “Registration Information” page displays information about your facility’s NMD registration. To view or update your registration information, find the NMD Registry menu, expand the Registry Management submenu, and click Registration Information:
October 14, 2010 17
NMD User Guide
Registration Information Link
The following page appears:
NMD Registration Page
October 14, 2010 18
NMD User Guide
If you have not yet registered in the NMD, this page will look somewhat different. Refer to Section 2.3.4, “NMD Registration”, in the NRDR User Guide for instructions on how to register in the NMD.
Note that your facility’s NRDR registration information, such as facility name and address, is shown on a separate page. Refer to Section 2.2, “NRDR Registration”, in the NRDR User Guide for information about NRDR registration.
5.1.1. Number of Participating Radiologists This field shows the number of radiologists that interpret mammograms at your site. This is the total of both full-time and part-time radiologists, not the number of full-time equivalencies. The field should be updated whenever this number changes.
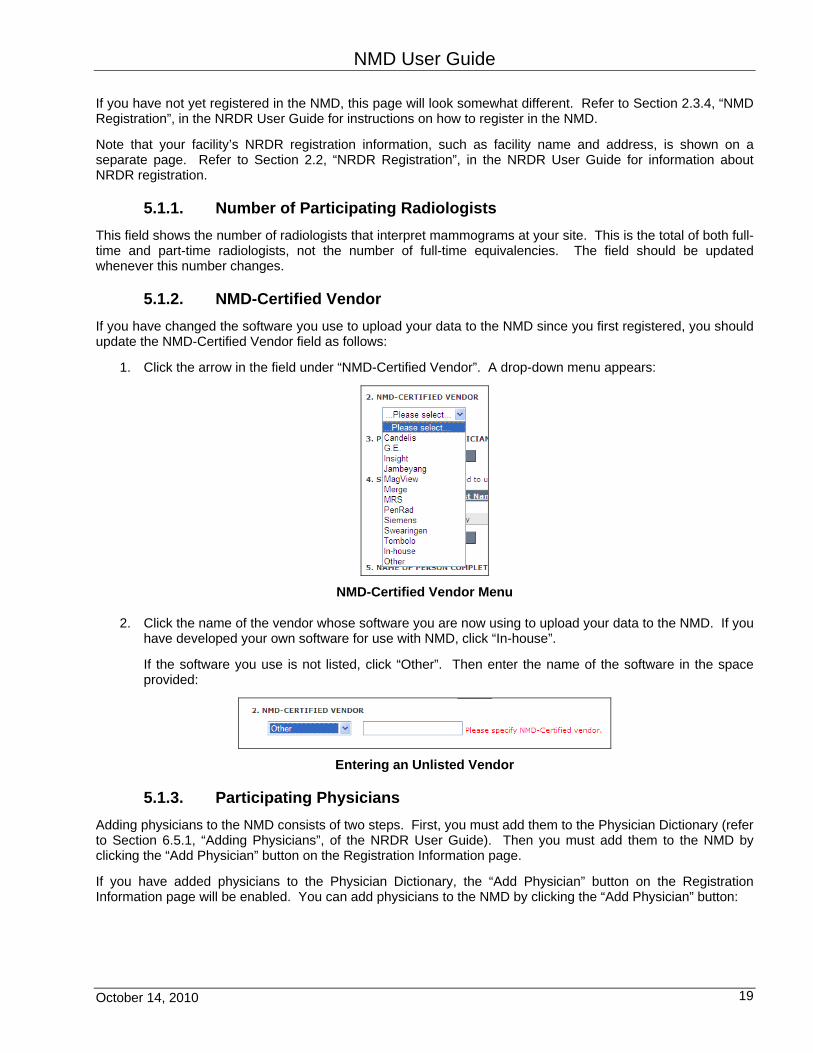
5.1.2. NMD-Certified Vendor If you have changed the software you use to upload your data to the NMD since you first registered, you should update the NMD-Certified Vendor field as follows:
1. Click the arrow in the field under “NMD-Certified Vendor”. A drop-down menu appears:
NMD-Certified Vendor Menu
2. Click the name of the vendor whose software you are now using to upload your data to the NMD. If you have developed your own software for use with NMD, click “In-house”.
If the software you use is not listed, click “Other”. Then enter the name of the software in the space provided:
Entering an Unlisted Vendor
5.1.3. Participating Physicians Adding physicians to the NMD consists of two steps. First, you must add them to the Physician Dictionary (refer to Section 6.5.1, “Adding Physicians”, of the NRDR User Guide). Then you must add them to the NMD by clicking the “Add Physician” button on the Registration Information page.
If you have added physicians to the Physician Dictionary, the “Add Physician” button on the Registration Information page will be enabled. You can add physicians to the NMD by clicking the “Add Physician” button:
October 14, 2010 19
NMD User Guide
“Add Physician” Button
A list of physicians from the Physician Dictionary will appear with checkboxes that you can use to indicate which physicians are NMD participants. If the “Add Physician” button is disabled, check to make sure that there is at least one active physician in the Physician Dictionary who has not yet been assigned to the NMD.
Adding a Physician as an NMD Participant
Click the “Add” button to add the physicians you have checked to the NMD.
Physicians must exist in the Physician Dictionary before you can indicate that they are NMD participants.
‼ Note – You will be unable to add a physician to the NMD if there is no Digital Radiography (DR) information in the Physician Dictionary for him or her.
You must first add the missing DR information in the Physician Dictionary, and then return to this page. Refer to Section 6.5.3, “Updating and Deleting Physicians”, of the NDRD User Guide for instructions on updating physician information.
Active physicians with no DR information will appear on the list of physicians when you click “Add Physician”, but the checkbox used to add them to the NMD will be disabled:
Physician List with Disabled Checkboxes
The “Add Physician” button is disabled if there are no active physicians in the Physician Dictionary:
Disabled “Add Physician” Button
You can remove a physician from the NMD by clicking the Remove link next to his or her name on the “Participating Physicians” list. The physician will remain in the NRDR Physician Dictionary, however. Refer to
October 14, 2010 20

NMD User Guide
Section 6.5.3, “Updating and Deleting Physicians”, in the NRDR User Guide for instructions on how to remove physicians from NRDR.
Physician List Showing “Remove” Link
The ability to add and remove physicians is not available to Facility Users.
5.1.4. Staff If you are a Facility or Registry Administrator, you can add users who are authorized to upload files to the NMD. Adding users to the NMD consists of two steps. First, you must add them to the User Dictionary (refer to Section 6.3.1, “Adding Users”, of the NRDR User Guide). Then you must add them to the NMD by clicking the “Add Facility User” button on the Registration Information page.
"Add Facility User" Button on the “Registration Information” Page
Users must exist in the User Dictionary before you can indicate that they are NMD users. If the “Add Facility User” button is disabled, check to make sure that there is at least one active user in the User Dictionary who has not yet been assigned to NMD.
You can remove a Facility User from the NMD by clicking the Remove link next to his or her name on the “Staff” list. The user will remain in the NRDR User Dictionary, however, and NMD forms previously entered by the user will not be affected. If you want to remove a Facility User from the User Dictionary, refer to Section 6.3.5, “Updating and Deleting Facility Users”, of the NRDR User Guide.
If you want to add or remove Facility Administrators or Registry Administrators from the NMD, you must do so through the NRDR User Dictionary. Refer to Section 6.3, “User Dictionary”, of the NRDR User Guide for additional information.
5.1.5. Name of Person Completing This Form The name of the person who registered your facility in the NMD appears in these fields, along with the date the registration was submitted. These fields cannot be changed.
6. DOCUMENTS
Several reference documents are available on the NMD website:
October 14, 2010 21
NMD User Guide
6.1. Data Elements The “National Mammography Database Data Elements” document lists the fields in the NMD file structure, with their definitions and formats. It also shows how BI-RADS® data elements are mapped to NMD fields. You can view this document by selecting the Data Elements link on the NMD Registry menu:
“Data Elements” Link
6.2. NMD User Guide The NMD User Guide is available by selecting the NMD User Guide link on the NMD Registry menu:
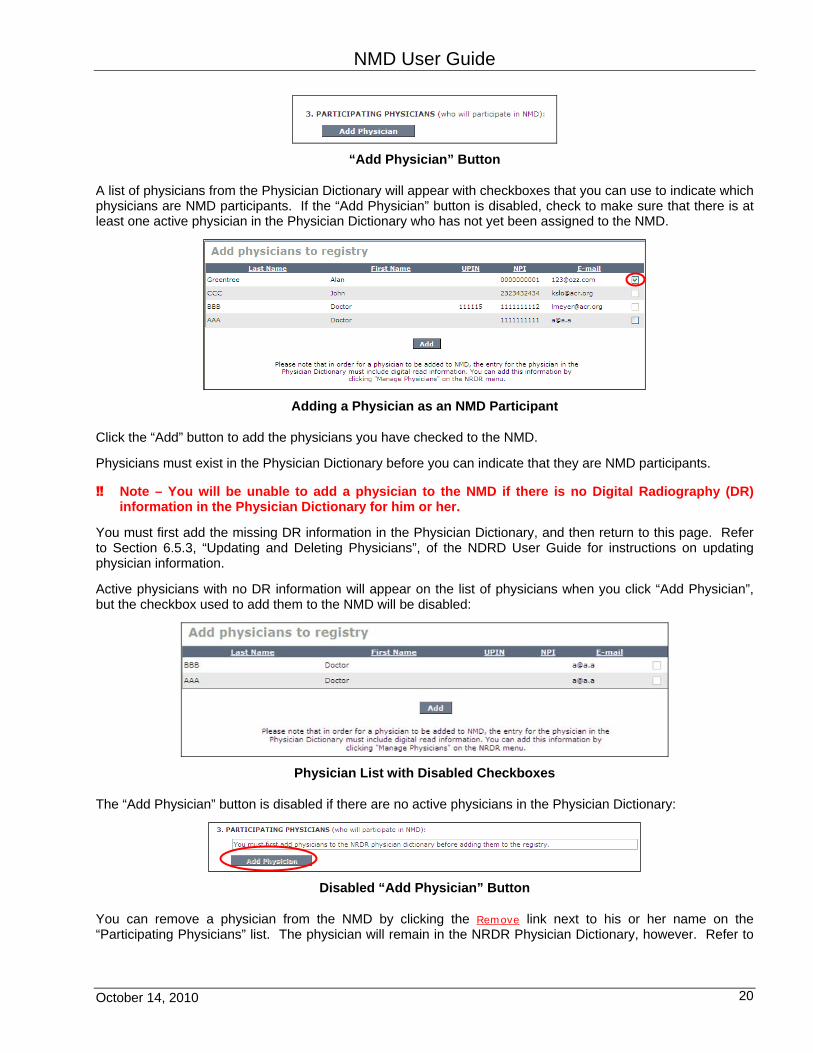
“NMD User Guide” Link
October 14, 2010 22
NMD User Guide
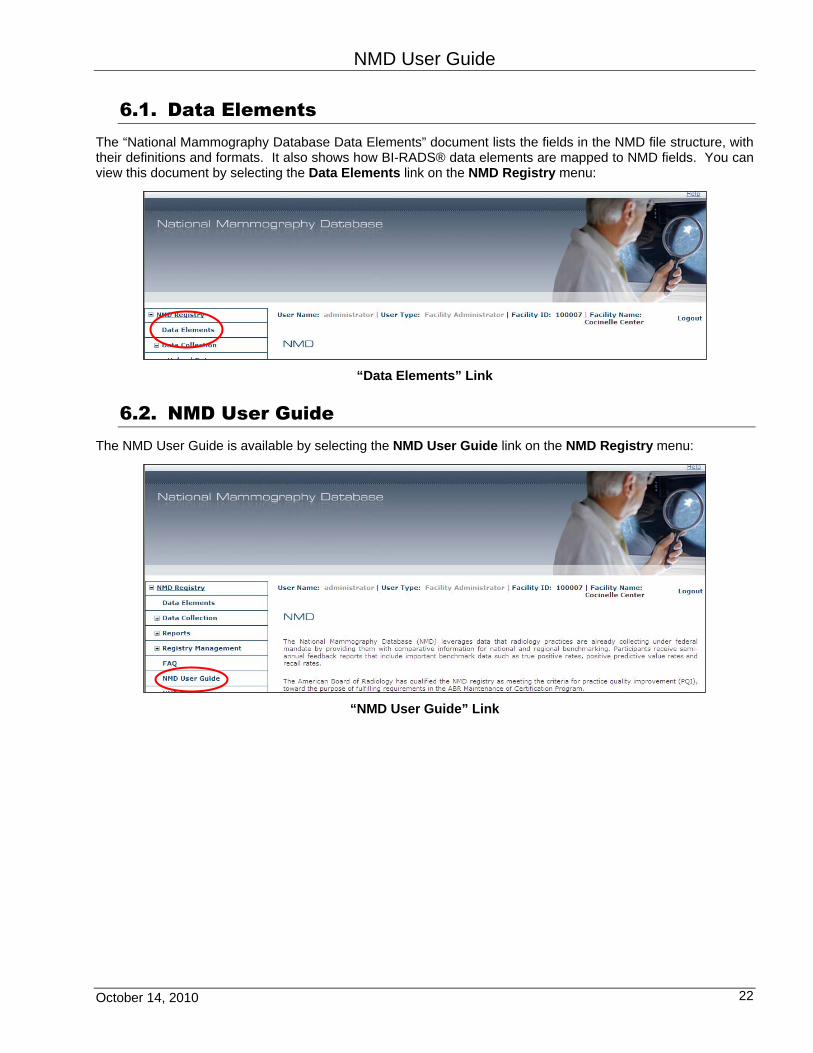
6.3. NMD Measures The “NMD Outcomes Measures” document lists measures that are included in NMD reports and a description of how they are calculated. You can view this document by selecting the NMD Measures link on the NMD Registry menu:
“NMD Measures” Link
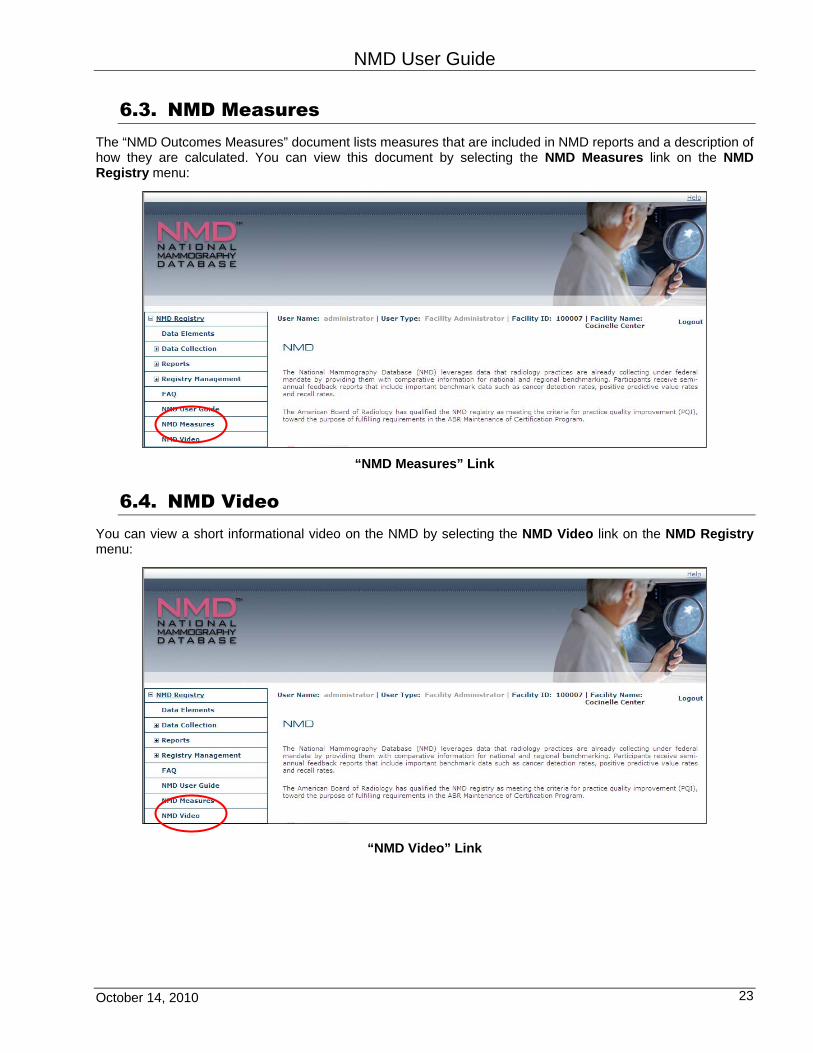
6.4. NMD Video You can view a short informational video on the NMD by selecting the NMD Video link on the NMD Registry menu:
“NMD Video” Link
October 14, 2010 23
NMD User Guide
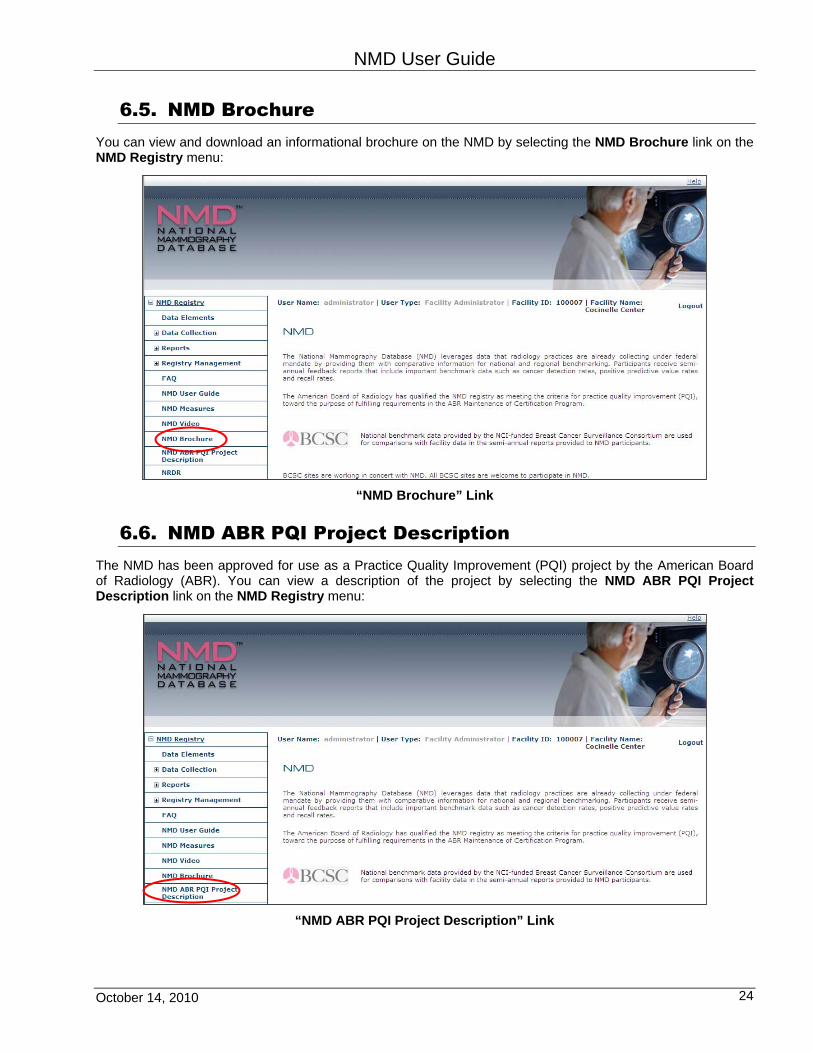
6.5. NMD Brochure You can view and download an informational brochure on the NMD by selecting the NMD Brochure link on the NMD Registry menu:
“NMD Brochure” Link
6.6. NMD ABR PQI Project Description The NMD has been approved for use as a Practice Quality Improvement (PQI) project by the American Board of Radiology (ABR). You can view a description of the project by selecting the NMD ABR PQI Project Description link on the NMD Registry menu:
“NMD ABR PQI Project Description” Link
October 14, 2010 24
NMD User Guide
7. GLOSSARY
ABR – American Board of Radiology.
ACR – American College of Radiology.
BI-RADS® – ACR Breast Imaging Reporting and Data System, a standardized method for breast imaging reporting. (American College of Radiology (ACR). ACR BI-RADS® - Mammography. 4th Edition. In: ACR Breast Imaging Reporting and Data System, Breast Imaging Atlas. Reston, VA. American College of Radiology; 2003.).
DR – Digital radiography.
Facility Administrator – The person performing the NRDR registration process. The Facility Administrator has access to certain administrative functions that are unavailable to other staff members. Only one staff member at a facility may act as Facility Administrator. Refer to Section 4.2, “Facility Administrators”, in the NRDR User Guide, for additional information.
Facility User – A person designated by a Facility Administrator or Registry Administrator as having the ability to upload a file to the NMD. Refer to Section 4.4, “Facility Users”, in the NRDR User Guide, for additional information.
NMD – National Mammography Database.
NRDR – National Radiology Data Registry.
PQI – Practice Quality Improvement.
Registry Administrator – A person designated by the Facility Administrator as having certain administrative functions for a specific registry. Refer to Section 4.3, “Registry Administrators”, in the NRDR User Guide, for additional information.
US – United States.
October 14, 2010 25
NMD User Guide
THIS PAGE INTENTIONALLY LEFT BLANK
October 14, 2010 26