teaching with comic life - university of iceland with comic life 2... · teaching with comic life a...
TRANSCRIPT
Teaching With Comic Life A guide to using Plasq’s Comic Life 2 in the Classroom
David Cleland | December 2010 www.digmo.co.uk
.......................................................Introduction to Comic Life 2 3
......................................................Story Telling with Comic Life 4
.......................................................................................................................Task 4
..............................................................................................Learning Outcomes 4
..................................................................................................Transferable skills 4
..............................................................................................................Resources 4
........................................................................Writing your Story 6
...........................................................Telling a Story Comic Life 7
.....................................................................Step 1 : Select your layout Template 9
..................................................................................Step 2 : Importing Images 11
............................................................................Step 4 : Adding Image Effects 13
...........................................................................................Step 3 : Adding Text 15
...............................................................Exporting and Sharing 16
........................Using Bluetooth to transfer Photos and Comics 17
........................................................................Transferring Files with Bluetooth 17
...........................................................Connecting with DigMo! 19
Chapter 1
Introduction to Comic Life 2Comic Life is a digital story telling application with a difference. The simple graphical user
interface and intuitive drag and drop workflow makes it a perfect tool for classrooms both at primary and secondary level.
The Comic Life Application is intuitive and fun to use, it simply removes any ICT barrier and allows pupils to focus on creative communication.
Comic Life is particularly affordable but if you are unsure of its benefits in the classroom situation a trial version is available via the www.plasq.com website.
I first devised this short unit for use with the original version of Comic Life and keystage 3 level students.
The workflow from mobile phone photos to Comic Life and then back to the phone demonstrates just how possible a paperless classroom could be and how much students enjoy capturing and processing images from mobile devices.
Chapter 2
Story Telling with Comic Life
TASK
In small groups pupils will write and communicate a story using only eight photos and the Comic Life Application. For older students you may want to limit the number of photos to six and if you really want to challenge the students then you could forbid them using any text in their story.
LEARNING OUTCOMES
On successful completion of this task pupils will be able to use bluetooth to transfer files to and from am computer.
On successful completion of the task pupils will be able use photos taken with a mobile phone in their own documents / coursework etc.
On successful completion of the task pupils will be able to manipulate / resize and filter their photographs.
On successful completion of the task pupils will be able to use suitable software applications to communicate in a range of different ways.
TRANSFERABLE SKILLS
Working with others, Organising oneself, Communication, Critical and discriminating skills, Reflection and decision making skills
RESOURCES
Apple Mac Computer / PC with Comic Life Installed, Digital Camera or Phone. If you do not

have enough digital cameras for your class it is possible to use a camera phone to take the photos and then Apple’s Bluetooth File Transfer system to send the photos from the phone to the Mac.
Note the bluetooth transfer option isn’t available if you are using Comic Life on a PC that doesn’t have a bluetooth feature.
Chapter 3
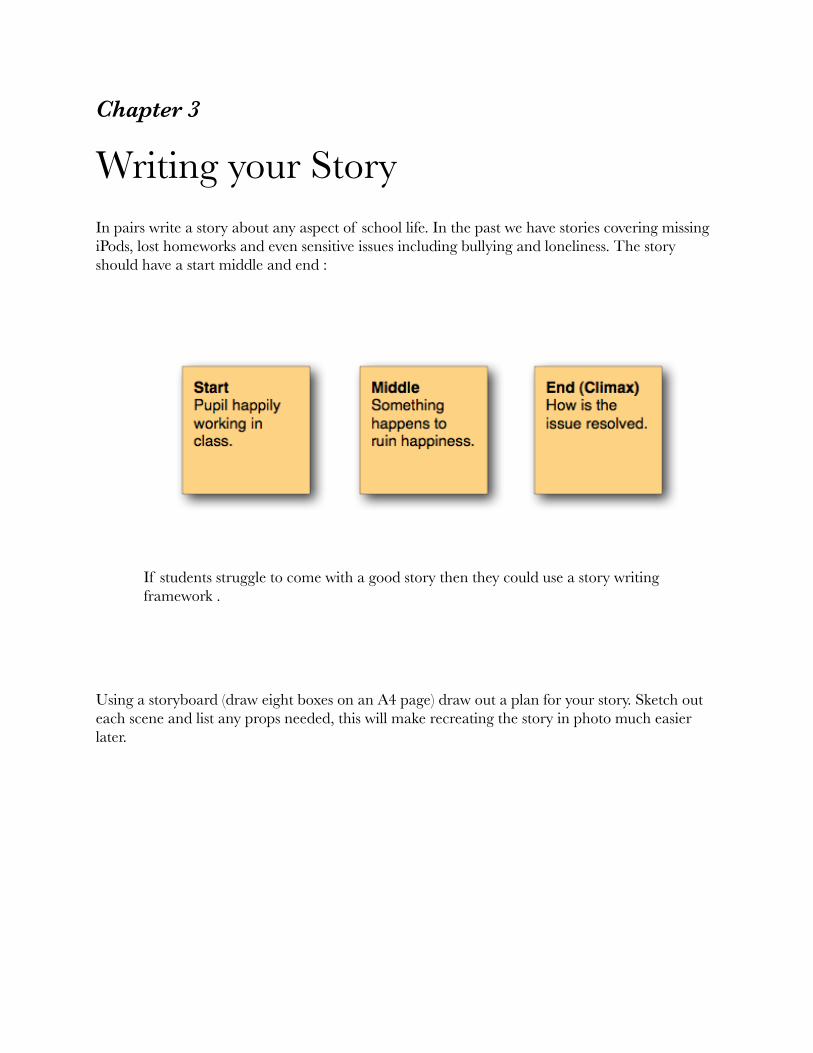
Writing your Story In pairs write a story about any aspect of school life. In the past we have stories covering missing iPods, lost homeworks and even sensitive issues including bullying and loneliness. The story should have a start middle and end :
If students struggle to come with a good story then they could use a story writing framework .
Using a storyboard (draw eight boxes on an A4 page) draw out a plan for your story. Sketch out each scene and list any props needed, this will make recreating the story in photo much easier later.
Chapter 4
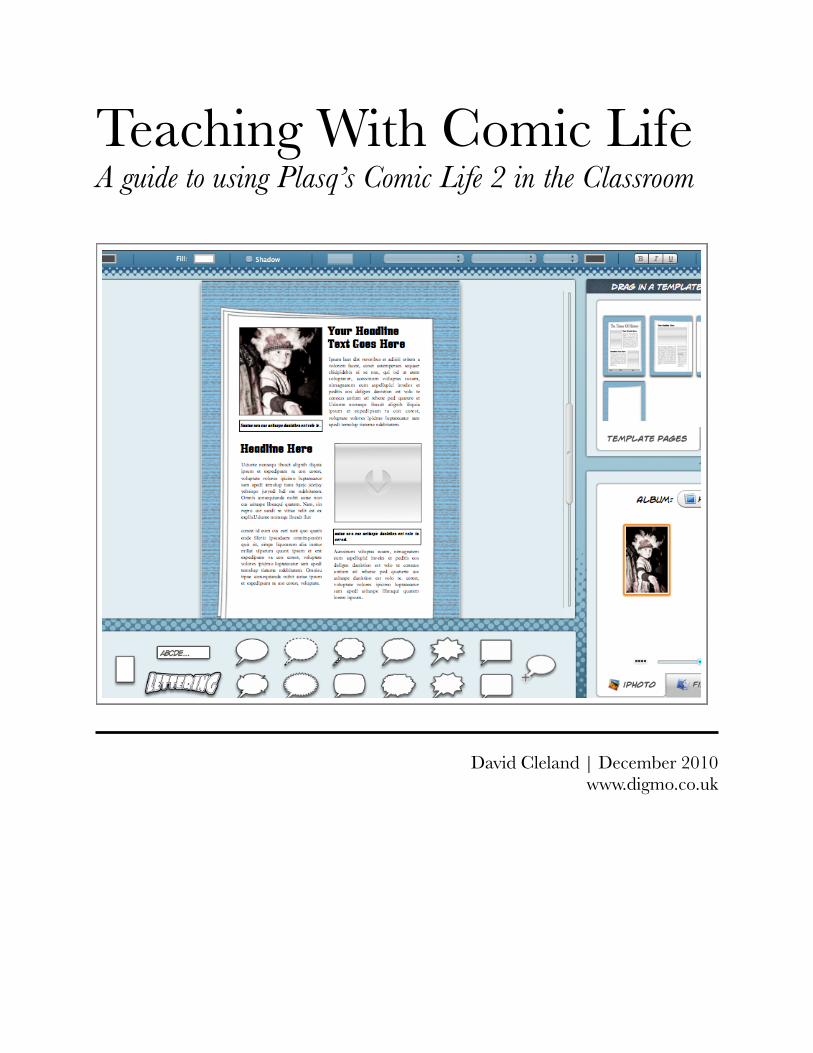
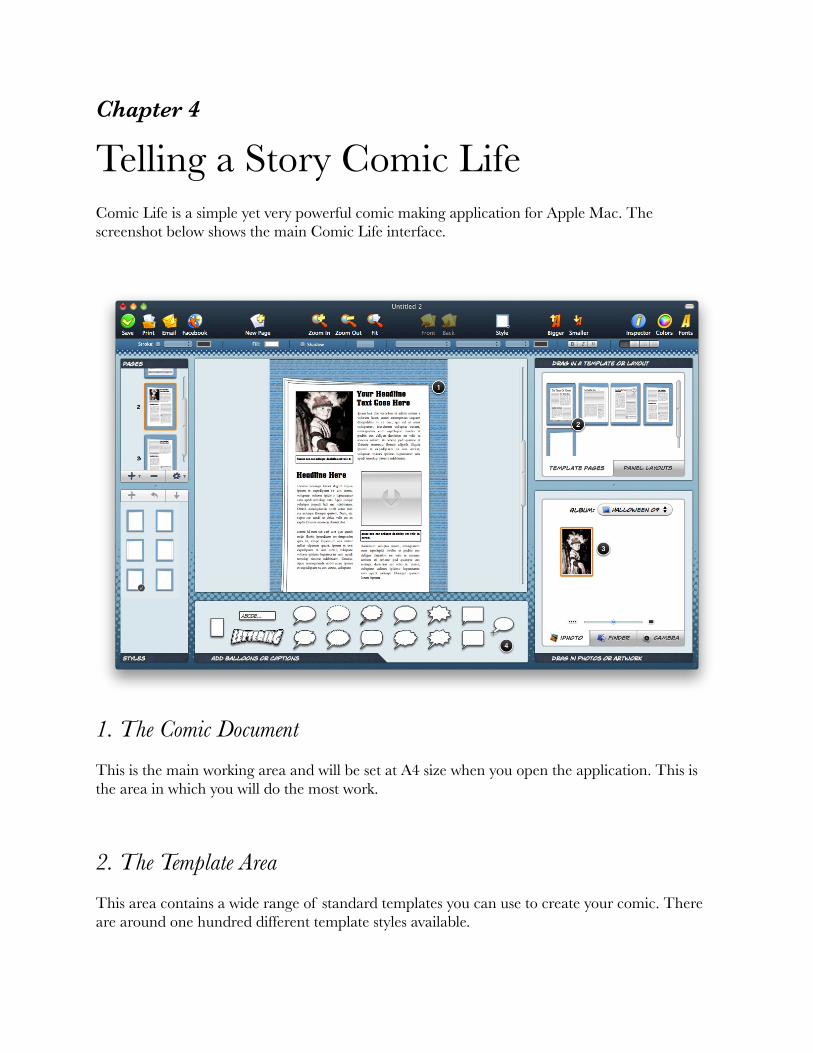
Telling a Story Comic LifeComic Life is a simple yet very powerful comic making application for Apple Mac. The screenshot below shows the main Comic Life interface.
1. The Comic Document
This is the main working area and will be set at A4 size when you open the application. This is the area in which you will do the most work.
2. The Template Area
This area contains a wide range of standard templates you can use to create your comic. There are around one hundred different template styles available.
3. The Photo Area
This area shows the photo resources that are currently available. There are three key sources of images, iPhoto (Apple’s photo management application that stores images imported from digital cameras etc), ‘Finder’ that will locate images stored on the hard drive and finally isight that will allow you to take photos directly from your Mac’s built in camera.
4. Lettering Console
This area allows you to create comic headlines, speech and thought bubbles etc.
This handout will show you how to create a basic comic and add visual effects. This will get you started but I would encourage you to experiment with the different aspects of Comic Life to try and produce the most creative comic you can!
Comic Life also offers a range of advanced features and menus such as the Inspector module. These offer detailed editing within the document.
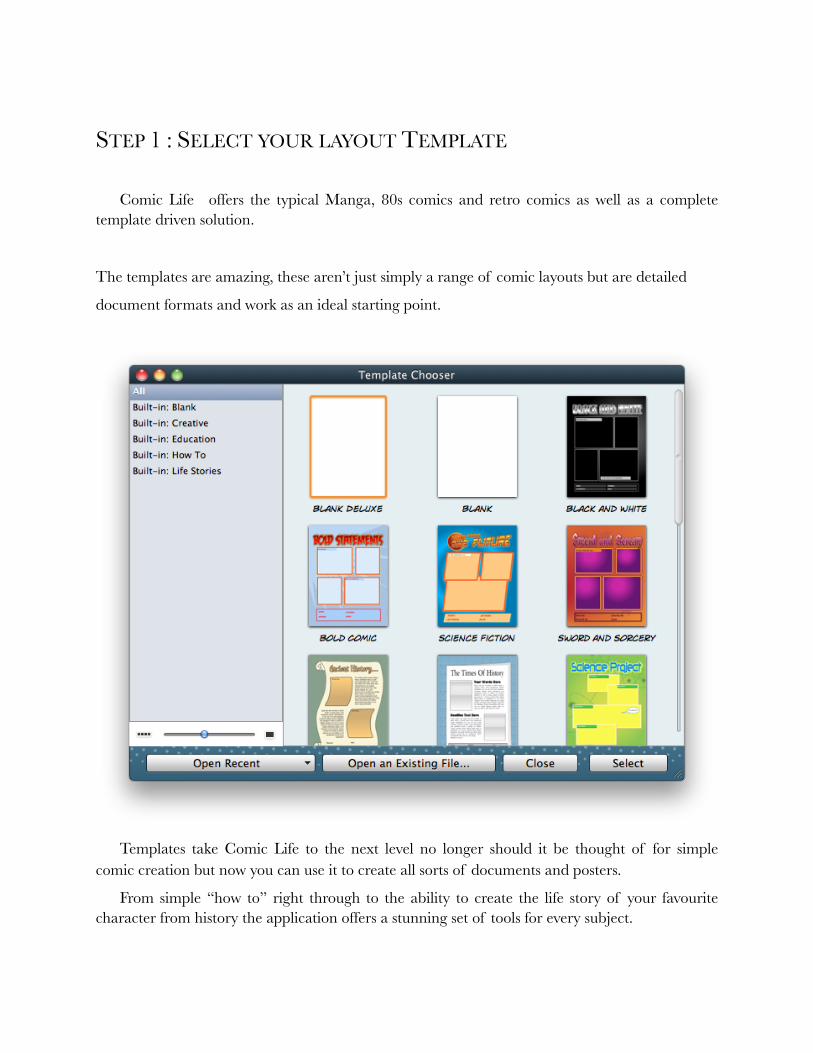
STEP 1 : SELECT YOUR LAYOUT TEMPLATE
Comic Life offers the typical Manga, 80s comics and retro comics as well as a complete template driven solution.
The templates are amazing, these aren’t just simply a range of comic layouts but are detailed
document formats and work as an ideal starting point.
Templates take Comic Life to the next level no longer should it be thought of for simple comic creation but now you can use it to create all sorts of documents and posters.
From simple “how to” right through to the ability to create the life story of your favourite character from history the application offers a stunning set of tools for every subject.
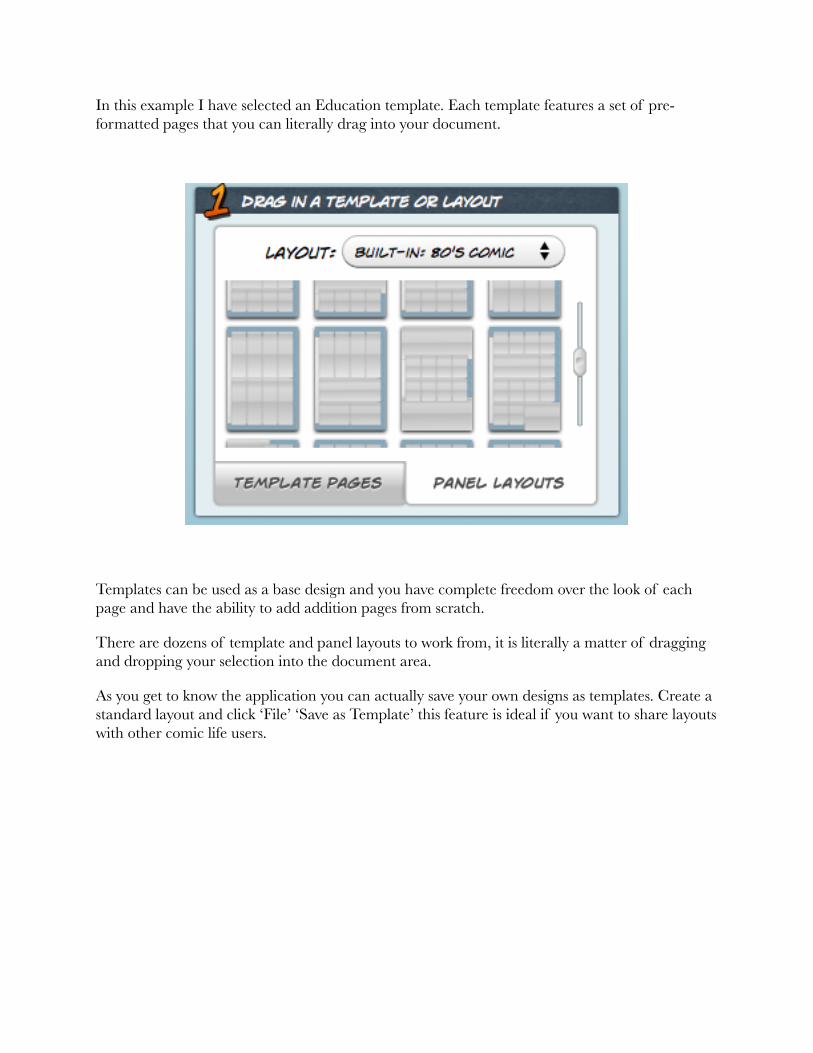
In this example I have selected an Education template. Each template features a set of pre-formatted pages that you can literally drag into your document.
Templates can be used as a base design and you have complete freedom over the look of each page and have the ability to add addition pages from scratch.
There are dozens of template and panel layouts to work from, it is literally a matter of dragging and dropping your selection into the document area.
As you get to know the application you can actually save your own designs as templates. Create a standard layout and click ‘File’ ‘Save as Template’ this feature is ideal if you want to share layouts with other comic life users.
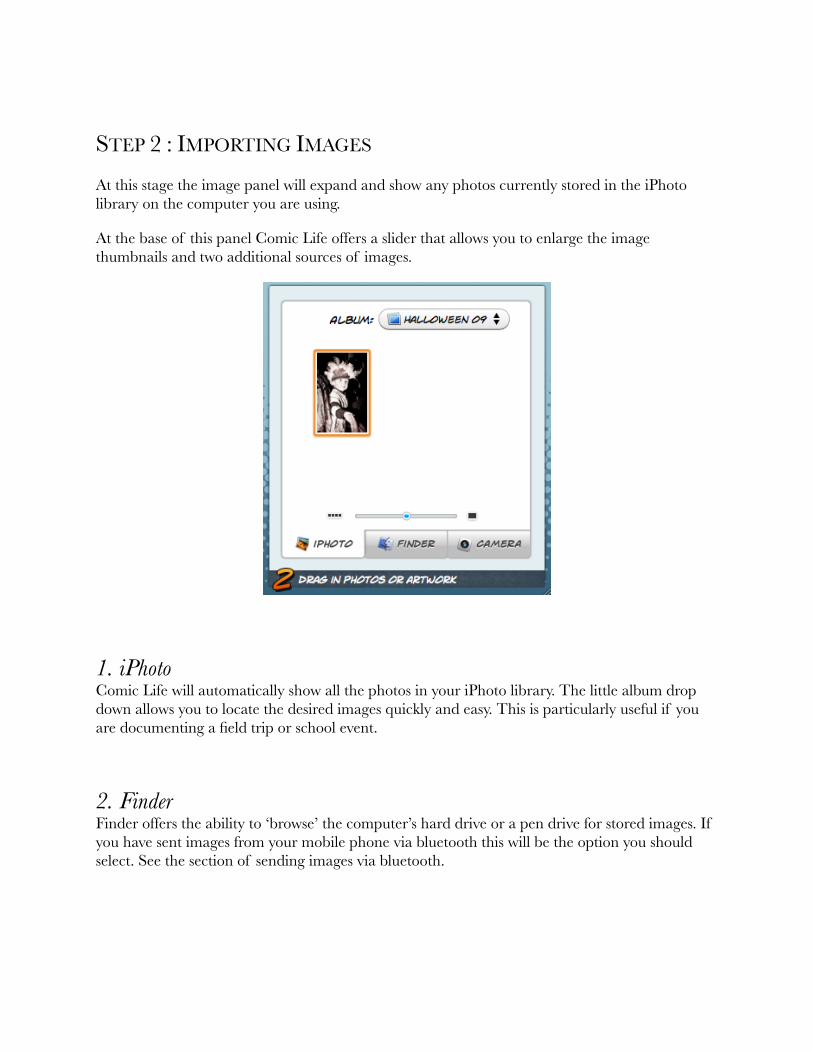
STEP 2 : IMPORTING IMAGES
At this stage the image panel will expand and show any photos currently stored in the iPhoto library on the computer you are using.
At the base of this panel Comic Life offers a slider that allows you to enlarge the image thumbnails and two additional sources of images.
1. iPhotoComic Life will automatically show all the photos in your iPhoto library. The little album drop down allows you to locate the desired images quickly and easy. This is particularly useful if you are documenting a field trip or school event.
2. Finder Finder offers the ability to ‘browse’ the computer’s hard drive or a pen drive for stored images. If you have sent images from your mobile phone via bluetooth this will be the option you should select. See the section of sending images via bluetooth.
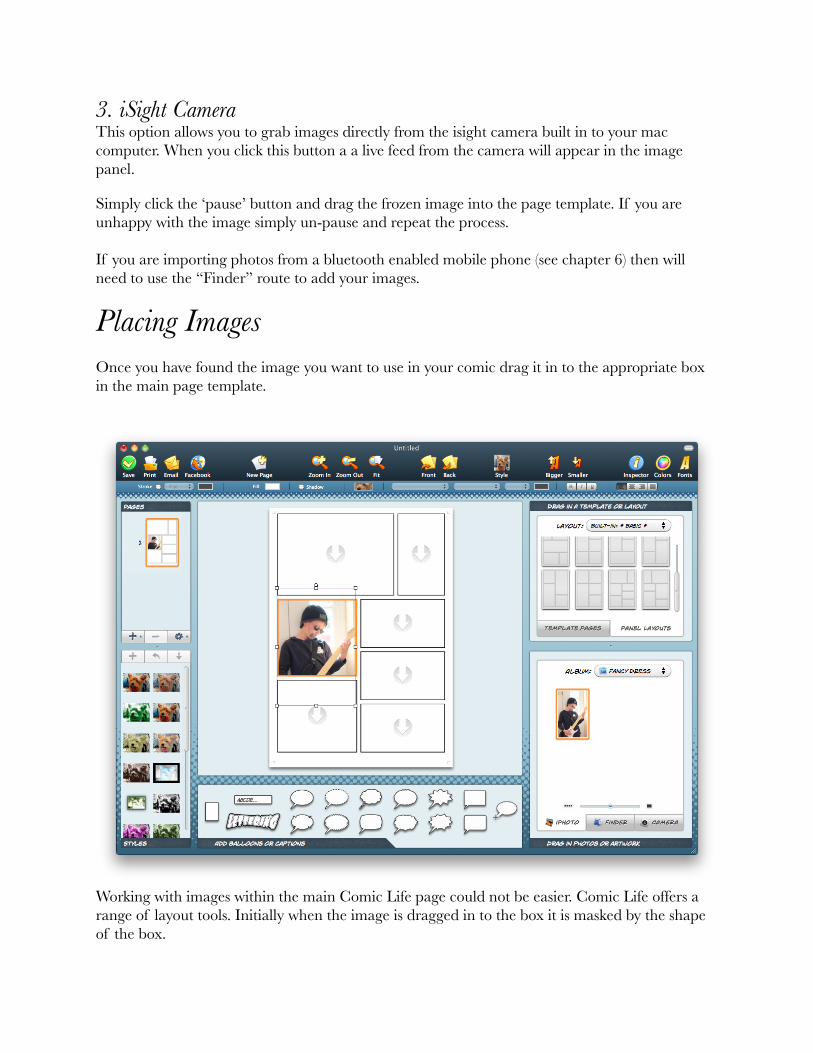
3. iSight CameraThis option allows you to grab images directly from the isight camera built in to your mac computer. When you click this button a a live feed from the camera will appear in the image panel.
Simply click the ‘pause’ button and drag the frozen image into the page template. If you are unhappy with the image simply un-pause and repeat the process. If you are importing photos from a bluetooth enabled mobile phone (see chapter 6) then will need to use the “Finder” route to add your images.
Placing ImagesOnce you have found the image you want to use in your comic drag it in to the appropriate box in the main page template.
Working with images within the main Comic Life page could not be easier. Comic Life offers a range of layout tools. Initially when the image is dragged in to the box it is masked by the shape of the box.

Working with Images
1. You can move the image around within the ‘masked’ frame work. This is useful if you only want to use aspect of the image.
2. Resize, use the green dots on the corners of the images to drag to the appropriate size.
Remember holding down the ‘shift’ key will ensure your image remains in proportion.
3. Rotate. When you click on your image you notice an orange dot appears with a pink arrow icon. Simply drag the pink arrows around the orange dot to rotate the image as appropriate.
Remember if you make a mistake you can undo a step my holding down the “Apple” key and Z.
STEP 4 : ADDING IMAGE EFFECTS
Comic Life offers a wide range of photo image effects to make your images more ‘comic like’. The best way to get to grips with the various options is simply to click on an image and have a play.
To display the ‘Styles’ option click the ‘Styles’ icon along the top menu bar. A new side panel should appear on the left hand side of Comic Life.
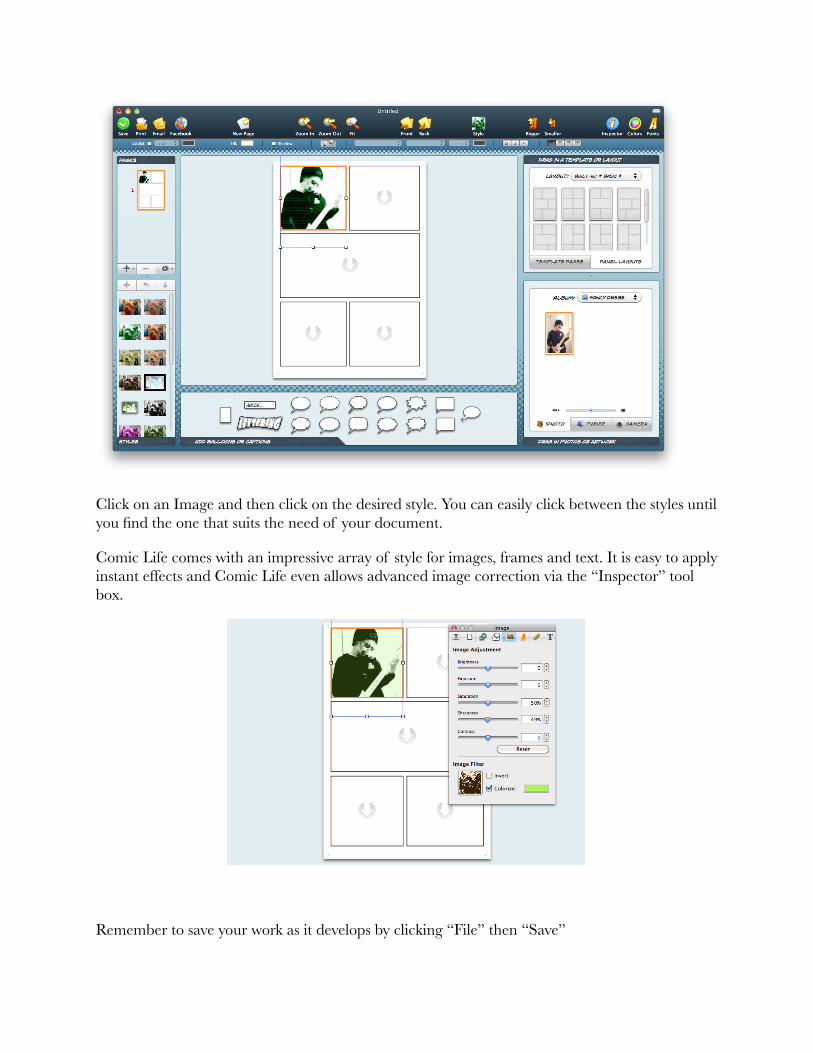
Click on an Image and then click on the desired style. You can easily click between the styles until you find the one that suits the need of your document.
Comic Life comes with an impressive array of style for images, frames and text. It is easy to apply instant effects and Comic Life even allows advanced image correction via the “Inspector” tool box.
Remember to save your work as it develops by clicking “File” then “Save”
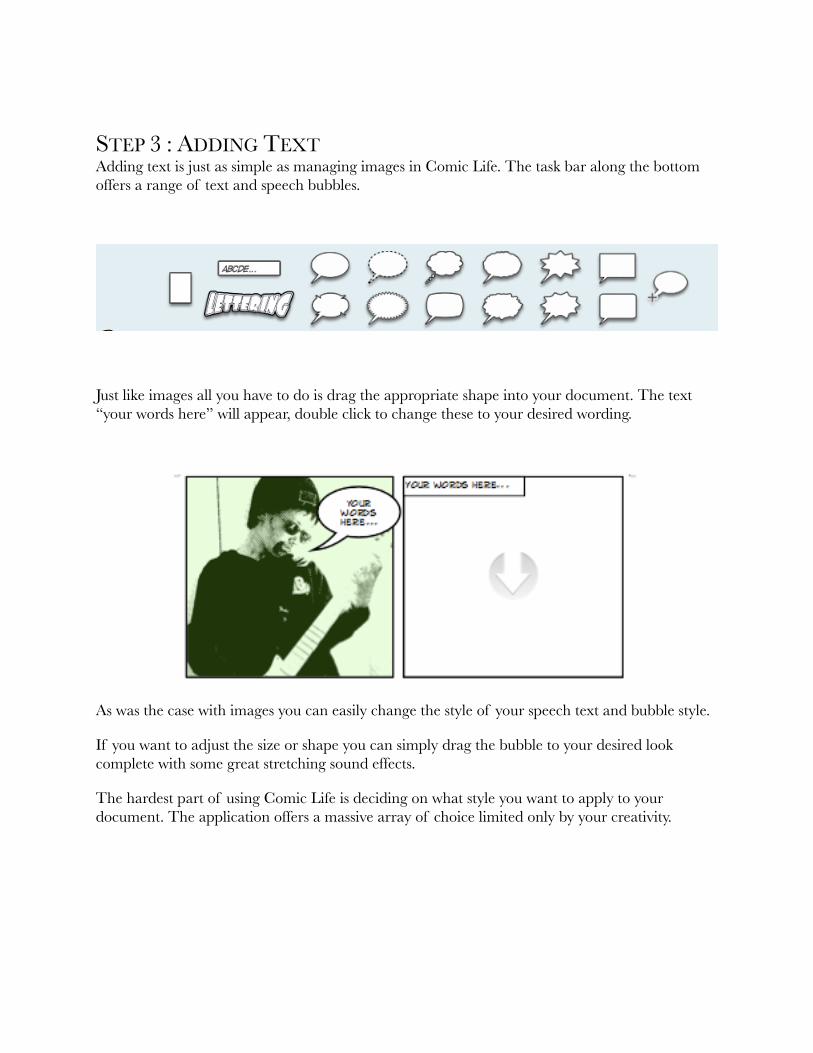
STEP 3 : ADDING TEXTAdding text is just as simple as managing images in Comic Life. The task bar along the bottom offers a range of text and speech bubbles.
Just like images all you have to do is drag the appropriate shape into your document. The text “your words here” will appear, double click to change these to your desired wording.
As was the case with images you can easily change the style of your speech text and bubble style.
If you want to adjust the size or shape you can simply drag the bubble to your desired look complete with some great stretching sound effects.
The hardest part of using Comic Life is deciding on what style you want to apply to your document. The application offers a massive array of choice limited only by your creativity.
Chapter 5
Exporting and Sharing
You can export your completed comic in a wide range of formats. Comic Life will create images, PDF files and even html files ready for inclusion in a website.
To export your completed comic in a format that you can share via bluetooth to your mobile phone then you need to save the file as an image. To do this click “File” and then “Export” then finally “Export to Images”
Save the file on to the desktop so it is easy to locate when sending to your phone with bluetooth.
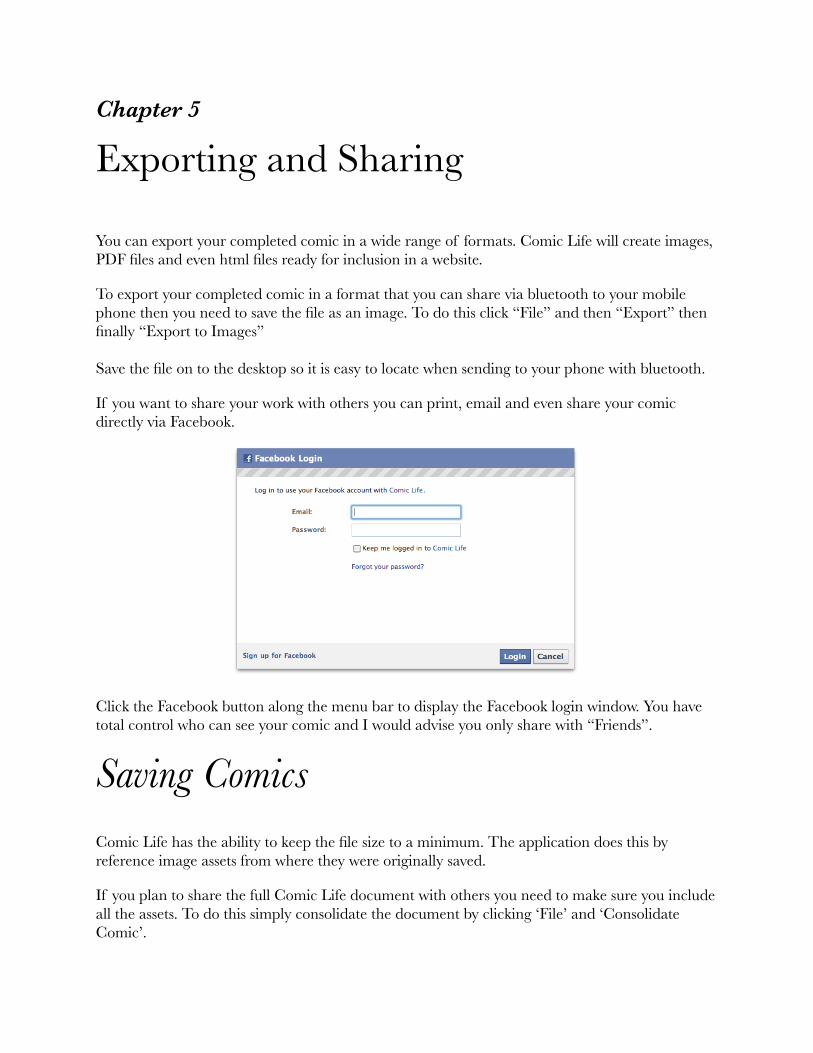
If you want to share your work with others you can print, email and even share your comic directly via Facebook.
Click the Facebook button along the menu bar to display the Facebook login window. You have total control who can see your comic and I would advise you only share with “Friends”.
Saving ComicsComic Life has the ability to keep the file size to a minimum. The application does this by reference image assets from where they were originally saved.
If you plan to share the full Comic Life document with others you need to make sure you include all the assets. To do this simply consolidate the document by clicking ‘File’ and ‘Consolidate Comic’.
Chapter 6
Using Bluetooth to transfer Photos
and Comics
Bluetooth wireless technology is a worldwide specification for a small-form factor, low-cost radio solution that provides links between mobile computers, mobile phones, other portable handheld devices, and connectivity to the Internet
TRANSFERRING FILES WITH BLUETOOTH
The idea is that pupils will take photos using their bluetooth enabled mobile phones and use bluetooth transfer to place them on the computer on which they are working. This is a relatively simple process.
The Apple computers you are working on come already pre-configured with bluetooth.
If you are sending images to your Apple computer via a mobile phone and bluetooth make sure the Mac is discoverable.
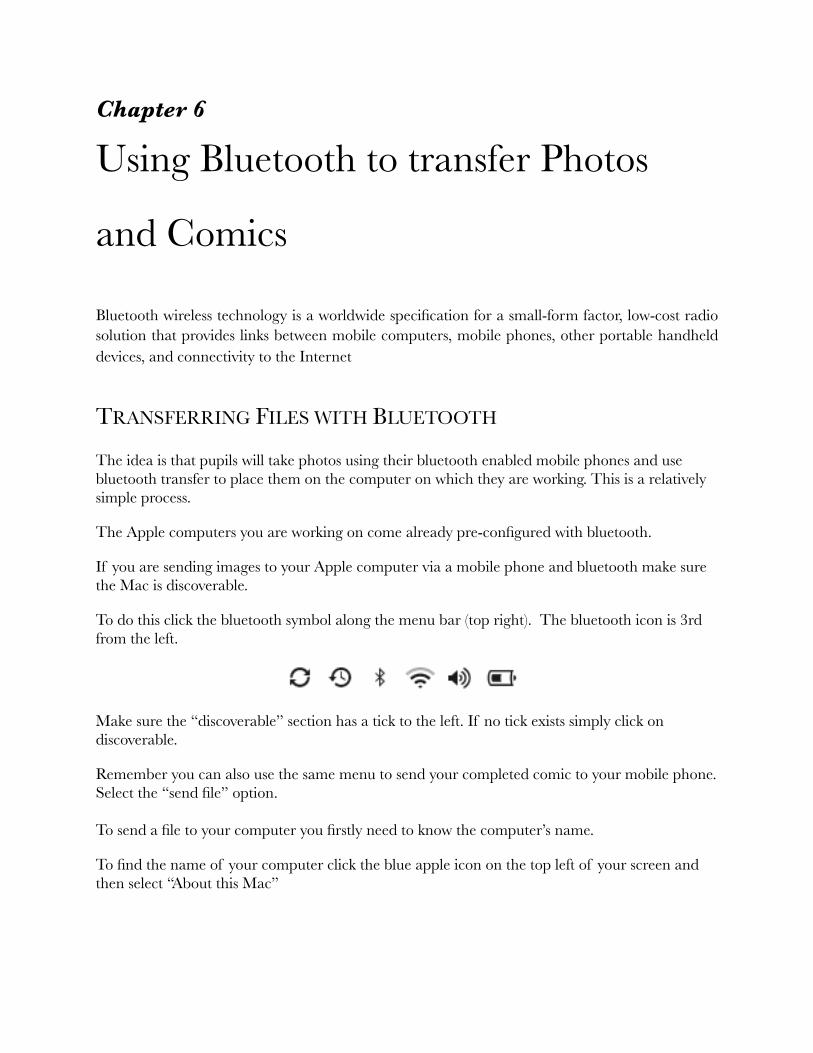
To do this click the bluetooth symbol along the menu bar (top right). The bluetooth icon is 3rd from the left.
Make sure the “discoverable” section has a tick to the left. If no tick exists simply click on discoverable.
Remember you can also use the same menu to send your completed comic to your mobile phone. Select the “send file” option.
To send a file to your computer you firstly need to know the computer’s name.
To find the name of your computer click the blue apple icon on the top left of your screen and then select “About this Mac”
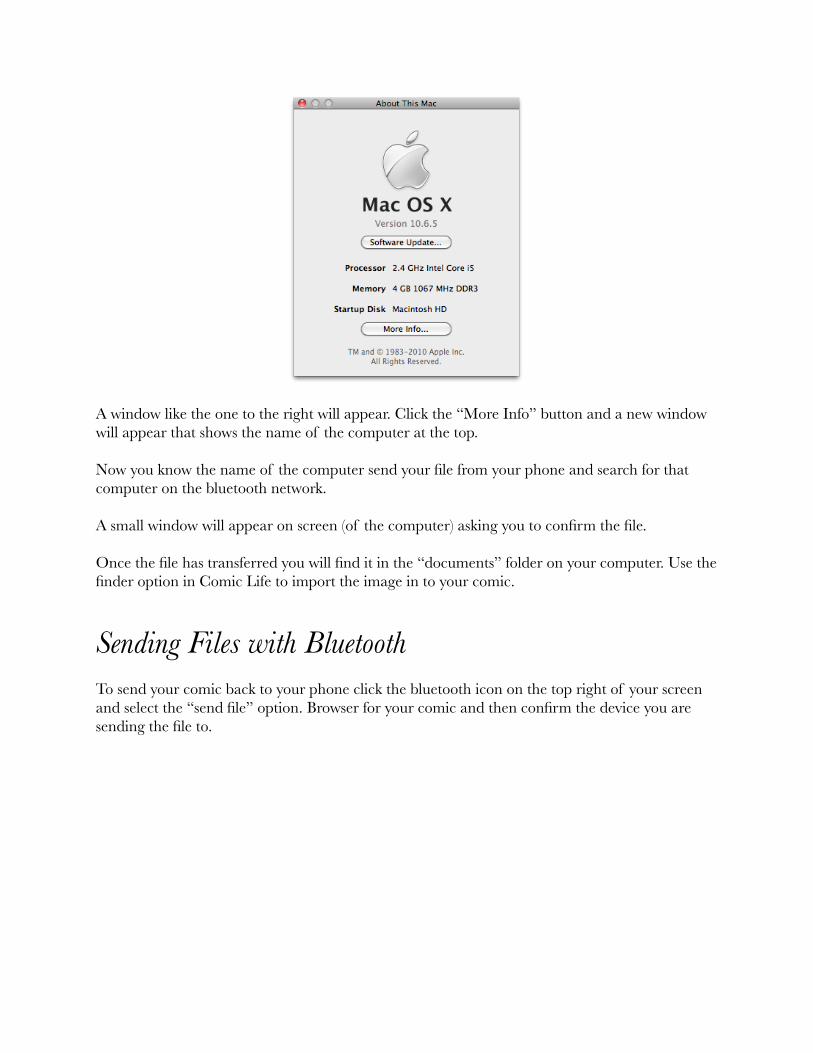
A window like the one to the right will appear. Click the “More Info” button and a new window will appear that shows the name of the computer at the top.
Now you know the name of the computer send your file from your phone and search for that computer on the bluetooth network.
A small window will appear on screen (of the computer) asking you to confirm the file.
Once the file has transferred you will find it in the “documents” folder on your computer. Use the finder option in Comic Life to import the image in to your comic.
Sending Files with BluetoothTo send your comic back to your phone click the bluetooth icon on the top right of your screen and select the “send file” option. Browser for your comic and then confirm the device you are sending the file to.
Connecting with DigMo!This Comic Life guide was published on DigMo! (www.digmo.co.uk) and is designed for use
by teachers and educators who use comic creation as a vehicle for learning.
You can follow DigMo! on Twitter at @digmo or on Facebook at http://www.facebook.com/digmo