taleo enterprise taleo onboarding configuration guide€¦ · configuration guide taleo onboarding...
TRANSCRIPT
Feature Pack 11BSeptember 15, 2011
Taleo Enterprise
Taleo OnboardingConfiguration Guide
Configuration Guide Taleo Onboarding FP11B ii
Confidential Information and Notices
Confidential Information
The recipient of this document (hereafter referred to as "the recipient") agrees that the ConfidentialInformation disclosed herein by Taleo shall be retained in confidence by the recipient, and itsrespective employees, affiliates and/or subsidiaries.
For the purpose herein, the term "Confidential Information" shall mean the following:
1. Any information, know-how, data, process, technique, design, drawing, program, formula or testdata, work in process, business plan, sales, suppliers, customer, employee, investor or businessinformation contained in a document, whether in written, graphic, or electronic form; or
2. Any document, diagram, or drawing which is either conspicuously marked as "Confidential", knownor reasonably known by the other party to be confidential, or is of a proprietary nature, and islearned or disclosed in the course of discussions, demonstrations, or other collaboration undertakenbetween the parties.
Limited Rights Notice (Dec 2007)
1. These data are submitted with limited rights under Subcontract No. 6896589. These data maybe reproduced and used by the Government with the express limitation that they will not, withoutwritten permission of the Contractor, be used for purposes of manufacture nor disclosed outsidethe Government; except that the Government may disclose these data outside the Governmentfor the following purposes, if any; provided that the Government makes such disclosure subject toprohibition against further use and disclosure: None.
2. This notice shall be marked on any reproduction of these data, in whole or in part.
© 2011 Taleo Corporation. Do not reproduce without the written permission of Taleo Corporation.
Configuration Guide Taleo Onboarding FP11B iii
Table of Contents
Confidential Information and Notices............................................................................................. ii
PrefaceRevision History.........................................................................................................................2Technical Configuration and Software Performance.................................................................3
Basic ConceptsOnboarding Overview................................................................................................................5
Understanding the Onboarding Process.............................................................................. 5Onboarding Administration Menu......................................................................................... 6
Login.......................................................................................................................................... 8Login and Product Access................................................................................................... 8
Getting Help.............................................................................................................................16Online Help......................................................................................................................... 16More Info.............................................................................................................................16Web Support.......................................................................................................................16Tooltip..................................................................................................................................17
Onboarding User Types and Permissions.............................................................................. 18Onboarding User Types and Permissions......................................................................... 18
New Hire Accounts..................................................................................................................22New Hire Account...............................................................................................................22
Settings.................................................................................................................................... 27Setting................................................................................................................................. 27Onboarding Settings........................................................................................................... 28
Security Policies...................................................................................................................... 33Security Policy for New Hires.............................................................................................33Security Policy Settings for New Hires.............................................................................. 33
Basic Concepts........................................................................................................................37Languages...........................................................................................................................37History Tracking..................................................................................................................39
Configuration Guide Taleo Onboarding FP11B iv
System Status.....................................................................................................................40
DocumentsDocument.................................................................................................................................42
Creating a Text Document................................................................................................. 42Paragraph Storage in Reusable Library.............................................................................43Creating a Document Containing a PDF File.....................................................................45
CorrespondenceMessage Template.................................................................................................................. 48
Forgot Password Message Template.................................................................................48Creating a Message Template........................................................................................... 49Editing the Properties of a Message Template..................................................................49Adding an Attachment to a Message Template.................................................................50Removing an Attachment from a Message Template........................................................50Activating a Message Template......................................................................................... 50Deactivating a Message Template..................................................................................... 51Deleting a Message Template............................................................................................51Duplicating a Message Template....................................................................................... 51
Paragraph................................................................................................................................ 53Adding a Paragraph to a Message Template.................................................................... 53Creating a Paragraph for a Message Template.................................................................54Ordering Paragraphs in a Message Template................................................................... 54Editing a Paragraph in a Message Template.....................................................................55Previewing a Paragraph in a Message Template.............................................................. 55Activating a Paragraph in a Message Template................................................................ 55Deactivating a Paragraph in a Message Template............................................................ 56
Variable....................................................................................................................................57Adding a Variable............................................................................................................... 57
User-Defined Fields and SelectionsUser-defined Fields..................................................................................................................59
User-defined Field...............................................................................................................59User-defined Fields in Onboarding vs Recruiting...............................................................61User-defined Field Reporting..............................................................................................63
User-defined Selections...........................................................................................................65User-defined Selection........................................................................................................65
Electronic SignaturesConfiguring an Electronic Signature........................................................................................70
Date and Time Setting for Electronic Signatures............................................................... 72Configuring an Electronic Signature...................................................................................73Adding an Electronic Signature in a Form......................................................................... 73Adding an Electronic Signature in a PDF.......................................................................... 74
User-defined FormsUser-defined Forms.................................................................................................................76
Configuring User-defined Forms.........................................................................................76Static Hyperlinks in User-defined Forms............................................................................85User-defined Form History Tracking.................................................................................. 86U.S. Form I-9......................................................................................................................87New Hire Details Form....................................................................................................... 87
Relationship between Forms and PDFs................................................................................. 88Tokenized PDF Document................................................................................................. 88
Configuration Guide Taleo Onboarding FP11B v
New Hire PortalNew Hire Portal....................................................................................................................... 94
Targeting Content to Different New Hire Experiences....................................................... 94Where to Configure Each Element of the New Hire Portal................................................ 95New Hire Portal Enhanced Layout and Original Layout.....................................................99Creating Portals................................................................................................................ 101Display Properties.............................................................................................................108Themes............................................................................................................................. 111
Images and HTML EditorsRich Text, Graphic and Video with the HTML Editor............................................................123
Linking a Video in the HTML Editor.................................................................................123Deleting an Image............................................................................................................ 124Uploading an Image......................................................................................................... 124Using an Image................................................................................................................ 124
External ServicesExternal Services...................................................................................................................126
Setting up your system for External Services.................................................................. 126Configuring External Service Details................................................................................128Troubleshooting External Services...................................................................................132
Processes and TasksProcesses and Tasks Overview............................................................................................135Tasks......................................................................................................................................136
Creating a Task................................................................................................................ 136Task Definition Action Types............................................................................................138New Hire Can Receive Passport Invitations on New Hire Portal..................................... 139Mentors for New Hires..................................................................................................... 140Retrying a Canceled Task from the Onboarding Webtop................................................ 141
Processes.............................................................................................................................. 142Process Statuses..............................................................................................................142Process Owner................................................................................................................. 142Supervisor......................................................................................................................... 143Steps................................................................................................................................. 144Transitions.........................................................................................................................148Transition Conditions........................................................................................................ 149Revisiting Tasks by Looping.............................................................................................153Transition List....................................................................................................................154Process Preview............................................................................................................... 155Restarting an Onboarding Process.................................................................................. 156Automatically Delete Old Onboarding Processes............................................................ 158
Product Resource AdministrationResource Administration........................................................................................................160
Resource Administration in the New Hire Portal..............................................................161Displaying Resource Identifiers........................................................................................ 162Displaying Resource Identifiers in the New Hire Portal................................................... 162Hiding Resource Identifiers.............................................................................................. 162Hiding Resource Identifiers in the New Hire Portal..........................................................163Refreshing Resource Values............................................................................................163Blocking Resource Value Refresh....................................................................................164Unblocking Resource Value Refresh............................................................................... 164

Configuration Guide Taleo Onboarding FP11B vi
Network DataNetwork Data Management...................................................................................................166Filtering Network Data Elements...........................................................................................167Activating a Network Data Element...................................................................................... 168Activating All Network Data Elements...................................................................................169Deactivating a Network Data Element.................................................................................. 170Deactivating All Network Data Elements.............................................................................. 171Synchronizing the Database with the NDA Central Database.............................................. 172

Preface
• Revision History................................................................................................................. 2• Technical Configuration and Software Performance......................................................... 3
Preface Revision History
Configuration Guide Taleo Onboarding FP11B 2
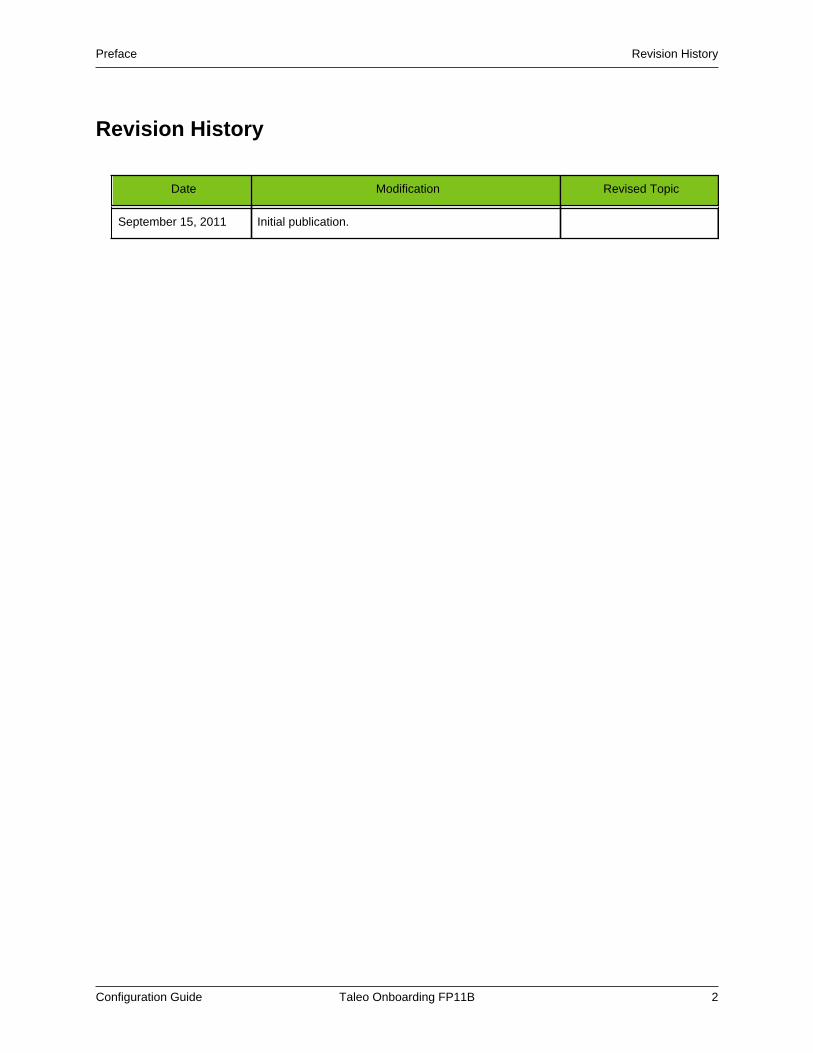
Revision History
Date Modification Revised Topic
September 15, 2011 Initial publication.
Preface Technical Configuration and Software Performance
Configuration Guide Taleo Onboarding FP11B 3
Technical Configuration and Software Performance
For the latest information, refer to the Taleo Enterprise Technical Configuration and SoftwarePerformance Guide document for the applicable release.
Basic Concepts
• Onboarding Overview........................................................................................................ 5• Login...................................................................................................................................8• Getting Help..................................................................................................................... 16• Onboarding User Types and Permissions.......................................................................18• New Hire Accounts.......................................................................................................... 22• Settings............................................................................................................................ 27• Security Policies...............................................................................................................33• Basic Concepts................................................................................................................ 37
Basic Concepts Onboarding Overview
Configuration Guide Taleo Onboarding FP11B 5
Onboarding Overview
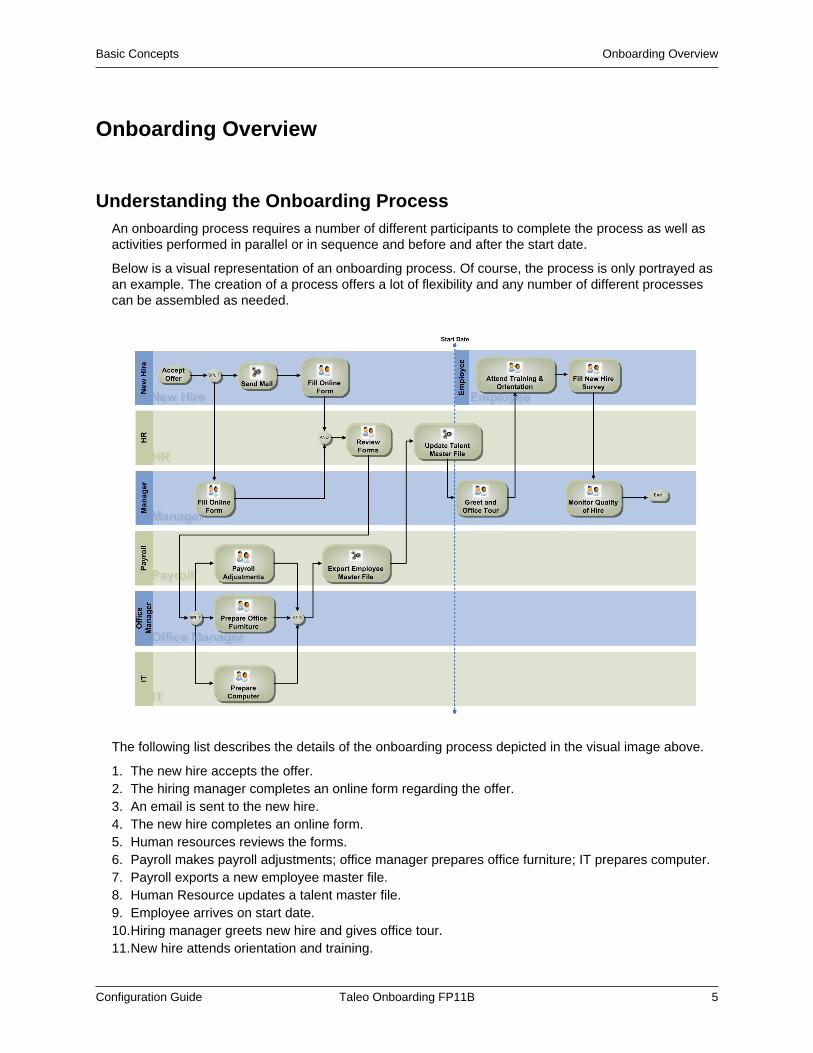
Understanding the Onboarding ProcessAn onboarding process requires a number of different participants to complete the process as well asactivities performed in parallel or in sequence and before and after the start date.
Below is a visual representation of an onboarding process. Of course, the process is only portrayed asan example. The creation of a process offers a lot of flexibility and any number of different processescan be assembled as needed.
The following list describes the details of the onboarding process depicted in the visual image above.
1. The new hire accepts the offer.2. The hiring manager completes an online form regarding the offer.3. An email is sent to the new hire.4. The new hire completes an online form.5. Human resources reviews the forms.6. Payroll makes payroll adjustments; office manager prepares office furniture; IT prepares computer.7. Payroll exports a new employee master file.8. Human Resource updates a talent master file.9. Employee arrives on start date.10.Hiring manager greets new hire and gives office tour.11.New hire attends orientation and training.
Basic Concepts Onboarding Overview
Configuration Guide Taleo Onboarding FP11B 6
12.New hire completes a new hire survey.13.Hiring manager monitors quality of hire.Before using Onboarding to create a process, you must first think about what your process will do andwho will be involved.
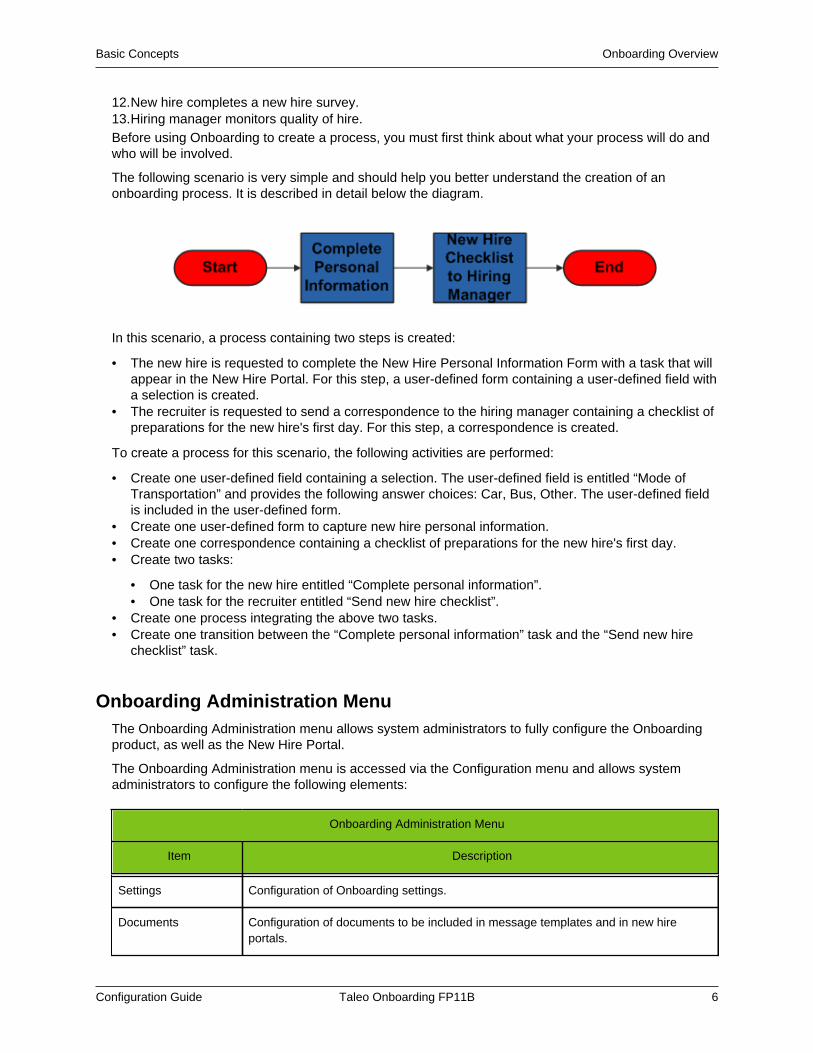
The following scenario is very simple and should help you better understand the creation of anonboarding process. It is described in detail below the diagram.
In this scenario, a process containing two steps is created:
• The new hire is requested to complete the New Hire Personal Information Form with a task that willappear in the New Hire Portal. For this step, a user-defined form containing a user-defined field witha selection is created.
• The recruiter is requested to send a correspondence to the hiring manager containing a checklist ofpreparations for the new hire's first day. For this step, a correspondence is created.
To create a process for this scenario, the following activities are performed:
• Create one user-defined field containing a selection. The user-defined field is entitled “Mode ofTransportation” and provides the following answer choices: Car, Bus, Other. The user-defined fieldis included in the user-defined form.
• Create one user-defined form to capture new hire personal information.• Create one correspondence containing a checklist of preparations for the new hire's first day.• Create two tasks:
• One task for the new hire entitled “Complete personal information”.• One task for the recruiter entitled “Send new hire checklist”.
• Create one process integrating the above two tasks.• Create one transition between the “Complete personal information” task and the “Send new hire
checklist” task.
Onboarding Administration MenuThe Onboarding Administration menu allows system administrators to fully configure the Onboardingproduct, as well as the New Hire Portal.
The Onboarding Administration menu is accessed via the Configuration menu and allows systemadministrators to configure the following elements:
Onboarding Administration Menu
Item Description
Settings Configuration of Onboarding settings.
Documents Configuration of documents to be included in message templates and in new hireportals.
Basic Concepts Onboarding Overview
Configuration Guide Taleo Onboarding FP11B 7
Onboarding Administration Menu
Item Description
Processes and TaskDefinitions
Configuration of onboarding processes and task requests to be sent to any personinvolved in the onboarding process.
New Hire PortalConfiguration
Configuration of the new hire portal, security settings and user accounts.
Correspondence Configuration of message templates.
User-defined Forms Creation of user-defined forms to be filled by various persons involved in the onboardingprocess.
User-defined Fields Configuration of fields and selections.
Services Configuration of services provided by partners.
Product Resources Display of resource ID.
Configuration
The following permission is required to access the Configuration menu.
User Type Permission
Name Location
Access Administration Configuration > [SmartOrg] Administration > User Types > Recruiting>Administration
There is no specific permission to access the Onboarding Administration menu. If a user is granted apermission in the Onboarding Administration category such as Manage User-defined Forms, the userwill be able to access the Onboarding Administration menu (Configuration > [SmartOrg] Administration> User Types > Recruiting > Onboarding > Administration).
Basic Concepts Login
Configuration Guide Taleo Onboarding FP11B 8
Login
Login and Product AccessAllows users to sign in to the Taleo Enterprise solution.
When opening the Taleo Enterprise solution, the User Sign In page appears. Users must select thelanguage in which they want to use the application. If a user changes the default language on the SignIn page, the page refreshes to the new language and subsequent Taleo pages are presented in theselected language. After selecting a language, users also have the possibility to tell the system toremember their selection so that the next time they sign in, the User Sign In page will be presented inthe language selected.
In the User Sign In page, users must also provide a user name and password before being able to seethe list of Taleo products to which they have access. The user name and password are provided by thesystem administrator. But the user has the ability to modify their password.
Once a user’s credentials have been entered and accepted, the Welcome Center appears and allowsaccess to Taleo products purchased by the organization and to which a user has access according tothe user’s user type and permissions.
When accessing a Taleo product, the information displayed in the Welcome Center is specific tothe user who signs in. The features to which the user has access also depends on product settingsenabled by the system administrator and on user type permissions granted to the user.
Accessing an Application
Prerequisite
You must know the Web address.
You must have received a user name and password from the system administrator.
Steps
1. Select the language in which you want to use the application.
2. Enter your user name and password.
3. Click Sign In.
Result
The Taleo Welcome Center is launched.
Welcome Center
The Welcome Center is a home page that is displayed to users immediately after they log in andprovides a "one-click" access point to Taleo products.
The Welcome Center contains a core navigation bar, an auxiliary navigation bar, a Quick Access paneland a Communications panel. If the Welcome Center is enabled, it replaces the table of contents page.
The core navigation bar is a set of tabs that provide direct links to Taleo products. A user might have atab for any or all of the following products: Taleo Performance, Taleo Recruiting, Taleo Compensation,Taleo Analytics, Taleo Configuration and Taleo Learn.
Basic Concepts Login
Configuration Guide Taleo Onboarding FP11B 9
A Quick Access panel provides an alternative "one-click" access to the same information and to aselection of modules within products.
The Welcome Center also contains, at the top right of the page, an auxiliary navigation bar containinglinks to additional resources and the Sign Out link.
Finally, Taleo clients can create information of interest to all Taleo product users in the organization fordisplay in the Communications section. Alternatively, they can create distinct sets of information for theCommunication section and associate an information set with a configuration profile.
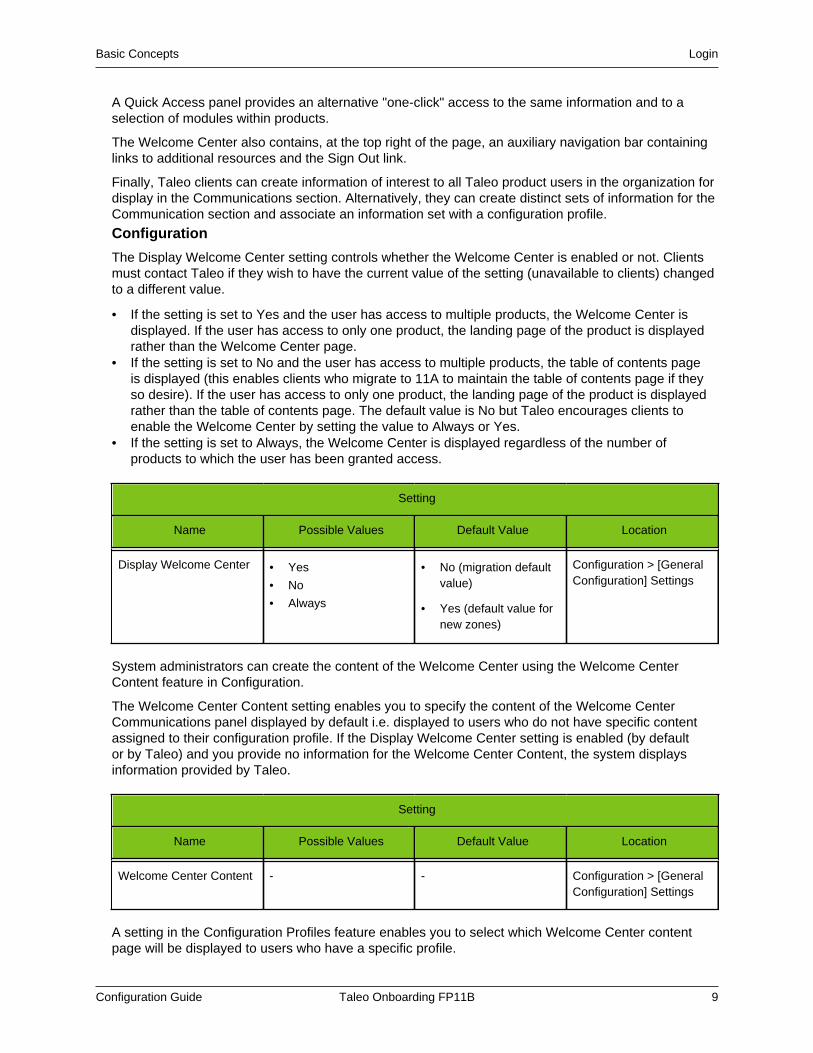
Configuration
The Display Welcome Center setting controls whether the Welcome Center is enabled or not. Clientsmust contact Taleo if they wish to have the current value of the setting (unavailable to clients) changedto a different value.
• If the setting is set to Yes and the user has access to multiple products, the Welcome Center isdisplayed. If the user has access to only one product, the landing page of the product is displayedrather than the Welcome Center page.
• If the setting is set to No and the user has access to multiple products, the table of contents pageis displayed (this enables clients who migrate to 11A to maintain the table of contents page if theyso desire). If the user has access to only one product, the landing page of the product is displayedrather than the table of contents page. The default value is No but Taleo encourages clients toenable the Welcome Center by setting the value to Always or Yes.
• If the setting is set to Always, the Welcome Center is displayed regardless of the number ofproducts to which the user has been granted access.
Setting
Name Possible Values Default Value Location
Display Welcome Center • Yes
• No
• Always
• No (migration defaultvalue)
• Yes (default value fornew zones)
Configuration > [GeneralConfiguration] Settings
System administrators can create the content of the Welcome Center using the Welcome CenterContent feature in Configuration.
The Welcome Center Content setting enables you to specify the content of the Welcome CenterCommunications panel displayed by default i.e. displayed to users who do not have specific contentassigned to their configuration profile. If the Display Welcome Center setting is enabled (by defaultor by Taleo) and you provide no information for the Welcome Center Content, the system displaysinformation provided by Taleo.
Setting
Name Possible Values Default Value Location
Welcome Center Content - - Configuration > [GeneralConfiguration] Settings
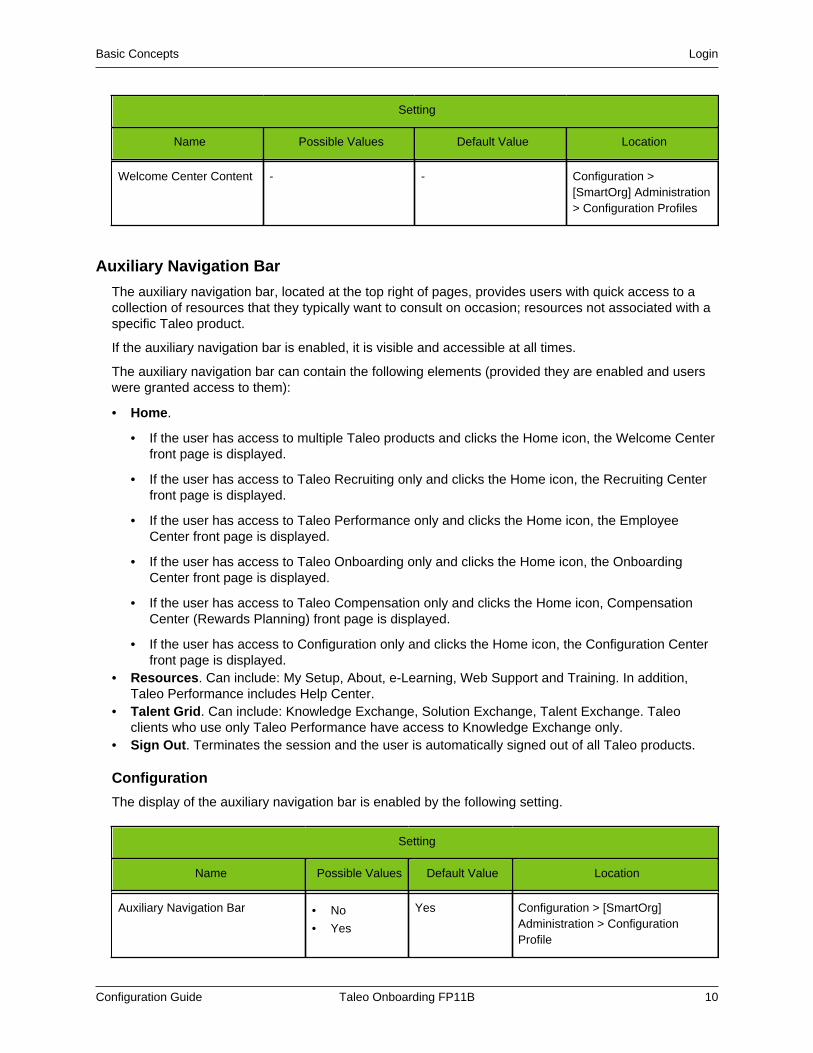
A setting in the Configuration Profiles feature enables you to select which Welcome Center contentpage will be displayed to users who have a specific profile.
Basic Concepts Login
Configuration Guide Taleo Onboarding FP11B 10
Setting
Name Possible Values Default Value Location
Welcome Center Content - - Configuration >[SmartOrg] Administration> Configuration Profiles
Auxiliary Navigation Bar
The auxiliary navigation bar, located at the top right of pages, provides users with quick access to acollection of resources that they typically want to consult on occasion; resources not associated with aspecific Taleo product.
If the auxiliary navigation bar is enabled, it is visible and accessible at all times.
The auxiliary navigation bar can contain the following elements (provided they are enabled and userswere granted access to them):
• Home.
• If the user has access to multiple Taleo products and clicks the Home icon, the Welcome Centerfront page is displayed.
• If the user has access to Taleo Recruiting only and clicks the Home icon, the Recruiting Centerfront page is displayed.
• If the user has access to Taleo Performance only and clicks the Home icon, the EmployeeCenter front page is displayed.
• If the user has access to Taleo Onboarding only and clicks the Home icon, the OnboardingCenter front page is displayed.
• If the user has access to Taleo Compensation only and clicks the Home icon, CompensationCenter (Rewards Planning) front page is displayed.
• If the user has access to Configuration only and clicks the Home icon, the Configuration Centerfront page is displayed.
• Resources. Can include: My Setup, About, e-Learning, Web Support and Training. In addition,Taleo Performance includes Help Center.
• Talent Grid. Can include: Knowledge Exchange, Solution Exchange, Talent Exchange. Taleoclients who use only Taleo Performance have access to Knowledge Exchange only.
• Sign Out. Terminates the session and the user is automatically signed out of all Taleo products.
Configuration
The display of the auxiliary navigation bar is enabled by the following setting.
Setting
Name Possible Values Default Value Location
Auxiliary Navigation Bar • No
• Yes
Yes Configuration > [SmartOrg]Administration > ConfigurationProfile
Basic Concepts Login
Configuration Guide Taleo Onboarding FP11B 11
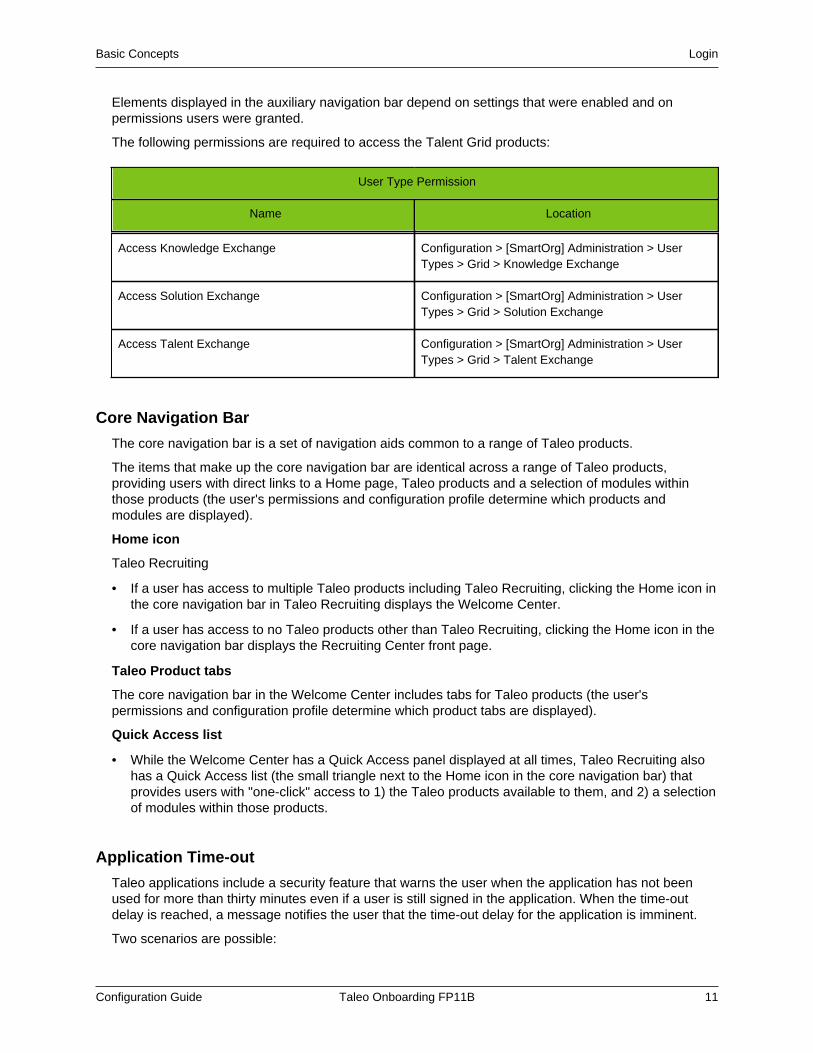
Elements displayed in the auxiliary navigation bar depend on settings that were enabled and onpermissions users were granted.
The following permissions are required to access the Talent Grid products:
User Type Permission
Name Location
Access Knowledge Exchange Configuration > [SmartOrg] Administration > UserTypes > Grid > Knowledge Exchange
Access Solution Exchange Configuration > [SmartOrg] Administration > UserTypes > Grid > Solution Exchange
Access Talent Exchange Configuration > [SmartOrg] Administration > UserTypes > Grid > Talent Exchange
Core Navigation Bar
The core navigation bar is a set of navigation aids common to a range of Taleo products.
The items that make up the core navigation bar are identical across a range of Taleo products,providing users with direct links to a Home page, Taleo products and a selection of modules withinthose products (the user's permissions and configuration profile determine which products andmodules are displayed).
Home icon
Taleo Recruiting
• If a user has access to multiple Taleo products including Taleo Recruiting, clicking the Home icon inthe core navigation bar in Taleo Recruiting displays the Welcome Center.
• If a user has access to no Taleo products other than Taleo Recruiting, clicking the Home icon in thecore navigation bar displays the Recruiting Center front page.
Taleo Product tabs
The core navigation bar in the Welcome Center includes tabs for Taleo products (the user'spermissions and configuration profile determine which product tabs are displayed).
Quick Access list
• While the Welcome Center has a Quick Access panel displayed at all times, Taleo Recruiting alsohas a Quick Access list (the small triangle next to the Home icon in the core navigation bar) thatprovides users with "one-click" access to 1) the Taleo products available to them, and 2) a selectionof modules within those products.
Application Time-out
Taleo applications include a security feature that warns the user when the application has not beenused for more than thirty minutes even if a user is still signed in the application. When the time-outdelay is reached, a message notifies the user that the time-out delay for the application is imminent.
Two scenarios are possible:
Basic Concepts Login
Configuration Guide Taleo Onboarding FP11B 12
• User takes action: When the application has been idled for thirty minutes, a message notifies theuser that the application requires attention. Clicking “Access the application” directs the user tothe application. When the user accesses the application, he/she can reset the application and amessage indicates the remaining time before the session expires.
• User does not take action: If the user does not reset the application within the defined delay, amessage is displayed, indicating that the user has been signed out of the application and has tosign in again to use the application.
The time-out delay is set by default to thirty minutes. The reminder displayed before time-out is set bydefault to ten minutes before time-out.
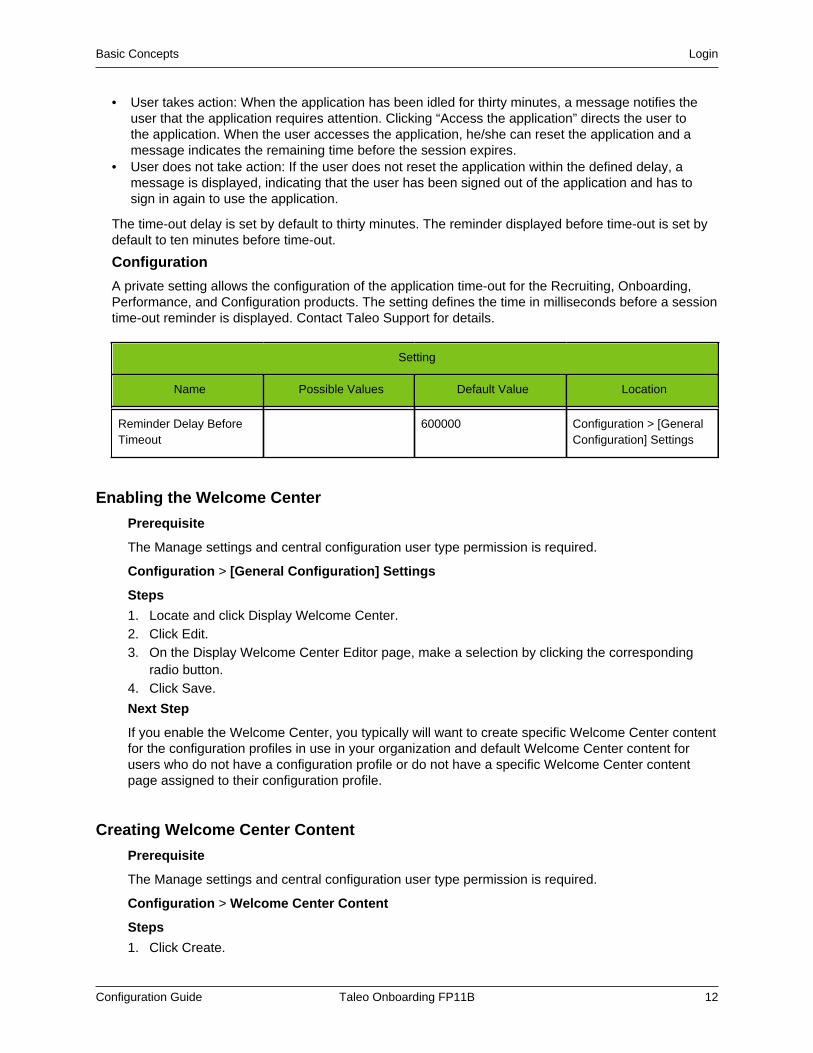
Configuration
A private setting allows the configuration of the application time-out for the Recruiting, Onboarding,Performance, and Configuration products. The setting defines the time in milliseconds before a sessiontime-out reminder is displayed. Contact Taleo Support for details.
Setting
Name Possible Values Default Value Location
Reminder Delay BeforeTimeout
600000 Configuration > [GeneralConfiguration] Settings
Enabling the Welcome Center
Prerequisite
The Manage settings and central configuration user type permission is required.
Configuration > [General Configuration] Settings
Steps
1. Locate and click Display Welcome Center.2. Click Edit.3. On the Display Welcome Center Editor page, make a selection by clicking the corresponding
radio button.4. Click Save.
Next Step
If you enable the Welcome Center, you typically will want to create specific Welcome Center contentfor the configuration profiles in use in your organization and default Welcome Center content forusers who do not have a configuration profile or do not have a specific Welcome Center contentpage assigned to their configuration profile.
Creating Welcome Center Content
Prerequisite
The Manage settings and central configuration user type permission is required.
Configuration > Welcome Center Content
Steps
1. Click Create.
Basic Concepts Login
Configuration Guide Taleo Onboarding FP11B 13
2. Enter values in the various fields.
In the Content box, you type or paste the text you want to display in the Communications sectionof the Welcome Center.
To apply a particular format to a word or passage, select the text with the mouse pointer andthen click the icon of the corresponding format in the toolbar.
You can add a static image to Welcome Center content by clicking in the Content toolbar.
3. Click Save.4. To make the page available for selection, click Activate on the Welcome Center Content page.
Result
An item corresponding to the content page you created is displayed in the Welcome Center ContentPages list.
Next Step
Once you create and enable Welcome Center content, you typically designate it as the defaultcontent to be displayed in the Communications section of the Welcome Center or you assign it to aconfiguration profile so the content is displayed to all users who have that configuration profile.
If you have not already enabled the Display Welcome Page setting in Configuration, you should alsoperform this task.
Specifying the Default Welcome Center Content
Prerequisite
The Manage settings and central configuration user type permission is required.
Configuration > [General Configuration] Settings
Steps
1. In the Settings list, click Welcome Center Content.2. Click Edit.3. Click Search next to the Value field.4. Click the radio button next to the item you want to designate as the default content page.5. Click Select.6. Click Save.
Result
The content page you selected is displayed to users who do not have one assigned to theirconfiguration profile.
Next Step
If you have not already enabled the Display Welcome Page setting in Configuration, you shouldperform this task now.
Assigning Welcome Center Content to a Configuration Profile
Prerequisite
The following user type permissions are required: Manage settings and central configuration andManage configuration profile.
Basic Concepts Login
Configuration Guide Taleo Onboarding FP11B 14
Configuration > [SmartOrg] Administration > Configuration Profiles
Steps
1. Create a new configuration profile or click the code of an existing configuration profile in theConfiguration Profiles list.
2. Click the Welcome Center Content link in the Configuration Profiles list.
3. Click Edit.
4. Click Search and select the radio button that corresponds to the content page you want todisplay to users who have been assigned the configuration profile.
5. Click Select.
6. Click Save.
7. Return to the Profile page and click Save to save your change.
Result
The system will show the Welcome Center content you selected to users who have thisconfiguration profile whenever the Welcome Center is displayed.
Next Step
If you have not already enabled the Display Welcome Page setting in Configuration, you shouldperform this task now.
Taleo Learn In the Welcome Center
The core navigation bar in the Welcome Center can include a tab for Taleo Learn and the QuickAccess panel can include a quick link to Learn.
Users can access Taleo Learn directly from the Welcome Center core navigation bar or the QuickAccess panel without logging into Taleo Learn. When users want to return to the Welcome Center,they can click Home on any Taleo Learn page.
Taleo clients can request that the Learn tab and Quick Access link be displayed or hidden in theWelcome Center.
Access to Learn is granted or rescinded via a user type permission in SmartOrg .
Learn user types can be assigned to Taleo Enterprise users via user type permissions in SmartOrg.
Prior to Feature Pack 11B, if a user had (Taleo Performance) development plan user permissions andthe Learn and Development modules were enabled, the link to Taleo Learn was displayed. Now aspecific Learn user permission must be associated with a user before the person can access the MyLearn link.
Learning is a platform designed to enable organizations to deliver and track structured curriculum andlearning events tied to compliance, regulatory, job role and onboarding requirements.
Configuration
User Type Permissions
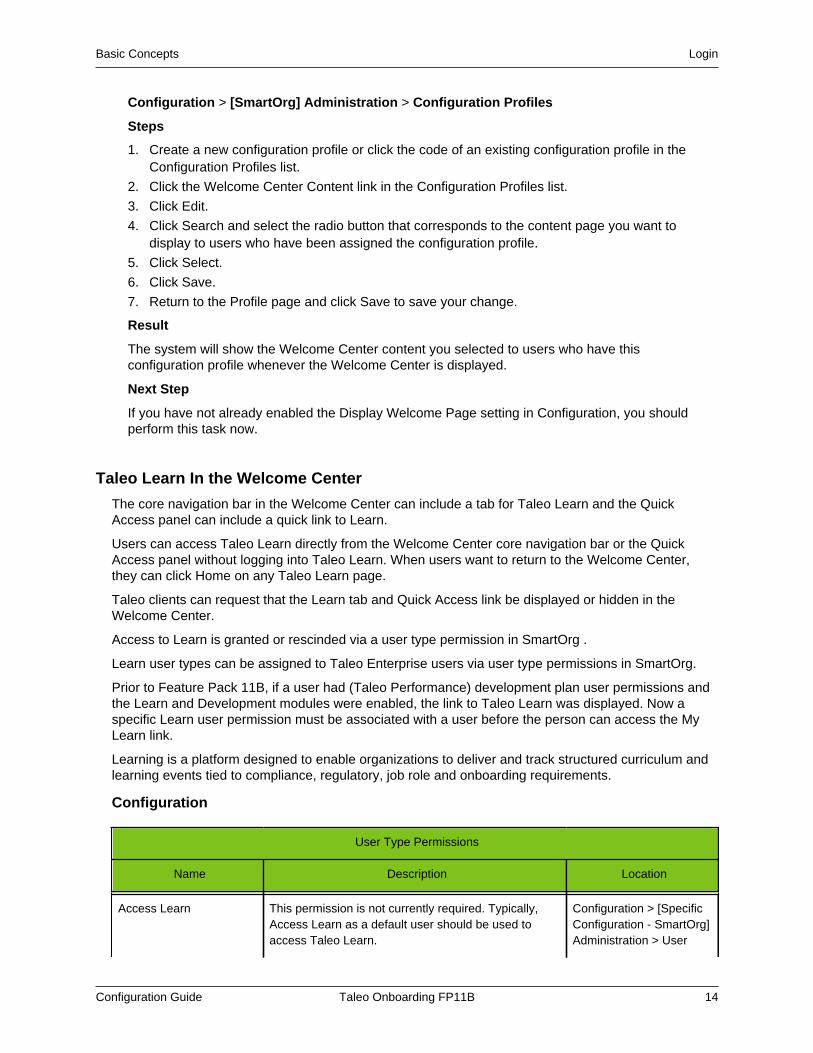
Name Description Location
Access Learn This permission is not currently required. Typically,Access Learn as a default user should be used toaccess Taleo Learn.
Configuration > [SpecificConfiguration - SmartOrg]Administration > User
Basic Concepts Login
Configuration Guide Taleo Onboarding FP11B 15
User Type Permissions
Name Description Location
Types > [FunctionalDomains] Learning >Global Learning
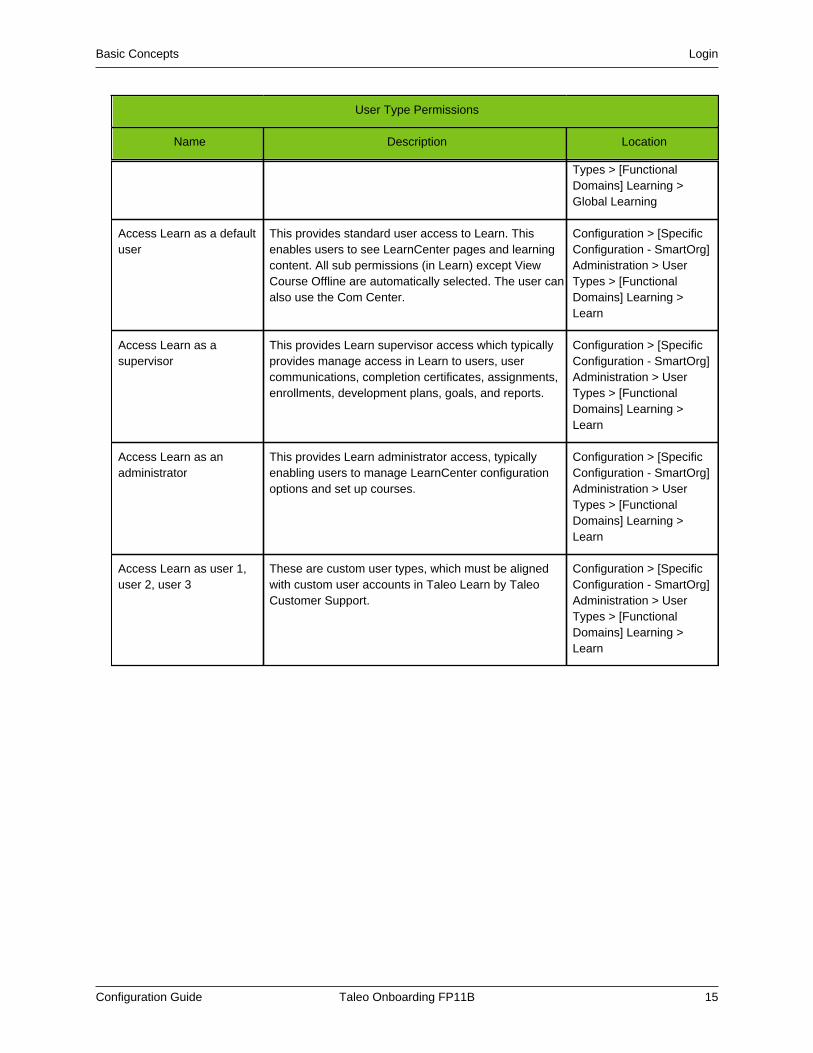
Access Learn as a defaultuser
This provides standard user access to Learn. Thisenables users to see LearnCenter pages and learningcontent. All sub permissions (in Learn) except ViewCourse Offline are automatically selected. The user canalso use the Com Center.
Configuration > [SpecificConfiguration - SmartOrg]Administration > UserTypes > [FunctionalDomains] Learning >Learn
Access Learn as asupervisor
This provides Learn supervisor access which typicallyprovides manage access in Learn to users, usercommunications, completion certificates, assignments,enrollments, development plans, goals, and reports.
Configuration > [SpecificConfiguration - SmartOrg]Administration > UserTypes > [FunctionalDomains] Learning >Learn
Access Learn as anadministrator
This provides Learn administrator access, typicallyenabling users to manage LearnCenter configurationoptions and set up courses.
Configuration > [SpecificConfiguration - SmartOrg]Administration > UserTypes > [FunctionalDomains] Learning >Learn
Access Learn as user 1,user 2, user 3
These are custom user types, which must be alignedwith custom user accounts in Taleo Learn by TaleoCustomer Support.
Configuration > [SpecificConfiguration - SmartOrg]Administration > UserTypes > [FunctionalDomains] Learning >Learn

Basic Concepts Getting Help
Configuration Guide Taleo Onboarding FP11B 16
Getting Help
Online HelpThe Taleo administration module offers comprehensive help about concepts or tasks to perform.
The online help provides information about a concept or a task to be performed. The online help,represented by this icon or the Help link, is available in the auxiliary navigation bar located in the topright-hand corner of all pages.
When clicking on the help icon or the Help link, a table of contents of available help topics is displayedand it is also possible to search the help database to locate specific subjects.
More InfoThe More Info link is another method of accessing online help.
A More info link is located at the end of the description in the top header of pages in Onboarding.Clicking this link will open a window containing context-sensitive, online help for that page.
Web SupportThe Web Support link gives users access to Taleo Web support and question submission feature.
The Web Support link is available in the auxiliary navigation bar of all pages of the application if it wasenabled by the system administrator.
Configuration
To display the Web Support link, the following setting must be set to Yes.
Setting
Name Possible Values Default Value Location
Display Web Support Link inAuxiliary Menu
• No
• Yes
No Configuration > [SmartOrg]Administration > ConfigurationProfiles
Furthermore, the Web Support optional feature must be activated by Taleo Support. If only the abovesetting is turned on, users will not have access to Web Support even though the link will still bepresent.
The auxiliary navigation bar must also be enabled.
Basic Concepts Getting Help
Configuration Guide Taleo Onboarding FP11B 17
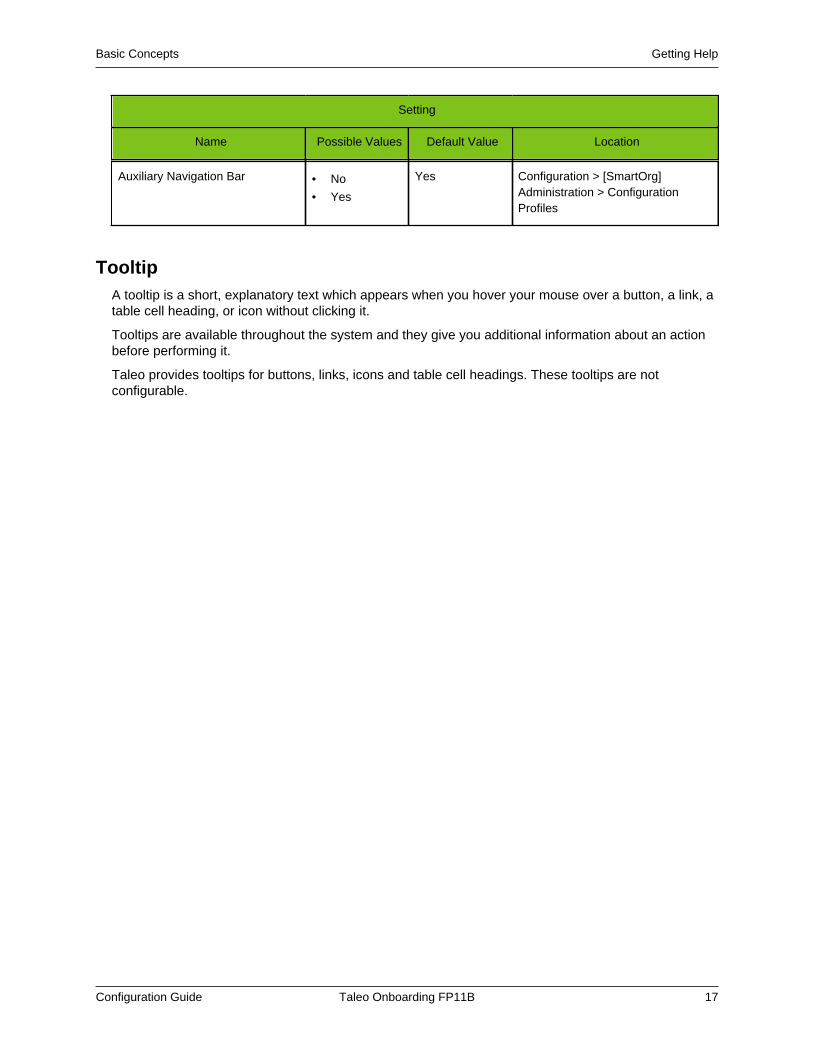
Setting
Name Possible Values Default Value Location
Auxiliary Navigation Bar • No
• Yes
Yes Configuration > [SmartOrg]Administration > ConfigurationProfiles
TooltipA tooltip is a short, explanatory text which appears when you hover your mouse over a button, a link, atable cell heading, or icon without clicking it.
Tooltips are available throughout the system and they give you additional information about an actionbefore performing it.
Taleo provides tooltips for buttons, links, icons and table cell headings. These tooltips are notconfigurable.
Basic Concepts Onboarding User Types and Permissions
Configuration Guide Taleo Onboarding FP11B 18
Onboarding User Types and Permissions
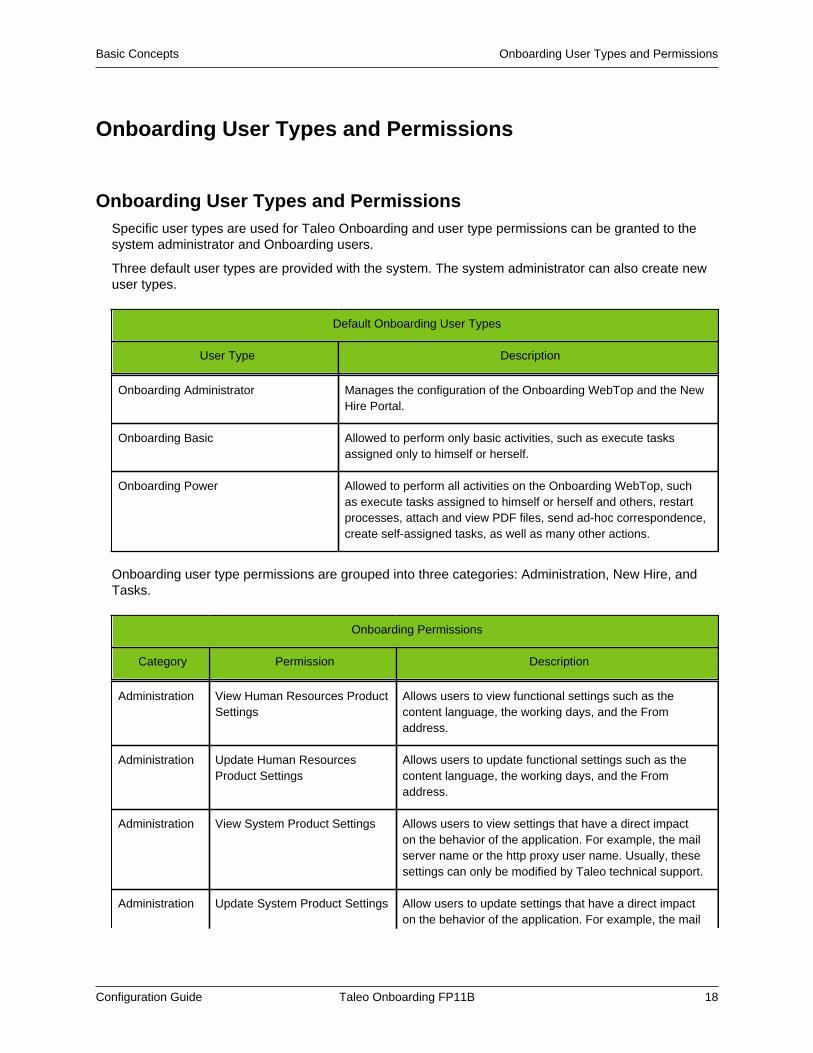
Onboarding User Types and PermissionsSpecific user types are used for Taleo Onboarding and user type permissions can be granted to thesystem administrator and Onboarding users.
Three default user types are provided with the system. The system administrator can also create newuser types.
Default Onboarding User Types
User Type Description
Onboarding Administrator Manages the configuration of the Onboarding WebTop and the NewHire Portal.
Onboarding Basic Allowed to perform only basic activities, such as execute tasksassigned only to himself or herself.
Onboarding Power Allowed to perform all activities on the Onboarding WebTop, suchas execute tasks assigned to himself or herself and others, restartprocesses, attach and view PDF files, send ad-hoc correspondence,create self-assigned tasks, as well as many other actions.
Onboarding user type permissions are grouped into three categories: Administration, New Hire, andTasks.
Onboarding Permissions
Category Permission Description
Administration View Human Resources ProductSettings
Allows users to view functional settings such as thecontent language, the working days, and the Fromaddress.
Administration Update Human ResourcesProduct Settings
Allows users to update functional settings such as thecontent language, the working days, and the Fromaddress.
Administration View System Product Settings Allows users to view settings that have a direct impacton the behavior of the application. For example, the mailserver name or the http proxy user name. Usually, thesesettings can only be modified by Taleo technical support.
Administration Update System Product Settings Allow users to update settings that have a direct impacton the behavior of the application. For example, the mail
Basic Concepts Onboarding User Types and Permissions
Configuration Guide Taleo Onboarding FP11B 19
Onboarding Permissions
Category Permission Description
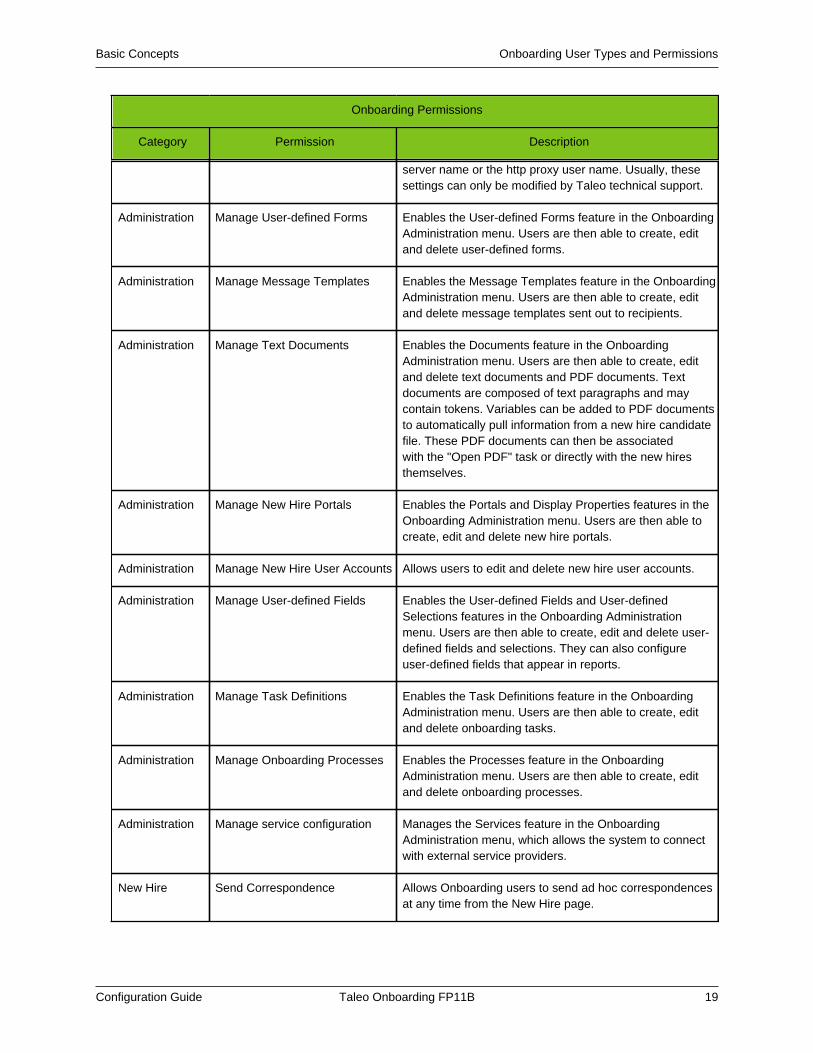
server name or the http proxy user name. Usually, thesesettings can only be modified by Taleo technical support.
Administration Manage User-defined Forms Enables the User-defined Forms feature in the OnboardingAdministration menu. Users are then able to create, editand delete user-defined forms.
Administration Manage Message Templates Enables the Message Templates feature in the OnboardingAdministration menu. Users are then able to create, editand delete message templates sent out to recipients.
Administration Manage Text Documents Enables the Documents feature in the OnboardingAdministration menu. Users are then able to create, editand delete text documents and PDF documents. Textdocuments are composed of text paragraphs and maycontain tokens. Variables can be added to PDF documentsto automatically pull information from a new hire candidatefile. These PDF documents can then be associatedwith the "Open PDF" task or directly with the new hiresthemselves.
Administration Manage New Hire Portals Enables the Portals and Display Properties features in theOnboarding Administration menu. Users are then able tocreate, edit and delete new hire portals.
Administration Manage New Hire User Accounts Allows users to edit and delete new hire user accounts.
Administration Manage User-defined Fields Enables the User-defined Fields and User-definedSelections features in the Onboarding Administrationmenu. Users are then able to create, edit and delete user-defined fields and selections. They can also configureuser-defined fields that appear in reports.
Administration Manage Task Definitions Enables the Task Definitions feature in the OnboardingAdministration menu. Users are then able to create, editand delete onboarding tasks.
Administration Manage Onboarding Processes Enables the Processes feature in the OnboardingAdministration menu. Users are then able to create, editand delete onboarding processes.
Administration Manage service configuration Manages the Services feature in the OnboardingAdministration menu, which allows the system to connectwith external service providers.
New Hire Send Correspondence Allows Onboarding users to send ad hoc correspondencesat any time from the New Hire page.

Basic Concepts Onboarding User Types and Permissions
Configuration Guide Taleo Onboarding FP11B 20
Onboarding Permissions
Category Permission Description
New Hire View processes I own or thathave been shared with me
Allows Onboarding users to view processes for which theyare the process owner or one of the supervisors for theprocesses that they have shared in Onboarding.
New Hire Manage processes I own or thathave been shared with me
Allows Onboarding users to manage processes for whichthey are the process owner or one of the supervisors forthe processes that they have shared in Onboarding.
New Hire Share processes I own or thathave been shared with me
Allows Onboarding users to explicitly allow another user toview a new hire's process temporarily.
New Hire View all processes Allows Onboarding users to view processes for new hires.
New Hire Manage all processes Allows Onboarding users to suspend, restart, or cancelprocesses for new hires, and to change the assignedusers, their hiring manager, recruiters or assistants, whilethe process is running.
New Hire Share all processes Allows Onboarding users to share and revoke the sharingof processes in Onboarding.
New Hire View and manage relateddocuments
Allows users to display the Attached Files section in theNew Hire Detail page seen by Onboarding users. Oncethis permission is enabled, a PDF document that getsassociated with the new hire via the Open PDF task wouldappear. There is also the possibility to associate other PDFdocuments from the document library to each new hire, ifdesired.
New Hire Delete processes Allows Onboarding users to delete processes inOnboarding.
Tasks View tasks assigned to me or thatI have initiated
Allows Onboarding users to view tasks in Onboarding forwhich the logged-in user is an assignee. Three options areavailable for this permission.
Tasks View tasks (Read-only) This option relates to the "View tasks assigned to me orthat I have initiated". When selected, for all tasks assignedto the user or that the user has initiated, the user can justview them.
Tasks Edit tasks assigned to me or thatI have initiated
This option relates to the "View tasks assigned to meor that I have initiated". Allows users to edit tasks inOnboarding for which the logged-in user is an assignee.
Tasks Create and edit tasks This option relates to the "View tasks assigned to me orthat I have initiated". When selected, for all tasks assigned
Basic Concepts Onboarding User Types and Permissions
Configuration Guide Taleo Onboarding FP11B 21
Onboarding Permissions
Category Permission Description
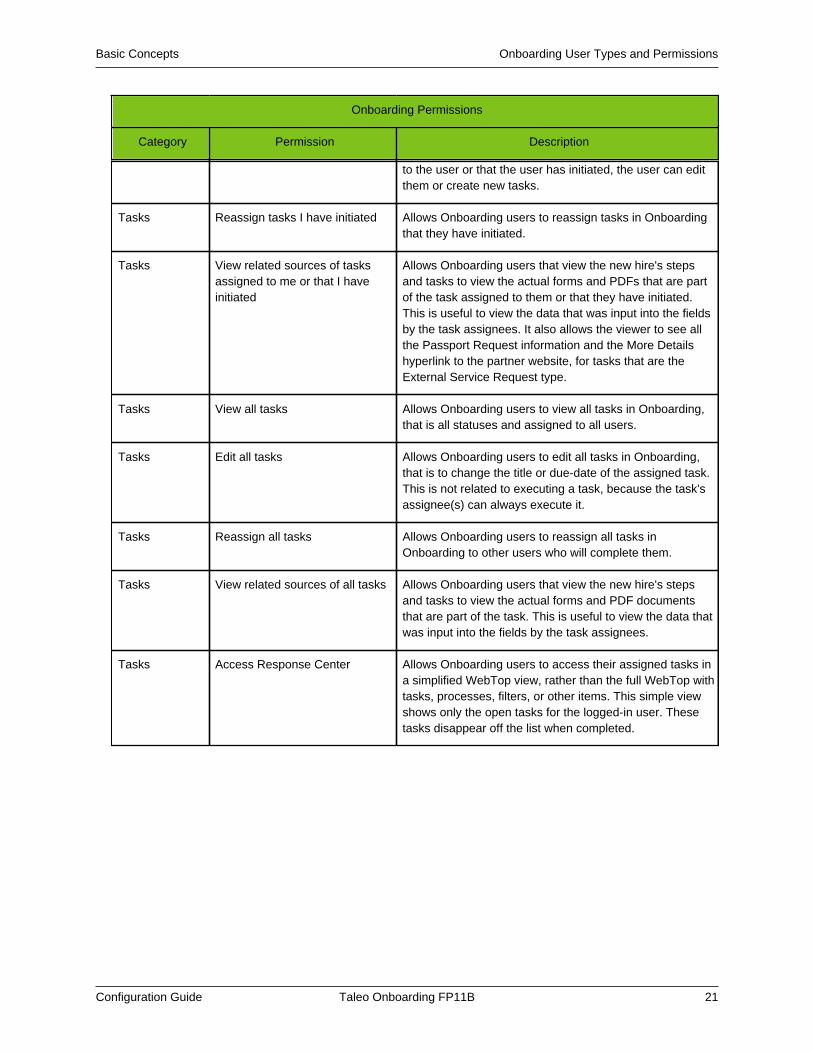
to the user or that the user has initiated, the user can editthem or create new tasks.
Tasks Reassign tasks I have initiated Allows Onboarding users to reassign tasks in Onboardingthat they have initiated.
Tasks View related sources of tasksassigned to me or that I haveinitiated
Allows Onboarding users that view the new hire's stepsand tasks to view the actual forms and PDFs that are partof the task assigned to them or that they have initiated.This is useful to view the data that was input into the fieldsby the task assignees. It also allows the viewer to see allthe Passport Request information and the More Detailshyperlink to the partner website, for tasks that are theExternal Service Request type.
Tasks View all tasks Allows Onboarding users to view all tasks in Onboarding,that is all statuses and assigned to all users.
Tasks Edit all tasks Allows Onboarding users to edit all tasks in Onboarding,that is to change the title or due-date of the assigned task.This is not related to executing a task, because the task'sassignee(s) can always execute it.
Tasks Reassign all tasks Allows Onboarding users to reassign all tasks inOnboarding to other users who will complete them.
Tasks View related sources of all tasks Allows Onboarding users that view the new hire's stepsand tasks to view the actual forms and PDF documentsthat are part of the task. This is useful to view the data thatwas input into the fields by the task assignees.
Tasks Access Response Center Allows Onboarding users to access their assigned tasks ina simplified WebTop view, rather than the full WebTop withtasks, processes, filters, or other items. This simple viewshows only the open tasks for the logged-in user. Thesetasks disappear off the list when completed.

Basic Concepts New Hire Accounts
Configuration Guide Taleo Onboarding FP11B 22
New Hire Accounts
New Hire AccountNew hire accounts are managed in the Onboarding User Account Management feature. This featureallows the system administrator to view the list of new hire accounts, modify information regarding theaccount and perform certain actions such as generating a password or locking an account.
The New Hire User Account contains the following information:
Element Description Notes
PersonalInformation
• Prefix, first name, middlename, last name, suffix
• Employee ID
• Title
• Email address
• Home phone number
Employee records are also maintained in external systemslike the company's HRIS. In those systems, the employeeis given a unique ID. The Employee ID field is necessary inorder to create the employee record in Taleo when being fedover from an external system. However, the Employee ID isNOT necessary within Taleo Onboarding.
The Email address field is automatically filled with the emailaddress of the candidate when starting an onboardingprocess. The email address is editable. However, anychanges made to it are not transferred in the candidate filein Taleo Recruiting. In Taleo Onboarding, each new hire hasthree separate fields for storing different email addresses:
• Corporate Address• Personal Address• Correspondence Address
By default, any email message sent to a new hire is sent tothe Corporate Address. If this field is empty, the messageis sent to the Personal Address. If this field is empty, themessage is sent to the Correspondence Address. The emailaddress displayed in the User Account Editor page is theaddress that was provided by the candidate when he or sheapplied in the Recruiting Candidate Section. It is stored inthe Correspondence Address field of Taleo Onboarding.Updating this email address will not have any effect onTaleo Recruiting, since changes to Onboarding informationnever have an effect on Recruiting data. When a new hireis launched into Onboarding, the Corporate Address fieldis empty on purpose. A form can be used to input the newcorporate address created for a new hire. Once created, theemail address is saved into Taleo and all email messages aresent to that address.
AccountInformation
• User name
• Password and ConfirmPassword
• Password validity period
The user name chosen by the candidate in the CareerSection is transferred in Onboarding when the Onboardingprocess is launched. This user name can then be used bythe new hire from then onward. Any changes made to theOnboarding user name do not affect the Career Section username. Any changes made to the Career Section user nameafter Onboarding has been launched for the first time do notaffect the Onboarding user name. If you do want an updated
Basic Concepts New Hire Accounts
Configuration Guide Taleo Onboarding FP11B 23
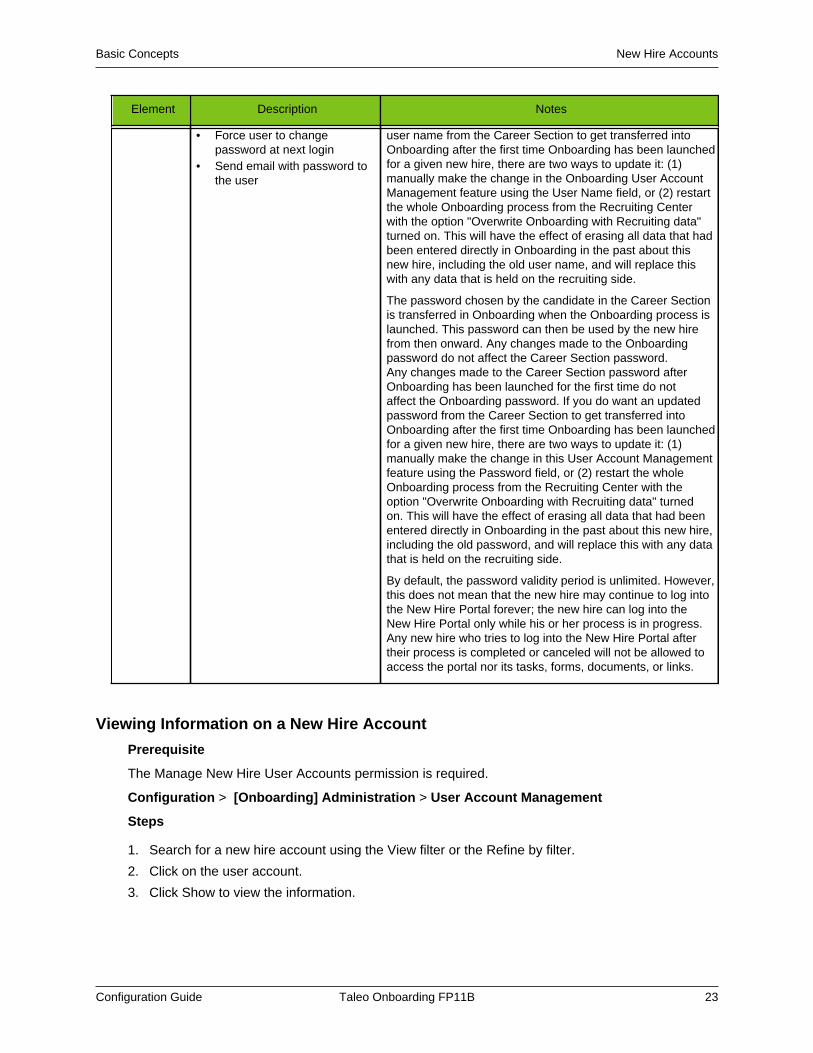
Element Description Notes
• Force user to changepassword at next login
• Send email with password tothe user
user name from the Career Section to get transferred intoOnboarding after the first time Onboarding has been launchedfor a given new hire, there are two ways to update it: (1)manually make the change in the Onboarding User AccountManagement feature using the User Name field, or (2) restartthe whole Onboarding process from the Recruiting Centerwith the option "Overwrite Onboarding with Recruiting data"turned on. This will have the effect of erasing all data that hadbeen entered directly in Onboarding in the past about thisnew hire, including the old user name, and will replace thiswith any data that is held on the recruiting side.
The password chosen by the candidate in the Career Sectionis transferred in Onboarding when the Onboarding process islaunched. This password can then be used by the new hirefrom then onward. Any changes made to the Onboardingpassword do not affect the Career Section password.Any changes made to the Career Section password afterOnboarding has been launched for the first time do notaffect the Onboarding password. If you do want an updatedpassword from the Career Section to get transferred intoOnboarding after the first time Onboarding has been launchedfor a given new hire, there are two ways to update it: (1)manually make the change in this User Account Managementfeature using the Password field, or (2) restart the wholeOnboarding process from the Recruiting Center with theoption "Overwrite Onboarding with Recruiting data" turnedon. This will have the effect of erasing all data that had beenentered directly in Onboarding in the past about this new hire,including the old password, and will replace this with any datathat is held on the recruiting side.
By default, the password validity period is unlimited. However,this does not mean that the new hire may continue to log intothe New Hire Portal forever; the new hire can log into theNew Hire Portal only while his or her process is in progress.Any new hire who tries to log into the New Hire Portal aftertheir process is completed or canceled will not be allowed toaccess the portal nor its tasks, forms, documents, or links.
Viewing Information on a New Hire Account
Prerequisite
The Manage New Hire User Accounts permission is required.
Configuration > [Onboarding] Administration > User Account Management
Steps
1. Search for a new hire account using the View filter or the Refine by filter.
2. Click on the user account.
3. Click Show to view the information.

Basic Concepts New Hire Accounts
Configuration Guide Taleo Onboarding FP11B 24
Editing the Personal Information of a New Hire Account
Prerequisite
The Manage New Hire User Accounts permission is required.
Configuration > [Onboarding] Administration > User Account Management
Steps
1. Click on a new hire account.
2. Click Edit next to Personal Information.
3. Edit the information.
4. Click Save.
Generating a New Hire Password
Prerequisite
The Manage New Hire User Accounts permission is required.
You may need to generate a password if, for example, the user does not have his or her user namehandy or does not have an email address to receive a temporary access code.
Configuration > [Onboarding] Administration > User Account Management
Steps
1. Click on a new hire account.
2. Click Generate Password.
3. Specify if you want to send an email to the new hire containing the new password.
4. Click Yes in the confirmation message box.
Result
The password is generated and it is displayed on the screen. If you chose to send an email to thecandidate, the password is still displayed on the screen and the candidate will receive the passwordby email.
Forcing a Password Change at Next Login
Prerequisite
The Manage New Hire User Accounts permission is required.
Configuration > [Onboarding] Administration > User Account Management
Steps
1. Click on a new hire account.
2. Click Edit next to Account Information.
3. Select the option Force user to change password at next login.
4. Click Save.
Result
When logging in the New Hire Portal, the new hire will have to change his or her password.
Basic Concepts New Hire Accounts
Configuration Guide Taleo Onboarding FP11B 25
Setting a Password Validity Period
Prerequisite
The Manage New Hire User Accounts permission is required.
Configuration > [Onboarding] Administration > User Account Management
Steps
1. Click on a new hire account.
2. Click Edit next to Account Information.
3. Specify if the password is always valid or valid for a specific period.
Use the calendar icon to specify a date.
4. Click Save.
Activating a New Hire Account
Prerequisite
The Manage New Hire User Account permission is required.
The status of the new hire account must be Inactive.
Configuration > [Onboarding] Administration > User Account Management
Steps
1. Click on a new hire account.
2. Click Activate.
3. Click Yes in the confirmation message box.
Result
You may want to Deactivate a new hire's account to prevent the new hire from logging into the NewHire Portal for a period of time. Then this is useful when it's time to reactivate them.
Deactivating a New Hire Account
Prerequisite
The Manage New Hire User Account permission is required.
The status of the new hire account must be Active.
Configuration > [Onboarding] Administration > User Account Management
Steps
1. Click on a new hire account.
2. Click Deactivate.
3. Click Yes in the confirmation message box.
Result
The new hire account is deactivated. This function can be used, for example, to prevent a new hirefrom logging into the New Hire Portal for a period of time.
Basic Concepts New Hire Accounts
Configuration Guide Taleo Onboarding FP11B 26
Locking a New Hire Account
Prerequisite
The Manage New Hire User Account permission is required.
You may need to lock a user account if, for example, the user was fired. As soon as the onboardingprocess for a person gets canceled, the person is no longer able to access his account. However,you may want to lock or deactivate an account immediately because it may take a bit longer tocancel the process, or if the process has some additional alternative non-hiring steps that should beallowed to continue for a while.
Configuration > [Onboarding] Administration > User Account Management
Steps
1. Click on a new hire account.2. Click Lock.3. Click Yes in the confirmation message box.
Result
The new hire can no longer access the New Hire Portal.
Unlocking a New Hire Account
Prerequisite
The Manage New Hire User Account permission is required.
Configuration > [Onboarding] Administration > User Account Management
Steps
1. Click on a new hire account.2. Click Unlock.3. Click Yes in the confirmation message box.
Result
The new hire can access the New Hire Portal as long as he or she has an Onboarding process inprogress.
Deleting a New Hire Account
Prerequisite
The Manage New Hire User Account permission is required.
Configuration > [Onboarding] Administration > User Account Management
Steps
1. Click Delete next to the new hire account.2. Click Yes in the confirmation message box.
Result
The new hire's information is removed from the system. However, the basic user name andpassword are retained and the user may be recovered later, if needed.
Basic Concepts Settings
Configuration Guide Taleo Onboarding FP11B 27
Settings
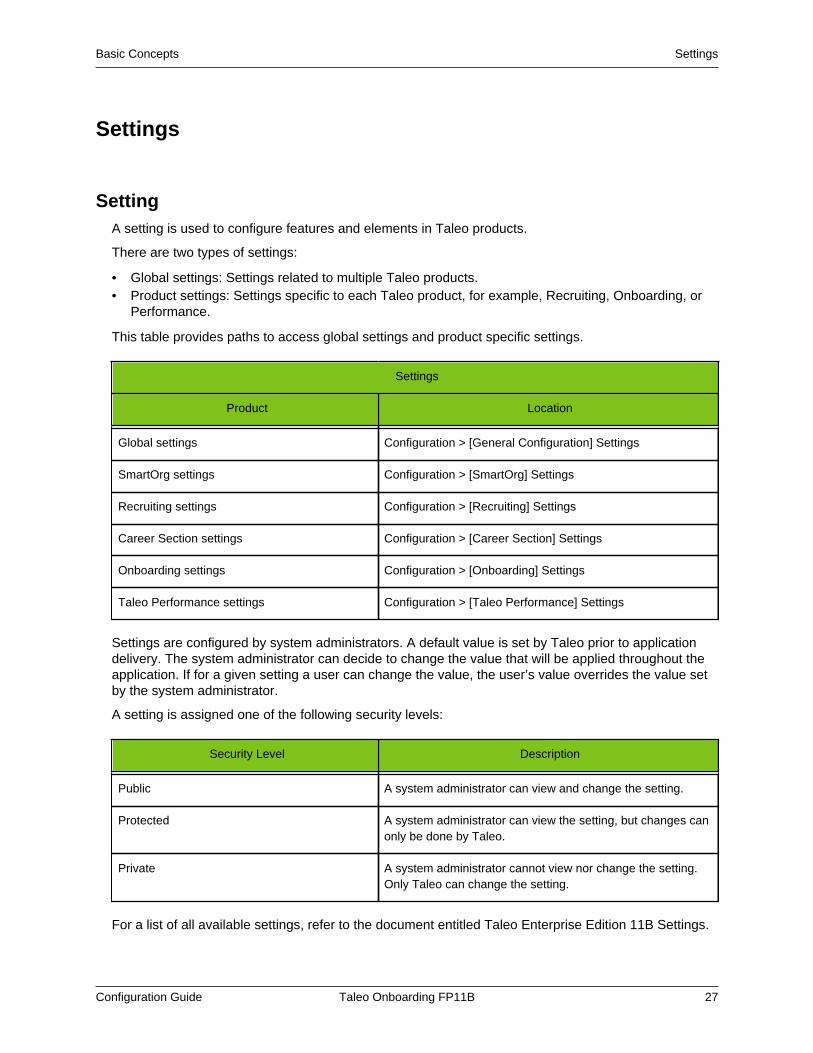
SettingA setting is used to configure features and elements in Taleo products.
There are two types of settings:
• Global settings: Settings related to multiple Taleo products.• Product settings: Settings specific to each Taleo product, for example, Recruiting, Onboarding, or
Performance.
This table provides paths to access global settings and product specific settings.
Settings
Product Location
Global settings Configuration > [General Configuration] Settings
SmartOrg settings Configuration > [SmartOrg] Settings
Recruiting settings Configuration > [Recruiting] Settings
Career Section settings Configuration > [Career Section] Settings
Onboarding settings Configuration > [Onboarding] Settings
Taleo Performance settings Configuration > [Taleo Performance] Settings
Settings are configured by system administrators. A default value is set by Taleo prior to applicationdelivery. The system administrator can decide to change the value that will be applied throughout theapplication. If for a given setting a user can change the value, the user’s value overrides the value setby the system administrator.
A setting is assigned one of the following security levels:
Security Level Description
Public A system administrator can view and change the setting.
Protected A system administrator can view the setting, but changes canonly be done by Taleo.
Private A system administrator cannot view nor change the setting.Only Taleo can change the setting.
For a list of all available settings, refer to the document entitled Taleo Enterprise Edition 11B Settings.
Basic Concepts Settings
Configuration Guide Taleo Onboarding FP11B 28
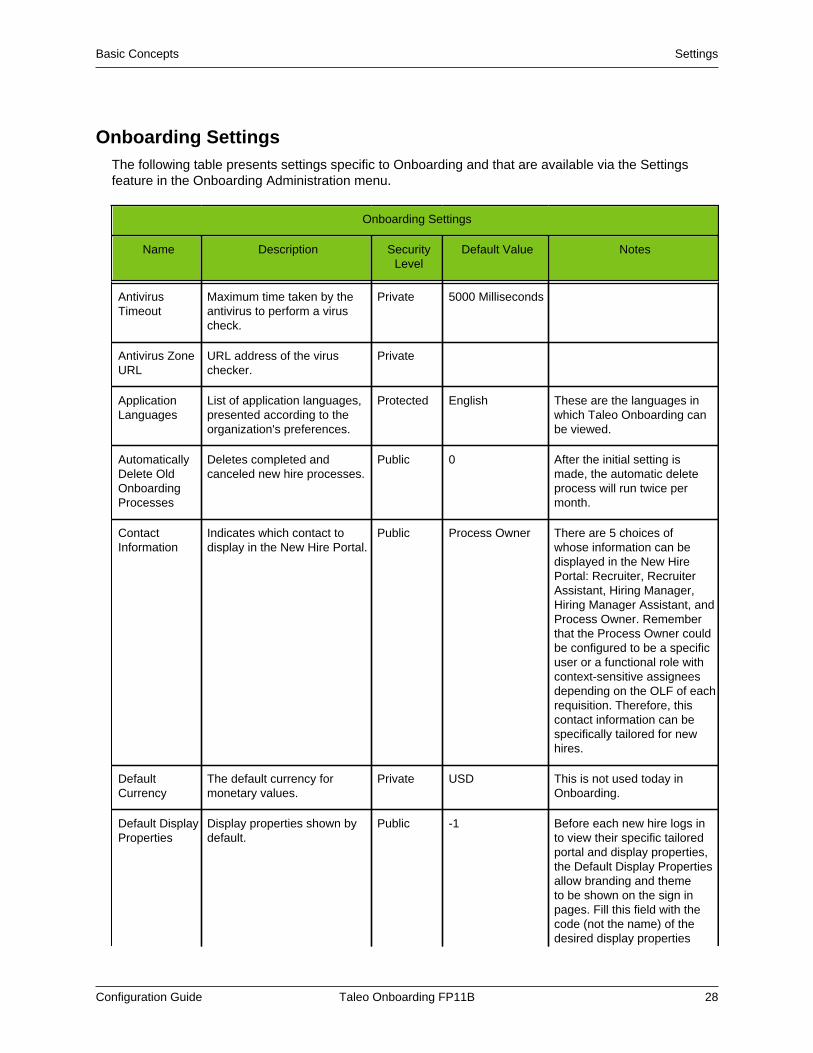
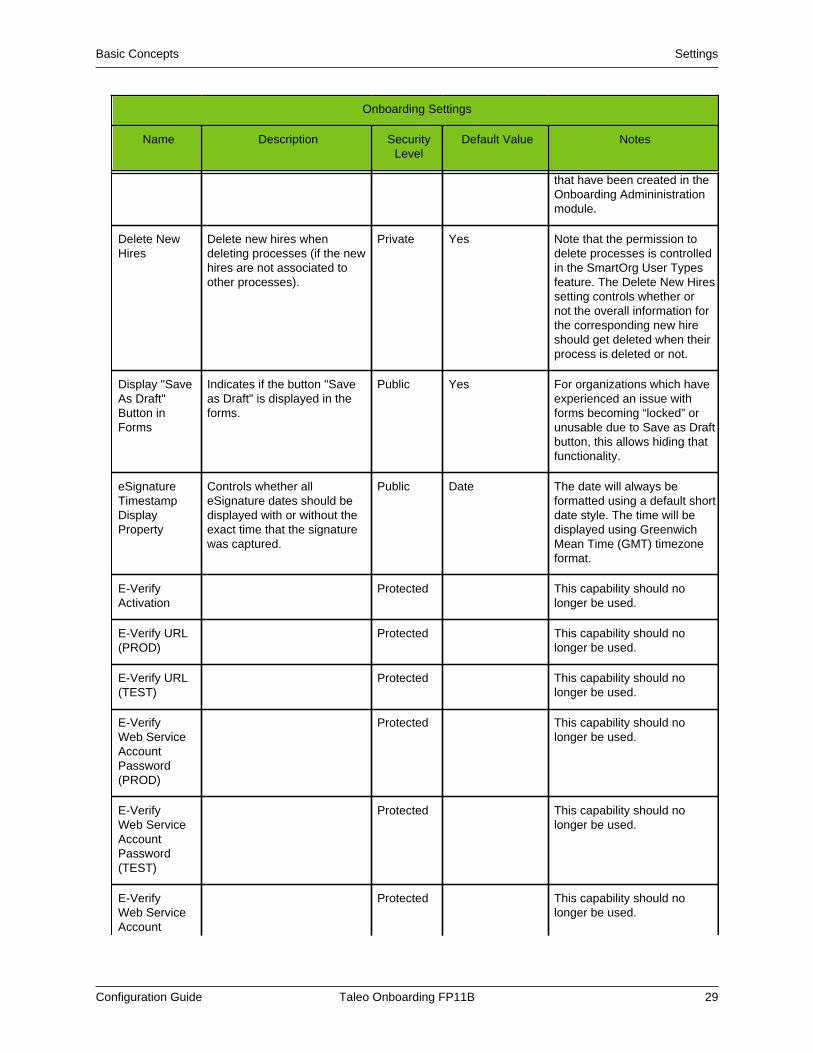
Onboarding SettingsThe following table presents settings specific to Onboarding and that are available via the Settingsfeature in the Onboarding Administration menu.
Onboarding Settings
Name Description SecurityLevel
Default Value Notes
AntivirusTimeout
Maximum time taken by theantivirus to perform a viruscheck.
Private 5000 Milliseconds
Antivirus ZoneURL
URL address of the viruschecker.
Private
ApplicationLanguages
List of application languages,presented according to theorganization's preferences.
Protected English These are the languages inwhich Taleo Onboarding canbe viewed.
AutomaticallyDelete OldOnboardingProcesses
Deletes completed andcanceled new hire processes.
Public 0 After the initial setting ismade, the automatic deleteprocess will run twice permonth.
ContactInformation
Indicates which contact todisplay in the New Hire Portal.
Public Process Owner There are 5 choices ofwhose information can bedisplayed in the New HirePortal: Recruiter, RecruiterAssistant, Hiring Manager,Hiring Manager Assistant, andProcess Owner. Rememberthat the Process Owner couldbe configured to be a specificuser or a functional role withcontext-sensitive assigneesdepending on the OLF of eachrequisition. Therefore, thiscontact information can bespecifically tailored for newhires.
DefaultCurrency
The default currency formonetary values.
Private USD This is not used today inOnboarding.
Default DisplayProperties
Display properties shown bydefault.
Public -1 Before each new hire logs into view their specific tailoredportal and display properties,the Default Display Propertiesallow branding and themeto be shown on the sign inpages. Fill this field with thecode (not the name) of thedesired display properties
Basic Concepts Settings
Configuration Guide Taleo Onboarding FP11B 29
Onboarding Settings
Name Description SecurityLevel
Default Value Notes
that have been created in theOnboarding Admininistrationmodule.
Delete NewHires
Delete new hires whendeleting processes (if the newhires are not associated toother processes).
Private Yes Note that the permission todelete processes is controlledin the SmartOrg User Typesfeature. The Delete New Hiressetting controls whether ornot the overall information forthe corresponding new hireshould get deleted when theirprocess is deleted or not.
Display "SaveAs Draft"Button inForms
Indicates if the button "Saveas Draft" is displayed in theforms.
Public Yes For organizations which haveexperienced an issue withforms becoming “locked” orunusable due to Save as Draftbutton, this allows hiding thatfunctionality.
eSignatureTimestampDisplayProperty
Controls whether alleSignature dates should bedisplayed with or without theexact time that the signaturewas captured.
Public Date The date will always beformatted using a default shortdate style. The time will bedisplayed using GreenwichMean Time (GMT) timezoneformat.
E-VerifyActivation
Protected This capability should nolonger be used.
E-Verify URL(PROD)
Protected This capability should nolonger be used.
E-Verify URL(TEST)
Protected This capability should nolonger be used.
E-VerifyWeb ServiceAccountPassword(PROD)
Protected This capability should nolonger be used.
E-VerifyWeb ServiceAccountPassword(TEST)
Protected This capability should nolonger be used.
E-VerifyWeb ServiceAccount
Protected This capability should nolonger be used.
Basic Concepts Settings
Configuration Guide Taleo Onboarding FP11B 30
Onboarding Settings
Name Description SecurityLevel
Default Value Notes
Username(PROD)
E-VerifyWeb ServiceAccountUsername(TEST)
Protected This capability should nolonger be used.
E-Verify WebService URL(PROD)
Protected This capability should nolonger be used.
E-Verify WebService URL(TEST)
Protected This capability should nolonger be used.
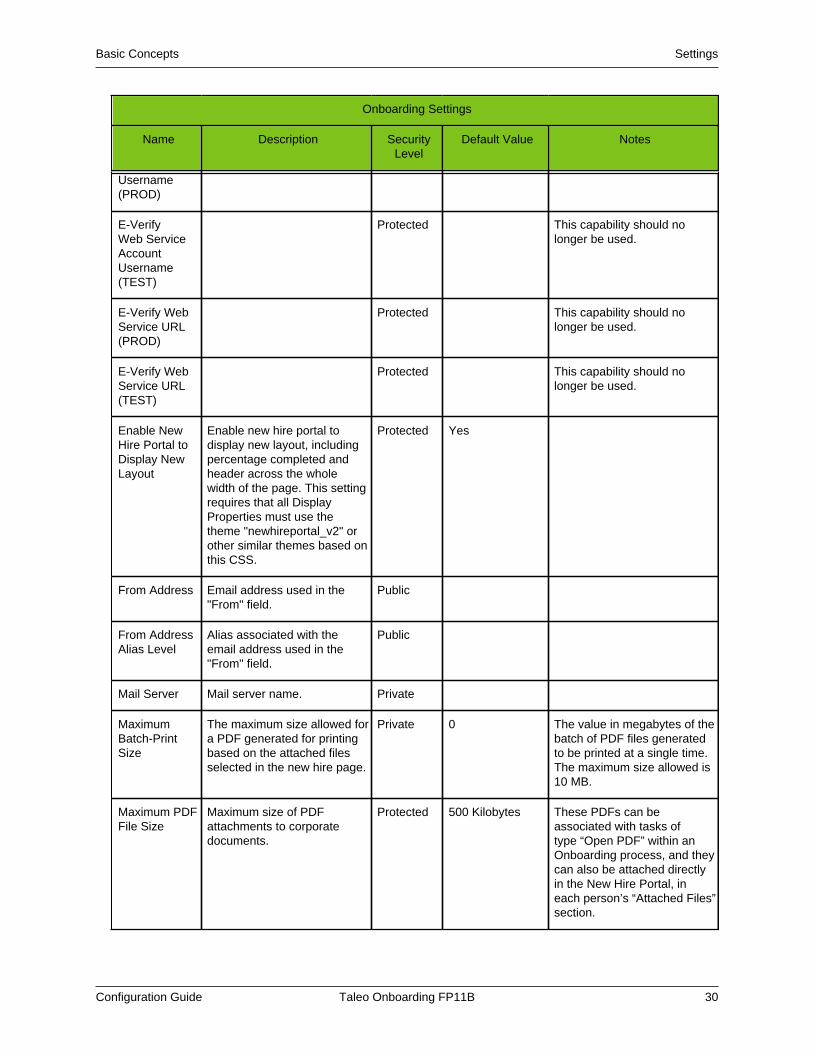
Enable NewHire Portal toDisplay NewLayout
Enable new hire portal todisplay new layout, includingpercentage completed andheader across the wholewidth of the page. This settingrequires that all DisplayProperties must use thetheme "newhireportal_v2" orother similar themes based onthis CSS.
Protected Yes
From Address Email address used in the"From" field.
Public
From AddressAlias Level
Alias associated with theemail address used in the"From" field.
Public
Mail Server Mail server name. Private
MaximumBatch-PrintSize
The maximum size allowed fora PDF generated for printingbased on the attached filesselected in the new hire page.
Private 0 The value in megabytes of thebatch of PDF files generatedto be printed at a single time.The maximum size allowed is10 MB.
Maximum PDFFile Size
Maximum size of PDFattachments to corporatedocuments.
Protected 500 Kilobytes These PDFs can beassociated with tasks oftype “Open PDF” within anOnboarding process, and theycan also be attached directlyin the New Hire Portal, ineach person’s “Attached Files”section.
Basic Concepts Settings
Configuration Guide Taleo Onboarding FP11B 31
Onboarding Settings
Name Description SecurityLevel
Default Value Notes
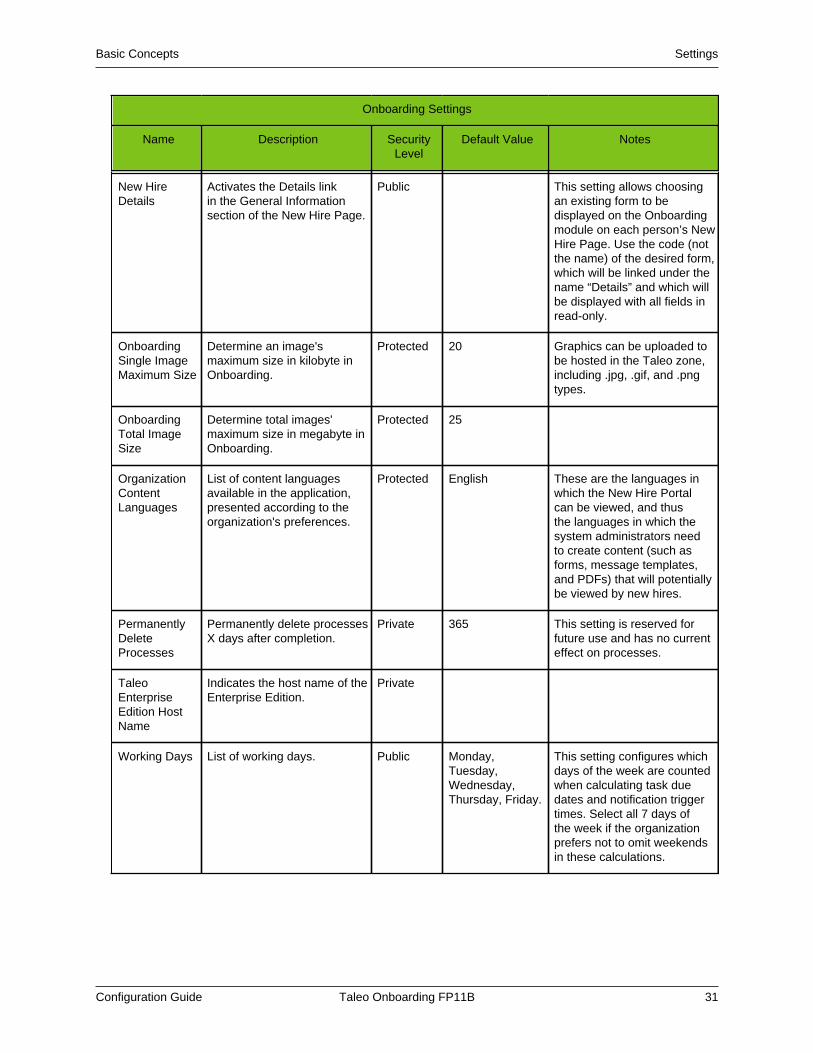
New HireDetails
Activates the Details linkin the General Informationsection of the New Hire Page.
Public This setting allows choosingan existing form to bedisplayed on the Onboardingmodule on each person’s NewHire Page. Use the code (notthe name) of the desired form,which will be linked under thename “Details” and which willbe displayed with all fields inread-only.
OnboardingSingle ImageMaximum Size
Determine an image'smaximum size in kilobyte inOnboarding.
Protected 20 Graphics can be uploaded tobe hosted in the Taleo zone,including .jpg, .gif, and .pngtypes.
OnboardingTotal ImageSize
Determine total images'maximum size in megabyte inOnboarding.
Protected 25
OrganizationContentLanguages
List of content languagesavailable in the application,presented according to theorganization's preferences.
Protected English These are the languages inwhich the New Hire Portalcan be viewed, and thusthe languages in which thesystem administrators needto create content (such asforms, message templates,and PDFs) that will potentiallybe viewed by new hires.
PermanentlyDeleteProcesses
Permanently delete processesX days after completion.
Private 365 This setting is reserved forfuture use and has no currenteffect on processes.
TaleoEnterpriseEdition HostName
Indicates the host name of theEnterprise Edition.
Private
Working Days List of working days. Public Monday,Tuesday,Wednesday,Thursday, Friday.
This setting configures whichdays of the week are countedwhen calculating task duedates and notification triggertimes. Select all 7 days ofthe week if the organizationprefers not to omit weekendsin these calculations.
Basic Concepts Settings
Configuration Guide Taleo Onboarding FP11B 32
Configuring a Setting
Prerequisite
The security level of the setting must be Public.
The Manage Settings user type permission is required.
For global settings:
Configuration > [General Configuration] Settings
For product settings:
Configuration > [Product name] Settings
Steps
1. Locate the setting using the Refine by list or the Feature column.
2. Click on the name of a setting.
3. Click Edit next to the name of the setting.
4. Make changes.
5. Click Save.
Resetting the Default Value of a Setting
Prerequisite
The security level of the setting must be Public.
The Manage Settings user type permission is required.
For global settings:
Configuration > [General Configuration] Settings
For product settings:
Configuration > [Product name] Settings
Steps
1. Locate the setting using the Refine by list or the Feature column.
2. Click on the name of a setting.
3. Click Reset next to the name of the setting.
Result
The default values of the setting is restored and reflects in the application.
Basic Concepts Security Policies
Configuration Guide Taleo Onboarding FP11B 33
Security Policies
Security Policy for New HiresSecurity policies are settings related to the sign in, password and forgot password procedures for newhires.
Settings for the following features can be modified:
• Sign in• Password• Forgot password
A History section provides information on actions performed on security settings such as the date andtime, a description and details on the action, as well as the “actor”, which is the person or system whoperformed the action.
For details on security policy settings, look at the list entitled Security Policy Settings for New Hires.
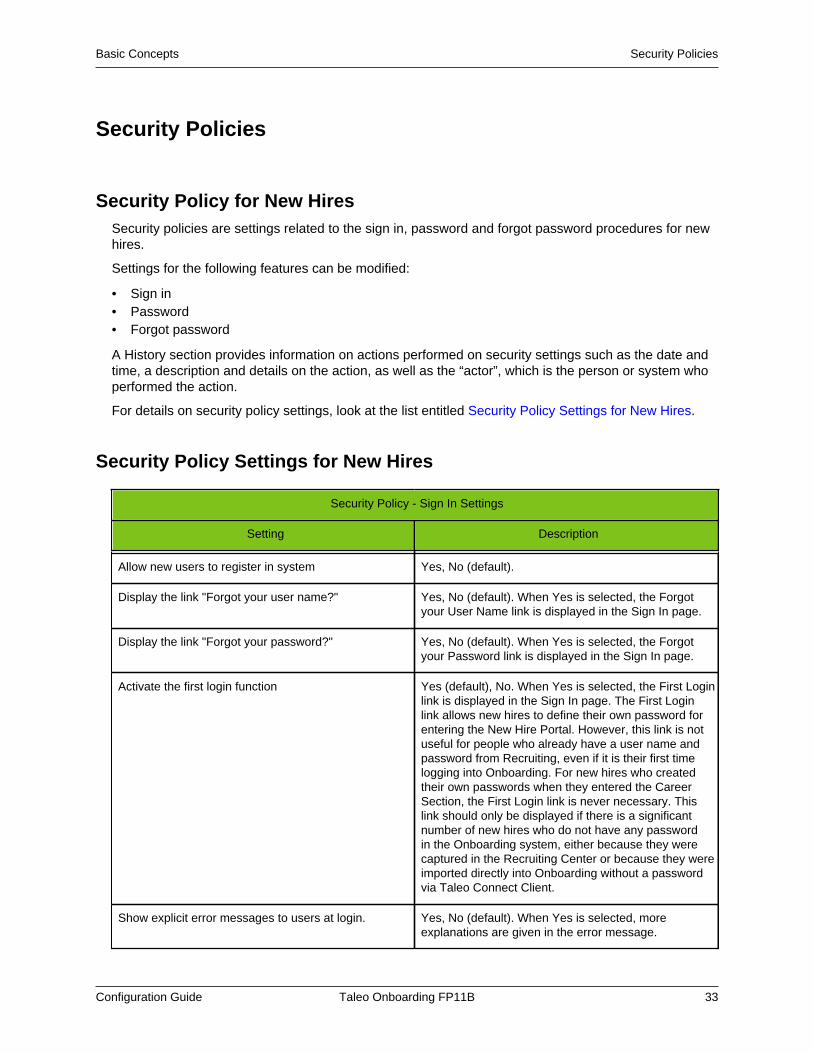
Security Policy Settings for New Hires
Security Policy - Sign In Settings
Setting Description
Allow new users to register in system Yes, No (default).
Display the link "Forgot your user name?" Yes, No (default). When Yes is selected, the Forgotyour User Name link is displayed in the Sign In page.
Display the link "Forgot your password?" Yes, No (default). When Yes is selected, the Forgotyour Password link is displayed in the Sign In page.
Activate the first login function Yes (default), No. When Yes is selected, the First Loginlink is displayed in the Sign In page. The First Loginlink allows new hires to define their own password forentering the New Hire Portal. However, this link is notuseful for people who already have a user name andpassword from Recruiting, even if it is their first timelogging into Onboarding. For new hires who createdtheir own passwords when they entered the CareerSection, the First Login link is never necessary. Thislink should only be displayed if there is a significantnumber of new hires who do not have any passwordin the Onboarding system, either because they werecaptured in the Recruiting Center or because they wereimported directly into Onboarding without a passwordvia Taleo Connect Client.
Show explicit error messages to users at login. Yes, No (default). When Yes is selected, moreexplanations are given in the error message.

Basic Concepts Security Policies
Configuration Guide Taleo Onboarding FP11B 34
Security Policy - Password Settings
Setting Description
Allow a password to be valid for X days (leave the fieldempty if you want passwords to be always valid)
Number of days before a user must change his/herpassword. Putting no values means that the passwordis always valid.
When a password change is required, prevent thereuse of the previous X passwords
Number of password changes required before a usercan use a password that he/she has used previously.Putting 0 means that the feature is disabled. 0 (defaultvalue).
Require passwords that contain at least X characters 6 to 20.
Require passwords that contain no more than Xcharacters
6 to 50. The system will start counting the number ofcharacters from the maximum number of charactersselected in the setting “Require passwords that containat least x characters”. For example, if you selected 10characters, the system will indicate a possible valuebetween 10 and 50.
Require passwords that contain at least X letters of theRoman alphabet
0 to 20. The number of characters cannot exceed thenumber indicated in the setting “Require passwordsthat contain at least x characters”.
Require passwords that contain at least X lowercaseletters of the Roman alphabet
0 to 20. The number of characters cannot exceed thenumber indicated in the setting “Require passwordsthat contain at least x characters”.
Require passwords that contain at least X uppercaseletters of the Roman alphabet
0 to 20. The number of characters cannot exceed thenumber indicated in the setting “Require passwordsthat contain at least x characters”.
Require passwords that contain at least X numericcharacters
0 to 20. The number of characters cannot exceed thenumber indicated in the setting “Require passwordsthat contain at least x characters”.
Require passwords that contain at least X charactersother than letters and numbers (! # $ % & ( ) * + , - . / : ;< = > ? @ [ ] _ ` { | } ~)
0 to 20. The number of characters cannot exceed thenumber indicated in the setting “Require passwordsthat contain at least x characters”.
Require passwords that contain no more than Xidentical consecutive characters
2, 3, 4, 5. The number of characters cannot exceed thenumber indicated in the setting “Require passwordsthat contain at least x characters”.
Require passwords that do not contain the user's firstname
Yes, No (default).
Require passwords that do not contain the user's lastname
Yes, No (default).
Require passwords that do not contain thecorresponding user name
Yes (default), No.
Require passwords that do not contain the user's emailaddress
Yes, No (default).

Basic Concepts Security Policies
Configuration Guide Taleo Onboarding FP11B 35
Security Policy - Forgot Password Settings
Setting Description
Use this method to change passwords For details, see below.
Require X security questions Determines the number of security questions the newhire must answer. Values: 1, 2, 3. Important Note:There is a similar setting in the Security Policies featureof the Central Configuration Menu to configure thenumber of security questions. These two settings areindependent BUT they should be set to the same value.When both settings are configured with the same value,then each set of questions and answers created by acandidate in the Career Section is smoothly transferredinto Onboarding for the new hire's use. Default in theCentral Configuration menu = 1; Default in Onboarding= 2.
Require answers that contain at least X characters (Xmust be greater than 0)
Number of attempts allowed per user to answer thesecurity question
Determines the maximum number of times a new hirecan enter incorrect information during sign-in beforetheir account is locked.
Lock a user's account when the number of attemptsallowed to answer the security question is exceeded
Yes (default), No.
Mask the security answer values Yes (default), No.
Details regarding the setting “Use this method to change passwords”
The change password procedure contains six options of authentication:
Options of the “Use this method to change passwords” Setting
Option Description
Access Code An email containing an access code is sent to the newhire once the new hire has confirmed his/her emailaddress. This email also contains a link to a URL wherethe new hire must enter that access code, and then willbe invited to enter a new password.
Security Questions The new hire is asked to answer the securityquestion(s) previously entered in his/her profile. Thesequestions and answers could have been createdoriginally within the Recruiting Center, and transferredover into Onboarding when the process was launched.If the answer is correct, the new hire is invited to entera new password.
Security Questions and Access Code The new hire is asked to answer the securityquestion(s) previously entered in his/her profile. These
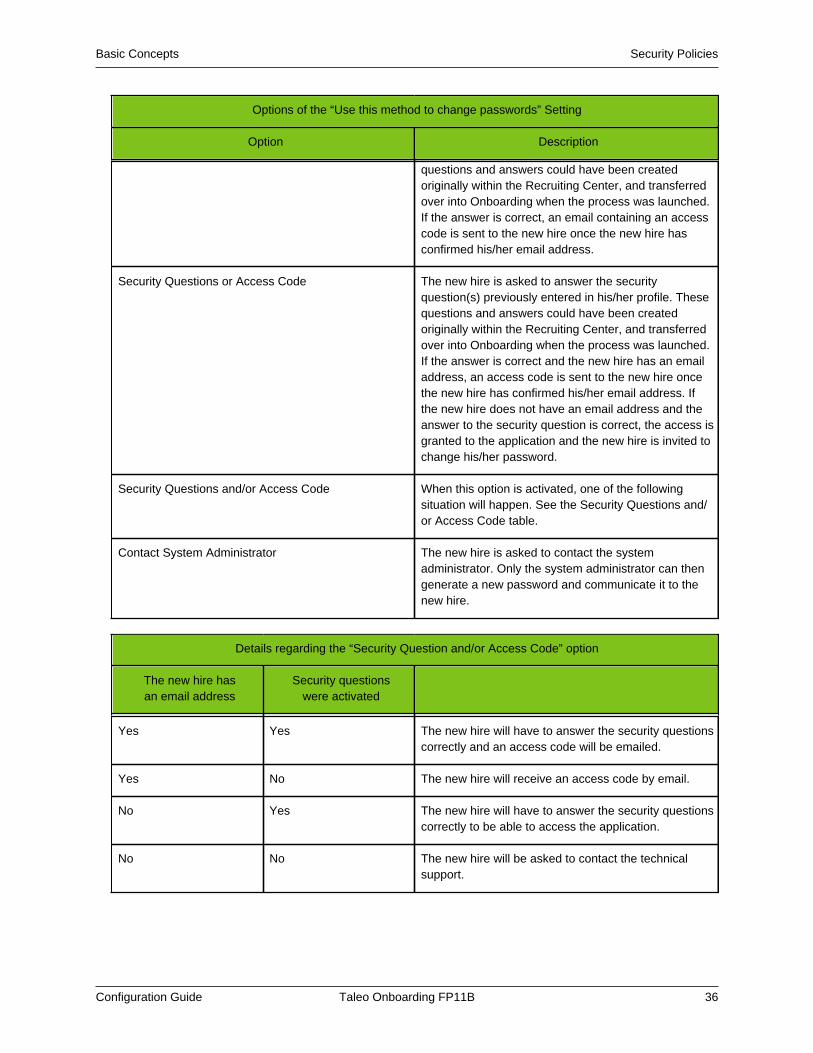
Basic Concepts Security Policies
Configuration Guide Taleo Onboarding FP11B 36
Options of the “Use this method to change passwords” Setting
Option Description
questions and answers could have been createdoriginally within the Recruiting Center, and transferredover into Onboarding when the process was launched.If the answer is correct, an email containing an accesscode is sent to the new hire once the new hire hasconfirmed his/her email address.
Security Questions or Access Code The new hire is asked to answer the securityquestion(s) previously entered in his/her profile. Thesequestions and answers could have been createdoriginally within the Recruiting Center, and transferredover into Onboarding when the process was launched.If the answer is correct and the new hire has an emailaddress, an access code is sent to the new hire oncethe new hire has confirmed his/her email address. Ifthe new hire does not have an email address and theanswer to the security question is correct, the access isgranted to the application and the new hire is invited tochange his/her password.
Security Questions and/or Access Code When this option is activated, one of the followingsituation will happen. See the Security Questions and/or Access Code table.
Contact System Administrator The new hire is asked to contact the systemadministrator. Only the system administrator can thengenerate a new password and communicate it to thenew hire.
Details regarding the “Security Question and/or Access Code” option
The new hire hasan email address
Security questionswere activated
Yes Yes The new hire will have to answer the security questionscorrectly and an access code will be emailed.
Yes No The new hire will receive an access code by email.
No Yes The new hire will have to answer the security questionscorrectly to be able to access the application.
No No The new hire will be asked to contact the technicalsupport.

Basic Concepts Basic Concepts
Configuration Guide Taleo Onboarding FP11B 37
Basic Concepts
LanguagesTaleo products are available in different optional languages.
Taleo products are available in different optional languages. Not all languages are available for allTaleo products and languages must be activated by the system administrator before they can be usedin an application.
The preferred language of a user is set in the user’s account by the system administrator. Thepreferred language is used by the system as the default content language which is the same across allTaleo products. If a product does not support the same set of content languages, it will have its ownpreference configuration.
In Taleo applications, the languages in which an element is available are indicated in the ActivatedLanguages field. When creating or editing an element, the user can chose the base language aswell as the languages in which an element will be available. The base language of an element is theitem’s reference language, usually used as a reference for other languages or fallback display in listmode. The user’s preferred language is used as the default base language when the user creates anelement. The base language of an element can be changed at any time by the user. A language mustbe activated before it can be designated as a base language.
When multiple languages are used for an element, the icon is displayed. Hovering the mouse overthe icon displays the languages activated for the element. When only one language is used for anelement, the name of the language is displayed. When only one language is used in your company,there is no special indicator.
Configuration
The organization content languages in Onboarding are set by the following protected setting. Theseare the languages in which the New Hire Portal can be viewed, and thus the languages in which thesystem administrator needs to create content, such as forms, message templates, and PDFs, that willpotentially be viewed by new hires.
Setting
Name Possible Values Default Value Location
Organization ContentLanguages
English Configuration > [Onboarding]Settings
The application languages in Onboarding are set by the following protected setting. These are thelanguages in which the Onboarding WebTop can be viewed. Also, this setting has some effect on theOnboarding Administration module to display in the chosen languages; however the only languagesthat are fully supported by the Onboarding Administration module for configuring Onboarding areEnglish and French.
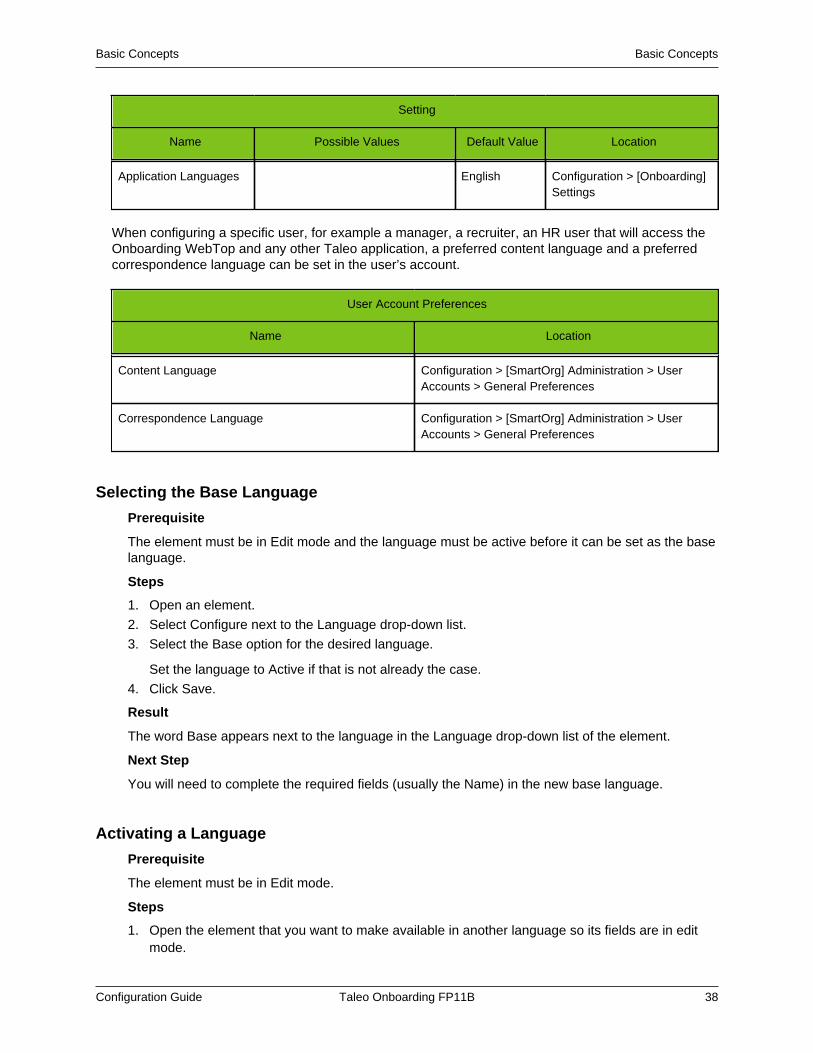
Basic Concepts Basic Concepts
Configuration Guide Taleo Onboarding FP11B 38
Setting
Name Possible Values Default Value Location
Application Languages English Configuration > [Onboarding]Settings
When configuring a specific user, for example a manager, a recruiter, an HR user that will access theOnboarding WebTop and any other Taleo application, a preferred content language and a preferredcorrespondence language can be set in the user’s account.
User Account Preferences
Name Location
Content Language Configuration > [SmartOrg] Administration > UserAccounts > General Preferences
Correspondence Language Configuration > [SmartOrg] Administration > UserAccounts > General Preferences
Selecting the Base Language
Prerequisite
The element must be in Edit mode and the language must be active before it can be set as the baselanguage.
Steps
1. Open an element.
2. Select Configure next to the Language drop-down list.
3. Select the Base option for the desired language.
Set the language to Active if that is not already the case.
4. Click Save.
Result
The word Base appears next to the language in the Language drop-down list of the element.
Next Step
You will need to complete the required fields (usually the Name) in the new base language.
Activating a Language
Prerequisite
The element must be in Edit mode.
Steps
1. Open the element that you want to make available in another language so its fields are in editmode.
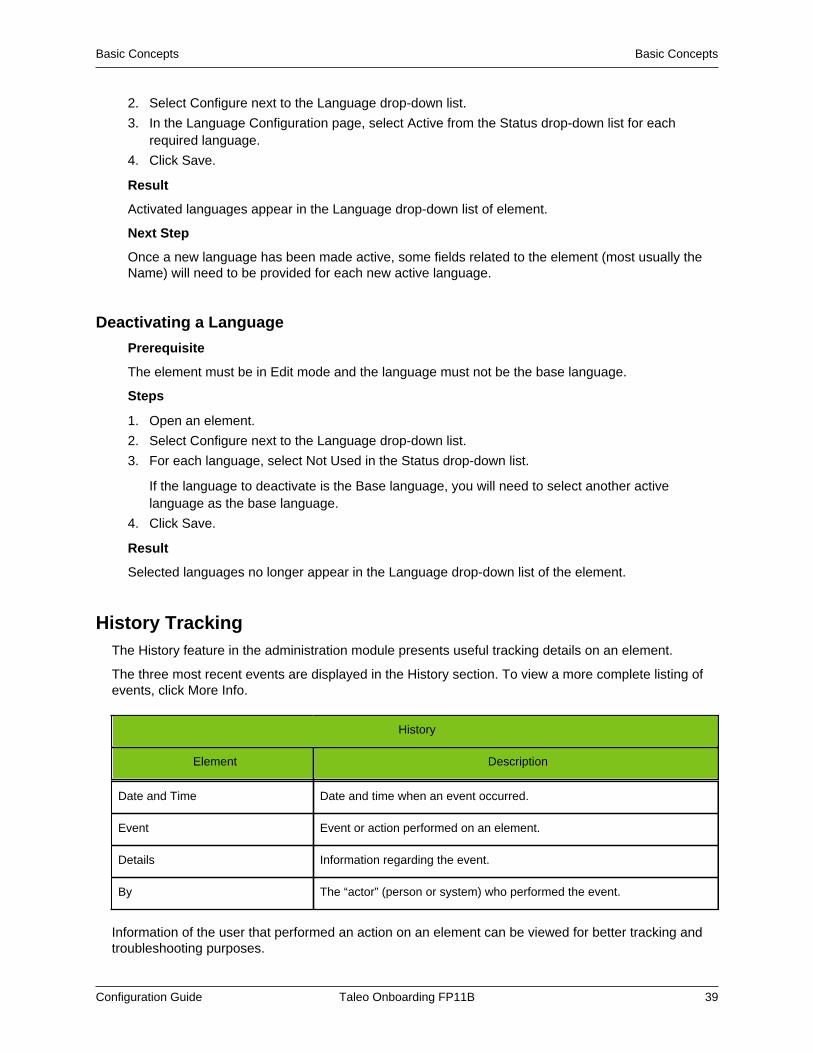
Basic Concepts Basic Concepts
Configuration Guide Taleo Onboarding FP11B 39
2. Select Configure next to the Language drop-down list.
3. In the Language Configuration page, select Active from the Status drop-down list for eachrequired language.
4. Click Save.
Result
Activated languages appear in the Language drop-down list of element.
Next Step
Once a new language has been made active, some fields related to the element (most usually theName) will need to be provided for each new active language.
Deactivating a Language
Prerequisite
The element must be in Edit mode and the language must not be the base language.
Steps
1. Open an element.
2. Select Configure next to the Language drop-down list.
3. For each language, select Not Used in the Status drop-down list.
If the language to deactivate is the Base language, you will need to select another activelanguage as the base language.
4. Click Save.
Result
Selected languages no longer appear in the Language drop-down list of the element.
History TrackingThe History feature in the administration module presents useful tracking details on an element.
The three most recent events are displayed in the History section. To view a more complete listing ofevents, click More Info.
History
Element Description
Date and Time Date and time when an event occurred.
Event Event or action performed on an element.
Details Information regarding the event.
By The “actor” (person or system) who performed the event.
Information of the user that performed an action on an element can be viewed for better tracking andtroubleshooting purposes.
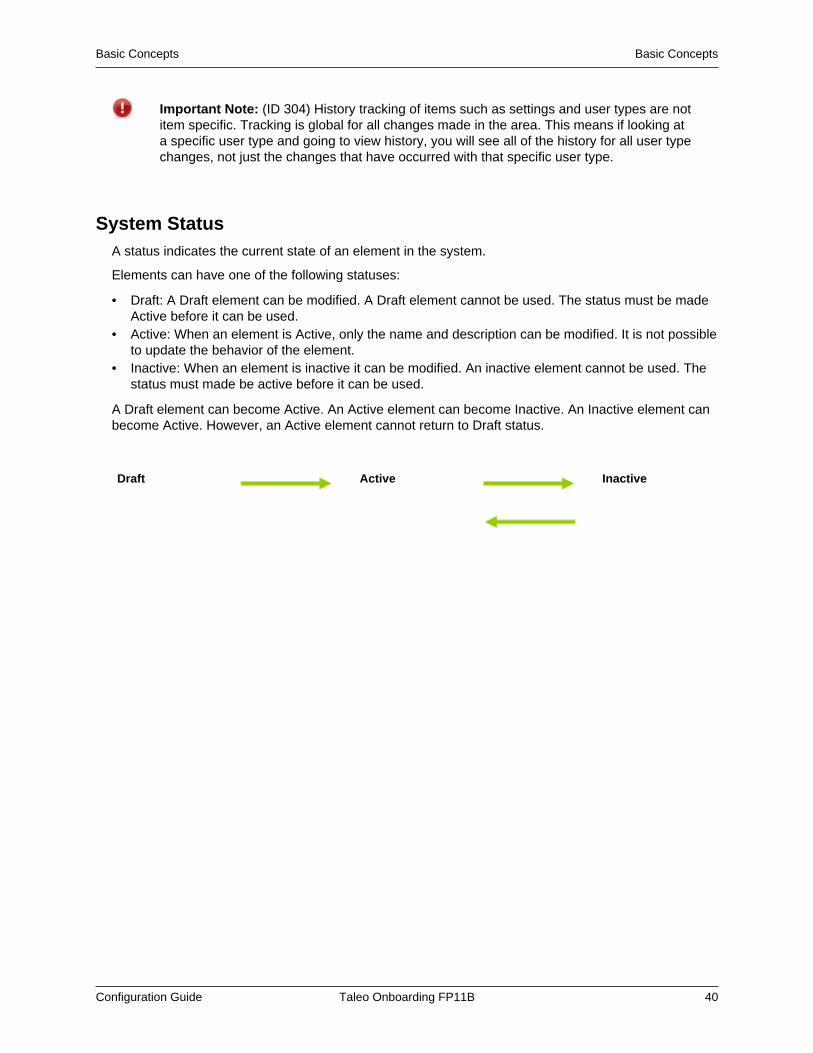
Basic Concepts Basic Concepts
Configuration Guide Taleo Onboarding FP11B 40
Important Note: (ID 304) History tracking of items such as settings and user types are notitem specific. Tracking is global for all changes made in the area. This means if looking ata specific user type and going to view history, you will see all of the history for all user typechanges, not just the changes that have occurred with that specific user type.
System StatusA status indicates the current state of an element in the system.
Elements can have one of the following statuses:
• Draft: A Draft element can be modified. A Draft element cannot be used. The status must be madeActive before it can be used.
• Active: When an element is Active, only the name and description can be modified. It is not possibleto update the behavior of the element.
• Inactive: When an element is inactive it can be modified. An inactive element cannot be used. Thestatus must made be active before it can be used.
A Draft element can become Active. An Active element can become Inactive. An Inactive element canbecome Active. However, an Active element cannot return to Draft status.
Draft Active Inactive

Documents
• Document......................................................................................................................... 42
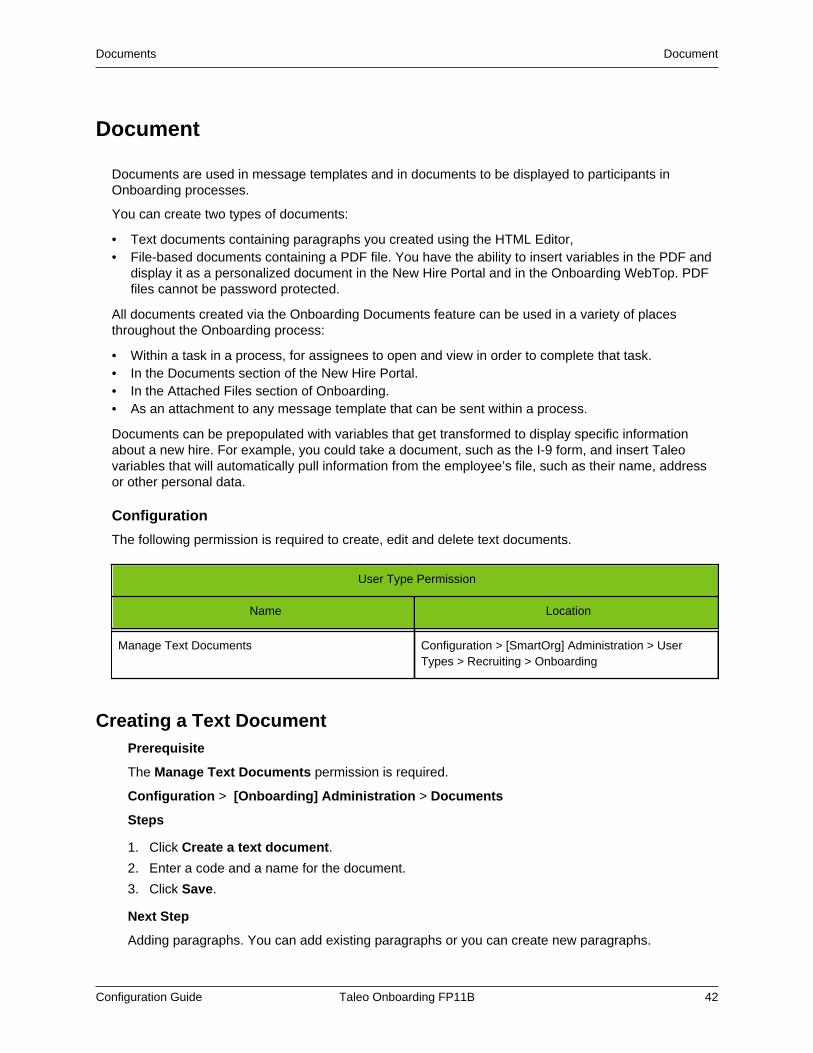
Documents Document
Configuration Guide Taleo Onboarding FP11B 42
Document
Documents are used in message templates and in documents to be displayed to participants inOnboarding processes.
You can create two types of documents:
• Text documents containing paragraphs you created using the HTML Editor,• File-based documents containing a PDF file. You have the ability to insert variables in the PDF and
display it as a personalized document in the New Hire Portal and in the Onboarding WebTop. PDFfiles cannot be password protected.
All documents created via the Onboarding Documents feature can be used in a variety of placesthroughout the Onboarding process:
• Within a task in a process, for assignees to open and view in order to complete that task.• In the Documents section of the New Hire Portal.• In the Attached Files section of Onboarding.• As an attachment to any message template that can be sent within a process.
Documents can be prepopulated with variables that get transformed to display specific informationabout a new hire. For example, you could take a document, such as the I-9 form, and insert Taleovariables that will automatically pull information from the employee’s file, such as their name, addressor other personal data.
Configuration
The following permission is required to create, edit and delete text documents.
User Type Permission
Name Location
Manage Text Documents Configuration > [SmartOrg] Administration > UserTypes > Recruiting > Onboarding
Creating a Text DocumentPrerequisite
The Manage Text Documents permission is required.
Configuration > [Onboarding] Administration > Documents
Steps
1. Click Create a text document.
2. Enter a code and a name for the document.
3. Click Save.
Next Step
Adding paragraphs. You can add existing paragraphs or you can create new paragraphs.
Documents Document
Configuration Guide Taleo Onboarding FP11B 43
Paragraph Storage in Reusable LibraryNewly created paragraphs can be immediately stored in the reusable library.
Onboarding Administrators can create paragraphs directly in the Paragraph List reusable library foruse in Text Documents and Message Templates. The paragraph library can be accessed from theParagraph List link in the Quick Access box on the Document page. Once the paragraph is created,saved, and status is set to Active, it can be added to any Document or Message Template. Draftparagraphs will only be available in the library view and only paragraphs with a draft status can bedeleted.
Once a paragraph is added to a document or message template, it can be edited. Edits are only visiblein the document or message template where the change was made. The original paragraph remainsintact in the paragraph library.
Adding a Paragraph to a Text Document
Prerequisite
The Manage Text Documents permission is required.
Configuration > [Onboarding] Administration > Documents
Steps
1. Open a text document.2. Click Add.3. Select a paragraph.
Result
The paragraph appears in the Paragraphs section of the document.
Next Step
Once paragraphs have been added to the text document and the document is ready, you need toactivate the text document.
Creating a New Paragraph for a Text Document
Prerequisite
The Manage Text Documents permission is required.
Configuration > [Onboarding] Administration > Documents
Steps
1. Open a text document.2. Click Create.3. Enter a code and a name.4. Type the paragraph content in the Text field using HTML Editor options.5. To include variables in the paragraph, copy the variable then paste it in the text box.6. Click Save.
Result
The paragraph appears in the Paragraphs section of the document.
Documents Document
Configuration Guide Taleo Onboarding FP11B 44
Next Step
Adding the paragraph to a text document.
Reordering Paragraphs in a Text Document
Prerequisite
The Manage Text Documents permission is required.
The text document must have the Draft status.
Configuration > [Onboarding] Administration > Documents
Steps1. Select a text document.2. Click Reorder.3. Reorder paragraphs using the up and down arrows.4. Click Save.
Editing a Paragraph Included in a Text Document
Prerequisite
The Manage Text Documents permission is required.
The text document must have the Draft status.
Configuration > [Onboarding] Administration > Documents
Steps1. Select a text document.2. Click Edit.3. Make changes.4. Click Save.
Removing a Paragraph Included in a Text Document
Prerequisite
The Manage Text Documents permission is required.
The text document must have the Draft status.
Configuration > [Onboarding] Administration > Documents
Steps1. Select a text document.2. Click Remove.3. Click Yes.
Previewing a Text Document
Prerequisite
The Manage Text Documents permission is required.
Documents Document
Configuration Guide Taleo Onboarding FP11B 45
Configuration > [Onboarding] Administration > Documents
Steps
1. Open a text document.
2. Click Preview.
Next Step
Activating the text document.
Duplicating a Text Document
Prerequisite
The Manage Text Documents permission is required.
Configuration > [Onboarding] Administration > Documents
Steps
1. Select a text document.
2. Click Duplicate.
3. In the message box:
• Select Create Copy if you want to create a copy of the paragraphs that the original documentcontains and link the document copy to this new set of paragraphs.
• Select Link Copy if you want to link the document copy to the original set of paragraphs.
4. Complete the fields.
5. Click Save.
Creating a Document Containing a PDF FilePrerequisite
The Manage Text Documents permission is required.
Configuration > [Onboarding] Administration > Documents
Steps
1. Click Create a file-based document.2. Enter a code and a name.
3. Click Browse to select on your computer the desired PDF file that has been created andoptionally already has Onboarding variables in it.
4. Enter a description of the PDF file.
5. Click Save.
Next Step
Activate the document.
Activating a Document
Prerequisite
The Manage Text Documents permission is required.
Documents Document
Configuration Guide Taleo Onboarding FP11B 46
The document must have Draft status.
Configuration > [Onboarding] Administration > Documents
Steps
1. Select a document.
2. Click Activate.
Result
The status of the document is now Active. You can use the document in message templates and ina New Hire Portal.
Deactivating a Document
Prerequisite
A document that contains an obsolete PDF should be deactivated.
The Manage Text Documents permission is required.
The document must have Active status.
Configuration > [Onboarding] Administration > Documents
Steps
1. Select a document.
2. Click Deactivate next to the document name.
Result
The status of the document is now Inactive. Once a document is deactivated, it can no longer beattached to objects within the system. However people who already have the document attached totheir file will still be able to see it.
Deleting a Document
Prerequisite
The Manage Text Documents permission is required.
The document must have Draft status.
Configuration > [Onboarding] Administration > Documents
Steps
1. In the Actions column, click Delete next to the desired document.
2. Click Yes in the message box.
Correspondence
• Message Template.......................................................................................................... 48• Paragraph.........................................................................................................................53• Variable............................................................................................................................ 57
Correspondence Message Template
Configuration Guide Taleo Onboarding FP11B 48
Message Template
A message template is an e-mail model used to send correspondence.
Message templates are used whenever a notification or an e-mail is sent via the application. They canbe associated with tasks within an Onboarding process, they can be sent to indicate when a task hasgotten assigned or gotten completed, and they can be used as Reminders before or after a task's duedate.
They are the invitations and reminders to perform tasks within the system. They can contain the URLswhich hyperlink the assignees directly into the work which they must complete.
Recipients of each message template can be specified by using tokens or variables that are relevantto each new hire's process, such as their Hiring Manager, the Recruiter, their Mentor, or the NewHire themselves. Recipients can also be specified with an explicit email address, for [email protected].
Message templates usually contain tokens that get replaced with personalized information for eachrecipient.
It is not necessary to specify any recipients within a Message Template, because it will always be sentto any assignee of the task with which it's associated, while each new hire's Onboarding process isrunning. However, you can choose additional recipients here within the Message Template, so thatthese people will always receive this message whenever the associated task assignee receives it.
The template name and message content can be edited. Templates may also be deactivated.
A message template can be created in different types of formats:
• HTML• Read only attachment• Plain text
Documents can also be attached to message templates. By default, the attached file maximum size is0.1 Mb, and the attached files maximum total size is 500 Mb. The maximum number of attachmentsallowed is by default 5. Settings allow the configuration of attachments. These attached documentscan be files of any type, including checklists in Word, spreadsheets in Excel, documents in PDF, ormaterials in any format. These attached files cannot contain personalized tokens or fields from theOnboarding database, unlike the PDF documents which the Onboarding administrator uploads into theDocuments.
Onboarding administrators can use filters to quickly locate message templates.
Within Onboarding, message templates cannot be contextualized in the same way that messageswithin Recruiting can be contextualized. All emails are sent based on the onboarding process in whichthey are placed, so they may be sent only if they are in a task that gets triggered within the workflow.If the contextualized conditions prevent a given correspondence task from being assigned, then theassociated message template will not be sent.
Forgot Password Message TemplateThe Forgot Password message template is a system template that uses a specific set of tokens.
The Forgot Password message template is available for creating correspondence to send to new hiresthat may have forgotten their password. There is a specific set of tokens for use with this template thatare able to be resolved before new hire information is contextualized.
Correspondence Message Template
Configuration Guide Taleo Onboarding FP11B 49
These tokens are:
• ForgotPasswordFields.FullName• ForgotPasswordFields.EmailAddress• ForgotPasswordFields.ForgotPasswordURL• ForgotPasswordFields.ForgotPasswordURLLink• ForgotPasswordFields.SecurityCode• ForgotPasswordFields.UserName• ForgotPasswordFields.FirstName• ForgotPasswordFields.LastName• ForgotPasswordFields.MiddleName
Creating a Message TemplatePrerequisite
The Manage Message Templates user type permission is required.
Configuration
Steps
1. Click Message Templates.
2. Click Create.
3. Enter the appropriate information.
If needed, variables can be used in the To, Cc, Bcc and Subject fields.
4. Click Save.
5. Back to the Template page, add at least one paragraph to the template by clicking Add orCreate.
6. Click Save.
Result
The message template is displayed in the Message Templates page. It can be configured into atask by the system administrator, or into a notification before and after a task, or sent ad-hoc ascorrespondence from the Onboarding WebTop.
Next Step
Activate the message template.
Editing the Properties of a Message TemplatePrerequisite
The Manage Message Templates user type permission is required.
It is a best practice to deactivate the message template before modifying it. When edits arecompleted, the message template should be reactivated.
Configuration
Steps
1. Click Message Templates for the desired product.
2. Click on a message template.
Correspondence Message Template
Configuration Guide Taleo Onboarding FP11B 50
3. Click Edit.
4. Modify the information.
5. Click Save.
Result
Modifications made to the code, name, description, message format and variable(s) used in themessage are automatically reflected in messages sent using this template.
Adding an Attachment to a Message TemplatePrerequisite
The Manage Message Templates user type permission is required.
By default, the attached file maximum size is 0.1 Mb, and the attached files maximum total size is500 Mb.
By default, the maximum number of attachments allowed is 5.
Steps
1. Click Message Templates for the desired product.
2. Click on the message template.
3. Click Add.
4. Enter information in the fields.
5. Click Browse... to select a document.
6. Click Save.
Result
The attachment appears in the Attachments section of the message template if the size is below orequal to the maximum size allowed for attachments.
Removing an Attachment from a Message TemplatePrerequisite
The Manage Message Templates user type permission is required.
Steps
1. Click Message Templates for the desired product.
2. Click on a message template.
3. Click Remove.
Result
The attachment no longer appears in the Attachments section of the message template.
Activating a Message TemplatePrerequisite
The Manage Message Templates user type permission is required.
The message template must have an Inactive or Draft status.
Correspondence Message Template
Configuration Guide Taleo Onboarding FP11B 51
Configuration
Steps
1. Click Message Templates for the desired product.
2. Click on a message template.
3. Click Activate.
Result
The status of the message template is Active. It can be configured into a task by the systemadministrator, or into a notification before and after a task, or send ad-hoc as correspondence fromthe Onboarding WebTop.
Deactivating a Message TemplatePrerequisite
The Manage Message Templates user type permission is required.
The message template must have the Active status.
Configuration
Steps
1. Click Message Templates for the desired product.
2. Click on a message template.
3. Click Deactivate.
Result
The status of the message template is Inactive. After the message template is deactivated, no newusages can be created; however, anyone whose process is already using that message templatewill still continue to use it as configured.
Deleting a Message TemplatePrerequisite
The Manage Message Templates user type permission is required.
Configuration
Steps
1. Click Message Templates for the desired product.
2. Click Delete next to the message template to delete.
3. Click Yes.
Result
The message template is permanently deleted from the database.
Duplicating a Message TemplatePrerequisite
The Manage Message Templates user type permission is required.
Correspondence Message Template
Configuration Guide Taleo Onboarding FP11B 52
Editing of system generated message templates is limited to optimize system performance. Inseveral cases, such templates may not be duplicated, and often the context cannot be modified.
Steps
1. Click Message Templates for the desired product.
2. Click Duplicate.
3. Make changes.
4. Click Save.
Result
The message template appears in the Message Templates page.
Correspondence Paragraph
Configuration Guide Taleo Onboarding FP11B 53
Paragraph
A paragraph is a block of text added to a message template.
Paragraphs can be supplied with the system, for example message templates supplied with the systemhave default paragraphs attached to them. They can also be duplicated; when duplicating a messagetemplate, paragraphs can be duplicated. They also can be created from scratch.
Paragraphs can be accessed from two places:
• Paragraphs List: The Paragraphs list is available via the Paragraphs link in the productadministration menu and in the Quick Access box within the Message Templates feature. Aparagraph created via the Paragraphs list is available for new and existing message templates.
• Message Template: A paragraph created directly in a message template is only available for thatmessage template and is not available in the Paragraph List.
Important Note: To create a paragraph that can be reused by other message templates, the
paragraph must be created via the Paragraphs feature available via the Paragraphs link in the productadministration menu or in the Quick Access box within the Message Templates feature.
Edits made to a paragraph in the Paragraph library will affect all templates using the paragraph,regardless of whether the edits are made directly from within a message template or from within theParagraphs list.
Paragraphs cannot be created if more than one language is activated for the message template.
Paragraph content is created by typing text and/or by adding variables. Variables automatically callinformation from the new hire and display it in the template. For example, if the {Candidate.LastName}variable is used, then the last name of the candidate will be automatically included by the system in theoutgoing message.
By default, all variables are listed in the Available Variables list. However, a shorter list of variables canbe displayed by entering a few letters contained in a variable. The system then automatically suggestsvariables containing these letters. For example, if entering the letters “add”, the system could suggestthe following variables: “Candidate.Address”, “Candidate.Address2”, “ElectronicSignature.IpAddress”.Once the right variables are displayed, the system administrator can drag and drop the desiredvariables in the paragraph. To return to the default list of variables, the system administrator just needsto remove the letters they entered.
Configuration
User Type Permission
Name Location
Access Correspondence Manager configuration Configuration > [SmartOrg] Administration > User Types >Recruiting > Administration
Adding a Paragraph to a Message TemplatePrerequisite
The Manage Message Templates user type permission is required.
Correspondence Paragraph
Configuration Guide Taleo Onboarding FP11B 54
The paragraph must be created and activated.
Configuration
Steps
1. Click Message Templates for the desired product.
2. Click on a message template.
3. Click Add.
4. Select a paragraph or chose to create a new one.
5. Click Select.
Result
The paragraph appears in the Paragraphs section of the message template.
Next Step
Order paragraphs.
Creating a Paragraph for a Message TemplatePrerequisite
The Manage Message Templates user type permission is required.
Configuration
Steps
1. Click Message Templates for the desired product.
2. Click on a message template.
3. Click Create.
4. Enter information in the fields.
5. Type the content of the paragraph in the Text box.
6. Insert variables in the Text box if desired.
7. Click Save.
Result
The paragraph appears in the Paragraphs section of the message template.
Next Step
Order paragraphs.
Ordering Paragraphs in a Message TemplatePrerequisite
The user type permission is required.
Configuration
Steps
1. Click Message Templates for the desired product.
2. Click on a message template.
3. Click Reorder.
Correspondence Paragraph
Configuration Guide Taleo Onboarding FP11B 55
4. Select a paragraph to move to a different position.
5. Use arrows to move the paragraph.
6. Click Save.
Result
The paragraphs are displayed in the new order in the Paragraphs section of the message template.
Editing a Paragraph in a Message TemplatePrerequisite
The Manage Message Templates user type permission is required.
Deactivate the message template before modifying a paragraph.
Note that any edits will affect all templates that use the paragraph, so edit with care. User maychose to duplicate the paragraph and then edit the new version only.
Configuration
Steps
1. Click Message Templates for the desired product.
2. Click on a message template.
3. In the Paragraphs section, click Edit.
4. Modify the information in the fields.
5. Click Save.
Result
The paragraph is saved with the modified information.
Previewing a Paragraph in a Message TemplatePrerequisite
The Manage Message Templates user type permission is required.
You must be in the active language of the message template.
Configuration
Steps
1. Click Message Templates for the desired product.
2. Click on a message template.
3. Click Preview.
Result
A preview of the content of the paragraph is displayed.
Activating a Paragraph in a Message TemplatePrerequisite
The Manage Message Templates user type permission is required.
Correspondence Paragraph
Configuration Guide Taleo Onboarding FP11B 56
The paragraph must have the Inactive status.
Configuration
Steps
1. Click Message Templates for the desired product.
2. Click on a message template.
3. In the Paragraphs section, click on the paragraph.
4. Click Activate.
Result
The status of the paragraph is Active and is now available for selection when adding a paragraph ina message template.
Deactivating a Paragraph in a Message TemplatePrerequisite
The Manage Message Templates user type permission is required.
The paragraph must have the Active status.
Configuration
Steps
1. Click Message Templates for the desired product.
2. Click on a message template.
3. In the Paragraphs section, click on a paragraph.
4. Click Deactivate.
Result
The status of the paragraph is Inactive and the paragraph can no longer be selected in a template.The paragraph is not permanently deleted from the data base.
Correspondence Variable
Configuration Guide Taleo Onboarding FP11B 57
Variable
Variables are strings of text replaced by contextual data that you can include in a message or aparagraph.
Variables, sometimes referred to as tokens, are very useful in the creation of customized messages.
Variables are most often used in paragraphs within the body of a message but they can also beinserted in the To, Cc, Bcc, and Subject fields.
Standard variables are provided with the system and represent a specific value in the database. Forexample, a message template contains the standard variable {NewHirePersonalInfo.LastName}. Justbefore sending the message to a candidate, the system will replace the variable by the new hire’s lastname.
There are two separate variables that can be used to display a new hire's startdate in correspondence. One variable is {Assignment.StartDate} and the other is{Assignment.StartDateNoTime}. The former is used when the date is to be displayed with the time. Thelatter is used when only the date is displayed, without the time.
Adding a VariablePrerequisite
Configuration
Steps
1. Select a message template.
2. To add a variable in the To, Cc, Bcc, and Subject fields, click Edit.
3. To add a variable in a paragraph, click on a paragraph.
4. Scroll the list of variables to find the desired variable.
To display a short list of variables matching a specific keyword, you can enter the keyword in theAvailable Variables field. For example, entering new hire would display all variables containingthe word new hire.
To display the complete list of variables, remove the keyword you entered.
5. In the list of variables, select the variable, including curly braces, with your cursor.
6. Drag the variable in the desired location.
Result
When sending the message, the variable is replaced by contextual data.
The system may be unable to replace a variable because the data is missing; the variable placeholder will be left blank.
User-Defined Fields and Selections
• User-defined Fields..........................................................................................................59• User-defined Selections...................................................................................................65

User-Defined Fields and Selections User-defined Fields
Configuration Guide Taleo Onboarding FP11B 59
User-defined Fields
User-defined FieldA user-defined field is used to capture any additional information that is needed about a new hire.
User-defined fields can be used in user-defined forms, message templates, documents, conditions ontransitions, reports and Taleo Connect Client exports.
The system administrator can create user-defined fields for the following categories:
Category Description
Assignment Refers to the assignment of a new hire to a specific job position at aspecific time.
Education Refers to new hire’s education-related information such as the institutionattended, education level achieved, program, start date, or graduationdate. This type of user-defined field can only be used as part of a multi-row table and has certain limitations: it can be shown in a form as editableor read-only, but cannot be shown in a correspondence nor a PDF; it mayrequire extra post-processing to use via Reporting or via Taleo ConnectClient exports.
Evaluation Refers to evaluations and surveys such as the quality of hires. This typeof user-defined field can only be used as part of a multi-row table and hascertain limitations: it can be shown in a form as editable or read-only, butcannot be shown in a correspondence nor a PDF; it may require extrapost-processing to use via Reporting or via Taleo Connect Client exports.
Job Application Refers to job application-related information such as the hiring processsteps.
Offer Refers to offer-related information such as the salary, bonuses, vacation,or expense accounts.
Talent Master File Refers to new hire related information such as personal information,address, phone number, or email address.
Work Experience Refers to new hire’s work experience-related information such as theemployer, job function, start date, or supervisor’s name. This type of user-defined field can only be used as part of a multi-row table and has certainlimitations: it can be shown in a form as editable or read-only, but cannotbe shown in a correspondence nor a PDF; it may require extra post-processing to use via Reporting or via Taleo Connect Client exports.
The following types of user-defined field can be created:
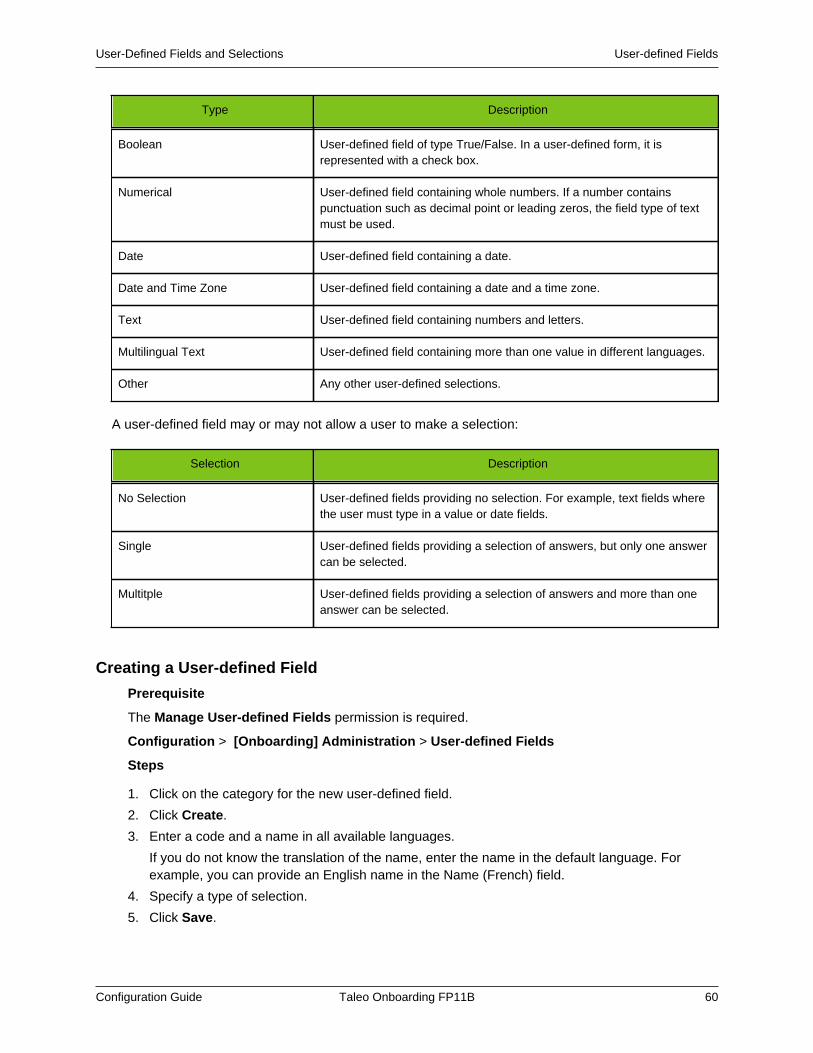
User-Defined Fields and Selections User-defined Fields
Configuration Guide Taleo Onboarding FP11B 60
Type Description
Boolean User-defined field of type True/False. In a user-defined form, it isrepresented with a check box.
Numerical User-defined field containing whole numbers. If a number containspunctuation such as decimal point or leading zeros, the field type of textmust be used.
Date User-defined field containing a date.
Date and Time Zone User-defined field containing a date and a time zone.
Text User-defined field containing numbers and letters.
Multilingual Text User-defined field containing more than one value in different languages.
Other Any other user-defined selections.
A user-defined field may or may not allow a user to make a selection:
Selection Description
No Selection User-defined fields providing no selection. For example, text fields wherethe user must type in a value or date fields.
Single User-defined fields providing a selection of answers, but only one answercan be selected.
Multitple User-defined fields providing a selection of answers and more than oneanswer can be selected.
Creating a User-defined Field
Prerequisite
The Manage User-defined Fields permission is required.
Configuration > [Onboarding] Administration > User-defined Fields
Steps
1. Click on the category for the new user-defined field.
2. Click Create.
3. Enter a code and a name in all available languages.
If you do not know the translation of the name, enter the name in the default language. Forexample, you can provide an English name in the Name (French) field.
4. Specify a type of selection.
5. Click Save.

User-Defined Fields and Selections User-defined Fields
Configuration Guide Taleo Onboarding FP11B 61
Result
The new field appears in the User-defined Fields list. It is available when creating user-definedforms, message templates, and documents. It is also available in reports and in Taleo ConnectClient exports.
Deleting a User-defined Field
Prerequisite
The Manage User-defined Fields permission is required.
Note that there is no warning message when deleting a user-defined field. Therefore, beforedeleting a field, verify that the field is no longer being used.
Configuration > [Onboarding] Administration > User-defined Fields
Steps
1. Click the category containing the user-defined field.2. Click Delete.
Result
The field can no longer be used in user-defined forms, message templates, documents, reports,conditions and in Taleo Connect Client exports.
Editing a User-defined Field
Prerequisite
The Manage User-defined Fields permission is required.
Configuration > [Onboarding] Administration > User-defined Fields
Steps
1. Click on the category containing the user-defined field.2. Click a field.3. Click Edit.4. Make changes.5. Click Save.
User-defined Fields in Onboarding vs RecruitingUser-defined fields in Onboarding are different than user-defined fields in Recruiting.
Certain objects in Recruiting can have user-defined fields (UDFs) defined to track additionalinformation about a candidate. Also, certain objects in Onboarding can have UDFs defined to trackadditional information about a new hire. However, the candidate UDFs are different from the new hireUDFs. They each must be created separately, and the following specific rules control how and whenthe information from Recruiting UDFs may transfer over into Onboarding UDFs:
• The user-defined field must be classified in the corresponding category.• The user-defined field must have the same name and/or code, name in the case of Recruiting and
code in the case of Onboarding.• The user-defined field must be of the same type/domain, type in the case of Recruiting and domain
in the case of Onboarding.
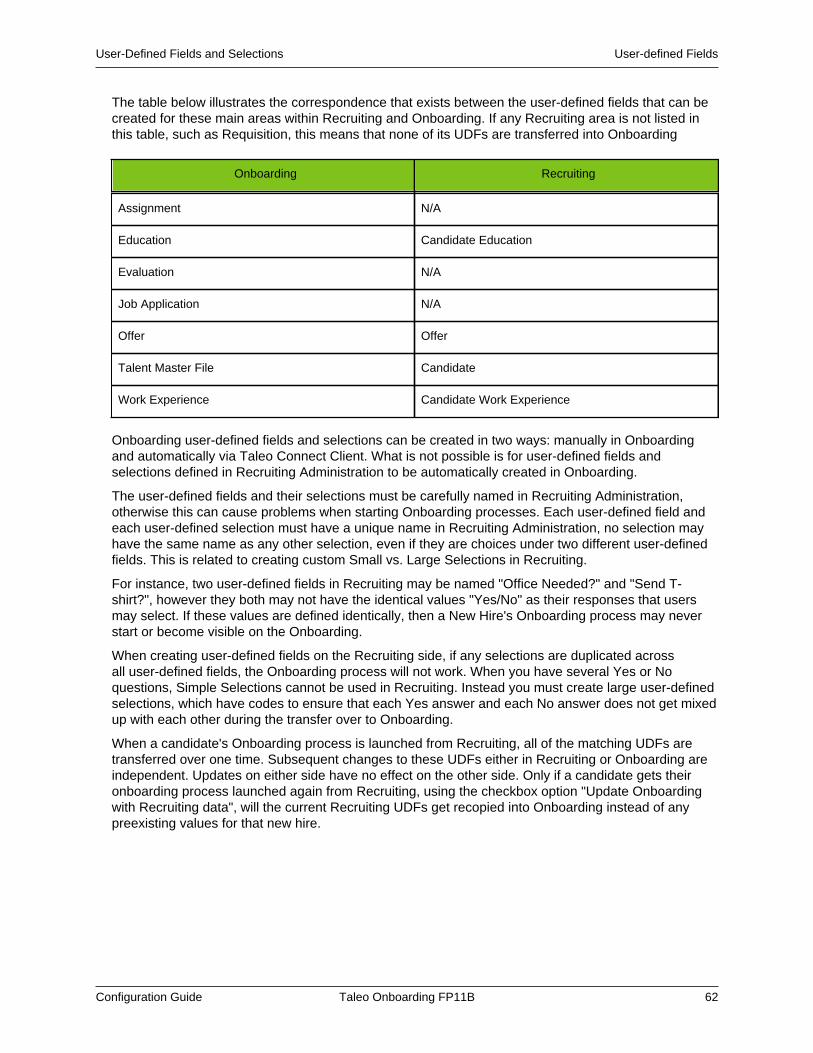
User-Defined Fields and Selections User-defined Fields
Configuration Guide Taleo Onboarding FP11B 62
The table below illustrates the correspondence that exists between the user-defined fields that can becreated for these main areas within Recruiting and Onboarding. If any Recruiting area is not listed inthis table, such as Requisition, this means that none of its UDFs are transferred into Onboarding
Onboarding Recruiting
Assignment N/A
Education Candidate Education
Evaluation N/A
Job Application N/A
Offer Offer
Talent Master File Candidate
Work Experience Candidate Work Experience
Onboarding user-defined fields and selections can be created in two ways: manually in Onboardingand automatically via Taleo Connect Client. What is not possible is for user-defined fields andselections defined in Recruiting Administration to be automatically created in Onboarding.
The user-defined fields and their selections must be carefully named in Recruiting Administration,otherwise this can cause problems when starting Onboarding processes. Each user-defined field andeach user-defined selection must have a unique name in Recruiting Administration, no selection mayhave the same name as any other selection, even if they are choices under two different user-definedfields. This is related to creating custom Small vs. Large Selections in Recruiting.
For instance, two user-defined fields in Recruiting may be named "Office Needed?" and "Send T-shirt?", however they both may not have the identical values "Yes/No" as their responses that usersmay select. If these values are defined identically, then a New Hire's Onboarding process may neverstart or become visible on the Onboarding.
When creating user-defined fields on the Recruiting side, if any selections are duplicated acrossall user-defined fields, the Onboarding process will not work. When you have several Yes or Noquestions, Simple Selections cannot be used in Recruiting. Instead you must create large user-definedselections, which have codes to ensure that each Yes answer and each No answer does not get mixedup with each other during the transfer over to Onboarding.
When a candidate's Onboarding process is launched from Recruiting, all of the matching UDFs aretransferred over one time. Subsequent changes to these UDFs either in Recruiting or Onboarding areindependent. Updates on either side have no effect on the other side. Only if a candidate gets theironboarding process launched again from Recruiting, using the checkbox option "Update Onboardingwith Recruiting data", will the current Recruiting UDFs get recopied into Onboarding instead of anypreexisting values for that new hire.
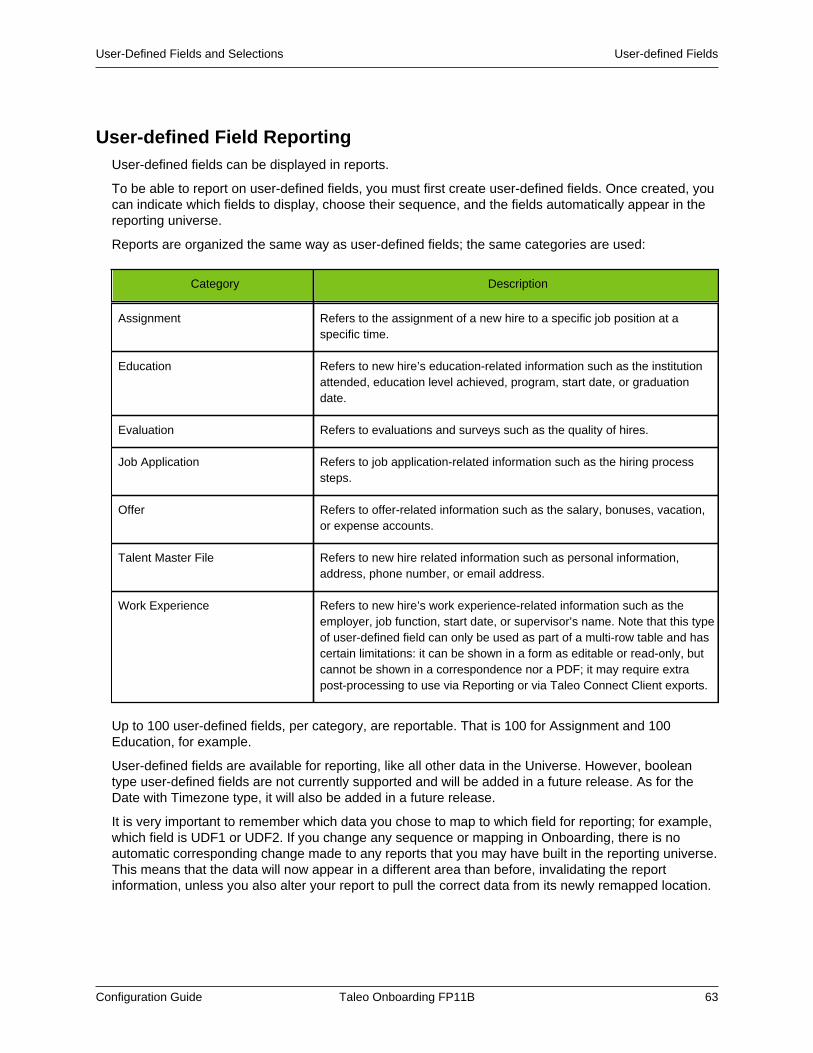
User-Defined Fields and Selections User-defined Fields
Configuration Guide Taleo Onboarding FP11B 63
User-defined Field ReportingUser-defined fields can be displayed in reports.
To be able to report on user-defined fields, you must first create user-defined fields. Once created, youcan indicate which fields to display, choose their sequence, and the fields automatically appear in thereporting universe.
Reports are organized the same way as user-defined fields; the same categories are used:
Category Description
Assignment Refers to the assignment of a new hire to a specific job position at aspecific time.
Education Refers to new hire’s education-related information such as the institutionattended, education level achieved, program, start date, or graduationdate.
Evaluation Refers to evaluations and surveys such as the quality of hires.
Job Application Refers to job application-related information such as the hiring processsteps.
Offer Refers to offer-related information such as the salary, bonuses, vacation,or expense accounts.
Talent Master File Refers to new hire related information such as personal information,address, phone number, or email address.
Work Experience Refers to new hire’s work experience-related information such as theemployer, job function, start date, or supervisor’s name. Note that this typeof user-defined field can only be used as part of a multi-row table and hascertain limitations: it can be shown in a form as editable or read-only, butcannot be shown in a correspondence nor a PDF; it may require extrapost-processing to use via Reporting or via Taleo Connect Client exports.
Up to 100 user-defined fields, per category, are reportable. That is 100 for Assignment and 100Education, for example.
User-defined fields are available for reporting, like all other data in the Universe. However, booleantype user-defined fields are not currently supported and will be added in a future release. As for theDate with Timezone type, it will also be added in a future release.
It is very important to remember which data you chose to map to which field for reporting; for example,which field is UDF1 or UDF2. If you change any sequence or mapping in Onboarding, there is noautomatic corresponding change made to any reports that you may have built in the reporting universe.This means that the data will now appear in a different area than before, invalidating the reportinformation, unless you also alter your report to pull the correct data from its newly remapped location.
User-Defined Fields and Selections User-defined Fields
Configuration Guide Taleo Onboarding FP11B 64
Selecting User-defined Fields for Reports
Prerequisite
The Manage User-defined Fields permission is required.
Configuration > [Onboarding] Administration > User-defined Reporting
Steps
1. Click a report category.
2. In the list of available items, select the desired fields and click Add.
3. Use the up and down arrows to modify the sequence.
4. Click Save.
5. Click Yes to confirm.
Result
That data is available for reporting.
User-Defined Fields and Selections User-defined Selections
Configuration Guide Taleo Onboarding FP11B 65
User-defined Selections
User-defined SelectionA user-defined selection is a field that provides a list of possible answers.
A user-defined selection contains elements that are possible entries to the field.
User-defined selection elements can be disabled and enabled after initial activation.
After user-defined selection elements have been in active use, they can be deactivated for futureuse. This allows an organization to change its list of possible responses over time, as older elementsbecome obsolete. Yet the prior responses of older new hires must be preserved on their completedforms.
Whenever an end-user is asked to make a choice among the elements in a user-defined selection,they are always presented with the currently active elements.
For instance, if user-defined elements A, B, and C are currently active, then a task assignee who fillsout a form is presented with choices A, B, and C. Later, if element A gets deactivated and element Dgets added, a subsequent task assignee who fills out the same form is presented with choices B, C,and D.
However, later in that first assignee's process, they were given another form and another opportunityto revise that answer, they would see the currently-available choices B, C, D. They would no longer bepermitted to actively choose the user-defined element A after its deactivation. The first assignee mayget a later opportunity to fill in a form that contains the same user-defined field. At that time, they willstill see the original value A that they chose. But if they wish to revise that answer, they would see thecurrently available choices B, C, D.
Creating a User-defined Selection
Prerequisite
The Manage User-defined Fields permission is required.
Configuration > [Onboarding] Administration > User-defined Selections
Steps
1. Click Create.
2. Enter a name and code.
3. Specify the order of appearance of the selection.
Sequential order:
Alphabetical order:
4. Click Save.
Next Step
Creating elements as the choices of entries that will be available.
User-Defined Fields and Selections User-defined Selections
Configuration Guide Taleo Onboarding FP11B 66
Creating an Element for a Selection
Prerequisite
The Manage User-defined Fields permission is required.
Configuration > [Onboarding] Administration > User-defined Selections
Steps
1. Click a user-defined selection.
2. Click Create.
3. Enter a code and a name.
4. Click Save.
Next Step
Repeat the above steps for all the elements you wish to create for the selection. Create as manyelements as required.
Activate the elements.
Reordering Elements in a Selection
Prerequisite
The Manage User-defined Fields permission is required.
Configuration > [Onboarding] Administration > User-defined Selections
Steps
1. Click a user-defined selection.
2. Click Reorder.
3. Use the up and down arrows to reorder elements.
4. Click Save.
Activating an Element in a Selection
Prerequisite
The Manage User-defined Fields permission is required.
Configuration > [Onboarding] Administration > User-defined Selections
Steps
1. Click a user-defined selection.
2. Click Activate.
Deactivating an Element in a Selection
Prerequisite
The Manage User-defined Fields permission is required.
The element must be Active.
User-Defined Fields and Selections User-defined Selections
Configuration Guide Taleo Onboarding FP11B 67
Configuration > [Onboarding] Administration > User-defined Selections
Steps
1. Click a user-defined selection.
2. Click Deactivate.
3. Click Yes.
Result
Once a user-defined selection is deactivated, it is no longer able to be chosen by future views.
Deleting an Element in a Selection
Prerequisite
The Manage User-defined Fields permission is required.
Configuration > [Onboarding] Administration > User-defined Selections
Steps
1. Click a user-defined selection.
2. Click Delete.
3. Click Yes.
Activating a User-defined Selection
Prerequisite
The Manage User-defined Fields permission is required.
Configuration > [Onboarding] Administration > User-defined Selections
Steps
1. Click a user-defined selection.
2. Click Activate.
Result
Once a user-defined selection is activated, it can be used. If the user-defined selection is chosenby a user, it will show in message templates, forms, PDF documents, reports, and Taleo ConnectClient exports.
Deactivating a User-defined Selection
Prerequisite
The Manage User-defined Fields permission is required.
The user-defined selection must be activated.
Configuration > [Onboarding] Administration > User-defined Selections
Steps
1. Click a user-defined selection.
2. Click Deactivate.

User-Defined Fields and Selections User-defined Selections
Configuration Guide Taleo Onboarding FP11B 68
Result
Once a user-defined selection is deactivated, it is no longer able to be chosen by future views.

Electronic Signatures
• Configuring an Electronic Signature................................................................................ 70
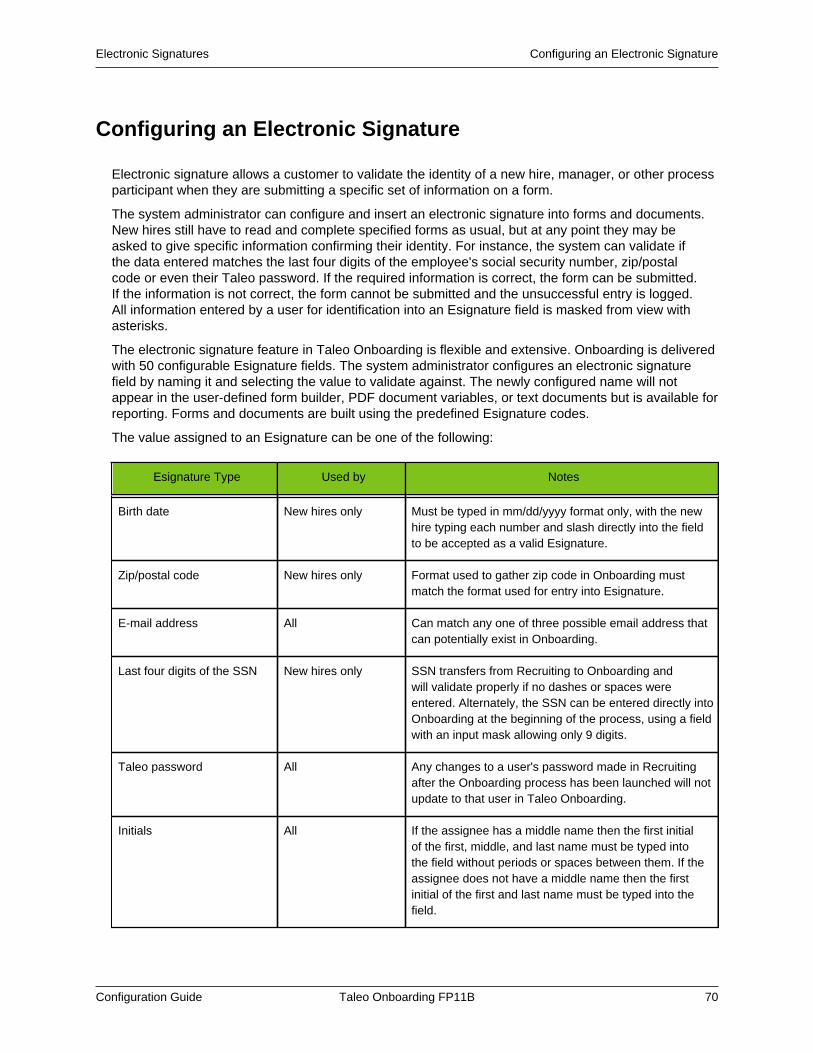
Electronic Signatures Configuring an Electronic Signature
Configuration Guide Taleo Onboarding FP11B 70
Configuring an Electronic Signature
Electronic signature allows a customer to validate the identity of a new hire, manager, or other processparticipant when they are submitting a specific set of information on a form.
The system administrator can configure and insert an electronic signature into forms and documents.New hires still have to read and complete specified forms as usual, but at any point they may beasked to give specific information confirming their identity. For instance, the system can validate ifthe data entered matches the last four digits of the employee's social security number, zip/postalcode or even their Taleo password. If the required information is correct, the form can be submitted.If the information is not correct, the form cannot be submitted and the unsuccessful entry is logged.All information entered by a user for identification into an Esignature field is masked from view withasterisks.
The electronic signature feature in Taleo Onboarding is flexible and extensive. Onboarding is deliveredwith 50 configurable Esignature fields. The system administrator configures an electronic signaturefield by naming it and selecting the value to validate against. The newly configured name will notappear in the user-defined form builder, PDF document variables, or text documents but is available forreporting. Forms and documents are built using the predefined Esignature codes.
The value assigned to an Esignature can be one of the following:
Esignature Type Used by Notes
Birth date New hires only Must be typed in mm/dd/yyyy format only, with the newhire typing each number and slash directly into the fieldto be accepted as a valid Esignature.
Zip/postal code New hires only Format used to gather zip code in Onboarding mustmatch the format used for entry into Esignature.
E-mail address All Can match any one of three possible email address thatcan potentially exist in Onboarding.
Last four digits of the SSN New hires only SSN transfers from Recruiting to Onboarding andwill validate properly if no dashes or spaces wereentered. Alternately, the SSN can be entered directly intoOnboarding at the beginning of the process, using a fieldwith an input mask allowing only 9 digits.
Taleo password All Any changes to a user's password made in Recruitingafter the Onboarding process has been launched will notupdate to that user in Taleo Onboarding.
Initials All If the assignee has a middle name then the first initialof the first, middle, and last name must be typed intothe field without periods or spaces between them. If theassignee does not have a middle name then the firstinitial of the first and last name must be typed into thefield.
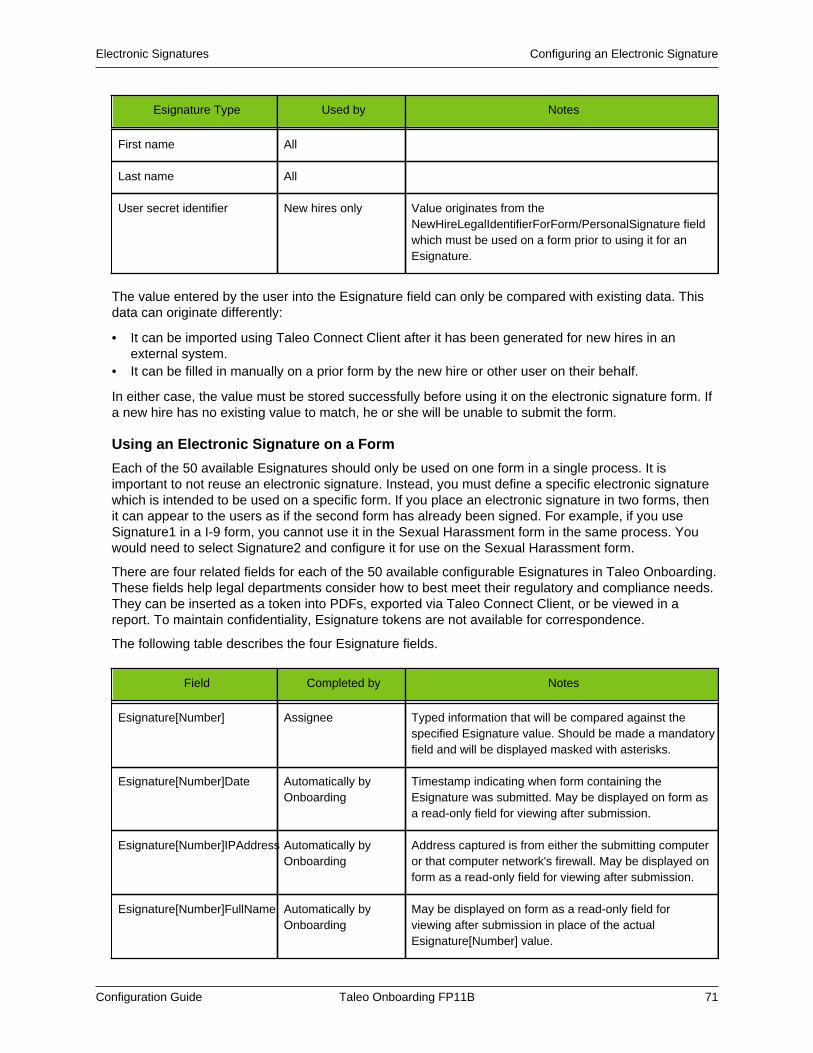
Electronic Signatures Configuring an Electronic Signature
Configuration Guide Taleo Onboarding FP11B 71
Esignature Type Used by Notes
First name All
Last name All
User secret identifier New hires only Value originates from theNewHireLegalIdentifierForForm/PersonalSignature fieldwhich must be used on a form prior to using it for anEsignature.
The value entered by the user into the Esignature field can only be compared with existing data. Thisdata can originate differently:
• It can be imported using Taleo Connect Client after it has been generated for new hires in anexternal system.
• It can be filled in manually on a prior form by the new hire or other user on their behalf.
In either case, the value must be stored successfully before using it on the electronic signature form. Ifa new hire has no existing value to match, he or she will be unable to submit the form.
Using an Electronic Signature on a Form
Each of the 50 available Esignatures should only be used on one form in a single process. It isimportant to not reuse an electronic signature. Instead, you must define a specific electronic signaturewhich is intended to be used on a specific form. If you place an electronic signature in two forms, thenit can appear to the users as if the second form has already been signed. For example, if you useSignature1 in a I-9 form, you cannot use it in the Sexual Harassment form in the same process. Youwould need to select Signature2 and configure it for use on the Sexual Harassment form.
There are four related fields for each of the 50 available configurable Esignatures in Taleo Onboarding.These fields help legal departments consider how to best meet their regulatory and compliance needs.They can be inserted as a token into PDFs, exported via Taleo Connect Client, or be viewed in areport. To maintain confidentiality, Esignature tokens are not available for correspondence.
The following table describes the four Esignature fields.
Field Completed by Notes
Esignature[Number] Assignee Typed information that will be compared against thespecified Esignature value. Should be made a mandatoryfield and will be displayed masked with asterisks.
Esignature[Number]Date Automatically byOnboarding
Timestamp indicating when form containing theEsignature was submitted. May be displayed on form asa read-only field for viewing after submission.
Esignature[Number]IPAddress Automatically byOnboarding
Address captured is from either the submitting computeror that computer network's firewall. May be displayed onform as a read-only field for viewing after submission.
Esignature[Number]FullName Automatically byOnboarding
May be displayed on form as a read-only field forviewing after submission in place of the actualEsignature[Number] value.
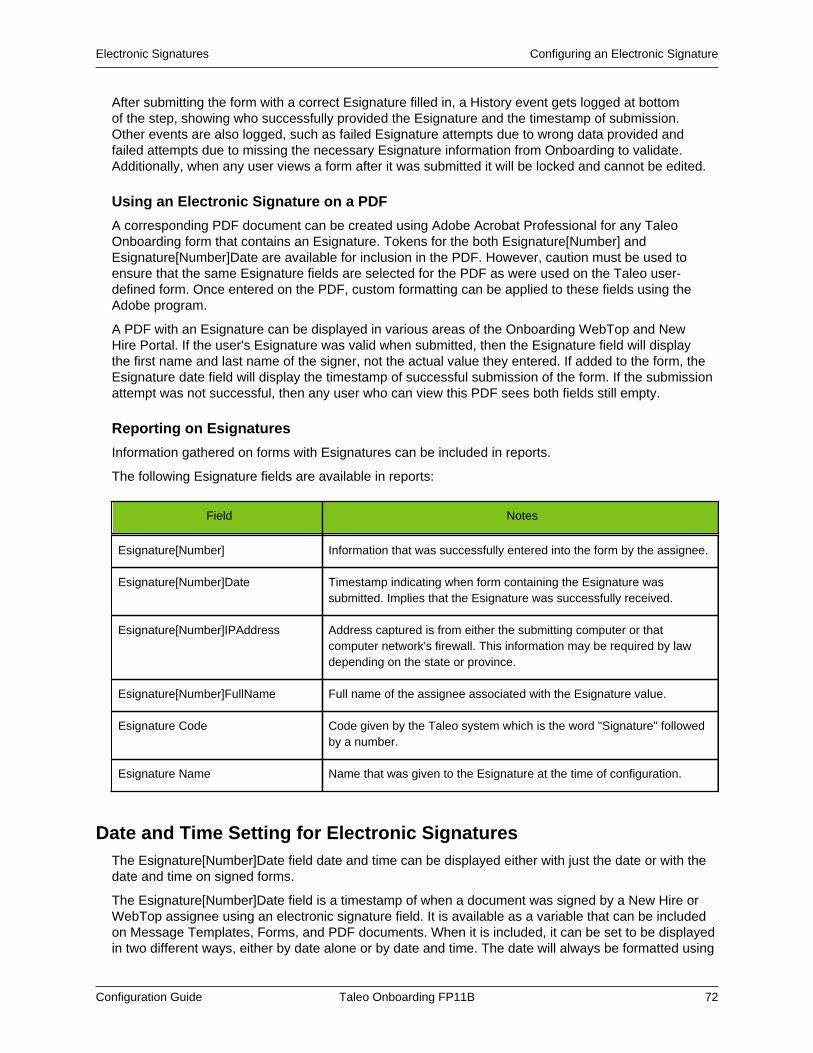
Electronic Signatures Configuring an Electronic Signature
Configuration Guide Taleo Onboarding FP11B 72
After submitting the form with a correct Esignature filled in, a History event gets logged at bottomof the step, showing who successfully provided the Esignature and the timestamp of submission.Other events are also logged, such as failed Esignature attempts due to wrong data provided andfailed attempts due to missing the necessary Esignature information from Onboarding to validate.Additionally, when any user views a form after it was submitted it will be locked and cannot be edited.
Using an Electronic Signature on a PDF
A corresponding PDF document can be created using Adobe Acrobat Professional for any TaleoOnboarding form that contains an Esignature. Tokens for the both Esignature[Number] andEsignature[Number]Date are available for inclusion in the PDF. However, caution must be used toensure that the same Esignature fields are selected for the PDF as were used on the Taleo user-defined form. Once entered on the PDF, custom formatting can be applied to these fields using theAdobe program.
A PDF with an Esignature can be displayed in various areas of the Onboarding WebTop and NewHire Portal. If the user's Esignature was valid when submitted, then the Esignature field will displaythe first name and last name of the signer, not the actual value they entered. If added to the form, theEsignature date field will display the timestamp of successful submission of the form. If the submissionattempt was not successful, then any user who can view this PDF sees both fields still empty.
Reporting on Esignatures
Information gathered on forms with Esignatures can be included in reports.
The following Esignature fields are available in reports:
Field Notes
Esignature[Number] Information that was successfully entered into the form by the assignee.
Esignature[Number]Date Timestamp indicating when form containing the Esignature wassubmitted. Implies that the Esignature was successfully received.
Esignature[Number]IPAddress Address captured is from either the submitting computer or thatcomputer network's firewall. This information may be required by lawdepending on the state or province.
Esignature[Number]FullName Full name of the assignee associated with the Esignature value.
Esignature Code Code given by the Taleo system which is the word "Signature" followedby a number.
Esignature Name Name that was given to the Esignature at the time of configuration.
Date and Time Setting for Electronic SignaturesThe Esignature[Number]Date field date and time can be displayed either with just the date or with thedate and time on signed forms.
The Esignature[Number]Date field is a timestamp of when a document was signed by a New Hire orWebTop assignee using an electronic signature field. It is available as a variable that can be includedon Message Templates, Forms, and PDF documents. When it is included, it can be set to be displayedin two different ways, either by date alone or by date and time. The date will always be formatted using
Electronic Signatures Configuring an Electronic Signature
Configuration Guide Taleo Onboarding FP11B 73
a default short date style. The time will be displayed using Greenwich Mean Time (GMT) timezoneformat. This setting will apply to all electronic signature fields, including existing fields on forms thathave already been signed.
The default value is Date and will apply to all Esignature[Number]Date fields.
Example:
When the short date is chosen to be displayed without the time, it will be displayed according to theshort date format for the locale. For a US locale, it will be displayed as MM/dd/yy. Regardless oflocale, the time part will always be formatted as HH:mm:ss GMT appearing after the date.
Configuring an Electronic SignaturePrerequisite
Onboarding has been preloaded with 50 electronic signatures.
The Manage User-defined Forms permission is required.
Configuration > [Onboarding] Administration > User-defined Signatures
Steps
1. Click a precoded electronic signature from the User-Defined Electronic Signature Managementlist.
2. Rename the signature with a meaningful name.
3. Select the Signature Type.
4. Click Save.
Result
The electronic signature can be added to a form.
Next Step
Create a form or PDF that will use the electronic signature.
Adding an Electronic Signature in a FormPrerequisite
The Manage User-defined Forms permission is required.
Configuration > [Onboarding] Administration > User-defined Forms
Steps
1. Click a user-defined form.
2. Create a space in the form to insert the electronic signature.
For example, you may need to add a row.
3. In the Field Chooser menu, select ESignatureForForm.
All created signatures are listed by code.
4. Drag and drop the desired electronic signature in the form.
5. Click the field to activate properties.
6. Select Yes from the Mandatory property drop-down list.
Electronic Signatures Configuring an Electronic Signature
Configuration Guide Taleo Onboarding FP11B 74
If this is an Esignature date field, the Access property should be set to Read-only.
7. Click Save.
Result
The form with the electronic signature can be used in a process.
Next Step
Create a process that will use the form containing the electronic signature.
Adding an Electronic Signature in a PDFPrerequisite
Adobe Acrobat Professional is required to insert electronic signatures into PDF documents. Notethat this procedure may differ according to the version of Adobe Acrobat Professional being used.The procedure below is described using version 7.0.
Steps
1. Using Adobe Acrobat Professional, open a PDF document.
2. In the Tools menu, select Advanced Editing, then Text Field Tool.
3. Draw a box using your cursor.
4. In the Text Field Properties window, under the General tab, type the code of the Esignature fieldin the Name field and replace the forward slash “/” by a dot “.”.
If you named Signature1 as "NondisclosureAgreementEsig" then it will still befound as "ESignatureForForm.ESignature1" and its corresponding Date will be"ESignatureForForm.ESignature1Date".
5. Enter any other information to appear on the PDF.
Result
Electronic signature field values will appear on the PDF.
Next Step
The PDF document containing an electronic signature can be used in the New Hire Portal and theOnboarding WebTop.
User-defined Forms
• User-defined Forms......................................................................................................... 76• Relationship between Forms and PDFs..........................................................................88
User-defined Forms User-defined Forms
Configuration Guide Taleo Onboarding FP11B 76
User-defined Forms
A user-defined form is one or more pages of information containing standard and/or custom fields thatcan be used in a specific context.
User-defined forms are used the same way throughout the application. User-defined forms can beedited or created from scratch. It is possible to customize the layout of the form, field labels, and otherobjects.
When defining the form, the system administrator provides a name, a code and a description tofacilitate future references. Then, rows, columns, and sections can be added to the form via theToolbox. Fields are then inserted in the form. A list of available fields appears on the left hand side ofthe window, in the Field Chooser. To insert fields, the system administrator must select the field, thendrag and drop the field in the desired section.
Each field included in the form can have different properties which can be edited by selecting the fieldand scrolling to the Selected Element Properties section at the bottom of the form. Some fields havelimited properties available according to best practices. For example, PositionForForm/DepartmentName Field Type can be set to either Read-only Text or URL because it is best practice for a WebTopuser or new hire not to edit this field.
Once created, user-defined forms can be previewed to see how the information will be displayed tousers. It is also possible to configure user-defined forms in all the languages activated for a company.Forms can be translated as required, but if no translation is provided, the form is displayed in the baselanguage.
User-defined forms must be activated before they can be used.
Configuring User-defined FormsUser-defined forms are configured by the system administrator in the User-defined Forms feature ofthe Administration menu of the product for which the user-defined form will be used.
When defining the form, the system administrator provides a name, a code and a description tofacilitate future references. Then, rows, columns, and sections can be added to the form via theToolbox. Fields are then inserted in the form. A list of available fields appears on the left hand sideof the window, in the Field Chooser. To insert fields, the system administrator must select the field,then drag and drop the field in the desired section. Each field included in the form can have differentproperties which can be edited by selecting the field and scrolling to the Selected Element Propertiessection at the bottom of the form.
When wanting to capture a new hire's start date on a form there are two choices. UseAssignmentForForm/StartDate to display or enter the date and time an employee started the job. Usethe read-only field, AssignmentForForm/StartDateNoTime to only display the new hire start date.
Once created, user-defined forms can be previewed to see how the information will be displayed tousers. It is also possible to configure user-defined forms in all the languages activated for a company.Forms can be translated as required, but if no translation is provided, the form is displayed in the baselanguage.
User-defined forms must be activated before they can be used.
User-defined Forms User-defined Forms
Configuration Guide Taleo Onboarding FP11B 77
Creating a User-defined Form
Prerequisite
The Manage User-defined Forms permission is required.
Configuration > [Onboarding] Administration > User-defined Forms
Steps1. Click Create.2. Provide a code, a name, and a page name.3. Add rows, columns, and sections using the Toolbox features.4. In the Field Chooser list, select fields, then drag and drop them in the desired section.5. Edit the properties of a field by selecting the field and scrolling to the Selected Element
Properties section at the bottom of the form.6. Click Save.Result
The form appears in the User-defined Forms list.
Next Step
Previewing the form.
Configure the form in all the languages activated for your company.
Activate the form.
Adding Fields to a User-defined Form
Prerequisite
The Manage User-defined Forms permission is required.
Configuration > [Onboarding] Administration > User-defined Forms
Steps1. Click a form.2. Select a field from the Field Chooser list.3. Drag and drop the field in the desired section.4. Edit the properties of a field by selecting the field and scrolling to the Selected Element
Properties section at the bottom of the form.5. Click Save.Next Step
Edit the properties of the fields.
Fields with Subcategory Items
The indented field categories in the field chooser create a table on user-defined forms to accommodatemultiple lines of text and may include subcategory fields.
Several fields in Onboarding must accommodate many separate lines of input from the formassignee. When these fields are dragged onto forms, a table is created in the Form Builder to allow theinclusion of child fields into the table as columns. Add and Delete buttons need to be added to allowform users to enter new rows of information or delete rows of information.
User-defined Forms User-defined Forms
Configuration Guide Taleo Onboarding FP11B 78
Fields that support multiple lines of text are only available for user-defined forms and are not availablefor inclusion on PDFs or correspondence.
All fields with subcategory items appear in the Field Chooser as indented items. These fields are:
• PreviousAddress• SecondaryAddress• NewHireAssets• NewHireEvaluation• HiringProcessStep• DirectDeposit• Relative• EmergencyContact• Education• WorkExperience• Competency• Reference
Adding Fields with Subcategory Items on a User-defined Form
Prerequisite
The Manage User-defined Forms permission is required.
Configuration > [Onboarding] Administration > User-defined Forms
Steps
1. Select a subcategory field from a main category in the Field Chooser list.
2. Drag and drop the field onto the form.
A table is displayed on the form labeled with the field name.
3. Select the indented field to display subcategory fields.
4. Drag and drop the fields from the subcategory list into the columns of the table.
More columns can be added to the table using the toolbox.
5. Drag and drop add to the gray title area of the table.
6. Drag and drop delete to the rightmost column of the table.
Next Step
Editing the properties of the fields.
External Service Request Fields for Forms
Passport partner fields can be configured on a form, showing all of a new hire's results for everyexternal service request, past or current, for that partner.
Forms for specific, activated Passport Partners are built using the Onboarding Form Builder. TheOnboarding administrator can build a table in the form by dragging and dropping the fields from thecategory ServiceRequestDataforForms onto the form. The available fields can include the following:
• Results fields• Input parameters• Standard fields
Each field creates a new table column.
User-defined Forms User-defined Forms
Configuration Guide Taleo Onboarding FP11B 79
The table is built dynamically each time the form is clicked on to view, with a separate table for eachPassport partner. The table rows represent one request, displaying the past values for the includedfields, with the table sorted with the latest request in the top row.
A link to the partner website can be placed on the form to allow the new hire or the hiring manager tovisit the partner website for more information.
When complete the form can be activated and included in an onboarding process.
By contrast, fields in the ServiceResult category displays only the latest result data for a new hire. Itcan be used on forms, PDFs, and message templates similar to other Onboarding fields.
Configuration
User Type Permission
Name Location
Manage User-defined Forms Configuration > [SmartOrg] Administration > UserTypes > Recruiting > Onboarding > OnboardingAdministration
For Passport partner UDFs to be available for forms, the partner must be activated on the zone. Thismay require a zone restart.
Adding External Service Request Fields on a Form
Prerequisite
The Manage User-defined Forms permission is required.
The Passport partner must be activated.
Configuration > [Onboarding] Administration > User-defined Forms
Steps
1. Click a form.
2. Drag ServiceRequestDataforForms onto the form.
3. Click ServiceRequest.
4. Drag desired fields into table columns.
More columns can be added to the table using the toolbox.
5. Click Save.
Result
This is the result for this task.
Next Step
Edit the properties of the fields.
User-defined Form Change Considerations
Changes made to a user-defined form used in a process will take effect immediately.
User-defined Forms User-defined Forms
Configuration Guide Taleo Onboarding FP11B 80
Immediate changes apply to future tasks and for tasks where the changed form is currently InProgress. The changes to the form will also apply for past tasks. Anytime the form is accessed after achange is made, even in a completed task or a completed process, the form will now appear with thechanges incorporated.
Good practices for changing a form might be:
• make any changes if the form is not yet in use.• if the change is cosmetic, making changes is likely acceptable whether or not it is in use.• if the desired change is important and the form is in use, create a duplicate of the form and make
changes there. Then create a duplicate of the whole process and substitute the new form in placeof the old form. This will have no effect on new hire processes that are currently ongoing in theold process, but the new process should now be selected instead for future launching from theRecruiting Center.
Editing the Properties of a Field in a User-defined Form
Prerequisite
The Manage User-defined Forms permission is required.
Configuration > [Onboarding] Administration > User-defined Forms
Steps
1. Click a user-defined form.
2. In the Page Content section, click a field.
3. In the Selected Element Properties section, located at the bottom of the form, modify theproperties of the field.
4. Click Save.
Selected Element Properties
The Selected Element Properties section allows you to configure fields added to the form.
Element Description
Binding field The Binding field refers to the data source to which the element is bound.The value displayed in the Binding field represents the data value (availablein the first list of the Field Chooser) to which the element is associated. Forexample, the Annual Bonus field is bound to the AssignmentOfferForForm/AnnualBonus. The value in the Binding field is not editable.
Field Type There are different field types to choose from: Text Input, Text Area, RichText Format, Read-only Text. When working with a date, the field can be textor:
• Date Drop-down list.• Date input-utilizes a calendar picker with keyboard short-cut keys
available.
• Control-Forward and Ctrl-Back changes the calendar by month• Ctrl-Up and Ctrl-Down changes the calendar by year, in the current
month• Escape key does the Cancel action
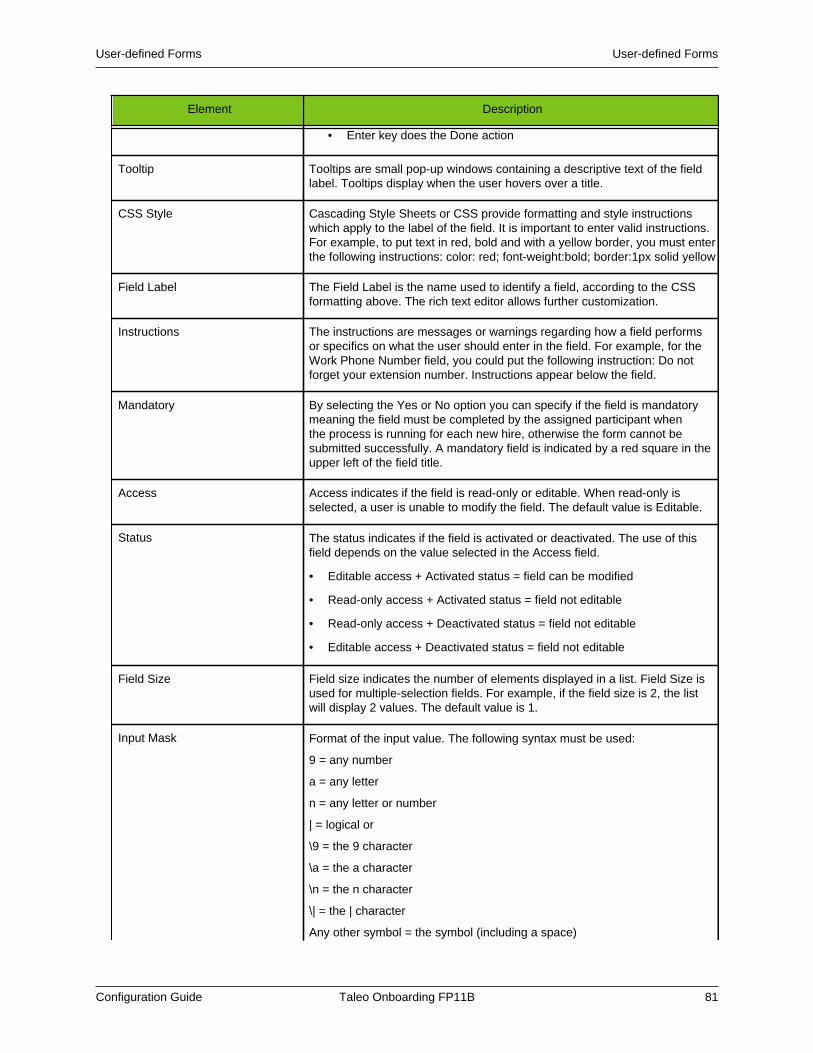
User-defined Forms User-defined Forms
Configuration Guide Taleo Onboarding FP11B 81
Element Description
• Enter key does the Done action
Tooltip Tooltips are small pop-up windows containing a descriptive text of the fieldlabel. Tooltips display when the user hovers over a title.
CSS Style Cascading Style Sheets or CSS provide formatting and style instructionswhich apply to the label of the field. It is important to enter valid instructions.For example, to put text in red, bold and with a yellow border, you must enterthe following instructions: color: red; font-weight:bold; border:1px solid yellow
Field Label The Field Label is the name used to identify a field, according to the CSSformatting above. The rich text editor allows further customization.
Instructions The instructions are messages or warnings regarding how a field performsor specifics on what the user should enter in the field. For example, for theWork Phone Number field, you could put the following instruction: Do notforget your extension number. Instructions appear below the field.
Mandatory By selecting the Yes or No option you can specify if the field is mandatorymeaning the field must be completed by the assigned participant whenthe process is running for each new hire, otherwise the form cannot besubmitted successfully. A mandatory field is indicated by a red square in theupper left of the field title.
Access Access indicates if the field is read-only or editable. When read-only isselected, a user is unable to modify the field. The default value is Editable.
Status The status indicates if the field is activated or deactivated. The use of thisfield depends on the value selected in the Access field.
• Editable access + Activated status = field can be modified
• Read-only access + Activated status = field not editable
• Read-only access + Deactivated status = field not editable
• Editable access + Deactivated status = field not editable
Field Size Field size indicates the number of elements displayed in a list. Field Size isused for multiple-selection fields. For example, if the field size is 2, the listwill display 2 values. The default value is 1.
Input Mask Format of the input value. The following syntax must be used:
9 = any number
a = any letter
n = any letter or number
| = logical or
\9 = the 9 character
\a = the a character
\n = the n character
\| = the | character
Any other symbol = the symbol (including a space)
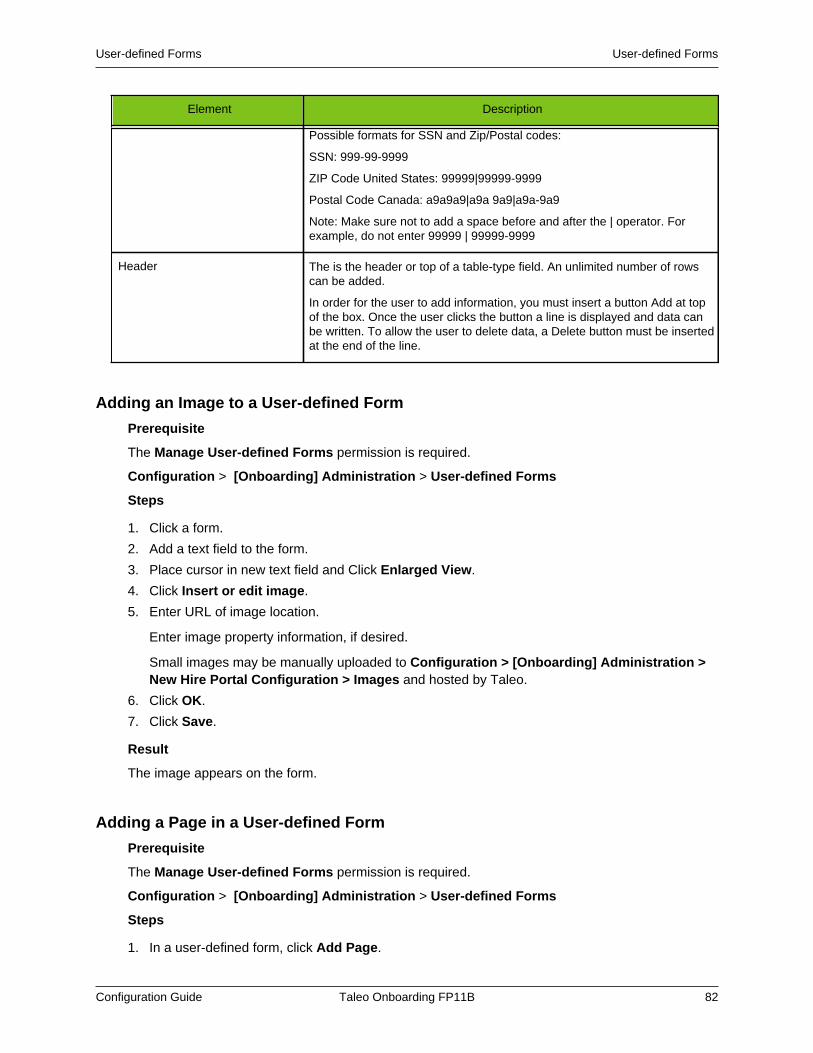
User-defined Forms User-defined Forms
Configuration Guide Taleo Onboarding FP11B 82
Element Description
Possible formats for SSN and Zip/Postal codes:
SSN: 999-99-9999
ZIP Code United States: 99999|99999-9999
Postal Code Canada: a9a9a9|a9a 9a9|a9a-9a9
Note: Make sure not to add a space before and after the | operator. Forexample, do not enter 99999 | 99999-9999
Header The is the header or top of a table-type field. An unlimited number of rowscan be added.
In order for the user to add information, you must insert a button Add at topof the box. Once the user clicks the button a line is displayed and data canbe written. To allow the user to delete data, a Delete button must be insertedat the end of the line.
Adding an Image to a User-defined Form
Prerequisite
The Manage User-defined Forms permission is required.
Configuration > [Onboarding] Administration > User-defined Forms
Steps
1. Click a form.
2. Add a text field to the form.
3. Place cursor in new text field and Click Enlarged View.
4. Click Insert or edit image.
5. Enter URL of image location.
Enter image property information, if desired.
Small images may be manually uploaded to Configuration > [Onboarding] Administration >New Hire Portal Configuration > Images and hosted by Taleo.
6. Click OK.
7. Click Save.
Result
The image appears on the form.
Adding a Page in a User-defined Form
Prerequisite
The Manage User-defined Forms permission is required.
Configuration > [Onboarding] Administration > User-defined Forms
Steps
1. In a user-defined form, click Add Page.

User-defined Forms User-defined Forms
Configuration Guide Taleo Onboarding FP11B 83
2. Add rows, columns and sections using the Toolbox features.
3. In the Field Chooser list, select fields, then drag and drop them in the desired section.
4. Edit the properties of a field by selecting the field and scrolling to the Selected ElementProperties section at the bottom of the form.
5. Click Save.
Result
A new page is added to the user-defined form. Navigate between pages by using the page indicator.
Reordering Pages in a User-defined Form
Prerequisite
The Manage User-defined Forms permission is required.
The user-defined form must contain more than one page.
Configuration > [Onboarding] Administration > User-defined Forms
Steps
1. In a user-defined form, click Reorder Pages.
2. Use the up and down arrows to position the pages.
3. Click Save.
Deleting a Page in a User-defined Form
Prerequisite
The Manage User-defined Forms permission is required.
Configuration > [Onboarding] Administration > User-defined Forms
Steps
1. In a user-defined form, click Delete Page.
2. Click Yes.
Result
The page is deleted from the user-defined form.
Previewing a User-defined Form
Prerequisite
The Manage User-defined Forms permission is required.
Configuration > [Onboarding] Administration > User-defined Forms
Steps
Click Preview.
Result
The page containing the form is displayed.
User-defined Forms User-defined Forms
Configuration Guide Taleo Onboarding FP11B 84
Next Step
Activate the form.
Print the form.
Activating a User-defined Form
Prerequisite
The Manage User-defined Forms permission is required.
Configuration > [Onboarding] Administration > User-defined Forms
StepsClick Activate.
Result
The status of the user-defined form is changed to Active in the Status column of the User-definedForms list. The user-defined form can be used in an onboarding process.
Deactivating a User-defined Form
Prerequisite
The Manage User-defined Forms permission is required.
The status of the user-defined form must be Active.
The user-defined form must not be in use.
Configuration > [Onboarding] Administration > User-defined Forms
StepsIn the User-defined Forms page, click Deactivate.
Result
The status of the user-defined form is changed to Inactive in the Status column of the User-definedForms list. The user-defined form is unavailable when building an onboarding process.
Duplicating a User-defined Form
Prerequisite
The Manage User-defined Forms permission is required.
Configuration > [Onboarding] Administration > User-defined Forms
StepsClick Duplicate.
Result
The new user-defined form appears in the User-defined Forms list with the extension (copy).
The user-defined form is in Draft status and cannot yet be used in tasks or processes.
Next Step
Edit the user-defined form.
User-defined Forms User-defined Forms
Configuration Guide Taleo Onboarding FP11B 85
Printing a User-defined Form
Prerequisite
The Manage User-defined Forms permission is required.
Configuration > [Onboarding] Administration > User-defined Forms
Steps
1. Click Preview.2. Click Print Preview.3. Click Print.4. Select a printer and click Print.
Deleting a User-defined Form
Prerequisite
The Manage User-defined Forms permission is required.
The status of the user-defined form must be Inactive.
Configuration > [Onboarding] Administration > User-defined Forms
Steps
1. Click Delete.2. Confirm the deletion.
Result
The user-defined form no longer appears in the User-defined Forms list. The user-defined form canno longer be included in a new Onboarding process.
Static Hyperlinks in User-defined FormsFields in user-defined forms can contain static hyperlinks.
Standard fields or user-defined fields contained in a form can display a clickable hyperlink. In a user-defined form, the URL field type available in the Selected Element Properties can be used to createstatic hyperlinks in user-defined forms.
Adding a Static Hyperlink in a User-defined Form
Prerequisite
The Manage User-defined Forms permission is required.
Configuration > [Onboarding] Administration > User-defined Forms
Steps
1. Click a user-defined form.2. Click a field.3. In the Selected Element Properties section, under Field Type, select URL.4. In the Selected Element Properties section, under Access Type, select Read-only.
User-defined Forms User-defined Forms
Configuration Guide Taleo Onboarding FP11B 86
Access must be set to read-only to ensure the user cannot change the value of the URL.
Adding a Static Hyperlink in a User-defined Form Using a Text Field
Prerequisite
The Manage User-defined Forms permission is required.
Configuration > [Onboarding] Administration > User-defined Forms
Steps
1. Click a form.
2. Add a text field to the form.
3. Place cursor in new text field and Click Enlarged View.
4. Enter text or an image. Follow the steps below to insert an image.
a) Click Insert or edit image.b) Enter URL of image location.
Enter image property information, if desired.
Small images may be manually uploaded to Configuration > [Onboarding] Administration> New Hire Portal Configuration > Images and hosted by Taleo.
5. Select the text or image for the hyperlink.
6. Click Hyperlink.
7. Enter destination URL.
Select Open in New Window for Target if the destination page is to open in a new browserwindow.
8. Click OK.
9. Click OK.
10. Click Save.
User-defined Form History TrackingThe History feature for user-defined forms presents most changes made to a form.
The Forms History here in the Administration area does not show history of assignees who arecompleting this form within processes. This history only shows modifications to the form definition itself.Updates or additions within text fields are not explicitly described.
The History section presents the following information:
Element Description
Date and Time Date and time when an event occurred.
Event Event or action performed on an element.
Details Information regarding the event.
By The actor, person or system, who performed the event.
User-defined Forms User-defined Forms
Configuration Guide Taleo Onboarding FP11B 87
The three most recent events are displayed in the History section. To view a more complete listing ofevents, click More Info.
U.S. Form I-9These forms look just like the official U.S. government form I-9 and are available in Onboarding tocapture U.S. employment information.
The following I-9 forms are available in the User-defined Forms section. A System administrator canmodify the forms as required:
• U.S. Form I-9 Employee - this replicates the details found in Section 1 of Form I-9, which containsemployee information and verification related fields to be filled out by the new hire.
• U.S. Form I-9 Employer - this replicates the details found in Section 2 of Form I-9, which containsinformation on the documents provided by the new hire and includes confirmation by the employerthat the information in the form is accurate.
• U.S. Form I-9 Sections 1+2 - combines both Section 1 and Section 2 of Form I-9 onto one form.
The U.S. Form I-9 is mandatory for newly hired U.S. employees. Passport partners are available tohandle the full I-9 process if desired; contact your Taleo representative.
User-defined forms, even these which are provided with Onboarding, cannot be exported and savedlong-term; instead, their companion PDFs are intended for this purpose. See Relationship BetweenForms and PDFs.
New Hire Details FormA form can be created to display extended details on the Onboarding WebTop beyond what isavailable on the New Hire Page.
The New Hire Page is a page of standard information about each new hire and their process. Thispage is built-in as part of the Onboarding WebTop product. To display a larger set of information, aNew Hire Details form can be linked from the New Hire page using a link called Details. The Detailslink is located in the General Section of the New Hire Page.
The New Hire Details form is a user-defined form that can be configured with any available Onboardingfields to provide more comprehensive information about the new hire. Regardless of the form name,the name of the link will always be Details.
Only one New Hire Details form can be used and will apply to all new hires in all processes and allOrganizations, Locations, and Job Fields. All information on the form is shown read-only.
The user-defined form must be activated after it is created. The setting New Hire Details, activates theDetails link on the New Hire Page and configures the user-defined form for use as the New Hire DetailsForm.
Setting
Name Possible Values Default Value Location
New Hire Details New Hire Details Form Code None Configuration > [Onboarding]Settings
User-defined Forms Relationship between Forms and PDFs
Configuration Guide Taleo Onboarding FP11B 88
Relationship between Forms and PDFs
An online, user-defined form is required to capture information for PDF documents.
For some business needs, capturing new hire information on a dynamic form within Onboarding is notsufficient; instead, particular data with particular formatting must be retained long-term and updatesare not permitted. An example might be a particular government form or an electronically-signedemployee agreement. Because the Onboarding system is designed to display the most recently-updated information in any field at any time, it becomes necessary to create and save a snapshot ofcertain information at a point in time if the business needs to preserve it as-is.
Adobe PDF documents can be uploaded to Onboarding to display current information fields abouta new hire and then these PDFs can be saved outside of the Taleo system. By exporting or savingthem, these PDFs can no longer receive any new information from the Onboarding database when thenew hire's fields get updated in the future. Therefore, the PDF is no longer dynamic, and serves as areliable record of the information and electronic signatures provided, as of the moment of export.
Tokenized PDF DocumentA tokenized PDF document will automatically extract information from Onboarding.
PDF documents can be prepopulated with variables retained in the system. Variables can beadded using Adobe Acrobat Professional or Adobe Acrobat 3D. For example, you could take a PDFdocument, such as the I-9 form, and insert variables that will automatically extract information froma new hire candidate file. Instead of showing a blank PDF and asking a new hire to print and fill intheir name on paper, each new hire or WebTop user who views a PDF during their process will seethat it contains all the information prefilled in for them, using the data that is currently stored in theOnboarding system
Capturing Form Information for PDFs Workflow
Two distinct phases are involved to create forms aligned with PDFs for capturing new hire information,configuration and runtime.
Configuration
In the Form Builder, the Onboarding Administrator creates a form that will be used at runtime tocapture the data that they will want to show on the PDF for long-term static use. This form only needsto gather input from those fields which are not expected to be already filled by Recruiting or TaleoConnect.
In Adobe Acrobat Professional or Adobe Acrobat 3D the Onboarding administrator creates thePDF that will display all those fields which are desired for long-term static use. This PDF containstokens, created with fields analogous to the items on a user-defined form. Every single tokenavailable in the system and that can be placed onto an Onboarding form can also be placed in aPDF document. When using a variable, it must be slightly modified by replacing the forward slash “/”with a dot “.”. For example, NewHirePersonalInfoForForm/LastName must be modified to becomeNewHirePersonalInfoForForm.LastName.
• The Onboarding administrator puts the user-defined form on a task: Creating a Task.• The Onboarding administrator puts the form task into a process: Processes.• The Onboarding administrator uploads the PDF into a document with different possible
configurations: Creating a Document Containing a PDF File.

User-defined Forms Relationship between Forms and PDFs
Configuration Guide Taleo Onboarding FP11B 89
• As a PDF task into a process, to have its completion tracked for any assignee and will beavailable for export at runtime.
• In a portal displayed to targeted new hires in the section called Documents and will not beavailable for export, but can be saved and printed by the new hire.
Runtime Use
Each new hire process goes through steps and any form tasks get assigned to their assignees.
Assignees open their forms, view any preexisting data in any fields, update any fields, and submit theform and its data into the Onboarding database.
Next time any PDF associated with that new hire's process gets viewed by anyone, it will contain theupdated current values for all fields that are shown on it.
• When an Open PDF task is viewed later in the process by any assignee,it will display the currentvalues for these tokens. An assignee merely opening the PDF is sufficient to make the taskComplete.
• When this PDF document is viewed later in the process by anyone with permission to view RelatedSources for tasks, they too will see the current values for its tokens.
• When the new hire on their new hire portal views their list of Documents, this PDF will contain thecurrent values for its tokens.
• A WebTop user can manually associate any PDF document from the Onboarding list into theAttached Files section of the New Hire page and then this too will display this new hire's currentvalues in any tokens. This page is only visible to WebTop users with the permission to viewprocesses.
As soon as the PDF Document is associated with the new hire's process, it can be exported fromOnboarding via Taleo Connect containing that new hire's data in its tokens.
• The Open PDF task must be at least In Progress to make it ready to export the PDF via TaleoConnect, though the task does not need to be in the status Complete before export occurs.
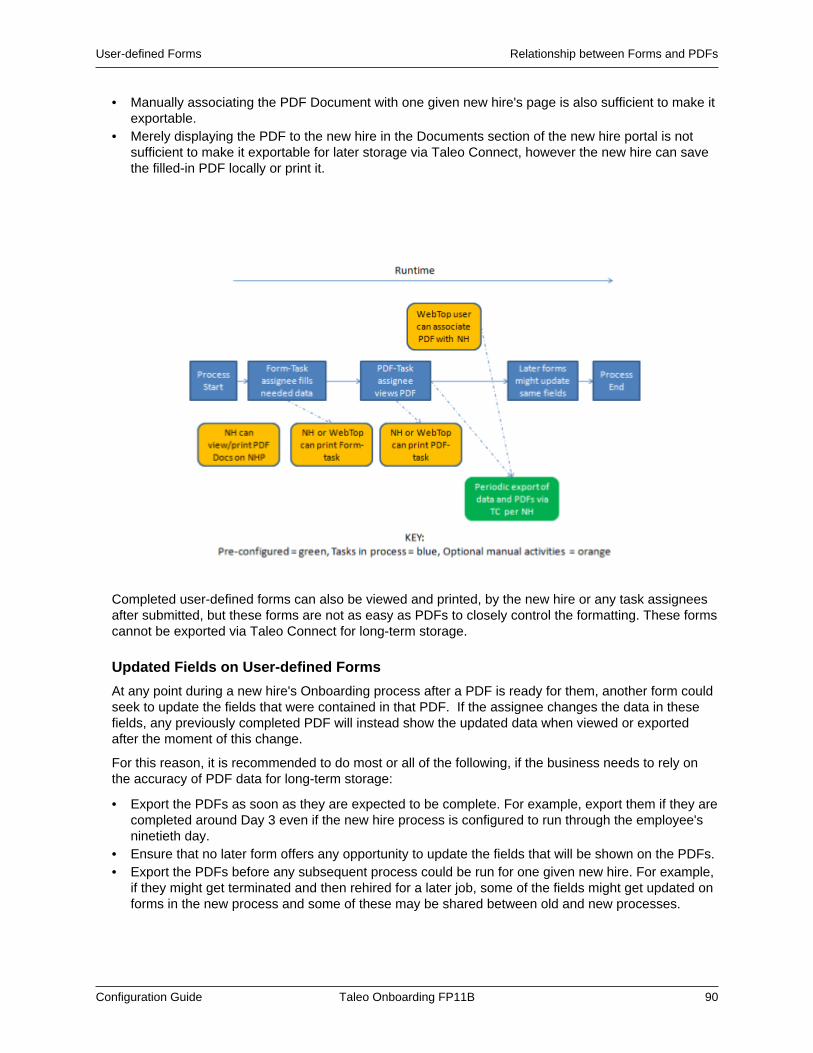
User-defined Forms Relationship between Forms and PDFs
Configuration Guide Taleo Onboarding FP11B 90
• Manually associating the PDF Document with one given new hire's page is also sufficient to make itexportable.
• Merely displaying the PDF to the new hire in the Documents section of the new hire portal is notsufficient to make it exportable for later storage via Taleo Connect, however the new hire can savethe filled-in PDF locally or print it.
Completed user-defined forms can also be viewed and printed, by the new hire or any task assigneesafter submitted, but these forms are not as easy as PDFs to closely control the formatting. These formscannot be exported via Taleo Connect for long-term storage.
Updated Fields on User-defined Forms
At any point during a new hire's Onboarding process after a PDF is ready for them, another form couldseek to update the fields that were contained in that PDF. If the assignee changes the data in thesefields, any previously completed PDF will instead show the updated data when viewed or exportedafter the moment of this change.
For this reason, it is recommended to do most or all of the following, if the business needs to rely onthe accuracy of PDF data for long-term storage:
• Export the PDFs as soon as they are expected to be complete. For example, export them if they arecompleted around Day 3 even if the new hire process is configured to run through the employee'sninetieth day.
• Ensure that no later form offers any opportunity to update the fields that will be shown on the PDFs.• Export the PDFs before any subsequent process could be run for one given new hire. For example,
if they might get terminated and then rehired for a later job, some of the fields might get updated onforms in the new process and some of these may be shared between old and new processes.

User-defined Forms Relationship between Forms and PDFs
Configuration Guide Taleo Onboarding FP11B 91
Common Onboarding Field Types and Corresponding Acrobat Fields
To successfully view accurate information in field in a tokenized PDF document, the fields in the PDFdocument must match the field types in the user-defined form.
Onboarding Field Types and Corresponding Adobe Acrobat Fields
Onboarding Field Type CorrespondingAdobe Field
Description Adobe Form Toolbar Button
• Text Input
• Text Area
• Rich Text Format
• URL
• Read-only Text
Text Values entered into an onlineform by a task assigneeor exist in the Onboardingdatabase and will display inthe PDF document.
Check Box Check Box Create a check box field inthe PDF document for everyselection choice. Multipleselections are allowed.
Radio Button Radio Button Create a radio button field inthe PDF document for everyselection choice. Multipleselections are not allowed,only one radio button may beselected.
Inserting Variables in a PDF Document
Prerequisite
Adobe Acrobat Professional or Adobe Acrobat 3D is required to insert variables.
This procedure may differ according to the version of Adobe Acrobat Professional being used. Theprocedure below is described using Adobe Acrobat 3D Version 8.0.
If using Adobe Acrobat 3D Version 8.0, show the Forms toolbar in Tools, select Forms, then ShowForms Toolbar.
Create a document in Word and save as a PDF file type, leaving an area to create fields.
Steps
1. Using Adobe Acrobat 3D, open a PDF document.
2. Click the appropriate field type button.
Clicking on the field type button highlights the existing fields of that type and allows insertion ofthe field type onto the document.
3. Double click on the document at the location of field insertion.
When the field is inserted the field properties box automatically displays.
User-defined Forms Relationship between Forms and PDFs
Configuration Guide Taleo Onboarding FP11B 92
4. In the field properties box, under General, type the name of the token in the Name field andreplace the forward slash “/” with a dot “.”.
5. If inserting a check box or a radio button, in the field properties box, under Options, type thename of the label in the Export Value field that was entered into the Onboarding Form Builder.
6. Enter any other information into the field properties box, such as a tooltip under General orformatting values under Appearance.
7. Click Close.
Result
The PDF document contains tokens that will automatically extract information from the new hireand insert it in the document. The names of the variables themselves will never be displayed to theviewer of the PDF. If no data exists for a given new hire, the area will appear empty in the finishedPDF when displayed.
Next Step
Upload the tokenized PDF into the Onboarding Document Library.
Getting Help in Adobe Acrobat
Adobe Acrobat provides Help within the product that can be utilized when building a form.
This information may differ according to the version of Adobe Acrobat Professional being used. Thisinformation is described using Adobe Acrobat 3D Version 8.0. Access Help using Help > CompleteAdobe Acrobat 3D Version 8 Help > Forms.
Review the following topics:
• Creating and editing forms• Laying out new form fields• Form fields behaviors
If additional assistance is needed, Adobe offers online support at Help > Online Support ...

New Hire Portal
• New Hire Portal............................................................................................................... 94
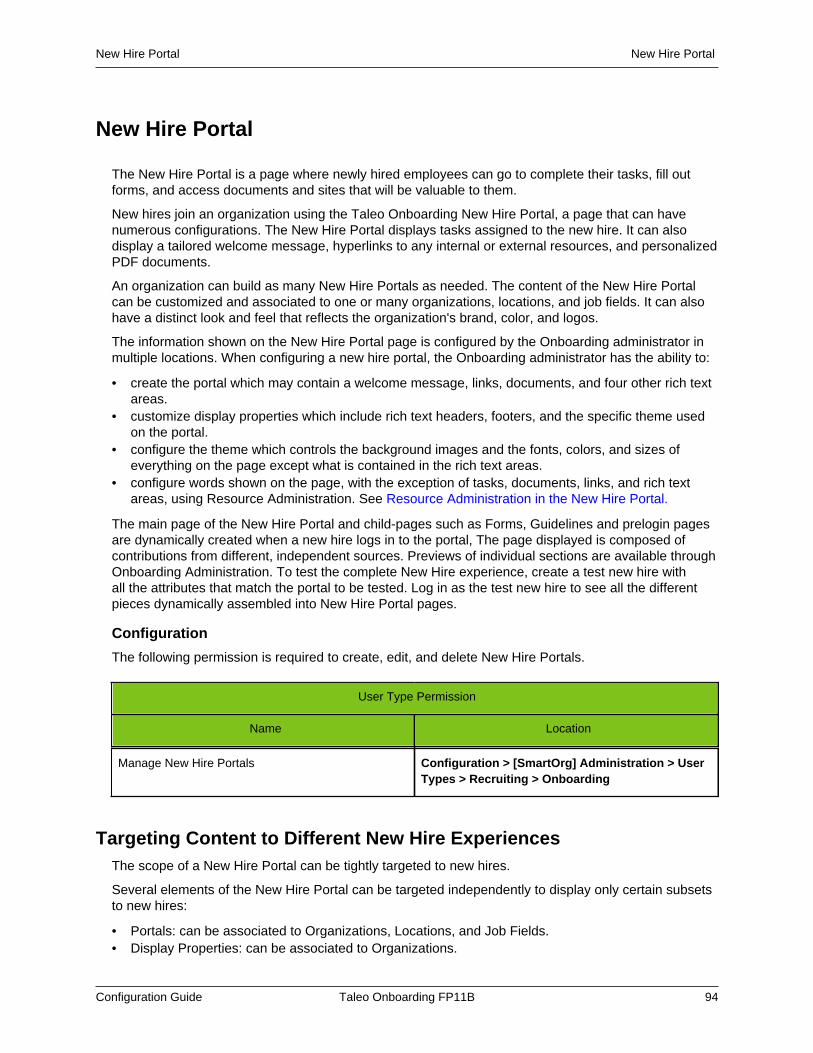
New Hire Portal New Hire Portal
Configuration Guide Taleo Onboarding FP11B 94
New Hire Portal
The New Hire Portal is a page where newly hired employees can go to complete their tasks, fill outforms, and access documents and sites that will be valuable to them.
New hires join an organization using the Taleo Onboarding New Hire Portal, a page that can havenumerous configurations. The New Hire Portal displays tasks assigned to the new hire. It can alsodisplay a tailored welcome message, hyperlinks to any internal or external resources, and personalizedPDF documents.
An organization can build as many New Hire Portals as needed. The content of the New Hire Portalcan be customized and associated to one or many organizations, locations, and job fields. It can alsohave a distinct look and feel that reflects the organization's brand, color, and logos.
The information shown on the New Hire Portal page is configured by the Onboarding administrator inmultiple locations. When configuring a new hire portal, the Onboarding administrator has the ability to:
• create the portal which may contain a welcome message, links, documents, and four other rich textareas.
• customize display properties which include rich text headers, footers, and the specific theme usedon the portal.
• configure the theme which controls the background images and the fonts, colors, and sizes ofeverything on the page except what is contained in the rich text areas.
• configure words shown on the page, with the exception of tasks, documents, links, and rich textareas, using Resource Administration. See Resource Administration in the New Hire Portal.
The main page of the New Hire Portal and child-pages such as Forms, Guidelines and prelogin pagesare dynamically created when a new hire logs in to the portal, The page displayed is composed ofcontributions from different, independent sources. Previews of individual sections are available throughOnboarding Administration. To test the complete New Hire experience, create a test new hire withall the attributes that match the portal to be tested. Log in as the test new hire to see all the differentpieces dynamically assembled into New Hire Portal pages.
Configuration
The following permission is required to create, edit, and delete New Hire Portals.
User Type Permission
Name Location
Manage New Hire Portals Configuration > [SmartOrg] Administration > UserTypes > Recruiting > Onboarding
Targeting Content to Different New Hire ExperiencesThe scope of a New Hire Portal can be tightly targeted to new hires.
Several elements of the New Hire Portal can be targeted independently to display only certain subsetsto new hires:
• Portals: can be associated to Organizations, Locations, and Job Fields.• Display Properties: can be associated to Organizations.
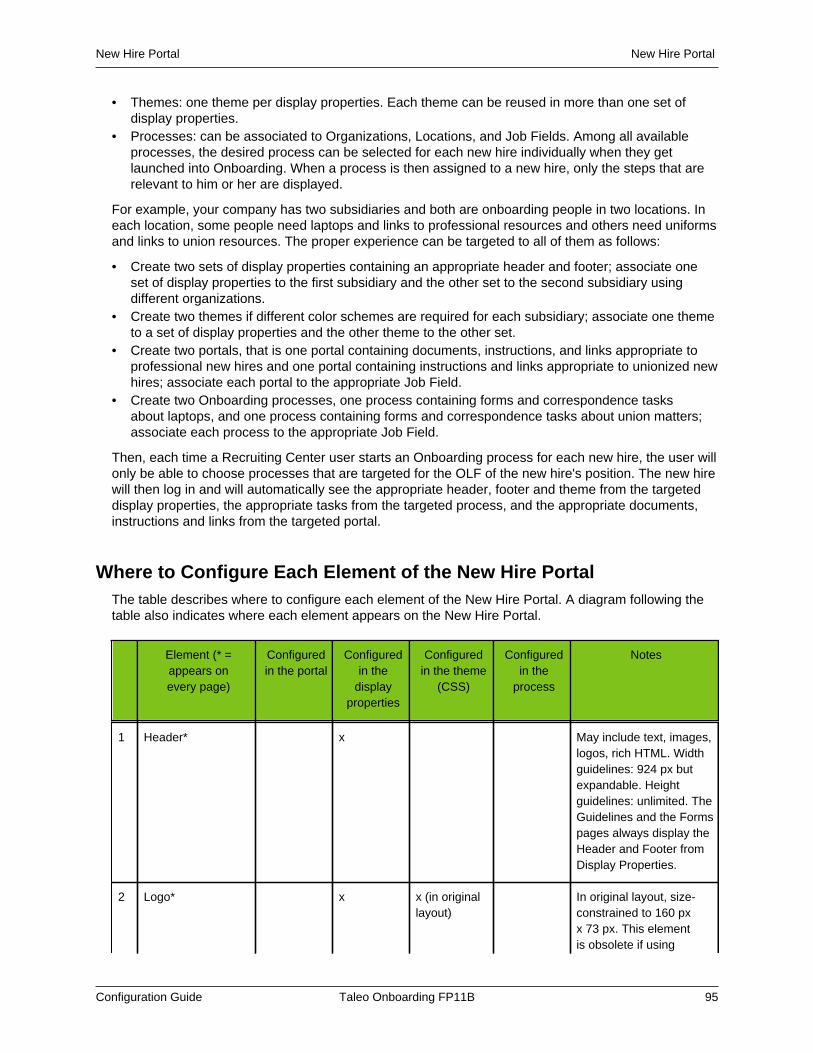
New Hire Portal New Hire Portal
Configuration Guide Taleo Onboarding FP11B 95
• Themes: one theme per display properties. Each theme can be reused in more than one set ofdisplay properties.
• Processes: can be associated to Organizations, Locations, and Job Fields. Among all availableprocesses, the desired process can be selected for each new hire individually when they getlaunched into Onboarding. When a process is then assigned to a new hire, only the steps that arerelevant to him or her are displayed.
For example, your company has two subsidiaries and both are onboarding people in two locations. Ineach location, some people need laptops and links to professional resources and others need uniformsand links to union resources. The proper experience can be targeted to all of them as follows:
• Create two sets of display properties containing an appropriate header and footer; associate oneset of display properties to the first subsidiary and the other set to the second subsidiary usingdifferent organizations.
• Create two themes if different color schemes are required for each subsidiary; associate one themeto a set of display properties and the other theme to the other set.
• Create two portals, that is one portal containing documents, instructions, and links appropriate toprofessional new hires and one portal containing instructions and links appropriate to unionized newhires; associate each portal to the appropriate Job Field.
• Create two Onboarding processes, one process containing forms and correspondence tasksabout laptops, and one process containing forms and correspondence tasks about union matters;associate each process to the appropriate Job Field.
Then, each time a Recruiting Center user starts an Onboarding process for each new hire, the user willonly be able to choose processes that are targeted for the OLF of the new hire's position. The new hirewill then log in and will automatically see the appropriate header, footer and theme from the targeteddisplay properties, the appropriate tasks from the targeted process, and the appropriate documents,instructions and links from the targeted portal.
Where to Configure Each Element of the New Hire PortalThe table describes where to configure each element of the New Hire Portal. A diagram following thetable also indicates where each element appears on the New Hire Portal.
Element (* =appears onevery page)
Configuredin the portal
Configuredin the
displayproperties
Configuredin the theme
(CSS)
Configuredin the
process
Notes
1 Header* x May include text, images,logos, rich HTML. Widthguidelines: 924 px butexpandable. Heightguidelines: unlimited. TheGuidelines and the Formspages always display theHeader and Footer fromDisplay Properties.
2 Logo* x x (in originallayout)
In original layout, size-constrained to 160 pxx 73 px. This elementis obsolete if using
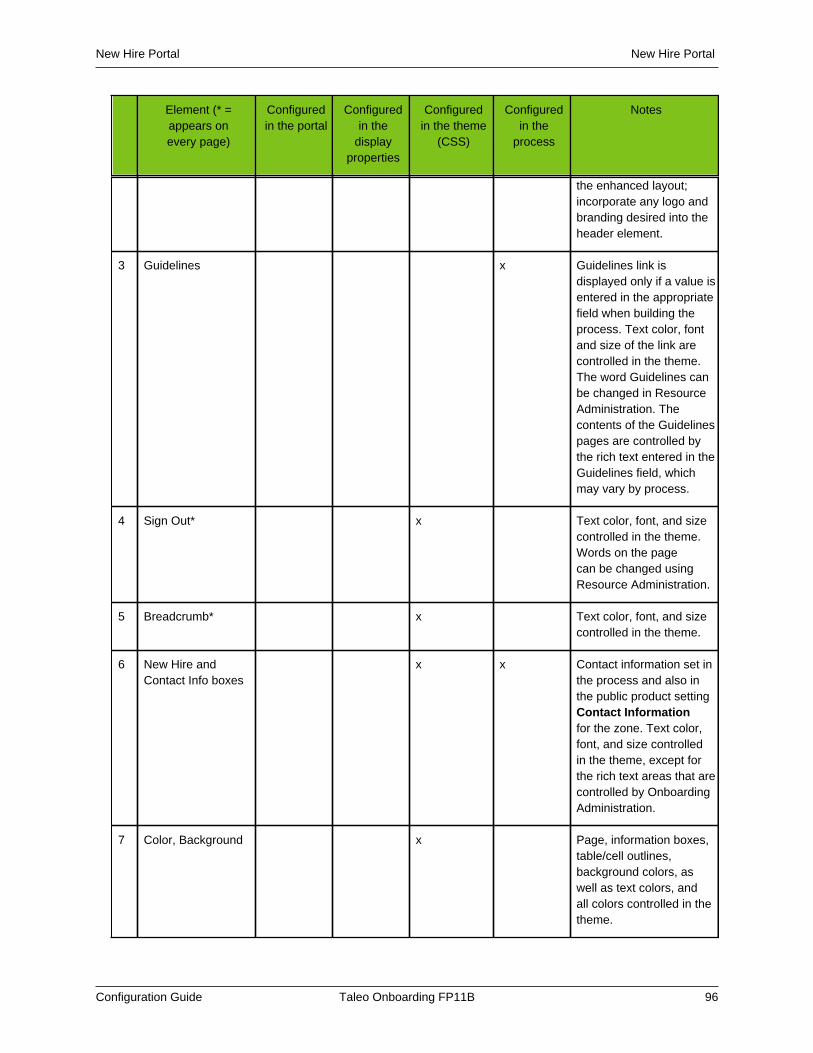
New Hire Portal New Hire Portal
Configuration Guide Taleo Onboarding FP11B 96
Element (* =appears onevery page)
Configuredin the portal
Configuredin the
displayproperties
Configuredin the theme
(CSS)
Configuredin the
process
Notes
the enhanced layout;incorporate any logo andbranding desired into theheader element.
3 Guidelines x Guidelines link isdisplayed only if a value isentered in the appropriatefield when building theprocess. Text color, fontand size of the link arecontrolled in the theme.The word Guidelines canbe changed in ResourceAdministration. Thecontents of the Guidelinespages are controlled bythe rich text entered in theGuidelines field, whichmay vary by process.
4 Sign Out* x Text color, font, and sizecontrolled in the theme.Words on the pagecan be changed usingResource Administration.
5 Breadcrumb* x Text color, font, and sizecontrolled in the theme.
6 New Hire andContact Info boxes
x x Contact information set inthe process and also inthe public product settingContact Informationfor the zone. Text color,font, and size controlledin the theme, except forthe rich text areas that arecontrolled by OnboardingAdministration.
7 Color, Background x Page, information boxes,table/cell outlines,background colors, aswell as text colors, andall colors controlled in thetheme.

New Hire Portal New Hire Portal
Configuration Guide Taleo Onboarding FP11B 97
Element (* =appears onevery page)
Configuredin the portal
Configuredin the
displayproperties
Configuredin the theme
(CSS)
Configuredin the
process
Notes
8 Welcome Message x May include text, images,logos, rich HTML. Widthguidelines: 682 px butexpandable. Heightguidelines: unlimited.
9 Section Titles(New Hire Portal,My OnboardingTasks, PersonalizedDocuments,GeneralDocuments, Links)
x x Text color, font, sizecontrolled in the theme.Section title displayedif there is content inthe section. The wordsin the titles can bechanged using ResourceAdministration.
10 SectionInstructions (Tasks,PersonalizedDocuments,GeneralDocuments, Footer)
x May include text, images,logos, rich HTML.Displayed if using newlayout. Width guidelines:682 px but expandable.Height guidelines:unlimited.
11 Task List x x Name of tasks currently InProgress or Completed,assigned to the newhire. Controlled by thespecific process launchedfor that new hire. Orderof display controlled inthe enhanced layout byusing the Sequence fieldon the process. Textcolor, font, size controlledin the theme. Themealso controls icons forComplete and Overduetasks.
12 Task Description x (inenhancedlayout)
Description createdin Task Definition andcopied into each processwhich uses the task,in any language. Onlydisplayed in the enhancedlayout.
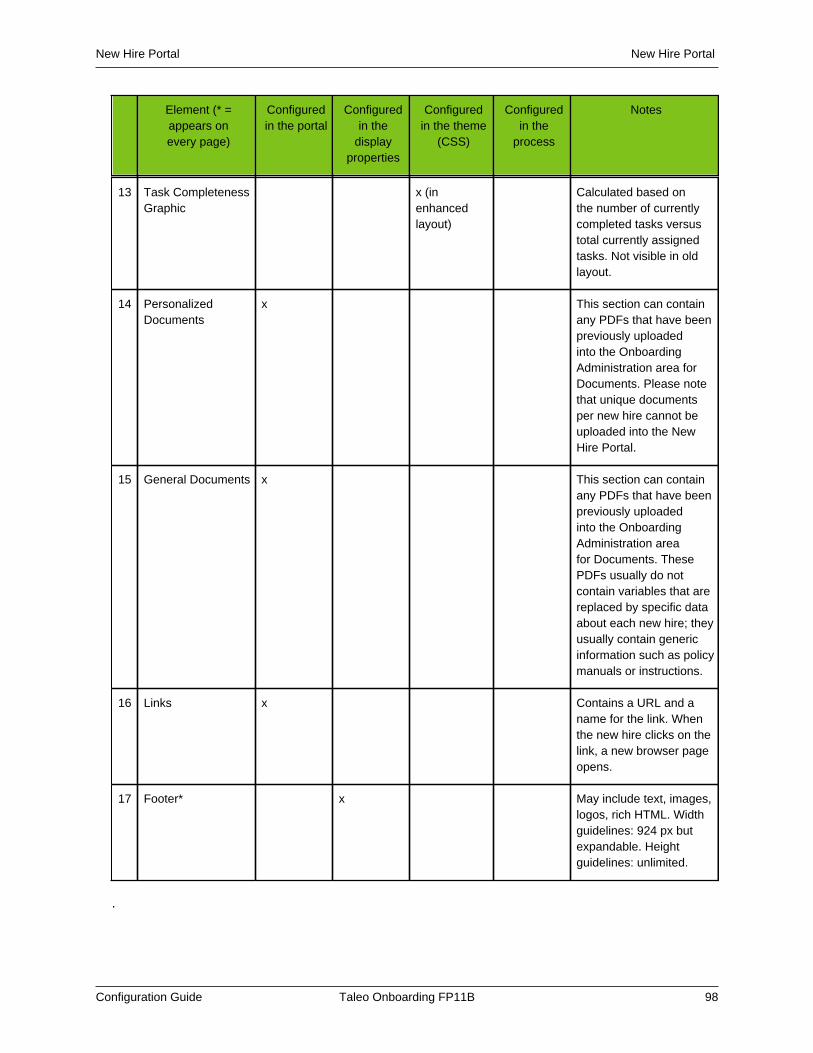
New Hire Portal New Hire Portal
Configuration Guide Taleo Onboarding FP11B 98
Element (* =appears onevery page)
Configuredin the portal
Configuredin the
displayproperties
Configuredin the theme
(CSS)
Configuredin the
process
Notes
13 Task CompletenessGraphic
x (inenhancedlayout)
Calculated based onthe number of currentlycompleted tasks versustotal currently assignedtasks. Not visible in oldlayout.
14 PersonalizedDocuments
x This section can containany PDFs that have beenpreviously uploadedinto the OnboardingAdministration area forDocuments. Please notethat unique documentsper new hire cannot beuploaded into the NewHire Portal.
15 General Documents x This section can containany PDFs that have beenpreviously uploadedinto the OnboardingAdministration areafor Documents. ThesePDFs usually do notcontain variables that arereplaced by specific dataabout each new hire; theyusually contain genericinformation such as policymanuals or instructions.
16 Links x Contains a URL and aname for the link. Whenthe new hire clicks on thelink, a new browser pageopens.
17 Footer* x May include text, images,logos, rich HTML. Widthguidelines: 924 px butexpandable. Heightguidelines: unlimited.
.
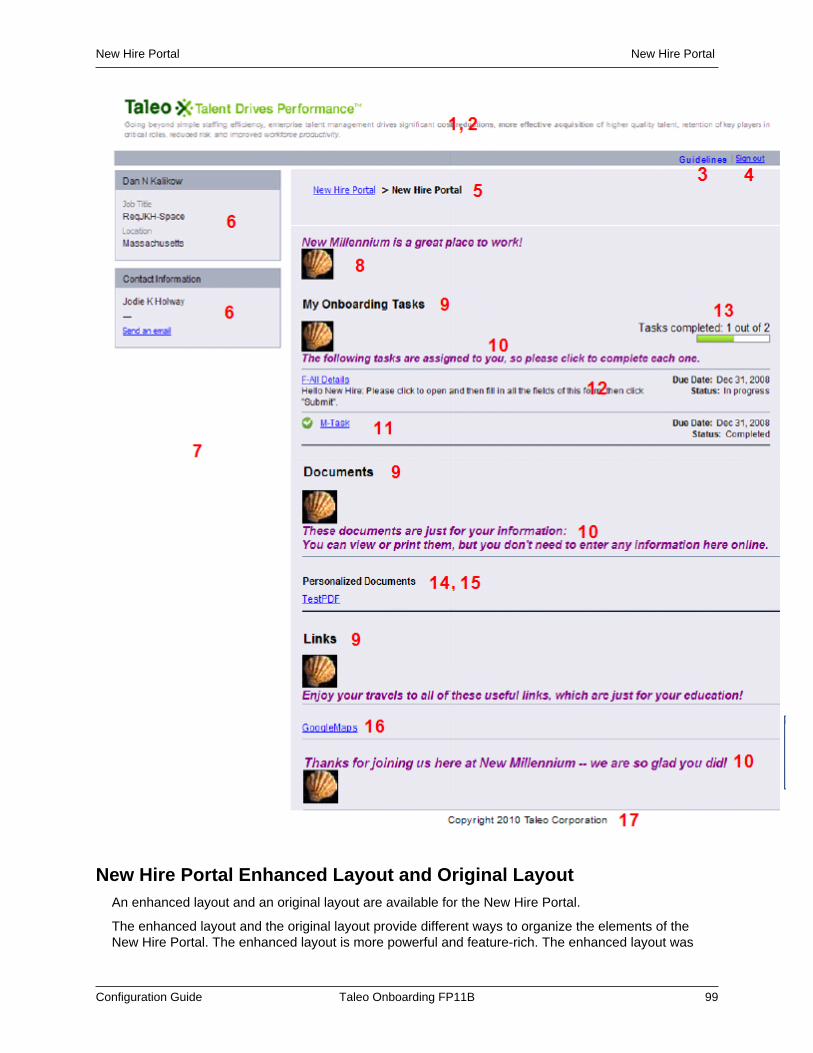
New Hire Portal New Hire Portal
Configuration Guide Taleo Onboarding FP11B 99
New Hire Portal Enhanced Layout and Original LayoutAn enhanced layout and an original layout are available for the New Hire Portal.
The enhanced layout and the original layout provide different ways to organize the elements of theNew Hire Portal. The enhanced layout is more powerful and feature-rich. The enhanced layout was
New Hire Portal New Hire Portal
Configuration Guide Taleo Onboarding FP11B 100
introduced in version 7.5 SP8, but either can be used for all the portals on a zone. Note that all NewHire Portals in a zone must use either the enhanced layout or the original layout.
For the enhanced layout to be available, the following private setting must be enabled: Enable NewHire Portal to Display New Layout.
The enhanced layout provides the following elements:
Rich Text Instructions Areas
Four areas are available to insert instructions for the following sections: Tasks, Documents, Links, andFooter.
Guidelines Link
Ability to remove the Guidelines link if there are no guidelines to display. It is not possible to createmultilingual guidelines. Therefore, you have two choices: create the guidelines with several languagesall concatenated or leave the guidelines blank so that other viewers do not see the English text.
New Hire Information
Ability to display information about the new hire in a box located in the left-column, above the ContactInformation box. The displayed values, transferred from Recruiting to Onboarding, include the Name,Location, and Job Title of the new hire.
Header and Footer
The header and footer are generated by the display properties. Once the setting Enable New HirePortal to Display New Layout is enabled, the text and any graphics you insert in the correspondingrich text fields will span the whole width of the page.
Task Sequence
Ability to set a sequence for the steps added to a process. The numbers provided do not have anyrelevance to the transactions and logic among the tasks; transitions and conditions still drive the orderin which the tasks are assigned. This feature only controls the display. The sequence number is notdisplayed to the New Hire.
Icons for Task Statuses
Icons provide a better visual indication of each task's completion status. They are shown next to eachtask in the New Hire Portal and they change according to the status. A check mark is displayed forCompleted and an exclamation point is displayed for Overdue.
New Hire Progress
A progression bar graphically shows how many tasks have been completed as compared to how manyare currently assigned to the new hire at this point in their onboarding process. The total number doesnot refer to the tasks for all assignees, only for the new hire. If additional tasks are assigned later on,the percentage changes dynamically.
Building a New Hire Portal
Prerequisite
The Manage New Hire Portals permission is required.
Below is a typical set of building blocks to build a new hire portal. Some steps may be optional.
Steps
1. Decide how many tasks need to be part of the Onboarding process.
New Hire Portal New Hire Portal
Configuration Guide Taleo Onboarding FP11B 101
You need to decide whether the same set of tasks are applicable to new hires from everyOrganization-Location-Job Field, which should be assigned to the new hires themselves insteadof WebTop users, and in what sequence.
For details, see Processes and Tasks
2. Decide how many different PDF documents need to be shared with new hires.
You need to decide whether the same set of PDF documents is useful to new hires from everyOrganization-Location-Job Field or whether they need to be subsetted down into different NewHire Portals.
For details, see Documents
3. Create the links area for additional materials that are hosted elsewhere and match this up withthe sets of PDF documents that are part of the one or more New Hire Portals.
4. Create a Welcome Message and rich text instructions for each section if desired.
5. Decide on the branding in the header and decide on the disclaimers or copyright or fine print inthe footer. Decide whether or not this needs to be different for various Organizations.
For details, see Display Properties
6. Decide whether the colors and branding on the header and footer and in the Instructions sectionare sufficient to achieve the appropriate look and feel of the New Hire Portal or whether thecompany really wants to make further changes to the fonts, colors, background, or layout of thepages.
If further changes are required, you need to design a CSS and have it uploaded by TaleoSupport as a Custom Theme that gets associated with the Display Properties.
Creating PortalsA portal displays content for a new hire and may contain a welcome message, documents, links, andother rich text areas.
When creating a portal, the system administrator configures the following elements:
Welcome Message
The welcome message appears at the top of the New Hire Portal page. The welcome message maycontain text as well as illustrations. The content of the welcome message may be formatted using theHTML Editor. See HTML Editor.
Instructions
Personalized instructions can be added in the Tasks, Documents, Links, and Footer sections.Instructions in the indented section footer can be used to give any final instructions, or to show anyadditional graphics, or to display anything at all that the system administrator desires to show to newhires.
The instructions may be formatted using the HTML Editor. See HTML Editor.
Note that instructions appear in the New Hire Portal only if the Enable New Hire Portal to DisplayNew Layout setting was enabled.
General Documents and Personalized Documents
Any PDF document can be added to a portal. In order to add a document to a portal, the documentneeds to have been previously uploaded in the system via the Documents feature in the OnboardingAdministration menu.

New Hire Portal New Hire Portal
Configuration Guide Taleo Onboarding FP11B 102
PDF documents are displayed to new hires. They can be viewed online by clicking the document title.A new browser window opens to display the document. New hires can be requested to read thesedocuments, to print them for future references, or to print out and sign them on paper to bring to theiremployer.
The General Documents and Personalized Documents sections both display PDF documents thatmay contain variables that are prefilled with dynamic data from the Onboarding database. As a bestpractice, the General Documents section is used for corporate documents and policies that new hiresmust read and that inform them of important information relevant to their job. An example of this typeof document is an Employee Handbook or company holiday calendar. Personalized Documents aredocuments that may contain more variables with a new hire personal date or that leave more space tobe filled in on paper later after printing the document.
There is no tracking to indicate whether or not a new hire opened a PDF document. Also, it is notpossible to request a new hire to type information in a PDF document online in order to upload thisdata back into Onboarding. PDF documents are generated only for display. Any information that a newhire types into the PDF document cannot get communicated back into Onboarding. The only way toupdate information about a new hire in Onboarding is via any assigned user-defined form at runtime forany assignee, either the New Hire, the WebTop user, or the external user.
Links
A link is a hyperlink to a URL giving new hires access to internet and intranet sites. For example,links to the company’s Web site, a prerecorded welcome message from the CEO, online training, ororientation. When clicking a link, a new browser window opens to display the website or informationthat is linked to that URL.
Since a portal can be targeted to a specific organization, location, or job field, the Onboardingadministrator can select a list of URLs that are relevant specifically to new employees in that area.
If an Onboarding process starts before the new hire is within your corporate firewall, any hyperlinkswhich reference intranet sites will not be accessible to them at first.
Organizations, Locations, Job Fields
The content of a portal can be associated to various Organizations, Locations, and Job Fields (OLF).A portal collection of rich text, documents, and links can be targeted to a given OLF, independently ofany targeting for any headers and footers and any processes. For example, you could create a portalfor IT technicians working in the United States and another portal for those working in Canada.
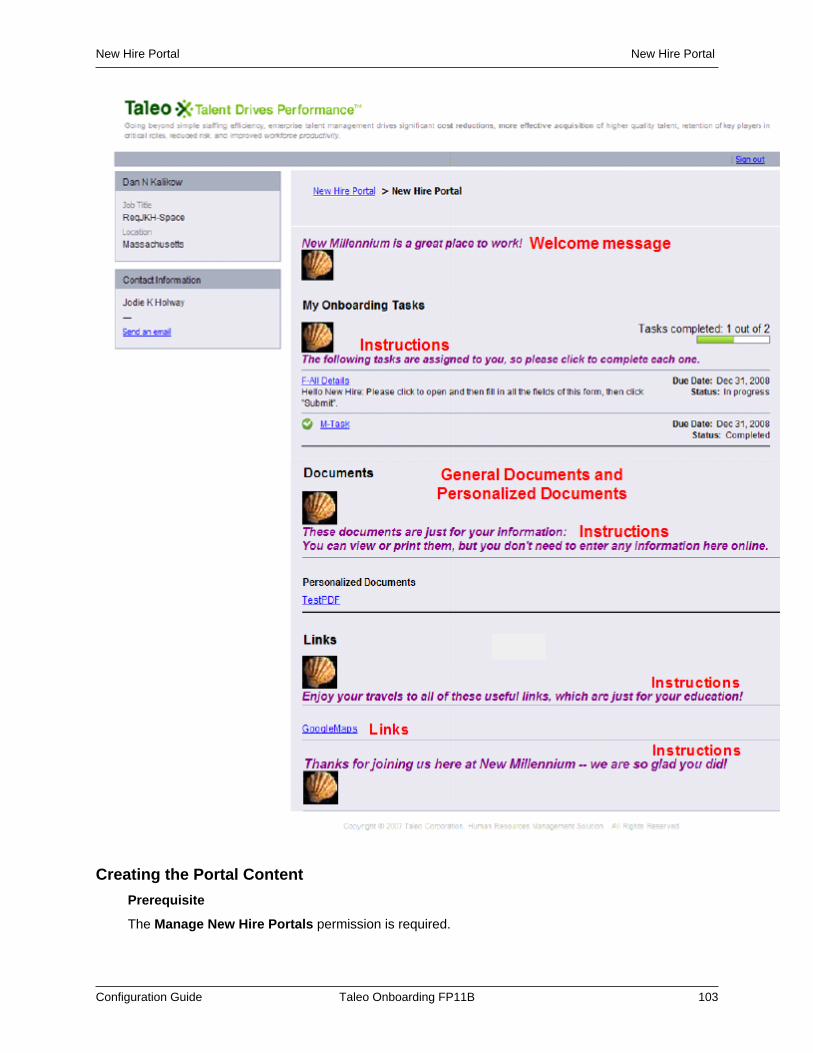
New Hire Portal New Hire Portal
Configuration Guide Taleo Onboarding FP11B 103
Creating the Portal Content
Prerequisite
The Manage New Hire Portals permission is required.

New Hire Portal New Hire Portal
Configuration Guide Taleo Onboarding FP11B 104
Configuration > [Onboarding] Administration > Portals
Steps
1. Click Create.
2. Enter a code and a name.
3. Enter the welcome message. You can enter text as well as any graphics, hyperlinks, bullets, orrich HTML. Use the HTML Editor options to format the text.
4. Enter instructions for the tasks, documents, and links. Enter content for the indented sectionfooter. Use the HTML Editor options to format the text.
5. Click Save.
Next Step
Add documents and links.
Associate the portal to Organizations, Locations and Job Fields.
Enable the Enable New Hire Portal to Display New Layout setting for the instructions to appearon the New Hire Portal.
Adding a Document to a Portal
Prerequisite
Documents available for selection need to have been previously loaded in the system via theDocuments feature.
The Manage New Hire Portals permission is required.
Configuration > [Onboarding] Administration > Portals
Steps
1. Click on a portal.
2. Click Add next to General Documents or Personalized Documents.
3. Select one or several documents.
4. Click Select.
Next Step
Reorder documents.
Reordering Documents in a Portal
Prerequisite
The Manage New Hire Portals permission is required.
Configuration > [Onboarding] Administration > Portals
Steps
1. Click on a portal.
2. In the General Documents or Personalized Documents section, click Reorder.
3. Reorder documents using the up and down arrows.
4. Click Save.
New Hire Portal New Hire Portal
Configuration Guide Taleo Onboarding FP11B 105
Removing a Document from a Portal
Prerequisite
The Manage New Hire Portals permission is required.
Configuration > [Onboarding] Administration > Portals
Steps
1. Click a portal.
2. Click Remove.
Result
The document is not deleted from the Onboarding system; it is only no longer displayed on thePortal.
Next Step
Add a document.
Adding a Link to a Portal
Prerequisite
The Manage New Hire Portals permission is required.
Configuration > [Onboarding] Administration > Portals
Steps
1. Click on portal.
2. Click Create.
3. Enter a code. This is a unique identifier. The code is not displayed to the new hire.
4. Enter a name. This is the label/text of the hyperlink that appears on the New Hire Portal.
5. Enter the URL. The complete domain name including the http prefix is required. For example,http://www.taleo.com not www.taleo.com.
6. You may enter a description that appears as a tool tip.
7. Click Save.
Next Step
Reorder links.
Reordering Links in a Portal
Prerequisite
The Manage New Hire Portals permission is required.
Configuration > [Onboarding] Administration > Portals
Steps
1. Click a portal.
New Hire Portal New Hire Portal
Configuration Guide Taleo Onboarding FP11B 106
2. Click Reorder.
3. Reorder links using the up and down arrows.
4. Click Save.
Removing a Link from a Portal
Prerequisite
The Manage New Hire Portals permission is required.
Configuration > [Onboarding] Administration > Portals
Steps
1. Click a portal.
2. Click Remove.
Next Step
Add a link.
Associating a Portal to Organizations, Locations, Job Fields
Prerequisite
The Manage New Hire Portals permission is required.
Configuration > [Onboarding] Administration > Portals
Steps
1. Click a portal.
2. Click Add.
3. Select one or more element.
4. Click Select.
Result
When a portal is associated to an Organization, Location, or Job Field (OLF), documents, links,and instructions get displayed to certain groups of new hires. When new hires get launched intoOnboarding to join the company on a requisition that is working in that OLF, they will see theappropriate documents, links, and instructions intended for them, shown around the specific set ofassigned tasks that comes from their process.
Dissociating a Portal from Organizations, Locations, Job Fields
Prerequisite
The Manage New Hire Portals permission is required.
Configuration > [Onboarding] Administration > Portals
Steps
1. Click a portal.
2. Click Remove.

New Hire Portal New Hire Portal
Configuration Guide Taleo Onboarding FP11B 107
Previewing a Portal
Prerequisite
The Manage New Hire Portals permission is required.
Configuration > [Onboarding] Administration > Portals
Steps
1. Click a portal.
2. Click Preview.
3. A new browser appears, showing this portal.
Result
The Preview does not contain every element as seen by users. It does not include any displayproperties nor any specifically assigned tasks.
Activating a Portal
Prerequisite
The Manage New Hire Portals permission is required.
Configuration > [Onboarding] Administration > Portals
Steps
1. Click a portal.
2. Click Activate.
Result
The status of the portal is now active. The information in this portal will now be shown to new hireswhose requisition is in the associated OLF when they view their New Hire Portal page.
Deactivating a Portal
Prerequisite
The Manage New Hire Portals permission is required.
There is no warning indicating whether or not a portal is in use by any current new hires.
Configuration > [Onboarding] Administration > Portals
Steps
1. Click a portal.
2. Click Deactivate.
Result
The status of the portal is now Inactive. Any new hires whose requisition is in the associated OLFwill no longer see this collection of documents, links, and instructions when they view their New HirePortal page.

New Hire Portal New Hire Portal
Configuration Guide Taleo Onboarding FP11B 108
Next Step
Delete the portal if you no longer need it.
Deleting a Portal
Prerequisite
The Manage New Hire Portals permission is required.
Configuration > [Onboarding] Administration > Portals
Steps
1. Click Delete.2. Click Yes.
Result
The portal is no longer available to use.
Display PropertiesThe display properties represent the header, footer, and theme of the new hire portal.
Display properties consist of the following elements:
• Theme controls the general font type and size, any background images, and the color scheme. Fordetails, refer to Themes.
• Header may contain text, any graphics, bullets, rich HTML, or logos.
• Footer may contain text, any graphics, bullets, rich HTML, or logos.
Display properties have an effect on the look of every page of the New Hire Portal, even the forms thenew hire sees.
Display properties can also be set for prelogin pages that appear before a new hire logs in the NewHire Portal, that is the Login page and Forgot Password page. This can extend the company brandto all pages and it removes confusion for new hires by adding graphical identity to the preloginexperience. Only one set of display properties can be created for prelogin pages.
Display properties can be associated to Organizations only, whereas the portal content can beassociated to Organizations, Locations, and Job Fields. This means that a new hire whose requisitionis associated with these organizations will see a New Hire Portal with this header, footer, andtheme. Since display properties cannot yet be associated to Locations nor Job Fields, the systemadministrator cannot, for instance, show a different header or footer per each different location whereonboarding new employees.
Creating Display Properties for the New Hire Portal
Prerequisite
The Manage New Hire Portals permission is required.
Configuration > [Onboarding] Administration > Display Properties
Steps
1. Click Create.
New Hire Portal New Hire Portal
Configuration Guide Taleo Onboarding FP11B 109
2. Enter a code and a name.3. Type the name of the theme.
The theme is optional. The desired theme must have already been uploaded into the zone byTaleo Support.
4. Create a header. You can enter text as well as any graphics, hyperlinks, bullets, or rich HTML.Use the HTML Editor options to format the text. See HTML Editor.
5. Create a footer. You can enter text as well as any graphics, hyperlinks, bullets, or rich HTML.Use the HTML Editor options to format the text. See HTML Editor.
6. Click Save.
Next Step
You may want to associate display properties to organizations.
Creating Display Properties for Prelogin Pages
Prerequisite
The Manage New Hire Portals permission is required.
Configuration > [Onboarding] Administration > Display Properties
Steps
1. Create display properties:a) Click Create.b) Enter a code and a name.c) Take note of the code as you will need it later.d) Enter a theme if desired.e) Enter a header and a footer. You can enter text as well as any graphics, hyperlinks, bullets,
or rich HTML. Use the HTML Editor options to format the text. See HTML Editor.f) Click Save.
2. Configure the Default Display Properties setting:a) In the Onboarding Administration menu, click Settings.b) Click on Default Display Properties.c) Click Edit.d) In the Value field, enter the code of the display properties you just created.e) Click Save.
Associating Display Properties to Organizations
Prerequisite
The Manage New Hire Portals permission is required.
Configuration > [Onboarding] Administration > Display Properties
Steps
1. Click on a set of display properties.2. Click Add.3. Select one or several organizations.4. Click Select.
New Hire Portal New Hire Portal
Configuration Guide Taleo Onboarding FP11B 110
Result
When display properties are associated to an organization, new hires who are being onboarded fora requisition associated to a given organization will be shown the tasks for their process on a pagethat contains the header, footer, and theme that was targeted for them by the display properties.If there are no specific display properties associated with their requisition's organization, then thegeneric display properties will be shown. If there are no appropriate display properties at all for thatnew hire's organization, then they will see no header and no footer, just the system's built-in theme.
Dissociating Display Properties from Organizations
Prerequisite
The Manage New Hire Portals permission is required.
Any display properties can be disassociated at any time. There is no warning indicating whetheror not the display properties are in use by any current new hires. After it gets disassociated, anynew hires who had been viewing their new hire portals with this header, footer, and theme will notsee this specific information any longer, but they will still see the associated tasks from their currentprocess.
Configuration > [Onboarding] Administration > Display Properties
Steps
1. Click a set of display properties.
2. Click Remove.
Activating Display Properties
Prerequisite
The Manage New Hire Portals permission is required.
Configuration > [Onboarding] Administration > Display Properties
Steps
1. Click a set of display properties.
2. Click Activate.
Result
The status of the display properties set is Active and display properties can be viewed by theappropriate new hires.
Deactivating Display Properties
Prerequisite
The Manage New Hire Portals permission is required.
Any display properties can be deactivated at any time. There is no warning indicating whether or notthe display properties are in use by any current new hires. After it gets deactivated, any new hireswho had been viewing their new hire portals with this header/footer/theme will not see this specificinformation any longer, but they will still see the associated tasks from their current process.
Configuration > [Onboarding] Administration > Display Properties
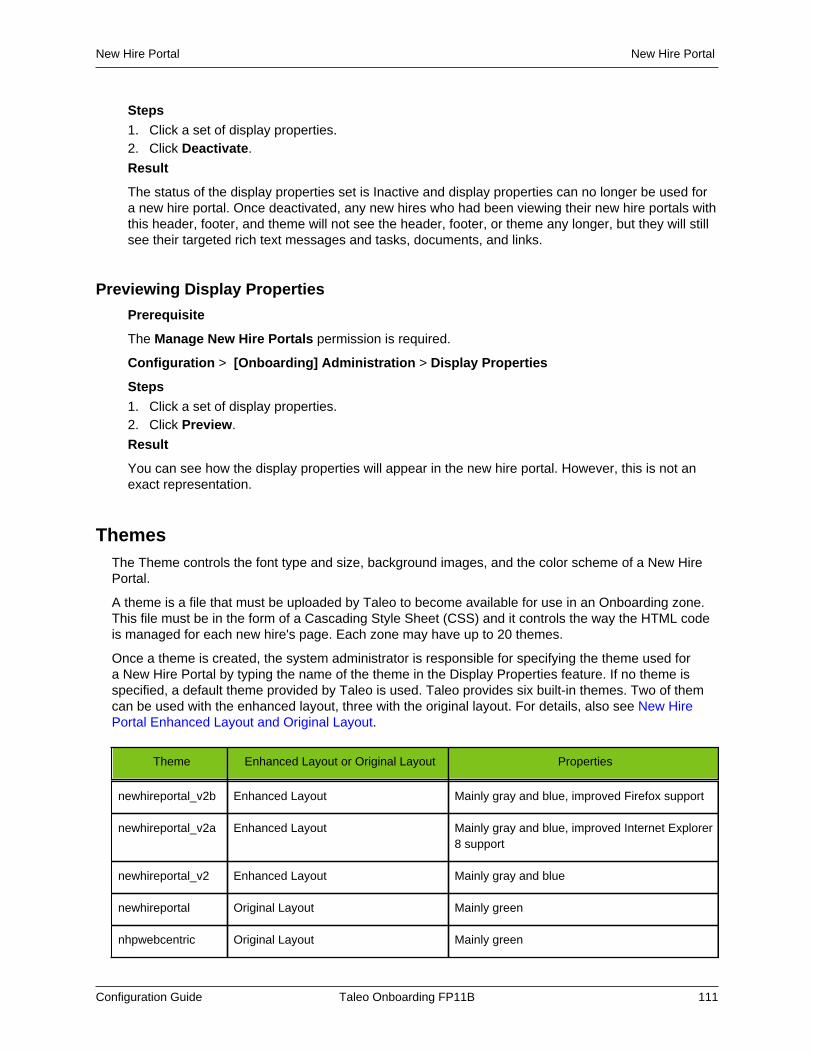
New Hire Portal New Hire Portal
Configuration Guide Taleo Onboarding FP11B 111
Steps1. Click a set of display properties.2. Click Deactivate.
Result
The status of the display properties set is Inactive and display properties can no longer be used fora new hire portal. Once deactivated, any new hires who had been viewing their new hire portals withthis header, footer, and theme will not see the header, footer, or theme any longer, but they will stillsee their targeted rich text messages and tasks, documents, and links.
Previewing Display Properties
Prerequisite
The Manage New Hire Portals permission is required.
Configuration > [Onboarding] Administration > Display Properties
Steps1. Click a set of display properties.2. Click Preview.
Result
You can see how the display properties will appear in the new hire portal. However, this is not anexact representation.
ThemesThe Theme controls the font type and size, background images, and the color scheme of a New HirePortal.
A theme is a file that must be uploaded by Taleo to become available for use in an Onboarding zone.This file must be in the form of a Cascading Style Sheet (CSS) and it controls the way the HTML codeis managed for each new hire's page. Each zone may have up to 20 themes.
Once a theme is created, the system administrator is responsible for specifying the theme used fora New Hire Portal by typing the name of the theme in the Display Properties feature. If no theme isspecified, a default theme provided by Taleo is used. Taleo provides six built-in themes. Two of themcan be used with the enhanced layout, three with the original layout. For details, also see New HirePortal Enhanced Layout and Original Layout.
Theme Enhanced Layout or Original Layout Properties
newhireportal_v2b Enhanced Layout Mainly gray and blue, improved Firefox support
newhireportal_v2a Enhanced Layout Mainly gray and blue, improved Internet Explorer8 support
newhireportal_v2 Enhanced Layout Mainly gray and blue
newhireportal Original Layout Mainly green
nhpwebcentric Original Layout Mainly green

New Hire Portal New Hire Portal
Configuration Guide Taleo Onboarding FP11B 112
Theme Enhanced Layout or Original Layout Properties
demoimage Original Layout Mainly green. Expects a logo named“logonhp.gif” to be manually uploaded to thezone.
Different versions of Taleo Onboarding rely upon different CSS by default when the Theme field in theDisplay Properties page is left blank when using the enhanced layout.
• In 7.5 SP8 to 7.5 SP13, newhireportal_v2.css is the default.• In 7.5 SP13 through 10 SP2, newhireportal_v2a.css is the default.• in 10 SP2 and later, newhireportal_v2b.css is the default.
The newhireportal theme is used when the Theme field in the Display Properties is left blank and whenthe Enable New Hire Portal to Display New Layout setting is disabled.
Applying a Theme to Display Properties
Prerequisite
The Manage New Hire Portals permission is required.
The CSS needs to have been properly uploaded into the zone by Taleo Support and they willprovide the exact name of the theme to type here.
Configuration > [Onboarding] Administration > Display Properties
Steps
1. Open a set of display properties.
2. Click Edit.
3. In the Theme field, type the name of the theme.
4. Click Save.
Modifying New Hire Portal Themes
A custom CSS should contain the specific values to be changed from what is already displayed bydefault to new hires and be submitted to Taleo support.
There are several methods for examining, viewing, and creating new CSS files.
To examine the existing CSS files and to experiment with what specific changes could be desirable,different tools are appropriate for each browser:
• Firefox by using the Firebug add-on.• Internet Explorer 8 and higher by pressing F12.• Google Chrome by pressing F12.
To create the custom CSS which will be applied atop all the existing CSS in the New Hire Portal pages,a tool such as notepad can be used. This simple file should contain only the new values to override theexisting CSS in the product, rather than duplicating all the information in the other existing CSS. Thisfile must be given the extension .css and must be submitted to Taleo Support on a ticket.
For guidance on modifying the theme of your New Hire Portal, contact your Taleo representative. TaleoTechnical Services can also provide assistance for creating or adjusting the CSS in a custom theme ifadditional expertise is required.

New Hire Portal New Hire Portal
Configuration Guide Taleo Onboarding FP11B 113
Fonts, Colors, and Backgrounds
Fonts, colors, and backgrounds can be modified in a new hire portal theme.
Sample Theme Modifications
Sample Value Description
background: url(“https:...”); Define with a URL pointing to a self-hosted image. Small imagesmay be manually uploaded to Configuration > [Onboarding]Administration > New Hire Portal Configuration > Images andhosted by Taleo. Flash images or videos are not allowed to beembedded in any New Hire Portal, however an animated gif will workproperly, embedded within the theme or the rich text areas.
background-color: grey; By default, the background color is grey and white. Define with astandard color name, hexadecimal or RGB value.
Color: blue; By default, the text is black, blue and purple. Define with a standardcolor name, hexadecimal or RGB value.
font-size: 2.4em; Taleo uses em measure but a different measure can be used. Usually,1em corresponds to a readable format for the font used. If 1em is toobig for the text body, 0.8em which corresponds to 11 points, can beused.
font-family: verdana, sans-serif; Multiple fonts can be named for use as a substitute if the primary font isnot available in the user's browser.
font-weight: bold; The text is not bold by default.
font-style: italic; The text is not italic by default.
text-decoration: underline; The text is not underlined by default.
Custom New Hire Portal Themes
Custom themes for the enhanced layout can be created and sent to Taleo for use in the New HirePortal.
If any changes are desired to the provided themes, it is only necessary to provide to Taleo the newstyles that contradict any of the default values. See Custom Theme Sample Values for an EnhancedLayout. The specific styles in your custom CSS will override default values, while anything notmentioned in your custom CSS will remain as-is using the default look and feel.
Customers' web design departments can work with Taleo consultants to define each theme, and itmay require several iterations of design, upload, and testing before the desired look is achieved. Forguidance on modifying the theme of your New Hire Portal, contact your Taleo representative. TaleoTechnical Services can also provide assistance for creating or adjusting the CSS in a custom theme ifadditional expertise is required.
The CSS for the enhanced layout can be divided into sections to produce a custom theme.
• Sign Out• New Hire Information
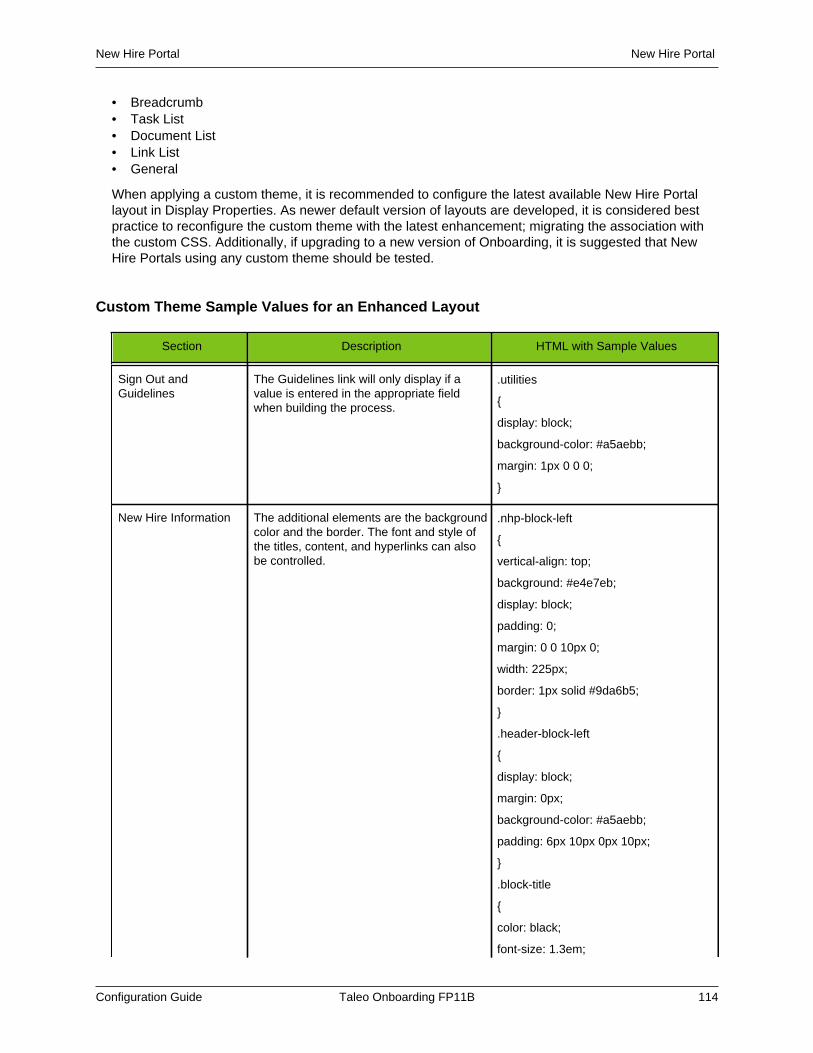
New Hire Portal New Hire Portal
Configuration Guide Taleo Onboarding FP11B 114
• Breadcrumb• Task List• Document List• Link List• General
When applying a custom theme, it is recommended to configure the latest available New Hire Portallayout in Display Properties. As newer default version of layouts are developed, it is considered bestpractice to reconfigure the custom theme with the latest enhancement; migrating the association withthe custom CSS. Additionally, if upgrading to a new version of Onboarding, it is suggested that NewHire Portals using any custom theme should be tested.
Custom Theme Sample Values for an Enhanced Layout
Section Description HTML with Sample Values
Sign Out andGuidelines
The Guidelines link will only display if avalue is entered in the appropriate fieldwhen building the process.
.utilities
{
display: block;
background-color: #a5aebb;
margin: 1px 0 0 0;
}
New Hire Information The additional elements are the backgroundcolor and the border. The font and style ofthe titles, content, and hyperlinks can alsobe controlled.
.nhp-block-left
{
vertical-align: top;
background: #e4e7eb;
display: block;
padding: 0;
margin: 0 0 10px 0;
width: 225px;
border: 1px solid #9da6b5;
}
.header-block-left
{
display: block;
margin: 0px;
background-color: #a5aebb;
padding: 6px 10px 0px 10px;
}
.block-title
{
color: black;
font-size: 1.3em;
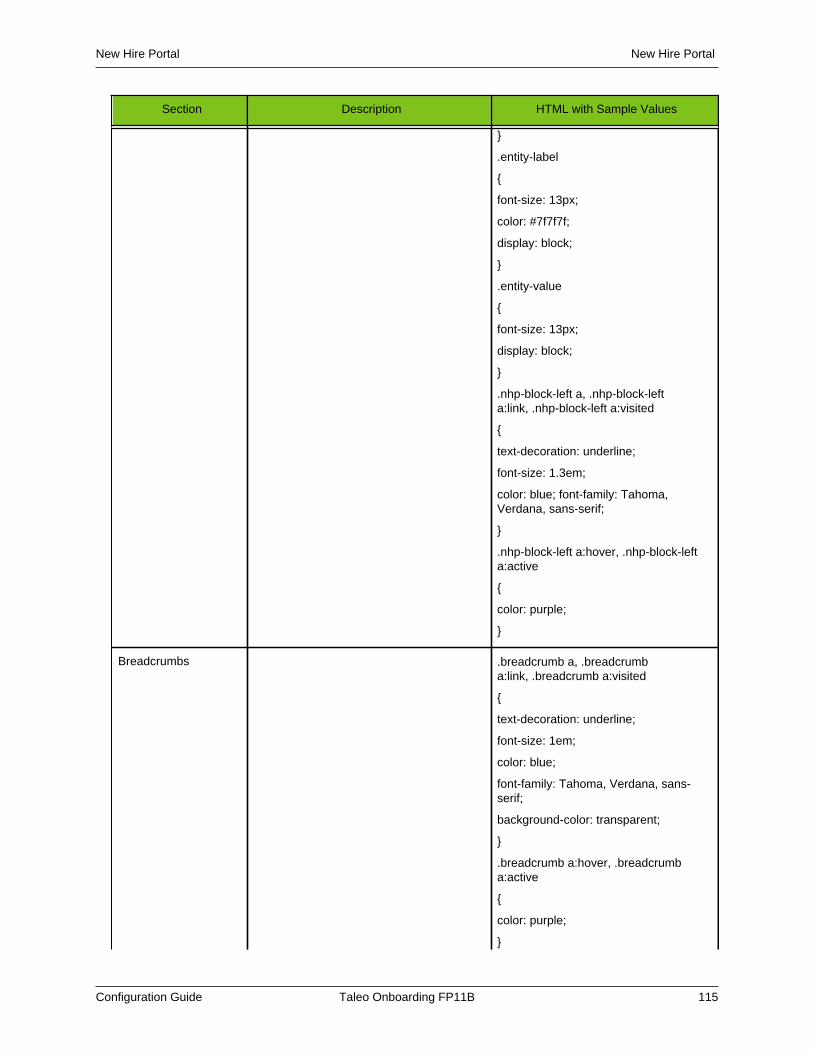
New Hire Portal New Hire Portal
Configuration Guide Taleo Onboarding FP11B 115
Section Description HTML with Sample Values
}
.entity-label
{
font-size: 13px;
color: #7f7f7f;
display: block;
}
.entity-value
{
font-size: 13px;
display: block;
}
.nhp-block-left a, .nhp-block-lefta:link, .nhp-block-left a:visited
{
text-decoration: underline;
font-size: 1.3em;
color: blue; font-family: Tahoma,Verdana, sans-serif;
}
.nhp-block-left a:hover, .nhp-block-lefta:active
{
color: purple;
}
Breadcrumbs .breadcrumb a, .breadcrumba:link, .breadcrumb a:visited
{
text-decoration: underline;
font-size: 1em;
color: blue;
font-family: Tahoma, Verdana, sans-serif;
background-color: transparent;
}
.breadcrumb a:hover, .breadcrumba:active
{
color: purple;
}
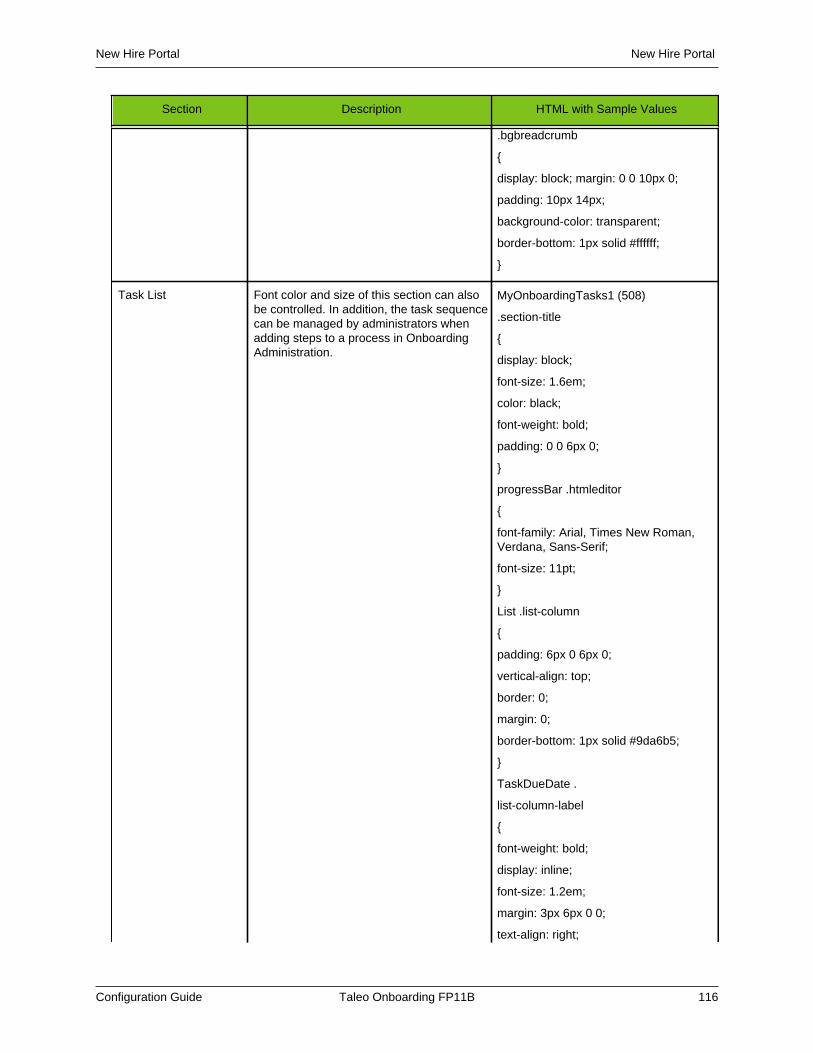
New Hire Portal New Hire Portal
Configuration Guide Taleo Onboarding FP11B 116
Section Description HTML with Sample Values
.bgbreadcrumb
{
display: block; margin: 0 0 10px 0;
padding: 10px 14px;
background-color: transparent;
border-bottom: 1px solid #ffffff;
}
Task List Font color and size of this section can alsobe controlled. In addition, the task sequencecan be managed by administrators whenadding steps to a process in OnboardingAdministration.
MyOnboardingTasks1 (508)
.section-title
{
display: block;
font-size: 1.6em;
color: black;
font-weight: bold;
padding: 0 0 6px 0;
}
progressBar .htmleditor
{
font-family: Arial, Times New Roman,Verdana, Sans-Serif;
font-size: 11pt;
}
List .list-column
{
padding: 6px 0 6px 0;
vertical-align: top;
border: 0;
margin: 0;
border-bottom: 1px solid #9da6b5;
}
TaskDueDate .
list-column-label
{
font-weight: bold;
display: inline;
font-size: 1.2em;
margin: 3px 6px 0 0;
text-align: right;

New Hire Portal New Hire Portal
Configuration Guide Taleo Onboarding FP11B 117
Section Description HTML with Sample Values
}
dueDateText .list-column-value
{
display: inline;
font-size: 1.2em;
margin-top: 3px;
text-align: right;
}
Document List Font color and size can be controlled in thissection.
documentsListTitle
.section-title
{
display: block; font-size: 1.6em;
color: black;
font-weight: bold;
padding: 0 0 6px 0;
}
typeName
.section-group-feature
{
font-size: 1.2em;
color: #000000;
font-weight: bold;
display: inline;
margin: 0;
}
Link List Font color and size can be controlled in thissection.
Links
.section-title
{ display: block;
font-size: 1.6em;
color: black;
font-weight: bold;
padding: 0 0 6px 0;
}
General The general section refers to thebackground and the different action linksfound in the New Hire Portal.
html
{
background-image: none;
background-color: #ffffff;
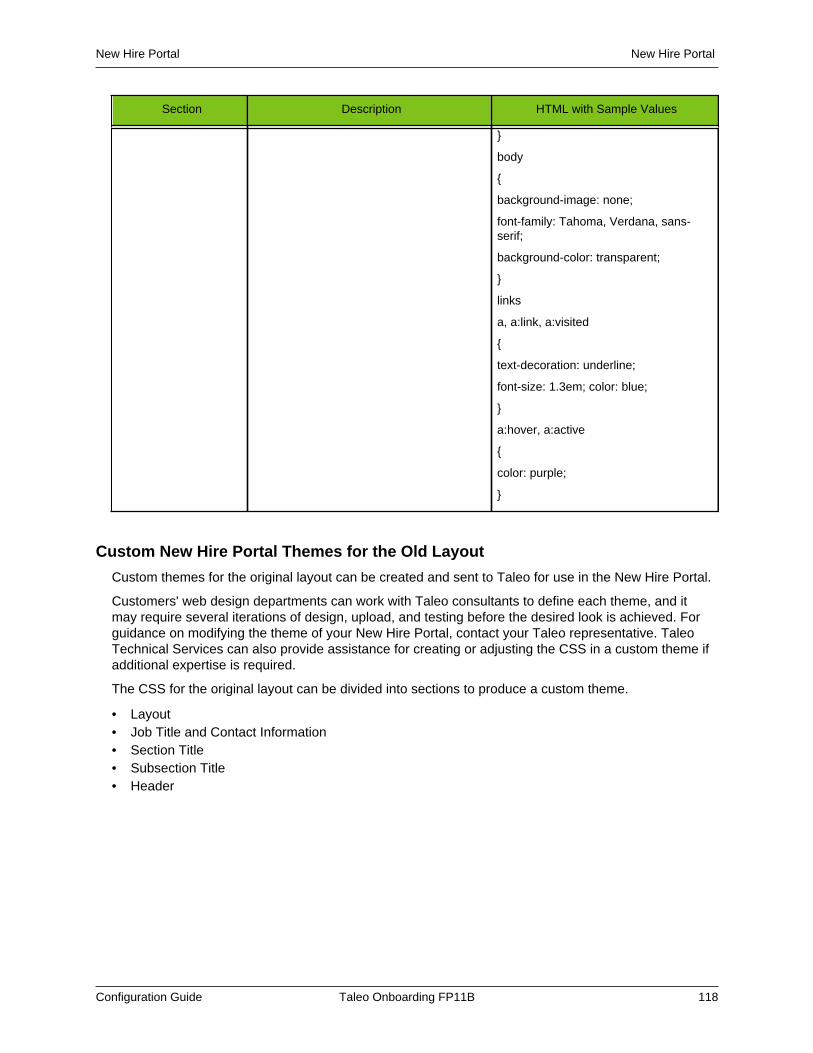
New Hire Portal New Hire Portal
Configuration Guide Taleo Onboarding FP11B 118
Section Description HTML with Sample Values
}
body
{
background-image: none;
font-family: Tahoma, Verdana, sans-serif;
background-color: transparent;
}
links
a, a:link, a:visited
{
text-decoration: underline;
font-size: 1.3em; color: blue;
}
a:hover, a:active
{
color: purple;
}
Custom New Hire Portal Themes for the Old Layout
Custom themes for the original layout can be created and sent to Taleo for use in the New Hire Portal.
Customers' web design departments can work with Taleo consultants to define each theme, and itmay require several iterations of design, upload, and testing before the desired look is achieved. Forguidance on modifying the theme of your New Hire Portal, contact your Taleo representative. TaleoTechnical Services can also provide assistance for creating or adjusting the CSS in a custom theme ifadditional expertise is required.
The CSS for the original layout can be divided into sections to produce a custom theme.
• Layout• Job Title and Contact Information• Section Title• Subsection Title• Header
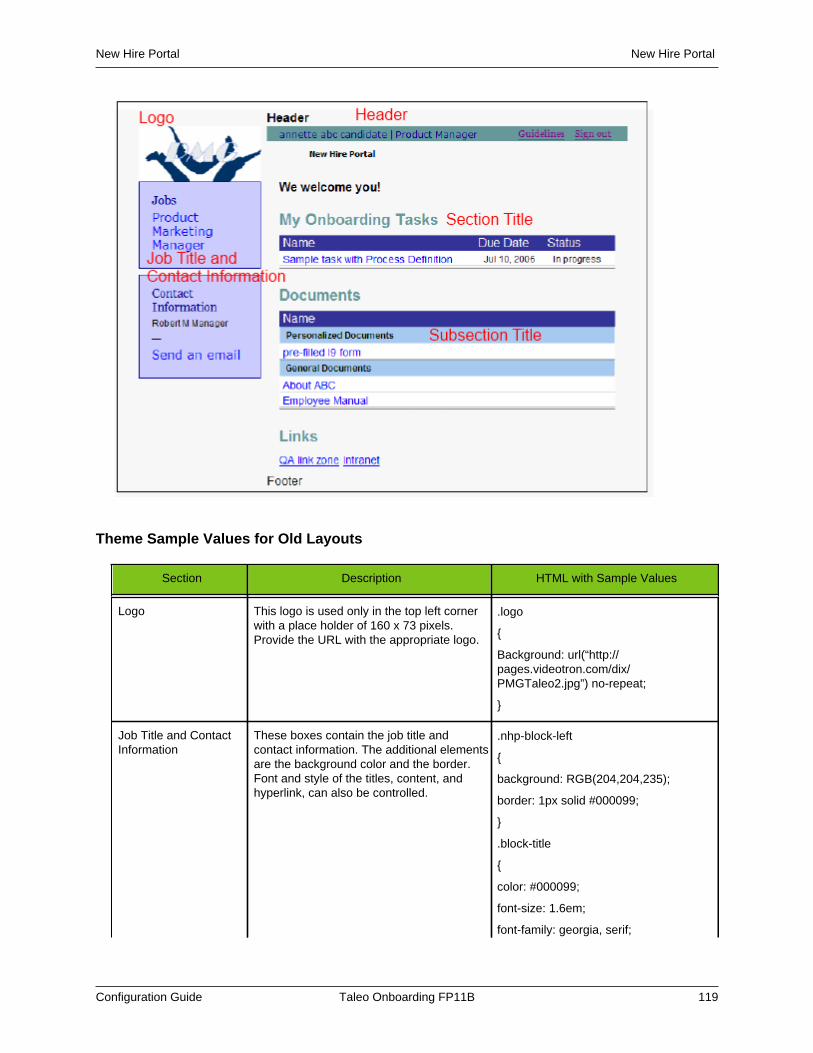
New Hire Portal New Hire Portal
Configuration Guide Taleo Onboarding FP11B 119
Theme Sample Values for Old Layouts
Section Description HTML with Sample Values
Logo This logo is used only in the top left cornerwith a place holder of 160 x 73 pixels.Provide the URL with the appropriate logo.
.logo
{
Background: url(“http://pages.videotron.com/dix/PMGTaleo2.jpg”) no-repeat;
}
Job Title and ContactInformation
These boxes contain the job title andcontact information. The additional elementsare the background color and the border.Font and style of the titles, content, andhyperlink, can also be controlled.
.nhp-block-left
{
background: RGB(204,204,235);
border: 1px solid #000099;
}
.block-title
{
color: #000099;
font-size: 1.6em;
font-family: georgia, serif;
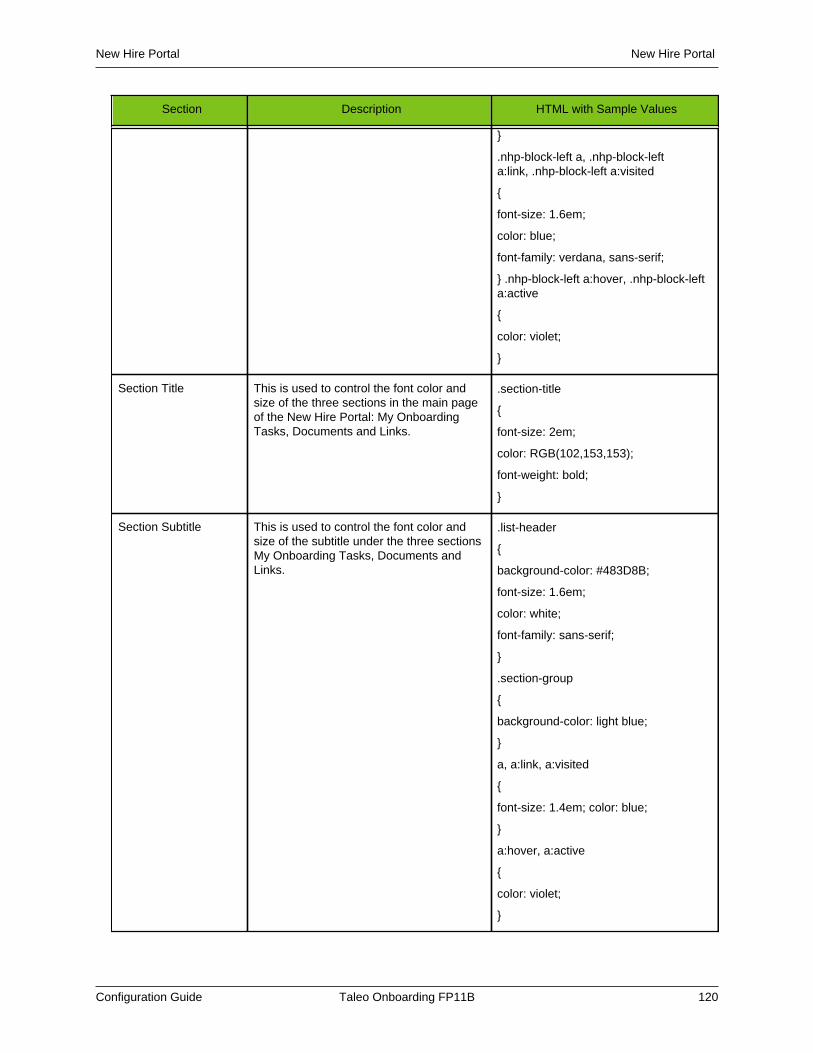
New Hire Portal New Hire Portal
Configuration Guide Taleo Onboarding FP11B 120
Section Description HTML with Sample Values
}
.nhp-block-left a, .nhp-block-lefta:link, .nhp-block-left a:visited
{
font-size: 1.6em;
color: blue;
font-family: verdana, sans-serif;
} .nhp-block-left a:hover, .nhp-block-lefta:active
{
color: violet;
}
Section Title This is used to control the font color andsize of the three sections in the main pageof the New Hire Portal: My OnboardingTasks, Documents and Links.
.section-title
{
font-size: 2em;
color: RGB(102,153,153);
font-weight: bold;
}
Section Subtitle This is used to control the font color andsize of the subtitle under the three sectionsMy Onboarding Tasks, Documents andLinks.
.list-header
{
background-color: #483D8B;
font-size: 1.6em;
color: white;
font-family: sans-serif;
}
.section-group
{
background-color: light blue;
}
a, a:link, a:visited
{
font-size: 1.4em; color: blue;
}
a:hover, a:active
{
color: violet;
}
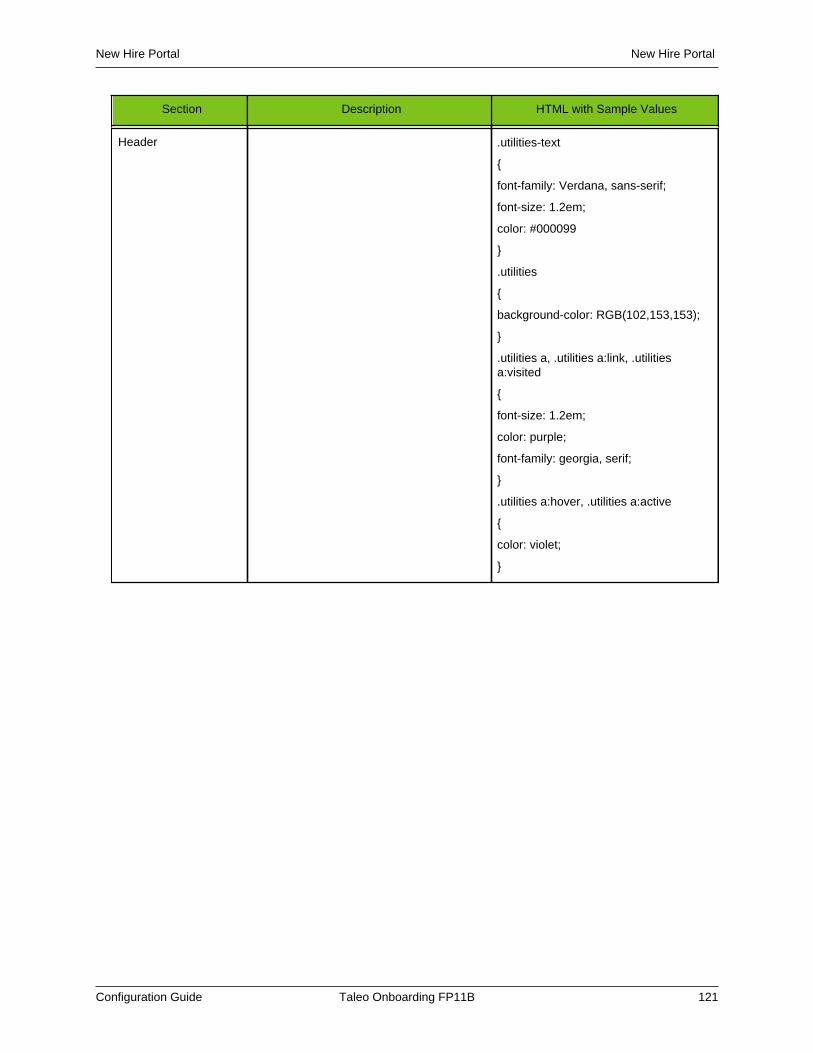
New Hire Portal New Hire Portal
Configuration Guide Taleo Onboarding FP11B 121
Section Description HTML with Sample Values
Header .utilities-text
{
font-family: Verdana, sans-serif;
font-size: 1.2em;
color: #000099
}
.utilities
{
background-color: RGB(102,153,153);
}
.utilities a, .utilities a:link, .utilitiesa:visited
{
font-size: 1.2em;
color: purple;
font-family: georgia, serif;
}
.utilities a:hover, .utilities a:active
{
color: violet;
}
Images and HTML Editors
• Rich Text, Graphic and Video with the HTML Editor.................................................... 123
Images and HTML Editors Rich Text, Graphic and Video with the HTML Editor
Configuration Guide Taleo Onboarding FP11B 123
Rich Text, Graphic and Video with the HTML Editor
The HTML Editor enables rich text content to be configured for display on the New Hire Portal and incorrespondence.
The HTML Editor allows system administrators to create rich text areas that provide appealing andinformative information to new hires and email recipients. The HTML Editor is used to create contentfor:
• display properties in the header and footer.
• portals in the welcome message and instructions.
• message templates in the body of email messages.
The HTML Editor is a WYSIWYG editor allowing system administrators to create text using bold,underline, italics and fonts of different styles, colors and sizes. It also allows the use of images,hyperlinks, bullets, spelling checker, and other elements.
The HTML Editor provides a Source mode that toggles the appearance of the HTML Editor to displaythe actual HTML instead of the WYSIWYG output. This allows system administrators to insert their ownHTML designs into these text areas.
Clicking the square screen icon button in the lower right of the toolbar shows an expanded view of thetext area, providing a better view of work for large text areas.
Note that certain types of HTML cannot be added into these HTML areas, due to security concernsagainst running dynamic and potentially malicious code and scripts. The following elements will not besaved within the HTML Editor when Save is clicked.
• Flash images
• Video clips
• Other dynamic content
However, many other appealing types of HTML can be added in these areas, without being strippedout when Save is clicked:
• images of any shapes or sizes, hosted on any Web server accessible by the new hires.
• images hosted by Taleo. See Uploading an image.
• animated gif files, which can resemble videos and provides motion on the page.
Any image can be displayed in the HTML Editor and it can also be made to behave as a hyperlink. Youcan therefore present a video experience within a New Hire Portal. See Linking a Video in the HTMLEditor.
Linking a Video in the HTML EditorPrerequisite
The HTML Editor is available in the Display Properties, Portals and Message Templates features.
Steps
1. In the HTML Editor, insert an image taken from the opening shot of the desired video clip.
Images and HTML Editors Rich Text, Graphic and Video with the HTML Editor
Configuration Guide Taleo Onboarding FP11B 124
2. Create a hyperlink on this image. This will launch a new browser window containing the URL ofthe place where the actual video is hosted.
Hosting services can be used to house the actual video, or public sites such as YouTube.
3. Click Save.
Result
When new hires click on the image of the video, a new window appears where they can watch thevideo without losing the original browser that was displaying the New Hire Portal.
Deleting an ImagePrerequisite
Configuration > [Onboarding] Administration > Images
Steps
Click Delete.
Uploading an ImagePrerequisite
Images can be used in New Hire Portals and in correspondence.
Only jpg, gif and png formats are supported.
File size limit for one image is 20 Kb. File size limit for all images in a zone is 25 Mb.
Configuration > [Onboarding] Administration > Images
Steps
1. Click Create.
2. Enter a code and a description.
3. Click Browse to upload the image.
4. Click Save.
5. Click Show next to Preview to view the image.
Using an ImagePrerequisite
Ensure you have uploaded images into the system.
Steps
1. In the Images area, copy the URL where the uploaded image is hosted.
For example: https://taleo.bigbank/images/imagename.png
2. From the area where the image should be displayed in the HTML Editor, select the image tooland place the URL on the page.
External Services
• External Services........................................................................................................... 126
External Services External Services
Configuration Guide Taleo Onboarding FP11B 126
External Services
Services provided by certified third parties, that engage users outside of the Taleo system, can beintegrated into the onboarding process.
An organization can choose to have services executed by an external provider. An external service cansupply services such as collecting information for tax withholding purposes.
Services must be certified and integrated by Taleo before they can be used in an onboarding workflow.Once the service is made available, users with the manage service configuration permission canactivate and deactivate services and modify them as required.
When a service is active, any onboarding administrator can create tasks to interact with it. Valuesreturned from the external service can be used as conditions to drive or direct subsequent tasks.External services tasks are added with other tasks to create the Onboarding workflow.
Users can create a specific message template with a link for the new hire to visit an external serviceswebsite to complete a task, if required. If no message template is specified or activated a generic,default message template will be sent. New hires may be asked to provide their standard Taleo username and password which gives them access to, and authenticates their use of, external serviceswebsites.
External services accept standard and customized settings. The standard settings include resultvalidity period, sender identifier, expectant reply time constraint and request time out time constraint.Taleo consultants add custom settings to a service, enabling administrators to use the them inonboarding workflows. For instance, a service may want to include a company identifier to be used ineach new hire interaction, so a Taleo consultant will add that setting to the service.
Once a new hire has completed their tasks, the results can be viewed in user-defined forms and canalso be used to drive conditional workflows. When setting up your forms, selecting the ServiceResultcategory displays all fields relating to the providers. By placing these fields in your form, along withmaking them a URL field type, the results can be viewed by assignees and task owners. Similar toforms, in the condition editor you can also make use of the ServiceResult fields.
Setting up your system for External ServicesThe system administrator and Taleo Support are required for setting up external services.
The following set up is required in the Onboarding Configuration module:
• Adding an External Service• Granting User Permissions
Adding and Activating External Services
A system administrator cannot add an external service. External services are added by Taleo support.
Activating an External Service
Prerequisite
The Manage service configuration user type permission must be granted in the SmartOrg UserType feature.
External Services External Services
Configuration Guide Taleo Onboarding FP11B 127
The external service must be inactive.
Configuration > [Onboarding] Administration > Services
Steps
1. Click the name of an external service.
2. Click Edit to display the external service properties page.
3. Click Activate.
4. Click Save.
Deactivating an External Service
Prerequisite
The Manage service configuration user type permission must be granted in the SmartOrg UserType feature.
Onboarding Administration > Services
Steps
1. Click the name of an external service.
2. Click Deactivate.
Result
The external service is unavailable for use.
Granting User Permissions
Both recruiting and onboarding specific user permissions are required to use external services.
While these user permissions are required to work with external services in the configuration module,some actions can still only be performed by Taleo Support.
Granting Permission to Configure Services
Prerequisite
Configuration > [SmartOrg] Administration > User Types
Steps
1. Select the required user.
2. Select Recruiting.
3. Click Edit.4. Select Screening/Request services from Taleo partners
5. Click Save.
6. Click Edit and select Administration/Manage service configuration.
7. Click Save.
Reference: External Services User Permissions
In order to configure external services, the appropriate user permissions are required.

External Services External Services
Configuration Guide Taleo Onboarding FP11B 128
Configuration > [SmartOrg] Administration > User Types >
Setting Description Value
Request services from Taleopartners
This screening permission is required for the userand that the partner will use for authentication, so thepartner can communicate with passport web services.
• Yes
• No
Manage service configuration This displays the Services section in the Onboardingconfiguration module.
• Yes
• No
Configuring External Service DetailsAn external service is composed of multiple mandatory and optional details that must be configuredcorrectly for an external service to work as expected.
The main external service details are as follows:
• Properties and Settings- the options available in these sections are the same regardless of theexternal service and include some mandatory values.
• External Service Fields- while the supported field types are the same regardless of the service, thefields themselves are service specific.
• External Service Correspondence and Forms- these enable WebTop users to receive data fromand communicate with external services.
Properties and Settings
Properties and settings provide configuration options that are applied globally to the external service.
The properties provide name and description fields, in addition to the type of service and whetherit is active. A service can accept four standard, generic settings or Taleo consultants can addcustomized settings to suit the service and implementation specific considerations. Once added,system administrators can set their values. The four settings are:
• Validity period• Candidate must answer email within [hours]• SenderID• Delay to wait before timing out a request [hours]
Editing Service Properties and Settings
Prerequisite
The Manage service configuration user type permission must be granted in the SmartOrg UserType feature.
Onboarding Administration > Services
Steps1. Click the name of a service.2. Click Edit.3. Modify the properties and settings as required.
External Services External Services
Configuration Guide Taleo Onboarding FP11B 129
4. Click Save.
External Service Fields
Fields are used for sending data to and from the external service.
External Service Input Fields
Input fields are created as default values, to be used in each new hire transaction based on theservice.
The external service controls which input fields are available for each implementation. The valuesthat can be entered into these fields are dependent on what the external service provider offers. Theadministrator can enter values into these fields while defining the Onboarding task. At runtime theseare the initial default values for each new hire.
The Input Fields are unique for each service.
Result Fields
A result field is similar to a User Defined Field which receives each new hire's results after theycomplete their interactions with the external service provider.
A result field is a field for which a partnering service will send one result value per service request.Result fields are specific to the service, therefore depending on the service used, the result fieldsdisplayed will differ from one service to another.
The result fields are used to build User-defined forms and conditions. They can also be added toPDFs, emails and conditions.
Only Taleo consultants can create or amend result fields.
Result Set Fields
This section of the Services detail page is not used at this time.
Correspondence
Each new hire may need to visit the external service provider's site in order to interact with the service.The Onboarding Administrator can configure a message template which will be sent to the new hire, ifrequired, containing an explanation and a clickable invitation.
This message template can contain any personalized tokens as usual, and it also mustcontain a URL token which leads to the external service. This URL must use the token{ServiceURL.ExternalServiceUrl}. When the new hire gets assigned this task and receives this emailcorrespondence, they must click on the link in the email. This will launch a web browser with anauthentication page just like the new hire portal, and then they will be brought directly browser to visitthe service.
If no specific message template is provided for each external service task, or if the selected messagetemplate is not active, then Onboarding's generic built-in default will be sent to the new hire instead.
External Services External Services
Configuration Guide Taleo Onboarding FP11B 130
Editing Correspondence
Prerequisite
The administrator must have Manage service configuration and all applicable correspondenceuser type permissions.
Configuration > [Onboarding] Administration > Services
Steps1. Click the name of a service.2. Click Edit.3. Add to or modify correspondence as required.4. Click Save.
Selecting External Services Message Template
Prerequisite
The Manage service configuration user type permission must be granted. The messagetemplate to be selected must be activated to be used within a workflow.
Onboarding Administration > Services
Steps1. Select service to which the message template will be added.2. Click Edit.3. Click Select.4. Select message template.5. Click Select.6. Click Save.Result
The message template added to the Correspondence section, if activated, will be sent by thesystem. If the message template is not activated the generic, default message is sent.
External Services Tokens
Tokens are available to display the result values received for new hires from external services and toprovide hyperlinks to details on the new hire kept on the external services site.
External service partners return various result fields to an Onboarding form for each new hire, duringor after their service has been completed. This information can be displayed in a message templateor on a form by using tokens with the proper service name, accessed via the ServiceResult categoryof the Field Chooser. For instance, Tax Partner ABC may send back two results fields and thesetokens may be named 'ServiceResult/UDFResult_TaxPartnerABC:TaxResult1' and 'ServiceResult/UDFResult_TaxPartnerABC:TaxResult2'. Placing these tokens onto a form in read-only or using themin a message template will ensure that each new hire’s results are shown to the assignee of thesetasks.
Hyperlinks are useful when information is accessible only via the partner's site. Sometimes the serviceproviders retain additional details about each new hire and they always retain any PDFs or other filesthat were generated while performing their services. This information cannot be viewed within TaleoOnboarding, however; hyperlinks can be added to any Onboarding form, which will bring the form
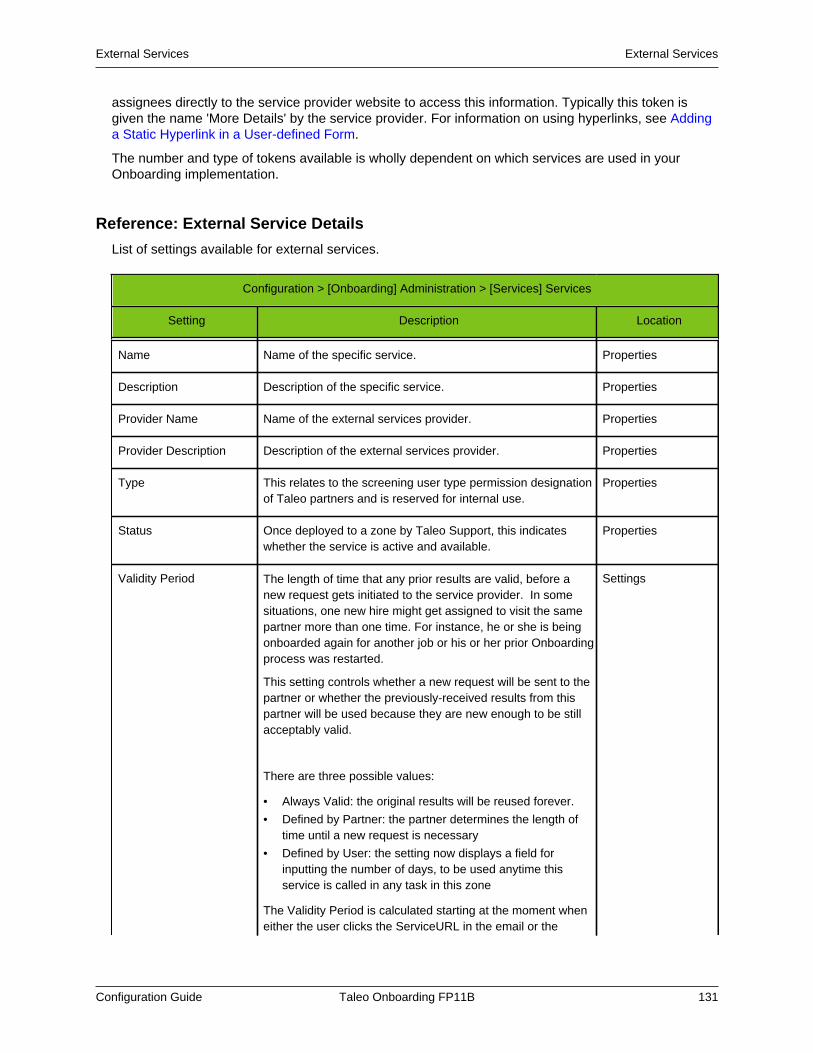
External Services External Services
Configuration Guide Taleo Onboarding FP11B 131
assignees directly to the service provider website to access this information. Typically this token isgiven the name 'More Details' by the service provider. For information on using hyperlinks, see Addinga Static Hyperlink in a User-defined Form.
The number and type of tokens available is wholly dependent on which services are used in yourOnboarding implementation.
Reference: External Service Details
List of settings available for external services.
Configuration > [Onboarding] Administration > [Services] Services
Setting Description Location
Name Name of the specific service. Properties
Description Description of the specific service. Properties
Provider Name Name of the external services provider. Properties
Provider Description Description of the external services provider. Properties
Type This relates to the screening user type permission designationof Taleo partners and is reserved for internal use.
Properties
Status Once deployed to a zone by Taleo Support, this indicateswhether the service is active and available.
Properties
Validity Period The length of time that any prior results are valid, before anew request gets initiated to the service provider. In somesituations, one new hire might get assigned to visit the samepartner more than one time. For instance, he or she is beingonboarded again for another job or his or her prior Onboardingprocess was restarted.
This setting controls whether a new request will be sent to thepartner or whether the previously-received results from thispartner will be used because they are new enough to be stillacceptably valid.
There are three possible values:
• Always Valid: the original results will be reused forever.
• Defined by Partner: the partner determines the length oftime until a new request is necessary
• Defined by User: the setting now displays a field forinputting the number of days, to be used anytime thisservice is called in any task in this zone
The Validity Period is calculated starting at the moment wheneither the user clicks the ServiceURL in the email or the
Settings
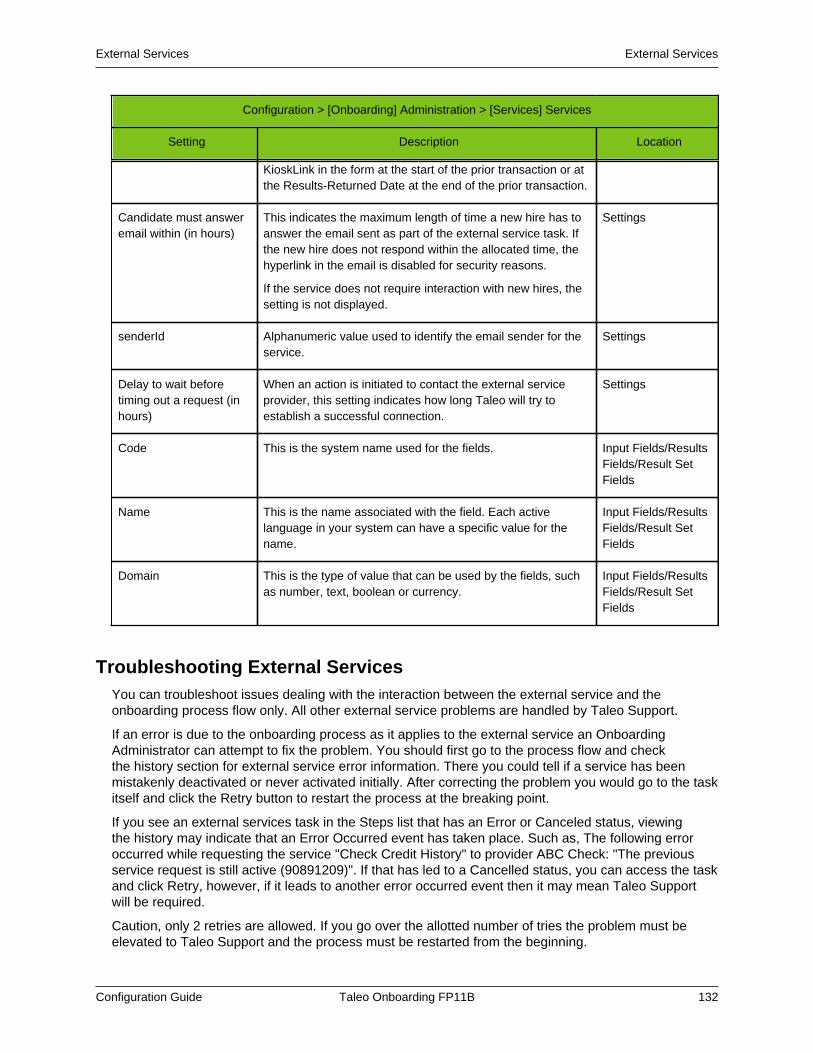
External Services External Services
Configuration Guide Taleo Onboarding FP11B 132
Configuration > [Onboarding] Administration > [Services] Services
Setting Description Location
KioskLink in the form at the start of the prior transaction or atthe Results-Returned Date at the end of the prior transaction.
Candidate must answeremail within (in hours)
This indicates the maximum length of time a new hire has toanswer the email sent as part of the external service task. Ifthe new hire does not respond within the allocated time, thehyperlink in the email is disabled for security reasons.
If the service does not require interaction with new hires, thesetting is not displayed.
Settings
senderId Alphanumeric value used to identify the email sender for theservice.
Settings
Delay to wait beforetiming out a request (inhours)
When an action is initiated to contact the external serviceprovider, this setting indicates how long Taleo will try toestablish a successful connection.
Settings
Code This is the system name used for the fields. Input Fields/ResultsFields/Result SetFields
Name This is the name associated with the field. Each activelanguage in your system can have a specific value for thename.
Input Fields/ResultsFields/Result SetFields
Domain This is the type of value that can be used by the fields, suchas number, text, boolean or currency.
Input Fields/ResultsFields/Result SetFields
Troubleshooting External ServicesYou can troubleshoot issues dealing with the interaction between the external service and theonboarding process flow only. All other external service problems are handled by Taleo Support.
If an error is due to the onboarding process as it applies to the external service an OnboardingAdministrator can attempt to fix the problem. You should first go to the process flow and checkthe history section for external service error information. There you could tell if a service has beenmistakenly deactivated or never activated initially. After correcting the problem you would go to the taskitself and click the Retry button to restart the process at the breaking point.
If you see an external services task in the Steps list that has an Error or Canceled status, viewingthe history may indicate that an Error Occurred event has taken place. Such as, The following erroroccurred while requesting the service "Check Credit History" to provider ABC Check: "The previousservice request is still active (90891209)". If that has led to a Cancelled status, you can access the taskand click Retry, however, if it leads to another error occurred event then it may mean Taleo Supportwill be required.
Caution, only 2 retries are allowed. If you go over the allotted number of tries the problem must beelevated to Taleo Support and the process must be restarted from the beginning.

External Services External Services
Configuration Guide Taleo Onboarding FP11B 133
If the error is due to issues around the external service you must contact Taleo Support for assistance.Taleo Support has access to a detailed history of each step of the transactions with external services.They can diagnose any errors, contact the external service or advise you on how to correct thesituation.

Processes and Tasks
• Processes and Tasks Overview.................................................................................... 135• Tasks..............................................................................................................................136• Processes.......................................................................................................................142
Processes and Tasks Processes and Tasks Overview
Configuration Guide Taleo Onboarding FP11B 135
Processes and Tasks Overview
An onboarding process is comprised of steps and transitions that need to be performed, referencingavailable tasks, ensuring that new hires are integrated successfully into your company.
Once you have created a suitable library of tasks, you can then begin creating processes that usethese tasks. It is the steps and transitions that reference the tasks for inclusion in your process. Thesesteps should make sure that this new hire’s onboarding experience is a positive one.
Processes and Tasks Tasks
Configuration Guide Taleo Onboarding FP11B 136
Tasks
A task is an operation automated by the system. It describes the nature of the work to be done.
Tasks are assigned to various assignees involved in a process. They trigger various actions thatensure an automatic progression of the process. A task can be used by several processes by pulling inthe task to specific steps within the process.
Tasks have to be precreated and stored in the library. Because tasks can be used by severalprocesses they cannot be modified after their activation. You must first deactivate a task to modify it.
Creating a TaskA task consists of a mandatory definition, detailing its action, and optional notifications and reminders.
The task definition indicates which of six action types the task is going to perform:
• Ask assignees to complete a form
• Send a correspondence
• Ask a person to execute a task manually
• Ask a person to open a PDF
• Make the system execute a task
• Make a request of a third-party provider, via an external service
Notifications are used to inform the assignee that the task must be completed or the owner of theprocess that the task has been completed.
Reminders are used for tasks that are not completed on time and can be sent to assignees or processowners.
Creating a Task Definition
Prerequisite
Configuration > [Onboarding] Administration > [Processes and Task Definitions] TaskDefinitions
Steps
1. Click Create.
2. Enter a code, name and description for the task.
3. Enter guidelines as required.
Guidelines are displayed to new hires when the task is assigned to them, if using the enhancedlayout in the New Hire Portal.
4. Select a type and priority.
Priority is displayed to assignees in the New Hire Portal and WebTop, while type can be used togenerate reports by type of tasks.
5. Select the action the task will perform and the associated related source, from amongst activesources.
Processes and Tasks Tasks
Configuration Guide Taleo Onboarding FP11B 137
For details on the Action types, see Task Definition Action Types.6. Click Save.Next Step
After completion, if required you can configure a notification and/or a reminder.
Creating a Task Reminder
Prerequisite
Configuration > [Onboarding] Administration > [Processes and Task Definitions] TaskDefinitions
Steps1. Select the task.2. Click Create.3. Select whether you wish to send the reminder to the assignee or the process owner.
Your selection can help in case an escalation is needed, such as if a task becomes seriouslyoverdue.
4. Set Triggering Time and Triggering Unit and whether it should occur before or after the due date.5. Click Search to select the reminder message.6. Click Save.Result
The Reminder is added to the Reminder list.
When the chosen date arrives, the reminder is sent to the assignees of the reminder. Once the taskis complete no further reminders are sent.
Deleting a Task Reminder
Prerequisite
The task is deactivated.
Configuration > [Onboarding] Administration > [Processes and Task Definitions] TaskDefinitions
Steps1. Select the task.2. Click Deactivate.
A delete button appears in the Actions column of the Reminders list.3. Click Delete.4. Click Activate.Result
The Reminder is deleted.
Creating a Task Notification
Prerequisite
Configuration > [Onboarding] Administration > [Processes and Task Definitions] TaskDefinitions
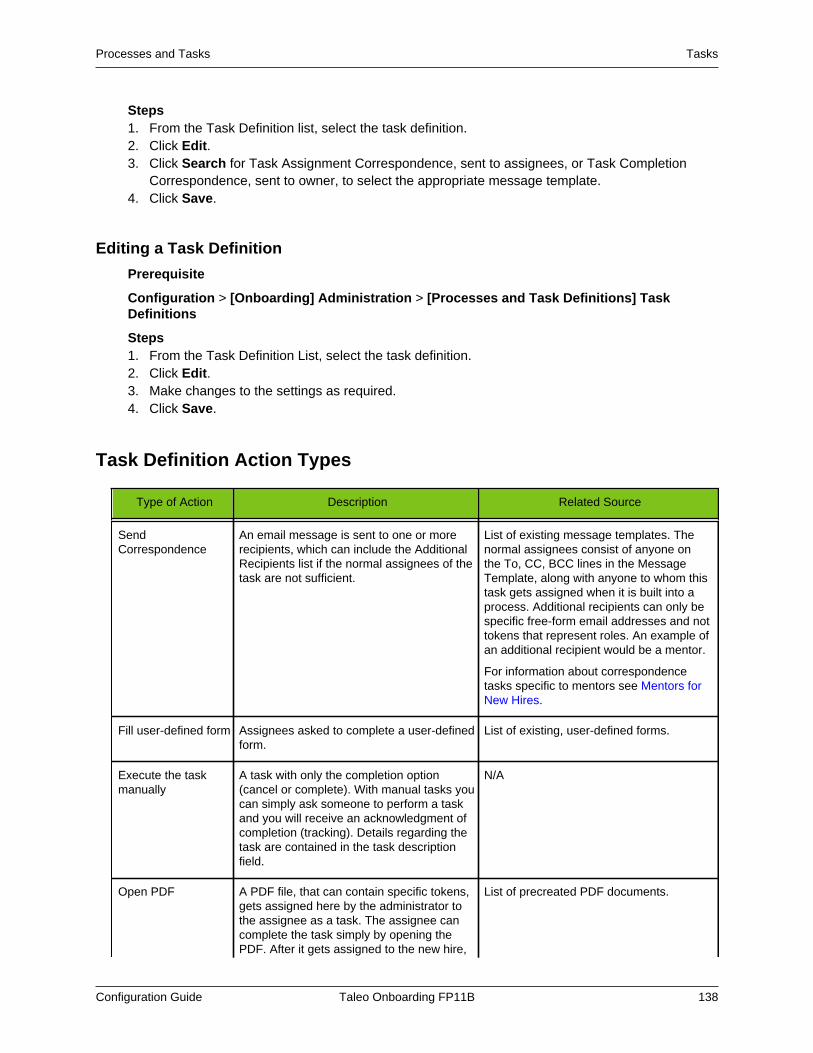
Processes and Tasks Tasks
Configuration Guide Taleo Onboarding FP11B 138
Steps1. From the Task Definition list, select the task definition.2. Click Edit.3. Click Search for Task Assignment Correspondence, sent to assignees, or Task Completion
Correspondence, sent to owner, to select the appropriate message template.4. Click Save.
Editing a Task Definition
Prerequisite
Configuration > [Onboarding] Administration > [Processes and Task Definitions] TaskDefinitions
Steps1. From the Task Definition List, select the task definition.2. Click Edit.3. Make changes to the settings as required.4. Click Save.
Task Definition Action Types
Type of Action Description Related Source
SendCorrespondence
An email message is sent to one or morerecipients, which can include the AdditionalRecipients list if the normal assignees of thetask are not sufficient.
List of existing message templates. Thenormal assignees consist of anyone onthe To, CC, BCC lines in the MessageTemplate, along with anyone to whom thistask gets assigned when it is built into aprocess. Additional recipients can only bespecific free-form email addresses and nottokens that represent roles. An example ofan additional recipient would be a mentor.
For information about correspondencetasks specific to mentors see Mentors forNew Hires.
Fill user-defined form Assignees asked to complete a user-definedform.
List of existing, user-defined forms.
Execute the taskmanually
A task with only the completion option(cancel or complete). With manual tasks youcan simply ask someone to perform a taskand you will receive an acknowledgment ofcompletion (tracking). Details regarding thetask are contained in the task descriptionfield.
N/A
Open PDF A PDF file, that can contain specific tokens,gets assigned here by the administrator tothe assignee as a task. The assignee cancomplete the task simply by opening thePDF. After it gets assigned to the new hire,
List of precreated PDF documents.

Processes and Tasks Tasks
Configuration Guide Taleo Onboarding FP11B 139
Type of Action Description Related Source
then WebTop users can access it on theNew Hire page. It can also be exported viaTaleo Connect Client.
System Task Reserved for future use. Reserved for future use.
Request ExternalService
A third party is the approved vendor fora specific service or product, such asI-9 form completion or help with tax formcompletion. When this type of task is part ofthe onboarding process, it makes a requestto a third-party provider to perform the typeof service configured here.
Once Request External Service is selectedthe user is presented with new fieldsrelevant to the service.
The Administrator chooses among anyactivated external service providers andthen they can configure any of the InputFields that are requested or required bythat selected partner.
New Hire Can Receive Passport Invitations on New Hire PortalNew hires can see and open correspondence tasks in the New Hire Portal that contain a URL topartner website for external service request task completion.
When an Onboarding process contains a Passport task that requires the new hire to complete a task,the new hire receives an invitation to access the external service partner website through an email andas a correspondence task on the task list of the New Hire Portal. When the email is sent and the taskappears on the new hire's task list, the task status is marked as In Progress.
When the new hire clicks on the correspondence task in the New Hire Portal, the body of the emailinvitation message is presented. This message will contain the URL needed for partner websiteaccess. User authentication can possibly be automatic on the partner when it is accessed through theNew Hire Portal correspondence task. Automatic authentication is at the discretion of the partner.
The task remains in In Progress status until the new hire completes the entire task. The progress canbe monitored on the Onboarding WebTop by viewing the associated system task. Once the new hirecompletes the Passport task, it is deleted from the task list on the New Hire Portal.
Configuration
User Type Permission
Name Location
Manage service configuration Configuration > [SmartOrg] Administration > UserTypes > Recruiting > Onboarding > OnboardingAdministration
When configuring the Service in the zone, an Onboarding administrator can create a messagetemplate to explain the work to the new hire and then choose it for use. This template must contain thecorrect URL to the partner website for proper task completion. If no message template is chosen, it willuse the default template.
Processes and Tasks Tasks
Configuration Guide Taleo Onboarding FP11B 140
Mentors for New HiresOnboarding customers can automate the mentoring process to help welcome and assimilate a newhire.
New hire mentoring programs formally pair the new hire with more experienced employees tohelp the new hire obtain information, get advice and learn the company culture. Studies show thatnew employees who are paired with a mentor are twice as likely to remain in the job and are moreproductive quicker than those who do not receive mentorships.
The new hire can also be paired with another new hire or a peer to encourage communication andprovide camaraderie.
Mentoring is also used to prepare new or veteran employees for leadership or executive roles.
Creating Forms to Assign Mentors
Onboarding Administrators can use the following tokens to create mentor forms:
• MentorEmail
• MentorFirstName
• MentorFullName
• MentorInitial
• MentorLastName
• MentorPrefix
• MentorSuffix
• MentorTitle
Assigning Mentor to New Hire
When the Onboarding process is running for each new hire, the form assignee must provideinformation about their mentor by typing in the name, e-mail address, and any additional information.
Mentors do not have to be first entered as users in the Taleo system, as Hiring Managers or Recruitersare entered. They can be anyone within the organization or anyone desired at all. Users can usementor tokens to assign a mentor to each new hire. These tokens are found in the User-defined formeditor category of “Requisition Owners.”
Mentors are Not Assigned Tasks
Because mentors may not in the system you cannot directly assign tasks to them.
Using Mentor tokens in Forms, PDFs, and Correspondence
The information that has been entered for each new hire can now be used just like any informationabout them or the process. The name or title or e-mail address of the mentor can be displayed onforms or PDFs, or can be used to e-mail the new hire to introduce their new mentor.
Sending Correspondence to Mentors
The token {RequisitionOwners.MentorEmail} can be used by the Onboarding Administrators onMessage Templates. The token can be used on the TO, CC or BCC line in order to send messagesto the mentor. However, because tasks cannot be assigned directly to mentors, please note that theremust be a different assignee in addition. In other words, when the Onboarding Administrators createsthe step during implementation, a regular SmartOrg user must be designated as the task assignee.
Processes and Tasks Tasks
Configuration Guide Taleo Onboarding FP11B 141
This person will also receive the correspondence, in addition to the mentor who was listed on theMessage Template recipient line.
Retrying a Canceled Task from the Onboarding WebtopRegardless of how well a task has been configured, there are instances when tasks will be canceledand you need to attempt to retry them.
Once a process has begun and is being tracked from the Onboarding WebTop, if an error occurs and itis canceled, you can retry the task.
Retrying Canceled Tasks
Steps
1. Wait until the overall situation which caused all of the errors is corrected, for example thepassword is refreshed.
2. Find each Step that is in Canceled status.
3. Open Canceled steps to find Tasks in Error status.
4. Click Retry.
Result
The task should go into the status of In Progress and progress to Completed status. If the overallerror situation persists, then the task reverts to Error status. The Retry button is only available twice,to execute each task a maximum of three times. After this limit is reached, the individual tasks canno longer be executed at breaking points, instead the whole onboarding process must be canceledand restarted.
Processes and Tasks Processes
Configuration Guide Taleo Onboarding FP11B 142
Processes
An onboarding process is comprised of steps and transitions that are performed in order to ensure thesmooth integration of a new employee.
Appropriate onboarding processes for your company must be defined. You can target differentonboarding processes to specific audiences according to Organizations, Locations and Job Fields.
A process includes steps which in turn include tasks. Once tasks are created and you have a suitabletask library, a process can be created. In a single process, multiple steps can be configured to beassigned concurrently or you can specify that a task must be complete before the process continues.
Transitions must be created between steps. For example, you could specify that the “Completepersonal information” task is to be performed before the “Send thank you correspondence” task. Thiscould guarantee that you will have the new hire’s information needed to populate the correspondence.
You can also configure steps to be assigned based on whether or not some condition is met, by addinga condition to a transition. This enables steps to take place based on conditions, such as whether thevalue contained in the new hire's job field is that of a salesperson or regional manager.
Process StatusesProcesses can be in Active, Inactive, or Draft status.
The status of a process effects the availability of a process for a new hire when the onboardingprocess is first launched, if changes can be made to a process, or if it can be deleted.
Active
An Active process is available to launch for new hires. Taleo Connect can only launch processes thatare Active.
An Active process cannot be modified in any substantial way. Steps within it cannot be changed orremoved. To test a process, it must be activated. If changes are needed a duplicate process must becreated. The duplicate will be created in Draft mode where changes can be made.
Inactive
A process that is in Inactive status cannot be seen or selected in Recruiting for candidates to beonboarded. Any new hires currently going through a process will not be affected if the process statuschanges to Inactive while they are being onboarded. Inactive process cannot be modified in anysubstantial way.
Draft
When processes are created initially they are in Draft status. A process that is in Draft status cannotbe seen or selected in Recruiting for candidates to be onboarded. Processes in Draft status may bemodified. Only processes in Draft status can be deleted.
Process OwnerThe process owner has the responsibility of ensuring process completion. The owner can be anOnboarding Role, like the hiring manager, a Functional Role, or a specifically named user.
The intent of having a process owner is that there is a single responsible party for viewing, managing,and sharing processes. With the appropriate user type and permission, the process owner can viewand execute all the tasks within the new hire's process, regardless of who is the assignee of each task.
Processes and Tasks Processes
Configuration Guide Taleo Onboarding FP11B 143
The process owner can reassign any task to a different assignee while a new hire's process is running,to prevent or recover from bottlenecks. The process owner's name and contact information can beconfigured to display on the New Hire Portal in case of questions, if the administrator has set this valuein the Product Settings.
Functional Roles as Process Owners
If an onboarding process names a Functional Role as the process owner, the best matching userwill be assigned as the process owner. There may also be users assigned to a Functional Role fora specific Organization, Location, and Job Field structure. Each functional role must have a DefaultAssignee. Onboarding will assign a user configured by OLF or a non-default assignee with no OLFas an Onboarding process owner before selecting a Default Assignee. The Default Assignee for aFunctional Role will only be used if there is no other appropriate user available to fill the Onboardingprocess owner role.
SupervisorThe Supervisor is any person/people who are assigned to do almost all of the same things as theProcess Owner.
Anything the owner can do, the supervisors can do based on their individual permissions. A supervisorcan be a role, like the hiring manager, or a specifically named user.
There are two ways for someone to be a supervisor:
• The administrator assigns users as supervisors for a process. This method happens in advanceof assigning the process to a new hire. It occurs when the process is being configured by theOnboarding administrator.
• After the process has started running, an additional supervisor can be manually added by clickingthe Share button on the New Hire page.
Creating a Process
Prerequisite
Configuration > [Onboarding] Administration > [Processes and Task Definitions] Processes
Steps1. Click Create.2. Enter the Code, Name, and a description.3. From the Type list, select Process or Sub-process.4. Specify the process owner, by searching for a role or specific user.5. Select none, one or multiple Supervisors.6. In the Guidelines field, enter instructions as needed, which will appear in the New Hire Portal.7. Click Save.
Editing a Process
Prerequisite
Configuration > [Onboarding] Administration > [Processes and Task Definitions] Processes
Steps1. Select the process to be edited.2. Click Edit.
Processes and Tasks Processes
Configuration Guide Taleo Onboarding FP11B 144
3. Make changes in fields as required.4. Edit the steps and their transitions and conditions as required.
Note: the process must be deactivated or in draft state for this step.5. Click Save.
Associating a Process with Organizations, Locations and Job Fields
Prerequisite
Onboarding Administration > Processes > [specific process]
Steps
1. Select the process.2. To associate the process to an Organization, Location or Job Field, click Add where relevant.3. Select element.4. Click Select.5. Click Save.
Result
This process is only available to be used by a Taleo Recruiting user for a new hire when therequisition and process OLFs match. Processes that are not associated with OLFs can be used withnew hires regardless of the associated requisition.
Deleting a Process
Prerequisite
The process must be in Draft status.
Configuration > [Onboarding] Administration > [Processes and Task Definitions] Processes
Steps
Click Delete.
StepsA process contains steps. A step is information about the assignee and sequence of each task.Steps are created for each process as a container for reusable tasks. The tasks are generic; the stepcontextualizes the task into the process.
The steps represent the individual units of work done by people who perform the tasks. Business logicis embedded within the transitions between the steps, to ensure the correct routing of the work to bedone.
Step Types
The first part of creating a step is to decide which type it will be.
Type Description
Task The step will consist of a task selected from defined lists.

Processes and Tasks Processes
Configuration Guide Taleo Onboarding FP11B 145
Type Description
Sub-process The step will consist of a sub-process. A sub-process is a small process used inside a largerprocess. For example, if you always reuse the same sequence for internal requests such ascomputer, office space, phone and business card requests, but have some variability on thenew hire side, you could create a sub-process and reuse it in various processes to simplifymanagement. Any modifications made to a sub-process after it was used in a larger process willhave no effect. The larger process will take the workflow of the sub-process at the time that itgets incorporated.
Routing The step will connect multiple parallel tasks together. Routing steps are like placeholder stepsthat do not contain any tasks to assign to any users. They are used to facilitate the workflowdesign for steps that split into parallel branches and then reconnect as needed. Standard taskscan also be used to handle branching and reconnecting, if their transitions are built to do so.
Understanding Step Execution
The three execute step options available for a task step, along with four different workflow scenarios,impact how you should execute steps.
The three options available for executing task steps should enable you to account for your company'sspecific process requirements, depending on whether certain steps are mandatory or optional and ifsubsequent steps can be repeated. The following scenarios should be considered, and used as bestpractice models, when implementing your step execution workflow:
• All steps are required - when there are multiple prior steps that transition into one main step andit should execute only after all prior steps are completed, then When all previous steps have beencompleted, must be selected. This means that the main step cannot begin until each prior individualstep is complete.
• One mutually exclusive step is required - when there are multiple prior steps that all transitioninto one main step, but they are mutually exclusive based on conditions, then only one of theseprior steps will ever be completed. In this instance, When One, and only one, of the previous stepshas been completed, should be selected. This means the main step does not have to have to waitfor all of the previous steps to be completed, as this will never occur and only result in stalling theoverall process.
• One or more steps may be completed - when multiple prior steps all transition into one mainstep and one or more of them may eventually be completed, but you only want the main step tobe executed once and then allow the process to progress further, When One, and only one, of theprevious steps has been completed should be selected. This means that when the any of the priorsteps is first completed, the main step can execute. Subsequently, if another prior step is completedit does not initiate a repeat execution of the main step.
• One or more dependent steps may be completed - when multiple prior steps transition into onemain step and one or more of them may eventually be completed, and you want the main step tobe executed each time one of the prior steps gets completed, you must select When one of theprevious steps has been completed. This can be useful in an instance where someone wanted toreceive an email anytime one of a group of prior tasks assignees completed their work.
Note: You must be sure not to view step execution options in isolation. While repeating a step maynot impact the relationship between it and the prior step that caused it, it could have unwanteddownstream implications for repeating other tasks.
Processes and Tasks Processes
Configuration Guide Taleo Onboarding FP11B 146
Creating a Task Step Using Step Wizard
Prerequisite
To create a step, the process must be in Draft status.
Onboarding Administration > Processes > [specific process]
Steps
1. Select the process and click Create to display Step Wizard.
2. Select Task and click Continue.
3. Use Search button to select predefined task and click Continue.
4. Complete fields as needed.
5. To specify the order with which the tasks display, in the Sequence field enter desired numericalvalue. This action will only affect the display of the tasks. The true order in which the tasks areperformed is determined by the transitions set.
6. In Duration field, enter the number of days required to perform the step. This will help calculatethe due date of the step.
7. Select one or multiple Assignees who are to perform the step.
8. From the Execute Step list select when the task is to be performed.
See Understanding Step Execution for more details.
9. From the After step execution list, you must select Execute all subsequent steps.
Note: The After Step Execution option of Execute one of the subsequent steps is reserved forfuture use.
10. Click Finish.
Next Step
Create Transition if required.
Creating a Sub-process Step Using Step Wizard
Prerequisite
To create a step, the process must be in Draft status.
Onboarding Administration > Processes > [specific process]
Steps
1. Select the process.
2. Click Create to display Step Wizard.
3. Select Sub-process and click Continue.
4. Use Search to select predefined Sub-process and click Continue.
5. Complete fields as needed.
6. From the Execute Step list select when the sub-process is to be performed.
See Understanding Step Execution for more details.
7. From the After step execution list, you must select Execute all subsequent steps.
Note: The After Step Execution option of Execute one of the subsequent steps is reserved forfuture use.
8. Click Finish.
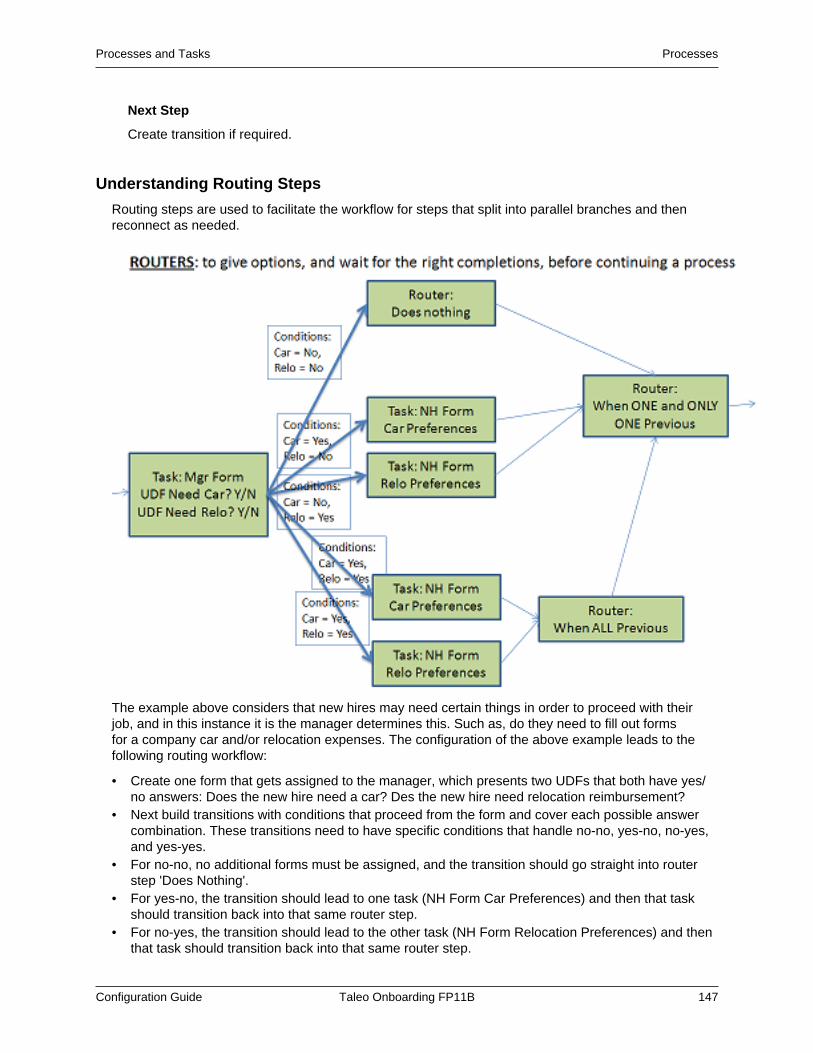
Processes and Tasks Processes
Configuration Guide Taleo Onboarding FP11B 147
Next Step
Create transition if required.
Understanding Routing Steps
Routing steps are used to facilitate the workflow for steps that split into parallel branches and thenreconnect as needed.
The example above considers that new hires may need certain things in order to proceed with theirjob, and in this instance it is the manager determines this. Such as, do they need to fill out formsfor a company car and/or relocation expenses. The configuration of the above example leads to thefollowing routing workflow:
• Create one form that gets assigned to the manager, which presents two UDFs that both have yes/no answers: Does the new hire need a car? Des the new hire need relocation reimbursement?
• Next build transitions with conditions that proceed from the form and cover each possible answercombination. These transitions need to have specific conditions that handle no-no, yes-no, no-yes,and yes-yes.
• For no-no, no additional forms must be assigned, and the transition should go straight into routerstep 'Does Nothing'.
• For yes-no, the transition should lead to one task (NH Form Car Preferences) and then that taskshould transition back into that same router step.
• For no-yes, the transition should lead to the other task (NH Form Relocation Preferences) and thenthat task should transition back into that same router step.
Processes and Tasks Processes
Configuration Guide Taleo Onboarding FP11B 148
• For yes-yes, there should be two transitions out of the manager's form, in order to assign both thecar and relocation tasks in parallel.
• Subsequently, each of these two tasks should have a transition to another small, yes-yes router.Only these two tasks feed into this router. The setting on this router must be to execute when allof the previous steps are completed, as we know that both are appropriate for the type of new hirewho requires a company car and relocation expenses.
• Finally, this yes-yes router must have a transition out from it, into the final car-relocation router.The setting on this car-relocation router must be to execute when one and only one of the previoustasks is completed. This is because we know that each new hire will only execute one of the fourinbound paths (no-no, yes-no, no-yes, yes-yes) and so only one of the prior tasks will ever getexecuted in a single process.
Creating a Routing Step Using Step Wizard
Prerequisite
To create a step, the process must be in Draft status.
Onboarding Administration > Processes > [specific process]
Steps1. Select the process.2. Click Create to display Step Wizard.3. Select Routing and click Continue.4. Complete fields as needed.5. To specify the order with which the tasks show on the New Hire page, in the Sequence field
enter desired numerical value.6. Use the drop down menus to select when the task is to be performed and what to do next.7. Click Finish.Next Step
Create Transition if required.
TransitionsTransitions must be created to link steps together.
You should create the transitions once you have completed the creation of all steps, as transitionsare used to define the From step and the To step and require that the steps are in place as they arecreated from within a step.
When using the Process Viewer, transitions are represented by an arrow.
To Create a Transition
Prerequisite
Onboarding Administration > Processes > [specific process]
Steps1. Select the process and step to access the Step page.2. Click Create next to Transitions to access the Transition Wizard.3. Indicate where the transition starts and where it goes next.4. Click Continue and complete the fields as required.
Processes and Tasks Processes
Configuration Guide Taleo Onboarding FP11B 149
5. Verify From Step and To Step.
6. Click Finish.
Next Step
You can add a condition to the transition.
To view the transition graphically, click Preview Process located on the left hand side of the window,under Quick Access. The preview process is very helpful to get a quick visual of whether everythingis connected together as intended.
Transition ConditionsYou can add a condition to the transition between two steps, to control when and whether the next stepshould occur.
Once a transition is created, it is possible to add a condition. This means that the transition will beexecuted ONLY if the condition is met. It enables you to further tailor your process, expanding thescope of scenarios the process can handle.
Every piece of data in Onboarding can be used to drive the process forward depending on its value.For instance, you can create a condition to execute a specific task if the New Hire’s location is Xbut not Y or Z. You can set different branches of the processes for different people. You can useorganization, location or field values to drive the process, including customized user-defined fields.
Conditions are indicated in the preview process graphic mode with a bold or thick arrow, but no writtendetails are available on the condition in the preview mode. If no conditions are applied, the arrow linedepicting the transition is lighter in weight.
You should set up the process and all its steps, transitions, and conditions, and then activate it all. Ifyour testing shows that your conditions were not designed properly, it is possible to make changeseven while the process is in Active status. However you cannot change the tasks or transitions.
Time Based Condition
Time based conditions can be used to start or delay a process for a number of days before executingthe next task.
When setting dates, always use is less than or equal to as the operator.
When you want a task to wait and not be sent until 5 days before the New Hire's official Start Date fortheir job, use this formula: “<= -5”. The negative sign indicates the countdown before start date, whilethe equals sign indicates when it should begin. If preceding tasks finish early, the process will wait until5 days before start, and then will assign this task. If preceding tasks finish late, this task will fire assoon as possible after 5 days before start date, due to the inclusion of the '<' character.
• When you want a task to wait and not be sent until 5 days after the New Hire's official Start Datefor their job, use this: “<= 5”. The positive number means that they have already been on the job for5 days. If preceding tasks finish early, the process will wait until 5 days after Start Date, and thenassign this task. If preceding tasks finish late, this task will fire as soon after 5 days as possible.
• In date formulas, 0 or zero means now or the current date.
For example, to set a condition to send a correspondence four days before the start the field values forthis equation would be:

Processes and Tasks Processes
Configuration Guide Taleo Onboarding FP11B 150
Field Process Assignment / Start Date
Operator Is less than or equal to
Value -4
These date-based conditions can be configured to use AssignmentForCondition.StartDate, whichrefers specifically to the start date for the job, Process Start Date or LastPreviousStepEndDate.
LastPreviousStepEndDate is useful for waiting until a certain number of days after theimmediately preceding task is completed. This means that negative numbers cannot be used withLastPreviousStepEndDate, as it is impossible to trigger a task days before its preceding task issupposed to be completed. Other dates such as “Expected Start Date” may be less reliable, and anychanges that were made in Recruiting after the Onboarding process was started will not be transferredinto Onboarding. However, Start Date changes are immediately transferred from Recruiting intoOnboarding.
When calculating a condition start date, only working or business days are considered. That is,if working days are from Monday to Friday, then Saturday and Sunday are not considered in theequation. For example, if Saturday and Sunday are not checked ON in the Calendar Days area of theSettings, then these days will not be counted. Therefore a task that is assigned on Thursday the 5thand is defined to take 2 days in duration, will have its due date automatically calculated to be Mondaythe 9th.
Conditions Based on Null Values
Taleo Onboarding accepts null values for transition conditions for processes.
When creating a condition for a transition between steps in an onboarding process, an Onboardingadministrator can select the operators of null or not null for the field specified in the condition. Thisallows the new hire or any other form assignee to either answer or not answer a question on a formthat may or may not be applicable to them, with the lack of answer value being considered in thecondition logic. Taleo Onboarding can then move forward through the onboarding process according towhether or not there is a value in the condition field.
Example:
If an onboarding process uses a form that includes a field asking the new hire to request aworkplace accommodation, such as a screen reader or ramp, the condition for the transition couldbe set to null or not null for that field. This step has two possible transitions out to two possiblesteps. If the new hire needs an accommodation and enters the information, the field value wouldreflect not null. The transition would then go to a step that addresses filling the accommodationrequest. If the new hire does not need an accommodation and does not enter any information, thefield value would be null. With this value, the transition would bypass the accommodation fulfillmentstep and skip to the next step in the process.
Setting Hold Until Prior Task Completion
You can make a task wait until a prior task completes by using the token LastPreviousStepEndDate.
By using the token LastPreviousStepEndDate from the CurrentProcess group, you can specify that atask will wait until a prior task hits its completion mark. You can also specify the number of days youwant the process to wait before restarting.
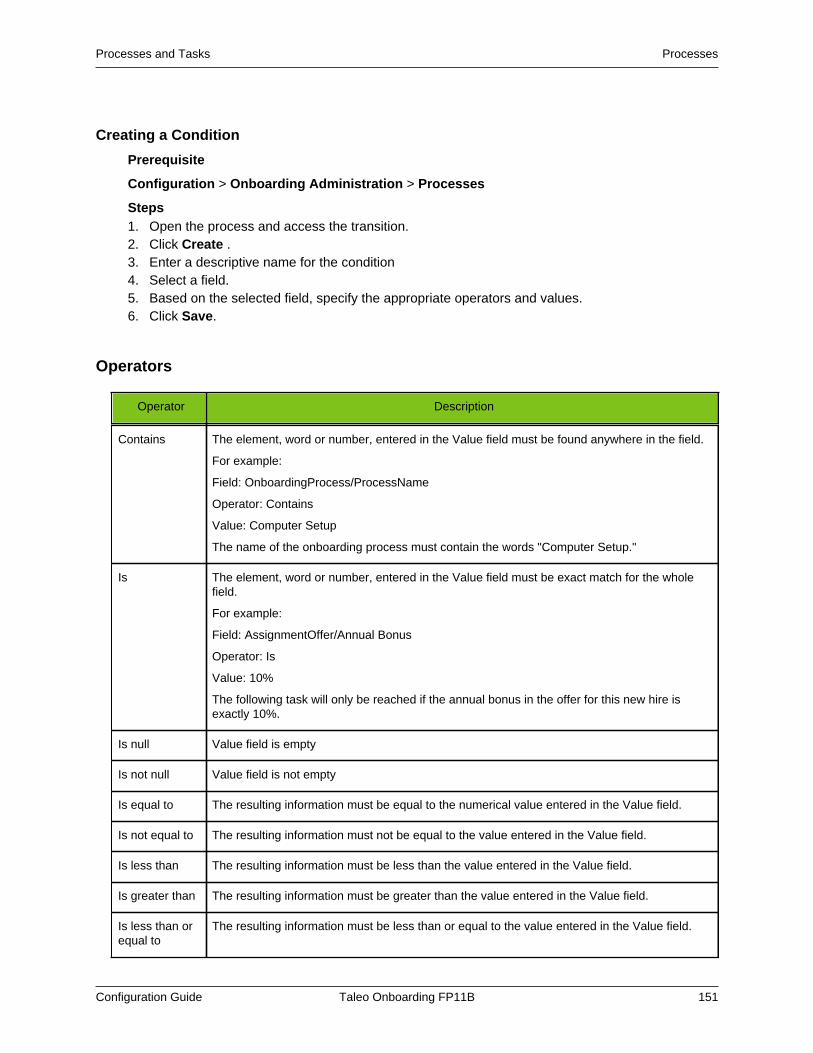
Processes and Tasks Processes
Configuration Guide Taleo Onboarding FP11B 151
Creating a Condition
Prerequisite
Configuration > Onboarding Administration > Processes
Steps1. Open the process and access the transition.2. Click Create .3. Enter a descriptive name for the condition4. Select a field.5. Based on the selected field, specify the appropriate operators and values.6. Click Save.
Operators
Operator Description
Contains The element, word or number, entered in the Value field must be found anywhere in the field.
For example:
Field: OnboardingProcess/ProcessName
Operator: Contains
Value: Computer Setup
The name of the onboarding process must contain the words "Computer Setup."
Is The element, word or number, entered in the Value field must be exact match for the wholefield.
For example:
Field: AssignmentOffer/Annual Bonus
Operator: Is
Value: 10%
The following task will only be reached if the annual bonus in the offer for this new hire isexactly 10%.
Is null Value field is empty
Is not null Value field is not empty
Is equal to The resulting information must be equal to the numerical value entered in the Value field.
Is not equal to The resulting information must not be equal to the value entered in the Value field.
Is less than The resulting information must be less than the value entered in the Value field.
Is greater than The resulting information must be greater than the value entered in the Value field.
Is less than orequal to
The resulting information must be less than or equal to the value entered in the Value field.
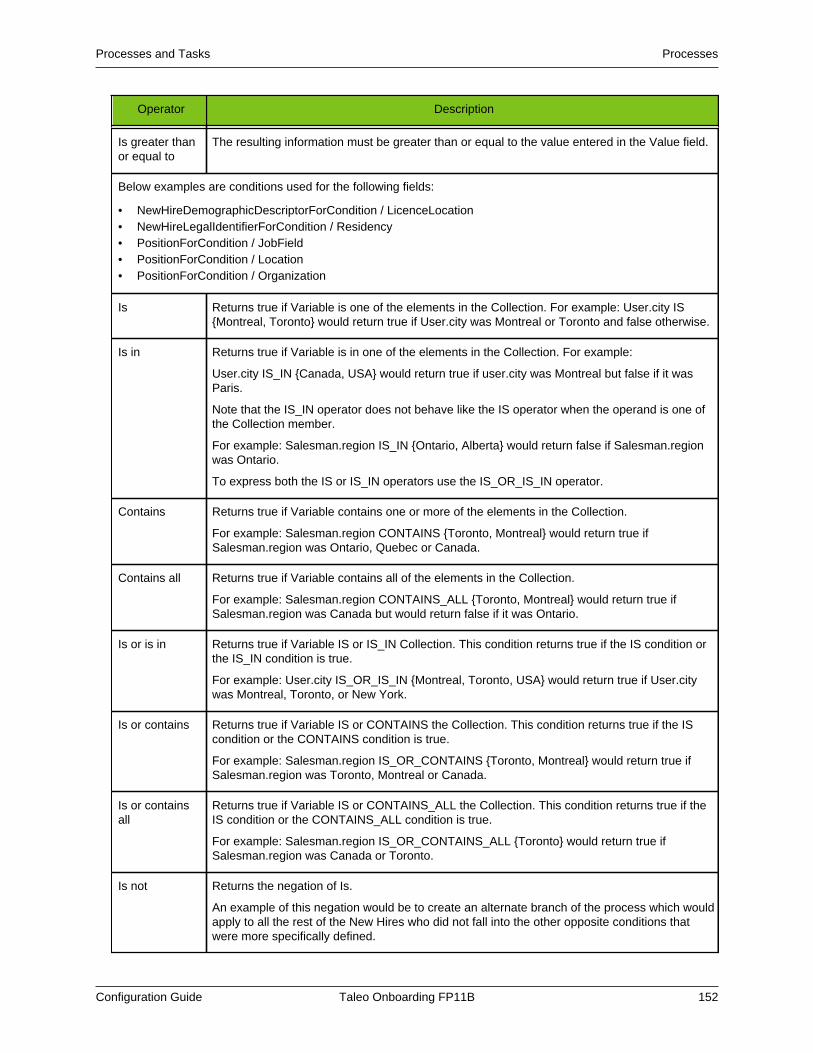
Processes and Tasks Processes
Configuration Guide Taleo Onboarding FP11B 152
Operator Description
Is greater thanor equal to
The resulting information must be greater than or equal to the value entered in the Value field.
Below examples are conditions used for the following fields:
• NewHireDemographicDescriptorForCondition / LicenceLocation• NewHireLegalIdentifierForCondition / Residency• PositionForCondition / JobField• PositionForCondition / Location• PositionForCondition / Organization
Is Returns true if Variable is one of the elements in the Collection. For example: User.city IS{Montreal, Toronto} would return true if User.city was Montreal or Toronto and false otherwise.
Is in Returns true if Variable is in one of the elements in the Collection. For example:
User.city IS_IN {Canada, USA} would return true if user.city was Montreal but false if it wasParis.
Note that the IS_IN operator does not behave like the IS operator when the operand is one ofthe Collection member.
For example: Salesman.region IS_IN {Ontario, Alberta} would return false if Salesman.regionwas Ontario.
To express both the IS or IS_IN operators use the IS_OR_IS_IN operator.
Contains Returns true if Variable contains one or more of the elements in the Collection.
For example: Salesman.region CONTAINS {Toronto, Montreal} would return true ifSalesman.region was Ontario, Quebec or Canada.
Contains all Returns true if Variable contains all of the elements in the Collection.
For example: Salesman.region CONTAINS_ALL {Toronto, Montreal} would return true ifSalesman.region was Canada but would return false if it was Ontario.
Is or is in Returns true if Variable IS or IS_IN Collection. This condition returns true if the IS condition orthe IS_IN condition is true.
For example: User.city IS_OR_IS_IN {Montreal, Toronto, USA} would return true if User.citywas Montreal, Toronto, or New York.
Is or contains Returns true if Variable IS or CONTAINS the Collection. This condition returns true if the IScondition or the CONTAINS condition is true.
For example: Salesman.region IS_OR_CONTAINS {Toronto, Montreal} would return true ifSalesman.region was Toronto, Montreal or Canada.
Is or containsall
Returns true if Variable IS or CONTAINS_ALL the Collection. This condition returns true if theIS condition or the CONTAINS_ALL condition is true.
For example: Salesman.region IS_OR_CONTAINS_ALL {Toronto} would return true ifSalesman.region was Canada or Toronto.
Is not Returns the negation of Is.
An example of this negation would be to create an alternate branch of the process which wouldapply to all the rest of the New Hires who did not fall into the other opposite conditions thatwere more specifically defined.
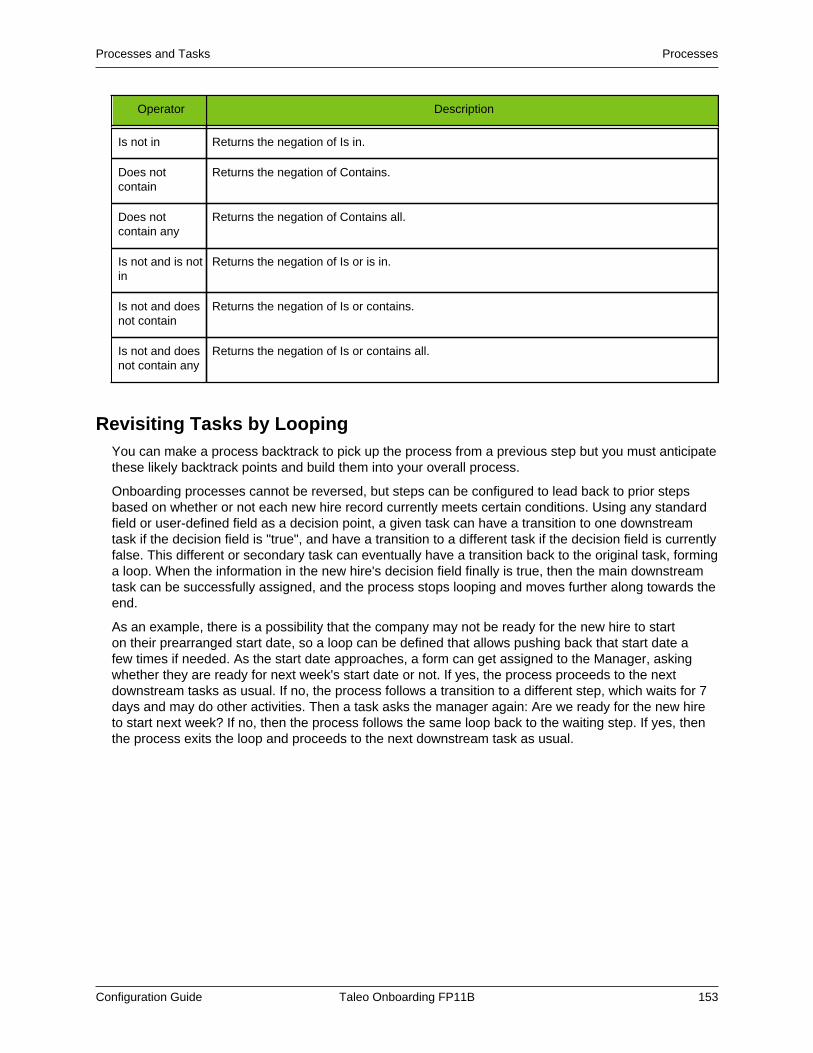
Processes and Tasks Processes
Configuration Guide Taleo Onboarding FP11B 153
Operator Description
Is not in Returns the negation of Is in.
Does notcontain
Returns the negation of Contains.
Does notcontain any
Returns the negation of Contains all.
Is not and is notin
Returns the negation of Is or is in.
Is not and doesnot contain
Returns the negation of Is or contains.
Is not and doesnot contain any
Returns the negation of Is or contains all.
Revisiting Tasks by LoopingYou can make a process backtrack to pick up the process from a previous step but you must anticipatethese likely backtrack points and build them into your overall process.
Onboarding processes cannot be reversed, but steps can be configured to lead back to prior stepsbased on whether or not each new hire record currently meets certain conditions. Using any standardfield or user-defined field as a decision point, a given task can have a transition to one downstreamtask if the decision field is "true", and have a transition to a different task if the decision field is currentlyfalse. This different or secondary task can eventually have a transition back to the original task, forminga loop. When the information in the new hire's decision field finally is true, then the main downstreamtask can be successfully assigned, and the process stops looping and moves further along towards theend.
As an example, there is a possibility that the company may not be ready for the new hire to starton their prearranged start date, so a loop can be defined that allows pushing back that start date afew times if needed. As the start date approaches, a form can get assigned to the Manager, askingwhether they are ready for next week's start date or not. If yes, the process proceeds to the nextdownstream tasks as usual. If no, the process follows a transition to a different step, which waits for 7days and may do other activities. Then a task asks the manager again: Are we ready for the new hireto start next week? If no, then the process follows the same loop back to the waiting step. If yes, thenthe process exits the loop and proceeds to the next downstream task as usual.
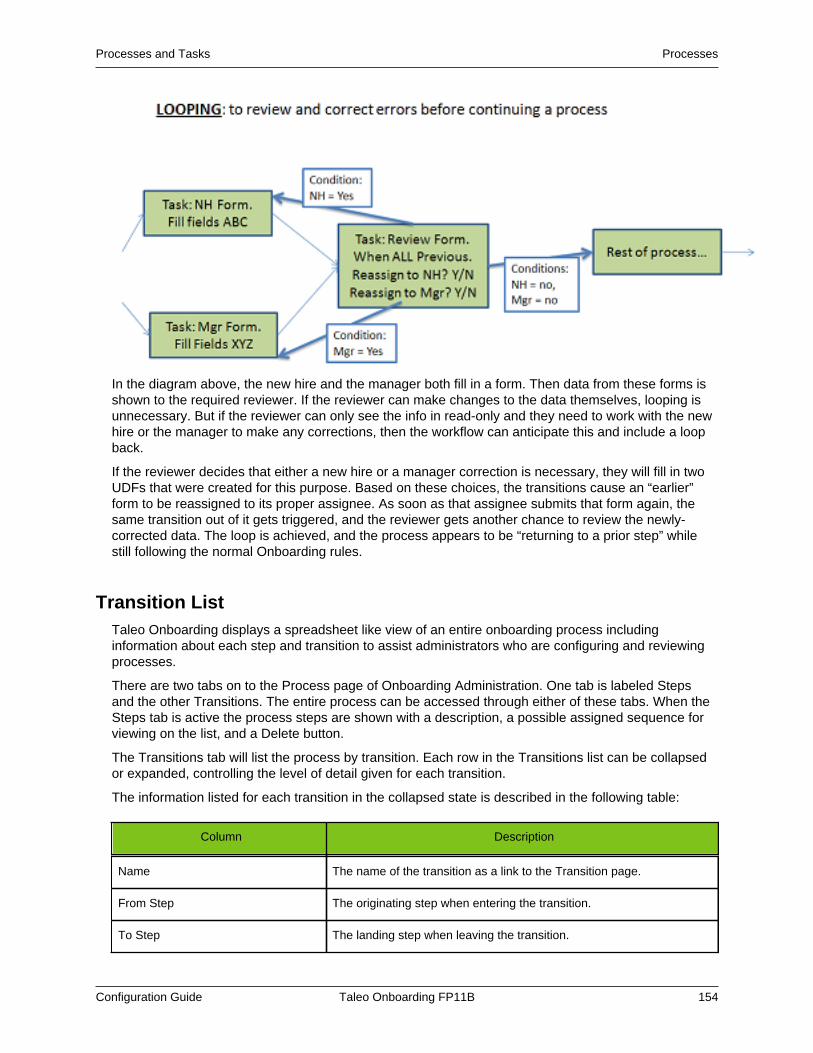
Processes and Tasks Processes
Configuration Guide Taleo Onboarding FP11B 154
In the diagram above, the new hire and the manager both fill in a form. Then data from these forms isshown to the required reviewer. If the reviewer can make changes to the data themselves, looping isunnecessary. But if the reviewer can only see the info in read-only and they need to work with the newhire or the manager to make any corrections, then the workflow can anticipate this and include a loopback.
If the reviewer decides that either a new hire or a manager correction is necessary, they will fill in twoUDFs that were created for this purpose. Based on these choices, the transitions cause an “earlier”form to be reassigned to its proper assignee. As soon as that assignee submits that form again, thesame transition out of it gets triggered, and the reviewer gets another chance to review the newly-corrected data. The loop is achieved, and the process appears to be “returning to a prior step” whilestill following the normal Onboarding rules.
Transition ListTaleo Onboarding displays a spreadsheet like view of an entire onboarding process includinginformation about each step and transition to assist administrators who are configuring and reviewingprocesses.
There are two tabs on to the Process page of Onboarding Administration. One tab is labeled Stepsand the other Transitions. The entire process can be accessed through either of these tabs. When theSteps tab is active the process steps are shown with a description, a possible assigned sequence forviewing on the list, and a Delete button.
The Transitions tab will list the process by transition. Each row in the Transitions list can be collapsedor expanded, controlling the level of detail given for each transition.
The information listed for each transition in the collapsed state is described in the following table:
Column Description
Name The name of the transition as a link to the Transition page.
From Step The originating step when entering the transition.
To Step The landing step when leaving the transition.
Processes and Tasks Processes
Configuration Guide Taleo Onboarding FP11B 155
Column Description
Conditions Possible entries:
• Yes
• No
Required Possible entries:
• All-All conditions must be valid.
• One-At least one of the conditions must be valid.
Actions Deletes the transition.
When the Transition is expanded detailed information is provided for both the originating step and thelanding step that encompass the transition. The information listed for each step when the transition isexpanded is described in the following table:
Row Description
Assignees The name or role of the assignee.
Task The name of the task as a link to the Task Definition page, if not part ofa routing step.
Execute Step Description of when the step will be executed.
After step execution Description of what will occur after the step is executed.
Process Preview is available for a graphic representation of all process in Taleo Onboarding.
Process PreviewOnce a process is created, it is possible to obtain a visual representation of the process by clicking thePreview Process link in the Quick Access box. This system generated flow chart can help you validatethe onboarding process you just created.
The start and the end are automatically generated by the system to help you visualize the transitionsamong your tasks. For any task that has no following or next transition, an End circle is created.Therefore if different parallel branches are created, each of them could have an independent End,unless a later step or task which reunifies the branches downstream has been created.
Transitions with one or multiple conditions are represented with a bold and thick black arrow.Transitions without conditions are represented with a lighter black arrow.
You are urged to preview your developing process often to ensure that any errors can be caught andcorrected.
Processes and Tasks Processes
Configuration Guide Taleo Onboarding FP11B 156
Process Flow Chart Elements
Element Description
Start Circle with arrow to the right
End Circle with arrow with dotted line coming from the left
Tasks Rectangle
Sub Process Rectangle with small rectangle inside
Steps that Split a Process, in which allsteps must be executed before thatstep is executed
Rectangle with right side convex
Steps that Merge a Process, in whichall steps must be executed after thatstep is executed
Rectangle with left side concave
Transition Arrow. It is thin if no condition, thick if conditions applied.
Restarting an Onboarding ProcessThis feature, performed in Taleo Recruiting or Onboarding, enables a user to cancel a process andstart it over. A whole new process is created, all tasks are assigned again, and the old process is givena status of Canceled.
Restarting a process gives the user with the correct user type and permissions, the opportunity tostart an onboarding process over from the beginning. When the new process is created, all the tasksfrom the original process are copied to the new process. All Onboarding forms that were previouslycompleted before the restart can be reviewed, updated if necessary, and submitted.
There are three ways to restart an onboarding process, each with a slightly different effect on the datathat is stored in Onboarding.
• Start the process again from Recruiting with Updated Data, to undo any changes that had beenmade in the prior Onboarding process up to this point.
• Start the process again from Recruiting without Updated Data, which updates only the informationabout Assignment, Position, and Application that are used in Onboarding.
• Restart the process from Onboarding WebTop, which leaves intact all the existing information inOnboarding that had been used in the prior Onboarding process up to this point.
Start the Process Again from Recruiting without Updated Data
Each time a process is started, including when it is started again after the original time, the candidate'scurrent data within the areas of Assignment, Position, and Application are transferred into Onboarding.Any data which had been transferred in at the start of the old process remains associated to thisprocess and the new set of data is associated to the newly restarted process.
Start the Process Again from Recruiting with Updated Data
Using the option Update onboarding data with current recruiting data, the system overwrites all of theCandidate, Experience and Education data fields, as well as the Assignment, Position, and Application
Processes and Tasks Processes
Configuration Guide Taleo Onboarding FP11B 157
areas. All data about the New Hire that may originate from Onboarding, such as forms, previousprocesses, or data that was imported via Taleo Connect Client, prior to performing the cancellation ofthe Onboarding process and starting again, is erased. It will be updated with the information availablein Recruiting at this point, and any field with or without a counterpart in Recruiting will be overwrittenwith the value or with null. Also, even if a user-defined field in Onboarding has no corresponding user-defined field in Recruiting, it will be erased.
When canceling an Onboarding process and restarting it from Recruiting, to preserve all data enteredpreviously on all Onboarding forms and keep it intact, enabling a review of each task to submit them asthey are, do not select the option Update onboarding data with current recruiting data.
Restart the Process from Onboarding WebTop
Cancels the running process and immediately restarts it again for the new hire from the first step.All information that was previously entered into Onboarding for this process is retained and no newinformation is taken from Recruiting. All onboarding forms that were previously completed before therestart can be reviewed, updated if necessary, and submitted.
Restarting a Process from Recruiting
Prerequisite
You must cancel the process in Recruiting before restarting.
Taleo Recruiting > Candidates
Steps
1. Click the name of the appropriate New Hire.
2. From My Actions, select Cancel Onboarding Process.
3. From My Actions, select Start Onboarding Process.
4. Check Start Onboarding and optionally, check Update onboarding data with current recruitingdata.
5. From the drop-down list, select an available Onboarding process and if required, add comments.
6. Click Done.
Restarting a Process from the Onboarding WebTop
Prerequisite
The user has the appropriate user type and permissions to manage Onboarding processes.
Steps
1. Access the New Hire page by clicking on the new hire name.
2. Click Cancel.
Result
Cancels the running process and immediately restarts it again for the new hire from the first step.All information that was previously entered into Onboarding for this process is retained and no newinformation is taken from Recruiting.
Next Step
All onboarding forms that were previously completed before the restart can be reviewed, updated ifnecessary, and submitted.
Processes and Tasks Processes
Configuration Guide Taleo Onboarding FP11B 158
Automatically Delete Old Onboarding ProcessesCompleted and canceled new hire processes can be automatically deleted from Onboarding.
Automatically Delete Old Onboarding Processes is a public setting that Onboarding administrators canconfigure to determine when to delete obsolete new hire processes. These processes are associatedwith a specific new hire and have been either completed or canceled. The administrator determinesthe number of days processes have aged beyond their completion or cancellation date as the criteriafor deletion. The number of days is entered as the setting value, with zero representing no automaticdeletion of processes.
After the initial setting is made, the automatic delete process will run twice per month. At that time, allcompleted and canceled processes that have reached at least the configured age will be automaticallydeleted. Therefore, it is recommended to complete any process-related Taleo Connect exports beforethe setting is configured and saved and again before any other subsequent automatic deletions.Processes that are deleted through the automatic deletion process are not recoverable.
When a new hire's completed or canceled process has reached the defined age value in days it isautomatically deleted. All the associated tasks within that process are also deleted, as are all historyentries related to the process. Personalized PDFs and forms for that new hire will no longer be ableto be generated. However, the new hire's Onboarding user account is not deleted. New hire data isretained in the database and is available for reporting purposes.
Configuration
Setting
Name PossibleValue
DefaultValue
Location
Automatically Delete Old OnboardingProcesses
• 0
• Anynumbervalue
0 Configuration > [Onboarding] Settings
Product Resource Administration
• Resource Administration................................................................................................160
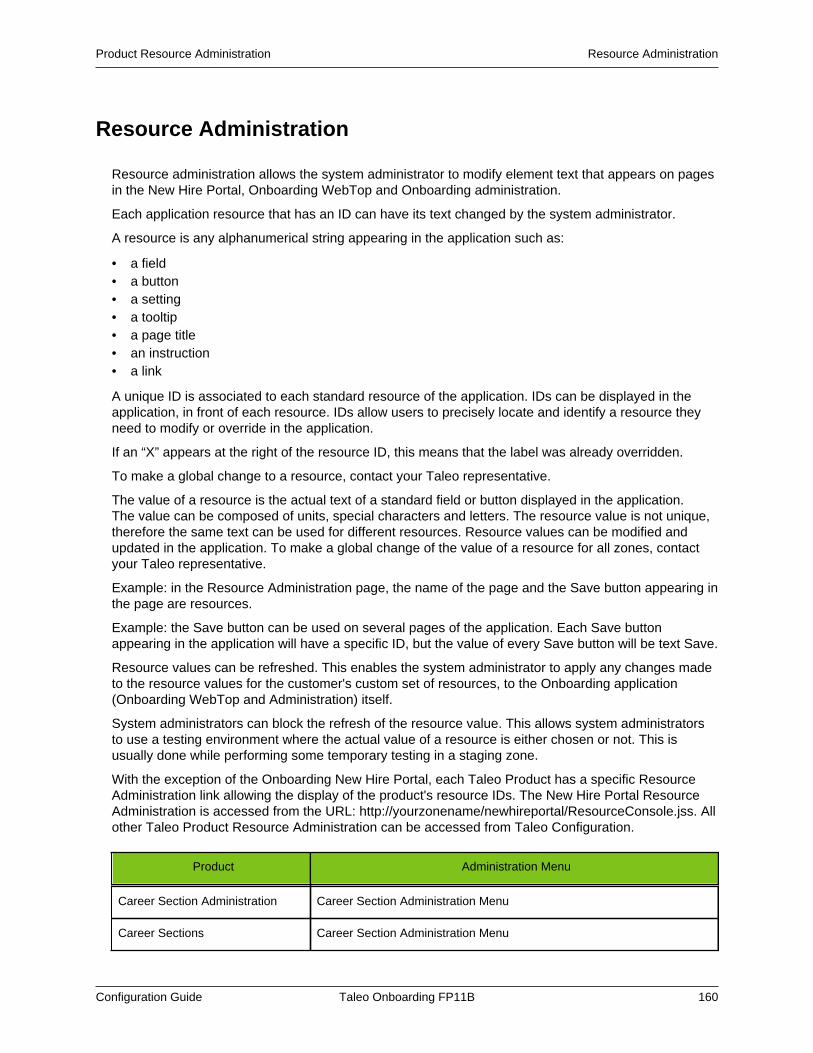
Product Resource Administration Resource Administration
Configuration Guide Taleo Onboarding FP11B 160
Resource Administration
Resource administration allows the system administrator to modify element text that appears on pagesin the New Hire Portal, Onboarding WebTop and Onboarding administration.
Each application resource that has an ID can have its text changed by the system administrator.
A resource is any alphanumerical string appearing in the application such as:
• a field• a button• a setting• a tooltip• a page title• an instruction• a link
A unique ID is associated to each standard resource of the application. IDs can be displayed in theapplication, in front of each resource. IDs allow users to precisely locate and identify a resource theyneed to modify or override in the application.
If an “X” appears at the right of the resource ID, this means that the label was already overridden.
To make a global change to a resource, contact your Taleo representative.
The value of a resource is the actual text of a standard field or button displayed in the application.The value can be composed of units, special characters and letters. The resource value is not unique,therefore the same text can be used for different resources. Resource values can be modified andupdated in the application. To make a global change of the value of a resource for all zones, contactyour Taleo representative.
Example: in the Resource Administration page, the name of the page and the Save button appearing inthe page are resources.
Example: the Save button can be used on several pages of the application. Each Save buttonappearing in the application will have a specific ID, but the value of every Save button will be text Save.
Resource values can be refreshed. This enables the system administrator to apply any changes madeto the resource values for the customer's custom set of resources, to the Onboarding application(Onboarding WebTop and Administration) itself.
System administrators can block the refresh of the resource value. This allows system administratorsto use a testing environment where the actual value of a resource is either chosen or not. This isusually done while performing some temporary testing in a staging zone.
With the exception of the Onboarding New Hire Portal, each Taleo Product has a specific ResourceAdministration link allowing the display of the product's resource IDs. The New Hire Portal ResourceAdministration is accessed from the URL: http://yourzonename/newhireportal/ResourceConsole.jss. Allother Taleo Product Resource Administration can be accessed from Taleo Configuration.
Product Administration Menu
Career Section Administration Career Section Administration Menu
Career Sections Career Section Administration Menu
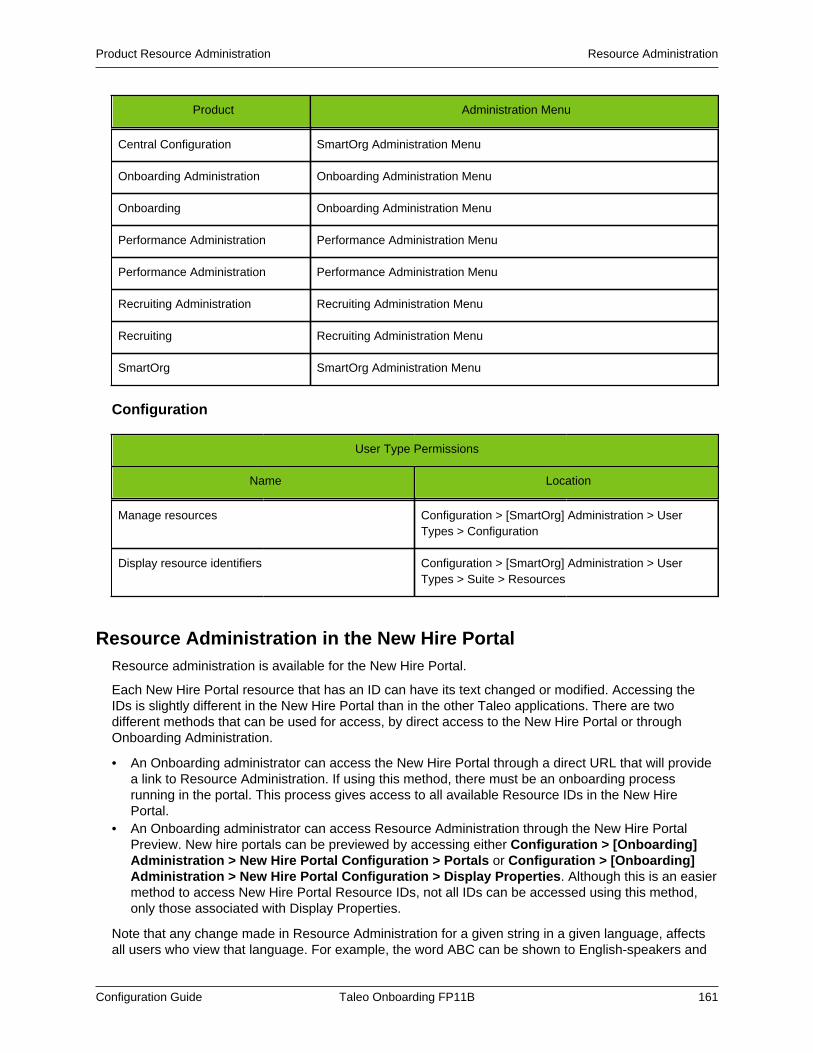
Product Resource Administration Resource Administration
Configuration Guide Taleo Onboarding FP11B 161
Product Administration Menu
Central Configuration SmartOrg Administration Menu
Onboarding Administration Onboarding Administration Menu
Onboarding Onboarding Administration Menu
Performance Administration Performance Administration Menu
Performance Administration Performance Administration Menu
Recruiting Administration Recruiting Administration Menu
Recruiting Recruiting Administration Menu
SmartOrg SmartOrg Administration Menu
Configuration
User Type Permissions
Name Location
Manage resources Configuration > [SmartOrg] Administration > UserTypes > Configuration
Display resource identifiers Configuration > [SmartOrg] Administration > UserTypes > Suite > Resources
Resource Administration in the New Hire PortalResource administration is available for the New Hire Portal.
Each New Hire Portal resource that has an ID can have its text changed or modified. Accessing theIDs is slightly different in the New Hire Portal than in the other Taleo applications. There are twodifferent methods that can be used for access, by direct access to the New Hire Portal or throughOnboarding Administration.
• An Onboarding administrator can access the New Hire Portal through a direct URL that will providea link to Resource Administration. If using this method, there must be an onboarding processrunning in the portal. This process gives access to all available Resource IDs in the New HirePortal.
• An Onboarding administrator can access Resource Administration through the New Hire PortalPreview. New hire portals can be previewed by accessing either Configuration > [Onboarding]Administration > New Hire Portal Configuration > Portals or Configuration > [Onboarding]Administration > New Hire Portal Configuration > Display Properties. Although this is an easiermethod to access New Hire Portal Resource IDs, not all IDs can be accessed using this method,only those associated with Display Properties.
Note that any change made in Resource Administration for a given string in a given language, affectsall users who view that language. For example, the word ABC can be shown to English-speakers and

Product Resource Administration Resource Administration
Configuration Guide Taleo Onboarding FP11B 162
Bon Jour to French speakers; but there is no way to show ABC to an English sales organization andXYZ to an English Research and Development organization.
Configuration
User Type Permission
Name Location
Display resource identifiers Configuration > [SmartOrg] Administration > UserTypes > Suite > Resources
Displaying Resource IdentifiersPrerequisite
The Display Resource Identifiers user type permission is required.
Configuration > [Product] Administration > Resource Administration
Steps
1. Click Show Identifiers.
2. Close this window.
Result
Starting with the next page that is displayed, resource IDs will be displayed in front of each elementof the application.
Displaying Resource Identifiers in the New Hire PortalPrerequisite
The Display Resource Identifiers user type permission is required.
There must be an onboarding process running in the New Hire Portal.
The resource identifiers must be hidden.
Steps
1. Login to the New Hire Portal.
2. Manually change the url in the browser to http://YOURZONENAME/newhireportal/ResourceConsole.jss.
3. Click Show Identifiers4. Click Back or change the url in the browser to http://YOURZONENAME/newhireportal/index.jsf.
Result
Resource IDs will be displayed in front of each element of the New Hire Portal.
Hiding Resource IdentifiersPrerequisite
Resource Identifiers must be displayed.

Product Resource Administration Resource Administration
Configuration Guide Taleo Onboarding FP11B 163
The Display Resource Identifiers user type permission is required.
Configuration > [Product] Administration > Resource Administration
Steps
1. Click Hide Identifiers.
2. Close this window.
Result
Starting with the next page that is loaded, resource IDs will no longer be displayed in front of eachelement of the application.
Hiding Resource Identifiers in the New Hire PortalPrerequisite
The Display Resource Identifiers user type permission is required.
There must be an onboarding process running in the New Hire Portal.
The resource identifiers must be displayed.
Steps
1. Login to the New Hire Portal.
2. Manually change the url in the browser to http://YOURZONENAME/newhireportal/ResourceConsole.jss.
3. Click Hide Identifiers
4. Click Back or change the url in the browser to http://YOURZONENAME/newhireportal/index.jsf.
Result
Resource IDs will no longer be displayed in front of each element of the New Hire Portal.
Refreshing Resource ValuesPrerequisite
The Manage Resources and Display Resource Identifiers user type permissions are required.
Configuration > [Product] Administration > Resource Administration
Steps
1. Click Unblock Refresh.
2. Select the desired type of refresh.
3. Enter the name of the project if necessary.
The project name is associated with revisions made to the customer's custom set of resourcevalues, administered in Taleo's TexTool application.
4. Click Refresh Values.
5. Close this window.
Result
The latest value of the resources is displayed.
Product Resource Administration Resource Administration
Configuration Guide Taleo Onboarding FP11B 164
Blocking Resource Value RefreshPrerequisite
The Manage Resources and Display Resource Identifiers user type permissions are required.
Configuration > [Product] Administration > Resource Administration
Steps
1. Click Block Refresh.
2. Add a comment.
3. Click Save.
4. Close this window.
Result
It will no longer be possible to have the application reflect any changes applied to a value.
Unblocking Resource Value RefreshPrerequisite
The Manage Resources and Display Resource Identifiers user type permissions are required.
Configuration > [Product] Administration > Resource Administration
Steps
1. Click Unblock Refresh.
2. Close this window.
Result
Any changes applied to resource values will be reflected in the application when refreshing thevalues.
Next Step
Refresh resource values.
Network Data
• Network Data Management........................................................................................... 166• Filtering Network Data Elements................................................................................... 167• Activating a Network Data Element...............................................................................168• Activating All Network Data Elements........................................................................... 169• Deactivating a Network Data Element...........................................................................170• Deactivating All Network Data Elements.......................................................................171• Synchronizing the Database with the NDA Central Database.......................................172
Network Data Network Data Management
Configuration Guide Taleo Onboarding FP11B 166
Network Data Management
Network data management gives system administrators limited control over network data elements.
Network data elements are data common to all Taleo products. With network data management,system administrators can activate, deactivate, filter, and synchronize network data elements withinfour network data element categories: certifications, employers, institutions, and programs. The valueswithin each category constitute the network data elements.
Data element synchronization is done between the customer's database and NDA central, the masterdata repository.
Example:
For example, the Employer network data category contains a list of all the companies in the Taleomaster data repository. These companies are network data elements. A system administrator canactivate, deactivate, filter, and synchronize some or all of the companies.
Configuration
The user must have the following user type permission:
User Type Permission
Name Location
Manage Foundation Data Configuration > [SmartOrg] Administration >[Users] User Types
Network Data Filtering Network Data Elements
Configuration Guide Taleo Onboarding FP11B 167
Filtering Network Data Elements
Prerequisite
You must have the Manage Foundation Data user type permission at Configuration [SmartOrg]Administration [Users] User Types.
This task applies to filtering certification, employer, institution, and program network data elements.
Configuration > [SmartOrg] Administration > [Network Data] Certifications/Employers/Institutions/Programs
Steps
1. Select an item in the Refine by list.
The Creation Date is the date the network data element was added to the NDA centraldatabase.
If you filter by Creation Date, click the date and use the calendar to select a specific date.Network data elements created as of the specified date will be listed.
2. Click Refresh.
Result
The filtered items are listed.
Network Data Activating a Network Data Element
Configuration Guide Taleo Onboarding FP11B 168
Activating a Network Data Element
Prerequisite
You must have the Manage Foundation Data user type permission at Configuration [SmartOrg]Administration [Users] User Types.
The status of the network data element must be Inactive.
This task applies to activating certification, employer, institution, and program network dataelements.
Configuration > [SmartOrg] Administration > [Network Data] Certifications/Employers/Institutions/Programs
Steps
Click Activate in the Actions column of the network data element you want to activate.
Result
The status of the network data element changes to Active.
The activated network data element is added to the respective list in Taleo Recruiting, TaleoPerformance, and Taleo Onboarding.

Network Data Activating All Network Data Elements
Configuration Guide Taleo Onboarding FP11B 169
Activating All Network Data Elements
Prerequisite
You must have the Manage Foundation Data user type permission at Configuration [SmartOrg]Administration [Users] User Types.
This task applies to activating certification, employer, institution, and program network dataelements.
Configuration > [SmartOrg] Administration > [Network Data] Certifications/Employers/Institutions/Programs
Steps
1. Filter list if necessary.
2. Click Activate All.
3. Click Yes.
Result
The status of all network data elements in the list changes to Active.
All network data elements are added to the respective list in Taleo Recruiting, Taleo Performance,and Taleo Onboarding.
Network Data Deactivating a Network Data Element
Configuration Guide Taleo Onboarding FP11B 170
Deactivating a Network Data Element
Prerequisite
You must have the Manage Foundation Data user type permission at Configuration [SmartOrg]Administration [Users] User Types.
The status of the network data element must be Active.
This task applies to deactivating certification, employer, institution, and program network dataelements.
Configuration > [SmartOrg] Administration > [Network Data] Certifications/Employers/Institutions/Programs
Steps
Click Deactivate in the Actions column of the network data element you want to deactivate.
Result
The status of the network data element changes to Inactive.
The deactivated network data element is removed from the respective list in Taleo Recruiting, TaleoPerformance, and Taleo Onboarding.
Data elements in lists that were selected before the element was deactivated remain selected.
Network Data Deactivating All Network Data Elements
Configuration Guide Taleo Onboarding FP11B 171
Deactivating All Network Data Elements
Prerequisite
You must have the Manage Foundation Data user type permission at Configuration [SmartOrg]Administration [Users] User Types.
This task applies to deactivating certification, employer, institution, and program network dataelements.
Configuration > [SmartOrg] Administration > [Network Data] Certifications/Employers/Institutions/Programs
Steps
1. Filter list if necessary.
2. Click Deactivate All.
3. Click Yes.
Result
The status of all network data elements in the list changes to Inactive.
All network data elements are removed from the respective list in Taleo Recruiting, TaleoPerformance, and Taleo Onboarding.
Data elements in lists that were selected before the element was deactivated remain selected.
Network Data Synchronizing the Database with the NDA CentralDatabase
Configuration Guide Taleo Onboarding FP11B 172
Synchronizing the Database with the NDA Central Database
Prerequisite
You must have the Manage Foundation Data user type permission at Configuration [SmartOrg]Administration [Users] User Types.
This task applies to synchronizing certification, employer, institution, and program network dataelements.
Configuration > [SmartOrg] Administration > [Network Data] Certifications/Employers/Institutions/Programs
Steps
1. Click Synchronize.
2. Click OK.
Result
An email is sent to you when the synchronization is complete.
When synchronizing institutions, RSLocations are also synchronized because institutions areassociated to RSLocations.