table of contents - the m14 rifle...
TRANSCRIPT


Table of Contents:
Overview of Course.......................................................................2
Safe Handling of a Firearm..........................................................3
Description and Nomenclature....................................................4
Dis-assembly into Three Main Groups........................................9
Assembly of the Three Main Groups.........................................14
Dis-assembly and Assembly of the Barrel and Receiver Group (Field Stripping)...........................................................................15
Dis-assembly and Assembly of the Magazine............................20
Loading the M14 Magazine........................................................23
Function Check............................................................................30
Fundamentals of Marksmanship................................................31
Range Commands and Ready Conditions.................................44
Sight Adjustment.........................................................................48
Cleaning and Maintenance.........................................................54
Becoming an M14 Instructor......................................................66
References.....................................................................................69

Overview of Course The M14 Basic Course was designed primarily to assist shooters, new to the M14, in acquiring basic knowledge of the rifle as well as its mechanical operation.
The course includes the general characteristics of the M14 rifle. Detailed procedures for dis-assembly and reassembly (field stripping), an explanation of its functioning, safe handling, care and maintenance, and basic marksmanship principles of the M14 platform.
Upon completion of the course, the student will have a firm working knowledge of the basics of the M14 rifle system. Those with the desire to become M14 Rifle Instructors, once passed, will have completed one of the required prerequisites for taking the Instructor Course.
Note: Although there are many military and civilian variants of the M14 platform, for our training purposes here, we will focus on the standard rack grade M14 rifle in a semi-automatic configuration ONLY.

Safe Handling of a Firearm Safe handling of the M14 rifle, like any firearm is critical. If proper firearms handling procedures are not followed, we risk our own safety as well as the safety of others. To ensure that only intended targets are engaged, we must all follow these few simple rules.
1. Treat every firearm as if it were loaded. When you take charge of a firearm in any situation, you must treat that firearm as if it were loaded. You must determine its condition and apply the other safety rules on a constant basis.
2. Never point a firearm at anything you do not intend to shoot. Muzzle awareness is a priority at all times.
3. Keep finger extended and away from the trigger until you are ready to fire. Before taking the firearm off of safe, you must identify your target and only then move your finger to the trigger.
4. Keep the firearm on safe until you are ready to fire. This is intended to eliminate the possibility of an accidental discharge.
5. Firearms are never to be handled on the firing line during a cease fire, line break or when anyone is down range. The firearm is to be grounded with an ECI (Empty Chamber Indicator) placed in the chamber.
Note: In addition to the above safety rules, we all should develop a regular habit of performing a safety check each and every time we remove or replace a firearm into its case.

Description and Basic Nomenclature U.S. Rifle, 7.62-MM, M14 Characteristics
Weight:
Length:
Barrel Length:
Operation Type:
Method of Actuation:
Magazine Type:
Magazine Capacity:
Caliber:
M14 Basic Description
9.1 Lbs (no magazine)
44.3 in
22.0 in
Rotating Bolt
Gas Operation
Box, Detachable
20
7.62x51mm NATO
The 7.62-MM, M14 rifle and rifle bipod M2 are described as follows:
The U.S. Rifle 7.62-MM, M14 rifle is a light weight, air cooled, gas operated, magazine fed, shoulder fired weapon, designed primarily for semi-automatic or full automatic fire at the cyclic rate of 750 rounds per minute.
The rifle is chambered for the 7.62x51mm NATO cartridge and is designed to accommodate a 20-round box type magazine, the rifle bipod M2, grenade launcher M76, and the bayonet knife M6. The grenade launcher sight M15 is also installed when the grenade launcher is used.

Magazines There are many manufacturers of M14 magazines including several different types and capacities. There are those made for the military as well as the civilian market.
For the military, M14 magazines typically were made with a 20- round capacity, however, there were 7-round capacity magazines developed by the Army Marksmanship Training Unit (AMTU) for use with the M21 sniper rifles used during Vietnam. The need for a shorter magazine was necessary to assist with concealment as the larger 20-round magazine would force the shooter to rise up more from concealment risking the enemy seeing his location.
In the civilian market, the different capacities for the M14 magazines are 5, 10, 15, 20, and 25 round capacities. (5 rd and 15 rd not shown)Most were made using the traditional steel box type, but a few others were made from a synthetic material.

For our course training purposes, we will discuss only the 20- round box magazine as it is the most common type.
Note: Disassembly and assembly of the M14 type magazine will be discussed in its own section further into this course.

U.S. Rifle M14 Nomenclature
For the purposes of this course, universal nomenclature that applies to the rack grade versions of both U.S. Rifle and to its civilian counterpart.


Dis-assembly into Three Main Groups The three main groups (sub-assemblies) are the barrel and receiver, stock and firing mechanism (trigger group).
Perform a safety check and make sure there is not a round in the chamber. Check it again!
Start by removing the magazine from the rifle.
After the rifle has been verified clear, the operating parts should be in the forward position for dis-assembly and the hammer in the cocked position.
To do this, pull back on the operating rod handle, pulling the bolt to the rear. Allow the bolt to return to the closed position. You can assist it forward with the forward motion of the operating rod.
Note: DO NOT let the operating rod slam home on an empty chamber! Severe damage can occur to the rifle. Always assist the bolt forward with your hand on the operating rod handle when NOT placing the rifle into Condition 1. The recommended use of a dry firing device or dummy rounds should be utilized for dry firing practice or for function tests.

Magazine removal.
Pulling the operating rod handle to the rear.

Assisting the operating rod and bolt into the forward position.
Pull down on the trigger guard.

Removal of the trigger group.
Utilizing two different tools for releasing a tight trigger guard.

Separate the barrel and receiver form the stock by laying the weapon on a flat surface with the sights up and the muzzle to the left. Grasp the receiver with your left hand over the rear sight and raise the rifle a few inches. With your right hand, strike down on and grasp the small of the stock, separating the barrel and receiver from the stock.
The separation of the barreled receiver group from the stock.

Assembly of the Three Main Groups Lay the barrel and receiver group on a flat surface, sights down. Pick up the stock group and engage the stock ferrule in the front band, then lower the stock into the barrel and receiver assembly.
Open the trigger guard and place the trigger group straight down into the receiver, making sure that the guard rib on the firing mechanism enters the recess in the receiver. Place the butt of the weapon on the left thigh, sights to the left, insuring the trigger guard has cleared the trigger. With the palm of your right hand, strike the trigger guard fully engaging it to the receiver.

Disassembly of the Barrel and Receiver Group (Field Stripping) Removing the Operating Rod Spring and Operating Rod Guide.
Place the barrel and receiver group on a flat surface, sights down, muzzle to the left (utilize a block of wood to support the receiver to prevent stress or damage to the rear sight, as pictured below). With your left hand, pull towards the muzzle on the operating rod spring to relieve pressure on the connector lock. With your forefinger or a small flat blade screwdriver, pull the connector lock toward you.
Allow the operating rod spring to slowly expand, disconnect and remove the operating rod spring guide by pulling upwards. Remove and separate from the operating rod.

Removing the Operating Rod
Turn the barrel and receiver group so the sights are up and the muzzle is pointing away from you. Pull back on the operating rod handle until the guide lug on its inside surface is aligned with the dis-assembly notch on the right side of the receiver, (the dis-assembly notch is located just below the windage knob). Rotate the operating rod downward and outward, then pull it to the rear, disengaging it from the operating rod guide.

Removing the Bolt
Grasp the bolt by the roller and while sliding it forward, lift it upward and outward to the right front with a slights rotating motion.

This completes the basic dis-assembly (field stripping) procedure.

Assembly of the Barrel and Receiver Group Replacing the Bolt
Place the barrel and receiver on the table, sights up, muzzle pointing away from you. Hold the bolt by the roller and locking lug and place the rear of the bolt on the bridge of the receiver. The firing pin tang should be pointed down and just above the notch in the receiver bridge. Turn the bolt slightly counterclockwise until the tang of the firing pin clears the bridge. Guide the left locking lug of the bolt into its groove on the left side of the receiver. Lower the right locking lug in its bearing surface and slide the bolt halfway to the rear.
Replacing the Operating Rod
Holding the operating rod at the handle, place the front end into the operating rod guide, and position the rod so that the recess in the hump fits over the bolt roller. Turn the operating rod to the left until the guide lug lifts into the dis-assembly notch on the receiver. Move the operating rod forward until the bolt is in the closed position.
Replacing the Operating Rod Spring Guide and Spring
Turn the barrel and receiver over so the sights are down and the muzzle is to the left. Place the operating rod spring into the operating rod spring, hump up, and feed the loose end of the spring into the operating rod. Grasp the spring and guide with the left hand and compress the spring until the hole in the guide can be aligned with the connector lock. Lower the guide and push the connector lock in with your right thumb.

Dis-assembly and Assembly of the Magazine Dis-assembly
Use a pointed object to raise the rear of the magazine base until the indentation on the base is clear of the magazine. Grasp the magazine with either hand, with one finger of the hand covering the base. Remove the base and guide the spring, one coil at a time, to clear the retaining lips of the magazine.
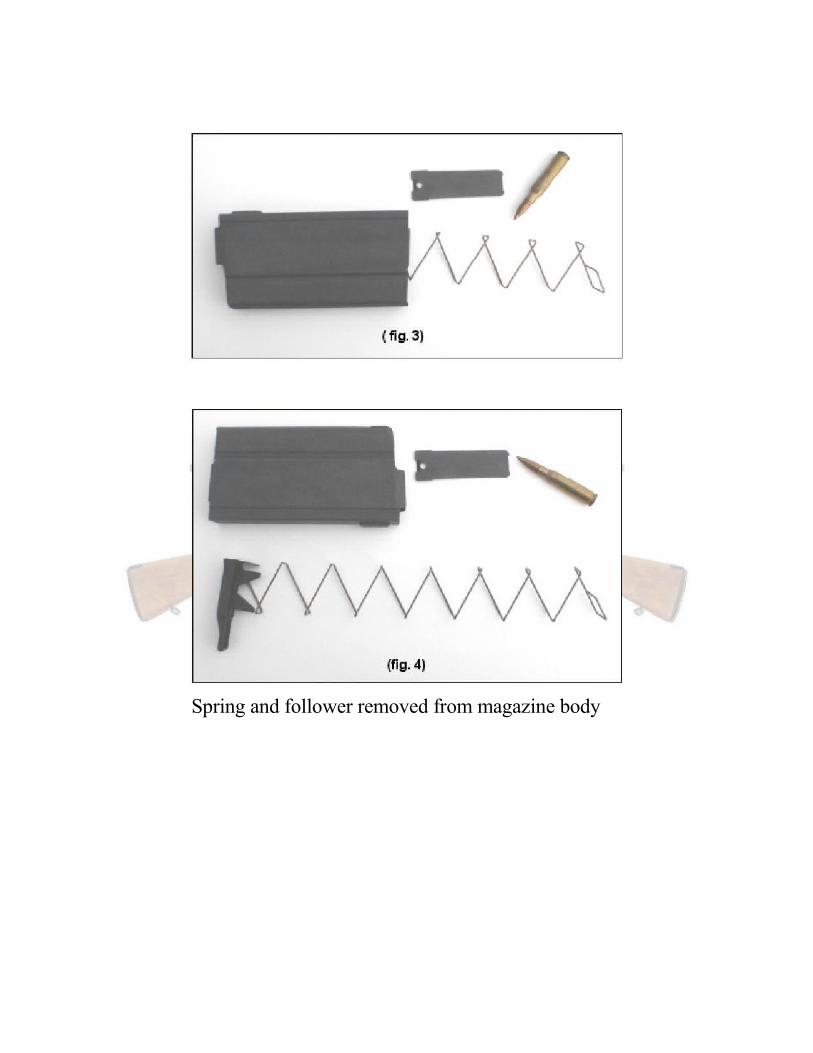
Spring and follower removed from magazine body

Assembly of the Magazine
Reposition the spring inside the follower with the rectangular shaped end of the spring against the rear of the follower. Replace the follower and spring inside the magazine body. Feed the spring around the retaining tabs on each side of the magazine body. Be sure to fully seat the follower against the bottom of the feed lips at the top of the magazine. Continue feeding the spring under the retaining tabs until it completely rests under the tabs. Replace the magazine base plate, making sure it sits between the spring and retaining tab, until the base locking tab snaps inside the back edge of the magazine body.
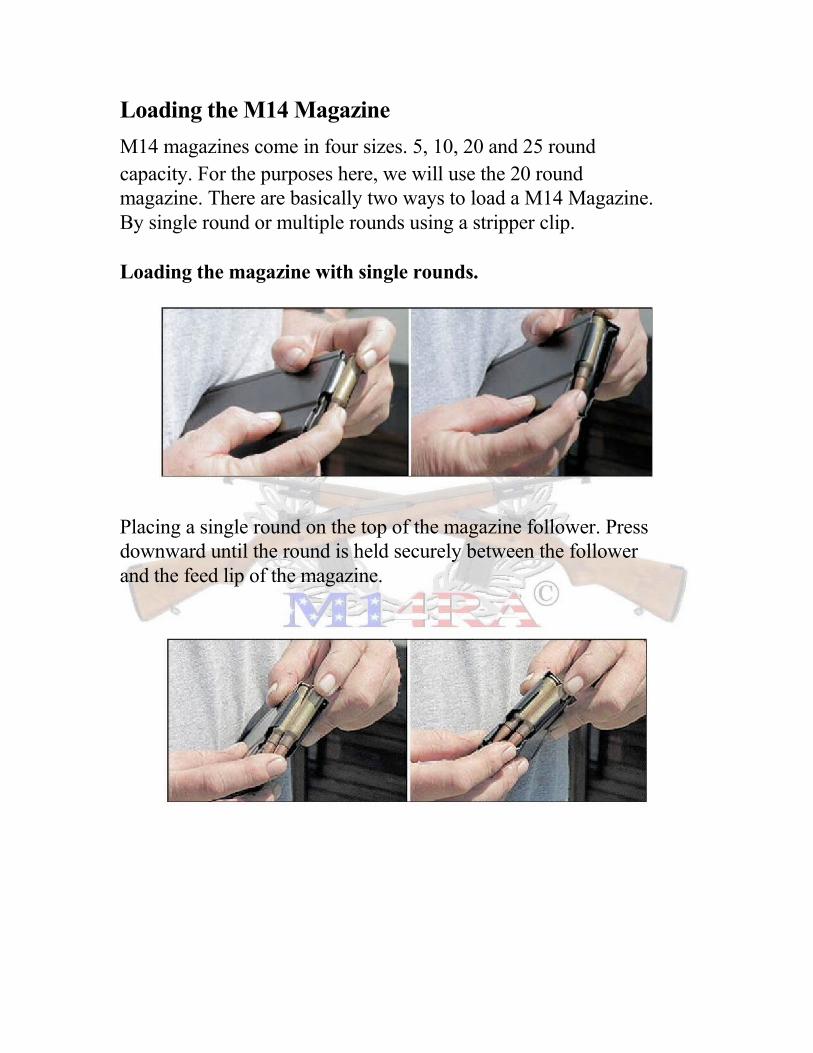
Loading the M14 Magazine M14 magazines come in four sizes. 5, 10, 20 and 25 round capacity. For the purposes here, we will use the 20 round magazine. There are basically two ways to load a M14 Magazine. By single round or multiple rounds using a stripper clip.
Loading the magazine with single rounds.
Placing a single round on the top of the magazine follower. Press downward until the round is held securely between the follower and the feed lip of the magazine.

Repeat this process until the desired number of rounds are loaded into the magazine. Once loaded, tap the back of the magazine against the palm of your hand to ensure the rounds are seated against the back of the magazine.
Loading the Magazine using Stripper Clips
A loaded M14 Stripper Clip
Loading an M14 magazine by use of stripper clips, requires the use of a charger clip, also known as a spoon.

Place the charger clip onto the back of the magazine as shown below.
Place a loaded stripper clip into the charger as shown below.

Using thumb pressure on the rear of the top round, press downward firmly until all 5 rounds are securely below the feed lips of the magazine.
Remove the empty stripper clip while holding the charger clip in place, and save as they can be reused. Repeat this procedure until the magazine is full. Once completed, remove the charger clip and retain for future use.
Tap the back of the magazine against the palm of your hand to ensure the rounds are seated against the back of the magazine.

NOTE: Magazines may also be loaded while inserted into the receiver with the same two methods. However, the stripper clip method does not require the use of the charger as there is a stripper clip guide attached to the receiver.
Utilizing the stripper clip guide on the receiver, insert a loaded stripper clip into the top of the receiver.

Press downward firmly until all 5 rounds are securely below the feed lips of the magazine.
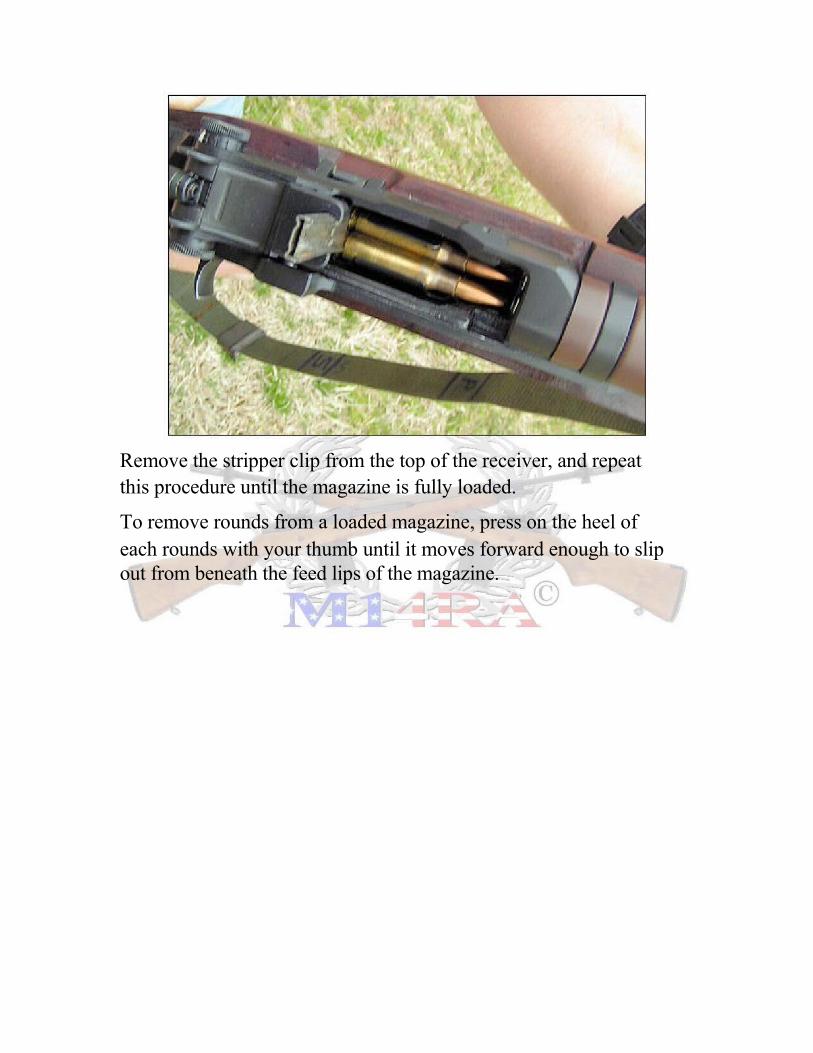
Remove the stripper clip from the top of the receiver, and repeat this procedure until the magazine is fully loaded.
To remove rounds from a loaded magazine, press on the heel of each rounds with your thumb until it moves forward enough to slip out from beneath the feed lips of the magazine.

Function Check A function check is performed to ensure the rifle operates properly. To perform a function check:
Note: All safety rules apply.
1. Place the rifle in Condition 4 (See section on Range Commands and Ready Conditions)
2. Pull the operating rod rearward and release allowing the bolt to go home. Ensure the safety is in the ON position and pull the trigger. The hammer SHOULD NOT fall.
3. Pull the operating rod rearward and release. Place the safety in the OFF position and pull the trigger. The hammer SHOULD fall.
4. Pull the operating rod handle rearward and release. Place the safety in the ON position.

Fundamentals of Marksmanship The fundamentals of marksmanship are aiming, breath control, and trigger control. These fundamentals provide the foundation for all marksmanship principles and skills. These skills must be developed so that they are applied instinctively. At longer ranges, the target is smaller and a more precise shot is required to accurately engage the target. The fundamentals are more critical to accurate engagement as the range to the target increases. To be accurate at longer ranges, the shooter must take the time to slow down and accurately apply the fundamentals. As the size of the target increases, and the distance to the target decreases, the fundamentals, while still necessary, become less critical to accuracy. The shooter must apply proper aiming, breathing, and trigger control techniques without hesitation.
Sight Alignment Sight alignment is the relationship between the front sight post and rear sight aperture and the aiming eye. This relationship is the most critical to aiming and must remain consistent from shot to shot. To achieve correct sight alignment center the tip of the front sight post vertically and horizontally in the rear sight aperture. Imagine a horizontal line drawn through the center of the rear sight aperture. The top of the front sight post will appear to touch this line. Imagine a vertical line drawn through the center of the rear sight aperture. The line will appear to bisect the front sight post.
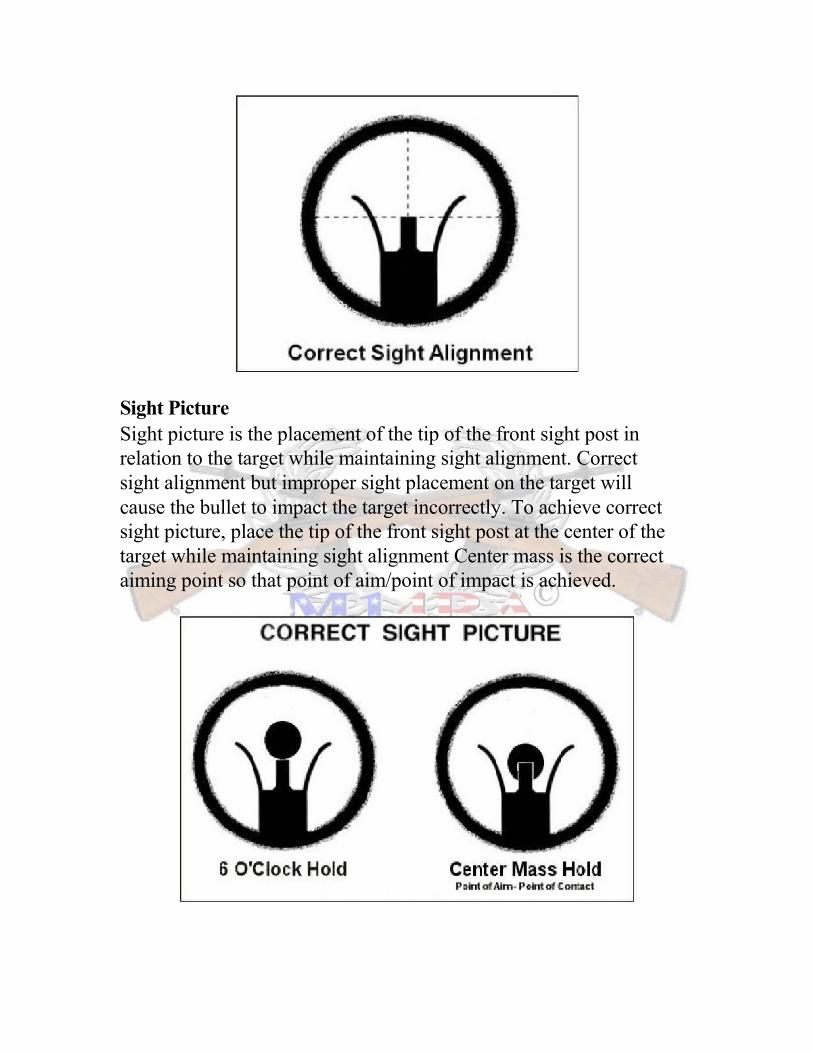
Sight Picture Sight picture is the placement of the tip of the front sight post in relation to the target while maintaining sight alignment. Correct sight alignment but improper sight placement on the target will cause the bullet to impact the target incorrectly. To achieve correct sight picture, place the tip of the front sight post at the center of the target while maintaining sight alignment Center mass is the correct aiming point so that point of aim/point of impact is achieved.

Importance of Correct Sight Alignment. A sight alignment error results in a misplaced shot. The error grows proportionately greater as the distance to the target increases. An error in sight picture, however, remains constant regardless of the distance to the target.
Factors Affecting Sight Alignment and Sight Picture Stock Weld
Stock weld is the firm point of contact between the cheek and the stock of the rifle.

The head should be as erect as possible to enable the aiming eye to look straight through the rear sight aperture. If the position of the shooter's head causes him to look across the bridge of his nose or out from under his eyebrow, the eye will be strained. The eye functions best in its natural forward position. Changing the placement of the cheek up or down on the stock from shot to shot may affect the zero on the rifle due to the perception of the rear sight aperture. A consistent and proper stock weld is critical to the aiming process because it provides consistency in eye relief which affects the ability to align the sights.
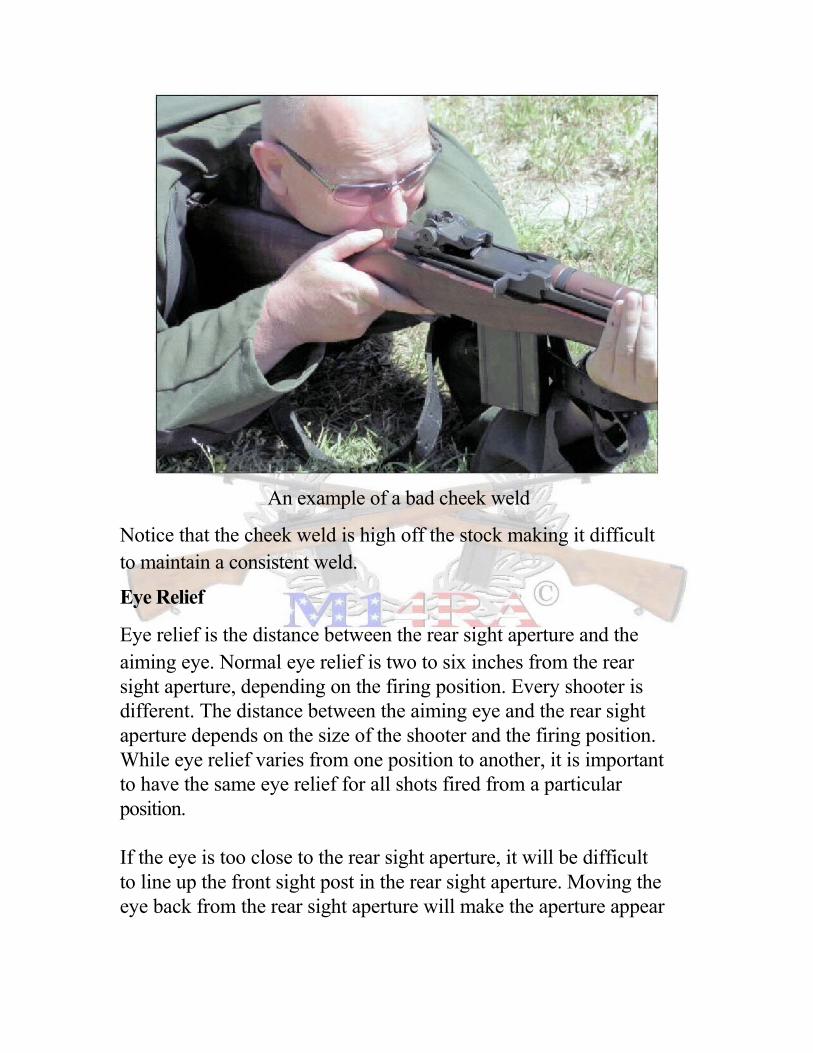
An example of a bad cheek weld
Notice that the cheek weld is high off the stock making it difficult to maintain a consistent weld.
Eye Relief
Eye relief is the distance between the rear sight aperture and the aiming eye. Normal eye relief is two to six inches from the rear sight aperture, depending on the firing position. Every shooter is different. The distance between the aiming eye and the rear sight aperture depends on the size of the shooter and the firing position. While eye relief varies from one position to another, it is important to have the same eye relief for all shots fired from a particular position.
If the eye is too close to the rear sight aperture, it will be difficult to line up the front sight post in the rear sight aperture. Moving the eye back from the rear sight aperture will make the aperture appear

smaller and allow the tip of the front sight post to be easily lined up inside the rear sight aperture.
Correct eye relief
If the eye is too far from the rear sight aperture, it will be difficult to acquire the target and to maintain a precise aiming point.

Incorrect eye relief

Note: Wearing glasses can alter the perception of sight alignment and sight picture. If wearing glasses, it is critical to look through the optic center of the lens.
Acquiring and Maintaining Sight Alignment and Sight Picture
The human eye can focus clearly on only one object at a time. For accurate shooting, it is important to focus on the tip of the front sight post the second the shot is fired. When the shot is fired, focus must be on the tip of the front sight post. Secondary focus will include the rear sight and the target. The rear sight and the target will appear blurry. To stare or fix the vision on the front sight post for longer than a few seconds can distort the image, making it difficult to detect minute errors in sight alignment.
Proper stock weld and placement of the butt of the rifle in the shoulder aids in establishing sight alignment quickly. The rifle butt's placement in the shoulder serves as the pivot point for presenting the rifle upward to a fixed point on the cheek (stock weld). The shooter will look at the target as the rifle is presented. As the rifle sights become level with the aiming eye, the shooter visually locates the target through the rear sight aperture. As the rifle settles, the shooter's focus shifts back to the front sight post to place the tip of the post on the target and obtain sight alignment and sight picture. To maintain sight alignment and sight picture, the shooter's focus should shift repeatedly from the front sight post to the target until correct sight alignment and sight picture are obtained. This enables the detection of minute errors in sight alignment and sight picture.
Breath Control
Proper breath control is critical to the aiming process. Breathing causes the body to move. This movement transfers to the rifle making it impossible to maintain proper sight picture. Breath control allows the shooter to fire the rifle at the moment of least movement.

Breath Control During Precision Fire (Slow Fire). It is critical that shooters interrupt their breathing at a point of natural respiratory pause before firing a precision shot from any distance. A respiratory cycle lasts 4 to 5 seconds. Inhaling and exhaling require about 2 seconds each. Between each respiratory cycle there is a natural pause of 2 to 3 seconds. The pause can be extended up to 10 seconds. During the pause, breathing muscles are relaxed and the sights settle at their natural point of aim. To minimize movement, the shooter must fire the shot during the natural respiratory pause. The basic technique is as follows:
A. Breathe naturally until the sight picture begins to settle. B. Take a slightly deeper breath. C. Exhale and stop breathing at the natural respiratory pause. D. Fire the shot during the natural respiratory pause.
Note: If the sight picture does not sufficiently settle to allow the shot to be fired, resume normal breathing and repeat the process.
Trigger Control Trigger control is the skillful manipulation of the trigger that causes the rifle to fire without disturbing sight alignment or sight picture. Controlling the trigger is a mental process, while pulling the trigger is a mechanical process.
A firm grip is essential for effective trigger control. The grip is established before starting the application of trigger control and it is maintained through the duration of the shot. Once established, the grip should be firm enough to allow manipulation of the trigger straight to the rear without disturbing the sights.

Trigger Finger Placement
Correct trigger finger placement allows the trigger to be pulled straight to the rear without disturbing sight alignment. The trigger finger should contact the trigger naturally. The trigger finger should not contact the rifle receiver or trigger guard.
Types of Trigger Control
There are two techniques of trigger control: uninterrupted and interrupted. The preferred method of trigger control is uninterrupted trigger control. After obtaining sight picture, the shooter applies smooth, continuous pressure rearward on the trigger until the shot is fired.
Interrupted Trigger Control. Interrupted trigger control is used in extremely windy conditions when the weapon will not settle, forcing the shooter to pause until the sights return to his aiming point. To perform interrupted trigger control:
A. Move the trigger to the rear until an error is detected in the aiming process. B. When this occurs, stop the rearward motion on the trigger but maintain the pressure on the trigger until sight picture is achieved. C. When the sight picture settles, continue the rearward motion on the trigger until the shot is fired.
Resetting the Trigger
During recovery, release the pressure on the trigger slightly to reset the trigger after the first shot is delivered (indicated by an audible click). Do not remove the finger from the trigger. This places the trigger in position to fire the next shot without having to reestablish trigger finger placement. Follow-through is the continued application of the fundamentals until the round has exited the barrel. Follow-through is important

to avoid altering the impact of the round by keeping the rifle as still as possible until the round exits the barrel.
A great way to remember is to use the B.R.A.S.S. method
Breathe Relax Aim Slack Squeeze
Recovery
It is important to get the rifle sights back on the target for another shot. This is known as recovery. Shot recovery starts immediately after the round leaves the barrel. To recover quickly, a shooter must physically bring the sights back on the target as quickly as possible.
Note: The ability to call your shot is important. As an example, if you called the shot at 5 o'clock and just out of the black. Then when you check the target and that is where the bullet hit, the shot wasn't a bad. The shot actually went where it was told to go. You just need to focus better on sight alignment and do the 6 steps required to put the shot in the center.
Natural Point of Aim
The point at which the rifle sights settle when in a firing position is called natural point of aim. When the shooter is in position with sight alignment, the position of the front sight post will indicate his natural point of aim.
Since the rifle becomes an extension of the shooter's body, it is necessary to adjust the position until the tip of the front sight post settles naturally on the center mass of the target. The shooter being

firmly in position, however the shooter will be relaxed with no muscle tension trying to bring the sights into alignment with the target.
Techniques for Adjusting Natural Point of Aim
Once the shooter is in position and aimed in on his target, a method of checking for the natural point of aim is for the shooter to close his eyes, take a couple of breaths, and relax as much as possible. Upon opening his eyes, the shooter should see his front sight post positioned center mass.
If the rifle sights are above or below the desired aiming point: Vary the placement of the support hand in relation to the hand guards.
A. Moving the support hand forward on the hand guards lowers the muzzle of the weapon, causing the sights to settle lower on the target.
B. Moving the support hand back on the hand guards raises the muzzle of the weapon, causing the sights to settle higher on the target.
C. Vary the placement of the stock in the shoulder.
D. Moving the stock higher in the shoulder lowers the muzzle of the weapon, causing the sights to settle lower on the target.
E. Moving the stock lower in the shoulder raises the muzzle of the weapon, causing the sights to settle higher on the target.
If the rifle sights are to the right or left of the desired aiming point, move the entire position of the body in relation to the target. In addition, the desired effect is to move the support hand and keep the stock firmly in the shoulder, if at all possible.

Acquiring Natural Point of Aim
Natural point of aim can be easily obtained during slow fire because the shooter has time to readjust his position. The shooter must be able to quickly assume a position that simultaneously establishes natural point of aim. Natural point of aim can be quickly acquired through practice in assuming positions during dry fire.
The key to establishing natural point of aim in the prone, sitting, and kneeling positions is placement of the forward (or support) elbow. The forward elbow pad serves as a pivot point for establishing the positions. For example, the placement of the feet is not important when standing prior to assuming a prone position in rapid fire. What is important is placement of the forward elbow of the support arm in the same position where natural point of aim was previously established.

Range Commands and Ready Conditions
Range Commands dictate the specific steps to safely load and unload the service rifle/carbine. Six commands are used in weapons handling:
A. "Load": The command used to take a firearm from Condition 4 to Condition 3.
B. "Make Ready": The command used to take a firearm from Condition 3 to Condition 1.
C. "Fire": The command used to specify when shooters may engage targets.
D. "Cease Fire": The command used to specify when shooters must stop target engagement.
E. "Unload": The command used to take a firearm from any condition to Condition 4.
F. "Unload", Show Clear": The command used to require that a second individual check the firearm to verify that no ammunition is present before the rifle is put into Condition 4.
Procedures to Execute the Range Commands
Each command has its own procedures to take the rifle through the firearm Conditions in order to ensure safe operations and handling.
A. Unload: On the command "Unload," perform the following steps to take the rifle from any condition to Condition 4:
1. Ensure the rifle is on safe

2. Remove the magazine from the rifle and retain it on your person.
3. Bring your left hand back to a point just forward of the magazine well, supporting the rifle in the palm of your hand. 4. Pull the charging handle to the rear and let the round eject on the deck.
5. Lock the bolt to the rear
6. Put the rifle on safe now if it would not go on safe earlier.
7. Ensure the chamber is empty and no ammunition is present.
8. Insert a ECI (empty chamber indicator) into the empty chamber.
9. Release the bolt stop and gently ride the bolt forward gently until it rests on the ECI.
Load: On the command "Load," perform the following steps to take the rifle from Condition 4 to Condition 3:
1. Ensure the rifle is on safe
2. Fully insert the magazine into the magazine well and, without releasing the magazine, tug rearward on the magazine to ensure it is seated.
Make Ready: On the command "Make Ready," perform the following steps to take the rifle from Condition 3 to Condition 1:
1. Pull the charging handle fully to the rear and release.
There are two methods for chambering a round:
1. Press downward on the bolt stop, allowing the bolt to go into battery.
2. Or pull the charging with the right hand.
Fire: On the command "Fire," perform the following steps:
1. Aim the rifle, take the rifle off Safe, and squeeze the trigger.
Cease Fire: On the command "Cease Fire," perform the following:
1. Place the weapon on Safe
2. Place your trigger finger straight along the receiver.
Unload, Show Clear: On the command "Unload, Show Clear," perform the following steps t o take the rifle from any condition to
Condition 4: 1. Ensure the rifle is on safe
2. Remove the magazine from the rifle.
3. bring your left hand back to a point just forward of the magazine well, supporting the rifle in the palm of your hand.
4. Pull the charging handle to the rear and let the round eject on the deck.
5. Lock the bolt to the rear.

6. Put the rifle on safe now if it would not go on safe earlier.
7. Inspect the chamber and insert a ECI to ensure it is empty and no ammunition is present. Ride the bolt forward gently until it rests on the ECI.
8. Have a second party inspect the rifle to ensure no ammunition is present.
9. After receiving verification that the rifle is clear, release the bolt stop and gently let the bolt go into battery.
Note: On some bigger ranges you may also hear several commands giving instructions as to the loading of a single round or magazine. You may also hear the commands, Ready on the left.....Ready on the right........Ready on the firing line.

Sight Adjustment With a knowledge of shot technique, proper use of the sling, how to get into a stable prone position, and after some dry firing practice (snapping in) the new shooter is ready for live firing in the prone position on the range. As soon as you begin live firing activities, you will need to know how to adjust your sights to place your shot groups in the middle of the target. This is known as "zeroing" your rifle.
In order to properly zero your rifle, the new shooter must understand some basic concepts concerning the zeroing of a rifle.
Why Zeroing is Important A series of shot fired by any shooter, whether a raw beginner or a Distinguished Rifleman, will form a shot group on the target. The better the shooter the smaller the shot groups, but no matter how large or small the shot group is on the target, the relation of the shot group to the center of the target is equally as important.
Zeroing This is the process of adjusting the sights on the rifle so that shot groups fired by a shooter with that particular rifle are centered on the target.
Zero The windage and elevation sight settings on a zeroed rifle, where its shot groups are centered, is its zero. Experienced shooters know that it is important to record these sight settings or zeroes for their rifles.
Starting Point The process of zeroing a military rifle usually begins by placing an initial sight setting on the rear sight. With the

M14, the windage adjustment should be set at "0" and the elevation adjustment should be moved up 10-12 clicks from the bottom.
Sights Tight A common problem in zeroing is trying to fire with a rifle that has a loose front or rear sight. Check to be sure they are tight and tighten if necessary. The M14 sight should be tight enough that you cannot place your thumb on an elevated sight aperture and push it down into it's base, yet not so tight that you cannot turn the windage knob.
Zeroing Rifles
Sight Adjustment Principle The fundamental principle of sight adjustment that governs all zeroing procedures is that you must move the rear sight aperture in the same direction that you want to move the shot group on the target. In the illustration above, the shot group is low and right and must be shifted up and to the left to zero the rifle. In this case, the rear sight aperture must be moved up and to the left to center the next shot group on the target. Moving a shot group up or down on a target is called making elevation adjustments. Moving a shot group left or right on a target is called making windage adjustments.
M14 Sight Operation During the period of instruction the term "push" or "rotate" will be used to simplify everything as we use it in our daily lives. Sights adjust in "clicks", each click moves the strike of the bullet 1 inch at 100 yards/meters. Shot groups move same direction as sight adjustments move the rear aperture.
WINDAGE KNOB: Turning/rotating the knob towards the muzzle or forward moves the bullet impact to the right. Pulling/rotating the knob back towards the shooter moves bullet

impact to the left.
ELEVATION KNOB Turning/rotating forward lowers bullet impact or return to zero, pulling/rotating back to raise bullet impact.
To zero your M14 you first need to understand how the M14 rear sight works.
This sight is a well-designed sight with one-minute of angle "clicks." Rifle shooters speak in the term of "minutes of angle" when referring to elevation or windage changes. At 100 yards "one minute" equals approximately 1.0 inch, 200 yards equals 2.0 inches and so on for longer yardage. On the M14 sight, when the rifle is "zeroed," it is possible to count the number of clicks back to the start point (0 elevation, 0 wind) and record this setting so that the rifle's zero can be reset for a subsequent firing activity.
Elevation Adjustment A sight's elevation knob moves the point of impact up or down on the target. The M14's elevation knob is located on the left side of the sight. To increase the elevation setting or raise the point of impact on the target, place the thumb on top of the sight and pull/rotate it to the rear (clockwise). The elevation knob moves in increments called "click" that can easily be felt as the knob is turned. To lower the point of impact on the target, push/rotate the knob forward (counter-clockwise).
Windage Adjustment The windage knob moves the point of impact left or right on the target. The M14 windage knob is located on the right side of the sight. Push/rotate the windage knob forward (clockwise) to move the point of impact to the right. Pull/Rotate the knob back (counter- clockwise) to move the point of impact to the left. There is a windage scale at the base of the sight with index

lines showing whether the sight is adjusted to the left or right of the rifle's true windage zero.
An example of correcting elevation and windage is below:
Target was fired at 200 yards, prone with a sling.
Target One is a five shot group. Point of impact is 3 MOA below center of the scoring rings or X ring. 3 clicks of elevation (remembering 1 inch equals 1 MOA at 100 yards) were added to the rear sight. The bull on the SR-1 Target is 13 inches.
This translates into 6 inches of elevation change at 200 yards, or 1/2 the black bull distance on the target.

Target Two is the second group that fell within the ten and X ring of the target.
Helpful Hints Remember that a safe initial sight setting for an M14 that you have not fired is 10-12 clicks elevation and "0" windage. If the windage knob on an M14 sight is difficult to turn, use the opposite thumb to press in on the slotted screw in the elevation knob. This screw is used to place tension on the sight so that it retains its adjustment. If the rear aperture can easily be pushed down after it is adjusted, it is necessary to tighten this screw. When deciding which direction to turn a sight knob to make a sight adjustment, look at the sight knob. The direction that an adjustment will move the shot group is engraved on the sight knob.
Sight Adjustment One of a shooter's most important skills is to be able to adjust the

sights to precisely zero the rifle so that the shot groups are in the center of the target. Sight adjustment and zeroing involves a logical, step-by-step process.
First, using the prone position fire a shot group-a group of 3 shots is recommended for new shooters. Find the center of the shot group.
Using a standard distance of 1 1/2 minutes of angle (MOA) per scoring ring (3" at 200yds., 1.5" at 100yds.), calculate the vertical distance in scoring rings (or fraction of a scoring ring) from the center of the shot group to the center of the target. Make that as your elevation adjustment on your sight.
Calculate the horizontal distance (# of scoring rings) from the center of your shot group to the center of the target. Make that number your windage adjustment.
Fire another group of 2-3 shots, then calculate and make additional sight adjustments as required.
While firing record shots, continue to observe whether your shot group is centered.
Note: Make additional sight adjustments whenever your shot group is not centered.

Cleaning and Maintenance
This section contains general lubricating instructions for the proper maintenance of the M14 Rifle and it's civilian counterparts. Maintenance includes all measures to keep the rifle in operating condition. This includes normal cleaning, inspection for defective parts, repair and lubrication. For the purposes of this basic course we will cover cleaning, inspection and lubrication.
Keep all lubricants in closed containers and store them in a clean dry place away from external heat. Do not allow any dust, dirt, or other foreign material to mix with the lubricants.
Keep all external parts not requiring lubrication, clean from all lubricants.
Before applying a lubricant to your rifle, wipe all lubrication points free of dirt and grease. Wipe all excessive lubrication from moving parts to prevent accumulation of foreign matter.
Cleaning Materials, Lubricants and Equipment There are many different products on the market today that will do the job. For the purposes of this course we do not recommend any one particular product as we feel that this should be left up to the preferences of each individual rifle owner.
Bore Cleaner There are numerous types of bore cleaner on the market today so we will let the gun owner decide as to which is the best to use.
Lubrication Lubricating oil, CLP or standard gun oil may be used to lubricate the non-moving parts under normal conditions and temperature.
Rifle Grease should be applied to the working surfaces of most moving parts with the exception of the interior working parts of both the bolt and gas system.
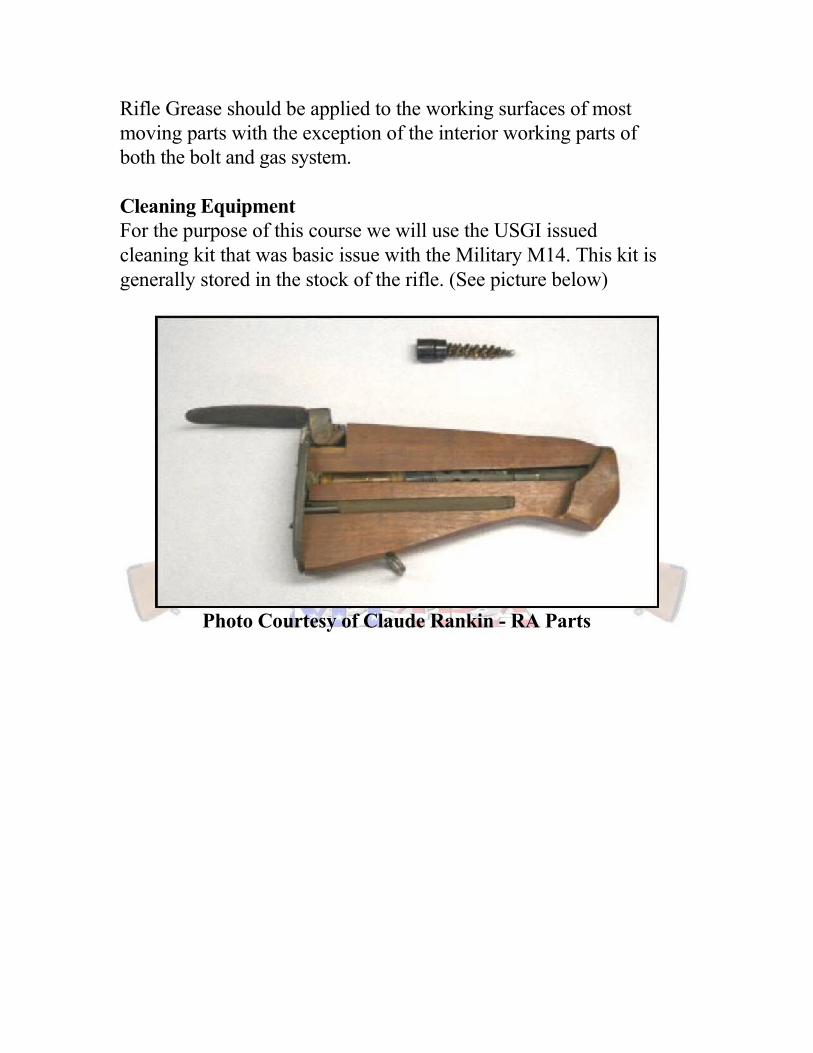
Cleaning Equipment For the purpose of this course we will use the USGI issued cleaning kit that was basic issue with the Military M14. This kit is generally stored in the stock of the rifle. (See picture below)
Photo Courtesy of Claude Rankin - RA Parts

M14 Cleaning Kit
Photo Courtesy of Claude Rankin - RA Parts
1. Combination Tool 2. Plastic case, Lubricant 3. Chamber Cleaning Brush 4. Cleaning Patch Holder 5. Small Arms Bore Cleaning Brush 6. Small Arms Cleaning Rod Case 7. Small Arms Cleaning Rod Sections (4 ea)
Photo Courtesy of Claude Rankin - RA Parts

Lubrication points (Grease)
Clean and dry all parts to be lubricated. Apply a light coat of rifle grease to the surfaces of the following parts.
A. Locking lugs of the bolt locking lug and recesses.
B. Bolt Guide
C. Bolt roller
D. Operating Rod guide groove on the side of the receiver.
Note: Caution, Always clean, wipe dry and lubricate the rifle immediately after exposure to adverse weather conditions or firing, to prevent damage and malfunctions.
General Cleaning Procedures
Cleaning the Barrel The rifle must be cleaned after it has been fired because firing leaves primer fouling, powder ashes, carbon and metal fouling. It is advised to turn the spindle valve in the off position when cleaning the barrel as this prevents bore cleaner from entering the gas cylinder through the gas port. Don't forget to turn the spindle valve back on after cleaning.
Cleaning the Bore A. Screw the threaded end of a cleaning rod section into the combination tool.
B. Assemble the remaining cleaning rod sections.
C. Screw the bore brush onto the other end of the cleaning rod sections. Moisten the bore brush with bore cleaner and insert into

the barrel. Push the bore brush into the barrel until you see it protrude from the chamber. Pull the cleaning rod back and out. Repeat several times. (See note below)
D. After thoroughly cleaning the bore with the bore brush, remove the bore brush from the cleaning rod and screw on the patch holder. Run a moistened patch through the bore, to remove excess fouling and then dry patches, replacing them until a patch comes out clean.
E. Apply a thin coat of gun lubricating oil.
F. Turn the spindle valve into the "ON" position after cleaning.
Note: Care should be used when using a USGI 4 section cleaning rod to clean the bore as it can cause damage to the interior and crown of the barrel. It is recommended to use a bore guide or insert the cleaning rod sections into the barrel screwing on the chamber brush or patch holder from the chamber end and pulling the brush or patch out rather than pushing it in. A recommended solution to this is to use a one piece coated cleaning rod.
Cleaning the Chamber A. Screw the threaded end of cleaning rod section into the ratchet base of the chamber brush as shown in photo below.

Photo Courtesy of Claude Rankin - RA Parts
B. Apply a light coat of bore cleaner to chamber.
C. Insert the chamber brush into the chamber with thumb pushing against the base of the brush.
D. Release the bolt lock and ease the operating rod and bolt forward, seating the into the chamber.
E. Move the rod section from side to side several times.
F. Lock the bolt to the rear and remove the chamber brush while grasping the cleaning rod section.
Cleaning the Gas Cylinder Assembly A. Gas cylinder plug. Pour a small quantity of bore cleaner into the plug. Insert and rotate the bore cleaning brush. Remove the brush, clean and dry the plug with patches.
B. Gas cylinder. Install the patch holder onto a cleaning rod section. Put two patches in the holder, moisten them with bore cleaner and swab the cylinder bore. Dry the cylinder bore with

clean patches. Do not use abrasives in cleaning the cylinder bore and do not oil the interior surfaces. The gas cylinder is NOT meant to be wet, as this will create a buildup of carbon.
C. Gas piston. Saturate patches with bore cleaner and wipe the exterior surface of the piston as clean as possible. Install the bore clean brush on a cleaning rod section. Moisten the brush with bore cleaner and clean the interior of the piston. Wipe the piston dry, but do NOT oil. As in the gas cylinder, do not use abrasives during cleaning.
Note: The gas system incorporates a self-cleaning section and functions within very close tolerances. A piston does not have to be shiny to function properly.
Cleaning the bolt face A. Clean the face of the bolt with a patch and bore cleaner, paying particular attention to it's inside edges. Remove the bore cleaner with dry patches and oil the part lightly.
The Spindle Valve A. Depress the valve and rotate it several times after each day's firing. Do not disassemble it.
Cleaning the magazine A. Inspect the interior of the magazine by depressing the follower with the thumb.
B. If the interior is dirty, disassemble the magazine and clean, then lightly oil the moving components. Otherwise, merely wipe the magazine assembly clean and dry, and apply a light coat of oil.
All other parts Dirt and sand should be removed from all other parts and exterior surfaces using a dry cloth. Apply a light coat of oil to the metal

parts and rub a coat of Boiled Linseed Oil (BLO) or Tung Oil into the wooden parts. Care should be given to prevent BLO or Tung Oil from getting on metal parts.
Note: The rifle should be inspected daily when in use, for evidence of rust and general appearance. A light coat of oil should be maintained on all metal parts, except the gas piston. interior of the gas cylinder, and the gas plug. The daily inspection should also reveal any defects such as burred, worn or cracked parts. Any defects found should be corrected. It may be necessary to consult or have a armorer or gunsmith qualified to work on M14 rifles to correct the issues. Unless you are sure you know what you are doing, do not attempt to correct issues or perform repairs due to possible further damage to the rifle or the possibility of creating a dangerous situation.
Improved Bore Cleaning Method Your rifle should be cleaned after every range trip or after every 20 shots or so if you are competing in a match. The action should not be required to be removed from the stock during normal cleaning. Removing the action from the stock for regular maintenance is not necessary, but optional.
Clean the rifle upside down, magazine well pointed upward as pictured below.

For the gas operating system to work, gas from the fired round needs to be bled off into the gas system via the gas port in order to cycle the action. Introducing oils and solvents into the barrel while right side up will result in, chemicals draining into the gas system.
Use a bore guide, to ensure the cleaning rod will not contact or scratch the muzzle crown.
Note: A bore guide can be made out of a 12ga shot shell by popping out the primer. Depending on what type of cleaning rod is chosen, it may be necessary to enlarge the hole to fit the rod diameter. (See picture below)
One piece cleaning rods are ideal to use when cleaning the M14 rifle as they are less likely to damage the bore than the sectional cleaning rods. A coated rod or stainless steel rod is recommended. It is recommended to use a cleaning port or similar product to hold the bolt back. Just a slight tap will disengage the bolt stop and the bolt will slam home sending the cleaning rod right back out the way it came with great force. possibly bending the cleaning rod or bore brush. Some shooters use an empty stripper clip and stick it into the stripper clip guide to act as a block for the bolt.
When installing the cleaning port, gently release the bolt letting it rest against the port keeping the cleaning port in place to prevent

any abrupt incidents while cleaning. (See picture below)
Note: DO NOT DIP A DIRTY BRUSH INTO A BOTTLE OF CLEAN SOLVENT!!!!! This will contaminate the solvent and introduce unwanted debris and particles into your bore.
When using the bore guide, slide the guide on before screwing on the attachment. Feed the attachment into the flash suppressor and as soon as it is inserted into the crown, slide the bore guide over the flash suppressor. Hold it there with your free hand throughout the push and pull of the rod. If using a cleaning jag and a patch, the patch will fall off as soon as it is clear of the chamber resulting in be pulling out an empty jag.

Cleaning tip: If you using an eyelet style patch holder, pull the dirty patch off at the chamber before pulling the rod back out the muzzle. This will keep contaminants and debris from making their way back to the muzzle.
If using a jag, do not flip a dirty patch over and use the "clean" side!! This will still introduce debris into the bore. Use a clean patch for every application. As the barrel becomes dry, debris that is run through the bore via a patch or dry bore brush will scratch the rifling in the barrel. The only thing that should be run through a dry barrel is a clean patch.
When pulling the bore brush out, slow down towards the end of the stroke, otherwise, once the brush is clear of the muzzle it will jam up in the bore guide damaging the bristles.
Once punching and patching the barrel is finished, clean all the solvents off the bore guide and flash suppressor. Now you can turn your rifle right side up and remove the cleaning port. Insert an empty magazine in the rifle at this point to prevent unwanted bolt release. Clean the face of the bolt with a nylon brush and touch up any areas that may have lost grease during firing or cleaning

Optional method of punching the bore: Some experts suggest removing the bore brush from the cleaning rod at the end of the stroke and cleaning the bore brush between punches. The theory is that keeping the muzzle clean is of the utmost importance. By pushing a brush through and pulling it back out, debris is pulled back toward the muzzle. It is suggested that you keep the movement of debris going in one direction; from muzzle to breach (chamber).

Becoming a M14 Rifle Instructor Now that you have completed the course, you may be thinking about becoming a M14 Rifle Instructor. Help teach other people that are interested in the M14 rifle, by passing on what you have learned in this course.
Note: You must be a M14RA member in good standing in order to take the M14 Rifle Instructor Course, and you must complete and pass the requirements listed below:
Requirements for Basic M14 Rifle Instructor 1. Take and pass the Basic and Intermediate M14 Rifle Courses with a minimum score of 80% for elevation to Instructor Candidate.
2. Instructor Candidates must complete and pass the Basic M14 Rifle Instructor's Course with a minimum score of 80%.
3. If currently certified with the CMP or NRA taking the complete basic course and/or complete Instructor Course may be waived after review of credentials.
3a. If a waiver is granted, taking of the classroom portion via manual or online version will be substituted and a test given. Minimum score of 85% will be in effect for elevation to Instructor Candidate.
4. Field requirements 4a. Instructor Candidates must demonstrate their ability to teach with positive reinforcement.
4b. Instructor Candidate must demonstrate their ability to teach the required course material.
4c. Instructor Candidates will be supervised and critiqued by a Senior Instructor.

Note: In the event a Senior Instructor is not available due to logistics, a Basic Instructor may be assigned to supervise the Instructor Candidate. In the event a Basic Instructor is not available, a acceptable substitute would be video taping and/or references.
5. Instructor Candidates must assist and participate in the Instruction of three (3) Basic M14 Courses in order to complete their basic Instructor Training.
5a. A Basic or Senior Instructor must "sign off" on the Instructor Candidate and forward an evaluation to the Instructor Review Board before a Instructor Candidate may be elevated to Basic M14 Rifle Instructor.
Instructor Levels
Level 5: Course Assistant Non-certified....The "CA" Has passed the Basic Course, but has yet to take the Instructor Course, but has shown an interest in becoming a Instructor and is enthusiastic about helping out with the Basic Course in the meantime. Level 4: Instructor Candidate or "IC" Non-certified....The "IC" or assistant instructor, Has passed the Basic course, Instructor course and is in the process of fulfilling the additional "field" requirements to become a level 3 instructor. Level 3: Instructor Certified....able to run basic courses with the authority to assign unofficial assistants as necessary using "ICs" or "CAs" whenever possible. Has the authority to grade and record test scores and forward results to the Association HQ for further processing.
Level 2: Advanced Instructor Certified....Able to run Basic and Advanced Courses with the authority to assign unofficial assistants from available resources as necessary using "ICs" or "CAs" whenever possible. Has the

authority to grade and record test scores and forward results to the Association HQ for further processing.
Level 1: Senior Instructor Certified....Has passed both the Basic Course and the Instructor Course, and fulfilled all "Field" requirements necessary to be elevated to Level 1. Has the authority to assign and direct assistants from available resources to assist in the running of Basic, Advanced, Instructor and Advanced level Instructor courses using "ICs" or "CAs" whenever possible. Has the authority to grade and record test scores and forward results to the Association HQ for further processing.
Note: All Certified Level Instructors (1 through 3) may mentor all levels beneath their own level, and are encouraged to submit written recommendations for those students at anytime if they feel it may be appropriate for them to be elevated to the next level.
All promotions will be reviewed by a panel of assigned Master Instructors. Once a decision has been made, any and all certifications will be issued from the Association HQ.
At the sole discretion of the Instructor Certification Panel, those with current certification from the NRA or CMP may be deemed exempt for certain portions of the Basic Course and have a standardization test administered in it's place.

References: 1. FM23 2. FM23-5 3. FM23-8A 4. US Marine Corps Combat Marksmanship Coaches Course CMC 11R, CMC 17R, CMC 18R, CMC 19R, CMC 20R and CMC 24R. 5. US Marine Corps Recruit Training Student Outline 1115, 1116 6. MCRP 3-01A Rifle Marksmanship 7. CMP Garand-Springfield-Military Rifle Clinic
We'd like to thank the following who submitted photographs for use in this manual.
Robert Brown, Tony Benevidez, Tony Diaz and Claude Rankin
M14 Rifle Association Course Development Panel Bob Brown, Fayetteville, NC - USA
Tony Diaz, Howes Cave, NY - USMC Mike Schwartz, El Paso, TX - USN
Todd Smith, Hopedale, MA
Copyright 2010 - The M14 Rifle Association All rights reserved
Images and text contained in this manual may not be reproduced by any means including electronically, without the
expressed written consent of the M14 Rifle Association.
The Only Association Geared Specifically for the M14 Rifle!!!
The M14 Rifle Association P.O. Box 14
Howes Cave, NY 12092

www.M14RA.org