system administrator guide for oce direct print …© system administrator user guide table of...
TRANSCRIPT

Océ System Administrator User Guide

Version 3.0.0 Confidential © 2014 Canon Solutions America 10/27/2014
Océ System Administrator User Guide
Table of Contents
SYSTEM ADMINISTRATOR GUIDE FOR OCE DIRECT PRINT ................................................. 3
SECTION 1: SYSTEM LICENSING CONFIGURATION ................................................................... 4 Importing the License File .......................................................................................................................... 4 Activations ................................................................................................................................................. 5 License Management Application: ............................................................................................................ 7
SECTION 2: SYSTEM ADMINISTRATOR CONFIGURATION .................................................. 10 Creating a New Device ............................................................................................................................. 11 Queue Creation and Configuration .......................................................................................................... 18 Media Option in Océ System Administrator: ........................................................................................... 39 People Configuration Settings ................................................................................................................. 40
SECTION 3: ACCOUNTING INTEGRATION OPTIONS ............................................................. 42 Océ Account Console and Account Logic Integration .............................................................................. 42
SECTION 4: PRINT SETTINGS ........................................................................................................ 43
SECTION 5: DATABASE SETTINGS ............................................................................................... 46
SECTION 6: CONVERT.BAT CONFIGURATION OPTIONS ..................................................... 47
SECTION 7: OCE DIRECT PRINT TROUBLESHOOTING GUIDE .......................................... 48 Installation Issues .................................................................................................................................... 48 Océ Direct Print Client Issues ................................................................................................................... 50 System Administrator Issues ................................................................................................................... 54 Logging Information................................................................................................................................. 57

Version 3.0.0 Confidential © 2014 Canon Solutions America 10/27/2014
Océ System Administrator User Guide
SYSTEM ADMINISTRATOR GUIDE FOR OCE DIRECT PRINT Océ Direct Print includes a Multi-client installation application. This allows for the installation of the required components for a server installation utilizing Microsoft SQL Server. At the client side the option to install a client allows for either a single seat installation (including the System Administration module) or just the Océ Direct Print client installation that will connect to the Microsoft SQL Server. Before beginning any of the installation methods, ensure that the user that is performing the installation has Local Administrator rights.

Version 3.0.0 Confidential © 2014 Canon Solutions America 10/27/2014
Océ System Administrator User Guide
SECTION 1: SYSTEM LICENSING CONFIGURATION When attempting to launch System Administrator application for the first time it will require the user to complete the system Licensing section first.
Importing the License File Select the “Import License File” button: In the next dialog box, browse to the location of the .SIG file that was provided to you by Software Fulfillment. If you do not have a .SIG file, contact Software Fulfillment at 800-714-4427.

Version 3.0.0 Confidential © 2014 Canon Solutions America 10/27/2014
Océ System Administrator User Guide
Select the appropriate “.sig” file and press Open
Close the window via the ‘X’ at the top right, and restart System Administrator before proceeding to the activation step.
Activations Click on the “Settings” button at the left, and then on the “Licensing” tab as shown below. Send an e-mail to Software Fulfillment ([email protected]), including the following information:
1. The ‘Server ID’ code, as shown below. 2. Clarify whether this is a Standalone or Server (multi-client) installation. 3. The version number, which can be found by going to Help > About 4. The host name (server) or machine name (standalone) to which Oce
Direct Print has been installed. When you receive an Activation Code back, enter it in the ‘Activation Code’ textbox and click on ‘Activate’. Click on ‘Save Changes’. You may have to close the ‘Configuration’ window and re-launch System Administrator to access the rest of the features.

Version 3.0.0 Confidential © 2014 Canon Solutions America 10/27/2014
Océ System Administrator User Guide
If an invalid Activation Code is used on the system, the following error will appear:

Version 3.0.0 Confidential © 2014 Canon Solutions America 10/27/2014
Océ System Administrator User Guide
License Management Application: This configuration section of System Administrator allows for better management of the available licenses.
Version 3.0.0 Confidential © 2014 Canon Solutions America 10/27/2014
Océ System Administrator User Guide
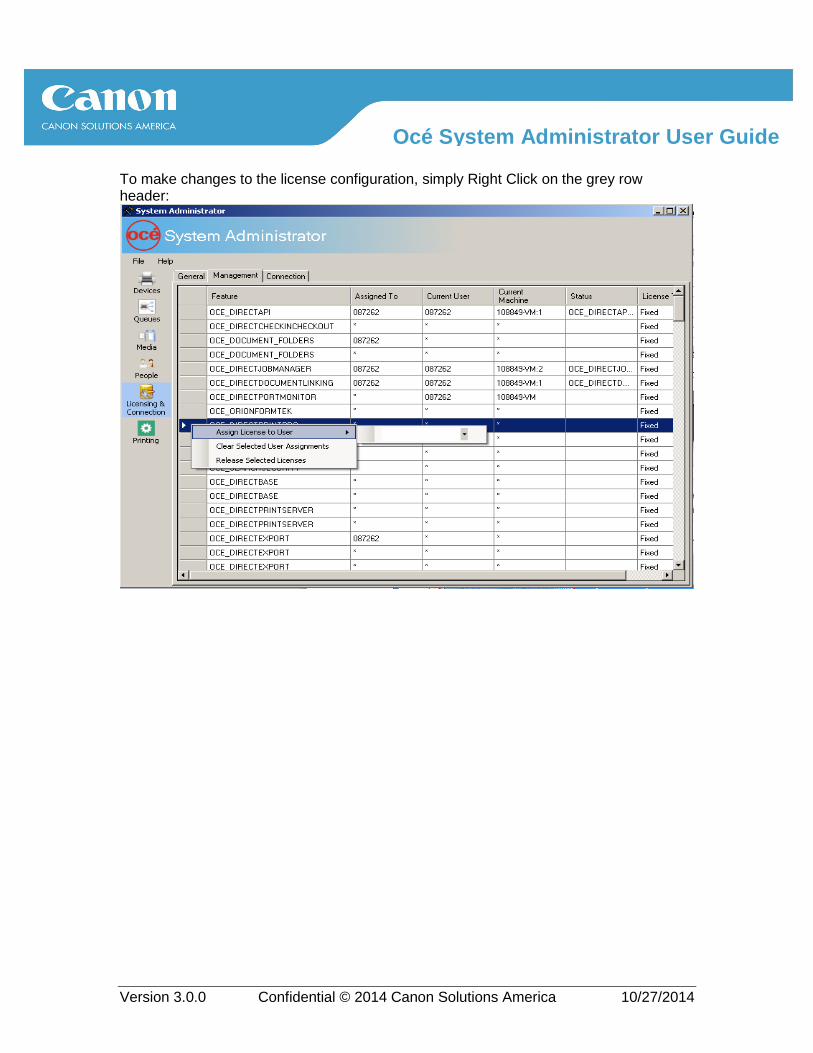
To make changes to the license configuration, simply Right Click on the grey row header:

Version 3.0.0 Confidential © 2014 Canon Solutions America 10/27/2014
Océ System Administrator User Guide
Selecting the Assign License to User option expands the dialog box to show the available users of the system. Select the user that requires the updated license:

Version 3.0.0 Confidential © 2014 Canon Solutions America 10/27/2014
Océ System Administrator User Guide
SECTION 2: SYSTEM ADMINISTRATOR CONFIGURATION When System Administrator is run for the first time, under Devices – you will see:
Only a PDF Export device has been created. Creating your devices is the first step in the configuration of this application.

Version 3.0.0 Confidential © 2014 Canon Solutions America 10/27/2014
Océ System Administrator User Guide
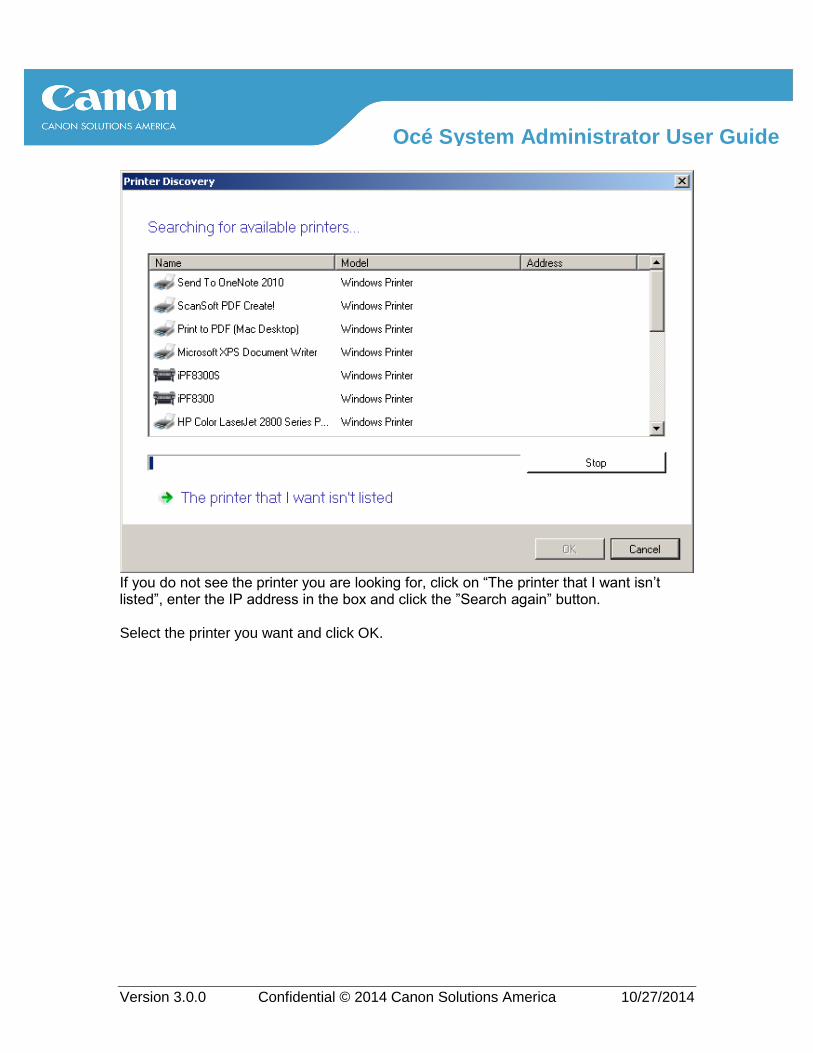
Creating a New Device To add a new Device, Press the Plus button then click on the “Find” button to locate your device on the network:
Version 3.0.0 Confidential © 2014 Canon Solutions America 10/27/2014
Océ System Administrator User Guide
If you do not see the printer you are looking for, click on “The printer that I want isn’t listed”, enter the IP address in the box and click the ”Search again” button. Select the printer you want and click OK.

Version 3.0.0 Confidential © 2014 Canon Solutions America 10/27/2014
Océ System Administrator User Guide
The model will be detected and all the appropriate settings will be set for the device.
If this is a standalone print application, then choose ODP from the Device Type. The Device Type options are: ODP: Océ Direct Print Device (controlled by ODP) PEP: Print Exec Pro RDP: Repro Desk

Version 3.0.0 Confidential © 2014 Canon Solutions America 10/27/2014
Océ System Administrator User Guide
Choose your model from the Printer Type drop down:
After you entered the Device Name, a description was automatically filled in. You can change this to something more else, if desired.
Version 3.0.0 Confidential © 2014 Canon Solutions America 10/27/2014
Océ System Administrator User Guide
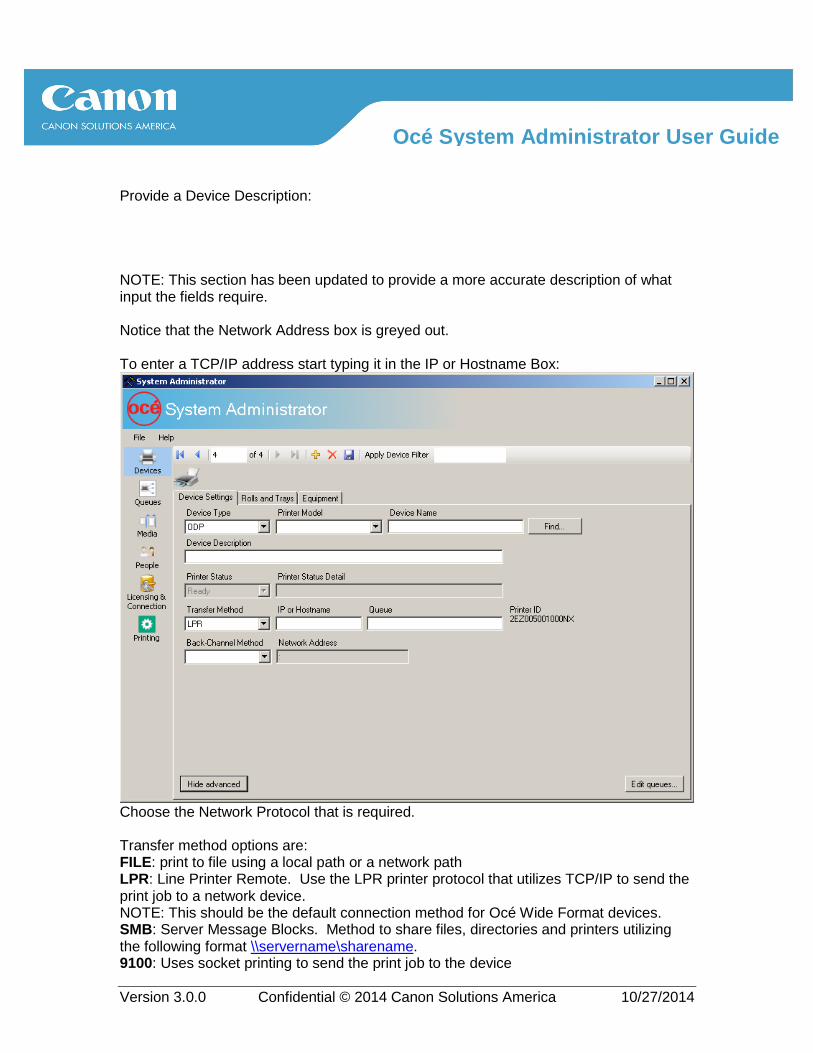
Provide a Device Description: NOTE: This section has been updated to provide a more accurate description of what input the fields require. Notice that the Network Address box is greyed out. To enter a TCP/IP address start typing it in the IP or Hostname Box:
Choose the Network Protocol that is required. Transfer method options are: FILE: print to file using a local path or a network path LPR: Line Printer Remote. Use the LPR printer protocol that utilizes TCP/IP to send the print job to a network device. NOTE: This should be the default connection method for Océ Wide Format devices. SMB: Server Message Blocks. Method to share files, directories and printers utilizing the following format \\servername\sharename. 9100: Uses socket printing to send the print job to the device

Version 3.0.0 Confidential © 2014 Canon Solutions America 10/27/2014
Océ System Administrator User Guide
WINPRINT: prints to a Windows printer using the printer driver Backchannel is used to retrieve information form the device (paper, job tracking, …) Backchannel options are: OCI: most common protocol used by Océ wide format device. It uses TCP 65200. WAVE: newer protocol used by Océ wide format devices. It uses TCP 80. SAVE YOUR SETTINGS Now choose the “Equipment” tab on the top:
This page determines what file format the device supports. Any unsupported file will be converted to TIFF or PS or PDF as needed before getting sent to the device. You typically do not need to change this unless configuring a ‘GENERIC’ device. SAVE YOUR SETTINGS AGAIN

Version 3.0.0 Confidential © 2014 Canon Solutions America 10/27/2014
Océ System Administrator User Guide
You should now see the Roll Width / Media and Color information filled in.
Any information can be retrieved using back-channel by clicking the “Query device” button.

Version 3.0.0 Confidential © 2014 Canon Solutions America 10/27/2014
Océ System Administrator User Guide
Queue Creation and Configuration Now we can define a Queue for the Device that was just created. (note that a device created using the Find method will already have an associated queue). Choose Queues from the left side menu. Choose the Plus sign to add a queue (do not start typing in data here):
Pressing the Plus sign will create a basic queue with default information: Lock settings at client: This feature allows all queue settings to be defined at the server and then locked so that the clients do not have the ability to modify the queue settings. This helps to standardize the queues to known settings that will provide consistent and predictable device output. Enable quickprint: when checked, this queue is also shared in the ODPInbox folder as \\servername\ODPInbox\quickprint\<queue_name>. Any file dropped in this folder will be printed using the settings defined in the queue.
Version 3.0.0 Confidential © 2014 Canon Solutions America 10/27/2014
Océ System Administrator User Guide
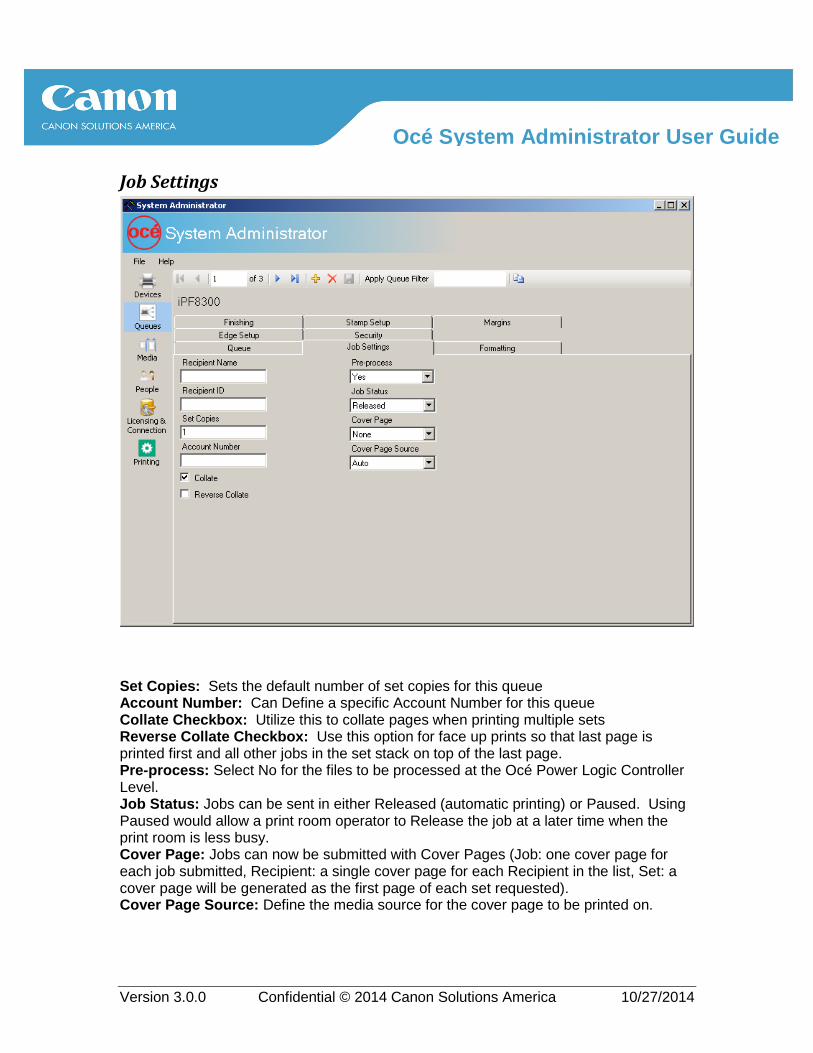
Job Settings
Set Copies: Sets the default number of set copies for this queue Account Number: Can Define a specific Account Number for this queue Collate Checkbox: Utilize this to collate pages when printing multiple sets Reverse Collate Checkbox: Use this option for face up prints so that last page is printed first and all other jobs in the set stack on top of the last page. Pre-process: Select No for the files to be processed at the Océ Power Logic Controller Level. Job Status: Jobs can be sent in either Released (automatic printing) or Paused. Using Paused would allow a print room operator to Release the job at a later time when the print room is less busy. Cover Page: Jobs can now be submitted with Cover Pages (Job: one cover page for each job submitted, Recipient: a single cover page for each Recipient in the list, Set: a cover page will be generated as the first page of each set requested). Cover Page Source: Define the media source for the cover page to be printed on.

Version 3.0.0 Confidential © 2014 Canon Solutions America 10/27/2014
Océ System Administrator User Guide
Finishing Options Output Location: NOTE: Not all of these options will be active for all devices. A device that does not have a folder defined will not be able to utilize the Folder / Bin / Belt options. The physical properties of your device will determine output locations.
Paper Source: Paper Source options are also dependent upon the physical properties of the output device.

Version 3.0.0 Confidential © 2014 Canon Solutions America 10/27/2014
Océ System Administrator User Guide

Version 3.0.0 Confidential © 2014 Canon Solutions America 10/27/2014
Océ System Administrator User Guide
Orientation:
Auto: The machine will determine the best orientation based on available media and the dimensions of the file to be printed. Landscape: All prints will be rotated to print along the long edge of the media. For example a D+ size image will be printed on 36” width media and cut to a length of 24” Portrait: All prints will be rotated to print along the short edge of the media. For example a D+ size image will be printed on the 24” width media and cut to a length of 36” Productive: All prints will be rotated to maximize the media through put of the print device. In most cases, this will be in the Landscape orientation.

Version 3.0.0 Confidential © 2014 Canon Solutions America 10/27/2014
Océ System Administrator User Guide

Version 3.0.0 Confidential © 2014 Canon Solutions America 10/27/2014
Océ System Administrator User Guide
Cut Type:
Auto: This setting lets the print device determine the best Cut Type (Method) for the file to be printed.
Plot Size: This setting uses the dimensions of the print file to determine the Cut Type (Method). Note that for Vector formats (HPGL2 / HPRTL) this method can produce output that varies slightly in size for each print.
Standard: This setting will produce a consistent media output size closest to the dimensions of the file to be printed. These standards can include ANSI Small, ANSI Mixed and MM.
Quality:

Version 3.0.0 Confidential © 2014 Canon Solutions America 10/27/2014
Océ System Administrator User Guide
A setting of Auto will let the device decide
Finishing:
Version 3.0.0 Confidential © 2014 Canon Solutions America 10/27/2014
Océ System Administrator User Guide
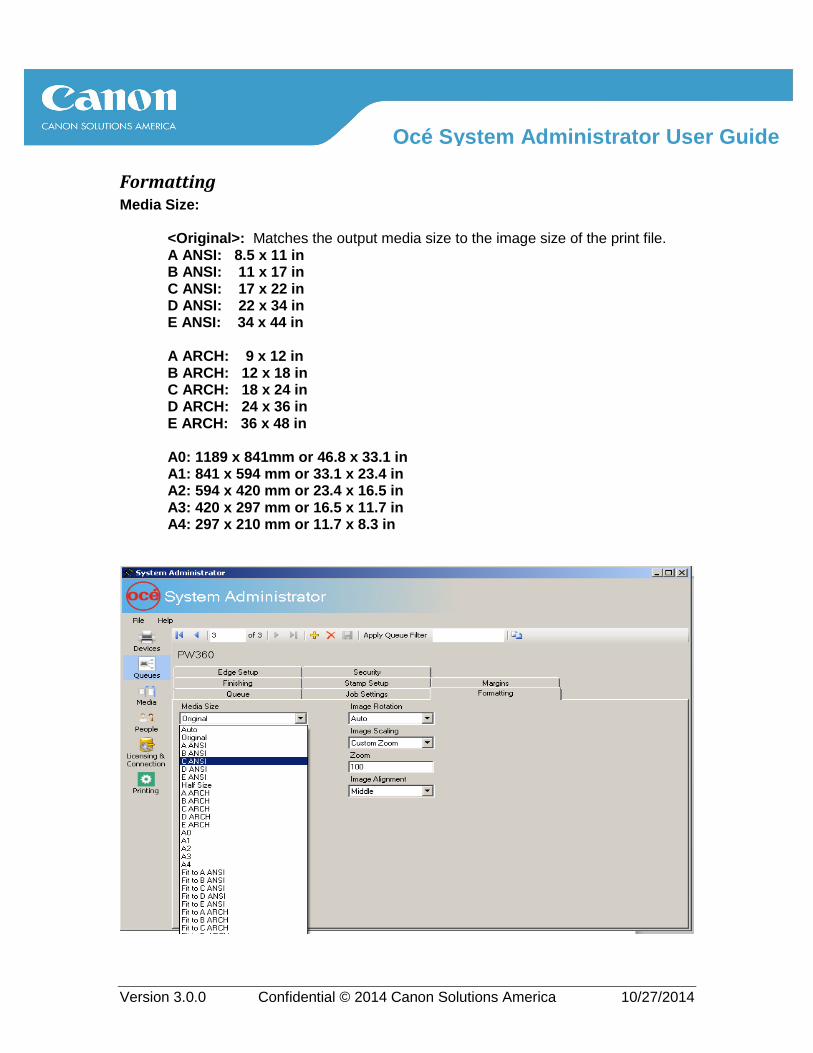
Formatting Media Size: <Original>: Matches the output media size to the image size of the print file. A ANSI: 8.5 x 11 in B ANSI: 11 x 17 in C ANSI: 17 x 22 in D ANSI: 22 x 34 in E ANSI: 34 x 44 in A ARCH: 9 x 12 in B ARCH: 12 x 18 in C ARCH: 18 x 24 in D ARCH: 24 x 36 in E ARCH: 36 x 48 in A0: 1189 x 841mm or 46.8 x 33.1 in A1: 841 x 594 mm or 33.1 x 23.4 in A2: 594 x 420 mm or 23.4 x 16.5 in A3: 420 x 297 mm or 16.5 x 11.7 in A4: 297 x 210 mm or 11.7 x 8.3 in

Version 3.0.0 Confidential © 2014 Canon Solutions America 10/27/2014
Océ System Administrator User Guide
Media Type:
Media Color:

Version 3.0.0 Confidential © 2014 Canon Solutions America 10/27/2014
Océ System Administrator User Guide
Color Mode:

Version 3.0.0 Confidential © 2014 Canon Solutions America 10/27/2014
Océ System Administrator User Guide

Version 3.0.0 Confidential © 2014 Canon Solutions America 10/27/2014
Océ System Administrator User Guide
Content Mode:

Version 3.0.0 Confidential © 2014 Canon Solutions America 10/27/2014
Océ System Administrator User Guide
Image Rotation:
Image Scaling:

Version 3.0.0 Confidential © 2014 Canon Solutions America 10/27/2014
Océ System Administrator User Guide
Zoom:

Version 3.0.0 Confidential © 2014 Canon Solutions America 10/27/2014
Océ System Administrator User Guide

Version 3.0.0 Confidential © 2014 Canon Solutions America 10/27/2014
Océ System Administrator User Guide
Image Alignment:

Version 3.0.0 Confidential © 2014 Canon Solutions America 10/27/2014
Océ System Administrator User Guide
Stamp Setup
The stamping feature and variables depend on the target device.
Use the Stamp Variables button to add a special field to the stamp or watermark. These can be included in the stamp/watermark text boxes and will display job specific information at the time of job submission. %Date
%Time %JobName %UserName %PageNumber %NumberOfPages

Version 3.0.0 Confidential © 2014 Canon Solutions America 10/27/2014
Océ System Administrator User Guide

Version 3.0.0 Confidential © 2014 Canon Solutions America 10/27/2014
Océ System Administrator User Guide
Edge Setup Leading Edge: The first edge of the paper as it exits the print device. Trailing Edge: The last edge of the paper as it exits the print device.
Extra paper can be added to either edge by setting a positive number in the boxes.
Paper will be removed from either edge by setting the value to a negative number.
Leading/Trailing Edges
The TDS 600, 9600, 9700, TDS800, 9800, TDS 400, 9400, 9300 and 9400II support leading and trailing edges.
Driver Leading Edge Trailing Edge
Océ 9300 0 to 80mm (3”) No removal 0 to 80mm (3”) No removal
Océ 9400 0 to 80mm (3”) No removal 0 to 80mm (3”) No removal
Océ 9400II 0 to 80mm (3”) No removal 0 to 80mm (3”) No removal
TDS 400 0 to 400mm (16”) No removal 0 to 400mm (16”) No removal
Océ 9700 0 to 100mm (4”) 0 to 100mm (4”)
Océ 9800 0 to 100mm (4”) 0 to 100mm (4”)
TDS 800 0 to 400mm (16”) 0 to 400mm (16”)
9600 0 to 100mm (4”) 0 to 100mm (4”)
TDS 600 0 to 400mm (16”) 0 to 400mm (16”)
All other device types do not support leading/trailing edges.

Version 3.0.0 Confidential © 2014 Canon Solutions America 10/27/2014
Océ System Administrator User Guide

Version 3.0.0 Confidential © 2014 Canon Solutions America 10/27/2014
Océ System Administrator User Guide
Media Option in Océ System Administrator:
Océ Direct Print has Media Types already defined within the system. Use the arrows to view the types that have been defined before adding custom types.
Media Sizes:
Standard Media Sizes have already been created in Océ Direct Print.

Version 3.0.0 Confidential © 2014 Canon Solutions America 10/27/2014
Océ System Administrator User Guide
Media Color Tab:
People Configuration Settings
In this section, either add new users or recipients, or edit existing ones.

Version 3.0.0 Confidential © 2014 Canon Solutions America 10/27/2014
Océ System Administrator User Guide
If the environment is set up for printing to multi-recipients, distribution lists can be created within the Océ Direct Print client application.

Version 3.0.0 Confidential © 2014 Canon Solutions America 10/27/2014
Océ System Administrator User Guide
SECTION 3: ACCOUNTING INTEGRATION OPTIONS Océ Direct Print is compatible with a wide range of account logging, cost recovery and accounting systems. This is done through Océ Account Console.
Océ Account Console and Account Logic Integration
After Enabling the Accounting option, provide the IP address of the Océ Account Console Host computer. As an alternative the IP address of any Océ device that has Account Logic enabled can also be used. Once this is enabled a new Accounting group is now available in the Océ Direct Print Client application. It will use the fields as defined in Océ Account Console.

Version 3.0.0 Confidential © 2014 Canon Solutions America 10/27/2014
Océ System Administrator User Guide
SECTION 4: PRINT SETTINGS The printing section allows you to set global print settings.
Logging level: determines the amount of logs written by all the modules for troubleshooting purposes. High means that the logs will fill up quicker. Number of days before a job gets removed from history: determines how far long old jobs are kept in the error, history or print vault folders Enable accounting: whether accounting is enabled along with IP or hostname of Océ Account Console or Océ device running Océ Account Logic Compress print jobs: determines whether jobs are transferred in zip form or not Enable queue security: enabling queue security restricts queue access to users who belong to the related user group Lock job settings on clients: print clients cannot modify job settings (except for a few like number of copies) Enable printing to local devices from clients: determines whether a print client can print directly from the viewer to a local windows printer and whether they can save previews

Version 3.0.0 Confidential © 2014 Canon Solutions America 10/27/2014
Océ System Administrator User Guide
Configuration path: points to the configuration file used Database path: indicates what database the system is using. (Note: Local database will prevent network connections) Inbox path: determines where incoming jobs transit through. This can be changed by browsing for a new path or entering a different value. Vault path: determines where the print job vault is located.
Prompt to update documents when changing queues: determines whether the settings from the new queue settings overwrite existing job settings Clear job on submit: determines whether the current job is kept in the client after hitting the submit button Use external processing: Determines if an external converter (like Cadzation’s Acroplot Repro) should be used File Processing section None: do not process files when adding them to the print client

Version 3.0.0 Confidential © 2014 Canon Solutions America 10/27/2014
Océ System Administrator User Guide
Enable TIFF conversion: convert files to TIFF when they are added to the print client Ask to convert: ask before converting to give a chance not to convert certain files Enable file splitting: split multipage files into single page documents Split PDF files using external processing: special case where PDF files can be split into TIFF images using an external tool as opposed to internal library Remove Oce Job Ticket: discards any Océ header found in the file Resolution for job preview: what DPI is used to process files for preview
Enable thumbnail ribbon: show thumbnail previews Show QuickPrint queues: determines whether queues that are of type quickprint also show up in print client Use alternate file browser: toggles the dialog shown when clicking the “Add” button in the print client Océ Viewer File Formats: determines what file formats will load in the internal viewer. Any non-highlighted file format will require a specific viewer on the client.

Version 3.0.0 Confidential © 2014 Canon Solutions America 10/27/2014
Océ System Administrator User Guide
SECTION 5: DATABASE SETTINGS
This tab shows the database connection and lets you switch from SQL authentication to Windows authentication. By default all modules use a specific login to access the database. This can be switched to using Windows authentication for more granular security control. However, this will typically require creation of user groups and assigning them to the OCEPRINT database.

Version 3.0.0 Confidential © 2014 Canon Solutions America 10/27/2014
Océ System Administrator User Guide
SECTION 6: CONVERT.BAT CONFIGURATION OPTIONS The convert.bat file is responsible for defining what third party applications are available for Océ Direct Print to utilize for file processing and converting. The location of the file is located here by default (the install drive may differ):
x86: C:\Program Files\Oce\Direct Suite\
x64: C:\Program Files (x86)\Oce\Direct Suite\ Common default parameters set by convert.bat Default preview resolution = 200dpi Default preview Width = 1280 pixels Default preview Height = 1024 pixels Default file converter = oceconvert.exe For external processing of postscript and PDF files, either of the following can be used (must be installed on local system, please verify installation location): Cadzation Acroplot Repro
OR Ghostscript 9.0 or greater For processing DWG, Cadzation Acroplot Auto or AnyDWG can be used.

Version 3.0.0 Confidential © 2014 Canon Solutions America 10/27/2014
Océ System Administrator User Guide
SECTION 7: OCE DIRECT PRINT TROUBLESHOOTING GUIDE
Installation Issues 1. Problem: When beginning installation, the following error message appears:
Solution: This occurs when the client machine does not have Windows Installer 4.5. Visit the Microsoft website to download and install Windows Installer 4.5: http://www.microsoft.com/en-us/download/details.aspx?id=8483
2. Problem: When installing Direct Suite on a Client PC, the following error occurs:
Solution: The PC you were trying to install Direct Suite on did not allow setup to install SQL Server CE 3.5. In some cases, if applications are open during the installation this component will fail to install. Make sure you close all applications prior to installing Direct Suite. You can try to perform a manual installation SQL server CE 3.5 prior to installing Direct Suite. The installation file for SQL Server CE 3.5 may have been included in the installation media. If not, try downloading the following link: http://www.microsoft.com/en-us/download/details.aspx?id=5783

Version 3.0.0 Confidential © 2014 Canon Solutions America 10/27/2014
Océ System Administrator User Guide
3. Problem: When installing SQL Server, the following error occurs:
Solution: This occurs when the server machine and current user have the same name. Log into the machine as a different user before performing the installation.
4. Problem: When installing Direct Suite, the following error occurs:
Solution: This occurs because the installer is actually unable to create some necessary configuration directories. Refer to the installation media and locate a batch file called “CreateIntallFolders.bat”. Execute the batch file and follow its directions. Then, return to the Direct Suite installer and click “Retry”.

Version 3.0.0 Confidential © 2014 Canon Solutions America 10/27/2014
Océ System Administrator User Guide
Océ Direct Print Client Issues
1. Problem: When I add a file into the print client, the thumbnail shows a read X Solution: Check to make sure the file types you are adding to the Print client is a supported file type. Supported File types are (DWF, PS, PRN, PDF, HPGL, HPGL/2, TIFF, JPEG)
2. Problem: I receive a connection error when launching the print client.
Solution: Make sure the Direct Print Server is running. Try browsing or pinging the Server.
3. Problem: When opening a previously saved a Direct Print job, an error indicating
the files are missing occurs.
Solution: If this occurs, the job was probably saved using the option ‘Save Job Ticket’ or ‘Save Job Ticket As’. Feature in the Direct Print client. To avoid this error, don’t move the original drawing locations after it’s saved, or save it using the ‘Save Full Job’ or ‘Save Full Job As’ option.

Version 3.0.0 Confidential © 2014 Canon Solutions America 10/27/2014
Océ System Administrator User Guide

Version 3.0.0 Confidential © 2014 Canon Solutions America 10/27/2014
Océ System Administrator User Guide
4. Problem: Print Jobs never make it to the Output device. Solution: Make sure the ‘Océ Direct Print Service’ is running on the Direct Print Server. If this service is not running, jobs will be held in the ‘ODPInbox’ on the Direct Print Server. Check the contents of the ‘ODPInbox’. Windows XP: C:\Documents and Settings\All Users\Application Data\Oce\Direct Print\ODPInbox\.
Windows Vista/7/8: C:\ProgramData\Oce Direct Print\ODPInbox\

Version 3.0.0 Confidential © 2014 Canon Solutions America 10/27/2014
Océ System Administrator User Guide
5. Problem: When launching ODP client after installing it on a Client PC, the following error occurs:
Solution: This error occurs when the client’s user account is local and unknown to the server PC. The user must be added to the server.
6. Problem: Changes made in System Administrator are not reflected in Océ Direct
Print client. Solution: In ODP client, either press F5 (to refresh) or close the program and restart it.

Version 3.0.0 Confidential © 2014 Canon Solutions America 10/27/2014
Océ System Administrator User Guide
System Administrator Issues 1. Problem: When creating devices in System Administrator, Roll information is not
updated:
Solutions:
Check that backchannel is configured and click on the “Query device” button
Close System Administrator and re-launch. Then, check the Rolls/Trays tab again.
If the roll information is still not updated, close System Administrator and restart the print service, OcePrintDirectSvc. Restart the service by:
1) Open the start menu, and right click on “My Computer”. Select “Manage”.
2) On the left pane, expand “Services and Applications”. Click on “Services”.
3) In the services list that has just opened, scroll down until you find “Océ Direct Print Service”. Restart the service. It should look like this:

Version 3.0.0 Confidential © 2014 Canon Solutions America 10/27/2014
Océ System Administrator User Guide
4) After restarting the service, re-launch System Administrator
and check the Rolls/Trays tab once more.
2. Problem: Can’t add a new ‘Device’ or ‘Queue’ to System Administrator. Solution: First click on the (+) sign first to create the new device.
3. Problem: My devices and Queue information does not save. Solution: Click on the ‘Save’ icon to save Device and Queue information.

Version 3.0.0 Confidential © 2014 Canon Solutions America 10/27/2014
Océ System Administrator User Guide

Version 3.0.0 Confidential © 2014 Canon Solutions America 10/27/2014
Océ System Administrator User Guide
Logging Information System Administrator has a log feature that details the activity of the print service and various Océ Direct Print applications. System administrators can increase or decrease the frequency of log updates by going to the Settings section of System Administrator:
The maximum history of the log can also be configured. The log files can be reached using the Help menu.

Version 3.0.0 Confidential © 2014 Canon Solutions America 10/27/2014
Océ System Administrator User Guide
The log file for the print service is named OceDirectPrintSvc.log and can be found:
On Windows Vista, 7, and 8: C:\ProgramData\Oce Direct Print\
On Windows XP machines at: C:\Documents and Settings\All Users\Application Data\Oce Direct Print\ Other application logs can be found:
On Windows Vista, 7, and 8 at: C:\Users\[Local User]\AppData\Local\Oce Direct Suite\
On Windows XP machines at: C:\Documents and Settings\[Local User]\Application Data\Local\Oce Direct Suite\