suraaj linens
TRANSCRIPT
COMPANY WORKFLOW PROCESSES
BRIEF INTRODUCTION INTO OUR MANUFACTURING
PROCESSES AND CONTROL MEASURES.
Quality Assurance Department: Suraaj Linen
Quality Assuarance Manager:
Shiv Kumar
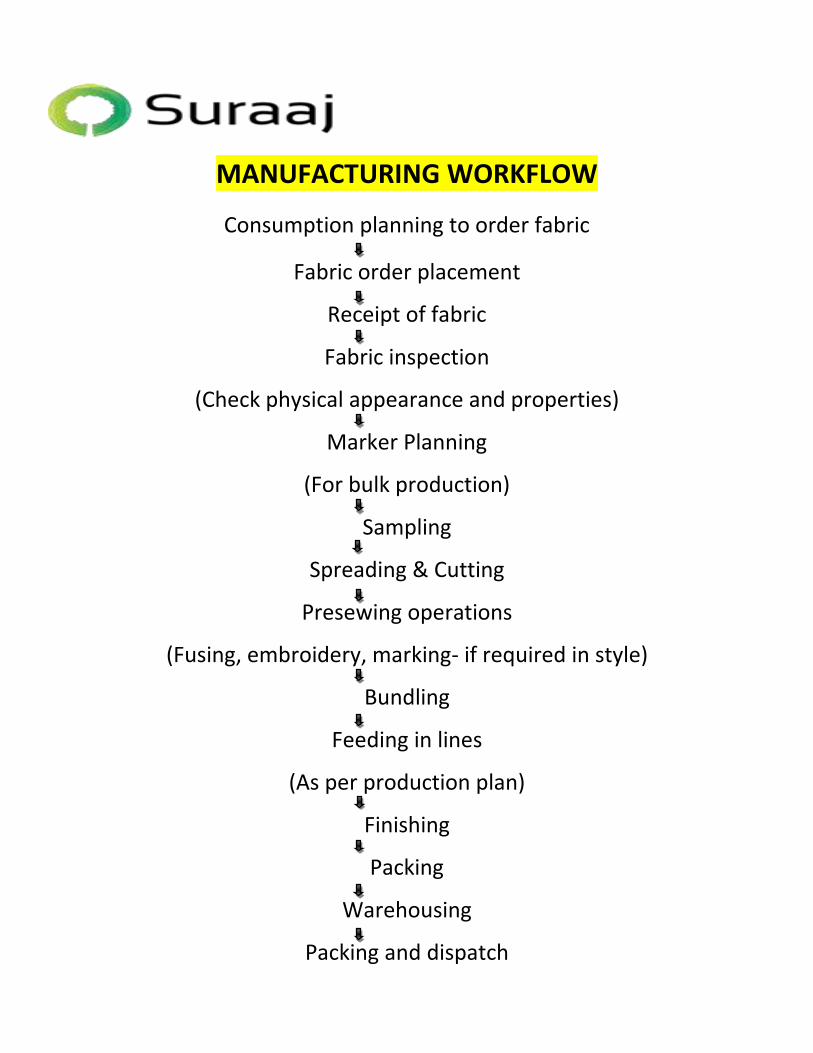
MANUFACTURING WORKFLOW
Consumption planning to order fabric
Fabric order placement
Receipt of fabric
Fabric inspection
(Check physical appearance and properties)
Marker Planning
(For bulk production)
Sampling
Spreading & Cutting
Presewing operations
(Fusing, embroidery, marking- if required in style)
Bundling
Feeding in lines
(As per production plan)
Finishing
Packing
Warehousing
Packing and dispatch
PRODUCT ENGINEERING
It starts in design development stage because it directly affects the costing of the
products .
People involved: Designers, sample room manager, industrial engineering
department and production management should all report from cutting to
finishing.
Key areas for analysis:
Seam types – Various seam types should be analyzed and considered to simplify/reduce the work.
Stitch types- Explore various options in terms of seam types. For example replace lock stitches by chain stitch in case of Multineedle seams.
Machine types- Optimum use of technology to maximize, look in to machine type, bed shapes and automation that’s possible.
Attachments – Attachment help in simplifying and reducing the work content and to increase line balancing efficiency.
Special work aids- Special work aids can be used to simplify/reduce the work content.
Fabric consumption- Fabric being 70% of the product cost is vitally important to monitor and if the engineering is done properly we can certainly expect to save fabric or reduce consumptions.
Cutting- how should it be done- we do not have Tailors now, we have operators instead and they should be working with clippers in their hands
Finishing- Finishing is the last link of the value chain which is essential for p
erformance point of view.

CAD DEPARTMENT
Receiving tech pack: Tech pack is received from Head office that contains all the information
regarding the style illustration, size, trims, colors, stitch and seam class, fit, sampling details, and packing and
finishing details.
Make basic pattern: Basic pattern is made manually by pattern master in one base size.
Digitizing: This base size is then digitized on the Gerber digitizer board.
Grading: After digitizing, it’s transferred to the computer on Gerber pattern design studio. Patterns
initially are made in only one size. We need to proportionally increase or decrease the size of a pattern, while
maintaining shape, fit, balance and scale of style details. Getting correct fit and drape of a product but also
maintain the measurements as graded specs is essential.
Using the CAD system, the pattern is resized according to a predetermined table of sizing increments (or
"grade rules"). The computerized plotter can then print out the pattern in each size.
Incorporating shrinkage in pattern grading
- First fabric has to be relaxed so that there is no tension or strain during rolling or unrolling while
layering or cutting. This will ensure that there is minimum shrinkage in products.
- So unwashed products are made with additional shrinkage tolerance included so that they gain their
original measurements after washing.
- Woven fabric products shrink about 2-3%. This shrinkage incorporated in patterns could be lengthwise
or width wise depending on type of fabric.
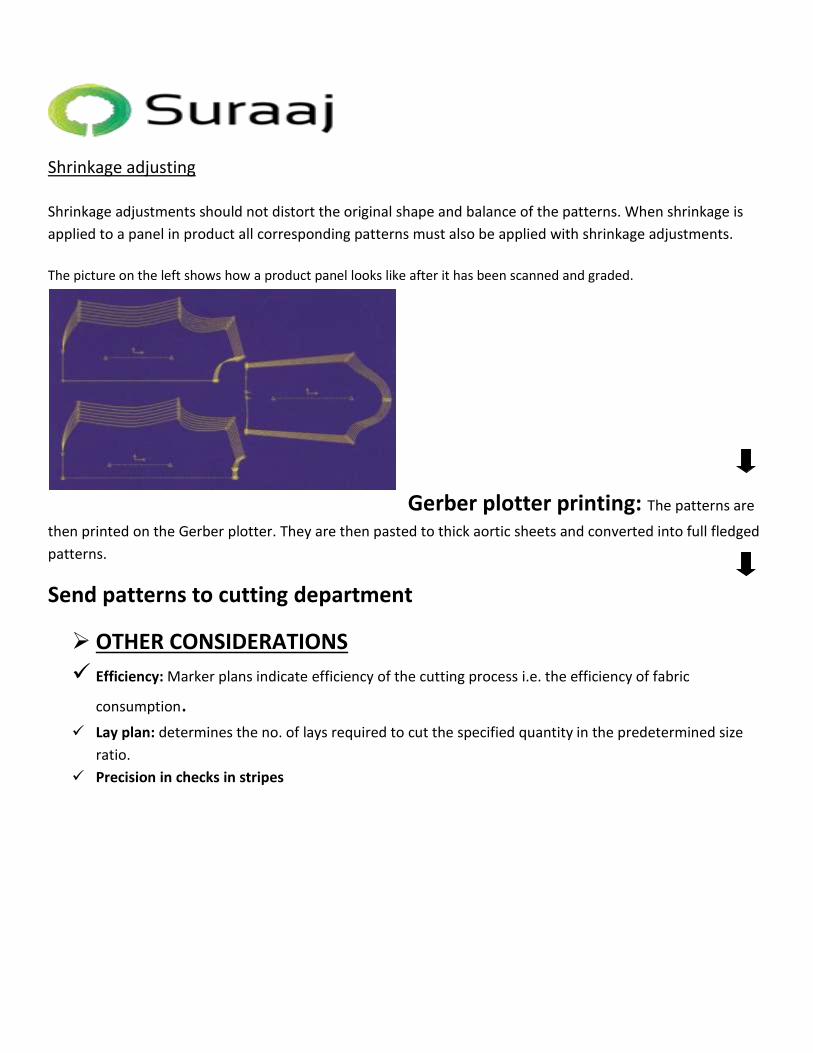
Shrinkage adjusting
Shrinkage adjustments should not distort the original shape and balance of the patterns. When shrinkage is
applied to a panel in product all corresponding patterns must also be applied with shrinkage adjustments.
The picture on the left shows how a product panel looks like after it has been scanned and graded.
Gerber plotter printing: The patterns are
then printed on the Gerber plotter. They are then pasted to thick aortic sheets and converted into full fledged
patterns.
Send patterns to cutting department
OTHER CONSIDERATIONS
Efficiency: Marker plans indicate efficiency of the cutting process i.e. the efficiency of fabric
consumption. Lay plan: determines the no. of lays required to cut the specified quantity in the predetermined size
ratio.
Precision in checks in stripes
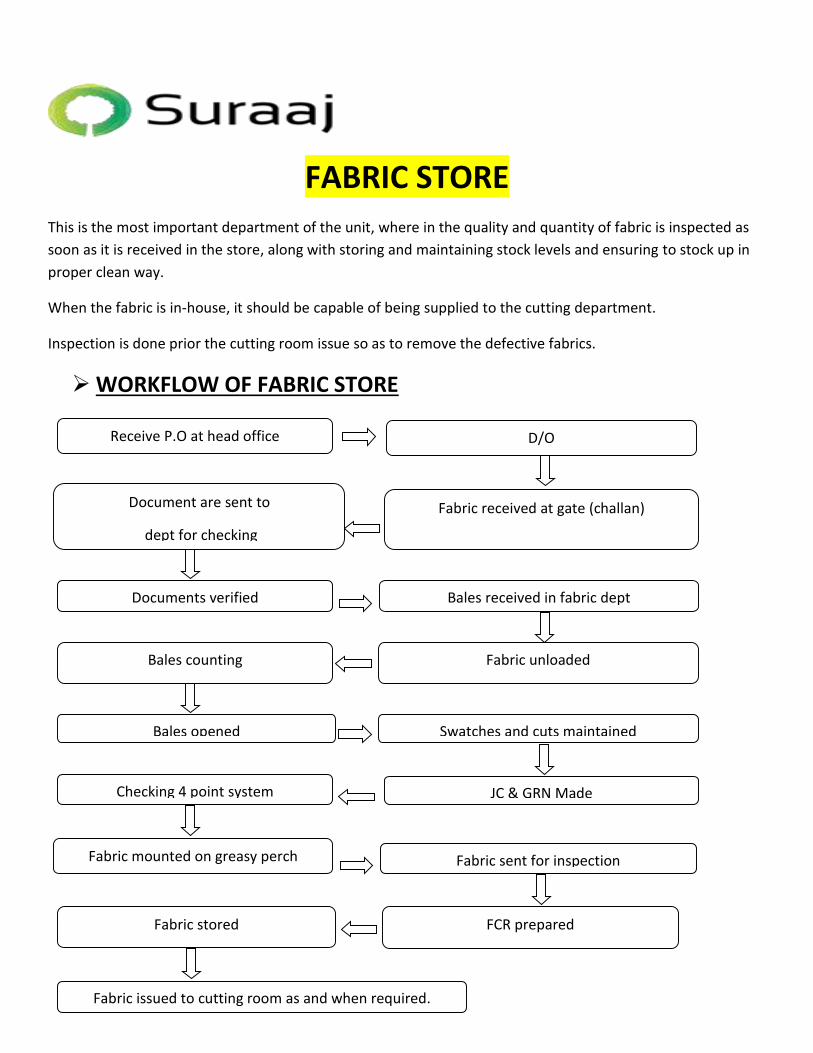
FABRIC STORE
This is the most important department of the unit, where in the quality and quantity of fabric is inspected as
soon as it is received in the store, along with storing and maintaining stock levels and ensuring to stock up in
proper clean way.
When the fabric is in-house, it should be capable of being supplied to the cutting department.
Inspection is done prior the cutting room issue so as to remove the defective fabrics.
WORKFLOW OF FABRIC STORE
Receive P.O at head office D/O
Fabric received at gate (challan) Document are sent to
dept for checking
Documents verified
Bales received in fabric dept
Bales counting Fabric unloaded
Swatches and cuts maintained Bales opened
JC & GRN Made Checking 4 point system
Fabric mounted on greasy perch Fabric sent for inspection
FCR prepared Fabric stored
Fabric issued to cutting room as and when required.
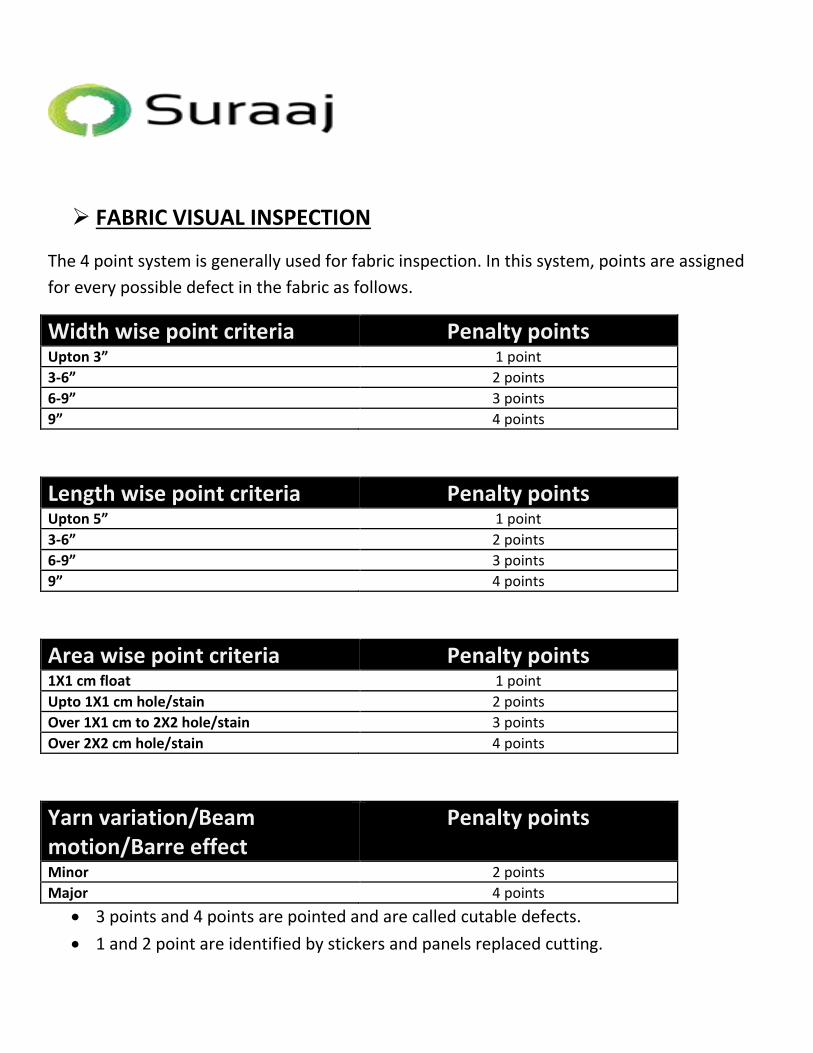
FABRIC VISUAL INSPECTION
The 4 point system is generally used for fabric inspection. In this system, points are assigned
for every possible defect in the fabric as follows.
Width wise point criteria Penalty points Upton 3” 1 point
3-6” 2 points
6-9” 3 points
9” 4 points
Length wise point criteria Penalty points Upton 5” 1 point
3-6” 2 points
6-9” 3 points
9” 4 points
Area wise point criteria Penalty points 1X1 cm float 1 point
Upto 1X1 cm hole/stain 2 points
Over 1X1 cm to 2X2 hole/stain 3 points
Over 2X2 cm hole/stain 4 points
Yarn variation/Beam motion/Barre effect
Penalty points
Minor 2 points
Major 4 points
3 points and 4 points are pointed and are called cutable defects.
1 and 2 point are identified by stickers and panels replaced cutting.

The maximum points and flags allowed as follows:-
FABRIC Max. no. of allowed points
Max. no. of flags per linear mts.
100% cotton and its blends 40 5
100% linear and its blends 40 4
Defect points/100m2 = Total pointsX3600/Fabric widthXFabric length.
If defect points/100m3 < 40 then accept the fabric.
If defect points/100m3 > 40 then reject the fabric.
Major woven defects : slubs, holes, missing yarns, yarn variation, end out, soiled yarns,
wrong warns.
Major dyeing or printing defects: out of register, dye stops, machine stops, color out,
color smear, or shading.
These defects are marked wth colored tape so that they can be easily located.
Others Penalty points Patta Cutable defect
Count or composition variation Cutable defect
Short end Reject roll
Selvedge loose Reject roll
Wrong drawing Reject roll
Reed marks Reject roll
Temple marks Reject roll
Damaged selvedge Reject roll
Wrong weave Reject roll

Other points to remember:
1. No linear meter shall be assigned more than 4 point or a flag.
2. All holes regardless of size small be assigned be assigned 4 point.
3. There should not be a major defect within 5 meters from beginning or the end of the roll or part therein.
4. The shade of the fabric should match with the approved shade of fabric from H.O.
5. There should not be shade variation from selvedge to selvedge, centre to selvedge and start and end
6. A repeating defect or running should not extend for more than 3 yards (2.73 meters), otherwise the roll will
be considered second quality.
7. No piece will be acceptable as first quality if it has noticeable side-to-side, side-to-centre or end-to-end
shading within a roll or a piece.
FABRIC INSPECTION MACHINE
This is used to inspect the fabric defects and measure the total meters of the fabric
FABRIC TESTS
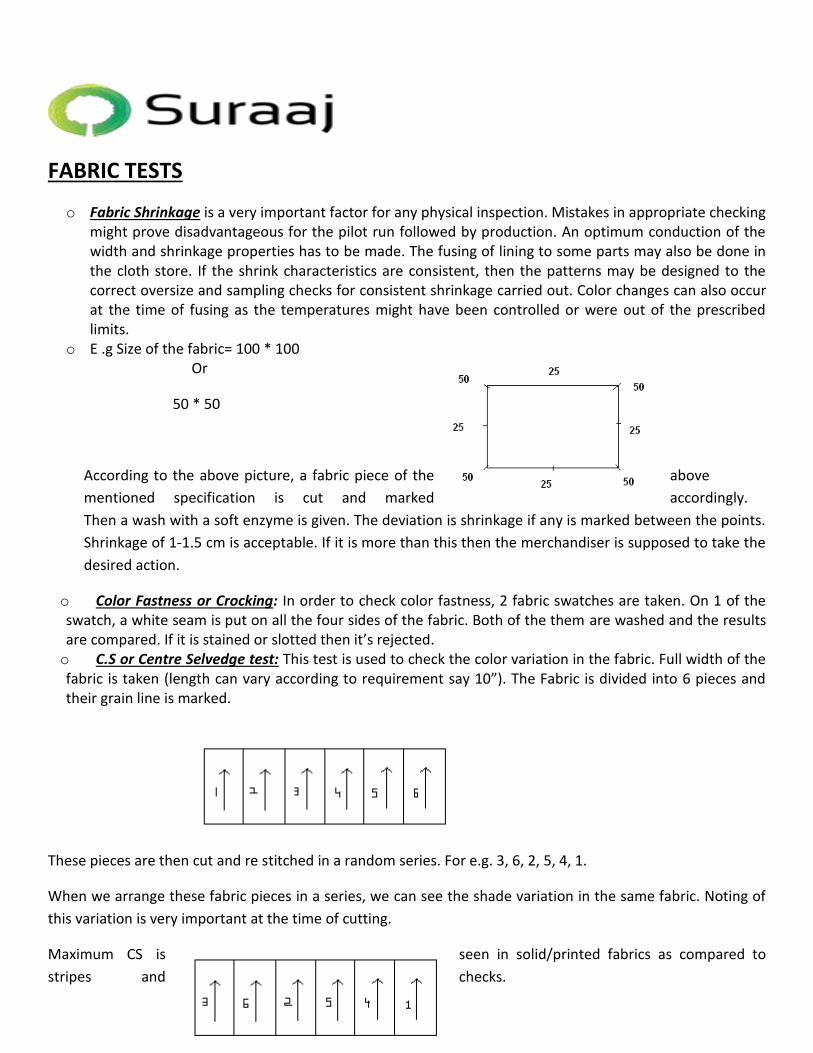
o Fabric Shrinkage is a very important factor for any physical inspection. Mistakes in appropriate checking might prove disadvantageous for the pilot run followed by production. An optimum conduction of the width and shrinkage properties has to be made. The fusing of lining to some parts may also be done in the cloth store. If the shrink characteristics are consistent, then the patterns may be designed to the correct oversize and sampling checks for consistent shrinkage carried out. Color changes can also occur at the time of fusing as the temperatures might have been controlled or were out of the prescribed limits.
o E .g Size of the fabric= 100 * 100 Or
50 * 50
According to the above picture, a fabric piece of the above
mentioned specification is cut and marked accordingly.
Then a wash with a soft enzyme is given. The deviation is shrinkage if any is marked between the points.
Shrinkage of 1-1.5 cm is acceptable. If it is more than this then the merchandiser is supposed to take the
desired action.
o Color Fastness or Crocking: In order to check color fastness, 2 fabric swatches are taken. On 1 of the swatch, a white seam is put on all the four sides of the fabric. Both of the them are washed and the results are compared. If it is stained or slotted then it’s rejected. o C.S or Centre Selvedge test: This test is used to check the color variation in the fabric. Full width of the fabric is taken (length can vary according to requirement say 10”). The Fabric is divided into 6 pieces and their grain line is marked.
These pieces are then cut and re stitched in a random series. For e.g. 3, 6, 2, 5, 4, 1.
When we arrange these fabric pieces in a series, we can see the shade variation in the same fabric. Noting of
this variation is very important at the time of cutting.
Maximum CS is seen in solid/printed fabrics as compared to
stripes and checks.
o Others include dry clean and washability, abrasion resistance, pilling (especially for mixed fibers), Bow and skew (using a ruler and set square for checks and stripes), Drape and crease resistance (that includes permanent press capability), Strength (tensile, tear and bursting (for seams), Flammability, Surface wetting and penetration.
FABRIC DEFECTS
o Abrasion Mark: A place in the fabric where the surface has been damaged due to friction or abnormally weakened by any operation through which it has been passed.
o Misprint: In printed fabrics, either missed, or partially missed, or incorrectly positioned relative to each other.
o Double Pick: Two yarns running simultaneously, mostly in the weft yarn.
o Oil Stain: Oil mark on the fabric.
o Hole: A breakage of yarns in the fabric involving more than two yarns.
o Bow: When the weft/filling yarns lie in an arc across the width of the fabric.
o Skew: Distortion in the construction of the fabric i.e. in the yarn that constitute the fabric.
o Crease: A fabric defect across the fabric width usually caused by a sharp fold.
o Dye Stain: An area of discoloration due to uneven absorption of colorant.
o Miss-pick: A pick/weft yarn not properly interlaced.
o Slubs: An abruptly thickened place in a yarn.
o Screen Out: The appearance of a colored separation line in a printed design.
o Calendar Line: Sharp pressmark on fabric due to the calendar during the processing.
o Contamination: Colored fibers with the warp or weft fibers.

Name of suppliers
Abc
Acb
Ca;k
Cal
Cal;
Dlkj
Dlkj
Slikj
;ljkd
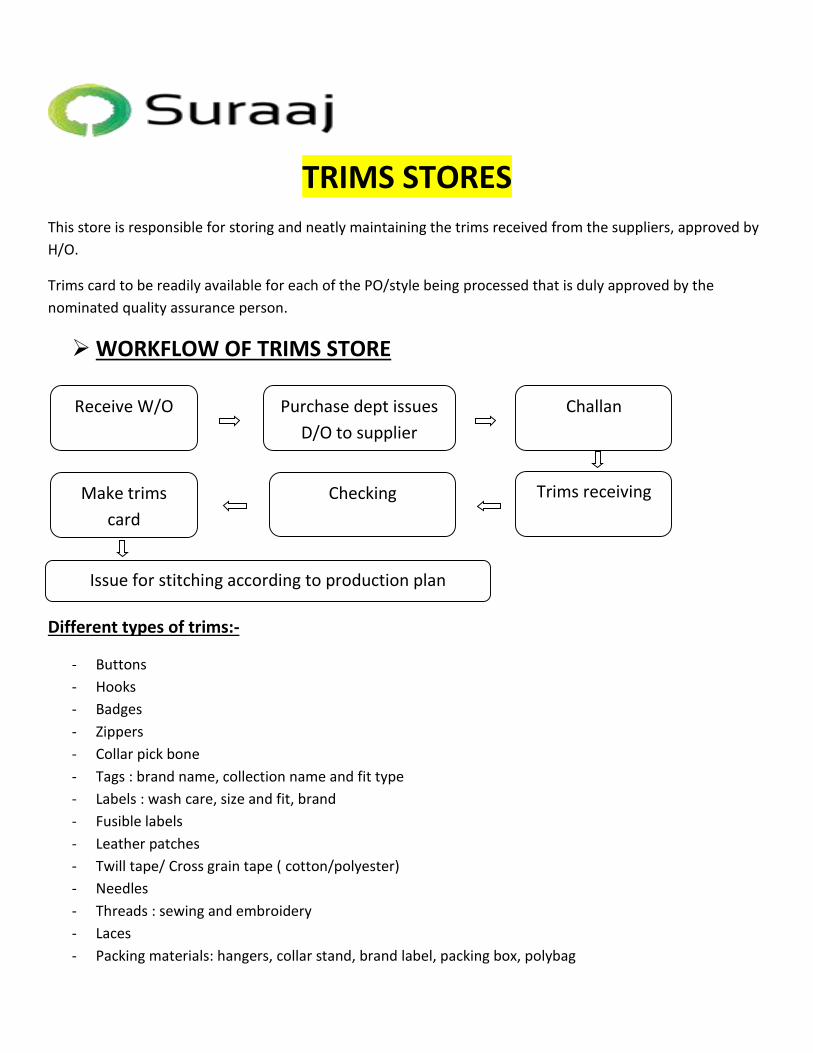
TRIMS STORES
This store is responsible for storing and neatly maintaining the trims received from the suppliers, approved by
H/O.
Trims card to be readily available for each of the PO/style being processed that is duly approved by the
nominated quality assurance person.
WORKFLOW OF TRIMS STORE
Different types of trims:-
- Buttons
- Hooks
- Badges
- Zippers
- Collar pick bone
- Tags : brand name, collection name and fit type
- Labels : wash care, size and fit, brand
- Fusible labels
- Leather patches
- Twill tape/ Cross grain tape ( cotton/polyester)
- Needles
- Threads : sewing and embroidery
- Laces
- Packing materials: hangers, collar stand, brand label, packing box, polybag
Receive W/O Purchase dept issues
D/O to supplier
Challan
Trims receiving Checking Make trims
card
Issue for stitching according to production plan
SPREADING AND CUTTING DEPARTMENT
Net cutting is an essential part of product engineering that demands precession in cutting and low shape
deformation afterwards. Accurate control of cloth width produces economies in edge margins. Precise cutting
not only avoids spoilt work at the making up stage but is the key to modern sewing room practice.
As soon as the work order is received, a fabric enquiry is conducted in fabric store weather the fabric is
available or not. The CAD department is responsible for making the pattern markers available in various
graded sizes for cutting purpose and calculate the consumption per product.
SPREADING
- Spreading is the process of unwinding large rolls of fabric onto long, wide tables and laying them in
superimposed plies of specified length.
- The number of lays depends upon the number of products desired and the fabric thickness.
- The maximum cutting width is the usable fabric width minus selvedge or needle marks caused by
stencil marks.
- Fabric utilization is the amount of fabric actually utilized in the marker as the percentage of the total
fabric area.
- The cutting marker is laid on the topmost layer.
Type of lay plan used: Since open width fabric is used, full product lay is used that has both left and right pieces.
Type of lay: Multiple Ply is used in which a number of fabric layers are stacked on one top of other.
Forms of spreading: Fabric is laid the same way up with grain or print pattern running in the same
direction. Fabric has to be cut at the end of each ply.
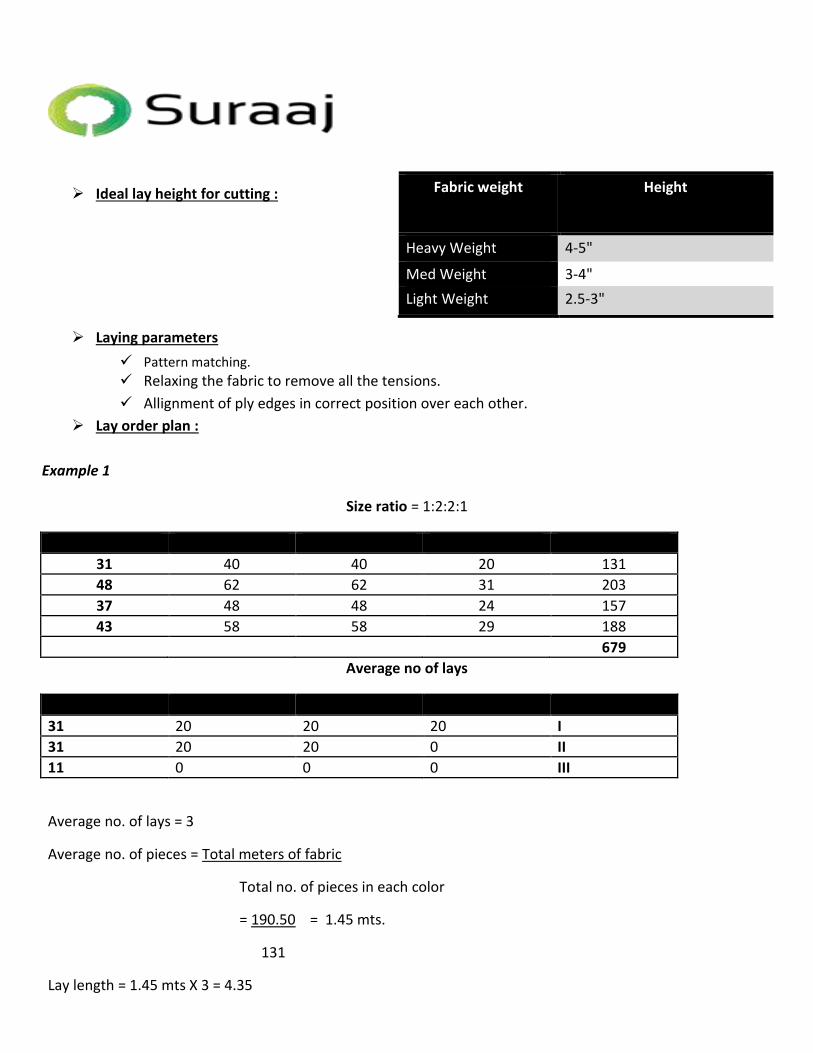
Ideal lay height for cutting :
Laying parameters
Pattern matching. Relaxing the fabric to remove all the tensions.
Allignment of ply edges in correct position over each other.
Lay order plan :
Example 1
Size ratio = 1:2:2:1
39 40 42 44 Total
31 40 40 20 131
48 62 62 31 203
37 48 48 24 157
43 58 58 29 188
679
Average no of lays
39 40 42 44 Avg. no. of lays
31 20 20 20 I
31 20 20 0 II
11 0 0 0 III
Average no. of lays = 3
Average no. of pieces = Total meters of fabric
Total no. of pieces in each color
= 190.50 = 1.45 mts.
131
Lay length = 1.45 mts X 3 = 4.35
Fabric weight Height
Heavy Weight 4-5"
Med Weight 3-4"
Light Weight 2.5-3"
CUTTING
Cutting parameters: - Precision in cutting: To ensure the cutting of fabric - accurately according to the line drown of the
marker plan.
- Clean edge: By avoiding the fraying out of yarn from the fabric edge. Cutting edge must be smooth
clean. Knife must be sharp for smooth or clean edge.
- Consistency in cutting: All the sizing safe of the cutting parts should be same of knife should be
operated of the right angle of the fabric lay.
Types of cutting equipments: - Scissors
- Round knife
- Straight knife
- Band knife cutting m/c
- Die cutting ( collars and cuffs )
Methods for marking directly on the cloth: CHALK: This is the traditional method in which thick lines are drawn on the cloth.
Preparation for sewing: 1) Position marking : Egg- pocket positions, tucks, pocket positions etc
2) Shade marking: each component is marked with a unique no. printed on a small ticket
stuck on the component.
3) Bundle making: according to size, color, quantity
4) Bungle tickets: to identify each bundle to size, lot, style and color wise.
5) Fusing parameters: There are different types of fusings depending upon the end use and
type of fabric.
Type Heat Pressure Time
Microdot 150 degree 2.5 13 sec Semi fusing 140 degree 1.5 15 sec Woven fusing 175 degree 3 18 sec
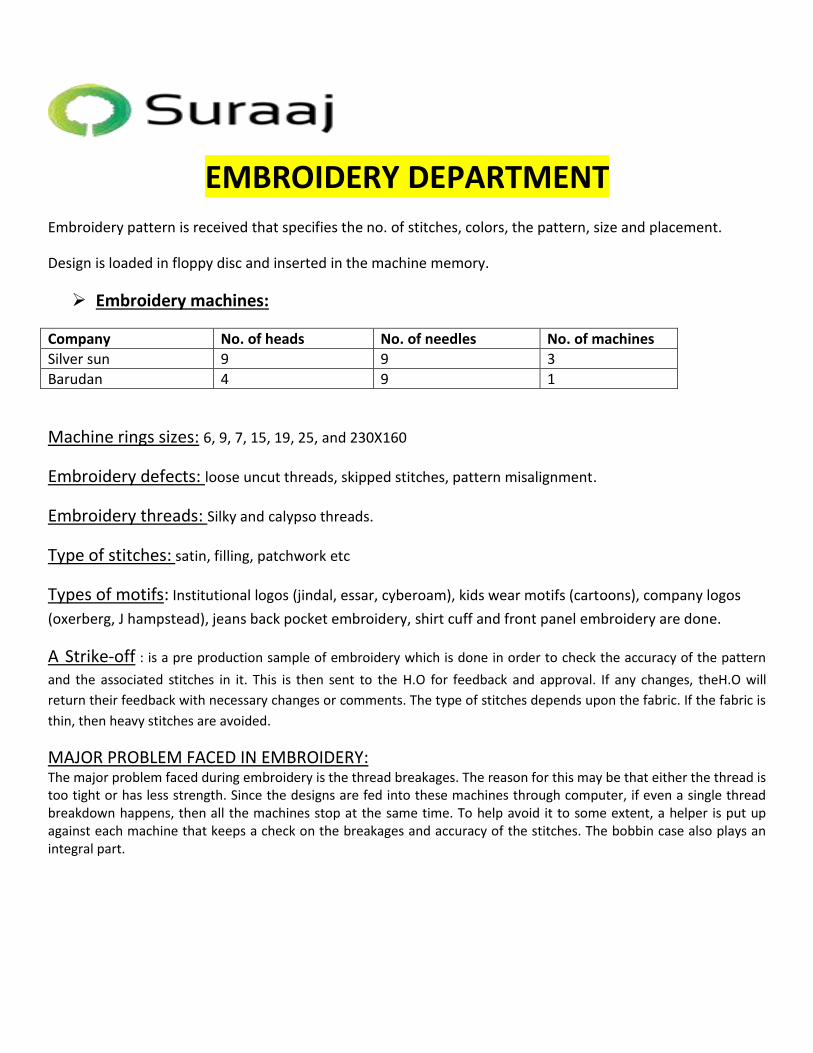
EMBROIDERY DEPARTMENT
Embroidery pattern is received that specifies the no. of stitches, colors, the pattern, size and placement.
Design is loaded in floppy disc and inserted in the machine memory.
Embroidery machines:
Company No. of heads No. of needles No. of machines
Silver sun 9 9 3
Barudan 4 9 1
Machine rings sizes: 6, 9, 7, 15, 19, 25, and 230X160
Embroidery defects: loose uncut threads, skipped stitches, pattern misalignment.
Embroidery threads: Silky and calypso threads.
Type of stitches: satin, filling, patchwork etc
Types of motifs: Institutional logos (jindal, essar, cyberoam), kids wear motifs (cartoons), company logos
(oxerberg, J hampstead), jeans back pocket embroidery, shirt cuff and front panel embroidery are done.
A Strike-off : is a pre production sample of embroidery which is done in order to check the accuracy of the pattern
and the associated stitches in it. This is then sent to the H.O for feedback and approval. If any changes, theH.O will
return their feedback with necessary changes or comments. The type of stitches depends upon the fabric. If the fabric is
thin, then heavy stitches are avoided.
MAJOR PROBLEM FACED IN EMBROIDERY: The major problem faced during embroidery is the thread breakages. The reason for this may be that either the thread is too tight or has less strength. Since the designs are fed into these machines through computer, if even a single thread breakdown happens, then all the machines stop at the same time. To help avoid it to some extent, a helper is put up against each machine that keeps a check on the breakages and accuracy of the stitches. The bobbin case also plays an integral part.
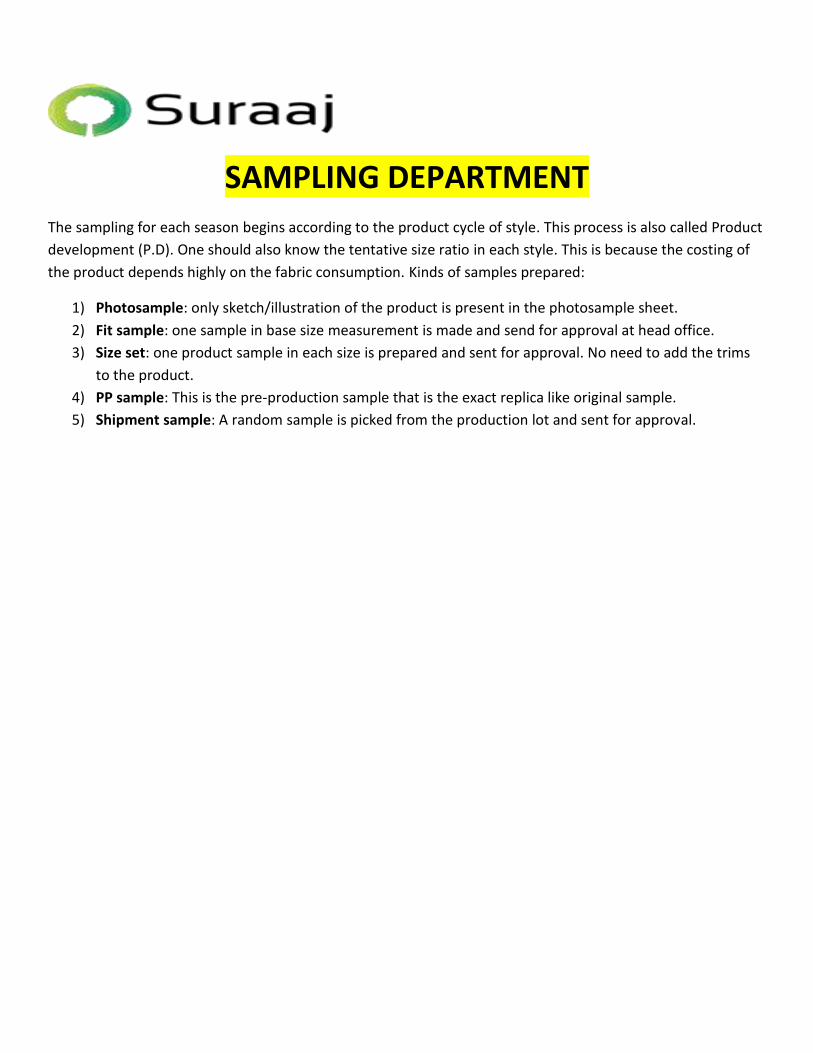
SAMPLING DEPARTMENT
The sampling for each season begins according to the product cycle of style. This process is also called Product
development (P.D). One should also know the tentative size ratio in each style. This is because the costing of
the product depends highly on the fabric consumption. Kinds of samples prepared:
1) Photosample: only sketch/illustration of the product is present in the photosample sheet.
2) Fit sample: one sample in base size measurement is made and send for approval at head office.
3) Size set: one product sample in each size is prepared and sent for approval. No need to add the trims
to the product.
4) PP sample: This is the pre-production sample that is the exact replica like original sample.
5) Shipment sample: A random sample is picked from the production lot and sent for approval.
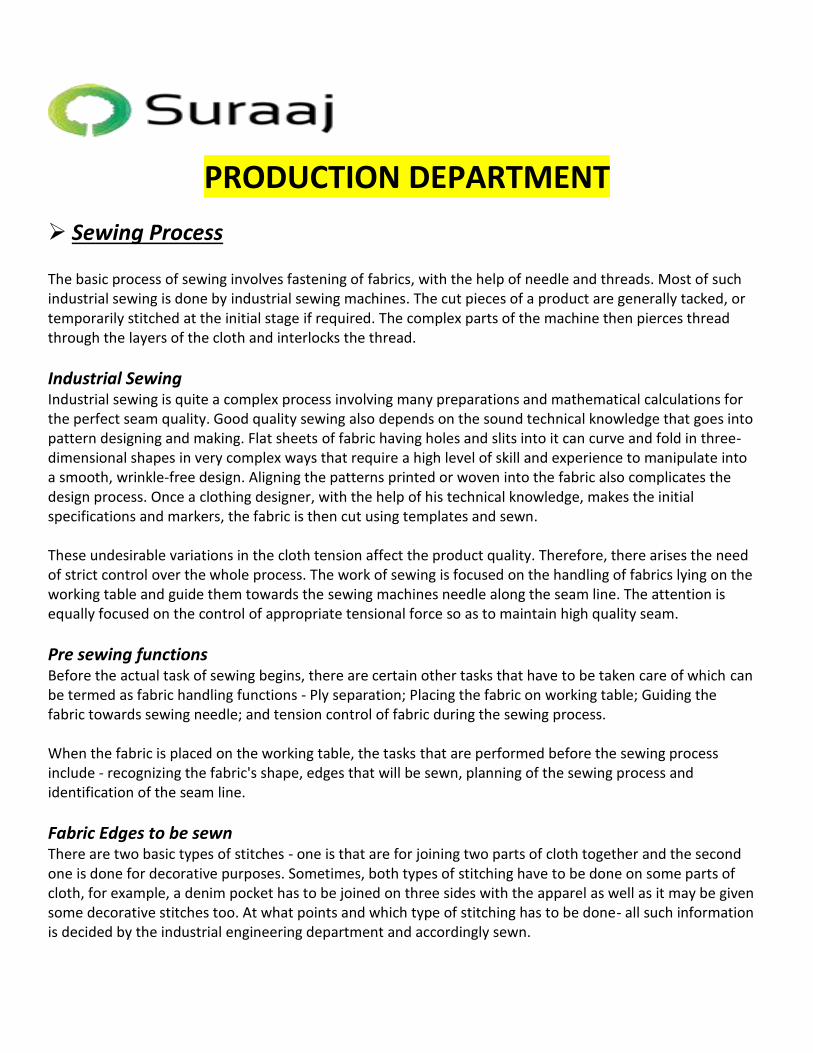
PRODUCTION DEPARTMENT
Sewing Process The basic process of sewing involves fastening of fabrics, with the help of needle and threads. Most of such industrial sewing is done by industrial sewing machines. The cut pieces of a product are generally tacked, or temporarily stitched at the initial stage if required. The complex parts of the machine then pierces thread through the layers of the cloth and interlocks the thread.
Industrial Sewing Industrial sewing is quite a complex process involving many preparations and mathematical calculations for the perfect seam quality. Good quality sewing also depends on the sound technical knowledge that goes into pattern designing and making. Flat sheets of fabric having holes and slits into it can curve and fold in three-dimensional shapes in very complex ways that require a high level of skill and experience to manipulate into a smooth, wrinkle-free design. Aligning the patterns printed or woven into the fabric also complicates the design process. Once a clothing designer, with the help of his technical knowledge, makes the initial specifications and markers, the fabric is then cut using templates and sewn. These undesirable variations in the cloth tension affect the product quality. Therefore, there arises the need of strict control over the whole process. The work of sewing is focused on the handling of fabrics lying on the working table and guide them towards the sewing machines needle along the seam line. The attention is equally focused on the control of appropriate tensional force so as to maintain high quality seam.
Pre sewing functions Before the actual task of sewing begins, there are certain other tasks that have to be taken care of which can be termed as fabric handling functions - Ply separation; Placing the fabric on working table; Guiding the fabric towards sewing needle; and tension control of fabric during the sewing process. When the fabric is placed on the working table, the tasks that are performed before the sewing process include - recognizing the fabric's shape, edges that will be sewn, planning of the sewing process and identification of the seam line.
Fabric Edges to be sewn There are two basic types of stitches - one is that are for joining two parts of cloth together and the second one is done for decorative purposes. Sometimes, both types of stitching have to be done on some parts of cloth, for example, a denim pocket has to be joined on three sides with the apparel as well as it may be given some decorative stitches too. At what points and which type of stitching has to be done- all such information is decided by the industrial engineering department and accordingly sewn.
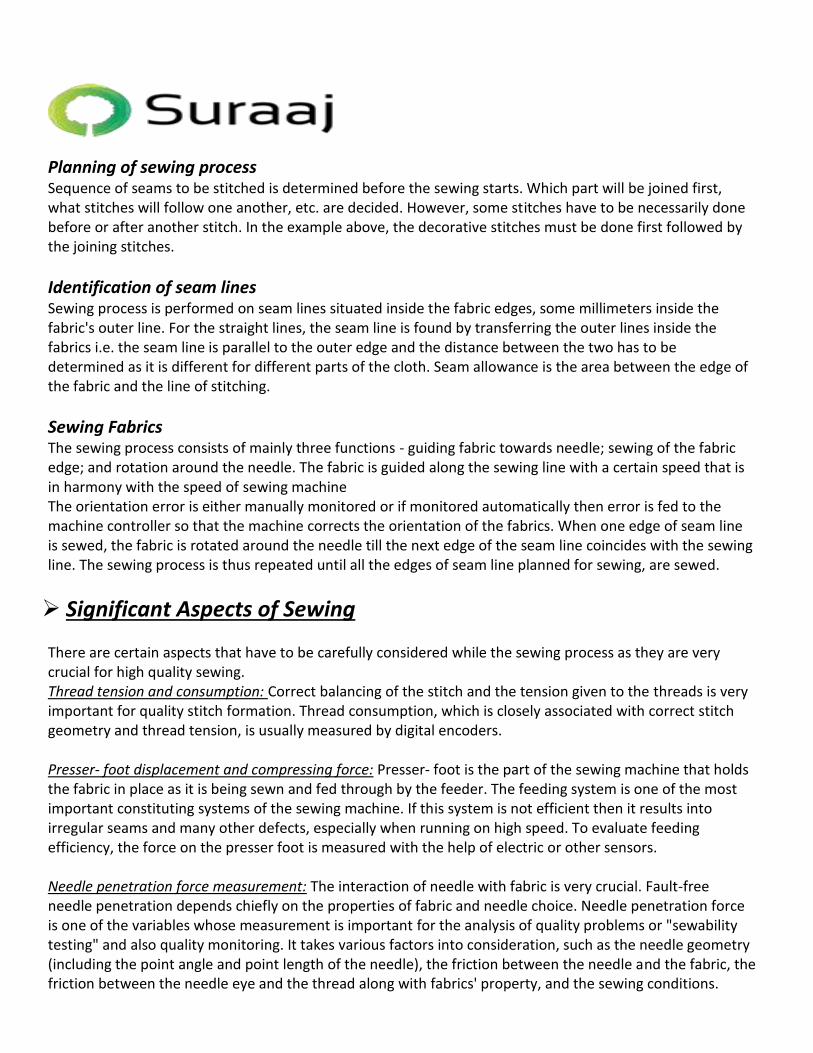
Planning of sewing process
Sequence of seams to be stitched is determined before the sewing starts. Which part will be joined first, what stitches will follow one another, etc. are decided. However, some stitches have to be necessarily done before or after another stitch. In the example above, the decorative stitches must be done first followed by the joining stitches.
Identification of seam lines Sewing process is performed on seam lines situated inside the fabric edges, some millimeters inside the fabric's outer line. For the straight lines, the seam line is found by transferring the outer lines inside the fabrics i.e. the seam line is parallel to the outer edge and the distance between the two has to be determined as it is different for different parts of the cloth. Seam allowance is the area between the edge of the fabric and the line of stitching.
Sewing Fabrics The sewing process consists of mainly three functions - guiding fabric towards needle; sewing of the fabric edge; and rotation around the needle. The fabric is guided along the sewing line with a certain speed that is in harmony with the speed of sewing machine The orientation error is either manually monitored or if monitored automatically then error is fed to the machine controller so that the machine corrects the orientation of the fabrics. When one edge of seam line is sewed, the fabric is rotated around the needle till the next edge of the seam line coincides with the sewing line. The sewing process is thus repeated until all the edges of seam line planned for sewing, are sewed.
Significant Aspects of Sewing There are certain aspects that have to be carefully considered while the sewing process as they are very crucial for high quality sewing. Thread tension and consumption: Correct balancing of the stitch and the tension given to the threads is very important for quality stitch formation. Thread consumption, which is closely associated with correct stitch geometry and thread tension, is usually measured by digital encoders. Presser- foot displacement and compressing force: Presser- foot is the part of the sewing machine that holds the fabric in place as it is being sewn and fed through by the feeder. The feeding system is one of the most important constituting systems of the sewing machine. If this system is not efficient then it results into irregular seams and many other defects, especially when running on high speed. To evaluate feeding efficiency, the force on the presser foot is measured with the help of electric or other sensors. Needle penetration force measurement: The interaction of needle with fabric is very crucial. Fault-free needle penetration depends chiefly on the properties of fabric and needle choice. Needle penetration force is one of the variables whose measurement is important for the analysis of quality problems or "sewability testing" and also quality monitoring. It takes various factors into consideration, such as the needle geometry (including the point angle and point length of the needle), the friction between the needle and the fabric, the friction between the needle eye and the thread along with fabrics' property, and the sewing conditions.
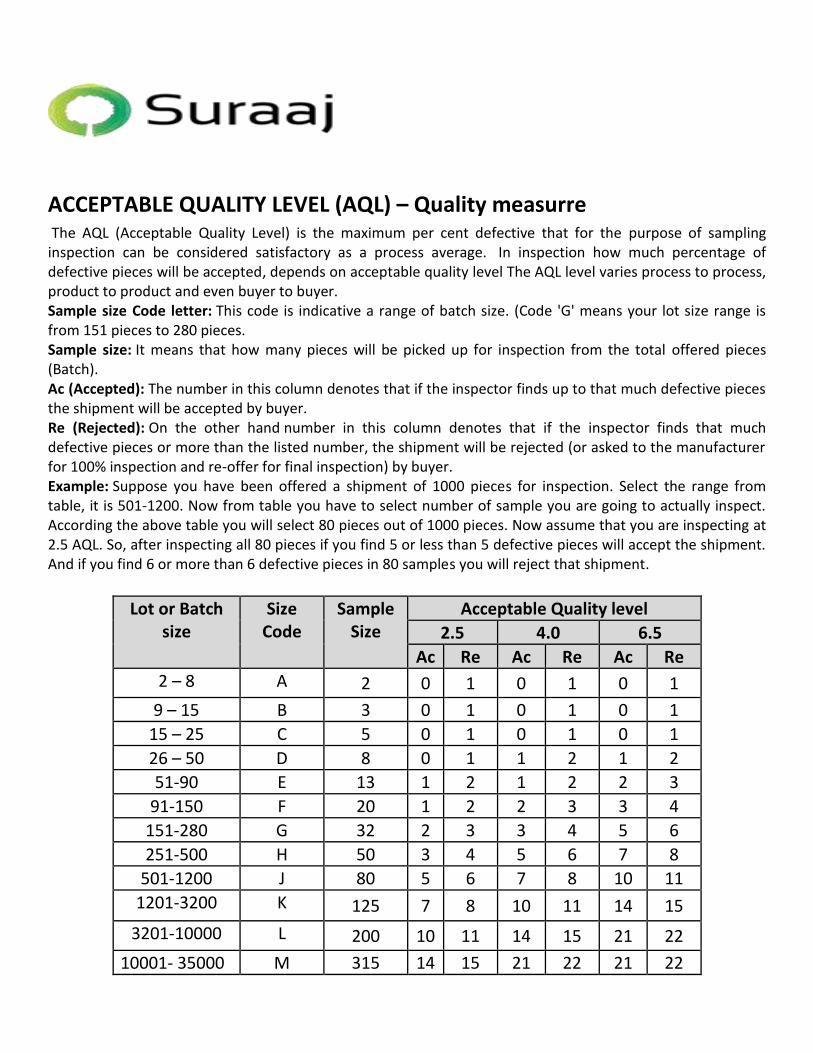
ACCEPTABLE QUALITY LEVEL (AQL) – Quality measurre The AQL (Acceptable Quality Level) is the maximum per cent defective that for the purpose of sampling inspection can be considered satisfactory as a process average. In inspection how much percentage of defective pieces will be accepted, depends on acceptable quality level The AQL level varies process to process, product to product and even buyer to buyer. Sample size Code letter: This code is indicative a range of batch size. (Code 'G' means your lot size range is from 151 pieces to 280 pieces. Sample size: It means that how many pieces will be picked up for inspection from the total offered pieces (Batch). Ac (Accepted): The number in this column denotes that if the inspector finds up to that much defective pieces the shipment will be accepted by buyer. Re (Rejected): On the other hand number in this column denotes that if the inspector finds that much defective pieces or more than the listed number, the shipment will be rejected (or asked to the manufacturer for 100% inspection and re-offer for final inspection) by buyer. Example: Suppose you have been offered a shipment of 1000 pieces for inspection. Select the range from table, it is 501-1200. Now from table you have to select number of sample you are going to actually inspect. According the above table you will select 80 pieces out of 1000 pieces. Now assume that you are inspecting at 2.5 AQL. So, after inspecting all 80 pieces if you find 5 or less than 5 defective pieces will accept the shipment. And if you find 6 or more than 6 defective pieces in 80 samples you will reject that shipment.
Lot or Batch size
Size Code
Sample Size
Acceptable Quality level
2.5 4.0 6.5
Ac Re Ac Re Ac Re
2 – 8 A 2 0 1 0 1 0 1
9 – 15 B 3 0 1 0 1 0 1
15 – 25 C 5 0 1 0 1 0 1
26 – 50 D 8 0 1 1 2 1 2
51-90 E 13 1 2 1 2 2 3
91-150 F 20 1 2 2 3 3 4
151-280 G 32 2 3 3 4 5 6
251-500 H 50 3 4 5 6 7 8
501-1200 J 80 5 6 7 8 10 11
1201-3200 K 125 7 8 10 11 14 15
3201-10000 L 200 10 11 14 15 21 22
10001- 35000 M 315 14 15 21 22 21 22

LIST OF POSSIBLE DEFECTS IN PRODUCTION
Component and materials
Possible Defects
Materials/fabric 1. Fabric holes 2. Slubs 3. Shading variation 4. Misprints, out-of-register prints, undesired color spots 5. Cut, visible notch mark tears or visible surface repairs 6. Bow or skew exceeding 1.5 percent 7. Double picks 8. Pilling
Cleanliness 1. Soil, Spots, stains or Dust 2. Attached thread clusters
Pressing 1. Burn or scorch marks 2. Glaring shine marks 3. Press marks from camps 4. Absence of pressing when specified 5. Products packaged moist after steam pressing 6. Improper pressing 7. Seams not lined up when specified for center leg crease 8. Loops twisted after pressing 9. Uneven creases after press
Seams and Stitching 1. Twisted, roped, or puckered seams 2. Open or broken stitches 3. Raw edges where covered edges are specified 4. Seams not back stitched or bar tacked when specified 5. Irregular or uneven top stitching 6. Seam grin-through, seam slippage 7. Pinching or any part of product caught in seam or stitches 8. Any exposed drill holes 9. Length of legs off by more than 3/8 inch 10. Stitch count not conforming to specifications 11. Stitch or seam type not conforming to specifications 12. Label is not correctly attached, position and layout 13. Sewn on design attached at incorrect place and sewn not according to specs 14. Double needle stitch on crotch seam is missing 15. Use of monofilament thread, other seams than where specified
Button holes 1. Size is not within specs
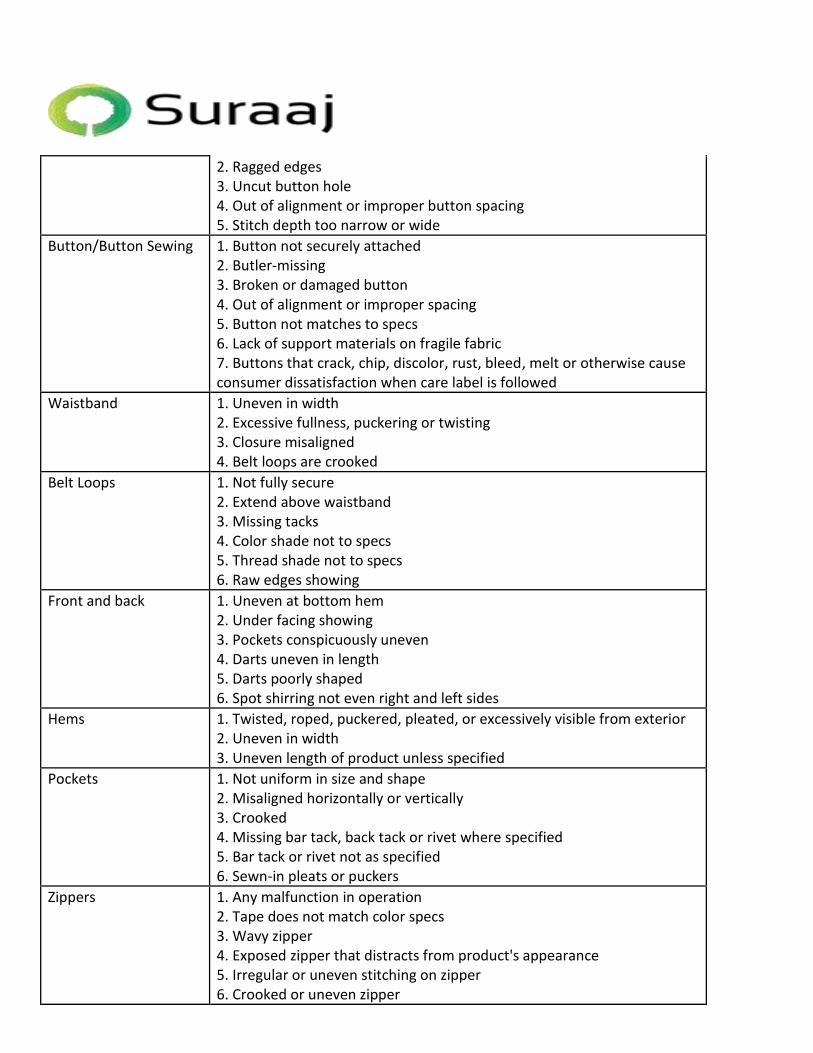
2. Ragged edges 3. Uncut button hole 4. Out of alignment or improper button spacing 5. Stitch depth too narrow or wide
Button/Button Sewing 1. Button not securely attached 2. Butler-missing 3. Broken or damaged button 4. Out of alignment or improper spacing 5. Button not matches to specs 6. Lack of support materials on fragile fabric 7. Buttons that crack, chip, discolor, rust, bleed, melt or otherwise cause consumer dissatisfaction when care label is followed
Waistband 1. Uneven in width 2. Excessive fullness, puckering or twisting 3. Closure misaligned 4. Belt loops are crooked
Belt Loops 1. Not fully secure 2. Extend above waistband 3. Missing tacks 4. Color shade not to specs 5. Thread shade not to specs 6. Raw edges showing
Front and back 1. Uneven at bottom hem 2. Under facing showing 3. Pockets conspicuously uneven 4. Darts uneven in length 5. Darts poorly shaped 6. Spot shirring not even right and left sides
Hems 1. Twisted, roped, puckered, pleated, or excessively visible from exterior 2. Uneven in width 3. Uneven length of product unless specified
Pockets 1. Not uniform in size and shape 2. Misaligned horizontally or vertically 3. Crooked 4. Missing bar tack, back tack or rivet where specified 5. Bar tack or rivet not as specified 6. Sewn-in pleats or puckers
Zippers 1. Any malfunction in operation 2. Tape does not match color specs 3. Wavy zipper 4. Exposed zipper that distracts from product's appearance 5. Irregular or uneven stitching on zipper 6. Crooked or uneven zipper
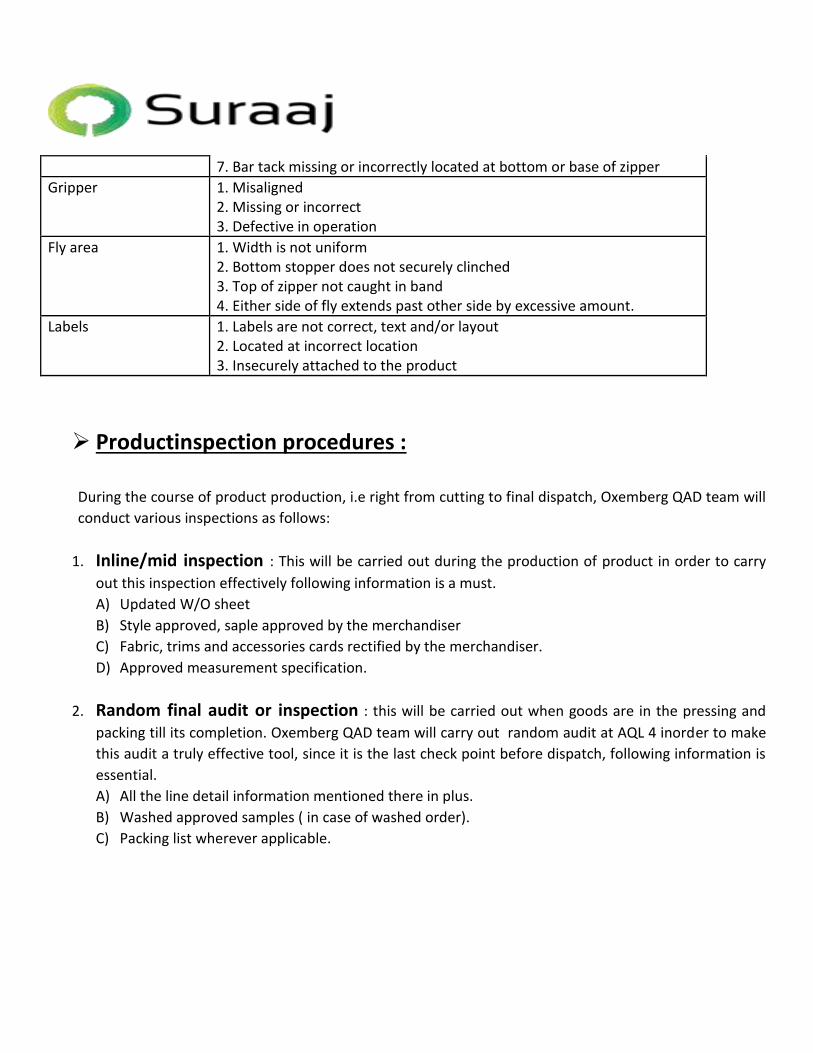
7. Bar tack missing or incorrectly located at bottom or base of zipper
Gripper 1. Misaligned 2. Missing or incorrect 3. Defective in operation
Fly area 1. Width is not uniform 2. Bottom stopper does not securely clinched 3. Top of zipper not caught in band 4. Either side of fly extends past other side by excessive amount.
Labels 1. Labels are not correct, text and/or layout 2. Located at incorrect location 3. Insecurely attached to the product
Productinspection procedures :
During the course of product production, i.e right from cutting to final dispatch, Oxemberg QAD team will
conduct various inspections as follows:
1. Inline/mid inspection : This will be carried out during the production of product in order to carry
out this inspection effectively following information is a must.
A) Updated W/O sheet
B) Style approved, saple approved by the merchandiser
C) Fabric, trims and accessories cards rectified by the merchandiser.
D) Approved measurement specification.
2. Random final audit or inspection : this will be carried out when goods are in the pressing and
packing till its completion. Oxemberg QAD team will carry out random audit at AQL 4 inorder to make
this audit a truly effective tool, since it is the last check point before dispatch, following information is
essential.
A) All the line detail information mentioned there in plus.
B) Washed approved samples ( in case of washed order).
C) Packing list wherever applicable.

PRODUCTION PLANNING, SCHEDULING AND
CONTROLLING
i. Planning: This involves a long term overview around the year, based on market forecast. An
agreement is necessary about whether the production unit can cope up with the expected sales, in terms of overall volume and in terms of specialized plant and operatives. The action is required of relevant departments to revise the plan, purchase the necessary machinery, train staff, obtain new premises or lease off unwanted ones, buying additional capacity from other manufacturers etc.
ii. Scheduling: The work is allocated to the production capacity according to the agreed plan as soon as
the orders are confirmed. It is at this stage that schedules are prepared as an exercise and later drafted in detail.
iii. Controlling: The production process is very uncertain and rarely goes according to the schedule,
especially when the processes are complex and dependent on the performance of individuals. Sometimes orders are cancelled and rush orders come through. Inefficiency can be avoided if the preliminary work is done thoroughly and the routine terms are accurately recorded. Balancing is a part of the process.
KEY FACTORS IN CONTROLING AND SCHEDULING
i.Time/ unit input: e.g. meters of cloth or SAM of work per minute.
ii.Work in process delays: Extension in output time is necessary to provide buffer against fluctuations in output where the no. of processes involved are many.
iii.Technical maintenance: Proper usage and maintenance of the machines and other electronically equipments should be done to provide smooth operation processes.
iv.Employee Training: The employees should be trained efficiently to increase production efficiency and reduce wastage.
v.Non productive hours: A provision for non-productive hours should be provided in the total available minutes as these by default are bound to happen. For e.g. lunch time, talking, going to washroom, sitting idle etc. These hours can be deceased by making changes in the production plan wisely.
vi.Line balancing: This is necessary to reduce the wastage of time as some workers might be sitting idle because the feeding has not been done properly and the pieces are not being delivered to them on time. The overall operation machine layout is faulty due to improper line balancing. A machine layout is considered to be optimum if all the machines in the line are producing their required quantities of pieces and no worker is sitting idle. Line balancing can be a way to increase the productivity as increasing or decreasing unwanted operations from the line can be done.
vii.Analyzing labour requirements and deficiencies: A difference in skilled and non-skilled labour can be assessed and accordingly work can be assigned to them.
viii.Optimum utilization of time and raw materials: Any type of unnecessary wastages should be avoided as far as possible. This requires a good production plan and the co ordination of related activities.
Production flow
This refers to the series in which the product moves from one workstation to another, requiring completion of
the desired operation. The products move from one work station to another in a straight line. The straight
could be work stations set up on either side of a belt conveyer/runner table. There is little amount or work in
process between the stations. In these cases, a limited amount of storage occurs after each workstation. This
can take the form of work bins attached to the machines stand in which the work is
Straight line or conveyer chain system
Where a work station is is storage indicates the direction of movement
A production process comprises of : Fabric consumption calculation, Thread consumption calculation, Fabric
inspection, pattern making, fabric cutting, machine layout and SAM calculation completed, pilot run
completed, testing sampling completed, line sewing completed, finishing sewing completed, final machine
inspection completed, end of line quality check completed, off pressing and finishing done, packing completed
and goods dispatched.
Production Quality Control
Quality implies value. It is something that is build into the product from the stage of market research and
design right up to pack and dispatch and extends beyond a careful analysis of the customer returns and
consultation with the buyers. The quality of the product is the reason that is bought by the customer and
comprises of a set of ‘quality characteristics’ which together make up its ‘fitness for purpose’. The key to
profitable product manufacture is to provide the best combination at lowest cost ‘the economic quality level’.
The costs of quality come from:
style; fabric and trimmings; cutting and making and packing (including repairs and rejects); Quality control function; Learning time of the workers; Work content; Present productivity; Other overhead costs (like salary, electricity, administrative cost, maintenance, transport etc)
Fitness for purpose comprises of:
Quality of design Quality of conformance Quality of delivery and service Economic cost
Quality Control Department
The main function of the quality control department is not to control quality but to provide a service which
allows people to make good clothes. Their main concern should be to do this at the minimum cost, balancing
the expense of the department against the savings in terms of reduced repairs and rejects. One aspect of this is
to define the quality level of plant and of the workplace in it. The raising of quality levels requires a major
project involving investment in machinery and training which cannot be done quickly.
The maintenance of quality at an agreed level implies clear specifications and these are an important task for
this department. The Product information sheet for individual styles can be kept as brief as possible. They
should contain the maximum information in the form of sketches and all dimensions should me quoted with
tolerances. Tolerances reflect the extent to which less than perfect is acceptable. However, small tolerances
exist for the products.
The function of the quality control department is to reduce the amount of bad work being made. This gives
savings in cost of the repairs and rejects but also speeds up delivery. Its aim is to make products correctly at the
first time. When the consistency of quality is poor, the expected quality level is substantially below standard.
Greater consistency has an even higher priority than raising the standard of the majority of the products made.
Tolerances
These are the limits of acceptability expressed in figures usually or by examples or photographs to demonstrate
the limits of acceptability. For example, the specification for a seam margin may be 1 cm and the tolerance is -
/+2 mm.
Quality characteristics
Quality of design requires higher amount of market research to establish what is the ultimate customer’s
preference at an acceptable price amongst a competitive set of characteristics. These can form the basis for
design. Customers demand various combinations of the following, in various orders of importance:
Price and value for money Individuality of appearance Fashion is appropriate to the period and group Image enhancement (e. g reliability of an executive’s suit, smartness for the air hostess etc) Comfort in wear, both from cut and fabric Durability of function and appearance Psychological qualities(waterproofing, warmth, sweat absorption etc) Ease of Care (crease and stain resistance, shape retention, washability etc) Size and shape Consistency of the product The production incharge must stick to the specifications and should also consider the needs of the
retailers like: Consistency (means to achieve the required quality level, the will to confirm of Management and
workforce, maintaining the specifications with tolerances). Delivery on time Lower cost to support competitive price.
Quality Specifications
o Factory specifications
Cloth and trimmings, button spacing Threads, needle types and sizes, by fabric and seam type Stitches per inch or per 2 cms Seam types, seam margins and tolerances Cutting standards
o Style or product specifications
Items of difference Special size ranges and grading Key features and quality points Special tolerances Fabric and trimmings, colors and shades ( shade cards checked regularly for fading)
Department wise quality system in factory
1) FABRIC STORES: o Neatly arrange the fabric rolls received and maintaining the department cleanliness to avoid spotting
and contamination of the fabrics. Packing the fabrics in plastic sheets can be useful. o Fabric inspection is done on 4 point system. o Shade cards/fabric quality swatches for each style approved by the PO are maintained.
2) TRIMS STORES: o Trims stores have racking system to store the trims in a proper order. o Trims card for each PO/style being processed should be maintained.
3) CUTTING SECTION: o Making CSV ( centre to selvedge variation) sample for each of the roll to analyze the shade
variation. o Maintaining shade samples and providing shade details to presentation checkers in finishing
dept for shade reference. o Proper pattern checking report. o Proper lay check, marking check, sorting/bundling check report. o Cutting projection tallies updated.
4) SEWING SECTION
o Effective maintenance for each of the machine. o Proper updated broken needle log (should have needle issuing record from stores and properly
pasted broken needle book). o Keyhole, bartack, overlock, label attach operation internal approvals and display of mockups. o Effective mockup system on all operational areas. o All scissors and trimmers should be secured properly. o Clearance of WIP at all levels. o Display of trim card at required areas. o Checking products before wash and after wash for both quality and measurement. o Random in-line checking at each chain stitch operation like feed of arm machine. o Each supervisor is advised to check randomly the operation in their own working limits. o Each operator is advised to clean their machine and area before start of work in the morning
and after lunch- waste fabric is issued to the operator for the same. o In-line and end-line checking report. o Before wet processing in-line audit report is also maintained. o Washing facility is not available in-house. It’s done on jobber basis.
5) FINISHING SECTION o Fabric defect identification by stickering and alteration piece identified by knotting at place of
alter by the checker. o Dusting is done by dust pads wherever sucking machine is not used. o Cartoons are properly stacked. o Presentation checker to have ready reference of shade cards of fabric and trims cards as well. o Daily checking report is maintained. o Measurement audit report is maintained. o Pre-final auditing is also gone on products. o Defective cartoons are replaced by good cartoons.
6) PACKING AND DESPATCH SECTION o Separate departments are maintained for topwear and bottom wear. o The fully packed products are racked in sequential manner and each rack is given a number for
identification. o Products are stored brand wise, sizewise, and product wise. o Barcode stickering is done and checked. o Packing in inners and outer cartoons is done according to the size ratio or packing specifications
as specified. o Goods to be shipped are packed readily with proper covering and sealing and kept near the
main gate to be loaded in the cargo. o Proper recording of dispatch, packing and stock stored in-house pending for shipment are
maintained along with Chelan entries of cargo and transportation services. o Good relations with distributors are held.
7) ENTIRE WORKING AREA o Properly certified fire extinguisher to be free from all obstacles. o Each operator to wear mask to avoid inhalation of dust inside the factory. o Dust collection bags for each work station/machine. o Separate area for storing rejected products. o Proper covering of stored pieces. o Properly maintained QC reports and files maintained by QA.
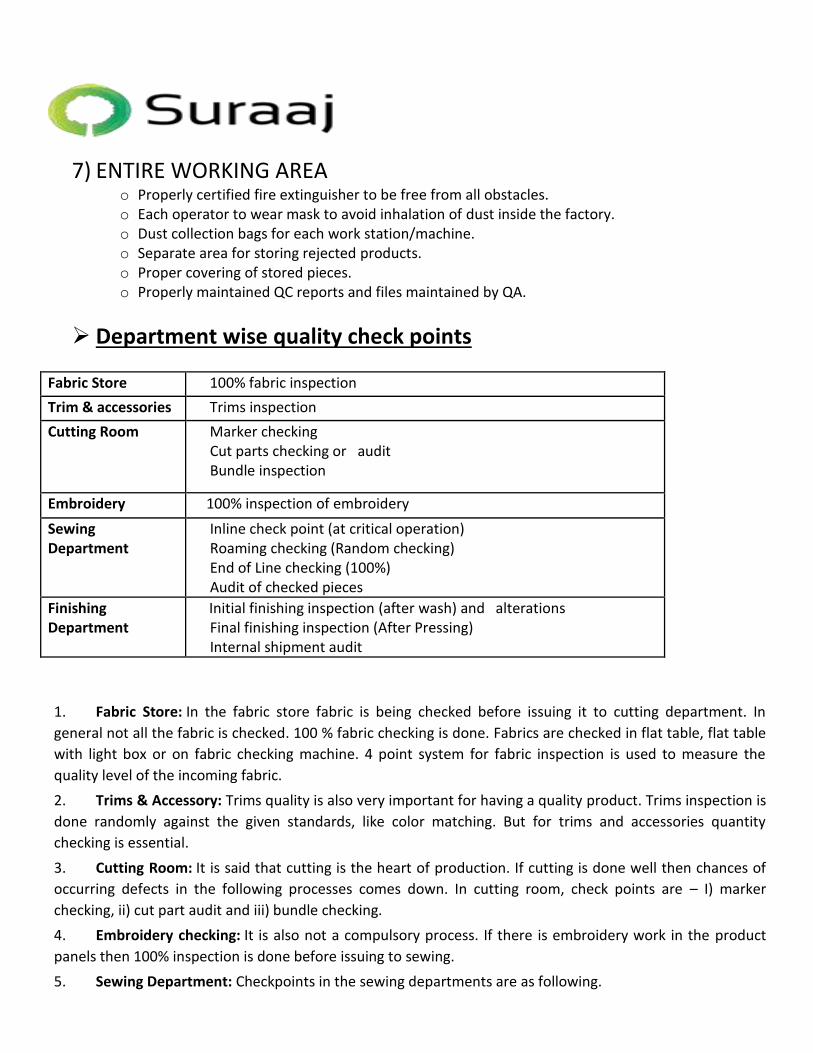
Department wise quality check points
Fabric Store - 100% fabric inspection
Trim & accessories - Trims inspection
Cutting Room - Marker checking - Cut parts checking or audit - Bundle inspection
Embroidery - 100% inspection of embroidery
Sewing Department
- Inline check point (at critical operation) - Roaming checking (Random checking) - End of Line checking (100%) - Audit of checked pieces
Finishing Department
Initial finishing inspection (after wash) and alterations - Final finishing inspection (After Pressing) - Internal shipment audit
1. Fabric Store: In the fabric store fabric is being checked before issuing it to cutting department. In
general not all the fabric is checked. 100 % fabric checking is done. Fabrics are checked in flat table, flat table
with light box or on fabric checking machine. 4 point system for fabric inspection is used to measure the
quality level of the incoming fabric.
2. Trims & Accessory: Trims quality is also very important for having a quality product. Trims inspection is
done randomly against the given standards, like color matching. But for trims and accessories quantity
checking is essential.
3. Cutting Room: It is said that cutting is the heart of production. If cutting is done well then chances of
occurring defects in the following processes comes down. In cutting room, check points are – I) marker
checking, ii) cut part audit and iii) bundle checking.
4. Embroidery checking: It is also not a compulsory process. If there is embroidery work in the product
panels then 100% inspection is done before issuing to sewing.
5. Sewing Department: Checkpoints in the sewing departments are as following.

- Inline inspection: In assembly line generally check pints are kept for the critical operations. In these checkpoints, 100% checking is done for partially stitched products and defect free pieces are forwarded to the next process.
- Roaming inspection: In this case checkers roam around the line and randomly check pieces at each operation.
- End of line inspection or table checking: A checker checks completely stitched product at the end of the line. 100% checking is done here.
- Audit of the checked pieces: 100% inspected product are sent to finishing from sewing department. And all defective pieces are repaired before sending to finishing.
6. Finishing Department: Check points in finishing department consists - Initial finishing inspection: checking done prior to pressing of the product at finishing room is known as initial finishing.
- Final finishing Inspection: After pressing products are again checked and passed for tagging and packing.
- Internal final audit: After products are packed up to certain quantity, quality control team, does audit of packed products. This process is carried out to ensure that before handing over shipment.
If the completed work is being checked at each process and defective pieces are corrected before handing to
the next process than at the end of production there is very little chance to have a defective at final inspection
stage.
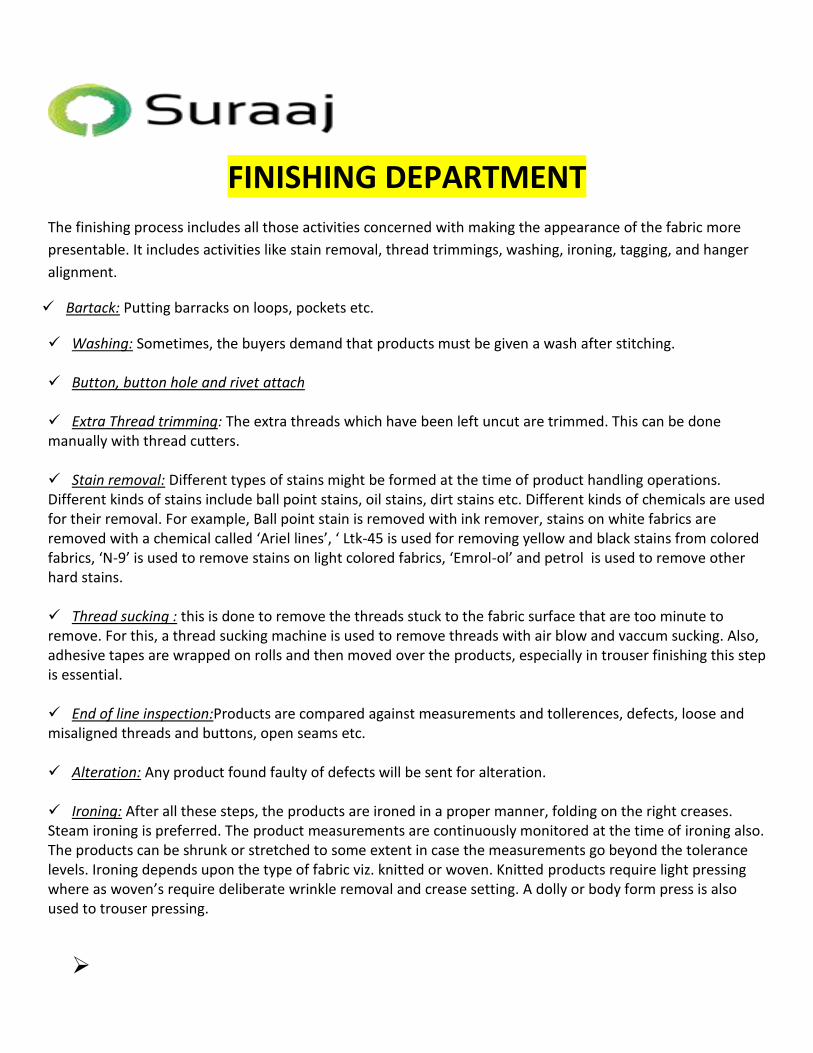
FINISHING DEPARTMENT
The finishing process includes all those activities concerned with making the appearance of the fabric more
presentable. It includes activities like stain removal, thread trimmings, washing, ironing, tagging, and hanger
alignment.
Bartack: Putting barracks on loops, pockets etc.
Washing: Sometimes, the buyers demand that products must be given a wash after stitching. Button, button hole and rivet attach Extra Thread trimming: The extra threads which have been left uncut are trimmed. This can be done manually with thread cutters. Stain removal: Different types of stains might be formed at the time of product handling operations. Different kinds of stains include ball point stains, oil stains, dirt stains etc. Different kinds of chemicals are used for their removal. For example, Ball point stain is removed with ink remover, stains on white fabrics are removed with a chemical called ‘Ariel lines’, ‘ Ltk-45 is used for removing yellow and black stains from colored fabrics, ‘N-9’ is used to remove stains on light colored fabrics, ‘Emrol-ol’ and petrol is used to remove other hard stains. Thread sucking : this is done to remove the threads stuck to the fabric surface that are too minute to remove. For this, a thread sucking machine is used to remove threads with air blow and vaccum sucking. Also, adhesive tapes are wrapped on rolls and then moved over the products, especially in trouser finishing this step is essential. End of line inspection:Products are compared against measurements and tollerences, defects, loose and misaligned threads and buttons, open seams etc.
Alteration: Any product found faulty of defects will be sent for alteration. Ironing: After all these steps, the products are ironed in a proper manner, folding on the right creases. Steam ironing is preferred. The product measurements are continuously monitored at the time of ironing also. The products can be shrunk or stretched to some extent in case the measurements go beyond the tolerance levels. Ironing depends upon the type of fabric viz. knitted or woven. Knitted products require light pressing where as woven’s require deliberate wrinkle removal and crease setting. A dolly or body form press is also used to trouser pressing.
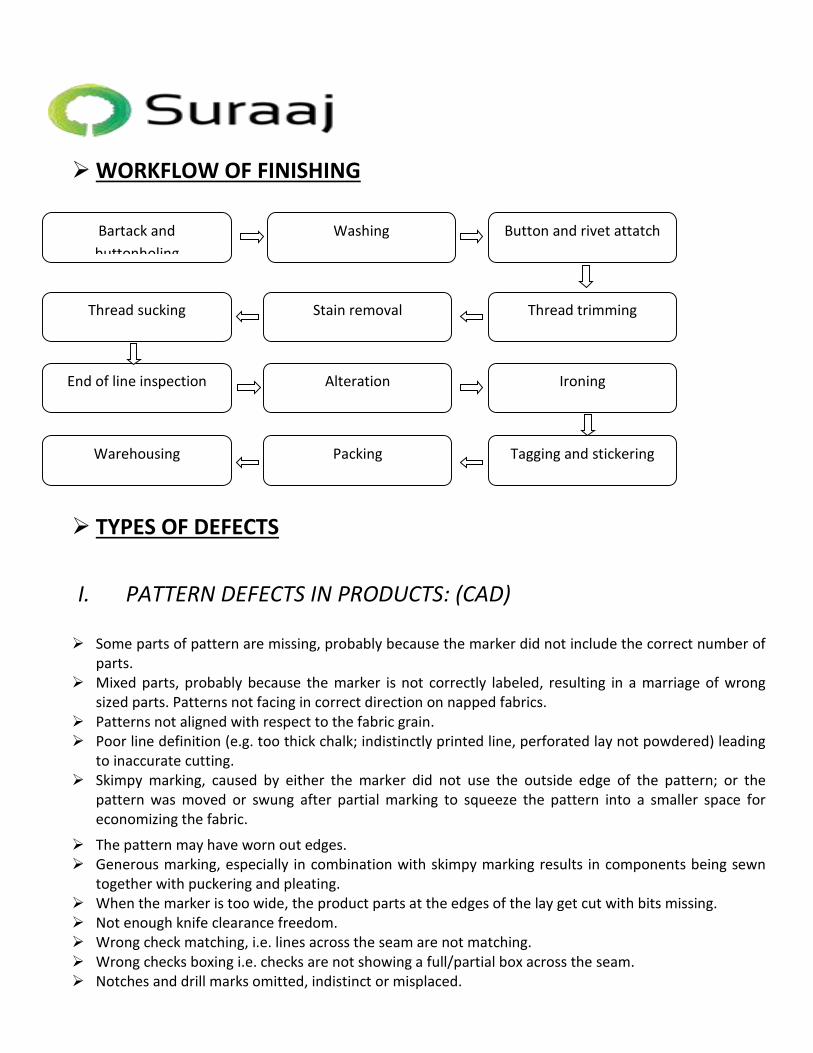
WORKFLOW OF FINISHING
TYPES OF DEFECTS
I. PATTERN DEFECTS IN PRODUCTS: (CAD)
Some parts of pattern are missing, probably because the marker did not include the correct number of parts.
Mixed parts, probably because the marker is not correctly labeled, resulting in a marriage of wrong sized parts. Patterns not facing in correct direction on napped fabrics.
Patterns not aligned with respect to the fabric grain. Poor line definition (e.g. too thick chalk; indistinctly printed line, perforated lay not powdered) leading
to inaccurate cutting. Skimpy marking, caused by either the marker did not use the outside edge of the pattern; or the
pattern was moved or swung after partial marking to squeeze the pattern into a smaller space for economizing the fabric.
The pattern may have worn out edges. Generous marking, especially in combination with skimpy marking results in components being sewn
together with puckering and pleating. When the marker is too wide, the product parts at the edges of the lay get cut with bits missing. Not enough knife clearance freedom. Wrong check matching, i.e. lines across the seam are not matching. Wrong checks boxing i.e. checks are not showing a full/partial box across the seam. Notches and drill marks omitted, indistinct or misplaced.
Bartack and
buttonholing
Washing Button and rivet attatch
Thread trimming Stain removal Thread sucking
End of line inspection Alteration Ironing
Tagging and stickering Packing Warehousing
II. SPREADING DEFECTS IN PRODUCTS
Not enough plies to cover quantity of products required. Plies misaligned, resulting in product parts getting cut with bits missing in some plies at the edge of the
spread. Narrow fabric width, causes product parts at the edge of the lay getting cut with bits missing. Incorrect tension of plies, i.e. fabric spread too tight or too loose. This will result in parts not fitting in
sewing, and finished products not meeting size tolerances. Not all plies facing in correct direction (whether 'one way' as with nap, or 'one way either way' as with
some check designs). This happens when fabric is not spread face down, face up, or face to face as required.
Unacceptable damages in the product parts. Parts not fully included owing to splicing errors. Spread distorted by the attraction or repulsion of plies caused by excessive static electricity e.g. in satin
fabric. Plies are not spread accurately one above another for cutting. This results in mismatching checks.
III. CUTTING DEFECTS IN PRODUCTS
Failure to follow the marker lines resulting in distorted product parts. Top and bottom plies can be a different size if the straight knife is allowed to lean, or if a round knife is
used on too high a spread. Notches, which are misplaced, too deep, too shallow, angled, omitted, or wrong type to suit fabric. Frayed edges, scorched or fused edges, caused by a faulty knife, not sharp enough, or rotating at too
high a speed knife cut. Product part damaged by careless use of knife, perhaps overrunning cutting previous piece. Marker incorrectly positioned on top of spread. Product parts have bits missing at edge of lay. If too tight or too loose then product parts are distorted. Spread distortion due to electricity, particularly in checks.
IV. COLOR DEFECTS IN PRODUCTS
Color defects that could occur are difference of the color of final produced product to the sample shown, accessories used are of wrong color combination and mismatching of dye amongst the pieces.
V. VI. SEWING DEFECTS IN PRODUCTS
Broken buttons Broken snaps Broken stitching Creasing of products Defective snaps Different shades within the same product Dropped stitches Exposed notches Exposed raw edges Fabric defects Holes Inoperative zipper Loose / hanging sewing threads and buttons Misaligned buttons and holes Missing buttons Missing stitches Needle cuts / chews Open seams Pulled / loose yarn ( thread tension ) Stain Unfinished buttonhole Wrong stitching technique
Zipper too short
Usage of different color threads on the product, creasing of the product Sizing defects - Wrong gradation of sizes, difference in measurement of a product part from other, for
example- sleeves of XL size but body of L size. Such defects do not occur has to be seen too.
VII. WASHING DEFECT IN PRODUCTS A rotation, usually lateral, between different panels of a product resulting from the release of latent stresses during laundering of the woven or knitted fabric forming the product. Twist may also be referred to as Torque or Spiraled.
WAYS OF DEFECT ALTERATION OBSERVED
Most of the fabric defects that are not acceptable in products are removed during cutting and stitching
processes. Still damaged part is found in the sewn product due to heavy washing, dyeing or other reasons.
Instead of rejecting the defective product, only damaged part can be changed and converted it into a quality product. It should not increase the fabric consumption or produce further defective product in the part changing process
1. End bit usage for part changing:
In the cutting room, during layering cutters store end bits that are not layered in the lay for a cutting.
These end bits are one type of cutting waste. So for the part change we can use those end bits without
increasing fabric consumption.
We need to take care about shade matching or lot matching of the fabrics with the damaged products.
If the products were heavily washed, then it will be very difficult to match the product fabric shade.
After changing the parts product must be washed again to give matching finished look and similar hand
feel.
2. Fresh fabric usage for Part changing:
If there are not enough end bits to replace the damaged parts from the product, then available fresh
fabric is used. Only use fresh fabric if there is no problem with shade matching otherwise it will
increase the fabric consumption. But for solid colors and yarn dyed fabric there is no issue related to
shade matching.
3. Using good components from other damaged products:
This option is chosen when products are dyed and there are no fresh fabric or end bits or fresh fabric
for that order.
Also for the high value product with fine hand embroidery work and where you have less time to
complete the shipment, this option is preferred.
Here we need to keep care of shade matching.
1. Sandblasting: Pressurized compressed air with sand is blown on the product.
2. Ball blast: It’s conducted into wooden m/c. bleach+caco3 power is used.
3. G2: It’s an advanced bleaching process done with ozone(O3). Bleaching pressure
is 240. If it’s done with chlorine bleach, it will become yellow. So, ozone is used.
4. Pigment spray: Pigment dyes are sprayed over the denim.
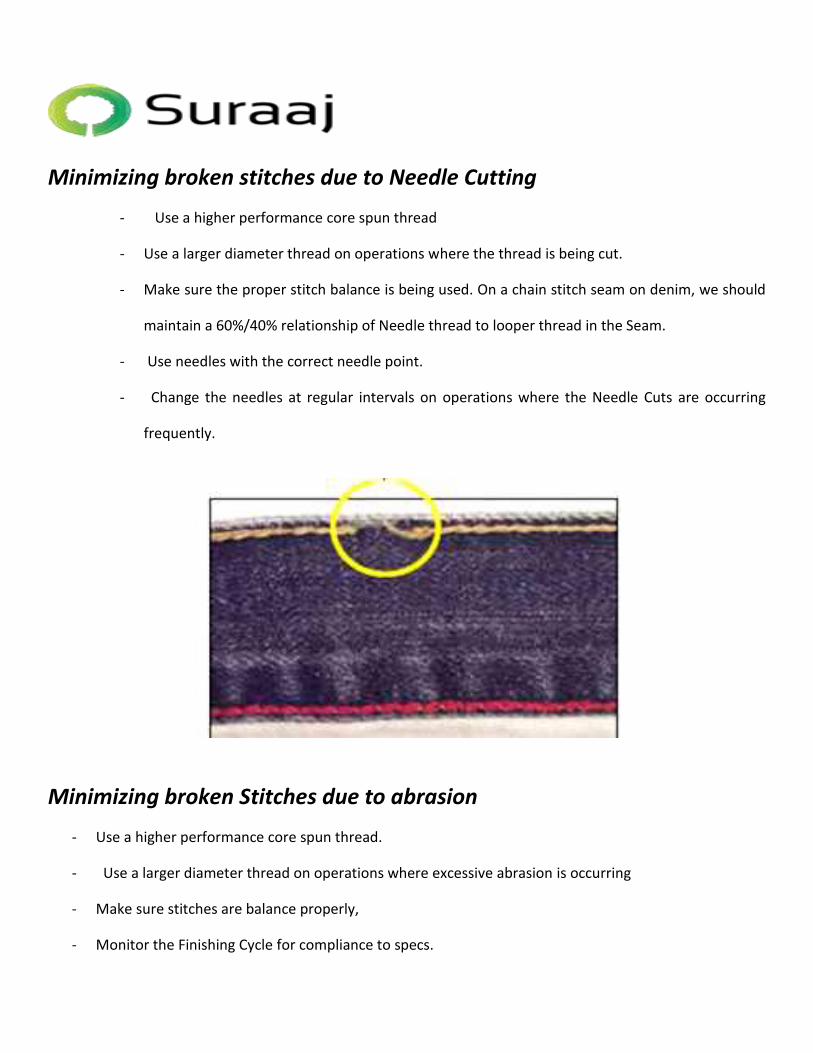
Minimizing broken stitches due to Needle Cutting
- Use a higher performance core spun thread
- Use a larger diameter thread on operations where the thread is being cut.
- Make sure the proper stitch balance is being used. On a chain stitch seam on denim, we should
maintain a 60%/40% relationship of Needle thread to looper thread in the Seam.
- Use needles with the correct needle point.
- Change the needles at regular intervals on operations where the Needle Cuts are occurring
frequently.
Minimizing broken Stitches due to abrasion
- Use a higher performance core spun thread.
- Use a larger diameter thread on operations where excessive abrasion is occurring
- Make sure stitches are balance properly,
- Monitor the Finishing Cycle for compliance to specs.
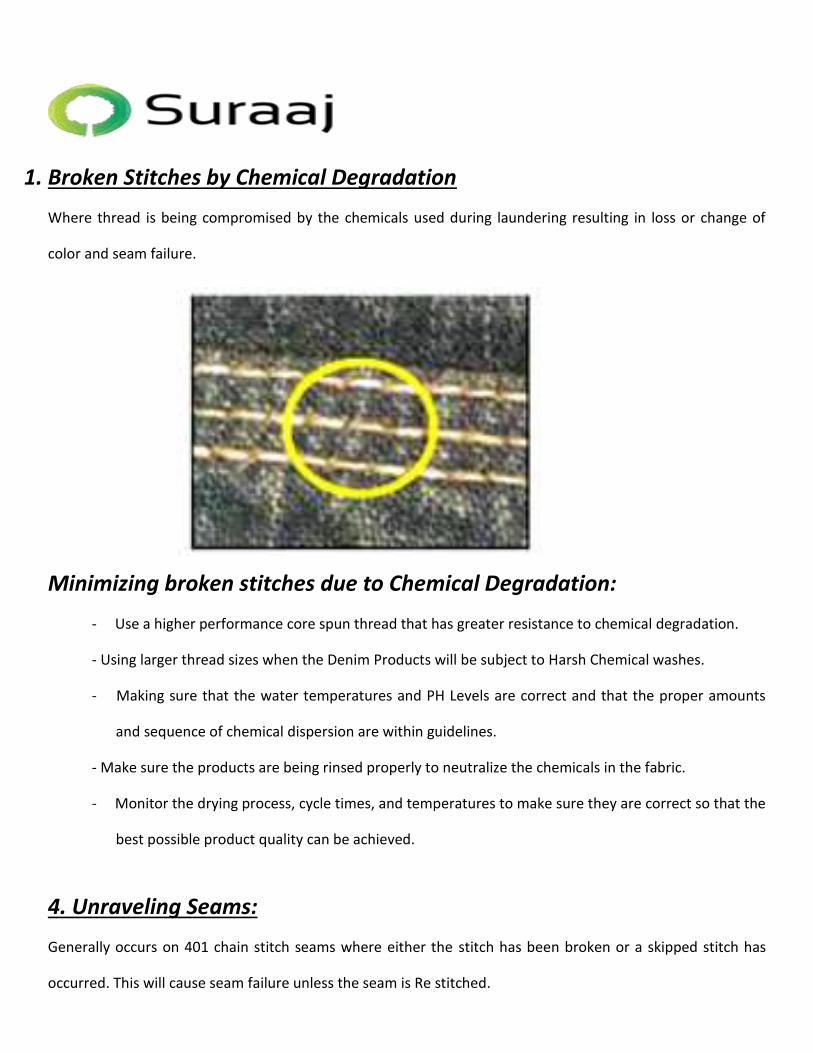
1. Broken Stitches by Chemical Degradation
Where thread is being compromised by the chemicals used during laundering resulting in loss or change of
color and seam failure.
Minimizing broken stitches due to Chemical Degradation:
- Use a higher performance core spun thread that has greater resistance to chemical degradation.
- Using larger thread sizes when the Denim Products will be subject to Harsh Chemical washes.
- Making sure that the water temperatures and PH Levels are correct and that the proper amounts
and sequence of chemical dispersion are within guidelines.
- Make sure the products are being rinsed properly to neutralize the chemicals in the fabric.
- Monitor the drying process, cycle times, and temperatures to make sure they are correct so that the
best possible product quality can be achieved.
4. Unraveling Seams:
Generally occurs on 401 chain stitch seams where either the stitch has been broken or a skipped stitch has
occurred. This will cause seam failure unless the seam is Re stitched.
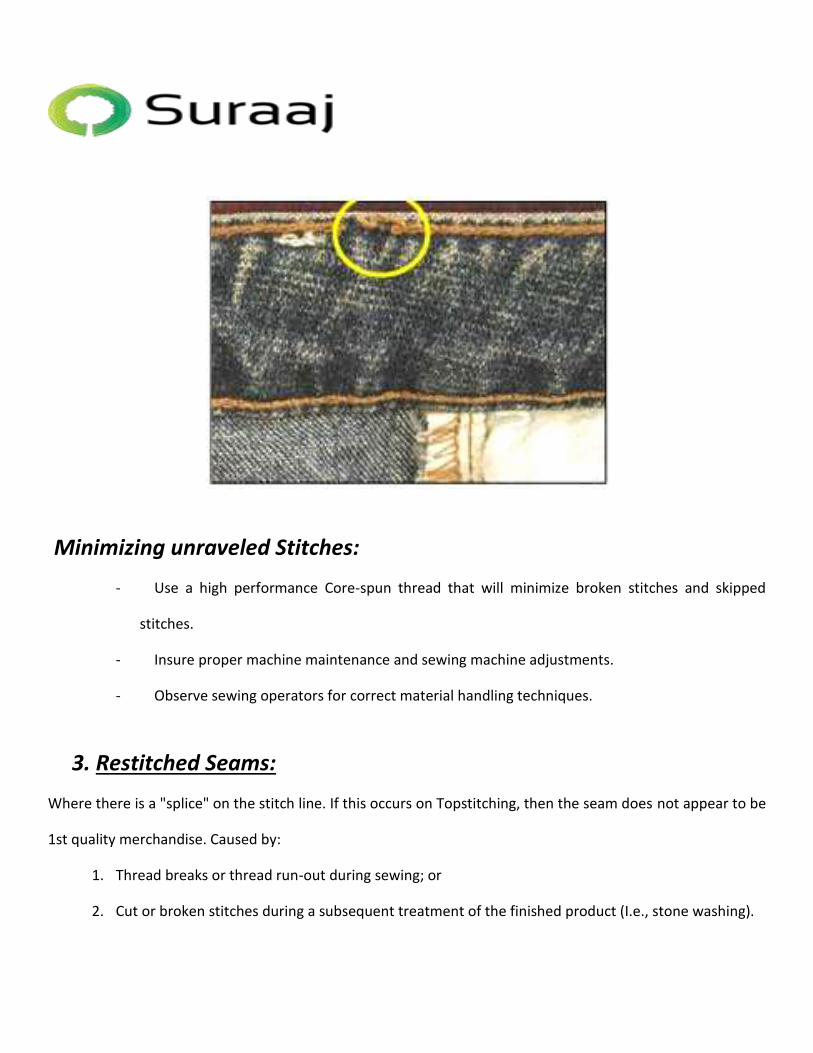
2. Minimizing unraveled Stitches:
- Use a high performance Core-spun thread that will minimize broken stitches and skipped
stitches.
- Insure proper machine maintenance and sewing machine adjustments.
- Observe sewing operators for correct material handling techniques.
3. Restitched Seams:
Where there is a "splice" on the stitch line. If this occurs on Topstitching, then the seam does not appear to be
1st quality merchandise. Caused by:
1. Thread breaks or thread run-out during sewing; or
2. Cut or broken stitches during a subsequent treatment of the finished product (I.e., stone washing).
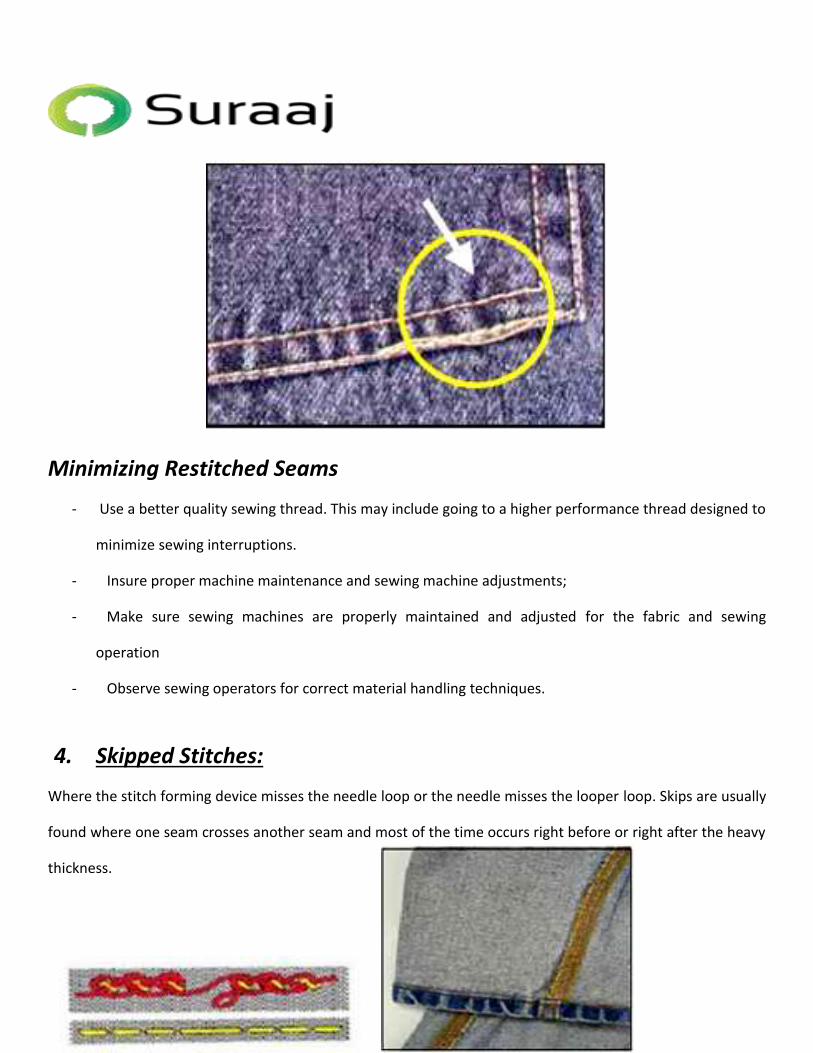
Minimizing Restitched Seams
- Use a better quality sewing thread. This may include going to a higher performance thread designed to
minimize sewing interruptions.
- Insure proper machine maintenance and sewing machine adjustments;
- Make sure sewing machines are properly maintained and adjusted for the fabric and sewing
operation
- Observe sewing operators for correct material handling techniques.
4. Skipped Stitches:
Where the stitch forming device misses the needle loop or the needle misses the looper loop. Skips are usually
found where one seam crosses another seam and most of the time occurs right before or right after the heavy
thickness.
Minimizing Skipped Stitches:
- Use core spun thread.
- Use minimum thread tension to get a balanced stitch.
- Use the ideal foot, feed and plate that help to minimize flagging.
- Training sewing operators NOT to stop on the thickness.
- Make sure the machine is feeding properly without stalling.
- Make sure the machine is not back feeding.
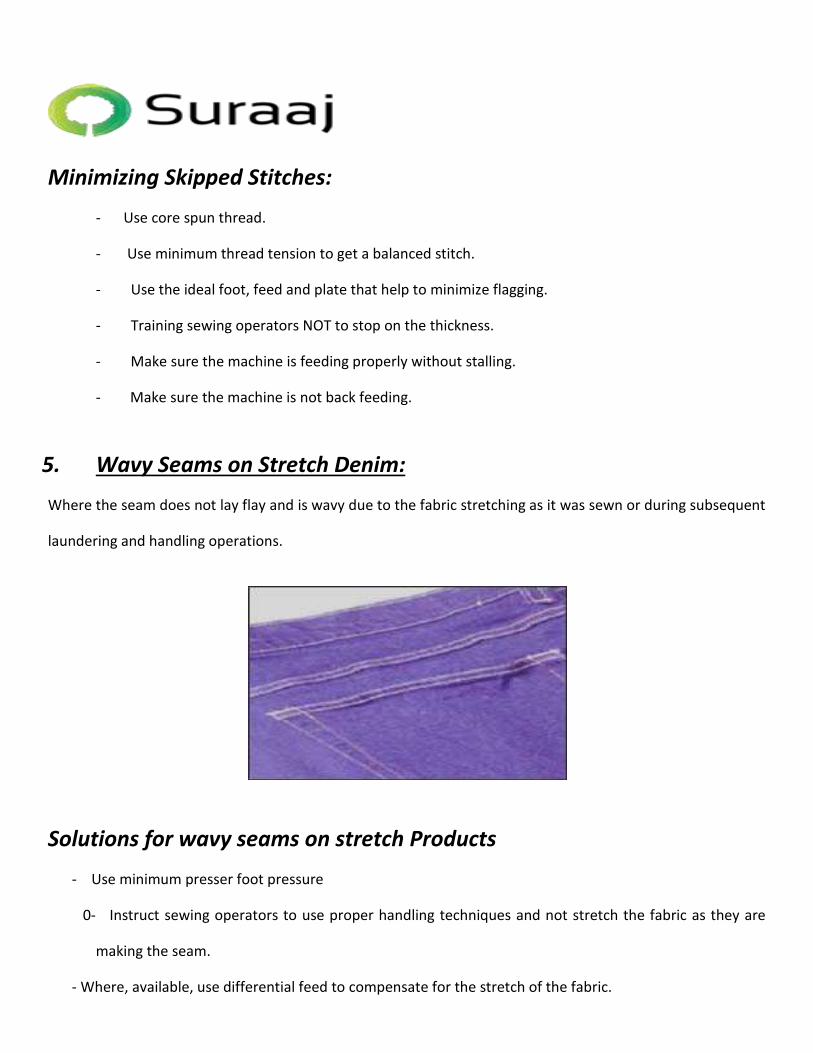
5. Wavy Seams on Stretch Denim:
Where the seam does not lay flay and is wavy due to the fabric stretching as it was sewn or during subsequent
laundering and handling operations.
Solutions for wavy seams on stretch Products
- Use minimum presser foot pressure
0- Instruct sewing operators to use proper handling techniques and not stretch the fabric as they are
making the seam.
- Where, available, use differential feed to compensate for the stretch of the fabric.
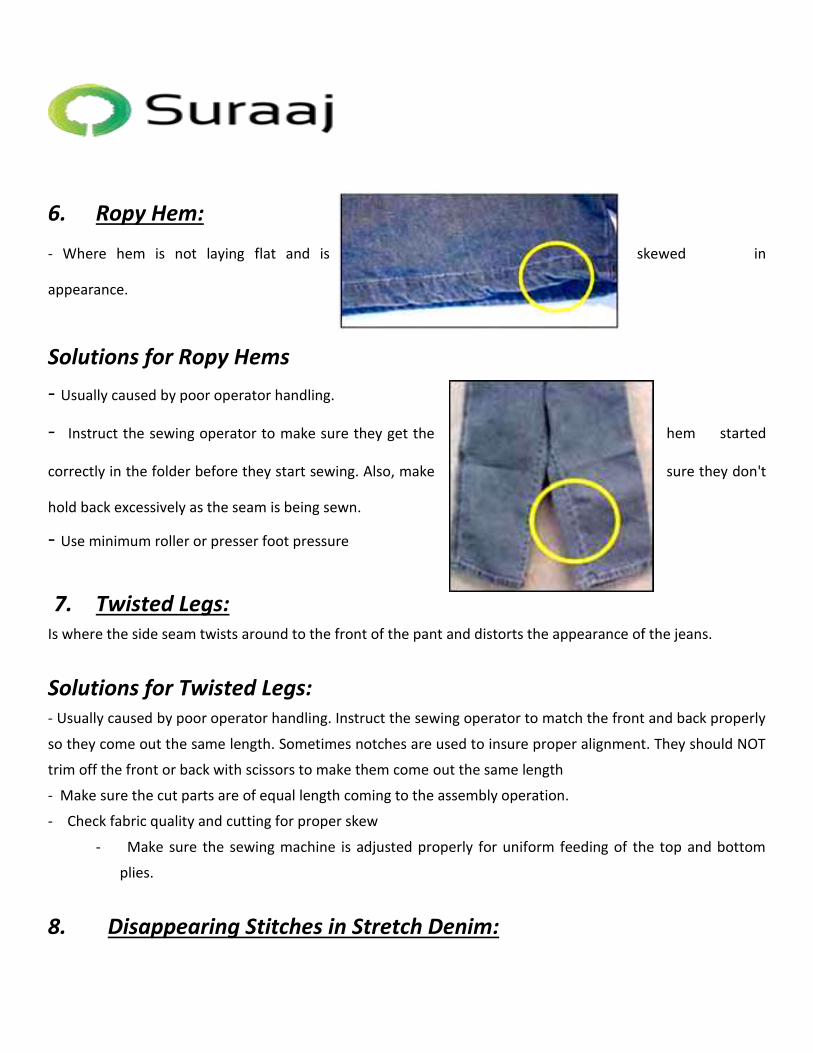
6. Ropy Hem:
- Where hem is not laying flat and is skewed in
appearance.
Solutions for Ropy Hems
- Usually caused by poor operator handling.
hem started - Instruct the sewing operator to make sure they get the
correctly in the folder before they start sewing. Also, make sure they don't
hold back excessively as the seam is being sewn.
- Use minimum roller or presser foot pressure
7. Twisted Legs:
Is where the side seam twists around to the front of the pant and distorts the appearance of the jeans.
Solutions for Twisted Legs: - Usually caused by poor operator handling. Instruct the sewing operator to match the front and back properly
so they come out the same length. Sometimes notches are used to insure proper alignment. They should NOT
trim off the front or back with scissors to make them come out the same length
- Make sure the cut parts are of equal length coming to the assembly operation.
- Check fabric quality and cutting for proper skew
- Make sure the sewing machine is adjusted properly for uniform feeding of the top and bottom
plies.
8. Disappearing Stitches in Stretch Denim:
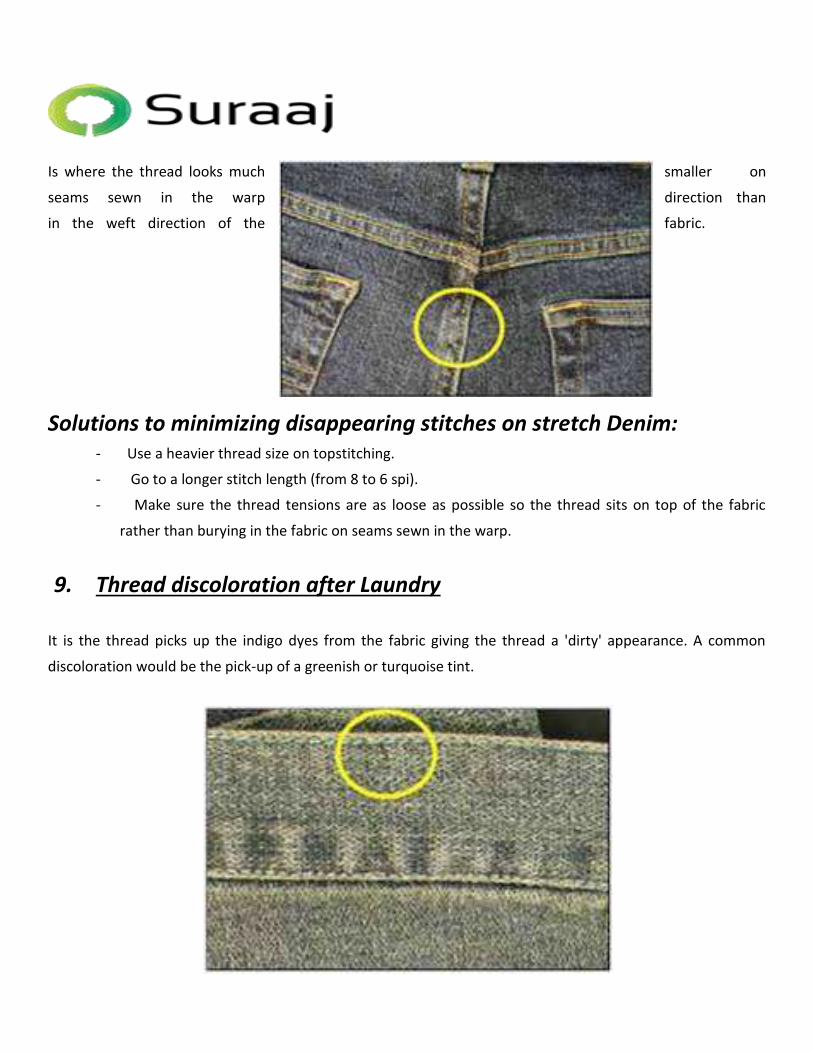
Is where the thread looks much smaller on
seams sewn in the warp direction than
in the weft direction of the fabric.
Solutions to minimizing disappearing stitches on stretch Denim:
- Use a heavier thread size on topstitching.
- Go to a longer stitch length (from 8 to 6 spi).
- Make sure the thread tensions are as loose as possible so the thread sits on top of the fabric
rather than burying in the fabric on seams sewn in the warp.
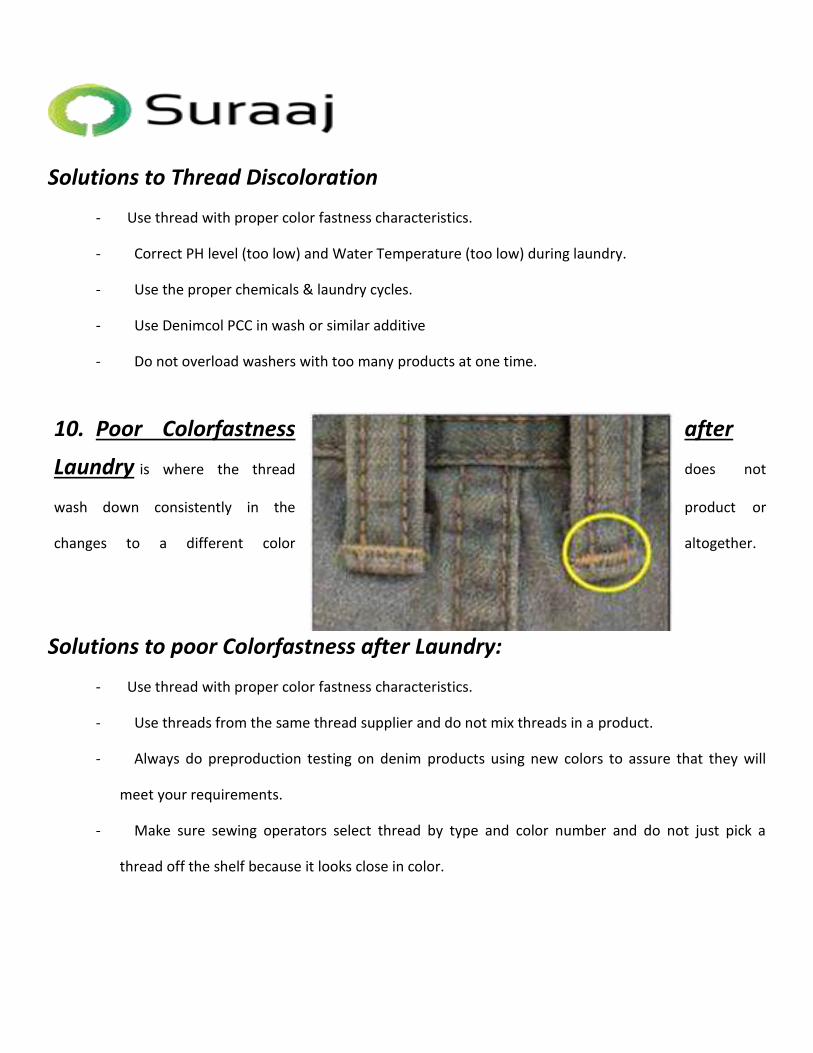
9. Thread discoloration after Laundry
It is the thread picks up the indigo dyes from the fabric giving the thread a 'dirty' appearance. A common
discoloration would be the pick-up of a greenish or turquoise tint.
Solutions to Thread Discoloration
- Use thread with proper color fastness characteristics.
- Correct PH level (too low) and Water Temperature (too low) during laundry.
- Use the proper chemicals & laundry cycles.
- Use Denimcol PCC in wash or similar additive
- Do not overload washers with too many products at one time.
10. Poor Colorfastness after
does not Laundry is where the thread
wash down consistently in the product or
changes to a different color altogether.
Solutions to poor Colorfastness after Laundry:
- Use thread with proper color fastness characteristics.
- Use threads from the same thread supplier and do not mix threads in a product.
- Always do preproduction testing on denim products using new colors to assure that they will
meet your requirements.
- Make sure sewing operators select thread by type and color number and do not just pick a
thread off the shelf because it looks close in color.
Merchandising Department
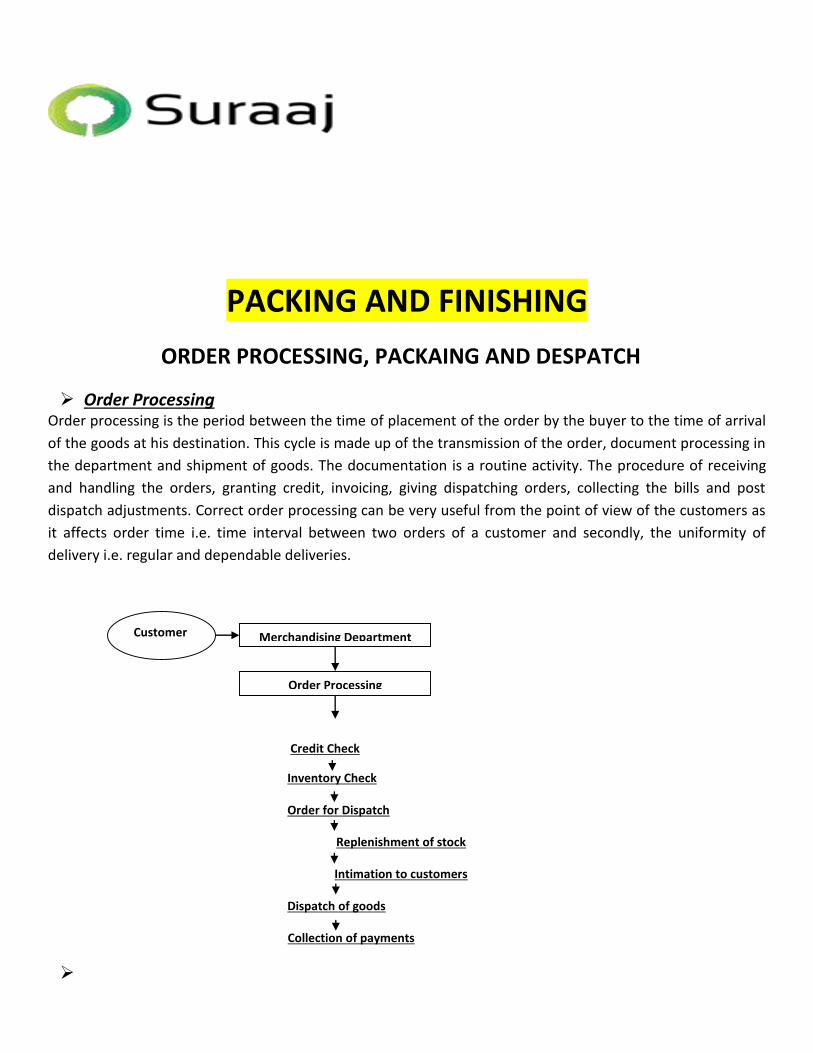
Order Processing
Customer
PACKING AND FINISHING
ORDER PROCESSING, PACKAING AND DESPATCH
Order Processing Order processing is the period between the time of placement of the order by the buyer to the time of arrival
of the goods at his destination. This cycle is made up of the transmission of the order, document processing in
the department and shipment of goods. The documentation is a routine activity. The procedure of receiving
and handling the orders, granting credit, invoicing, giving dispatching orders, collecting the bills and post
dispatch adjustments. Correct order processing can be very useful from the point of view of the customers as
it affects order time i.e. time interval between two orders of a customer and secondly, the uniformity of
delivery i.e. regular and dependable deliveries.
Credit Check
Inventory Check
Order for Dispatch
Replenishment of stock
Intimation to customers
Dispatch of goods
Collection of payments
Packaging
Packing is traditionally meant to protect goods. However, it is also a promotional tool and a major image builder
contributing to product success. Packing is a process that speaks of company’s ability to contain economically man made
or natural products for shipment, storage, sale or final use. ‘Packaging’ on the other hand deals with activities of planning
and designing of different means of packaging the product. However, it should be noted that packing is concerned with
product protection while packaging is concerned product promotion.
Objectives of packing
Protection of the product: To keep the products clean, fresh and unspoilt by using moisture proof and damage resistant materials. It’s done basically to avoid any type of deterioration or contamination of the product. The main aim is to maintain the quality of the products intact unaffected by dust and dirt.
Product identification: Packing is a convenient way to identify the products of different buyers as each buyer would have a different type of packing requirement. The size, color combinations, graphics used in each package are unique and can be easily remembered.
Product convenience: Packing aims at providing maximum convenience to the purchasers, producers and distributors alike. A nicely designed product package facilitates product shipping, storage, stocking, handling and display on part of producers and distributors. Neat packing can bring reduction in inventory costs, packing cost, space and time costs.
Product package promotion: A good packaging performs effective advertising function. The general appearance and selling features created by the packaging techniques decide the product success. As a promotional tool, it does self advertising, displaying, publishing and acts as an advertising medium.
Essentials of Good Packing
It should protect the contents: A good packaging is a means of preservation of products from possible damage or loss in value. The quality of the products is maintained intact. The packing is designed to protect it against natural and artificial factors of damage like dirt, dust, theft, shrinkage, contamination etc.
It Should be attractive: Apart from protection, seeking the attention of the consumers is also essential. Package design, weight, material, color combinations, graphics, texture, illustrations etc form the essentials of a good package. Some customers buy products because they are impressed by the packing. Therefore, package attraction generates impulsive buying.
It Should provide convenience: Good packaging increases product sanitation, ease in handling, transportation, storing and using packages. The package so designed should grant highest degree of convenience to manufacturers, distributors and consumers alike. Consumers are seeking packages that are easy to handle, open and reusable.
It Should be economical: Economy is something that reduces not only packing and its expenses, but also brings down other allied expenses such as transport, warehousing, tax-levies and handling. Cost reduction are possible through multi-packaging allows more cost re3duction than when one pack is sold on its own.
It should be pollution free: It is a well known fact all over the world that packing has environmental problem, particularly the discarded packing. Hence it is advisable to use recycled or bio-degradable packaging materials that minimize pollution.

It should be informative: Provision of information about product illustration, features/specifications, instruction
to handle, prices, the amount of product in the package, the content brand’s name, and other relevant information for the consumer as well as distributor. Detailed labeling is a must.
It should assure adjustability: The packaging should have the ability to adjust or flexibility to be put to different uses. Paper packaging is known for cheapness and lightness.
It should be labeled: Labeling is the act of attaching or tagging labels. A label may be a piece of paper , printed statement which is either a part of a package or attached to it, indicating value of contents, price, product name, and place and name of producer. Thus, a label is an informative tag, wrapper or seal attached to a product or product’s package.
Considerations for new packing development
In designing a new product package or redesigning the existing one, the manufacturers take into account: Nature of product: The type of container to be used depends upon the form and ingredients of the product.
Transparent containers are most suited for attractive colors and appearance, vacuum sealed ingredients for volatile ingredients and glass containers to minimize chemical reactions. Plastic and metal packages can also be used.
Costs: The cost of packing must be absorbed by the production economies, increased sales volumes or higher price. The packing material, label, filling and closure costs, handling, distribution and breakage cost of package are important.
Family resemblance: If the product is one of a number of related items, it’s advisable to design the package that confirms to the containers of other products in the same line to assist consumer and dealer identification
Advertising value: Unique shape, attractive design gives a package greater sales and advertising value. Legal requirements: the packages must confirm to the laws prohibiting the deception of consumers by the use of
false bottoms, slack fill and other means of giving an impression that a package contains a larger quantity than the case. There are legal requirements prescribing the copy appearing on the labels of the cartoons which should be confirmed to.
Test the design in the market: test-marketing must be conducted in the market to get indirect replies through dealer feedback.
Environmental checking: the packing development decision may be influenced by legal, ecological and social forces. Thus issues like consumer packing safety, disposable packing, the quantity of packaging, littering, wise labeling and so on.
Packing strategies
After the products arrive from the finishing and quality check department, they are packed in hangers or simple fold pack in
polybags, according to buyer requirements. Here, multiple packaging strategies are followed. It is a kind of strategy in which
a no. of closely related but heterogeneous products used by one consumer are placed in a single package. Such a package
conveys that idea of an ideal matching set that one should possess. For example as in case of assorted collection kids wear
packages are packed along together. It facilitates acceptance of a new product idea by a consumer who normally may not
want to venture into buying it. However there is danger of the whole package being rejected through a consumer who is
interested in only one or two items in the total set. Since the consumer will have to buy the whole set he will reject the 2
items he was favoring a will not buy the set.
Inventory Inventory management is a task of planning and controlling of finished goods after they have been bought from the
production department and before their delivery to the users. It has 2 parts: Inventory and Warehousing.
Warehousing: This performs two functions namely movement and storage of goods. Movement refers to the actual receipt of products from the manufacturing centre their transfer in the warehouse and stocking at designated place, assorting to consumer orders and transferring them to common carriers on their way to consumers. The storage function is mainly concerned with holding and caring the goods from the time they are placed in, till they are places out in common carriers. It is basically a safety and preservative function.
Inventory controlling: Inventory implies the stock of goods held over a period of time for meeting the consumer needs. For the production department, inventory means stock of raw material, machine and parts, stock of goods partly manufactured and finished goods. For the distributors or dispatchers, it is the finished stock meant of the final consumption.
Material Handling This refers to the handling of the goods ready for dispatch. They can be classified into: Manual: This involves usage of human labour. This is restricted to areas with unorganized plant layout and costs
of movements. Mechanical: This involves the use of machines driven by power like for e. g cranes, trucks, stackers, side loaders,
mobile cranes etc. these have more fixed costs if the capacity utilization is less. Automatic: These are fully automatic operated by automatic machines and computers. These require heavy capital
investments.
Transportation and Dispatch When the products are readily packed and arranged in containers/cartoons, they are arranged buyer wise and shipment
date wise. Right dispatch time means right delivery time. Hence there should be no delay in dispatching the goods from
the manufacturer’s premises because delivery time depends on the mode of transit viz. air, sea, and rail. The main aim
should be delivering the right product to the right place at the right time at economical costs. Firms can attract lots of
buyers by offering better service or lower prices through physical distribution improvements. Similarly the profit margin
for the manufacturers will be increased by making this physical distribution more effective and efficient. Effectiveness
and efficiency will bring in economy and this will thus affect the profit margins. This is because the price of the product
does not just include the cost of production but also the cost of delivery. The cost of transportation is determined by the
distance covered and the volume of goods. Also, the performance of the transportation mode i.e. the speed/pace of
movement in kms /hr. Calculation of speed must take into account the total time from point of start to point of
destination.
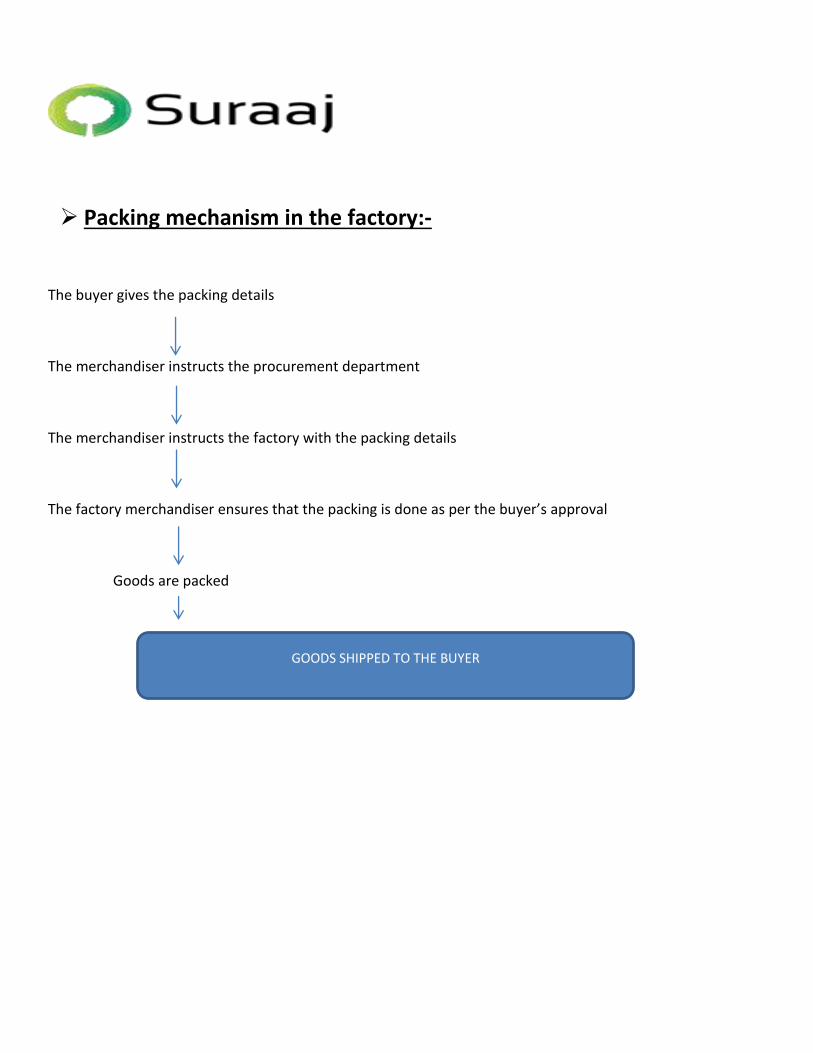
Packing mechanism in the factory:-
The buyer gives the packing details
The merchandiser instructs the procurement department
The merchandiser instructs the factory with the packing details
The factory merchandiser ensures that the packing is done as per the buyer’s approval
Goods are packed
GOODS SHIPPED TO THE BUYER