sunlite (10mm) - installation instructions · 10mm twin wall sheet installation steps. sunlite...
TRANSCRIPT
10mm Twin Wall Sheet
Installation Steps
SUNLITE (10mm) - Installation Instructions
Rafter and Purlin Nominal Spacing (mm)
Notes
Sheet Thickness Sheet width Rafter Centers Purlin Centers
10mm
©1998 PALRAM Industries Ltd. | SUNLITE is a registered trademark of PALRAM Industries Ltd.
980 1000 1200 (Maximum)
®
Carefully read all installation instructions before you start. Always exercise extreme care when working on a roof. Never walk directly on the sheeting, use walking boards along purlins. Always wear eye protection when using cutting tool. For safety precautions Palram recommends the use of safety mesh for installations above 3m height.
1. Always install Sunlite sheets with the ribs running vertically with the direction of the fall.
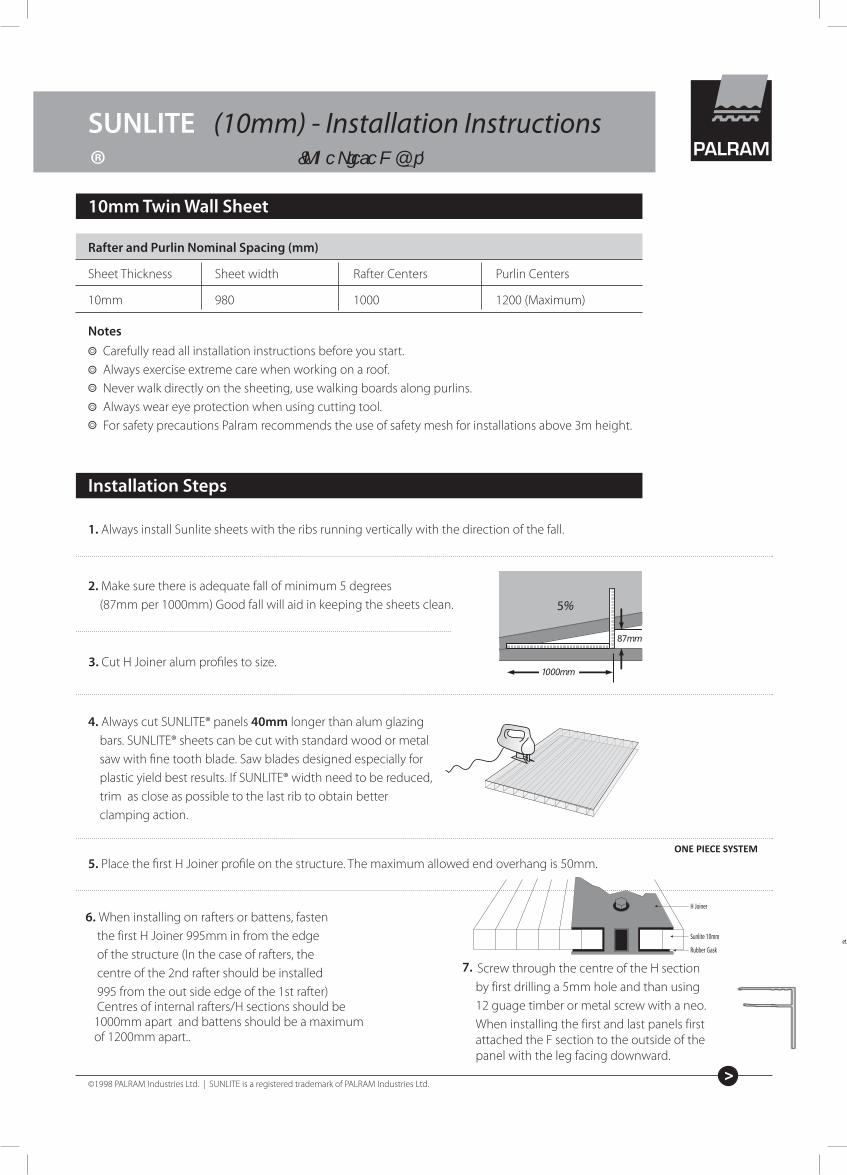
2. Make sure there is adequate fall of minimum 5 degrees (87mm per 1000mm) Good fall will aid in keeping the sheets clean.
4. Always cut SUNLITE® panels 40mm longer than alum glazing bars. SUNLITE® sheets can be cut with standard wood or metal saw with fine tooth blade. Saw blades designed especially for plastic yield best results. If SUNLITE® width need to be reduced, trim as close as possible to the last rib to obtain better clamping action.
5. Place the first H Joiner profile on the structure. The maximum allowed end overhang is 50mm.
3. Cut H Joiner alum profiles to size.
7. Screw through the centre of the H section by first drilling a 5mm hole and than using 12 guage timber or metal screw with a neo. When installing the first and last panels first attached the F section to the outside of the panel with the leg facing downward.
6. When installing on rafters or battens, fasten the first H Joiner 995mm in from the edge of the structure (In the case of rafters, the centre of the 2nd rafter should be installed 995 from the out side edge of the 1st rafter) Centres of internal rafters/H sections should be 1000mm apart and battens should be a maximum of 1200mm apart..
5
87
ONE PIECE SYSTEM
©1998 PALRAM Industries Ltd.SUNLITE is a registered trademark of PALRAM Industries Ltd.
Inasmuch as PALRAM Industries has no control over the use to which others may put the material, it does not guarantee that the same results as those described herein will be obtained. Each user of the material should make his own tests to determine the material’s suitability for his own particular use. State-ments concerning possible or suggested uses of the materials described herein are not to be construed as constituting a license under any PALRAM Industries patent covering such use or as recommendations for use of such materials in the infringement of any patent. PALRAM Industries or its distributors cannot be held responsible for any losses incurred through incorrect installation of the material. In accordance with our company policy of continual product develop-ment you are advised to check with your local PALRAM Industries supplier to ensure that you have obtained the most up to date information.
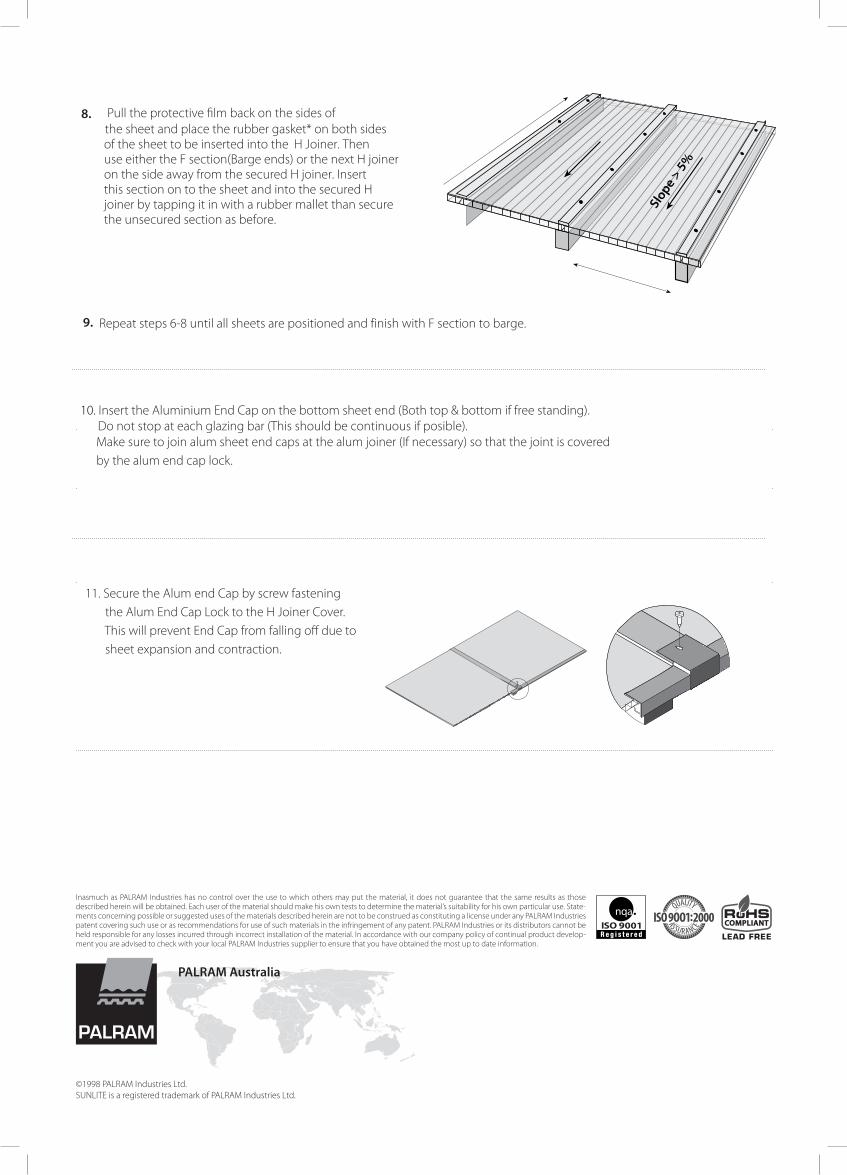
8. Pull the protective film back on the sides of the sheet and place the rubber gasket* on both sides
of the sheet to be inserted into the H Joiner. Then use either the F section(Barge ends) or the next H joineron the side away from the secured H joiner. Insert this section on to the sheet and into the secured H joiner by tapping it in with a rubber mallet than secure the unsecured section as before.
9. Repeat steps 6-8 until all sheets are positioned and finish with F section to barge.
11. Secure the Alum end Cap by screw fastening the Alum End Cap Lock to the H Joiner Cover. This will prevent End Cap from falling off due to sheet expansion and contraction.
10. Insert the Aluminium End Cap on the bottom sheet end (Both top & bottom if free standing). Do not stop at each glazing bar (This should be continuous if posible).
Make sure to join alum sheet end caps at the alum joiner (If necessary) so that the joint is covered by the alum end cap lock.
Slope
> 5%
PALRAM Australia