sunless splendour
DESCRIPTION
Feature article on fake tanning. Published in Modern Hair+Beauty magazine issue 7TRANSCRIPT

A fake tan is a great way to get that healthy glow without compromising your health. While a real tan exposes you to the dangers of the sun: cancer and premature aging, a fake tan gives you all the benefits, without the drama. Your teeth look whiter, your body more toned and you feel like you’ve just hopped off a jet from Hawaii! While transforming into a bronzed goddess is your goal, there are must-do before and after steps to achieve a flawless fake-bake. We’ve broken them down into three easy steps: preparation, application and maintenance.
Before application, you need a clean canvas: exfoliation is key to ensuring an even tan. There are many products for exfoliating: from pre-tan scrubs to exfoliating gloves. If you’re a true DIY-er, create your own exfoliating scrub using some raw or brown sugar. Slough off any dead skin; especially on dry areas such as knees, elbows and the heels of your feet. This is most effective in the shower or bath when your skin is well-hydrated. The best time to apply fake tan is right after an exfoliating shower or bath, when your skin is softest.
Now your body is prepped, time to tan-proof your bathroom. If you’re using a spray tan, apply it in an (empty) bath or shower to make the clean up easier. It’s likely that the spray will tan things other than your body so tidy your bathroom and pop on a shower cap before you start.
This is the tricky part! If you’re using a mousse, cream or lotion, use latex gloves or apply body lotion to your hands to avoid staining. Start with your feet and work your way up your body;
SUNLESS
If you haven’t already tried your hand at DIY fake tanning, it can be an intimidating experience. But worry not: your concerns of zebra stripes and Oompa Loompa orange can be easily avoided by following our guide to the perfect at-home faux glow!
Splendour
this way you don’t risk wiping off wet tan on your thighs when reaching for your feet. Go easy on dry knees and elbows and remember that less is more! It’s easier to apply another layer than to remove one: the final shade won’t develop for a good eight hours, so be patient.
If you have a sister/ close friend/ non-judgemental boyfriend, consider asking them to do your back. If not, a spray is your best bet for solo back tanning as it gives the most even coverage of hard-to-reach areas. After removing your gloves and washing your hands, ensure you apply tanner to the back of your hands and fingers with a cotton pad to avoid the white gloved look. Once you’re done, wait for the tan to dry completely (enlist a hairdryer) before putting on clothes or sitting on any white sofas!
Moisturising everyday is the best way to prolong your tan. But once it starts to fade, it’s better to scrub it all off and start again than to try save what blotches you have left.
WORDS Kathryn Kessler
Clin
ique S
elf S
un B
ody D
aily
Mois
turis
er
build
s a g
radu
al ta
n an
d mois
turis
es yo
ur
skin
. A g
ood
way t
o eas
e int
o fak
e-ba
king
as
you
cont
rol t
he co
lour!
$39.
00
Mar
y Ka
y Su
btle
Tan
ning
Lot
ion
is an
eas
y
way
to sl
owly
bui
ld u
p a
smoo
th, e
ven
tan.
If yo
u ar
e go
ing
for t
hat b
ronz
e go
ddes
s
look
, we
sugg
est s
tarti
ng o
n M
onda
y
for t
he p
arty
on
Frid
ay to
real
ly g
et th
e
colo
ur ri
ght!
$25.
00
MODERN HAIR+BEAUTY 131
SUNLESS TANNING
PREPARATION
MAINTENANCE
APPLICATION
132 MODERN HAIR+BEAUTY
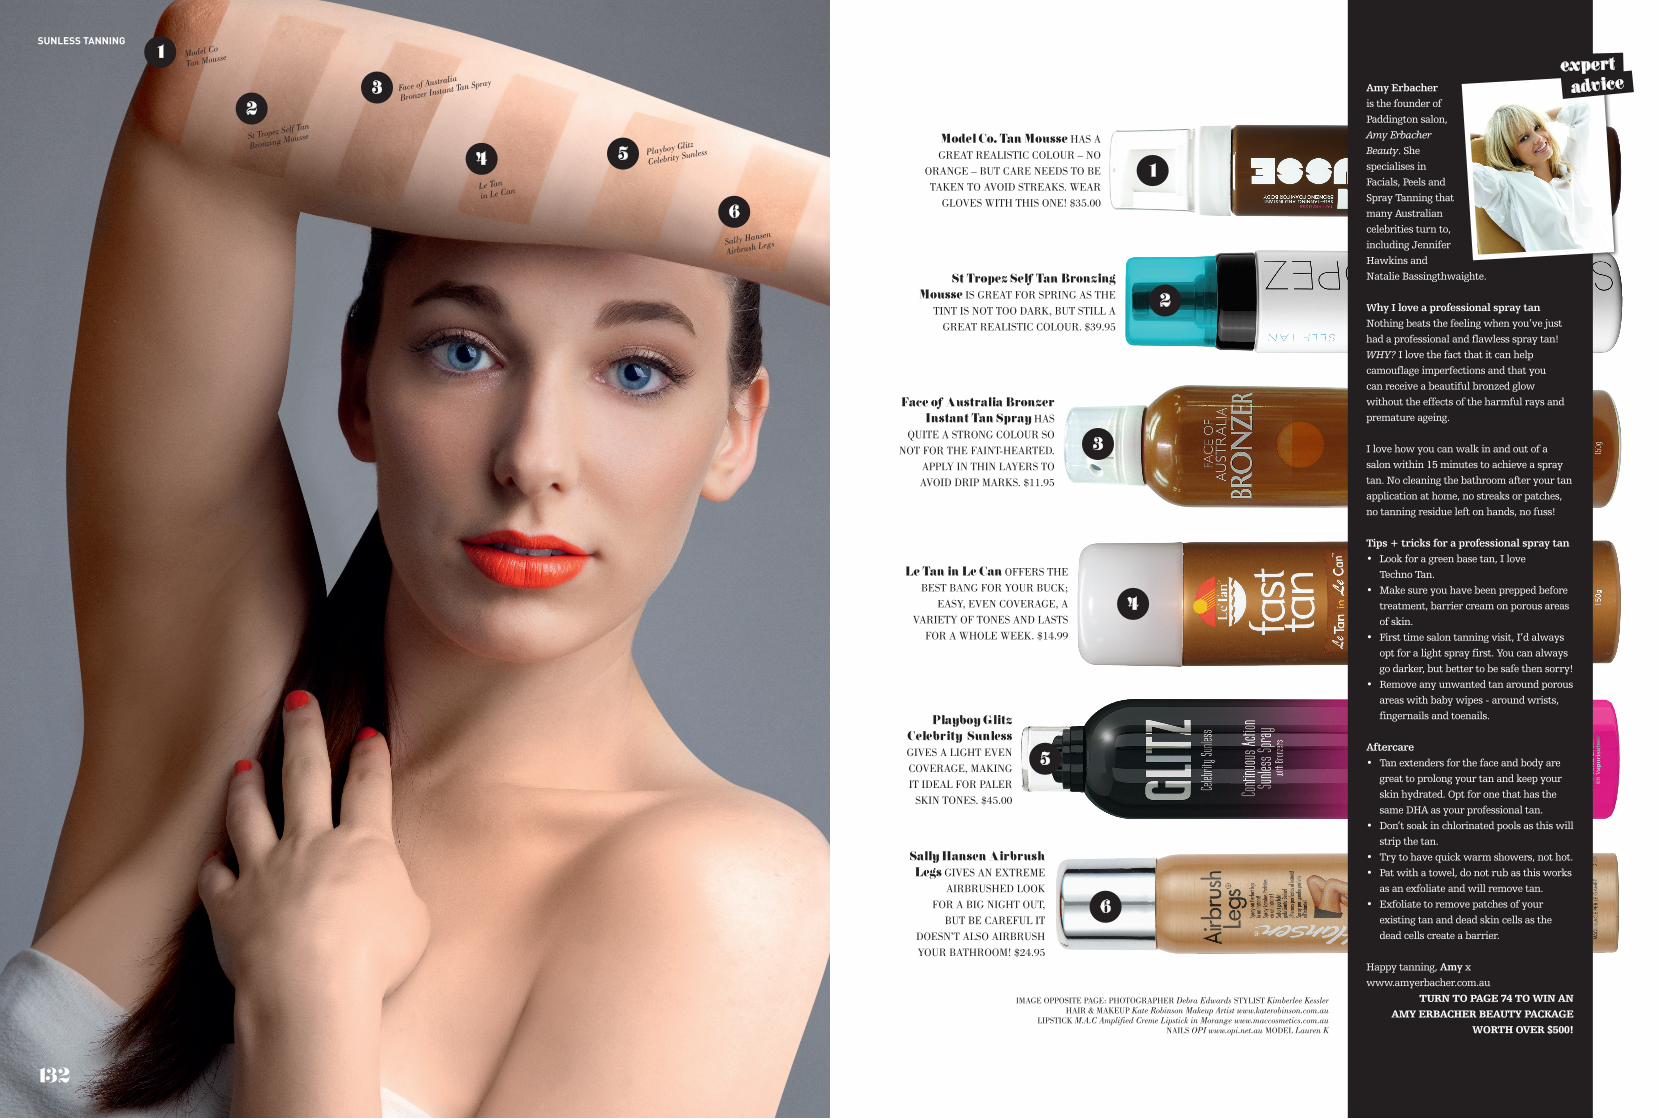
SUNLESS TANNING1
23
4 5
6
Model Co
Tan Mousse
St Tropez Self Tan
Bronzing Mousse
Le Tan
in Le Can
Face of Australia
Bronzer Instant Tan Spray
Playboy Glitz
Celebrity Sunless
Sally Hansen
Airbrush Legs
6
5
4
3
2
1
Model Co. Tan Mousse HAS A GREAT REALISTIC COLOUR – NO
ORANGE – BUT CARE NEEDS TO BE TAKEN TO AVOID STREAKS. WEAR
GLOVES WITH THIS ONE! $35.00
St Tropez Self Tan Bronzing Mousse IS GREAT FOR SPRING AS THE
TINT IS NOT TOO DARK, BUT STILL A GREAT REALISTIC COLOUR. $39.95
Face of Australia Bronzer Instant Tan Spray HAS
QUITE A STRONG COLOUR SO NOT FOR THE FAINT-HEARTED.
APPLY IN THIN LAYERS TO AVOID DRIP MARKS. $11.95
Le Tan in Le Can OFFERS THE BEST BANG FOR YOUR BUCK;
EASY, EVEN COVERAGE, A VARIETY OF TONES AND LASTS
FOR A WHOLE WEEK. $14.99
Playboy Glitz Celebrity Sunless GIVES A LIGHT EVEN COVERAGE, MAKING IT IDEAL FOR PALER
SKIN TONES. $45.00
Sally Hansen Airbrush Legs GIVES AN EXTREME
AIRBRUSHED LOOK FOR A BIG NIGHT OUT,
BUT BE CAREFUL IT DOESN’T ALSO AIRBRUSH YOUR BATHROOM! $24.95
Amy Erbacher
is the founder of
Paddington salon,
Amy Erbacher
Beauty. She
specialises in
Facials, Peels and
Spray Tanning that
many Australian
celebrities turn to,
including Jennifer
Hawkins and
Natalie Bassingthwaighte.
Why I love a professional spray tanNothing beats the feeling when you’ve just
had a professional and flawless spray tan!
WHY? I love the fact that it can help
camouflage imperfections and that you
can receive a beautiful bronzed glow
without the effects of the harmful rays and
premature ageing.
I love how you can walk in and out of a
salon within 15 minutes to achieve a spray
tan. No cleaning the bathroom after your tan
application at home, no streaks or patches,
no tanning residue left on hands, no fuss!
Tips + tricks for a professional spray tan• Lookforagreenbasetan,Ilove
Techno Tan.
• Makesureyouhavebeenpreppedbefore
treatment, barrier cream on porous areas
of skin.
• Firsttimesalontanningvisit,I’dalways
opt for a light spray first. You can always
go darker, but better to be safe then sorry!
• Removeanyunwantedtanaroundporous
areas with baby wipes - around wrists,
fingernails and toenails.
Aftercare• Tanextendersforthefaceandbodyare
great to prolong your tan and keep your
skin hydrated. Opt for one that has the
same DHA as your professional tan.
• Don’tsoakinchlorinatedpoolsasthiswill
strip the tan.
• Trytohavequickwarmshowers,nothot.
• Patwithatowel,donotrubasthisworks
asanexfoliateandwillremovetan.
• Exfoliatetoremovepatchesofyour
existingtananddeadskincellsasthe
dead cells create a barrier.
Happy tanning, Amy xwww.amyerbacher.com.au
TURN TO PAGE 74 TO WIN AN AMY ERBACHER BEAUTY PACKAGE
WORTH OVER $500!
132
SUNLESS TANNING
IMAGE OPPOSITE PAGE: PHOTOGRAPHER Debra Edwards STYLIST Kimberlee KesslerHAIR & MAKEUP Kate Robinson Makeup Artist www.katerobinson.com.au
LIPSTICK M.A.C Amplified Creme Lipstick in Morange www.maccosmetics.com.auNAILS OPI www.opi.net.au MODEL Lauren K
expertadvice