struts tools tutorialdocs.jboss.org/tools/old/3.1.0.ga/en/struts_tools_tutorial/pdf/... · struts...
TRANSCRIPT

Struts Tools Tutorial
Version: 3.1.0.GA

Struts Tools Tutorial
ii
1. Introduction ................................................................................................................. 1
1.1. Key Features Struts Tools ................................................................................... 1
1.2. Other relevant resources on the topic .................................................................. 2
2. Creating a Simple Struts Application .......................................................................... 3
2.1. Starting Up ......................................................................................................... 3
2.2. Creating the Application Components .................................................................. 3
2.2.1. Creating JSP Page Placeholders .............................................................. 3
2.2.2. Creating an Action Mappings .................................................................... 4
2.2.3. Creating a Link ........................................................................................ 5
2.2.4. Creating a Forward .................................................................................. 5
2.2.5. Creating a Global Forward ........................................................................ 6
2.2.6. Creating a Form Bean .............................................................................. 7
3. Generating Stub Coding .............................................................................................. 8
4. Coding the Various Files ............................................................................................. 9
4.1. Java Stub Classes .............................................................................................. 9
4.1.1. GetNameForm.java .................................................................................. 9
4.1.2. GreetingAction.java ................................................................................ 10
4.2. JSP Pages ....................................................................................................... 12
4.2.1. inputname.jsp ......................................................................................... 12
4.2.2. greeting.jsp ............................................................................................ 14
4.2.3. index.jsp ................................................................................................ 15
5. Compiling the Classes and Running the Application ................................................ 17
6. Struts Validation Examples ....................................................................................... 18
6.1. Starting Point .................................................................................................... 18
6.2. Defining the Validation Rule .............................................................................. 18
6.3. Client-Side Validation ........................................................................................ 20
6.4. Server Side Validation ....................................................................................... 22
6.5. Editing the JSP File .......................................................................................... 22
6.6. Editing the Action .............................................................................................. 22
6.7. Editing the Form Bean ...................................................................................... 23
7. Other Relevant Resources on the topic ..................................................................... 25

Chapter 1. Introduction
1
IntroductionThe following chapters describe how to deal with classic/old style of Struts development. We
recommend users to use JBoss Seam [../../seam/html_single/index.html] to simplify development,
but until then you can read about classical Struts usage here.
We are going to show you how to create a simple Struts application using the JBoss Tools. The
completed application will ask a user to enter a name and click a button. The resulting new page
will display the familiar message, "Hello <name>!"
This document will show you how to create such an application from the beginning, along the way
demonstrating some of the powerful features of JBoss Tools. With the help of our tutorial you will
design the application, generate stub code for the application, fill in the stub coding, compile the
application, and finally run it all from inside the Eclipse.
1.1. Key Features Struts Tools
For a start, we propose you to look through the table of main features of Struts Tools:
Table 1.1. Key Functionality of Struts Tools
Feature Benefit
Struts Support Step-by-step wizards for creating a new struts project with a
number of predefined templates, importing existing ones and
adding struts capabilities to non-struts web projects.
Support for Struts
Configuration File
Working on file using three modes: diagram, tree and source.
Synchronization between the modes and full control over the
code. Easy moving around the diagram using the Diagram
Navigator. Working with struts projects that have multiple
modules. Possibility to use Struts configuration file debugger
allowing to set break points on struts diagram and then launch
the server in debug mode.
Support for Struts modules A Struts module (struts-config.xml) is automatically created
while creating a new project. There is also possibility to add new
ones or edit already existing modules in your existing project or
while importing Struts project.
Verification and Validation All occurring errors will be immediately reported by verification
feature, no matter in what view you are working. Constant
validation and errors checking allows to catch many of the
errors during development process that significantly reduces
development time.
Chapter 1. Introduction
2
1.2. Other relevant resources on the topic
All JBoss Developer Studio/JBoss Tools release documentation you can find athttp://
docs.jboss.org/tools [http://docs.jboss.org/tools/] in the corresponding release directory.
The latest documentation builds are available at http://download.jboss.org/jbosstools/nightly-docs
[http://download.jboss.org/jbosstools/nightly-docs/].

Chapter 2. Creating a Simple Struts Application
3
Creating a Simple Struts ApplicationFirstly, we assume that you have already launched Eclipse with JBoss Tools installed and also that
the Web Development perspective is the current perspective. (If not, make it active by selecting
Window > Open Perspective > Other > Web Development from the menu bar.)
2.1. Starting Up
We are first going to create a new project for the application.
• Go to the menu bar and select File > New > Struts Project
• Next enter "StrutsHello" as the project name
• Leave everything else as it is, and click Next
• If you have server runtime already defined, just pass to next point. Otherwise in the Runtime
section click the New button and target at needed server runtime environment. Click Finish.
• Click Next
• Make sure that struts-bean.tld , struts-html.tld , and struts-logic.tld are checked in the list of
included tag libraries and then hit Finish
A "StrutsHello" node should appear in the Package Explorer view.
• Click the plus sign next to StrutsHello to reveal the child nodes
• Click the plus sign next to WebContent under StrutsHello
• Click the plus sign next to WEB-INF under WebContent
• Then, double-click on the struts-config.xml node to display a diagram of the Struts application
configuration file in the editing area
At this point, its empty except for the background grid lines.
2.2. Creating the Application Components
Now, we will design the application by creating the individual components as placeholders first.
(We don't have to complete all of the details inside the components until afterwards.)
2.2.1. Creating JSP Page Placeholders
Next, let's create and place two JSP pages. We will not write any code for the files, but only create
them as placeholders so that we can create links to them in the diagram. We will write the code
a little bit later.

Chapter 2. Creating a Simple Struts Application
4
2.2.1.1. Creating the Page Placeholders
• Bring the Web Projects view to the front of the Package Explorer view by selecting the Web
Projects tab next to that tab.
• Right-click the StrutsHello > WEB-ROOT (WebContent) folder in the Web Projects view and
select New > Folder...
• Enter pages for a folder name and click Finish
• We will keep our presentation files in this folder
• Right-click the pages folder and select New > File > JSP...
• For Name type in inputname (the JSP extension will be automatically added to the file), for
Template select StrutsForm and then click on the Finish button
• Right-click the pages folder again and select New > File > JSP...
• For Name type in greeting , for Template leave as Blank, and then click on the Finish button
Just leave these files as is for now.
2.2.1.2. Placing the Page Placeholders
Lets now place the two pages just created on the diagram.
• Click on the struts-config.xml tab in the editing area to bring the diagram to the front
• Click on the inputname.jsp page in the Web Projects view, drag it onto the diagram, and drop it
• Click on the greeting.jsp page in the Web Projects view, drag it onto the diagram, and drop it
to the right of the /pages/inputname.jsp icon with some extra space
You should now have two JSP pages in the diagram.
2.2.2. Creating an Action Mappings
Using a context menu on the diagram, we are next going to create an Action mapping.
• Right-click between the two icons and select New > Action
• Enter the following values:
Table 2.1. Action values
path /greeting

Chapter 2. Creating a Simple Struts Application
5
name GetNameForm
scope request
type sample.GreetingAction
validate <leave blank>
("GetNameForm" is the name for a form bean that we will create later.)
• Click Finish
The /greeting action should appear in four places, in the diagram, under the action-mappings
node, under the struts-config.xml node in Tree view, in Web Projects view and in the Outline view.
Also, note the asterisk to the right of the name, struts-config.xml, in the Outline view showing that
the file has been changed, but not saved to disk.
2.2.3. Creating a Link
Let's now create a link from the inputname.jsp page to the action.
• On the left-hand side of the diagram in the column
of icons, click on the Create New Connection icon(
).
• In the connect-the-components mode you are in now, click on the /pages/inputname.jsp icon
in the diagram and then click on the /greeting action
A link will be created from the page to the action.
2.2.4. Creating a Forward
Next, we are going to create a forward for the action.
• On the left-hand side of the diagram in the column
of icons, click on the Create New Connection icon(
),
again.
• Click on the /greeting action icon in the diagram and then click on the pages/greeting.jsp icon
• That's it. A link will be drawn from the actions new greeting forward to the greeting.jsp JSP
page. Note that the forwards name will be set based on the name of the target JSP file name.
If you don't like it, you can easily change it
• Select the Tree tab at the bottom of the editor window (between Diagram and Source)

Chapter 2. Creating a Simple Struts Application
6
• Expand the struts-config.xml/action-mappings/ /greeting node and then select the greeting
forward
• In the Properties Editor to the right, change the text to "sayHello" in the Name field
• Select the Diagram tab at the bottom of the editor window and see how the diagram is also
updated to reflect the change
2.2.5. Creating a Global Forward
One last component that we need to create in the diagram is a global forward.
• Somewhere in the top-left corner of diagram, right-click and select New > Global Forward
• Enter getName in the Name field
• Select the Change... button for Path
• In the Edit Path window, switch to the Pages tab
• Expand the StrutsHello > WEB-ROOT (WebContent) > pages node and then select the
inputname.jsp page
• Click Ok .
• Leave the rest of the fields blank and click OK
A forward object now appears on the diagram and also in the global-forwards folder in the Outline
view.
• Tidy up the diagram, by clicking and dragging around each icon, so that the diagram looks
something like this:
Figure 2.1. Diagram View
Chapter 2. Creating a Simple Struts Application
7
2.2.6. Creating a Form Bean
One last thing that we need to do is to create a form bean.
• Switch to the Tree viewer in the editor for the struts-config.xml file, by selecting the Tree tab
at the bottom of the editor window
• Right-click struts-config.xml > form-beans and select Create Form Bean
• Enter GetNameForm in the name field and sample.GetNameForm for type
• Click Finish
• To save your changes to struts-config.xml, select File > Save from the menu bar
Note the disappearance of the asterisk next to the name, struts-config.xml.

Chapter 3. Generating Stub Coding
8
Generating Stub CodingWe are done with designing the application through the diagram. Now we need to write code for
the action component. We also need to write an action class for the /greeting mapping along
with a FormBean. To aid in the coding phase, JBoss Developer Studio can generate Java class
stubs for all of the components shown in the diagram.
• Switch back to the diagram, by selecting the Diagram tab at the bottom of the editor window
• Right-click a blank space in the diagram and select Generate Java Code
• Leave everything as is in the dialog box and click Generate
You should see a screen that says:
Generated classes: 2
Actions: 1
Form beans: 1
• Click Finish
The Java files will be generated in a JavaSource > sample folder that you can see in the Package
Explorer view under the "StrutsHello" node. One Action stub and one FormBean stub will have
been generated.

Chapter 4. Coding the Various Files
9
Coding the Various FilesWe will now code both the Java stub classes just generated, the JSP files left in as placeholders
from previous steps, and a new start JSP page we will have to create.
4.1. Java Stub Classes
• To finish the two Java classes, switch to the Package Explorer view and expand the
JavaSource > sample folder
4.1.1. GetNameForm.java
• Double-click GetNameForm.java for editing
• You are looking at a Java stub class that was generated by JBoss Tools. Now we are going
to edit the file
• Add the following attributes at the beginning of the class:
private String name = "";
• Inside the reset method, delete the TO DO and throw lines and add:
this.name = "";
• Inside the validate method, delete the TO DO and throw lines and add:
ActionErrors errors = new ActionErrors();
return errors;
• Right-click and select Source > Generate Getters and Setters from the context menu
• In the dialog box, check the check box for name, select First method for Insertion point, and
click on the OK button
The final GetNameForm.java file should look like this:

Chapter 4. Coding the Various Files
10
package sample;
import javax.servlet.http.HttpServletRequest;
import org.apache.struts.action.ActionErrors;
import org.apache.struts.action.ActionMapping;
public class GetNameForm extends org.apache.struts.action.ActionForm
{
private String name = "";
public String getName()
{
return name;
}
public void setName(String name)
{
this.name = name;
}
public GetNameForm()
{
}
public void reset(ActionMapping actionMapping, HttpServletRequest request)
{
this.name = "";
}
public ActionErrors validate(ActionMapping actionMapping,
HttpServletRequest request)
{
ActionErrors errors = new ActionErrors();
return errors;
}
}
• Save the file
4.1.2. GreetingAction.java
• Open GreetingAction.java for editing
• Inside the execute method, delete the TO DO lines and add the following:
Chapter 4. Coding the Various Files
11
String name = ((GetNameForm)form).getName();
String greeting = "Hello, "+name+"!";
((GetNameForm)form).setName(greeting);
return mapping.findForward(FORWARD_sayHello);
The final version of GreetingAction.java should look like this:
package sample;
import javax.servlet.http.HttpServletRequest;
import javax.servlet.http.HttpServletResponse;
import org.apache.struts.action.ActionForm;
import org.apache.struts.action.ActionForward;
import org.apache.struts.action.ActionMapping;
public class GreetingAction extends org.apache.struts.action.Action
{
// Global Forwards
public static final String GLOBAL_FORWARD_getName = "getName";
// Local Forwards
public static final String FORWARD_sayHello = "sayHello";
public GreetingAction()
{
}
public ActionForward execute(ActionMapping mapping, ActionForm form,
HttpServletRequest request, HttpServletResponse response) throws Exception
{
String name = ((GetNameForm)form).getName();
String greeting = "Hello, "+name+"!";
((GetNameForm)form).setName(greeting);
return mapping.findForward(FORWARD_sayHello);
}
}
• Save the file
• Close the editors for the two Java files
The last thing left to do is to code the JSP files whose editors should still be open from having
been created as placeholders.
Chapter 4. Coding the Various Files
12
4.2. JSP Pages
4.2.1. inputname.jsp
In this page, the user will enter any name and click the submit button. Then, the greeting action
will be called through the form.
• Click on the inputname.jsp tab in the Editing area to bring its editor forward
• In the Web Projects view, expand StrutsHello > Configuration > default > struts-config.xml >
action-mappings and select /greeting
• Drag it and drop it between the quotes for the "action" attribute to the <html:form> element
in the Source pane of the editor
• Then type this text on a new line just below this line:
Input name:
• Select the Visual pane of the editor
• Then, in the JBoss Tools Palette, expand the Struts Form library, select text , and drag it
onto the box
Note:
By default there are only four groups on the JBoss Tools Palette. If you wish to
make some group visible click the Show/Hide button on the top of palette and
in the prompted dialog check the group (or groups) you want to be shown.

Chapter 4. Coding the Various Files
13
Figure 4.1. JBoss Tools Palette
• In the Insert Tag dialog box, type in name for property and select Finish
• In the StrutsForm library in the JBoss Tools Palette, select submit , and drag it to right after
the text box in the Visual pane of the editor
• Right-click the submit button and select <html:submit> Attributes from the context menu
• In the Attributes dialog box, select the value field and type in "Say Hello!" for its value
After tidying the page source, the Editor window for the file should look something like this:

Chapter 4. Coding the Various Files
14
Figure 4.2. Editor Window
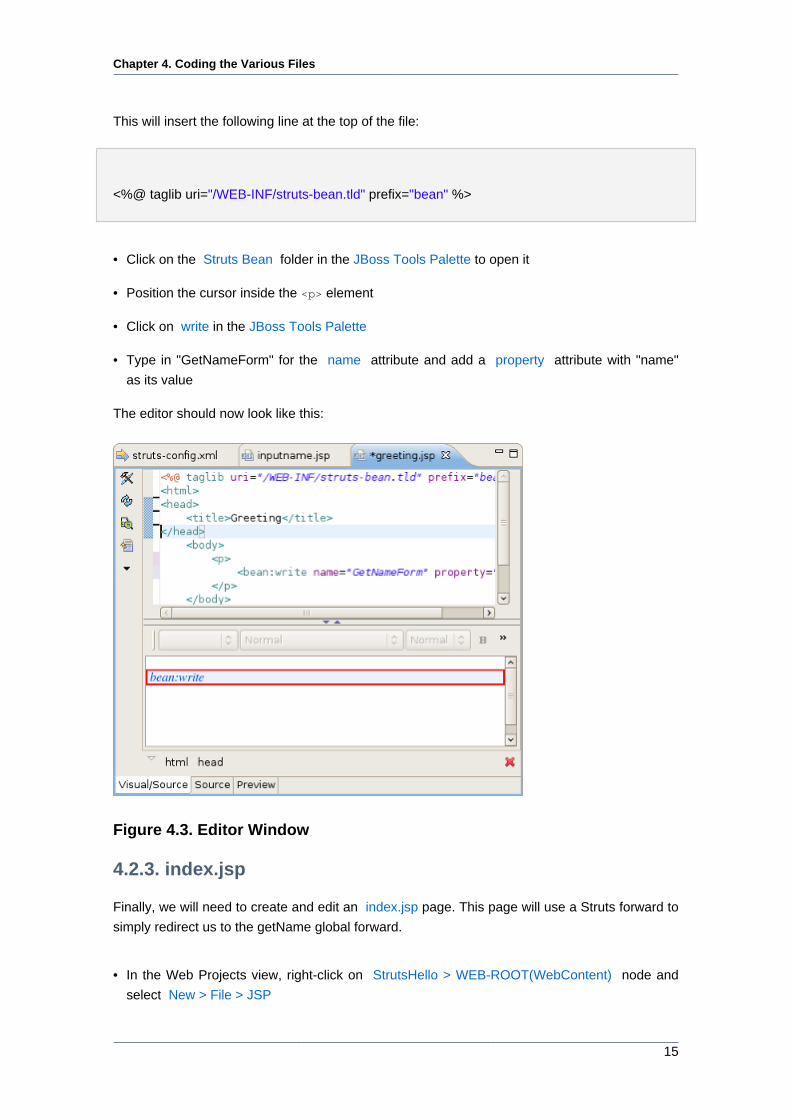
4.2.2. greeting.jsp
Next, we will fill in the result page.
• Click on the greeting.jsp tab in the Editing area to bring its editor forward
• Type in the following code:
<html>
<head>
<title>Greeting</title>
</head>
<body>
<p>
</p>
</body>
</html>
To complete editing of this file, we will use macros from the JBoss Tools Palette. This palette is
a view that should be available to the right of the editing area.
• Click on the Struts Common folder in the JBoss Tools Palette to open it
• Position the cursor at the beginning of the greeting.jsp file in the Source pane and then click
on bean taglib in the JBoss Tools Palette
Chapter 4. Coding the Various Files
15
This will insert the following line at the top of the file:
<%@ taglib uri="/WEB-INF/struts-bean.tld" prefix="bean" %>
• Click on the Struts Bean folder in the JBoss Tools Palette to open it
• Position the cursor inside the <p> element
• Click on write in the JBoss Tools Palette
• Type in "GetNameForm" for the name attribute and add a property attribute with "name"
as its value
The editor should now look like this:
Figure 4.3. Editor Window
4.2.3. index.jsp
Finally, we will need to create and edit an index.jsp page. This page will use a Struts forward to
simply redirect us to the getName global forward.
• In the Web Projects view, right-click on StrutsHello > WEB-ROOT(WebContent) node and
select New > File > JSP

Chapter 4. Coding the Various Files
16
• Type index for Name and click on the Finish button
• On the JBoss Tools Palette, select the Struts Common folder of macros by clicking on it in
the palette
• Click on the logic taglib icon
• Press the Enter key in the editor to go to the next line
• Back on the palette, select the Struts Logic folder of macros
• Click on redirect
• Delete the ending tag, put a forward slash in front of the closing angle bracket, and type
"forward=getName" in front of the slash
The finished code for the page is shown below:
<%@ taglib uri="/WEB-INF/struts-logic.tld" prefix="logic" %>
<logic:redirect forward="getName"/>
• To save all the edits to files, select File>Save All from the menu bar
Chapter 5. Compiling the Classes and Running
the Application
17
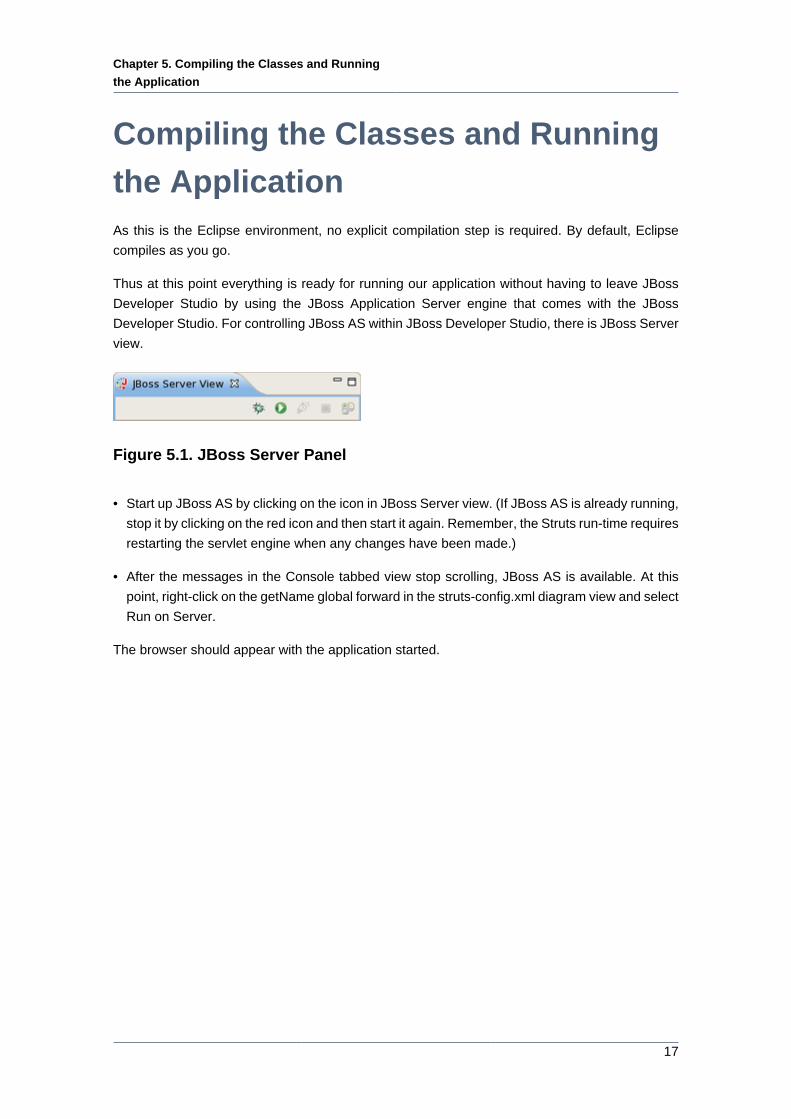
Compiling the Classes and Running
the ApplicationAs this is the Eclipse environment, no explicit compilation step is required. By default, Eclipse
compiles as you go.
Thus at this point everything is ready for running our application without having to leave JBoss
Developer Studio by using the JBoss Application Server engine that comes with the JBoss
Developer Studio. For controlling JBoss AS within JBoss Developer Studio, there is JBoss Server
view.
Figure 5.1. JBoss Server Panel
• Start up JBoss AS by clicking on the icon in JBoss Server view. (If JBoss AS is already running,
stop it by clicking on the red icon and then start it again. Remember, the Struts run-time requires
restarting the servlet engine when any changes have been made.)
• After the messages in the Console tabbed view stop scrolling, JBoss AS is available. At this
point, right-click on the getName global forward in the struts-config.xml diagram view and select
Run on Server.
The browser should appear with the application started.
Chapter 6. Struts Validation Examples
18
Struts Validation ExamplesValidation of input is an important part of any Web application. All Apache Jakarta frameworks,
including Struts, can use a common Jakarta Validation Framework for streamlining this aspect
of Web application development. The Validation Framework allows you to define validation rules
and then apply these rules on the client-side or the server-side.
JBoss Developer Studio makes using the Validation Framework in Struts even easier with the
help of a specialized editor for the XML files that controls validation in a project. In this document,
we'll show you how this all works by creating some simple client-side validation and server-side
validation examples.
6.1. Starting Point
The example assumes that you have already created our sample "StrutsHello" application from
the Getting Started Guide for Creating a Struts Application. You should have the JBoss Developer
Studio perspective open on this StrutsHello project.
6.2. Defining the Validation Rule
In these steps you will set up the validation that can be used for either client-side or server side
validation. You need to enable validation as a part of the project, define an error message, and
tie it into an appropriate part of the application.
• Right-click on a "plug-ins" node under the StrutsHello > Configuration > default > struts-
config.xml node in the Web Projects view and select Create Special Plugin > Validators from
the context menu
• Further down in the Web Projects view, right-click on the StrutsHello > ResourceBundles node
and select New > Properties File...from the context menu
• In the dialog box, click on the Browse...button next to the Folder field, expand the JavaSource
folder in this next dialog box, select the sample subfolder, and click on the OK button
• Back in the first dialog box, type in "applResources" for the Name field and click on the Finish
button
• Right-click on a newly created file and select Add > Default Error Messages from the context
menu
• Drag up the sample.applResources icon until you can drop it on the resources folder under
struts-config.xml
• Select File > Save All from the menu bar

Chapter 6. Struts Validation Examples
19
• Select validation.xml under the StrutsHello > Validation node and double-click it to open it with
the JBoss Tools XML Editor
• Here you must create a Formset.
• In the validation.xml file editor click the button Create Formset on the panel Formsets
• In the dialog Add Formset fill the fields Language and Country or just leave them empty to create
a default formset. Click OK
Figure 6.1. Create Formset
• Expand the "form-beans" node under the StrutsHello > Configuration > default > struts-
config.xml node. Then, drag the form bean "GetNameForm" and drop it onto a formset in the
XML Editor
• In the Validation Editor, expand the formset node, right-click GetNameForm, and select Create
Field... from the context menu
• Enter a name for Property in the dialog box. A new property will be created:

Chapter 6. Struts Validation Examples
20
Figure 6.2. New Property Is Added
• In the Properties view for the name field to the right of the "tree" for the validation.xml file, click
on the Change...button next to the Depends entry field
• In the displayed double list, select required from the left list and then click Add
• Click Ok
• Right-click name and select Add Arg... from the context menu
• In the Add Arg dialog box, click on the Change...button next to the Key field
• In the Key dialog box that appears now, click on the Add button
• Enter "name.required" in the Name field, and enter a person's name in the Value field
• Click Finish, then Ok, and then Ok again
• Select File > Save All from the menu bar
6.3. Client-Side Validation
Client-side validation uses a scripting language (like JavaScript) running in the client browser to
actually do the validation. In a Struts application using the Validation Framework, however, you
don't actually have to do any of the script coding. The Validation Framework handles this.
To see how this works in our application, you'll just need to make a couple of modifications to
one of the JSP files.

Chapter 6. Struts Validation Examples
21
• Double-click inputname.jsp under StrutsHello > WEB-ROOT(WebContent) > pages to open it
for editing
• Find the tag near the top and hit Return to make a new line under it
• In the JBoss Tools Palette view to the right, open the Struts HTML folder and click on the
javascript tag
• Back in the editor, just in front of the closing slash for this inserted tag, hit Ctrl+Space and select
"formName" from the prompting menu
• Over in the Web Projects view, select GetNameForm under the StrutsHello > Configuration >
default > struts-config.xml > form-beans node, drag it, and drop it between the quotes in the
editor
• Modify the <html:form> tag by inserting this attribute:
onsubmit="return validateGetNameForm(this)"
The file should now look like this:
<%@ taglib uri="/WEB-INF/struts-html" prefix="html" %>
<html:html >
<head>
<html:javascript formName="GetNameForm"/>
<title></title>
</head>
<body>
<html:form action="/greeting.do" onsubmit="return validateGetNameForm(this)">
Input name:<html:text property="name"/><html:submit value="Say Hello!"/>
</html:form>
</body>
</html:html>
• Select File > Save from the menu bar
• Start JBoss Application Server by clicking on its icon (a right-pointing arrow) in the toolbar
• Click the Run
icon( )
or right click your project folder and select Run As > Run on Server

Chapter 6. Struts Validation Examples
22
• In the browser window, click on the "Say Hello!" button without having entered any name in
the form
A JavaScript error message should be displayed in an alert box.
6.4. Server Side Validation
Server side validation does the validation inside the application on the server. In a Struts
application using the Validation Framework, you still don't have to do any of the actual validation
coding. The Validation Framework handles this. You will though have to make a few changes to
the JSP file you modified for client-side validation along with a change to an action and a few
changes to the form bean class.
6.5. Editing the JSP File
• Reopen inputname.jsp for editing
• Delete the "onsubmit" attribute in the <html:form> element that you put in for client-side
validation
• Add an <html:errors/> tag after the <html:form> tag
The JSP file should now look like this:
<%@ taglib uri="/WEB-INF/struts-html" prefix="html" %>
<html:html >
<head>
<html:javascript formName="GetNameForm"/>
<title></title>
</head>
<body>
<html:form action="/greeting.do" >Input name:<html:text property="name"/>
<html:submit value="Say Hello!"/>
</html:form>
<html:errors/>
</body>
</html:html>
6.6. Editing the Action
• In the Web Projects view, expand the node under the StrutsHello > Configuration > default
> struts-config.xml > action-mappings node, right-click the /greeting action, and then select
Properties...from the context menu

Chapter 6. Struts Validation Examples
23
• In the Edit Properties window, insert the cursor into the value column for the input property and
click on the ... button
• In the dialog box, make sure the Pages tab is selected, select StrutsHello > WEB-
ROOT(WebContent) > pages > inputname.jsp, click the Ok button, and then click on the Close
button
6.7. Editing the Form Bean
• Right-click the /greeting action again and select Open Form-bean Source to open the
GetNameForm.java file for editing
• Change the class that it extends from: org.apache.struts.action.ActionForm to
org.apache.struts.validator.ValidatorForm
• Comment out a validate method
The file should now look like this:
package sample;
import javax.servlet.http.HttpServletRequest;
import org.apache.struts.action.ActionErrors;
import org.apache.struts.action.ActionMapping;
public class GetNameForm extends
org.apache.struts.validator.ValidatorForm
{
private String name = "";
/**
* @return Returns the name.
*/
public String getName()
{
return name;
}
/**
* @param name The name to set.
*/
public void setName(String name)
{
this.name = name;
}

Chapter 6. Struts Validation Examples
24
public GetNameForm ()
{
}
public void reset(ActionMapping actionMapping,
HttpServletRequest request)
{
this.name = "";
}
// public ActionErrors validate(ActionMapping actionMapping,
// HttpServletRequest request)
//{
// ActionErrors errors = new ActionErrors();
// return errors;
// }
}
• Select File > Save All from the menu bar
• Reload the application into JBoss AS by clicking on the "Change Time Stamp" icon (a finger
pointing with a little star) in the toolbar
• Run the application
• In the browser window, click on the "Say Hello!" button without having entered any name in
the form
The error message should appear in a refreshed version of the form.
Chapter 7. Other Relevant Resources on the topic
25
Other Relevant Resources on the
topicOur reference: Struts Tools Reference Guide [../../struts_tools_ref_guide/html_single/index.html]
Apache Struts: Struts Technology [http://struts.apache.org/]
Struts 2: Apache Struts 2 [http://struts.apache.org/2.x/]
Get Started: Struts Getting Started [http://struts.apache.org/2.x/docs/home.html]
Struts on IBM: Struts - An open-source MVC implementation [http://www.ibm.com/
developerworks/library/j-struts/]
FAQ: Struts FAQ [http://struts.apache.org/2.x/docs/faqs.html]
Download: Release of Apache Struts [http://struts.apache.org/download.cgi#struts206]
Thus, this tutorial should help you to execute the hole development circle for building a sample
Struts-based Web application using JBoss Tools bundle of Eclipse plugins starting from organizing
a new Struts project and ending with the running and deploying it onto the JBoss Server.
To find out all the features of JBoss Tools for working with Struts refer to our Struts
Tools Reference Guide [../../struts_tools_ref_guide/html_single/index.html]. If you still have
questions you are always welcome on JBoss Tools Forum [http://www.jboss.com/index.html?
module=bb&op=viewforum&f=201].