storefront product guide
TRANSCRIPT

Storefront Product Guide (updated for version 10.3.2) Page 1
Storefront Product Guide
1. Adding Product 2. Setting up Product Keywords 3. Setting up Related Products 4. Customizing how your products are displayed

Storefront Product Guide (updated for version 10.3.2) Page 2
Adding a Product to your Storefront
Depending on your store’s Product List layout (which can be updated using the Page Builder or for advanced users the Page Template Manager), you can include a description and/or image for your category. Be sure to resize your category image before bring it into Storefront (generally category images are around 100 to 300 pixels). You can also update the page title for your product list page. Updating your Page Title to include keywords for your category can help improve your ranking on the search engines. Since this will be viewed by potential
Before you add a new product, let’s start by creating the product category.
Here you can change the category sort priority, which controls the order of categories on your live store. The category with the lowest sort priority number will be displayed first. If you leave the sort priority as 9999 the categories will be listed alphabetically.
Here you can enter the name of the category.

Storefront Product Guide (updated for version 10.3.2) Page 3
customers when your site is listed as a search result, you will want to keep this short and to the point while still being readable. You can also come back and make a category hidden on your store if you ever need to take down an entire category at once. This can be helpful if you have seasonal categories that you don’t want up year round.
If you have created multiple product layouts using the Page Builder, you can select the List template that you would like to use for this category.
Click Submit when you have finished setting up the category. You will be able to back and make changes if needed.
Once you have created your category, you can start adding product or if you have a large number of items in this category, you may want to create subcategories to break up your products into smaller groups.
To create a subcategory, click on the
Subcategories button.

Storefront Product Guide (updated for version 10.3.2) Page 4
To use the subcategory sort priority on your store, additional custom code will need to be added to your header’s source code. Since updating your store’s code is required this feature is for advanced users only.
Now that you have created a category, you can now add a product to your store.
Here you can enter the name
of your subcategory.

Storefront Product Guide (updated for version 10.3.2) Page 5
These additional fields can be used to enter more specific information about a product. Note: Many of these fields maybe left blank.
Here you can enter in the name of the product. Helpful Tip: A good product name is descriptive and to the point.

Storefront Product Guide (updated for version 10.3.2) Page 6
Once you have entered in the general information about a product you will be able to assign it to a category. For this example, let’s place this product in the Handbag subcategory for Spring Line.
Step 4: Remember to click Save.
Step 3: Click on the arrow to assign the product to the selected category.
Step 2: Once you have expanded your category, you can select the category or subcategories from the list of available categories.
Step 1: To add a product to a
subcategory, you will need to
first click on the next to the
main category. This will expand
the category menu to show any
subcategories.

Storefront Product Guide (updated for version 10.3.2) Page 7
Your detailed product description carries a lot of weight with the search engines. The information that you provide gives the search engines a detailed description of the specifics about this product. The detailed description is where search engines will look for keywords that describe this product. Successful online stores generally have product descriptions that are at least 50 to 100 words with keywords included in the description. While you don’t need to write a short novel about your product, you do need to provide enough information to give the search engines and your customers a good idea of what your product is and its benefits.
Enter a detailed description of the product here. This is the description that customers will see when they are looking at this product only. Be sure to take some time to include all the important information about this product. This description is your opportunity to sell this product to potential customers. Helpful tip: If you are selling items from a drop shipper, you will want to take some time to modify the product description to make it unique (this will help you stand out from other stores selling the same products).
Enter a short one or two sentence description of your product here. When a customer is looking at multiple products they will see a small image and the brief description of each product. You will want to keep this description short and to the point. You also have the option to leave this field blank in which customers will just see the product name, price and a small thumbnail of the product.
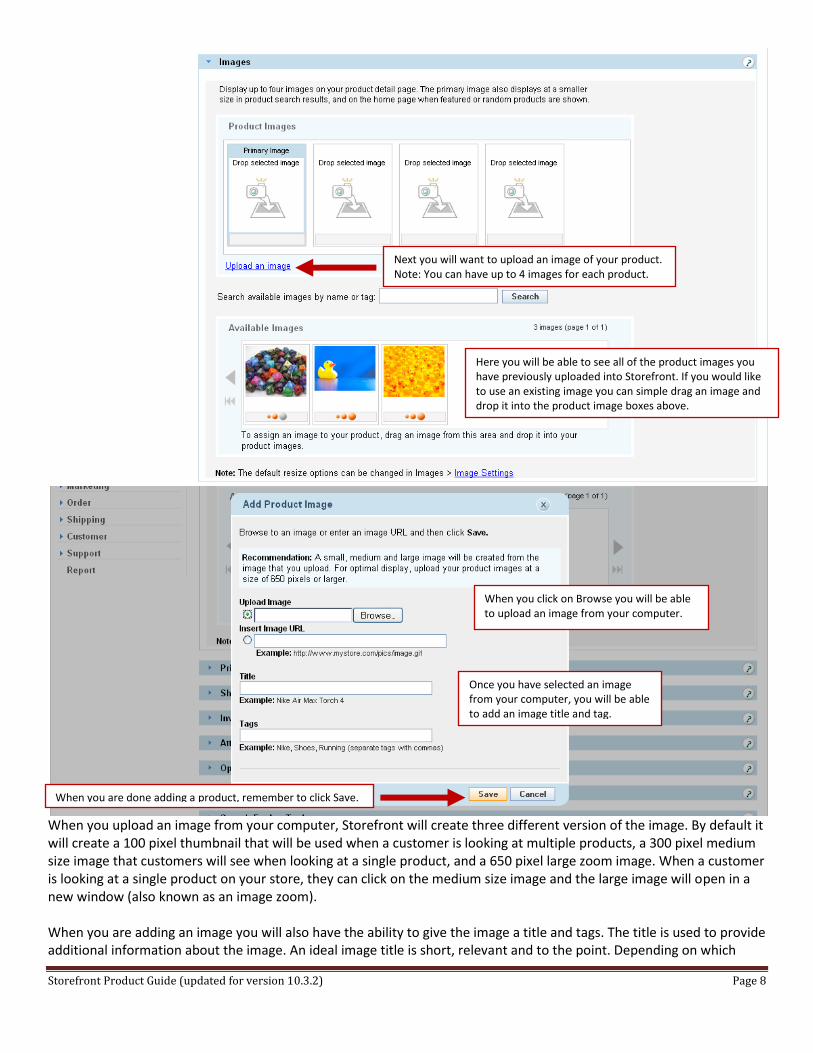
Storefront Product Guide (updated for version 10.3.2) Page 8
When you upload an image from your computer, Storefront will create three different version of the image. By default it will create a 100 pixel thumbnail that will be used when a customer is looking at multiple products, a 300 pixel medium size image that customers will see when looking at a single product, and a 650 pixel large zoom image. When a customer is looking at a single product on your store, they can click on the medium size image and the large image will open in a new window (also known as an image zoom). When you are adding an image you will also have the ability to give the image a title and tags. The title is used to provide additional information about the image. An ideal image title is short, relevant and to the point. Depending on which
Here you will be able to see all of the product images you have previously uploaded into Storefront. If you would like to use an existing image you can simple drag an image and drop it into the product image boxes above.
Next you will want to upload an image of your product. Note: You can have up to 4 images for each product.
When you are done adding a product, remember to click Save.
Once you have selected an image from your computer, you will be able to add an image title and tag.
When you click on Browse you will be able to upload an image from your computer.

Storefront Product Guide (updated for version 10.3.2) Page 9
browsers your customers use when they are viewing your store, they may be able to see this information so while this is a great place to include keywords about your product, customers should be able to read this information. Image tags are general keywords for this image. While setting up image tags is part of properly setting up a product, image tags are not nearly as important as the name of your product, product description and image title.
If you are selling discounted items, you may choose to include a retail price, will provide customer an easy way to see how much they are saving by purchasing on your store. If you aren’t seeing discounted items, then you will want to leave the retail price field blank because including a retail price will show customers they are saving $0. When using a surcharge for a product, customers viewing your live store will see the total cost of the product (ie: the sell price + any surcharge). This option gives you the ability to include information about any surcharges on the customer’s invoice. Because customers will see the overall total cost when looking at a product, these feature isn’t commonly used. Depending how you are calculating shipping, you will need to provide different shipping information. For example if you are using UPS, you have the ability to calculate based soloing on the weight of an item (in pounds). When you are using USPS, shipping is calculated based on a packing algorithm. USPS requires that weight is entered in pounds (if an item is 8 ounces you will need to enter the weight as .5 lbs) and that dimensions are entered in inches. You will also need to set up shipping containers for USPS to determine the packaging that will be used when calculating shipping.
Here you can enter the sell price, which is the price customers will pay for this product.
Note on Shipping Information: Depending on how you are calculating shipping, you will need to provide different information.
If you want to have your Storefront keep track of your inventory, you will want to place the quantity you have in stock here. You will also need to enable inventory tracking under Store then Product Prefs.

Storefront Product Guide (updated for version 10.3.2) Page 10
When you are detail with attributes (or product options) will be able to enter in the attribute inventory or attribute price once the product has been created.
Unlike a product attribute where customers can select information from predefined options, product services allow customers to type information into this field. Generally this field is used if you need to gather additional information to personalize a product. For example, if you are selling shirts and need to know the name of the company to put on the shirt, you could check the box for gather and put “Company Name” as the title. Customers view your store will see a box for company name where they can type the name of the company. You also have the ability to charge an additional fee for personalization.
Customers won’t see this information when they are looking at this product on your live store. Typically, search engines will display this text with the link to a particular product on your store. The blue link is generally the name of your product and the text underneath it is your meta description. While it is helpful to include keywords in this short description, the goal of a good meta description is to be easily understood and encourage customers to click on the link to this product.
If you have any product options, you can add an attribute. Common attributes are size, color and scent. To add a new product option click on Add Attribute.
Here you can enter the name of the product option. For example if you wanted customers to choose the color of the purse, the Storefront label would be Color and the attribute values would be the choices in this case Light Pink and Hot Pink.
Be sure to separate your product options with a comma.
Product Services are used
to collect additional
information that
customers can type into
this field.
Custom information is used when custom code has been added to your Storefront. In most cases these fields will be left blank.
Here you can enter a meta description for this product.

Storefront Product Guide (updated for version 10.3.2) Page 11
Next if you are uploading your products to Google Shopping, you can include more detailed information that Google Shopping uses for items. If you are in the US, UK, Germany or France there are several categories of items that must include the Google Category. Additional information on categorize your products Note: Any product belonging to the following Google categories must set the Product > Google Product Search Feed > Google Category value as shown below.
Apparel & Accessories > Clothing
Apparel & Accessories > Shoes (Note: Do not use Apparel & Accessories for clothing and shoes.)
Media > Books
Media > DVDs & Videos
Media > Music
Software > Video Game Software
Also remember that specifying a Google category does not replace the Product Type. The category that you place your product in is used for the product type for Google Shopping. If you are selling Apparel & Accessories, you will also need to select the gender (Female, Male or Unisex) and Age Group (Adults or Kids) for this item. Once you have finished creating your product, remember to click submit! You can always come back and update this product later.

Storefront Product Guide (updated for version 10.3.2) Page 12
Setting up Product Keywords Once you have created a product in Storefront, you can now add keywords. To add keywords for a product, you will need to log into your Storefront Administrator. You will want to go to Product and then list.
Once you log into your Store Administrator, you will want to click on Product and then List.
To add keywords to a product, click on the box labeled keys under Options.

Storefront Product Guide (updated for version 10.3.2) Page 13
When you open your product keywords, you will see a couple different sections. There are two types of keywords that you can set up for each product. Search Engine Keywords are placed in the back end code for the search engines. Generally you don't want to have more than 5 to 7 key phrase for a given product (otherwise it looks more like keyword stuffing which is frowned upon). Product Search Keywords are keywords used when doing a search on your store for a given product. You can have as many product search keywords as you want (including common misspellings).
It is very important to understand that while you can set up search engine keywords for each product; these keywords don’t carry a lot of weight with the search engines. The main reason behind this reality is that every search engine has a very specific algorithm that they used to rank sites. Search engines are going to pay more attention to the actual content around your products and not search engine keywords. Ultimately, the search engines will care more about the conclusions they reach from their algorithms than the keywords you say are relevant. Product Search keywords are actually much more useful for customers shopping on your store. When a customer is looking for a specific product they can perform a search on your store. Storefront will automatically generate keywords
Here you can enter key phrases that describe this product. Remember key phrases should be separated by commas.
Here you can add additional product keywords. These key words are used when a customer performs a search on your store. You can have many product search keywords as you like (often misspelled words are helpful for customers looking for a specific product.

Storefront Product Guide (updated for version 10.3.2) Page 14
for a product based on the product name, category, sku and OEM. You can additional product keywords if there are other words that describe your product that aren’t already part of the product name or category. Note: Product Search Keywords are all single words, where search engine keywords can be phrases.

Storefront Product Guide (updated for version 10.3.2) Page 15
Setting up Related Products Once you have created a product in Storefront, you can now add related products. Related products are a great way to cross sell your products, by recommending other products that your customer might be interested in. To add related products for a product, you will need to log into your Storefront Administrator. You will want to go to Product and then list.
Once you log into your Store Administrator, you will want to click on Product and then List.
To add related products, click on the box labeled relate under Options.

Storefront Product Guide (updated for version 10.3.2) Page 16
When you open you related products, you will see a list of currently related products and list to add related products.
Once you have added a related product, you will be able to see that product under the list of currently related products.
For example, you can tell customers looking at Marc Jacobs Spring Pink Handbag, that they might also be interested in the Purse of the Month Club. To make this a related product, click on Purse of the month club from the list of related products. And then click on Relate.
You can see the list of related product here. You can always remove a related product, by click on the checkbox next to the related product and then click delete.

Storefront Product Guide (updated for version 10.3.2) Page 17
Now that you have added a related product, let’s take a look at how this looks on your live store.
Here you will be able to view the product information, including the price and description.
Here you will be able to view the related products. This will allow your customers to see other items that they might like.

Storefront Product Guide (updated for version 10.3.2) Page 18
Customizing how your products are displayed You can customize the information that is displayed when a customer is looking at a single product in your store by using the Page Builder. The Page Builder is designed to offer a simple way to customize the most important pages on your store. The Page Builder uses a panel-based design tool that allows you add, remove or move a page element (or panel) on a page without any SSML or HTML code. Note: If you have had any custom design work done to your store, check with your web designer before making any changes in the Page Builder as this will change the code for your product detail page.
To start customizing your product detail page, click on Store Design then Design Settings.
The product detail page is used when you are viewing a single item on your live store. This page has a larger photo of the product as well as the detailed information for the product. To start customizing your product detail, click on manage.

Storefront Product Guide (updated for version 10.3.2) Page 19
There are 3 main areas of Page Builder.
Current Default will show you the default version of this page. Page Builder makes it easy to create multiple versions of a page that can easily be updated.
Pre-Designed Layouts will show you a few different layouts that you can use as is or modify to create your own custom layout.
My Pages will show you all of the pages that you have created (including the default starting page). This will you will go to access any additional layouts that you have created.
Let’s start by taking a look at the Pre-Designed Product Detail Layouts. Once you have selected a layout, you will be able to start customizing.
Here you will see a quick view of the base layout for viewing an individual product. This will give you a general starting point for where the information and image of the product is placed. You will be able to change what information is displayed once you start customizing a layout. .
When you move your mouse over each arrangement, the name of the layout and the different elements will be listed below.
Once you have selected an arrangement, you can either use the layout as it is or make changes.

Storefront Product Guide (updated for version 10.3.2) Page 20
When you are looking at the layout of different elements that will be displayed, you may see elements that you don’t want displayed. For example, there is a section in each layout to show items listed to eBay. Most Storefronts don’t have items listed on eBay. While this element will only show items if you do have items listed on eBay, you will have the ability to remove it once you start customizing your product detail.
Once you have chosen the arrangement for your product detail, you will be able to select the layout. The layout determines what other elements will be displayed when looking at a single product. You will notice that both layouts include related products and items listed to eBay. Note: If you see something on one of the layouts you don’t like, you will be able to remove that element once you have started customizing your layout.
Once you have selected an arrangement and layout, you can start customizing your product detail by clicking on Customize.
This is the Editor for the Page Builder; here you will be able to edit individual elements as well as a few page elements. Let’s start by going over the different icons.
edit a particular element
add a new element
save your page under the current file name
save your page as new file name
opens the help guide
exit the Page Builder

Storefront Product Guide (updated for version 10.3.2) Page 21
First let’s take a look at the Page Display by clicking on the pencil at the top of the page. When you click on the pencil, you will be taken to the Edit Page Display.
If you have the display bookmark element enabled, customers will see this element at the top of your product detail page.
If you have the display email a friend link enabled, customers will see a link at the bottom of your product detail page that will take them to a page where they can send a link with a personal message to a friend.
If you have the display return to catalog link enabled, customers will see a link at the bottom of your product detail page which will take them back to the product list for a given category.
You can make changes to the product layout by clicking on the pencil next to product item. This will open the edit panel display.
First you can edit the layout options. This controls the placement of the product image, product information and product description. By default, you will notice that “use tabs to group product information” is enabled. This will show your brief description, detailed description and product specifications in three separate folder tabs when looking a single product.

Storefront Product Guide (updated for version 10.3.2) Page 22
The first step in customizing your product detail is deciding the layout option that works best for your store. First let’s take a look at what the product detail looks like with tabs enabled.
Here is an example of a product detail that has the product information grouped by tabs. Here you can see three folder tabs that display the brief (or short) description, the detailed (or long) description and specifications. The product specifications tab displays the basic product information. This includes the product SKU, ISBN, UPC, Manufacturer and MPN.

Storefront Product Guide (updated for version 10.3.2) Page 23
Next let’s take a look at the same product detail without tabs enabled.
If you are having a hard time deciding which layout will work best for your products, it helps to figure out how much information you have for each product. When you are dealing with an online store, you want to make buying your products as easy as possible. For that reason, you will want to avoid having a lot of information above your add to cart button. This will help your customers easily purchase items on your store. So if you have a lot of product specifications that you want displayed on your store, you may want to use a layout that has tabs enabled. On the other hand, if you don’t have a lot of product specifications, you may not want to have tabs enabled so that customers can easily see the detailed description for your products. The detailed description is where you traditionally include the most important information about a product including all the benefits of buying this product. When you have tabs enabled the detailed description will often be overlooked. Ultimately it comes down to what you are selling and your personally preferences. Luckily, with the Page Builder it is easy to try one layout and then make changes later.
In this example, the product
specifications are now shown
under the product name.
When tabs aren’t enabled, you will notice that you will only see the detailed (or long) description for a product.

Storefront Product Guide (updated for version 10.3.2) Page 24
Next let’s go over the second part of customizing your product detail. To make it easy to see all the different information that can be modified let’s look at each different section of item options.
Next let’s look at customizing your item options.
The first section allows you to customize your name & descriptions. This section will be a bit different if you don’t have tabs enabled.
First you can control if your customer’s see the name of your product. Generally the vast majority of online stores will display the name of a product.
Next you can control if customers can see the brief and long description for a product.

Storefront Product Guide (updated for version 10.3.2) Page 25
As a general rule of thumb, you will want to display the name and description for each product. The detailed description of the product is more important than the brief description.
The second section allows you to control the pricing information that is displayed when a customer looks at a product. The product price shows the base price of this product. If a given product has attributes (or product options that affect the price of the product), attribute pricing will show the price and quantity for each attribute combination. Finally, when you have a product that has a retail price in addition to the sell price, the sales savings will show customers the total amount they are saving by purchasing the product on your store.

Storefront Product Guide (updated for version 10.3.2) Page 26
Generally if you have a product with pricing based attributes, you can turn off the sell price of the product so that visitors to your store only see the attribute pricing.
Here you will see the price of the product.
If a given product has attributes (or product options that affect the price of the product), attribute pricing will show the price and quantity for each attribute combination.
When you have a product that has a retail price in addition to the sell price, the sales savings will show customers the total amount they are saving by purchasing the product on your store. Note: Turn off the sale price will only remove the “You Save $x” feature.

Storefront Product Guide (updated for version 10.3.2) Page 27
The placement of product identifiers will vary based on whether the layout has tabs enabled. When tabs are enabled your product identifiers will appear in the specifications tab.
The third section controls which product identifiers are displayed when a customer is looking at an individual product.
SKU- Number and or characters used to identify a specific product
ISBN- International Standard Book Numbering
UPC- Universal Product Code. Generally a Product UPC is associated with the bar code numbers for that specific product.
When you have tabs enabled, visitors will need to click on the specification tab to view the product identifiers.

Storefront Product Guide (updated for version 10.3.2) Page 28
If tabs are not enabled, the specification information will generally appear below the product name and above the product price.
When tabs are disabled, the product identifiers will generally appear above the product price. Note: This will vary based on the product detail layout selected. So it is possible to have this information displayed in a different location.
The fourth section controls what information about the product manufacturer is displayed. The placement of this information will be different based on the detail layout. You can have the manufacturer name; logo and description appear when customers are looking at a single product. You also display the manufacturer product or part number for that specific product.

Storefront Product Guide (updated for version 10.3.2) Page 29
When tabs are enabled your manufacturer
information will appear in the specifications tab.
When tabs are disabled, the manufacturer information will generally appear below the product name. Note: This will vary based on the product detail layout selected. So it is possible to have this information displayed in a different location.

Storefront Product Guide (updated for version 10.3.2) Page 30
The last section controls what additional miscellaneous information is displayed when a customer is looking at a product. Condition- shows if this item is new, used or refurbished Unit of Measure- here you can enter the quantity that a customer receives when they order one of this product. Generally if your products aren’t sold individually, they can be sold by the box. Stock Availability- Shows if a product is in stock. This feature will not show the quantity in stock. (Inventory will need to be enabled for this feature to work) Services- Allows you to collect additional information from your customers. Generally this feature is used to gather information to personalize a product. Custom Fields- Generally used to add additional fields that are standard across all products.

Storefront Product Guide (updated for version 10.3.2) Page 31
If tabs are enabled, most of this information will be displayed under the specifications tab.
Stock availability will vary depending on a couple settings. If a product has attributes, the attribute inventory will be display next to the attribute pricing. Removing attribute pricing will also remove the attribute inventory. For products without attributes, stock availability will NOT show the quantity in stock, just a message that this product is in stock.
Services will display a field where customers can enter custom information for a product. This feature will only be displayed if a product service option has been enabled.
Note: You the fee for this service will ALWAYS be displayed.
Under the specifications tab, customers will be able to view the product condition, the unit of measure and any custom fields that have been created.

Storefront Product Guide (updated for version 10.3.2) Page 32
If tabs are disabled, then the most of this additional product information will be displayed above the product price.
Here is an example of product without attributes the stock availability will NOT show the exact inventory in stock. It will only display a statement of whether this product is in stock or on backorder. Note an item will show as backordered if
Here customers will be able to view the
product condition, the unit of measure and
any custom fields that have been created.
Stock availability will vary depending on a couple settings. If a product has attributes, the attribute inventory will be display next to the attribute pricing. Removing attribute pricing will also remove the attribute inventory. For products without attributes, stock availability will NOT show the quantity in stock, just a message that this product is in stock.
Services will display a field where customers can enter custom information for a product. This feature will only be displayed if a product service option has been enabled.
Note: The fee for this service will ALWAYS be displayed.

Storefront Product Guide (updated for version 10.3.2) Page 33
the item is not currently in stock and backorders have not been disabled under Product Preferences.
For products without attributes, the stock availability will be displayed underneath the price of the product.