steps for onboarding – new ffki these steps … 1 of 26 steps for onboarding – new ffki these...
TRANSCRIPT

Page 1 of 26
STEPS FOR ONBOARDING – NEW FFKI These steps apply to the following persona: FFKI
1. Introduction
1.1 What is the FFKI Persona in MDOS? Description: Factory Floor Key Inventory (FFKI) refers to the inventory on the factory floor where devices are manufactured on a large scale. The number of keys needed on the manufacturing line is determined by the OEM. The number is based on the line forecast and current inventories on the Factory Floor Key Inventory system on the factory floor. The keys are protected and transmitted from MDOS to the Factory Key Inventory system via HTTPS or may be manually transferred (e.g. via USB). The MDOS FFKI business model does not have a direct agreement with Microsoft, but they do connect to MDOS directly via API or support via an offline model. The FFKI also directly connects to the OA 3.0 tool. Example: FFKI Mexico works in a centralized business model with Contoso OEM to manufacture their devices on a large scale. FFKI Mexico does not have a direct agreement with Microsoft. Contoso OEM provides the specs for the devices and forecasts that they will need to build 500 units, so will need 500 keys. Contoso OEM protects and transmits the key information from MDOS to the Factory Key Inventory system via USB, since FFKI Mexico’s factory floor does not have a secure internet connection to access MDOS. Once the devices are built and the keys have been injected, FFKI Mexico provides the CBR back to Contoso OEM via USB. Contoso OEM and FFKI Mexico are working to get secure internet connection to the factory floor so they can begin working with keys and reporting in real time. The MDOS FFKI Client V1.2:
• Interacts with MDOS, and consumes the services relating to key fulfillment, computer build report, product binding report, and key recall.
• Interacts with Microsoft OA3.0 Tool, and provides interface support to its Assemble, Report, and Return through the Key Provider Service (KPS) component.
• Works as a production system in a factory’s production line that adopts OA3.0. • Supports user management, role management, and logging support for security and
traceability.
1.2 High-Level Steps

Page 2 of 26
Instruction: Follow the high-level steps to get set up as an FFKI client in MDOS. High-level steps for setting up an FFKI: 1. Invitation: Receive email from MDOS. 2. System Requirements: Review minimum software and hardware required and collect if
necessary. 3. SQL Server set up: Set up SQL Server on single server or two machines. 4. Installation verification: verify that the MDOS Client Setup is ready to use. 5. FFKI Configuration: Internal web service settings and configuration settings.
2. System Requirements
Instruction: Review the system requirements and acquire the software and hardware system needed before beginning the MDOS installation process.
2.1 Software The following are the minimum software system requirements for the application server and database servers. Application Server:
• Windows Server 2008 R2 Enterprise Edition (64-bit) / Windows Server 2012 Enterprise Edition (64-bit) / Windows Server 2012 R2 Enterprise Edition (64-bit)
• IIS 7.0 / IIS 7.5 / IIS 8.0 • .NET Framework 4.5 • ADO.NET Entity Framework 4.1 (available at http://www.microsoft.com/en-
us/download/details.aspx?id=8363 ) • Visual C++® 2013 Redistributable (x86) package (available at
http://www.microsoft.com/en-us/download/details.aspx?id=40784 ) • SQL Server 2012 SP1 Features Packs (available at http://www.microsoft.com/en-
us/download/details.aspx?id=35580): SQL Server 2012 SP1 Native Client SQL Server 2012 SP1 Command Line Utilities (SQLCMD) CLR Types for SQL Server 2012 SP1 (both x86 and amd64) SQL Server 2012 SP1 Shared Management Objects (SMO) (both x86 and amd64) PowerShell Extensions for SQL Server 2012 SP1

Page 3 of 26
Database Server: • Windows Server 2008 R2 Enterprise Edition (64-bit) / Windows Server 2012 Enterprise
Edition (64-bit) / Windows Server 2012 R2 Enterprise Edition (64-bit) • SQL Server 2008 R2 / SQL Server 2012 / SQL Server 2012 SP1 / SQL Server 2014 / SQL
Server 2014 SP1
Note: - Application Server and Database Server can be on the same machine or two machines. - All the above software (EXCEPT the operating system and SQL Server) can be installed
automatically by PowerShell script run.ps1 after following preparation steps below.
2.2 Hardware The following are the minimum hardware system requirements for MDOS. Hardware:
• 64-bit infrastructure processor • 8GB RAM minimum • 250GB HD minimum • 100M Ethernet adapter x 2 minimum • Screen resolution: 1024*768 minimum
3. SQL Server Set UP - Preparation Steps
Instruction: Follow the preparation steps to configure the Application Server and Database Server before installing MDOS Client for a single server or servers on two separate machines Description: The following preparation steps are required to configure the Application Server and Database Server using PowerShell script “run.ps1”, before MDOS Client V1.2 can be installed. (Note: Machines need to have .Net Framework4 and Microsoft SQL Server installed before script can be run). The Application Server and Database Servers can be on:
• Single Server – both the Application Server and Database Server are on a single machine.
• Two Machines – the Application Server and Database Server are on two separate machines.
Note: This example will assumes partner has previously download the required software, and partners are using Windows Server 2012, and SQL 2012. For more information on other

Page 4 of 26
configurations, and software’s supported please go to the user manual. This demo video will demonstrate how to setup MDOS FFKI in a single server, and that this is ONLY ONE way to install MDOS FFKI. There are other alternatives, please refer to user manual for more details
3.1 Single Server Instruction: Follow the preparation steps to configure the Application Server and Database Server when the application and database servers are on a single machine. Step-by-step:
1. Create VM in Azure with any of the Windows Server 2012 (64-bit) or install Windows Server in your server with Windows Server 2012 (64-bit).
2. Log on in your Server or Virtual Server as administrator. 3. Copy MDOS required software into Desktop 4. Install ADO.NET Framework 4.1 by double going to the C++ folder on your MDOS
software folder and clicking on the application “EntityFramework41”. Follow the prompt 5. Install Visual C++ by going to the C++ folder on your MDOS software folder and double
clicking on the “vcredist_x64”. Follow the prompt 6. Start SQL Server 2012 installation process by double going to the SQL server 2012 folder
on your MDOS software folder and clicking on the application “SQLFULL x64_ENU_Install”.
7. Go to the newly created carpet “SQLFULL_x64_ENU”, and double click the “SETUP” application. SQL server installation will begin.
8. The installation screen will appear, please click on the installation button to start installation
9. Select the “New SQL Server standalone installation” option 10. SQL server will verify if there any support rules violations, click OK 11. SQL server will ask to input your key or run a software trial. Please note that is you run a
trial the software will stop working in 6 months, and your FFKI will stop working. 12. Accept the license, and conditions terms 13. SQL server will look for updates, if any are found please install them, and click next. 14. SQL sever will notify the user of any errors if any. Click next 15. Select the feature installation option, and click next 16. Select the features that are desired to install, and click next. 17. Click next after installation rules are passed 18. On the instance configuration please select the default option, and click next

Page 5 of 26
19. SQL server will display the required disk space. Click next 20. Use the default server configuration unless your company requires otherwise, click next. 21. The database engine should be configured in the “Mixed Mode”, set a password for
your user, and the current user should be added as an administrator. Click next
22. On the Analysis services configuration add the current user as an administrator, and
click next 23. For the reporting services configuration use the default options, and click next 24. In the distributed replay controller add current user as administrator, and click next. 25. Use the default configuration for distributed replay client, click next 26. Use the default error reporting options, and click next 27. SQL server will verify there are none installation configuration rule violations, click next 28. SQL server is ready to be installed, click install. 29. Once installation is completed successfully click close. 30. From the Start Screen or Start menu, type “PowerShell” in the Search box, and then
right click the PowerShell item in the search result list. In the context menu that opens, click “Run as administrator”.
31. In the PowerShell prompt window, use the CD command to navigate to the .\preparation\ sub directory from the home directory of the extracted release package: CD [ABSOLUTE PATH TO THE HOME DIRECTORY OF THE INSTALLATION PACKAGE]\preparation\

Page 6 of 26
32. After navigating to the home directory of the preparation folder, type in the following
PS command to enable the PS script execution: .\db\run.cmd
33. Type in the following PS command to enable the PS script execution: Set-ExecutionPolicy -ExecutionPolicy Bypass -Force;
34. In the PowerShell prompt, type in the following command to start the preparation: .\run.ps1
35. Make sure that there are no errors displayed in the screen output. If there are any errors, copy and record the messages from the screen for issue analysis, then resolve all issues before installing MDOS Client V1.2.
36. Open SQL Server Management Studio and make sure that you can log on to the default
SQL Server instance with the username of “MDOS” and the password of “[email protected]” in SQL Server Authentication Mode. Note: If you are able to login you correctly installed SQL server, if unable to login with an “MDOS” account, please refer to the Errors and Troubleshooting section of the FAQs for more This completes the SQL server set up.
4. MDOS FFKI Set Up - Installation of MDOS
Instruction: Follow the steps to install an FFKI client in MDOS. Step-by-step:
1. Go to the MDOS Client 1.2 release package extraction folder.
2. Right-click MDOSClientSetup.exe, and select ‘Run as administrator’.
Commented [CN(L1]: Add link to the Errors & Troubleshooting section of FAQs

Page 7 of 26
Note: If the UAC is turned on for your machine, this dialog may pop up. Select ‘Yes’ to continue.
3. After the setup wizard is launched, a welcome screen will pop up. Click Next.

Page 8 of 26
4. When directed to the End-User License Agreement (EULA) window, check the “I accept the terms in the License Agreement” checkbox to accept the terms and conditions in the license agreement, and then click Next.

Page 9 of 26
5. In the Destination Folder window, select the installation location by clicking the Change button, or you may accept the default value that is pre-populated, and then click the Next button.
6. In the Custom Setup page (all the components are checked by default), click Next.
Note: For the Database feature; If Database is checked on this page, it will create one new database. This will be based on the settings that are input in the Configuration Database dialog box in the next step.

Page 10 of 26
Note: For the Database feature; If Database is unchecked, then it will connect to one of the existing databases. This will be based on the settings that are input in the Configuration database dialog box in next step.
7. Configure the database connection information and then click Next. Example: Here are three different potential cases:
1) Case 1: You have your database server and application server on the same machine, and have executed run.ps1 successfully. Therefore, all the information on this page will be pre-populated and you just need to click Next.
2) Case 2: You set up your database on another machine and already execute run.cmd successfully. Update ‘SQL Instance Name’ and keep the other default values as shown in the following screenshot.
3) Case 3: You set up the database manually but not through run.cmd. Update all the information based on your setup.

Page 11 of 26
Note: The default password is [email protected] for MDOS user. 8. On the IIS Configuration page, configure the http port for Internal Web Service. This
is to be used by the MDOS Client to interact with MDOS. The default port is 8032. If you want to modify the value, please remember the value you enter. You will need to re-enter the port in the following system setting page again later.
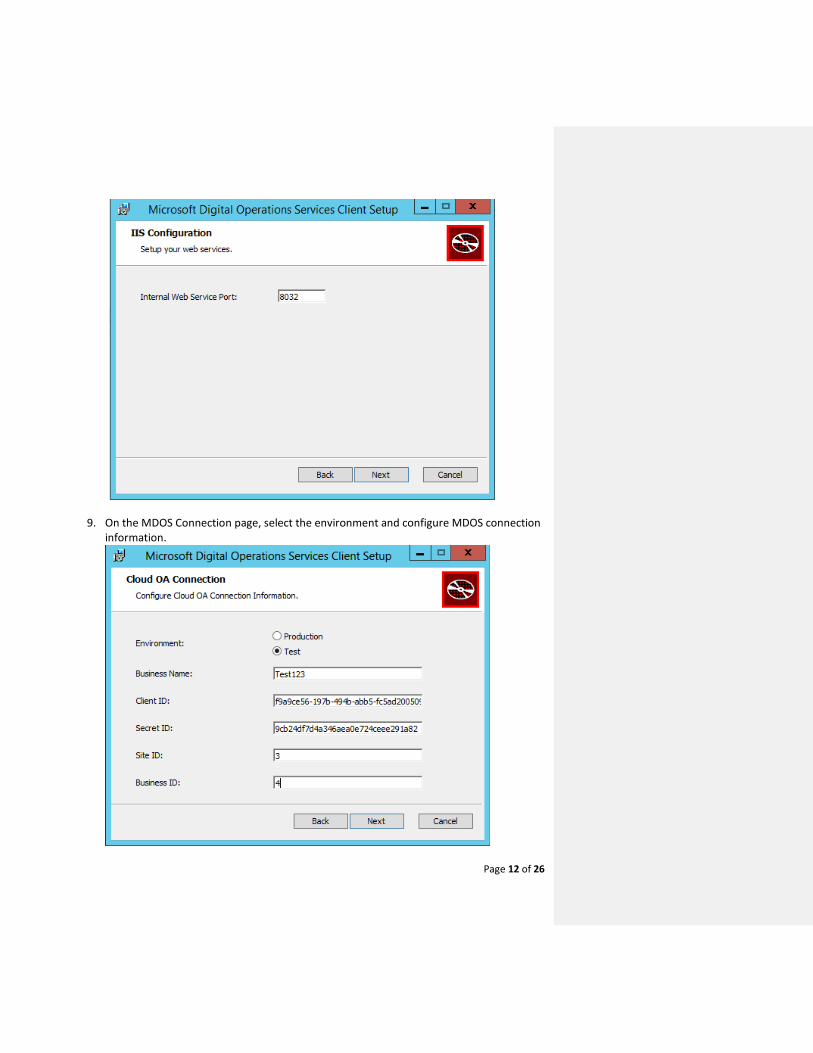
Page 12 of 26
9. On the MDOS Connection page, select the environment and configure MDOS connection information.

Page 13 of 26
Note:
• The Business Name is self-defined. Other MDOS connection information is provided by your uplevel partner within MDOS, which is sent by email.
• If database is unchecked in the Custom Setup page, you will not see this “MDOS Connection” page.
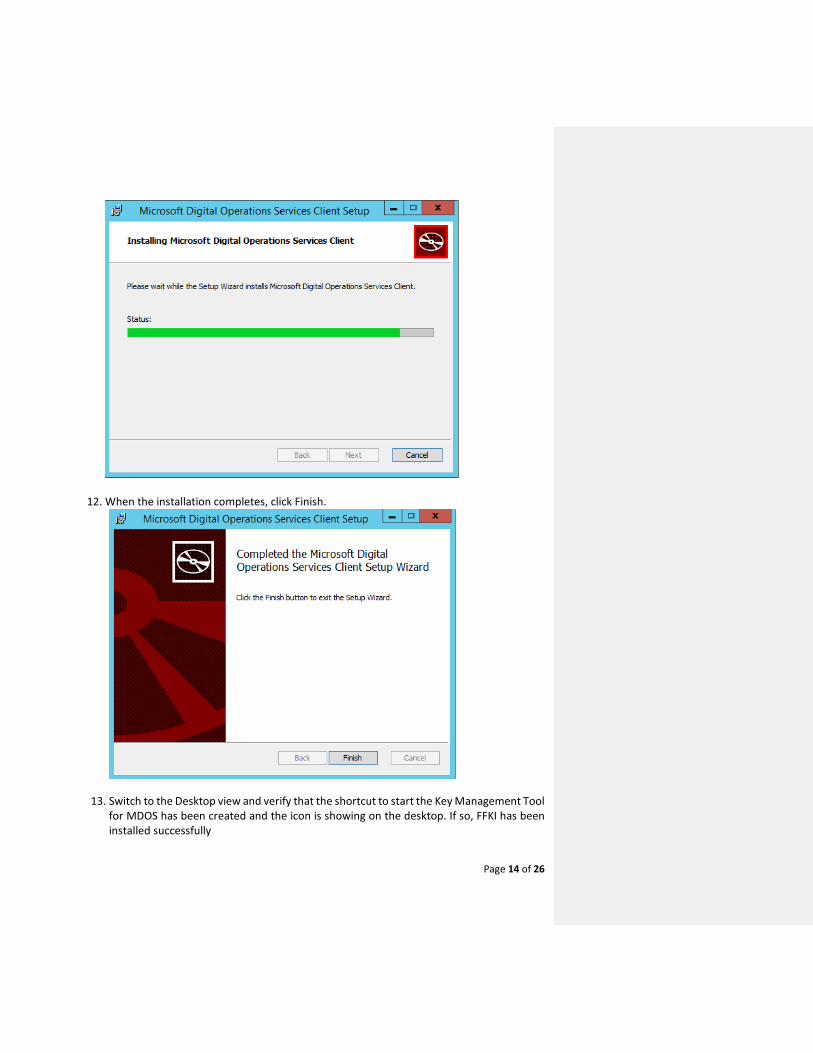
10. In the confirmation page, click the Install button to start the installation.
11. During the installation process, if you see any errors, please be sure to record the error message prompted before you click the Cancel button to roll back the installation for MDOS Client 1.2.
Page 14 of 26
12. When the installation completes, click Finish.
13. Switch to the Desktop view and verify that the shortcut to start the Key Management Tool for MDOS has been created and the icon is showing on the desktop. If so, FFKI has been installed successfully
Page 15 of 26
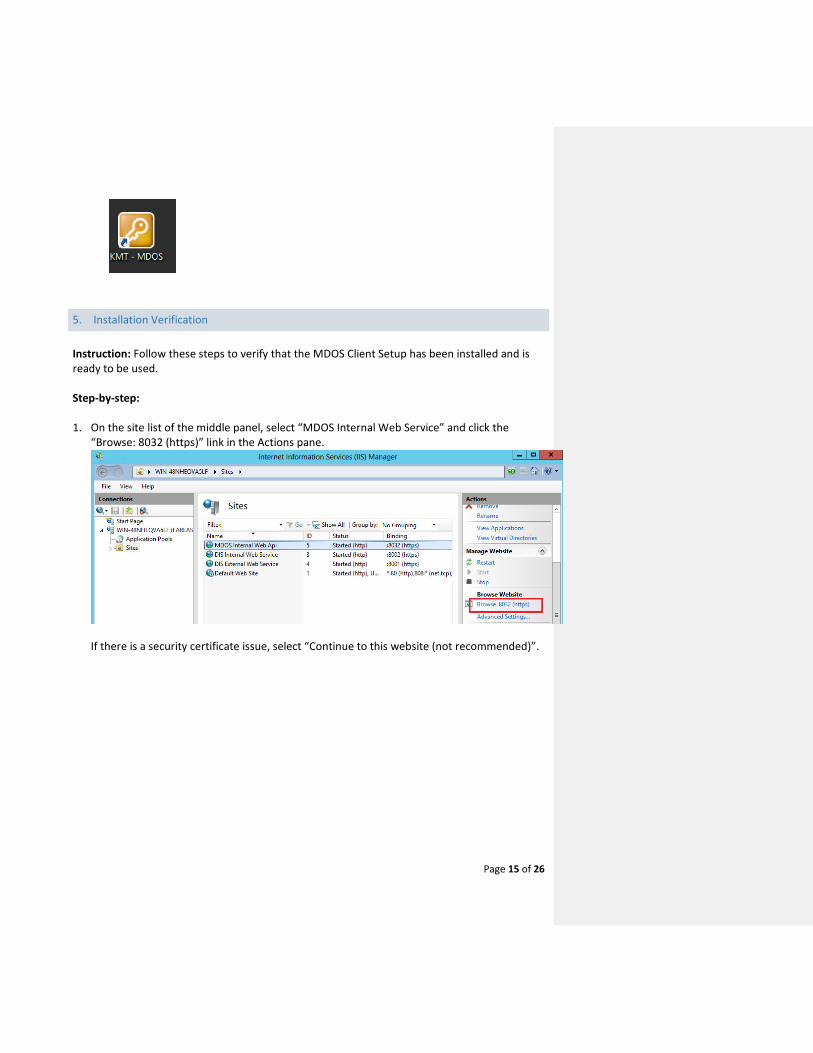
5. Installation Verification
Instruction: Follow these steps to verify that the MDOS Client Setup has been installed and is ready to be used. Step-by-step:
1. On the site list of the middle panel, select “MDOS Internal Web Service” and click the
“Browse: 8032 (https)” link in the Actions pane.
If there is a security certificate issue, select “Continue to this website (not recommended)”.

Page 16 of 26
If you can see this screen. FFKI has been installed succesfully
2. Double click the shortcut on your desktop to launch the MDOS Client.
Note: The default Login ID is “Admin” and password is “123”.

Page 17 of 26
3. After logging into the Key Management Tool (KMT), the KMT main page will open.
4. From the main menu, select Diagnostic from the tool icon pulldown menu.

Page 18 of 26
5. In the Diagnostic dialog box, check the checkbox for “Check status of system
components automatically”. This will ensure the MDOS Client checks whether the four system components listed below work correctly. If some components don’t work, notification in MDOS Client main page will pop up to prompt the user.
• Internal Web Service • Data Polling Service • Key Provider Service • Database
6. Click the Test internal web service button to test that the Key Management Tool can
successfully establish communication with the Internal Web Service. If it returns unsuccessful results, please check the failure message and go back to “Option” window -> System setting, to check the Internal web service setting.

Page 19 of 26
7. Select the business from the dropdown list, and then click the “Connect to MDOS”
button. Ensure that a Success result message is received. If it returns unsuccessful results, please check the failure message and go back to “Option” window, to check the Business setting.

Page 20 of 26
6. FFKI Configuration
Instruction: Before the MDOS Client is activated and ready for business users, the following configurations for the FFKI must be completed.
6.1 Internal Web Service Setting Step-by-step:
8. Double click the shortcut on your desktop to launch the MDOS Client. Note: The default Login ID is “Admin” and password is “123”.

Page 21 of 26
9. After logging into the Key Management Tool (KMT), the KMT main page will open.
10. From the main menu, select Options from the tool icon pulldown menu.

Page 22 of 26
11. When the Options dialog box opens, select System from the left panel and then change
the Host and Port for Internal Web Service to the information that corresponds with what you used during your installation.
A. Data Polling Service setting
Instructions: Set up the Data Polling Service configurations from the System setting panel.
Step-by-step:

Page 23 of 26
12. Get Fulfillment Automatically checkbox: If this checkbox is checked, MDOS Client will get keys from MDOS per the fulfillment interval (in minutes) that you set. Note: If this checkbox is left unchecked, MDOS Client will get keys from MDOS per the fulfillment interval default setting of 10 minutes.
13. Report Automatically checkbox: If this checkbox is checked, MDOS Client will report CBRs to MDOS per the fulfillment interval (in minutes) that you set.
14. Delete Logs Automatically checkbox: If this checkbox is checked, MDOS Client will automatically delete logs (including operation logs and system logs in MDOS Client) which exceed 3 months. MDOS Client will check the log created date every 10 minutes. The main purpose for this option is to provide additional space for the database.
B. Old timeline and Hardware Hash length setting
Instructions: Set up the Old timeline and Hardware Hash length configurations from the System setting panel. Step-by-step: 15. Old Timeline setting:
If the key fulfillment date exceeds [old timeline] days (default is 180 days), the key will be displayed as red font in the KMT main window. Meanwhile, the “Exceed timeline” notification will pop up to notify the user. (Note: this doesn't affect the user who will use the keys. The user can also edit this field).

Page 24 of 26
16. “Only report product keys of which hardware hash length is not more than 128” checkbox: If this checkbox is checked, MDOS Client will check the hardware hash length while submitting the CBR to MDOS. If the hardware hash length is greater than 128, MDOS Client will not report this key. (Currently Microsoft only supports hardware hash length <= 128).
Note: It is highly recommended to check this checkbox until Microsoft accepts CBRs which contain hardware hash length greater than 128 bytes.
6.2 Configuring Integrations with MDOS API Instruction: Before the MDOS Client is activated and ready for business users, the following integrations with MDOS API and business settings must be configured. Step-by-step:
1. After logging in to KMT, from the main menu, select Options from the tool icon pulldown menu.

Page 25 of 26
2. When the Options dialog box opens, select Business from the left pane. Then in the right
pane, confirm that the information that was input during installation is correct.
3. If you have more than one business, please click Add button to create a new business. 4. If you want to make additional changes, select the Business in the list and then click the
Edit button above the list. Confirm any changes, click the Save button on the bottom right to save the changes, and close the dialog.

Page 26 of 26
Note:
• Businesses will automatically be displayed in alphabetical/numerical order by Business name.
• If you already have received keys from a business, you are unable to remove this business. You are also unable to edit SiteID and BusinessID.
7. Advanced functionalities
7.1 Diagnosis and Testing Instructions: Follow the diagnosis and testing steps to confirm a successful set up in MDOS. Step-by-step: