stellent content server workflow implementation guide is a registered trademark, and solaris,...
TRANSCRIPT
Content ServerVersion 7.5
Workflow Implementation Guide
© 1996-2005 Stellent, Inc. All rights reserved.No part of this document may be reproduced or transmitted in any form or by any means, electronic or mechanical, including photocopying, recording, or by any information storage and retrieval system without written permission from the owner, Stellent, Inc., 7777 Golden Triangle Drive, Eden Prairie, Minnesota 55344 USA. The copyrighted software that accompanies this manual is licensed to the Licensee for use only in strict accordance with the Software License Agreement, which the Licensee should read carefully before commencing use of this software.
Stellent, the Stellent logo, Stellent Content Server, Stellent Collaboration Server, Stellent Extrasite Server, Stellent Content Management, Stellent Content Publisher, Stellent Dynamic Converter, Stellent Inbound Refinery, Ancept, the Ancept logo, and Ancept Media Server are trademarks of Stellent, Inc. in the USA and other countries.
Adobe, Acrobat, the Acrobat Logo, Acrobat Capture, Distiller, Frame, the Frame logo, and FrameMaker are registered trademarks of Adobe Systems Incorporated.ActiveIQ is a trademark of ActiveIQ Technologies, Incorporated. Portions Powered by Active IQ Engine.BEA WebLogic Personalization Server is a trademark of BEA Systems, Inc.HP-UX is a registered trademark of Hewlett-Packard Company.IBM, Informix, and WebSphere are registered trademarks of IBM Corporation.Jaws PDF Library is a registered trademark of Global Graphics Software Ltd.Kofax is a registered trademark, and Ascent and Ascent Capture are trademarks of Kofax Image Products.Linux is a registered trademark of Linus Torvalds.Microsoft is a registered trademark, and Windows, Word, and Access are trademarks of Microsoft Corporation.MrSID is property of LizardTech, Inc. It is protected by U.S. Patent No. 5,710,835. Foreign Patents Pending.Oracle is a registered trademark of Oracle Corporation.Portions Copyright © 1994-1997 LEAD Technologies, Inc. All rights reserved.Portions Copyright © 1990-1998 Handmade Software, Inc. All rights reserved.Portions Copyright © 1988, 1997 Aladdin Enterprises. All rights reserved.Portions Copyright © 1997 Soft Horizons. All rights reserved.Portions Copyright © 1999 ComputerStream Limited. All rights reserved.Portions Copyright © 1995-1999 LizardTech, Inc. All rights reserved.Red Hat is a registered trademark of Red Hat, Inc.Sun is a registered trademark, and Solaris, iPlanet, Java, and all Java-based trademarks are trademarks of Sun Microsystems, Inc.Sybase is a trademark of Sybase, Inc.UNIX is a registered trademark of The Open Group.Verity is a registered trademark of Verity, Incorporated.
All other trade names are the property of their respective owners.

Stellent Content Server Workflow Implementation Guide iii
T a b l e o f C o n t e n t s
CHAPTER 1: OVERVIEW
About This Guide . . . . . . . . . . . . . . . . . . . . . . . . . . . . . . . . . . . . . . . . . . . . .1-1Audience . . . . . . . . . . . . . . . . . . . . . . . . . . . . . . . . . . . . . . . . . . . . . . . . . . .1-2Support. . . . . . . . . . . . . . . . . . . . . . . . . . . . . . . . . . . . . . . . . . . . . . . . . . . . .1-2
CHAPTER 2: INTRODUCTION TO WORKFLOWS
Workflow Overview . . . . . . . . . . . . . . . . . . . . . . . . . . . . . . . . . . . . . . . . . . .2-1Types of Workflows . . . . . . . . . . . . . . . . . . . . . . . . . . . . . . . . . . . . . . . .2-2Workflow Advantages and Disadvantages . . . . . . . . . . . . . . . . . . . . . .2-2
Workflow Steps . . . . . . . . . . . . . . . . . . . . . . . . . . . . . . . . . . . . . . . . . . . . . .2-2Events . . . . . . . . . . . . . . . . . . . . . . . . . . . . . . . . . . . . . . . . . . . . . . . . . .2-5Workflow Files . . . . . . . . . . . . . . . . . . . . . . . . . . . . . . . . . . . . . . . . . . . .2-6
Companion File . . . . . . . . . . . . . . . . . . . . . . . . . . . . . . . . . . . . . . . .2-6Keys . . . . . . . . . . . . . . . . . . . . . . . . . . . . . . . . . . . . . . . . . . . . . . . .2-6Parent List . . . . . . . . . . . . . . . . . . . . . . . . . . . . . . . . . . . . . . . . . . . .2-7
Workflow Step Evaluation Process . . . . . . . . . . . . . . . . . . . . . . . . . . . . . . .2-7Status of Items in Workflows . . . . . . . . . . . . . . . . . . . . . . . . . . . . . . . . .2-9
Workflow Participation . . . . . . . . . . . . . . . . . . . . . . . . . . . . . . . . . . . . . . . .2-10
CHAPTER 3: PLANNING A WORKFLOW
Choosing a Workflow Type . . . . . . . . . . . . . . . . . . . . . . . . . . . . . . . . . . . . .3-1Security Issues . . . . . . . . . . . . . . . . . . . . . . . . . . . . . . . . . . . . . . . . . . .3-2
Designing a Workflow . . . . . . . . . . . . . . . . . . . . . . . . . . . . . . . . . . . . . . . . .3-3Modifying Workflows . . . . . . . . . . . . . . . . . . . . . . . . . . . . . . . . . . . . . . .3-4
The Workflow Admin Application . . . . . . . . . . . . . . . . . . . . . . . . . . . . . . . . .3-5
CHAPTER 4: CREATING A CRITERIA WORKFLOW
Criteria Workflow Process . . . . . . . . . . . . . . . . . . . . . . . . . . . . . . . . . . . . . .4-2
iv Stellent Content Server Workflow Implementation Guide
Table of Contents
Criteria Workflow Tips . . . . . . . . . . . . . . . . . . . . . . . . . . . . . . . . . . . . . . . . .4-4Setting Up a Criteria Workflow . . . . . . . . . . . . . . . . . . . . . . . . . . . . . . . . . . .4-4Changing a Criteria Workflow or Sub-workflow . . . . . . . . . . . . . . . . . . . . . .4-8Disabling a Criteria Workflow or Sub-workflow . . . . . . . . . . . . . . . . . . . . . .4-9The Criteria Workflow User Interface . . . . . . . . . . . . . . . . . . . . . . . . . . . . . .4-9
Workflow Admin: Criteria Tab . . . . . . . . . . . . . . . . . . . . . . . . . . . . . . . .4-9New/Edit Criteria Workflow Screen . . . . . . . . . . . . . . . . . . . . . . . . . . .4-11Add New/Edit Step Screen . . . . . . . . . . . . . . . . . . . . . . . . . . . . . . . . .4-13Add Alias to Step Screen. . . . . . . . . . . . . . . . . . . . . . . . . . . . . . . . . . .4-15Add User to Step . . . . . . . . . . . . . . . . . . . . . . . . . . . . . . . . . . . . . . . . .4-16Add Token to Step . . . . . . . . . . . . . . . . . . . . . . . . . . . . . . . . . . . . . . . .4-17Edit Additional Exit Condition Screen . . . . . . . . . . . . . . . . . . . . . . . . .4-17
CHAPTER 5: CREATING A BASIC WORKFLOW
Basic Workflow Process. . . . . . . . . . . . . . . . . . . . . . . . . . . . . . . . . . . . . . . .5-2Basic Workflow Tips. . . . . . . . . . . . . . . . . . . . . . . . . . . . . . . . . . . . . . . . . . .5-4Setting up a Basic Workflow . . . . . . . . . . . . . . . . . . . . . . . . . . . . . . . . . . . .5-4Changing a Basic Workflow . . . . . . . . . . . . . . . . . . . . . . . . . . . . . . . . . . . . .5-8The Basic Workflow User Interface . . . . . . . . . . . . . . . . . . . . . . . . . . . . . . .5-9
Workflow Admin: Workflows Tab . . . . . . . . . . . . . . . . . . . . . . . . . . . . . .5-9Add New/Edit Workflow Screen. . . . . . . . . . . . . . . . . . . . . . . . . . . . . .5-12Add Content to Workflow (New Content) Screen . . . . . . . . . . . . . . . .5-12Add Content to Workflow (Existing Content) Screen . . . . . . . . . . . . . .5-13Add Alias to Workflow Screen . . . . . . . . . . . . . . . . . . . . . . . . . . . . . . .5-15Add New/Edit Step Screen . . . . . . . . . . . . . . . . . . . . . . . . . . . . . . . . .5-15Add Alias to Step Screen. . . . . . . . . . . . . . . . . . . . . . . . . . . . . . . . . . .5-18Add User: Basic Workflow . . . . . . . . . . . . . . . . . . . . . . . . . . . . . . . . . .5-18Add Token: Basic Workflow. . . . . . . . . . . . . . . . . . . . . . . . . . . . . . . . .5-20Edit Additional Exit Condition Screen . . . . . . . . . . . . . . . . . . . . . . . . .5-20Start Workflow Screen . . . . . . . . . . . . . . . . . . . . . . . . . . . . . . . . . . . . .5-22
CHAPTER 6: CUSTOMIZING WORKFLOWS
Idoc Script Functions . . . . . . . . . . . . . . . . . . . . . . . . . . . . . . . . . . . . . . . . . .6-2About Tokens . . . . . . . . . . . . . . . . . . . . . . . . . . . . . . . . . . . . . . . . . . . . . . . .6-3
Token Syntax. . . . . . . . . . . . . . . . . . . . . . . . . . . . . . . . . . . . . . . . . . . . .6-3Creating a Token . . . . . . . . . . . . . . . . . . . . . . . . . . . . . . . . . . . . . . . . . . . . .6-4Changing a Token . . . . . . . . . . . . . . . . . . . . . . . . . . . . . . . . . . . . . . . . . . . .6-5Deleting a Token . . . . . . . . . . . . . . . . . . . . . . . . . . . . . . . . . . . . . . . . . . . . .6-5Token Examples . . . . . . . . . . . . . . . . . . . . . . . . . . . . . . . . . . . . . . . . . . . . .6-6Tokens User Interface . . . . . . . . . . . . . . . . . . . . . . . . . . . . . . . . . . . . . . . . .6-7
Stellent Content Server Workflow Implementation Guide v
Table of Contents
Workflow Tokens Screen. . . . . . . . . . . . . . . . . . . . . . . . . . . . . . . . . . . .6-7Add/Edit Token Screen . . . . . . . . . . . . . . . . . . . . . . . . . . . . . . . . . . . . .6-8Add Token User Screen . . . . . . . . . . . . . . . . . . . . . . . . . . . . . . . . . . . .6-9
About Jumps . . . . . . . . . . . . . . . . . . . . . . . . . . . . . . . . . . . . . . . . . . . . . . .6-10Jumps and Events . . . . . . . . . . . . . . . . . . . . . . . . . . . . . . . . . . . . . . . .6-11Side Effects . . . . . . . . . . . . . . . . . . . . . . . . . . . . . . . . . . . . . . . . . . . . .6-12
Jump Variables and Steps . . . . . . . . . . . . . . . . . . . . . . . . . . . . . . . . . . . . .6-13Setting Up Jumps. . . . . . . . . . . . . . . . . . . . . . . . . . . . . . . . . . . . . . . . . . . .6-14Creating a Jump. . . . . . . . . . . . . . . . . . . . . . . . . . . . . . . . . . . . . . . . . . . . .6-15Changing a Jump . . . . . . . . . . . . . . . . . . . . . . . . . . . . . . . . . . . . . . . . . . . .6-17Jump Examples . . . . . . . . . . . . . . . . . . . . . . . . . . . . . . . . . . . . . . . . . . . . .6-18
Jump Example 1: Metadata Criteria Jump. . . . . . . . . . . . . . . . . . . . . .6-18Jump Example 2: Time-dependent Jump . . . . . . . . . . . . . . . . . . . . . .6-19Jump Errors . . . . . . . . . . . . . . . . . . . . . . . . . . . . . . . . . . . . . . . . . . . . .6-20
The Jump User Interface . . . . . . . . . . . . . . . . . . . . . . . . . . . . . . . . . . . . . .6-21Add New/Edit Step Screen: Events Tab . . . . . . . . . . . . . . . . . . . . . . .6-21Edit Script for StepName Screen. . . . . . . . . . . . . . . . . . . . . . . . . . . . .6-23Edit Script Screen . . . . . . . . . . . . . . . . . . . . . . . . . . . . . . . . . . . . . . . .6-24Edit Script Screen: Jumps Tab . . . . . . . . . . . . . . . . . . . . . . . . . . . . . .6-25Edit Script Screen: Custom Tab . . . . . . . . . . . . . . . . . . . . . . . . . . . . .6-27Edit Script Screen: Test Tab . . . . . . . . . . . . . . . . . . . . . . . . . . . . . . . .6-28Select Target Step Screen. . . . . . . . . . . . . . . . . . . . . . . . . . . . . . . . . .6-30Add/Edit Jump Screen . . . . . . . . . . . . . . . . . . . . . . . . . . . . . . . . . . . . .6-30Add/Edit Jump Screen: Side Effects Tab. . . . . . . . . . . . . . . . . . . . . . .6-31Add/Edit Jump Screen: Message Tab . . . . . . . . . . . . . . . . . . . . . . . . .6-33Content Item View Screen . . . . . . . . . . . . . . . . . . . . . . . . . . . . . . . . . .6-34
CHAPTER 7: WORKFLOW AND SCRIPT TEMPLATES
Creating a Workflow Template. . . . . . . . . . . . . . . . . . . . . . . . . . . . . . . . . . .7-1Changing a Workflow Template . . . . . . . . . . . . . . . . . . . . . . . . . . . . . . . . . .7-2Deleting a Workflow Template . . . . . . . . . . . . . . . . . . . . . . . . . . . . . . . . . . .7-3Creating a Script Template . . . . . . . . . . . . . . . . . . . . . . . . . . . . . . . . . . . . .7-3
Changing a Script Template . . . . . . . . . . . . . . . . . . . . . . . . . . . . . . . . .7-5Deleting a Script Template . . . . . . . . . . . . . . . . . . . . . . . . . . . . . . . . . .7-6
Workflow Template Interface Screens . . . . . . . . . . . . . . . . . . . . . . . . . . . . .7-7Workflow Admin: Templates Tab. . . . . . . . . . . . . . . . . . . . . . . . . . . . . .7-7Add/Edit Template Screen. . . . . . . . . . . . . . . . . . . . . . . . . . . . . . . . . . .7-8Add New/Edit Step Screen . . . . . . . . . . . . . . . . . . . . . . . . . . . . . . . . .7-10Add Alias to Step Screen. . . . . . . . . . . . . . . . . . . . . . . . . . . . . . . . . . .7-10Add User to Template . . . . . . . . . . . . . . . . . . . . . . . . . . . . . . . . . . . . .7-11Add Token: Templates. . . . . . . . . . . . . . . . . . . . . . . . . . . . . . . . . . . . .7-12Edit Additional Exit Condition Screen . . . . . . . . . . . . . . . . . . . . . . . . .7-13

vi Stellent Content Server Workflow Implementation Guide
Table of Contents
Workflow Scripts User Interface. . . . . . . . . . . . . . . . . . . . . . . . . . . . . . . . .7-15Workflow Scripts Screen . . . . . . . . . . . . . . . . . . . . . . . . . . . . . . . . . . .7-15Add/Edit Script Screen. . . . . . . . . . . . . . . . . . . . . . . . . . . . . . . . . . . . .7-16Add/Edit Script Screen: Jumps Tab. . . . . . . . . . . . . . . . . . . . . . . . . . .7-18Add/Edit Script Screen: Custom Tab . . . . . . . . . . . . . . . . . . . . . . . . . .7-19Add/Edit Script Screen: Test Tab . . . . . . . . . . . . . . . . . . . . . . . . . . . .7-21Add/Edit Jump Screen . . . . . . . . . . . . . . . . . . . . . . . . . . . . . . . . . . . . .7-22Add/Edit Jump Screen: Side Effects Tab. . . . . . . . . . . . . . . . . . . . . . .7-23Add/Edit Jump Screen: Message Tab . . . . . . . . . . . . . . . . . . . . . . . . .7-24Content Item View Screen . . . . . . . . . . . . . . . . . . . . . . . . . . . . . . . . . .7-25Select Workflow Step Screen . . . . . . . . . . . . . . . . . . . . . . . . . . . . . . .7-26
CHAPTER 8: WORKFLOW SCENARIOS
Scenario 1: Criteria Workflow. . . . . . . . . . . . . . . . . . . . . . . . . . . . . . . . . . . .8-1Scenario 2: Tokens . . . . . . . . . . . . . . . . . . . . . . . . . . . . . . . . . . . . . . . . . . .8-2Scenario 3: Jump Based on Metadata . . . . . . . . . . . . . . . . . . . . . . . . . . . . .8-2Scenario 4: Time-Dependent Jump . . . . . . . . . . . . . . . . . . . . . . . . . . . . . . .8-3
CHAPTER 9: WORKFLOW TIPS AND TRICKS
Acquiring a Digital Signature . . . . . . . . . . . . . . . . . . . . . . . . . . . . . . . . . . . .9-1Setting Up Parallel Workflows . . . . . . . . . . . . . . . . . . . . . . . . . . . . . . . . . . .9-2Adding Ad Hoc Step Users . . . . . . . . . . . . . . . . . . . . . . . . . . . . . . . . . . . . .9-4Customizing Criteria Workflow Emails . . . . . . . . . . . . . . . . . . . . . . . . . . . . .9-4
Customizing Email Templates . . . . . . . . . . . . . . . . . . . . . . . . . . . . . . . .9-5Customizing the Subject or Message Line . . . . . . . . . . . . . . . . . . . . . .9-5
Modifying Strings. . . . . . . . . . . . . . . . . . . . . . . . . . . . . . . . . . . . . . .9-6Changing Idoc Variables . . . . . . . . . . . . . . . . . . . . . . . . . . . . . . . . .9-6
Workflow Escalation. . . . . . . . . . . . . . . . . . . . . . . . . . . . . . . . . . . . . . . . . . .9-6Other Customizations. . . . . . . . . . . . . . . . . . . . . . . . . . . . . . . . . . . . . . . . .9-11
Setting Approval by Non-Reviewers . . . . . . . . . . . . . . . . . . . . . . . . . .9-11Scenarios . . . . . . . . . . . . . . . . . . . . . . . . . . . . . . . . . . . . . . . . . . .9-12
Automatic Replication of Workflow Items . . . . . . . . . . . . . . . . . . . . . .9-13Potential Conflicts . . . . . . . . . . . . . . . . . . . . . . . . . . . . . . . . . . . . .9-13Scenarios . . . . . . . . . . . . . . . . . . . . . . . . . . . . . . . . . . . . . . . . . . .9-14
Triggering Criteria Workflows from Folders . . . . . . . . . . . . . . . . . . . . .9-15Using the Contribution Template Editor. . . . . . . . . . . . . . . . . . . . . . . .9-16Searching Within a Workflow Step . . . . . . . . . . . . . . . . . . . . . . . . . . .9-17
INDEX

Stellent Content Server Workflow Implementation Guide 1-1
C h a p t e r
OVERVIEWWorkflows can be used to route content in Content Server to specific people for review and action. This guide discusses how to set up, use, and customize workflows for your business application.
This section contains these topics:
About This Guide (page 1-1)
Audience (page 1-2)
Support (page 1-2)
ABOUT THIS GUIDEThis guide provides task information as well as conceptual and reference information for using the workflow functionality available with Stellent Content Server.
Note: The information contained in this guide is based on Stellent Content Server 7.5. The information is subject to change as the product technology evolves and as hardware and operating systems are created and modified. Due to the technical nature of browsers, databases, web servers, and operating systems, Stellent, Inc. cannot warrant compatibility with all versions and features of third-party products.
Note: This reference guide is part of the Stellent Software Developer’s Kit (SDK). For more information about customizing and integrating Stellent Content Server, refer to the SDK.

1-2 Stellent Content Server Workflow Implementation Guide
Overview
AUDIENCEThis guide is intended for developers who need to use services to customize Stellent software and for application developers who need to access Stellent Content Server functions.
SUPPORTThe Stellent family of products is backed by a full range of support options to meet every business need. The following support options are available:
Support programs—See the support site for detailed information: http://support.stellent.com.
Telephone—The support telephone number is 1-888-688-TECH (1-888-688-8324). This hotline is toll-free world-wide. Callers outside the U.S. and Canada need to dial a country-specific access code (see http://www.business.att.com/bt/tollfree.jsp).
Fax—The support fax number is +1 952-946-0056.
E-mail—The support e-mail address is [email protected].
Internet website—The support website can be found at http://support.stellent.com.
Online technical newsgroup—This user-supported newsgroup can be found at http://groups.yahoo.com/group/intradoc_users.
Before contacting support—Refer to the Content Server Troubleshooting Guide for detailed information.
The service philosophy is to keep your Stellent environment fully operational by providing the best information and solutions available. The Stellent product support team consists of highly trained product engineers who excel at resolving complex technical issues. Every customer inquiry is tracked and managed through automated systems.
Important: The support options that are available for specific systems may vary, depending on the applicable service and maintenance agreements. Please refer to your contract for the support details for your Stellent system.
Stellent Content Server Workflow Implementation Guide 2-1
C h a p t e r
INTRODUCTION TO WORKFLOWSThis section provides an overview to workflows, their uses, and the advantages they can provide for your business operation. It discusses the following topics:
❖ Workflow Overview (page 2-1)
❖ Workflow Steps (page 2-2)
❖ Workflow Step Evaluation Process (page 2-7)
❖ Workflow Participation (page 2-10)
WORKFLOW OVERVIEWWorkflows are used to specify how content is routed for review, approval, and release to the system.
For example, using a workflow ensures that the appropriate people in the Legal Department, Human Resource Department, and in upper management review and approve new policies before being released on the organization’s intranet. Or a workflow could be set up to obtain timely approval and sign-off on marketing campaigns that are produced in-house. Users receive e-mail notification when content in a workflow is ready for review.
Designing an effective workflow is an iterative process. Workflows are planned, refined, and re-defined as the process is implemented. Good planning in the beginning can eliminate many problems before the workflow is enabled.
2-2 Stellent Content Server Workflow Implementation Guide
Introduction to Workflows
Types of WorkflowsThere are three types of workflows:
❖ A criteria workflow is used for content that enters a workflow automatically based on metadata that matches predefined criteria.
❖ A basic workflow defines the review process for specific content items, and must be initiated manually.
❖ In addition to these two basic types, sub-workflows can be used. Sub-workflows do not have an initial contribution step, but are entered via a workflow jump. They are created in the same manner as criteria workflows. Sub-workflows are useful for splitting large, complex workflows into manageable pieces.
Workflow Advantages and DisadvantagesSetting up workflows for your business processes can provide several advantages:
❖ Workflows provide good reporting metrics; by using workflows, an audit trail can be created of who signed off on content at various points of the life cycle of the content.
❖ Workflows help you get the right information to the relevant person, and the relevant information to the right person.
❖ Designing a workflow forces you to examine and understand your business processes, helping you find areas that can be improved.
The same elements that provide advantages can also be disadvantages: you will be forced to examine your business processes and map out how you want to use workflows. This can be a time-consuming process, but the end result is worth it.
WORKFLOW STEPSSteps define the process and the functionality of the workflow. Each workflow can include multiple review and notification steps, and multiple reviewers can be assigned to approve or reject the content at each step. For each step in a workflow, a set of users and a step type must be defined.
The users defined for a step can perform only the tasks allowed for that step type:

Stellent Content Server Workflow Implementation Guide 2-3
Introduction to Workflows
After a workflow is enabled, it goes through several specific stages:
❖ When a content item is approved by the minimum number of reviewers for a particular step, it goes to the next step in the workflow.
❖ If the step is defined with 0 approvals required, the reviewers are notified, but the content goes to the next step automatically. This is useful to ensure that the proper people are aware that an item is in the workflow process.
❖ If any reviewer rejects the content, it goes back to the most recent Review/Edit Revision or Review/New Revision step. If there is no such step, the content goes back to the original author.
❖ Depending on how the edit criteria is defined, the most recent Review/Edit Revision or Review/New Revision step may result in a new revision or an updated revision.
❖ A revision may be released to the system:
• After it exits the workflow: When content is approved at the last step in the workflow, the content item is released to the system. When content is in a workflow, it can be checked out and checked back in an unlimited number of times without affecting the revision number (unless you enable the original author to edit the revision).
Step Type Description
ContributionThe initial step of a Basic workflow. Administrators define the contributors when the workflow is created.
Auto-Contribution
The initial step of a Criteria workflow. There are no predefined users involved in this step. The contributor who checks in a content item that enters the workflow process automatically becomes part of the workflow.
ReviewUsers can only approve or reject the content; editing is not allowed.
Review/Edit RevisionUsers can edit the content if necessary and then approve or reject it, maintaining the revision.
Review/New Revision
Users can edit the content if necessary and then approve or reject it, creating a new revision.
2-4 Stellent Content Server Workflow Implementation Guide
Introduction to Workflows
• Before it exits the workflow: When you set up a side effect that releases a document from edit state, the document is available for indexing, searching, and archiving. This is useful primarily for business routing that doesn’t require publishing to the web, for example an expense report.
❖ Generally, if a Basic workflow contains multiple content items, none of them will be released to the system until all of the items have been released from completion of the workflow. However, if you release a content item from edit state as a side effect, that content item can be released without waiting for all items in the Basic workflow.
The standard workflow process can be customized and made more flexible by using jumps, tokens, and aliases. These are discussed fully in Customizing Workflows (page 6-1).
❖ Tokens and aliases provide flexibility in specifying users in a workflow. Tokens are variables that can be used to designate unknown users and aliases can be used to include a group of people in a workflow step.
❖ Jumps enable you to create conditional statements that can branch content through different paths in the same workflow, or can send content items from a Criteria or sub-workflow to a different Criteria or sub-workflow.
❖ Exit conditions enable you to create conditional statements that can prevent content from moving to the next step unless certain conditions are met. This is useful when metadata could be changed by an external process during a workflow step.
❖ You can also create a custom metadata field and use it to trigger different workflows.
The following illustration shows a general workflow process.

Stellent Content Server Workflow Implementation Guide 2-5
Introduction to Workflows
EventsEach step in a workflow has three events: entry, update, and exit.
❖ An entry event script is evaluated upon entering the step. If the entry event script does not result in a jump or exit, any users, aliases, and tokens are evaluated, and e-mail notifications are sent.
❖ An update event script is evaluated at various points (for example, during the hourly update cycle or on checkin of the revision). Extra exit conditions are evaluated each time the update event script is evaluated.
❖ An exit event script is evaluated when a revision has completed the step’s approval requirements and the step’s extra exit conditions are met.
Jumps are discussed in more detail in Jumps and Events (page 6-11).

2-6 Stellent Content Server Workflow Implementation Guide
Introduction to Workflows
Workflow FilesThis section discusses the files that are created as you initiate and use workflows.
Companion FileThe companion file is a text file that maintains information about the state of a revision in a workflow.
❖ The companion file keeps track of the steps that the revision has been through and maintains the current values of workflow variables.
❖ Each revision in a workflow has a companion file, which exists as long as the revision remains in the workflow. When a revision is released from a workflow, the corresponding companion file is deleted.
❖ Companion files are located in the <install_dir>/data/workflow/states/ directory. These files are in the HDA file format, and are named by Content ID (for example, HR_004.hda).
❖ Each companion file contains two sets of data:
• The LocalData Properties section defines the Parent List (page 2-7) and other workflow variables.
• The WorkflowActionHistory ResultSet section contains a record of the steps, workflow actions, and users that have been involved in the revision’s workflow history.
KeysThe companion file uses keys to keep track of workflow variables. For example, the following keys define the value of the EntryCount and Last Entry variables for an “Editor” step in a workflow called Marketing Brochures:
Editor@Marketing Brochures.entryCount=1
Editor@Marketing Brochures.lastEntryTs={ts '2001-05-02 16:57:00'}
Important: Update and exit event scripts are not run when a revision is rejected. Any code that is to be evaluated upon rejection must be located in the entry event script for the step that the rejected content is sent to.
Stellent Content Server Workflow Implementation Guide 2-7
Introduction to Workflows
Parent ListThe companion file maintains a parent list, which lists the sequence of steps that the revision has been to, starting with the current step and working backward. The parent list is used to determine which step to return to when a file is rejected, when the last step of a workflow is finished, or when an error occurs. For example, the following parent list shows the Marketing Team, Editor, and Graphic Artist steps of the Marketing Brochures workflow:
WfParentList=Marketing Team@Marketing Brochures#Editor@Marketing Brochures#Graphic Artist@Marketing Brochures#contribution@Marketing Brochures
An asterisk (*) in front of a step name in the parent list indicates a jump step.
WORKFLOW STEP EVALUATION PROCESSWhen a revision enters a workflow step, it goes through the following process:
1. The entry script is evaluated.
• The default entry script that keeps track of the entry count and last entry is updated.
• Actions (such as additional user notification) are executed.
• If the jump condition is met and a target step is defined, the revision jumps to another step.
• If the jump condition is not met, reviewers for the current step are notified that the revision is ready for approval.
• To avoid infinite loops, the entry script of a previously visited step is ignored. The only exception to this is when the step has been restarted using the wfCurrentStep(0) symbolic step.
2. When the required number of reviewers have approved the revision, the exit script is evaluated.
• If there is no exit script, the revision goes to the next step in the workflow.
• If an exit script jump condition is met and a target step is defined, the revision jumps to another step.
2-8 Stellent Content Server Workflow Implementation Guide
Introduction to Workflows
3. After the exit script is evaluated, the current action state (the wfAction workflow variable) is set. The following are the possible actions:
• APPROVE
• REJECT
• CHECKIN
• CONVERSION
• META_UPDATE
• TIMED_UPDATE
• RESUBMIT
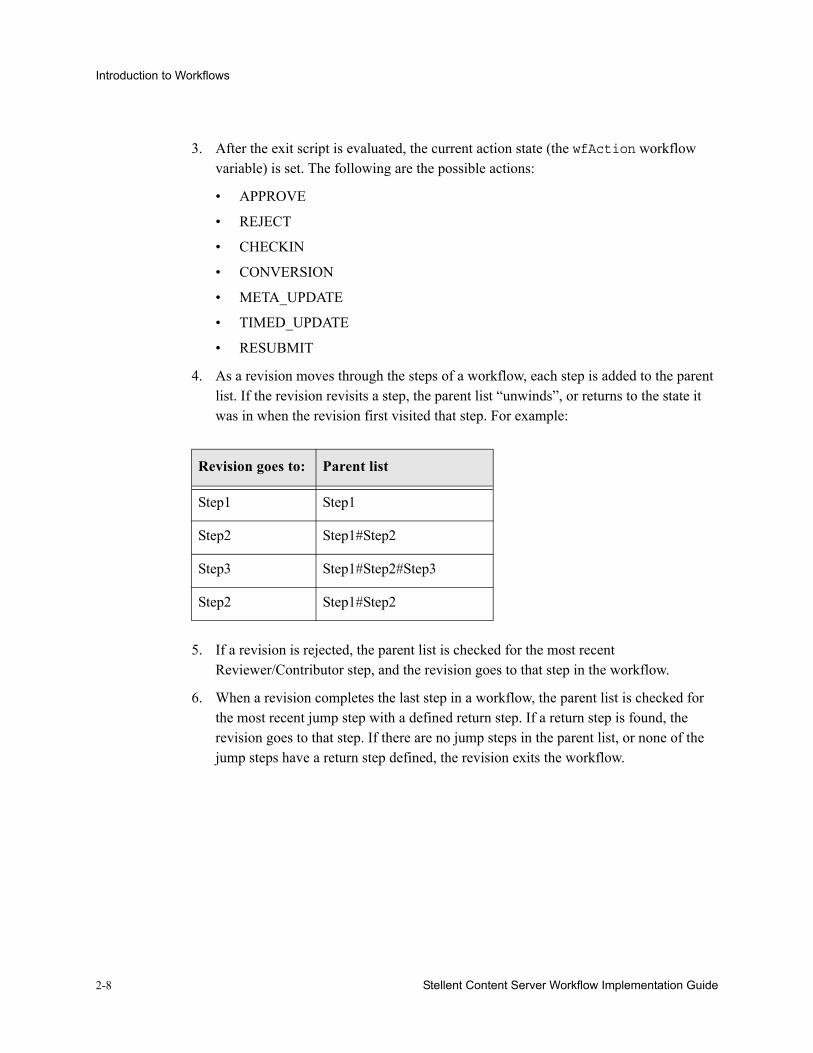
4. As a revision moves through the steps of a workflow, each step is added to the parent list. If the revision revisits a step, the parent list “unwinds”, or returns to the state it was in when the revision first visited that step. For example:
5. If a revision is rejected, the parent list is checked for the most recent Reviewer/Contributor step, and the revision goes to that step in the workflow.
6. When a revision completes the last step in a workflow, the parent list is checked for the most recent jump step with a defined return step. If a return step is found, the revision goes to that step. If there are no jump steps in the parent list, or none of the jump steps have a return step defined, the revision exits the workflow.
Revision goes to: Parent list
Step1 Step1
Step2 Step1#Step2
Step3 Step1#Step2#Step3
Step2 Step1#Step2

Stellent Content Server Workflow Implementation Guide 2-9
Introduction to Workflows
Status of Items in WorkflowsContent items that are in a workflow can have the following statuses:
Status Criteria Workflow Basic Workflow
EDITThe content item has been rejected and returned to the initial contribution step.
The content item is in the initial contribution step, or the content item has been rejected and returned to the initial contribution step.
REVIEWThe content item is in the review process.
The content item is in the review process.
PENDING N/A
The content item has completed all the workflow steps, but other content items in the workflow are not finished. This status occurs only when the workflow includes more than one content item.
DONEThe content item in the workflow is finished.
All of the content items in the workflow are finished.
GENWWWThe content is being converted to web-viewable format.
The content is being converted to web-viewable format.
RELEASEDThe revision is available in the content server.
The revision is available in the content server.
2-10 Stellent Content Server Workflow Implementation Guide
Introduction to Workflows
WORKFLOW PARTICIPATIONWhen participating in a Basic workflow, email is sent to the contributor who needs to check in designated content. Email is also sent to reviewers who are involved in the different steps of a workflow.
The Workflow Content Items page identifies the actions to perform in the workflow. This can be accessed via the Content Management tray, under Active Workflows. Reviewers can review content, reject or approve content, and view information about the content and the workflow.
If content is rejected, the Reject Content Item page is displayed. Reviewers can enter a message explaining the reason for rejection. That message is sent to the reviewers assigned to the previous contribution step. Those reviewers can then check out the content, edit it and check the content back in. On the Content Check In form, the reviewer should check the Revision Finished Editing box. The content then goes to the next step in the workflow. If the box is not selected, the content remains in Review status and must be approved before moving on through the workflow.
It is good practice to discuss workflows with the people involved so they are aware of the responsibilities they will have in the process. More information about workflow participation is discussed in the Stellent Content Server User Guide.

Stellent Content Server Workflow Implementation Guide 3-1
C h a p t e r
PLANNING A WORKFLOWThis section describes the steps you should follow to choose a workflow type and plan the workflow. The following topics are discussed:
Choosing a Workflow Type (page 3-1)Designing a Workflow (page 3-3)The Workflow Admin Application (page 3-5)
CHOOSING A WORKFLOW TYPEConsider the following points when you decide which type of workflow to use.
Use a Basic Workflow when you need to:
Specify an ‘ad hoc’ workflow, one that does not depend on specific criteria to be enabled.
Route multiple content items to go through the same series of steps. The items go through the steps individually, but are not released at the end of the cycle until all items are finished in the workflow.
Notify or remind a user to contribute a content item to the workflow.
Submit items to a workflow manually.
Specify a workflow that is used infrequently.
Use a Basic workflow to set up a unique review process or to set up the review process for a group of related content items.

3-2 Stellent Content Server Workflow Implementation Guide
Planning a Workflow
Specify a user to start the workflow. Content can enter a Basic workflow only when a user with Workflow rights starts the workflow.
Use a Criteria Workflow when you need to:
Have content enter a workflow automatically.
Route single content items that match specific criteria. You can route multiple items that match the criteria but they do not progress through the workflow as a unit.
Set up a standardized review process for individual documents.
Specify a workflow that is used frequently.
Open the workflow to many users. Users do not need Workflow rights for their content to enter a Criteria workflow.
When deciding which type of workflow to use, keep the following key points in mind:
If content is checked in with the wrong security group or wrong metadata value, it can enter a Criteria Workflow accidentally.
If users are frequently processing content through the same Basic workflow, consider setting up a Criteria workflow to automate the process.
You cannot use the same or overlapping criteria for multiple workflows. If a content item matches the criteria for more than one workflow, it will enter the first workflow in the list.
Security IssuesKeep the following security issues in mind when administering workflows:
Each workflow is associated with a security group.
• For a Criteria workflow, only content items that are in the same security group will enter the workflow.
• For a Basic workflow, new content items will be assigned to the security group of the workflow, and existing content items must belong to the workflow’s security group.
A workflow can only jump to another workflow belonging to the same security group.
The security group of a workflow cannot be changed while the workflow is active. However, the security group of a content item currently in the workflow process can be changed.

Stellent Content Server Workflow Implementation Guide 3-3
Planning a Workflow
To set up a workflow and start or enable the workflow process, you must have Workflow rights and admin permission for the security group of the content items.
To set up a workflow you can use a workflow template to initiate contribution steps.
To participate in a workflow as a contributor, you must have Write permission to the workflow’s security group.
DESIGNING A WORKFLOWTo design a workflow:
1. Draw a flowchart of the workflow. (See the flowcharts for the Criteria Workflow Process (page 4-2) and Basic Workflow Process (page 5-2) for examples.)
2. Verify that you have all the metadata needed for the workflow.
3. Set up any aliases you will need for the workflow. Alias creation is discussed in the Stellent Content Server Administration Guide.
4. Set up any tokens you will need for the workflow. See Creating a Token (page 6-4) for details.
5. Set up a Basic or Criteria workflow. If workflow templates are available, consider using a template as a starting point. See Workflow and Script Templates (page 7-1) for details.
6. Set up sub-workflows as necessary.
7. Set up jumps as necessary. See Setting Up Jumps (page 6-14) for details.
• If script templates are available, use them to create the step event scripts.
• If jumps will be used, consider setting up a “master” workflow with sub-workflows for each jump.
8. Test the workflow.
• For a Criteria workflow, check in a test document that matches the defined security group and metadata field value.
• For a Basic workflow, define test content and start the workflow.
• Simulate as many approval/rejection scenarios as possible.
• For workflows that contain jumps, simulate as many event scenarios as possible.
• Include reviewers in the workflow testing to verify that people understand their roles.

3-4 Stellent Content Server Workflow Implementation Guide
Planning a Workflow
Modifying WorkflowsAfter you have created a workflow, you can change some aspects of the workflow, but not others. Keep these points in mind as you design your workflow:
You can:
Modify the criteria for a Criteria workflow.
Add or delete content items from a Basic workflow.
Modify step definitions (including reviewers, exit conditions, and events)
You cannot:
Change the order of the steps. You can delete a step and re-create it in a different place, however.
Add steps in the middle of the workflow (new steps are always added to the end of the workflow).
The following tips may help you modify existing workflows:
Keep in mind that if you disable a Criteria workflow or cancel a Basic workflow in order to add or delete steps, any content in the workflow is released (Criteria) or deleted (Basic).
If you need to add or reorder steps in an existing workflow, consider the following options:
• Create a sub-workflow and add a jump to it from an existing step. (See About Jumps (page 6-10) for more information.) You can make this change to an existing step without disabling or canceling the workflow. This option should be considered a short-term fix until you can disable or cancel the workflow and rebuild it as necessary.
• Add step event scripts to an existing step to define the actions that would normally take place in a separate step. (See Jumps and Events (page 6-11) for more information.) You can make these changes to an existing step without disabling or canceling the workflow. This option should be considered a short-term fix until you can disable or cancel the workflow and rebuild it as necessary.
• Create a temporary sub-workflow that duplicates the workflow you need to modify; use the Repository Manager to move content items in the existing workflow to the temporary workflow; disable and modify the existing workflow; and then move content items back to the modified workflow.

Stellent Content Server Workflow Implementation Guide 3-5
Planning a Workflow
THE WORKFLOW ADMIN APPLICATIONThe Workflow Admin application is an administration application used to manage workflows. To access this screen, launch the Administration menu and select Admin Applets.
Feature Description
Options menu Script Templates—Displays the Workflow Scripts User Interface (page 7-15).Tokens—Displays the Workflow Tokens Screen (page 6-7).Tracing—Displays the Tracing Configuration screen.Exit—Closes the Workflow Admin application.

3-6 Stellent Content Server Workflow Implementation Guide
Planning a Workflow
Apps menu Lets you access other options from the Admin Applets menu. The other applications will open in the same mode (applet or stand-alone) as the current application.
Help menu Contents—Displays the content server online help.About Content Server—Displays version, build, and copyright information for the content server.
Workflows tab Used to add, edit, and delete Basic workflows. See Basic Workflow Process (page 5-2).
Criteria tabUsed to add, edit, and delete Criteria workflows. See Criteria Workflow Process (page 4-2).
Templates tabUsed to add, edit, and delete workflow templates. See Creating a Workflow Template (page 7-1).
Feature Description

Stellent Content Server Workflow Implementation Guide 4-1
C h a p t e r
CREATING A CRITERIA WORKFLOWCriteria workflows are used to set up a standardized review process for individual documents. They define the review process for content that enter the workflow automatically when they match predefined criteria. For example, any time a new purchase order is generated, it might be automatically routed to specific reviewers for approval.
A Criteria workflow includes the following:
Criteria defined by a security group and one metadata field.
Auto-contribution step with no predefined users.
One or more reviewer steps with one or more reviewers per step.
A sub-workflow is a workflow that does not have an initial contribution step. Sub-workflows are useful for splitting large, complex workflows into manageable pieces.
Content can enter a sub-workflow only through a jump from a Criteria workflow.
This section discusses the following topics:
Criteria Workflow Process (page 4-2)
Criteria Workflow Tips (page 4-4)
Setting Up a Criteria Workflow (page 4-4)
Changing a Criteria Workflow or Sub-workflow (page 4-8)
Disabling a Criteria Workflow or Sub-workflow (page 4-9)
The Criteria Workflow User Interface (page 4-9)
4-2 Stellent Content Server Workflow Implementation Guide
Creating a Criteria Workflow
CRITERIA WORKFLOW PROCESSThe following steps briefly explain the Criteria workflow process:
1. A user with Workflow rights sets up the Criteria workflow by defining the following:
• Security group
• Metadata field and value (for example, ContentType matches PurchaseOrder)
• Review steps and reviewers for each step
• The number of approvals required for each step. For example, do all reviewers need to approve it before it can move to the next step?
• If a group of people need to be included in an alias or if a token should be set up, perform those tasks ahead of time.
2. A user with Workflow rights starts the Criteria workflow by enabling it.
3. When content is checked in with the defined security group and metadata field value, the content enters the workflow.
4. Reviewers for the first step are notified by e-mail that the revision is ready for review.
5. The reviewers approve or reject the revision.
• If the step is a reviewer/contributor step, the reviewers can check out the revision, edit it, and check it back in before approving it. For example, editors may need to alter the content of an item in the workflow.
• If a user rejects the revision, the workflow returns to the previous contribution step, and the users for that step are notified by e-mail.
• When the minimum number of users have approved the revision, it goes to next step. (If the minimum number of approvals is 0, the revision moves to the next step automatically.)
6. When all steps are complete, the revision is released to the system.
Note: Sub-workflows are set up using the same procedure as Criteria workflows with a few minor exceptions. Those exceptions are noted in the procedure for setting up Criteria workflows.

Stellent Content Server Workflow Implementation Guide 4-3
Creating a Criteria Workflow

4-4 Stellent Content Server Workflow Implementation Guide
Creating a Criteria Workflow
CRITERIA WORKFLOW TIPS
All users assigned to the Criteria workflow must have Read permission to the selected security group. Contributors must have Write permission to the selected security group to be able to check the revision in and out.
You cannot add or delete steps while a Criteria workflow is enabled.
Any content items checked in while a Criteria workflow is disabled will bypass the workflow process and be released to the system.
Disabling a Criteria workflow releases any revisions still in the workflow process to the system.
A Criteria workflow can use jumps to sub-workflows and other Criteria workflows in the same security group, and can jump to other steps in the same workflow.
Consider making at least one step in the workflow a Reviewer/Contributor step so that rejected revisions go back to that step rather than back to the original author.
SETTING UP A CRITERIA WORKFLOW
All users assigned to the workflow must have Read permission to the selected security group, and Contributors must have Write permission. If the security group of a checked in item does not match the security group of the workflow, the item will not enter the workflow.
Define aliases and tokens before setting up your workflow.
When you use a template, you must use the reviewers from the selected template.
Make sure that the criteria is not the same as for any other Criteria workflows. If a content item matches the criteria for two different workflows, it will enter the first workflow in the list of workflows.
Important: Each Criteria workflow must have unique criteria. If a content item matches the criteria for two different workflows, it will enter the first workflow in the list of defined workflows.
Important: There are several important points to keep in mind before creating a Criteria workflow.

Stellent Content Server Workflow Implementation Guide 4-5
Creating a Criteria Workflow
If you select Content ID as the Field and your content server uses an Oracle or Tamino database, you must enter all uppercase characters for the Value. All other fields can have mixed case.
Also, if you select ContentID as the Field, you can select an existing content item by clicking Select below the Value field.
You can enter zero (0) in the At least this many reviewers field to notify reviewers that the revision has reached the step, but reviewers will not be able to approve, reject, or edit the revision at that step. The workflow will pass to the next step automatically.
Follow these steps to create a Criteria workflow or sub-workflow:
1. Display the Workflow Admin: Criteria Tab (page 4-9) from the Workflow Admin applet.
2. Click Add.
The New/Edit Criteria Workflow Screen (page 4-11) screen is displayed.
3. Enter a name in the Workflow Name field. The Workflow Name has a maximum field length of 30 characters and cannot contain special characters (; @ &, and so on). The workflow name cannot be changed after the workflow is created.
4. Enter a detailed description for the workflow in the Description field.
5. Select the Security Group from the pull-down list. This is the security group to which the content items in this workflow belongs.
6. Select an option from Original Author Edit Rule. This specifies whether to permit the original author to edit the existing revision or create a new revision if the content item is rejected.
7. If you want to use a workflow template, select the Use Template check box and select the template name. This box is displayed only if a template currently exists. See Workflow and Script Templates (page 7-1) for details.
8. Determine the type of workflow:
• To create a Criteria workflow, select the Has Criteria Definition check box.
• To create a sub-workflow, clear the Has Criteria Definition check box.
You can change the type of workflow later by clearing or selecting the Has Criteria Definition check box
9. For a Criteria workflow, define the criteria by choosing the appropriate Field, Operator, and Value. For example, Review Process matches HRBenefits.
10. Click OK.
4-6 Stellent Content Server Workflow Implementation Guide
Creating a Criteria Workflow
11. If a template was not used to create steps, or if you want to add another step, click Add in the right pane of the Workflow Admin screen. The Add New/Edit Step Screen (page 4-13) screen is displayed.
12. Enter an appropriate Name and Description for the step. The name cannot be changed after the step is created. The name is usually descriptive of the step (for example, EditorialReview or TechnicalReview).
13. Specify the authority level of the users for the step:
• Users can review the current revision—Users can approve or reject the revision but cannot edit the revision.
• Users can review and edit (replace) the current revision—Users can edit the revision, approve it, or reject it. Any edit will not update the revision of the content item.
• Users can review the current revision or create new revision—Users can edit the revision, approve it, or reject it. Any edit will update the revision of the content item. This preserves the original content and provides an audit trail of changes.
14. Select the type of users to be added to the step. More than one type of user can be defined for a step:
• To add a group of users defined by an alias, click Add Alias. The Add Alias to Step Screen (page 4-15) is displayed. Choose the alias from the displayed list.
• To add individual user logins, click Add User. The Add User to Step (page 4-16) is displayed.
• To narrow the list of users, select the Use Filter check box, click Define Filter, select the filter criteria, and click OK.
• To select a range of users, click one user and then hold down the Shift key while clicking another user name.
• To select users individually, hold down the Ctrl key while clicking each user name.
• To add a variable user defined by a token, click Add Token. The Add Token to Step (page 4-17) screen is displayed. See Creating a Token (page 6-4) for details about creating tokens.
15. Click OK.
16. Click the Exit Conditions tab.

Stellent Content Server Workflow Implementation Guide 4-7
Creating a Criteria Workflow
17. Specify how many reviewers must approve the revision before it passes to the next step.
• To require approval by all reviewers, select All reviewers.
• To specify a minimum number of reviewers who must approve the revision, select At least this many reviewers and enter the number.
18. Typically, exit conditions are useful when metadata could be changed by an external process during the workflow step. Use the following instructions if the step requires additional exit conditions to be able to pass to the next step:
a. Select the Use Additional Exit Condition check box.
b. Click Edit.
The Edit Additional Exit Condition Screen (page 4-17) screen is displayed. You can use this screen to select additional criteria from pull-down option lists.
c. Select a workflow condition or a metadata field from the Field option list.
d. Select an operator from the Operator option list. This is a dependent choice list that shows operators associated with the Field.
e. Select a value from the Value option list. This is a dependent list based on the option chosen as the Field.
f. Click Add to add the conditional statement to the Condition Clause. The clause appears in the Condition Clause box. Multiple clauses can be appended with AND statements.
g. Repeat for as many conditions as required. To modify an expression, select it in the Condition Clause box, change the Field, Operator, or Value, and click Update.
h. To modify the condition expression, select the Custom Condition Expression check box and edit the script (for example, use OR not AND for a condition). The additional exit conditions must be Idoc Script statements that evaluate to “true” or “false”. Do not enclose the code in Idoc Script tags <$ $>.
i. Click OK.
19. If the workflow requires conditional steps or special processing, click the Events tab and add the appropriate scripts. See Setting Up Jumps (page 6-14) for more information.
Caution: If you clear the Custom Condition Expression check box, the expression reverts to its original definition; all modifications are lost.

4-8 Stellent Content Server Workflow Implementation Guide
Creating a Criteria Workflow
20. Click OK.
21. Add, edit, and delete steps as necessary to complete the workflow.
• To add another step to the workflow, repeat steps 11through 20.
• To edit an existing step, select the step and click Edit.
• To delete an existing step, select the step and click Delete.
22. Make sure that the correct workflow is selected in the left pane, and click Enable.
A confirmation screen is displayed.
23. Click Yes to activate the selected workflow.
CHANGING A CRITERIA WORKFLOW OR SUB-WORKFLOW
To change an existing Criteria workflow or sub-workflow:
1. Display the Workflow Admin: Criteria Tab (page 4-9).
2. Select the workflow you want to change in the left pane.
3. If you want to add or delete steps, disable the workflow.
4. Use the Add, Edit, and Delete buttons in the left and right panes to change the following:
• workflow description
• security group
• type of workflow (Criteria or sub-workflow)
• criteria
• step description
• type of step (reviewer, contributor same revision, contributor new revision)
• users
• events
• number of approvals required
• exit conditions

Stellent Content Server Workflow Implementation Guide 4-9
Creating a Criteria Workflow
5. If the workflow is disabled, make sure that the correct workflow is selected in the left pane and click Enable.
A confirmation screen is displayed.
6. Click Yes to activate the selected workflow.
DISABLING A CRITERIA WORKFLOW OR SUB-WORKFLOW
To disable a criteria workflow or sub-workflow:
1. Display the Workflow Admin: Criteria Tab (page 4-9).
2. Select the workflow.
3. Click Disable.
4. If there are any content items still in the workflow process, you will be notified that all of the content revisions will be released. If you don’t want to release the content, click No.
5. Click Yes to disable the workflow.
The status of the workflow changes to Disabled.
THE CRITERIA WORKFLOW USER INTERFACEThe following screens are used in the creation of criteria workflows.
Workflow Admin: Criteria TabThe Criteria tab of the Workflow Admin application is used to add, edit, enable, disable, and delete Criteria workflows and sub-workflows.
Caution: You can add users to a step while the Criteria workflow is enabled, but if any revisions are currently at that step in the workflow, the new users will not be notified automatically.

4-10 Stellent Content Server Workflow Implementation Guide
Creating a Criteria Workflow
Feature Description
Name column Lists the workflow names.
Status column The status of the workflow: enabled or disabled.
Security Group columnThe security group that will cause the content to enter the workflow.
Add (Workflow) buttonDisplays the New/Edit Criteria Workflow Screen (page 4-11).
Edit (Workflow) buttonDisplays the New/Edit Criteria Workflow Screen (page 4-11).
Stellent Content Server Workflow Implementation Guide 4-11
Creating a Criteria Workflow
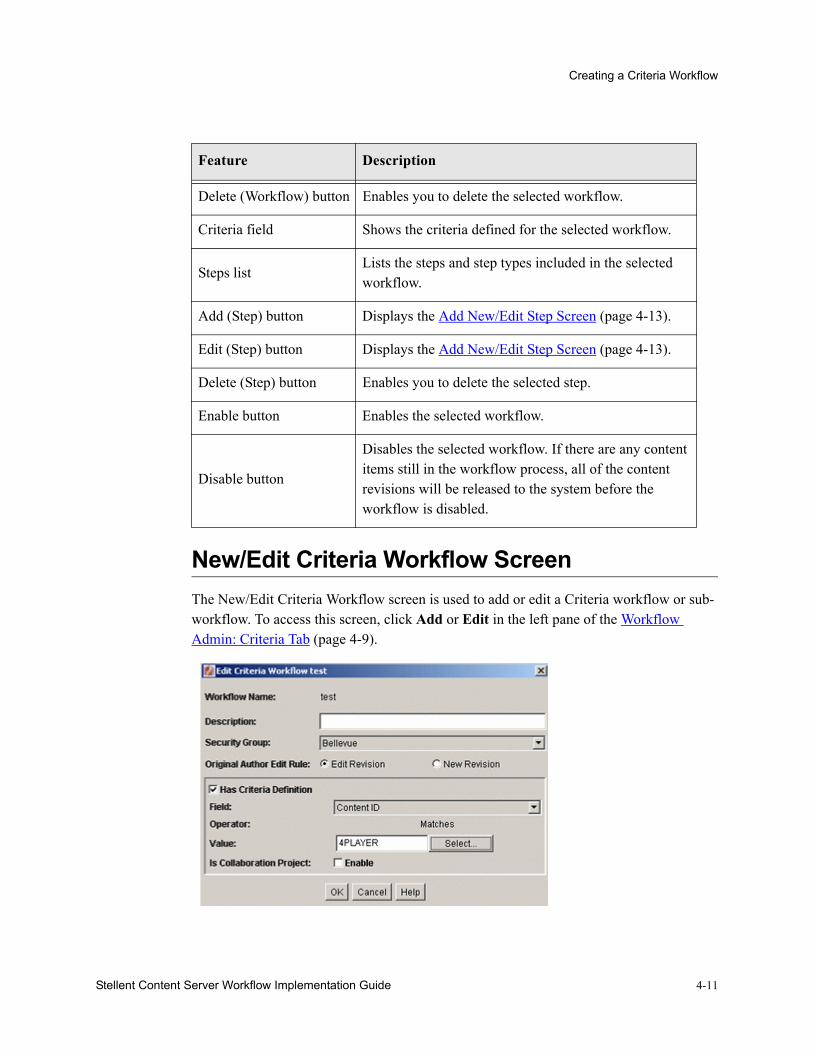
New/Edit Criteria Workflow ScreenThe New/Edit Criteria Workflow screen is used to add or edit a Criteria workflow or sub-workflow. To access this screen, click Add or Edit in the left pane of the Workflow Admin: Criteria Tab (page 4-9).
Delete (Workflow) button Enables you to delete the selected workflow.
Criteria field Shows the criteria defined for the selected workflow.
Steps listLists the steps and step types included in the selected workflow.
Add (Step) button Displays the Add New/Edit Step Screen (page 4-13).
Edit (Step) button Displays the Add New/Edit Step Screen (page 4-13).
Delete (Step) button Enables you to delete the selected step.
Enable button Enables the selected workflow.
Disable button
Disables the selected workflow. If there are any content items still in the workflow process, all of the content revisions will be released to the system before the workflow is disabled.
Feature Description

4-12 Stellent Content Server Workflow Implementation Guide
Creating a Criteria Workflow
Feature Description
Workflow Name field
The name for the workflow. The Workflow Name has a maximum field length of 30 characters, and the following characters should not be used: spaces, tabs, and the symbols ; ^ : @ & + " # % < > * ~ |
Description field A description of the workflow.
Security Group listSpecifies the security group that the revisions must be in to enter the workflow process.
Use Template check box
Select this check box if you want to use a workflow template. This check box is displayed only if at least one workflow template exists.
Use Template listLists the workflow templates that have been created. This list is displayed only if at least one workflow template exists.
Original Author Edit Rule
Edit Revision—Ensures that the content item in the workflow stays at the existing revision when the original author edits it.New Revision—Permits the original author to create a new revision of the content when the author edits the content item during the workflow.
Has Criteria Definition check box
Selected—Criteria workflowCleared—Sub-workflow
Field list
The metadata field that will be evaluated when each content item is checked in. Options are Content ID, Author, Type, Account (if accounts are enabled), and any custom metadata fields that you have created.
Operator field Defaults to matches.
Stellent Content Server Workflow Implementation Guide 4-13
Creating a Criteria Workflow
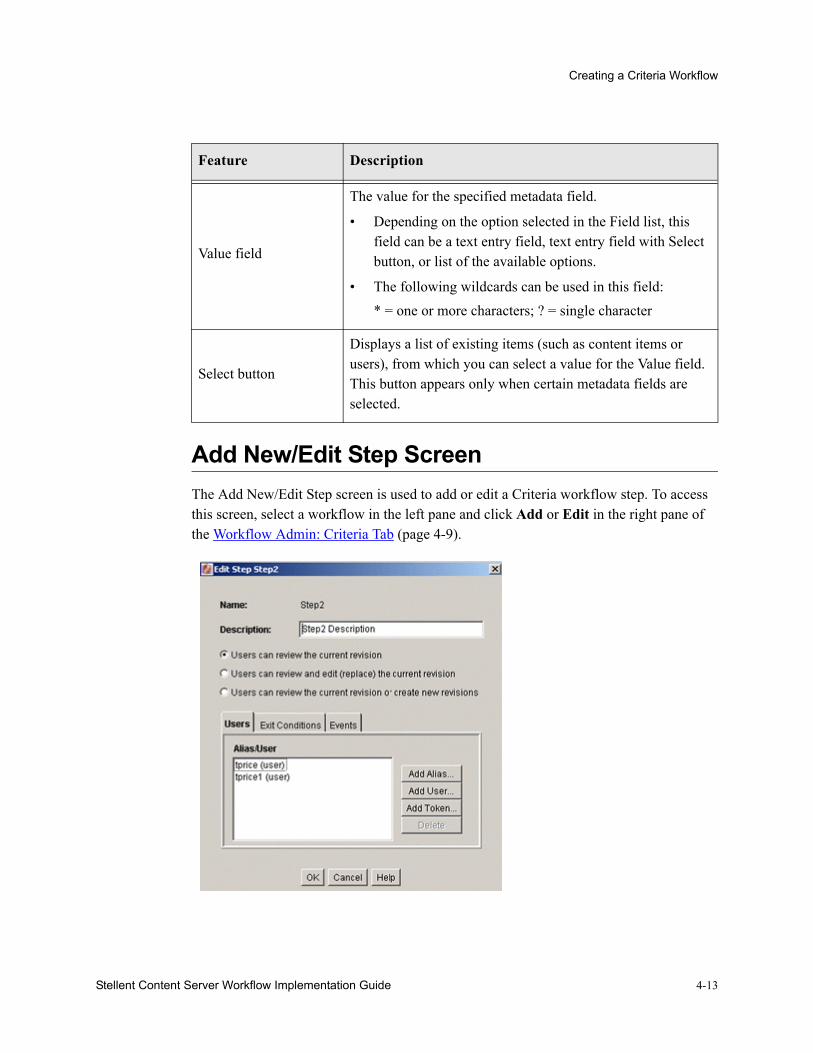
Add New/Edit Step ScreenThe Add New/Edit Step screen is used to add or edit a Criteria workflow step. To access this screen, select a workflow in the left pane and click Add or Edit in the right pane of the Workflow Admin: Criteria Tab (page 4-9).
Value field
The value for the specified metadata field.
• Depending on the option selected in the Field list, this field can be a text entry field, text entry field with Select button, or list of the available options.
• The following wildcards can be used in this field:* = one or more characters; ? = single character
Select button
Displays a list of existing items (such as content items or users), from which you can select a value for the Value field. This button appears only when certain metadata fields are selected.
Feature Description

4-14 Stellent Content Server Workflow Implementation Guide
Creating a Criteria Workflow
Feature Description
Name field
The name for the step. Typically this is the type of review (such as initial review or copy edit) or the function of the reviewer (such as manager or copy editor).
Description field A description for the step.
Users can review the current revision
Users can approve or reject the revision.
Users can review and edit (replace) the current revision
Users can edit the revision, approve it, or reject it. Any edit will not update the revision of the content item.
Users can review the current revision or create new revisions.
Users can edit the revision, approve it, or reject it. Any edit updates the revision of the content item.
Users Tab
Alias/User listLists the users, aliases, and tokens currently assigned to the step.
Add Aliases button Displays the Add Alias to Step Screen (page 4-15).
Add User button Displays the Add User to Step (page 4-16).
Add Token button Displays the Add Token to Step (page 4-17).
Delete buttonEnables you to delete the selected step from the workflow.
Exit Conditions Tab
All reviewers optionIf this is selected, all users assigned to the step must approve the revision before the workflow passes to the next step.
At least this many reviewers option and field
If this is selected, the workflow passes to the next step as soon as the specified number of users have approved the revision.

Stellent Content Server Workflow Implementation Guide 4-15
Creating a Criteria Workflow
Add Alias to Step ScreenThe Add Alias to Step screen is used to assign aliases to a Criteria workflow step. To access this screen, click Add Alias on the Users tab of the Add New/Edit Step Screen (page 4-13).
Use Additional Exit Condition check box
If this is selected, the conditions defined in the text box must be met before the workflow passes to the next step.
Edit buttonDisplays the Edit Additional Exit Condition Screen (page 4-17).
Clear button Clears the Exit Condition text box.
Events TabSee Add New/Edit Step Screen: Events Tab (page 6-21).
Feature Description

4-16 Stellent Content Server Workflow Implementation Guide
Creating a Criteria Workflow
Add User to StepThe Add User to Step screen is used to assign users to a Criteria workflow step. To access this screen, click Add User on the Users tab of the Add New/Edit Step Screen (page 4-13).
Feature Description
Alias column Lists the available aliases.
Description column A description of the alias.
Feature Description
Use Filter check boxSelect this check box to narrow the Users list as defined by the Define Filter Screen (described in the Stellent Content Server System Administration Guide).
Define Filter buttonDisplays the Define Filter Screen (described in the Stellent Content Server System Administration Guide).

Stellent Content Server Workflow Implementation Guide 4-17
Creating a Criteria Workflow
Add Token to StepThe Add Token to Step screen is used to assign workflow tokens to a Criteria workflow step. To access this screen, click Add Token on the Users tab of the Add New/Edit Step Screen (page 4-13).
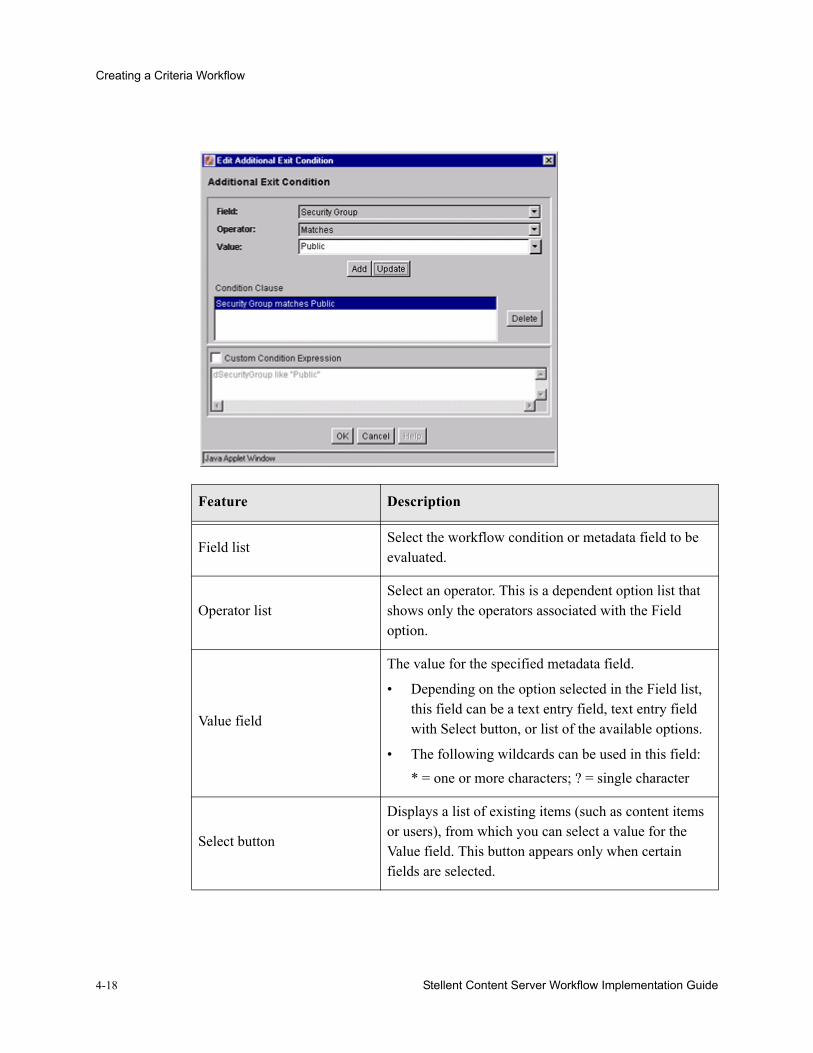
Edit Additional Exit Condition ScreenThe Edit Additional Exit Condition screen is used to define exit conditions for a Criteria workflow step. To access this screen, click Edit on the Exit Conditions tab of the Add New/Edit Step Screen (page 4-13).
Show Columns button Displays the Show Columns Screen.
Users list Shows the users that match the filter settings.
Feature Description
Name column Lists the available tokens.
Description column A description of the token.
Feature Description
4-18 Stellent Content Server Workflow Implementation Guide
Creating a Criteria Workflow
Feature Description
Field listSelect the workflow condition or metadata field to be evaluated.
Operator listSelect an operator. This is a dependent option list that shows only the operators associated with the Field option.
Value field
The value for the specified metadata field.
• Depending on the option selected in the Field list, this field can be a text entry field, text entry field with Select button, or list of the available options.
• The following wildcards can be used in this field:* = one or more characters; ? = single character
Select button
Displays a list of existing items (such as content items or users), from which you can select a value for the Value field. This button appears only when certain fields are selected.
Stellent Content Server Workflow Implementation Guide 4-19
Creating a Criteria Workflow
Add buttonAdds the conditional statement defined by the Field, Operator, and Value fields to the exit condition clause.
Update buttonChanges the selected conditional statement to the statement defined by the Field, Operator, and Value fields.
Condition Clause boxLists the conditional statements that have been added to the exit condition. Multiple clauses can be appended as AND statements.
Delete button Deletes the selected conditional statement.
Custom Condition Expression check box and field
Enables display and edit of the Idoc Script generated from the condition clauses.
• The additional exit conditions must be Idoc Script statements that evaluate to “true” or “false”.
• Do not enclose the code in Idoc Script tags <$ $>.Caution: If you clear the Custom Condition Expression check box, the expression reverts to its original definition; all modifications will be lost.
Feature Description

Stellent Content Server Workflow Implementation Guide 5-1
C h a p t e r
CREATING A BASIC WORKFLOWA Basic workflow defines the review process for specific content items. It is different from a Criteria workflow in that you do not need to define criteria for content to enter the workflow. A Basic workflow is set up and initiated manually.
A Basic workflow includes the following:
❖ One or more content items.
❖ Initial contribution step with one or more contributors.
❖ Zero or more review steps with zero or more reviewers per step.
This section discusses the following topics:
❖ Basic Workflow Process (page 5-2)
❖ Basic Workflow Tips (page 5-4)
❖ Setting up a Basic Workflow (page 5-4)
❖ Changing a Basic Workflow (page 5-8)
❖ The Basic Workflow User Interface (page 5-9)

5-2 Stellent Content Server Workflow Implementation Guide
Creating a Basic Workflow
BASIC WORKFLOW PROCESSThe following steps explain the Basic workflow process:
1. A user with Workflow rights sets up the Basic workflow by defining the following items:
• Content: New content can be created and/or existing content can be selected. After going through the workflow, new content is released to the system at revision 1, and existing content is released to the system at the next revision number for that content item.
• Initial contributors
• Review steps, reviewers for each step and nmber of approvals required for each step.
2. A user with Workflow rights starts the Basic workflow by enabling it.
3. An e-mail is sent to the contributors.
4. Any of the contributors can check out and then check in a file for each content item in the workflow.
5. Reviewers for the first step are notified by e-mail that the revisions are ready for review.
6. The reviewers approve or reject the revisions.
• If the step permits editing, the reviewers can check out the revisions, edit them, and check them back in before approving it.
• If a user rejects a revision, the revision returns to the previous contribution step, and the users for that step are notified by e-mail.
• When the minimum number of users have approved the revision, it goes to next step. (If the minimum number of approvals is 0, the revision moves to the next step automatically.)
7. Generally, if a Basic workflow contains multiple files, none of them will be released to the system until all of the files have been released from completion of the workflow. Completed content items stay in PENDING status until the last revision is approved. However, if you release a content item from edit state as a side effect, that content item can be released without waiting for all items in the Basic workflow.
8. When all steps are complete and all revisions are approved, the revisions are released to the system.

Stellent Content Server Workflow Implementation Guide 5-3
Creating a Basic Workflow

5-4 Stellent Content Server Workflow Implementation Guide
Creating a Basic Workflow
BASIC WORKFLOW TIPS❖ For new content, the Content ID defined in the workflow is the Content ID that will be
applied when the revision is released to the system. The Content ID cannot be changed after it is created.
❖ You cannot add a content item to multiple basic workflows. This will cause an error message to appear and the workflow will not be enabled.
❖ New content will be assigned to the security group of the Basic workflow.
❖ The security group of an existing revision must match the security group of the Basic workflow.
❖ All users assigned to the Basic workflow must have Read permission to the selected security group. Contributors must have Write permission to the selected security group to be able to edit revisions.
❖ You cannot add, edit, or delete review steps while a Basic workflow is active.
❖ You can cancel an active workflow, but any revisions in the workflow are deleted from the system. Any edits that have been made to the files are lost unless they have also been saved on a local hard drive.
❖ An inactive Basic workflow can be reused, but it must be started manually each time.
❖ A Basic workflow can use jumps, but only to other steps in the same workflow. A Basic workflow cannot jump to a sub-workflow.
SETTING UP A BASIC WORKFLOW
❖ All users assigned to the workflow must have Read permission to the selected security group, and Contributors must have Write permission.
❖ When you use a template, you must change the reviewers if they are different from those defined in the selected template.
❖ Do not add a content item to multiple basic workflows. This causes errors and the workflow will not be enabled.
Important: There are several important points to keep in mind before creating a Basic workflow.

Stellent Content Server Workflow Implementation Guide 5-5
Creating a Basic Workflow
❖ You can enter zero (0) in the At least this many reviewers field to notify reviewers that the revision has reached the step, but reviewers will not be able to approve, reject, or edit the revision at that step. The workflow will pass to the next step automatically.
Use the following steps to create a Basic workflow:
1. Display the Workflow Admin: Workflows Tab (page 5-9). The default tab view is that of a Basic workflow.
2. Click Add.
The Add New/Edit Workflow Screen (page 5-12) screen is displayed.
3. Enter a name in the Workflow Name field. The Workflow Name has a maximum field length of 30 characters and cannot contain special characters (; @ &, and so on). The Workflow Name cannot be changed after the workflow is created.
4. Enter a detailed description for the workflow in the Description field.
5. Select the Security Group from the pull-down list. This is the security group to which the content items in this workflow belong.
6. Select an option from Original Author Edit Rule. This specifies whether to permit the original author to edit the existing revision or create a new revision if the content item is rejected.
7. If you want to use a template, select the Use Template check box and select the template name. This box is displayed only if a template exists. See Workflow and Script Templates (page 7-1) for details.
8. Click OK.
9. To add a new content item to the workflow, click New.
The Add Content to Workflow (New Content) Screen (page 5-12) screen is displayed.
a. Enter a Content ID for the new content item. The Content ID cannot be changed after the content item is created. To change a Content ID, delete the content item from the list and add a new content item. If you are using an Oracle or Tamino database, all Content IDs are converted automatically to uppercase letters.
b. Click OK.
10. To add an existing content item to the workflow, click Select.
The Add Content to Workflow (Existing Content) Screen (page 5-13) screen is displayed.
• To narrow the list of content items, specify criteria for the filter and release date.
5-6 Stellent Content Server Workflow Implementation Guide
Creating a Basic Workflow
• To select a range of content items, click one item and then hold down the Shift key while clicking another item.
• To select content items individually, hold down the Ctrl key while clicking each item.
Existing content items must have the same security group as the workflow.
11. Repeat steps 9 and 10 as necessary to add the desired content items to the workflow.
12. Define one or more contributors for the initial contribution step. More than one type of user can be defined for the contribution step.
• To add a group of users defined by an alias, click Add Alias. The Add Alias to Workflow Screen (page 5-15) screen is displayed.
• To add individual user logins, click Add User. The Add User: Basic Workflow (page 5-18) screen is displayed.
• To narrow the list of users, select the Use Filter check box, click Define Filter, select the filter criteria, and click OK.
• To select a range of users, click one user and then hold down the Shift key while clicking another user.
• To select users individually, hold down the Ctrl key while clicking each user.
13. If a template was not used to create review steps, or if you want to add another step, click Add in the right pane near the Steps box.
The Add New/Edit Step Screen (page 5-15) screen is displayed.
14. Enter an appropriate Name and Description for the step. The Name cannot be changed after the step is created. Use a descriptive name for the step (for example, CopyEditReview or FinalApproval).
15. Specify the authority level of the users for the step.
• Users can review the current revision—Users can approve or reject the revision.
• Users can review and edit (replace) the current revision—Users can edit the revision, approve it, or reject it. Any edit will not update the revision of the content item.
• Users can review the current revision or create new revision—Users can edit the revision, approve it, or reject it. Any edit will update the revision of the content item. This preserves the original content and provides an audit trail of changes.

Stellent Content Server Workflow Implementation Guide 5-7
Creating a Basic Workflow
16. Select the type of users to be added to the step. More than one type of user can be defined for a step:
• To add a group of users defined by an alias, click Add Alias. The Add Alias to Step Screen (page 5-18) screen is displayed.
• To add individual user logins, click Add User. The Add User: Basic Workflow (page 5-18) screen is displayed. To narrow the list use the Use Filter check box; to select a range of users, click one user and then hold down the Shift key while clicking another user. name. To select users individually, hold down the Ctrl key while clicking each user name.
• To add a variable user defined by a token, click Add Token. The Add Token: Basic Workflow (page 5-20) screen is displayed. See Creating a Token (page 6-4) for more information.
17. Click the Exit Conditions tab.
18. Specify how many reviewers must approve the revision before it passes to the next step.
• To require approval by all reviewers, select All reviewers.
• To specify a minimum number of reviewers who must approve the revision, select At least this many reviewers and enter the number.
19. Typically, exit conditions are useful when metadata could be changed by an external process during the workflow step. Use the following instructions if the step requires additional exit conditions to be able to pass to the next step:
a. Select the Use Additional Exit Condition check box.
b. Click Edit.
The Edit Additional Exit Condition Screen (page 5-20) screen is displayed. You can use this screen to select additional criteria from pull-down option lists.
c. Select a workflow condition or a metadata field from the Field option list.
d. Select an operator from the Operator option list. This is a dependent option list that shows operators associated with the Field.
e. Select a value from the Value option list. This is a dependent list based on the option chosen as the Field.
f. Click Add to add the conditional statement to the Condition Clause. The clause appears in the Condition Clause box. Multiple clauses can be appended with AND statements.
5-8 Stellent Content Server Workflow Implementation Guide
Creating a Basic Workflow
g. Repeat for as many conditions as required. To modify an expression, select it in the Condition Clause box, change the Field, Operator, or Value, and click Update.
h. To modify the condition expression, select the Custom Condition Expression check box and edit the script (for example, use OR not AND for a condition). The additional exit conditions must be Idoc Script statements that evaluate to “true” or “false”. Do not enclose the code in Idoc Script tags <$ $>.
i. Click OK.
20. If the workflow requires conditional steps or special processing, click the Events tab and add the appropriate scripts. See Customizing Workflows (page 6-1) for more information.
21. Click OK.
22. Add, edit, and delete steps as necessary to complete the workflow.
• To add another user to the initial contribution step, repeat step 12.
• To delete a user from the initial contribution step, click Delete.
• To add another review step to the workflow, repeat steps 13 through 21.
• To edit an existing review step, select the step and click Edit.
• To delete an existing review step, select the step and click Delete.
23. Make sure that the correct workflow is selected in the left pane, and click Start.
The Start Workflow Screen (page 5-22) screen is displayed.
24. Enter a message to be sent to the contributors.
25. Click OK.
CHANGING A BASIC WORKFLOWTo change an existing Basic workflow:
1. Display the Workflow Admin: Workflows Tab (page 5-9).
2. Select the workflow you want to change in the left pane.
3. If you want to change the workflow security group or the number of review steps in an active workflow, you must first click Cancel to cancel the workflow.
Caution: If you clear the Custom Condition Expression check box, the expression reverts to its original definition; all modifications are lost.
Stellent Content Server Workflow Implementation Guide 5-9
Creating a Basic Workflow
4. Click Edit in the left pane to change the workflow description or the security group.
5. Use the New, Select, and Delete buttons in the Content pane to add or delete content from the workflow.
6. Use the Add Alias, Add User, and Delete buttons in the Contributors pane to add or delete contributors from the initial contribution step.
7. Use the Add, Edit, and Delete buttons in the Steps pane to change the following:
• step description
• type of step (reviewer or reviewer/contributor)
• users
• events
• number of approvals required
• exit conditions
THE BASIC WORKFLOW USER INTERFACEThe following screens are used in the creation of Basic workflows.
Workflow Admin: Workflows TabThe Workflows tab of the Workflow Admin application is used to add, edit, start, cancel, and delete Basic workflows. To access this tab, click the Workflows tab on the The Workflow Admin Application (page 3-5).
Caution: You can change content items in a Basic workflow after it has been started, but the contributors will not be notified automatically. You can also change contributors in a Basic workflow after it has been started, but any new contributors will not be notified automatically.
Note: Many of the screens used in the creation of the Criteria workflow are the same screens used in Basic workflows. They are repeated here for completeness.

5-10 Stellent Content Server Workflow Implementation Guide
Creating a Basic Workflow
Feature Description
Name column Lists the workflow names.
Status column The status of the workflow: active or inactive.
Completed At column
Date and time the content in a finished workflow was released to the system.
Security Group column
The security group assigned to the workflow. This security group will be assigned to all new content in the workflow.
Add (Workflow) button
Displays the Add New/Edit Workflow Screen (page 5-12).

Stellent Content Server Workflow Implementation Guide 5-11
Creating a Basic Workflow
Edit (Workflow) button
Displays the Add New/Edit Workflow Screen (page 5-12).
Delete (Workflow) button
Enables you to delete the selected workflow.
Content list Lists the content items included in the selected workflow.
New buttonDisplays the Add Content to Workflow (New Content) Screen (page 5-12).
Select buttonDisplays the Add Content to Workflow (Existing Content) Screen (page 5-13).
Delete (Content) button
Enables you to delete the selected content item.
Contributors listLists the users, aliases, and tokens assigned to the initial contribution step of the selected workflow.
Add Alias button Displays the Add Alias to Workflow Screen (page 5-15).
Add User button Displays the Add User: Basic Workflow (page 5-18).
Delete (Contributor) button
Enables you to delete the selected user from the initial contribution step.
Steps list Lists the steps and step types included in the selected workflow.
Add (Step) button Displays the Add New/Edit Step Screen (page 5-15).
Edit (Step) button Displays the Add New/Edit Step Screen (page 5-15).
Delete (Step) button Enables you to delete the selected step.
Start button Displays the Start Workflow Screen (page 5-22).
Cancel button
Cancels the selected workflow. If there are any content items still in the workflow process, any revisions in the workflow are deleted from the system. Any edits that have been made to the content items will be lost unless they have also been saved on a local hard drive.
Feature Description

5-12 Stellent Content Server Workflow Implementation Guide
Creating a Basic Workflow
Add New/Edit Workflow ScreenThe Add New/Edit Workflow screen is used to add or edit a Basic workflow. To access this screen, click Add or Edit in the left pane of the Workflow Admin: Workflows Tab (page 5-9).
Add Content to Workflow (New Content) ScreenThe Add Content to Workflow (New Content) screen is used to specify a new content item for a Basic workflow. To access this screen, select a workflow in the left pane and click New in the Content pane of the Workflow Admin: Workflows Tab (page 5-9).
Feature Description
Workflow Name field
The name for the workflow. Workflow Name has a maximum field length of 30 characters. The following characters are NOT acceptable: spaces, tabs, and the symbols ; ^ : @ & + " # % < > * ~ |
Description field A description of the workflow.
Security Group list
Specifies the security group for the content items.
Original Author Edit Rule
Identifies whether to permit the original author to create a new revision of the content when the author edits the content item.
Use Template check box and field
Select this check box and a template name if you want to use a workflow template. This box is displayed only if a template exists.
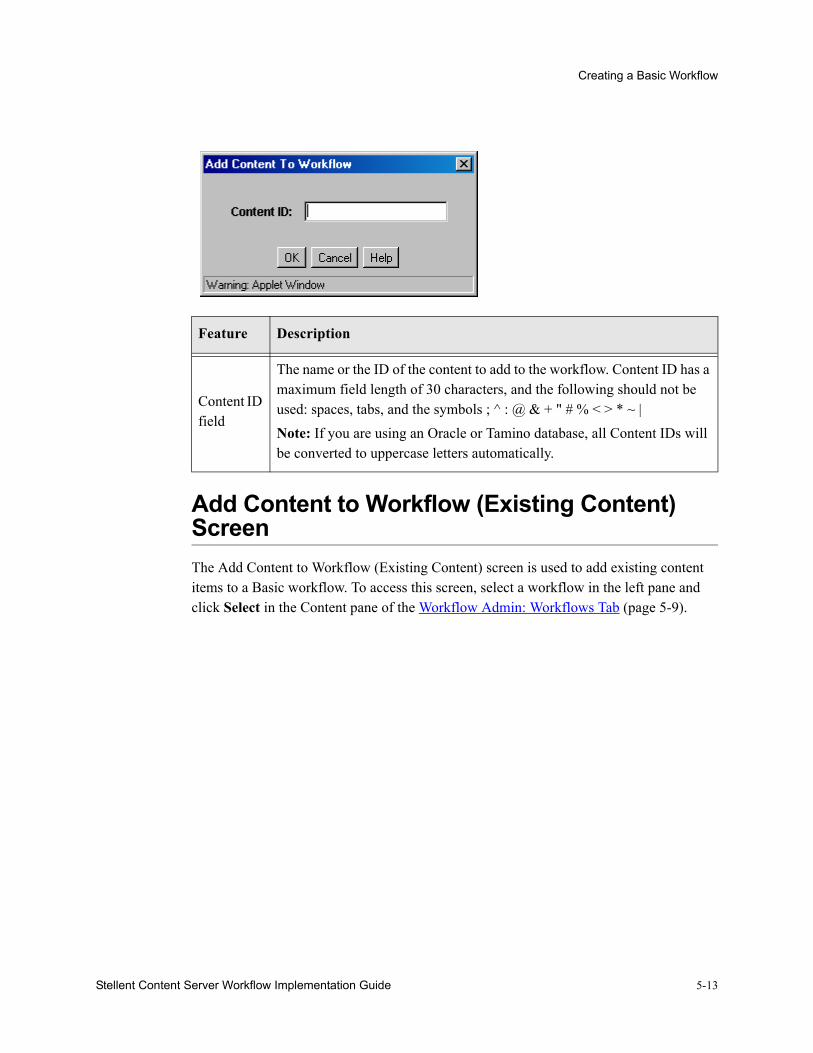
Stellent Content Server Workflow Implementation Guide 5-13
Creating a Basic Workflow
Add Content to Workflow (Existing Content) ScreenThe Add Content to Workflow (Existing Content) screen is used to add existing content items to a Basic workflow. To access this screen, select a workflow in the left pane and click Select in the Content pane of the Workflow Admin: Workflows Tab (page 5-9).
Feature Description
Content ID field
The name or the ID of the content to add to the workflow. Content ID has a maximum field length of 30 characters, and the following should not be used: spaces, tabs, and the symbols ; ^ : @ & + " # % < > * ~ |Note: If you are using an Oracle or Tamino database, all Content IDs will be converted to uppercase letters automatically.
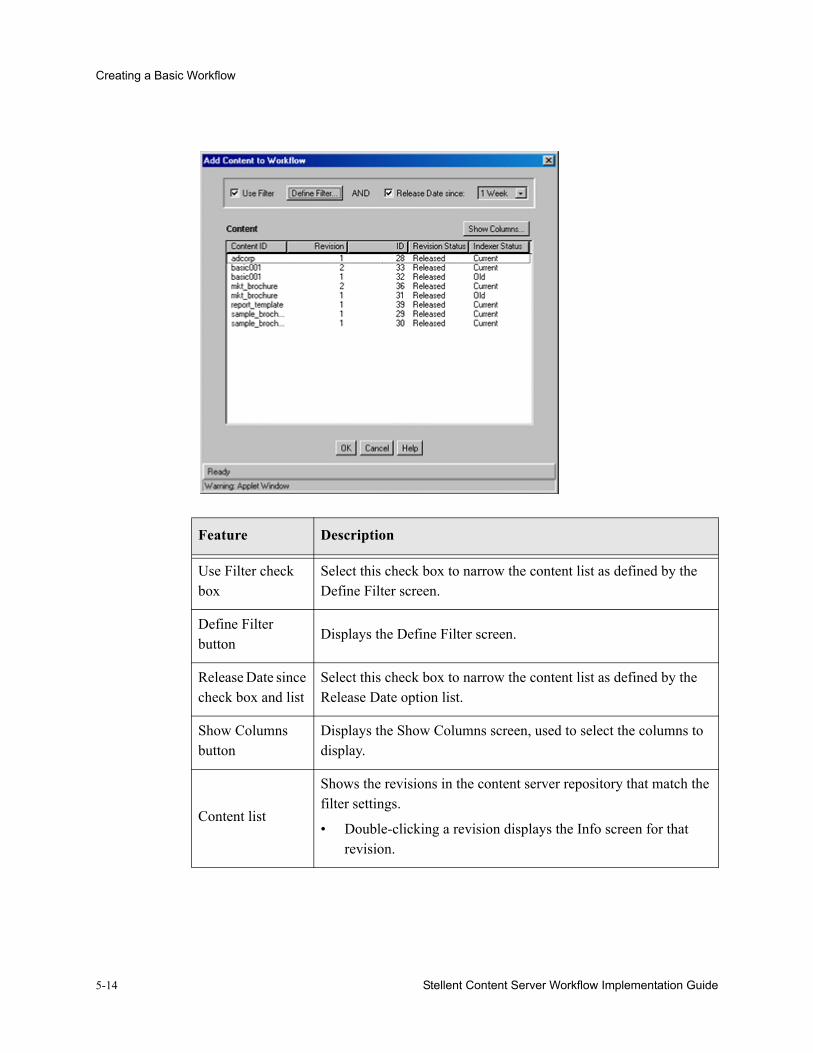
5-14 Stellent Content Server Workflow Implementation Guide
Creating a Basic Workflow
Feature Description
Use Filter check box
Select this check box to narrow the content list as defined by the Define Filter screen.
Define Filter button
Displays the Define Filter screen.
Release Date since check box and list
Select this check box to narrow the content list as defined by the Release Date option list.
Show Columns button
Displays the Show Columns screen, used to select the columns to display.
Content list
Shows the revisions in the content server repository that match the filter settings.
• Double-clicking a revision displays the Info screen for that revision.
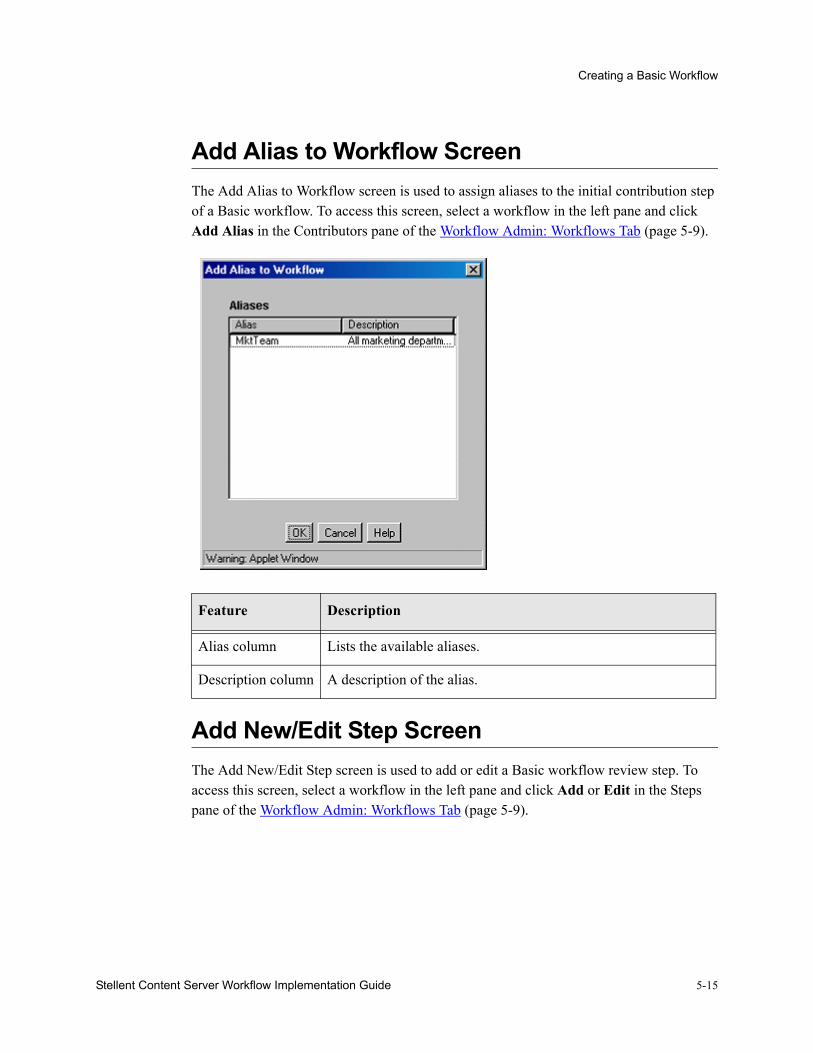
Stellent Content Server Workflow Implementation Guide 5-15
Creating a Basic Workflow
Add Alias to Workflow ScreenThe Add Alias to Workflow screen is used to assign aliases to the initial contribution step of a Basic workflow. To access this screen, select a workflow in the left pane and click Add Alias in the Contributors pane of the Workflow Admin: Workflows Tab (page 5-9).
Add New/Edit Step ScreenThe Add New/Edit Step screen is used to add or edit a Basic workflow review step. To access this screen, select a workflow in the left pane and click Add or Edit in the Steps pane of the Workflow Admin: Workflows Tab (page 5-9).
Feature Description
Alias column Lists the available aliases.
Description column A description of the alias.
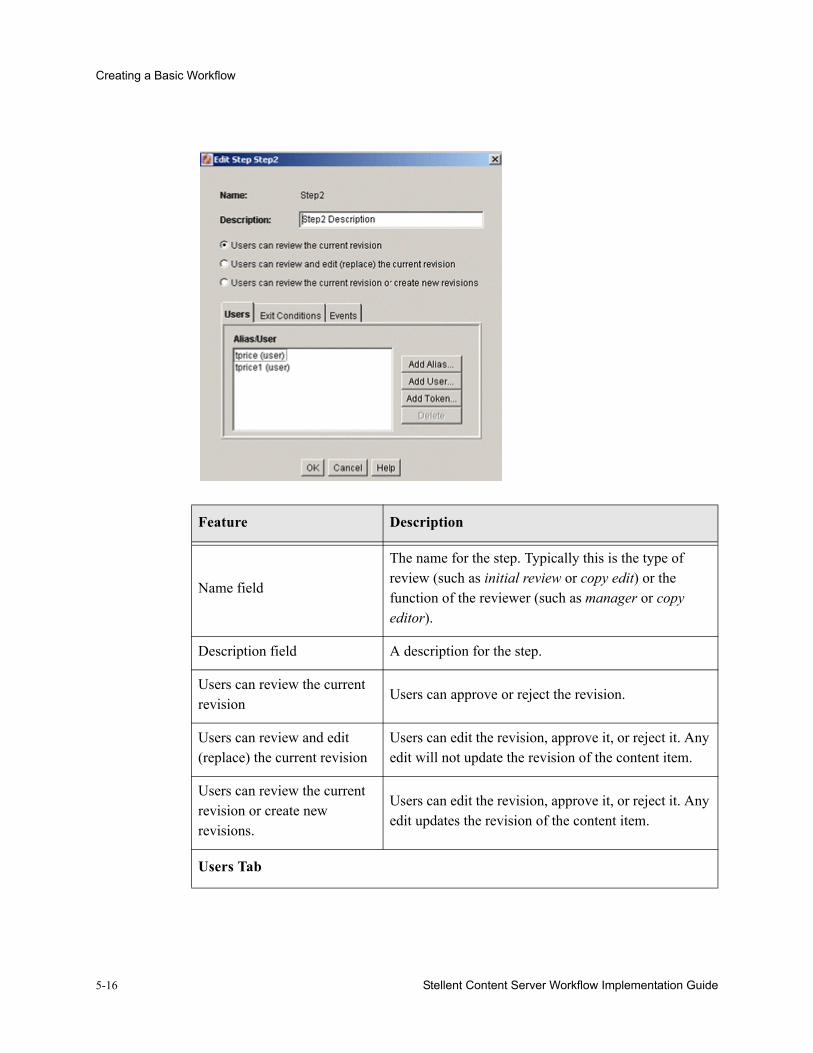
5-16 Stellent Content Server Workflow Implementation Guide
Creating a Basic Workflow
Feature Description
Name field
The name for the step. Typically this is the type of review (such as initial review or copy edit) or the function of the reviewer (such as manager or copy editor).
Description field A description for the step.
Users can review the current revision
Users can approve or reject the revision.
Users can review and edit (replace) the current revision
Users can edit the revision, approve it, or reject it. Any edit will not update the revision of the content item.
Users can review the current revision or create new revisions.
Users can edit the revision, approve it, or reject it. Any edit updates the revision of the content item.
Users Tab

Stellent Content Server Workflow Implementation Guide 5-17
Creating a Basic Workflow
Alias/User listLists the users, aliases, and tokens currently assigned to the step.
Add Aliases button Displays the Add Alias to Step Screen (page 5-18).
Add User button Displays the Add User: Basic Workflow (page 5-18).
Add Token button Displays the Add Token: Basic Workflow (page 5-20).
Delete buttonEnables you to delete the selected step from the workflow.
Exit Conditions Tab
All reviewers optionIf this is selected, all users assigned to the step must approve the revision before the workflow passes to the next step.
At least this many reviewers option and field
If this is selected, the workflow passes to the next step as soon as the specified number of users have approved the revision.
Use Additional Exit Condition check box and field
If this is selected, the conditions defined in the text box must be met before the workflow passes to the next step.
Edit buttonDisplays the Edit Additional Exit Condition Screen (page 5-20).
Clear button Clears the Exit Condition text box.
Events TabSee Add New/Edit Step Screen: Events Tab (page 6-21).
Feature Description
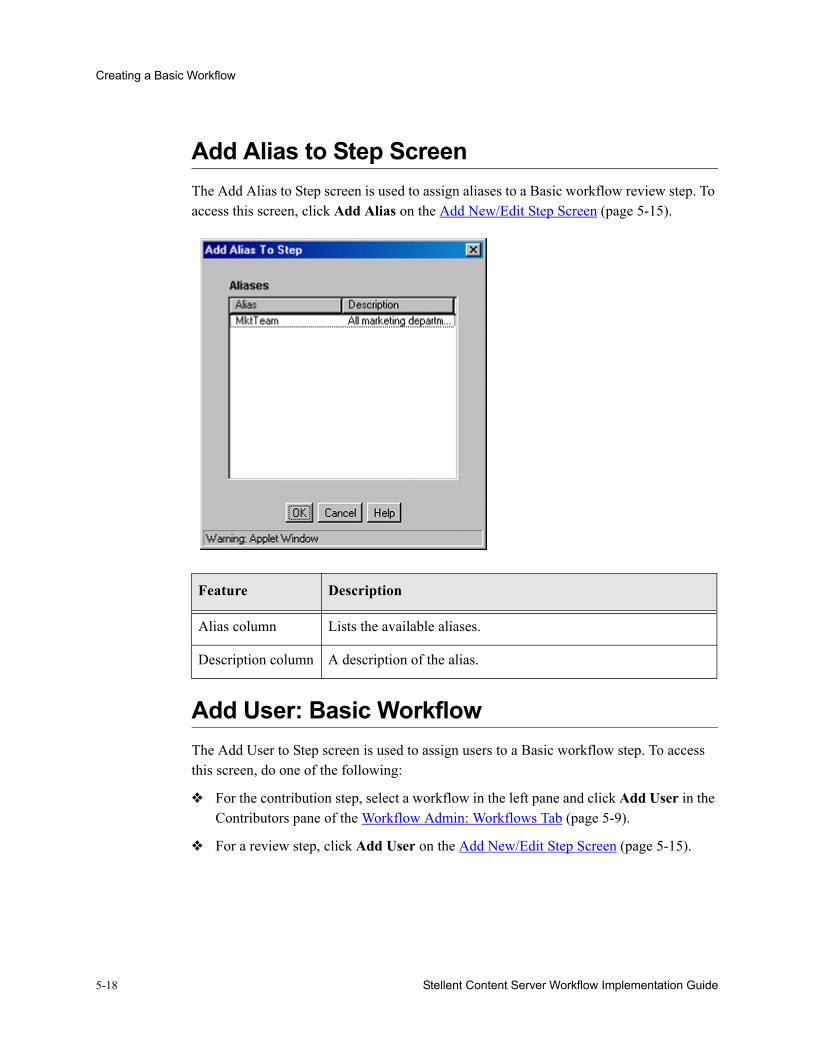
5-18 Stellent Content Server Workflow Implementation Guide
Creating a Basic Workflow
Add Alias to Step ScreenThe Add Alias to Step screen is used to assign aliases to a Basic workflow review step. To access this screen, click Add Alias on the Add New/Edit Step Screen (page 5-15).
Add User: Basic WorkflowThe Add User to Step screen is used to assign users to a Basic workflow step. To access this screen, do one of the following:
❖ For the contribution step, select a workflow in the left pane and click Add User in the Contributors pane of the Workflow Admin: Workflows Tab (page 5-9).
❖ For a review step, click Add User on the Add New/Edit Step Screen (page 5-15).
Feature Description
Alias column Lists the available aliases.
Description column A description of the alias.
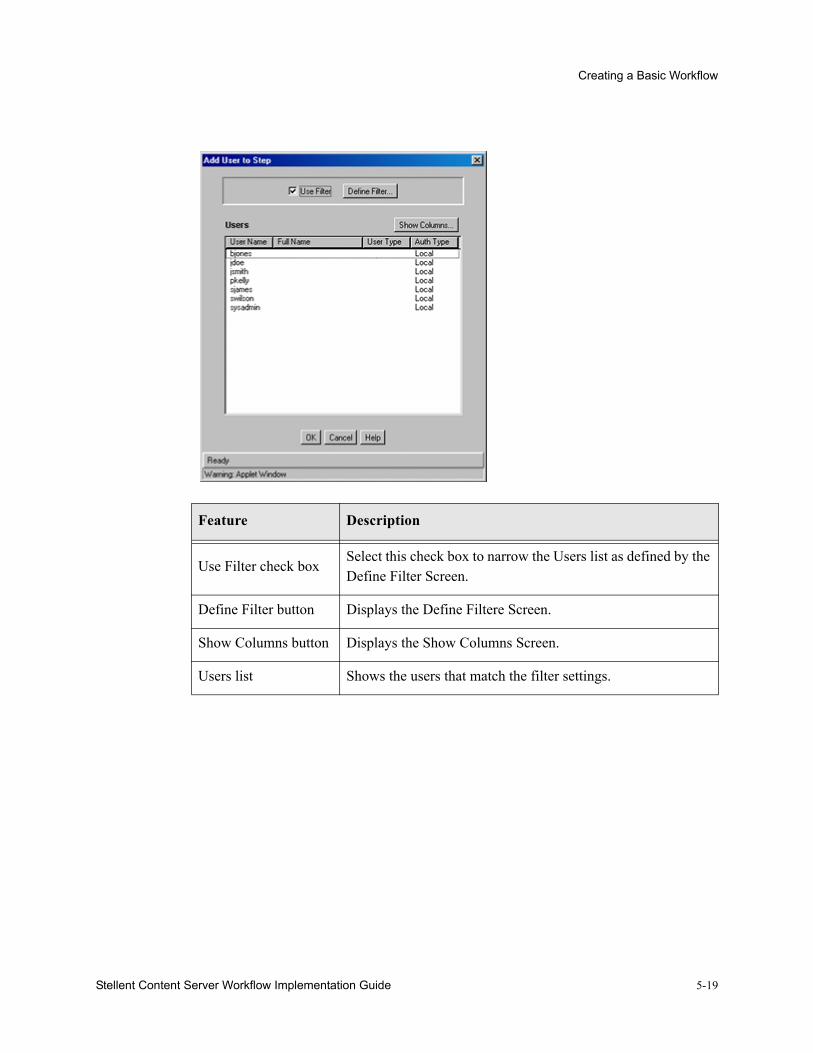
Stellent Content Server Workflow Implementation Guide 5-19
Creating a Basic Workflow
Feature Description
Use Filter check boxSelect this check box to narrow the Users list as defined by the Define Filter Screen.
Define Filter button Displays the Define Filtere Screen.
Show Columns button Displays the Show Columns Screen.
Users list Shows the users that match the filter settings.

5-20 Stellent Content Server Workflow Implementation Guide
Creating a Basic Workflow
Add Token: Basic WorkflowThe Add Token to Step screen is used to assign a workflow token to a Basic workflow review step. To access this screen, click Add Token on the Add New/Edit Step Screen (page 5-15).
Edit Additional Exit Condition ScreenThe Edit Additional Exit Condition screen is used to define exit conditions for a Basic workflow review step. To access this screen, click Edit in the Exit Conditions tab of the Add New/Edit Step Screen (page 5-15).
Feature Description
Name column Lists the available tokens.
Description column A description of the token.

Stellent Content Server Workflow Implementation Guide 5-21
Creating a Basic Workflow
Feature Description
Field listSelect the workflow condition or metadata field to be evaluated.
Operator listSelect an operator. This is a dependent option list that shows only the operators associated with the Field option.
Value list
The value for the specified metadata field.
• Depending on the option selected in the Field list, this field can be a text entry field, text entry field with Select button, or list of the available options.
• The following wildcards can be used in this field:* = one or more characters; ? = single character
Select button
Displays a list of existing items (such as content items or users), from which you can select a value for the Value field. This button appears only when certain metadata fields are selected.
5-22 Stellent Content Server Workflow Implementation Guide
Creating a Basic Workflow
Start Workflow ScreenThe Start Workflow screen is used to start a Basic workflow and add to the e-mail message that is sent to initial contributors. To access this screen, select a workflow in the left pane and click Start on the Workflow Admin: Workflows Tab (page 5-9).
AddAdds the conditional statement defined by the Field, Operator, and Value fields to the exit condition clause.
UpdateChanges the selected conditional statement to the statement defined by the Field, Operator, and Value fields.
Condition ClauseLists the conditional statements that have been added to the exit condition. Multiple clauses can be appended as AND statements.
Delete Deletes the selected conditional statement.
Custom Condition Expression
Enables display and edit of the Idoc Script generated from the condition clauses.
• The additional exit conditions must be Idoc Script statements that evaluate to “true” or “false”.
• Do not enclose the code in Idoc Script tags <$ $>.Caution: If you clear the Custom Condition Expression check box, the expression reverts to its original definition; all modifications are lost.
Feature Description

Stellent Content Server Workflow Implementation Guide 5-23
Creating a Basic Workflow
g
Feature Description
Message field Enter a message for the workflow contributors.


Stellent Content Server Workflow Implementation Guide 6-1
C h a p t e r
CUSTOMIZING WORKFLOWSTokens and jumps can be used to customize your workflows to accommodate different business scenarios. A token defines variable users in a workflow and a jump can be used to branch a workflow to a different side effect.
This section describes how to set up and use tokens and jumps. It discusses the following topics:
❖ About Tokens (page 6-3)
❖ Creating a Token (page 6-4)
❖ Changing a Token (page 6-5)
❖ Deleting a Token (page 6-5)
❖ Token Examples (page 6-6)
❖ Tokens User Interface (page 6-7)
❖ About Jumps (page 6-10)
❖ Jump Variables and Steps (page 6-13)
❖ Setting Up Jumps (page 6-14)
❖ Changing a Jump (page 6-17)
❖ Jump Examples (page 6-18)
❖ The Jump User Interface (page 6-21)

6-2 Stellent Content Server Workflow Implementation Guide
Customizing Workflows
IDOC SCRIPT FUNCTIONSJumps and tokens are created using Idoc Script, the Stellent Content Server scripting language. The interfaces create the correct syntax and usage for you when you create tokens and jumps. However, you may wish to customize your scripts using the following Idoc Script functions. See the Idoc Script Reference Guide for complete details about usage:
❖ wfAction: retrieves the action currently being performed on the revision.
❖ wfAdditionalExitCondition: retrieves the exit condition that has been defined for the current step.
❖ wfAddUser: adds a user, alias, or workflow token to the list of reviewers for a workflow.
❖ wfCurrentGet: retrieves a local state value from the companion file.
❖ wfCurrentSet: sets the local state value of a key in the companion file.
❖ wfCurrentStep: retrieves the name of a step relative to the current step.
❖ wfDisplayCondition: retrieves the exit condition for a workflow step.
❖ wfExit: exits a workflow step.
❖ wfGet: retrieves a state value from the companion file.
❖ wfGetStepTypeLabel: takes an internal workflow step value and turns it into a human-readable label.
❖ wfIsReleasable: indicates if the document is released (as far as the workflow is concerned).
❖ wfJumpEntryNotifyOff: turns on/off the jump notification.
❖ wfJumpMessage: defines a message that will be included in the notification e-mail that is issued when a jump is entered.
❖ wfJumpName: retrieves the name of the current jump.
❖ wfJumpReturnStep: retrieves the name of the step in the parent workflow that the revision returns to when exiting a workflow after the current jump.
❖ wfJumpTargetStep: retrieves the name of the step where the revision will jump if the conditions are met.
❖ wfMailSubject: defines the subject line of a workflow e-mail notification.

Stellent Content Server Workflow Implementation Guide 6-3
Customizing Workflows
❖ wfMessage: defines a message that will be included in a workflow e-mail notification.
❖ wfNotify: sends an e-mail to a specified user, alias, or workflow token.
❖ wfParentList: retrieves a list of the workflow steps that the revision has visited.
❖ wfReleaseDocument: causes a workflow to release all outstanding document revisions for a document that are currently being locked by the workflow.
❖ wfSet: sets a key with a particular value in the companion file.
❖ wfStart: sends the revision to the first step in the current workflow.
❖ wfupdateMetaData: defines a metadata value for the current content item revision in a workflow.
ABOUT TOKENSA token can be used to:
❖ Add a variable to a workflow which is interpreted to be a specific user or class of user when the workflow is run.
❖ Include users and aliases in workflow jumps.
❖ Define users with conditional statements.
Several sample workflow tokens are included in the Workflow Admin application; they can be used as is, or they can be modified to create your own workflow tokens. Note that these tokens can be used with Content Server or Stellent Collaboration Manager.
Token SyntaxThe Idoc Script function for tokens, wfAddUser, takes two parameters:
❖ User—The first parameter is the metadata field, alias name, or a variable that resolves to a user name or alias.
❖ Type—The second parameter is the type of token: user or alias.
Important: If a token does not resolve to any valid user names, the token is ignored. If no valid users are defined for a step, the revision moves to the next step in the workflow. For this reason, it is a good idea to identify at least one defined user for each step.
6-4 Stellent Content Server Workflow Implementation Guide
Customizing Workflows
All Idoc Script commands begin with <$ and end with $> delimiters. For example:
<$wfAddUser(dDocAuthor, "user")$>
<$wfAddUser("MktTeam", "alias")$>7
<$wfAddUser("myUserList", "alias")$>
See the Idoc Script Reference Guide for more information about Idoc Script syntax and usage.
CREATING A TOKEN
Follow these steps to create a token:
1. From the The Workflow Admin Application (page 3-5), select Options—Tokens. The predefined tokens in the Name list are associated with the sample workflow template that is included with the Workflow Admin application. You can use these tokens as is, or you can use them as templates to customize your own tokens.
The Workflow Tokens Screen (page 6-7) is displayed.
2. Click Add.
The Add/Edit Token Screen (page 6-8) is displayed.
3. Enter a token name in the Token Name field. The Token Name cannot be changed after the token is created. Try to use a descriptive name for the token (for example, GetOriginalAuthor, or AuthorManager).
4. Enter a detailed description in the Description field.
5. Click Add.
The Add Token User Screen (page 6-9) is displayed.
6. Select User or Alias.
7. Enter a metadata field.
• To specify the original author of the content item, enter dDocAuthor.
• To specify an alias, type the alias name exactly. See the Screen Aliases tab on the User Admin screen for a list of defined aliases.
8. Click OK. The Idoc Script containing the value you specified is shown in the User window.
9. Repeat steps 5 through 8 to add another user or alias.
Stellent Content Server Workflow Implementation Guide 6-5
Customizing Workflows
10. To create a conditional token, edit the Users field.
11. Click OK.
CHANGING A TOKENTo change an existing workflow token:
1. From the The Workflow Admin Application (page 3-5) select Options—Tokens.
The Workflow Tokens Screen (page 6-7) screen is displayed.
2. Select the token you want to change.
3. Click Edit.
The Add/Edit Token Screen (page 6-8) is displayed.
4. Edit the token script as necessary. See About Jumps (page 6-10) for more information.
5. Click OK.
DELETING A TOKENTo delete a workflow token:
1. From the The Workflow Admin Application (page 3-5) select Options—Tokens.
The Workflow Tokens Screen (page 6-7) is displayed.
2. Select the token you want to delete.
3. Click Delete.
A confirmation screen is displayed.
4. Click Yes.
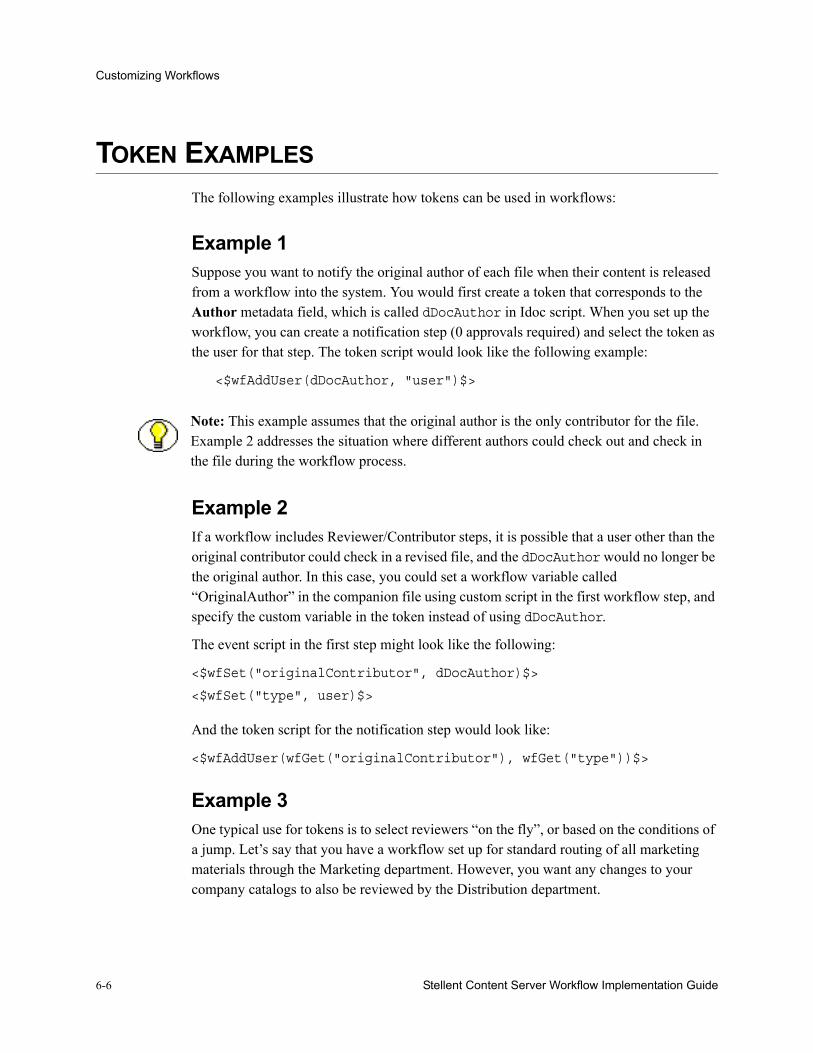
6-6 Stellent Content Server Workflow Implementation Guide
Customizing Workflows
TOKEN EXAMPLESThe following examples illustrate how tokens can be used in workflows:
Example 1Suppose you want to notify the original author of each file when their content is released from a workflow into the system. You would first create a token that corresponds to the Author metadata field, which is called dDocAuthor in Idoc script. When you set up the workflow, you can create a notification step (0 approvals required) and select the token as the user for that step. The token script would look like the following example:
<$wfAddUser(dDocAuthor, "user")$>
Example 2If a workflow includes Reviewer/Contributor steps, it is possible that a user other than the original contributor could check in a revised file, and the dDocAuthor would no longer be the original author. In this case, you could set a workflow variable called “OriginalAuthor” in the companion file using custom script in the first workflow step, and specify the custom variable in the token instead of using dDocAuthor.
The event script in the first step might look like the following:
<$wfSet("originalContributor", dDocAuthor)$>
<$wfSet("type", user)$>
And the token script for the notification step would look like:
<$wfAddUser(wfGet("originalContributor"), wfGet("type"))$>
Example 3One typical use for tokens is to select reviewers “on the fly”, or based on the conditions of a jump. Let’s say that you have a workflow set up for standard routing of all marketing materials through the Marketing department. However, you want any changes to your company catalogs to also be reviewed by the Distribution department.
Note: This example assumes that the original author is the only contributor for the file. Example 2 addresses the situation where different authors could check out and check in the file during the workflow process.

Stellent Content Server Workflow Implementation Guide 6-7
Customizing Workflows
You could create a jump that adds a token to the list of reviewers whenever the Type is “catalog”. The token script would look like:
<$wfAddUser("Dist_Dept", "alias")$>
Example 4Rather than creating a jump script for the previous example, you could define a conditional token that adds the Dist_Dept alias whenever the Type is “catalog”. The token script would look like the following:
<$if dDocType like "catalog"$>
<$wfAddUser("Dist_Dept", "alias")$>
<$endif$>
Example 5Another common use for tokens is specifying the current user’s manager as a reviewer. (The manager attribute must be specified as a user information field in the content server, or as a user attribute in an external directory such as LDAP or ADSI.) The token script would look like:
<$wfAddUser(getUserValue("uManager"), "user")$>
TOKENS USER INTERFACEThe following screens are all used in the creation and editing of tokens.
Workflow Tokens ScreenThe Workflow Tokens screen is used to add, edit, and delete workflow tokens. To access this screen, select Options—Tokens from the The Workflow Admin Application (page 3-5).
Note: The predefined tokens in the Name list are associated with the sample workflow template that is included with the Workflow Admin application. You can use these tokens as is, or you can use them as templates to customize your own tokens.
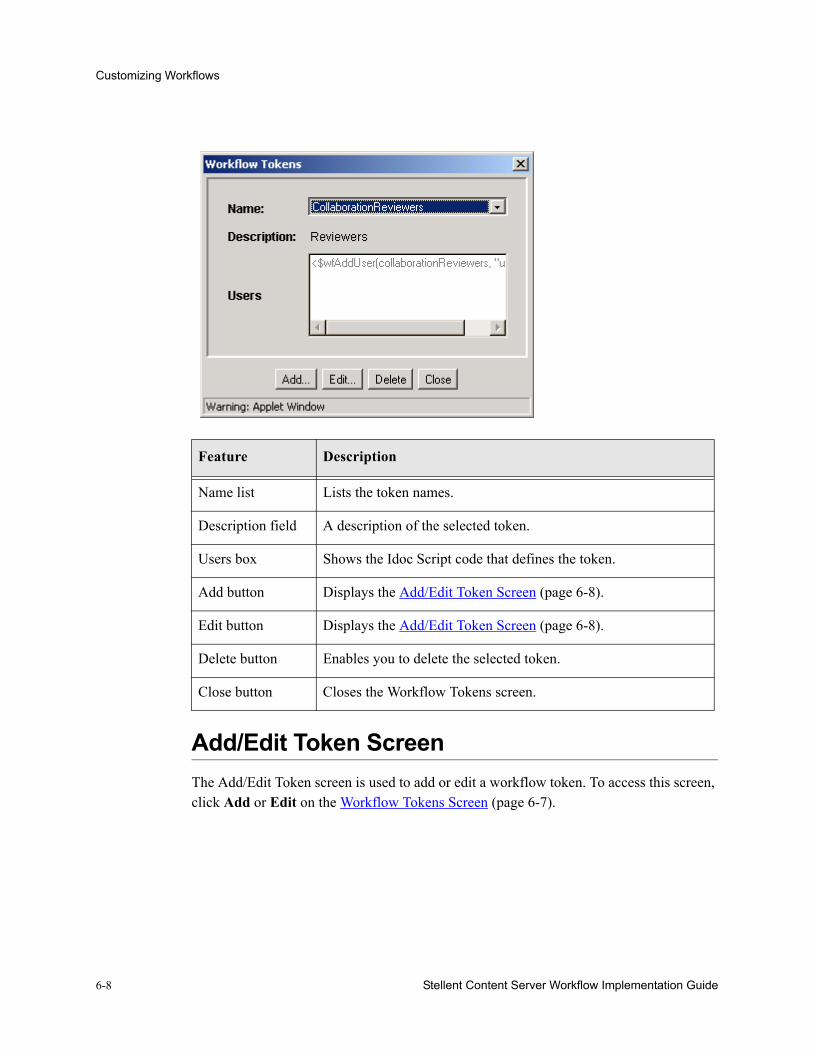
6-8 Stellent Content Server Workflow Implementation Guide
Customizing Workflows
Add/Edit Token ScreenThe Add/Edit Token screen is used to add or edit a workflow token. To access this screen, click Add or Edit on the Workflow Tokens Screen (page 6-7).
Feature Description
Name list Lists the token names.
Description field A description of the selected token.
Users box Shows the Idoc Script code that defines the token.
Add button Displays the Add/Edit Token Screen (page 6-8).
Edit button Displays the Add/Edit Token Screen (page 6-8).
Delete button Enables you to delete the selected token.
Close button Closes the Workflow Tokens screen.
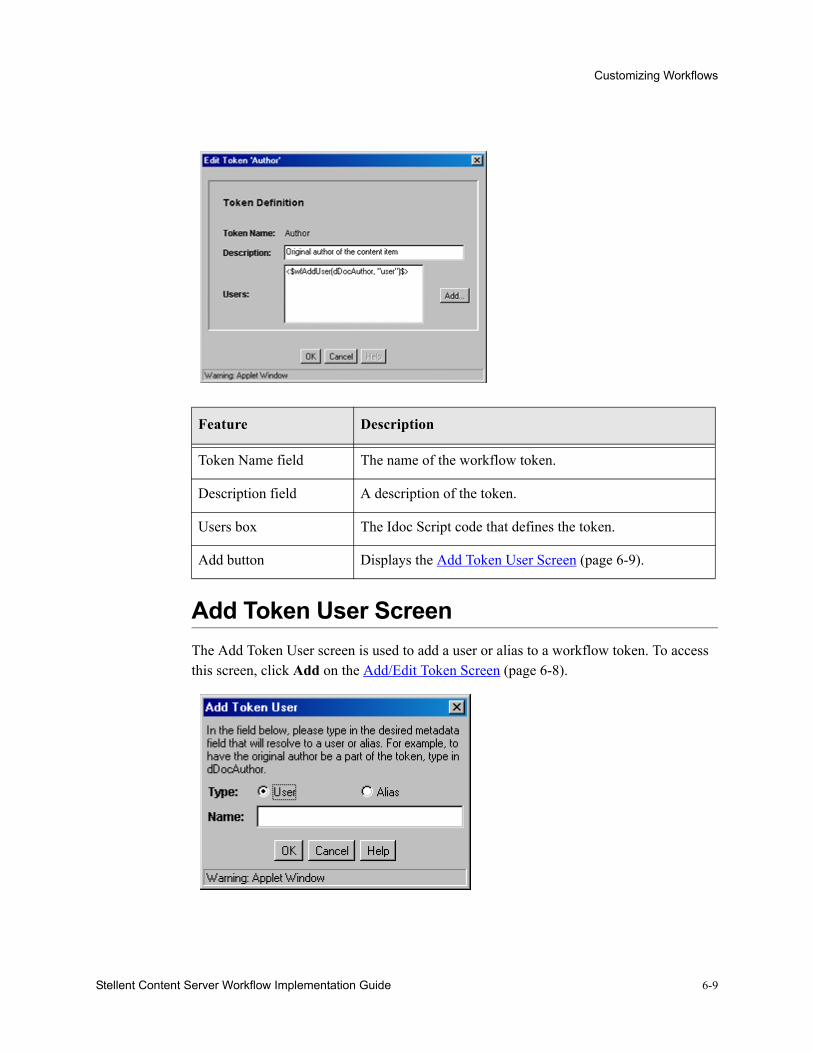
Stellent Content Server Workflow Implementation Guide 6-9
Customizing Workflows
Add Token User ScreenThe Add Token User screen is used to add a user or alias to a workflow token. To access this screen, click Add on the Add/Edit Token Screen (page 6-8).
Feature Description
Token Name field The name of the workflow token.
Description field A description of the token.
Users box The Idoc Script code that defines the token.
Add button Displays the Add Token User Screen (page 6-9).

6-10 Stellent Content Server Workflow Implementation Guide
Customizing Workflows
ABOUT JUMPSJumps enable you to customize workflows for your system, your content, and your users. A jump is usually a conditional statement, written in Idoc Script.
Typical uses of jumps include:
❖ Specifying more than one metadata field as the criteria for entering a workflow.
❖ Taking action on content automatically after a certain amount of time has passed.
❖ Defining different paths for files to move through the same workflow depending on metadata and user criteria.
❖ Releasing a workflow document prior to approval by using the side effect: Release document from edit state.
The following is an example of a jump that exits the workflow if the author is sysadmin:
<$if dDocAuthor like "sysadmin"$>
<$wfSet("wfJumpName", "Entry step")$>
<$wfSet("wfJumpTargetStep", wfExit(0, 0))$>
<$wfSet("wfJumpEntryNotifyOff", "0")$>
<$endif$>
In most cases, a jump will include a conditional statement. However, you can create a jump that consists of non-conditional code, such as:
<$wfSet("custom_wf_variable", new_value)$>
<$wfSet("wfJumpTargetStep", step_1)$>
Feature Description
Type optionsUser—An individual user login.Alias—A group of users defined by an alias.
Name fieldEnter the metadata field that corresponds to a user or alias.Original author (User)—Type dDocAuthor.Alias—Type the alias name exactly.

Stellent Content Server Workflow Implementation Guide 6-11
Customizing Workflows
You can use this type of jump to execute code or move a revision to another step automatically
Jumps and EventsAs mentioned in Events (page 2-5), each step in a workflow has an entry, update, and exit event.
A script with one or more jumps can be defined for any or all of the events in a step. Any Idoc Script defined for an event is evaluated at a specific time that depends on the type of event:
❖ An entry event script is evaluated upon entering the step. Every time a step is entered, a default script is evaluated in addition to any user-defined custom script. The default script keeps track of the number of times the step has been entered (entryCount) and the last time the step was entered (lastEntryTs).
If the entry event script does not result in a jump or exit, any users, aliases, and tokens are evaluated, and e-mail notifications are sent.
❖ An update event script is evaluated and triggered by a state change of the content, such as the workflow update cycle, the update of the revision’s metadata or approval or checkin of the revision.
Extra exit conditions are evaluated each time the update event script is evaluated.
❖ An exit event script is evaluated when a revision has completed the step’s approval requirements and the step’s extra exit conditions are met.
By default, the workflow update cycle occurs hourly. This cycle time can be increased in increments of one hour (using the WorkflowIntervalHours configuration setting), but cannot be reduced to less than one hour. To have update scripts evaluated more often or in response to other events, you could initiate a metadata update cycle without changing any metadata
Important: You can create jumps without comprehensive knowledge of Idoc Script, but some familiarity is helpful. See the Idoc Script Reference Guide for more information.
Important: Update and exit event scripts are not run when a revision is rejected. Any code that is to be evaluated upon rejection must be located in the entry event script for the step that the rejected file is sent to.
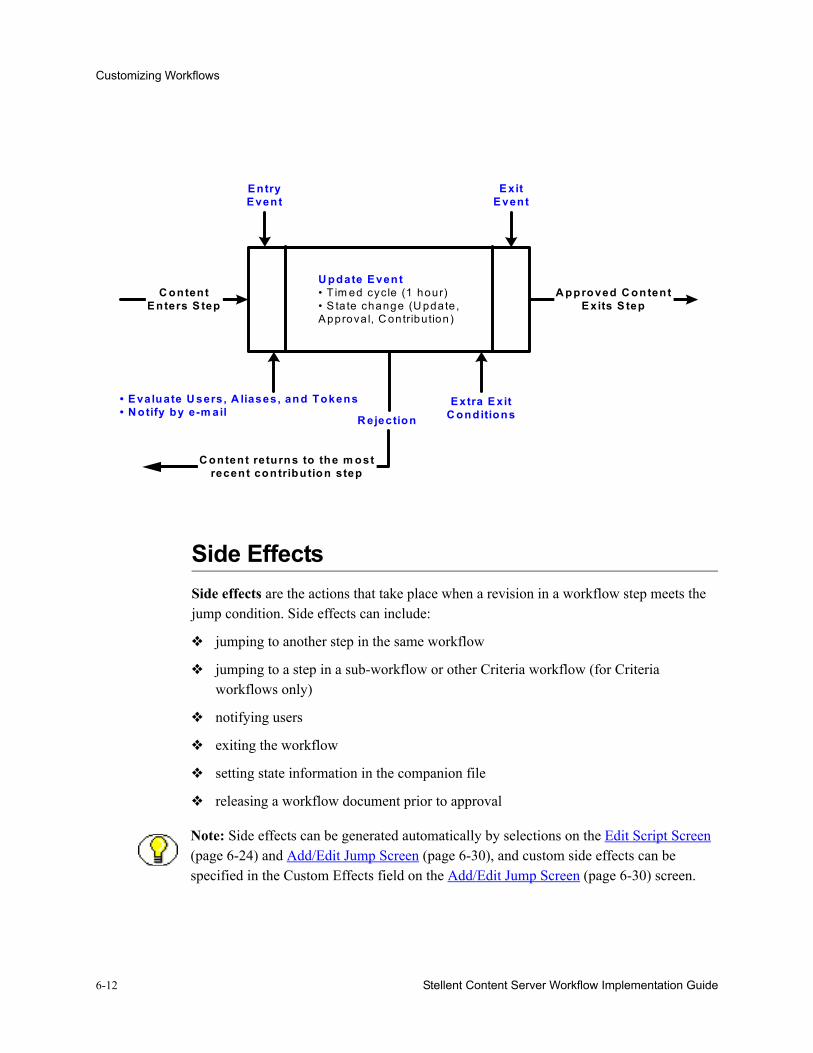
6-12 Stellent Content Server Workflow Implementation Guide
Customizing Workflows
Side EffectsSide effects are the actions that take place when a revision in a workflow step meets the jump condition. Side effects can include:
❖ jumping to another step in the same workflow
❖ jumping to a step in a sub-workflow or other Criteria workflow (for Criteria workflows only)
❖ notifying users
❖ exiting the workflow
❖ setting state information in the companion file
❖ releasing a workflow document prior to approval
C ontentE nters S tep
A pproved C ontentE xits S tep
E ntryEvent
• E valuate U sers, A liases, and Tokens• N otify by e-m ail
R ejection
E xitE vent
U pdate Event• T im ed cyc le (1 hour)• S ta te change (U pdate ,Approva l, C ontribution)
Extra E xitC onditions
C ontent returns to the m ostrecent contribution step
Note: Side effects can be generated automatically by selections on the Edit Script Screen (page 6-24) and Add/Edit Jump Screen (page 6-30), and custom side effects can be specified in the Custom Effects field on the Add/Edit Jump Screen (page 6-30) screen.

Stellent Content Server Workflow Implementation Guide 6-13
Customizing Workflows
JUMP VARIABLES AND STEPSA jump can include a target step, which tells the workflow where to go to if the content meets the jump condition. The following is an example of a target step that sends the content to the next step in the workflow:
<$wfSet("wfJumpTargetStep", wfCurrentStep(1))$>
A jump can also include a return step, which tells the workflow where to go if the content is returning from another workflow. The following is an example of a return step that sends the content to the next step in the workflow:
<$wfSet("wfJumpReturnStep", wfCurrentStep(1))$>
A step name variable, step_name>@<workflow_name, is assigned to each step in a workflow. There are two ways to reference a step in a jump:
❖ Explicit reference is made to a specific step name, such as Editor@Marketing Brochures.
❖ Symbolic reference is made relative to the current step and workflow, such as wfCurrentStep(-1) (previous step) or wfStart (first step in the workflow).
The entry count variable, entryCount, keeps track of how many times a step has been entered. This is part of the default entry script that is updated each time a step is entered. The following is an example of how an entry count variable is used in a conditional statement:
<$if entryCount = 1$>
The last entry variable, lastEntryTs, keeps track of when the step was last entered. This is part of the default entry script that is updated each time a step is entered. The following is an example of how the last entry variable is used to specify that action should occur if the step has not been acted on within seven days:
<$if parseDate(wfCurrentGet("lastEntryTs")) < dateCurrent(-7)$>
Tech Tip: Use symbolic references rather than explicit step names when creating a script template.

6-14 Stellent Content Server Workflow Implementation Guide
Customizing Workflows
SETTING UP JUMPSBefore you create jumps in a workflow, you should draw a flowchart and work out all the possible jump scenarios. A recommended method of structuring jumps is to create a main workflow with steps that jump to sub-workflows. (See the example flowchart below.)
After you have decided what jumps need to occur within a workflow, set up the jumps and then test them. You can create jumps directly in an existing workflow, or you can create script templates for jumps that will be reused in different workflows.

Stellent Content Server Workflow Implementation Guide 6-15
Customizing Workflows
CREATING A JUMPTo create a jump:
1. Create the workflow that will contain jumps. See Setting Up a Criteria Workflow (page 4-4) or Setting up a Basic Workflow (page 5-4).
2. Select the workflow on the Workflow Admin: Criteria Tab or the Workflow Admin: Workflows Tab (depending on the type of workflow).
3. In the Steps pane, click Add, or select the step that will include the jump and click Edit.
The Add New/Edit Step screen for the workflow type (Criteria or Basic) is displayed.
4. Click the Events tab.
5. Click Edit next to the event (entry, update, or exit) that will contain the jump.
• If a script template does not exist, the Edit Script Screen (page 6-24) is displayed. Go to step 8.
• If a script template exists, the Edit Script for StepName Screen (page 6-23) is displayed.
6. Select an editing option:
• To create the script from a blank screen, select Create New.
• To create the script from a script template, select Use Script Template and then select a template from the option list.
7. Click OK.
The Edit Script Screen (page 6-24) is displayed.
To set up the side effects for the jump:8. On the Jumps tab, click Add, or select an existing jump and click Edit.
The Add/Edit Jump Screen (page 6-30) is displayed.
9. For a new jump, enter a jump name. The Jump Name cannot be changed after the jump is created. Try to use a meaningful, descriptive name.
10. If the jump needs to specify a return point, select the Has Return Point check box and select a return point from the option list. The possible options are: Current Step, Next Step, Previous Step.

6-16 Stellent Content Server Workflow Implementation Guide
Customizing Workflows
11. If the reviewers for this step should not be notified when the jump is entered, select the Do not notify users on entry check box.
12. If the content item should be released prior to approval, select the Release document from edit state check box.
13. Enter any custom side effects in the Custom Effects field. See Jump Examples (page 6-18) for some examples.
14. If the reviewers will be notified when the jump is entered, click the Message tab and enter the notification message.
15. Click OK. The Edit Script screen is re-displayed.
To set up the conditional statement for the jump:16. Select a metadata field from the Field option list. This is the workflow conditions or
metadata field to be evaluated.
17. Select an operator from the Operator option list. This is a dependent option list that shows only the operators associated with the Field.
18. Select a value from the Value option list. This is the value associated with the specified metadata field.
19. Click Add to add the conditional statement to the script.
To complete the jump:20. If the jump needs to specify a target step:
• To specify a specific step, click Select, and then select the workflow and step name on the Select Target Step screen.The target step name is displayed in the target step area.
• To select a symbolic step, such as the current step or exit the workflow, select the step from the Target Step pull-down option list.
21. To modify the script that was just created, click the Custom tab, select the Custom Script Expression check box, and edit the code.
Caution: If you clear the Custom Script Expression check box, the expression reverts to its original definition; all modifications will be lost.

Stellent Content Server Workflow Implementation Guide 6-17
Customizing Workflows
To test the script:22. Click the Test tab.
23. Click Select.
The Content Item View Screen (page 6-34) is displayed.
24. To narrow the content list, select the Use Filter check box, click Define Filter, select the filter criteria, and click OK.
25. Select a content item to test and click OK.
26. Click Load Item's Workflow State.
If the selected content item is in a workflow, the companion file is loaded in the Input Data field.
27. Click Test Script.
28. The test results are displayed in the Results field.
• The value of each parameter in the script is displayed.
• If any Idoc script errors occur, they are displayed along with the script containing the errors.
29. To save the script, click OK.
30. Continue adding jumps as needed to different steps.
CHANGING A JUMPTo change an existing jump:
1. Select the workflow on the Workflow Admin: Criteria Tab (page 4-9) or the Workflow Admin: Workflows Tab (page 5-9).
2. In the Steps pane, select the step that includes the jump to be changed.
3. Click Edit in the Steps pane.
The Add New/Edit Step screen appears for the workflow type (Criteria or Basic).
Tech Tip: Check in and process a test document so that it is in the workflow and at the step you are adding the jump to, and then select that content item for testing. If the selected content item is not currently in a workflow, you can still use it to test the script, but it will be treated as if it were newly in the workflow.

6-18 Stellent Content Server Workflow Implementation Guide
Customizing Workflows
4. Click the Events tab.
5. To delete a jump, click Clear in the corresponding event pane.
6. To change a jump, click Edit in the corresponding event pane.
The Edit Script for StepName Screen (page 6-23) is displayed.
7. Select an editing option:
• To edit the existing script, select Edit Current.
• To create a new script, select Create New.
• To use a script template, select Use Script Template and then select a template from the option list.
The Edit Script Screen (page 6-24) is displayed.
8. Use the Add, Edit, and Delete buttons in the Jumps pane to change the jump side effects.
9. Use the Field, Operator, Value fields and Add and Update buttons in the Script Clauses pane to change the conditional statements for the jumps.
10. Use the Target Step option list to change the target step for the jump.
11. To change the automatically generated script, click the Custom tab, select the Custom Script Expression check box, and edit the code.
12. Test the script before saving it. See step 22 of Creating a Jump (page 6-15).
13. Click OK to save the changes.
JUMP EXAMPLESThe following examples describe how to set up different types of jumps.
Jump Example 1: Metadata Criteria JumpPerhaps ou have a Criteria workflow called Marketing Brochures that is defined with the Marketing security group and the MktBrochure content type. However, any brochures submitted by a graphic artist do not need to go through the first step, which is graphics
Caution: If you clear the Custom Script Expression check box, the expression reverts to its original definition; all modifications will be lost.
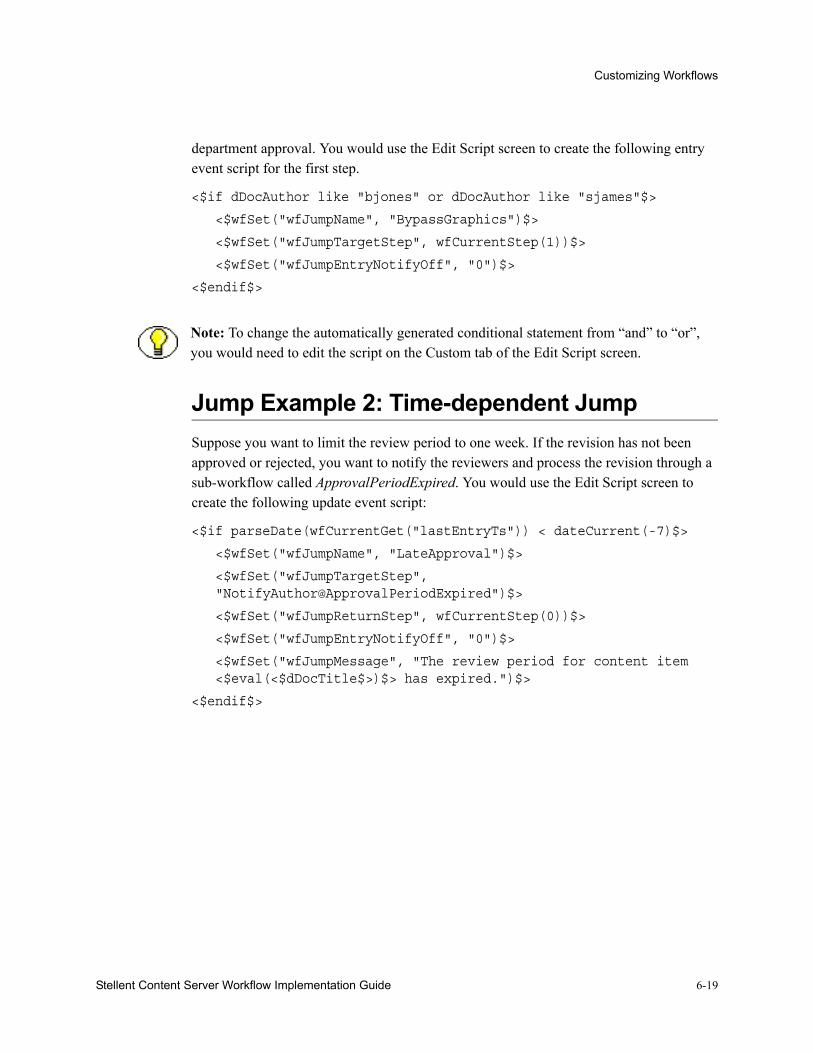
Stellent Content Server Workflow Implementation Guide 6-19
Customizing Workflows
department approval. You would use the Edit Script screen to create the following entry event script for the first step.
<$if dDocAuthor like "bjones" or dDocAuthor like "sjames"$>
<$wfSet("wfJumpName", "BypassGraphics")$>
<$wfSet("wfJumpTargetStep", wfCurrentStep(1))$>
<$wfSet("wfJumpEntryNotifyOff", "0")$>
<$endif$>
Jump Example 2: Time-dependent JumpSuppose you want to limit the review period to one week. If the revision has not been approved or rejected, you want to notify the reviewers and process the revision through a sub-workflow called ApprovalPeriodExpired. You would use the Edit Script screen to create the following update event script:
<$if parseDate(wfCurrentGet("lastEntryTs")) < dateCurrent(-7)$>
<$wfSet("wfJumpName", "LateApproval")$>
<$wfSet("wfJumpTargetStep", "NotifyAuthor@ApprovalPeriodExpired")$>
<$wfSet("wfJumpReturnStep", wfCurrentStep(0))$>
<$wfSet("wfJumpEntryNotifyOff", "0")$>
<$wfSet("wfJumpMessage", "The review period for content item <$eval(<$dDocTitle$>)$> has expired.")$>
<$endif$>
Note: To change the automatically generated conditional statement from “and” to “or”, you would need to edit the script on the Custom tab of the Edit Script screen.
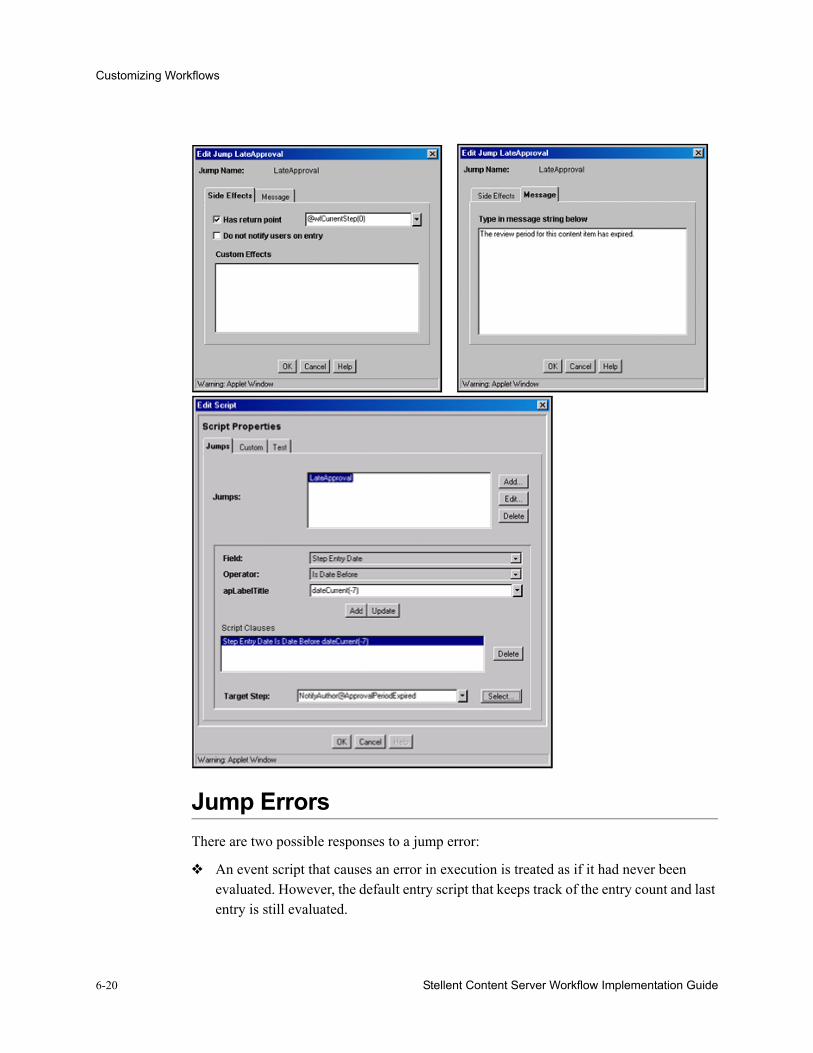
6-20 Stellent Content Server Workflow Implementation Guide
Customizing Workflows
Jump ErrorsThere are two possible responses to a jump error:
❖ An event script that causes an error in execution is treated as if it had never been evaluated. However, the default entry script that keeps track of the entry count and last entry is still evaluated.

Stellent Content Server Workflow Implementation Guide 6-21
Customizing Workflows
❖ A jump to an invalid step or a step in an inactive workflow results in an error, and the revision is treated as if it has completed the last step of the workflow.
THE JUMP USER INTERFACEThe following screens are used to create jumps.
Add New/Edit Step Screen: Events TabThe Events tab of the Add New/Edit Step screen is used to add or edit step event scripts. To access this tab, click the Events tab on the Add New/Edit Step Screen (page 4-13) for a Criteria workflow or the Add New/Edit Step Screen (page 5-15) for a Basic workflow.

6-22 Stellent Content Server Workflow Implementation Guide
Customizing Workflows
Feature Description
Name fieldThe name for the step. Typically this is the type of review (such as initial review or copy edit) or the function of the reviewer (such as manager or copy editor).
Description field A description for the step.
Users can review the current revision
Users can approve or reject the revision.
Users can review and edit (replace) the current revision
Users can edit the revision, approve it, or reject it. Any edit will not update the revision of the content item.
Users can review the current revision or create new revisions.
Users can edit the revision, approve it, or reject it. Any edit updates the revision of the content item.
Entry field Displays the script that will be evaluated when the step is entered.
Edit (Entry) button
• If an entry event script or script template exists, the Edit Script for StepName Screen (page 6-23) is displayed.
• If no entry event script or script template exists, the Edit Script Screen (page 6-24) is displayed.
Clear (Entry) button
Deletes the script from the Entry field.
Update field
Displays the script that will be evaluated when any of the following events occurs:
• Hourly workflow update cycle
• Update of the revision’s metadata
• Any approval of the revision
• Any checkin of the revision
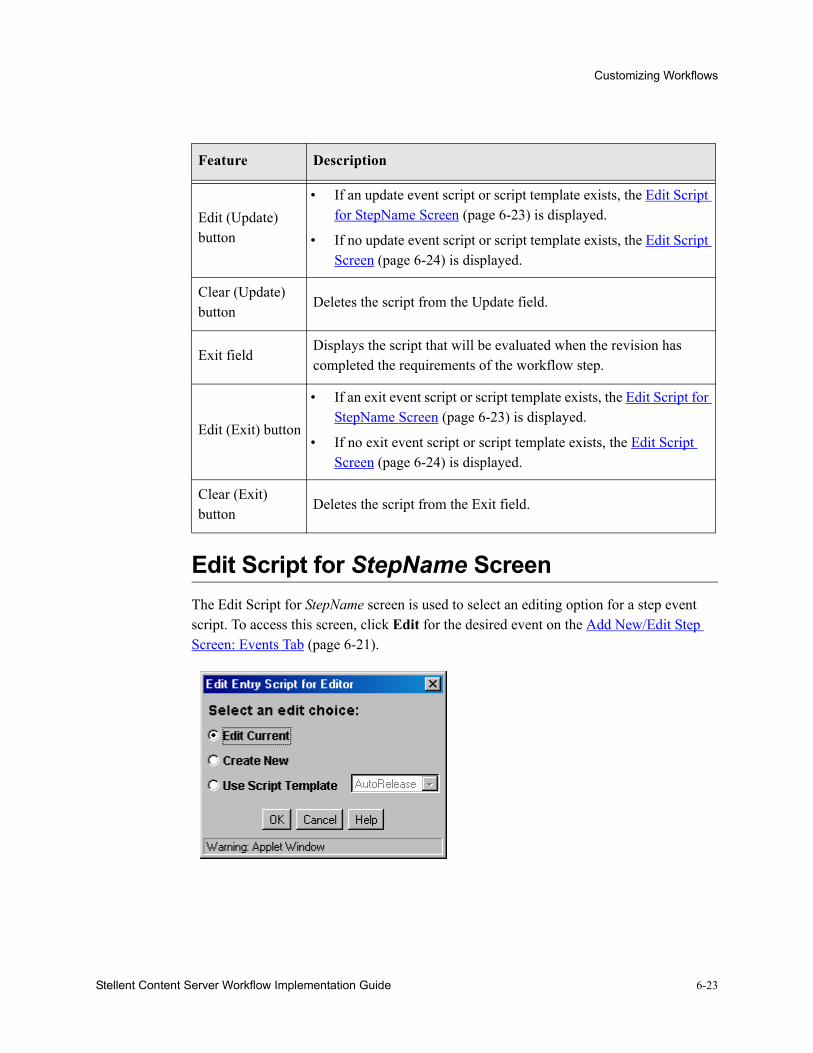
Stellent Content Server Workflow Implementation Guide 6-23
Customizing Workflows
Edit Script for StepName ScreenThe Edit Script for StepName screen is used to select an editing option for a step event script. To access this screen, click Edit for the desired event on the Add New/Edit Step Screen: Events Tab (page 6-21).
Edit (Update) button
• If an update event script or script template exists, the Edit Script for StepName Screen (page 6-23) is displayed.
• If no update event script or script template exists, the Edit Script Screen (page 6-24) is displayed.
Clear (Update) button
Deletes the script from the Update field.
Exit fieldDisplays the script that will be evaluated when the revision has completed the requirements of the workflow step.
Edit (Exit) button
• If an exit event script or script template exists, the Edit Script for StepName Screen (page 6-23) is displayed.
• If no exit event script or script template exists, the Edit Script Screen (page 6-24) is displayed.
Clear (Exit) button
Deletes the script from the Exit field.
Feature Description
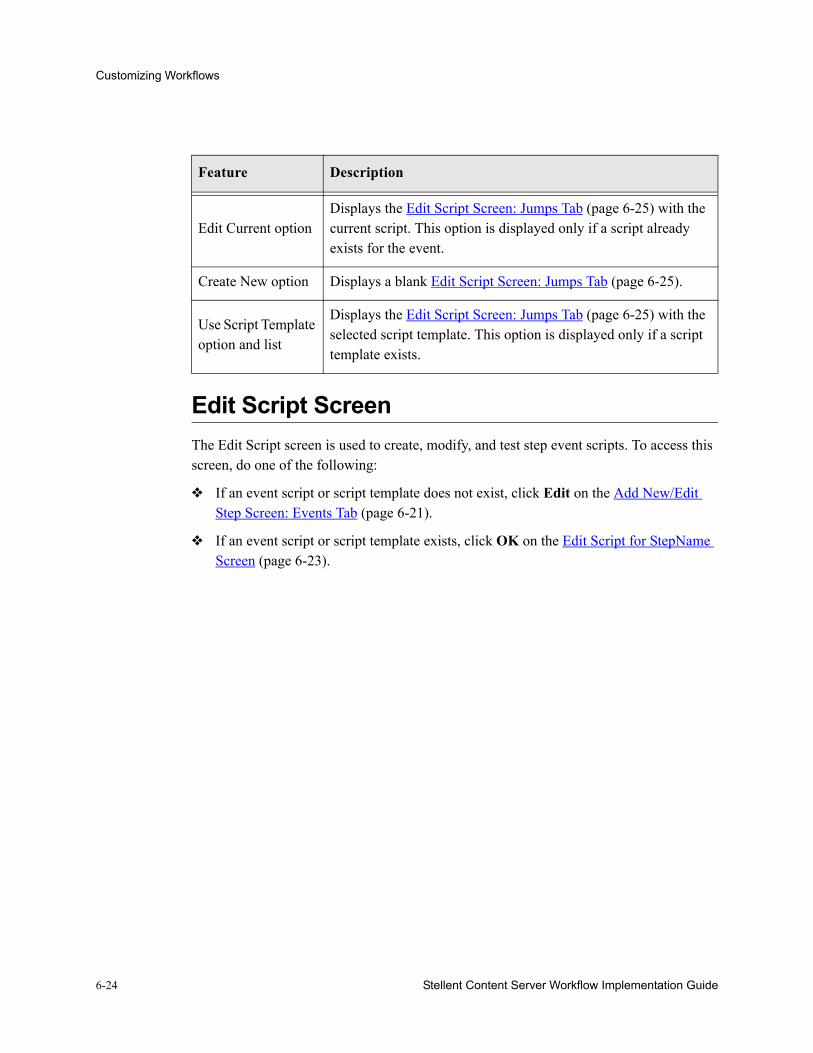
6-24 Stellent Content Server Workflow Implementation Guide
Customizing Workflows
Edit Script ScreenThe Edit Script screen is used to create, modify, and test step event scripts. To access this screen, do one of the following:
❖ If an event script or script template does not exist, click Edit on the Add New/Edit Step Screen: Events Tab (page 6-21).
❖ If an event script or script template exists, click OK on the Edit Script for StepName Screen (page 6-23).
Feature Description
Edit Current optionDisplays the Edit Script Screen: Jumps Tab (page 6-25) with the current script. This option is displayed only if a script already exists for the event.
Create New option Displays a blank Edit Script Screen: Jumps Tab (page 6-25).
Use Script Template option and list
Displays the Edit Script Screen: Jumps Tab (page 6-25) with the selected script template. This option is displayed only if a script template exists.
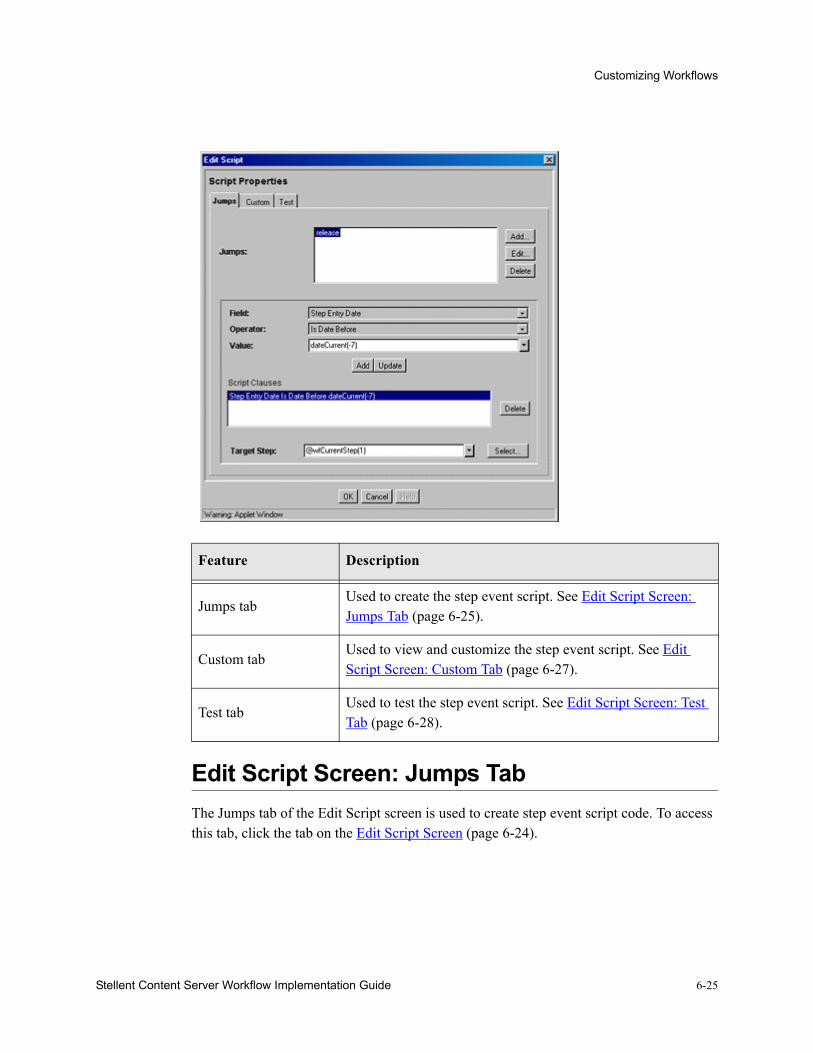
Stellent Content Server Workflow Implementation Guide 6-25
Customizing Workflows
Edit Script Screen: Jumps TabThe Jumps tab of the Edit Script screen is used to create step event script code. To access this tab, click the tab on the Edit Script Screen (page 6-24).
Feature Description
Jumps tabUsed to create the step event script. See Edit Script Screen: Jumps Tab (page 6-25).
Custom tabUsed to view and customize the step event script. See Edit Script Screen: Custom Tab (page 6-27).
Test tabUsed to test the step event script. See Edit Script Screen: Test Tab (page 6-28).
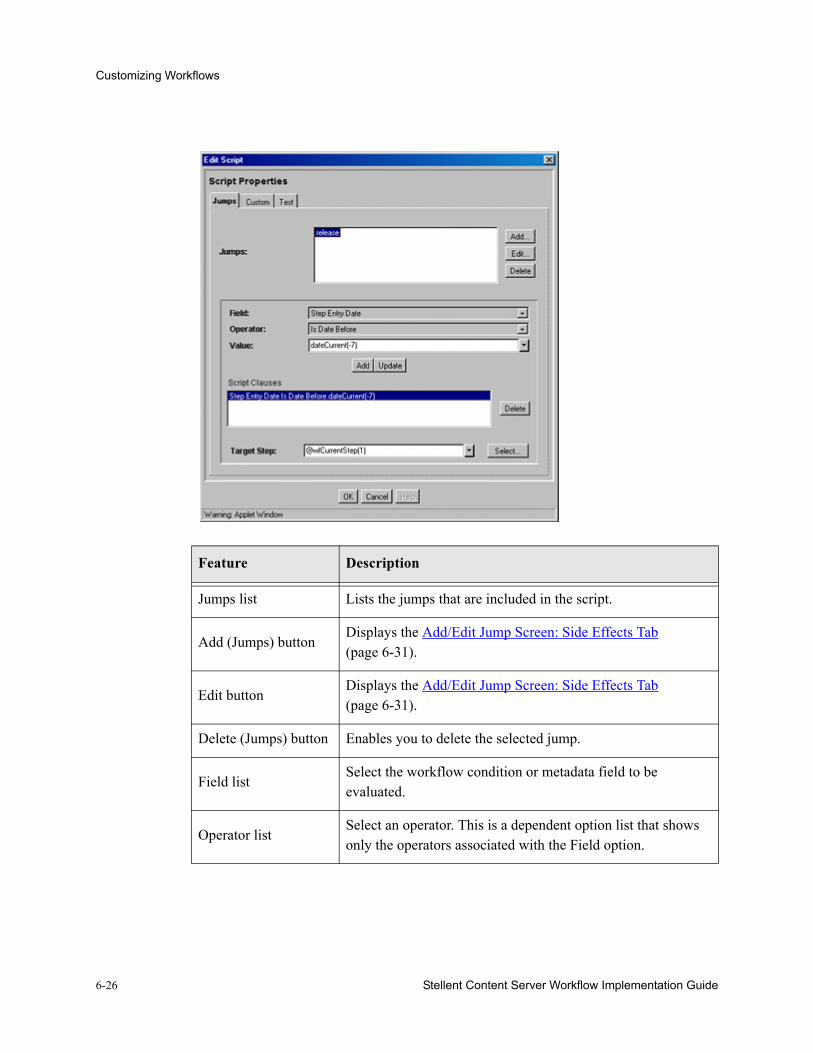
6-26 Stellent Content Server Workflow Implementation Guide
Customizing Workflows
Feature Description
Jumps list Lists the jumps that are included in the script.
Add (Jumps) buttonDisplays the Add/Edit Jump Screen: Side Effects Tab (page 6-31).
Edit buttonDisplays the Add/Edit Jump Screen: Side Effects Tab (page 6-31).
Delete (Jumps) button Enables you to delete the selected jump.
Field listSelect the workflow condition or metadata field to be evaluated.
Operator listSelect an operator. This is a dependent option list that shows only the operators associated with the Field option.
Stellent Content Server Workflow Implementation Guide 6-27
Customizing Workflows
Edit Script Screen: Custom TabThe Custom tab of the Edit Script screen is used to edit the script that was generated automatically by the options on the Jumps tab. To access this tab, click the tab on the Edit Script Screen (page 6-24).
Value list
The value for the specified metadata field.
• Depending on the option selected in the Field list, this field can be a text entry field, text entry field with Select button, or list of the available options.
• The following wildcards can be used in this field:* = one or more characters; ? = single character
Select button
Displays a list of existing items (such as content items or users), from which you can select a value for the Value field. This button appears only when certain metadata fields are selected.
Add (Script Clauses) button
Adds the conditional statement defined by the Field, Operator, and Value fields to the selected jump.
Update buttonChanges the selected conditional statement to the statement defined by the Field, Operator, and Value fields.
Script Clauses listLists the conditional statements that have been added to the jump. Multiple clauses can be appended as AND statements.
Delete (Script Clauses) button
Deletes the selected conditional statement.
Target Step list
Specifies a target step for the jump.
• Select a value from the option list to specify a symbolic step name.
• Click Select to display the Select Target Step Screen (page 6-30).
Feature Description

6-28 Stellent Content Server Workflow Implementation Guide
Customizing Workflows
Edit Script Screen: Test TabThe Test tab of the Edit Script screen is used to test a step event script. To access this tab, click the tab on the Edit Script Screen (page 6-24).
Feature Description
Custom Script Expression check box
Selected: The script can be edited, and the revised script will be saved. The jumps cannot be edited from the Jumps tab.Cleared: The script reflects the statements as defined on the Jumps tab.Caution: If you clear the Custom Script Expression check box, the expression reverts to its original definition; all modifications will be lost.
Script field Shows the script of all jumps in the script template.
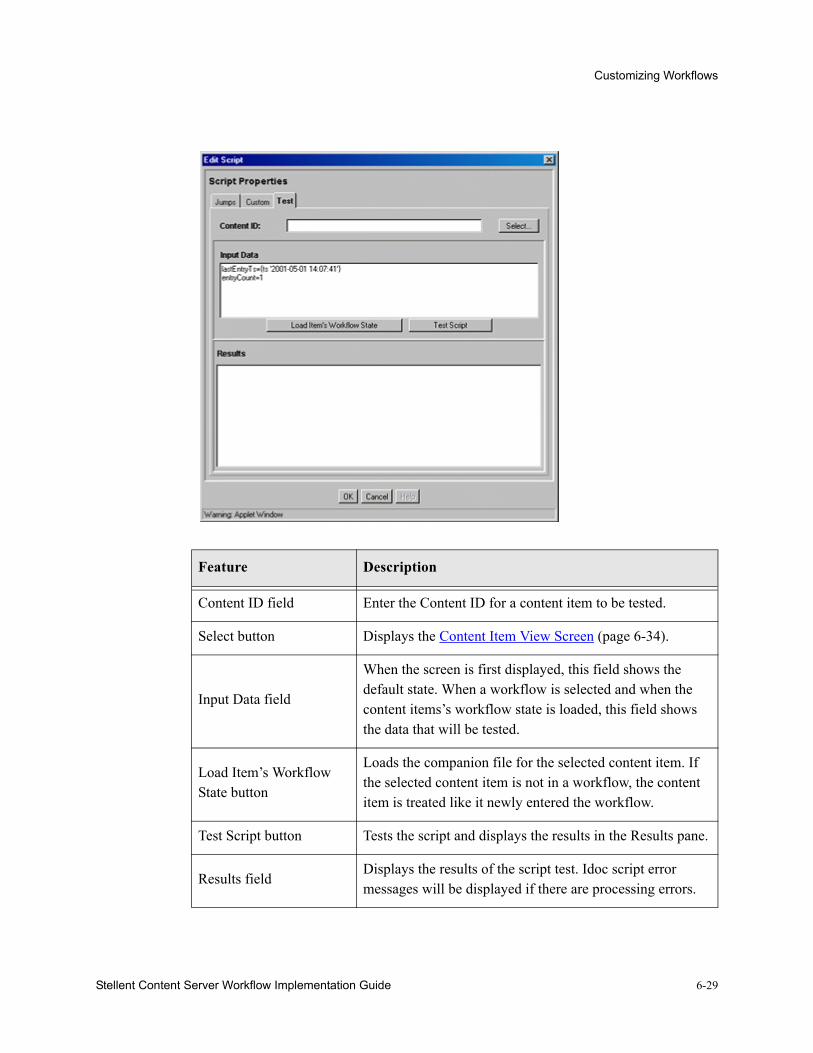
Stellent Content Server Workflow Implementation Guide 6-29
Customizing Workflows
Feature Description
Content ID field Enter the Content ID for a content item to be tested.
Select button Displays the Content Item View Screen (page 6-34).
Input Data field
When the screen is first displayed, this field shows the default state. When a workflow is selected and when the content items’s workflow state is loaded, this field shows the data that will be tested.
Load Item’s Workflow State button
Loads the companion file for the selected content item. If the selected content item is not in a workflow, the content item is treated like it newly entered the workflow.
Test Script button Tests the script and displays the results in the Results pane.
Results fieldDisplays the results of the script test. Idoc script error messages will be displayed if there are processing errors.
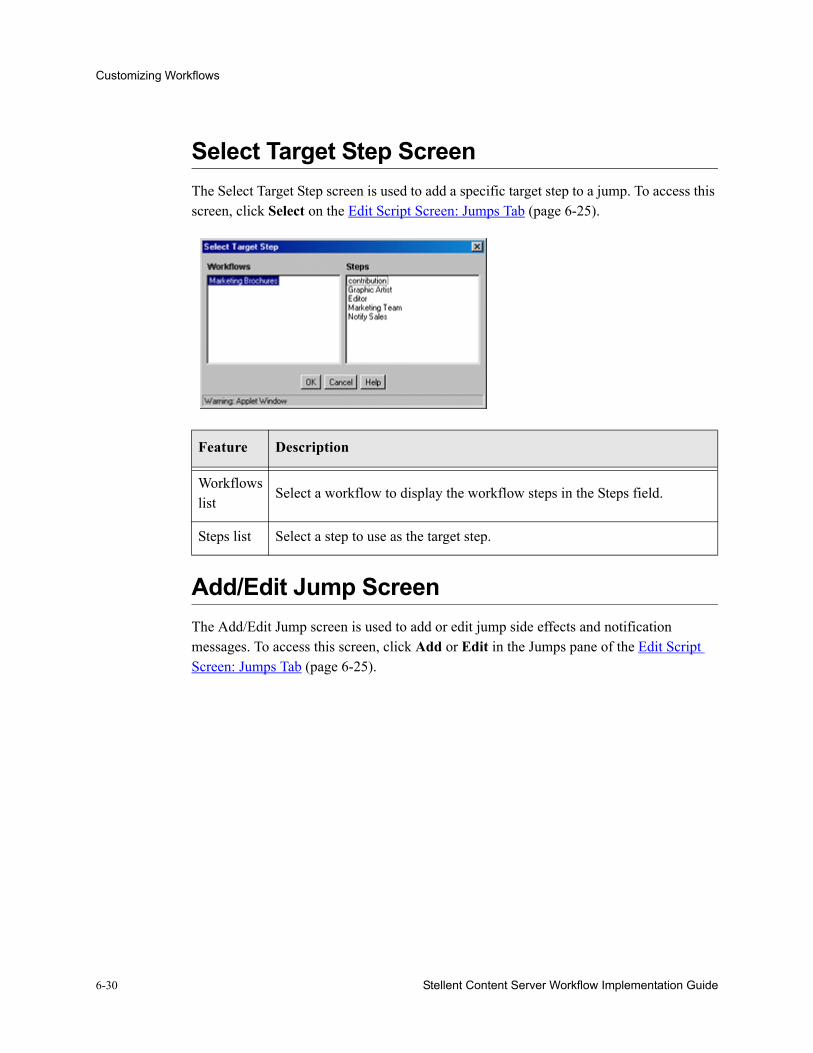
6-30 Stellent Content Server Workflow Implementation Guide
Customizing Workflows
Select Target Step ScreenThe Select Target Step screen is used to add a specific target step to a jump. To access this screen, click Select on the Edit Script Screen: Jumps Tab (page 6-25).
Add/Edit Jump ScreenThe Add/Edit Jump screen is used to add or edit jump side effects and notification messages. To access this screen, click Add or Edit in the Jumps pane of the Edit Script Screen: Jumps Tab (page 6-25).
Feature Description
Workflows list
Select a workflow to display the workflow steps in the Steps field.
Steps list Select a step to use as the target step.
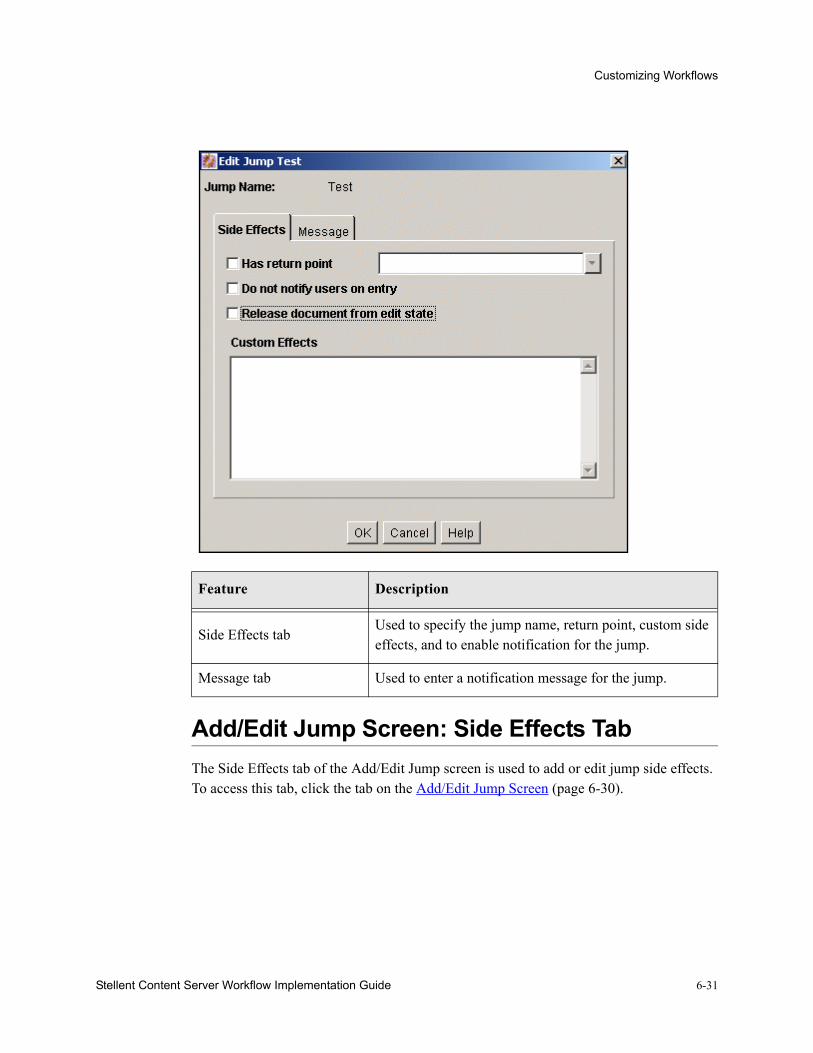
Stellent Content Server Workflow Implementation Guide 6-31
Customizing Workflows
Add/Edit Jump Screen: Side Effects TabThe Side Effects tab of the Add/Edit Jump screen is used to add or edit jump side effects. To access this tab, click the tab on the Add/Edit Jump Screen (page 6-30).
Feature Description
Side Effects tabUsed to specify the jump name, return point, custom side effects, and to enable notification for the jump.
Message tab Used to enter a notification message for the jump.
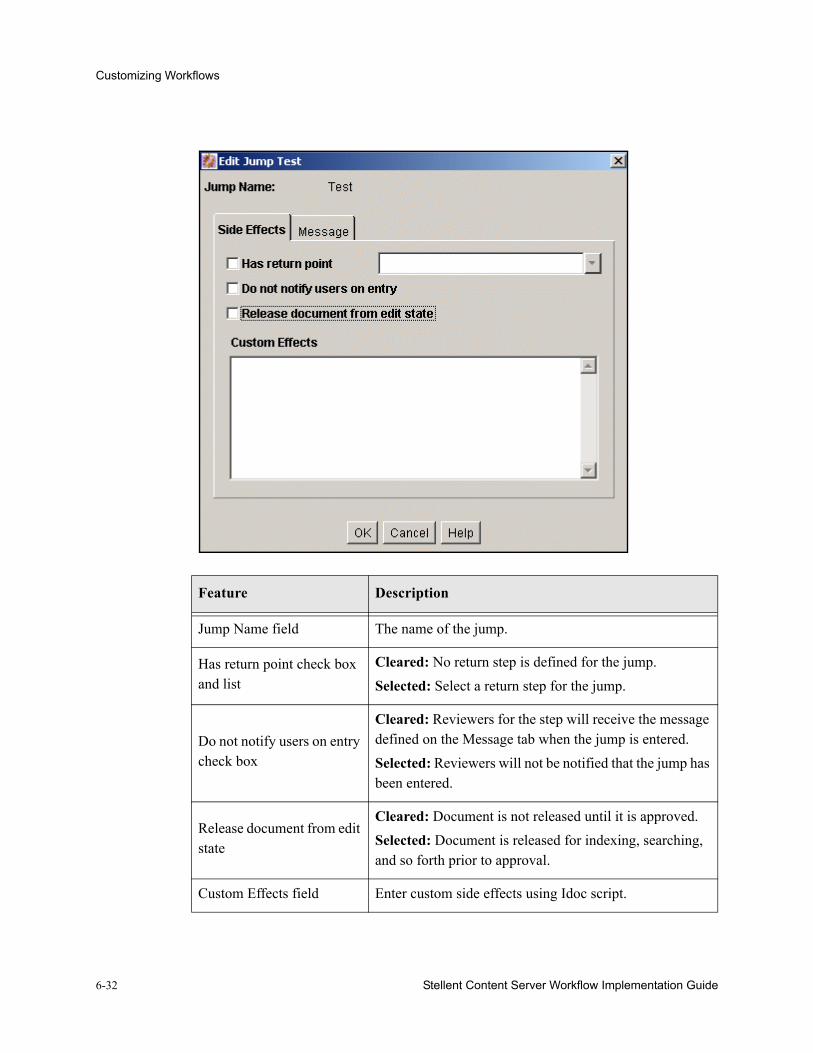
6-32 Stellent Content Server Workflow Implementation Guide
Customizing Workflows
Feature Description
Jump Name field The name of the jump.
Has return point check box and list
Cleared: No return step is defined for the jump.Selected: Select a return step for the jump.
Do not notify users on entry check box
Cleared: Reviewers for the step will receive the message defined on the Message tab when the jump is entered.Selected: Reviewers will not be notified that the jump has been entered.
Release document from edit state
Cleared: Document is not released until it is approved.Selected: Document is released for indexing, searching, and so forth prior to approval.
Custom Effects field Enter custom side effects using Idoc script.
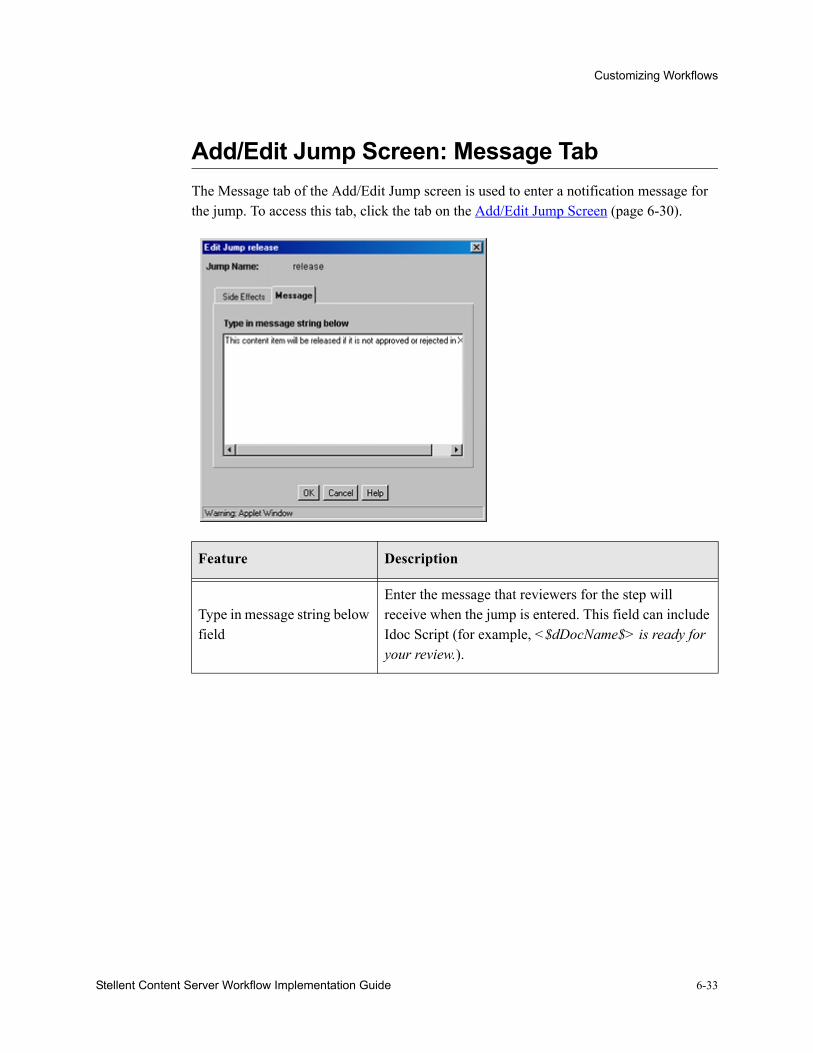
Stellent Content Server Workflow Implementation Guide 6-33
Customizing Workflows
Add/Edit Jump Screen: Message TabThe Message tab of the Add/Edit Jump screen is used to enter a notification message for the jump. To access this tab, click the tab on the Add/Edit Jump Screen (page 6-30).
Feature Description
Type in message string below field
Enter the message that reviewers for the step will receive when the jump is entered. This field can include Idoc Script (for example, <$dDocName$> is ready for your review.).
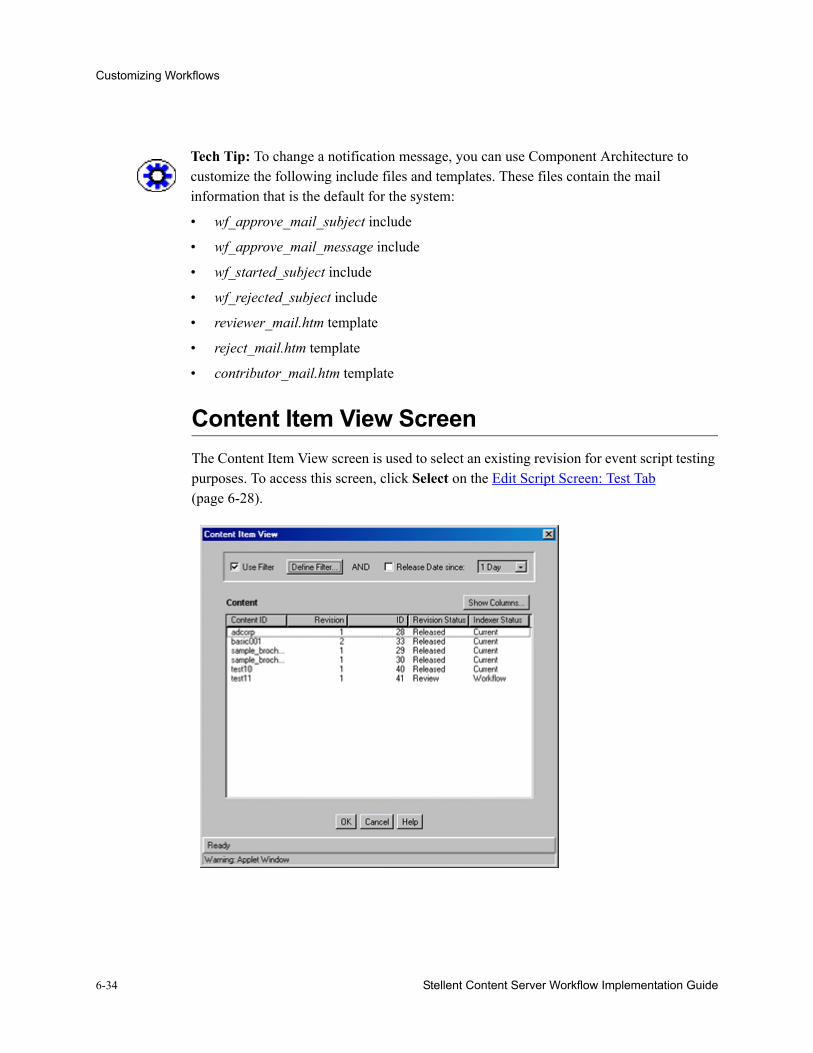
6-34 Stellent Content Server Workflow Implementation Guide
Customizing Workflows
Content Item View ScreenThe Content Item View screen is used to select an existing revision for event script testing purposes. To access this screen, click Select on the Edit Script Screen: Test Tab (page 6-28).
Tech Tip: To change a notification message, you can use Component Architecture to customize the following include files and templates. These files contain the mail information that is the default for the system:
• wf_approve_mail_subject include
• wf_approve_mail_message include
• wf_started_subject include
• wf_rejected_subject include
• reviewer_mail.htm template
• reject_mail.htm template
• contributor_mail.htm template

Stellent Content Server Workflow Implementation Guide 6-35
Customizing Workflows
Feature Description
Use Filter check boxSelect this check box to narrow the Content list as defined by the Define Filter Screen.
Define Filter button Displays the Define Filter Screen.
Release Date since check box and list
Select this check box to narrow the Content list as defined by the Release Date option list.
Show Columns button Displays the Show Columns screen.
Content list
Shows the revisions in the content server repository that match the filter settings.
• The list displays 50 revisions per page.
• Double-clicking a revision displays the Info page for that revision.


Stellent Content Server Workflow Implementation Guide 7-1
C h a p t e r
WORKFLOW AND SCRIPT TEMPLATESWorkflow templates are a quick way to re-use workflows that you’ve already created. Each workflow template is an outline for a Basic, Criteria, or sub-workflow that is stored in the Workflow Admin tool. A workflow template is not tied to a security group, and it cannot include step event scripts.
A sample workflow template named collaboration_template is included in the Workflow Admin tool; it can be used as an example, or can be modified to create your own workflow. Note that this template can be used with Stellent Content Server or Stellent Collaboration Server.
Script templates can be used to store step event scripts, but they work differently than workflow templates. See Creating a Script Template (page 7-3) for more information.
The procedure to create a template uses many of the same steps used in setting up a workflow. This section provides an overview of the process. For details see Setting Up a Criteria Workflow (page 4-4) or Setting up a Basic Workflow (page 5-4).
CREATING A WORKFLOW TEMPLATETo create a workflow template:
1. Display the Workflow Admin: Templates Tab (page 7-7).
2. Click Add.
Important: When you use a workflow template, you must change the reviewers if they are different from those defined in the selected template.

7-2 Stellent Content Server Workflow Implementation Guide
Workflow and Script Templates
The Add/Edit Template Screen (page 7-8) is displayed.
3. Enter a template name in the Template Name field. The Template Name cannot be changed after the template is created.
4. Enter a detailed description in the Description field.
5. Specify whether to permit the original author to edit the existing revision or create a new revision if the content item is rejected by checking the appropriate box.
6. Add a step by clicking Add.
7. Enter an appropriate Name and Description for the step.
8. Specify the authority level of the users for the step: Users can review the current revision, Users can review and edit (replace) the current revision or Users can review the current revision or create new revision.
9. Click OK.
10. Select the type of users to be added the step. More than one type of user can be defined for a step.
11. Click OK.
12. Click the Exit Conditions tab.
13. Specify how many reviewers must approve the revision before it passes to the next step.
14. Specify additional exit conditions if needed.
15. If the workflow requires conditional steps or special processing, click the Events tab and add the appropriate scripts.
16. Click OK.
CHANGING A WORKFLOW TEMPLATETo change an existing workflow template:
1. Display the Workflow Admin: Templates Tab (page 7-7).
2. Select the workflow template you want to change.
3. Click Edit.
The Add/Edit Template Screen (page 7-8) is displayed.
4. Use the Add, Edit, and Delete buttons in the Steps pane to change the steps.
Stellent Content Server Workflow Implementation Guide 7-3
Workflow and Script Templates
5. Use the Add Alias, Add User, Add Token, and Delete buttons on the Users tab to add or delete reviewers for the selected step.
6. On the Exit Conditions tab, change the number of reviewers required or the additional exit conditions as necessary.
7. On the Events tab, add, change, or delete jumps as necessary. See Setting Up Jumps (page 6-14) for more information.
8. Click OK.
DELETING A WORKFLOW TEMPLATETo delete a workflow template:
1. Display the Workflow Admin: Templates Tab (page 7-7).
2. Select the workflow template you want to delete.
3. Click Delete.
A confirmation screen is displayed.
4. Click Yes.
CREATING A SCRIPT TEMPLATEScript templates are a quick way to re-use step event scripts that you’ve already created. A script template is used as a starting point for creating event scripts. Each script template is a piece of Idoc Script stored in the Workflow Admin tool.
Follow these steps to create a script template:
1. From the The Workflow Admin Application (page 3-5), select Options—Script Templates.
2. Click Add.
The Add/Edit Script Screen (page 7-16) is displayed.
3. Enter a script name in the Script Name field. The Script Name cannot be changed after the script template is created.
Important: Script templates should use symbolic step names rather than explicit references. See Jump Variables and Steps (page 6-13) for more information.
7-4 Stellent Content Server Workflow Implementation Guide
Workflow and Script Templates
4. Enter a detailed description in the Description field.
Set up the side effects5. On the Jumps tab, click Add.
6. Enter a jump name. The name cannot be changed after the jump is created.
7. If the jump needs to specify a return point, select the Has Return Point check box and select a return point from the option list.
8. If users should not be notified when the jump is entered, select the Do not notify users on entry check box.
9. If the content item should be released prior to approval, select the Release document from edit state check box.
10. Enter any custom side effects in the Custom Effects field.
11. If users will be notified when the jump is entered, click the Message tab and enter the notification message.
12. Click OK.
Set up the conditional statement for the script template:13. Select a metadata field from the Field option list.
14. Select an operator from the Operator option list.
15. Select a value from the Value option list.
16. Click Add to add the conditional statement to the script.
Complete the script template:17. Select a target step from the Target Step option list.
18. To modify the script, click the Custom tab, select the Custom Script Expression check box, and edit the text.
Test the script:19. Click the Test tab.
Caution: If you clear the Custom Script Expression check box, the expression reverts to its original definition; all modifications will be lost.
Stellent Content Server Workflow Implementation Guide 7-5
Workflow and Script Templates
20. Click Select.
The Content Item View Screen (page 7-25) is displayed.
21. To narrow the content list, select the Use Filter check box, click Define Filter, select the filter criteria, and click OK.
22. Select a content item to test and click OK.
23. Click Select Workflow.
The Select Workflow Step Screen (page 7-26) is displayed.
24. Select a workflow in the Workflows pane, select a step in the Steps pane, and click OK. Select a workflow step that is similar to the ones for which the script template will be used.
25. Click Load Item’s Workflow State.
If the selected content item is in a workflow, the companion file is loaded in the Input Data field.
26. Click Test Script.
27. The test results are displayed in the Results field.
• The value of each parameter in the script is displayed.
• If any Idoc script errors occur, they are displayed along with the script containing the errors.
28. To save the script template, click OK.
Changing a Script TemplateTo change an existing script template:
1. From the The Workflow Admin Application (page 3-5) select Options—Script Templates.
The Workflow Scripts Screen (page 7-15) is displayed.
2. Select the script template you want to change.
3. Click Edit.
Note: If the selected content item is not currently in a workflow, you can still use it to test the script, but it will be treated as if it were newly in the workflow.

7-6 Stellent Content Server Workflow Implementation Guide
Workflow and Script Templates
The Add/Edit Script Screen (page 7-16) is displayed.
4. Use the Add, Edit, and Delete buttons in the Jumps pane to change the jumps.
5. Use the Field, Operator, Value fields and Add and Update buttons in the Script Clauses pane to change the conditional statements for the jumps.
6. Use the Target Step option list to change the target step for the jump.
7. To modify the automatically generated script, click the Custom tab, select the Custom Script Expression check box, and edit the text.
8. Test the script before saving it. See step 22 of Creating a Jump (page 6-15).
9. Click OK to save the changes.
Deleting a Script TemplateTo change an existing script template:
1. From the The Workflow Admin Application (page 3-5) select Options—Script Templates.
The Workflow Scripts Screen (page 7-15) is displayed.
2. Select the script template you want to delete.
3. Click Delete.
A confirmation screen is displayed.
4. Click Yes.
Caution: If you clear the Custom Script Expression check box, the expression reverts to its original definition; all modifications will be lost.
Stellent Content Server Workflow Implementation Guide 7-7
Workflow and Script Templates
WORKFLOW TEMPLATE INTERFACE SCREENSThe following screens are used to create templates.
Workflow Admin: Templates TabThe Templates tab of the Workflow Admin application is used to add, edit, and delete workflow templates. To access this tab, click the tab on the The Workflow Admin Application (page 3-5).
Feature Description
Name columnLists the workflow template names. The following characters are not allowed: spaces, tabs, line feeds, carriage returns, and ; : ^ ? @ & + " # % < * ~ |
Description column A description of the workflow template.
Add button Displays the Add/Edit Template Screen (page 7-8).
7-8 Stellent Content Server Workflow Implementation Guide
Workflow and Script Templates
Add/Edit Template ScreenThe Add/Edit Template screen is used to add or edit a workflow template. To access this screen, click Add or Edit on the Workflow Admin: Templates Tab (page 7-7).
Edit button Displays the Add/Edit Template Screen (page 7-8).
Delete button Enables you to delete the selected workflow template.
Feature Description
Template Name fieldThe name of the workflow template. The following characters are not allowed: spaces, tabs, line feeds, returns, and ; : ^ ? @ & + " # % < * ~ |
Description field A description of the workflow template.
Steps pane
Steps list Lists the steps included in the workflow template.
Add button Displays the Add New/Edit Step Screen (page 7-10).
Edit button Displays the Add New/Edit Step Screen (page 7-10).
Feature Description

Stellent Content Server Workflow Implementation Guide 7-9
Workflow and Script Templates
Delete (Step) buttonEnables you to delete the selected step from the workflow template.
Users tab
Alias/User listLists the users, aliases, and tokens currently assigned to the selected step.
Add Alias button Displays the Add Alias to Step Screen (page 7-10).
Add User button Displays the Add User to Template (page 7-11).
Add Token button Displays the Add Token: Templates (page 7-12).
Delete (User) buttonEnables you to delete the selected alias, user, or token from the step.
Exit Conditions tab
All reviewers optionIf this is selected, all users assigned to the step must approve the revision before the workflow passes to the next step.
At least this many reviewers option and field
If this is selected, the workflow passes to the next step as soon as the specified number of users have approved the revision.
Use Additional Exit Condition check box and field
If this is selected, the conditions defined in the text box must be met before the workflow passes to the next step.
Edit buttonDisplays the Edit Additional Exit Condition Screen (page 7-13).
Clear button Clears the Exit Condition text box.
Events TabSee Add New/Edit Step Screen: Events Tab (page 6-21).
Feature Description
7-10 Stellent Content Server Workflow Implementation Guide
Workflow and Script Templates
Add New/Edit Step ScreenThe Add New/Edit Step screen is used to add or edit a step in a workflow template. To access this screen, select a step and click Add or Edit in the Steps pane of the Add/Edit Template Screen (page 7-8).
Add Alias to Step ScreenThe Add Alias to Step screen is used to assign aliases to a workflow template step. To access this screen, click Add Alias on the Users tab of the Add/Edit Template Screen (page 7-8).
Feature Description
Name fieldThe name for the step. Typically this is the type of review (such as initial review or copy edit) or the function of the reviewer (such as manager or copy editor).
Description field A description for the step.
Type listReviewer—Approves or rejects the revision.Reviewer/Contributor—Can edit the revision and approves or rejects it.

Stellent Content Server Workflow Implementation Guide 7-11
Workflow and Script Templates
Add User to TemplateThe Add User to Step screen is used to assign users to a workflow template step. To access this screen, click Add User on the Users tab of the Add/Edit Template Screen (page 7-8).
Feature Description
Alias column Lists the available aliases.
Description column A description of the alias.
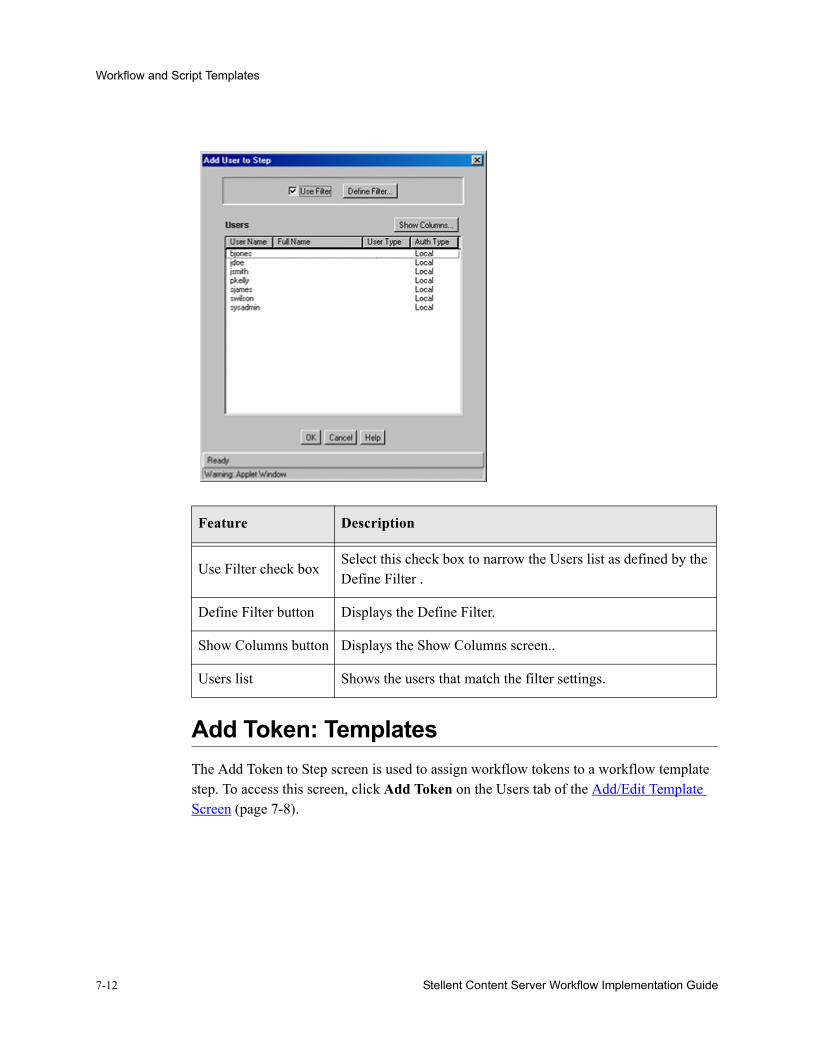
7-12 Stellent Content Server Workflow Implementation Guide
Workflow and Script Templates
Add Token: TemplatesThe Add Token to Step screen is used to assign workflow tokens to a workflow template step. To access this screen, click Add Token on the Users tab of the Add/Edit Template Screen (page 7-8).
Feature Description
Use Filter check boxSelect this check box to narrow the Users list as defined by the Define Filter .
Define Filter button Displays the Define Filter.
Show Columns button Displays the Show Columns screen..
Users list Shows the users that match the filter settings.
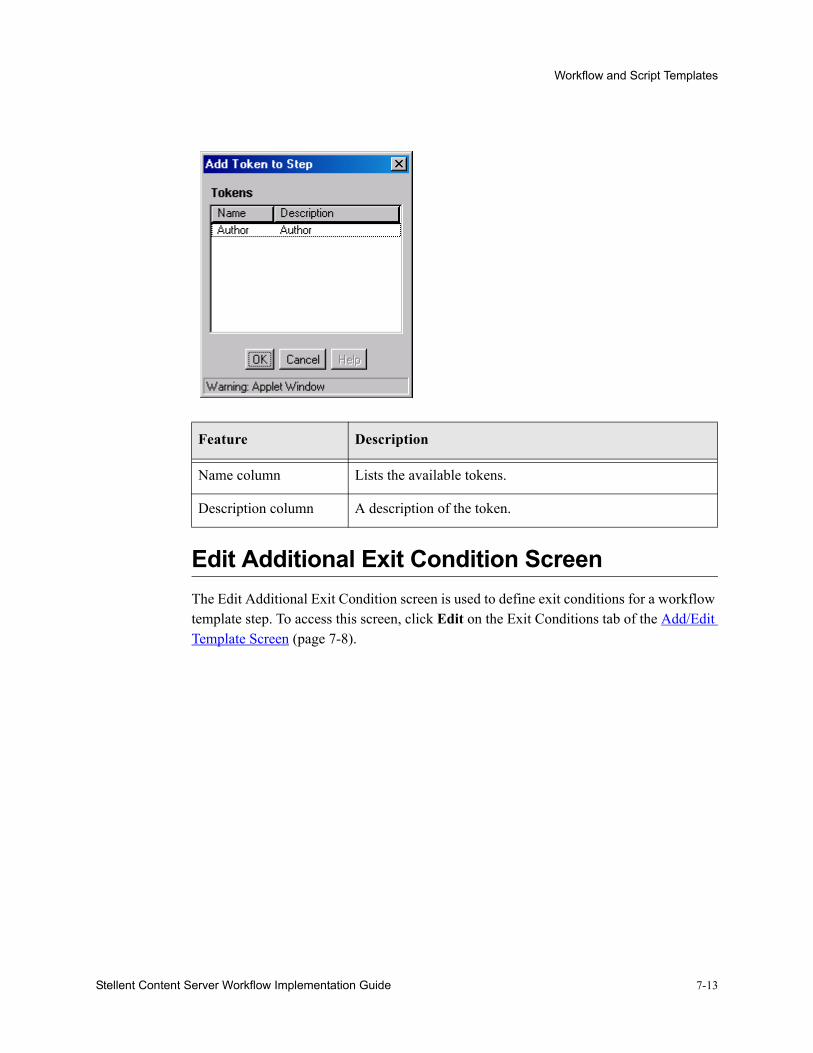
Stellent Content Server Workflow Implementation Guide 7-13
Workflow and Script Templates
Edit Additional Exit Condition ScreenThe Edit Additional Exit Condition screen is used to define exit conditions for a workflow template step. To access this screen, click Edit on the Exit Conditions tab of the Add/Edit Template Screen (page 7-8).
Feature Description
Name column Lists the available tokens.
Description column A description of the token.

7-14 Stellent Content Server Workflow Implementation Guide
Workflow and Script Templates
5.
Feature Description
Field listSelect the workflow condition or metadata field to be evaluated.
Operator listSelect an operator. This is a dependent option list that shows only the operators associated with the Field option.
Value list
The value for the specified metadata field.
• Depending on the option selected in the Field list, this field can be a text entry field, text entry field with Select button, or list of the available options.
• The following wildcards can be used in this field:* = one or more characters; ? = single character
Select button
Displays a list of existing items (such as content items or users), from which you can select a value for the Value field. This button appears only when certain metadata fields are selected.

Stellent Content Server Workflow Implementation Guide 7-15
Workflow and Script Templates
WORKFLOW SCRIPTS USER INTERFACEThe following screens are used to create workflow scripts.
Workflow Scripts ScreenThe Workflow Scripts screen is used to add, edit, and delete script templates. To access this screen, select Options—Script Templates from The Workflow Admin Application (page 3-5).
Add buttonAdds the conditional statement defined by the Field, Operator, and Value fields to the exit condition clause.
Update buttonChanges the selected conditional statement to the statement defined by the Field, Operator, and Value fields.
Condition Clause listLists the conditional statements that have been added to the exit condition. Multiple clauses can be appended as AND statements.
Delete button Deletes the selected conditional statement.
Custom Condition Expression check box and field
Enables display and edit of the Idoc Script generated from the condition clauses.
• The additional exit conditions must be Idoc Script statements that evaluate to “true” or “false”.
• Do not enclose the code in Idoc Script tags <$ $>.Caution: If you clear the Custom Condition Expression check box, the expression reverts to its original definition; all modifications will be lost.
Feature Description

7-16 Stellent Content Server Workflow Implementation Guide
Workflow and Script Templates
Add/Edit Script ScreenThe Add/Edit Script screen is used to create, modify, and test script templates. To access this screen, click Add or Edit on the Workflow Scripts Screen (page 7-15).
Feature Description
Name field Lists the script template names.
Description field A description of the script template.
Summary field Shows the code that is defined for the script template.
Add button Displays the Add/Edit Script Screen (page 7-16).
Edit button Displays the Add/Edit Script Screen (page 7-16).
Delete button Enables you to delete the selected script template.
Close button Closes the Workflow Scripts screen.
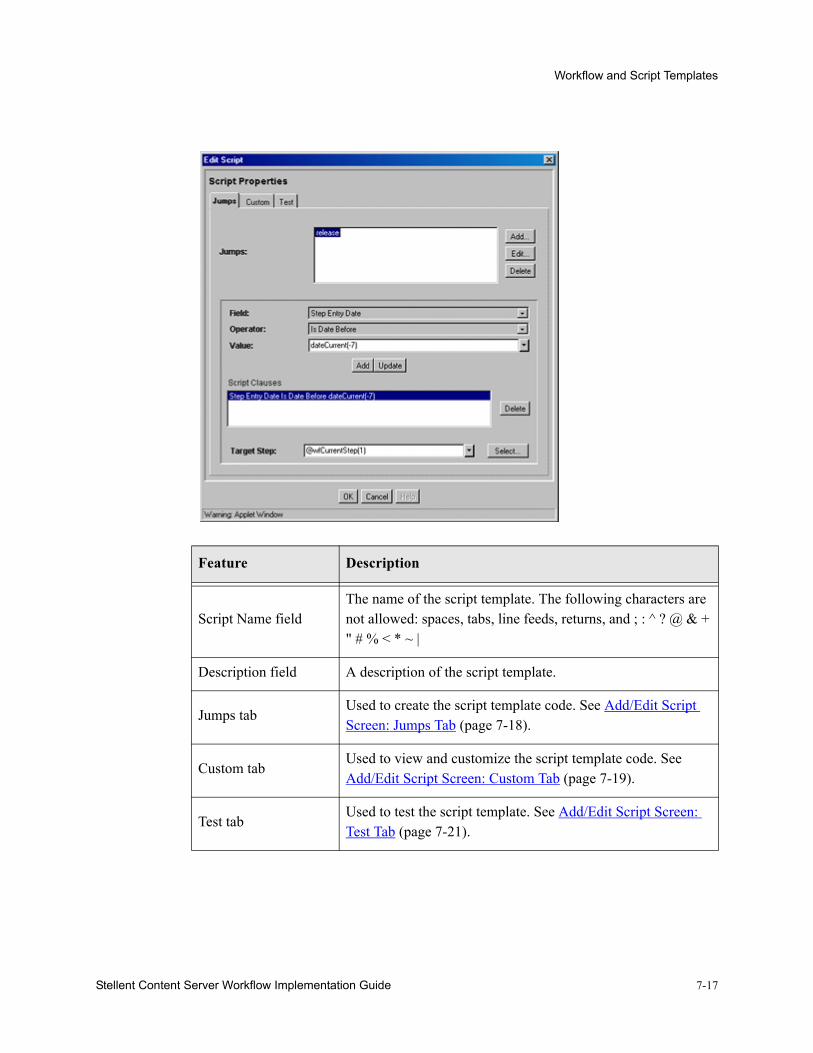
Stellent Content Server Workflow Implementation Guide 7-17
Workflow and Script Templates
Feature Description
Script Name fieldThe name of the script template. The following characters are not allowed: spaces, tabs, line feeds, returns, and ; : ^ ? @ & + " # % < * ~ |
Description field A description of the script template.
Jumps tabUsed to create the script template code. See Add/Edit Script Screen: Jumps Tab (page 7-18).
Custom tabUsed to view and customize the script template code. See Add/Edit Script Screen: Custom Tab (page 7-19).
Test tabUsed to test the script template. See Add/Edit Script Screen: Test Tab (page 7-21).
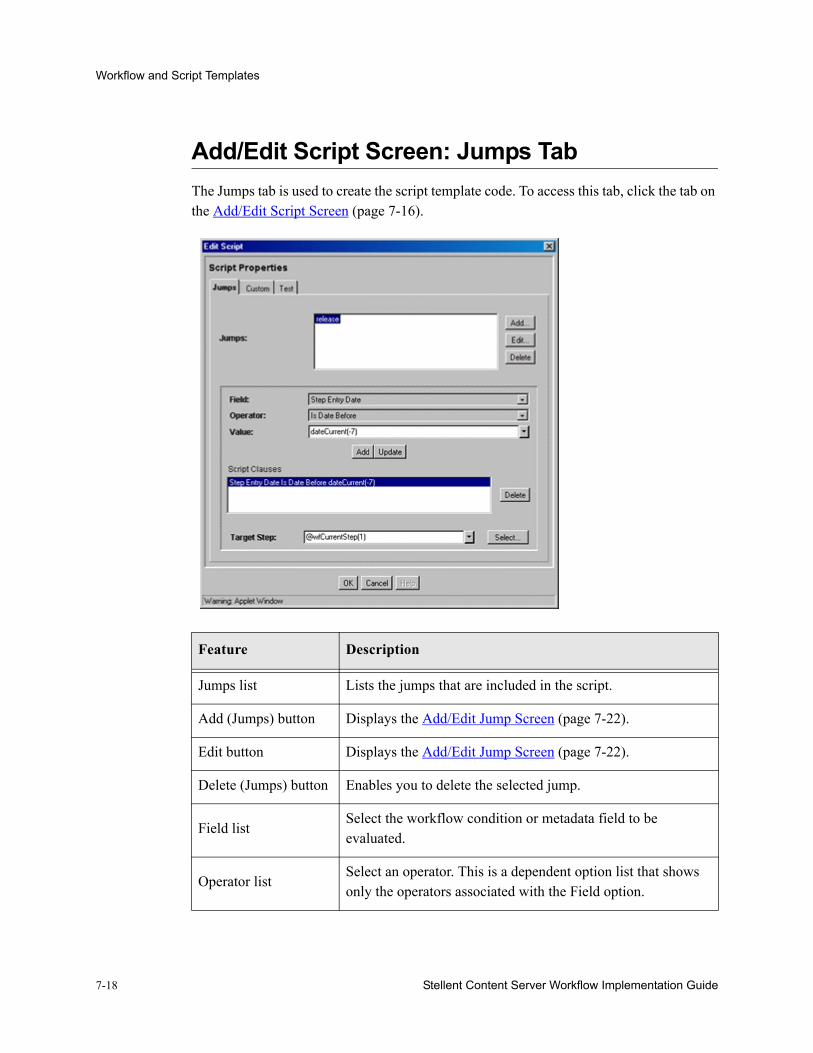
7-18 Stellent Content Server Workflow Implementation Guide
Workflow and Script Templates
Add/Edit Script Screen: Jumps TabThe Jumps tab is used to create the script template code. To access this tab, click the tab on the Add/Edit Script Screen (page 7-16).
Feature Description
Jumps list Lists the jumps that are included in the script.
Add (Jumps) button Displays the Add/Edit Jump Screen (page 7-22).
Edit button Displays the Add/Edit Jump Screen (page 7-22).
Delete (Jumps) button Enables you to delete the selected jump.
Field listSelect the workflow condition or metadata field to be evaluated.
Operator listSelect an operator. This is a dependent option list that shows only the operators associated with the Field option.
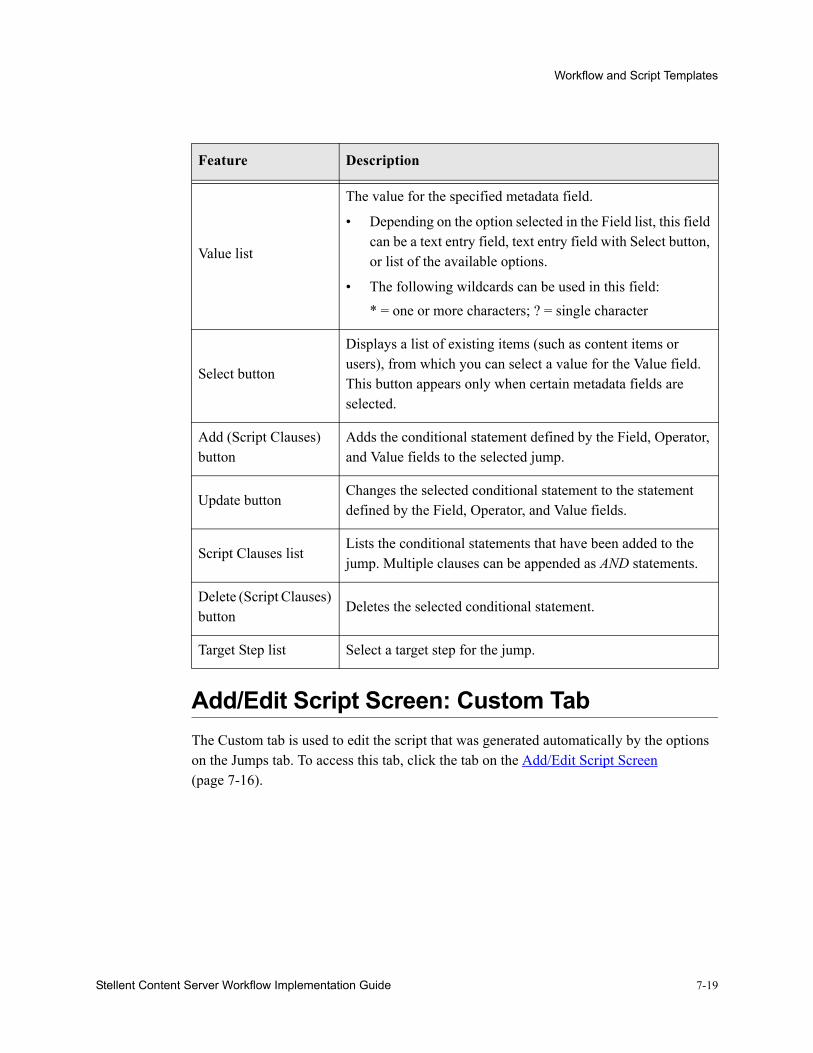
Stellent Content Server Workflow Implementation Guide 7-19
Workflow and Script Templates
Add/Edit Script Screen: Custom TabThe Custom tab is used to edit the script that was generated automatically by the options on the Jumps tab. To access this tab, click the tab on the Add/Edit Script Screen (page 7-16).
Value list
The value for the specified metadata field.
• Depending on the option selected in the Field list, this field can be a text entry field, text entry field with Select button, or list of the available options.
• The following wildcards can be used in this field:* = one or more characters; ? = single character
Select button
Displays a list of existing items (such as content items or users), from which you can select a value for the Value field. This button appears only when certain metadata fields are selected.
Add (Script Clauses) button
Adds the conditional statement defined by the Field, Operator, and Value fields to the selected jump.
Update buttonChanges the selected conditional statement to the statement defined by the Field, Operator, and Value fields.
Script Clauses listLists the conditional statements that have been added to the jump. Multiple clauses can be appended as AND statements.
Delete (Script Clauses) button
Deletes the selected conditional statement.
Target Step list Select a target step for the jump.
Feature Description

7-20 Stellent Content Server Workflow Implementation Guide
Workflow and Script Templates
Feature Description
Custom Script Expression check box
Selected: The script can be edited, and the revised script will be saved. The jumps cannot be edited from the Jumps tab.Cleared: The script reflects the statements as defined on the Jumps tab.Caution: If you clear the Custom Script Expression check box, the expression reverts to its original definition; all modifications will be lost.
Script field Shows the script of all jumps in the script template.

Stellent Content Server Workflow Implementation Guide 7-21
Workflow and Script Templates
Add/Edit Script Screen: Test TabThe Test tab is used to test a script template. To access this tab, click the tab on the Add/Edit Script Screen (page 7-16).
Feature Description
Content ID field Enter the Content ID for a content item to be tested.
Select button Displays the Content Item View Screen (page 7-25).
Input Data field
When the screen is first displayed, this field shows the default state. When a workflow is selected and when the content item’s workflow state is loaded, this field shows the data that will be tested.
Select Workflow button Displays the Select Workflow Step Screen (page 7-26)
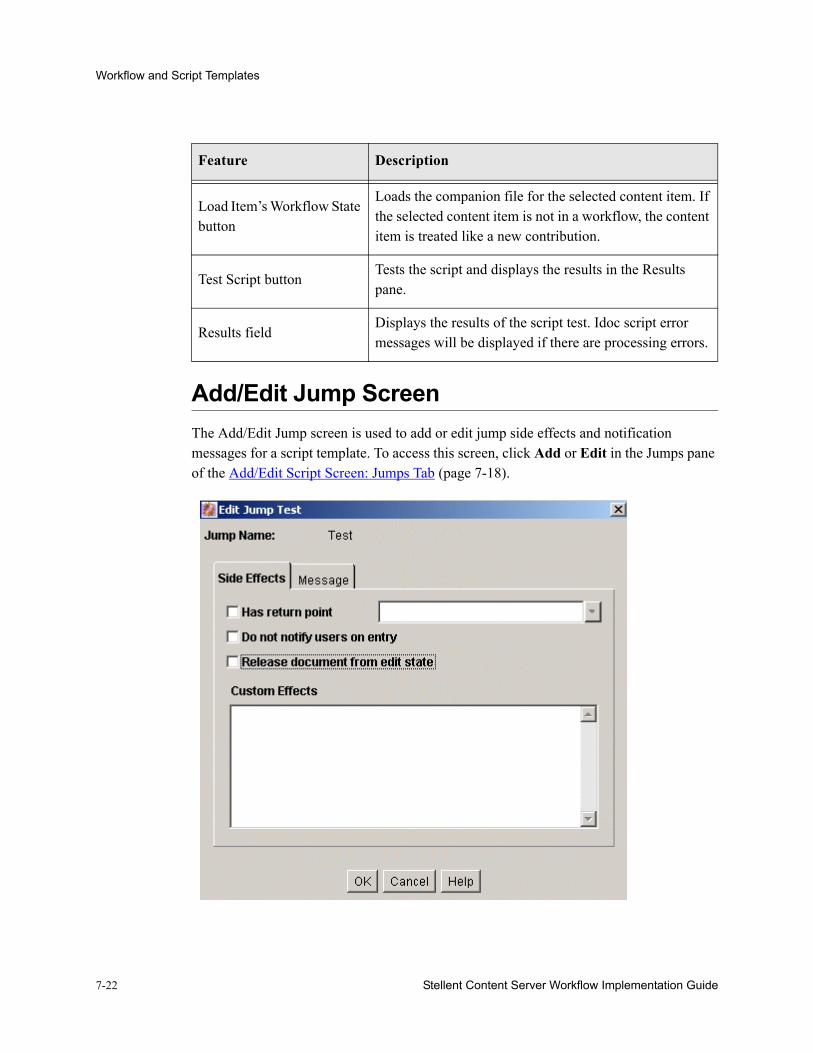
7-22 Stellent Content Server Workflow Implementation Guide
Workflow and Script Templates
Add/Edit Jump ScreenThe Add/Edit Jump screen is used to add or edit jump side effects and notification messages for a script template. To access this screen, click Add or Edit in the Jumps pane of the Add/Edit Script Screen: Jumps Tab (page 7-18).
Load Item’s Workflow State button
Loads the companion file for the selected content item. If the selected content item is not in a workflow, the content item is treated like a new contribution.
Test Script buttonTests the script and displays the results in the Results pane.
Results fieldDisplays the results of the script test. Idoc script error messages will be displayed if there are processing errors.
Feature Description
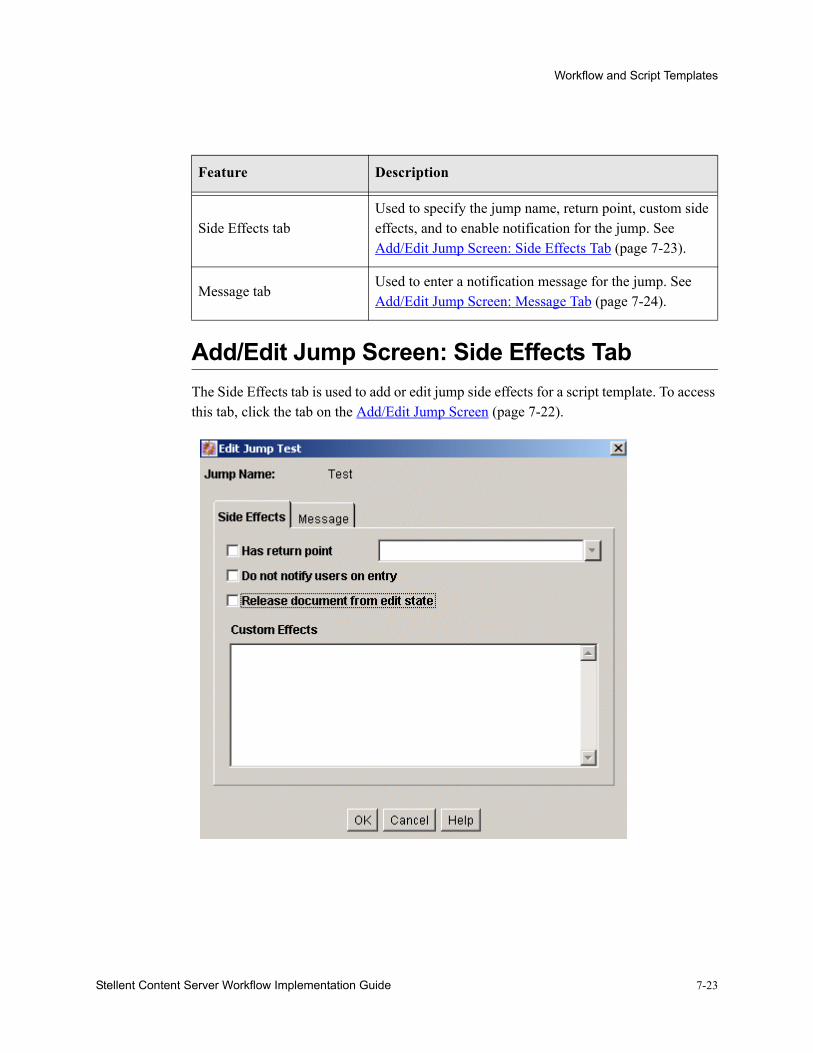
Stellent Content Server Workflow Implementation Guide 7-23
Workflow and Script Templates
Add/Edit Jump Screen: Side Effects TabThe Side Effects tab is used to add or edit jump side effects for a script template. To access this tab, click the tab on the Add/Edit Jump Screen (page 7-22).
Feature Description
Side Effects tabUsed to specify the jump name, return point, custom side effects, and to enable notification for the jump. See Add/Edit Jump Screen: Side Effects Tab (page 7-23).
Message tabUsed to enter a notification message for the jump. See Add/Edit Jump Screen: Message Tab (page 7-24).

7-24 Stellent Content Server Workflow Implementation Guide
Workflow and Script Templates
Add/Edit Jump Screen: Message TabThe Message tab is used to enter a notification message for a jump in a script template. To access this tab, click the tab on the Add/Edit Jump Screen (page 7-22).
Feature Description
Jump Name field The name of the jump.
Has return point check box and list
Cleared: No return step is defined for the jump.Selected: Select a return step for the jump.
Do not notify users on entry check box
Cleared: Reviewers for the step will receive the message defined on the Message tab when the jump is entered.Selected: Reviewers will not be notified that the jump has been entered.
Release document from edit state
Cleared: Document is not released until it is approved.Selected: Document is released for indexing, searching, and so forth prior to approval.
Custom Effects field Enter custom side effects using Idoc Script.

Stellent Content Server Workflow Implementation Guide 7-25
Workflow and Script Templates
Content Item View ScreenThe Content Item View screen is used to select an existing revision for script template testing purposes. To access this screen, click Select on the Add/Edit Script Screen: Test Tab (page 7-21).
Feature Description
Type in message string below field
Enter the message that reviewers for the step will receive when the jump is entered.
Feature Description
Use Filter check boxSelect this check box to narrow the Content list as defined by the Define Filter screen.
Define Filter button Displays the Define Filter screen.
Release Date since check box and list
Select this check box to narrow the Content list as defined by the Release Date option list.

7-26 Stellent Content Server Workflow Implementation Guide
Workflow and Script Templates
Select Workflow Step ScreenThe Select Workflow Step screen is used to select an existing workflow step for script template testing purposes. To access this screen, click Select Workflow on the Add/Edit Script Screen: Test Tab (page 7-21).
Show Columns buttonDisplays the Show Columns screen, where you can select which columns to display.
Content list
Shows the revisions in the content server repository that match the filter settings.
• Double-clicking a revision displays the Info screen for that revision.
Feature Description
Workflows list Selecting a workflow displays the workflow steps in the Steps field.
Steps list The selected step will be used for testing purposes.
Feature Description
Stellent Content Server Workflow Implementation Guide 8-1
C h a p t e r
WORKFLOW SCENARIOSThe following workflow scenario describe the planning process and the types of actions required to accomplish specific workflow tasks. It includes the following workflow examples:
❖ Scenario 1: Criteria Workflow (page 8-1). For details about the steps used to set up a criteria workflow, see Setting Up a Criteria Workflow (page 4-4).
❖ Scenario 2: Tokens (page 8-2). For details about creating tokens, see Creating a Token (page 6-4).
❖ Scenario 3: Jump Based on Metadata (page 8-2). For information about setting up a jump, see Creating a Jump (page 6-15).
❖ Scenario 4: Time-Dependent Jump (page 8-3). For information about using variables to set jumps, see Jump Variables and Steps (page 6-13).
SCENARIO 1: CRITERIA WORKFLOWYour Marketing department wants to have all marketing brochures approved by at least one of the three graphic artists, the editor, and all of the marketing supervisors. The graphic artists and editor should be able to edit the content, but the supervisors should not have editing privileges.
To set up the workflow for this example, you would:❖ Define a security group called Marketing, and make sure that the graphic artists and
the editor have Write permission, and the marketing supervisors have Read permission to the security group.

8-2 Stellent Content Server Workflow implementation Guide
Workflow Scenarios
❖ Define a content type called MktBrochure.
❖ Define a workflow called Marketing Brochures, with the security group set to Marketing and criteria set to Type = MktBrochure.
❖ Define the first step, called Graphic Artist, as a Reviewer/Contributor step with approval required from at least 1 reviewer. Because the graphics department is very stable, you can assign the user logins of the three graphic artists to the step.
❖ Define the second step, called Editor, as a Reviewer/Contributor step. Assign the editor's user login to the step.
❖ Define the third step, called Marketing Team, as a Reviewer step with approval required from all reviewers. The management structure changes frequently, so set up an alias called MktTeam and assign it to this step.
❖ All marketing brochures must be checked into the Marketing security group with a Type of MktBrochure, so it is a good idea to instruct all possible contributors of marketing brochures about how to check them in.
❖ For the approval process to work correctly, the MktTeam alias must be kept up-to-date.
SCENARIO 2: TOKENSAfter you created the Marketing Brochures workflow in Scenario 1, the Marketing department requested that all marketing brochures be returned to the original author for final review before they are released. The original author should not have editing privileges.
To set up the workflow for this example, you would:❖ Create a token called Author and define the user as dDocAuthor.
❖ Define a fourth step in the workflow, called Original Author, as a Reviewer step. Assign the Author token to the step.
SCENARIO 3: JUMP BASED ON METADATAThe Marketing Brochures workflow you created in Scenarios 1 and 3 is working smoothly, but now the Marketing department would like to automatically notify the various sales reps when a new brochure is released for one of their product lines.

Stellent Content Server Workflow Implementation Guide 8-3
Workflow Scenarios
To set up the workflow for this example, you would:❖ Define a required custom metadata field called Product, and create an option list of
the products.
❖ Set up an alias for each product, and assign the appropriate sales reps to each alias. Note that each user can be assigned to more than one alias.
❖ Define a fifth step in the workflow, called Notify Sales, as a Reviewer step with approval required from zero (0) reviewers.
❖ Define a sub-workflow for each product that contains one Reviewer step with approval required from zero (0) reviewers. Assign the corresponding product alias to the step.
❖ Define an entry script in the Notify Sales step that jumps to the sub-workflow that matches the product.
❖ For the notification process to work correctly, the product option list and aliases must be kept up-to-date.
SCENARIO 4: TIME-DEPENDENT JUMPThe Marketing department is having trouble getting marketing brochures approved in a timely manner. They would like to change the Marketing Brochures workflow to automatically move content to the next step if it hasn't been approved or rejected by the graphics department, supervisors, or original author within 7 days. The editor is allowed a little more time—they get 10 days before the content goes to the next step.
To set up the workflow for this example, you would:❖ Define a script template called AutoApprove, with a target step that goes to the next
step in the workflow if the last entry was 7 days ago.
❖ Add an update jump to the Graphic Artist, Marketing Team, and Original Author steps. Use the AutoApprove script template to create the jump.
❖ Add an update jump to the Editor step, using the AutoApprove script template. Edit the script so that the jump occurs at 10 days rather than 7 days.


Stellent Content Server Workflow Implementation Guide 9-1
C h a p t e r
WORKFLOW TIPS AND TRICKSThis section describes workflow tips and tricks. It covers the following topics:
Setting Up Parallel Workflows (page 9-2)
Adding Ad Hoc Step Users (page 9-4)
Customizing Criteria Workflow Emails (page 9-4)
Workflow Escalation (page 9-6)
In addition to this functionality, additional customizations are available through Stellent Consulting Services. See Other Customizations (page 9-11), for details.
For details about troubleshooting specific problems, see the Stellent Content Server Troubleshooting Guide.
ACQUIRING A DIGITAL SIGNATUREIt is sometimes necessary to re-authenticate a user during a workflow. This serves as a digital signature for the users during that particular step of the workflow. To enable this functionality, first determine which workflow steps require authentication before approval. Then do the following:
1. Add the following line to the <install_dir>/config/config.cfg file:
<workflow step name>:isRepromptLogin=true
If multiple workflow steps require validation, add those steps on separate lines.
2. Restart the Content Server.

9-2 Stellent Content Server Workflow Implementation Guide
Workflow Tips and Tricks
3. Set up and enable the workflow, making sure to use the step name designated in the configuration entry for the step where validation is required.
When the workflow is initiated, the users at the workflow step designated with the isRepromptLogin configuration variable are prompted to login in before they can approve the content at the workflow step.
In the following example, validation is required at the steps named VIPApproval and CEOsignoff. The following entries are added to the config.cfg file:
VIPApproval:isRepromptLogin=true
CEOsignoff:isRepromptLogin=true
The Content Server is restarted and a workflow is set up and enabled with steps named VIPApproval and CEOsignoff. Multiple users are assigned to the VIPApproval step, and only one user (the CEO of the company) is assigned to the CEOsignoff step.
Before the users at those steps can approve the workflow item, they must login again to the content server.
This functionality is available in Content Server 7.5 and later versions.
SETTING UP PARALLEL WORKFLOWSIt is sometimes desirable to have two distinct groups of users be able to review content items in workflow at the same time and to have a specified number of users from each group approve the content before it proceeds in the workflow.
When using Stellent Content Server, either all users or a specified number of users must approve the content before it continues. Usually the workflow does not differentiate between sources of approval. Consequently, all members of one group may approve content while none of another group would approve it, and the content would still advance through the workflow. The following code provides an example of how approval process discrimination can be added.
This code allows step users to be set into groups. At each approval, the script checks for the group to which a user belongs. A user may belong to multiple groups; if the approving user is in a group, the counter for that group is incremented by one.
Extra exit conditions hold the content in the step until the extra conditions are met.
Add the following code in the entry portion of the step:
<$wfSet("set1", "0")$>
<$wfSet("set2", "0")$>
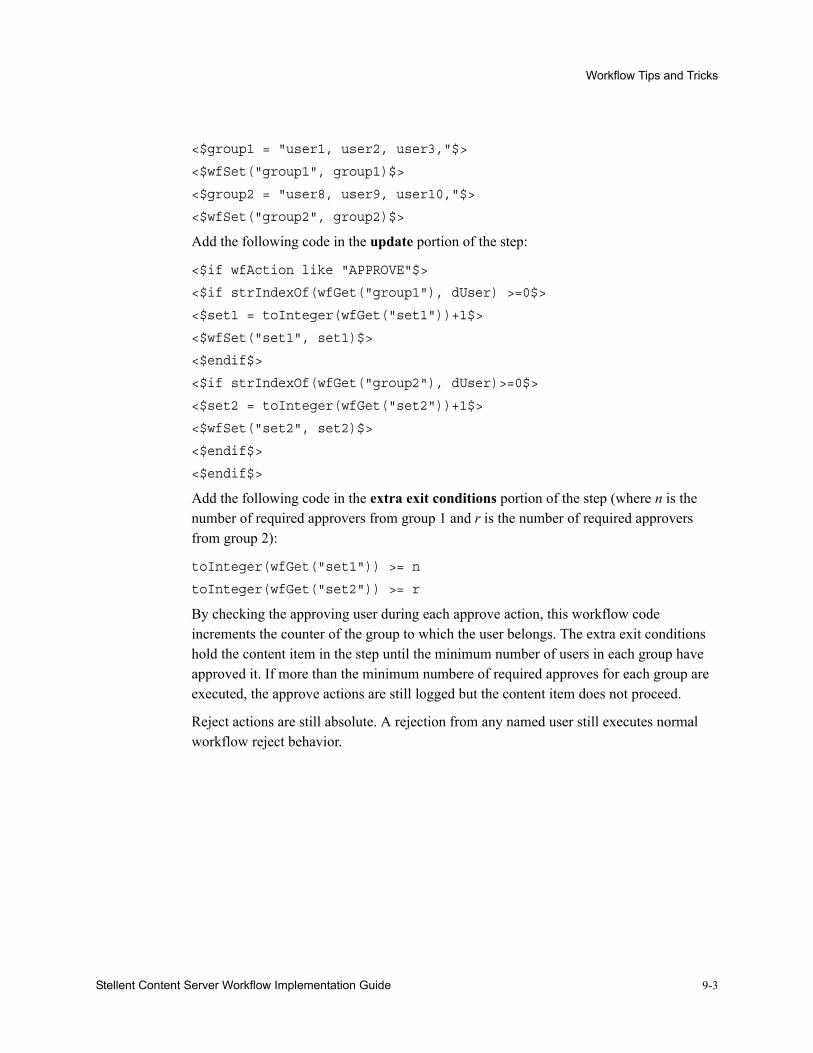
Stellent Content Server Workflow Implementation Guide 9-3
Workflow Tips and Tricks
<$group1 = "user1, user2, user3,"$>
<$wfSet("group1", group1)$>
<$group2 = "user8, user9, user10,"$>
<$wfSet("group2", group2)$>
Add the following code in the update portion of the step:
<$if wfAction like "APPROVE"$>
<$if strIndexOf(wfGet("group1"), dUser) >=0$>
<$set1 = toInteger(wfGet("set1"))+1$>
<$wfSet("set1", set1)$>
<$endif$>
<$if strIndexOf(wfGet("group2"), dUser)>=0$>
<$set2 = toInteger(wfGet("set2"))+1$>
<$wfSet("set2", set2)$>
<$endif$>
<$endif$>
Add the following code in the extra exit conditions portion of the step (where n is the number of required approvers from group 1 and r is the number of required approvers from group 2):
toInteger(wfGet("set1")) >= n
toInteger(wfGet("set2")) >= r
By checking the approving user during each approve action, this workflow code increments the counter of the group to which the user belongs. The extra exit conditions hold the content item in the step until the minimum number of users in each group have approved it. If more than the minimum numbere of required approves for each group are executed, the approve actions are still logged but the content item does not proceed.
Reject actions are still absolute. A rejection from any named user still executes normal workflow reject behavior.

9-4 Stellent Content Server Workflow Implementation Guide
Workflow Tips and Tricks
ADDING AD HOC STEP USERSUsers can be added to workflow steps without utilizing metadata fields that are normally accessed by tokens. For example, a content item is traveling (and being edited) in workflow; each edit lists the person editing the content as the dDocAuthor. In order to send the item to the original author at the end of the workflow cycle, a special token must be created:
<$wfAddUser(wfGet("originalContributor"), wfGet("type”))$>
Add the following code to the entry event of the first step in the workflow to restore the original author:
<$originalContributor =dDocAuthor$>
<$wfSet("originalContributor",originalContributor)$>
<$type="user"$>
<$wfSet("type",type)$>
The event script uses wfSet() to put custom variables and values into the companion file at a point prior to the token call. The token then uses wfGet() to pull out those values and set the step user.
This technique can be used to obtain and store any standard or custom Idoc variable that holds valid user names or aliases. The Idoc variable can contain a comma-separated list of user names or aliases. If user names are being stored, the <$type$> variable must be set to user (for example, <$type=”user”$>. If alias names are being stored, the <$type$> variable must be set to alias (for example, <$type=”alias”$>.
When placed in the entry event of a workflow step with the token set as the step user, the entry event code processes the information. It stores the user name (or alias) which is then called by the token and is set as a step user (or users, if a list was specified). Adding multiple or conditional code blocks and tokens (as shown previously) to your step entry events and step user definitions allows true ad hoc workflow routing.
CUSTOMIZING CRITERIA WORKFLOW EMAILSEmails are triggered by criteria workflow at three points in the process:
On entry to a step.
On receipt of a reject reasons form.
On execution of the wfNotify Idoc script function.

Stellent Content Server Workflow Implementation Guide 9-5
Workflow Tips and Tricks
It is possible to customize the email message, the email subject, and the template used for emails sent during criteria workflows. This section describes the processes for customizing the email aspects of criteria workflows.
Customizing Email TemplatesThe two most commonly used templates used to generate email messages sent to recipients involved in a workflow are reviewer_mail.htm and reject_mail.htm. These are stored in <install_dir>/shared/config/templates.
These templates can be modified like any other template. Email template modification provides the greatest flexibility and opportunity for customizing workflow emails. Although this kind of modification is relatively straightforward, it still requires careful component development. Modifying the subject and the message in the email is often the most important part of the message, and thus is often the most modified.
Custom workflow email templates that are based on the standard templates can also be created. Custom templates can be called as needed by adding them as the optional third parameter to the wfNotify function, as in these examples:
<$wfNotify (userName, “user”, templateName)$>
<$wfNotify (aliasName, “alias”, templateName)$>
If an alternate template is not specified, the system default template is used.
Customizing the Subject or Message LineCriteria workflow email subject and message lines can be customized for your application.The email subject line appears in the email; the message line appears in the email body with other information about the workflow email (workflow name, step, and content item).
The message line defaults to one of two messages, depending on whether the step is notification-only (that is, if it has zero required reviewers).
Subject lines and message lines can be customized in two ways:
The core string resource file can be modified according to standard component architecture.
For simple customizations, the wfMailSubject (for email subjects) or wfMessage (for message lines) Idoc Script variable can be declared in a criteria workflow step event script or stored in the companion file.

9-6 Stellent Content Server Workflow Implementation Guide
Workflow Tips and Tricks
Modifying StringsDefault criteria workflow email subject lines are defined in the ww_strings.htm file, located in <install_dir>/shared/config/resources/lang. The string definitions are as follows (variable “1” is the content item title and variable “2” is the name of the workflow step):
<@wwWfIsNotifyOnly=Workflow notification for content item ‘{1}’
is in step ‘{2}’.@>
<@wwWfReadyForStep=Content item ‘{1}’ is ready for workflow step
‘{2}’.@>
<@wwWfRejected=Content item ‘{1}’ has been rejected.@>
These string definitions are usually called with the Idoc Script <$lc()$> localization function and they can be aliased in a component resource file. See the <@dynamichtml wf_approve_mail_subject@> include definition in the std_page.htm file for an example of email subject line string includes.
Changing Idoc VariablesFor simple email or subject line changes, Idoc Script rather than a component can be used. The wfMailSubject configuration variable or the wfMessage configuration variable can be placed in step event script. The value of these variables can also accept Idoc Script, as in this example:
<$wfMailSubject=”My custom subject text for content with
<$dDocTitle$> title”$>
No eval() function is required for the Idoc Script variables to evaluate.
If wfMailSubject or wfMessage is placed in the entry event of a workflow step, the email messages triggered by content entering the step receives the customized subject or message line. These variables can also be declared prior to a wfNotify() function and the email then generated by that function receives the customization.
WORKFLOW ESCALATIONThis example requires familiarity with tokens and coding.
Workflow escalation (that is, dynamically routing workflow content to different people than listed users) is a common workflow requirement. While this is easily accomplished with jumps and parsing of some criteria (for example, date, action, metadata) there is often some initial confusion or hesitation as to where or to whom the content should go.
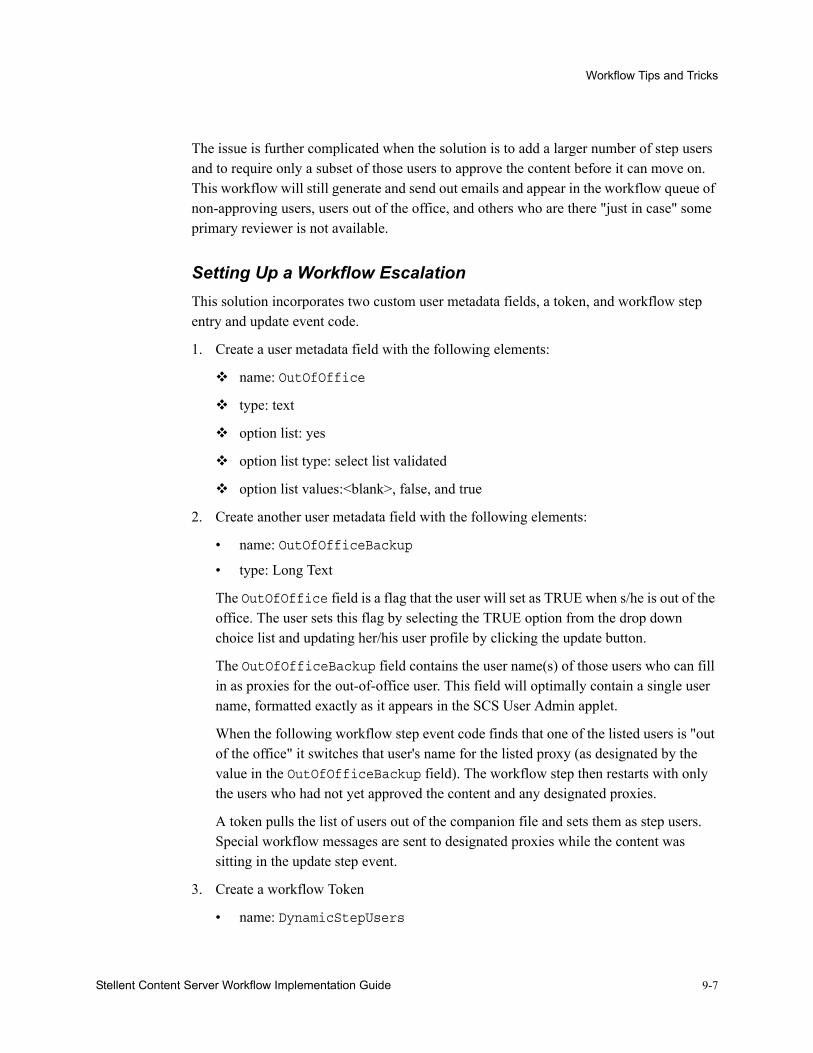
Stellent Content Server Workflow Implementation Guide 9-7
Workflow Tips and Tricks
The issue is further complicated when the solution is to add a larger number of step users and to require only a subset of those users to approve the content before it can move on. This workflow will still generate and send out emails and appear in the workflow queue of non-approving users, users out of the office, and others who are there "just in case" some primary reviewer is not available.
Setting Up a Workflow EscalationThis solution incorporates two custom user metadata fields, a token, and workflow step entry and update event code.
1. Create a user metadata field with the following elements:
name: OutOfOffice
type: text
option list: yes
option list type: select list validated
option list values:<blank>, false, and true
2. Create another user metadata field with the following elements:
• name: OutOfOfficeBackup
• type: Long Text
The OutOfOffice field is a flag that the user will set as TRUE when s/he is out of the office. The user sets this flag by selecting the TRUE option from the drop down choice list and updating her/his user profile by clicking the update button.
The OutOfOfficeBackup field contains the user name(s) of those users who can fill in as proxies for the out-of-office user. This field will optimally contain a single user name, formatted exactly as it appears in the SCS User Admin applet.
When the following workflow step event code finds that one of the listed users is "out of the office" it switches that user's name for the listed proxy (as designated by the value in the OutOfOfficeBackup field). The workflow step then restarts with only the users who had not yet approved the content and any designated proxies.
A token pulls the list of users out of the companion file and sets them as step users. Special workflow messages are sent to designated proxies while the content was sitting in the update step event.
3. Create a workflow Token
• name: DynamicStepUsers
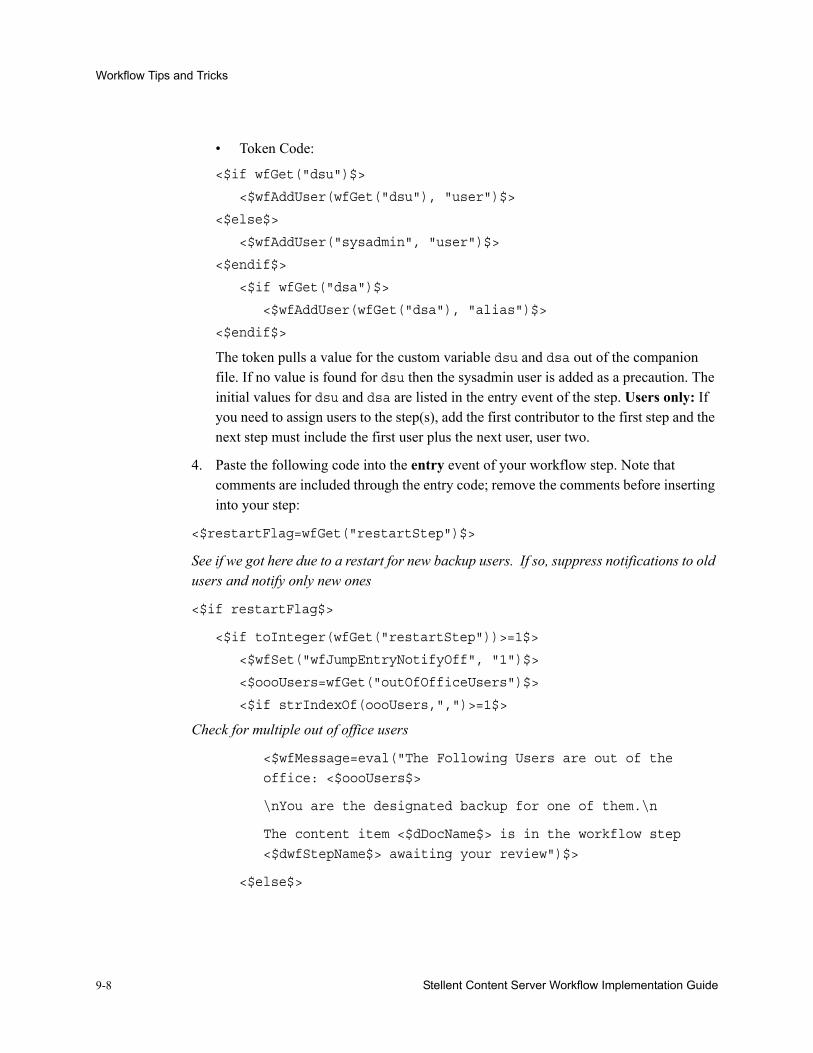
9-8 Stellent Content Server Workflow Implementation Guide
Workflow Tips and Tricks
• Token Code:
<$if wfGet("dsu")$>
<$wfAddUser(wfGet("dsu"), "user")$>
<$else$>
<$wfAddUser("sysadmin", "user")$>
<$endif$>
<$if wfGet("dsa")$>
<$wfAddUser(wfGet("dsa"), "alias")$>
<$endif$>
The token pulls a value for the custom variable dsu and dsa out of the companion file. If no value is found for dsu then the sysadmin user is added as a precaution. The initial values for dsu and dsa are listed in the entry event of the step. Users only: If you need to assign users to the step(s), add the first contributor to the first step and the next step must include the first user plus the next user, user two.
4. Paste the following code into the entry event of your workflow step. Note that comments are included through the entry code; remove the comments before inserting into your step:
<$restartFlag=wfGet("restartStep")$>
See if we got here due to a restart for new backup users. If so, suppress notifications to old users and notify only new ones
<$if restartFlag$>
<$if toInteger(wfGet("restartStep"))>=1$>
<$wfSet("wfJumpEntryNotifyOff", "1")$>
<$oooUsers=wfGet("outOfOfficeUsers")$>
<$if strIndexOf(oooUsers,",")>=1$>
Check for multiple out of office users
<$wfMessage=eval("The Following Users are out of the
office: <$oooUsers$>
\nYou are the designated backup for one of them.\n
The content item <$dDocName$> is in the workflow step
<$dwfStepName$> awaiting your review")$>
<$else$>

Stellent Content Server Workflow Implementation Guide 9-9
Workflow Tips and Tricks
<$wfMessage=eval("The Following User is out of the office:
<$oooUsers$>
\nYou are the designated backup for this user.\n
The content item <$dDocName$> is in the workflow step
<$dwfStepName$> awaiting your review")$>
<$endif$>
<$rsMakeFromString("ooou",oooUsers)$>
<$loop ooou$>
<$userBackupName=row&"_Bkup"$>
<$wfNotify(wfGet(userBackupName),"user")$>
<$endloop$>
<$wfSet("restartStep","0")$>
<$endif$>
<$else$>
<$wfSet("restartStep","0")$>
<$endif$>
Set your step users here. Multiple users should be comma-separated, user names should be in quotes, metadata field references are unquoted. This example proceeds, using user names rather than aliases. Slight code re-working is required if using aliases.
<$dynamicStepUsers= <LIST USER NAMES IN QUOTES HERE>$>
<$if strIndexOf(dynamicStepUsers,",")>=1$>
If there are multiple users specified check to see if any of the MULTIPLE users are out of the office
<$rsMakeFromString("multiDynamicUsers",dynamicStepUsers)$>
<$loop multiDynamicUsers$>
<$if strEquals(getValueForSpecifiedUser(row,"uOutOfOffice"),"true")$>
If user is out of office, get their backup
<$backup=getValueForSpecifiedUser(row,"uOutOfOfficeBackup")$>
Replace out-of-office user in users list with their backup
<$dynamicStepUsers=strReplace(dynamicStepUsers,row,backup)$>

9-10 Stellent Content Server Workflow Implementation Guide
Workflow Tips and Tricks
<$endif$>
<$endloop$>
<$else$>
Check to see if the SINGLE user is out of the office
<$if strEquals(getValueForSpecifiedUser(dynamicStepUsers,"uOutOfOffice"),"true")$>
If user is out of office, get their backup
<$dynamicStepUsers=getValueForSpecifiedUser(dynamicStepUsers,"uOutOfOfficeBackup")$>
<$endif$>
<$endif$>
<$wfSet("dsu",dynamicStepUsers)$>
Set the dsu variable into the companion file with listed and backup users
5. Paste the following code into the update event of your workflow step, removing comment lines before doing so:
<$remainingUsers=wfGet("wfUserQueue")$>
Get users who have yet to approve
<$rsMakeFromString("ru", remainingUsers)$>
<$loop ru$>
<$if strEquals(getValueForSpecifiedUser(row,"uOutOfOffice"),"true")$>
Check the remaining users to see if they are out of the office
<$if getBackup$>
Create list of users requiring backup substitutes
<$getBackup=row &","&getBackup$>
<$else$>
<$getBackup=row$>
<$endif$>
<$endif$>
<$endloop$>
<$if getBackup or strLength(getBackup)>0 $>
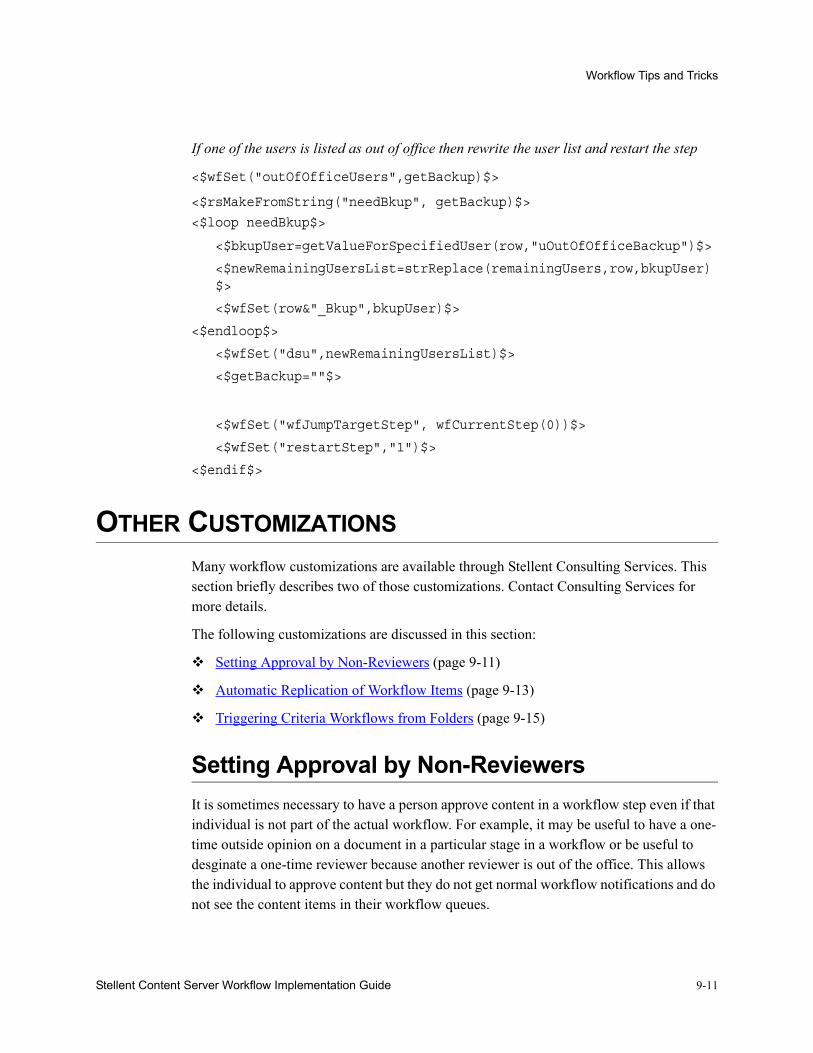
Stellent Content Server Workflow Implementation Guide 9-11
Workflow Tips and Tricks
If one of the users is listed as out of office then rewrite the user list and restart the step
<$wfSet("outOfOfficeUsers",getBackup)$>
<$rsMakeFromString("needBkup", getBackup)$>
<$loop needBkup$>
<$bkupUser=getValueForSpecifiedUser(row,"uOutOfOfficeBackup")$>
<$newRemainingUsersList=strReplace(remainingUsers,row,bkupUser)$>
<$wfSet(row&"_Bkup",bkupUser)$>
<$endloop$>
<$wfSet("dsu",newRemainingUsersList)$>
<$getBackup=""$>
<$wfSet("wfJumpTargetStep", wfCurrentStep(0))$>
<$wfSet("restartStep","1")$>
<$endif$>
OTHER CUSTOMIZATIONSMany workflow customizations are available through Stellent Consulting Services. This section briefly describes two of those customizations. Contact Consulting Services for more details.
The following customizations are discussed in this section:
Setting Approval by Non-Reviewers (page 9-11)
Automatic Replication of Workflow Items (page 9-13)
Triggering Criteria Workflows from Folders (page 9-15)
Setting Approval by Non-ReviewersIt is sometimes necessary to have a person approve content in a workflow step even if that individual is not part of the actual workflow. For example, it may be useful to have a one-time outside opinion on a document in a particular stage in a workflow or be useful to desginate a one-time reviewer because another reviewer is out of the office. This allows the individual to approve content but they do not get normal workflow notifications and do not see the content items in their workflow queues.

9-12 Stellent Content Server Workflow Implementation Guide
Workflow Tips and Tricks
Users with designated roles or who are members of designated aliases can approve content on this basis. These designated users see a Bypass Approve link in the workflow actions box for each item in a workflow to which they have normal security access. Performing a Bypass Approve approves the content item in the step in which it currently resides. Defined step exit conditions are still evaluated and still apply. The approval is logged in the Workflow History database table and in the WorkflowActionHistory ResultSet of the companion file.
A designated approver is not a regular workflow step approver and thus does not receive automatic workflow notifications. Because of this, access to a content item in a workflow where the approver wants to perform a Bypass Approve action must be intentional. The designated approver must access the Active Workflows menu, then select the workflow name and select an action.
The designated approver component aliases core resources. Therefore if other components are running or are planned, this should be taken into account. In some cases, component resources may be combined to include all desired functionality or can be renamed and re-referenced to keep all components working correctly (but separately).
ScenariosFor the following scenarios, assume that User A has a role or alias that grants designated approver status and that a sample workflow named MyWF has two steps.
Scenario 1: User A is listed as an approver for step 1 in MyWF but not in step 2. Therefore, no Bypass Approve link appears for Step 1. User A received default workflow action capabilities and notifications. The Bypass Approve link for step 2 appears under the Workflow Actions menu if User A accesses the Content in workflow ‘MyWF’ page when the content item is in step 2.
Scenario 2: User A is not listed as an approver in MyWF. The Bypass Approve link appears in the action menu on the Content in workflow ‘MyWF’ page for all steps and for all content to which User A has at least Read permission in its Security group.
Scenario 3: User A is not listed as an approver for Step 1 in MyWF. Step 1 requires two approvals from reviewers before it will move to step 2. The Bypass Approve link appears for User A. Clicking Bypass Approve registers an approval and fulfills one of the two required approvals for the step to continue in the workflow.
Contact Stellent Consulting Services forinformation about the components needed to install the designated approver functionality.
Stellent Content Server Workflow Implementation Guide 9-13
Workflow Tips and Tricks
Automatic Replication of Workflow ItemsContent items are often processed (in one form or another) before they are ‘released’. A released content item is indexed and can then be included in search results, archives, and in other processes and applications.
It is sometimes useful to release a content item prior to its completion in the workflow. For example, a content item must be in a released state in order to be replicated (and perhaps later used in disaster recovery). Items not released (such as items in workflows) are not used by the replicator.
It is possible to designate workflow items as released while still in workflow. Normal workflow actions, such as updating, checking out, and checking in are still available. However, these items will be indexed and show up in search results, can be used in replication and archiving, and in any other processes or applications.
Potential ConflictsThere are several points to be aware of before setting up automatic replication:
Loss of data integrity: A premature release of content, whether intentional or otherwise, can have unforeseen effects on business process management, content accessibility, and information integrity. Potential ramifications should be thoroughly considered before the release of items still in workflow is considered.
Non-capture of workflow information: Workflows are a combination of process and content. While it is possible to release content and make it available for replication and other processes, it is not possible (without customization and assistance from Stellent Consulting Services) to capture and replicate workflow state information.
If content in a workflow on a source instance is replicated and released on a target instance without passing through a workflow on that instance, the recovery process will involve manual effort to re-set the content’s workflow state.
In most cases, cloning of workflow information is not necessary because recovery to a prior workflow state is required only during true disaster recovery. In all other cases, content items will replicate as normal after exiting a workflow and will supersede versions or revisions replicated during workflow.
Important: There are several elements to consider before replicating workflow items. This section describes the process but does not go into detail; contact Stellent Consulting Services before setting up replication of workflow items.
9-14 Stellent Content Server Workflow Implementation Guide
Workflow Tips and Tricks
Imported content items do not enter workflow: Content items replicated while in a workflow on a source instance will not enter a workflow on the target instance without additional customization and assistance from Stellent Consulting Services. Replicated content items will be checked in to the target instance and released.
Restoration of replicated workflow items requires manual intervention: Some workflow information can be captured as metadata for use in a manual restoration of the workflow. Only a check-in action triggers a content item’s entry into workflow; therefore, the restoration of an item back into a workflow requires that a new revision be created.
This introduces a discrepancy between the number of revisions on the source and the target instances. In order to recover the content items on the target to a state as close as possible to their previous state on the source, a discrepancy between the two instances is intentionally and unavoidably introduced.
ScenariosFor content item 1, not released while in workflow, the following is true:
The content item moves through workflow in a non-released state.
The content item is not a candidate for replication while in workflow.
The content item is available only to named workflow step reviewers and administrators.
When the content item completes the workflow, it is released to the Content Server, indexed, and is now a candidate for replication.
For content item 2, released while in workflow, the following is true:
The content item moves through workflow and is released as specified. After an item is released, it cannot be ‘unreleased’. New revisions of a content item created during workflow are not released unless specified.
Content items released while in workflow will display in search results and can be viewed by users with the appropriate security access.
Users cannot edit, check out, check in, or update a released item that is in workflow unless they are designated users for the step in which the item is located and that step allows the attempted action.
A content item released while in workflow is a candidate for automatic replication. The Replicator treats the item as if it is not in workflow.
Stellent Content Server Workflow Implementation Guide 9-15
Workflow Tips and Tricks
Content items completing workflow are replicated in the normal fashion and supersede any pre-existing content item versions replicated during workflow.
Contact Stellent Consulting Services for details about and the implications of the release of content items in workflow for replication or other purposes.
Triggering Criteria Workflows from FoldersIt is sometimes necessary for documents in a particular folder to go through a criteria workflow. However, when you create a criteria workflow based on a folder, the criteria option of folder is not listed in the field list. The field list in critera workflows only lists fields with a type of text or long text. Because Folder (xCollectionID) is an integer field, it is not an option.
Although the folder field cannot be selected on the Edit Criteria form, it can be defined as a criteria in Events. In the Entry Event of the first step, a criteria can be set up to check for the appropriate folder number (xCollectionID). If it does not fulfill the criteria, the item can be exited from the workflow.
The following general steps detail how to set up such a workflow:
1. Start a new criteria workflow and choose the Security Group that the workflow will use.
2. In the Criteria Definition section, define a global criteria to monitor all of the documents that enter the system. This can be something as simple as the following:
Field: ContentID
Operator: Matches
Value: *
This checks every content item matching the Security Group coming into the system. It may be preferable to only monitor items coming in through folders. In that scenario, an extra metadata field can be set which is defaulted on all folders for which the critera is based.
If multiple workflows are in place, it may be best to filter all content through this workflow and jump to sub-workflows through multiple criteria settings in the first step of this workflow.
3. Add the first step to the workflow.
4. In the Events tab, click Edit from the Entry Event.
5. On the Jumps tab, click Add.

9-16 Stellent Content Server Workflow Implementation Guide
Workflow Tips and Tricks
6. Give the jump a meaningful name (for example, Folder Criteria) and click OK.
7. For the jump criteria, enter the following:
Field: Folder
Operator: Not Equals
Value: Folder ID on which the workflow should be based
When done, click Add.
8. For the Target Step, select Exit to Parent Step and change both of the 0 parameters to 10 (for example, @wfExit(10,10). This forces documents that are not in the folder out of the workflow.
9. Click OK on the Entry Event and click OK on the Add New Step dialog.
10. Add the necessary jumps, steps, and events for the rest of the workflow and enable it.
Using the Contribution Template EditorThe Contribution Template Editor (CTE) is a Stellent ‘extra’ which can be downloaded from the Stellent Support Site. It can be used to create and edit Contribution Templates in a WYSIWYG mode. The graphical interface elminates the need to manually add code such as HTML, Idoc Script, or JavaScript. You can also use source mode to manually modify a Contribution Template.
In order to make the checked-in CTE form work with a workflow, you must add a hidden field on the CTE form above the Submit button. With the hidden field selected, click on the properties tab and verify that the properties are as follows:
ID=isFinished
title=
type=hidden
size=20(default)
value=1
name=isFinished
The hidden field will cause the workflow to go to the next step after the form is changed and submitted.
Because of the way CTE forms work and save data after submitting, they do not behave the same way in a workflow as in other content. You should not save the .hcsp files or try to upload them from the workflow interface.

Stellent Content Server Workflow Implementation Guide 9-17
Workflow Tips and Tricks
Searching Within a Workflow StepWhen executing the GET_SEARCH_RESULTS service within a workflow step, you may not get the expected results. When executing services in a workflow event, you can experience data corruption because the workflow’s data binder is being used by the service.
A solution for this is to temporarily set the security group value into a temporary variable. Then clear the current security group value, make the call for the search results, then reset the security group back again. This should return the results being sought.


Stellent Content Server Workflow Implementation Guide I-1
I n d e x
Aad hoc users 9-4Add Alias to Step screen 4-15, 5-18, 7-10Add Alias to Workflow screen 5-15Add Content to Workflow screen
Existing Content 5-13New Content 5-12
Add Jump screen 7-22Message tab 6-33, 7-24Side Effects tab 6-31, 7-23
Add New Step screen 4-13, 5-15, 7-10Events tab 6-21
Add New Workflow screen 5-12Add Script screen
Custom tab 7-19Jumps tab 7-18Test tab 7-21
Add Template screen 7-8Add Token screen 6-8Add Token to Step screen 4-17, 5-20, 7-12Add Token User screen 6-9Add User to Step screen 4-16, 5-18, 7-11adding ad hoc users 9-4adding workflow steps 3-4aliases
definition 2-4Auto-Contribution step 2-3automatic replication 9-13
BBasic workflows
changing 5-8process 5-2set-up tips 5-4status 2-9usage 3-1
user interface 5-9
Cchanging
Basic workflow 5-8Criteria workflow 4-8jump 6-17script template 7-5sub-workflow 4-8token 6-5workflow templates 7-2
choosing workflow type 3-1companion files
contents 2-6location 2-6
completingjump 6-16script template 7-4
conditional statementssetting up for jump 6-16setting up for script template 7-4
Content Item View screen 6-34, 7-25Contribution step 2-3creating 7-1
script templates 7-3tokens 6-4workflow templates 7-1workflows
jump 6-15Criteria workflows
changing 4-8disabling 4-9process 4-2setting up 4-5status 2-9tips 4-3usage 3-2

I-2 Stellent Content Server Workflow Implementation Guide
Index
user interface 4-9customizing email message line 9-5customizing email subject line 9-5customizing email templates 9-5
Ddefinitions
aliases 2-4tokens 2-4
deletingworkflow templates 7-3
designing workflows 3-3digital signatures
acquiring 9-1setup 9-1
disablingCriteria workflow 4-9sub-workflow 4-9
DONE status 2-9
Ee-mail address of support 1-2Edit Additional Exit Condition screen 4-17, 5-20, 7-13Edit Criteria Workflow screen 4-11Edit Jump screen 7-22
Message tab 6-33, 7-24Side Effects tab 6-31, 7-23
Edit Script screenCustom tab 6-27, 7-19Jumps tab 6-25, 7-18Test tab 6-28, 7-21
EDIT status 2-9Edit Step screen 4-13, 5-15, 7-10
Events tab 6-21Edit Template screen 7-8Edit Token screen 6-8Edit Type Script screen 6-23Edit Workflow screen 5-12email message lines 9-5email subject lines 9-5email templates, customizing 9-5entry count variable 6-13entry script 2-7errors
jump 6-20escalation 9-6event scripts
update 6-14events 2-5, 6-11
examplesjumps 6-14, 6-19token 6-4
exit conditions 2-4exit script 2-7
GGENWWW status 2-9
IIdoc variables, modifying 9-6Internet website of support 1-2intradoc_users newsgroup 1-2
Jjump entry count variable 6-13jump last entry variable 6-13jump return step 6-13jump scripts, testing 6-17jump step name variable 6-13jumps 2-4, 6-10
changing 6-17completing 6-16creating 6-15errors 6-20example 6-14, 6-19setting up 6-14setting up conditional statement 6-16setting up side effects 6-15
Kkeys, workflow 2-6
Llast entry variable 6-13
Mmodifying email strings 9-6modifying Idoc variables 9-6modifying workflows
tips 3-4
Stellent Content Server Workflow Implementation Guide I-3
Index
NNew Criteria Workflow screen 4-11newsgroup 1-2non-reviewer approval 9-11
Oorganization 1-2overview 1-1
Audience 1-2
Pparallel workflows 9-2parent list 2-7PENDING status 2-9process
Basic workflow 5-2Criteria workflow 4-2workflow step 2-7, 6-20
RRELEASED status 2-9reordering workflow steps 3-4return step 6-13REVIEW status 2-9Review/Edit Revision step 2-3Review/New Revision step 2-3Reviewer step 2-3reviewers not in workflow 9-11
Sscript templates
changing 7-5completing 7-4creating 7-3setting up conditional statement 7-4setting up side effects 7-4testing 7-4
scriptstesting workflow jump 6-17update event 6-14
securityworkflow issues 3-2
Select Target Step screen 6-30setting up
conditional statement for jump 6-16conditional statement for script template 7-4
jumps 6-14side effects for jump 6-15side effects for script template 7-4
setting up Criteria workflows 4-5side effects
setting up 6-15setting up for script template 7-4
Start Workflow screen 5-22status, workflow 2-9Stellent
support 1-2step name variable 6-13steps
auto-contribution 2-3contribution 2-3reivew/edit revision 2-3review 2-3review/new revision 2-3
sub-workflowschanging 4-8disabling 4-9set-up 4-2
support 1-2before contacting -- 1-2e-mail 1-2Internet website 1-2newsgroup 1-2support programs 1-2
syntax, workflow token 6-3
Ttarget step 6-13, 6-13templates 7-1
changing script 7-5changing workflow 7-2completing script 7-4creating script 7-3deleting workflow 7-3testing workflow script 7-4
testingworkflow jump script 6-17workflow script template 7-4
tipsCriteria workflow 4-3
token screens 6-7tokens
changing 6-5creating 6-4definition 2-4examples 6-4syntax 6-3

I-4 Stellent Content Server Workflow Implementation Guide
Index
Uupdate scripts, workflow 6-14
Wwebsite of support 1-2wfAction 6-2wfAdditionalExitCondition 6-2wfAddUser 6-2wfCurrentGet 6-2wfCurrentSet 6-2wfCurrentStep 6-2wfDisplayCondition 6-2wfExit 6-2wfGet 6-2wfGetStepTypeLabel 6-2wfIsReleasable 6-2wfJumpEntryNotifyOff 6-2wfJumpMessage 6-2wfJumpName 6-2wfJumpReturnStep 6-2wfJumpTargetStep 6-2wfMailSubject 6-2wfMessage 6-3wfNotify 6-3wfParentList 6-3wfReleaseDocument 6-3wfSet 6-3wfStart 6-3wfupdateMetaData 6-3Workflow Admin 6-1, 7-1
Criteria tab 4-9sample workflow template 7-1Templates tab 7-7Workflows tab 5-9
workflow escalation 9-6workflow replication 9-13workflow scenarios 9-11Workflow Scripts screen 7-15workflow step process 6-20workflow templates
creating 7-1, 7-1Workflow Tokens screen 6-4, 6-7workflows 6-1, 7-1
actions 2-8Basic
changing 5-8process 5-2
set-up 5-5tips 5-4user interface 5-9
companion file 2-6Criteria
changing 4-8disabling 4-9process 4-2set-up 4-5tips 4-3user interface 4-9
designing 3-3events 2-5, 6-11examples 6-14, 6-19jumps
completing 6-16creating 6-15setting up 6-14setting up conditional statement 6-16setting up side effects 6-15testing scripts 6-17
keys 2-6overview 2-1parent list 2-7process 2-7, 6-20script templates 7-15
changing 7-5completing 7-4creating 7-3testing 7-4
security issues 3-2status 2-9step types 2-2sub-workflow type 2-2sub-workflows
changing 4-8disabling 4-9
templateschanging 7-2deleting 7-3
tokenschanging 6-5creating 6-4
types 2-2update event scripts 6-14
working withBasic workflow user interface 5-9Criteria workflow user interface 4-9