star wars - jedi knight - manual - pc
DESCRIPTION
Star Wars - Jedi Knight - ManualTRANSCRIPT

“Only a fully trained JediKnight, with the Force as his
ally, will conquer...” —Jedi Master Yoda
“Only a fully trained JediKnight, with the Force as his
ally, will conquer...” —Jedi Master Yoda
Jedi Knight PC CD UK Man 19/4/01 8:57 pm Page 1

2
J E D I K N I G H T : D A R K F O R C E S I I
Backstory 3Checking Your System 4Installation 4Running the Game 6
Launcher Screen 6Creating a New Player 7Select an Existing Player 8Main Menu 8Save and Load Games 8
Setup Screen 9General Screen 9Gameplay Screen 10Display Screen 11Adjusting for 3D Acceleration 11Sound Screen 12Controls Screen 13
Level Completion Screen (Single Player Only) 15Ranks Used in Jedi Knight 15
Force Power Allocation Screen 15Game Controls 16Option Screen 19Status Display 20Weapons 21
Lightsaber 23Inventory Items 25Power-Up Items 26Ammo Items 27Force Powers 28
Gaining Force Powers 28Assigning Force Power Stars 28
Morality Scale 29Using Force Powers 29
Choose the Dark Side or Light Side 30Neutral Force Abilities 31The Light Side Abilities 32The Dark Side Abilities 33
Playing Tips and Strategies 34Characters 35Multiplayer Games 41
Mulitiplayer Limitations 41Multiplayer Characters 41
Edit Character 42Multiplayer Levels 43
Capture the Flag Levels 43Jedi Training Levels 45
Displays 45Communication 45Console Commands 46Host Game 46
Network Providers 46Game Configuration 47Join Game 48
Playing Jedi Knight on the Internet 49Play Jedi Knight in
The Internet Gaming Zone™ 50Hosting Your Own Internet Game 51
Useful Internet Utilities Included with Windows95 53Performance Tips for Playing
Jedi Knight on the Internet 54Glossary of Internet-Related Terms 56Jedi Knight Credits 59Customer Support 62Product License Agreement 62
C O N T E N T S
B A C K S T O R Y
You play Kyle Katarn, the mercenary hero from Dark Forces who
successfully infiltrated the Empire. Jedi Knight: Dark Forces II continues the
story of Katarn as he embarks on a quest into his past and learns the mysterious
ways of the Jedi. Soon after the destruction of the Emperor and Darth Vader,
the Jedi are rising once again. Your father has been murdered by Jerec, the
most powerful of seven Dark Jedi. Jerec wants to unlock the Force
energy of thousands of past Jedi Knights held in a hidden Jedi burial ground.
Your father died keeping the burial ground’s location a secret from Jerec. As
Kyle, you must stop Jerec’s evil quest and avenge the death of your father.
This task forces Katarn to decide his destiny. If he chooses the darkside, he will come into enormous power. If he chooses the light side, he
faces seemingly insurmountable evil. Whatever path Katarn chooses will
change the face of the galaxy forever.
When Kyle initially discovers the Force, he is uncommitted to either side.
Eventually, he develops his Force powers and must make a choice. During
the game, your actions help determine your alignment to either the dark
or the light side. If you choose the light side, you’ll want to stop Jerec from
unleashing his evil on the galaxy. If you choose the dark side, you’ll want
to stop him and seize the power for yourself. To find the powerful burial
ground, you’ll need to follow scant clues left by your dead father and his
allies. Along the way, you aspire to become a Jedi Knight yourself, though
whether it’s a good or an evil Jedi is yet to be decided.
“A Jedi’s strength flows from the Force.
But beware of the dark side.”
—Yoda
Jedi Knight PC CD UK Man 19/4/01 8:57 pm Page 2
5
J E D I K N I G H T : D A R K F O R C E S I I
Ω Analyse Your Computer: This button runs a system checker to make sure yoursystem meets the basic requirements for running the game. See Checking Your Systemabove for details.
Ω Exit to Windows: Returns you to your desktop.4 To install, click the Install Jedi Knight button. Follow the onscreen instructions to
setup and install.5 You will be prompted to select a 2D video resolution. The low-res option (320 x 200)
increases game performance, but graphics quality may suffer. The high-res option (640x 480) is only for users with high-end machines and video cards. If you are not sureabout your system, pick low-res. Other video resolution options are available withinthe game.
6 You’ll be asked to select low-res or high-res sound. Low-res is the default setting.WARNING: Choosing high-res can adversely affect performance. Pick high-res only ifyour system has at least 32MB of RAM.
7 You will be asked to choose size of installation (Minimum, Standard and Complete).Minimum is not recommended for low-end machines, but select it if you are short onhard drive space. The load times will be very slow. Standard is recommended for mostmachines. The Complete install is recommended for low-end machines and willimprove load times and overall performance.
8 Next, choose the destination for Jedi Knight installation. The default Jedi Knightdirectory is: C:\\Program Files\\LucasArts\\Jedi Knight. (The letter of your hard drivemay be different.) If this is not what you want, specify a different drive and/ordirectory name.
9 Setup will create a Jedi Knight Program Folder for the program icons. Click Next tocreate a new folder or select an existing folder, then click Next.
10 You’ll be given the option to create a series of shortcuts. Creating a shortcut will makeit easier for you to find the game and start it up. Click the tickboxes to deselect anyshortcuts you don’t want. You’ll also have another opportunity to view the Readme.
11 If the game is successfully installed, you will see a Setup Complete screen. 12 While installing Jedi Knight, you will be asked to install Microsoft’s DirectX, which is
necessary to run the game. If you have not installed DirectX 5.0 on your machinebefore, then you will be prompted to do so. You can also select to install or reinstallDirectX by choosing Readme and Troubleshooting from the Launcher, thenselect Install DirectX 5.0. If you are not sure if DirectX 5.0 will work on yourmachine, choose Readme and Troubleshooting from the Launcher, and selectAnalyse Your Computer to see if your hardware has DirectX 5.0-certified driversinstalled. Click OK when finished. See the Troubleshooting Guide for moreinformation on DirectX. NOTE: You may be prompted to insert your Windows 95CD-ROM while installing DirectX. It’s a good idea to analyse your system afterinstalling DirectX to see if everything is in order.
13 Now you are ready to play Jedi Knight.If You Have Trouble Installing
4
J E D I K N I G H T : D A R K F O R C E S I I
C H E C K I N G Y O U R S Y S T E MIf you are not sure if your computer
meets the system requirements to runJedi Knight, you can analyse yourcomputer before installing.
1 Insert the Jedi Knight Disc 1 into yourCD-ROM drive. The Installationmenu should appear.
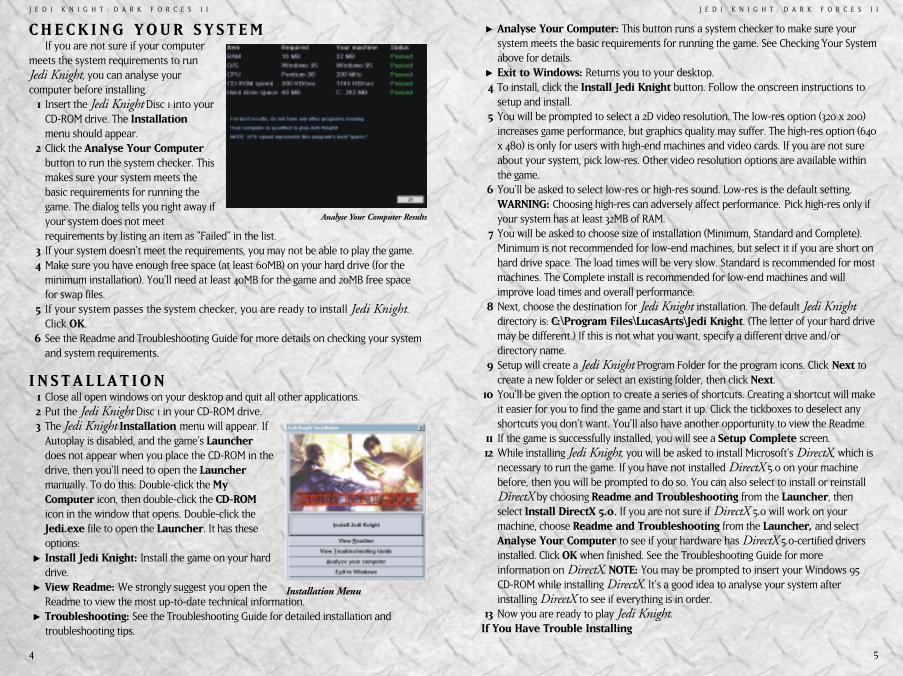
2 Click the Analyse Your Computerbutton to run the system checker. Thismakes sure your system meets thebasic requirements for running thegame. The dialog tells you right away ifyour system does not meetrequirements by listing an item as “Failed” in the list.
3 If your system doesn’t meet the requirements, you may not be able to play the game.4 Make sure you have enough free space (at least 60MB) on your hard drive (for the
minimum installation). You’ll need at least 40MB for the game and 20MB free spacefor swap files.
5 If your system passes the system checker, you are ready to install Jedi Knight.Click OK.
6 See the Readme and Troubleshooting Guide for more details on checking your systemand system requirements.
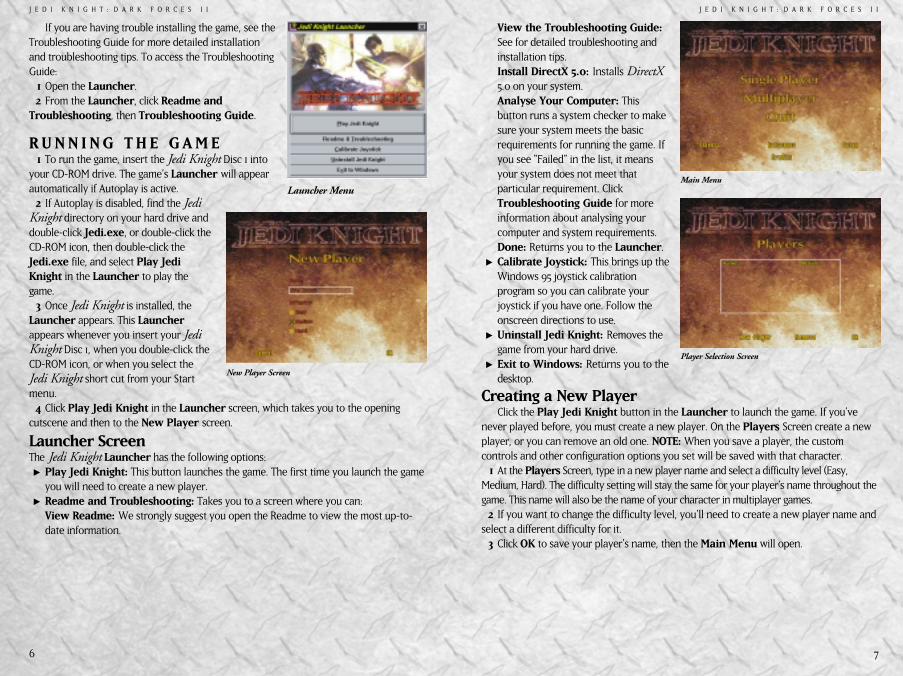
I N S T A L L A T I O N 1 Close all open windows on your desktop and quit all other applications.2 Put the Jedi Knight Disc 1 in your CD-ROM drive. 3 The Jedi Knight Installation menu will appear. If
Autoplay is disabled, and the game’s Launcherdoes not appear when you place the CD-ROM in thedrive, then you’ll need to open the Launchermanually. To do this: Double-click the MyComputer icon, then double-click the CD-ROMicon in the window that opens. Double-click theJedi.exe file to open the Launcher. It has theseoptions:
Ω Install Jedi Knight: Install the game on your harddrive.
Ω View Readme: We strongly suggest you open theReadme to view the most up-to-date technical information.
Ω Troubleshooting: See the Troubleshooting Guide for detailed installation andtroubleshooting tips.
Analyse Your Computer Results
Installation Menu
Jedi Knight PC CD UK Man 19/4/01 8:57 pm Page 4
7
J E D I K N I G H T : D A R K F O R C E S I I
View the Troubleshooting Guide:See for detailed troubleshooting andinstallation tips.Install DirectX 5.0: Installs DirectX5.0 on your system.Analyse Your Computer: Thisbutton runs a system checker to makesure your system meets the basicrequirements for running the game. Ifyou see “Failed” in the list, it meansyour system does not meet thatparticular requirement. ClickTroubleshooting Guide for moreinformation about analysing yourcomputer and system requirements.Done: Returns you to the Launcher.
Ω Calibrate Joystick: This brings up theWindows 95 joystick calibrationprogram so you can calibrate yourjoystick if you have one. Follow theonscreen directions to use.
Ω Uninstall Jedi Knight: Removes thegame from your hard drive.
Ω Exit to Windows: Returns you to thedesktop.
Creating a New PlayerClick the Play Jedi Knight button in the Launcher to launch the game. If you’ve
never played before, you must create a new player. On the Players Screen create a newplayer, or you can remove an old one. NOTE: When you save a player, the customcontrols and other configuration options you set will be saved with that character.
1 At the Players Screen, type in a new player name and select a difficulty level (Easy,Medium, Hard). The difficulty setting will stay the same for your player’s name throughout thegame. This name will also be the name of your character in multiplayer games.
2 If you want to change the difficulty level, you’ll need to create a new player name andselect a different difficulty for it.
3 Click OK to save your player’s name, then the Main Menu will open.
6
J E D I K N I G H T : D A R K F O R C E S I I
If you are having trouble installing the game, see theTroubleshooting Guide for more detailed installationand troubleshooting tips. To access the TroubleshootingGuide:
1 Open the Launcher.2 From the Launcher, click Readme and
Troubleshooting, then Troubleshooting Guide.
R U N N I N G T H E G A M E1 To run the game, insert the Jedi Knight Disc 1 into
your CD-ROM drive. The game’s Launcher will appearautomatically if Autoplay is active.
2 If Autoplay is disabled, find the JediKnight directory on your hard drive anddouble-click Jedi.exe, or double-click theCD-ROM icon, then double-click theJedi.exe file, and select Play JediKnight in the Launcher to play thegame.
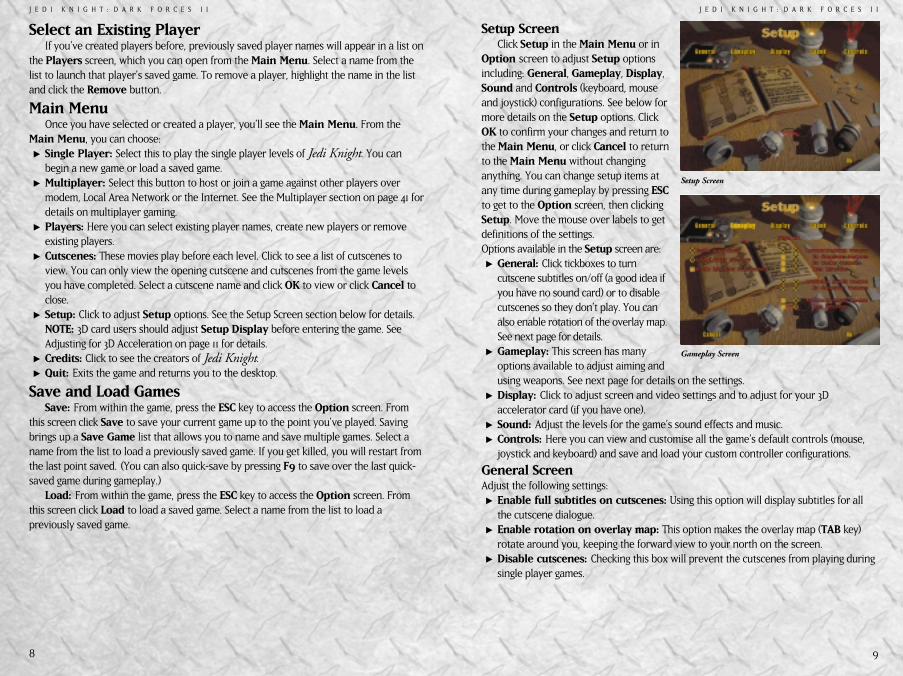
3 Once Jedi Knight is installed, theLauncher appears. This Launcherappears whenever you insert your JediKnight Disc 1, when you double-click theCD-ROM icon, or when you select theJedi Knight short cut from your Startmenu. 4 Click Play Jedi Knight in the Launcher screen, which takes you to the opening
cutscene and then to the New Player screen.
Launcher ScreenThe Jedi Knight Launcher has the following options:Ω Play Jedi Knight: This button launches the game. The first time you launch the game
you will need to create a new player.Ω Readme and Troubleshooting: Takes you to a screen where you can:
View Readme: We strongly suggest you open the Readme to view the most up-to-date information.
Launcher Menu
New Player Screen
Player Selection Screen
Main Menu
Jedi Knight PC CD UK Man 19/4/01 8:57 pm Page 6
9
J E D I K N I G H T : D A R K F O R C E S I I
Setup ScreenClick Setup in the Main Menu or in
Option screen to adjust Setup optionsincluding: General, Gameplay, Display,Sound and Controls (keyboard, mouseand joystick) configurations. See below formore details on the Setup options. ClickOK to confirm your changes and return tothe Main Menu, or click Cancel to returnto the Main Menu without changinganything. You can change setup items atany time during gameplay by pressing ESCto get to the Option screen, then clickingSetup. Move the mouse over labels to getdefinitions of the settings.Options available in the Setup screen are:Ω General: Click tickboxes to turn
cutscene subtitles on/off (a good idea ifyou have no sound card) or to disablecutscenes so they don’t play. You canalso enable rotation of the overlay map.See next page for details.
Ω Gameplay: This screen has manyoptions available to adjust aiming andusing weapons. See next page for details on the settings.
Ω Display: Click to adjust screen and video settings and to adjust for your 3Daccelerator card (if you have one).
Ω Sound: Adjust the levels for the game’s sound effects and music.Ω Controls: Here you can view and customise all the game’s default controls (mouse,
joystick and keyboard) and save and load your custom controller configurations.
General ScreenAdjust the following settings: Ω Enable full subtitles on cutscenes: Using this option will display subtitles for all
the cutscene dialogue.Ω Enable rotation on overlay map: This option makes the overlay map (TAB key)
rotate around you, keeping the forward view to your north on the screen.Ω Disable cutscenes: Checking this box will prevent the cutscenes from playing during
single player games.
8
J E D I K N I G H T : D A R K F O R C E S I I
Select an Existing PlayerIf you’ve created players before, previously saved player names will appear in a list on
the Players screen, which you can open from the Main Menu. Select a name from thelist to launch that player’s saved game. To remove a player, highlight the name in the listand click the Remove button.
Main MenuOnce you have selected or created a player, you’ll see the Main Menu. From the
Main Menu, you can choose:Ω Single Player: Select this to play the single player levels of Jedi Knight. You can
begin a new game or load a saved game.Ω Multiplayer: Select this button to host or join a game against other players over
modem, Local Area Network or the Internet. See the Multiplayer section on page 41 fordetails on multiplayer gaming.
Ω Players: Here you can select existing player names, create new players or removeexisting players.
Ω Cutscenes: These movies play before each level. Click to see a list of cutscenes toview. You can only view the opening cutscene and cutscenes from the game levelsyou have completed. Select a cutscene name and click OK to view or click Cancel toclose.
Ω Setup: Click to adjust Setup options. See the Setup Screen section below for details.NOTE: 3D card users should adjust Setup Display before entering the game. SeeAdjusting for 3D Acceleration on page 11 for details.
Ω Credits: Click to see the creators of Jedi Knight. Ω Quit: Exits the game and returns you to the desktop.
Save and Load GamesSave: From within the game, press the ESC key to access the Option screen. From
this screen click Save to save your current game up to the point you’ve played. Savingbrings up a Save Game list that allows you to name and save multiple games. Select aname from the list to load a previously saved game. If you get killed, you will restart fromthe last point saved. (You can also quick-save by pressing F9 to save over the last quick-saved game during gameplay.)
Load: From within the game, press the ESC key to access the Option screen. Fromthis screen click Load to load a saved game. Select a name from the list to load apreviously saved game.
Setup Screen
Gameplay Screen
Jedi Knight PC CD UK Man 19/4/01 8:57 pm Page 8
11
J E D I K N I G H T : D A R K F O R C E S I I
Display ScreenΩ Video Mode: This is a list of screen resolutions that can be selected (which affects the
frame rate). You can select to enable 3D acceleration if you have a 3D accelerator card.See the Adjusting for 3D Acceleration section above for details on doing this. If you donot have a 3D card, the game defaults to software settings. In general, setting a higherresolution produces better graphics, but can slow down game performance.Experiment to see which resolution works best on your machine. 320 x 200 isrecommended for users with slower machines. (Resolutions that say “ModeX” afterthem generally are slower than non-ModeX resolutions of the same dimensions.) 640 x480 is recommended for users with higher-end machines. Some display cards areunable to use modes above 640 x 480. Only advanced users should use resolutionsabove 640 x 480.
Ω Screen Brightness: Move the slider either way to adjust screen brightness in thegame.
10
J E D I K N I G H T : D A R K F O R C E S I I
Gameplay ScreenYou can adjust settings related to aimingand using weapons. If you wish to changesettings, click the tickboxes to togglefeatures on/off for both single andmultiplayer (MP) games. Settings for bothsingle and multiplayer have (MP) afterthem.Ω Enable auto-aiming: This option
allows you to hit targets moreaccurately. It’s recommended if youuse only the keyboard for movement.
Ω Enable aiming cross hair: Thisdisplays cross hairs in the game screenthat can help you aim at targets.
Ω Enable lightsaber auto-camera:This option will change to third-personview whenever you arm thelightsaber. It will return to first-personview when you switch to anotherweapon.
Ω Automatic pickup weapon (MP):Check this to automatically arm anyweapon that you pick up.No dangerous weapons (MP): This does not allow the automatic switch to armpotentially dangerous weapons like the thermal detonator, rail detonator, sequencercharge and concussion rifle.No weaker weapons (MP): This does not arm weaker weapons when you pickthem up.Keep lightsaber (MP): This always keeps your lightsaber in hand even if you pick upother weapons.
Ω Automatic switch weapons (MP): When you run out of ammo, this automaticallyswitches your weapon to the next available weapon. No dangerous weapons (MP): This does not allow the automatic switch to armpotentially dangerous weapons.
Ω Automatic reload weapon (MP): This reloads a previously emptied weapon whenyou pick up some ammo for it. It does not load dangerous weapons if you have Nodangerous weapons checked.Keep lightsaber (MP): This allows you to keep the lightsaber regardless of theweapons you pick up.
A D J U S T I N G F O R 3 DA C C E L E R A T I O N (For 3D Accelerator Card Owners)
Jedi Knight has Direct3D supportand will run Direct3D-compatible 3Dacceleration cards. If you have asupported 3D accelerator card, you canenable 3D acceleration for better displayperformance. For more on specific 3Dacceleration cards and up-to-dateinformation and developments, see theReadme, Troubleshooting Guide, or theTechnical Support section of theLucasArts Web page(www.lucasarts.com). Also, consult themanufacturer’s documentation thatcomes with your 3D card.
NOTE: Some 3D accelerator cardsare incompatible with Jedi Knight. To configure your particular 3Daccelerator card:
1 To adjust your video settings, selectSetup from the Main Menu. (If you arealready in the game, press ESC to get tothe Setup screen.)
2 From within Setup, click Display.3 Click the Enable 3D Acceleration
tickbox. If the tickbox does not appear,your 3D card may not be compatiblewith the game. 4 Choose the video resolution best
suited for your card and system. Acommon one to try is 640 x 480. Youmay need to experiment to see whichresolution gives the best performancewhile looking the best. NOTE: Mostdisplays will not be able to run atresolutions higher than 640 x 480.
5 To experiment, enter the game tosee its graphic quality and performance. 6 If the graphics look poor or the game
runs too slowly, return to the Displayscreen (Press ESC, then Setup, thenDisplay) and select a differentresolution. Return to the Setup screen.
7 You may need to set a minimum 3Dtexture size. See the page under 3DAccelerator Minimum Texture Size fordetails.
Display Screen
Sound Screen
Jedi Knight PC CD UK Man 19/4/01 8:57 pm Page 10
13
J E D I K N I G H T : D A R K F O R C E S I I
the game. Select the other set ofsounds during installation to change it.Be sure to save your players whenprompted, or you will lose any savedgames made with those players.
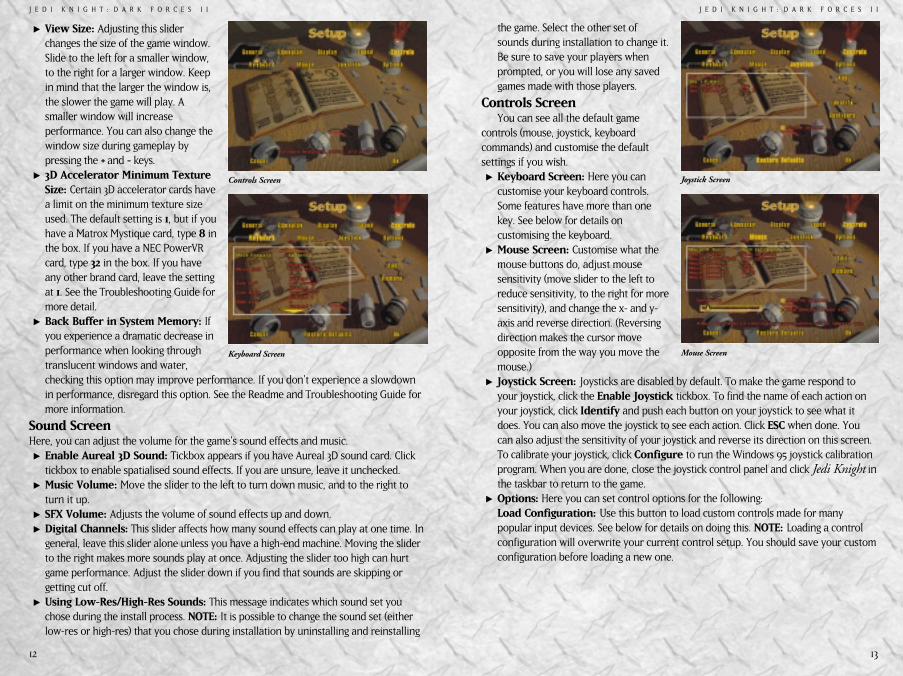
Controls ScreenYou can see all the default game
controls (mouse, joystick, keyboardcommands) and customise the defaultsettings if you wish. Ω Keyboard Screen: Here you can
customise your keyboard controls.Some features have more than onekey. See below for details oncustomising the keyboard.
Ω Mouse Screen: Customise what themouse buttons do, adjust mousesensitivity (move slider to the left toreduce sensitivity, to the right for moresensitivity), and change the x- and y-axis and reverse direction. (Reversingdirection makes the cursor moveopposite from the way you move themouse.)
Ω Joystick Screen: Joysticks are disabled by default. To make the game respond toyour joystick, click the Enable Joystick tickbox. To find the name of each action onyour joystick, click Identify and push each button on your joystick to see what itdoes. You can also move the joystick to see each action. Click ESC when done. Youcan also adjust the sensitivity of your joystick and reverse its direction on this screen.To calibrate your joystick, click Configure to run the Windows 95 joystick calibrationprogram. When you are done, close the joystick control panel and click Jedi Knight inthe taskbar to return to the game.
Ω Options: Here you can set control options for the following:Load Configuration: Use this button to load custom controls made for manypopular input devices. See below for details on doing this. NOTE: Loading a controlconfiguration will overwrite your current control setup. You should save your customconfiguration before loading a new one.
12
J E D I K N I G H T : D A R K F O R C E S I I
Ω View Size: Adjusting this sliderchanges the size of the game window.Slide to the left for a smaller window,to the right for a larger window. Keepin mind that the larger the window is,the slower the game will play. Asmaller window will increaseperformance. You can also change thewindow size during gameplay bypressing the + and - keys.
Ω 3D Accelerator Minimum TextureSize: Certain 3D accelerator cards havea limit on the minimum texture sizeused. The default setting is 1, but if youhave a Matrox Mystique card, type 8 inthe box. If you have a NEC PowerVRcard, type 32 in the box. If you haveany other brand card, leave the settingat 1. See the Troubleshooting Guide formore detail.
Ω Back Buffer in System Memory: Ifyou experience a dramatic decrease inperformance when looking throughtranslucent windows and water,checking this option may improve performance. If you don’t experience a slowdownin performance, disregard this option. See the Readme and Troubleshooting Guide formore information.
Sound ScreenHere, you can adjust the volume for the game’s sound effects and music. Ω Enable Aureal 3D Sound: Tickbox appears if you have Aureal 3D sound card. Click
tickbox to enable spatialised sound effects. If you are unsure, leave it unchecked.Ω Music Volume: Move the slider to the left to turn down music, and to the right to
turn it up.Ω SFX Volume: Adjusts the volume of sound effects up and down. Ω Digital Channels: This slider affects how many sound effects can play at one time. In
general, leave this slider alone unless you have a high-end machine. Moving the sliderto the right makes more sounds play at once. Adjusting the slider too high can hurtgame performance. Adjust the slider down if you find that sounds are skipping orgetting cut off.
Ω Using Low-Res/High-Res Sounds: This message indicates which sound set youchose during the install process. NOTE: It is possible to change the sound set (eitherlow-res or high-res) that you chose during installation by uninstalling and reinstalling
Controls Screen
Keyboard Screen Mouse Screen
Joystick Screen
Jedi Knight PC CD UK Man 19/4/01 8:57 pm Page 12
15
J E D I K N I G H T : D A R K F O R C E S I I
1 After you’ve made any changes to your controls, click Options in the Setup screen. 2 Select Save Configuration. Type in a name for your custom configuration and click
OK.3 To use your custom settings another time, click Options in the Setup screen, then
select Load Configuration. Select the name of the custom configuration you wish touse from the list.
Level Completion Screen (Single Player Only)When you finish a level, the Level Completion screen appears. This screen shows a
tally of what you accomplished during the level, including secret areas found and Forceexperience stars earned. (See the Gaining Force Powers section on page 28 for details onearning stars.) At the top of the screen you’ll see your player name and your Jedi Rank.Your Rank increases as you complete game levels and gain more Force power ability. Ranks Used in Jedi KnightBasic Jedi Ranks Light Side Ranks Dark Side Ranks1. Initiate 5. Charge 5. Charge
2. Learner 6. Disciple 6. Disciple
3. Apprentice 7. Master 7. Primarch
4. Journeyman 8. Lord 8. Dark Lord
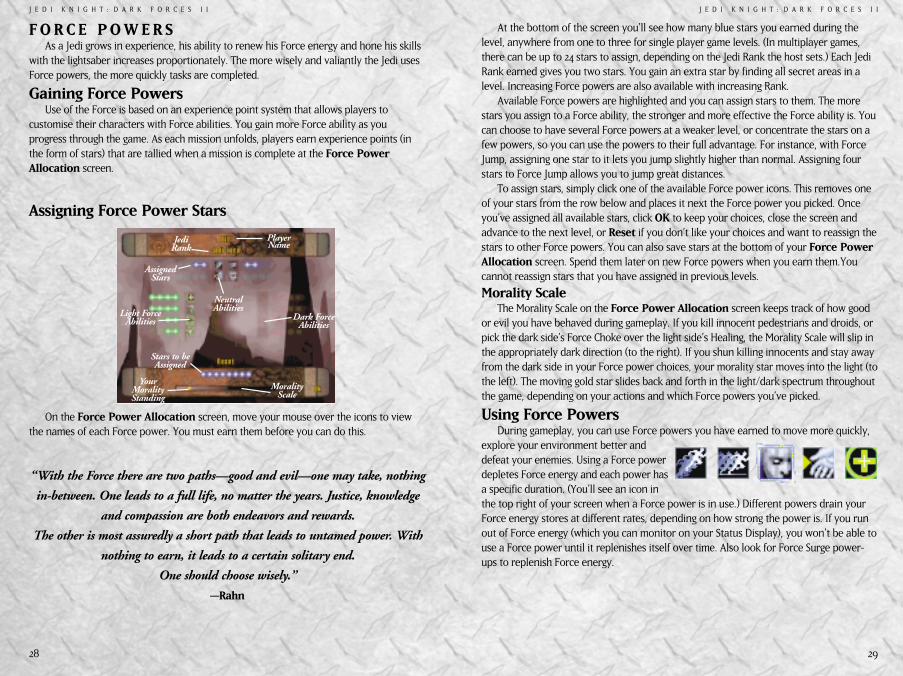
Force Power Allocation ScreenThis screen does not appear until Force Powers or stars are earned. Beyond that,
you’ll see it after the completion of everylevel. You get Force points or “stars,”depending on how many of the secretareas you found. You can allocate thestars among the available set of specificForce powers.
Having these Force powers enhancesyour abilities during the game. (Forexample, you might be able to jumphigher, throw lightning bolts or healyourself.) Your character may have Forceabilities your rivals don’t possess. See theAssigning Force Power Stars section onpage 28 for more details on this screen.
14
J E D I K N I G H T : D A R K F O R C E S I I
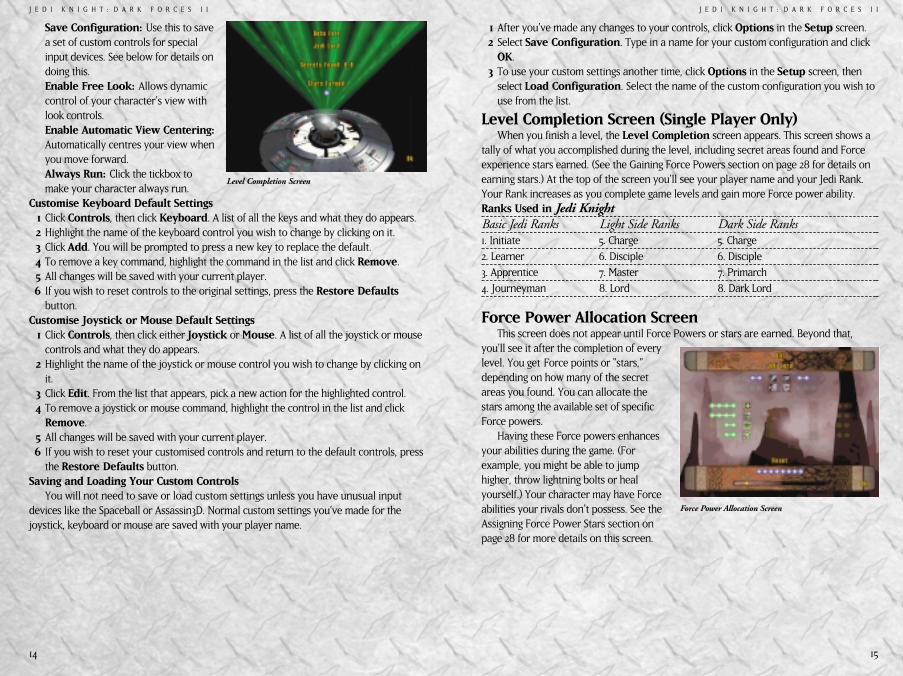
Save Configuration: Use this to savea set of custom controls for specialinput devices. See below for details ondoing this.Enable Free Look: Allows dynamiccontrol of your character’s view withlook controls.Enable Automatic View Centering:Automatically centres your view whenyou move forward.Always Run: Click the tickbox tomake your character always run.
Customise Keyboard Default Settings1 Click Controls, then click Keyboard. A list of all the keys and what they do appears. 2 Highlight the name of the keyboard control you wish to change by clicking on it. 3 Click Add. You will be prompted to press a new key to replace the default.4 To remove a key command, highlight the command in the list and click Remove.5 All changes will be saved with your current player.6 If you wish to reset controls to the original settings, press the Restore Defaults
button. Customise Joystick or Mouse Default Settings
1 Click Controls, then click either Joystick or Mouse. A list of all the joystick or mousecontrols and what they do appears.
2 Highlight the name of the joystick or mouse control you wish to change by clicking onit.
3 Click Edit. From the list that appears, pick a new action for the highlighted control.4 To remove a joystick or mouse command, highlight the control in the list and click
Remove.5 All changes will be saved with your current player.6 If you wish to reset your customised controls and return to the default controls, press
the Restore Defaults button.Saving and Loading Your Custom Controls
You will not need to save or load custom settings unless you have unusual inputdevices like the Spaceball or Assassin3D. Normal custom settings you’ve made for thejoystick, keyboard or mouse are saved with your player name.
Level Completion Screen
Force Power Allocation Screen
Jedi Knight PC CD UK Man 19/4/01 8:58 pm Page 14
17
J E D I K N I G H T : D A R K F O R C E S I I
Toggle Overlay Map On/Off
†(To see a 2D map of the area you are
currently exploring, press the TAB key. The red circle
designates your location within the map. More of the
map appears as you explore the area more widely.
The map moves with you as you explore. The + and -
keys zoom the map in and out. You must use this
map or the 3D map to use Force Seeing which allows
you to see enemies, pedestrians and items through
walls.)
Score Tally (During multiplayer games, press
~~ ~ key to list players, their scores and
costumes.)
Talk (In single player games, T brings up the
tCommand Console, where players can type
in commands by hand. Most likely, single players
won’t use this. To close, press ESC or ENTER. In
multiplayer games, press T to communicate with
other plays during multiplayer games. To switch to
the Command prompt in multiplayer games, press T,
then TAB. See the Console Commands section on
page 46 for more details on multiplayer console
commands.)
Movement Keyboard Controls
(keypad) Move
Forward
wOR“OR8(keypad) Move
Backward
sORæOR2Fast Mode
ß (Hold key down while moving.)
Slow Mode
˚ (Hold key down while moving.)
(keypad) Sidestep
aOR1 to Left
(keypad) Sidestep
dOR3 to Right
Slide Toggle (Modifies your
åTurn Right/Turn Left controls.)
(keypad) Turn Left
…OR4(keypad) Turn Right
‘OR6Jump
xOR or Swim Up
Crouch
cor Swim Down
(keypad) Centre View (Centres
OR5 your view in middle of
screen.)
Look Up
∑Look Down
©Free Look (If you press and hold the V key
vwhile moving the mouse, it allows you to look
around. This feature is on by default.)
16
J E D I K N I G H T : D A R K F O R C E S I I
G A M E C O N T R O L S Below is a list of the default keyboard,
joystick and mouse controls for JediKnight. If you wish to customisekeyboard, mouse or joystick controls, ClickESC to open the Option Screen, click theSetup button, then Controls, thencustomise your controls. See the ControlsScreen section on pages 13 for details oncustomising your controllers.
General Keyboard ControlsOpens Option Screen from Game
çToggle Camera Mode Between
¡First and Third Person
Field Light On/Off (Turn off field light
™to conserve battery power.)
Infrared Goggle On/Off (Allows you to see in
£the dark without enemy detection. Turn off
to conserve battery power.)
Bacta Tank Quick-Use
¢The following Force powers are available only if you
have allotted Force experience stars to these powers:
Force Jump Force Seeing
∞ ¶Force Speed Force Pull
§ •
Quick-Save Game
ªAdjust Screen Brightness
⁄Take a Screenshot. (Saves image in the
¤directory where Jedi Knight is installed.)
Adjust Screen Size (Smaller
+AND- screen size increases game
performance, large screen size decreases it.)
Zoom Overlay Map In/Out
(Press
+AND- TAB to open overlay map,
then zoom.)
Cycle Through Inventory Items
[AND] (Cycle through inventory
items, highlight one, then click
ENTER to use it.)
Activate/Use
πNext Inventory Item
rUse Inventory Item
∆Cycle Through Force Powers
;AND' (Cycle through Force powers,
highlight one, then click the F key to use it.)
Cycle Through Force Powers
eANDq (Cycle through Force powers,
highlight one, then click the F
key to use it.)
Use Selected Force Power
f
Jedi Knight PC CD UK Man 19/4/01 8:58 pm Page 16

19
J E D I K N I G H T : D A R K F O R C E S I I
Option ScreenFrom within the game, press the ESC
key to access the Option screen. Fromthis screen you can access:Ω Objectives: Read your mission
objectives. You can also see howmany secrets you’ve found (leftnumber) out of secrets available (rightnumber).
Ω Map: View a 3D map of what youhave explored in the current level.
Ω Jedi Powers: Opens the ForcePower Allocation screen so you canview your current Force abilities andRank. See the Assigning Force PowersStars section on page 28 for details onthis screen.
Ω Return to Game: Closes the Optionscreen and returns you to gameplay.
Ω Restart: Lets you restart the currentmission from the beginning.
Ω Load: Click to load a previously savedgame.
Ω Save: Click to save your current game,including your level, episode, health and shields.
Ω Setup: Click to adjust the setup for displays, sound, keyboard, mouse and joystick. Seethe Setup section on page 9 for details.
Ω Abort: Click to end your mission and return to the Main Menu.
Map ScreenSelecting this option lets you see a 3D wire-frame map of the explored area to give you
a sense of its size and layout. The white circle marks your location. The buttons along thebottom of the map control it. When you have the overlay map turned on, press + or - tozoom the map in and out. Click the various arrows to rotate or move the 3D model indifferent directions. If the map is rotating, the solid button stops and recentres the map.The upside-down triangle button closes the 3D map. You must be in this map or theoverlay map (TAB key) to use Force Seeing to see enemies, pedestrians and items throughwalls.
Jedi Powers ScreenThis screen opens the Force Power Allocation screen where you can check your
Jedi Rank, your morality on the Morality Scale and which Force abilities you have. Youcannot alter the Force Power Allocation screen from here. See the Assigning ForcePower Stars section on page 28 for a full description.
18
J E D I K N I G H T : D A R K F O R C E S I I
Weapons Keyboard ControlsCycle Weapons
.AND/(keypad)
¬OR0 Primary Fire
ORSecondary Fire
zKyle’s Fists
1Bryar Pistol
2Stormtrooper Rifle
3
Thermal Detonator4
Bowcaster5
Imperial Repeater6
Rail Detonator7
Sequencer Charge 8
Concussion Rifle9
Lightsaber0
Secondary KFire
PrimaryKFire
Activate/Use
Jump
LookKUp
LookKDown
StrafeKRight
StrafeKLeft
P.O.V. Hat
SecondaryKFire
PrimaryKFire Jump
LookKUp
LookKDown
StrafeKRight
StrafeKLeft
Activate/Use
P.O.V. Hat
Secondary KFire
Primary KFire
Next KInventory K
ItemKKUse K
Inventory KItemK
K
Jump
Activate/Use
LookKUp
LookKDown
StrafeKRight
StrafeKLeft
P.O.V. Hat
Rotate Stick KLeft/Right
Jump
PrimaryKFire
LookKDown
LookKUp
RotateKLeft
RotateKRight
SecondaryKFire
Joysticks and Mouse
Option Screen
Map Screen
Jedi Knight PC CD UK Man 19/4/01 8:58 pm Page 18
21
J E D I K N I G H T : D A R K F O R C E S I I
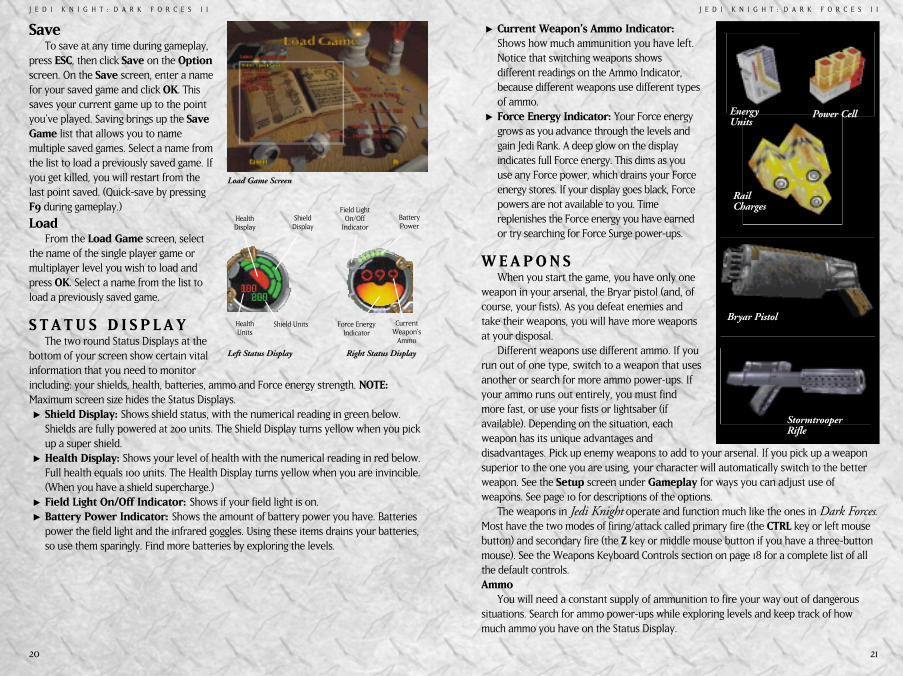
Ω Current Weapon’s Ammo Indicator:Shows how much ammunition you have left.Notice that switching weapons showsdifferent readings on the Ammo Indicator,because different weapons use different typesof ammo.
Ω Force Energy Indicator: Your Force energygrows as you advance through the levels andgain Jedi Rank. A deep glow on the displayindicates full Force energy. This dims as youuse any Force power, which drains your Forceenergy stores. If your display goes black, Forcepowers are not available to you. Timereplenishes the Force energy you have earnedor try searching for Force Surge power-ups.
W E A P O N SWhen you start the game, you have only one
weapon in your arsenal, the Bryar pistol (and, ofcourse, your fists). As you defeat enemies andtake their weapons, you will have more weaponsat your disposal.
Different weapons use different ammo. If yourun out of one type, switch to a weapon that usesanother or search for more ammo power-ups. Ifyour ammo runs out entirely, you must findmore fast, or use your fists or lightsaber (ifavailable). Depending on the situation, eachweapon has its unique advantages anddisadvantages. Pick up enemy weapons to add to your arsenal. If you pick up a weaponsuperior to the one you are using, your character will automatically switch to the betterweapon. See the Setup screen under Gameplay for ways you can adjust use ofweapons. See page 10 for descriptions of the options.
The weapons in Jedi Knight operate and function much like the ones in Dark Forces.Most have the two modes of firing/attack called primary fire (the CTRL key or left mousebutton) and secondary fire (the Z key or middle mouse button if you have a three-buttonmouse). See the Weapons Keyboard Controls section on page 18 for a complete list of allthe default controls.Ammo
You will need a constant supply of ammunition to fire your way out of dangeroussituations. Search for ammo power-ups while exploring levels and keep track of howmuch ammo you have on the Status Display.
20
J E D I K N I G H T : D A R K F O R C E S I I
SaveTo save at any time during gameplay,
press ESC, then click Save on the Optionscreen. On the Save screen, enter a namefor your saved game and click OK. Thissaves your current game up to the pointyou’ve played. Saving brings up the SaveGame list that allows you to namemultiple saved games. Select a name fromthe list to load a previously saved game. Ifyou get killed, you will restart from thelast point saved. (Quick-save by pressingF9 during gameplay.)
Load From the Load Game screen, select
the name of the single player game ormultiplayer level you wish to load andpress OK. Select a name from the list toload a previously saved game.
S T A T U S D I S P L A YThe two round Status Displays at the
bottom of your screen show certain vitalinformation that you need to monitorincluding: your shields, health, batteries, ammo and Force energy strength. NOTE:Maximum screen size hides the Status Displays.Ω Shield Display: Shows shield status, with the numerical reading in green below.
Shields are fully powered at 200 units. The Shield Display turns yellow when you pickup a super shield.
Ω Health Display: Shows your level of health with the numerical reading in red below.Full health equals 100 units. The Health Display turns yellow when you are invincible.(When you have a shield supercharge.)
Ω Field Light On/Off Indicator: Shows if your field light is on.Ω Battery Power Indicator: Shows the amount of battery power you have. Batteries
power the field light and the infrared goggles. Using these items drains your batteries,so use them sparingly. Find more batteries by exploring the levels.
BatteryPower
ShieldDisplay
Shield Units
HealthDisplay
HealthUnits
CurrentWeapon’s
Ammo
Force EnergyIndicator
Field LightOn/Off
Indicator
Load Game Screen
Left Status Display Right Status Display
EnergyUnits
Power Cell
RailCharges
Bryar Pistol
StormtrooperRifle
Jedi Knight PC CD UK Man 19/4/01 8:58 pm Page 20
22
J E D I K N I G H T : D A R K F O R C E S I I
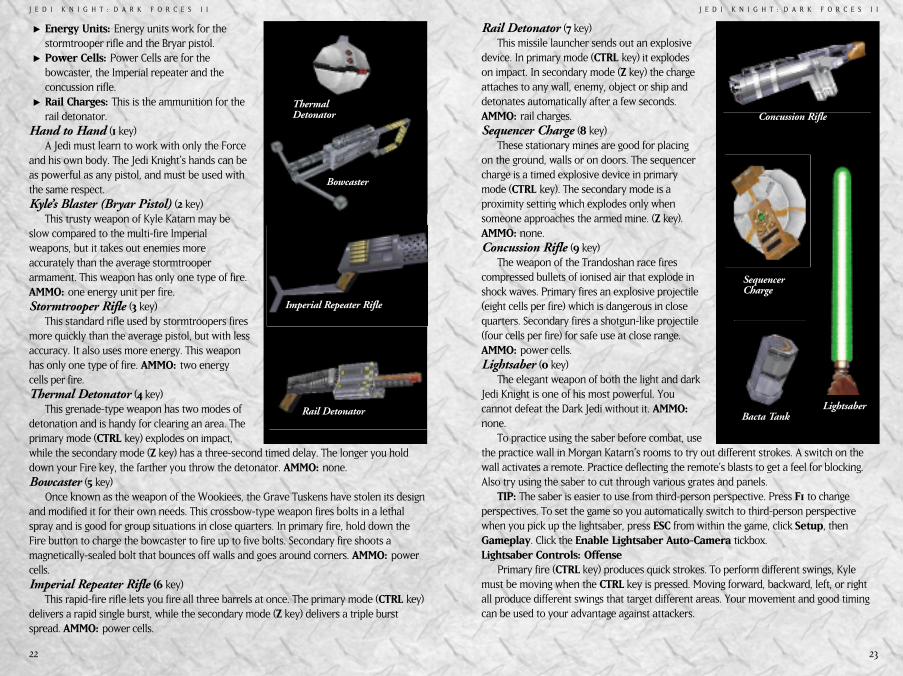
Ω Energy Units: Energy units work for thestormtrooper rifle and the Bryar pistol.
Ω Power Cells: Power Cells are for thebowcaster, the Imperial repeater and theconcussion rifle.
Ω Rail Charges: This is the ammunition for therail detonator.
Hand to Hand (1 key) A Jedi must learn to work with only the Force
and his own body. The Jedi Knight’s hands can beas powerful as any pistol, and must be used withthe same respect.Kyle’s Blaster (Bryar Pistol) (2 key)
This trusty weapon of Kyle Katarn may beslow compared to the multi-fire Imperialweapons, but it takes out enemies moreaccurately than the average stormtrooperarmament. This weapon has only one type of fire.AMMO: one energy unit per fire. Stormtrooper Rifle (3 key)
This standard rifle used by stormtroopers firesmore quickly than the average pistol, but with lessaccuracy. It also uses more energy. This weaponhas only one type of fire. AMMO: two energycells per fire.Thermal Detonator (4 key)
This grenade-type weapon has two modes ofdetonation and is handy for clearing an area. Theprimary mode (CTRL key) explodes on impact,while the secondary mode (Z key) has a three-second timed delay. The longer you holddown your Fire key, the farther you throw the detonator. AMMO: none.Bowcaster (5 key)
Once known as the weapon of the Wookiees, the Grave Tuskens have stolen its designand modified it for their own needs. This crossbow-type weapon fires bolts in a lethalspray and is good for group situations in close quarters. In primary fire, hold down theFire button to charge the bowcaster to fire up to five bolts. Secondary fire shoots amagnetically-sealed bolt that bounces off walls and goes around corners. AMMO: powercells.Imperial Repeater Rifle (6 key)
This rapid-fire rifle lets you fire all three barrels at once. The primary mode (CTRL key)delivers a rapid single burst, while the secondary mode (Z key) delivers a triple burstspread. AMMO: power cells.
23
J E D I K N I G H T : D A R K F O R C E S I I
Rail Detonator (7 key) This missile launcher sends out an explosive
device. In primary mode (CTRL key) it explodeson impact. In secondary mode (Z key) the chargeattaches to any wall, enemy, object or ship anddetonates automatically after a few seconds.AMMO: rail charges.Sequencer Charge (8 key)
These stationary mines are good for placingon the ground, walls or on doors. The sequencercharge is a timed explosive device in primarymode (CTRL key). The secondary mode is aproximity setting which explodes only whensomeone approaches the armed mine. (Z key).AMMO: none.Concussion Rifle (9 key)
The weapon of the Trandoshan race firescompressed bullets of ionised air that explode inshock waves. Primary fires an explosive projectile(eight cells per fire) which is dangerous in closequarters. Secondary fires a shotgun-like projectile(four cells per fire) for safe use at close range.AMMO: power cells.Lightsaber (0 key)
The elegant weapon of both the light and darkJedi Knight is one of his most powerful. Youcannot defeat the Dark Jedi without it. AMMO:none.
To practice using the saber before combat, usethe practice wall in Morgan Katarn’s rooms to try out different strokes. A switch on thewall activates a remote. Practice deflecting the remote’s blasts to get a feel for blocking.Also try using the saber to cut through various grates and panels.
TIP: The saber is easier to use from third-person perspective. Press F1 to changeperspectives. To set the game so you automatically switch to third-person perspectivewhen you pick up the lightsaber, press ESC from within the game, click Setup, thenGameplay. Click the Enable Lightsaber Auto-Camera tickbox.Lightsaber Controls: Offense
Primary fire (CTRL key) produces quick strokes. To perform different swings, Kylemust be moving when the CTRL key is pressed. Moving forward, backward, left, or rightall produce different swings that target different areas. Your movement and good timingcan be used to your advantage against attackers.
ThermalDetonator
Bowcaster
Imperial Repeater Rifle
Rail Detonator Bacta Tank
SequencerCharge
Lightsaber
Concussion Rifle
Jedi Knight PC CD UK Man 19/4/01 8:58 pm Page 22

25
J E D I K N I G H T : D A R K F O R C E S I I
I N V E N T O R Y I T E M SThe inventory is thecollection of usefulitems you pick up
throughout the game. (Some items are onlyneeded for the current mission and are notcarried over to the next mission.) Items areautomatically added to your inventory when youpick them up. Use the [ and ] keys to bring up andscroll through inventory items. Press the ENTERkey to use the selected item. If the item usesbattery power, you’ll see the Battery Indicatordrain on the top of the right Status Display. Seethe Status Display section on page 20 for details.
When inventory items are in use, the icon forthat item appears in the upper-right corner of thescreen.Bacta Tank
This portable device restores 30 points ofhealth. Use the [ and ] keys to bring up and scrollthrough inventory items, then highlight a bactatank (if you have one in your inventory) andpress the ENTER key to use it or F4 for bacta tankquick-use. Your Health Display in the StatusDisplay will show your increased health. Thenumber of tanks you have appears in theinventory icon.Journal Disk
The disk contains a message from MorganKatarn. Field Light
Use for short-term illumination. Remember your field light makes you visible toenemies in the dark and uses battery power. Turn it on/off by pressing the F2 key.Infrared Goggles
These provide better vision in darkened rooms and help you see enemies, power-upsand traps while remaining hidden in the dark. Infrared goggles use battery power. Turnthem on/off by pressing the F3 key.Keys
Some doors need special keys. Explore to find doors and their keys.Wrench
If you find a wrench, pick it up; it will come in handy when you least expect it.
24
J E D I K N I G H T : D A R K F O R C E S I I
Secondary Fire (Z key) produces a wide double swing that can clear out a large area.This swing is more powerful than the primary attack, but it takes a moment to return tothe ready position, leaving you temporarily vulnerable.Lightsaber Controls: Defence
You can block enemy fire by centring your saber toward the incoming attack. Block bycentring on the face of your enemy at all times. As you increase in Rank, you’ll increaseyour ability to deflect fire that then bounces back to strike the enemy. Keep in mind thatif you are attacking, you are unable to block and are vulnerable. A good strategy is toattack quickly then resume a blocking stance. Other Uses
Sabers also light up rooms in the dark, so you can reserve use of the field light whichdrains your batteries. Don’t forget that you can slash through certain barriers and walls.
Journal Disk
FieldLight
Infrared Goggles
Key
Imperial Key
Fuel Key
Yellow WrenchBattery
Jedi Knight PC CD UK Man 19/4/01 8:58 pm Page 24

27
J E D I K N I G H T : D A R K F O R C E S I I
Light Force SurgeGives you unlimited Force energy for 20
seconds if you are on the light side.Dark Force Surge
Gives you unlimited Force energy for 20seconds if you are on the dark side.Super Shield (Multiplayer Only)
Provides unlimited shields for 30 seconds.
A M M O I T E M SThese power-ups provide more ammo for
your weapons or act as weapons on their own(like thermal detonators and sequence charges).They are picked up immediately and increaseyour ammo count in your right Status Display.NOTE: The weapon must be armed in order tosee the ammo count change.Thermal Detonator Belt
This power-up provides three thermals to use.Sequencer Charges
These sequencer charges come in packs ofthree. Energy Cell
This ammo powers the Bryar pistol andstormtrooper rifle.Power Cell
This form of ammo is used for the bowcaster,repeater and concussion rifle.Rail Charges
This explosive charge is ammo for the rail detonator and comes in three-packs.Stormtrooper Backpack
The pack includes a stormtrooper rifle, energy cells, and some shield power.Smuggler Backpack
The pack includes a stormtrooper rifle, energy cells, shield power, and health.
26
J E D I K N I G H T : D A R K F O R C E S I I
P O W E R - U PI T E M S
These are items that you donot store in your inventory thatare used immediately uponpickup. Pick up these itemsautomatically by coming incontact with them. Batteries
You’ll need battery power torun the field light and infraredgoggles. Check the top of yourright Status Display to monitorbattery levels. Shield Units
Shields can protect you, butnot entirely. They protect youfrom energy weapons, but notfrom physical damage caused bya fist or falling off a ledge.Monitor your Shield Indicator onthe Status Display to keep trackof shield strength: 200 units isfull strength. When your shieldunits drop below 50, your healthstarts to diminish. Picking up aShield Belt adds 20 units to yourshields. Shield Supercharge
This glowing vest makes you invulnerable for 30 seconds.Armoured Vest
Boosts shields 200 points. Health Pack
Finding one gives you 20 health points. Medical Droid (2-1B)
Press SPACEBAR to wake the droid and it will restore you to maximum health. Health Revive
Restores full health and full shields. Weapons SuperchargeDoubles your fire rate yet uses half the ammo for a limited time.Force Energy Boost
This boosts your Force energy 50 points in a single player, 100 points in multiplayer.
ShieldUnit
Shield Supercharge Armoured Vest
Health PackHealth Revive
MedicalDroid
WeaponsSupercharge
Force EnergyBoost
Light ForceSurge
Dark ForceSurge
Energy Cell
SequencerCharge
Thermal DetonatorBelt
SmugglerBackpack
StormtrooperBackpack
Power Cells
Rail Charges
Jedi Knight PC CD UK Man 19/4/01 8:58 pm Page 26
29
J E D I K N I G H T : D A R K F O R C E S I I
At the bottom of the screen you’ll see how many blue stars you earned during thelevel, anywhere from one to three for single player game levels. (In multiplayer games,there can be up to 24 stars to assign, depending on the Jedi Rank the host sets.) Each JediRank earned gives you two stars. You gain an extra star by finding all secret areas in alevel. Increasing Force powers are also available with increasing Rank.
Available Force powers are highlighted and you can assign stars to them. The morestars you assign to a Force ability, the stronger and more effective the Force ability is. Youcan choose to have several Force powers at a weaker level, or concentrate the stars on afew powers, so you can use the powers to their full advantage. For instance, with ForceJump, assigning one star to it lets you jump slightly higher than normal. Assigning fourstars to Force Jump allows you to jump great distances.
To assign stars, simply click one of the available Force power icons. This removes oneof your stars from the row below and places it next the Force power you picked. Onceyou’ve assigned all available stars, click OK to keep your choices, close the screen andadvance to the next level, or Reset if you don’t like your choices and want to reassign thestars to other Force powers. You can also save stars at the bottom of your Force PowerAllocation screen. Spend them later on new Force powers when you earn them.Youcannot reassign stars that you have assigned in previous levels.
Morality ScaleThe Morality Scale on the Force Power Allocation screen keeps track of how good
or evil you have behaved during gameplay. If you kill innocent pedestrians and droids, orpick the dark side’s Force Choke over the light side’s Healing, the Morality Scale will slip inthe appropriately dark direction (to the right). If you shun killing innocents and stay awayfrom the dark side in your Force power choices, your morality star moves into the light (tothe left). The moving gold star slides back and forth in the light/dark spectrum throughoutthe game, depending on your actions and which Force powers you’ve picked.
Using Force PowersDuring gameplay, you can use Force powers you have earned to move more quickly,
explore your environment better anddefeat your enemies. Using a Force powerdepletes Force energy and each power hasa specific duration. (You’ll see an icon inthe top right of your screen when a Force power is in use.) Different powers drain yourForce energy stores at different rates, depending on how strong the power is. If you runout of Force energy (which you can monitor on your Status Display), you won’t be able touse a Force power until it replenishes itself over time. Also look for Force Surge power-ups to replenish Force energy.
28
J E D I K N I G H T : D A R K F O R C E S I I
F O R C E P O W E R SAs a Jedi grows in experience, his ability to renew his Force energy and hone his skills
with the lightsaber increases proportionately. The more wisely and valiantly the Jedi usesForce powers, the more quickly tasks are completed.
Gaining Force PowersUse of the Force is based on an experience point system that allows players to
customise their characters with Force abilities. You gain more Force ability as youprogress through the game. As each mission unfolds, players earn experience points (inthe form of stars) that are tallied when a mission is complete at the Force PowerAllocation screen.
Assigning Force Power Stars
On the Force Power Allocation screen, move your mouse over the icons to viewthe names of each Force power. You must earn them before you can do this.
PlayerNameJedi
Rank
AssignedStars
Stars to beAssigned
YourMoralityStanding
MoralityScale
Light ForceAbilities Dark Force
Abilities
NeutralAbilities
“With the Force there are two paths—good and evil—one may take, nothing
in-between. One leads to a full life, no matter the years. Justice, knowledge
and compassion are both endeavors and rewards.
The other is most assuredly a short path that leads to untamed power. With
nothing to earn, it leads to a certain solitary end.
One should choose wisely.”
—Rahn
Jedi Knight PC CD UK Man 19/4/01 8:58 pm Page 28
31
J E D I K N I G H T : D A R K F O R C E S I I
Neutral Force Abilities The Jedi apprentice holds basic Force abilities, including the ability to jump, see, move
at great speed, and Force Pull. At the Force Power Allocation screen you can choose to addexperience stars to gain these powers.Force Speed
The Jedi, in or out of battle, moves with the quickness of light. Feel the Forceflowing through you, quickening your limbs so they move with the speed ofthought. This power makes you run like the wind.
Force JumpThe intuitive leaps of the true Jedi are physically manifested in agility of body.The more experienced the student, the greater the jump. This power lets youleap unnaturally high. A quick tap of the F key produces the highest jump. Hold
down the F key down to vary the height of the jump. Force Pull
The Jedi is never weaponless. Your reach is far with the Force as your ally, andweapons may be whisked away from under your enemies’ feet or even tornfrom their unsuspecting grasps. This
power grabs and brings items to you. It is useful for disarming enemies and for reachingitems in out-of-the-way places.Force Seeing
There is no darkness for the true Jedi. As the inner vision deepens, the outer,physical vision becomes more acute and all is revealed. No wall may hide evil,and the simplest map reveals the location of all enemies. When using either the
overlay or 3D map, this power makes walls invisible so you can see the location ofenemies and items. Your strength in the Force determines what you can see (weapons,items or other players in multiplayer games).
30
J E D I K N I G H T : D A R K F O R C E S I I
Force Power Hot KeysChoose which Force power to use by cycling through them with the ; or ‘ keys. Once
you have chosen a power, press the F key to activate it.
Use Force Powerf
Cycle Through qANDeOR;AND' Force Powers
The following Force powers are available only if you have allotted Force experience starsto these powers:
Force Jump Force Seeing ∞ ¶
Force Speed Force Pull § •Choose the Dark Side or Light Side
At some point along your journey, you will reach a point of no return. Your moralityat that defining moment will determine which path you take. If you have held true to theteachings of Rahn and the wisdom of your father, you will resist the temptations of thedark side. Or you may succumb. Then, your choice is made between the light or the darkside.
At this crossroads, the Force Power Allocation screen appears and your fateregisters on the Morality Scale (whether it’s in the light or in the dark), and determineswhich path you will take and the outcome of the game. Gameplay doesn’t change, butyour motivations do. You’ll either protect the Valley of the Jedi from Jerec, or try to takethe Valley’s limitless power for yourself. Once your make your choice, you follow the JediKnight story to its ultimate conclusion.
If you have chosen a mixture of dark and light Force abilities throughout the game,your morality will rest somewhere in the middle of the Morality Scale. Once your destinyis known, your morality will swing completely to either the dark or the light. Yourassigned Force stars from the opposite side will be swept to the bottom of the screen andthe Force powers for the opposite side will go dark. You are now irreversibly aligned withone side of the Force, and can no longer use any of the opposite side’s powers that youonce possessed. You will need to reassign your fallen stars to the Force powers of yournew alliance.
Jedi Knight PC CD UK Man 19/4/01 8:58 pm Page 30
33
J E D I K N I G H T : D A R K F O R C E S I I
The Dark Side AbilitiesIf you have darker tendencies, you can choose Force powers
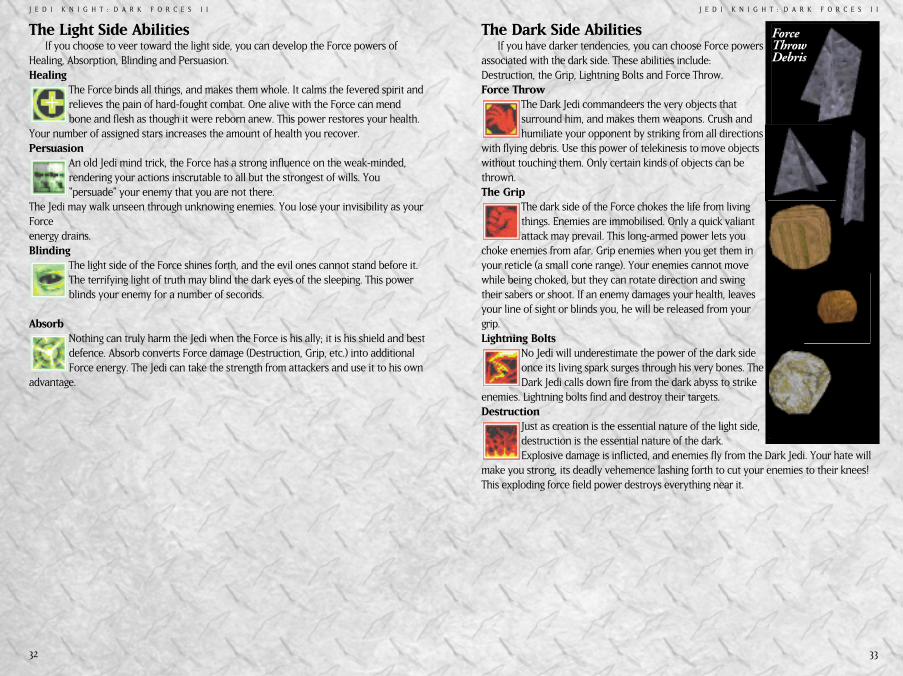
associated with the dark side. These abilities include:Destruction, the Grip, Lightning Bolts and Force Throw.Force Throw
The Dark Jedi commandeers the very objects thatsurround him, and makes them weapons. Crush andhumiliate your opponent by striking from all directions
with flying debris. Use this power of telekinesis to move objectswithout touching them. Only certain kinds of objects can bethrown. The Grip
The dark side of the Force chokes the life from livingthings. Enemies are immobilised. Only a quick valiantattack may prevail. This long-armed power lets you
choke enemies from afar. Grip enemies when you get them inyour reticle (a small cone range). Your enemies cannot movewhile being choked, but they can rotate direction and swingtheir sabers or shoot. If an enemy damages your health, leavesyour line of sight or blinds you, he will be released from yourgrip.Lightning Bolts
No Jedi will underestimate the power of the dark sideonce its living spark surges through his very bones. TheDark Jedi calls down fire from the dark abyss to strike
enemies. Lightning bolts find and destroy their targets.Destruction
Just as creation is the essential nature of the light side,destruction is the essential nature of the dark.Explosive damage is inflicted, and enemies fly from the Dark Jedi. Your hate will
make you strong, its deadly vehemence lashing forth to cut your enemies to their knees!This exploding force field power destroys everything near it.
32
J E D I K N I G H T : D A R K F O R C E S I I
The Light Side AbilitiesIf you choose to veer toward the light side, you can develop the Force powers of
Healing, Absorption, Blinding and Persuasion.Healing
The Force binds all things, and makes them whole. It calms the fevered spirit andrelieves the pain of hard-fought combat. One alive with the Force can mendbone and flesh as though it were reborn anew. This power restores your health.
Your number of assigned stars increases the amount of health you recover.Persuasion
An old Jedi mind trick, the Force has a strong influence on the weak-minded,rendering your actions inscrutable to all but the strongest of wills. You“persuade” your enemy that you are not there.
The Jedi may walk unseen through unknowing enemies. You lose your invisibility as yourForce energy drains.Blinding
The light side of the Force shines forth, and the evil ones cannot stand before it.The terrifying light of truth may blind the dark eyes of the sleeping. This powerblinds your enemy for a number of seconds.
AbsorbNothing can truly harm the Jedi when the Force is his ally; it is his shield and bestdefence. Absorb converts Force damage (Destruction, Grip, etc.) into additionalForce energy. The Jedi can take the strength from attackers and use it to his own
advantage.
ForceThrowDebris
Jedi Knight PC CD UK Man 19/4/01 8:58 pm Page 32
35
J E D I K N I G H T : D A R K F O R C E S I I
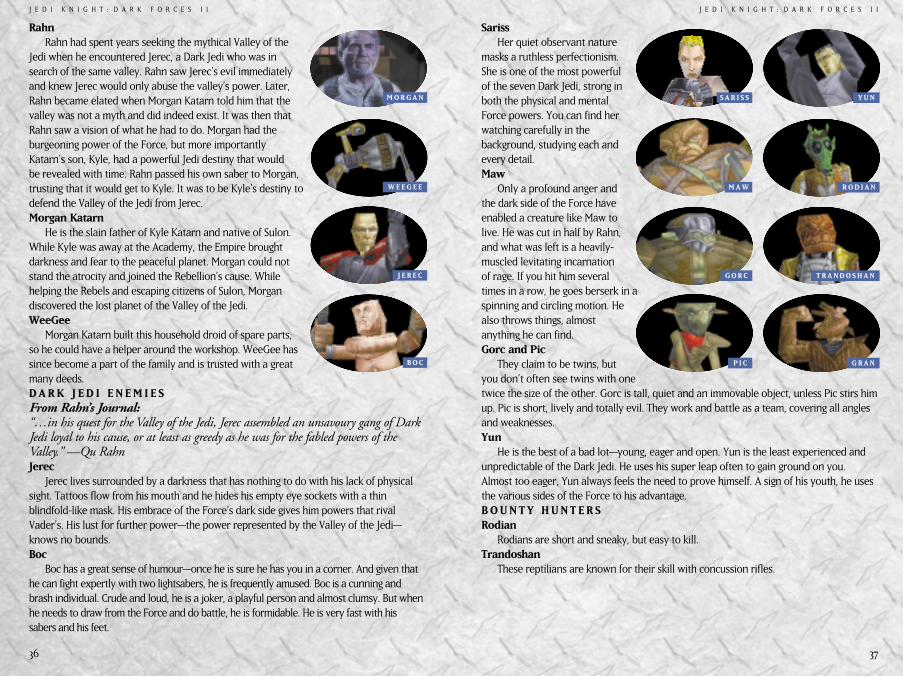
C H A R A C T E R SKyle
In Dark Forces, young mercenary Kyle Katarn successfully infiltrated the Empire. JediKnight continues the story of Katarn as he embarks on a quest into his past and learnsthe mysterious ways of the Jedi. Kyle’s path takes him back to his home planet, a placethat he has not seen since he left for the Academy 12 years ago. There he learns thecircumstances of his father’s death and who was responsible. He must use this knowledgewith great care for there are those who would use his past to turnhim to the dark side.
Jan OrsJan Ors is back to pull Kyle out of the trouble that he inevitably gets himself into. She
keeps him briefed on anything that he might want to know. Truly tough and loyal to theRebellion, Jan is only person that Kyle trusts.
34
J E D I K N I G H T : D A R K F O R C E S I I
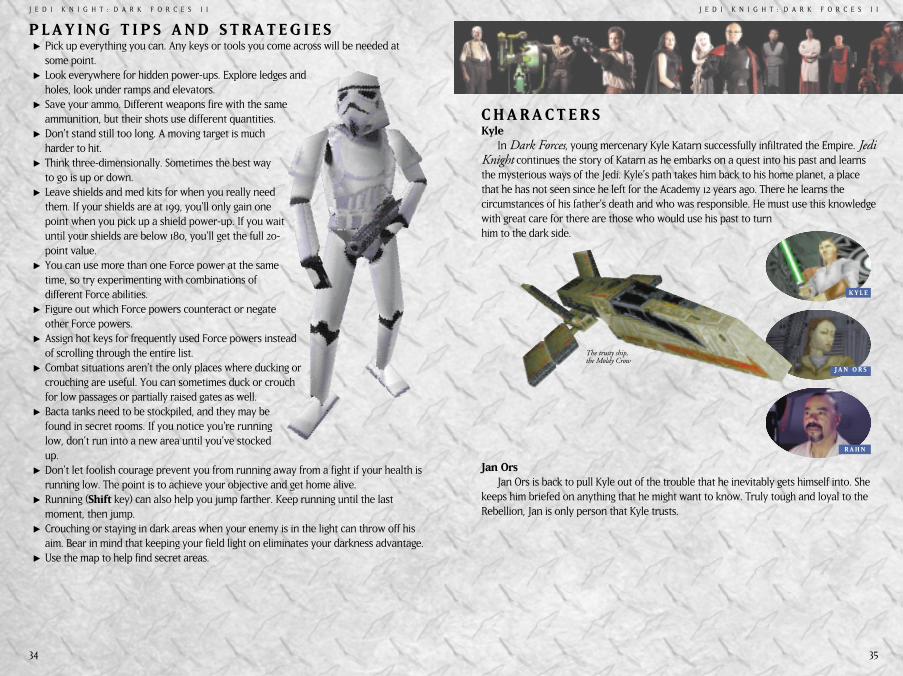
P L A Y I N G T I P S A N D S T R A T E G I E SΩ Pick up everything you can. Any keys or tools you come across will be needed at
some point.Ω Look everywhere for hidden power-ups. Explore ledges and
holes, look under ramps and elevators.Ω Save your ammo. Different weapons fire with the same
ammunition, but their shots use different quantities. Ω Don’t stand still too long. A moving target is much
harder to hit.Ω Think three-dimensionally. Sometimes the best way
to go is up or down.Ω Leave shields and med kits for when you really need
them. If your shields are at 199, you’ll only gain onepoint when you pick up a shield power-up. If you waituntil your shields are below 180, you’ll get the full 20-point value.
Ω You can use more than one Force power at the sametime, so try experimenting with combinations ofdifferent Force abilities.
Ω Figure out which Force powers counteract or negateother Force powers.
Ω Assign hot keys for frequently used Force powers insteadof scrolling through the entire list.
Ω Combat situations aren’t the only places where ducking orcrouching are useful. You can sometimes duck or crouchfor low passages or partially raised gates as well.
Ω Bacta tanks need to be stockpiled, and they may befound in secret rooms. If you notice you’re runninglow, don’t run into a new area until you’ve stockedup.
Ω Don’t let foolish courage prevent you from running away from a fight if your health isrunning low. The point is to achieve your objective and get home alive.
Ω Running (Shift key) can also help you jump farther. Keep running until the lastmoment, then jump.
Ω Crouching or staying in dark areas when your enemy is in the light can throw off hisaim. Bear in mind that keeping your field light on eliminates your darkness advantage.
Ω Use the map to help find secret areas.
K Y L E
J A N O R S
R A H N
The trusty ship,the Moldy Crow
Jedi Knight PC CD UK Man 19/4/01 8:58 pm Page 34
37
J E D I K N I G H T : D A R K F O R C E S I I
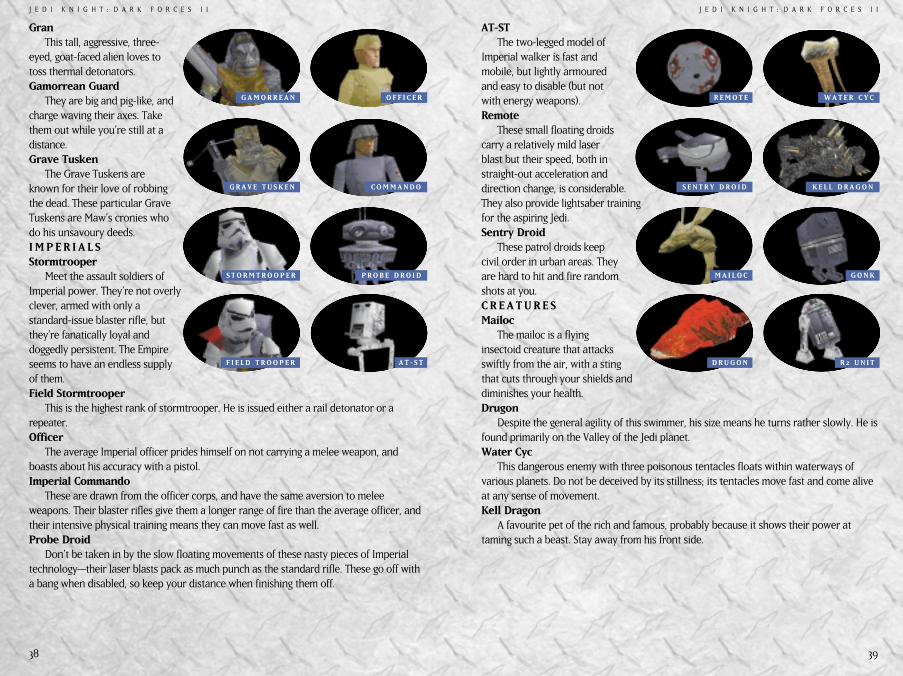
SarissHer quiet observant nature
masks a ruthless perfectionism.She is one of the most powerfulof the seven Dark Jedi, strong inboth the physical and mentalForce powers. You can find herwatching carefully in thebackground, studying each andevery detail. Maw
Only a profound anger andthe dark side of the Force haveenabled a creature like Maw tolive. He was cut in half by Rahn,and what was left is a heavily-muscled levitating incarnationof rage. If you hit him severaltimes in a row, he goes berserk in aspinning and circling motion. Healso throws things, almostanything he can find. Gorc and Pic
They claim to be twins, butyou don’t often see twins with onetwice the size of the other. Gorc is tall, quiet and an immovable object, unless Pic stirs himup. Pic is short, lively and totally evil. They work and battle as a team, covering all anglesand weaknesses.Yun
He is the best of a bad lot—young, eager and open. Yun is the least experienced andunpredictable of the Dark Jedi. He uses his super leap often to gain ground on you.Almost too eager, Yun always feels the need to prove himself. A sign of his youth, he usesthe various sides of the Force to his advantage. B O U N T Y H U N T E R SRodian
Rodians are short and sneaky, but easy to kill.Trandoshan
These reptilians are known for their skill with concussion rifles.
36
J E D I K N I G H T : D A R K F O R C E S I I
Rahn Rahn had spent years seeking the mythical Valley of the
Jedi when he encountered Jerec, a Dark Jedi who was insearch of the same valley. Rahn saw Jerec’s evil immediatelyand knew Jerec would only abuse the valley’s power. Later,Rahn became elated when Morgan Katarn told him that thevalley was not a myth and did indeed exist. It was then thatRahn saw a vision of what he had to do. Morgan had theburgeoning power of the Force, but more importantlyKatarn’s son, Kyle, had a powerful Jedi destiny that wouldbe revealed with time. Rahn passed his own saber to Morgan,trusting that it would get to Kyle. It was to be Kyle’s destiny todefend the Valley of the Jedi from Jerec.Morgan Katarn
He is the slain father of Kyle Katarn and native of Sulon.While Kyle was away at the Academy, the Empire broughtdarkness and fear to the peaceful planet. Morgan could notstand the atrocity and joined the Rebellion’s cause. Whilehelping the Rebels and escaping citizens of Sulon, Morgandiscovered the lost planet of the Valley of the Jedi. WeeGee
Morgan Katarn built this household droid of spare parts,so he could have a helper around the workshop. WeeGee hassince become a part of the family and is trusted with a greatmany deeds. D A R K J E D I E N E M I E SFrom Rahn’s Journal:“…in his quest for the Valley of the Jedi, Jerec assembled an unsavoury gang of DarkJedi loyal to his cause, or at least as greedy as he was for the fabled powers of theValley.” —Qu RahnJerec
Jerec lives surrounded by a darkness that has nothing to do with his lack of physicalsight. Tattoos flow from his mouth and he hides his empty eye sockets with a thinblindfold-like mask. His embrace of the Force’s dark side gives him powers that rivalVader’s. His lust for further power—the power represented by the Valley of the Jedi—knows no bounds. Boc
Boc has a great sense of humour—once he is sure he has you in a corner. And given thathe can fight expertly with two lightsabers, he is frequently amused. Boc is a cunning andbrash individual. Crude and loud, he is a joker, a playful person and almost clumsy. But whenhe needs to draw from the Force and do battle, he is formidable. He is very fast with hissabers and his feet.
M O R G A N
W E E G E E
J E R E C
B O C
Y U N
R O D I A N
T R A N D O S H A N
G R A N
S A R I S S
M A W
G O R C
P I C
Jedi Knight PC CD UK Man 19/4/01 8:58 pm Page 36
39
J E D I K N I G H T : D A R K F O R C E S I I
AT-STThe two-legged model of
Imperial walker is fast andmobile, but lightly armouredand easy to disable (but notwith energy weapons).Remote
These small floating droidscarry a relatively mild laserblast but their speed, both instraight-out acceleration anddirection change, is considerable.They also provide lightsaber trainingfor the aspiring Jedi.Sentry Droid
These patrol droids keepcivil order in urban areas. Theyare hard to hit and fire randomshots at you.C R E A T U R E SMailoc
The mailoc is a flyinginsectoid creature that attacksswiftly from the air, with a stingthat cuts through your shields anddiminishes your health.Drugon
Despite the general agility of this swimmer, his size means he turns rather slowly. He isfound primarily on the Valley of the Jedi planet.Water Cyc
This dangerous enemy with three poisonous tentacles floats within waterways ofvarious planets. Do not be deceived by its stillness; its tentacles move fast and come aliveat any sense of movement.Kell Dragon
A favourite pet of the rich and famous, probably because it shows their power attaming such a beast. Stay away from his front side.
38
J E D I K N I G H T : D A R K F O R C E S I I
GranThis tall, aggressive, three-
eyed, goat-faced alien loves totoss thermal detonators.Gamorrean Guard
They are big and pig-like, andcharge waving their axes. Takethem out while you’re still at adistance.Grave Tusken
The Grave Tuskens areknown for their love of robbingthe dead. These particular GraveTuskens are Maw’s cronies whodo his unsavoury deeds.I M P E R I A L SStormtrooper
Meet the assault soldiers ofImperial power. They’re not overlyclever, armed with only astandard-issue blaster rifle, butthey’re fanatically loyal anddoggedly persistent. The Empireseems to have an endless supplyof them.Field Stormtrooper
This is the highest rank of stormtrooper. He is issued either a rail detonator or arepeater.Officer
The average Imperial officer prides himself on not carrying a melee weapon, andboasts about his accuracy with a pistol.Imperial Commando
These are drawn from the officer corps, and have the same aversion to meleeweapons. Their blaster rifles give them a longer range of fire than the average officer, andtheir intensive physical training means they can move fast as well.Probe Droid
Don’t be taken in by the slow floating movements of these nasty pieces of Imperialtechnology—their laser blasts pack as much punch as the standard rifle. These go off witha bang when disabled, so keep your distance when finishing them off.
O F F I C E R
C O M M A N D O
P R O B E D R O I D
G A M O R R E A N
G R A V E T U S K E N
S T O R M T R O O P E R
F I E L D T R O O P E R A T - S T
W A T E R C Y C
K E L L D R A G O N
G O N K
R 2 U N I T
R E M O T E
S E N T R Y D R O I D
M A I L O C
D R U G O N
Jedi Knight PC CD UK Man 19/4/01 8:58 pm Page 38
41
J E D I K N I G H T : D A R K F O R C E S I I
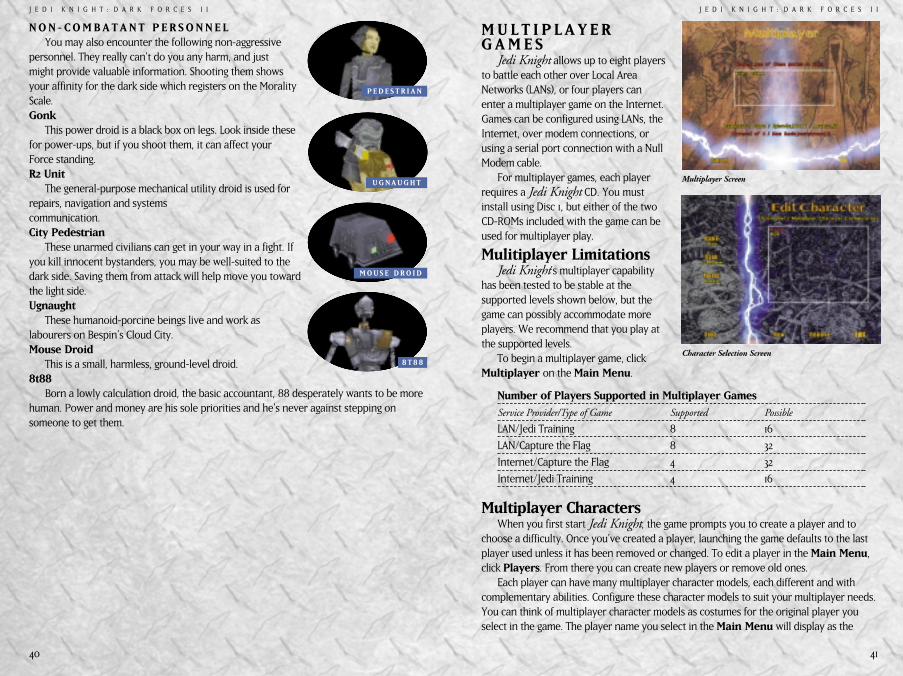
M U L T I P L A Y E RG A M E S
Jedi Knight allows up to eight playersto battle each other over Local AreaNetworks (LANs), or four players canenter a multiplayer game on the Internet.Games can be configured using LANs, theInternet, over modem connections, orusing a serial port connection with a NullModem cable.
For multiplayer games, each playerrequires a Jedi Knight CD. You mustinstall using Disc 1, but either of the twoCD-ROMs included with the game can beused for multiplayer play.
Mulitiplayer LimitationsJedi Knight’s multiplayer capability
has been tested to be stable at thesupported levels shown below, but thegame can possibly accommodate moreplayers. We recommend that you play atthe supported levels.
To begin a multiplayer game, clickMultiplayer on the Main Menu.
Number of Players Supported in Multiplayer Games
Service Provider/Type of Game Supported Possible
LAN/Jedi Training 8 16
LAN/Capture the Flag 8 32
Internet/Capture the Flag 4 32
Internet/Jedi Training 4 16
Multiplayer CharactersWhen you first start Jedi Knight, the game prompts you to create a player and to
choose a difficulty. Once you’ve created a player, launching the game defaults to the lastplayer used unless it has been removed or changed. To edit a player in the Main Menu,click Players. From there you can create new players or remove old ones.
Each player can have many multiplayer character models, each different and withcomplementary abilities. Configure these character models to suit your multiplayer needs.You can think of multiplayer character models as costumes for the original player youselect in the game. The player name you select in the Main Menu will display as the
40
J E D I K N I G H T : D A R K F O R C E S I I
N O N - C O M B A T A N T P E R S O N N E LYou may also encounter the following non-aggressive
personnel. They really can’t do you any harm, and justmight provide valuable information. Shooting them showsyour affinity for the dark side which registers on the MoralityScale. Gonk
This power droid is a black box on legs. Look inside thesefor power-ups, but if you shoot them, it can affect yourForce standing.R2 Unit
The general-purpose mechanical utility droid is used forrepairs, navigation and systems communication.City Pedestrian
These unarmed civilians can get in your way in a fight. Ifyou kill innocent bystanders, you may be well-suited to thedark side. Saving them from attack will help move you towardthe light side.Ugnaught
These humanoid-porcine beings live and work aslabourers on Bespin’s Cloud City.Mouse Droid
This is a small, harmless, ground-level droid.8t88
Born a lowly calculation droid, the basic accountant, 88 desperately wants to be morehuman. Power and money are his sole priorities and he’s never against stepping onsomeone to get them.
P E D E S T R I A N
U G N A U G H T
M O U S E D R O I D
8 T 8 8
Multiplayer Screen
Character Selection Screen
Jedi Knight PC CD UK Man 19/4/01 8:58 pm Page 40
43
J E D I K N I G H T : D A R K F O R C E S I I
Available Force Powers by Rank in MultiplayerRank Title Stars Powers Available0 Uninitiated 0 None
1 Initiate 3 Neutral Powers
2 Learner 6 Neutral Powers
3 Apprentice 9 Neutral Powers
4 Journeyman 12 Up to Healing and Throw
5 Charge 15 Up to Persuasion and Grip
6 Disciple 18 Up to Blinding and Lightning
7 Master/Primarch 21 Only Light or Dark
8 Lord/Dark Lord 24 Only Light or Dark
Multiplayer LevelsCapture the Flag Levels
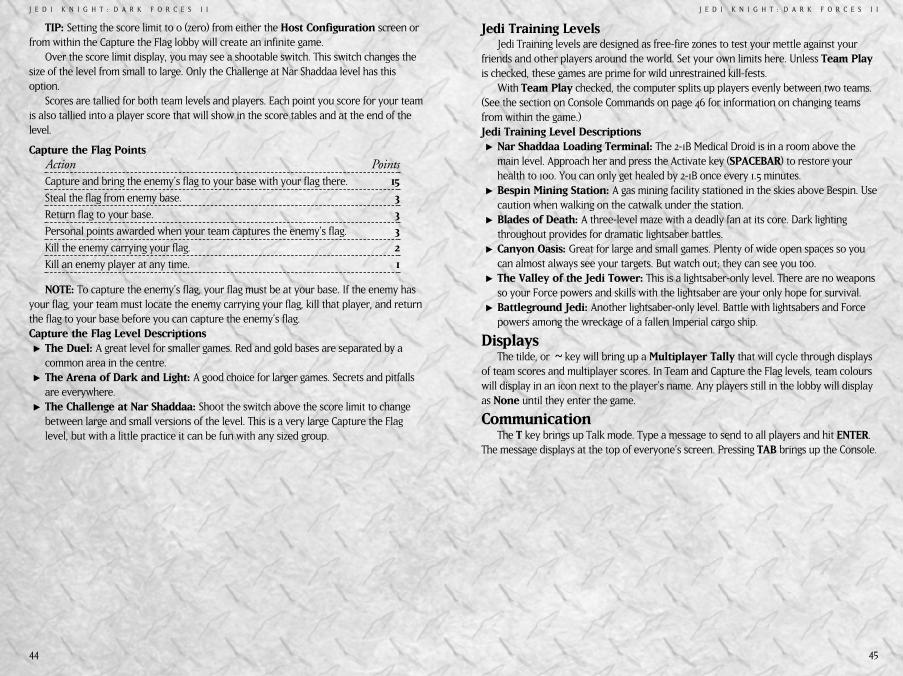
Capture the Flag levels (levels are the environments where you play against otherplayers) have been designed to provide team play scenarios on a symmetrical—sometimesnot so symmetrical—playing field with a clear objective: Capture the enemy’s flag as oftenas possible while preserving your team’s flag from capture. The flag is a mechanical “flagdroid” that follows you while it’s in your possession. A small flag icon appears in theupper right corner of your screen. The winning team is the first to reach the set scorelimit established by the game’s host.
Players entering the game are placed into a lobby. On either side of the lobby aredoors to enter the game, one red, one gold. In the centre of the lobby is a score limit. Thescore limit displays the host’s score limit setting, but any player can change the limit byapproaching and activating any of the three digits with SPACEBAR. All players mustremain in the lobby for the score limit to be changed. As soon as one player enters thegame, the score limit can’t be changed. NOTE: Reaching the score limit overrides the timelimit and vice-versa.
42
J E D I K N I G H T : D A R K F O R C E S I I
name of your multiplayer character,showing in score tables and kill notices.
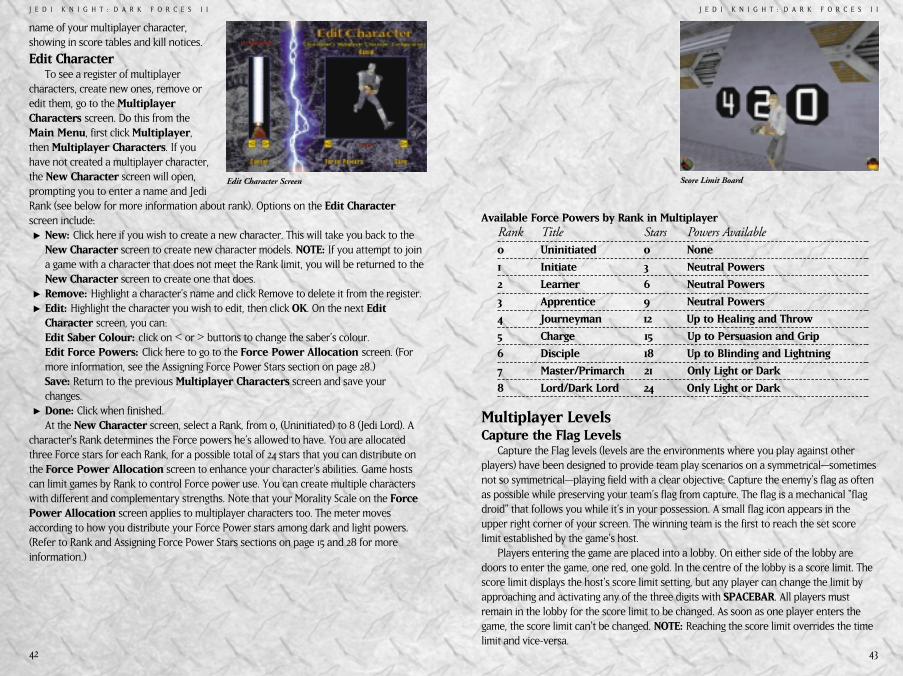
Edit CharacterTo see a register of multiplayer
characters, create new ones, remove oredit them, go to the MultiplayerCharacters screen. Do this from theMain Menu, first click Multiplayer,then Multiplayer Characters. If youhave not created a multiplayer character,the New Character screen will open,prompting you to enter a name and JediRank (see below for more information about rank). Options on the Edit Characterscreen include: Ω New: Click here if you wish to create a new character. This will take you back to the
New Character screen to create new character models. NOTE: If you attempt to joina game with a character that does not meet the Rank limit, you will be returned to theNew Character screen to create one that does.
Ω Remove: Highlight a character’s name and click Remove to delete it from the register. Ω Edit: Highlight the character you wish to edit, then click OK. On the next Edit
Character screen, you can: Edit Saber Colour: click on < or > buttons to change the saber’s colour.Edit Force Powers: Click here to go to the Force Power Allocation screen. (Formore information, see the Assigning Force Power Stars section on page 28.)Save: Return to the previous Multiplayer Characters screen and save yourchanges.
Ω Done: Click when finished. At the New Character screen, select a Rank, from 0, (Uninitiated) to 8 (Jedi Lord). A
character’s Rank determines the Force powers he’s allowed to have. You are allocatedthree Force stars for each Rank, for a possible total of 24 stars that you can distribute onthe Force Power Allocation screen to enhance your character’s abilities. Game hostscan limit games by Rank to control Force power use. You can create multiple characterswith different and complementary strengths. Note that your Morality Scale on the ForcePower Allocation screen applies to multiplayer characters too. The meter movesaccording to how you distribute your Force Power stars among dark and light powers.(Refer to Rank and Assigning Force Power Stars sections on page 15 and 28 for moreinformation.)
Edit Character Screen Score Limit Board
Jedi Knight PC CD UK Man 19/4/01 8:58 pm Page 42
45
J E D I K N I G H T : D A R K F O R C E S I I
Jedi Training LevelsJedi Training levels are designed as free-fire zones to test your mettle against your
friends and other players around the world. Set your own limits here. Unless Team Playis checked, these games are prime for wild unrestrained kill-fests.
With Team Play checked, the computer splits up players evenly between two teams.(See the section on Console Commands on page 46 for information on changing teamsfrom within the game.)Jedi Training Level DescriptionsΩ Nar Shaddaa Loading Terminal: The 2-1B Medical Droid is in a room above the
main level. Approach her and press the Activate key (SPACEBAR) to restore yourhealth to 100. You can only get healed by 2-1B once every 1.5 minutes.
Ω Bespin Mining Station: A gas mining facility stationed in the skies above Bespin. Usecaution when walking on the catwalk under the station.
Ω Blades of Death: A three-level maze with a deadly fan at its core. Dark lightingthroughout provides for dramatic lightsaber battles.
Ω Canyon Oasis: Great for large and small games. Plenty of wide open spaces so youcan almost always see your targets. But watch out; they can see you too.
Ω The Valley of the Jedi Tower: This is a lightsaber-only level. There are no weaponsso your Force powers and skills with the lightsaber are your only hope for survival.
Ω Battleground Jedi: Another lightsaber-only level. Battle with lightsabers and Forcepowers among the wreckage of a fallen Imperial cargo ship.
DisplaysThe tilde, or ~ ~ key will bring up a Multiplayer Tally that will cycle through displays
of team scores and multiplayer scores. In Team and Capture the Flag levels, team colourswill display in an icon next to the player’s name. Any players still in the lobby will displayas None until they enter the game.
CommunicationThe T key brings up Talk mode. Type a message to send to all players and hit ENTER.
The message displays at the top of everyone’s screen. Pressing TAB brings up the Console.
44
J E D I K N I G H T : D A R K F O R C E S I I
TIP: Setting the score limit to 0 (zero) from either the Host Configuration screen orfrom within the Capture the Flag lobby will create an infinite game.
Over the score limit display, you may see a shootable switch. This switch changes thesize of the level from small to large. Only the Challenge at Nar Shaddaa level has thisoption.
Scores are tallied for both team levels and players. Each point you score for your teamis also tallied into a player score that will show in the score tables and at the end of thelevel.
Capture the Flag Points Action PointsCapture and bring the enemy’s flag to your base with your flag there. 15
Steal the flag from enemy base. 3
Return flag to your base. 3
Personal points awarded when your team captures the enemy’s flag. 3
Kill the enemy carrying your flag. 2
Kill an enemy player at any time. 1
NOTE: To capture the enemy’s flag, your flag must be at your base. If the enemy hasyour flag, your team must locate the enemy carrying your flag, kill that player, and returnthe flag to your base before you can capture the enemy’s flag. Capture the Flag Level DescriptionsΩ The Duel: A great level for smaller games. Red and gold bases are separated by a
common area in the centre.Ω The Arena of Dark and Light: A good choice for larger games. Secrets and pitfalls
are everywhere. Ω The Challenge at Nar Shaddaa: Shoot the switch above the score limit to change
between large and small versions of the level. This is a very large Capture the Flaglevel, but with a little practice it can be fun with any sized group.
Jedi Knight PC CD UK Man 19/4/01 8:58 pm Page 44
47
J E D I K N I G H T : D A R K F O R C E S I I
Direct Serial: To play a head-to-head game between two computers over a Direct Serialconnection, you need a NULL Modem cable (or serial cable with a NULL Modemadapter) connected to a free serial port on the back of both computers. Be sure toconfirm the COM Port before starting the game. See the Readme, TroubleshootingGuide and the Technical Support section of the LucasArts Web site(www.lucasarts.com) for more detailed technical information. Once the connection isset up, click Direct Serial Connection for DirectPlay then click OK. Configure the game, select a multiplayer character and configure the connection in thewindows box that appears for COM Port settings. We recommend that you use thedefault configuration for Baud Rate, Stop Bits, Parity, and Flow. Click OK to startthe game. NOTE: A connection between two computers using a parallel or standard serial cable(without a NULL Modem adapter) will NOT work.
Game ConfigurationOnce you’ve selected a network provider, click OK. This takes you to the Game
Configuration screen. Configure the game for the following:Ω Name of the Game: The name can be a word or combination of words, numbers
and spaces.Ω Maximum Jedi Rank: Hosts can set Rank limits to regulate gameplay. Limiting Rank
limits the amount of Force powers used in any given game. (See section on ForcePowers by Rank page 43 for more information.)
Ω Maximum Players: Up to eight players supported on a LAN, four supported over theInternet.
Ω Score Limit: Up to 999 points.Ω Time Limit: Up to 999 minutes.Ω Team Play: The host computer automatically assigns players to two sides, red or gold.
The first team to score the limit is the winner. Ω Single Level Only: Will limit play to one level when checked. If left unchecked,
players move to the next level upon completion of the current level.
46
J E D I K N I G H T : D A R K F O R C E S I I
Console CommandsConsole commands are advanced options that provide hosts and players with control
over network and gameplay options from within the game. To access the Console, hit the T key, then TAB. At the console prompt, type the
following: Ω “Team 1” (2, 3 and 4 are also possible) to change teams in the middle of a multiplayer
game. Teams 1 and 2 are Red and Gold. Teams 3 and 4 are not listed, and are Blue andGreen respectively. (Extra teams are not available in Capture the Flag levels.)
Ω “Endlevel” Command enables the game server to move on to the next level withoutescaping to the Main Menu and ending the game.
Host Game To host a game, click Multiplayer, then Host Game. Select a network provider to
host the game and click OK.
Network ProvidersIPX: No extra configuration is necessary for IPX play over a Local Area Network. Click
IPX Connection for DirectPlay and click OK. Configure the game as instructedbelow in the Game Configuration section and click OK to host the game.
TCP/IP: No extra configuration is necessary for TCP/IP games hosted over a LAN. ClickInternet TCP/IP Connection for DirectPlay and click OK. Configure the game asbelow and click OK to host the game. Instruct joining players to leave the IP addressblank and click OK to search for your game. For Internet play, joining players must enter the IP Address of the host computer. Seethe section on Playing Jedi Knight over the Internet on page 49. This provides youwith detailed information and instructions for playing on Microsoft’s Internet GamingZone or setting up your own Internet game.
Modem: To host a game over a modem connection, first make sure your modem isconnected correctly and turned on, then click Modem Connection for DirectPlay.Configure the game as described below and click OK. Choose your multiplayercharacter as instructed below and click OK. Then select the connected modem in theWindows modem box and click Answer. An answer box will open, indicating that thecomputer is waiting for anothermodem to connect.
Multiplayer Provider Screen Game Configuration Screen
Jedi Knight PC CD UK Man 19/4/01 8:58 pm Page 46
49
J E D I K N I G H T : D A R K F O R C E S I I
password, Click OK to advance to the Load Character screen. Choose a multiplayercharacter or create a new one and click OK to join the game. NOTE: For up-to-datehardware and technical issues, please see the Readme or the Jedi KnightTroubleshooting Guide.
P L A Y I N G J E D I K N I G H T O N T H E I N T E R N E TJedi Knight uses DirectPlay, the multiplayer component of DirectX 5.0. DirectPlay
has support for TCP/IP, the network protocol used on the Internet. This means that youcan challenge your friends and other online gamers to a Jedi Knight game anytime,provided you have access to the Internet via an Internet Service Provider (ISP).
Getting StartedFor the latest information about Jedi Knight and other LucasArts multiplayer games,
check out the Rebel HQ Web page at http://www.rebelhq.com. Here you will find up-to-the-minute information and news about your favourite LucasArts multiplayer games,as well as links to the Internet Gaming Zone.™
To make it easy for you to find other players for an Internet game, you can join theInternet Gaming Zone. Once you have the Zone software installed and a membership setup with the Zone, you can play Jedi Knight for free on the Internet anytime you wish.You don’t need to use the Internet Gaming Zone to play Jedi Knight online, but itsimplifies the process of finding players and joining Internet games.
We’ve also provided some useful information to help you play Jedi Knight directlyover the Internet without the Internet Gaming Zone in case you don’t have an ActiveX-capable browser or just want to set up your own game. You’ll find a Glossary of Internet-Related Terms on page 56. If you don’t understand a term or acronym used in thismanual, refer to the Glossary.
48
J E D I K N I G H T : D A R K F O R C E S I I
Ω Password: Can be any word orcombination of letters, numbers orspaces to allow hosts to limit playerswith a password.
Ω Advanced Options: For advancedusers setting up Internet games.Gives you the ability to changenetwork Tick Rate. For more detailedinformation, see the section onPlaying Jedi Knight Over the Internetlater in the manual.
Ω Choose Episode: Choose from eitherJedi Training or Capture the Flag.
Ω Choose Level: Choose the level you would like to play in based on the episode.Once the game is configured, click OK to move to the Load Character screen. Choose
your multiplayer character or create a new one and click OK to start the game.
Join GameTo join a game hosted by another computer, click Join Game, then choose a service
provider for your computer to search for a hosted game.IPX: Click IPX Connection for DirectPlay and OK. The computer will search for games
over the LAN.TCP/IP: To play over a LAN using TCP/IP Protocol, click Internet TCP/IP Connection
for DirectPlay then OK. A Windows box will prompt you for an IP address. Leave itblank and click OK. Jedi Knight will search for TCP/IP configured hosts over yourlocal network. For Internet play, see the section on Playing Jedi Knight over theInternet on page 49 for detailed information and instructions for playing onMicrosoft’s Internet Gaming Zone or setting up your own Internet game.
Modem: To connect to a host using a modem, click Modem Connection forDirectPlay, then enter the telephone number of the host’s computer and clickConnect. When connected, click on the game listed and click OK. On the next screen,select a multiplayer character and click OK to join the game.
Direct Serial: Connect a NULL Modem cable between free Serial ports on twocomputers. Once connected, click Multiplayer, then click Serial Connection forDirectPlay and click OK. In the Windows box that appears, configure the connectionfor COM Port settings. We recommend that you use the default configuration forBaud Rate, Stop Bits, Parity and Flow. Once configured correctly, click OK. A gamehosted over a direct serial connection will appear in the Games list immediately. Onceyou have selected the appropriate service provider, click the OK button. The searchwindow will show you a list of the available games. Click on the game you want tojoin. Detailed information including the number of players in the game, maximumnumber of players allowed, episode, level, and team play information about the gamewill appear below the window. A Password box will appear if required. Enter the
Multiplayer Join Game Screen
Jedi Knight PC CD UK Man 19/4/01 8:58 pm Page 48
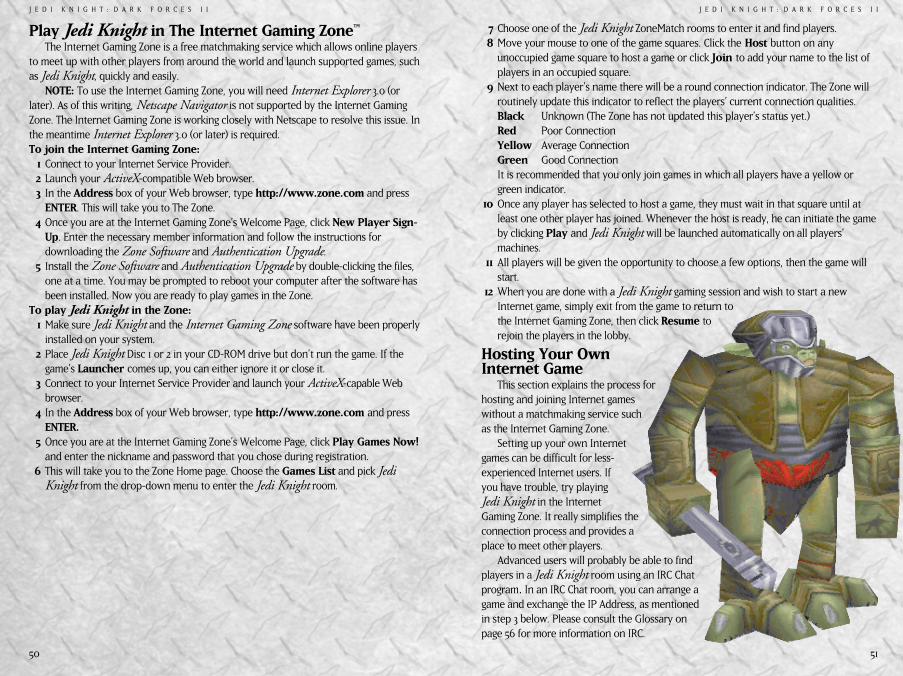
51
J E D I K N I G H T : D A R K F O R C E S I I
7 Choose one of the Jedi Knight ZoneMatch rooms to enter it and find players.8 Move your mouse to one of the game squares. Click the Host button on any
unoccupied game square to host a game or click Join to add your name to the list ofplayers in an occupied square.
9 Next to each player’s name there will be a round connection indicator. The Zone willroutinely update this indicator to reflect the players’ current connection qualities. Black Unknown (The Zone has not updated this player’s status yet.)Red Poor ConnectionYellow Average ConnectionGreen Good ConnectionIt is recommended that you only join games in which all players have a yellow orgreen indicator.
10 Once any player has selected to host a game, they must wait in that square until atleast one other player has joined. Whenever the host is ready, he can initiate the gameby clicking Play and Jedi Knight will be launched automatically on all players’machines.
11 All players will be given the opportunity to choose a few options, then the game willstart.
12 When you are done with a Jedi Knight gaming session and wish to start a newInternet game, simply exit from the game to return tothe Internet Gaming Zone, then click Resume torejoin the players in the lobby.
Hosting Your OwnInternet Game
This section explains the process forhosting and joining Internet gameswithout a matchmaking service suchas the Internet Gaming Zone.
Setting up your own Internetgames can be difficult for less-experienced Internet users. Ifyou have trouble, try playingJedi Knight in the InternetGaming Zone. It really simplifies theconnection process and provides aplace to meet other players.
Advanced users will probably be able to findplayers in a Jedi Knight room using an IRC Chatprogram. In an IRC Chat room, you can arrange agame and exchange the IP Address, as mentionedin step 3 below. Please consult the Glossary onpage 56 for more information on IRC.
50
J E D I K N I G H T : D A R K F O R C E S I I
Play Jedi Knight in The Internet Gaming Zone™
The Internet Gaming Zone is a free matchmaking service which allows online playersto meet up with other players from around the world and launch supported games, suchas Jedi Knight, quickly and easily.
NOTE: To use the Internet Gaming Zone, you will need Internet Explorer 3.0 (orlater). As of this writing, Netscape Navigator is not supported by the Internet GamingZone. The Internet Gaming Zone is working closely with Netscape to resolve this issue. Inthe meantime Internet Explorer 3.0 (or later) is required. To join the Internet Gaming Zone:
1 Connect to your Internet Service Provider.2 Launch your ActiveX-compatible Web browser.3 In the Address box of your Web browser, type http://www.zone.com and press
ENTER. This will take you to The Zone.4 Once you are at the Internet Gaming Zone’s Welcome Page, click New Player Sign-
Up. Enter the necessary member information and follow the instructions fordownloading the Zone Software and Authentication Upgrade.
5 Install the Zone Software and Authentication Upgrade by double-clicking the files,one at a time. You may be prompted to reboot your computer after the software hasbeen installed. Now you are ready to play games in the Zone.
To play Jedi Knight in the Zone:1 Make sure Jedi Knight and the Internet Gaming Zone software have been properly
installed on your system.2 Place Jedi Knight Disc 1 or 2 in your CD-ROM drive but don’t run the game. If the
game’s Launcher comes up, you can either ignore it or close it. 3 Connect to your Internet Service Provider and launch your ActiveX-capable Web
browser.4 In the Address box of your Web browser, type http://www.zone.com and press
ENTER.5 Once you are at the Internet Gaming Zone’s Welcome Page, click Play Games Now!
and enter the nickname and password that you chose during registration.6 This will take you to the Zone Home page. Choose the Games List and pick Jedi
Knight from the drop-down menu to enter the Jedi Knight room.
Jedi Knight PC CD UK Man 19/4/01 8:58 pm Page 50
53
J E D I K N I G H T : D A R K F O R C E S I I
4Enter the IP Address when prompted and click OK. Be sure to enter the number exactlyand include periods to separate the numbers. A valid number will look something likethis: 199.3.89.200.
5 Once you have entered a valid IP Address and clicked OK, you will see “Searching” onthe Multiplayer Game list. When the game has been launched by the host, and yourcomputer finds the game, “Searching” will be replaced by the name of the host’s game.If the game isn’t found, click Cancel, verify that the IP Address was entered correctly,and try again.
6 When the game is found, click the name, then click OK to connect.7 Lastly, you will need to create a character to use for this game, or use an existing one
that you have previously created. Click OK when you have selected a character andthe game will start. This screen is described in the Edit Character section on page 42of this manual.
U S E F U L I N T E R N E T U T I L I T I E S I N C L U D E D W I T H W I N D O W S 9 5Ω IP CONFIGURATION VIEWER: This utility allows you to view your TCP/IP settings,
such as your IP address. To join an Internet game, you will need to know the IPAddress of the computer hosting the game. The host can use the IP ConfigurationViewer to identify his IP address and give this number to you so that you can find hisgame on the Internet.
To obtain your IP Address:1 Connect to your ISP.2 Click the Start button.3 Then click Run.4 Type WINIPCFG, and press ENTER to display the IP
Configuration Viewer.5 Click the arrow to the right of the drop-down box and
select PPP Adapter from the list (if necessary).6 Make note of the number in the IP Address window. This is
your current Internet IP Address. You will need to give thisnumber to others who wish to join your Internet game. Thisaddress will usually change every time you disconnect andre-connect to your ISP. You can now minimise the viewerand your IP address will be displayed on the taskbar.
Ω PING: You can use the DOS-based PING command todetermine latency between you and the host.
52
J E D I K N I G H T : D A R K F O R C E S I I
Suggested Steps for the Host of an Internet Game:1 First you need to connect to the Internet.2 Next, you need to determine what your IP Address is. This number is usually different
each time you connect. You can use the IP Configuration Viewer (included withWindows 95) to determine your IP Address. See the section on page 56 entitled UsefulInternet Utilities Included with Windows 95 for details.
3 You will need to give your current IP Address to anyone interested in joining yourgame. If you are playing with friends, you could e-mail them this number or call them(if you have access to a phone that isn’t tied up by your connection to the Internet).
4 Launch Jedi Knight and choose to host a multiplayer game by clicking Multiplayerand then click Host Game.
5 Select the TCP/IP protocol as your network provider by double-clicking on InternetTCP/IP Connection for DirectPlay. This will bring you to the GameConfiguration screen where you will set various options for the game. This screen isdescribed in the Host Game section on page 46 of this manual.
6 Next, you will need to create a character to use for this game, or use an existing onethat you have previously created. Click OK when you have selected a character andthe game will start. This screen is described in the Edit Character section on page 42of this manual.
7 Once the game is active, other players will be able to join using the IP Address yougave them. Just wait until they show up in the game.
Suggested Steps for Clients to Join an Internet Game:1 You will need to obtain the IP Address of the computer hosting the game. You could
arrange the game online through an IRC Chat program or obtain the address via e-mailor other means. This number will usually change every time the host connects to theInternet, so you need to obtain the host’s current IP Address before joining a game.
2 Launch Jedi Knight and choose to join a multiplayer game by clicking Multiplayerand then click Join Game.
3 Select the TCP/IP protocol as your network provider by double-clicking on InternetTCP/IP Connection for DirectPlay.
Jedi Knight PC CD UK Man 19/4/01 8:58 pm Page 52
55
J E D I K N I G H T : D A R K F O R C E S I I
Playing a multiplayer game, especially an Internet game, is more demanding on yourcomputer’s CPU hardware. For this reason, you may want to choose a lowerresolution for online play than you would during single player games. After all, whencompeting with other players, the most important thing is that you have a good framerate so you can react quickly to your opponents’ actions.
Ω The number of players in the game will affect performance. If you are havingperformance problems, try playing with fewer players. The better the connection of allplayers, the more players can join. For instance, a game hosted on a good ISDN, Cablemodem, or T1 connection may allow nearly as many players as a LANconnection, offering good performance. Games hosted onstandard modems will perform well with four or five players onaverage.
Ω The host should be the fastest machine in the game. Itis always a good idea to have the fastest machine in amultiplayer game be the host. If you are on the Zoneand don’t have a really fast machine, you should joingames hosted by other people on a faster machines,rather than hosting yourself. The basic rule of thumb isthe faster the frame rate on the host machine, the betterthe game will be for all players. A fast machine runningtoo high of a resolution that yields a less than optimalframe rate will result in poor performance overall.
Ω Use the Network Tick Rate setting to compensate fora poor connection. This setting, in the host’s MultiplayerAdvanced Options screen, allows you to adjusts howoften data is transmitted between computers while in amultiplayer game. The tick rate number is in milliseconds(ms). For example: A tick rate of 200 will send a packet onceevery 200 ms or five times per second. A tick rate of 100 willsend data ten times a second. Valid ranges are 100-250 andthe default setting is 180. The default value has been foundto work fine in most cases and should only be modified byadvanced users. If you are looking to optimise performancewhile hosting on a poor connection to the Internet, you can increase thissetting so that packets are sent less often. If you are hosting on a fastconnection, or are hosting a LAN game, setting this number lower will send updatesmore frequently and give more responsive network play.
G L O S S A R Y O F I N T E R N E T - R E L A T E D T E R M SActiveX™: This is a technology developed by Microsoft to allow active animation andother active content within any Web pages that use the technology. To view a Web pagethat uses ActiveX, your Web browser must have ActiveX support. The Internet Gaming
54
J E D I K N I G H T : D A R K F O R C E S I I
To use the PING command:1 Click on the Start menu, then choose Programs.2 Click MS-DOS Prompt to open up a DOS window.3 At the MS-DOS Prompt, type Ping followed by the IP address of the host and then
press ENTER. For example:C:\Windows>ping 199.3.89.200 <Enter>You will then see something like this:Pinging 199.3.89.200 with 32 bytes of data:
Reply from 199.3.89.200: bytes=32 time=296ms TTL=128Reply from 199.3.89.200: bytes=32 time=302ms TTL=128Reply from 199.3.89.200: bytes=32 time=331ms TTL=128Reply from 199.3.89.200: bytes=32 time=290ms TTL=128The PING command will “ping” the host four times and return the above information.
The number following time= is your latency. An average latency of 500 ms (milliseconds)or less is generally acceptable for playing Jedi Knight, but the lower this number thebetter your game experience will be. A “Ping time” of 300 ms or less (average) is optimalfor playing Jedi Knight.
NOTE: If you get Request timed out one or more times, you will likely experiencepoor performance while playing online, due to Internet congestion and dropped packets.
P E R F O R M A N C E T I P S F O R P L A Y I N G J E D I K N I G H T O N T H E I N T E R N E TΩ You need a quality connection to the Internet. The Internet is always changing
and is unpredictable by nature. If you have performance problems while playingonline, you might want to disconnect from your ISP and reconnect to attempt to get abetter connection. You may also have a better experience by playing at other times ofthe day or night, when the Internet is less congested. Some commercial membershiponline services that offer Internet access may not perform adequately. Anindependent or local Internet Service Provider will generally offer the bestperformance.
Ω Connect to the Internet using your modem’s highest speed possible. When youconnect to your ISP, you will see a message Connected at 28800 bps or somethingsimilar. This is especially important if you are the host for an Internet game.
Ω It is important to have a low latency connection. A latency of 500 ms or lessbetween players is acceptable; it is recommended that you have an average latency of300 ms or less. Refer to the PING command in the Useful Internet Utilities Includedwith Windows 95 section on page 53 for more information. Some online membershipservices that offer access to the Internet (through their proprietary dial-up services)have high latency and may not perform well with Jedi Knight.
Ω Try turning down the game’s detail levels or playing in a lower resolution.
Jedi Knight PC CD UK Man 19/4/01 8:59 pm Page 54
57
J E D I K N I G H T : D A R K F O R C E S I I
IRC: (Internet Relay Chat) Using an IRC program (not included with Jedi Knight, butavailable as shareware from many sources on the Internet), you can connect to chatrooms across the country. It is likely that you can find chat rooms dedicatedto Internet gaming or specifically, Jedi Knight, in which you can exchangeIP Addresses and arrange Internet games.ISP: (Internet Service Provider) A company or service that provides localdial-up access to the Internet using your modem, usually for a monthlyfee. Some online services offer Internet access as part of a number ofservices. These types of ISPs may not be adequate for online gamingdue to the inherent latency caused by the overhead of theirproprietary services.LAN: (Local Area Network) Two or more computers connectedtogether with network adapter cards and network cable.Latency: Latency, or Internet lag as it is commonly referred to,is a measure (in milliseconds) of the amount of time that ittakes for data to travel from one computer to another andback, over a network or the Internet. This lag time can bemeasured using the PING command. (See the UsefulUtilities section on page 53 for more information onthe PING command and latency). Latency is usuallynot an issue on a Local Area Network, but on theInternet, excessive latency can cause game performance todegrade substantially. Therefore, when playing any game overthe Internet, it is important to have a low latency connection.High latencies can cause poor multiplayer performance and candecrease stability. Network Protocol: The method, or language, that computersuse to communicate with each other over a network or theInternet. For computers to be able to communicate over a network,they must share a common protocol. It is common for Windows 95computers to use more than one protocol at the same time forcompatibility with various networks. Common protocols are IPX,NetBEUI, and TCP/IP.
56
J E D I K N I G H T : D A R K F O R C E S I I
Zone uses an ActiveX Lobby and thus requires an ActiveX-compatible browser.Bandwidth: The amount of data that can be transmitted or received in a given amountof time. For example, a 28.8 modem can send and receive at 28.8 kbps (kilobits persecond) and an ISDN card can transmit at speeds ranging from 56 Kps (Kilobytes persecond) to 128 Kps. Client (also see Host): In multiplayer gaming, a client refers to a person who is joininga network game that has been created by another player. The player that creates the gameis referred to as the Host (or Server).DirectX: DirectX is the API (Applications Programming Interface) that Jedi Knight usesto access your computer’s hardware. DirectX has been developed by Microsoft tointegrate into the Windows 95 operating system and provides games with a standardmethod of direct access to the advanced features of your computer’s hardware, withouthaving to develop specifically for that hardware. DirectX is made up of five components:DirectDraw for 2D display capabilities, Direct3D for 3D display, DirectSound for soundcapabilities, DirectPlay for multiplayer capabilities, and DirectInput for input devicessuch as mice, keyboards and joysticks.Host (also see Client): The host is the computer that creates the multiplayer game forothers to join. The host’s computer also handles a lot of the chores associated withcommunication between participants in a multiplayer game.Internet: The Internet, is an internetwork, or network of smaller networks that, today,spans the entire globe. Since its inception in the 1970s, the Internet has grown to epicproportions and, in essence, has become a public network.IP Address: (Internet Protocol Address) This is a number, commonly referred to as an IPAddress, that is assigned to all computers on a TCP/IP network. Your ISP assigns one ofthese to you whenever you connect to the Internet. You should use the IP ConfigurationViewer to obtain this number if you are hosting an Internet game. Refer to the IPConfiguration Viewer in the Useful Internet Utilities Included with Windows 95 section onpage 53 for more information.IPX: (Internetwork Packet Exchange) Network protocol used in Novell Netware-compatible networks. Most commonly used protocol for LANs. Some commercial gamingservices such as Kali and Internet Gaming Zone’s ZoneLAN are designed to allow IPXgames to be played over the Internet using custom software. This software converts IPXpackets to TCP packets for transmission over the Internet. Jedi Knight is supporteddirectly by the Internet Gaming Zone so there is no need to play it using ZoneLAN.
Jedi Knight PC CD UK Man 19/4/01 8:59 pm Page 56

59
J E D I K N I G H T : D A R K F O R C E S I I
J E D I K N I G H TC R E D I T SProject Leader, Writer, Game DesignJustin ChinLead ConceptualDesigner and StoryboardsPeter ChanProduction ManagerBrett TostiProductionCoordinatorLori BeckAdditional StoryEditingGarry M. GaberGAMEPROGRAMMINGLead ProgrammerRay GreskoSimulation EngineProgrammerRobert HuebnerLevel Editor,GameplayProgrammingChe-Yuan WangLevel Editor, UserInterface, ToolsWinston WolffCOG ProgrammingYves BorckmansAdditional UIProgrammingAaron GilesInstallerDarren JohnsonAdditional ToolsProgrammingBret MogilefskyMatt RussellHwei-Li Tsao
3D LEVEL DESIGNLead Level DesignerIngar ShuLevel DesignDuncan BrownMatthew TateishiReed Knight DerlethSteven ChenJacob StephensDoug ShannonYves BorckmansSerge DebroeyerGame Tuning/EnemyPlacementChristopher RossBrett TostiJim CurrentLevel Texture ArtworkChris HockaboutMartin YeeKevin EvansBill Stoneham3D SIMULATIONLead CharacterAnimatorLeonard RobelCharacter AnimationJim RiceJon KnolesLea Mai Nguyen3D ModelsClint YoungLea Mai NguyenLeonard RobelAndrew Holdun
3D Art TechnicianAnthony ChiangIndustrial Light andMagic AnimationSupervisorMiguel FuertesIndustrial Light andMagic AnimationTeamTrish Schutz, Julija LearieJenn Emberly, WilliamR. Wright, Neil Michka,David Parsons, VictoriaLivingstoneIndustrial Light andMagic ProductionManagerSuzie TooleyMgr. DigitalAnimation & CreatureDevelopmentIndustrial Light andMagicKen MaruyamaAdditional 3D WorkSteven BakerSoftImage TechnicalAssistanceCraig RundelsCUTSCENESLead 3D ArtistRalph M. Gerth IV3D ArtGarry M. GaberLea Mai NguyenBill StonehamAndrew HoldunClint YoungCreature SculptingBill Stoneham
Lead EffectsCompositingArtist/Video EditorMichael LevineVideo Effects &CompositingC. Andrew NelsonScene Compression &Colour ReductionChristopher RossJedi Knight UsesSmacker VideoTechnology Copyright © 1994-1996 by Invisible, Inc.d.b.a. RAD SoftwareSOUND AND AUDIOOriginal MusicJohn WilliamsMusic Editing andSound QualityControlPeter McConnellCutscene SoundDesignLarry the OClint BajakianInteractive SoundEffectsDavid LevisonVoice DirectorsTamlynn NiglioDarragh O’FarrellKhris BrownSenior Voice EditorKhris BrownAssistant Voice EditorCoya ElliottSpecialized DialogEditingLarry the O
58
J E D I K N I G H T : D A R K F O R C E S I I
Packet: A single unit of data sent over a network or the Internet. When computerscommunicate with each other, they group their data into a form called a packet. Eachpacket of information is then addressed so that it can find its way to the intendedrecipient. Games work best if each packet sent by the game is received intact and in atimely manner. A problem that can happen on overcrowded networks and especially theInternet is that packets can get lost or dropped. In this case, the packet is resent, requiringextra work for the sending computer and creating more data that needs to be sentthrough your modem. Excessive dropped packets can cause performance problems duringgameplay, and strange phenomena can occur. Jedi Knight has been designed towithstand a reasonable amount of packet loss, but excessive packet loss due to Internetcongestion will adversely affect gameplay. Try playing at different times to avoid prime-time congestion of the Internet and you will most likely see better performance.PING: This is a DOS command line program (included with Windows 95) that allows youto measure latency between your computer and another computer on a TCP/IP networkor the Internet. It sends a small amount of data to an IP Address you specify and awaits aresponse. When it gets a response from the other computer, it will display (inmilliseconds) how long it takes for the data to make the trip over the network. This iscalled “pinging” the host.PPP: (Point-to-Point Protocol) You must have a PPP account with an Internet ServiceProvider (ISP) to play Jedi Knight on the Internet. If you can browse the Web, you mostlikely have this type of account.TCP/IP: This is a network protocol used on LANs and the Internet. You need this protocolloaded and configured properly to play TCP/IP games on the Internet. If you areconnected via modem, you should have this protocol configured for use with a Dial-Upadapter. We recommend that you use Microsoft’s TCP/IP protocol that is supplied withWindows 95. Third party TCP/IP software has not been fully tested with Jedi Knight.
Jedi Knight PC CD UK Man 19/4/01 8:59 pm Page 58

61
J E D I K N I G H T : D A R K F O R C E S I I
MARKETINGMarketing ManagerBarbara GleasonManual WritersMollie BoeroJason YunkerDoyle GilstrapBrett TostiBarbara GleasonJo ‘Captain Tripps’AshburnTechnical WritingLynn SelkChip HinnenbergDoyle GilstrapJason YunkerManual DesignMark ShepardPackage DesignTerri Soo HooPackage ArtLea Mai NguyenINTERNATIONALGROUPInternationalProduction ManagerCindy LeungLead Programmer,InternationalJudith LuceroLead InternationalTesterAdam PasztoryAssistant InternationalDeveloperMark Cooke
LUCASARTSENTERTAINMENTCOMPANYPresidentJack SorensenDirector of ProductionSteve DautermanDirector of MarketingMary BihrDirector of the ArtDepartmentJudy RosenfeldManager ofInternational BusinessLisa StarManager of QualityAssuranceMark CartwrightSupervisor of QualityAssuranceDan ConnorsManager of SoundDevelopmentMichael LandTools ManagerAric WilmunderProduct SupportManagerDan GossettProduct SupportSupervisorDave HarrisNational SalesManagerMeredith CahillFinance ManagerTom McCarthy
Business AffairsJeremy SalesinSenior Manager, Sales OperationsJason HorstmanPublic RelationsManagerTom SarrisPublic RelationsAssociateHeather TwistWeb SpecialistJason DeadrichBrooding MoraleCoordinatorTim SchaferADDITONAL THANKSStacy Mollema, AthenaPortillo, Joy, ColinMalloy and Bruce, TheKittleson FamilyThuyen Tang, CathyWautersMelissa Gaber andPeepers, Kevy and Ren-RenJoseph R. Hummel andD.P. and P.P., Chuck(cat) 1976-1995Mrs. Veronica Loud-Nelson, Sarah Fiene,Karin VolzSusan Lyn McKinley,The Ross Family, ColletteMichaud The Posse... Alyxandra,Drache, Teddy andTravis LeeColette Chew, ScottTaylor, Baby BlairHinnenbergErin Wise, Caroline‘LloraC’ Liu, Oden, SunTzuDa Weasel, Chris Miles,Miyamoto Musashi,CaffeineJohn Loose, DolbyLaboratories, Inc.
Special ThanksGeorge Lucas
60
J E D I K N I G H T : D A R K F O R C E S I I
Voice ProductionCoordinatorPeggy BartlettSpecial ThanksRussian Hill Recording,San Francisco, CAScreenMusic, StudioCity, CATESTING & QUALITYASSURANCELead TesterJohn HannonAssistant Lead TestersTim MillerGeoff JonesTesters(Listed Alphabetically)Jo Ashburn Matthew AzevedaJohn BuzolichJoe ChiangJohn CastilloAlbert Chen Tim ChenLeyton Chew Michael DillonJohn DrakeErik EllestadDerek FlippoMorgan GrayBuddy HannonBrent JalipaAri KanterJohn KathreinGreg LandTim LongoStuart MalkinJesse Moore
Colin MunsonJune ParkDan PettitJeff SandersCharlie W. SmithChristopher John SnyderTodd StritterLeon SusenRandy TudorTrey TurnerJason YunkerPaul ZabierekSenior CompatibilityTechnicianChip HinnenbergLead NetworkCompatibilityDoyle GilstrapCompatibilityTechniciansJim DavisonLynn SelkKevin Von Aspern Dan MihoerckJason LauboroughBurning GoddessWendy ‘Cupcake’KaplanBurning AssistantKellie ‘Twinky’ WalkerVIDEO CASTKyle KatarnJason CourtJan OrsAngela HarryJerecChristopher NeameRahnBennett Gilory
SarissValerie WildmanBocTime WintersMawMorgan HunterGorcAs HimselfPic (Voice)Denny DelkYunRafer Weigel8t88 (Voice)Denny DelkMorgan KatarnJacob WitkinBounty Hunter 1Dan BloomBounty Hunter 2Dylan HaggertyGreedo (Voice)Roger L. JacksonThe Computer (Voice)Roger L. JacksonVIDEO PRODUCTIONCREWDirector/DPScott EwersProducer/ADGeorge YoungProduction ManagerBeth GeorgeProductionCoord/2ND ADJeff FisherFight DirectorRick Sordelet
GafferBob KrebsbachBest BoyJack GubermanKey GripJohn Brunold2nd GripJoel PrescottSwingDon ChongVideo Tech/UltimatteJim RolinScript SupervisorLisa GinsburgSoundGreg Von BuchauBoom OpSteve KlinghofferMakeupMichael BurnettSF StylistAnna BiesLA StylistMarie BurkSeamstressCarol WilliamsProp ConstructionDon BiesProduction AssistantJoel FriedmanP.A/Video AssistLee CuellarP.A/PropsGarin BougieCraft ServiceLaura BaganoInternNick FriendCatererWhat’s Cookin GoodLookin
Jedi Knight PC CD UK Man 19/4/01 8:59 pm Page 60
63
J E D I K N I G H T : D A R K F O R C E S I I
When returning the Program for warranty replacement please send the original product discs only in protective packaging
and include: (1) a photocopy of your dated sales receipt; (2) your name and return address typed or clearly printed; (3) a brief
note describing the defect, the problem(s) you encountered and the system on which you are running the product (4) if you
are returning the product after the 90-day warranty period, but within one year after the date of purchase, please include
cheque or money order for £20.00 sterling or AUD $20 per disc replacement.
Note: Certified mail is recommended.
In Europe send to:
WARRANTY REPLACEMENTS
ACTIVISION (UK) Ltd., Parliament House, St Laurence Way, Slough, Berkshire SL1 2BW, United Kingdom
Disc Replacement: + 44 1753 756 189
LIMITATION ON DAMAGES. IN NO EVENT WILL ACTIVISION BE LIABLE FOR SPECIAL, INCIDENTAL OR CONSEQUENTIAL
DAMAGES RESULTING FROM POSSESSION, USE OR MALFUNCTION OF THE PRODUCT, INCLUDING DAMAGES TO PROPERTY,
LOSS OF GOODWILL, COMPUTER FAILURE OR MALFUNCTION AND, TO THE EXTENT PERMITTED BY LAW, DAMAGES FOR
PERSONAL INJURIES, EVEN IF ACTIVISION HAS BEEN ADVISED OF THE POSSIBILITY OF SUCH DAMAGES. ACTIVISION'S
LIABILITY SHALL NOT EXCEED THE ACTUAL PRICE PAID FOR THE LICENSE TO USE THIS PRODUCT. SOME STATES/COUNTRIES
DO NOT ALLOW LIMITATIONS ON HOW LONG AN IMPLIED WARRANTY LASTS AND/OR THE EXCLUSION OR LIMITATION OF
INCIDENTAL OR CONSEQUENTIAL DAMAGES, SO THE ABOVE LIMITATIONS AND/OR EXCLUSION OR LIMITATION OF LIABILITY
MAY NOT APPLY TO YOU. THIS WARRANTY GIVES YOU SPECIFIC LEGAL RIGHTS, AND YOU MAY HAVE OTHER RIGHTS WHICH
VARY FROM JURISDICTION TO JURISDICTION.
TERMINATION. Without prejudice to any other rights of Activision, this Agreement will terminate automatically if you fail to
comply with its terms and conditions. In such event, you must destroy all copies of this Product and all of its component
parts.
INJUNCTION. Because Activision would be irreparably damaged if the terms of this Agreement were not specifically enforced,
you agree that Activision shall be entitled, without bond, other security or proof of damages, to appropriate equitable
remedies with respect to breaches of this Agreement, in addition to such other remedies as Activision may otherwise have
under applicable laws.
INDEMNITY. You agree to indemnify, defend and hold Activision, its partners, affiliates, contractors, officers, directors,
employees and agents harmless from all damages, losses and expenses arising directly or indirectly from your acts and
omissions to act in using the Product pursuant to the terms of this Agreement
MISCELLANEOUS. This Agreement represents the complete agreement concerning this license between the parties and
supersedes all prior agreements and representations between them. It may be amended only by a writing executed by both
parties. If any provision of this Agreement is held to be unenforceable for any reason, such provision shall be reformed only
to the extent necessary to make it enforceable and the remaining provisions of this Agreement shall not be affected.
This Agreement shall be construed under California law as such law is applied to agreements between California residents
entered into and to be performed within California, except as governed by federal law and you consent to the exclusive
jurisdiction of the state and federal courts in Los Angeles, California.
If you have any questions concerning this license, you may contact Activision at 3100 Ocean Park Boulevard, Santa Monica,
California 90405,+ 1 (310) 255-2000, Attn. Business and Legal Affairs, [email protected].
© 1997 Lucasfilm Ltd. and LucasArts Entertainment Company. All Rights Reserved. Dark Forces, Star Wars and the LucasArts
logo are registered trademarks and Jedi Knight is a trademark of Lucasfilm Ltd., used under authorisation.
No droids were harmed in the making of this game.
62
J E D I K N I G H T : D A R K F O R C E S I I
For support via the web please visit http://support.lucasarts.com
CUSTOMER AND TECHNICAL SUPPORT IN EUROPE
For Customer Support you can contact Activision in the UK on 0990 143 525 between the hours of 8.00am and 7.00pm
Product License Agreement
IMPORTANT - READ CAREFULLY: USE OF THIS PRODUCT IS SUBJECT TO THE SOFTWARE LICENSE TERMS SET FORTH BELOW.
"PRODUCT" INCLUDES THE SOFTWARE INCLUDED WITH THIS AGREEMENT, THE ASSOCIATED MEDIA, ANY PRINTED
MATERIALS, AND ANY ON-LINE OR ELECTRONIC DOCUMENTATION, AND ANY AND ALL COPIES AND DERIVATIVE WORKS OF
SUCH SOFTWARE AND MATERIALS. BY OPENING THIS PACKAGE, AND/OR USING THE PRODUCT, YOU ACCEPT THE TERMS OF
THIS LICENSE WITH ACTIVISION, INC. ("ACTIVISION").
LIMITED USE LICENSE. Activision grants you the non-exclusive, non-transferable, limited right and license to use one copy
of this Product solely and exclusively for your personal use. All rights not specifically granted under this Agreement are
reserved by Activision. This Product is licensed, not sold. Your license confers no title or ownership in this Product and
should not be construed as a sale of any rights in this Product.
OWNERSHIP. All title, ownership rights and intellectual property rights in and to this Product and any and all copies thereof
(including but not limited to any titles, computer code, themes, objects, characters, character names, stories, dialog, catch
phrases, locations, concepts, artwork, animation, sounds, musical compositions, audio-visual effects, methods of operation,
moral rights, and any related documentation, incorporated into this Product) are owned by Activision or its licensors. This
Product is protected by the copyright laws of the United States, international copyright treaties and conventions and other
laws. This Product contains certain licensed materials and Activision's licensors may protect their rights in the event of any
violation of this Agreement.
YOU SHALL NOT:
• Exploit this Program or any of its parts commercially, including but not limited to use at a cyber cafe, computer gaming
centre or any other location-based site. Activision may offer a separate Site License Agreement to permit you to make this
Product available for commercial use; see the contact information below.
• Sell, rent, lease, license, distribute or otherwise transfer this Product, or any copies of this Product, without the express
prior written consent of Activision.
• Reverse engineer, derive source code, modify, decompile, disassemble, or create derivative works of this Product, in whole
or in part.
• Remove, disable or circumvent any proprietary notices or labels contained on or within the Product.
• Export or re-export this Product or any copy or adaptation in violation of any applicable laws or regulations.
LIMITED WARRANTY. Activision warrants to the original consumer purchaser of this Product that the recording medium on
which the product is recorded will be free from defects in material and workmanship for 90 days from the date of purchase.
If the recording medium is found defective within 90 days of original purchase, Activision agrees to replace, free of charge,
any product discovered to be defective within such period upon its receipt of the Product, postage paid, with proof of the
date of purchase, as long as the Product is still being manufactured by Activision. In the event that the Product is no longer
available, Activision retains the right to substitute a similar product of equal or greater value.
This warranty is limited to the recording medium containing the Product as originally provided by Activision and is not
applicable to normal wear and tear. This warranty shall not be applicable and shall be void if the defect has arisen through
abuse, mistreatment, or neglect. Any implied warranties prescribed by statute are expressly limited to the 90-day period
described above.
EXCEPT AS SET FORTH ABOVE, THIS WARRANTY IS IN LIEU OF ALL OTHER WARRANTIES, WHETHER ORAL OR WRITTEN, EXPRESS OR
IMPLIED, INCLUDING ANY WARRANTY OF MERCHANTABILITY, FITNESS FOR A PARTICULAR PURPOSE OR NON-INFRINGEMENT, AND
NO OTHER REPRESENTATIONS OR CLAIMS OF ANY KIND SHALL BE BINDING ON OR OBLIGATE ACTIVISION.
Jedi Knight PC CD UK Man 19/4/01 8:59 pm Page 62

64
J E D I K N I G H T : D A R K F O R C E S I I
Imperial AttackThe Last Battle(John Williams)
1977All Rights Reserved. Used By Permission.
The Empire Strikes Back (Main Title)
(John Williams)1980
All Rights Reserved. Used By Permission.
The Emperor(John Williams)
1983All Rights Reserved. Used By Permission.
Star Wars (Main Title)The Princess Appears
The Land of the Sand PeopleThe Return Home
The Inner CityThe Mouse Robot/Blasting Off
Rescue of the PrincessBen’s Death/TIE Fighter Attack
Luke’s EscapeLuke’s Rescue
Imperial MarchBattle in the SnowLuke’s First Crash
The Rebels Escape AgainThe Asteroid Field
The Magic TreeCity in the Clouds
Lando’s Palace
The DuelThe Empire Strikes Back (Finale)
Jedi (Main Title)Han Solo Returns
Fight in the DungeonThe Return of the Jedi
The Death of YodaThe Emperor Confronts Luke
Into the TrapThe Final Duel/Into
the Death StarThrough the Flames
Heroic EwokThe Fleet Goes into Hyperspace
A Hive of VillainyThe Destruction of Alderaan
Drawing the Battle Lines/Leia’s InstructionsAttack PositionCrash LandingFaking the Code
Carbon Freeze/Luke Pursues the Captives
Losing the HandThe Return of the Jedi (Alternate)
(John Williams)1993
All Rights Reserved. Used By Permission.
Death Star/StormtroopersWampa/SpeedersProbe/ExecutorStarFleet/Clouds
Betrayal at Bespin(John Williams)
1997All Rights Reserved. Used By Permission.
M U S I C C R E D I T S
Jedi Knight PC CD UK Man 19/4/01 8:59 pm Page 64