spinning disc step sequencer - cdn-learn.adafruit.com · sequencers come in many forms. today, we...
TRANSCRIPT

Spinning Disc Step SequencerCreated by John Park
Last updated on 2019-01-09 06:27:17 PM UTC

23456
8889
11
13151516181821232324
252527
29293133343536394142
Guide Contents
Guide ContentsOverview
How it WorksPartsMaterials
Feather M4 and Crickit PrepCrickit FeatherWing SetupAudio AmpAudio JumperPlug the Feather M4 into the Crickit
Build the Sensor CircuitProto Board BuildSensorsResistorsGroundInterconnectsWiring the SensorsSpeakerServoPower
Disc Step Sequencer Audio and CodeCodeTune the Servo
Build the Sequencer and Make BeatsSequencer TheoryPattern DiscsPlatterServo Horn MountBuild the PlayerSensor ArmSensor Placement and Test RunDIY PatternsMods and Improvements
© Adafruit Industries https://learn.adafruit.com/spinning-disc-step-sequencer Page 2 of 43

Overview
Play fresh drum patterns with this 16-step disc sequencer, made with CircuitPython on Feather M4 Express and Crickit!It uses reflection sensors to read the steps marked on the paper wheel — four tracks of different sound samples canbe triggered. The outer clock track keeps everything synchronized.
You’ll use a continuous rotation servo to spin the disc, driven by the Crickit FeatherWing, plus the capacitive touchpads provide tempo controls to increase or decrease the BPM (beats per minute) of your player. CircuitPython coderunning on the Feather M4 handles all of the coordination of the elements, and audio mixer playback duties as well.
© Adafruit Industries https://learn.adafruit.com/spinning-disc-step-sequencer Page 3 of 43

Sequencers come in many forms. Today, we recognize drum machines, groove boxes, and computer DAW (digitalaudio workstation) software as typical sequencers. However, the player piano, with its paper roll that actuates valvesand hammers to strike strings, or a music box, with its revolving cylinder or disc that plucks a tuned metal comb arealso early forms of music sequencers. Our disc-based step sequencer works just like these early sequencers, but usesoptical sensing to read the steps to play at the proper time.
How it Works
The Disc Step Sequencer works like this:
The Feather M4, running a CircuitPython program, tells the Crickit's servo driver to spin the continuous rotationservo, to which the disc is connectedFive IR (infrared) reflection sensors watch for black drum pattern step marks and clock step marks (more on thislater) on the disc, and send signals through the Crickit's Signal I/O pins to the Feather M4Each time the outer sensor detects a clock step, the Feather M4 polls the other four sensors to see if any of themhave encountered a drum pattern stepWhen one or more of the four drum track sensors are triggered for a given clock step, the CircuitPython audiomixer plays the assocated drum voice sample .wav files over the Crickit's amplifier to the connected speakerThe tempo can be adjusted by touching the capacitive touch sensors on the Crickit
© Adafruit Industries https://learn.adafruit.com/spinning-disc-step-sequencer Page 4 of 43

Parts
1 x Adafruit Feather M4 Express - Featuring ATSAMD51Featuring ATSAMD51
ADD TO CART
1 x Adafruit CRICKIT FeatherWing for any Featherfor any Feather
OUT OF STOCK
1 x Continuous Rotation ServoContinuous Rotation Servo
ADD TO CART
1 x Miniature Reflective Infrared Optical Sensors5 Pack
OUT OF STOCK
1 x Adafruit Perma-Proto Half-sized Breadboard PCBSingle
ADD TO CART
1 x Helping Third Hand MagnifierW/Magnifying Glass Tool
ADD TO CART
1 x 5V 2A (2000mA) switching power supplyUL Listed
© Adafruit Industries https://learn.adafruit.com/spinning-disc-step-sequencer Page 5 of 43

ADD TO CART
1 x Speaker - 40mm Diameter4 Ohm 3 Watt
ADD TO CART
1 x Through-Hole Resistors220 ohm 5% 1/4W - Pack of 25
ADD TO CART
1 x Jumper Shunt with Handle (0.1" / 2.54mm)10 Pack
ADD TO CART
1 x Break-away 0.1" 36-pin strip male header(10 pieces)
ADD TO CART
1 x 0.1" 36-pin Strip Right-Angle Female/Socket Header(5 pack)
ADD TO CART
1 x Break-away 0.1" 36-pin strip right-angle male header(10 pack)
ADD TO CART
1 x Premium Male/Male Raw Jumper Wires40 x 6" (150mm)
ADD TO CART
1 x Premium Male/Female Raw Jumper Wires40 x 6"
ADD TO CART
1 x Small Single Row Wire Housing Packfor DIY Jumper Cables
ADD TO CART
1 x Hook-up Wire Spool Set - 22AWG Solid Core6 x 25 ft
ADD TO CART
1 x Black Nylon Screw and Stand-off SetM2.5 Thread
ADD TO CART
Materials
In addition to the parts listed above, you'll also need:
White letter sized cardstock or paper, 8-1/2" x 11"
© Adafruit Industries https://learn.adafruit.com/spinning-disc-step-sequencer Page 6 of 43

Printer for printing the disc templateBlack chalk marker for creating patterns by hand (regular markers are too shiny and don't reliably absorb theinfrared light)ScissorsHobby knifeSoldering iron and solderSmall screwdriverDiagonal cuttersChipboard for cutting an 8" diameter disc, orMDF wood circle (https://adafru.it/Dxe) from hobby storeGlue stickHot melt glue gun and glue sticks
© Adafruit Industries https://learn.adafruit.com/spinning-disc-step-sequencer Page 7 of 43

Feather M4 and Crickit Prep
We'll be using CircuitPython for this project. Are you new to using CircuitPython? No worries, there is a full gettingstarted guide here (https://adafru.it/cpy-welcome).
Adafruit suggests using the Mu editor to edit your code and have an interactive REPL in CircuitPython. You can learnabout Mu and its installation in this tutorial (https://adafru.it/ANO).
Follow this guide for instructions on installing the latest release version of CircuitPython for the Feather M4 Express.
https://adafru.it/Amd
https://adafru.it/Amd
You'll also need to add the following libraries for this project. Follow this guide (https://adafru.it/Cqa) on addinglibraries. The ones you'll need are:
adafruit_bus_deviceadafruit_motoradafruit_registeradafruit_seesawadafruit_crickitadafruit_dotstaradafruit_debouncerneopixelsimpleio
Download the latest adafruit-circuitpython-bundle .zip file as instructed in the guide linked below. Unzip the file anddrag those libraries to the lib folder on your Feather M4 CIRCUITPY drive (create it if it does not already exist).
https://adafru.it/ABU
https://adafru.it/ABU
Crickit FeatherWing Setup
If you're new to the wonderful Crickit board, take a look at the main guide here (https://adafru.it/C2K). You'll notice theCrickit has its own micro USB port -- this is used only occasionally to update the seesaw firmware on the Crickit itself.You can follow these instructions on updating to the latest firmware (https://adafru.it/BMV) before getting started.
Audio Amp
The Crickit FeatherWing has a 3W class-D audio amplifier built in. By default, it is not connected to the Feather's pin A0DAC (digital-analog converter) pin, since you can also choose to connect it to a PWM pin. We'll be using the A0 DACoutput pin, so go ahead and solder a jumper across the pads shown here to send the DAC audio to the amp.
You can use a small wire or solder blob to get the job done, however, I like to use two male header pins and a jumpershunt so that I can "mute" the speaker easily by lifting the shunt.
© Adafruit Industries https://learn.adafruit.com/spinning-disc-step-sequencer Page 8 of 43

Audio Jumper
Solder two male header pins to the pads labeled
"Audio"
Connect them with a jumper shunt to send the Feather
M4 pin A0 DAC output to the Crickit FeatherWing's
Class-D amplifier
© Adafruit Industries https://learn.adafruit.com/spinning-disc-step-sequencer Page 9 of 43

© Adafruit Industries https://learn.adafruit.com/spinning-disc-step-sequencer Page 10 of 43

Plug the Feather M4 into the Crickit
There is a tiny trim potentiometer on the Crickit just below the Audio jumper where you can adjust volumewith a small screwdriver.
© Adafruit Industries https://learn.adafruit.com/spinning-disc-step-sequencer Page 11 of 43

Now, we're ready to build the sensor circuit, and connect it to the Crickit, along with the speaker, servo, and power.
© Adafruit Industries https://learn.adafruit.com/spinning-disc-step-sequencer Page 12 of 43

Build the Sensor Circuit
We'll build our own sensor bar to read the track steps. We'll use five sensors. The IR sensor packages contain twosmall elements, an IR LED and an IR sensor enclosed in a plastic housing.
© Adafruit Industries https://learn.adafruit.com/spinning-disc-step-sequencer Page 13 of 43

You can ignore the leg lengths (short leg doesn't mean ground in all cases) and instead use the diagram to orientthings properly.
The IR LED is the clear element. It will receive power from the Crickit's 3.3V line, with a 220 Ohm resistor to reduce thevoltage. The dark element is the IR phototransistor. It will send a signal to one of the Crickit's Signal input pins, usingthe internal pullup resistors of the Crickit. Both are tied to ground.
© Adafruit Industries https://learn.adafruit.com/spinning-disc-step-sequencer Page 14 of 43

You can build this on a breadboard for testing; ultimately we'll solder it onto an Adafruit Perma Proto board.
Proto Board Build
Sensors
To start, place the sensors into the perma-proto board
as shown and solder them in place. Match the
orientation and spacing shown here.
You don't have to flip the board upside down, I only did
so to keep the fancy silkscreen side facing up in the
final project.
Don't push them down too far, the distance from the
board must be consistent from sensor to sensor -- about
12mm away from the board. This will allow us to angle
the board for optimal reflection reading.
© Adafruit Industries https://learn.adafruit.com/spinning-disc-step-sequencer Page 15 of 43

Resistors
Next, add 220 Ohm current limiting resistors for each IR
LED element.
Run a resistor from the V+ leg of each sensor to the +
power rail on the Perma Proto board. (Note how I
marked each rail to avoid confusion due to flipping the
board upside down.)
© Adafruit Industries https://learn.adafruit.com/spinning-disc-step-sequencer Page 16 of 43

© Adafruit Industries https://learn.adafruit.com/spinning-disc-step-sequencer Page 17 of 43

Ground
Now, ground each of the sensor ground legs to the
bottom ground rail on the perma-proto board with a
small wire jumper.
You can ground each wire to the rail individually, or
jumper them all horizontally as shown. It doesn't look
pretty, but it works and won't be seen in the final
project!
To connect them horizontally, strip the insulation from a
length of wire that spans the width of the sensor array
and then solder it down to each column with a giant,
slug-like trail of solder. Admittedly, this was faster than
making nine more small jumpers, but I sorta wish I had
now ; ]
We'll also connect the Perma Proto board's two ground rails with a jumper wire.
Interconnects
To connect the sensor bar to the Crickit sensor inputs
and power, we'll make some cable sets and add
removable header connectors.
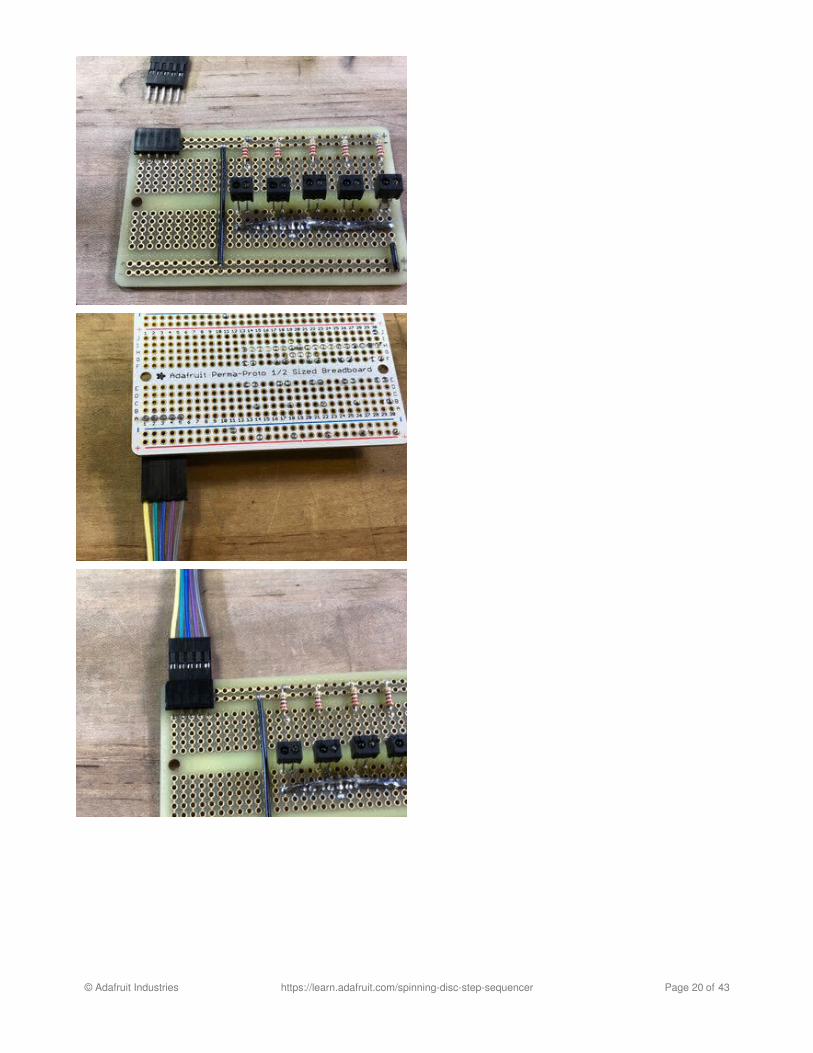
© Adafruit Industries https://learn.adafruit.com/spinning-disc-step-sequencer Page 18 of 43

First, peel off a five wire section of the raw male/male
jumper wires with the color set as shown.
Then, push the cable ends on either side into their own
5-pin dupont connector.
Repeat this with a red-brown pair of male/female jumper
wire, and add 2-pin dupont connectors to it.
Next, use diagonal cutters to clip off a 5-pin section of
the right-angled female header, and a 2-pin section of
the right-angled male header. We'll use different
polarities here to reduce the chance of mis-plugging
something.
Solder the 5-pin header as shown.
Jumper a column to power rail and ground as shown,
then add the 2-pin male header as shown, this is where
the power will plug in. It is important to plug these in
correctly! The color coded jumper wire helps.
© Adafruit Industries https://learn.adafruit.com/spinning-disc-step-sequencer Page 19 of 43
© Adafruit Industries https://learn.adafruit.com/spinning-disc-step-sequencer Page 20 of 43

© Adafruit Industries https://learn.adafruit.com/spinning-disc-step-sequencer Page 21 of 43

Wiring the Sensors
Lastly, run a color coded jumper wire from each sensor's signal leg to the associated pin coming from the cableinterconnect as shown. Solder these in place and our sensor board is ready for use!
© Adafruit Industries https://learn.adafruit.com/spinning-disc-step-sequencer Page 22 of 43

Now, plug the cables into the Crickit's Signal I/O ports as shown.
© Adafruit Industries https://learn.adafruit.com/spinning-disc-step-sequencer Page 23 of 43

Speaker
Place the speaker wires into the two speaker terminal ports on the Crickit and screw them down firmly. You may needto strip a little extra insulation from each wire first to get a better connection.
Servo
Plug the continuous rotation servo cable into the Servo 1 port on the Crickit with the orange wire nearest to the outsideedge of the Crickit.
Power
Plug the 5V 2A DC power adapter plug into the Crickit's power barrel jack.
© Adafruit Industries https://learn.adafruit.com/spinning-disc-step-sequencer Page 24 of 43

© Adafruit Industries https://learn.adafruit.com/spinning-disc-step-sequencer Page 25 of 43

Disc Step Sequencer Audio and Code
Power your Crickit with a 5V supply into the black power connector (and not the Crickit's silver USB port).
Plug in your Feather M4 to your computer via USB and then turn on the Crickit's power switch. (Make sure you pluginto the Feather M4 USB port, not the Crickit USB port!)
The Feather M4's CIRCUITPY drive will show up on your computer. We're going to copy some .wav files onto theCIRCUITPY drive. Download and uncompress this .zip file and then drag the .wav files onto the Feather M4'sCIRCUITPY drive.
https://adafru.it/DxW
https://adafru.it/DxW
Code
Here is the code we'll use. Copy it and then paste it into the Mu editor. Save it to your Feather M4 as code.py
"""Opto Mechanical Disc Step Sequencer from John Park's Workshop Crickit Feather M4 Express, Crickit FeatherWing, continuous servo, four reflection sensors, speaker
Adafruit invests time and resources providing this open source code.Please support Adafruit and open source hardware by purchasingproducts from Adafruit!
Written by Dave Astels for Adafruit IndustriesCopyright (c) 2018 Adafruit IndustriesLicensed under the MIT license.
All text above must be included in any redistribution."""
import audioioimport boardfrom digitalio import DigitalInOut, Directionfrom adafruit_crickit import crickitfrom adafruit_debouncer import Debouncer
# You get 4 samples, they must all have the same sample rate and must# all be mono or stereo (no mix-n-match!)# mixer info https://circuitpython.readthedocs.io/en/latest/shared-bindings/audioio/Mixer.html
VOICES = ["bd_tek.wav", "elec_hi_snare.wav", "ch_01.wav", "clap_01.wav"]# Parse the first file to figure out what format its inwith open(VOICES[0], "rb") as f: wav = audioio.WaveFile(f) print("%d channels, %d bits per sample, %d Hz sample rate " % (wav.channel_count, wav.bits_per_sample, wav.sample_rate))
# Audio playback object - we'll go with either mono or stereo depending on # what we see in the first file if wav.channel_count == 1: audio = audioio.AudioOut(board.A0)
© Adafruit Industries https://learn.adafruit.com/spinning-disc-step-sequencer Page 26 of 43

audio = audioio.AudioOut(board.A0) elif wav.channel_count == 2: # audio = audioio.AudioOut(board.A0, right_channel=board.A0) audio = audioio.AudioOut(board.A0) else: raise RuntimeError("Must be mono or stereo waves!") mixer = audioio.Mixer(voice_count=4, sample_rate=wav.sample_rate, channel_count=wav.channel_count, bits_per_sample=wav.bits_per_sample, samples_signed=True) audio.play(mixer)
samples = []# Read the 4 wave files, convert to stereo samples, and store# (show load status on neopixels and play audio once loaded too!)for v in VOICES: wave_file = open(v, "rb") print(v) # OK we managed to open the wave OK sample = audioio.WaveFile(wave_file) # debug play back on load! mixer.play(sample, voice=0) while mixer.playing: pass samples.append(sample)
led = DigitalInOut(board.D13)led.direction = Direction.OUTPUT
# For signal control, we'll chat directly with seesaw, use 'ss' to shorten typing!ss = crickit.seesaw
# define and set up inputs to use the debouncerdef make_criket_signal_debouncer(pin): # create pin signal objects ss.pin_mode(pin, ss.INPUT_PULLUP) return Debouncer(lambda : ss.digital_read(pin))
# The IR sensors on are pullups, connect to ground to activateclock_pin = make_criket_signal_debouncer(crickit.SIGNAL1)voice_1_pin = make_criket_signal_debouncer(crickit.SIGNAL2)voice_2_pin = make_criket_signal_debouncer(crickit.SIGNAL3)voice_3_pin = make_criket_signal_debouncer(crickit.SIGNAL4)voice_4_pin = make_criket_signal_debouncer(crickit.SIGNAL5)# Crickit capacitive touch padstouch_1_pad = Debouncer(lambda: crickit.touch_1.value)touch_4_pad = Debouncer(lambda: crickit.touch_4.value)touch_2_3_pad = Debouncer(lambda: crickit.touch_2.value and crickit.touch_3.value)
crickit.continuous_servo_1.set_pulse_width_range(min_pulse=500, max_pulse=2500)speed = -0.04 #this is clockwise/forward at a moderate tempo
def play_voice(vo): mixer.stop_voice(vo) mixer.play(samples[vo], voice=vo, loop=False)
while True: clock_pin.update() #debouncer at work voice_1_pin.update()
© Adafruit Industries https://learn.adafruit.com/spinning-disc-step-sequencer Page 27 of 43

The board will start up and play the four samples and then begin turning the servo motor!
Tune the Servo
Go ahead and plug in the power adapter and turn on the Crickit. The sounds will each play one time and then theservo will start to spin. In order to calibrate the servo, press the Crickit's touch pads 2 & 3 at the same time. If the servostopped spinning, great! More likely, it is still spinning, perhaps even faster than before.
voice_1_pin.update() voice_2_pin.update() voice_3_pin.update() voice_4_pin.update() touch_1_pad.update() touch_4_pad.update() touch_2_3_pad.update()
crickit.continuous_servo_1.throttle = speed # spin the disc at speed defined by touch pads
if clock_pin.fell: # sensor noticed change from white (reflection) to black (no reflection) # this means a clock tick has begun, time to check if any steps will play led.value = 0
if voice_1_pin.value: # a black step (no reflection) mark during clock tick, play a sound! led.value = 1 # light up LED when step is read # print('| .kick. | | | |') play_voice(0)
if voice_2_pin.value: led.value = 1 # print('| | .snare. | | |') play_voice(1)
if voice_3_pin.value: led.value = 1 # print('| | | .closed hat. | |') play_voice(2)
if voice_4_pin.value: led.value = 1 # print('| | | | .clap. |') play_voice(3)
if touch_4_pad.rose: # speed it up speed -= 0.001 # print("speed: %s" % speed)
if touch_1_pad.rose: # slow it down speed += 0.001 # you can comment out the next two lines if you want to go backwards # however, the clock ticks may not register with the default template spacing if speed >= 0: # to prevent backwards speed = 0 # print("speed: %s" % speed)
if touch_2_3_pad.rose: # stop the disc speed = 0 # print("speed: %s" % speed)
© Adafruit Industries https://learn.adafruit.com/spinning-disc-step-sequencer Page 28 of 43

Use a small Phillips screwdriver to turn the adjustment potentiometer that is accessible through a small hole in theservo housing until the servo stops spinning. Now, it is calibrated.
You can get the servo moving forward again by tapping the Crickit's touch pad 4 a few times.
Go ahead and turn off the Crickit's power switch while we set it all up!
© Adafruit Industries https://learn.adafruit.com/spinning-disc-step-sequencer Page 29 of 43

Build the Sequencer and Make Beats
Sequencer Theory
This is the anatomy of a sequencer disc. There are five circular tracks, each broken into 16 steps. Think of them as fourmeasures of 4/4 time (four beats to the measure, 1/4 note gets the beat). So, each step is a quarter note.
This is a typical pattern style for a 16-step drum machine pattern. You can count it off as "one-2-3-4, two-2-3-4, three-2-3-4, four-2-3-4"
The outer ring is the clock track. It keeps time and its steps tell the whole system when to check for drum steps to play.Whenever a new clock step is sensed, the pattern has advanced one step.
The four inner tracks are for the four drum sample .wav files (they don't have to be drums, actually, any sample youwant to play will work). One sample sound will be triggered per track, wherever a filled-in black step is sensed.
I've chosen a kick drum, snare drum, closed high hat, and clap as the four samples. Each track corresponds to onesample .wav file as well as one "voice" of the CircuitPython audio mixer.
Here's an example of a traditional, Roland 808-style drum pattern, created withPattern.Sketch.com (https://adafru.it/DxJ)
https://adafru.it/DxK
https://adafru.it/DxK
© Adafruit Industries https://learn.adafruit.com/spinning-disc-step-sequencer Page 30 of 43

Now, imagine we tidy that up to only the four tracks and the clock track at the top:
Then, we deform it into a circle, by going from rectangular to circular polar coordinates:
© Adafruit Industries https://learn.adafruit.com/spinning-disc-step-sequencer Page 31 of 43

Hey! Now we've got a disc version of our drum pattern!
Pattern Discs
Here's a clean version we can use with the sensor strip:
© Adafruit Industries https://learn.adafruit.com/spinning-disc-step-sequencer Page 32 of 43

One difference you'll notice is that the clock steps have been rotated to occur a little bit before the drum steps. This isto give the clock track sensor and Feather M4 time to register a clock tick and then scan the other four sensors to seeif a drum step needs to be triggered.
I've also added some space between steps, this aids the sensors in detecting the "edge" between a white, reflectiveportion of the disc, and a black, non-reflective step mark.
You can now download and print out the .pdf files linked below. Just make sure you print them at 1:1 scale (a.k.a."actual size") -- the circle has an 8" diameter so will fit on a sheet of Letter-sized paper.
White cardstock works great, but you can use regular printer paper as well. Use scissors to cut out the discs.
https://adafru.it/DxL
https://adafru.it/DxL
https://adafru.it/DxM
https://adafru.it/DxM
You can use a hobby knife to cut out the center circle, which helps with alignment later.
© Adafruit Industries https://learn.adafruit.com/spinning-disc-step-sequencer Page 33 of 43

Platter
Now, we need a way to mount the pattern disc to the continuous rotation servo motor. You can cut out a flat piece ofchipboard, or even better, laser cut an 8" circle with a hole in the middle for perfect servo horn alignment.
This can also be done with an MDF circle from the craft store or laser cut acrylic if you want something perfectly flat.
You can print and cut this template to make it simple to find the edges and center of your cardboard if you like.
© Adafruit Industries https://learn.adafruit.com/spinning-disc-step-sequencer Page 34 of 43

https://adafru.it/DxO
https://adafru.it/DxO
Servo Horn Mount
Use hot glue to mount one of the servo horns to the center of the platter. To keep things even, I find it best to hold thetwo parts together and then use hot glue on top of them, rather than between the surfaces.
Next, use a few dabs of glue stick to hold the paper disc to the cardboard platter. Go sparingly and the disc will workwell, but still be easy to remove to swap out discs.
© Adafruit Industries https://learn.adafruit.com/spinning-disc-step-sequencer Page 35 of 43

Now, press the platter and horn onto the servo shaft.
Build the Player
Now, we'll arrange our parts onto a base made of foam-core board, using hot glue to hold down the servo andspeaker. (Platter has been removed from the servo for this photo.)
© Adafruit Industries https://learn.adafruit.com/spinning-disc-step-sequencer Page 36 of 43

You don't need to mount the Crickit if you don't want to, or use some double-stick foam tape or 2.5mm nylon screwsand standoffs to secure it.
Sensor Arm
The sensor bar requires adjustment to get the best angle, so we'll convert a third-hand tool into our adjustable sensorarm.
Remove the main arm from the base by loosening the
retention screw.
Take one of the alligator clips off of one end, and place
it into the base socket, then tighten.
© Adafruit Industries https://learn.adafruit.com/spinning-disc-step-sequencer Page 37 of 43

This will allow three degrees of freedom in placing the
board.
Add a nylon standoff and screw to the perma proto
board as shown.
Clamp alligator clip onto the standoff. (Heat shrink
tubing is optional.)
The stand can now be adjusted easily!
© Adafruit Industries https://learn.adafruit.com/spinning-disc-step-sequencer Page 38 of 43

© Adafruit Industries https://learn.adafruit.com/spinning-disc-step-sequencer Page 39 of 43

Sensor Placement and Test Run
We're ready to do this! Place the sensor assembly over the disc and angle it as shown, with the sensors a fewmillimeters from the surface.
© Adafruit Industries https://learn.adafruit.com/spinning-disc-step-sequencer Page 40 of 43

Plug in the power adapter, and turn on the Crickit on/off switch. The sounds will each play once, then the disc will startto spin! If it doesn't spin, double check all connections and make sure you calibrated the servo as outlined on theprevious page of this guide.
You'll hear a hip hop beat playing when the sensor is aligned properly. This is the trickiest part, so take your timeadjusting the angle and height of the sensors over the disc. Each sensor should be over it's own track.
Once you have a good alignment, go ahead and secure the sensor base to the foam-core with some hot glue. You'llstill be able to make fine adjustments if needed, but won't need to worry about the base being knocked off course.
© Adafruit Industries https://learn.adafruit.com/spinning-disc-step-sequencer Page 41 of 43

DIY Patterns
To make your own pattern discs, all you need to do is print out a blank template, and then fill in the steps with a blackchalk marker. Sharpies and other ink markers tend to be too shiny, so the matte finish of the chalk paint marker is whatyou want.
© Adafruit Industries https://learn.adafruit.com/spinning-disc-step-sequencer Page 42 of 43

Now, you can make your own drum tracks! You can also use your own samples as well -- just make sure they are PCM16-bit Mono WAV files at 22KHz sample rate. You can follow this guide for more info on converting your audio files.
Mods and Improvements
This project could be extended into an even more fully featured drum sequencer! Here are some ideas:
With a greater distance between sensors you may improve their ability to read tracks from a greater distance(less lateral IR light spill from neighborsYou could use a full sized perma-proto board and a larger disc to add more sensors and therefore the ability to
© Adafruit Industries Last Updated: 2019-01-09 06:27:16 PM UTC Page 43 of 43

read more tracks. How about some toms, cymbals, and clavs?What about subdividing it into 32 steps for greater variety?A metal disc with magnetic step markers could be fun for quickly adjusting patternsYou could go out to a proper amplifier and speaker stack for some huge sound!