speos caa v5 based - optis portalportal.optis-world.com/webdata/42257_optis_sv5_ig_v15.0.pdf ·...
TRANSCRIPT
SPEOS CAA V5
Based
V15.0

Table of Contents
Welcome to SPEOS CAA V5 Based Installation Guide ......................................................... 5
System Requirements ............................................................................................... 6 OPTIS License Manager System Requirements ............................................................ 6 SPEOS CAA V5 Based System Requirements ............................................................... 7 OPTIS Labs System Requirements .......................................................................... 10
OPTIS Labs Hardware Requirements .............................................................. 10 OPTIS Labs Software Requirements ............................................................... 12
System Recommendations ........................................................................................ 14 OPTIS License Manager System Recommendations ..................................................... 14 SPEOS CAA V5 Based System Recommendations ........................................................ 14 OPTIS Labs System Recommendations .................................................................... 15
SPEOS CAA V5 Based System Performances .................................................................. 17
Local Installation ................................................................................................... 18 Uninstalling SPEOS CAA V5 Based .......................................................................... 18 Getting SPEOS CAA V5 Based from the CD-ROM ......................................................... 19 Getting SPEOS CAA V5 Based from the Web ............................................................. 19
Connecting to the Portal ............................................................................ 19 Obtaining SPEOS CAA V5 Based ..................................................................... 19
Parameterizing the User Account Control ................................................................ 19 Installing SPEOS CAA V5 Based ............................................................................. 19 Installing the OPTIS license ................................................................................. 20
Configuring a Nodelock License .................................................................... 20 Configuring a Floating License ..................................................................... 21
Setting the OPTIS license from SPEOS CAA V5 Based................................................... 22 Launching SPEOS CAA V5 Based ............................................................................ 23 Installing SPEOS CAA V5 Based from a Command Line ................................................. 23 Uninstalling SPEOS CAA V5 Based from a Command Line .............................................. 24 Warnings and Errors Messages .............................................................................. 24
Warning: Video Configuration Error, Well Supported Mode Are 24 Bits and 32 Bits ...... 24 Getting the 1722 or 1721 Error Message .......................................................... 25 Getting the 1901 Error Message .................................................................... 26 Getting the 1500 Error Message .................................................................... 26 CATIA release not recognized while SPEOS installation ....................................... 26 SPEOS CAA V5 Based command is not displayed in the Start menu .......................... 27 SPEOS CAA V5 Based License is not Displayed in the SPEOS License Panel ................. 28 SPEOS CAA V5 Based workbench is not activated ............................................... 28 Warning: The Startup Catalog Files in the Following List Could Not be Found ............ 28
Code Server Installation .......................................................................................... 30 Code Server Installation Architecture .................................................................... 30 Parameterizing the User Account Control ................................................................ 31 From the Code Server ........................................................................................ 31
Getting Code Server Installation from the CD-ROM ............................................ 31 Getting Code Server Installation from the Web ................................................. 31 Downloading the Code Server software........................................................... 32
Environment ................................................................................................... 32 Creating Bat Files ..................................................................................... 32 Adding SV5 to the CATIA V5 Environment ........................................................ 33 OPTIS Environment Variables ....................................................................... 33
Installing the OPTIS license ................................................................................. 34 Configuring a Nodelock License .................................................................... 34 Configuring a Floating License ..................................................................... 35 Configuring for other Client computers .......................................................... 37 Setting the OPTIS license from SPEOS CAA V5 Based ........................................... 37

Launching the Environment from a Client computer ................................................... 38 VBA installation for a CATIA Code Server installation ................................................. 38 Checking the Environment Log File ....................................................................... 38
Creating Environment ............................................................................................. 40 Creating environment for CATIA V5 & SPEOS CAA V5 Based .......................................... 40 Creating environment for Digital Project & SPEOS CAA V5 Based ................................... 45
OPTIS Distributed Computing .................................................................................... 51 Architecture and Process of the OPTIS Distributed Computing ...................................... 51 Configuring the OPTIS Distributed Computing for a Local Installation .............................. 53
Within a Same Network Domain .................................................................... 53 Within a Workgroup .................................................................................. 62 Learn More ............................................................................................. 69 Doing Some Quick Checks Before Running a Distributed Simulation ........................ 70
Configuring the OPTIS Distributed Computing for Code Server Installation ........................ 71 Within a Same Network Domain .................................................................... 71 Within a Workgroup .................................................................................. 75 Doing Some Quick Checks Before Running a Distributed Simulation ........................ 79 Uninstalling the OPTIS Distributed Computing .................................................. 80
Troubleshooting ............................................................................................... 80 OPTIS Distributed Computing Process ............................................................. 80 How to Configure the Windows Firewall? ......................................................... 81 How to Set the OPTIS Control Panel Properties? ................................................ 82 What to Do if the Spooler Status Does not See the Spooler? .................................. 82 What to Do if the Simulation Spooler Status Does not See the Servers? .................... 82
Customizing Paths .................................................................................................. 84
Index .................................................................................................................. 85
Welcome to SPEOS CAA V5 Based Installation Guide Page 5 of 87
WELCOME TO SPEOS CAA V5 BASED INSTALLATION GUIDE
System Requirements (see page 6)
System Recommendations (see page 14)
SPEOS CAA V5 Based System Performances (see page 17)
WORKSTATION INSTALLATION Local Installation (see page 18)
Code Server Installation (see page 30)
OPTIS DISTRIBUTED COMPUTING FOR HIGH PERFORMANCES COMPUTING
Local Installation (see page 53)
Code Server Installation (see page 71)
Page 6 of 87 SPEOS CAA V5 Based Installation Guide
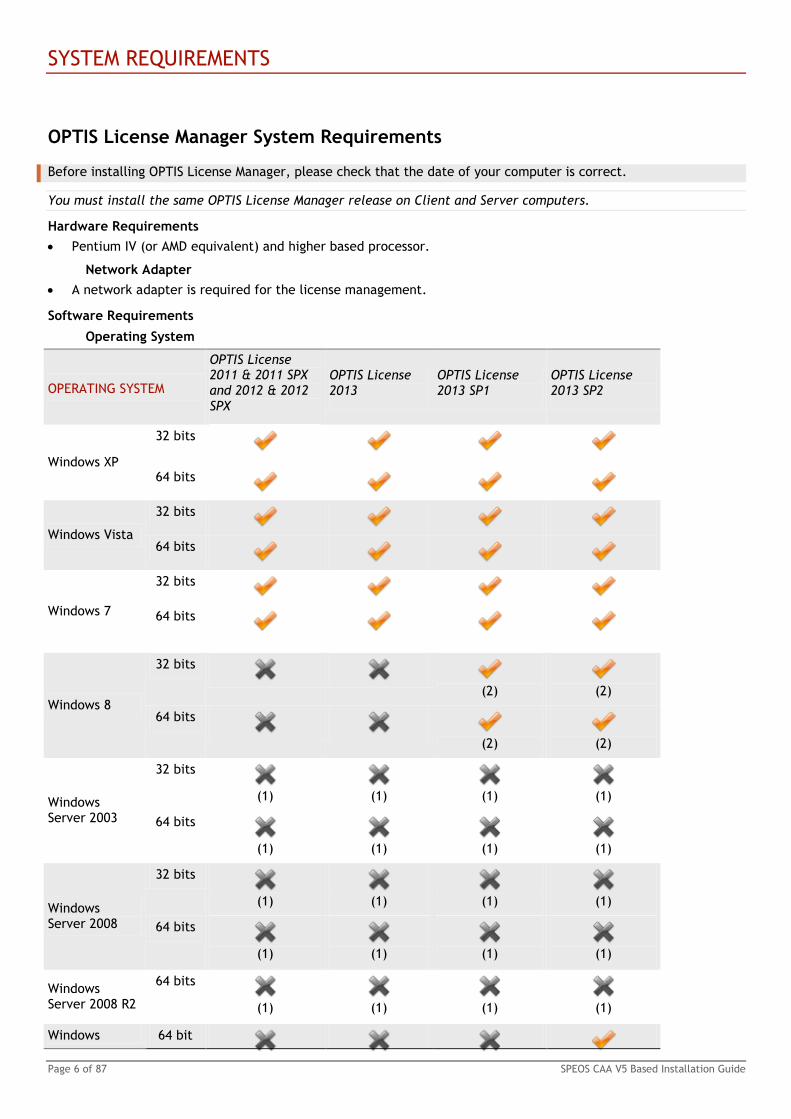
SYSTEM REQUIREMENTS
OPTIS License Manager System Requirements
Before installing OPTIS License Manager, please check that the date of your computer is correct.
You must install the same OPTIS License Manager release on Client and Server computers.
Hardware Requirements
Pentium IV (or AMD equivalent) and higher based processor.
Network Adapter
A network adapter is required for the license management.
Software Requirements
Operating System
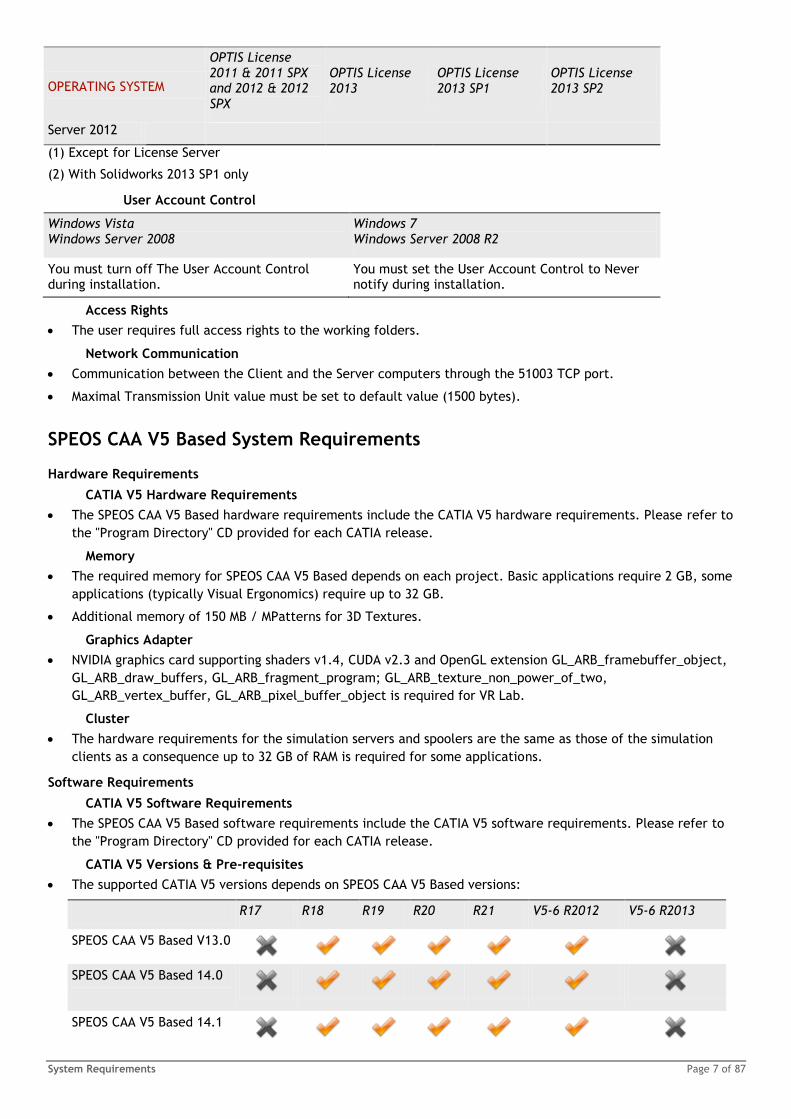
OPERATING SYSTEM
OPTIS License 2011 & 2011 SPX and 2012 & 2012
SPX
OPTIS License 2013
OPTIS License 2013 SP1
OPTIS License 2013 SP2
Windows XP
32 bits
64 bits
Windows Vista
32 bits
64 bits
Windows 7
32 bits
64 bits
Windows 8
32 bits
(2)
(2)
64 bits
(2)
(2)
Windows Server 2003
32 bits
(1)
(1)
(1)
(1)
64 bits
(1)
(1)
(1)
(1)
Windows Server 2008
32 bits
(1)
(1)
(1)
(1)
64 bits
(1)
(1)
(1)
(1)
Windows Server 2008 R2
64 bits
(1)
(1)
(1)
(1)
Windows 64 bit
System Requirements Page 7 of 87
OPERATING SYSTEM
OPTIS License 2011 & 2011 SPX and 2012 & 2012
SPX
OPTIS License 2013
OPTIS License 2013 SP1
OPTIS License 2013 SP2
Server 2012
(1) Except for License Server
(2) With Solidworks 2013 SP1 only
User Account Control
Windows Vista Windows Server 2008
Windows 7 Windows Server 2008 R2
You must turn off The User Account Control during installation.
You must set the User Account Control to Never notify during installation.
Access Rights
The user requires full access rights to the working folders.
Network Communication
Communication between the Client and the Server computers through the 51003 TCP port.
Maximal Transmission Unit value must be set to default value (1500 bytes).
SPEOS CAA V5 Based System Requirements
Hardware Requirements
CATIA V5 Hardware Requirements
The SPEOS CAA V5 Based hardware requirements include the CATIA V5 hardware requirements. Please refer to
the "Program Directory" CD provided for each CATIA release.
Memory
The required memory for SPEOS CAA V5 Based depends on each project. Basic applications require 2 GB, some
applications (typically Visual Ergonomics) require up to 32 GB.
Additional memory of 150 MB / MPatterns for 3D Textures.
Graphics Adapter
NVIDIA graphics card supporting shaders v1.4, CUDA v2.3 and OpenGL extension GL_ARB_framebuffer_object,
GL_ARB_draw_buffers, GL_ARB_fragment_program; GL_ARB_texture_non_power_of_two,
GL_ARB_vertex_buffer, GL_ARB_pixel_buffer_object is required for VR Lab.
Cluster
The hardware requirements for the simulation servers and spoolers are the same as those of the simulation
clients as a consequence up to 32 GB of RAM is required for some applications.
Software Requirements
CATIA V5 Software Requirements
The SPEOS CAA V5 Based software requirements include the CATIA V5 software requirements. Please refer to
the "Program Directory" CD provided for each CATIA release.
CATIA V5 Versions & Pre-requisites
The supported CATIA V5 versions depends on SPEOS CAA V5 Based versions:
R17 R18 R19 R20 R21 V5-6 R2012 V5-6 R2013
SPEOS CAA V5 Based V13.0
SPEOS CAA V5 Based 14.0
SPEOS CAA V5 Based 14.1
Page 8 of 87 SPEOS CAA V5 Based Installation Guide
R17 R18 R19 R20 R21 V5-6 R2012 V5-6 R2013
SPEOS CAA V5 Based 15.0
Installation of the Human Builder 2 Product (HBR) for all packages.
HBR license is not required.
The CATIA V5 pre-requisites depends on SPEOS CAA V5 Based packages:
Any P2 configuration including RT1 (MD2, HD2, ...) for Light Modeling (LMX), Digital Vision and Surveillance
(DVSX) and Windshield Analysis (WAX).
Any P2 configuration including RT1 (MD2, HD2, ...) + PH1 for Architecture Lighting (AL) packages.
Any P2 configuration including RT1 and PhotoStudio (PHS) for Visual Ergonomics packages.
Product Engineering Optimizer for PEO Interoperability (OPTIM2).
MD2 for Optical Shape Design (OSD) package.
Operating System
The supported operating systems are:
SPEOS CAA V5 Based
V13.0 & 13.1
SPEOS CAA V5 Based
V14.0 & V14.1
SPEOS CAA V5 Based
V15.0
Windows XP
32 bits (1)
(1)
(1)
64 bits
Windows VISTA
32 bits (1)
(1)
(1)
64 bits
Windows 7
32 bits (1) (2) (3)
(1) (2) (3)
(1) (2) (3)
64 bits Professional and Enterprise
(2)
(2)
(2)
Windows 8
32 bits
64 bits
Windows Server 2003
32 bits (4) (5)
(4) (5)
(4) (5)
64 bits (5)
(5)
(5)
Windows Server 2008
32 bits (4) (5)
(4) (5)
(4) (5)
64 bits (5)
(5)
(5)
Windows Server 2008 64 bits
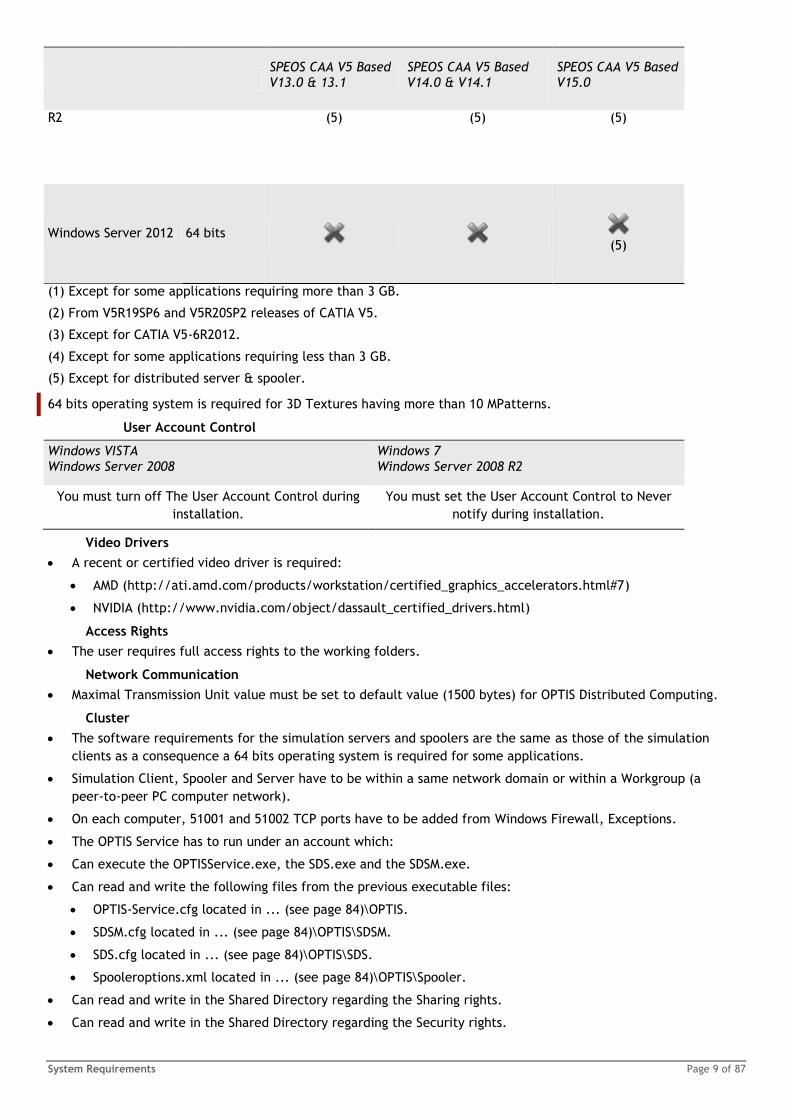
System Requirements Page 9 of 87
SPEOS CAA V5 Based V13.0 & 13.1
SPEOS CAA V5 Based V14.0 & V14.1
SPEOS CAA V5 Based V15.0
R2 (5) (5) (5)
Windows Server 2012 64 bits
(5)
(1) Except for some applications requiring more than 3 GB.
(2) From V5R19SP6 and V5R20SP2 releases of CATIA V5.
(3) Except for CATIA V5-6R2012.
(4) Except for some applications requiring less than 3 GB.
(5) Except for distributed server & spooler.
64 bits operating system is required for 3D Textures having more than 10 MPatterns.
User Account Control
Windows VISTA
Windows Server 2008
Windows 7
Windows Server 2008 R2
You must turn off The User Account Control during
installation.
You must set the User Account Control to Never
notify during installation.
Video Drivers
A recent or certified video driver is required:
AMD (http://ati.amd.com/products/workstation/certified_graphics_accelerators.html#7)
NVIDIA (http://www.nvidia.com/object/dassault_certified_drivers.html)
Access Rights
The user requires full access rights to the working folders.
Network Communication
Maximal Transmission Unit value must be set to default value (1500 bytes) for OPTIS Distributed Computing.
Cluster
The software requirements for the simulation servers and spoolers are the same as those of the simulation
clients as a consequence a 64 bits operating system is required for some applications.
Simulation Client, Spooler and Server have to be within a same network domain or within a Workgroup (a
peer-to-peer PC computer network).
On each computer, 51001 and 51002 TCP ports have to be added from Windows Firewall, Exceptions.
The OPTIS Service has to run under an account which:
Can execute the OPTISService.exe, the SDS.exe and the SDSM.exe.
Can read and write the following files from the previous executable files:
OPTIS-Service.cfg located in ... (see page 84)\OPTIS.
SDSM.cfg located in ... (see page 84)\OPTIS\SDSM.
SDS.cfg located in ... (see page 84)\OPTIS\SDS.
Spooleroptions.xml located in ... (see page 84)\OPTIS\Spooler.
Can read and write in the Shared Directory regarding the Sharing rights.
Can read and write in the Shared Directory regarding the Security rights.

Page 10 of 87 SPEOS CAA V5 Based Installation Guide
The default configuration is the SYSTEM account with the particularity that a SYSTEM account of a computer is
seeing through the domain by others computers as a Domain's computer.
That's why sharing rights are affected to the SYSTEM and to the Domain's computers.
Additional Software for MSI Installations
32-bits Operating System
Microsoft Visual C++ 2008 SP1 32bits
(http://download.microsoft.com/download/5/D/8/5D8C65CB-C849-4025-8E95-C3966CAFD8AE/vcredist_x86.exe
) Redistributable Package has to be installed.
MSI installation already includes Microsoft Visual C++ 2010.
64-bits Operating System
Microsoft Visual C++ 2008 SP1 64bits
(http://download.microsoft.com/download/5/D/8/5D8C65CB-C849-4025-8E95-C3966CAFD8AE/vcredist_x64.exe
) Redistributable Package has to be installed.
MSI installation already includes Microsoft Visual C++ 2010.
Additional Software for CSI Installations
You can find this additional software in the Prereqs directory of your installation.
32-bits Operating System
Microsoft Visual C++ 2008 SP1 32bits
(http://download.microsoft.com/download/5/D/8/5D8C65CB-C849-4025-8E95-C3966CAFD8AE/vcredist_x86.exe
) and Microsoft Visual C++ 2010 32bits
(http://download.microsoft.com/download/1/6/5/165255E7-1014-4D0A-B094-B6A430A6BFFC/vcredist_x86.exe)
Redistributable Packages have to be installed.
64-bits Operating System
Microsoft Visual C++ 2008 SP1 32bits
(http://download.microsoft.com/download/5/D/8/5D8C65CB-C849-4025-8E95-C3966CAFD8AE/vcredist_x86.exe
) and Microsoft Visual C++ 2010 32bits
(http://download.microsoft.com/download/1/6/5/165255E7-1014-4D0A-B094-B6A430A6BFFC/vcredist_x86.exe)
Redistributable Packages have to be installed.
Microsoft Visual C++ 2008 SP1 64bits
(http://download.microsoft.com/download/5/D/8/5D8C65CB-C849-4025-8E95-C3966CAFD8AE/vcredist_x64.exe
) and Microsoft Visual C++ 2010 64bits
(http://download.microsoft.com/download/1/6/5/165255E7-1014-4D0A-B094-B6A430A6BFFC/vcredist_x64.exe)
Redistributable Packages have to be installed.
OPTIS Labs System Requirements
OPTIS Labs Hardware Requirements
General Requirements
Intel Pentium IV (or AMD equivalent) and higher based processor.
Memory
The required memory for OPTIS Labs depends on each project. Basic applications require 2 GB, some
applications (typically Visual Ergonomics) require up to 32 GB.
Graphics Adapter
Support of OpenGL v2.1 minimum.
Specific requirements (see page 10) are needed for 3D Energy Density Lab and Virtual Reality Lab.
Specific Requirements
Specific requirements are needed for 3D Energy Density Lab and Virtual Reality Lab.
Intel Pentium IV (or AMD equivalent) and higher based processor.
System Requirements Page 11 of 87
Memory
The required memory for OPTIS Labs depends on each project. Basic applications require 2 GB, some
applications (typically Visual Ergonomics) require up to 32 GB.
Required memory estimation for Virtual Reality Lab.
Graphic Adapter
3D Energy Density Lab
NVIDIA graphics processor.
Support of Cg 3.0 minimum.
Virtual Reality Lab
AMD or NVIDIA graphics processor.
Support of OpenCL 1.0 minimum.
Support of OpenGL v2.1 minimum.
SDK OpenCL is not required for GPU since it is already included in drivers.
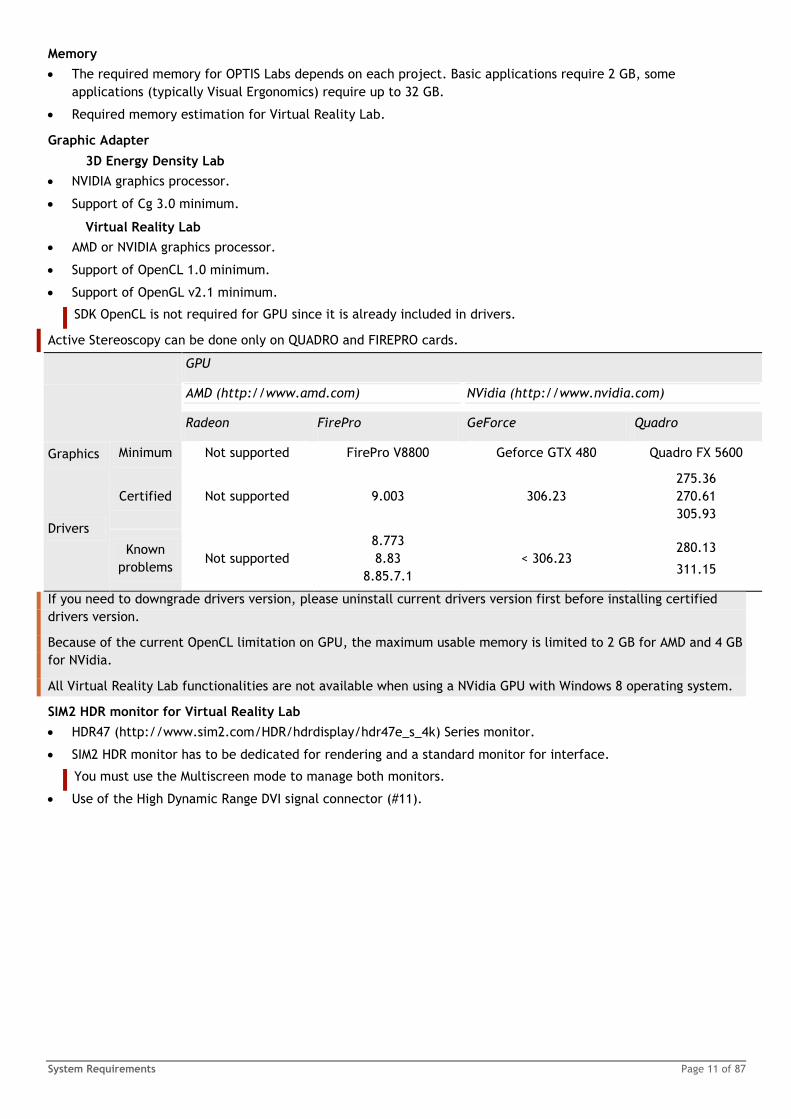
Active Stereoscopy can be done only on QUADRO and FIREPRO cards.
GPU
AMD (http://www.amd.com) NVidia (http://www.nvidia.com)
Radeon FirePro GeForce Quadro
Graphics Minimum Not supported FirePro V8800 Geforce GTX 480 Quadro FX 5600
Drivers
Certified Not supported 9.003 306.23
275.36
270.61
305.93
Known
problems Not supported
8.773
8.83
8.85.7.1
< 306.23 280.13
311.15
If you need to downgrade drivers version, please uninstall current drivers version first before installing certified
drivers version.
Because of the current OpenCL limitation on GPU, the maximum usable memory is limited to 2 GB for AMD and 4 GB
for NVidia.
All Virtual Reality Lab functionalities are not available when using a NVidia GPU with Windows 8 operating system.
SIM2 HDR monitor for Virtual Reality Lab
HDR47 (http://www.sim2.com/HDR/hdrdisplay/hdr47e_s_4k) Series monitor.
SIM2 HDR monitor has to be dedicated for rendering and a standard monitor for interface.
You must use the Multiscreen mode to manage both monitors.
Use of the High Dynamic Range DVI signal connector (#11).
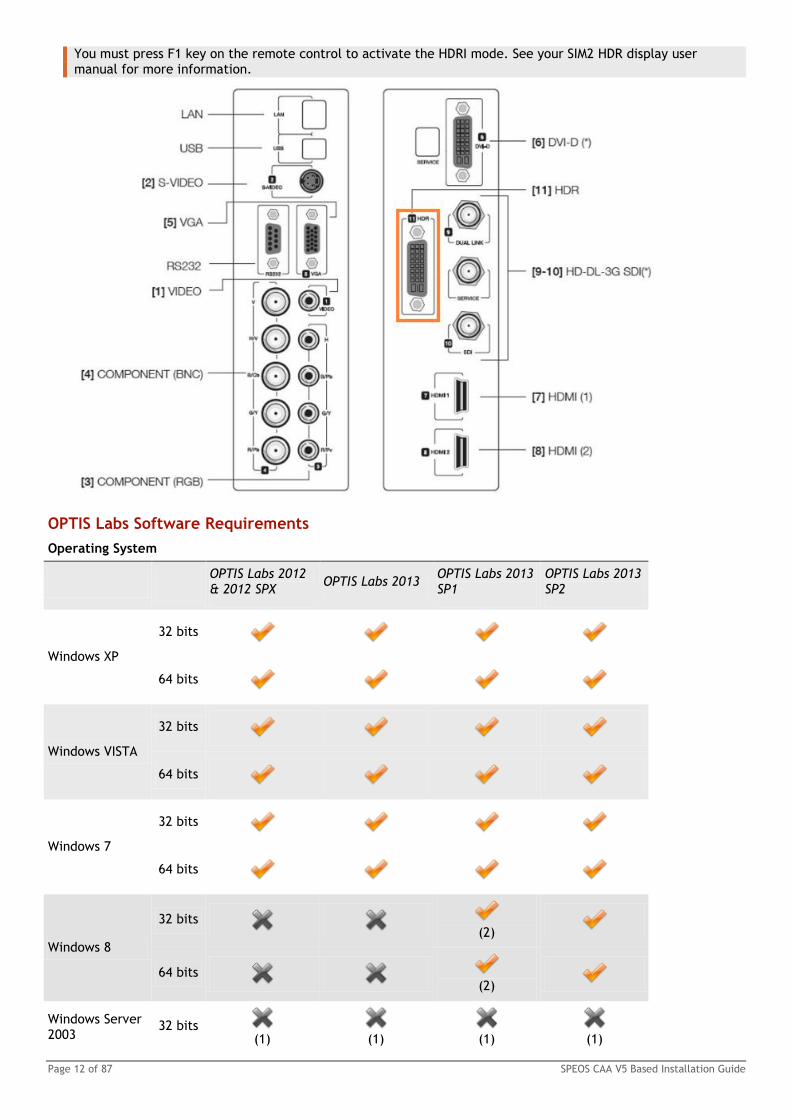
Page 12 of 87 SPEOS CAA V5 Based Installation Guide
You must press F1 key on the remote control to activate the HDRI mode. See your SIM2 HDR display user manual for more information.
OPTIS Labs Software Requirements
Operating System
OPTIS Labs 2012 & 2012 SPX
OPTIS Labs 2013 OPTIS Labs 2013 SP1
OPTIS Labs 2013 SP2
Windows XP
32 bits
64 bits
Windows VISTA
32 bits
64 bits
Windows 7
32 bits
64 bits
Windows 8
32 bits
(2)
64 bits
(2)
Windows Server 2003
32 bits (1)
(1)
(1)
(1)
System Requirements Page 13 of 87
OPTIS Labs 2012 & 2012 SPX
OPTIS Labs 2013 OPTIS Labs 2013 SP1
OPTIS Labs 2013 SP2
64 bits (1)
(1)
(1)
(1)
Windows Server 2008
32 bits (1)
(1)
(1)
(1)
64 bits (1)
(1)
(1)
(1)
Windows Server 2008 R2
64 bits (1)
(1)
(1)
(1)
Windows Server 2012
64 bits
(1)
(1) Except for distributed server & spooler
(2) Except for Virtual Reality Lab
User Account Control
Windows VISTA
Windows Server 2008
Windows 7
Windows Server 2008 R2
You must turn off The User Account Control during installation.
You must set the User Account Control to Never notify during installation.
Network Communication
Port 51008 must be available for the OPTIS Daemon in TCP.
Port 51004 must be available for Virtual Reality Lab in TCP.
Port 51005 must be available for Virtual Reality Lab in multicast UDP.
Maximal Transmission Unit value must be set to default value (1500 bytes) for Virtual Reality Lab in
multiscreen.
Additional Software
32-bits Operating System
Microsoft Visual C++ 2008 SP1 32bits
(http://download.microsoft.com/download/5/D/8/5D8C65CB-C849-4025-8E95-C3966CAFD8AE/vcredist_x86.exe
) Redistributable Package has to be installed.
64-bits Operating System
Microsoft Visual C++ 2008 SP1 64bits
(http://download.microsoft.com/download/5/D/8/5D8C65CB-C849-4025-8E95-C3966CAFD8AE/vcredist_x64.exe
) Redistributable Package has to be installed.

Page 14 of 87 SPEOS CAA V5 Based Installation Guide
SYSTEM RECOMMENDATIONS
OPTIS License Manager System Recommendations
Hardware Recommendations
Processor
Bi-Xeon Quad-core Processors.
Software Recommendations
Operating System
Windows Vista x64.
SPEOS CAA V5 Based System Recommendations
Hardware Recommendations
Workstation Server/Spooler
PROCESSOR
Bi Intel Xeon E5-2650 (2.00Ghz 20
MB 1600 8 Cores) Processor.
-Or-
Bi Intel Xeon E5-2687 (3.1 Ghz
20MB 1600 8 Cores) Processor .
Bi Intel Xeon E7-4870 (2.4Ghz 30 MB
1600 10 Cores) Processor
For one machine,use the maximum number of cores for the lowest number of processors.
MEMORY 8 GB of RAM for Light Modeling application.
48 GB of RAM for Visual Ergonomic application (up to 64 GB are required for some
applications).
HARD DISK
600GB 15k RPM SAS
10 GB for one Visual Ergonomic project.
20 GB for one Virtual Reality project in Immersive view.
Avoid SSD Drives for data storage.
NETWORK Not Applicable 10 Gbits
CLUSTER Not Applicable Less than 15 computers.
Similar performance for each
computer except for direct
simulations.
It is recommended not to use power
management of the network adapter.
Software Recommendations
OPERATING SYSTEM FOR WORKSTATION OPERATING SYSTEM FOR DISTRIBUTED COMPUTING CLUSTER
System Recommendations Page 15 of 87
Windows Vista x64 Windows Vista x64 for Simulation clients.
Windows HPC Server x64 2008 for Simulation Spooler
and Simulation Server.
OPTIS Labs System Recommendations
Hardware Recommendations
Processor
Bi-Xeon Quad-core Processors.
Memory
8 GB of RAM for Light Modeling application.
16 GB of RAM for Visual Ergonomic application (up to 32 GB are required for some applications).
16 GB of RAM when using Observer View of Virtual Reality Lab.
1 GB of RAM for Real Time Lab.
Hard Disk
10 GB for one Visual Ergonomic project.
20 GB for one Virtual Reality project in Immersive view.
Graphics Adapter
AMD or NVIDIA graphics card with up to date drivers.
-Or-
Micro processor (CPU) supporting OpenCL.
GPU
AMD (http://www.amd.c
om)
NVidia (http://www.nvidia.com)
FirePro GeForce Quadro
RECOMMENDED GRAPHICS FirePro V9800 GeForce GTX 580 Quadro 6000
For better performances, use only one graphics adapter in each computer.

Page 16 of 87 SPEOS CAA V5 Based Installation Guide
Software Recommendations
Operating System
Windows Vista x64 for Simulation clients computers.
Windows HPC Server x64 2008 for Simulation Spooler and Simulation Server.
SPEOS CAA V5 Based System Performances Page 17 of 87
SPEOS CAA V5 BASED SYSTEM PERFORMANCES
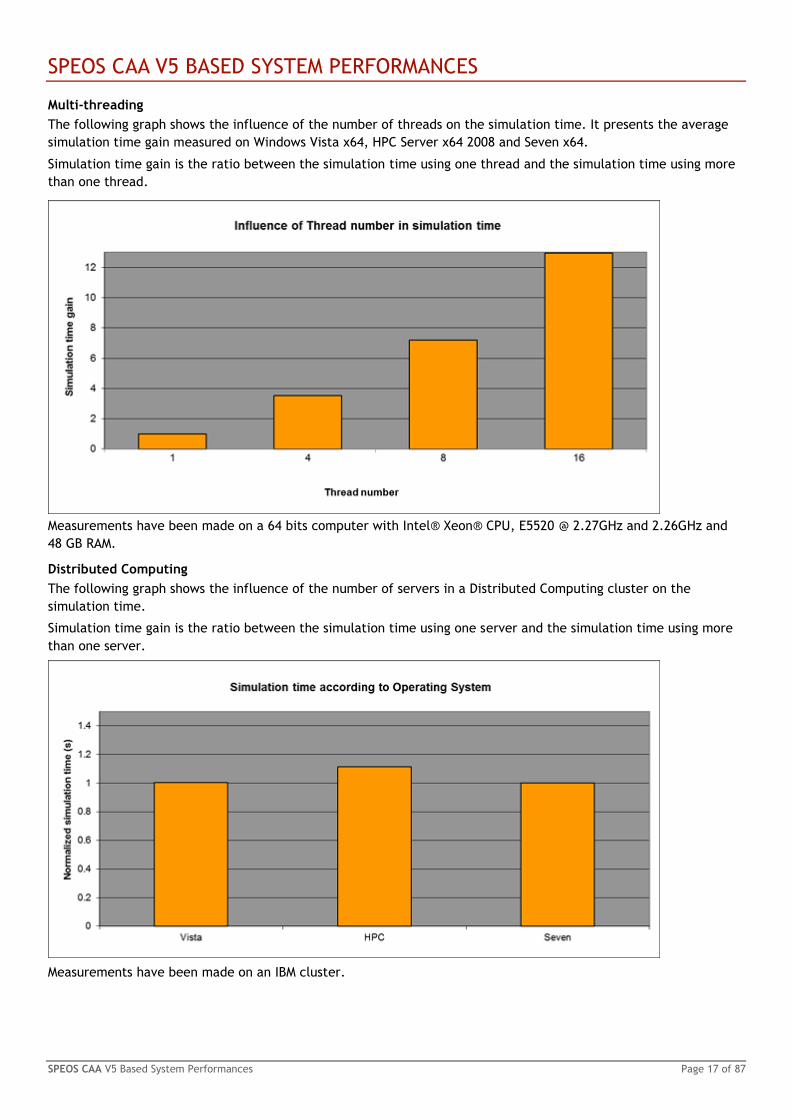
Multi-threading
The following graph shows the influence of the number of threads on the simulation time. It presents the average
simulation time gain measured on Windows Vista x64, HPC Server x64 2008 and Seven x64.
Simulation time gain is the ratio between the simulation time using one thread and the simulation time using more
than one thread.
Measurements have been made on a 64 bits computer with Intel® Xeon® CPU, E5520 @ 2.27GHz and 2.26GHz and
48 GB RAM.
Distributed Computing
The following graph shows the influence of the number of servers in a Distributed Computing cluster on the
simulation time.
Simulation time gain is the ratio between the simulation time using one server and the simulation time using more
than one server.
Measurements have been made on an IBM cluster.
Page 18 of 87 SPEOS CAA V5 Based Installation Guide
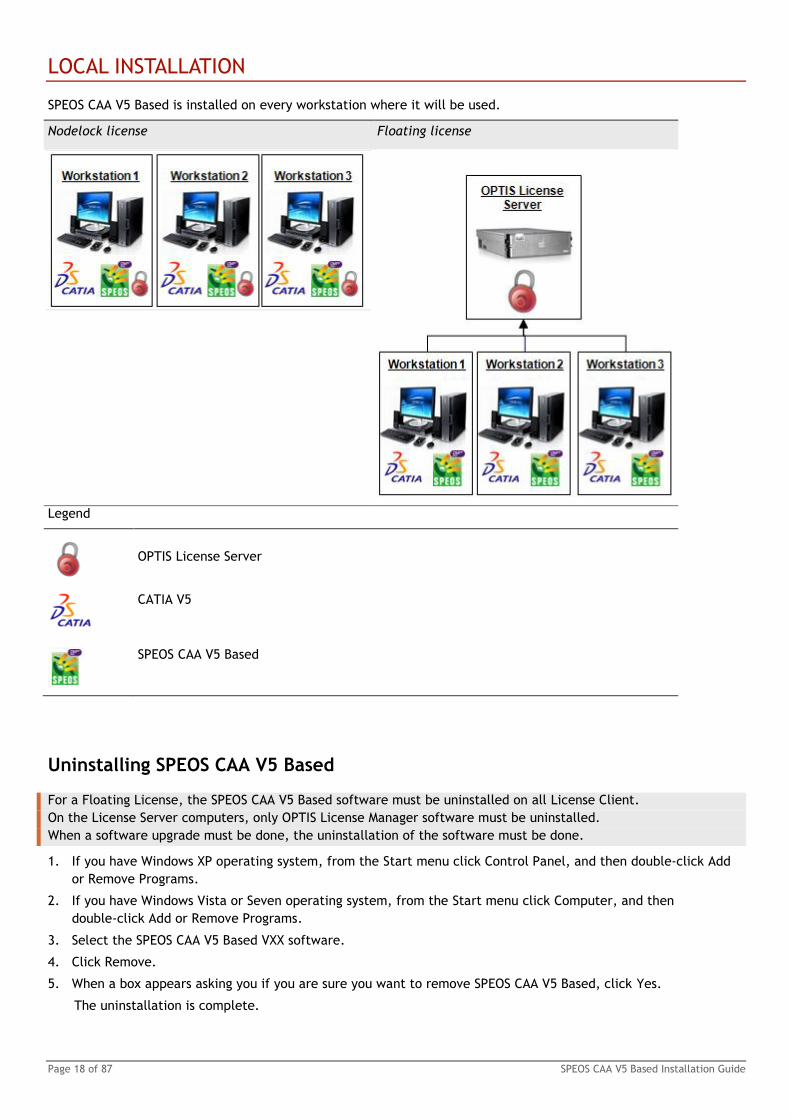
LOCAL INSTALLATION
SPEOS CAA V5 Based is installed on every workstation where it will be used.
Nodelock license Floating license
Legend
OPTIS License Server
CATIA V5
SPEOS CAA V5 Based
Uninstalling SPEOS CAA V5 Based
For a Floating License, the SPEOS CAA V5 Based software must be uninstalled on all License Client.
On the License Server computers, only OPTIS License Manager software must be uninstalled.
When a software upgrade must be done, the uninstallation of the software must be done.
1. If you have Windows XP operating system, from the Start menu click Control Panel, and then double-click Add
or Remove Programs.
2. If you have Windows Vista or Seven operating system, from the Start menu click Computer, and then
double-click Add or Remove Programs.
3. Select the SPEOS CAA V5 Based VXX software.
4. Click Remove.
5. When a box appears asking you if you are sure you want to remove SPEOS CAA V5 Based, click Yes.
The uninstallation is complete.
Local Installation Page 19 of 87
Getting SPEOS CAA V5 Based from the CD-ROM
If you upgrade your software, you must uninstall it before.
1. Insert the CD-ROM from the SPEOS CAA V5 Based VXX kit.
If needed, you can double-click the index.html file to run the CD-ROM.
2. When the page appears, click Setups.
3. Click your operating system.
4. Click Download.
5. When the box asking you if you want to run or save the file appears, click Save.
6. Save the file.
Getting SPEOS CAA V5 Based from the Web
Connecting to the Portal
1. Go to the OPTIS website (http://www.optis-world.com).
2. Click Portal Login.
A new page appears.
3. Type your e-mail or login and password.
4. Click Login.
The welcome page of the Portal appears.
Obtaining SPEOS CAA V5 Based
1. Click Software in the Portal page.
2. Select SPEOS CAA V5 Based from the list.
3. Select your operating system.
You must select the operating system according to the configuration of your computer.
4. Click Setup.
5. Click Download.
6. When a box asking you if you want to run or save the file appears, click Save.
7. Save the file.
Parameterizing the User Account Control
This parameterization must be done before all software installation.
If you have Windows XP, you do not need to follow these steps.
If you have Windows 8, you can let the default user account control settings.
1. From Start, click Control Panel and click User Accounts.
2. If you have Windows Vista, click Turn User Account control on or off, click to clear the User Account Control
(UAC) to help protect your computer check box, and then click OK.
3. If you have Windows 7, click Change User Account Control settings, move the slider to the bottom till Never
Notify, and then click OK.
4. If you have Windows Server 2008 or 2012, click User Accounts, click Change User Account Control settings,
move the slider to the bottom till Never Notify, and then click OK.
5. When a box asking you if you want to restart your computer appears, click Restart Now to take into account
modifications.
Installing SPEOS CAA V5 Based
Page 20 of 87 SPEOS CAA V5 Based Installation Guide
Before installing SPEOS CAA V5 Based, you must uninstall all OPTIS software of the version 12.0 / 2012 SP1 or older.
If you have Windows Vista or Windows 7, you must parameterize the installation for Vista or Windows 7 before.
A computer restart is required between CATIA V5 and SPEOS CAA V5 Based installation.
For a Floating License, the SPEOS CAA V5 Based software must be installed on all License Client.
Only OPTIS License Manager software must be installed on License Server computer.
1. Double-click the file to run it.
2. When the Windows Installer box appears, click Next.
The box changes.
3. Click I accept the terms in the license agreement, and then click Next.
The box changes.
4. When no OPTIS software is installed on the computer, choose the destination folder, and then click Next.
The box changes.
5. Select the Custom setup type and click on Next.
The box changes.
6. By right-clicking, select the program feature to install belong to the CATIA version and the operating system of
your computer. Click Next button.
In case the set up does not recognize the correct CATIA releases installed, please have a look at Troubleshooting.
7. Click Install.
The installation is running.
8. When the installation is complete, you can click Finish.
9. When a box asking you if you want to restart your system appears, click Yes.
Installing the OPTIS license
Configuring a Nodelock License
For a Nodelock License, you must install the Optis software.
At the end of the installation, if the computer cannot restart or has specific administrator rights, you must follow
the instructions of Running the OPTIS License Server.
Obtaining a License
1. Click All Programs on the Start menu, and then click OPTIS, OPTIS License, OPTIS License Manager.
If the License Server information does not appear, you must follow the instructions located in Running the
OPTIS License Server or in Configuring the Windows Firewall.
2. Use the following icon to copy the Serial Number of License Server.
Before copying the serial number, you must be careful to select the License Server Adapter.
3. Click File, License portal...
4. When the OptisLicenseManager box appears, click OK.
5. Log onto the Portal.
6. Select the license title, and then click the appropriate icon.
-Or-
Send an email to [email protected].
It can take few hours before receiving an email notification about new license file available on your Portal.
Local Installation Page 21 of 87
Downloading the license file
1. Log onto the Portal (http://www.optis-world.com/login.htm), and then click Licenses.
2. Click the appropriate OptisLicense file.
3. Click Download.
4. When a box asking you if you want to save the file or find a program to open it appears, click Save.
You can save it on your desktop or in any folder except the OPTIS folder.
Launching the OPTIS License Manager
1. Click All Programs on the Start menu, and then click OPTIS, OPTIS License, OPTIS License Manager.
Importing a License
Selected account has to be the current user.
1. Click File, Import a license...
If the File commands are not available, you must follow Running the OPTIS License Server.
2. Select the new license in the box, and then click Open.
The update appears.
A star * in the Default box indicates the default license.
It may happen that the license is not set by default.
In this case, you must click Configuration, Use this license by default or directly double-click in the Default
box.
You must adapt the threads number of the computer to the license threads number. For more details, you can contact your sales contact (http://www.optis-world.com/contact.htm).
Configuring a Floating License
Configuring a Floating License from the Server
For a Floating License, you must install the Optis License Manager on the License Server.
At the end of the installation, if the computer cannot restart or has specific administrator rights, you must follow
the instructions of Running the OPTIS License Server.
If you prefer to install the OPTIS software (SPEOS, OptisWorks, SPEOS CAA V5 Based, SPEOS for Pro/ENGINEER®...), it is also possible.
Obtaining a License
1. Click All Programs on the Start menu, and then click OPTIS, OPTIS License, OPTIS License Manager.
If the License Server information does not appear, you must follow the instructions located in Running the
OPTIS License Server or in Configuring the Windows Firewall.
2. Use the following icon to copy the Serial Number of License Server.
Before copying the serial number, you must be careful to select the License Server Adapter.
3. Click File, License portal...
4. When the OptisLicenseManager box appears, click OK.
5. Log onto the Portal.
6. Select the license title, and then click the appropriate icon.
-Or-
Send an email to [email protected].
It can take few hours before receiving an email notification about new license file available on your Portal.
Page 22 of 87 SPEOS CAA V5 Based Installation Guide
Downloading the license file
1. Log onto the Portal (http://www.optis-world.com/login.htm), and then click Licenses.
2. Click the appropriate OptisLicense file.
3. Click Download.
4. When a box asking you if you want to save the file or find a program to open it appears, click Save.
You can save it on your desktop or in any folder except the OPTIS folder.
Launching the OPTIS License Manager
1. Click All Programs on the Start menu, and then click OPTIS, OPTIS License, OPTIS License Manager.
Importing a License
Selected account has to be the current user.
1. Click File, Import a license...
If the File commands are not available, you must follow Running the OPTIS License Server.
2. Select the new license in the box, and then click Open.
The update appears.
You must adapt the threads number of the computer to the license threads number. For more details, you can contact your sales contact (http://www.optis-world.com/contact.htm).
Configuring a Floating License from the Client
For a Floating License, you must install the Optis software on all License Client.
At the end of the installation, if the computer cannot restart or has specific administrator rights, you must follow
the instructions of Running the OPTIS License Server.
Launching the OPTIS License Manager
1. Click All Programs on the Start menu, and then click OPTIS, OPTIS License, OPTIS License Manager.
Connecting to the OPTIS License Server
When importing a distributed license on a spooler computer runs as a service, you must select the SYSTEM account too.
1. Click Configuration, Configuration.
-Or-
1. Click Select.
The Configuration box appears.
2. Click Select, and then select the License Server computer.
3. Click OK.
If nothing happens, you must check that the License Server computer is running as a server. For more details, you can view Running the OPTIS License Server.
Leaving the box empty is like selecting the computer you are working with.
The update appears.
4. Select the license you want to use.
5. Click Configuration, Use this license by default to define it as the default one.
A star * in the Default box indicates the default license.
6. Redo the same process by being connected as the user of the software.
7. For this time, select the User Account configuration to set the license by default.
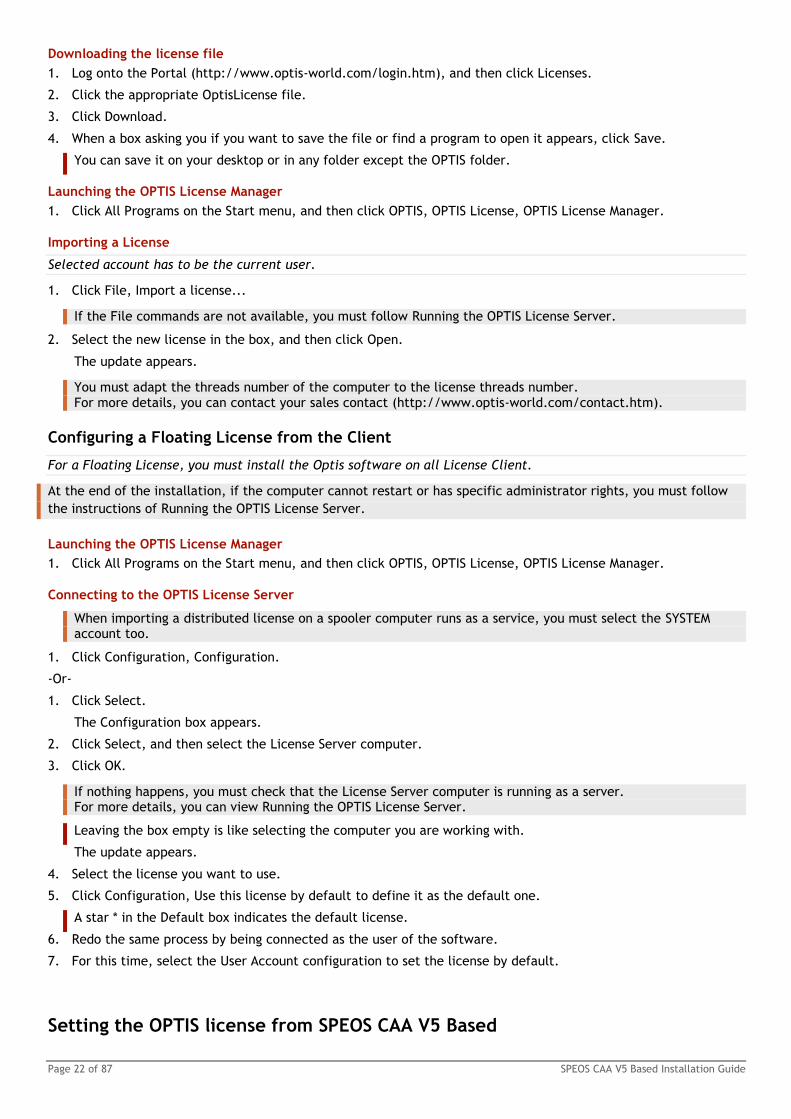
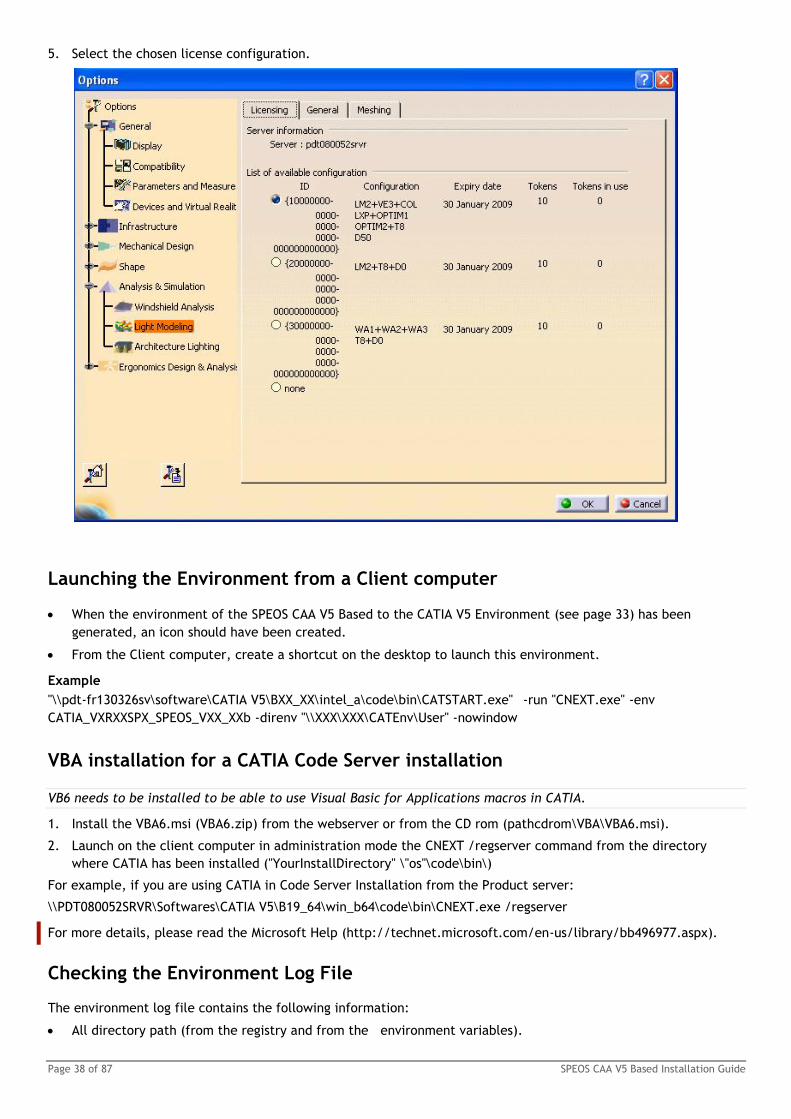
Setting the OPTIS license from SPEOS CAA V5 Based
Local Installation Page 23 of 87
The OPTIS license can be set from the SPEOS CAA V5 Based VXX software itself.
1. Launch SPEOS CAA V5 Based VXX software.
2. Click Tools, Options.
3. From the Options, Analysis & Simulation menu select your workbench.
4. A list of available configurations is displayed in the "Licensing" panel.
5. Select the chosen license configuration.
Launching SPEOS CAA V5 Based
When License installation has been done successfully you are ready to launch the software.
1. Select the Start, All Programs, OPTIS, SPEOS CAA V5 Based VX, SPEOS CAA V5 Based VX RXX command.
2. The SPEOS CAA V5 Based VX software is launching.
If a security window appears, Unblock the application.
3. As an example, select the Start, Analysis & Simulation, Light Modeling command to launch Light Modeling
workbench or the Start, Ergonomics Design & Analysis, Visual Ergonomics command to launch Visual Ergonomics
workbench.
4. The workbench is opened. The commands for Light Modeling or Visual Ergonomics are available in the toolbar to
the top and the right of the application window.
Installing SPEOS CAA V5 Based from a Command Line
The SPEOS CAA V5 Based installation with a command line relies on the msiexec command of Microsoft.
A full description of the options of the msiexec command can be found at the following link: msiexec
(http://www.microsoft.com/resources/documentation/windows/xp/all/proddocs/en-us/msiexec.mspx?mfr=true).
1. Save your msi file on your desktop.
2. Go to Start menu and select the Run tool.
Page 24 of 87 SPEOS CAA V5 Based Installation Guide
3. Type the following command:
msiexec /i "C:\Documents and Settings\username\Desktop\SPEOS CAA V5 Based VXX for XX bits operating
system.msi" COLOR_TEST=0 /l*v "c:\log.txt"
To get the correct "SPEOS CAA V5 Based VXX for XX bits operating system.msi" path , drag and drop the msi file
from the desktop into the "Run" box.
4. Click OK.
5. Send the log.txt file to OPTIS support in case of installation problems.
COLOR_TEST=0 avoids the check of video card capabilities (useful in Remote Control mode).
/l*v "c:\log.txt" creates a log file.
/qn displays no user interface.
INSTALLDIR="c:\OPTIS" defines the target directory. You can change the target place.
It is also possible to install all Catia releases using the following commands: msiexec /i "sv5.msi"
FEATURE_STATE_SV5_B18_32=1
FEATURE_STATE_SV5_B18_64=1
FEATURE_STATE_SV5_B19_32=1
FEATURE_STATE_SV5_B19_64=1
FEATURE_STATE_SV5_B20_32=1
FEATURE_STATE_SV5_B20_64=1
FEATURE_STATE_SV5_B21_32=1
FEATURE_STATE_SV5_B21_64=1
FEATURE_STATE_SV5_B22_32=1
FEATURE_STATE_SV5_B22_64=1
If using "=0" it will not install the selected release.
Uninstalling SPEOS CAA V5 Based from a Command Line
The SPEOS CAA V5 Based uninstallation with a command line relies on the msiexec command of Microsoft.
A full description of the options of the msiexec command can be found at the following link: msiexec
(http://www.microsoft.com/resources/documentation/windows/xp/all/proddocs/en-us/msiexec.mspx?mfr=true).
1. Go to Start menu and select the Run tool.
2. Type the following command:
msiexec /x "C:\Documents and Settings\username\Desktop\SPEOS CAA V5 Based VXX for XX bits operating
system.msi" COLOR_TEST=0 /l*v "c:\log.txt"
To get the correct "SPEOS CAA V5 Based VXX for XX bits operating system.msi" path , drag and drop the msi file
from the desktop into the "Run" box.
3. Click OK.
4. Send the log.txt file to OPTIS support in case of uninstallation problems.
Warnings and Errors Messages
Warning: Video Configuration Error, Well Supported Mode Are 24 Bits and 32 Bits
If a message saying "Video configuration error, well supported mode are 24 bits and 32 bits" appears, do the
following:
1. From the Start menu, click Control Panel.
2. Double-click Display and select the Settings tab.
3. Select Highest (32 bit) for Color quality.
4. Install SPEOS CAA V5 Based.
5. If it does not success, install SPEOS CAA V5 Based with a command line.
You can view Installing SPEOS CAA V5 Based from a Command Line (see page 23).
Local Installation Page 25 of 87
Getting the 1722 or 1721 Error Message
Problem
It happens one of the following message appears at the end of the installation execution.
Error 1721. There is a problem with this Windows Installer package. A program required for this install to complete
could not be run. Contact your support personnel or package vendor. Action: EnvR XX_XX_X, location: ...\BXX_XX
-icon no -menu no -desktop no.
Error 1722. There is a problem with this Windows Installer package. A program run as part of the setup did not
finish as expected. Contact your support personnel or package vendor. Action: EnvR XX_XX_X, location: ...\BXX_XX
-icon no -menu no -desktop no.
Causes
The CATIA V5 "setcatenv" command is not available on the computer due to a specific or uncompleted
installation of CATIA V5.
-Or-
The CATIA V5 environment (.CATEnv) referencing SPEOS cannot be automatically created by the installation
package.
Solutions
1. Uninstall SPEOS CAA V5 Based from the Start menu, Control Panel, Add/Remove Programs.
2. From the Start menu,
1. Click Run...,
2. Type regedit and OK.
3. Check if there is the DEST_FOLDER file in the HKEY_LOCAL_MACHINE/SOFTWARE/Dassault Systemes/BXX/0
path.
If there is not, right-click to create new keys and a new string value. Value data of the string value has to be
the setcatenv.exe path.
4. Check if there is the DEST_FOLDER file in the HKEY_LOCAL_MACHINE/SOFTWARE/Dassault Systemes/BXX/1
path.
If there is not, right-click to create new keys and a new string value. Value data of the string value has to be
the setcatenv.exe path.
5. Check if there is the OSNAME file in the both 0 and 1 folders.
If there is not, right-click to create new key and a new string value. Value data of the string value has to be
intel if the 32 bits CATIA release has been installed and win64 if it is the 64 bits CATIA release.
3. From the explorer, open the ...\Dassault Systemes\BXX\win_b64\code\bin path and check if there is the
setcatenv.exe file.
4. Check that there is the administrative rights to the setcatenv.exe file.
5. Install SPEOS CAA V5 Based using the Custom installation.
Custom installation has a look in 0 and 1 folders located in the registry data to activate the correct CATIA
releases.
If a CATIA release appears but it should not, you can remove it by right-clicking on the not concerned CATIA
release.
6. If you can not launch the SPEOS CAA V5 Based installation,
1. If you have a Windows XP operating system, from the Start menu, click Run..., type cmd and click OK.
2. If you have a Windows Vista or Windows 7 operating system, from the Start menu, type cmd, and right-click
on cmd.exe to select Run as administrator.
3. Type msiexec /i "repertoire/mon_msi".
7. Install the SPEOS CAA V5 Based license.
8. Launch SPEOS CAA V5 Based.
The current environment(s) have to be customized manually or dedicated environment(s) have to be created
manually by your IT CATIA administrator(s).
Page 26 of 87 SPEOS CAA V5 Based Installation Guide
If your company uses a specific launcher for CATIA V5, it has to be customized by your IT CATIA administrator(s) to
reference SPEOS.
See also Creating environment for CATIA V5 & SPEOS CAA V5 Based (see page 40).
Getting the 1901 Error Message
Problem
The following message can appear during the installation:
Error 1901. Error attempting to read from the source installation database.
C:\WINDOWS\Installer\XXXXX.msi
Cause
This error is a Windows error which occurs when the install file was not completely or correctly downloaded.
Solution
1. Download the install file again.
2. Check the size of the file you just downloaded.
You can compare the size of the file to the size indicated in the kits to make sure it was correctly downloaded.
3. Relaunch the installation.
Getting the 1500 Error Message
Problem
The following message can appear during the installation:
Error 1500. Another installation is in progress. You must complete that installation before continuing this one.
Cause
There can be two causes to this issue:
Multiple instances of MSIEXEC.EXE are running at the same time.
-Or-
The registry key that indicates an installation is in progress was not properly removed by MSIEXEC.EXE.
Solution
To solve this issue, you can
1. Reboot the affected machine.
2. Try the installation again.
-Or-
3. Download Msizap.exe (http://msdn.microsoft.com/en-us/library/aa370523.aspx) from Microsoft.
4. Run it to remove unwanted Windows Installer information.
CATIA release not recognized while SPEOS installation
Description
It happens that the installation setup does not recognize all CATIA releases installed on the computer.
Explanation
This happens when there is a custom CATIA installation.
Resolution
When using a 64 bits XP computer on which a 32 bits CATIA release has been installed, you must install the SPEOS CAA V5 Based 64 bits set up using the custom installation to be sure that the 32 bits CATIA add-on is selected.
1. Uninstall SPEOS CAA V5 Based from the Start menu, Control Panel, Add/Remove Programs.
2. From the Start menu,
Local Installation Page 27 of 87
1. Click Run...,
2. Type regedit and OK.
3. Check if there is the DEST_FOLDER file in the HKEY_LOCAL_MACHINE/SOFTWARE/Dassault Systemes/BXX/0
path.
If there is not, right-click to create new keys and a new string value. Value data of the string value has to be
the setcatenv.exe path.
4. Check if there is the DEST_FOLDER file in the HKEY_LOCAL_MACHINE/SOFTWARE/Dassault Systemes/BXX/1
path.
If there is not, right-click to create new keys and a new string value. Value data of the string value has to be
the setcatenv.exe path.
5. Check if there is the OSNAME file in the both 0 and 1 folders.
If there is not, right-click to create new key and a new string value. Value data of the string value has to be
intel if the 32 bits CATIA release has been installed and win64 if it is the 64 bits CATIA release.
3. Install SPEOS CAA V5 Based using the Custom installation.
Custom installation has a look in 0 and 1 folders located in the registry data to activate the correct CATIA
releases.
If a CATIA release appears but it should not, you can remove it by right-clicking on the not concerned CATIA
release.
4. Install the SPEOS CAA V5 Based license.
5. Launch SPEOS CAA V5 Based.
SPEOS CAA V5 Based command is not displayed in the Start menu
Description
From Start menu, when clicking All Programs, OPTIS, SPEOS CAA V5 Based VXX, the SPEOS CAA V5 Based VXX
command does not appear.
Explanation
The CATIA V5 environment (.CATEnv) referencing SPEOS has not being automatically created by the installation
package.
Resolution
1. Uninstall SPEOS CAA V5 Based from the Start menu, Control Panel, Add/Remove Programs.
2. From the Start menu,
1. Click Run...,
2. Type regedit and OK.
3. Check if there is the DEST_FOLDER file in the HKEY_LOCAL_MACHINE/SOFTWARE/Dassault Systemes/BXX/0
path.
If there is not, right-click to create new keys and a new string value. Value data of the string value has to be
the setcatenv.exe path.
4. Check if there is the DEST_FOLDER file in the HKEY_LOCAL_MACHINE/SOFTWARE/Dassault Systemes/BXX/1
path.
If there is not, right-click to create new keys and a new string value. Value data of the string value has to be
the setcatenv.exe path.
5. Check if there is the OSNAME file in the both 0 and 1 folders.
If there is not, right-click to create new key and a new string value. Value data of the string value has to be
intel if the 32bits CATIA release has been installed and win64 if it is the 64bits CATIA release.
3. Install SPEOS CAA V5 Based using the Custom installation.
Custom installation has a look in 0 and 1 folders located in the registry data to activate the correct CATIA
releases.
If a CATIA release appears but it should not, you can remove it by right-clicking on the not concerned CATIA
release.
4. Install the SPEOS CAA V5 Based license.
Page 28 of 87 SPEOS CAA V5 Based Installation Guide
5. Launch SPEOS CAA V5 Based.
6. If the SPEOS workbench is missing, the current environment(s) has (have) to be customized manually or
dedicated environment(s) has (have) to be created manually by your IT CATIA administrator(s).
If your company uses a specific launcher for CATIA V5, it has to be customized by your IT CATIA administrator(s) to reference SPEOS.
See also Creating environment for CATIA V5 & SPEOS CAA V5 Based (see page 40).
SPEOS CAA V5 Based License is not Displayed in the SPEOS License Panel
1. Install the Microsoft Visual C++ Redistributable Package, click OK, and then click Finish.
The links are available in SPEOS CAA V5 Based Requirements (see page 7, see page 12).
2. Check if you still have the issue.
1. If you still have the issue, create a .bat file
2. Edit it.
3. Type SET CNEXTOUTPUT=CONSOLE on first line
4. From Start, All Programs, OPTIS, SPEOS CAA V5 Based, right-click on the SPEOS CAA V5 Based VXX RXX
XXbits shortcut.
5. Select Properties.
6. Select the Shortcut tab.
7. Copy the Target link, and then paste it in the .bat file.
8. Save the .bat file.
9. Launch the .bat file.
10. Check if an error is displayed in the "...\Dassault Systems\BXX\intel_a\code\bin\CNEXT.exe" -env
SPEOSCAAVXX... console.
11. If yes please send the screenshot to OPTIS support (http://www.optis-world.com/contact.htm#support).
SPEOS CAA V5 Based workbench is not activated
When SPEOS CAA V5 Based workbench is not activated, you can:
1. Open ..\Program files\Dassault Systemes\BXX\intel_a\code\bin directory.
2. Check if there is the SWKHUMANMODELINGITF.dll file.
3. It is missing, uninstall and then reinstall the complete CATIA.
Warning: The Startup Catalog Files in the Following List Could Not be Found
Problem
I get a warning saying:
"The startup catalog files in the following list could not be found or contain the wrong information for the active
document.
OPTOSD.CATfct
Verify your installation or ask the owner of this document to send them."
Causes
This warning appears when opening a CATPart file including SPEOS OSD features with CATIA V5 without SPEOS.
Solutions
If using SPEOS CAA V5 Based 32 bits operating system:
1. Copy the OPTOSD.CATfct file from the SPEOS CAA V5 Based installation folder: "…\OPTIS\SPEOS CAA V5 Based
VXX\BYY_32\intel_a\resources\graphic".
2. Paste it to the CATIA V5 installation folder: "…\Dassault Systemes\BYY\intel_a\resources\graphic".
If using SPEOS CAA V5 Based 64 bits operating system:

Local Installation Page 29 of 87
1. Copy the OPTOSD.CATfct file from the SPEOS CAA V5 Based installation folder: "…\OPTIS\SPEOS CAA V5 Based
VXX\BYY_64\win_b64\resources\graphic".
2. Paste it to the CATIA V5 installation folder: "…\Dassault Systemes\BYY\win_b64\resources\graphic".
XX is the SPEOS CAA V5 Based version and YY the CATIA V5 release.

Page 30 of 87 SPEOS CAA V5 Based Installation Guide
CODE SERVER INSTALLATION
Code Server Installation Architecture
The use of the Code Server Installation requires the Code Server Installation (O_SV5_CSI) option.
SPEOS CAA V5 Based is installed on a centralized server and shared. An user at a workstation connects to the server
to run the application.
Advantages
Compatible with existing architectures in large companies, without having to make exceptions to existing
company standards.
Reduces installation time, particularly in large environments with many users.
Facilitates upgrades deployment, and give access to multiple versions or service packs.
Simplifies the administration (license, settings).
Reduces required disk space on each workstation.
Nodelock license Floating license
Legend
OPTIS License Server
Microsoft Visual C++ Redistributable Packages
Both .exe files of each folders included in ...\PreReqs folder has to be installed.

Code Server Installation Page 31 of 87
OPTIS License Server
CATIA V5
SPEOS CAA V5 Based
Parameterizing the User Account Control
This parameterization must be done before all software installation.
If you have Windows XP, you do not need to follow these steps.
If you have Windows 8, you can let the default user account control settings.
1. From Start, click Control Panel and click User Accounts.
2. If you have Windows Vista, click Turn User Account control on or off, click to clear the User Account Control
(UAC) to help protect your computer check box, and then click OK.
3. If you have Windows 7, click Change User Account Control settings, move the slider to the bottom till Never
Notify, and then click OK.
4. If you have Windows Server 2008 or 2012, click User Accounts, click Change User Account Control settings,
move the slider to the bottom till Never Notify, and then click OK.
5. When a box asking you if you want to restart your computer appears, click Restart Now to take into account
modifications.
From the Code Server
Getting Code Server Installation from the CD-ROM
1. Insert the CD-ROM from the SPEOS CAA V5 Based VXX kit.
If needed, you can double-click the index.html file to run the CD-ROM.
2. When the page appears, click Setups.
3. Click your operating system.
4. Select the Code Server Installation files corresponding to your CATIA release.
Getting Code Server Installation from the Web
Connecting to the Portal
1. Go to the OPTIS website (http://www.optis-world.com).
2. Click Portal Login.
A new page appears.
3. Type your e-mail or login and password.
4. Click Login.
The welcome page of the Portal appears.
Obtaining Code Server
1. Click Software in the Portal page.
2. Select SPEOS CAA V5 Based from the list.
Page 32 of 87 SPEOS CAA V5 Based Installation Guide
3. Select your operating system.
You must select the operating system according to the configuration of your computer.
4. Select the Code Server Installation files corresponding to your CATIA release.
Downloading the Code Server software
1. Click on Download.
2. Save the *.exe file in a folder of the Server.
3. Launch the file which is available as self extracting zip files.
The folder in which you launch the *.exe file has to be a shared directory.
Environment
Creating Bat Files
A bat file is required for each application as SPEOS CAA V5 Based, SPEOS Core, OPTIS License Manager...
1. Create a Shortcuts folder.
2. Right-click in the folder.
3. Select New, Text Document.
4. Name it SPEOS Core XXb.bat or Optis License Manager XXb.bat.
5. When the Rename message appears, click Yes.
6. Right-click to edit the file.
7. Type echo off.
8. Enter.
9. Type cls.
10. Enter.
11. Add the OPTIS Environment variables (see page 33).
Never insert spaces between a variable and its value.
12. Execute the application.
Example for Optis License Manager WFX_XXb.bat
echo off
cls
set OPTIS_BASE_PATH=\\pdt-fr130326sv\Software\SPEOS CAA V5
Based\SPEOS_CAA_V5_Based_V11.0.0_B28\B20_64\Optis\
set OPTIS_SOFTWARE_BASE_PATH=\\pdt-fr130326sv\Software\SPEOS CAA V5
Based\SPEOS_CAA_V5_Based_V11.0.0_B28\B20_64\Optis\SPEOS CAA V5 Based\
set OPTIS_USER_APPLICATION_DATA_PATH=U:\Settings\V11\User\
set OPTIS_GLOBAL_APPLICATION_DATA_PATH=U:\Settings\V11\Global\
"\\pdt-fr130326sv\Software\SPEOS CAA V5
Based\SPEOS_CAA_V5_Based_V11.0.0_B28\B20_64\Optis\OptisLicense\OptisLicenseManager.exe"
Code Server Installation Page 33 of 87
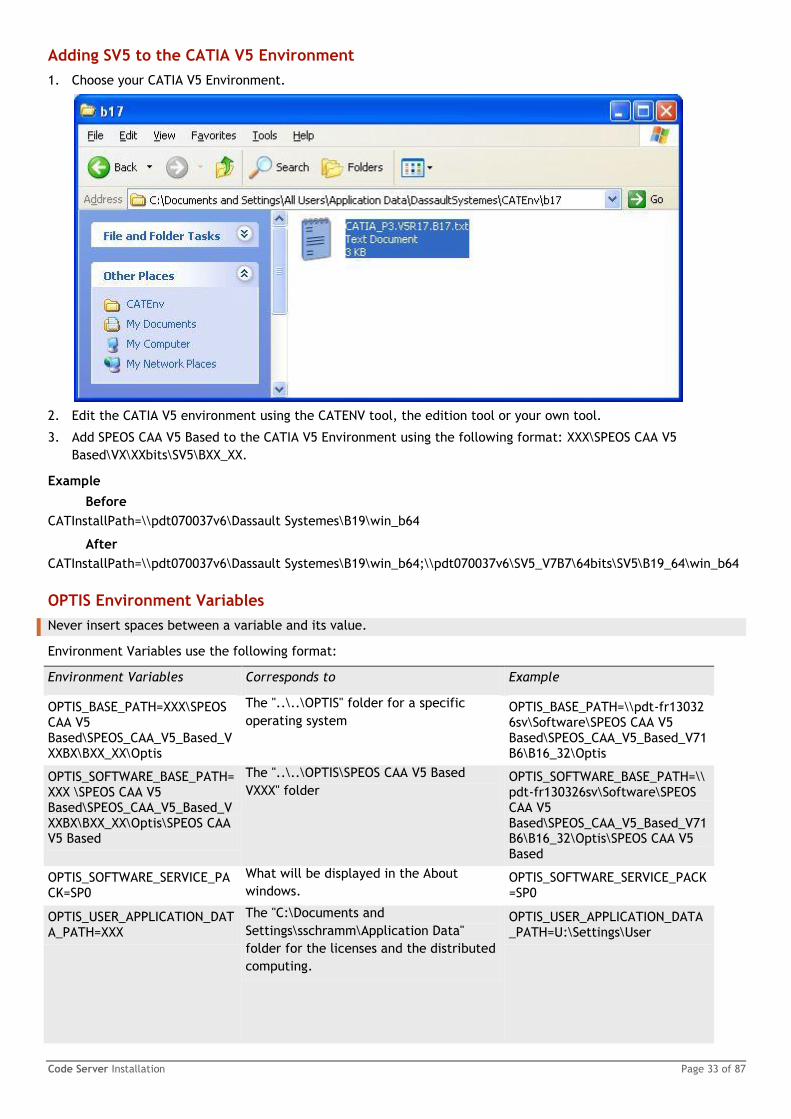
Adding SV5 to the CATIA V5 Environment
1. Choose your CATIA V5 Environment.
2. Edit the CATIA V5 environment using the CATENV tool, the edition tool or your own tool.
3. Add SPEOS CAA V5 Based to the CATIA V5 Environment using the following format: XXX\SPEOS CAA V5
Based\VX\XXbits\SV5\BXX_XX.
Example
Before
CATInstallPath=\\pdt070037v6\Dassault Systemes\B19\win_b64
After
CATInstallPath=\\pdt070037v6\Dassault Systemes\B19\win_b64;\\pdt070037v6\SV5_V7B7\64bits\SV5\B19_64\win_b64
OPTIS Environment Variables
Never insert spaces between a variable and its value.
Environment Variables use the following format:
Environment Variables Corresponds to Example
OPTIS_BASE_PATH=XXX\SPEOS CAA V5 Based\SPEOS_CAA_V5_Based_VXXBX\BXX_XX\Optis
The "..\..\OPTIS" folder for a specific
operating system OPTIS_BASE_PATH=\\pdt-fr130326sv\Software\SPEOS CAA V5 Based\SPEOS_CAA_V5_Based_V71B6\B16_32\Optis
OPTIS_SOFTWARE_BASE_PATH=XXX \SPEOS CAA V5 Based\SPEOS_CAA_V5_Based_VXXBX\BXX_XX\Optis\SPEOS CAA V5 Based
The "..\..\OPTIS\SPEOS CAA V5 Based
VXXX" folder OPTIS_SOFTWARE_BASE_PATH=\\pdt-fr130326sv\Software\SPEOS CAA V5 Based\SPEOS_CAA_V5_Based_V71B6\B16_32\Optis\SPEOS CAA V5 Based
OPTIS_SOFTWARE_SERVICE_PACK=SP0
What will be displayed in the About
windows. OPTIS_SOFTWARE_SERVICE_PACK=SP0
OPTIS_USER_APPLICATION_DATA_PATH=XXX
The "C:\Documents and
Settings\sschramm\Application Data"
folder for the licenses and the distributed
computing.
OPTIS_USER_APPLICATION_DATA_PATH=U:\Settings\User
Page 34 of 87 SPEOS CAA V5 Based Installation Guide
OPTIS_GLOBAL_APPLICATION_DATA_PATH=XXX
The "C:\Documents and Settings\All Users\Application Data" folder for the distributed computing.
OPTIS_GLOBAL_APPLICATION_DATA_PATH=U:\Settings\Global
OPTIS_LICENSE_SERVER=servername
The set of the selected License Server and of the license.
OPTIS_LICENSE_SERVER=ELE100092
OPTIS_DEFAULT_LICENSE_SOFTWARE_ID=XX
OPTIS_DEFAULT_LICENSE_SOFTWARE_ID= 40 for V12, 44 for V13, 46 for V14 and 58 for V15
OPTIS_DEFAULT_LICENSE_SOFTWARE_ID=58
OPTIS_DEFAULT_LICENSE_CONFIGURATION_ID={configurationID}
OPTIS_DEFAULT_LICENSE_CONFIGURATION_ID={configurationID} can be found on the Portal page where is downloaded the license file.
OPTIS_DEFAULT_LICENSE_CONFIGURATION_ID={00000000-0000-0000-0000-000000001235}
Writing rights are needed for the related folders:
OPTIS_USER_APPLICATION_DATA_PATH
OPTIS_GLOBAL_APPLICATION_DATA_PATH
OPTIS_USER_APPLICATION_DATA_PATH & OPTIS_GLOBAL_APPLICATION_DATA_PATH contents
License files of the License Server.
Files of the license configuration of the system account (created when the user configures a license from the
system account, that's why rights are needed).
Configuration files of the OPTIS Distributed Computing (SDS, SDSM, SpoolerStatus).
Temporary files of the SDS.
Configuration file of the OPTIS Control Panel.
Checking the Use of the Environment Variables
To be sure that the OPTIS License Server launched by the Optis Service functions using the OPTIS environment
variables, you must:
1. Define these variables in the System Variables section of the Environment Variables in Windows (See the
Windows Advanced System Settings).
2. Stop and restart the OPTIS Service.
If you want to generate the the log server in a directory other than the default directory
(C:\ProgramData\OPTIS\OptisLicenseServer), you must define the OPTIS_USER_APPLICATION_DATA_PATH and
OPTIS_GLOBAL_APPLICATION_DATA_PATH OPTIS environment variables following the previous steps.
The CSI module of the license manages only environment variables linked to the installation :
OPTIS_BASE_PATH, OPTIS_SOFTWARE_BASE_PATH et OPTIS_SOFTWARE_SERVICE_PACK.
You can define all other environment variables linked to configuration without having the CSI module in the
license (OPTIS_USER_APPLICATION_DATA_PATH, OPTIS_GLOBAL_APPLICATION_DATA_PATH,
OPTIS_LICENSE_SERVER, OPTIS_DEFAULT_LICENSE_SOFTWARE_ID and
OPTIS_DEFAULT_LICENSE_CONFIGURATION_ID).
Installing the OPTIS license
Configuring a Nodelock License
For a Nodelock License, you must install the Optis software.
At the end of the installation, if the computer cannot restart or has specific administrator rights, you must follow
the instructions of Running the OPTIS License Server.
Obtaining a License
1. Click All Programs on the Start menu, and then click OPTIS, OPTIS License, OPTIS License Manager.
If the License Server information does not appear, you must follow the instructions located in Running the
OPTIS License Server or in Configuring the Windows Firewall.
2. Use the following icon to copy the Serial Number of License Server.
Before copying the serial number, you must be careful to select the License Server Adapter.
Code Server Installation Page 35 of 87
3. Click File, License portal...
4. When the OptisLicenseManager box appears, click OK.
5. Log onto the Portal.
6. Select the license title, and then click the appropriate icon.
-Or-
Send an email to [email protected].
It can take few hours before receiving an email notification about new license file available on your Portal.
Downloading the license file
1. Log onto the Portal (http://www.optis-world.com/login.htm), and then click Licenses.
2. Click the appropriate OptisLicense file.
3. Click Download.
4. When a box asking you if you want to save the file or find a program to open it appears, click Save.
You can save it on your desktop or in any folder except the OPTIS folder.
Launching the Optis License Manager
1. Double-click on the Optis License Manager XXb.bat file.
The OPTIS License Manager window opens.
Importing a License
Selected account has to be the current user.
1. Click File, Import a license...
If the File commands are not available, you must follow Running the OPTIS License Server.
2. Select the new license in the box, and then click Open.
The update appears.
You must adapt the threads number of the computer to the license threads number. For more details, you can contact your sales contact (http://www.optis-world.com/contact.htm).
Configuring a Floating License
Configuring a Floating License from the Server
For a Floating License, you must install the Optis License Manager on the License Server.
At the end of the installation, if the computer cannot restart or has specific administrator rights, you must follow
the instructions of Running the OPTIS License Server.
If you prefer to install the OPTIS software (SPEOS, OptisWorks, SPEOS CAA V5 Based, SPEOS for Pro/ENGINEER®...), it is also possible.
Obtaining a License
1. Click All Programs on the Start menu, and then click OPTIS, OPTIS License, OPTIS License Manager.
If the License Server information does not appear, you must follow the instructions located in Running the
OPTIS License Server or in Configuring the Windows Firewall.
2. Use the following icon to copy the Serial Number of License Server.
Before copying the serial number, you must be careful to select the License Server Adapter.
3. Click File, License portal...
4. When the OptisLicenseManager box appears, click OK.
5. Log onto the Portal.
6. Select the license title, and then click the appropriate icon.
-Or-

Page 36 of 87 SPEOS CAA V5 Based Installation Guide
Send an email to [email protected].
It can take few hours before receiving an email notification about new license file available on your Portal.
Downloading the license file
1. Log onto the Portal (http://www.optis-world.com/login.htm), and then click Licenses.
2. Click the appropriate OptisLicense file.
3. Click Download.
4. When a box asking you if you want to save the file or find a program to open it appears, click Save.
You can save it on your desktop or in any folder except the OPTIS folder.
Importing a License
Selected account has to be the current user.
1. Click File, Import a license...
If the File commands are not available, you must follow Running the OPTIS License Server.
2. Select the new license in the box, and then click Open.
The update appears.
You must adapt the threads number of the computer to the license threads number. For more details, you can contact your sales contact (http://www.optis-world.com/contact.htm).
Configuring a Floating License from the Client
For a Floating License, you must install the Optis software on all License Client.
At the end of the installation, if the computer cannot restart or has specific administrator rights, you must follow
the instructions of Running the OPTIS License Server.
Launching the Optis License Manager
1. Double-click on the Optis License Manager XXb.bat file.
The OPTIS License Manager window opens.
Connecting to the OPTIS License Server
When importing a distributed license on a spooler computer runs as a service, you must select the SYSTEM account too.
1. Click Configuration, Configuration.
-Or-
1. Click Select.
The Configuration box appears.
2. Click Select, and then select the License Server computer.
3. Click OK.
If nothing happens, you must check that the License Server computer is running as a server. For more details, you can view Running the OPTIS License Server.
Leaving the box empty is like selecting the computer you are working with.
The update appears.
4. Select the license you want to use.
5. Click Configuration, Use this license by default to define it as the default one.
A star * in the Default box indicates the default license.
6. Redo the same process by being connected as the user of the software.
7. For this time, select the User Account configuration to set the license by default.
Code Server Installation Page 37 of 87
Configuring for other Client computers
To configure the license for other Client computers, there are two possibilities:
Proceed again as following:
Creating bat files (see page 32).
Installing the OPTIS License (see page 20).
- or -
Report the configuration on all client computers using the "SPEOS CAA V5 Based VX.X.cfg" and the
"OptisLicenseClient.cfg" files.
Copy them from an already configured computer.
Paste them in the OPTIS_XXX_APPLICATION_DATA_PATH\OPTIS\OptisLicenseClient folder of another one.
Details of the ".cfg" files OptisLicenseClient.cfg: For floating configuration this file gives the name of the License Server. SPEOS CAA V5 Based VX.X.cfg: This file defines the defined license from the License Server list. Example of OptisLicenseClient.cfg <?xml version="1.0" encoding="ISO-8859-1"?> <Configuration> <Server>pdt080052srvr</Server> </Configuration>
Example of SPEOS CAA V5 Based VX.X.cfg <?xml version="1.0" encoding="ISO-8859-1"?> <Configuration> <SelectedSoftwareId>9</SelectedSoftwareId> <SelectedConfigurationGUID>"{00000000-0000-0000-0000-000000000000}"</SelectedConfigurationGUID> <LastWarningBeforeExpiration>6</LastWarningBeforeExpiration> </Configuration>
Setting the OPTIS license from SPEOS CAA V5 Based
The OPTIS license can be set from the SPEOS CAA V5 Based VXX software itself.
1. Launch SPEOS CAA V5 Based VXX software.
2. Click Tools, Options.
3. From the Options, Analysis & Simulation menu select your workbench.
4. A list of available configurations is displayed in the "Licensing" panel.
Page 38 of 87 SPEOS CAA V5 Based Installation Guide
5. Select the chosen license configuration.
Launching the Environment from a Client computer
When the environment of the SPEOS CAA V5 Based to the CATIA V5 Environment (see page 33) has been
generated, an icon should have been created.
From the Client computer, create a shortcut on the desktop to launch this environment.
Example
"\\pdt-fr130326sv\software\CATIA V5\BXX_XX\intel_a\code\bin\CATSTART.exe" -run "CNEXT.exe" -env
CATIA_VXRXXSPX_SPEOS_VXX_XXb -direnv "\\XXX\XXX\CATEnv\User" -nowindow
VBA installation for a CATIA Code Server installation
VB6 needs to be installed to be able to use Visual Basic for Applications macros in CATIA.
1. Install the VBA6.msi (VBA6.zip) from the webserver or from the CD rom (pathcdrom\VBA\VBA6.msi).
2. Launch on the client computer in administration mode the CNEXT /regserver command from the directory
where CATIA has been installed ("YourInstallDirectory" \"os"\code\bin\)
For example, if you are using CATIA in Code Server Installation from the Product server:
\\PDT080052SRVR\Softwares\CATIA V5\B19_64\win_b64\code\bin\CNEXT.exe /regserver
For more details, please read the Microsoft Help (http://technet.microsoft.com/en-us/library/bb496977.aspx).
Checking the Environment Log File
The environment log file contains the following information:
All directory path (from the registry and from the environment variables).

Code Server Installation Page 39 of 87
License initialization parameters (from the registry and from the environment variables).
Record of any error occurring during OPTIS environment initialization.
Environment log file content is refreshed every 24 hours.
The environment log file is generated in ... (see page 84)\OPTIS\OPTIS-SoftwareEnvironment.log.
Page 40 of 87 SPEOS CAA V5 Based Installation Guide
CREATING ENVIRONMENT
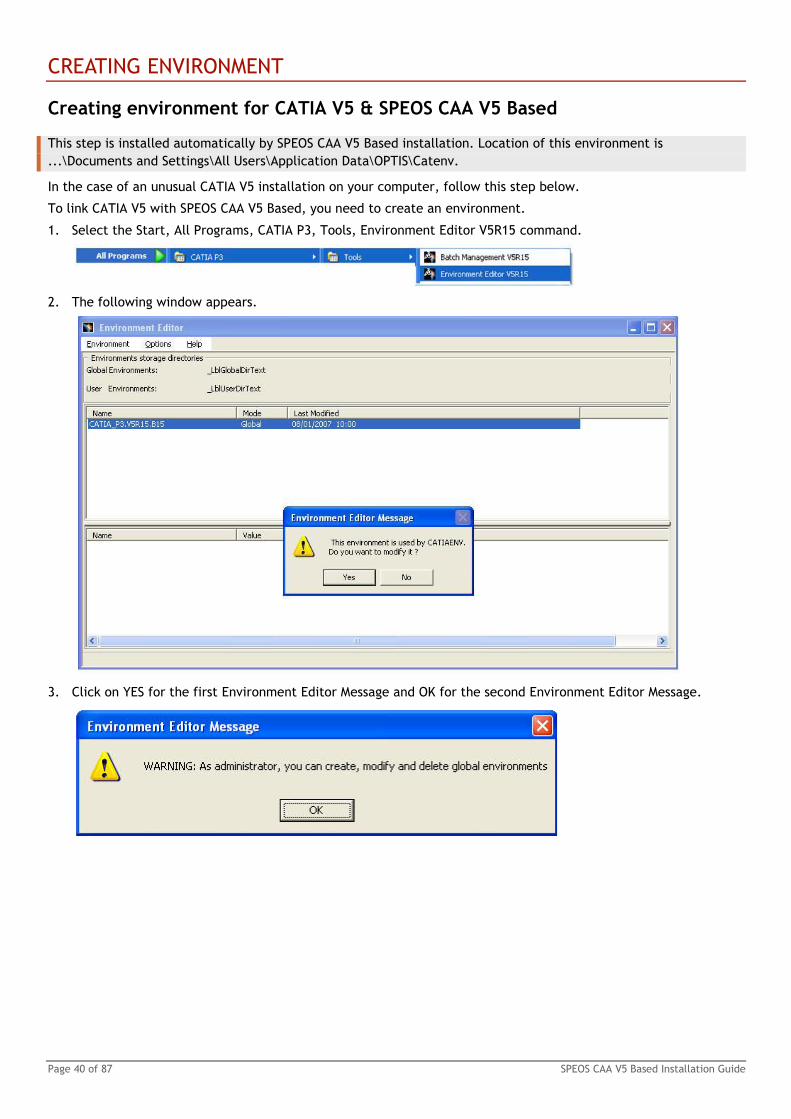
Creating environment for CATIA V5 & SPEOS CAA V5 Based
This step is installed automatically by SPEOS CAA V5 Based installation. Location of this environment is
...\Documents and Settings\All Users\Application Data\OPTIS\Catenv.
In the case of an unusual CATIA V5 installation on your computer, follow this step below.
To link CATIA V5 with SPEOS CAA V5 Based, you need to create an environment.
1. Select the Start, All Programs, CATIA P3, Tools, Environment Editor V5R15 command.
2. The following window appears.
3. Click on YES for the first Environment Editor Message and OK for the second Environment Editor Message.
Creating Environment Page 41 of 87
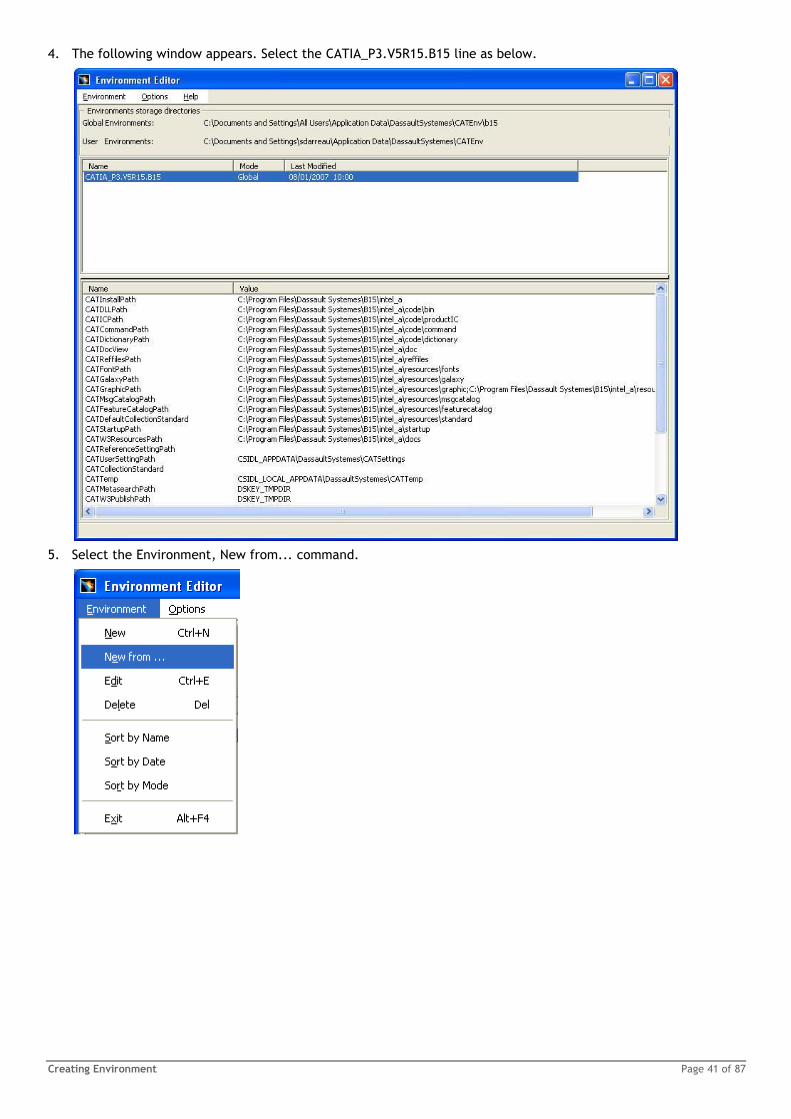
4. The following window appears. Select the CATIA_P3.V5R15.B15 line as below.
5. Select the Environment, New from... command.
Page 42 of 87 SPEOS CAA V5 Based Installation Guide
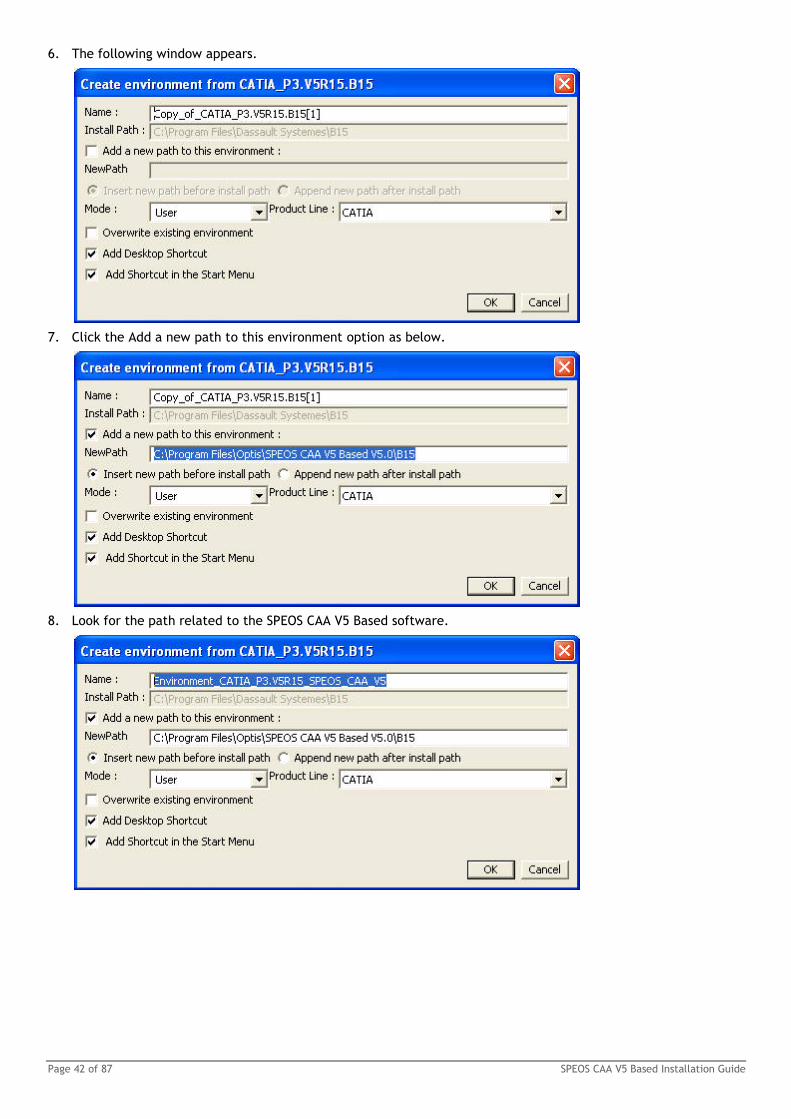
6. The following window appears.
7. Click the Add a new path to this environment option as below.
8. Look for the path related to the SPEOS CAA V5 Based software.

Creating Environment Page 43 of 87
9. Copy and paste the path in the Create environment from CATIA_P3.V5R15.B15 window.
10. Give a name for your new environment relating Digital Project and SPEOS.
11. Select Global for the Module option.
Page 44 of 87 SPEOS CAA V5 Based Installation Guide
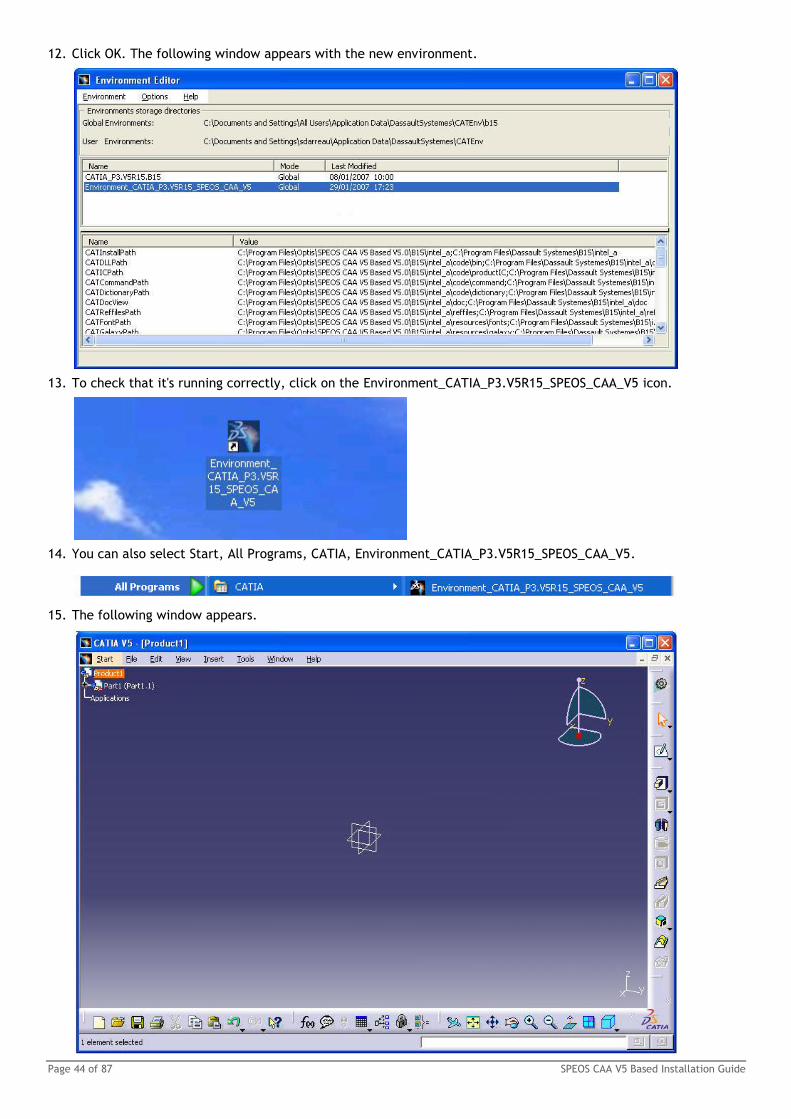
12. Click OK. The following window appears with the new environment.
13. To check that it's running correctly, click on the Environment_CATIA_P3.V5R15_SPEOS_CAA_V5 icon.
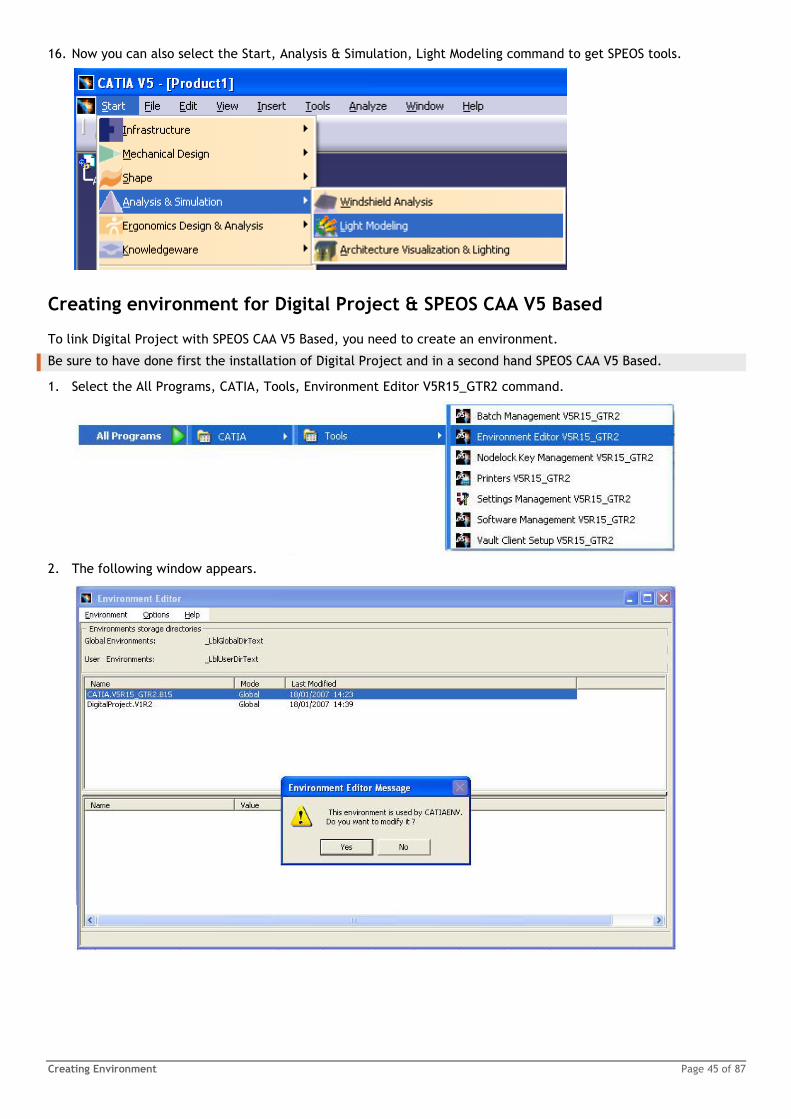
14. You can also select Start, All Programs, CATIA, Environment_CATIA_P3.V5R15_SPEOS_CAA_V5.
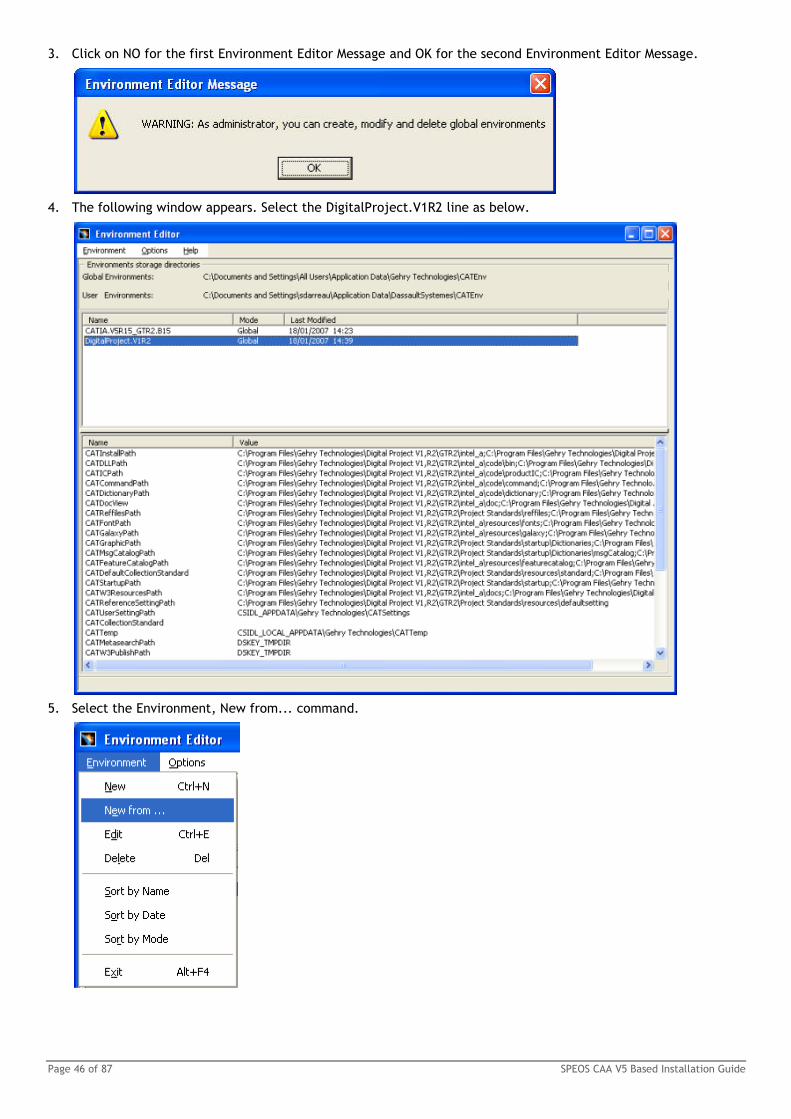
15. The following window appears.
Creating Environment Page 45 of 87
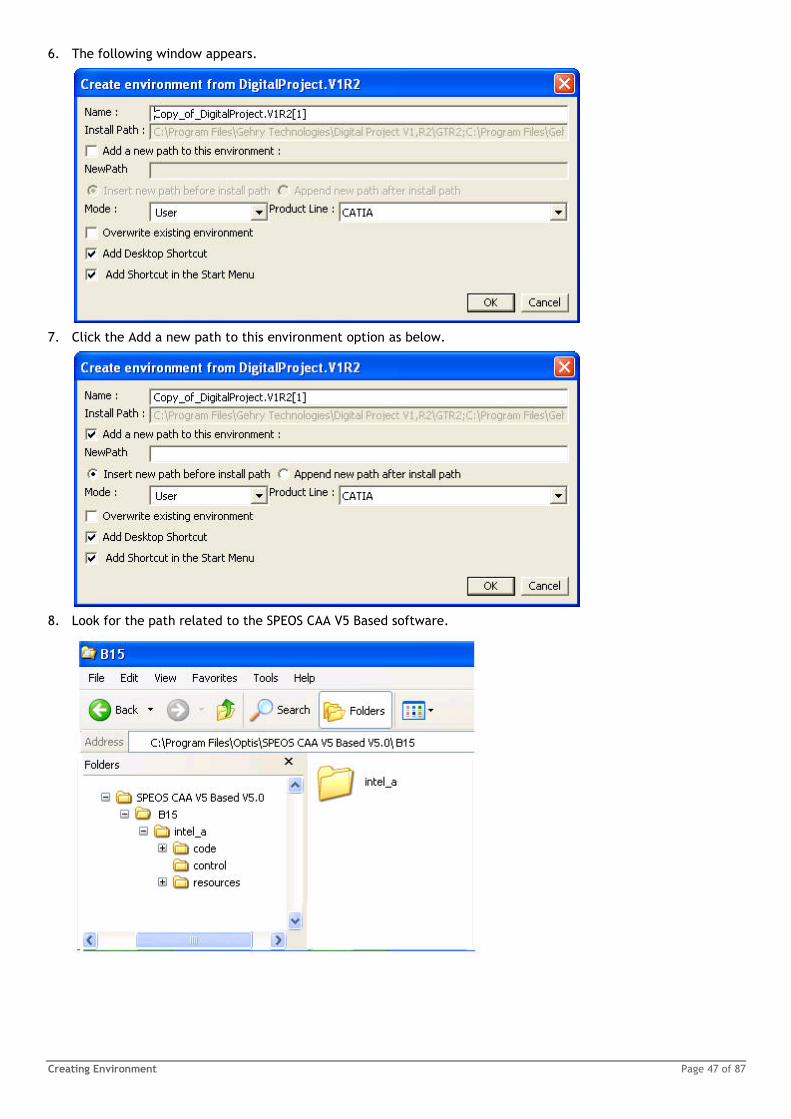
16. Now you can also select the Start, Analysis & Simulation, Light Modeling command to get SPEOS tools.
Creating environment for Digital Project & SPEOS CAA V5 Based
To link Digital Project with SPEOS CAA V5 Based, you need to create an environment.
Be sure to have done first the installation of Digital Project and in a second hand SPEOS CAA V5 Based.
1. Select the All Programs, CATIA, Tools, Environment Editor V5R15_GTR2 command.
2. The following window appears.
Page 46 of 87 SPEOS CAA V5 Based Installation Guide
3. Click on NO for the first Environment Editor Message and OK for the second Environment Editor Message.
4. The following window appears. Select the DigitalProject.V1R2 line as below.
5. Select the Environment, New from... command.
Creating Environment Page 47 of 87
6. The following window appears.
7. Click the Add a new path to this environment option as below.
8. Look for the path related to the SPEOS CAA V5 Based software.
Page 48 of 87 SPEOS CAA V5 Based Installation Guide
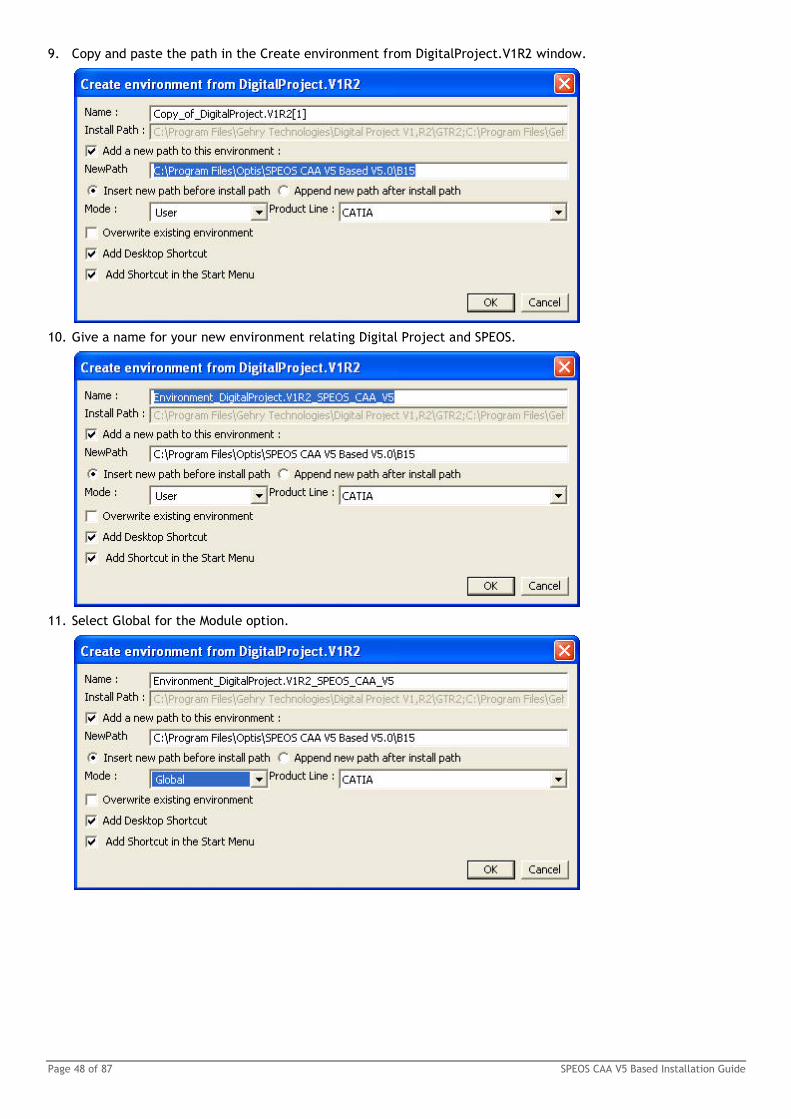
9. Copy and paste the path in the Create environment from DigitalProject.V1R2 window.
10. Give a name for your new environment relating Digital Project and SPEOS.
11. Select Global for the Module option.

Creating Environment Page 49 of 87
12. Click OK. The following window appears with the new environment.
13. To check that it's running correctly, click on the Environment_DigitalProject.V1R2_SPEOS_CAA_V5 icon.
You can also select AllPrograms, CATIA, Environment_digitalProject.V1R2_SPEOS_CAA_V5 from the Start menu.
14. The following window appears.
Page 50 of 87 SPEOS CAA V5 Based Installation Guide
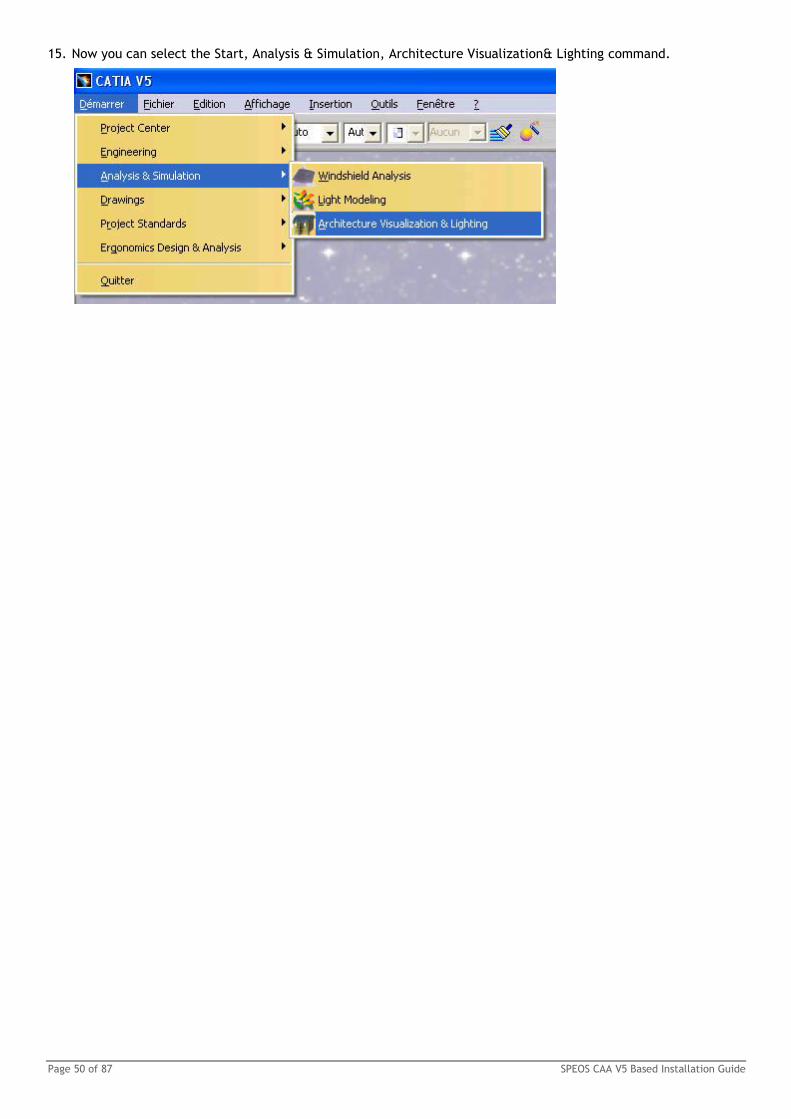
15. Now you can select the Start, Analysis & Simulation, Architecture Visualization& Lighting command.
OPTIS Distributed Computing Page 51 of 87
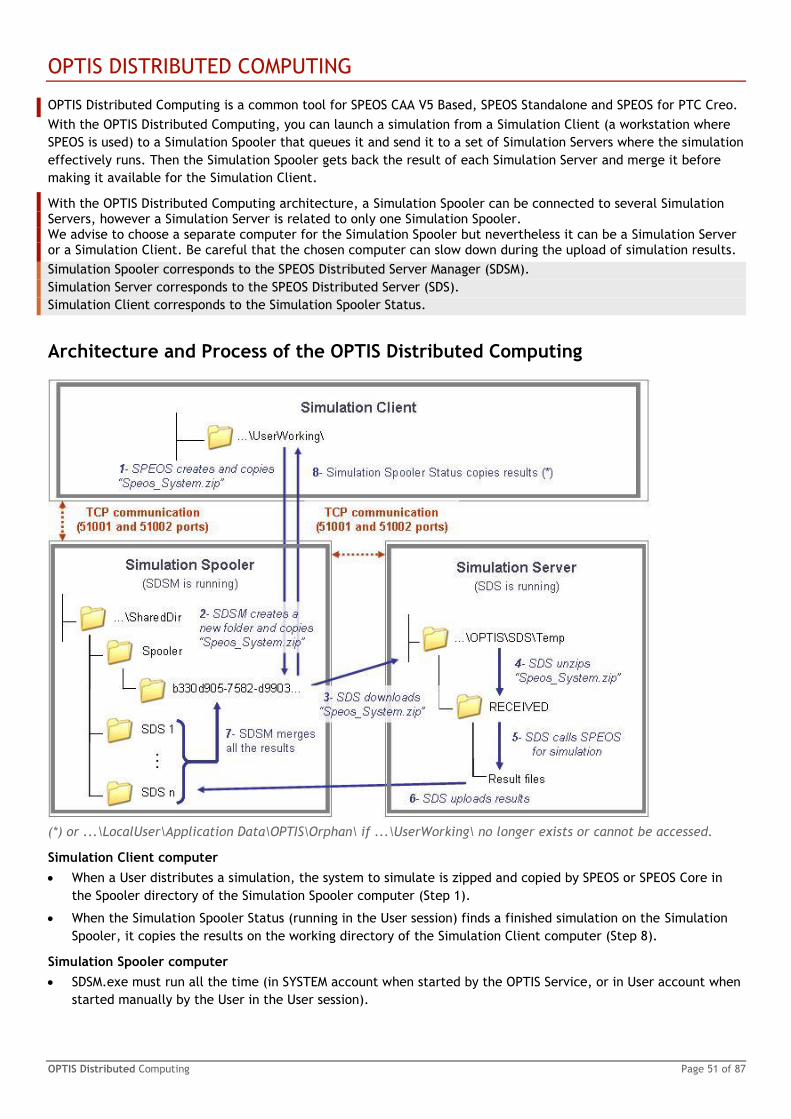
OPTIS DISTRIBUTED COMPUTING
OPTIS Distributed Computing is a common tool for SPEOS CAA V5 Based, SPEOS Standalone and SPEOS for PTC Creo.
With the OPTIS Distributed Computing, you can launch a simulation from a Simulation Client (a workstation where
SPEOS is used) to a Simulation Spooler that queues it and send it to a set of Simulation Servers where the simulation
effectively runs. Then the Simulation Spooler gets back the result of each Simulation Server and merge it before
making it available for the Simulation Client.
With the OPTIS Distributed Computing architecture, a Simulation Spooler can be connected to several Simulation Servers, however a Simulation Server is related to only one Simulation Spooler. We advise to choose a separate computer for the Simulation Spooler but nevertheless it can be a Simulation Server or a Simulation Client. Be careful that the chosen computer can slow down during the upload of simulation results.
Simulation Spooler corresponds to the SPEOS Distributed Server Manager (SDSM).
Simulation Server corresponds to the SPEOS Distributed Server (SDS).
Simulation Client corresponds to the Simulation Spooler Status.
Architecture and Process of the OPTIS Distributed Computing
(*) or ...\LocalUser\Application Data\OPTIS\Orphan\ if ...\UserWorking\ no longer exists or cannot be accessed.
Simulation Client computer
When a User distributes a simulation, the system to simulate is zipped and copied by SPEOS or SPEOS Core in
the Spooler directory of the Simulation Spooler computer (Step 1).
When the Simulation Spooler Status (running in the User session) finds a finished simulation on the Simulation
Spooler, it copies the results on the working directory of the Simulation Client computer (Step 8).
Simulation Spooler computer
SDSM.exe must run all the time (in SYSTEM account when started by the OPTIS Service, or in User account when
started manually by the User in the User session).
Page 52 of 87 SPEOS CAA V5 Based Installation Guide
Depending of the Simulation Spooler option in the OPTIS Control Panel, the SDSM could be started without
being logged (it is started by the OPTISService.exe) or could be started in a user session (Start/All
Programs/Startup).
When the SDSM finds a new simulation in the Spooler directory:
SDSM copies the system to simulate from the Spooler directory to the shared CurrentSimulation directory
(Step 2).
SDSM sends a simulation request to the Simulation Servers.
When all the Simulation Servers have finished their simulation, the SDSM merges all the uploaded results
(Step 7).
Simulation Server computers
SDS.exe must run all the time (in SYSTEM account when started by the OPTIS Service, or in User account when
started manually by the User in the User session).
Depending of the Simulation Server option in the OPTIS Control Panel, the SDS could be started without being
logged (it is started by the OPTISService.exe) or could be started in a user session (Start/All Programs/Startup).
When the SDS receives a simulation request from the Simulation Spooler:
SDS downloads the system to simulate from the Simulation Spooler (Step 3).
SDS unzips the system to simulate (Step 4) then executes the simulation by running SPEOS or SPEOS Core
using Automation (Step 5).
At the end of the simulation, SDS uploads the results to the Simulation Spooler (Step 6).
All computers of the cluster must have the same configuration. A computer can simultaneously be a Simulation Client, a Simulation Spooler and a Simulation Server. Simulation Spooler and Simulation Server can be used without be logged. SPEOS CAA V5 Based add-in is not required on all computers, only SPEOS Core needs to be installed.
Recommendations for SPEOS CAA V5 Based
For Visual Ergonomics simulation (Inverse Simulation) it is recommended to use Simulation Servers with the same
level of performance, the global performance being defined by the lower performing computer.
Adding a low performance computer in the cluster can slow down the simulation time.
On another hand for Light Modeling simulation (Direct Simulation) each Simulation Server that is added will speed
up the simulation time whatever its performance.
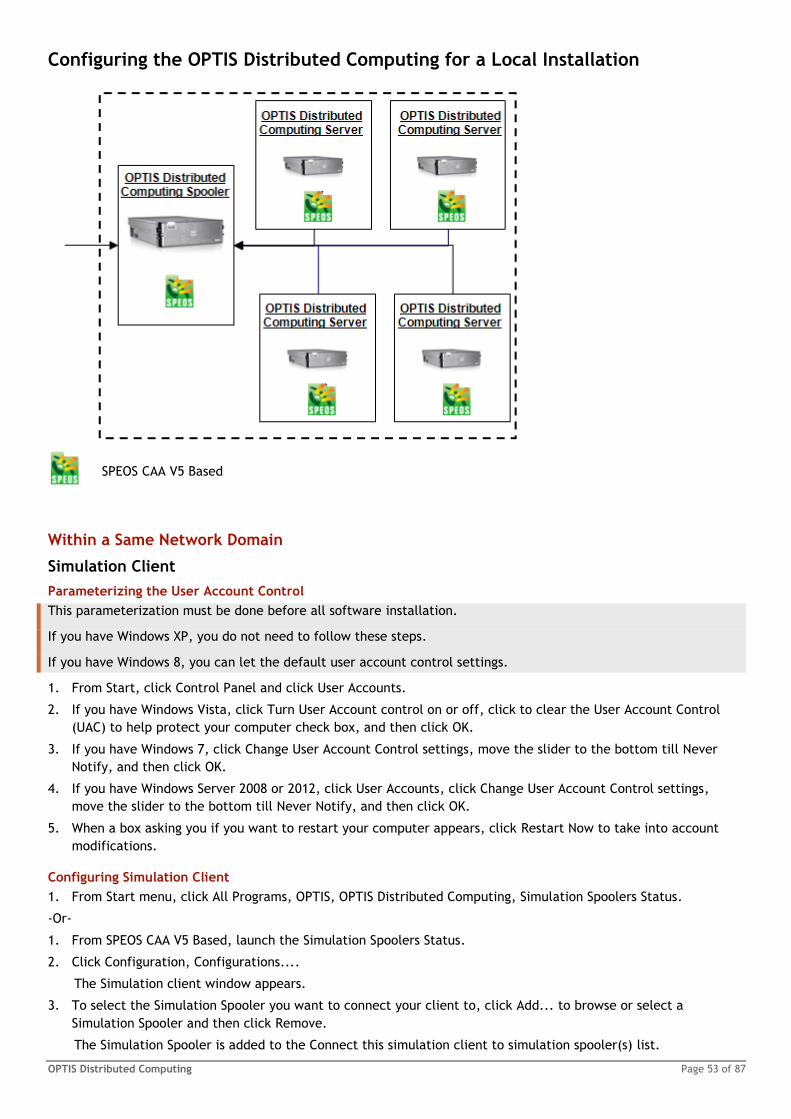
OPTIS Distributed Computing Page 53 of 87
Configuring the OPTIS Distributed Computing for a Local Installation
SPEOS CAA V5 Based
Within a Same Network Domain
Simulation Client
Parameterizing the User Account Control
This parameterization must be done before all software installation.
If you have Windows XP, you do not need to follow these steps.
If you have Windows 8, you can let the default user account control settings.
1. From Start, click Control Panel and click User Accounts.
2. If you have Windows Vista, click Turn User Account control on or off, click to clear the User Account Control
(UAC) to help protect your computer check box, and then click OK.
3. If you have Windows 7, click Change User Account Control settings, move the slider to the bottom till Never
Notify, and then click OK.
4. If you have Windows Server 2008 or 2012, click User Accounts, click Change User Account Control settings,
move the slider to the bottom till Never Notify, and then click OK.
5. When a box asking you if you want to restart your computer appears, click Restart Now to take into account
modifications.
Configuring Simulation Client
1. From Start menu, click All Programs, OPTIS, OPTIS Distributed Computing, Simulation Spoolers Status.
-Or-
1. From SPEOS CAA V5 Based, launch the Simulation Spoolers Status.
2. Click Configuration, Configurations....
The Simulation client window appears.
3. To select the Simulation Spooler you want to connect your client to, click Add... to browse or select a
Simulation Spooler and then click Remove.
The Simulation Spooler is added to the Connect this simulation client to simulation spooler(s) list.
Page 54 of 87 SPEOS CAA V5 Based Installation Guide
A Simulation Spooler can also be added by typing its name in the edit box on the right side of the Add button
and then by clicking Add....
4. Move up or down Simulation Spoolers in the list to define the order of the Spoolers' display when the Network
Update command is launched (Have a look to the SPEOS User Guide
(http://portal.optis-world.com/portal/documentation/documentation.asp) for more details).
The Simulation Spooler located at the top of the list is set up as the default one for this Simulation Client, this
one on each are transferred the distributed simulations.
5. Click OK.
The Simulation spoolers status window appears. The Simulation Spooler is added to the Simulation spoolers list.
The Simulation progress list indicates the Simulation Servers connected to this Simulation Spooler.
Simulation Spooler
Parameterizing the Rights for Accessing Server and Spooler
In case Server and Spooler computers have the Windows Server 2012 system, IT manager must give administrators
rights to users managing the cluster and follow the next steps.
1. From the top right of the screen, open the menus bar and click Settings.
2. Select Server info.
3. From the System window, click Remote settings.
4. From the Remote tab, select Allow remote connections to this computer, click to clear Allow connections only
from computers running Remote Desktop with Network Level Authentication (recommended) and click OK.
Parameterizing the User Account Control
This parameterization must be done before all software installation.
If you have Windows XP, you do not need to follow these steps.
If you have Windows 8, you can let the default user account control settings.
1. From Start, click Control Panel and click User Accounts.
2. If you have Windows Vista, click Turn User Account control on or off, click to clear the User Account Control
(UAC) to help protect your computer check box, and then click OK.
3. If you have Windows 7, click Change User Account Control settings, move the slider to the bottom till Never
Notify, and then click OK.
4. If you have Windows Server 2008 or 2012, click User Accounts, click Change User Account Control settings,
move the slider to the bottom till Never Notify, and then click OK.
5. When a box asking you if you want to restart your computer appears, click Restart Now to take into account
modifications.
Installing the SPEOS CAA V5 Based
To be able to install some required files for OPTIS Distributed Computing, you must follow the next steps:
1. Getting SPEOS CAA V5 Based from the CD-ROM (see page 19).
-Or-
1. Getting SPEOS CAA V5 Based from the Web (see page 19).
2. Installing the SPEOS CAA V5 Based software (see page 19).
Setting the Shared Directory
Be in administrator mode to personalize the Shared Directory.
The Simulation Spooler automatically communicates the shared directory name to the Simulation Servers and
Simulation Clients computers.
It is also possible to localize the shared directory on the Simulation Server computer. In this case please when
reading the following instructions, replace the Simulation Spooler computer name by the Simulation Server one.
For the purpose of this page, we are going to personalize the CurrentSimulation directory created by default in the Distributed directory during the software installation.

OPTIS Distributed Computing Page 55 of 87
1. Open the ...\OPTIS\Distributed directory.
2. Select the CurrentSimulation folder.
3. Right-click and select Properties.
The CurrentSimulation Properties window appears.
4. Select the Sharing tab.
5. On Windows XP Operating System, click Permissions.
-Or-
On Windows Vista Operating System, click Advanced Sharing and then Permissions.
6. In the Permissions window, click Add....
7. Click Locations... and select the domain where the client is located.
8. In the Enter the object names to select frame, type the client’s name.
9. Click Check Names to get the complete name and then click OK to validate.
Client is added to the list of Permissions.
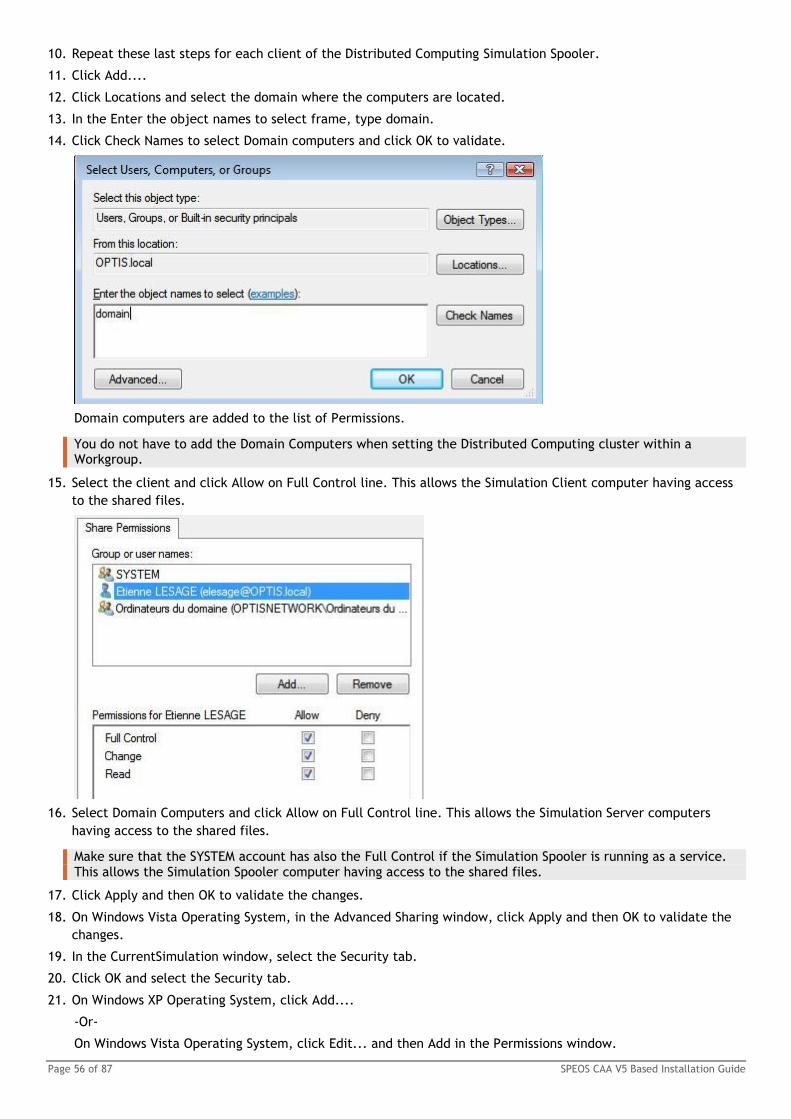
Page 56 of 87 SPEOS CAA V5 Based Installation Guide
10. Repeat these last steps for each client of the Distributed Computing Simulation Spooler.
11. Click Add....
12. Click Locations and select the domain where the computers are located.
13. In the Enter the object names to select frame, type domain.
14. Click Check Names to select Domain computers and click OK to validate.
Domain computers are added to the list of Permissions.
You do not have to add the Domain Computers when setting the Distributed Computing cluster within a Workgroup.
15. Select the client and click Allow on Full Control line. This allows the Simulation Client computer having access
to the shared files.
16. Select Domain Computers and click Allow on Full Control line. This allows the Simulation Server computers
having access to the shared files.
Make sure that the SYSTEM account has also the Full Control if the Simulation Spooler is running as a service. This allows the Simulation Spooler computer having access to the shared files.
17. Click Apply and then OK to validate the changes.
18. On Windows Vista Operating System, in the Advanced Sharing window, click Apply and then OK to validate the
changes.
19. In the CurrentSimulation window, select the Security tab.
20. Click OK and select the Security tab.
21. On Windows XP Operating System, click Add....
-Or-
On Windows Vista Operating System, click Edit... and then Add in the Permissions window.
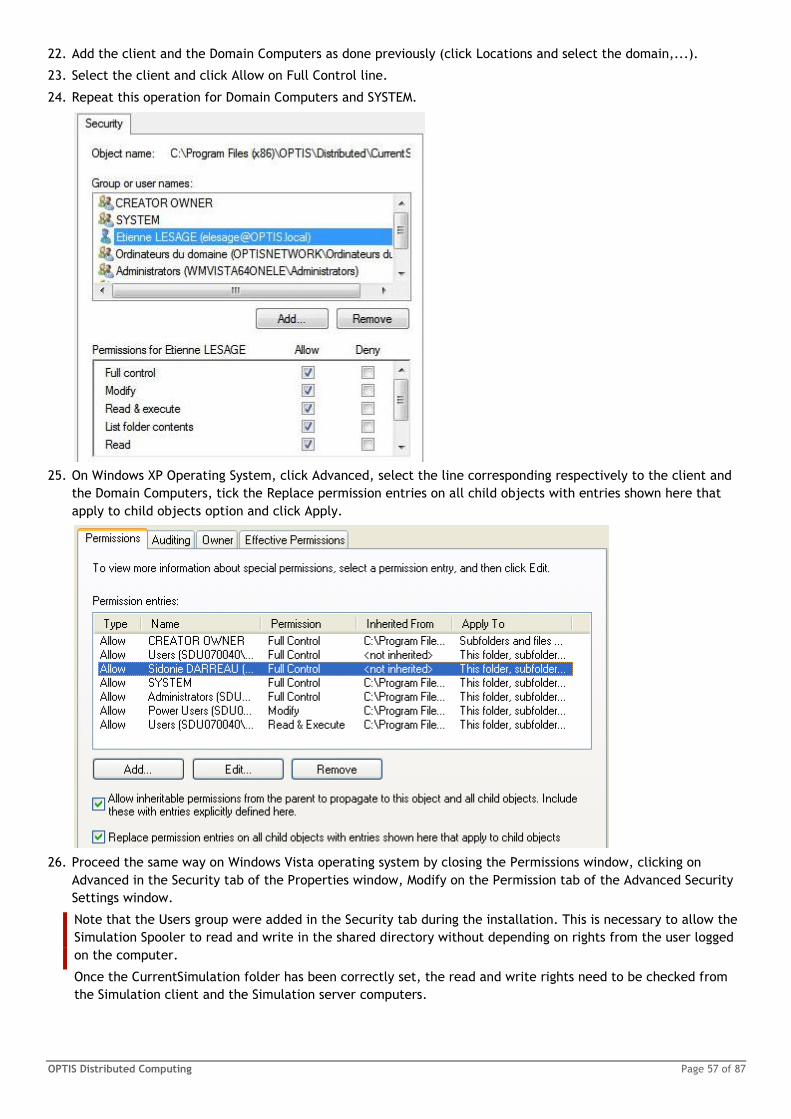
OPTIS Distributed Computing Page 57 of 87
22. Add the client and the Domain Computers as done previously (click Locations and select the domain,...).
23. Select the client and click Allow on Full Control line.
24. Repeat this operation for Domain Computers and SYSTEM.
25. On Windows XP Operating System, click Advanced, select the line corresponding respectively to the client and
the Domain Computers, tick the Replace permission entries on all child objects with entries shown here that
apply to child objects option and click Apply.
26. Proceed the same way on Windows Vista operating system by closing the Permissions window, clicking on
Advanced in the Security tab of the Properties window, Modify on the Permission tab of the Advanced Security
Settings window.
Note that the Users group were added in the Security tab during the installation. This is necessary to allow the
Simulation Spooler to read and write in the shared directory without depending on rights from the user logged
on the computer.
Once the CurrentSimulation folder has been correctly set, the read and write rights need to be checked from
the Simulation client and the Simulation server computers.
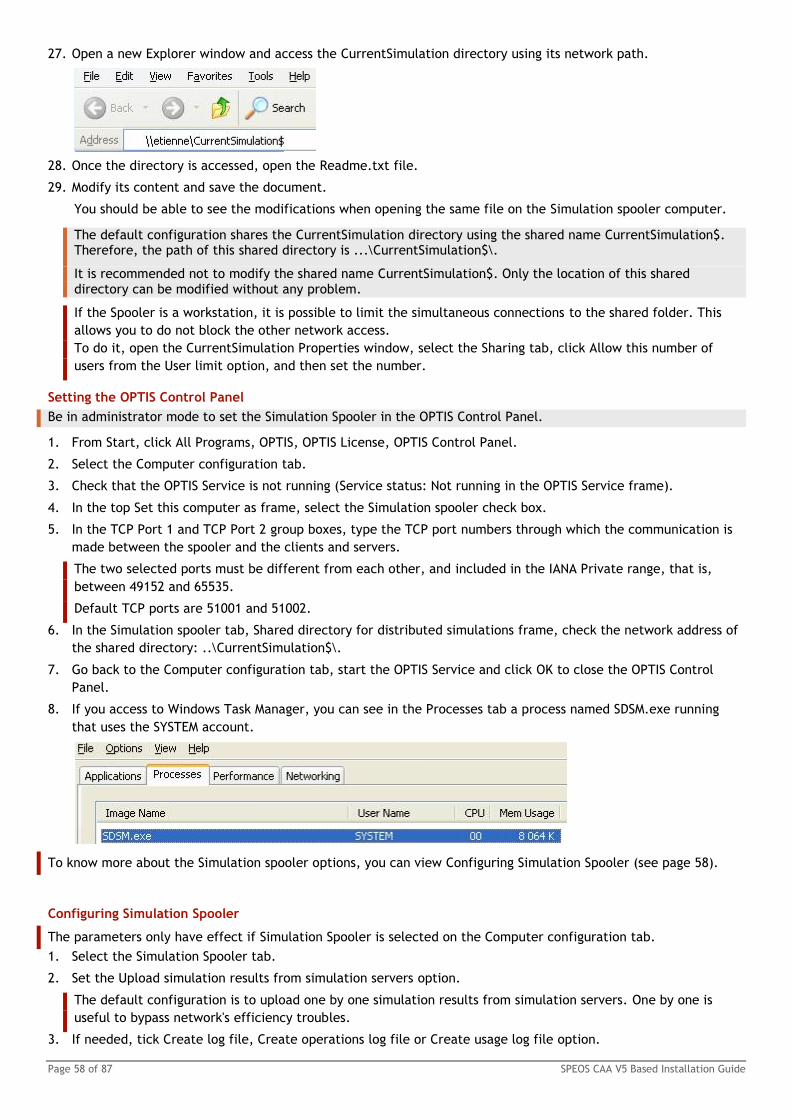
Page 58 of 87 SPEOS CAA V5 Based Installation Guide
27. Open a new Explorer window and access the CurrentSimulation directory using its network path.
28. Once the directory is accessed, open the Readme.txt file.
29. Modify its content and save the document.
You should be able to see the modifications when opening the same file on the Simulation spooler computer.
The default configuration shares the CurrentSimulation directory using the shared name CurrentSimulation$. Therefore, the path of this shared directory is ...\CurrentSimulation$\.
It is recommended not to modify the shared name CurrentSimulation$. Only the location of this shared directory can be modified without any problem.
If the Spooler is a workstation, it is possible to limit the simultaneous connections to the shared folder. This
allows you to do not block the other network access.
To do it, open the CurrentSimulation Properties window, select the Sharing tab, click Allow this number of
users from the User limit option, and then set the number.
Setting the OPTIS Control Panel
Be in administrator mode to set the Simulation Spooler in the OPTIS Control Panel.
1. From Start, click All Programs, OPTIS, OPTIS License, OPTIS Control Panel.
2. Select the Computer configuration tab.
3. Check that the OPTIS Service is not running (Service status: Not running in the OPTIS Service frame).
4. In the top Set this computer as frame, select the Simulation spooler check box.
5. In the TCP Port 1 and TCP Port 2 group boxes, type the TCP port numbers through which the communication is
made between the spooler and the clients and servers.
The two selected ports must be different from each other, and included in the IANA Private range, that is,
between 49152 and 65535.
Default TCP ports are 51001 and 51002.
6. In the Simulation spooler tab, Shared directory for distributed simulations frame, check the network address of
the shared directory: ..\CurrentSimulation$\.
7. Go back to the Computer configuration tab, start the OPTIS Service and click OK to close the OPTIS Control
Panel.
8. If you access to Windows Task Manager, you can see in the Processes tab a process named SDSM.exe running
that uses the SYSTEM account.
To know more about the Simulation spooler options, you can view Configuring Simulation Spooler (see page 58).
Configuring Simulation Spooler
The parameters only have effect if Simulation Spooler is selected on the Computer configuration tab.
1. Select the Simulation Spooler tab.
2. Set the Upload simulation results from simulation servers option.
The default configuration is to upload one by one simulation results from simulation servers. One by one is
useful to bypass network's efficiency troubles.
3. If needed, tick Create log file, Create operations log file or Create usage log file option.
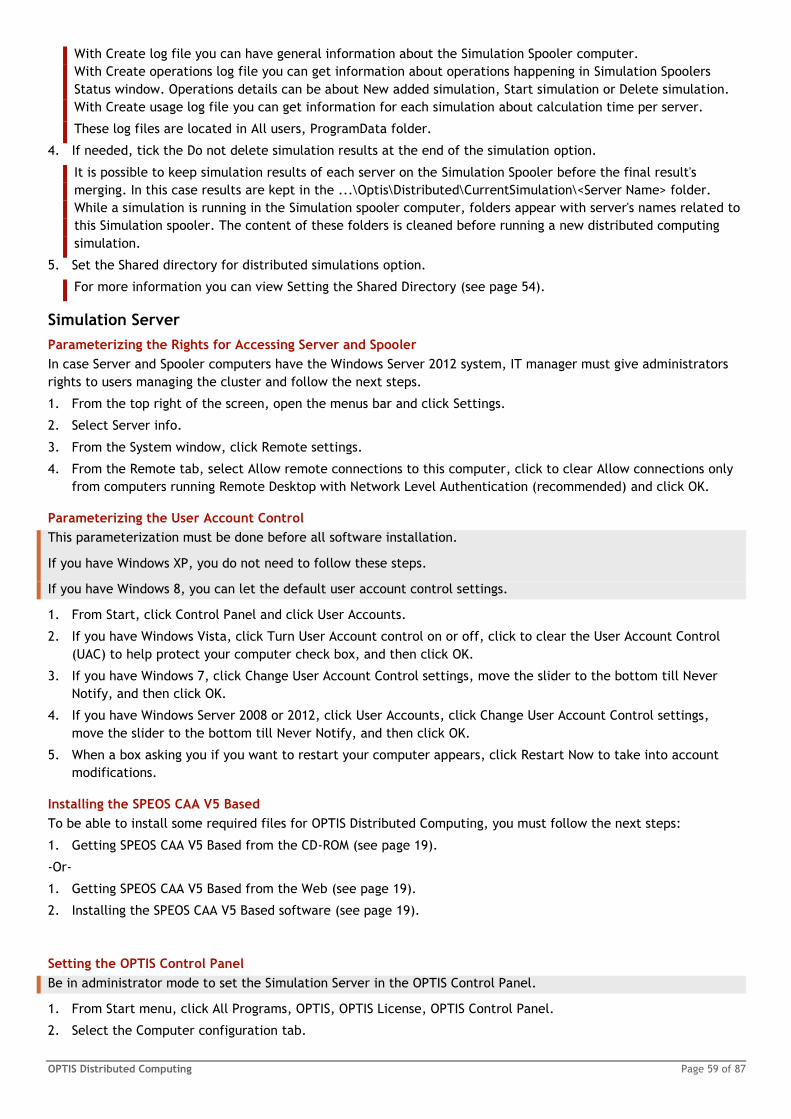
OPTIS Distributed Computing Page 59 of 87
With Create log file you can have general information about the Simulation Spooler computer.
With Create operations log file you can get information about operations happening in Simulation Spoolers
Status window. Operations details can be about New added simulation, Start simulation or Delete simulation.
With Create usage log file you can get information for each simulation about calculation time per server.
These log files are located in All users, ProgramData folder.
4. If needed, tick the Do not delete simulation results at the end of the simulation option.
It is possible to keep simulation results of each server on the Simulation Spooler before the final result's
merging. In this case results are kept in the ...\Optis\Distributed\CurrentSimulation\<Server Name> folder.
While a simulation is running in the Simulation spooler computer, folders appear with server's names related to
this Simulation spooler. The content of these folders is cleaned before running a new distributed computing
simulation.
5. Set the Shared directory for distributed simulations option.
For more information you can view Setting the Shared Directory (see page 54).
Simulation Server
Parameterizing the Rights for Accessing Server and Spooler
In case Server and Spooler computers have the Windows Server 2012 system, IT manager must give administrators
rights to users managing the cluster and follow the next steps.
1. From the top right of the screen, open the menus bar and click Settings.
2. Select Server info.
3. From the System window, click Remote settings.
4. From the Remote tab, select Allow remote connections to this computer, click to clear Allow connections only
from computers running Remote Desktop with Network Level Authentication (recommended) and click OK.
Parameterizing the User Account Control
This parameterization must be done before all software installation.
If you have Windows XP, you do not need to follow these steps.
If you have Windows 8, you can let the default user account control settings.
1. From Start, click Control Panel and click User Accounts.
2. If you have Windows Vista, click Turn User Account control on or off, click to clear the User Account Control
(UAC) to help protect your computer check box, and then click OK.
3. If you have Windows 7, click Change User Account Control settings, move the slider to the bottom till Never
Notify, and then click OK.
4. If you have Windows Server 2008 or 2012, click User Accounts, click Change User Account Control settings,
move the slider to the bottom till Never Notify, and then click OK.
5. When a box asking you if you want to restart your computer appears, click Restart Now to take into account
modifications.
Installing the SPEOS CAA V5 Based
To be able to install some required files for OPTIS Distributed Computing, you must follow the next steps:
1. Getting SPEOS CAA V5 Based from the CD-ROM (see page 19).
-Or-
1. Getting SPEOS CAA V5 Based from the Web (see page 19).
2. Installing the SPEOS CAA V5 Based software (see page 19).
Setting the OPTIS Control Panel
Be in administrator mode to set the Simulation Server in the OPTIS Control Panel.
1. From Start menu, click All Programs, OPTIS, OPTIS License, OPTIS Control Panel.
2. Select the Computer configuration tab.
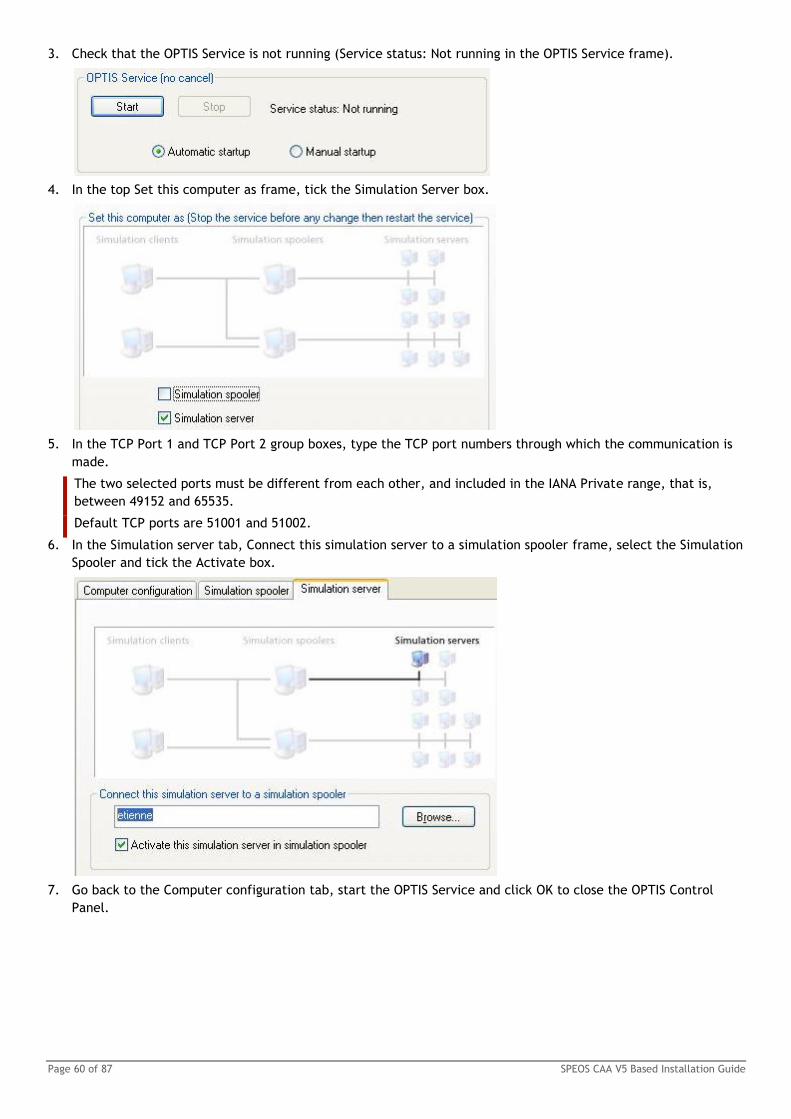
Page 60 of 87 SPEOS CAA V5 Based Installation Guide
3. Check that the OPTIS Service is not running (Service status: Not running in the OPTIS Service frame).
4. In the top Set this computer as frame, tick the Simulation Server box.
5. In the TCP Port 1 and TCP Port 2 group boxes, type the TCP port numbers through which the communication is
made.
The two selected ports must be different from each other, and included in the IANA Private range, that is,
between 49152 and 65535.
Default TCP ports are 51001 and 51002.
6. In the Simulation server tab, Connect this simulation server to a simulation spooler frame, select the Simulation
Spooler and tick the Activate box.
7. Go back to the Computer configuration tab, start the OPTIS Service and click OK to close the OPTIS Control
Panel.
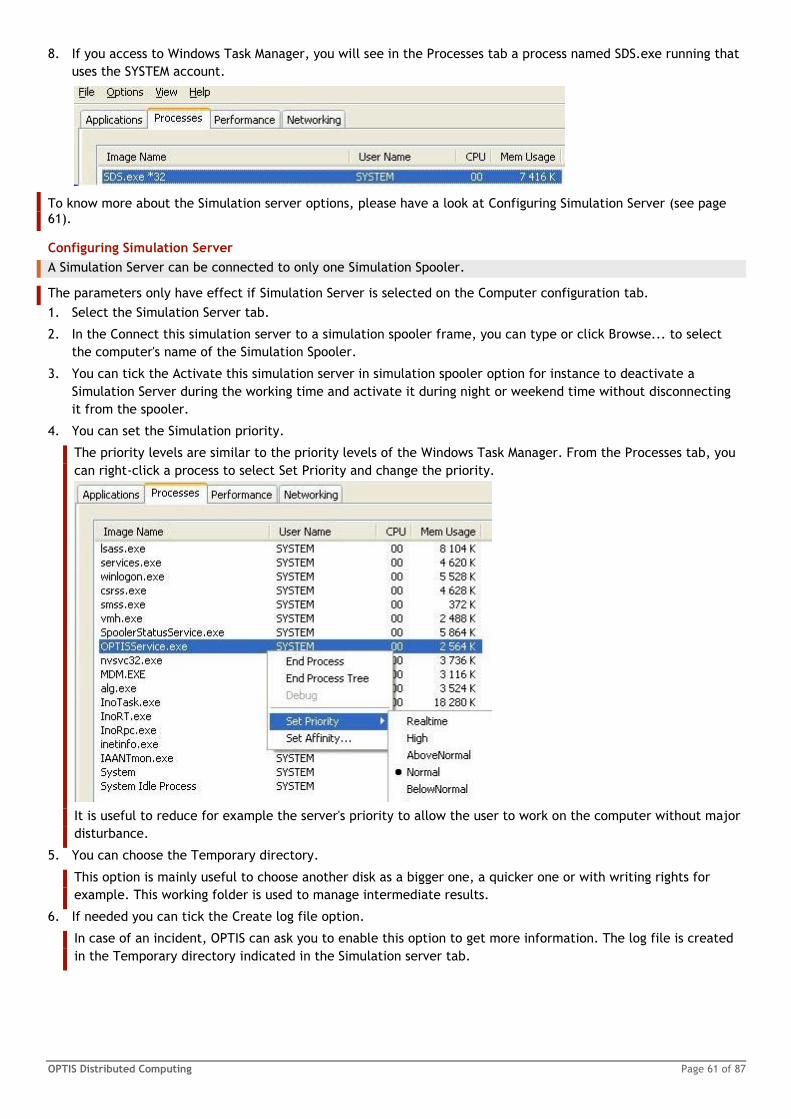
OPTIS Distributed Computing Page 61 of 87
8. If you access to Windows Task Manager, you will see in the Processes tab a process named SDS.exe running that
uses the SYSTEM account.
To know more about the Simulation server options, please have a look at Configuring Simulation Server (see page 61).
Configuring Simulation Server
A Simulation Server can be connected to only one Simulation Spooler.
The parameters only have effect if Simulation Server is selected on the Computer configuration tab.
1. Select the Simulation Server tab.
2. In the Connect this simulation server to a simulation spooler frame, you can type or click Browse... to select
the computer's name of the Simulation Spooler.
3. You can tick the Activate this simulation server in simulation spooler option for instance to deactivate a
Simulation Server during the working time and activate it during night or weekend time without disconnecting
it from the spooler.
4. You can set the Simulation priority.
The priority levels are similar to the priority levels of the Windows Task Manager. From the Processes tab, you
can right-click a process to select Set Priority and change the priority.
It is useful to reduce for example the server's priority to allow the user to work on the computer without major
disturbance.
5. You can choose the Temporary directory.
This option is mainly useful to choose another disk as a bigger one, a quicker one or with writing rights for
example. This working folder is used to manage intermediate results.
6. If needed you can tick the Create log file option.
In case of an incident, OPTIS can ask you to enable this option to get more information. The log file is created
in the Temporary directory indicated in the Simulation server tab.
Page 62 of 87 SPEOS CAA V5 Based Installation Guide
Within a Workgroup
Simulation Client
Parameterizing the User Account Control
This parameterization must be done before all software installation.
If you have Windows XP, you do not need to follow these steps.
If you have Windows 8, you can let the default user account control settings.
1. From Start, click Control Panel and click User Accounts.
2. If you have Windows Vista, click Turn User Account control on or off, click to clear the User Account Control
(UAC) to help protect your computer check box, and then click OK.
3. If you have Windows 7, click Change User Account Control settings, move the slider to the bottom till Never
Notify, and then click OK.
4. If you have Windows Server 2008 or 2012, click User Accounts, click Change User Account Control settings,
move the slider to the bottom till Never Notify, and then click OK.
5. When a box asking you if you want to restart your computer appears, click Restart Now to take into account
modifications.
Configuring Simulation Client
1. From Start menu, click All Programs, OPTIS, OPTIS Distributed Computing, Simulation Spoolers Status.
-Or-
1. From SPEOS CAA V5 Based, launch the Simulation Spoolers Status.
2. Click Configuration, Configurations....
The Simulation client window appears.
3. To select the Simulation Spooler you want to connect your client to, click Add... to browse or select a
Simulation Spooler and then click Remove.
The Simulation Spooler is added to the Connect this simulation client to simulation spooler(s) list.
A Simulation Spooler can also be added by typing its name in the edit box on the right side of the Add button
and then by clicking Add....
4. Move up or down Simulation Spoolers in the list to define the order of the Spoolers' display when the Network
Update command is launched (Have a look to the SPEOS User Guide
(http://portal.optis-world.com/portal/documentation/documentation.asp) for more details).
The Simulation Spooler located at the top of the list is set up as the default one for this Simulation Client, this
one on each are transferred the distributed simulations.
5. Click OK.
The Simulation spoolers status window appears. The Simulation Spooler is added to the Simulation spoolers list.
The Simulation progress list indicates the Simulation Servers connected to this Simulation Spooler.
Simulation Spooler
Parameterizing the User Account Control
This parameterization must be done before all software installation.
If you have Windows XP, you do not need to follow these steps.
If you have Windows 8, you can let the default user account control settings.
1. From Start, click Control Panel and click User Accounts.
2. If you have Windows Vista, click Turn User Account control on or off, click to clear the User Account Control
(UAC) to help protect your computer check box, and then click OK.
3. If you have Windows 7, click Change User Account Control settings, move the slider to the bottom till Never
Notify, and then click OK.
4. If you have Windows Server 2008 or 2012, click User Accounts, click Change User Account Control settings,
move the slider to the bottom till Never Notify, and then click OK.
OPTIS Distributed Computing Page 63 of 87
5. When a box asking you if you want to restart your computer appears, click Restart Now to take into account
modifications.
Parameterizing the Rights for Accessing Server and Spooler
In case Server and Spooler computers have the Windows Server 2012 system, IT manager must give administrators
rights to users managing the cluster and follow the next steps.
1. From the top right of the screen, open the menus bar and click Settings.
2. Select Server info.
3. From the System window, click Remote settings.
4. From the Remote tab, select Allow remote connections to this computer, click to clear Allow connections only
from computers running Remote Desktop with Network Level Authentication (recommended) and click OK.
Installing the SPEOS CAA V5 Based
To be able to install some required files for OPTIS Distributed Computing, you must follow the next steps:
1. Getting SPEOS CAA V5 Based from the CD-ROM (see page 19).
-Or-
1. Getting SPEOS CAA V5 Based from the Web (see page 19).
2. Installing the SPEOS CAA V5 Based software (see page 19).
Setting the Shared Directory
Be in administrator mode to personalize the Shared Directory.
The Simulation Spooler automatically communicates the shared directory name to the Simulation Servers and
Simulation Clients computers.
It is also possible to localize the shared directory on the Simulation Server computer. In this case please when
reading the following instructions, replace the Simulation Spooler computer name by the Simulation Server one.
For the purpose of this page, we are going to personalize the CurrentSimulation directory created by default in the Distributed directory during the software installation.
1. Open the ...\OPTIS\Distributed directory.
2. Select the CurrentSimulation folder.
3. Right-click and select Properties.
The CurrentSimulation Properties window appears.
4. Select the Sharing tab.
5. On Windows XP Operating System, click Permissions.
-Or-
On Windows Vista Operating System, click Advanced Sharing and then Permissions.
6. In the Permissions window, click Add....
7. Click Locations... and select the domain where the client is located.
8. In the Enter the object names to select frame, type the client’s name.
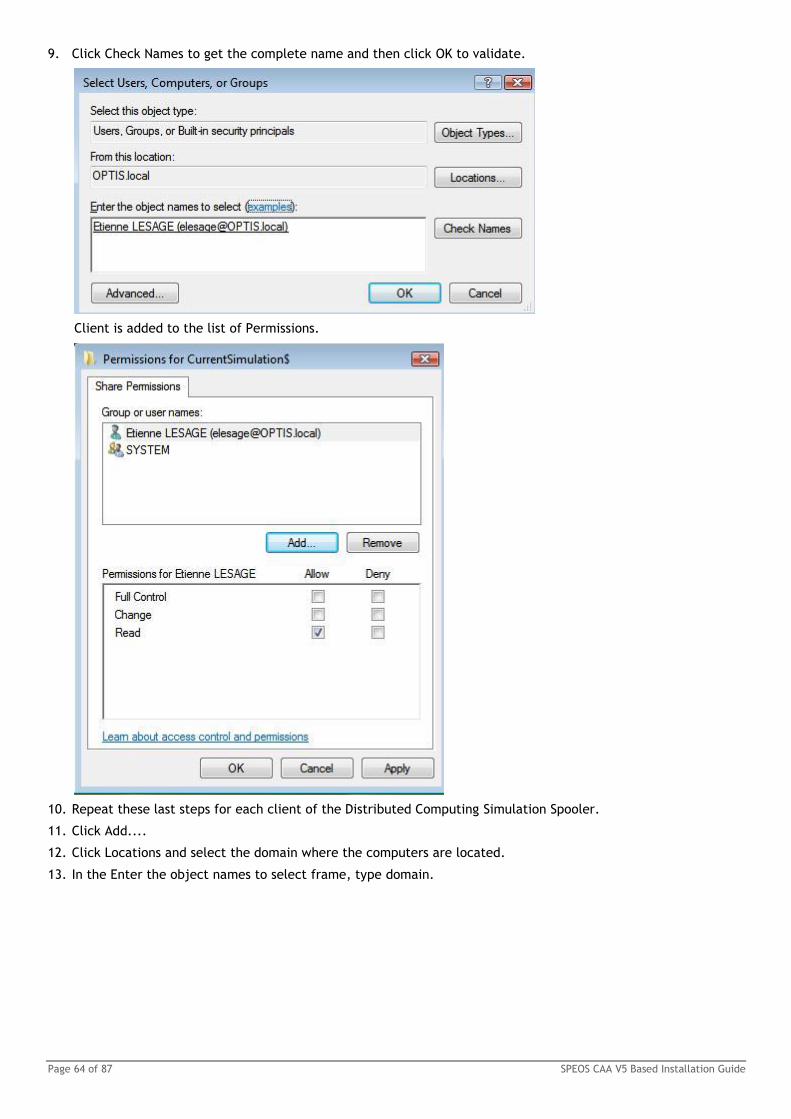
Page 64 of 87 SPEOS CAA V5 Based Installation Guide
9. Click Check Names to get the complete name and then click OK to validate.
Client is added to the list of Permissions.
10. Repeat these last steps for each client of the Distributed Computing Simulation Spooler.
11. Click Add....
12. Click Locations and select the domain where the computers are located.
13. In the Enter the object names to select frame, type domain.
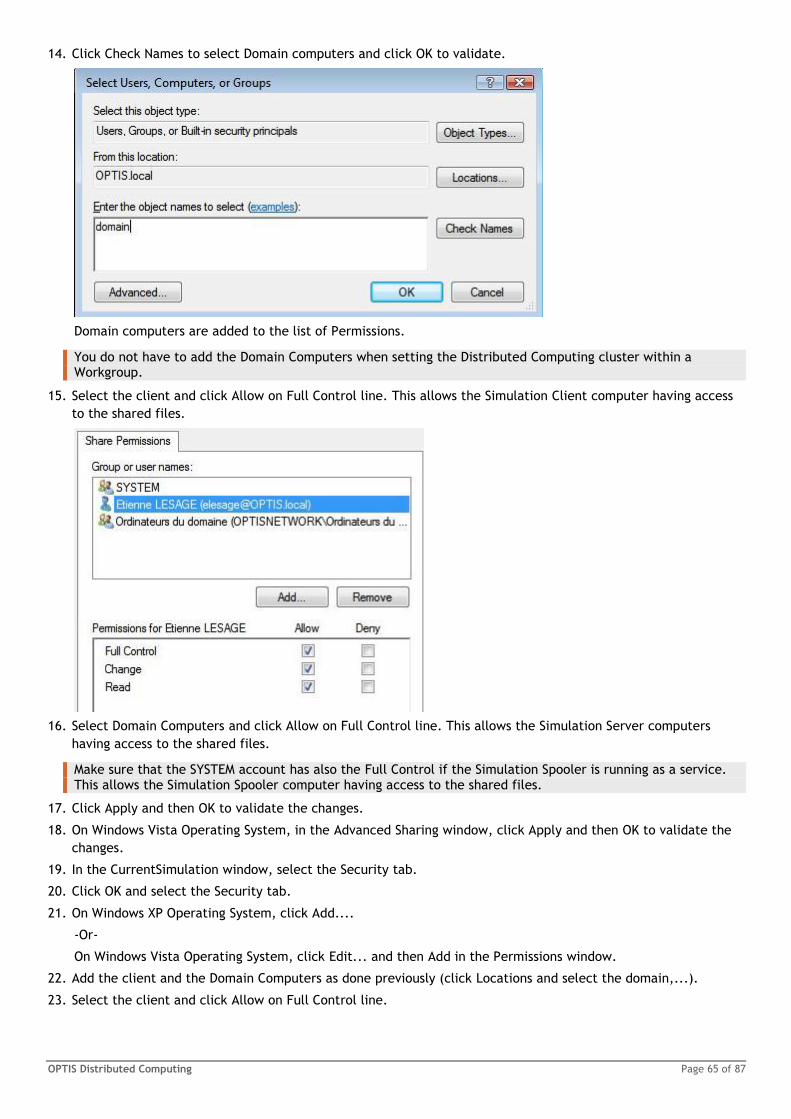
OPTIS Distributed Computing Page 65 of 87
14. Click Check Names to select Domain computers and click OK to validate.
Domain computers are added to the list of Permissions.
You do not have to add the Domain Computers when setting the Distributed Computing cluster within a Workgroup.
15. Select the client and click Allow on Full Control line. This allows the Simulation Client computer having access
to the shared files.
16. Select Domain Computers and click Allow on Full Control line. This allows the Simulation Server computers
having access to the shared files.
Make sure that the SYSTEM account has also the Full Control if the Simulation Spooler is running as a service. This allows the Simulation Spooler computer having access to the shared files.
17. Click Apply and then OK to validate the changes.
18. On Windows Vista Operating System, in the Advanced Sharing window, click Apply and then OK to validate the
changes.
19. In the CurrentSimulation window, select the Security tab.
20. Click OK and select the Security tab.
21. On Windows XP Operating System, click Add....
-Or-
On Windows Vista Operating System, click Edit... and then Add in the Permissions window.
22. Add the client and the Domain Computers as done previously (click Locations and select the domain,...).
23. Select the client and click Allow on Full Control line.

Page 66 of 87 SPEOS CAA V5 Based Installation Guide
24. Repeat this operation for Domain Computers and SYSTEM.
25. On Windows XP Operating System, click Advanced, select the line corresponding respectively to the client and
the Domain Computers, tick the Replace permission entries on all child objects with entries shown here that
apply to child objects option and click Apply.
26. Proceed the same way on Windows Vista operating system by closing the Permissions window, clicking on
Advanced in the Security tab of the Properties window, Modify on the Permission tab of the Advanced Security
Settings window.
Note that the Users group were added in the Security tab during the installation. This is necessary to allow the
Simulation Spooler to read and write in the shared directory without depending on rights from the user logged
on the computer.
Once the CurrentSimulation folder has been correctly set, the read and write rights need to be checked from
the Simulation client and the Simulation server computers.
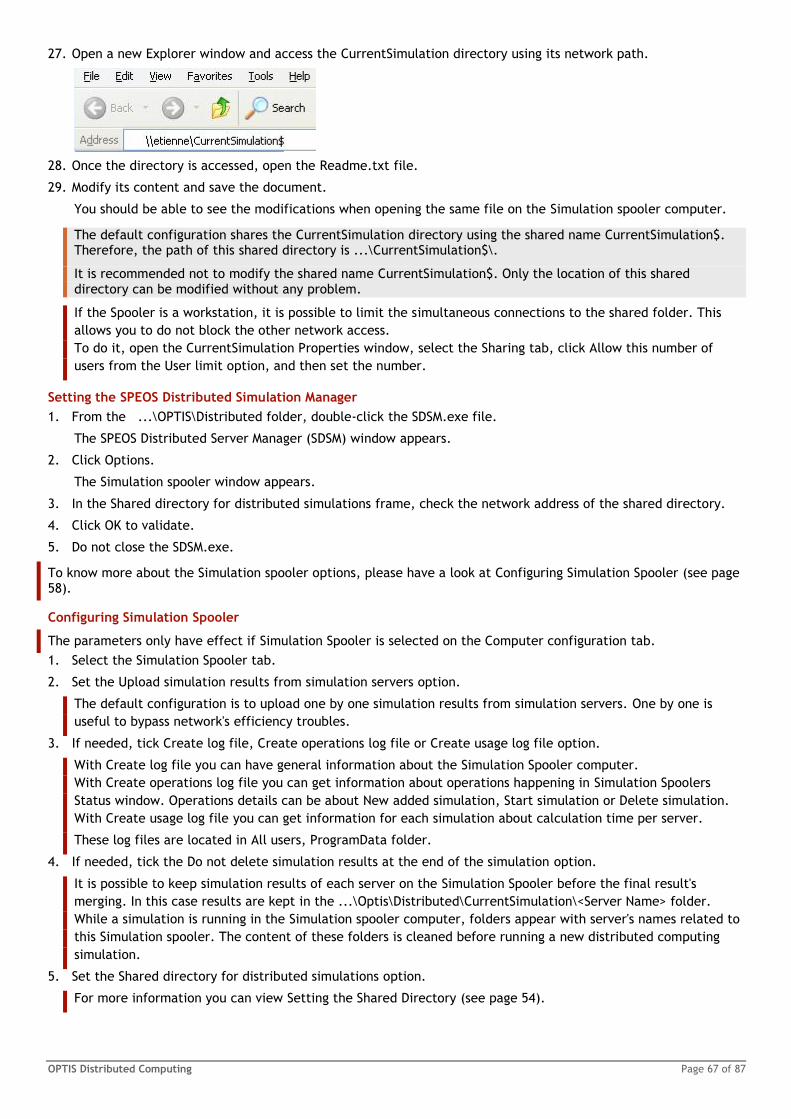
OPTIS Distributed Computing Page 67 of 87
27. Open a new Explorer window and access the CurrentSimulation directory using its network path.
28. Once the directory is accessed, open the Readme.txt file.
29. Modify its content and save the document.
You should be able to see the modifications when opening the same file on the Simulation spooler computer.
The default configuration shares the CurrentSimulation directory using the shared name CurrentSimulation$. Therefore, the path of this shared directory is ...\CurrentSimulation$\.
It is recommended not to modify the shared name CurrentSimulation$. Only the location of this shared directory can be modified without any problem.
If the Spooler is a workstation, it is possible to limit the simultaneous connections to the shared folder. This
allows you to do not block the other network access.
To do it, open the CurrentSimulation Properties window, select the Sharing tab, click Allow this number of
users from the User limit option, and then set the number.
Setting the SPEOS Distributed Simulation Manager
1. From the ...\OPTIS\Distributed folder, double-click the SDSM.exe file.
The SPEOS Distributed Server Manager (SDSM) window appears.
2. Click Options.
The Simulation spooler window appears.
3. In the Shared directory for distributed simulations frame, check the network address of the shared directory.
4. Click OK to validate.
5. Do not close the SDSM.exe.
To know more about the Simulation spooler options, please have a look at Configuring Simulation Spooler (see page 58).
Configuring Simulation Spooler
The parameters only have effect if Simulation Spooler is selected on the Computer configuration tab.
1. Select the Simulation Spooler tab.
2. Set the Upload simulation results from simulation servers option.
The default configuration is to upload one by one simulation results from simulation servers. One by one is
useful to bypass network's efficiency troubles.
3. If needed, tick Create log file, Create operations log file or Create usage log file option.
With Create log file you can have general information about the Simulation Spooler computer.
With Create operations log file you can get information about operations happening in Simulation Spoolers
Status window. Operations details can be about New added simulation, Start simulation or Delete simulation.
With Create usage log file you can get information for each simulation about calculation time per server.
These log files are located in All users, ProgramData folder.
4. If needed, tick the Do not delete simulation results at the end of the simulation option.
It is possible to keep simulation results of each server on the Simulation Spooler before the final result's
merging. In this case results are kept in the ...\Optis\Distributed\CurrentSimulation\<Server Name> folder.
While a simulation is running in the Simulation spooler computer, folders appear with server's names related to
this Simulation spooler. The content of these folders is cleaned before running a new distributed computing
simulation.
5. Set the Shared directory for distributed simulations option.
For more information you can view Setting the Shared Directory (see page 54).
Page 68 of 87 SPEOS CAA V5 Based Installation Guide
Simulation Server
Parameterizing the User Account Control
This parameterization must be done before all software installation.
If you have Windows XP, you do not need to follow these steps.
If you have Windows 8, you can let the default user account control settings.
1. From Start, click Control Panel and click User Accounts.
2. If you have Windows Vista, click Turn User Account control on or off, click to clear the User Account Control
(UAC) to help protect your computer check box, and then click OK.
3. If you have Windows 7, click Change User Account Control settings, move the slider to the bottom till Never
Notify, and then click OK.
4. If you have Windows Server 2008 or 2012, click User Accounts, click Change User Account Control settings,
move the slider to the bottom till Never Notify, and then click OK.
5. When a box asking you if you want to restart your computer appears, click Restart Now to take into account
modifications.
Parameterizing the Rights for Accessing Server and Spooler
In case Server and Spooler computers have the Windows Server 2012 system, IT manager must give administrators
rights to users managing the cluster and follow the next steps.
1. From the top right of the screen, open the menus bar and click Settings.
2. Select Server info.
3. From the System window, click Remote settings.
4. From the Remote tab, select Allow remote connections to this computer, click to clear Allow connections only
from computers running Remote Desktop with Network Level Authentication (recommended) and click OK.
Installing the SPEOS CAA V5 Based
To be able to install some required files for OPTIS Distributed Computing, you must follow the next steps:
1. Getting SPEOS CAA V5 Based from the CD-ROM (see page 19).
-Or-
1. Getting SPEOS CAA V5 Based from the Web (see page 19).
2. Installing the SPEOS CAA V5 Based software (see page 19).
Setting the SPEOS Distributed Server
1. From the ...\OPTIS\Distributed\32bits folder, double-click the SDS.exe.
At the opening, a tray icon corresponding to the SDS is created on the right side of the task bar.
2. Right-click on the icon and click Show.
The SPEOS Distributed Server window appears.
3. Click Options.
The Simulation server window appears.
4. In the Connect this simulation server to a simulation spooler frame, select the Simulation Spooler and tick the
Activate box.
5. Click Ok to validate.
The SPEOS Distributed Server window appears.
6. Click Hide to put the SDS as a tray icon in the task bar.
To know more about the Simulation server window options, please have a look at Configuring Simulation Server (see page 61).
Configuring Simulation Server
A Simulation Server can be connected to only one Simulation Spooler.
The parameters only have effect if Simulation Server is selected on the Computer configuration tab.
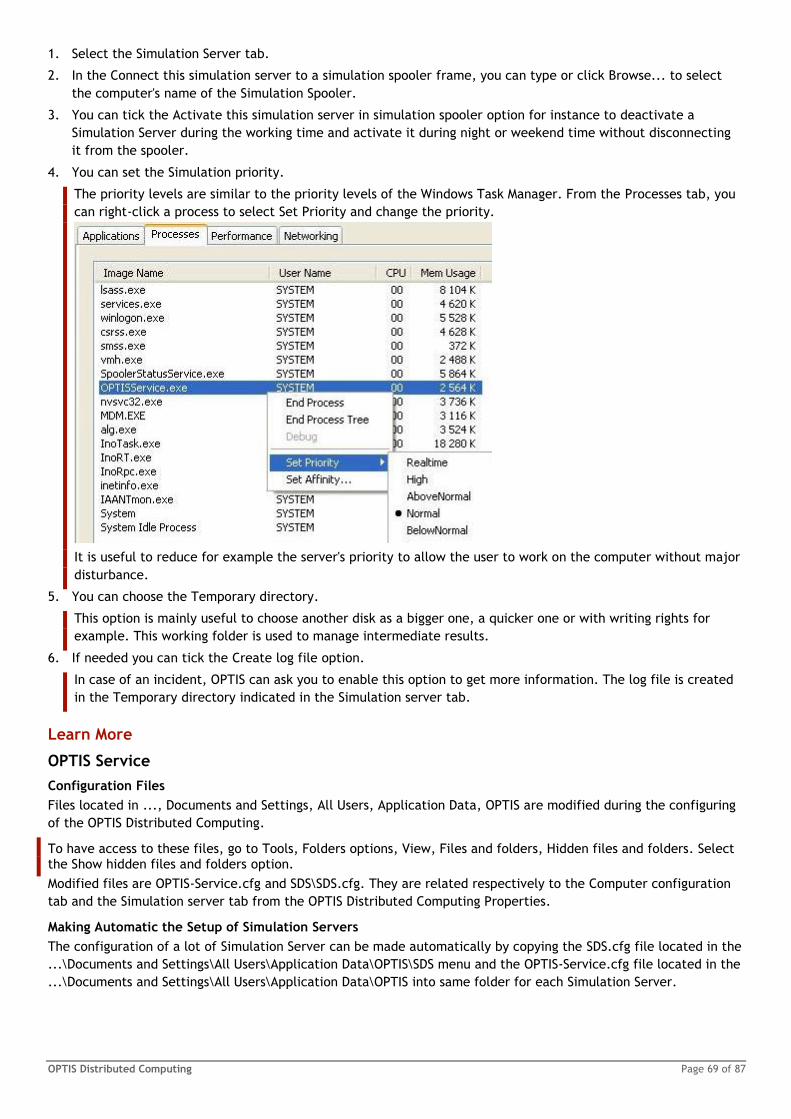
OPTIS Distributed Computing Page 69 of 87
1. Select the Simulation Server tab.
2. In the Connect this simulation server to a simulation spooler frame, you can type or click Browse... to select
the computer's name of the Simulation Spooler.
3. You can tick the Activate this simulation server in simulation spooler option for instance to deactivate a
Simulation Server during the working time and activate it during night or weekend time without disconnecting
it from the spooler.
4. You can set the Simulation priority.
The priority levels are similar to the priority levels of the Windows Task Manager. From the Processes tab, you
can right-click a process to select Set Priority and change the priority.
It is useful to reduce for example the server's priority to allow the user to work on the computer without major
disturbance.
5. You can choose the Temporary directory.
This option is mainly useful to choose another disk as a bigger one, a quicker one or with writing rights for
example. This working folder is used to manage intermediate results.
6. If needed you can tick the Create log file option.
In case of an incident, OPTIS can ask you to enable this option to get more information. The log file is created
in the Temporary directory indicated in the Simulation server tab.
Learn More
OPTIS Service
Configuration Files
Files located in ..., Documents and Settings, All Users, Application Data, OPTIS are modified during the configuring
of the OPTIS Distributed Computing.
To have access to these files, go to Tools, Folders options, View, Files and folders, Hidden files and folders. Select the Show hidden files and folders option.
Modified files are OPTIS-Service.cfg and SDS\SDS.cfg. They are related respectively to the Computer configuration
tab and the Simulation server tab from the OPTIS Distributed Computing Properties.
Making Automatic the Setup of Simulation Servers
The configuration of a lot of Simulation Server can be made automatically by copying the SDS.cfg file located in the
...\Documents and Settings\All Users\Application Data\OPTIS\SDS menu and the OPTIS-Service.cfg file located in the
...\Documents and Settings\All Users\Application Data\OPTIS into same folder for each Simulation Server.
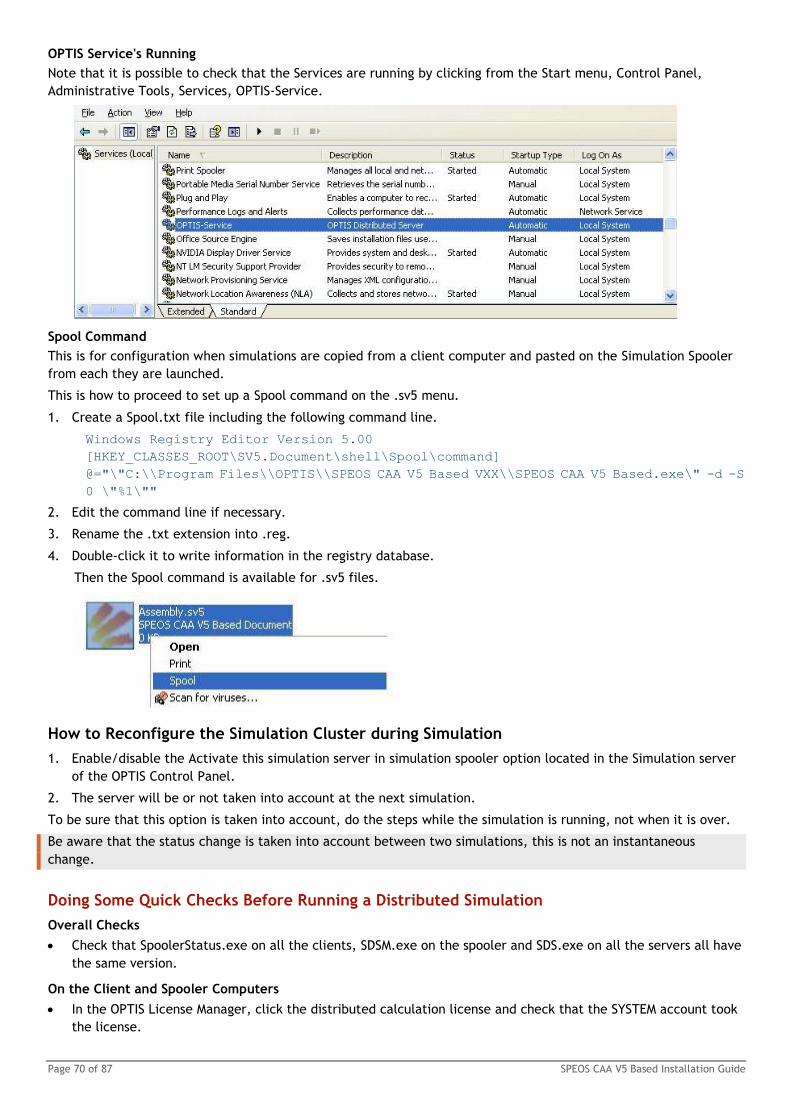
Page 70 of 87 SPEOS CAA V5 Based Installation Guide
OPTIS Service's Running
Note that it is possible to check that the Services are running by clicking from the Start menu, Control Panel,
Administrative Tools, Services, OPTIS-Service.
Spool Command
This is for configuration when simulations are copied from a client computer and pasted on the Simulation Spooler
from each they are launched.
This is how to proceed to set up a Spool command on the .sv5 menu.
1. Create a Spool.txt file including the following command line.
Windows Registry Editor Version 5.00
[HKEY_CLASSES_ROOT\SV5.Document\shell\Spool\command]
@="\"C:\\Program Files\\OPTIS\\SPEOS CAA V5 Based VXX\\SPEOS CAA V5 Based.exe\" -d -S
0 \"%1\""
2. Edit the command line if necessary.
3. Rename the .txt extension into .reg.
4. Double-click it to write information in the registry database.
Then the Spool command is available for .sv5 files.
How to Reconfigure the Simulation Cluster during Simulation
1. Enable/disable the Activate this simulation server in simulation spooler option located in the Simulation server
of the OPTIS Control Panel.
2. The server will be or not taken into account at the next simulation.
To be sure that this option is taken into account, do the steps while the simulation is running, not when it is over.
Be aware that the status change is taken into account between two simulations, this is not an instantaneous
change.
Doing Some Quick Checks Before Running a Distributed Simulation
Overall Checks
Check that SpoolerStatus.exe on all the clients, SDSM.exe on the spooler and SDS.exe on all the servers all have
the same version.
On the Client and Spooler Computers
In the OPTIS License Manager, click the distributed calculation license and check that the SYSTEM account took
the license.
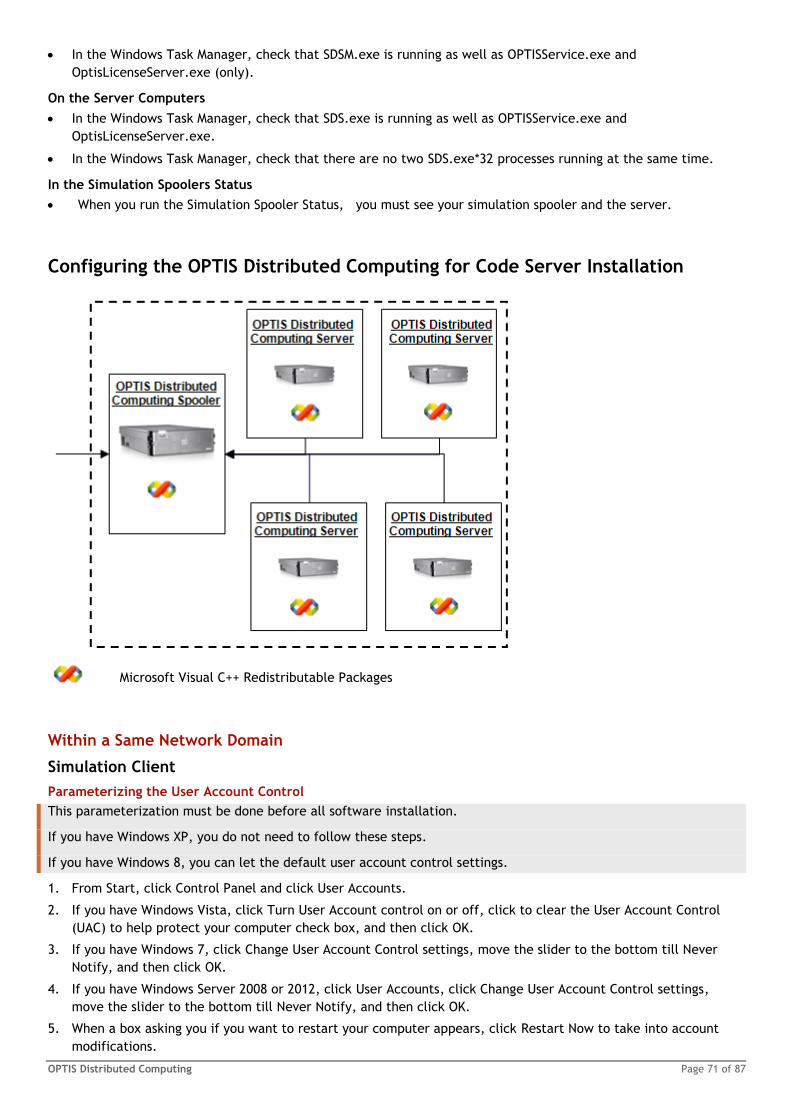
OPTIS Distributed Computing Page 71 of 87
In the Windows Task Manager, check that SDSM.exe is running as well as OPTISService.exe and
OptisLicenseServer.exe (only).
On the Server Computers
In the Windows Task Manager, check that SDS.exe is running as well as OPTISService.exe and
OptisLicenseServer.exe.
In the Windows Task Manager, check that there are no two SDS.exe*32 processes running at the same time.
In the Simulation Spoolers Status
When you run the Simulation Spooler Status, you must see your simulation spooler and the server.
Configuring the OPTIS Distributed Computing for Code Server Installation
Microsoft Visual C++ Redistributable Packages
Within a Same Network Domain
Simulation Client
Parameterizing the User Account Control
This parameterization must be done before all software installation.
If you have Windows XP, you do not need to follow these steps.
If you have Windows 8, you can let the default user account control settings.
1. From Start, click Control Panel and click User Accounts.
2. If you have Windows Vista, click Turn User Account control on or off, click to clear the User Account Control
(UAC) to help protect your computer check box, and then click OK.
3. If you have Windows 7, click Change User Account Control settings, move the slider to the bottom till Never
Notify, and then click OK.
4. If you have Windows Server 2008 or 2012, click User Accounts, click Change User Account Control settings,
move the slider to the bottom till Never Notify, and then click OK.
5. When a box asking you if you want to restart your computer appears, click Restart Now to take into account
modifications.
Page 72 of 87 SPEOS CAA V5 Based Installation Guide
Configuring Simulation Client
1. From Start menu, click All Programs, OPTIS, OPTIS Distributed Computing, Simulation Spoolers Status.
-Or-
1. From SPEOS CAA V5 Based, launch the Simulation Spoolers Status.
2. Click Configuration, Configurations....
The Simulation client window appears.
3. To select the Simulation Spooler you want to connect your client to, click Add... to browse or select a
Simulation Spooler and then click Remove.
The Simulation Spooler is added to the Connect this simulation client to simulation spooler(s) list.
A Simulation Spooler can also be added by typing its name in the edit box on the right side of the Add button
and then by clicking Add....
4. Move up or down Simulation Spoolers in the list to define the order of the Spoolers' display when the Network
Update command is launched (Have a look to the SPEOS User Guide
(http://portal.optis-world.com/portal/documentation/documentation.asp) for more details).
The Simulation Spooler located at the top of the list is set up as the default one for this Simulation Client, this
one on each are transferred the distributed simulations.
5. Click OK.
The Simulation spoolers status window appears. The Simulation Spooler is added to the Simulation spoolers list.
The Simulation progress list indicates the Simulation Servers connected to this Simulation Spooler.
Simulation Spooler
Parameterizing the Rights for Accessing Server and Spooler
In case Server and Spooler computers have the Windows Server 2012 system, IT manager must give administrators
rights to users managing the cluster and follow the next steps.
1. From the top right of the screen, open the menus bar and click Settings.
2. Select Server info.
3. From the System window, click Remote settings.
4. From the Remote tab, select Allow remote connections to this computer, click to clear Allow connections only
from computers running Remote Desktop with Network Level Authentication (recommended) and click OK.
Parameterizing the User Account Control
This parameterization must be done before all software installation.
If you have Windows XP, you do not need to follow these steps.
If you have Windows 8, you can let the default user account control settings.
1. From Start, click Control Panel and click User Accounts.
2. If you have Windows Vista, click Turn User Account control on or off, click to clear the User Account Control
(UAC) to help protect your computer check box, and then click OK.
3. If you have Windows 7, click Change User Account Control settings, move the slider to the bottom till Never
Notify, and then click OK.
4. If you have Windows Server 2008 or 2012, click User Accounts, click Change User Account Control settings,
move the slider to the bottom till Never Notify, and then click OK.
5. When a box asking you if you want to restart your computer appears, click Restart Now to take into account
modifications.
Installing the Microsoft Visual C++ Redistributable Package
For more details, you can view the SPEOS CAA V5 Based System Requirements (see page 7).
If you have Windows Server 2012, you may have to run as administrator the Microsoft Visual C++ Redistributable
Packages.
OPTIS Distributed Computing Page 73 of 87
Preparing the OPTIS Distributed Computing Installation
You must be in full administrator mode. You must have write access on system folders.
You must parametrize the machines following the System Requirements (see page 6).
When using Windows Vista operating system, you must have installed Windows PowerShell. For more details, you can view here (http://www.microsoft.com/en-us/download/details.aspx?id=9864).
1. Copy the OptisCluster (OptisCluster.zip) folder at the root directory of a disk.
OptisCluster folder includes a PowerShellScript folder, some scripts (CreateSharedFolder.bat, Install_Base.bat,
INSTALL_VXX.bat, RunSpeosCore.bat, UnInstall.bat) and the README text file.
2. Open the folder.
3. Right-click INSTALL_VXX.bat and select Edit.
4. Edit the following paths to the binary files to match your installation.
Binary files are located on the Code Server.
Environment Variables Corresponds to Example
SET OPTIS_DIR=XXX The "..\..\" corresponds to the path of the Code Server installation files.
SET OPTIS_DIR=\\SIM-EU120188\Installs CSI\V15.0.0 _ B23 _ B21_64\
5. Save and close the file.
6. Right-click CreateSharedFolder.bat and select Edit.
7. Edit the OptisCluster example with a group name using your cluster or with all users names.
8. Edit Ordinateurs du domaine and replace it with your language translation.
9. Save the .bat file.
Installing the OPTIS Distributed Computing on Simulation Spooler
1. Find the cmd.exe command and select Run as administrator.
2. Type cd.. and click Enter until you come back to the root directory where is located the OptisCluster folder.
3. Type cd OptisCluster and click Enter.
4. Type install_vxx and click Enter.
5. Let the command prompt window running and keep it opened when the installation is finished.
You can check that the Optis folder has been created in the OptisCluster directory.
6. From the command prompt window, type a key.
7. Type CreateSharedFolder and click Enter.
The CurrentSimulation shared folder is created, you can check rights by right-clicking on the folder, selecting
Properties and checking the Security tab.
8. Close the command prompt window.
9. When installing the OPTIS Distributed Computing for the first time on a machine,
1. From the Control Panel, select the OPTIS Control Panel.
From the Computer configuration tab,
1. Under OPTIS Service, click Stop.
If you can not stop the service, from the Windows Search menu, look for Services, right-click OPTIS-Service and
click Stop.
2. Select Simulation spooler.
3. Click to clear License server if the computer is not a License Server.
4. If the computer is also a calculation computer, select Simulation server.
From Simulation spooler tab,
1. If needed, you can select some options.
For more details, you can view Configuring Simulation Spooler (see page 58).

Page 74 of 87 SPEOS CAA V5 Based Installation Guide
Shared directory for distributed simulations has automatically been parameterized.
From the Simulation server tab,
1. If the computer is also a server computer, click Browse to select the Simulation Spooler you want to
connect your client to, and tick the Activate this simulation server in simulation spooler.
In this specific case, it is the computer itself.
It is also recommended to set the priority of the simulation just below Normal.
From the Computer configuration tab,
1. Under OPTIS Service, click Start.
If you can not start the service, from the Windows Search menu, look for Services, right-click OPTIS-Service
and click Start.
2. When the service is running, click OK to close the OPTIS Control Panel Properties window.
10. Restart your computer.
Simulation Server
Parameterizing the Rights for Accessing Server and Spooler
In case Server and Spooler computers have the Windows Server 2012 system, IT manager must give administrators
rights to users managing the cluster and follow the next steps.
1. From the top right of the screen, open the menus bar and click Settings.
2. Select Server info.
3. From the System window, click Remote settings.
4. From the Remote tab, select Allow remote connections to this computer, click to clear Allow connections only
from computers running Remote Desktop with Network Level Authentication (recommended) and click OK.
Parameterizing the User Account Control
This parameterization must be done before all software installation.
If you have Windows XP, you do not need to follow these steps.
If you have Windows 8, you can let the default user account control settings.
1. From Start, click Control Panel and click User Accounts.
2. If you have Windows Vista, click Turn User Account control on or off, click to clear the User Account Control
(UAC) to help protect your computer check box, and then click OK.
3. If you have Windows 7, click Change User Account Control settings, move the slider to the bottom till Never
Notify, and then click OK.
4. If you have Windows Server 2008 or 2012, click User Accounts, click Change User Account Control settings,
move the slider to the bottom till Never Notify, and then click OK.
5. When a box asking you if you want to restart your computer appears, click Restart Now to take into account
modifications.
Installing the Microsoft Visual C++ Redistributable Package
For more details, you can view the SPEOS CAA V5 Based System Requirements (see page 7).
If you have Windows Server 2012, you may have to run as administrator the Microsoft Visual C++ Redistributable
Packages.
Preparing the OPTIS Distributed Computing Installation
You must be in full administrator mode. You must have write access on system folders.
You must parametrize the machines following the System Requirements (see page 6).
When using Windows Vista operating system, you must have installed Windows PowerShell. For more details, you can view here (http://www.microsoft.com/en-us/download/details.aspx?id=9864).
1. Copy the OptisCluster (OptisCluster.zip) folder at the root directory of a disk.

OPTIS Distributed Computing Page 75 of 87
OptisCluster folder includes a PowerShellScript folder, some scripts (CreateSharedFolder.bat, Install_Base.bat,
INSTALL_VXX.bat, RunSpeosCore.bat, UnInstall.bat) and the README text file.
2. Open the folder.
3. Right-click INSTALL_VXX.bat and select Edit.
4. Edit the following paths to the binary files to match your installation.
Binary files are located on the Code Server.
Environment Variables Corresponds to Example
SET OPTIS_DIR=XXX The "..\..\" corresponds to the path of the Code Server installation files.
SET OPTIS_DIR=\\SIM-EU120188\Installs CSI\V15.0.0 _ B23 _ B21_64\
5. Save and close the file.
Installing the OPTIS Distributed Computing
1. Find the cmd.exe command and select Run as administrator.
2. Type cd.. and click Enter until you come back to the root directory where is located the OptisCluster folder.
3. Type cd OptisCluster and click Enter.
4. Type install_vxx and click Enter.
5. Let the command prompt window running and close it when the installation is finished.
You can check that the Optis folder has been created in the OptisCluster directory.
6. When installing the OPTIS Distributed Computing for the first time on a machine,
1. From the Control Panel, select the OPTIS Control Panel.
From the Computer configuration tab,
1. Under OPTIS Service, click Stop.
If you can not stop the service, from the Windows Search menu, look for Services, right-click OPTIS-Service and
click Stop.
2. Click to clear License server if the computer is not a License Server.
3. Select Simulation server.
From the Simulation server tab,
1. Click Browse to select the Simulation Spooler you want to connect your server to, and tick the Activate this
simulation server in simulation spooler.
For more details about the options, you can view Configuring Simulation Server (see page 61).
From the Computer configuration tab,
1. Under OPTIS Service, click Start.
If you can not start the service, from the Windows Search menu, look for Services, right-click OPTIS-Service
and click Start.
2. When the service is running, click OK to close the OPTIS Control Panel Properties window.
7. Restart your computer.
Within a Workgroup
Simulation Client
Parameterizing the User Account Control
This parameterization must be done before all software installation.
If you have Windows XP, you do not need to follow these steps.
If you have Windows 8, you can let the default user account control settings.
1. From Start, click Control Panel and click User Accounts.
Page 76 of 87 SPEOS CAA V5 Based Installation Guide
2. If you have Windows Vista, click Turn User Account control on or off, click to clear the User Account Control
(UAC) to help protect your computer check box, and then click OK.
3. If you have Windows 7, click Change User Account Control settings, move the slider to the bottom till Never
Notify, and then click OK.
4. If you have Windows Server 2008 or 2012, click User Accounts, click Change User Account Control settings,
move the slider to the bottom till Never Notify, and then click OK.
5. When a box asking you if you want to restart your computer appears, click Restart Now to take into account
modifications.
Configuring Simulation Client
1. From Start menu, click All Programs, OPTIS, OPTIS Distributed Computing, Simulation Spoolers Status.
-Or-
1. From SPEOS CAA V5 Based, launch the Simulation Spoolers Status.
2. Click Configuration, Configurations....
The Simulation client window appears.
3. To select the Simulation Spooler you want to connect your client to, click Add... to browse or select a
Simulation Spooler and then click Remove.
The Simulation Spooler is added to the Connect this simulation client to simulation spooler(s) list.
A Simulation Spooler can also be added by typing its name in the edit box on the right side of the Add button
and then by clicking Add....
4. Move up or down Simulation Spoolers in the list to define the order of the Spoolers' display when the Network
Update command is launched (Have a look to the SPEOS User Guide
(http://portal.optis-world.com/portal/documentation/documentation.asp) for more details).
The Simulation Spooler located at the top of the list is set up as the default one for this Simulation Client, this
one on each are transferred the distributed simulations.
5. Click OK.
The Simulation spoolers status window appears. The Simulation Spooler is added to the Simulation spoolers list.
The Simulation progress list indicates the Simulation Servers connected to this Simulation Spooler.
Simulation Spooler
Parameterizing the Rights for Accessing Server and Spooler
In case Server and Spooler computers have the Windows Server 2012 system, IT manager must give administrators
rights to users managing the cluster and follow the next steps.
1. From the top right of the screen, open the menus bar and click Settings.
2. Select Server info.
3. From the System window, click Remote settings.
4. From the Remote tab, select Allow remote connections to this computer, click to clear Allow connections only
from computers running Remote Desktop with Network Level Authentication (recommended) and click OK.
Parameterizing the User Account Control
This parameterization must be done before all software installation.
If you have Windows XP, you do not need to follow these steps.
If you have Windows 8, you can let the default user account control settings.
1. From Start, click Control Panel and click User Accounts.
2. If you have Windows Vista, click Turn User Account control on or off, click to clear the User Account Control
(UAC) to help protect your computer check box, and then click OK.
3. If you have Windows 7, click Change User Account Control settings, move the slider to the bottom till Never
Notify, and then click OK.
4. If you have Windows Server 2008 or 2012, click User Accounts, click Change User Account Control settings,
move the slider to the bottom till Never Notify, and then click OK.
OPTIS Distributed Computing Page 77 of 87
5. When a box asking you if you want to restart your computer appears, click Restart Now to take into account
modifications.
Installing the Microsoft Visual C++ Redistributable Package
For more details, you can view the SPEOS CAA V5 Based System Requirements (see page 7).
If you have Windows Server 2012, you may have to run as administrator the Microsoft Visual C++ Redistributable
Packages.
Preparing the OPTIS Distributed Computing Installation
You must be in full administrator mode. You must have write access on system folders.
You must parametrize the machines following the System Requirements (see page 6).
When using Windows Vista operating system, you must have installed Windows PowerShell. For more details, you
can view here (http://www.microsoft.com/en-us/download/details.aspx?id=9864).
1. Copy the OptisCluster (OptisCluster.zip) folder at the root directory of a disk.
OptisCluster folder includes a PowerShellScript folder, some scripts (CreateSharedFolder.bat, Install_Base.bat,
INSTALL_VXX.bat, RunSpeosCore.bat, UnInstall.bat) and the README text file.
2. Open the folder.
3. Right-click INSTALL_VXX.bat and select Edit.
4. Edit the following paths to the binary files to match your installation.
Binary files are located on the Code Server.
Environment Variables Corresponds to Example
SET OPTIS_DIR=XXX The "..\..\" corresponds to the path of the Code Server installation files.
SET OPTIS_DIR=\\SIM-EU120188\Installs CSI\V15.0.0 _ B23 _ B21_64\
5. Save and close the file.
Installing the OPTIS Distributed Computing on Simulation Spooler
1. Find the cmd.exe command and select Run as administrator.
2. Type cd.. and click Enter until you come back to the root directory where is located the OptisCluster folder.
3. Type cd OptisCluster and click Enter.
4. Type install_vxx and click Enter.
5. Let the command prompt window running and keep it opened when the installation is finished.
You can check that the Optis folder has been created in the OptisCluster directory.
6. From the command prompt window, type a key.
7. Type CreateSharedFolder and click Enter.
The CurrentSimulation shared folder is created, you can check rights by right-clicking on the folder, selecting
Properties and checking the Security tab.
8. Close the command prompt window.
9. When installing the OPTIS Distributed Computing for the first time on a machine,
1. From the Control Panel, select the OPTIS Control Panel.
From the Computer configuration tab,
1. Under OPTIS Service, click Stop.
If you can not stop the service, from the Windows Search menu, look for Services, right-click OPTIS-Service and
click Stop.
2. Select Simulation spooler.
3. Click to clear License server if the computer is not a License Server.
4. If the computer is also a calculation computer, select Simulation server.
From Simulation spooler tab,
Page 78 of 87 SPEOS CAA V5 Based Installation Guide
1. If needed, you can select some options.
For more details, you can view Configuring Simulation Spooler (see page 58).
Shared directory for distributed simulations has automatically been parameterized.
From the Simulation server tab,
1. If the computer is also a server computer, click Browse to select the Simulation Spooler you want to
connect your client to, and tick the Activate this simulation server in simulation spooler.
In this specific case, it is the computer itself.
It is also recommended to set the priority of the simulation just below Normal.
From the Computer configuration tab,
1. Under OPTIS Service, click Start.
If you can not start the service, from the Windows Search menu, look for Services, right-click OPTIS-Service
and click Start.
2. When the service is running, click OK to close the OPTIS Control Panel Properties window.
10. Restart your computer.
Simulation Server
Parameterizing the Rights for Accessing Server and Spooler
In case Server and Spooler computers have the Windows Server 2012 system, IT manager must give administrators
rights to users managing the cluster and follow the next steps.
1. From the top right of the screen, open the menus bar and click Settings.
2. Select Server info.
3. From the System window, click Remote settings.
4. From the Remote tab, select Allow remote connections to this computer, click to clear Allow connections only
from computers running Remote Desktop with Network Level Authentication (recommended) and click OK.
Parameterizing the User Account Control
This parameterization must be done before all software installation.
If you have Windows XP, you do not need to follow these steps.
If you have Windows 8, you can let the default user account control settings.
1. From Start, click Control Panel and click User Accounts.
2. If you have Windows Vista, click Turn User Account control on or off, click to clear the User Account Control
(UAC) to help protect your computer check box, and then click OK.
3. If you have Windows 7, click Change User Account Control settings, move the slider to the bottom till Never
Notify, and then click OK.
4. If you have Windows Server 2008 or 2012, click User Accounts, click Change User Account Control settings,
move the slider to the bottom till Never Notify, and then click OK.
5. When a box asking you if you want to restart your computer appears, click Restart Now to take into account
modifications.
Installing the Microsoft Visual C++ Redistributable Package
For more details, you can view the SPEOS CAA V5 Based System Requirements (see page 7).
If you have Windows Server 2012, you may have to run as administrator the Microsoft Visual C++ Redistributable
Packages.
Preparing the OPTIS Distributed Computing Installation
You must be in full administrator mode. You must have write access on system folders.
You must parametrize the machines following the System Requirements (see page 6).
OPTIS Distributed Computing Page 79 of 87
When using Windows Vista operating system, you must have installed Windows PowerShell. For more details, you can view here (http://www.microsoft.com/en-us/download/details.aspx?id=9864).
1. Copy the OptisCluster (OptisCluster.zip) folder at the root directory of a disk.
OptisCluster folder includes a PowerShellScript folder, some scripts (CreateSharedFolder.bat, Install_Base.bat,
INSTALL_VXX.bat, RunSpeosCore.bat, UnInstall.bat) and the README text file.
2. Open the folder.
3. Right-click INSTALL_VXX.bat and select Edit.
4. Edit the following paths to the binary files to match your installation.
Binary files are located on the Code Server.
Environment Variables Corresponds to Example
SET OPTIS_DIR=XXX The "..\..\" corresponds to the path of the Code Server installation files.
SET OPTIS_DIR=\\SIM-EU120188\Installs CSI\V15.0.0 _ B23 _ B21_64\
5. Save and close the file.
Installing the OPTIS Distributed Computing
1. Find the cmd.exe command and select Run as administrator.
2. Type cd.. and click Enter until you come back to the root directory where is located the OptisCluster folder.
3. Type cd OptisCluster and click Enter.
4. Type install_vxx and click Enter.
5. Let the command prompt window running and close it when the installation is finished.
You can check that the Optis folder has been created in the OptisCluster directory.
6. When installing the OPTIS Distributed Computing for the first time on a machine,
1. From the Control Panel, select the OPTIS Control Panel.
From the Computer configuration tab,
1. Under OPTIS Service, click Stop.
If you can not stop the service, from the Windows Search menu, look for Services, right-click OPTIS-Service and
click Stop.
2. Click to clear License server if the computer is not a License Server.
3. Select Simulation server.
From the Simulation server tab,
1. Click Browse to select the Simulation Spooler you want to connect your server to, and tick the Activate this
simulation server in simulation spooler.
For more details about the options, you can view Configuring Simulation Server (see page 61).
From the Computer configuration tab,
1. Under OPTIS Service, click Start.
If you can not start the service, from the Windows Search menu, look for Services, right-click OPTIS-Service
and click Start.
2. When the service is running, click OK to close the OPTIS Control Panel Properties window.
7. Restart your computer.
Doing Some Quick Checks Before Running a Distributed Simulation
Overall Checks
Check that SpoolerStatus.exe on all the clients, SDSM.exe on the spooler and SDS.exe on all the servers all have
the same version.
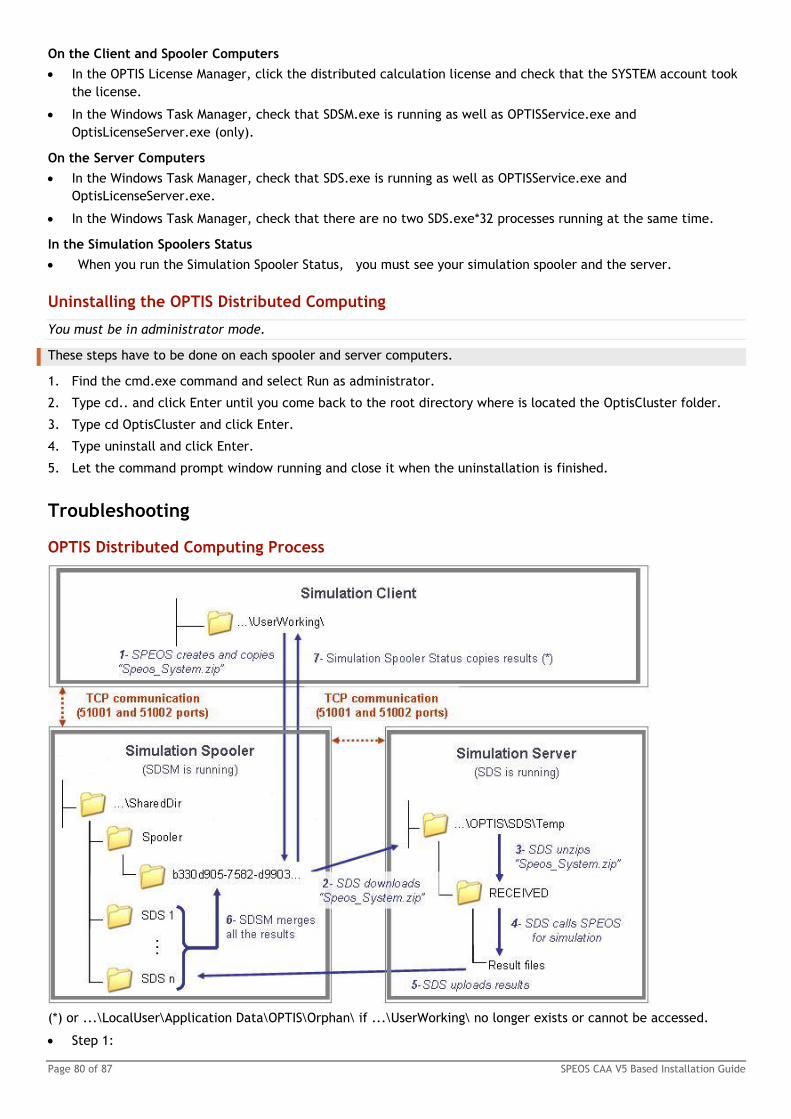
Page 80 of 87 SPEOS CAA V5 Based Installation Guide
On the Client and Spooler Computers
In the OPTIS License Manager, click the distributed calculation license and check that the SYSTEM account took
the license.
In the Windows Task Manager, check that SDSM.exe is running as well as OPTISService.exe and
OptisLicenseServer.exe (only).
On the Server Computers
In the Windows Task Manager, check that SDS.exe is running as well as OPTISService.exe and
OptisLicenseServer.exe.
In the Windows Task Manager, check that there are no two SDS.exe*32 processes running at the same time.
In the Simulation Spoolers Status
When you run the Simulation Spooler Status, you must see your simulation spooler and the server.
Uninstalling the OPTIS Distributed Computing
You must be in administrator mode.
These steps have to be done on each spooler and server computers.
1. Find the cmd.exe command and select Run as administrator.
2. Type cd.. and click Enter until you come back to the root directory where is located the OptisCluster folder.
3. Type cd OptisCluster and click Enter.
4. Type uninstall and click Enter.
5. Let the command prompt window running and close it when the uninstallation is finished.
Troubleshooting
OPTIS Distributed Computing Process
(*) or ...\LocalUser\Application Data\OPTIS\Orphan\ if ...\UserWorking\ no longer exists or cannot be accessed.
Step 1:
OPTIS Distributed Computing Page 81 of 87
Check that the User account of the Simulation Client has read/write access to the SharedDir shared
directory on the network.
Check the network path of the SharedDir shared directory in the Simulation Spooler tab of the OPTIS Control
Panel.
Check the Firewall settings for the 51001 and 51002 ports on both Simulation Client and Simulation Spooler
computers.
Steps 3 and 6:
Check that the SYSTEM account of Simulation Servers has read/write access to the SharedDir shared
directory on the network.
Check the Firewall settings for the 51001 and 51002 ports on Simulation Spooler and each Simulation Server
computers.
Step 8:
Check that the User account of the Simulation Client has read/write access to the SharedDir shared
directory on the network.
Check that the User account of a Simulation Client has write access to the UserWorking directories of this
Client (which should be always the case).
Check the Firewall settings for the 51001 and 51002 ports on both Simulation Client and Simulation Spooler
computers.
In the case SDS and SDSM are running in a User session (instead of the SYSTEM account), the read/write access
must be set for the User account.
How to Configure the Windows Firewall?
For all computers, make sure to configure your firewall in the correct way.
If you have Windows XP,
1. From Start, click Control Panel, Windows Firewall.
2. Open the Exceptions tab.
A window appears.
3. Click Add Program....
The Add a Program window appears.
A window appears.
4. Click Add.
The Add a Program window appears.
5. Click Browse....
6. Open the ...\Optis\Distributed directory.
7. On the servers, select the SDS.exe file located in the 32bits folder. Click Open and OK.
8. SDS.exe is added in the Programs and Services list.
9. On the spooler, select the SDSM.exe file. Click Open and OK.
SDSM.exe is added in the Programs and Services list.
-Or-
If you have Windows Vista or higher,
10. From Start, click Control Panel, Windows Firewall.
11. Click Allow a program or feature through Windows Firewall.
12. Click Allow another program....
The Add a Program window appears.
Click Add.
13. Click Browse....
14. Open the ...\Optis\Distributed directory.
15. On the servers, select the SDS.exe file located in the 32bits folder. Click Open and OK.
Page 82 of 87 SPEOS CAA V5 Based Installation Guide
SDS.exe is added in the Programs and Services list.
16. On the spooler, select the SDSM.exe file. Click Open and OK.
SDSM.exe is added in the Programs and Services list.
Note that if the Firewall Unblock has been made manually with a pop up coming out automatically, the
SDSM.exe appears in the following window.
How to Set the OPTIS Control Panel Properties?
1. From Start, click All Programs, OPTIS, OPTIS License, OPTIS Control Panel. Select the Computer configuration
tab.
2. Stop the OPTIS Service.
3. Set the configuration of your machines:
1. For the clients and the spooler, activate Simulation client and Simulation spooler.
2. For the servers, activate Simulation server.
4. In the Simulation Spooler tab, enter the name of the shared directory.
The path to you shared directory must end with \ , for example \\SpoolerMachine\CurrentSimulation$\.
5. In the Simulation Server tab, make sure you entered the name of your spooler and that you selected Activate
this simulation server in simulation spooler.
6. Check that the License Server is activated.
7. Start the OPTIS Service.
What to Do if the Spooler Status Does not See the Spooler?
Problem
The spooler does not appear in the Simulation spoolers list of the Simulation Spooler Status.
Cause
The TCP communication from the clients to the spooler does not work.
Solution
1. On the clients,
1. In the OPTIS Control Panel Properties, check in the Computer configurations tab that Simulation Spooler is
selected.
2. In the Simulation client properties, check the name of the Spooler in the Connect this simulation client to
simulation spooler(s) list.
2. On the spooler,
1. Open the Windows Task Manager and check that SDSM.exe is started.
2. Open the Windows Firewall and check that the 51001 and 51002 TCP ports are opened and that SDSM.exe is
allowed to run.
For more information, you can view How to Configure the Windows Firewall? (see page 81).
3. In the Windows Network and Sharing Center, open the Change advanced sharing settings section and check
that Network discovery is turned on.
What to Do if the Simulation Spooler Status Does not See the Servers?
Problem
One or more servers do not appear in the Simulation progress area of the Simulation Spooler Status, but the spooler
appear in the Simulation Spoolers list.

OPTIS Distributed Computing Page 83 of 87
Cause
The Server is not started or not connected to the spooler.
Solution
On the servers:
1. In the OPTIS Control Panel Properties, check in the Computer configuration tab that Simulation Server is
selected.
You can also check in the Windows Task Manager thats SDS.EXE is running.
2. Open the Windows Firewall and check that the 51001 and 51002 TCP ports are opened and that SDSM.exe is
allowed to run.
For more information, you can view How to Configure the Windows Firewall? (see page 81).
3. In the OPTIS Control Panel Properties, check the name of the spooler in the Connect this simulation server to a
simulation spooler box.

Page 84 of 87 SPEOS CAA V5 Based Installation Guide
CUSTOMIZING PATHS
Local Installation
WINDOWS XP ...\All Users\Application Data
WINDOWS VISTA ...\ProgramData
WINDOWS 7 ...\ProgramData
WINDOWS 8 ...\ProgramData
WINDOWS SERVER 2003 ...\All Users\Application Data
WINDOWS SERVER 2008 ...\ProgramData
Code Server Installation
You must add the path of the OPTIS_GLOBAL_APPLICATION_DATA_PATH environment variable.
For more details, you can view OPTIS Environment Variables (see page 33).
INDEX
A
Adding SV5 to the CATIA V5 Environment • 33, 38
Architecture and Process of the OPTIS Distributed Computing • 51
C
CATIA release not recognized while SPEOS installation • 26
Checking the Environment Log File • 38
CODE SERVER INSTALLATION • 30
Code Server Installation Architecture • 5, 30
Configuring a Floating License • 21, 35
Configuring a Floating License from the Client • 22, 36
Configuring a Floating License from the Server • 21, 35
Configuring a Nodelock License • 20, 34
Configuring for other Client computers • 37
Configuring Simulation Client • 53, 62, 72, 76
Configuring Simulation Server • 61, 68, 75, 79
Configuring Simulation Spooler • 58, 67, 73, 78
Configuring the OPTIS Distributed Computing for a Local Installation • 5, 53
Configuring the OPTIS Distributed Computing for Code Server Installation • 5, 71
Connecting to the OPTIS License Server • 22, 36
Connecting to the Portal • 19, 31
Creating Bat Files • 32, 37
Creating Environment • 26, 28
CREATING ENVIRONMENT • 40
Creating environment for CATIA V5 & SPEOS CAA V5 Based • 40
Creating environment for Digital Project & SPEOS CAA V5 Based • 45
Customizing Paths • 9, 39
CUSTOMIZING PATHS • 84
D
Doing Some Quick Checks Before Running a Distributed Simulation • 70, 79
Downloading the Code Server software • 32
Downloading the license file • 21, 22, 35, 36
E
Environment • 32
F
From the Code Server • 31
G
General Requirements • 10
Getting Code Server Installation from the CD-ROM • 31
Getting Code Server Installation from the Web • 31
Getting SPEOS CAA V5 Based from the CD-ROM • 19, 54, 59, 63, 68
Getting SPEOS CAA V5 Based from the Web • 19, 54, 59, 63, 68
Getting the 1500 Error Message • 26
Getting the 1722 or 1721 Error Message • 25
Getting the 1901 Error Message • 26
H
How to Configure the Windows Firewall? • 81, 82, 83
How to Reconfigure the Simulation Cluster during Simulation • 70
How to Set the OPTIS Control Panel Properties? • 82
I
Importing a License • 21, 22, 35, 36
Installing SPEOS CAA V5 Based • 19, 54, 59, 63, 68
Installing SPEOS CAA V5 Based from a Command Line • 23, 24
Installing the Microsoft Visual C++ Redistributable Package • 72, 74, 77, 78
Installing the OPTIS Distributed Computing • 75, 79
Installing the OPTIS Distributed Computing on Simulation Spooler • 73, 77
Installing the OPTIS license • 20, 34, 37
Installing the SPEOS CAA V5 Based • 54, 59, 63, 68
L
Launching SPEOS CAA V5 Based • 23
Launching the Environment from a Client computer • 38
Launching the Optis License Manager • 35, 36
Launching the OPTIS License Manager • 21, 22
Learn More • 69
Local Installation • 5
LOCAL INSTALLATION • 18
O
Obtaining a License • 20, 21, 34, 35
Obtaining Code Server • 31
Obtaining SPEOS CAA V5 Based • 19
OPTIS DISTRIBUTED COMPUTING • 51
OPTIS Distributed Computing Process • 80
OPTIS Environment Variables • 32, 33, 84
OPTIS Labs Hardware Requirements • 10
OPTIS Labs Software Requirements • 12, 28
OPTIS Labs System Recommendations • 15
OPTIS Labs System Requirements • 10
OPTIS License Manager System Recommendations • 14
OPTIS License Manager System Requirements • 6
OPTIS Service • 69
P
Parameterizing the Rights for Accessing Server and Spooler • 54, 59, 63, 68, 72, 74, 76, 78
Parameterizing the User Account Control • 19, 31, 53, 54, 59, 62, 68, 71, 72, 74, 75, 76, 78
Preparing the OPTIS Distributed Computing Installation • 73, 74, 77, 78
S
Setting the OPTIS Control Panel • 58, 59
Setting the OPTIS license from SPEOS CAA V5 Based • 22, 37
Setting the Shared Directory • 54, 59, 63, 67
Setting the SPEOS Distributed Server • 68
Setting the SPEOS Distributed Simulation Manager • 67
Simulation Client • 53, 62, 71, 75
Simulation Server • 59, 68, 74, 78
Simulation Spooler • 54, 62, 72, 76
Specific Requirements • 10
SPEOS CAA V5 Based command is not displayed in the Start menu • 27
SPEOS CAA V5 Based License is not Displayed in the SPEOS License Panel • 28
SPEOS CAA V5 Based System Performances • 5
SPEOS CAA V5 BASED SYSTEM PERFORMANCES • 17
SPEOS CAA V5 Based System Recommendations • 14
SPEOS CAA V5 Based System Requirements • 7, 28, 72, 74, 77, 78
SPEOS CAA V5 Based workbench is not activated • 28
System Recommendations • 5
SYSTEM RECOMMENDATIONS • 14
System Requirements • 5, 73, 74, 77, 78
SYSTEM REQUIREMENTS • 6
T
Troubleshooting • 80
U
Uninstalling SPEOS CAA V5 Based • 18
Uninstalling SPEOS CAA V5 Based from a Command Line • 24
Uninstalling the OPTIS Distributed Computing • 80
V
VBA installation for a CATIA Code Server installation • 38
W
Warning
The Startup Catalog Files in the Following List Could Not be Found • 28
Video Configuration Error, Well Supported Mode Are 24 Bits and 32 Bits • 24
Warnings and Errors Messages • 24
WELCOME TO SPEOS CAA V5 BASED INSTALLATION GUIDE • 5
What to Do if the Simulation Spooler Status Does not See the Servers? • 82
What to Do if the Spooler Status Does not See the Spooler? • 82
Within a Same Network Domain • 53, 71
Within a Workgroup • 62, 75