solar water heating - build-it-solar · made available with generous permission of the authors diy...
TRANSCRIPT
Made available with generous permission of the authors
www.BuildItSolar.com DIY Solar Projects
10 SOLAR WATER HEATING
Site-built air-heating collectors that are tilted are a natural for domestic water heating in addition to their primary space heating function. Installation of the subsystem and its controls is simple, and since the collectors canbe used throughout the year, the payback on money invested in a water-heating system will be rapid. It is important to note that liquid-medium collectors do perform better for heating water than do air heaters per square foot of collector. But air-heating systems that are sized for space heating nevertheless perform admirably for summertime water heating because they incorporate a large collector area. If you have limited space available for a collector and no plans for solar space heating, a liquid-based collector system will probably be the better selection. But for do-it-yourself combination space-heating/ water-heating installations, a large, air-based collector system is the best choice. We have also found that a smaller (75 to 100 square feet), tilted air-heating collector can in some regions be used cost-effectively to heat water year-round with no space-heating mode. But, again, their cost-effectiveness is not universal; in some cases liquid heating systems will be the best choice. The following design guidelines refer to both space/domestic hot water combinations and domestic hot water onlysystems.
Design Guidelines for Air-to- Water Systems
Collectors for hot water systems need to deliver higher temperatures than when the collectors are used for space heating. Air that is 100 to 120°F is adequate for heating a room, but usable hot water temperatures are 120°F and above. It is a good idea to use a selective surface absorber in an air system that includes water heating, especially in the hot half closest to the outlet. Double glazing can be more cost-effective than single glazing, especially where outside temperatures are low. Double glazing is a good idea if you can't build as large a collector array as you would like, because of space limitations or whatever. A smaller, double-glazed collector will perform better than a single-glazed unit of the same size, especially in colder climates. More insulation behind the collector and around ductwork is helpful in minimizing heat losses from the airstream. The airflow rate in the water-heating mode should be lower than it is in the space-heating mode. The blower should be sized to deliver 2 cfm per square foot of collector (at sea level) rather than 2 ½ cfm, so there will be a higher temperature rise through the collector.
Most importantly, there needs to be a good exchange of heat at the air-to-water heat
239
Made available with generous permission of the authors
www.BuildItSolar.com DIY Solar Projects
240 THE COMPLETE HANDBOOK OF SOLAR AIR HEATING SYSTEMS
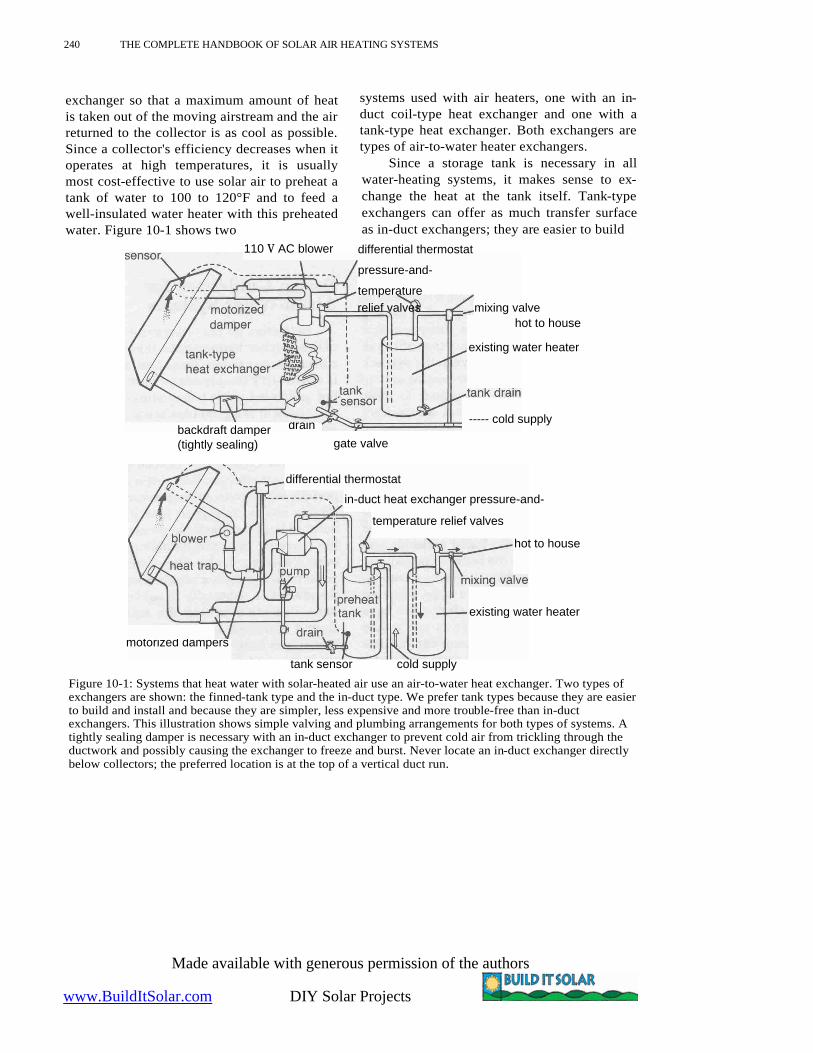
exchanger so that a maximum amount of heat is taken out of the moving airstream and the air returned to the collector is as cool as possible. Since a collector's efficiency decreases when it operates at high temperatures, it is usually most cost-effective to use solar air to preheat a tank of water to 100 to 120°F and to feed a well-insulated water heater with this preheated water. Figure 10-1 shows two
110 v AC blower
backdraft damper (tightly sealing)
systems used with air heaters, one with an in-duct coil-type heat exchanger and one with a tank-type heat exchanger. Both exchangers are types of air-to-water heater exchangers.
Since a storage tank is necessary in all water-heating systems, it makes sense to ex-change the heat at the tank itself. Tank-type exchangers can offer as much transfer surface as in-duct exchangers; they are easier to build
differential thermostat
pressure-and-
temperature relief valves mixing valve
hot to house
existing water heater
gate valve
differential thermostat
in-duct heat exchanger pressure-and-
temperature relief valves
hot to house
motorized dampers
existing water heater
tank sensor cold supply Figure 10-1: Systems that heat water with solar-heated air use an air-to-water heat exchanger. Two types of exchangers are shown: the finned-tank type and the in-duct type. We prefer tank types because they are easier to build and install and because they are simpler, less expensive and more trouble-free than in-duct exchangers. This illustration shows simple valving and plumbing arrangements for both types of systems. A tightly sealing damper is necessary with an in-duct exchanger to prevent cold air from trickling through the ductwork and possibly causing the exchanger to freeze and burst. Never locate an in-duct exchanger directly below collectors; the preferred location is at the top of a vertical duct run.
drain ----- cold supply
Made available with generous permission of the authors
www.BuildItSolar.com DIY Solar Projects
242 THE COMPLETE HANDBOOK OF SOLAR AIR HEATING SYSTEMS
is large. The collector can be small if the solar heater is located in a sunny, warm area and the tank is small. Larger collectors (or those with selective surface absorbers) will provide a greater annual percentage of hot water smallercollectors a smaller percentage. As a rule of thumb, figure that 1 to 11/2 square feet of collector will heat 1 gallon of storage. (See chapter 3 for information on sizing a hot water system for your site.)
Using a Large Collector for Heating Water
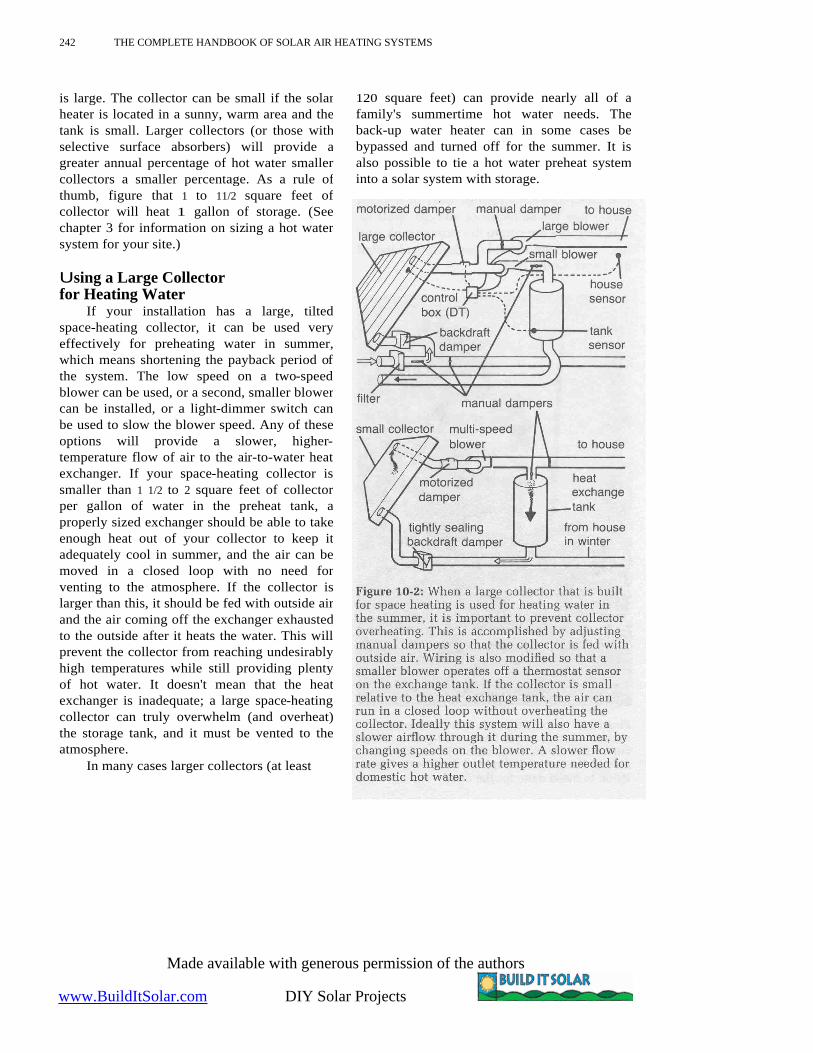
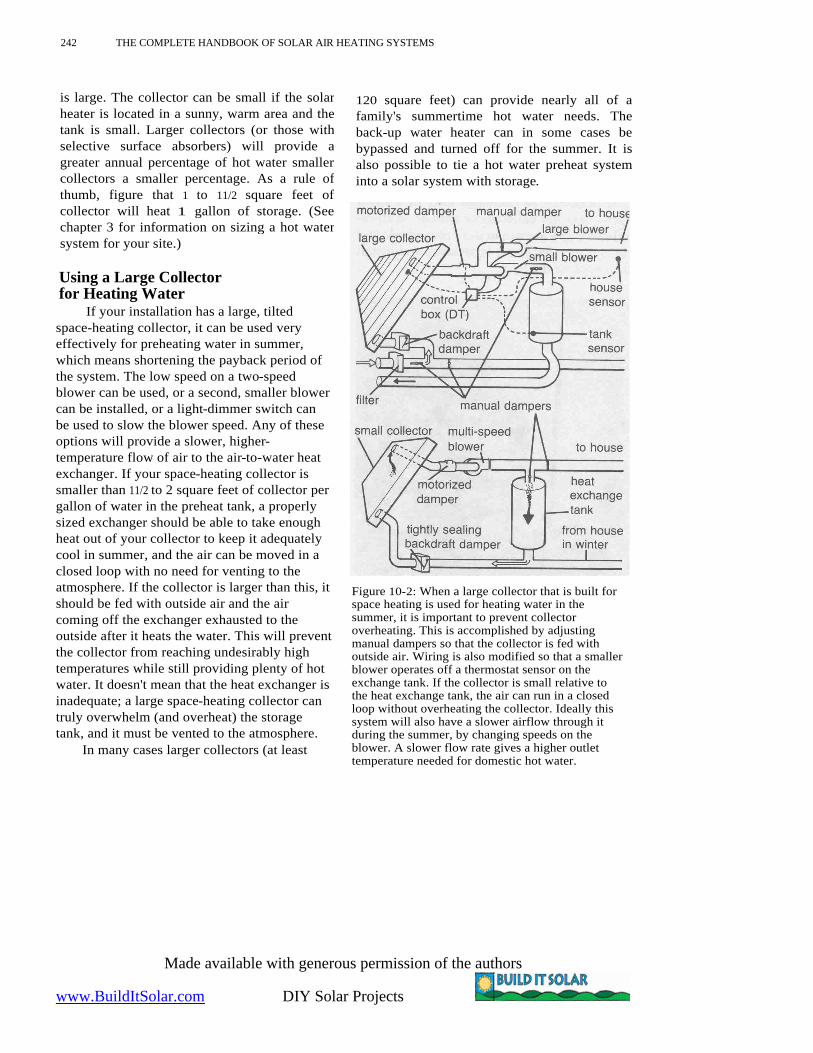
If your installation has a large, tilted space-heating collector, it can be used very effectively for preheating water in summer, which means shortening the payback period of the system. The low speed on a two-speed blower can be used, or a second, smaller blower can be installed, or a light-dimmer switch can be used to slow the blower speed. Any of these options will provide a slower, higher-temperature flow of air to the air-to-water heat exchanger. If your space-heating collector is smaller than 1 1/2 to 2 square feet of collector per gallon of water in the preheat tank, a properly sized exchanger should be able to take enough heat out of your collector to keep it adequately cool in summer, and the air can be moved in a closed loop with no need for venting to the atmosphere. If the collector is larger than this, it should be fed with outside air and the air coming off the exchanger exhausted to the outside after it heats the water. This will prevent the collector from reaching undesirably high temperatures while still providing plenty of hot water. It doesn't mean that the heat exchanger is inadequate; a large space-heating collector can truly overwhelm (and overheat) the storage tank, and it must be vented to the atmosphere.
In many cases larger collectors (at least
120 square feet) can provide nearly all of a family's summertime hot water needs. The back-up water heater can in some cases be bypassed and turned off for the summer. It is also possible to tie a hot water preheat system into a solar system with storage.
Made available with generous permission of the authors
www.BuildItSolar.com DIY Solar Projects
and are less expensive. No pump is required, as it is with an in-duct exchanger. Plumbing is simplified, and there is little danger of freezing problems.
In-duct exchangers do have their appli-cations, however, especially in cases where it is desirable to exchange heat in a small space near the collector or storage. Well-insulated pipes are run to the storage tank, and there is no need to cut large holes and install ductwork to the tank.
SOLAR WATER HEATING 241
Isolating the Exchanger It is important to isolate the heat exchanger
from the collector at night to prevent heat loss. This is especially important when using an in-duct exchanger. Water won't be moving through the exchanger coils at night, and even a tiny trickle of very cold air from the collector can freeze the stagnant water and possibly burst the exchanger. These exchangers should be located high in the system or at the top of a heat trap to prevent this. A tightly sealing motorized damper is also a must.
Tank-type exchangers won't freeze up, but they can lose a lot of heat at night if they aren't properly isolated. A well-built backdraft damper is usually sufficient, but your systemmay require a motorized damper if there is no heat trap on the ductwork from the collector.
Sizing The amount of hot water needed by a
family will vary somewhat, but a good rule of thumb is 20 gallons per person per day for average use habits. Thus an average family of four would use about 80 gallons of hot water every day. The solar preheat tank for this system should be sized at 80 gallons to provide the existing water heater with all the preheated water the family will need. Families that are very energy conscious (10 to 15 gallons per person per day) can get by with a tank system that is considerably smaller than this. In any case, the tank should be glass or epoxy-glass lined and should last at least as long as the water-heater tank (a new one lasts 10 to 15 years).
A collector for a hot water system needs to be sized for the tank and for the climate. It needs to be large if the installation is in a cloudy, cold location or if the preheat tank
..
Made available with generous permission of the authors
www.BuildItSolar.com DIY Solar Projects
242 THE COMPLETE HANDBOOK OF SOLAR AIR HEATING SYSTEMS
is large. The collector can be small if the solar heater is located in a sunny, warm area and the tank is small. Larger collectors (or those with selective surface absorbers) will provide a greater annual percentage of hot water smallercollectors a smaller percentage. As a rule of thumb, figure that 1 to 11/2 square feet of collector will heat 1 gallon of storage. (See chapter 3 for information on sizing a hot water system for your site.)
Using a Large Collector for Heating Water
If your installation has a large, tilted space-heating collector, it can be used very effectively for preheating water in summer, which means shortening the payback period of the system. The low speed on a two-speed blower can be used, or a second, smaller blower can be installed, or a light-dimmer switch can be used to slow the blower speed. Any of these options will provide a slower, higher-temperature flow of air to the air-to-water heat exchanger. If your space-heating collector is smaller than 11/2 to 2 square feet of collector per gallon of water in the preheat tank, a properly sized exchanger should be able to take enough heat out of your collector to keep it adequately cool in summer, and the air can be moved in a closed loop with no need for venting to the atmosphere. If the collector is larger than this, it should be fed with outside air and the air coming off the exchanger exhausted to the outside after it heats the water. This will prevent the collector from reaching undesirably high temperatures while still providing plenty of hot water. It doesn't mean that the heat exchanger is inadequate; a large space-heating collector can truly overwhelm (and overheat) the storage tank, and it must be vented to the atmosphere.
In many cases larger collectors (at least
120 square feet) can provide nearly all of a family's summertime hot water needs. The back-up water heater can in some cases be bypassed and turned off for the summer. It is also possible to tie a hot water preheat system into a solar system with storage.
Figure 10-2: When a large collector that is built for space heating is used for heating water in the summer, it is important to prevent collector overheating. This is accomplished by adjusting manual dampers so that the collector is fed with outside air. Wiring is also modified so that a smaller blower operates off a thermostat sensor on the exchange tank. If the collector is small relative to the heat exchange tank, the air can run in a closed loop without overheating the collector. Ideally this system will also have a slower airflow through it during the summer, by changing speeds on the blower. A slower flow rate gives a higher outlet temperature needed for domestic hot water.
Made available with generous permission of the authors
www.BuildItSolar.com DIY Solar Projects
One- Tank Systems Most electric water heaters and hot water
storage tanks have top and bottom heating elements, or fittings to allow for them. If the tank-type heat exchanger is made with this type of tank, the solar exchanger is placed on the lower portion of the tank and the bottom heating element can be disconnected. The top electrode remains operable to bring the water to a usable temperature if there isn't enough solar input.
If your existing water heater is wearing out and you want to install a solar water heater, you can replace it with a larger, single tank. This will save space over a two-tank system. There will be less tank surface area to insulate and less heat loss.
Most residences could benefit from a 120-gallon tank unless both the collector and con-sumption of hot water is small (less than 20 gallons per person). The collector for a single-tank system with a 120-gallon tank should be sized to heat between 80 and 120 gallons of water. Since large gas-fired tanks tend to be pretty expensive, this system requires an electric backup. Two-tank systems are a better choice if your existing gas water heater is in good shape or if your hot water consumption is high (the construction of a one-tank system is discussed later in this chapter).
Tank Placement The ideal place for a tank is next to the
existing water heater, and if you have a large utility room/washroom or basement, you're in business. Plumbing can be kept to a minimum and there will be easy access to control valves and drains. Another good choice is a closet or other storage area near the existing water heater.
If you don't have room in your living area, a well-insulated preheat tank can be
SOLAR WATER HEATING 243
placed in a crawl space or attic. Getting a large tank into these locations can be difficult, so plan ahead. A tank in the attic must be placed so that its weight is spread over three to four ceiling joists. Placing it over an interior load-bearing wall is also a good idea. Along with strong supports an attic tank needs a drip pan in case of leaks. The pan has a hose that is run to a drain or outside the house. Don't hesitate to consult a structural engineer if you are in doubt about an attic installation. When it's located in a crawl space, a tank can sit horizontally in a wooden cradle on top of cinder block supports, although it is usually necessary to pour a small concrete pad to support this arrangement since any settling of the tank can cause plumbing leaks. You'll need at least 2 1/2 feet of vertical clearance for the tank and its cradle.
There is a slight advantage in placing the solar tank vertically rather than horizontally, because hotter water can be taken off the top of a vertical tank due to heat stratification in the tank. A horizontal mount can provide preheated water of nearly the same temperature, however, if you use a side port on the tank to take water from the top of the tank.
Thermostatic Controls A differential thermostat (DT) is the key to
getting hot water from your preheat tank. A DT turns on the blower and sends solar heat to the heat exchanger (in-duct or tank type) only when the collector is warmer than the tank. In the late afternoon, when the tank is hot and the collector is warm, some usable heat will be lost from the collector, but a DT will ensure that the collector isn't delivering air that would cool the tank at this time. An 18°F on differential and a 5°F off differential thermostat is about right for this thermostat.
There are differential sensors available
..
Made available with generous permission of the authors
www.BuildItSolar.com DIY Solar Projects
244 THE COMPLETE HANDBOOK OF SOLAR AIR HEATING SYSTEMS
that screw directly into a plumbing fitting on the bottom of a tank. If you use a tank-type exchanger, a standard sensor can be used. It should be put in an immersion well low on the tank, or be attached to the outside of the bottom of the tank (cold end) with a glob of silicone, in a location that is easy to reach should the sensor fail. The silicone must not insulate the sensor from the tank, and the sensor must be insulated from the airflow cavity so that it reads the tank temperature, not the air temperature.
More complicated systems, such as a two-mode system, will require an additional ther-mostat to act as a shutoff when the tank reaches a desired temperature. This is typically a re-mote bulb thermostat called an aquastat (Grainger's no. 2E146). The sensing bulb is placed inside an immersion well that extends into the tank, allowing the thermostat to be replaced without draining the system. The thermostat should be mounted so that it senses the tank temperature near the bottom of the tank. In a two-mode system where water heating is the first priority, this aquastat will trip a relay when the tank is heated up, and solar air will be diverted to another point of use. If water heating is the second priority, this additional thermostat may not be required, but as a safety measure all systems that have water heating as the last priority should have an aquastat installed to turn off the blower if the tank ever reaches 180°F (see Appendix 2 for a wiring schematic for a two-mode water-heating system).
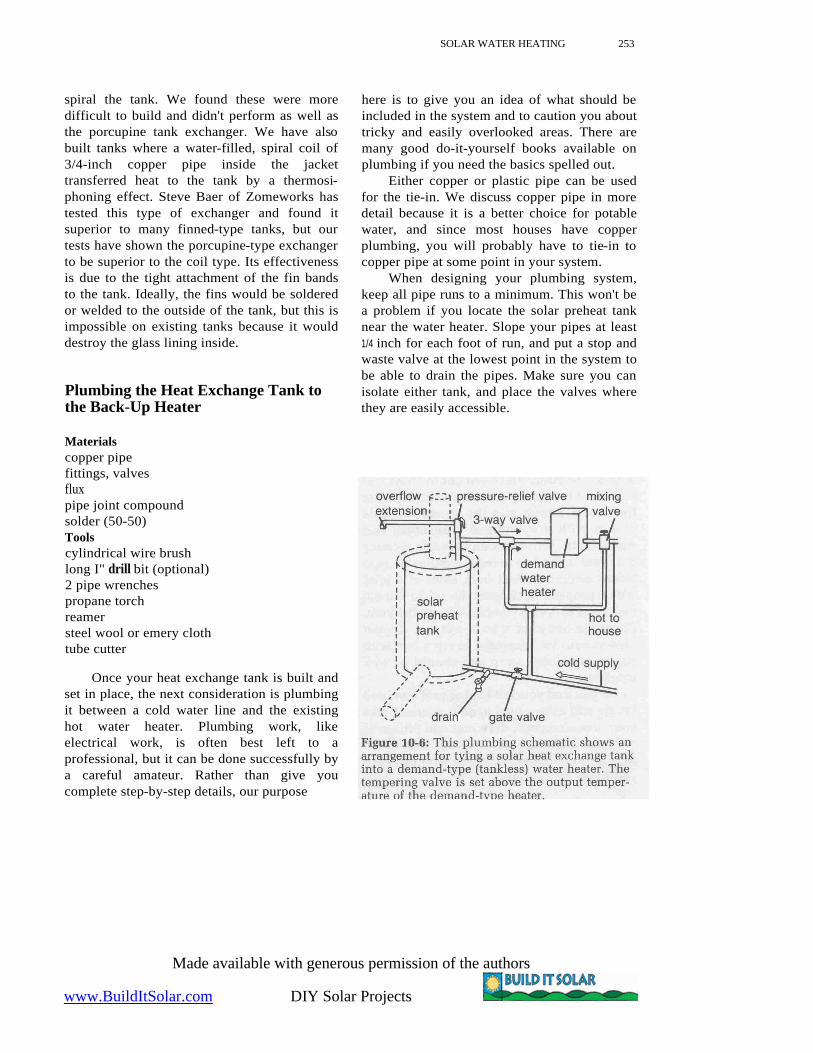
Demand-Type Water Heaters The best back-up tank for a solar water-
heating system may be no tank at all. Tankless or demand-type water heaters are becoming more popular for back-up water heat-
ing. Widely used in Europe and Japan, these electric and gas-fired units heat water only when a hot water tap is opened. They can deliver as much hot water as a conventional tank-type water heater with as little as one halfthe fuel consumption.
Demand-type water heaters operate in one of two ways. The type suitable for a solar backup heats water to a preset temperature. If the solar tank is delivering water that's hot enough, this type won't turn on. If the solar preheat tank is cool, the water from it will be raised to the preset temperature with a corresponding fuel savings from the solar input. The type that isn't suitable for solar backup produces a set temperature rise in the water flowing through it. This is fine if the heater is always being fed water from the water main at a constant temperature, but it's not effective when dealing with the wide range of temperatures encountered in water from a solar storage tank.
Using a demand-type water heater for solar backup not only saves fuel, but it also simplifies the solar plumbing. There is no need to include the possibility of bypassing and turning off the back-up heater when solar is supplying all the hot water needs. If the proper type of tankless heater is used, it won't come on if the solar is hot enough.
Demand-type water heaters cost about twice as much as conventional water heaters, but fuel savings, especially when used in conjunction with a solar system, can make this figure look insignificant. One factor con-tributing to the present high cost of these units is the fact that most brands are manufactured overseas and have limited distribution in North America. In the next few years look for more units to be manufactured domestically and sold at lower prices. A plumbing schematic appears later in this chapter.
Made available with generous permission of the authors
www.BuildItSolar.com DIY Solar Projects
Building an Air-to- Water Heat Exchange Tank
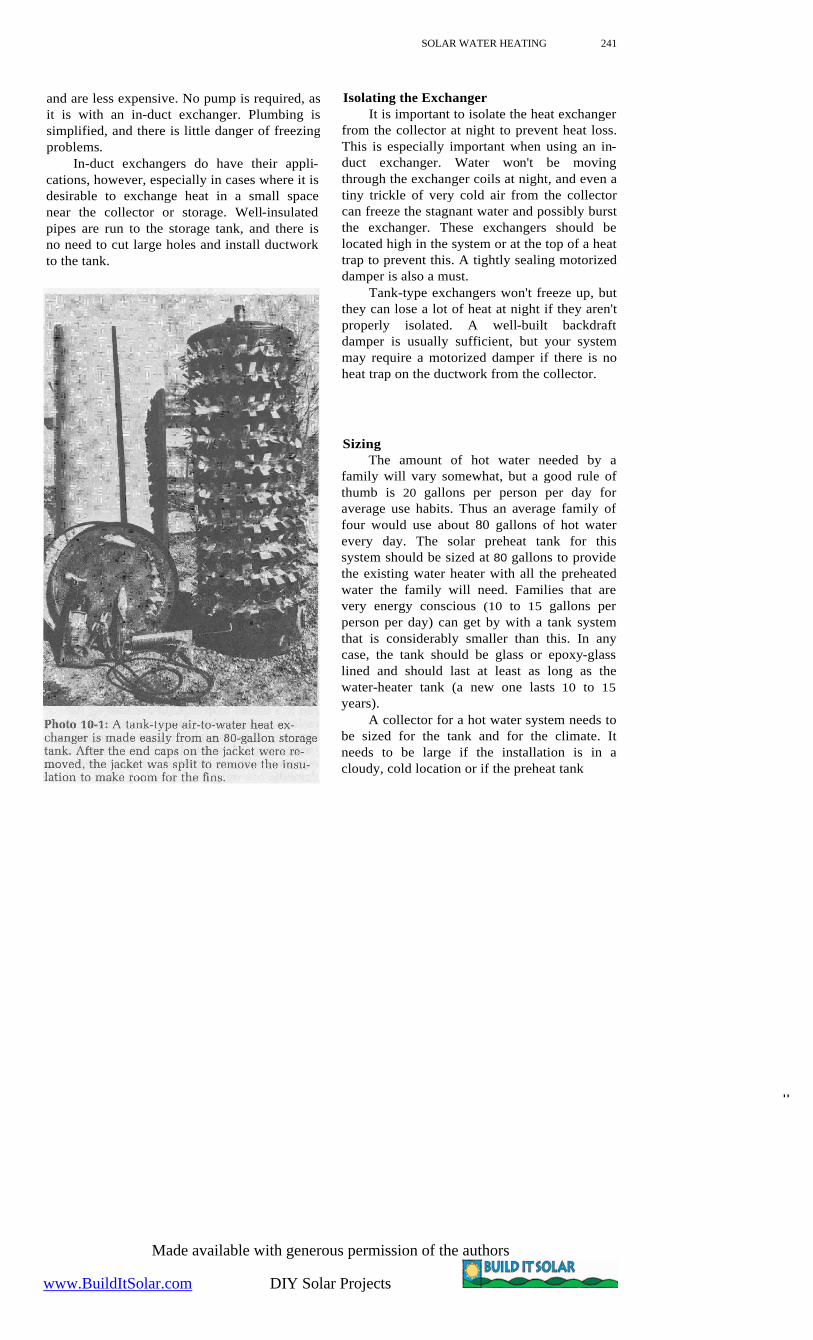
A satisfactory and inexpensive air-towater heat exchanger can be built using an 80- or 82-gallon hot water storage tank. This is a simple project even for those of you who are new to plumbing. A storage tank has much in common with a conventional water heater. It is an insulated tank enclosed in a sheetmetal jacket. To build the exchanger, first remove the jacket and the insulation. The jacket is replaced around the tank, and solar-heated air is blown into the space between the jacket and tank. The air returns to the collector in a closed loop. Efficiency can be increased if fins are attached to the outside of the tank to increase its surface area and promote better heat transfer. In the most effective tank design these fins are formed by attaching bands to the tank and bending out tabs to create a porcupine tank.
Materials 82-gal glass-lined water storage tank (without
heating elements) plumbing fittings for the tank 12 to 17 sheet-metal bands, 4" wide and equal
in length to the tank circumference 36 1/2" *8 sheet-metal screws 12 to 17 1 %" * 10 bolts with 2 washers each silicone (2 tubes) pressure-and-temperature relief valve (20,000
Btu/hr) Labor 2 people @ 3 or 4 hours
Construction Steps
Prepare the Tank Locate and purchase a new 82-gallon,
glass-lined hot water storage tank ($270 to
SOLAR WATER HEATING 245
$300) without heating elements. A smaller system with less than 80 square feet of collector can utilize a smaller tank. A tall tank will have more surface area for heat transfer than a short, squat tank, so buy the tallest tank available. We suggest buying a new tank rather than using a recycled water heater because you never know how much life an old water-heater tank has left in it. Do not use a galvanized tank; it'll have a much shorter usable life.
Consult the plumbing schematics in this section to plan your fittings. Most storage tanks have plenty of ports to choose from. Remove the jacket and loosen all of the fittings on the tank. (They will be difficult to loosen after the fin bands are attached.) Remove the screws (or drill out the pop rivets) that hold the round jacket end caps on both ends of the tank. Set the tank on its side and pull off the ends. If the tank is insulated with fiberglass batts, pull these out and remove the jacket in one piece. If the tank is insulated with foam, as most new ones are, slit the jacket lengthways using a saber saw with a short (1-inch), metal cutting blade. Dig out the insulation as you peel the jacket off. If foam insulation is stuck to the jacket, tank or end caps, scrape it off with a chisel and use a wire brush to clean the surface.
Before attaching the bands to the tank, lift it up and set it vertically onto the bottom end cap with insulation under the concave bottom of the tank. Center the tank over the end cap, andrun a large bead of silicone around the bottom of the tank to seal off any perforations in the end cap. Let the silicone cure for a day or two before moving the tank or putting the jacket back in place. Later, when moving the tank around, don't rest the tank on the edge of the bottom end cap, to avoid disturbing this seal.
Made available with generous permission of the authors
www.BuildItSolar.com DIY Solar Projects
246 THE COMPLETE HANDBOOK OF SOLAR AIR HEATING SYSTEMS
Prepare and Install the Bands If, for example, the tank has 2 inches of
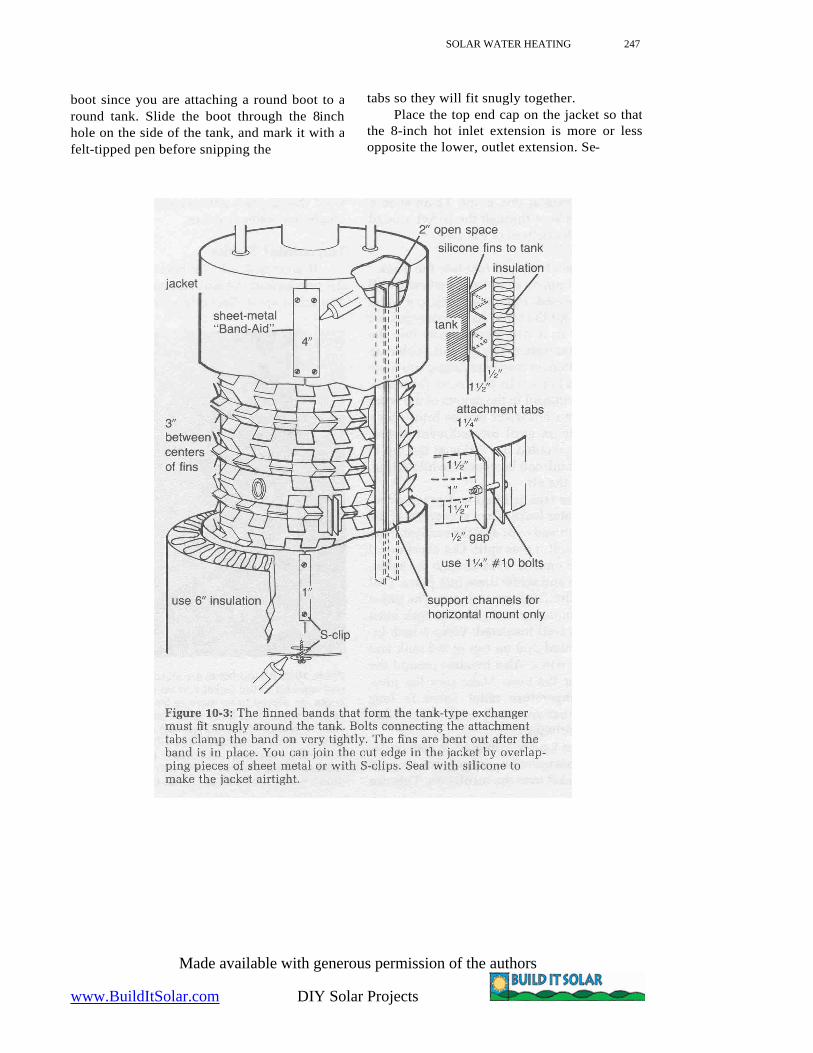
insulation between the tank and the jacket, the fin bands required for it should be 4 inches wide. The tabs are cut to extend 1 1/2 inches from the tank. If your tank had thicker original insulation, use wider bands, but be sure and leave a 1/2-inch gap between the jacket and the tab ends, or the tank will have excessively high static pressure. The bands should be as long as the circumference of the tank plus 2 inches for fastening the ends together at the attachment tabs (see figure 10-3).
Install the first band before making the rest so you will get a feel for things. Wrap it around the tank and bend up both ends 1 1/4 inches at a gO-degree angle to form the attachment tabs. When the band is held tightly around the tank, these tabs should be about 1/2 inch apart. This is a critical measurement. Remove the band and drill 1/4-inch holes in both tabs. The edge of the hole should be about 1/8 inch from the bend in the tab. Cut 11/2-inch-deep slits in both sides of the band every inch. Try to make the slits opposite each other. Don't bend out the heat exchange tabs yet. Run a 1/4-inch bead of silicone down the center of the band that will be attached to the tank. The silicone eliminates any air gaps between the tank and the bands.
With help from an assistant carefully po-sition the first band on the lower portion of the tank. Pull it tight and have your helper hold it in position while you bolt the two attachment tabs together. Use l1/4-inch *10 bolts with a washer on both sides. Bolt the band on very tight, and then bend up the tabs at alternate 50-degree angles (see figure 10-3). If you have used the proper amount of silicone, a small amount should ooze out around most of the edges. This silicone at-
tachment should be as thin as possible, and there should be no air gaps between the band and the tank. Silicone is not a great heat conductor, but it is the best material (at a reasonable price) for attaching the fins. We have attached bands using heat-conducting compounds such as Thermon Cement but have found that it is more difficult to work with. These compounds also don't compress as well as silicone when the bands are tightened, so there is more material between the band and the tank, which results in poor transfer of heat.
Plan ahead when placing bands near tank ports, and cut off or bend over tabs wherenecessary. Place the bands as closely together as possible (the more the better) while still allowing yourself room to bend up the tabs.
If your system requires an aquastat ther-mostat, install the "well" for it to a fitting high on the tank. If you are using a plug-type sensor (thermistor) for a DT, install it in a low port on the tank. A regular surface-mount thermistor can be put in an immersion well on the tank or bonded to the tank, near the bottom.
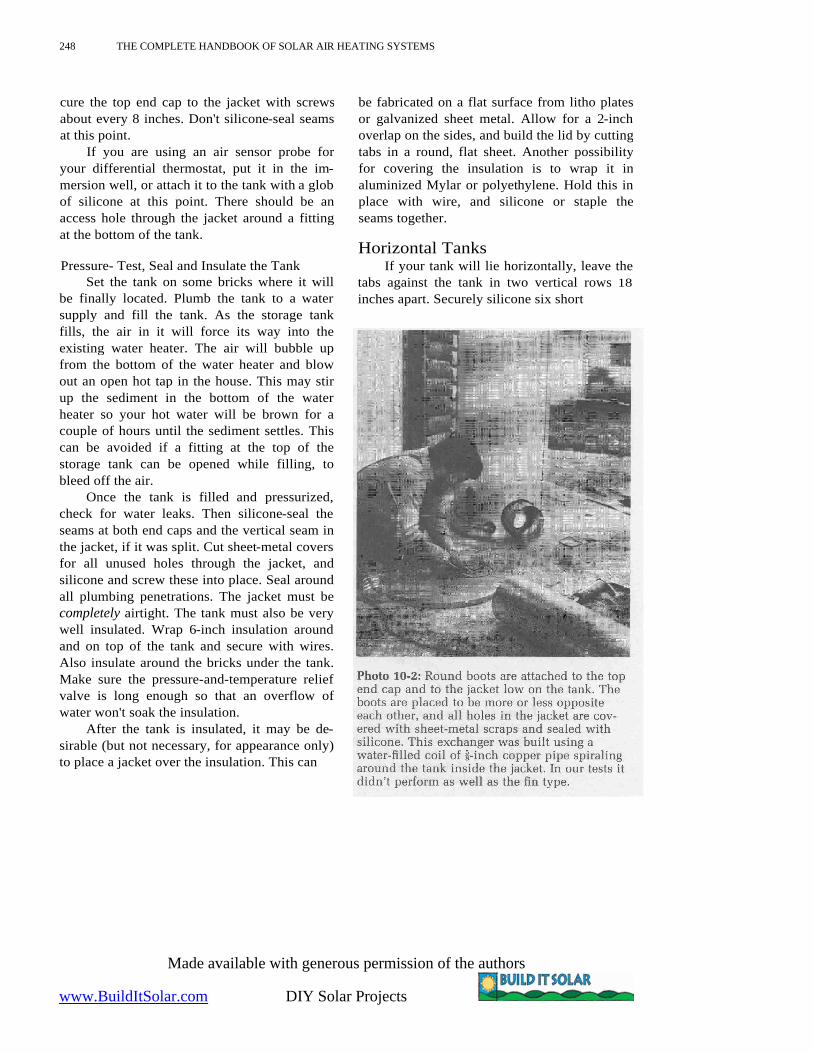
Install the Jacket and Boots Wrestle the jacket back onto the lower end
cap and secure it in one or two places with sheet-metal screws. If you had to split the jacket, cover the joint with a strip of sheet metal or join the two edges with S-clips. Finish attaching the jacket to the bottom cap with screws about every 8 inches.
Cut an 8-inch-round hole near one edge of the top end cap and another in the jacket near the bottom side of the tank. Install short sections of 8-inch duct to these holes, with four tabs outside the jacket and screwed to it and theother tabs bent over the inside. The tabs will be different lengths on the lower
Made available with generous permission of the authors
www.BuildItSolar.com DIY Solar Projects
SOLAR WATER HEATING 247
boot since you are attaching a round boot to a round tank. Slide the boot through the 8inch hole on the side of the tank, and mark it with a felt-tipped pen before snipping the
tabs so they will fit snugly together. Place the top end cap on the jacket so that
the 8-inch hot inlet extension is more or less opposite the lower, outlet extension. Se-
Made available with generous permission of the authors
www.BuildItSolar.com DIY Solar Projects
248 THE COMPLETE HANDBOOK OF SOLAR AIR HEATING SYSTEMS
cure the top end cap to the jacket with screws about every 8 inches. Don't silicone-seal seams at this point.
If you are using an air sensor probe for your differential thermostat, put it in the im-mersion well, or attach it to the tank with a glob of silicone at this point. There should be an access hole through the jacket around a fitting at the bottom of the tank.
Pressure- Test, Seal and Insulate the Tank Set the tank on some bricks where it will
be finally located. Plumb the tank to a water supply and fill the tank. As the storage tank fills, the air in it will force its way into the existing water heater. The air will bubble up from the bottom of the water heater and blow out an open hot tap in the house. This may stir up the sediment in the bottom of the water heater so your hot water will be brown for a couple of hours until the sediment settles. This can be avoided if a fitting at the top of the storage tank can be opened while filling, to bleed off the air.
Once the tank is filled and pressurized, check for water leaks. Then silicone-seal the seams at both end caps and the vertical seam in the jacket, if it was split. Cut sheet-metal covers for all unused holes through the jacket, and silicone and screw these into place. Seal aroundall plumbing penetrations. The jacket must be completely airtight. The tank must also be very well insulated. Wrap 6-inch insulation around and on top of the tank and secure with wires. Also insulate around the bricks under the tank. Make sure the pressure-and-temperature relief valve is long enough so that an overflow of water won't soak the insulation.
After the tank is insulated, it may be de-sirable (but not necessary, for appearance only) to place a jacket over the insulation. This can
be fabricated on a flat surface from litho plates or galvanized sheet metal. Allow for a 2-inch overlap on the sides, and build the lid by cutting tabs in a round, flat sheet. Another possibility for covering the insulation is to wrap it in aluminized Mylar or polyethylene. Hold this in place with wire, and silicone or staple the seams together.
Horizontal Tanks If your tank will lie horizontally, leave the
tabs against the tank in two vertical rows 18 inches apart. Securely silicone six short

Made available with generous permission of the authors
www.BuildItSolar.com DIY Solar Projects
sections of 2-by-2-by-1/8-inch channel over the tabs and to the tank after all of the tabs are installed. Use duct tape to hold the channel in place until the silicone cures. These sections will rest on the cradle that supports the tank so plan their placement carefully.
To mount a horizontal tank, build a wooden cradle from 2 x Bs or 2 x 10s that supports the tank in three places and that extends halfway around the circumference of the tank. Set the tank in the cradle, and fill any gaps between the tank and cradle with silicone before filling the tank with water. If the tank and cradle are placed in the attic, locate them so their weight (80 gallons equals 700 pounds) is distributed evenly over a load bearing wall or several joists. When placing
SOLAR WATER HEATING 249
the tank in the crawl space, set the cradle on a 3-inch reinforced concrete pad.
Dribblers When building a horizontal tank, it is a
good idea to build a dribbler for the cold in-coming line. This is a capped, 3-foot section of copper pipe with holes drilled in one side. It connects with the incoming cold line located at the bottom of the tank. The holes in this extension are pointed at the bottom of the tank when installed so that cold water entering the tank doesn't stir up the entire tank and reduce temperature stratification. The dribbler is made by reaming out the ridge on a 1/2- to 3/4-inch copper flush bushing so a 1/2-inch pipe will slide through it. This ar-
..
Made available with generous permission of the authors
www.BuildItSolar.com DIY Solar Projects
250 THE COMPLETE HANDBOOK OF SOLAR AIR HEATING SYSTEMS
rangement is soldered inside a 3/4-inch fitting which attaches to the tank. Drill enough equally spaced 1/8-inch holes to equal the area of the pipe diameter, and tighten the tank fitting until the holes point downward. If the only suitable fitting for the cold, incoming line on a horizontal tank is in through the center of the bottom end cap, the dribbler can have a downward jog in it so that water enters the tank on the bottom (see figure 10-4).
Building a One-Tank System One-tank systems can be built using a
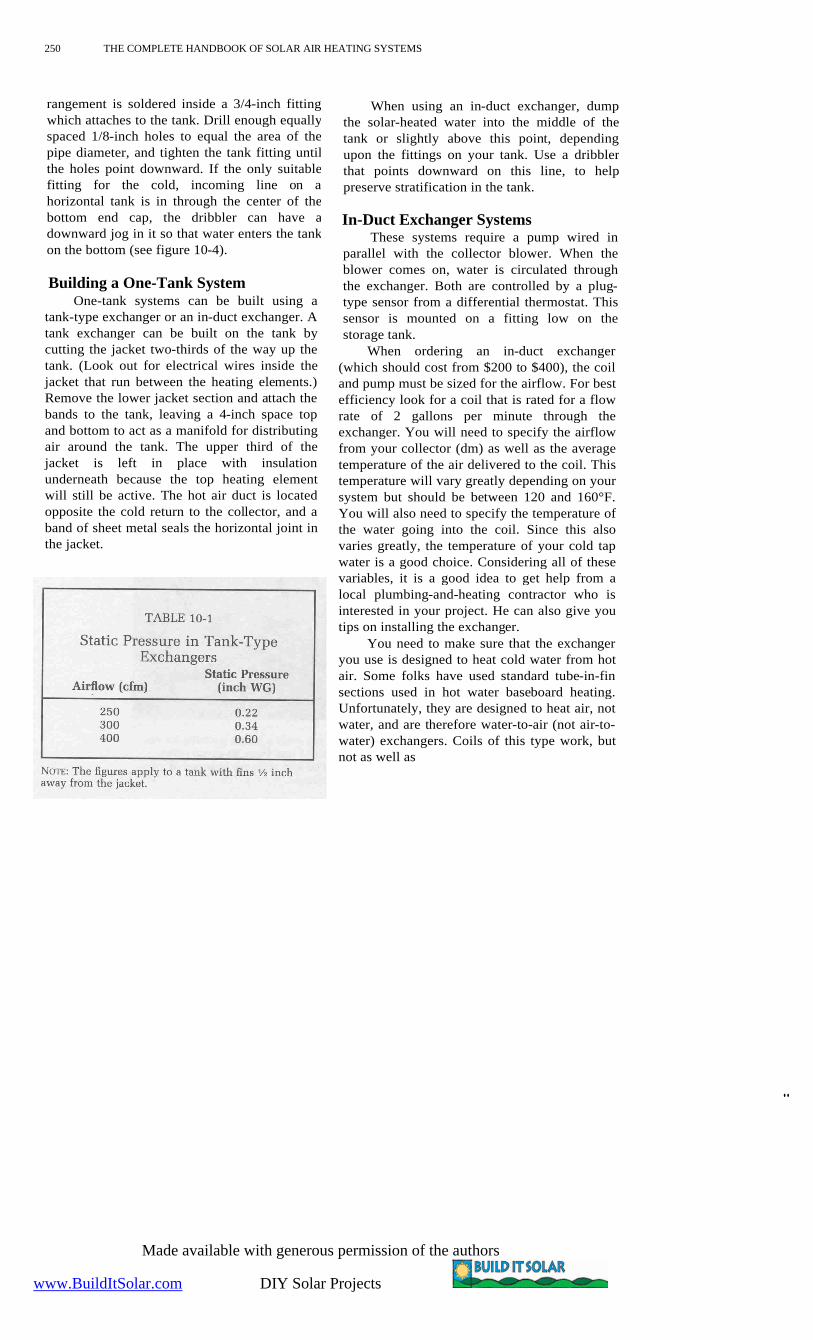
tank-type exchanger or an in-duct exchanger. A tank exchanger can be built on the tank by cutting the jacket two-thirds of the way up the tank. (Look out for electrical wires inside the jacket that run between the heating elements.) Remove the lower jacket section and attach the bands to the tank, leaving a 4-inch space top and bottom to act as a manifold for distributing air around the tank. The upper third of the jacket is left in place with insulation underneath because the top heating element will still be active. The hot air duct is located opposite the cold return to the collector, and a band of sheet metal seals the horizontal joint in the jacket.
When using an in-duct exchanger, dump the solar-heated water into the middle of the tank or slightly above this point, depending upon the fittings on your tank. Use a dribbler that points downward on this line, to help preserve stratification in the tank.
In-Duct Exchanger Systems These systems require a pump wired in
parallel with the collector blower. When the blower comes on, water is circulated through the exchanger. Both are controlled by a plug-type sensor from a differential thermostat. This sensor is mounted on a fitting low on the storage tank.
When ordering an in-duct exchanger (which should cost from $200 to $400), the coil and pump must be sized for the airflow. For best efficiency look for a coil that is rated for a flow rate of 2 gallons per minute through the exchanger. You will need to specify the airflow from your collector (dm) as well as the average temperature of the air delivered to the coil. This temperature will vary greatly depending on your system but should be between 120 and 160°F. You will also need to specify the temperature of the water going into the coil. Since this also varies greatly, the temperature of your cold tap water is a good choice. Considering all of these variables, it is a good idea to get help from a local plumbing-and-heating contractor who is interested in your project. He can also give you tips on installing the exchanger.
You need to make sure that the exchanger you use is designed to heat cold water from hot air. Some folks have used standard tube-in-fin sections used in hot water baseboard heating. Unfortunately, they are designed to heat air, not water, and are therefore water-to-air (not air-to-water) exchangers. Coils of this type work, but not as well as
..

Made available with generous permission of the authors
www.BuildItSolar.com DIY Solar Projects
SOLAR WATER HEATING 251
ones specifically designed for air-to-water applications.
Mexico, who has used tanks of this type, but with longer fins, for air-to-water heat ex-changers in convective (passive) solar air in-stallations. We have also built other tank-type exchangers for active systems using vertical fins and tanks in which the air was forced to
Other Tanks The idea for the porcupine tank came to us
from W. Scott Morris of Santa Fe, New
dribbler
Made available with generous permission of the authors
www.BuildItSolar.com DIY Solar Projects
252 THE COMPLETE HANDBOOK OF SOLAR AIR HEATING SYSTEMS
Made available with generous permission of the authors
www.BuildItSolar.com DIY Solar Projects
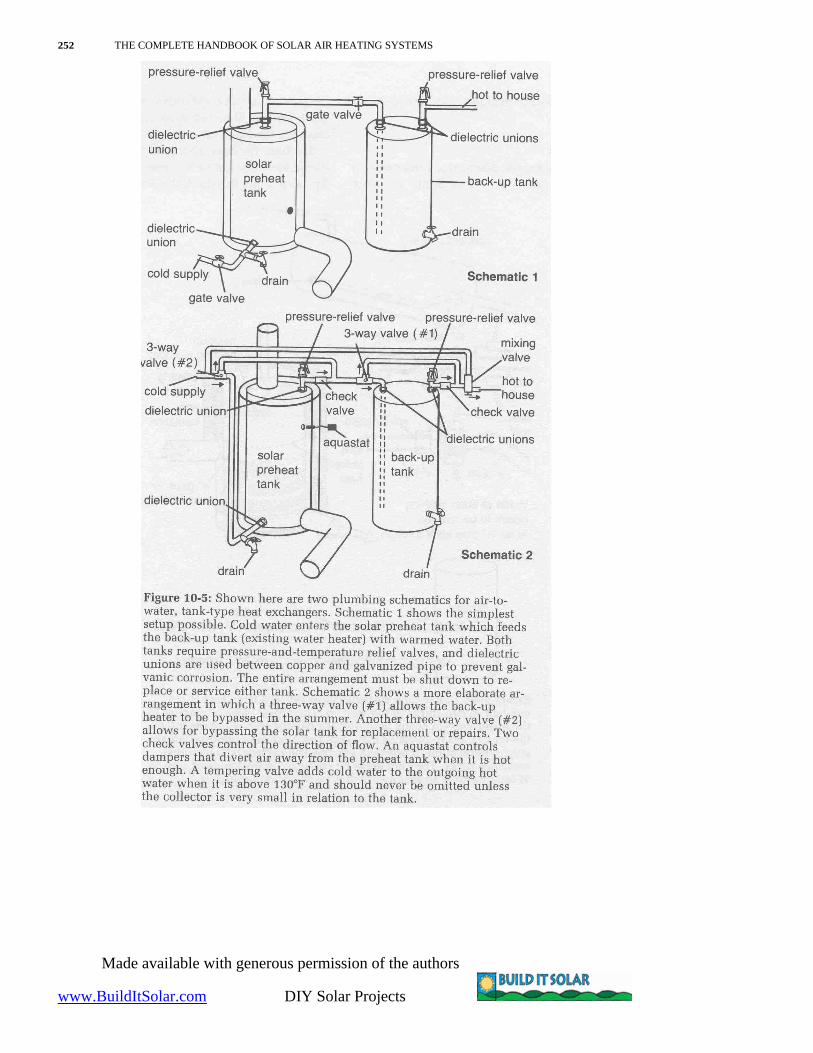
spiral the tank. We found these were more difficult to build and didn't perform as well as the porcupine tank exchanger. We have also built tanks where a water-filled, spiral coil of 3/4-inch copper pipe inside the jacket transferred heat to the tank by a thermosi-phoning effect. Steve Baer of Zomeworks has tested this type of exchanger and found it superior to many finned-type tanks, but our tests have shown the porcupine-type exchanger to be superior to the coil type. Its effectiveness is due to the tight attachment of the fin bands to the tank. Ideally, the fins would be soldered or welded to the outside of the tank, but this is impossible on existing tanks because it would destroy the glass lining inside.
Plumbing the Heat Exchange Tank to the Back-Up Heater
Materials copper pipe fittings, valves flux pipe joint compound solder (50-50) Tools cylindrical wire brush long I" drill bit (optional) 2 pipe wrenches propane torch reamer steel wool or emery cloth tube cutter
Once your heat exchange tank is built and set in place, the next consideration is plumbing it between a cold water line and the existing hot water heater. Plumbing work, like electrical work, is often best left to a professional, but it can be done successfully by a careful amateur. Rather than give you complete step-by-step details, our purpose
SOLAR WATER HEATING 253
here is to give you an idea of what should be included in the system and to caution you about tricky and easily overlooked areas. There are many good do-it-yourself books available on plumbing if you need the basics spelled out.
Either copper or plastic pipe can be used for the tie-in. We discuss copper pipe in more detail because it is a better choice for potable water, and since most houses have copper plumbing, you will probably have to tie-in to copper pipe at some point in your system.
When designing your plumbing system, keep all pipe runs to a minimum. This won't be a problem if you locate the solar preheat tank near the water heater. Slope your pipes at least 1/4 inch for each foot of run, and put a stop and waste valve at the lowest point in the system to be able to drain the pipes. Make sure you can isolate either tank, and place the valves where they are easily accessible.
Made available with generous permission of the authors
www.BuildItSolar.com DIY Solar Projects
254 THE COMPLETE HANDBOOK OF SOLAR AIR HEATING SYSTEMS
Consider using three-way valves in suitable locations. They are easier to install than two gate valves, cost about the same and help simplify the plumbing.
Connections between galvanized pipe or fittings (usually at the preheat tank) and copper pipe or brass fittings must be made with dielectric unions (or plastic adapters) to prevent galvanic corrosion from taking place. These are readily available at most plumbing suppliers. Be sure to disassemble valves before soldering them. This prevents damage to the rubber O-rings. Gate valves don't need to be taken apart but should be soldered with the valves tightly closed. Install a pressure and-temperature relief valve on both the solar preheat tank and the existing hot water heater within 6 inches of the top of the tank.
Working with Copper Pipe Three-quarter-inch copper pipe is a good
choice for plumbing your tank. Cut the pipe with a tube cutter and ream out the burr that is created inside the cut. Clean the inside of the female fittings and the outside of male fittings with a cylindrical wire brush and emery cloth. Brush flux on the male sections only and assemble several sections of pipe before soldering. Heat both sides of a joint with a propane torch until the solder (50-50) melts and is drawn completely into the joint. Clean the hot joint with a wet rag. Copper pipe should be supported every 4 feet with copper plumber's strap and should be well insulated.
If you find yourself having problems and yet are still determined to do it yourself, take your measurements, drawings and fittings to the local hardware store. There is undoubtedly a plumbing expert there who can help· you figure things out.
Sources for Supplies
In-Duct Heat Exchangers
Plumbing Materials All of the plumbing materials you need
will be readily available at any large hardware store, although dielectric unions may have to be ordered, depending upon common plumbing practices in your area.
Tank- Type Heat Exchangers We know of only one company that offers
tank-type, air-to-water heat exchangers. These tanks, pre-wired with a differential thermostat and blower, are ready to install. We haven't installed any of these tanks because they are quite expensive ($1,400 for a 75-gallon tank), but they look like a good item. Contact the following for more information:
Park Energy Co . Star Route, Box 9 Jackson, WY 83001 Phone: Park Energy requests that consumers write for information.
..