smartplant materials business intelligence reporting
TRANSCRIPT

SmartPlant Materials Business Intelligence Reporting Installation Guide
Version 2013 R1 SP2 (7.1.2)
November 2013 / November 2014
DMAR1-PE-200154B-UPDATED

Copyright Copyright © 2012-2014 Intergraph® Corporation. All Rights Reserved. Intergraph is part of Hexagon.
Including software, file formats, and audiovisual displays; may be used pursuant to applicable software license agreement; contains confidential and proprietary information of Intergraph and/or third parties which is protected by copyright law, trade secret law, and international treaty, and may not be provided or otherwise made available without proper authorization from Intergraph Corporation.
U.S. Government Restricted Rights Legend Use, duplication, or disclosure by the government is subject to restrictions as set forth below. For civilian agencies: This was developed at private expense and is "restricted computer software" submitted with restricted rights in accordance with subparagraphs (a) through (d) of the Commercial Computer Software - Restricted Rights clause at 52.227-19 of the Federal Acquisition Regulations ("FAR") and its successors, and is unpublished and all rights are reserved under the copyright laws of the United States. For units of the Department of Defense ("DoD"): This is "commercial computer software" as defined at DFARS 252.227-7014 and the rights of the Government are as specified at DFARS 227.7202-3.
Unpublished - rights reserved under the copyright laws of the United States.
Intergraph Corporation 300 Intergraph Way Huntsville, AL 35813
Documentation Documentation shall mean, whether in electronic or printed form, User's Guides, Installation Guides, Reference Guides, Administrator's Guides, Customization Guides, Programmer's Guides, Configuration Guides and Help Guides delivered with a particular software product.
Other Documentation Other Documentation shall mean, whether in electronic or printed form and delivered with software or on Intergraph Smart Support, SharePoint, or box.net, any documentation related to work processes, workflows, and best practices that is provided by Intergraph as guidance for using a software product.
Terms of Use a. Use of a software product and Documentation is subject to the End User License Agreement ("EULA") delivered with the
software product unless the Licensee has a valid signed license for this software product with Intergraph Corporation. If the Licensee has a valid signed license for this software product with Intergraph Corporation, the valid signed license shall take precedence and govern the use of this software product and Documentation. Subject to the terms contained within the applicable license agreement, Intergraph Corporation gives Licensee permission to print a reasonable number of copies of the Documentation as defined in the applicable license agreement and delivered with the software product for Licensee's internal, non-commercial use. The Documentation may not be printed for resale or redistribution.
b. For use of Documentation or Other Documentation where end user does not receive a EULA or does not have a valid licenseagreement with Intergraph, Intergraph grants the Licensee a non-exclusive license to use the Documentation or Other Documentation for Licensee’s internal non-commercial use. Intergraph Corporation gives Licensee permission to print a reasonable number of copies of Other Documentation for Licensee’s internal, non-commercial. The Other Documentation may not be printed for resale or redistribution. This license contained in this subsection b) may be terminated at any time and for any reason by Intergraph Corporation by giving written notice to Licensee.
Disclaimer of Warranties Except for any express warranties as may be stated in the EULA or separate license or separate terms and conditions, Intergraph Corporation disclaims any and all express or implied warranties including, but not limited to the implied warranties of merchantability and fitness for a particular purpose and nothing stated in, or implied by, this document or its contents shall be considered or deemed a modification or amendment of such disclaimer. Intergraph believes the information in this publication is accurate as of its publication date.
The information and the software discussed in this document are subject to change without notice and are subject to applicable technical product descriptions. Intergraph Corporation is not responsible for any error that may appear in this document.
The software, Documentation and Other Documentation discussed in this document are furnished under a license and may be used or copied only in accordance with the terms of this license. THE USER OF THE SOFTWARE IS EXPECTED TO MAKE THE FINAL EVALUATION AS TO THE USEFULNESS OF THE SOFTWARE IN HIS OWN ENVIRONMENT.
Intergraph is not responsible for the accuracy of delivered data including, but not limited to, catalog, reference and symbol data. Users should verify for themselves that the data is accurate and suitable for their project work.
2 SmartPlant Materials Business Intelligence Reporting Installation Guide

Limitation of Damages IN NO EVENT WILL INTERGRAPH CORPORATION BE LIABLE FOR ANY DIRECT, INDIRECT, CONSEQUENTIAL INCIDENTAL, SPECIAL, OR PUNITIVE DAMAGES, INCLUDING BUT NOT LIMITED TO, LOSS OF USE OR PRODUCTION, LOSS OF REVENUE OR PROFIT, LOSS OF DATA, OR CLAIMS OF THIRD PARTIES, EVEN IF INTERGRAPH CORPORATION HAS BEEN ADVISED OF THE POSSIBILITY OF SUCH DAMAGES.
UNDER NO CIRCUMSTANCES SHALL INTERGRAPH CORPORATION’S LIABILITY EXCEED THE AMOUNT THAT INTERGRAPH CORPORATION HAS BEEN PAID BY LICENSEE UNDER THIS AGREEMENT AT THE TIME THE CLAIM IS MADE. EXCEPT WHERE PROHIBITED BY APPLICABLE LAW, NO CLAIM, REGARDLESS OF FORM, ARISING OUT OF OR IN CONNECTION WITH THE SUBJECT MATTER OF THIS DOCUMENT MAY BE BROUGHT BY LICENSEE MORE THAN TWO (2) YEARS AFTER THE EVENT GIVING RISE TO THE CAUSE OF ACTION HAS OCCURRED.
IF UNDER THE LAW RULED APPLICABLE ANY PART OF THIS SECTION IS INVALID, THEN INTERGRAPH LIMITS ITS LIABILITY TO THE MAXIMUM EXTENT ALLOWED BY SAID LAW.
Export Controls Intergraph Corporation’s software products and any third-party Software Products obtained from Intergraph Corporation, its subsidiaries, or distributors (including any Documentation, Other Documentation or technical data related to these products) are subject to the export control laws and regulations of the United States. Diversion contrary to U.S. law is prohibited. These Software Products, and the direct product thereof, must not be exported or re-exported, directly or indirectly (including via remote access) under the following circumstances:
a. To Cuba, Iran, North Korea, Sudan, or Syria, or any national of these countries. b. To any person or entity listed on any U.S. government denial list, including but not limited to, the U.S. Department of Commerce
Denied Persons, Entities, and Unverified Lists, http://www.bis.doc.gov/complianceandenforcement/liststocheck.htm, the U.S. Department of Treasury Specially Designated Nationals List, http://www.treas.gov/offices/enforcement/ofac/, and the U.S. Department of State Debarred List, http://www.pmddtc.state.gov/compliance/debar.html.
c. To any entity when Licensee knows, or has reason to know, the end use of the Software Product is related to the design, development, production, or use of missiles, chemical, biological, or nuclear weapons, or other un-safeguarded or sensitive nuclear uses.
d. To any entity when Licensee knows, or has reason to know, that an illegal reshipment will take place. e. Any questions regarding export or re-export of these Software Products should be addressed to Intergraph Corporation’s Export
Compliance Department, Huntsville, Alabama 35894, USA.
Trademarks Intergraph, the Intergraph logo, Intergraph Smart, PDS, SmartPlant, SmartMarine, FrameWorks, I-Sketch, IntelliShip, ISOGEN, SmartSketch, SPOOLGEN, SupportManager, SupportModeler, Sapphire, and FreeView are trademarks or registered trademarks of Intergraph Corporation or its subsidiaries in the United States and other countries. Microsoft and Windows are registered trademarks of Microsoft Corporation. MicroStation is a registered trademark of Bentley Systems, Inc. Other brands and product names are trademarks of their respective owners.
SmartPlant Materials Business Intelligence Reporting Installation Guide 3

4 SmartPlant Materials Business Intelligence Reporting Installation Guide

Contents Preface .......................................................................................................................................................... 7
Documentation Comments ..................................................................................................................... 7
Hardware and Software Requirements ..................................................................................................... 9
SmartPlant Materials Database Server .................................................................................................. 9 SmartPlant Materials Business Intelligence Reporting Client ............................................................... 10 Other Requirements .............................................................................................................................. 10
License ....................................................................................................................................................... 11
Pre-Checks on your Database and Environment ................................................................................... 13
Extract Business Intelligence Reporting Components ......................................................................... 15
Install Apex on PL/SQL Gateway (recommended) ................................................................................. 19
Configure the Embedded PL/SQL Gateway ......................................................................................... 21 Verifying the Oracle XML DB HTTP Server Port .................................................................................. 26 Enabling Oracle XML DB HTTP Server ................................................................................................ 26 Enabling Network Services in Oracle Database 11g ............................................................................ 26
Granting Connect Privileges ........................................................................................................... 27
Set Up a New Workspace for SmartPlant Materials Business Intelligence ......................................... 29
Prevent Admin Password Changes ...................................................................................................... 33
Install SmartPlant Materials Business Intelligence Modules in Apex .................................................. 37
Configure DBA Settings ............................................................................................................................ 41
BI_REPORT_CURRENCY ................................................................................................................... 42 BI_REPORT_DATA_LANGUAGE ........................................................................................................ 42 BI_REPORT_GLOSSARY .................................................................................................................... 42 BI_REPORT_HELP .............................................................................................................................. 43 BI_REPORT_LANGUAGE .................................................................................................................... 43 BI_REPORT_SCHEMA ........................................................................................................................ 43 BI_REPORT_URL................................................................................................................................. 44 WEB_APPROVAL_URL_BIR ............................................................................................................... 44 WEB_APPROVAL_WITH_BIR ............................................................................................................. 44
SmartPlant Materials Business Intelligence Reporting Installation Guide 5

Contents Configure Date and Number Format ....................................................................................................... 45
Define Application Language ................................................................................................................... 47
Using SmartPlant Materials Business Intelligence Reporting .............................................................. 49
Schedule Synchronization Jobs .............................................................................................................. 51
Grant BIR_BI_FUNCTIONS Permission ............................................................................................... 51 Create and Install Synchronization Jobs .............................................................................................. 51
Identify Unit Conversion Discrepancies ................................................................................................. 54
Index ........................................................................................................................................................... 57
6 SmartPlant Materials Business Intelligence Reporting Installation Guide

The document describes the Oracle Application Express (Apex) installation and setup. Apex is used for business intelligence reporting.
Documentation Comments Send documentation comments or suggestions to [email protected] (mailto:[email protected]?subject=documentation comments).
Preface
SmartPlant Materials Business Intelligence Reporting Installation Guide 7

Preface
8 SmartPlant Materials Business Intelligence Reporting Installation Guide

S E C T I O N 1
Before beginning an installation of SmartPlant Materials, verify that your server and client computers meet the following hardware and software requirements.
SmartPlant Materials Database Server Each database server must meet the following recommendations:
The SmartPlant Materials database server must be installed on a single, dedicated server
without other production applications running on the same server hardware.
You must run two servers minimum because the 11g Fusion Middleware (SmartPlant Materials application server) and the 11g R2 Database (SmartPlant Materials database server) are not supported by Intergraph to run on a single machine.
The configuration is tightly related to the number of concurrent users working on the system. Refer to Oracle documentation for detailed information.
For the database server, Intergraph only supports operating systems that are certified/supported by Oracle for the specific RDBMS version required by SmartPlant Materials. The list of Oracle-supported operating systems can be accessed on the Oracle Support web site.
When running a non-Windows server environment on the database server, please contact the SmartPlant Materials Support Center to determine the supported combination of RDBMS version and required Oracle RDBMS patch set.
Supported Database Servers Oracle Database 11g Release 2 (11.2.0.3.0) (minimum release for SmartPlant Materials
7.1.0.0)
Media for SmartPlant Materials Database Server Media Packs
11.2.0.3.0 PATCH SET FOR ORACLE DATABASE SERVER (Patchset) Microsoft Windows x64 (64-bit) p10404530
Required Parts
Oracle Database 11g Release 2 (11.2.0.3.0) for Microsoft Windows x64 (64-bit) Microsoft p13555974_112030_MSWIN-x86-64
OPatch p6880880_112000_MSWIN-x86-64
This oPatch version (112000) is the minimum OPatch version that you need for this installation. Other higher versions are allowed. The file name is always the same, so for example, if you download p6880880_112000_MSWIN-x86-64 today, it could be oPatch
Hardware and Software Requirements
SmartPlant Materials Business Intelligence Reporting Installation Guide 9

Hardware and Software Requirements
version 11.2.0.1.9. If you download p6880880_112000_MSWIN-x86-64 in a few weeks, it may be oPatch version 11.2.0.1.12.
Installation Prerequisites The following table shows the memory and disk space requirements for installing Oracle Database 11g Release 2:
Size Users CPUs RAM Hard Drive Size - Basic Installation
/tmp Directory
Small <= 15 1x XEON 4 Core
16 GB 80 GB
200 MB
Medium <= 100 2x XEON 4 Core
48 GB
Large <= 400 4x XEON 4 Core
128 GB
Between 3.5 GB and 5 GB of disk space for the Oracle and SmartPlant Materials software, depending on the installation type
SmartPlant Materials Business Intelligence Reporting Client
To run SmartPlant Materials Business Intelligence Reporting on your client computer, a web browser is required that supports JavaScript and adheres to W3C standards for HTML and CSS. It is recommended to use the following browser with HTML5 support:
Microsoft Internet Explorer 9 onwards
If you're using Internet Explorer 9, you must install Adobe Flash Player.
SmartPlant Materials Business Intelligence Reporting requires a minimum screen resolution of 1280*1024.
Other Requirements In addition, you will need:
SmartPlant Materials version 7.1.2.
APEX 4.2.1 Multilanguage
10 SmartPlant Materials Business Intelligence Reporting Installation Guide

S E C T I O N 2
To use SmartPlant Materials Business Intelligence Reporting, you need a license key with the BIR module.
If your license key does not contain Business Intelligence Reporting (BIR) seats, any other available seat is used instead when launching SmartPlant Materials Business Intelligence Reporting. The seats are taken in this sequence:
1. BIR
2. E&PI
3. MSCM
4. MLCL
5. SPRD
6. SPMAT
For information about licensing, refer to the SmartPlant Materials License Handling Guide, available from the Help > Printable Guides command in SmartPlant Materials.
License
SmartPlant Materials Business Intelligence Reporting Installation Guide 11

License
12 SmartPlant Materials Business Intelligence Reporting Installation Guide
S E C T I O N 3
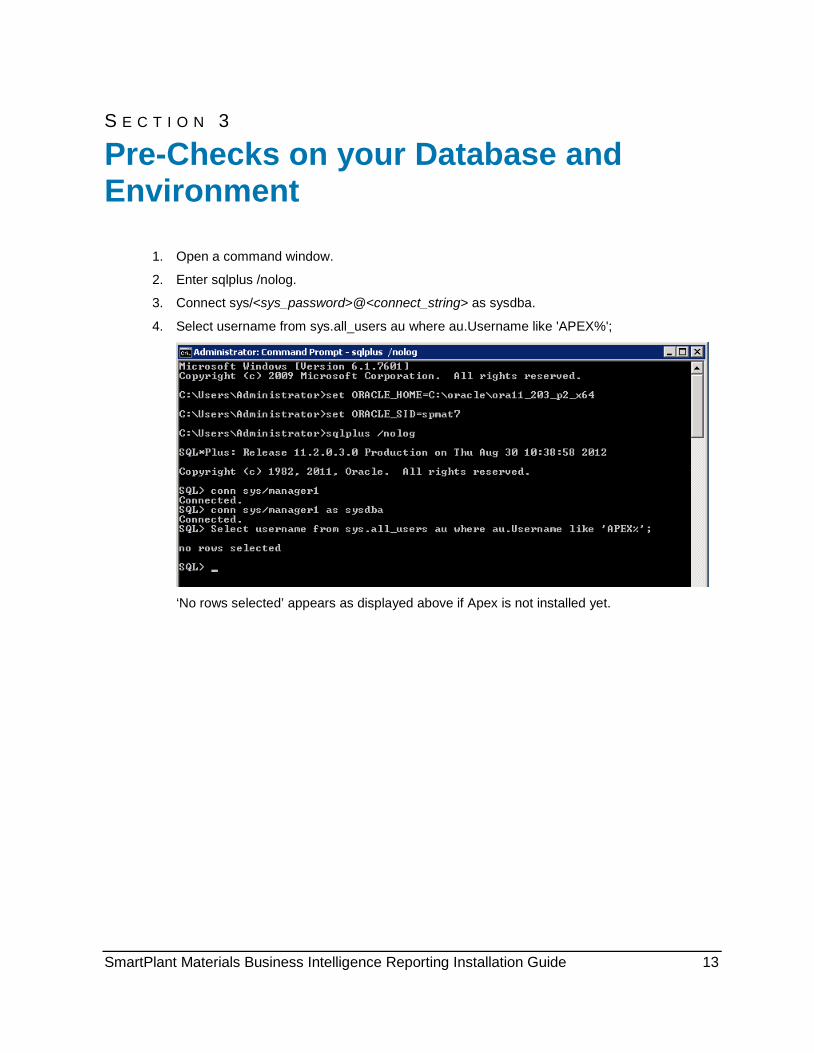
1. Open a command window.
2. Enter sqlplus /nolog.
3. Connect sys/<sys_password>@<connect_string> as sysdba.
4. Select username from sys.all_users au where au.Username like 'APEX%';
‘No rows selected’ appears as displayed above if Apex is not installed yet.
Pre-Checks on your Database and Environment
SmartPlant Materials Business Intelligence Reporting Installation Guide 13

Pre-Checks on your Database and Environment
In some cases, you will see the following two users as shown in the picture below; they are from a previous version installed with a standard database installation from Oracle.
If Apex is installed, make sure that the version is 4.2.1 (see Prerequisites).
14 SmartPlant Materials Business Intelligence Reporting Installation Guide

S E C T I O N 4
1. Start the setup media (either the original installation media, or a shared location on the network), and click SmartPlant Materials Business Intelligence Reporting.
Extract Business Intelligence Reporting Components
SmartPlant Materials Business Intelligence Reporting Installation Guide 15

Extract Business Intelligence Reporting Components 2. Click SmartPlant Materials BIR Installation.
3. Click Yes.
16 SmartPlant Materials Business Intelligence Reporting Installation Guide

Extract Business Intelligence Reporting Components 4. Click Next.
5. Enter your name and the company name, and click Next.
6. Click Change to choose your installation location, select the directory, and click Next.
7. Click Install.
8. Click Finish.
SmartPlant Materials Business Intelligence Reporting Installation Guide 17

Extract Business Intelligence Reporting Components
After the installation finishes, the following files are in the installation directory.
18 SmartPlant Materials Business Intelligence Reporting Installation Guide

S E C T I O N 5
1. Download Oracle Application Express to c:\tmp.
2. Extract apex_4.2.1.zip to your hard drive.
3. Open a command prompt.
4. Change your working directory to the apex directory where you unzipped the installation software (for example, c:\tmp\apex).
5. Set the following Oracle parameters:
set ORACLE_HOME=<ORACLE_HOME>
set ORACLE_SID=<SID>
Install Apex on PL/SQL Gateway (recommended)
SmartPlant Materials Business Intelligence Reporting Installation Guide 19

Install Apex on PL/SQL Gateway (recommended) 6. Launch SQL*Plus and connect to the database.
7. Execute @apexins SYSAUX SYSAUX TEMP /i/.
It takes a moment.
8. Change the password for the admin account.
20 SmartPlant Materials Business Intelligence Reporting Installation Guide

Install Apex on PL/SQL Gateway (recommended)
Launch SQL*Plus and connect to the database as SYS specifying the SYSDBA role.
Run the apxchpwd.sql script.
When prompted, enter a password for the ADMIN account.
Configure the Embedded PL/SQL Gateway In a new installation, you configure the embedded PL/SQL gateway by running the configuration script apex_epg_config.sql. Then, you unlock the ANONYMOUS account.
If you are upgrading and have previously configured the embedded PL/SQL gateway, skip this section and go to Updating the Images Directory When Upgrading from a Previous Release (http://docs.oracle.com/cd/E23903_01/doc/doc.41/e21673/otn_install.htm#autoId31).
To run the apex_epg_config.sql configuration script:
1. Open a command prompt.
2. Change your working directory to the apex directory where you unzipped the Oracle Application Express (APEX) installation software (for example, c:\tmp\apex).
3. Set the following Oracle parameters:
set ORACLE_HOME=<ORACLE_HOME>
set ORACLE_SID=<SID>
SmartPlant Materials Business Intelligence Reporting Installation Guide 21

Install Apex on PL/SQL Gateway (recommended) 4. Launch SQL*Plus and connect to the database (where APEX is installed) as SYS specifying
the SYSDBA role.
5. Run the apex_epg_config.sql script passing the file system path to the base directory where
the Oracle Application Express software was unzipped as shown in the following example (Windows OS).
@apex_epg_config C:\Apex\apex_4.2.1\
Do not point to the sub folder apex (like: C:\Apex\apex_4.2.1\apex). Use the base directory with a concluding \ (like C:\Apex\apex_4.2.1\).
22 SmartPlant Materials Business Intelligence Reporting Installation Guide

Install Apex on PL/SQL Gateway (recommended)
If you haven’t entered the correct path, error messages appear as shown in the picture below.
SmartPlant Materials Business Intelligence Reporting Installation Guide 23

Install Apex on PL/SQL Gateway (recommended)
The following two pictures show examples where the path is correct:
24 SmartPlant Materials Business Intelligence Reporting Installation Guide

Install Apex on PL/SQL Gateway (recommended)
6. Enter the following statement to unlock the ANONYMOUS account:
ALTER USER ANONYMOUS ACCOUNT UNLOCK;
SmartPlant Materials Business Intelligence Reporting Installation Guide 25

Install Apex on PL/SQL Gateway (recommended)
Verifying the Oracle XML DB HTTP Server Port The embedded PL/SQL gateway runs in the Oracle XML DB HTTP server in the Oracle database. You can determine if the Oracle XML DB HTTP server is enabled by verifying the associated port number.
1. Launch SQL*Plus and connect to the database (where APEX installed) as SYS specifying the SYSDBA role:
2. Enter the following statement to verify the port number:
SELECT DBMS_XDB.GETHTTPPORT FROM DUAL;
If the port number returns 0, the Oracle XML DB HTTP Server is not enabled. Follow the instructions in the next chapter to enable the XML DB HTTP Server.
Enabling Oracle XML DB HTTP Server To enable the Oracle XML DB HTTP server:
1. Launch SQL*Plus and connect to the database (where APEX is installed) as SYS specifying the SYSDBA role.
2. Enter the following statement after you replaced port with the actual port number:
EXEC DBMS_XDB.SETHTTPPORT(port);
For example:
EXEC DBMS_XDB.SETHTTPPORT(8080);
Enabling Network Services in Oracle Database 11g By default, the ability to interact with network services is disabled in Oracle Database 11g release 1 or 2. Therefore, if you are running Oracle Application Express with Oracle Database 11g release 1 or 2, you must use the new DBMS_NETWORK_ACL_ADMIN package to grant connect privileges to any host for the APEX_040200 database user. Failing to grant these privileges results in issues with:
Sending outbound mail in Oracle Application Express. Users can call methods from the APEX_MAIL package, but issues arise when sending outbound email.
Using Web services in Oracle Application Express
PDF/report printing
26 SmartPlant Materials Business Intelligence Reporting Installation Guide

Install Apex on PL/SQL Gateway (recommended) Topics Granting Connect Privileges (http://docs.oracle.com/cd/E23903_01/doc/doc.41/e21673/otn_install.htm#autoId35) Troubleshooting an Invalid ACL Error (http://docs.oracle.com/cd/E23903_01/doc/doc.41/e21673/otn_install.htm#autoId36)
To run the examples described in this section, the compatible initialization parameter of the database must be set to at least 11.1.0.0.0. By default, an 11g database will already have the parameter set properly, but a database upgraded to 11g from a prior version may not. See Creating and Configuring an Oracle Database (http://docs.oracle.com/cd/E11882_01/server.112/e25494/create.htm#ADMIN002) in the Oracle Database Administrator's Guide for information about changing database initialization parameters.
Granting Connect Privileges The following example demonstrates how to grant connect privileges to any host for the APEX_040200 database user. This example assumes you are connected to the database where Oracle Application Express is installed as SYS specifying the SYSDBA role.
DECLARE ACL_PATH VARCHAR2(4000); BEGIN -- Look for the ACL currently assigned to '*' and give APEX_040200 -- the "connect" privilege if APEX_040200 does not have the privilege yet. SELECT ACL INTO ACL_PATH FROM DBA_NETWORK_ACLS WHERE HOST = '*' AND LOWER_PORT IS NULL AND UPPER_PORT IS NULL; IF DBMS_NETWORK_ACL_ADMIN.CHECK_PRIVILEGE(ACL_PATH, 'APEX_040200', 'connect') IS NULL THEN DBMS_NETWORK_ACL_ADMIN.ADD_PRIVILEGE(ACL_PATH, 'APEX_040200', TRUE, 'connect'); END IF; EXCEPTION -- When no ACL has been assigned to '*'. WHEN NO_DATA_FOUND THEN DBMS_NETWORK_ACL_ADMIN.CREATE_ACL('power_users.xml', 'ACL that lets power users to connect to everywhere', 'APEX_040200', TRUE, 'connect'); DBMS_NETWORK_ACL_ADMIN.ASSIGN_ACL('power_users.xml','*'); END; / COMMIT;
Proceed with Set Up a New Workspace for SmartPlant Materials Business Intelligence (on page 29).
SmartPlant Materials Business Intelligence Reporting Installation Guide 27


S E C T I O N 6
1. Open Workspace Administration in Apex.
2. Go to the web URL: http://<your_database_server>:8080/apex
Set Up a New Workspace for SmartPlant Materials Business Intelligence
SmartPlant Materials Business Intelligence Reporting Installation Guide 29

Set Up a New Workspace for SmartPlant Materials Business Intelligence 3. Enter your credentials (as defined during installation) and log in.
4. Enter a new password, and click Apply Changes.
30 SmartPlant Materials Business Intelligence Reporting Installation Guide

Set Up a New Workspace for SmartPlant Materials Business Intelligence 5. Click Return.
6. Re-log in with the new password.
The Admin Dashboard for Apex Administration appears.
If you upgrade from BIR 707 to BIR 708, see Install SmartPlant Materials Business Intelligence Modules in Apex (on page 37).
7. Click Create Workspace.
8. Enter a workspace name (BIR_SPMAT) and a workspace ID (optional), and then click Next.
9. On the next screen, do the following:
Select No in the Re-use existing schema box.
Select BIR_SPMAT in the Schema Name box.
Enter the password in the Schema Password box.
Select 1000 in the Space Quota (MB) box.
SmartPlant Materials Business Intelligence Reporting Installation Guide 31

Set Up a New Workspace for SmartPlant Materials Business Intelligence
Click Next.
10. To create the admin account for the workspace BIR_SPMAT, type:
the administrator username
the administrator password
the administrator e-mail address
(Optionally) type the administrator First Name and Last Name values.
Finally, click Next.
32 SmartPlant Materials Business Intelligence Reporting Installation Guide

Set Up a New Workspace for SmartPlant Materials Business Intelligence 11. On the Confirm Request box, check the settings and then click Create Workspace.
12. On the result screen, click Done.
Prevent Admin Password Changes To prevent the workspace admin account’s password from being changed, do the following steps:
1. Click Manage Workspaces on the Admin Dashboard.
SmartPlant Materials Business Intelligence Reporting Installation Guide 33

Set Up a New Workspace for SmartPlant Materials Business Intelligence 2. Click Manage Developers and Users.
3. Click the Edit button (pencil) beside the ADMIN user in the BIR_SPMAT workspace.
34 SmartPlant Materials Business Intelligence Reporting Installation Guide

Set Up a New Workspace for SmartPlant Materials Business Intelligence 4. Select No in the Require Change of Password on First Use box, and then click Apply
Changes.
A confirmation message appears.
You’re done. You can create more users if you need to, but that is optional.
5. Click Logout.
SmartPlant Materials Business Intelligence Reporting Installation Guide 35

Set Up a New Workspace for SmartPlant Materials Business Intelligence
36 SmartPlant Materials Business Intelligence Reporting Installation Guide

S E C T I O N 7
1. Open the directory where Install_SPMAT_BIR.sql is located.
Example:
C:\Program Files (x86)\Intergraph\SmartPlant Materials Business Intelligence Reporting 2013
2. Open a command prompt.
3. Change your working directory to the above mentioned directory.
4. Set the following Oracle parameters:
set ORACLE_HOME=<ORACLE_HOME>
set ORACLE_SID=<SID>
5. Launch SQL*Plus.
6. Run the Install_SPMAT_BIR.sql script.
Install SmartPlant Materials Business Intelligence Modules in Apex
SmartPlant Materials Business Intelligence Reporting Installation Guide 37

Install SmartPlant Materials Business Intelligence Modules in Apex
Enter the database connect string.
Enter the password for the sys account.
Enter the password for the m_sys account.
Enter the BIR Workspace name (configured in Set Up a New Workspace for SmartPlant Materials Business Intelligence (on page 29)).
Enter the BIR Schema password. (configured in Set Up a New Workspace for SmartPlant Materials Business Intelligence (on page 29)).
You will be asked for the application IDs for the BIR applications, which are 101, 102, and 103 by default.
After the script has checked the version, press Enter to continue.
The script pauses with the following output:
Press Enter to proceed with the installation.
38 SmartPlant Materials Business Intelligence Reporting Installation Guide

Install SmartPlant Materials Business Intelligence Modules in Apex
The procedure will end as displayed in the picture below.
The installation was successful.
7. Open a browser and launch Oracle Application Express. For example, enter a URL similar to the following:
http://dor-msc-lug:8080/apex
8. In the Workspace box, type BIR_SPMAT, and enter the admin account credentials.
9. Click Login to Application Express.
SmartPlant Materials Business Intelligence Reporting Installation Guide 39

Install SmartPlant Materials Business Intelligence Modules in Apex
If you log in successfully, you will see the following.
10. Click Application Builder at the top.
It should look like the picture below.
The applications were installed by the BIR installation script.
11. Configure the DBA settings in Smart Plant Materials (see Configure DBA Settings (on page 41)).
40 SmartPlant Materials Business Intelligence Reporting Installation Guide
S E C T I O N 8
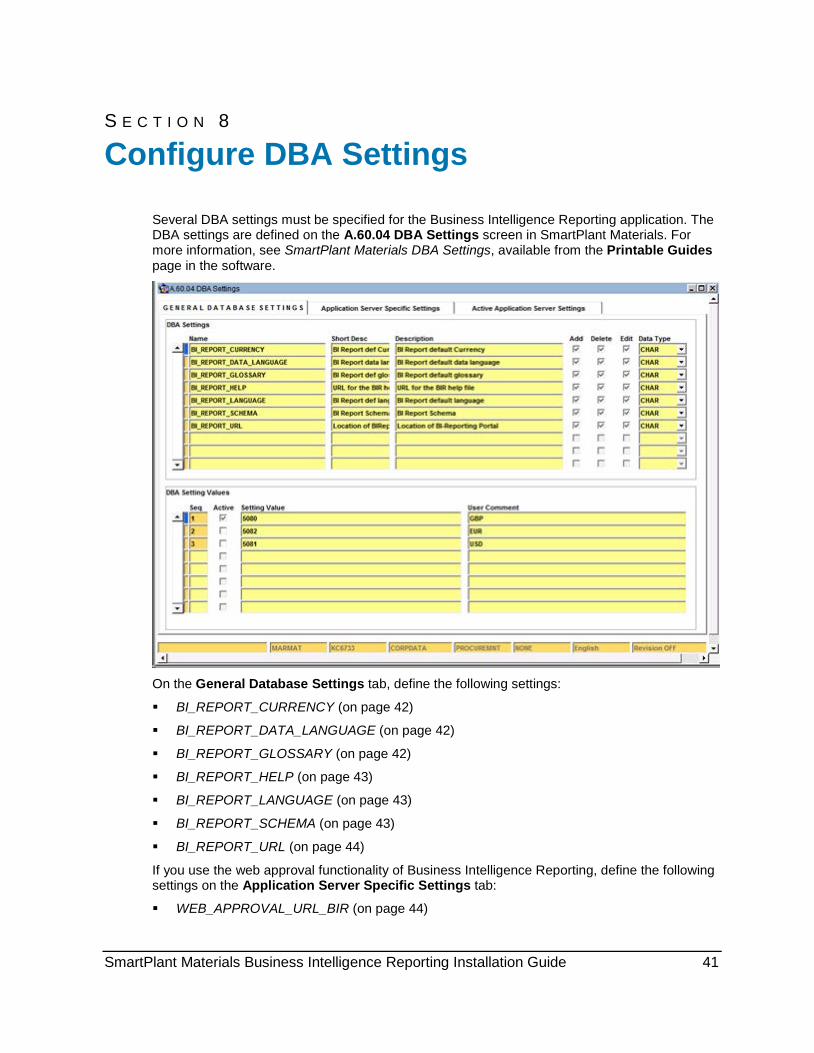
Several DBA settings must be specified for the Business Intelligence Reporting application. The DBA settings are defined on the A.60.04 DBA Settings screen in SmartPlant Materials. For more information, see SmartPlant Materials DBA Settings, available from the Printable Guides page in the software.
On the General Database Settings tab, define the following settings:
BI_REPORT_CURRENCY (on page 42)
BI_REPORT_DATA_LANGUAGE (on page 42)
BI_REPORT_GLOSSARY (on page 42)
BI_REPORT_HELP (on page 43)
BI_REPORT_LANGUAGE (on page 43)
BI_REPORT_SCHEMA (on page 43)
BI_REPORT_URL (on page 44)
If you use the web approval functionality of Business Intelligence Reporting, define the following settings on the Application Server Specific Settings tab:
WEB_APPROVAL_URL_BIR (on page 44)
Configure DBA Settings
SmartPlant Materials Business Intelligence Reporting Installation Guide 41

Configure DBA Settings WEB_APPROVAL_WITH_BIR (on page 44)
BI_REPORT_CURRENCY With BI_REPORT_CURRENCY, you define the Business Intelligence Reporting default currency. This currency is used in the reports where the spent money is shown. Enter the unit_id of the selected currency in the Setting Value field. Use this statement in SQL*Plus to determine the unit_id for the currency USD:
select unit_id from m_units where unit_code='USD';
For other currencies, replace USD with the unit_code of the currency.
The currencies are defined on the A.10.12 Units of Measure screen, underneath the CURRENCY unit group.
If different currencies are used in a project, ensure that the unit to unit conversion rules are defined on the A.10.13 Unit to Unit screen.
BI_REPORT_DATA_LANGUAGE With BI_REPORT_DATA_LANGUAGE, you define the language for the output of the NLS specific short descriptions and descriptions. Enter the nls_id of the selected language in the Setting Value field. The languages are defined on the A.10.01 Languages screen.
BI_REPORT_GLOSSARY With BI_REPORT_GLOSSARY, you define the default glossary and thereby the language of the prompts used by the Business Intelligence Reporting application. On the login screen, this default glossary appears in the Language box.
Enter the gl_id of the selected glossary in the Setting Value field. Use this statement in SQL*Plus to determine the gl_id for the glossary BIR:
select gl_id from m_glossaries where gl_code='BIR';
For other glossaries, replace BIR with the gl_code of the glossary.
The glossaries are defined on the A.30.12 Glossaries screen in SmartPlant Materials. For more information, see Glossaries in the SmartPlant Materials Administrator’s Guide, available from the Printable Guides page in the software.
42 SmartPlant Materials Business Intelligence Reporting Installation Guide

Configure DBA Settings
BI_REPORT_HELP With BI_REPORT_HELP you define the URL for the Business Intelligence Reporting User’s Guide, or the online help start page. If you assign a proper value to this setting, the user’s guide or the start page opens when you click the Help link.
Define the url for the pdf file or the index.htm file in the form:
http://<your_application_server>/<mapping_name_for_web_entry>/pdf/<filename>
or
http://<your_application_server>/<mapping_name_for_web_entry>/BIR/index.htm
For example:
http://my_spmatas/spmat_webentry/pdf/ SPMAT Business Intelligence Reporting.pdf
or
http://my_spmatas/spmat_webentry/BIR/index.htm
BI_REPORT_LANGUAGE With BI_REPORT_LANGUAGE, you define the application language of the Business Intelligence Reporting application. This setting specifies in which language the selected glossary is applied. Enter the nls_id of the selected language in the Setting Value field. The languages are defined on the A.10.01 Languages screen.
BI_REPORT_SCHEMA The BIR schema is the schema name from the created BIR workspace (see Set Up a New Workspace for SmartPlant Materials Business Intelligence (on page 29)). The default schema name is BIR_SPMAT. Assign this schema name to BI_REPORT_SCHEMA. If this DBA setting is not correctly set, the forecast run will not prepare data for the BIR tables, the Start BI Reporting Portal menu item is not available in Smart Plant Materials, and single sign on will not work for BIR.
SmartPlant Materials Business Intelligence Reporting Installation Guide 43

Configure DBA Settings
BI_REPORT_URL With BI_REPORT_URL, you define the location of the Business Intelligence Reporting application. Enter the URL in the Setting Value field. Here is an example for a valid URL:
http://dor-mds-db04.ingrnet.com:8090/apex/f?p=101
http://[your-server-name]:[port]/apex/f?p=[application_id of BIR]
WEB_APPROVAL_URL_BIR With this DBA setting you define the URL for Business Intelligence Reporting Web Approval.
Assign the following link to WEB_APPROVAL_URL_BIR: http://<your_database_server_name>:<port>/apex/f?p=102
Replace <your_database_server_name> and <port> with appropriate values.
WEB_APPROVAL_WITH_BIR Use Business Intelligence Reporting for Web Approval.
If this DBA setting is set to Y, the Web Approval part of SmartPlant Materials Business Intelligence Reporting is enabled.
44 SmartPlant Materials Business Intelligence Reporting Installation Guide

S E C T I O N 9
The date and number format is specified by the browser language setting.
1. In Internet Explorer, click Tools > Internet Options.
2. On the General tab, click Languages.
3. Select the preferred language and move it to the top of the list.
The picture below shows English as the preferred language.
Configure Date and Number Format
SmartPlant Materials Business Intelligence Reporting Installation Guide 45

Configure Date and Number Format
46 SmartPlant Materials Business Intelligence Reporting Installation Guide

S E C T I O N 1 0
To display prompts and labels in SmartPlant Business Intelligence Reporting in another language, you must specify a glossary. Glossaries are defined on the A.30.12 Glossaries screen in SmartPlant Materials. For more information, see Glossaries in the SmartPlant Materials Administrator's Guide, available from the Printable Guides page in the software.
The procedure to define a glossary is described below.
1. Login to SmartPlant Materials with the language of the glossary you want to create.
2. Select Administration -> A.30 Menus/Roles -> A.30.12 Glossaries to open the Glossaries screen.
3. Type the name of the new glossary in the Glossary box.
4. Type the glossary descriptions in the Short Desc and Description boxes.
5. Click Save.
6. In the second (Translations) block, select the label you want to translate from the LOV in the Prompt box.
7. Type the label translation in the Translated Prompt box.
8. For all other labels you want to translate, click New record and repeat the two previous steps.
9. Click Save.
To define a glossary as the default glossary, assign this glossary to the DBA setting
BI_REPORT_GLOSSARY.
To specify in which language the selected glossary is applied, assign the nls_id of the language to the DBA setting BI_REPORT_LANGUAGE.
To define label translations for an existing glossary in another language, login to SmartPlant Materials with this language and proceed as described above (step 6 to 9).
The default glossary appears in the Language box on the Login page. To choose another language, select a glossary from the drop-down list.
Define Application Language
SmartPlant Materials Business Intelligence Reporting Installation Guide 47

Define Application Language
48 SmartPlant Materials Business Intelligence Reporting Installation Guide

S E C T I O N 1 1
Ensure that access control is set up as described in Access Control in the SmartPlant Materials Business Intelligence Reporting User’s Guide.
1. Launch a web browser.
2. Go to the web URL: http://<your_application_server>:8080/apex/f?p=101
3. Log in with your SmartPlant Materials account.
You can login only once to SmartPlant Materials Business Intelligence Reporting
within a browser session.
Using SmartPlant Materials Business Intelligence Reporting
SmartPlant Materials Business Intelligence Reporting Installation Guide 49

Using SmartPlant Materials Business Intelligence Reporting
50 SmartPlant Materials Business Intelligence Reporting Installation Guide

S E C T I O N 1 2
BIR synchronization jobs can be scheduled using the Synchronization Jobs report from the Administration menu.
Grant BIR_BI_FUNCTIONS Permission As a prerequisite for scheduling synchronization jobs, the M_SYS user must have permission to execute the BIR_BI_FUNCTIONS package of the BIR_SPMAT schema. To grant permission, proceed as follows.
1. Launch SQL*Plus.
2. Connect as SYS.
3. Execute this command:
grant execute on BIR_SPMAT.BIR_BI_FUNCTIONS to M_SYS;
Create and Install Synchronization Jobs To improve the performance of business intelligence reports, some of the reports use separate database tables. To ensure that the reports use current data, synchronization jobs must be run on the database to synchronize the database tables. Synchronization jobs must be created and run for the following reports:
Adherence to Delivery Dates
Agreements and Line Items
Bill of Materials
Commodity Code Report
Expediting Report
Ident Report (Full Listing)
On-Time Delivery
Schedule Synchronization Jobs
SmartPlant Materials Business Intelligence Reporting Installation Guide 51
Schedule Synchronization Jobs Procurement Progress
Procurement Status
Requisitions
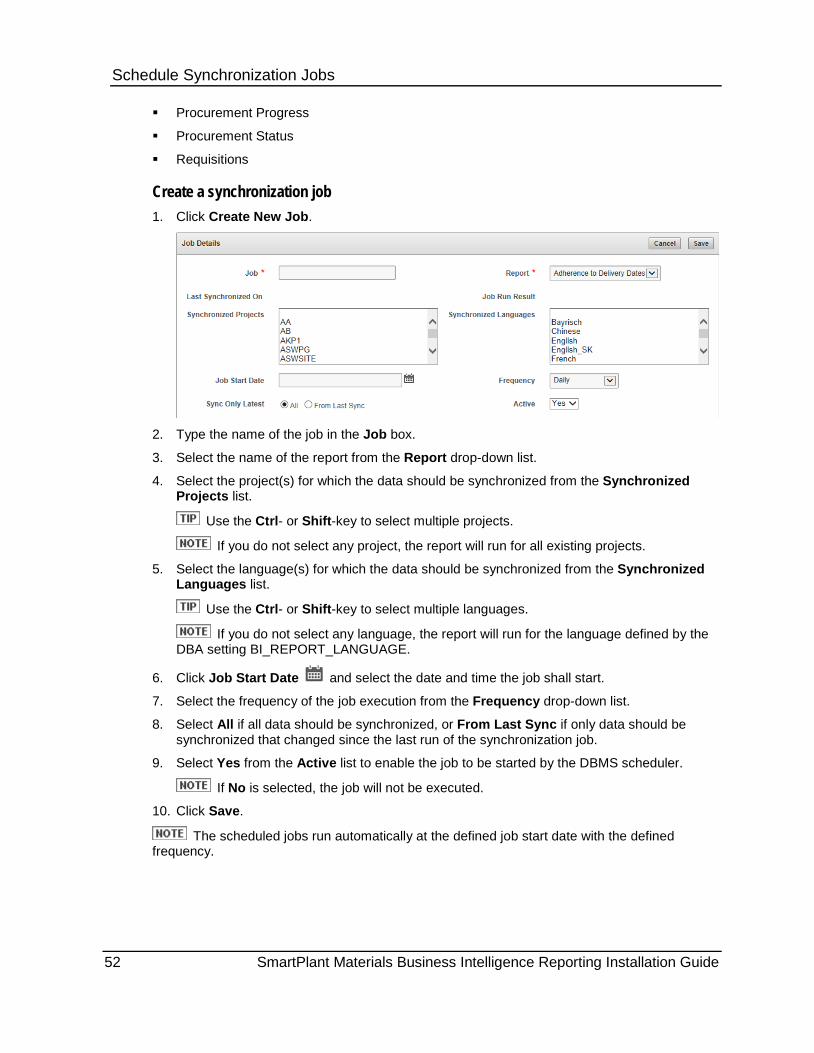
Create a synchronization job 1. Click Create New Job.
2. Type the name of the job in the Job box.
3. Select the name of the report from the Report drop-down list.
4. Select the project(s) for which the data should be synchronized from the Synchronized Projects list.
Use the Ctrl- or Shift-key to select multiple projects.
If you do not select any project, the report will run for all existing projects.
5. Select the language(s) for which the data should be synchronized from the Synchronized Languages list.
Use the Ctrl- or Shift-key to select multiple languages.
If you do not select any language, the report will run for the language defined by the DBA setting BI_REPORT_LANGUAGE.
6. Click Job Start Date and select the date and time the job shall start.
7. Select the frequency of the job execution from the Frequency drop-down list.
8. Select All if all data should be synchronized, or From Last Sync if only data should be synchronized that changed since the last run of the synchronization job.
9. Select Yes from the Active list to enable the job to be started by the DBMS scheduler.
If No is selected, the job will not be executed.
10. Click Save.
The scheduled jobs run automatically at the defined job start date with the defined frequency.
52 SmartPlant Materials Business Intelligence Reporting Installation Guide

Schedule Synchronization Jobs Edit a synchronization job The existing jobs are displayed in the upper part of the page.
The result of the job is displayed in the Job Run Result cell. Possible values are:
Succeeded
Stopped
Failed - nnnnn (nnnnn indicates the Oracle error message code)
The Last Synchronized On cell shows the date and time of the last synchronization, with a comment about modifications to database objects that are relevant for the report. The comment appears in red when objects have been modified and the synchronization job should run again.
If customer installed procedures (CIPs) have been modified, it is necessary to update the version number and the build number in the VERSION procedure in the concerning custom package because this procedure is used to track package modifications.
1. Click .
The job details are displayed in the Job Details section at the bottom.
2. Edit the data you want to change.
3. Click Save.
To delete the selected job, click Delete.
Ad-hoc synchronization You can start a synchronization job immediately.
1. Select the check box in the second column for the jobs you want to run.
SmartPlant Materials Business Intelligence Reporting Installation Guide 53
Identify Unit Conversion Discrepancies 2. Click Synchronize Now.
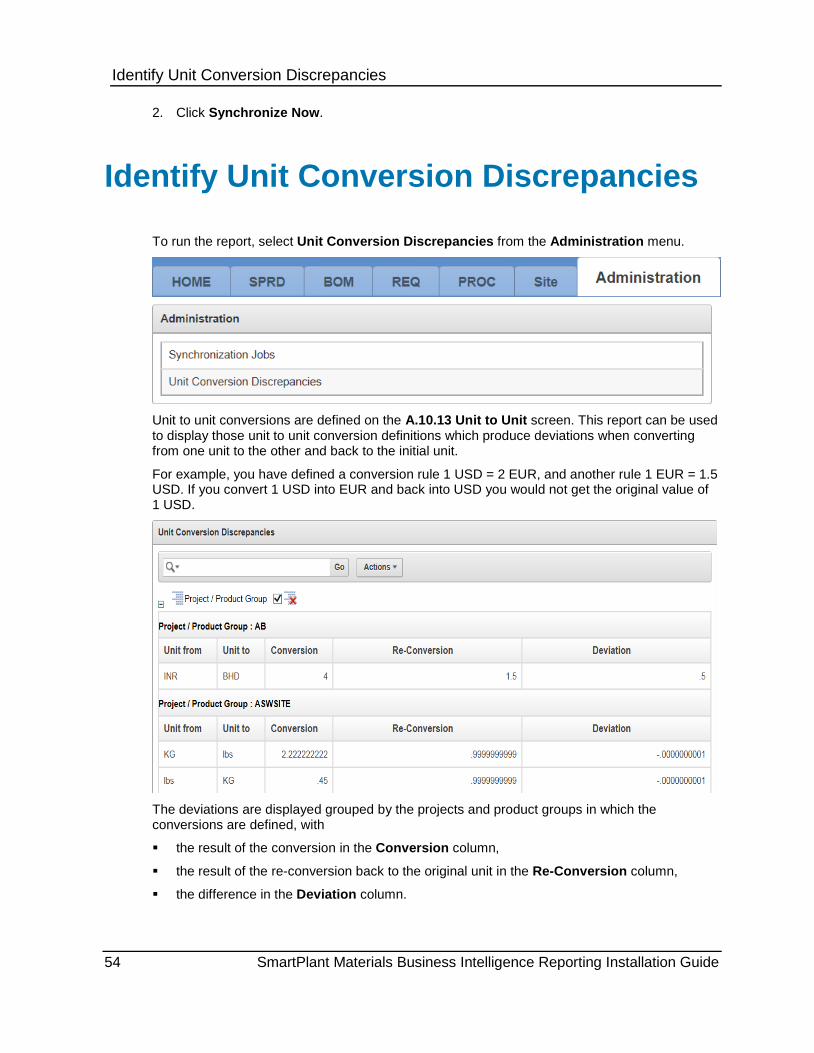
To run the report, select Unit Conversion Discrepancies from the Administration menu.
Unit to unit conversions are defined on the A.10.13 Unit to Unit screen. This report can be used to display those unit to unit conversion definitions which produce deviations when converting from one unit to the other and back to the initial unit.
For example, you have defined a conversion rule 1 USD = 2 EUR, and another rule 1 EUR = 1.5 USD. If you convert 1 USD into EUR and back into USD you would not get the original value of 1 USD.
The deviations are displayed grouped by the projects and product groups in which the conversions are defined, with
the result of the conversion in the Conversion column,
the result of the re-conversion back to the original unit in the Re-Conversion column,
the difference in the Deviation column.
Identify Unit Conversion Discrepancies
54 SmartPlant Materials Business Intelligence Reporting Installation Guide

Identify Unit Conversion Discrepancies
SmartPlant Materials Business Intelligence Reporting Installation Guide 55


B BI_REPORT_CURRENCY • 44 BI_REPORT_DATA_LANGUAGE • 44 BI_REPORT_GLOSSARY • 44 BI_REPORT_HELP • 45 BI_REPORT_LANGUAGE • 45 BI_REPORT_SCHEMA • 45 BI_REPORT_URL • 46
C Configure Date and Number Format • 47 Configure DBA Settings • 43 Configure the Embedded PL/SQL Gateway
• 23 Create and Install Synchronization Jobs •
53
D Define Application Language • 49
E Enabling Network Services in Oracle
Database 11g • 28 Enabling Oracle XML DB HTTP Server • 28 Extract Business Intelligence Reporting
Components • 17
G Grant BIR_BI_FUNCTIONS Permission •
53 Granting Connect Privileges • 29
H Hardware and Software Requirements • 9
I Identify Unit Conversion Discrepancies • 56 Install Apex on PL/SQL Gateway
(recommended) • 21 Install SmartPlant Materials Business
Intelligence Modules in Apex • 39
L License • 13
O Other Requirements • 10
P Pre-Checks on your Database and
Environment • 15 Preface • 7 Prevent Admin Password Changes • 35
S Schedule Synchronization Jobs • 53 Set Up a New Workspace for SmartPlant
Materials Business Intelligence • 31 SmartPlant Materials Business Intelligence
Reporting Client • 10 SmartPlant Materials Database Server • 9
U Using SmartPlant Materials Business
Intelligence Reporting • 51
V Verifying the Oracle XML DB HTTP Server
Port • 28
W WEB_APPROVAL_URL_BIR • 46 WEB_APPROVAL_WITH_BIR • 46
Index
SmartPlant Materials Business Intelligence Reporting Installation Guide 57