smartplant materials a-z training - create a componentspmat.hec.co.kr/marian_webentry/pdfs/spmat a-z...
TRANSCRIPT
SmartPlant Materials A-Z Training – Create a Component
Version 2011 SP1 (7.0.1)
September 2010
DMAR1-TE-100003A

Copyright Copyright © 2010 Intergraph Corporation. All Rights Reserved. Including software, file formats, and audiovisual displays; may be used pursuant to applicable software license agreement; contains confidential and proprietary information of Intergraph and/or third parties which is protected by copyright law, trade secret law, and international treaty, and may not be provided or otherwise made available without proper authorization from Intergraph Corporation.
U.S. Government Restricted Rights Legend Use, duplication, or disclosure by the government is subject to restrictions as set forth below. For civilian agencies: This was developed at private expense and is "restricted computer software" submitted with restricted rights in accordance with subparagraphs (a) through (d) of the Commercial Computer Software - Restricted Rights clause at 52.227-19 of the Federal Acquisition Regulations ("FAR") and its successors, and is unpublished and all rights are reserved under the copyright laws of the United States. For units of the Department of Defense ("DoD"): This is "commercial computer software" as defined at DFARS 252.227-7014 and the rights of the Government are as specified at DFARS 227.7202-3. Unpublished - rights reserved under the copyright laws of the United States. Intergraph Corporation P.O. Box 240000 Huntsville, AL 35813 Street address: 170 Graphics Drive, Madison, AL 35758
Terms of Use Use of this software product is subject to the End User License Agreement ("EULA") delivered with this software product unless the licensee has a valid signed license for this software product with Intergraph Corporation. If the licensee has a valid signed license for this software product with Intergraph Corporation, the valid signed license shall take precedence and govern the use of this software product. Subject to the terms contained within the applicable license agreement, Intergraph Corporation gives licensee permission to print a reasonable number of copies of the documentation as defined in the applicable license agreement and delivered with the software product for licensee's internal, non-commercial use. The documentation may not be printed for resale or redistribution.
Warranties and Liabilities All warranties given by Intergraph Corporation about equipment or software are set forth in the EULA provided with the software or applicable license for the software product signed by Intergraph Corporation, and nothing stated in, or implied by, this document or its contents shall be considered or deemed a modification or amendment of such warranties. Intergraph believes the information in this publication is accurate as of its publication date. The information and the software discussed in this document are subject to change without notice and are subject to applicable technical product descriptions. Intergraph Corporation is not responsible for any error that may appear in this document. The software discussed in this document is furnished under a license and may be used or copied only in accordance with the terms of this license. No responsibility is assumed by Intergraph for the use or reliability of software on equipment that is not supplied by Intergraph or its affiliated companies. THE USER OF THE SOFTWARE IS EXPECTED TO MAKE THE FINAL EVALUATION AS TO THE USEFULNESS OF THE SOFTWARE IN HIS OWN ENVIRONMENT. Intergraph is not responsible for the accuracy of delivered data including, but not limited to, catalog, reference and symbol data. Users should verify for themselves that the data is accurate and suitable for their project work.
Trademarks Intergraph, the Intergraph logo, PDS, SmartPlant, SmartMarine, FrameWorks, I-Convert, I-Export, I-Sketch, IntelliShip, INtools, ISOGEN, MARIAN, SmartSketch, SPOOLGEN, SupportManager, and SupportModeler are trademarks or registered trademarks of Intergraph Corporation or its subsidiaries in the United States and other countries. Microsoft and Windows are registered trademarks of Microsoft Corporation. MicroStation is a registered trademark of Bentley Systems, Inc. Other brands and product names are trademarks of their respective owners.
SmartPlant Materials A-Z Training – Create a Component i
Contents Objectives .................................................................................................................................................... 1
Prerequisites ........................................................................................................................................... 1 Overview ................................................................................................................................................ 2
Explanation ................................................................................................................................................. 3
Workflow Diagram ................................................................................................................................ 5 Commodity Attributes ............................................................................................................................ 6 Commodity Rules .................................................................................................................................. 7 Commodity Codes ................................................................................................................................ 10 Object Parameter .................................................................................................................................. 13 Commodity Geometric Relations ......................................................................................................... 15 Build Idents .......................................................................................................................................... 18
Tutorial ...................................................................................................................................................... 21
Commodity Attributes .......................................................................................................................... 21 Commodity Rules ................................................................................................................................ 24 Commodity Codes ................................................................................................................................ 26 Object Parameter .................................................................................................................................. 29 Commodity Geometric Relations ......................................................................................................... 31 Build Idents .......................................................................................................................................... 33
Quiz ............................................................................................................................................................ 37
Summary ................................................................................................................................................... 39
Quiz Answers ....................................................................................................................................... 39 Helpful References ............................................................................................................................... 39 Comments and Questions ..................................................................................................................... 39

Contents
ii SmartPlant Materials A-Z Training – Create a Component
SmartPlant Materials A-Z Training – Create a Component 1
In this lesson you will learn how to create a new component in SmartPlant Reference Data. In detail, you will learn how to:
• Use Commodity Rules • Define Object Parameters • Maintain Commodity Attribute Tables • Create a Commodity Code • Define Geometrics • Set-up Geometric Relations • Build Idents
Prerequisites For this session, you must know how to log in to the software with the appropriate access
rights from your administrator. In addition, you need a consolidated knowledge about the SmartPlant Materials/Reference Data basic functionality. That means you should be familiar with general screen handling.
Sessions BASICS – General Screen Handling
Objectives
Objectives
2 SmartPlant Materials A-Z Training – Create a Component
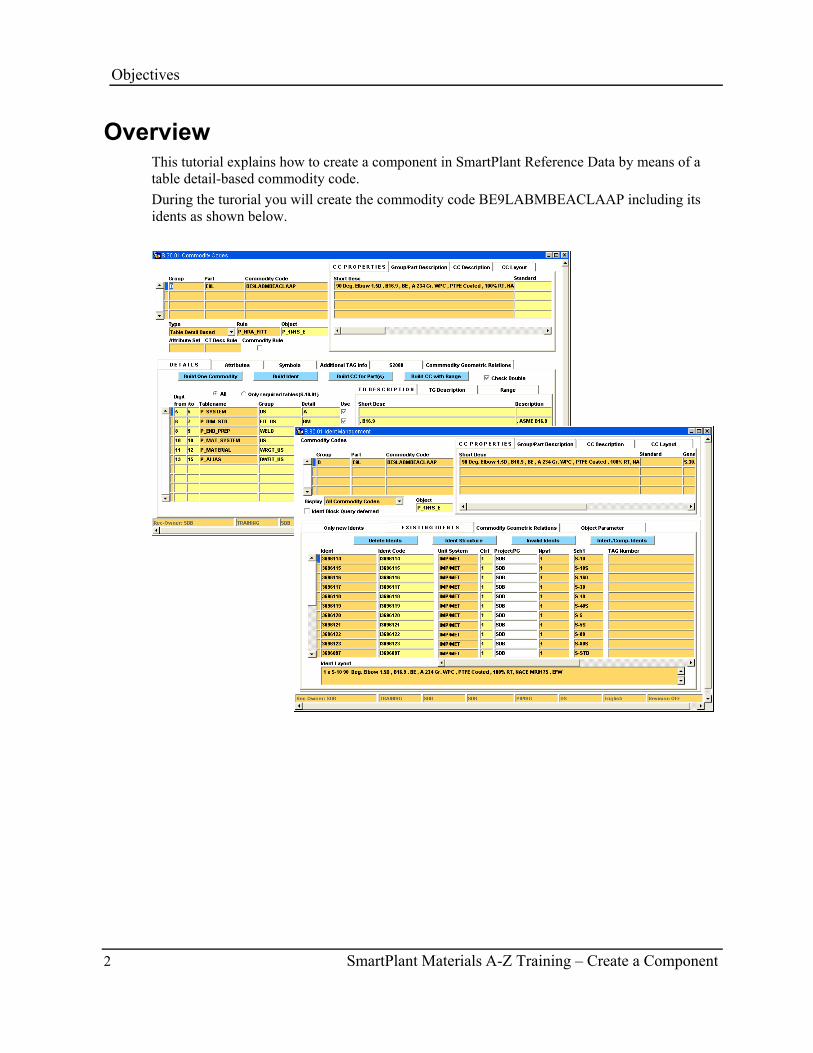
Overview This tutorial explains how to create a component in SmartPlant Reference Data by means of a table detail-based commodity code. During the turorial you will create the commodity code BE9LABMBEACLAAP including its idents as shown below.
SmartPlant Materials A-Z Training – Create a Component 3
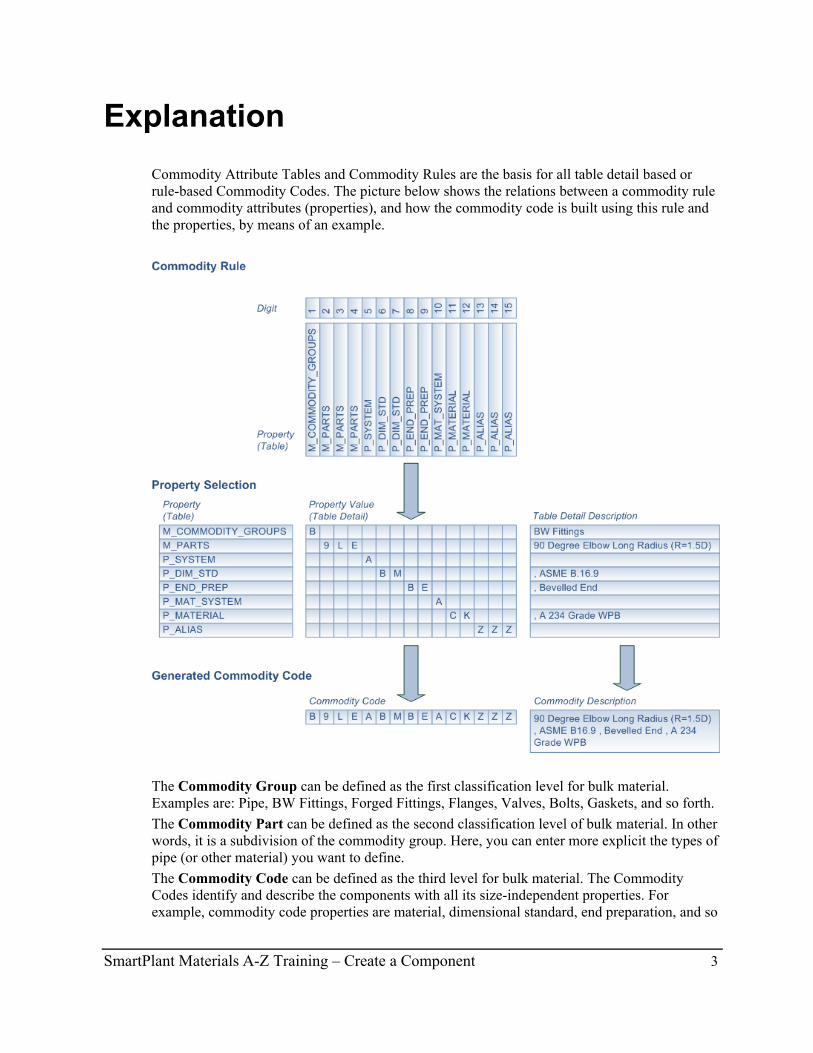
Commodity Attribute Tables and Commodity Rules are the basis for all table detail based or rule-based Commodity Codes. The picture below shows the relations between a commodity rule and commodity attributes (properties), and how the commodity code is built using this rule and the properties, by means of an example.
The Commodity Group can be defined as the first classification level for bulk material. Examples are: Pipe, BW Fittings, Forged Fittings, Flanges, Valves, Bolts, Gaskets, and so forth. The Commodity Part can be defined as the second classification level of bulk material. In other words, it is a subdivision of the commodity group. Here, you can enter more explicit the types of pipe (or other material) you want to define. The Commodity Code can be defined as the third level for bulk material. The Commodity Codes identify and describe the components with all its size-independent properties. For example, commodity code properties are material, dimensional standard, end preparation, and so
Explanation
Explanation
4 SmartPlant Materials A-Z Training – Create a Component
forth. The commodity code is an alphanumerical string that is built according to user-definable rules. Each character represents a specific property of the part. The Ident represents the fourth and lowest material classification level. It combines the commodity codes with the geometric dimensions and finally identifies an item with all its properties including the dimensions. For example, dimensions of a pipe are NPS (nominal pipe size) and schedule. An ident number is what you can use to look up an item in a catalog. The main aspects to consider for the process of creating components are as follows:
• Commodity Rules • Object Parameters • Commodity Attribute Tables • Creating Commodity Codes • Geometrics • Geometric Relations • Building Idents
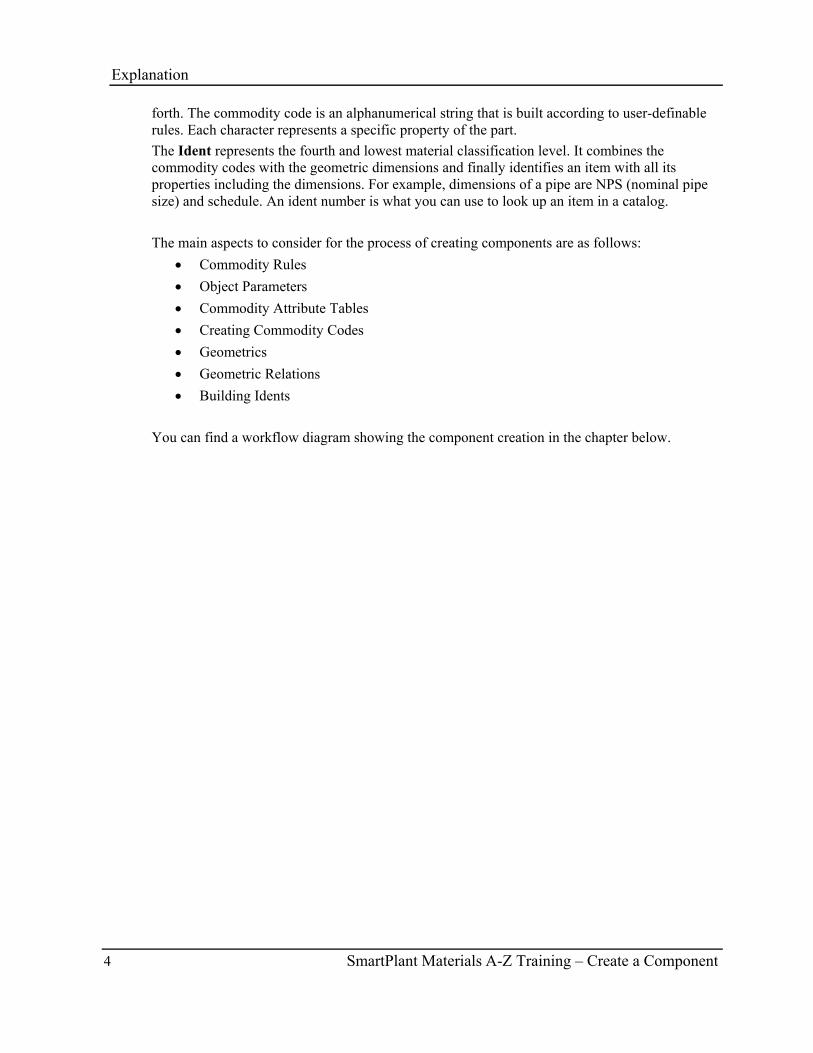
You can find a workflow diagram showing the component creation in the chapter below.
Explanation
SmartPlant Materials A-Z Training – Create a Component 5
Workflow Diagram
Explanation
6 SmartPlant Materials A-Z Training – Create a Component
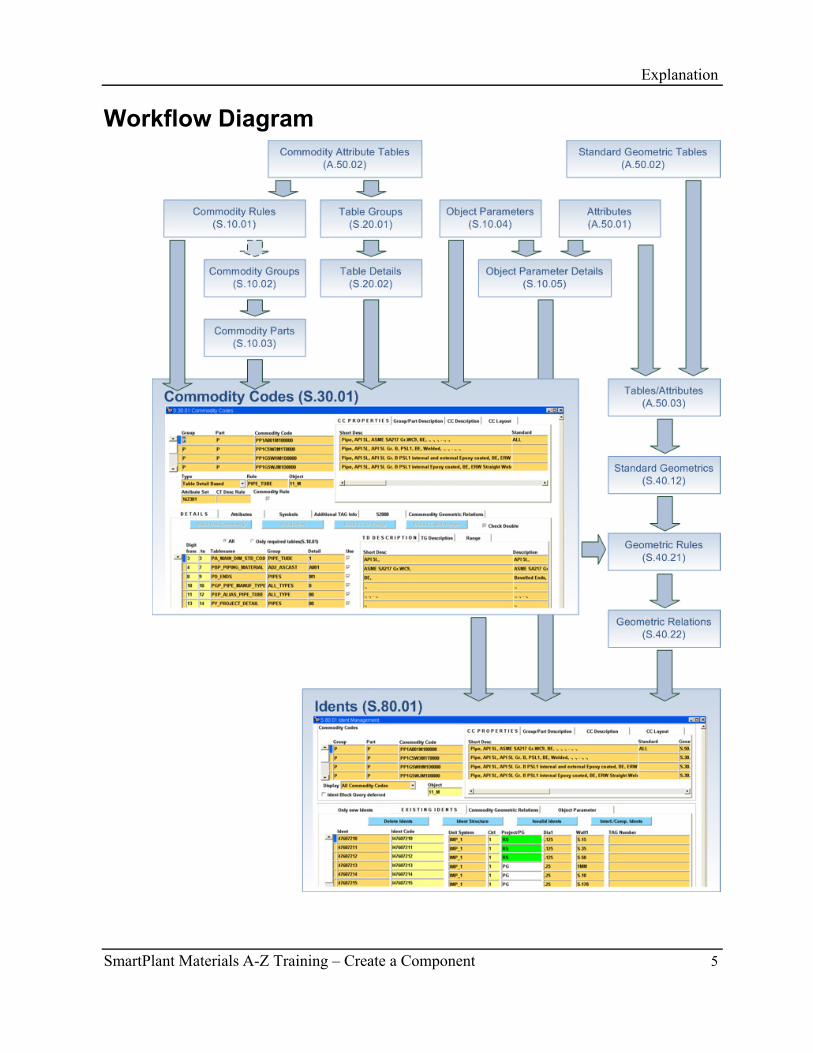
Commodity Attributes Before we can start to create commodity codes, we must define the commodity attributes or properties. The property values will be stored in tables, whereas the table identifies the property, for example design standard or material grade. The table can be divided into groups to clearly arrange the property values. For example, if you have a table called Materials, you could arrange the details in groups like steel materials, plastic materials, and so forth. The table details represent the property values, which are used to create the commodity codes and to describe the components. To define the commodity properties in that manner ensures that a specific property is always used in the same way, because the list of available entries is restricted to the pre-defined values. This is crucial for quick and clear identification of components. For example, when thinking about a property called Material, one user might say ‘Carbon Steel’, while another user says ‘C Steel’. Even if both of them are talking about the same thing, SmartPlant Reference Data is not able to understand that both descriptions are really identical. The property values are defined on the S.20.02 Tablenames with Details screen, found in the S.20 Commodity Attributes branch under SmartPlant Reference Data.
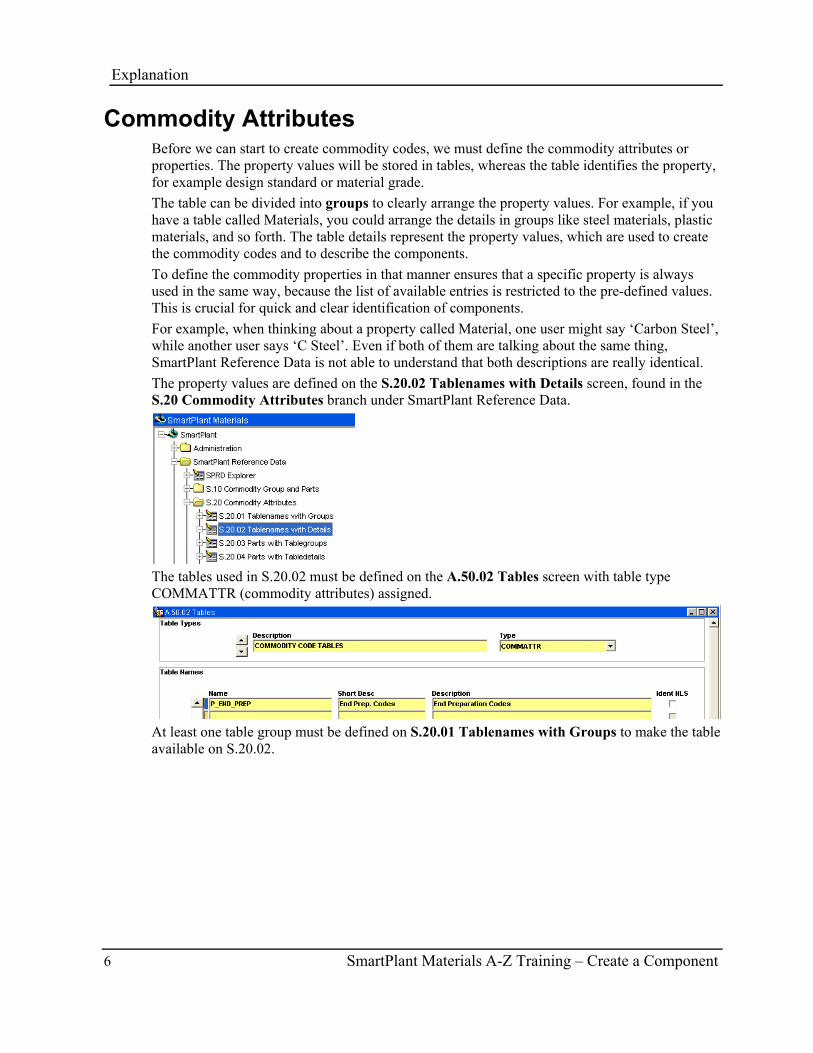
The tables used in S.20.02 must be defined on the A.50.02 Tables screen with table type COMMATTR (commodity attributes) assigned.
At least one table group must be defined on S.20.01 Tablenames with Groups to make the table available on S.20.02.
Explanation
SmartPlant Materials A-Z Training – Create a Component 7
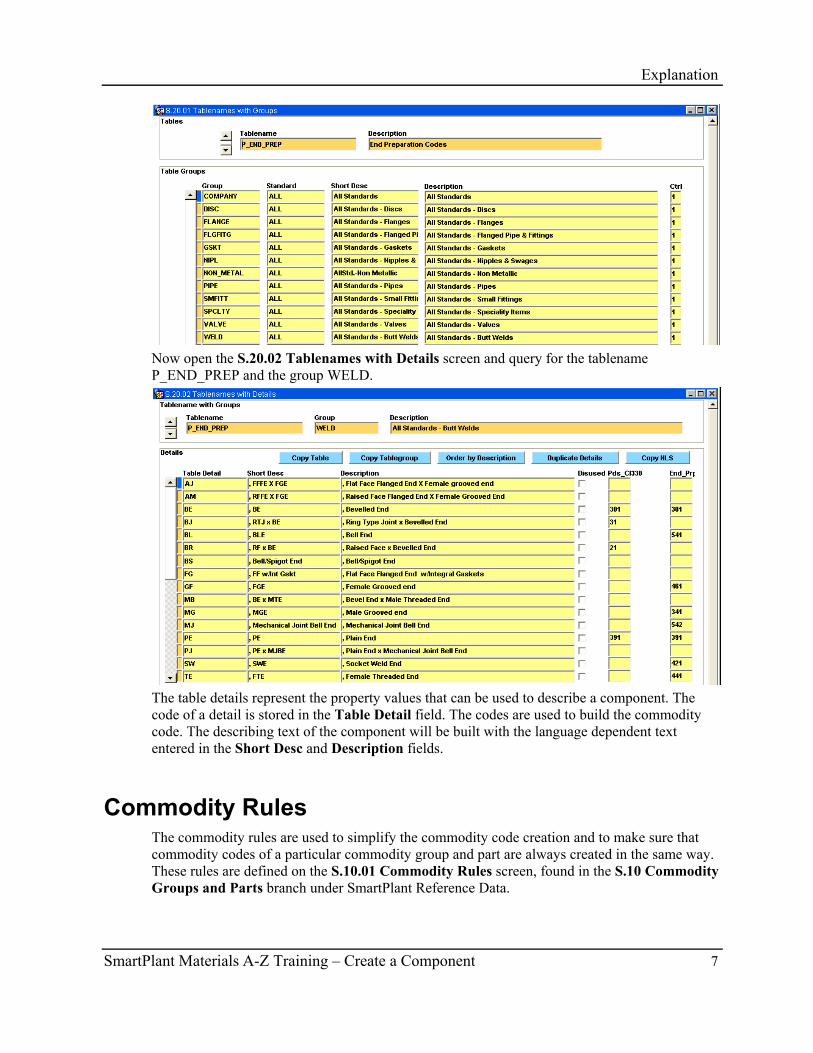
Now open the S.20.02 Tablenames with Details screen and query for the tablename P_END_PREP and the group WELD.
The table details represent the property values that can be used to describe a component. The code of a detail is stored in the Table Detail field. The codes are used to build the commodity code. The describing text of the component will be built with the language dependent text entered in the Short Desc and Description fields.
Commodity Rules The commodity rules are used to simplify the commodity code creation and to make sure that commodity codes of a particular commodity group and part are always created in the same way. These rules are defined on the S.10.01 Commodity Rules screen, found in the S.10 Commodity Groups and Parts branch under SmartPlant Reference Data.
Explanation
8 SmartPlant Materials A-Z Training – Create a Component
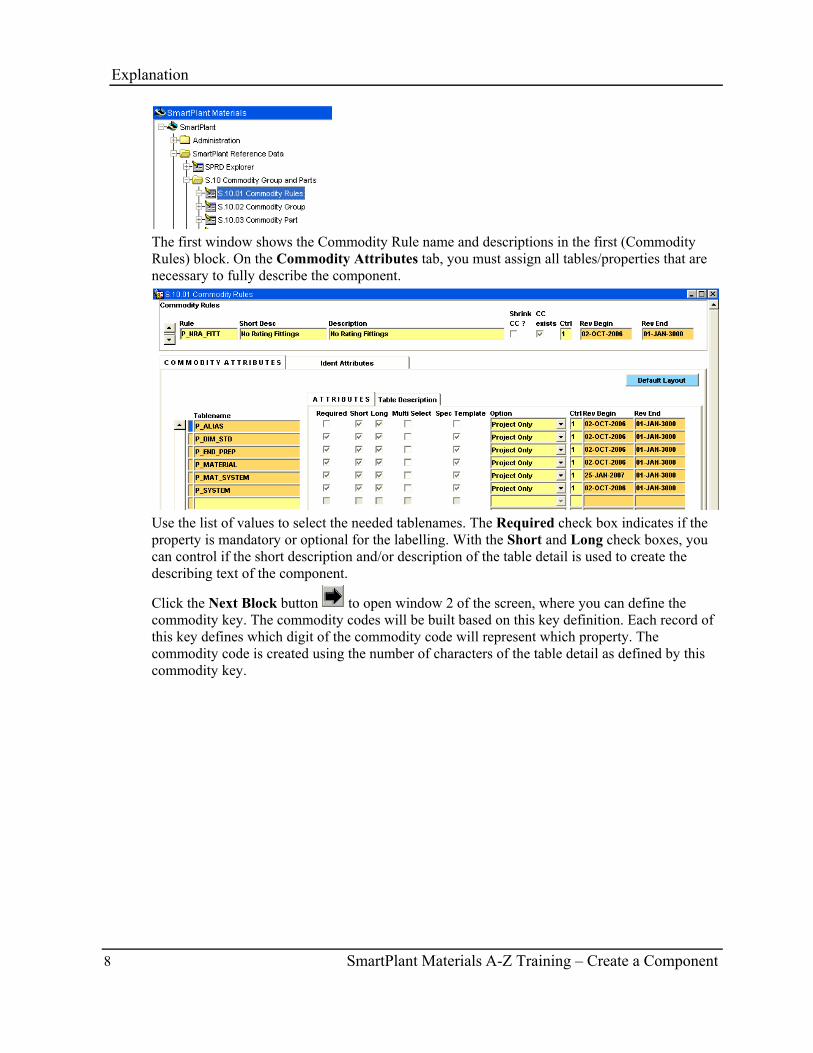
The first window shows the Commodity Rule name and descriptions in the first (Commodity Rules) block. On the Commodity Attributes tab, you must assign all tables/properties that are necessary to fully describe the component.
Use the list of values to select the needed tablenames. The Required check box indicates if the property is mandatory or optional for the labelling. With the Short and Long check boxes, you can control if the short description and/or description of the table detail is used to create the describing text of the component.
Click the Next Block button to open window 2 of the screen, where you can define the commodity key. The commodity codes will be built based on this key definition. Each record of this key defines which digit of the commodity code will represent which property. The commodity code is created using the number of characters of the table detail as defined by this commodity key.
Explanation
SmartPlant Materials A-Z Training – Create a Component 9
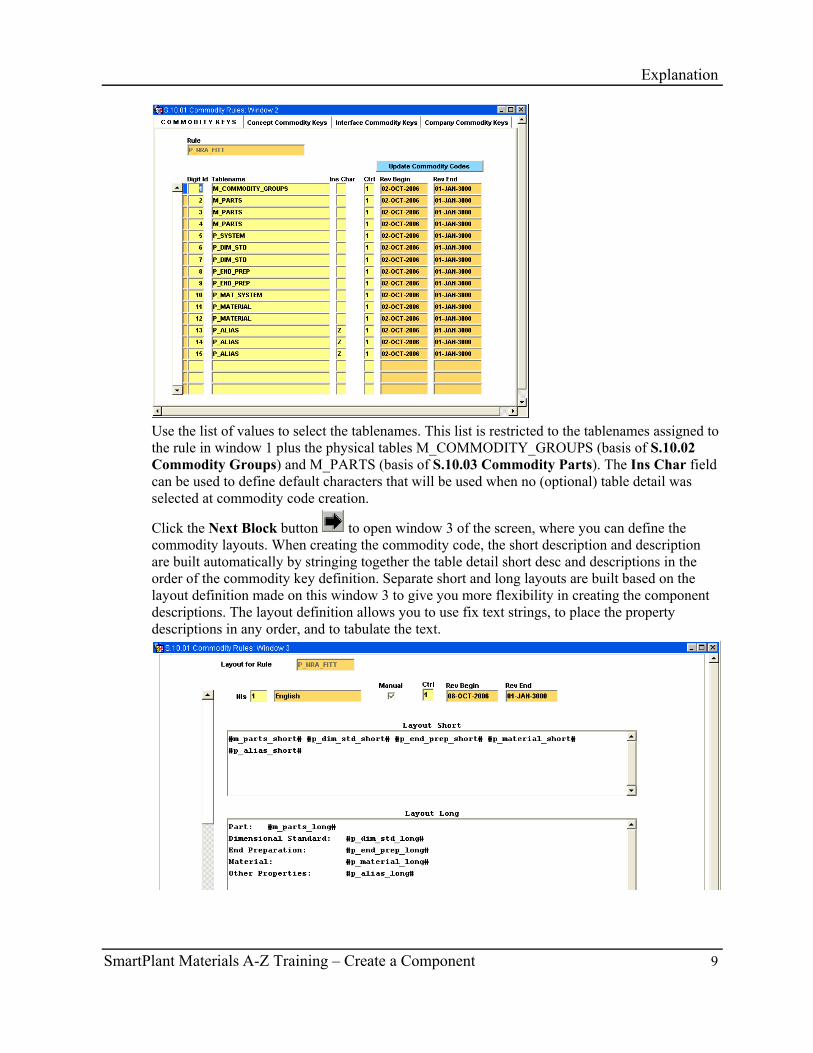
Use the list of values to select the tablenames. This list is restricted to the tablenames assigned to the rule in window 1 plus the physical tables M_COMMODITY_GROUPS (basis of S.10.02 Commodity Groups) and M_PARTS (basis of S.10.03 Commodity Parts). The Ins Char field can be used to define default characters that will be used when no (optional) table detail was selected at commodity code creation.
Click the Next Block button to open window 3 of the screen, where you can define the commodity layouts. When creating the commodity code, the short description and description are built automatically by stringing together the table detail short desc and descriptions in the order of the commodity key definition. Separate short and long layouts are built based on the layout definition made on this window 3 to give you more flexibility in creating the component descriptions. The layout definition allows you to use fix text strings, to place the property descriptions in any order, and to tabulate the text.
Explanation
10 SmartPlant Materials A-Z Training – Create a Component
Use the list of values to select the needed text modules. The tablenames assigned to the rule on window 1 are available, in addition to the attributes assigned to these tables and some values like the company code. These values are entered with concluding short or long identifying the short desc or description, and enclosed with # characters. Key in the fixed text strings when needed. To create tabulated text, use the Ctrl + Tab key from the keyboard.
Commodity Codes The commodity codes are created and maintained on the S.30.01 Commodity Codes screen.
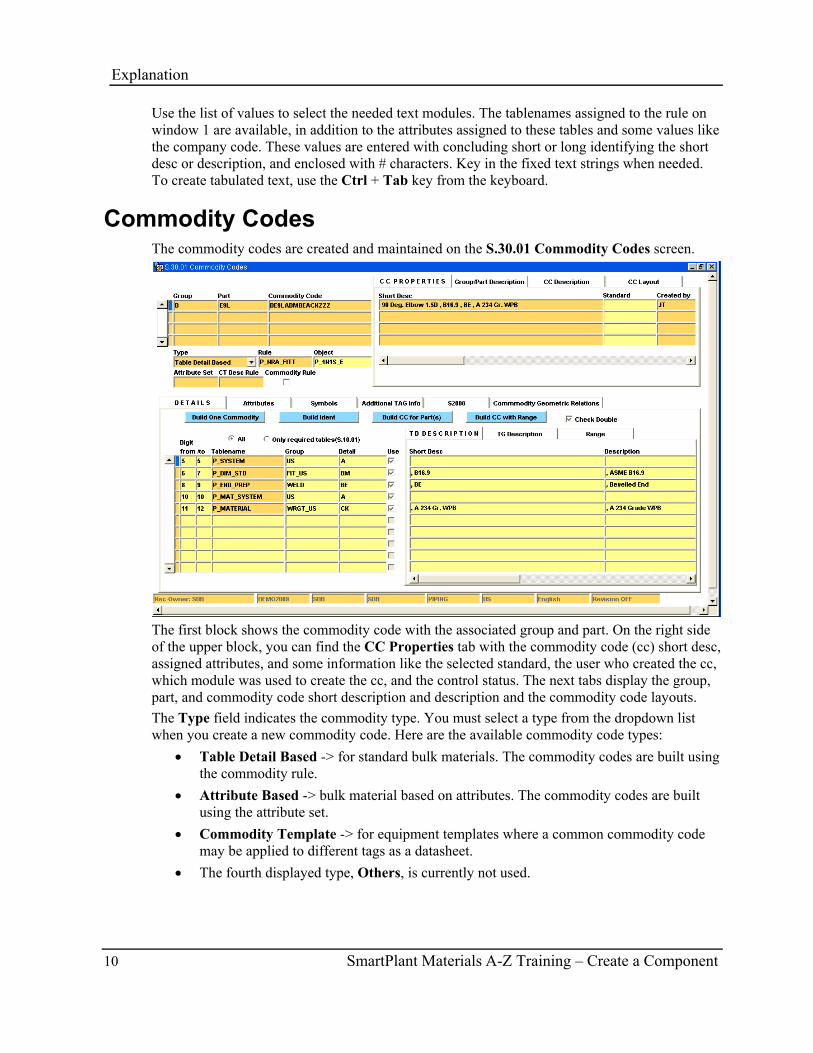
The first block shows the commodity code with the associated group and part. On the right side of the upper block, you can find the CC Properties tab with the commodity code (cc) short desc, assigned attributes, and some information like the selected standard, the user who created the cc, which module was used to create the cc, and the control status. The next tabs display the group, part, and commodity code short description and description and the commodity code layouts. The Type field indicates the commodity type. You must select a type from the dropdown list when you create a new commodity code. Here are the available commodity code types:
• Table Detail Based -> for standard bulk materials. The commodity codes are built using the commodity rule.
• Attribute Based -> bulk material based on attributes. The commodity codes are built using the attribute set.
• Commodity Template -> for equipment templates where a common commodity code may be applied to different tags as a datasheet.
• The fourth displayed type, Others, is currently not used.
Explanation
SmartPlant Materials A-Z Training – Create a Component 11
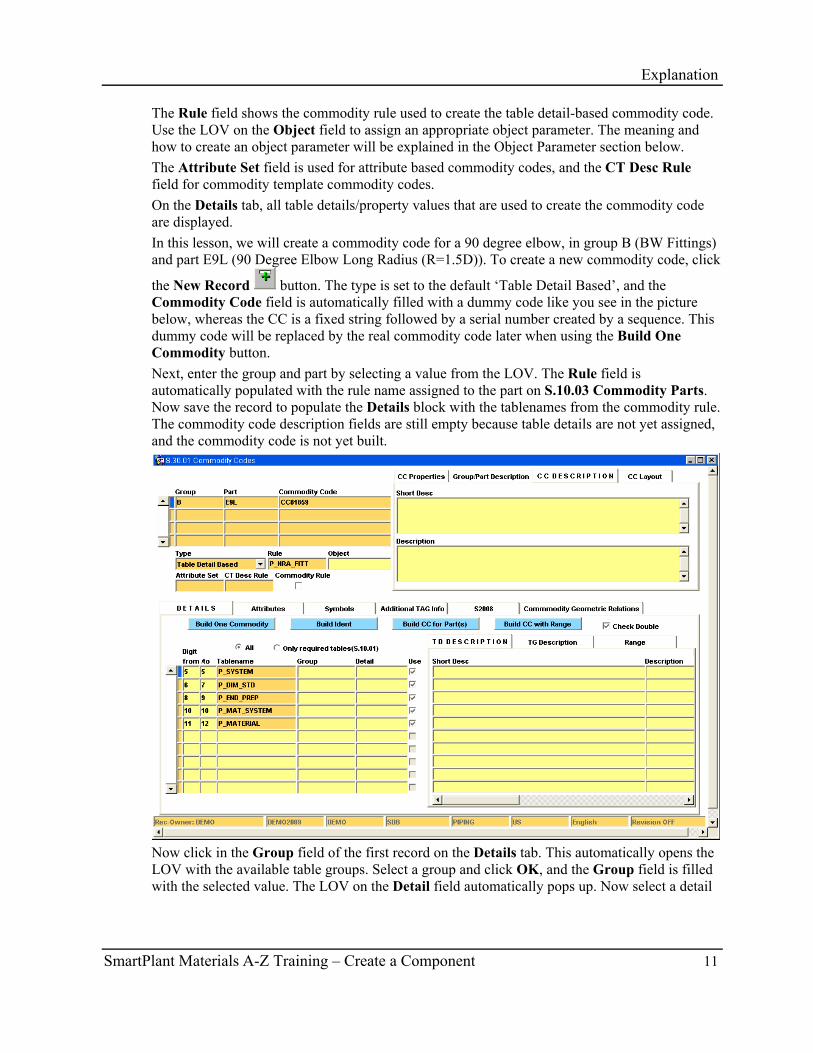
The Rule field shows the commodity rule used to create the table detail-based commodity code. Use the LOV on the Object field to assign an appropriate object parameter. The meaning and how to create an object parameter will be explained in the Object Parameter section below. The Attribute Set field is used for attribute based commodity codes, and the CT Desc Rule field for commodity template commodity codes. On the Details tab, all table details/property values that are used to create the commodity code are displayed. In this lesson, we will create a commodity code for a 90 degree elbow, in group B (BW Fittings) and part E9L (90 Degree Elbow Long Radius (R=1.5D)). To create a new commodity code, click
the New Record button. The type is set to the default ‘Table Detail Based’, and the Commodity Code field is automatically filled with a dummy code like you see in the picture below, whereas the CC is a fixed string followed by a serial number created by a sequence. This dummy code will be replaced by the real commodity code later when using the Build One Commodity button. Next, enter the group and part by selecting a value from the LOV. The Rule field is automatically populated with the rule name assigned to the part on S.10.03 Commodity Parts. Now save the record to populate the Details block with the tablenames from the commodity rule. The commodity code description fields are still empty because table details are not yet assigned, and the commodity code is not yet built.
Now click in the Group field of the first record on the Details tab. This automatically opens the LOV with the available table groups. Select a group and click OK, and the Group field is filled with the selected value. The LOV on the Detail field automatically pops up. Now select a detail
Explanation
12 SmartPlant Materials A-Z Training – Create a Component
from the list and click OK. The Detail field is filled with the selected value. Continue in the same manner with the other records.
When just one table detail exists, it will be filled in automatically without popping up the LOV.
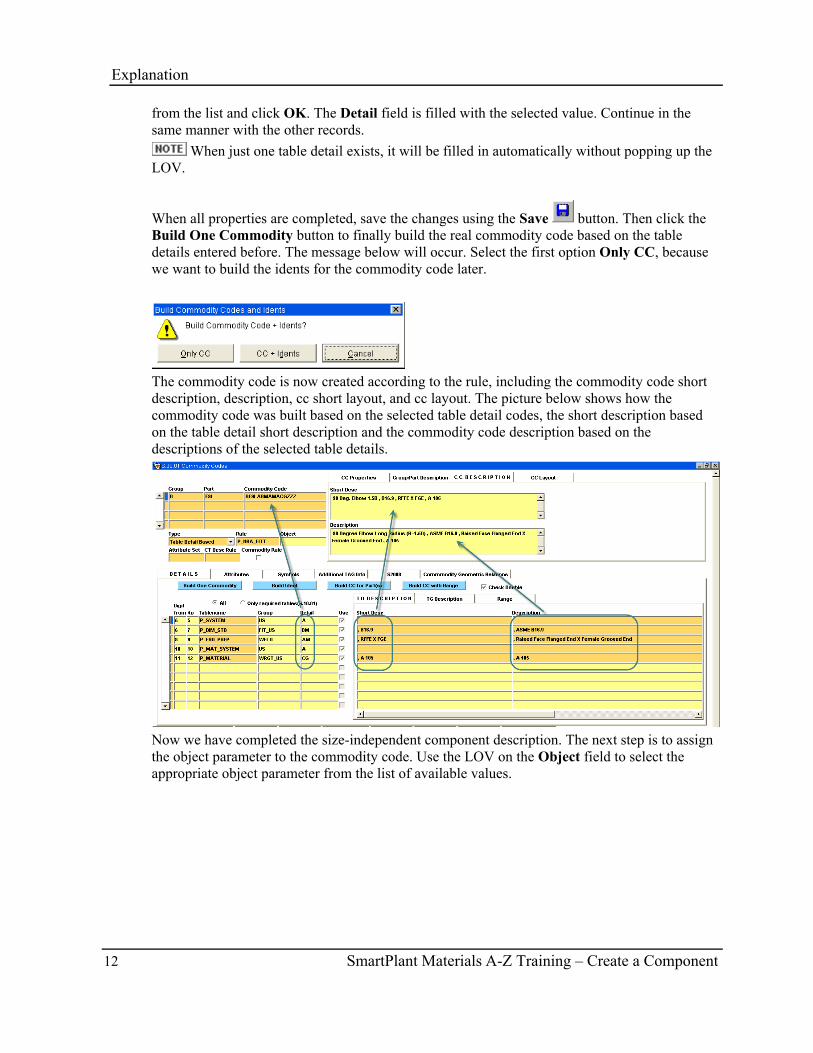
When all properties are completed, save the changes using the Save button. Then click the Build One Commodity button to finally build the real commodity code based on the table details entered before. The message below will occur. Select the first option Only CC, because we want to build the idents for the commodity code later.
The commodity code is now created according to the rule, including the commodity code short description, description, cc short layout, and cc layout. The picture below shows how the commodity code was built based on the selected table detail codes, the short description based on the table detail short description and the commodity code description based on the descriptions of the selected table details.
Now we have completed the size-independent component description. The next step is to assign the object parameter to the commodity code. Use the LOV on the Object field to select the appropriate object parameter from the list of available values.
Explanation
SmartPlant Materials A-Z Training – Create a Component 13
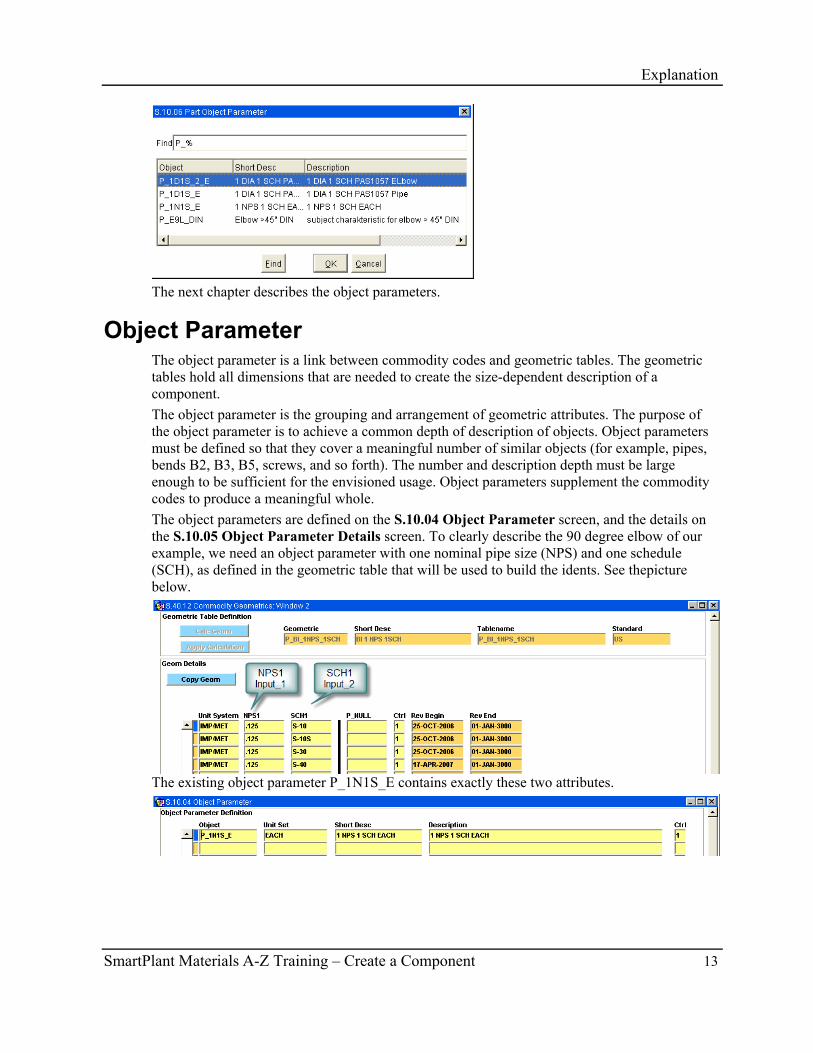
The next chapter describes the object parameters.
Object Parameter The object parameter is a link between commodity codes and geometric tables. The geometric tables hold all dimensions that are needed to create the size-dependent description of a component. The object parameter is the grouping and arrangement of geometric attributes. The purpose of the object parameter is to achieve a common depth of description of objects. Object parameters must be defined so that they cover a meaningful number of similar objects (for example, pipes, bends B2, B3, B5, screws, and so forth). The number and description depth must be large enough to be sufficient for the envisioned usage. Object parameters supplement the commodity codes to produce a meaningful whole. The object parameters are defined on the S.10.04 Object Parameter screen, and the details on the S.10.05 Object Parameter Details screen. To clearly describe the 90 degree elbow of our example, we need an object parameter with one nominal pipe size (NPS) and one schedule (SCH), as defined in the geometric table that will be used to build the idents. See thepicture below.
The existing object parameter P_1N1S_E contains exactly these two attributes.
Explanation
14 SmartPlant Materials A-Z Training – Create a Component
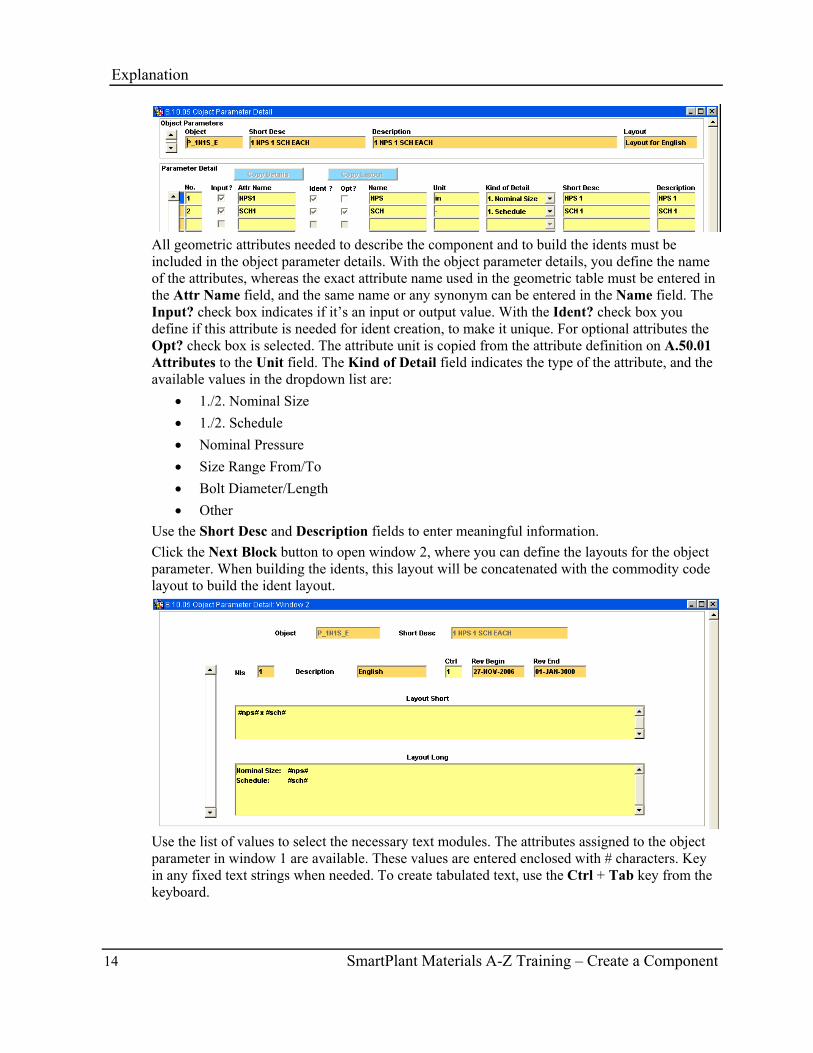
All geometric attributes needed to describe the component and to build the idents must be included in the object parameter details. With the object parameter details, you define the name of the attributes, whereas the exact attribute name used in the geometric table must be entered in the Attr Name field, and the same name or any synonym can be entered in the Name field. The Input? check box indicates if it’s an input or output value. With the Ident? check box you define if this attribute is needed for ident creation, to make it unique. For optional attributes the Opt? check box is selected. The attribute unit is copied from the attribute definition on A.50.01 Attributes to the Unit field. The Kind of Detail field indicates the type of the attribute, and the available values in the dropdown list are:
• 1./2. Nominal Size • 1./2. Schedule • Nominal Pressure • Size Range From/To • Bolt Diameter/Length • Other
Use the Short Desc and Description fields to enter meaningful information. Click the Next Block button to open window 2, where you can define the layouts for the object parameter. When building the idents, this layout will be concatenated with the commodity code layout to build the ident layout.
Use the list of values to select the necessary text modules. The attributes assigned to the object parameter in window 1 are available. These values are entered enclosed with # characters. Key in any fixed text strings when needed. To create tabulated text, use the Ctrl + Tab key from the keyboard.
Explanation
SmartPlant Materials A-Z Training – Create a Component 15
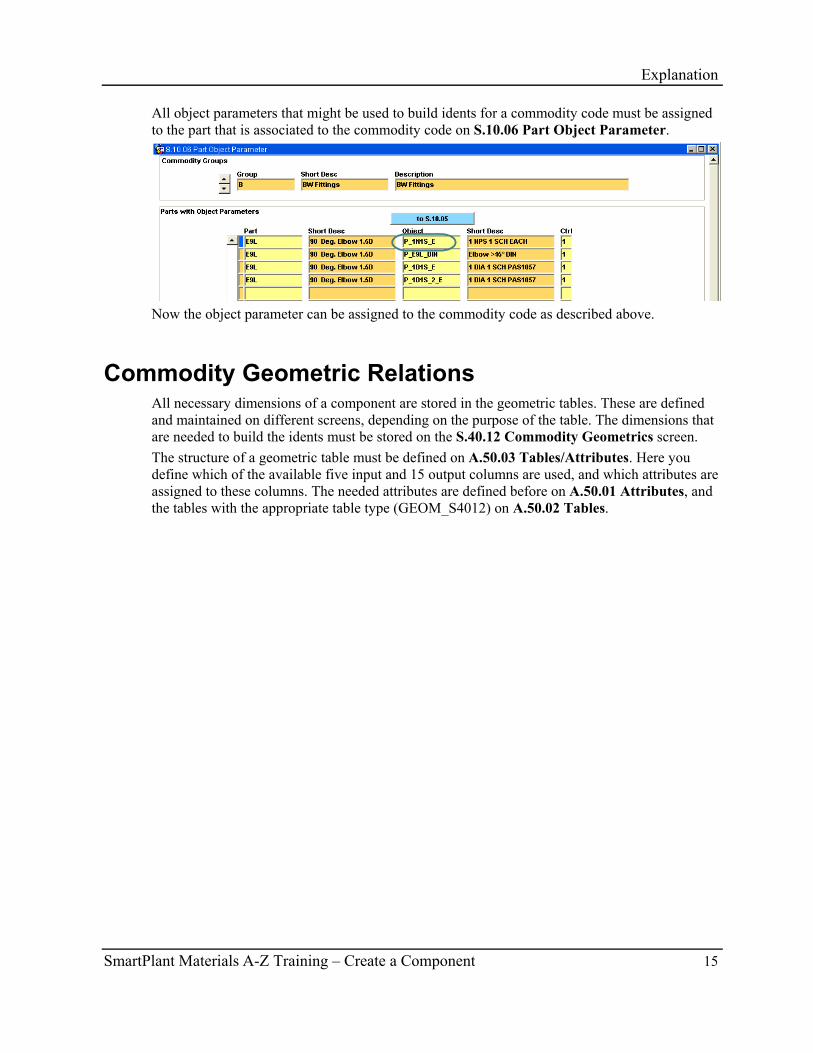
All object parameters that might be used to build idents for a commodity code must be assigned to the part that is associated to the commodity code on S.10.06 Part Object Parameter.
Now the object parameter can be assigned to the commodity code as described above.
Commodity Geometric Relations All necessary dimensions of a component are stored in the geometric tables. These are defined and maintained on different screens, depending on the purpose of the table. The dimensions that are needed to build the idents must be stored on the S.40.12 Commodity Geometrics screen. The structure of a geometric table must be defined on A.50.03 Tables/Attributes. Here you define which of the available five input and 15 output columns are used, and which attributes are assigned to these columns. The needed attributes are defined before on A.50.01 Attributes, and the tables with the appropriate table type (GEOM_S4012) on A.50.02 Tables.

Explanation
16 SmartPlant Materials A-Z Training – Create a Component
In our example, we use the commodity geometric table P_BI_1NPS_1SCH.
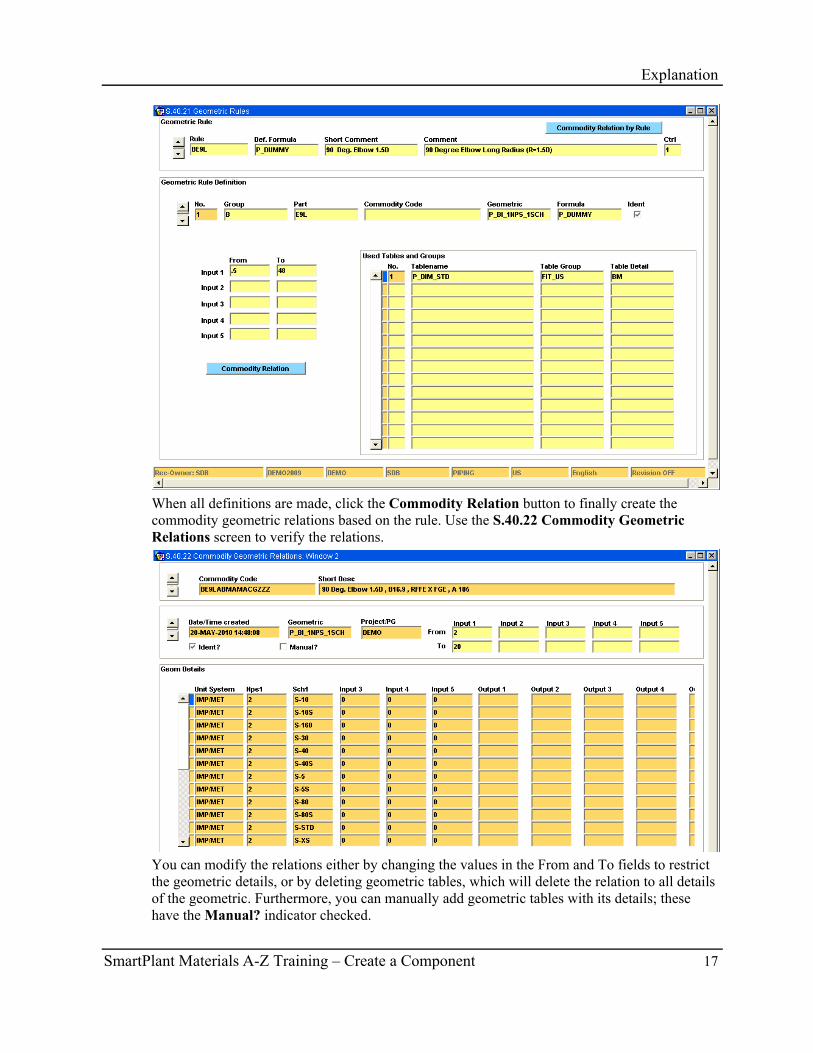
Only geometrics that are linked with the commodity code can be used to provide a basis for building idents. Therefore, we must create a relation between the commodity code and the geometric using screen S.40.21 Geometric Rules. The displayed rule BE9L was defined for 90 degree elbows. In the second (Geometric Rule Definition) block, you can define the rules for creating the commodity geometric relations. In the Geometric field, you enter the geometric table that must be linked. The definition can be made on different levels. If you just enter the commodity group in the Group field, the commodity relations will be built for all commodity codes associated to the selected group. If you enter a group and a part, the relations will be built for all commodity codes associated to the selected part. When you enter any table details in the Used Tables and Groups block, only commodity codes with the entered property values will be linked. The From and To fields can be used to restrict the sizes of the geometric tables that shall be linked to the commodity code. For example, the geometric table contains nominal sizes from .5 to 40 in the first column input_1. When now entering 2 in the From field and 20 in the To field for Input_1, only the records with nominal size between 2 and 20 will be available to build idents. Only geometrics with the Ident check box selected will be available for building idents.
Explanation
SmartPlant Materials A-Z Training – Create a Component 17
When all definitions are made, click the Commodity Relation button to finally create the commodity geometric relations based on the rule. Use the S.40.22 Commodity Geometric Relations screen to verify the relations.
You can modify the relations either by changing the values in the From and To fields to restrict the geometric details, or by deleting geometric tables, which will delete the relation to all details of the geometric. Furthermore, you can manually add geometric tables with its details; these have the Manual? indicator checked.
Explanation
18 SmartPlant Materials A-Z Training – Create a Component
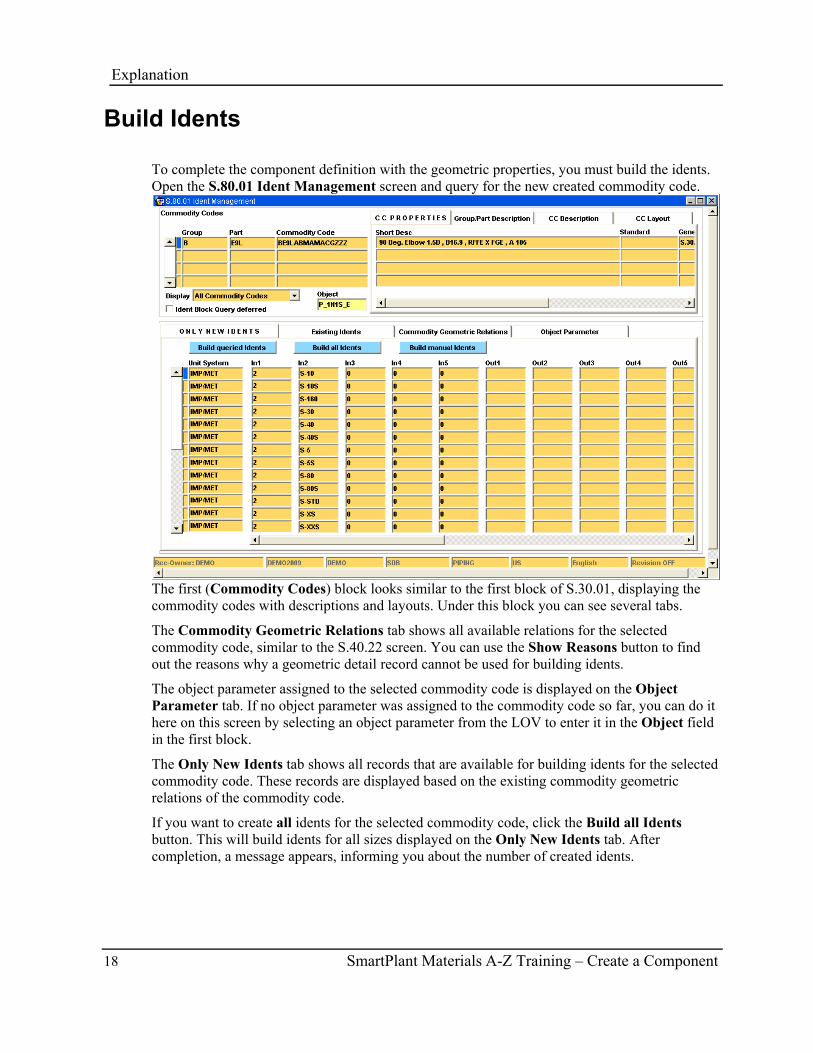
Build Idents To complete the component definition with the geometric properties, you must build the idents. Open the S.80.01 Ident Management screen and query for the new created commodity code.
The first (Commodity Codes) block looks similar to the first block of S.30.01, displaying the commodity codes with descriptions and layouts. Under this block you can see several tabs.
The Commodity Geometric Relations tab shows all available relations for the selected commodity code, similar to the S.40.22 screen. You can use the Show Reasons button to find out the reasons why a geometric detail record cannot be used for building idents.
The object parameter assigned to the selected commodity code is displayed on the Object Parameter tab. If no object parameter was assigned to the commodity code so far, you can do it here on this screen by selecting an object parameter from the LOV to enter it in the Object field in the first block.
The Only New Idents tab shows all records that are available for building idents for the selected commodity code. These records are displayed based on the existing commodity geometric relations of the commodity code.
If you want to create all idents for the selected commodity code, click the Build all Idents button. This will build idents for all sizes displayed on the Only New Idents tab. After completion, a message appears, informing you about the number of created idents.
Explanation
SmartPlant Materials A-Z Training – Create a Component 19
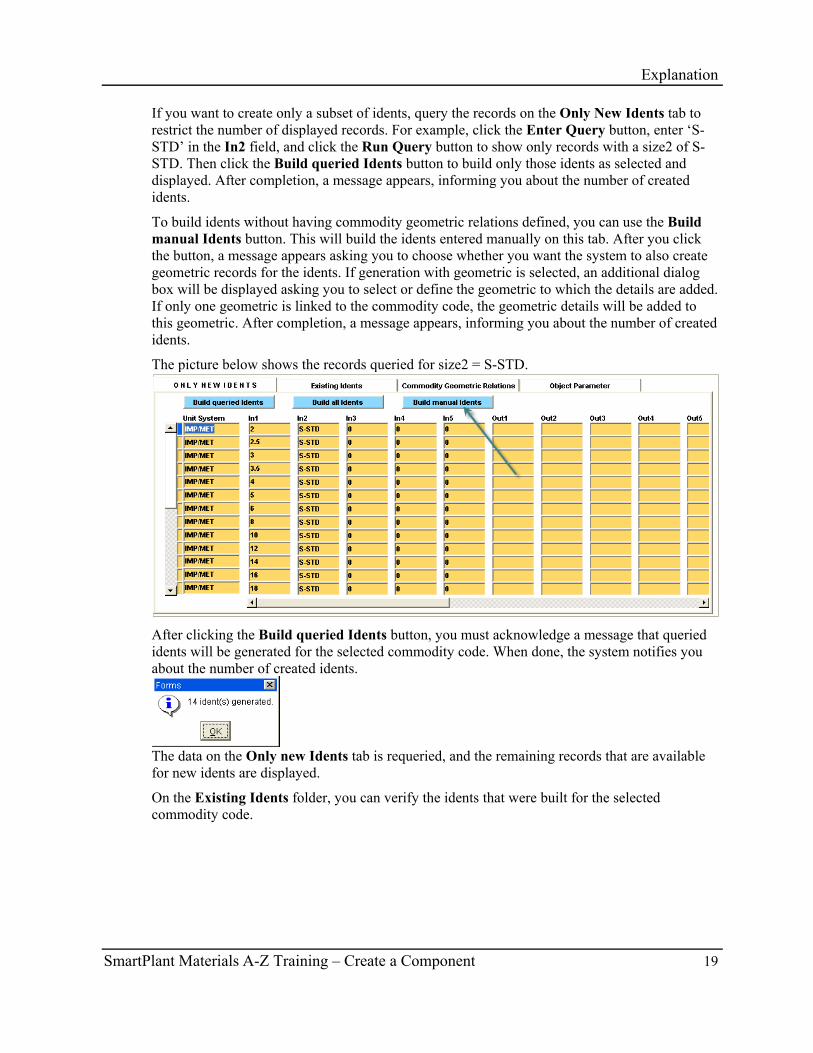
If you want to create only a subset of idents, query the records on the Only New Idents tab to restrict the number of displayed records. For example, click the Enter Query button, enter ‘S-STD’ in the In2 field, and click the Run Query button to show only records with a size2 of S-STD. Then click the Build queried Idents button to build only those idents as selected and displayed. After completion, a message appears, informing you about the number of created idents.
To build idents without having commodity geometric relations defined, you can use the Build manual Idents button. This will build the idents entered manually on this tab. After you click the button, a message appears asking you to choose whether you want the system to also create geometric records for the idents. If generation with geometric is selected, an additional dialog box will be displayed asking you to select or define the geometric to which the details are added. If only one geometric is linked to the commodity code, the geometric details will be added to this geometric. After completion, a message appears, informing you about the number of created idents.
The picture below shows the records queried for size2 = S-STD.
After clicking the Build queried Idents button, you must acknowledge a message that queried idents will be generated for the selected commodity code. When done, the system notifies you about the number of created idents.
The data on the Only new Idents tab is requeried, and the remaining records that are available for new idents are displayed.
On the Existing Idents folder, you can verify the idents that were built for the selected commodity code.

Explanation
20 SmartPlant Materials A-Z Training – Create a Component
These idents are now available in downstream processes like specification management, BOMs, requisitions, and so forth.

SmartPlant Materials A-Z Training – Create a Component 21
The purpose of this tutorial is to create a new component (ident) step-by-step. Be sure to read the Explanation section of this training document before starting
the tutorial. Please log in to the SDB product group and Piping discipline. You can check the product group and discipline by looking at the bottom of the screen.
Commodity Attributes Purpose This section explains how to define commodity attributes (properties). The property values, which are needed to create commodity codes, are stored in tables of type commodity attribute.
Exercise 1. Open the A.50.02 Tables screen from the menu branch Administration -> A.50
Database Structure. The screen opens in query mode, all fields are empty and displayed with yellow background.
2. Select COMMATTR from the dropdown list in the Type field.
3. Click the Run Query button to display the selected table type.
4. Click in the Name field in the second (Table Names) block.
5. Click the Enter Query button.
Tutorial
Tutorial
22 SmartPlant Materials A-Z Training – Create a Component
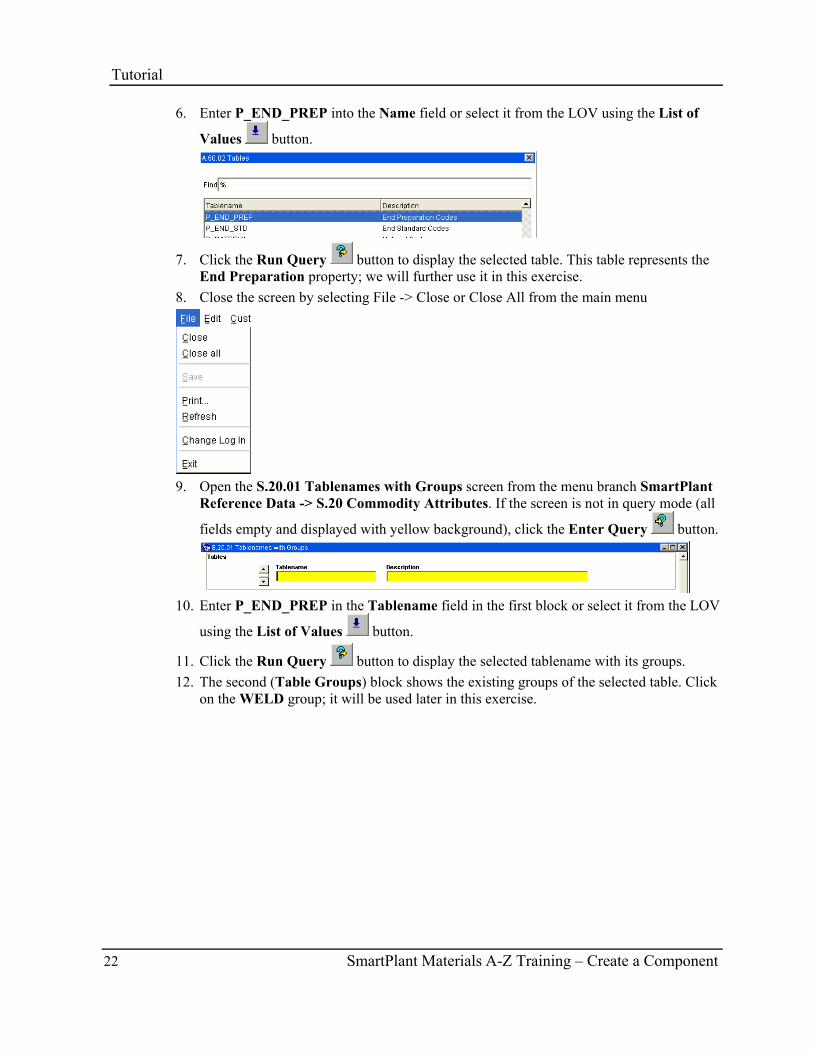
6. Enter P_END_PREP into the Name field or select it from the LOV using the List of
Values button.
7. Click the Run Query button to display the selected table. This table represents the End Preparation property; we will further use it in this exercise.
8. Close the screen by selecting File -> Close or Close All from the main menu
9. Open the S.20.01 Tablenames with Groups screen from the menu branch SmartPlant
Reference Data -> S.20 Commodity Attributes. If the screen is not in query mode (all
fields empty and displayed with yellow background), click the Enter Query button.
10. Enter P_END_PREP in the Tablename field in the first block or select it from the LOV
using the List of Values button.
11. Click the Run Query button to display the selected tablename with its groups. 12. The second (Table Groups) block shows the existing groups of the selected table. Click
on the WELD group; it will be used later in this exercise.
Tutorial
SmartPlant Materials A-Z Training – Create a Component 23
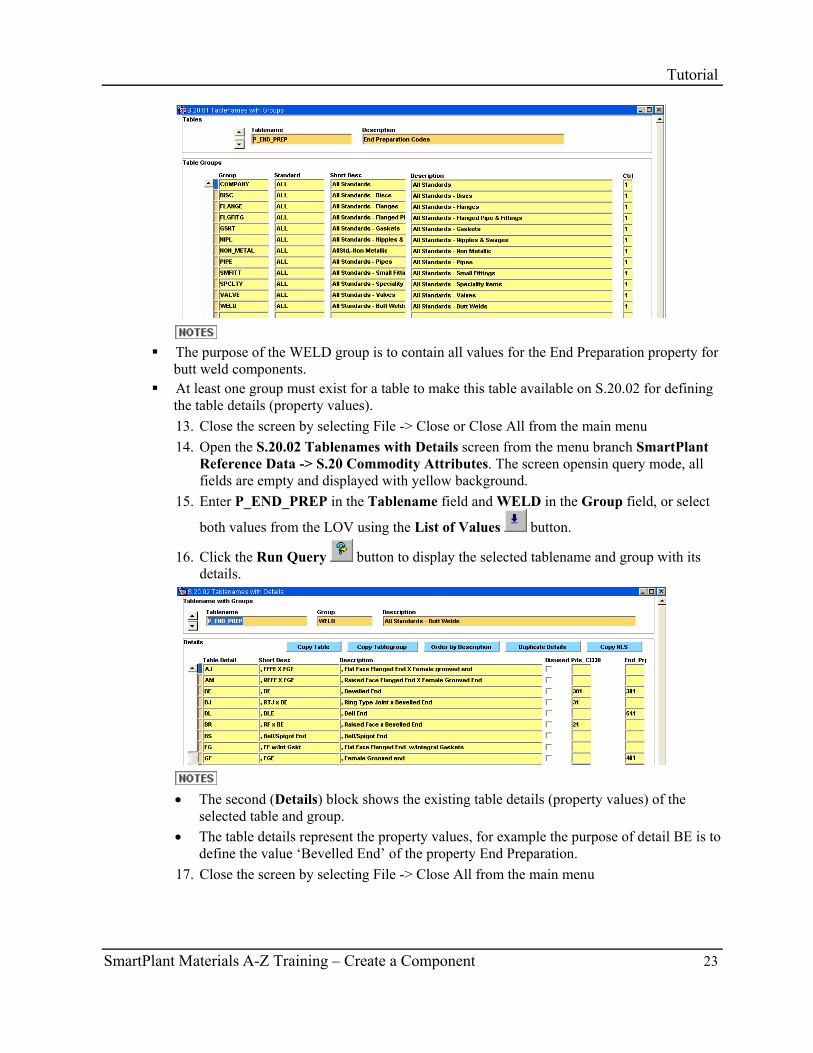
The purpose of the WELD group is to contain all values for the End Preparation property for butt weld components.
At least one group must exist for a table to make this table available on S.20.02 for defining the table details (property values). 13. Close the screen by selecting File -> Close or Close All from the main menu 14. Open the S.20.02 Tablenames with Details screen from the menu branch SmartPlant
Reference Data -> S.20 Commodity Attributes. The screen opensin query mode, all fields are empty and displayed with yellow background.
15. Enter P_END_PREP in the Tablename field and WELD in the Group field, or select
both values from the LOV using the List of Values button.
16. Click the Run Query button to display the selected tablename and group with its details.
• The second (Details) block shows the existing table details (property values) of the selected table and group.
• The table details represent the property values, for example the purpose of detail BE is to define the value ‘Bevelled End’ of the property End Preparation.
17. Close the screen by selecting File -> Close All from the main menu
Tutorial
24 SmartPlant Materials A-Z Training – Create a Component
Commodity Rules Purpose This section explains how to define commodity rules. The commodity rules are needed to create table detail-based commodity codes. With the rules you define the properties, the structure, and the layout of the commodity codes.
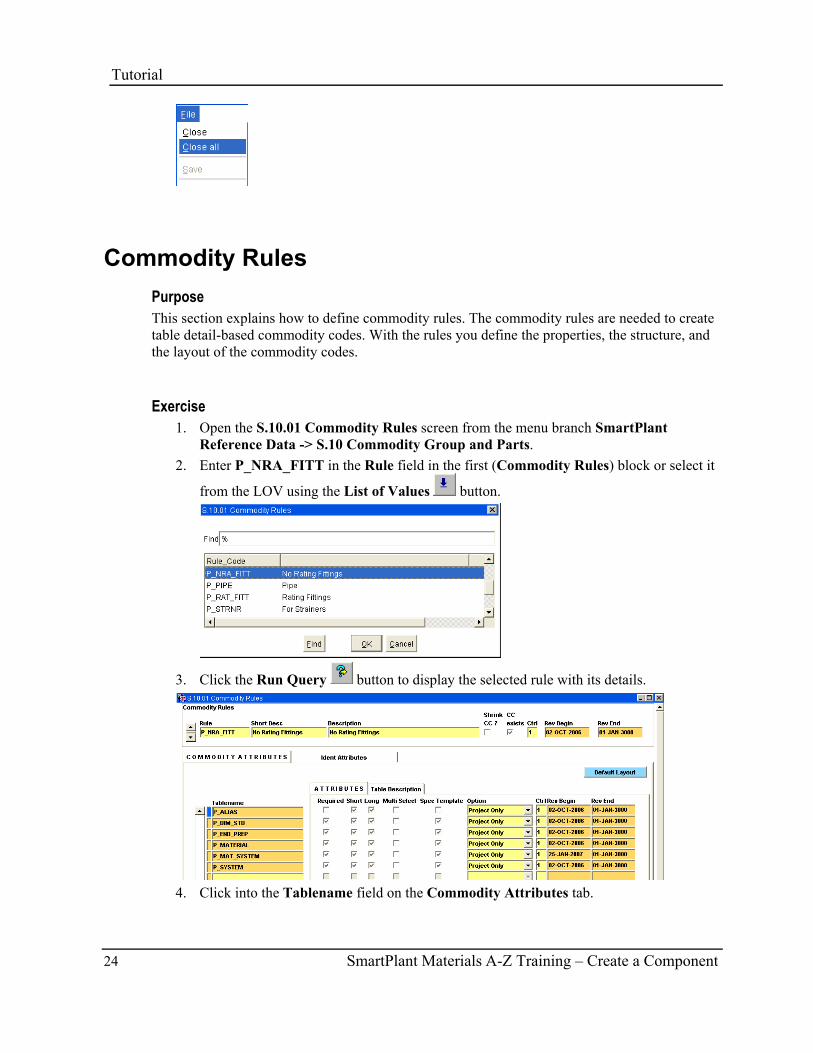
Exercise 1. Open the S.10.01 Commodity Rules screen from the menu branch SmartPlant
Reference Data -> S.10 Commodity Group and Parts. 2. Enter P_NRA_FITT in the Rule field in the first (Commodity Rules) block or select it
from the LOV using the List of Values button.
3. Click the Run Query button to display the selected rule with its details.
4. Click into the Tablename field on the Commodity Attributes tab.
Tutorial
SmartPlant Materials A-Z Training – Create a Component 25
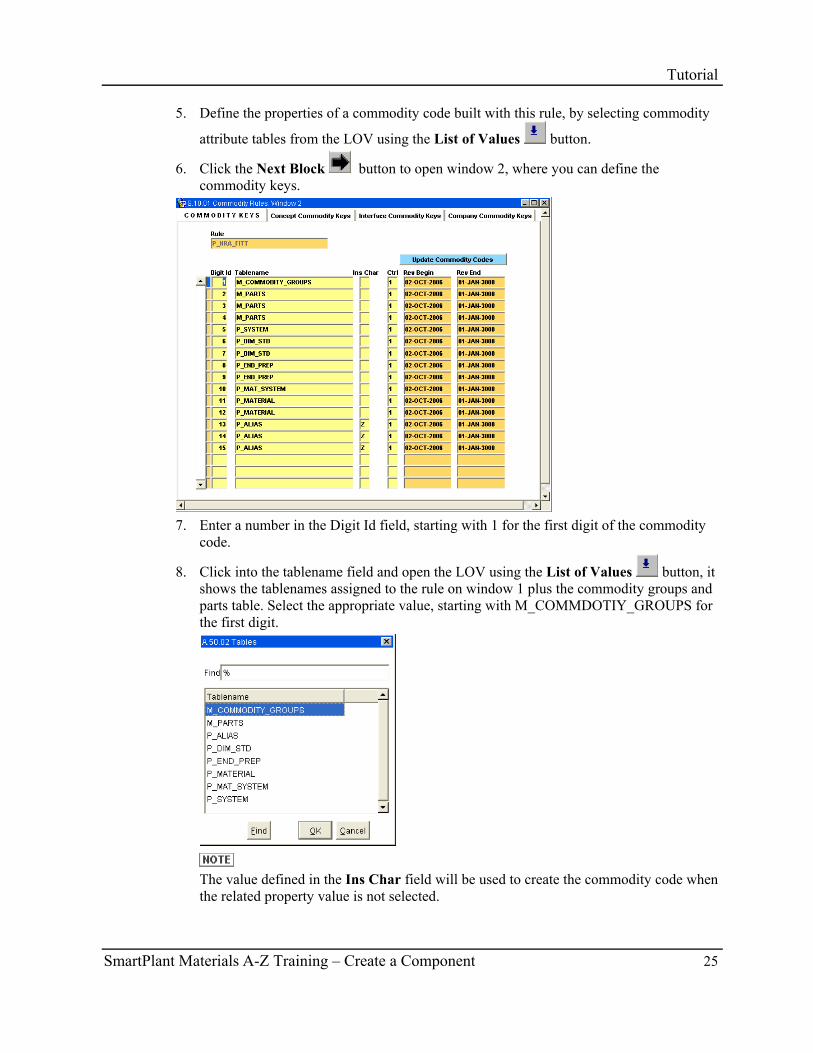
5. Define the properties of a commodity code built with this rule, by selecting commodity
attribute tables from the LOV using the List of Values button.
6. Click the Next Block button to open window 2, where you can define the commodity keys.
7. Enter a number in the Digit Id field, starting with 1 for the first digit of the commodity
code.
8. Click into the tablename field and open the LOV using the List of Values button, it shows the tablenames assigned to the rule on window 1 plus the commodity groups and parts table. Select the appropriate value, starting with M_COMMDOTIY_GROUPS for the first digit.
The value defined in the Ins Char field will be used to create the commodity code when the related property value is not selected.
Tutorial
26 SmartPlant Materials A-Z Training – Create a Component
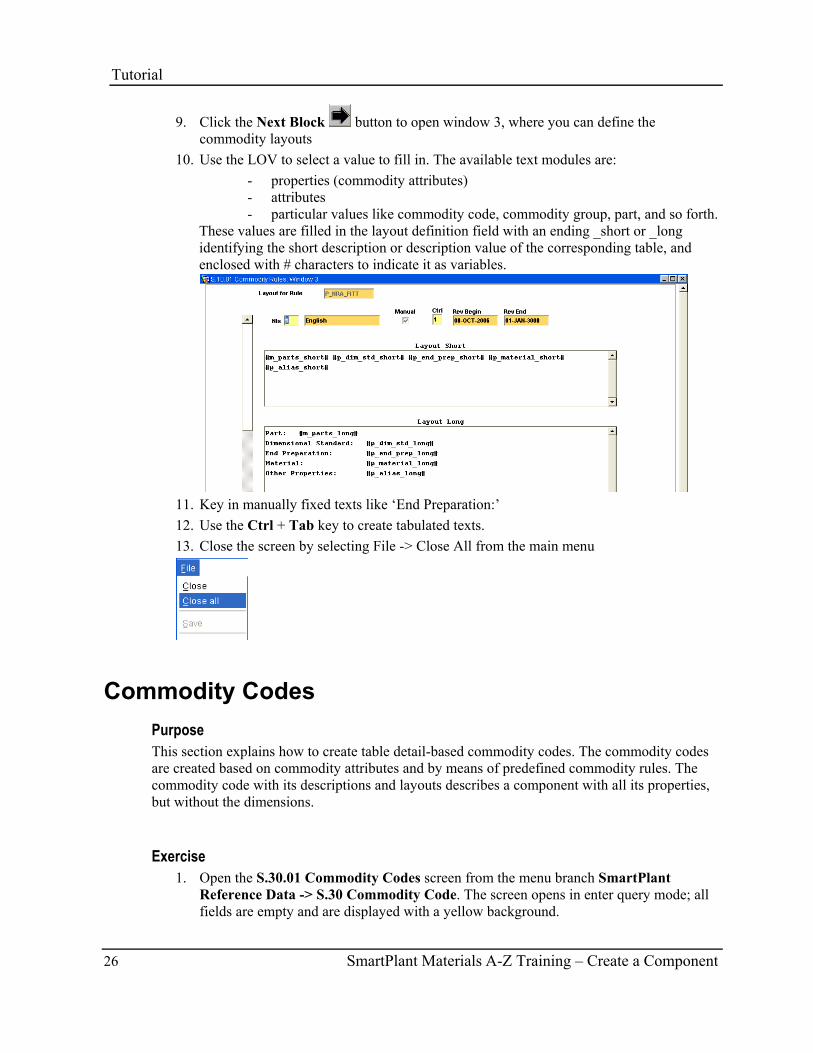
9. Click the Next Block button to open window 3, where you can define the commodity layouts
10. Use the LOV to select a value to fill in. The available text modules are: - properties (commodity attributes) - attributes - particular values like commodity code, commodity group, part, and so forth.
These values are filled in the layout definition field with an ending _short or _long identifying the short description or description value of the corresponding table, and enclosed with # characters to indicate it as variables.
11. Key in manually fixed texts like ‘End Preparation:’ 12. Use the Ctrl + Tab key to create tabulated texts. 13. Close the screen by selecting File -> Close All from the main menu
Commodity Codes Purpose This section explains how to create table detail-based commodity codes. The commodity codes are created based on commodity attributes and by means of predefined commodity rules. The commodity code with its descriptions and layouts describes a component with all its properties, but without the dimensions.
Exercise 1. Open the S.30.01 Commodity Codes screen from the menu branch SmartPlant
Reference Data -> S.30 Commodity Code. The screen opens in enter query mode; all fields are empty and are displayed with a yellow background.
Tutorial
SmartPlant Materials A-Z Training – Create a Component 27
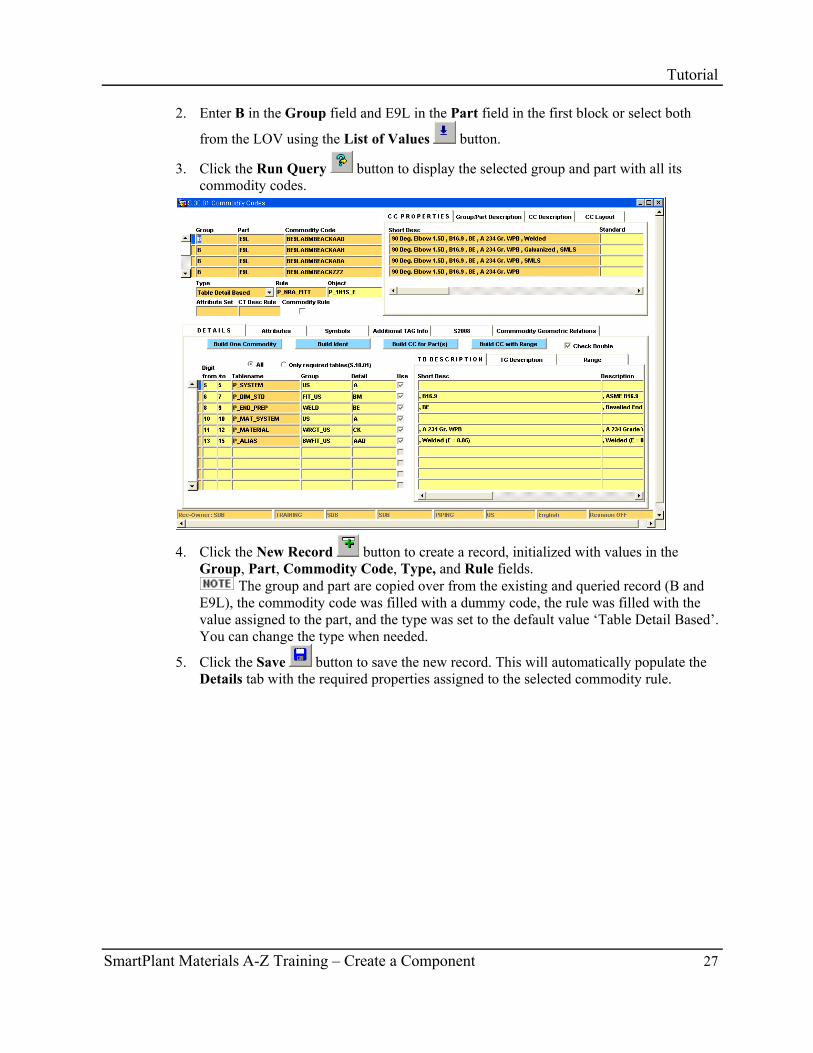
2. Enter B in the Group field and E9L in the Part field in the first block or select both
from the LOV using the List of Values button.
3. Click the Run Query button to display the selected group and part with all its commodity codes.
4. Click the New Record button to create a record, initialized with values in the Group, Part, Commodity Code, Type, and Rule fields.
The group and part are copied over from the existing and queried record (B and E9L), the commodity code was filled with a dummy code, the rule was filled with the value assigned to the part, and the type was set to the default value ‘Table Detail Based’. You can change the type when needed.
5. Click the Save button to save the new record. This will automatically populate the Details tab with the required properties assigned to the selected commodity rule.
Tutorial
28 SmartPlant Materials A-Z Training – Create a Component
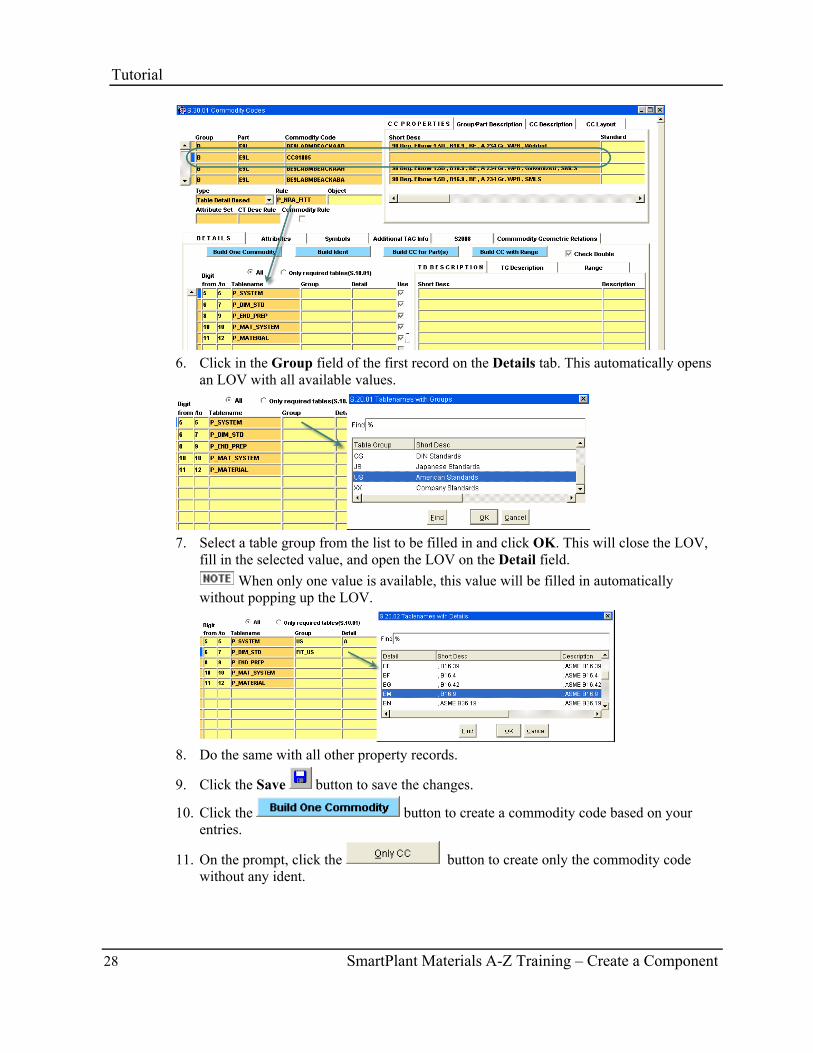
6. Click in the Group field of the first record on the Details tab. This automatically opens
an LOV with all available values.
7. Select a table group from the list to be filled in and click OK. This will close the LOV,
fill in the selected value, and open the LOV on the Detail field. When only one value is available, this value will be filled in automatically
without popping up the LOV.
8. Do the same with all other property records.
9. Click the Save button to save the changes.
10. Click the button to create a commodity code based on your entries.
11. On the prompt, click the button to create only the commodity code without any ident.
Tutorial
SmartPlant Materials A-Z Training – Create a Component 29
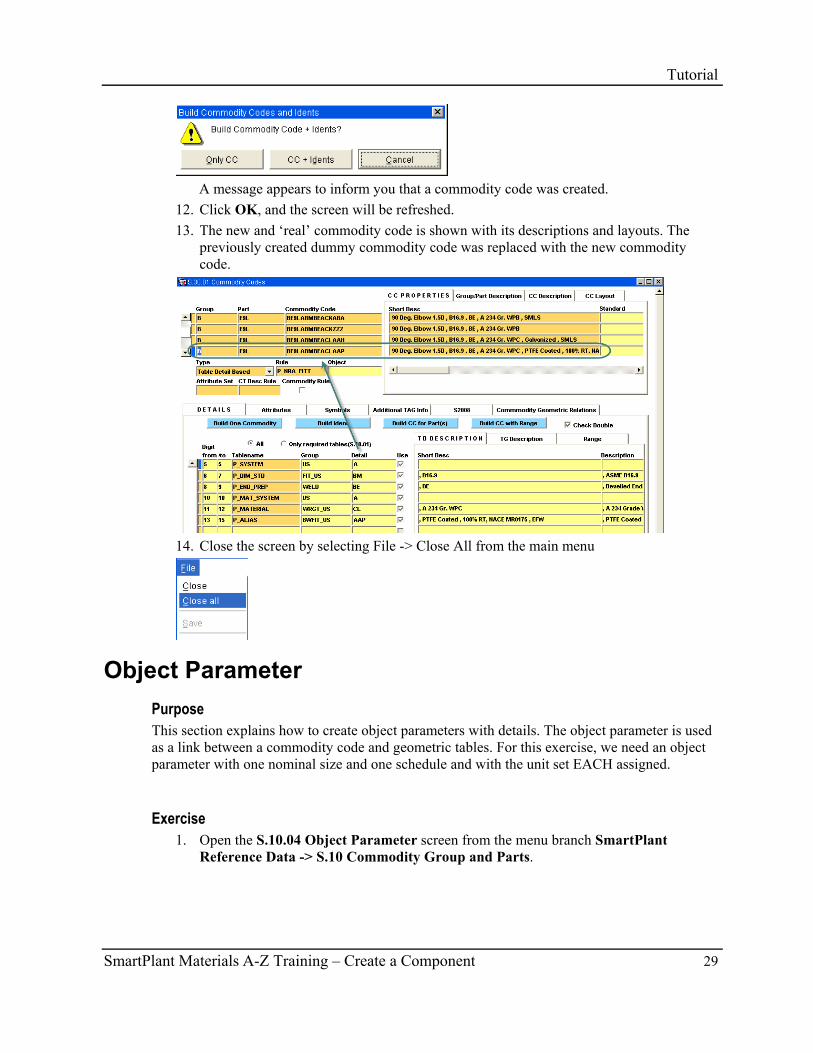
A message appears to inform you that a commodity code was created.
12. Click OK, and the screen will be refreshed. 13. The new and ‘real’ commodity code is shown with its descriptions and layouts. The
previously created dummy commodity code was replaced with the new commodity code.
14. Close the screen by selecting File -> Close All from the main menu
Object Parameter Purpose This section explains how to create object parameters with details. The object parameter is used as a link between a commodity code and geometric tables. For this exercise, we need an object parameter with one nominal size and one schedule and with the unit set EACH assigned.
Exercise 1. Open the S.10.04 Object Parameter screen from the menu branch SmartPlant
Reference Data -> S.10 Commodity Group and Parts.

Tutorial
30 SmartPlant Materials A-Z Training – Create a Component
2. Click the Run Query button to display all object parameters. Search for an existing object parameter that meets the above requirements (P_1N1S_E); it will be used later in this exercise.
3. Close the screen by selecting File -> Close All from the main menu 4. Open the S.10.05 Object Parameter Detail screen from the menu branch SmartPlant
Reference Data -> S.10 Commodity Group and Parts.
5. Click the Enter Query button and enter P_1N1S_E in the Object field or select it
from the LOV using the List of Values button.
6. Click the Run Query button to display the selected object parameter with its details.
7. Verify the records in the second (Parameter Details) block. They must include all
attributes of the geometric table needed for the ident generation. The attribute names must match with the attribute names of the geometric tables. The value of the Kind of Detail field indicates the attribute type like Nominal Size, Schedule, and so forth.
8. Click the Next Block button to open window 2 to define the layouts.
9. Use the LOV button to open the list of values. 10. Select any of the available values and click OK.
The LOV is closed, and the value is filled in at the cursor position enclosed with # characters.
11. Key in any fixed text like ‘Nominal Size:’
12. Click the Save button to save the changes. 13. Close the screen by selecting File -> Close All from the main menu 14. Open the S.10.06 Part Object Parameter screen from the menu branch SmartPlant
Reference Data -> S.10 Commodity Group and Parts.
Tutorial
SmartPlant Materials A-Z Training – Create a Component 31
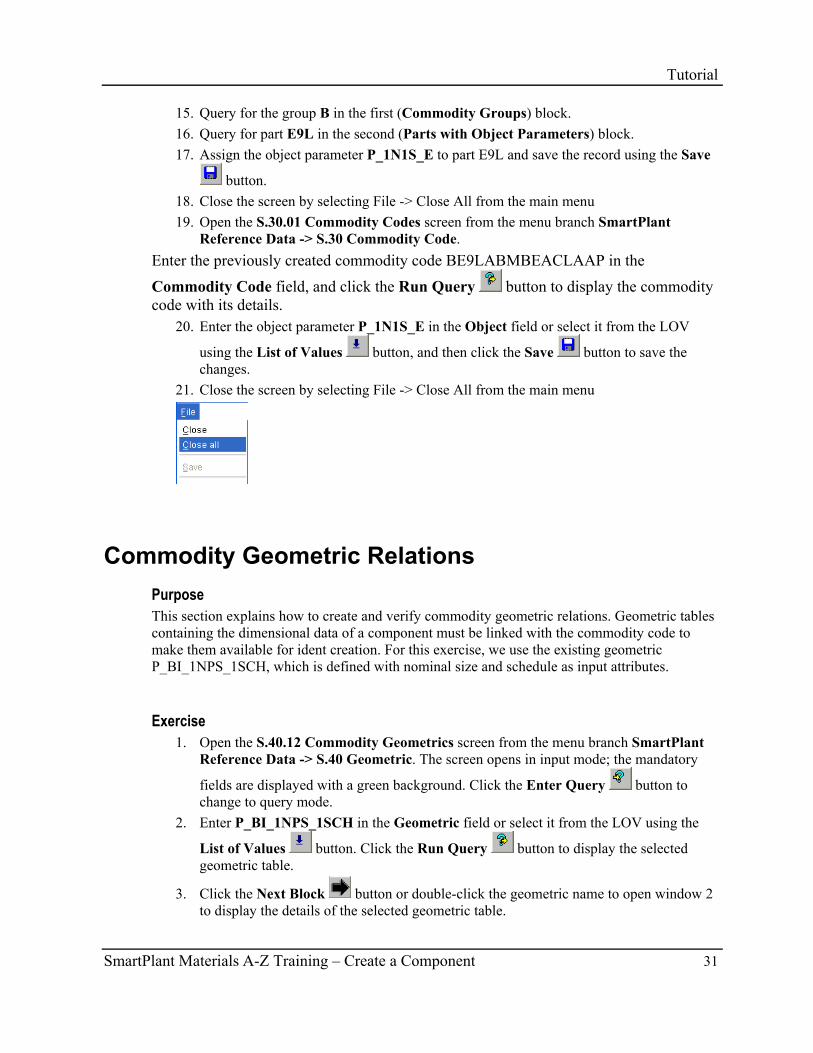
15. Query for the group B in the first (Commodity Groups) block. 16. Query for part E9L in the second (Parts with Object Parameters) block. 17. Assign the object parameter P_1N1S_E to part E9L and save the record using the Save
button. 18. Close the screen by selecting File -> Close All from the main menu 19. Open the S.30.01 Commodity Codes screen from the menu branch SmartPlant
Reference Data -> S.30 Commodity Code. Enter the previously created commodity code BE9LABMBEACLAAP in the Commodity Code field, and click the Run Query button to display the commodity code with its details.
20. Enter the object parameter P_1N1S_E in the Object field or select it from the LOV
using the List of Values button, and then click the Save button to save the changes.
21. Close the screen by selecting File -> Close All from the main menu
Commodity Geometric Relations Purpose This section explains how to create and verify commodity geometric relations. Geometric tables containing the dimensional data of a component must be linked with the commodity code to make them available for ident creation. For this exercise, we use the existing geometric P_BI_1NPS_1SCH, which is defined with nominal size and schedule as input attributes.
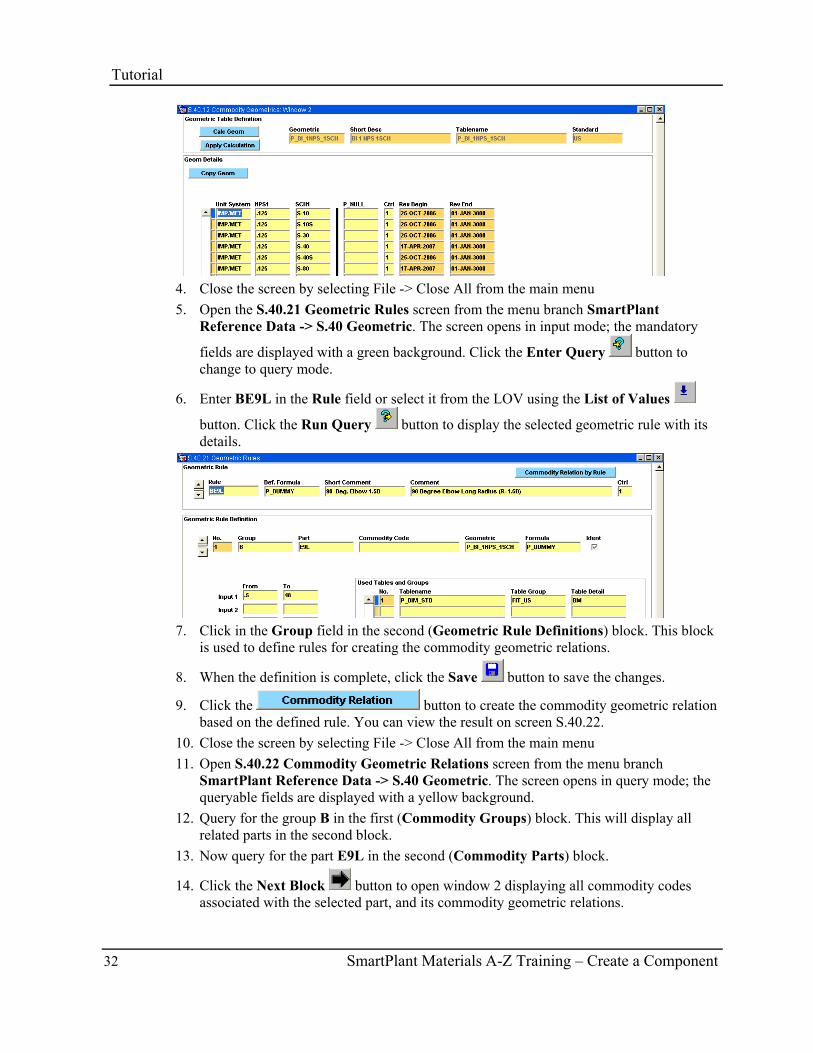
Exercise 1. Open the S.40.12 Commodity Geometrics screen from the menu branch SmartPlant
Reference Data -> S.40 Geometric. The screen opens in input mode; the mandatory
fields are displayed with a green background. Click the Enter Query button to change to query mode.
2. Enter P_BI_1NPS_1SCH in the Geometric field or select it from the LOV using the
List of Values button. Click the Run Query button to display the selected geometric table.
3. Click the Next Block button or double-click the geometric name to open window 2 to display the details of the selected geometric table.
Tutorial
32 SmartPlant Materials A-Z Training – Create a Component
4. Close the screen by selecting File -> Close All from the main menu 5. Open the S.40.21 Geometric Rules screen from the menu branch SmartPlant
Reference Data -> S.40 Geometric. The screen opens in input mode; the mandatory
fields are displayed with a green background. Click the Enter Query button to change to query mode.
6. Enter BE9L in the Rule field or select it from the LOV using the List of Values
button. Click the Run Query button to display the selected geometric rule with its details.
7. Click in the Group field in the second (Geometric Rule Definitions) block. This block
is used to define rules for creating the commodity geometric relations.
8. When the definition is complete, click the Save button to save the changes.
9. Click the button to create the commodity geometric relation based on the defined rule. You can view the result on screen S.40.22.
10. Close the screen by selecting File -> Close All from the main menu 11. Open S.40.22 Commodity Geometric Relations screen from the menu branch
SmartPlant Reference Data -> S.40 Geometric. The screen opens in query mode; the queryable fields are displayed with a yellow background.
12. Query for the group B in the first (Commodity Groups) block. This will display all related parts in the second block.
13. Now query for the part E9L in the second (Commodity Parts) block.
14. Click the Next Block button to open window 2 displaying all commodity codes associated with the selected part, and its commodity geometric relations.
Tutorial
SmartPlant Materials A-Z Training – Create a Component 33
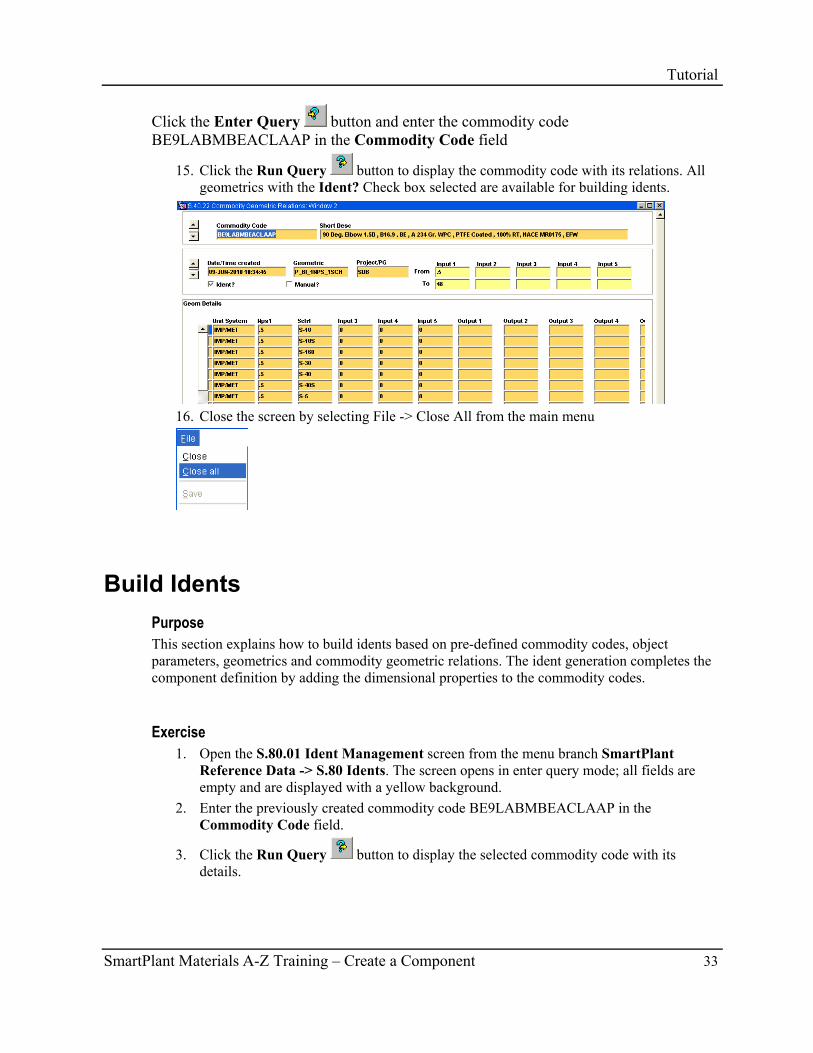
Click the Enter Query button and enter the commodity code BE9LABMBEACLAAP in the Commodity Code field
15. Click the Run Query button to display the commodity code with its relations. All geometrics with the Ident? Check box selected are available for building idents.
16. Close the screen by selecting File -> Close All from the main menu
Build Idents Purpose This section explains how to build idents based on pre-defined commodity codes, object parameters, geometrics and commodity geometric relations. The ident generation completes the component definition by adding the dimensional properties to the commodity codes.
Exercise 1. Open the S.80.01 Ident Management screen from the menu branch SmartPlant
Reference Data -> S.80 Idents. The screen opens in enter query mode; all fields are empty and are displayed with a yellow background.
2. Enter the previously created commodity code BE9LABMBEACLAAP in the Commodity Code field.
3. Click the Run Query button to display the selected commodity code with its details.
Tutorial
34 SmartPlant Materials A-Z Training – Create a Component
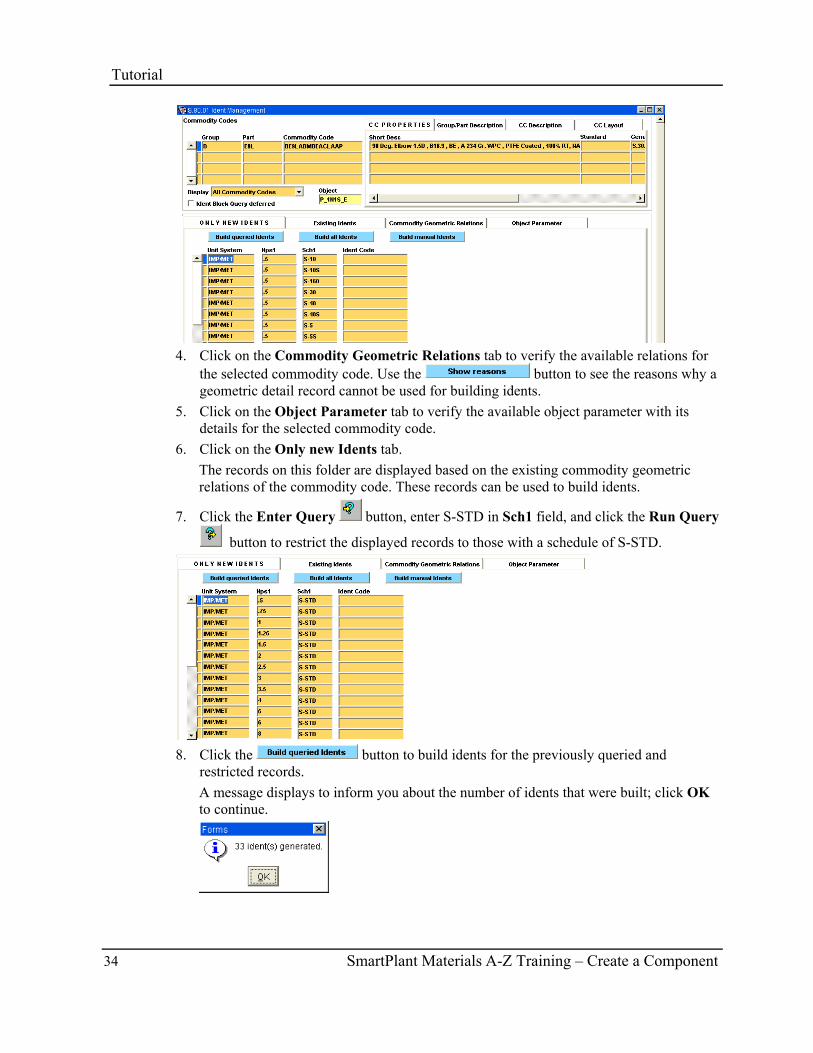
4. Click on the Commodity Geometric Relations tab to verify the available relations for
the selected commodity code. Use the button to see the reasons why a geometric detail record cannot be used for building idents.
5. Click on the Object Parameter tab to verify the available object parameter with its details for the selected commodity code.
6. Click on the Only new Idents tab. The records on this folder are displayed based on the existing commodity geometric relations of the commodity code. These records can be used to build idents.
7. Click the Enter Query button, enter S-STD in Sch1 field, and click the Run Query
button to restrict the displayed records to those with a schedule of S-STD.
8. Click the button to build idents for the previously queried and
restricted records. A message displays to inform you about the number of idents that were built; click OK to continue.
Tutorial
SmartPlant Materials A-Z Training – Create a Component 35
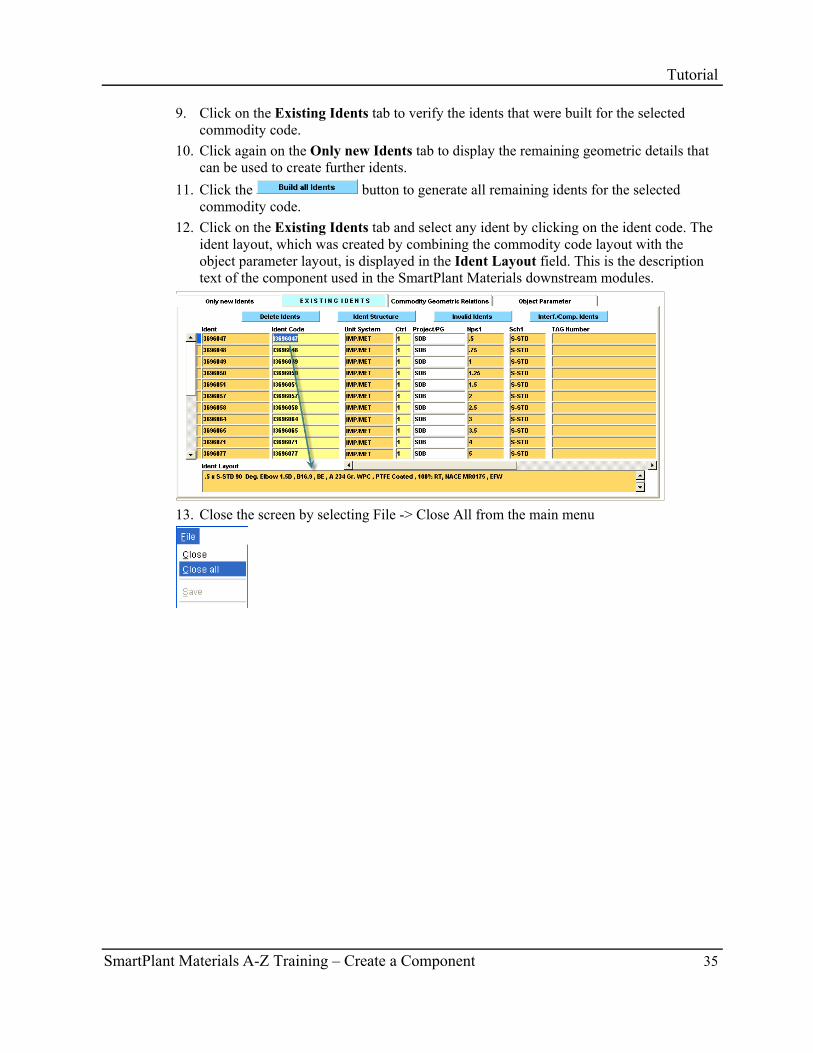
9. Click on the Existing Idents tab to verify the idents that were built for the selected commodity code.
10. Click again on the Only new Idents tab to display the remaining geometric details that can be used to create further idents.
11. Click the button to generate all remaining idents for the selected commodity code.
12. Click on the Existing Idents tab and select any ident by clicking on the ident code. The ident layout, which was created by combining the commodity code layout with the object parameter layout, is displayed in the Ident Layout field. This is the description text of the component used in the SmartPlant Materials downstream modules.
13. Close the screen by selecting File -> Close All from the main menu

SmartPlant Materials A-Z Training – Create a Component 37
1. What is another word for “commodity attribute”? 2. What are the main purposes of a commodity rule? 3. Which kind of commodity codes are created based on commodity rules? 4. What has to be set-up to make the geometrics available for building idents? 5. What is another meaning of an ident?
Quiz

SmartPlant Materials A-Z Training – Create a Component 39
In this tutorial, you learned how to: • use Commodity Rules • define Object Parameters • maintain Commodity Attribute Tables • create a Commodity Code • define Geometrics • set-up Geometric Relations • build Idents
Quiz Answers 1. What is another word for commodity attribute?
Property
2. What are the main purposes of a commodity rule? To simplify commodity code creation and to make sure that the commodity codes always have the same structure.
3. Which kind of commodity codes are created based on commodity rules? Table detail based commodity codes
4. What has to be set-up to make the geometrics available for building idents? Commodity geometric relations
5. What’s another meaning of an Ident? Description of a component with its dimensions
Helpful References SmartPlant Materials and Reference Data - User Interface Basics SmartPlant Materials - How to define Piping Material
Comments and Questions Please send comments or questions to [email protected].
Summary