slide 1 cs 170 java programming 1 testing...
TRANSCRIPT
CS 170 Lecture: Testing Karel Page 1 of 10 © 2008-2075 Stephen Gilbert
CS 170Java Programming 1
Testing Karel
Introducing
Unit Tests to
Karel's World
Slide 1 CS 170 Java Programming 1 Testing Karel
Notes: Hi Everybody. This is the CS 170, Java Programming 1 lecture, Testing Karel.
In the last CS 170 online lecture, you met Karel the Robot and wrote your first robot task program. You learned how to create a robot object and told your robot to move, pick up a beeper, and turn himself off.
We didn't quite reach our goal, though, which was to have Karel deliver the beeper to the FedEx depot at 4th Street and 2nd Avenue, and then go home to 1st Street 3rd Avenue and go to sleep. We left Karel asleep on the corner, still holding onto his package.
In this lecture, you'll show Karel how to finish up his task and then learn how to use BlueJ's testing facilities to write a second program, called a unit test, that will check your first BeeperDelivery program for correctness. You'll also learn how to use BlueJ's CheckStyle plug-in to make sure your program meets the CS 170 style requirements before you turn it in for grading.
Ready? Let's get started.
Express Yourself
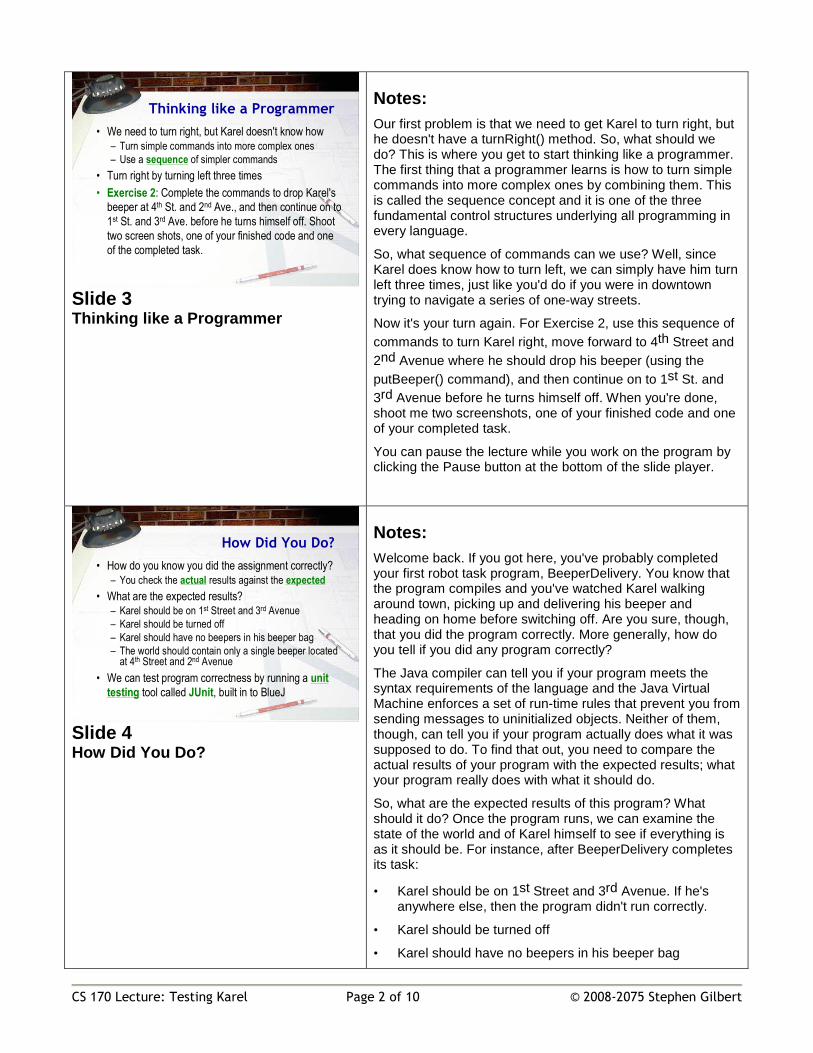
• Exercise 1: Start BlueJ and open the ic04 project we
started last week. Create a BeeperDelivery object
on the object bench, and call it's task() method. Shoot
a screenshot of your code and one of your robot.
Slide 2 Express Yourself
Notes: Open this week's "in-class" exercise document and create a new section for this mini-lecture's exercises. You'll find the file-name you should use for this IC document on this week's class Web page.
Start BlueJ and open up the ic04 project that contains your BeeperDelivery project from last week. (If you didn't do that exercise, then you'll need to complete that first. You can find the instructions in the last online lecture from last week.)
For Exercise 1 in this section, create a BeeperDelivery object on the object bench, and call it's task() method. Shoot me a screen-shot of your code and a second screen-shot of Karel after he's picked up the beeper and turned himself off at 4th Street and 1st Avenue, similar to those shown here.
To complete our task, we need to turn right and move one block forward and drop off our beeper. Then we need to move forward again, make another right turn, before heading home and switching off.
Let's see how we do that.
CS 170 Lecture: Testing Karel Page 2 of 10 © 2008-2075 Stephen Gilbert
Thinking like a Programmer
• We need to turn right, but Karel doesn't know how
– Turn simple commands into more complex ones
– Use a sequence of simpler commands
• Turn right by turning left three times
• Exercise 2: Complete the commands to drop Karel's
beeper at 4th St. and 2nd Ave., and then continue on to
1st St. and 3rd Ave. before he turns himself off. Shoot
two screen shots, one of your finished code and one
of the completed task.
Slide 3 Thinking like a Programmer
Notes: Our first problem is that we need to get Karel to turn right, but he doesn't have a turnRight() method. So, what should we do? This is where you get to start thinking like a programmer. The first thing that a programmer learns is how to turn simple commands into more complex ones by combining them. This is called the sequence concept and it is one of the three fundamental control structures underlying all programming in every language.
So, what sequence of commands can we use? Well, since Karel does know how to turn left, we can simply have him turn left three times, just like you'd do if you were in downtown trying to navigate a series of one-way streets.
Now it's your turn again. For Exercise 2, use this sequence of commands to turn Karel right, move forward to 4th Street and 2nd Avenue where he should drop his beeper (using the putBeeper() command), and then continue on to 1st St. and 3rd Avenue before he turns himself off. When you're done, shoot me two screenshots, one of your finished code and one of your completed task.
You can pause the lecture while you work on the program by clicking the Pause button at the bottom of the slide player.
How Did You Do?
• How do you know you did the assignment correctly?
– You check the actual results against the expected
• What are the expected results?– Karel should be on 1st Street and 3rd Avenue
– Karel should be turned off
– Karel should have no beepers in his beeper bag
– The world should contain only a single beeper located at 4th Street and 2nd Avenue
• We can test program correctness by running a unit
testing tool called JUnit, built in to BlueJ
Slide 4 How Did You Do?
Notes: Welcome back. If you got here, you've probably completed your first robot task program, BeeperDelivery. You know that the program compiles and you've watched Karel walking around town, picking up and delivering his beeper and heading on home before switching off. Are you sure, though, that you did the program correctly. More generally, how do you tell if you did any program correctly?
The Java compiler can tell you if your program meets the syntax requirements of the language and the Java Virtual Machine enforces a set of run-time rules that prevent you from sending messages to uninitialized objects. Neither of them, though, can tell you if your program actually does what it was supposed to do. To find that out, you need to compare the actual results of your program with the expected results; what your program really does with what it should do.
So, what are the expected results of this program? What should it do? Once the program runs, we can examine the state of the world and of Karel himself to see if everything is as it should be. For instance, after BeeperDelivery completes its task:
• Karel should be on 1st Street and 3rd Avenue. If he's anywhere else, then the program didn't run correctly.
• Karel should be turned off
• Karel should have no beepers in his beeper bag
CS 170 Lecture: Testing Karel Page 3 of 10 © 2008-2075 Stephen Gilbert
• The world should contain only a single beeper located at 4th Street and 2nd Avenue
To test whether all of these things are true, we first run the program and then compare the actual state and the expected state, just like you did with the PongBall class in lecture this week. This kind of test program is called a unit test. Rather than writing a manual testing program, and then visually comparing the actual and expected values, like we did with PongBall, we can use BlueJ to write the code for us and to automatically check for correctness using a testing tool called JUnit.
Unit Testing Tools
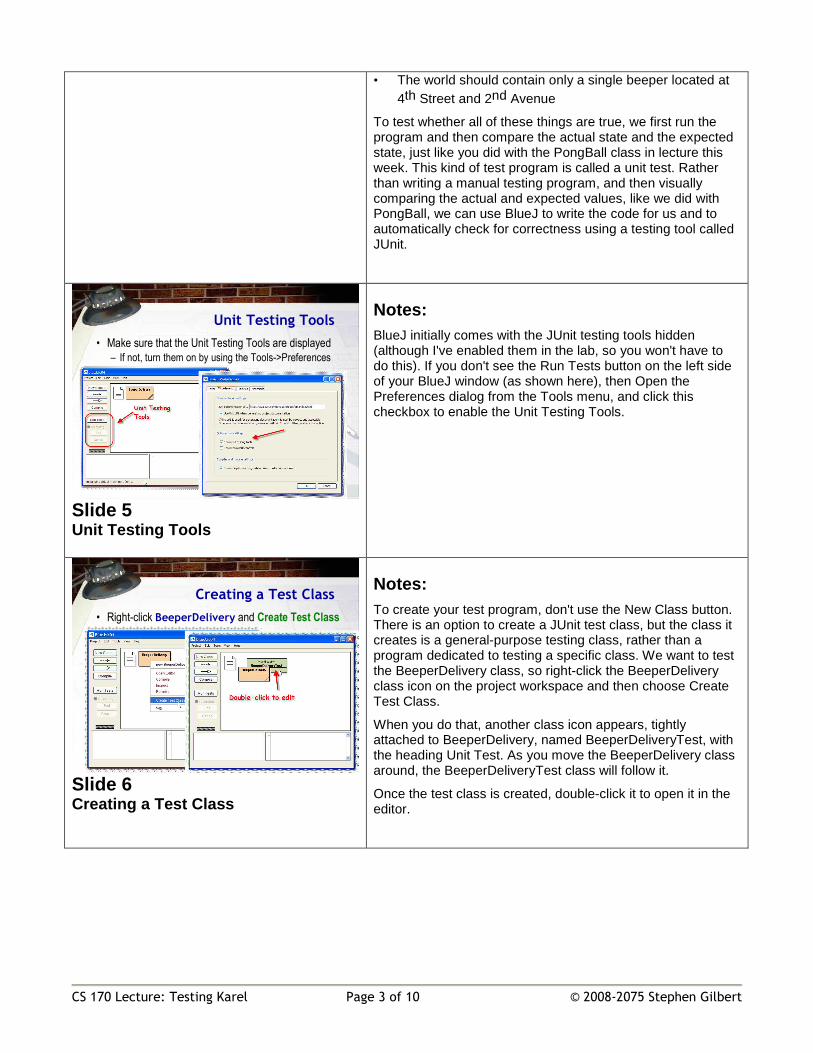
• Make sure that the Unit Testing Tools are displayed
– If not, turn them on by using the Tools->Preferences
Slide 5 Unit Testing Tools
Notes: BlueJ initially comes with the JUnit testing tools hidden (although I've enabled them in the lab, so you won't have to do this). If you don't see the Run Tests button on the left side of your BlueJ window (as shown here), then Open the Preferences dialog from the Tools menu, and click this checkbox to enable the Unit Testing Tools.
Creating a Test Class
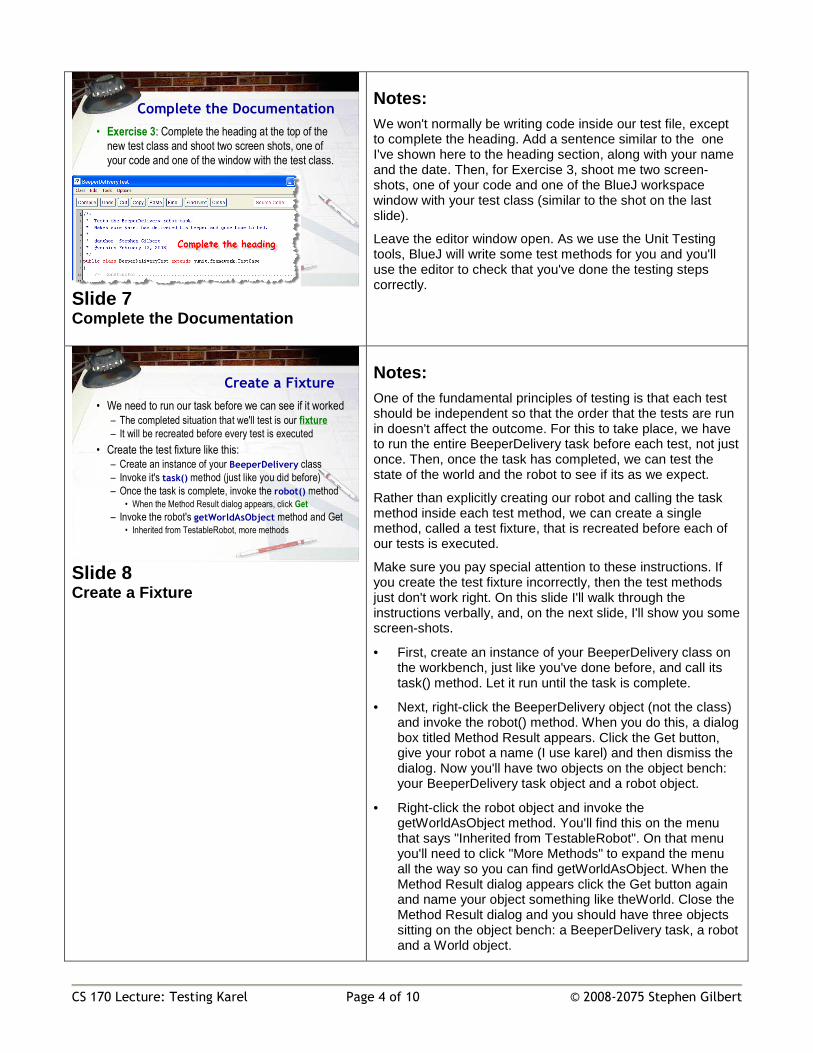
• Right-click BeeperDelivery and Create Test Class
Slide 6 Creating a Test Class
Notes: To create your test program, don't use the New Class button. There is an option to create a JUnit test class, but the class it creates is a general-purpose testing class, rather than a program dedicated to testing a specific class. We want to test the BeeperDelivery class, so right-click the BeeperDelivery class icon on the project workspace and then choose Create Test Class.
When you do that, another class icon appears, tightly attached to BeeperDelivery, named BeeperDeliveryTest, with the heading Unit Test. As you move the BeeperDelivery class around, the BeeperDeliveryTest class will follow it.
Once the test class is created, double-click it to open it in the editor.
CS 170 Lecture: Testing Karel Page 4 of 10 © 2008-2075 Stephen Gilbert
Complete the Documentation
• Exercise 3: Complete the heading at the top of the
new test class and shoot two screen shots, one of
your code and one of the window with the test class.
Slide 7 Complete the Documentation
Notes: We won't normally be writing code inside our test file, except to complete the heading. Add a sentence similar to the one I've shown here to the heading section, along with your name and the date. Then, for Exercise 3, shoot me two screen-shots, one of your code and one of the BlueJ workspace window with your test class (similar to the shot on the last slide).
Leave the editor window open. As we use the Unit Testing tools, BlueJ will write some test methods for you and you'll use the editor to check that you've done the testing steps correctly.
Create a Fixture
• We need to run our task before we can see if it worked
– The completed situation that we'll test is our fixture
– It will be recreated before every test is executed
• Create the test fixture like this:– Create an instance of your BeeperDelivery class
– Invoke it's task() method (just like you did before)
– Once the task is complete, invoke the robot() method• When the Method Result dialog appears, click Get
– Invoke the robot's getWorldAsObject method and Get• Inherited from TestableRobot, more methods
Slide 8 Create a Fixture
Notes: One of the fundamental principles of testing is that each test should be independent so that the order that the tests are run in doesn't affect the outcome. For this to take place, we have to run the entire BeeperDelivery task before each test, not just once. Then, once the task has completed, we can test the state of the world and the robot to see if its as we expect.
Rather than explicitly creating our robot and calling the task method inside each test method, we can create a single method, called a test fixture, that is recreated before each of our tests is executed.
Make sure you pay special attention to these instructions. If you create the test fixture incorrectly, then the test methods just don't work right. On this slide I'll walk through the instructions verbally, and, on the next slide, I'll show you some screen-shots.
• First, create an instance of your BeeperDelivery class on the workbench, just like you've done before, and call its task() method. Let it run until the task is complete.
• Next, right-click the BeeperDelivery object (not the class) and invoke the robot() method. When you do this, a dialog box titled Method Result appears. Click the Get button, give your robot a name (I use karel) and then dismiss the dialog. Now you'll have two objects on the object bench: your BeeperDelivery task object and a robot object.
• Right-click the robot object and invoke the getWorldAsObject method. You'll find this on the menu that says "Inherited from TestableRobot". On that menu you'll need to click "More Methods" to expand the menu all the way so you can find getWorldAsObject. When the Method Result dialog appears click the Get button again and name your object something like theWorld. Close the Method Result dialog and you should have three objects sitting on the object bench: a BeeperDelivery task, a robot and a World object.
CS 170 Lecture: Testing Karel Page 5 of 10 © 2008-2075 Stephen Gilbert
The next slide walks through this same process with screen-shots, so you might want to watch it before trying it on your own.
Create a FixtureExercise 4
Snap a pic ofthe object bench
Slide 9 Create a Fixture
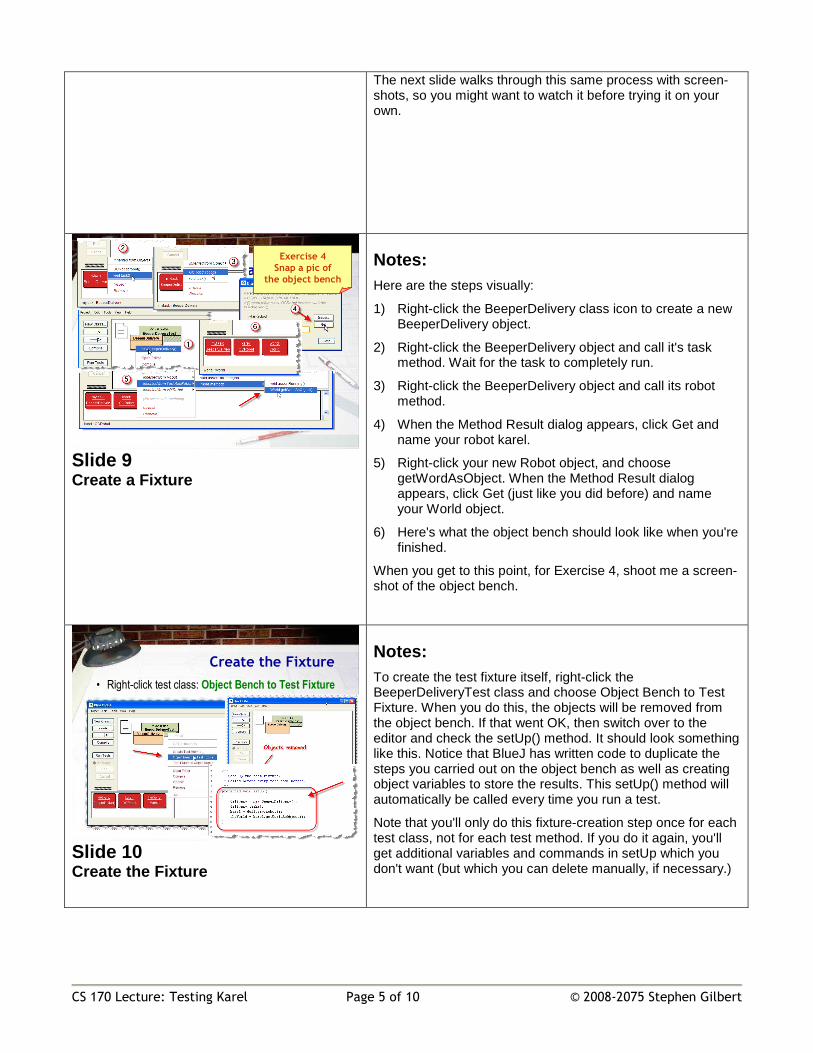
Notes: Here are the steps visually:
1) Right-click the BeeperDelivery class icon to create a new BeeperDelivery object.
2) Right-click the BeeperDelivery object and call it's task method. Wait for the task to completely run.
3) Right-click the BeeperDelivery object and call its robot method.
4) When the Method Result dialog appears, click Get and name your robot karel.
5) Right-click your new Robot object, and choose getWordAsObject. When the Method Result dialog appears, click Get (just like you did before) and name your World object.
6) Here's what the object bench should look like when you're finished.
When you get to this point, for Exercise 4, shoot me a screen-shot of the object bench.
Create the Fixture
• Right-click test class: Object Bench to Test Fixture
Slide 10 Create the Fixture
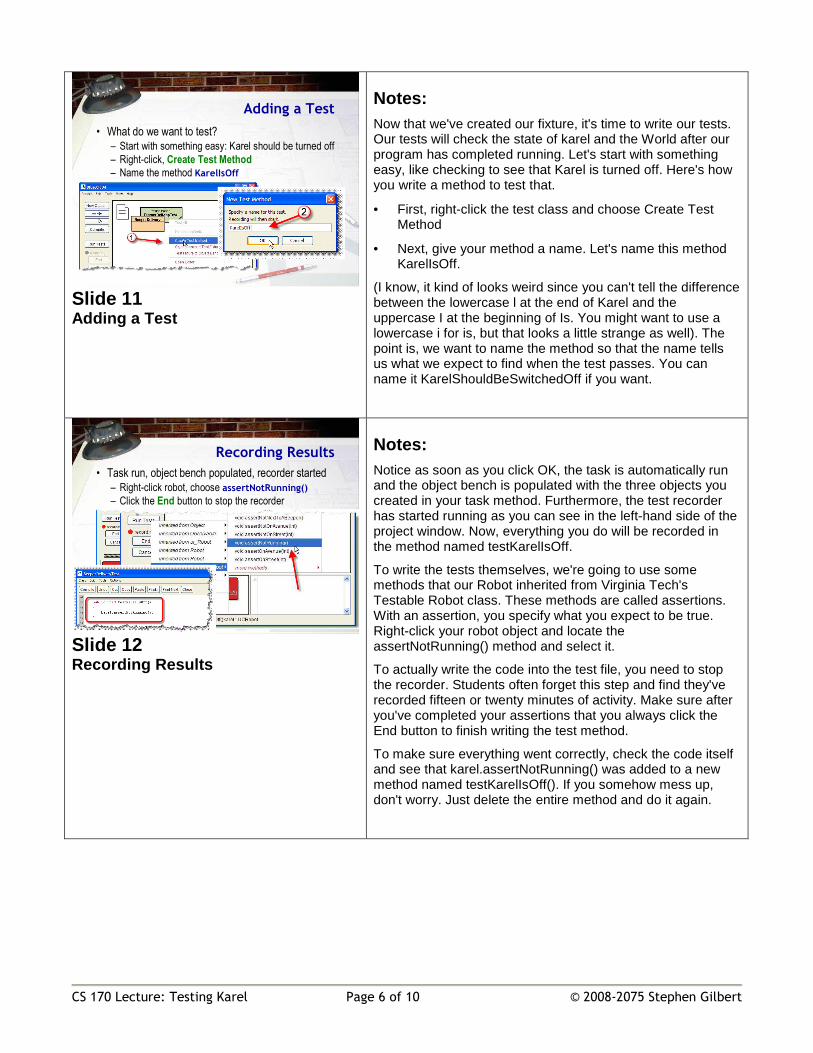
Notes: To create the test fixture itself, right-click the BeeperDeliveryTest class and choose Object Bench to Test Fixture. When you do this, the objects will be removed from the object bench. If that went OK, then switch over to the editor and check the setUp() method. It should look something like this. Notice that BlueJ has written code to duplicate the steps you carried out on the object bench as well as creating object variables to store the results. This setUp() method will automatically be called every time you run a test.
Note that you'll only do this fixture-creation step once for each test class, not for each test method. If you do it again, you'll get additional variables and commands in setUp which you don't want (but which you can delete manually, if necessary.)
CS 170 Lecture: Testing Karel Page 6 of 10 © 2008-2075 Stephen Gilbert
Adding a Test
• What do we want to test?
– Start with something easy: Karel should be turned off
– Right-click, Create Test Method
– Name the method KarelIsOff
Slide 11 Adding a Test
Notes: Now that we've created our fixture, it's time to write our tests. Our tests will check the state of karel and the World after our program has completed running. Let's start with something easy, like checking to see that Karel is turned off. Here's how you write a method to test that.
• First, right-click the test class and choose Create Test Method
• Next, give your method a name. Let's name this method KarelIsOff.
(I know, it kind of looks weird since you can't tell the difference between the lowercase l at the end of Karel and the uppercase I at the beginning of Is. You might want to use a lowercase i for is, but that looks a little strange as well). The point is, we want to name the method so that the name tells us what we expect to find when the test passes. You can name it KarelShouldBeSwitchedOff if you want.
Recording Results
• Task run, object bench populated, recorder started
– Right-click robot, choose assertNotRunning()
– Click the End button to stop the recorder
Slide 12 Recording Results
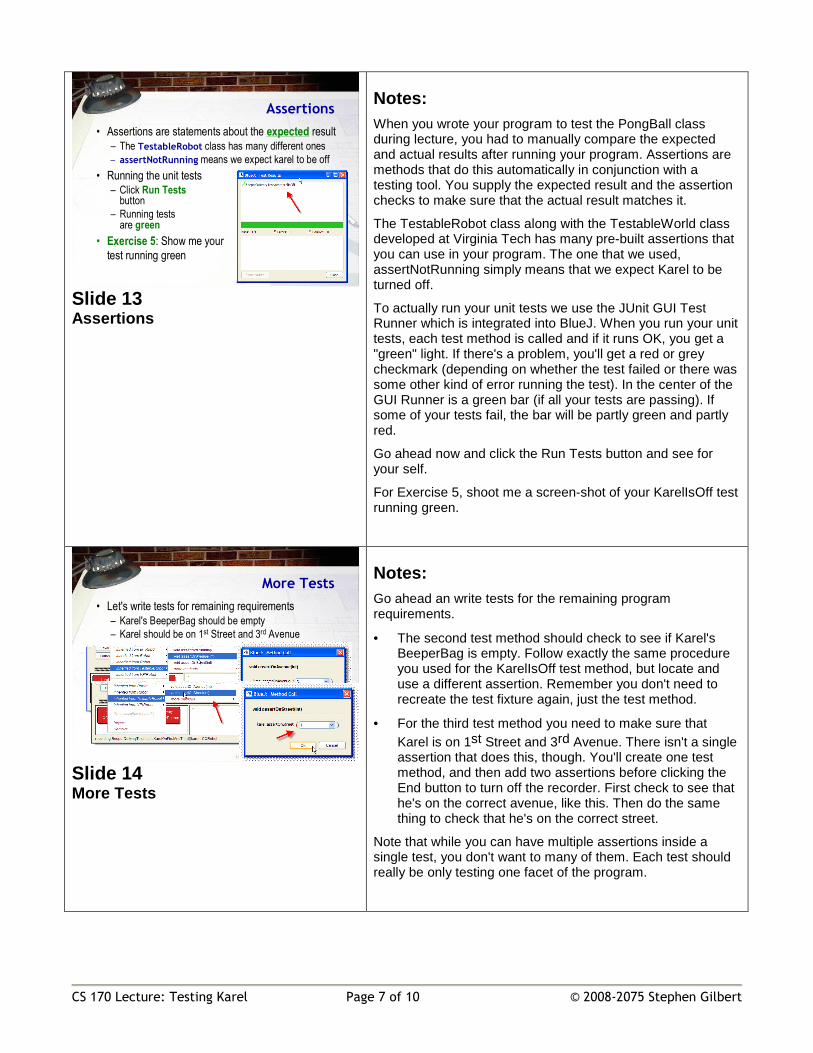
Notes: Notice as soon as you click OK, the task is automatically run and the object bench is populated with the three objects you created in your task method. Furthermore, the test recorder has started running as you can see in the left-hand side of the project window. Now, everything you do will be recorded in the method named testKarelIsOff.
To write the tests themselves, we're going to use some methods that our Robot inherited from Virginia Tech's Testable Robot class. These methods are called assertions. With an assertion, you specify what you expect to be true. Right-click your robot object and locate the assertNotRunning() method and select it.
To actually write the code into the test file, you need to stop the recorder. Students often forget this step and find they've recorded fifteen or twenty minutes of activity. Make sure after you've completed your assertions that you always click the End button to finish writing the test method.
To make sure everything went correctly, check the code itself and see that karel.assertNotRunning() was added to a new method named testKarelIsOff(). If you somehow mess up, don't worry. Just delete the entire method and do it again.
CS 170 Lecture: Testing Karel Page 7 of 10 © 2008-2075 Stephen Gilbert
Assertions
• Assertions are statements about the expected result
– The TestableRobot class has many different ones
– assertNotRunning means we expect karel to be off
• Running the unit tests– Click Run Tests
button
– Running testsare green
• Exercise 5: Show me your
test running green
Slide 13 Assertions
Notes: When you wrote your program to test the PongBall class during lecture, you had to manually compare the expected and actual results after running your program. Assertions are methods that do this automatically in conjunction with a testing tool. You supply the expected result and the assertion checks to make sure that the actual result matches it.
The TestableRobot class along with the TestableWorld class developed at Virginia Tech has many pre-built assertions that you can use in your program. The one that we used, assertNotRunning simply means that we expect Karel to be turned off.
To actually run your unit tests we use the JUnit GUI Test Runner which is integrated into BlueJ. When you run your unit tests, each test method is called and if it runs OK, you get a "green" light. If there's a problem, you'll get a red or grey checkmark (depending on whether the test failed or there was some other kind of error running the test). In the center of the GUI Runner is a green bar (if all your tests are passing). If some of your tests fail, the bar will be partly green and partly red.
Go ahead now and click the Run Tests button and see for your self.
For Exercise 5, shoot me a screen-shot of your KarelIsOff test running green.
More Tests
• Let's write tests for remaining requirements
– Karel's BeeperBag should be empty
– Karel should be on 1st Street and 3rd Avenue
Slide 14 More Tests
Notes: Go ahead an write tests for the remaining program requirements.
• The second test method should check to see if Karel's BeeperBag is empty. Follow exactly the same procedure you used for the KarelIsOff test method, but locate and use a different assertion. Remember you don't need to recreate the test fixture again, just the test method.
• For the third test method you need to make sure that Karel is on 1st Street and 3rd Avenue. There isn't a single assertion that does this, though. You'll create one test method, and then add two assertions before clicking the End button to turn off the recorder. First check to see that he's on the correct avenue, like this. Then do the same thing to check that he's on the correct street.
Note that while you can have multiple assertions inside a single test, you don't want to many of them. Each test should really be only testing one facet of the program.
CS 170 Lecture: Testing Karel Page 8 of 10 © 2008-2075 Stephen Gilbert
World Methods
• The world should contain only a single beeper
– Located at 4th Street and 2nd Avenue
Slide 15 World Methods
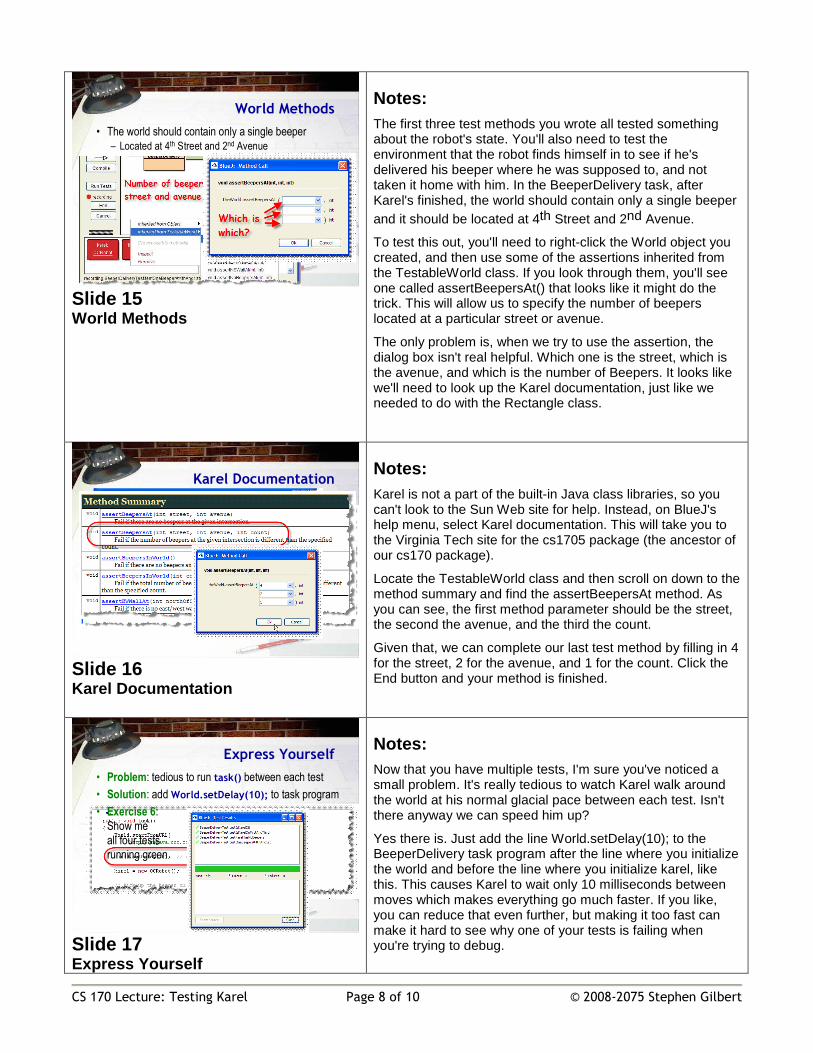
Notes: The first three test methods you wrote all tested something about the robot's state. You'll also need to test the environment that the robot finds himself in to see if he's delivered his beeper where he was supposed to, and not taken it home with him. In the BeeperDelivery task, after Karel's finished, the world should contain only a single beeper and it should be located at 4th Street and 2nd Avenue.
To test this out, you'll need to right-click the World object you created, and then use some of the assertions inherited from the TestableWorld class. If you look through them, you'll see one called assertBeepersAt() that looks like it might do the trick. This will allow us to specify the number of beepers located at a particular street or avenue.
The only problem is, when we try to use the assertion, the dialog box isn't real helpful. Which one is the street, which is the avenue, and which is the number of Beepers. It looks like we'll need to look up the Karel documentation, just like we needed to do with the Rectangle class.
Karel Documentation
Slide 16 Karel Documentation
Notes: Karel is not a part of the built-in Java class libraries, so you can't look to the Sun Web site for help. Instead, on BlueJ's help menu, select Karel documentation. This will take you to the Virginia Tech site for the cs1705 package (the ancestor of our cs170 package).
Locate the TestableWorld class and then scroll on down to the method summary and find the assertBeepersAt method. As you can see, the first method parameter should be the street, the second the avenue, and the third the count.
Given that, we can complete our last test method by filling in 4 for the street, 2 for the avenue, and 1 for the count. Click the End button and your method is finished.
Express Yourself
• Problem: tedious to run task() between each test
• Solution: add World.setDelay(10); to task program
• Exercise 6:
Show me
all four tests
running green
Slide 17 Express Yourself
Notes: Now that you have multiple tests, I'm sure you've noticed a small problem. It's really tedious to watch Karel walk around the world at his normal glacial pace between each test. Isn't there anyway we can speed him up?
Yes there is. Just add the line World.setDelay(10); to the BeeperDelivery task program after the line where you initialize the world and before the line where you initialize karel, like this. This causes Karel to wait only 10 milliseconds between moves which makes everything go much faster. If you like, you can reduce that even further, but making it too fast can make it hard to see why one of your tests is failing when you're trying to debug.
CS 170 Lecture: Testing Karel Page 9 of 10 © 2008-2075 Stephen Gilbert
Well, that's it for JUnit. For Exercise 6, shoot me a screen-shot showing me all tests running green.
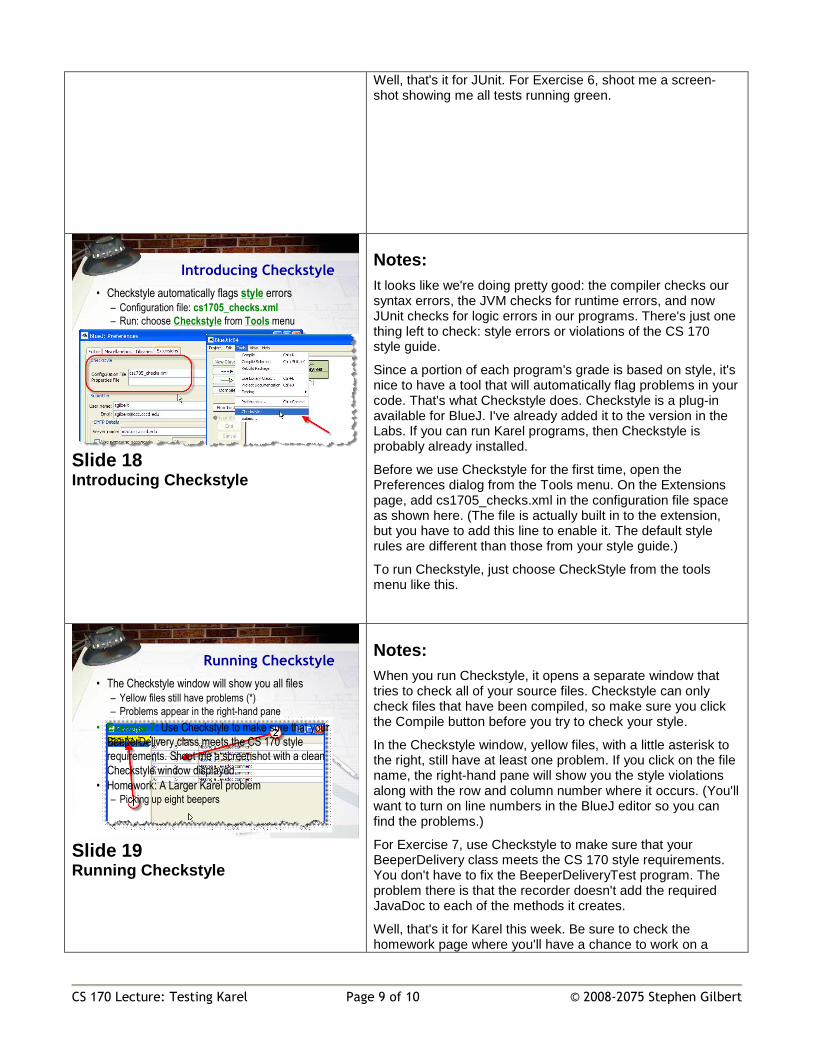
Introducing Checkstyle
• Checkstyle automatically flags style errors
– Configuration file: cs1705_checks.xml
– Run: choose Checkstyle from Tools menu
Slide 18 Introducing Checkstyle
Notes: It looks like we're doing pretty good: the compiler checks our syntax errors, the JVM checks for runtime errors, and now JUnit checks for logic errors in our programs. There's just one thing left to check: style errors or violations of the CS 170 style guide.
Since a portion of each program's grade is based on style, it's nice to have a tool that will automatically flag problems in your code. That's what Checkstyle does. Checkstyle is a plug-in available for BlueJ. I've already added it to the version in the Labs. If you can run Karel programs, then Checkstyle is probably already installed.
Before we use Checkstyle for the first time, open the Preferences dialog from the Tools menu. On the Extensions page, add cs1705_checks.xml in the configuration file space as shown here. (The file is actually built in to the extension, but you have to add this line to enable it. The default style rules are different than those from your style guide.)
To run Checkstyle, just choose CheckStyle from the tools menu like this.
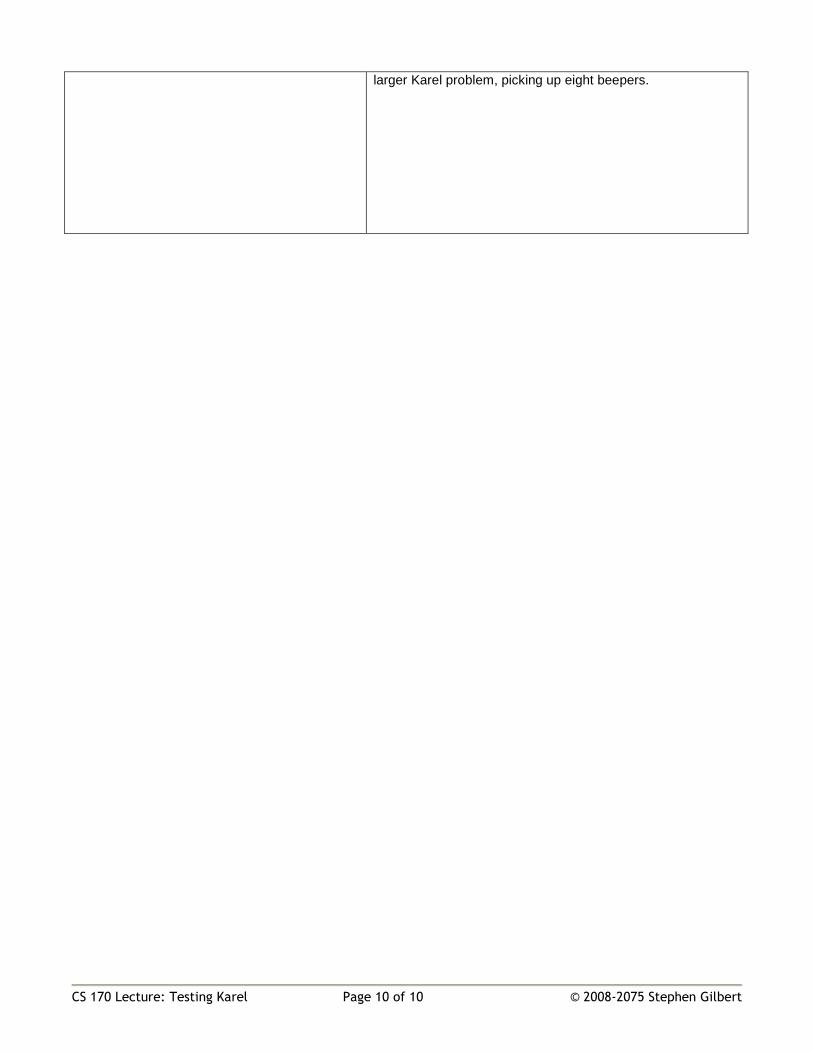
Running Checkstyle
• The Checkstyle window will show you all files
– Yellow files still have problems (*)
– Problems appear in the right-hand pane
• Exercise 7: Use Checkstyle to make sure that your
BeeperDelivery class meets the CS 170 style
requirements. Shoot me a screenshot with a clean
Checkstyle window displayed.
• Homework: A Larger Karel problem– Picking up eight beepers
Slide 19 Running Checkstyle
Notes: When you run Checkstyle, it opens a separate window that tries to check all of your source files. Checkstyle can only check files that have been compiled, so make sure you click the Compile button before you try to check your style.
In the Checkstyle window, yellow files, with a little asterisk to the right, still have at least one problem. If you click on the file name, the right-hand pane will show you the style violations along with the row and column number where it occurs. (You'll want to turn on line numbers in the BlueJ editor so you can find the problems.)
For Exercise 7, use Checkstyle to make sure that your BeeperDelivery class meets the CS 170 style requirements. You don't have to fix the BeeperDeliveryTest program. The problem there is that the recorder doesn't add the required JavaDoc to each of the methods it creates.
Well, that's it for Karel this week. Be sure to check the homework page where you'll have a chance to work on a
CS 170 Lecture: Testing Karel Page 10 of 10 © 2008-2075 Stephen Gilbert
larger Karel problem, picking up eight beepers.