sketchup design project: grades 6 - 9 - 3dvinci · sketchup teacher guide sketchup design project:...
TRANSCRIPT
www.3dvinci.net Page 1
SketchUpDesign Project:
Grades 6 - 9This project works in any version of SketchUp.
This age group can make relatively complex designs, so it’s important that they learn good design practices. One of the most important features of SketchUp is components, which are essential to use when you have objects that repeat. Components provide flexibility; they enable you to make quick changes to multiple objects at once, plus they keep the file size from getting out of control.
For basic information on downloading SketchUp, as well as its user interface and basic tools, please see our printable “Intro to SketchUp” PDF: www.3dvinci.net/SketchUp_Intro.pdf.
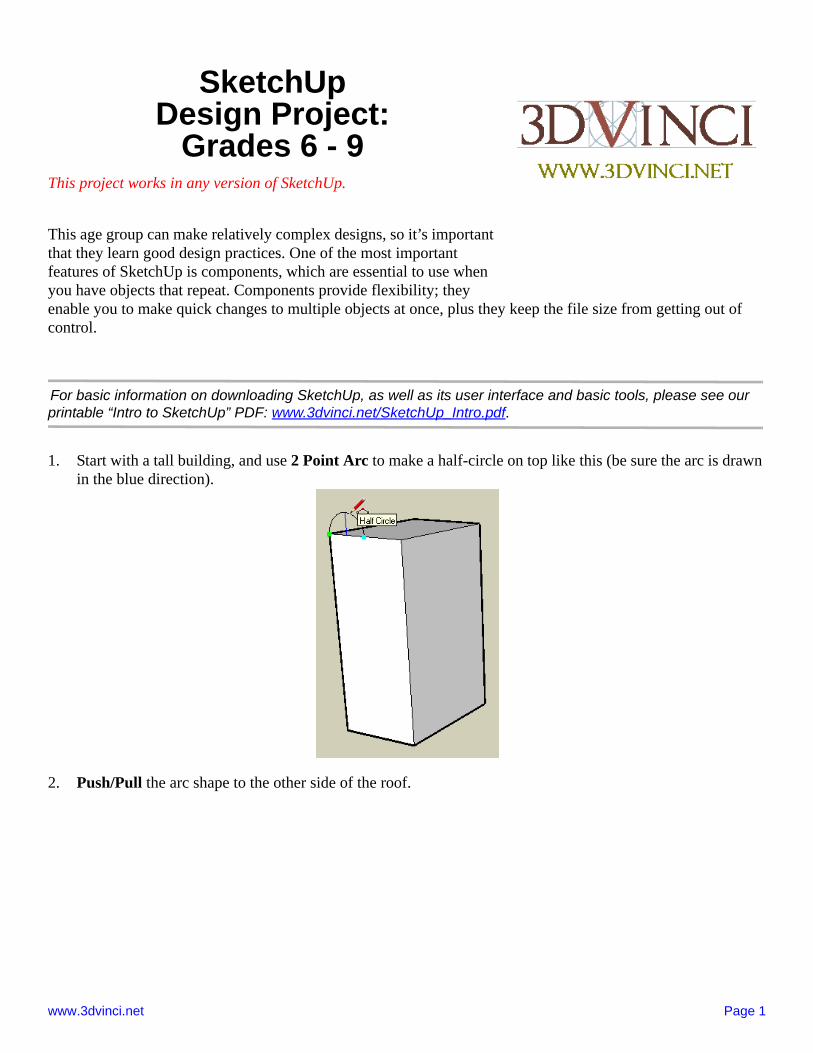
1. Start with a tall building, and use 2 Point Arc to make a half-circle on top like this (be sure the arc is drawn in the blue direction).
2. Push/Pull the arc shape to the other side of the roof.
SketchUp Teacher Guide SketchUp Design Project: Grades 6 - 9
www.3dvinci.net Page 2
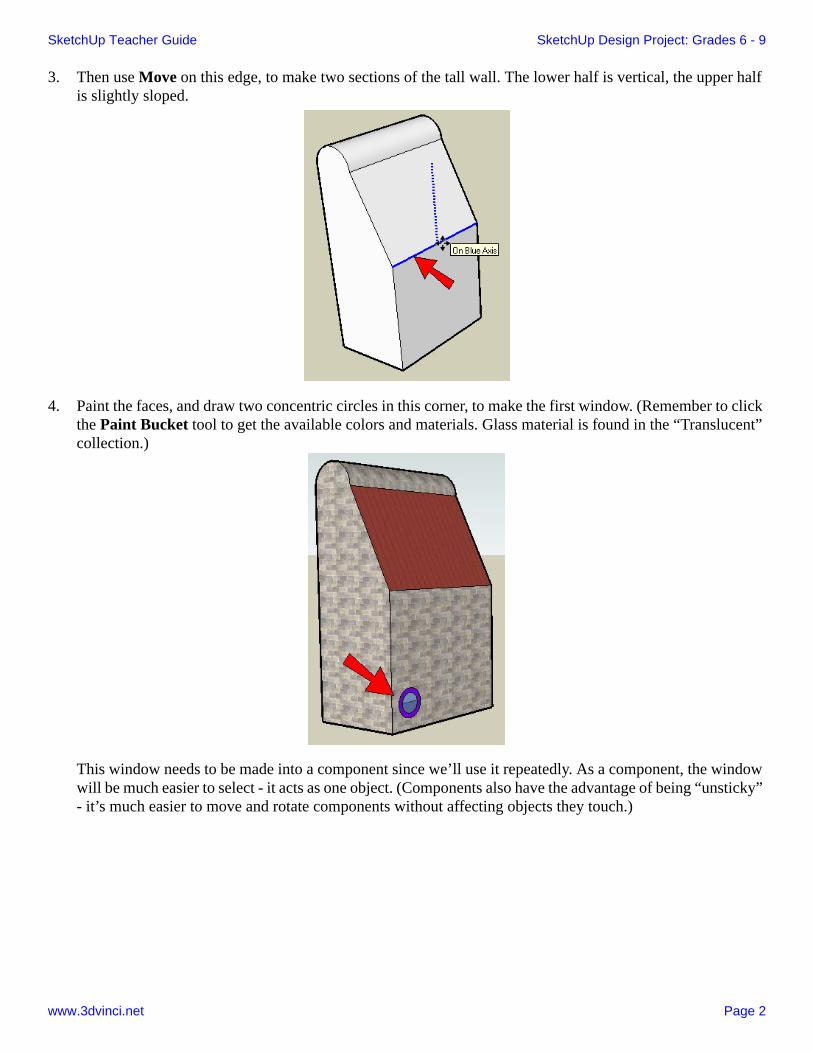
3. Then use Move on this edge, to make two sections of the tall wall. The lower half is vertical, the upper half is slightly sloped.
4. Paint the faces, and draw two concentric circles in this corner, to make the first window. (Remember to click the Paint Bucket tool to get the available colors and materials. Glass material is found in the “Translucent” collection.)
This window needs to be made into a component since we’ll use it repeatedly. As a component, the window will be much easier to select - it acts as one object. (Components also have the advantage of being “unsticky” - it’s much easier to move and rotate components without affecting objects they touch.)

SketchUp Teacher Guide SketchUp Design Project: Grades 6 - 9
www.3dvinci.net Page 3
5. Select both faces of this window, and right-click on either of the faces. Choose Make Component.
6. Give the component any name you want. Since it’s a window, you want it to Cut opening, and also check Replace selection with component.
7. To add more windows, use the Move tool and press Ctrl / Option. After you place the first copy, type “3x” to make three copies. You can continue entering different numbers to get more or fewer windows. If you enter a value without the “x” you can change the spacing, which is also useful.
SketchUp Teacher Guide SketchUp Design Project: Grades 6 - 9
www.3dvinci.net Page 4
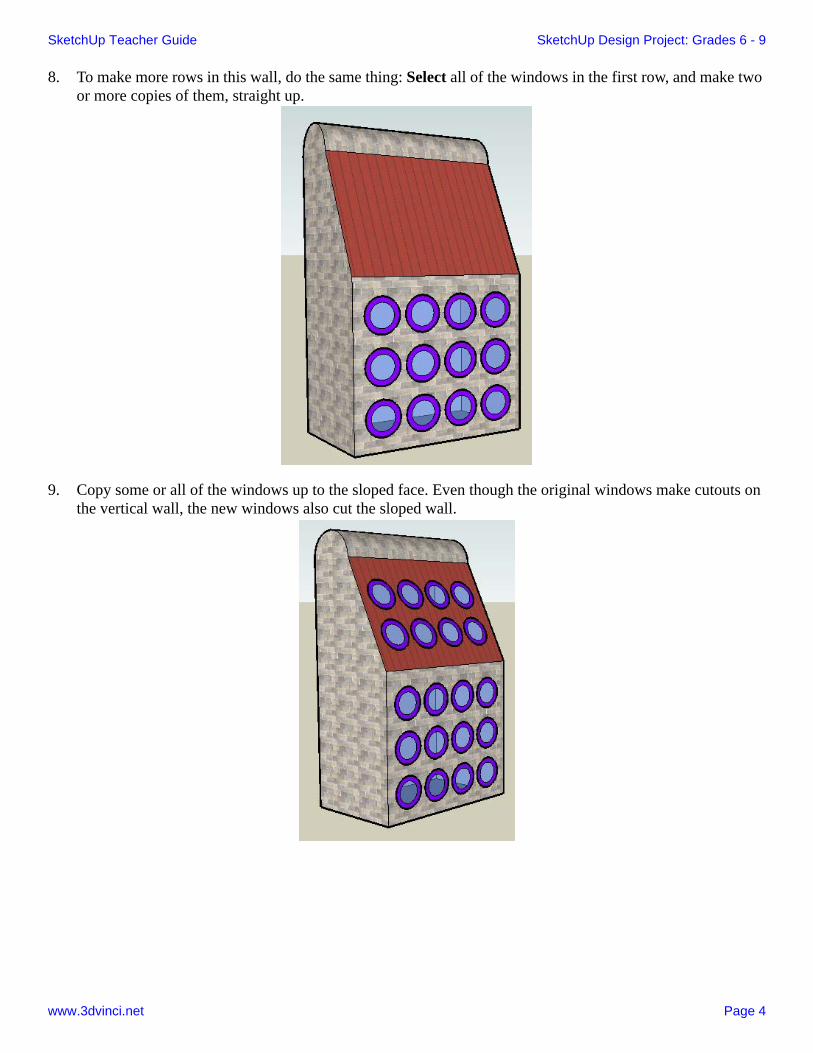
8. To make more rows in this wall, do the same thing: Select all of the windows in the first row, and make two or more copies of them, straight up.
9. Copy some or all of the windows up to the sloped face. Even though the original windows make cutouts on the vertical wall, the new windows also cut the sloped wall.
SketchUp Teacher Guide SketchUp Design Project: Grades 6 - 9
www.3dvinci.net Page 5
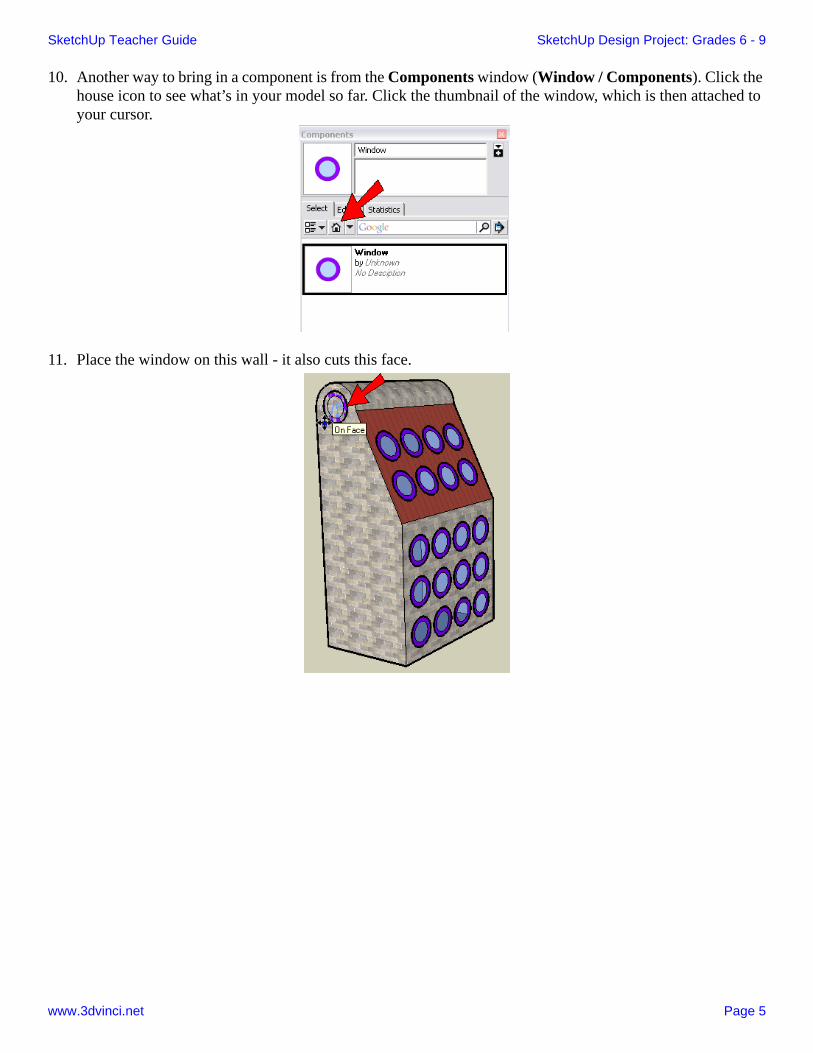
10. Another way to bring in a component is from the Components window (Window / Components). Click the house icon to see what’s in your model so far. Click the thumbnail of the window, which is then attached to your cursor.
11. Place the window on this wall - it also cuts this face.
SketchUp Teacher Guide SketchUp Design Project: Grades 6 - 9
www.3dvinci.net Page 6
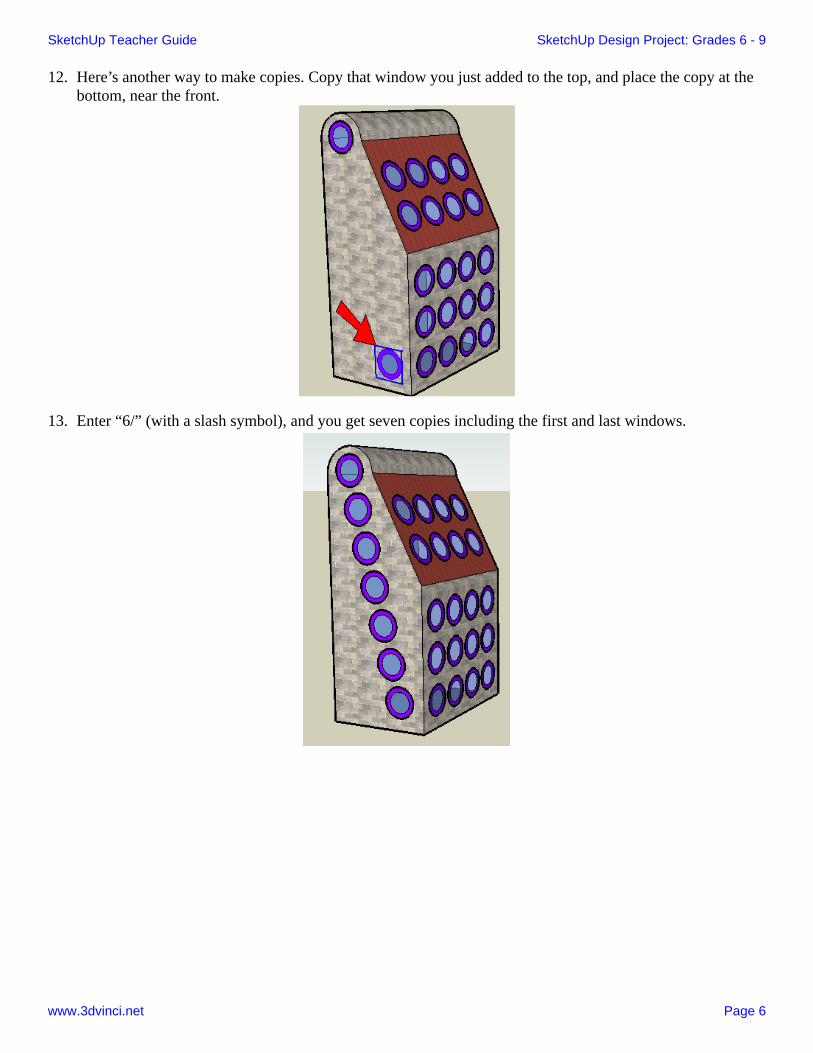
12. Here’s another way to make copies. Copy that window you just added to the top, and place the copy at the bottom, near the front.
13. Enter “6/” (with a slash symbol), and you get seven copies including the first and last windows.

SketchUp Teacher Guide SketchUp Design Project: Grades 6 - 9
www.3dvinci.net Page 7
14. Here’s a great feature of components: you change one, and you change them all. But you need to “open” a component before you can make any changes to it. The easiest way to edit a component is to activate Select and double-click it. Do this for any window - they’re all the same. You’ll see the one you’re editing outlined in a dashed box, and everything else is faded.
15. Use Push/Pull to make the outer circle into a window frame, and add some more colors.
16. When you’re done, close the component by activating Select and clicking outside the component.

SketchUp Teacher Guide SketchUp Design Project: Grades 6 - 9
www.3dvinci.net Page 8
17. What if you want some of the windows to be different? For instance, I want all the windows on the sloped face to have a shade cover. Select the components you want to make different (all the ones on the sloped face), and right-click on one of them. Choose Make Unique.
18. Now edit one of the “unique” windows. For my cover, I added two lines to the front face, and colored the top part the same as I painted the roof.
19. To make the cover, use Push/Pull but before clicking anything press the Ctrl / Option key. This way you’ll be adding a new set of faces, instead of pulling out an existing face.
SketchUp Teacher Guide SketchUp Design Project: Grades 6 - 9
www.3dvinci.net Page 9
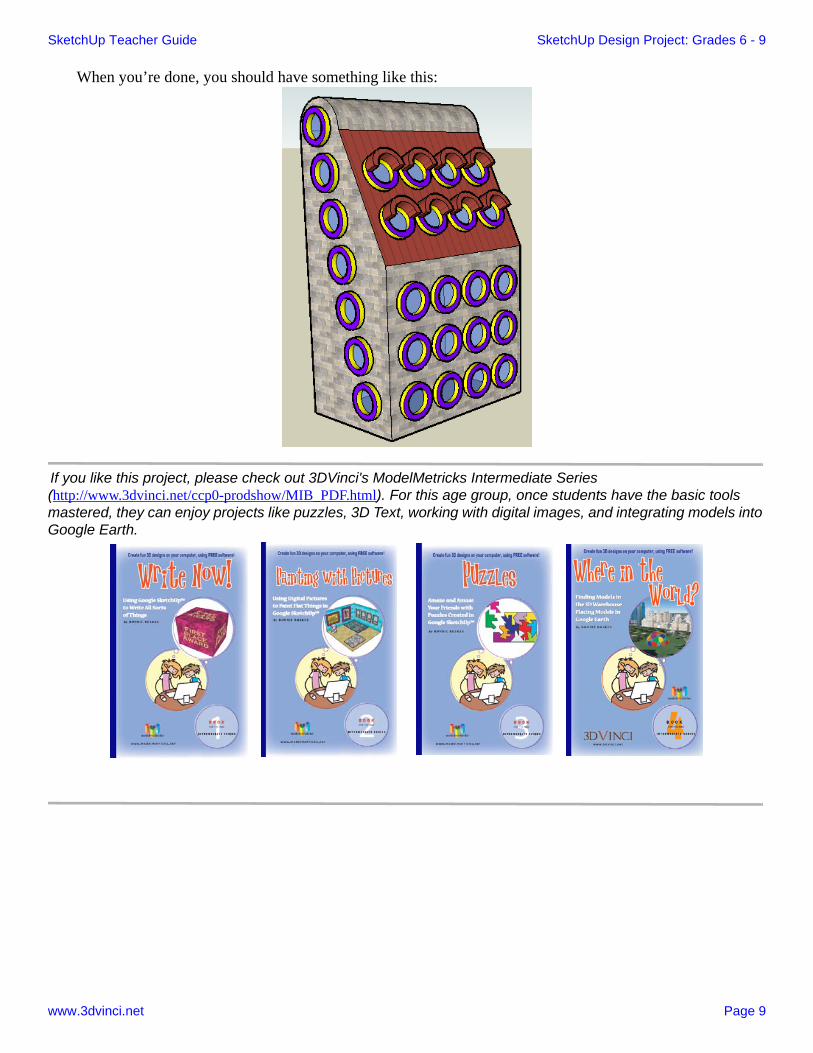
When you’re done, you should have something like this:
If you like this project, please check out 3DVinci's ModelMetricks Intermediate Series (http://www.3dvinci.net/ccp0-prodshow/MIB_PDF.html). For this age group, once students have the basic tools mastered, they can enjoy projects like puzzles, 3D Text, working with digital images, and integrating models into Google Earth.
SketchUp Teacher Guide SketchUp Design Project: Grades 6 - 9
www.3dvinci.net Page 10
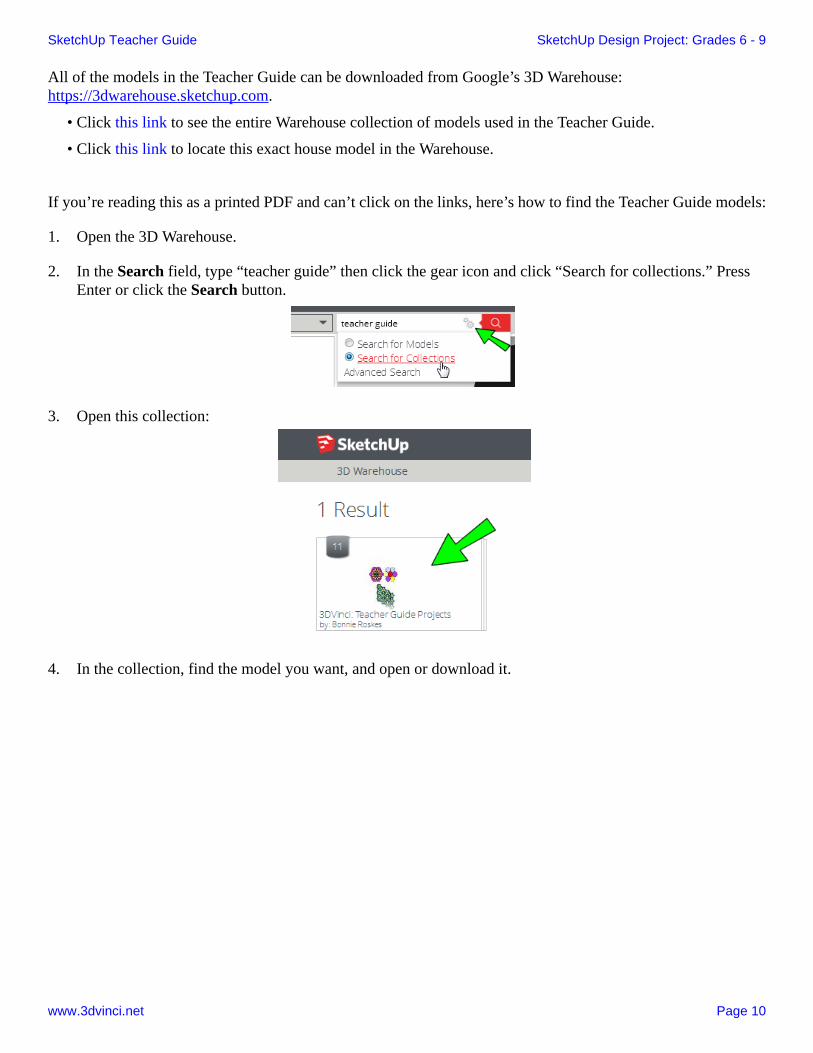
All of the models in the Teacher Guide can be downloaded from Google’s 3D Warehouse: https://3dwarehouse.sketchup.com.
• Click this link to see the entire Warehouse collection of models used in the Teacher Guide.
• Click this link to locate this exact house model in the Warehouse.
If you’re reading this as a printed PDF and can’t click on the links, here’s how to find the Teacher Guide models:
1. Open the 3D Warehouse.
2. In the Search field, type “teacher guide” then click the gear icon and click “Search for collections.” Press Enter or click the Search button.
3. Open this collection:
4. In the collection, find the model you want, and open or download it.