sisteme de tratare apă cu rășini schimbatoare de ioni · hidrofor house water supply plant...
TRANSCRIPT

Manual de instalare și operare sisteme de tratare apă
cu rășini schimbatoare de ioni
RO
pag 2
page 24
EN
seite 57
DE
стр. 74
RU
pagina 40
IT
Handbook of installation and operation water treatment systems
with ion exchange resins
Manuale di installazione e operazione sistemi di trattamento dell’acqua con resine a scambio
ionico
Montage - und Bedienungsanleitung
Wasserbehandlungssysteme mit Ionenaustauschharze
Инструкции по установке и пользованию
системы обработки воды с ионообменными смолами

2
Stații dedurizare SOFT 10, SOFT 18 și SOFT 25SOFT 10, SOFT 18 and SOFT 25 Softening stationsImpianti di potabilizzazione SOFT 10, SOFT 18 e SOFT 25Wasserenthärtungsstationen SOFT 10, SOFT 18 und SOFT 25Станции умягчения SOFT 10, SOFT 18 и SOFT 25
Stații dedurizare SOFT 37 și SOFT 50SOFT 37 and SOFT 50 Softening stationsImpianti di potabilizzazione SOFT 37 e SOFT 50Wasserenthärtungsstationen SOFT 37 und SOFT 50Станции умягчения SOFT 37 и SOFT 50

3
Stație tratare MIX 25MIX 25 Treatment stationImpianto di trattamento MIX 25Behandlungsstation MIX 25Станция обработки MIX 25
Stație tratare MIX 37 și MIX 50MIX 37 and MIX 50 Treatment stationImpianto di trattamento MIX 37 e MIX 50Behandlungsstation MIX 37 und MIX 50Станции обработки MIX 37 и MIX 50

4
Fig.1 Schemă de montaj stații cu rășini schimbătoare de rășiniFig.1 Schema di montaggio degli impianti con resine a scambio ionico Fig.1 Mounting diagram, resin stations with exchange resinsAbb. 1 Montageschema für Harzstationen mit Harztauscher Рис. 1 Схема монтажа станции с ионообменивающими смолами
Con
sum
ator
apă
net
rata
tă (e
x: ir
igaț
ii)U
ntre
ated
wat
er c
onsu
mer
(for
inst
ance
for i
rrig
atio
ns)
Con
sum
ator
e di
acq
ua n
on tr
atta
ta (a
d es
empi
o: ir
rigaz
ioni
)Ve
rbra
uche
r unb
ehan
delte
s W
asse
r (z.
B.: B
ewäs
seru
ng)
Потр
ебит
ель
необ
рабо
танн
ых в
од (к
при
меру
: оро
шен
ия)
Hid
rofo
rH
ouse
wat
er s
uppl
y pl
ant
Idro
foro
Was
serd
rück
erhö
hung
sanl
age
Гидр
офор
Apă
net
rata
tăU
ntre
ated
wat
erA
cqua
non
trat
tata
Unbe
hand
elte
s W
asse
rНе
обра
бота
нная
вод
а
Apă
trat
ată
Trea
ted
wat
erA
cqua
trat
tata
Beha
ndel
tes
Was
ser
Обр
абот
анна
я во
да
Filtr
u im
purit
ăți <
100
mic
roni
Impu
ritie
s fil
ter <
100
mic
rons
Filtr
o im
purit
à <
100
mic
roni
Schm
utzfi
lter <
100
Mikr
onФ
ильт
р пр
имес
ей <
100
мик
рон
Cana
lizar
e Se
wer
Fogn
atur
aKa
nalis
atio
nКа
нали
заци
я
Tub
evac
uare
sar
amur
ă (Ø
int.
12 m
m)
Brin
e di
scha
rge
tube
(Ø in
t. 12
mm
)Tu
bo d
i eva
cuaz
ione
del
la s
alam
oia
(Ø in
t. 12
mm
)Ab
fluss
rohr
Sal
zsol
e (In
nenw
eite
Ø 1
2 m
m)
Труб
а вы
брос
а со
лянн
ой с
меси
(Ø в
н. 1
2 мм
)
Sta
ție d
e tra
tare
cu
răși
ni s
chim
băto
are
de io
niTr
eatm
ent s
tatio
n w
ith io
n ex
chan
ge re
sins
Impi
anti
di tr
atta
men
to c
on re
sine
a s
cam
bio
ioni
coHa
rzbe
hand
lung
sanl
age
Ione
naus
taus
cher
Стан
ция
обра
ботк
и пр
и по
мощ
и ио
нооб
менн
ых с
мол
BYP
ASS
Ø 1
"
Tub
prea
plin
(Ø in
t. 12
mm
)O
verfl
ow tu
be (Ø
int.
12 m
m)
Tubo
di s
caric
o (Ø
int.
12 m
m)
Über
lauf
rohr
(Inn
enwe
ite Ø
12
mm
)Тр
уба
пере
лива
(Ø в
н. 1
2 мм
)

5
poziția serviceservice position
posizione serviceService-Positionпозиция service
poziția bypassbypass position
posizione bypassBypass-Positionпозиция bypass
Canalizare Sewage systemFognaturaKanalisationКанализация
Fig. 2 Robinet amestecFig. 2 Mixture tap Fig. 2 Rubinetto miscuglioAbb. 2 Mischschieber Рис. 2 Кран смешивания
Fig. 3 Poziții BypassFig. 3 Bypass positions Fig. 3 Posizioni BypassAbb. 3 ByPass - StellungenРис. 3 Позиции bypass
Fig. 4 Alimentarea stațieiFig. 4 Station supply Fig. 4 Rifornimento dell’impiantoAbb. 4 Versorgung der StationРис. 4 Подача станции
Fig. 5 Conectare la canalizareFig. 5 Connection to the sewerageFig. 5 Collegamento alla fognaturaAbb. 5 Kanalisationsanschluss Рис. 5 Соединение к канализации
Tub evacuare saramură (Ø int. 12 mm)Brine discharge tube (Ø int. 12 mm)Tubo evacuazione salamoia (Ø int. 12 mm)Rohr -Salzsole Abfluss (Innenweite Ø 12 mm)Шланг выброса соляной смеси (Ø вн. 12 мм)
Tub preaplin (Ø int. 12 mm)Overflow tube (Ø int. 12 mm)Tubo di scarico (Ø int. 12 mm)Rohr -Überlauf (Innenweite Ø 12 mm)Шланг перелива (Ø вн. 12 мм)

6
1
5
9
13
17
2
6
10
14
18
3
7
11
15
19
4
8
12
16
20
Fig. 6 Etapele de asamblare stații compuse din două corpuri (simplex) Fig. 6 Assembling stages of stations composed of two blocks (simplex) Fig. 6 Le tappe di assemblaggio degli impianti composti da due nuclei (simplex)Abb. 6 Etappen für den Zusammenbau der zweiteiligen Stationen (Simplex)Рис. 6 Этапы сбора станций составленных из двух корпусов (simplex)

7
Stimați parteneri,
Vă mulțumim că ați ales sistemele de tratare apă cu rășini schimbătoare de ioni aquaPUR fabricate de SC Valrom Industrie SRL.Înainte de utilizare vă rugăm să citiţi cu atenţie aceste instrucţiuni de instalare şi exploatare.
Pentru alte informaţii vă rugăm să vizitaţi site-ul www.valrom.ro sau www.aqua-pur.ro
1. TIPURI DE SISTEME ȘI CARACTERISTICI TEHNICE
Tehnologia de tratare/filtrare cu rășini schimbătore de ioni este una din cele mai simple și mai convenabile metode de îmbunătățire a calității apei. Sistemul de tratare a apei cu rășină schimbătoare de ioni este îmbunătățit prin adăugarea altor medii cu scop de a reduce din apă alți poluanți din apă ca de exemplu fier, amoniu.În acest manual este prezentată montarea și operarea următoarelor sisteme de tratare:- stații dedurizare <aquaPUR> SOFT – pe bază de rășini schimbătoare de ioni; - stații tratare <aquaPUR> MIX – un amestec de diverse medii filtrante.
Stații de dedurizare <aquaPUR> SOFT
Duritatea apei este cauza frecventă de defecțiuni ale instalațiilor de încălzire, în special centrale, boilere, electrocasnice (mașina de spălat, fier de călcat, cafetiere, etc), efecte care duc la cheltuieli suplimentare și chiar deprecierea confortului. Un alt efect al apei dure este spumarea redusă a detergenților și săpunurilor, care conduce la creșterea cheltuielilor de întreținere a locuinței. Alte efecte ale apei dure sunt de natura estetică cum ar fi depunerile pe obiectele sanitare și de confort cum ar fi deprecierea hainelor, uscarea pielii și a părului.
Dedurizarea prin schimb de ioni este cea mai simplă și convenabilă metodă pentru a reduce duritatea apei. Rășinile schimbătoare de ioni atrag și rețin ionii de calciu și magneziu dizolvați în apă și sunt înlocuiți cu ionii de sodiu. Când se consumă volumul de apă între două regenerări, rășina se va regenera cu soluție de clorură de sodiu (saramură). Ciclurile regenerării sunt: Backwash (Spălare inversă), Brine draw (Alimentare cu saramură), Rinse (Clătire) și Refill (Reumplere).
Stații tratare <aquaPUR> MIX
Stațile de tratare <aquaPUR> MIX realizează reducerea concentrațiilor mai multor substanțe într-o singură treaptă bazată pe mediul de filtrare Ecomix.Mediul filtrant din stațile MIX este un amestec de medii care cuprinde rășini schimbătoare de ioni cu proprietăți sinergice. În interiorul sistemului de tratare, patul de mediu filtrant se stratifică în straturi care lucrează complementar reducand din apa duritatea, fierul, manganul, amoniul și substanțe organice.Regenerarea mediului este făcută cu soluție de clorură de sodiu într-un mod identic cu acela al dedurizatoarelor.

8
1.1 Stații dedurizare SOFT
Mod
elSO
FT 1
0SO
FT 1
8SO
FT 2
5SO
FT 3
7SO
FT 5
0C
odA
QU
A09
1100
1000
8A
QU
A09
1100
1801
5A
QU
A09
1100
2502
0A
QU
A09
1100
3702
5A
QU
A09
1100
5003
0B
y-pa
ss in
clus
DA
DA
Tip
echi
pam
ent
cabi
net (
tanc
răși
nă ș
i vas
sar
amur
ă în
ace
lași
cor
p)si
mpl
ex (t
anc
răși
nă ș
i vas
sar
amur
ă se
para
te)
Alim
enta
re e
lect
rică
230
V, 5
0 H
zC
onsu
mul
de
ener
gie
3WM
od d
e co
ntro
l van
ăVo
lum
sau
tim
p D
imen
siun
i rac
ord
IN/O
UT
[inch
]1”
Rac
ord
cana
lizar
e po
rtfur
tun
[mm
]12
Deb
it no
min
al[m
³/h]
0,8
1,5
22,
53
Pre
siun
e de
lucr
u[b
ar]
2–6
Volu
m m
ediu
filtr
ant
[litri
]10
1825
Cap
acita
te re
zerv
or s
are
[kg]
2343
6280
80Te
mpe
ratu
ra a
pei
[°C
]5
– 30
Cap
acita
te c
iclic
ă =
m³ x
°G
3054
7511
015
0C
onsu
m a
prox
imat
iv d
e sa
re p
e re
gene
rare
[k
g]1,
01,
82,
53,
75
Con
sum
apr
oxim
ativ
de
apă
pent
ru o
rege
nera
re[li
tri]
100
180
250
370
500
Tim
p ap
roxi
mat
iv d
e
rege
nera
re
[min
]35
5883
116
151
Dis
tanț
a în
tre b
ază
și ra
cord
ca
naliz
are
[mm
]50
573
596
514
4512
95
Dis
tanț
a în
tre b
ază
și
raco
rdur
i IN
/OU
T[m
m]
475
705
935
1415
1265
Dis
tanț
a în
tre b
ază
și ra
cord
pr
eapl
in[m
m]
290
495
730
680
680
A[m
m]
590
330
470
880
880
B[m
m]
330
330
470
335
335
C[m
m]
470
330
470
--
H[m
m]
--
-15
313
8Ø
D[m
m]
--
-27
032
0

9
1.2 Stații tratare MIXM
odel
MIX
25
MIX
37
MIX
50
Cod
AQ
UA
0910
0025
012
AQ
UA
0910
0037
014
AQ
UA
0910
0050
018
By-
pass
incl
usD
AD
A
Tip
echi
pam
ent
cabi
net (
tanc
răși
nă ș
i va
s sa
ram
ură
în a
cela
și
corp
)si
mpl
ex (t
anc
răși
nă ș
i vas
sar
amur
ă se
para
te)
Alim
enta
re e
lect
rică
230
V, 5
0 H
zC
onsu
mul
de
ener
gie
3WM
od d
e co
ntro
l van
ăVo
lum
sau
tim
p D
imen
siun
i rac
ord
IN/O
UT
[inch
]1”
Rac
ord
cana
lizar
e po
rtfur
tun
[mm
]12
Deb
it no
min
al[m
³/h]
1,2
1,4
1,8
Pre
siun
e de
lucr
u[b
ar]
2 –
6Vo
lum
med
iu fi
ltran
t[li
tri]
2537
50Te
mpe
ratu
ra a
pei
[°C
]5
– 30
Cap
acita
te c
iclic
ă =
m³ x
°G
5378
105
Con
sum
apr
oxim
ativ
de
sare
pe
ntru
o re
gene
rare
[kg]
2,5
3,7
5
Con
sum
apr
oxim
ativ
de
apă
pent
ru o
rege
nera
re[li
tri]
250
370
500
Dis
tanț
a în
tre b
ază
și ra
cord
ca
naliz
are
[mm
]96
514
4512
95
Dis
tanț
a în
tre b
ază
și ra
cord
uri
IN/O
UT
[mm
]93
514
1512
65
Dis
tanț
a în
tre b
ază
și ra
cord
pr
ea-p
lin[m
m]
730
680
680
Tim
p ap
roxi
mat
iv re
gene
rare
[min
]88
122
156
Cap
acita
te re
zerv
or s
are
[kg]
6280
80H
[m
m]
-15
3013
80Ø
D[m
m]
-27
032
0A
[mm
]10
5088
088
0B
[m
m]
330
335
335
C[m
m]
470
--

10
2. INSTALAREA SISTEMELOR
2.1. Locul de montare□ Trebuie să fie ferit de îngheț și de contactul direct cu razele soarelui. □ Trebuie să fie uscat.□ NU trebuie să fie inundabil.□ Suprafața trebuie să fie plană și să suporte greutatea stației. Nu se acceptă montarea stației pe suprafețe înclinate.□ Recomandat sa fie cât mai aproape de canalizare. Furtunul conectat la preaplinul stației și cel conectat la ștuțul de evacuare a apelor de regenerare trebuie să fie cât mai aproape de un sifon/gură de canalizare, deoarece curgerile prin aceste furtune sunt gravitaționale.
2.2 Condiții de montare (Vezi Fig1, pag 4)□ Trebuie montat un filtru mecanic maxim 100 microni.□ Recomandăm montarea stației și a filtrului mecanic pe by pass.□ Recomandăm montarea unei supape de sens dupa stația de dedurizare/tratare care să prevină refluxul de apă.□ Recomandăm montarea de manometre înainte și după sistemul de tratare apă.□ Pentru alimentarea electrică se va folosi doar transformatorul din dotare (12V). □ Consumatorii externi (ex. robinetul care alimentează sistemul de irigații) se montează înainte de filtrul de impurități și de stația de tratare cu rășini schimbătoare de ioni.(Vezi Fig1, pag 4)
2.3 Componente necesare instalării și punerii în funcțiune a sistemelor
Acestea NU fac parte din pachetul de livrare.□ Furtun cu diametrul interior 12 mm și coliere pentru conectarea preaplinului la canalizare și a racordului de evacuare apă de spălare/regenerare.□ Sare tip pastile cu puritate de peste 99,5% NaCl. Folosirea de alte tipuri de săruri duce la degradarea rășinii/mediului filtrant și nefuncționarea sistemului.
2.4 Etapele instalării stației
Recomandăm instalarea echipamentului de către un specialist.Înainte de instalare verificați daca stația este completă și nu a suferit deteriorari în urma manipulărilor și transportului. Dacă considerați că ceva nu este în regulă, vă rugăm să contactați firma de unde ați achiziționat stația.
Informativ:
Utilizatorul are posibilitatea de a regla duritatea apei după stație. Prin rotirea vanei de amestec în sensul acelor de ceasornic poate crește duritatea apei la ieșirea din stație iar în sens invers acelor de ceasornic poate reduce duritatea la ieșirea din stație. (Vezi Fig 2, pag 5)
În poziția de service robinetele sunt deschise, tot fluxul de apă trece prin stație.În poziția de bypass robinetele sunt închise, fluxul de apa NU trece prin stație, se pot face intervenții la stație fără să fi nevoie de întreruperea alimentării cu apă. (Vezi Fig 3, pag 5)
Datorită faptului că, de la caz la caz, distanța între canalizare și stație diferă, furtunul de 12 mm și colierele de 12-22 mm, nu sunt incluse, se achiziționează separat în funcție de nevoi.!

11
2.4.1 Etapele instalării sistemelor tip cabinet (cu tancul de rășină și vasul de sare în același corp)
• Poziționați sistemul la locul hotarât respectând condițiile de la punctele 2.1 și 2.2.• Introduceți conectorii în bypass (Fig 6, pag 6 - foto 15,16)• Conectați instalația de alimentare la by-passul stației (Vezi Fig 4, pag 5), la intrarea care are semnul „→” orientat către stație (stația de tratare vine cu sistemul de by-pass premontat, cele două conexiuni ale by-passului sunt de 1” cu filet exterior)• Pentru conectarea țevilor la by-passul stației folosiți materiale de etanșare (teflon etc.)• Instalația de apă către consumatori se conectează la by-pass, pe ieșirea cu semnul „→” orientat către exteriorul stației. (Vezi Fig 4, pag 5)• Conectați racordul de preaplin al stației la canalizare cu ajutorul furtunului de 12 mm și a colierelor de 12 - 22 mm achiziționate. (Vezi Fig 5, pag 5)• Conectați racordul de evacuare apă de regenerare al stației la canalizare cu ajutorul furtunului de 12 mm și a colierelor de 12 - 22 mm. (Vezi Fig 5, pag 5)• Asigurați-vă că bypass-ul este în poziție de bypass (cu robinetele închise) (Vezi Fig 3, pag 5)
Punerea în funcțiune:
• Pe toata perioada de instalare robinete bypass sunt închise (nu există apă în stație).• Se conectează la alimentarea electrică prin transformatorul din dotare 12V. • Se va urmări panoul vanei de control. • Se elimină aerul din stație astfel: - Se setează [Stepwise Regen/Backwashing]: Se apasă [Menu] și se selectează utilizând „ ▼” până la [Stepwise Regen] și apăsați [SET/REGEN] ---> [Backwashing] - Se deschide ½ cursă robinet bypass de la intrarea în stație semnalizată cu săgeată spre vană - Se urmărește ca pe furtunul de evacuare apa de spălare/regenerare să curgă apa. • Se deschide total robinetul bypass de la intrarea în stație semnalizată cu săgeată spre vană• Se urmărește ca pe furtunul de evacuare apa de spălare să curgă apă limpezită • Când apa este limpede se apasă [SET] succesiv până apare [SYSTEM RETURN].• Dacă aerul nu este eliminat sau apa nu este limpede, se repetă ciclul [Backwash]• Se deschide robinetul de ieșire din stație• Se desumflă și se scoate perna de aer din vasul de saramură și se alimentează vasul cu sare și 10 litri de apă.
Asigurați curgerea gravitațională în furtunele care fac conectarea între preaplin, respectiv racord evacuare apa spalare/regenerare si canalizare. Asigurați-vă că furtunele nu sunt obturate și că apa din canalizare nu poate refula pe acestea la racordul de preaplin, respectiv la racordul de evacuare.!NU conectați stația direct la 220 V.!

12
2.4.2 Etapele instalării stațiilor cu tanc rășină și vas saramură separate (simplex)
Stațile cu tanc rășină și vas saramură separate se livrează semiasamblate. Asamblarea lor se realizează la locul de montaj. Pentru asamblare efectuați următorii pași: (vezi figura 6, pag. 6)
Poziționați sistemul la locul hotarât respectând condițiile de la punctele 2.1 si 2.2.
(1) După poziționarea tancului cu rășină (FRP), se montează în interior tubul central cu difuzorul premontat în partea de jos a tancului în poziția predefintă (de obicei este montat).
(2) Nivelul la partea superioară a tubului central cu difuzorul trebuie să fie la același nivel cu deschiderea tancului FRP, acceptat maxim +5mm.
(3), (4) Acoperiți, în partea superioară, tubul central.
(5) Încărcați rezervorul FRP cu mediul filtrant. Asigurați-vă că mediul filtrant nu intră și în tubul central.În timp ce încărcați rezervorul FRP cu mediul filtrant, asigurați-vă că tubul central rămâne poziționat vertical și în mijlocul rezervorului.ATENȚIE! Nu extrageți tubul central cu difuzor premontat din poziția inițială.
(6) Înlăturați acoperirea tubului central.
(7) Se curăță filetul tancului cu rășină (FRP) de particulele de mediu filtrant (se poate clăti cu apă).
(8) Se montează difuzorul superior (crepina superioară) pe vană, astfel: în interiorul vanei sunt 4 pene de fixare iar pe crepină 4 fante corespunzătoare, se cuplează între ele prin apăsare astfel penele vor pătrunde în fante și apoi se rotește crepina. Montarea crepinei pe vană se verifică prin încercarea de extragere a crepinei.
(9) Ansamblul vană de control cu difuzor superior montat se introduce pe tubul central prin apăsare. Difuzorul superior montat în vană trebuie să îmbrace tubul central.
(10) Înșurubați vana de control pe tancul cu rășină (FRP).
(11) Ridicați capacul vasului de saramură și introduceți tubul prin orificiul existent.
(12), (13) Se deșurubează piulița cotului de saramură din vană, se introduce tubul prin piuliță astfel încât sa treacă aproximativ 1 cm. Se introduce piesa tronconică în tub.
(14) Se înșurubează ansamblul în vană.
(15) Se scot siguranțele bypass-ului și se introduc prin apăsare conectorii.
(16) Se monteză siguranțele bypass-ului.
(17) Se introduce bypass-ul în vană.
(18) Se asigură legătura între bypass și vană cu ajutorul clemelor metalice.
(19) Se introduce senzorul de debit în bypass.
(20) Sistem complet.
Respectați în continuare pașii de montaj (vezi 2.4.1) de la varianta cabinet. Respectați în continuare pașii de punere în funcțiune (vezi 2.4.1) de la varianta cabinet.

13
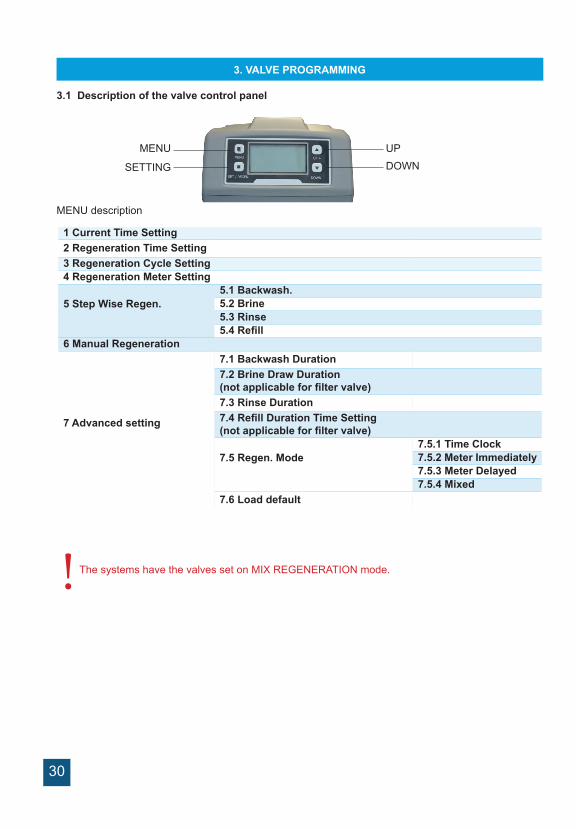
3. PROGRAMARE VANĂ
3.1 Descrierea panoului de comanda al vanei
Descriere MENIU1 Current Time Setting - Setare dată și oră2 Regeneration Time Setting - Setare ora de regenerare3 Regeneration Cycle Setting - Setare număr zile pentru regenerarea de protecție4 Regeneration Meter Setting - Volum apă regenerată
5 Step Wise Regen.Regenerare în trepte
5.1 Backwash. - Spălare inversă5.2 Brine - Saramură5.3 Rinse - Clătire5.4 Refill - Reumplere
6 Manual Regeneration - Regenerare manuală
7 Advanced setting(Setări avansate)
7.1 Backwash Duration - Setare durată spălare inversă7.2 Brine Draw Duration(not applicable for filter valve) - Setare durată alimentare cu saramură7.3 Rinse Duration - Setare durată de clătire7.4 Refill Duration Time Setting(not applicable for filter valve)- Setare durată reumplere vas saramură
7.5 Regen. Mode- Mod regenerare
7.5.1 Time Clock- Regenerare în funcție de timp7.5.2 Meter Immediately- Regenerarevolumetrică imediată7.5.3 Meter Delayed Regenerarevolumetrică întârziată7.5.4 Mixed- Regenerare mixtă
7.6 Load default- Revenire la setările din fabrică
Sistemele au vanele setate pe modul REGENERARE MIXT.!
MENIU SUS
SETEAZĂ JOS

14
3.2 Inițializarea sistemului
După ce vana a fost conectată la sursa de energie electrică, aceasta va trece automat în poziția de lucru iar pe ecran vor fi afișate mesajele: System intializing (Inițializare sistem), Please wait (Vă rog așteptați)
3.3 Poziția de Stand-byDacă vana este programată în Timer mode (Mod regenerare în funcție de timp), pe ecranul vanei va apărea urmatorul mesaj:
Dacă vana este programată în Meter mode (Modul regenerare în funcție de volum), pe ecranul vanei va apărea urmatorul mesaj:
3.4 Setarea parametrilor
Pentru setarea paramerilor apăsați tasta MENIU „ ”. Pentru siguranță, după 3 minute de nefolosire, meniul revine în stand-by și se blochează. În această situație pentru a accesa fereastra de setare a parametrilor vanei este necesar să țineți apăsat timp de 5 secunde pe tasta MENIU „ ”. După ce ați accesat MAIN MENU (Meniul principal), parametrii vanei vor fi afișați. Pentru a selecta un parametru cu tasta UP „ ▲” (Sus) navigați prin meniu în sus, iar cu tasta DOWN „ ▼” (Jos) navigați prin meniu în jos. Dupa ce ați selectat un parametru, pentru a-l accesa apăsați tasta SET „■”.În menul principal parametrii vor fi afișați după cum urmează:
3.4.1. Current time setting (Setare dată și oră)
Accesând acest parametru prin intermediul tastei SET „■”, va apărea următoarea fereastră:
System initializingPlease wait
Inițializare sistemVă rog așteptați
Current day/Time00-00-0000 00:00:00
Time of Next Regen00-00-0000 00:00:00
Dată/Oră00-00-0000 00:00:00
Data și ora următoarei regenerări00-00-0000 00:00:00
Current day/Time00-00-0000 00:00:00
Residual/Total Water00.00m3 0000.00m3
Dată/Oră00-00-0000 00:00:00
Cantitate apă Totalpână la următoarea cantitate apăregenerare folosită00.00m3 0000.00m3
꞊꞊꞊꞊꞊System Time꞊꞊꞊꞊꞊00-00-0000 00:00
Press to cancel Press ■ to confirm
꞊꞊꞊꞊꞊Data și ora꞊꞊꞊꞊꞊00-00-0000 00:00
Apasă pentru ieșire Apasă ■ pentru confirmare

15
Pentru a naviga în cadrul ferestrei folosiți tasta SET „■”, iar pentru a modifica valorile folosiți tastele UP „ ▲” ( Sus) și DOWN „ ▼” (Jos). Pentru a confirma modificările făcute apăsați tasta SET „■”. După ce ați confirmat modificarile făcute va apărea următoarea fereastră:
Prin apăsarea tastei MENIU „ ” veți reveni la MAIN MENIU (Meniul principal).
3.4.2. Regeneration time setting (Setare ora de regenerare)
Accesând acest parametru prin intermediul tastei SET „■”, va apărea următoarea fereastră:
Pentru a naviga în cadrul ferestrei folosiți aceeași procedură ca la punctul "3.4.1.".
3.4.3. Regeneration cycle setting (Setare număr zile pentru regenerarea de protecție)
Accesând acest parametru prin intermediul tastei SET „■”, va apărea următoarea fereastră:
Din fabrică acest parametru este setat la 7 zile pentru Timer mode (Modul regenerare în funcție de timp) și la 10 zile pentru Mix mode (Modul regenerare mixt). Se recomandă a se păstra aceste setări.Mai jos, în acest manual, veți găsi procedura de alegere a modului de regenerare. Dacă veți alege Modul de regenerare în funcție de timp, este bine să setați acest parametru la valoarea de 3 zile. Pentru a naviga în cadrul ferestrei folosiți aceeași procedură ca la punctul "3.4.1.".
3.4.4. Regeneration meter capacity settings (Setare volum apă între 2 regenerări)
Accesând acest parametru prin intermediul tastei SET „■”, va apărea următoarea fereastră:
Setting Complete!
Press to return
Setare completă!
Apasă pentru revenire
꞊꞊꞊꞊꞊Regen. Time꞊꞊꞊꞊꞊00:00
Press to Return Press ■ to Confirm
꞊꞊꞊꞊꞊Ora regenerare꞊꞊꞊꞊꞊00:00
Apasă pentru revenire Apasă ■ pentru confirmare
꞊꞊꞊꞊꞊Regen. Cycle꞊꞊꞊꞊꞊00 days
Press to Return Press ■ to Confirm
꞊꞊꞊꞊꞊Ciclu regenerare꞊꞊꞊꞊꞊00 zile
Apasă pentru revenire Apasă ■ pentru confirmare
꞊꞊꞊꞊꞊Regen. Meter Setting꞊꞊꞊꞊꞊Capacity: 00.00 m3
Press to Return Press ■ to Confirm
꞊꞊꞊꞊꞊Volum apă regenerată꞊꞊꞊꞊꞊Capacitate: 00.00 m3
Apasă pentru revenire Apasă ■ pentru confirmare

16
Din fabrică acest parametru este setat la 6 m³.
Astfel: Capacitatea ciclică se găsește pentru fiecare stație la începutul acestui manual la capitolul „1. Modele și caracteristici tehnice„.Duritatea se află din buletinul de analize al apei care urmează a fi tratată. (pentru realizarea analizelor contactați compania Valrom Industrie)
Formula de calcul:Volum apă între 2 regenerări = Capacitate ciclică / Duritate =[m³]
Exemplu de calcul:Capacitate ciclică = 75 pentru „Stație dedurizare <aquaPUR> SOFT 25” (conform capitolul „1. Modele și caracteristici tehnice„)Duritate apă = 15 ºGVolum apă între 2 regenerări = Capacitate ciclică / Duritate = 75/15 = 5 [m³]
După efectuarea calculului, în fereastra respectivă, la Capacity (Capacitate) se introduce rezultatul obținut. Pentru a naviga în cadrul ferestrei folosiți aceeași procedură ca la punctul "3.4.1.".
! În acest moment stația este funcțională. Setările urmatoare se adresează personalului autorizat.
3.4.5. Stepwise regeneration (Regenerare în trepte)
Un ciclu de regenerare al rășinii este alcătuit din mai multe trepte în următoarea ordine:• Backwash (spălare inversa a patului de rășină) • Brine draw (alimentare cu saramură a patului de rășină)• Rinse (clătirea patului de rășină)• Refil (reumplere cu apă a rezervorului de saramură) Accesând acest parametru prin intermediul tastei SET „■”, puteți realiza, la alegere, în funcție de nevoie, doar una din treptele unui ciclu de regenerare, astfel:Pentru început, vana va începe automat cu treapta de Backwash deschizând următoarea fereastră
Dacă nici una din tastele vanei nu este apăsată atunci vana va finaliza treapta de Backwashing (30 minute) și se va întoarce la MAIN MENU (meniul principal) fără a continua cu restul treptelor.Dacă în timp ce vana realizează treapta de Backwash apăsăm oricare tastă a vanei, aceasta va trece la treapta urmatoare, afisând:
! Acest parametru este foarte important pentru funcționarea corectă a stației și se introduce de către beneficiar, fiind diferit de la o situație la alta.Pentru a calcula corect acest parametru aveți nevoie să știți duritatea apei și capacitatea ciclică a stației pe care ați achiziționat-o.
Backwashing...
Any Key to Cancel
Spălare inversă...
Orice tastă pentru ieșire
Brine Drawing...
Any Key to Cancel
Alimentare cu saramură…
Orice tastă pentru ieșire
17
Dacă nici una din tastele vanei nu este apăsată atunci vana va finaliza treapta de Brine drawing (60 minute) și se va întoarce la MAIN MENU (meniul principal) fără a continua cu restul treptelor.Daca în timp ce vana realizează treapta de Braine drawing apăsăm oricare tastă a vanei, aceasta va trece la treapta următoare, afișând:
Dacă nici una din tastele vanei nu este apăsată, atunci vana va finaliza treapta de Rinsing (30 minute) și se va întoarce la MAIN MENU (meniul principal) fără a continua cu restul treptelor.Dacă în timp ce vana realizează treapta de Rinsing apăsăm oricare tastă a vanei, aceasta va trece la treapta următoare, afișând:
Dacă nici una din tastele vanei nu este apasată, atunci vana va finaliza treapta de Refilling (30 minute) și se va întoarce la MAIN MENU (meniul principal).Dacă în timp ce vana realizează treapta de Refiling apăsăm oricare tastă a vanei, aceasta se va întoarce la MAIN MENU (meniul principal).
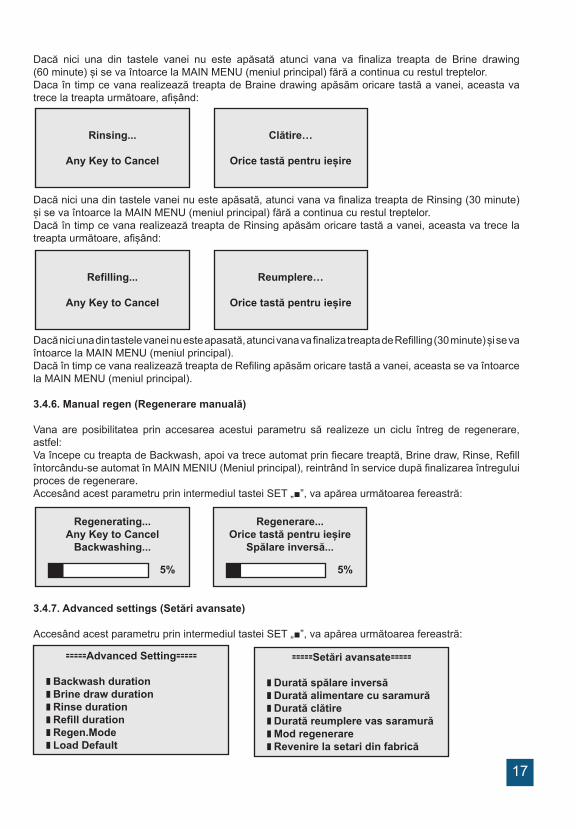
3.4.6. Manual regen (Regenerare manuală)
Vana are posibilitatea prin accesarea acestui parametru să realizeze un ciclu întreg de regenerare, astfel:Va începe cu treapta de Backwash, apoi va trece automat prin fiecare treaptă, Brine draw, Rinse, Refill întorcându-se automat în MAIN MENIU (Meniul principal), reintrând în service după finalizarea întregului proces de regenerare.Accesând acest parametru prin intermediul tastei SET „■”, va apărea următoarea fereastră:
3.4.7. Advanced settings (Setări avansate)
Accesând acest parametru prin intermediul tastei SET „■”, va apărea următoarea fereastră:
Rinsing...
Any Key to Cancel
Clătire…
Orice tastă pentru ieșire
Refilling...
Any Key to Cancel
Reumplere…
Orice tastă pentru ieșire
Regenerating...Any Key to Cancel
Backwashing...
5%
Regenerare...Orice tastă pentru ieșire
Spălare inversă...
5%
꞊꞊꞊꞊꞊Advanced Setting꞊꞊꞊꞊꞊
Backwash duration Brine draw duration Rinse duration Refill duration Regen.Mode Load Default
꞊꞊꞊꞊꞊Setări avansate꞊꞊꞊꞊꞊
Durată spălare inversă Durată alimentare cu saramură Durată clătire Durată reumplere vas saramură Mod regenerare Revenire la setari din fabrică

18
Folosiți tastele UP „▲” (Sus) și DOWN „▼” (Jos) pentru a naviga în această fereastră iar pentru a accesa un parametru folosiți tasta SET „■”. Pentru a reveni la meniul precedent folosiți tasta MENIU „ ”.
3.4.7.1. Backwash duration time settings (Setare durată spălare inversă)
Folosiți tastele UP „▲” (Sus) și DOWN „ ▼” (Jos) pentru a schimba valorile și tasta SET „■” pentru a salva modificarile. După salvarea modificarilor va apărea următoarea fereastră:
Prin apăsarea tastei MENIU „ ” a vanei, aceasta va reveni la meniul anterior. Dacă timp de 1 minut nu se va apăsa nici o tastă, vana va reveni la meniul stand-by. Orice valoare modificată va reveni la valoarea inițială dacă aceasta nu a fost salvată cu tasta SET „■”.
3.4.7.2. Brine draw duration time setting (Setare durată alimentare cu saramură)
Folosiți tastele UP „▲” (Sus) și DOWN „▼” (Jos) pentru a schimba valorile și tasta SET „■” pentru a salva modificările. După salvarea modificărilor va apărea următoarea fereastră:
Prin apăsarea tastei MENIU „ ” a vanei, aceasta va reveni la meniul anterior. Dacă timp de 1 minut nu se va apăsa nici o tastă, vana va reveni la meniul stand-by. Orice valoare modificată va reveni la valoarea inițială dacă aceasta nu a fost salvată cu tasta SET „■”.
꞊꞊꞊꞊꞊Backwash Duration꞊꞊꞊꞊꞊00 minutes
Press to Return Press ■ to Confirm
꞊꞊꞊꞊꞊Ciclu regenerare꞊꞊꞊꞊꞊00 minute
Apasă pentru revenire Apasă ■ pentru confirmare
! NU modificați acest parametru;Dacă stația nu funcționează corespunzător, contactați personalul S.C. Valrom Industrie S.R.L.
Setting Complete!
Press to Return
Setare completă!
Apasă pentru revenire
꞊꞊꞊꞊꞊Brine Draw Duration꞊꞊꞊꞊꞊00 minutes
Press to Return Press ■ to Confirm
꞊Durată alimentare cu saramură꞊00 minutes
Apasă pentru revenire Apasă ■ pentru confirmare
Setting Complete!
Press to Return
Setare completă!
Apasă pentru revenire
! NU modificați acest parametru;Dacă stația nu funcționează corespunzător, contactați personalul S.C. Valrom Industrie S.R.L.

19
3.4.7.3. Fast rinse duration time setting (Setare durată de clătire)
Folosiți tastele UP „▲” (Sus) și DOWN „ ▼” (Jos) pentru a schimba valorile și tasta SET „■” pentru a salva modificările. După salvarea modificărilor va apărea următoarea fereastră:
Prin apăsarea tastei MENIU „ ” a vanei, aceasta va reveni la meniul anterior. Dacă timp de 1 minut nu se va apăsa nici o tastă, vana va reveni la meniul stand-by. Orice valoare modificată va reveni la valoarea inițială dacă aceasta nu a fost salvată cu tasta SET „■”.
3.4.7.4. Refill duration time settings (Setare durată reumplere vas saramură)
Folosiți tastele UP „▲” (Sus) și DOWN „▼” (Jos) pentru a schimba valorile și tasta SET „■” pentru a salva modificările. După salvarea modificărilor va apărea următoarea fereastră:
Prin apăsarea tastei MENIU „ ” a vanei, aceasta va reveni la meniul anterior. Dacă timp de 1 minut nu se va apăsa nici o tastă, vana va reveni la meniul stand-by. Orice valoare modificată va reveni la valoarea inițială dacă aceasta nu a fost salvată cu tasta SET „■”.
꞊꞊꞊꞊꞊Rinse Duration꞊꞊꞊꞊꞊00 minutes
Press to Return Press ■ to Confirm
꞊꞊꞊꞊꞊Durată clătire꞊꞊꞊꞊꞊00 minutes
Apasă pentru revenire Apasă ■ pentru confirmare
Setting Complete!
Press to Return
Setare completă!
Apasă pentru revenire
! NU modificați acest parametru;Dacă stația nu funcționează corespunzător, contactați personalul S.C. Valrom Industrie S.R.L.
꞊꞊꞊꞊꞊Refill Duration꞊꞊꞊꞊꞊00 minutes
Press to Return Press ■ to Confirm
꞊꞊꞊꞊꞊Durată reumplere vas saramura꞊꞊꞊꞊꞊00 minutes
Apasă pentru revenire Apasă ■ pentru confirmare
Setting Complete!
Press to Return
Setare completă!
Apasă pentru revenire
NU modificați acest parametru;Dacă stația nu funcționează corespunzător, contactați personalul S.C. Valrom Industrie S.R.L.!

20
3.4.7.5. Select regeneration mode (Selectare mod de regenerare)
În această fereastră puteți să alegeți modul de regenerare cel mai potrivit nevoilor dumneavoastră.
Folosiți tastele UP „▲” (Sus) și DOWN „▼” (Jos) pentru a selecta parametrul dorit și tasta SET „■” pentru a confirma parametrul selectat. Apăsați tasta MENIU „ ” pentru a reveni la meniul anterior.
Timer (Regenerare în funcție de timp) - stația va iniția regenerarea la ora setată și la data rezultată în urma numărului de zile setat pentru ciclul de regenerare.Meter immediate (Regenerare volumetrică imediată) – stația va iniția regenerarea imediat ce volumul de apă pe care-l poate trata între doua regenerări a fost consumat. Meter delayed (Regenerare volumetrică întârziată) – când cantitatea pe care o poate trata până la ur-mătoarea regenerare a ajuns la 0, stația va iniția regenerarea la ora stabilită (ora 02:00 AM stabilită din fabrică).Mix regeneration (Regenerare mixtă) – când cantitatea pe care o poate trata până la următoarea regenerare a ajuns la 0, stația va iniția regenerarea cu prima ocazie, la ora stabilită; dacă se ajunge la numărul de zile setate înainte ca, cantitatea de apă pe care o poate trata între două regenerări să ajungă la 0, atunci stația va iniția regenerarea.
Din fabrică, stațiile sunt setate pe Modul de regenerare mixt. Vă recomandăm să păstrați acest mod de regenerare.
3.4.7.6. Restore factory default settings (Revenire la setările din fabrică)
Apăsați tasta SET „■” pentru a reveni la setările din fabrică. Prin apăsarea tastei MENIU „ ” a vanei, aceasta va reveni la meniul anterior. Dacă timp de 1 minut nu se va apăsa nici o tastă, vana va reveni la meniul stand-by. Orice valoare modificată va reveni la valoarea inițială dacă aceasta nu a fost salvată cu tasta SET „■”.
꞊꞊꞊꞊꞊Regen. Mode꞊꞊꞊꞊꞊
Timer Meter Immediate Meter Delayed Mix Regen
꞊꞊꞊꞊꞊Mod regenerare꞊꞊꞊꞊꞊
Regenerare în funcție de timp Regenerare volum-metrică imediată Regenerare volum-metrică întârziată Regenerare mixtă
Load Default
Press to cancel Press ■ to confirm
Revenire la setări fabrică
Apasă pentru ieșire Apasă ■ pentru confirmare
! Dacă ați revenit la setările din fabrică, contactați personalul Valrom pentru restabilirea setărilor necesare stației dumneavoastră.

21
4. MĂSURI DE PRECAUȚIE
• Înainte de orice operație de întreținere sau reparație, întrerupeți alimentarea cu energie electrică, închideți robineții de alimentare cu apă și depresurizați instalația.• Nu puneți greutăți pe stație.• Țineți evidența consumului de sare și completați când este nevoie.• Verificați periodic etanșările conexiunilor.• Periodic verificați ora și data și corectați-le dacă este necesar.• Filtrul montat înainte de stație trebuie întreținut și schimbat la nevoie.• Protejați stația și componentele de umiditate.
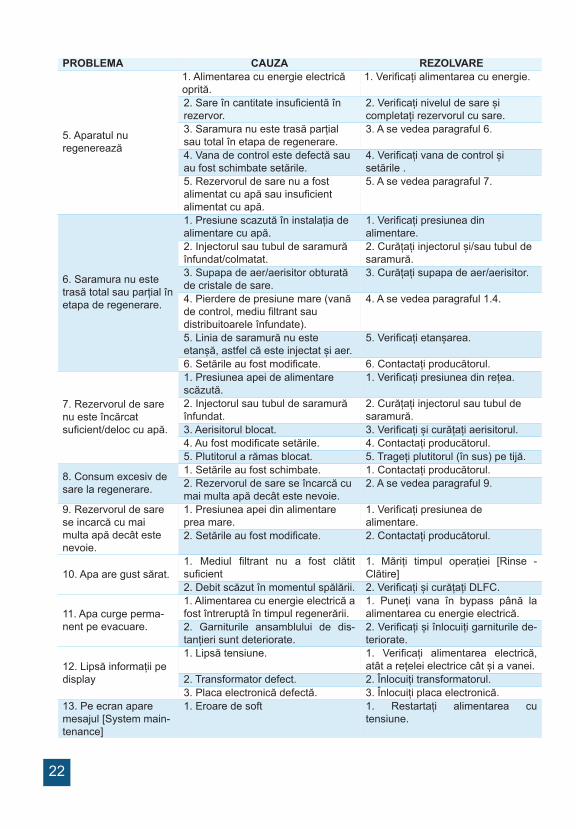
5. DEPANARE
PROBLEMĂ CAUZĂ REZOLVARE
1.Scade debitul de apă
1. Presiunea din alimentare scăzută. 1. Creșteți presiunea din alimentare.2. Filtru colmatat. 2. Curățați sau înlocuiți filtrul montat
înaintea stației.3. Pat mediu filtrant colmatat 3. Consultați paragraful 3.4. Vana de control înfundată. 4. Desfaceți, verificați și curățați
vana.5. Bypass defect . 5. Verificați și reparați bypass.
2. A scăzut calitatea apei tratate.
1. Analiza apei eronate. 1. Refaceți analiza apei și contactați vânzătorul.
2. Calitatea apei din alimentare s-a schimbat.
2. Faceți o analiză a apei și con-tactați vânzătorul.
3. Bypass în poziția greșită. 3. Rotiți vana bypass pe poziția de operare.
4. Tubul ascendent sau garnituri deteriorate.
4. Desfaceți aparatul, reparați/în-locuiți tubul și înlocuiți sau lubrifiați garniturile dacă e necesar.
5. Patul filtrant colmatat. 5. Consultați paragraful 3.6. În etapa de antrenare se pierde mediu filtrant.
6. Consultați paragraful 4.
7. Regenerare improprie/slabă a filtrului.
7.Consultați paragraful 6.
8. Scurgeri de apă în vana de control.
8. Desfaceți vana de control, verificați-o și înlocuiți sau lubrifiați garniturile dacă e necesar.
3. Patul filtrant colmatat.
1. Debitul de apă de spălare insuficient.
1. Verificați debitul de apă de spălare. Dacă presiunea din alimentare este între limitele acceptate și debitul de apă este insuficient, verificați și curățați/înlocuiți dacă e nevoie linia de drenare.
2. Timp insuficient pentru etapa de spălare.
2. Creșteți durata etapei de spălare.(contactați service Valrom)
3. Difuzorul superior/inferiorînfundat.
3. Curățați difuzorul superior/inferior.
4. Mediul filtrant este eliminat din rezervor.
1. Mediu filtrant este antrenat șieliminat în etapa de regenerare.
1. Verificați difuzorul superior. Înlocuiți-l dacă este nevoie.
2. Mediu filtrant este antrenat șieliminat în funcționare.
2. Verificați difuzorul inferior. Înlocuiți-l dacă este nevoie.
22
PROBLEMA CAUZA REZOLVARE
5. Aparatul nuregenerează
1. Alimentarea cu energie electrică oprită.
1. Verificați alimentarea cu energie.
2. Sare în cantitate insuficientă în rezervor.
2. Verificați nivelul de sare și completați rezervorul cu sare.
3. Saramura nu este trasă parțial sau total în etapa de regenerare.
3. A se vedea paragraful 6.
4. Vana de control este defectă sau au fost schimbate setările.
4. Verificați vana de control și setările .
5. Rezervorul de sare nu a fost alimentat cu apă sau insuficient alimentat cu apă.
5. A se vedea paragraful 7.
6. Saramura nu este trasă total sau parțial în etapa de regenerare.
1. Presiune scazută în instalația de alimentare cu apă.
1. Verificați presiunea din alimentare.
2. Injectorul sau tubul de saramură înfundat/colmatat.
2. Curățați injectorul și/sau tubul de saramură.
3. Supapa de aer/aerisitor obturată de cristale de sare.
3. Curățați supapa de aer/aerisitor.
4. Pierdere de presiune mare (vană de control, mediu filtrant saudistribuitoarele înfundate).
4. A se vedea paragraful 1.4.
5. Linia de saramură nu este etanșă, astfel că este injectat și aer.
5. Verificați etanșarea.
6. Setările au fost modificate. 6. Contactați producătorul.
7. Rezervorul de sare nu este încărcatsuficient/deloc cu apă.
1. Presiunea apei de alimentare scăzută.
1. Verificați presiunea din rețea.
2. Injectorul sau tubul de saramură înfundat.
2. Curățați injectorul sau tubul de saramură.
3. Aerisitorul blocat. 3. Verificați și curățați aerisitorul.4. Au fost modificate setările. 4. Contactați producătorul.5. Plutitorul a rămas blocat. 5. Trageți plutitorul (în sus) pe tijă.
8. Consum excesiv de sare la regenerare.
1. Setările au fost schimbate. 1. Contactați producătorul.2. Rezervorul de sare se încarcă cu mai multa apă decât este nevoie.
2. A se vedea paragraful 9.
9. Rezervorul de sare se incarcă cu mai multa apă decât este nevoie.
1. Presiunea apei din alimentare prea mare.
1. Verificați presiunea de alimentare.
2. Setările au fost modificate. 2. Contactați producătorul.
10. Apa are gust sărat.1. Mediul filtrant nu a fost clătit suficient
1. Măriți timpul operației [Rinse - Clătire]
2. Debit scăzut în momentul spălării. 2. Verificați și curățați DLFC.
11. Apa curge perma-nent pe evacuare.
1. Alimentarea cu energie electrică a fost întreruptă în timpul regenerării.
1. Puneți vana în bypass până la alimentarea cu energie electrică.
2. Garniturile ansamblului de dis-tanțieri sunt deteriorate.
2. Verificați și înlocuiți garniturile de-teriorate.
12. Lipsă informații pe display
1. Lipsă tensiune. 1. Verificați alimentarea electrică, atât a rețelei electrice cât și a vanei.
2. Transformator defect. 2. Înlocuiți transformatorul.3. Placa electronică defectă. 3. Înlocuiți placa electronică.
13. Pe ecran apare mesajul [System main-tenance]
1. Eroare de soft 1. Restartați alimentarea cu tensiune.

23
6. CONCENTRAȚIILE MAXIME ADMISE ÎN APA CARE INTRĂ (INFLUENT)
Stații dedurizare SOFT
Duritatea ………………………………………………………………......42 °dH Fier ……………………………………………………………………... 0,20 mg/lMangan ………………………………………………………………....0,05 mg/lPură din punct de vedere microbiologic
Stații tratare MIX
Duritatea ……………………………………………………………….....42 °dHFier …………………………………………………………………..........15 mg/lMangan ………………………………………………………………....... 3 mg/lAmoniu ………………………………………………………………........ 4 mg/lConsumul chimic de oxigen................................................................20 mg/l O2Total solide dizolvate ……………………………………………….... 4000 mg/lPură din punct de vedere microbiologic
Service Valrom: Tel: +4 0724.200.005

24
Dear partners,
Thank you for having chosen the water treatment systems with ion exchange resins aquaPUR manufactured by SC Valrom Industrie SRL.Prior to utilization, please read carefully these guidelines for installation and operation.
For other information please refer to the site www.valrom.ro or www.aqua-pur.ro
1. SYSTEM TYPES AND TECHNICAL CHARACTERISTICS
The treatment/filtering technology with ion exchange resins is one of the simplest and most convenient methods to improve water quality. The water treatment system with ion exchange resins is improved by adding other agents aimed to reduce other pollutants from water as for instance iron, ammonium.The mounting and operation of the following treatment systems is shown in this handbook:- <aquaPUR>SOFT softening stations based on ion exchange resins,- <aquaPUR>MIX treatment stations – a mix of various filtering agents.
<aquaPUR> SOFT softening stations
Water hardness is the frequent cause of defects in the heating installations, especially, stations, boilers, electric household appliances (washing machine, flat-irons, coffee machines etc.) which lead to additional expenses and even a depreciation in comfort. Another effect of the hard water is a reduced foam formation of detergents and soaps which leads to an increase in the house maintenance costs. Other effects of hard water are those of an aesthetic type such as deposits on sanitary appliances and those related to comfort such as clothes depreciation, skin and hair drying.
Softening through an ion exchange is the simplest and most convenient method to reduce water hardness. Ion exchange resins attract and retain calcium and magnesium ions diluted in water to be replaced with sodium ions. When the water volume is consumed between two regenerations, the resin will be regenerated with sodium chloride solution (brine). The regeneration cycles are: Backwash, Brine draw, Rinse and Refill
<aquaPUR> MIX treatment station
<aquaPUR> MIX treatment stations achieve a reduction in concentration of several substances based on only one step in Ecomix filtering agent. The filtering agent from MIX stations is a mix of agents that includes ion exchange resins with synergic properties. Inside the treatment system, the filtering agent bed is stratified on levels that work in a complementary way, reducing hardness from water, iron, manganese, ammonium and organic substances. The medium regeneration is carried out with a sodium chloride solution in an identical way as that performed by softeners.
EN

25
1.1 SOFT Softening stationsM
odel
SOFT
10
SOFT
18
SOFT
25
SOFT
37
SOFT
50
Cod
eA
QU
A09
1100
1000
8A
QU
A09
1100
1801
5A
QU
A09
1100
2502
0A
QU
A09
1100
3702
5A
QU
A09
1100
5003
0B
y-pa
ss in
clud
edY
ES
YE
S
Equ
ipm
ent t
ype
cabi
net (
resi
n ta
nk a
nd b
rine
tank
in th
e sa
me
body
)si
mpl
ex (s
epar
ate
resi
n ta
nk a
nd b
rine
tank
)E
lect
ric s
uppl
y23
0 V,
50
Hz
Ene
rgy
cons
umpt
ion
3WM
ode
of v
alve
con
trol
Volu
me
or ti
me
Con
nect
ion
size
s IN
/OU
T[in
ch]
1”H
ose
hold
er s
ewag
e sy
stem
[mm
]12
Nom
inal
out
put
[m³/h
]0,
81,
52
2,5
3W
orki
ng p
ress
ure
[bar
]2–
6Av
erag
e fil
terin
g vo
lum
e[li
tres]
1018
25S
alt t
ank
capa
city
[kg]
2343
6280
80W
ater
tem
pera
ture
[°C
]5
– 30
Cyc
lic c
apac
ity =
m³ x
°G
3054
7511
015
0A
ppro
xim
ate
salt
cons
ump-
tion
for r
egen
erat
ion
[k
g]1,
01,
82,
53,
75
App
roxi
mat
e w
ater
con
-su
mpt
ion
for a
rege
nera
tion
[litre
s]10
018
025
037
050
0
App
roxi
mat
e re
gene
ratio
n tim
e [m
in]
3558
8311
615
1
Dis
tanc
e be
twee
n ba
se a
nd
sew
age
syst
em[m
m]
505
735
965
1445
1295
Dis
tanc
e be
twee
n ba
se a
nd
IN/O
UT
conn
ectio
ns[m
m]
475
705
935
1415
1265
Dis
tanc
e be
twee
n ba
se a
nd
over
flow
out
let
[mm
]29
049
573
068
068
0
A[m
m]
590
330
470
880
880
B[m
m]
330
330
470
335
335
C[m
m]
470
330
470
--
H[m
m]
--
-15
313
8Ø
D[m
m]
--
-27
032
0

26
1.2 MIX Treatment stationM
odel
MIX
25
MIX
37
MIX
50
Cod
eA
QU
A09
1000
2501
2A
QU
A09
1000
3701
4A
QU
A09
1000
5001
8B
y-pa
ss in
clud
edY
ES
YE
S
Equ
ipm
ent t
ype
cabi
net (
resi
n ta
nk a
nd
brin
e ta
nk in
the
sam
e bo
dy)
sim
plex
(sep
arat
e re
sin
tank
and
brin
e ta
nk)
Ele
ctric
sup
ply
230
V, 5
0 H
zE
nerg
y co
nsum
ptio
n3W
Mod
e of
val
ve c
ontro
lVo
lum
e or
tim
eC
onne
ctio
n si
zes
IN/O
UT
[inch
]1”
Hos
e ho
lder
sew
age
syst
em[m
m]
12N
omin
al o
utpu
t[m
³/h]
1,2
1,4
1,8
Wor
king
pre
ssur
e[b
ar]
2 –
6Av
erag
e fil
terin
g vo
lum
e[li
tres]
2537
50W
ater
tem
pera
ture
[°C
]5
– 30
Cyc
lic c
apac
ity =
m³ x
°G
5378
105
App
roxi
mat
e sa
lt co
nsum
ptio
n fo
r a
rege
nera
tion
[kg]
2,5
3,7
5
App
roxi
mat
e w
ater
con
sum
ptio
n fo
r a re
gene
ratio
n[li
tres]
250
370
500
Dis
tanc
e be
twee
n ba
se a
nd
sew
age
syst
em[m
m]
965
1445
1295
Dis
tanc
e be
twee
n ba
se a
nd
IN/O
UT
conn
ectio
ns[m
m]
935
1415
1265
Dis
tanc
e be
twee
n ba
se a
nd o
ver-
flow
out
let
[mm
]73
068
068
0
App
roxi
mat
e re
gene
ratio
n tim
e[m
in]
8812
215
6C
apac
ity o
f sal
t tan
k[k
g]62
8080
H
[mm
]-
1530
1380
Ø D
[mm
]-
270
320
A [m
m]
1050
880
880
B
[mm
]33
033
533
5C
[mm
]47
0-
-

27
2. SYSTEM INSTALLATION
2.1. Mounting place□ It should be deprived of freeze and a direct contact with sun rays □ It should be dry.□ It should NOT be flooded.□ Surface should be plane and accommodate the station weight. No station mounting on acclive surfaces is accepted.□ It is recommended to be as near as possible to the sewage system.The hose connected to the station overflow and that connected to the regeneration waters discharge socket should be as near as possible to a slush trap/pit as discharges through these hoses are gravitational.
2.2 Mounting conditions (See figure 1, page 4)□ A mechanical filter of maximum 100 microns should be mounted.□ It is recommended to mount the station and the mechanical filter on by pass.□ It is recommended to mount a direction valve after the softening/treatment station that should prevent water reflux.□ It is recommended to mount pressure gauges before and after the water treatment system.□ Only the provided transformer will be used for the electric supply (12V).□ External consumers (e.g. the valve supplying the irrigation system) are mounted before the impurities filter and the treatment station with ion exchange resins. (See figure 1, page 4)
2.3 Components necessary for system installation and putting into operation
They are not part of the supply package.□ Hose with an interior diameter of 12 mm and collars to connect the overflow to the sewage system and the connection for wash /regeneration water discharge.□ Salt tablets with a purity of more than 99.5% NaCl. The use of several types of salt may lead to a resin/filtering agent degradation and system malfunction.
2.4 Stages of station installation
Equipment installation by a specialist is recommended.Prior to installation please check whether the station is complete and has not suffered any deteriorations further to handling and transport. If you think that there is anything that is not in order, please contact the company where from the station was purchased.
For information purposes :
User has the possibility to control water hardness beyond the station. By rotating the mix tank clockwise water hardness may be increased when exiting the station and if counter clockwise water hardness may be reduced when exiting the station. (See figure 2, page 5)
In service position valves are open, the entire water flow passes through the station.In bypass position valves are closed, the water flow does NOT pass through the station, interventions can be done in the station without any need to cut the water supply. (See figure 3, page 5)
Due to the fact that the distance between the sewage system and the station is different, as appro-priate, the 12 mm hose and the 12-22mm collars are not included, they are procured separately, as needed.!

28
2.4 .1 Installation stages of cabinet type systems (with the resin tank and the salt tank in the same body)
• Set the system in the decided spot while observing the conditions under items 2.1 and 2.2.• Introduce the connectors in the by-pass (See figure 6, page 6, photo 15, 16)• Connect the supply installation to the station by-pass (See figure 4, page 5), at the inlet with „→” sign oriented towards the station (the treatment station is supplied with a pre-mounted by-pass sys-tem, the two by-pass connections are with 1” with an exterior thread.• To connect the pipes to the station by-pass you should use packing materials (teflon etc.)• Water installation to consumers is connected to the by-pass, on the outlet with „→” sign oriented towards the station exterior.(See figure 4, page 5) • Connect the overflow outlet of the station to the sewage system by means of the purchased 12 mm hose and 12-22 mm collars. (See figure 5, page 5)• Connect the regeneration water discharge connection of the station to the sewage system by means of the 12 mm hose and the 12-22 mm collars. (See figure 5, page 5)• Make sure that by-pass is in by-pass position (with valves closed) (See figure 3, page 5)
Putting into operation:• During the entire period of installation, the by-pass valves are closed (no water in the station).• The connection to power supply will be achieved through the 12V transformer to be equipped.• The control valve panel will be monitored. • Air is discharged from the station, namely:- It will be set [Stepwise Regen/Backwashing]: [Menu} is pressed and selection is made using „▼” up to [Stepwise Regen] and press [SET/REGEN]; ---> [Backwashing]- A by-pass valve ½ drive is opened from the entry to the station as signalled by an arrow towards the valve.- It should be checked whether water flows in the wash/regeneration water discharge hose.• The by-pass valve from the entry to the station is entirely open, as signalled by an arrow towards the valve.• It should be checked whether clean water flows through wash water discharge hose.• When water is clear [SET] is successively pressed until [SYSTEM RETURN] appears.• If air is not eliminated or water is not lean, the [Backwash] cycle will be repeated.• The outlet valve of the station is opened.• The air cushion is deflated and taken out of the brine vessel, and the vessel is filled with salt and 10 liters of water.
Make sure that there is a gravity flow in the hoses making the connection between overflow, the connection for wash/regeneration water discharge and the sewage system. Make sure that hoses are not clogged and that water in the sewage system cannot backwater there at overflow outlet and the discharge outlet, respectively.!Do NOT connect the station directly to 220 V.!

29
2.4.2 Installation stages of stations with separate resin tank and brine tank (simplex)
Stations with separate resin tank and brine tank are supplied in a semi-assembly condition. Their assembly will be carried out on the mounting spot. For assembly you should carry out the following steps: (See figure 6, page 6)Set the system at the decided spot while observing the conditions under items 2.1 and 2.2.
(1) After positioning the resin tank (FRP), the central tube with the pre-mounted diffuser is mounted inside in the lower part of the tank in the pre-defined position (it is usually mounted).
(2) The level in the upper part of the central tube with diffuser should be at the same level with the opening of FRP tank, maximum accepted at +5mm.
(3), (4) Cover the central tube in the upper part.
(5) Fill FRP tank with the filtering agent. Make sure the filtering agent does not go also in the central tube.While filling FRP tank with the filtering agent make sure that the central tube remains in vertical position and inthe middle of the tank.Take care!: do not extract the central tube with pre-mounted diffuser from the initial position.
(6) Remove the cover of the central tube.
(7) The resin tank (FRP) thread is cleaned off particles of the filtering agent (it may be cleansed with water).
(8) The upper diffuser (superior crib) is mounted on the valve, as such: inside the valve there are 4 fixing wedges and on the crib 4 appropriate slots, they are to be coupled between them by pressing so as the wedges to go inside the slots and then the crib is rotated. The mounting of the crib on the valve will be checked while trying to extract the crib.
(9) The assembly of the control valve with mounted upper diffuser is introduced on the central tube by pressing. The upper diffuser mounted in the valve should coat the central tube.
(10) Screw the control valve to (FRP) resin tank.
(11) Lift the cover of the brine tank and introduce the tube through the existing inlet.
(12), (13) The nut of the brine elbow will be loosened from the valve, the tube is inserted through the nut so as to go beyond for approximately 1 cm. The taper part is introduced in the tube.
(14) The assembly is screwed in the valve.
(15) The by-pass locks are taken out and the connectors are introduced through pressing.
(16) The by-pass locks are mounted.
(17) By-pass is introduced in the valve.
(18) The connection between the by-pass and the valve is assured by means of the metal clips.
(19) The output sensor is introduced in the by-pass.
(20) Complete system.
Observe further on the mounting steps (see 2.4.1) from the cabinet alternative.Observe further on the steps for putting into operation from the cabinet alternative.
30
3. VALVE PROGRAMMING
3.1 Description of the valve control panel
MENU description
MENU UP
SETTING DOWN
1 Current Time Setting 2 Regeneration Time Setting 3 Regeneration Cycle Setting 4 Regeneration Meter Setting
5 Step Wise Regen.5.1 Backwash. 5.2 Brine 5.3 Rinse 5.4 Refill
6 Manual Regeneration
7 Advanced setting
7.1 Backwash Duration7.2 Brine Draw Duration(not applicable for filter valve)7.3 Rinse Duration 7.4 Refill Duration Time Setting(not applicable for filter valve)
7.5 Regen. Mode7.5.1 Time Clock7.5.2 Meter Immediately7.5.3 Meter Delayed 7.5.4 Mixed
7.6 Load default
The systems have the valves set on MIX REGENERATION mode.!

31
3.2 System initializingAfter the valve was connected to the power source, it will automatically pass to the working position and messages will be displayed on the monitor: System initializing, Please wait.
3.3 Stand-by positionIf the valve is programmed in Timer Mode, the following message will be displayed on the valve monitor:
If the valve is programmed in the Meter mode, the following message will be displayed on the valve monitor:
3.4 Parameter settingIn order to set the parameters press key MENU „ ”. For safety after 3 minutes of being not used the menu will return to stand-by and block itself. Under such circumstances in order to access the setting window of the valve parameters it is necessary to keep the key MENU „ ” pressed for 5 seconds. After going to the MAIN MENU, the valve parameters will be displayed. In order to select a parameter with key UP „ ▲” scroll through the menu upwards, and with key DOWN „ ▼” scroll through the menu downwards. After selecting a parameter, in order to access it press the key SET „■”.
In the Main Menu the parameters will be displayed as follows:
3.4.1. Current time settingWhen accessing this parameter by means of the key SET „■”, the following window will appear:
In order to scroll within the window use the key SET „■”, and to modify the values use the keys UP „ ▲” and DOWN „ ▼”. To confirm the performed modifications press key SET „■”. After confirming the performed modifications the following window will appear:Pressing the key MENU „ ” you will return to the MAIN MENIU.
System initializingPlease wait
Current day/Time00-00-0000 00:00:00
Time of Next Regen00-00-0000 00:00:00
Current day/Time00-00-0000 00:00:00
Residual/Total Water00.00m3 0000.00m3
꞊꞊꞊꞊꞊System Time꞊꞊꞊꞊꞊00-00-0000 00:00
Press to cancel Press ■ to confirm

32
3.4.2. Regeneration time settingThe following window will appear while accessing this parameter by means of key SET „■”:
To scroll within the window use the same procedure as under item „3.4.1.”.
3.4.3. Regeneration cycle settingThe following window will appear while accessing this parameter by means of key SET „■”:
This parameter is set in the factory for 7 days for Timer mode and for 10 days for Mix mode. It is recommended to maintain these settings.You will find hereinafter in this handbook the procedure to select the regeneration mode. If you select the Timer mode it would be appropriate to set this parameter at the value of 3 days.
In order to scroll within the window you should use the same procedure as under item „3.4.1.”.
3.4.4. Regeneration meter capacity settingsThe following window will appear when accessing this parameter by means of key SET „■”:
This parameter is set at 6 m3 in the factory.
As such : The cyclic capacity for each station is found at the beginning of this handbook under chapter “1. Models and technical characteristics”.Hardness is stated in the test bulletin for the water that is to be treated. (for test performance please contact the company Valrom Industrie).
Calculation formula:Regeneration Meter Setting between 2 regenerations = Cyclic capacity / Hardness = [m³]
Calculation example:Cyclic capacity = 75 for “Softening station <aquaPUR> SOFT 25” (according to chapter “1. Models and
꞊꞊꞊꞊꞊Regen. Time꞊꞊꞊꞊꞊00:00
Press to Return Press ■ to Confirm
꞊꞊꞊꞊꞊Regen. Cycle꞊꞊꞊꞊꞊00 days
Press to Return Press ■ to Confirm
꞊꞊꞊꞊꞊Regen. Meter Setting꞊꞊꞊꞊꞊Capacity: 00.00 m3
Press to Return Press ■ to Confirm
! This parameter is very important for the correct operation of the station and will be introduced by the beneficiary, differing from one situation to another one.In order to correctly calculate this parameter you need to know the water hardness and the cyclic capacity of the station you procured.

33
technical characteristics”)Water hardness = 15 ºGRegeneration Meter Setting between 2 regenerations = Cyclic capacity / Hardness = 75/15 = 5 [m³]
After making the calculation, in the respective window, the obtained result is to be introduced under Capacity. When scrolling within the window you should use the same procedure as under item "3.4.1.".
! At this point the station is functional. The following settings are addressed to authorized personnel.
3.4.5. Stepwise regeneration
A resin regeneration cycle is made up of several steps in the following order:• Backwash • Brine draw • Rinse• Refil When accessing this parameter by means of key SET „■”, you may achieve, on choice, subject to the respective need, only one of the steps of a regeneration cycle, namely:For a start, the valve will automatically begin with the Backwash step opening the following window:
If none of the valve keys is pressed then the valve will complete the Backwashing step (30 minutes) and return to the MAIN MENU without going on with the remaining steps.If during the time the valve achieves the Backwash step you press any valve key, this one will pass on to the next step, showing:
If none of the valve keys is pressed then the valve will complete the Brine Drawing step (60 minutes) and return to the MAIN MENU without going on with the remaining steps. If during the time the valve achieves the Brine Drawing step you press any valve key, this one will pass on to the next step, showing:
If none of the valve keys is pressed then the valve will complete the Rinsing step (30 minutes) and return to the MAIN MENU without going on with the remaining steps.If during the time the valve achieves the Rinsing step you press any valve key, this one will pass on to the next step, showing:
Backwashing...
Any Key to Cancel
Rinsing...
Any Key to Cancel
Refilling...
Any Key to Cancel

34
If none of the valve keys is pressed then the valve will complete the Refilling step (30 minutes) and return to the MAIN MENU without going on with the remaining steps.If during the time the valve achieves the Refilling step you press any valve key, this one will return to the MAIN MENU.
3.4.6. Manual regenWhen accessing this parameter the valve may achieve an entire regeneration cycle, namely:
It will start with the backwash step, then it will automatically pass through each step, Brine draw, Rinse, Refill automatically returning to the MAIN MENU re-entering in service after the completion of the entire regeneration process. While accessing this parameter by means of the key SET „■”, the following window will appear:
3.4.7. Advanced settingsWhile accessing this parameter by means of the key SET „■”, the following window will appear:
Use keys UP „▲” and DOWN „▼” to scroll in this window and to access a parameter use the key SET „■”. In order to return to the preceding menu use key MENU „ ”.
3.4.7.1. Backwash duration time settings
Use keys UP „▲” and DOWN „▼” to change values and the key SET „■” to save modifications. The following window will appear after saving modifications:
Regenerating...Any Key to Cancel
Backwashing...
5%
꞊꞊꞊꞊꞊Advanced Setting꞊꞊꞊꞊꞊
Backwash duration Brine draw duration Rinse duration Refill duration Regen.Mode Load Default
꞊꞊꞊꞊꞊Backwash Duration꞊꞊꞊꞊꞊00 minutes
Press to Return Press ■ to Confirm
Setting Complete!
Press to Return

35
When pressing the key MENU „ ” of the valve, this one will return to the previous menu. If during 1 minute no key is to be pressed, the valve will return to the stand-by menu. Any modified value will return to the initial value if not saved by means of SET „■” key.
3.4.7.2. Brine draw duration time setting
Use keys UP „▲” and DOWN „▼” to change values and the key SET „■” to save modifications. The following window will appear after saving modifications:
When pressing the key MENU „ ” of the valve, this one will return to the previous menu. If during 1 minute no key is to be pressed, the valve will return to the stand-by menu. Any modified value will return to the initial value if not saved by means of SET „■” key.
3.4.7.3. Fast rinse duration time setting
Use keys UP „▲” and DOWN „▼” to change values and the key SET „■” to save modifications. The following window will appear after saving modifications:
When pressing the key MENU „ ” of the valve, this one will return to the previous menu. If during 1 minute no key is to be pressed, the valve will return to the stand-by menu. Any modified value will return to the initial value if not saved by means of SET „■” key.
! This parameter is NOT to be modified;In case the station does not operate appropriately, you should contact the staff of S.C. Valrom Industrie S.R.L.
꞊꞊꞊꞊꞊Brine Draw Duration꞊꞊꞊꞊꞊00 minutes
Press to Return Press ■ to Confirm
Setting Complete!
Press to Return
! This parameter is NOT to be modified;In case the station does not operate appropriately, you should contact the staff of S.C. Valrom Industrie S.R.L.
꞊꞊꞊꞊꞊Rinse Duration꞊꞊꞊꞊꞊00 minutes
Press to Return Press ■ to Confirm
Setting Complete!
Press to Return
! This parameter is NOT to be modified; In case the station does not operate appropriately, you should contact the staff of S.C. Valrom Industrie S.R.L.

36
3.4.7.4. Refill duration time settingsUse keys UP „▲” and DOWN „▼” to change values and the key SET „■” to save modifications. The following window will appear after saving modifications:
When pressing the key MENU „ ” of the valve, this one will return to the previous menu. If during 1 minute no key is to be pressed, the valve will return to the stand-by menu. Any modified value will return to the initial value if not saved by means of SET „■” key.
3.4.7.5. Select regeneration modeIn this window you may choose the regeneration mode that is the most appropriate to your needs.
Use keys UP „▲” and DOWN „▼” to select the desired parameter and the key SET „■” to confirm the selected parameter. Press key MENU „ ” to return to the previous menu.
Timer (Time regeneration) – the station will initiate regeneration on the set hour and on the date resulting further to the set number of days for the regeneration cycle.Meter immediate (Immediate volumetric regeneration) – the station will initiate regeneration immediately after the water volume that may be treated between two regenerations is consumed. Meter delayed (Delayed volumetric regeneration) – when the quantity that may be treated until the next regeneration reached 0, the station will initiate regeneration on the set hour (02:00 AM hours asset in the factory).Mix regeneration - when the quantity that may be treated until the next regeneration reached 0, the station will initiate regeneration on the first occasion, on the set hour; if the number of set days is reached prior to the moment when the water quantity that may be treated between two regenerations reaches 0, then the station will initiate regeneration.
In the the factory the stations are set to the Mix regeneration mode. It is recommended to maintain this regeneration mode.
3.4.7.6. Restore factory default settings
Press the key SET „■”, to return to settings made in the factory. By pressing the key MENU „ ” of the valve, this one will return to the previous menu. If during 1 minute no key is to be pressed, the valve will
꞊꞊꞊꞊꞊Refill Duration꞊꞊꞊꞊꞊00 minutes
Press to Return Press ■ to Confirm
! This parameter is NOT to be modified;In case the station does not operate appropriately, you should contact the staff of S.C. Valrom Industrie S.R.L.
꞊꞊꞊꞊꞊Regen. Mode꞊꞊꞊꞊꞊
Timer Meter Immediate Meter Delayed Mix Regen
Load Default
Press to cancel Press ■ to confirm

37
return to the stand-by menu. Any modified value will return to the initial value if not saved by means of SET „■” key.4. P
4.RECAUTION MEASURES
• Prior to any maintenance or repair operation, shut off the power supply, close the water supply ccks and depressurize the installation.• Do not place any weights on the station.• Keep records of the salt consumption and fill in when necessary.• Periodically check the connection packing.• Periodically check the hour and date and make the necessary corrections.• The filter mounted ahead of the station should be maintained and changed when needed.• Protect the station and components against humidity.
5. DAMAGE REPAIRSPROBLEM CAUSE SOLVING
1.Water output is low
1. Low supply pressure 1. Increase the supply pressure.2. Clogged filter 2. Clean of replace the filter mount-
ed prior to the station.3. Clogged filtering agent bed 3. Refer to paragraph 3.4. Choked control valve. 4. Pull apart, check and clean the
valve.5. Defective by-pass. 5. Check and repair the by-pass.
2. Quality of treated water is low.
1. Test the erroneous water. 1. Re-test water and contact the seller.
2. The quality of the supply water has changed.
2. Perform a water test and contact the seller.
3. By-pass in the wrong position. 3. Rotate the by-pass valve in the operation position.
4. Damaged ascending tube or fittings.
4. Pull apart the device, repair/replace the tube and replace or lubricate the packing when needed.
5. Clogged filtering bed. 5. Refer to paragraph 3.6. Filtering agent is lost during the driving stage.
6. Refer to paragraph 4.
7. Inappropriate/ low regeneration of filter.
7. Refer to paragraph 6.
8. Water leaks in the control valve. 8. Pull apart the control valve, check it and replace or lubricate the pack-ing when necessary.
3. Clogged filtering bed.
1. Insufficient wash water output. 1. Check the wash water output. If the supply pressure is between the accepted limits and the water output is insufficient, check and clean/replace when needed the drainage line.
2. Insufficient time for the washing stage.
2. Increase the duration of the washing stage (contact Valrom service)
3. Clogged upper/lower diffuser. 3. Clean the upper/lower diffuser.
4. Filtering agent is eliminated from the tank.
1. Filtering agent is driven and elimi-nated during the regeneration stage.
1. Check the upper diffuser.Replace it, if necessary.
2. Filtering agent is driven and elimi-nated during operation.
2. Check the lower diffuser.Replace it, if necessary.

38
PROBLEM CAUSE SOLVING
5. Device does not regenerate.
1. Power supply stopped. 1. Check the power supply.2. Salt in insufficient quantity in the tank.
2. Check the salt level and fill the salt tank.
3. Brine is not partially or totally drawn during the regeneration stage.
3. See paragraph 6.
4. The control valve is defective or the settings were changed.
4. Check the control valve and settings.
5. The salt tank was not supplied with water or is insufficiently sup-plied with water.
5. See paragraph 7.
6. Brine is not totally or partially drawn during the regeneration stage.
1. Low pressure in the water supply installation.
1. Check the supply pressure.
2. Blocked/clogged brine injector or tube.
2. Clean the brine injector and/or tube.
3. Air/aeration valve blocked with salt crystals.
3. Clean the air/aeration valve.
4. High pressure loss (blocked control valve, filtering agent or distributors).
4. See paragraph 1.4.
5. The brine line is not tight, and air is also injected as such.
5. Check packing.
6. Settings were modified. 6. Contact the producer.
7. The salt tank is not sufficiently loaded or not at all with water.
1. Low supply water pressure. 1. Check the network pressure.2. Clogged brine injector or tube. 2. Clean the brine injector or tube.3. Blocked aeration device. 3. Check and clean the aeration
device.4. Settings were modified. 4. Contact the producer.5. Float remained blocked. 5. Draw the float (upwards) on the
rod.8. Excessive salt consumption during regeneration.
1. Settings were changed. 1. Contact the producer.2. The salt tank is loaded with more water than needed.
2. See paragraph 9.
9. The salt tank is load-ed with more water than needed.
1. Pressure of supply water too high.
1. Check the supply pressure.
2. Settings were modified. 2. Contact the producer.
10. Water has a salty taste.
1. The filtering agent was not suffi-ciently rinsed.
1. Increase the operation time [Rinse]
2. Low output during washing. 2. Check and clean DLFC.
11. Water permanently flows through dis-charge.
1. The power supply was cut during regeneration.
1. Put the valve on by-pass up to the power supply.
2. The packing of the distance meter assembly is damaged.
2. Check and replace the damaged packing.
12. Lack of information on display.
1. Voltage absence. 1. Check the power supply both of the electric network and the valve.
2. Defective transformer. 2. Replace the transformer.3. Defective electronic plate. 3. Replace the electronic plate.
13. The message [System maintenance] appears on display.
1. Soft error 1. Restart the voltage supply.

39
6. MAXIMUM ADMISSIBLE CONCENTRATIONS IN THE INFLUENT
SOFT softening stations
Hardness ……………………….…………………………………….......42 °dH Iron ……………………………………………………………………... 0,20 mg/lManganese …………………………………………..………………....0,05 mg/lPure from the microbiological point of view
Stații tratare MIX
Hardness ……………………………………………………………….....42 °dHIron …………………………………………………………………..........15 mg/lManganese …………………………………………………………..........3 mg/lAmmonium …………………………………………………………...........4 mg/lOxygen chemical consumption...........................................................20 mg/l O2Total dissolved solids ………………………………………………....4000 mg/lPure from the microbiological point of view
Service Valrom: Tel: +4 0724.200.005

40
Gentili partner,
Vi ringraziamo per aver scelto i sistemi di trattamento dell’acqua con resine a scambio ionico aquaPur fabbricati dalla SC Valrom Industrie SRL.Prima dell’utilizzo vi preghiamo di leggere attentamente queste istruzioni di installazione e utilizzo.
Per altre informazioni vi preghiamo di visitare il sito www.valrom.ro o www.aqua-pur.ro
1. TIPI DI SISTEMI E CARATTERISTICHE TECNICHE
La tecnologia di trattamento/filtraggio con resine a scambio ionico è uno dei più semplici e convenienti metodi di miglioramento della qualità dell’acqua. Il sistema di trattamento dell’acqua con resina a scambio ionico è migliorato mediante l’aggiunta di altri materiali al fine di ridurre dall’acqua altri inquinanti come ad esempio il ferro, l’ammonio.In questo manuale è presentato il montaggio e l’operazione dei seguenti sistemi di trattamento:- impianti di potabilizzazione <aquaPUR> SOFT – su base di resine a scambio ionico;- impianti di trattamento <aquaPUR> MIX - un miscuglio di vari ambienti filtranti.
Impianti di potabilizzazione <aquaPUR> SOFT
La durezza dell’acqua è la causa frequente dei guasti degli impianti di riscaldamento, specialmente centra-li, caldaie, elettrodomestici (lavatrice, ferro da stiro, caffettiere, ecc.), effetti che portano spese aggiuntive e anche deprezzamento del comfort. Un altro effetto dell’acqua dura è la schiuma ridotta dei detersivi e dei saponi, che porta alla crescita delle spese di manutenzione dell’abitazione. Altri effetti dell’acqua dura sono a carattere estetico, come le sedimentazioni su oggetti sanitari e di comfort come il deprezzamento dei vestiti, la pelle e i capelli secchi.
La potabilizzazione attraverso lo scambio ionico è il più semplice e conveniente metodo per ridurre la durezza dell’acqua. Le resine a scambio ionico attirano e trattengono gli ioni di calcio e magnesio sciolti nell’acqua e sono sostituiti con ioni di sodio. Quando si consuma il volume d’acqua tra due rigenerazioni, la resina sarà rigenerata con soluzione di clorura di sodio (salamoia). Le tappe della rigenerazione sono: Backwash (Lavaggio contrario), Brine draw (Rifornimento con salamoia), Rinse (Risciacquata) e Refill (Riempimento).
Impianto di trattamento <aquaPUR> MIX
Gli impianti di trattamento <aquaPUR> MIX realizzano la riduzione delle concentrazioni di più sostanze in una sola tappa fondata sul materiale di filtraggio Ecomix.Il materiale filtrante degli impianti MIX è un miscuglio di ambienti che contengono resine a scambio ionico con proprietà sinergiche. All’interno dell’impianto di trattamento il letto dell’ambiente filtrante si stratifica in strati che operano complementariamente riducendo dall’acqua la durezza, il ferro, il mangane, l’ammonio e le sostanze organiche. La rigenerazione dell’ambiente è fatta con soluzione di cloruro di sodio in una maniera identica a quella dei purificatori.
IT

41
1.1 Impianti di potabilizzazione SOFTM
odel
loSO
FT 1
0SO
FT 1
8SO
FT 2
5SO
FT 3
7SO
FT 5
0C
odic
eA
QU
A09
1100
1000
8A
QU
A09
1100
1801
5A
QU
A09
1100
2502
0A
QU
A09
1100
3702
5A
QU
A09
1100
5003
0B
y-pa
ss in
clus
oS
IS
I
Tipo
equ
ipag
giam
ento
G
abin
etto
(tan
k re
sina
e v
aso
sala
moi
a ne
llo s
tess
o co
rpo)
Sim
plex
(tan
k re
sina
e v
aso
sala
moi
a se
para
ti)Fo
rnitu
ra e
lettr
ica.
230
V, 5
0 H
zC
onsu
mo
di e
nerg
ia3W
Mod
alità
di c
ontro
llo d
ella
val
vola
Volu
me
o te
mpo
D
imen
sion
i del
l’uge
llo IN
/OU
T[in
ch]
1”U
gello
fogn
atur
a po
rtatu
bo[m
m]
12Fl
usso
nom
inal
e[m
³/h]
0,8
1,5
22,
53
Pre
ssio
ne d
i ese
rciz
io[b
ar]
2–6
Volu
me
mat
eria
le fi
ltran
te[li
tri]
1018
25C
apac
ità d
el s
erba
toio
sal
e[c
hili]
2343
6280
80Te
mpe
ratu
ra d
ell’a
cqua
[°C
]5
– 30
Cili
ndra
ta =
m³ x
°G
3054
7511
015
0C
onsu
mo
appr
ossi
mat
ivo
di
sale
di r
igen
eraz
ione
[c
hili]
1,0
1,8
2,5
3,7
5
Con
sum
o ap
pros
sim
ativ
o di
ac
qua
per u
na ri
gene
razi
one
[litri
]10
018
025
037
050
0
Tem
po a
ppro
ssim
ativ
o di
rig
ener
azio
ne
[min
]35
5883
116
151
Dis
tanz
a tra
la b
ase
e
l’uge
llo d
ella
fogn
atur
a[m
m]
505
735
965
1445
1295
Dis
tanz
a tra
la b
ase
e gl
i ug
elli
IN/A
UT
[mm
]47
570
593
514
1512
65
Dis
tanz
a tra
la b
ase
e l’u
gel-
lo d
i sca
rico
[mm
]29
049
573
068
068
0
A[m
m]
590
330
470
880
880
B[m
m]
330
330
470
335
335
C[m
m]
470
330
470
--
H[m
m]
--
-15
313
8Ø
D[m
m]
--
-27
032
0

42
1.2 Impianto di trattamento MIXM
odel
loM
IX 2
5M
IX 3
7M
IX 5
0C
odA
QU
A09
1000
2501
2A
QU
A09
1000
3701
4A
QU
A09
1000
5001
8B
y-pa
ss in
clus
SI
SI
Tipo
equ
ipag
giam
ento
G
abin
etto
(tan
k re
sina
e
vaso
sal
amoi
a ne
llo
stes
so c
orpo
)S
impl
ex (t
ank
resi
na e
vas
o sa
lam
oia
sepa
rati)
Forn
itura
ele
ttric
a23
0 V,
50
Hz
Con
sum
o di
ene
rgia
3WM
odal
ità d
i con
trollo
del
la v
alvo
laVo
lum
e o
tem
poD
imen
sion
i del
l’uge
llo IN
/OU
T[in
ch]
1”U
gello
fogn
atur
a po
rtatu
bo[m
m]
12Fl
usso
nom
inal
e[m
³/h]
1,2
1,4
1,8
Pre
ssio
ne d
i ese
rciz
io[b
ar]
2 –
6Vo
lum
e m
ater
iale
filtr
ante
[litri
]25
3750
Tem
pera
tura
del
l’acq
ua[°
C]
5 –
30C
ilind
rata
= m
³ x °
G53
7810
5C
onsu
mo
appr
ossi
mat
ivo
di s
ale
per u
na ri
gene
razi
one
[c
hilo
]2,
53,
75
Con
sum
o ap
pros
sim
ativ
o di
ac
qua
per u
na ri
gene
razi
on[li
tri]
250
370
500
Dis
tanz
a tra
la b
ase
e l’u
gello
de
lla fo
gnat
ura
[mm
]96
514
4512
95
Dis
tanz
a tra
la b
ase
e gl
i uge
lli
IN/A
UT
[mm
]93
514
1512
65
Dis
tanz
a tra
la b
ase
e l’u
gello
di
scar
ico
[mm
]73
068
068
0
Tem
po a
ppro
ssim
ativ
o di
rig
ener
azio
ne[m
in]
8812
215
6
Cap
acità
ser
bato
io s
ale
[chi
lo]
6280
80H
[m
m]
-15
3013
80Ø
D[m
m]
-27
032
0A
[mm
]10
5088
088
0B
[m
m]
330
335
335
C[m
m]
470
--

43
2. INSTALLAZIONE DEGLI IMPIANTI
2.1. Luogo di montaggio □ Bisogna ricoverarlo contro il gelo e il contatto diretto con i raggi del sole.□ Bisogna essere secco.□ NON deve essere inondabile.□ La superficie deve essere piana e reggere il peso dell’impianto. Non è consentito il montaggio dell’impianto su superfici chinate.□ È consigliabile che sia molto vicino alla fognatura. Il tubo collegato all’ugello di scarico dell’impianto e quello collegato al raccordo di evacuazione delle acque di rigenerazione deve essere molto vicino a un sifone/una bocca da fogna, perchè i flussi attraverso questi tubi sono gravitazionali.
2.2 Condizioni di montaggio (Vedasi la figura 1., pagina 4)□ Bisogna montare un filtro meccanico da 100 microni al massimo.□ È consigliabile il montaggio dell’impianto e del filtro meccanico su by pass.□ È consigliabile il montaggio di una valvola di ritegno dopo l’impianto di potabilizzazione/trattamento per prevenire il riflusso dell’acqua.□ È consigliabile il montaggio di manometri prima e dopo l’impianto di trattamento dell’acqua.□ Per la fornitura elettrica sarà utilizzato soltanto il trasformatore della dotazione (12V).□ I consumatori esterni (ad esempio il rubinetto di rifornimento del sistema di irrigazioni) si montano prima del filtro di impurità e dell’impianto di trattamento con resine a scambio ionico. (Vedasi la figura 1., pagina 4)
2.3 Componenti necessari all’installazione e alla messa in funzione degli impianti
Questi NON fanno parte del pacco di consegna.□ Tubo dal diametro interno di 12 mm e cerchio per il collegamento del tubo di scarica alla fognatura e del raccordo di evacuazione dell’acqua per il lavaggio/la rigenerazione.□ Sale in pastiglie con purità di oltre il 99,5% NaCl. L’utilizzo di altri tipi di sali porta al degrado della resina/del materiale filtrante e al mancato funzionamento dell’impianto.
2.4 Le tappe dell’installazione dell’impianto
È consigliabile l’installazione dell’equipaggiamento da parte di uno specialista.Prima dell’installazione verificate se l’impianto è completo e non ha subito guasti a seguito delle ma-nipolazioni e dei trasporti. Qualora riteniate che qualcosa non va bene, vi preghiamo di contattare la società da dove avete acquistato l’impianto.
A titolo informativo:
L’utente ha la possibilità di regolare la durezza dell’acqua dall’impianto. Girando la valvola di miscuglio in senso orario può aumentare la durezza dell’acqua all’uscita dall’impianto e in senso antiorario può ridurne la durezza all’uscita dall’impianto. (Vedasi la figura 2, pagina 5)Nella posizione service i rubinetti sono aperti, tutto il flusso d’acqua passa attraverso l’impianto.Nella posizione bypass i rubinetti sono chiusi, il flusso d’acqua NON passa attraverso l’impianto, possono essere fatti interventi all’impianto senza che sia necessaria l’interruzione del rifornimento d’acqua. (Vedasi la figura 3, pagina 5.)
A causa del fatto che, a seconda del caso, la distanza tra la fognatura e l’impianto è diversa, il tubo da 12 mm e i cerchi da 12-22 mm, non sono inclusi, si acquistano separatamente, in funzione delle necessità.!Assicurate lo scorrimento gravitazionale nei tubi che fanno il collegamento tra il tubo di scarico, il raccordo di evacuazione dell’acqua di lavaggio/rigenerazione e la fognatura. Verificate che i tubi non siano otturati e che l’acqua della fognatura non possa essere rigettata attraverso i tubi all’ug-ello di scarico o al raccordo di evacuazione.!

44
2.4.1 Le tappe dell’installazione dei sistemi tipo gabinetto (con tank di resina e vaso di sale nello stesso corpo)
• Mettete in posizione il sistema al posto deciso con l’osservanza delle condizioni di cui ai punti 2.1 e 2.2.• Inserite i connettori nel bypass (Vedasi la figura 6, pagina 6, foto 15,16)• Collegate l’impianto di rifornimento al by-pass dell’impianto (Vedasi la figura 4., pagina 5), all’entrata con il segno „→” orientato verso l’impianto (l’impianto di trattamento arriva con il sistema by-pass premontato, i due collegamenti del by-pass sono di „1” con filetto esterno)• Per il collegamento dei tubi al by-pass dell’impianto utilizzate materiali di stagnatura (teflon ecc.)• L’impianto d’acqua verso i consumatori si collega al by-pass, sull’uscita con il segno „→” orientato verso l’esterno dell’impianto. (Vedasi la figura 4, pagina 5)• Collegate l’ugello di scarico dell’impianto alla fognatura con l’aiuto del tubo da 12 mm e dei cerchi da 12 – 22 mm acquistati. (Vedasi la figura 5, pagina 5)• Collegate l’ugello di evacuazione dell’acqua di rigenerazione dell’impianto alla fognatura con l’aiuto del tubo da 12 mm e dei cerchi da 12 - 22 mm. (Vedasi la figura 5, pagina 5)• Assicuratevi che il bypass è in posizione bypass (con i rubinetti chiusi) (Vedasi la figura 3, pagina 5)
Messa in funzione:• Durante tutto il periodo di installazione i rubinetti bypass sono chiusi (non esiste acqua nell’impianto).• Si collega al rifornimento elettrico attraverso il trasformatore della dotazione 12V. • Sarà osservato il panello della valvola di controllo. • Si elimina l’aria dall’impianto come segue:- Si seleziona[Stepwise Regen/Backwashing]: Si preme [Menu] e si seleziona utilizzando „ ▼” fino a [Stepwise Regen] e si preme [SET/REGEN] ---> [Backwashing].- Si apre ½ corsa rubinetto bypass all’entrata nell’impianto segnalato con la freccia verso la valvola.- Si assicura che sul tubo di evacuazione dell’acqua di lavaggio/rigenerazione l’acqua scorre.• Si apre completamente il rubinetto bypass sito all’entrata nell’impianto segnalato con freccia verso la valvola.• Si assicura che sul tubo di evacuazione dell’acqua di lavaggio l’acqua chiara scorre.• Quando l’acqua è chiara si preme [SET] successivamente finché appare [SYSTEM RETURN].• Allorquando l’aria non è eliminata o l’acqua non è chiara, si ripete il giro [Backwash].• Si apre il rubinetto di uscita dell’impianto.• Si sgonfia e si tira fuori il cuscino d’aria dal vaso di salamoia e si rifornisce il vaso con sale e 10 litri d'acqua
2.4.2 Le tappe dell’installazione degli impianti con tank resina e vaso salamoia separati (simplex)
Gli impianti con tank resina e vaso salamoia separati si consegnano semi assemblati. Il loro assemblag-gio si realizza al luogo di montaggio. Per l’assemblaggio bisogna fare i seguenti passi: (Vedasi la figura 6, pagina 6).
Mettete in posizione il sistema al posto deciso con l’osservanza delle condizioni di cui ai punti 2.1 e 2.2.
(1) Dopo la messa in posizione del tank con resina (FRP), si monta all’interno il tubo centrale con l’altoparlante premontato nella parte inferiore del tank nella posizione predefinita (di solito è montato).
(2) Il livello alla parte superiore del tubo centrale con l’altoparlante deve trovarsi allo stesso livello dell’apertura del tank FRP, accettato per +5mm al massimo.
! NON collegate l’impianto direttamente a 220 V.

45
(3), (4) Coprite, nella parte superiore, il tubo centrale.(5) Caricate il serbatoio FRP con il materiale filtrante. Assicuratevi che il materiale filtrante non entra anche nel tubo centrale. Mentre caricate il serbatoio FRP con il materiale filtrante, assicuratevi che il tubo centrale rimane posizionato verticalmente e in mezzo al serbatoio.Attenzione! Non estrarre il tubo centrale con altoparlante premontato dalla posizione iniziale.
(6) Rimuovete la copertura del tubo centrale.
(7) Si pulisce il filetto del tank con resina (FRP) dalle particelle del materiale filtrante (si può risciacquare con acqua).
(8) Si monta l’altoparlante superiore (succhierola superiore) sulla valvola, come segue: all’interno del rubinetto sono 4 biette di fissaggio e sulla succhierola 4 fessure adeguate, si accoppiano tra di loro premendo, così le biette penetrano nelle fessure e poi si gira la succhierola. Il montaggio della succhierola sul rubinetto si verifica tentando di estrarre la succhierola.
(9) L’insieme valvola di controllo con l’altoparlante superiore montato si introduce sul tubo centrale premendo. L’altoparlante superiore montato nel rubinetto deve coprire il tubo centrale.
(10) Avvitate la valvola di controllo sul tank con resina (FRP).
(11) Alzate il coperchio del vaso di salamoia e infilate il tubo attraverso l’orifizio esistente.
(12), (13) Si svita la madrevite del gomito di salamoia della valvola, si infila il tubo attraverso la madrevite di modo che passi circa 1 cm. Si infila il pezzo troncoconico nel tubo.
(14) Si svita l’insieme nella valvola.
(15) Si tolgono i fusibili del bypass e si infilano premendo i connettori.
(16) Si montano i fusibili del bypass.
(17) Si infila il bypass nella valvola.
(18) Si assicura il collegamento tra bypass e valvola con i morsetti metallici.
(19) Si infila il sensore di flusso nel bypass.
(20) Sistema completo.
Rispettate poi i passi di montaggio (vedasi 2.4.1) della variante gabinetto.Rispettate poi i passi di messa in funzione (vedasi 2.4.1) della variante gabinetto.

46
3. PROGRAMMAZIONE DELLA VALVOLA
3.1 Descrizione del pannello di comando della valvola
Descrizione del MENU
MENU SU
SELEZIONA GIU
1 Current Time Setting - Configurazione data e ora2 Regeneration Time Setting - Configurazione ora di rigenerazione3 Regeneration Cycle Setting - Configurazione numero giorni per la rigenerazione di protezione4 Regeneration Meter Setting - Volume acqua rigenerata
5 Step Wise Regen.RRigenerazione a tappe
5.1 Backwash. - Lavaggio al rovescio5.2 Brine - Salamoia5.3 Rinse - Risciaquata5.4 Refill - Riempimento di nuovo
6 Manual Regeneration - Rigenerazione manuale
7 Advanced setting(Configurazioni avanzate)
7.1 Backwash Duration - Configurazione durata lavaggio al rovescio7.2 Brine Draw Duration(not applicable for filter valve) - Configurazione durata rifornitura con salamoia7.3 Rinse Duration - Configurazione durata risciacquata7.4 Refill Duration Time Setting(not applicable for filter valve)- Configurazione durata riempimento di nuovo del vaso salamoia
7.5 Regen. Mode- Modalità rigenerazione
7.5.1 Time Clock- Rigenerazione infunzione del tempo7.5.2 Meter Immediately- Rigenerazione volumetrica immediata7.5.3 Meter Delayed Rigenerazione volumetrica ritardata7.5.4 Mixed- Rigenerazione mista
7.6 Load default- Ritorno alle configurazioni della fabbrica
I sistemi hanno le valvole configurate sulla modalità RIGENERAZIONE MISTA.!

47
3.2 Inizializzazione del sistemaDopo che la valvola è stata collegata alla fonte di energia elettrica, questa passa automaticamente nella posizione di lavoro e sullo schermo appariranno i messaggi: System intializing (Inizializzazione sistema), Please wait (Attendere, prego)
3.3 Posizione Stand-byQualora la valvola sia programmata in Timer mode (Modalità rigenerazione in funzione del tempo), sullo schermo del rubinetto apparirà il seguente messaggio:
Qualora la valvola sia programmata in Meter mode (Modalità rigenerazione in funzione del volume), sullo schermo del rubinetto apparirà il seguente messaggio:
3.4 Configurazione dei parametri
Per la configurazione dei parametri premete il tasto MENU „ ”. Per la sicurezza, dopo 3 minuti di man-cato utilizzo, il menu ritorna a stand-by e si blocca. In questo caso, per accedere alla finestra di configu-razione dei parametri della valvola occorre premere per 5 secondi sul tasto MENU „ ”. Dopo l’accesso a MAIN MENU (Menu principale), i parametri della valvola appariranno. Per selezionare un parametro con il tasto UP „ ▲” (Su) navigate nel menu in su, e con il tasto DOWN „ ▼” (Giù) navigate nel menu in giù. Dopo che avete selezionato un parametro, per utilizzarlo premete il tasto SET „■”.Nel menu principale i parametri appariranno come segue:
3.4.1 Current time setting (Configurazione data e ora)Attivando questo parametro per il tramite del tasto SET „■”, apparirà la seguente finestra:
Per navigare all’interno della finestra utilizzate il tasto SET „■”, e per modificare i valori utilizzate i tasti UP „ ▲” (Su) e DOWN „ ▼” (Giù).
System initializingPlease wait
Inizializzazione sistema
Attendere, prego
Current day/Time00-00-0000 00:00:00
Time of Next Regen00-00-0000 00:00:00
Data/Ora00-00-0000 00:00:00
Data e ora della prossima rigenerazione00-00-0000 00:00:00
Current day/Time00-00-0000 00:00:00
Residual/Total Water00.00m3 0000.00m3
Data/Ora00-00-0000 00:00:00
Quantità acqua Totale fino alla prossima quantità d’acquarigenerazione folosită00.00m3 0000.00m3
꞊꞊꞊꞊꞊System Time꞊꞊꞊꞊꞊00-00-0000 00:00
Press to cancel Press ■ to confirm
꞊꞊꞊꞊꞊Data e ora꞊꞊꞊꞊꞊00-00-0000 00:00
Premi per uscire Premi ■ per confermare

48
Per confermare le modifiche fatte premete il tasto SET „■”. Dopo che avete confermato le modifiche fatte apparirà la seguente finestra:
Premendo il tasto MENU „ ” ritornate a MAIN MENIU (Menu principale).
3.4.2. Regeneration time setting (Configurazione ora di rigenerazione)Attivando questo parametro per il tramite del tasto SET „■”, apparirà la seguente finestra:
Per navigare all’interno della finestra usate la stessa procedura del punto "3.4.1.".
3.4.3. Regeneration cycle setting (Configurazione numero giorni per la rigenerazione della protezi-one)Attivando questo parametro per il tramite del tasto SET „■”, apparirà la seguente finestra:
Dalla fabbrica questo parametro è fissato a 7 giorni per Timer mode (Modalità rigenerazione in funzione del tempo) e a 10 giorni per Mix mode (Modalità rigenerazione mista). È consigliabile conservare queste configurazioni.Più giù, in questo manuale, troverete la procedura di scelta della modalità di rigenerazione. Se scegliete la Modalità di rigenerazione in funzione del tempo, è preferibile configurare questo parametro al valore di 3 giorni. Per navigare all’interno della finestra usate la stessa procedura del punto "3.4.1.".
3.4.4. Regeneration meter capacity settings (Configurazione volume acqua tra 2 rigenerazioni)Attivando questo parametro per il tramite del tasto SET „■”, apparirà la seguente finestra:
Dalla fabbrica questo parametro è fissato a 6 m3.
Setting Complete!
Press to return
Configurazione completa!
Premi per ritornare
꞊꞊꞊꞊꞊Regen. Time꞊꞊꞊꞊꞊00:00
Press to Return Press ■ to Confirm
꞊꞊꞊꞊꞊Ora rigenerazione꞊꞊꞊꞊꞊00:00
Premi per ritornare Premi ■ per confermare
꞊꞊꞊꞊꞊Regen. Cycle꞊꞊꞊꞊꞊00 days
Press to Return Press ■ to Confirm
꞊꞊꞊꞊꞊Giro rigenerazione꞊꞊꞊꞊꞊00 zile
Premi per ritornare Premi ■ per confermare
꞊꞊꞊꞊꞊Regen. Meter Setting꞊꞊꞊꞊꞊Capacity: 00.00 m3
Press to Return Press ■ to Confirm
꞊꞊꞊꞊꞊Volume acqua rigenerata꞊꞊꞊꞊꞊Capacità: 00.00 m3
Premi per ritornare Premi ■ per confermare
! Questo parametro è molto importante per il funzionamento giusto dell’impianto ed è inserito dal cliente perchè è diverso da una situazione all’altra.Per calcolare correttamente questo parametro dovete conoscere la durezza dell’acqua e la cilin-drata dell’impianto che avete acquistato.

49
Così: La cilindrata si trova per ogni impianto all’inizio di questo manuale al capitolo „1. Modelli e caratteristiche tecniche,,.La durezza si scopre dal bollettino di analisi dell’acqua che sarà trattata. (per la realizzazione delle analisi contattate la compagnia Valrom Industrie)
Formula di calcolo:Volume acqua tra 2 rigenerazioni = Cilindrata / Durezza =[m³]
Esempio di calcolo:Cilindrata = 75 per „Impianto di potabilizzazione <aquaPUR> SOFT 25” (in conformità al capitolo „1. Modelli e caratteristiche tecniche„)Durezza acqua = 15 °GVolume acqua tra 2 rigenerazioni = Cilindrata / Durezza = 75/15 = 5 [mq]Dopo l’effettuazione del calcolo, nella relativa finestra, a Capacity (Capacità) si inserisce il risultato otte-nuto. Per navigare all’interno della finestra usate la stessa procedura del punto "3.4.1.".
A questo punto la stazione è funzionale. Le seguenti impostazioni sono indirizzate al personale autorizzato. 3.4.5. Stepwise regeneration (Rigenerazione a tappe) Un giro di rigenerazione della resina è costituito da più tappe nel seguente ordine:• Backwash (lavaggio al rovescio del letto di resina)• Brine draw (rifornimento con salamoia del letto di resina)• Rinse (risciaquata del letto di resina)• Refil (riempimento di nuovo con acqua del serbatoio di salamoia)
Attivando questo parametro per il tramite del tasto SET „■”, potete realizzare, a vostra scelta, in funzione della necessità, soltanto una delle tappe del giro di rigenerazione, come segue:All’inizio, la valvola inizia automaticamente con la tappa Backwash aprendo la seguente finestra:
Qualora alcuno dei tasti della valvola sia premuto allora la valvola finirà la tappa Backwashing (30 minuti) e ritornerà a MAIN MENU (menu principale) senza continuare il resto delle tappe.Se mentre la valvola realizza la tappa Backwash si preme ogni tasto della valvola, questa passa alla tappa seguente e indica:
Qualora alcuno dei tasti della valvola sia premuto allora la valvola finirà la tappa Brine drawing (60 minuti) e ritornerà a MAIN MENU (menu principale) senza continuare il resto delle tappe.Se mentre la valvola realizza la tappa Braine drawing si preme ogni tasto della valvola, questa passa alla tappa seguente e indica:
Backwashing...
Any Key to Cancel
Lavaggio al rovescio...
Qualsiasi tasto per l’uscita
Brine Drawing...
Any Key to Cancel
Rifornimento con salamoia...
Ogni tasto per uscire
!

50
Qualora alcuno dei tasti della valvola sia premuto allora la valvola finirà la tappa Rinsing (30 minuti) e ritornerà a MAIN MENU (menu principale) senza continuare il resto delle tappe.Se mentre la valvola realizza la tappa Rinsing si preme ogni tasto della valvola, questa passa alla tappa seguente e indica:
Qualora alcuno dei tasti della valvola sia premuto allora la valvola finirà la tappa Refilling (30 minuti) e ritornerà a MAIN MENU (menu principale).Se mentre la valvola realizza la tappa Refiling si preme ogni tasto della valvola, questa ritorna a MAIN MENU (menu principale).
3.4.6. Manual regen (Rigenerazione manuale)La valvola ha la possibilità, mediante la configurazione di questo parametro, di realizzare un giro intero di rigenerazione, come segue:Inizierà con la tappa Backwash, poi passerà automaticamente attraverso ogni tappa, Brine draw, Rinse, Refill ritornando automaticamente a MAIN MENIU (Menu principale), rientrando in service dopo l’ultimazi-one di tutto il processo di rigenerazione.Attivando questo parametro per il tramite del tasto SET „■”, apparirà la seguente finestra:
3.4.7. Advanced settings (Configurazioni avanzate)Attivando questo parametro per il tramite del tasto SET „■”, apparirà la seguente finestra:
Usate i tasti UP „▲” (Su) e DOWN „▼” (Giù) per navigare in questa finestra e per attivare un parametro usate il tasto SET „■”. Per ritornare al menu precedente usate il tasto MENU „ ”.
Rinsing...
Any Key to Cancel
Risciacquata...
Ogni tasto per uscire
Refilling...
Any Key to Cancel
Riempimento di nuovo.
Ogni tasto per uscire
Regenerating...Any Key to Cancel
Backwashing...
5%
Rigenerazione...Ogni tasto per uscire
Lavaggio al rovescio...
5%
꞊꞊꞊꞊꞊Advanced Setting꞊꞊꞊꞊꞊
Backwash duration Brine draw duration Rinse duration Refill duration Regen.Mode Load Default
꞊꞊꞊꞊꞊Configurazioni avanzate꞊꞊꞊꞊꞊
Durata lavaggio al rovescio Durata rifornimento con salamoia Durata risciacquata Durata riempimento vaso salamoia Modalità rigenerazione Ritorno alle configurazioni dalla fabbrica

51
3.4.7.1. Backwash duration time settings (Configurazione durata lavaggio al rovescio)
Usate i tasti UP „▲” (Su) e DOWN „▼” (Giù) per cambiare i valori e il tasto SET „■” per salvare le mod-ifiche. Dopo che le modifiche sono state salvate apparirà la seguente finestra:
Premendo il tasto MENU „ ” della valvola, questa ritornerà al menu precedente. Se per 1 minuto non si preme alcun tasto, la valvola ritorna al menu stand-by. Ogni valore modificato ritornerà al valore iniziale se non è stato salvato con il tasto SET „■”.
3.4.7.2. Brine draw duration time setting (Configurazione durata rifornimento con salamoia)
Usate i tasti UP „▲” (Su) e DOWN „▼” (Giù) per cambiare i valori e il tasto SET „■” per salvare le modifiche. Dopo che le modifiche sono state salvate apparirà la seguente finestra:
Premendo il tasto MENU „ ” della valvola, questa ritornerà al menu precedente. Se per 1 minuto non si preme alcun tasto, la valvola ritorna al menu stand-by. Ogni valore modificato ritornerà al valore iniziale se non è stato salvato con il tasto SET „■”.
3.4.7.3. Fast rinse duration time setting (Configurazione durata di risciacquata)
꞊꞊꞊꞊꞊Backwash Duration꞊꞊꞊꞊꞊00 minutes
Press to Return Press ■ to Confirm
꞊꞊꞊꞊꞊Giro rigenerazione꞊꞊꞊꞊꞊00 minutes
Premi per ritornare Premi ■ per confermare
! NON modificate questo parametro;Se l’impianto non funziona adeguatamente, contattate il personale della S.C. Valrom Industrie S.R.L.
Setting Complete!
Press to Return
Configurazione completa!
Premi per ritornare
꞊꞊꞊꞊꞊Brine Draw Duration꞊꞊꞊꞊꞊00 minutes
Press to Return Press ■ to Confirm
꞊Durata rifornimento con salamoia꞊00 minutes
Premi per ritornare Premi ■ per confermare
Setting Complete!
Press to Return
Configurazione completa!
Premi per ritornare
! NON modificate questo parametro;Se l’impianto non funziona adeguatamente, contattate il personale della S.C. Valrom Industrie S.R.L.
꞊꞊꞊꞊꞊Rinse Duration꞊꞊꞊꞊꞊00 minutes
Press to Return Press ■ to Confirm
꞊꞊꞊꞊꞊Durata risciacquata ꞊꞊꞊꞊꞊00 minutes
Premi per ritornare Premi ■ per confermare

52
Usate i tasti UP „▲” (Su) e DOWN „▼” (Giù) per cambiare i valori e il tasto SET „■” per salvare le modi-fiche. Dopo che le modifiche sono state salvate apparirà la seguente finestra:
Premendo il tasto MENU „ ” della valvola, questa ritornerà al menu precedente. Se per 1 minuto non si preme alcun tasto, la valvola ritorna al menu stand-by. Ogni valore modificato ritornerà al valore iniziale se non è stato salvato con il tasto SET „■”.
3.4.7.4. Refill duration time settings (Configurazione durata riempimento di nuovo del vaso salamoia)
Usate i tasti UP „▲” (Su) e DOWN „▼” (Giù) per cambiare i valori e il tasto SET „■” per salvare le modi-fiche. Dopo che le modifiche sono state salvate apparirà la seguente finestra:
Premendo il tasto MENU „ ” della valvola, questa ritornerà al menu precedente. Se per 1 minuto non si preme alcun tasto, la valvola ritorna al menu stand-by. Ogni valore modificato ritornerà al valore iniziale se non è stato salvato con il tasto SET „■”.
3.4.7.5. Select regeneration mode (Configurazione modalità di rigenerazione)In questa finestra potete scegliere la modalità di rigenerazione la più adeguata per le vostre esigenze.
Usate i tasti UP „▲” (Su) e DOWN „▼” (Giù) per scelgiere il parametro desiderato e il tasto SET „■” per confermare il parametro scelto. Premete il tasto MENU „ ” per ritornare al menu precedente.
Timer (Rigenerazione in funzione del tempo) – l’impianto inizierà la rigenerazione all’ora scelta e alla data risultata a seguito del numero di giorni configurato per il giro di rigenerazione.
Setting Complete!
Press to Return
Configurazione completa!
Premi per ritornare
! NON modificate questo parametro;Se l’impianto non funziona adeguatamente, contattate il personale della S.C. Valrom Industrie S.R.L.
꞊꞊꞊꞊꞊Refill Duration꞊꞊꞊꞊꞊00 minutes
Press to Return Press ■ to Confirm
꞊꞊꞊꞊꞊Durata riempimento vaso salamoia꞊꞊꞊꞊꞊00 minutes
Premi per ritornare Premi ■ per confermare
Setting Complete!
Press to Return
Configurazione completa!
Premi per ritornare
NON modificate questo parametro;Se l’impianto non funziona adeguatamente, contattate il personale della S.C. Valrom Industrie S.R.L.!
꞊꞊꞊꞊꞊Regen. Mode꞊꞊꞊꞊꞊
Timer Meter Immediate Meter Delayed Mix Regen
꞊꞊꞊꞊꞊Modalità rigenerazione꞊꞊꞊꞊꞊
Rigenerazione in funzione del tempo Rigenerazione volumetrica immediata Rigenerazione volumetrica ritardata Rigenerazione mista

53
Meter immediate (Rigenerazione volumetrica immediata) – l’impianto inizierà la rigenerazione appena il volume d’acqua che può trattare tra due rigenerazioni è stato consumato. Meter delayed (Rigenerazione volumetrica ritardata) – quando la quantità che può trattare fino alla pros-sima rigenerazione è arrivata allo 0, l’impianto inizierà la rigenerazione all’ora fissata (ora 02:00 AM fissata dalla fabbrica).Mix regeneration (Rigenerazione mista) – quando la quantità che può trattare fino alla prossima rigen-erazione è arrivata allo 0, l’impianto inizierà la rigenerazione alla prima occasione, all’ora fissata; se si arriva al numero di giorni configurati prima che la quanità di acqua che può trattare tra due rigenerazioni arrivi allo 0, allora l’impianto inizierà la rigenerazione.Dalla fabbrica, gli impianti sono configurati su Modalità di rigenerazione mista. È consigliabile conser-vare questa modalità di rigenerazione.
3.4.7.6. Restore factory default settings (Ritorno alle configurazioni dalla fabbrica)
Premete il tasto SET „■” per ritornare alle configurazioni dalla fabbrica. Premendo il tasto MENU „ ” della valvola, questa ritornerà al menu precedente. Se per 1 minuto non si preme alcun tasto, la valvola ritorna al menu stand-by. Ogni valore modificato ritornerà al valore iniziale se non è stato salvato con il tasto SET „■”.
4. MISURE DI PRECAUZIONE
• Prima di ogni operazione di manutenzione o riparazione bisogna interrompere il rifornimento di energia elettrica, chiudere i rubinetti di rifotnitura d’acqua e depressurizzare l’impianto.• Non mettete pesi sull’impianto.• Fate la scheda sul consumo di sale e aggiungete quando è necessario.• Verificate periodicamente le stagnature delle connessioni.• Periodicamente verificate l’ora e la data e correggetele se è necessario.• Il filtro montato prima dell’impianto deve essere mantenuto e cambiato in caso di necessità.• Proteggete l’impianto e le componenti contro l’umidità.
5. RIPARAZIONE
Load Default
Press to cancel Press ■ to confirm
Ritorno alle configurazioni dalla fabbrica
Premi per uscire Premi ■ per confermare
! Se siete ritornati alle configurazioni dalla fabbrica, contattate il personale Valrom per ristabilire le configurazioni necessarie al vostro impianto.
PROBLEMA CAUSA SOLUZIONE
1.Diminuisce il flusso d’acqua
1. La pressione per il rifornimento è bassa
1. Aumentate la pressione al rifornimento
2. Filtro colmato 2. Pulite o sostituite il filtro montato prima dell’impianto
3. Letto materiale filtrante colmato 3. Consultate il comma 34. Valvola di controllo occlusa 4. Svitate, verificate e pulite la
valvola5. Bypass guasto 5. Verificate e riparate il bypass

54
PROBLEMA CAUSA SOLUZIONE
2. È diminuita la qualità dell’acqua trattata
1. Analisi dell’acqua sbagliata. 1. Rifate l’analisi dell’acqua e con-tattate il venditore
2. La qualità dell’acqua al riforni-mento è cambiata
2. Fate un’analisi dell’acqua e con-tattate il venditore
3. Bypass in posizione sbagliata. 3. Rotate la valvola bypass sulla posizione di operazione
4. Tubo ascendente o guarnizioni deteriorate.
4. Smontate l’apparecchio, riparate/sostituite il tubo e sostituite o lubrifi-cate le guarnizioni se è necessario
5. Letto filtrante colmato. 5. Consultate il comma 36. Nella tappa di preparazione si perde il materiale filtrante.
6. Consultate il comma 4
7. Rigenerazione impropria/debole del filtro.
7.Consultate il comma 6
8. Perdite d’acqua nella valvola di controllo.
8. Smontate la valvola di controllo, verificatela e sostituitela o lubrificate le guarnizioni se è necessario
3. Letto filtrante colmato
1. Flusso d’acqua di lavaggio insufficiente.
1. Verificate il flusso d’acqua di lavaggio. Se la pressione di riforni-mento è tra i limiti accettati e il flus-so d’acqua è insufficiente, verificate e pulite/sostituite se è necessario la linea di drenaggio
2. Tempo insufficiente per la tappa lavaggio.
2. Aumentate la durata della tappa lavaggio. (contattate l’officina Valrom)
3. Altoparlante superiore/inferiore occluso.
3. Pulite l’altoparlante superiore/inferiore.
4. l materiale filtrante è eliminato dal serbatoio
1. Il materiale filtrante è trascinato e eliminato nella tappa di rigenerazione
1. Verificate l’altoparlante superiore. Sostituitelo se è necessario.
2. Il materiale filtrante è trascinato e eliminato durante il funzionamento
2. Verificate l’altoparlante inferiore. Sostituitelo se è necessario.
5. L’apparecchio non rigenera
1. Il rifornimento di energia elettrica fermato
1. Verificate il rifornimento di energia.
2. Quantità insufficiente nel serbatoio
2. Verificate il livello del sale e aggiungere sale nel serbatoio.
3. La salamoia non è tirata il parteo interamente nella fase di rigenerazione
3. Vedasi il comma 6
4. La valvola di controllo è guasta o sono state cambiate le configu-razioni
4. Verificate la valvola di controllo e le configurazioni
5. Il serbatoio di sale non è stato rifornito d’acqua o è stato insuffici-entemente rifornito d’acqua
5.Vedasi il comma 7

55
PROBLEMA CAUSA SOLUZIONE
6. La salamoia non è tirata il parte o interamente nella fase di rigenerazione.
1. Pressione bassa all’impianto di rifornimento d’acqua
1. Verificate la pressione di riforni-mento
2. IIniettore o tubo di salamoia occluso/colmato.
2. Pulite l’iniettore e/o il tubo dalla salamoia
3. Valvola d’aria/ventilatore occluso da cristalli di sale.
3. Pulite la valvola d’aria/il ventila-tore
4. Perdita di pressione grande (val-vola di controllo, materiale filtrante o distributori occlusi).
4. Vadasi il comma 1.4
5. La linea di salamoia non è ermeti-ca, di modo che è iniettata anche l’aria.
5. Verificate la stagnatura
6. Le configurazioni sono state modificate.
6. Contattate il produttore
7. Il serbatoio di sale non è sufficientemente/per niente caricato con acqua.
1. Pressione dell’acqua di riforni-mento bassa.
1. Verificate la pressione della rete.
2. Iniettore o tubo di salamoia occluso 2. Pulite l’iniettore o il tubo dalla salamoia.
3. Ventilatore occluso 3. Verificate e pulite il ventilatore.4. Sono state modificate le configurazioni
4. Contattate il produttore.
5. Il galleggiante è rimasto bloccato 5. Tirate il galleggiante (in su) sulla sbarra
8. Consumo eccessivo di sale alla rigenerazione.
1. Le configurazioni sono state cambiate.
1. Contattate il produttore
2. Il serbatoio di sale si carica con più acqua di quanto sia necessaria
2. Vedasi il comma 9
9. Il serbatoio di sale si carica con più acqua di quanto sia necessaria.
1. Pressione dell’acqua di riforni-mento troppo alta
1. Verificate la pressione di riforni-mento
2. Le configurazioni sono state modificate
2. Contattate il produttore
10. L’acqua ha il gusto salato.
1. Il materiale filtrante non è stato risciacquato sufficientemente
1. Aumentate il tempo dell’operazi-one [Rinse – Risciacquata]
2. Flusso basso nel momento del lavaggio
2. Verificate e pulite DLFC
11. L’acqua scorre in permanenza sull’evac-uazione.
1. Il rifornimento di energia elettrica è stato interrotto durante la rigenerazione.
1. Mettete la valvola in bypass fino al rifornimento di energia elettrica.
2. Le guarnizioni dell’insieme di dis-tanziatori sono deteriorate.
2. Verificate e sostituite le guarnizioni deteriorate.
12. Mancanza di infor-mazioni sul display
1. Manca la tensione. 1. Verificate il rifornimento elettrico, tanto della rete elettrica quanto della valvola.
2. Trasformatore guasto. 2. Sostituite il trasformatore.3. Scheda elettonica guasta. 3. Sostituite la scheda elettronica.
13. Sullo schermo appare il messaggio [System maintenance]
1. Errore di software 1. Fatte ripartire il rifornimento con tensione.

56
6. LE CONCENTRAZIONI MASSIME AMMESSE NELL’ACQUA CHE ENTRA (INFLUENTE)
Impianti di potabilizzazione SOFT
Durezza ………………………………………………………...………......42 °dH Ferro ……………………………………………………………………... 0,20 mg/lMangane ………………………………………………….……………....0,05 mg/lPura dal punto di vista microbiologico
Impianti trattamento MIX
Durezza ……………………………………………………………….........42 °dHFerro …………………………………………………………………..........15 mg/lMangane ………………………………………………………………....... 3 mg/lAmmonio ………………………………………………………………....... 4 mg/lConsumo chimico di ossigeno..............................................................20 mg/l O2Totale solidi sciolti ……………………………………………….......... 4000 mg/lPura dal punto di vista microbiologico
Service Valrom: Tel: +4 0724.200.005

57
Sehr geehrte Partner
Vielen Dank für Ihre Wahl von aquaPUR Ionenaustausch - Wasseraufbereitungsanlagen von SC Valrom Industrie SRL.Bitte lesen Sie diese Montage- und Bedienungsanleitung sorgfältig durch, bevor Sie sie benutzen.
Weitere Informationen finden Sie unter www.valrom.ro oder www.aqua-pur.ro
1. TIPURI DE SISTEME ȘI CARACTERISTICI TEHNICE
Die Behandlungs-/Filtrationstechnologie mit Ionenaustauschharzen ist eine der einfachsten und be-quemsten Methoden zur Verbesserung der Wasserqualität. Das Wasseraufbereitungssystem mit Ionenaustauschharz wird durch Zugabe anderer Medien zur Reduktion anderer Wasserschadstoffe wie Eisen und Ammoniak verbessertDieses Handbuch stellt die Installation und den Betrieb der folgenden Behandlungssysteme vor:- Wasserenthärtungsstationen <aquaPUR> SOFT - mit Ionenaustauschharzen,- Behandlungsanlagen <aquaPUR> MIX - eine Mischung aus verschiedenen Filtermedien.
Wasserenthärtungsstationen <aquaPUR> SOFT
Die Wasserhärte ist die häufigste Ursache für Schäden an Heizungsanlagen, insbesondere Heizungsan-lagen, Kesseln, Haushaltsgeräten (Waschmaschinen, Bügelmaschinen, Kaffeemaschinen usw.), was zu zusätzlichen Aufwendungen und sogar Beeinträchtigung des Komforts führt. Eine weitere Wirkung von hartem Wasser ist das geringe Schäumen von Wasch- und Seifenspülmitteln, was zu erhöhten Instandhaltungskosten für die Wohnung führt. Andere Effekte von hartem Wasser sind von ästhetischer Natur, wie die Ablagerungen auf sanitären und Komfortgegenständen wie Kleidungabnutzung, Haut- und Haare trocknen
Wasserenthärtung über Ionenaustausch ist die einfachste und bequemste Methode, die Wasserhärte zu reduzieren. Die Ionenaustauschharze ziehen an und zurückhalten die in Wasser gelösten Calcium- und Magnesium-Ionen, um diese mit Natriumionen zu ersetzen. Falls das Wasservolumen zwischen zwei Regenerierungen verbraucht wird, wird das Harz mit Natriumchloridlösung (Salzlösung) regeneriert. Die Regenerierungszyklen sind: Backwash (Rückstrom), Brine draw (Versorgung mit Salzlösung), Rinse (Spülung) und Refill (Nachfüllung).
Behandlungsanlagen <aquaPUR> MIX
Die <aquaPUR> MIX-Behandlungsanlagen bewirken die Reduktion der Konzentrationen von mehreren Substanzen in einem einzigen Schritt auf Basis des Ecomix-Filtermittels.Das Filtermittel in den MIX-Stationen ist eine Mischung von Medien mit Ionenaustauschharzen mit syn-ergistischen Eigenschaften. Im Inneren des Behandlungssystems wird das Filterbett in Schichten ab-gelagert, welche komplementär arbeiten, wodurch die Härte, das Eisen, das Mangan, Ammoniak und organische Stoffe aus dem Wasser reduziert werden. Die Regeneration des Mediums erfolgt mit Natri-umchlorid Lösung genauso wie bei Weichmacher
DE

58
1.1 Wasserenthärtungsstationen SOFTM
odel
lSO
FT 1
0SO
FT 1
8SO
FT 2
5SO
FT 3
7SO
FT 5
0K
ennz
eich
enA
QU
A09
1100
1000
8A
QU
A09
1100
1801
5A
QU
A09
1100
2502
0A
QU
A09
1100
3702
5A
QU
A09
1100
5003
0B
ypas
s ei
nges
chlo
ssen
JAJA
Aus
rüst
ungs
art
Kab
inet
t (H
arzb
ehäl
ter u
nd S
alzs
oleg
efäß
in d
erse
lben
K
örpe
r)si
mpl
ex (H
arzb
ehäl
ter u
nd S
alzs
oleg
efäß
, ge
trenn
t)S
trom
vers
orgu
ng23
0 V,
50
Hz
Ene
rgie
verb
rauc
h3W
Wan
nens
teue
rung
sart
Volu
men
ode
r Zei
tA
bmes
sung
en d
es A
n-sc
hlus
ses
IN/O
UT
[inch
]1”
Sch
lauc
hans
chlu
ss
Kan
alis
atio
n[m
m]
12
Nen
ndur
chflu
ss[m
³/h]
0,8
1,5
22,
53
Arb
eits
druc
k[b
ar]
2–6
Dur
chsc
hnitt
liche
s Fi
lterv
olum
en[li
ter]
1018
25
Sal
zbeh
älte
rkap
azitä
t[k
g]23
4362
8080
Was
serte
mpe
ratu
r [°
C]
5 –
30Zy
klis
che
Kapa
zitä
t = m
³ x °G
3054
7511
015
0U
ngef
ähre
r Ver
brau
ch v
on
Sal
z au
f Reg
ener
atio
n
[kg]
1,0
1,8
2,5
3,7
5
Ung
efäh
rer W
asse
rver
-br
auch
für e
ine
Reg
ener
atio
n[li
ter]
100
180
250
370
500
Ung
efäh
re R
egen
era-
tions
zeit
[m
in]
3558
8311
615
1
Abs
tand
zw
isch
en B
asis
un
d Ve
rbin
dung
[mm
]50
573
596
514
4512
95
Abs
tand
zw
isch
en B
asis
un
d IN
/OU
T K
anal
isat
ion-
sans
chl
[mm
]47
570
593
514
1512
65
Abs
tand
zw
isch
en B
asis
un
d Ü
berla
uf-V
erbi
ndun
g[m
m]
290
495
730
680
680
A[m
m]
590
330
470
880
880
B[m
m]
330
330
470
335
335
C[m
m]
470
330
470
--
H[m
m]
--
-15
313
8Ø
D[m
m]
--
-27
032
0
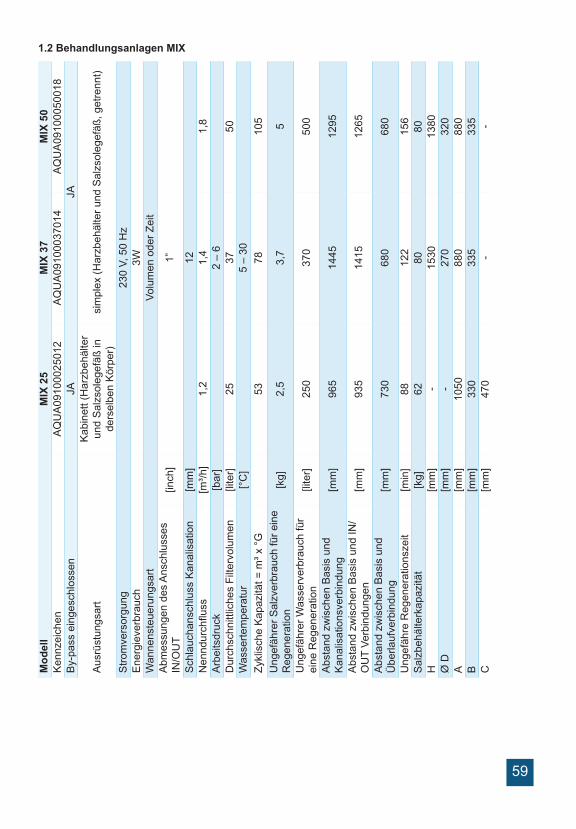
59
1.2 Behandlungsanlagen MIXM
odel
lM
IX 2
5M
IX 3
7M
IX 5
0K
ennz
eich
enA
QU
A09
1000
2501
2A
QU
A09
1000
3701
4A
QU
A09
1000
5001
8B
y-pa
ss e
inge
schl
osse
nJA
JA
Aus
rüst
ungs
art
Kab
inet
t (H
arzb
ehäl
ter
und
Sal
zsol
egef
äß in
de
rsel
ben
Kör
per)
sim
plex
(Har
zbeh
älte
r und
Sal
zsol
egef
äß, g
etre
nnt)
Stro
mve
rsor
gung
230
V, 5
0 H
zE
nerg
ieve
rbra
uch
3WW
anne
nste
ueru
ngsa
rtVo
lum
en o
der Z
eit
Abm
essu
ngen
des
Ans
chlu
sses
IN
/OU
T[in
ch]
1”
Sch
lauc
hans
chlu
ss K
anal
isat
ion
[mm
]12
Nen
ndur
chflu
ss[m
³/h]
1,2
1,4
1,8
Arb
eits
druc
k[b
ar]
2 –
6D
urch
schn
ittlic
hes
Filte
rvol
umen
[lite
r]25
3750
Was
serte
mpe
ratu
r [°
C]
5 –
30Zy
klis
che
Kap
azitä
t = m
³ x °
G53
7810
5U
ngef
ähre
r Sal
zver
brau
ch fü
r ein
e R
egen
erat
ion
[kg]
2,5
3,7
5
Ung
efäh
rer W
asse
rver
brau
ch fü
r ei
ne R
egen
erat
ion
[lite
r]25
037
050
0
Abs
tand
zw
isch
en B
asis
und
K
anal
isat
ions
verb
indu
ng[m
m]
965
1445
1295
Abs
tand
zw
isch
en B
asis
und
IN/
OU
T Ve
rbin
dung
en[m
m]
935
1415
1265
Abs
tand
zw
isch
en B
asis
und
Ü
berla
ufve
rbin
dung
[mm
]73
068
068
0
Ung
efäh
re R
egen
erat
ions
zeit
[min
]88
122
156
Sal
zbeh
älte
rkap
azitä
t [k
g]62
8080
H
[mm
]-
1530
1380
Ø D
[mm
]-
270
320
A [m
m]
1050
880
880
B
[mm
]33
033
533
5C
[mm
]47
0-
-

60
2. EINRICHTUNG DER SYSTEMEN
2.1. Montageort□ Es muss frei von Frost und direktem Kontakt mit den Sonnenstrahlen sein. □ Es muss trocken sein.□ Es DARF NICHT überschwemmbar sein.□ Die Oberfläche muss flach sein und das Gewicht der Station tragen können. Man darf die Station nicht auf geneigten Flächen montieren.□ Es sollte so nah wie möglich an der Abwasserleitung sein. Der Schlauch, der mit dem Überlauf der Station verbunden ist, und der Schlauch, der mit dem Regenerationswasserausgang verbunden ist, sollten so nah wie möglich an einem Entwässerungssiphon/ Wasserabfluss sein, da die Ströme durch diese Schläuche gravitativ sind.
2.2 Montagebedingungen (Siehe Abbildung 1, seite 4)□ Es muss ein mechanischer Filter von bis zu 100 Mikron installiert werden.□ Wir empfehlen, die Station und den mechanischen Filter auf Bypass zu installieren.□ Wir empfehlen, einen Rückschlagventil an die Wasserenthärtung-/ Behandlungsstation anzuschließen, um einen Rückfluss des Wassers zu verhindern.□ Wir empfehlen, Manometer vor und nach der Wasserbehandlungssystem zu montieren.□ Verwenden Sie für die Stromversorgung nur den mitgelieferten Transformator (12V).□ Externe Verbraucher (z.B. das Bewässerungsversorgungsventil) werden vor dem Verunreinigungsfilter und der Ionenaustauschharz - Behandlungsanlage montiert. (Siehe Abbildung 1, seite 4)
2.3 Für die Installation und Inbetriebnahme erforderliche Komponenten
Diese sind im Lieferumfang NICHT enthalten.□ Schlauch mit 12 mm Innendurchmesser und Schlauchschellen zum Anschluss des Überlaufs an den Abwasserkanal und an den Wasch-/ Regenerations-Wasserablauf.□ Salztabletten mit einer Reinheit von über 99,5% NaCl. Die Verwendung anderer Salze führt zu einem Abbau des Harzes / Filtermittels und zum Systemversagen.
2.4 Schritte der Stationseinbau
Wir empfehlen den Einbau des Gerätes durch einen Fachmann.Überprüfen Sie vor der Installation, ob die Station vollständig ist und ob sie nicht durch Handhabung und Transport beschädigt wurde. Wenn Sie meinen, dass etwas nicht stimmt, wenden Sie sich bitte an die Firma, wo Sie die Station gekauft haben.
Bitte beachten Sie:
Der Benutzer hat die Möglichkeit, die Wassershärte nach der Station anzupassen. Durch das Drehen der Mischwanne im Uhrzeigersinn kann die Härte des Wassers beim Verlassen der Station erhöht werden. Durch das Drehen gegen den Uhrzeigersinn kann die Härte des Wassers beim Verlassen der Station reduziert werden. (Siehe Abbildung 2, seite 5)
In der Bypass-Position sind die Hähne geschlossen, fließt der Wasserfluss NICHT durch die Station, es können Interventionen an der Station vorgenommen werden, ohne dass die Wasserversorgung unter-brochen werden muss. (Siehe Abbildung 3, seite 5)
Aufgrund der Tatsache, dass, je nach dem Fall, der Abstand zwischen dem Abwasserkanal und der Station unterschiedlich ist, sind der 12-mm-Schlauch und die 12-22 mm Schlauchschellen nicht enthalten, diese sind separat je nach Bedarf zu kaufen.!

61
2.4.1 Schritte beim Einbau der Kabinettsystemen (mit dem Harzbehälter und der Salzbehälter im gleichen Körper)
• Stellen Sie das System auf den dafür vorgesehenen Platz, gemäß den Bedingungen bei den Ziffern 2.1 und 2.2.• Führen Sie die Verbindungsstücke im Bypass (Siehe Abbildung 6, seite, 6, Foto 15,16) ein• Verbinden Sie die Stromversorgungsanlage mit dem Stationsbypass (Siehe Abbildung 4, seite 5) am Eingang mit dem "→" -Zeichen, stationsorientiert (die Behandlungsstation kommt mit dem vormontierten Bypass-System, die beiden Bypass-Anschlüsse sind von 1“ mit Außengewinde)• Um die Röhre mit dem Stationsbypass zu verbinden, verwenden Sie Dichtungsmaterialien (Teflon, etc.)• Das Wassersystem zu den Verbrauchern wird am Bypass verbunden, am Ausgang mit dem "→" Schild, das auf die Außenseite der Station zeigt. (Siehe Abbildung 4, seite 5)• Verbinden Sie den Überlaufanschluss der Station an der Kanalisation mit Hilfe des gekauften 12 mm Schlauchs und der 12 - 22 mm Schlauchschellen. (Siehe Abbildung 5, seite 5)• Verbinden Sie den Regenerationswasserabflussverbindung der Station mit dem 2 mm Schlauch und den 12 - 22 mm Schlauchschellen. (Siehe Abbildung 5, seite 5)• Stellen Sie sicher, dass sich der Bypass in Bypass-Position befindet (mit geschlossenen Ventilen) (Siehe Abbildung 3, seite 5)
Inbetriebnahme:
• Während der ganzen Montageperiode sind die Bypass-Ventile geschlossen (es gibt kein Wasser in der Station).• Verbinden Sie die Stromversorgung über den mitgelieferten Transformator (12V).• Das Bedienfeld des Steuerventils wird überwacht. • Entfernen Sie die Luft von der Station wie folgt:- Am Bedienfeld stellt man ein [Stepwise Regen/Backwashing]: Drücken Sie [Menu] und wählen Sie mit "▼" [Stepwise Regen] und drücken Sie auf [SET/REGEN] ---> [Backwashing]- Öffnen Sie ½ Hub des Bypass-Ventils beim Stationseinlauf, gekennzeichnet mit einem Pfeil, der auf der Wanne zeigt- Überprüfen Sie, ob Wasser durch den Abflussschlauch für das Wasch- / Regenerationswasser fließt• Das Bypass-Ventil am Eingang der Signalstation, gekennzeichnet mit einem Pfeil, der auf der Wanne zeigt, wird komplett geöffnet• Überprüfen Sie, ob sauberes Wasser durch den Abflussschlauch für das Waschwasser fließt• Nachdem das Wasser klar ist, wird [SET] mehrmals gedrückt, bis [SYSTEM RETURN] erscheint.• Wenn die Luft nicht entfernt ist, oder das Wasser nicht klar ist, muss man den [Backwash] wiederholen• Den Stationsabflusshahn wird geöffnet• Die Luft wird aus dem Luftkissen ausgelassen, das Luftkissen wird aus dem Salzlösungsbehälter entnommen und das Behälter wird mit Salz versorgt und 10 Liter Wasser
Schwerkraftfluss sichern in den Schläuchen zwischen den Überlauf, bzw. der Waschwasserabfluss / Regeneration und den Entwässerungsanschluss. Vergewissern Sie sich, dass die Schläuche nicht verstopft sind und dass das Abwässer nicht dadurch beim Überlaufanschluss oder beim Ab-flussanschluss zurückdrängen kann.!Schließen Sie die Station NICHT direkt an 220 V an.!

62
2.4.2 Einbauschritte für den getrennten Harzbehälter und Salzsolegefäß (simplex)
Die Stationen mit getrennten Harzbehälter und Salzsolegefäß werden teilweise montiert geliefert. Die endgültige Montage erfolgt am Montageort. Für die Montage führen Sie folgende Schritte aus: (Siehe Abbildung 6, seite 6)Stellen Sie das System auf den dafür vorgesehenen Platz, gemäß den Bedingungen bei den Ziffern 2.1 und 2.2.
(1) Nach dem Aufsetzen des Harzbehälters (FRP) wird drinnen das Mittelrohr mit dem vormontierten Diffusor an der Unterseite des Tanks in der vorgegebenen Position (montiert in der Regel) montiert.
(2) Das Niveau an der Oberseite des Mittelrohres mit dem Diffusor sollte auf dem gleichen Niveau sein wie die maximale Öffnung des FRP-Tanks + 5mm.
(3), (4) Decken Sie die Oberseite des Zentralrohres.
(5) Füllen Sie das Filtermittel im FRP-Tank auf. Achten Sie darauf, dass das Filtermittel nicht in das Ze-ntralrohr gelangt. Beim Auffüllen des FRP-Reservoirs mit dem Filtermittel ist darauf zu achten, dass das Zentralrohr senkrecht und in der Mitte des Tanks bleibt.Achtung!Sie dürfen nicht das Zentralrohr mit vorher angebrachtem Diffusor in der Anfangsstellung ausnehmen.
(6) Entfernen Sie die Abdeckung des Zentralrohres.
(7) Reinigen Sie die Harzbehältergewinde (FRP) von den Filtermittelpartikeln (kann mit Wasser abge-spült werden).
(8) Montieren Sie den oberen Diffusor (obere Saughaube) auf dem Ventil wie folgt: Es gibt 4 Befesti-gungsfedern im Inneren des Ventils und 4 entsprechende Schlitze auf der Saughaube. Diese werden durch Festdrücken zusammengeklemmt, so dass die Federn in die Schlitzen durchdringen, dann wird die Saughaube gedreht. Die Montage der Saughaube auf dem Ventil wird überprüft, indem man ver-sucht, die Saughaube zu entfernen.
(9) Die Bauteilgruppe Steuerventil mit angebrachtem oberem Diffusor wird durch Drücken in das Zentral-rohr eingesetzt. Der obere Diffusor, der im Ventil montiert ist, muss das Zentralrohr umhüllen.
(10) Schrauben Sie das Steuerventil auf den Harzbehälter (FRP).
(11) Heben Sie den Deckel der Solebehälter an und setzen Sie das Rohr durch das vorhandene Loch ein.
(12), (13) Schrauben Sie die Sole-Bogenstückmutter im Ventil ab, stecken Sie das Rohr durch die Mut-ter, so dass es etwa 1 cm verläuft. Setzen Sie den kegelstumpfförmigen Teil in das Rohr ein.
(14) Schrauben Sie die Baugruppe in das Ventil.
(15) Entfernen Sie die Bypass-Sicherungen und schieben Sie die Verbindungsklemmen durch Drücken ein.
(16) Montieren Sie die Bypass-Sicherungen.
(17) Bringen Sie den Bypass in das Ventil.
(18) Die Verbindung zwischen dem Bypass und dem Ventil wird durch Metallclips gewährleistet.
(19) Setzen Sie den Durchflusssensor in den Bypass ein.
(20) Das System ist komplett.
Bitte beachten Sie weiter die Installationsschritte (siehe 2.4.1) für die Schrank-Variante.Bitte beachten Sie weiter die Inbetriebnahmeschritte für die Schrank-Variante.

63
3. VENTILPROGRAMMIERUNG
3.1 Beschreibung des Bedienfeldes des Ventils
MENU Beschreibung
MENU OBEN
EINSTELLEN UNTEN
1 Current Time Setting - Datums- und Uhrzeiteinstellung2 Regeneration Time Setting - Regenerationszeiteinstellung3 Regeneration Cycle Setting - Einstellung der Anzahl der Tage für die Schutzregeneration4 Regeneration Meter Setting - Volumen des regenerierten Wassers
5 Step Wise Regen.Stufenregeneration
5.1 Backwash. - Rückspülung5.2 Brine - Salzsole5.3 Rinse - Spülung5.4 Refill - Nachfüllung
6 Manual Regeneration - Manuelle Regeneration
7 Advanced setting(Erweiterte Einstellungen)
7.1 Backwash Duration - Einstellung der Rückspülungsdauer7.2 Brine Draw Duration(not applicable for filter valve) - Einstellung der Salzsolezufuhr7.3 Rinse Duration - Einstellung der Spülungsdauer7.4 Refill Duration Time Setting(not applicable for filter valve)- Einstellung der Wiederfüllungsdauer des Salzsolenbehälters
7.5 Regen. Mode- Regenerationsart
7.5.1 Time Clock- Regeneration abhängig von Zeit7.5.2 Meter Immediately- Regeneration sofortig, volumetrisch7.5.3 Meter Delayed Regeneration volume-trisch, verzögert7.5.4 Mixed- Gemischte Regeneration
7.6 Load default- Rückkehr zur Werkseinstellung
Die Systemventile sind auf MIXED REGENERATION-Modus eingestellt.!

64
3.2 Systeminitialisierung
Nachdem das Ventil an die Stromversorgung angeschlossen wurde, wechselt es automatisch in die Arbeitsstellung und die folgende Meldungen werden auf dem Bildschirm angezeigt: System intializing (Systeminitialisierung), Please wait (Bitte warten)
3.3 Standby StellungWenn das Ventil im Timer-Modus programmiert ist, erscheint folgende Meldung auf dem Ventilschirm:
Wenn das Ventil im Meter-Modus (volumenabhängige Regeneration) programmiert ist, erscheint folgen-de Meldung auf dem Ventilschirm:
3.4 Einstellung der Parameter
Um die Parameter einzustellen, drücken Sie die MENU-Taste „ ”. Für die Sicherheit, nach 3 Minuten Nichtbenutzungszeit, kehrt das Menü zum Stand-by und verriegelt sich. In diesem Fall, um auf das Ventil-Parametereinstellfenster zuzugreifen, müssen Sie die MENU-Taste 5 Sekunden lang gedrückt halte „ ”. Nachdem Sie auf das MAIN MENU (Hauptmenü) zugegriffen haben, werden die Ventilparameter ange-zeigt. Um einen Parameter mit der AUF-Taste "▲" (UP) auszuwählen, navigieren Sie durch das Menü nach oben. Drücken Sie die Abwärts-Taste "▼" (DOWN), um das Menü nach unten zu navigieren. Na-chdem Sie einen Parameter ausgewählt haben, drücken Sie die Taste SET „■”, um darauf zuzugreifen. Im Hauptmenü werden die Parameter wie folgt angezeigt:
3.4.1 Current time setting (Datums- und Uhrzeiteinstellung)
Durch den Zugriff auf diesen Parameter mit der SET-Taste "■" erscheint folgendes Fenster:
System initializingPlease wait
SysteminitialisierungBitte Warten
Current day/Time00-00-0000 00:00:00
Time of Next Regen00-00-0000 00:00:00
Datum/Zeit00-00-0000 00:00:00
Datum und Zeit der nächsten Regeneration00-00-0000 00:00:00
Current day/Time00-00-0000 00:00:00
Residual/Total Water00.00m3 0000.00m3
Datum/Zeit00-00-0000 00:00:00
Wassermenge Gesamtbis zum nächsten benutzteRegeneration Wassermenge00.00m3 0000.00m3
꞊꞊꞊꞊꞊System Time꞊꞊꞊꞊꞊00-00-0000 00:00
Press to cancel Press ■ to confirm
꞊꞊꞊꞊꞊Datum und Uhrzeit꞊꞊꞊꞊꞊00-00-0000 00:00
Drücken um zu beenden ■ Drücken um zu bestätigen
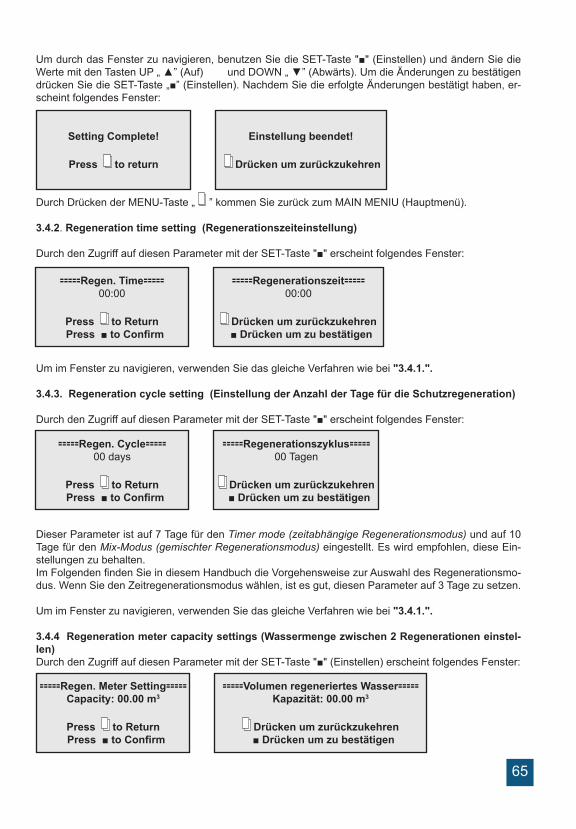
65
Um durch das Fenster zu navigieren, benutzen Sie die SET-Taste "■" (Einstellen) und ändern Sie die Werte mit den Tasten UP „ ▲” (Auf) und DOWN „ ▼” (Abwärts). Um die Änderungen zu bestätigen drücken Sie die SET-Taste „■” (Einstellen). Nachdem Sie die erfolgte Änderungen bestätigt haben, er-scheint folgendes Fenster:
Durch Drücken der MENU-Taste „ ” kommen Sie zurück zum MAIN MENIU (Hauptmenü).
3.4.2. Regeneration time setting (Regenerationszeiteinstellung)
Durch den Zugriff auf diesen Parameter mit der SET-Taste "■" erscheint folgendes Fenster:
Um im Fenster zu navigieren, verwenden Sie das gleiche Verfahren wie bei "3.4.1.".
3.4.3. Regeneration cycle setting (Einstellung der Anzahl der Tage für die Schutzregeneration)
Durch den Zugriff auf diesen Parameter mit der SET-Taste "■" erscheint folgendes Fenster:
Dieser Parameter ist auf 7 Tage für den Timer mode (zeitabhängige Regenerationsmodus) und auf 10 Tage für den Mix-Modus (gemischter Regenerationsmodus) eingestellt. Es wird empfohlen, diese Ein-stellungen zu behalten.Im Folgenden finden Sie in diesem Handbuch die Vorgehensweise zur Auswahl des Regenerationsmo-dus. Wenn Sie den Zeitregenerationsmodus wählen, ist es gut, diesen Parameter auf 3 Tage zu setzen. Um im Fenster zu navigieren, verwenden Sie das gleiche Verfahren wie bei "3.4.1.".
3.4.4 Regeneration meter capacity settings (Wassermenge zwischen 2 Regenerationen einstel-len)Durch den Zugriff auf diesen Parameter mit der SET-Taste "■" (Einstellen) erscheint folgendes Fenster:
Setting Complete!
Press to return
Einstellung beendet!
Drücken um zurückzukehren
꞊꞊꞊꞊꞊Regen. Time꞊꞊꞊꞊꞊00:00
Press to Return Press ■ to Confirm
꞊꞊꞊꞊꞊Regenerationszeit꞊꞊꞊꞊꞊00:00
Drücken um zurückzukehren ■ Drücken um zu bestätigen
꞊꞊꞊꞊꞊Regen. Cycle꞊꞊꞊꞊꞊00 days
Press to Return Press ■ to Confirm
꞊꞊꞊꞊꞊Regenerationszyklus꞊꞊꞊꞊꞊00 Tagen
Drücken um zurückzukehren ■ Drücken um zu bestätigen
꞊꞊꞊꞊꞊Regen. Meter Setting꞊꞊꞊꞊꞊Capacity: 00.00 m3
Press to Return Press ■ to Confirm
꞊꞊꞊꞊꞊Volumen regeneriertes Wasser꞊꞊꞊꞊꞊Kapazität: 00.00 m3
Drücken um zurückzukehren ■ Drücken um zu bestätigen

66
Dieser Parameter ist werkseitig auf 6 m³ eingestellt.
Also: Die zyklische Kapazität für jede Station befindet sich am Anfang dieses Handbuchs, in Kapitel "1. Modelle und technische Eigenschaften".Die Härte ist aus dem Analyse-Bulletin des zu behandelnden Wassers zu entnehmen. (Um die Analysen durchzuführen bitte setzen Sie sich in Verbindung mit der Fa. Valrom Industrie)
Berechnungsformel:Wassermenge zwischen 2 Regenerationen = Zyklische Kapazität/ Härt =[m³]
Beispielrechnung:Zyklische Kapazität = 75 für „Wasserenthärtestation <aquaPUR> SOFT 25” (gemäß dem Kapitel „1. Modelle und technische Eigenschaften“)Wasserhärte = 15 ºGWassermenge zwischen 2 Regenerationen = Zyklische Kapazität / Härte = 75/15 = 5 [m³]
Nach Durchführung der Berechnung wird im entsprechenden Fenster bei Capacity (Kapazität) das Ergebnis eingegeben. Um im Fenster zu navigieren, verwenden Sie das gleiche Verfahren wie bei "3.4.1". Zu diesem zeitpunkt ist die Station funktionsfähig. Die folgenden einstellungen sind für autorisiertes Personal.
3.4.5. Stepwise regeneration (Stufenregeneration)
Ein Harzregenerationszyklus besteht aus mehreren Schritten in folgender Reihenfolge:• Backwash (Rückspülung des Harzbettes)• Brine draw (Salzsolezufuhr des Harzbettes)• Rinse (Spülung des Harzbettes)• Refil (Wiederauffüllung des Salzsolegefäßes mit Wasser)Durch den Zugriff auf diesen Parameter mit der SET-Taste "■" können Sie wahlweise nur einen der Schritte eines Regenerationszyklus nach Bedarf durchführen:
Zuerst beginnt das Ventil automatisch mit Backwash, indem es das folgende Fenster öffnet:
Wenn keine der Ventiltasten gedrückt wird, schließt das Ventil den Backwashing-Schritt (30 minuten) ab und kehrt zum MAIN MENU (Hauptmenü) zurück, ohne die weitere Schritte durchzuführen.Wenn das Ventil den Backwash-Schritt beendet hat, drücken Sie eine beliebige Taste am Ventil, es geht zum nächsten Schritt und zeigt:
! Dieser Parameter ist für den korrekten Betrieb der Station sehr wichtig und wird vom Betreiber eingeführt. Es ist unterschiedlich von einer Situation zur anderen.Um diesen Parameter korrekt zu berechnen, müssen Sie die Wasserhärte und die zyklische Kapazität der Station kennen, die Sie gekauft haben.
Backwashing...
Any Key to Cancel
Rückspülung...
Beliebige Taste drücken um zu beenden
Brine Drawing...
Any Key to Cancel
Salzsolezufuhr...
Beliebige Taste drücken um zu beenden
!

67
Wenn keine der Ventiltasten gedrückt wird, schließt das Ventil den Brine Drawing-Schritt (60 minuten) ab und kehrt zum MAIN MENU (Hauptmenü) zurück, ohne die weitere Schritte durchzuführen.Wenn während das Ventil die Brine Drawing-Stufe durchführt, eine beliebige Ventiltaste gedrückt wird, geht es zum nächsten Schritt und zeigt:
Wenn keine der Ventiltasten gedrückt wird, schließt das Ventil den Rinsing-Schritt (30 minuten) ab und kehrt zum MAIN MENU (Hauptmenü) zurück, ohne die weitere Schritte durchzuführen.Wenn während das Ventil die Rinsing-Stufe durchführt, eine beliebige Ventiltaste gedrückt wird, geht es zum nächsten Schritt und zeigt:
Wenn keine der Ventiltasten gedrückt wird, schließt das Ventil den Refilling-Schritt (30 minuten) ab und kehrt zum MAIN MENU (Hauptmenü) zurück.Wenn während das Ventil die Refilling-Stufe durchführt, eine beliebige Ventiltaste gedrückt wird, kehrt es zum MAIN MENU (Hauptmenü) zurück.
3.4.6. Manual regen (Manuelle Regeneration)
Das Ventil hat die Möglichkeit, durch auf diesen Parameter zuzugreifen, um einen ganzen Regenera-tionszyklus durchzuführen, wie folgt:Es startet mit dem Backwash-Schritt, dann schreitet es automatisch durch jeden Schritt, Brine Draw, Rinse, Refill und kehrt automatisch zum MAIN MENU (Hauptmenü) zurück. Es startet den Betrieb wieder nach Abschluss der gesamten Regenerationsprozess.Durch den Zugriff auf diesen Parameter mit der SET-Taste "■" (Einstellen) erscheint folgendes Fenster:
3.4.7. Advanced settings (Erweiterte Einstellungen)Durch den Zugriff auf diesen Parameter mit der SET-Taste "■" (Einstellen) erscheint folgendes Fenster:
Rinsing...
Any Key to Cancel
Spülung...
Beliebige Taste drücken um zu beenden
Refilling...
Any Key to Cancel
Nachfüllung...
Beliebige Taste drücken um zu beenden
Regenerating...Any Key to Cancel
Backwashing...
5%
Regeneration...Beliebige Taste drücken um zu beenden
Rückspülung...
5%
꞊꞊꞊꞊꞊Advanced Setting꞊꞊꞊꞊꞊
Backwash duration Brine draw duration Rinse duration Refill duration Regen.Mode Load Default
꞊꞊꞊꞊꞊Erweiterte Einstellungen꞊꞊꞊꞊꞊
Dauer der Rückspülungsdauer Dauer der Salzsolezufuhr Dauer der Spülung Dauer der Wiederfüllung des Salzsolenbehälters Regeneration Modus Rückkehr zur Werkseinstellung

68
Benutzen Sie die Tasten UP „▲” (Auf) und DOWN „▼” (Abwärts) um in diesem Fenster zu navigie-ren. Um ein Parameter zuzugreifen verwenden Sie die SET-Taste „■”. Um zum vorherigen Menü zu-rückzukehren, verwenden Sie die MENU-Taste „ ”.
3.4.7.1. Backwash duration time settings (Einstellung der Rückspülungsdauer)
Benutzen Sie die Tasten UP „▲” (Auf) und DOWN „▼” (Abwärts) um die Werten zu ändern und die taste SET „■” um die Änderungen zu speichern. Nach dem Speichern der Änderungen erscheint folgendes Fenster:
Durch Drücken der MENU-Taste „ ” des Ventils kehrt es zum vorherigen Menü zurück. Wenn 1 Minute lang keine Taste gedrückt wird, kehrt das Ventil in das Standby-Menü zurück. Jeder geänderte Wert wird zum Ausgangswert zurückkehren, wenn dieser nicht mit der SET-Taste gespeichert wurde „■”.
3.4.7.2. Brine draw duration time setting (Einstellung der Dauer der Salzsolezufuhr)
Benutzen Sie die Tasten UP „▲” (Auf) und DOWN „▼” (Abwärts) um die Werten zu ändern und die taste SET „■” um die Änderungen zu speichern. Nach dem Speichern der Änderungen erscheint folgendes Fenster:
Durch Drücken der MENU-Taste „ ” des Ventils kehrt es zum vorherigen Menü zurück. Wenn 1 Minute lang keine Taste gedrückt wird, kehrt das Ventil in das Standby-Menü zurück. Jeder geänderte Wert wird zum Ausgangswert zurückkehren, wenn dieser nicht mit der SET-Taste gespeichert wurde „■”.
꞊꞊꞊꞊꞊Backwash Duration꞊꞊꞊꞊꞊00 minutes
Press to Return Press ■ to Confirm
꞊꞊꞊꞊꞊Regenerationszyklus꞊꞊꞊꞊꞊00 minuten
Drücken um zurückzukehren ■ Drücken um zu bestätigen
! Diesen Parameter NICHT ändern;Wenn die Station nicht ordnungsgemäß funktioniert, wenden Sie sich an S.C. Valrom Industrie, S.R.L.
Setting Complete!
Press to Return
Einstellung beendet!
Drücken um zurückzukehren
꞊꞊꞊꞊꞊Brine Draw Duration꞊꞊꞊꞊꞊00 minutes
Press to Return Press ■ to Confirm
==꞊Dauer der Salzsolezufuhr꞊==00 minuten
Drücken um zurückzukehren ■ Drücken um zu bestätigen
Setting Complete!
Press to Return
Einstellung beendet!
Drücken um zurückzukehren

69
3.4.7.3. Fast rinse duration time setting (Einstellung der Spülungsdauer)
Benutzen Sie die Tasten UP „▲” (Auf) und DOWN „▼” (Abwärts) um die Werten zu ändern und die taste SET „■” um die Änderungen zu speichern. Nach dem Speichern der Änderungen erscheint folgendes Fenster:
Durch Drücken der MENU-Taste „ ” des Ventils kehrt es zum vorherigen Menü zurück. Wenn 1 Minute lang keine Taste gedrückt wird, kehrt das Ventil in das Standby-Menü zurück. Jeder geänderte Wert wird zum Ausgangswert zurückkehren, wenn dieser nicht mit der SET-Taste gespeichert wurde „■”.
3.4.7.4. Refill duration time settings (Einstellung der Wiederfüllungsdauer des Salzso-lenbehälters)
Benutzen Sie die Tasten UP „▲” (Auf) und DOWN „▼” (Abwärts) um die Werten zu ändern und die taste SET „■” um die Änderungen zu speichern. Nach dem Speichern der Änderungen erscheint folgendes Fenster:
Durch Drücken der MENU-Taste „ ” des Ventils kehrt es zum vorherigen Menü zurück. Wenn 1 Minute lang keine Taste gedrückt wird, kehrt das Ventil in das Standby-Menü zurück. Jeder geänderte Wert wird zum Ausgangswert zurückkehren, wenn dieser nicht mit der SET-Taste gespeichert wurde „■”..
! Diesen Parameter NICHT ändern;Wenn die Station nicht ordnungsgemäß funktioniert, wenden Sie sich an S.C. Valrom Industrie, S.R.L.
꞊꞊꞊꞊꞊Rinse Duration꞊꞊꞊꞊꞊00 minutes
Press to Return Press ■ to Confirm
꞊꞊꞊꞊꞊Dauer der Spülung꞊꞊꞊꞊꞊00 minuten
Drücken um zurückzukehren ■ Drücken um zu bestätigen
Setting Complete!
Press to Return
Einstellung beendet!
Drücken um zurückzukehren
! Diesen Parameter NICHT ändern;Wenn die Station nicht ordnungsgemäß funktioniert, wenden Sie sich an S.C. Valrom Industrie, S.R.L.
꞊꞊꞊꞊꞊Refill Duration꞊꞊꞊꞊꞊00 minutes
Press to Return Press ■ to Confirm
꞊꞊꞊Wiederfüllungsdauer des Salzsolenbehälters꞊꞊꞊00 minuten
Drücken um zurückzukehren ■ Drücken um zu bestätigen
Setting Complete!
Press to Return
Einstellung beendet!
Drücken um zurückzukehren
Diesen Parameter NICHT ändern;Wenn die Station nicht ordnungsgemäß funktioniert, wenden Sie sich an S.C. Valrom Industrie, S.R.L.!

70
3.4.7.5. Select regeneration mode (Regenerationsmodus Auswählen)
In diesem Fenster können Sie den für Ihre Bedürfnisse am besten geeigneten Regenerationsmodus wählen.
Benutzen Sie die Tasten UP „▲” (Auf) und DOWN „▼” (Abwärts) um den gewünschten Parameter zu wählen und die SET-Taste „■” um den ausgewählten Parameter zu bestätigen. Drücken Sie die MENU-Taste „ ” um zum vorherigen Menü zurückzukehren.
Timer (Zeitabhängige Regeneration) - Die Station startet die Regeneration zur eingestellten Zeit und Datum, die sich aus der Anzahl für den Regenerationszyklus eingestellten Tagen ergibtMeter immediate (Sofortige volumetrische Regeneration) – die Station wird die Regeneration einleit-en, sobald die Wassermenge, die sie zwischen zwei Regenerationen verarbeiten kann, verbraucht wurde. Meter delayed (verzögerte volumetrische Regeneration) – Wenn die Menge, die sie bis zur nächsten Regeneration verarbeiten kann, 0 erreicht hat, wird die Station die Regeneration zur eingestellten Zeit einleiten (02:00 AM, werkseitig eingestellt)Mix regeneration (Gemischte Regeneration) – wenn die Menge, die sie bis zur nächsten Regenera-tion behandeln kann, 0 erreicht hat, wird die Station die Regeneration bei der ersten Gelegenheit, zur eingestellten Zeit einleiten; wenn die Anzahl Tagen, die eingestellt wurde, bevor der Wassermenge die sie zwischen zwei Regenerationen behandelt kann, 0 erreicht hat, dann wird die Station die Regenera-tion einleiten
Die Stationen werden werkseitig auf dem gemischte Regeneration - Modus eingestellt. Wir empfehlen Ihnen, diesen Regenerationsmodus zu behalten
3.4.7.6. Restore factory default settings (Rückkehr zur Werkseinstellung)
Drücken Sie die SET-Taste „■” um zur Werkseinstellung zurückzukehren. Durch Drücken der MENU-Taste „ ” des Ventils kehrt es zum vorherigen Menü zurück. Wenn 1 Minute lang keine Taste gedrückt wird, kehrt das Ventil in das Standby-Menü zurück. Jeder geänderte Wert kehrt zu seinem ursprüngli-chen Wert zurück, wenn diese nicht mit der SET-Taste „■” gespeichert wurde.
꞊꞊꞊꞊꞊Regen. Mode꞊꞊꞊꞊꞊
Timer Meter Immediate Meter Delayed Mix Regen
꞊꞊꞊꞊꞊Regenerationsmodus꞊꞊꞊꞊꞊
Zeitabhängige Regeneration Sofortige volumetrische Regeneration volumetrische Regeneration verzögert Gemischte Regeneration
Load Default
Press to cancel Press ■ to confirm
Rückkehr zur Werkseinstellung
Drücken um zurückzukehren ■ Drücken um zu bestätigen
! Wenn Sie zu den Werkseinstellungen zurückgekehrt sind, wenden Sie sich an den Personal Valrom, um die Einstellungen für Ihre Station wiederherzustellen.

71
4. VORSICHTSMASSNAHMEN• Vor irgendwelchen Wartungs- oder Reparaturarbeiten unterbrechen Sie die Stromversorgung, schließen Sie die Wasserzufuhrventile und entspannen Sie den Systemdruck.• Legen Sie keine Gewichte auf der Station.• Führen Sie Aufzeichnungen über den Salzverbrauch und bei Bedarf ausfüllen.• Überprüfen Sie regelmäßig die Anschlussdichtungen.• Überprüfen Sie regelmäßig die Uhrzeit und das Datum und korrigieren Sie diese bei Bedarf.• Der Filter vor der Station muss bei Bedarf gewartet und gewechselt werden.• Schützen Sie die Station und ihre Komponenten vor Feuchtigkeit.
5. STÖRUNGSBEHEBUNGPROBLEM URSACHE LÖSUNG
1.Wasserfluss wird niedriger
1. Versorgungsdruck niedrig 1. Versorgungsdruck erhöhen.2. Schmutzfilter verstopft. 2. Reinigen oder ersetzen Sie den
vor der Station montierten Filter.3. Filtermittelbett verstopft 3. Siehe Absatz 3.4. Steuerventil verstopft. 4. Ventil abbauen, überprüfen und
reinigen.5. Bypass defekt. 5. Bypass überprüfen und reparieren.
2. Qualität des behandelten Wassers niedriger.
1. Wasseranalyse ist falsch. 1. Wasseranalyse bitte erneut durchführen und Kontakt mit dem Verkäufer aufnehmen.
2. Die Qualität des Versorgung-swassers hat sich geändert.
2. Bitte Wasseranalyse durchführen und Kontakt mit dem Verkäufer aufnehmen.
3. Bypass in der falschen Position. 3. Bypass-Ventil in Betriebsposition bringen.
4. Aufwärtsrohr oder Dichtungen beschädigt.
4. Gerät abbauen, reparieren / Rohr ersetzen und Dichtungen erneuern oder schmieren wenn notwendig.
5. Filterbett verstopft. 5. Siehe Absatz 3.6. Im Antriebsschritt geht Filtermittel verloren.
6. Siehe Absatz 4.
7. ungeeignete / schwache Regen-eration des Filters.
7. Siehe Absatz 6.
8. Wasserverluste im Steuerventil. 8. Steuerventil abbauen, überprüfen und ersetzen, oder schmieren wenn notwendig.
3. Filterbett verstopft.
1. Waschwassermenge ungenü-gend.
1. Waschwassermenge überprüfen. Wenn der Versorgungsdruck innerhalb der genehmigten Grenzen liegt und der Wasserdurchfluss ungenügend ist, Entwässerungslinie überprüfen und reinigen /ersetzen wenn notwendig
2. Ungenügende Zeit für den Waschschritt.
2. Dauer des Waschschrittes erhöhen. (Kontakt aufnehmen mit dem Valrom-Kundendienst)
3. Oberer/unterer Diffusor verstopft. 3. Oberer/unterer Diffusor reinigen.
4. Filtermittel ist aus dem Behälter ausges-chieden.
1. Filtermittel angetrieben und in der Regenerationschritt ausgeschieden.
1. Oberer Diffusor überprüfen. Erset-zen wenn notwendig.
2. Filtermittel angetrieben und während des Betriebs ausgeschieden.
2. Unterer Diffusor überprüfen. Er-setzen wenn notwendig.

72
PROBLEM URSACHE LÖSUNG
5. Das Gerätregeneriert nicht
1. Stromversorgung ist aus. 1. Stromversorgung überprüfen.2. Salzmenge im Behälter ungenü-gend.
2. Salzniveau überprüfen und Be-hälter auffüllen.
3. Sole wird teilweise oder gar nicht während der Regenerationschritt extrahiert.
3. Siehe Absatz 6.
4. Steuerventil ist defekt oder Ein-stellungen wurden geändert.
4. Steuerventil und Einstellungen überprüfen.
5. Der Salzbehälter wurde nicht oder nicht genügend mit Wasser versorgt.
5. Siehe Absatz 7.
6. Salzsole ist teilweise oder gar nicht gesaugt in der Regenerations-schritt.
1. Niedriger Druck in der Was-serversorgungsanlage..
1. Versorgungsdruck überprüfen.
2. Salzsoleinjektor oder –rohr voll/verstopft.
2. Salzsoleinjektor oder -rohr von Salzsole reinigen.
3. Luftventil/Ventilator verstopft durch Salzkristallen.
3. Luftventil/Ventilator reinigen.
4. Hoher Druckverlust (Steuerventil Filtermittel oder Verteiler verstopft).
4. Siehe Absatz 1.4.
5. Salzsoleanlage ist nicht dicht, d.h. es wird auch Luft injiziert.
5. Dichtung überprüfen.
6. Einstellungen wurden geändert. 6. Kontakt mit dem Hersteller auf-nehmen.
7. Salzbehälter nicht genug / gar nicht mit Wasser geladen.
1. Versorgungswasserdruck niedrig. 1. Netzversorgungsdruck über-prüfen.
2. Salzsoleinjektor oder -rohr verstopft.
2. Salzsoleinjektor oder -rohr von Salzsole reinigen.
3. Ventilator blockiert. 3. Ventilator überprüfen und reinigen.4. Einstellungen wurden geändert. 4. Kontakt mit dem Hersteller auf-
nehmen.5. Der Schwimmer ist festgeblieben. 5. Schwimmer (nach oben) auf der
Stange ziehen.
8. Übermäßiger Ver-brauch von mit Salz geladen.
1. Einstellungen wurden geändert. 1. Kontakt mit dem Hersteller auf-nehmen.
2. Salzbehälter wird bei Regenera-tion mehr Wasser als notwendig.
2. Siehe Absatz 9.
9. Salzbehälter wird mit mehr Wasser geladen als notwendig.
1. Versorgungswasserdruck zu hoch.
1. Versorgungsdruck überprüfen.
2. Einstellungen wurden geändert. 2. Kontakt aufnehmen mit dem Hersteller.
10. Das Wasser schmeckt salzig.
1. Filtermittel wurde nicht genug gespült
1. Dauer der Operation erhöhen [Rinse -Spülung]
2. Niedriger Durchfluss während dem Waschen.
2. DLFC überprüfen und reinigen.
11. Wasser fließt stän-dig auf Abwasser.
1. Stromversorgung wurde während der Regeneration unterbrochen.
1. Stellen Sie den Ventil auf Bypass bis die Stromversorgung wieder aufgenommen wird.
2. Die Dichtungen des Abstandshal-tersystems sind beschädigt.
2. Überprüfen und ersetzen Sie die beschädigte Dichtungen.

73
6. MAXIMALE KONZENTRATIONEN IM EINGELEITETEN WASSER (ZUFLUSS)
SOFT Behandlungsstationen
Härte ………………………………………………………………...............42 °dH Eisen ……………………………………………………………………... 0,20 mg/lMangan ……………………………………………………………….......0,05 mg/lMikrobiologisch rein
MIX Behandlungsstationen
Härte …………………………………………………………….......….....42 °dHEisen ……….………………………………………………………..........15 mg/lMangan ………………………………………………………………....... 3 mg/lAmmonium ………………………………….………………………........ 4 mg/lChemischer Sauerstoffverbrauch.......................................................20 mg/l O2Gesamt gelöste Feststoffen ……………………………………….... 4000 mg/lMikrobiologisch rein
Valrom Service (Kundendienst): Tel: +4 0724.200.005
PROBLEM URSACHE LÖSUNG
12. Keine Anzeige auf dem Display
1. Keine Spannung. 1. Stromversorgung überprüfen, sowohl im Netz als auch beim Ventil.
2. Transformator defekt. 2. Transformator ersetzen.3. Elektronische Leiterplatte defekt. 3. Elektronische Leiterplatte erset-
zen.13. Auf dem Bildschirm erscheint die Meldung [System Maintenance]
1. Softwarefehler 1. Spannungszufuhr erneut starten.

74
Уважаемые партнеры,
Благодарим за то, что вы выбрали систему обработки воды с ионообменными смолами aquaPur от компании VALROM Industrie ООО.Перед использованием просим внимательно прочитать данную инструкцию об установку и пользовании.
Для дополнительной информации, просим посетить сайт www.aqua-pur.ro.
1. ВИДЫ СИСТЕМ И ТЕХНИЧЕСКИЕ ХАРАКТЕРИСТИКИ
Технология обрабротки / фильтрации с ионообменными смолами является одной из самых простых и доступных методов улучшения качества воды. Система обработки воды при помощи ионообменных смол улучшена через добавление других сред в целях снижения содержания в воде других загрязнителей, к примеру железа, аммиака.В данных инструкциях представлены условия установки и использования следующих систем обработки:- станции умягчения <aquaPUR> SOFT – на основе ионообменных смол,- станции обработки <aquaPUR> MIX – смесь разных фильтрирующих сред.
Станции умягчения <aquaPUR> SOFT
Жесткость воды является частой причиной для появления неисправностей установок обогревания, в особенности централей, бойлеров, электробытовых предметов (стиральных машин, утюгов, кофеварок и так далее), что приводит к дополнительным расходам и даже снижению комфорта жизни. Другим последствием жесткой воды является недостаточное вспенивание стиральных порошков и мыл, что приводит к росту расходов на поддержку дома. Другие эффекты жесткой воды имеют эстетический характер, к примеру налет на санитарных предметах и снижение комфорта в связи с повреждением одежды, сухости кожи и волос.
Умягчение воды через ионообмен является самым простым и дешевым методом снижения жесткости воды. Ионообменные смолы привлекают и задерживают ионы кальция и магния, растворенные в воде и они заменены ионами натрия. Когда израсходуется объем воды между двумя регенерациями, смола будет регенерирована при помощи раствора хлорида натрия (соляной смеси). Циклами регенерации являются: Backwash (Обратная промывка), Brine draw (Подача соляного раствора), Rinse (Ополаскивание) и Refill (Повторное наполнение).
Станция обработки <aquaPUR> MIX
Станции обработки <aquaPUR> MIX проводят снижение концентрации ряда веществ в одном этапе на основании фильтрующей среды Ecomix.Фильтрующая среда MIX является смесью сред, которая содержит ионообменные смолы имеющие синергические свойства. Внутри системы обработки, слои фильтрующего вещества установлены таким образом, чтобы работать в дополнении друг к другу, снижая в воде жесткость, содержание железа, мангана, аммиака и органических веществ. Восстановление среды осуществлено при помощи раствора хлорида натрия также как это происходит и в случае систем умягчения.
RU

75
1.1 Станции умягчения SOFT
Мод
ель
SOFT
10
SOFT
18
SOFT
25
SOFT
37
SOFT
50
Код
AQ
UA
0911
0010
008
AQ
UA
0911
0018
015
AQ
UA
0911
0025
020
AQ
UA
0911
0037
025
AQ
UA
0911
0050
030
Вкл
юче
нны
й ба
йпас
сД
АД
АТи
п ос
нащ
ения
каби
нет
(ем
кост
ь см
олы
и е
мко
сть
раст
вора
в о
дном
ко
рпус
е)ст
анци
й с
отде
льны
ми
емко
стям
и дл
я см
олы
и с
олян
ого
раст
вора
(sim
plex
)П
одач
а эл
ектр
ичес
тва
230
V, 5
0 H
zП
отре
блен
ие э
нерг
ии3W
Мод
уль
конт
роля
кла
пана
Volu
m s
au ti
mp
Разм
еры
сое
дине
ния
IN/O
UT
[инч
]1”
Сое
дине
ние
кана
лиза
ции
для
шла
нга
[мм
]12
Ном
инал
ьны
й де
бит
[м3 /ч
]0,
81,
52
2,5
3Ра
боче
е да
влен
ие[б
ар]
2–6
Объ
ем ф
ильт
рую
щей
ср
еды
[лит
ры]
1018
25Вм
ести
мос
ть е
мко
сти
для
соли
[кг]
2343
6280
80Те
мпе
рату
ра в
оды
[°C
]5
– 30
Цик
личе
ская
спо
собн
ость
=
м3 x
°Г
3054
7511
015
0П
рибл
изит
ельн
ое
потр
ебле
ние
соли
при
ре
гене
раци
и
[кг]
1,0
1,8
2,5
3,7
5
При
близ
ител
ьное
по
треб
лени
е во
ды п
ри
реге
нера
ции
[лит
ры]
100
180
250
370
500
При
близ
ител
ьное
вре
мя
реге
нера
ции
[мин
]35
5883
116
151
Расс
тоян
ие м
ежду
ос
ново
й и
соед
инен
ием
ка
нали
заци
и[м
м]
505
735
965
1445
1295
Расс
тоян
ие м
ежду
ос
ново
й и
соед
инен
иям
и IN
/ОU
T[м
м]
475
705
935
1415
1265
Расс
тоян
ие м
ежду
ос
ново
й и
соед
инен
ием
пе
рели
ва[м
м]
290
495
730
680
680
A[м
м]
590
330
470
880
880
B[м
м]
330
330
470
335
335
C[м
м]
470
330
470
--
H[м
м]
--
-15
313
8Ø
D[м
м]
--
-27
032
0
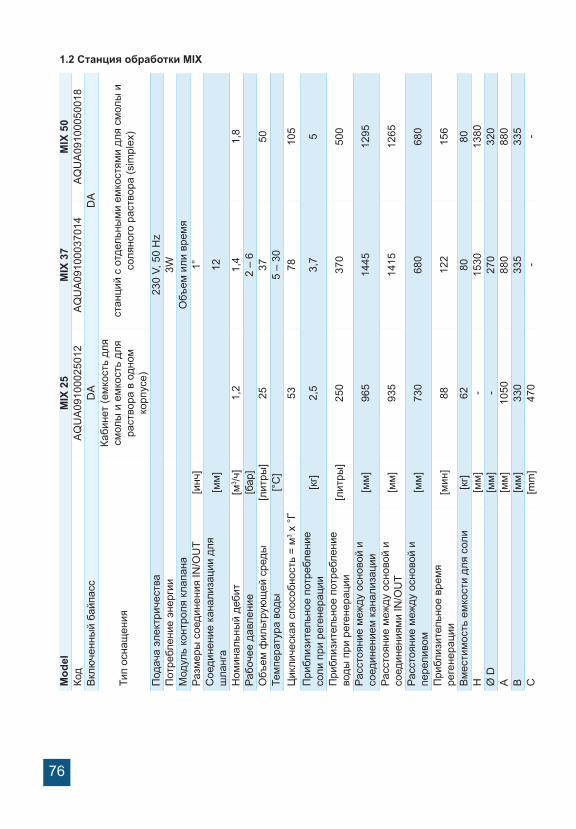
76
1.2 Станция обработки MIXM
odel
MIX
25
MIX
37
MIX
50
Код
AQ
UA
0910
0025
012
AQ
UA
0910
0037
014
AQ
UA
0910
0050
018
Вкл
юче
нны
й ба
йпас
сD
AD
A
Тип
осна
щен
ия
Каби
нет
(ем
кост
ь дл
я см
олы
и е
мко
сть
для
раст
вора
в о
дном
ко
рпус
е)
стан
ций
с от
дель
ным
и ем
кост
ями
для
смол
ы и
со
ляно
го р
аств
ора
(sim
plex
)
Под
ача
элек
трич
еств
а23
0 V,
50
Hz
Пот
ребл
ение
эне
ргии
3WМ
одул
ь ко
нтро
ля к
лапа
наО
бъем
или
вре
мя
Разм
еры
сое
дине
ния
IN/O
UT
[инч
]1”
Сое
дине
ние
кана
лиза
ции
для
шла
нга
[мм
]12
Ном
инал
ьны
й де
бит
[м3 /ч
]1,
21,
41,
8Ра
боче
е да
влен
ие[б
ар]
2 –
6О
бъем
фил
ьтру
ющ
ей с
реды
[лит
ры]
2537
50Те
мпе
рату
ра в
оды
[°C
]5
– 30
Цик
личе
ская
спо
собн
ость
= м
3 x °
Г53
7810
5П
рибл
изит
ельн
ое п
отре
блен
ие
соли
при
рег
енер
ации
[кг]
2,5
3,7
5
При
близ
ител
ьное
пот
ребл
ение
во
ды п
ри р
еген
ерац
ии[л
итры
]25
037
050
0
Расс
тоян
ие м
ежду
осн
овой
и
соед
инен
ием
кан
ализ
ации
[мм
]96
514
4512
95
Расс
тоян
ие м
ежду
осн
овой
и
соед
инен
иям
и IN
/ОU
T[м
м]
935
1415
1265
Расс
тоян
ие м
ежду
осн
овой
и
пере
ливо
м[м
м]
730
680
680
При
близ
ител
ьное
вре
мя
реге
нера
ции
[мин
]88
122
156
Вмес
тим
ость
ем
кост
и дл
я со
ли[к
г]62
8080
H
[мм
]-
1530
1380
Ø D
[мм
]-
270
320
A [м
м]
1050
880
880
B
[мм
]33
033
533
5C
[mm
]47
0-
-

77
2. УСТАНОВКА СИСТЕМ
2.1. Место для установки□ Место должно быть защищено против заморозков и прямого контакта с солнечными лучами.□ Место должно быть сухим.□ Место ДОЛЖНО быть ненаводняемым.□ Поверхность должна быть ровной и должно выдержать вес станции. Не разрешено установление станции на наклоненной поверхности.□ Рекомендуем установить станцию как можно ближе к канализации. Шланг соединенный к переливу станции и к эвакуации воды из системы регенерации должны находится как можно ближе к канализации, так как выброс из этих шлангов является гравитационным.
2.2 Условия монтажа Смотри рис. 1, стр. 4□ Необходимо установить механический фильтр в не более 100 микрон.□ Рекомендуем установку станции и механического фильтра на байпассе.□ Рекомендуем установку клапана направления после станции умягчения/обработки, с тем чтобы предупредить перелив воды.□ Рекомендуем установку манометров перед и после системы очистки воды.□ Для подачи электроэнергии будет использован только трансформатор в оснащении (12В).□ Внешние потребители (к примеру кран, который подает воду в систему орошения) должен быть установлен перед фильтром для примесей и станции обработки с ионообменными смолами. Смотри рис. 1, стр. 4
2.3 Компоненты необходимые для установки и пуска в действие систем
Эти части НЕ включены в пакет поставки.□ Шланг с внутренним диаметром в 12 мм и уплотнительными кольцами для соединения перелива к канализации и выбросного соединения воды промыва/регенерации.□ Соль типа таблетки чистотой в более 99,5% NaCl. Использование других типов соли приводит к деградации смолы/фильтрующей среды и нефункциональности системы.
2.4 Этапы установки станции
Рекомендуем установку оборудования специалистом.Перед установкой проверьте, если станция полностью оснащена и не повреждена в результате перевоза. Если заметны проблемы, просим обратиться в компанию поставившую станцию.
Информация:
Пользователь имеет возможность регулировать жесткость воды полученной из станции. Через поворот емкости для смеси по направлению вращения часовых стрелок, жесткость воды при выходе из станции может быть повышена, а через вращение в обратную сторону жесткость может быть понижена. (Смотри рис. 2, стр. 5)
В позиции service краны открыты, и весь поток воды протекает через станцию.В позиции bypass краны закрыты, поток воды НЕ протекает через станцию, вмешательства невозможны без необходимости прерывания подачи воды. (Смотри рис. 3, стр. 5)
В связи с тем, что, от случая к случаю, расстояние между канализацией и станцией различно, шланг в 12 мм и уплотнительные кольца в 12 -22 мм не включены, их следует приобрести отдельно в зависимости от потребностей.!

78
2.4 .1 Этапы установки систем типа кабинет (с емкостью для смолы и емкостью для соли в одном корпусе)
• Установите систему на обусловленное место при соблюдении условий предусмотренных в пунктах 2.1 и 2.2.• Введите коннекторы в байпасс (Смотри рис. 6, стр. 6 – фото 15,16)• Соедините установку подачи к байпассу станции (Смотри рис. 4, стр. 5), на входе которой поставлен знак „→” ориентированный к станции (станция обработки поставлена вместе с предварительно установленной системой байпасс, двумя соединениями байпасса в 1” с внешней резьбой)• Для соединения труб к байпассу станции следует использовать герметизирующие материалы (тефлон итд.)• Установка подачи воды потребителям соединяется к байпассу, на выходе со знаком „→” ориентированным к внешней части станции. (Смотри рис. 4, стр. 5)• Соедините соединение перелива станции к канализации при помощи шланга в 12 мм и приобретенных уплотнительных колец в 12 мм и колец в 12 - 22 мм. (Смотри рис. 5, стр. 5)• Соедините соединение выброса воды регенерации станции к канализации при помощи шланга в 12 мм и уплотнительных колец в 12 - 22 мм. (Смотри рис. 5, стр. 5)• Убедитесь, что байпасс находится в позиции bypass (с закрытыми кранами) (Смотри рис. 3, стр. 5)
Пуск в действие:
• На всем протяжении срока установки краны байпасса должны быть закрыты (нет воды в станции).• Подключается к электросети через трансформатор в оснащении 12V.• Будет мониторизировано пано контрольной емкости.• Из системы выводится воздух следующим образом:- Oтрегулируйте[Stepwise Regen/Backwashing]: Нажать [Menu] и выбрать используя „▼” до [Stepwise Regen] и нажать [SET/REGEN] ---> [Backwashing]- Открыть ½ ход крана байпасса со выхода в станцию указанную стрелой к емкости- Следует следить, чтобы по шлангу эвакуации воды промыва/регенерации текла вода• Открыть полностью кран байпасса со входа в станцию указанный стрелкой к емкости• Следить, чтобы на шланге эвакуации воды промывки текла чистая вода• Kогда вода прозрачная нажать [SET] последовательно пока появляется [SYSTEM RETURN].• Если вода не устранена или вода не течет чистой, следует повторить цикл [Backwash]• Открыть кран на выходе из станции• Раздуть и вытащить воздушную подушку из емкости соляного раствора и наполнить емкость солью и 10 литров воды
2.4.2 Этапы установки станций с отдельными емкостями для смолы и соляного раствора (simplex)
Станции с отдельными емкостями для смолы и для соляного раствора поставляются полусмонтированными. Их монтаж осуществляется на месте установки. Для монтажа необходимо пройти следующие шаги: (Смотри рис. 6, стр. 6)Установите систему на согласованном месте соблюдая условия, предусмотренные в пунктах 2.1 и 2.2.
Проверьте гравитационное течение в шлангах, которые соединяют перелив, соответственно соединение эвакуации воды промыва/регенерации и канализации. Убедитесь, что шланги не закупорены и что вода из канализации не может перелиться через них на соединение перелива, соответственно в соединение эвакуации.!НЕ подключайте станцию прямо к 220 В.!

79
(1) После позиционирования емкости со смолой (FRP), внутри следует установить центральный шланг с предварительно смонтированным распределителем в нижней части емкости в предусмотренной позиции (обычно он установлен).
(2) Уровень в верхней части центрального шланга должен находится на одном уровне с отверстием емкости FRP, приемлемое отклонение в положительную сторону +5мм.
(3), (4) Закрыть, в верхней части, центральный шланг.
(5) Загрузите емкость FRP фильтрирующей средой. Убедитесь, что фильтрующая среда не попадает и в центральный шланг.Во время загрузки емкости FRP фильтрующей средой, убедитесь, что центральный шланг остается в вертикальной позиции и в середине емкости.Внимание! Hе вытаскивайте центральную трубу с предварительно смонтированным распределителем из первоначальной позиции.
(6) Удалите покрытие центрального шланга.
(7) Очистить резьбовую часть емкости со смолой (FRP) от частиц фильтрующей среды (можно промыть водой).
(8) Смонтировать верхей распределитель (верхнюю всасывающую сетку) на емкости, следующим образом: внутри емкости находятся 4 крепежа а на всасывающей сетке 4 соответствующих отверстия, их следует соединить через нажатие, таким образом, чтобы крепежи вошли в отверстия, затем всасывающая сетка поворачивается. Монтаж всасывающей сетки на емкости проверяется через попытку вытащить всасывающую сетку.
(9) Комплект контрольной емкости с верхнем монтированным распределителем вводится в центральный шланг через нажатие. Верхней распределитель смонтированный в емкости должен полностью покрыть центральный шланг.
(10) Закрутите контрольную емкость на емкости со смолой (FRP).
(11) Поднимите крышку емкости для соляного раствора и введите трубу через существующее отверстие.
(12), (13) Раскрутить гайку колена для смеси соли из емкости, ввести трубу через гайку таким образом, чтобы она выходила приблизительно 1 см. Ввести элемент в форме усеченного конуса в трубу.
(14) Закрутить модуль в емкость.
(15) Снять предохранители байпасса и ввести через нажатие на коннекторы.
(16) Смонтировать предохранители байпасса.
(17) Ввести байпасс в емкость.
(18) Обеспечить соединение между байпассом и емкостью при помощи металлических крепежей.
(19) Ввести датчик дебита в байпасс.
(20) Полная система.
Соблюдайте дальше шаги монтажа (смотри 2.4.1) от варианта кабинета.Соблюдайте дальше шаги пуска в действие от варианта кабинета.

80
3. ПРОГРАММИРОВАНИЕ ЕМКОСТИ
3.1 Описание командного панно емкость
Описание МЕНЮ
МЕНЮ ВВЕРХ
РЕГУЛИРОВКА ВНИЗ
1 Current Time Setting - Регулировка даты и времени2 Regeneration Time Setting - Регулировка времени регенерации3 Regeneration Cycle Setting - Регулировка числа дней для регенерации защиты4 Regeneration Meter Setting - Объем регенерированной вод
5 Step Wise Regen.Поэтапная регенерация
5.1 Backwash. - Обратное промывание5.2 Brine - Смесь соли5.3 Rinse - Ополаскивани5.4 Refill - Наполнение
6 Manual Regeneration - Ручная регенерация
7 Advanced setting(Продвинутые регулировки)
7.1 Backwash Duration - Регулировка продолжительности обратного промывания7.2 Brine Draw Duration(not applicable for filter valve) - Регулировка продолжительности подачи смеси соли7.3 Rinse Duration - Регулировка продолжительности полоскания7.4 Refill Duration Time Setting(not applicable for filter valve)- Регулировка продолжительности наполнения емкости для раствора соли
7.5 Regen. Mode- Модуль регенерации
7.5.1 Time Clock- Регенерация в зависимости от времени7.5.2 Meter Immediately- Немедленная объемная регенерация7.5.3 Meter Delayed Отсроченная объемная регенерация7.5.4 Mixed- Смешанная регенерация
7.6 Load default- Возвращение к изначальным регулировкам
Системы имеют отрегулированные емкости на модуле СМЕШАННАЯ РЕГЕНЕРАЦИЯ.!

81
3.2 Инициализация системы
После того как емкость была подключена к источнику электроэнергии, она перейдет автоматически в рабочую позицию, а на экране будут выставлены сообщения: System intializing (Инициализация системы), Please wait (Просим подождать)
3.3 Позиция Stand-byЕсли емкость запрограммирована в Timer mode (Модуль регенерации в завимости от времени), на экране емкости будет выставлено следующее сообщение:
Если емкость запрограммирована в Meter mode (Модуль регенерации в зависимости от объема), на экране емкости будет выставлено следующее сообщение:
3.4 Регулировка параметров
Для регулировки параметров нажмите на кнопку МЕНЮ „ ”. Для безопасности, спустя 3 минуты неиспользования, меню возвращается в режим стендбай и блокируется. В данной ситуации, чтобы иметь доступ к окну регулировки параметров емкости необходимо продержать нажатой на протяжении 5 секунд кнопку МЕНЮ „ ”. После доступа в MAIN MENU (Главное меню), будут выставлены параметры емкости. Чтобы выбрать параметр следует навигировать по меню при помощи кнопки UP „ ▲” (Вверх) и при помощи кнопки DOWN „ ▼” (Вниз) навигировать вниз по меню. После выбора параметра, чтобы иметь е нему доступ следует нажать кнопку SET „■”.В главном меню параметры будут выставлены следующим образом:
3.4.1. Current time setting (Регулировка числа и времени)
Имея доступ к этому параметру при помощи кнопки SET „■”, будет выставлено следующее окно:
System initializingPlease wait
Инициализация системыПросим подождать
Current day/Time00-00-0000 00:00:00
Time of Next Regen00-00-0000 00:00:00
Число/Время00-00-0000 00:00:00
Число и время следующей регенерации00-00-0000 00:00:00
Current day/Time00-00-0000 00:00:00
Residual/Total Water00.00m3 0000.00m3
Число/Время00-00-0000 00:00:00
Количество воды Общее количестводо следующей потребленнойрегенерации воды00.00m3 0000.00m3
꞊꞊꞊꞊꞊System Time꞊꞊꞊꞊꞊00-00-0000 00:00
Press to cancel Press ■ to confirm
꞊꞊꞊꞊꞊Число и время꞊꞊꞊꞊꞊00-00-0000 00:00
Нажать для выхода Нажать ■ для подтверждения

82
Для навигирования в окне следует использовать кнопку SET „■”, а для изменений значений используйте кнопки UP „ ▲” (Вверх) и DOWN „ ▼” (Вниз). Для подтверждения сделанных изменений нажать кнопку SET „■”. После подтверждения сделанных изменений будет выставлено следующее окно::
Через нажатие кнопки МЕНЮ„ ” вы вернетесь к MAIN MENIU (Главному меню).
3.4.2. Regeneration time setting (Регулировка времени регенерации)
После активации этого параметра при помощи кнопки SET „■”, будет выставлено следующее окно:
Чтобы навигировать в рамках окна используйте туже процедуру как при пункте "3.4.1.".
3.4.3. Regeneration cycle setting (Регулировка числа дней для регенерации защиты)
После активации этого параметра при помощи кнопки SET „■”, будет выставлено следующее окно:
С фабрики данный параметр задается на 7 дней для Timer mode (Модуль регенерации в зависимости от времени) и на 10 дней для Mix mode (Модуля смешанной регенерации). Рекомендуется сохранять эти регулировки.Ниже, в данной инструкции, приведена процедура выбора способа регенерации. Если избрать Модуль регенерации в зависимости от времени, рекомендует отрегулировать этот параметр на уровне 3 дней. Для навигации в рамках окна следует использовать одинаковую процедуру как и при пункте "3.4.1.".
Setting Complete!
Press to return
Регулировка закончена!
Нажать чтобы вернуться
꞊꞊꞊꞊꞊Regen. Time꞊꞊꞊꞊꞊00:00
Press to Return Press ■ to Confirm
꞊꞊꞊꞊꞊Время регенерации꞊꞊꞊꞊꞊00:00
Нажать чтобы вернуться Нажать ■ чтобы подтвердить
꞊꞊꞊꞊꞊Regen. Cycle꞊꞊꞊꞊꞊00 days
Press to Return Press ■ to Confirm
꞊꞊꞊꞊꞊Цикл регенерации꞊꞊꞊꞊꞊00 дней
Нажать чтобы вернуться Нажать ■ чтобы подтвердить
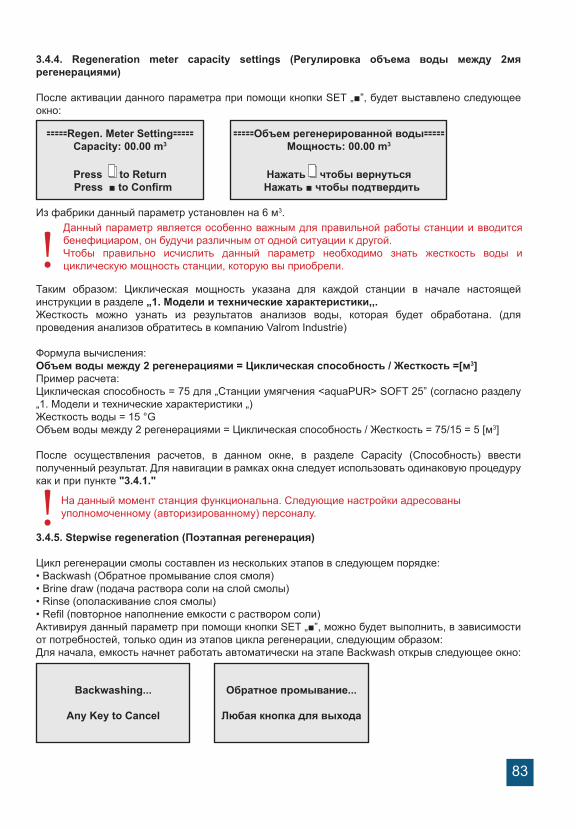
83
3.4.4. Regeneration meter capacity settings (Регулировка объема воды между 2мя регенерациями)
После активации данного параметра при помощи кнопки SET „■”, будет выставлено следующее окно:
Из фабрики данный параметр установлен на 6 м3.
Таким образом: Циклическая мощность указана для каждой станции в начале настоящей инструкции в разделе „1. Mодели и технические характеристики,,.Жесткость можно узнать из результатов анализов воды, которая будет обработана. (для проведения анализов обратитесь в компанию Valrom Industrie)
Формула вычисления:Объем воды между 2 регенерациями = Циклическая способность / Жесткость =[м3]Пример расчета:Циклическая способность = 75 для „Станции умягчения <aquaPUR> SOFT 25” (согласно разделу „1. Модели и технические характеристики „)Жесткость воды = 15 °GОбъем воды между 2 регенерациями = Циклическая способность / Жесткость = 75/15 = 5 [м3]
После осуществления расчетов, в данном окне, в разделе Capacity (Способность) ввести полученный результат. Для навигации в рамках окна следует использовать одинаковую процедуру как и при пункте "3.4.1."
! 3.4.5. Stepwise regeneration (Поэтапная регенерация)
Цикл регенерации смолы составлен из нескольких этапов в следующем порядке:• Backwash (Обратное промывание слоя смоля) • Brine draw (подача раствора соли на слой смолы)• Rinse (ополаскивание слоя смолы)• Refil (повторное наполнение емкости с раствором соли) Активируя данный параметр при помощи кнопки SET „■”, можно будет выполнить, в зависимости от потребностей, только один из этапов цикла регенерации, следующим образом:Для начала, емкость начнет работать автоматически на этапе Backwash открыв следующее окно:
꞊꞊꞊꞊꞊Regen. Meter Setting꞊꞊꞊꞊꞊Capacity: 00.00 m3
Press to Return Press ■ to Confirm
꞊꞊꞊꞊꞊Объем регенерированной воды꞊꞊꞊꞊꞊Мощность: 00.00 m3
Нажать чтобы вернуться Нажать ■ чтобы подтвердить
!Данный параметр является особенно важным для правильной работы станции и вводится бенефициаром, он будучи различным от одной ситуации к другой.Чтобы правильно исчислить данный параметр необходимо знать жесткость воды и циклическую мощность станции, которую вы приобрели.
Backwashing...
Any Key to Cancel
Обратное промывание...
Любая кнопка для выхода
На данный момент станция функциональна. Следующие настройки адресованы уполномоченному (авторизированному) персоналу.

84
Если ни одна из кнопок емкости не будет нажата тогда емкость завершит этап Backwashing (30 минуты) и вернется к MAIN MENU (главному меню) без продолжения остальных этапов.Если в то время когда емкость выполняет этап Backwash нажать на любую кнопку емкости, она перейдет к следующему этапу, выставляя на экране:
Если ни одна из кнопок емкости не будет нажата тогда емкость завершит этап Brine drawing (60 минуты) и вернется к MAIN MENU (главному меню) без продолжения остальных этапов.Если в то время когда емкость выполняет этап Braine drawing нажать на любую кнопку емкости, она перейдет на следующий этап, выставляя на экране:
Если ни одна из кнопок емкости не будет нажата тогда емкость завершит этап Rinsing (30 минуты) и вернется к MAIN MENU (главному меню) без продолжения остальных этапов.Если в то время когда емкость выполняет этап Rinsing нажать на любую кнопку емкости, она перейдет на следующий этап, выставляя на экране:
Если ни одна из кнопок емкости не будет нажата тогда емкость завершит этап Refilling (30 минуты) и вернется к MAIN MENU (главному меню).Если в то время как емкость выполняет этап Refiling нажать на любую кнопку емкости, она вернется к MAIN MENU (главному меню).
3.4.6. Manual regen (Ручная регенерация)
Емкость имеет возможность при помощи активации данного параметра осуществить полный цикл регенерации, следующим образом:Будет начат этап Backwash, затем пройдет автоматически через каждый этап, Brine draw, Rinse, Refill автоматически возвращаясь в MAIN MENIU (Главное меню), вновь входя в обслуживание после завершения всего процесса регенерации.После активации данного параметра при помощи кнопки SET „■”, будет выставлено следующее окно:
Brine Drawing...
Any Key to Cancel
Подача соляной смеси...
Любая кнопка для выхода
Rinsing...
Any Key to Cancel
Ополаскивание...
Любая кнопка для выхода
Refilling...
Any Key to Cancel
Повторное наполнение…
Любая кнопка для выхода
Regenerating...Any Key to Cancel
Backwashing...
5%
Регенерация...Любая кнопка для выходаОбратное промывание...
5%

85
3.4.7. Advanced settings (Продвинутые регулировки)
После активации данного параметра при помощи кнопки SET „■”, будет выставлено следующее окно:
Используя кнопки UP „▲” (Вверх) и DOWN „▼” (Вниз) для навигации в данном окне, а для доступа к параметру используйте кнопку SET „■”. Для возвращения к предыдущему меню используйте кнопку MENIU „ ”.
3.4.7.1. Backwash duration time settings (Регулировка продолжительности обратного промывания)
Можно использовать кнопки UP „▲” (Вверх) и DOWN „ ▼” (Вниз) чтобы определить значения и кнопку SET „■” чтобы сохранить изменения. После сохранения изменений будет выставлено следующее окно:
Нажатием на кнопку MENIU „ ” емкости, она вернется к предыдущему меню. Если на протяжении 1 минуты ни одна кнопка не будет нажата, емкость возвратится к меню стендбай. Любое измененное значение возвратится к первоначальному значению, если оно не было сохранено при помощи кнопки SET „■”..
꞊꞊꞊꞊꞊Advanced Setting꞊꞊꞊꞊꞊
Backwash duration Brine draw duration Rinse duration Refill duration Regen.Mode Load Default
꞊꞊꞊꞊꞊Продвинутые регулировки꞊꞊꞊꞊꞊
Продолжительность обратного промывания Продолжительность подачи воды с солью Продолжительность ополаскивания Продолжительность перенаполнения емкости смеси соли Модуль регенерации Возвращение к фабричным регулировкам
꞊꞊꞊꞊꞊Backwash Duration꞊꞊꞊꞊꞊00 minutes
Press to Return Press ■ to Confirm
꞊꞊꞊꞊꞊Цикл регенерации꞊꞊꞊꞊꞊00 минуты
Нажать чтобы вернутьсяНажать ■ чтобы подтвердить
! НЕ изменяйте данный параметр;Если станция не работает соответствующим образом, обратитесь к персоналуК.О. Valrom Industrie О.О.О.
Setting Complete!
Press to Return
Регулировка окончена!
Нажать чтобы вернуться

86
3.4.7.2. Brine draw duration time setting (Регулировка продолжительности подачи смеси соли)
Используйте кнопки UP „▲” (Вверх) и DOWN „▼” (Вниз) чтобы изменить значения и кнопку SET „■” чтобы сохранить изменения. После сохранения изменений будет выставлено следующее окно:
Через нажатие кнопки MENIU „ ” емкости, она вернется к предыдущему меню. Если на протяжении 1 минуты ни одна кнопка не будет нажата, емкость возвратится к меню стендбай. Любое измененное значение возвратится к первоначальному значению, если оно не было сохранено при помощи кнопки SET „■”.
3.4.7.3. Fast rinse duration time setting (Регулировка продолжительности ополаскивания)
Используйте кнопки UP „▲” (Вверх) и DOWN „▼” (Вниз) чтобы изменить значения и кнопку SET „■” чтобы сохранить изменения. После сохранения изменений будет выставлено следующее окно:
Через нажатие кнопки MENIU„ ” емкости, она вернется к предыдущему меню. Если на протяжении 1 минуты ни одна кнопка не будет нажата, емкость возвратится к меню стендбай. Любое измененное значение возвратится к первоначальному значению, если оно не было сохранено при помощи кнопки SET „■”.
꞊꞊꞊꞊꞊Brine Draw Duration꞊꞊꞊꞊꞊00 minutes
Press to Return Press ■ to Confirm
꞊Продолжительность подачи раствора соли꞊00 минуты
Нажать для возвращенияНажать ■ для подтверждения
Setting Complete!
Press to Return
Регулировка окончена!
Нажать для возвращения
! НЕ изменяйте данный параметр;Если станция не работает соответствующим образом, обратитесь к персоналуК.О. Valrom Industrie О.О.О.
꞊꞊꞊꞊꞊Rinse Duration꞊꞊꞊꞊꞊00 minutes
Press to Return Press ■ to Confirm
꞊꞊꞊꞊꞊Продолжительность ополаскивания꞊꞊꞊꞊꞊00 минуты
Нажать для возвращенияНажать ■ для подтверждения
Setting Complete!
Press to Return
Регулировка окончена!
Нажать для возвращения
! НЕ изменяйте данный параметр;Если станция не работает соответствующим образом, обратитесь к персоналуК.О. Valrom Industrie О.О.О.

87
3.4.7.4. Refill duration time settings (Регулировка продолжительности повторного наполнения емкости для смеси соли)
Используйте кнопки UP „▲” (Вверх) и DOWN „▼” (Вниз) чтобы изменить значения и кнопку SET „■” чтобы сохранить изменения. После сохранения изменений будет выставлено следующее окно:
Через нажатие кнопки MENIU „ ” емкости, она вернется к предыдущему меню. Если на протяжении 1 минуты ни одна кнопка не будет нажата, емкость возвратится к меню стендбай. Любое измененное значение возвратится к первоначальному значению, если оно не было сохранено при помощи кнопки SET „■”.
3.4.7.5. Select regeneration mode (Выбор модуля регенерации)
În această fereastră puteți să alegeți modul de regenerare cel mai potrivit nevoilor dumneavoastră.
Используйте кнопки UP „▲” (Вверх) и DOWN „▼” (Вниз) чтобы выбрать желаемый параметр и кнопку SET „■” чтобы подтвердить выбранный параметр. Нажмите кнопку МЕНЮ „ ” чтобы вернуться к предыдущему меню.
Timer (Регенерация в зависимости от времени) – станция начнет регенерацию в установленное время и в полученное число в результате расчета дней установленных для цикла регенерации.Meter immediate (Немедленная объемная регенерация) – станция начнет регенерацию сразу после того как объем воды, который она способна обработать между двумя регенерациями будет использован. Meter delayed (Отсроченная объемная регенерация) – когда количество, которое может обработать до следующей регенерации достигло 0, станция начнет регенерацию в определенное время (время 02:00 AM установленное на фабрике).Mix regeneration (Смешанная регенерация) – когда количество, которое может обработать станция до следующей регенерации достигло 0, станция начнет регенерацию при первом удобном случае,
꞊꞊꞊꞊꞊Refill Duration꞊꞊꞊꞊꞊00 minutes
Press to Return Press ■ to Confirm
꞊꞊꞊꞊꞊Продолжительность повторного наполнения емкости раствора соли꞊꞊꞊꞊꞊
00 минуты
Нажать для возвращения Нажать ■ для подтверждения
Setting Complete!
Press to Return
Регулировка окончена!
Нажать для возвращения
НЕ изменяйте данный параметр;Если станция не работает соответствующим образом, обратитесь к персоналуК.О. Valrom Industrie О.О.О.!
꞊꞊꞊꞊꞊Regen. Mode꞊꞊꞊꞊꞊
Timer Meter Immediate Meter Delayed Mix Regen
꞊꞊꞊꞊꞊Модуль регенерации꞊꞊꞊꞊꞊
Регенерация в зависимости от времени Немедленная объемная регенерация Отсроченаня объемная регенерация Смешанная регенерация
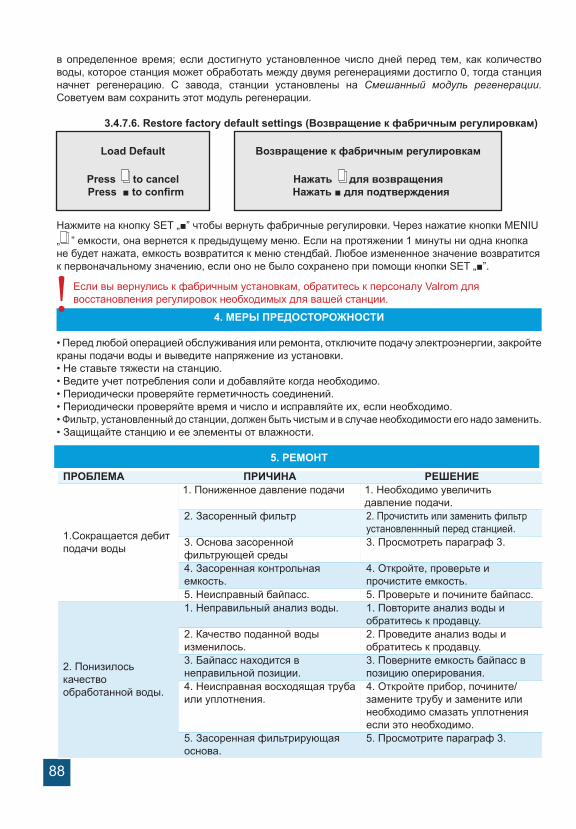
88
в определенное время; если достигнуто установленное число дней перед тем, как количество воды, которое станция может обработать между двумя регенерациями достигло 0, тогда станция начнет регенерацию. С завода, станции установлены на Смешанный модуль регенерации. Советуем вам сохранить этот модуль регенерации.
3.4.7.6. Restore factory default settings (Возвращение к фабричным регулировкам)
Нажмите на кнопку SET „■” чтобы вернуть фабричные регулировки. Через нажатие кнопки MENIU „ ” емкости, она вернется к предыдущему меню. Если на протяжении 1 минуты ни одна кнопка не будет нажата, емкость возвратится к меню стендбай. Любое измененное значение возвратится к первоначальному значению, если оно не было сохранено при помощи кнопки SET „■”.
4. МЕРЫ ПРЕДОСТОРОЖНОСТИ
• Перед любой операцией обслуживания или ремонта, отключите подачу электроэнергии, закройте краны подачи воды и выведите напряжение из установки.• Не ставьте тяжести на станцию.• Ведите учет потребления соли и добавляйте когда необходимо.• Периодически проверяйте герметичность соединений.• Периодически проверяйте время и число и исправляйте их, если необходимо.• Фильтр, установленный до станции, должен быть чистым и в случае необходимости его надо заменить.• Защищайте станцию и ее элементы от влажности.
5. РЕМОНТ
Load Default
Press to cancel Press ■ to confirm
Возвращение к фабричным регулировкам
Нажать для возвращения Нажать ■ для подтверждения
! Если вы вернулись к фабричным установкам, обратитесь к персоналу Valrom для восстановления регулировок необходимых для вашей станции.
ПРОБЛЕМА ПРИЧИНА РЕШЕНИЕ
1.Сокращается дебит подачи воды
1. Пониженное давление подачи 1. Необходимо увеличить давление подачи.
2. Засоренный фильтр 2. Прочистить или заменить фильтр установленнный перед станцией.
3. Основа засоренной фильтрующей среды
3. Просмотреть параграф 3.
4. Засоренная контрольная емкость.
4. Откройте, проверьте и прочистите емкость.
5. Неисправный байпасс. 5. Проверьте и почините байпасс.
2. Понизилось качество обработанной воды.
1. Неправильный анализ воды. 1. Повторите анализ воды и обратитесь к продавцу.
2. Качество поданной воды изменилось.
2. Проведите анализ воды и обратитесь к продавцу.
3. Байпасс находится в неправильной позиции.
3. Поверните емкость байпасс в позицию оперирования.
4. Неисправная восходящая труба или уплотнения.
4. Откройте прибор, почините/замените трубу и замените или необходимо смазать уплотнения если это необходимо.
5. Засоренная фильтрирующая основа.
5. Просмотрите параграф 3.

89
ПРОБЛЕМА ПРИЧИНА РЕШЕНИЕ6. На этапе начала теряется фильтрующая среда.
6. Просмотрите параграф 4.
7. Несвойственная/слабая регенерация фильтра.
7. Просмотрите параграф 6.
8. Утечки воды в контрольную емкость.
8. Откройте контрольную емкость, проверьте и замените уплотнения в случае необходимости.
3. Засоренная фильтрующая основа.
1. Недостаточный дебит воды для промывки.
1. Проверьте дебит воды для промывания. Если давление подачи находится в приемлемых пределах и дебит воды недостаточен проверьте и почистите/замените если необходимо линию дренажа.
2. Недостаточное время для этапа промывки.
2. Повысить продолжительность этапа промывки. (обратитесь в службу Valrom)
3. Засоренный верхний/нижний распределитель.
3. Прочистить верхний/нижний распределитель.
4. Фильтрующая среда удалена из емкости.
1. Фильтрующая среда привлечена и удалена на этапе регенерации.
1. Проверьте верхний распределитель. Замените его в случае необходимости.
2. Фильтрующая среда привлечена и удалена на этапе функционирования.
2. Проверьте нижний распределитель. Замените его в случае необходимости.
5. Прибор не регенерирует
1. Остановлена подача электроэнергии.
1. Проверьте подачу энергии.
2. Соль в недостаточном количестве в емкости.
2. Проверьте уровень соли и заполните емкость с солью.
3. Соляной раствор неполностью или полностью не засосан на этапе регенерации.
3. Просмотреть параграф 6.
4. Контрольная емкость неисправна или были изменены регулировки.
4. Проверить контрольную емкость и регулировки.
5. Емкость с солью не была наполнена водой или количество воды недостаточно.
5. Просмотреть параграф 7.
6. Раствор соли полностью или неполностью засосан на этапе регенерации.
1. Пониженное давление в установке подачи воды.
1. Проверьте давление подачи.
2. Инжектор или труба для соляного раствора засорены.
2. Почистить инжектор и/или трубу для соляного раствора.
3. Воздушный клапан/проветриватель засорен кусочками соли.
3. Прочистить воздушный вентиль/проветриватель.
4. Потеря высокого давления (контрольная емкость, фильтрующая среда или распределители засорены).
4. Просмотреть параграф 1.4.
5. Линия соляного раствора не герметизирована, таким образом что попадает и воздух.
5. Проверить герметичность.
6. Регулировки были изменены. 6. Обратится к производителю.

90
ПРОБЛЕМА ПРИЧИНА РЕШЕНИЕ
7. Емкость для соли не нагружена достаточно/совсем водой.
1. Пониженное давление поданной воды.
1. Проверить давление в сети.
2. Засоренный инжектор или труба для смеси соли.
2. Прочистить инжектор или трубу для смеси соли.
3. Заблокированное проветривание.
3. Проверить и прочистить проветриватель.
4. Были изменены регулировки. 4. Обратитесь к производителю.5. Поплавок остался заблокированным.
5. Потяните поплавок (вверх) по стержню.
8. Чрезмерное потребление соли при регенерации.
1. Регулировки были изменены. 1. Обратитесь к производителю.2. Резервуар с солю загружается с большим количеством воды чем необходимо.
2. Смотри параграф 9.
9. Резервуар с солю загружается с большим количеством воды чем необходимо.
1. Давление подачи воды слишком большое.
1. Проверить давление подачи.
2. Регулировки были изменены. 2. Обратитесь к производителю.
10. Вода имеет соленый вкус.
1. Фильтрующая среда не была достоточно промыта
1. Повысить время операции [Rinse - Ополаскивание]
2. Пониженный дебит в момент промывки.
2. Проверить и почистить DLFC.
11. Вода постоянно течет по эвакуации.
1. Подача электроэнергии была прервана во время регенерации.
1. Переведите емкость в байпасс до подачи электроэнергии.
2. Уплотнения корпуса дистанционных прокладок были повреждены.
2. Проверить и заменить поврежденные уплотнения.
12. Отсутствие данных на экране
1. Нет давления. 1. Проверить подачу электричества, как в электросети также и в емкость.
2. Неисправный трансформатор. 2. Замените трансформатор.3. Неисправная электронная плитка. 3. Замените электронную плитку.
13. На экране появляется сообщение [System maintenance]
1. Ошибка программного обеспечения.
1. Подключите вновь подачу энергии.

91
6. МАКСИМАЛЬНО ПРИЕМЛЕМЫЕ КОНЦЕНТРАЦИИ В ВОДЕ, КОТОРАЯ ПОСТУПАЕТ
(ИНФЛЮЕНТ)
Станции умягчения SOFT
Жесткость ………………………………………………………………........42 °dH Железо ……………………………………………………………………... 0,20 mг/лМанган ………………………………………………………………............0,05 mг/лЧистая с микробиологической точки зрения
Станции обработки MIX
Жесткость ………………………………………………………………........42 °dHЖелезо …………………………………………………………………..........15 mг/лМанган ……………………………………………………………….............. 3 mг/лAммиак ………………………………………………………………............. 4 mг/лХимическое потребления водорода .....................................................20 mг/л O2Всего растворенных твердых веществ……………………………..... 4000 mг/лЧистая с микробиологической точки зрения
Сервис Valrom: Тел: +4 0724.200.005
