silvestri cameras
TRANSCRIPT

Via Della Gora 13/5 - 50025 Montespertoli FI, Italye.mail [email protected] - www.silvestricamera.com
Tel +39.0571.675049 Fax +39.0571.675919silvestri
silvestri
Bicam III User Manual

In the diagrams you will see the position of the various components, others can
be added or removed to construct a variety of systems. At first you may experience
a little difficulty, but once used to the logic of the system, everything becomes
simple and intuitive.
Some tables will help you to combine the various elements on the basis of the
lenses used.
Legenda
1
2
3
4
5
6
Top rail for the quick mounting of accessories and the camera overturning.
Bottom rail for the fitting of the Flexi Bellow Maxi and other accessories.
Shoe to attach the viewfinder.
Precise screw control of rise and fall movement of the back element of the
camera' body: 15mm up, 15mm down.
Rotating knob to lock and unlock the lens board in position.
The back ring is a rapid 4-point mounting system with 8° rotation. Two red
reference spots indicate the entry position of the attachments.
viewfinder housing
rise & fall control
top spirit level
rise & fall scale
horizontal spirit level
bottom rail lock
top rail
lens boardlock
bottom rail
back ring
horizontal spirit level1
2
3
4
5
7
6
horizontal shift control8Side shift on Flexi
bellow Maxi:
swingtilt
Focusing system on Flexi Bellow Maxi:
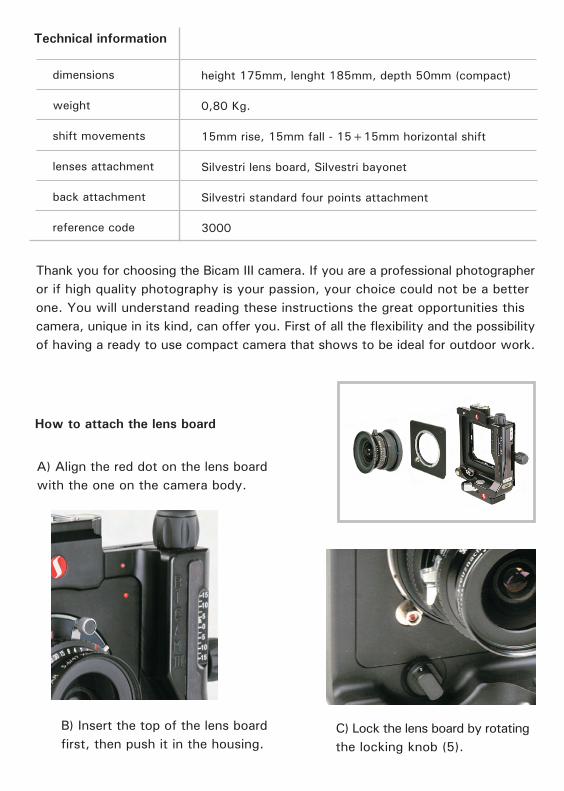
A) Align the red dot on the lens board
with the one on the camera body.
dimensions
weight
shift movements
lenses attachment
back attachment
reference code
height 175mm, lenght 185mm, depth 50mm (compact)
0,80 Kg.
15mm rise, 15mm fall - 15+15mm horizontal shift
Silvestri lens board, Silvestri bayonet
Silvestri standard four points attachment
3000
Technical information
C) Lock the lens board by rotating
the locking knob (5).
B) Insert the top of the lens board
first, then push it in the housing.
How to attach the lens board
Thank you for choosing the Bicam III camera. If you are a professional photographer
or if high quality photography is your passion, your choice could not be a better
one. You will understand reading these instructions the great opportunities this
camera, unique in its kind, can offer you. First of all the flexibility and the possibility
of having a ready to use compact camera that shows to be ideal for outdoor work.
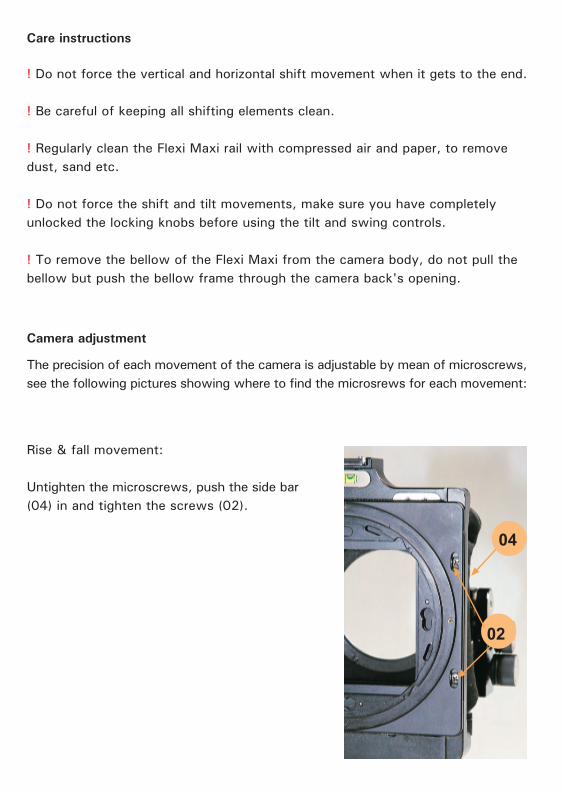
Care instructions
! Do not force the vertical and horizontal shift movement when it gets to the end.
! Be careful of keeping all shifting elements clean.
! Regularly clean the Flexi Maxi rail with compressed air and paper, to remove
dust, sand etc.
! Do not force the shift and tilt movements, make sure you have completely
unlocked the locking knobs before using the tilt and swing controls.
! To remove the bellow of the Flexi Maxi from the camera body, do not pull the
bellow but push the bellow frame through the camera back's opening.
Camera adjustment
The precision of each movement of the camera is adjustable by mean of microscrews,
see the following pictures showing where to find the microsrews for each movement:
Rise & fall movement:
Untighten the microscrews, push the side bar
(04) in and tighten the screws (02).
04
02
+
D7215
D7200
D7218
D7222
D7243
D7110
D7112
D7113
D7114
D7116
D7118
Apo Digitar 5,6/24XL
Apo Digitar 2,8/28L
Super Digitar 5,6/28XL
Apo Digitar 5,6/35XL
Apo Digitar 5,6/43
Apo Digitar 5,6/47XL
Apo Digitar 4/60N
Apo Digitar 5,6/72L
Apo Digitar 4/80N
Apo Digitar 4,5/90N
Apo Digitar 5,6/100N
2324K
2328K
2428K
2334K
2243K
2247K
2260K
2272K
2280K
2290K
2210K
Copal 0 ProntorMagnetic
Special board included
Board �R� Cod. 1119
Special board included
Special board included
Special board included
Board �R� Cod. 1119
Board �R� Cod. 1119
Board "R" Cod. 1119
Board "R" Cod. 1119
Board "F" Cod. 1123
Board "E" Cod. 1121
HR Digaron S 5,6/23mm
HR Digaron S 4,5/28mm
HR Digaron W 4,0/32mm
HR Digaron S 4/35mm
HR Digaron W 4,0/40mm
HR Digaron W 4,0/50mm
HR Digaron S 4/60mm
HR Digaron W 5,6/70mm
HR Digaron W 5,6/90mm
HR Digaron S 4/100mm
Apo Sironar Digital 4,5/35mm
Apo Sironar Digital 4,5/45mm
Apo Sironar Digital 4,5/55mm
D7336
D7326
D7325
D7328
D7340
D7350
D7334
D7339
D7329
D7339
D7329
D7330
D7332
2323K
2232K
2332K
2235K
2246K
2350K
2264K
2275K
2294K
2211K
2233K
2244K
2254K
Copal 0ProntorMagnetic
no
n.1�code 3565
no
no
no
no
no
n.1�code 3565
n.2 code 3575
n.1�code 3565
n.1�code 3565
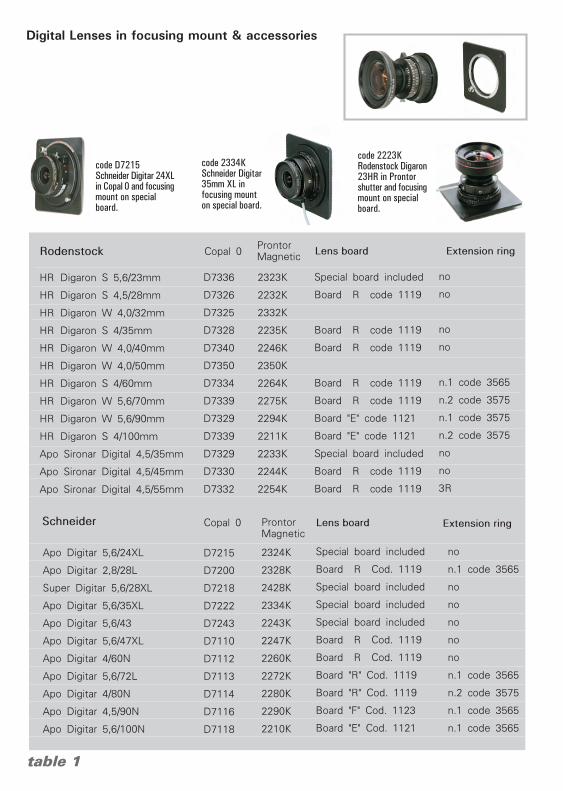
Digital Lenses in focusing mount & accessories
Schneider
Special board included
Board �R� code 1119
Board �R� code 1119
Board �R� code 1119
Board �R� code 1119
Board �R� code 1119
Board "E" code 1121
Board "E" code 1121
Special board included
Board �R� code 1119
Board �R� code 1119
Rodenstock
code 2334KSchneider Digitar35mm XL infocusing mounton special board.
code D7215Schneider Digitar 24XLin Copal 0 and focusingmount on specialboard.
code 2223KRodenstock Digaron23HR in Prontorshutter and focusingmount on specialboard.
no
no
no
no
n.1�code 3565
n.2�code 3575
n.1�code 3575
n.2�code 3575
no
no
3R
table 1
Lens board Extension ring
Extension ringLens board M
N
O
P
Q
R
S
Bicam III Body only without back & lens board, with 15+15mm shift
Extension ring n. 0
Extension Ring N.1
Extension Ring N.1 shiftable 15+15mm
Extension Ring n. 2
Extension Ring N.2 shiftable 15+15mm
Slide Adapter 5x7 with Silvestri Attachment (without Drop-in Plate)
Adapter with Hasselblad V 6x6 interface
Adapter with Hasselblad H interface
Adapter with Contax 645 interface
Adapter with Mamiya 645 AFD interface
Drop-in Plate for Slide Adapter 5x7 Hasselblad 'H' type (for D7023)
Drop-in Plate for Slide Adapter 5x7 Hasselbald 'V' type (for D7023)
Drop-in Plate for Slide Adapter 5x7 Mamiya 645 AFD type (for D7023)
Drop-in Plate for Slide Adapter 5x7 Contax 645 type (for D7023)
Drop-in Plate for Slide Adapter 5x7 AFI type (for D7023)
Hassel Type - Metal Frame 6x6 + Lupe 4x
Magnifying Glass in Bellow for 5x7 stitching slide adapter D7023
Rotating Reflex Viewfinder for 5x7 stitching slide adapter D7023
3000
3547
3565
3565B
3575
3575B
D7023
DF7020
DF7019
DF7013
DF7015
D7023H
D7023V
D7023M
D7023C
D7023A
D7016
5010
5030
M
N
O
P
Q
R
S
For full features and instructions read the DRCU user manual.
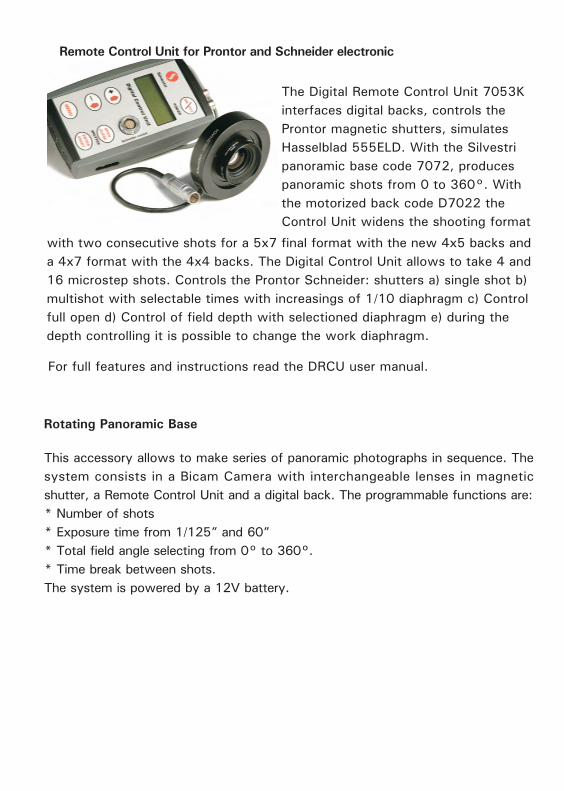
Remote Control Unit for Prontor and Schneider electronic
Rotating Panoramic Base
The Digital Remote Control Unit 7053K
interfaces digital backs, controls the
Prontor magnetic shutters, simulates
Hasselblad 555ELD. With the Silvestri
panoramic base code 7072, produces
panoramic shots from 0 to 360°. With
the motorized back code D7022 the
Control Unit widens the shooting format
with two consecutive shots for a 5x7 final format with the new 4x5 backs and
a 4x7 format with the 4x4 backs. The Digital Control Unit allows to take 4 and
16 microstep shots. Controls the Prontor Schneider: shutters a) single shot b)
multishot with selectable times with increasings of 1/10 diaphragm c) Control
full open d) Control of field depth with selectioned diaphragm e) during the
depth controlling it is possible to change the work diaphragm.
This accessory allows to make series of panoramic photographs in sequence. The
system consists in a Bicam Camera with interchangeable lenses in magnetic
shutter, a Remote Control Unit and a digital back. The programmable functions are:
* Number of shots
* Exposure time from 1/125� and 60�
* Total field angle selecting from 0° to 360°.
* Time break between shots.
The system is powered by a 12V battery.
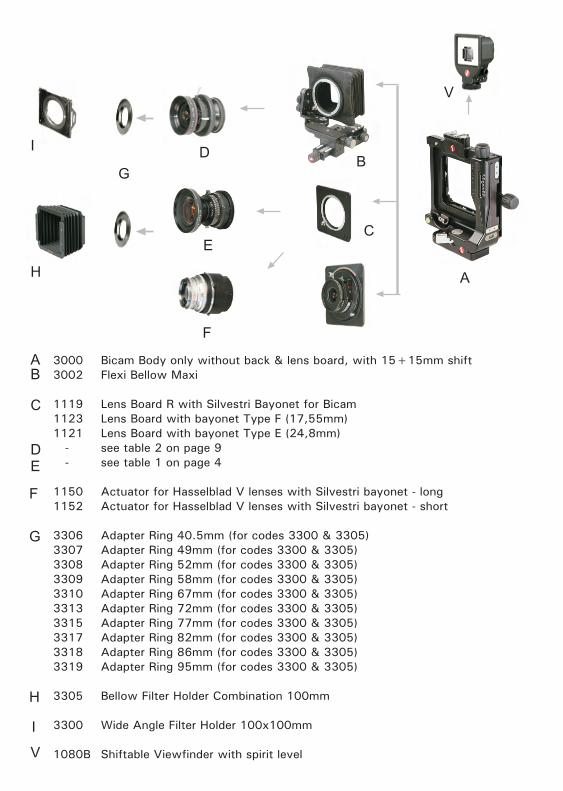
Bicam Body only without back & lens board, with 15+15mm shift
Flexi Bellow Maxi
Lens Board R with Silvestri Bayonet for Bicam
Lens Board with bayonet Type F (17,55mm)
Lens Board with bayonet Type E (24,8mm)
see table 2 on page 9
see table 1 on page 4
Actuator for Hasselblad V lenses with Silvestri bayonet - long
Actuator for Hasselblad V lenses with Silvestri bayonet - short
Adapter Ring 40.5mm (for codes 3300 & 3305)
Adapter Ring 49mm (for codes 3300 & 3305)
Adapter Ring 52mm (for codes 3300 & 3305)
Adapter Ring 58mm (for codes 3300 & 3305)
Adapter Ring 67mm (for codes 3300 & 3305)
Adapter Ring 72mm (for codes 3300 & 3305)
Adapter Ring 77mm (for codes 3300 & 3305)
Adapter Ring 82mm (for codes 3300 & 3305)
Adapter Ring 86mm (for codes 3300 & 3305)
Adapter Ring 95mm (for codes 3300 & 3305)
Bellow Filter Holder Combination 100mm
Wide Angle Filter Holder 100x100mm
Shiftable Viewfinder with spirit level
3000
3002
1119
1123
1121
-
-
1150
1152
3306
3307
3308
3309
3310
3313
3315
3317
3318
3319
3305
3300
1080B
A
B
C
D
E
F
G
H
I
V
A
B
C
D
E
F
G
H
I
V
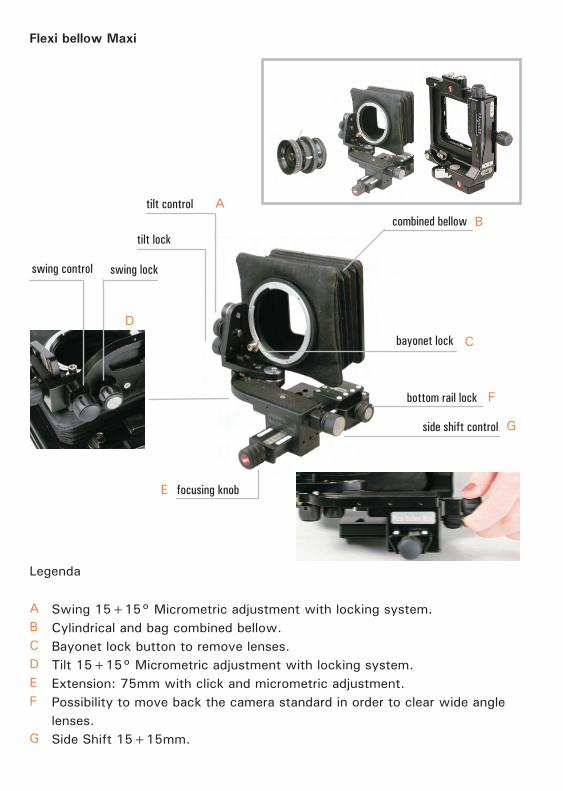
Legenda
A
B
C
D
E
F
G
Swing 15+15° Micrometric adjustment with locking system.
Cylindrical and bag combined bellow.
Bayonet lock button to remove lenses.
Tilt 15+15° Micrometric adjustment with locking system.
Extension: 75mm with click and micrometric adjustment.
Possibility to move back the camera standard in order to clear wide angle
lenses.
Side Shift 15+15mm.
combined bellow
swing control
bayonet lock
side shift control
focusing knob
tilt control
bottom rail lock
A
F
B
D
swing lock
tilt lock
C
E
G
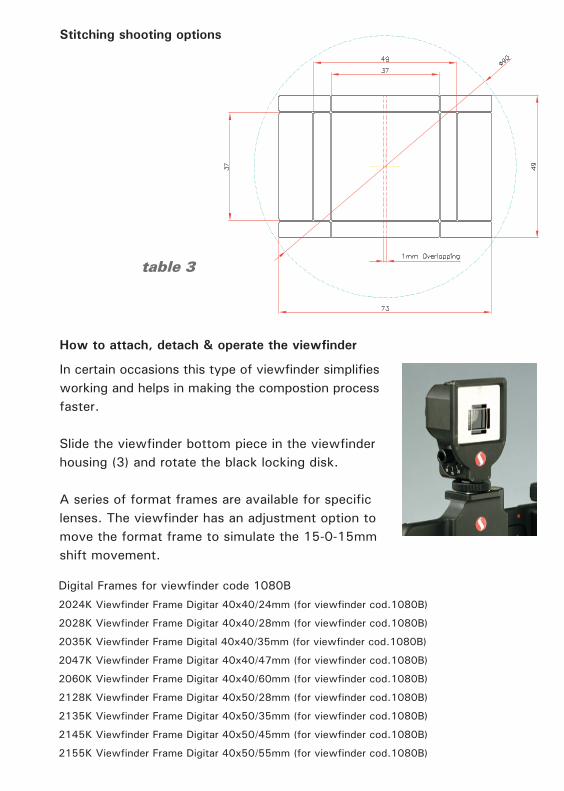
Flexi bellow Maxi
In certain occasions this type of viewfinder simplifies
working and helps in making the compostion process
faster.
Slide the viewfinder bottom piece in the viewfinder
housing (3) and rotate the black locking disk.
A series of format frames are available for specific
lenses. The viewfinder has an adjustment option to
move the format frame to simulate the 15-0-15mm
shift movement.
How to attach, detach & operate the viewfinder
Stitching shooting options
table 3
Digital Frames for viewfinder code 1080B
2024K Viewfinder Frame Digitar 40x40/24mm (for viewfinder cod.1080B)
2028K Viewfinder Frame Digitar 40x40/28mm (for viewfinder cod.1080B)
2035K Viewfinder Frame Digital 40x40/35mm (for viewfinder cod.1080B)
2047K Viewfinder Frame Digitar 40x40/47mm (for viewfinder cod.1080B)
2060K Viewfinder Frame Digitar 40x40/60mm (for viewfinder cod.1080B)
2128K Viewfinder Frame Digitar 40x50/28mm (for viewfinder cod.1080B)
2135K Viewfinder Frame Digitar 40x50/35mm (for viewfinder cod.1080B)
2145K Viewfinder Frame Digitar 40x50/45mm (for viewfinder cod.1080B)
2155K Viewfinder Frame Digitar 40x50/55mm (for viewfinder cod.1080B)
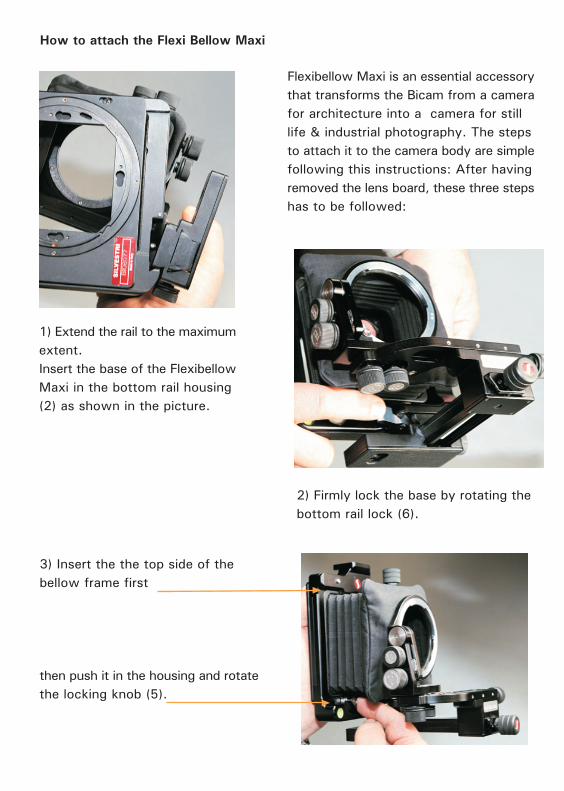
Flexibellow Maxi is an essential accessory
that transforms the Bicam from a camera
for architecture into a camera for still
life & industrial photography. The steps
to attach it to the camera body are simple
following this instructions: After having
removed the lens board, these three steps
has to be followed:
3) Insert the the top side of the
bellow frame first
then push it in the housing and rotate
the locking knob (5).
1) Extend the rail to the maximum
extent.
Insert the base of the Flexibellow
Maxi in the bottom rail housing
(2) as shown in the picture.
2) Firmly lock the base by rotating the
bottom rail lock (6).
How to attach the Flexi Bellow Maxi
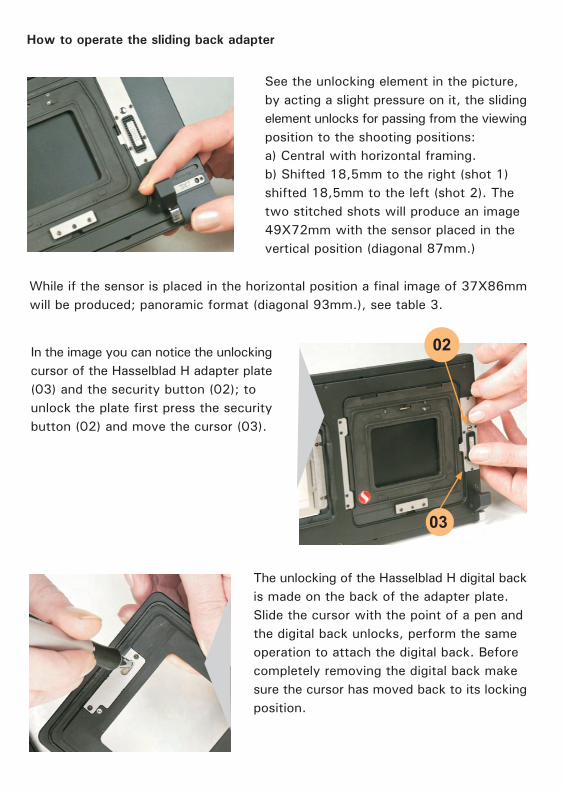
In the image you can notice the unlocking
cursor of the Hasselblad H adapter plate
(03) and the security button (02); to
unlock the plate first press the security
button (02) and move the cursor (03).
The unlocking of the Hasselblad H digital back
is made on the back of the adapter plate.
Slide the cursor with the point of a pen and
the digital back unlocks, perform the same
operation to attach the digital back. Before
completely removing the digital back make
sure the cursor has moved back to its locking
position.
See the unlocking element in the picture,
by acting a slight pressure on it, the sliding
element unlocks for passing from the viewing
position to the shooting positions:
a) Central with horizontal framing.
b) Shifted 18,5mm to the right (shot 1)
shifted 18,5mm to the left (shot 2). The
two stitched shots will produce an image
49X72mm with the sensor placed in the
vertical position (diagonal 87mm.)
How to operate the sliding back adapter
While if the sensor is placed in the horizontal position a final image of 37X86mm
will be produced; panoramic format (diagonal 93mm.), see table 3.
02
03
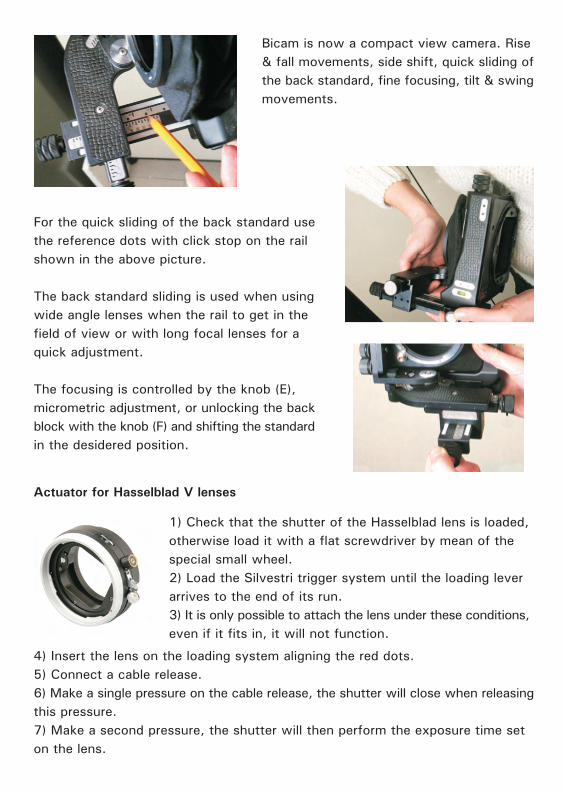
Bicam is now a compact view camera. Rise
& fall movements, side shift, quick sliding of
the back standard, fine focusing, tilt & swing
movements.
For the quick sliding of the back standard use
the reference dots with click stop on the rail
shown in the above picture.
The back standard sliding is used when using
wide angle lenses when the rail to get in the
field of view or with long focal lenses for a
quick adjustment.
The focusing is controlled by the knob (E),
micrometric adjustment, or unlocking the back
block with the knob (F) and shifting the standard
in the desidered position.
Actuator for Hasselblad V lenses
1) Check that the shutter of the Hasselblad lens is loaded,
otherwise load it with a flat screwdriver by mean of the
special small wheel.
2) Load the Silvestri trigger system until the loading lever
arrives to the end of its run.
3) It is only possible to attach the lens under these conditions,
even if it fits in, it will not function.
4) Insert the lens on the loading system aligning the red dots.
5) Connect a cable release.
6) Make a single pressure on the cable release, the shutter will close when releasing
this pressure.
7) Make a second pressure, the shutter will then perform the exposure time set
on the lens.
Line up the red dot on the camera's
back ring with the one on the adapter.
Insert the live-video or
sliding back adapter then
turn clockwise by 8°.
To remove the adapter, press the
botton (03) shown in the picture
and keep the pressure while rotating
the adapter unticlockwise by 8°.
How to attach and detach the back adapters
03

Digitar 2,8/28L
Apo Digitar 5,6/47XL
Apo Digitar 4/60N
Apo Digitar 5,6/72L
Apo Digitar 4/80N
Apo Digitar 4,5/90N
Apo Digitar 5,6/100N
Apo Digitar 5,6/120N
Apo Digitar 5,6150N
Apo Digitar 5,6/180T
Apo Digitar 5,6/80 M
Apo DIgitar 5,6/120 M
D7202
D7218
D7206
D7207
D7208
D7212
D7214
D7216
D7225
D7248
D7210
D7250
2329K
2248K
2261K
2273K
2281K
2291K
2214K
2212K
2215K
2284K
2282K
2213K
2329KS
2248KS
2261KS
2276KS
2281KS
2291KS
2214KS
2212KS
2215KS
2284KS
2282KS
2213KS
Copal 0 ProntorMagnetic
SchneiderElectronic
Schneider
Digital Lenses in Bayonet
How to attach the back
extension rings
table 2
Bicam back ring Seen in the photo is the rapid
4-point mounting system with 8° rotation.
Mounting a back attachment on the Bicam. After
lining up the two red spots, insert the space ring
then turn clockwise by 8°. All the other attachments
are mounted using this same system.
WARNINGS
The space rings given in the table 1 must be used. When carrying out one offset
on the camera body and another on the shift space ring, the offsets must never
contradict each other. This can cause unpleasant mechanical vignettings.
Beyond the standard extension rings, there are two
shiftable rings 15+15mm: n°1 and n°2, these rings
are used in combination with the suitable lenses (see
lens combination table 1). The shift space rings can be
used to increase the width of offset, adding to the offset
of the camera body. A scale on its side shows the extent
of offset. The two offsets must always consider the
limits covered by the lens in use (see pages 10 - 11).
HR Digaron S 4,5/28mm
HR Digaron W 4,0/32mm
HR Digaron S 4/35mm
HR Digaron W 4,0/40mm
HR Digaron W 4,0/50mm
HR Digaron S 4/60mm
HR Digaron W 5,6/70mm
HR Digaron W 5,6/90mm
HR Digaron S 4/100mm
Apo Sironar Digital 4,5/45mm
Apo Sironar Digital 4,5/55mm
Apo Sironar Digital 5,6/70mm
Apo Sironar Digital 5,6/90mm
Apo Sironar Digital 5,6/105mm
Apo Sironar Digital 5,6/135mm
Apo Sironar Digital 5,6/150mm
Apo Macro Sironar 5,6/120mm
D7226
D8032
D7228
D7448
D7450
D7234
D7231
D7237
D7239
D7230
D7232
D7233
D7238
D7240
D7242
D7244
D7246
2234K
3232K
2236K
2346K
3250K
2266K
2278K
2295K
2268K
2245K
2255K
2276K
2293K
2205K
2217K
2218K
2221K
Copal 0 ProntorMagnetic
Rodenstock
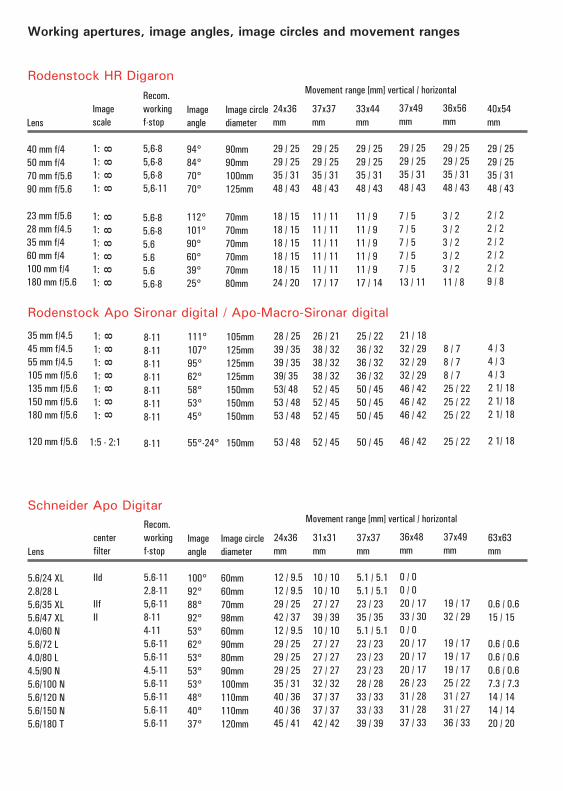
Working apertures, image angles, image circles and movement ranges
center
filter
IId
IIf
II
Lens
5.6/24 XL
2.8/28 L
5.6/35 XL
5.6/47 XL
4.0/60 N
5.6/72 L
4.0/80 L
4.5/90 N
5.6/100 N
5.6/120 N
5.6/150 N
5.6/180 T
Recom.
working
f-stop
5.6-11
2.8-11
5,6-11
8-11
4-11
5.6-11
5.6-11
4.5-11
5.6-11
5.6-11
5.6-11
5.6-11
Image
angle
100°
92°
88°
92°
53°
62°
53°
53°
53°
48°
40°
37°
Image circle
diameter
60mm
60mm
70mm
98mm
60mm
90mm
80mm
90mm
100mm
110mm
110mm
120mm
24x36
mm
12 / 9.5
12 / 9.5
29 / 25
42 / 37
12 / 9.5
29 / 25
29 / 25
29 / 25
35 / 31
40 / 36
40 / 36
45 / 41
31x31
mm
10 / 10
10 / 10
27 / 27
39 / 39
10 / 10
27 / 27
27 / 27
27 / 27
32 / 32
37 / 37
37 / 37
42 / 42
37x37
mm
5.1 / 5.1
5.1 / 5.1
23 / 23
35 / 35
5.1 / 5.1
23 / 23
23 / 23
23 / 23
28 / 28
33 / 33
33 / 33
39 / 39
36x48
mm
0 / 0
0 / 0
20 / 17
33 / 30
0 / 0
20 / 17
20 / 17
20 / 17
26 / 23
31 / 28
31 / 28
37 / 33
37x49
mm
19 / 17
32 / 29
19 / 17
19 / 17
19 / 17
25 / 22
31 / 27
31 / 27
36 / 33
63x63
mm
0.6 / 0.6
15 / 15
0.6 / 0.6
0.6 / 0.6
0.6 / 0.6
7.3 / 7.3
14 / 14
14 / 14
20 / 20
Movement range [mm] vertical / horizontal
111°
107°
95°
62°
58°
53°
45°
55°-24°
26 / 21
38 / 32
38 / 32
38 / 32
52 / 45
52 / 45
52 / 45
52 / 45
25 / 22
36 / 32
36 / 32
36 / 32
50 / 45
50 / 45
50 / 45
50 / 45
8 / 7
8 / 7
8 / 7
25 / 22
25 / 22
25 / 22
25 / 22
Image
scale
1:
1:
1:
1: 8 8
8 8
Lens
40 mm f/4
50 mm f/4
70 mm f/5.6
90 mm f/5.6
Recom.
working
f-stop
5,6-8
5,6-8
5,6-8
5,6-11
Image
angle
94°
84°
70°
70°
Image circle
diameter
90mm
90mm
100mm
125mm
24x36
mm
29 / 25
29 / 25
35 / 31
48 / 43
37x37
mm
29 / 25
29 / 25
35 / 31
48 / 43
33x44
mm
29 / 25
29 / 25
35 / 31
48 / 43
37x49
mm
29 / 25
29 / 25
35 / 31
48 / 43
36x56
mm
29 / 25
29 / 25
35 / 31
48 / 43
40x54
mm
29 / 25
29 / 25
35 / 31
48 / 43
Rodenstock HR Digaron
1:
1:
1:
1:
1:
1: 8 8
8 8
8 8
23 mm f/5.6
28 mm f/4.5
35 mm f/4
60 mm f/4
100 mm f/4
180 mm f/5.6
5.6-8
5.6-8
5.6
5.6
5.6
5.6-8
112°
101°
90°
60°
39°
25°
70mm
70mm
70mm
70mm
70mm
80mm
18 / 15
18 / 15
18 / 15
18 / 15
18 / 15
24 / 20
11 / 11
11 / 11
11 / 11
11 / 11
11 / 11
17 / 17
11 / 9
11 / 9
11 / 9
11 / 9
11 / 9
17 / 14
7 / 5
7 / 5
7 / 5
7 / 5
7 / 5
13 / 11
3 / 2
3 / 2
3 / 2
3 / 2
3 / 2
11 / 8
2 / 2
2 / 2
2 / 2
2 / 2
2 / 2
9 / 8
Movement range [mm] vertical / horizontal
1:
1:
1:
1:
1:
1:
1:
35 mm f/4.5
45 mm f/4.5
55 mm f/4.5
105 mm f/5.6
135 mm f/5.6
150 mm f/5.6
180 mm f/5.6
120 mm f/5.6
8-11
8-11
8-11
8-11
8-11
8-11
8-11
8-11
105mm
125mm
125mm
125mm
150mm
150mm
150mm
150mm
28 / 25
39 / 35
39 / 35
39/ 35
53/ 48
53 / 48
53 / 48
53 / 48
21 / 18
32 / 29
32 / 29
32 / 29
46 / 42
46 / 42
46 / 42
46 / 42
4 / 3
4 / 3
4 / 3
2 1/ 18
2 1/ 18
2 1/ 18
2 1/ 18
8 8
8 8
8 8
8
1:5 - 2:1
Rodenstock Apo Sironar digital / Apo-Macro-Sironar digital
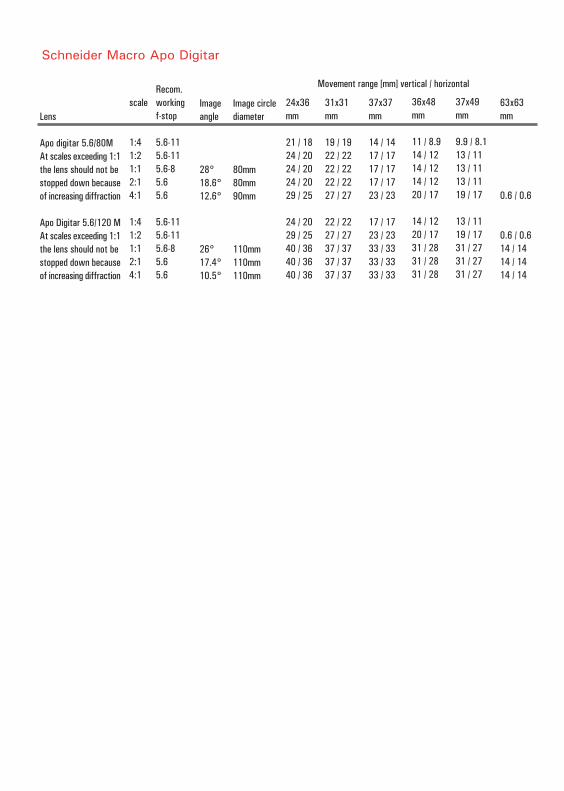
Schneider Apo Digitar
scale
1:4
1:2
1:1
2:1
4:1
1:4
1:2
1:1
2:1
4:1
Lens
Apo digitar 5.6/80M
At scales exceeding 1:1
the lens should not be
stopped down because
of increasing diffraction
Apo Digitar 5.6/120 M
At scales exceeding 1:1
the lens should not be
stopped down because
of increasing diffraction
Recom.
working
f-stop
5.6-11
5.6-11
5.6-8
5.6
5.6
5.6-11
5.6-11
5.6-8
5.6
5.6
Image
angle
28°
18.6°
12.6°
26°
17.4°
10.5°
Image circle
diameter
80mm
80mm
90mm
110mm
110mm
110mm
24x36
mm
21 / 18
24 / 20
24 / 20
24 / 20
29 / 25
24 / 20
29 / 25
40 / 36
40 / 36
40 / 36
31x31
mm
19 / 19
22 / 22
22 / 22
22 / 22
27 / 27
22 / 22
27 / 27
37 / 37
37 / 37
37 / 37
37x37
mm
14 / 14
17 / 17
17 / 17
17 / 17
23 / 23
17 / 17
23 / 23
33 / 33
33 / 33
33 / 33
36x48
mm
11 / 8.9
14 / 12
14 / 12
14 / 12
20 / 17
14 / 12
20 / 17
31 / 28
31 / 28
31 / 28
37x49
mm
9.9 / 8.1
13 / 11
13 / 11
13 / 11
19 / 17
13 / 11
19 / 17
31 / 27
31 / 27
31 / 27
63x63
mm
0.6 / 0.6
0.6 / 0.6
14 / 14
14 / 14
14 / 14
Movement range [mm] vertical / horizontal
Schneider Macro Apo Digitar
Working apertures, image angles, image circles and movement ranges
center
filter
IId
IIf
II
Lens
5.6/24 XL
2.8/28 L
5.6/35 XL
5.6/47 XL
4.0/60 N
5.6/72 L
4.0/80 L
4.5/90 N
5.6/100 N
5.6/120 N
5.6/150 N
5.6/180 T
Recom.
working
f-stop
5.6-11
2.8-11
5,6-11
8-11
4-11
5.6-11
5.6-11
4.5-11
5.6-11
5.6-11
5.6-11
5.6-11
Image
angle
100°
92°
88°
92°
53°
62°
53°
53°
53°
48°
40°
37°
Image circle
diameter
60mm
60mm
70mm
98mm
60mm
90mm
80mm
90mm
100mm
110mm
110mm
120mm
24x36
mm
12 / 9.5
12 / 9.5
29 / 25
42 / 37
12 / 9.5
29 / 25
29 / 25
29 / 25
35 / 31
40 / 36
40 / 36
45 / 41
31x31
mm
10 / 10
10 / 10
27 / 27
39 / 39
10 / 10
27 / 27
27 / 27
27 / 27
32 / 32
37 / 37
37 / 37
42 / 42
37x37
mm
5.1 / 5.1
5.1 / 5.1
23 / 23
35 / 35
5.1 / 5.1
23 / 23
23 / 23
23 / 23
28 / 28
33 / 33
33 / 33
39 / 39
36x48
mm
0 / 0
0 / 0
20 / 17
33 / 30
0 / 0
20 / 17
20 / 17
20 / 17
26 / 23
31 / 28
31 / 28
37 / 33
37x49
mm
19 / 17
32 / 29
19 / 17
19 / 17
19 / 17
25 / 22
31 / 27
31 / 27
36 / 33
63x63
mm
0.6 / 0.6
15 / 15
0.6 / 0.6
0.6 / 0.6
0.6 / 0.6
7.3 / 7.3
14 / 14
14 / 14
20 / 20
Movement range [mm] vertical / horizontal
111°
107°
95°
62°
58°
53°
45°
55°-24°
26 / 21
38 / 32
38 / 32
38 / 32
52 / 45
52 / 45
52 / 45
52 / 45
25 / 22
36 / 32
36 / 32
36 / 32
50 / 45
50 / 45
50 / 45
50 / 45
8 / 7
8 / 7
8 / 7
25 / 22
25 / 22
25 / 22
25 / 22
Image
scale
1:
1:
1:
1: 8 8
8 8
Lens
40 mm f/4
50 mm f/4
70 mm f/5.6
90 mm f/5.6
Recom.
working
f-stop
5,6-8
5,6-8
5,6-8
5,6-11
Image
angle
94°
84°
70°
70°
Image circle
diameter
90mm
90mm
100mm
125mm
24x36
mm
29 / 25
29 / 25
35 / 31
48 / 43
37x37
mm
29 / 25
29 / 25
35 / 31
48 / 43
33x44
mm
29 / 25
29 / 25
35 / 31
48 / 43
37x49
mm
29 / 25
29 / 25
35 / 31
48 / 43
36x56
mm
29 / 25
29 / 25
35 / 31
48 / 43
40x54
mm
29 / 25
29 / 25
35 / 31
48 / 43
Rodenstock HR Digaron
1:
1:
1:
1:
1:
1: 8 8
8 8
8 8
23 mm f/5.6
28 mm f/4.5
35 mm f/4
60 mm f/4
100 mm f/4
180 mm f/5.6
5.6-8
5.6-8
5.6
5.6
5.6
5.6-8
112°
101°
90°
60°
39°
25°
70mm
70mm
70mm
70mm
70mm
80mm
18 / 15
18 / 15
18 / 15
18 / 15
18 / 15
24 / 20
11 / 11
11 / 11
11 / 11
11 / 11
11 / 11
17 / 17
11 / 9
11 / 9
11 / 9
11 / 9
11 / 9
17 / 14
7 / 5
7 / 5
7 / 5
7 / 5
7 / 5
13 / 11
3 / 2
3 / 2
3 / 2
3 / 2
3 / 2
11 / 8
2 / 2
2 / 2
2 / 2
2 / 2
2 / 2
9 / 8
Movement range [mm] vertical / horizontal
1:
1:
1:
1:
1:
1:
1:
35 mm f/4.5
45 mm f/4.5
55 mm f/4.5
105 mm f/5.6
135 mm f/5.6
150 mm f/5.6
180 mm f/5.6
120 mm f/5.6
8-11
8-11
8-11
8-11
8-11
8-11
8-11
8-11
105mm
125mm
125mm
125mm
150mm
150mm
150mm
150mm
28 / 25
39 / 35
39 / 35
39/ 35
53/ 48
53 / 48
53 / 48
53 / 48
21 / 18
32 / 29
32 / 29
32 / 29
46 / 42
46 / 42
46 / 42
46 / 42
4 / 3
4 / 3
4 / 3
2 1/ 18
2 1/ 18
2 1/ 18
2 1/ 18
8 8
8 8
8 8
8
1:5 - 2:1
Rodenstock Apo Sironar digital / Apo-Macro-Sironar digital
Schneider Apo Digitar
scale
1:4
1:2
1:1
2:1
4:1
1:4
1:2
1:1
2:1
4:1
Lens
Apo digitar 5.6/80M
At scales exceeding 1:1
the lens should not be
stopped down because
of increasing diffraction
Apo Digitar 5.6/120 M
At scales exceeding 1:1
the lens should not be
stopped down because
of increasing diffraction
Recom.
working
f-stop
5.6-11
5.6-11
5.6-8
5.6
5.6
5.6-11
5.6-11
5.6-8
5.6
5.6
Image
angle
28°
18.6°
12.6°
26°
17.4°
10.5°
Image circle
diameter
80mm
80mm
90mm
110mm
110mm
110mm
24x36
mm
21 / 18
24 / 20
24 / 20
24 / 20
29 / 25
24 / 20
29 / 25
40 / 36
40 / 36
40 / 36
31x31
mm
19 / 19
22 / 22
22 / 22
22 / 22
27 / 27
22 / 22
27 / 27
37 / 37
37 / 37
37 / 37
37x37
mm
14 / 14
17 / 17
17 / 17
17 / 17
23 / 23
17 / 17
23 / 23
33 / 33
33 / 33
33 / 33
36x48
mm
11 / 8.9
14 / 12
14 / 12
14 / 12
20 / 17
14 / 12
20 / 17
31 / 28
31 / 28
31 / 28
37x49
mm
9.9 / 8.1
13 / 11
13 / 11
13 / 11
19 / 17
13 / 11
19 / 17
31 / 27
31 / 27
31 / 27
63x63
mm
0.6 / 0.6
0.6 / 0.6
14 / 14
14 / 14
14 / 14
Movement range [mm] vertical / horizontal
Schneider Macro Apo Digitar

Digitar 2,8/28L
Apo Digitar 5,6/47XL
Apo Digitar 4/60N
Apo Digitar 5,6/72L
Apo Digitar 4/80N
Apo Digitar 4,5/90N
Apo Digitar 5,6/100N
Apo Digitar 5,6/120N
Apo Digitar 5,6150N
Apo Digitar 5,6/180T
Apo Digitar 5,6/80 M
Apo DIgitar 5,6/120 M
D7202
D7218
D7206
D7207
D7208
D7212
D7214
D7216
D7225
D7248
D7210
D7250
2329K
2248K
2261K
2273K
2281K
2291K
2214K
2212K
2215K
2284K
2282K
2213K
2329KS
2248KS
2261KS
2276KS
2281KS
2291KS
2214KS
2212KS
2215KS
2284KS
2282KS
2213KS
Copal 0 ProntorMagnetic
SchneiderElectronic
Schneider
Digital Lenses in Bayonet
How to attach the back
extension rings
table 2
Bicam back ring Seen in the photo is the rapid
4-point mounting system with 8° rotation.
Mounting a back attachment on the Bicam. After
lining up the two red spots, insert the space ring
then turn clockwise by 8°. All the other attachments
are mounted using this same system.
WARNINGS
The space rings given in the table 1 must be used. When carrying out one offset
on the camera body and another on the shift space ring, the offsets must never
contradict each other. This can cause unpleasant mechanical vignettings.
Beyond the standard extension rings, there are two
shiftable rings 15+15mm: n°1 and n°2, these rings
are used in combination with the suitable lenses (see
lens combination table 1). The shift space rings can be
used to increase the width of offset, adding to the offset
of the camera body. A scale on its side shows the extent
of offset. The two offsets must always consider the
limits covered by the lens in use (see pages 10 - 11).
HR Digaron S 4,5/28mm
HR Digaron W 4,0/32mm
HR Digaron S 4/35mm
HR Digaron W 4,0/40mm
HR Digaron W 4,0/50mm
HR Digaron S 4/60mm
HR Digaron W 5,6/70mm
HR Digaron W 5,6/90mm
HR Digaron S 4/100mm
Apo Sironar Digital 4,5/45mm
Apo Sironar Digital 4,5/55mm
Apo Sironar Digital 5,6/70mm
Apo Sironar Digital 5,6/90mm
Apo Sironar Digital 5,6/105mm
Apo Sironar Digital 5,6/135mm
Apo Sironar Digital 5,6/150mm
Apo Macro Sironar 5,6/120mm
D7226
D8032
D7228
D7448
D7450
D7234
D7231
D7237
D7239
D7230
D7232
D7233
D7238
D7240
D7242
D7244
D7246
2234K
3232K
2236K
2346K
3250K
2266K
2278K
2295K
2268K
2245K
2255K
2276K
2293K
2205K
2217K
2218K
2221K
Copal 0 ProntorMagnetic
Rodenstock

Bicam is now a compact view camera. Rise
& fall movements, side shift, quick sliding of
the back standard, fine focusing, tilt & swing
movements.
For the quick sliding of the back standard use
the reference dots with click stop on the rail
shown in the above picture.
The back standard sliding is used when using
wide angle lenses when the rail to get in the
field of view or with long focal lenses for a
quick adjustment.
The focusing is controlled by the knob (E),
micrometric adjustment, or unlocking the back
block with the knob (F) and shifting the standard
in the desidered position.
Actuator for Hasselblad V lenses
1) Check that the shutter of the Hasselblad lens is loaded,
otherwise load it with a flat screwdriver by mean of the
special small wheel.
2) Load the Silvestri trigger system until the loading lever
arrives to the end of its run.
3) It is only possible to attach the lens under these conditions,
even if it fits in, it will not function.
4) Insert the lens on the loading system aligning the red dots.
5) Connect a cable release.
6) Make a single pressure on the cable release, the shutter will close when releasing
this pressure.
7) Make a second pressure, the shutter will then perform the exposure time set
on the lens.
Line up the red dot on the camera's
back ring with the one on the adapter.
Insert the live-video or
sliding back adapter then
turn clockwise by 8°.
To remove the adapter, press the
botton (03) shown in the picture
and keep the pressure while rotating
the adapter unticlockwise by 8°.
How to attach and detach the back adapters
03
Flexibellow Maxi is an essential accessory
that transforms the Bicam from a camera
for architecture into a camera for still
life & industrial photography. The steps
to attach it to the camera body are simple
following this instructions: After having
removed the lens board, these three steps
has to be followed:
3) Insert the the top side of the
bellow frame first
then push it in the housing and rotate
the locking knob (5).
1) Extend the rail to the maximum
extent.
Insert the base of the Flexibellow
Maxi in the bottom rail housing
(2) as shown in the picture.
2) Firmly lock the base by rotating the
bottom rail lock (6).
How to attach the Flexi Bellow Maxi
In the image you can notice the unlocking
cursor of the Hasselblad H adapter plate
(03) and the security button (02); to
unlock the plate first press the security
button (02) and move the cursor (03).
The unlocking of the Hasselblad H digital back
is made on the back of the adapter plate.
Slide the cursor with the point of a pen and
the digital back unlocks, perform the same
operation to attach the digital back. Before
completely removing the digital back make
sure the cursor has moved back to its locking
position.
See the unlocking element in the picture,
by acting a slight pressure on it, the sliding
element unlocks for passing from the viewing
position to the shooting positions:
a) Central with horizontal framing.
b) Shifted 18,5mm to the right (shot 1)
shifted 18,5mm to the left (shot 2). The
two stitched shots will produce an image
49X72mm with the sensor placed in the
vertical position (diagonal 87mm.)
How to operate the sliding back adapter
While if the sensor is placed in the horizontal position a final image of 37X86mm
will be produced; panoramic format (diagonal 93mm.), see table 3.
02
03
Legenda
A
B
C
D
E
F
G
Swing 15+15° Micrometric adjustment with locking system.
Cylindrical and bag combined bellow.
Bayonet lock button to remove lenses.
Tilt 15+15° Micrometric adjustment with locking system.
Extension: 75mm with click and micrometric adjustment.
Possibility to move back the camera standard in order to clear wide angle
lenses.
Side Shift 15+15mm.
combined bellow
swing control
bayonet lock
side shift control
focusing knob
tilt control
bottom rail lock
A
F
B
D
swing lock
tilt lock
C
E
G
Flexi bellow Maxi
In certain occasions this type of viewfinder simplifies
working and helps in making the compostion process
faster.
Slide the viewfinder bottom piece in the viewfinder
housing (3) and rotate the black locking disk.
A series of format frames are available for specific
lenses. The viewfinder has an adjustment option to
move the format frame to simulate the 15-0-15mm
shift movement.
How to attach, detach & operate the viewfinder
Stitching shooting options
table 3
Digital Frames for viewfinder code 1080B
2024K Viewfinder Frame Digitar 40x40/24mm (for viewfinder cod.1080B)
2028K Viewfinder Frame Digitar 40x40/28mm (for viewfinder cod.1080B)
2035K Viewfinder Frame Digital 40x40/35mm (for viewfinder cod.1080B)
2047K Viewfinder Frame Digitar 40x40/47mm (for viewfinder cod.1080B)
2060K Viewfinder Frame Digitar 40x40/60mm (for viewfinder cod.1080B)
2128K Viewfinder Frame Digitar 40x50/28mm (for viewfinder cod.1080B)
2135K Viewfinder Frame Digitar 40x50/35mm (for viewfinder cod.1080B)
2145K Viewfinder Frame Digitar 40x50/45mm (for viewfinder cod.1080B)
2155K Viewfinder Frame Digitar 40x50/55mm (for viewfinder cod.1080B)
For full features and instructions read the DRCU user manual.
Remote Control Unit for Prontor and Schneider electronic
Rotating Panoramic Base
The Digital Remote Control Unit 7053K
interfaces digital backs, controls the
Prontor magnetic shutters, simulates
Hasselblad 555ELD. With the Silvestri
panoramic base code 7072, produces
panoramic shots from 0 to 360°. With
the motorized back code D7022 the
Control Unit widens the shooting format
with two consecutive shots for a 5x7 final format with the new 4x5 backs and
a 4x7 format with the 4x4 backs. The Digital Control Unit allows to take 4 and
16 microstep shots. Controls the Prontor Schneider: shutters a) single shot b)
multishot with selectable times with increasings of 1/10 diaphragm c) Control
full open d) Control of field depth with selectioned diaphragm e) during the
depth controlling it is possible to change the work diaphragm.
This accessory allows to make series of panoramic photographs in sequence. The
system consists in a Bicam Camera with interchangeable lenses in magnetic
shutter, a Remote Control Unit and a digital back. The programmable functions are:
* Number of shots
* Exposure time from 1/125� and 60�
* Total field angle selecting from 0° to 360°.
* Time break between shots.
The system is powered by a 12V battery.
Bicam Body only without back & lens board, with 15+15mm shift
Flexi Bellow Maxi
Lens Board R with Silvestri Bayonet for Bicam
Lens Board with bayonet Type F (17,55mm)
Lens Board with bayonet Type E (24,8mm)
see table 2 on page 9
see table 1 on page 4
Actuator for Hasselblad V lenses with Silvestri bayonet - long
Actuator for Hasselblad V lenses with Silvestri bayonet - short
Adapter Ring 40.5mm (for codes 3300 & 3305)
Adapter Ring 49mm (for codes 3300 & 3305)
Adapter Ring 52mm (for codes 3300 & 3305)
Adapter Ring 58mm (for codes 3300 & 3305)
Adapter Ring 67mm (for codes 3300 & 3305)
Adapter Ring 72mm (for codes 3300 & 3305)
Adapter Ring 77mm (for codes 3300 & 3305)
Adapter Ring 82mm (for codes 3300 & 3305)
Adapter Ring 86mm (for codes 3300 & 3305)
Adapter Ring 95mm (for codes 3300 & 3305)
Bellow Filter Holder Combination 100mm
Wide Angle Filter Holder 100x100mm
Shiftable Viewfinder with spirit level
3000
3002
1119
1123
1121
-
-
1150
1152
3306
3307
3308
3309
3310
3313
3315
3317
3318
3319
3305
3300
1080B
A
B
C
D
E
F
G
H
I
V
A
B
C
D
E
F
G
H
I
V

+
D7215
D7200
D7218
D7222
D7243
D7110
D7112
D7113
D7114
D7116
D7118
Apo Digitar 5,6/24XL
Apo Digitar 2,8/28L
Super Digitar 5,6/28XL
Apo Digitar 5,6/35XL
Apo Digitar 5,6/43
Apo Digitar 5,6/47XL
Apo Digitar 4/60N
Apo Digitar 5,6/72L
Apo Digitar 4/80N
Apo Digitar 4,5/90N
Apo Digitar 5,6/100N
2324K
2328K
2428K
2334K
2243K
2247K
2260K
2272K
2280K
2290K
2210K
Copal 0 ProntorMagnetic
Special board included
Board �R� Cod. 1119
Special board included
Special board included
Special board included
Board �R� Cod. 1119
Board �R� Cod. 1119
Board "R" Cod. 1119
Board "R" Cod. 1119
Board "F" Cod. 1123
Board "E" Cod. 1121
HR Digaron S 5,6/23mm
HR Digaron S 4,5/28mm
HR Digaron W 4,0/32mm
HR Digaron S 4/35mm
HR Digaron W 4,0/40mm
HR Digaron W 4,0/50mm
HR Digaron S 4/60mm
HR Digaron W 5,6/70mm
HR Digaron W 5,6/90mm
HR Digaron S 4/100mm
Apo Sironar Digital 4,5/35mm
Apo Sironar Digital 4,5/45mm
Apo Sironar Digital 4,5/55mm
D7336
D7326
D7325
D7328
D7340
D7350
D7334
D7339
D7329
D7339
D7329
D7330
D7332
2323K
2232K
2332K
2235K
2246K
2350K
2264K
2275K
2294K
2211K
2233K
2244K
2254K
Copal 0ProntorMagnetic
no
n.1�code 3565
no
no
no
no
no
n.1�code 3565
n.2 code 3575
n.1�code 3565
n.1�code 3565
Digital Lenses in focusing mount & accessories
Schneider
Special board included
Board �R� code 1119
Board �R� code 1119
Board �R� code 1119
Board �R� code 1119
Board �R� code 1119
Board "E" code 1121
Board "E" code 1121
Special board included
Board �R� code 1119
Board �R� code 1119
Rodenstock
code 2334KSchneider Digitar35mm XL infocusing mounton special board.
code D7215Schneider Digitar 24XLin Copal 0 and focusingmount on specialboard.
code 2223KRodenstock Digaron23HR in Prontorshutter and focusingmount on specialboard.
no
no
no
no
n.1�code 3565
n.2�code 3575
n.1�code 3575
n.2�code 3575
no
no
3R
table 1
Lens board Extension ring
Extension ringLens board M
N
O
P
Q
R
S
Bicam III Body only without back & lens board, with 15+15mm shift
Extension ring n. 0
Extension Ring N.1
Extension Ring N.1 shiftable 15+15mm
Extension Ring n. 2
Extension Ring N.2 shiftable 15+15mm
Slide Adapter 5x7 with Silvestri Attachment (without Drop-in Plate)
Adapter with Hasselblad V 6x6 interface
Adapter with Hasselblad H interface
Adapter with Contax 645 interface
Adapter with Mamiya 645 AFD interface
Drop-in Plate for Slide Adapter 5x7 Hasselblad 'H' type (for D7023)
Drop-in Plate for Slide Adapter 5x7 Hasselbald 'V' type (for D7023)
Drop-in Plate for Slide Adapter 5x7 Mamiya 645 AFD type (for D7023)
Drop-in Plate for Slide Adapter 5x7 Contax 645 type (for D7023)
Drop-in Plate for Slide Adapter 5x7 AFI type (for D7023)
Hassel Type - Metal Frame 6x6 + Lupe 4x
Magnifying Glass in Bellow for 5x7 stitching slide adapter D7023
Rotating Reflex Viewfinder for 5x7 stitching slide adapter D7023
3000
3547
3565
3565B
3575
3575B
D7023
DF7020
DF7019
DF7013
DF7015
D7023H
D7023V
D7023M
D7023C
D7023A
D7016
5010
5030
M
N
O
P
Q
R
S
A) Align the red dot on the lens board
with the one on the camera body.
dimensions
weight
shift movements
lenses attachment
back attachment
reference code
height 175mm, lenght 185mm, depth 50mm (compact)
0,80 Kg.
15mm rise, 15mm fall - 15+15mm horizontal shift
Silvestri lens board, Silvestri bayonet
Silvestri standard four points attachment
3000
Technical information
C) Lock the lens board by rotating
the locking knob (5).
B) Insert the top of the lens board
first, then push it in the housing.
How to attach the lens board
Thank you for choosing the Bicam III camera. If you are a professional photographer
or if high quality photography is your passion, your choice could not be a better
one. You will understand reading these instructions the great opportunities this
camera, unique in its kind, can offer you. First of all the flexibility and the possibility
of having a ready to use compact camera that shows to be ideal for outdoor work.
Care instructions
! Do not force the vertical and horizontal shift movement when it gets to the end.
! Be careful of keeping all shifting elements clean.
! Regularly clean the Flexi Maxi rail with compressed air and paper, to remove
dust, sand etc.
! Do not force the shift and tilt movements, make sure you have completely
unlocked the locking knobs before using the tilt and swing controls.
! To remove the bellow of the Flexi Maxi from the camera body, do not pull the
bellow but push the bellow frame through the camera back's opening.
Camera adjustment
The precision of each movement of the camera is adjustable by mean of microscrews,
see the following pictures showing where to find the microsrews for each movement:
Rise & fall movement:
Untighten the microscrews, push the side bar
(04) in and tighten the screws (02).
04
02

In the diagrams you will see the position of the various components, others can
be added or removed to construct a variety of systems. At first you may experience
a little difficulty, but once used to the logic of the system, everything becomes
simple and intuitive.
Some tables will help you to combine the various elements on the basis of the
lenses used.
Legenda
1
2
3
4
5
6
Top rail for the quick mounting of accessories and the camera overturning.
Bottom rail for the fitting of the Flexi Bellow Maxi and other accessories.
Shoe to attach the viewfinder.
Precise screw control of rise and fall movement of the back element of the
camera' body: 15mm up, 15mm down.
Rotating knob to lock and unlock the lens board in position.
The back ring is a rapid 4-point mounting system with 8° rotation. Two red
reference spots indicate the entry position of the attachments.
viewfinder housing
rise & fall control
top spirit level
rise & fall scale
horizontal spirit level
bottom rail lock
top rail
lens boardlock
bottom rail
back ring
horizontal spirit level1
2
3
4
5
7
6
horizontal shift control8Side shift on Flexi
bellow Maxi:
swingtilt
Focusing system on Flexi Bellow Maxi:

Via Della Gora 13/5 - 50025 Montespertoli FI, Italye.mail [email protected] - www.silvestricamera.com
Tel +39.0571.675049 Fax +39.0571.675919silvestri
silvestri
Bicam III User Manual