shortcut to manuscript - don potter to manuscript ... learners will practice writing the letters ......
TRANSCRIPT
1
ShortcuttoManuscript
TheDirectPathtoFluentManuscriptHandwriting
CreatedwithanEyetoEarlyTransitiontoCursive
By the Author of Shortcut to Cursive
ByDonaldL.Potter
Copyright© January2013andJuly2017
www.donpotter.net
www.blendphonics.org
Permissionisgrantedforreduplicationandfreeusage
fornon-profiteducationalpurposes
CONTENTS
Preface1PositionandTechniques2HowtoHoldthePencilandPaper3GeneralRules4FormationoftheLetters6WordsofWisdomfromRomaldaSpalding13PracticeWordsforDevelopingFluency14Pangrams15TechniquesforTeachingNumbers18NotefromAuthor19Dr.MarilynJagerAdamsonHandwriting21ValuableSuggestionsfromMaryPecci25 HowtheBrainControlsHandwritingbyPamVersfeld26HandwritingPaper27
1
ShortcuttoManuscriptByDonaldL.Potter
January30,2013
Students need to be able to form all the letters of the alphabet automatically without stress or hesitation. The writing process is directed by the mind, which directs the pencil to perform accurately. The mind, the child’s voice in saying quietly aloud (at first) for each letter the detailed steps necessary to write it, and the hand holding the pencil only to write (the other hand does all the holding and moving of the paper) the only parts of the body actively engaged.
I have worked with hundred of students who found handwriting and spelling difficult. Their common characteristic was their excessive tensing of the muscles in hands and arms and also in their legs.
Small errors prevent children from learning to write easily, legibly and neatly. They require careful and continued teaching of all the techniques. Children from the beginning need to be taught to follow directions. Success in these writing skills gives children great pride and interest in learning each day’s lesson. Each skill builds self-confidence.
Start by teaching letter formation and the letter name. I am aware that many phonics programs discourage teaching letter names. In the long run, I feel that it is much better to establish a strong association between the letter formation and letter name right from the start, especially if we expect the students to develop strong oral spelling skills.
Many teachers and parents fail to realize the importance of teaching correct formation of the letters from the very start of teaching written language. Unless children write correctly, they do not see the correct symbols for the sounds, and motor patterns once formed are difficult to correct. Children need much patient supervision at this beginning stage. The beginner at any age needs to be taught all the writing techniques, which help any child acquire the correct motor patterns. Do not skip any of the techniques.
All parents should be taught this handwriting method so they can enjoy with their children what they are learning in school. In writing the brain directs the hand. This cannot be done correctly unless there is a thorough knowledge of how each letter and number is made.
The child who has no difficulty in learning to write needs to be taught at first, but need not be held for drill. The children who need help should be given the specific directions over and over until they can direct their hands in writing and no longer make errors in direction or orientation. This is where drill is an essential part of teaching, if children are to learn. The teacher has done no teaching unless and until the student learns.
InourmethodthelettersaretaughtinABCorder.LearnerswillpracticewritingthelettersinABCorderdailyuntiltheycandosofrommemoryrapidly(40LPMforkindergarten)anderror free. They will learn to identify the letters by letter name at sight, and write thelettersfromthedictationoftheletternameinrandomorderwithouthesitationorerror.
2
PositionandTechniquesAfterMasterHandwritingTeacher,RomaldaSpalding
Clear the desk of books and materials not needed. Sit with hips against the back of the chair, feet flat on the floor and back straight, with head tall. The straight spinal column supports the head. Keep two inches between the body and the desk. Lean forward just enough to see the paper clearly, but keep the head high. Let the chair carry the weight of the body. Do not let the head fall forward because its heavy weight then it would be carried by the neck and back muscle. Place both forearms on the desk with the elbows just off the front edge and comfortably close to the body. Think of the hands as two separates parts needed for writing. One part holds and moves the paper and the other writes the letters. The paper holding hand is the one that does not hold the pencil. It is placed across the top edge of the paper and moves the paper back and fourth, up and down, and holds it steadily. The paper weighs so little that little pressure from the paper holding hand is required to hold and move it. The writing hand holds the pencil and writes. Keep the side edge of the paper parallel to the arm of the hand that holds the pencil (like the two rails of a railroad track). The left-handed child needs special attention to be sure his paper is parallel to his writing (left) arm. The writing hand and arm for all children should be below the base line on which they write. Spaldingtellsus,“Formanyyears,sinceIlearnedtobasicelementsofthismethod,Ihavebeenabletopreventbeginnerswhowereclearlytendingtowarddyslexiafromdevelopingthisgreathandicap.Ihavealsobythissamemethodrescuedmanyolderchildrenfromthefrustratingfailurestowhichtheirdyslexiacondemnedthem.(59)
3
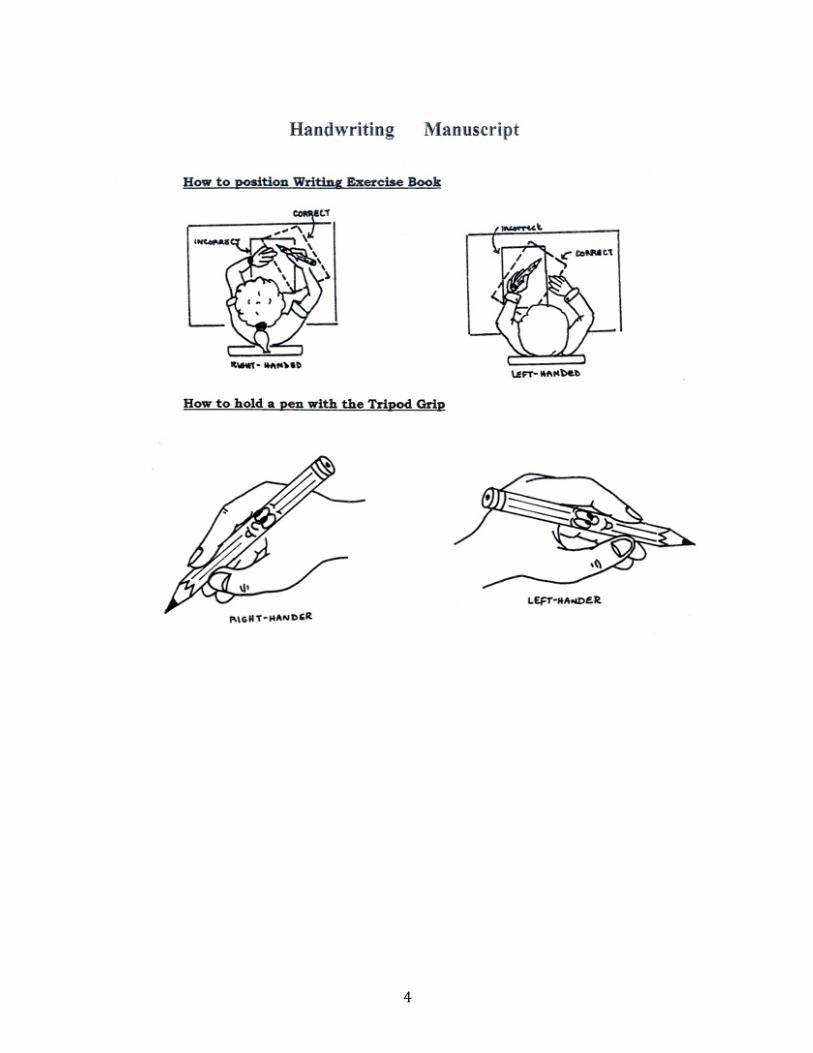
HowtoHoldthePencil
The middle finger and thumb form a vise for holding the pencil. Mrs. Spalding recommended the use of a six-sided, common wooden pencil for every age. Fountain pens are also very good for young students. The pointing finger rounds, and the end of the nail sits on the pencil where the paint ends, about an inch from the point. (I have noted that many students hold the pencil too close to the tip, which blocks their view of what the are writing and forces them to bend their head sideways and close to the paper to see what they are writing. Often just correcting the grip solves the problem of poor posture.) The hinge (elbow) on the on the arm of the paper holding hand should be stationary. The writing hand moves the paper enough so that the pencil points remain in as small area just forward of the center of the body. Have each child hold a pencil across the palm of the hand and make him or her see that it weighs next to nothing. Train the student to consciously write with no real pressure in the arm or fingers. The arm should feel as light and soft as the leg and paw of a friendly kitten. Hold the child’s elbow in one our your hands and his in the other and have him feel no weight in his arm and hand. Write with the point of the pencil. The pencil should stand forward of the main knuckle. All knuckles including the thumb should be bent and the fingers and thumb rounded to the same degree (liken this to the way a cat’s claws are rounded). Leave the space of one flat side between the pointing finger and the thumb. Run a finger between the thumb and pointing finger to make sure this is so. Never use the writing hand to hold the paper. Make the other hand do that. The two hands have completely separate functions.
PaperforWriting
For beginners through second grade, use paper with lines 5/8-inch apart. Wider spacing forces children to draw letters instead of writing. For third grade and above, use paper with standard 3/8-inch spacing between letters.
ForgetMeNot
“In writing the brain directs the hand. This cannot be done correctly unless there is a thorough knowledge of how each letter and number is made.” (Spalding WRTR 81). Spalding is absolutely correct, contra the Whole Language movement misguided contention that children would pick up correct writing without direct instruction.
4
5
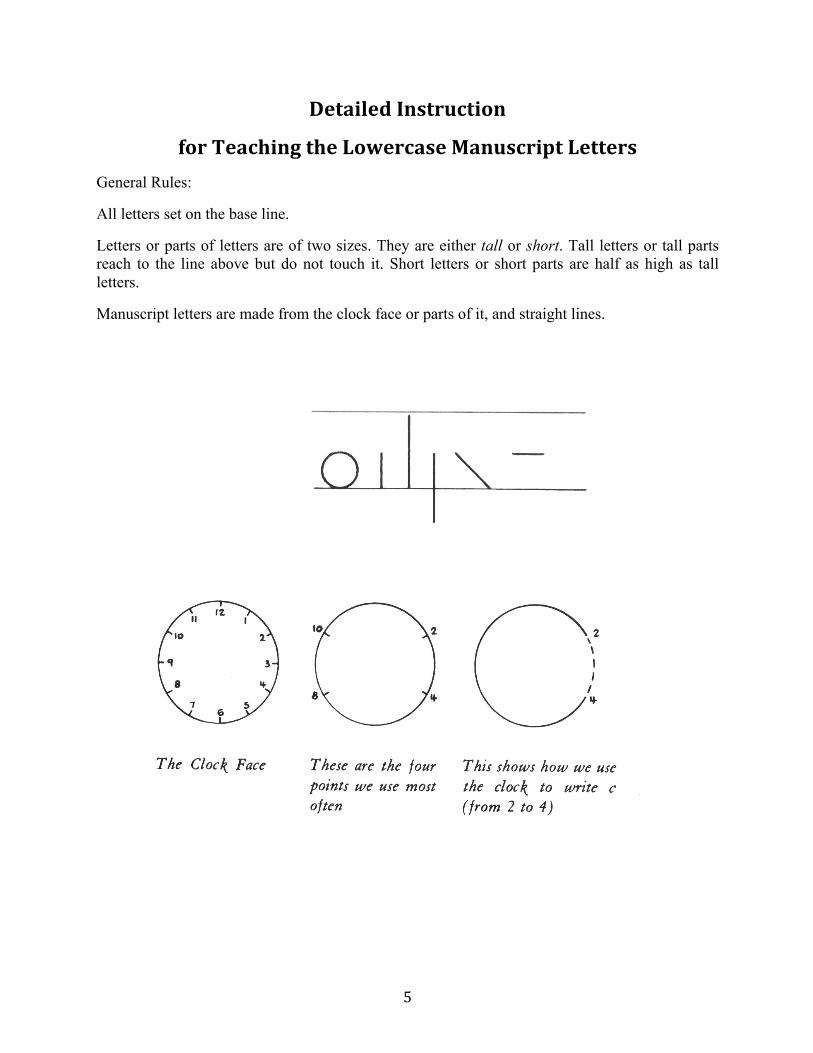
DetailedInstruction
forTeachingtheLowercaseManuscriptLettersGeneral Rules:
All letters set on the base line.
Letters or parts of letters are of two sizes. They are either tall or short. Tall letters or tall parts reach to the line above but do not touch it. Short letters or short parts are half as high as tall letters.
Manuscript letters are made from the clock face or parts of it, and straight lines.
6
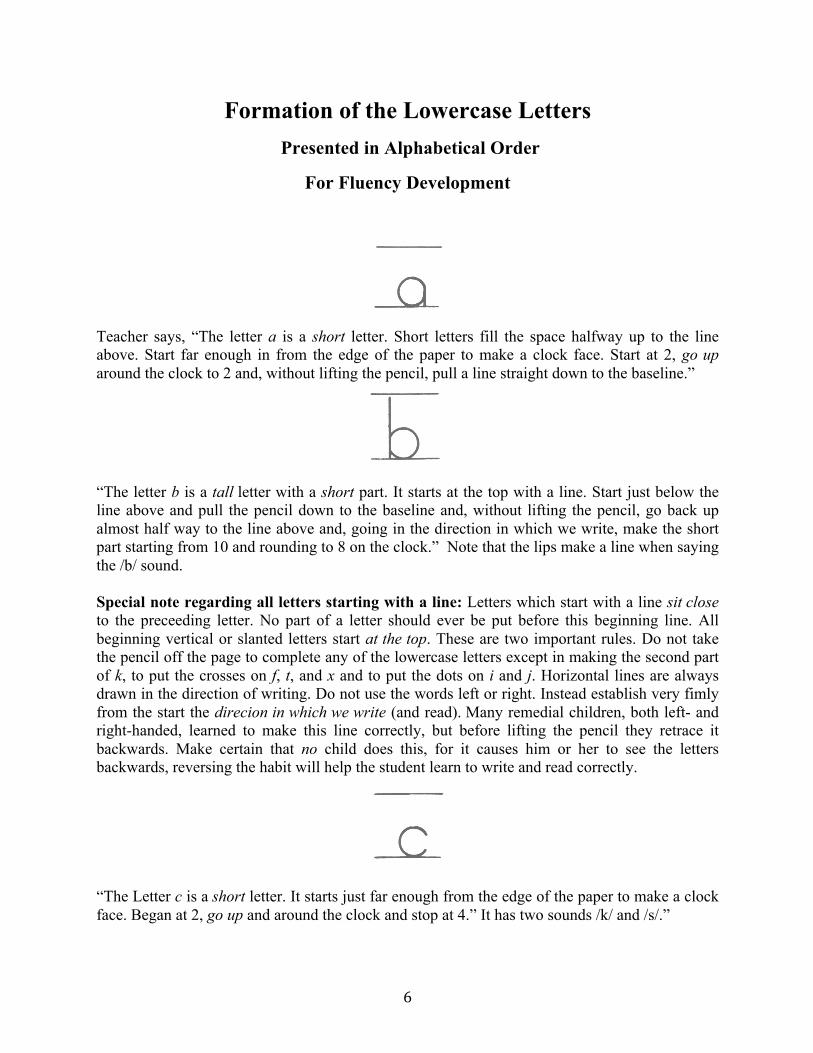
Formation of the Lowercase Letters Presented in Alphabetical Order
For Fluency Development
Teacher says, “The letter a is a short letter. Short letters fill the space halfway up to the line above. Start far enough in from the edge of the paper to make a clock face. Start at 2, go up around the clock to 2 and, without lifting the pencil, pull a line straight down to the baseline.”
“The letter b is a tall letter with a short part. It starts at the top with a line. Start just below the line above and pull the pencil down to the baseline and, without lifting the pencil, go back up almost half way to the line above and, going in the direction in which we write, make the short part starting from 10 and rounding to 8 on the clock.” Note that the lips make a line when saying the /b/ sound. Special note regarding all letters starting with a line: Letters which start with a line sit close to the preceeding letter. No part of a letter should ever be put before this beginning line. All beginning vertical or slanted letters start at the top. These are two important rules. Do not take the pencil off the page to complete any of the lowercase letters except in making the second part of k, to put the crosses on f, t, and x and to put the dots on i and j. Horizontal lines are always drawn in the direction of writing. Do not use the words left or right. Instead establish very fimly from the start the direcion in which we write (and read). Many remedial children, both left- and right-handed, learned to make this line correctly, but before lifting the pencil they retrace it backwards. Make certain that no child does this, for it causes him or her to see the letters backwards, reversing the habit will help the student learn to write and read correctly.
“The Letter c is a short letter. It starts just far enough from the edge of the paper to make a clock face. Began at 2, go up and around the clock and stop at 4.” It has two sounds /k/ and /s/.”
7
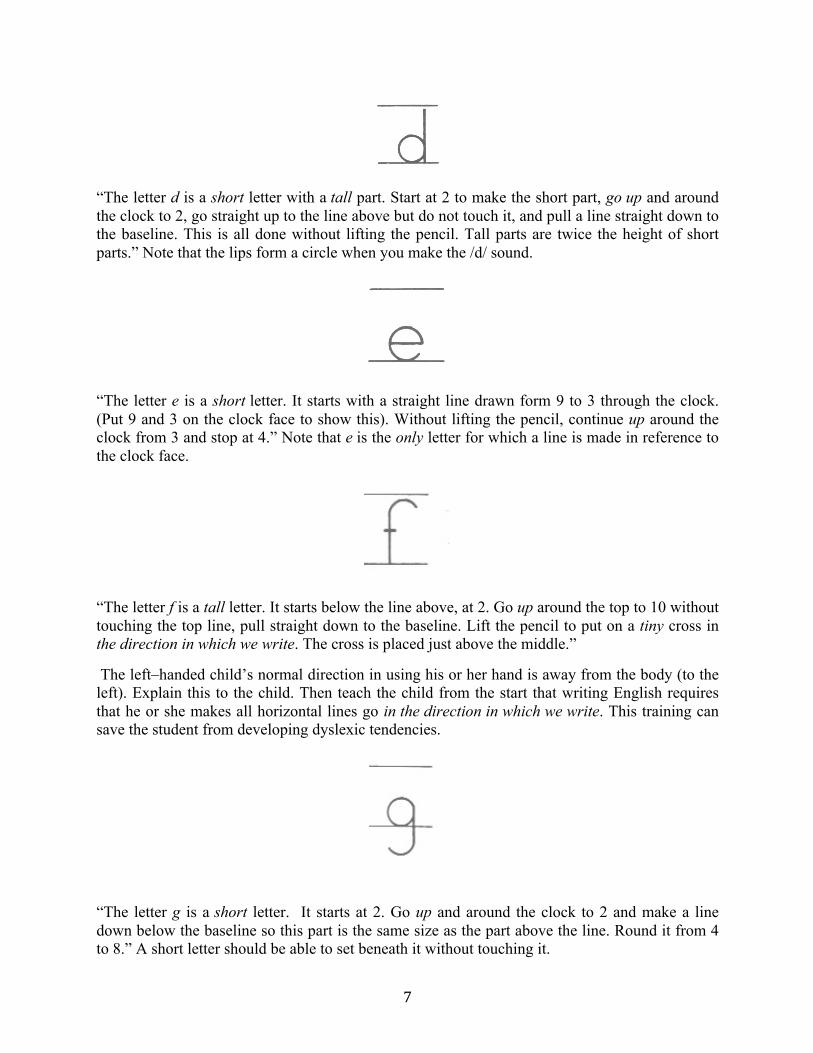
“The letter d is a short letter with a tall part. Start at 2 to make the short part, go up and around the clock to 2, go straight up to the line above but do not touch it, and pull a line straight down to the baseline. This is all done without lifting the pencil. Tall parts are twice the height of short parts.” Note that the lips form a circle when you make the /d/ sound.
“The letter e is a short letter. It starts with a straight line drawn form 9 to 3 through the clock. (Put 9 and 3 on the clock face to show this). Without lifting the pencil, continue up around the clock from 3 and stop at 4.” Note that e is the only letter for which a line is made in reference to the clock face.
“The letter f is a tall letter. It starts below the line above, at 2. Go up around the top to 10 without touching the top line, pull straight down to the baseline. Lift the pencil to put on a tiny cross in the direction in which we write. The cross is placed just above the middle.” The left–handed child’s normal direction in using his or her hand is away from the body (to the left). Explain this to the child. Then teach the child from the start that writing English requires that he or she makes all horizontal lines go in the direction in which we write. This training can save the student from developing dyslexic tendencies.
“The letter g is a short letter. It starts at 2. Go up and around the clock to 2 and make a line down below the baseline so this part is the same size as the part above the line. Round it from 4 to 8.” A short letter should be able to set beneath it without touching it.
8
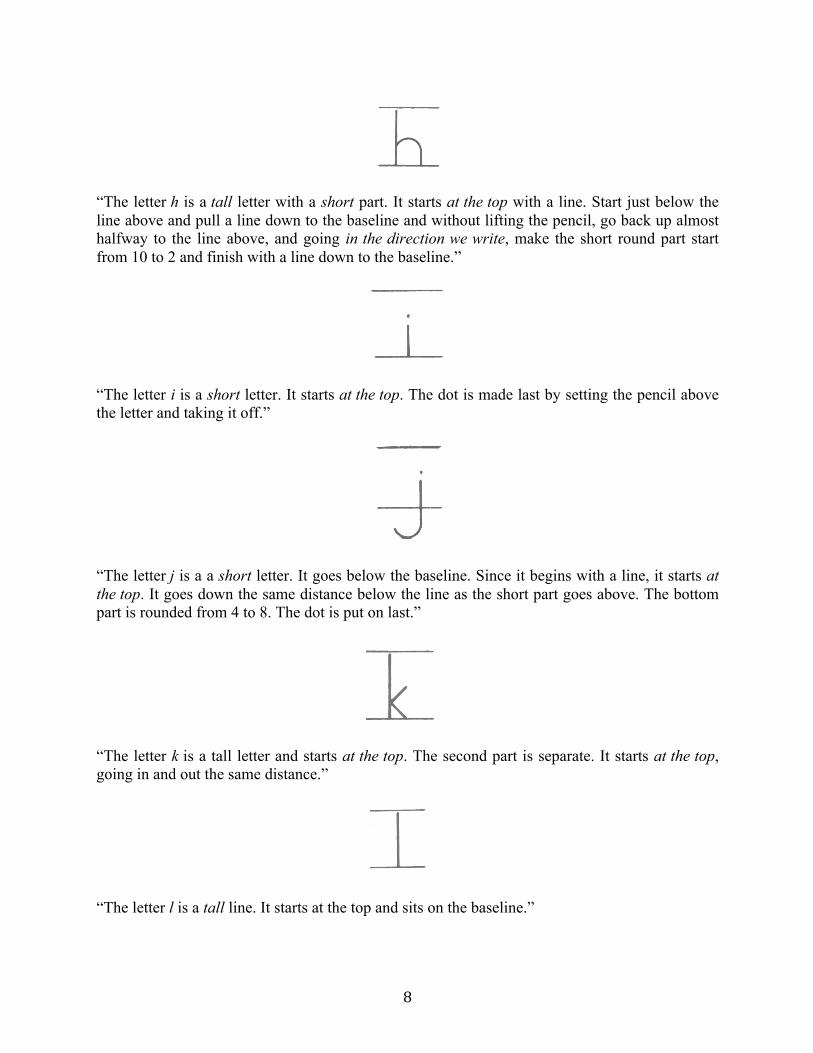
“The letter h is a tall letter with a short part. It starts at the top with a line. Start just below the line above and pull a line down to the baseline and without lifting the pencil, go back up almost halfway to the line above, and going in the direction we write, make the short round part start from 10 to 2 and finish with a line down to the baseline.”
“The letter i is a short letter. It starts at the top. The dot is made last by setting the pencil above the letter and taking it off.”
“The letter j is a a short letter. It goes below the baseline. Since it begins with a line, it starts at the top. It goes down the same distance below the line as the short part goes above. The bottom part is rounded from 4 to 8. The dot is put on last.”
“The letter k is a tall letter and starts at the top. The second part is separate. It starts at the top, going in and out the same distance.”
“The letter l is a tall line. It starts at the top and sits on the baseline.”
9
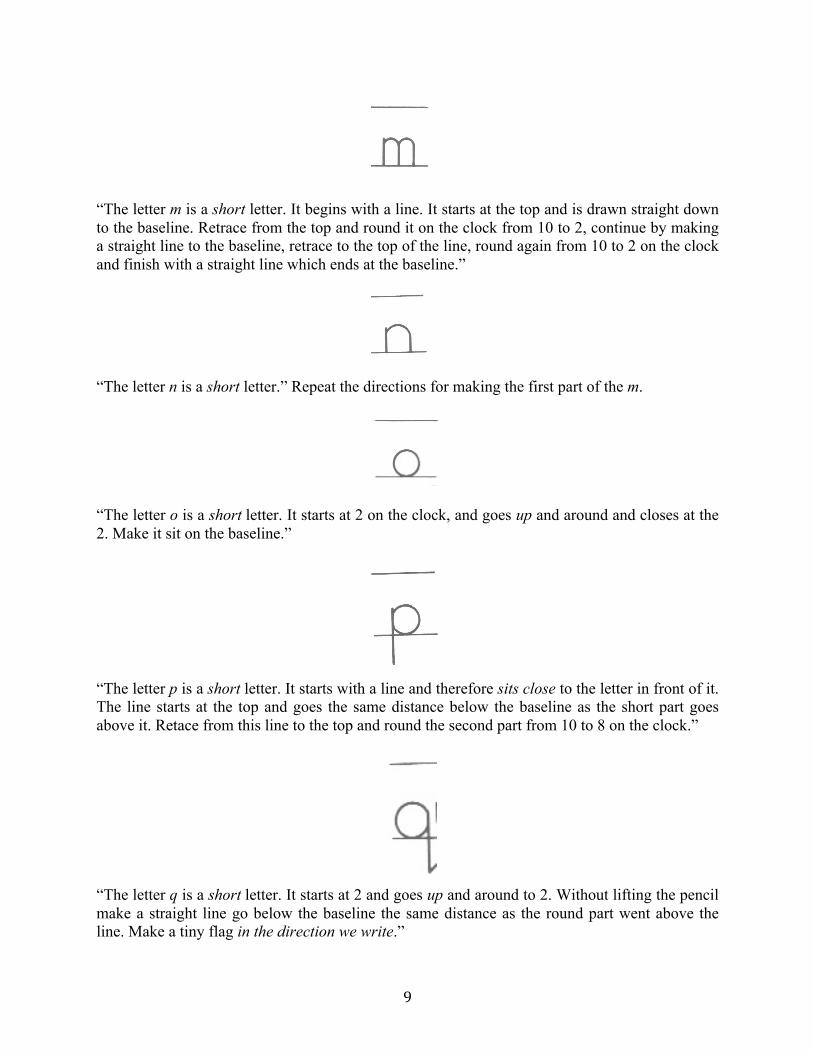
“The letter m is a short letter. It begins with a line. It starts at the top and is drawn straight down to the baseline. Retrace from the top and round it on the clock from 10 to 2, continue by making a straight line to the baseline, retrace to the top of the line, round again from 10 to 2 on the clock and finish with a straight line which ends at the baseline.”
“The letter n is a short letter.” Repeat the directions for making the first part of the m.
“The letter o is a short letter. It starts at 2 on the clock, and goes up and around and closes at the 2. Make it sit on the baseline.”
“The letter p is a short letter. It starts with a line and therefore sits close to the letter in front of it. The line starts at the top and goes the same distance below the baseline as the short part goes above it. Retace from this line to the top and round the second part from 10 to 8 on the clock.”
“The letter q is a short letter. It starts at 2 and goes up and around to 2. Without lifting the pencil make a straight line go below the baseline the same distance as the round part went above the line. Make a tiny flag in the direction we write.”

10
“The letter r is a short letter. It starts at the top. Make the short line go to the baseline, retrace to the top and round it from 10 to 2 on the clock.”
“The letter s is a short letter. It starts at 2 on the clock, goes up around to 10, slides across to 4 (which is below 2) and back around to 8 (which is below 10).”
“The letter t is a tall letter. It begin at the top. The cross is small and drawn just above the center, in the direction we write.” Make sure they do not retrace backwards!
“The letter u is a short letter. It starts with a line at the top. Bring the line almost to the baseline and round it from 8 to 4, continue up with a straight line, and retrace with a line to the base line.”
“The letter v is a short letter. It starts with a line and therefore it is started at the top and sits close to the letter in front. The first line slants in the direction in which we write. Finish without lifting the pencil.”
11
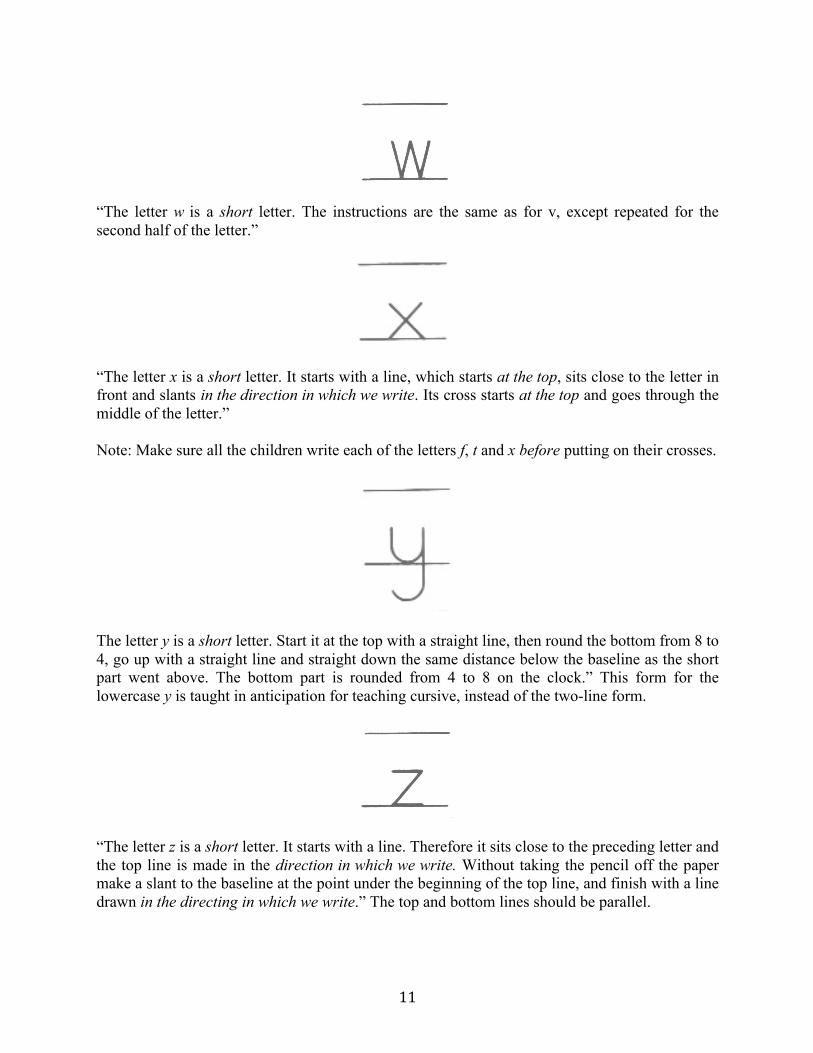
“The letter w is a short letter. The instructions are the same as for v, except repeated for the second half of the letter.”
“The letter x is a short letter. It starts with a line, which starts at the top, sits close to the letter in front and slants in the direction in which we write. Its cross starts at the top and goes through the middle of the letter.” Note: Make sure all the children write each of the letters f, t and x before putting on their crosses.
The letter y is a short letter. Start it at the top with a straight line, then round the bottom from 8 to 4, go up with a straight line and straight down the same distance below the baseline as the short part went above. The bottom part is rounded from 4 to 8 on the clock.” This form for the lowercase y is taught in anticipation for teaching cursive, instead of the two-line form.
“The letter z is a short letter. It starts with a line. Therefore it sits close to the preceding letter and the top line is made in the direction in which we write. Without taking the pencil off the paper make a slant to the baseline at the point under the beginning of the top line, and finish with a line drawn in the directing in which we write.” The top and bottom lines should be parallel.
12
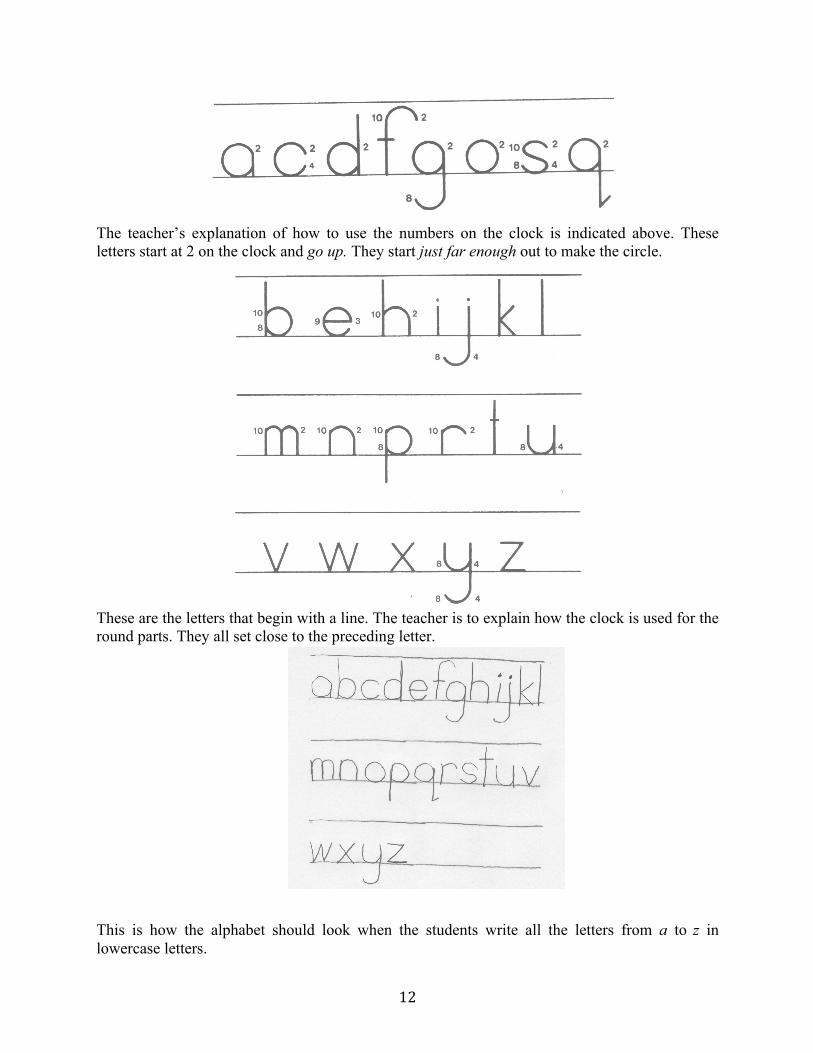
The teacher’s explanation of how to use the numbers on the clock is indicated above. These letters start at 2 on the clock and go up. They start just far enough out to make the circle.
These are the letters that begin with a line. The teacher is to explain how the clock is used for the round parts. They all set close to the preceding letter.
This is how the alphabet should look when the students write all the letters from a to z in lowercase letters.
13
WordsofWisdomfromRomaldaSpalding Romalda Spalding was correct when she wrote, “I have gone into great detail in what to say to children who are learning to write because it is necessary to be specific if handwriting is to become a correct and facile tool for learning. (Cursive or connected writing is easily learned from correct manuscript writing). If letters are made incorrectly, they are mentally pictured incorrectly also. This is a serious cause of failure in both reading and written spelling. It develops dyslexia or perceptual handicap.” Spalding continues, “Have the letters written across the page to teach the spacing of both kinds of letters (Letters starting at 2 and with a line). Letters that begin with 2 on the clock start just far enough from the preceding letter to form the clock. Letters that begin with a line sit very close to the preceding letter.” I have the child say the letter name when practicing writing the alphabet for fluency. Spalding concludes, “The beginner at any age in school (and at home) needs to be taught all these writing techniques which helps any child acquire the correct motor patterns. The first-grade and second-grade teachers cannot afford to skip any of them. Handwriting with the sounds of the phonograms is a basic means of preventing or overcoming confusion and reversals in spelling and reading from which so many children needlessly suffer. (WRTR p. 78) Notice carefully that we do not use trace and copy to teach letter formation. All letters are taught by direct instruction. Students must be taught every detail of letter formation, including grip, posture, and strokes. This will require intense teacher observation until the correct habits are well established. Notice that we do not used specially lined handwriting paper. There is no need for any workbooks, special handwriting paper, or special writing instruments. There are no worksheets of any kind. There are no hidden overhead costs, yet the undeniably excellent outcomes speak for themselves. There is no need for computers or sophisticated software. See the last page of this document for proper handwriting paper. Alphabet fluency transfers naturally to typing when the latter is taught correctly with direct instruction. I highly recommend Diana Hanbury King’s Keyboarding Skills, which teaches touch-typing in ABC order, just like my Shortcut to Manuscript. They are a perfect complement. My Shortcut to Cursive has proven highly effective for teaching cursive from kindergarten through adult. It is the perfect follow-up to Shortcut to Manuscript. Letter writing fluency in letters per minute (LPM) can be calculated by timing the students writing the entire alphabet in seconds and dividing that number by 1560 (26 x 60). 1560/seconds = LPM
14
TechniquesforTeachingtheManuscriptUppercaseLetters
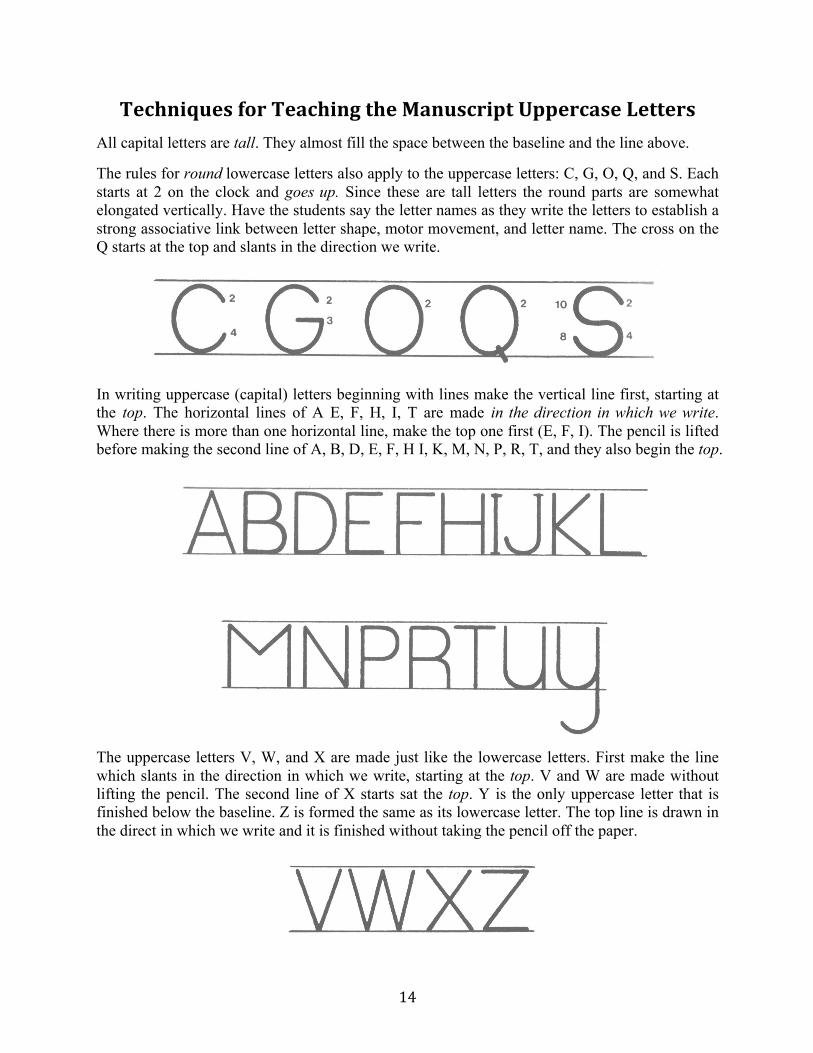
All capital letters are tall. They almost fill the space between the baseline and the line above. The rules for round lowercase letters also apply to the uppercase letters: C, G, O, Q, and S. Each starts at 2 on the clock and goes up. Since these are tall letters the round parts are somewhat elongated vertically. Have the students say the letter names as they write the letters to establish a strong associative link between letter shape, motor movement, and letter name. The cross on the Q starts at the top and slants in the direction we write.
In writing uppercase (capital) letters beginning with lines make the vertical line first, starting at the top. The horizontal lines of A E, F, H, I, T are made in the direction in which we write. Where there is more than one horizontal line, make the top one first (E, F, I). The pencil is lifted before making the second line of A, B, D, E, F, H I, K, M, N, P, R, T, and they also begin the top.
The uppercase letters V, W, and X are made just like the lowercase letters. First make the line which slants in the direction in which we write, starting at the top. V and W are made without lifting the pencil. The second line of X starts sat the top. Y is the only uppercase letter that is finished below the baseline. Z is formed the same as its lowercase letter. The top line is drawn in the direct in which we write and it is finished without taking the pencil off the paper.
15
Words for Practicing Manuscript
by Donald L. Potter
March 8, 2014
1. a: a, A. 2. b: ab. Abe, B, Bab. 3. c: abc, cab, C, Cab 4. d: abcd, dab, bad, dad, cad, add, D, Dad 5. e: abcde, bed, dead, deed, bead, Abe, ace, bee, babe, E, Ed. 6. f: abcdef, fad, fed, feed, deaf, fade, fee, F, Feb. 7. g: abcdefg, gab, gad, gag, fag, badge, edge, cage, beg, age, aged, beg bag, G, Gabe 8. h: abcdefgh, had, head, hag, head, chaff, chef, heed, headed, heeded, H, Hebb. 9. i: abcdefghi, biff, big, bid, hid, hide, bide, fig, gig, dig, bib, chief, did, gig, ice, hick, aid, bade, high, I, Ida. 10. j: abcdefghij, jag, jig, jab, jib, jade, jibe, jiff, J, Jade. 11. k: abcdefghijk, kid, jack, back, hack, beck, kick, deck, Dick, beck, keg, hick, K, Kidd. 12. l: abcdefghijkl, lab, lad, led, lag, leg, glad, life, flick, black, bled, lead, lid, dig, gall, calf, kill, lade, dial, laid, leak, lick, lack, leaf, feel, keel, call, fall, ball, glee, leaf, L, Lad. 13. m: abcdefghijklm, mad, bam, dam, ham, him, hem, cam, came, jam, mike, gem, game, mill, nilk, fame, lame, blame, meal, lamb, dame, mail, jam, male, mall, Kim, make, meek, mime, lime, climb, Jim, M, Maggie. 14. n: abcdefghijklmn, can, ban, nab, nag, neck, man, men, knack, knee, gang, dangle, kin, gin, name, angle, land, hand, kin, nail, knife, knell, jingle, Jean, K, Kim. 15. o: abcdefghijklmnno, on, of, bog, fog, dog, cog, log, flog, off, of, nod, odd, job, cob, bob, mob, home, comb, bomb, old, fold, mold, God, mom, mock, clock, gold, cold, code mole, roll, role, coal, long, foil, boil, hoe, hone, dome, come, go, gone, cone, nock, lock, look, cool, doggie, golf, gone, knock, knob, John, O, Ogden. 16. p: abacdefghijklmnop, gap, pail, paid, pill, cap, cop, jip, lap, lip, clip, hip, dip, map, mop, flap, flip, fop, nap, pin, pen, pan, nip, pack, plan, palm, map, lope, hope, pencil, pop, hop, in, pond, pick, pole, pledge, apple, dapple, paddle, chapel, P, Pam. 17. q: abcdefghijklmnopq, Q, (See u for words.) 18. r: abcdefghijklmnopqr, or, rag, rig, rap, rip, ran, rain, bar, far, mar, mark, dark, brag, car, ear, fear, rear, jar, ram, rim, drag, rib, rack, raid, rail, read, robin, rock, radio, ride, rope, grope, grace, brace, race, brim, brick, brig, brand, grand, grin, grad, roar, rebel, radical, ridge, frog, free, large, roll, ginger, R, Robin.

16
19. s: abcdefghijklmnoprs, so, as, is, gas, ask, sand, sip, slap, horse, lash, slosh, sop, sap, has, sip, sis, sin, lass, has, hiss, lass, hose, ship, shop, rash, sharp, pass, scam, scan, scar, sage, see, seeds, sea, school, scold, scamp, some, risk, science, scone, shone, shock, scoop, scroll, scream, soldier, screech, scribble, sack, scorn, snack, slack, scram, sock, screen, scene, sand, shake, shell, shoes, farms, charms, bash, hash, harm, rash, sap, loss, moss, miss, mass, simple, sample, S, Sammie 20. t: abcdefghijklmnopqrst, to, at, too, tab, tap, tip, top, ton, tan, bitter, hotter, tag, pot, pat, pit, lit, train, trash, the, those, thank, get, tank, at, mat, sat, hat, ten, tend, tell, lot, hot, list, rate, late, fate, tramp, faith, taste, haste, paste, tick, till, tall, tail, right, bright, flat, tin, them, tar, last, list, got, gloat, gnat, jet, roast, mart, sat, seat, T, Tom. 21. u: abcdefghijklmnopqrstu, up, bun, fun, gun, bus, sub, caught, fought, usher, sun, mutt, nut, put, use, uncle, shut, under, hut, junk, luck, lump, pup, under, user, uncle, urge, group, gulf, glue, glut, rub, run, summer, U, Uriah. qu: quick, quack, quad, qualm, quarrel, quit, quarter, quail, quill, quilt, squirrel, squeal, question, quench, quick, qualm, Q, Queen 22. v: abcdsefghijklmnopqrstuv, vim, have, laver, valve, oval, van, vat, vast, over, hover, savage, savior, vigor, love, value, vote, vase, valve, leave, vogue, valet, grave, stave, stove, grove, veal, violet, verge, vest, lavender, gave, V, Vance 23. w: abcdefghijklmnopqrstuvw, what, when, who, where, while, wheel, whale, whack, well, west, want, went, wave, know, knew, work, word, worm, worth, walk, watt, weasel, weave, web, webbing, wedding, wedge, wedlock, weed, wait, weird, brawl, pawn, W, Wilmington. wr: wrong, wreck, wrestle, wrench, witch, wring, wreath, wretch, wrinkle, wrist, Wrangler, Wright. 24. x: abcdefghijklmnopqrstuvwx, fax, tax, fox, box, lax, sax, six, max, mix, nix, fix, crux, axel, axis, flex, hoax, mix, ox, oxen, taxi, exam, exile, expel, extra, pixie, relax, reflex, coax, exit, mixture, remix, exciting, relax, x-ray, X, Xavier. 25. y: abcdefghijklmnopqrstuvwsy, yo-yo, yet, yes, you, yellow, way, say, tray, may, baby, they, lay, stay, year, yearn, yeast, young, youth, yawn, yell, lay, day, clay, hay, bay, today, Monday, Tuesday, Wednesday, Thursday, Friday, Saturday, Sunday, yesterday, why, cry, worthy, stray, by, my, dry, fly, guy, busy, history, only, city, secretary, any, many, bunny, nanny, mystery, system, cyclone, type, lady, yarn, yacht, yield, yip, yippee, yikes, yet, yew, year, you, yoga, yodel, yogurt, yuck, yucca, every, journey, quantity, victory, Y, Yvonne, Yellowstone, Yakima, Yahweh, Yorktown, Yosemite, Yukon, Yugoslavia 26 z: abcdefghijklmnopqrstuvwsyz, zag, zap, Zaire, zeal, zealot, zebra, zoo, zero, zip, zipper, ziti, zone, zonked, adz, jazz, waltz, lizard, wizard, lazy, crazy, prize, haze, maze, ozone, Z, Zechariah. Zaire, Zen, Zeus, Zip Code, Zoe, Zulu, Zurich.

17
Sentences Containing All the Letters of the Alphabet
Pangrams 1. The quick brown fox jumps over the lazy dog. (35 letters)
2. How quickly daft jumping zebras. (27 letters)
3. The five boxing wizards jump quickly. (31 letters)
3. The five boxes perform quick waltzes and jigs. (38 letters)
4. Sixty zippers were quickly picked from the woven jute box. (48 letters)
6. A quart jar of oil mixed with zinc oxide makes a very bright color. (53 letters)
7. The job requires pluck and zeal from very young wage earners. (50 letters)
8. Crazy Frederica brought many very exquisite opal jewels. (60 letters)
9. The public was amazed to view the quickness and dexterity of the juggler. (60 letters)
10. We promptly judged antique ivory buckles for the next prize. (50 letters)
11. Mr. Potter wrote this pangram to see how hard it might be to write a sentence containing all the letters in the alphabet and to help you very quickly zero in on the cursive connections. (35 letters)
Calculating Sentence Copying Fluency in Letters Per Minute
Letters per minute (LPM) = 60 x letter count divided by seconds needed to write the sentence.
Example: The student wrote Pangram #10 in 25 seconds. 50 x 60 = 3000. 3000/25 = 120 LPM.
Mean Handwriting Copying Speeds: Letters per Minute Girls Boys Grade 1 21 17 Grade 2 36 32 Grade 3 50 45 Grade 4 66 61 Grade 5 75 71 Grade 6 91 78 Grade 7 109 91 Grade 8 118 112 Grade 9 121 114
Note that these are letter-copying speeds. Alphabet writing speeds should be higher.
18
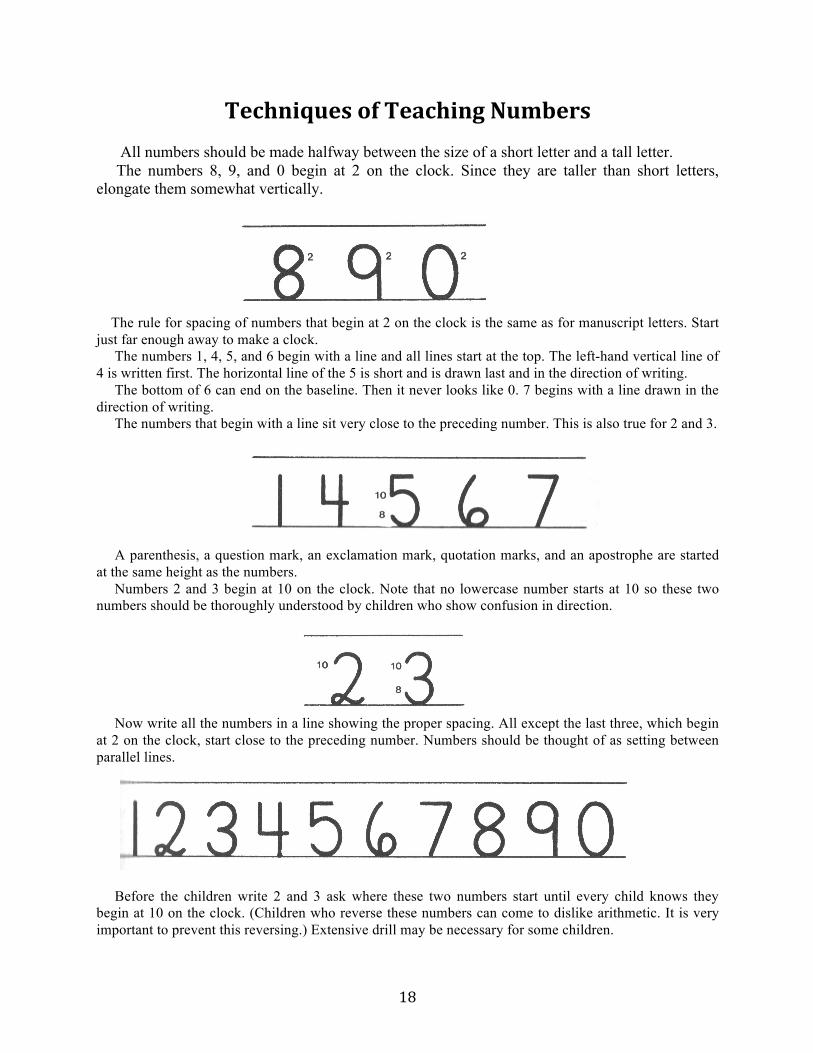
TechniquesofTeachingNumbers All numbers should be made halfway between the size of a short letter and a tall letter. The numbers 8, 9, and 0 begin at 2 on the clock. Since they are taller than short letters, elongate them somewhat vertically.
The rule for spacing of numbers that begin at 2 on the clock is the same as for manuscript letters. Start just far enough away to make a clock. The numbers 1, 4, 5, and 6 begin with a line and all lines start at the top. The left-hand vertical line of 4 is written first. The horizontal line of the 5 is short and is drawn last and in the direction of writing. The bottom of 6 can end on the baseline. Then it never looks like 0. 7 begins with a line drawn in the direction of writing. The numbers that begin with a line sit very close to the preceding number. This is also true for 2 and 3.
A parenthesis, a question mark, an exclamation mark, quotation marks, and an apostrophe are started at the same height as the numbers. Numbers 2 and 3 begin at 10 on the clock. Note that no lowercase number starts at 10 so these two numbers should be thoroughly understood by children who show confusion in direction. Now write all the numbers in a line showing the proper spacing. All except the last three, which begin at 2 on the clock, start close to the preceding number. Numbers should be thought of as setting between parallel lines.
Before the children write 2 and 3 ask where these two numbers start until every child knows they begin at 10 on the clock. (Children who reverse these numbers can come to dislike arithmetic. It is very important to prevent this reversing.) Extensive drill may be necessary for some children.
19
NotefromInternetPublisher:DonaldL.Potter
January 2, 2014
I have had excellent results teaching this method to many children for close to twenty years. I am absolutely confident that any teacher who will study and master this method will be able to teach all students to write the alphabet with high-level fluency and excellent legibility. I was initially motivated to publish this method because of my experience testing student handwriting fluency. In 2008 I began correspondence with Dr. Bob Rose, the author of Forget the Bell Curve. Bob maintained that students fluent in writing the alphabet from memory all learn to read. The fastest, surest, and easiest way to make certain kindergartners are fluent with the alphabet is simply to have them write the alphabet over and over until they can write the alphabet in ABC order from memory at 40 letters per minute. When I first read Bob’s book, I figured that all first grade and most kindergarten students knew the alphabet fluently. It was then that I developed my Alphabet Fluency Assessment, which measures the students’ ABC writing fluency, letter identification fluency, and copying fluency. To my utter dismay, ALL of my many tutoring students had very poor pencil grip, poor posture, poor letter formation, poor letter knowledge, and poor letter writing fluency. It became obvious that teachers were attempting to teach children to read BEFORE they had mastered to alphabet to the point of automatic production and recognition. This was my amazing and deeply disconcerting discovery. They were putting the proverbial cart before the horse. Marilyn Jager Adams puts it plainly and correctly, “Both theory and data suggest that instruction on neither the sounds of letters nor the recognition of whole words should be earnestly undertaken until the child has become confidence and quick at recognizing individual letters.” (363) I consider that one of the most valuable sentences in her 1990 Beginning to Read: Thinking and Learning about Print (BTR). Read that sentence several times and consider the implications. Adams continues, “While every aspect of reading growth depends on the speed and accuracy of letter perception, learning to recognize and discriminate printed letters is just too big, too hard, and too fussy a task to be mastered incidentally, in tandem with some other hard and fussy task, or without an adult’s focused attention to its progress and difficulties. Succinctly, what a waste of time to correct the pronunciation of a letter sound or word if the child’s confusion was really in the visual identity of the letter.” (363) [This is why I teach my students to “look at all the letters the right way, with no guessing.” I have a “NO GUESSING ZONE” sign in the front of my room.] Dr. Adams reveals in her 2013 ABC Foundations for Young Children that most first graders in America do not know the entire alphabet at the end of first grade. No wonder we have millions of illiterates! I highly recommend her book. The essential difference between her approach and mine is that I teach the students to write the letters in ABC order, whereas she teaches by stroke commonality. We both use the clock face to teach letter formation.
20
In Beginning to Read Adams writes, “But it appears that neither tracing or copying, but independent printing holds the greatest leverage for perceptual and motor learning of letter shapes.” (364) You will notice that our method dispenses entirely with tracing or copying letters to teach handwriting. With my approach the students can begin daily ABC writing in ABC order using just the letters they have learned to date. You do not have to teach all the letters to start the daily timed writing practice. I call this the Alphabet String. Make sure that your students have proper grip, posture, and letter stroke at ALL times. The right time to develop the proper habits is from the very start. One thing that makes it so difficult to teach proper writing (grip, posture, and strokes) is that the Whole Language movement pretty well destroyed - in many areas of the country - the infrastructure necessary for the entire community to support good handwriting. Many teachers now going into the classrooms are totally bereft of any significant knowledge of good handwriting and how to develop it in their students. Parents are no longer able to help their children. I recall vividly when our Whole Language Supervisors removed ALL handwriting books and methods from the classroom in my school district. That would have been in the early 1990’s, and the situation has not changed as of the date of this writing. While I am speaking of our local situation, the movement had an enormous impact in practically all parts of the country. In developing fluency, there are two ways to time students ABC writing speeds. The first is simply to time them for one minute and record the score. The problem with this method at first is that the students will not be able to write the entire alphabet in 60 seconds so they will not be able to practice the entire alphabet during the timing period. My preferred method is to time how long it takes the students to write the alphabet and then divide that number in seconds by 1560. That will give the letters per minute. The number 1560 comes from multiplying 26 letters times 60 seconds. Both ways give the rate in letters per minute (LPM). For the importance of fluency, look up Precision Teaching. All references to Romalda and Walter Spalding’s The Writing Road to Reading are from the 1990, 4th Edition. The book is now in its 6th edition. I highly recommend it, especially the manuscript handwriting instructions. Note that Spalding’s style of manuscript was specifically designed to facilitate a smooth transition to cursive. She recommended making the transition in the middle of second grade. I recommend teaching manuscript to three and four years olds and transitioning to cursive in either kindergarten or the beginning of first grade. On the last page of this document is the handwriting paper that I used to teach Shortcut to Manuscript. The customary middle dotted line is missing purposefully because I consider it an unnecessary distraction that hinders the transfer to regular lined paper. Last revised on 7/4/17. www.donpotter.net and www.blendphonics.org
Two YouTube training videos are available for this method: Introduction for Teachers and Demonstration for Students. My Channel is Don Potter.

21
QuotesRegardingAlphabetFluencyfromMarilynJagerAdams’1990Beginning to Read: Thinking and Learning about Print
The following quote is taken from Chapter 13 of Adam’s well-respected and much quoted book. I am afraid that Chapter 13 on “Print Preliminaries” has been largely overlooked and unfortunately underestimated in the designing of reading curriculum.
Both theory and data suggest that instruction on neither the sounds of letters nor the recognition of whole words should be earnestly undertaken until the child has become confident and quick at recognizing individual letters (363).
In Chapter 6 of Beginning to Read, Dr. Adams gives a summary and the instructional implications of the Orthographic Processing Module of the reading process according to the Parallel Distributed Processing (Connectionist) Model of Reading. It merits careful consideration.
When the skilled reader fixates on a word, each letter activates is own recognition unit in the reader’s memory. These directly activated units, in turn, send activation to teach other, with the result that the associations between them are strengthened as the automatic consequence of having looked at the word. Over time, as the reader encounters more and more words, the associations between the letter units will ultimately come to reflect the more general orthographic structure of the printed language. Strong associations develop between the units representing sequences and patterns of letters that have been seen frequently. As a result, any word composed of these sequences and patterns is perceive more or less holistically: Because of the learned associative linkages, every one of its component letters effectively primes and reinforces the perception of every other. In contrast, weak of inhibitory associations develop between letters that have rarely occurred together. As a result, long words are automatically broken into syllables: Because the letter sequences within syllables are quite predictable, the perception of the syllable as a whole coheres; because the sequences of letters that occur between syllables are unpredictable, the perception of the word becomes somewhat disassociated at the syllable boundary. In short, then, although the skilled reader’s Orthographic processor requires sequences of individual letters as input, it effectively perceives whole words and syllables. In reverse, however, the ability to perceive words and syllables as wholes evolves only through complete repeated attention to sequences of individual letters. With concern toward how to develop word recognition skills, the theory thus carries several implications. First, it is extremely important that young readers be able to recognize individual letters accurately before word recognition instruction begins. Individual letters are input to the network. If a child cannot recognize a letter, it will not activate the appropriate unit within the network. Unless it activates its appropriate unit with the network, it cannot share the excitation with the other letters of the word under study. Unless the letters share excitation with the other letters of the word under study, the associations between them cannot be strengthened. Only through strengthening of these associations can word study enhance word recognition capacity. Second, for the development of word recognition proficiency to proceed at its optimal rate, young readers must be able to recognize individual letters relatively quickly. The associations between one letter and another is strengthen or created only when both recognition units are active at the same time If the child spends any measurable amount of time recognizing the second letter in a word, then, by the time it is resolved, the activation of the first will have uselessly swindled away. Difficulties in individual letter recognition thus subtract directly from any potential profit to be gained from studying whole words. Third, for immature readers – readers who have not yet acquired a set of associations to math the print before them, it is important not just that they look at the word before them but that they attend carefully to its completed ordered sequence of letters. Toward hastening the development and refinement of the letter recognition network, students should be engaged in activities that encourage attention to the ordered, letter-by-letter structure of the syllables and words they are to read. (Remember that the order of letters in a sequence is poorly perceived until the sequence becomes familiar.) Many of the most common practices of reading programs – including synthetic phonics, writing exercise with frequent blends and digraphs, and practice with word families – seem ideally suited to this end.
22
In this context, the allure of phonics, or the exercise of discovering words by sounding out its spelling, is that it inherently forces the child to attend to each and every letter of the word, in left-to-right order. The motivation for its recommendation has little to do with the value or importance of actually sounding out words. It is, from this perspective, merely a gimmick to focus the child’s attention on its spelling. Note too that phonics activates that direct the child’s attention to individual letters rather than sequences of letters do not seem useful to this end. The value of having children write and spell is also strongly reinforced. It has been shown that the act of writing newly learned words results in a significant strengthening of their perceptual integrity in recognition. By writing and spelling, I mean writing and spelling of whole words, as when a child composes her or his own story, writes to dictation, or even copies words over. (See Endnote) Workbook exercises that have children fill in the appropriate letter in a blank do not serve the same purpose because they do not force the child’s attention to the spelling patterns of the words as wholes. Exercise on frequent blends and digraphs such as bl, st, pr, th, sh and ch also seem worthwhile. As attention to such letter groups serves to strengthen the associations among their letters in memory, it should hasten the children’s ability to perceive such strings quickly and holistically. In the same spirit, instruction on frequent prefixes and suffixes may similarly be helpful for the reader who is sufficiently advanced to be working on polysyllable words. The theory suggests further that children be discouraged from skipping or glossing over words that are difficult for them. When the encounter a word that is hard to read, they should take the time to study it. They should look carefully at its spelling and sound out its pronunciation; then they should repeat this process until they can read off he word with something close to normal ease and speed. Happily, for children who are normal readers, this level is reached with only a couple encounters of the word, even if the encounters are separated by several days. Importantly such focused word study during corrected reading should be relatively infrequent in practice. Intuitions and research concur that students’ reading abilities are best advanced by giving them tests in which the vast majority of words are manageable. When students are stumbling on too many words, the best solution is no longer to ask them to reread; it is to give them an easier text. Note further that the objective here is not to force children to study and reread difficult words while you are watching; it is to help them develop the inclination to study and reread words they are reading by themselves. These qualifications notwithstanding, repeated readings of difficult words and passages result in marked improvements in children’s speed, accuracy, and expression during oral reading and, most important, in their comprehension. In view of this, we should choose texts that are worth rereading and, and whenever it seems worthwhile, we should have children reread them. In view of the importance of syllabification skills, one might infer that they to ought to be taught. Is this inference supportable? Opponents of syllabification training have argued that it is circularly unproductive. In order to break a word down into syllables, they argue, the readers must first sound the word out. Being able to sound the word out was the goal of breaking it into syllables in the first place. Consistent with this argument, various efforts to teach children to divide words into syllables have generally produced very little improvement either in children’s ability to divide new, untrained words into syllables or in their overall vocabulary and reading comprehension scores. As exceptions, several recent studies have obtained improvement in children’s ability to pronounce two-syllable words by training them to compare the syllable to known one-syllable words (e.g., problem-rob, them) … Overall, the best instructional strategy for orthographic development is to induce children to focus on likely sequences that comprise syllables, words, and frequent blends and digraphs. As the children become familiar with these spelling patterns their ability to syllabify will natural emerge along with the automaticity with which they will recognize the ordered spellings of single syllables. Beyond that, the strongest implication of the theory toward developing solid word recognition skills is that children should read lots and often.
Endnote It is worth taking time to watch individual students copying words. Some persist in looking at the word to be copied, writing down one single letter and then looking back for the next letter. With respect to orthographic learning, however, the benefits of copying are expected to come from looking at the text to be copied, remembering the whole word or syllable, and writing that down before looking back to check one’s spelling or to get the next word or syllable to be copied. Sometimes letter-by-letter copying seems to be nothing more than a habit, as though it simply has not occurred to the child to go for whole words or syllables. In these cases, the problem may be fully remedied by providing a little guidance on the method and increase efficiency of treating the to-be-copied materials in a word-by-word or syllable-by-syllable manner.
23
QuotesRegardingAlphabetFluencyfromMarilynJagerAdams’2013ABC Foundations for Young Chi ldren: A Classroom Curri culum
I was overjoyed to learn that Dr. Adams has published a new book: ABC Foundations for Young Children: A Classroom Curriculum, published by Paula H. Brookes Publ. Co, Baltimore, Maryland, 2013. In this book, Dr. Adams has translated the most current research into classroom practice. It is basically the outworking of the principles laid down in Chapter 13 of her 1990 Beginning to Read. I am surprised that it took 23 long years for someone to finally write the book we have need all along. I had surmised from reading the book that there was one very creative and practical mind behind it. Dr. Adams recent emailed me that my suspicion was correct, and that she had written it herself from start to finish. Let’s proceed to my quotes. I will not be including the references. I trust that everyone who reads these quotes will have their appetite whet sufficiently to purchase the book and read it all for themselves.
Children need to know the alphabet. To use phonemic awareness for reading, children need to know which letter represents which phoneme. In turn, learning letter-sound correspondences requires that children not only be able to discern each letter but also to identify each letter by shape, confidently and securely. To use their phonemic awareness to write, children must also be able to form the letters with legible accuracy and reasonable ease. For much of their classroom instruction on reading and spelling, they must be able not only to recognize each letter, but also to see, recall, or even image the letter given only its name or sound. (2). Even so, the issue is deeper than that, for children’s letter knowledge is a good predictor of their responsiveness to phonemic training. … It may well be, as several have argued, that gaining phonemics awareness depends on prior letter knowledge. (2) In all, children’s knowledge of letter names and sounds at school entry is the single best predictor of their reading and spelling growth, not just at the outset but throughout the elementary school years. Moreover, this is so even when other weighty predictors such as phonological awareness, language development, and intelligence measures are factored out of the equation. Children who enter school with poor knowledge of letters names and sounds face a far higher risk of reading delay and disability. (2) Studies commonly show that only a minority of children are able to name or write all letters of the alphabet by the end of first grade and that the number who know the letter sounds is still smaller. (2) How can this be? Alphabetic knowledge is so fundamental and so pervasively important to literacy development. Without a comfortable familiarity with the alphabet, the student is effectively locked out of virtually everything that formal education has to offer. Our schools must do far better in helping children learn their ABC’s. What could be the problem? (3, 4) Of all the challenges that the child will ultimately confronting the letters of the alphabet is the only on that depends exactly and only on sheer rote memorization, and it must be over-memorization, at that. (4) If the support they need is offered neither at home nor at school, then how will they learn? And without solid alphabetic knowledge, how much else will remain unlearnable? (4) Alphabetic knowledge refers to the children’s familiarity with the names, forms, and sounds of the letters of the alphabet as measured by recognition, production, and writing tasks. (5) There are two underlying motivations for this design. The first, of course, is to help the children learn to print each letter efficiently and legibly. The second is that learning to write the letters significantly hastens children’s ability to recognize them as, deep in the brain, the motor habits involved in writing each letter become tightly tied to the letter’s visual representation. (6) [“Design” here refers to Adam’s explicit letter writing instructions. [

24
In the Introduction to “Writing Uppercase Letters,” Dr. Adams has some very important information that should be carefully considered.
There are several strong reasons for anchoring letter writing as soon as possible. The most obvious, of course, is to engage children in writing as soon as possible – yet students will not be able to write much as long as the letters are insecure or onerous for them. A second reason is that spelling activities, both structured and independent are shown to be a superlative means of advancing children’s phonemic awareness, their grasp of the alphabetic principle, and their internalization of spelling patterns and conventions. However, spelling activities are thwarted to the extent that children are struggling with letters. (59)
Even so, learning to form letters so that they look right is only part of the challenge. Mature readers and writers do not “draw” letters in the way they draw faces, bunnies, or trees. Instead, each letter is tied to a highly overlearned series of movements that are executed almost automatically as people write. Thus, most people can write more legibly with their eyes closed than they can with their nondominant hand. A more important consequence is that as letter formation becomes automatic, people can devote their attention to their message, choice of wording, and spelling as they write. (59)
Leading children to practice a consistent set of strokes for each letter serves to accelerate the development of letter-writing automaticity. Furthermore, as the hand movements involved in writing each letters becomes bound to the visual representation, they serve to hasten and secure the child’s ability to recognize the letters. (59) [The term “bound” here refers to the connections model of learning that is the psychological theory behind Dr. Adams’ work – and mine. This would apply to any letterform, cursive, manuscript, or italic.]]
In the Introduction to “Writing Lowercase Letters,” Dr. Adams has some very important information that should be carefully considered.
As mentioned in the introduction to Unit II, visual representation of the letters is integrally bound to the movements that the hands make when writing them. But there is more. Although learning to recognize uppercase letters is hastened by learning to write them, research indicates that learning to recognize lowercase letters depends on learning to write them. This is the reason that, for survival purposes, the visual system itself is preprogrammed to ignore differences in orientation of objects; yet, orientation is integral to letter identity and, indeed, makes al the difference between b, p, q and between n and u. (121)
What matters is not just writing the letters, but linking the appearance to a common habitual stroke sequence for its writing. Thus, letter-writing lessons are designed to help the children write letters such that each is represented by a consistent set of strokes, produced in a consistent order. You will be able to tell whether children are using the proper stroke sequence by examining their written work. The tendency to write letters backwards is a strong indication that children are not adhering to recommended starting spots or stroke sequences, as is inconsistency in rendering of a letterform from one occasion to the next. (121)
June Brown in her excellent 1981 Guide to l e t ’ s read , writes,
Every child I worked with learned to read providing he or she could see a pin on the floor and pick it up, could button clothes, and had to ta l r e ca l l o f the a lphabet . No one can read an alphabet language without total recall of the alphabet. ‘Total recall’ means that he student can recite the letters in alphabetical order, can identify them when they are presented in random order, and can print any word when it is pronounced and spelled. These three goals must be met with absolute perfection before the student can become a good reader. Unfortunately, many schools do not insist on total recall. They teach children to recite the letters in alphabetical order, and sometimes they teach them to identify the letters in random order. However, very few schools teach children to print any word when it is pronounced and spelled. The foundation of reading success is total recall of the alphabet. (7)
“Let’s get the facts straight! There is no such thing as dyslexia among children who know the alphabet. Any child who can learn the alphabet is not dyslexic. Therefore, if your child knows the alphabet, can see normally, can button clothes, your child can and will learn to read. “Dyslexia” is a very confusing term. Many educators no longer use it because no one is quite sure what it means. Generally it means that a child can only read with great difficulty, but sometimes it means a child cannot read at all. I have seen many children labeled dyslexia. But every one of them who knew the alphabet learned to read.” (12)
25
InformationonLetter-Writing
From Mary Pecci’s At Last! A Reading Method for EVERY CHILD
While the child is learning to recognize the letters of the alphabet, it is very important that he learn to write the letters because there is a correlation between letter-writing and reading. Lack of ability in one area will have its effects in the other. Do not require the children to write anything until they have been taught how to write. When children are required to copy their names (which may consist of as many as 15 letters) or information from the chalkboard before they have been carefully instruction in the correct formation of letters or before they even know what letters they are copying, the result is that the child may, do a number of things ranging from an unlimited number of lines pieced together to resemble the strange forms he is copying, reversing the direction of strokes in vital letters, improver spacing, complete disregard for size and scale, to total lack of resemblance of that which he is copying. It is a major task to re-teach proper letter writing, and in some cases children never entirely recover from these early habits. It is no coincidence that most children with reading deficiencies have the common characteristic of scrambled and illegible handwriting. Continuous Strokes: Each letter is formed by using the least number of stokes. The advantage of this method is that even when rushing, it is difficult to distort the letters. Also, it prepares the way for cursive writing, which is one continuous stroke. The reason this method is not as popular as Separate Strokes because it is more difficult to teach. However, if you will invest the time and patience to teach this technique, it is well worth the effort and will reap far-reaching rewards when the children are soon able to do it with ease. [We teach continuous strokes in Shortcut to Manuscript.]
PetersonDirectedHandwritingTrainingVideos
Impact of Handwriting: https://mrpencil.adobeconnect.com/_a769934917/handwriting_impact/ Learn the Peterson Method: https://mrpencil.adobeconnect.com/_a769934917/pdhmethod1/ Peterson First Grade Pupil Book: https://www.youtube.com/watch?v=fP25W-Rhcig&feature=youtu.be

26
Understandinghowthebraincontrolsdrawingandhandwriting
By Pam Versfeld, Physiotherapist
Experienced hand writers can write a sentence without needing visual guidance. This is because fluent and efficient handwriting is produced with minimal need for visual feedback. Visual monitoring of handwriting is important for positioning of handwriting on the page and keeping the writing in a straight line.
Letters are formed by a series of small movements called strokes.
The pattern of strokes needed to form a letter are stored in the brain as a motor plan. The motor plans (also referred to as representations) for letters contain information about the relative length, direction and sequence of the strokes needed to form each letter.
Well-learned motor plans control the direction and sequence of strokes without the need for feedback for completing the movements with reasonable accuracy. Handwriting movements occur to fast to rely on feedback for controlling each letter. The movements (strokes) used to form letters are pre-planned and very rapid. In fact the speed of fluent handwriting is so fast that they are completed before any information from the muscles or from the vision reaches the brain. In fluent handwriting each letter is pre-planned and the movement is carried out without the need for visual monitoring or feedback from the muscles. In fact research has shown that after the first few months of handwriting young children not only pre-plan letters, but have started to pre-plan whole syllables.
The equivalence factor: writing big or small uses the same motor plan
Learning to print letters is all about learning the motor plan for the letter.
Learning to write a letter is a process of learning the relative length, direction and sequence of the strokes that form the letter and storing this information in the brain as a motor plan for the letter. When a letter is well learned seeing an example of the letter (grapheme) or hearing the letter (phoneme) will call up the motor plan for writing the letter. With repeated the practice the link between seeing, hearing or thinking about a letter becomes more direct, efficient and faster and requires no attention.
When learners have acquired the motor plan for a letter they are able to write the letters without hesitation.
Learners who have not developed a direct link between the letter and the motor plan will hesitate before writing a letter.
Tracing letters inhibits learning the motor plan
Tracing letters or writing a letter guided by an outline of the letter can only be done with any degree of accuracy by using visual monitoring of the movement of the pencil tip. To do this the child uses a series of short strokes to make sure that the line they are drawing stays on the line (or between the lines) on the page.
This has two consequences: children get into the habit using vision to monitor their actions and they do not learn the motor plan for the letter. Tracing is a bad idea - and should be banned from handwriting programs.
27
StrengtheningtheMind’sEyeThecaseforcontinuedhandwritinginstructinginthe21thCentury
byVirginiaWiseBerninger“If it’s not tested, it doesn’t get taught” is the prevailing belief that guides many educators’ practice of only teaching skills that are addressed in the latest governing standards. Most states have now adopted the Common Core State Standards (CCSS), which don’t cover handwriting or spelling. Consequently, some states and school districts have stopped—or will stop— teaching these skills, which support the composing process. Although the CCSS specify desired goals at specific grade levels, the standards do not offer a plan for reaching those goals that takes into account the scope and sequence of developmentally appropriate curriculum and teaching practices. Even though handwriting is not specifically covered in the CCSS, handwriting instruction and mastery of the practice help students meet the standards that are included. Handwriting 101
Handwriting is the use of the hand to produce units of written language— single letters, written words, sentences, and text—to express ideas and thinking. Handwriting instruction remains important, despite present-day doubts about its continued significance in the technology age. Through handwriting students fine-tune several motor skills: planning handwriting movements, controlling them during letter production, and executing them. Contrary to popular belief, handwriting is not merely a motor skill; it is also a written language skill. The following non-motor mental processes are also involved: ■ Working memory, a temporary memory system for storing and processing letter forms in the “mind’s eye.” That is, our eyes provide a window through which the written language we read and write enters our mind, which in turn has an inner “eye” for viewing and analyzing letters and written words as we read and write. ■ Naming letters, which helps find the letter form in long-term memory and then write it. ■ Planning to form letters before the motor system writes them. ■ Incoming visual and touch sensory information as letters produced are viewed and hands and fingers move. ■ The orthographic loop of working memory, which integrates the letters and written words in the mind’s eye with the sequential hand and finger movements during writing. Multiple dimensions of handwriting are also instructionally relevant. Tobegin with, letters should be formed legibly so that others can identify them. Spatial arrangement on, above, or below a resting line on lined paper can also affect legibility. In addition, letters should be formed automatically (effortlessly and quickly) so that the writer’s limited working memory resources are free to focus on generating ideas, choosing words, constructing sentences, and adapting the text to the audience. Finally, proportionality of component strokes that differentiate a given letter from others needs to be obtained, unless using a keyboard. For example, printed n and h are differentiated only by height of the left stroke.
Why Handwriting Is Still Important
Brain research has revealed the importance of handwriting. Karin James and Thea Atwood at Indiana University showed that handwriting leads to better perception of letters in reading than does keyboarding. Forming letters might help create the letter form in the mind’s eye better than does selecting them by key press. Todd Richards and I, both at the University of Washington, found that developing writers with and without handwriting difficulties activated many more brain regions in learning a new letter than in writing a highly practiced letter. They differed significantly in writing familiar letters in brain region where letters and written words are analyzed in the mind. Also, brain activation during serial finger movements as used in handwriting is related not only to handwriting, but also to spelling and composing. Thus, handwriting is important because it:

28
1. Trains the orthographic loop, which supports spelling and composing. 2. Facilitates perception of letters, which transfers to reading real words, as shown in both instructional and brain imaging studies. 3. Trains serial organization, which pioneer cognitive psychologist Karl Lashley, in 1952, proposed underlies human cognition. Teaching Handwriting In the 1960s and 1970s, writing instruction overemphasized handwriting and spelling and neglected composing. In the 1980s and 1990s, process writing introduced composing and neglected handwriting and spelling. Students need all three skills—handwriting, spelling, and composing—to succeed in writing. School psychologist Kristen Begay has offered this research-supported analogy: Handwriting is to written expression of ideas as the paintbrush is to the artist’s expression of ideas through painting. Cross-disciplinary communication and collaboration between occupational therapists and classroom teachers is needed to teach the multiple dimensions of handwriting. For example, occupational therapists have expertise in assessing and teaching motor planning, control, and execution skills. Teachers are skilled in teaching letter formation, assessing response to this instruction, and integrating handwriting, which is both a language skill and a motor skill, with reading and writing activities. Research indicates that effective writing instruction:
■ Is directed at the orthographic loop; ■ Provides a visual plan with numbered arrow cues for forming the sequential strokes in each letter form; ■ Includes practice in copying letters, writing them from memory, and finding letters in the ordered alphabet series in long-term memory; ■ Emphasizes that letters should be both legible (recognized by others) and automatic (written effortlessly); ■ Teaches transfer of handwriting to composing; ■ Aims instruction at all levels (units) of language close in time so that all the components of working memory perform in synchrony, like the musical instruments in an orchestra; and ■ Adds instruction in transcription (handwriting and spelling) to writers’ workshops and process approaches to written composition. Research shows that students who learn from teachers with professional training in handwriting demonstrate more improvement in their handwriting and in transfer to better composing. Thus, professional development for teachers in handwriting instruction might be another key to helping more students master the CCSS in writing. Print Versus Cursive. Controversy continues over whether one format of writing is better than the other. Beginning writers can learn either format; developing writers show individual differences in which they prefer; and both formats might contribute to writing development, but in different ways. For example printing, which has a manuscript format most like that in books or on monitors, might show the most transfer to reading, but cursive might train executive functions for self-regulation of the writing process. Also, students need to be able to read others’ writing which might be in printed, cursive, or mixed formats. Evidence supports teaching both formats of handwriting and then letting each student choose which works best for him or her, as is customary in Australia.
29
Pen and Paper Versus Keyboarding. Evidence reveals an advantage for handwriting using pen and paper over keyboarding for students in grades 2 to 6 for amount written, rate of word writing, and number of ideas expressed. Handwriting by pen requires writing with a single hand, which activates the opposite side of the brain. Because the fibers that support communication across both sides of the brain don’t fully mature until adolescence, there might be an advantage for writing by a single hand early in writing development but not after adolescence. It’s not a surprise, then, that the advantage of keyboarding emerges for writers in grades 7 and 8, when neural paths are more likely developed for communication across the two sides of the brain. However, research also shows that generally handwriting is used during the school day and computers are used for homework, suggesting that the role of practice might explain these results. Also, younger children might benefit from explicit keyboarding instruction during the school day. Keep in mind that many other computer tools now exist besides keyboards for producing written language. Despite advances in computer technology, research supports the argument that today’s students still need instruction in handwriting for two primary reasons. First, learning to form letters by hand improves perception of letters and contributes to better reading and spelling. Second, automatic letter writing promotes better composing—both amount written and quality of writing.
Schools that have halted or plan to stop handwriting instruction should reconsider. Educators can set up their students for academic success by choosing an instructional program for handwriting that supports Common Core standards, providing adequate professional development for teaching handwriting, and assessing students’ development of legible and automatic handwriting.
Handwriting Timeline
With a national goal of preparing students to enter kindergarten ready to learn, more focus needs to be placed on prewriting skills during early childhood. Consider the following developmental stepping-stones for reaching the Common Core Standards for writing.
Preschool Years. Writing begins at about 10 months of age when the infant can grasp a writing tool with his or her first and leave visible traces on paper. The pincer grip develops during the first year of life. Two-year-olds operate a computer using a mouse, with a handgrip guided by the thumb and pointing finger. Preschoolers imitate scribbling, vertical strokes, and horizontal strokes as well as copy lines, circles, and squares. Preschoolers also benefit from play with clay or play-dough to develop motor strength, and bead stringing, pegboards, mazes, and puzzles to develop fine motor control
Educators also must monitor oral language development, and if necessary provide early intervention, because many children who have motor or prewriting problems also have oral language deficits.
Kindergarten. Handwriting should be accurate and legible. In instruction, teachers model sequence of motor acts, which children observe and imitate, tracing over letters with the eraser end of a pencil before writing the letter while naming it. Children go on to copy and name letters. Names serve as retrieval cues for letter forms in developing automatic orthographic loop function and are as important as learning sounds associated with the alphabet.
First Grade. The goal is to move beyond drawing letters and to develop automatic letter writing. Educators should teach a consistent plan, with numbered arrow cues to practice each alphabet letter every day (in a different order each day), and teach for transfer so that students can compose writing and share it with peers.
Second and Third Grade. The goals for second- and third-grade handwriting are improved written expression of ideas and development of long-term memory by teaching fast and automatic retrieval of letter forms from the ordered alphabet letters.
Fourth Grade and Beyond. The goal is now periodic tune-ups to review legible and automatic letter formation and to teach strategies for self-monitoring of letter legibility for the various kinds of writing assignments students are given across the curriculum, which often involve integrating writing with reading or listening.
http://www.naesp.org/sites/default/files/MJ12%20Berninger.pdf
