set 2015 toyota prius ec mirrortoyotaparts.sparkstoyota.com/install/00016-05463-prius...toyota prius...
TRANSCRIPT
Toyota Prius Frameless® EC Mirror w/ Compass & HomeLink®
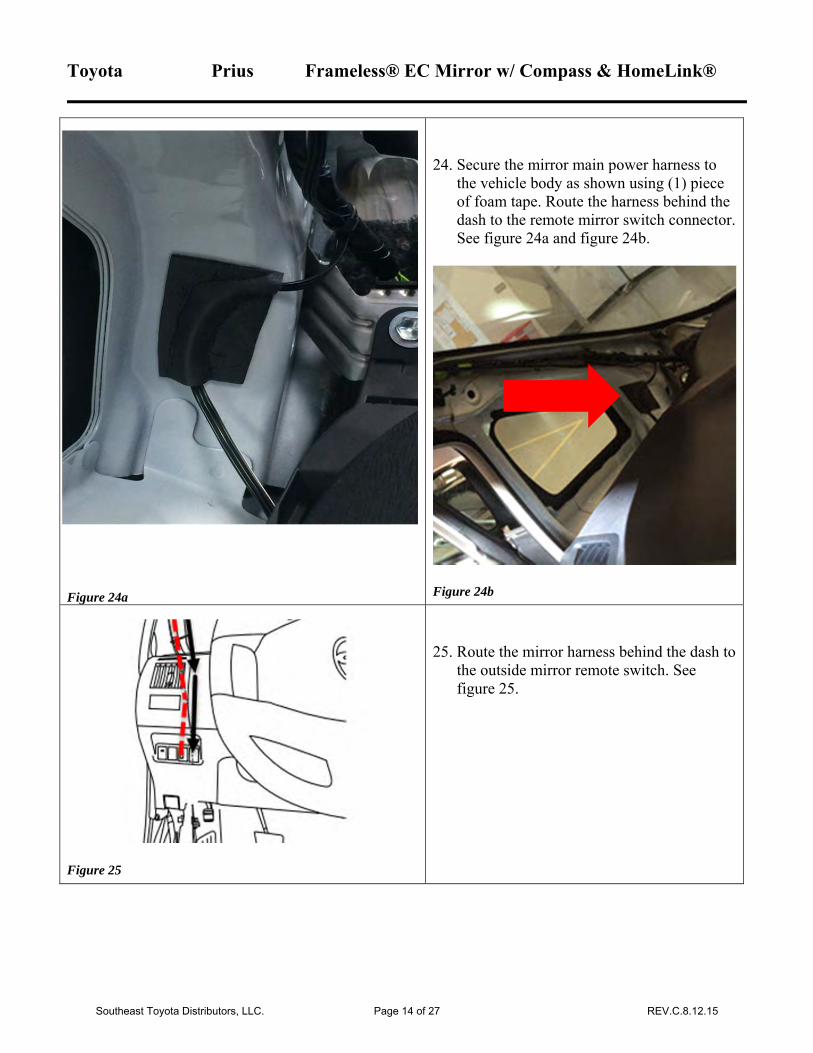
Figure 24a
24. Secure the mirror main power harness tothe vehicle body as shown using (1) pieceof foam tape. Route the harness behind thedash to the remote mirror switch connector.See figure 24a and figure 24b.
Figure 24b
Figure 25
25. Route the mirror harness behind the dash tothe outside mirror remote switch. Seefigure 25.
Southeast Toyota Distributors, LLC. Page 14 of 27 REV.C.8.12.15
Toyota Prius Frameless® EC Mirror w/ Compass & HomeLink®
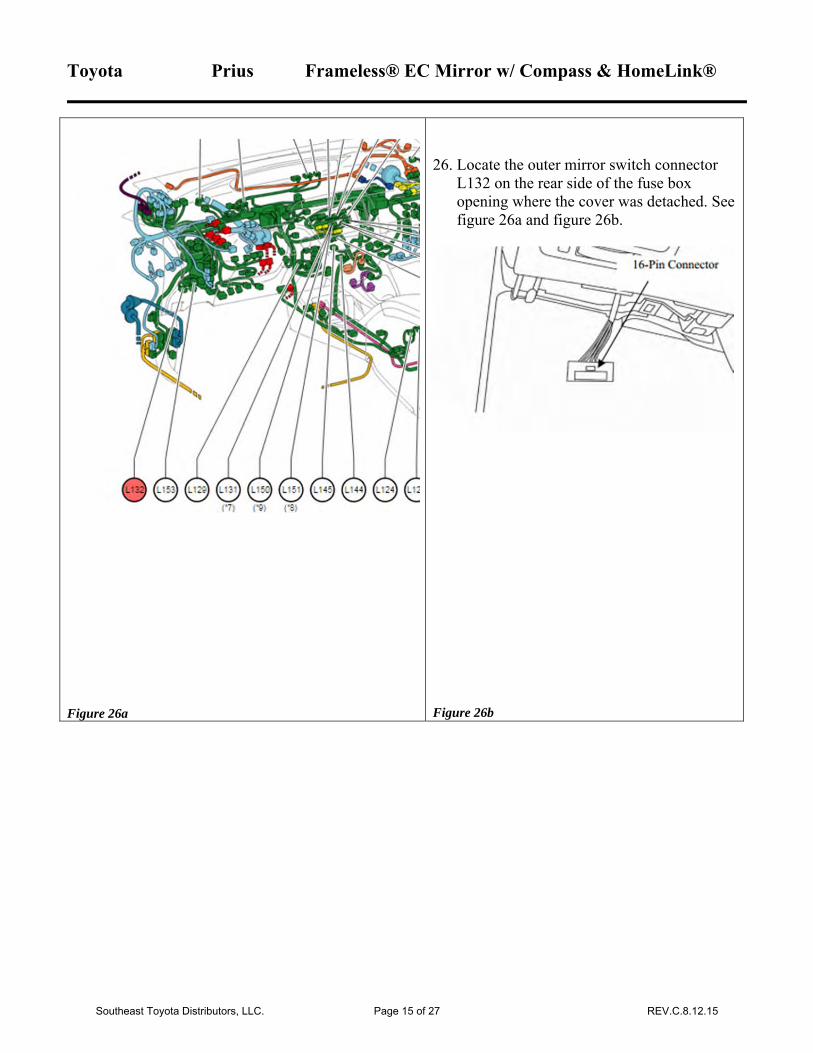
Figure 26a
26. Locate the outer mirror switch connectorL132 on the rear side of the fuse boxopening where the cover was detached. Seefigure 26a and figure 26b.
Figure 26b
Southeast Toyota Distributors, LLC. Page 15 of 27 REV.C.8.12.15
Toyota Prius Frameless® EC Mirror w/ Compass & HomeLink®
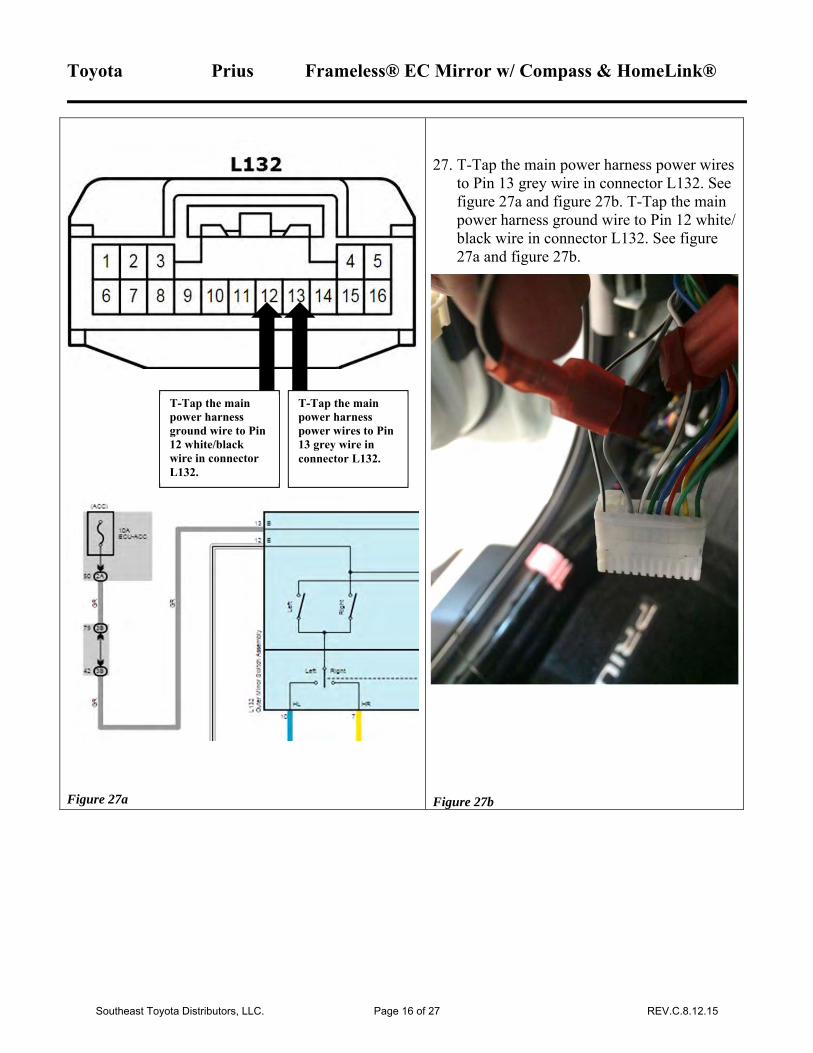
Figure 27a
27. T-Tap the main power harness power wiresto Pin 13 grey wire in connector L132. Seefigure 27a and figure 27b. T-Tap the mainpower harness ground wire to Pin 12 white/black wire in connector L132. See figure27a and figure 27b.
Figure 27b
T-Tap the main power harness power wires to Pin 13 grey wire in connector L132.
T-Tap the main power harness ground wire to Pin 12 white/black wire in connector L132.
Southeast Toyota Distributors, LLC. Page 16 of 27 REV.C.8.12.15
Toyota Prius Frameless® EC Mirror w/ Compass & HomeLink®
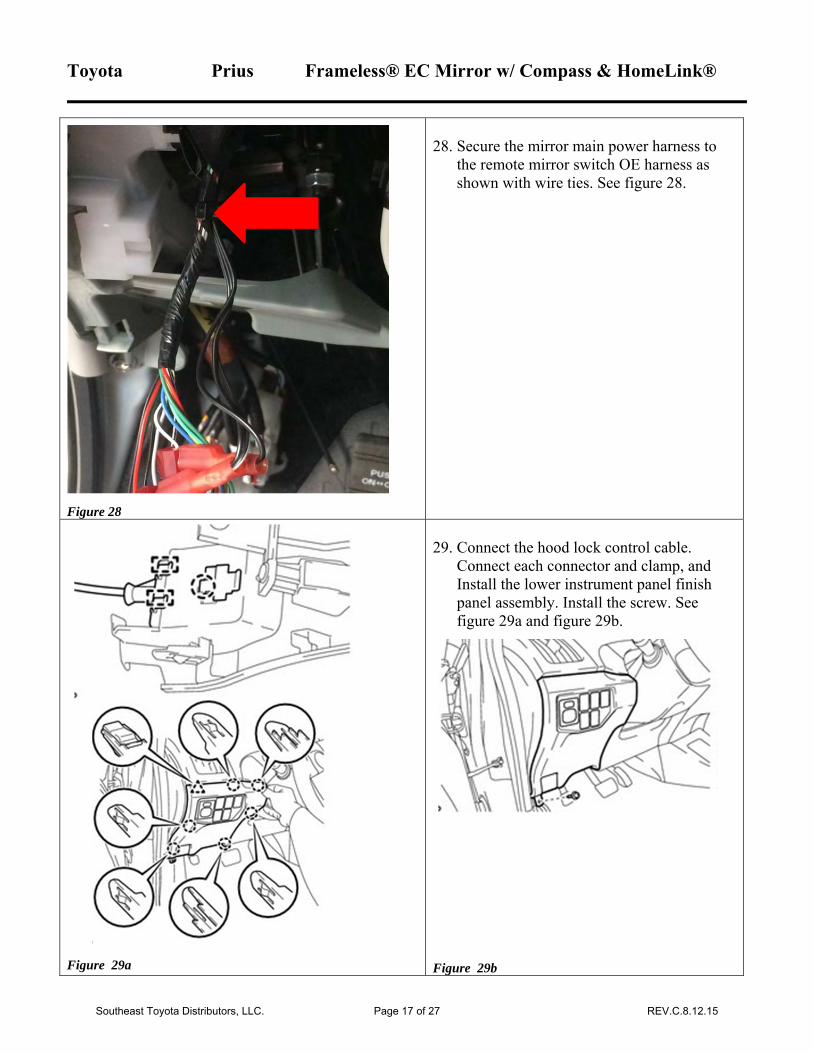
Figure 28
28. Secure the mirror main power harness tothe remote mirror switch OE harness asshown with wire ties. See figure 28.
Figure 29a
29. Connect the hood lock control cable.Connect each connector and clamp, andInstall the lower instrument panel finishpanel assembly. Install the screw. Seefigure 29a and figure 29b.
Figure 29b
Southeast Toyota Distributors, LLC. Page 17 of 27 REV.C.8.12.15
Toyota Prius Frameless® EC Mirror w/ Compass & HomeLink®
Figure 30
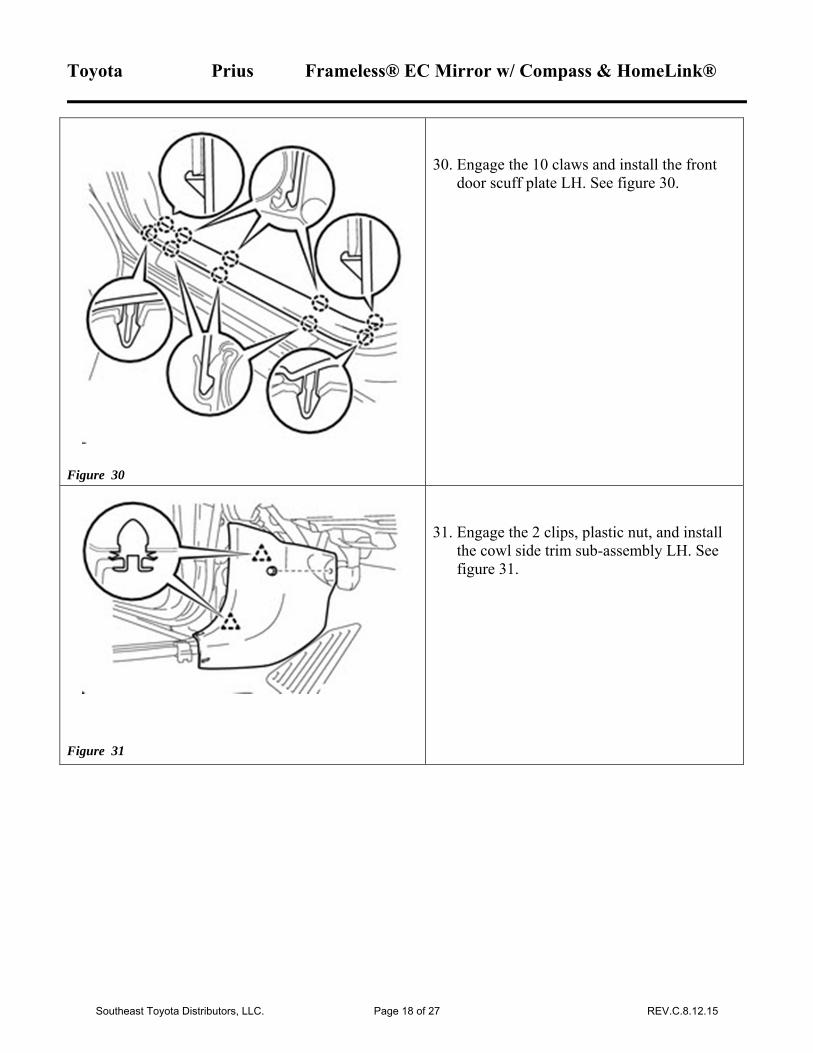
30. Engage the 10 claws and install the frontdoor scuff plate LH. See figure 30.
Figure 31
31. Engage the 2 clips, plastic nut, and installthe cowl side trim sub-assembly LH. Seefigure 31.
Southeast Toyota Distributors, LLC. Page 18 of 27 REV.C.8.12.15
Toyota Prius Frameless® EC Mirror w/ Compass & HomeLink®
Figure 32
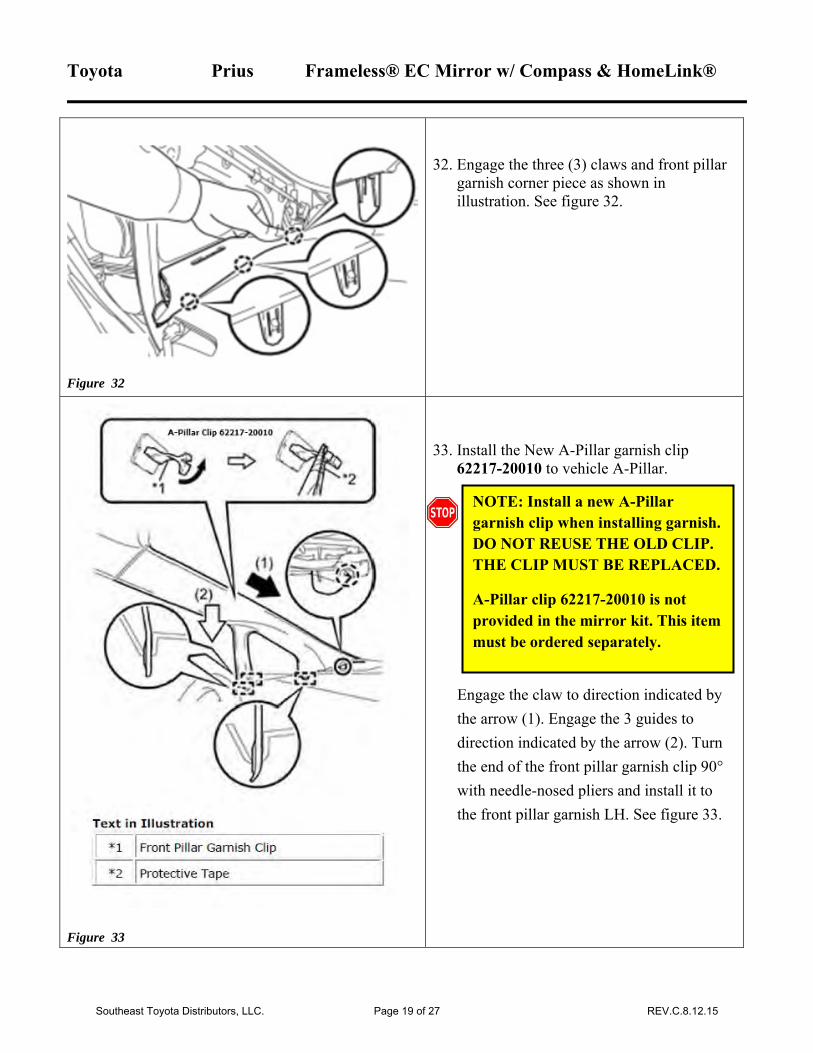
32. Engage the three (3) claws and front pillargarnish corner piece as shown inillustration. See figure 32.
Figure 33
33. Install the New A-Pillar garnish clip62217-20010 to vehicle A-Pillar.
Engage the claw to direction indicated by the arrow (1). Engage the 3 guides to direction indicated by the arrow (2). Turn the end of the front pillar garnish clip 90° with needle-nosed pliers and install it to the front pillar garnish LH. See figure 33.
NOTE: Install a new A-Pillar garnish clip when installing garnish. DO NOT REUSE THE OLD CLIP. THE CLIP MUST BE REPLACED.
A-Pillar clip 62217-20010 is not provided in the mirror kit. This item must be ordered separately.
Southeast Toyota Distributors, LLC. Page 19 of 27 REV.C.8.12.15
Toyota Prius Frameless® EC Mirror w/ Compass & HomeLink®
Figure 34
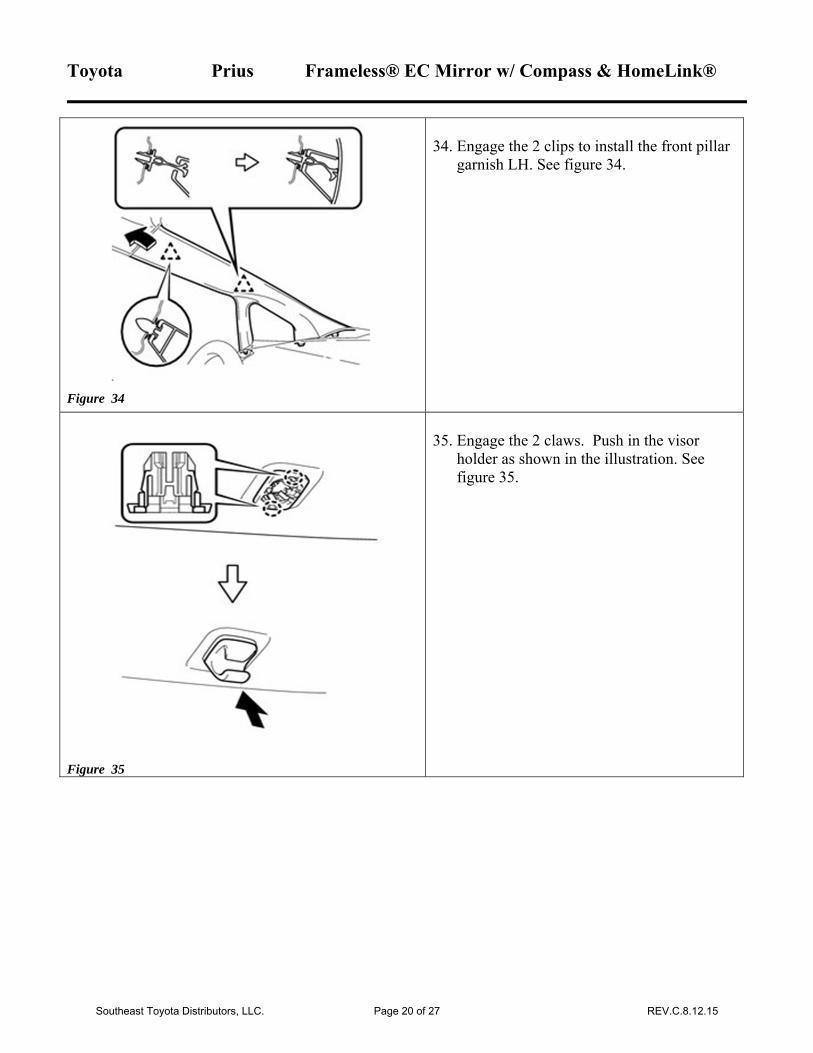
34. Engage the 2 clips to install the front pillargarnish LH. See figure 34.
Figure 35
35. Engage the 2 claws. Push in the visorholder as shown in the illustration. Seefigure 35.
Southeast Toyota Distributors, LLC. Page 20 of 27 REV.C.8.12.15
Toyota Prius Frameless® EC Mirror w/ Compass & HomeLink®
Figure 36
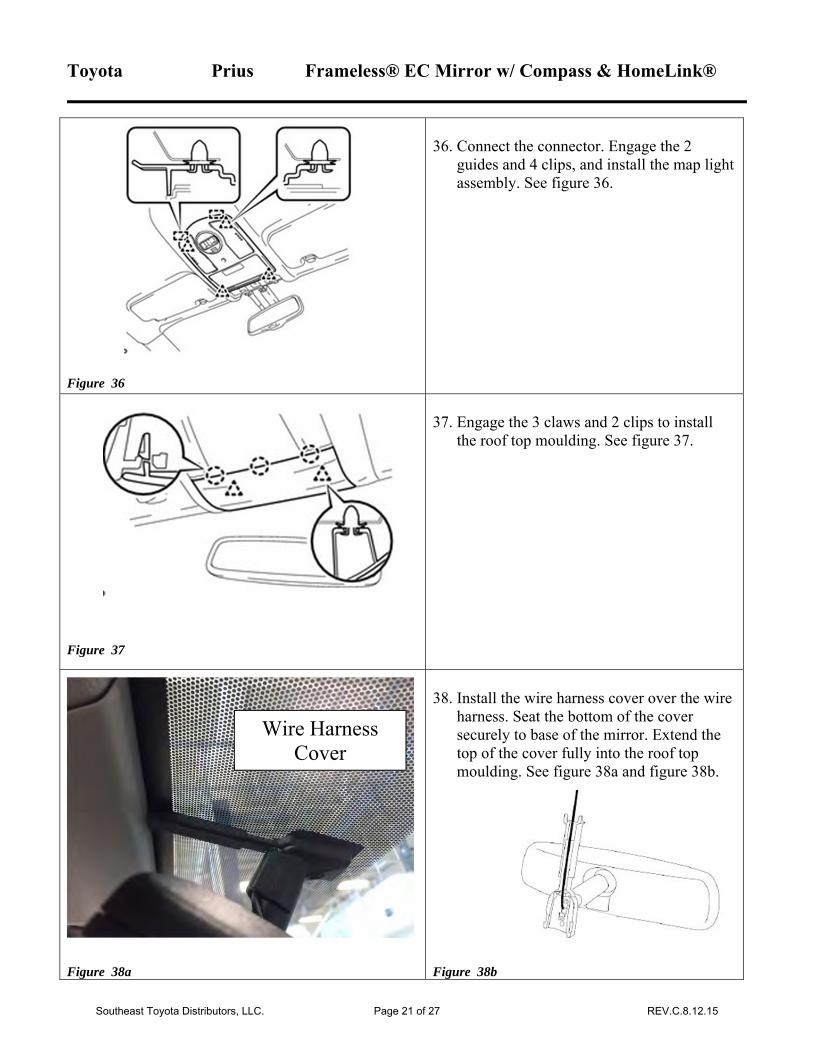
36. Connect the connector. Engage the 2guides and 4 clips, and install the map lightassembly. See figure 36.
Figure 37
37. Engage the 3 claws and 2 clips to installthe roof top moulding. See figure 37.
Figure 38a
38. Install the wire harness cover over the wireharness. Seat the bottom of the coversecurely to base of the mirror. Extend thetop of the cover fully into the roof topmoulding. See figure 38a and figure 38b.
Figure 38b
Wire Harness Cover
Southeast Toyota Distributors, LLC. Page 21 of 27 REV.C.8.12.15
Toyota Prius Frameless® EC Mirror w/ Compass & HomeLink®
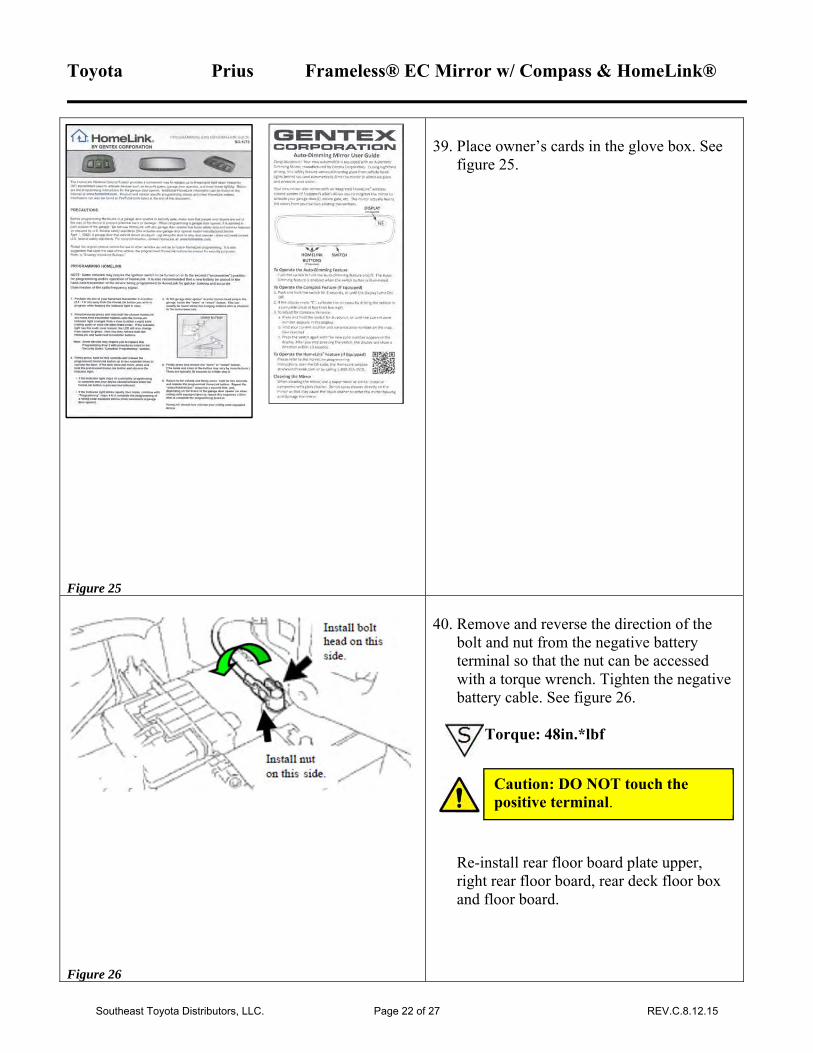
Figure 25
39. Place owner’s cards in the glove box. Seefigure 25.
Figure 26
40. Remove and reverse the direction of thebolt and nut from the negative batteryterminal so that the nut can be accessedwith a torque wrench. Tighten the negativebattery cable. See figure 26.
Torque: 48in.*lbf
Re-install rear floor board plate upper, right rear floor board, rear deck floor box and floor board.
Caution: DO NOT touch the positive terminal.
Southeast Toyota Distributors, LLC. Page 22 of 27 REV.C.8.12.15
Toyota Prius Frameless® EC Mirror w/ Compass & HomeLink®
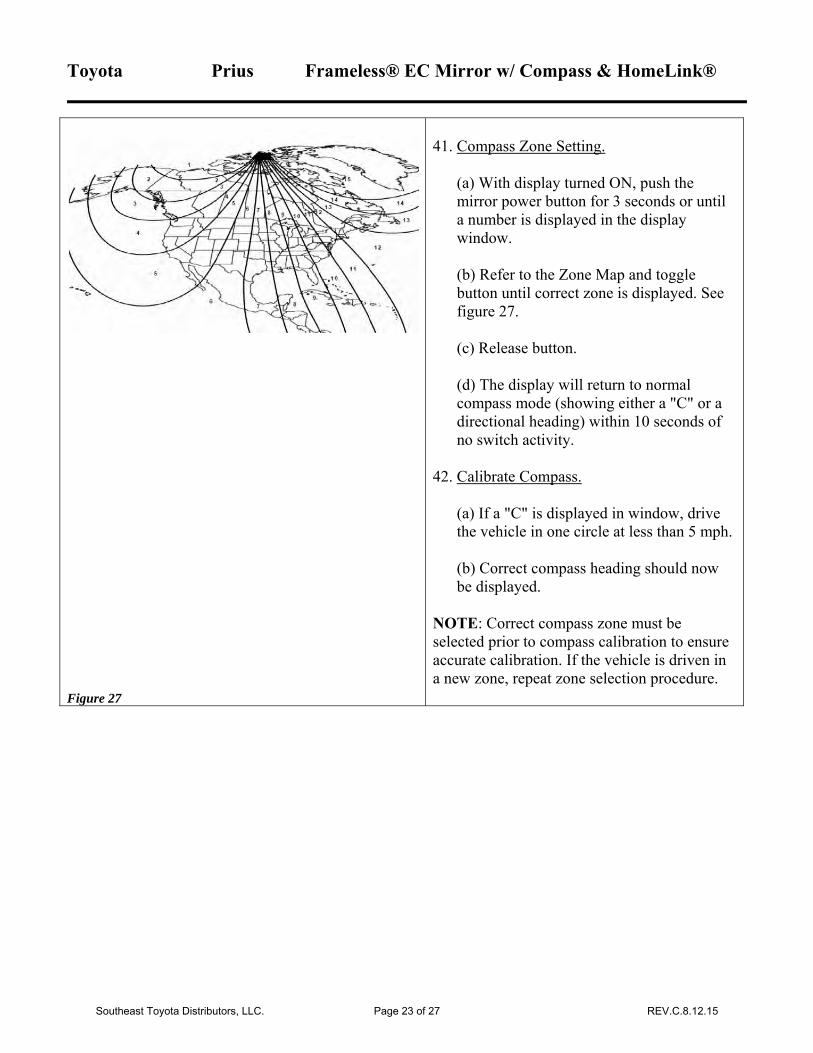
Figure 27
41. Compass Zone Setting.
(a) With display turned ON, push themirror power button for 3 seconds or untila number is displayed in the displaywindow.
(b) Refer to the Zone Map and togglebutton until correct zone is displayed. Seefigure 27.
(c) Release button.
(d) The display will return to normalcompass mode (showing either a "C" or adirectional heading) within 10 seconds ofno switch activity.
42. Calibrate Compass.
(a) If a "C" is displayed in window, drivethe vehicle in one circle at less than 5 mph.
(b) Correct compass heading should nowbe displayed.
NOTE: Correct compass zone must be selected prior to compass calibration to ensure accurate calibration. If the vehicle is driven in a new zone, repeat zone selection procedure.
Southeast Toyota Distributors, LLC. Page 23 of 27 REV.C.8.12.15

Toyota Prius Frameless® EC Mirror w/ Compass & HomeLink®
Checklist - these points MUST be checked to Ensure a quality installation.
Check: After Installation
Vehicle should be in a fairly well lit area. Turn ignition (ACC power) to ON.
Auto-dimming feature:
Cover the forward-looking light sensor (located on the back of the mirror).
Remove cover from photocell.
Compass Feature:
Look at the mirror compass display.
Operation Instruction Cards .
HomeLink Feature:
Look at the mirror’s (3) HomeLink buttons.
Press the mirror’s (3) HomeLink buttons.
Overhead Console:
Check dome light.
Check the Sunroof if applicable.
Remote Mirror Switch
Check the remote mirror switch.
Look For:
Verify green LED is on. If it is not ON press ON / OFF button - confirm LED is ON.
Verify mirror darkens.
Mirror returns to clear state.
Correct compass heading should now be displayed. If a "C" is displayed in window, calibrate the compass.
Place in the vehicle glove box.
Verify all (3) buttons are illuminated when the vehicle ignition is ON.
HomeLink icon will appear in mirror. Press button again to stop the icon from flashing.
Verify the dome light functions properly.
Verify the sunroof functions properly.
Verify the remote mirror switch functions properly.
Southeast Toyota Distributors, LLC. Page 24 of 27 REV.C.8.12.15

Toyota Prius Frameless® EC Mirror w/ Compass & HomeLink®
B
B
Block Diagram Frameless® EC Mirror w/Compass & HomeLink®
Applies to SET P/N 00016-05463 2015 Prius
1
T-Tap the main power harness power wires to Pin 13 grey wire in connector L132.
L132 13
L132 12
T-Tap the main power harness ground wire to Pin 12 white/black wire in connector L132.
IMH1 6
IMH1 2
IMH1
GR
B‐W
W‐B
Frameless® EC Mirror w/Compassand HomeLink®
SET P/N 00016-05463-01
Southeast Toyota Distributors, LLC. Page 25 of 27 REV.C.8.12.15
Toyota Prius Frameless® EC Mirror w/ Compass & HomeLink®
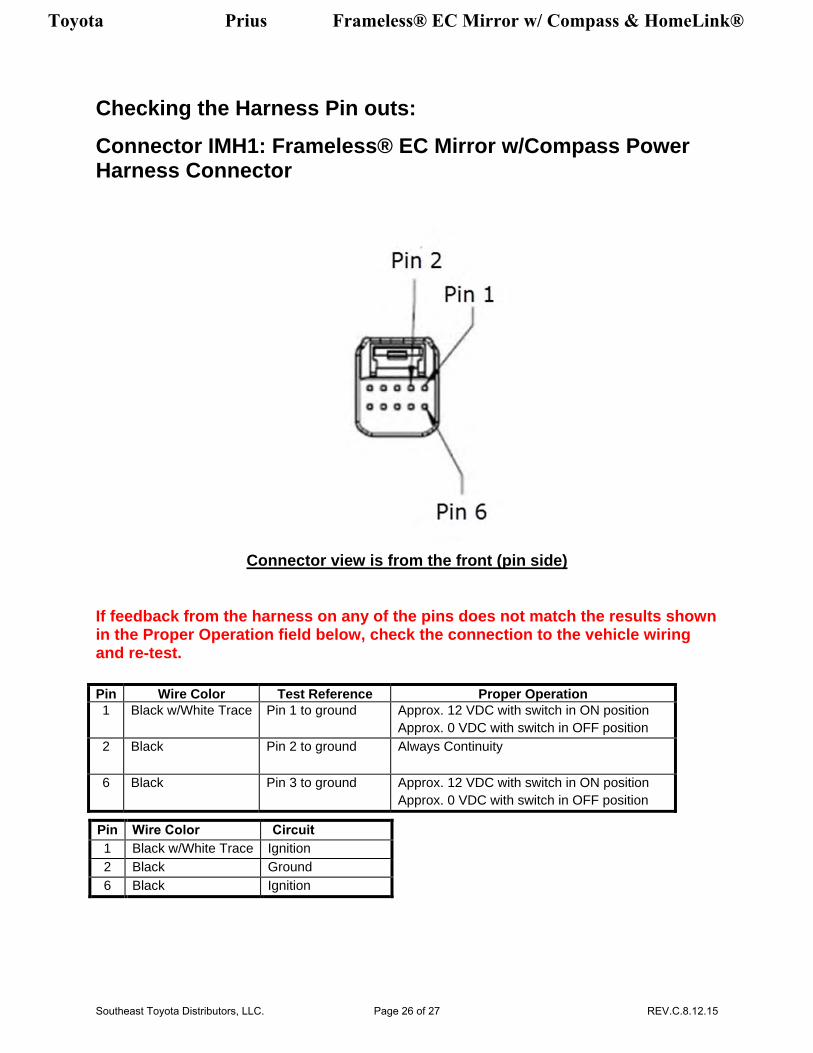
Checking the Harness Pin outs:
Connector IMH1: Frameless® EC Mirror w/Compass Power Harness Connector
Connector view is from the front (pin side)
If feedback from the harness on any of the pins does not match the results shown in the Proper Operation field below, check the connection to the vehicle wiring and re-test.
Pin Wire Color Test Reference Proper Operation 1 Black w/White Trace Pin 1 to ground Approx. 12 VDC with switch in ON position
Approx. 0 VDC with switch in OFF position
2 Black Pin 2 to ground Always Continuity
6 Black Pin 3 to ground Approx. 12 VDC with switch in ON position Approx. 0 VDC with switch in OFF position
Pin Wire Color Circuit 1 Black w/White Trace Ignition 2 Black Ground 6 Black Ignition
Southeast Toyota Distributors, LLC. Page 26 of 27 REV.C.8.12.15
Toyota Prius Frameless® EC Mirror w/ Compass & HomeLink®
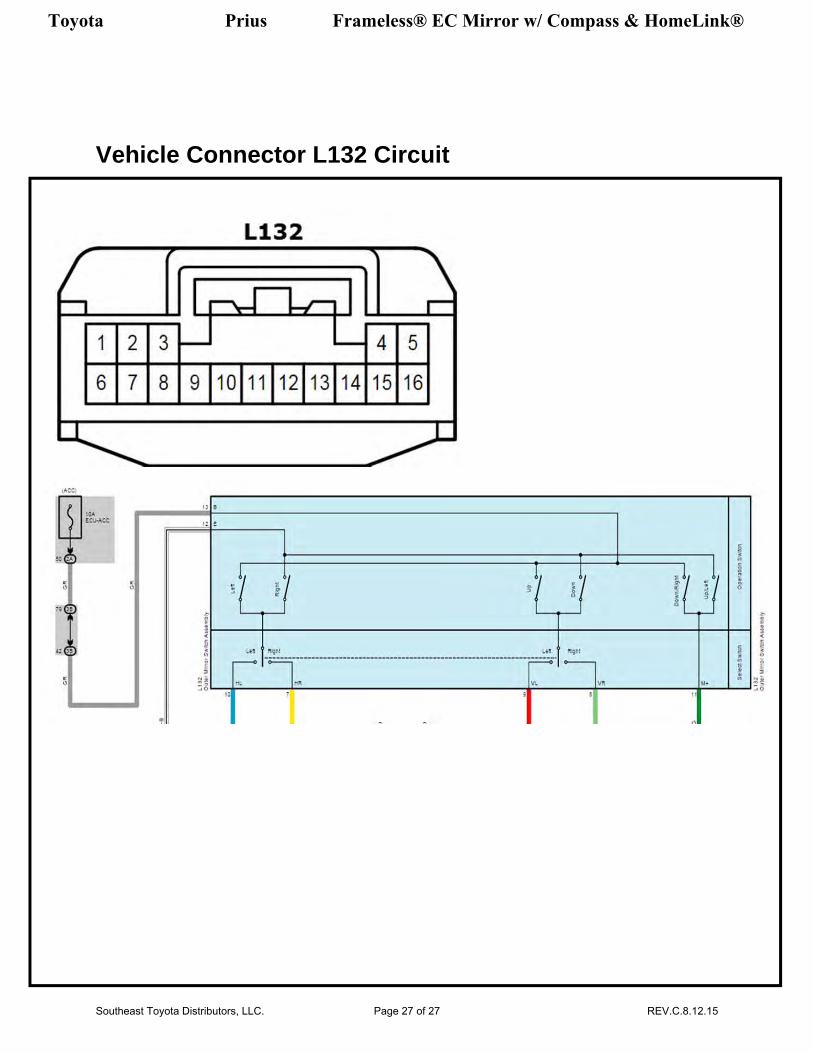
Vehicle Connector L132 Circuit
Southeast Toyota Distributors, LLC. Page 27 of 27 REV.C.8.12.15