select file -> new -> other -> android -> android project and … file5.3. create...
TRANSCRIPT

Select File -> New -> Other -> Android -> Android Project and create the Android
project " temperature". Enter the following.
Press "Finish". This should create the following directory structure.

While "res" contains structured values which are known to the Android platform the
directory "assets" can be used to store any kind of data. In Java you can access this data
via the AssetsManager and the method getAssets().
5.2. Two faces of things
The Android SDK allows to define certain artifacts, e.g. strings and UI's, in two ways, via
a rich editor and directly via XML. The following description tries to use the rich UI but
for validation lists also the XML. You can switch between both things by clicking on the
tab on the lower part of the screen. For example in the Package Explorer select
"res/layout/main.xml".

5.3. Create attributes
Android allows you to create attributes for resources, e.g. for strings and / or colors.
These attributes can be used in your UI definition via XML or in your Java source code.
Select the file "res/values/string.xml" and press "Add". Select "Color" and enter
"myColor" as the name and "#3399CC" as the value.

Add also the following "String" attributes. String attributes allow to translate the
application at a later point. Table 1. String Attributes
Name Value
myClickHandler myClickHandler
celsius to Celsius
fahrenheit to Fahrenheit
calc Calculate
Switch to the XML representation and validate the values.

5.4. Add UI Elements
Select "res/layout/main.xml" and open the Android editor via a double-click. This editor
allows you to create the UI via drag and drop or via the XML source code. You can
switch between both representations via the tabs at the bottom of the editor. For
changing the position and grouping elements you can use the outline view.
The following shows a screenshot of the Palette view from which you can drag and drop
new UI elements into your layout. Please note that the "Palette" view changes frequently
so your view might be a bit different.
Right-click on the text object “Hello World, Hello!” in the layout. Select Delete on the
popup menu to remove the text object. Then, from the “Palette” view, select Text Fields
and locate “Plain Text”. Drag this onto the layout to create a text input field. All object
types in the section "Text Fields” derive from the class "EditText", they just specify via
an additional attribute which text type can be used.

Now select the Palette section “Form Widgets” and drag a “RadioGroup” object onto the
layout. The number of radio buttons added to the radio button group depends on your
version of Eclipse. Make sure there are two radio buttons by deleting or adding radio
buttons to the group.
From the Palette section Form Widgets, drag a Button object onto the layout.
The result should look like the following and the corresponding XML is listed below.
Make sure that your code is the same as listed below.
Switch to "main.xml" and verify that your XML looks like the following.
<?xml version="1.0" encoding="utf-8"?>
<LinearLayout xmlns:android="http://schemas.android.com/apk/res/android"
android:orientation="vertical" android:layout_width="fill_parent"
android:layout_height="fill_parent">
<EditText android:layout_height="wrap_content" android:id="@+id/editText1"
android:layout_width="match_parent" android:text="EditText"></EditText>
<RadioGroup android:layout_height="wrap_content" android:id="@+id/radioGroup1"
android:layout_width="match_parent">

<RadioButton android:text="RadioButton"
android:layout_width="wrap_content" android:id="@+id/radio0"
android:layout_height="wrap_content"
android:checked="true"></RadioButton>
<RadioButton android:text="RadioButton"
android:layout_width="wrap_content" android:id="@+id/radio1"
android:layout_height="wrap_content"></RadioButton>
</RadioGroup>
<Button android:text="Button" android:id="@+id/button1"
android:layout_width="wrap_content"
android:layout_height="wrap_content"></Button>
</LinearLayout>
5.5. Edit UI properties
If you select a UI element you can change its properties via the properties view. Most of
the properties can also be changed via the right mouse menu. Select the EditText field,
right mouse click on it, select Properties-> Text and delete the content. This means no
text will be initially shown in the text field.

Assign the "celsius" string attribute to your "text" property of the first radio button and
"fahrenheit" to the second.


From now on I assume you are able to use the properties menu on the UI elements. Set
the property "Checked" to true for the first RadioButton. Assign "calc" to the text
property of your button and assign "myClickHandler" to the "OnClick" property. Set the
"Input type" property for the EditText to "numberSigned" and "numberDecimal" on
your EditText.
Right-click on the view in Graphical Layout mode, then select
“Properties”/”Background...” from the popup menu. Select “Color” and then “myColor”
in the list.

Switch to the "main.xml" tab and verify that the XML is correctly maintained.
<?xml version="1.0" encoding="utf-8"?>
<LinearLayout xmlns:android="http://schemas.android.com/apk/res/android"
android:orientation="vertical" android:layout_width="fill_parent"
android:layout_height="fill_parent" android:background="@color/myColor">
<EditText android:layout_height="wrap_content" android:id="@+id/editText1"
android:layout_width="match_parent" android:inputType="numberDecimal|numberSigned"></EditText>
<RadioGroup android:layout_height="wrap_content" android:id="@+id/radioGroup1"
android:layout_width="match_parent">
<RadioButton android:layout_width="wrap_content"
android:id="@+id/radio0" android:layout_height="wrap_content"
android:text="@string/celsius" android:checked="true"></RadioButton>
<RadioButton android:layout_width="wrap_content"
android:id="@+id/radio1" android:layout_height="wrap_content"
android:text="@string/fahrenheit"></RadioButton>
</RadioGroup>
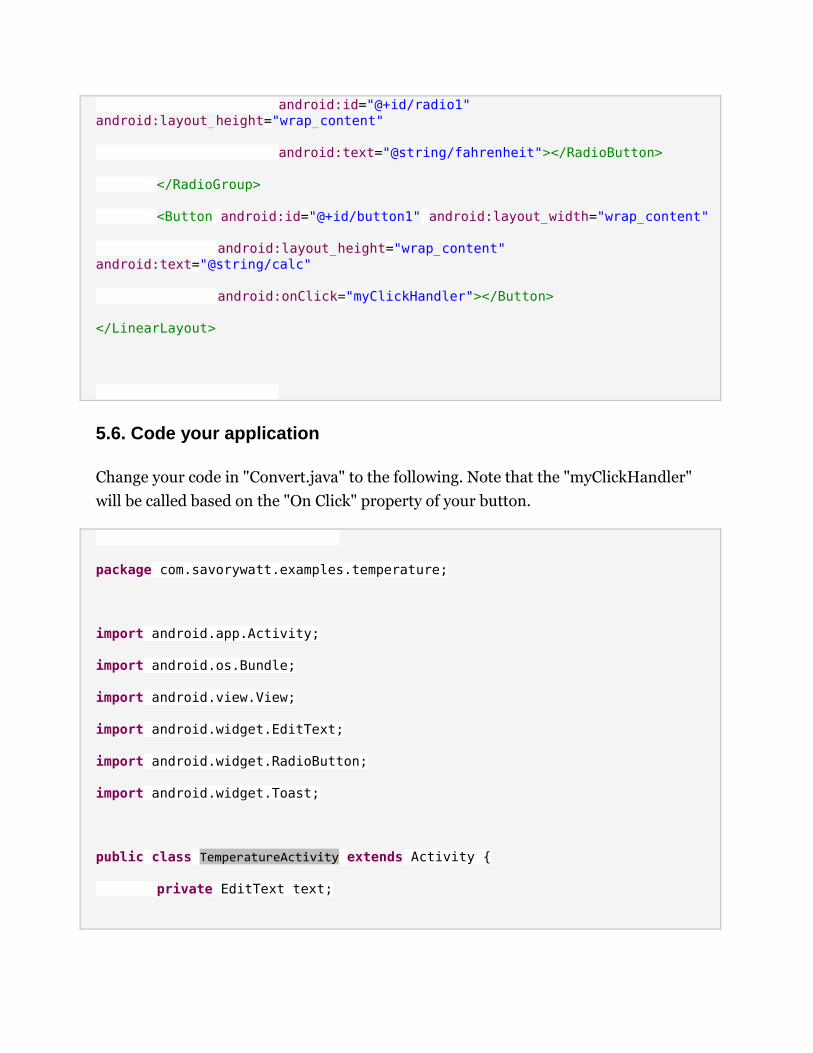
<Button android:id="@+id/button1" android:layout_width="wrap_content"
android:layout_height="wrap_content" android:text="@string/calc"
android:onClick="myClickHandler"></Button>
</LinearLayout>
5.6. Code your application
Change your code in "Convert.java" to the following. Note that the "myClickHandler"
will be called based on the "On Click" property of your button.
package com.savorywatt.examples.temperature;
import android.app.Activity;
import android.os.Bundle;
import android.view.View;
import android.widget.EditText;
import android.widget.RadioButton;
import android.widget.Toast;
public class TemperatureActivity extends Activity {
private EditText text;

@Override
public void onCreate(Bundle savedInstanceState) {
super.onCreate(savedInstanceState);
setContentView(R.layout.main);
text = (EditText) findViewById(R.id.editText1);
}
// This method is called at button click because we assigned the name to the
// "On Click property" of the button
public void myClickHandler(View view) {
switch (view.getId()) {
case R.id.button1:
RadioButton celsiusButton = (RadioButton) findViewById(R.id.radio0);
RadioButton fahrenheitButton = (RadioButton) findViewById(R.id.radio1);
if (text.getText().length() == 0) {
Toast.makeText(this, "Please enter a valid number",
Toast.LENGTH_LONG).show();
return;
}
float inputValue = Float.parseFloat(text.getText().toString());
if (celsiusButton.isChecked()) {
text.setText(String

.valueOf(convertFahrenheitToCelsius(inputValue)));
celsiusButton.setChecked(false);
fahrenheitButton.setChecked(true);
} else {
text.setText(String
.valueOf(convertCelsiusToFahrenheit(inputValue)));
fahrenheitButton.setChecked(false);
celsiusButton.setChecked(true);
}
break;
}
}
// Converts to celsius
private float convertFahrenheitToCelsius(float fahrenheit) {
return ((fahrenheit - 32) * 5 / 9);
}
// Converts to fahrenheit
private float convertCelsiusToFahrenheit(float celsius) {
return ((celsius * 9) / 5) + 32;
}
}
5.7. Start Project

To start the Android Application, select your project, right click on it, Run-As-> Android
Application Be patient, the emulator starts up very slow. You should get the following
result.
Type in a number, select your conversion and press the button. The result should be
displayed and the other option should get selected.