sdmx central - dsbb.imf.org · 2 1. convert excel to sdmx imf sdmx central provides three ways to...
TRANSCRIPT
Version: 20171214
Last updated: December 14th
2017
SDMX CENTRAL User Guide
Abstract This guide provides information on the services provided by IMF SDMX CENTRAL
Convert Register Publish
Subscribe Browse
1
IMF SDMX CENTRAL
Contents
1. Convert Excel to SDMX ................................................................................................................... 2
Excel Data Format ............................................................................................................................... 2
Excel Template .................................................................................................................................... 5
FusionXL Plugin ................................................................................................................................... 9
2. Registering Data ............................................................................................................................ 13
3. Publishing ...................................................................................................................................... 15
Publishing Data via FusionXL............................................................................................................. 17
4. Subscribing As A Service ............................................................................................................... 18
RSS Feed ............................................................................................................................................ 18
Notifications via Email or POST ......................................................................................................... 18
5. Browse Data .................................................................................................................................. 20
Browse Data via Web Interface ........................................................................................................ 20
Browse Data via Excel ....................................................................................................................... 21
2
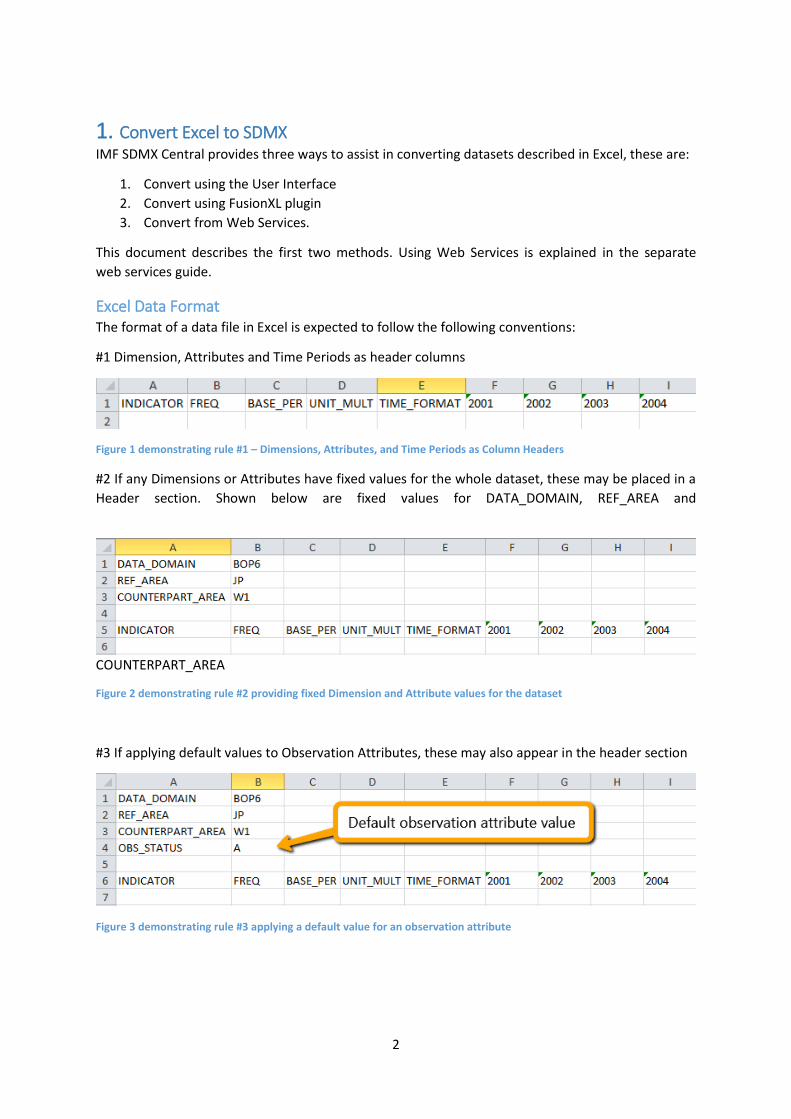
1. Convert Excel to SDMX IMF SDMX Central provides three ways to assist in converting datasets described in Excel, these are:
1. Convert using the User Interface
2. Convert using FusionXL plugin
3. Convert from Web Services.
This document describes the first two methods. Using Web Services is explained in the separate
web services guide.
Excel Data Format The format of a data file in Excel is expected to follow the following conventions:
#1 Dimension, Attributes and Time Periods as header columns
Figure 1 demonstrating rule #1 – Dimensions, Attributes, and Time Periods as Column Headers
#2 If any Dimensions or Attributes have fixed values for the whole dataset, these may be placed in a
Header section. Shown below are fixed values for DATA_DOMAIN, REF_AREA and
COUNTERPART_AREA
Figure 2 demonstrating rule #2 providing fixed Dimension and Attribute values for the dataset
#3 If applying default values to Observation Attributes, these may also appear in the header section
Figure 3 demonstrating rule #3 applying a default value for an observation attribute
3
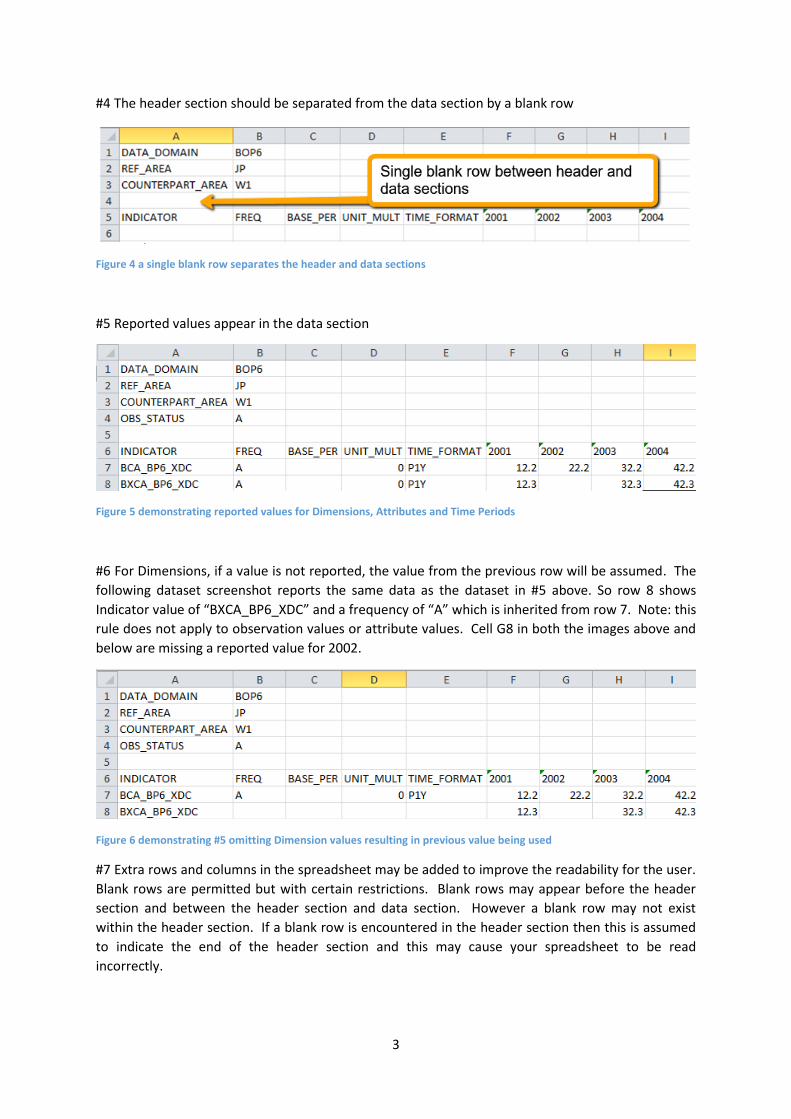
#4 The header section should be separated from the data section by a blank row
Figure 4 a single blank row separates the header and data sections
#5 Reported values appear in the data section
Figure 5 demonstrating reported values for Dimensions, Attributes and Time Periods
#6 For Dimensions, if a value is not reported, the value from the previous row will be assumed. The
following dataset screenshot reports the same data as the dataset in #5 above. So row 8 shows
Indicator value of “BXCA_BP6_XDC” and a frequency of “A” which is inherited from row 7. Note: this
rule does not apply to observation values or attribute values. Cell G8 in both the images above and
below are missing a reported value for 2002.
Figure 6 demonstrating #5 omitting Dimension values resulting in previous value being used
#7 Extra rows and columns in the spreadsheet may be added to improve the readability for the user.
Blank rows are permitted but with certain restrictions. Blank rows may appear before the header
section and between the header section and data section. However a blank row may not exist
within the header section. If a blank row is encountered in the header section then this is assumed
to indicate the end of the header section and this may cause your spreadsheet to be read
incorrectly.
4
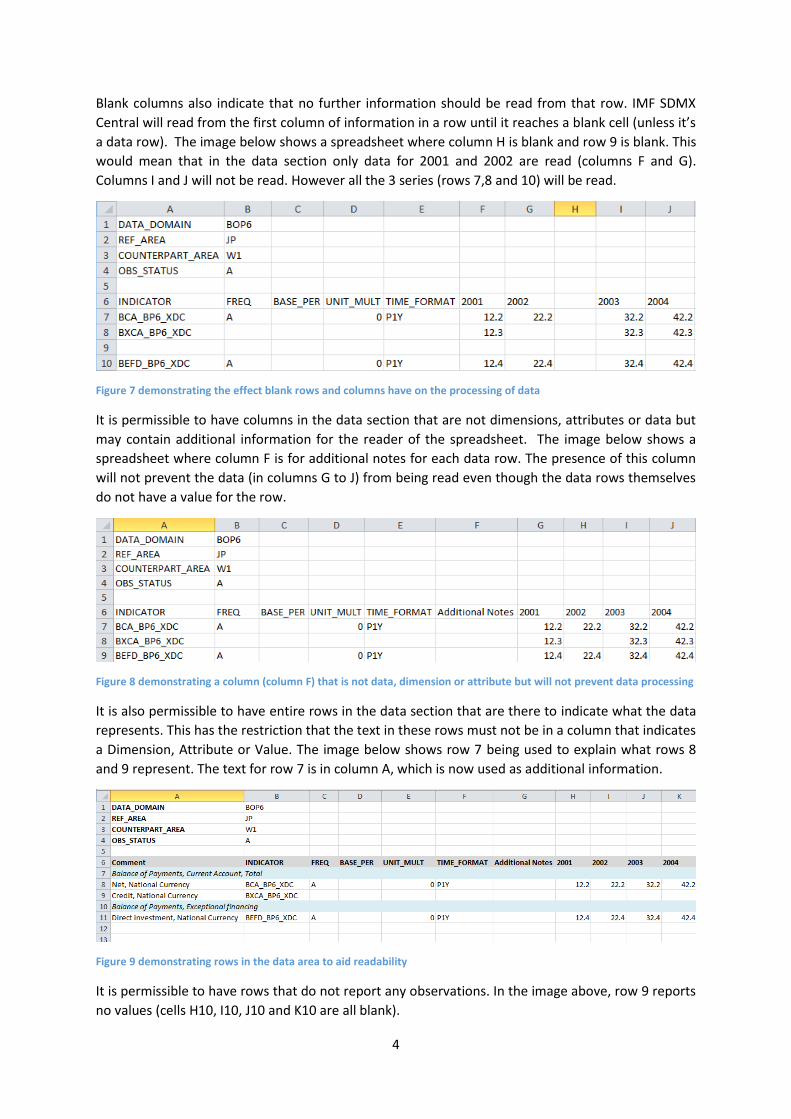
Blank columns also indicate that no further information should be read from that row. IMF SDMX
Central will read from the first column of information in a row until it reaches a blank cell (unless it’s
a data row). The image below shows a spreadsheet where column H is blank and row 9 is blank. This
would mean that in the data section only data for 2001 and 2002 are read (columns F and G).
Columns I and J will not be read. However all the 3 series (rows 7,8 and 10) will be read.
Figure 7 demonstrating the effect blank rows and columns have on the processing of data
It is permissible to have columns in the data section that are not dimensions, attributes or data but
may contain additional information for the reader of the spreadsheet. The image below shows a
spreadsheet where column F is for additional notes for each data row. The presence of this column
will not prevent the data (in columns G to J) from being read even though the data rows themselves
do not have a value for the row.
Figure 8 demonstrating a column (column F) that is not data, dimension or attribute but will not prevent data processing
It is also permissible to have entire rows in the data section that are there to indicate what the data
represents. This has the restriction that the text in these rows must not be in a column that indicates
a Dimension, Attribute or Value. The image below shows row 7 being used to explain what rows 8
and 9 represent. The text for row 7 is in column A, which is now used as additional information.
Figure 9 demonstrating rows in the data area to aid readability
It is permissible to have rows that do not report any observations. In the image above, row 9 reports
no values (cells H10, I10, J10 and K10 are all blank).
5
It is possible to submit an Excel file which has multiple worksheets. Multiple worksheets will only be
processed if the data on each worksheet is for the same Data Structure. There is also the restriction
that the header section on each worksheet is the same as the header section on the first page. The
position of columns on each worksheet must be consistent.
For simplicity it is recommended to submit Excel files which only have a single worksheet.
Excel Template In order to assist in the generation of valid Excel data file, IMF SDMX Central provides a mechanism
to generate an Excel Template. The Excel Template is an Excel file with prefilled cells based on the
selected Dataflow and Reporting Period. The second approach to authoring data makes use of a
plugin library for Microsoft Excel to facilitate the construction of a dataset, by generating the column
headers, and then providing an author helper which can be used to choose from a list of predefined
values when filling in each column.
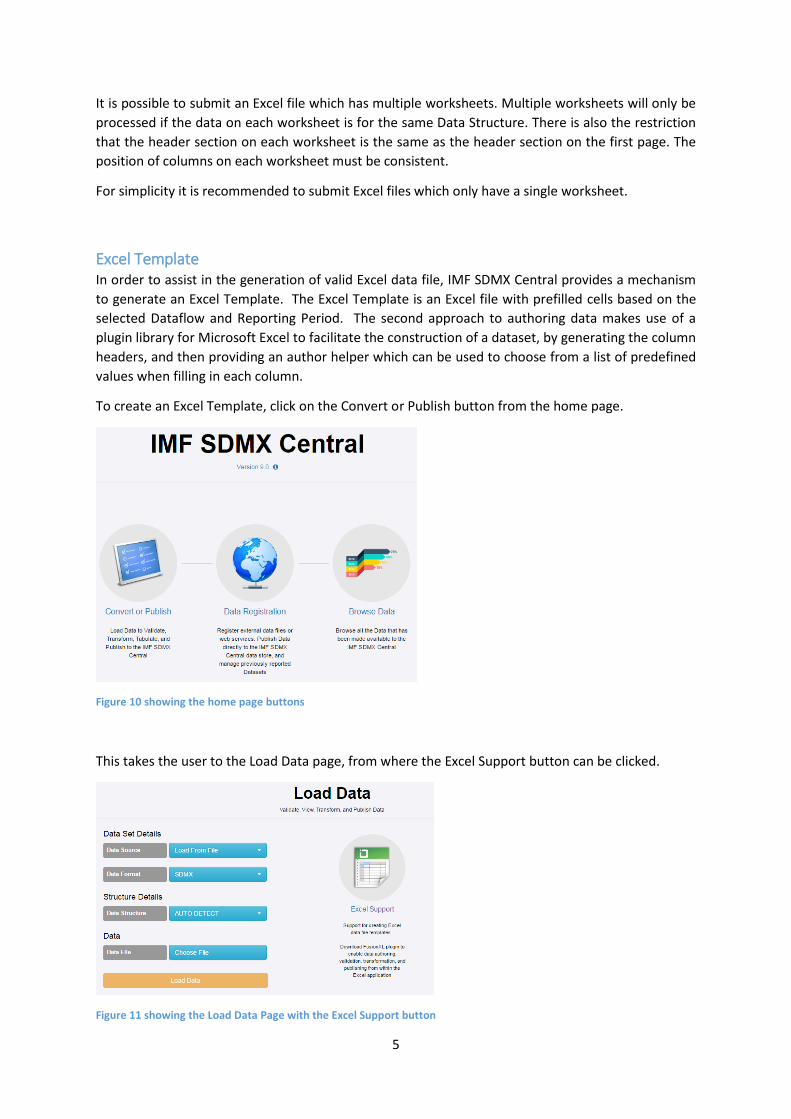
To create an Excel Template, click on the Convert or Publish button from the home page.
Figure 10 showing the home page buttons
This takes the user to the Load Data page, from where the Excel Support button can be clicked.
Figure 11 showing the Load Data Page with the Excel Support button
6
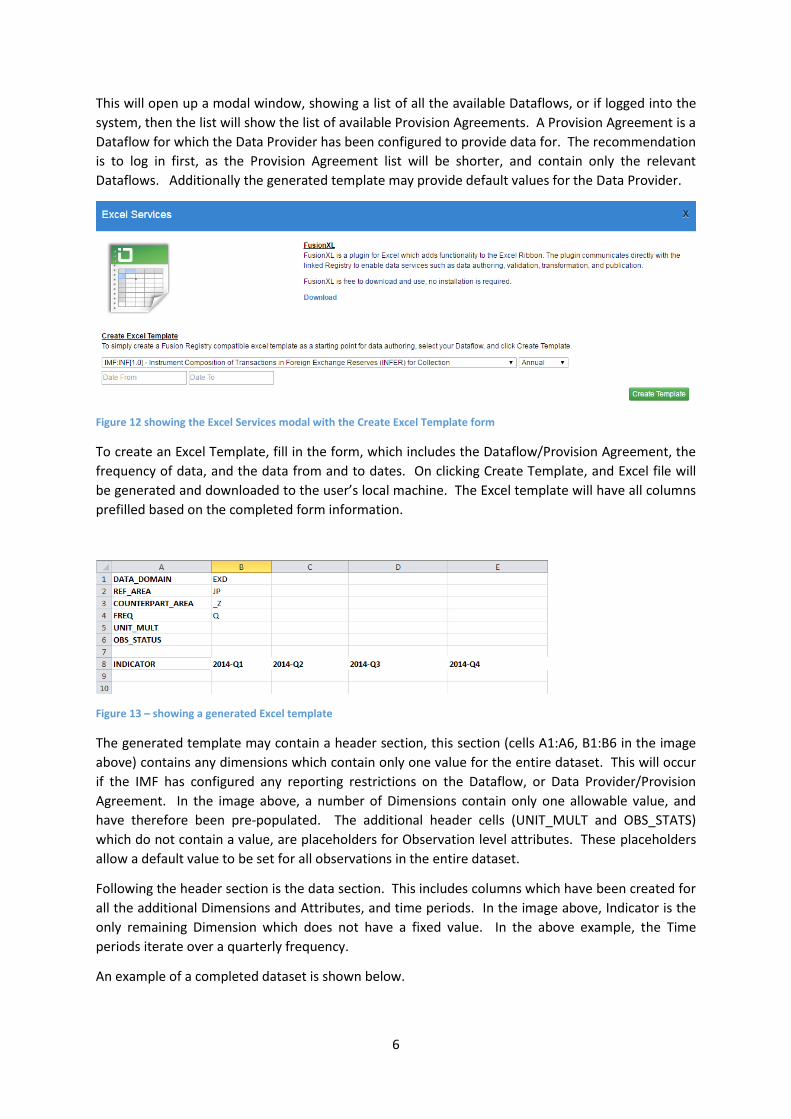
This will open up a modal window, showing a list of all the available Dataflows, or if logged into the
system, then the list will show the list of available Provision Agreements. A Provision Agreement is a
Dataflow for which the Data Provider has been configured to provide data for. The recommendation
is to log in first, as the Provision Agreement list will be shorter, and contain only the relevant
Dataflows. Additionally the generated template may provide default values for the Data Provider.
Figure 12 showing the Excel Services modal with the Create Excel Template form
To create an Excel Template, fill in the form, which includes the Dataflow/Provision Agreement, the
frequency of data, and the data from and to dates. On clicking Create Template, and Excel file will
be generated and downloaded to the user’s local machine. The Excel template will have all columns
prefilled based on the completed form information.
Figure 13 – showing a generated Excel template
The generated template may contain a header section, this section (cells A1:A6, B1:B6 in the image
above) contains any dimensions which contain only one value for the entire dataset. This will occur
if the IMF has configured any reporting restrictions on the Dataflow, or Data Provider/Provision
Agreement. In the image above, a number of Dimensions contain only one allowable value, and
have therefore been pre-populated. The additional header cells (UNIT_MULT and OBS_STATS)
which do not contain a value, are placeholders for Observation level attributes. These placeholders
allow a default value to be set for all observations in the entire dataset.
Following the header section is the data section. This includes columns which have been created for
all the additional Dimensions and Attributes, and time periods. In the image above, Indicator is the
only remaining Dimension which does not have a fixed value. In the above example, the Time
periods iterate over a quarterly frequency.
An example of a completed dataset is shown below.
7
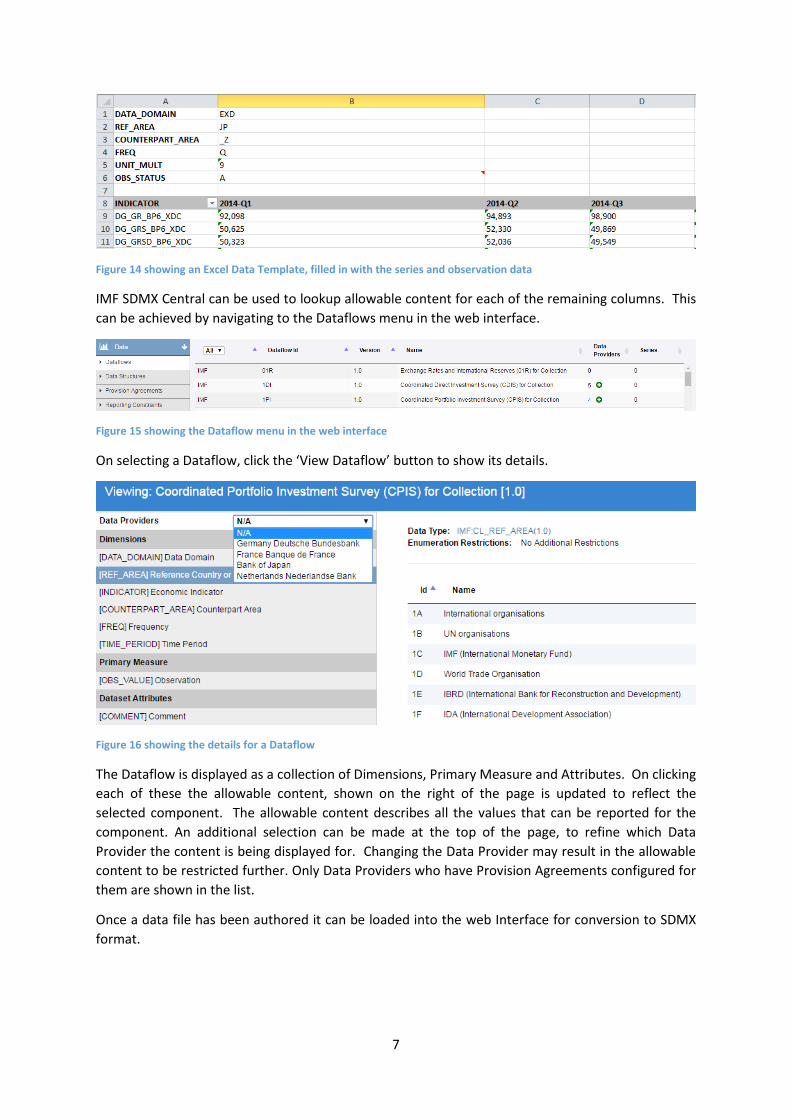
Figure 14 showing an Excel Data Template, filled in with the series and observation data
IMF SDMX Central can be used to lookup allowable content for each of the remaining columns. This
can be achieved by navigating to the Dataflows menu in the web interface.
Figure 15 showing the Dataflow menu in the web interface
On selecting a Dataflow, click the ‘View Dataflow’ button to show its details.
Figure 16 showing the details for a Dataflow
The Dataflow is displayed as a collection of Dimensions, Primary Measure and Attributes. On clicking
each of these the allowable content, shown on the right of the page is updated to reflect the
selected component. The allowable content describes all the values that can be reported for the
component. An additional selection can be made at the top of the page, to refine which Data
Provider the content is being displayed for. Changing the Data Provider may result in the allowable
content to be restricted further. Only Data Providers who have Provision Agreements configured for
them are shown in the list.
Once a data file has been authored it can be loaded into the web Interface for conversion to SDMX
format.
8
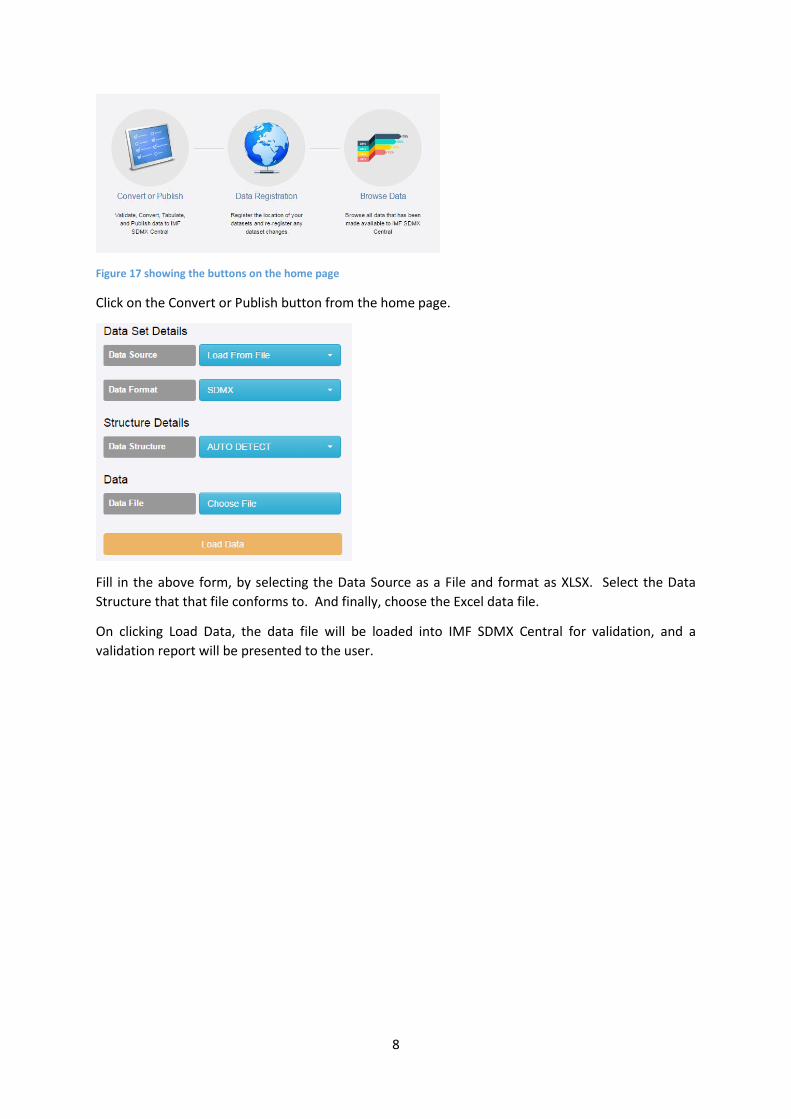
Figure 17 showing the buttons on the home page
Click on the Convert or Publish button from the home page.
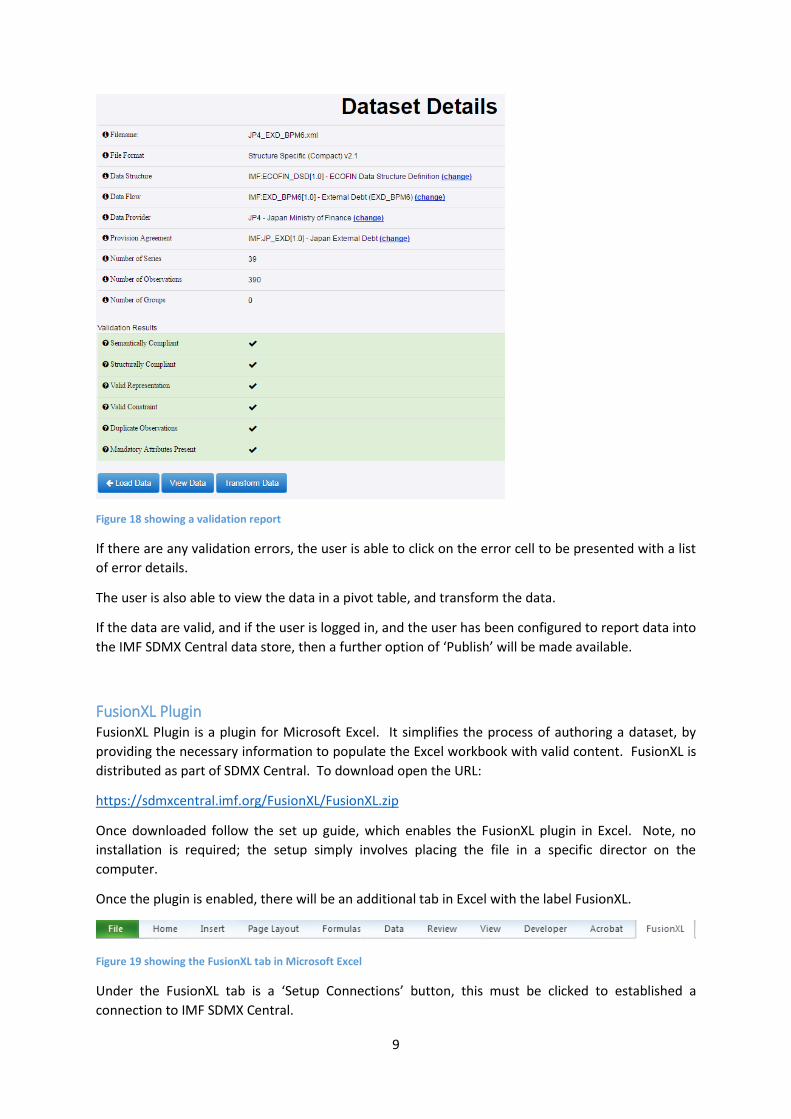
Fill in the above form, by selecting the Data Source as a File and format as XLSX. Select the Data
Structure that that file conforms to. And finally, choose the Excel data file.
On clicking Load Data, the data file will be loaded into IMF SDMX Central for validation, and a
validation report will be presented to the user.
9
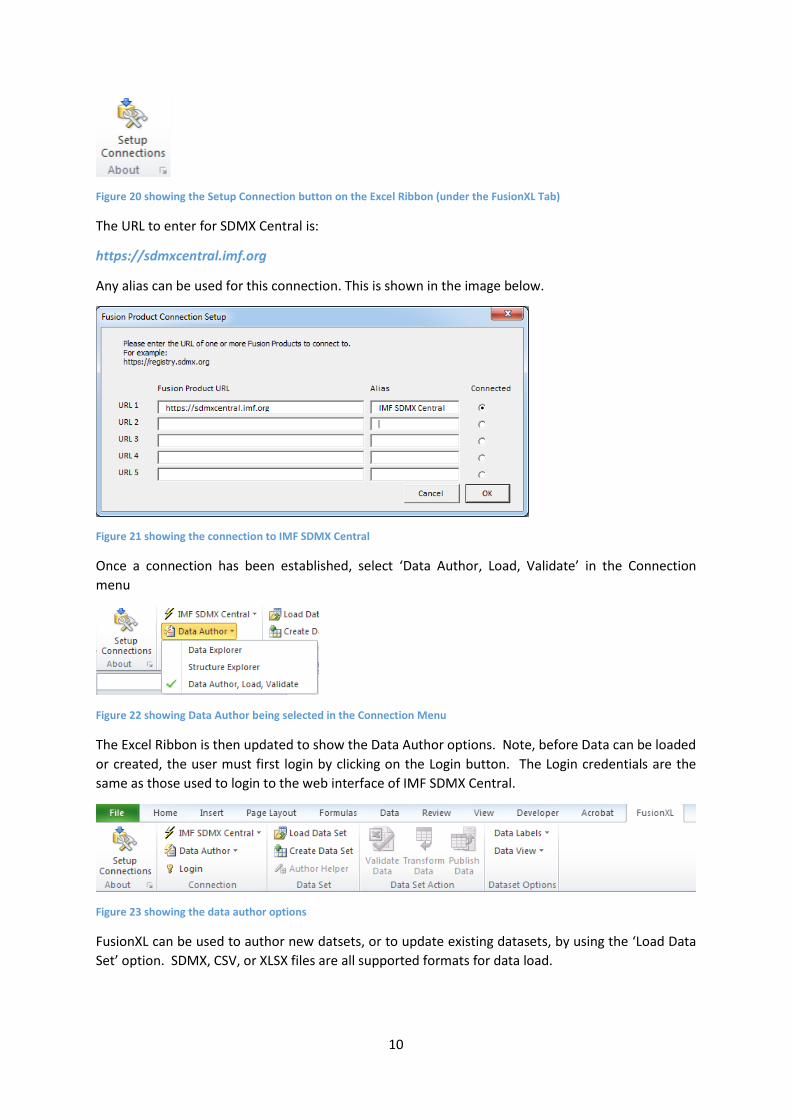
Figure 18 showing a validation report
If there are any validation errors, the user is able to click on the error cell to be presented with a list
of error details.
The user is also able to view the data in a pivot table, and transform the data.
If the data are valid, and if the user is logged in, and the user has been configured to report data into
the IMF SDMX Central data store, then a further option of ‘Publish’ will be made available.
FusionXL Plugin FusionXL Plugin is a plugin for Microsoft Excel. It simplifies the process of authoring a dataset, by
providing the necessary information to populate the Excel workbook with valid content. FusionXL is
distributed as part of SDMX Central. To download open the URL:
https://sdmxcentral.imf.org/FusionXL/FusionXL.zip
Once downloaded follow the set up guide, which enables the FusionXL plugin in Excel. Note, no
installation is required; the setup simply involves placing the file in a specific director on the
computer.
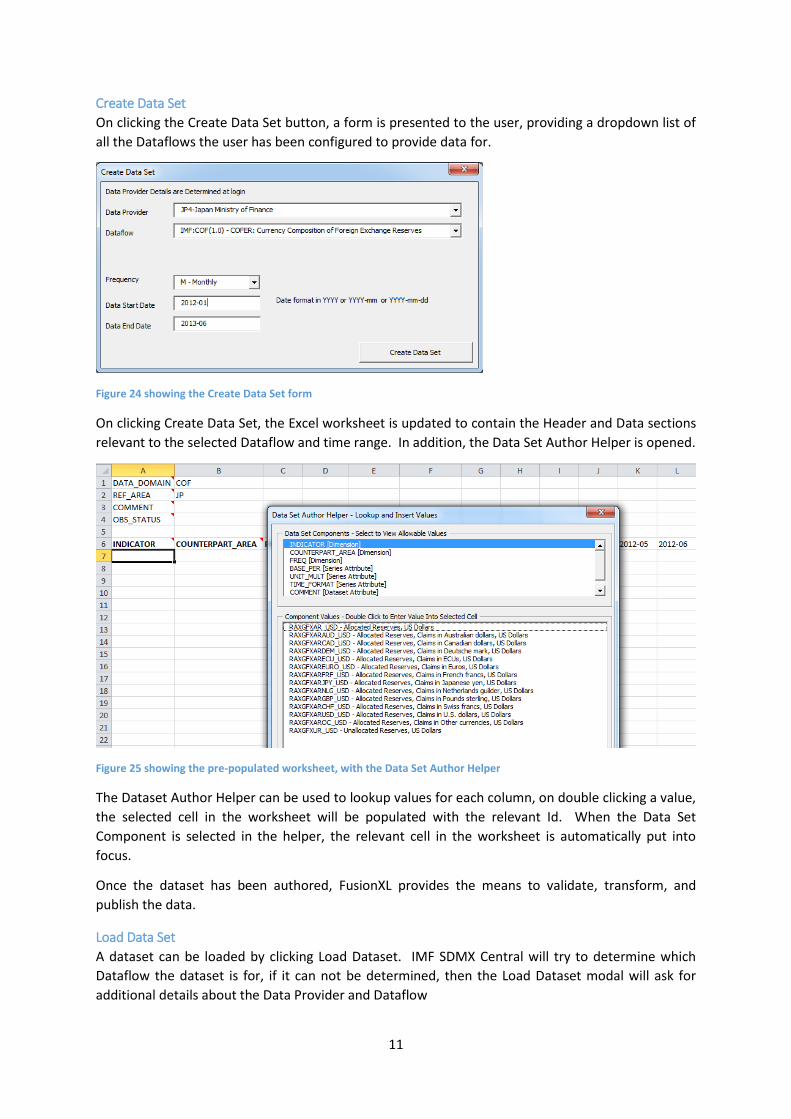
Once the plugin is enabled, there will be an additional tab in Excel with the label FusionXL.
Figure 19 showing the FusionXL tab in Microsoft Excel
Under the FusionXL tab is a ‘Setup Connections’ button, this must be clicked to established a
connection to IMF SDMX Central.
10
Figure 20 showing the Setup Connection button on the Excel Ribbon (under the FusionXL Tab)
The URL to enter for SDMX Central is:
https://sdmxcentral.imf.org
Any alias can be used for this connection. This is shown in the image below.
Figure 21 showing the connection to IMF SDMX Central
Once a connection has been established, select ‘Data Author, Load, Validate’ in the Connection
menu
Figure 22 showing Data Author being selected in the Connection Menu
The Excel Ribbon is then updated to show the Data Author options. Note, before Data can be loaded
or created, the user must first login by clicking on the Login button. The Login credentials are the
same as those used to login to the web interface of IMF SDMX Central.
Figure 23 showing the data author options
FusionXL can be used to author new datsets, or to update existing datasets, by using the ‘Load Data
Set’ option. SDMX, CSV, or XLSX files are all supported formats for data load.
11
Create Data Set
On clicking the Create Data Set button, a form is presented to the user, providing a dropdown list of
all the Dataflows the user has been configured to provide data for.
Figure 24 showing the Create Data Set form
On clicking Create Data Set, the Excel worksheet is updated to contain the Header and Data sections
relevant to the selected Dataflow and time range. In addition, the Data Set Author Helper is opened.
Figure 25 showing the pre-populated worksheet, with the Data Set Author Helper
The Dataset Author Helper can be used to lookup values for each column, on double clicking a value,
the selected cell in the worksheet will be populated with the relevant Id. When the Data Set
Component is selected in the helper, the relevant cell in the worksheet is automatically put into
focus.
Once the dataset has been authored, FusionXL provides the means to validate, transform, and
publish the data.
Load Data Set
A dataset can be loaded by clicking Load Dataset. IMF SDMX Central will try to determine which
Dataflow the dataset is for, if it can not be determined, then the Load Dataset modal will ask for
additional details about the Data Provider and Dataflow
12
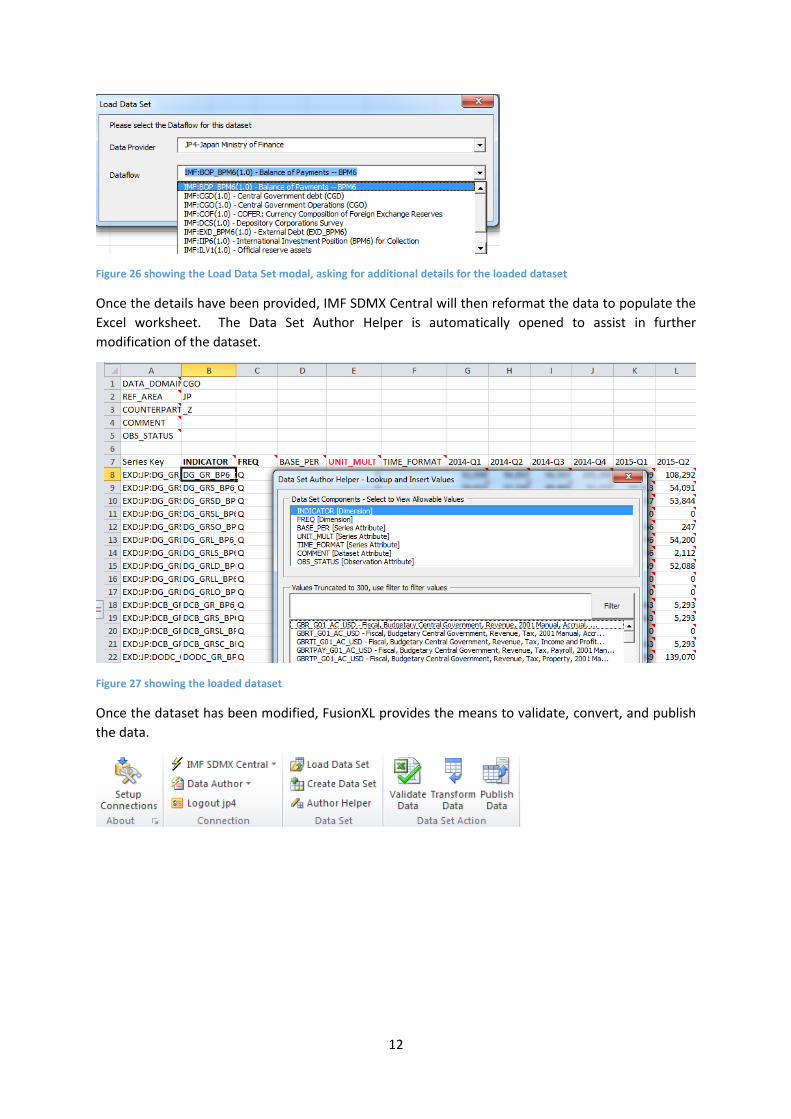
Figure 26 showing the Load Data Set modal, asking for additional details for the loaded dataset
Once the details have been provided, IMF SDMX Central will then reformat the data to populate the
Excel worksheet. The Data Set Author Helper is automatically opened to assist in further
modification of the dataset.
Figure 27 showing the loaded dataset
Once the dataset has been modified, FusionXL provides the means to validate, convert, and publish
the data.
13
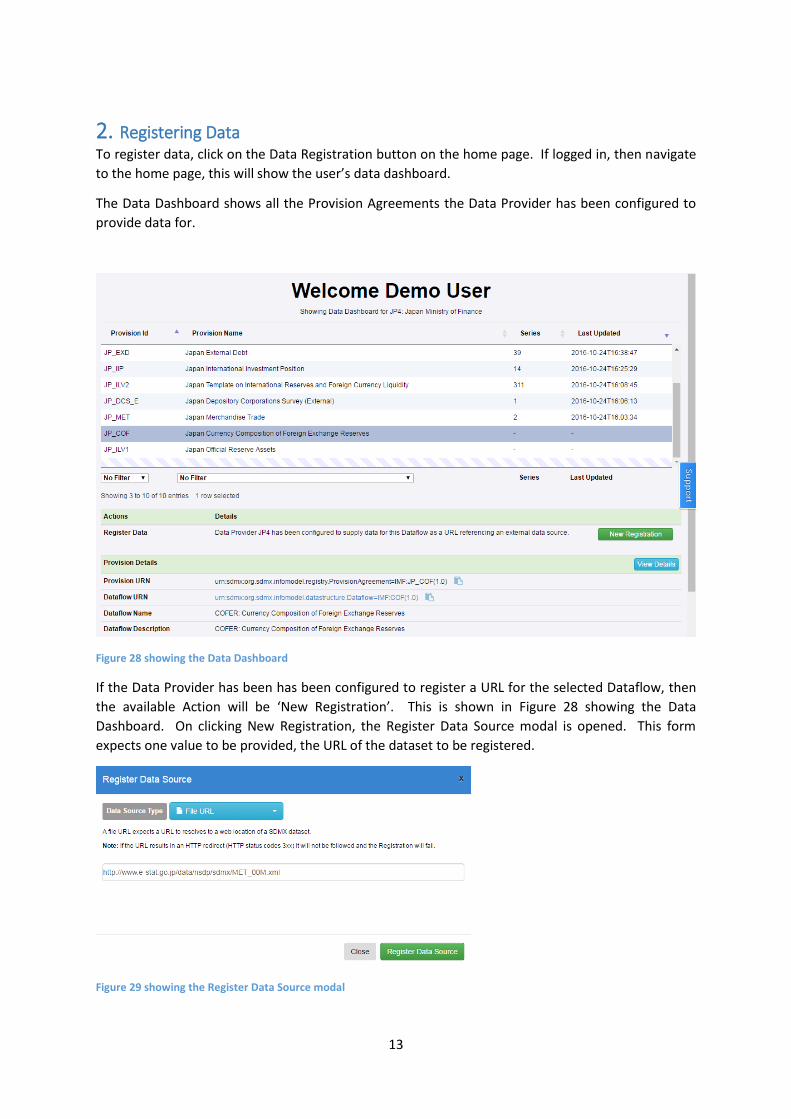
2. Registering Data To register data, click on the Data Registration button on the home page. If logged in, then navigate
to the home page, this will show the user’s data dashboard.
The Data Dashboard shows all the Provision Agreements the Data Provider has been configured to
provide data for.
Figure 28 showing the Data Dashboard
If the Data Provider has been has been configured to register a URL for the selected Dataflow, then
the available Action will be ‘New Registration’. This is shown in Figure 28 showing the Data
Dashboard. On clicking New Registration, the Register Data Source modal is opened. This form
expects one value to be provided, the URL of the dataset to be registered.
Figure 29 showing the Register Data Source modal
14
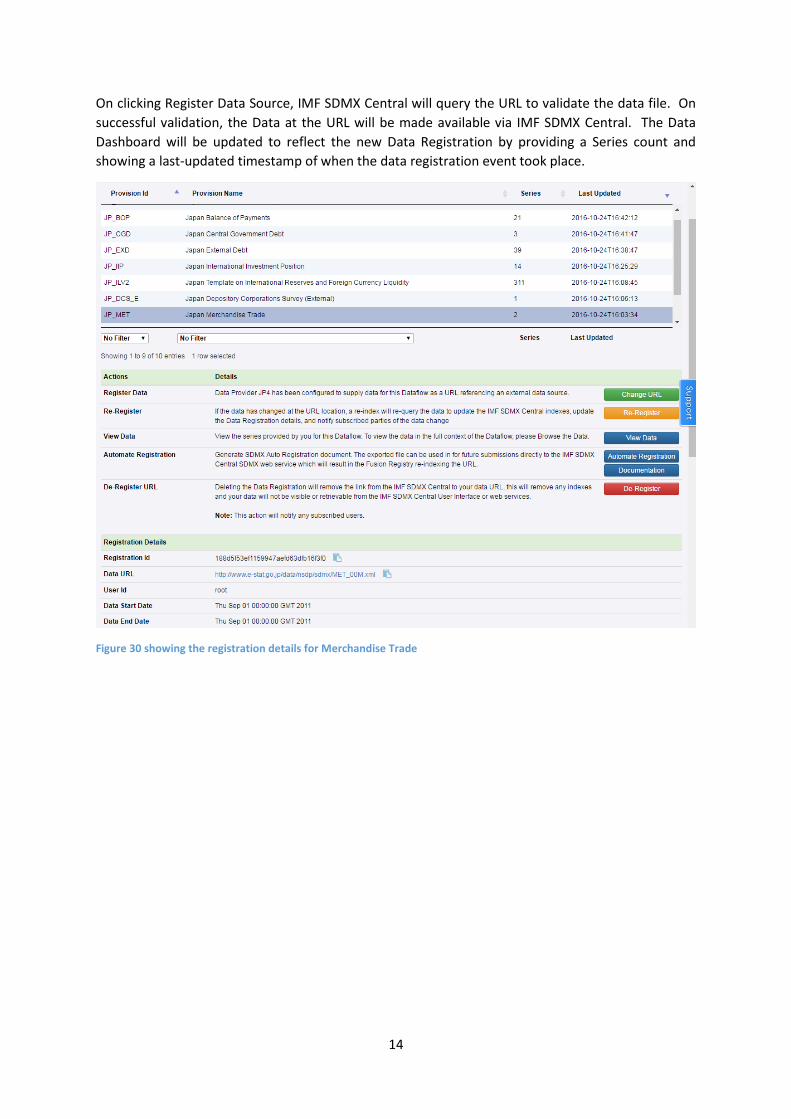
On clicking Register Data Source, IMF SDMX Central will query the URL to validate the data file. On
successful validation, the Data at the URL will be made available via IMF SDMX Central. The Data
Dashboard will be updated to reflect the new Data Registration by providing a Series count and
showing a last-updated timestamp of when the data registration event took place.
Figure 30 showing the registration details for Merchandise Trade
15
3. Publishing To publish data, log into SDMX Central, and click Convert or Publish.
Figure 31 showing the buttons on the home page
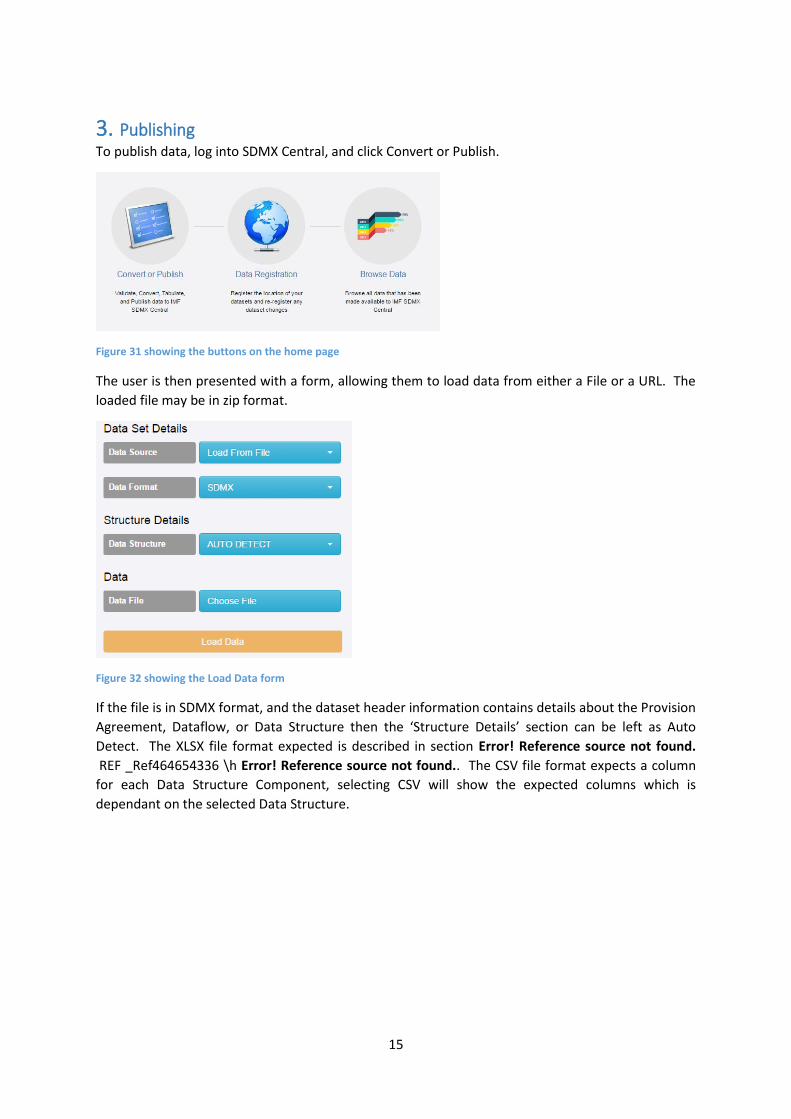
The user is then presented with a form, allowing them to load data from either a File or a URL. The
loaded file may be in zip format.
Figure 32 showing the Load Data form
If the file is in SDMX format, and the dataset header information contains details about the Provision
Agreement, Dataflow, or Data Structure then the ‘Structure Details’ section can be left as Auto
Detect. The XLSX file format expected is described in section Error! Reference source not found.
REF _Ref464654336 \h Error! Reference source not found.. The CSV file format expects a column
for each Data Structure Component, selecting CSV will show the expected columns which is
dependant on the selected Data Structure.
16
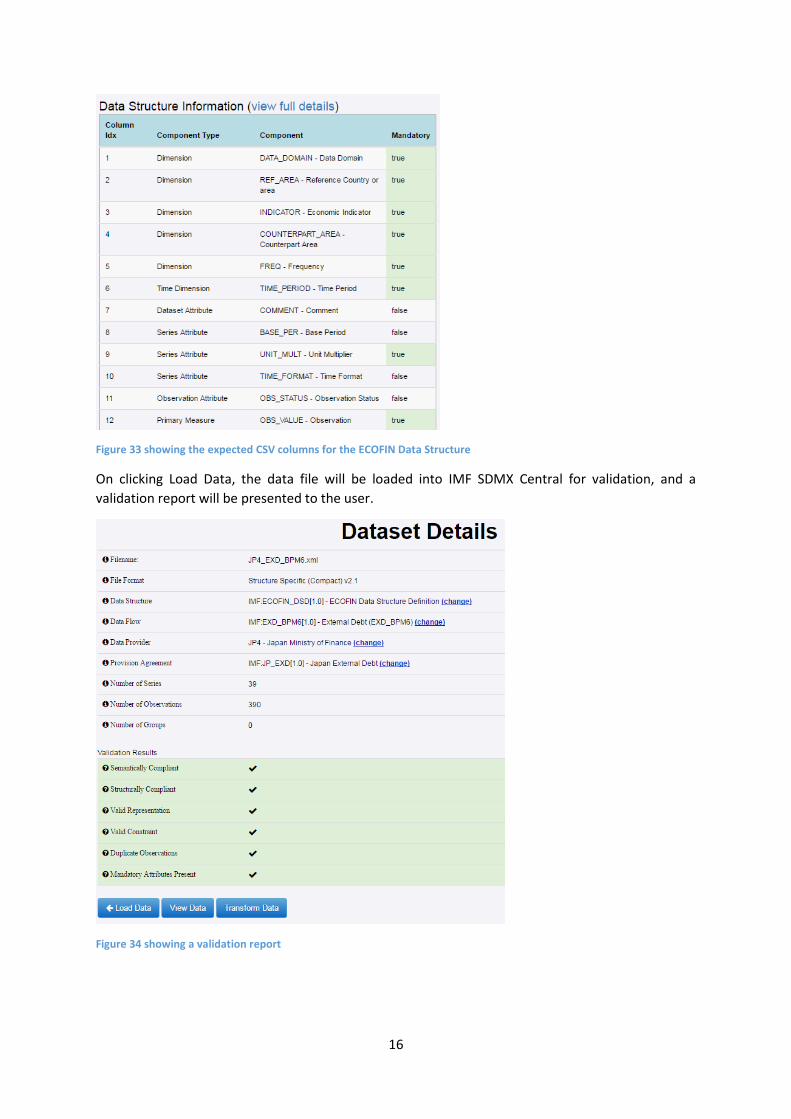
Figure 33 showing the expected CSV columns for the ECOFIN Data Structure
On clicking Load Data, the data file will be loaded into IMF SDMX Central for validation, and a
validation report will be presented to the user.
Figure 34 showing a validation report
17
If there are any validation errors, the user is able to click on the error cell to be presented with a list
of error details.
The user is able to view the data in a pivot table, and transform the data.
If the data are valid, and if the user is logged in, and the user has been configured to report data into
the IMF SDMX Central data store, then a further option of ‘Publish’ will be made available to them.
On clicking publish data, the user will be presented with the option to choose the publish action.
One important distinction between publishing data and registering the URL of a dataset, is that data
publications support incremental updates. It is therefore possible to load only new observation
values, which will be appended to the previously reported values.
On clicking Publish Data, the user is presented with 3 options:
1. Append
2. Replace
3. Delete
If the dataset to be published contains new information, then the selected action should be Append.
If the dataset contains either new information, or is replacing existing information, then the selected
action should be Replace. If the dataset is deleting attributes, observations, or series, then the
selected action should be Delete.
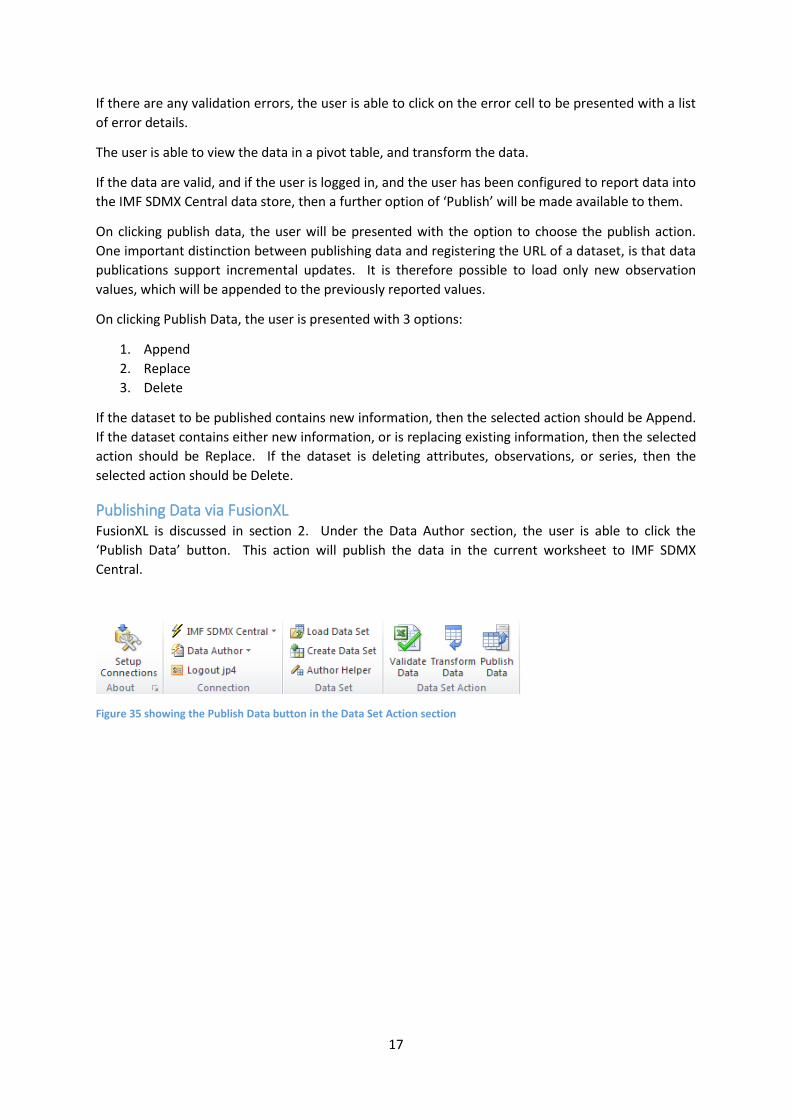
Publishing Data via FusionXL FusionXL is discussed in section 2. Under the Data Author section, the user is able to click the
‘Publish Data’ button. This action will publish the data in the current worksheet to IMF SDMX
Central.
Figure 35 showing the Publish Data button in the Data Set Action section
18
4. Subscribing As A Service IMF SDMX Central provides three mechanisms for receiving notifications of structure and data
updates, these are:
1. RSS Feed
2. Notification via Email
3. Notification via HTTP POST
RSS Feed IMF SDMX Central RSS feed is linked to from the footer of the user interface. The URL of the RSS
feed is:
https://sdmxcentral.imf.org/rss.xml
The RSS feed is updated each time a transaction is made with the service. A transaction includes
structure additions, modifications, and deletions, as well as data registrations and deletions. Each
transaction contains a URL link to the underlying SDMX document containing the information on the
submission. The SDMX document is in version 2.1, and is a RegistryInterface document containing
either a SubmitStructureRequest of a SubmitRegistration Request.
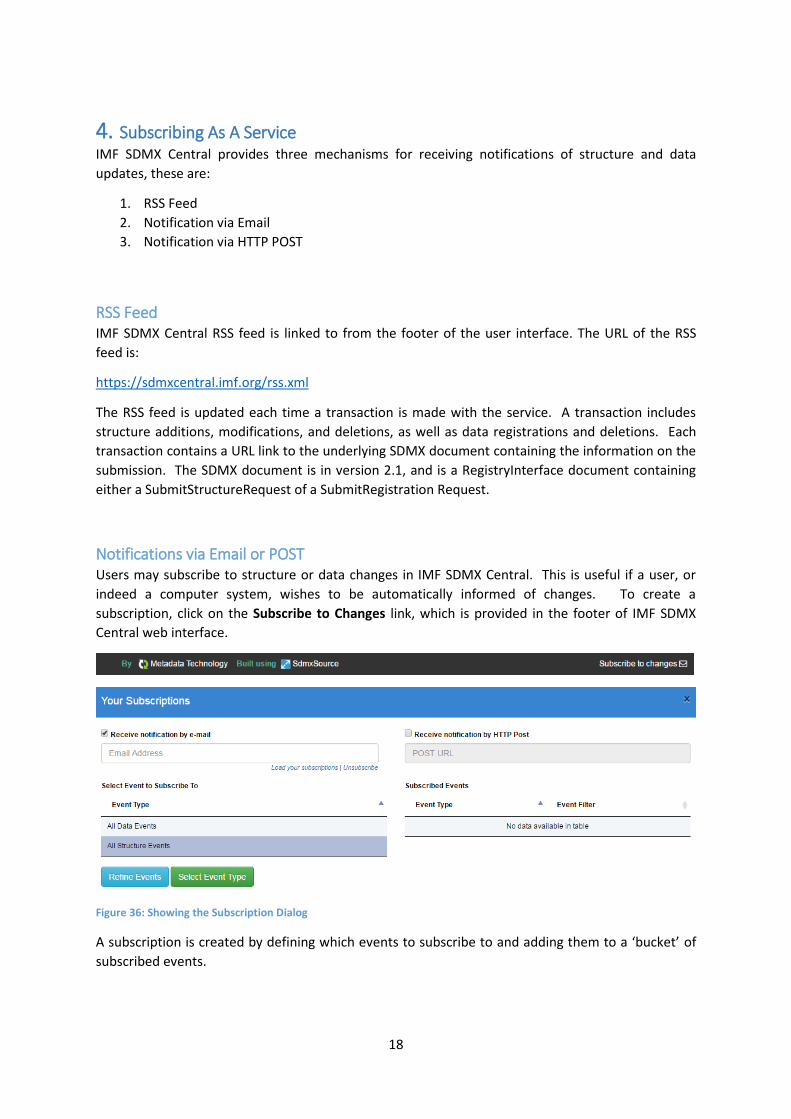
Notifications via Email or POST Users may subscribe to structure or data changes in IMF SDMX Central. This is useful if a user, or
indeed a computer system, wishes to be automatically informed of changes. To create a
subscription, click on the Subscribe to Changes link, which is provided in the footer of IMF SDMX
Central web interface.
Figure 36: Showing the Subscription Dialog
A subscription is created by defining which events to subscribe to and adding them to a ‘bucket’ of
subscribed events.
19
To receive Subscription notification events, users do not need to have an account with IMF SDMX
Central. The user must provide a valid e-mail address and select the events that they wish to
subscribe to.
On creating a subscription it will either be actioned immediately (if the user is authenticated in IMF
SDMX Central and their subscription email matches their user account) or a confirmation email will
be sent which contains a link to complete the request.
When a structure is modified in IMF SDMX Central, or a new Data Registration event occurs, all of
the subscribers who are registered to receive a notification.
Notifications via email will include an attached zip file containing the SDMX document with the
modification that was made. The email will also contain a link which the user can click if they wish to
unsubscribe from IMF SDMX Central.
Notifications via POST will be sent to the URL defined using the HTTP POST protocol. The POSTed
document will be a SDMX version 2.1 RegistryInterface document, containing either a
SubmitStructureRequest or a SubmitRegistrationRequest. The HTTP Content-Type header is set to
‘application/text’, and the document is contained in the body of the POST.
20
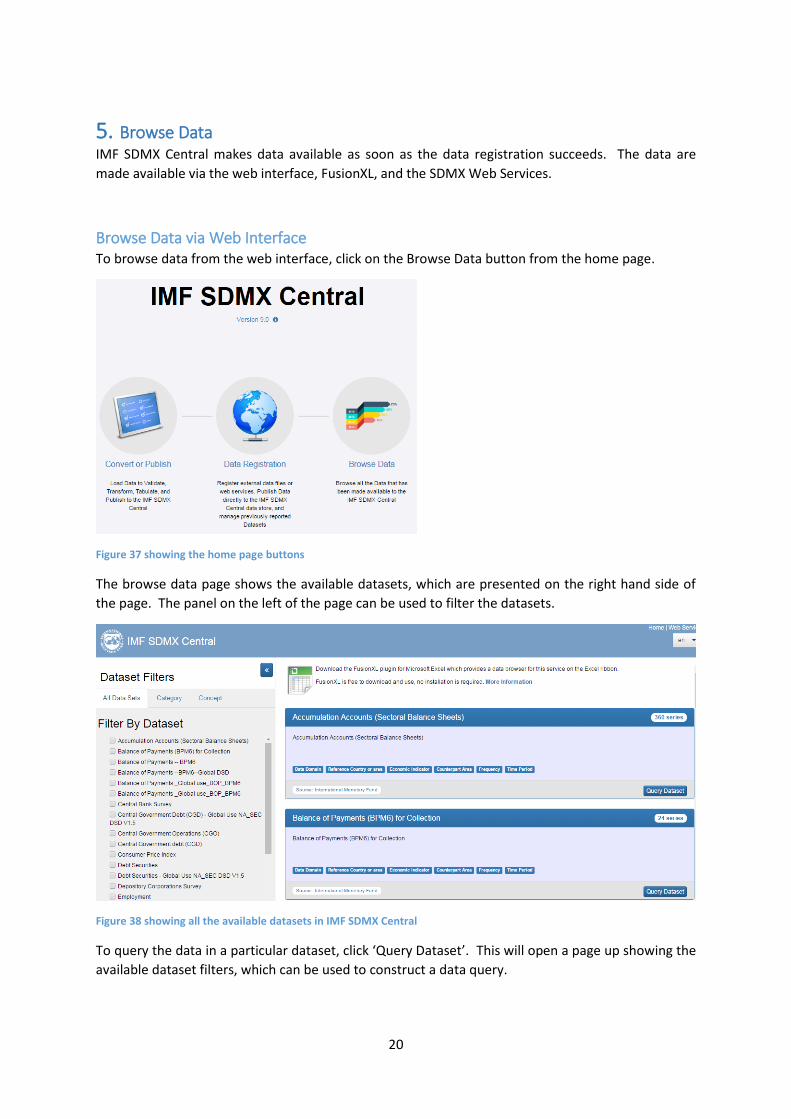
5. Browse Data IMF SDMX Central makes data available as soon as the data registration succeeds. The data are
made available via the web interface, FusionXL, and the SDMX Web Services.
Browse Data via Web Interface To browse data from the web interface, click on the Browse Data button from the home page.
Figure 37 showing the home page buttons
The browse data page shows the available datasets, which are presented on the right hand side of
the page. The panel on the left of the page can be used to filter the datasets.
Figure 38 showing all the available datasets in IMF SDMX Central
To query the data in a particular dataset, click ‘Query Dataset’. This will open a page up showing the
available dataset filters, which can be used to construct a data query.
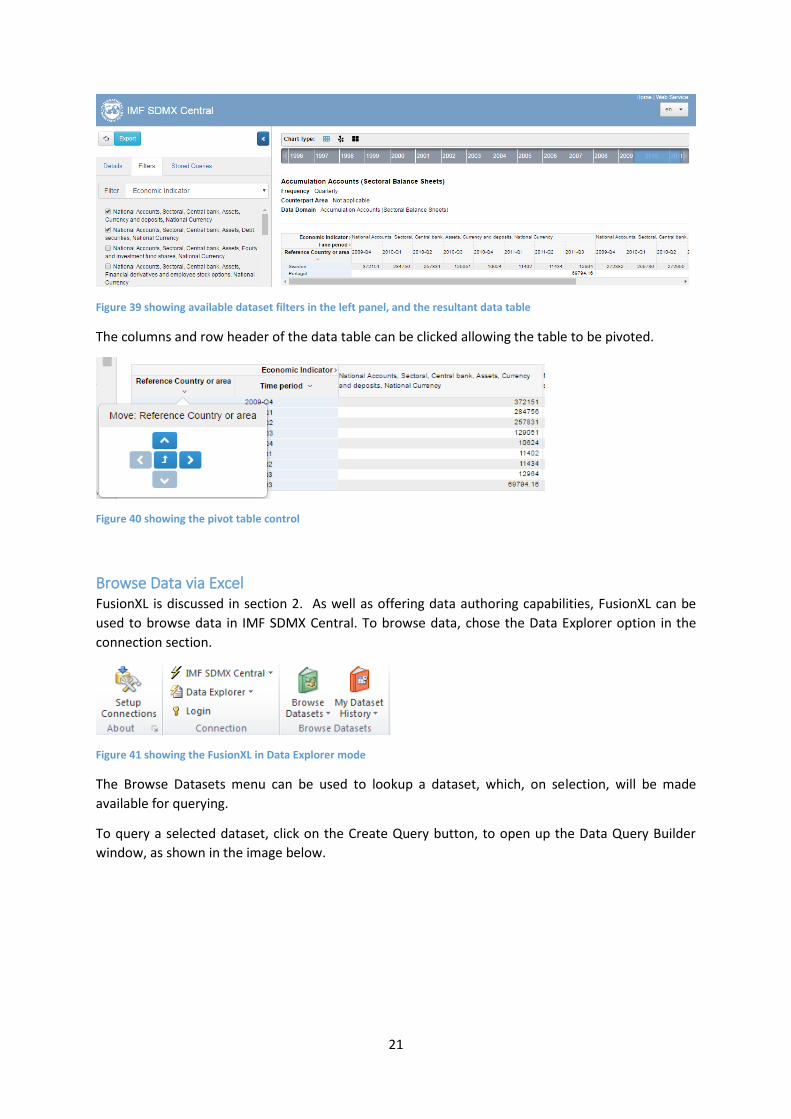
21
Figure 39 showing available dataset filters in the left panel, and the resultant data table
The columns and row header of the data table can be clicked allowing the table to be pivoted.
Figure 40 showing the pivot table control
Browse Data via Excel FusionXL is discussed in section 2. As well as offering data authoring capabilities, FusionXL can be
used to browse data in IMF SDMX Central. To browse data, chose the Data Explorer option in the
connection section.
Figure 41 showing the FusionXL in Data Explorer mode
The Browse Datasets menu can be used to lookup a dataset, which, on selection, will be made
available for querying.
To query a selected dataset, click on the Create Query button, to open up the Data Query Builder
window, as shown in the image below.

22
Figure 42 showing Balance of Payments (BPM6) Dataflow being queried
The Data Query Builder can be used to choose filter options for each of the available dimensions, in
addition the observations can be refined by observation date, reported date, or last ‘N’.
On clicking run query, the data query is executed on the IMF SDMX Central server and the worksheet
is populated with the data query response.
Figure 43 showing the result of a data query
23
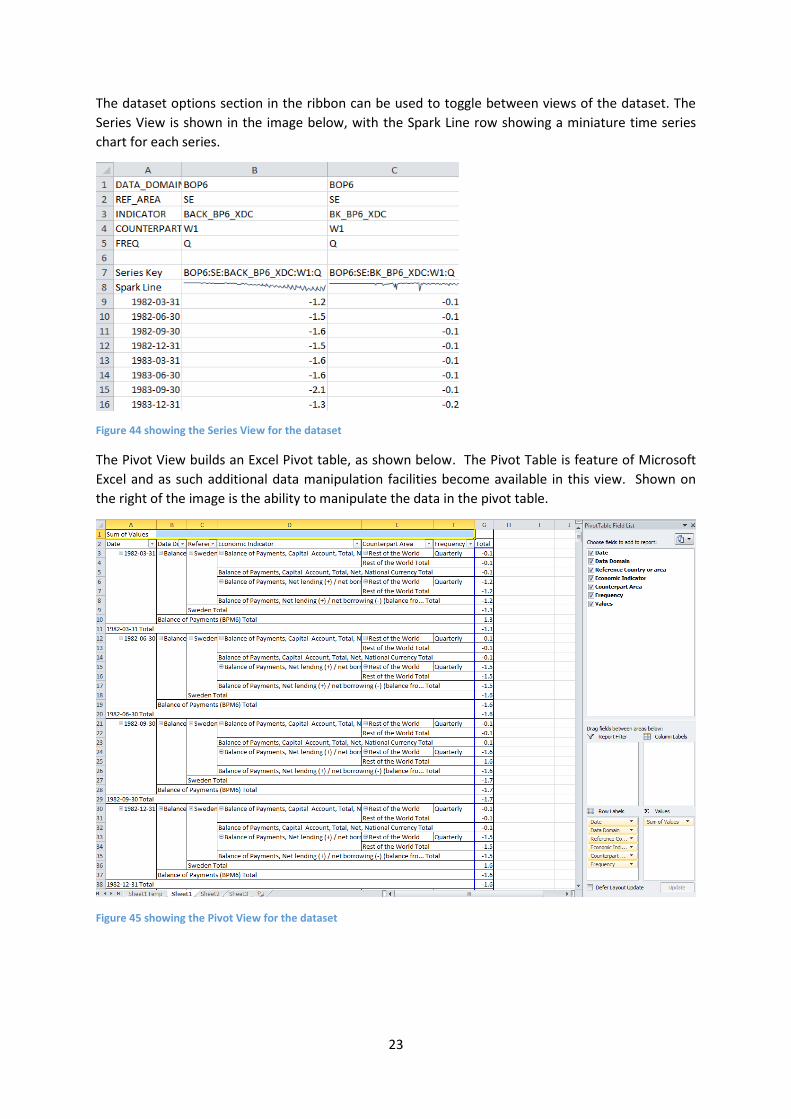
The dataset options section in the ribbon can be used to toggle between views of the dataset. The
Series View is shown in the image below, with the Spark Line row showing a miniature time series
chart for each series.
Figure 44 showing the Series View for the dataset
The Pivot View builds an Excel Pivot table, as shown below. The Pivot Table is feature of Microsoft
Excel and as such additional data manipulation facilities become available in this view. Shown on
the right of the image is the ability to manipulate the data in the pivot table.
Figure 45 showing the Pivot View for the dataset