sd10863 using the vault api and view and data ... -...
TRANSCRIPT
SD10863
Using the Vault API and View and Data API Together to Download and View Assemblies Wayne Brill Autodesk
Learning Objectives
Learn how to use the Vault API to download files
Learn how to use the REST View and Data API to translate files
Learn how to use JavaScript View Data API to view files
Learn how to use different APIs from a single custom application
Description
In this class you will see how you can use the Vault software API and the View and Data API together. The View and Data API enables you to programmatically view models in 3D in a browser. The Vault software API enables you to download files from Vault software. The topics covered in this class will be from an application that uses C# Vault API calls to download files along with View and Data API REST calls to translate the files. You will see how to use the View and Data API JavaScript functions to view the translated files. Please note that prior programming knowledge with C#, REST, and JavaScript is recommended. This class is not suitable for people who do not have any programming experience.
Your AU Experts
Wayne Brill has been a member of Autodesk Developer Technical Services supporting Autodesk, Inc., APIs for13 years. Wayne provides API support for Inventor software, Fusion 360 software, Vault software, and the View and Data API.

Using the Vault API and View and Data API Together to Download and View Assemblies
2
Overview:
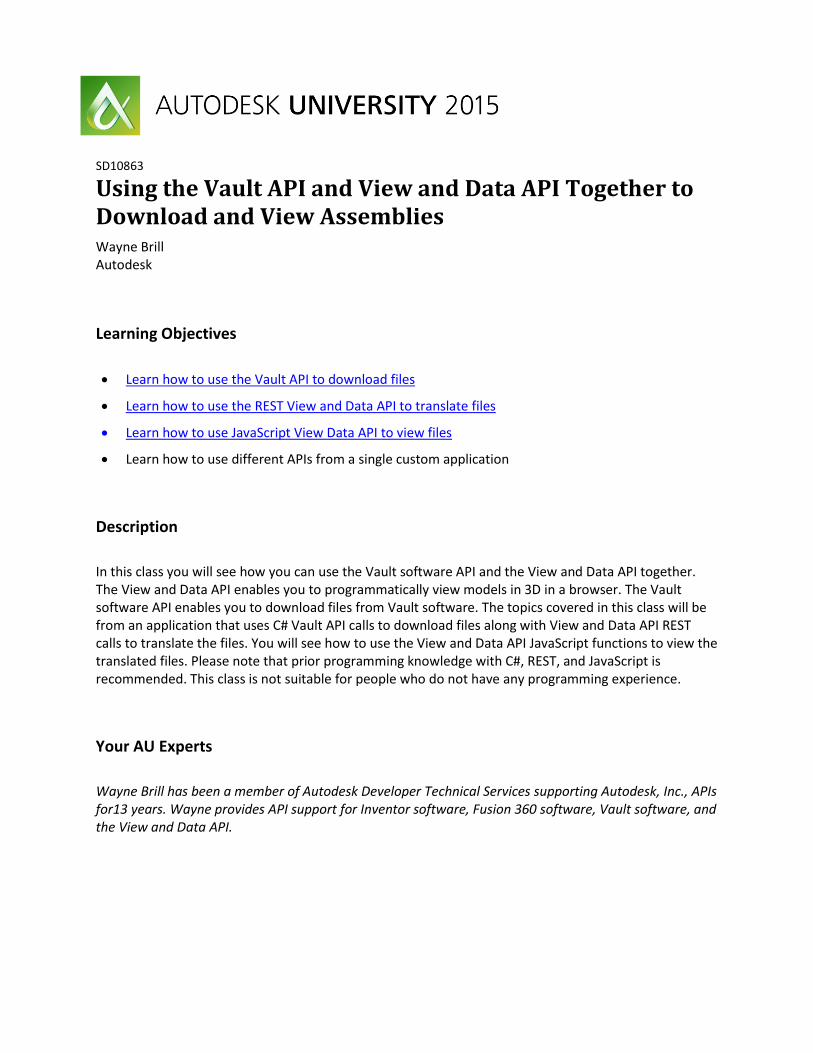
To create an application that will demonstrate the Vault API and View & data API I started with the SDK project named VaultBrowserSample. This sample is located here in the default install of the Vault SDK: C:\Program Files (x86)\Autodesk\Autodesk Vault 2016 SDK\vs12\CSharp\VaultBrowserSample The original project allows you to see a list of files in the vault in a grid. It also has a menu item that will download the files to a local drive. I updated this sample so that the downloaded assembly is uploaded to the cloud (called a bucket) using the Object Storage Service (OSS) REST API and a viewable is created that allows you to view the assembly in a browser. Here is the form. The interface on the form for the View & Data API has TextBoxes for the keys needed to get the access token. You can also create a bucket to store translated files. When the assembly is uploaded the URN of the file in the bucket is returned. This URN is used to display the model in the browser. (URN – uniform resource name – Wikipedia definition)
You can create an app to get a Consumer key and Secret key on this page. (need to sign in) https://developer.autodesk.com/api/view-and-data-api/ There are two ways in the User Interface to run the code. (It will download from Vault and upload to a bucket). One way is the “Upload Assembly” on the Actions dropdown and the other is the “Upload Assembly” button near the lower right. These are only enabled when an assembly in the grid is selected. You can also use the Advanced Find… to locate an assembly to upload.
Using the Vault API and View and Data API Together to Download and View Assemblies
3
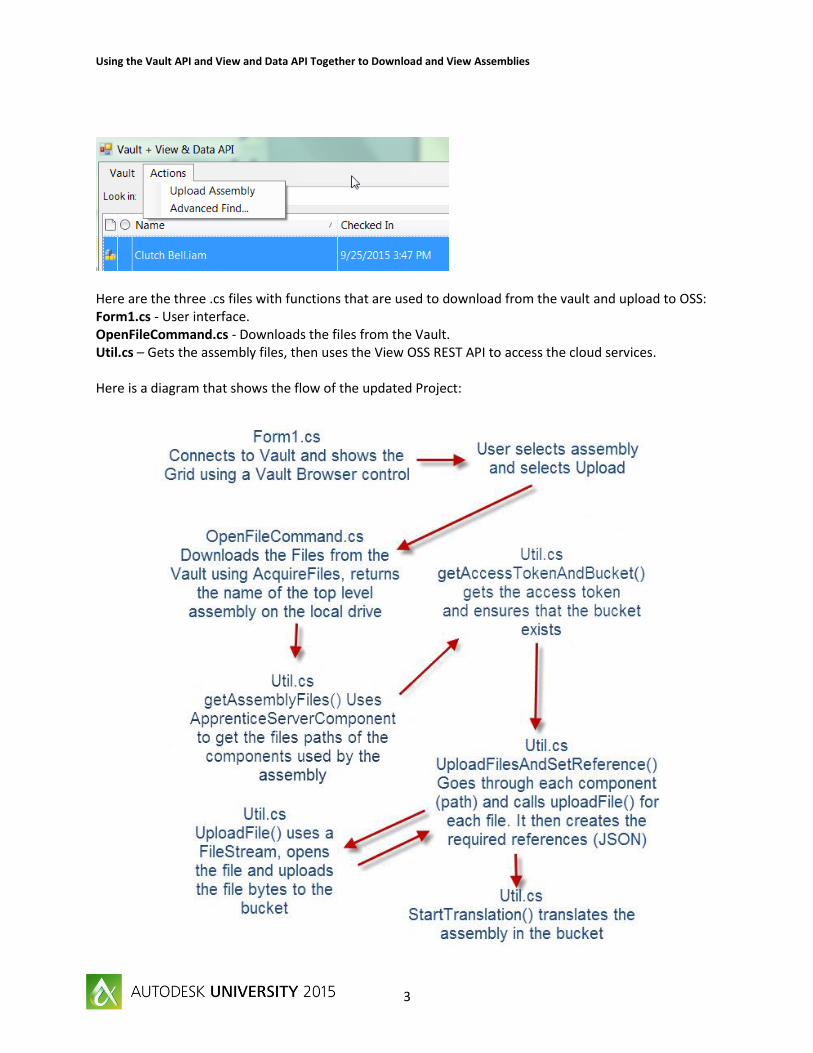
Here are the three .cs files with functions that are used to download from the vault and upload to OSS: Form1.cs - User interface. OpenFileCommand.cs - Downloads the files from the Vault. Util.cs – Gets the assembly files, then uses the View OSS REST API to access the cloud services. Here is a diagram that shows the flow of the updated Project:
Using the Vault API and View and Data API Together to Download and View Assemblies
4
Learn how to use the Vault API to download files
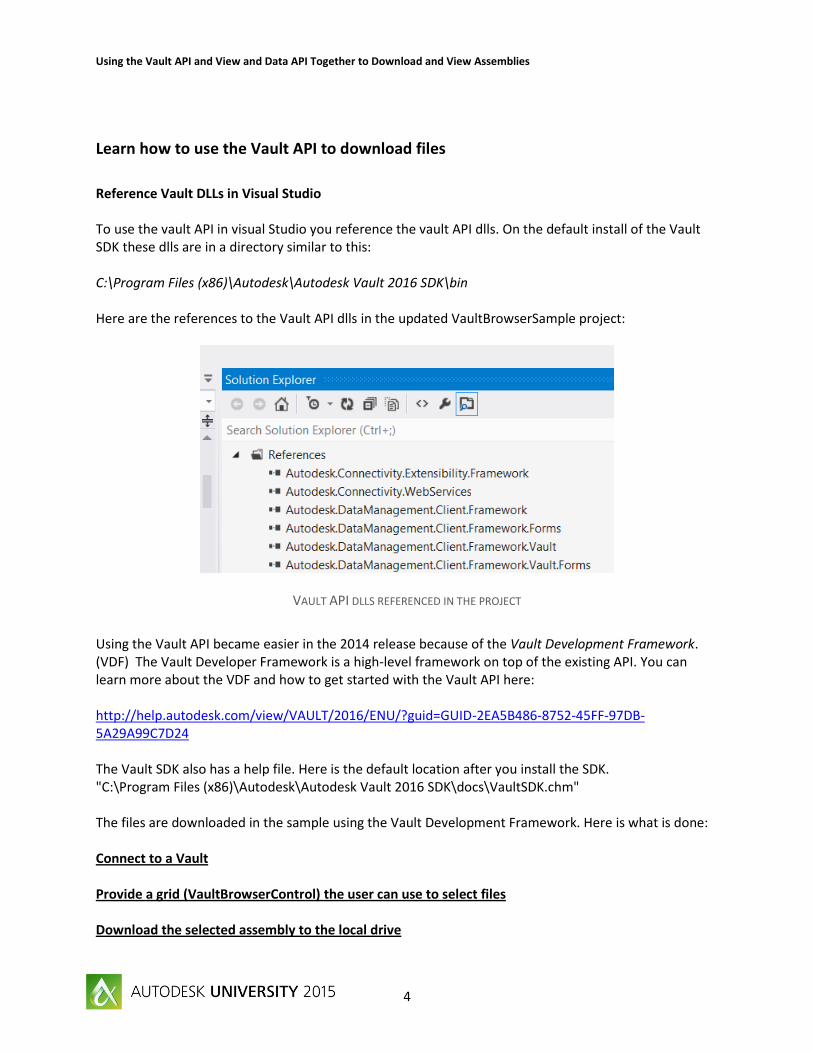
Reference Vault DLLs in Visual Studio To use the vault API in visual Studio you reference the vault API dlls. On the default install of the Vault SDK these dlls are in a directory similar to this: C:\Program Files (x86)\Autodesk\Autodesk Vault 2016 SDK\bin Here are the references to the Vault API dlls in the updated VaultBrowserSample project:
VAULT API DLLS REFERENCED IN THE PROJECT
Using the Vault API became easier in the 2014 release because of the Vault Development Framework. (VDF) The Vault Developer Framework is a high-level framework on top of the existing API. You can learn more about the VDF and how to get started with the Vault API here: http://help.autodesk.com/view/VAULT/2016/ENU/?guid=GUID-2EA5B486-8752-45FF-97DB-5A29A99C7D24 The Vault SDK also has a help file. Here is the default location after you install the SDK. "C:\Program Files (x86)\Autodesk\Autodesk Vault 2016 SDK\docs\VaultSDK.chm" The files are downloaded in the sample using the Vault Development Framework. Here is what is done: Connect to a Vault Provide a grid (VaultBrowserControl) the user can use to select files Download the selected assembly to the local drive

Using the Vault API and View and Data API Together to Download and View Assemblies
5
Connect to a Vault There is a connection class that represents a connection to a vault server. This is instantiated by using the Login method of in the Library class in the Autodesk.DataManagement.Client.Framework.Vault.Forms Namespace . This will show a dialog that the user can use to enter the Server, Vault name and password. // Connection to the Vault public Vault.Currency.Connections.Connection m_conn = null; // This shows the dialog and returns the connection (instantiates global variable m_conn) m_conn = Vault.Forms.Library.Login(null);
VAULT LOGIN DIALOG
You could also login without using a dialog. //Login read only Framework.Vault.Forms.Library.Initialize(); // needed to initialize the grid Autodesk.DataManagement.Client.Framework.Vault.Results.LogInResult lr = Autodesk.DataManagement.Client.Framework.Vault.Library.ConnectionManager.LogIn ("localhost", "Vault", "administrator", "", Framework.Vault.Currency.Connections.AuthenticationFlags.ReadOnly, null); if (lr.Success) m_conn = lr.Connection;
Using the Vault API and View and Data API Together to Download and View Assemblies
6
This DevBlog post may be of interest. It explains a problem that can occur with the Vault Browser control if the Library is not initialized when logging in this way: http://adndevblog.typepad.com/manufacturing/2015/06/vault-browser-control-icon-column-incorrect-call-libraryinitialize.html Provide a grid the user can use to select a file
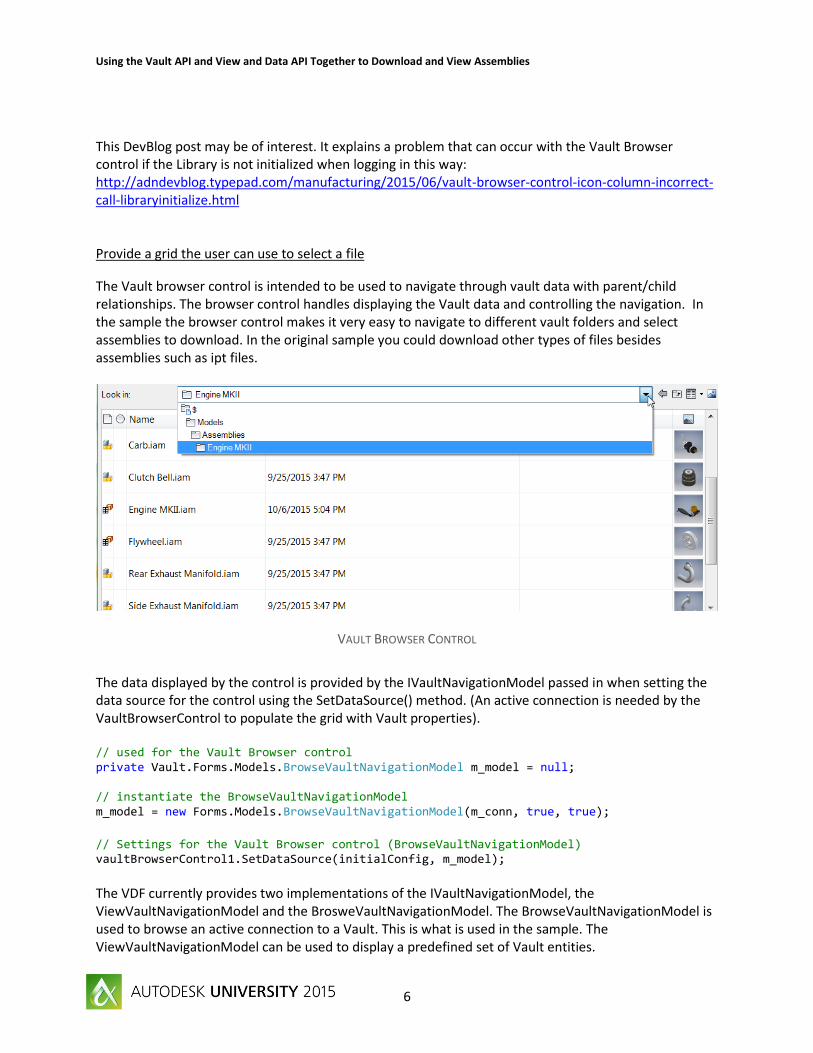
The Vault browser control is intended to be used to navigate through vault data with parent/child relationships. The browser control handles displaying the Vault data and controlling the navigation. In the sample the browser control makes it very easy to navigate to different vault folders and select assemblies to download. In the original sample you could download other types of files besides assemblies such as ipt files.
VAULT BROWSER CONTROL
The data displayed by the control is provided by the IVaultNavigationModel passed in when setting the data source for the control using the SetDataSource() method. (An active connection is needed by the VaultBrowserControl to populate the grid with Vault properties). // used for the Vault Browser control private Vault.Forms.Models.BrowseVaultNavigationModel m_model = null; // instantiate the BrowseVaultNavigationModel m_model = new Forms.Models.BrowseVaultNavigationModel(m_conn, true, true); // Settings for the Vault Browser control (BrowseVaultNavigationModel) vaultBrowserControl1.SetDataSource(initialConfig, m_model); The VDF currently provides two implementations of the IVaultNavigationModel, the ViewVaultNavigationModel and the BrosweVaultNavigationModel. The BrowseVaultNavigationModel is used to browse an active connection to a Vault. This is what is used in the sample. The ViewVaultNavigationModel can be used to display a predefined set of Vault entities.

Using the Vault API and View and Data API Together to Download and View Assemblies
7
The VDF.Vault.Forms.Controls.VaultBrowserControl.Configuration class which is passed in to the VaultBrowserControl’s SetDataSource() method is used to configure the grid. This call to AddInitialColumn() is adding the Icon column. //used to add the columns to the grid Vault.Forms.Controls.VaultBrowserControl.Configuration initialConfig = new Vault.Forms.Controls.VaultBrowserControl.Configuration(m_conn, "VaultBrowserSample", propDefs); initialConfig.AddInitialColumn(Vault.Currency.Properties.PropertyDefinitionIds.Client.EntityIcon); The Vault Browser control is described in the help here: http://help.autodesk.com/view/VAULT/2016/ENU/?guid=GUID-BF02FAE3-15EA-4E7C-8896-025981104F74 A few other things: You may get a message about DevExpress when you use the VaultBrowserControl. Using DevExpress when using Vault API controls is described on this post: http://justonesandzeros.typepad.com/blog/2013/05/devexpress-dlls.html There is not a way to display non-vault entities in the Vault Browser control. Also there is not any public API for the VaultTreeControl. At this time is it intended for internal use only by the VDF provided dialogs. (The VaultTreeControl is intentionally excluded from the documentation). Download the selected assembly to the local drive
You use the AcquireFiles method to get files out of a vault. Here is the call from the project:
VDF.Vault.Results.AcquireFilesResults myAcqFilesResults = connection.FileManager.AcquireFiles(settings);
Before the 2014 release you could have used DocumentService.DownloadFile and DocumentService.CheckoutFile but these were removed in the 2014 API. (Connection.FileManager.AcquireFiles is the replacement). See the topic “How To Acquire Files” in the help for more information on AcquireFiles. (VaultSDK.chm) and this page in the online help:
http://help.autodesk.com/view/VAULT/2016/ENU/?guid=GUID-C711E51B-B069-4A80-8611-0A6FC8B5FA13
The AcquireFiles method that is using in the project has one parameter - an AcquireFilesSettings object. This object is used to control how AcquireFiles will work. Below is the code from the project that instantiates the AcquireFilesSettings object and sets the values we want. The fileIter object is the assembly that is getting downloaded. (Selected by the user) IncludeChidren is true because we want to include the parts and subassemblies. RecurseChildren is true because we want to get all the files in

Using the Vault API and View and Data API Together to Download and View Assemblies
8
subassemblies. LocaPath is where the files will be downloaded to on the local drive. DefaultAcquisitionOption is Download. (We do not need to check out the files)
VDF.Vault.Settings.AcquireFilesSettings settings = new VDF.Vault.Settings.AcquireFilesSettings(connection); settings.AddEntityToAcquire(fileIter); settings.OptionsRelationshipGathering.FileRelationshipSettings.IncludeChildren = true; settings.OptionsRelationshipGathering.FileRelationshipSettings.RecurseChildren = true; settings.LocalPath = new VDF.Currency.FolderPathAbsolute(folderPath); settings.DefaultAcquisitionOption = VDF.Vault.Settings.AcquireFilesSettings.AcquisitionOption.Download;
The AcquireFiles method returns an AcquireFilesResults object. This object will allow you to get the local paths of the files that were downloaded. Here you see the code from the project. In this example topLevelAssemblyName is the name of the assembly that was selected by the user. (Used to determine where the top level assembly is located on the local drive) AcquireFiles downloads the files on the local drive following the folder structure that exists in the vault. We need to know where the files are to get the files to upload to the bucket. (Using the Object Storage Service – OSS).
foreach (VDF.Vault.Results.FileAcquisitionResult myFileAcquistionResult in myAcqFilesResults.FileResults) { m_downloadedFilesToDelete.Add(myFileAcquistionResult.LocalPath.ToString()); if (myFileAcquistionResult.File.EntityName == topAssemblyName) { VDF.Currency.FilePathAbsolute myFilePathAbs = myFileAcquistionResult.LocalPath; topLevelAssemblyPath = myFilePathAbs.ToString(); } }
Using Inventor Apprentice to get the file paths of the files
The Vault API AcquireFiles method used to get the files out of vault could have included files that are not needed to view the assembly in a browser using the View & Data API. Our project uses Apprentice to get a list of the components the top level assembly is using. (This topic on Apprentice is a bonus topic and was not included in the description for this class). Apprentice is an ActiveX component that runs within the process space of the client that's using it. You can use apprentice on systems that do not have Inventor installed. See the topic “Apprentice Server” in the Inventor API. The API help is here by default:
"C:\Program Files\Autodesk\Inventor 2016\Local Help\admapi_20_0.chm"
You can also access the Inventor API help from the help dropdown:

Using the Vault API and View and Data API Together to Download and View Assemblies
9
HOW TO LAUNCH THE HELP INSIDE INVENTOR
Here is the code that is instantiating the ApprenticeServerComponent.
//Get Apprentice Inventor.ApprenticeServerComponent objapprenticeServerApp = new Inventor.ApprenticeServerComponent(); //This is the name of the top level assembly string asmFileName = System.IO.Path.GetFileName(asmFilePath);
Here you see the code that removes spaces in the name of the top level assembly. When I ran into this problem I got this reply. “The solution right now is to change the file names before uploading. What A360 does is serialize the file names no matter what name the file is called – to solve this problem.” (Also see this post) //Uploading a file with a name that contains spaces causes a problem when // trying to view the file in a browser. If the name contains spaces the // space is replaced with an underscore if (asmFileName.Contains(" ")) { // Get a string with the spaces removed string nameWithStringsRemoved = asmFileName.Replace(" ", "_"); // Create a string with the path to the top level assembly with a name that has // underscores instead of spaces
asmFilePathNoSpaces = System.IO.Path.GetDirectoryName(asmFilePath) + "\\" + nameWithStringsRemoved;
if (!System.IO.File.Exists(asmFilePathNoSpaces)) { //Copy the top level assembly to an assembly with the spaces removed System.IO.File.Copy(asmFilePath, asmFilePathNoSpaces); // This is the string with the path to the top level assembly asmFilePath = asmFilePathNoSpaces; } else { MessageBox.Show("Unable to rename file with spaces in the name",
"Problem renaming file", MessageBoxButtons.OK, MessageBoxIcon.Exclamation);
return "Unable to rename file with spaces in the name"; } }

Using the Vault API and View and Data API Together to Download and View Assemblies
10
Instantiate an ApprenticeServerDocument object by using the Open method of ApprenticeServerComponent. The document is the top level assembly that was downloaded from the vault to the local drive. The code goes through the referenced documents of the ApprenticeServerDocument and puts the paths of referenced documents in a list. This list will be used to upload each file to a bucket using Object Storage Service (OSS). // Get the top level assembly document using apprentice Inventor.ApprenticeServerDocument appServerDoc = objapprenticeServerApp.Open(asmFilePath); if (appServerDoc == null) { MessageBox.Show("Unable to open the specified file", "Problem getting file", MessageBoxButtons.OK, MessageBoxIcon.Exclamation); return "Problem opening file"; } // FileList will contain a list of strings (the paths of the files to upload to oss) // call Clear to remove any existing paths. (could be there is code is run twice) fileList.Clear(); // Add the top level assembly path to the list of paths fileList.Add(appServerDoc.FullFileName); // Add the paths to the referenced documents to the list of paths foreach (Inventor.ApprenticeServerDocument oRefDoc in appServerDoc.AllReferencedDocuments) { fileList.Add(oRefDoc.FullDocumentName); }
The fileList is a global variable of the type System.Collections.ArrayList. All the paths to all of the files that need to be uploaded to the bucket are added to fileList. This list is passed to getAccessTokenAndBucket() and from there is passed UploadFilesAndSetReference(). In this function the list is iterated over and each file is uploaded to a bucket and the assembly is translated.
Learn how to use the REST View and Data API to translate files
You use Object Storage Service (OSS) REST API to upload files to a location (called a bucket) on the Autodesk cloud. A bucket keeps the data private and separate. This REST API is also used to get the access token and translate files. (All OSS API calls are secured using an access token) Here is a location to get up to speed with the View & Data API.
https://developer.autodesk.com/api/view-and-data-api/
See these topics:
Authentication API OSS Bucket API OSS Upload API Viewing API
Using the Vault API and View and Data API Together to Download and View Assemblies
11
To learn about RE S T “Representational State Transfer” see the many articles on the WEB. Here is one I have used:
http://www.soapui.org/testing-dojo/best-practices/understanding-rest-headers-and-parameters.html
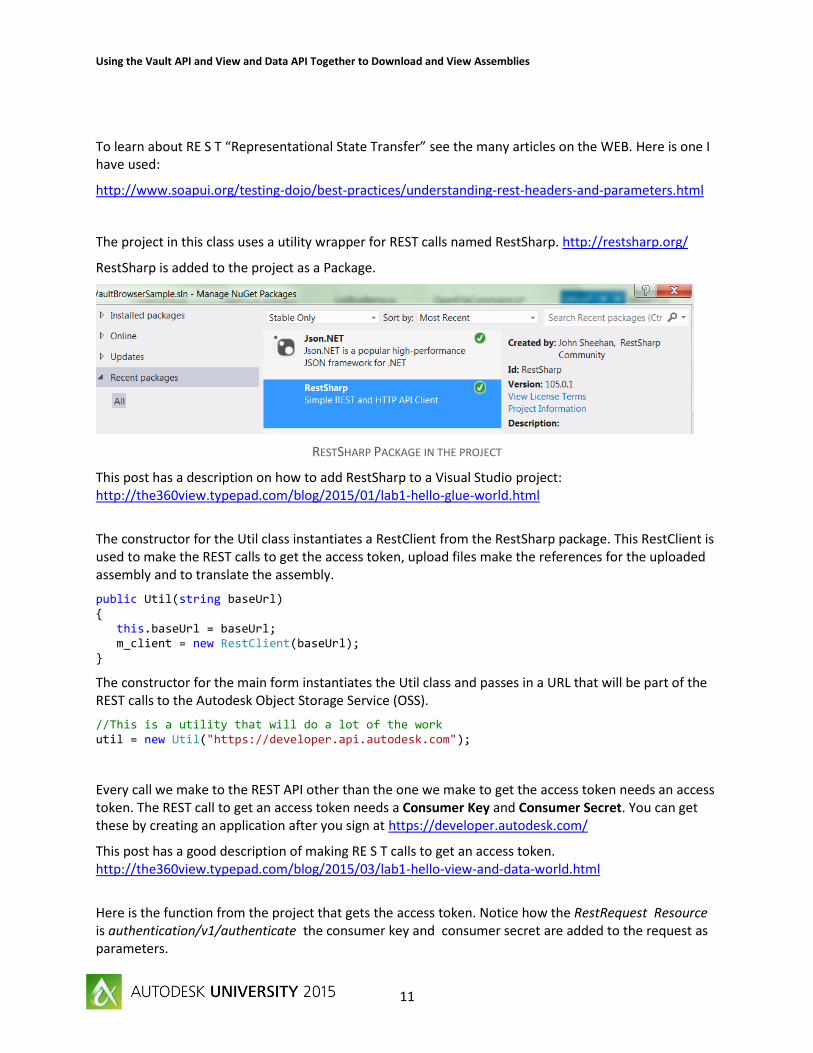
The project in this class uses a utility wrapper for REST calls named RestSharp. http://restsharp.org/
RestSharp is added to the project as a Package.
RESTSHARP PACKAGE IN THE PROJECT
This post has a description on how to add RestSharp to a Visual Studio project: http://the360view.typepad.com/blog/2015/01/lab1-hello-glue-world.html
The constructor for the Util class instantiates a RestClient from the RestSharp package. This RestClient is used to make the REST calls to get the access token, upload files make the references for the uploaded assembly and to translate the assembly.
public Util(string baseUrl) { this.baseUrl = baseUrl; m_client = new RestClient(baseUrl); }
The constructor for the main form instantiates the Util class and passes in a URL that will be part of the REST calls to the Autodesk Object Storage Service (OSS).
//This is a utility that will do a lot of the work util = new Util("https://developer.api.autodesk.com");
Every call we make to the REST API other than the one we make to get the access token needs an access token. The REST call to get an access token needs a Consumer Key and Consumer Secret. You can get these by creating an application after you sign at https://developer.autodesk.com/
This post has a good description of making RE S T calls to get an access token. http://the360view.typepad.com/blog/2015/03/lab1-hello-view-and-data-world.html
Here is the function from the project that gets the access token. Notice how the RestRequest Resource is authentication/v1/authenticate the consumer key and consumer secret are added to the request as parameters.
Using the Vault API and View and Data API Together to Download and View Assemblies
12
public AccessToken GetAccessToken(string clientId, string clientSecret) { //no token or token is going to be expired // (less than ABOUT_EXPIRED_SECONDS) if (token == null || (DateTime.Now - issueDateTime).TotalSeconds > (token.expires_in - ABOUT_EXPIRED_SECONDS)) { RestRequest req = new RestRequest(); // this is the Autodesk REST authentication API req.Resource = "authentication/v1/authenticate"; req.Method = Method.POST; req.AddHeader("Content-Type", "application/x-www-form-urlencoded"); req.AddParameter("client_id", clientId); req.AddParameter("client_secret", clientSecret); req.AddParameter("grant_type", "client_credentials"); // avoid CORS issue, do not use this if you just need to // get the access token from same domain req.AddHeader("Access-Control-Allow-Origin", "*"); IRestResponse<AccessToken> resp = m_client.Execute<AccessToken>(req); // The server response should have a 200 status with a json body: //{ // "token_type" : "Bearer", // "expires_in" : xxxx, // "access_token" : "xxxxxx" //} if (resp.StatusCode == System.Net.HttpStatusCode.OK) { AccessToken ar = resp.Data; if (ar != null) { token = ar; //update the token issue time issueDateTime = DateTime.Now; } } else { MessageBox.Show("Authentication failed! clientId:" + clientId); } } else { ;//Do nothing, use the saved access token in static var } return token; }
When you look at the other functions in the project that create a bucket, upload files, or translate files you will see the same pattern as used in GetAccessToken(). One difference will be the RestRequest Resource. Here is a list of the different RestRequest Resource:

Using the Vault API and View and Data API Together to Download and View Assemblies
13
To access bucket information: "oss/v1/buckets" + "/" + defaultBucketKey + "/details". (defaultBucketKey is the name of the bucket)
To upload files: "oss/v1/buckets/" + bucketKey + "/objects/" + objectKey . (bucketKey is the name of the bucket and objectKey is the name of the file being uploaded.
To create references: "references/v1/setreference".
To translate the assembly: "viewingservice/v1/register"
Each of these RestRequest Resource settings are using different parts of the View & Data REST API. The parameters needed for each call are also different. For example a parameter named “requestBody” is needed to upload files.
// this is the bytes to store req.AddParameter("requestBody", fileData, ParameterType.RequestBody);
A parameter named "application/json" is needed to post the references
// add the references json req.AddParameter("application/json", body, ParameterType.RequestBody);
Reference Dependency array
The Reference service is a mechanism to tell the cloud services how to rebuild the referenced files for a model such as an Inventor assembly. There is no mechanism to upload all the files as a single package. (The files need to be uploaded one by one).
When registering the top level assembly for viewing there is nothing that tells the system about the subassemblies and parts needed by the top level assembly. This is what the References API is used for.
Farther below is an example of the dependency array used with setreference from this post:
http://adndevblog.typepad.com/cloud_and_mobile/2015/09/how-to-set-references-with-inventor-files-for-view-and-data-api.html
Trying to manually create this dependency array would be very time consuming and is automated in the project used for this session. Notice how each referenced file in the assembly needs a “file” entry that includes the childPath and parentPath. Also notice that the parentPath is the name of the top level assembly. When I was first trying to create the dependency array I was using the subassemblies as the parent for a child that was a child of the subassembly. Here is a reply I received about this from a colleague in Autodesk engineering.
“From a service standpoint what you’re telling the system is how to download all files and where to place them on disk, so from the payload standpoint you could tell that all files are child of the parent IAM and Inventor itself will figure things out in the backend.”
Using the Vault API and View and Data API Together to Download and View Assemblies
14
Here is an example of a references dependency array.
{
"master" : "urn:adsk.objects:os.object:shiyas-bucket-100/scissors.iam",
"dependencies" : [
{ "file" : "urn:adsk.objects:os.object:shiyas-bucket-100/blade_main.ipt",
"metadata" : {
"childPath" : "blade_main.ipt",
"parentPath" : "scissors.iam"
}
},
{ "file" : "urn:adsk.objects:os.object:shiyas-bucket-100/blade_top.ipt",
"metadata" : {
"childPath" : "blade_top.ipt",
"parentPath" : "scissors.iam"
}
},
{ "file" : "urn:adsk.objects:os.object:shiyas-bucket-100/scissor_spring.ipt",
"metadata" : {
"childPath" : "scissor_spring.ipt",
"parentPath" : "scissors.iam"
}
}
]
}
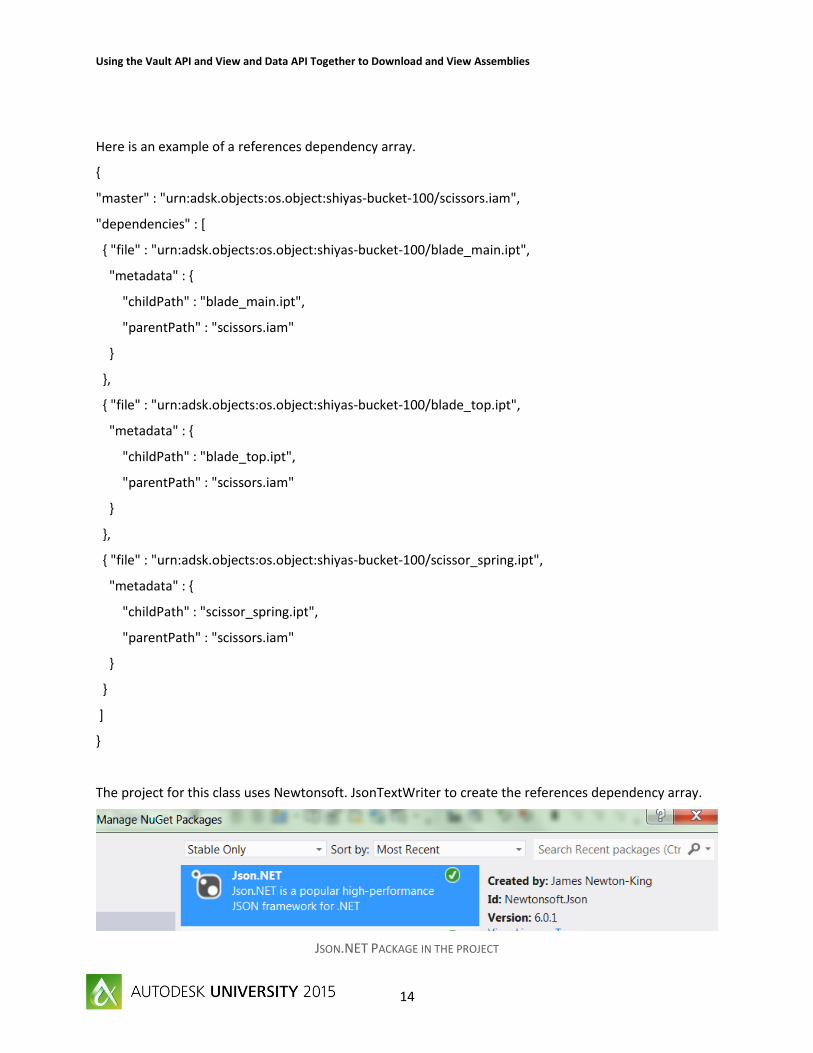
The project for this class uses Newtonsoft. JsonTextWriter to create the references dependency array.
JSON.NET PACKAGE IN THE PROJECT
Using the Vault API and View and Data API Together to Download and View Assemblies
15
Here is an excerpt of the code that creates the references dependency array in the project. (JSON) It iterates over a dictionary that was populated with the file names and the URN of the file in the bucket. Notice the array includes “master”, “file”, a urn, “metadata”,” childPath”, “childName” and “parentPath”. ( Adding the childName solved a problem in one assembly – although it seems redundant).
RestRequest req = new RestRequest(); req.Resource = "/references/v1/setreference"; req.Method = Method.POST; req.AddParameter("Authorization", "Bearer " + accessToken, ParameterType.HttpHeader); req.AddParameter("Content-Type", "application/json", ParameterType.HttpHeader); StringWriter sw = new StringWriter(); JsonTextWriter jsw = new JsonTextWriter(sw); jsw.WriteStartObject(); jsw.WritePropertyName("master"); jsw.WriteValue(top_level_assembly_urn); jsw.WritePropertyName("dependencies"); jsw.WriteStartArray(); foreach (string key in map_filename_urn.Keys) { jsw.WriteStartObject(); jsw.WritePropertyName("file"); jsw.WriteValue(map_filename_urn[key]); jsw.WritePropertyName("metadata"); jsw.WriteStartObject(); jsw.WritePropertyName("childPath"); jsw.WriteValue(key); jsw.WritePropertyName("childName"); jsw.WriteValue(key); jsw.WritePropertyName("parentPath"); jsw.WriteValue(top_level_assembly_name); jsw.WriteEndObject(); jsw.WriteEndObject(); } jsw.WriteEndArray(); jsw.WriteEndObject(); string body = sw.ToString(); // add the references json req.AddParameter("application/json", body, ParameterType.RequestBody);
After the files are uploaded and the reference dependency array is posted the top level assembly is translated. (The order is necessary to get a good viewable)
The URN that is used with the translation needs to be a URN that is 64bit encoded. (In the references dependency array the URN is plain text).

Using the Vault API and View and Data API Together to Download and View Assemblies
16
Here is the code that gets the URN to 64bit:
public static string Base64Encode(string URNinPlainText) { byte[] bytes = Encoding.UTF8.GetBytes(URNinPlainText); return Convert.ToBase64String(bytes); }
Here is the code that does the translation of the file in the bucket. Notice the RestRequest.Resource is = "viewingservice/v1/register".
public bool StartTranslation(string URNofTopLevelAsm, string accessToken) { RestRequest req = new RestRequest(); req.Resource = "viewingservice/v1/register"; req.Method = Method.POST; req.AddParameter("Authorization", "Bearer " + accessToken, ParameterType.HttpHeader); req.AddParameter("Content-Type", "application/json;charset=utf-8", ParameterType.HttpHeader); req.AddParameter("x-ads-force","true", ParameterType.HttpHeader); string body = "{\"urn\":\"" + URNofTopLevelAsm + "\"}"; req.AddParameter("application/json", body, ParameterType.RequestBody); IRestResponse resp = m_client.Execute(req);
Learn how to use JavaScript View Data API to view files
We will use the example from this site to explore what is needed to view translated files in a browser. (Contents farther below)
https://github.com/Developer-Autodesk/View-and-Data-Barebone
This site also has similar information that we are covering in this topic:
http://developer.api.autodesk.com/documentation/v1/vs/vs_quick_start.html#step-7-load-the-urn-in-the-javascript-viewer
Before getting into the html that is needed to view the translated file in the browser notice that the “View in Browser” button in the sample is using the code below to launch a browser that will display the model. The URN of the translated assembly and the access token are added to the URL. This site: //viewer.autodesk.io/node/view-helper is doing something similar to what the html we are going to explore is doing.
Using the Vault API and View and Data API Together to Download and View Assemblies
17
public void launchBrowser(string URN, string AccessToken)
{ string url = string.Format( "http://viewer.autodesk.io/node/view-helper?urn={0}&token={1}", HttpUtility.UrlEncode(URN), AccessToken); System.Diagnostics.Process.Start(url); }
Farther below is the complete content of an html file that will show the translated model in a browser. There are two <script> tags and one link to the viewer style.css. One of the scripts brings in viewer3D.min.js:
src="https://developer.api.autodesk.com/viewingservice/v1/viewers/viewer3D.min.js?v=v1.2.
viewer3D.min.js is the viewer3D library provided by Autodesk. The viewer3D.min.js is the version without any formatting. You can get a version of this file that has comments that make it easier to understand what the code is doing. (viewer3D.js)
https://developer.api.autodesk.com/viewingservice/v1/viewers/viewer3D.js
There two main functions that do most of the work are initialize() and loadDocument(). Initialize() is called when the html page loads by the onload event set in the body tag. Also a div named “viewer” is created. Here is an excerpt from the html file:
<body onload="initialize()"> <div id="viewer"></div> </body>
In the initialize function a var containing json with the document : URN, env : ‘AutodeskProduction’, getAccessToken : getToken and refreshToken : getToken is created. This var with these options will be passed to the Autodesk.Viewing.Initializer function. getToken is a function that returns the hard coded token. (in your production code this would be some type of service that provides the access token). A new Viewer3D is created using the div element. A callback function is also a parameter to Autodesk.Viewing.Initializer(). When this call back is run it will call the initialize function of the Viewer3D and then call our loadDocument function. (Passing in the Viewer3D and the URN – options.document)
function initialize() { var options = { 'document' : 'urn:' + urn, 'env':'AutodeskProduction', 'getAccessToken': getToken, 'refreshToken': getToken, }; var viewerElement = document.getElementById('viewer'); var viewer = new Autodesk.Viewing.Viewer3D(viewerElement, {}); Autodesk.Viewing.Initializer(options,function() { viewer.initialize(); loadDocument(viewer, options.document); });

Using the Vault API and View and Data API Together to Download and View Assemblies
18
}
Note: You can change the constructor for the viewer so it has the toolbar. var viewer = new Autodesk.Viewing.Private.GuiViewer3D(viewerElement, {}); Links to help: Initializer Class Viewer3D Class
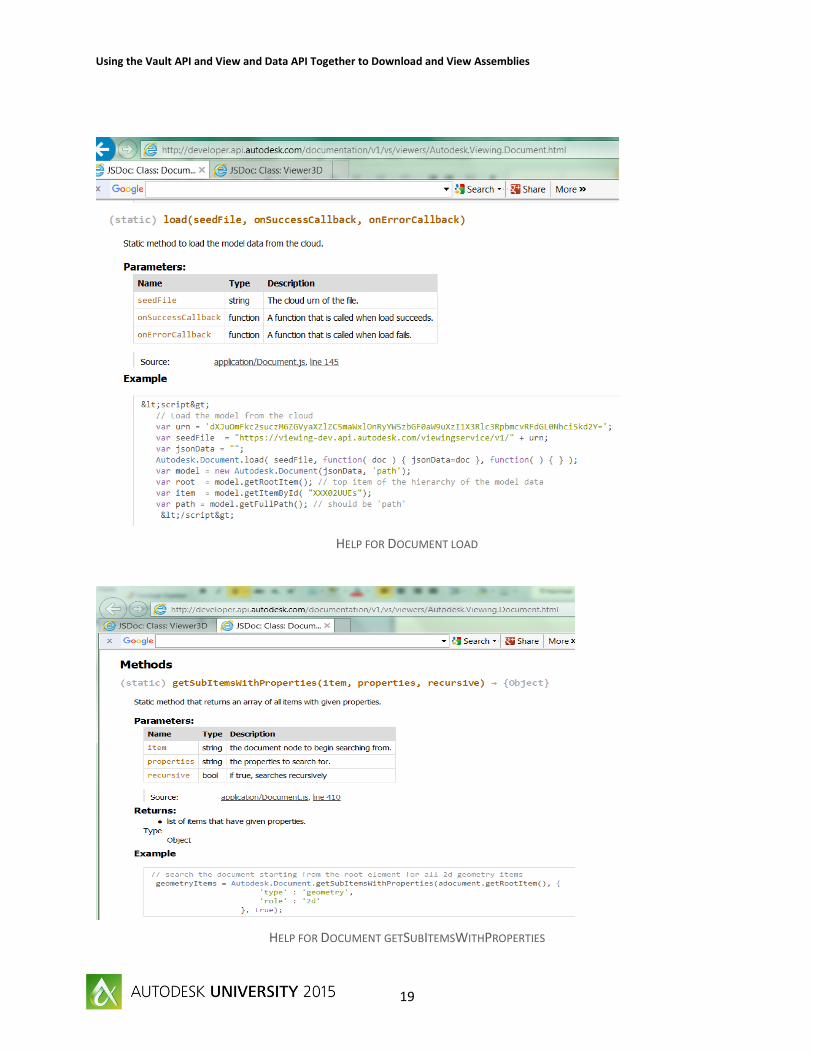
In the loadDocument function Autodesk.Viewing.Document.load() is called. This function takes the URN and has a callback function parameter. This callback function will be called passing in a document that was loaded using the URN. An array named geometryItems is populated using Autodesk.Viewing.Document.getSubItemsWithProperties. If this array is ok (length > 0) the load method of the Viewer3D is called. The getViewablePath method of the document that was returned in the callback function in the Autodesk.Viewing.Document.load is used. (it uses the first item in the geometryItems array)
function loadDocument(viewer, documentId) { // Find the first 3d geometry and load that. Autodesk.Viewing.Document.load(documentId, function(doc) { var geometryItems = []; geometryItems = Autodesk.Viewing.Document.getSubItemsWithProperties(doc.getRootItem(), { 'type' : 'geometry', 'role' : '3d' }, true); if (geometryItems.length > 0) { viewer.load(doc.getViewablePath(geometryItems[0])); } }, function(errorMsg) {// onErrorCallback alert("Load Error: " + errorMsg); }); }
Link to help: Document class
Using the Vault API and View and Data API Together to Download and View Assemblies
19
HELP FOR DOCUMENT LOAD
HELP FOR DOCUMENT GETSUBITEMSWITHPROPERTIES

Using the Vault API and View and Data API Together to Download and View Assemblies
20
Complete Example from https://github.com/Developer-Autodesk/View-and-Data-Barebone
<!DOCTYPE html> <html> <head> <title>Very Basic 3D Viewer</title> <!-- specify the viewer version at the end of reference with ?v=v1.2.13 --> <link rel="stylesheet" href="https://developer.api.autodesk.com/viewingservice/v1/viewers/style.css?v=v1.2.13" type="text/css"> <script src="https://developer.api.autodesk.com/viewingservice/v1/viewers/viewer3D.min.js?v=v1.2.13"></script> <script> // change the token and urn(translated file location) before you try to run // easiest is to go through steps on http://shiya.github.io/Intro-View-and-Data/ var token = "put your token here"; var urn = "put the URN of translated file here"; function getToken() { return token; } function loadDocument(viewer, documentId) { // Find the first 3d geometry and load that. Autodesk.Viewing.Document.load(documentId, function(doc) { var geometryItems = []; geometryItems = Autodesk.Viewing.Document.getSubItemsWithProperties (doc.getRootItem(), { 'type' : 'geometry', 'role' : '3d' }, true); if (geometryItems.length > 0) { viewer.load(doc.getViewablePath(geometryItems[0])); } }, function(errorMsg) {// onErrorCallback alert("Load Error: " + errorMsg); }); } function initialize() { var options = { 'document' : 'urn:' + urn, 'env':'AutodeskProduction', 'getAccessToken': getToken, 'refreshToken': getToken, }; var viewerElement = document.getElementById('viewer'); var viewer = new Autodesk.Viewing.Viewer3D(viewerElement, {});
Using the Vault API and View and Data API Together to Download and View Assemblies
21
Autodesk.Viewing.Initializer(options, function() { viewer.initialize(); loadDocument(viewer, options.document); }); } </script> </head> <body onload="initialize()"> <div id="viewer"></div> </body> </html>
Additional resources:
Vault:
Vault API Blog: http://justonesandzeros.typepad.com/ MFG DevBlog: http://adndevblog.typepad.com/manufacturing/ Vault customization forum: http://forums.autodesk.com/t5/vault-customization/bd-p/301
Inventor:
MFG DevBlog: http://adndevblog.typepad.com/manufacturing/
Mod the machine blog: http://modthemachine.typepad.com/ Autodesk View and Data API
Good starting point: https://developer.autodesk.com/api/view-and-data-api/
Viewer API Reference http://developer.api.autodesk.com/documentation/v1/vs/viewers/index.html
Live site:

Using the Vault API and View and Data API Together to Download and View Assemblies
22
https://developer.static.autodesk.com/interactive/liveSample.html
Samples on GitHub (has other samples besides just View and Data API) https://github.com/Developer-Autodesk?page=1
This site has some labs: http://the360view.typepad.com/blog/2015/02/autodesk-view-and-data-api-intro-overview.html
When I was first working on the sample for this class I would use this site to check the status of the translated file and to view the model. You can paste the URN and the access token you get from the sample and then check the translation status and view the model. http://www.shiyaluo.com/Intro-View-and-Data/
USEFUL SITE - GETTING THE TRANSLATION STATUS

Using the Vault API and View and Data API Together to Download and View Assemblies
23