screenshots of film mag process
TRANSCRIPT
Screenshots of Film Mag process
Photoshop was the software used to create my production of my film magazine, as it has a wide variety of tools and elements that can be used to create creative piece of work, with a lot of professional arts institutions making use of it. It is quite complex to use, but once played around with becomes more easier to use.
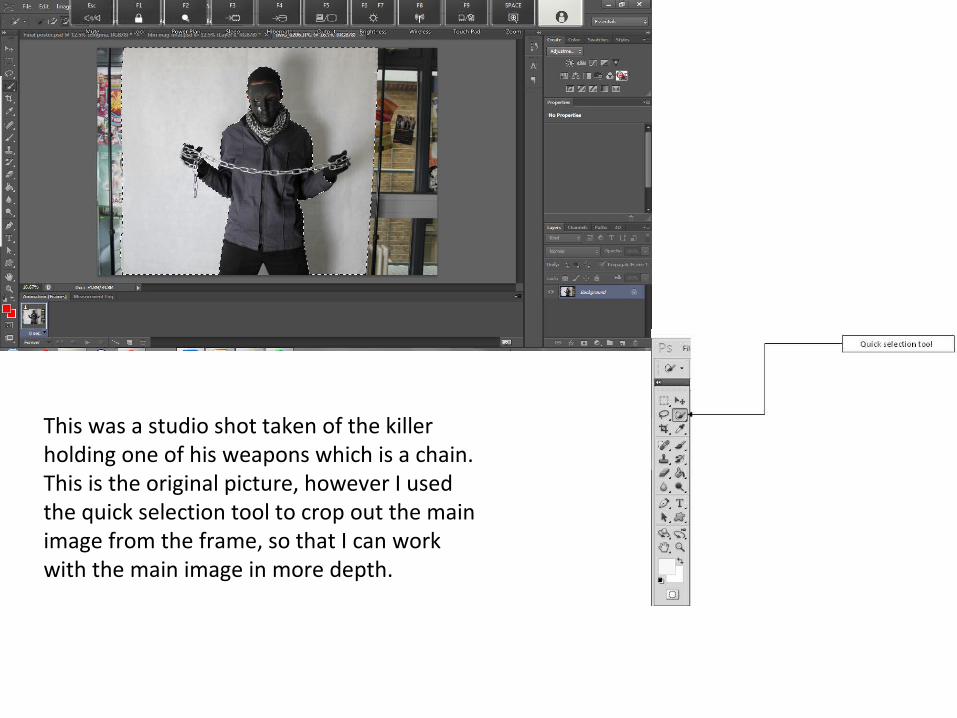
This was a studio shot taken of the killer holding one of his weapons which is a chain. This is the original picture, however I used the quick selection tool to crop out the main image from the frame, so that I can work with the main image in more depth.

To start of the film magazine I had to create a new file, which had to consists of A4 as that’s the size of magazines. Afterwards, I made background colour black, however it looked to plain so I went on the layer style where you can do various things to make things look better on Photoshop and not too basic. So having this in mind as you can see from the picture I used a lot of effects but one that worked well was the drop shadow as it made the diamond in the middle have a real presence and made the background colour more interesting that it just being plain.

After I had played with the background colour and the different things I had done to it, I was happy enough to put my model on the front cover and the model fitted in well with the background colour.
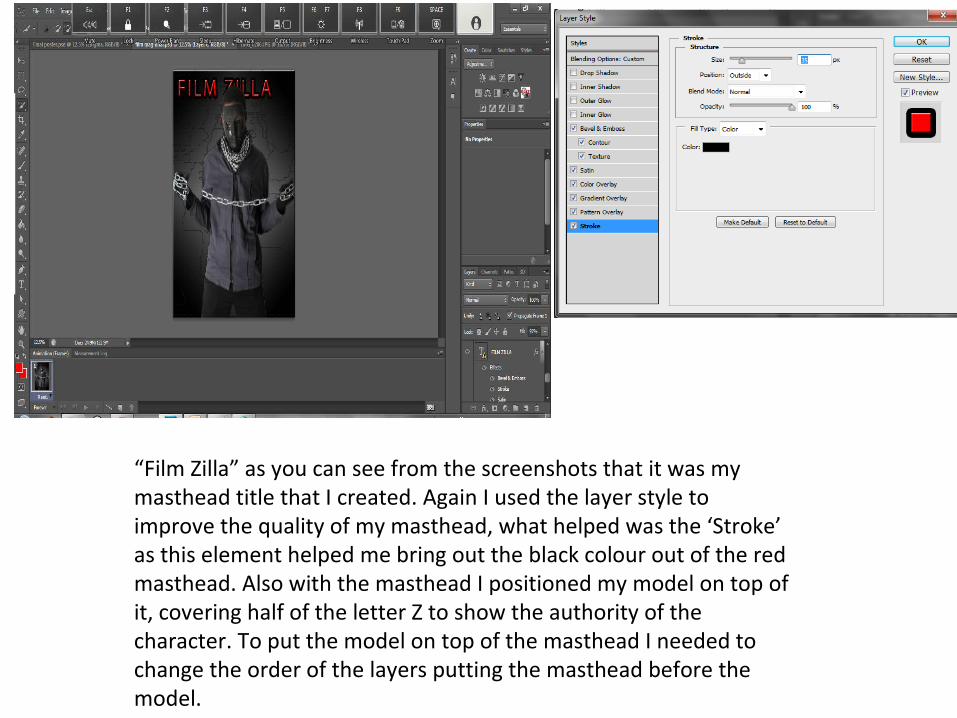
“Film Zilla” as you can see from the screenshots that it was my masthead title that I created. Again I used the layer style to improve the quality of my masthead, what helped was the ‘Stroke’ as this element helped me bring out the black colour out of the red masthead. Also with the masthead I positioned my model on top of it, covering half of the letter Z to show the authority of the character. To put the model on top of the masthead I needed to change the order of the layers putting the masthead before the model.

I then started to incorporating sell lines with different types of fonts, also with the colour scheme being red, black and white, with a touch of grey due to the background. This was where I could really see the layout of the magazine and gave me an overview on what may need to be improved. As you can see in the screenshot I added a button which is quite common in magazine, as it grabs the audiences’ attention giving them some sort of exclusive insight on a must read article, or sometimes often giveaways or prizes

As you can see from this screenshot, the progress of the magazine had developed, as I then thought it was the right thing to incorporate sub images of other films from the horror genre which I did; which was used so that the audience can have a variety of films to look at from the magazine.

Staying with the sub images aspects, I incorporated the red arrow to connote to the audience that there is a lot more stuff which is included in the magazine; this arrow used on top of the sub images, would be useful in aiding help to promote the magazine.

The film title is displayed on the left hand side coming into the middle. With the name of the film being the main headline. I then again went on layer style, so that I could give the film title “ENIGMA” a unique style to it so that it would stand out from the other fonts in the magazine. With this particular film title I experimented with the “Bevel&Emboss” sections to see whether it would add flavour to the film title and it did, as the way the red colour is portrayed in the film mag is different and unique.