sagem ma520 readers - galaxy control systems - … sagem ma520 (10.2).pdf · sagem ma520 readers ....
TRANSCRIPT

SG 10.2.0
MAR 2013
System Galaxy Quick Guide CONFIGURATION AND OPERATION
SAGEM MA520 READERS FINGER & SMART CARD ENROLLMENT
Page 2

System Galaxy Biometrics Guide Sagem MA520 & MIFARE Interface
Page 3
System Galaxy Biometric Guide for Sagem MA520
& MIFARE Cards
Configuring System Galaxy
to use MIFARE Cards with
Sagem MA520 Readers
This document describes setup of System Galaxy to interface with Sagem Biometric MorphoAccess™ Terminals (MA520) using human fingerprint data and MIFARE Contactless Cards.
Information in this document is subject to change without notice. No claims are made, express or implied, as to the completeness or accuracy of this document.
Galaxy Control Systems supports installing and using the enrollment devices described herein on workstations running Windows XP Pro, or Vista Ultimate and Business. Windows Server operating systems are not supported for this enrollment interface.
This document does not intend to supersede any installation or operating requirements for products not manufactured by Galaxy Control Systems.
No claims are made, express or implied, about operating system compatibility or system requirements for 3rd party applications or devices.
first edition Copyright © 2008 Galaxy Control Systems All rights reserved
Galaxy Control Systems
3 North Main Street
Walkersville MD 21793 800-445-5560
www.galaxysys.com
No part of this document may be reproduced, copied, adapted, or transmitted, in any form or by any means, electronic or mechanical, for any purpose, without the express written consent of Galaxy Control Systems. Copyright protection claims include all forms and matters of copyrighted material and information, including but not limited to, material generated from the software programs, which are displayed on the screen such as icons, look and feel, etc.
Microsoft®, Windows®, Windows NT®, Active Directory®, MS-DOS®, SQL Server®, and Windows Server System®, are registered trademarks of the Microsoft Corporation in the U.S. and other countries.
“Morpho” and the Sagem logos are registered trademarks of Sagem Sécurité or Sagem SA or Sagem Morpho in the U.S. and other countries.
HID, iClass, MIFARE, all other products are trademarks, trade names, registered trademarks, or registered trade names of their respective holders.
Adobe® and Acrobat® are registered trademarks of Adobe Systems Inc.
Technical illustrations are creations of the technical author.
Revision 1.8 | 3-6-2012

System Galaxy Biometrics Guide Sagem MA520 & MIFARE Interface
Page 4
Table of Contents
Preface .......................................................................................................................8
NOTICES ....................................................................................................................9
List of System Galaxy Manuals...........................................................................10 SG Hardware Manuals:..................................................................................................................10 SG Software Manuals:...................................................................................................................10 SG Biometric Addendums: ...........................................................................................................10
1 Introduction ........................................................................................................11 1.1 Overview of SG Hardware Interface...................................................................................11 1.2 Overview of System Features & Capabilities....................................................................12
1.2.1 Able to encode MIFARE cards to work with Sagem 520 readers.............................12
1.2.1.1 Ordering ~ Part Numbers for Compatible MIFARE cards 12
1.2.2 Able to Enroll and Encode Fingerprints onto MIFARE cards....................................12
1.2.2.1 Ordering ~ Part Numbers for Finger Enrollment and Card Writer devices 12
1.2.3 Able to Configure Sagem ‘Card Modes’ in System Galaxy ......................................13
1.2.4 Able to Set Sagem M520 Reader ‘Recognition Modes’ in System Galaxy ..............13
1.2.5 Able to Manage Sagem Bases and Reader Functions from Galaxy. .......................13 1.3 Overview & Diagram of Credentialing Process ................................................................14
1.3.1 Overview of Creating and Using Biometric Credentials............................................14 1.4 Requirements .......................................................................................................................15
1.4.1 Installation Requirements .........................................................................................15
1.4.2 Biometric Device Installation Requirements .............................................................15
1.4.3 Card Encoding Requirements...................................................................................16
2 System Planning ................................................................................................17 2.1 Planning Step 1 – Accessibility and Visitor Mode............................................................17 2.2 Planning Step 2 - Choose the Card Output Format..........................................................18 2.3 Planning Step 3 - Determine the Type of Credentials ......................................................20 2.4 Planning Step 4 - Determine the Recognition Mode ........................................................21
2.4.1 Sagem MA110 Recognition Modes described..........................................................22
2.4.1.1 #1) Card Determines Mode 22
2.4.1.2 #2) Prints in Card Mode 23
2.4.1.3 #3) Prints in Reader Mode 24
2.4.1.4 #4) Card or Identification Mode (Multifactor) 25

System Galaxy Biometrics Guide Sagem MA520 & MIFARE Interface
Page 5
2.4.1.5 #5) Identification Mode [1:n] 26
2.4.1.6 No Fingerprints – Local Keypad Mode 27
2.4.1.7 #7) No Fingerprints – MIFARE Card Only Mode 28
2.4.1.8 #8) No Fingerprints – Card Pass-Through Mode 29 2.5 Planning Step 5 – Administrator Setup Options...............................................................30
2.5.1 Setting fingerprint triple-scan option: ........................................................................31
2.5.2 Setting the default Card Writer:.................................................................................31
2.5.3 Setting the default Card Behavior: ............................................................................31 2.6 Planning Step 6 – Understanding Operator Privileges ....................................................32 2.7 Flow diagrams of biometric credentials at the MA520.....................................................33
2.7.1 MA520 Authentication Modes (1:1)...........................................................................33
2.7.2 MA520 Identification Modes (1:N).............................................................................34
2.7.3 MA520 Card Only Modes..........................................................................................35
3 Installing Biometric Equipment ........................................................................36 3.1 Installing the Sagem MA520 Reader ..................................................................................36 3.2 Installing the MSO-300 Fingerprint Enrollment device ....................................................37 3.3 Installing the MIFARE Card Writer (encoding) device......................................................38
3.3.1 Installing the SDI011 Driver ......................................................................................38
3.3.2 Testing the SDI011 Driver.........................................................................................38
3.3.3 Suppressing the Smart Card Nuisance Plug-n-Play popups....................................39
4 Setting up System Galaxy for Biometrics........................................................40 4.1 Installing New System Galaxy Software............................................................................40 4.2 Upgrading an Existing Sagem Site ....................................................................................41
4.2.1 Performing the standard system upgrade.................................................................41
4.2.2 Importing fingerprint templates via GCS MA Loader ................................................42
4.2.3 Quick Steps to Upgrading to SG 10.2.......................................................................42
4.2.4 Detailed Instructions to Upgrading to SG 10.2 .........................................................43
4.2.4.1 Backing up you Sagem FGR files before upgrading SG 43
4.2.4.2 Upgrading your System to SG 10.2 43
4.2.4.3 Import existing FGR files into the SysGal Database 43
4.2.4.4 Recreate Bases and Load existing Sagem 200/300 readers 44
4.2.4.5 Create Bases and Load newly installed MA520 readers 44
4.2.4.6 Integration with other reader types 44
4.2.4.7 Register and Configure SG for Sagem interface 44 4.3 Registering for Biometrics..................................................................................................45 4.4 Configuring System Settings..............................................................................................47
System Galaxy Biometrics Guide Sagem MA520 & MIFARE Interface
Page 6
4.5 About Operator Privileges ..................................................................................................48 4.6 About System Programming ..............................................................................................48 4.7 Configuring Reader Properties...........................................................................................49 4.8 Configuring Biometric Options in SG................................................................................50
4.8.1 Configure the Card Writer Block Number in SG .......................................................50
4.8.2 Configure the Setup Options for Encoding Cards in SG ..........................................51
5 Enrolling Cardholder Biometric Data ...............................................................53 5.1 Capturing Finger Data Only ................................................................................................54 5.2 Encoding the Contactless Card..........................................................................................55 5.3 Loading Users / Finger Data to the reader ........................................................................56 5.4 Managing the Sagem Readers via MALoader ...................................................................57
5.4.1.1 Managing Bases 57
5.4.1.2 Delete Card Before Loading option 57
5.4.1.3 Importing FGR files 58
5.4.1.4 Configuring Reader Recognition modes 59

System Galaxy Biometrics Guide Sagem MA520 & MIFARE Interface
Page 7
List of Tables and Figures
LIST OF TABLES
Table 1: System Galaxy Overall Biometric Capabilities................................................................... 11
Table 2: Compatible MIFARE Cards ................................................................................................... 12
Table 3: Compatible Finger Enrollment / Card Writer devices ........................................................ 12
Table 4: Types of Credentials with compatible Recognition Modes............................................... 19
Table 5: Types of Credentials & Encoding Supported: .................................................................... 20
Table 6: MA520 Recognition Modes and the Accepted Credentials ............................................... 21
Table 7: Behavior of credentials in “Card Determines Mode”......................................................... 22
Table 8: Behavior of credentials in “Prints in the Card Mode” ....................................................... 23
Table 9: Behavior of credentials in “Prints in the 520 Reader Mode” ............................................ 24
Table 10: Behavior of credentials in “MIFARE Card or Identification Mode” ................................ 25
Table 11: Behavior of credentials in “Identification Mode” ............................................................. 26
Table 12: Behavior of credentials in “No Fingerprint – use Local Keypad Mode”........................ 27
Table 13: Behavior of credentials in “No Fingerprints - MIFARE Card Mode” .............................. 28
Table 14: Behavior of credentials in “Card Pass-Through Mode” .................................................. 29
Table 15: Administrator Setup / Enrollment Options ....................................................................... 30
Table 16: System Upgrade Quick Steps ............................................................................................ 42
LIST OF FIGURES
Figure 1 - System Galaxy Biometrics Interface – Enrollment & Access Control:................................... 14
Figure 2 – Flow-chart of MA520 Authentication (1:1) using MIFARE cards and fingerprints: ............... 33
Figure 3 - Flow-chart of MA520 Identification mode (1:N) using fingerprints:........................................ 34
Figure 4 - Flow-chart of MA520 Card-Only mode: .................................................................................35
Figure 5 - SG SYSTEM SETTINGS SCREEN ..................................................................................................... 47
Figure 6 – Setting Sagem options in the Reader Properties screen:..................................................... 49
Figure 7 – Setting Card Writer Block Number in SG:.............................................................................50
Figure 8 – Setting Administrator Setup Options in SG:..........................................................................51
Figure 9 – Capturing Fingers in System Galaxy: ................................................................................... 54
Figure 10 – Encoding Contactless Card ................................................................................................ 55
Figure 11 – Pointing to FGR files for importing: ..................................................................................... 58
Figure 12 – Setting Reader Recognition mode via MALoader:.............................................................. 59

System Galaxy Biometrics Guide Sagem MA520 & MIFARE Interface
Page 8
Preface This manual describes the following;
GETTING STARTED
System Overview, Capabilities and Requirements
how to plan your system for MA520 and MIFARE contactless cards (13.56 MHz)
how to create a single-card solution* for Sagem MA520 and other readers.
how to order MIFARE cards and enrollment equipment
how to upgrade existing biometric customers
how to import FGR templates into SG 10.2
HOW TO INSTALL and CONFIGURE MA520 and ENROLLMENT DEVICES
how to register System Galaxy (SG) for Biometrics
how to install MA520 with Galaxy Hardware
how to install enrollment devices and drivers
HOW TO SET UP ADMINISTRATOR OPTIONS SYSTEM GALAXY
how to manage operator privileges for biometric options
how to configure card data format and card mode (behavior)
HOW TO CREATE CREDENTIALS IN SYSTEM GALAXY
how to enroll fingerprints in System Galaxy
how to encode MIFARE cards in System Galaxy
HOW TO CONFIGURE SAGEM READERS
how to set recognition modes for the MA520
how to set output format option for the MA520
HOW TO MANAGE YOUR READER BASES AND USERS
how to load fingerprints and cardholder data to the MA520
how to manage your Sagem reader BASES using the GCS MALoader Utility
NOTE: See Chapter 1 to order single-card or dual-card technology to support mixed readers along with the Sagem MA520 .

System Galaxy Biometrics Guide Sagem MA520 & MIFARE Interface
Page 9
NOTICES IMPORTANT: It is important to understanding how credentials and modes work before setting up your system. The Introduction and System Planning chapters are designed to guide you through the following:
overview of capabilities & requirements of using MIFARE cards with Sagem MA520
determining which credentials you want to make (finger-only, MIFARE - prints on card, MIFARE - prints in reader, MIFARE - ID Only, pass-through, etc.)
determining which reader recognition modes you want to use and how the credentials will behave in
those modes (identification mode, card mode, prints in card, prints in reader, multifactor mode, etc.)
IMPORTANT! CARD TECHNOLOGY – 1k read/write MIFARE smart cards are compatible with the Sagem MA520. See ordering information in Chapter 1.
IMPORTANT! READER TECHNOLOGY – Sagem MA520 reader is compatible with MIFARE cards and reads the data encoded by System Galaxy on the application sector of the card.
IMPORTANT! Configuring CARD MODES - The cards must be properly encoded with the correct card mode. It is important to determine your intended use of biometric credentials before you start making cards. It is possible to encode cards in a way that is not compatible with a reader ‘recognition mode’, thus resulting in undesired behavior.
IMPORTANT! Configuring READER MODES - The MA520 Recognition Mode must be set properly to
work with your credentials. It is possible to configure the ‘recognition mode’ in a way that results in
undesired behavior.
WARNING! It is possible to customize your reader’s recognition mode. Doing this can change how
your credentials work and can result in undesired behavior. If your credentials work differently or stop
working, you need to correct the reader settings to work with your credentials.
This manual describes the configurations that Galaxy considers the most logical solution. This manual
does not cover every possible combination of settings at the reader. Some combinations may conflict
and thus may not be valid.
IMPORTANT: Galaxy Control Systems supports installing and using the enrollment devices described herein on workstations running Windows XP Pro, or Vista Ultimate and Business. Windows Server operating systems are not supported for this enrollment interface.
No claims are made, express or implied, about operating system compatibility or system requirements for 3rd party applications and devices

System Galaxy Biometrics Guide Sagem MA520 & MIFARE Interface
Page 10
List of System Galaxy Manuals System Galaxy manuals are found on the Galaxy Software Installation DVD disk 2 and the Galaxy website (dealer password is required).
SG Hardware Manuals: 600-series Hardware Install Manual - covers installation and configuration of 600-series controllers.
600-series Configuration Tool Guide - covers installation / operation of the hardware programming tool.
508i-series Hardware Addendum - covers installation and configuration of 600-series controllers.
508i-series Blue Board System Planning - covers CPU install/replacement using 508i Blue CPU’s.
SG Software Manuals: System Galaxy Software Installation Guide - covers installing the SG software from the Galaxy DVD.
System Galaxy Software User Manual - covers SG system programming and functionality.
SG Biometric Addendums: System Galaxy Biometrics Guide for Sagem MA110 using HID iClass Cards
System Galaxy Biometrics Guide for Sagem MA520 using MIFARE Cards (this manual)
NOTE: Sagem manuals are also located on the System Galaxy installation DVD.

System Galaxy Biometrics Guide Sagem MA520 & MIFARE Interface
1 Introduction
System Galaxy v10.2 interfaces to the Sagem MA520 Terminal/Reader. System Galaxy can capture fingerprints and can encode card ID, PIN Code, and fingerprints/BIOPIN on MIFARE contactless cards. Galaxy provides a single-card solution using MIFARE cards for MIXED reader sites.
1.1 Overview of SG Hardware Interface
SG SOFTWARE: System Galaxy 10.2.0 (or later) is compatible with…
Sagem MA520 Biometric Reader/Terminal (indoor) for fingerprint identification and MIFARE card authentication. 1 base - 3,000 users (5 bases – 50,000 users)
MIFARE read/write contactless cards – supports reading and encoding card data and fingerprints onto the application sector of the card using the SDI011 SCM Device.
Sagem MSO-300 finger enrollment station.
Fingers can be enrolled from the reader; although this may not be advisable for a large volume of enrollment. Enrolling from an MSO-300 acquires a better quality finger template.
SMART CARD ENROLLMENT DEVICE: System Galaxy 10.2.0 uses SDI011 Enrollment Reader (SG 10.1 or
earlier used SDI010). You must install the SDI011 device driver, which can be found in the Installers
folder on the Galaxy Install DVD‐disk1.
SMART CARD ENROLLMENT ENABLED: In the System Galaxy System Settings screen, on the General
tab, you must enable/check the [Smart Card Support Enabled] option under the Sagem Morpho setting.
GALAXY HARDWARE: For proper operation of hardware, you must flash all Galaxy controllers
(635/600 or 508i CPUs) to the correct s28 version released with the System Galaxy software.
FLASH VERSION: System Galaxy 10.2.0 uses S28 Flash v5.0 for 635/600 CPUs and v8.0 for 508i.
Table 1: System Galaxy Overall Biometric Capabilities
Reader Fingerprint Encoding
Card ID Encoding Contactless Card
PIN Code BIOPIN
(accessibility)
Sagem MA520/521 Yes* MIFARE YES YES **
Sagem MA120 Yes* MIFARE NO NO
* Supports Identification (1:N) and Authentication (1:1) ** If a person(s) prints cannot be captured, or do not work reliably at the reader, the MA520 supports
the BIOPIN feature. Simply provide the user with a numeric BIOPIN instead of a fingerprint.
NOTE: see the SG Biometric Guide for MA110 & iClass for integrating with HID iClass cards.
Page 11

System Galaxy Biometrics Guide Sagem MA520 & MIFARE Interface
Page 12
1.2 Overview of System Features & Capabilities
1.2.1 Able to encode MIFARE cards to work with Sagem 520 readers
System Galaxy allows the customer to choose which card output format to use.
System Galaxy can encode the Data/Clock (ABA) Card Serial number onto the MIFARE
(recommended).
SG also supports user‐defined ABA and 26‐bit Wiegand ID’s.
1.2.1.1 Ordering ~ Part Numbers for Compatible MIFARE cards
Table 2: Compatible MIFARE Cards
MIFARE Card – for MA520/521 readers (SG uses 1 application area)
** MIFARE 13MHz card 1k card
**Contact Galaxy Customer Service for ordering information 800-445-5560.
1.2.2 Able to Enroll and Encode Fingerprints onto MIFARE cards
System Galaxy allows customer to choose where fingerprint templates are stored.
Galaxy can encode fingerprint templates onto the MIFARE card, or can load fingerprint templates into
the reader. It is possible to have a mixture of credentials using prints‐only, or cards with prints in
reader, or prints on cards, or any combination.
Fingerprint templates are also saved in the System Galaxy database in 10.2 (or later). For customers who
are upgrading, see the section on Upgrading in this manual.
1.2.2.1 Ordering ~ Part Numbers for Finger Enrollment and Card Writer devices
Table 3: Compatible Finger Enrollment / Card Writer devices
Fingerprint Enrollment and Encoding devices
** MSO 300 Sagem Finger Enrollment station
** MIFARE encoder card read/writer device
**Contact Galaxy Customer Service for ordering information 800-445-5560.

System Galaxy Biometrics Guide Sagem MA520 & MIFARE Interface
Page 13
1.2.3 Able to Configure Sagem ‘Card Modes’ in System Galaxy
System Galaxy encodes card modes on MIFARE cards. The card mode is read by the Sagem reader. The card mode dictates how the credential will be handled based on the recognition mode set at the reader.
Card Mode / Behavior
ID Only = Prints not on card; prints could be in the MA520/120 if they are captured / loaded in SG.
Biometric = Prints or BIOPIN are on the card.
Pin Code = ID and Pin Code are on the card (prints not on card; prints could be in the MA520 if
they are captured and loaded in SG.
Pin Code + Biometric = Pin Code and Prints or BIOPIN are on the card.
NOTE: See more on the Card Modes and how they behave in specific recognition modes in Planning Chapter of this manual.
1.2.4 Able to Set Sagem M520 Reader ‘Recognition Modes’ in System Galaxy
A recognition mode is a specific combination of Sagem biometric control options that are configured in the MA520.
Recognition Modes
Pre-defined Recognition modes: Galaxy provides seven pre-defined ‘recognition modes’. These are the most commonly needed configurations. The list includes modes for Finger Identification, Card ID Only, Multi-factor mode, Card Mode and Card Pass-through.
Sagem’s Visitor Mode: This is supported by the “MIFARE - Card Determines Mode” (i.e. Card Mode). It allows the MA520 to read both card behaviors at one reader (i.e. the ‘biometric cards’ and ‘ID Only cards’) in the case where you will fingerprint employees and not visitors.
Customizing modes: It is possible to manually configure the MA520 to use a combination of options outside the pre-defined list. WARNING: Customization beyond the recommended solution could cause undesired results or security risks.
NOTE: See more on the Recognition Modes and how each credential/card is treated in the Planning Chapter of this manual.
1.2.5 Able to Manage Sagem Bases and Reader Functions from Galaxy.
The Galaxy GCS MA Loader utility allows a customer to manage the Sagem readers individually.
Managing the bases and users/finger templates:
User can create and delete the MA520 base.
User can delete all fingers and load fingerprint templates
Managing the reader configuration:
user can configure output format at the MA520 (i.e. Wiegand, etc.)
user can set the Recognition Mode of the MA520. Seven predefined recognition modes are provided (see the Planning chapter for more details).

System Galaxy Biometrics Guide Sagem MA520 & MIFARE Interface
1.3 Overview & Diagram of Credentialing Process
1.3.1 Overview of Creating and Using Biometric Credentials
1. Cardholder is enrolled at the System Galaxy client workstation. Fingerprints are captured and associated with a card ID. The card is encoded.
2. Cardholder data is sent/loaded to MA520 over an Ethernet connection. This is done when the credentials are saved* in System Galaxy or when loaded via the GCS MALoader utility.
3. Cardholder presents credentials (finger/card). Card and human finger are matched to the fingerprint template and the associated with the card ID**. User is identified/authenticated.
4. MA520 outputs data to the Galaxy controller for an access control decision. The cardholder is granted or denied access based on the programming of access rules/schedules at the panel.
5. Access Control Event is logged to the System Galaxy database and Event monitoring screen.
* The Load Morpho option must be checked and the Loop and Access Privileges must be assigned in order for the credentials to be sent to the MA520 when the cardholder record is saved.
** A valid card code is required in SG even when cards are not issued (e.g. Fingerprint Identification mode). This card code allows access privileges to be assigned and controlled for the enrollee.
Figure 1 - System Galaxy Biometrics Interface – Enrollment & Access Control:
Page 14

System Galaxy Biometrics Guide Sagem MA520 & MIFARE Interface
Page 15
1.4 Requirements
1.4.1 Installation Requirements
1. System Galaxy Installation/Upgrade must be completed (i.e. the main communication server, database, and client workstation(s)).
For new installs:
Programming of Loops, Schedules, & Access Rules should be completed before attempting cardholder enrollment. Refer to the installation instructions found on disk-2 of the install DVD.
For upgrades:
Always back-up .FGR files to a safe location before upgrading Galaxy software.
You can import .fgr files into the SysGal database using the GCS MALoader after the System Galaxy database and software upgrades are properly completed.
A valid maintenance agreement is required to upgrade. See upgrading in Chapter 4.
2. System Galaxy must be registered for biometrics. SG must be restarted after registration is done.
1.4.2 Biometric Device Installation Requirements
3. The Sagem MA520 Reader must be installed and configured properly.
MA520 Reader must be wired to the Dual Port Reader board (DPI) using 22 AWG, 10-conductor wiring, and stranded shielded cable.
MA520 must use a separate power supply.
MA520 must have a TCP/IP (LAN) connection to perform configuration and load the credentials (cardholders/fingerprints).
The MA520 must have an IP address. A static IP address is recommended.
An initial hardware connection test should be done
The GCS MALoader utility can be used to set up the card format and recognition mode, create bases, load fingerprints, etc. The MALoader is described in this manual.
Initial configuration is done using the Sagem Configuration tool, found on disk-2 of the Galaxy DVD.
4. The MSO-300 Fingerprint Capture device must be installed, including the MSO driver, if the customer will be capturing fingerprints. See Chapter 3 for details.
5. The SDI011 MIFARE Card Writer device drivers must be installed, if the customer will be encoding MIFARE cards. The driver setup.exe is found in the Installers/SCM folder on the Galaxy DVD. See Chapter 3 for installation steps.
6. SMART CARD ENROLLMENT ENABLED: In the System Galaxy System Settings screen, on the General tab, you must enable/check the [Smart Card Support Enabled] option under the Sagem Morpho setting.
IMPORTANT: Galaxy Control Systems supports installing and using the enrollment devices described herein on workstations running Windows XP Pro, or Vista Ultimate and Business. Windows Server operating systems are not supported for this enrollment interface.
No claims are made, express or implied, about operating system compatibility or system requirements for 3rd party applications and devices.

System Galaxy Biometrics Guide Sagem MA520 & MIFARE Interface
Page 16
1.4.3 Card Encoding Requirements
1. CARD TECHNOLOGY MA520/521 is compatible with MIFARE contactless cards.
IMPORTANT: You must set the reader Recognition Mode to be compatible with the way you are encoding and using the cards. See Table 6 in Section 2.4. for details.
IMPORTANT: The reader Output Format must match the Card Code Format (Wiegand or ABA)
2. CARD ENCODING: You should configure the Administrative Setup Options for Capture/Encoding to ensure cards are created correctly and consistently. See Chapter 4.
3. If you want fingerprints on the card, you should choose Card Behavior = “Biometric” or “Pin Code + Biometric” before you [write data to card] in the Capture/Encode Card screen.
4. If you do not want fingerprints on the card, you should choose Card Behavior = “ID Only” or “Pin Code” before you [write data to card] in the Capture/Encode Card screen and do not capture fingerprints.
5. If you want to use the Card Serial Number for the card ID, you must do the following:
In the Setup Options screen, choose Card Format = “data/clock” and How Card ID is Generated = “Use Card Serial Number”.
If the serial number is more than 12 digits long, you must turn "ON” the Data Folding option (on=checked) in the Loop Properties Screen.
6. LOADING CARDS: Users must be loaded into the MA520 based on how you are using the cards.
NOTE: users are sent to readers when cardholder data is saved in System Galaxy, only if the loop/access privileges are assigned and the ‘Load Morpho’ option is checked when the [Apply] button is clicked. Also, you can send users to the Sagem readers via the MALoader Utility.
7. Two unique fingerprints must be captured for every cardholder * who needs access at a Sagem reader. Sagem readers require 2 unique prints to load users into their bases.
* There are two exceptions to this rule.
1- If the card is ID Only (visitor) card that will be used at a reader set for Card Determines Mode
2- if the card is ID Only card to be used at a reader set for Card Pass-Through mode, and this card will not need access at other reader / recognition modes.
8. If using Finger-only Identification (not issuing cards), you must create a unique Card ID in System Galaxy, but simply do not encode a card. This way the Galaxy controller can identify the access rules associated with the finger.
9. If using Card Pass-through, you do not need to capture prints and you do not need to load data to the MA520. You must set the MA520 for pass-through mode via the MALoader.
10. To take advantage of Sagem’s Visitor Mode: make ID Only cards for visitors without capturing prints. Visitors cards are recognized/work at readers that are set to Card Determines Mode. ID Only cards are also recognized at readers set for Pass-Through. Door Access is denied for cards that are not given ‘access privileges’ to the loop or door.

System Galaxy Biometrics Guide Sagem MA520 & MIFARE Interface
Page 17
2 System Planning
This chapter leads you through important planning steps and basic concerns you will encounter. To implement your biometric system successfully, you must have a good understanding of which credential type you want, how the reader will be configured, and how your credentials should work at the reader. In addition, you must determine which pieces of enrollment hardware you must install in order to support your enrollment process.
The MA520 handles credentials differently depending on the “recognition mode” at the reader. Also the type of credential used and its card mode or “behavior” will affect whether the credential is accepted with each recognition mode.
Basic System Considerations to be Determined:
2.1 Accessibility & Visitor Mode: Will you need an accessibility solution? Step-1 p. 17
2.2 Card Output/Format: Which card output/format will you choose? Step-2 p. 18
2.3 Type of Credentials: What type of credentials will you be creating? Step-3 p. 21
2.4 Recognition Mode: Which recognition mode must be configured at the MA520 to be compatible with credentials you will use?
Step-4 p. 30
2.5 Administrator Setup Options: How do you need to configure the setup options to support your credentialing process?
Step-5 p. 30
2.6 Understanding Operator Privileges as they pertain to enrollment Step-6 p. 32
2.7 Flow diagrams of the biometric credentials at the MA520 Step-7 p. 33
2.1 Planning Step 1 – Accessibility and Visitor Mode
You may need to make a credential for a cardholder who cannot be fingerprinted. System Galaxy supports the BIOPIN feature with the Sagem 520/521 models. The BIOPIN is a numeric value that is encoded on the MIFARE card instead of fingerprint templates. The user will present credentials and enter the BIOPIN number on the keypad at the MA520/521.
Be aware that Sagem supports an option known as ‘Visitor Mode’. This is supported by the “Card Determines Mode”. It allows the MA520 to read two card modes at the same reader (i.e. the ‘biometric cards’ and ‘ID Only cards’). This method is used in a situation where you fingerprint employees, but not visitors. Employees are given a ‘biometric card’ that has their prints encoded in their card. Visitors are given an ID Only card that will not have prints encoded in the card or stored in the reader. Both card types are accepted at the same reader if it is configured for ‘Card Determines Mode’. Both cards will also be required to pass the access control rules at the Galaxy controller. The use or activity of both cards will be logged in system events and can be traced.
SECURITY: Always carefully consider security risks when using any bypass or ID Only feature.

System Galaxy Biometrics Guide Sagem MA520 & MIFARE Interface
Page 18
2.2 Planning Step 2 - Choose the Card Output Format
System Galaxy requires a valid ID code for every access credential. The code must be transmitted in a compatible format such as 26-bit Wiegand or Data/Clock(ABA).
You must create an ID code and choose output format even if you are not encoding and assigning a physical card. Fingerprint-only identification mode is an example of a credential that does not get a card (ref. mode-5 in Table 6) but still needs a code and format. The Galaxy controller uses the code to determine whether to allow or deny access (Figure 1).
System Galaxy can encode the MIFARE cards in the following formats:
1. Data/Clock(ABA) / Card Serial Number(2)
: RECOMMENDED - System Galaxy encodes the Card Serial Number onto the application sector of the MIFARE card. The Serial Numer is automatically read out when you click [Write Data to Card]. If you are using ABA format, this method is recommended over option 2 (below).
NOTE: the MA520 must be configured for clock/data output.
2. Data/Clock(ABA) / Numeric ID (1)
(2)
: System Galaxy encodes a unique ID set by the enrollment operator. The software provides a [Next Number] button in the Card/badge Settings tab that auto-assigns the next number (after the highest number already used).
NOTE: the MA520 must be configured for clock/data output.
3. 26-bit Wiegand / Numeric ID (1)
: System Galaxy encodes the unique ID set by the enrollment operator.
a. Uses the facility code that is set in the MA520 reader (7 is default ).
NOTE: the MA520 must be configured for Wiegand output.
(1) If you are doing fingerprint-only (no card/mode in Table 6), you can use Numeric ID in either 26-bit wiegand or Data/Clock formats as the card code. You must set the MA520 to use the same output format you have applied in System Galaxy.
(2) SG panel stores up to 48 bits binary (max. 12 digit number). If the number is larger than 12 digits, you must turn on the data-folding checkbox option in Loop properties.
NOTE: If you have HID prox readers or iClass readers elswhere on site, then you might consider the MA110 interface. Be aware that MA110 does not support keypad entries (Pin Code and BIOPIN).

System Galaxy Biometrics Guide Sagem MA520 & MIFARE Interface
Page 19
IMPORTANT: THIS TABLE IS BASED ON BEHAVIOR USING THE MA520 FIRMWARE AT THE TIME OF ITS CREATION; YOU MUST VALIDATE YOUR OWN CONFIGURATIONS AND TYPE OF CREDENTIALS AT THE POINT IN TIME YOU INSTALL OR UPGRADE YOUR SYSTEM.
Table 4: Types of Credentials with compatible Recognition Modes
Type of Credentials you are making
Valid Card Mode
Compatible Recognition Modes (1)
(a credential can be compatible with more than one recognition mode)
Output Format
MIFARE cards w/ prints
(prints on the card)
Biometric &
PIN + Biometric
#1) MIFARE - Card Determines mode
#2) MIFARE - Prints in Card mode
#4) MIFARE - Card or Identification (Multifactor)
MIFARE cards w/o prints
(prints not in card)
ID Only * /
Pin Code *
#1) MIFARE - Card Determines Mode (visitor*)
#3) MIFARE - Prints in the MA520 Reader
MIFARE cards only
(prints not in card)
ID Only /
Pin Code
#7) No Fingerprints – Card Only
(prints Must be captured, but are not autheticated)
Card Pass-Through ANY * #8) Card Pass-Through
26-bit Wiegand
Numeric ID
Data/Clock
Serial number**
Numeric ID
Fingerprints only credential
Card not encoded
#4) MIFARE Card or Identification (Multifactor)
#5) Identification Mode (Fingerprint Only)
26-bit Wiegand Numeric ID
Data/Clock Numeric ID
* ID Only cardholders are not required to enroll/capture fingerprints ONLY IF they are Visitor Cards needing access at readers set for Card Determines mode, or needing access for readers set for Pass-Through.
** Serial Number uses 48-bit binary, which means you must enable data folding if the ID is larger than 12 digits.
(1) see Section 2.4 for a Table 6: MA520 Recognition Modes and the Accepted Credentials

System Galaxy Biometrics Guide Sagem MA520 & MIFARE Interface
Page 20
2.3 Planning Step 3 - Determine the Type of Credentials
The types of credentials that work at the MA520 are fingerprints and MIFARE Contactless Cards. These can be used individually or in various combinations depending on your site needs. Pin code and BioPin are also supported.
Table 5: Types of Credentials & Encoding Supported:
Cards without User PIN Codes Biometric Card without User PIN A. Card + Fingerprint Template (prints are captured and encoded on card)
B. Card + BIOPIN (BIOPIN number is encoded on the card as a substitue for the missing fingerprints. BIOPIN is not a user PIN code)
ID Only Card (No user PIN) C. Card only (prints are not captured at all or stored anywhere) D. Card only with ‘Prints in Reader ‘ recognition mode (prints are captured and stored in reader ONLY)
Fingerprint Only Identification E. Fingerprint only – (prints captured and stored in the 520 Reader (not encoded on a card))
Cards with User PIN codes* Biometric Card with User PIN F. Card + Fingerprint + PIN Code (Prints are captured and encoded along with the PIN Number on the card) G. Card + BIOPIN + PIN Code (BIOPIN and PIN are encoded on the card)
ID Only Card with User PIN H. Card + PIN Code (prints not capture or stored in SG/ not loaded to 520 reader) I. Card + PIN Code + Prints based on Prints in Reader recognition mode (prints in reader)
IMPORTANT: how credentials work (accept/reject) depends on which recognition mode is set at the MA520 reader.
*SECURITY: For users with a PIN Code Credential: the pin code control option must be enabled at the reader to
make the reader prompt for the PIN Code. Otherwise PIN Code will be omitted from identification process.
IMPORTANT: Users without a PIN Code Credential will be rejected at a reader if the pin code control option is
enabled at the reader.

System Galaxy Biometrics Guide Sagem MA520 & MIFARE Interface
Page 21
2.4 Planning Step 4 - Determine the Recognition Mode
You must decide which recognition mode you will use at each MA520. The mode you choose must be compatible with the credential typye and card mode/behavior you are using.
NOTE: The GCS MALoader Utility is used to set the Recognition mode at the MA520. The MALoader utility is found in the System Galaxy folder after the SG Installation is completed.
IMPORTANT: the installation and initial configuration of the MA520 is done using the Sagem Configuration tools. These tools and their manuals are on disk-2 of the Galaxy Install DVD.
IMPORTANT: THIS TABLE IS BASED ON BEHAVIOR USING THE MA520 FIRMWARE AT THE TIME OF ITS
CREATION; YOU MUST VALIDATE YOUR OWN CONFIGURATIONS AND TYPE OF CREDENTIALS AT THE POINT IN
TIME YOU INSTALL OR UPGRADE YOUR SYSTEM.
Table 6: MA520 Recognition Modes and the Accepted Credentials
MA520 Recognition Mode
MA520 Sensor
Credentials Encoded / Accepted (behavior)
Devices Needed
1 MIFARE – the Card Determines Mode (1:1)
OFF until card is
presented
MIFARE cards with fingerprints (Biometric)
MIFARE cards without fingerprints ( ID Only) – visitor mode The card determinse where the MA520 looks for print (i.e. on the card or in the MA520 Base). If you cannot fingerprint an enrollee, you can issue a card ID Only. Notes A, B, and C apply.
MSO-300 Card Writer
MIFARE cards
2 MIFARE – Prints In the Card Mode (1:1)
OFF until card is
presented
MIFARE cards with fingerprints (Biometric). Notes A, and C apply.
MSO-300 Card Writer
MIFARE cards
3 MIFARE – Prints in MA520 Reader Mode (1:1)
OFF until card is
presented
MIFARE cards – no prints encoded on card Notes A, B, and C apply.
MSO-300 Card Writer
MIFARE cards
4
MIFARE or Identification Mode (1:1 or 1:N)
-Multifactor mode-
ON - card or finger can be
presented
MIFARE cards with fingerprints (Biometric). Fingerprints enrolled and card not issued (SG requires a valid card
code to be assigned for access control) Notes B, and C apply.
MSO-300 Card Writer
MIFARE cards
5 Identification mode (1:N)
ON - only finger is
presented
Fingerprints enrolled and card not issued ( note that SG requires a valid card code to be assigned for access control).
Cards are not encoded. Fingerprints must be loaded to MA520. MSO-300
6 No fingerprint – Local Keypad OFF
This option user will enter their Card ID code at reader keypad (prints must be captured, but not authenticated; no card is issued)
MSO-300
7 No fingerprint – MIFARE Card OFF
MIFARE cards
(any card behavior; prints must be captured, but not autnenticated)
MSO-300 Card Writer
MIFARE cards
8 No fingerprint – passthrough OFF
MIFARE cards without fingerprints ( ID Only) Card ID is not in the MA520, prints are not required
Card Writer MIFARE cards
a) A card must be presented at the reader before a fingerprint is read. b) Fingerprints that are not on the card must be loaded to the MA520. c) The finger that is presented must match the print that is associated with the card. Wrong fingers or unidentified cards are
not forwarded to the Galaxy controller for access decisioning.

System Galaxy Biometrics Guide Sagem MA520 & MIFARE Interface
Page 22
2.4.1 Sagem MA110 Recognition Modes described
2.4.1.1 #1) Card Determines Mode
iClass –Card Determines Mode (1:1) – in this mode the Sagem Reader determines how to handle the card
based on which Card Mode is set in the card. Biometric cards and ID-Only cards (visitor) are recognized at
the same reader when using this recognition mode.
If prints are in the card (biometric card), then the prints are authenticated. See the following section
about Prints in Card for information how biometric credentials are enrolled.
IF the card is ID Only, the card is passed-through to the Galaxy control panel even if there are prints in
the reader for that cardholder. See the following section on Mifare Card Only for enrollment information.
This mode is also known as the Sagem Visitor Mode. An example scenario: employees might be required to enroll fingerprints, while visitors would be given an ID Only card that can be given access without capturing or authenticating prints.
IMPORTANT: Care should be taken as to whether “visitor access” is appropriate for the intended area. Visitor
cards should have the appropriate limitations such as an expire date or limited number of uses. These options
are set in the Card / Badge settings tab of the cardholder programming screen.
Table 7: Behavior of credentials in “Card Determines Mode”
Card Mode Behavior
What’s encoded How it works at reader Galaxy access control panel
(ACP)
Biometric & Pin +
Biometric
ID + PRINTS / BIOPIN
ID + PIN + PRINTS / BIOPIN
Reader recognizes card and prompts for finger or
BIOPIN and PIN if present
ID Only & Pin Code
ID (no prints– visitor)
ID + Pin Code
ID Only & Pin Code
ID (prints in reader)
ID + Pin Code
Card is passed-through
to ACP without authenticating fingerprint
or prompting for PIN
Access is granted or denied based on access rules from Galaxy.
A bad or incorrect finger will be logged as Invalid Access Attempt – not recognized ID”
An invalid or rejected card will not create a logged event in galaxy because the reader does not forward it to the panel. Access to the door will not be granted.
IMPORTANT: THIS TABLE IS BASED ON BEHAVIOR VALIDATION USING THE MA520 FIRMWARE AT
THE TIME OF ITS CREATION; YOU MUST VERIFY YOUR OWN CONFIGURATIONS AND CREDENTIALS
AT THE TIME YOU IMPLEMENT THE SYSTEM.

System Galaxy Biometrics Guide Sagem MA520 & MIFARE Interface
Page 23
2.4.1.2 #2) Prints in Card Mode
Prints in Card Mode (1:1) – in this mode, the user presents the card to the Sagem Reader, which reads the
prints from the card, then prompts user to provide a fingerprint (scanner turns on). When user provides the
correct print, the reader forwards the card data to the access control panel for access decisioning.
ENROLLMENT: Biometric Cards are created by enrolling prints in System Galaxy, and choosing either
BIOMETRIC, or PIN CODE + BIOMETRIC. Then add the card ID, capture prints (or add the BIOPIN number )
and encode data to the card.
NOTE: Control PIN option must be set to “1” if you want the reader to prompt for the Pin Code. Pin
Control can be set to 1 by checking the option in the MALoader when setting the reader to prints in card mode.
Unchecking Pin Control will set the control Pin option to “0”. Pin code will be ignored when this option is set to
“0”. You must click the [Send to Reader] button in the MALoader to set the option.
NOTE: BIOPIN option must be set to “1” if you want the reader to prompt for the BIOPIN. BIOPIN option
can be set to 1 by checking the option in the MALoader when setting the reader to prints in card mode.
Unchecking BIOPIN option will set the control Pin option to “0”. Pin code will be ignored when this option is set
to “0”. You must click the [Send to Reader] button in the MALoader to set the option.
NOTE: Prints are not required to be loaded the reader, since comparison is made to the prints that were encoded
in the card.
NOTE: ID ONLY and PIN CODE cards are not recognized / accepted in this mode, even if prints were captured /
enrolled and loaded to the reader.
Table 8: Behavior of credentials in “Prints in the Card Mode”
Card Mode Behavior
What’s encoded How it works at
reader Galaxy access control panel
(ACP)
Biometric & Pin + Biometric
ID + PRINTS or BIOPIN
ID + PIN + PRINTS or BIOPIN
ID Only & Pin Code
Rejected
Reader reads card, prompts for prints
or BIOPIN and PIN if present
o Access is granted or denied based on access rules from Galaxy.
o A bad or incorrect finger will be logged as Invalid Access Attempt – not recognized ID”
IMPORTANT: THIS TABLE IS BASED ON BEHAVIOR VALIDATION USING THE MA520 FIRMWARE AT
THE TIME OF ITS CREATION; YOU MUST VERIFY YOUR OWN CONFIGURATIONS AND CREDENTIALS
AT THE TIME YOU IMPLEMENT THE SYSTEM.

System Galaxy Biometrics Guide Sagem MA520 & MIFARE Interface
Page 24
2.4.1.3 #3) Prints in Reader Mode
Prints in Reader Mode (1:1) – in this mode, the user presents the card to the Sagem Reader, which looks up
the print from the Sagem reader base that is assigned to that card ID, then prompts user to provide a fingerprint
(scanner turns on).
ENROLLMENT: Credential is created by enrolling fingerprints in System Galaxy, then select ID Only, create a
card ID and write data to the card.
NOTE: PIN CODE and BIOPIN may not be accepted in this mode.
NOTE: prints must be loaded to the reader.
Table 9: Behavior of credentials in “Prints in the 520 Reader Mode”
Card Mode Behavior
What’s encoded How it works at reader Galaxy access control panel
(ACP)
Biometric ID + PRINTS o Card accepted if user is loaded to the reader
o Card is rejected if user is not loaded to the reader
ID Only ID (no prints captured)
Card is rejected – User not found in base.
o A rejected card will not create a logged event in galaxy because the reader does not forward it to the panel. Access to the door will not be granted.
ID Only ID (prints capture in System Galaxy and loaded to reader)
Reader recognizes card and prompts for finger > sends
data to ACP
o Access is granted or denied based on access rules from Galaxy.
o A bad or incorrect finger will be logged as Invalid Access Attempt – not recognized ID”
IMPORTANT: THIS TABLE IS BASED ON BEHAVIOR VALIDATION USING THE MA520 FIRMWARE AT
THE TIME OF ITS CREATION; YOU MUST VERIFY YOUR OWN CONFIGURATIONS AND CREDENTIALS
AT THE TIME YOU IMPLEMENT THE SYSTEM.

System Galaxy Biometrics Guide Sagem MA520 & MIFARE Interface
Page 25
2.4.1.4 #4) Card or Identification Mode (Multifactor)
Card or Identification Mode (Multifactor) – in this mode, the reader will accept two kinds of credentials,
fingerprint identification and biometric cards. This mode is a combination of identification and ‘prints in card’
modes also know to Sagem as Multifactor or Merged mode. The scanner is on all the time in this mode.
ENROLLMENT: Credential is created by enrolling fingerprints in System Galaxy, then select Biometric behavior,
create a card ID and write data to the card. (prints are on the card) User presents the card to the Sagem
Reader, which gets the print from the card, then user to provides a fingerprint (scanner is on).
NOTE if you want to make PIN CODE + BIOMETRIC behavior, you must create a pin code and a biopin value
before encodeing the card. You must also “check” the contorl PIN and BIOPIN options in MALoader and send
them to the reader if you want the reader to prompt for PIN or BIOPIN .
Fingerprint-only credential is created by enrolling fingerprints in System Galaxy, creating a card ID. You do not
write data to a card for Identification mode credential. User presents the fingerprint (scanner is on). Card is not
issued to the finger-only user.
NOTE: prints must be loaded to the reader for the biometric card and the finger-only credential.
Table 10: Behavior of credentials in “MIFARE Card or Identification Mode”
Card Mode Behavior
What’s encoded How it works at reader Galaxy access control panel
(ACP)
Biometric ID + PRINTS OF BIOPIN
Reader recognizes card and prompts for finger >
sends data to ACP
Finger-only credential
Fingers are enrolled, but card is not created
Reader searches it base for a matching print
o Access is granted or denied based on access rules from Galaxy.
o A bad or incorrect finger will be logged as Invalid Access Attempt – not recognized ID”
ID Only ID (no prints captured)
Card is rejected
ID Only ID (prints capture in System Galaxy)
Card is rejected
o A rejected card will not create a logged event in galaxy because the reader does not forward it to the panel. Access to the door will not be granted.
IMPORTANT: THIS TABLE IS BASED ON BEHAVIOR VALIDATION USING THE MA520 FIRMWARE AT
THE TIME OF ITS CREATION; YOU MUST VERIFY YOUR OWN CONFIGURATIONS AND CREDENTIALS
AT THE TIME YOU IMPLEMENT THE SYSTEM.

System Galaxy Biometrics Guide Sagem MA520 & MIFARE Interface
Page 26
2.4.1.5 #5) Identification Mode [1:n]
Identification Mode – in this mode, the reader accepts finger-only credentials. This is the same mode all older readers use.
ENROLLMENT: Fingerprint-only credential is created by enrolling fingerprints in System Galaxy, creating a card ID. You do not write data to a card for Identification mode credential. User presents the fingerprint (scanner is on). Card is not issued to the finger-only user.
NOTE: prints must be loaded to the reader for finger-only credential.
Table 11: Behavior of credentials in “Identification Mode”
Card Mode
Behavior What’s encoded How it works at reader
Galaxy access control panel (ACP)
Finger-only credential
Fingers are enrolled, but card is not created
Reader searches it base for a matching print
o Access is granted or denied based on access rules from Galaxy.
Biometric ID + PRINTS Card is rejected
ID Only ID Card is rejected
o A rejected card will not create a
logged event in galaxy because
the reader does not forward it to
the panel. Access to the door
will not be granted.
IMPORTANT: THIS TABLE IS BASED ON BEHAVIOR VALIDATION USING THE MA520 FIRMWARE AT
THE TIME OF ITS CREATION; YOU MUST VERIFY YOUR OWN CONFIGURATIONS AND CREDENTIALS
AT THE TIME YOU IMPLEMENT THE SYSTEM.

System Galaxy Biometrics Guide Sagem MA520 & MIFARE Interface
Page 27
2.4.1.6 No Fingerprints – Local Keypad Mode
No Fingerprints – Local Keypad Mode – in this mode, the reader accepts keypad entry only. The user’s ID-
code is manually entered at the reader’s keypad and forwarded to the Galaxy access control panel for verification
of access ruels..
Fingerprints must be captured at System Galaxy cardholder screen, but are not authenticated at the reader.
ENROLLMENT: This credential is made by capturing the user’s fingerprints (stored in Galaxy database only) and
assigning an ID code to the user. In this case, a physical card does not exist for this credential. Therefore, the
System Galaxy operator will not encode or issue a card to this user.
Table 12: Behavior of credentials in “No Fingerprint – use Local Keypad Mode”
<< no table is available for this mode >>
IMPORTANT: YOU MUST VERIFY YOUR OWN CONFIGURATIONS AND CREDENTIALS AT THE TIME
YOU IMPLEMENT THE SYSTEM.

System Galaxy Biometrics Guide Sagem MA520 & MIFARE Interface
Page 28
2.4.1.7 #7) No Fingerprints – MIFARE Card Only Mode
No Fingerprints – MIFARE Card Mode – in this mode, the reader accepts ID-only cards. Fingerprints must be captured, but are not authenticated.
ENROLLMENT: Credential is made by capturing fingers and selecting ID Only, creating an ID and writing data to the card. Prints are not in the card.
NOTE: prints must be loaded to the reader for this credential.
Table 13: Behavior of credentials in “No Fingerprints - MIFARE Card Mode”
Card Mode Behavior
What’s encoded How it works at reader Galaxy access control panel
(ACP)
Biometric ID + PRINTS Card is rejected
ID Only ID (prints not captured)
Card is rejected
A rejected card will not create a logged
event in galaxy because the reader
does not forward it to the panel.
Access to the door will not be granted.
ID Only ID (prints captured) Reader recognizes card
o Access is granted or denied based on access rules from Galaxy.

System Galaxy Biometrics Guide Sagem MA520 & MIFARE Interface
Page 29
2.4.1.8 #8) No Fingerprints – Card Pass-Through Mode
No Fingerprints – Card Pass-through Mode – in this mode, the reader accepts and passes-through all valid
cards. Fingerprints are not captured/loaded for a pass-through mode unless they are needed for access at a
different reader in the same system. To work be captured, but are not authenticated.
ENROLLMENT: Credential is made by ID Only, creating an ID and writing data to the card. Prints are not in the
card and do not have to be captured.
Table 14: Behavior of credentials in “Card Pass-Through Mode”
Card Mode Behavior
What’s encoded How it works at reader Galaxy access control panel
(ACP)
Biometric & Pin + Biometric
ID + PRINTS
ID Only & Pin Code
ID (no prints)
Reader recognizes card and ID is passed-through
o Access is granted or denied based on access rules from Galaxy.

System Galaxy Biometrics Guide Sagem MA520 & MIFARE Interface
Page 30
2.5 Planning Step 5 – Administrator Setup Options
You should determine how the Cardholder Enrollment workstation will be configured. The enrollment options can be pre-configured in the Administrator Setup Options screen by a master operator.
System Galaxy allows you to …
1. Pre-set the certain fields in the Capture/Enrollment screen: This helps the operator capture fingerprints and encode cards the same way each time.
2. Lock certain fields in the Capture/Enrollment screen: This ensures the operator doesn’t accidentally disrupt the feature that is locked.
NOTE: Only a Master Operator can open the Administrator Setup Options screen.
NOTICE: Some options can only be changed by a Master Operator. Some options can be configured by Enrollment Operators as long as the feature is unlocked by the Master Operator.
Table 15: Administrator Setup / Enrollment Options
Capture/Encoding Feature Options PresetableTo Lock Feature in
Setup Options screen
Fingerprint Consolidation (triple-scan)
on/off - - Check the ‘Always requrie Consolidation (triple-scan)’ option.
Acquire 1st Fingerprint - - - - - -
Acquire 2nd Fingerprint - - - - - -
Compare Fingerprints - - - - - -
Default Card Writer type droplist
Choices are iClass Mifare
YES Uncheck the ‘Allow Non-Master to select different writers’
Default Card Behavior droplist
Choices are Biometric ID Only
YES Uncheck the ‘Allow Non-Master to select card behavior
Card ID format * droplist
Choices are 26-bit Wieg. Data/Clock
YES Locked by default. Only a master operator can change this.
How Card ID is Generated* droplist
Choices are Numeric ID Card S/N
YES Locked by default. Only a master operator can change this.
* see Planning Step 2 - Choose the Card Output Format for description of valid Output/Formats

System Galaxy Biometrics Guide Sagem MA520 & MIFARE Interface
Page 31
2.5.1 Setting fingerprint triple-scan option:
If you are capturing fingerprints, you must set the Use Consolidation (triple-scan) option in the Capture/Encoding Screen. This option requires you capture the finger 3 times. Checked means you will capture every print 3 times.
NOTE: you can require triple-scan on all cardholders by enabling the ‘Always require the triple-scan’ option in the Setup Options screen. Checked means triple-scan enabled/required.
2.5.2 Setting the default Card Writer:
You can set the default card writer to always be MIFARE. You can also lock this field from being changed by non-master operators. iClass and MIFARE are the current options available.
NOTE: you can lock this card writer field so the operator can only uses the default writer. Checked means unlock field for non-master operators. Unchecked means locked.
2.5.3 Setting the default Card Behavior:
You can set the default card behavior to and also lock the card behavior field.
Biometric means you will encode the fingerprints on the card. Optionally you can encode a BIOPIN instead of fingerprints for those who may not be able to produce prints.
ID Only means fingerprint data will not be encoded on the card. Only the card ID will be encoded. If you are capturing prints when using ID Only, fingerprint data will be saved in the System Galaxy database and can be loaded to the MA520 reader for use with ‘Mifare – prints in reader’ mode.
Pin Code means you will encode a pin code onto the card. The pincode minimum field length is set in the Administrator Setup screen (master operator login required)
Pin Code + Biometric means you will encode a pin code onto the card. The pincode minimum field length is set in the Administrator Setup screen (master operator login required).
NOTE: Pin Codes are not prompted for at reader unless the control PIN option is enabled (1).
NOTE: BIOPIN are not prompted for at reader unless the BIOPIN option is enabled (1). Reader may reject (not recognize) a BIOPIN card if the BIOPIN option is off.
NOTE: you can lock the Card Behavior field so that the operator only uses the defaulted behavior. Checked means unlock field for non-master operators. Unchecked means locked.
IMPORTANT: If you are using ‘MIFARE Card determines mode’, you should not lock the Card Behavior field.

System Galaxy Biometrics Guide Sagem MA520 & MIFARE Interface
Page 32
2.6 Planning Step 6 – Understanding Operator Privileges
You should create Operator logins for each operator. Logins and passwords should not be shared. Operator priviliges are set up in the System Operator screen (see Chap. 10 - SG 8.2 software manual).
SG operator privileges do not apply to the MALoader utility.
MASTER OPERATOR:
At least one Master Operator should be created for the system. A master operator will have full privileges to view and edit all fields in any screen in System Galaxy.
Master Operator Privileges for CAPTURE/ENCODING and SETUP screens:
Always able to capture prints and encode cards.
Always able to edit fields that are locked for non-master operators.
Always required to perform a triple-scan on fingerprint capture in the Capture/Encoding screen ONLY IF the [Always require triple-scan] option is checked (ON) in the Setup Options screen.
Must use the defaulted card format and ID numbering scheme in the Card/Encoding screen.
Always able to change the card format and ID numbering scheme in the Setup Options screen.
Always able to see the [Setup Options] button or open the Setup Options screen.
Always able to open the Setup Options screen and see/change the setup options (including locking or unlocking card writer field and card behavoir field).
ENROLLMENT OPERATOR:
An Enrollment Operator should not be given master operator rights. The enrollment operator should have the correct privileges ( viewing/editing Cardholder-programming, Loops, Access Groups, etc.).
Enrollment Operator Privileges for CAPTURE/ENCODING screen:
Able to capture prints and encode cards.
Able to edit fields that are unlocked for non-master operators.
Always required to perform a triple-scan on fingerprint capture ONLY IF the [Always require triple-scan] option is checked (ON) in the Administrator Setup screen .
Must use the defaulted card format and ID numbering scheme. Master operator can change the format and ID numbering scheme in Administrator Setup screen.
Never able to see the [Setup Options] button or open the Administrator Setup screen.
Never able to see/change the setup options, including locking or unlocking card writer field and card behavoir field.

System Galaxy Biometrics Guide Sagem MA520 & MIFARE Interface
2.7 Flow diagrams of biometric credentials at the MA520
As explained in prior sections, the MA520 Terminal/reader has several recognition modes. This section provides a visual example of how each type of credential (by behavior/card mode) will be handled at the MA520.
2.7.1 MA520 Authentication Modes (1:1)
All authentication modes using MIFARE cards (Wiegand or ABA) require fingerprints. You must use the mode that is compatible with the card behavior (i.e. Biometric or ID Only).
Four modes use authentication for MIFARE card and fingerprints:
MIFARE – Card Determines Mode (ID Only and Biometrics)
MIFARE – Prints in MA520 (ID Only) with prints enrolled and must be loaded to reader.
MIFARE – Prints in Card (Biometrics) – prints are not required to be in reader.
MIFARE – (Multifactor) Card and Identification – mix of prints in card mode and identification mode.
Figure 2 – Flow-chart of MA520 Authentication (1:1) using MIFARE cards and fingerprints:
Page 33

System Galaxy Biometrics Guide Sagem MA520 & MIFARE Interface
2.7.2 MA520 Identification Modes (1:N)
All Identification modes require using fingerprints. In Identification modes, the finger credentials are compared to the prints stored in the MA520.
Two modes allow fingerprint-only identification:
MIFARE – (Multifactor) Card Authentication and Identification
Fingerprint Identification mode (Finger only)
NOTICE: Multifactor mode accepts both Fingerprint-only credentials and MIFARE cards at the same reader. The flowchart (Figure 3 below) shows the Fingerprint-only behavior for mixed mode. The previous flow-chart (Figure 2) shows the MIFARE card behavior for mixed mode.
Remember that Table 6 lists all the modes of operation with the compatible credentials.
Figure 3 - Flow-chart of MA520 Identification mode (1:N) using fingerprints:
Page 34

System Galaxy Biometrics Guide Sagem MA520 & MIFARE Interface
2.7.3 MA520 Card Only Modes
All “Card-only” or “No Finger” modes do not use fingerprints. These modes allow the MA520 identify cards or work as a pass-through reader.
In the No Finger mode, the Card ID is stored in the MA520 terminal base. Only the cards that are in the MA520 base are forwarded to the SG controller for access decisions.
In the Card Pass-through mode, the MA520 does not store any card IDs in its base. It simply reads the card and passes the ID to the SG controller for access validation.
Two modes use Card-only credentials:
No Finger (ID Only)
No Finger - pass-through (ID Only)
Remember that Table 6 lists all the modes of operation with the compatible credentials.
Figure 4 - Flow-chart of MA520 Card-Only mode:
Page 35

System Galaxy Biometrics Guide Sagem MA520 & MIFARE Interface
Page 36
3 Installing Biometric Equipment
This chapter covers installing the biometric readers and biometric enrollment devices.
3.1 Installing the Sagem MA520 Reader
You will install and set up the MA520 Terminal/Reader according to the Sagem manufacturer’s directions. The following must be done before you can interface with System Galaxy.
Do not power Sagem reader off the Galaxy access control panel power supply. Sagem readers should be powered separately
Also do not power door locks off the Galaxy access control panel power supply.
Once the MA520 is installed, you will connect to the Dual Reader Module (DPI) Board in the System Galaxy access control panel according to the instructions in the Hardware Manual.
The MA520 will need to be given and IP Address that is valid for the customer’s network. This is done using the Sagem Configuration Tool found on disk-2 of the Galaxy Install DVD.
Once the MA520 has a valid IP Address you can connect to it using the Sagem Configuration tool (found on disk-2 of the DVD in the Sagem folder) to do the initial configuration.
After configuration is done you should test the reader to ensure it is working.
Once this is done, you can use the Galaxy GCS MALoader to do the following:
1. create bases in the MA520
2. configure the output format as needed (Data/Clock(ABA) 26-bit Wiegand)
3. note that Data/Clock ABA format is recommended to use MIFARE cards
4. note that using the MIFARE card serial number is recommended
5. If you want to use the Card Serial Number for the card ID, you must do the following:
In the Administrator Setup Options screen*, choose Card Format = “data/clock” and How Card ID is Generated = “Use Card Serial Number”.
If the serial number is more than 12 digits long, you must turn "ON” the Data Folding option (on=checked) in the Loop Properties Screen.
* NOTE: to open the Administrator Setup screen, you must open the Cardholder programming screen, click EDIT, select the Card/Badge Settings tab, and click the [Scan Fingers] button to open the Encoding screen. Then click the [Administrator Setup Options] button. You must be logged in as a master operator.

System Galaxy Biometrics Guide Sagem MA520 & MIFARE Interface
Page 37
3.2 Installing the MSO-300 Fingerprint Enrollment device
If your site is capturing fingerprints as a part of your credentialing, you will need to install the fingerprint enrollment device. System Galaxy 10.2 is compatible with the MSO-300 Enrollment device. The MSO-100 will not work.
NOTICE: you can install the MSO-300 after you install the System Galaxy software if you desire since testing the device will require you to get to the Cardholder screen. Installing the software is covered briefly in the following chapter, and in great detail in the SG Software Installation manual or the Galaxy Install DVD help screens.
The MSO-300 MorphoAccess USB Driver must be installed.
The driver can be installed from disk-1 of the Galaxy Install DVD at Installers\ Drivers\Sagem\Sagem MorphoSmart USB Driver.
Double click “setup” file to install driver.
The enrollment device requires a USB port (2.0) to connect to the Client Workstation PC
Once the installation of these components is properly completed, you should be able to capture fingerprints in the System Galaxy Capture/Encoding screen.
Open the Cardholder programming screen at the bottom of the Card/Badge Settings tab.
Click the [Scan Fingers] button to open the Capture/Encoding window.
NOTE: In order to scan fingers, the Biometric Interface Support option must be enabled when System Registration is performed.

System Galaxy Biometrics Guide Sagem MA520 & MIFARE Interface
3.3 Installing the MIFARE Card Writer (encoding) device
If you are encoding cards as a part of your credentialing, you will need to install the Card Writer device. Contact Galaxy Control Systems Customer or Technical Support for a valid part number.
NOTICE: you can install the card writer after you install the System Galaxy software if you desire since testing
the device will require you to get to the Cardholder screen. Installing the software is covered briefly in the
following chapter, and in detail in the SG Software Installation manual or the Galaxy Install DVD help screens.
3.3.1 Installing the SDI011 Driver
To install the drivers do the following:
1. connecting the writer to the PC USB Port
2. Open the PC’s device manager and browse to the drivers. They are found on disk-1 of the Galaxy Install DVD under the folder Installers\Drivers\SCM_SDI011.
3. Double-click the Setup.exe file to install the drivers.
3.3.2 Testing the SDI011 Driver
You can test the card writer from the System Galaxy cardholder screen.
1. Sign in as a Master Operator
2. Open System Galaxy Cardholder screen and click the [ Edit ] button to edit a cardholder
3. Click the [Scan Fingers] button on the bottom of the Card / Badge Settings tab
4. To test the writer, place a MIFARE card onto the card writer and click the [Read card] button. System Galaxy should pop up a dialog box with the card data shown. If the card is blank, you can enter an ID number into the ID field and set the Behavior field to ID Only. Then write the ID onto the card and read it back.
NOTICE: You must connect the USB Enrollment Reader to the PC before you start System Galaxy.
NOTE: In order to test the driver, the Biometric Interface Support option must be enabled when an authorized
Galaxy dealer performs the System Registration.
NOTE: Any key files associated with the SDI011 writer will be installed automatically as a part of the software
installation process. Registration of Biometric Support will enable you to see the key files.
Page 38

System Galaxy Biometrics Guide Sagem MA520 & MIFARE Interface
3.3.3 Suppressing the Smart Card Nuisance Plug-n-Play popups
On some systems, the Smart Card Plug-n-Play option will cause repeated popup messages to occur every time you place a smart card on the SDI011. This popup is a nuisance since the device drivers are truly installed. Disabling the Plug-n-Play option in the PC’s local group policy should suppress this OS pop-up message.
To disable Smart Card Plug and Play in local Group Policy, follow these steps:
1. Click Start, type gpedit.msc in the Search programs and files box, and then press ENTER. 2. In the console tree under Computer Configuration, click Administrative Templates. 3. In the details pane, double‐click Windows Components, and then double‐click Smart Card. 4. Right‐click Turn on Smart Card Plug and Play service, and then click Edit. 5. Click Disabled, and then click OK.
Page 39
System Galaxy Biometrics Guide Sagem MA520 & MIFARE Interface
Page 40
4 Setting up System Galaxy for Biometrics
This chapter covers the following:
Brief notes on installing and registering System Galaxy
Upgrading an existing biometric systems to SG 10.2
Importing existing FGR files into the SysGal database
Programming the biometric readers in System Galaxy
Setting up the Card Encoding options in the Administrator Setup screen
IMPORTANT: you must be logged in as a master operator to configure the software.
4.1 Installing New System Galaxy Software
System Galaxy 10.2 or later supports the biometric features described in this manual.
IMPORTANT: If you are upgrading please perform all backups before you upgrade and see important
information in the next section.
For new installs, run all three parts of the Install (1-Prerequisites, 2-Database, and 3-Software) on
every Server and Client Workstation.
The details of doing the software install is documented in the System Galaxy Software Installation
Manual and also in the Installation DVD Help screens which run in a windows browser (IE-6 or later).

System Galaxy Biometrics Guide Sagem MA520 & MIFARE Interface
Page 41
4.2 Upgrading an Existing Sagem Site
In the SG 10.2, the fingerprint templates are stored in the SysGal database.
IMPORTANT: Always back up your databases and any support files you must continue to use after the upgrade (custom/saved reports, badge design templates, photo, graphics, icons, and .FGR files). All system assets should be backed up on a separate drive. See Chapter 22 in the main Software Manual for details and charts on databases.
If your site does not have existing fingerprints, see Section 4.2.1.
If your site does have existing biometrics (FGR files), do the standard upgrade in Section 4.2.1 and then see Section 4.2.2 .
4.2.1 Performing the standard system upgrade
The SG 10.2 Install DVD allows you to do the normal database and software upgrades. You will run the Install (1-Prerequisites, 2-Database, and Software upgrade). If you have existing Sagem equipment, see the following section.
See the System Galaxy Software Installation Manual and in the Install Help screens for details. Coordinate large systems or systems with a lot of cardholders with the technical support department.
NOTE: If the site you are upgrading does not already use Sagem readers, then you will not have fingerprint templates to import. You will simply perform the system upgrade and advance to the next section.
IMPORTANT: Remember to back up your databases and all system assets (badge designs, graphics, icons, photos, reports and .FGR files) to a separate drive.

System Galaxy Biometrics Guide Sagem MA520 & MIFARE Interface
Page 42
4.2.2 Importing fingerprint templates via GCS MA Loader
Once the standard system upgrade is finished, you can import your fingerprint templates into the SysGal database.
In previous versions of SG, the fingerprint templates were stored in the Sagem folder under the System Galaxy directory. This is typically found in c:\Program Files\System Galaxy.
When the software installation / upgrade was completed, the GCS MA Loader utility was installed in the System Galaxy folder. It is recommended you use the MA Loader from the PC that is normally responsible for connecting to the Sagem readers. Do not move the MA Loader to a different location. You can make a desktop shortcut to point to the MA Loader in the System Galaxy folder.
IMPORTANT: If the customer is keeping existing Sagem 200 / 300-series MA Terminals, they MUST recreate their bases and reload fingers (see below for details).
4.2.3 Quick Steps to Upgrading to SG 10.2
Table 16: System Upgrade Quick Steps
1 Back-up your FGR files to a separate drive. See section 4.2.4.1
2 Upgrade your entire system to SG 10.2 See section 4.2.4.2
3 Flash your hardware panels to the current S28 code. See section 4.2.4.2
4 - 5 Import FGR files into SysGal database. See section 4.2.4.3
6 Recreate Bases and Load any existing Sagem 200/300 readers and load finger data. (also applies to MA100/500)
See section 4.2.4.4
7 Create Bases, Load, and Configure newly installed Sagem readers.
See section 4.2.4.5
8 Integration with other reader types. See section 4.2.4.6
9 Configure System Galaxy for the MA520 readers according to instructions in this manual.
See section 4.2.4.7

System Galaxy Biometrics Guide Sagem MA520 & MIFARE Interface
Page 43
4.2.4 Detailed Instructions to Upgrading to SG 10.2
4.2.4.1 Backing up you Sagem FGR files before upgrading SG
1. Copy / Back-up your SagemMA folder that stores the FGR files to a separate drive before you upgrade your System Galaxy Software and database! Leave your FGR files in their SagemMA subdirectories and do not uninstall your System Galaxy software.
4.2.4.2 Upgrading your System to SG 10.2
NOTE: A valid maintenance / registration is required to upgrade. Contact Galaxy Customer Service or Technical Support for assistance.
2. Use the Galaxy Installation DVD to upgrade your SG databases and System Galaxy software at all servers and client workstations. Follow the installation procedures found on the DVD.
3. Flash all your control panels to the proper flash (635/600-series uses v5.0 and 508i-series uses 8.0 in SG 10.2). Instructions for flashing panels are found in the Galaxy Hardware manual.
4.2.4.3 Import existing FGR files into the SysGal Database
4. Start/Run the GCS MALoader from the same PC/workstation that the customer used in the previous version to load fingerprints to Sagem readers.
a. Click the [Applications Settings] button on the main MALoader screen. The MALoader should already be pointed to the data source for the SysGal database and correct SagemMA directory that stored the FGR templates.
b. Test the data source connection by clicking the [Test Connection] button. A dialog message should display “Connection Successful”. .
c. Verify the path to SagemMA in the MALoader. For typical installs, this path should be
C:\Program Files\System Galaxy\SagemMA\ Although the finger files are stored in subfolders, you must point to the SagemMA folder.
5. From the MALoader main screen, select the File menu and “Import Finger Files into Database”. The MALoader searches the SysGal database for indicators for employees that have fingerprints on file, and then writes the fingerprint files into the SysGal database.
a. When MALoader is finished, a message displays showing how many records were updated.
b. If MALoader cannot locate any FGR files, the message “0 finger files imported” displays.
IMPORTANT: you should randomly spot-check (compare) fingerprints for several users to verify the prints imported correctly. This is done in the Galaxy Cardholder screen.
IMPORTANT: You should keep a backup of your SagemMA directory and .FGR files until you are sure your imported files are correctly stored and credentials are working.

System Galaxy Biometrics Guide Sagem MA520 & MIFARE Interface
Page 44
4.2.4.4 Recreate Bases and Load existing Sagem 200/300 readers
6. If the customer is keeping existing Sagem 200/300-series readers, the bases must be recreated – do the following steps: (also applies to MA100/500)
a. Execute “delete all bases” and then “get all DB configuration” to verify “0” bases exist.
b. Execute “create all bases”, then “get all DB configuration” to verify bases are recreated.
c. Execute “load finger data”, then choose “get all DB configuration” to verify users are loaded.
NOTE: Sagem 200/300 readers only support fingerprint identification mode. Thus, information that applies to card modes and recognition modes at MA520 does not apply. MA 200/300 readers can be operated in Fingerprint Identification Mode without conflicting with the single-card solution at other readers. MA520 recognition modes and card modes should not adversely affect the system integration with older readers.
NOTE: If external readers exist on the MA 200/300 readers, then you may be able to purchase dual-technology cards in order to continue providing a single-card solution. Or you may need to upgrade the reader technology to a more current solution.
4.2.4.5 Create Bases and Load newly installed MA520 readers
7. If the customer is adding MA520 readers to the system, the MA110 must be properly installed according to Sagem documentation and must be configured into System Galaxy according to the instructions in this addendum. Note wiring to the Galaxy panel is covered in Hardware Manuals
4.2.4.6 Integration with other reader types
8. If the customer is keeping or adding other technology, such as iClass or Prox readers, etc., you must do the following:
a. Determine which cards will be ordered, (single- or dual-technology cards) and properly order the configuration of the card chip.
b. If Prox or other type readers are used, the site can order dual-technology cards. The dealer must order the 125kHz chip to be programmed for the type of reader being used. Contact Galaxy Customer Service for assistance.
4.2.4.7 Register and Configure SG for Sagem interface
9. Once these steps are completed, you should be able to register and configure System Galaxy according to the instructions in this manual.

System Galaxy Biometrics Guide Sagem MA520 & MIFARE Interface
4.3 Registering for Biometrics
System Galaxy must be registered for biometric support. This option is found in the System Registration screen.
To start System Galaxy 8, double-click the System Galaxy icon (on PC’s desktop)
If this is the first time you have started the system, you must choose your product level, create a master operator login, and then sign into the system with it.
If this is the first time you have logged into the system, the Loop Wizard opens up. You can close this wizard and go ahead to the registration. Then return to the wizard later.
Open the Registration Wizard from the following menu selections: Configure >> Options >> Registration >> Wizard
CAUTION about registration: The ability to use the Card Import Utility to setup users/cardholders could be impacted by system registration – see items below:
1. Card Import Utility will not be available after completing system registration if the site will be registering for ‘Professional’ Product Level.
2. Card Import Utility will not be available after completing system registration if the site is Corporate or Enterprise, but WILL NOT BE purchasing the Card Import/ Export feature.
Note: that the Card Import is available during the 14-day grace period as a courtesy for upgrades.
IMPORTANT: Card Import and Batch Loading cards is separate from importing FGR files and you will want to do the batch load or card import first. See Chapter 12 in the SG Software manual.
Page 45
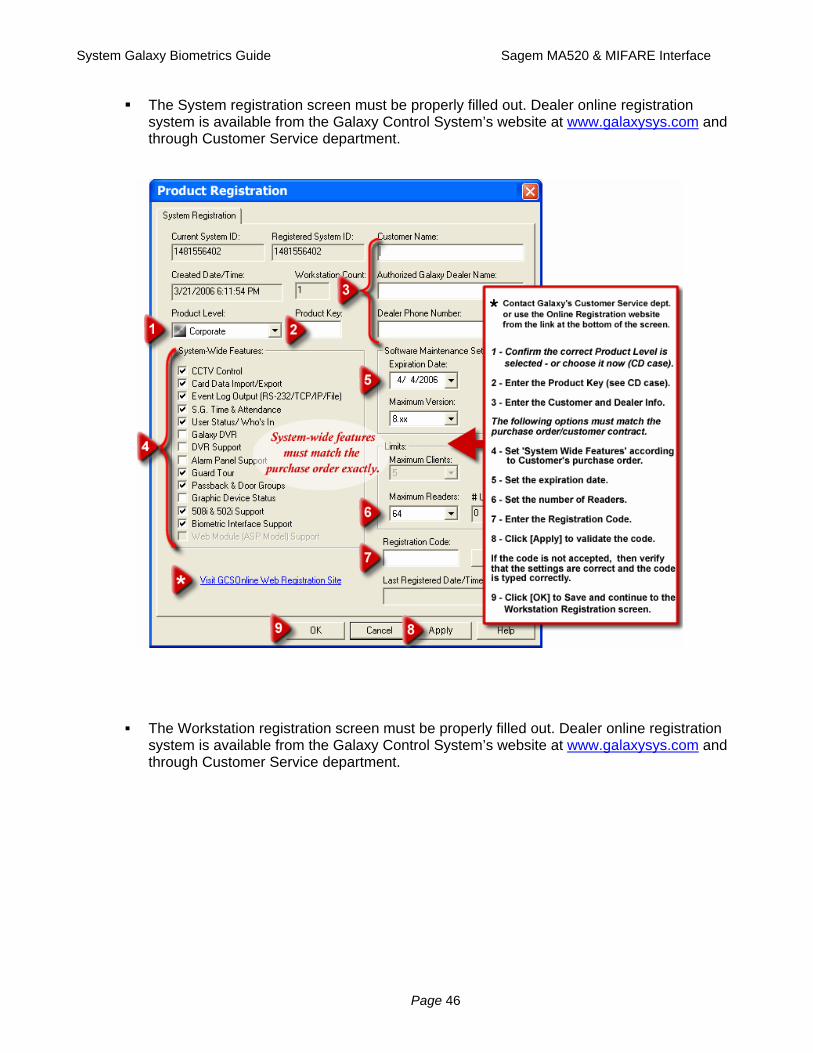
System Galaxy Biometrics Guide Sagem MA520 & MIFARE Interface
The System registration screen must be properly filled out. Dealer online registration system is available from the Galaxy Control System’s website at www.galaxysys.com and through Customer Service department.
The Workstation registration screen must be properly filled out. Dealer online registration system is available from the Galaxy Control System’s website at www.galaxysys.com and through Customer Service department.
Page 46

System Galaxy Biometrics Guide Sagem MA520 & MIFARE Interface
4.4 Configuring System Settings
In the System Settings screen on the General Options tab, you must ensure that the system is set for “Sagem” and that the ‘Smart Card’ option is OFF/unchecked for finger-only operation.
1. To start System Galaxy, double-click the System Galaxy icon (located on the PC’s desktop)
and sign into the system with a master operator login.
2. Open the System Settings from the menu: Configure >> Options >> System Settings
3. On the General Options tab, set the [Biometric System] droplist to “Sagem Morpho” and check the [Smart Card Support Enabled] option for smart card capture/encoding.
IMPORTANT: If the Smart Card Support option is unchecked, the card enrollment portion of the Sagem Capture and Enrollment screen will be hidden.
Figure 5 - SG SYSTEM SETTINGS SCREEN
Note: You must check
this option if you are
capturing and encoding
smart cards.
Page 47

System Galaxy Biometrics Guide Sagem MA520 & MIFARE Interface
Page 48
4.5 About Operator Privileges
You must be signed in as a master operator to perform the programming and setup for the Sagem options. You must be signed in as a master operator to create an enrollment operator (in system operator programming).
When you create a system operator to do the cardholder enrollment, you will need to make sure you allow the operator to have access to edit the cardholder programming screens, loop and access control, etc.
See Chapter 2 in this manual for information that applies to operators concerning the Sagem programming screens. See Chapter 10 in the main SG Software manual for detailed instructions about all the filters and privileges in the Operator Programming screens.
4.6 About System Programming
Schedules, access groups, controllers, boards, etc. are covered in detail in the main SG Software manual (esp. Chapters 7, 8, and 9). This section covers information that is directly related to programming the Sagem options for readers and cardholders.
Assumptions: You have properly installed or upgraded all servers and workstations in your system
(database and software). See instructions in this manual and in the SG software manual. GCS core services are running on the main communication server. Services are covered in
detail in Chapter 11 in the SG Software manual. You have installed your Galaxy Hardware. See SG Hardware manuals. You have installed your Sagem readers and finished programming the IP Addresses and
basic reader options. And the readers are online / on the network. See instructions in this manual as well as the Sagem manuals main and SG hardware manual.
You have completed programming your hardware loop/clusters, controllers and boards. Also see to Chapters 8 and 9 of the SG Software manual for instructions.
You have completed programming your necessary schedules, days, access groups or profiles. See Chapter 7 of the SG Software manual for instructions
You properly imported, or batch loaded, cards and cardholder data as is appropriated for your system. If this is a new install and you do not have employee or cardholder data from a prior or external system, then you will be enrolling your cardholders from scratch. Also see to Chapters 6, 12 and 13 of the SG Software manual for general instructions.
You have imported your FGR files according to the upgrade instructions in this manual. This does not apply to sites that are not upgrading existing Sagem readers.
You have registered your system for biometric support according to instructions in this manual.
You have installed your MSO-300 and card writer and their drivers (see this manual).

System Galaxy Biometrics Guide Sagem MA520 & MIFARE Interface
4.7 Configuring Reader Properties
To set up the Reader Properties for a Sagem reader, you need to do the following:
Program the Loops and controllers and add the DPI – Dual Reader Modules as required.
Open the Reader Properties screen and select the General tab. To configure a Reader Port, open the Reader Port window. Follow the menu selections Configure > Hardware > Reader Ports, or click the
Doors/Readers button on the toolbar.
Give the reader a unique name that you can correctly identify from the MA Loader utility. Example could be “Lobby MA520”, which tells you that the reader is the MA520 in the lobby. The galaxy screen will always display the system default name, which shows which controller, and board the reader is on. You
can leave this as part of the reader name if you like.
Set the reader technology as appropriate for the type of reader and output format. This means that if you are going to use the Wiegand format, you must choose MA500 Wiegand option. And if you are using the ABA format, you will choose MA500 Data/clock option.
Then enter the reader’s IP address in the IP field at the bottom of the screen.
Click APPLY to save your settings. Once this is done, the GCS MA Loader should be able to connect to the reader.
Figure 6 – Setting Sagem options in the Reader Properties screen:
Page 49

System Galaxy Biometrics Guide Sagem MA520 & MIFARE Interface
4.8 Configuring Biometric Options in SG
This section covers information specific to setting up the biometric options directly related to enrolling biometric
cardholders.
Assumptions:
You must be signed in as a master operator.
The Card Writer and MSO-300 should already be installed according to instructions in this manual.
To set up the Biometric Options for the cardholder enrollment, you will need to have covered the
planning information in Chapter 2 of this manual regarding output format, card modes/behavior, and the
fingerprint enrollment options. You should have an understanding of which recognition modes you plan
to use so that you can setup the card mode options correctly (also covered in Chapter 2).
4.8.1 Configure the Card Writer Block Number in SG
To configure the Card Writer options do the following:
Open the cardholder programming screen by following the menu selections
Configure > Cards > Cardholders or clicking the Cardholder button on the toolbar
Click ADD NEW to start a cardholder record (you will use this to get the setup screen).
Choose the Card / Badge Settings tab and click the [Scan Fingers] button at the bottom of the screen. This opens the Capture / Encode Card screen.
Click the [Administrator Setup Options] button. If you cannot see this button, you are not signed in as
a master operator.
Click the [Configure Writer] button. This opens the Writer Configuration screen. The options in this screen will be setup according to the install.
Set the Block Number to “4” if it is not already set.
Click OK to save and go ahead to the section to setup the encoding options (next section).
Figure 7 – Setting Card Writer Block Number in SG:
Page 50

System Galaxy Biometrics Guide Sagem MA520 & MIFARE Interface
4.8.2 Configure the Setup Options for Encoding Cards in SG
To configure the Encoding Options do the following:
Open the cardholder programming screen by following the menu selections
Configure > Cards > Cardholders or clicking the Cardholder button on the toolbar
Click ADD NEW to start a cardholder record (you will use this to get the setup screen).
Choose the Card / Badge Settings tab and click the [Scan Fingers] button at the bottom of the screen.
This opens the Capture / Encode Card screen.
Click the [Administrator Setup Options] button. If you cannot see this button, you are not signed in as
a master operator.
Figure 8 – Setting Administrator Setup Options in SG:
Check the [Triple Scan] option if you want the enrollment operator to always perform a triple scan when
fingerprints are captured for each print (optional setting).
<<instructions continue on next page>>
Page 51

System Galaxy Biometrics Guide Sagem MA520 & MIFARE Interface
Page 52
Set the Default Card Writer field to the type of cards you are encoding – the choices are “iClass” and
“MIFARE”.
Set the allow non-master operators to choose a different writer option. Checked will let the
enrollment operator switch writers (not typical). Unchecked will lock this field in the Encoding Screen.
Set the Default Card Behavior to the type of credentials (card mode) you have planned to make.
Planning information about card modes is covered in Chapter 2.
Set the allow non-master operators to change behavior / card mode option. Checked will allow the
operator switch between card modes in the Encoding screen. You should check this option if you are
making Visitor Mode cards that will work without prints in the reader’s Card Determines Mode. If you do
not check this option the default value will be the only card mode the operator can encode. Unchecked
locks the field to the operator in the Encoding screen.
The two modes are …
Biometric = prints are required and will be encoded on the card.
ID Only = prints may or may not be capture but will NOT be encoded on the card. If prints are
captured, they can be loaded to the reader for use in the “Prints in Card” recognition mode.
Pin Code = same as ID Only plus a pin code is encoded on the card
Pin Code + Biometric = same as Biometric plus a pin code is encoded on the card
Set the Card ID format for the. Encoding screen
Set the how card ID is generated field to the desired value. Remember Chapter 2 covers these
options.
The choices are …
User determines number = means that the SG operator will manually set the ID value to a
valid and unique number in the system. If you are using the ABA format, you can use the NEXT
NUMBER option back in the Card/badge Settings tab to generate the next consecutive number in
the system.
User card serial number = means that your operator will manually read out the card serial
number in the Encoding screen and enter that value into the ID field. This is recommended for ABA
Data/Clock formats. Keep in mind that data folding may need to be turned on in the controller
programming screen– see Requirements in this manual.
Set the create files when reading data from card option as desired (diagnostic purpose). Checking
this option will cause system galaxy software to create a text file of the card contents when the card is
read in the Encoding screen. Every time you read a card, the file is overwritten. The file is placed in the
System Galaxy folder.
Click OK to save these settings.

System Galaxy Biometrics Guide Sagem MA520 & MIFARE Interface
Page 53
5 Enrolling Cardholder Biometric Data
This chapter covers the following:
Capturing Fingerprints System Galaxy
Encoding Cards
Loading Fingerprints to the Sagem Reader
NOTE 1: the main SG Software Manual covers information that is not covered in this manual.
NOTE 2: It is possible to set up Card Credentials without fingerprints, or have the choice of where the fingerprints reside (in the card or at the MA520). The MA520 must be configured to operate.
NOTE 3: The card number is a placeholder in the SG panel/system that associates the credentials with the access rules. Thus, a card number is always required even if the fingerprint is the only credential used at the MA520.
NOTE 4: If you are using finger-only, you must create a valid/unique card ID for SG, but you do not need to encode a card. Otherwise, you can encode the Card ID only, or the Card and Finger data.
NOTE 5: that fingerprints are stored in the SG database and will load to the MA520, provided the Load Morpho option is ON/Checked and loop/access privileges are set.
IMPORTANT: In order to capture and encode smart cards, you must enable the System Settings Smart Card Support option in the General tab of the System Settings screen.

System Galaxy Biometrics Guide Sagem MA520 & MIFARE Interface
5.1 Capturing Finger Data Only
1. Open and Edit the Cardholder screen and enter the cardholder’s information such as Name,
Department, Loop privileges, Access groups, or profiles.
2. Set the Card Technology,
3. Enter a unique Card ID number if you are using the “USER SETS ID NUMBER” option to get an ID. If
you are capturing the CSN you don’t need to enter an ID at this point.
4. Click the SCAN FINGERS button on the Badge Settings tab to open the Encoding screen
5. Capture two different fingers for the cardholder in the Encoding screen.
You must capture two unique prints unless you are making ID Only Visitor Card to be used at reader set to Card Determines Mode. The second exception would be if you are making a pass-through card that will only be used at a pass through reader.
NOTE: you SHOULD set the droplist to indicate which finger you captured.
NOTE: that two prints will be encoded on the card if you are using a “biometric” behavior or the “pin + biometric” behavior and have not set up a BIOPIN value.
NOTE: you will see fingerprint icons appear when the finger is captured.
IMPORTANT: Clicking the RESET button will erase both fingerprints.
MPORTANT: In order to capture and encode smart cards, you must enable the System Settings Smart Card Support option in the General tab of the System Settings screen.
NOTICE: In System Galaxy 10.0 or later, Galaxy supports enrolling fingers from a 500‐series Sagem reader. You
must choose which enrollment source to use in this screen (i.e. MSO‐300 or specific Sagem Reader).
Figure 9 – Capturing Fingers in System Galaxy:
Page 54

System Galaxy Biometrics Guide Sagem MA520 & MIFARE Interface
5.2 Encoding the Contactless Card 6. The card Behavior should be set by default – change it if needed to the value you desire. Card Modes
are described in Chapter 2.
7. Enter a Card ID if you did not set one already. If you are using the Card Serial Number, place the card on the Card Writer and click the Get Serial Number button.
8. Enter a PIN CODE only if you are creating a ‘Pin Code’ type card. Note the pin code will only be prompted for at a reader that has the Control PIN option enabled.
9. Check the BIOPIN option and enter a BIOPIN only if you are making a card with a BIOPIN. The BIOPIN will replace the fingerprints on the card. Note the BIOPIN will only be prompted for at a reader that has the BIOPIN option enabled.
10. Place the card on the Card Writer and click the [Write Data to Card] button. The system will encode the card in a few seconds.
11. You can read the card if you wish to ensure the data was written as expected.
12. Click OK to save all data and prints.
13. When you are returned to the Badge Settings tab, the Load Morpho option will be checked. This tells the system to send the prints and card data to the Sagem readers in the assigned loop. You must have assigned loop and access privileges for the fingerprint to load.
14. Click APPLY to save record and load fingerprints to Sagem reader.
IMPORTANT: In order to capture and encode smart cards, you must enable the System Settings Smart Card Support option in the General tab of the System Settings screen.
Figure 10 – Encoding Contactless Card
Page 55

System Galaxy Biometrics Guide Sagem MA520 & MIFARE Interface
Page 56
5.3 Loading Users / Finger Data to the reader
There are two ways to load users to the Sagem reader after the reader has a valid IP Address and is online on the customer’s network.
1. When you click Apply in the cardholder screen, the user/finger data is sent to any readers that the cardholder has been given loop/access privileges, provided the Load Morpho option is “checked”. The Load Morpho option is at the bottom of the Card / Badge Settings tab in the cardholder screen.
2. When you select a reader and choose to execute a ‘Load Finger Data’ action from the MALoader. The MALoader sends all users to the selected readers that have been given loop/access privileges, provided the Load Morpho option is “checked”. The Load Morpho option is at the bottom of the Card / Badge Settings tab in the cardholder screen.
Once you load finger data, you can execute a ‘Get DB information’ action to see how many users are in your reader base.
See next section for description managing the ‘Delete Card Before Loading’ option, found in Application Setting screen in the MALoader.

System Galaxy Biometrics Guide Sagem MA520 & MIFARE Interface
Page 57
5.4 Managing the Sagem Readers via MALoader
System Galaxy makes managing the Sagem biometric reader very easy from the MALoader utility.
The likelihood that a site has more than one Sagem reader and are using different models dictates the
capabilities that Galaxy built into the MALOADER.
The MALoader allows the Technician to …
Manage the base(s) of Sagem readers (create or delete and get the database info).
Load users / finger data into the readers (see section 5.3).
Import FGR files (for upgrades – also see Chapter 4).
Configure the Recognition modes, output format, and related options of the readers.
NOTE: You should run the MALoader from the System Galaxy directory on the computer you normally use to
connect to the readers. You can make a desktop shortcut to make it easier to open the MALoader from its home
directory.
5.4.1.1 Managing Bases
The MALoader allow you to delete bases, which also deletes all users. If you need to get old records out of the bases, you will use this option.
Also you can create a single base or all bases for the readers as is appropriate. The Select Action droplist contains a list of actions or commands that the MALoader can run when it is connected to the Sagem Reader. Click the EXECUTE ACTION button to send the command to the chosen reader. The actions allow you to delete and create bases, get DB configurations, and load finger data to the reader.
The MA110 has one base that holds 500 users.
the MA520 has multiple bases that hold up to 1 base with 3,000 users with the standard
memory allocation and up to 5 bases with 50,000 users with the extended memory license.
5.4.1.2 Delete Card Before Loading option
In the MALoader has an option to delete card before loading.
To find this option open the MALoader, click on the Applications Settings button. Look for the option at the bottom of the screen.
When checked the option will delete the card being loaded if it existed in the reader already and then load it into the reader. To maintain database integrity it is recommended to use this option. However, be aware that this could slow down large loads and can be unchecked to speed up loading fingers to the reader.

System Galaxy Biometrics Guide Sagem MA520 & MIFARE Interface
5.4.1.3 Importing FGR files
You only need to import FGR files if you are upgrading from a prior version of System Galaxy such as
v 8.2.3 or earlier, and you have captured FGR files that you need to import.
IMPORTANT: You should backup all FGR files before you upgrade your software. The upgrade should not disturb your FGR files; however, it is always good practice to backup assets whenever you are upgrading a computer. Upgrading a computer can uncover unexpected hazards that cannot be accounted for in software upgrade processes.
To run the IMPORT of FGR files,
Open the MALOADER utility and click the FILE menu
Select the IMPORT option and allow the import to complete.
NOTE: the MALoader must be pointed to the SagemMA folder that is storing the FGR files. FGR files
are typically located in a directory structure c:\Program Files\ System Galaxy\SagemMA on the
computer performing the finger enrollment. The files are actually in subfolders under the SagemMA
folder, but the MALoader must point to the SagemMA folder. The path is set in the Application Settings
Setup screen.
Figure 11 – Pointing to FGR files for importing:
Page 58

System Galaxy Biometrics Guide Sagem MA520 & MIFARE Interface
5.4.1.4 Configuring Reader Recognition modes
You can set the recognition mode for the selected reader from the MALoader utility.
Select the desired reader in the main screen
Click the CONFIGURE READER button
On the Data Output Format tab, you will set the output format and the site code if you are using Wiegand. You can also set the reader to ABA-Data/Clock (recommended with MIFARE).
In Multifactor mode and Prints in Card mode you will notice PIN CONTROL and BIOPIN options. Checking these options cause them to be enabled / set to “1” at the reader. Unchecking them causes the options to be disabled and set to “0” at the reader.
Click SEND TO MA TERMINAL button to send the configuration to the reader. The commands will display on the main screen as they are sent.
You can set the reader’s date and time to match the PC time.
You can reboot the reader also. It is recommended to reboot the reader after it has loaded a new recognition mode. See chapter 2 for a list of recognition modes and how they work.
Figure 12 – Setting Reader Recognition mode via MALoader:
Page 59
MIFARE Print in MA Terminal / Reader