ruulelsa ndglead ltiodemlrt imsmlrt - txdps · ruulelsa ndglead ltiodemlrt imsmlrt. ......
TRANSCRIPT

RULES AND REGULATIONS MANUALFOR OPERATION OF OFFICIAL
VEHICLE INSPECTION STATIONS
This manual presented by:
DPSRepresentative __________________________________________________________
Street _________________________________________________________________
City __________________________________________________________________
Phone ________________________________________________________________VI-87 (5/07)
OFFICIAL VEHICLEINSPECTION STATION

DEPARTMENT OF PUBLIC SAFETYINTEROFFICE MEMORANDUM
HQ-9
Date: 5-31-05TO: Regional Vehicle Inspection Supervisors
Divison:FROM: Thomas A. Davis, Jr., Director
SUBJECT: Revision of Rules and Regulations Manual for Official Vehicle InspectionStations and Certified Inspectors
1. Effective immediately, the current Rules and Regulations Manual for Official Vehicle Inspection Stations and Certified Inspectors is rescinded and should be destroyed when removed from the manual.
Effective immediately, the revised Rules and Regulations Manual for Official Vehicle Inspection Stations and Certified Inspectors is in effect and should be inserted in the manu-al immediately upon receipt.
2. Regional Vehicle Inspection supervisors will be responsible for the distribution of the aboverevisions to the vehicle inspection stations under their supervision.
Thomas A. Davis, Jr.Director
TAD:Hs
Distribution: Special for Rules and Regulations Manual for Official Vehicle Inspection Stations and Certified Inspectors

RULES AND REGULATIONS FOR THE OPERATION OFOFFICIAL VEHICLE INSPECTION STATIONS
FOREWORD AND AUTHORITY
The inspection of vehicles under the Texas Vehicle Inspection Act is conducted in approved, privatelyowned and operated garages and repair shops designated by the Texas Department of Public Safety.These approved Official Vehicle Inspection Stations carry on their own private business, but the inspec-tion of vehicles submitted for official inspection is not entirely private business. In conducting inspec -tions, the inspection station and its personnel act in the public capacity. It is carrying out the responsi -bility of the State Government to serve its citizens honestly and efficiently. This should, and must be,the guiding principle of the inspection station personnel, and it will be the standard used by all TexasDepartment of Public Safety personnel in supervising the conduct of vehicle inspection procedure.
Operators and employees of Official Vehicle Inspection Stations should be courteous and patient inexplaining to the motorists that the requirements of vehicle inspection are designed primarily to promotesafety. All employees should clearly understand that the function of the Official Vehicle InspectionStations is not just an arbitrary enforcement of the law but is for the advancement of highway safety. Allpersonnel of Official Vehicle Inspection Stations must adopt the attitude that they are selling safety ser-vice, and must also bear in mind that one certificate placed on an unsafe vehicle may be the cause ofa serious accident, and that they owe a duty to themselves, their families, and other vehicle owners andoperators not to jeopardize lives by errors, carelessness, or indifference.
The rules and regulations contained in the following pages of this manual are promulgated under theauthority of Texas Transportation Code, Compulsory Inspection of Vehicles, Chapter 548.
Failure to comply with all the provisions, rules, regulations, and laws pertaining to vehicle inspectionmay result in suspension or revocation of inspection authority and/or criminal charges being filed.
Thomas A. Davis, Jr.Director

TEXAS DEPARTMENT OF PUBLIC SAFETYVEHICLE INSPECTION SERVICEREGIONAL AND AREA OFFICES
LOCATION AREA CODE PHONE NUMBER ADDRESS
REGIONAL OFFICEGarland 214 861-2400 350 West Interstate 30
Garland, Texas 75043
AREA OFFICESDenton 940 484-6661 820 North Loop 288
ext. 254, 255 Denton, Texas 76209
Hurst 817 299-1472 624 NE Loop 820Hurst, Texas 76053
Longview 903 758-1790 416 Lake Lamond RoadLongview, Texas 75604
McKinney 214 733-5374 400 Powerhouseor 733-5373 McKinney, Texas 75069
Mt. Pleasant 903 572-3616 1906 North JeffersonMt. Pleasant, Texas 75455
Paris 903 785-8421 2885 North MainParis, Texas 75460
Sherman 903 813-3436 1413 Texoma ParkwaySherman, Texas 75090
Sulphur Springs 903 885-1800 1528 East Shannon RoadSulphur Springs, Texas 75482
Texarkana 903 255-5736 1516 HamptonTexarkana, Texas 75503
Tyler 903 939-6000 4700 University BlvdTyler, Texas 75713
REGIONAL OFFICEHouston 281 517-1350 12230 West Road
Houston, Texas 77065
AREA OFFICESAngleton 979 849-5706 501 South Velasco
Angleton, Texas 77515
Baytown 713 422-8582 1308 South Hwy. 146Baytown, Texas 77520
Beaumont 409 924-5400 7200 Eastex FreewayBeaumont, Texas 77708
5-30-07

LOCATION AREA CODE PHONE NUMBER ADDRESS
Brenham 979 836-2020 Box 119Brenham, Texas 77834
Conroe 936 539-2228 804 South IH 45Conroe, Texas 77305
Houston 281 272-1150 11222 North Houston-RosslynHouston, Texas 77088
Humble 281 446-4495 7710 Will Clayton Pkwy.Humble, Texas 77338
Lufkin 936 699-7300 2809 South John ReddittLufkin, Texas 76904
Pearland 281 412-7417 3224 South Main StreetPearland, Texas 77581
Pierce 979 541-4500 US 59 BypassPierce, Texas 77467
Texas City 409 938-7899 1325 North Amburn RoadTexas City, Texas 77591
REGIONAL OFFICECorpus Christi 361 698-5657 1922 South Padre Island Drive
Corpus Christi, Texas 78465
AREA OFFICESBeeville 361 358-8891 400 Hillside
Beeville, Texas 78102
San Antonio 210 531-2265 6502 South New Braunfels AvenueSan Antonio, Texas 78223
Seguin 830 379-4210 1440 East KingsburySeguin, Texas 78155
Victoria 361 578-2771 8802 North NavarroVictoria, Texas 77904
REGIONAL OFFICEMidland 432 498-2170 2405 South Loop 250 West
Midland, Texas 79703
AREA OFFICESAbilene 325 795-4000 2720 Industrial Blvd.
Abilene, Texas 79605
Brownwood 325 646-6867 540 Commerce SquareBrownwood, Texas 76801
El Paso 915 849-4000 11612 Scott Simpson DriveEl Paso, Texas 79936
5-30-07

LOCATION AREA CODE PHONE NUMBER ADDRESS
Ft. Stockton 432 336-3414 2302 West DickinsonFt. Stockton, Texas 79735
Odessa 432 332-6100 1910 Interstate 20 WestOdessa, Texas 79763
San Angelo 325 942-8203 1600 West Loop 306San Angelo, Texas 76904
REGIONAL OFFICELubbock 806 472-2700 1302 Mac Davis Lane
Lubbock, Texas 79401
AREA OFFICESAmarillo 806 468-1300 4200 Canyon Drive
Box 31960Amarillo, Texas 79120
Decatur 940 627-0035 2000 TrinityExt. 106 Box 248
Decatur, Texas 76234
Mineral Wells 940 325-6903 600 FM 1821 NorthMineral Wells, Texas 76067
Pampa 806 665-7168 2909 Perryton ParkwayPampa, Texas 79065
Weatherford 817 594-2696 207 Ft Worth HighwayWeatherford, Texas 76086
Wichita Falls 940 851-5500 5505 N Central ExpresswayWichita Falls, Texas 76308
REGIONAL OFFICEWaco 254 759-7136 1617 East Crest Drive
Waco, Texas 76705
AREA OFFICESAustin 512 424-7010 108 B Denson Drive
Austin, Texas 78773
Austin, South 512 444-4178 4319 South CongressAustin, Texas 78745
Bryan 409 776-3145 1540 Highway 6 East BypassBox 3861Bryan, Texas 77805
Cleburne 817 641-2204 600 West KilpatrickCleburne, Texas 76031
Corsicana 903 872-5633 US 287 SouthPO Box 1636Corsicana, Texas 75151
5-30-07

LOCATION AREA CODE PHONE NUMBER ADDRESS
Georgetown 512 930-3115 515 Pine StreetGeorgetown, Texas 78626
Kerrville 830 257-7876 311 Sidney Baker SouthKerrville, Texas 78028
Killeen 254 634-3447 302 Priest Driveext. 101 Killeen, Texas 76541
Palestine 903 729-3124 PO Box 2800Palestine, Texas 75802-2800
Temple 254 939-5838 6612 General Bruce DriveTemple, Texas 76502
Waxahachie 972 923-5106 701 IH 35 6BWaxahachie, Texas 75165
REGIONAL OFFICEMcAllen 956 984-5600 1414 North Bicentennial
McAllen, Texas 78501
AREA OFFICES Laredo 956 728-2200 1901 Bob Bullock Loop
Laredo, Texas 78043-9701
Brownsville 956 983-1900 2901 Paredes Line RoadBrownsville, Texas 78521
Del Rio 830 703-1264 2012 Veterams BlvdDel Rio, Texas 78840
Harlingen 956 440-6714 1630 North 77 Sunshine StripHarlingen, Texas 78550
5-30-07

TABLE OF CONTENTS
CHAPTER 1 STATION CERTIFICATION
CHAPTER 2 INSPECTOR CERTIFICATION
CHAPTER 3 STATION OPERATION
CHAPTER 4 INSPECTION PROCEDURES AND REFERENCES
CHAPTER 5 RECORDS AND REPORTS
CHAPTER 6 FMCSR ANNUAL INSPECTION (If applicable)
3-30-2000

5-30-07
CHAPTER ONESTATION CERTIFICATION
CHAPTER CONTENT
PROCEDURE FOR A P P O I N T M E N TAS AN OFFICIALVEHICLE INSPECTION STAT I O N . . . . . . . . . .01.05.00 p. 1-1
CLASSES OF OFFICIAL VEHICLE INSPECTION STATIONS.............................................01.10.00 p. 1-2
STATION ENDORSEMENTS.................................................................................................01.15.00 p. 1-3
RESPONSIBILITY OF INSPECTION STATION OWNER OR OPERATOR..........................01.20.00 p. 1-3
MINIMUM REQUIREMENTS FOR OFFICIAL VEHICLE INSPECTION STATION...............01.25.00 p. 1-4Space Requirements...................................................................................................... 25.01 p. 1-4Equipment Requirements............................................................................................... 25.02 p. 1-5Brake Test Area Specifications....................................................................................... 25.03 p. 1-7Inspection Station Display Area..................................................................................... 25.04 p. 1-7Inspection Area............................................................................................................... 25.05 p. 1-7Official Vehicle Inspection Station Sign.......................................................................... 25.06 p. 1-8
CHANGE OF NAME, LOCATION, OR OWNERSHIP............................................................01.30.00 p. 1-8
GOING OUT OF BUSINESS.................................................................................................01.35.00 p. 1-8
INSPECTION STATION CANCELLATIONS AND SUSPENSIONS...................................... 01.40.00 p. 1-9
REINSTATEMENT AFTER SUSPENSION............................................................................01.45.00 p. 1-9
LEASE OR SALE OF INSPECTION STATION DURING SUSPENSION............................. 01.50.00 p. 1-9
CRIMINAL VIOLATIONS........................................................................................................01.50.00 p. 1-9
i

01.05.00
5-31-05
01.05.00 PROCEDURE FOR APPOINTMENT AS AN OFFICIALVEHICLE INSPECTION STATION
Those desiring to make application for an Official Ve h i c l eInspection Station should notify Vehicle Inspection personnel, anyregional Department of Public Safety office, or the headquartersoffice in Austin.
Vehicle Inspection personnel, with all necessary forms, will call atthe place of business of the applicant for a personal inspection ofthe premises, personnel and equipment to determine the ability ofthe applicant to conduct inspections in accordance with the provi -sions of the Transportation Code. If application is approved, appli-cant will be notified and upon receipt of a fee of $30 which shallconstitute the certificate fee until August 31 of the odd-numberedyear following the date of appointment as an Official VehicleInspection Station, a Certificate of Appointment will be issued to theapplicant. Thereafter, appointments will be made for two-year peri-ods, and the certificate fee for each such period will be $30. Allfees shall be submitted by either check, cashier ’s check or moneyorder, which shall be made payable to the Texas Department ofPublic Safety. An inspector employed only at a governmental sta-tion is exempt from the fee.
Applicant shall be informed of the required equipment includingsuch items as approved testing devices, tools, measuring devices,display area, brake machines, marked brake test area, andapproved inspection test area. Applicant shall be advised not topurchase any testing equipment until notified by the Departmentrepresentative that all minimum requirements are in compliancewith Department rules and regulations.
An applicant for an Official Vehicle Inspection Station must meetthe space, equipment, and manpower requirements as prescribedfor the class of vehicle inspection station, and must have a certifiedinspector in his employ. Applications for Official Vehicle InspectionStations shall not be considered unless the vehicle inspection sta -tion is open for inspections at least eight (8) consecutive hours(excluding the lunch hour) of each approved business day, a mini -mum of 40 hours per week, and able to perform inspections 12months throughout the year, except during illness of limited dura -tion or normal vacation. Additional hours of inspection are permit -ted. Hours of inspection must be approved by supervisingDepartment representative. All appointments are provisional, andare conditioned on a proper conduct of inspection and compliancewith Department rules and regulations. Inspections by appoint -ment only are not permitted. The Department may require anapplicant for appointment as an Official Vehicle Inspection Stationto furnish evidence of sound business practices. Financial insta -bility can be a cause for disapproval.
Application forms necessary for certification as an Official VehicleInspection Station must be properly completed, signed, and sub -mitted with all other necessary forms and fees to the Department.If the application is approved, on initial investigation, the applicantwill be advised to proceed with the installation of testing equipment.
After such installation, the Department will inspect the equipmentfor approval. The Department will conduct an investigation of eachapplicant to determine full compliance with the Official VehicleInspection Station rules and regulations, which may include thecomplete character check of the owner or operators. Every personlicensed to operate an Official Vehicle Inspection Station shall be ofgood reputation, character, and moral conduct.
In accordance with the Texas Transportation Code, the Departmentof Public Safety may deny an application for certification or revokeor suspend an outstanding certificate of any inspection station orthe certificate to inspect vehicles of any person who has been con-victed of: (1) a felony or Class A or B misdemeanor; (2) a similarcrime under the jurisdiction of another state or the federal govern -ment that is punishable to the same extent as a felony or Class Aor Class B misdemeanor; or (3) a crime under the jurisdiction ofanother state or the federal government that would be a felony orClass A or Class B misdemeanor if the crime were committed inthis state.
1. A conviction for a felony or a Class A or Class B misde -meanor will be cause for denial, suspension, or revocationunder this subsection until after the court-imposed punish -ment or supervision has elapsed. For purposes of this sec -tion, a person is convicted of an offense when a court entersagainst the person an adjudication of guilt, including an orderof probation or deferred adjudication.
2. The certification of an inspection station will be subject todenial, revocation, or suspension in the event the owner orinspector is convicted of such an offense. In the event thatan inspector or inspector applicant is convicted of such anoffense, that person’s certification will be subject to revoca -tion, or suspension, or his application will be subject todenial.
3. Deferred adjudications and orders of probation are con -sidered to be equivalent to convictions until the charges thatare the basis for these orders are dismissed or discharged.
The Department has determined a certified inspection station andcertified vehicle inspector is in a position of trust, performing a serv-ice to members of the public where the Transportation Code,Chapter 548, requires the public to report for vehicle inspection.Therefore, the department has determined the following crimesrelate directly to the duties and responsibilities of a certified vehicleinspector and/or those for whom this section is applicable asdetailed in subsection (b) of this section. Those crimes include:
1. any crime of which fraud is an element,
2. deceptive business practices, deceptive trade practices, orany criminal violation of statutes that protect consumersagainst unlawful business or trade practices,
3. murder,
1-1
[

01.10.00
1-2
4. burglary,
5. robbery,
6. aggravated robbery,
7. aggravated sexual assault,
8. indecency with a child,
9. sexual assault,
10. aggravated assault,
11. any violent crime against a person involving knowledge orpurpose,
12. theft,
13. violation of the Texas Controlled Substance Act (Healthand Safety Code, 481.112-481.126),
14. driving while intoxicated, and
15. conviction of an offense as detailed in Te x a sTransportation Code, Chapter 548, 548.601, and 584.603.
As an authorized owner or operator of an Official Vehicle InspectionStation, you are responsible to the Department for the proper oper-ation of the Official Vehicle Inspection Station. An owner or opera-tor will recognize and acknowledge their responsibility to the publicto offer a good, complete and thorough inspection, according to therules and regulations.
Based upon the application and results of investigations made,each applicant will be approved or disapproved for appointment.Each applicant approved, will be issued a Certificate ofAppointment. Such Certificate of Appointment shall be for theplace of business set forth in the application. The Certificate ofAppointment shall not be assignable and shall be valid only for theowner or owners in whose name or names they are issued and fortransaction of business only at the place designated thereon.
No business will be approved as an Official Vehicle InspectionStation until all certification requirements have been met.Inspection area must be designated and approved by the super -vising Department representative. Businesses meeting all qualifi -cations will be required to complete an application, signature cards,and furnish the appointment fee. The applicant will be notified ofappointment as an Official Vehicle Inspection Station and aCertificate of Appointment will be issued to the applicant after thenecessary forms have been completed and approved.
A Certificate of Appointment will not be issued for the operation ofan Official Vehicle Inspection Station until an investigation hasbeen made by the Department to assure that it has the proper facil-ities, required equipment, and is properly qualified or has properly
qualified personnel to accomplish satisfactory inspections.Companies and governmental agencies who have their owngarages and repair facilities may apply for an Official VehicleInspection Station Certificate of Appointment provided such facili -ties, equipment, and personnel meet the requirements set forth inthese rules and regulations.
The application shall be signed by the owner, if a natural person,and in the case where the owner is a corporation, co-partnership orassociation, by an executive officer thereof or some other personspecifically authorized by said corporation to sign the application towhich shall be attached written evidence of their authority. Proof ofownership may be required of applicant.
When all certification requirements have been met the supervisingDepartment representative will issue and explain the use of all sup-plies and forms necessary for the operation as an Official VehicleInspection Station.
In accepting your appointment as an Official Vehicle InspectionStation, you accept the responsibility to properly inspect all vehi -cles submitted for inspection and to serve the citizens efficiently .This will be the standard used by the Department in supervisingyour conduct as an Official Vehicle Inspection Station. Any OfficialVehicle Inspection Station which fails to maintain this standard indealing with the public cannot be allowed to continue as an OfficialVehicle Inspection Station. The procedures outlined herein shouldbe carefully studied and frequently reviewed by your entire organi -zation. If the inspection program is to be effective, you must bethoroughly familiar with and follow all of the provisions as outlined.If your appointment is subsequently withdrawn, it is because youand your employees have failed to follow the instructions containedin this Rules and Regulations Manual.
Instructions for the renewal process will be provided well inadvance of August 31 of the odd-numbered year when the station’sCertificate of Appointment is due to expire.
01.10.00 CLASSES OF OFFICIAL VEHICLE INSPECTION STA-TIONS
The classes of Official Vehicle Inspection Stations authorized inTexas are as follows:
1. Public Station: An Official Vehicle Inspection Station towhich the Department has granted authority to inspect anyand every vehicle presented for inspection for which theyhave an endorsement.
2. Fleet Station: An Official Vehicle Inspection Station towhich the Department has granted authority to inspect onlythose vehicles for which they have an endorsement and areowned by, or under bona fide lease to or under service con -tract to, the company in whose name the fleet inspection sta-tion’s Certificate of Appointment is issued.
5-31-05

01.15.00 - 20.00
5-31-05
3. Governmental Station: An Official Vehicle InspectionStation to which the Department has granted authority toinspect only those vehicles for which they have an endorse -ment and are owned and operated by the political subdivisionand agency of the state and in whose name the governmen -tal vehicle inspection station’s Certificate of Appointment isissued.
01.15.00 STATION ENDORSEMENTS. The following six (6) en-dorsements will be used in conjunction with the three (3) classes ofOfficial Inspection Stations to further identify the types of inspectioncertificates to be issued by each Official Inspection Station.
1. Endorsement: 1Y - may inspect any vehicle requiring aone-year windshield certificate.
2. Endorsement: 2Y - may inspect any vehicle requiring atwo-year windshield certificate.
3. Endorsement: CW - may inspect any vehicle requiring acommercial windshield certificate.
4. Endorsement: CT - may inspect any vehicle requiring acommercial trailer certificate.
5. Endorsement: TL - may inspect any vehicle requiring atrailer certificate.
6. Endorsement: MC - may inspect any vehicle requiring amotorcycle certificate.
01.20.00 RESPONSIBILITY OF INSPECTION STATION OWNEROR OPERATOR
Upon being appointed as an Official Vehicle Inspection Station, youas the inspection station owner or operator, will be deemed to haveaccepted the following obligations and responsibilities. The personsigning the inspection station application form is obligated, uponbeing certified, to comply with the following responsibilities:
1. To act as directed by the Texas Department of PublicSafety in inspecting vehicles in accordance with the Rulesand Regulations Manual.
2. To inspect only those vehicles authorized by the class ofinspection station and specific endorsements.
3. To make the Rules and Regulations Manual available to allcertified inspectors.
4. To properly instruct all employees in accordance with thismanual.
5. Use only employees certified by the Department of Public
Safety to do the actual inspecting in accordance with therequirements.
6. That owner/operator will notify the Department represen -tative supervising the station when a certified inspectorleaves employment.
7. Ensure that all inspectors will conduct honest, thorough,and efficient safety inspections and issue out-of-state identi -fication certificates as promptly as possible, in accordancewith the Transportation Code and the Department’s regula -tions.
8. Maintain in good working order all required tools andequipment prescribed in the minimum requirements and tocease operations immediately when this condition is not met.
9. Maintain a clean and orderly place of business, shop, andinspection area. (Owner is responsible for employees in thisrespect.)
10. Keep an up-to-date set of inspection records at theOfficial Vehicle Inspection Station.
11. Records are to be kept on forms and in the manner pre -scribed by the Department and shall be available for exami -nation during approved business hours by any authorizedagent of the Texas Department of Public Safety.
12. Records shall be kept for at least one year from the daterecorded.
13. Records may be removed from premises by anyDepartment representative for investigation or evidence andshall be returned without undue delay.
14. Keep an adequate supply of safety inspection certifi -cates, out-of-state identification certificate forms, and allother supplies on hand.
15. Refrain from the use of alcohol.
16. Refrain from the use of drugs in any degree except whenprescribed by a licensed physician, providing that normal fac-ulties shall not be impaired.
17. Have a reputation for sound business practices, highmoral character, and obedience to law and order.
18. Each Official Vehicle Inspection Station must have a min-imum of one certified inspector on duty to perform inspec -tions promptly during the approved working hours of theinspection station. Adequate supervision of employees certi-fied to make inspections should be provided during this time.It is recommended that every inspection station have morethan one certified inspector available to ensure prompt
1-3
[

01.25.00 - 25.01
1-4
inspection service to the public at all times. Vacations anddays off should be anticipated by management.
19. Be open for inspections eight (8) consecutive hours(excluding the lunch hour) each approved business day witha minimum of forty (40) hours per week. Additional hours ofinspection are permitted. Hours of inspection must beapproved by supervising Department representative. Daysand hours of inspection may be required to be posted in anarea accessible to the public.
20. Properly display visible to the general public theCertificate of Appointment, procedure chart, Official VehicleInspection Station sign (not required on fleet or governmen -tal inspection stations), and any other notices deemed nec -essary by the Department.
21. Shall be solely responsible for maintaining all suppliesissued by the Department in reasonably good condition.Shall take particular care to ensure that safety inspection cer-tificates, out-of-state identification certificates, and numberinserts assigned are safeguarded against theft, loss, or dam-age, and kept under lock and key at all times. Numericalsequence of issuance must be strictly adhered to ensuringthat certificates are placed on or issued for vehicles in accor-dance with rules and regulations.
22. Make reasonable charges for any adjustments, correc -tions, or repairs required by such inspection. (Prices for laborcharges may be required to be posted at the discretion of theTexas Department of Public Safety.)
23. Shall notify the Department representative supervisingthe station of any change of location, name or ownership, orwhen going out of business. Upon the effective date of anysuch change in location, name or ownership, all inspectionprivileges will cease.
24. Shall make inspections and affix certificates of inspectionand issue out-of-state vehicle identification certificates onlyat the business location designated on the Certificate ofAppointment.
25. Shall affix certificates and issue out-of-state vehicle iden-tification certificates only to those vehicles which have beenproperly inspected and are passed as safe.
26. Submit the required inspection report to the TexasDepartment of Public Safety as directed.
27. Shall upon termination of the Certificate of Appointment,for any reason, immediately turn over all inspection materialsissued by the Department to the supervising Department rep-resentative and shall receive a receipt for any unused certifi -cates to be refunded by the state.
28. It is your responsibility to determine that every vehiclesubmitted for inspection is properly and thoroughly inspectedby a certified inspector and that the operation of your inspec-tion station is in accordance with these rules and regulations.You have the duty to place vehicular safety foremost as thisis the primary intent of Vehicle Inspection in Texas.
29. Inspection stations that have purchased inspection cer -tificates with checks that have been returned for insufficientfunds are subject to suspension or revocation of theCertificate of Appointment. In the event a station’s certifica -tion is suspended or revoked for insufficient funds checks, alloutstanding checks with the Department must be clearedbefore an applicant can be recertified. Upon recertification,inspection certificate purchase will only be allowed bycashier’s check or money order for a minimum of six-months.
A second incident involving a purchase of inspection certifi -cates resulting in the check being returned for insufficientfunds may again result in the suspension or revocation of thestation’s Certificate of Appointment until the check(s) havebeen cleared. If the station recertifies, inspection certificatepurchases will only be allowed by cashier ’s check or moneyorder for a minimum of 18 months.
A third incident involving a purchase of inspection certificatesresulting in the check being returned for insufficient fundsmay also result in the suspension or revocation of the sta -tion’s Certificate of Appointment until the check(s) have beencleared. If the station recertifies, inspection certificates willonly be allowed by cashier ’s check or money order for anindefinite period of time.
NOTE: Failure to comply with any of the above-listedresponsibilities may result in suspension of the Certificate ofAppointment.
01.25.00 MINIMUM REQUIREMENTS FOR OFFICIAL VEHICLEINSPECTION STATIONS
Approval of inspection station applications cannot be granted, norappointment allowed to continue, unless full compliance with thefollowing requirements is met and maintained.
25.01 Space
1. General Requirements
a. The building must be a sound structure, in good repair ,to qualify as an official Vehicle Inspection Station. Thebuilding must be a permanent type building with at leasttwo permanent walls and a permanent roof. The inspec -tion area must be located entirely within or adjacent to thebuilding and in an area approved by the Department. Tem-
5-31-05
[

01.25.02
5-31-05
porary expedients such as tents, arbors, or sheds are notacceptable. (For stations with trailer endorsements, seespecific requirements.)
b. Every inspection station shall have an inspection areawithin the station, set aside and approved for conductingthe inspection of vehicles. When an inspection stationdesires to have more than one inspection area, the spacerequirements for each lane must be met. (For stationswith trailer endorsements, see specific requirements.)
c. At least one approved inspection area containing all therequired equipment is to be available during approvedbusiness hours for the purpose of inspection during theentire calendar year.
d. Inspection area is defined as the designated spaceapproved for inspection purposes. Approval cannot begranted, nor permitted to continue, unless full complianceof the minimum inspection station requirements is main -tained.
e. The inspection lane area shall be sufficiently lighted toafford good visibility for performing all inspection proce -dures.
f. The entire floor of the approved inspection area of thebuilding shall be hard surfaced. (See floor materialrequirements under specific requirements.)
g. The inspection area must be kept clean at all times.The business location will be routinely checked to see that it is as clean and orderly as could be reasonably expect -ed.
h. Lifts, pits, and runners are permissible if all otherrequirements are met.
i. The inspection area must be free of any obstructionsthat will interfere with inspections. Work benches, storagecabinets, or tools may be allowed if sufficient space toconduct inspection is not affected.
j. An approved inspection area will be maintained at alltimes during inspection periods so that vehicles may beinspected without unreasonable delay.
2. Specific Requirements
a. Public, Fleet, and Governmental Classes ofInspection Stations
1) The inspection area shall include: an area of 12 feetby 24 feet of minimum space. The inspection areamust be in an area approved by the Department.
2) Floors: The entire floor must be hard surfaced, suchas concrete. Dirt, gravel, wood, or hot mix floors arenot acceptable.
3) Governmental inspection stations shall meet all ofthe requirements as prescribed for a public inspectionstation.
4) Fleet inspection stations shall meet all the require -ments as prescribed for a public inspection station.Fleet inspection stations may only inspect vehiclesowned by the company or under bona fide lease to thecompany or vehicles that are covered under a currentservice contract with the company.
5) Fleet and governmental inspection stations are notpermitted to inspect the personal vehicles of officers,employees, or the general public. This applies eventhough personal vehicles may be used part- or full-timefor business.
6) Inspection stations will not be approved where freeaccess to the inspection station grounds is not grantedto representatives of the Department.
7) Firms open to the public will not be issued a fleetinspection station Certificate of Appointment except ininstances where such firms are currently certified as apublic inspection station and desire a fleet inspectionstation Certificate of Appointment.
b. Trailer Endorsement Inspection Stations
1) The building must be of a permanent type suitablefor display area, tools, and storage for records andnecessary supplies.
2) Inspection area may be of any hard surfacing mate-rial.
3) Inspection stations with trailer endorsements musthave a towing vehicle capable of handling the typevehicle being inspected.
4) Vehicle inspection stations with trailer endorsementsmust have 1/4-inch round hole paper punch for punch-ing trailer inspection certificates.
c. Motorcycle Endorsement Inspection Stations
1) The inspection area shall include: an area of 8 feetby 10 feet of minimum space.
2) Vehicle inspection stations with motorcycle endorse-ments must have a 1/4-inch round hole paper punchfor punching motorcycle inspection certificates.
1-5

01.25.02
1-6
3) Floors: The entire floor of the approved inspectionarea of the building must be hard surfaced, such asconcrete. Dirt, gravel, wood, or hot mix floors are notacceptable.
d. Commercial Windshield and Commercial TrailerEndorsement Inspection Stations. Stations issuingcommercial certificates in addition to meeting require -ments for their class of inspection station are required tohave a 1/4-inch round hole punch for punching commer -cial inspection certificates.
25.02 Equipment
1. General Requirements for All Classes of InspectionStations
a. The minimum amount of tools, equipment, approvedtesting devices, and current Rules and RegulationsManual must be kept and maintained in proper conditionat all times in the inspection station area defined herein.
b. In the event machines or equipment are utilized in theperformance of the inspection procedure, the inspectionstation owner or operator shall have the responsibility forthe use, accuracy, and general maintenance of all equip -ment. Whenever adjustments and/or calibrations areneeded to assure the accuracy and performance of suchequipment, the Department’s specifications and recom -mendations will be followed. Under no circumstances canequipment be used for the purpose of inspecting vehicleswhen the known method of calibration or adjustment nec -essary for the maintenance of such equipment is not avail-able and in constant use at the inspection station. Anyknown deficiency in such equipment shall be correctedimmediately. Any defective equipment will not be useduntil and unless such deficiencies are corrected and thenapproved by the supervising Department representative.
c. All testing equipment used at an inspection station musthave been approved for such use by the Department. Alltesting equipment shall be installed and used in accor -dance with the Department’s recommendation. To ensureproper functioning, equipment shall be checked and cali -brated frequently and shall be properly maintained.Inspections may not be conducted when any requiredtesting device is malfunctioning until the device has beenrepaired and subsequently approved for use by theDepartment. Equipment shall be arranged and located ator near the approved inspection area to obtain maximumefficiency.
d. Every certified inspector shall have a working knowl -
edge of all testing devices used in the performance of aninspection in their inspection station. It is also necessarythat the certified inspector know the procedure for setting,calibrating, and otherwise causing such equipment to beaccurate and effective, according to the Department’s rec-ommendations.
e. Each Official Vehicle Inspection Station is required toown and maintain the minimum amount of equipment, aslisted below.
1) Tools and facilities for making tests, repairs, andadjustments ordinarily encountered on those types ofvehicles to be inspected.
2) A brake test area which has been approved by thesupervising Department representative, measured andmarked as follows: 0, 25’, 30’, 40’, and 50’OR
3) A brake decelerometer which has been approved,OR
4) A brake machine which has been approved andproperly installed.
5) A measuring device(s) clearly indicating a 12-inchmeasurement, a 15-inch measurement, a 20-inchmeasurement, a 24-inch measurement, a 54-inchmeasurement, a 60-inch measurement, a 72-inchmeasurement, and an 80-inch measurement to meas -ure height, width of lighting, and other safety equip -ment.
6) A laundry marking pen or permanent ink pen forcompleting out-of-state vehicle identification certificatesand the reverse side of the safety inspection certificate.
7) A glass or acrylic faced frame the size of theCertificate of Appointment.
8) A scraping device for removing the old inspectioncertificate.
9) Agauge for measuring tire tread depth calibrated in32nds of an inch and designed with a metal probe.
10) A measuring device for checking brake pedalreserve clearance.
11) A Department-approved device for measuring thelight transmission of sunscreening devices. This equip -ment requirement may not apply to government, fleet, orother types of inspection stations as determined by theDepartment.
5-31-05
[
01.25.03 - 25.05
1-1-03
12) A Department-approved device for checking gascaps. This equipment requirement may not apply to gov-ernmental, fleet, or other types of inspection stations asdetermined by the Department.
f. All Official Vehicle Inspection Stations equipped withapproved testing devices, (decelerometers and brakemachines) which manufacturers have discontinued mayuse them as long as they are in proper working order ,capable of testing, and as long as they can continue to getservice and repairs for them. When they are no longerserviceable, they must be replaced.
25.03 Brake Test Area Specifications
Every vehicle inspection station must have a designated braketest area where road tests are conducted unless a machine isused for brake tests. Any number of inspection stations mayuse the same area in a given town if authorized by theDepartment representative.
All road tests for braking efficiency shall be made only at ameasured, marked, and approved brake test area. The areashall be substantially level (not to exceed plus or minus 1%grade), smooth, hard surfaced, and free of loose material, oil, orgrease. The area must be designated by painted lines, stakesor other devices noting where the brakes are to be applied; 25feet forward from this beginning designation, there should beanother marker; 5 feet further from the second marker (at 30feet) there should be a third marker; 10 feet further from the thirdmarker (at 40 feet) there should be a fourth marker.Thoseinspection stations that inspect large truck-trailer combinationswill be required to have an additional line or marker, 50 feet.
It is the responsibility of the inspection station owner or operatorto secure an acceptable area and maintain the painted lines,stakes, or other devices indicating the brake test area. In someinstances, all of the above-mentioned lines or markers will notbe necessary. You should consult the Department representa -tive supervising your inspection station as to the numberrequired.
The brake test area and location must be marked and main -tained by the inspection station.
The area and location must be approved by the Department rep-resentative supervising the station. Any change in the locationor additions to the brake test area must be approved by thesupervising Department representative.
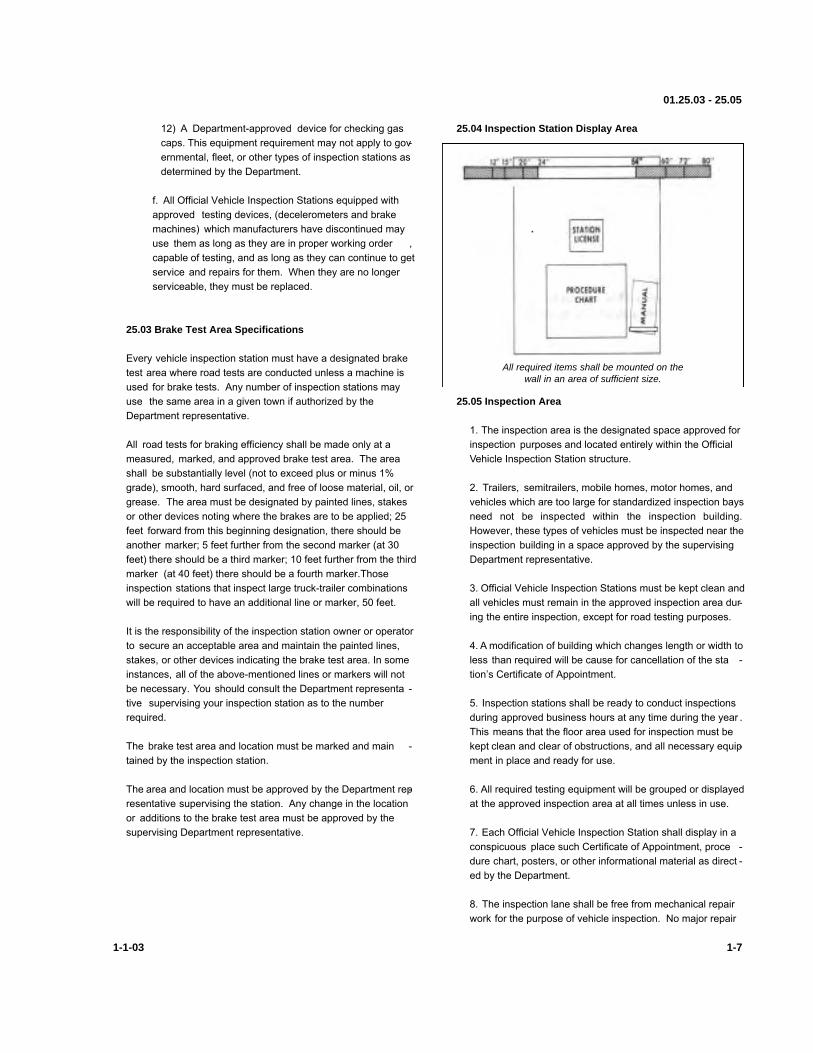
25.04 Inspection Station Display Area
25.05 Inspection Area
1. The inspection area is the designated space approved forinspection purposes and located entirely within the OfficialVehicle Inspection Station structure.
2. Trailers, semitrailers, mobile homes, motor homes, andvehicles which are too large for standardized inspection baysneed not be inspected within the inspection building.However, these types of vehicles must be inspected near theinspection building in a space approved by the supervisingDepartment representative.
3. Official Vehicle Inspection Stations must be kept clean andall vehicles must remain in the approved inspection area dur-ing the entire inspection, except for road testing purposes.
4. A modification of building which changes length or width toless than required will be cause for cancellation of the sta -tion’s Certificate of Appointment.
5. Inspection stations shall be ready to conduct inspectionsduring approved business hours at any time during the year .This means that the floor area used for inspection must bekept clean and clear of obstructions, and all necessary equip-ment in place and ready for use.
6. All required testing equipment will be grouped or displayedat the approved inspection area at all times unless in use.
7. Each Official Vehicle Inspection Station shall display in aconspicuous place such Certificate of Appointment, proce -dure chart, posters, or other informational material as direct -ed by the Department.
8. The inspection lane shall be free from mechanical repairwork for the purpose of vehicle inspection. No major repair
1-7
All required items shall be mounted on thewall in an area of sufficient size.

01.25.06 - 35.00
1-8
shall be performed in this area during approved work hourswhen inspections are to be performed. Minor repair jobs per-formed in this lane must be of such a nature that the vehicleundergoing such repair can be easily moved out of the areafor the purpose of inspection of another vehicle.
9. Official Vehicle Inspection Stations shall not refuse toinspect any vehicle, for which an endorsement is held, that ispresented for inspection, if the vehicle is of the type autho-rized to be inspected at an Official Vehicle Inspection Station,provided the necessary tools and equipment needed to com-plete that inspection are available.
10. When refusing to inspect for a justified cause, it is a goodpractice to know and refer the customer to another conven -ient station that is qualified to serve the customer .
NOTE: The station Certificate of Appointment and procedurechart may be displayed in the customer waiting area, asapproved by the supervising Department representative.
25.06 Official Vehicle Inspection Station Sign
1. In order to meet the minimum requirements for vehicleinspection stations in Texas, every Official Vehicle InspectionStation, except fleet and governmental inspection stations, isrequired to display, at all times during the official life of thestation, the Official Vehicle Inspection Station sign.
2. The official sign that is displayed designating your estab -lishment as an Official Vehicle Inspection Station must reflectcredit upon your place of business and the state of Texas.
3. The sign and replacements are provided by the state at nocost to the station and shall always remain the property of the Department as a means of identification of the OfficialVehicle Inspection Station.
4. Only one official sign will be displayed at any public inspec-tion station, but dissimilar signs may be displayed.Replications of the official sign may not include the StateSeal of Texas. The supervising Department representativewill issue only one sign per public inspection station licenseissued.
5. Signs will be displayed from the inspection station buildingfacing the street, preferably in the open to provide maximumvisibility.
6. Signs will be firmly and solidly mounted on the wall orframework of the station with no sign edge overhang and ina location designated by the supervising Department repre -sentative.
7. The sign will ordinarily be displayed at or near the serviceentrance or inspection area entrance to the building. Whendisplayed, the sign will cover no part of any other sign oradvertisement nor will any other sign or advertisement coverany portion of the Official Vehicle Inspection Station sign.
8. The sign shall not be altered in any manner unless autho-rized by the Department.
9. Failure to display the Official Vehicle Inspection Stationsign is grounds for inspection station suspension. The signshall be surrendered upon demand of the Department.
01.30.00 CHANGE OF NAME, LOCATION, OR OWNERSHIP
Owners or operators of Official Vehicle Inspection Stations con -templating a change of location, change of name, or change ofownership must notify the supervising Department representativebefore such change is made to avoid delay.
Upon the effective date of any such change of location, name, orownership, all of your inspection privileges will cease under theformer name or address, and you will not be allowed to inspectvehicles under the new name or location or as a new owner untilyou are certified by the Department.
The Certificate of Appointment fee for any such change in location,name, or ownership will be the same as for a new inspection sta -tion application.
01.35.00 GOING OUT OF BUSINESS
Whenever any Official Vehicle Inspection Station goes out of busi -ness, the owner or operator shall notify the Department represen -tative supervising the station of this intent and immediately returnall forms, certificates, sign furnished by the Department, and anyother official materials relating to inspections to the Department. Afinal accounting of all forms and other items shall be includedimmediately upon termination of business.
All unused inspection certificates must be returned or accountedfor to the Department of Public Safety. When an inspection stationgoes out of business or its inspection privileges are revoked, arefund for the unused certificates will be issued as soon as is prac-ticable.
The count of the Department for returned certificates shall beaccepted as final. An Official Vehicle Inspection Station mustaccount for all inspection certificates issued and received.
Failure to comply with the above requirement would be grounds fordenial of future applications.
1-1-03
[

01.40.00 - 55.00
1-1-03
01.40.00 INSPECTION STATION CANCELLATIONS AND SUS-PENSIONS
Discontinuance of business for any reason, changes of location,name, or ownership automatically cancels your inspection stationauthorization to inspect.
Any inspection station whose Certificate of Appointment is sus-pended or revoked shall return all unused inspection certificatesand supplies to the Department and no such inspection stationshall inspect vehicles while its Certificate of Appointment is sus -pended or revoked. All inspection certificates and supplies fur -nished by the Department are to be surrendered to the Departmentin the event an inspection station terminates its business or uponthe suspension or revocation of the Certificate of Appointment. TheDepartment will refund such inspection station for its cost of certifi-cates returned.
01.45.00 REINSTATEMENT AFTER SUSPENSION
After expiration of suspension in which the Certificate ofAppointment has expired, a vehicle inspection station owner desir-ing reinstatement may request reinstatement by notifying in writingthe appropriate Regional Supervisor. Station must meet minimumrequirements for class of station. A properly completed applicationand signature cards, along with the statutory Certificate ofAppointment fee of $30.00, will be submitted to the supervisingDepartment representative.
After expiration of suspension of which the Certificate ofAppointment has not expired a vehicle inspection station ownerdesiring to reinstate may request reinstatement by notifying in writ-ing the appropriate Regional Supervisor. Station must meet mini-mum requirements for class of station. A properly completed appli-cation and signature cards will be submitted to the supervisingDepartment representative. No Certificate of Appointment fee isrequired.
Unless all inspection certificates issued to an inspection station areaccounted for, a Certificate of Appointment will not be reinstated atthe end of the suspension period and the inspection station owneror operator who discontinued as an inspection station will, uponapplication be denied another Certificate of Appointment.
No person may apply for certification as a vehicle inspection sta -tion after denial or revocation by the Director of the Department ofPublic Safety of an application until such time as the applicantcomplies with all requirements for certification.
01.50.00 LEASE OR SALE OF INSPECTION STATION DURINGSUSPENSION
A change of ownership or lease to another person during a sus -pension period will require the new owner or lessee to complete an
application for certification. All procedures for a new applicationincluding all forms and an investigation will be required.
The lease of the building and/or inspection bay will in additionrequire:
1. A copy of the lease agreement must be on file with thecounty clerk.
2. A certified copy of the lease agreement submitted with theapplication for appointment as an Official Inspection Station.
3. A suspended, revoked, or denied owner/operator may notsupervise the inspection of any vehicle nor otherwise partici -pate in the inspection of any vehicle.
4. Astation’s Certificate of Appointment and the Certificate ofAppointment of a lessee or an inspector will be subject tosuspension if the lessee or inspector knowingly allows a sus-pended owner/operator to supervise the operation of the cer-tified vehicle inspection station, inspectors, or inspectionsperformed at the leased location or otherwise participates inthe inspection of any vehicle.
01.55.00 CRIMINAL VIOLATIONS
All bona fide complaints received by the Department about anyinspection station shall be investigated for the purpose of deter -mining whether there has been a violation of the TransportationCode or regulations.
Appropriate action will be taken when it appears from any investi -gation that the Transportation Code or any regulation includedherein has been violated by an inspection station or its agents oremployees.
Any owner of an Official Vehicle Inspection Station, agent, servant,or employee violates any provision of the Transportation Code orrequires the repair of any equipment other than that equipmentrequired to be inspected, upon conviction, shall be subject to a fine.
The Transportation Code states that it is a violation of the law orRules and Regulations to commit any of the following acts:
1. Issuing an inspection certificate with knowledge that theissuance is in violation of this chapter or rules adopted underthis chapter.
2. Falsely or fraudulently representing to the owner or opera-tor of a vehicle that equipment inspected or required to beinspected must be repaired, adjusted, or replaced for thevehicle to pass an inspection.
3. Misrepresenting:
1-9
[

01.55.00
1-10
a. material information in an application in violation ofSection 548.402 or 548.403; or
b. information filed with the department under this chapteror as required by department rule;
4. Issuing an inspection certificate:
a. without authorization to issue the certificate; or
b. without inspecting the vehicle;
5. Issuing an inspection certificate for a vehicle with knowl -edge that the vehicle has not been repaired, adjusted, or cor-rected after an inspection has shown a repair, adjustment, orcorrection to be necessary;
6. Knowingly issuing an inspection certificate:
a. for a vehicle without conducting an inspection of eachitem required to be inspected; or
b. for a vehicle that is missing an item required to beinspected or that has an item required to be inspected thatis not in compliance with state law or department rules;
7. Refusing to allow a vehicle’s owner to have a qualified per-son of the owner’s choice make a required repair, adjustmentor correction;
8. Charging for an inspection an amount greater than theauthorized fee; or
9. Performing an act prohibited by or fails to perform an actrequired by this chapter or a rule adopted under this chapter.
Unless otherwise prescribed by law, the offense is a Class C mis -demeanor. A designated representative of the department mayissue a notice of an offense or a notice to appear to a person,including an inspector or inspection station, who violates this chap-ter or a rule adopted under this chapter.
1-1-03

3-30-2000
CHAPTER TWOINSPECTOR CERTIFICATION
CHAPTER CONTENT
CERTIFICATION PROCEDURES.........................................................................................02.05.00 p. 2-1
DUTIES AND RESPONSIBILITIES........................................................................................02.10.00 p. 2-2
CRIMINAL VIOLATIONS....................................................................................................... 02.15.00 p. 2-3
i

02.05.00
5-31-05
02.05.00 CERTIFICATION PROCEDURES
The certification of persons to inspect vehicles shall be in accor -dance with the rules and regulations promulgated by theDepartment.
In accordance with the Texas Transportation Code, the Departmentof Public Safety may deny an application for certification or revokeor suspend an outstanding certificate of any inspection station orthe certificate to inspect vehicles of any person who has been con-victed of: (1) a felony or Class A or Class B misdemeanor; (2) asimilar crime under the jurisdiction of another state or the federalgovernment that is punishable to the same extent as a felony orClass A or Class B misdemeanor; or (3) a crime under the jurisdic-tion of another state or federal government that would be a felonyor Class A or Class B misdemeanor if the crime were committed inthis state.
1. A conviction for a felony or a Class A or Class B misde -meanor will be cause for denial, suspension, or revocation,under this subsection until after the court-imposed punish -ment or supervision has elapsed. For purposes of this sec -tion, a person is convicted of an offense when a court entersagainst the person an adjudication of guilt, including an orderof probation or deferred adjudication.
2. The certification of an inspection station will be subject todenial, revocation, or suspension in the event the owner orinspector is convicted of such an offense. In the event thatan inspector or inspector application is convicted of such anoffense, that person’s certification will be subject to revoca -tion, or suspension, or his application will be subject todenial.
3. Deferred adjudications and orders of probation are con -sidered to be equivalent to convictions until the charges thatare the basis for these orders are dismissed or discharged.
As an authorized owner, operator, or inspector of an Official VehicleInspection Station, you are responsible to the Department of PublicSafety for the proper operation of the Official Vehicle InspectionStation. An owner, operator, or inspector will recognize andacknowledge his responsibility to the public to offer a good, com -plete, and thorough inspection, according to the rules and regula -tions.
No person shall perform an inspection, issue an inspection certifi -cate, or issue an identification certificate without such person firsthaving been certified to do so by the Department.
1. Before any person can be certified to inspect vehiclesunder the Texas Vehicle Inspection Act, they shall attend aspecial training course conducted by the Texas Departmentof Public Safety for the purpose of learning the exact meth -ods and procedures to be used in performing inspections.
NOTE: Persons with disabilities should make prior arrange -ments for reasonable accommodations to be made.
2. The person must make written application and take anexamination as to their knowledge of the rules and regula -tions and the requirements of the law for various types ofvehicles.
3. Failure to Qualify on the Examination. Each applicantwill be given a minimum of two opportunities to pass aninspector’s examination. Applicants will be notified of anyfailure, shown their mistakes, and given the correct answersto questions missed on the first examination. Applicants whofail their first examination will be given a different examinationfor the second examination in not less than seven (7) days.Applicants who fail their second examination must wait atleast 30 days before taking a subsequent examination.
The Department has determined a certified inspection station andcertified vehicle inspector is in a position of trust, performing a serv-ice to members of the public where the Transportation Code,Chapter 548, requires the public to report for vehicle inspection.Therefore, the department has determined the following crimesrelate directly to the duties and responsibilities of a certified vehicleinspector and/or those for whom this section is applicable asdetailed in subsection (b) of this section. Those crimes include:
1. any crime of which fraud is an element,
2. deceptive business practices, deceptive trade practices, orany criminal violation of statutes that protect consumersagainst unlawful business or trade practices,
3. murder,
4. burglary,
5. robbery,
6. aggravated robbery,
7. aggravated sexual assault,
8. indecency with a child,
9. sexual assault,
10. aggravated assault,
11. any violent crime against a person involving knowledge orpurpose,
12. theft,
13. violation of the Texas Controlled Substance Act (Healthand Safety Code, 481.112-481.126),
14. driving while intoxicated, and
15. conviction of an offense as detailed in Te x a sTransportation Code, Chapter 548, 548.601, and 584.603
2-1
[

02.10.00 - 10.01
2-2
4. The person must demonstrate their ability to efficiently andcorrectly operate the various testing devices required in theinspection program. Each must demonstrate to theDepartment representative checking for certification theirknowledge and ability to perform each step correctly and effi-ciently through the entire inspection procedure.
5. When a person has satisfactorily passed the written exam-ination and demonstrated their ability to operate the testingdevices, the statutory fee will be paid which will certify aninspector until August 31 of the even-numbered year follow -ing the date of appointment. Thereafter, appointment asinspectors shall be made for two-year periods and the certifi-cation fee for each period will be paid. An inspector employedonly at a governmental station is exempt from the fee.
6. If a certified inspector changes place of employment, thethe Department representative must be notified immediately.The inspector may be required to demonstrate their ability tocorrectly operate the testing equipment at such new inspec -tion station and may be required to take a complete exami -nation. No inspection can be made by this person until suchtime as they have been approved at the new place ofemployment by an authorized Department representative.
7. When a person has been certified as an inspector, theDepartment will issue certification to that person certifyingthem to inspect vehicles. This certificate is provisional and isconditional upon compliance with the rules and regulationsand is subject to renewal.
8. The Department reserves the right to suspend for cause itscertification of any inspector, or require attendance at anyprocedure updating training program at any time, or requirereexamination at any time to determine if they have fullknowledge of the current official rules and regulations. If theexamination discloses the certified inspector is not familiarwith new or existing regulations, the inspector will be prohib -ited from making inspections until able to take a reexamina -tion.
9. No person who is under the age of 18 years will be certi -fied to inspect vehicles.
10. A valid driver ’s license from their state of residence isrequired of every person who desires to be certified toinspect vehicles.
NOTE: Any individual possessing a driver license from anystate other than Texas and resides in Texas must also pos -sess a valid Texas Identification Card.
NOTE: Any individual possessing a driver license from anyother state and does not reside in Texas must have a
Department issued TAVIS Identification Card.
11. The certified inspector is responsible for the safeguardingand completion of all inspection certificates and recordsregarding inspections performed by the inspector.
NOTE: A certified inspector may be authorized to inspect atmore than one station. No inspections can be made by thisinspector at a new location until such time as the inspectorhas been approved at that location by an authorized repre -sentative of the Department of Public Safety.
02.10.00 CERTIFIED INSPECTORS
10.01 Duties and Responsibilities
1. Will conduct, as promptly as possible, a thorough and effi-cient inspection of any vehicle for which the station holds anendorsement to inspect. Such inspection must be performedin the manner prescribed by the Department.
2. Will affix an official inspection certificate to an approvedvehicle. The certified inspector is placing a “certificate ofsafety” on that vehicle indicating the vehicle has passed thestandards of the Texas Vehicle Inspection Program.
3. Owes a duty to oneself since a life may be jeopardized byerrors or carelessness on their part. An inspector owes aduty to their family and to the vehicle owners and operators,for death or serious injury may result if the inspector is indif -ferent to their duty.
4. Will conduct honest and thorough vehicle identificationnumber certifications and complete the forms only at the offi-cial inspection station for vehicles personally inspected inaccordance with the rules and regulations contained in thismanual.
5. Owes a duty to their employer who has pledged to assistin safeguarding the lives of motorists by ensuring against theoperation of unsafe vehicles.
6. Will assume this responsibility and is willing to performtheir duty to the very best of their ability and to place safetyfirst and foremost, which is the primary intent of the law .
7. After completing the inspection, the inspector will informthe owner or operator of any equipment that marginallymeets inspection requirements. This should include possiblefuture repairs or adjustments which may be necessary tokeep the vehicle in safe operating condition.
8. See that required equipment on the vehicle is of an accept-
5-30-07
[
[

02.15.00
5-30-07
able type, is properly adjusted, and meets Department stan -dards.
9. Shall properly discharge their duties at an Official VehicleInspection Station and will, at all times, have a Rules andRegulations Manual immediately available for reference.
10. In performing the inspection, the inspectors will remem -ber they assume full responsibility for the quality of theinspection when signing the safety inspection certificate oridentification certificate and placing their name on the inspec-tion station report.
11. In completing the reverse side of the inspection certificateand the station weekly report book an inspector’s signature isrequired and cannot be printed.
12. Will always remember they have been certified becausethey have demonstrated their knowledge, ability, honesty ,and integrity when performing safety inspections.
13. Be aware that any deviation from the established rules,regulations, and/or procedures committed by the certifiedinspector is a violation of the law or regulation.
14. Will refrain from the use of alcohol.
15. Will refrain from the use of drugs in any degree exceptwhen prescribed by a licensed physician, providing that nor -mal faculties shall not be impaired.
16. Will make inspections within a reasonable length of timeafter the vehicle is presented and the inspector will not causeundue delay to the vehicle operator. When an inspectioncannot be performed immediately for a justified reason, aproper explanation will be given to the customer as to thereason for the delay in a courteous manner.
17. Will notify the Department representative immediately ifdriver’s license has been suspended or revoked.
18. Will conduct all inspections and affix all inspection certifi-cates at the time of inspection in the approved inspectionarea of the inspection station location designated on theCertificate of Appointment, with the exception of the roadtest.
19. Shall always obtain authorization from the vehicle owneror operator prior to making any repairs or adjustments.
20. Will not delegate responsibility of the proper and thor -ough inspection to any other person.
21. Shall have complete control of the vehicle to be testedduring the entire test procedure.
22. Shall maintain a clean and orderly appearance and becourteous and patient in contacts with the public.
23. Will make an actual physical check of vehicle identifica -tion numbers paying particular attention to make sure thenumber is accurate in all cases on both safety inspection cer-tificates and identification certificates.
02.15.00 CRIMINAL VIOLATIONS
All bona fide complaints received by the Department about anyinspection station shall be investigated for the purpose of deter -mining whether there has been a violation of the TransportationCode or regulations.
Appropriate action will be taken when it appears from any investi -gation that the Transportation Code or any regulation includedherein has been violated by an inspection station or its agents oremployees.
The Transportation Code states that it is a violation of the law orRules and Regulations to commit any of the following acts:
1. Issuing an inspection certificate with knowledge that theissuance is in violation of this chapter or rules adopted underthis chapter.
2. Falsely or fraudulently representing to the owner or opera-tor of a vehicle that equipment inspected or required to beinspected must be repaired, adjusted, or replaced for thevehicle to pass an inspection.
3. Misrepresenting:
a. material information in an application in violation ofSection 548.402 or 548.403; or
b. information filed with the department under this chapteror as required by department rule;
4. Issuing an inspection certificate:
a. without authorization to issue the certificate; or
b. without inspecting the vehicle;
5. Issuing an inspection certificate for a vehicle with knowl -edge that the vehicle has not been repaired, adjusted, or cor-rected after an inspection has shown a repair, adjustment, orcorrection to be necessary;
6. Knowingly issuing an inspection certificate:
a. for a vehicle without conducting an inspection of eachitem required to be inspected; or
2-3

02.15.00
2-4
b. for a vehicle that is missing an item required to beinspected or that has an item required to be inspected thatis not in compliance with state law or department rules;
7. Refusing to allow a vehicle’s owner to have a qualified per-son of the owner’s choice make a required repair, adjustmentor correctino;
8. Charging for an inspection an amount greater than theauthorized fee; or
9. Performing an act prohibited by or fails to perform an actrequired by this chapter or a rule adopted under this chapter.
Unless otherwise prescribed by law, the offense is a Class Cmisdemeanor.A designated representative of the departmentmay issue a notice of an offense or a notice to appear to aperson, including an inspector or inspection station, who vio-lates this chapter or a rule adopted under this chapter .
5-30-07

3-30-2000
CHAPTER THREESTATION OPERATIONCHAPTER CONTENT
INSPECTION FEES............................................................................................................. 03.05.00 p. 3-1
SAFEGUARDING INSPECTION CERTIFICATES, IDENTIFICATION CERTIFICATES,AND NUMBER INSERTS................................................................................................ 03.10.00 p. 3-1
ISSUANCE OF INSPECTION CERTIFICATES.....................................................................03.15.00 p. 3-1
INSTRUCTIONS FOR APPLYING INSPECTION CERTIFICATES.......................................03.20.00 p. 3-2Cars, Trucks, Buses, and School Buses (Windshield-Type)............................................ 20.01 p. 3-2Motor Vehicles With Windshields (Cars, Trucks, Buses, and School Buses).................. 20.02 p. 3-2Motor Vehicles Without Windshields (Cars, Trucks, Buses, and School Buses)............. 20.03 p. 3-2Certificate Mounting Procedures for Motorcycles, Motor-Driven Cycles, and Mopeds.... 20.04 p. 3-2Certificate Mounting Procedures for Trailers, Semitrailers, Pole Trailers, and Mobile
Homes.......................................................................................................................... 20.05 p. 3-2
EXPIRATION OF INSPECTION CERTIFICATES................................................................. 03.25.00 p. 3-3
MISTAKES ON INSPECTION CERTIFICATES.....................................................................03.30.00 p. 3-3
DUPLICATE INSPECTION CERTIFICATES.........................................................................03.35.00 p. 3-3
REFUNDS OF UNUSED INSPECTION CERTIFICATES..................................................... 03.40.00 p. 3-3
INSPECTION REFUSALS.....................................................................................................03.45.00 p. 3-3
i

03.05.00 - 15.00
5-31-05
03.05.00 INSPECTION FEES
The maximum inspection fees charged for all vehicles are set bystatute. All required inspection items shall be inspected and nomore than the statutory fee may be charged.
The inspection fee is chargeable at the time of the original inspec -tion whether the vehicle is approved or disapproved. Every inspec-tion shall be completed before a vehicle is approved or rejected.
The inspection fee may be included in combination with other serv-ices or products not related to any item of inspection. Under no cir-cumstances shall an inspection station require purchase or pay -ment for these additional services or products as prerequisite inobtaining an inspection of a vehicle.
The inspection fee may be advertised in conjunction with otherproducts or services not related to any item of inspection. All adver-tisements of the inspection fee in conjunction or in combinationwith non-related services or products must clearly state that thepurchase of the services or products are not required to obtain therequired inspection.
The inspection fee must be billed on work orders as a separateitem.
The fee or any portion of the fee, may be waived, or paymentdeferred, provided advance payment for certificates issued hasbeen made to the Department.
Fees for emissions inspection and maintenance counties will varyaccording to emission tests performed in that county.
03.10.00 SAFEGUARDING INSPECTION CERTIFICATES, IDEN-TIFICATION CERTIFICATES, AND NUMBER INSERTS
O fficial Vehicle Inspection Station owners and operators areresponsible for all safety inspection certificates, identification cer -tificates, and number inserts issued to them. Adequate facilitiesmust be provided for the security of all certificates and numberinserts. They must be kept under lock and key at all times in ametal box or secure container. Any missing certificate(s), whetherlost or stolen or in any way unaccounted for, may be cause for rev-ocation or suspension of the station’s Certificate of Appointment.
Upon discovery of a loss or theft of any inspection certificate(s),Official Vehicle Inspection Stations must immediately report suchloss or theft to the supervising Department representative.
Reports of lost or stolen inspection certificate(s) will be investigat -ed and if it becomes apparent that improper safeguarding wasmaintained, revocation or suspension of the inspection station’ sCertificate of Appointment and/or court action may result. Norefund will be allowed for stolen or missing certificates.
Inspection stations cannot furnish, give, loan, or sell inspection cer-tificates to any other inspection station. The failure to have an ade-quate supply of inspection certificates on hand at an inspection sta-tion at all times during the inspection year may be cause for sus -pension or revocation of the inspection station’s Certificate ofAppointment.
When the old inspection certificate is removed, it shall bedestroyed to prevent reuse. Inspection certificates shall not betransferred to another windshield or reissued. They may only beaffixed to the vehicle designated on the inspection station report.
03.15.00 ISSUANCE OF INSPECTION CERTIFICATES
An inspection certificate shall be issued at the time of inspection forevery vehicle inspected and approved. The certificates shall beissued in numerical sequence. It is the responsibility of the certi -fied inspector to personally place the proper number insert on theface of the windshield certificate to indicate the month and year inwhich the certificate will expire.
The reverse side of the windshield inspection certificate will becompleted with a laundry marking pen or permanent ink pen givingthe information requested and must be signed by the certifiedinspector making the inspection.
Facsimile signatures or initials are not acceptable.
An inspection certificate shall be voided if it is damaged so as tomake it illegible, torn, or if the wrong number insert is used. Write“VOID” across the face of the certificate and enter the number ofthe voided certificate on the inspection station report. Retain thevoided inspection certificate and give to the supervisingDepartment representative.
The inspector who performs the inspection shall place the certifi -cate on the windshield and be especially alert to see that the cer -tificate does not interfere with the vision of the driver through thewindshield or any rear-view mirror. Certificates should not beplaced on the windshield so as to interfere with the reading of theVehicle Identification Number from the outside of the vehicle.
The windshield-type inspection certificates, to be properly valid,shall contain number inserts indicating the month and year of expi-ration, except the annual commercial windshield-type certificates,FMCSR, to be valid, shall have the month and year of expirationpunched out.
The motorcycle-trailer and annual commercial trailer inspectioncertificates, to be properly valid, shall have the month and year ofexpiration punched out.
NOTE: A passenger car or light truck that qualifies for a two-yearinspection certificate is one that is: sold in this state; has not been
3-1
[

03.20.00 - 20.04
3-2
previously registered in this or another state; and on the date ofsale is of the current or preceding year model. A “passenger car”means a motor vehicle, other than a motorcycle, used to transportpersons and designed to accommodate 10 or fewer passengers. Amotor home not registered as a commercial vehicle is consideredto be a passenger car . A “light truck” means a truck, including apickup truck, panel delivery truck, or carryall truck, that has a man-ufacturer’s rated carrying capacity of 2000 pounds or less.
03.20.00 INSTRUCTIONS FOR APPLYING INSPECTION CER-TIFICATES
20.01 Cars, Trucks, Buses, and School Buses (Windshield-Type)
1. Complete the information required on the back side of thecertificate with a laundry marking pen, permanent ink pen ortypewriter; signature required by certified inspector makingthe inspection.
2. To avoid damage to the pressure sensitive “dry mountdecal” type certificate, remove protective face paper slowlyfrom adhesive side of certificate.
3. Place number inserts with adhesive side up in the locationreserved for that purpose on the inspection certificate.
Number inserts should correspond with the number of themonth during which inspection is made and the year in whichthe inspection certificate is to expire.
4. Certificates are pressure sensitive and must be handledvery carefully. They cannot be removed or repositioned afterthey are placed on any surface.
5. Be sure that the windshield is free of any oily film. If thesurface is wet, be sure to dry it before applying the certificate.
6. Place certificate in position on a clean, dry surface andapply firmly until tightly affixed to the surface, right side up.
a. Apply evenly and smooth down thoroughly to remove allair bubbles between certificates and surface.
b. Use a plastic or hard rubber squeegee for best results.
7. Many of the newer vehicles are equipped with new innershield windshields which have a transparent sheet of plasticon the inner surface. This windshield requires special carewhen removing decals or stickers.
8. The proper application of any inspection certificate is veryimportant to ensure adherence.
20.02 Motor Vehicles With Windshields (Cars, Tr u c k s ,Buses, and School Buses). If the motor vehicle has a wind -shield, the inspection certificate shall be attached firmly to thelower left-hand inside corner of the windshield as viewed fromthe driver’s seat as close to the frame as possible. The certifi -cate must be applied to the inside of the windshield and can onlybe affixed to a vehicle in the approved inspection area of theOfficial Vehicle Inspection Station by the certified inspector whomade the inspection. Certificates cannot be issued or affixed tovehicles at any other area or location.
Any other certificate, decal, or sticker, such as a parking permit,property owner identification, etc., must be removed if it is in thelower left-hand corner of the windshield where the Texas inspec-tion certificate is required to be affixed. The vehicle owner oroperator shall be advised that the Department designates thislocation for the inspection certificate and that they should obtaina replacement permit or decal and locate it in another locationon the vehicle.
Do not remove the old inspection certificate until immediatelyprior to placing the new certificate on the windshield.
20.03 Motor Vehicles Without Windshields (Cars, Trucks,Buses, and School Buses). If the motor vehicle is notequipped with a windshield, the certificate will be completed onthe reverse side and given to the operator of the vehicle.Instruct owner or operator to keep the certificate in their pos -session and present it on demand. All inspection stations andcertified inspectors are instructed to remove and reverse theface paper and adhere it to the certificate so that it cannot beused again for some other vehicle.
20.04 Certificate Mounting Procedures for Motorcycles,Motor-Driven Cycles, and Mopeds
1. On the Vehicle (Optional). Punch the month of issuanceand year of expiration. Remove the certificate’s back paperand attach the certificate face up on the vehicle’s rear fenderor any other visible location on the rear near its license plate.
Place the certificate in place and apply firmly. OR
2. Backing Plate (Optional - to be furnished by cycle owner).Punch the month of issuance and year of expiration.Remove the certificate’s back paper and attach the certifi -cate face up on the backing plate which is mounted on thecycle near the license plate for this purpose. Place the cer -tificate in place and apply firmly.
3. Other Provisions - Motorcycles, Motor-Driven Cycles,and Mopeds. Reject the vehicle if no fender or optional loca-tion is available for applying the inspection certificate.
5-31-05

03.20.05 - 45.00
5-31-05
20.05 Certificate Mounting Procedures for Tr a i l e r s ,Semitrailers, Pole Trailers, Mobile Homes, and ConverterDolly
1. On the Vehicle (Optional). Punch the month of issuanceand year of expiration. Remove the inspection certificate’ sback paper and attach the certificate face up on a cleanmetal surface at or near the left front or side of the trailer .Place the inspection certificate in place and apply firmly. Onpole trailers, attach to the left front or side of the rear bolster.OR
2. Metal Plate or Holder - Backing plate or metal certificateholder (optional - to be furnished by vehicle owner). Punchthe month of issuance and year of expiration. Remove thecertificate’s back paper and attach the certificate face up onthe clean metal surface of the plate or holder . The plate orholder should be mounted at or near the left front or side ofthe trailer. On pole trailers, attach to the left front or side ofthe rear bolster. On the backing plate, place the inspectioncertificate in place and apply firmly.
NOTE: On mobile homes and travel trailers the certificatemay be mounted on a window located at or near the left frontor side of the vehicle.
NOTE: On House Moving Dollies, the owner must furnish ametal backing plate or metal certificate holder which shall bemounted at or near the license plate for the purpose ofattaching the certificate.
03.25.00 EXPIRATION OF INSPECTION CERTIFICATES
The certificate of inspection shall not be valid after the end of the12th month in which the vehicle was last inspected (24th month fortwo-year certificates).
Enforcement on expired inspection certificates shall begin after thefifth day following the expiration of the period designated for theinspection indicated by the month and year on the certificate.
03.30.00 MISTAKES ON INSPECTION CERTIFICATES
If an inspector makes a mistake on an inspection certificate, it shallbe voided and a new inspection certificate issued at no charge.
03.35.00 DUPLICATE INSPECTION CERTIFICATES
No duplicate inspection certificate can be issued. If a certificate islost, stolen, or mutilated, the vehicle must be submitted for anoth -er inspection.
03.40.00 REFUNDS OF UNUSED INSPECTION CERTIFICATES
All applications for refunds of inspection certificates shall be pickedup by the Department representative.
All unused inspection certificates must be returned or accountedfor to the Department of Public Safety. Refunds will be made cov -ering all unused inspection certificates when the Departmentchanges certificate design or when an inspection station goes outof business or its inspection privileges are suspended or revoked.A refund for the unused certificates will be issued as soon as ispracticable.
The count of the Department for returned certificates shall beaccepted as final. An Official Vehicle Inspection Station mustaccount for all inspection certificates issued and received.
No refunds will be allowed for stolen or missing certificates.
03.45.00 INSPECTION REFUSALS
No Official Vehicle Inspection Station during approved businesshours shall refuse to inspect a vehicle that is presented for inspec-tion. Official Vehicle Inspection Stations will be required to inspectonly those types of vehicles authorized by the endorsement(s) totheir Certificate of Appointment.
A vehicle inspection station must refuse to inspect any motor vehi -cle for which no evidence of financial responsibility is presented orif the motor vehicle is too large for the inspection station entranceexcept trailers, semitrailers, mobile homes, motor homes and othervehicles which are too large for standardized inspection bays neednot be inspected within the inspection building. However, thesetypes of vehicles must be inspected near the inspection building ina space approved by the Department representative.
3-3

5-30-07
CHAPTER FOURINSPECTION PROCEDURES
CHAPTER CONTENT
INSPECTION ITEMS FOR VEHICLE CLASSES................................................................... 04.05.00 p. 4-1Passenger Car.................................................................................................................. 05.01 p. 4-1Pickup, Panel, or Truck under 80 inches wide ................................................................. 05.02 p. 4-1Truck 80 inches or more, overall width ............................................................................. 05.03 p. 4-1Truck-Tractor .................................................................................................................... 05.04 p. 4-2Bus (except School Bus), Motor Home............................................................................. 05.05 p. 4-2Trailers, Semitrailers, Pole Trailers, or Mobile Homes exceeding
4,500 pounds gross weight ........................................................................................... 05.06 p. 4-3Motorcycle and Motor-Driven Cycle.................................................................................. 05.07 p. 4-4.......................................................................................................................................... 20.04 p. 4-12Moped............................................................................................................................... 05.08 p. 4-4.......................................................................................................................................... 15.05 p. 4-8.......................................................................................................................................... 20.04 p. 4-12School Bus........................................................................................................................ 05.09 p. 4-4Special Requirements for School Bus Only...................................................................... 05.10 p. 4-5
PRIOR TO INSPECTION....................................................................................................... 04.10.00 p. 4-5
INSPECTION REQUIREMENTS ........................................................................................... 04.15.00 p. 4-6Vehicles Exempt from Inspection ..................................................................................... 15.01 p. 4-6General Inspection Requirements .................................................................................... 15.02 p. 4-6Foreign Vehicles............................................................................................................... 15.03 p. 4-8Miniature Vehicles ............................................................................................................ 15.04 p. 4-8Mopeds............................................................................................................................. 15.05 p. 4-8Reconstructed or Rebuilt Vehicles ................................................................................... 15.06 p. 4-8Multi-Purpose Vehicles..................................................................................................... 15.07 p. 4-8Vehicles Equipped to Use LQ Gas as a Fuel ................................................................... 15.08 p. 4-9Unsafe Vehicles................................................................................................................ 15.09 p. 4-9Special Lighting Devices and Reflector Requirements..................................................... 15.10 p. 4-9Commercial Motor Vehicle Inspection Program ............................................................... 15.11 p. 4-9Acceptance of Out-of-State Commercial Vehicle Inspection Certificates......................... 15.12 p. 4-9
DETAILS OF INSPECTION ................................................................................................... 04.20.00 p. 4-9ITEMS OF INSPECTION
Beam Indicator.................................................................................................................. 20.01 p. 4-10Brakes............................................................................................................................... 20.02 p. 4-10
Parking Brakes .............................................................................................................. 20.03 p. 4-12Motorcycle, Moped, Motor-Driven Cycle ....................................................................... 20.04 p. 4-12Road Test Procedures .................................................................................................. 20.05 p. 4-12Platform-Type Brake Tester .......................................................................................... 20.06 p. 4-13Roller-Type Brake Tester .............................................................................................. 20.07 p. 4-13Decelerometer-Type Brake Tester ................................................................................ 20.08 p. 4-14Vacuum Brake System.................................................................................................. 20.09 p. 4-14Air Brake System........................................................................................................... 20.10 p. 4-14Electric Brake System ................................................................................................... 20.11 p. 4-15
Cab Lamps ....................................................................................................................... 20.12 p. 4-15Clearance Lamps.............................................................................................................. 20.13 p. 4-16
i

CHAPTER CONTENT (continued)
Exhaust Emission System ................................................................................................ 20.14 p. 4-16Exhaust System................................................................................................................ 20.15 p. 4-17Headlamps........................................................................................................................ 20.16 p. 4-18Horn.................................................................................................................................. 20.17 p. 4-20License Plate Lamp .......................................................................................................... 20.18 p. 4-20Mirrors............................................................................................................................... 20.19 p. 4-21Reflectors (Rear) .............................................................................................................. 20.20 p. 4-21Reflectors (Side) ............................................................................................................... 20.21 p. 4-22Safety Guards or Flaps..................................................................................................... 20.22 p. 4-22Seat Belts ......................................................................................................................... 20.23 p. 4-23Side Marker Lamps........................................................................................................... 20.24 p. 4-23Steering ............................................................................................................................ 20.25 p. 4-24Stop Lamps....................................................................................................................... 20.26 p. 4-25Tail Lamps ........................................................................................................................ 20.27 p. 4-25Tires.................................................................................................................................. 20.28 p. 4-26Turn Signal Lamps............................................................................................................ 20.29 p. 4-27Vehicle Identification Number, Motor or Serial Number ................................................... 20.30 p. 4-28Wheel Assembly ............................................................................................................... 20.31 p. 4-28Window Tinting ................................................................................................................. 20.32 p. 4-28Windshield Wipers ............................................................................................................ 20.33 p. 4-29Rejected Vehicles............................................................................................................. 20.34 p. 4-29Repairs ............................................................................................................................. 20.35 p. 4-30
IDENTIFICATION CERTIFICATE, VI-30A............................................................................. 04.25.00 p. 4-30
REFERENCE SECTION........................................................................................................ 04.30.00 p. 4-32
ii 3-30-2000

04.05.00 INSPECTION ITEMS FOR VEHICLE CLASSES
05.01 Inspect Every Passenger Car For: (Listed in sug-gested order of inspection)
* Check for evidence of Financial Responsibility
1. Horn
2. Windshield Wipers
3. Mirror
4. Steering
5. Seat Belts
6. Brakes (system) (Parking - beginning with 1960 models)
7. Tires
8. Wheel Assembly
9. Exhaust System
10. Exhaust Emission System (beginning with 1968 models)
11. Beam Indicator (beginning with 1948 models)
12. Tail Lamps (2); (1) if 1959 model or earlier
13. Stop Lamps (2); (1) if 1959 model or earlier
14. License Plate Lamp (1)
15. Rear Red Reflectors (2)
16. Turn Signal Lamps (beginning with 1960 models)
17. Head Lamps (2)
18. Motor, Serial, or Vehicle Identification Number
19. 1988 & newer - inspect for window tinting or coating
20. Gas caps on vehicles 2-24 model years old.
05.02 Inspect Every Pickup, Panel, or Truck Under 80 InchesWide For: (Listed in suggested order of inspection)
* Check for evidence of Financial Responsibility
1. Horn
2. Windshield Wipers
3. Mirror
4. Steering
5. Seat Belts
6. Brakes (system) Parking - (beginning with 1960 models)
7. Tires
8. Wheel Assembly
9. Safety Guards or Flaps (if four tires or more on rearmostaxle)
10. Exhaust System
11. Exhaust Emission System (beginning with 1968 models)
12. Beam Indicator (beginning with 1948 models)
13. Tail Lamps (2); (1) if 1959 model or earlier
14. Stop Lamps (2); (1) if 1959 model or earlier
15. License Plate Lamp (1)
16. Rear Red Reflectors (2)
17. Turn Signal Lamps (beginning with 1960 models) (mea-sure if 1959 model or earlier)
18. Head Lamps (2)
19. Motor, Serial, or Vehicle Identification Number
20. 1988 & newer - inspect for window tinting or coating
21. Gas caps on vehicles 2-24 model years old.
Overall width is determined by measuring from the widest parton one side to the widest part on the other side of the vehicle.In some vehicles this may be the dual wheels which would beconsidered as part of the width. Do not include an outsidemirror or mirrors in determining overall width.
05.03 Inspect Every Truck 80 Inches or More in OverallWidth For: (Listed in suggested order of inspection) Referto Federal Motor Carrier Safety Regulations, if required.
* Check for evidence of Financial Responsibility
1. Horn
2. Windshield Wipers
04.05.00 - 05.03
5-30-07 4-1
[

3. Mirror
4. Steering
5. Seat Belts
6. Brakes system (Parking - beginning with 1960 models)
7. Tires
8. Wheel Assembly
9. Safety Guards or Flaps (if four tires or more on rearmostaxle)
10. Exhaust System
11. Exhaust Emission System (beginning with 1968 models)
12. Beam Indicator (beginning with 1948 models)
13. Tail Lamps (2); (1) if 1959 model or earlier
14. Stop Lamps (2); (1) if 1959 model or earlier
15. License Plate Lamp (1)
16. Rear Red Reflectors (2)
17. Turn Signal Lamps
18. Clearance Lamps
19. Side Marker Lamps
20. Side Reflectors
21. Head Lamps (2)
(Refer to Reference Section as per lighting diagrams andas applicable to the particular style of truck being inspected.)
22. Motor, Serial, or Vehicle Identification Number
23. 1988 & newer - inspect for window tinting or coating
24. Gas caps on vehicles 2-24 model years old.
Overall width is determined by measuring from the widest parton one side to the widest part on the other side of the vehicle.In some vehicles this may be the dual wheels which would beconsidered as part of the width. Do not include an outsidemirror or mirrors in determining overall width.
05.04 Inspect Every Truck-Tractor For: (Listed in suggestedorder of inspection) Refer to Federal Motor Carrier Safety Reg-ulations, if required.
* Check for evidence of Financial Responsibility
1. Horn
2. Windshield Wipers
3. Mirror
4. Steering
5. Seat Belts
6. Brakes (system) Parking - (beginning with 1960 models)
7. Tires
8. Wheel Assembly
9. Exhaust System
10. Exhaust Emission System (beginning with 1968 models)
11. Beam Indicator (beginning with 1948 models)
12. Tail Lamps (2); (1) if 1959 model or earlier
13. Stop Lamps (2); (1) if 1959 model or earlier
14. Rear Red Reflectors (2)
15. Turn Signal Lamps
16. Cab Lamps (2)
17. Head Lamps (2)
18. Motor, Serial, or Vehicle Identification Number
19. 1988 & newer - inspect for window tinting or coating
20. Gas caps on vehicles 2-24 model years old.
Definition of a Truck-Tractor. Every motor vehicle designedand used primarily for drawing other vehicles and not so con-structed as to carry a load other than a part of the weight of thevehicle and load so drawn.
NOTE: License plate lamp required if the truck-tractor has a rearlicense plate.
05.05 Inspect Every Bus (Except School Bus), or MotorHome For: (Listed in suggested order of inspection) Refer toFederal Motor Carrier Safety Regulations, if required.
04.05.04 - 05.05
4-2 5-30-07
[

NOTE: A Motor Home less than 80 inches in overall width willbe inspected for the items required on a passenger car.
NOTE: No bus, motor coach, or motor home shall be altered inany manner to lower the road clearance of the vehicle below themanufacturer’s clearance standards.
*Check for evidence of Financial Responsibility
1. Horn
2. Windshield Wipers
3. Mirror
4. Steering
5. Seat Belts
6. Brakes (system) Parking - (beginning with 1960 models)
7. Tires
8. Wheel Assembly
9. Exhaust System
10. Exhaust Emission System (beginning with 1968 models)
11. Beam Indicator (beginning with 1948 models)
12. Tail Lamps (2)
13. Stop Lamps (2)
14. License Plate Lamp (1)
15. Rear Red Reflectors (2)
16. Turn Signal Lamps
17. Clearance Lamps
18. Side Marker Lamps
19. Side Reflectors
20. Head Lamps (2)
(Refer to Reference Section as per lighting diagrams andas applicable to the particular style of bus being inspected.)
21. Motor, Serial, or Vehicle Identification Number
05.06 Inspect All Trailers, Semitrailers, Pole Trailers, or Mo-bile Homes Exceeding 4,500 Pounds Actual Gross Weight
or Registered Weight For: (Listed in suggested order of in-spection) Refer to Federal Motor Carrier Safety Regulations, ifrequired.
* Check for evidence of Financial Responsibility on towing ve-hicle
1. Brakes (system) (If gross weight exceeds 4,500 pounds)
2. Tires
3. Wheel Assembly
4. Safety Guards or Flaps (if four tires or more on rearmostaxle) Pole trailers exempt.
5. Tail Lamps (2)
6. Stop Lamps (2)
7. License Plate Lamp (1)
8. Rear Red Reflectors (2)
9. Turn Signal Lamps
10. Clearance Lamps
11. Side Marker Lamps
12. Side Reflectors
13. Side Marker Lamps and Reflectors (30 feet or more inoverall length)
(Refer to Reference Section as per lighting diagrams andas applicable to the particular trailer being inspected.)
14. Serial or Vehicle Identification Number
NOTE: On House Moving Dollies and Coverter Dollies, theonly items of inspection are:
a. Brakes (on converter dollies only)
b. Tires
c. Wheel Assembly
d. Coupling Devices (on converter dollies)
e. Reflector, rear, red (2), one on each side
f. Tail lamps, rear, red (2), one on each side
g. Stop lamps, rear red (2), one on each side
04.05.06
5-30-07 4-3
[
[

(Refer to reference section as per lighting diagram)
05.07 Inspect Every Motorcycle and Motor-Driven Cycle For:(listed in suggested order of inspection)
* Check for evidence of Financial Responsibility
1. Horn
2. Mirror
3. Steering
4. Brakes (system)
5. Tires
6. Wheel Assembly
7. Exhaust System
8. Tail Lamp (1)9. Stop Lamp (1)
10. License Plate Lamp
11. Rear Red Reflector (1)
12. Head Lamp (1)
13. Motor, Serial, or Vehicle Identification Number
Definitions:
Motorcycle: Every motor vehicle having a saddle for the use ofthe rider and designed to propel itself with not more than threewheels in contact with the ground but excluding a tractor.
Motor-Driven Cycle: Every motorcycle with a motor which has anengine piston displacement of not more than 125cc.
05.08 Inspect Every Moped For: (Listed in suggested order ofinspection)
* Check for evidence of Financial Responsibility
1. Brake
2. Head Lamp
3. Reflector
4. Rear Lamp
Definition of a Moped: Moped means a motor-driven cyclewhose speed attainable in one mile is not more than 30 mph andthat is equipped with a motor that produces not more than two-brake horsepower. If an internal combustion engine is used, thepiston displacement may not exceed 50cc and the power drivesystem may not require the operator to shift gears.
05.09 Inspect Every School Bus For: (Listed in suggestedorder of inspection) Refer to Federal Motor Carrier Safety Reg-ulations, if required.
* Check for evidence of Financial Responsibility - unless gov-ernment owned.
1. Horn
2. Windshield Wipers
3. Mirror
4. Steering
5. Seat Belts (driver only)
6. Brakes (system) Parking - (beginning with 1960 models)
7. Tires
8. Wheel Assembly
9. Exhaust System
10. Exhaust Emission System (beginning with 1968 models)
11. Beam Indicator (beginning with 1948 models)
12. Tail Lamps (2)
13. Stop Lamps (2)
14. License Plate Lamp (1)
15. Rear Red Reflectors (2)
16. Turn Signal Lamps
17. Clearance Lamps
18. Side Marker Lamps
19. Side Reflectors
04.05.07 - 05.09
4-4 5-30-07

20. Red Warning Lamps (2 front - 2 rear - alternately flashing)
(Refer to Reference Section as per lighting diagrams andas applicable to the particular bus being inspected.)
21. Signs (“SCHOOL BUS” 8 inches in height on front and onrear of bus)
22. Fire Extinguisher (one quart chemical)
23. Head Lamps (2)
24. Exterior Crossover (Convex) Mirror
25. Motor, Serial, or Vehicle Identification Number
26. Gas caps on vehicles 2-24 model years old.
Definition of a School Bus: Every motor vehicle that complieswith the color and identification requirements set forth in the mostrecent edition of standards as produced and sponsored by theNational Commission on Safety Education of the National Edu-cation Association, Washington, D.C., and is being used to trans-port children to or from school or in connection with schoolactivities, not including buses operated by common carriers inurban transportation of schoolchildren.
04.05.09
1-1-03 4-4a

05.10 Special Requirements for School Buses Only
In addition to all other equipment required by law as determinedby size, weight, or vehicle class, school buses are required to beequipped with the following items:
1. Signs on the front and on the rear of the vehicle showingthe words “SCHOOL BUS” in plainly readable letters not lessthan 8 inches in height.
2. At least one quart of chemical-type fire extinguisher in goodcondition and conveniently located for immediate use.
3. School bus RED signal lamps mounted as high and aswidely spaced laterally as practicable, which should be capa-ble of displaying to the front, two alternately flashing REDlights located at the same level AND to the rear, two alter-nately flashing RED lights located at the same level. Theselights should have sufficient intensity to be visible at 500 feetin normal sunlight. These lamps are intended to identify a ve-hicle as a school bus and to inform other users of the highwaythat such vehicle is stopped on the highway to take on or dis-charge schoolchildren.
4. One or more exterior (crossover) mirror of convex designmounted at or near the front of the school bus and adjustableto give the driver, at all times when seated in the driver’s seat,a clear view of the ground or roadway immediately ahead ofthe front bumper and beside the front wheels of the schoolbus. Crossover mirror(s) is required on all school buses nomatter how the design of the bus.
Inspect For and Reject If:
1. All equipment required by size, weight, or class of the ve-hicle does not meet requirements.
2. Signs are not present, readable, and of proper height.
3. Fire extinguisher is not of required capacity, proper type,or in good condition and properly located.
4. School bus RED signal lamps are not present, properlyworking, and in good condition.
5. Crossover mirror mounting is loose or will not adjust to dif-ferent positions or will not hold firm after adjustment.
6. Crossover mirror offers unsafe interference with driver’s for-ward vision or hides either front turn signal from view of on-coming driver.
7. Crossover mirror’s reflective surface is cracked, broken,peeled, or tarnished, or has sharp edges.
NOTE: Some school buses may be equipped with 8 warning
signal lamps, 4 red and 4 amber, working in an automatic in-tegrated system. This system of alternately flashing warninglamps will be accepted provided it has 2 red lamps on the frontand 2 red lamps on the rear.
04.10.00 PRIOR TO INSPECTION
The owner or operator of a vehicle shall present evidence of Fi-nancial Responsibility to the inspection station in one of the follow-ing ways:
1. A liability insurance policy, or a copy of the policy, in at leastthe minimum amounts required by law.
2. A standard proof of liability insurance form promulgated bythe Texas Department of Insurance and issued by a liability in-surer that includes:
a. the name of the insurer;
b. the insurance policy number;
c. the policy period (dates of coverage must be 30-dayminimum);
d. the name and address of each insured person;
e. the policy limit or a statement that the coverage of thepolicy complies with at least the minimum amounts of lia-bility insurance required by this Act; and
f. the make and model of each covered vehicle.
3. An insurance binder that confirms that the owner and/or op-erator is in compliance.
4. A copy of a certificate issued by the Department of PublicSafety that shows that the vehicle is covered by self-insur-ance.
5. A certificate (or copy) issued by the State Treasurer thatshows that the owner of the vehicle has on deposit with thetreasurer money or securities in at least the amount requiredby law.
6. A certificate (or copy of a certificate) issued by the Depart-ment of Public Safety that shows that the vehicle is a vehiclefor which a bond is on file with the Department.
7. A copy of a certificate issued by the County Judge where thevehicle is registered that shows that the owner has on deposit,cash or a cashier’s check in at least the amount required bylaw.
NOTE: Evidence of Financial Responsibility must be fur-
04.05.10 - 10.00
3-30-2000 4-5

nished for the TOWING VEHICLE of any trailer, semitrailer,or pole trailer presented for inspection.
NOTE: A non owner’s policy is not acceptable as evidenceof Financial Responsibility.
NOTE: Proof of Financial Responsibility from another stateis acceptable.
An inspection certificate may not be issued for a vehicle for whichthe owner or operator fails to furnish the required evidence of Fi-nancial Responsibility.
1. Vehicles exempt from this requirement:
a. GOVERNMENT VEHICLES (U.S., State-Texas, county,city, or other political subdivision)
b. Vehicles registered to volunteer fire departments
c. Antique vehicles
04.15.00 INSPECTION REQUIREMENTS
Every vehicle which is registered in this state and operated onthe highways of this state is required to be inspected.
15.01 Vehicles Exempt from Inspection
1. Equipment:
a. Road-Building Equipment
b. Farm Machinery
*c. Trailers
*d. Semitrailers
*e. Pole Trailers
*f. Mobile Homes
g. Any Vehicle required to Display a Slow-Moving VehicleEmblem
*When the actual gross weight or registered gross weightis 4,500 pounds or less.
2. A vehicle with one of the following type Texas licenseplates:
a. Paper Dealer Demonstration/In-transit/Converter Tag
b. Parade License
c. Former Military Vehicle License
d. In-Transit License
e. Machinery License
f. Disaster License
g. Farm Trailer License
h. Permit License
i. Antique License
j. Charitable Organization Tag
k. All-Terrain Vehicle Validation Sticker
3. A vehicle with one of the following Texas permits:
a. Factory Delivery Permits
b. Prorate Tabs
c. One-Trip Permits
d. Temporary 24-Hour Permits
e. Mobile drilling and servicing equipment used in gas, oil,or crude production having a 72- or 144-Hour Permit
15.02 General Inspection Requirements
1. City, county, state or federally owned vehicles, if licensedwith Texas plates, require inspection and they must meet thesame requirements of any other vehicle of that same size,weight, etc. (Example: Fire trucks, garbage trucks, ambu-lances, police vehicles, and others; except that these vehiclesare exempt from evidence of Financial Responsibility re-quirements.) (See 04.10.00.)
2. In inspecting trailers, semitrailers, pole trailers, and mobilehomes, these vehicles will be considered a separate vehiclewhether used in connection with a motor vehicle or not andwill require a separate inspection and certificate. A separatefee shall be charged for each vehicle inspected.
3. Each inspection shall be a complete inspection performedby a certified inspector and shall include a check of all theitems in the Rules and Regulations Manual, except that a
04.15.00 - 15.02
4-6 3-30-2000

reinspection of a rejected vehicle by the same station within15 days of the initial inspection that resulted in rejection needonly check the items previously found defective, unless anyother obvious defects are noted. A vehicle NOT inspected be-cause of no evidence of Financial Responsibility will not beconsidered as rejected and no fee will be charged. Once theinspection on a vehicle has begun, it must be completedwhether or not the vehicle is passed or rejected.
4. All inspections must be made only at the approved inspec-tion areas at the location approved by the Texas Departmentof Public Safety.
5. All persons used as inspectors shall be certified by theTexas Department of Public Safety. If a certified inspectorchanges their place of employment, the inspector certificationceases and the Department representative must be notifiedimmediately. Each inspection shall be performed by a prop-erly certified inspector.
6. Inspections may be made while it is raining or snowing.Care must be exercised when making inspections during in-clement weather. Road (brake) tests will be permitted withdue care when it is raining or when braking surfaces are wet.No road (brake) tests are permitted on icy road test areas.
7. No duplicate safety inspection certificates can be issued. Ifa certificate is lost, stolen, or mutilated, the vehicle must besubmitted for another inspection and subject to statutory fee.
8. Refusing to inspect a vehicle submitted for inspection with-out sufficient cause or the careless inspection and willful vio-lation of the inspection requirements may result in suspensionof the Certificate of Appointment and possible court action.
9. Vehicles not registered in the state of Texas may be in-spected, but shall not be issued a Texas vehicle inspectioncertificate unless they meet Texas’ requirements, includingevidence of Financial Responsibility.
10. Complete Vehicle Identification Number or serial numbershall be listed on the inspection station report, on the identifi-cation certificate, and on the reverse side of the safety in-spection certificate in the space provided for same. If nonumber is on the vehicle, show “None.”
11. Fleet Station: An Official Vehicle Inspection Station towhich the Department has granted authority to inspect onlythose vehicles which are owned by, or under bona fide leaseto or under service contract to, the company in whose namethe fleet inspection station license is issued.
12. Governmental Station: An Official Vehicle Inspection Sta-tion to which the Department has granted authority to inspectonly those vehicles which are owned and operated by the po-litical subdivision and agency of the state and in whose name
the governmental vehicle inspection station’s Certificate ofAppointment is issued.
13. Each Official Vehicle Inspection Station must inspectevery vehicle (according to endorsement) presented for in-spection as prescribed by the rules and regulations, either re-jecting or approving it. A vehicle rejected by one inspectionstation may be reinspected by another inspection station if thevehicle owner desires to have this done, and is willing to payan additional fee.
14. Any vehicle coming under the provisions of the VehicleInspection Act that is involved in an accident which results inapparent property damage or affects the safety of said vehi-cle in the items covered under the Vehicle Inspection Act mustbe reinspected after adequate repairs are made. The re-quired fee shall be collected.
15. Safety inspection certificates and identification certificatesmust be affixed to or issued to a vehicle ONLY by the certifiedinspector within the approved area of inspection in the in-spection station where he is certified to inspect.
16. Foreign-made, as well as American-made, motor vehiclesmust comply with all the vehicle inspection requirements, in-cluding lighting equipment meeting Department standards.
17. Reports of violations of the Vehicle Inspection Act or ofthese rules and regulations will be investigated. When suchreports are found to be justified they may result in the sus-pension of the inspection station, possible court action, orother appropriate action. Repeated violations or serious vio-lations may result in the revocation of the appointment by theDepartment or action against the certified inspector.
18. The term “inspection” as herein used shall not include re-pairs or adjustments. Repairs or adjustments necessary tobring the vehicle into conformity with these regulations may bemade by agreement between the vehicle owner and such in-spection station or whatever repair shop the vehicle ownermay select. Total charges for inspection, repairs, and adjust-ments, including any state sales tax, must be reported on theinspection station report.
19. All vehicles owned by the federal government shall be ex-empt from all provisions of the Vehicle Inspection Act or rulesand regulations, except those which are registered in Texasand display Texas registration plates.
20. Vehicles that are temporarily out of the state and not con-veniently available for inspection during the month designatedby the inspection certificate must be presented for inspectionimmediately upon return to the state.
21. Each vehicle that meets the requirements as set forth inthese regulations shall be issued an approval certificate.
04.15.02
5-31-05 4-7
[

Those vehicles that do not meet the inspection requirementsmust be issued a rejection receipt.
15.03 Foreign Vehicles
The inspection of vehicles applies to foreign-made motor vehi-cles as well as American-made motor vehicles. However, thereare some foreign-made vehicles that cannot be inspected in theusual manner. Therefore, when inspecting those foreign-madevehicles, you are authorized to follow the Department’s recom-mendation for inspection and to reject any vehicle for an itemthat is worn, missing, broken, or defective in any manner that ex-ceeds the Department’s tolerance for replacement.
Many of these vehicles are not export models and, therefore, areequipped with lighting and other devices that do not meet stan-dards adopted by the Texas Department of Public Safety. Alldevices must meet applicable Department standards. In caseswhere those devices do not comply with the inspection require-ments, legal devices must be installed. Head lamps on thosevehicles must be of a type acceptable by the Department beforean inspection certificate can be issued.
15.04 Miniature Vehicles
These miniature vehicles (mini-bikes, go-carts, or toy class ve-hicles) must pass the inspection requirements and obtain an in-spection certificate before being operated on the streets andhighways of this state.
Such vehicles with not more than three wheels in contact withthe ground will be inspected as motor-driven cycles. All otherswill be inspected as passenger cars.
Before an inspection certificate is issued to one of these vehi-cles, be absolutely sure that it meets all inspection requirementsfor the class vehicle and is equipped with acceptable lighting de-vices that meet Department standards.
All-Terrain Vehicles (ATV) cannot be inspected regardless ofhow equipped. This class vehicle is not designed for use on pub-lic roads.
15.05 Mopeds
Definition: Moped means a motor-driven cycle whose speed at-tainable in one mile is not more than 30 mph and that is equippedwith a motor that produces not more than two-brake horsepower.If an internal combustion engine is used, the piston displacementmay not exceed 50cc and the power drive system may not re-quire the operator to shift gears.
NOTE: A moped will be issued a regular motorcycle registrationplate by the Texas Department of Transportation.
NOTE: The only items of inspection on a moped will be thebrake, head lamp, rear lamp, and reflector.
15.06 Reconstructed or Rebuilt Vehicles
All vehicles used on the public highways are required to meet allof the state equipment laws and requirements; therefore, recon-structed or rebuilt vehicles which are using the public highwaysare also expected to meet all of the state equipment laws andregulations. Reconstructed or rebuilt vehicles in many instancesfail to meet state requirements and, therefore, are not legal foruse on the public highways.
All reconstructed or rebuilt vehicles (sand or dune buggies or hotrods) must comply with inspection requirements for the class ofmotor vehicle it is being inspected as, such as car, truck, motor-cycle, or motor-driven cycle.
Be sure to check reconstructed or rebuilt vehicles for all requireditems of inspection with particular attention to the lighting de-vices. Head lamps shall be of a type acceptable by the Depart-ment. No modifications are allowed that will change the originaldesign or performance of any lamp. Only acceptable automobilehead lamps may be used on cars and trucks. Either the 7-inchhead lamps or both dual head lamps (type 1 and type 2) may beused. Only acceptable motorcycle head lamps may be used onmotorcycles, motor-driven cycles, and mopeds.
All lighting devices must be of an acceptable type that meet De-partment standards and must comply with the mounting heightsas specified in the inspection requirements.
The year model of a reconstructed vehicle will be the same yearin which it was reconstructed and not the year of original manu-facture. Therefore, the inspection requirements would be for themodel year of the vehicle (same as the year of reconstruction) orthe year model of the engine itself, whichever is the later model.
Motor vehicles used for competitive racing, such as modifiedstock cars, dragsters, and hot rods may be inspected. Whensuch a vehicle is presented for inspection, all rules and regula-tions regarding the inspection of the vehicle will apply. This ap-plies to brake requirements, exhaust systems, as well as anyother item required in these provisions.
15.07 Multi-Purpose Vehicles
Multi-purpose passenger vehicle means a motor vehicle withpower, except a trailer, designed to carry 10 persons or less
04.15.03 - 15.07
4-8 3-30-2000

which is constructed either on a truck chassis or with specialfeatures for occasional off-road operation. Lighting and reflectorrequirements for this type vehicle would refer to diagrams of sim-ilar type vehicle such as bus or van-type truck. The type of reg-istration plate is not a determining factor in the number of lightingdevices required for inspection purposes.
15.08 Vehicles Equipped to Use Liquefied Gas as a Fuel. Nocertificate of safety inspection may be issued by any inspector orinspection station for a motor vehicle equipped with a carburetiondevice permitting the use of liquefied gas alone or interchange-ably with other fuels, unless a currently valid liquefied gas taxdecal issued by the Comptroller of Public Accounts is affixed tothe lower right-hand corner of the front windshield of the vehicleon the passenger’s side. Vehicles operated by a public schooldistrict or county are exempt from this requirement.
NOTE: Certain commercial vehicles with apportioned registra-tion may be exempt from the liquefied gas tax decal requirementif they present an exemption letter issued by the Comptroller’s of-fice. The exemption letter will identify the vehicle by VehicleIdentification Number (VIN), license number, and must be fur-nished to inspector prior to inspection.
15.09 Unsafe Vehicles. It is a violation of the TransportationCode for any person to drive or move on any highway any motorvehicle, trailer, semitrailer, pole trailer, mobile home, or combi-nation thereof unless the equipment upon any and every saidvehicle is in good working order and adjustment as required inthis Act and said vehicle is in such safe mechanical condition asnot to endanger the driver or other occupant or any person uponthe highway. It is also a violation for any person to drive or moveor for the owner to cause or to permit to be moved on the high-way any vehicle, or combination of vehicles, which is in unsafecondition as to endanger any person, or which does not containthose parts or is not at all times equipped with such lamps andother equipment in proper condition and adjustment as requiredby law, or which is equipped in any manner in violation of thelaw, or for any person to do any act forbidden or fail to performany act required by law.
15.10 Special Lighting Devices and Reflector Requirements.The law describes certain lamps and reflectors that certain vehi-cles must have regardless of whether or not those vehicles areoperated at night. The law further states that when these vehi-cles are operated at night all of these prescribed lamps must beburning.
Any lighting device, lens and/or reflector used on a vehicle mustmeet standards adopted by the Texas Department of PublicSafety for that particular use.
Whenever a requirement is declared as to the mounted height oflamps or devices, it shall mean from the center of such lamp ordevice to the level ground upon which the vehicle stands whensuch vehicle is without a load.
Whenever requirement is declared as to visibility distance fromwhich certain lamps and devices shall render objects visible orwithin which such lamps or devices shall be visible, these provi-sions shall apply at nighttime in respect to a vehicle without aload when upon a straight, level, unlighted highway under normalatmospheric conditions unless a different time or condition is ex-pressly stated.
REJECT ANY VEHICLE PRESENTED FOR INSPECTIONWHICH IS NOT EQUIPPED WITH ALL THE LAMPS AND DE-VICES PRESCRIBED REGARDLESS OF HOW AND WHENTHE VEHICLE IS OPERATED.
15.11 Commercial Motor Vehicle Inspection Program. Theterm “commercial motor vehicle” means a self-propelled or towedvehicle, used to transport persons or property that is used on apublic highway to transport passengers or cargo if:
1. the vehicle or combination of vehicles has a gross weight,registered weight, or gross weight rating of more than 26,000pounds; or
2. the vehicle is a farm vehicle with a gross weight, a regis-tered weight, or a gross weight rating of more than 48,000pounds; or
3. the vehicle is designed to transport more than 15 passen-gers, including the driver; or
4. the vehicle is used to transport hazardous materials in aquantity requiring placarding by a regulation issued under theHazardous Materials Transportation Act; or
5. the vehicle or combination of vehicles has a gross weightrating of more than 10,000 pounds and is operated in inter-state commerce and registered in this state.
6. the vehicle is a school bus that will operate at a speed au-thorized by the Texas Transportation Code; or
7. the vehicle is a school activity bus that has a gross weight,registered weight, or gross weight rating of more than 26,000pounds, or is designed to trasport more than 15 passengers,including the driver.
15.12 Acceptance of Out-of-State Commercial Vehicle In-spection Certificates. A valid commercial vehicle inspectioncertificate issued outside of Texas is acceptable on a Texas-reg-istered vehicle.
Valid out-of-state inspection certificates will not be honored oncommercial vehicles required to be registered in this state.
04.20.00 DETAILS OF INSPECTION
All items of inspection enumerated will be covered which are re-quired to be inspected in accordance with the Texas Vehicle In-
04.15.08 - 20.00
3-30-2000 4-9

spection Act and these rules and regulations prior to the affixing ofan inspection certificate on a vehicle.
During the brake/road test of a vehicle requiring a CommercialDriver License (CDL) the certified inspector may ride in the vehicledriven by its operator observing the braking performance at thebrake test area, provided the inspector is not licensed to operatethe class vehicle presented for inspection.
Any vehicle presented for inspection that is modified for use by adisabled person may be driven by the operator with the certified in-spector riding and observing during the road test portion of the in-spection.
NOTE: The following items of inspection are listed alphabetically.
20.01 Beam Indicator. Every new motor vehicle registered inthis state after January 1, 1948, other than a motorcycle or amotor-driven cycle, which has multiple beam road lighting equip-ment, shall be equipped with a beam indicator (no certain colorrequired) which shall be lighted whenever the uppermost distri-bution of light from the head lamp is in use, and shall not be oth-erwise lighted. Said indicator shall be so designed and locatedthat when lighted it will be readily visible without glare to thedriver of the vehicle so equipped.
1. Inspection Procedure. Check operation and condition vi-sually.
2. Inspect for and reject if: (When required)
a. Vehicle not equipped with a beam indicator.
b. Improper switching indication.
c. Produces glaring light.
d. Inoperative for any reason.
20.02 Brakes. Every passenger car, truck, bus, school bus, andmotorcycle shall be equipped with brakes acting on all wheelsexcept:
1. Motor-driven cycles, motor scooters, motorcycle sidecars,or mopeds.
2. Trucks and truck tractors (manufactured prior to 1981) hav-ing three or more axles need not have brakes on the frontwheels, except that when such vehicles are equipped with atleast two steerable axles, the wheels on one steerable axleneed not have brakes. However, such trucks and truck trac-tors must be capable of complying with the performance re-quirements of this Act.
3. Any vehicle being towed in a driveaway or towaway oper-ation, provided the combination of vehicles is capable of com-plying with the brake performance requirements, does notrequire brakes acting on all wheels.
Definition of Terms:
Brake System: A combination of one or more brakes andtheir related means of operation and control.
Service Brake System: A brake system used for retard-ing, stopping, and controlling the vehicle under normal op-erating conditions. This brake is sometimes referred to as“foot brake.”
Parking Brake System: A brake system used to hold andmaintain the vehicle in a stationary position. (A positivemechanical means is employed to hold the brake appliedwhen the vehicle is unattended.)
Pedal Reserve: As applied to hydraulic, mechanical, orpower assisted hydraulic brakes, this is the amount of dis-tance (total pedal travel) left in reserve when the pedal isdepressed to the brake-applied position. (The purpose ofthe pedal reserve check is to ascertain the degree of thebrake adjustment and to demonstrate satisfactory brakeactuating system condition).
Equalization: Brakes shall be so adjusted as to operateas equally as practicable with respect to the wheels on theopposite sides of the vehicle.
Driveaway-Towaway Operation: Any operation in whichany motor vehicle, trailer, or semitrailer, singly or in com-bination, new or used, constitutes the commodity beingtransported when one set or more of wheels of any suchvehicle are on the roadway during the course of the trans-portation, whether or not any such vehicle furnishes themotor power.
4. Inspection Procedure. Service brake performance testsshould be conducted on a substantially level, hard, smoothsurface road or area that is free from loose material, oil, orgrease. Using the service brake only, the stopping ability ofthe vehicle should be tested by one of the following methods.
a. Service Brake Test
1) On Road (Decelerometer): Mount an approved de-celerometer at centerline of vehicle. Level the de-celeromoter. At a speed of 20 mph apply service brakefirmly. Observe decelerometer reading.
2) On Road (Road Test): At a speed of 20 mph applyservice brakes firmly. Observe whether a vehicle comesto a smooth stop within the distance prescribed by thechart, “Required Brake Performance.” Inspector shouldhave firm control of the steering wheel throughout thetest.
04.20.01 - 20.02
4-10 3-30-2000

3) Platform Tester: Drive vehicle onto “drive-on-and-stop” platform tester. Apply brakes firmly at a speedfrom 4-8 mph without wheel lockup. All braking actionmust take place on the platforms.
NOTE: Front-wheel drive vehicles are to be checkedby road test only unless a platform tester specificallyapproved by the Department to test front-wheel drivevehicles is used.
These machines may be used to inspect the relative ef-fectiveness of each wheel. There should be braking ac-tion on all wheels and the action on any one wheelshould be 75 percent or more of the action on the otherwheel on the same axle.
4) Roller-Type Brake (Dynamometer-Force Measur-ing Type):
a) Adjust tire inflation to recommended values.
b) Position vehicle on dynamometer rolls and begintest.
c) Follow Department’s recommended testing pro-cedures.
b. Test Brake Hydraulic System for Leakage.
While vehicle is stopped, inspector should be able to applya moderate foot force (40-60 pounds in nonpowered sys-tems and 15-20 pounds in power assisted systems).
c. Test Pedal Reserve.
While the vehicle is stopped, depress brake pedal undermoderate foot force (40-60 pounds in nonpowered sys-tems and 15-20 pounds in power assisted systems).
d. Condition of Vacuum System.
Visually inspect system for collapsed, broken, badly chafedand improperly supported hoses and tubes, and loose orbroken hose clamps.
5. Inspect Service Brakes for and reject if:
a. Vehicle is not equipped with required service brakes.
b. Upon first application, there is less than 2 inches ofpedal reserve as determined by the use of an accuratemeasurement on the fully applied brake pedal of vehiclesequipped with conventional brakes.
c. Upon first application, there is less than 1 inch of pedalreserve as determined by the use of an accurate mea-
surement on the fully applied brake pedal of vehicles withpower brakes (power must be on and operating whentested).
d. On service brakes that cannot be checked with the useof an accurate measurement, there is less than a reserveof one-third of the total travel distance of the brake actua-tor.
e. Brake pedal height cannot be maintained under moder-ate foot force (40 to 60 pounds for conventional - 15 to 20pounds for power) for a period of 1 minute.
f. There is visible leakage or audible seepage in hydrauliclines and cylinders, or any other part of the service brakesystem.
g. Fluid level in the master cylinder is more than 1 inchbelow the top of the reservoir or below manufacturer’s rec-ommended level.
h. Hoses or cables are restricted, abraded, crimped,cracked, leaking, frayed, or broken.
i. Brake rods or mechanical parts are missing, broken,badly worn, or misaligned.
j. Brake operating levers or control cables do not operatefreely, improperly positioned, or misaligned.
k. Any part of the service brake system has been removed,disconnected, rendered inoperative.
l. There is an obvious metal to metal contact sound whenbrakes are applied, and upon investigation, drum or diskis being scored.
m. The service brakes do not develop the required totalbraking force as determined by machine tests.
n. Brakes do not meet requirements for stopping distancesfor the class of vehicle.
o. The brakes are not equalized as determined from roadtesting or by machine tests of the vehicle.
p. Brake warning lamp or signal is on or comes on duringtest.
NOTE: Anti-lock (ABS) lamp or signal which is on or comeson during test will not be cause for rejection.
NOTE: It is imperative that brake system reservoir coverand the surrounding area be thoroughly cleaned beforecover is removed for inspection to assure that NO DIRTOR WATER is mixed with the brake fluid.
04.20.02
3-30-2000 4-11

20.03 Parking Brake. The inspection of the parking brake (aux-iliary or holding) applies only to all motor vehicles beginning withthe model year 1960. This does not include motorcycles, motor-driven cycles, mopeds, trailers, semitrailers, pole trailers, andmobile homes.
Some types of parking brake may be actuated by foot or handlever.
The parking brake may be assisted by the service brakes orother source of power, provided that failure of the service brakeactuating system or other power assisting mechanism will notprevent the parking brakes from being applied. The parkingbrakes should be so designed that when once applied, they shallremain applied - despite exhaustion of any source of energy orleakage of any kind. If the means of applying the parking brakesand the service brakes are connected in any way, they shall beso constructed that failure of any one part shall not leave the ve-hicle without operative brakes. Brake lock systems will not meetthe parking brake requirement.
1. Inspection Procedure. On a motor vehicle that has the au-tomatic parking brake release when the transmission isplaced in gear, the parking brake should be held down withthe foot and the engine accelerated enough with the vehiclein gear to determine if it is working properly.
2. Inspect Parking Brake for and reject if:
a. Motor vehicle is not equipped with a parking brake.
b. Operating mechanism, when fully applied, does not holdthe vehicle.
c. Actuating mechanism is not fully released when the re-lease control is operated.
d. Any mechanical parts are missing, broken, badly worn,or not operating properly.
e. Pull cables are badly worn, stretched, frayed, or not op-erating freely.
f. Parking brake will not hold the vehicle in place when, withthe engine running, the vehicle is placed in forward gearand the engine is accelerated enough to cause a pull onthe braking mechanism.
20.04 Motorcycle, Motor-Driven Cycle, and Moped Brake Re-quirements. Every motorcycle, motor-driven cycle, and moped,at all times and under all conditions of loading, upon applicationof the service brake pedal or control, shall be capable of:
1. Developing a brake force that is not less than 43.5% of itsgross weight, OR
2. Decelerating to a stop from not more than 20 miles per hourat not less than 14 feet per second, OR
3. Stopping from a speed of 20 miles per hour in not morethan 30 feet, such distance to be measured from the point atwhich movement of the service brake pedal or control begins.
Motorcycles shall be provided with adequate brakes on allwheels. Sidecars are not required to have brakes when brakingperformance of the motorcycle or motor-driven cycle is met.Motor-driven cycles and mopeds are required to have brakes onat least the rear wheel. During the brake road test, a motorcy-cle, motor-driven cycle, or moped may be driven by its owner oroperator with certified inspector observing the braking perform-ance at the brake test area if the certified inspector is not li-censed to operate a motorcycle, motor-driven cycle, or moped.
20.05 Road Test Procedures. If a road test is used for check-ing service brakes:
1. Brake test area must be used on every inspection made.
2. When it is raining, snowing, or when the brake surfaces arewet, brake tests are permitted; however, if the certified in-spector feels that they cannot safely and with due care accu-rately check the service brakes they may refuse to make theinspection.
3. No inspections are permitted when the brake test areas areicy.
4. Extreme care must be exercised and sudden stops mustbe avoided if other traffic is affected.
5. All vehicles so tested (brake test area) should be driven ata speed of 20 miles per hour and the vehicle must stop as in-dicated by the stopping distance chart. (See brake perform-ance chart in reference section 30.06.)
The brake application must be started as close to a speed of 20miles per hour as possible. The stopping distance is to be meas-ured from the point at which the service brake pedal or controlbegins. The vehicle must stop within the prescribed stoppingdistance requirements and must not pull to the right or left. Usingthe service (foot) brake only, the stopping ability of the vehicleshould be tested by actual operation of the vehicle.
When applying brakes to the moving vehicle, the braking forcemust be evenly distributed to the wheels. The brakes should beso adjusted as to operate as equally as practicable with respectto the wheels on the opposite sides of the vehicle. The drivershould have a firm control of the steering wheel throughout thetest.
04.20.03 - 20.05
4-12 3-30-2000

Brakes on a truck-tractor may be inspected without a trailer; how-ever, a trailer shall be inspected only with a towing vehicle at-tached.
Approved brake machines may be used for testing brakes solong as the machine and the braking surfaces afford a compe-tent brake test.
All testing of service brakes for stopping distance and equaliza-tion must be done either by an actual road test or by a machine.
NOTE: If platform-type brake tester is used, a measured braketest area must also be maintained to test vehicles with more thantwo (2) axles or vehicles with front-wheel drive, unless, the testerhas been specifically approved by the Department to test thesevehicles.
20.06 Platform-Type Tester. This type of brake tester is a drive-on-and-stop machine consisting of 4 pads or platforms, one foreach wheel. When the brakes are applied at the time the vehi-cle is moving on the pads, the braking effort at each wheelcauses a proportionate movement of the pad against the meas-uring system. All braking action must take place on the plat-forms.
1. Operation
a. Drive vehicle on brake tester about 5 miles per hour andapply the brakes firmly but not severely. (Excessive speedand braking should be avoided).
b. These machines may be used to inspect the relative ef-fectiveness of each wheel. There should be braking ac-tion on all wheels.
c. Each gauge will record the individual wheel braking ef-fort in hundreds of pounds.
d. Total braking effort and comparative braking energy canbe determined.
e. The tester must be properly installed, maintained, andkept clean at all times.
f. If the vehicle fails the first brake test, a second brake testmust be conducted before the vehicle is rejected.
2. Equalization and tolerances:
a. Total reading must not be less than 50% of the totalweight of the vehicle if the vehicle has brakes on allwheels. The required 50% is the equivalent of a vehiclestopping within 25 feet at 20 miles per hour.
b. Total reading must not be less than 35% of the weight
of the vehicle if the vehicle does not have brakes on allwheels. The required 35% is the equivalent of a vehiclestopping within 39 feet at 20 miles per hour.
c. Brake machine readings on each opposing wheel of thesame axle shall be within 25% on the front axle and within35% on the rear axle.
3. Conditions affecting brake tester readings:
a. Wet tires or wet tread plates (pads) will cause readingsof braking efficiency to be inaccurate.
b. Grease, sand, or other foreign material on tires or treadplates (pads) will also cause readings of braking efficiencyto be inaccurate.
c. Worn or slick tires will not affect brake tester as much asthey will affect a road test.
d. Dirt and debris under the tread plates (pads).
20.07 Roller-Type Tester. This type brake tester (Dynamome-ter [Force Measuring Type]) is equipped with powered rollers thatrotate the wheels at a speed of approximately 35 to 45 miles perhour with the vehicle in a stationary position. The brakes are ap-plied while the wheels are turning and developing braking force.Measurements of both BRAKING FORCE (Brake Effort) andBRAKE BALANCE are indicated on the gauge(s). Brake fadecan also be tested on this machine.
1. Operation - Acceptance Tests. With tester in operationand wheels turning, apply brakes slowly until brake effortreaches the following values and hold for 5-6 seconds:
a. Small vehicle up to 2,200 pounds - 175 lb Brake Ef-fort/Wheel (Total 350 pounds)
b. Light compacts 2,300 to 3,000 pounds - 230 lb BrakeEffort/Wheel (Total 460 pounds)
c. Heavy compacts 3,100 to 3,600 pounds - 285 lb BrakeEffort/Wheel (Total 570 pounds)
d. All others over 3,700 pounds - 335 lb Brake Effort/Wheel(Total 670 pounds)
Brake Balance Test - During the “Brake Force Test,” variancein braking force between wheels should not exceed 70pounds.
NOTE: As an additional service to the vehicle owner or op-erator, the inspection station is permitted to perform an addi-tional dynamic brake inspection according torecommendations of the equipment manufacturer. However,
04.20.06 - 20.07
3-30-2000 4-13
legal reject must be based on the above parameters under“Operation - Acceptance Tests.”If substandard brake conditions are found that are not ex-posed by the above acceptance test, the inspection stationmay suggest that the brake repairs be made but must clearlyinform the vehicle owner or operator that such repairs are notmandatory to pass inspection.
20.08 Deceleromoter-Type Tester. This tester is an inertia-typedecelerometer consisting of a scale to measure the vehicle’s de-celeration or equivalent braking force (sometimes referred to asbrake efficiency) in percentages. The decelerometer is generallyplaced as close to the center of the vehicle as practicable (onwindow of right front door) and the vehicle is operated on thehighway outside the inspection station.
1. Operation
a. Level decelerometer and set to “0.”
b. Drive vehicle on a clean, level road (road grade of 5% orless) at 20 mph and apply brakes evenly, without skiddingvehicle wheels.
c. Read the dial to see if vehicle stopped within requiredstopping distance for class of vehicle.
d. For brake balance (equalization), the vehicle should stopin a straight line. A pull to either side, right or left, during atest stop indicates brake unbalance.
2. Conditions affecting brake tester readings:
a. Wet tires and highways may cause readings of brakingefficiency to be inaccurate.
b. Oil slicks, sand, or other foreign material on tires or high-ways may also cause readings of braking efficiency to beinaccurate.
c. Worn or slick tires may also cause readings to be inac-curate.
d. Any fast, hard application of the brake can cause wheellockup and tire skid.
20.09 Vacuum Brake System
1. When checking the operation of the vacuum system on atruck or truck-tractor, the trailer shutoff valves must be closed.When checking the operation of the vacuum system on atrailer or semitrailer, the trailer must be coupled to a truck ora truck-tractor with the trailer shutoff valve open. The engine
of the truck-tractor should be allowed to run for one minute tobuild up vacuum.
a. Visually inspect system for collapsed, broken, badlychafed, and improperly supported hoses and tubes, andloose or broken hose clamps.
b. On truck or truck-tractor, depress brake pedal with mod-erate foot force. While maintaining this force on the pedal,start engine, and observe if pedal falls slightly when en-gine starts.
On trucks with low vacuum indicators build full vacuum. Shutoff engine and reduce vacuum by making a series of moder-ate brake applications. A flashing or buzzing signal shall func-tion when vacuum reaches eight inches mercury.
Apply and release pedal a number of times and observe ac-tion on brake chamber rod on trailers.
2. Inspect for and reject if:
a. Hoses, tubes, or connections leaking, restricted,abraded, crimped, cracked, or broken; or collapse of vac-uum hoses when vacuum is applied. Connecting lines notproperly attached or supported to prevent damage or abra-sion by contact with frame, axle, other lines, or any otherpart of the vehicle.
b. Evidence of leakage in the system.
c. In vacuum-assisted systems, service brake pedal doesnot move slightly as the engine is started while pressure ismaintained on the pedal.
d. Trailer vacuum brake chamber rods not operating inconjunction with the tractor brake pedal, or not reachingfull released position.
e. In vacuum-equipped vehicles in excess of 10,000pounds gross vehicle weight and vehicle combinations, in-sufficient vacuum reserve to permit three full service brakeapplications after engine is stopped.
f. Failure of low-vacuum indicator to function when systemis reduced to eight inches of mercury vacuum.
20.10 Air Brake System
1. With air system charged, open drain cocks in each reser-voir, carbon trap, or filter used in the air system; close draincocks and with air system at zero gauge pressure, checkpressure buildup, running engine at fast idle, and record time
04.20.08 - 20.10
4-14 3-30-2000

to raise air pressure from 50 to 90 psi on the gauge. Checkpressures at which light, buzzer, or flag connected to the low-pressure indicator is no longer visible or audible. Continuerunning engine until the governor cuts out and observe pres-sure-gauge reading. With engine idling, reduce pressure insystem by making a series of brake applications and observepressure at which governor cuts in. With system fullycharged, stop engine and check for air leakage by recordingthe pressure drop in psi per minute both with brakes releasedand brakes fully applied. Inspect for restricted, abraded, col-lapsed, improperly supported, or broken hoses and tubes andaudible leaks. Check safety valve for freedom of action. Ifthe compressor is belt driven, check belt for tightness and ob-serve belt condition. Check air compressor for air cleanercondition and restrictions.
2. Inspect for and reject if:
a. Time required to build up air pressure from 50 to 90 psimore than 3 minutes with engine running at fast idle.
b. Warning device (light, buzzer, or flag) connected to thelow pressure indicator of the air brake system not operat-ing when air pressure is lowered to 55 psi.
c. Governor cut-in pressure lower than 80 psi or cut-outpressure higher than 135 psi, unless other values are rec-ommended by the vehicle manufacturer.
d. Compressed air reserve insufficient to permit one fullservice brake application after engine is stopped, and withsystem fully charged, without lowering reservoir pressuremore than 20% below initial reading.
e. Air brake pressure drop of more than 2 psi in 1 minutefor single vehicles or more than 3 psi in 1 minute for vehi-cle combinations, with engine stopped and service brakesreleased.
f. Air pressure drop of more than 3 psi in 1 minute for sin-gle vehicles or more than 4 psi in 1 minute for vehicle com-binations with engine stopped and service brakes fullyapplied.
g. Hoses, tubes, or connections leaking, restricted,abraded, crimped, cracked, or broken. Connecting linesnot properly attached or supported to prevent damage orabrasion by contact with frame, axle, other lines, or anyother part of the vehicle.
h. Valves, diaphragms, or piston cups leaking audibly.
i. Air safety valve inoperative.
j. Compressor drive belt without sufficient tension, or badlyworn or frayed.
k. Compressor air intake cleaner clogged sufficiently toprevent proper intake of air.
20.11 Electric Brake System
1. Insert a low-range (0 to 25 amperes will be adequate formost two and four brake systems; 0 to 40 amperes may be re-quired for a six brake system) dc ammeter into the brake cir-cuit between the controller and the brakes. With controller in“off” position, ammeter should read zero. Gradually applycontroller to “full on” position; observe maximum ammeterreading and current modulation. Gradually return controller to“full off” and observe return to zero ampere and current mod-ulation. Divide maximum ammeter reading by number ofbrakes.
Check for loose or dirty terminal connections and for broken,frayed, or unsupported wires.
2. Inspect for and reject if:
a. Trailers showing a per-brake maximum amperage valueof more than 20% above, or less than 30% below, thebrake manufacturer’s maximum current rating.
b. Ammeter showing no reading, or needle indication notsteady on application and release of brake controller.
c. Loose or dirty terminal connections; broken, frayed, orunsupported wires. Trailers using single conductor or non-stranded wires or wires of a size below brake manufac-turer’s minimum recommendation.
NOTE: Parking brakes are not inspected on trailers, semi-trailers, pole trailers, and mobile homes.
20.12 Cab Lamps. Refer to Reference Section for lighting dia-grams. Every truck-tractor shall have on the front, two cab clear-ance lamps, one on each side.
1. Definition of a Truck-Tractor. Every motor vehicle de-signed and used primarily for drawing other vehicles and notso constructed as to carry a load other than a part of theweight of the vehicle and load so drawn.
a. Required on truck-tractors only.
b. Color amber.
c. Number - 2.
d. Location - shall be mounted on the front of the cab, oneon each side as described in lighting diagram. If the vehi-cle has a sleeper cab, these lights may be placed on the
04.20.11 - 20.12
3-30-2000 4-15

highest and widest part of the cab with the light showing tothe front of the vehicle. Cab lamps should be located so asto indicate the extreme width of the truck-tractor cab.
2. Inspection Procedure. Check operation and condition.
3. Inspect for and reject if:
a. Lamps are required and not present.
b. Lamp is not securely mounted and properly located.
c. Lamp does not emit required color, lens, or bulb painted.
d. Lamp lens is discolored, or missing.
e. Lamp is not visible from distance between 500 feet and50 feet.
f. Wiring insulation is worn, rubbed bare, or shows any ev-idence of burning, short circuiting, or poor electrical con-nections.
g. Lens is cracked or broken to the extent that a portion ofthe lens is missing and/or separated, permitting light fromthe bulb to emit through the crack or break.
20.13 Clearance Lamps. Refer to Reference Section for light-ing diagrams.
1. Required on all:
Buses 80 inches or more in overall width.Trucks 80 inches or more in overall width.Trailers and semitrailers 80 inches or more in overall width.Trailers and semitrailers 30 feet or more in overall length.Pole trailers.
a. Clearance lamps shall, so far as is practicable, bemounted on the permanent structure of the vehicle in sucha manner as to indicate the extreme height and width ofthe vehicle. When identification lamps are present and aremounted as high as practicable, clearance lamps may bemounted at optional height. When the mounting of frontclearance lamps results in such lamps failing to indicatethe extreme width of the trailer, such lamps may bemounted at optional height but must indicate, as near aspracticable, the extreme width of the trailer.
b. Clearance lamps and side marker lamps may bemounted in combinations, provided illumination is given asrequired by law.
c. Clearance lamps mounted on the front or on the sidesnear the front of a vehicle shall display an amber color.
d. Clearance lamps mounted on the rear or on the sidesnear the rear of a vehicle shall display a red color.
e. Clearance lamps shall be visible under normal atmos-pheric conditions at a distance between 500 feet and 50feet from the vehicle on which mounted.
f. On buses and trucks 80 inches or more in overall widthand trailers and semitrailers 80 inches or more in overallwidth:
1) On the front, two clearance lamps.
2) On the rear, two clearance lamps.
2. Inspection Procedures:
a. A crack is defined as any break, separation, or missingpart that permits light from the bulb to emit through thecrack or break.
b. Check operation and condition.
3. Inspect for and reject if:
a. Lamps are not present.
b. Lamps are not securely mounted and properly located.
c. Lamps do not emit required color; lens or bulb painted.
d. Visibility requirements are not met.
e. Lenses are discolored, or missing.
f. Wiring insulation is worn, rubbed bare, or shows any ev-idence of burning, short circuiting, or poor electrical con-nections.
g. Lens is cracked or broken to the extent that a portion ofthe lens is missing and/or separated, permitting light fromthe bulb to emit through the crack or break.
20.14 Exhaust Emission System. The owner or operator ofany new motor vehicle or new motor vehicle engine beginningwith the model year 1968 equipped with an exhaust emissionsystem shall maintain the exhaust emission system in good op-erable condition and shall use it at all times that the motor vehi-cle or motor vehicle engine is operated. The owner or operator
04.20.13 - 20.14
4-16 3-30-2000

of the motor vehicle or motor vehicle engine shall not remove orintentionally make inoperable within the state of Texas the ex-haust emission system or any part thereof, except where the pur-pose of removal of the exhaust emission system or part thereofis to install another exhaust emission system or part thereof,which is intended to be equally effective in reducing atmosphericemissions from the vehicle or engine.
The exhaust emission system was installed by manufacturers ofmotor vehicles beginning with model year 1968. The inspectionof the exhaust emission system will apply only to those vehiclesthat are equipped with such a system. The following exhaustemission systems will be inspected if installed as original equip-ment by the manufacturer: thermostatic air cleaner, exhaust gasrecirculation system, positive crankcase ventilation system, airinjection system, evaporative emission system, and/or catalyticconverter.
If installed as original equipment by the manufacturer, the cat-alytic converter will be considered a part of the exhaust emissionsystem on all 1984 and later model vehicles. It will be inspectedas a part of the exhaust system on prior to 1984 model vehicles.
NOTE: The inspection of the exhaust emission system shall notapply to motor vehicles altered and modified to use only a fuelother than gasoline.
NOTE: Vehicles using liquefied petroleum gas as fuel or a com-bination of liquefied petroleum gas and any other fuel must beara liquefied gas tax decal on the windshield lower right-hand cor-ner showing this vehicle uses liquefied petroleum gas, before asafety inspection certificate can be issued.
NOTE: A motor vehicle that uses liquefied petroleum gas that isoperated by a public school district or county in this state is notrequired to have a liquefied gas tax decal or special use liquefiedgas tax decal.
NOTE: Vehicles that are originally manufactured with a Ther-mostatic Air Cleaner (TAC) System are required to have aclosed-type design air filter system. (Vehicles 1996 and newerwre not originally manufactured with a Thermostatic Air Cleaner(TAC) System.)
NOTE: Vehicles that are not originally equipped with a Thermo-static Air Cleaner (TAC) System may have an aftermarket open-type air filter intake system installed. This type of system is notan item of inspection.
1. Inspection Procedure. Examine visually.
2. Inspect for and reject if:
a. The exhaust emission system has been removed.
b. The exhaust emission system has been disconnected.
c. The plumbing or hoses are loose, broken, leaking, or im-properly routed.
d. Air pump (air injection-type) belt is loose, removed, ex-cessively cracked, frayed or has pieces missing.
e. The exhaust emission system has been altered in anymanner to make it ineffective.
f. The catalytic converter has been removed, leaking, ordisconnected on a 1984 or later model vehicle.
3.Gas Cap Testing. Every gasoline-powered vehicle* from 2-24 model years old will be checked for presence of and by aDepartment approved “Gas Cap Testing Device” to determineif the gas cap is missing or defective. The following vehiclesare exempt:
a. Antique vehicles.
b. Slow-moving vehicles.
c. Motorcycles.
d. Vehicles operated exclusively by a fuel other than gaso-line.
e. Vehicles newer than 2 years old and older than 24 yearsold.
4. Inspection Procedure.
a. Conduct daily calibration check of gas cap testing de-vice.
b. Check for presence (all gas caps must be checked).
c. Check for correct type of gas cap(s).
d. Remove gas cap(s) and test using an approved testingdevice. (Gas cap present but not testable will not be causefor rejection.)
e. Any gas cap(s) failing the initial test will be tested a sec-ond time to verify failure.
5. Inspect for and reject if:
a. Vehicle not equipped with required gas cap(s).
b. Vehicle not equipped with proper type gas cap(s).
c. Gas cap(s) fails both tests.
04.20.14
5-30-07 4-17
[
[

NOTE: When a vehicle is presented for inspection and thevehicle is from a designated emissions county and is sub-ject to the Texas Vehicle Emissions Inspection and Main-tenance Program an Affidavit (VIE-12) is required. (SeeChapter 5, page 5-14.)
20.15 Exhaust System. Every motor vehicle shall at all times beequipped with muffler in good working order and in constant op-eration.
Muffler defined: Muffler is a device consisting of a series ofchambers or baffle plates or other mechanical design for the pur-pose of receiving exhaust gas from an internal combustion en-gine and/or turbine wheels for the purpose of receiving exhaustgas from a diesel engine, both of which are effective in reducingnoise.
NOTE:On vehicles manufactured or equipped with a muffler anda turbo, the muffler must be present and in good working order.
The exhaust system includes the manifolds, gaskets, exhaustlines, mufflers, resonators, tailpiping, and supporting hardware.
Motor vehicles cannot be equipped with a muffler which is per-forated or which was perforated and has been repaired, eitherby a muffler repair jacket or by patching or in any other way. Inthose cases where a muffler is perforated at the time of an in-spection or has been perforated and has been repaired previousto the inspection, the muffler must be replaced or the vehicle re-jected.
Some pickups are equipped with a camper or hard shell coverand are sometimes used for the transportation of passengers.The tailpipe should discharge the exhaust at the rear or sides.This truck modification will be considered as a passenger com-partment.
The entire structure of a passenger vehicle or a motor home-typevehicle is considered a passenger compartment. The cab only ofall other truck-type vehicles is considered passenger or luggagecompartment.
If the vehicle is equipped with lake pipes or similar devices, suchpipes or devices must be securely plated and bolted or capped.
Dual exhaust systems may be modified to single exhaust sys-tems and single exhaust systems to dual exhaust systems, pro-vided the modification does not violate requirements concerningexhaust emission systems.
The catalytic converter will be considered as a part of the ex-haust system on all vehicles prior to 1984 year model and willbe inspected only visually (if present) for leakage. On 1984 andlater model light truck and passenger vehicles, the catalytic con-
verter will be checked for presence and leakage. Flexible tubingwhich meets the requirements listed below may be used any-where in the exhaust system.
NOTE: Inspection of exhaust systems covers the discharge ofexhaust fumes and is not concerned with the noise level.
1. Inspection Procedure. The exhaust system shall be ex-amined visually while the engine is running to determine effi-ciency of the system.
2. Inspect for and reject if:
a. Vehicle is not equipped with a muffler.
b. Any joint is loose or leaking, including manifolds. Doesnot include minor leakage at exhaust control valve (mani-fold damper or heat riser valve).
c. Manifold is cracked or broken causing leakage.
d. Holes, leaking seams, or patches on the muffler, res-onators, exhaust pipe, tailpipe, or catalytic converter.
e. Exhaust system is not secured to the vehicle by mount-ing brackets designed for exhaust systems (wire is not ac-ceptable).
f. Any brackets are loose, broken, or missing.
g. There is excessive vibration of exhaust line.
h. Any part of the exhaust system passes through the pas-senger compartment.
i. The tailpipe is broken, pinched, or eroded off to the ex-tent to allow exhaust fumes to penetrate into the interior ofthe passenger compartment.
j. The tailpipe fails to discharge exhaust from the rear orsides or top of the passenger compartment of the vehicle.
NOTE: Holes in the exhaust system made by the manufac-turer for drainage are not cause for rejection. The tailpipemust direct the exhaust fumes out from under the passengercompartment.
NOTE: On pickups not equipped with a camper or hard shellcover, holes or leaks in the tailpipe extending beyond the pas-senger compartment will not be cause for rejection.
20.16 Head Lamps
1. Motor Vehicles. Every motor vehicle shall be equipped
04.20.15 - 20.16
4-18 5-30-07
[
[
with at least two head lamps, at least one on each side of thefront of the motor vehicle, which head lamps shall comply withthe requirements and limitations set forth in these regulations.
Every head lamp upon every motor vehicle shall be located ata height of not more than 54 inches nor less than 24 inchesto be measured from the center of such lamp to the levelground upon which the vehicle stands when such vehicle iswithout a load.
2. Motorcycles, Motor-Driven Cycles, Mopeds. Every mo-torcycle, motor-driven cycle, and moped shall be equippedwith at least one and not more than two head lamps whichshall comply with the requirements and limitations of theseregulations.
Every head lamp upon every motorcycle, motor-driven cycle,and moped shall be located at a height of not more than 54inches nor less than 24 inches to be measured from the cen-
04.20.16
5-30-07 4-18a

ter of such lamp to the level ground upon which the vehiclestands when such vehicle is without a load. The head lampon a motor-driven cycle or moped may be a single beamlamp.
3. General Provisions. All motor vehicles including motor-cycles sold new after January 1, 1948, other than motor-dri-ven cycles (motor scooters and motorbikes), must beequipped with multiple beam head lamps. Single beam headlamps will be permitted on those vehicles sold new prior toJanuary 1, 1948, and on all motor-driven cycles (motor scoot-ers, motorbikes, and mopeds).
There shall be an uppermost distribution of light, or compos-ite beam, so aimed and of such intensity as to reveal personsand vehicles at a distance of at least 450 feet ahead for allconditions of loading (motorcycles, motor-driven cycles, andmopeds at a distance of at least 300 feet).
There shall be a lowermost distribution of light, or compositebeam, so aimed and of sufficient intensity to reveal personsand vehicles at a distance of at least 150 feet ahead.
a. Single beam head lamp: A head lamp which providesonly one fixed beam, which is not adjustable from the driv-er’s seat (usually on motor-driven cycles and mopedsonly).
b. Multiple beam head lamp: A head lamp which providesmore than one beam, which may be selected as requiredfrom the driver’s seat.
c. Dual head lamp system: Those vehicles using the dualor four head lamp system must be equipped with a combi-nation of a #1 and a #2 type head lamp on each side ofthe vehicle. The use of any other type of lamp in thosesockets is illegal and does not meet the inspection re-quirements for head lamps. The four head lamp systemmust be wired to burn as originally designed.
d. Other lamps: Fog lamps, auxiliary passing lamps, aux-iliary driving lamps, backup lamps, and parking lamps arenot required to be inspected.
e. Headlight identification: The 7-inch diameter 6000 se-ries lamp, identified by the #2 on the lens, contains two fil-aments. One filament produces the upper beam, the otherproduces the lower beam. The original 7-inch sealed beamlamp can be identified by the absence of the #2 on thelens.
Composite 9,000 series head lamp, identified by bulbhousing, lens, or lamp housing marking of DOT or SAEand/or series 9,000.
f. Retractable lamps: check if fully retractable and will fully
open and lock in a rigid position.
g. Composite head lamps: These 9,000 series headlightsare of a new composite design. They consist of a lens(usually contoured to the grill and fenders of the vehicle),a reflector, and one or two halogen replaceable bulbs.These lamps are not sealed beam. Some moisture mayappear in these lamp assemblies when the vehicle has notbeen in use. The moisture will dissipate when the lampsare turned on for a few seconds. Slight moisture will not re-ject these lamps. Some types of the composite headlightshave a single lens but two bulbs, one of which burns onlow beam and one on high beam. Most will have a singlebulb that will burn on both high and low beam. Either typewill pass inspection as long as the bulbs are under onecommon lens and are of a type meeting Department stan-dards.
h. Halogen lamps: Acceptable if they are of the type meet-ing Department standards.
Head lamps approved for use on motorcycles and motor-driven cycles cannot be used on an automobile or truckand vice versa.
On motorcycles, motor-driven cycles, and mopeds withoutbatteries, the engine should be run at high idle speed toobserve operation of head lamp.
Refer to the Reference Section for further inspection pro-cedures.
4. Preparation for Head Lamp Inspection
a. Clean head lamp lenses, if necessary.
b. Check for burned out head lamp and proper beamswitching.
5. Inspection Procedure. Check operation and condition.
6. All head lamps will be inspected for and rejected if:
a. Lamp or lamp assembly is not securely fastened to thevehicle.
b. Lamp is improperly connected and does not light theproper filament for different switch positions.
c. Lamp lens is cracked, broken, discolored, or missing.(Exception: Composite or halogen-type lamps will not berejected for being cracked, unless the reflector material in-side the lamp is discolored or deteriorated.)
d. Lamp is not of a type meeting Department standards.
04.20.16
3-30-2000 4-19

e. Wiring insulation is worn, rubbed bare, or shows any evi-dence of burning, short circuiting, or poor electrical connec-tions.
f. Lamp lens is rotated, upside down, canted, or is marked“Right,” “Left,” #1 or #2 and not appropriately installed.
g. Lamp fails to function properly in any manner.
h. Lamp has dirt or any contamination or discoloration insideor moisture except condensed moisture in composite headlamps non-seal beam halogen lamps.
i. Lamp switch or dimmer switch does not operate properlyand is not convenient to the driver.
j. Foreign material placed on head lamp lens, such as shields,half of lens, paint, tape, etc., that interferes with the light beamof the lamp.
k. Vehicle is not equipped with head lamps as required.
l. Lamp can be moved easily by hand, due to a broken fenderor loose support.
m. Lamp is missing.
n. Lens is other than clear (white).
o. Any filament in head lamps fails to burn except compositelamps with more than one bulb when both upper and lowerbeam burn when selected.
p. Wiring is dangling or connections are loose.
q. A good ground is not made by the lamp mounting.
r. Lamp is mounted on vehicle more than or less than pre-scribed mounting heights.
s. Head lamp is covered by any lens or cover located in frontof the head lamp which is any shade or color other than clear.
t. There is physical damage that would obviously cause aheadlight beam to fail to illuminate the roadway ahead of thevehicle sufficiently.
20.17 Horn. Every motor vehicle shall be equipped with a horn(electric or air) in good working order and capable of emitting asound audible for a distance of 200 feet or more, but no hornshall emit an unreasonably loud or harsh sound or a whistle.
Bulb or hand-operated horn is acceptable if original vehicleequipment.
1. Inspection Procedure
a. Sound horn.
b. Check actuating device.
c. Examine wiring - mounting.
2. Inspect for and reject if:
a. Vehicle is not equipped with a horn.
b. Horn or horn switch is not securely fastened.
c. Wiring insulation is worn, rubbed bare, or shows any ev-idence of burning, short circuiting, or poor connections.
d. Horn switch not readily accessible to vehicle operator.
e. Horn is actuated by grounding two naked wires or simi-lar method.
f. Sound is not audible under normal conditions for 200feet.
g. Horn emits an unusually loud or harsh sound or whistle.
h. Operation of the horn interferes with the operation of anyother circuit.
i. Horn switch missing or inoperative
20.18 License Plate Lamp. Either a taillamp or a separate lampshall be so constructed and placed as to illuminate with a whitelight the rear registration plate and render it clearly legible for adistance of 50 feet to the rear. Any such lamp shall be so wiredas to be lighted when the head lamps or auxiliary driving lampsare lighted.
On vehicles such as truck-tractors which require no rear regis-tration plate, a license plate lamp would not be required. If twolicense plates are issued, a license plate lamp is required.
Do not reject a vehicle because the rear registration plate is ob-structed.
1. Inspection Procedure. Check operation and condition vi-sually.
2. Inspect for and reject if:
a. Lamp is not present.
b. Lamp is not securely mounted to the vehicle.
04.20.17 - 20.18
4-20 3-30-2000

c. Lamp is not placed to illuminate with a white light therear registration plate. (Only one lamp is required.)
d. Wiring insulation is worn, rubbed bare, or shows any ev-idence of burning, short circuiting, or poor electrical con-nections.
e. Lamp is not wired so as to be lighted when head lampsor auxiliary driving lamps are lighted.
f. Lamp emits a glaring light to the rear.
g. Lens is cracked or broken to the extent that a portion ofthe lens is missing and/or separated, permitting light fromthe bulb to emit through the crack or break.
20.19 Mirror. Every motor vehicle shall be equipped with a mir-ror so located as to reflect to the driver a view of the highway fora distance of at least 200 feet to the rear of such motor vehicle.
1. Inspection Procedure
a. Inspect only one mirror.
1) Exterior Rearview Mirror: From the driver’s position,visually inspect exterior mirror for a clear and reason-ably unobstructed view to the rear. Look for correct lo-cation and stable mounting.
2) Interior Rearview Mirror: From the driver’s position,visually inspect interior mirror for proper mounting, lo-cation, cracks, sharp edges, and ease of adjustment.
2. Inspect for and reject if:
a. Mirror does not provide the driver with a clear view tothe rear of 200 feet.
b. Vehicle is not equipped with at least one mirror.
c. Mirror offers unsafe interference with driver’s forward vi-sion.
d. Reflective surface of mirror is cracked, broken, peeled,tarnished, or has sharp edges.
e. Mirror is not mounted securely to prevent swing or ex-cessive vibration unless the vehicle is equipped with an-other mirror which meets requirements.
NOTE: An inside mirror would meet all the above require-ments. If the vehicle is equipped with more than one mir-ror, only one, either inside or outside, needs to meet allrequirements.
20.20 Reflectors (Rear). Every motor vehicle, trailer, semitrailer,and pole trailer shall carry on the rear, either as a part of the taillamps or separately, two or more red reflectors. Motorcycles,motor-driven cycles, and mopeds shall have mounted on therear, either as a part of the tail lamp or separately, at least onered reflector.
Every reflector upon any vehicle shall be of such size and char-acteristics and so mounted as to be visible at night from all dis-tances within 600 feet to 100 feet from such vehicle when directlyin front of the lawful lower beams of head lamps, except that re-flectors on passenger cars, motorcycles, and motor-driven cy-cles manufactured or assembled prior to January 1, 1972, shallbe visible at night from all distances within 350 feet to 100 feetwhen directly in front of lawful upper beams of the head lamps.
Reflectors on passenger cars, motorcycles, motor-driven cycles,and mopeds shall be mounted at a height of not less than 15inches nor more than 60 inches measured from the center ofsuch reflector to the level ground upon which the vehicle standswhen the vehicle is without a load. On commercial vehicles theheight shall not be less than 24 inches and not higher than 60inches above the ground on which the vehicle stands.
If the highest part of the permanent structure of the vehicle isless than the height required, the reflector shall be mounted ashigh as that part of the permanent structure will permit.
Rear reflectors on a vehicle shall reflect a red color.
Red reflectors required on the rear of a vehicle may be incorpo-rated with the tail lamp assembly.
Required rear reflectors may be suspended on straps of notmore than 6 inches in length.
Required rear reflectors shall be mounted with one on each sideof the center of the vehicle.
Rear reflectors on pole trailers may be mounted on each side ofthe bolster or load.
1. Inspection Procedure. Check condition and mounting.
2. Inspect for and reject if:
a. Reflector is not present.
b. Reflector is not of red color.
c. Reflector is not properly and/or securely mounted to thevehicle.
d. Reflector is cracked to the extent that the reflecting abil-ity is impaired.
04.20.19 - 20.20
3-30-2000 4-21

e. Reflector is discolored, deteriorated, or painted.
f. Visibility distance is not as required.
g. Requirements shown on lighting diagram are not met.
20.21 Reflectors (Side). Refer to Reference Section for lightingdiagrams.
1. Required on all:
Buses 80 inches or more in overall width.Trucks 80 inches or more in overall width.Trailers and semitrailers 80 inches or more in overall width.Trailers and semitrailers 30 feet or more in overall length.Pole trailers.
a. Every required reflector upon any of the above namedcommercial vehicles shall be of such size and characteris-tics and so maintained as to be readily visible at nighttimefrom all distances within 600 feet to 100 feet from the ve-hicle when directly in front of the lawful lower beams ofhead lamps, except that the visibility for reflectors on vehi-cles manufactured or assembled prior to January 1, 1972,shall be measured in front of lawful upper beams of headlamps.
b. Reflectors on commercial vehicles should be mounted ata height of not less than 24 nor higher than 60 inchesabove the ground on which the vehicle stands.
c. If the highest part of the permanent structure of the ve-hicle is less than the height required, the reflector shall bemounted as high as that part of the permanent structurewill permit.
d. Reflectors mounted on the sides near the front of a ve-hicle shall reflect an amber color.
e. Reflectors mounted on the sides near the rear of a ve-hicle shall reflect a red color.
f. Reflectors may be suspended on straps of not more than6 inches in length.
g. On buses and trucks 80 inches or more in overall widthand trailers and semitrailers 80 inches or more in overallwidth:
On each side, two reflectors, one at or near the front andone at or near the rear.
h. On trailers and semitrailers 30 feet or more in overalllength:
On each side one amber reflector, centrally located withrespect to the length of the vehicle.
i. On pole trailers:
One amber reflector at or near the front of the load (ifloaded.)
2. Inspection Procedure. Check condition and mounting.
3. Inspect for and reject if:
a. Reflectors are not present.
b. Reflectors are not of the required color for the locationon the vehicle.
c. Reflectors are not properly and/or securely mounted tothe vehicle.
d. Reflector is cracked to the extent that the reflecting abil-ity is impaired.
e. Reflectors are discolored, deteriorated, or painted.
f. Requirements shown on lighting diagram are not met.
g. Visibility distance is not as required.
20.22 Safety Guards or Flaps. Safety Guards or Flaps Re-quirement and Inspection.
Required on all:
Trucks or Light Trucks -If the rearmost axle of the vehicle or (combination) has fourtires or more.Trailers or semitrailers (In combination with a towing vehi-cle).
Not Required:
BusesMotor homesPole trailersTruck-tractors
Safety guards or flaps shall be located and suspended behindthe rearmost wheels of such vehicle or if in combination behindthe rearmost wheels of such combination to within eight (8)inches of the surface of the roadway. A tolerance of four (4)inches will be allowed. Safety guards or flaps shall be at least aswide as the tires they are protecting.
04.20.21 - 20.22
4-22 3-30-2000

Safety guards or flaps shall be of metal, rubber, rubberized ma-terial, or other substantial material, capable of remaining in placeback of rear wheels by their own weight while the said vehicle isbeing operated. The construction of safety guards or flaps will besuch that they will remain in proper place back of rear wheelsand will be rigid enough to prevent slush, mud, or gravel beingtransmitted from the vehicle’s rear wheels to the windshield ofthe following vehicle.
When trailers and semitrailers are presented for inspection incombination, each trailer or semitrailer will be considered a sep-arate vehicle and safety guards or flaps will be required on therearmost axle of each trailer or semitrailer.
1. Inspection Procedure. Check for presence and condition.
2. Inspect for and reject if:
a. Safety guard or flap is not present.
b. Safety guard or flap is not securely mounted.
c. Safety guard or flap is not as wide as the tire that it isprotecting.
d. Safety guard or flap is split or torn to the extent that it isineffective.
e. The bottom edge of safety guard or flap is more thantwelve (12) inches from the surface of the roadway.
20.23 Seat Belts. Front seat belts are required on every motorvehicle in which front seat belt anchorages were a part of themanufacturer’s original equipment on the vehicle.
Anchorages defined: A seat belt anchorage consists of athreaded hole in suitable structure to receive the seat belt at-tachment fittings or a circular pluck which is welded to the vehi-cle chassis. Self-treading bolts are inserted into the pluck to formthe complete seat belt anchorage assembly.
1. Inspection Procedure. Inspect front lap seat belts forfrayed, split, or torn webbing; malfunctioning buckles; andloose or damaged anchorages or floor pan. Vehicles origi-nally equipped with automatic seat belts (shoulder belts) with-out front lap seat belts will have the automatic belts inspected.
Front lap belts only will be inspected in all other vehicles. Theignition seat belt interlock system is not an item of inspection.
2. Inspect for and reject if:
a. Front lap seat belts are required and not present.
b. Seat belt webbing is frayed, split, or torn.
c. Belt anchorages or attachment fittings are loose, badlycorroded, missing, or not fastened to belt.
d. Belt buckles loose or inoperative.
e. All seat belt anchor bolts are not securely fastened tofloor or are missing.
f. Pelvic restraint is not present.
g. Seat belt will not adjust to allow proper fit.
20.24 Side Marker Lamps. Refer to Reference Section for light-ing diagrams.
1. Required on all:
Buses 80 inches or more in overall width.Trucks 80 inches or more in overall width.Trailers and semitrailers 80 inches or more in overall width.Trailers and semitrailers 30 feet or more in overall length.Pole trailers.
a. Side marker lamps shall, so far as is practicable, bemounted on the permanent structure of the vehicle in sucha manner as to indicate the length of the vehicle.
b. Side marker lamps and clearance lamps may bemounted in combination, provided illumination is given asrequired by law.
c. Side marker lamps mounted on the front or on the sidesnear the front of a vehicle shall display an amber color.
d. Side marker lamps mounted on the rear or on the sidesnear the rear of a vehicle shall display a red color.
e. Side marker lamps shall be visible under normal atmos-pheric conditions at a distance between 500 feet and 50feet from the vehicle on which mounted.
f. On buses and trucks 80 inches or more in overall widthand trailers and semitrailers 80 inches or more in overallwidth.
On each side, two side marker lamps, one at or near thefront and one at or near the rear.
g. All trailers and semitrailers 30 feet or more in overalllength are required to have mounted centrally located withrespect to the length of the vehicle:
04.20.23 - 20.24
3-30-2000 4-23

1) On each side, one amber side marker lamp.
2) On each side, one amber reflector.
h. On pole trailers:
1) On each side, one amber side marker lamp at ornear the front of the load (if loaded).
2) On each side, one amber reflector at or near the frontof the load (if loaded).
3) On the rearmost support for the load, one combina-tion marker lamp showing amber to the front and red tothe rear and side, or cluster of required color lamps.
2. Inspection Procedure. Check operation and condition vi-sually.
3. Inspect for and reject if:
a. Lamps are not present.
b. Lamps are not securely mounted and properly located.
c. Lamps do not emit required color; lens or bulb painted.
d. Visibility requirements are not met.
e. Lenses are discolored or missing.
f. Wiring insulation is worn, rubbed bare, or shows any ev-idence of burning, short circuiting, or poor electrical con-nections.
g. Lens is cracked or broken to the extent that a portion ofthe lens is missing and/or separated, permitting light fromthe bulb to emit through the crack or break.
20.25 Steering. The steering system of the vehicle must be in-spected to determine if excessive wear and/or maladjustment ofthe steering linkage and/or steering gear exists. Wear and ad-justment of the steering system will be checked by measuringlash. Vehicle must be on a dry surface.
Lash defined: Lash is the condition in which the steering controlcan be turned through some part of a revolution without frontwheel motion. The wheels should be loaded and positionedstraight ahead.
Jamming defined: Jamming is any obstruction to the turning ofthe steering control caused by interference between some com-ponents of the steering system.
The obstruction would include tires too large or damaged fend-ers that would interfere with a full right or left turn.
1. Inspection Procedure. Lash or Free Play: With roadwheels in straight ahead position, turn steering wheel until theturning motion can be observed at the road wheels. Measurelash. (See diagram.)
2. Inspect for and reject if:
a. Steering Lash (see chart)
Steering Wheel Manual Steering Power Steeringdiameter system system
14” or less............. 2”.......................... 3”16”......................... 2”.......................... 4”18”..........................2”......................... 4-3/4”20”..........................2”......................... 5”22”......................... 2-3/4”................... 5-3/4”
b. It is impossible to turn the steering wheel from full rightto full left without binding or jamming other than at wheelstops.
c. Steering mechanism is not firmly attached and free offrame cracks or missing bolts.
d. Modification of the steering system so as to affect theproper steering of the vehicle or steering wheel has beenmodified or replaced with one that is noticeably smallerthan original factory equipment.
e. Any excessively worn or broken parts in the steeringsystem.
f. Visible leaks in power steering unit or hoses.
g. Power steering belt is excessively cracked, frayed, orhas pieces missing or tension is not adequate. Serpentinebelts are not to be rejected merely for cracks in the ribs.
h. Fluid in power steering unit is below manufacturer’s rec-ommended level. Do not overfill.
i. On motorcycles and motor-driven cycles, handlebars orsteering head is bent, loose, broken or damaged so as tocause unsafe condition in steering.
j. On motorcycles and motor-driven cycles, handlebar gripsextend to a height in excess of 15 inches above the sad-dle level.
04.20.25
4-24 3-30-2000

On vehicles equipped with flexible couplings, or energy-absorbing steering columns, when it is obvious through avisual inspection of the vehicle that the column has beendamaged and is in an unsafe condition, it should be re-jected. Tilt steering wheels must lock into position. Steer-ing wheel must be securely mounted to the steering shaft.
NOTE:On vehicles equipped with power steering, the fluidlevel, belt tension and belt condition must be check forcompliance before starting the engine to check for properoperation of the steering.
20.26 Stop Lamp. Every motor vehicle, trailer, semitrailer, andpole trailer shall be equipped with two or more stop lamps, ex-cept that passenger cars and trucks manufactured or assembledprior to the model year 1960 shall be equipped with at least onestop lamp.
At least two stop lamps are required on all motor vehicles, trail-ers, semitrailers, and pole trailers, except that at least one stoplamp is required on all motorcycles, motor-driven cycles,and all 1959 model year and earlier passenger cars andtrucks.
A stop lamp must emit a red or amber light, or any shade of colorbetween red and amber, and be visible from a distance of notless than 300 feet to the rear in normal sunlight. The stop lampshall be actuated upon application of the service brake and whichmay, but need not, be incorporated with one or more other rearlamps.
Stop lamp lens must be of a type meeting Department of PublicSafety standards.
1. Inspection Procedure. Check operation and condition vi-sually.
2. Inspect for and reject if:
a. Required lamp or lamps are not present.
b. Lamp is not securely mounted to the vehicle.
c. Lamp does not emit a red or amber light which is actu-ated on application of the service (foot) brake.
d. Lamp is not visible from a minimum distance of 300 feetto the rear of the vehicle to which it is attached.
e. Lamp lens is painted, missing, discolored, or does not fitproperly.
f. Wiring is shoddy or electrical connections are poor.
g. Lamp projects a glaring or a dazzling light.
h. Lamp is not mounted on rear of vehicle.
i. Lens is cracked or broken to the extent that a portion ofthe lens is missing and/or separated, permitting light from
the bulb to emit through the crack or break.
NOTE: Lamp lenses cannot be repaired with repair tapeor repair kit.
20.27 Tail Lamp. Every motor vehicle, trailer, semitrailer, poletrailer, and any other vehicle which is being drawn at the end ofa combination of vehicles shall be equipped with at least two tail-lamps mounted on the rear which, when lighted, shall emit a redlight plainly visible from a distance of 1,000 feet to the rear, ex-cept that passenger cars and trucks manufactured or assembledprior to the model year 1960 shall have at least one tail lamp.On vehicles equipped with more than one tail lamp, the taillampsshall be mounted on the same level and as widely spaced later-ally as practicable.
Every tail lamp upon every vehicle shall be located at a height ofnot more than 72 inches nor less than 15 inches. Taillamps areused only to designate the rear of a vehicle.
Every tail lamp upon motorcycles, motor-driven cycles, or mopedsshall be located at a height of not more than 72 inches nor lessthan 20 inches. Tail lamp lens must be of a type meeting De-partment of Public Safety standards.
At least two taillamps are required on all motor vehicles, trailers,semitrailers, and pole trailers, except that at least one tail lampis required on motorcycles, motor-driven cycles, andmopeds and all 1959 model year and earlier passenger carsand trucks.
1. Inspection Procedure. Check operation and condition vi-sually.
2. Inspect for and reject if:
a. Required lamp or lamps are not present.
b. Lamp is not securely mounted to vehicle.
c. Lamp does not completely emit a red light plainly visible1,000 feet to the rear.
d. Lamp lens is painted, missing, discolored, or does not fitproperly.
e. Wiring is shoddy or electrical connections are poor.
f. Lamp is not wired so as to be lighted when head lampsor auxiliary driving lamps are lighted.
g. Lamp is obstructed by any part of the body.
h. Lamp does not emit a red color. (See note, pg. 4-26)
i. Lamps are not mounted on the same level and as widelyspaced laterally as practicable.
j. Lamps are not mounted on rear of vehicle.
04.20.26 - 20.27
5-30-07 4-25

k. Lens is cracked or broken to the extent that a portion ofthe lens is missing and/or separated, permitting light fromthe bulb to emit through the crack or break.
NOTE: Lamp lenses cannot be repaired with repair tapeor repair kit.
NOTE: Vehicles that are equipped from the manufacturerwith approved lenses which are clear and lighted by L.E.D.lights will pass state inspection.
NOTE: Vehicles that are equipped with after market lenseswhich are clear and lighted by a red bulb will be rejected.(There are no red bulbs currently approved for use on ve-hicles.)
20.28 Tires. Every motor vehicle (including motorcycles andmotor-driven cycles, trailer, semitrailer, pole trailer, and mobilehome) registered in this state and operated on the streets andhighways of this state and required to be inspected shall beequipped with tires in proper and safe condition.
Definition of terms:
Rim: A metal support for a tire or a tire and tube assembly uponwhich the tire beads are seated.
Bead: The part of the tire made of high tensile steel wires,wrapped and reinforced by the ply cords, which is shaped to fitthe rim.
Bead Separation: A breakdown of bond between components inthe bead area.
Sidewall: The portion of the tire between the tread and the bead.
Cord: Textile, steel wire strands, and the like, forming the pliesor other structure of the tire.
Cord Separation: Cord parting away from adjacent rubber com-pounds.
Ply: Layer of rubber coated parallel cords forming the tire body.
Ply Separation: A parting of rubber compound between adja-cent plies.
Tread: The portion of the tire that comes in contact with the road.
Tread Separation: The pulling away of the tread from the tirecarcass.
Tread Rib: A tread section running circumferentially around atire.
Groove: The space between two adjacent tread ribs.
Tread Depth: The amount of tread design on the tire. Treaddepth includes both original, retread, and recapped tread design;and in respect to special mileage commercial tire design.
Regroovable Commercial Tire: A tire manufactured with an extralayer of rubber between the cord body and the original tread de-sign which extra layer is designed for the purpose of recutting orregrooving, and which tire is specifically labeled as a regroov-able tire.
Belt: A layer or layers made of fabric or other material, locatedunder the tread area.
1. Inspection Procedure. Tires should be inspected visuallyand the tread should be measured with a tread depth gaugecalibrated in 32nds of an inch if it does not have tread wear in-dicators.
No tire shall be passed to be in safe operating condition un-less it meets the visual and tread depth requirements set forthin these regulations.
Inspection of the spare tire is not required. All tires must ap-pear to be properly inflated - even though a gauge check isnot required.
The tread depth requirement of these regulations shall applyto both tires of each set of dual wheels. The other require-ments will also apply to both tires in each set of dual wheels.
Dragster tires or racing slicks without sufficient tread or whichhave had all tread removed are not acceptable.
2. Inspect for and reject if:
a. Any tire with a localized worn spot that exposes the plyor cord through the tread.
b. Any tire with tread or sidewall cracks, cuts, or snags (asmeasured on the outside of the tire) in excess of one inchin any direction and deep enough to expose the bodycords.
c. Any tire which has any visible bumps, bulges, or knotsapparently related to tread or sidewall separation or par-tial failure of the tire structure, including bead area.
d. Any tire which has been regrooved or recut below theoriginal groove depth, except special (regroovable) tireswhich have extra undertread rubber for this purpose (com-mercial vehicles only) and are identified as such.
e. Any dual wheel assembly where the side of one tire is incontact with the other. (Any dual tires that contact eachother.)
04.20.28
4-26 5-30-07
[
[

f. Any tire that is marked “Not for Highway Use,” “Farm UseOnly,” “For Racing Purposes Only,” or with other use re-strictions that would indicate the tire is not meant for high-way use. This includes temporary spares, inflatables, orsmall high pressure spares.
g. Any tire which has been repaired temporarily by the useof blowout patches and boots. Nail hole plugs or patchesare not cause for rejection.
h. Any tire without tread wear indicators worn so that lessthan 2/32 (1/16) of an inch of tread design depth remainswhen measured (with a tread depth gauge) at the lowestpoints in any two adjacent major grooves in the center ormiddle of the tire.
i. Any tire with tread wear indicators worn so that the treadwear indicators contact the road in any two adjacent majorgrooves in the center or middle of the tire.
Refer to Reference Section for further tire inspection pro-cedures.
20.29 Turn Signal Lamps. Every motor vehicle, trailer, semi-trailer, and pole trailer shall be equipped with electrical turn sig-nal lamps, except that passenger cars and trucks less than 80inches in width and manufactured or assembled prior to themodel year 1960 need not be equipped with electrical turn signallamps.
If the bed, body, cab, load, and any other equipment on a vehi-cle or combination of vehicles exceeds 24 inches or more to theleft of the center of the top of the steering post in the same hor-izontal plane (that is, as high as the center of the top of the steer-ing post) or when the distance from the center of the top of thesteering post to the rear limit of the body or load exceeds 14 feet,then turn signal lamps are required, even though a hand and armsignal can be seen and the vehicle was manufactured or as-sembled prior to model year 1960.
NOTE: Required turn signal lamps must be visible to the frontand to the rear of the vehicle.
1. Electric turn signal lamp types:
a. Single-faced units.
b. Double-faced units.
c. Arrow-faced units.
d. Kits designed to be used in conjunction with the parkinglight assembly.
2. Electric turn signal lamp flashers. All open-faced and
arrow-type turn signal lamps must flash on and off in order toclearly indicate an intention to turn.
Turn signal lamps are required on those vehicles manufac-tured with a right-hand (steering wheel) drive, regardless ofmodel year.
A single lamp (large double-faced unit) on each side of atruck-tractor, which is visible to the front and rear, will sufficefor turn signal lamps.
3. Turn signal lamp mounting. The lamps showing to thefront shall be mounted on the same level and as widelyspaced laterally as practicable and, when signalling, shall emita white or amber light or any shade of light between white andamber.
The lamps showing to the rear shall be mounted on the samelevel and as widely spaced laterally as practicable and, whensignalling, shall emit a red or amber light or any shade of colorbetween red and amber.
Turn signal lamps on vehicles 80 inches or more in overallwidth shall be visible from a distance of not less than 500 feetto the front and rear in normal sunlight.
Turn signal lamps may, but need not, be incorporated in otherlamps on the vehicle.
Turn signal lamps shall indicate an intention to turn by flash-ing lamps showing to the front and rear of a vehicle. On acombination of vehicles, turn signal lamps shall indicate anintention to turn by flashing lamps to that side of the vehicle orcombination toward which the turn is to be made.
Motorcycles, motor-driven cycles, and mopeds are not re-quired to be equipped with turn signal lamps.
Semaphore or mechanical arm devices are not acceptable asturn signal lamps.
4. Inspection Procedure. Check operation and condition vi-sually.
5. Inspect for and reject if:
a. Lamps are required and not present.
b. Device is not securely mounted or properly located onthe vehicle.
c. Device is not of a type meeting Department standards.
d. Lamp lens is discolored or missing.
e. Wiring insulation is worn, rubbed bare, or shows any ev-
04.20.29
3-30-2000 4-27

idence of burning, short circuiting, or poor electrical con-nections.f. Switch is not convenient to driver or indicator light doesnot operate.
g. Signal shows any color other than white or amber to thefront, or signal shows any color other than red or amber tothe rear.
h. Signal does not flash or is not operating properly.
i. Signal is not clearly visible to the front and to the rear ofthe vehicle.
j. Lens is cracked or broken to the extent that a portion ofthe lens is missing and/or separated, permitting light fromthe bulb to emit through the crack or break.
NOTE: Selector switch must lock in proper turn positionwhen applied but need not cancel automatically.
NOTE: Lamp lenses cannot be repaired with repair tapeor repair kit.
20.30 Vehicle Identification Number, Motor, or Serial Num-ber. Make an actual physical check of the motor block, frame,or body part where such number is located and record same onthe inspection station report. If the vehicle has no such number,write “NONE” on the inspection certificate and on the inspectionstation report. If such number is obscured, “OBS” should be en-tered. Station or certified inspector suspension can result fromtaking this number from the old inspection certificate, title, or reg-istration receipt.
The entire vehicle identification number must be used.
Do not reject a vehicle because it has no vehicle identificationnumber or motor or serial number.
NOTE: Vehicles with altered or removed vehicle identificationnumbers or motor or serial numbers should be reported to yourDepartment representative.
20.31 Wheel Assembly. The inspection of all wheels and rimswill be visual. Spare wheels and rims will not be inspected.
Wheel covers or hubcaps may be removed from the vehicle ifthe certified inspector has probable cause or reason to believethat wheel or rim defects exist.
1. Inspection Procedure. Examine visually.
2. Inspect for and reject if:
a. Loose, missing, or damaged wheel studs, bolts, nuts, orlugs.
b. Any part of the wheel is bent, cracked, rewelded, ordamaged so as to affect safe operation of the vehicle.
c. Wheel nuts, studs, and clamps which are loose, broken,missing, or mismatched. Adequate thread engagement isimperative. Stud and nut threads on wheel lugs must en-gage completely through the entire threaded portion of thenut.
d. Rims and rings which are mismatched, bent, sprung, orotherwise damaged. Check for evidence of rim slippage -this is an indication of wear of loose nuts.
e. Disc wheels with elongated bolts, holes, or cracks be-tween hand holes or stud holes, or both.
f. Cast wheels with cracks, evidence of wear in the clamparea, or both.
g. Rims have defects or cracks to the extent that they im-pair the safe mounting and proper retention of tires.
h. Any wheel cannot be securely fastened to the hub of thevehicle.
i. On motorcycles and motor-driven cycles, any spokes arebent, loose, broken, or missing.
20.32 Window Tinting. All 1988 or newer model vehicles thathave window coating, tinting, or sunscreening applied to the win-dows must be inspected for the following:
1. Inspect for and reject if:
a. Glass coating or sunscreening devices on windshields:
1) Extends downward beyond the AS-1 line or morethan five (5) inches from the top of windshield on vehi-cles without an AS-1 line. Measurements shall betaken from inside the windshield; or
2) is red, blue, amber in color or is a reflective type.
b. Glass coating or sunscreening devices on windows:
Windows immediately to the right and left of the driver,which open, have less than 20% light transmittance.
NOTE: If one window is inspected and has more than 20%light transmittance and the other window has window tint-ing which is obviously the same degree of sunscreening,only the one window needs to be inspected
c. Check calibration before rejecting vehicle.
04.20.30 - 20.32
4-28 10-15-07
[

2. Exemptions:
a. The following will not be considered as sunscreening orglass coating devices:
1) Rearview mirror.
2) Sun visors.
3) Motor carrier destination signs.
4) Rear window wipers and motors.
5) Trunk lid handle or hinge.
6) Luggage racks.
b. Do not inspect glass coating on vehicles used to trans-port passengers on a regular basis for a fee, (i.e., taxi, lim-ousine, and buses).
c. Do not inspect glass coating on a vehicle that is main-tained by a law enforcement agency and used for law en-forcement purposes.
d. Vehicles used by persons with medical permits. Driversof these vehicles must present a letter of authorization fromthe Texas Department of Public Safety to gain this ex-emption.
e. Multipurpose vehicles may be equipped with any non-reflective film on the side windows that is to the rear of thedriver. No label required. (Those motor vehicles designedto carry 10 or fewer persons constructed either on a truckchassis or with special features for occasional off-roaduse.)
See Reference Section for diagram.
20.33 Windshield Wipers. Every motor vehicle with a wind-shield must be equipped with a windshield wiper or wipers ade-quate for cleaning rain, snow, or other moisture from thewindshield; in good working order; and constructed so as to per-mit operation and control by the driver of the vehicle.
All motor vehicles which were originally equipped (manufactured)with one wiper, only one wiper is required; if originally equipped(manufactured) with two or more wipers, all wipers will be re-quired. Replacement of vacuum with electric or electric with vac-uum wipers is permissible. Vehicles presented for inspectionwithout windshields will not be required to have wipers. Thewindshield is not an item of inspection. Manually operatedwipers are permissible if original vehicle equipment.
1. Inspection Procedure. Inspect for satisfactory operation.(If vacuum operated, engine must be idling and control fullon.)
Inspect for proper contact of blades with windshield. Raisearm away from windshield and release. Arm should return tooriginal position and wiper blade should contact the wind-shield firmly.
2. Inspect for and reject if:
a. Vehicle is not equipped with the number of wipers withwhich it was originally equipped.
b. Wiper is inoperative, does not operate freely, or is im-properly adjusted.
c. Wiper blades have damaged, hardened, or badly wornrubber elements.
d. The portion of the rubber element that contacts the wind-shield is torn more than one inch on one end or is torn atotal of one inch on both ends.
e. Any part of the rubber element is torn loose from themetal backing or blade base.
f. Metal parts of wiper blades or arms are damaged orcome in contact with the windshield.
g. Wiper is incapable of adequately cleaning the wind-shield.
h. Wiper blades are not making proper contact with wind-shield.
i. Wiper controls are not operating properly or are locatedbeyond the driver’s reach.
NOTE: The rear window is not considered a windshieldand any wiper present on the rear window is not an item ofinspection.
20.34 Rejected Vehicles. Every inspection must be a completeinspection before a vehicle may be approved or rejected. In casea vehicle is rejected and the owner fails to have the necessaryadjustments made to the vehicle in conformance with the mini-mum requirements of the Texas Vehicle Inspection Act, the re-quired inspection fee will be charged and a rejection receipt shallbe issued which lists items rejected and other required informa-tion. The rejection receipt must be delivered and explained to theowner or operator of the vehicle.
The certified inspector shall mark the back of the inspection cer-tificate which is presently affixed to the vehicle’s windshield, with
04.20.33 - 20.34
5-30-07 4-29

a large “X” using a laundry marking pen, if the vehicle has failedthe inspection and is issued a rejection receipt.DO NOT ISSUE AN OUT-OF-STATE IDENTIFICATION CER-TIFICATE TO A VEHICLE WHICH IS REJECTED ON THESAFETY INSPECTION.
The owner or operator of a vehicle rejected must make or havemade the necessary adjustment or repairs and return to the orig-inal inspection station for one reinspection within fifteen (15) daysfrom the date of rejection (excluding the day of rejection), in orderto obtain the one reinspection without charge. The rejection re-ceipt must be delivered to the inspection station on reinspection.The vehicle owner or operator shall have the right to remove thevehicle to such place for correction upon paying the inspectionfee and has the exclusive right to determine by whom any re-pairs will be made. The customer should be informed of all de-fects necessary to put the vehicle in passing condition.
The rejection receipt form must be neat and legible. It must listthe reasons why the vehicle was rejected. A copy of the rejec-tion receipt must be kept by the station as part of the inspectionstation records and subject to examination at any time by an au-thorized agent of the Department. Rejection receipts must be is-sued by the certified inspector for a vehicle presented forinspection that does not pass the inspection requirements. Re-jection receipts are an official part of the inspection program. Allrejection receipts must be completely filled in. Give original to thecustomer and keep one copy with the inspection station records.
Any inspection station which, for any reason, cannot reinspect avehicle to which that inspection station has issued a rejection re-ceipt shall return the full inspection fee. No vehicle will be re-jected on any items not covered by the Vehicle Inspection Act.
A reinspection of a rejected vehicle by the initial inspection sta-tion shall only include a check of the items previously found de-fective unless any other obvious defects are noted. When avehicle is repaired and returned for the one free reinspectionwithin fifteen (15) days (excluding the day of rejection), no addi-tional inspection fee may be charged. In the event the vehiclefails to pass this free reinspection, the inspection station’s obli-gation is fulfilled. Any subsequent inspection shall be consideredas a new inspection procedure. If the rejected vehicle is returnedfor reinspection to the original inspection station after the fifteen(15) days have elapsed from the date of rejection (excluding theday of rejection), or if the vehicle is presented to a different in-spection station for reinspection, the vehicle will be handled as ifit were being inspected for the first time.
IMPORTANT: A rejection receipt issued to a vehicle which doesnot have a valid current inspection certificate shall not entitlesuch vehicle to legally operate on a public street or highway.
NOTE: Refer to Chapter 5, Records and Reports.
20.35 Repairs. The owner of a vehicle is under no obligation tohave disclosed defects corrected by the inspection station. Theymay have the necessary work done where they desire or theymay do it themselves. The inspection alone is all that is required.Although an owner has a right to have the necessary repairs oradjustments made wherever they wish, they often show by theiractions or remarks that they expect to secure a certificate fromsome other person without having the defects corrected. Pleasereport this at once to the representative supervising your in-spection station. Investigation of such cases by this Departmentwill be the most effective way of protecting both the inspectionstations which are honestly conducting inspections and the mo-toring public. No charge is made to vehicle owners for the cer-tificates. The fee is for your work in making the inspections. Youshall collect your inspection fee at the time of inspection whetherthe approval certificate is issued or a rejection receipt is issued.
Inspection stations shall not in any manner attempt to requireowners or operators of disapproved vehicles to have the vehi-cles repaired at the inspection station. The repairs necessaryfor approval may be made at any place chosen by the owner oroperator of the vehicle. Any and all repairs or adjustments mustbe specifically authorized by the vehicle owner or operator beforebeing made by any inspection station.
After a defect requiring repair is discovered by an Official Vehi-cle Inspection Station, the owner of the defective vehicle shallhave the right to ask for, and receive, an estimate of the cost ofparts and labor necessary to accomplish such repair if the Offi-cial Vehicle Inspection Station is in the business of making suchrepairs. Said estimate shall not in any way obligate the owner ofthe defective vehicle to have their vehicle repaired at the OfficialVehicle Inspection Station, nor shall it create any right for the Of-ficial Vehicle Inspection Station to make such repairs.
NOTE: Certain items of inspection require that established tol-erances are necessary. It is necessary that every Official Vehi-cle Inspection Station inform the vehicle owner or operator of anyborderline passage. This precaution should be taken in any in-stance where it can be of value to the owner of a vehicle for min-imum conformance.
04.25.00 IDENTIFICATION CERTIFICATE - VI-30
Any vehicle last registered and titled out of state is required to passthe Texas safety inspection before it may be registered and titled inTexas except as follows:
04.20.35 - 25.00
4-30 5-30-07

25.01 Exemptions to VI-30
1. Travel trailers having gross weights of 4,500 pounds or lessare not subject to safety inspection or VIN verification.
2. Certified mopeds or other vehicles which are registered butnot titled are not subject to safety inspection or VIN verifica-tion as a prerequisite to registration.
3. Off-highway motorcycles which are titled but not registeredfor operation on the highways are not subject to safety in-spection or VIN verification.
4. Mobile homes which are being registered for the sole pur-pose of obtaining a certificate of title and not for operation onthe highways are not subject to the safety inspection require-ments. Owners of this class vehicle should contact theircounty tax assessor-collector’s office for information.
5. Vehicles registered with Antique, Parade, or Disaster Re-lief license plates are not subject to the safety inspection re-quirements since these plates are restricted and cannot beused for regular transportation. However, the applicant mustfurnish a self-certification statement as to the correct vehicleidentification number appearing on the vehicle.
NOTE: Refer to Chapter 5, Records and Reports.
04.25.01
5-30-07 4-31

5-30-07
REFERENCE SECTION04.30.00
Reference Content ................................................................................................................. 04.30.00Recommended Inspection Procedure ............................................................................... 30.01 p. 4-33Suggested Order of Inspection Chart ................................................................................ 30.02 p. 4-34Commercial Vehicle Lighting, Reflector Requirements ..................................................... 30.03 p. 4-35Wheel and Tire References ............................................................................................... 30.04 p. 4-39Window Tinting Procedures............................................................................................... 30.05 p. 4-47Brake Performance Chart .................................................................................................. 30.06 p. 4-49Exhaust Emission Systems ............................................................................................... 30.07 p. 4-51List of Approved Testing Devices ...................................................................................... 30.08 p. 4-55Motor Vehicle Model Year Reference Chart ...................................................................... 30.09 p. 4-57
i

30.01 Recommended Inspection Procedure
Check for evidence of Financial Responsibility
Inside the vehicle
1. Check horn - sound and actuating device
2. Check windshield wipers - control and operation
3. Check mirror - view to the rear and mounting (if inside only)
4. Check seat belts - presence and condition.
5. Check turn signal lamps - switch and proper indication
6. Check head lamps - turn on - beam indicator and dimmerswitch
Road Test
1. Check steering - lash and free movement (full turn withoutjamming)
2. Check brakes
a. Service - pedal reserve, stopping ability, and equaliza-tion
b. Parking - pedal reserve and holding ability
Under the vehicle
1. Check tires - tread depth and visible cuts
2. Check wheels and rims - defective or bent
3. Check brakes
a. Service - leaks, defective rods, or cables
b. Parking - defective cables
4. Check catalytic converter - leaks, presence when required
5. Check exhaust system - muffler, exhaust pipe, tailpipe,mounting brackets, and hangers for presence and condition
Outside vehicle - parked
1. Check window tint (if required)
2. Check windshield wipers - required number and conditionof blades
3. Check mirror - (mounting only if outside mirror required)
4. Check tail lamp(s) - operation and condition
5. Check stop lamp(s) - operation and condition
6. Check license plate lamp - operation and condition
7. Check reflectors - condition
8. Check turn signal lamps - operation and condition
9. Check head lamps - mounting, condition, and operation
10. Check commercial vehicles - clearance lamps, sidemarker lamps, safety guards and flaps, etc.
11. Check school buses - warning lamps, signs, fire extin-guisher, crossover mirror, etc.
Under the hood
1. Check brakes - master cylinder fluid level - leaks
2. Check exhaust emission system - presence - if required
3. Check horn - mounting and wiring
4. Check exhaust system - manifold leaks
5. Check steering - belts - fluid level - leaks
6. Check motor number (if 1955 or earlier model)
Completion
1. Check vehicle identification number (if 1956 or later model)
2. Record vehicle information on inspection station report
3. Explain rejection receipt (if issued)
4. Remove old inspection certificate
5. Issue new inspection certificate
04.30.01
3-30-2000 4-33

Page 1 of 1 04.30.02
4-34 3-30-2000

04.30.03 Page 1 of 3
3-30-2000 4-35

Page 2 of 3 04.30.03
4-36 3-30-2000

04.30.03 Page 3 of 3
3-30-2000
EQUIPMENT AND VEHICLE STANDARDS
1. Definition. Vehicle equipment means a system, part, or device that is manufactured or sold as original equipment, as replacementequipment, or as an accessory for a vehicle or a device or article of apparel manufactured or sold to protect a driver or passenger ofa vehicle.
2. Standards - Federal Motor Vehicle Safety Standard. The performance standard for vehicle equipment established by the TexasDepartment of Public Safety shall be identical to the applicable federal standard.
Lighting Device - FMVSS 108Backup LampClearance LampHazard Warning Lamp, Signal, Flashers, and SwitchesHeadlamp - Sealed and Nonsealed Beam and HousingIdentification LampLicense Plate LampParking Lamp (Front Position Lamps)Reflex ReflectorReplacement LensesSchool Bus Alternating Warning Lamp, Signal, Flashers, and SwitchesSide Marker LampStop Signal LampTail Lamp (Rear Position Lamps)Turn Signal Lamp, Signal, Flashers, and SwitchesTriangle Warning Device - FMVSS 125
Safety Glass and Glazing - FMVSS 205
Seat Belts - FMVSS 209
3. Standards - Society of Automotive Engineers. The performance standard for vehicle equipment established by the Texas Departmentof Public Safety in which no federal standard is in effect shall be identical to the applicable standard adopted by the Society of AutomotiveEngineers.
Lighting Devices - SAEAuxiliary
Auxiliary Low Beam (Passing Lamp) ........................................................................... J582Driving Lamp ................................................................................................................... J581Fog Lamp ........................................................................................................................ J583Spot Lamp ....................................................................................................................... J591High Mounted Stop and Turn Signal Lamp ..................................................................... J186Cornering Lamp............................................................................................................... J852Side Turn Signal Lamp .................................................................................................... J914Flashing Warning Lamp for Emergency Vehicle ............................................................. J595360° Emergency Warning Lamp..................................................................................... J845
Special Vehicle Equipment - SAE
Warning Lamp Alternating Flashers................................................................................... J1054Motorcycle Auxiliary Front Lamps ...................................................................................... J1306
4-37

04.30.04 Page 1 of 7
3-30-2000 4-39

Page 2 of 7 04.30.04
4-40 3-30-2000

04.30.04 Page 3 of 7
3-30-2000 4-41

Page 4 of 7 04.30.04
4-42 3-30-2000

04.30.04 Page 5 of 7
3-30-2000 4-43

Page 6 of 7 04.30.04
4-44 3-30-2000

04.30.04 Page 7 of 7
3-30-2000 4-45
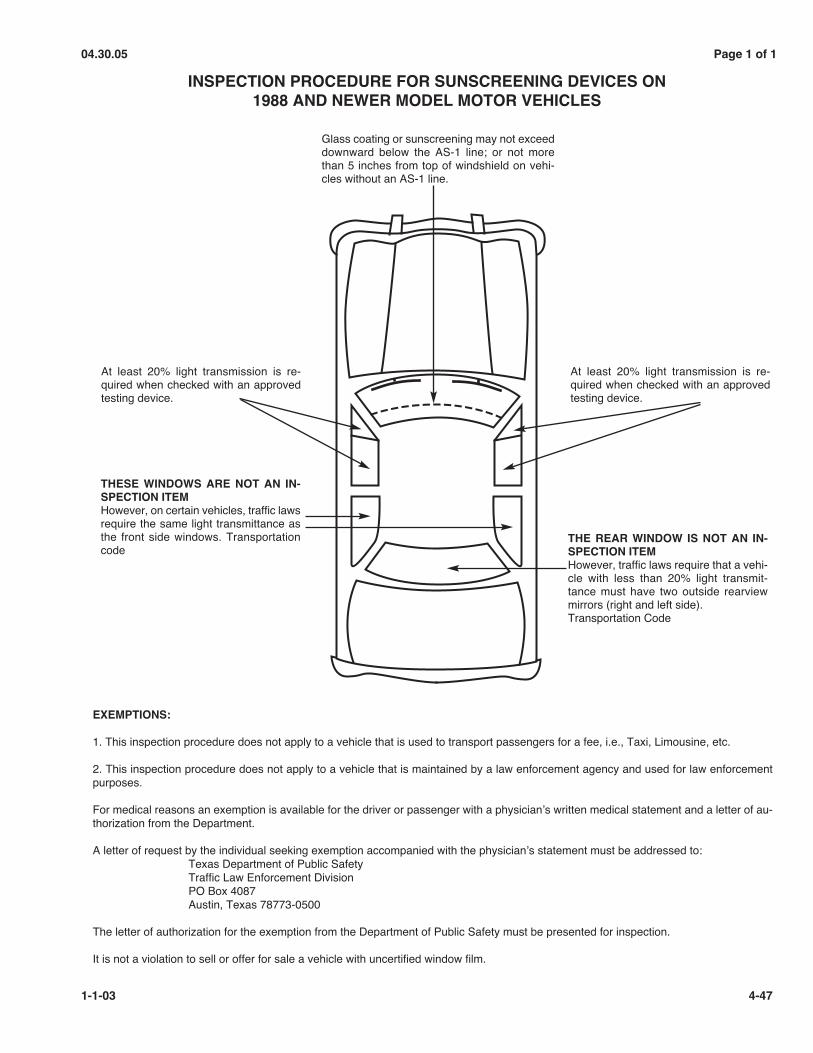
04.30.05 Page 1 of 1
1-1-03 4-47
INSPECTION PROCEDURE FOR SUNSCREENING DEVICES ON1988 AND NEWER MODEL MOTOR VEHICLES
Glass coating or sunscreening may not exceeddownward below the AS-1 line; or not morethan 5 inches from top of windshield on vehi-cles without an AS-1 line.
At least 20% light transmission is re-quired when checked with an approvedtesting device.
At least 20% light transmission is re-quired when checked with an approvedtesting device.
THESE WINDOWS ARE NOT AN IN-SPECTION ITEMHowever, on certain vehicles, traffic lawsrequire the same light transmittance asthe front side windows. Transportationcode
THE REAR WINDOW IS NOT AN IN-SPECTION ITEMHowever, traffic laws require that a vehi-cle with less than 20% light transmit-tance must have two outside rearviewmirrors (right and left side).Transportation Code
EXEMPTIONS:
1. This inspection procedure does not apply to a vehicle that is used to transport passengers for a fee, i.e., Taxi, Limousine, etc.
2. This inspection procedure does not apply to a vehicle that is maintained by a law enforcement agency and used for law enforcementpurposes.
For medical reasons an exemption is available for the driver or passenger with a physician’s written medical statement and a letter of au-thorization from the Department.
A letter of request by the individual seeking exemption accompanied with the physician’s statement must be addressed to:Texas Department of Public SafetyTraffic Law Enforcement DivisionPO Box 4087Austin, Texas 78773-0500
The letter of authorization for the exemption from the Department of Public Safety must be presented for inspection.
It is not a violation to sell or offer for sale a vehicle with uncertified window film.

04.30.06 Page 1 of 1
3-30-2000 4-49

04.30.07 Page 1 of 4
3-30-2000 4-51

Page 2 of 4 04.30.07
4-52 3-30-2000

04.30.07 Page 3 of 4
3-30-2000 4-53

Page 4 of 4 04.30.07
4-54 3-30-2000

DECELEROMETERS
AMINCO-JAMESModel 5-4015
American Instrument CompanySilver Springs, Maryland 20910
ATLAS (Bear)Model EB-495
Atlas CompanySpringfield, New Jersey 07081
BOWMONKModel Mark III
Lasco Importers123 West 47th AvenueVancouver, Canada
MUTHERModel Stopmeter
Muther Manufacturing Company44 Binford StreetBoston, Massachusetts 02210
VC 2000 Braking Test ComputerMinnetonka Warehouse Supply, Inc.Verlcom VC000 Computer Division6008 Culligan WayMinnetonka, Minnesota 55345
BEAR (Marquette)Models 46-154 (1148), 47-16(4505), 47-105(450W), 47-107(4506)
440441, 451W, 1145, 4510, 4511Marquette Mfg. Company3800 North Dunlap StreetSt. Paul, Minnesota 55112
FRASER GAUGEModels FBT-101, FBT-102, FBT-2000 and FBT-BSP
1352 Harvard RoadGrosse Point, Michigan 48211(313) 832-0020
BRAKE MACHINES
ATLAS (Bear)Model EB450WAtlas CompanySpringfield, New Jersey 07081
BEARModel 47-700, 47-800
8001 Angling RoadKalamazoo, MichiganApproved for front-wheel drive vehicles
CLAYTONModels B 8 CP-200; B 8 CP-400
Clayton Mfg. CompanyPost Office Box 550El Monte, California 91734
HEKA BRAKE ANALYZER76 University AvenueRochester, New York 14605HUNTER ENGINEERING COMPANYModel B400
Approved for front-wheel drive vehicles
AMMCOModels 7350, 7375
(Bennett-Feragan)Ammco Tools, Inc.2100 CommonwealthNorth Chicago, Illinois 60064
BEAR (Marquette)Model 47-108495
Marquette Mfg. Company3800 North Dunlap StreetSt. Paul, Minnesota 55112
JOHN BEANModels 1360, 1361
John Bean DivisionFMC CorporationLansing, Michigan 48909
TAPLEYModels 84, 87
Tapley Products53 Park PlaceNew York, New York 10007
WEAVERModels WY-400, WY-75, WY-75.36,
Weaver Division, Dura CorporationWalter Kidde & Company, Inc.Paris, Kentucky 40361
04.30.08
5-31-05 4-55
LIST OF APPROVED TESTING DEVICES

MAHA USAModel IW 2 PROFI
148 E. Highway 134Pinckard, AL 36371(847) 609-2580
Mustang Dynamometer2300 Pinnacle Pkwy.Twinsburg, Ohio 44087-2368Model: MD-03K-BT-SLApproved for front wheel drive vehicles(330) 963-5400
Hunter Engineering CompanyModel B400 and B400TApproved for front wheel drive vehicles11250 Hunter DriveBridgeton, Missouri 63044-2391(314) 731-3020
Vehicle Inspection Systems, Inc.Model VIS Performance Brake Tester (PBBT)(This model commonly known as VIS-Check)2400 Lake Orange Drive, Suite 105Orlando, Florida 32837(407) 206-3615
TINT METERS
Laser Labs, Inc.Models 100, 200 and 400454 Firt Parish RoadScituate, Massachusetts 020661-800-452-2344
Monroe PMP (Previously approved as Pocket Detective Tint Meter)Models 2.1 (Part #801-0) and new model 2.168 South Squirrel RoadAuburn Hills, MI 48326-32491-800-440-3967
LASH TESTING DEVICES
LASH CHEKModel VTI
Wallace Instruments, Inc.Post Office Box 831Gladewater, Texas 75647
GAS CAP TESTERS
Stant Mfg. Co.Models 12370, 12470, 12300, 12400, 12440
1-800-822-3121 Ext. 330
Waekon CorporationModels FPT 2600 EX1, FPT 27-EX1
1-800-367-9235
04.30.08
4-56 5-30-07

04.30.09
5-30-07
30.09 MOTOR VEHICLE YEAR MODEL REFERENCE CHART
On 1981 and later year model vehicles the 10th digit from left to right will designate the year model of a motor vehicle according to thefollowing chart:
VEHICLE MODEL YEAR
4-57
MOTOR VEHICLE MODEL YEAR
1980 . . . . . . . . . . . . . . . . . . . . . .A1981 . . . . . . . . . . . . . . . . . . . . . .B1982 . . . . . . . . . . . . . . . . . . . . . .C1983 . . . . . . . . . . . . . . . . . . . . . .D1984 . . . . . . . . . . . . . . . . . . . . . .E1985 . . . . . . . . . . . . . . . . . . . . . .F1986 . . . . . . . . . . . . . . . . . . . . . .G1987 . . . . . . . . . . . . . . . . . . . . . .H1988 . . . . . . . . . . . . . . . . . . . . . .J1989 . . . . . . . . . . . . . . . . . . . . . .K
2010 . . . . . . . . . . . . . . . . . . . . . .A2011 . . . . . . . . . . . . . . . . . . . . . .B2012 . . . . . . . . . . . . . . . . . . . . . .C2013 . . . . . . . . . . . . . . . . . . . . . .D2014 . . . . . . . . . . . . . . . . . . . . . .E2015 . . . . . . . . . . . . . . . . . . . . . .F2016 . . . . . . . . . . . . . . . . . . . . . .G2017 . . . . . . . . . . . . . . . . . . . . . .H2018 . . . . . . . . . . . . . . . . . . . . . .J2019 . . . . . . . . . . . . . . . . . . . . . .K
1990 . . . . . . . . . . . . . . . . . . . . . .L1991 . . . . . . . . . . . . . . . . . . . . . .M1992 . . . . . . . . . . . . . . . . . . . . . .N1993 . . . . . . . . . . . . . . . . . . . . . .P1994 . . . . . . . . . . . . . . . . . . . . . .R1995 . . . . . . . . . . . . . . . . . . . . . .S1996 . . . . . . . . . . . . . . . . . . . . . .T1997 . . . . . . . . . . . . . . . . . . . . . .V1998 . . . . . . . . . . . . . . . . . . . . . .W1999 . . . . . . . . . . . . . . . . . . . . . .X
2020 . . . . . . . . . . . . . . . . . . . . . .L2021 . . . . . . . . . . . . . . . . . . . . . .M2022 . . . . . . . . . . . . . . . . . . . . . .N2023 . . . . . . . . . . . . . . . . . . . . . .P2024 . . . . . . . . . . . . . . . . . . . . . .R2025 . . . . . . . . . . . . . . . . . . . . . .S2026 . . . . . . . . . . . . . . . . . . . . . .T2027 . . . . . . . . . . . . . . . . . . . . . .V2028 . . . . . . . . . . . . . . . . . . . . . .W2029 . . . . . . . . . . . . . . . . . . . . . .X
2000 . . . . . . . . . . . . . . . . . . . . . .Y2001 . . . . . . . . . . . . . . . . . . . . . .12002 . . . . . . . . . . . . . . . . . . . . . .22003 . . . . . . . . . . . . . . . . . . . . . .32004 . . . . . . . . . . . . . . . . . . . . . .42005 . . . . . . . . . . . . . . . . . . . . . .52006 . . . . . . . . . . . . . . . . . . . . . .62007 . . . . . . . . . . . . . . . . . . . . . .72008 . . . . . . . . . . . . . . . . . . . . . .82009 . . . . . . . . . . . . . . . . . . . . . .9
2030 . . . . . . . . . . . . . . . . . . . . . .Y2031 . . . . . . . . . . . . . . . . . . . . . .12032 . . . . . . . . . . . . . . . . . . . . . .22033 . . . . . . . . . . . . . . . . . . . . . .32034 . . . . . . . . . . . . . . . . . . . . . .42035 . . . . . . . . . . . . . . . . . . . . . .52036 . . . . . . . . . . . . . . . . . . . . . .62037 . . . . . . . . . . . . . . . . . . . . . .72038 . . . . . . . . . . . . . . . . . . . . . .82039 . . . . . . . . . . . . . . . . . . . . . .9
NOTE: Do not include special characters such as asterisk, stars, etc.
NOTE: This chart does not apply to trailers

5-30-07
CHAPTER FIVERECORDS AND REPORTS
CHAPTER CONTENT
RECORDS AND REPORTS . . . . . . . . . . . . . . . . . . . . . . . . . . . . . . . . . . . . . . . . . . . . . . . . . . . . . . . . . .05.05.00 p. 5-1Signature Card - VI-13 . . . . . . . . . . . . . . . . . . . . . . . . . . . . . . . . . . . . . . . . . . . . . . . . . . . . . . . . . . . . . . . . . 05.01 p. 5-2Station Application - VI-2 . . . . . . . . . . . . . . . . . . . . . . . . . . . . . . . . . . . . . . . . . . . . . . . . . . . . . . . . . . . . . . . 05.02 p. 5-3Inspection Certificate Requisition - VI-18A . . . . . . . . . . . . . . . . . . . . . . . . . . . . . . . . . . . . . . . . . . . . . . . . . 05.03 p. 5-5Inspection Station Weekly Report - VI-8A . . . . . . . . . . . . . . . . . . . . . . . . . . . . . . . . . . . . . . . . . . . . . . . . . . 05.04 p. 5-7Inspection Station Weekly Report - VI-8 . . . . . . . . . . . . . . . . . . . . . . . . . . . . . . . . . . . . . . . . . . . . . . . . . . . 05.05 p. 5-10Rejected Vehicles and Rejection Receipt - VI-7 . . . . . . . . . . . . . . . . . . . . . . . . . . . . . . . . . . . . . . . . . . . . . 05.06 p. 5-11Out-of-State Identification Certificate - VI-30A . . . . . . . . . . . . . . . . . . . . . . . . . . . . . . . . . . . . . . . . . . . . . . . 05.07 p. 5-12Waiver Affidavit - VIE-12 . . . . . . . . . . . . . . . . . . . . . . . . . . . . . . . . . . . . . . . . . . . . . . . . . . . . . . . . . . . . . . . 05.08 p. 5-14
i

05.05.00
3-30-2000
05.05.00 RECORDS AND REPORTS
As in any business, records must be kept, reports made, and sup -plies ordered. This section discusses the records kept, reportsmade, and the ordering of supplies, all necessary to the operationof your Official Vehicle Inspection Station. These forms are dis -cussed to assist you in their handling and to facilitate proper andspeedy utilization of all required records and reports.
Records that are to be retained by the inspection station shall bekept in a safe place, within the inspection station, and shall beavailable to authorized representatives of the Department. The sta-tion owner or operator shall file such records in a manner as toassure the easy location of specific records when necessary .
Duplicate copies of inspection station reports, rejection receipts,identification certificates, and station requisitions shall be kept ofeach inspection year at the Official Vehicle Inspection Station for aperiod of at least one year from date of completion.
All reports, and all other correspondence relative to VehicleInspection must be sent to the following address otherwise, thisDepartment will not be responsible for any delay or loss incurred:Vehicle Inspection Records, Texas Department of Public Safety ,Box 14900, Austin, Texas 78761-4900. All requisitions shall be sentto Texas Department of Public Safety, Box 15999, Austin, Texas78761-5999.
Storage space should be provided in the inspection station for theproper preservation of inspection records. Every inspection stationshall keep the current inspection records available in the immedi -ate area where the inspections are performed. Inspection certifi -cates and identification certificates are not included in theserequirements. Inspection certificates and identification certificatesmust be kept locked to prevent theft, even during normal businesshours. It is permissible to keep accumulative records as well ascompleted records not currently in use, in another location in theinspection station, but those records that are in daily use must beconveniently available for the use of the certified inspector .
Additional inspection station report forms, rejection books, and re-quisition forms are available from the Department representativesupervising your inspection station.
Every person, firm, or corporation engaged in the business of oper-ating a repair shop or garage of every kind, within this state, wherethe repairing, rebuilding, or repainting of automobiles is carried on,or electrical work in connection with the repair of automobiles isdone and performed, and every person, firm, or corporationengaged in the business of the purchase and sale of secondhandor used automobiles within this state, shall keep a well bound bookin the office or place of business where said work is carried on, orsaid business conducted, in which shall be kept in a clear and intel-ligent manner, a register of each repair or change in any automo -bile of every description so repaired or dealt in by any party men -
tioned in this law. Repairs of a value not exceeding One Dollar($1.00) are hereby excepted.
Said register shall contain a substantially complete and accuratedescription of each car upon which there is performed said repairs,or upon which there is installed any new parts or accessories ofany character, and where the said car is bought or sold as a usedcar, the said register shall particularly show in each of the casesmentioned, the make of the automobile, the number of cylinders,motor number, passenger capacity, model, and also the name,apparent age and sex, and any special identifying physical char -acteristics of the party or parties claiming to be the owner or own -ers of the automobile, or their usual place of address, and the stateregister number of such automobile. In case of the sale of a usedor secondhand car by any dealer or the owner or proprietor of anygarage, a like register shall be made as to the name and addressand description of said purchaser, the character and description ofsaid car and the state register thereof. Said registers shall be keptin a secure place and be subject at all times to the inspection of anypeace officer desiring to examine the same or any party or partiesinterested in tracing or locating stolen automobiles.
All records required to be kept by the requirements of this articleshall be preserved for one year after the date recorded and shallbe open to the inspection of the public at all reasonable hours.Whoever shall fail to comply with any provision of this article shallbe fined not less than Ten Dollars ($10.00) nor more than OneHundred Dollars ($100.00).
5-1

05.05.01
5-2
05.01 Signature Card Procedure. Requisitions must be signed by the authorized owner or employee with the signature as it appears on thesignature card on file in Austin.
One, two, or three persons may be authorized to sign a requisition and thus order additional inspection certificates for the inspection station.The persons designated by the owner of the inspection station must place their own personal signatures on all cards in one of the threespaces provided. The owner, or person whose signature appears on the application, must endorse the cards on line #1.
No one, regardless of title, can requisition inspection certificates unless their signature is on the signature card on file in Austin.
5-31-05
Inspection Station Name (DBA)
Mailing Address
City State Zip County
Physical Address Telephone # ( )
Federal or State Tax ID #
TEXAS DEPARTMENT OF PUBLIC SAFETYSIGNATURE CARD
c 1 Yr Safety c OBD c ASM c TSI c 2 YR Safetyc T/MC c Unique c CT c CW
Date Region DPS Rep. Insp. Station #
The following persons are authorized to order inspection certificates:Name (Type or Print) DL # Signature
1. (Owner/or Manager)
2.
3. VI-13 (Rev. 5/05)
Expires

05.05.02 Page 1 of 2
5-31-05 5-3

Page 2 of 2 05.05.02
5-4 5-31-05

05.05.03
5-31-05
05.03 Requisition for Inspection Certificates. The initialorder for safety inspection certificates and identification certifi -cates will be supplied by the Department representative whenthe inspection station is placed in operation.
All subsequent orders for safety inspection certificates must bedirected to Vehicle Inspection Records MSC 0542, Te x a sDepartment of Public Safety, Box 15999, Austin, Texas 78761-5999. Identification certificates may also be ordered throughVehicle Inspection Records, or any local DPS office that sellsinspection certificates.
Demands for safety inspection certificates and identification cer-tificates should be anticipated enough in advance that requisi -tions can be filled by mail from Austin before the inspection sta-tion’s supply is depleted.
Requisitions must be accompanied by a check, cashier’s check,or money order, made payable to the Texas Department ofPublic Safety. Checks, cashier ’s checks, and money ordersreceived for inspection certificates without a properly executedrequisition form will be returned.
All incomplete or improper requisitions, checks, or money orderswill be returned to the inspection stations for correction. Toavoid unnecessary inconvenience or delay, recheck the infor -mation very carefully before submitting the requisition.
Requisitions will be filled and delivered to the requesting inspec-tion station in a manner to be determined by the Department. Allinformation listed on the requisition form must be completed ordelay will result. Check the requisition carefully. Money totalmust equal number of books ordered. No cash can be accept -ed. Two copies of the requisition form are necessary. Submitthe original and one copy to Austin, four copies if buying at alocal DPS Office.
Safety inspection certificates and identification certificates arenot sold, loaned, or transferred to another inspection station orindividual or issued at any location other than at the approvedinspection station.
Inspection stations are required to have safety inspection certifi-cates and identification certificates on hand at all times duringthe year. Inspection stations which fail to keep an ample supplyon hand in order to accommodate motorists will not be tolerat -ed.
When a person who has been authorized to order certificatesresigns or otherwise leaves your employ, the station owner oroperator must advise the Department representative supervis -ing the inspection station.
The following rules must be followed in preparing and sub-mitting the vehicle inspection station report (Form VI-18).
1. Station number must reflect region, class and 5-digitnumber as stated.
2. Date must have complete month, day and year. (Example:01 03 98)
3. Authorized signature: Person who has authorization topurchase the certificates.
4. Inspection station name should reflect the name the sta -tion is doing business as (d.b.a.). Print the name, mailingaddress, city and zip code. Please do not write TX or Texasin the city portion of the form.
5. Place how many books of certificates for each type of cer-tificate sold in spaces provided.
6. Amount of each type of certificate in spaces provided nextto how many books.
7. Total all fees collected for certificates.
8. Denote check/money order number in space below feescollected.
9. Begin to print what certificate series were purchased(beginning and ending certificate numbers).
10. Signature of Person Receiving Certificates and their driv-er license number or ID number.
11. Date sold. See #2.
12. DPS Representative ID is the person issuing the certifi -cates to the inspection station.
13. When printing information on VI-18, please use allCAPITAL LETTERING.
5-5

05.05.03
5-6 5-31-05

05.05.04
5-31-05
05.04 Inspection Station Reports. Inspection certificatesissued for new calendar year must be reported on a separateweekly report.
The inspection report forms shall be submitted in the originalonly to the Department on Monday of each week. Inspectionstations issuing both types of certificates will mail reports asrequired, except report forms will be submitted when trailer andmotorcycle inspections have been recorded for the week or aminimum of at least once a month.
Inspection certificate serial numbers will be listed in consecutivenumerical order, listing all vehicles inspected as approved orrejected.
When the inspection certificate alphabet prefix or the numbersequence changes, skip a line on the inspection station report.A duplicate copy of such reports shall be made and retained forone year by the inspection station for its records. This shallinclude the current and preceding inspection year.
Immediately notify your supervising Vehicle InspectionDepartment representative if any inspection certificates are lostor stolen.
Lost, stolen, or voided safety inspection certificates must beshown on the inspection station report in their proper numericalorder with a notation as to the disposition. All reports must beneat, legible, and contain the correct information and date forevery vehicle inspected. Every item adjusted, replaced, orrepaired must be reported and the correct charges listed.
The certified inspector making the inspection shall be responsi -ble for recording the necessary information, including their sig -nature, in the appropriate column on the inspection stationreport.
Each inspection station will be accountable for each certificate itreceives from the Department. Each certificate’s serial numbermust be shown on the inspection station report as issued orreturned to the Austin office for credit at the end of the inspec -tion year.
Inspection station reports should be signed by the personresponsible for the Official Vehicle Inspection Station. Failure tosubmit inspection station reports as required herein shall begrounds for suspension or revocation of station license.Fraudulent entries that deliberately misrepresent an inspectionwill be sufficient cause to suspend inspection privileges.
Inspection station reports, rejection books, requisitions, etc., willbe supplied by the Department representative supervising theinspection station.
The following rules must be followed in preparing and sub-mitting the Vehicle Inspection Station Report
1. The vehicle inspection report must be submitted eachMonday for the period covering the previous week if the vehi-cle inspection station is classed as public, motorcycle, ortrailer. Fleet or governmental vehicle inspection stations willsubmit the Vehicle Inspection Station Report monthly.
2. The report must be made in duplicate. The original reportsmust be mailed to the Texas Department of Public Safety ,Vehicle Inspection Records, PO Box 14900, Austin, Texas78761-4900; the duplicate must be kept in the inspection sta-tion file for a permanent record.
3. If more than one page of report is submitted for one week,all sheets must be headed with inspection station num-ber label, (place label in designated area only) name,etc., and signed by someone at the inspection station. (Thissignature need not be a certified inspector or inspection sta -tion owner or operator.) When printing information on VI-8A, please use all CAPITAL LETTERING.
4. The certified inspector performing the inspection shall beresponsible for recording the necessary information includinghis signature in the appropriate box on the inspection stationreport. Do not use nicknames. The use of ditto marks is notpermitted.
5. The true date of the inspection must be entered in theboxes provided on the report. A new report form must bestarted January 1 of each year.
6. The license plate number that the vehicle is displaying atthe time of the inspection must be entered in the space/boxesprovided. If there is no license plate on the vehicle at the timeof inspection, the word “NONE” will be entered. Out-of-statelicense, dealer’s numbers, etc., are permissible.
7. The vehicle identification number taken from the vehiclemust be entered in the space/boxes provided. If there is novehicle identification number, the word “NONE” will beentered. If the number is obscured, “OBS” will be entered.
8. The correct year model and code for the make of the vehi-cle will be entered in the boxes provided.
9. The correct mileage or odometer reading of the vehicle willbe entered in the boxes provided.
10. If the vehicle PASSES ALL OF THE REQUIREMENTSFOR THE INSPECTION, nothing will be written in the boxesprovided for checking each item of inspection. Boxes are pro-vided for the inspection certificate number. Use the barcodealong with the certificate number provided with each book ofcertificates. If unavailable, then print the certificate number inthe boxes provided. VI-30 (out-of-state vehicle identificationcertificate serial number) must be entered in the boxes pro -vided. THE STATUTORY FEE WILL BE ENTERED AS THETOTAL CHARGE.
11. If the vehicle FAILS TO PASS ONE OR MORE OF THEREQUIRED ITEMS OF INSPECTION AND THE VEHICLE
5-7
[
[

05.05.04
5-8
OWNER OR OPERATOR ELECTS TO HAVE THE NECES-SARY REPLACEMENTS OR REPAIRS MADE AT YOURINSPECTION STATION, then enter the number symbol iden-tifying the item in need of repair in the box provided. IN THISCASE THE CHARGE WILL BE THE STATUTORY FEEPLUS THE CHARGES MADE FOR THE REPLACEMENTOR REPAIRS OF REQUIRED ITEMS OF INSPECTIONONLY.
12. If the vehicle FAILS TO PASS ONE OR MORE OF THEREQUIRED ITEMS OF INSPECTION AND THE VEHICLEOWNER OR OPERATOR ELECTS TO HAVE THEREPAIRS MADE ELSEWHERE, enter the number symbolidentifying each item failed in the boxes provided. IN THISCASE A REJECTION RECEIPT WILL BE ISSUED ANDTHE TOTAL CHARGE WILL BE THE STATUTORY FEE.Explain the rejection receipt procedure to the vehicle owneror operator. Do not put rejection where certificate numberwould appear. Leave area blank.
13. If the vehicle described in Rule 12 returns to the sameinspection station within fifteen (15) days after the rejectionreceipt was issued and the vehicle now passes all therequirements, a new line will be entered on the report, theinspection certificate number issued will be shown, leavetotal charges blank.
14. Do not enter charges made by an outside garage even
though the amount of charges is known. NEVER ENTERANY CHARGE ON THIS REPORT THAT IS FOR ANYOTHER ITEM OTHER THAN REPLACEMENTS ORREPAIRS THAT WERE NECESSARY FOR THE VEHICLETO PASS INSPECTION.
15. NEW VEHICLES, MOTORCYCLE-TYPE VEHICLESAND ALL TRAILER-TYPE VEHICLES WILL BE REPORT-ED ON SEPARATE FORM (VI-8A) AND THE CERTIFICATENUMBER WILL BE RECORDED IN THE APPROPRIATEBOXES. All reports must be originals before mailing toAustin.
16. To void line or certificate, fill in bubble marked “Void.” Donot put “Void” in any of the boxes. Do not draw a line throughthe boxes. Skip to the next line to begin another entry .
17. Duplicate copies of form VI-8A covering the issuance ofannual and motorcycle-trailer inspections will be retained bythe vehicle inspection station for its records for a period ofone year. Duplicate copies of the report covering the 2 yearinspection will be retained for a period of two years.
18. The Texas Vehicle Inspection Act states that it is a viola -tion of the law not to record and report inspections as pre -scribed by the Department of every inspection made andevery inspection certificate issued (TRC, Section 548.253).
5-31-05
PLEASE FOLLOW THE INSTRUCTIONS LISTED BELOW FOR ENTERING THE APPROPRIATE NUMBER FOR REPAIRS OR FAIL-URES AND THE NUMBER FOR THE MAKE OF THE VEHICLE BEING INSPECTED.
SHOW REPAIRS OR FAILURES BYENTERING THE APPROPRIATE NUMBER SYMBOL IN THE “REPAIRS” OR “FAILURES” SEC-TION ON THE REPORT.
INSERT APPROPRIATE NUMBER FOR THE MAKE OF VEHICLE BEING INSPECTED
01 - HORN02 - BRAKES03 - TIRES04 - STEERING05 - REFLECTORS06 - HEADLAMPS07 - MIRRORS08 - WHEELASSEMBLY09 - SEAT BELTS10 - EMISSION SYSTEM
11 - TURN SIGNALS12 - REAR LIGHTING13 - SAFETYGUARDS (MUDFLAPS)14 - WINDSHIELD WIPERS15 - CAB/SIDE MARKER LAMPS16 - WARNING LAMPS (SCHOOLBUS)17 - SIGNS (SCHOOLBUS ONLY)18 - FIRE EXTINGUISHER ( S C H O O LB U S )19 - EXHAUSTS Y S T E M20 - WINDOW T I N T I N G21 - GAS CAP
C O M M E R C I A L INSPECTIONS ONLY22 - I/D LAMP23 - BACK UPL A M P S24 - HAZARD LAMPS25 - COUPLING DEVICES26 - FUELS Y S T E M27 - SUSPENSION28 - FRAME29 -WINDSHIELD
01 - ACUR02 - ALFA03 - AMER04 - BMW05 - BUIC06 - CADI07 - CHEV08 - CHRY09 - DAIH10 - DATS11 - DODG
12 - FIAT13 - FORD14 - GEO15 - GMC16 - HOND17 - HYUN18 - INFI19 - ISU20 - JAGU21 - JEEP22 - KIA
23 - LEXU24 - LINC25 - MB26 - MAZD27 - MERC28 - MITS29 - NISS30 - OLDS31 - PEUG32 - PLYM33 - PONT
34 - PORS35 - SAA36 - STRN37 - SUBA38 - SUZI39 - TOYT40 - VOLK41 - VOLV42 - OTHER
43 - BMW44 - EGLE45 - HD46 - HOND47 - KAWK48 - KTM49 - SUZI50 - YAM51 - OTHER
52 - OTHER
VEHICLE MAKE
TRUCKS (INCLUDING BUSES, MOTORIZED HOMES, VANS, ETC.)
MOTORCYCLES/MOPEDS
SAFETYTRAILERS
COMMERCIAL TRAILERS
53 - AIRS - AIRSTREAM54 - CAT - CATERPILLER55 - CHNO - CHINOOK56 - FORD - FORD57 - FRHT- FREIGHTLINER58 - FTWD - FLEETWOOD59 - HUNT- HUNTSMAN60 - INTL- INTERNATIONAL61 - ITAS - ITASCA
62 - KW - KENWORTH63 - LNDR - LANDROVER64 - MACK - MACK TRUCK65 - MCIN - MOTOR COACH66 - PTRB - PETERBILT67 - REDM - REDMAN68 - ROAE - ROADLINER69 - ROV - ROVER70 - SILV - SILVERSTREAK
71 - VOLV - VOLVO72 - WHIT- WHITE73 - WINN - WINNEBAGO74 - OTHER BUS75 - OTHER MOTORHOME76 - OTHER TRUCK
77 - OTHER

05.05.04
5-31-05 5-9

05.05.05
5-10 1-1-03

05.05.06
5-31-05
05.06 Rejected Vehicles. In case a vehicle is rejected and theowner fails to have the necessary adjustments made to the vehiclein conformance with the minimum requirements of the TexasInspection Act, the required inspection fee will be charged and arejection receipt shall be issued listing items rejected for, and otherinformation required on the receipt. The rejection receipt must bedelivered and explained to the owner or operator of the vehicle.
The owner or operator of a vehicle rejected must make or havemade the necessary adjustment or repairs and return to the origi -nal inspection station for one reinspection within fifteen (15) daysfrom the date of rejection in order to obtain the one reinspectionwithout charge. The rejection receipt must be delivered to theinspection station on reinspection. The vehicle owner or operatorshall have the right to remove the vehicle to such place for correc -tion upon paying the inspection fee and has the exclusive right todetermine by whom any repairs will be made. The customershould be informed of all defects necessary to put the vehicle inpassing condition.
The rejection receipt form must be neat and legible. It must list thereasons why the vehicle was rejected. A copy of the rejectionreceipt must be kept by the station as a part of the inspection sta -tion records and subject to examination at any time by an autho-rized agent of the Department. Rejection receipts must be issuedby the certified inspector for a vehicle presented for inspection thatdoes not pass the inspection requirements. Rejection receipts arean official part of the inspection program.
All rejection receipts must be completely filled in. Give original tothe customer and keep the copy with the inspection stationrecords.
Any inspection station which, for any reason, cannot reinspect avehicle to which that inspection station has issued a rejectionreceipt shall return the inspection fee. No vehicle will be rejected onany items not covered by TRC, Section 548.051.
The one reinspection must be made within 15 days of the date ofthe initial inspection excluding the date of the rejection.
A reinspection of a rejected vehicle by the same inspection stationshall include a check of the items previously found defective unlessany other obvious defects are noted. When a vehicle is repairedand returned for the one reinspection within 15 days, no additionalinspection fee may be charged.
If the rejected vehicle is returned for reinspection to the originalinspection station after the 15 days have elapsed from the date ofrejection (excluding the date of rejection) or if the vehicle is pre -sented to a different inspection station for reinspection, the vehiclewill be handled as if it were being inspected for the first time andthe inspection fee may be charged.
NOTE: A rejection receipt issued to a vehicle which does not havea valid current inspection certificate shall not entitle such vehicle tolegally operate on a public street or highway.
5-11
[
VEHICLE INSPECTION REJECTION RECEIPT
Date Vehicle Make Model Year
Vehicle License # Inspection Station #
Inspection Station Name REJECTED FOR DEFECTIVE
Horn o Windshield Wiper o Seat Belt o Steering o Mirror oBrake o Stop, Tail or License Lamp o Turn Signal o Safety Guard oExhaust System o Exhaust Emission System o Reflector o Tire oHeadlamp or Beam Indicator o Wheel Assembly o Cab Lamp oClearance/Side Marker Lamp oOther oEXPLAIN REJECTION FULLY:
Certified Inspector Making Inspection If defects indicated above are corrected and the vehicle returned to the original inspection sta -tion within 15 days, vehicle will be reinspected once with no additional fee. THIS IS NOTA PER-MIT TO DRIVE A DEFECTIVE VEHICLE OR TO DRIVE A VEHICLE WITHOUT A CURRENTVALID INSPECTION CERTIFICATE.
Fee Paid $ DirectorVI-7 (11/03) Texas Department of Public Safety

05.05.07
5-12
05.07 Instructions for Out-of-State Identification Certificate- VI-30. The Department shall furnish to all inspection stationsserially numbered identification certificates for the purpose ofverifying the vehicle identification number on vehicles cominginto Texas from another state or country.
1. This certificate will be completed by the certified inspectormaking the inspection of out-of-state registered vehicles pre-sented for inspection for the purpose of registering and titlingthe vehicle in Texas and may charge a $1.00 fee.
2. The certificate will not be issued unless the vehicle pass -es the Texas safety inspection and an official Texas inspec-tion certificate issued to the vehicle.
3. The complete vehicle identification number must berecorded on the identification certificate exactly as it appearson the vehicle. The number will not be taken from any title,old inspection certificate, or any other document. If the vehi-cle identification number is missing, obscured, or mutilated,the identification certificate will be completed, showingNONE, OBSCURED, or MUTILATED in the blanks providedfor the vehicle identification number.
4. If any error is made while recording any of the informationrequired on the identification certificate, VOID the form andfill out another certificate with the correct information. Keepall copies of all voided forms.
5. The number appearing on the odometer of the motor vehi-cle at the time of the inspection, if the motor vehicle has anodometer, should be recorded on the identification certificatein the space provided under the inspection certificate num -ber.
6. The original of the identification certificate will be present -ed to the driver of the vehicle for their use in registering andtitling the vehicle. The copy of the identification certificate willbe retained by the inspection station.
7. If the vehicle already bears a valid Texas inspection certifi-cate issued within the last 30 days, no additional inspectionis required unless an item of inspection is obviously defec -tive. The identification certificate number shall be recordedin parentheses in the portion normally used to record “R’s” ona state inspection and a $1.00 fee will be recorded in the“Total Charges” column.
8. The identification certificates shall be safeguarded in thesame manner required to safeguard safety inspection certifi -cates.
9. The identification certificate number shall be recorded onthe Vehicle Inspection Station Report VI-8 in spaces whererepairs are normally noted. The number shall be placed in
parentheses ( ) in any portion not used to record “R’s” forthat particular vehicle.
10. The identification certificate will be completed in ink bythe certified inspector. The certified inspector will not sign theidentification certificate until all blanks have been completed.Make sure that your carbon copy of this form is legible.These forms will be obtained from the Vehicle InspectionDepartment representative at no cost.
11. Failure to comply with the rules governing the issuanceand safeguarding of out-of-state identification certificates asrequired by law and Department of Public Safety Rules, canresult in enforcement or suspension action against the certi -fied inspector and/or station.
5-31-05
[
[

05.05.07
5-31-05 5-13

05.05.08
5-14 5-31-05

5-30-07
CHAPTER SIXFEDERAL MOTOR CARRIER SAFETY REGULATIONS
ANNUAL INSPECTIONCHAPTER CONTENT
INFORMATION . . . . . . . . . . . . . . . . . . . . . . . . . . . . . . . . . . . . . . . . . . . . . . . . . . . . . . . . . . . 06.00.00 p. 6-1REQUIREMENTS FOR THE APPOINTMENT AND OPERATIONAS AN OFFICIAL FMCSR INSPECTION STATION . . . . . . . . . . . . . . . . . . . . . . . . . . . . . . 06.05.00 p. 6-1
QUALIFICATIONS FOR CERTIFICATION OF FMCSR INSPECTORS . . . . . . . . . . . . . . . . 06.10.00 p. 6-2
DUTIES AND RESPONSIBILITIES OF CERTIFIED FMCSR INSPECTORS . . . . . . . . . . . 06.15.00 p. 6-2
INSPECTION ITEMS . . . . . . . . . . . . . . . . . . . . . . . . . . . . . . . . . . . . . . . . . . . . . . . . . . . . . . 06.20.00 p. 6-2
DETAILS OF INSPECTION . . . . . . . . . . . . . . . . . . . . . . . . . . . . . . . . . . . . . . . . . . . . . . . . . 06.25.00 p. 6-2Backup Lamp . . . . . . . . . . . . . . . . . . . . . . . . . . . . . . . . . . . . . . . . . . . . . . . . . . . . . . . . . 25.01 p. 6-2Beam Indicator . . . . . . . . . . . . . . . . . . . . . . . . . . . . . . . . . . . . . . . . . . . . . . . . . . . . . . . . 25.02 p. 6-3Brake System . . . . . . . . . . . . . . . . . . . . . . . . . . . . . . . . . . . . . . . . . . . . . . . . . . . . . . . . . 25.03 p. 6-3Clearance Lamps . . . . . . . . . . . . . . . . . . . . . . . . . . . . . . . . . . . . . . . . . . . . . . . . . . . . . . 25.04 p. 6-4Coupling Devices . . . . . . . . . . . . . . . . . . . . . . . . . . . . . . . . . . . . . . . . . . . . . . . . . . . . . . 25.05 p. 6-5Exhaust Emission System . . . . . . . . . . . . . . . . . . . . . . . . . . . . . . . . . . . . . . . . . . . . . . . . 25.06 p. 6-6Exhaust System . . . . . . . . . . . . . . . . . . . . . . . . . . . . . . . . . . . . . . . . . . . . . . . . . . . . . . . 25.07 p. 6-6Frame . . . . . . . . . . . . . . . . . . . . . . . . . . . . . . . . . . . . . . . . . . . . . . . . . . . . . . . . . . . . . . . 25.08 p. 6-6Fuel System . . . . . . . . . . . . . . . . . . . . . . . . . . . . . . . . . . . . . . . . . . . . . . . . . . . . . . . . . . 25.09 p. 6-6Hazard Warning Lights . . . . . . . . . . . . . . . . . . . . . . . . . . . . . . . . . . . . . . . . . . . . . . . . . . 25.10 p. 6-6Head Lamps . . . . . . . . . . . . . . . . . . . . . . . . . . . . . . . . . . . . . . . . . . . . . . . . . . . . . . . . . . 25.11 p. 6-6Horn . . . . . . . . . . . . . . . . . . . . . . . . . . . . . . . . . . . . . . . . . . . . . . . . . . . . . . . . . . . . . . . . . 25.12 p. 6-6Identification Lamps . . . . . . . . . . . . . . . . . . . . . . . . . . . . . . . . . . . . . . . . . . . . . . . . . . . . 25.13 p. 6-6License Plate Light . . . . . . . . . . . . . . . . . . . . . . . . . . . . . . . . . . . . . . . . . . . . . . . . . . . . . 25.14 p. 6-7Mirrors . . . . . . . . . . . . . . . . . . . . . . . . . . . . . . . . . . . . . . . . . . . . . . . . . . . . . . . . . . . . . . . 25.15 p. 6-7Motor Serial Number . . . . . . . . . . . . . . . . . . . . . . . . . . . . . . . . . . . . . . . . . . . . . . . . . . . . 25.16 p. 6-7Reflective Sheeting, Conspicuity Tape . . . . . . . . . . . . . . . . . . . . . . . . . . . . . . . . . . . . . . 25.17 p. 6-7Safety Guards or Flaps . . . . . . . . . . . . . . . . . . . . . . . . . . . . . . . . . . . . . . . . . . . . . . . . . . 25.18 p. 6-8Seat Belts . . . . . . . . . . . . . . . . . . . . . . . . . . . . . . . . . . . . . . . . . . . . . . . . . . . . . . . . . . . . 25.19 p. 6-8Side Marker Lamps . . . . . . . . . . . . . . . . . . . . . . . . . . . . . . . . . . . . . . . . . . . . . . . . . . . . . 25.20 p. 6-8Steering Mechanism . . . . . . . . . . . . . . . . . . . . . . . . . . . . . . . . . . . . . . . . . . . . . . . . . . . . 25.21 p. 6-8Stop Lamps . . . . . . . . . . . . . . . . . . . . . . . . . . . . . . . . . . . . . . . . . . . . . . . . . . . . . . . . . . . 25.22 p. 6-9Suspension . . . . . . . . . . . . . . . . . . . . . . . . . . . . . . . . . . . . . . . . . . . . . . . . . . . . . . . . . . . 25.23 p. 6-9Tail Lamps . . . . . . . . . . . . . . . . . . . . . . . . . . . . . . . . . . . . . . . . . . . . . . . . . . . . . . . . . . . . 25.24 p. 6-9Tires . . . . . . . . . . . . . . . . . . . . . . . . . . . . . . . . . . . . . . . . . . . . . . . . . . . . . . . . . . . . . . . . . 25.25 p. 6-9Turn Signals . . . . . . . . . . . . . . . . . . . . . . . . . . . . . . . . . . . . . . . . . . . . . . . . . . . . . . . . . . 25.26 p. 6-10Wheel Assembly . . . . . . . . . . . . . . . . . . . . . . . . . . . . . . . . . . . . . . . . . . . . . . . . . . . . . . . 25.27 p. 6-10Window Tinting or Coating . . . . . . . . . . . . . . . . . . . . . . . . . . . . . . . . . . . . . . . . . . . . . . . 25.28 p. 6-10Windshield . . . . . . . . . . . . . . . . . . . . . . . . . . . . . . . . . . . . . . . . . . . . . . . . . . . . . . . . . . . . 25.29 p. 6-10Windshield Wiper . . . . . . . . . . . . . . . . . . . . . . . . . . . . . . . . . . . . . . . . . . . . . . . . . . . . . . 25.30 p. 6-10
BRAKE CHAMBER DATA . . . . . . . . . . . . . . . . . . . . . . . . . . . . . . . . . . . . . . . . . . . . . . . . . . ANNEX #1
REQUIRED COMMERCIAL VEHICLE LIGHTING EQUIPMENT . . . . . . . . . . . . . . . . . . . . ANNEX #2
CONSPICUITY, REFLECTIVE SHEETING DIAGRAMS . . . . . . . . . . . . . . . . . . . . . . . . . . . ANNEX #3
i

06.00.00 - 05.00
5-30-07
06.00.00 INFORMATION
Compulsory Inspection of Commercial Motor Vehicle
1. The term “commercial motor vehicle” means a self-pro -pelled or towed vehicle, used to transport persons or proper-ty that is used on a public highway to transport passengersor cargo if:
a. The vehicle or combination of vehicles has a grossweight, registered weight, or gross weight rating of morethan 26,000 pounds; or
b. The vehicle is a farm vehicle with a gross weight, a reg-istered weight, or a gross weight rating of more than48,000 pounds; or
c. The vehicle is designed to transport more than 15 pas -sengers, including the driver; or
d. The vehicle is used to transport hazardous materials ina quantity requiring placarding by a regulation issuedunder the Hazardous Materials Transportation Act; or
e. The vehicle or combination of vehicles has a grossweight rating of more than 10,000 pounds and is operatedin interstate commerce and registered in this state.
2. A commercial motor vehicle that is registered in this stateshall be required to pass an annual inspection of all safetyequipment required by the Federal Safety Regulations.
3. A commercial motor vehicle required to be inspected underthe Federal Motor Carrier Safety Regulations is also subjectto the regular state inspection requirements set forth inChapter 4 of this Rules and Regulations Manual.
NOTE: For inspection requirements on house moving andconverter dollies refer to Chapter 4.
Acceptance of out-of-state commercial vehicle inspectioncertificates:
1. A valid commercial vehicle inspection certificate issuedoutside of Texas is acceptable on a Texas registered com-mercial vehicle.
2. Valid out-of-state inspection certificates will not be honoredon commercial vehicles required to be registered in this state.
Exceptions to the Federal Motor Carrier Safety Regulationsinspection are as follows:
1. All school bus operations used to transport only childrenand/or school personnel from home to school and school tohome, or a school related activity trip other than all routes toand from school and operated at a speed of 50 mph or less
(contract school buses are not exempt if used for any pur -pose other than transporting children to and from schoolonly).
2. Transportation performed by the Federal Government,state, or any political subdivision of a state or an agencyestablished under a compact between states that has beenapproved by Congress of the United States.
3. The occasional transportation of personal property by indi-viduals not for compensation or in the furtherance of a com -mercial enterprise.
4. The transportation of human corpses or sick or injured per-sons.
5. The operation of fire trucks and rescue vehicles whileinvolved in emergency and related operations.
6. Farm vehicles with a gross weight, registered weight, orgross weight rating less than 48,000 pounds except inter -state operation of more than 10,000 pounds.
The statutory fee may be charged for each Federal MotorCarrier inspection. A unique inspection certificate will be issuedwhich will designate the vehicle has met the FMCSR and stateinspection requirements.
06.05.00 REQUIREMENTS FOR THE APPOINTMENT A N DOPERATION AS AN OFFICIAL FMCSR INSPECTION STATION.(Refer to Chapters 1, 2, and 3.)
1. Procedure for appointment
2. Classes of Official Vehicle Inspection Stations
3. Periods of inspection
4. Responsibility of inspection station owner or operator
5. Minimum requirements for Official Vehicle InspectionStation:
a. Space
b. Equipment
c. Manpower
6. Operation of Vehicle Inspection Station:
a. Inspection fee
b. Refund of unused inspection certificates
c. Change of location, name, ownership
6-1
[

06.10.00 - 25.01
6-2
d. Going out of business
e. Inspection station cancellation
f. Certification of inspectors
06.10.00 QUALIFICATIONS FOR CERTIFICATION OF FMCSRINSPECTORS. (Refer to Chapter 2.)
06.15.00 DUTIES AND RESPONSIBILITIES OF CERTIFIEDFMCSR INSPECTORS. (Refer to Chapter 2.)
06.20.00 INSPECTION ITEMS
The following is a list of items to be inspected in order to be in com-pliance with the FMCSR Annual Inspection.
20.01 Inspect items listed below which are applicable for theclass of vehicle being inspected. Refer to Chapter 4 for types ofvehicles.
*Check for evidence of Financial Responsibility
1. Horn
2. Windshield
3. Windshield wiper
4. Mirror
5. Steering
6. Seat belt
7. Brakes
8. Tires
9. Wheel assembly
10. Safety guards or flaps
11. Exhaust system
12. Exhaust emission system
13. Beam indicator
14. Tail lamps
15. Stop lamps
16. License plate lamp
17. Reflective sheeting tape, conspicuity
18. Turn signal lamps
19. Clearance lamps
20. Side marker lamps
21. Identification lamps
22. Head lamps
23. Coupling devices
24. Fuel systems
25. Suspension
26. Frame
27. Window tinting or coating
28. Motor, serial, or vehicle identification number
29. Hazard warning lights
30. Backup lamp
06.25.00 DETAILS OF INSPECTION
25.01 Backup Lamp
1. Inspect for and reject if:
a. Lamp is not present
b. Not securely mounted and properly located
c. Lamp does not emit proper color; lamp or bulb painted
d. Lens cracked, broken, discolored, or missing
e. Wiring insulation is worn, rubbed bare, or evidence ofburning, short circuiting, or poor connection
f. Visibility requirements not met
5-31-07
[

06.25.02 - 25.03
1-1-03
g. Lamp is not activated properly when vehicle is inreverse
25.02 Beam Indicator
1. Inspect for and reject if:
In accordance with Chapter 4
25.03 Brake System. Every commercial motor vehicle shall beequipped with brakes acting on all wheels except trucks andtruck-tractors having three or more axles manufactured before1981.
House moving dollies that are required to be inspected underthe Commercial Vehicle Inspection Program are exempt frombraking requirements under the Motor Carrier Safety Standardsand under special mobile equipment sections of state law .Therefore, to avoid conflice, it shall be Department policy to notinspect the brakes on house moving dollies. The inspection cer-tificate for these vehicles should be placed on a plate next to thelicense plate. This will require the owner of the vehicle to installa special metal plate that allows the inspection station to affixthe certificate.
Converter dollies are not exempt from the braking requirementsunder the Motor Carrier Safety Standards or under specialmobile equipment sections of state law.
NOTE: Refer to Chapter 3, 20.05, for certificate mountingrequirements.
Every vehicle inspection station must have designated braketest area where road tests are conducted unless a machine isued to brake tests. Any number of inspection stations may usethe same area in a given town if authorized by the Departmentrepresentative.
All road tests for braking efficiency shall be made only at ameasured, marked, and approved brake test area. The areashall be substantially level (not to exceed plus or minus 1%grade), smooth, hard surface and free of loose material, oil, orgrease. The area must be designated by painted lines, stakes,or other devices noting where the brakes are to be applied.
NOTE: See Chapter 1 for proper marking of brake test area.
Brake test area must be used on every inspection made. Braketests are permitted when it is raining, snowing, or when thebrake test area surface is wet; however, if the certified inspectorfeels they cannot safely and with due care accurately check theservice brakes, they may refuse to make the inspection.
No inspections are permitted when the brake test areas are icy.Extreme care must be exercised and sudden stops must beavoided if other traffic is affected.
All vehicles so tested (brake test area) should be driven at aspeed of 20 mph and the vehicle must stop as indicated by theStopping Distance Chart. (See Reference Section.)
1. Inspect for and reject if:
a. Absence of braking action on any axle required to havebrakes upon application of the service brakes (such asmissing brakes or brake shoe(s) failing to move uponapplication of a wedge, S-cam, cam, or disc brake).
b. Missing or broken mechanical components including:shoes, lining, pads, springs, anchor pins, spiders, camrollers, push rods, and air chamber mounting bolts.
c. Loose brake components including air chambers, spi -ders, and cam shaft support brackets.
d. Audible air leak at brake chamber ( Example: ruptureddiaphragm, loose chamber clamp, etc.)
e. Any brake stroke is at the readjustment limit (See Annex #1).
f. Brake linings or pads
1) Lining or pad is not firmly attached to the shoe;
2) Saturated with oil, grease, or brake fluid; or
3) Nonsteering axles: Lining with a thickness less than1/4-inch at the shoe center for air drum brakes, 1/16-inch or less at the shoe center for hydraulic and elec -tric drum brakes, and less than 1/8-inch for air discbrakes.
4) Steering axles: Lining with a thickness less than1/4-inch at the shoe center for drum brakes, less than1/8-inch for air disc brakes, and 1/16-inch or less forhydraulic disc and electric brakes.
g. Brake is missing on any axle required to have brakes.
h. Mismatch across any power unit steering axle of:
1) Air chamber sizes
6-3
[

06.25.04
6-4
2) Slack adjuster length
i. Parking Brake System - In accordance with Chapter 4
j. Brake Drums or Rotors
1) Any external crack or cracks that open uponbrake application (do not confuse short hairline heatcheck cracks with flexural cracks).
2) Any portion of the drum or rotor is missing.
k. Brake Hose
1) Hose with any damage extending through the outerreinforcement ply
2) Bulge or swelling when air pressure is applied
3) Any audible leaks
4) Two hoses improperly joined (such as a splice madeby sliding the hose ends over a piece of tubing andclamping the hose to the tube)
5) Air hose cracked, broken, or crimped
l. Brake Tubing
1) Any audible leak
2) Tubing cracked, broken, or crimped
m. Low Pressure Warning Device
Missing, inoperative, or does not operate at 55 psi andbelow, or 1/2 the governor cut-out pressure, whichever isless
NOTE: 1974 and earlier model vehicles may have eitheran audible or visible warning device. 1975 and later modelvehicles must have a visible device amd may have anaudible warning driver in addition. Gauges alone are notacceptable as warning devices.
n. Tractor Protection Valve
Inoperable or missing tractor protection valve(s) on powerunit
o. Air Compressor
1) Compressor drive belts cracked or frayed
2) Loose compressor mounting bolts
3) Cracked, broken, or loose pulley
4) Cracked or broken mounting brackets, braces, oradaptors
p. Electric Brakes
1) Absences of braking action on any wheel required tohave brakes
2) Missing or inoperable breakaway braking device
q. Hydraulic Brakes. (including Power Assist OverHydraylic and Engine Drive Hydraulic Booster)
1) Master cylinder fluid level is 1 inch or more belowthe top of the reservoir or below manufacturer ’s rec-ommended level.
2) No pedal reserve with engine running except bypumping pedal.
3) Power assist unit fails to operate.
4) Seeping or swelling brake hose(s) under applicationof pressure.
5) Missing or inoperative check valve.
6) Has any visual observed leaking hydraulic fluid inthe brake system.
7) Has hydraulic hose(s) abraded (chafed) throughouter cover-to-fabric layer.
8) Fluid lines or connections leaking, restricted,crimped, cracked, or broken.
9) Brake failure or low fluid warning light on and/orinoperative.
r. Vacuum Systems
1) Has insufficient vacuum reserve to permit one fullbrake application after engine is shut off.
2) Has vacuum hose(s) or line(s) restricted, abraded(chafed), through outer cover to cord ply, crimped,cracked, broken, or has collapsed vacuum hose(s)when vacuum is applied.
3) Lacks an operative low-vacuum warning device asrequired.
25.04 Clearance Lamps
1. Inspect for and reject if:
1-1-03

06.25.05
1-1-03
In accordance with Chapter 4
25.05 Coupling Devices
1. Inspect fifth wheel for and reject if:
a. Any fasteners missing or ineffective
b. Any movement between mounting components
c. Any mounting angle iron cracked or broken
d. Any fasteners missing or ineffective on mounting platesand pivot brackets
e. Any cracked welds, including repair weld cracks or par-ent metal cracked
f. More than 3/8-inch horizontal movement between pivotbracket pin and bracket
g. Pivot bracket pin missing or not secured
h. Any latching fasteners missing or ineffective on sliders
i. Any fore or aft stop missing or not securely attached
j. Movement more than 3/8-inch between slider bracketand slider base
k. Any slider component cracked in parent metal or weld
l. Horizontal movement between the upper and lower fifthwheel halves exceeds 1/2-inch on lower coupler
m. Operating handle not in closed or locked position
n. Kingpin not properly engaged
o. Separation between upper and lower coupler allowinglight to show through from side to side
p. Cracks in the fifth wheel plate. (Exceptions: Cracks infifth wheel approach ramps and casting shrinkage cracksin the ribs of the body of a cast fifth wheel.)
q. Locking mechanism parts missing, broken, or deformedto the extent the kingpin is not securely held
2. Inspect Pintle Hooks for and reject if:
a. Any missing or ineffective fasteners (a fastener is notconsidered missing if there is an empty hole in the devicebut no corresponding hole in the frame or vice versa).
b. Mounting surface cracks extending from point of attach-ment (e.g., cracks in the frame at mounting bolt holes).
c. Loose mounting
d. Frame cross member providing pintle hook attachmentcracked
e. Cracks anywhere in pintle hook assembly
f. Any welded repairs to the pintle hook
g. Any part of the horn section reduced by more than 20%
h. Latch insecure
3. Inspect Drawbar/Towbar Eye for and reject if:
a. Any cracks in attachment welds
b. Any missing or ineffective fasteners
c. Any part of the eye reduced by more than 20%
4. Inspect Drawbar/Towbar Tongue for and reject if:
a. Ineffective latching mechanism
b. Missing or ineffective stop
c. Movement of more than 1/4-inch between slider andhousing
d. Any leaking, air or hydraulic cylinders, hoses, or cham-bers (other than slight oil weeping normal with hydraulicseals)
e. Any cracks
f. Movement of 1/4-inch between subframe and drawbarat point of attachment
5. Inspect Safety Devices for and reject if:
a. Safety devices missing
b. Unattached or incapable of secure attachment
c. Chains and hooks
1) Worn to the extent of a measurable reduction in linkcross section
2) Improper repairs including welding, wire, small bolts,rope, and tape
d. Cable
1) Kinked or broken cable strands
6-5
06.25.06 - 25.13
6-6
2) Improper clamps or clamping
6. Inspect Saddle Mounts for and reject if:
a. Any missing or ineffective fasteners
b. Loose mountings
c. Any cracks or breaks in a stress or load-bearing mem -ber
d. Horizontal movement between upper and lower saddlemount halves exceeds 1/4-inch
25.06 Exhaust Emission System
1. Inspect for and reject if:
In accordance with Chapter 4
25.07 Exhaust System
1. Inspect for and reject if:
In accordance with Chapter 4
25.08 Frame
1. Inspect for and reject if:
a. Any part of frame member is cracked, broken, loose, orsagging
b. Fasteners attaching the engine, transmission, steeringgear, suspension, body parts, and fifth wheel loose ormissing
c. Any condition that causes the body or frame to be incontact with a tire or wheel assembly
d. Locking pins missing or not engaged on adjustable axleassemblies
25.09 Fuel System
1. Inspect for and reject if:
a. Visible leaks
b. Filler cap missing
c. Fuel tank not securely mounted
d. No valid Liquefied Petroleum Gas Tax Decal issued bythe State Comptroller for LPG powered vehicles
25.10 Hazard Warning Lights.Every bus, truck, and truck-trac-tor is not equipped with a signaling system that, in addition tosignaling turning movements, shall have a switch or combina -tion of switches that will cause the two front turn signals and thetwo rear signals to flash simultaneously as a vehicular trafficwarning. The system shall be capable of flashing simultaneous-ly with the ignition of the vehicle on or off.
1. Inspect for and reject if:
a. Lamps are not present
b. Not securely mounted and properly located
c. Lamp does not emit proper color; lamp or bulb painted
d. Lens cracked, broken, discolored, or missing
e. Wiring insulation is worn, rubbed bare, or evidence ofburning, short circuiting, or poor connection
f. Visibility requirements not met
25.11 Head Lamps
1. Inspect for and reject if:
In accordance with Chapter 4
25.12 Horn
1. Inspect for and reject if:
In accordance with Chapter 4
25.13 Identification Lamps. All buses, trucks, and truck-trac -tors 80 inches wide or wider must be equipped with three (3)identification lamps of amber color mounted on the cab of thevehicle, one (1) as close to the vertical center line of the vehicleas practicable and one (1) on each side of the center line, notless than 6 inches or more than 12 inches.
All buses, trucks, and trailers 80 inches wide or wider must beequipped with three (3) identification lamps of red color mount -ed on the rear of the vehicle as high as practicable. One (1)mounted as close as possible to the center line of the vehicleand one on each side of the center line of not less than 6 inch -es or more than 12 inches.
1. Inspect for and reject if:
a. Lamps are not present
b. Not securely mounted and properly located
1-1-03

06.25.14 - 25.17
1-1-03
c. Lamp does not emit proper color; lamp or bulb painted
d. Lens cracked, broken, discolored, or missing
e. Wiring insulation is worn, rubbed bare, or evidence ofburning, short circuiting, or poor connection
f. Visibility requirements not met
25.14 License Plate Light
1. Inspect for and reject if:
In accordance with Chapter 4
25.15 Mirrors. Every bus, truck, and truck-tractor shall beequipped with two rear-vision mirrors, one at each side, firmlyattached to the outside of the motor vehicle, and so located asto reflect to the driver a niew of 200 feet to the rear, along bothsides of the vehicle.
Only one outside mirror shall be required, which shall be on thedriver’s side, on trucks which are so constructed that the driverhas a view to the rear by means of an interior mirror .
In driveaway-towaway operations, the driven vehicle shall haveat least one mirror furnishing a clear view to the rear .
1. Inspect for and reject if:
a. Proper number of mirrors
b. Clear view of 200 feet to rear
c. Interference of driver ’s foward vision
d. Reflective surface of mirrors is cracked, broken, peeled,or tarnished
e. Not mounted securely ot prevent swing or excessivevibration
25.16 Motor Serial Number
1. Inspect for and reject if:
In accordance with Chapter 4
25.17 Reflective Sheeting, Conspicuity Tape.
1. Inspect for and reject if:
a. Any trailer or semi-trailer regulated by Federal MotorCarrier Safety Regulations (FMCSR) that is over 80 inch -
es wide and 10,001 pounds GVWR except pole trailersand mobile office/housing trailers.
NOTE: If GVWR plate is not present than actual or regis -tered weight of 10,001 pounds or more will apply .
b. Inspection Procedure. Inspect for proper placement,coverage, and color.
1) Color combinations of red and white shall be used,may begin with red or white, and alternate color com -bination must be uniform along the sides and lowerrear of the trailer. NOTE: Reflective strips in color com-binations other than red and white may be used on thesides and lower rear until June 1, 2009.
2) The centerline for each reflective strip shall bebetween 15 inches and 60 inches above the road sur -face or as close as practicable with the trailer empty .
3) Must be an approved type. The manufacturer certi -fication will consist of one of the following markings:
a) DOT – C
b) DOT – C2, 2 inch (50mm)
c) DOT – C3, 3 inch (75mm)
d) DOT – C4, 4 inch (100mm)
c. Inspect for and reject if:
1) Trailer is not equipped with reflective sheeting, tape,or reflex reflectors.
2) Not properly placed or secured to the trailer or prop-er colors used
a) on each side placed horizontally:
(1) the total length of the sections do not equal toat least one half of the total length of the trailer
(2) the placement is not reasonably evenly dis -tributed down the full length of the trailer and asnear the front and rear as practicable.
b) on the lower rear, placed horizontally:
(1) the total length does not extend as near aspracticable across the full rear of the trailer .
(2) the placement is not as low as practicable.
c) on the underride protection device, if equipped:
6-7

06.25.18 - 25.21
6-8
(1) placed horizontally across the full width of thedevice
d) on the upper rear:
(1) the placement is not as close as practicableto the extreme outer and upper dimensions of thetrailer.
(2) two pairs of white reflective strips, each sec -tion at least 12 inches long, must be positionedhorizontally and vertically on the right and leftupper corners of the rear of the body.
(3) the reflective material is not white in color .
3) Reflective material is excessively discolored, deteri-orated, or painted, to the extent the ability to reflect issubstantially affected.
NOTE: Reflector strips can be used in lieu of the “normal” reflexreflectors when they are mounted on the rear and over the fullwidth of the trailer or on the side over at least one-half of thelength of the trailer, distributed evenly from the front to the rearof the trailer.
N O T E : Reflex Reflector requirements in accordance withChapter 4.
NOTE: Refer to Annex 3 for reflective sheeting, tape, conspicu-ity requirement, diagrams for trailer types.
25.18 Safety Guards or Flaps
1. Inspect for and reject if:
In accordance with Chapter 4
25.19 Seat Belts
1. Inspect for and reject if:
In accordance with Chapter 4
25.20 Side Marker Lamps
1. Inspect for and reject if:
In accordance with Chapter 4
25.21 Steering Mechanism. The steering system of the vehicle
must be inspected to determine if excessive wear and/or mal -adjustment of the steering wheel linkage and/or steering gearexists. Wear and adjustment of the steering system will bechecked by measuring lash. Vehicle must be on a dry surface.
Lash Defined: Lash is the condition in which the steering con -trol can be turned through some part of a revolution without frontwheel motion. The wheels should be loaded and positionedstraight ahead.
Jamming Defined: Jamming is any obstruction to the turning ofthe steering control caused by interference between some com-ponents of the steering system.
1. Inspect for and reject if:
a. Steering Lash (see chart)
1-1-03
Steering Wheel Manual Steering Power Steeringdiameter system system
14” or less.................. 2”............................. 3”16”.............................. 2”............................. 4”18”.............................. 2”............................. 4-3/4”20”.............................. 2”............................. 5”22”.............................. 2-3/4”....................... 5-3/4”
b. Steering Column
1) Any absence or looseness of U-bolt(s) or positioningpart(s)
2) Worn, faulty, or obviously welded universal joint(s)
3) Steering wheel not properly secured
c. Front Axle Beam and All Steering Components OtherThan Steering Column
1) Any crack(s)
2) Any obvious welded repair(s)
d. Steering Grear Box
1) Any mounting bolt(s) loose or missing
2) Any crack(s) in gear box or mounting brackets
e. Pitman Arm
Any looseness of the pitman arm on the steering gear out-put shaft
f. Power Steering
Auxillary power assist cylinder loose

06.25.22 - 25.25
5-31-05
g. Ball and Socket Joints
1) Any movement under steering load of a stud nut
2) Any motion other than rotational, between any link -age member and its attachment point of more than 1/4-inch
h. tie Rods and Drag Links
1) Loose clamp(s) or clamp bolt(s) on tie rods or draglinks
2) Any looseness in any threaded joint
i. Nuts
Nut(s) loose or missing on tie rods, pitman arm, drag link,steering arm or tie rod arm
j. Steering System
Any modification or other condition that interferes with freemovement of any steering component
NOTE: For leaks and fluid levels, inspect in accordancewith Chapter 4.
25.22 Stop Lamps
1. Inspect for and reject if:
In accordance with Chapter 4
25.23 Suspension
1. Inspect for and reject if:
a. U-bolt, spring hanger, or other axle parts are cracked,broken, loose, or missing
b. Any leaf spring assembly leaves broken or missing
c. Coil spring broken
d. Rubber spring missing
e. Any leaves displaced that could cause contact with atire, rim, brake drum, or frame
f. Broken torsion bar spring
g. Deflated air suspension
h. Torque, radius, or tracking component cracked, loose,broken, or missing
25.24 Tail Lamps
1. Inspect for and reject if:
In accordance with Chapter 4
25.25 Tires
1. Inspect any tire on Steering Axle for and reject if:
a. With less than 4/32-inch tread when measured at anypoint on a major tread groove.
b. Has body ply or belt material exposed through the treador sidewall
c. Has any tread or sidewall separation.
d. Has a cut where the ply or belt material is exposed.
e. Labeled “Not for Highway Use” or displaying othermarking which would exclude use of steering axle.
f. A bus operated with regrooved, recapped, or retreadedtires on the front wheels.
g. A truck or truck-tractor with regrooved tires on the frontwheels.
h. A tube-type radial tire without radial tube stem mark -ings. These markings include a red band around the tubestem, the word “radial” embossed in metal stems, or theword “radial” molded in rubber stems.
i. Mixing bias and radial tires on the same axle.
j. The flap protrudes through valve slot in rim and touchesstem.
k. Regrooved tire except motor vehicles used solely inurban or suburban areas.
l. Boot, blowout patch, or other ply repair.
m. Weight carried exceeds tire load limit. This includesoverloaded tire resulting from low air pressure.
n. Tire is flat or has noticeable (i.e., can be heard or felt)leak.
o. Any bus equipped with recapped or retreaded tire(s).
p. So mounted or inflated that it comes in contact with any
6-9
[

06.25.25 - 25.30
6-10
part of the vehicle.
2. Inspect all other tires and reject if:
a. Weight carried exceeds tire load limit. This includesoverloaded tire resulting from low air pressure.
b. Tire is flat or has noticeable (i.e., can be heard or felt)leak.
c. Has body ply or belt material exposed through the treador sidewall.
d. Has any tread or sidewall separation.
e. Has a cut where ply or belt material is exposed.
f. So mounted or inflated that it comes in contact with anypart of the vehicle. (This includes a tire that contacts itsmate).
g. Is marked “Not for Highway Use” or otherwise markedand having like meaning.
h. With less than 2/32-inch tread when measured at anypoint on a major tread groove.
25.26 Turn Signals
1. Inspect for and reject if:
In accordance with Chapter 4
25.27 Wheel Assembly
1. Inspect for and reject if:
In accordance with Chapter 4
25.28 Window Tinting or Coating
1. Inspect for and reject if: (All year models)
a. Tint or coating is extending more than 2 inches belowthe top of the windshield
b. Tint or coating has more than 1 inch border at each sideof windshield
c. Tinting or coating and any vision restricting materialsare above the topmost portion of the steering wheel
d. Windows, immediately to the right and left of the driver,which open, have less than 70% light transmittance
NOTE: Commercial motor vehicles registered and operat-ed in intrastate commerce in Texas are allowed to tint thewindows to the immediate left and right of the operator toless than 25% of light transmittance.
e. Check calibration before rejecting vehicle
25.29 Windshield
1. Inspect for and reject if:
a. Any crack over 1/4-inch wide
b. Any damaged area of more than 3/4 inch in diameter .
c. Damaged area is closer than 3 inches to any otherdamaged area.
d. Any crack less than 1/4 inch wide intersecting with anyother crack.
25.30 Windshield wiper
1. Inspect for and reject if:
In accordance with Chapter 4
5-30-07
[
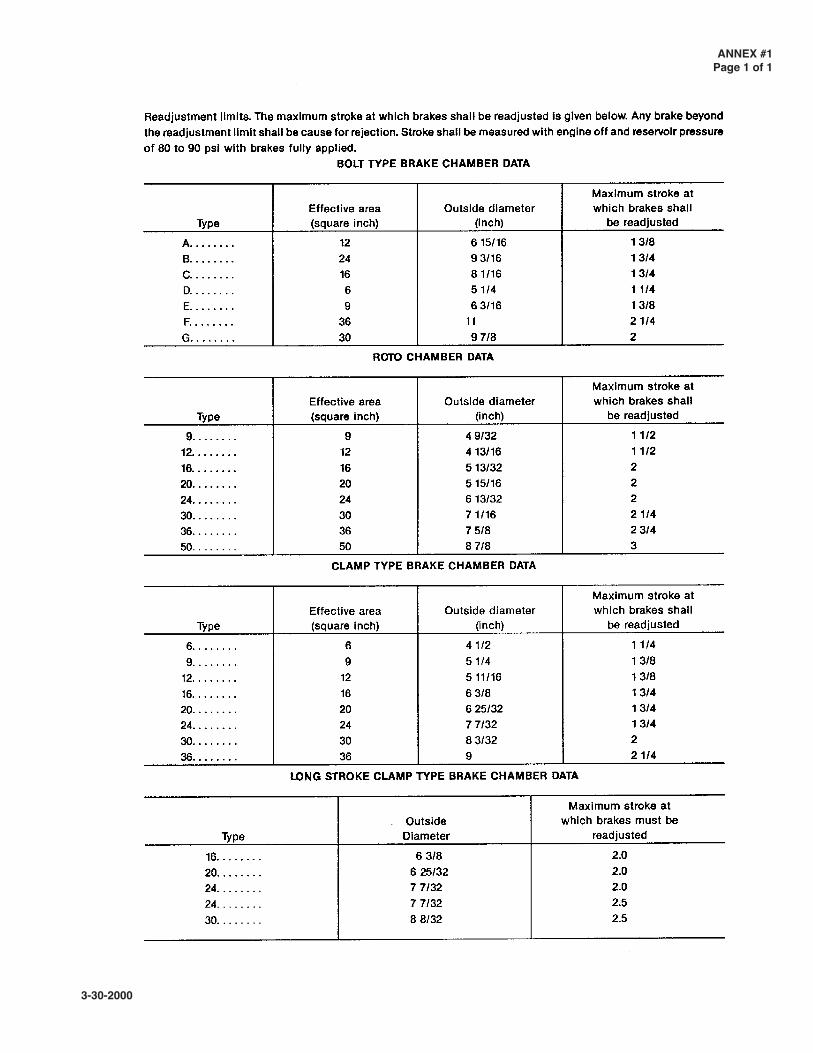
ANNEX #1Page 1 of 1
3-30-2000

ANNEX #2Page 1 of 8

ANNEX #2Page 2 of 8

ANNEX #2Page 3 of 8

ANNEX #2Page 4 of 8

ANNEX #2Page 5 of 8

ANNEX #2Page 6 of 8

ANNEX #2Page 7 of 8

ANNEX #2Page 8 of 8

06.00.00 ANNEX #3 Page 1 of 2
1-1-03
Trailers–
Flatbeds–
CONSPICUITYTREATMENTS THATALLOW FORUPPER HINGES

ANNEX #3 Page 2 of 2 06.00.00
1-1-03
Tankers–

Texas Automated Vehicle Inspection System
Student Training Manual
March 2, 2007

TAVIS Student Training Manual Version 1.0 Page 2 of 85
Private and Confidential
Table of Contents
TAVIS Training Curriculum .......................................................................................... 4 Texas Automated Vehicle Inspection Unit – Background ............................................. 5 Module 1 – Activate TAVIS Unit................................................................................... 6
TAVIS Unit Activation....................................................................................... 7 Get Station Screen............................................................................................... 8 Activate Unit Confirmation Screen .................................................................... 9 Main Menu – After Activation ......................................................................... 10
Module 2 – TAVIS User Login ................................................................................... 11 TAVIS User Login............................................................................................ 12 Training Certification Acknowledgement ........................................................ 13 Change Inspector PIN....................................................................................... 14 Secret Question and Answer Screen ................................................................. 15 Inspection Menu................................................................................................ 16
Module 3 – Communicate With Host ........................................................................... 17 Communicate with Host ................................................................................... 18 Data Refresh Screen.......................................................................................... 19 Configure Connection....................................................................................... 20
Module 4 – Perform Safety Inspection ......................................................................... 22 Main Menu........................................................................................................ 23 Login Screen ..................................................................................................... 24 Inspection Menu................................................................................................ 25 Inspection Search .............................................................................................. 26 Data Refresh...................................................................................................... 28 Vehicle Information Entry ................................................................................ 32 Inspection Item Entry > Item 1 ......................................................................... 34 Inspection Item Entry > Item 2 ......................................................................... 36 Inspection Results Summary............................................................................. 37 Certificate Entry................................................................................................ 38 Texas Department of Public Safety Vehicle Inspection Report ....................... 39 Conduct Re-Inspection Differences.................................................................. 40 Re-Inspection Match Found.............................................................................. 43 Cancel Inspection.............................................................................................. 47 Issue a VI-30 Certificate ................................................................................... 48 Replace Certificate............................................................................................ 51
Module 5 – Manage Certificate Status ......................................................................... 54 Manage Certificate Status ................................................................................. 55 Transaction Information Screen........................................................................ 56
Module 6 – Display TAVIS Messages ......................................................................... 57 Display TAVIS Messages................................................................................. 58 Message Details ................................................................................................ 59
Module 7 – Access Certificate Sales Application at Station ........................................ 60 Access Certificate Sales Application at Station................................................ 61 Certificate Purchase – Station User Login........................................................ 62 Certificate Purchase – Select Station ................................................................ 63 Certificate Purchase – Order Form ................................................................... 64 Certificate Purchase – Order Confirmation ...................................................... 65 Certificate Purchase – Payment Form............................................................... 66

TAVIS Student Training Manual Version 1.0 Page 3 of 85
Private and Confidential
Certificate Purchase – Order Receipt................................................................ 67 Certificate Purchase – Station Order History.................................................... 68 Certificate Purchase – Order Details................................................................. 69
Module 8 – Receive Inventory At The Station ............................................................. 70 Receive Inventory at Station............................................................................. 71 Receive Inventory ............................................................................................. 72 Receive Inventory Confirmation....................................................................... 73
Module 9 – Train On TAVIS........................................................................................ 74 Training Mode .................................................................................................. 75
Module 10 – Reports..................................................................................................... 78 Reports .............................................................................................................. 79
Module 11 – Shutdown TAVIS Unit ........................................................................... 82 Shutdown TAVIS Unit ..................................................................................... 83 Shutdown .......................................................................................................... 84 Shutdown In Progress ....................................................................................... 85
TAVIS Student Training Manual Version 1.0 Page 4 of 85
Private and Confidential
TAVIS Training Curriculum Objective: The purpose of this document is to provide a detailed description of the operation of the Texas Automated Vehicle Inspection System (TAVIS) Unit. This document is divided into several modules. Each of these modules addresses one key feature of the Unit in an elaborative manner.

TAVIS Student Training Manual Version 1.0 Page 5 of 85
Private and Confidential
Texas Automated Vehicle Inspection Unit – Background The Texas Automated Vehicle Inspection System (TAVIS) is primarily intended to automate the safety inspection and reporting processes. This will benefit both the Vehicle Inspection Stations and the Texas Department of Public Safety (DPS). Instead of reporting vehicle safety inspections using the VI-8 logbook, inspectors will enter the inspection information directly into the TAVIS Unit, which will send the information to a centralized computer database. In addition to automating the vehicle safety inspection process, the system will provide the following features: a. Enhanced reporting and inspection tracking capabilities. b. Improved access to vehicle inspection data. c. Improved accuracy of vehicle safety inspection data. d. Ability for stations to order and pay for certificates online through the TAVIS Unit
and via any personal computer, or by telephone using the Integrated Voice Response (IVR) system.
This program will benefit Inspection Stations by:
a. Reducing the amount of paperwork required to perform safety inspections. b. Speeding up the vehicle inspection reporting processes. c. Providing accurate, efficient and streamlined vehicle inspections. d. Allowing stations to order inspection certificates online or by telephone. e. Providing automated availability of vehicle inspection history and related
information.

TAVIS Student Training Manual Version 1.0 Page 6 of 85
Private and Confidential
Module 1 – Activate TAVIS Unit
The TAVIS Unit is activated when it is first set up at the Station. It is deactivated when the Station closes, or if, for some reason, the Unit will no longer be assigned to that Station. While anyone can activate the Unit, only a Texas Department of Public Safety Field Technician (DPS FT) may deactivate the TAVIS Unit. During deactivation, all of the prime TAVIS Unit features are non-accessible. Note that, during the first activation, the Unit will be automatically locked out. A Unit lockout still permits a Station to access all of the Unit functions besides those accessible through the Inspection Menu. Only DPS staff can unlock the Unit; he/she can do so remotely or from the Station via the Unit.
Upon completion of the Maintain TAVIS Status module a student will:
Be able to activate a TAVIS Unit.

TAVIS Student Training Manual Version 1.0 Page 7 of 85
Private and Confidential
TAVIS Unit Activation Should a user (DPS personnel or a station representative) turn on a TAVIS Unit, which has not been activated yet or needs to be reactivated, he/she will have to activate it first. To do so, the user will select “9. Activate TAVIS Unit” from the Main Menu. Figure 1.1
After the selection, the Get Station screen (Figure 1.2) appears.

TAVIS Student Training Manual Version 1.0 Page 8 of 85
Private and Confidential
Get Station Screen The Get Station screen prompts the user to enter the Station ID number and select the "F2" key to proceed or the "F12" key to return to the Main Menu (for Activation). Figure 1.2
After the user completes entering the 5-digit Station ID number and selects the "F2" key, the TAVIS Unit will display the Activate Unit Confirmation screen (Figure 1.3). If instead of selecting the “F2” key, the user selects the "F12" key, the TAVIS Unit will re-direct him/her back to the Main Menu (Figure 1.1).

TAVIS Student Training Manual Version 1.0 Page 9 of 85
Private and Confidential
Activate Unit Confirmation Screen The Activate Unit Confirmation screen allows the user to confirm whether the data about to be sent to the host is accurate or not. The data that the user verifies is the Station ID, DBA name, and physical address. If the data is correct, the user will select the "F2" key to proceed. If the data is incorrect, the user will select the "F12" key to cancel. Figure 1.3
After the user selects the "F2" key, the TAVIS Unit will be activated and the Main Menu will be displayed as shown in Figure 1.4. However, if the user selects the "F12" key, he/she will be re-directed back to the Main Menu as shown in Figure 1.1.

TAVIS Student Training Manual Version 1.0 Page 10 of 85
Private and Confidential
Main Menu – After Activation Following the TAVIS Unit activation process, the Main Menu will now have the appearance as seen in Figure 1.4. The Main Menu allows the Inspector to select the function he/she desires to perform. There are 11 functions to choose from as seen below. Figure 1.4
However, note that only an Inspector can access the “1. Inspection Menu”, a Buyer (Station Representative having authority to purchase certificates for the Station) can access the “4. Certificate Purchase”, and only a Texas Department of Public Safety Field Technician (DPS FT) have the authority to access the “7. State Menu”.

TAVIS Student Training Manual Version 1.0 Page 11 of 85
Private and Confidential
Module 2 – TAVIS User Login
As mentioned earlier, only an Inspector can access all the features in the “1. Inspection Menu”. Upon selection of the “1. Inspection Menu”, the TAVIS Unit software will ask the Inspector to enter his/her personalized ID number and PIN. The Inspector’s ID is his/her Texas ID or DL number, whichever he/she provided to the DPS during registration. The ID, therefore, consists of 8 digits. Module 2 describes the initial login process.
Upon completion of the Inspector Login module a student will be able to:
Enter his/her ID and PIN, and log in to the TAVIS unit. Understand the importance of maintaining the privacy of the ID and PIN. Complete the secret question and answer request from the TAVIS Unit. Know what steps to take when the TAVIS Unit displays the Inspector’s expiration
date warning message. Be aware of the process to follow if the following should occur:
o The TAVIS Unit software does not recognize the Inspector ID. o The Inspector ID and PIN do not match. o The two entries of the new PIN do not match. o Entry violates field validation rules. o Communication between the Unit and the host fails.

TAVIS Student Training Manual Version 1.0 Page 12 of 85
Private and Confidential
TAVIS User Login As mentioned earlier, the Inspector is required to log on to the TAVIS Unit using his/her pre-assigned 8 digit ID number and 5 digit PIN. From the Main Menu, the Inspector selects “1. Inspection Menu” to access the Login screen. The Login screen prompts the Inspector to enter the ID (TX DL/ID) and PIN. Once they are entered, the Inspector will select the “F2” key to proceed with the login process. Figure 2.1
The TAVIS Unit Software validates the ID and PIN against the stored data. If the initial login credentials are valid, the TAVIS Unit Software will display the Training Certification Acknowledgement screen (Figure 2.2). If the TAVIS Unit Software is unable to validate the login credentials as entered, it will display an error message. The Inspector is allowed to correct the ID and/or PIN. After the third error message, the TAVIS Unit Software returns the Inspector to the Main Menu. Should the ID and PIN be correct and the Inspector continues to receive the error message, he/she can call the Help Desk for assistance.

TAVIS Student Training Manual Version 1.0 Page 13 of 85
Private and Confidential
Training Certification Acknowledgement The Training Certification Acknowledgement screen (Figure 2.2) appears only for new Inspectors or for those who have not used a Unit previously. The screen confirms that the Inspector has received the required TAVIS Unit training as approved by the Texas Department of Public Safety (DPS), and fully understands the operation of the TAVIS Unit, system functions and requirements. By continuing, the Inspector agrees to comply with the DPS requirements and procedures for TAVIS use in recording the vehicle inspection data, purchasing, accounting, and tracking of inspection certificates. The Inspector confirms his/her understanding that TAVIS is a proprietary DPS system for administering the state vehicle inspection program and thereby, acknowledges receipt of the notice that improper use of the TAVIS Unit may result in administrative disciplinary actions, including revocation and/or suspension of the Inspector’s certification, as well as any other penalties as may be authorized under the law. Figure 2.2
If the Inspector does not agree with the Training Certification Acknowledgement, he/she will select the “F12” key and be returned to the Main Menu. Should the Inspector agree with the Training Certification Acknowledgement, he/she will select the “F2” key to proceed to the Change Inspector PIN screen (Figure 2.3).

TAVIS Student Training Manual Version 1.0 Page 14 of 85
Private and Confidential
Change Inspector PIN For the Inspector (new or existing) using a Unit for the first time, the TAVIS Unit Software will request that he/she changes the PIN for security purposes. The TAVIS Unit will prompt the Inspector to enter the new PIN twice. The new PIN should consist of 5 digits (the first digit can not be a ‘0’), be easy for the inspector to remember but difficult for others to guess. The Inspector PIN must be kept private. Figure 2.3
After the Inspector enters his/her new PIN and selects the “F2”key to continue, the TAVIS Unit Software records the new data and displays the Secret Question and Answer screen (Figure 2.4). Should the Inspector inadvertently enter invalid characters for the PIN or there is a mismatch between two PIN entries, the TAVIS Unit Software will display an error message and request the Inspector re-enter the new PIN and confirm it.

TAVIS Student Training Manual Version 1.0 Page 15 of 85
Private and Confidential
Secret Question and Answer Screen The Secret Question and Answer screen appears for the Inspector (new or existing) using the TAVIS Unit for the first time, or for the one, whose PIN was changed recently by the DPS for some reason. This screen allows the Inspector to select a secret question and enter his/her answer to the selected question. DPS uses this question/answer to verify the Inspector’s identity, should he/she request a PIN change. Figure 2.4
Once the Inspector has selected a secret question, entered the answer, and selected the “F2” key to continue, the Inspection Menu appears (Figure 2.5). The PIN may be changed from time to time for various reasons. Should a PIN need to be changed, this function is found in the Inspection Menu.

TAVIS Student Training Manual Version 1.0 Page 16 of 85
Private and Confidential
Inspection Menu Upon completion of the PIN change, and secret question and answer selection, the Inspector advances to the Inspection Menu from where he/she can choose one of the eight functions as listed in Figure 2.5. Figure 2.5
All of the features and functionality of the Inspection Menu are elaborated on in Module 4.
TAVIS Student Training Manual Version 1.0 Page 17 of 85
Private and Confidential
Module 3 – Communicate With Host
The TAVIS Unit Software connects with the host to upload and download data. Uploaded data typically includes (among other items) inspection records, certificate books – that have been received at the Station and, Inspector PINs. Downloaded data typically includes (among other items) the most recent TAVIS Unit status (ex: activated, deactivated, etc), DPS FTs – who have the authority to visit the Station and access all of the Units, messages – broadcasted by the DPS from the host, software updates, and Inspector PINs. This module describes the overall communication process and how the user can configure the TAVIS Unit to communicate with the host successfully. Note that, no section in this module requires logging into the Unit.
Upon completion of the Communicate With The Host module a student will: Have the ability to perform a data refresh on the TAVIS Unit. Have the ability to configure the TAVIS Unit communications.
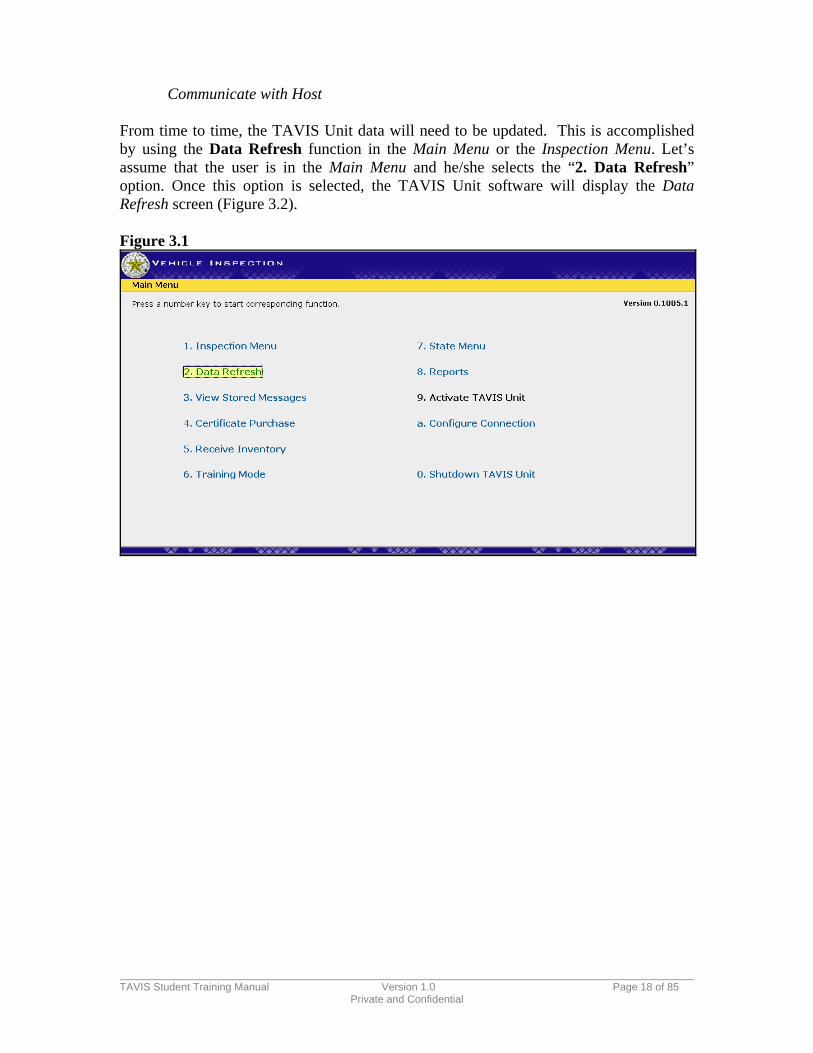
TAVIS Student Training Manual Version 1.0 Page 18 of 85
Private and Confidential
Communicate with Host From time to time, the TAVIS Unit data will need to be updated. This is accomplished by using the Data Refresh function in the Main Menu or the Inspection Menu. Let’s assume that the user is in the Main Menu and he/she selects the “2. Data Refresh” option. Once this option is selected, the TAVIS Unit software will display the Data Refresh screen (Figure 3.2). Figure 3.1

TAVIS Student Training Manual Version 1.0 Page 19 of 85
Private and Confidential
Data Refresh Screen During the Data Refresh function, the TAVIS Unit dials up to the host. Once a communication is established, the TAVIS Unit Software uploads the data, if any, to the host. The host processes the uploaded data and sends any pending updates to the TAVIS Unit. Thereafter, the TAVIS Unit Software processes the data that it receives and informs the user once the Data Refresh is complete as shown in Figure 3.2. Figure 3.2
Once the data refresh is complete, the user selects the “F12” key to continue. The TAVIS Unit Software will then bring the user back to the Main Menu as seen in Figure 1.4.
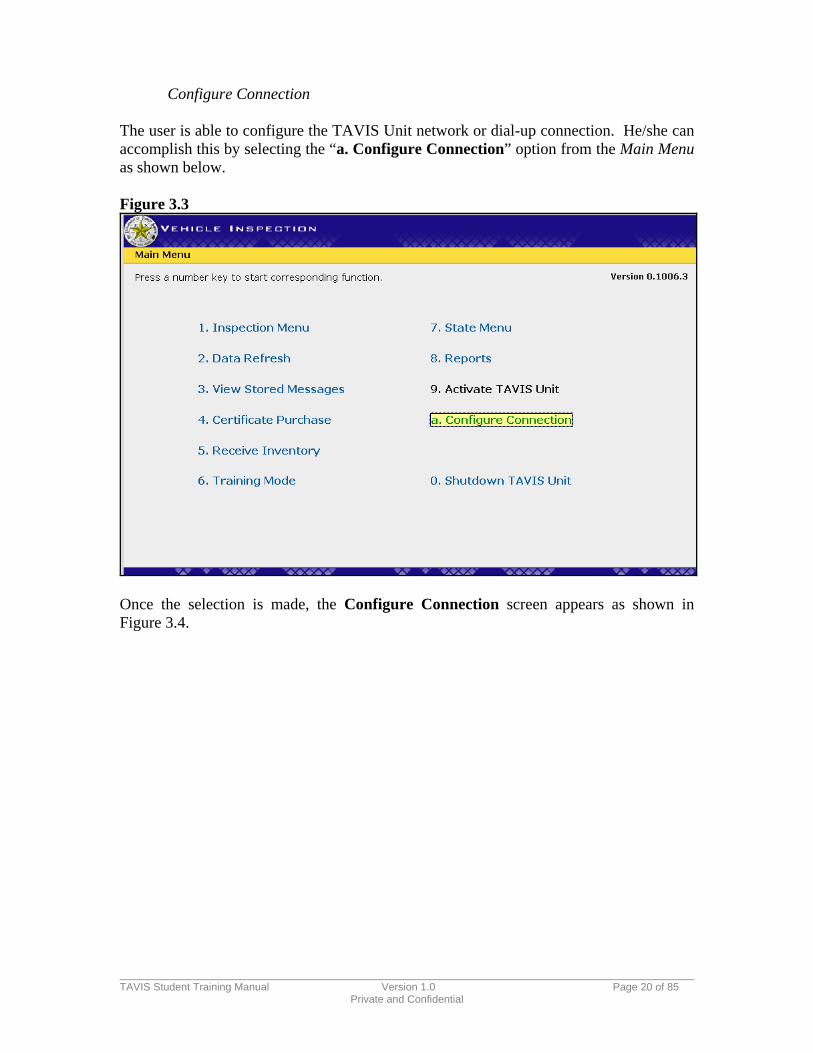
TAVIS Student Training Manual Version 1.0 Page 20 of 85
Private and Confidential
Configure Connection The user is able to configure the TAVIS Unit network or dial-up connection. He/she can accomplish this by selecting the “a. Configure Connection” option from the Main Menu as shown below. Figure 3.3
Once the selection is made, the Configure Connection screen appears as shown in Figure 3.4.

TAVIS Student Training Manual Version 1.0 Page 21 of 85
Private and Confidential
Figure 3.4
From this screen the user can choose which connection type to use: Network or Phone Line. If the user selects phone line, the extra number field becomes active for entry. If the local phone line requires an additional number (ex: prefix of 8 or 9) to make an outside call, the user will type the number in this field. Once the appropriate changes are made, the user can select “F2” to test the connection, “F3” to save the changes, “F4” for Toll Free data refresh, or “F12” to Cancel.

TAVIS Student Training Manual Version 1.0 Page 22 of 85
Private and Confidential
Module 4 – Perform Safety Inspection
This module allows the Inspector to enter vehicle and safety inspection data into the TAVIS Unit, proceeding with an initial inspection or re-inspection.
Upon completion of the Perform Safety Inspection module a student will: Be able to navigate through the Inspection Menu and select “Conduct Initial
Inspection” or “Conduct Re-inspection”. Have ability to enter and override, if necessary, vehicle inspection data in the
system. Be able to record a ‘pass’ or ‘fail’ for an inspection item. If an item has been
repaired at the Station, the Inspector will be able to record that as well. Have the ability to enter the certificate number and associated cost for a passed
inspection. Be able to submit or cancel the current inspection process. Submit an inspection record to be sent to the host on the next communication. Have the working knowledge of how to proceed should any of the following
occur: o Insurance policy expiration date is past due or is not available. o Inspector has not entered all the mandatory data or simply entered invalid
data. o Connection to the host is not available. o The TAVIS Unit Software and/or host cannot find the vehicle’s original
inspection record. o Vehicle is eligible or not eligible for re-inspection. o The TAVIS Unit Software recognizes an out of sequence certificate. o Inspector scans/enters the wrong certificate type for the inspection. o Inspection cost exceeds the maximum cost for the certificate type. o VIN does not conform to recognized standards.

TAVIS Student Training Manual Version 1.0 Page 23 of 85
Private and Confidential
Main Menu To begin the Vehicle Inspection process, the Inspector selects “1. Inspection Menu” from the Main Menu. Figure 4.1
The TAVIS Unit Software then displays the Login screen as seen in Figure 4.2.

TAVIS Student Training Manual Version 1.0 Page 24 of 85
Private and Confidential
Login Screen The TAVIS Unit Software needs to verify the Inspector’s credentials first. Therefore, it asks the Inspector to login. Figure 4.2
After the Inspector enters his/her ID and PIN and selects the "F2" key, the TAVIS Unit Software validates the Inspector’s credentials against those stored in the database. If the Inspector is valid, the TAVIS Unit Software displays the Inspection Menu (Figure 4.3), or the Training Certification Acknowledgement screen (for new Inspectors or Inspectors using a Unit for the first time – Figure 2.2). If the Inspector ID and PIN do not match, the TAVIS Unit Software displays a message indicating that the ID and PIN do not match and asks the Inspector to re-enter his/her login information. In total, the Inspector is given 3 chances to enter his/her ID and PIN. If a match cannot be found within these 3 attempts, the TAVIS Unit Software will redirect the Inspector back to the Main Menu. If this condition continues, the Inspector can call the help desk.

TAVIS Student Training Manual Version 1.0 Page 25 of 85
Private and Confidential
Inspection Menu In the Inspection Menu, the Inspector will have eight functions to choose from (Figure 4.3): Figure 4.3
Should the Inspector select “1. Conduct Initial Inspection” to perform a vehicle inspection, the TAVIS Unit Software re-displays the Login screen, as shown in Figure 4.2, and requests that the Inspector re-enter his/her ID and PIN. This Login screen appears at the beginning of every inspection. The reason the TAVIS Unit Software requires an Inspector to login prior to starting every inspection is so that no one else can perform an inspection using an ID and PIN that does not belong to the person. Thus, this feature promotes accountability among Inspectors. Once the Inspector has logged in, the Inspection Search screen appears as shown in Figure 4.4.

TAVIS Student Training Manual Version 1.0 Page 26 of 85
Private and Confidential
Inspection Search For verification, the Inspection Search screen requests that the Inspector enters the Vehicle Identification Number (VIN) for the vehicle or VIN Exception, and the insurance expiration date or insurance exception reason. The Inspector scans or manually enters the VIN into the appropriate data field, and then can use the "TAB" key or the mouse to move between fields for data entry. Note that, when VIN is not available or is unreadable, the Inspector uses the VIN Exception. Similarly, the Inspector uses the Insurance Exception Reason when insurance data cannot be used for a certain vehicle. Figure 4.4
If manually entering the VIN, after the Inspector selects the "F2" key to continue, the TAVIS Unit Software requests that the Inspector re-enter the VIN for verification. Should the Inspector have made a keystroke error during the second VIN entry or the two VIN entries do not match, the TAVIS Unit Software requests that the VIN be re-entered (Figure 4.5).

TAVIS Student Training Manual Version 1.0 Page 27 of 85
Private and Confidential
Figure 4.5
After the Inspector re-enters the VIN and selects the "F2" key, the TAVIS Unit Software searches for the inspection records in the database for a match. While the TAVIS Unit Software is searching for the records, the Data Refresh screen will be displayed (Figure 4.6).

TAVIS Student Training Manual Version 1.0 Page 28 of 85
Private and Confidential
Data Refresh During the Data Refresh function, the TAVIS Unit searches for a vehicle match. Figure 4.6
If the TAVIS Unit Software is unable to establish communication with the host and no local vehicle match is found, the below screen will display stating that the communication has failed and asking the Inspector to continue or retry the communication.

TAVIS Student Training Manual Version 1.0 Page 29 of 85
Private and Confidential
Figure 4.7
The Inspector can retry the connection multiple times. If the connection continues to fail, the Inspector continues to the next screen (as shown in Figure 4.8) with a message stating that the Unit could not communicate with the server and asking the Inspector if he/she wants to start an offline inspection. Figure 4.8

TAVIS Student Training Manual Version 1.0 Page 30 of 85
Private and Confidential
If the Inspector selects “F2” to continue with an offline inspection, the Vehicle Information Entry screen will appear as shown in Figure 4.9. There will be a clear distinction on the screen that the Inspector has chosen to perform an offline inspection. The words “Offline Test of F12 to Cancel” will appear above the ‘Year’ field. Figure 4.9
As the TAVIS Unit Software successfully communicates, it first compares the VIN to the inspection records stored in the Unit from the previous inspections. If the vehicle search finds a matching record that is eligible for a re-inspection then the following screen will display as shown in Figure 4.10 stating the eligibility.

TAVIS Student Training Manual Version 1.0 Page 31 of 85
Private and Confidential
Figure 4.10
Once it is determined that a vehicle is eligible for a re-inspection and the Inspector selects “F2” to continue, the TAVIS Unit Software begins the re-inspection process as described later in this module. The TAVIS Unit Software will change the test type to a re-inspection with a clear distinction on the screen to indicate such (as shown in Figure 4.24). If the vehicle is not eligible for re-inspection, the TAVIS Unit Software displays the Vehicle Information Entry screen. However, this screen will vary with the amount of information pre-populated. With a VIN match, the screen displays pre-populated data from the last inspection record as shown in Figure 4.11. But when a VIN match is not found, the screen displays with only default selections as shown in Figure 4.12.

TAVIS Student Training Manual Version 1.0 Page 32 of 85
Private and Confidential
Vehicle Information Entry When a VIN match is found, the Unit will pre-populate the following data on the vehicle: Year, Make, Model, Vehicle Type and Inspection Type data fields as shown in Figure 4.11. The Inspector is then required to enter the Plate Number and Odometer Reading for the vehicle. Note that, one or more of the pre-populated data in the Vehicle Information Entry screen may be wrong. This may happen if during the last inspection, the Inspector incorrectly overrode the data in question. At this point, the current Inspector may choose to rectify the error(s). Figure 4.11
If no match is found, the same Vehicle Information Entry screen would appear, but with only the default selections pre-filled in as shown in Figure 4.12. All other fields would need to be manually entered.
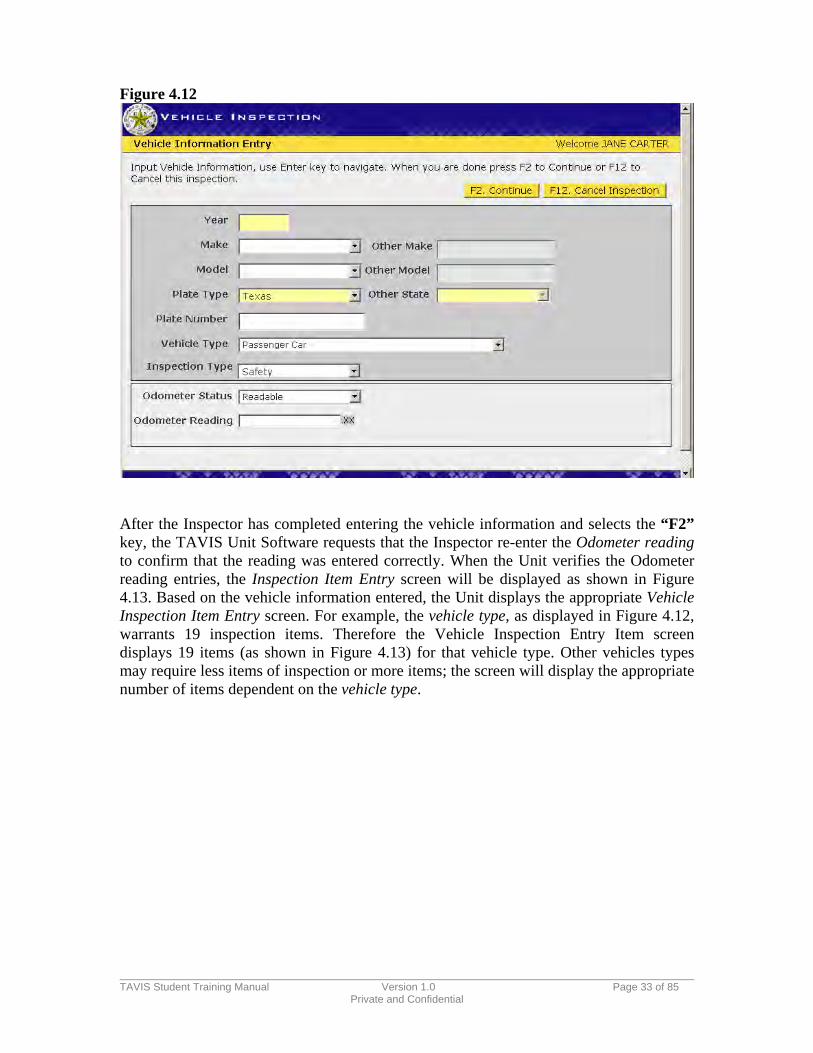
TAVIS Student Training Manual Version 1.0 Page 33 of 85
Private and Confidential
Figure 4.12
After the Inspector has completed entering the vehicle information and selects the “F2” key, the TAVIS Unit Software requests that the Inspector re-enter the Odometer reading to confirm that the reading was entered correctly. When the Unit verifies the Odometer reading entries, the Inspection Item Entry screen will be displayed as shown in Figure 4.13. Based on the vehicle information entered, the Unit displays the appropriate Vehicle Inspection Item Entry screen. For example, the vehicle type, as displayed in Figure 4.12, warrants 19 inspection items. Therefore the Vehicle Inspection Entry Item screen displays 19 items (as shown in Figure 4.13) for that vehicle type. Other vehicles types may require less items of inspection or more items; the screen will display the appropriate number of items dependent on the vehicle type.
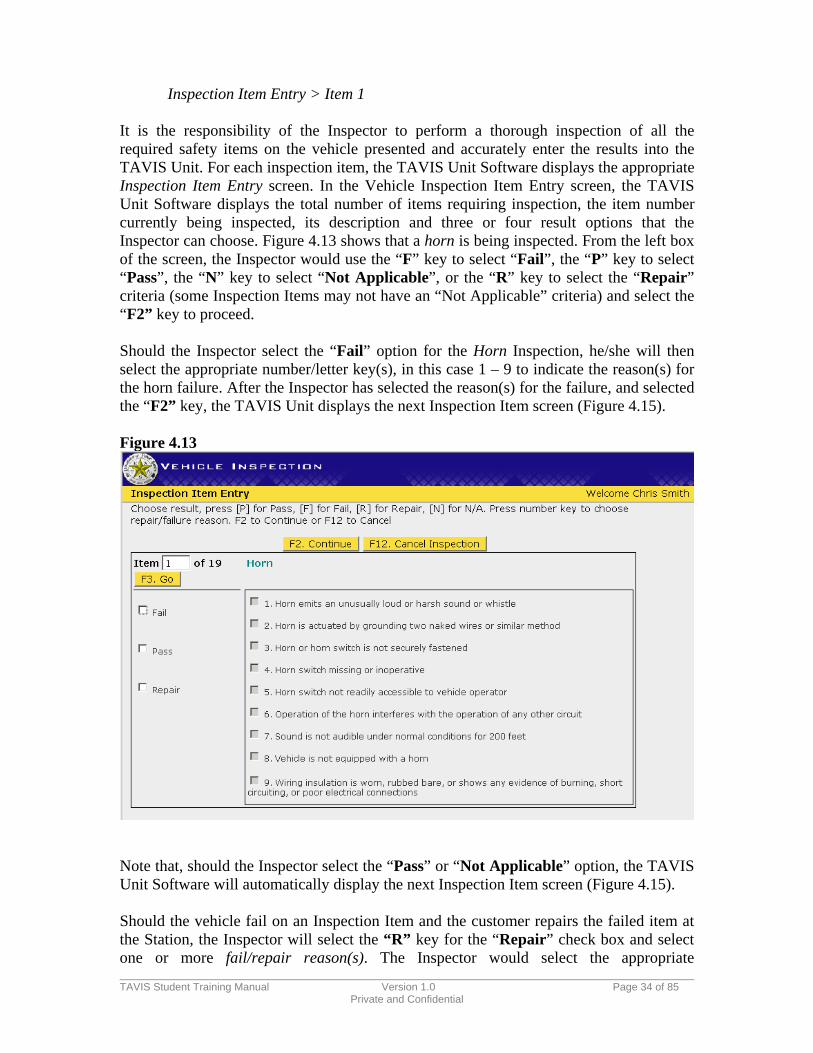
TAVIS Student Training Manual Version 1.0 Page 34 of 85
Private and Confidential
Inspection Item Entry > Item 1 It is the responsibility of the Inspector to perform a thorough inspection of all the required safety items on the vehicle presented and accurately enter the results into the TAVIS Unit. For each inspection item, the TAVIS Unit Software displays the appropriate Inspection Item Entry screen. In the Vehicle Inspection Item Entry screen, the TAVIS Unit Software displays the total number of items requiring inspection, the item number currently being inspected, its description and three or four result options that the Inspector can choose. Figure 4.13 shows that a horn is being inspected. From the left box of the screen, the Inspector would use the “F” key to select “Fail”, the “P” key to select “Pass”, the “N” key to select “Not Applicable”, or the “R” key to select the “Repair” criteria (some Inspection Items may not have an “Not Applicable” criteria) and select the “F2” key to proceed. Should the Inspector select the “Fail” option for the Horn Inspection, he/she will then select the appropriate number/letter key(s), in this case 1 – 9 to indicate the reason(s) for the horn failure. After the Inspector has selected the reason(s) for the failure, and selected the “F2” key, the TAVIS Unit displays the next Inspection Item screen (Figure 4.15). Figure 4.13
Note that, should the Inspector select the “Pass” or “Not Applicable” option, the TAVIS Unit Software will automatically display the next Inspection Item screen (Figure 4.15). Should the vehicle fail on an Inspection Item and the customer repairs the failed item at the Station, the Inspector will select the “R” key for the “Repair” check box and select one or more fail/repair reason(s). The Inspector would select the appropriate

TAVIS Student Training Manual Version 1.0 Page 35 of 85
Private and Confidential
number/letter key(s), in this case 1 – 9 to indicate the reason(s) for the horn failure/repair (Figure 4.14). Figure 4.14
After the Inspector has selected “F”, “P”, “N” or “R” and chosen reason(s) – if applicable – and selected the "F2" key, the TAVIS Unit will display the next Inspection Item Entry screen (Figure 4.15).

TAVIS Student Training Manual Version 1.0 Page 36 of 85
Private and Confidential
Inspection Item Entry > Item 2 As the Inspector continues entering the inspection results for each safety item that applies to the vehicle being inspected, the TAVIS Unit Software will continue to display the appropriate Inspection Item Entry screen for each item. The Inspector would repeat the process described in the Horn section above for the remaining items. Figure 4.15
After the inspection results for all the Inspection Item Entry screens have been entered, the TAVIS Unit Software displays the Inspection Results Summary screen (Figure 4.16).

TAVIS Student Training Manual Version 1.0 Page 37 of 85
Private and Confidential
Inspection Results Summary The Inspection Results Summary screen displays a description of all the inspected items and their safety results, as entered by the Inspector. Should the Inspector have failed or repaired an item, the reason(s) for the failure or repair would also be displayed. Figure 4.16
When the Inspector reviews the information on the Inspection Results Summary screen, he/she will have the option to correct any data entered incorrectly. The Inspector would use the “TAB” key or arrow keys to move up and down the list of inspection items. With an item highlighted, the inspector could press the “Enter” key to return to the Inspection Item Entry screen for the specific item and change the value entered. Once any value is changed, the TAVIS Unit Software will return to the Inspection Results Summary page for further review. Once the review is complete, select the "F2" key to continue or “F12” key to cancel the Inspection. Should the Inspector select the “F12” key, he/she will be redirected to the Main Menu, if the "F2" key is selected, the TAVIS Unit will proceed and display the Certificate Entry screen (Figure 4.17).

TAVIS Student Training Manual Version 1.0 Page 38 of 85
Private and Confidential
Certificate Entry The Certificate Entry screen requires the Inspector to enter the data that will enable the TAVIS Unit Software to complete the inspection process and display the Vehicle Inspection Report. The Inspector would first select a certificate type, which would then pre-fill the Inspection Cost. The Inspector would enter the certificate number by scanning the certificate barcode or using the keyboard to manually enter the certificate number. The next step would be to enter any repair cost for repaired inspection items. The TAVIS Unit Software will populate the Inspector ID, Inspection Type, Inspection Result and the Total Cost. Figure 4.17
When the Inspector has completed entering the required data, he/she will have a choice of selecting the "F2" key to submit the data, the “F3” key to change the inspection type, the “F4” key to go to the Manage Certificate Status menu or the “"F12” key to cancel the Inspection. If all of the data is correct and the Inspector will select the "F2" key and the TAVIS Unit Software will display the Texas Department of Public Safety (TxDPS) Vehicle Inspection Report (VIR) (Figure 4.18).

TAVIS Student Training Manual Version 1.0 Page 39 of 85
Private and Confidential
Texas Department of Public Safety Vehicle Inspection Report There are six sections on the TxDPS VIR. Section one contains the Test Date, Start Time and End Time along with the Overall Result. Section two contains the Station Information. Section three contains the Vehicle Information. Section four contains the Certificate Type and Test Type. Section five contains the Inspection Items and identifies whether or not the item passed, failed, not applicable or was repaired. Section six contains the Fees for the Inspection. Figure 4.18
Section 1
Section 2
Section 3
Section 4
Section 5
Section 6
At this point the Inspector will have the choice to either select "F2" to print the certificate or "F12" to return to the Inspection Menu.

TAVIS Student Training Manual Version 1.0 Page 40 of 85
Private and Confidential
Conduct Re-Inspection Differences When an Inspector selects “2. Conduct Re-Inspection” from the Main Menu, the TAVIS Unit Software will re-display the Login screen (Figure 4.2) and request that the Inspector re-enter his/her ID and PIN. This Login screen will appear at the beginning of every inspection and re-inspection to validate that the person performing the inspection or re-inspection is qualified and the only one carrying out the inspection process. Once the Inspector has successfully logged in, the first screen of the re-inspection process, Re-Inspection Search By VIN, will appear as shown in Figure 4.19. Figure 4.19
The Inspector must then select the criteria that he/she wants to use to search for a matching record. The first option is search by VIN, as shown above. However, if no VIN match is found in the local TAVIS Unit, the TAVIS Unit Software will prompt the Inspector to search by License Plate Number as shown in Figure 4.20.

TAVIS Student Training Manual Version 1.0 Page 41 of 85
Private and Confidential
Figure 4.20
If no license plate match is found in the local TAVIS Unit, the TAVIS Unit Software will prompt the Inspector to search by the Fail Confirmation Number as shown in Figure 4.21. Figure 4.21
If no fail confirmation number match is found in the local TAVIS Unit, the TAVIS Unit Software will prompt the Inspector to locate the inspection record by VIN (displayed from first search criteria entry) but this time on the Host as shown in Figure 4.22.
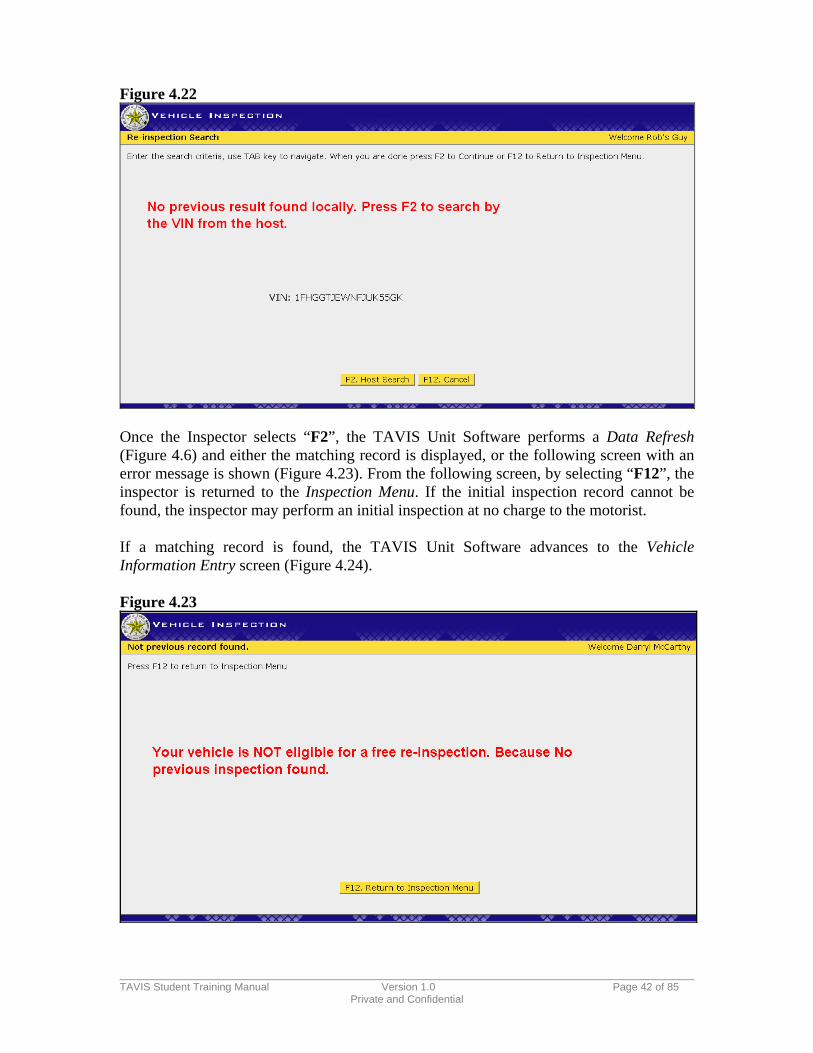
TAVIS Student Training Manual Version 1.0 Page 42 of 85
Private and Confidential
Figure 4.22
Once the Inspector selects “F2”, the TAVIS Unit Software performs a Data Refresh (Figure 4.6) and either the matching record is displayed, or the following screen with an error message is shown (Figure 4.23). From the following screen, by selecting “F12”, the inspector is returned to the Inspection Menu. If the initial inspection record cannot be found, the inspector may perform an initial inspection at no charge to the motorist. If a matching record is found, the TAVIS Unit Software advances to the Vehicle Information Entry screen (Figure 4.24). Figure 4.23

TAVIS Student Training Manual Version 1.0 Page 43 of 85
Private and Confidential
Re-Inspection Match Found When the Inspector successfully locates an inspection record match (either on the Unit or the host itself), the following Vehicle Information Entry screen appears as shown in Figure 4.24. There will be a clear distinction between the entry screen of an initial inspection and that in the re-inspection. Figure 4.24
During the re-inspection, the grayed out fields in the Vehicle Information Entry screen are not editable. All the other fields are editable and the Inspector fills them out or changes their value as appropriate. The last entry on this screen for the Inspector is to provide a value for Odometer, if its status was not mentioned to be ‘None’ or ‘Obscured’, and select “F2”. The TAVIS Unit Software will then ask the Inspector to confirm the odometer reading entry by re-entering its value. The Inspector is then taken to the Inspection Item Entry screen for the first item that failed during the previous inspection (Figure 4.25).

TAVIS Student Training Manual Version 1.0 Page 44 of 85
Private and Confidential
Figure 4.25
The Inspector can then update the results for the failed inspection items one at a time. Once the new result is selected, the TAVIS Unit Software advances through all of the previous failing inspection items. After all the failed items are reviewed, the Inspector is taken to the Inspection Results Summary screen as shown in Figure 4.26.
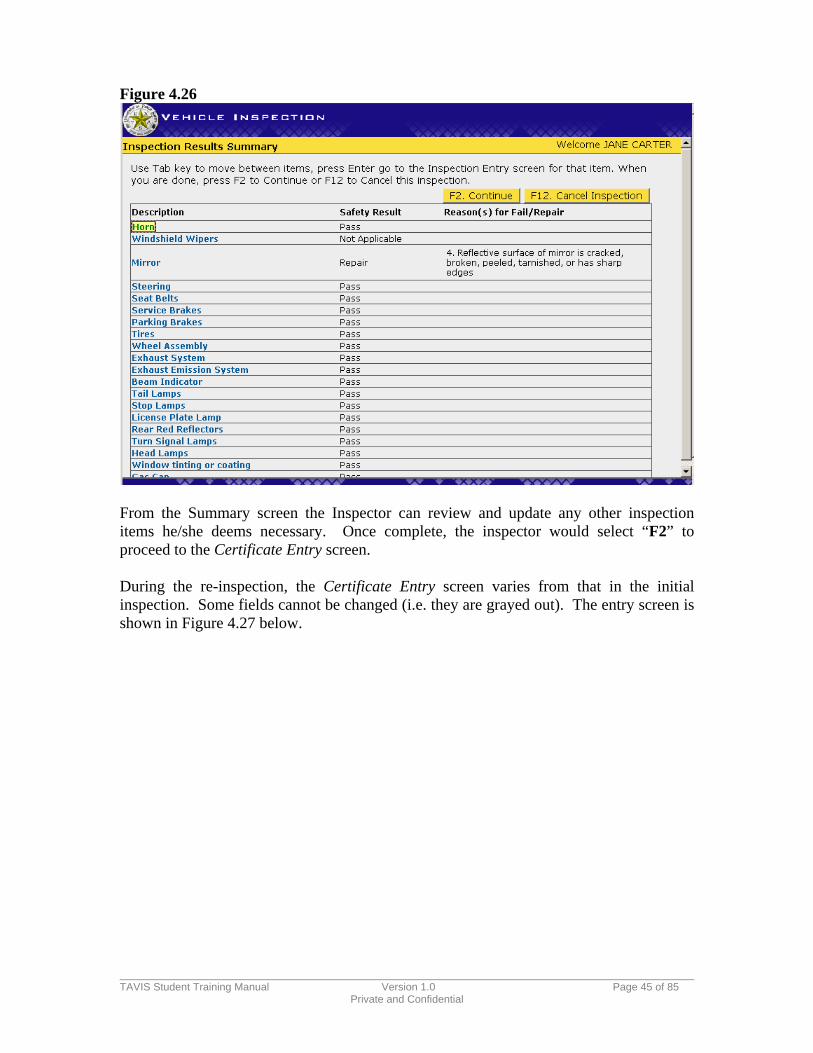
TAVIS Student Training Manual Version 1.0 Page 45 of 85
Private and Confidential
Figure 4.26
From the Summary screen the Inspector can review and update any other inspection items he/she deems necessary. Once complete, the inspector would select “F2” to proceed to the Certificate Entry screen. During the re-inspection, the Certificate Entry screen varies from that in the initial inspection. Some fields cannot be changed (i.e. they are grayed out). The entry screen is shown in Figure 4.27 below.

TAVIS Student Training Manual Version 1.0 Page 46 of 85
Private and Confidential
Figure 4.27
The Certificate Type and Inspection Cost are two fields that should never be changed during a re-inspection. If the certificate type needs to be changed, the Inspector must cancel the current inspection and start an initial inspection for the new certificate type. Once all the relevant information is entered, the Inspector must select “F2” to submit the inspection results.

TAVIS Student Training Manual Version 1.0 Page 47 of 85
Private and Confidential
Cancel Inspection During the inspection process, the Inspector may need to cancel an inspection. If the Inspector selected the “F12 – Cancel Inspection” function from any screen during the Vehicle Inspection, the TAVIS Unit Software would display the Cancel Inspection screen (Figure 4.28). The TAVIS Unit will request that the Inspector choose a reason for the inspection to be cancelled. The Inspector would use the arrow keys to select a reason from the list provided by the TAVIS Unit Software, or select “Other” and enter a reason in the “Other Reason” text box. Once the reason for the cancellation has been selected or entered, the Inspector would select the “F2” key to submit the reason and return to the Inspection Menu. If the Inspector does not want to cancel the current inspection, he/she needs to select the “F12” key; the Inspector will then be returned to the screen where the inspection process was at before canceling. Figure 4.28

TAVIS Student Training Manual Version 1.0 Page 48 of 85
Private and Confidential
Issue a VI-30 Certificate A VI-30 can be issued during the inspection process, or as a separate process all on its own. The vehicle needs a passing inspection within the last 30 days to receive a VI-30. When a VI-30 is issued during the inspection process, the Inspector supplies the VI-30 number and cost information needed. When issuing a VI-30 as a separate process, Figure 4.29 is the first screen to appear that allows the Inspector to search for the passed inspection needed prior to issuance. On the VI-30 Search screen, the Inspector can search for the inspection record by Certificate Number, License Plate Number, or VIN. Figure 4.29
The inspection record search is performed on the host. If no match is found, an error message will display prompting the Inspector to perform another search, force the VI-30 issuance or cancel the VI-30 issuance (Figure 4.30).

TAVIS Student Training Manual Version 1.0 Page 49 of 85
Private and Confidential
Figure 4.30
At any time, if the Inspector has a copy of the inspection at his/her disposal and no record match is returned from the host, the Inspector still can issue the appropriate VI-30. When a matching record is found, Figure 4.31 is displayed for data verification, entry and VI-30 issuance.

TAVIS Student Training Manual Version 1.0 Page 50 of 85
Private and Confidential
Figure 4.31
Once all the data is entered, the Inspector can select “F2” to continue with the VI-30 issuance, or “F12” to cancel. Upon continuance, a Data Refresh is performed and once it is complete, the Inspector returns to the Inspection Menu.

TAVIS Student Training Manual Version 1.0 Page 51 of 85
Private and Confidential
Replace Certificate After completing an inspection, if something were to happen to the certificate issued prior to placing it on the vehicle (ex: if the certificate gets damaged), the Inspector has the option of replacing the damaged, missing, or defective certificate with a new valid certificate. “4. Replace Certificate” in the Inspection Menu provides the option to replace a certificate (as shown in Figure 4.32). Figure 4.32
When replacing a certificate, Figure 4.33 is the first screen to appear that allows the Inspector to search for the inspection record needed prior to the new certificate’s issuance. On the Replace Certificate search screen, the Inspector can search by Certificate Number, License Plate Number, or VIN.

TAVIS Student Training Manual Version 1.0 Page 52 of 85
Private and Confidential
Figure 4.33
The inspection record search request is sent directly to the host. If no match is found, an error message will display prompting the Inspector to perform another search. When a matching record is found, Figure 4.34 is displayed for replace certificate data entry. Figure 4.34
The original certificate status is recorded as ‘Missing’ or ‘Void’, and a new certificate number is entered for the inspection record. Once complete, the Inspector can select “F2”
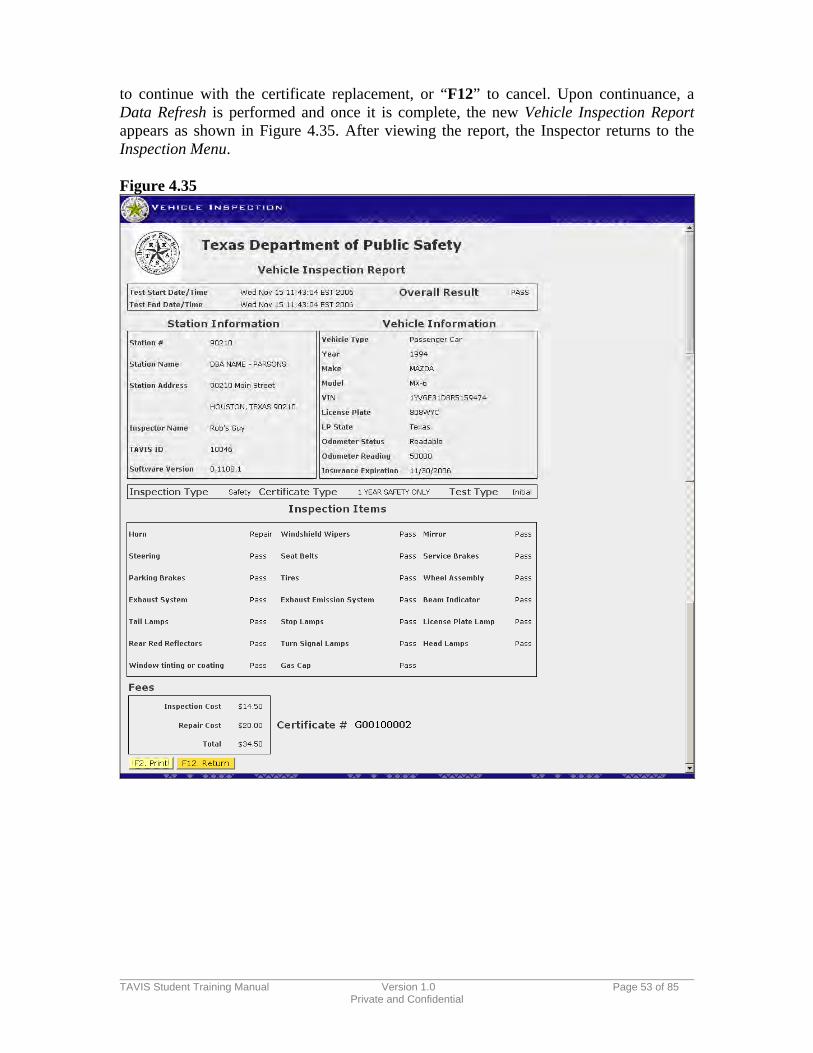
TAVIS Student Training Manual Version 1.0 Page 53 of 85
Private and Confidential
to continue with the certificate replacement, or “F12” to cancel. Upon continuance, a Data Refresh is performed and once it is complete, the new Vehicle Inspection Report appears as shown in Figure 4.35. After viewing the report, the Inspector returns to the Inspection Menu. Figure 4.35

TAVIS Student Training Manual Version 1.0 Page 54 of 85
Private and Confidential
Module 5 – Manage Certificate Status
This module describes how the Inspectors can record ‘missing’ and ‘void’ certificates using the TAVIS Unit Software.
Upon completion of the Manage Certificate Status module a student will: Be able to select the Manage Certificate Status option from the Inspection Menu
and change the status of a certificate. Have the ability to scan certificates or manually enter them to indicate the status
change for the certificates and submit the transaction.

TAVIS Student Training Manual Version 1.0 Page 55 of 85
Private and Confidential
Manage Certificate Status When the Inspector selects “6. Manage Certificate Status” from the Inspection Menu, the TAVIS Unit Software displays the Manage Certificate Status data entry screen. The Inspector then scans or manually enters books or individual certificates, selects the appropriate new statuses, which can be: ‘Missing’, ‘Void’ or ‘Active (at Station)’ and submits the transaction. Note that, books can ONLY be set to Missing or Active. Voids status’ can only be set for one certificate at a time. Should the Inspector enter an invalid book or certificate number, the TAVIS Unit Software will display an error message. The Inspector should verify the book or certificate number and re-enter. Figure 5.1
The TAVIS Unit Software then updates the certificates’ records in the TAVIS Unit and displays the Transaction Information screen (Figure 5.2).

TAVIS Student Training Manual Version 1.0 Page 56 of 85
Private and Confidential
Transaction Information Screen When the Inspector enters a certificate number, the TAVIS Unit Software displays the Transaction Information screen, informing the Inspector that the status change will be sent to the host and that the certificate status changes are subject to validation at a later date by a DPS Field Technician. Figure 5.2

TAVIS Student Training Manual Version 1.0 Page 57 of 85
Private and Confidential
Module 6 – Display TAVIS Messages
This module describes the two major types of messages handled by the TAVIS Unit. The first type is broadcast messages that come from the host. The second type is messages that the TAVIS Unit displays based on conditions that require a specific message.
Upon completion of the Display TAVIS Message Module 6 the student will: Have the ability to view messages. Be able to choose to view or not view the stored messages.

TAVIS Student Training Manual Version 1.0 Page 58 of 85
Private and Confidential
Display TAVIS Messages When the Station Representative chooses option “3. View Stored Messages” from the Main Menu, the list of stored messages is displayed as shown below. The Station Representative will use the “Tab” key to highlight the message he/she wishes to view and select the “Enter” key to view the message details. Figure 6.1
In this case the Station Representative has selected the “Test 20” message and selected the “Enter” key. Message ID 187 will be displayed as shown in Figure 6.2.

TAVIS Student Training Manual Version 1.0 Page 59 of 85
Private and Confidential
Message Details The TAVIS Unit Software displays the requested message. When the Station Representative has reviewed the message, he/she can select “F2” to return to the list of messages or “F12” to return to the Main Menu. Figure 6.2

TAVIS Student Training Manual Version 1.0 Page 60 of 85
Private and Confidential
Module 7 – Access Certificate Sales Application at Station
The TAVIS Unit allows Vehicle Inspection Stations to purchase certificates in a fully automated fashion. A Station authorized Buyer can order certificates online and can choose ‘delivery’ or ‘pickup’ as the fulfillment method. If ‘delivery’ is chosen, certificates will be shipped to the Station. If ‘pickup’ is chosen, any Station Representative can pick them up from any DPS location as long as they can show a valid ID, such as a Texas DL and proof of purchase (ex: the ‘trace number’ of the order). This module describes how a Buyer can access the Certificate Sales Application using the TAVIS Unit.
Upon completion of the Access Certificate Sales Application At The Station module a student will: Be able to access the Certificate Sales Application and login using a valid ID and
PIN. Have the ability to view the Station sales history, place a certificate order and
process payment.

TAVIS Student Training Manual Version 1.0 Page 61 of 85
Private and Confidential
Access Certificate Sales Application at Station As the Station’s certificate inventory depletes, the Buyer can logon to the TAVIS Unit to order/replenish the Station’s certificate inventory. To order certificates, the Buyer must have a valid ID and PIN. Usually the Buyer’s TX ID/DL number is his/her ID. In the event the Buyer does not have any TX ID/DL, DPS will provide the Buyer with a unique 8 digit ID number. Once the Buyer chooses the “4. Certificate Purchase” option from the Main Menu, the TAVIS Unit Software will make a connection to the Certificate Sales Application. The TAVIS Unit Software will then display the Station User Login screen (Figure 7.2). Figure 7.1

TAVIS Student Training Manual Version 1.0 Page 62 of 85
Private and Confidential
Certificate Purchase – Station User Login The Certificate Purchase – Station User Login screen allows the Buyer to enter his/her “Buyer ID” and “PIN” and access the Certificate Sales Application. After the Buyer enters the Buyer ID, he/she can use the “TAB” key, or the mouse, to move to the PIN entry data field. Following the PIN data entry, the Buyer can use the “TAB” key again to highlight the “Log In” button and then select the “Enter” key to log in. Or the Buyer may click on the “Log In” button with the mouse. Figure 7.2
Buyers logging in for the first time must use a ‘1’ plus the first four digits of their ID as their first PIN. Any time a Buyer is using a default password as set by DPS, they will be prompted to create a new PIN and also select and answer a security question. If the Buyer forgets their PIN, they can contact DPS to have it reset. DPS administrators will ask the Buyer their security question, such as their mother’s maiden name, and verify the answer. Failure to correctly answer the security question will likely require in-person verification at a DPS location and/or by a DPS Technician. Once logged in, the TAVIS Unit Software will display the Select Station screen (Figure 7.3).

TAVIS Student Training Manual Version 1.0 Page 63 of 85
Private and Confidential
Certificate Purchase – Select Station Once the Buyer has logged into the system, they need to choose a Station before proceeding to other functions. The system will present the Buyer with a list of Stations to which the Buyer has an active relationship, as shown in Figure 7.3. In the Select Station screen the Buyer selects the Station for which a purchase is going to be made and uses the “TAB” key to highlight the “Select Station” button. Figure 7.3
The Buyer can change the Station selection at any time using the “Select Station” menu option shown in the top left corner of the screen in Figure 7.4. When the user has completed the Station ID entry and selects the “Enter” key with the “Select Station” button highlighted, the TAVIS Unit software will display the Station Order History screen (Figure 7.4).

TAVIS Student Training Manual Version 1.0 Page 64 of 85
Private and Confidential
Certificate Purchase – Order Form
Once the Buyer is logged in and they have selected a Station, they are prompted to place a new order, as shown in Figure 7.4. The user would choose which Certificate Type they wish to purchase by entering the book quantity in the appropriate data field. The user would use the “TAB” key to move from data field to data field. Figure 7.4
When the user has entered the quantity of books required, he/she would use the “TAB” key to highlight “Calculate” to proceed with the current order or “Clear” to re-enter the quantity or certificate type. When the user presses the “Enter” key, the TAVIS Unit software will display the Order Confirmation screen. Figure 7.5.

TAVIS Student Training Manual Version 1.0 Page 65 of 85
Private and Confidential
Certificate Purchase – Order Confirmation The Order Confirmation screen displays the Buyer Name, Station ID, Station Name, Shipping Address, Physical Address, Book Orders, and Certificate Type ordered, Certificate Type Price, Book Quantity and the Extended Price. The user will use the drop down menu to select certificate Delivery or Pickup and then use the "TAB" key to highlight the “Proceed To Payment” button to proceed or the “Change Order” button to edit the order.
Figure 7.5
When the user has selected delivery or pickup and presses the “Enter” key with the “Proceed to Payment” button highlighted, the TAVIS Unit software will display the Payment Form screen. Figure 7.6.

TAVIS Student Training Manual Version 1.0 Page 66 of 85
Private and Confidential
Certificate Purchase – Payment Form The Payment Form screen displays the Total Order Price and requests the ACH Account Type, ABA Routing Number and Account Number to be entered into the appropriate fields. The user would use the drop down menu to select the ACH Account Type; Checking/Savings and enter the ABA Routing and Account numbers. The user would then use the "TAB" key highlight the “Submit” button to proceed with the order or “Cancel” to cancel the order. Figure 7.6
The Payment Form screen also displays where to find the ABA Routing Number and Account Number on a typical check. This information is not used to setup an “automatic/recurring draft” from this account. Future orders will require this banking information to be resubmitted. The ABA Routing Number is typically the first 9 digits in the lower left corner of the check. The Account Number is typically the next 9 to 16 digits on the check. The last 4-6 digits on the bottom right corner of the check is typically the check number, which is also located in the upper right corner of the check. When the user completes the data entry and presses the “Enter” key, with the “Submit” button highlighted, the TAVIS Unit software will display the Order Receipt screen. Figure 7.7.
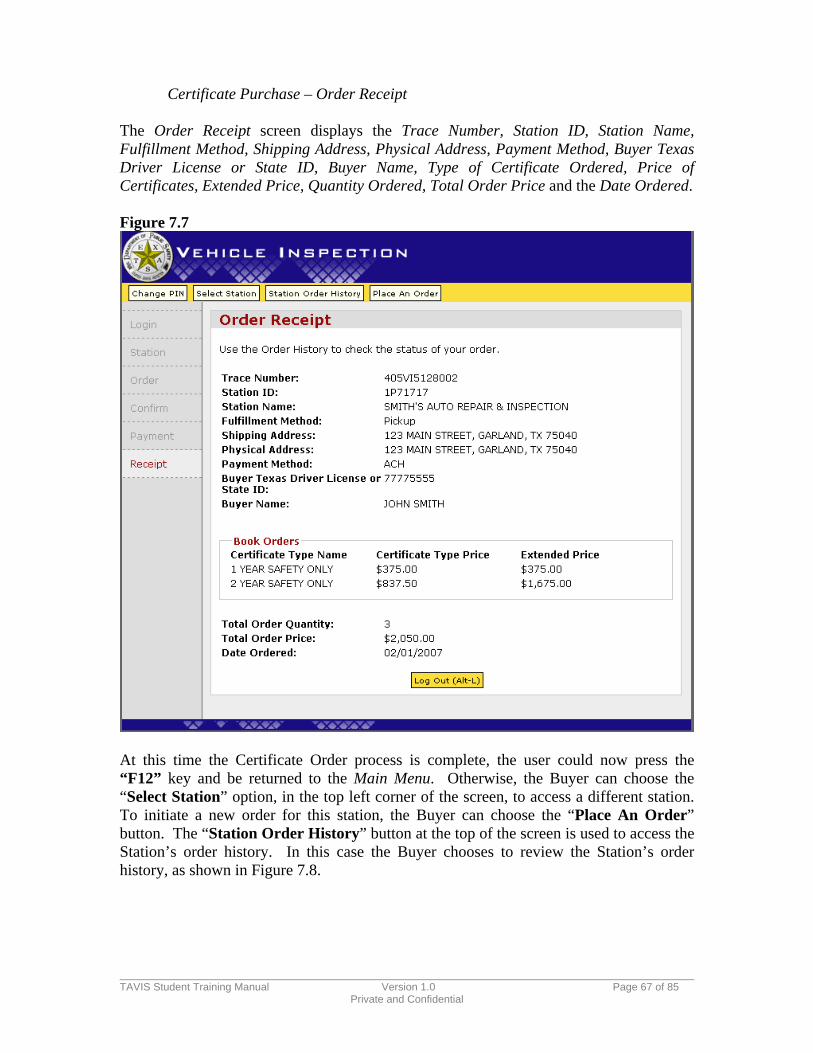
TAVIS Student Training Manual Version 1.0 Page 67 of 85
Private and Confidential
Certificate Purchase – Order Receipt The Order Receipt screen displays the Trace Number, Station ID, Station Name, Fulfillment Method, Shipping Address, Physical Address, Payment Method, Buyer Texas Driver License or State ID, Buyer Name, Type of Certificate Ordered, Price of Certificates, Extended Price, Quantity Ordered, Total Order Price and the Date Ordered. Figure 7.7
At this time the Certificate Order process is complete, the user could now press the “F12” key and be returned to the Main Menu. Otherwise, the Buyer can choose the “Select Station” option, in the top left corner of the screen, to access a different station. To initiate a new order for this station, the Buyer can choose the “Place An Order” button. The “Station Order History” button at the top of the screen is used to access the Station’s order history. In this case the Buyer chooses to review the Station’s order history, as shown in Figure 7.8.

TAVIS Student Training Manual Version 1.0 Page 68 of 85
Private and Confidential
Certificate Purchase – Station Order History
The Station Order History screen displays the Trace Number, Order Status, and Order Status Date. The orders are listed in descending order, with the most recent orders displayed first. Buyers can review the trace numbers, status, and dates for each order. Each order’s “trace number” is a hyperlink to the details for the order. The user would use the “TAB” key to move between fields. Figure 7.8
If the Buyer uses the “TAB” key to select a hyperlinked trace number for one of the orders, then presses the “Enter” key, then the Order Details screen in Figure 7.9 is displayed.

TAVIS Student Training Manual Version 1.0 Page 69 of 85
Private and Confidential
Certificate Purchase – Order Details
The Order Details page essentially provides the Buyer with all the information captured in the receipt page shown when an order is submitted. In addition, the current Order Status is displayed. For orders that have a status of “Placed”, the fulfillment method can be modified by using the “TAB” key to select a new fulfillment method and using the “TAB” key to select the “Change Fulfillment Method” button, the pressing the “Enter” key. Orders in this status can also be cancelled by providing a status change reason and selecting the “Cancel Order” button. Figure 7.9
To exit the Certificate Sales application the user would select “ALT+R” to be returned to the TAVIS Main Menu.

TAVIS Student Training Manual Version 1.0 Page 70 of 85
Private and Confidential
Module 8 – Receive Inventory At The Station
This module describes the process by which the inventory is received at the station. The certificate books are scanned when they are received. The TAVIS Unit sends the information to the host, and updates the Inventory Management Application.
Upon completion of the Receive Inventory At The Station module the student will: Be able to receive certificate books arriving at the Station. Have the ability to scan or manually enter each certificate book into the TAVIS
unit.

TAVIS Student Training Manual Version 1.0 Page 71 of 85
Private and Confidential
Receive Inventory at Station Following the Buyer’s purchase and receipt of certificates, a Station Representative will be required to receive the inventory at the station. Figure 8.1
Upon the inventory arrival at the Station, the Station representative would choose the “5. Receive Inventory” function from the Main Menu. The TAVIS Unit Software will then display the Receive Inventory screen (Figure 8.2).

TAVIS Student Training Manual Version 1.0 Page 72 of 85
Private and Confidential
Receive Inventory The Receive Inventory screen will display as shown below. The Station Representative will then scan or manually enter each certificate book into the appropriate Book Number field. Figure 8.2
After the Station Representative enters all the received certificate books, he/she will select the “F2 - Submit” button to proceed or the “F12 - Cancel” button to cancel the function. If submitted, the TAVIS Unit Software will display the Receive Inventory Confirmation screen (Figure 8.3).

TAVIS Student Training Manual Version 1.0 Page 73 of 85
Private and Confidential
Receive Inventory Confirmation The TAVIS Unit Software will display the following message after then inventory has been successfully received at the station. Figure 8.3
To complete the process the user will select the “F2 - Continue” button and he/she will be returned to the Main Menu.

TAVIS Student Training Manual Version 1.0 Page 74 of 85
Private and Confidential
Module 9 – Train On TAVIS
This module describes the TAVIS Unit’s training mode functions. The TAVIS Unit will provide a training mode that will allow inspectors to go through all the screens for each inspection type available on the TAVIS Unit without actually conducting any inspections.
Upon completion of the Train On TAVIS module a student will: Have a good working knowledge of how to enter the TAVIS Unit training mode. Be able to select the inspection type from training mode menu and navigate
through the screens in training mode. Be able to practice conducting an inspection to aid in the training process.

TAVIS Student Training Manual Version 1.0 Page 75 of 85
Private and Confidential
Training Mode
Upon arrival at a Station, the Inspector can choose the “6. Training Mode” function from the Main Menu to learn more about the TAVIS Unit. Figure 9.1
Once the training mode is selected, the TAVIS Unit Software will display the Login screen, with Training Mode clearly marked on the screen as shown in Figure 9.2.

TAVIS Student Training Manual Version 1.0 Page 76 of 85
Private and Confidential
Figure 9.2
The training mode then goes on to function just like the regular menu options on the TAVIS Unit. An initial login will lead to the training certification screen, changing the PIN, and establishing the secret question and answer. Once the Inspector is logged into the training mode, all menu options from the Inspection Menu are available to use in a training fashion. In the training mode, none of the data will be sent to the host and inspections will go un-recorded. Please remember to logout of the training mode before conducting an inspection. Once the Inspector logs out, a message will appear to confirm the logout (as shown in Figure 9.3) and the Inspector will be returned to the Main Menu.

TAVIS Student Training Manual Version 1.0 Page 77 of 85
Private and Confidential
Figure 9.3

TAVIS Student Training Manual Version 1.0 Page 78 of 85
Private and Confidential
Module 10 – Reports
This module describes how to run reports on the TAVIS Unit.
Upon completion of the Reports module the student will: Know how to access reports. Have the ability to choose different search criteria and run reports.

TAVIS Student Training Manual Version 1.0 Page 79 of 85
Private and Confidential
Reports From time to time the Inspector or Station Representative may need to run reports on the activity at the Station. The Reports function is where this can be accomplished. To access the Reports function, the Inspector or Station Representative will select the “8. Reports” option from the Main Menu. Figure 10.1
Once the selection for reports is made, the list of available reports (as shown in Figure 10.2) is displayed.

TAVIS Student Training Manual Version 1.0 Page 80 of 85
Private and Confidential
Figure 10.2
Available reports (for the Station Representatives) include the ‘Vehicle Inspection Report’ and the ‘Vehicle Inspection Station Report’. Once the user selects a report to run, the parameter entry screen for that report appears. If the user selects “1. Vehicle Inspection Report” from above, the following Figure 10.3 would appear.

TAVIS Student Training Manual Version 1.0 Page 81 of 85
Private and Confidential
Figure 10.3
The user enters the search criteria and selects “F2” to continue and run the report, or “F12” to return to the Main Menu. Each report has its own parameter entry page.

TAVIS Student Training Manual Version 1.0 Page 82 of 85
Private and Confidential
Module 11 – Shutdown TAVIS Unit
The TAVIS Unit can be shutdown for multiple reasons. The two most common reasons are when the Unit will not be used for an extended period of time, or when the system needs a refresh. During the shutdown, the Unit will be unavailable for inspections. Module 11 describes the shutdown process.
Upon completion of the Shutdown TAVIS Unit module a student will be able to:
Shutdown the TAVIS unit properly.

TAVIS Student Training Manual Version 1.0 Page 83 of 85
Private and Confidential
Shutdown TAVIS Unit From time to time the Inspector or Station Representative may need to shutdown the Unit. The Shutdown function is where this can be accomplished. To access the Shutdown TAVIS Unit function, the Inspector or Station Representative will select the “0. Shutdown TAVIS Unit” option from the Main Menu. Note: Always perform this shutdown process to turn the TAVIS Unit off instead of cutting the power to the Unit by any other methods. Figure 11.1
Once the Inspector selects the Shutdown option, the Shutdown screen will appear as seen in Figure 11.2.

TAVIS Student Training Manual Version 1.0 Page 84 of 85
Private and Confidential
Shutdown The Shutdown screen displays a confirmation message stating that you are about to shutdown the TAVIS Unit. Select “F2” to continue with the shutdown process, or “F12” to cancel the shutdown and return to the Main Menu. Figure 11.2
Upon continuing, the Shutdown In Progress screen will appear as shown in Figure 11.3.
TAVIS Student Training Manual Version 1.0 Page 85 of 85
Private and Confidential
Shutdown In Progress The Shutdown in Progress screen will appear until the TAVIS Unit completely shuts down and turns off. Figure 11.3