runtime - appx
TRANSCRIPT

Prospect Management System Runtime
Demo Guide
Revised 6 July, 2001
The Prospect Management System Runtime Demo
www.tryappx.com 1-800-TRY-APPX ii
Objective of the Demo Guide This demo guide is intended to assist users who are unfamiliar with the APPX runtime environment and the Prospect Management System demo application with running the Prospect Management System demo application. The Prospect Management System has been written entirely in APPX and demonstrates many of APPX’s powerful features. Assumed Knowledge A working knowledge of a Windows environment, the ability to launch applications from Explorer and to manipulate the desktop and its menus is assumed. Please direct all comments and questions relating to this demo to: [email protected] This demo guide may be reproduced in electronic or printed form provided the document is reproduced in its entirety without change. Copyright 2001 APPX Software, Inc. APPX Software, Inc. 11363 San Jose Blvd., Suite 301 Jacksonville, FL 32223 Phone: 1-904-880-5560 FAX: 1-904-880-6635

The Prospect Management System Runtime Demo
www.tryappx.com 1-800-TRY-APPX iii
Table of Contents: Introduction................................................................................................................................................................... 1 Getting Started .............................................................................................................................................................. 2 Navigating the System................................................................................................................................................... 4 The Demo Company ..................................................................................................................................................... 8 The Prospect Management System Application............................................................................................................ 9 Application Menus ...................................................................................................................................................... 10 Default Application Settings ....................................................................................................................................... 11 Adding a Sales Representative .................................................................................................................................... 15 Viewing Prospect Details ............................................................................................................................................ 18 Adding a New Prospect............................................................................................................................................... 26 Follow-up .................................................................................................................................................................... 32 Marketing Activity Report .......................................................................................................................................... 34 Sales Forecast Report - The Test ................................................................................................................................ 42 Conclusion: ................................................................................................................................................................. 42
The Prospect Management System Runtime Demo
www.tryappx.com 1-800-TRY-APPX iv
Table of Figures: Figure 1 – The APPX Utility Menu............................................................................................................................... 1 Figure 2 – The APPX Client Login Dialog Box............................................................................................................ 2 Figure 3 – The APPX Demo Server .............................................................................................................................. 3 Figure 4 – The Print Setup Dialog Box ........................................................................................................................ 4 Figure 5 – The Print Setup Dialog Box ........................................................................................................................ 5 Figure 6 – The APPX Toolbar ...................................................................................................................................... 6 Figure 7 – Dazzle’s Prospect Management System ...................................................................................................... 8 Figure 8 – Prospect Management System Menu......................................................................................................... 10 Figure 9 – Revenue Types........................................................................................................................................... 11 Figure 10 – Scrolling Countries List .......................................................................................................................... 12 Figure 11 – Country Address Format Rules ............................................................................................................... 13 Figure 12 – Options Presented on Mouse Right-Click ............................................................................................... 14 Figure 13 – The Sales Representatives screen............................................................................................................ 15 Figure 14 – The ‘Right-Click’ Pull-Down Menu ........................................................................................................ 16 Figure 15 – Adding a Sales Rep Record ..................................................................................................................... 17 Figure 16 – Prospects File Maintenance.................................................................................................................... 18 Figure 17 – Scan List.................................................................................................................................................. 19 Figure 18 – Prospects File Maintenance Record ....................................................................................................... 20 Figure 19 – Fixed Field Address ................................................................................................................................ 21 Figure 20 – Scrolling Contact Details ........................................................................................................................ 22 Figure 21 – Marketing Activities ................................................................................................................................ 23 Figure 22 – Sales Opportunities Screen ..................................................................................................................... 24 Figure 23 – Sales Opportunity Detail Screen ............................................................................................................. 25 Figure 24 – Adding a Prospect Record ...................................................................................................................... 26 Figure 25 – Valid List of Industries ............................................................................................................................ 27 Figure 26 – Scanning the Sales Rep File.................................................................................................................... 27 Figure 27 – Selecting the Activity Type ...................................................................................................................... 28 Figure 28 – Sales Opportunity Detail......................................................................................................................... 30 Figure 29 -- Calendar................................................................................................................................................. 31 Figure 30 – Follow-up ................................................................................................................................................ 32 Figure 31 – Record Selection (Marketing Activity Report) ........................................................................................ 34 Figure 32 – Relation Values ....................................................................................................................................... 35 Figure 33 – Using the Copy Option............................................................................................................................ 36 Figure 34 – Sort Order (Marketing Activity Report) .................................................................................................. 37 Figure 35 – Re-displayed Sort Order Screen.............................................................................................................. 38 Figure 36 – Disposition Screen .................................................................................................................................. 39 Figure 37 – Show Report Progress............................................................................................................................. 40 Figure 38 – Report On-Screen Display ...................................................................................................................... 41
The Prospect Management System Runtime Demo
www.tryappx.com 1-800-TRY-APPX 1
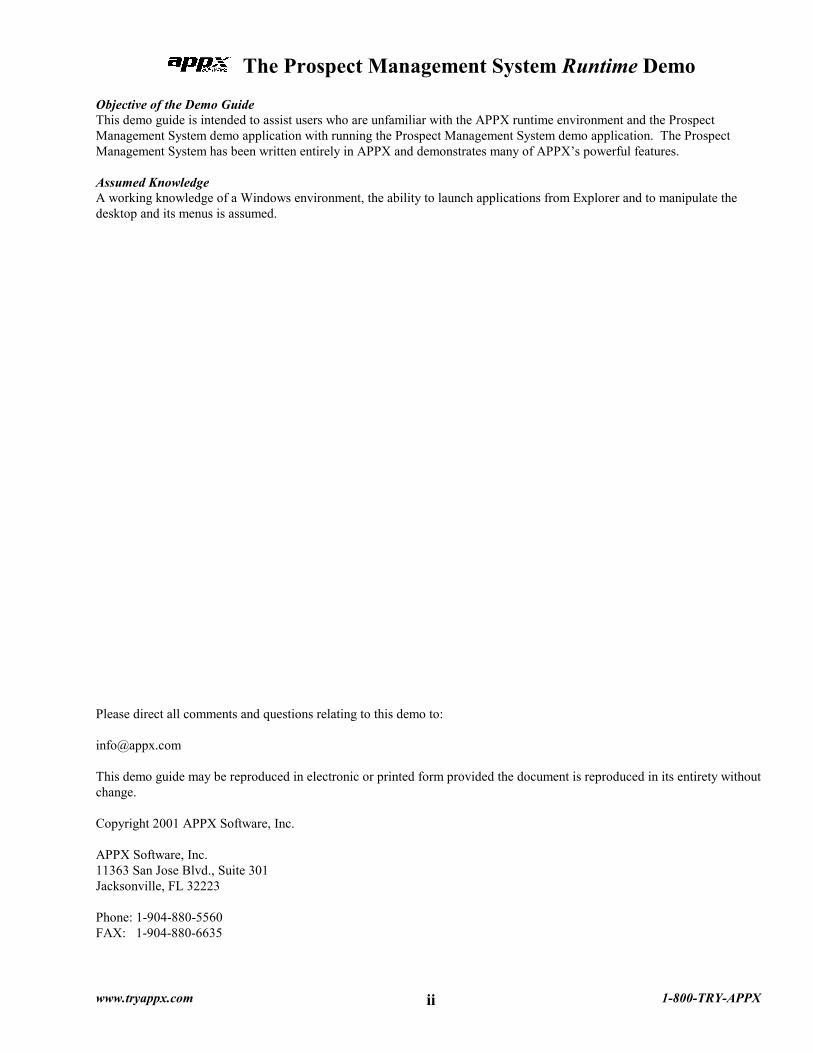
Introduction APPX is a powerful development tool and runtime environment. The APPX development environment can be used to develop full-featured, business applications quickly and easily. Whether your application is complex or simple, APPX can meet your business needs. APPX applications are readily maintainable and extensible with a minimum of effort. Start off small and expand your simple application into a suite of applications, or begin with a suite of ready-to-run business application templates that can be enhanced and made even more sophisticated to match the fluidity of your business rules. Either way, APPX can provide you with the perfect business solutions. The APPX runtime environment provides all APPX applications with a consistent look and feel. All APPX applications also inherit significant functionality from the runtime environment. With each new release of APPX, existing applications gain increased functionality, usually without requiring any programming changes. As you run the demo, you will encounter many features that are common to all APPX applications.
Figure 1 – The APPX Utility Menu
The Prospect Management System Runtime Demo
www.tryappx.com 1-800-TRY-APPX 2
Getting Started To run the Prospect Management System Runtime Demo, you will need to use the APPX Web Client or the APPX Desktop Client to connect to the APPX Demo Server where APPX and the demo software have been installed. The APPX Demo Server is accessible via the Internet. The easiest way to run the demo is to use your Microsoft Internet Explorer web browser to access the Prospect Management System demo web page that can be found on the APPX web site at the following address:
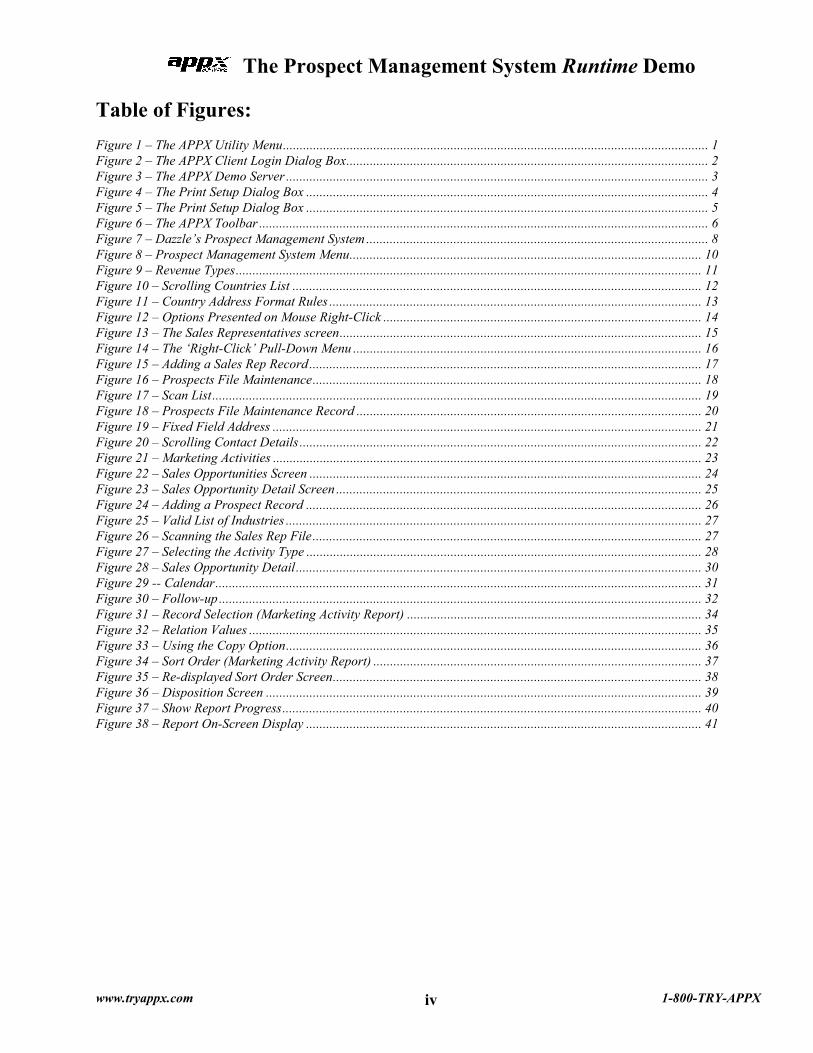
http://www.tryappx.com/demos/prospect_management_system.htm When you click on the "Run the Demo Using the APPX Web Client" link, another browser window will open and the APPX Web Client components will be installed into your browser. The first time you run the APPX Web Client, you will need to wait while the necessary APPX Web Client components are automatically installed. Depending on the speed of your Internet connection, the initial download and installation of the APPX Web Client components can take from 1 to 15 minutes. When the installation is complete, the APPX Web Client will display the APPX Demo Server screen (see Figure 3 on the next page). Please note that the next time you use the APPX Web Client, your browser will be able to launch the APPX Web Client much more quickly since the APPX Web Client components will have been previously installed. Another way to run the demo is to use the "standalone" APPX Desktop Client to login to the APPX Demo Server directly via the Internet. To use the APPX Desktop Client, you must first download and install the APPX Desktop Client to your desktop. The APPX Desktop Client can be downloaded from the Prospect Management System Demo web page identified above. To install the APPX Desktop Client, simply run the file you downloaded and follow the installation directions. After completing the installation of the APPX Desktop Client, ensure that you still have an Internet connection. Then, run the APPX Desktop Client using the program that was added to your Windows Start Programs menu by the installation process. After starting the APPX Desktop Client, enter the following "Remote" connection information when the APPX Client Login dialog box is presented (see Figure 2 below):
Figure 2 – The APPX Client Login Dialog Box
Login: prospect Password: prospect Server: vardemo.appx.com Server Port: 8064
The Prospect Management System Runtime Demo
www.tryappx.com 1-800-TRY-APPX 3
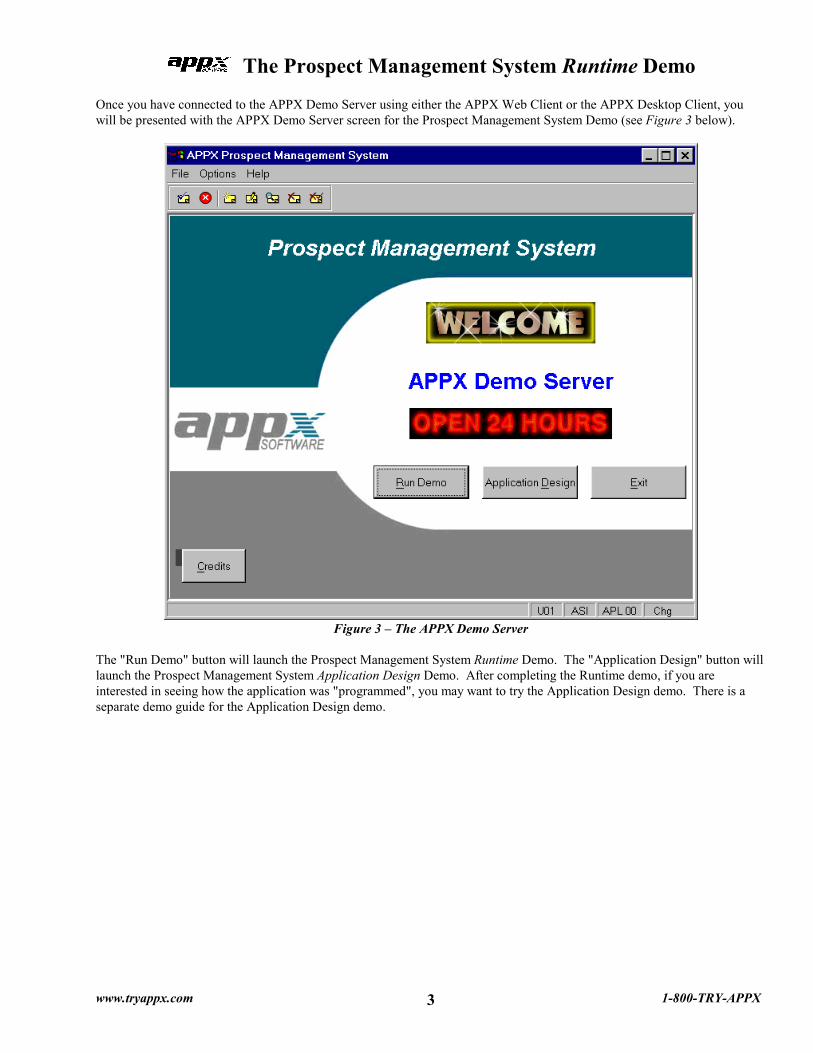
Once you have connected to the APPX Demo Server using either the APPX Web Client or the APPX Desktop Client, you will be presented with the APPX Demo Server screen for the Prospect Management System Demo (see Figure 3 below).
Figure 3 – The APPX Demo Server
The "Run Demo" button will launch the Prospect Management System Runtime Demo. The "Application Design" button will launch the Prospect Management System Application Design Demo. After completing the Runtime demo, if you are interested in seeing how the application was "programmed", you may want to try the Application Design demo. There is a separate demo guide for the Application Design demo.
The Prospect Management System Runtime Demo
www.tryappx.com 1-800-TRY-APPX 4
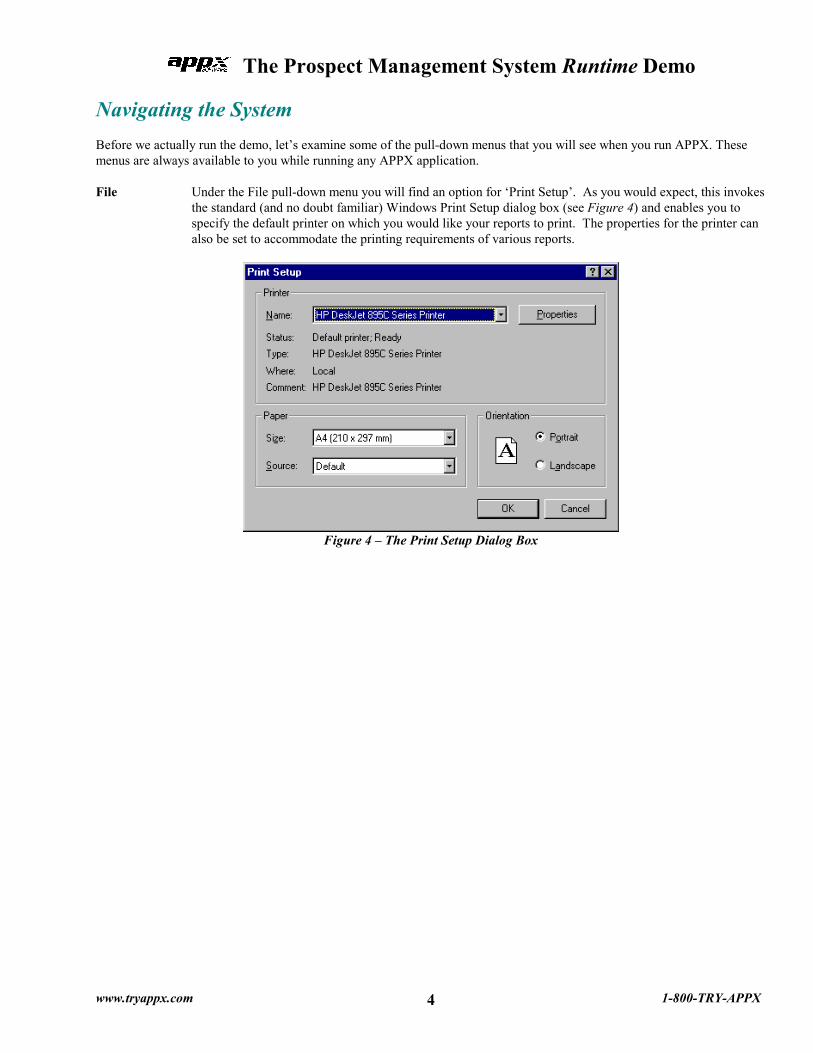
Navigating the System Before we actually run the demo, let’s examine some of the pull-down menus that you will see when you run APPX. These menus are always available to you while running any APPX application. File Under the File pull-down menu you will find an option for ‘Print Setup’. As you would expect, this invokes
the standard (and no doubt familiar) Windows Print Setup dialog box (see Figure 4) and enables you to specify the default printer on which you would like your reports to print. The properties for the printer can also be set to accommodate the printing requirements of various reports.
Figure 4 – The Print Setup Dialog Box

The Prospect Management System Runtime Demo
www.tryappx.com 1-800-TRY-APPX 5
Options On the Options pull-down menu you will find several useful options:
Figure 5 – The Print Setup Dialog Box
GUI Interface – This option allows you to control the appearance of your screens. This option is primarily for debugging use and should normally be enabled. You should not change this option unless you are instructed to do so by your system administrator. Show Option Numbers – APPX applications are mouse enabled but can also be run entirely from the keyboard. If you intend to use the keyboard instead of your mouse, but you do not know the APPX option numbers for the various application features, then you should enable the ‘Show Option Numbers’ option. Auto Tab-Out – If this option is enabled, then APPX will automatically tab to the next field when the current field has been filled with data from the keyboard. Auto Select – If this option is enabled, then APPX will automatically select the contents of a field when the field gets the focus. Always Dock Scroll Bar – If this option is enabled, then APPX will always display the scroll bar for scrolling regions of data entry screens. If this option is not enabled, then APPX will only display the scroll bar if the mouse pointer is moved near the right side of a scrolling region of an input process. You may want to enable this option while running the Prospect Management System Runtime Demo.

The Prospect Management System Runtime Demo
www.tryappx.com 1-800-TRY-APPX 6
Show Gridlines – If this option is enabled, then APPX will superimpose a grid over the contents of the current screen. This option is primarily intended for use by an application designer to facilitate the design and layout of screens.
The APPX Toolbar The buttons on the APPX toolbar at the top of the APPX screen (and shown in Figure 6) perform very specific pre-defined tasks and are standard throughout the entire system. If you have trouble remembering what any button does, simply move your cursor over the button and the appropriate tooltip will be displayed indicating the function of the button.
Figure 6 – The APPX Toolbar
These buttons perform the following tasks (which can also be achieved using the keys or combination of keys indicated in parentheses):
The ENTER button is used to save input and complete the current task. (ENTER)
The CANCEL button enables you to immediately cancel a task or process without saving. (CTRL + F8)
The ADD MODE button moves you into Add Mode so you can add new information. (F9)
The CHANGE MODE button moves you into Change Mode so you can change existing information. (F12)
The INQUIRE MODE button moves you into Inquire Mode so you can view, but not modify, existing information. (F11)
The DELETE MODE button moves you into Delete Mode so you can delete existing information. (F10) Once you enter DELETE MODE, you will be prompted to acknowledge that you wish to delete the selected record using the ACKNOWLEDGE DELETE key described below. The selected record will not be deleted until the action is confirmed.
The ACKNOWLEDGE DELETE key confirms that you wish to permanently delete a record. (CTRL + F10)
The function keys on your keyboard also perform pre-defined tasks as follows: F1 The HELP key enables you to get online help. Position the mouse/cursor on the field for which you require
assistance, then press F1and the help text will be displayed. Alternatively, you may select the ‘?’ in the top right corner of your APPX window and then click on the field in question in order to see the help text.
F2 The SCAN key allows you to look up information in a file from your current process. Fields on which
SCAN can be executed are generally identifiable by the binoculars button that appears to the right of the field.
The Prospect Management System Runtime Demo
www.tryappx.com 1-800-TRY-APPX 7
F3 The SELECT ACCESS PATH key allows you to select which predefined index should be used when retrieving records from a file.
F4 The PREVIOUS IMAGE key allows you to return to a previous step. Think of it as a ‘Back’ key. F5 The NEXT RECORD key allows you to move from your currently selected record to the next record when
in inquire, change or delete mode. F8/ESC The END key allows you to exit or end the current process. You can use either the F8 or the ESC key.
HELPFUL TIP:
If you find yourself "lost" within an APPX application or “stuck” on a screen during the course of this demonstration, try one of the following: ? or F1 Select HELP if you are unsure what to enter in a particular field.
Select ENTER to move forward.
ESC Select ESC to exit the current screen.
If all else fails, select CANCEL to immediately end your current task. Entries you made on the current screen will most likely be lost when CANCEL is used.
Most important of all, remember to check your screen for useful information. Error and Warning messages are displayed in the status bar at the bottom of your APPX screen and will often supply the answer to a problem you may be experiencing. This is where you will be advised of any invalid data that you have entered or any invalid options that you have selected. Note: The options described above are standard throughout all APPX applications and will produce the same results regardless of which APPX application you are running. Once you are familiar with these keyboard shortcuts and toolbar usage, you will be able to navigate your way around any APPX application.

The Prospect Management System Runtime Demo
www.tryappx.com 1-800-TRY-APPX 8
The Demo Company Click on the "Run Demo" button to run the Prospect Management System Runtime Demo. The main menu for the application will be displayed as shown below in Figure 7.
Figure 7 – Dazzle’s Prospect Management System
Dazzle Marketing Operations (DMO) is a fictitious company located in the Florida Keys. Dazzle specializes in distributing software worldwide. One of its primary tasks involves managing intensive marketing activities to businesses in need of productivity software. The key to their success is the Prospect Management System that they have designed based on the requirements of their marketing program. Though still under construction, the Prospect Management System enables Dazzle to track all sales and marketing activities to ensure that up-to-date information is readily available for all prospects.

The Prospect Management System Runtime Demo
www.tryappx.com 1-800-TRY-APPX 9
The Prospect Management System Application Dazzle’s application enables its staff to perform the following functions:
�� Enter and maintain Sales Representatives’ records �� Enter and maintain Prospect records with full details including names and addresses, web address, number of
employees, market sector, number of locations, etc. together with a history of sales and marketing activities relating to that prospect
�� Generate reports on all marketing activities for a particular prospect including details of correspondence sent and received
�� Generate sales forecast reports �� Track follow-up activities requiring action
During the course of this demonstration, you’ll be taken through each process to show how easy it is to use applications designed in APPX.

The Prospect Management System Runtime Demo
www.tryappx.com 1-800-TRY-APPX 10
Application Menus Menus designed with APPX provide a variety of simple methods for running processes within an application.
Figure 8 – Prospect Management System Menu
For example, if you wish to run the Sales Reps data entry process as shown in Figure 8 above, then you can do so by:
a) Clicking on the ‘Sales Reps’ button b) Selecting the ‘Setup’ pull-down menu and, from there, choosing the ‘Sales Reps’ option. c) Using the shortcut key (Alt + L), where the underlined letter on the option label indicates the shortcut key d) Right click on the menu surface to invoke a pop-up menu and, from there, choosing the 'Sales Reps' option
These methods of selection apply to all menu options within the Prospect Management System.
The Prospect Management System Runtime Demo
www.tryappx.com 1-800-TRY-APPX 11
Default Application Settings You’ve just arrived at Dazzle for your first day at work. Unfortunately for you (but fortunately for Dazzle), the phones are ringing off the hook, all sales consultants are busy and there is no time for any system training. You know it won’t be long until a call is put through to you so you prepare yourself by checking the Default Application Settings.
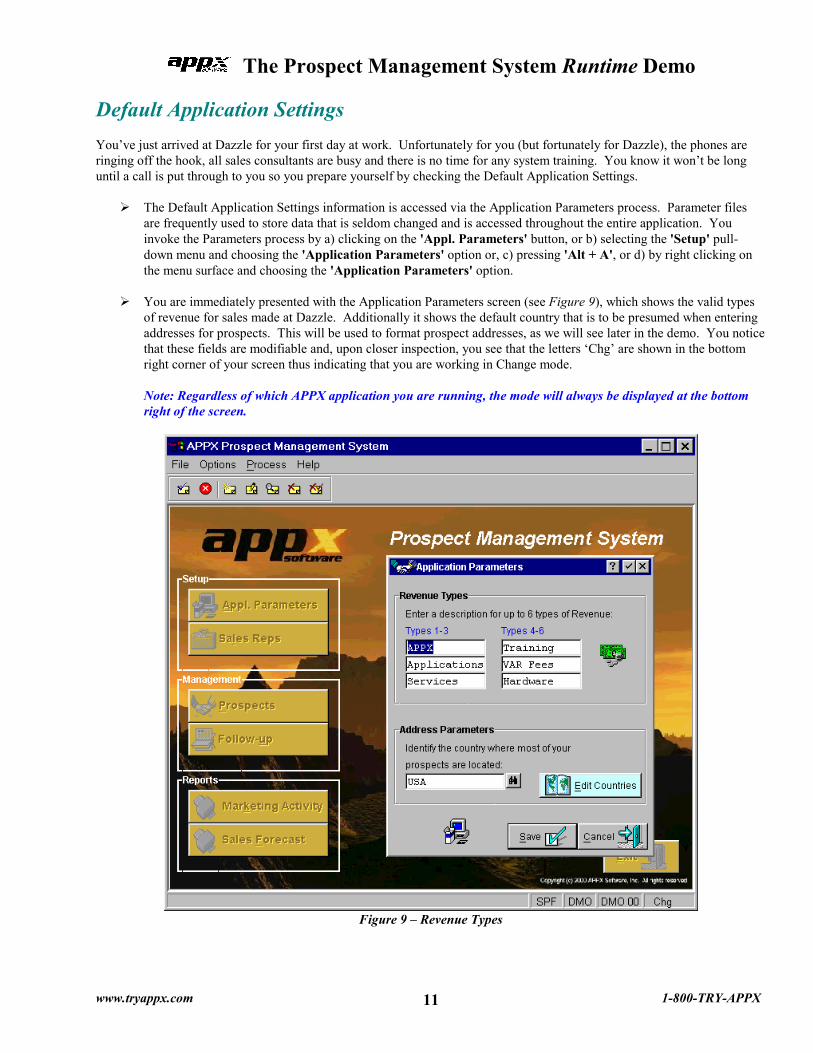
��The Default Application Settings information is accessed via the Application Parameters process. Parameter files are frequently used to store data that is seldom changed and is accessed throughout the entire application. You invoke the Parameters process by a) clicking on the 'Appl. Parameters' button, or b) selecting the 'Setup' pull-down menu and choosing the 'Application Parameters' option or, c) pressing 'Alt + A', or d) by right clicking on the menu surface and choosing the 'Application Parameters' option.
��You are immediately presented with the Application Parameters screen (see Figure 9), which shows the valid types
of revenue for sales made at Dazzle. Additionally it shows the default country that is to be presumed when entering addresses for prospects. This will be used to format prospect addresses, as we will see later in the demo. You notice that these fields are modifiable and, upon closer inspection, you see that the letters ‘Chg’ are shown in the bottom right corner of your screen thus indicating that you are working in Change mode.
Note: Regardless of which APPX application you are running, the mode will always be displayed at the bottom right of the screen.
Figure 9 – Revenue Types

The Prospect Management System Runtime Demo
www.tryappx.com 1-800-TRY-APPX 12
Too late, you realize that you have inadvertently overwritten one of the Revenue Types and you cannot remember the original value. What do you do? Panic?
��No, simply click on the Cancel button, or use the Tab key to move from the highlighted Save button to the Cancel button and press ENTER, or click the � in the top right hand corner of the Revenue Types screen. Any of these methods will ensure that you are exited from the process without saving your changes, and returned to the menu.
��In the unlikely event (given that it is your first day) that you wish to save the changes you have made, click the Save
button or the ���� key at the top right of the Revenue Types screen. Alternatively, simply pressing ENTER will save your changes since the Save button is highlighted indicating that it is the default button.
��Disaster averted, you click on the Parameters button on the main Prospect Management menu in order to continue
reviewing the Application Settings. The binoculars button to the right of the country field indicates that you can do a lookup/scan on the Country file so you decide to investigate further.
Note: The binoculars button is used throughout all APPX applications to indicate that you can search for information, whether it is a Country Code, Prospect Number, Sales Rep Name, or whatever. In APPX terminology, this is called a SCAN button. SCAN can also be invoked using the F2 key when the cursor is positioned on a "SCANable" field.
��You click on the binoculars button and a list of countries is displayed (Figure 10). You use the scroll bar to the right
of the list to move through the records (alternatively, you could use the Cursor Up and Cursor Down or Page Up and Page Down keys to move through the list).
Figure 10 – Scrolling Countries List
��You click on the Edit Countries button on the Parameters screen to run the process to maintain countries and their
address formatting rules.

The Prospect Management System Runtime Demo
www.tryappx.com 1-800-TRY-APPX 13
Figure 11 – Country Address Format Rules
��These rules are used within the Prospect Management System to convert address details from free-format text to
fixed field addresses and are necessary because address formats vary from country to country. Pressing the Help key (F1 or ?) on each field reveals what each field controls. The ‘Region Label’ field allows you to specify the appropriate label for a country’s designation after city (for example, State, Province or County). In the ‘City/Region on Sep Ln?’ field you can specify whether or not the ‘Region’ should appear on a separate line from the city name. In relation to a country’s postal code, you can specify the number of components, or ‘words’, in the postal code. A postal code of ‘85705-7445’, for example, qualifies as a single component since there are no embedded spaces while ‘R3J 1R2’ qualifies as two components since it has one embedded space. In addition you can use the ‘Postal Code Location’ field to indicate whether or not the postal code is normally entered on a separate address line. We will see how this addressing information is used to parse address details when we add a prospect record later in this demo. Note that if you enter an address for a country whose address formatting rules have not been specified here, then the formatting rules for the default country (as specified in the Application Parameters) will be used instead. Also, if you do not specify a country as the last line of the address, the formatting rules for the default country will apply.
��While still on the Country Address Format Rules screen, you right click with your mouse and a pop-up menu is
presented to you (Figure 12). This menu has two options – one that allows you to produce a listing of countries and their address formatting rules and another that allows you to view the audit information for the currently selected record in the Countries file. You make a mental note to explore these useful options later.

The Prospect Management System Runtime Demo
www.tryappx.com 1-800-TRY-APPX 14
Figure 12 – Options Presented on Mouse Right-Click
��You select the Close button to return to the Application Parameters screen.
��On the Application Parameters screen, you can use any one of a variety of keys to return you to the Prospect
Management main menu. You can use ESC, click on the Cancel button, press Alt + c, click on the� in the top right corner of the Revenue Types screen, or press F8.
As you return to the main menu you see that there is a setup option for Sales Representatives, so you decide to check and see whether or not a record has already been added for you.

The Prospect Management System Runtime Demo
www.tryappx.com 1-800-TRY-APPX 15
Adding a Sales Representative From the Main Menu, click on the Sales Reps button and the Sales Representatives screen is displayed (see Figure 13 below).
Figure 13 – The Sales Representatives screen
Your first step is to check the 'mode' in which you are running to ensure there is no possibility of repeating your earlier mistake of typing over existing data. The bottom right corner of your screen is showing ‘Inq’ which indicates that you are running in Inquire mode, so the fields on your screen are not modifiable.
While checking your screen, you notice that two new buttons have appeared on your toolbar: . The person who designed the Prospect Management System added these two buttons.
Selecting this button enables you to view the audit information for a record (the date on which the record was added, and the user ID of the person who added the record).
Selecting this button enables you to produce a report listing all Sales Representatives.

The Prospect Management System Runtime Demo
www.tryappx.com 1-800-TRY-APPX 16
Since you are checking available options from the Sales Representative screen, you decide to right click with your mouse to see what happens. You discover that the right click brings up a pull-down menu (Figure 14) just as it did when you right clicked on the Country Address Format Rules screen. This pull-down menu offers options for producing a listing of Sales Representatives and viewing the audit information for a selected record. Again, you make a mental note to these options at a later time.
Figure 14 – The ‘Right-Click’ Pull-Down Menu
As you check through the list of Sales Reps that are displayed, you realize that you have not yet been set up as a Sales Rep so you need to add a record.
��In order to add a record you must be running in 'Add' mode, so you select on the toolbar (or press F9) to move into 'Add' mode. Note that the bottom right corner of your screen now displays ‘Add’ as confirmation that you are running in Add mode.
��Once in 'Add' mode, you are presented with a blank screen ready to accept your data into the First Name field
(shown in Figure 15).
The Prospect Management System Runtime Demo
www.tryappx.com 1-800-TRY-APPX 17
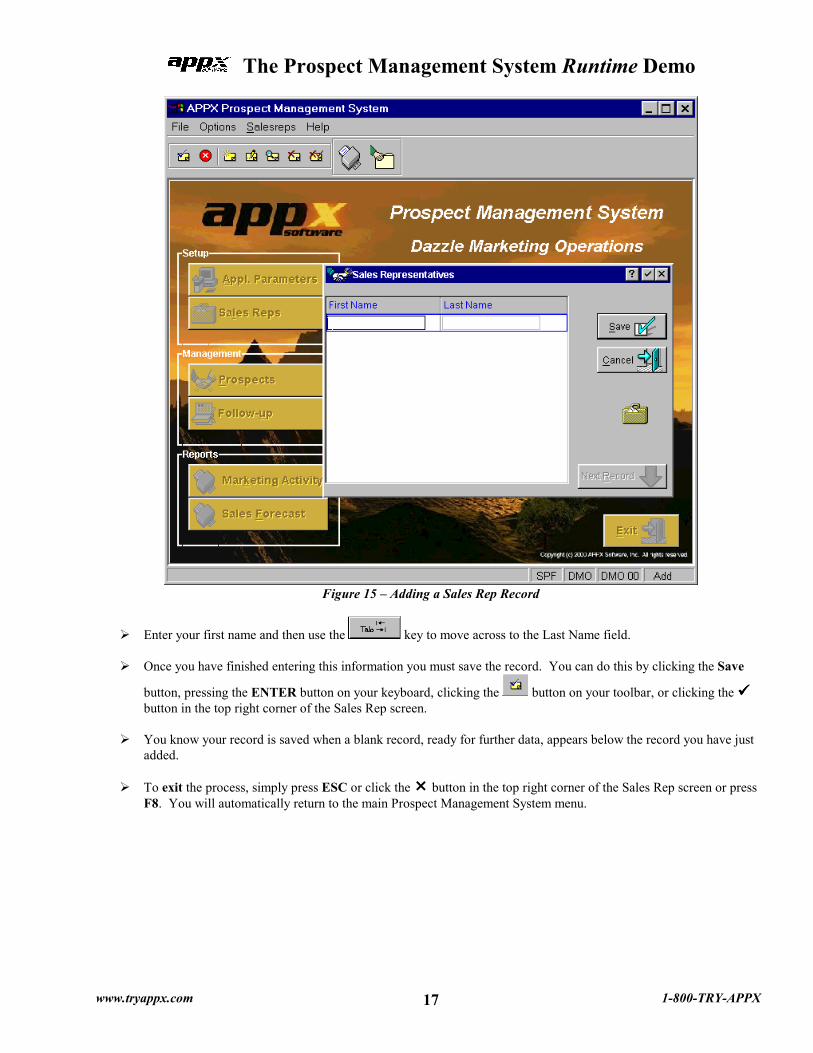
Figure 15 – Adding a Sales Rep Record
��Enter your first name and then use the key to move across to the Last Name field.
��Once you have finished entering this information you must save the record. You can do this by clicking the Save
button, pressing the ENTER button on your keyboard, clicking the button on your toolbar, or clicking the ���� button in the top right corner of the Sales Rep screen.
��You know your record is saved when a blank record, ready for further data, appears below the record you have just
added.
��To exit the process, simply press ESC or click the � button in the top right corner of the Sales Rep screen or press F8. You will automatically return to the main Prospect Management System menu.

The Prospect Management System Runtime Demo
www.tryappx.com 1-800-TRY-APPX 18
Viewing Prospect Details You decide to take this opportunity to familiarize yourself with the Prospects screen by reviewing some existing prospects. So, you invoke the 'Prospects' option from the Main Menu by clicking on the 'Prospects' button. Obviously you could have chosen to invoke this process by using the shortcut key, by using the pull-down menus, or by accessing the right click pop-up menu, but why not take the easiest method and simply click on the button? Having invoked the 'Prospects' option, you are presented with the Prospects file maintenance screen (as shown in Figure 16).
Figure 16 – Prospects File Maintenance
Following your earlier experience, your first instinct is to check the mode in which you are running. The bottom right corner of your screen is displaying ‘Chg/Key’ indicating that you are in Change mode and that the system is awaiting the entry of a key value which will identify a specific prospect record to retrieve.
Since you are only interested in viewing the existing data, you press F11 (or click the button on the toolbar) to move into Inquire mode. You note that the bottom right corner of the screen is now displaying 'Inq/Key'. The screen is prompting you for a Company Name but, being new to the company, you do not know any company names yet. One way of selecting a record is to click on the ‘First Record’ button so that the first record in the file is displayed. However, you recall from the earlier discussion of APPX functions that the binoculars button indicates that you can do a scan/lookup on this field, so you click on the binoculars. The resulting screen shows a list of prospect names (Figure 17).
The Prospect Management System Runtime Demo
www.tryappx.com 1-800-TRY-APPX 19
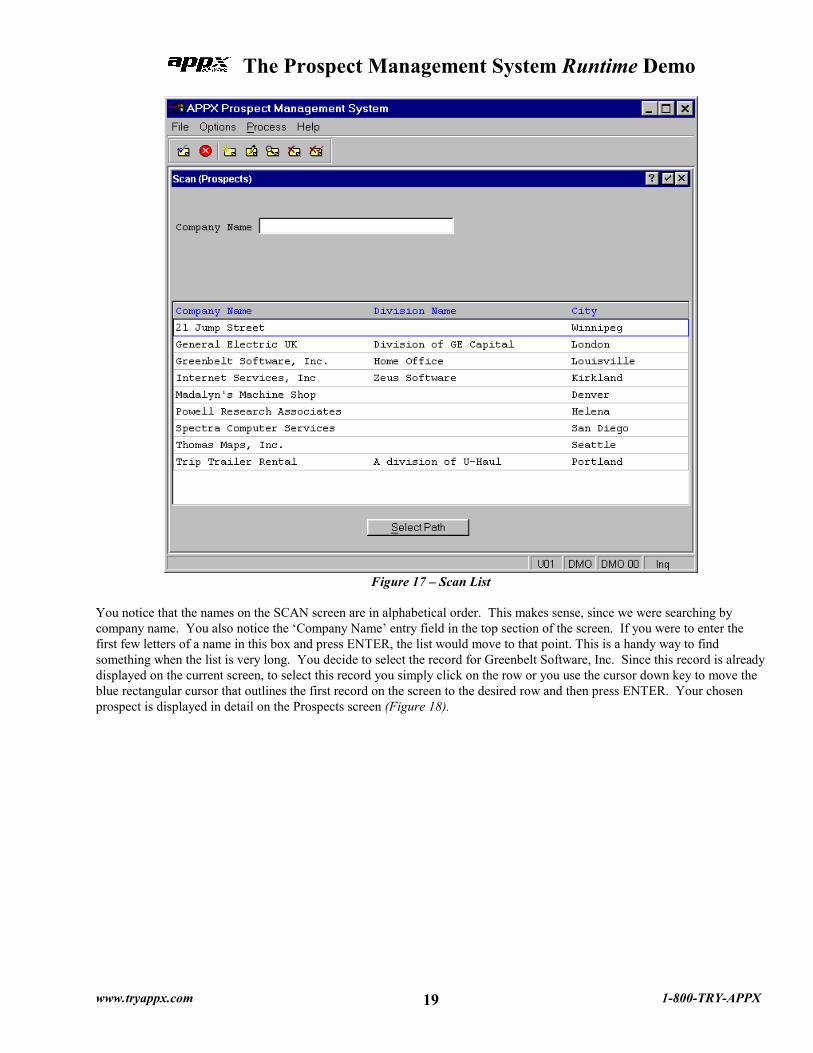
Figure 17 – Scan List
You notice that the names on the SCAN screen are in alphabetical order. This makes sense, since we were searching by company name. You also notice the ‘Company Name’ entry field in the top section of the screen. If you were to enter the first few letters of a name in this box and press ENTER, the list would move to that point. This is a handy way to find something when the list is very long. You decide to select the record for Greenbelt Software, Inc. Since this record is already displayed on the current screen, to select this record you simply click on the row or you use the cursor down key to move the blue rectangular cursor that outlines the first record on the screen to the desired row and then press ENTER. Your chosen prospect is displayed in detail on the Prospects screen (Figure 18).
The Prospect Management System Runtime Demo
www.tryappx.com 1-800-TRY-APPX 20
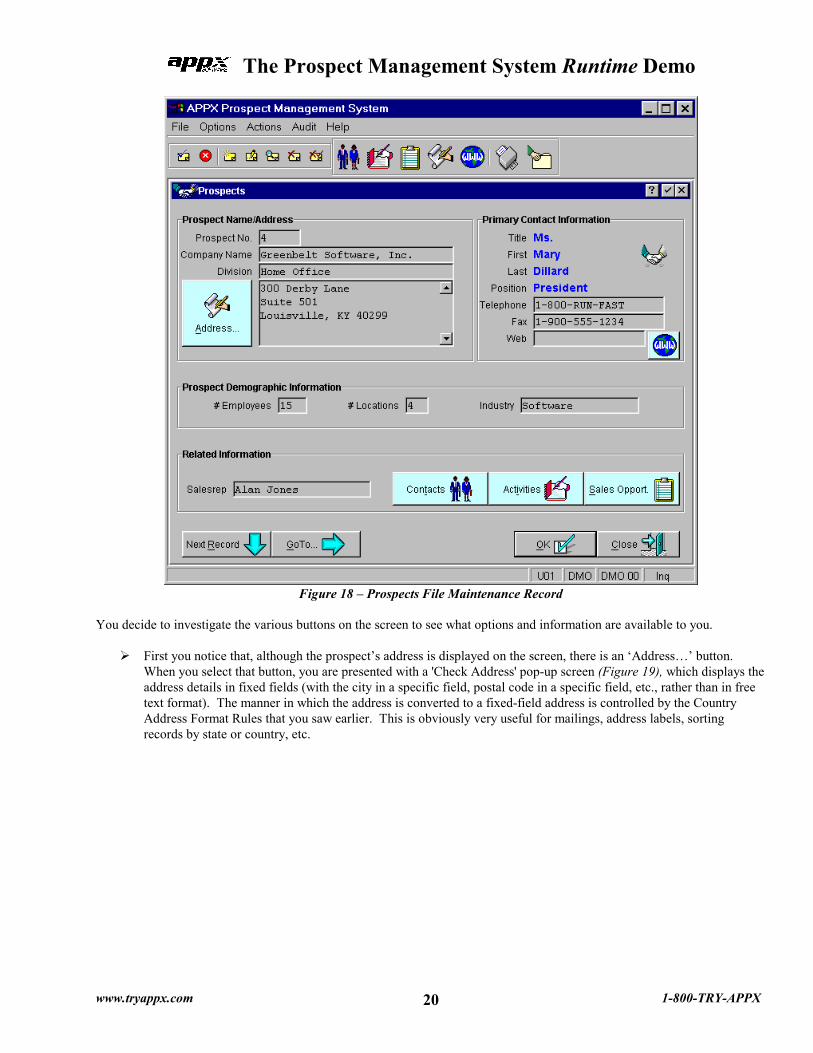
Figure 18 – Prospects File Maintenance Record
You decide to investigate the various buttons on the screen to see what options and information are available to you.
��First you notice that, although the prospect’s address is displayed on the screen, there is an ‘Address…’ button. When you select that button, you are presented with a 'Check Address' pop-up screen (Figure 19), which displays the address details in fixed fields (with the city in a specific field, postal code in a specific field, etc., rather than in free text format). The manner in which the address is converted to a fixed-field address is controlled by the Country Address Format Rules that you saw earlier. This is obviously very useful for mailings, address labels, sorting records by state or country, etc.
The Prospect Management System Runtime Demo
www.tryappx.com 1-800-TRY-APPX 21
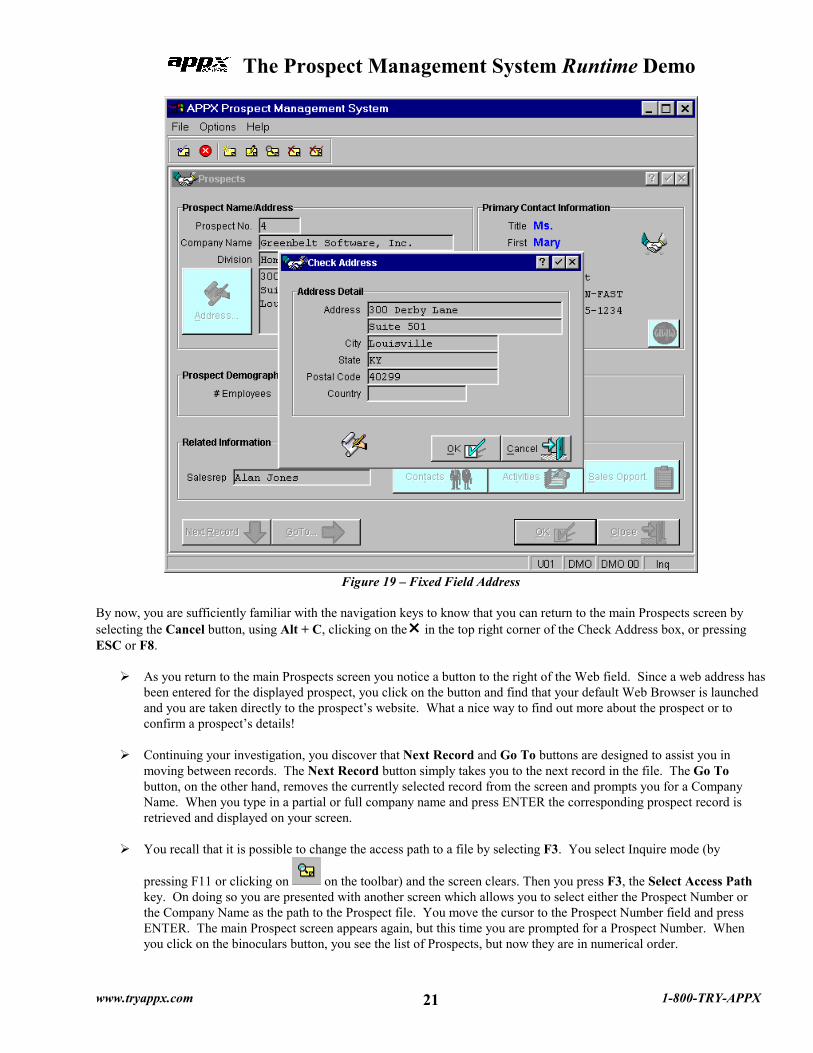
Figure 19 – Fixed Field Address
By now, you are sufficiently familiar with the navigation keys to know that you can return to the main Prospects screen by selecting the Cancel button, using Alt + C, clicking on the� in the top right corner of the Check Address box, or pressing ESC or F8.
��As you return to the main Prospects screen you notice a button to the right of the Web field. Since a web address has been entered for the displayed prospect, you click on the button and find that your default Web Browser is launched and you are taken directly to the prospect’s website. What a nice way to find out more about the prospect or to confirm a prospect’s details!
��Continuing your investigation, you discover that Next Record and Go To buttons are designed to assist you in
moving between records. The Next Record button simply takes you to the next record in the file. The Go To button, on the other hand, removes the currently selected record from the screen and prompts you for a Company Name. When you type in a partial or full company name and press ENTER the corresponding prospect record is retrieved and displayed on your screen.
��You recall that it is possible to change the access path to a file by selecting F3. You select Inquire mode (by
pressing F11 or clicking on on the toolbar) and the screen clears. Then you press F3, the Select Access Path key. On doing so you are presented with another screen which allows you to select either the Prospect Number or the Company Name as the path to the Prospect file. You move the cursor to the Prospect Number field and press ENTER. The main Prospect screen appears again, but this time you are prompted for a Prospect Number. When you click on the binoculars button, you see the list of Prospects, but now they are in numerical order.
The Prospect Management System Runtime Demo
www.tryappx.com 1-800-TRY-APPX 22
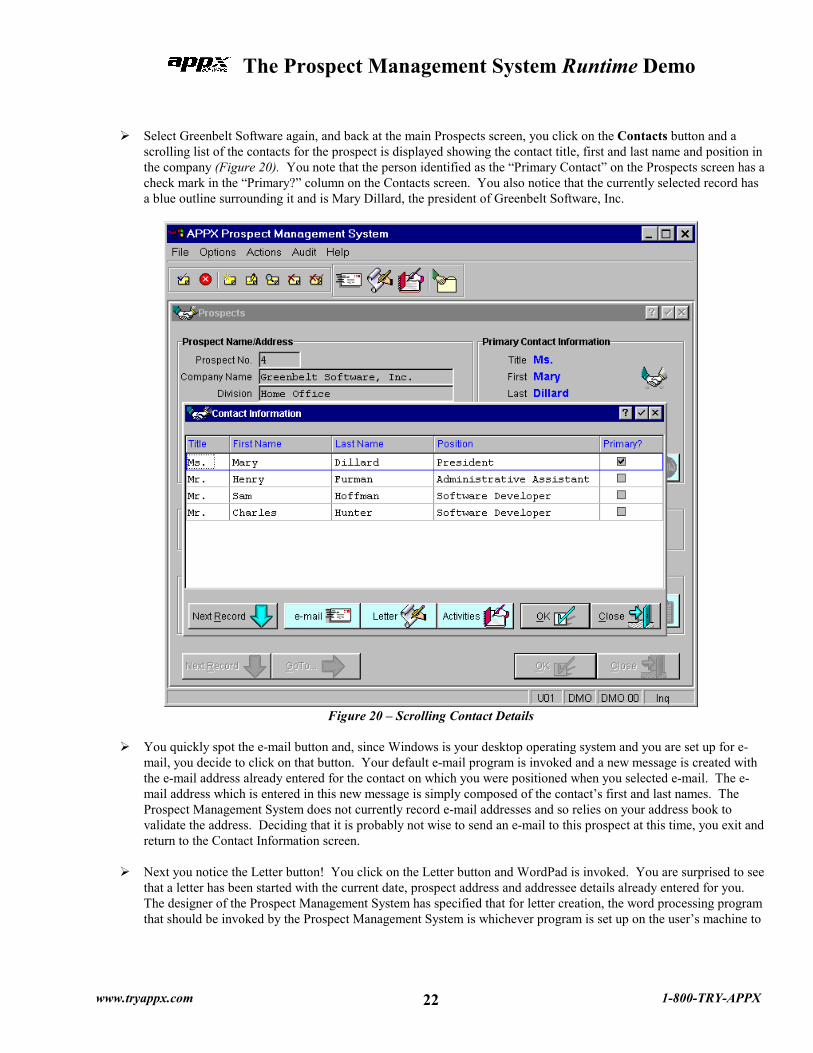
��Select Greenbelt Software again, and back at the main Prospects screen, you click on the Contacts button and a
scrolling list of the contacts for the prospect is displayed showing the contact title, first and last name and position in the company (Figure 20). You note that the person identified as the “Primary Contact” on the Prospects screen has a check mark in the “Primary?” column on the Contacts screen. You also notice that the currently selected record has a blue outline surrounding it and is Mary Dillard, the president of Greenbelt Software, Inc.
Figure 20 – Scrolling Contact Details
��You quickly spot the e-mail button and, since Windows is your desktop operating system and you are set up for e-
mail, you decide to click on that button. Your default e-mail program is invoked and a new message is created with the e-mail address already entered for the contact on which you were positioned when you selected e-mail. The e-mail address which is entered in this new message is simply composed of the contact’s first and last names. The Prospect Management System does not currently record e-mail addresses and so relies on your address book to validate the address. Deciding that it is probably not wise to send an e-mail to this prospect at this time, you exit and return to the Contact Information screen.
��Next you notice the Letter button! You click on the Letter button and WordPad is invoked. You are surprised to see
that a letter has been started with the current date, prospect address and addressee details already entered for you. The designer of the Prospect Management System has specified that for letter creation, the word processing program that should be invoked by the Prospect Management System is whichever program is set up on the user’s machine to
The Prospect Management System Runtime Demo
www.tryappx.com 1-800-TRY-APPX 23
handle ‘.wri’ files. Unless remapped to another program by the user, this is usually WordPad. Having satisfied your curiosity, you exit WordPad and return to the Contact Details screen.
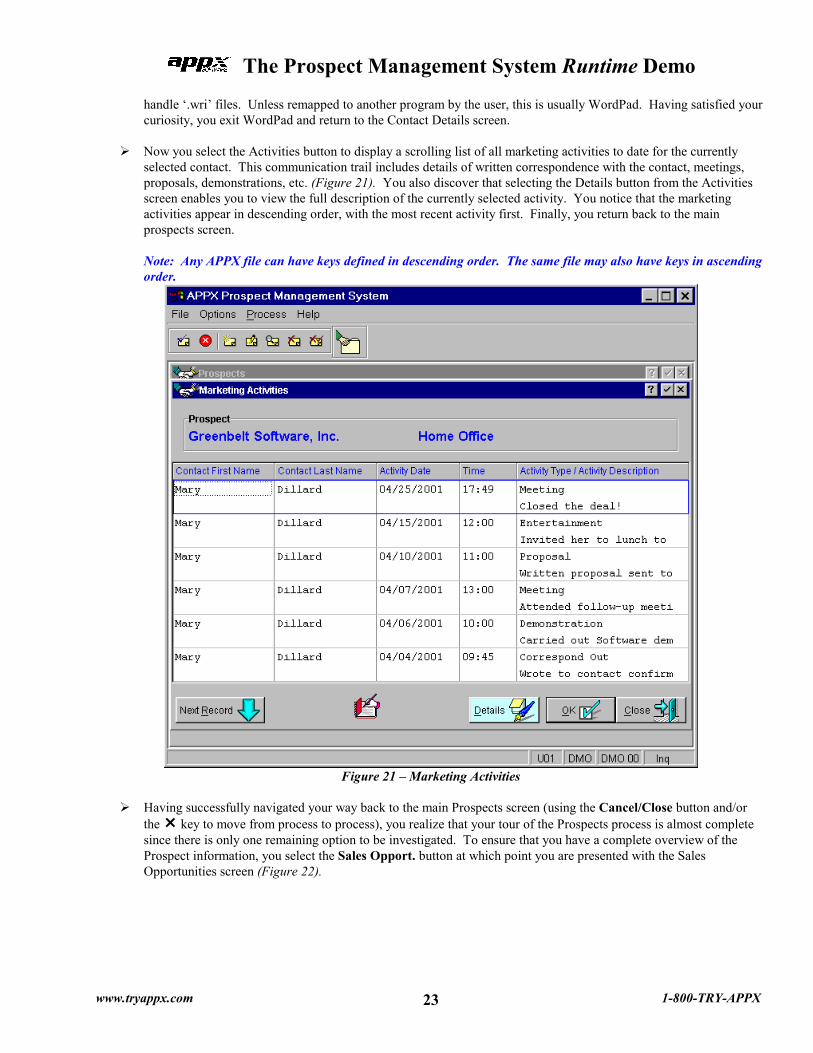
��Now you select the Activities button to display a scrolling list of all marketing activities to date for the currently
selected contact. This communication trail includes details of written correspondence with the contact, meetings, proposals, demonstrations, etc. (Figure 21). You also discover that selecting the Details button from the Activities screen enables you to view the full description of the currently selected activity. You notice that the marketing activities appear in descending order, with the most recent activity first. Finally, you return back to the main prospects screen.
Note: Any APPX file can have keys defined in descending order. The same file may also have keys in ascending order.
Figure 21 – Marketing Activities
��Having successfully navigated your way back to the main Prospects screen (using the Cancel/Close button and/or
the � key to move from process to process), you realize that your tour of the Prospects process is almost complete since there is only one remaining option to be investigated. To ensure that you have a complete overview of the Prospect information, you select the Sales Opport. button at which point you are presented with the Sales Opportunities screen (Figure 22).

The Prospect Management System Runtime Demo
www.tryappx.com 1-800-TRY-APPX 24
Figure 22 – Sales Opportunities Screen
This screen shows information relating to the potential revenue from a sale to this prospect, the likelihood of the sale being closed, and the stage at which this sale currently stands in the sales cycle. This is all very useful information for Dazzle’s cash flow forecasting.
��All fields on this screen are pretty much self-explanatory with the exception of the ‘Odds’ field. To clarify the meaning of this field, you decide to use the help key. So, you click on the ‘?’ in the top right corner of the Sales Opportunities screen, position your cursor on the Odds field and then click. (Alternatively, of course, you could have positioned the cursor to the Odds field and pressed the F1 Help Key). Immediately an explanation is displayed.
��You click on the �in the top right corner of the Help screen and return to the Sales Opportunities screen.
��Back on the Sales Opportunities screen you see an ‘Attach File button. By selecting this option you can browse
directories and files on your desktop system in order to select a file. The selected file is physically transferred from your desktop computer to the currently selected APPX database directory on the APPX server and is stored under a unique filename generated automatically from the prospect number and forecast number. The complete path and filename of the original file is stored in the Sales Opportunity record thus enabling APPX to validate its existence and thereby enable or disable the ‘View File’ option as appropriate. When a user selects the ‘View File’ option, the file is uploaded to the user’s machine using the stored file information. It is possible to attach any kind of document or even an executable file. When an attached document is viewed, it will be "displayed" using the program associated with that document’s file extension. If an executable file is attached then it will be uploaded and run.
The Prospect Management System Runtime Demo
www.tryappx.com 1-800-TRY-APPX 25
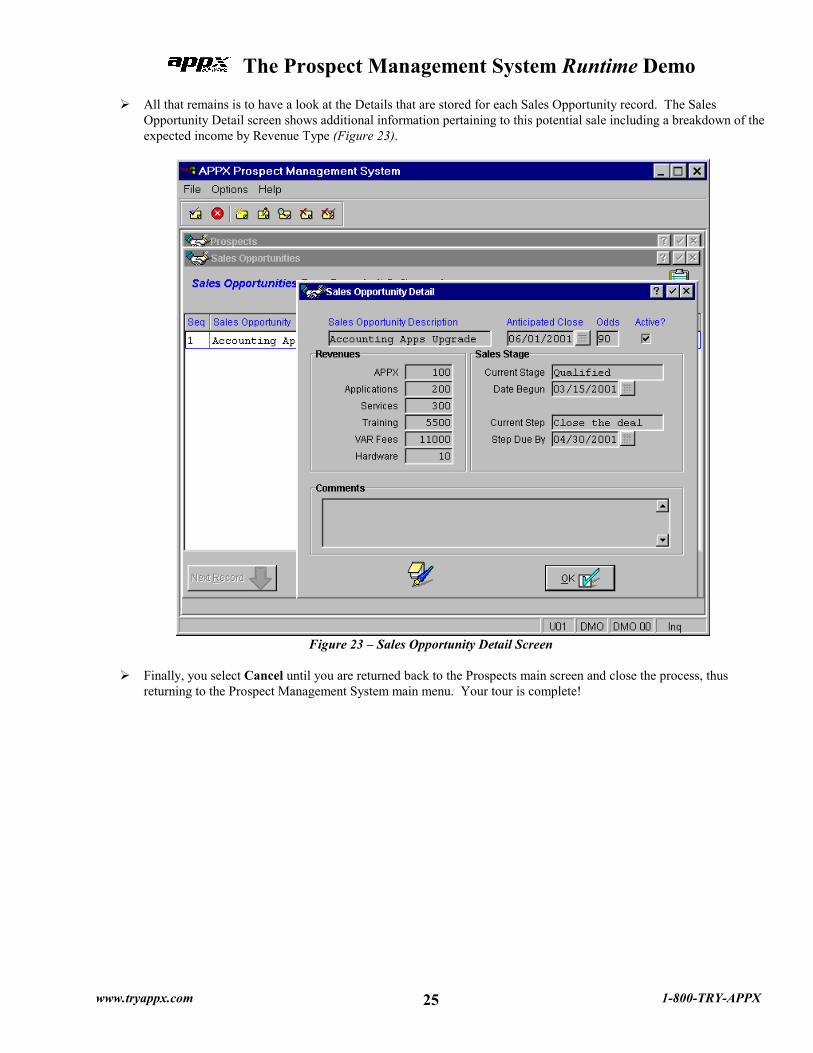
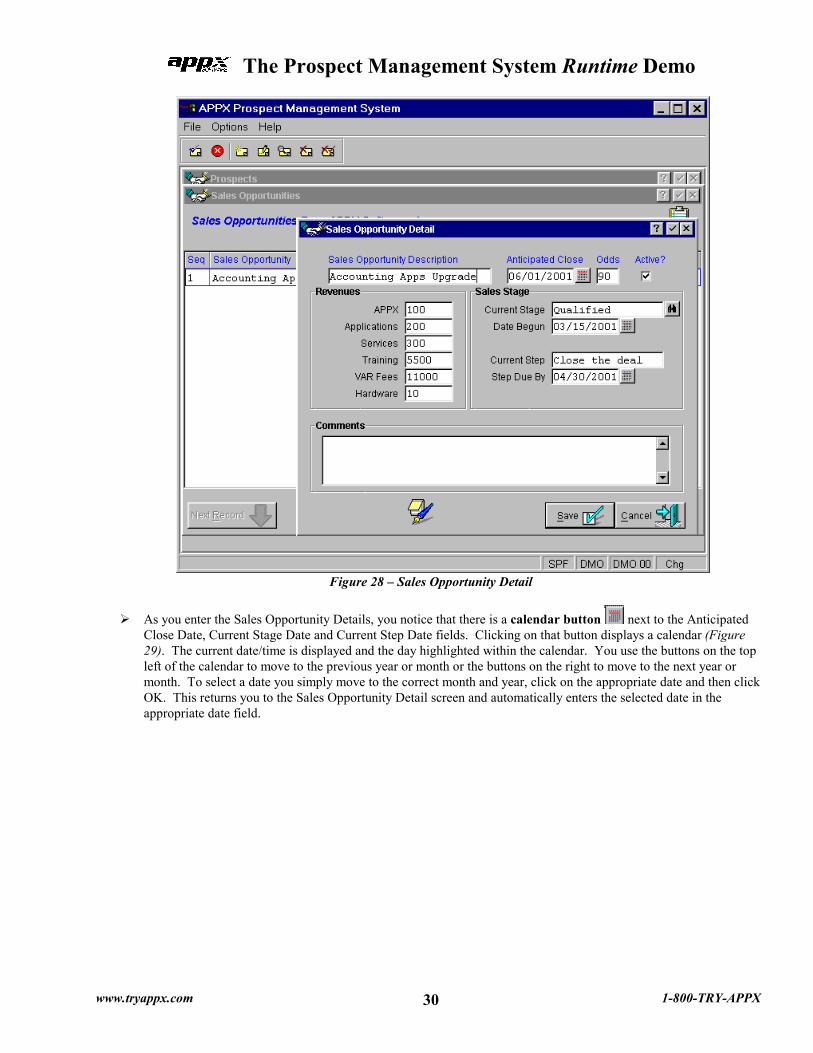
��All that remains is to have a look at the Details that are stored for each Sales Opportunity record. The Sales Opportunity Detail screen shows additional information pertaining to this potential sale including a breakdown of the expected income by Revenue Type (Figure 23).
Figure 23 – Sales Opportunity Detail Screen
��Finally, you select Cancel until you are returned back to the Prospects main screen and close the process, thus
returning to the Prospect Management System main menu. Your tour is complete!
The Prospect Management System Runtime Demo
www.tryappx.com 1-800-TRY-APPX 26
Adding a New Prospect No sooner have you returned to the menu than your phone rings. As luck would have it, it is a call from a new Prospect so you cannot simply retrieve an existing prospect record and update it, you must add a new Prospect to the system.
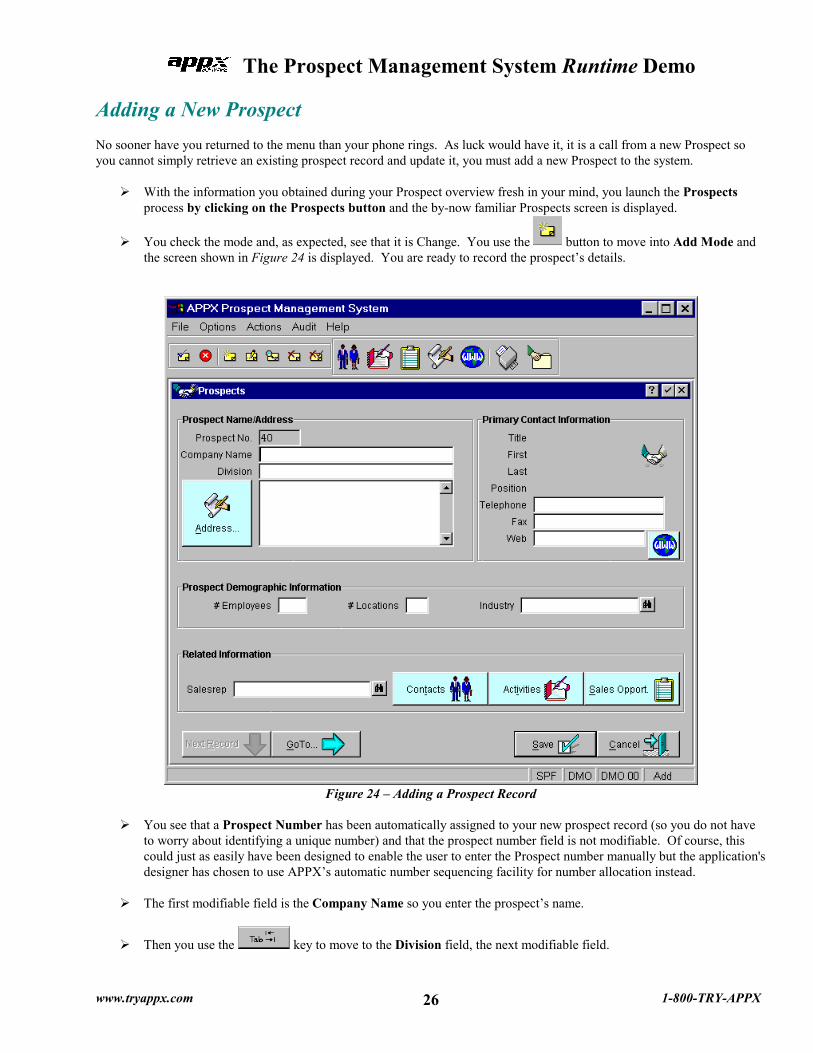
��With the information you obtained during your Prospect overview fresh in your mind, you launch the Prospects process by clicking on the Prospects button and the by-now familiar Prospects screen is displayed.
��You check the mode and, as expected, see that it is Change. You use the button to move into Add Mode and the screen shown in Figure 24 is displayed. You are ready to record the prospect’s details.
Figure 24 – Adding a Prospect Record
��You see that a Prospect Number has been automatically assigned to your new prospect record (so you do not have
to worry about identifying a unique number) and that the prospect number field is not modifiable. Of course, this could just as easily have been designed to enable the user to enter the Prospect number manually but the application's designer has chosen to use APPX’s automatic number sequencing facility for number allocation instead.
��The first modifiable field is the Company Name so you enter the prospect’s name.
��Then you use the key to move to the Division field, the next modifiable field.
The Prospect Management System Runtime Demo
www.tryappx.com 1-800-TRY-APPX 27
��Next is the prospect’s Address. You tab to this field and enter the address, using Ctrl + ENTER or Shift +
ENTER to insert a carriage return at the end of each line of the address. You ensure that you enter a valid country on the last line of the address since that will be used by the system to convert your free-form address to a fixed-field address. Having entered the address in free-format, you select the ‘Address …’ button and see that the rules from the Country Address Format Rules, which you accessed from the Application Parameters screen, have been used to parse the free-format address into a fixed-field address. If the address is not parsed correctly, you can just manually correct it. As long as you enter the free-format address according to the rules defined for the address country, the address should be correct on this screen. You close the Check Address screen.
��Tabbing again, your cursor moves to the Telephone field and you enter the telephone number.
��You continue to use the Tab key to move between fields and you enter the Prospect’s Fax Number, URL, Number
of Employees and Number of Locations.
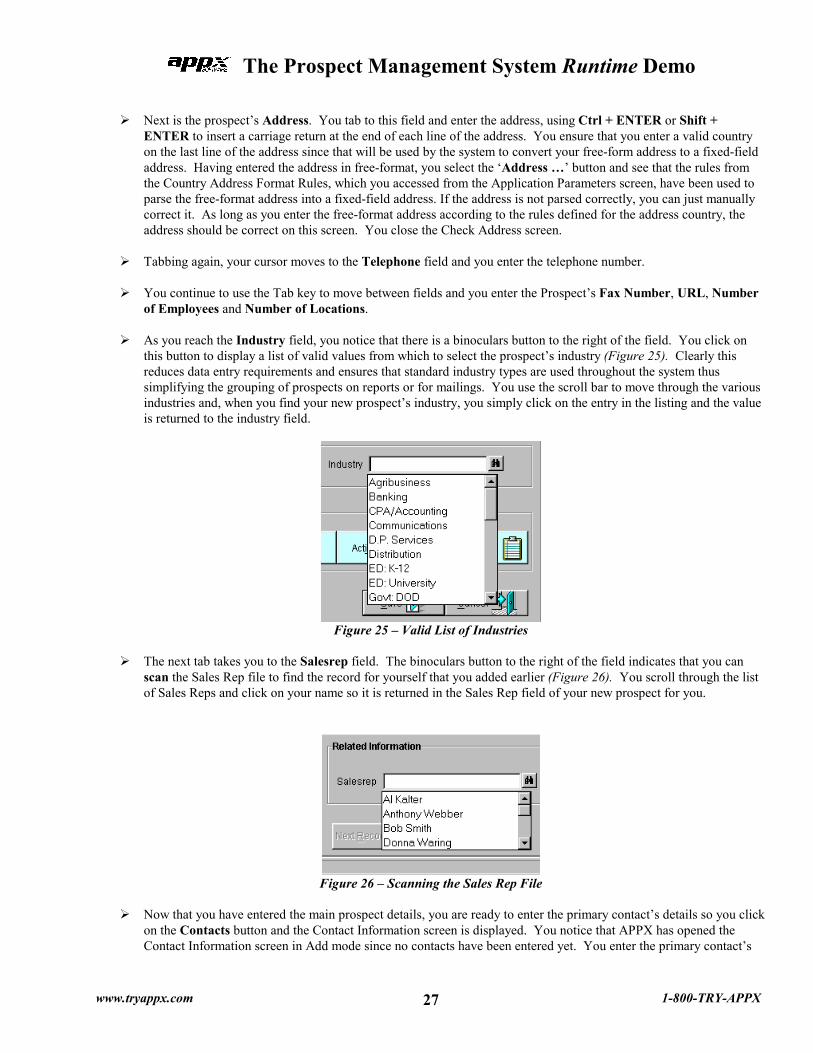
��As you reach the Industry field, you notice that there is a binoculars button to the right of the field. You click on this button to display a list of valid values from which to select the prospect’s industry (Figure 25). Clearly this reduces data entry requirements and ensures that standard industry types are used throughout the system thus simplifying the grouping of prospects on reports or for mailings. You use the scroll bar to move through the various industries and, when you find your new prospect’s industry, you simply click on the entry in the listing and the value is returned to the industry field.
Figure 25 – Valid List of Industries
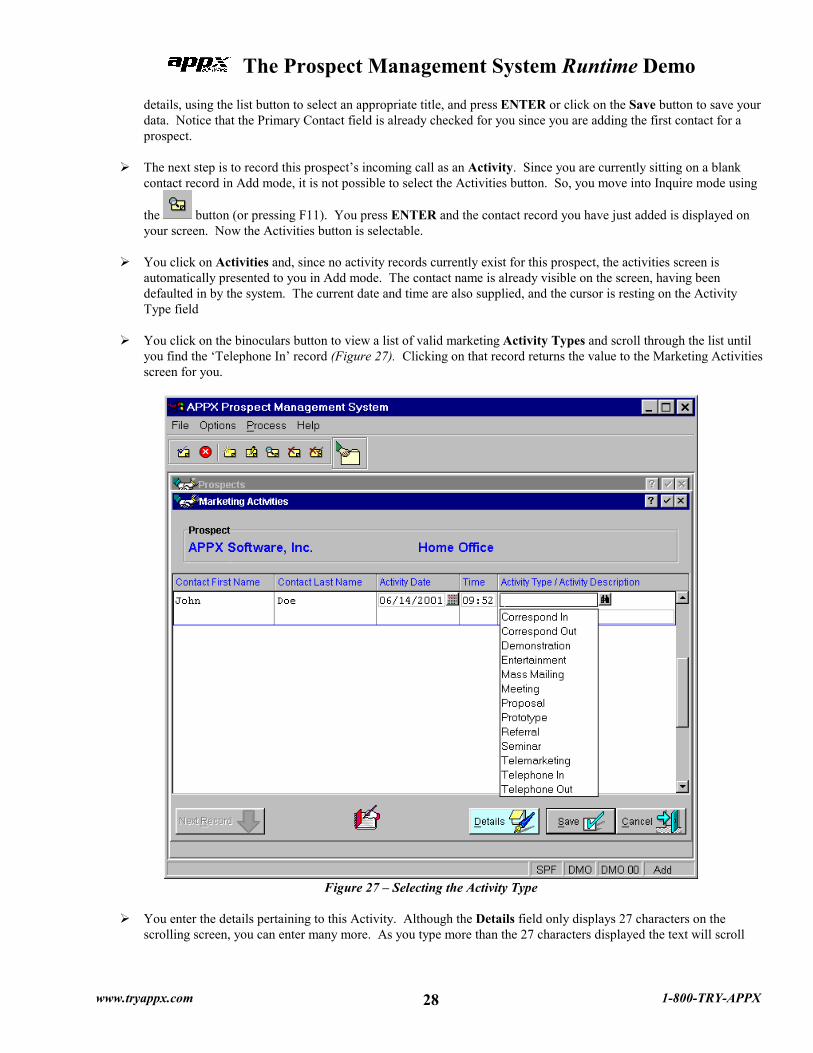
��The next tab takes you to the Salesrep field. The binoculars button to the right of the field indicates that you can
scan the Sales Rep file to find the record for yourself that you added earlier (Figure 26). You scroll through the list of Sales Reps and click on your name so it is returned in the Sales Rep field of your new prospect for you.
Figure 26 – Scanning the Sales Rep File
��Now that you have entered the main prospect details, you are ready to enter the primary contact’s details so you click
on the Contacts button and the Contact Information screen is displayed. You notice that APPX has opened the Contact Information screen in Add mode since no contacts have been entered yet. You enter the primary contact’s
The Prospect Management System Runtime Demo
www.tryappx.com 1-800-TRY-APPX 28
details, using the list button to select an appropriate title, and press ENTER or click on the Save button to save your data. Notice that the Primary Contact field is already checked for you since you are adding the first contact for a prospect.
��The next step is to record this prospect’s incoming call as an Activity. Since you are currently sitting on a blank
contact record in Add mode, it is not possible to select the Activities button. So, you move into Inquire mode using
the button (or pressing F11). You press ENTER and the contact record you have just added is displayed on your screen. Now the Activities button is selectable.
��You click on Activities and, since no activity records currently exist for this prospect, the activities screen is
automatically presented to you in Add mode. The contact name is already visible on the screen, having been defaulted in by the system. The current date and time are also supplied, and the cursor is resting on the Activity Type field
��You click on the binoculars button to view a list of valid marketing Activity Types and scroll through the list until
you find the ‘Telephone In’ record (Figure 27). Clicking on that record returns the value to the Marketing Activities screen for you.
Figure 27 – Selecting the Activity Type
��You enter the details pertaining to this Activity. Although the Details field only displays 27 characters on the
scrolling screen, you can enter many more. As you type more than the 27 characters displayed the text will scroll

The Prospect Management System Runtime Demo
www.tryappx.com 1-800-TRY-APPX 29
along as it is entered. You can use the Home key to move to the beginning of your text, the End key to move to the end and the arrow keys to move along the text. To view the full details that you have entered you simply click on the Details button at the bottom of the Marketing Activities screen and it will be displayed. Alternatively, you can use the Details screen to enter lengthy activity descriptions.
��The application designer has specified that APPX should automatically default the current date and time for the
Activity, but these fields are modifiable so, if you get behind with entering your Activities, you can add them later and change the date and time.
��When you have entered all the necessary information you press ENTER (or click on the Save button) to save your
record.
��Having saved the Activity record, you click on the Cancel button and then click on the Close button to return to the Contacts screen.
��If you want to send an e-mail or write a Letter to a contact, then you would do so by selecting either option at the
bottom of the screen. However, at this point you decide to finish recording the prospect’s details. You will be able to come back later and create the appropriate correspondence.
��Having obtained all the necessary information to create a new prospect record you then discuss the prospect’s
requirements in more detail so you can enter the appropriate Sales Opportunity information. To record the Sales Opportunity data you press the Sales Opport. button on the main Prospect screen.
��On the Sales Opportunities screen you enter the date on which this sale is expected to be closed, the likelihood of
this sale being closed and a short description of the sales opportunity. In addition, you select the relevant description (from the scroll-down list) of the prospect’s stage in the sales cycle. Since this is a new prospect and you are still gleaning information, you may want to select the ‘Qualification' stage. As the sale progresses along the sales cycle, you can update the Forecast information. You notice that the Total Revenue field is not modifiable.
��From the Sales Opportunities screen you click on the Save button to save your record and you are immediately
presented with the Details screen (Figure 28), which enables you to provide a breakdown of the expected revenue from this potential sale. The revenue types, you notice, are those that you saw when you checked the Application Parameters early in your system overview.
The Prospect Management System Runtime Demo
www.tryappx.com 1-800-TRY-APPX 30
Figure 28 – Sales Opportunity Detail
��As you enter the Sales Opportunity Details, you notice that there is a calendar button next to the Anticipated Close Date, Current Stage Date and Current Step Date fields. Clicking on that button displays a calendar (Figure 29). The current date/time is displayed and the day highlighted within the calendar. You use the buttons on the top left of the calendar to move to the previous year or month or the buttons on the right to move to the next year or month. To select a date you simply move to the correct month and year, click on the appropriate date and then click OK. This returns you to the Sales Opportunity Detail screen and automatically enters the selected date in the appropriate date field.

The Prospect Management System Runtime Demo
www.tryappx.com 1-800-TRY-APPX 31
Figure 29 -- Calendar
Note: This calendar facility is a standard feature of APPX and will work in the same manner wherever it is used.
��You enter the details and press Save to return to the Sales Opportunities screen. As you return to the main Sales
Opportunities screen you see that the Total Revenue field has been updated with the total of the individual revenue amounts that you entered on the Details screen.
��Since you have no relevant documents to attach at this point, you click the Cancel button to return to the main
Prospects screen.
��You have now completed your Prospect entry so you click on the Cancel button to exit the current record and then select the Close button or press ESC to exit the Prospects process and return to the Prospect Management System main menu.
The Prospect Management System Runtime Demo
www.tryappx.com 1-800-TRY-APPX 32
Follow-up Having successfully completed the data entry process for a new prospect, you decide to continue your investigation of the system.
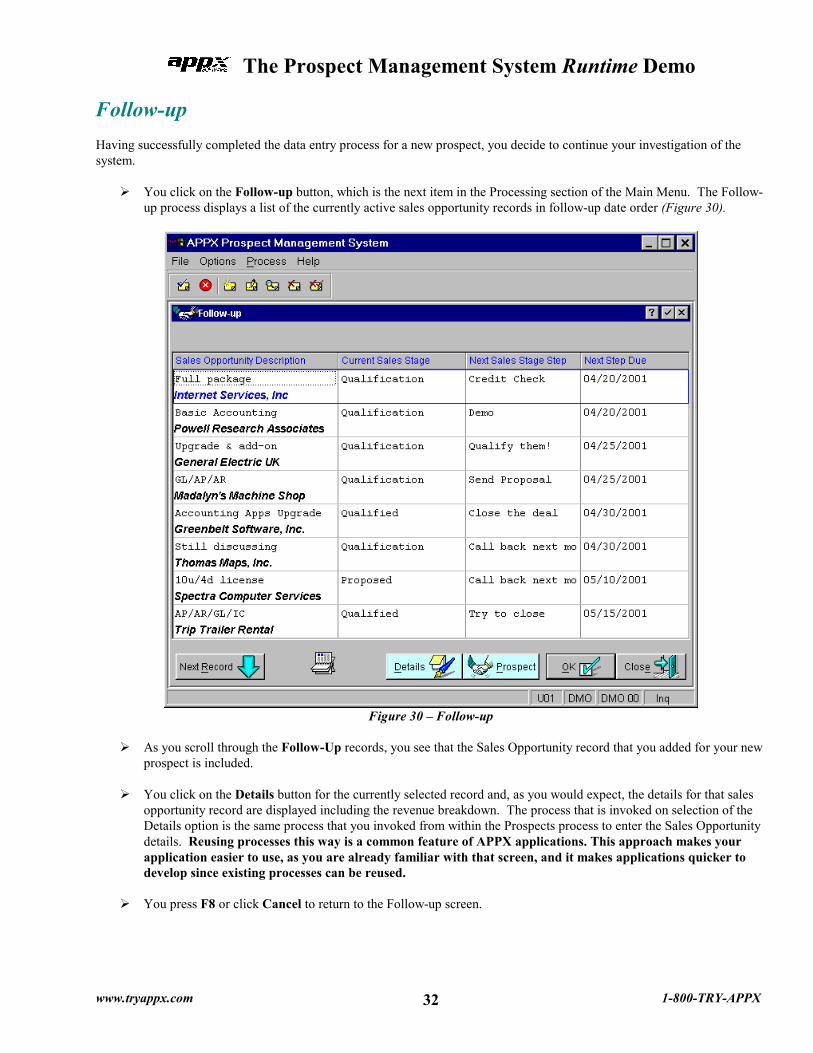
��You click on the Follow-up button, which is the next item in the Processing section of the Main Menu. The Follow-up process displays a list of the currently active sales opportunity records in follow-up date order (Figure 30).
Figure 30 – Follow-up
��As you scroll through the Follow-Up records, you see that the Sales Opportunity record that you added for your new
prospect is included. ��You click on the Details button for the currently selected record and, as you would expect, the details for that sales
opportunity record are displayed including the revenue breakdown. The process that is invoked on selection of the Details option is the same process that you invoked from within the Prospects process to enter the Sales Opportunity details. Reusing processes this way is a common feature of APPX applications. This approach makes your application easier to use, as you are already familiar with that screen, and it makes applications quicker to develop since existing processes can be reused.
��You press F8 or click Cancel to return to the Follow-up screen.

The Prospect Management System Runtime Demo
www.tryappx.com 1-800-TRY-APPX 33
��You then click on the Prospect button to see if that is a different process or the standard Prospects process and realize that it is the same process that you invoked from the Prospects main menu. In this case, however, rather than being prompted to enter a Prospect Name, a record is already retrieved for you. Not surprisingly, the selected record is the prospect to which the selected Follow-up record applies.
��Having completed your investigation, you click on the � in the top right corner of the Prospects screen to return to
the Follow-up process.
��To Exit the Follow-up process and return to the Prospects application main menu, you click on the Close button.
The Prospect Management System Runtime Demo
www.tryappx.com 1-800-TRY-APPX 34
Marketing Activity Report Now you decide to run a report to get an overview of the marketing activities currently in progress at Dazzle.
��You select the Marketing Activity Report by clicking on the Marketing Activity button on the main menu.
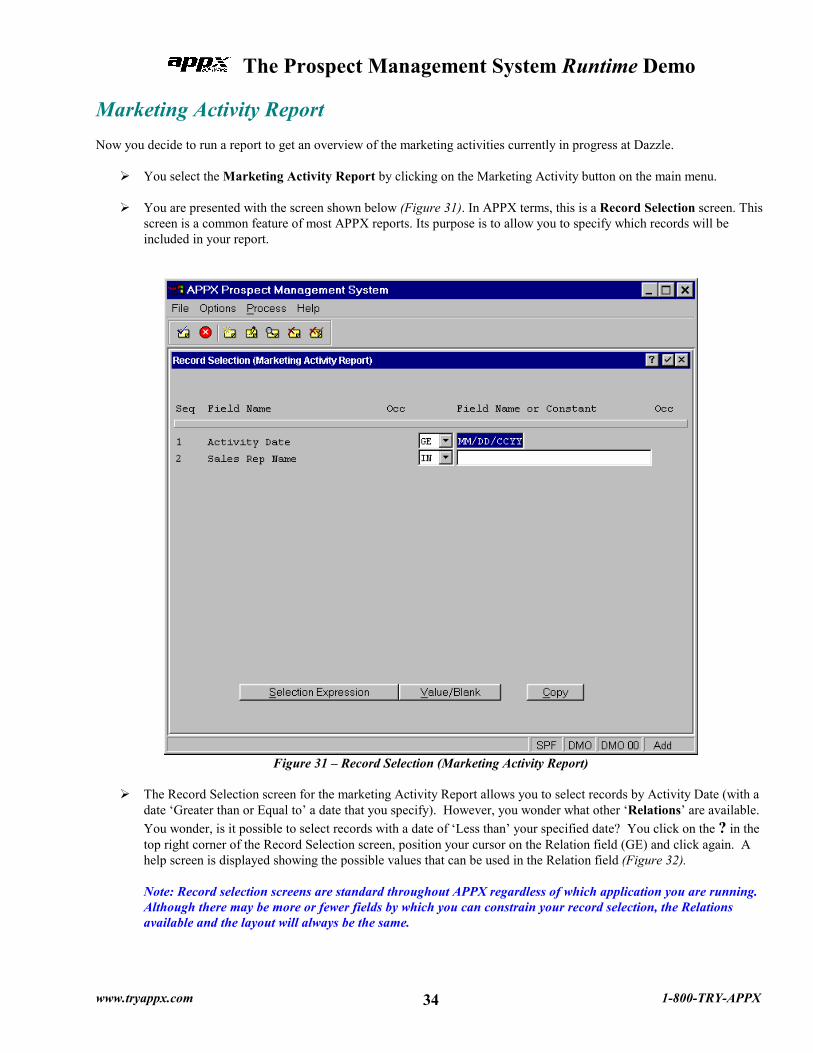
��You are presented with the screen shown below (Figure 31). In APPX terms, this is a Record Selection screen. This screen is a common feature of most APPX reports. Its purpose is to allow you to specify which records will be included in your report.
Figure 31 – Record Selection (Marketing Activity Report)
��The Record Selection screen for the marketing Activity Report allows you to select records by Activity Date (with a
date ‘Greater than or Equal to’ a date that you specify). However, you wonder what other ‘Relations’ are available.
You wonder, is it possible to select records with a date of ‘Less than’ your specified date? You click on the ? in the top right corner of the Record Selection screen, position your cursor on the Relation field (GE) and click again. A help screen is displayed showing the possible values that can be used in the Relation field (Figure 32).
Note: Record selection screens are standard throughout APPX regardless of which application you are running. Although there may be more or fewer fields by which you can constrain your record selection, the Relations available and the layout will always be the same.

The Prospect Management System Runtime Demo
www.tryappx.com 1-800-TRY-APPX 35
Figure 32 – Relation Values
��You click on the� in the top right corner of the Help screen to return to the Record Selection screen.
��Of course, then you wonder if it would be possible to select records within a date range. You position your cursor on
the Date line and click the Copy button. Immediately an additional selection line appears on your screen allowing you to change the relation and thereby specify a date range (Figure 33). It is worth noting that using the Copy option only changes the selection criteria for this invocation of the report. When the report is next run, it will revert back to the original selection criteria.
��On the bottom left of your screen a message is displayed indicating that you should ‘Review Selection Expression’
(Figure 33) which allows you to edit the logical grouping of your selections.

The Prospect Management System Runtime Demo
www.tryappx.com 1-800-TRY-APPX 36
Figure 33 – Using the Copy Option
��In addition to limiting your record selection by date, you see that you can also limit your selection by Sales Rep
Name.
��Having investigated the options available to you, you decide to leave all selections blank thus ensuring that all records will be included in your report.
��You press ENTER (or select the button on your toolbar) to continue.
��Next, a Sort Order screen is displayed (Figure 34). This screen allows you to specify how the records that are included in your report are to be grouped, ordered and subtotaled.

The Prospect Management System Runtime Demo
www.tryappx.com 1-800-TRY-APPX 37
Figure 34 – Sort Order (Marketing Activity Report)
��This report is set up to sort the records by Sales Rep name first, then by Company/Prospect name within Sales Rep
and finally by Activity Date within Company/Prospect. You decide that you wish to sort the report only by Company/Prospect and then Activity Date. So, your first step is to click on the ‘Clear Sort Levels’ button to remove the sequence numbers from the Sort Level fields. Then, you put the number 1 in the Company Name sort level field and the number 2 in the Date sort level field. Alternatively, of course, you could simply type over the currently displayed sort levels with your preferred sort levels. When you press ENTER to save your changes, APPX automatically rearranges the screen to display the sort levels you have selected in the correct order (Figure 35).
The Prospect Management System Runtime Demo
www.tryappx.com 1-800-TRY-APPX 38
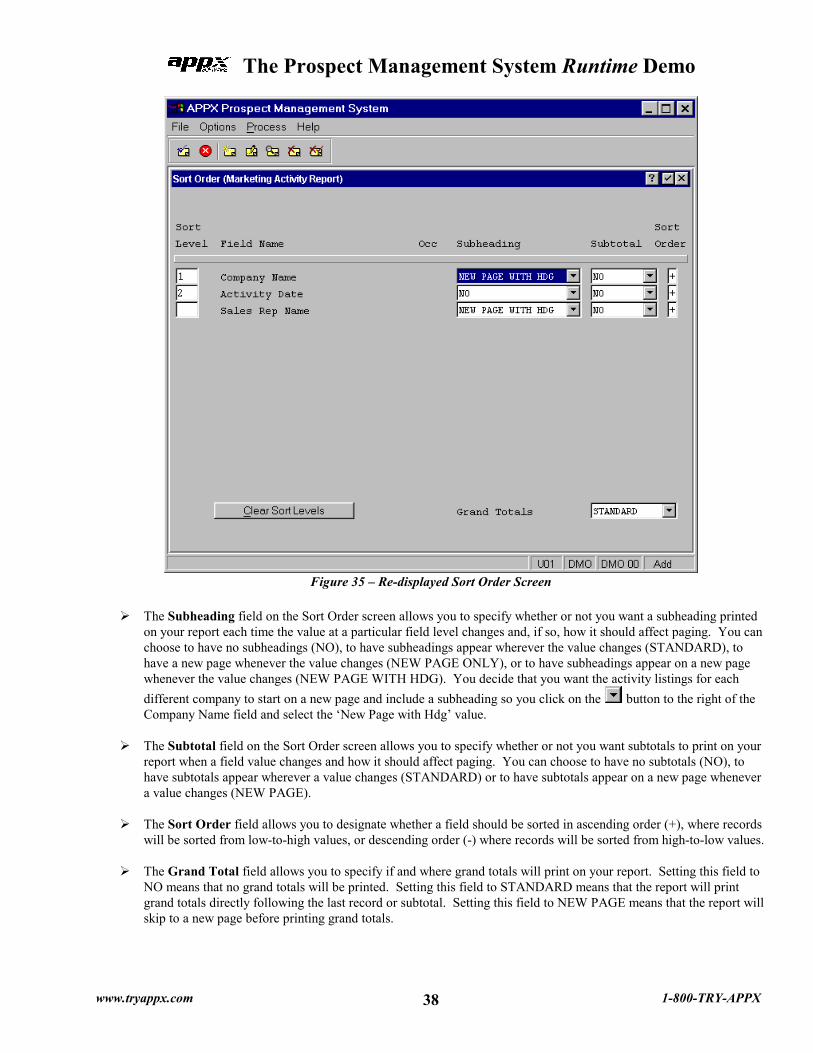
Figure 35 – Re-displayed Sort Order Screen
��The Subheading field on the Sort Order screen allows you to specify whether or not you want a subheading printed
on your report each time the value at a particular field level changes and, if so, how it should affect paging. You can choose to have no subheadings (NO), to have subheadings appear wherever the value changes (STANDARD), to have a new page whenever the value changes (NEW PAGE ONLY), or to have subheadings appear on a new page whenever the value changes (NEW PAGE WITH HDG). You decide that you want the activity listings for each
different company to start on a new page and include a subheading so you click on the button to the right of the Company Name field and select the ‘New Page with Hdg’ value.
��The Subtotal field on the Sort Order screen allows you to specify whether or not you want subtotals to print on your
report when a field value changes and how it should affect paging. You can choose to have no subtotals (NO), to have subtotals appear wherever a value changes (STANDARD) or to have subtotals appear on a new page whenever a value changes (NEW PAGE).
��The Sort Order field allows you to designate whether a field should be sorted in ascending order (+), where records
will be sorted from low-to-high values, or descending order (-) where records will be sorted from high-to-low values.
��The Grand Total field allows you to specify if and where grand totals will print on your report. Setting this field to NO means that no grand totals will be printed. Setting this field to STANDARD means that the report will print grand totals directly following the last record or subtotal. Setting this field to NEW PAGE means that the report will skip to a new page before printing grand totals.

The Prospect Management System Runtime Demo
www.tryappx.com 1-800-TRY-APPX 39
Note: The Subheading, Subtotal and Grand Total options are standard features of APPX. However, the APPX application designer can choose to design specific subheadings, subtotals and grand totals so the resulting output differs from the default APPX layout.
��Having reordered the report, you press ENTER to continue.
��The next screen that appears is the print Disposition screen (Figure 36). The Disposition screen allows you to
specify where and how your report will print. For example, if you tick the ‘Print on Screen?’ box then your report will be displayed on your screen when it runs. If you tick the ‘Print Hard Copy?’ box then your report will be sent to the printer specified in Printer ID (which of course you can change simply by clicking on the binoculars button and selecting an alternative printer). You can add your own subheading text to the final report by entering the required text in the Report Subheading field. Additionally, you can change the Form on which your report prints, the Number of Copies and you can even select a different disposition simply by using the ‘Select Disposition’ button. The Disposition screen is also where you specify that you wish to save a report to disk so it can be printed later, transferred to another machine, viewed or manipulated by another program, and so forth.
Note: A standard feature of APPX is the facility for users to customize dispositions and save them for re-use when they run any report.
Figure 36 – Disposition Screen
��Once you have finished making your changes to the Disposition screen, you click the Execute Now button (or press
ENTER) to continue.

The Prospect Management System Runtime Demo
www.tryappx.com 1-800-TRY-APPX 40
��Your report is now running. You notice that progress is indicated in the bottom left of your screen where the number of records being processed is displayed (Figure 37).
Figure 37 – Show Report Progress
��When your report appears on the screen (Figure 38) you can use the arrow buttons at the bottom left of the screen
to move around the report: . From left to right, these buttons enable the user to move to the far left column of the report, move one screen to the left, move one column to the left, move one column to the right, move one screen to the right, move to the far right column, move to the top of the report, move up one screen, move up one line, move down one line, move down one screen and move to the end of the report.
Note: These arrow buttons are available on all APPX reports as a standard feature and will always work in the same manner regardless of which application is being run.

The Prospect Management System Runtime Demo
www.tryappx.com 1-800-TRY-APPX 41
Figure 38 – Report On-Screen Display
��Also, you can use the binoculars button at the bottom of your screen to Search your report for a particular value or
string or, in the case of large reports, to move to a specific page in the report.
��While the report is displayed on your screen, you can choose to print a hard copy even though you did not 'check' the ‘Print Hard Copy?’ check box on the disposition screen. You do so simply by clicking on the ‘Print?’ box at the bottom of the report screen or by pressing Option 4 to toggle the ‘Print?’ box on and off. Conversely, if you had checked the ‘Print Hard Copy?’ on the disposition screen but decided when you viewed the report on screen that you did not actually want to print it, then you could clear the ‘Print?’ box (or use Option 4) while your report was displayed on screen and it would not print.
��Once you have viewed the report to your satisfaction you simply press the Close button or ESC or F8 or the �
button in the top right corner of the screen to END and return to the menu.
It is important to remember that if you have checked both the ‘Print on Screen’ box and the ‘Print Hard Copy’ box, then your report will not be printed on the selected printer until you have finished viewing it on the screen.

The Prospect Management System Runtime Demo
www.tryappx.com 1-800-TRY-APPX 42
Sales Forecast Report - The Test Feeling confident that you have mastered the Prospect Management System, you ask one of your new colleagues to assign you a task. Here are the details of what they ask you to do:
��Produce a Sales Forecast Report for all sales expected to earn between $1000 and $2500 and with odds of success greater than 75%. Group the orders by Sales Representative Name and then by Company/Prospect Name with a Subheading (on a new page) for each Sales Rep and a Subtotal for each rep.
��Hint: You’ll need to use the Record Selection screen and the Copy option to select the desired sales, and then use the
Sort Order screen to get the grouping and totaling you want.
Conclusion: If you made it this far, you have successfully completed the Prospect Management System Runtime Demo. Please feel free to explore this application and its many features more completely. If you are interested in seeing how this application was designed, you may want to also run the Prospect Management System Application Design Demo. Please direct all comments and questions relating to this demo to: [email protected] Thanks for taking the time to Try APPX!