revised 7/12/17 disclaimer - pumping station: one · revised 7/12/17 disclaimer: ... -explanation...
TRANSCRIPT
Revised 7/12/17
DISCLAIMER: I am giving this instruction for free. It is not a comprehensive treatment of the subject matters being discussed. Although I do my best to be as accurate and complete as possible, I may leave out important safety information, and I may mistakenly say things that aren't correct. Nevertheless, I believe the content is complete and accurate enough to help PS:1 members work safely in the shop. Shop work carries a number of risks. People who use this information or the demos that go with it assume all risks themselves. Attending this authorization does not guarantee that you will be authorized to use the machine. User must demonstrate understanding and ability during the hands-on portion to be authorize. Lathe Authorization:( Authorization will take 2 .5 hours- 3 hours depending on the person) 1 1/2 hours of demo. 1- 1 1/2 hours of hands on. The purpose of this lathe authorization is show people how to using the machine safely and how not to hurt themselves. This is not an instructional guide to being a machinist. For skill development in using tools in fabrication, you should take a class of some kind and practice, practice, practice. In this authorization, you will be shown only the basic operation of the tools. The purpose of these minimal illustrations of technique is so that you might have some idea of the types of things the tools are capable of. Authorization gives you permission to use the tools. Authorization to use the tools is not a certification of your competence. Safety first: Do not operate machine tools under influence of drug (prescription or otherwise) and alcohol when using a lathe you should be aware of your person. Long hair must be tied back, jewelry or anything hanging from wrist and neck must be removed. Short sleeves are preferred. Loose sleeves must be rolled up. Anything that potential can get pulled in by the running machine must be removed. Goggles must be worn at all times. Please try not to talk to people when you are running the machine. Do not run the machine if your attention is divided. Let other people know, when they are in proximity to the machine to stay within a good distance from the running machine. For safe operation of the machine please stay on the right side of the saddle. Never walk away from the machine when it is running. (PLEASE TAKE NOTES. EMTPY SPACE IS PROVIDED BETWEEN SECTIONS) A. Introduction to the metal lathe, what does it, what is it for. (can skip if one already had previous experience.) B. Begin -Drop cover should be removed and place somewhere it does not get wet. -How to turn on machine. Make sure both power cords of the machine are plugged in. Turn toggle switch in back of machine on. Pull lighted emergency stop on the machine to ON position C. User interface box: -Emergency stop -Fault light. (Provide instances of how you can fault the machine) -Fault reset -Speed Dial -Speed Dial Light (Lights up when the machine is up to speed)
Revised 7/12/17
D: Feeds and Speeds -Explanation of what speed and feed is. Feed and speed is dictated by the material hardness. -How to adjust speed of spindle. Motor and pulley. Speed chart on machine. How to use and read the variable control on user interface box. (20%-100% of current belt) -How to change the belts. E. How to change chuck
- pin for direct drive. (Do not pull out completely.) Explanation of back gear and direct drive. (note color dots on settings: red dot DO NOT change when machine is running. Green can be adjusted when the machine is running)
- Make sure you engage e-stop before making any attempts to change attachments (chucks) on the spindle, so the machine doesn’t turn on accidentally. - How to lock the spindle. - Ways must be covered by a piece of wood before removal. - How to loosen the chuck from the spindle for removal. Never pound on the machine in an attempt to remove the chuck. Be aware that chuck may be heavy, never drop the chuck on the lathe. - Spindle accessories for Clausing. (four jaw chuck, faceplate, collet chuck currently not in service)
- Size capacity. (size capacity of 3 jaw is 2.5”, four jaws can be larger 3”- 4”) - Jaw flipping of step jaw of 4 jaw chuck. - Always make sure the the spindle thread and mating thread on the accessories
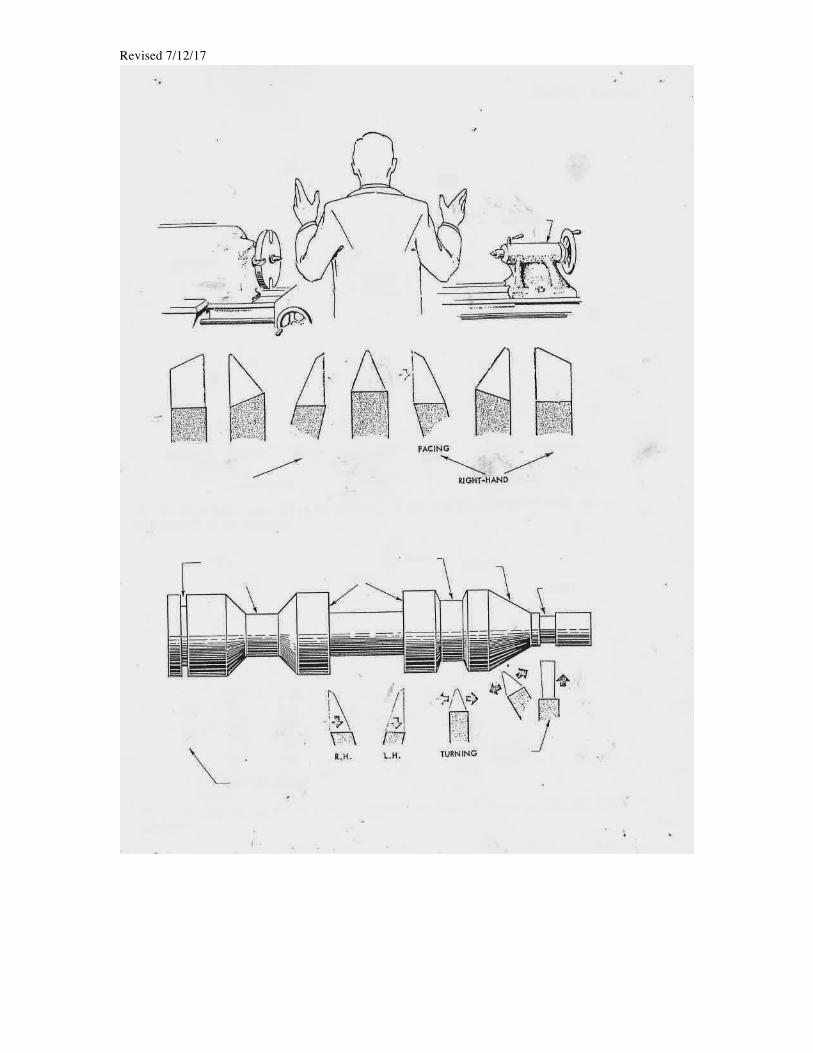
is free of chips otherwise, there may be problems with attaching the accessory to the spindle of the chuck. Chips can prevent the attachment from being seated properly on the nose and can cause the the accessory to unthread from the nose when the machine is rotating. F. Types of cutter (Users are responsible for getting their own cutting bits. But some bits are provided. A set of indexable bars are available. Users must buy their own carbide inserts. Maximum size of bits are ½” shank for Clausing) -HHS steel blanks -Cemented carbide bit -Index carbide bits. (explain rake angles, relief angles, angle of the cutter) -Attaching cutting tools to holders. Cutting bit should have a fair amount sticking out but not too much, since the bit can deflect and cause errors in cutting or cause serious vibration and chattering on the cutting tool. G. Attaching cutting tool to tool post. - Location of compound rest. Tool post must be well support under the compound rest. Should not be cantilevered. -Centering cutting tool.
H. How to chuck up your stock on the lathe. - Always engage the e-stop when attaching anything on the chuck so to insure that the machine does not turn on accidentally.
- Correct way of chucking materials - When Chucking your stock you need to use the maximum surface area of the
jaws to hold work. Otherwise damage can occur on the chuck.

Revised 7/12/17
- DO NOT over tighten jaws (This can also damage the chuck. Jaws that are splayed can not accurately hold stock.) - Do not leave chuck key in the chuck when you are finish with clamping your work. Otherwise injury or damage to machine can happen. I. Saddle. - Compound rest (Compound should not be canter levered out.) - Cross slide axis - Longitude feed axis J. OPERATIONS: (refer to diagram on lathe on wall) For safe operation of the lathe please stay on the right side of the machine when the machine is running. NEVER LEAVE THE MACHINE UNATTENDED WHEN IT IS RUNNING!
1. Facing -Turning on the motor using the drum switch.
-Facing your stock (used as your reference) -Explanation of manual machining and roughing cuts ( no more than 3/16 “ (only
on soft materials like machining plastics) on ½” cutters, depending on type of materials) -locking the saddle. Saddle lock prevents any lateral movement when using the
cross slide. -Back out using the compound rest so when you move the cross slide axis
across your cut you do not mar your surface. -Finishing passes. Finishing cuts should be shallow.
-Settings for threading and automatic feed (NOTE COLOR DOTS): Explanation of thread chart
Slide gearbox Thread and feed selector handle Lead screw direction Selector Knob
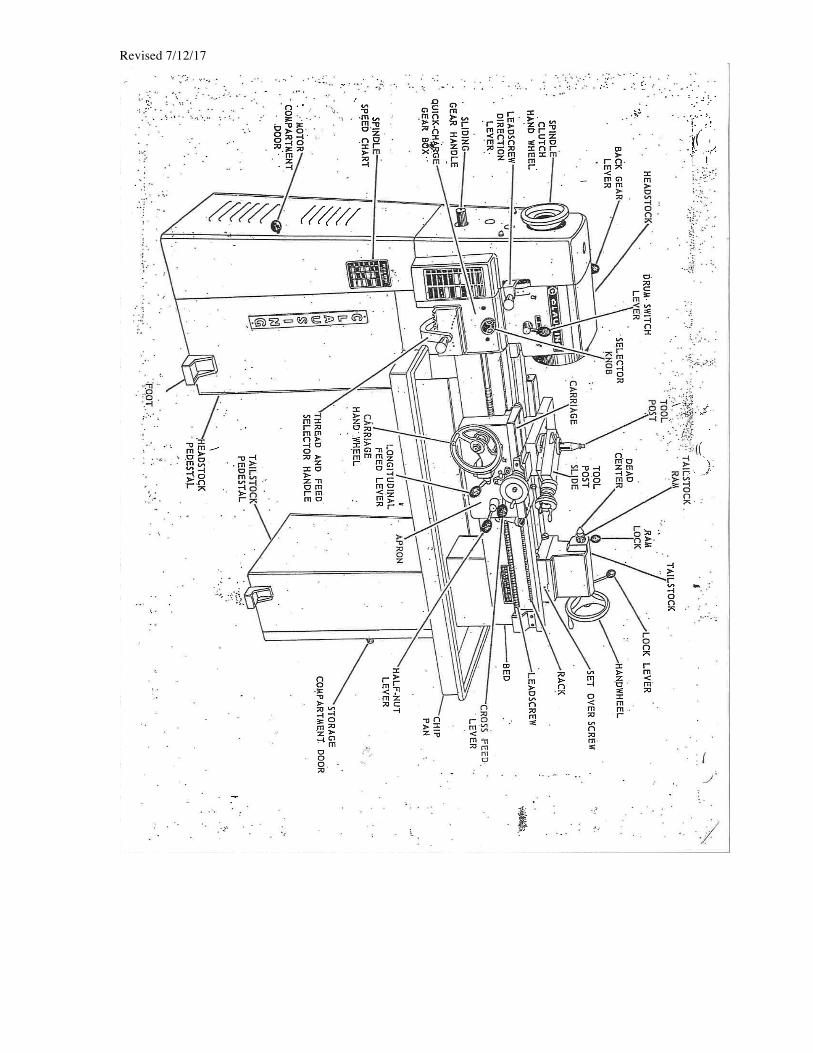
-Engaging cross slide lever for automatic feed. Top lever. ( Note position of lever when feed is not engaged. If feed does not engage adjust the hand wheel until you are able to engage feed.) When finished with finishing pass. 1.Disengage feed. 2. Back out of cut. 3. turn off motor. Unlock saddle. -If saddle is hard to move, Do not force the machine. Feed may be engaged or saddle is locked 2. Turning -Adjust compound slide for angle of your cutter. -User should check that their setup will not interfere with the chuck. The work, chuck, will not collide with the cutter or the DRO scale in front of the saddle. -Note mechanical stop. (This will not prevent damage to the machine or DRO. It is just a reminder) User should visually inspect the maximum allowed travel before starting the machine. Scoring your work can help provide a visual clue to allowing the user to know that the maximum travel is getting close. - Locate automatic feed longitude feed. (Third on the bottom. Default not engage position is pointing down) -Illustrate difference in cuts (make three cuts. Hand turning, automatic feed, and automatic feed with coolant) - Clearing chips and using coolant must be done on the right side of the saddle.
Revised 7/12/17
3. Half nut ( what is it for) K. Tail Stock (Attachments for the tail stock: live center, dead center, drill chuck.)
-How to chuck up attachment to tail stock ( If your attachment starts to
rotate in the tailstock sleeve, you must stop the machine and back out of your work and reattach the attachment. If the attachment continues to slip in the tailstock there will be damage to the tailstock sleeve. Anyone who damages the sleeve will have to pay $269 for the replacement of the sleeve.)
-Adjustment on the tailstock: ram lock, locking lever, handwheel -Maximum travel for tailstock is 2 ½” ( do not exceed travel otherwise ram will
pop out) 1. Demo of using drilling Use of center bits 2. Using live center to support work.
L. HANDS ON PORTION. (User must demonstrate what they have seen and ability to be able to be authorized to use the machine. Authorizer will use this to decide at the end of the hands-on portion of the authorization) 1. Face end until it is flat. This may take multiple passes. Finishing pass with auto feed. 2. Introduce DRO. Use reference end to zero for x. Use uncut side to zero for y. 3. User will turn the stock to a measured length ( 1” from the end using the dro.) Make 4 passes at a total of.030” deep . Two roughing passes and two finishing passes. (finishing passes tend to be shallow .005” or less) M. Importance of Clean up. -Shutting down the machine. -Cover machine N. Problems with the machine. If you experience problems with the machine please contact anna and ed. Emails are on the machine. Helpful websites videos http://web.mit.edu/2.670/www/Tutorials/Machining/lathe/Description.html Supplier for raw material and cutting tools: Mcmaster Carr (http://www.mcmaster.com) Msc Industrial Supply (http://www.mscdirect.com) Shars (http://www.shars.com) Enco (http://www.use-enco.com)

Revised 7/12/17
Book references: Machinist Handbook Machine Shop Practice, Vol. 1, 2
Revised 7/12/17
Revised 7/12/17